

Page 1
Instructions manual
F A D I N I
F A D I N I
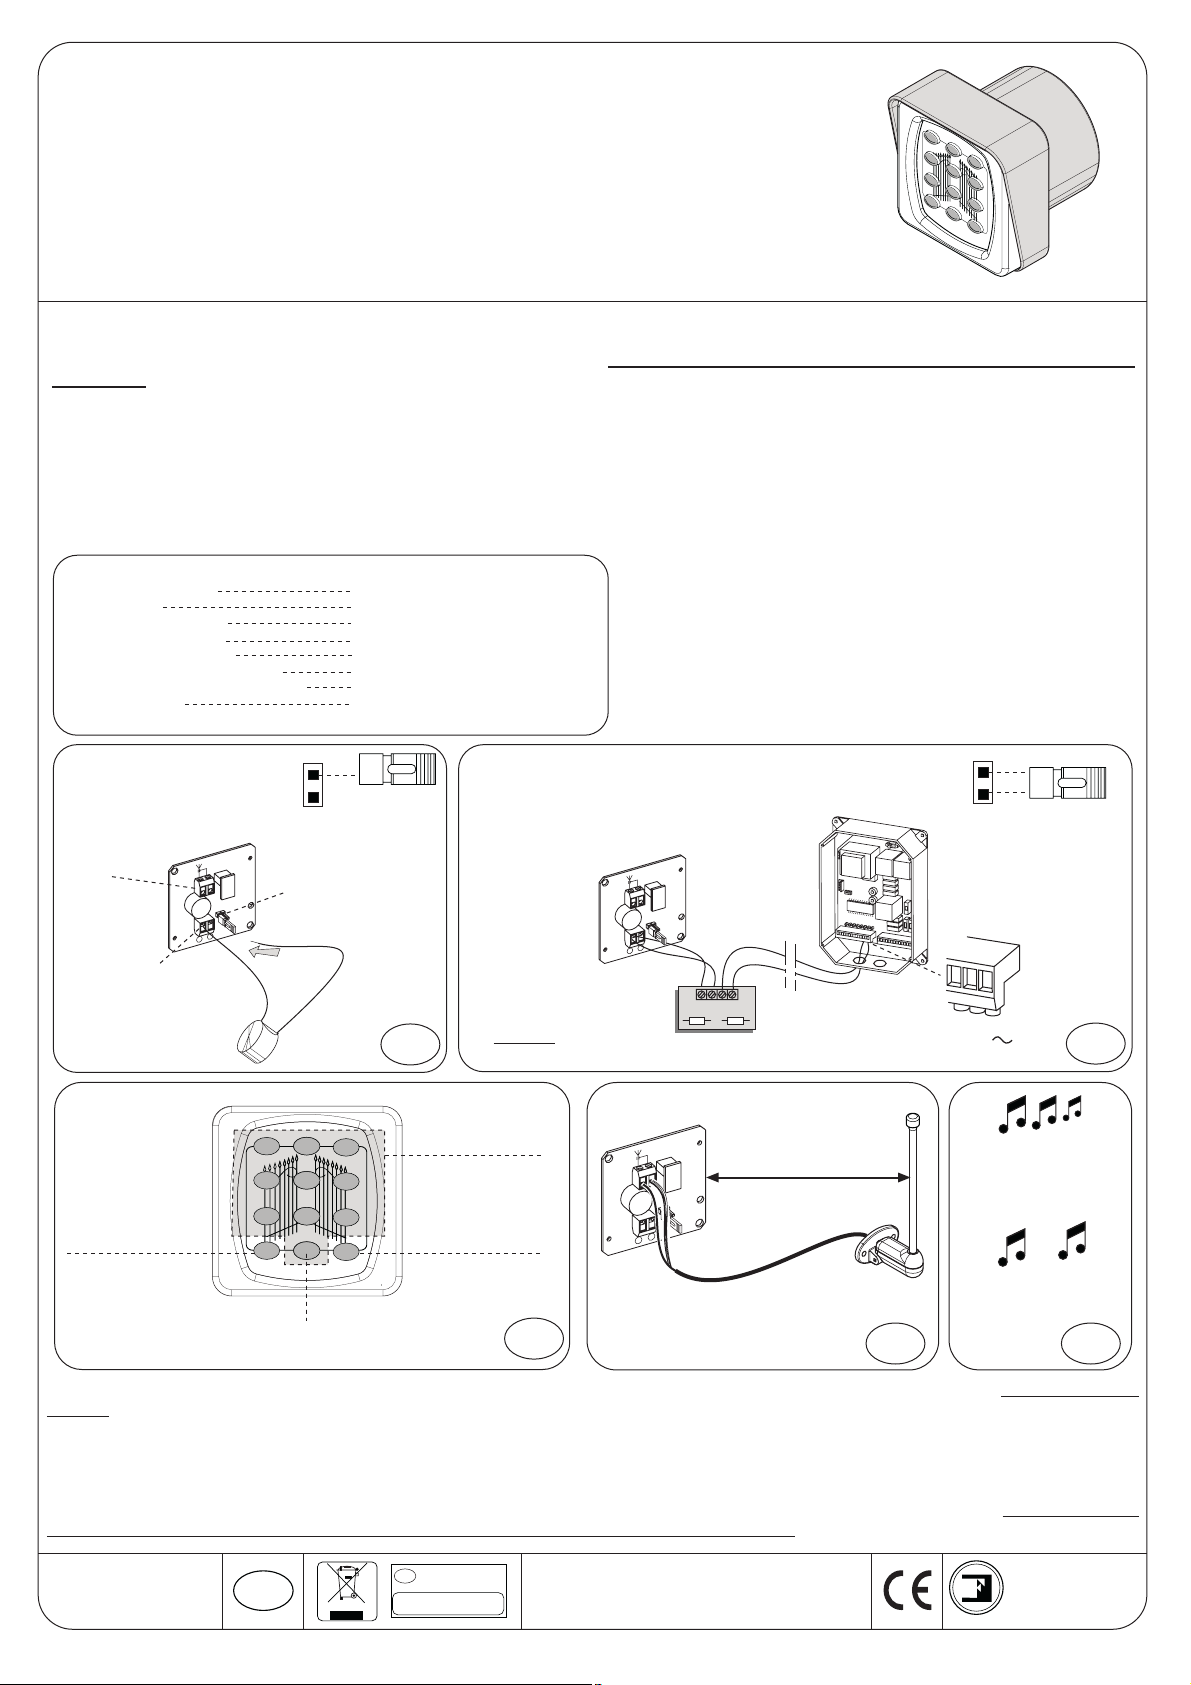
RADI 12
Digital push-button panel, custom-made encoding
Radio transmission at 433.92 MHz to suit the receivers:
Astro 43,
Jubi 433,
Siti 63
1
2
4
5
7
8
R
0
3
6
9
E
Back-illumination of the key pad
Confirming tone
GENERAL DESCRIPTION
This push-button panel has been designed to be integrated in a system to operate automatic doors and gates when access control through a uniquely
encoded unit is required, allowing only authorized gating, for security reasons.
radio chanel. It can be installed inside wall- or surface-mounted containers from the Prit 19 series or using Sech 15 series adaptors. Installation and
programming should be performed by a qualified technician, in the observance of the good installation practices and applicable safety regulations.
POWER SUPPLY
- Powered with 12Vdc buffer battery provided but not connected (Pic.1): Radi 12 operates as a transmitter (max distance 20 metres from radio
receiver and aerial), in this mode it is recommended NOT to permanently illuminate the digital key-pad to avoid battery rundown (the Strip must be on
a single PIN, Pic.1).
- Powered with a suitable Alternate-Direct connection Card (Item No.1204 - optional) that makes it possible to power Radi 12 directly from the control
box, 24Vdc output. The battery supplied is not connected (Pic.2).
TECHNICAL DATA
Operating frequency 433.92 MHz ± 75 KHz
Power supply 12Vdc (±20%)
Absorption on standby 0.4mA
Maximum absorption 10mA
Operating temperature -40°C + 85°C
Transmission range with aerial 20 m
Non-rechargeable lithium battery 12 Vdc
Protection Class IP 55
Up to maximum 8 different Personal Access Codes each radio chanel.
Up to maximum 8 different Personal Access Codes can be entered, each
Power supply by battery
by pressing any key for 2
seconds the panel is backilluminated for 10 seconds.
Aerial
RADI
terminals
RADI 12
+
-
Power supply
terminals
Buffer
Battery
Programming
Button
Strip
+
Red
Black
-
12 3
456
78
RE
Stop Button
(where enabled)
9
0
Pic.1
Power supply directly from control panel
Radi 12
card
RADI
RADI 12
+
-
Connection card
Alternated-Direct
12Vdc
+
-
+
123
"Optional" Item No. 1204
Numerical
RADI 12 Card
Buttons/Keys
RADI
Enter button
to confirm
RADI 12
+
-
RG58
cable
Pic.3
4
12
13
20 metres
Birio A8 Aerial
Pic.4
PERMANENTLY
BACK-ILLUMINATED
12
13
24V
Long tone: OK
Double tone: NO
Pic.2
Pic.5
Basic Key Code: numerical code (max 9 digits) that, once entered, enables the installer to access Radi 12 programming mode. The factory default
key is 0. The default Basic Key Code 0 does not need to be modified for programming purposes.
Radio Receiver Code: corresponds to the code set on to the "Astro 43" radio receiver, dip-switches to ON position. In this way it is possible to combine
Radi 12 with an Astro 43 radio receiver.
Personal Access Code: corresponds to the code/keys (max 9 digits) that the user has to press to open his/her automated access.
This personal code
must always be followed by a number, corresponding to the channel enabled on to the Radio Receiver.
Drwg. No. 6519
GB
Directive 2003/108/EC
GB
Disposal of electric
andelectronic material
DO NOT DISPOSE OF AS NORMAL
WASTE HARMFUL FOR THE
ENVIRONMENT
Via Mantova 177/A - C.P. 126 - 37053 Cerea (VR) Italy
Tel. +39 0442 330422 - Fax +39 0442 331054
e-mail: info@fadini.net - www.fadini.net
meccanica
FADINI
page 5
Page 2

Astro 43
Astro 43 MQB
IMPORTANT: Read the instructions in the radio receiver how the radio signal is memorized
OPERATION 1 (for ASTRO 43 and ASTRO 43 MQB) - Deleting all numerical codes from the Memory
R - 4 - E
R - 0* - E
R - 0* - E
Long tone after 50 seconds: confirmation sound,
memory blanked
Double tone: NO
* the "0" is the factory
default Basic Key Code
OPERATION 2 (for ASTRO 43 and ASTRO 43 MQB) - Entering the Basic Key Code (Optional)
R - 0 - E
R - EXISTING Basic key Code* - E
R - NEW Basic Key Code - E
R - NEW Basic Key Code - E
* the "0" is the factory
default Basic Key Code
OPERATION 3 (for ASTRO 43 and ASTRO 43 MQB) - Resetting the Memory once the Basic key Code has been entered
R - 4 - E
R - type in the personal Basic Key Code* - E
R - type in the personal Basic Key Code* - E
Long tone after 50 seconds: confirmation sound,
memory blanked
Double tone: NO
* the "0" is the factory
default Basic Key Code
OPERATION 4 (for ASTRO 43 and ASTRO 43 MQB) - Recognising the Radio Receiver
R - 1 - E
R - type in the personal Basic Key Code* - E
R - 1 - E
* the "0" is the factory
default Basic Key Code
OPERATION 5
for ASTRO 43 - Match encoding with the Radio Receiver and Personal Access Code
R - 1 - 1 - E
R - type in the personal Basic Key Code* - E
R - numbers corresponding to the radio receiver Dip-switches to ON - E
R - Personal Access Code - E
(should 0 be required to be used as STOP button, the Personal Acces Code and the Basic key Code
must not start with 0)
*the "0" is the factory
default Basic Key Code
for ASTRO 43 MQB - match encoding with the Radio Receiver and Personal Access Code
1) R - 1 - 1 - E
2) R - type in the personal Basic Key Code* - E
3) R - numbers corresponding to the Dip-switches to ON of a hypothetical transmitter - E ( not to forget, in case deleting is required)
4) R - Personal Access Code - E
5) Power supply Astro 43 MQB and set any one of the Dip-switches 1,2,3 or 4 of the radio channel as required and Dip-switch 5 to ON
6) On RADI 12 press only the Personal Access Code - radio channel - E: wait and after about 2 seconds the receiver red led flashes once
7) Set all of the Dip-switches of Astro 43 MQB to OFF, wait for the five flashes at the end confirmimg memorazing completed.
(should 0 be required to be used as STOP button, the Personal Acces Code must not start with 0)
* the "0" is the factory
default Basic Key Code
Operating with Radi 12 digital key panel
Press in sequence Personal Access Code Number of radio channel - E
Resetting the Personal Access Code (for Astro 43 and Astro 43 MQB)
R - 1 - 1 - E
R - type in the personal Basic Key Code* - E
R -
numbers corresponding to the Dip-switches to ON - E (for Astro 43 MQB press the "numbers of the dip-switches to ON of a hypothetical transmitter"
R - Personal Access Code to be deleted - E
* the "0" is the factory
default Basic Key Code
Enabling the "0" key as STOP button - It is essential that the first digit of the Personal Access Code and Basic Key Code is not 0 . Therefore
the Basic key Code must be changed into a number different from "0", as described in step 2.
Series connect the required NC channel of the radio receiver and the NC contact of the Stop terminal in the electronic control board.
For Astro 43 MQB: set to ON the Dip-Switch n°5 and one of the Dip-switches for the channel to be used as STOP contact.
Press only the Personal Access Code No. of the STOP radio channel - E
R - 0 - 0 - Basic Key Code* - E
For Astro 43 MQB: set all of the Dip-switches on to OFF.
To test this function, press only the 0 key and the automation in motion stops.
* the "0" is the factory
default Basic Key Code
Deactivating the "0" key as STOP button
R - 0 - 0 - Basic Key Code * - E
Drwg. No. 6519
page 6
GB
Directive 2003/108/EC
GB
Disposal of electric
andelectronic material
DO NOT DISPOSE OF AS NORMAL
WASTE HARMFUL FOR THE
ENVIRONMENT
Via Mantova 177/A - C.P. 126 - 37053 Cerea (VR) Italy
Tel. +39 0442 330422 - Fax +39 0442 331054
e-mail: info@fadini.net - www.fadini.net
* the "0" is the factory
default Basic Key Code
meccanica
FADINI
Page 3

Jubi 433
IMPORTANT: Read the instructions in the radio receiver how the radio signal is memorized
OPERATION 1 - Deleting all numerical codes from the Memory
R - 4 - E
R - 0* - E
R - 0* - E
Long tone after 50 seconds: confirmation sound,
memory blanked
Double tone: NO
OPERATION 2 - Inserting the Basic Key Code (Optional)
R - 0 - E
R - EXISTING Basic key Code* - E
R - NEW Basic Key Code - E
R - NEW Basic Key Code - E
OPERATION 3 - Resetting the Memory once the Basic Key Code has been entered
R - 4 - E
R - type in the personal Basic Key Code* - E
R - type in the personal Basic Key Code* - E
Long tone after 50 seconds: confirmation sound,
memory blanked
Double tone: NO
OPERATION 4 - Recognising the Jubi 433 Radio Receiver
R - 1 - E
R - type in the personal Basic Key Code* - E
R - 2 - E
* the "0" is the factory
default Basic Key Code
* the "0" is the factory
default Basic Key Code
* the "0" is the factory
default Basic Key Code
* the "0" is the factory
default Basic Key Code
OPERATION 5 - Match encoding with Jubi 433 Radio Receiver and Personal Access Code
* the "0" is the factory
1) R - 1 - 1 - E
2) R - type in the personal Basic Key Code* - E
3) R - Personal Access Code - E
4) R - Personal Access Code - X - E
X= Number of the Radi 12 units being programmed with a Jubi 433 receiver (eg.: No.1 Radi, X=1)
5) Power the Jubi 433 receiver and position the Strip on the desired channel
6) Press and hold down the "P" button on the Jubi 433 receiver
7) Press only the Personal Access Code Number of radio channel - E
The red Led on the Receiver is illuminated: the Personal Access Code is entered
(should 0 be required to be used as STOP button, the Personal Acces Code must not start with 0)
default Basic Key Code
Operating with Radi 12 digital key panel
Press in sequence Personal Access Code Number of radio channel - E
Resetting the Personal Access Code
R - 1 - 1 - E
R - type in personal Basic Key code* - E
R - Personal Access Code to be deleted - E
* the "0" is the factory
default Basic Key Code
Enabling the "0" key as STOP button - It is essential that the first digit of the Personal Access Code is not "0".
Series connect the required NC channel of the radio receiver and the NC contact of the Stop terminal in the electronic control board.
Position the STRIP jumper on to the channel where the STOP function is required. Press and hold the P button on the receiver card.
Press only the Personal Access Code - number of the STOP radio channel - E
R - 0 - 0 - Basic Key Code* - E
Release the P button.
To test this function, press only the " 0" key and the automation stops.
* the "0" is the factory
default Basic Key Code
Deactivating the "0" key as STOP button
R - 0 - 0 - Basic Key Code* - E
Drwg. No. 6519
GB
Directive 2003/108/EC
GB
Disposal of electric
andelectronic material
DO NOT DISPOSE OF AS NORMAL
WASTE HARMFUL FOR THE
ENVIRONMENT
Via Mantova 177/A - C.P. 126 - 37053 Cerea (VR) Italy
Tel. +39 0442 330422 - Fax +39 0442 331054
e-mail: info@fadini.net - www.fadini.net
* the "0" is the factory
default Basic Key Code
meccanica
FADINI
page 7
Page 4

Siti 63
IMPORTANT: Read the instructions in the radio receiver how the radio signal is memorized
OPERATION 1 - Deleting all numerical codes from the Memory
R - 4 - E
R - 0* - E
R - 0* - E
Long tone after 50 seconds: confirmation sound,
memory blanked
Double tone: NO
OPERATION 2 - Inserting the Basic Key Code (Optional)
R - 0 - E
R - EXISTING Basic key Code* - E
R - NEW Basic Key Code - E
R - NEW Basic Key Code - E
OPERATION 3 - Resetting the Memory once the Basic Key Code has been entered
R - 4 - E
R - type in the personal Basic Key Code* - E
R - type in the personal Basic Key Code* - E
Long tone after 50 seconds: confirmation sound,
memory blanked
Double tone: NO
OPERATION 4 - Recognising the Siti 63 Radio Receiver
R - 1 - E
R - type in the personal Basic Key Code* - E
R - 3 - E
* the "0" is the factory
default Basic Key Code
* the "0" is the factory
default Basic Key Code
* the "0" is the factory
default Basic Key Code
* the "0" is the factory
default Basic Key Code
OPERATION 5 - Match encoding with Siti 63 Radio Receiver and Personal Access Code
* the "0" is the factory
1) R - 1 - 1 - E
2) R - type in the personal Basic Key Code* - E
3) R - Personal Access Code - E
4) R - Personal Access Code - X - E
X= Number of the Radi 12 units being programmed with a Siti 63 receiver (eg.: No.1 Radi, X=1)
5) Power the Siti 63 receiver and position the Strip on the desired channel
6) Press and hold down the "P" button on the Siti 63 receiver
7) Press only the Personal Access Code Number of radio channel - E
The red Led on the Receiver is illuminated: the Personal Access Code is entered
(should 0 be required to be used as STOP button, the Personal Acces Code must not start with 0)
default Basic Key Code
Operating with Radi 12 digital key panel
Press in sequence Personal Access Code Number of radio channel - E
Resetting the Personal Access Code
R - 1 - 1 - E
R - type in personal Basic Key code* - E
R - Personal Access Code to be deleted - E
* the "0" is the factory
default Basic Key Code
Enabling the "0" key as STOP button - It is essential that the first digit of the Personal Access Code is not "0".
Series connect the required NC channel of the radio receiver and the NC contact of the Stop terminal in the electronic control board.
Position the STRIP jumper on to the channel where the STOP function is required. Press and hold the P button on the receiver card.
Press only the Personal Access Code - number of the STOP radio channel - E
R - 0 - 0 - Basic Key Code* - E
Release the P button.
To test this function, press only the " 0" key and the automation stops.
* the "0" is the factory
default Basic Key Code
Deactivating the "0" key as STOP button
R - 0 - 0 - Basic Key Code* - E
Drwg. No. 6519
page 8
GB
Directive 2003/108/EC
GB
Disposal of electric
andelectronic material
DO NOT DISPOSE OF AS NORMAL
WASTE HARMFUL FOR THE
ENVIRONMENT
Via Mantova 177/A - C.P. 126 - 37053 Cerea (VR) Italy
Tel. +39 0442 330422 - Fax +39 0442 331054
e-mail: info@fadini.net - www.fadini.net
* the "0" is the factory
default Basic Key Code
meccanica
FADINI
 Loading...