

Page 1
40011718-1847 User manual MatriX I.T.C. Honeywell ENG
User manual I.T.C.
“Intelligent Technical Controller”
Page 2

User manual
1 < < < <
Registration plate/Typenschild/Type de plaque:
NL: Serienummer
ENG: Serial number
DE: Seriennummer
FR: Numéro de série
ESP: Número de serie
NO: Serienummer
IT: Numero di serie
PL: Numer seryjny
This user manual is intended for the following gas fires:
MatriX 450/500 I, II, III
MatriX 450/650 I, II, III
MatriX 800/500 I, II, III
MatriX 800/650 I, II, III
MatriX 1050/500 I, II, III
MatriX 1050/650 I, II, III
MatriX 800/500 RD, ST
Page 3
User manual
2 < < < <
1.0
1.1
1.2
1.3
1.4
1.5
1.6
1.7
Page 4
User manual
3 < < < <
Dear User
Congratulations on your purchase of a Faber fire! A
quality product from which you will experience
warmth and atmosphere for many years. We
recommend that you read this manual carefully
before using the fire. In the event a failure occurs
despite careful final checks, you can contact your
dealer or www.faber-fires.eu at all times.
For any warranty claims, it is essential you first
register your fire.
Details about your fire can be found on page 1 of
this user manual or in the App. (See 8.1).
You can register your fire at:
www.faber-fires.eu
Check
Check the fire for transport damage and
immediately report any damage to your supplier.
Introduction
Installation and maintenance of the fire must be
carried out by a professional expert who has
proven knowledge and demonstrable competence.
A professional craftsman takes into account all
technical aspects such as heat delivery, gas
connection as well as flue gas discharge
requirements.
Where the installation instructions are not clear,
the national / local regulations must be followed.
Safety instructions for the user
Please note:
It is recommended to always place a protective
grille in front of the fire when children, elderly or
disabled persons are present in the same room. If
vulnerable persons may often be present in the
room without supervision, a fixed screen should
be mounted around the fire.
As a fire is a source of heat, hot air
circulation is created. It is therefore
important that the fire is not stoked too
soon after a renovation. As a result of
natural air circulation, moisture and not
yet cured volatile components from paint,
building materials and carpeted floors and
the like are included in this air circulation.
These parts can settle as soot on cold
surfaces. The moment you can begin using
the fire for the first time depends on
various circumstances. Consult your
installer/dealer about this matter.
The device is designed for atmosphere
and heating purposes. This means that all
visible surfaces, including the glass, may
become hotter than 100°C.
Do not use the remote control and/or App
outside the room where the fire is
situated. Be sure that you are always
aware of the situation around the fire
when it is operated.
The fire cannot be used when: the glass is
damaged or removed or when the
combustion chamber is open.
Do not place flammable materials in the
combustion chamber.
Never change the arrangement of the log
kit and do not add more decoration
material than included with the fire.
Do not place any curtains, clothes,
furniture or other combustible materials
in the vicinity of the device. The minimum
distance is 1 meter.
Do not allow children to use the remote
control without supervision.
Using the fire for the first time
Take care of extra ventilation and open all the
windows in the room during the first
commissioning of the fire. Stoke the fire for some
hours at the highest setting, so that the paint gets
the chance to harden and any escaping vapours
are disposed of safely. Keep vulnerable people and
pets outside the room during this process!
Cleaning and maintenance
The device must be cleaned and checked annually
for proper operation by an installer.
The outside of the fire can be cleaned with a clean
damp cloth.
Cleaning of the glass
Remove the glass as described in the installation
instructions.
The glass can be cleaned with Faber glass cleaner.
This is a specially formulated cleaning agent that
can be ordered at authorised Faber dealers. Never
use aggressive cleaning agents or abrasive
products.
Please note:
Avoid fingerprints on the glass. These may be
retained by the heat and may then no longer be
removable.
Page 5

User manual
4 < < < <
Operation I.T.C. "Intelligent Technical
Controller" (fig 1.4)
The I.T.C. controller controls, monitors, records the
consumption and, if necessary, gives warning and
error codes. The I.T.C. controller is not connected
to the internet and not accessible to third parties
from the outside. Only in combination with the
optional available Domotica Interface Unit is it
possible, if desired, to realise connection at a great
distance.
Control is possible with remote control,
Smartphone or Tablet. All 3 use a Bluetooth
connection with the fire. The latter has a limited
range so that you need to be in the vicinity of the
fire at all times.
Starting procedure
Starting the fire is done according to a built-in
procedure. This procedure may differ per type of
fire. During this procedure no commands can be
entered.
This is shown on the remote control by a white
flashing LED and in the App this will be visible on
the display.
If a start-up procedure is aborted by the user or
the fire does not ignite at the end of the start-up
procedure, then there is a waiting period of 30 sec.
after switching off before it will be possible to
restart. The waiting time increases in case of
multiple starting attempts.
After 3 full attempts, the I.T.C. is blocked for at
least half an hour. The I.T.C. restores itself after
this half hour. The waiting period is visible in the
App.
If during normal use the fire is switched off it is
possible to switch it on again after 15 seconds.
Switching off unexpectedly and switching on
again automatically
The burner automaton automatically checks the
correct operation twice per 24 hours. After 12
hours the first check takes place, but this is skipped
if the device is actually burning. If the device is
burning at the second attempt 12 hours later, the
device is switched off and switched on again
immediately after checking the safety system and
will return to the position in which the device was
before the test.
Please note:
If it is not possible anymore to operate the fire
using the remote control or App, the fire can be
switched on/off with the on/off button on the I.T.C.
controller, see fig. 1.4. (The latter is located behind
the small service door)
Fire OFF: Press On/Off button briefly.
Fire ON: Press and hold On/Off button until the
LED turns green.
(If released earlier the start is interrupted).
At pressing longer, the flame will change from low
to high and from narrow to wide. Release the
button at the moment when the desired position
has been reached. If the button is not released, the
fire will automatically switch off.
(If the button is pressed longer than 5 min., the
I.T.C. controller shows an error message that the
button might be broken and that service is
desired).
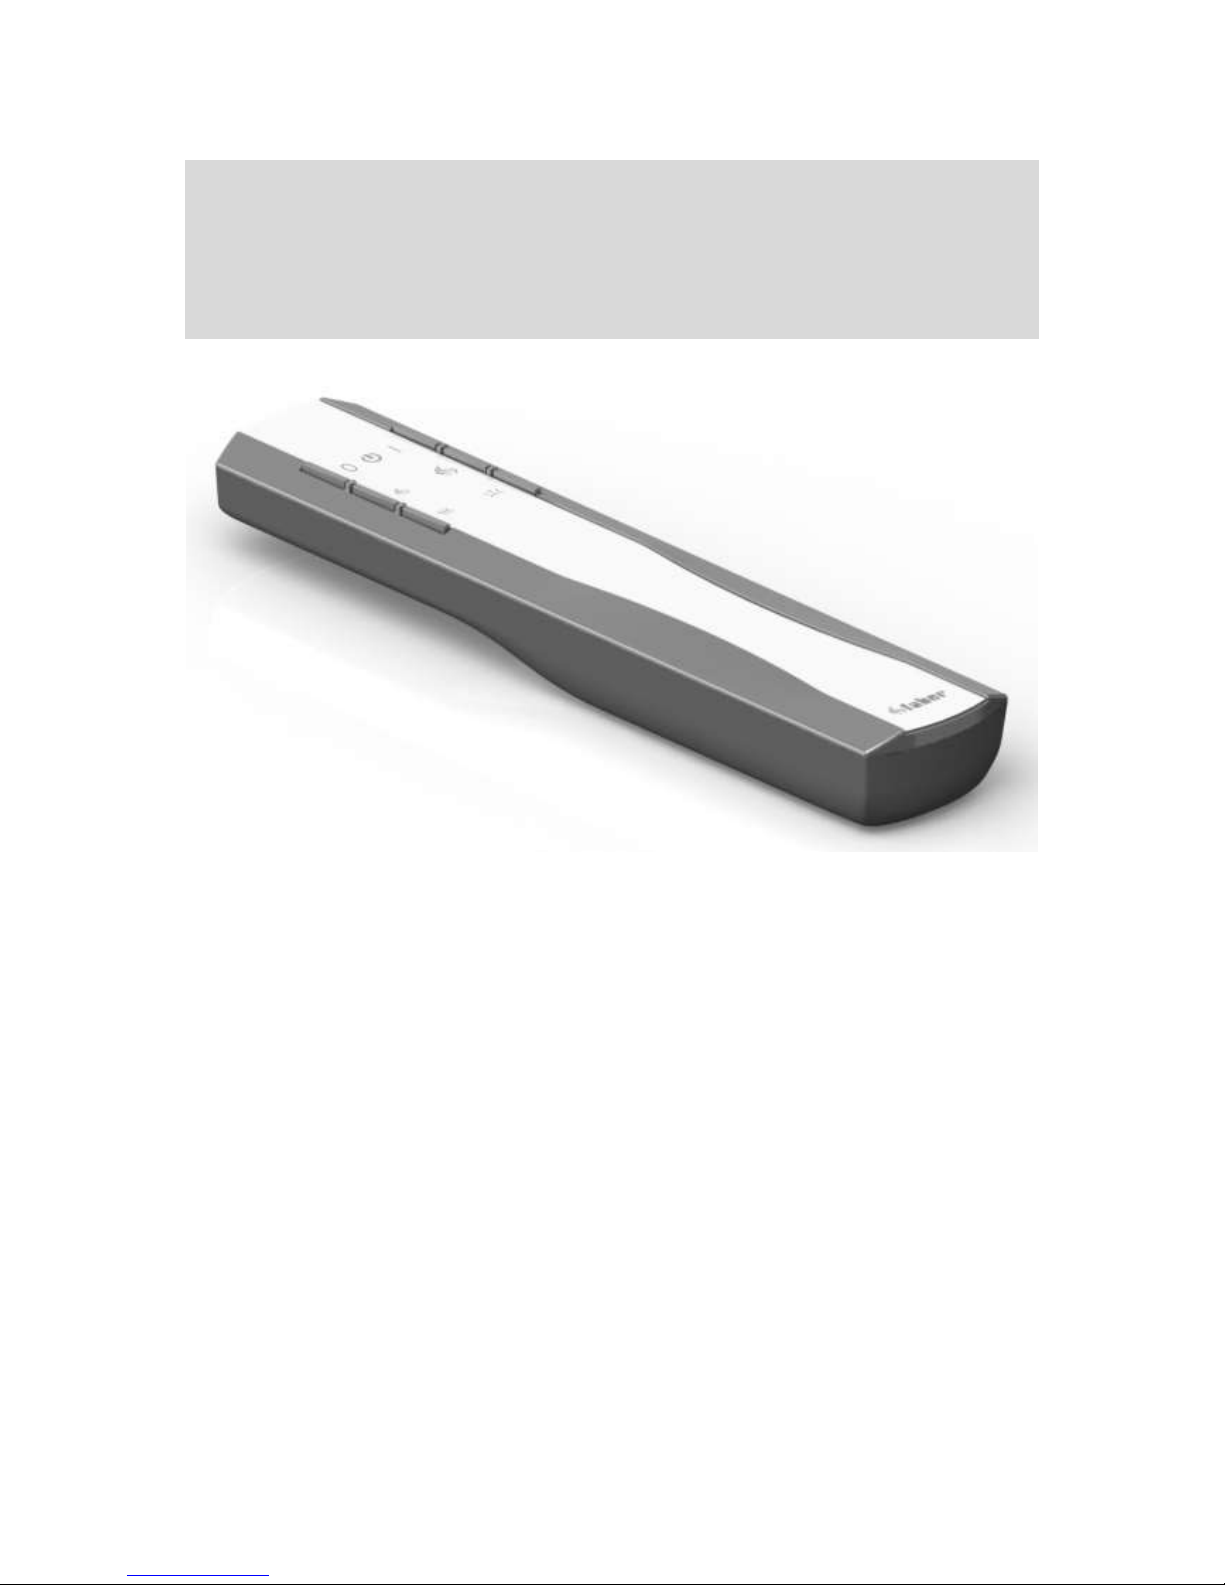
Remote control (fig. 1.0)
The remote control is already connected to the
I.T.C. controller so that the fire is ready for use. If
this is not the case, follow the instructions in
accordance with section 4.1.
With the remote control all the basic functions can
be activated. For the operation of the thermostat
function and to change settings, it is necessary to
use the Faber App on Smartphone or Tablet.
The remote control also functions as a room
thermostat and must therefore be placed in a
suitable place in the supplied cradle.
(See section 8).
Remote control button functions
1: OFF
(top left)
2: ON
(top right)
3: Fire lower
(centre left)
4: Fire higher
(centre right)
5: Additional burner on/off
(bottom left)
6: Glow effect on/off
(bottom right)
The function of button 6 is only available with an
installed Symbio LED module.
The LED intensity can be customised by pressing
and holding button 6 and simultaneously briefly
pressing button 3 or 4 one or more times. This new
setting is saved.
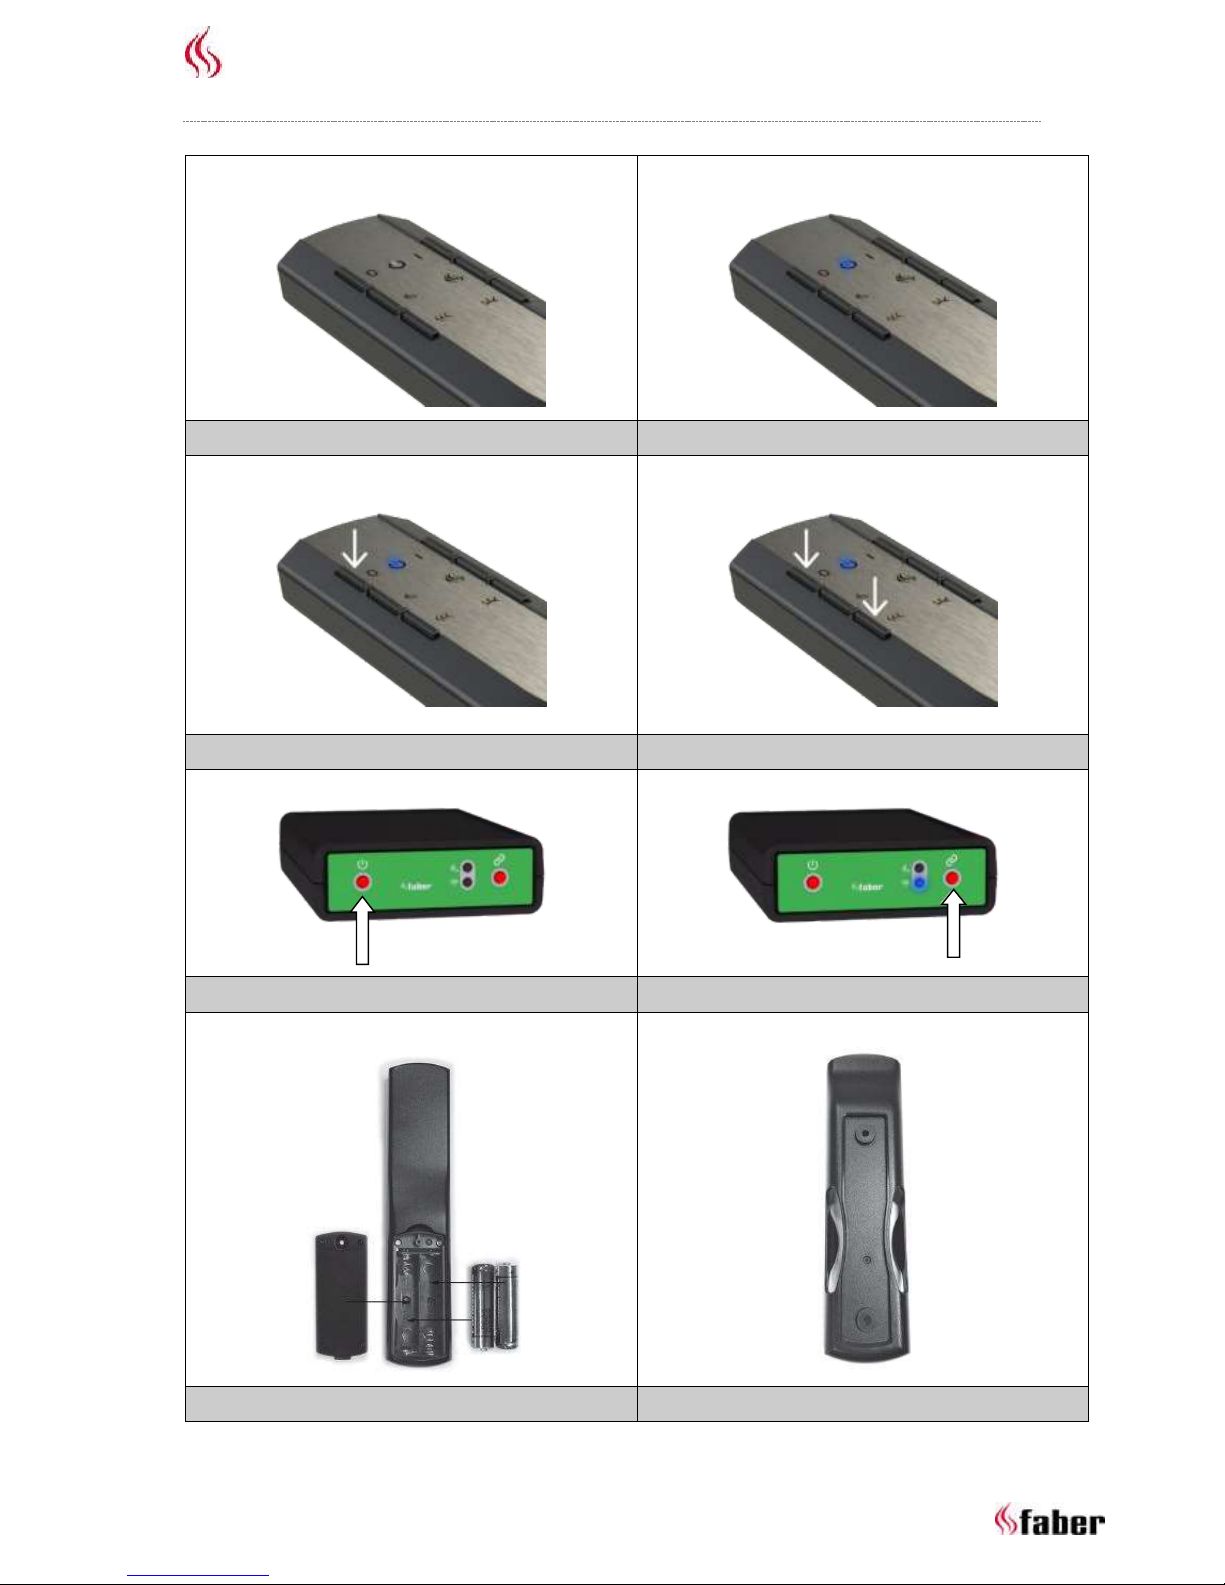
Pairing remote control with I.T.C.
On the remote control simultaneously press
buttons 1 and 5 until the LED rapidly starts flashing
blue and release the buttons. (See fig. 1.3).
The LED continues to flash blue for as long as the
pairing mode is activated (60 sec.).
Press the "connect" button of the I.T.C. controller,
which is located behind the small service door,
until it flashes blue. (See fig. 1.5).
The LED continues to flash blue for as long as the
pairing mode is activated (60 sec.).
Now the pairing process will start automatically. If
pairing is successful, both on the remote control
and I.T.C. controller the LED will briefly flash green.
Page 6

User manual
5 < < < <
If pairing fails, on the I.T.C. controller and/or the
remote control the LED will flash red momentarily.
If this occurs, please repeat the procedure again
and check whether all activities have been carried
out correctly and reduce the distance between the
remote control and the I.T.C. controller. After the
end of the pairing procedure the blue flashing of
the LED will stop.
You may also follow the instruction using the App.
Click on the main menu in the upper left corner
and choose "Info" and then "Connect remote
control".
LED signals in "power" symbol remote
control (see fig 1.1)
LED flashes white:
o Fire starting procedure is running.
LED flashes orange (1 time):
o Min or max reached.
(Flame height, light intensity, etc.)
o Start interrupted or not successful
(During waiting period no start
possible. When using App remaining
waiting period is displayed).
o Switching on too quickly after
switching off.
LED flashes blue (heart rate rhythm with
intervals of 0.5 sec.):
o I.T.C. in connect mode (60 sec.) for
pairing Smartphone/Tablet.
LED flashes blue (continuously):
o Remote control in pairing mode for
pairing with I.T.C.
LED flashes green (1 up to 4 times):
o Transmitting user command.
(Remote Control repeats command
max 4 times if the command is not
confirmed by the I.T.C.).
LED flashes orange (4 times):
o 1 or more active I.T.C. warnings. (To
be read in the App).
LED flashes red (7 times):
o 1 or more active I.T.C. failures.
(To be read in the App).
Replacement remote control batteries
Replacement of the batteries in the remote control
is indicated by the App in a timely manner. You will
be notified of this on your Smartphone or Tablet.
Please note:
After replacing the batteries, it is not necessary to
pair the remote control with the I.T.C. controller
again!
Remove the cover on the back of the
remote control. (See fig. 1.6).
Place 2 AA 1.5 Volt Alkaline long live
batteries.
Put the cover back.
Control via Smartphone or Tablet
Suitable for Android or iOS operating
systems in combination with the free
download "Faber ITC V2" App or
higher.
Download and install the App on your device.
Faber App uses a Bluetooth connection with the
fire that needs your Smartphone or Tablet
Bluetooth to be enabled.
Your Smartphone/Tablet needs to be paired with
the I.T.C. controller. Follow the instructions in the
App or consult 5.1. You can connect an unlimited
number of devices.
Pairing Smartphone/Tablet with I.T.C.
controller (via remote control)
On the remote control, press the OFF button (top
left) and hold it until the blue LED starts flashing
(heart rate rhythm) and release the button.
(See fig. 1.2).
The LED continues to flash blue for as long as the
pairing mode is activated (60 sec.).
Start the App on your Smartphone or Tablet.
If the control screen is shown:
Press the "list" symbol next to the name
of the fire in the control screen.
If you wish to add an extra fire:
Press the "+" button at the bottom of the
screen.
Connection is automatically realised now.
App functions
With Smartphone/Tablet, all functions of the I.T.C.
can be fully exploited. Besides standard functions
are also available:
Thermostat function (see 5.3)
Manual temperature setting.
Clock thermostat with a day/week
program.
Flame/light patterns
In addition to a manual setting you may choose
from four different flame patterns that have been
designed with care:
Campfire
Party
Relaxed
ECO
In addition to varying flame effects also the Symbio
LED module (if available) of a light pattern
appropriate for the fire pattern is provided. Within
Page 7

User manual
6 < < < <
these flame patterns, you yourself can adjust the
power output and switch the extra burner on and
off.
Fire consumption statistics
Gas consumption and burning hours arranged per
day, month and year provide insight in the
operating costs for you.
Personal user settings
Here you can customise your fire even better to
your requirements (see section 6):
You can change the name "My Faber" of
the fire, which appears on your
Smartphone or Tablet, according to your
wishes.
Do you wish to use the thermostat
function and probably also the clock
thermostat with day and week settings or
not, on the contrary, then switch these
features on or off.
Decide if you wish to set the glow effect
automatically or not. The factory setting is
ON.
Customise the basic glow effect setting of
the Symbio LED module to your desired
strength.
Determine whether you wish to display
your consumption in m³ gas or in kWh.
Decide which auto power off features you
wish to activate and determine the
conditions yourself.
At calibration you have the opportunity to
sync temperature measurement of the
I.T.C. with your own home thermostat. At
this setting you specify the temperature
difference of the I.T.C. from your own
home thermostat.
Decide whether you wish to apply open-
window-detection.
Finally, you can always delete your personal
settings.
Notifications
The App will notify you when something special
occurs such as:
Maintenance required.
Failures with error codes
(with proposed action).
Shutdown by the automatic shutdown
function.
Low batteries remote control.
Thermostat function
By default, the thermostat function is OFF and the
clock thermostat is OFF.
At settings under "Thermostat" you can customise
this.
It is advisable to switch off both functions if the
device is placed in a public space and/or is mainly
used for decorative purposes. By switching on
these functions the device may switch on and off
at random intervals.
In the thermostat the I.T.C. controller
automatically switches on the extra burner if it is
necessary to reach the desired temperature more
quickly.
The thermostat is activated by pressing the
"thermostat" symbol in the lower right corner of
your screen. A screen will appear with in the circle
a hand to indicate that you are in the manual
mode. Now you can set the required temperature
by moving the point on the circle.
If the clock thermostat has been released at
settings, you can activate the clock thermostat by
tapping the hand. The automatic day/week
program has been activated now.
Moving the point in the circle allows you to change
the actual temperature setting for the current
period. This setting will not be saved. If you wish to
customise the day/week program you have to go
to the main menu, select "settings" and then
"day/week program" and change the program to
your own wishes.
Please note! The device is automatically switched
off in the thermostat function if:
The fire has not been switched on by the
thermostat during 8 days.
After 8 hours at maximum power the fire
has still not reached the desired
temperature.
The room temperature measured by the
remote control rises higher than the userdefined maximum value (default 31
degrees).
The remote control is out of range of the
fire.
Flame patterns
Fire is slowly changing in movement and action. A
chosen flame pattern needs about 1 hour to get to
show the flame pattern as it is meant to look.
Please take this into consideration when you judge
the flame pattern.
Manual adjustment and flame patterns are
enabled by selecting the flame in the App, on the
lower bar. If you have not yet selected a flame
pattern, by default you will get into the manual
mode "flame pattern constant".
Page 8

User manual
7 < < < <
Otherwise the last flame pattern selected by you
will be selected.
With the remote control you cannot select a flame
pattern; however, you can adjust the power as
mentioned in the table below at the flame
patterns. For this purpose you can use the keys 3
(Fire low), 4 (Fire high) and 5 (Additional burner
on/off) .
Select flame pattern
Tap the symbol "flame pattern" in the middle of
the circle, which gets you into the pattern selection
menu. The present flame pattern is clear in the
picture. Now select the desired flame pattern.
You can make your choice final by tapping the
arrow in the top bar. You are returned to the
control screen.
Constant flame pattern
This is the default manual setting. The flame
pattern is constant and depending on the mode
selected by you. The glow effect is lightly
modulating between 80 and 100% of your
customised basic settings of the Symbio LED
module.
This glow effect setting can be controlled with the
remote control or with the App. (See 6.3 or in the
menu setting "glow effect" in the App). Moving the
point in the circle varies the height of the flame.
By tapping the upper circle the extra burner is
switched on or off.
Campfire flame pattern
A 13-minute animation of a real campfire with
flames continuously varying in height and a
modulating glow effect variation.
The fire starts with a slightly yellowish weak glow
effect. Slowly the fire will get hotter and the flames
higher and the glow effect stronger and warmer
(more red) in colour. At the end of this stage the
flames will become smaller, just like in a real wood
fire, but the glow effect stronger and deeper red in
colour. When the flames have been minimal for
some time, also the glow effect will slowly
decrease. Now 13 minutes will have elapsed and
the process starts again.
By turning the dot on the circle clockwise more
average power is supplied and both the duration
and the height of the flames are adjusted
proportionally. You can also enable or disable the
extra burner.
Relaxed flame pattern
A quiet sparkling fire. Movement and frequency
are visible but gradually. Pattern is dynamic and
unpredictable and also the glow effect moves
along in this pattern of unpredictability.
By turning the dot on the circle clockwise more
average power is supplied and both the duration
and the height of the flames are adjusted
proportionally. You can also enable or disable the
extra burner by tapping in the top circle.
Party flame pattern
In Party mode, a striking flame is looked for that is
briefly visible in order to create limited heat
release, assuming that the room will be quite
warmed up by the many attendees already. In
Party mode, a lot of movement in both flame
height and time is looked for. This is also
demonstrated in the glow effect.
By turning the dot in the circle clockwise more
average power is supplied. Only duration and
repetition vary with the adjustment and the extra
burner can be turned on or off.
ECO flame pattern
In the ECO modes the intention is to save as much
energy as possible, at which with a minimum
amount of energy still a maximum flame
experience is looked for.
Movement and frequency are subtle and not
remarkable.
Personal settings and device information
Personal settings can only be customised with the
App.
Customise device name
If you are connected with your fire, touch the
upper-left corner of the menu.
Select the top setting, by default the name "My
Faber” is displayed.
You will now open a screen that displays all
information about your fire. Tap "My Faber” and
customise the latter.
Device information
The device information, which is visible in the
display (see 6.1), is required at a service request.
The list includes:
Official name of the fire
Article number
Serial number
Date of installation
Load of the fire in kW
Customising glow effect
Go to menu and select the option "Settings" and
then "Glow effect" and "Automatic” on.
Auto on/off
The glow effect switches on at the moment that
there are flames. If you do not like this, this
Page 9

User manual
8 < < < <
function can be switched off. During use you can
temporarily switch on or off the glow effect with
the remote control or App.
Customising brightness glow effect
Here you can set the basic brightness of the glow
effect. When you select this option the glow effect
will switch on during setup and you can adjust the
brightness by moving the dot in the circle. The
choice you made is stored as soon as you leave the
setting screen.
This setting can also be customised when the fire is
enabled!
Setting of thermostat
For a proper functioning of the thermostat, it is
necessary that the remote control is installed in
the cradle in the prescribed location.
(See section 8).
Namely, room temperature is measured by the
remote control.
Manual setting of thermostat
The manual thermostat function is ON by default.
If the function is not used on a regular basis and if
the remote control is used for operation of the fire
instead of the App, we recommend to switch this
feature OFF. Unnecessary or unexpected enabling
will be avoided.
Setting of clock thermostat
The latter is switched OFF by default and can be
switched ON only if the manual mode is switched
ON.
Setting of clock program
The clock thermostat has a day and week feature.
When enabled, the fire follows the entered
program fully automatically until the fire is
switched off. With this setting you can customise
the program to your own needs.
The program has the following steps:
Getting up
Leaving
Coming home
Sleep
At each step the time and temperature can be set.
Please note:
The times do have to be connected to the previous
step.
Setting energy saving
Max room temperature
Here you can set the maximum room temperature
(default 31 degrees). If the temperature exceeds
the preset value, the fire will switch off.
This feature is provided to disable the fire if you
forgot to switch off the fire in manual mode when
leaving the room. Please note that if the remote
control is heated up by the sun or is located near
the fire, the temperature may quickly rise above 30
degrees.
Switch-off time in hours
If the fire is enabled in the manual mode or on one
of the flame patterns and during the preset time
no command is received from the remote control
or App, the I.T.C. will switch off the fire.
As a user, you can set this time between 1 and 24
hours.
Open-window detection
This feature is OFF by default.
By ENABLING this feature the open-window
detection is activated. If the I.T.C. detects an
unexpected rapid temperature drop within a
preset time this will be regarded as an open
window or door and the device will be disabled.
Display (setting display temperature and
consumption)
Sets how the temperature and consumption are
displayed.
At "Consumption" you can choose from:
Volume of gas in m³
Energy consumption in kWh
At "Temperature" you can choose from:
Celsius
Fahrenheit
Calibration
At calibration you have the opportunity to sync
temperature measurement of the I.T.C. with your
own home thermostat. You indicate at this setting
how much the temperature of the I.T.C. deviates
from your own home thermostat. It is important
that the remote control is located in its cradle in
the specified location.
(See section 8).
Adjust the value only after the thermostat has had
a few hours to adjust to the ambient temperature.
Page 10

User manual
9 < < < <
Reset function
Reset I.T.C./automatic burner
In the unlikely event that your fire crashed due to a
software failure, you can fully reset the I.T.C and
automatic burner with this function.
Please note:
This is not possible when the fire is blocked by the
I.T.C for safety reasons.
Reset user settings
Here you can reset your personal settings to the
factory default settings.
Register
The I.T.C. controller records the number of usage
and stand-by hours plus energy consumption. The
I.T.C. also calculates the maintenance period based
on this data.
The calculated gas consumption is a good
approximation.
The I.T.C. also registers the nature and the number
of malfunctions.
Statistics
If you are connected with your fire, touch the
upper-left corner of the menu in the control
screen.
Select "Statistics". In the screen, you can now
choose from energy consumption or the number of
hours that the fire burned.
Here you can read how many m³ gas or kWh of
electricity per day, month or year was consumed.
Wall mount remote control
For a good operation of the thermostat and ECOfeature it is necessary to put the remote control in
its cradle (see fig 1.7) in an suitable place. The
remote control is also the room temperature
sensor. Place the cradle at a height of
approximately 1.5m and outside of the radiation
area of the fire. Avoid location in corners and the
vicinity of windows, doors and heat sources such
as central heating radiators.
Page 11

User manual
10 < < < <
Page 12

Dealer info:
www.faber-fires.eu
Saturnus 8
P.O.Box 219
info@faber-fires.eu
NL-8448 CC Heerenveen
NL-8440 AE Heerenveen
 Loading...