

Page 1
412
Page 2

Page 3
ENGLISH
EC DECLARATION OF CONFORMITY FOR MACHINES
(DIRECTIVE 2006/42/EC)
Manufacturer: FAAC S.p.A.
Address: Via Benini, 1 - 40069 Zola Predosa BOLOGNA - ITALY
ENGLISH
Declares that:
Operator mod. 412
is built to be integrated into a machine or to be assembled with other machinery to create a machine under
the provisions of Directive 98/37/EC;
conforms to the essential safety requirements of the following EEC directives:
2006/95/EC Low Voltage Directive
2004/108/EC Electromagnetic Compatibility Directive
and also declares that it is prohibited to put into service the machinery until the machine in which it will be
integrated or of which it will become a component has been identified and declared as conforming to the
conditions of Directive 2006/42/EEC and subsequent amendments.
Bologna, 01-01-2009
The Managing Director
A. Marcellan
WARNINGS FOR THE INSTALLER
GENERAL SAFETY OBLIGATIONS
1) ATTENTION! To ensure the safety of people, it is important that you read
all the following instructions. Incorrect installation or incorrect use of
the product could cause serious harm to people.
2) Carefully read the instructions before beginning to install the product.
3) Do not leave packing materials (plastic, polystyrene, etc.) within reach
of children as such materials are potential sources of danger.
4) Store these instructions for future reference.
5) This product was designed and built strictly for the use indicated in this
documentation. Any other use, not expressly indicated here, could
compromise the good condition/operation of the product and/or be
a source of danger.
6) FAAC declines all liability caused by improper use or use other than that
for which the automated system was intended.
7) Do not install the equipment in an explosive atmosphere: the presence
of inflammable gas or fumes is a serious danger to safety.
8) The mechanical parts must conform to the provisions of Standards EN
12604 and EN 12605.
For non-EU countries, to obtain an adequate level of safety, the Stand
ards mentioned above must be observed, in addition to national legal
regulations.
9) FAAC is not responsible for failure to observe Good Technique in the
construction of the closing elements to be motorised, or for any defor
mation that may occur during use.
10) The installation must conform to Standards EN 12453 and EN 12445.
For non-EU countries, to obtain an adequate level of safety, the Stand
ards mentioned above must be observed, in addition to national legal
regulations.
11) Before attempting any job on the system, cut out electrical power.
12) The mains power supply of the automated system must be fitted with an
all-pole switch with contact opening distance of 3 mm or greater. Use
of a 6A thermal breaker with all-pole circuit break is recommended.
13) Make sure that a differential switch with threshold of 0.03 A is fitted
upstream of the system.
14) Make sure that the earthing system is perfectly constructed and con
nect metal parts of the closure to it.
15) The automated system is supplied with an intrinsic anti-crushing safety
device consisting of a torque control. Nevertheless, its tripping thresh
old must be checked as specified in the Standards indicated at point
10.
16) The safety devices (EN 12978 standard) protect any danger areas
against mechanical movement Risks, such as crushing, dragging, and
shearing.
17) Use of at least one indicator-light (e.g. FAACLIGHT ) is recommended
for every system, as well as a warning sign adequately secured to the
frame structure, in addition to the devices mentioned at point “16”.
18) FAAC declines all liability as concerns safety and efficient operation of
the automated system, if system components not produced by FAAC
are used.
19) For maintenance, strictly use original parts by FAAC.
20) Do not in any way modify the components of the automated sys
tem.
-
21) The installer shall supply all information concerning manual operation
of the system in case of an emergency and shall hand over to the user
the warnings handbook supplied with the product.
22) Do not allow children or adults to stay near the product while it is
operating.
23) Keep remote controls or other pulse generators away from children,
to prevent the automated system from being activated involuntarily.
-
24) Transit is permitted only when the automated system is idle.
25) The user must not attempt any kind of repair or direct action whatever
and contact qualified personnel only.
26) Check at least every 6 months the efficiency of the system, particularly
the efficiency of the safety devices (including, where foreseen, the
operator thrust force) and of the release devices.
27) Anything not expressly specified in these instructions is not permit
ted.
-
-
-
-
5
Page 4

ENGLISH ENGLISH
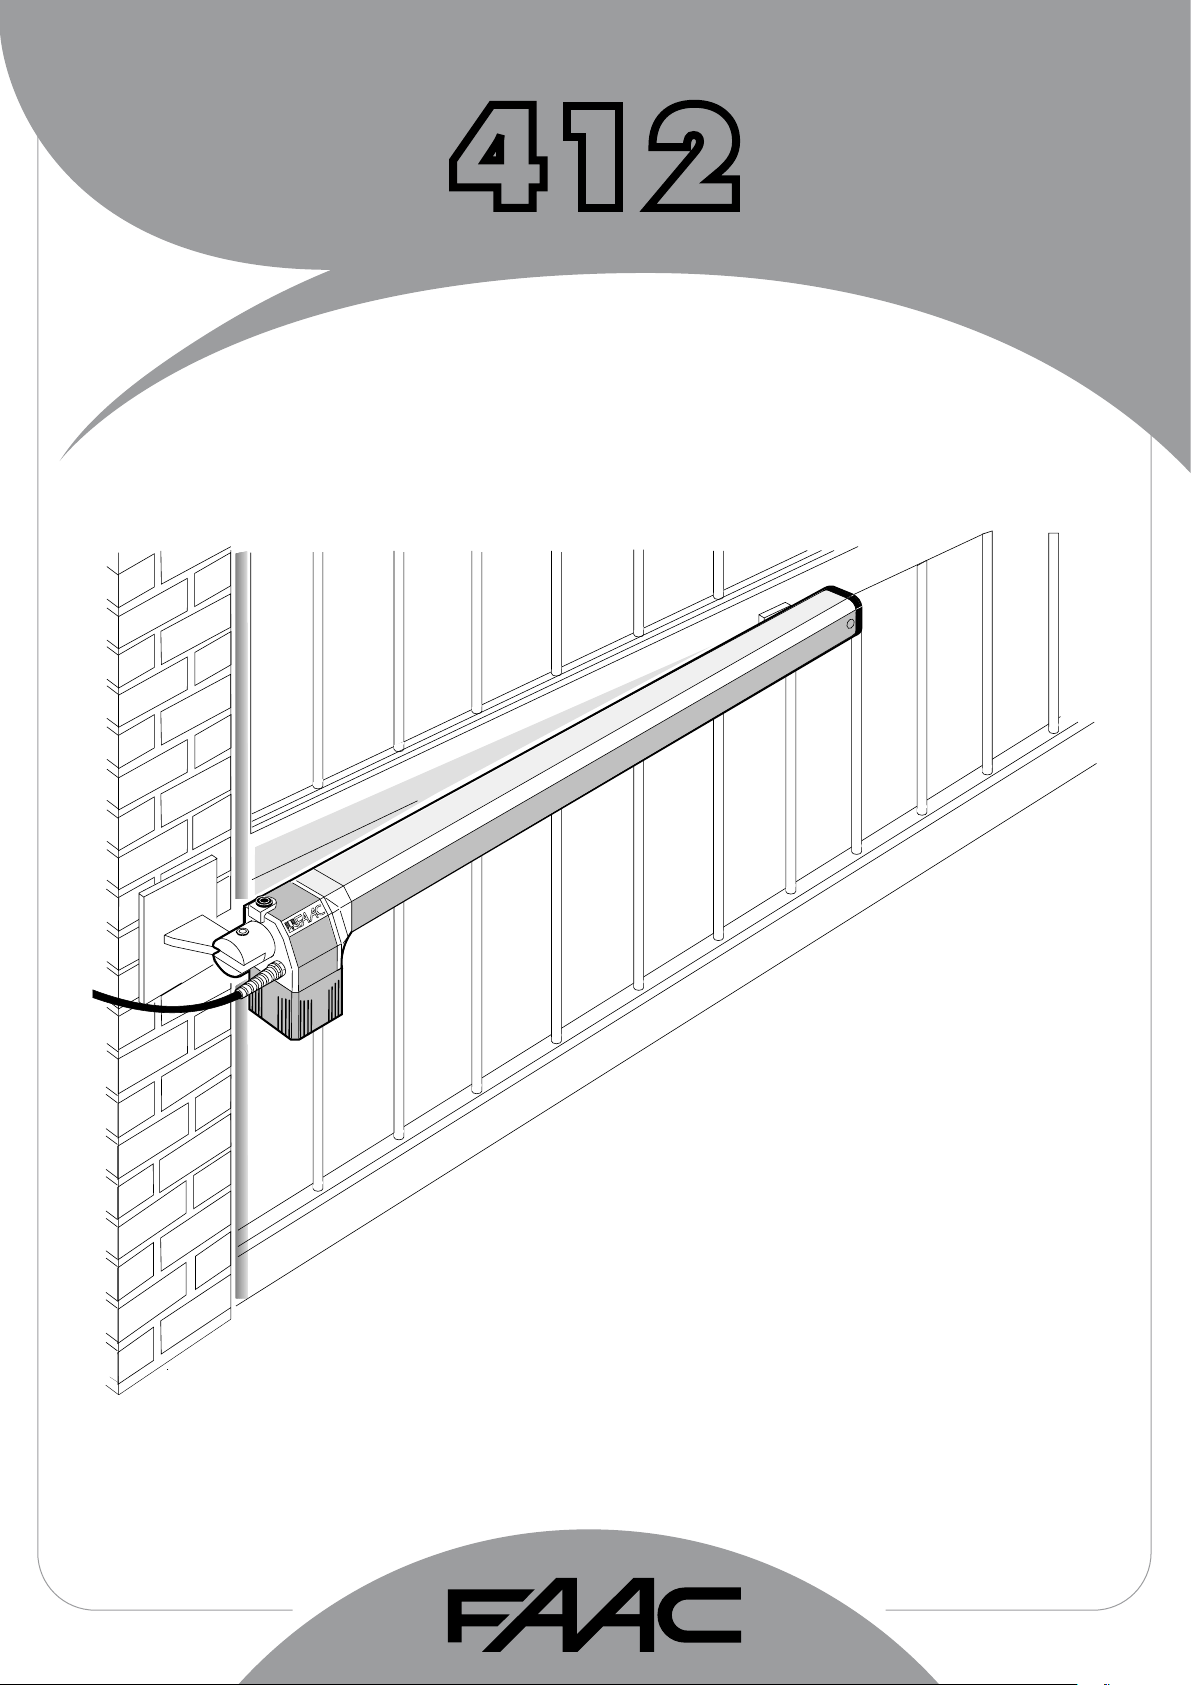
412 AUTOMATION SYSTEM
These instructions apply to the following models:
Operators 412 and 412-24V
The FAAC 412 AUTOMATION SYSTEM for swing gates comprises
two electromechanical operators which drive the gate leaves
by means of a worm screw.
The system locks mechanically; therefore no electric lock is
required.
ÜÜ
Ü To obtain anti-crushing protection, you have to use elec-
ÜÜ
tronic control units with a torque control electronic device.
The 412 automation was designed and manufactured to control access of vehicles.
Avoid any other use whatever.
1. DESCRIPTION AND TECHNICAL SPECIFICATIONS
4
3
7
5
Drawing A
a
INSTALLATION DIMENSIONS
b
d
z
892
80
Table A: Recommended dimensions
Opening a b c (*) d (**)
αα
angle "
α" (mm) (mm) (mm) (mm)
αα
90° 145 145 290 100
110° 125 125 290 80
(*) working excursion of piston rod (**)maximum dimensions
Fig. A
a
Motor Unit
b
Power cable
c
162
Worm screw
d
Front bracket
e
Rear bracket
f
Cable cover
g
Cover
Fig. 1
Table 1:
Power supply 230 V~ 50 Hz 24Vdc
Absorbed power (W) 280 70
Current drawn (A) 1,5 3
Electric motor 1400 rpm
Motor winding thermal cutout 140 °C /
Capacitor 8 µF/400V /
Max. thrust/traction force (daN) 350 250
Rod stroke (mm) 290
Rod speed (cm/s) 1,6
Temperature range (°C) -20 v +55 °C
Operator weight (Kg) 6,5
Housing protection IP 44
Duty cycle (cycles/hour ) 18 50
Maximum leaf length (m) 1,80
412 operator technical specifications
412 412-24V
CALCULATING INSTALLATION DIMENSIONS:
GENERAL RULES
If modifications to the dimensions specified in Table A
are necessary, proceed as follows:
- For 90° leaf opening: a + b = c
- For leaf opening over 90°: a + b < c
- The lower the dimensions of a and b the higher the gate
speed. Always respect current standards.
- Limit the difference between a and b to within 4 cm: larger
differences alter speed considerably during opening and
closing.
- For reasons of operator clearance, the minimum value for
Z is 45 mm (fig. A)
If the dimensions of the gate post or position of the hinge do
not allow for the specified distance of “a”, make a recess
in the gate post as shown in fig. B.
100 mm
300 mm
150 mm
Fig. B
6
Page 5

ENGLISHENGLISH
2. STANDARD INSTALLATION LAYOUT
a Operators 412
b Photocells
c Control unit
d Pushbutton
e Receiver
f Flashing light
•Use suitable rigid/flexible pipes for laying power cables.
•Always keep low voltage accessory cables separate from 230V~ power
cables. To avoid interference, use separate sheaths.
Fig. 2
3. INSTALLATION OF THE AUTOMATION SYSTEM
3.1. PRELIMINARY CHECKS
To ensure trouble-free operation, make sure that the gate
(whether existing or yet to be installed) has the following
specifications:
• max. length of each gate leaf: 1.8 metres
• strong and rigid leaf frame
• smooth gate movement, with no stiff points
• hinges in good condition
• mechanical travel limit stops
If any welding or brazing has to be done on the gate, do this
before installing the automation system. The good order of the
structure directly influences the reliability and safety of the
automation system.
3.2. INSTALLATION OF THE OPERATORS
1) Fix the rear bracket to the gate post according to the
instructions in Table A. Adjust the length of the bracket if
necessary.
Warning:
correct operator functioning.
In the case of iron gate posts, weld the bracket directly
onto the gate post.
In the case of brick/concrete gate posts, flush-mount a
wall plate (fig. 3), and weld the bracket to the plate.
2) Fix the operator to the rear bracket by means of the screws
supplied (fig. 3).
Observe the specified dimensions to ensure
Caution: the operators supplied in the kit are left and right
hand versions.
For correct installation the operator must be positioned as
shown in fig. 3.
3) Release the operator (see paragraph 5).
4) Extend the rod to the end of its stroke (fig. 4).
5) Lock the operator (see paragraph 6).
6) Rotate the operator rod two full turns clockwise (fig. 4).
7) Fit the front bracket onto the rod as shown in fig. 5.
8) Close the gate leaf and, keeping the operator perfectly
horizontal, locate the leaf attachment position of the front
bracket (fig. 6).
9) Fix the front bracket temporarily to the leaf by two welds.
N.B.: If the gate frame does not allow for secure fixing of
the bracket, add a support plate.
Fig. 4
Fig. 5
Fig. 3
Fig. 6
10) Release the operator and ensure that the gate opens
smoothly with no stiff points and that it stops on the
mechanical travel stops.
11) Completely weld the front bracket to the leaf. To weld,
detach the operator temporarily from the bracket to
prevent any waste material from damaging it.
7
Page 6

ENGLISH ENGLISH
SBLOCCA
DESBLOQUEAR
DEBLOQUE
UNLOCK
ENTRIEGELT
BLOCCA
BLOQUEAR
BLOQUE
LOCK
VERRIEGELT
SBLOCCA
DESBLOQUEAR
DEBLOQUE
UNLOCK
ENTRIEGELT
BLOCCA
BLOQUEAR
BLOQUE
LOCK
VERRIEGELT
N.B.: 1) Grease all pivots on brackets
2) If welding is not possible, the front and rear
bracket plates are also designed for fixing by
screws and screw anchors.
12) Fit the cover (fig. 7) on the operator as shown in fig. 8.
N.B.: Fix the guide support of the cover on the hole furthest
from the cap (fig.7).
13) Repeat the above operations to install the second operator.
14) Make the control unit connections.
15) Programme the control unit to set the specific installation
requirements.
Fig. 7
4. TESTING THE AUTOMATED UNIT
On completing installation, affix a danger warning adhesive
label in a clearly visible position on the side of the operator (fig.
9).
Careful check operation of the operator and all accessories
connected to it.
Give the customer the “User guide” and demonstrate how to
use the operator correctly. Point out the potential danger
zones of the automated unit.
5. MANUAL OPERATION
In the event of a power failure or malfunction, the gate can be
operated manually by removing the plug and inserting the
special release key as shown in fig. 10.
To release the operator, turn the key in the direction of leaf
closing (fig. 10).
Open or close the leaves manually.
6. RETURNING TO NORMAL OPERATION
Turn off the electricity supply to the system before re-locking
the operators to avoid all risk of starting them accidentally.
To re-lock the operator, turn the key in the leaf opening
direction (fig. 10).
Fig. 8
Fig. 9
Fig. 10
7. SPECIAL APPLICATIONS
There are no special applications.
8. MAINTENANCE
Carry out periodic checks of the gate structure and ensure in
particular that the hinges are in perfect working condition.
Check periodically that the electronic anti-crushing system is
adjusted correctly and that the release mechanism for manual
movement is fully operative (see relative paragraph).
Safety devices installed on the plant must be checked every
six months.
9. REPAIRS
For repairs, refer to authorised FAAC service centres.
8
Page 7

412
Page 8

END-USER GUIDE
412 Automation Systems
ENGLISHENGLISH
Read the end user guide carefully before using the product
and keep it in a safe place for future reference.
GENERAL SAFETY REGULATIONS
When correctly installed and used, the 412 automation
system ensures a high degree of safety.
A few simple rules should be followed to prevent accidental
problems.
- Do not pass between the leaves when they are still moving:
always wait until they have opened completely.
- Do not linger between the leaves.
- Do not linger near the automation system; do not allow
children or adults to linger near it; and do not leave
objects near it.
- Keep wireless control devices, or other devices that might
accidentally activate the automation system, out of the
reach of children.
- Do not allow children to play with the automation system.
- Do not impede the movement of the leaves.
- Do not allow branches or bushes to interfere with the
movement of the leaves.
- Ensure that the warning lamps are in always in working
order and visible.
- Do not attempt to actuate the leaves manually unless you
have first unlocked them.
- In case of a malfunction, unlock the leaves to allow
vehicles to pass, and call a qualified technician.
- If you have set the manual mode, before restoring normal
operation, disconnect the power supply.
- Do not modify the components of the automation system.
- Do not attempt to repair the automation system or to
perform any operation on it. Call qualified technicians
only.
- At least once every 6 months, have qualified personnel
check that the automation system, safety devices and
earth connection are in working order.
DESCRIPTION
The FAAC 412 automation consists of two
electromechanical operators which are ideal for controlling
swinging gates with each leaf up to 1.80 m long.
The two electromechanical operators transmit movement
to the leaves by a worm screw system.
The operators are controlled by an electronic control unit,
mounted in an enclosure which assures adequate
protection against atmospheric agents.
The leaves are normally closed. When the electronic control
unit receives an open command from the remote radio
control or any other control device, it activates the
electromechanical system and causes the leaves to rotate
by an angle of up to 110° to their open position, so as to
allow access.
If automatic operation has been selected, the leaves close
automatically after the selected pause time.
If semiautomatic operation has been selected, a second
impulse must be sent to close the leaves.
An open command given while the leaves are closing
causes the leaves to reverse direction of movement.
A stop command (if available) stops movement at any
time.
For detailed information on the operation of the automation
system in the various operating modes, contact the
installation technician.
The automation system is equipped with a photocell safety
device which prevents the leaves from closing when the
photocells are darkened by an obstacle.
The 412 automation system is also equipped with an anticrushing safety device (fitted as standard) that limits the
torque transmitted to the leaves.
The operators ensure that the system is mechanically locked
when the motor is not running, so there is no need to install
a lock.
The leaves can be opened manually only by operating the
unlocking device.
The lamp flashes while the leaves are moving.
MANUAL OPERATION
If the gate has to be operated manually due to a malfunction
or power supply failure, remove the safety cap and insert
the key provided into the release system as shown in fig. 1.
To release the operator, turn the key in the leaf closure
direction (fig. 1).
Open or close the leaf manually.
RETURNING TO NORMAL OPERATION
To prevent an accidental impulse from activating the
operators during this operation, disconnect the system
from the power supply before re-locking the operators.
To re-lock the operator, turn the key in the leaf opening
direction (fig. 1).
BLOCCA
LOCK
BLOQUE
VERRIEGELT
BLOQUEAR
SBLOCCA
UNLOCK
DEBLOQUE
ENTRIEGELT
DESBLOQUEAR
SBLOCCA
UNLOCK
DEBLOQUE
ENTRIEGELT
DESBLOQUEAR
BLOCCA
LOCK
BLOQUE
VERRIEGELT
BLOQUEAR
Fig. 1
9
Page 9

Le descrizioni e le illustrazioni del presente manuale non sono impegnative. La FAAC si riserva il diritto, lasciando inalterate le caratteristiche essenziali dell’apparecchiatura, di apportare in qualunque momento e senza impegnarsi
ad aggiornare la presente pubblicazione, le modifiche che essa ritiene convenienti per miglioramenti tecnici o per
qualsiasi altra esigenza di carattere costruttivo o commerciale.
The descriptions and illustrations contained in the present manual are not binding. FAAC reserves the right, whilst
leaving the main features of the equipments unaltered, to undertake any modifications it holds necessary for either
technical or commercial reasons, at any time and without revising the present publication.
Les descriptions et les illustrations du présent manuel sont fournies à titre indicatif. FAAC se réserve le droit d’apporter à
tout moment les modifications qu’elle jugera utiles sur ce produit tout en conservant les caractéristiques essentielles,
sans devoir pour autant mettre à jour cette publication.
Die Beschreibungen und Abbildungen in vorliegendem Handbuch sind unverbindlich. FAAC behält sich das Recht
vor, ohne die wesentlichen Eigenschaften dieses Gerätes zu verändern und ohne Verbindlichkeiten in Bezug auf die
Neufassung der vorliegenden Anleitungen, technisch bzw. konstruktiv/kommerziell bedingte Verbesserungen vorzunehmen.
Las descripciones y las ilustraciones de este manual no comportan compromiso alguno. FAAC se reserva el derecho,
dejando inmutadas las características esenciales de los aparatos, de aportar, en cualquier momento y sin comprometerse a poner al día la presente publicación, todas las modificaciones que considere oportunas para el perfeccionamiento técnico o para cualquier otro tipo de exigencia de carácter constructivo o comercial.
FAAC S.p.A.
Via Benini, 1
40069 Zola Predosa (BO) - ITALIA
Tel. 0039.051.61724 - Fax. 0039.051.758518
www.faac.it
www.faacgroup.com
732238 - Rev. C
 Loading...