


Userʼs Guide for
5-in-1 Classic Music Player
Model No. RD70
Congratulations on your purchase of the 5-in-1 Classic Music Player from Excalibur Electronics, Inc. This nostalgic radio in its wooden cabinet
will have you grooving to the good old days in no time.
Your 5-in-1 Classic Music Player is easy to use, but be sure to use it safely. Before starting, please read this manual thoroughly, especially noting safety and care. Keep this users guide for reference.
This package includes one 5-in-1 Classic Music Player and its Userʼs Guide.
The legendary King Arthur brandished a magic sword, Excalibur, from which we take our company name. With this unique weapon in his hands, he could not be vanquished.
Although Excalibur Electronics canʼt claim the magical secrets of Merlin, King Arthurʼs court wizard, sometimes our patented technology may make it seem as if we could.
We make you think.
Table of Contents
Safety Instructions ……………………………………… page 4 Layout of the 5-in-1 Classic Music Player………………page 6 Functions of Buttons …………………………………… page 7 Using Your 5-in-1 Classic Music Player ……………… page 8 Record Player ………………………………… page 8 Radio ……………………………………………page 10 CD Player ………………………………………page 10 Cassette………………………………………….page 13 Auxiliary (MP3, iPod, computers)……………...page 13
Specifications ……………………………………………page 13 Troubleshooting ………………………………………… page 14 Important Safety Instructions ……………………………page 15 Special Care and Handling ………………………………page 18 Caution ………………………………………………… page 18 Limited 90-day Warranty ……………………………… page 19
Radio Stand available for the 5-in-1 Classic Music Player.
Order by visiting
www.ExcaliburElectronics.com
2 |
3 |

Read these instructions prior to using your
5-in-1 Classic Music Player.
nChoose your 5-in-1 Classic Music Playerʼs location carefully. Avoid placing it in direct sunlight or close to a source of heat. Please keep in mind to avoid locations subject to excessive dust, cold, moisture or vibrations (humming–such as motors or transformers),
nDo not open the cabinet as this might result in damage to the circuitry or electrical shock.
nDo not insert any foreign objects into your 5-in-1 Classic Music Player. If this occurs, immediately, contact your dealer.
nWhen using the CD Player option, be sure not to handle CDs with dirty or oily fingers. Never insert a disc that has a crack on the surface.
nNever remove the power cord from an outlet by pulling on the actual cord. Instead, pull directly on the plug to remove it from the wall outlet.
nIt is important with the CD Player to keep the laser pickup clean, do not touch it. Do not forget to close the disc tray.
nDo not attempt to clean the unit with chemical solvents. Use a clean, soft dry cloth.
nIn order to shut off the power to this product completely, unplug the power cord from the wall outlet. Be sure to unplug the 5-in-1 Classic Music Player if you do not intend to use it for an extended period of time, such as a vacation.
Beware of Condensation
When the player (or a CD) is moved from a cold to a warm place or is used after a sudden temperature change, there is a danger of condensation. Water vapor in the air could condense on the mechanism or the laser pickup. If droplets of water form on these parts, correct playback will be impossible because the laser cannot read the information from the disc correctly.
To prevent this, if you are going |
of condensation. If this is done, the |
to use the player in a condition |
player will stabilize at the tempera- |
where condensation could occur, |
ture of its surroundings. |
you should leave the player for 1 |
|
or 2 hours after plugging it into an |
|
AC outlet depending on the amount |
|
CAUTION
RISK OF ELECTRIC SHOCKDO NOT OPEN
ANY PART OF THIS UNIT!
TO REDUCE THE RISK OF ELECTRIC SHOCK, DO NOT REMOVE COVER OR BACK. THERE ARE NO USER SERVICEABLE PARTS LOCATED INSIDE OF THE UNIT. REFER
ALL SERVICING TO QUALIFIED SERVICE PERSONNEL.
The light flash with arrowhead symbol, within an equilateral triangle, is intended to alert user to the presence of uninsulated “dangerous voltage” within the productʼs enclosure that may be of sufficient magnitude to constitute risk of electric shock to persons.
The exclamation point within an equilateral triangle is intended to alert user to the presence of important operating and maintenance (servicing) instructions in the literature accompanying the appliance.
CAUTION:
FOR COMPACT DISC UNITS ONLY: INVISIBLE LASER RADIATION WHEN OPEN AND INTERLOCK FAILED OR DEFEATED. AVOID DIRECT EXPOSURE TO LASER BEAM.
(See markings on the back of the unit)
4 |
5 |
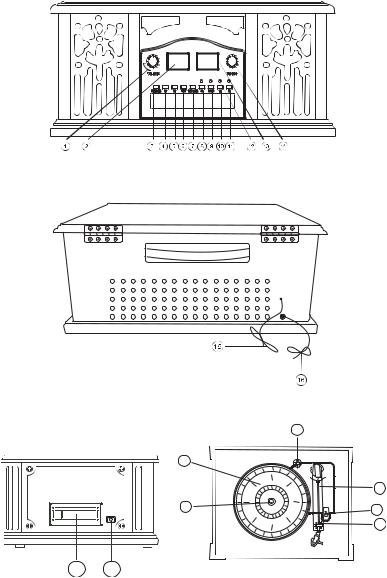
Layout of the 5-in-1 Classic Music Player
1. ON/OFF/VOLUME KNOB
2. LED DISPLAY
3. OPEN/CLOSE BUTTON
4. F.R. BUTTON
5. F.F. BUTTON
6. STOP BUTTON
7. PLAY/PAUSE BUTTON
8. CD BUTTON
9. PHONO BUTTON
10. AM BUTTON
11. FM BUTTON
12. RADIO DIAL SCALE
13. FM STEREO INDICATOR
14. TUNING DIAL
15. FM ANTENNA
16. POWER CORD
17. CASSETTE
18. AUX IN
19. TURNTABLE
20. SPINDLE
21.45 RPM ADAPTER
22.TONE ARM
23. |
|
21 |
SPEED CONTROL SWITCH |
|
|
24. |
ARM REST |
19 |
|
|
22 |
20 |
23 |
|
|
|
24 |
17 18
Functions of Buttons
ON/OFF/VOLUME KNOB: Use the ON/OFF/VOLUME KNOB to adjust
the volume. Use this knob to switch the unit on or off.
LED DISPLAY: Displays track number during CD play.
oPEN/CLOSE: This button opens and closes the CD door.
F.R. BUTTON: Fast reverse.
F.F. BUTTON: Fast forward.
STOP: To stop any play mode.
PLAY/PAUSE: Play or pause your music selection.
CD BUTTON: Play music from a compact disk.
PHONO BUTTON: Play music
from a vinyl record.
AM BUTTON: Play an AM radio station.
FM BUTTON: Play an FM radio station.
RADIO DIAL SCALE: Displays
radio frequency.
FM STEREO INDICATOR: Lights
when an FM station is playing.
TUNING DIAL: Turn to adjust radio station.
FM ANTENNA: Use to improve
FM reception by positioning near open sky.
POWER CORD: Plug your unit into the wall for power. Be sure to note all safety precautions in this manual.
CASSETTE: Insert a cassette tape into this slot. Playback will begin immediately.
AUX IN: Docking port for all auxiliary music sources, such as MP3 Players, iPod®, personal computers or laptops.
TURNTABLE: Place records on the turntable to play (33, 45 or 78 RPM).
SPINDLE: Align mounting hole in vinyl record with spindle for proper placement..
45 RPM ADAPTER: Place
over spindle to play 45 RPM records.
TONE ARM: Lift and gently lower onto a record as it spins.
SPEED CONTROL SWITCH: Use
to switch play speeds between 33, 45 and 78 RPM.
ARM REST: Position tone arm on arm rest when not in use.
6 |
7 |
 Loading...