

Page 1

User Manual
Version 1.18 - July 2012
EVS Server Gigabit Ethernet Gateway
Page 2

Page 3

XTAccess Version 1.18 – User Manual
EVS Broadcast Equipment – July 2012
Issue 1.18.A
I
Copyright
EVS Broadcast Equipment – Copyright © 2008 - 2012. All rights reserved.
Disclaimer
The information in this manual is furnished for informational use only and subject to
change without notice. While every effort has been made to ensure that the information
contained in this user manual is accurate, up-to-date and reliable, EVS Broadcast
Equipment cannot be held responsible for inaccuracies or errors that may appear in this
publication.
Improvement Requests
Your comments will help us improve the quality of the user documentation. Do not
hesitate to send improvement requests, or report any error or inaccuracy in this user
manual, by e-mail to
doc@evs.tv.
Regional Contacts
You will find the full list of addresses and phone numbers of local offices on the EVS
website, on the following page:
http://www.evs.tv/contacts.
User Manuals on EVS Website
The latest version of the user manual, if any, and other user manuals on EVS products
can be found on the EVS download center, on the following webpage:
http://www.evs.tv/downloadcenter.
Page 4

Issue 1.18.A
XTAccess Version 1.18 – User Manual
EVS Broadcast Equipment – July 2012
II
Page 5

XTAccess Version 1.18 – User Manual
EVS Broadcast Equipment – July 2012
Issue 1.18.A
III
Table of Contents
TABLE OF CONTENTS .................................................................................................... III
WHAT’S NEW? ........................................................................................................... VII
1. INTRODUCTION ...................................................................................................... 1
2. HARDWARE RECOMMENDATIONS ............................................................................ 3
3. SOFTWARE INSTALLATION ...................................................................................... 4
4. XSECURE MANAGEMENT ....................................................................................... 9
4.1 List of codes ................................................................................................................ 9
5. UNICODE AND XTACCESS .................................................................................... 10
5.1 Configuration ............................................................................................................ 10
5.2 Metadata ................................................................................................................... 11
5.3 Filename ................................................................................................................... 11
6. USER INTERFACE ................................................................................................ 12
6.1 Introduction ............................................................................................................... 12
6.2 Jobs Monitoring ......................................................................................................... 12
6.3 Additional Buttons/Menus ......................................................................................... 13
6.4 Application Title Bar .................................................................................................. 14
6.4.1 Introduction ...........................................................................................................................14
6.4.2 Configuration Menu ..............................................................................................................14
6.5 Contextual menu ....................................................................................................... 18
7. XML JOBS SCAN ................................................................................................ 19
7.1 Introduction ............................................................................................................... 19
7.2 Job types .................................................................................................................. 19
7.3 Creation of a XML Jobs Scan .................................................................................... 21
7.3.1 Creating a New XML Scan ...................................................................................................21
7.3.2 XML Scan Dialog Box ...........................................................................................................21
7.3.3 XML Scan Settings ...............................................................................................................22
7.3.4 NLE Configuration ................................................................................................................25
7.4 XML Jobs Processing ............................................................................................... 32
7.4.1 Launch of Multiple XML Jobs Scan ......................................................................................32
7.4.2 Start of XML Jobs Scan ........................................................................................................32
7.4.3 Processing of a XML JOB ....................................................................................................32
7.5 Load Balancing between Multiple XTAccess Devices ............................................... 33
7.5.1 Management of XML Jobs ....................................................................................................33
7.5.2 Control Parameters ..............................................................................................................34
8. SCAN FOLDER ..................................................................................................... 36
8.1 Scan Folder Window ................................................................................................. 36
8.2 Add and Edit a Scan Folder Item .............................................................................. 38
8.3 XEDIO Integration with the Scan Folder .................................................................... 42
8.3.1 Overview ...............................................................................................................................42
8.3.2 Workflow ...............................................................................................................................42
8.3.3 Remarks ...............................................................................................................................42
8.4 ScanFolder Post Processing ..................................................................................... 43
8.4.1 Workflow ...............................................................................................................................43
Page 6

Issue 1.18.A
XTAccess Version 1.18 – User Manual
EVS Broadcast Equipment – July 2012
IV
8.5 Remarks on the Scan Process .................................................................................. 43
9. BACKUP OF EVS SERVER CLIPS TO FILES ............................................................ 45
9.1 Workflow ................................................................................................................... 45
9.2 Example of XML backup File ..................................................................................... 46
9.3 Local XTAccess Settings (non XML) ......................................................................... 47
9.4 Miscellaneous ........................................................................................................... 47
10. RESTORE/COPY OF FILES TO EVS SERVER ........................................................... 48
10.1 Workflow ................................................................................................................... 48
10.1.1 Workflow (Restore via XML Jobs) Explanation ....................................................................48
10.1.2 Workflow (Folder File Scan) Explanation .............................................................................49
10.2 Example of XML Copy File ........................................................................................ 49
11. RENDERING OF EDL TO ONE FILE ......................................................................... 50
11.1 Local XTAccess Settings (non XML) ......................................................................... 50
11.2 XTGATEWAY ........................................................................................................... 51
11.3 Smart Rendering ....................................................................................................... 52
11.4 Effects ....................................................................................................................... 52
12. RENDERING OF EDL TO ONE EVS SERVER CLIP .................................................... 53
12.1 Local XTAccess Settings (non XML) ......................................................................... 53
12.2 XTGATEWAY ........................................................................................................... 53
12.3 Smart Rendering ....................................................................................................... 54
12.4 Effects ....................................................................................................................... 54
13. BACKUP OF EDL TO FILES ................................................................................... 55
13.1 Local XTAccess Settings (non XML) ......................................................................... 55
13.1.1 Registry Settings ..................................................................................................................55
13.2 Smart Backup MODE ................................................................................................ 55
13.3 Effects ....................................................................................................................... 56
14. FILE REWRAP...................................................................................................... 57
14.1 Workflow ................................................................................................................... 57
14.2 Example of XML File Rewrap .................................................................................... 58
15. ADDITIONAL CODEC FILE ON THE FLY .................................................................... 59
15.1 Workflow ................................................................................................................... 59
15.2 Codecs supported ..................................................................................................... 60
15.3 Local XTAccess Settings (non XML) ......................................................................... 60
15.3.1 Smart Rendering ..................................................................................................................62
15.3.2 Registry Settings ..................................................................................................................62
16. TRANSCODING FILES ............................................................................................ 63
16.1 Workflow ................................................................................................................... 63
16.2 Example of XML File Rewrap .................................................................................... 64
16.3 codecs supported ...................................................................................................... 64
16.4 Local XTAccess Settings (non XML) ......................................................................... 64
16.4.1 Smart Rendering ..................................................................................................................65
16.4.2 Registry Settings ..................................................................................................................65
17. EXAMPLE OF ENCODER PROFILES ......................................................................... 66
17.1 MPEG-1 .................................................................................................................... 66
17.2 Avid DNxHD® ........................................................................................................... 66
18. EXAMPLES OF CONFIGURATION ............................................................................ 68
Page 7

XTAccess Version 1.18 – User Manual
EVS Broadcast Equipment – July 2012
Issue 1.18.A
V
18.1 Backup EVS Server native codec + Creation of LOW Res ........................................ 68
18.2 Transcode Native EVS Server clip ............................................................................ 70
18.3 Transocode one file to file ......................................................................................... 71
18.4 Double Transcoding .................................................................................................. 72
18.5 Transocode one file to EVS Server using XML job .................................................... 73
19. BACKUP OF EVS SERVER TRAINS TO FILES .......................................................... 74
19.1 Workflow ................................................................................................................... 74
19.2 Example of XML backup Train to File ........................................................................ 75
19.3 Example of XML Update Train .................................................................................. 76
19.4 Local XTAccess Settings (non XML) ......................................................................... 76
19.5 Registry Settings ....................................................................................................... 76
19.6 Miscellaneous ........................................................................................................... 77
19.6.1 Backup/Update of Trains and Load Balancing .....................................................................77
19.6.2 Max XML Jobs Setting ..........................................................................................................77
20. TRANSFER TO AVID TRANSFER MANAGER ............................................................. 78
20.1 Workflow ................................................................................................................... 78
20.2 Example of XML Avid Transfer of Clip ....................................................................... 79
20.3 Example of XML Avid Transfer of Stream record train ............................................... 80
20.4 Example of XML Avid Transfer of File ....................................................................... 80
20.5 Local XTAccess Settings (non XML) ......................................................................... 81
20.6 Registry Settings ....................................................................................................... 81
21. TRANSFER TO AVID WEBSERVICE ........................................................................ 82
21.1 Workflow ................................................................................................................... 82
22. EVS SERVER COPY ............................................................................................. 84
22.1 Workflow ................................................................................................................... 84
22.2 Example of XML EVS Server Copy File .................................................................... 85
22.3 Force transcoding EVS Server to EVS Server........................................................... 86
23. INTEGRATION WITH XEDIO .................................................................................. 87
23.1 Workflow ................................................................................................................... 87
23.2 Example of XML Transfer to Xedio File ..................................................................... 89
23.3 XTAccess configuration ............................................................................................ 90
23.4 Registry Settings ....................................................................................................... 91
23.5 Workflow with the Create additional codec ................................................................ 91
24. GRAB FIELD FROM EVS SERVER .......................................................................... 92
24.1 Example of XML Grab Field to a File ......................................................................... 92
25. GRAB FIELD FROM FILE ....................................................................................... 93
25.1 Example of XML Grab Field to a File ......................................................................... 93
26. DELETE FILE FROM DISK ...................................................................................... 94
26.1 Example of DElete File XML Job ............................................................................... 94
27. DELETE CLIP FROM EVS SERVER ......................................................................... 95
27.1 Example of DElete Clip XML Job .............................................................................. 95
28. CANCEL JOB ....................................................................................................... 96
28.1 Example of Cancel XML Job ..................................................................................... 96
29. XTACCESS TROUBLESHOOTING ........................................................................... 97
Page 8

Issue 1.18.A
XTAccess Version 1.18 – User Manual
EVS Broadcast Equipment – July 2012
VI
29.1 XTAccess Error Messages ........................................................................................ 97
29.2 XTAccess logs .......................................................................................................... 97
29.2.1 XTAccess.log ........................................................................................................................98
29.2.2 XTAccess_Jobs.log ..............................................................................................................98
29.2.3 XTTransfer.log ......................................................................................................................98
29.2.4 XML_Scan.log ......................................................................................................................98
29.2.5 XTAccess_UI.cvs .................................................................................................................98
Page 9

XTAccess Version 1.18 – User Manual
EVS Broadcast Equipment – July 2012
Issue 1.18.A
VII
What’s New?
The former version of the XTAccess user manual, which had been published with the
XTAccess release 1.17, remains compliant with XTAccess version 1.18. This manual has
therefore not been subject to changes.
Page 10

Page 11

XTAccess Version 1.18 – User Manual
EVS Broadcast Equipment – July 2012
Issue 1.18.A
1
1. Introduction
The Gigabit connection on EVS server makes it possible to transfer video and audio
material from the EVS servers to external systems via the TCP/IP network.
The external systems can be the following ones:
• A storage system or an archiving system, such as XStore, XFile or a 3
storage.
• A non-linear Editing system, such as EVS CleanEdit, Apple Final Cut Pro or Avid.
• Another EVS server
However, the external systems cannot read the raw files coming from the EVS servers.
For this reason, XTAccess is used as a “gateway” between the EVS Server and the IT
world. It takes up the role of gateway used so far by XFile/XStream as it creates file
formats compliant with external systems.
XTAccess is directly connected to the EVS servers through the Gigabit network. It runs
on an XP workstation and is mainly controlled by the external systems (no user interface)
via XML files or other processes.
rd
party
The Gigabit connection fulfills the following functions in relation with the EVS servers:
• Backup of clips or trains from an EVS server to an Archive
• (Partial) restore and copy of clips from an Archive to an EVS server
Page 12

Issue 1.18.A
XTAccess Version 1.18 – User Manual
EVS Broadcast Equipment – July 2012
2
• Backup of clips or trains from an EVS server to EVS CleanEdit Suite
• Exchange of EVS content (clips or trains) with Avid systems via Avid Transfer
Manager or using Avid WebService
• Exchange of EVS content (clips or trains) with Apple Final Cut Pro
• Exchange of EVS content (clips only) with another EVS server
• (Partial) rewrap of file from an Archive
• Rendering of EDL from files or clips
• Backup of EDL from files or clips
• Grab frames of a clip on a EVS server in order to create thumbnails (e.g. for
IPDirector)
Page 13

XTAccess Version 1.18 – User Manual
EVS Broadcast Equipment – July 2012
Issue 1.18.A
3
2. Hardware Recommendations
The XTAccess software is installed on a workstation operating under Windows XP,
Windows 2003 Server, windows Seven 32 bit, windows Seven 64 bit or Windows Server
2008 SP2 64 bit. With the 64 bit OS, XTAccess runs as a 32 bit application.
The minimum system requirements are:
• Workstation or Laptop
• CPU Pentium P4, 2.0 GHz +
• 512 MB RAM (2GB for the rendering of playlist and transcoding jobs)
• GigE board with Jumbo Frame capabilities
• VGA 1024x768
The XTAccess software runs either on EVS workstations like IPDirector, XFile, XStore, or
on any standalone third-party workstation.
Important
Jobs like transcoding, backup of clips or trains, restore/copy of files to EVS
Server use CPU resources on the device where XTAccess runs. It is then
advised not to run any other critical application simultaneously on the
XTAccess device, especially when the Xedio Suite or IPDirector are installed
as standalone systems with a local database.
Page 14

Issue 1.18.A
XTAccess Version 1.18 – User Manual
EVS Broadcast Equipment – July 2012
4
3. Software Installation
The installation package is based on one installshield:
XTAccess_1.17.xx_Setup.exe
For the Xedio Integration Option, contact the Xedio support to install the compliant
software.
To install XTAccess; proceed as follows:
1. Copy the installshield XTAccess_1.17.xx_Setup.exe in a temp directory (e.g.
C:\Install Software\XTAccess\).
2. Run XTAccess installshield XTAccess_1.17.xx_Setup.exe and then follow the steps
of the Setup wizard.
3. Press NEXT.
Page 15

XTAccess Version 1.18 – User Manual
EVS Broadcast Equipment – July 2012
Issue 1.18.A
5
4. Select “I accept the agreement” and press NEXT
5. Select the destination directory to install the new software and then press NEXT.
Page 16

Issue 1.18.A
XTAccess Version 1.18 – User Manual
EVS Broadcast Equipment – July 2012
6
6. You can select here the different XTAccess components:
• Install VCRedist: If you install XTAccess for the first time on this workstation,
you need to install Microsoft Visual C++ Redistributable application by selecting
“Install VCRedist”. For future installations or upgrade, you may deselect this
option to reduce installation time.
• Install XSecure Manager: This option will install the EVS License software (EVS
Licenses XSecure codes are necessary for the transcoding jobs and rendering of
playlists).
• Install XTGateway: This option will install XTGateway. XTGateway is a Windows
service required for rendering playlists with XTAccess.
• Install AppGuard: This option will install AppGuard. AppGuard will restart
automatically XTAccess in case of crash.
• XTAccess Inscription to the EVS SNMP: This option will inscribe XTAccess to
the EVS SNMP Agent (the EVS SNMP Agent must be installed on the computer).
• Install EVS SNMP Agent: If you install XTAccess for the first time on this
workstation, you should select this option to install the EVS SNMP Agent.
Then press NEXT.
Page 17

XTAccess Version 1.18 – User Manual
EVS Broadcast Equipment – July 2012
Issue 1.18.A
7
7. Specify the start folder directory and then press NEXT.
8. Press INSTALL to begin the installation of XTAccess.
9. If you have selected “Install XTGateway”: the XTGateway Setup will appear once
XTAccess has been installed.
Page 18

Issue 1.18.A
XTAccess Version 1.18 – User Manual
EVS Broadcast Equipment – July 2012
8
10. If you have selected “Install XSecure Manager”: the XSecure Setup will appear once
XTAccess has been installed.
The XTAccess software installation is successfully completed.
Note
The installer includes a registry key that disables the autorun function on USB keys
to avoid virus intrusion.
Note that a Shortcut of XTAccess has been automatically created on the desktop.
XTAccess icon is the following:
When you first launch XTAccess, the application modifies or adds the TcpAckFrequency
in the registry. This key allows having better performances for Backup. You need to
restart your computer afterwards.
Page 19

XTAccess Version 1.18 – User Manual
EVS Broadcast Equipment – July 2012
Issue 1.18.A
9
4. XSecure Management
From XTAccess v.1.07.22, XSecure is used. XSecure can be installed with XTAccess
installshield (see the chapter ‘Software Installation’).
XSecure uses hardware information from the device where XTAccess is running. This
means it is impossible to exchange licenses or codes between devices.
Please refer to the XSecure User’s Manual to:
• Start XSecure Manager
• Collect information about your device
• Request a license key from the EVS support
• Import new license keys
4.1 List of codes
60 – XTAccess
• 10 – Base Package : Not use for the moment
• 20 – Transcoding: Needed to use the transcoding on the fly
Page 20

Issue 1.18.A
XTAccess Version 1.18 – User Manual
EVS Broadcast Equipment – July 2012
10
5. Unicode and XTAccess
5.1 Configuration
To use different languages and Unicode instead of ASCII characters: you have first to
configure Windows:
1. Select your keyboard in your Unicode language
2. And then you have to set up the default Language for non Unicode programs:
Start\Settings\Control Panel\Regional and Language Settings\Advanced
Page 21

XTAccess Version 1.18 – User Manual
EVS Broadcast Equipment – July 2012
Issue 1.18.A
11
5.2 Metadata
These Metadata Tags can be used in Unicode:
• ClipName
• Keyword
• VarID
The UmID cannot be Unicode.
5.3 Filename
XTAccess never generates files with Unicode filenames. Files are named
"UnicodeFilename.mxf" instead of the "real" Unicode clipname.
XTAccess is capable to use files with Unicode filenames. These files can be located in a
folder having a Unicode filename. And these Unicode files can be used into scan folder
without any trouble.
Page 22

Issue 1.18.A
XTAccess Version 1.18 – User Manual
EVS Broadcast Equipment – July 2012
12
6. User Interface
6.1 Introduction
XTAccess has been designed to be used as a black box. It is mainly controlled by
external systems via XML files or other processes.
When the XTAccess application is launched the following GUI is displayed on the
workstation.
6.2 Jobs Monitoring
The main window displays the status of each job handled by XTAccess.
Description of the columns:
Column heading Description
Job Type
Source
Clip/File
Type of Job: Backup, Avid Ingest, Restore, XT Transfer, etc.
Source server:
• Backup, Avid Ingest, XT Copy, Grab Field: FTP address and
path of the EVS server.
• Restore/Copy, File Rewrap: the source directory where the file to
be processed is located.
Source Clip or File:
• ClipID of the clip processed on the EVS server
• Filename stored in the Source path (defined above)
Destination
This is the target destination of the job.
• Backup: folder to store the file
• Avid Ingest Name
• Restore, XT Copy: FTP address of the EVS server
Page 23

XTAccess Version 1.18 – User Manual
EVS Broadcast Equipment – July 2012
Issue 1.18.A
13
: Instantaneous bit rate during job progress.
Launch of scan folder for restore/copy/transcode processes
Column heading Description
Status
Status of the job:
• In Progress: The job is running
• Done: the job is done and successful
• Error Message: the transfer has failed. Please check the list of
error messages and the reason in Section 20.1
MB/s
Frm/s
Start Time
End Time
XML job file
Backup Restore
Between brackets, the value displayed is the mean transfer rate
since the beginning of the job. At the end of the job, the mean
transfer rate is displayed. Not available for Avid Ingest.
Transcoding: Number of frames decoded by second.
Start Time of the job
End Time of the job
Path of the xml job file used
6.3 Additional Buttons/Menus
Several buttons and menus are available at the bottom of XTAccess window.
Button Name Description
New XML Scan
Scan Folders
Abort job
Launch of XML scan window. (described in section 7 ‘XML Jobs
Scan’ on page 19)
(described in section 10 ‘Restore/Copy of Files to EVS Server’ on
page48)
When pushed, the selected job is immediately aborted. You can
also press on CTRL + Abort to abort all the jobs (needs reboot of
XTAccess afterwards).
Page 24

Issue 1.18.A
XTAccess Version 1.18 – User Manual
EVS Broadcast Equipment – July 2012
14
6.4 Application Title Bar
6.4.1 Introduction
XTAccess Title bar displays some useful information:
• XTAccess 1.17.xx: Version of the running application
• [SN: 655000]: EVS Serial Number of the computer
• [Reporting :<Status> (host name) NickName=xxx Group=xx]: The reporting
status, host name, Vedio NickName and group
• [Win x.x] : Version of Windows
• [xxxxxx] : Windows user right
• X/Y: Ratio of Running Jobs (X) versus the Max. Running Jobs available (Y). Example
- 2/6: This means 2 jobs are currently running. 4 additional jobs can be launched for
a maximum of 6 simultaneous running jobs.
6.4.2 Configuration Menu
Right-clicking on the link on the Application Title bar displays the configuration menu, with
specific commands for XTAccess.
Disp. AutoUpdate
Select it to update the interface each time there is a new transfer.
Page 25

XTAccess Version 1.18 – User Manual
EVS Broadcast Equipment – July 2012
Issue 1.18.A
15
Reporting System
This window allows you to activate the reporting system of XTAccess to Vedio.
Command name Description
Nickname
Group
Reporting Server
Name
Reporting Server
Port
Notification
Frequency
Allows you to define a nickname for XTAccess
Allows you to define a group to which XTAccess will belong in
the Vedio user interface.
Host name or IP Address of the Vedio Notification Server
Port of the Vedio Notification Server
Duration between two notifications to Vedio
Page 26

Issue 1.18.A
XTAccess Version 1.18 – User Manual
EVS Broadcast Equipment – July 2012
16
cast Wave
Select the default picture you want to add to your audio
Equipment\XTAccess\Default Picture Files\
Graphical Settings
These settings relate to the generation of files/clips from a picture (BMP, TIFF & TGA
formats) or audio (Wav, BWav).
Command name Description
Video System
Sequence TimeCode
Fill & Key encoding
Add Audio when
encoding Graphical
Sequence
Sequence Duration
Default Audio
Bitmap
Select either Pal or NTSC, in progressive or not.
Enter the value of the first TC included in the destination file/clip.
Check this option if you want to generate two synchronous
files/clips based on Alpha Channel: one file/clip with the Fill
sequence and one file/clip with the Key sequence.
Check this option if you want to add audio to the sequence
created with your graphic files.
The audio files must be 16-bit audio files of 48 kHz (1 to 8
channels). The file format must be Broad
Uncompressed (BWAVE) (.wav).
Type the duration (only valid for pictures, not for animated
sequences).
encoding. The EVS server does not support audio only so you
have to add a graphic picture.
Some default pictures are available in the XTAccess folder
C:\Program Files\EVS Broadcast
Page 27

XTAccess Version 1.18 – User Manual
EVS Broadcast Equipment – July 2012
Issue 1.18.A
17
Show Buttons
Select this option if you want to see the buttons in the XTAccess Interface.
If the option is not selected you can right click on XTAccess to create XML scan unit or
open the Scan folder.
Enable TestMode
Select this option if you want to use the test mode of XTAccess. Please contact EVS
support if you want to use it as it is not supported. This feature is only present for test
purposes.
About XTAccess
It shows the version of XTAccess. Additional information:
• FileWriter No Buffering: Activated or Not Activated (see Section 0 ‘Registry Settings’
on page 47)
• Transcoder Allowed: Specifies if you have the XSecure code for transcoding.
Page 28

Issue 1.18.A
XTAccess Version 1.18 – User Manual
EVS Broadcast Equipment – July 2012
18
6.5 Contextual menu
Command Name Description
Abort job
Status Details
Open Destination
folder…
The selected job is immediately aborted.
Give you more information about the job status
Open the destination folder
Open XML Job file
Clear List
New XML Scan Folder
Use Scan Folder
Drag And Drop Settings
For test and debug only
Clear the whole list of the jobs done by XTAccess
Select it to create new XML Scan folder
Select it to open the Scan Folder window
For test and debug only
Page 29

XTAccess Version 1.18 – User Manual
EVS Broadcast Equipment – July 2012
Issue 1.18.A
19
7. XML Jobs Scan
7.1 Introduction
XTAccess is triggered by external applications (like IPDirector), mainly via XML files.
XTAccess scans pre-defined folders to check for new XML jobs to process.
The details of the XML format will be described in the following sections, especially for
each job type.
The scan process of XML jobs is anyway identical for any type of job.
7.2 Job types
The table below shows the list of all jobs available according to the version number of
IPDirector.
Abbreviations used:
• XFI : XFile
• XTA : XTAccess
• XST: XStream
Page 30

Issue 1.18.A
XTAccess Version 1.18 – User Manual
EVS Broadcast Equipment – July 2012
20
Backups
XT XT copy
Playlists
Grabs
File rewraps
Transcode
Restores
Delete
To Avid
Misc
Job_Type
0 Backup Clip from XT to file 1.05 4.3
11 Short Backup Clip from XT to file 1.05 5
20 Backup Train from XT to file 1.05 5
21 Update Backup Train 1.05 5
9 Backup Playlist /cut
10 Render Playlist /concat
24 Render Playlist /concat from XT to XT 1.09 5
40 Transfer from file to file 1.04 4.4
41 Partial Transfer from file to file 1.04 4.4
1 Restore Clip from file to XT 1.05 5
2 Copy Clip from file to XT 1.05 5
12 Short Copy Clip from file to XT 1.05 5
7 Transfer Clip from XT to Avid 1.05 4.3
43 Short Transfer Clip from XT to Avid 1.04 4.4
22 Stream record train from XT to Avid 1.05 5
8 Transfer from file to Avid 1.05 5
42 Short Transfer from file to Avid 1.04 4.4
13 XT Copy from XT to XT 1.00 4.4
44 Short XT Copy from XT to XT 1.07
6 Grab Clip/Trn Field from XT to file 1.05 4.3
17 Grab Clip/Trn Frame from XT to file
16 Grab File Field from file to file 1.07 5.5
3 Delete Clip from XT 1.08
5 Delete File from file 1.05
4 Cancel Job 1.05 5
from XT or
files
from XT or
files
to files 1.09
to 1 file 1.09 4.3
Supported from XTAccess version
Color legend
Supported from IPDirector version
Page 31

XTAccess Version 1.18 – User Manual
EVS Broadcast Equipment – July 2012
Issue 1.18.A
21
manually or selected using Windows Explorer with the
automatically creates this folder during the XTAccess
Local XTAccess Settings
7.3 Creation of a XML Jobs Scan
7.3.1 Creating a New XML Scan
On the XTAccess GUI, select the New XML Scan button to create a new scan session
for XML jobs:
The following window is displayed:
Point to the folder where XTAccess will check for XML jobs, and click Start after you have
checked the XML Scan settings.
7.3.2 XML Scan Dialog Box
Field/Button Description
Title Bar
XML Scan[1] –0/6
XML Root
XML Scan Settings
The Title Bar specifies the ID of Scan XML Jobs folder.
It also displays the number of running jobs vs. the max. running
jobs allowed for this scan folder.
Folder to be scanned by XTAccess. This folder can be entered
associated button.
By default, the scan folder is C:\XTAccess_XML\. XTAccess
installation process.
This button is used to display the scan XML Job settings. Those
settings are the default settings of this XML Jobs scan.
The XML file generated to trigger an XTAccess job replaces the
General Settings (see section 9.3 ‘
(non XML) on page 47) and XML Jobs default settings by its
own values. This means the default settings are only used in
case the XML file triggering the job does not contain the
specific tag.
OPEN
This button is used to open the XML Root folder.
Page 32

Issue 1.18.A
XTAccess Version 1.18 – User Manual
EVS Broadcast Equipment – July 2012
22
Field/Button Description
START/STOP
CLOSE
This button is used to start and stop scanning the specified
folder
This button is used to close the specified scan folder.
7.3.3 XML Scan Settings
Overview
When you click the XML Scan settings button, you access the following window.
The settings are split in 3 categories:
• Job To File
• Job To XT Server
• Create Additional codec File
Page 33

XTAccess Version 1.18 – User Manual
EVS Broadcast Equipment – July 2012
Issue 1.18.A
23
Title Bar
The Title Bar displays one of the following information:
• [2MB Blocks EVS MXF]: A backup of clip or train will be wrapped in EVS MXF in
native 2 MB Blocks. This is the default setting for backup.
• [8MB Blocks EVS MXF]: A backup of clip or train will be wrapped in EVS MXF in
native 8 MB Blocks. This setting only exists if the user has modified the default
settings, which is 2 MB Blocks.
To File
Possible Options
Three options are submitted:
• Keep the Wrapper/codec from the XML job:
Use this option if you do not want to change the file wrapper which will be created by
XTAccess
• Force the Wrapper format to : “EVS MXF”
Use this option if you want to change the file wrapper which will be created by
XTAccess
• Transcode the source media using the ‘Default File Transcoding Profile’
Use this option if you want to transcode the source clip, and so define the codec and
the wrapper of the destination
NLE
See below the NLE configuration
Audio Format
• Stereo: if selected, audio essences are considered as a stereo tracks, otherwise
mono tracks. Only used for Quick Time Movies and Quick Time Reference, wav
backup jobs.
• 16-Bit/24-Bit: stereo button to select the audio resolution. Only used for transfer to
Avid and OP-1a,QT,QT Ref, OPATOM and Wav format
• Little Endian or Big Endian: Stereo button to select the audio format. Only used for
QuickTime Movies or QuickTime Reference formats.
SuperMotion Mode
This setting allows you to select the SuperMotion backup mode
• Real Time [1/2 or 1/3 frames with audio]: XTAccess will keep only one frame over
• All Frames [with unsynchronized/without audio]: XTAccess will keep the entire
2 or 3 (following the Super Motion Rec mode) and keep the audio. Audio & TC will be
consistent with the XT clip.
frame of the SSLM Clip.
Page 34

Issue 1.18.A
XTAccess Version 1.18 – User Manual
EVS Broadcast Equipment – July 2012
24
Audio Channels Map
This setting is used to define how the output audio channels will be distributed to the
generated audio files:
• Use <;> to separate the content of the various audio files to generate
• Use a space between each audio channel to be included in an audio file
• Use <-1> to mute a channel (not for the Wav backup)
• Audio channel are between 0 and 7
Example: 0 1 3 4; 7 2; 4 5; 3 6 will create 4 BWAV files
Destination file’s native TimeCode
This setting allows you to define which timecode will be saved in the video file
• Primary TC : Saves the XT Primary TC in the video file
• LTC : Saves the LTC in the video file
• User TC: Saves the User TC in the video file
Default File Transcoding Profile
Default Transcoding profile is used for the job to file (if you have selected the 3rd option
“Transcode the source media using …”) or for the Rendering of playlist
In this field, you have to define an XML profile file that defines the codec and parameter
of the codec used to transcode the file.
You can find some encoder profiles into the “C:\Program Files\EVS Broadcast
Equipment\XTAccess\Encoder Profiles 2.0” folder
To XT Server
Transcode Restored File
Select this option if you want to transcode the file during the restore operation.
Remove Source file if restore successful
In case of Restore and Copy, it could be useful to automatically delete the source file to
clean the source storage. The file will be removed only if the job is successful.
Default File Transcoding Profile
rd
Default Transcoding profile used for the job to XT (if you have selected the 3
“Transcode the source media using …”) or for the Rendering of playlist.
In this field, you have to define an XML profile file that defines the codec and parameter
of the codec used to transcode the file.
You can find some encoder profiles in the “C:\Program Files\EVS Broadcast
Equipment\XTAccess\Encoder Profiles” folder
option
Enable Multi-Dests
If the multi-destination is activated in the XML Scan Folder, XTAccess will use the multidest template and not anymore the XML job or the XTAccess interface to define the
different destination paths.
Page 35

XTAccess Version 1.18 – User Manual
EVS Broadcast Equipment – July 2012
Issue 1.18.A
25
There is one example of template in the XTAccess folder:
“C:\Program Files\EVS Broadcast Equipment\XTAccess\multi_dests_sample.dst.xm”
There is some information about the structure of the template directly in this example.
This example template will be replaced at each update of XTAccess so it is necessary to
create a copy with a different name before modifying it.
Status of the sub-jobs related to each destination defined in the template is only available
through the Notification Center and Vedio. The XML job will only contain the first
destination status.
Please contact EVS before using this option
Create Additional Codec
Create Additional Codec File: Select this option if you want to create an additional file,
for example a proxy file, at the same time as your hires backup. The additional codec file
will be generated on the fly with the principal job.
• Target Path: This is the destination target path used for the additional file. This path
can be entered manually or by browsing Windows Explorer with the associated
button.
• Transcoding profile: This is the XML profile used by XTAccess. It defines the codec
and parameter of the codec used by XTAccess to transcode the file. You can find
some encoder profiles in the “C:\Program Files\EVS Broadcast
Equipment\XTAccess\Encoder Profiles” folder.
• Create Metadata XML: Select this option if you want to create EVS XML metadata
file with you additional codec file
• Path: This is the destination target path used for the metadata XML file
7.3.4 NLE Configuration
The NLE settings are used to set up the integration with AVID, FCP, Xedio or EVS. The
NLE settings can also be used directly in the XML job but some of them are not yet
implemented in IPDirector.
AVID
For Avid applications, the settings allow you to save the Avid AAF file with the file
generated by XTAccess or to use the Avid WebService
Page 36

Issue 1.18.A
XTAccess Version 1.18 – User Manual
EVS Broadcast Equipment – July 2012
26
Field/Button Description
Active
Save EDL to disk
Allows you to activate or not the settings
Allows you to back up the AAF file on disk before checking it into
Avid Interplay. The AFF file can then be used to directly drag your
transferred clip or playlist into MediaComposer without using Avid
Interplay Access.
EDL path
Interplay Check In
Interplay User
Path where you want to store your AAF file
Allows you to activate or not the Interplay check-in
Interplay user who must have enough rights to check files into
Interplay.
Interplay Password
Web Services Host
Password of the previous user
Link to the Web Service on the Avid Interplay System.
You have to replace:
[IP] by the IP address of the computer where the Avid web
•
Services are running
[PORT] by the port that you have configured for your Avid Web
•
Page 37

XTAccess Version 1.18 – User Manual
EVS Broadcast Equipment – July 2012
Issue 1.18.A
27
Services ( example : 8080)
Field/Button Description
Interplay URI
You can also test the connection by clicking on the
Connection
button
Test
Path where the clip/playlist will be seen in the Interplay DB. You
can add sub-folder after the Incoming Media folder. You have to
replace [Workgroup] by your Avid workgroup.
Example: interplay://AvidWG/Incoming Media/EVS
Media/Monday/
Mixed Codecs
Table for EDL
Export
With this table: you will have the possibility to map a specific
source codec for transcoding purpose.
All items with this source codec will be transcoded.
Useful for several cases :
• Transcoding if source codec not supported by XTAccess
• Transcoding if source codec not supported by NLE
The table is only used by XTAccess for the EDL export jobs.
Page 38

Issue 1.18.A
XTAccess Version 1.18 – User Manual
EVS Broadcast Equipment – July 2012
28
Equipment\XTAccess\EVS_Metadatas_template.evs.xml
FinalCutPro
For FinalCutPro applications, these settings allow you to save the FCP XML Metadata file
with the file generated with XTAccess and configure which EVS metadata you want to
keep to FCP
Field/Button Description
Active
Save EDL to
Allows you to activate or not the settings.
Allows you to back up the FCP XML file on disk.
disk
EDL path
Generate
FinalCutPro
XML
Path where you want to store the FCP XML file
Only 6 EVS custom metadata can be imported in Final Cut Pro Project
fields. In this field box, you can create a matrix with the EVS metadata
and FCP metadata.
The Matrix is based on an EVS metadata template that you can find
using the following path:
C:\Program Files\EVS Broadcast
Page 39

XTAccess Version 1.18 – User Manual
EVS Broadcast Equipment – July 2012
Issue 1.18.A
29
Local path (where your backed up clip is saved on your FCP
Field/Button Description
Quick Time
Movies Local
Path
computer) referenced into the XML FCP to point to the Quick Time
Movies File. Final Cut Pro only supports local paths.
Mixed Codecs
Table for EDL
Export
With this table: you will have the possibility to map a specific source
codec for transcoding purpose.
All items with this source codec will be transcoded.
Useful for several cases :
• Transcoding if source codec not supported by XTAccess
• Transcoding if Source codec not supported by NLE
The table is only used by XTAccess for the EDL export jobs.
Page 40

Issue 1.18.A
XTAccess Version 1.18 – User Manual
EVS Broadcast Equipment – July 2012
30
EVSEDL
For EVS applications, these settings allow you to save the EDL with the concatenated
playlist file or the backup of playlist.
Field/Button Description
Active
Save EDL to
disk
EDL path
Mixed Codecs
Table for EDL
Export
Allows you to activate or not the settings.
Allows you to back up the EVS EDL file
Path where you want to store your EVS EDL file
With this table: you will have the possibility to map a specific source
codec for transcoding purpose.
All items with this source codec will be transcoded.
Useful for several cases :
• Transcoding if source codec not supported by XTAccess
• Transcoding if Source codec not supported by NLE
The table is only used by XTAccess for the EDL export jobs.
Page 41
XTAccess Version 1.18 – User Manual
EVS Broadcast Equipment – July 2012
Issue 1.18.A
31
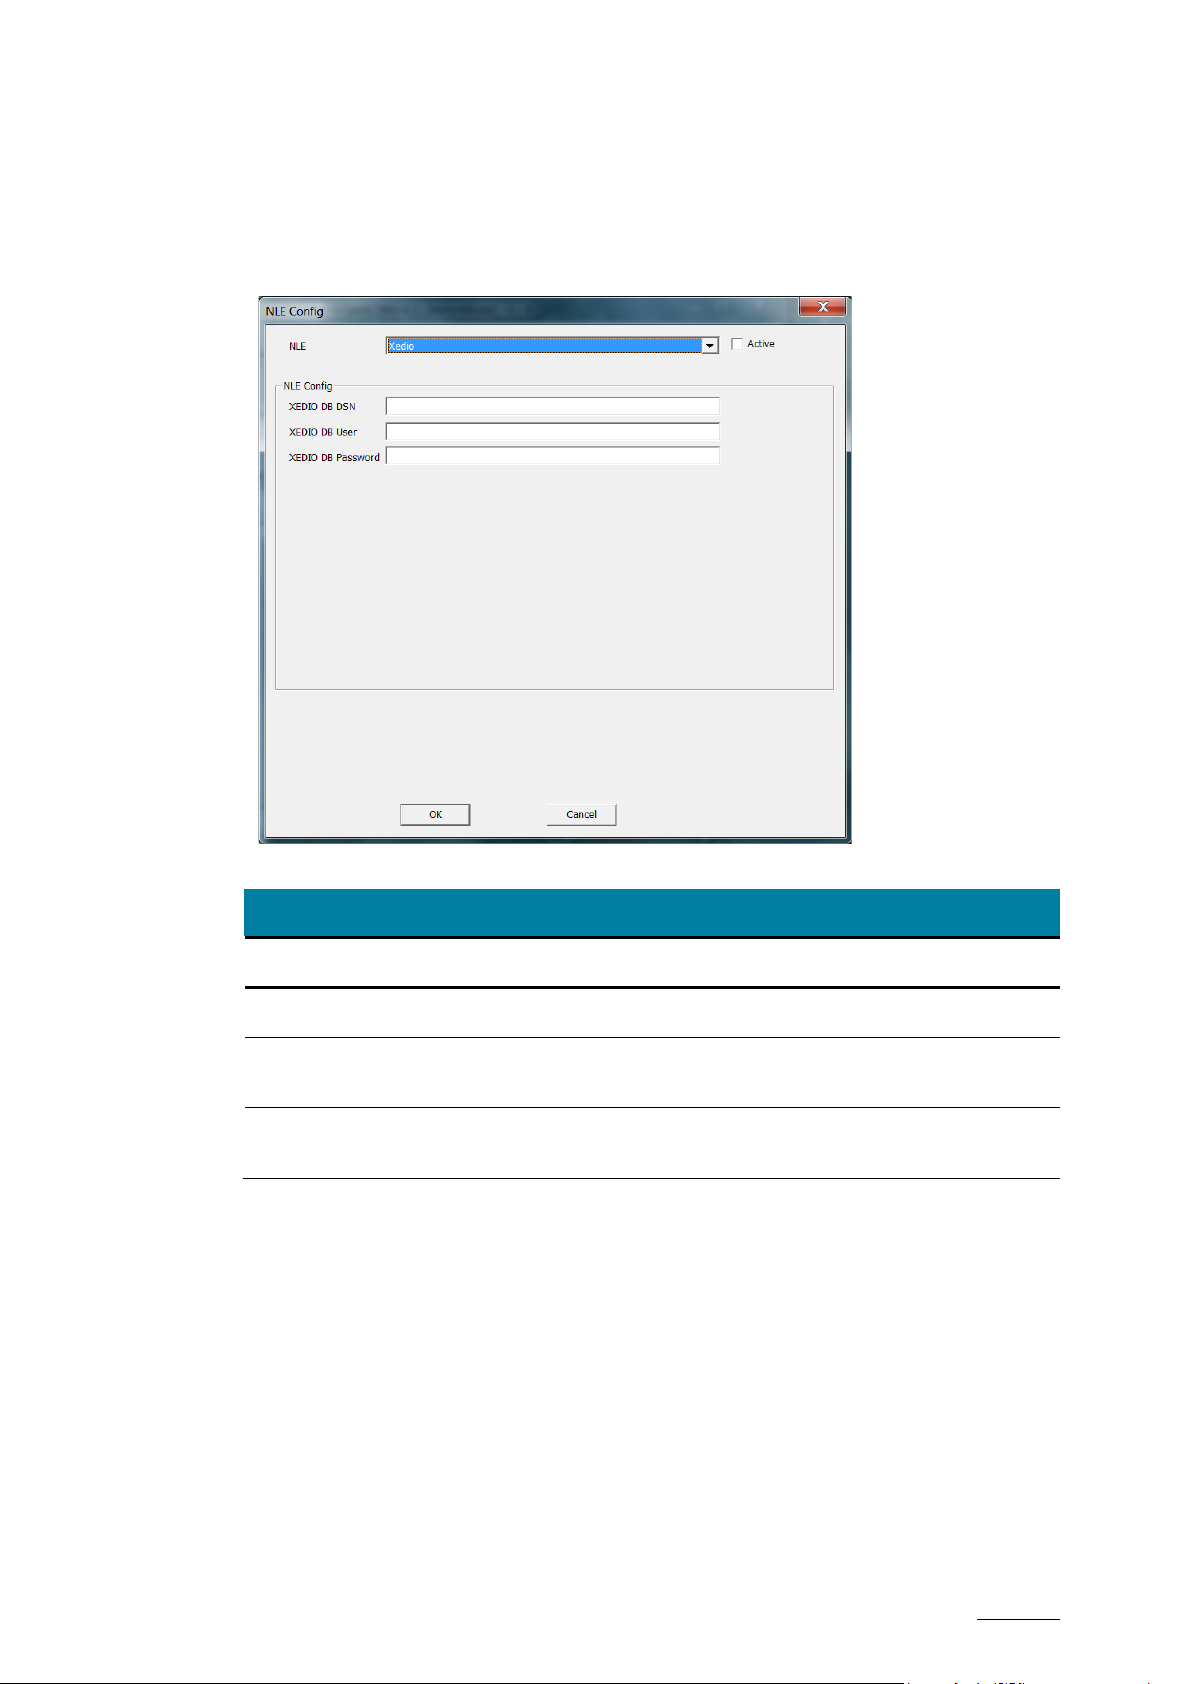
Xedio
For Xedio applications, the settings allow you to reference media to the Xedio database in
case of backup file
Field/Button Description
Active
XEDIO DB DNS
XEDIO DB
User
XEDIO DB
Pass
Allows you to activate or not the settings.
DNS Name of Xedio database target
DNS User of Xedio database target
DNS Password of Xedio database target
Page 42

Issue 1.18.A
XTAccess Version 1.18 – User Manual
EVS Broadcast Equipment – July 2012
32
7.4 XML Jobs Processing
7.4.1 Launch of Multiple XML Jobs Scan
One can launch as many XML Jobs Scan folders as wished. Each XML Jobs Scan
window can be positioned anywhere on the desktop.
7.4.2 Start of XML Jobs Scan
When the XML Jobs Scan folder is displayed, the scan process begins when clicking the
START button.
• Note 1: The first time the START button is clicked, XTAccess will automatically
generate the XML scan subfolders:
o \Jobs_Done\
o \Jobs_In_Progress\
o \Jobs_Incoming\
o \Jobs_Scheduled\
• Note 2: In case the XML Jobs Scan was already used before, each time you launch
this XML Jobs Scan, it will start automatically after a countdown of 10 seconds
• Note 3: If XTAccess has stopped during transfer, at next start of XTAccess:
o The XML job files that were in \Jobs_In_Progress\ or \Jobs_Scheduled\ folder
will move into \Jobs_Done\ folder with Job_status 7.
7.4.3 Processing of a XML JOB
During the whole XML jobs processing, XTAccess updates the status of the XML file,
especially to provide third-party applications with information about the transfer process.
IPDirector can use the information included in the XML file to get the status of the transfer
in progress (only available for non proxy FTP modes – Backup of clips and trains,
Restore/Copy, XT Copy, File Rewrap).
At the end, the XML file with the final job status is moved to \Jobs_Done\ to be checked
and removed by IPDirector. The mechanism of the XML processing is described in
details in the ”XML Jobs” document.
Page 43

XTAccess Version 1.18 – User Manual
EVS Broadcast Equipment – July 2012
Issue 1.18.A
33
7.5 Load Balancing between Multiple XTAccess Devices
Multiple XTAccess devices can scan the same XML scan folder.
In order to efficiently distribute the XML jobs over all the XTAccess devices, load
balancing rules must be defined.
7.5.1 Management of XML Jobs
Once a new XML job is sent to XTAccess, several criteria are taken into account in order
to decide whether the job must be processed:
• Maximum amount of jobs simultaneously processed.
• Maximum amount of jobs simultaneously processed per IP address
• Presence of a job waiting for a connection to EVS server with the same IP address.
Besides, the maximum amount of XML jobs that can be simultaneously processed per
XML scan module is also limited. The XML scan per folder is processed every 5
seconds.
Once a job is processed by XTAccess, the first action is an attempt to connect the XT
FTP server. In case the connection failed, 2 cases are considered:
• The connection is refused by the EVS server because the maximum amount of
connections is reached (max. 6 FTP connections for HiRes EVS servers). The status
will be “Server busy”. Unlimited connection attempts are done every 2-4 seconds
until getting an available connection.
• The connection cannot be established because the IP address is not reachable. The
status is “Server IP failed”. Several connection attempts are done within fixed time
intervals (see ‘IP Retry parameter’ in section 7.5.2 ‘Control Parameters’ on page 34).
After some attempts (see ‘IP Retry Timeout parameter’ in section 7.5.2 ‘Control
Parameters’ on page 34) the job will be cancelled and an error status will be
generated.
Any other failure during the connection to an EVS server will cancel the job and generate
an error “GENERAL FAILURE”.
In case a job that is processed is not able to connect, no other job with the same IP
address will be taken into account. Once the connection will be resumed by this
“blocked” job, the other waiting jobs will be processed again.
In case of XT Copy job, connection is first established to the destination EVS server prior
to the source server. In case the connection failed, the connection to the source server is
not used, in order to avoid unexpected XT FTP connections.
Every jobs are taken into account following a FIFO stack (oldest job first).
Page 44

Issue 1.18.A
XTAccess Version 1.18 – User Manual
EVS Broadcast Equipment – July 2012
34
7.5.2 Control Parameters
Some parameters have been added to better control the load balancing job management.
Those parameters can be changed in the registry. XTAccess must be re-started in order
to take them into account.
• HKEY_CURRENT_USER\Software\EVS Broadcast Equipment\XTAccess\Max
Running Jobs (default value = 6): Maximum amount of jobs simultaneously
processed by XTAccess. Once the limit is reached, any additional job will be
“scheduled” (in Jobs_Scheduled” folder) until an “in-progress” job is over.
• HKEY_CURRENT_USER\Software\EVS Broadcast Equipment\XTAccess\Max IP
Jobs (default value = 6): Maximum amount of jobs simultaneously processed by
XTAccess to or from a given IP address (as destination or source XT server). Once
the limit is reached, any new job involving the same IP address will be “scheduled” (in
Jobs_Scheduled” folder) until a “in-progress” job related to this IP address is over.
Besides, in case a job related to the IP address is in status “Server Busy”, any next
job using the same IP address will stay in “Scheduled” status until all jobs under
“Server Busy” will be passed to “in-progress” status. At that time XTAccess scans the
job list “scheduled” in order to move them to “in-progress” status. In case of XT Copy
job, IP addresses of source and destination XT server are taken into account.
• HKEY_CURRENT_USER\Software\EVS Broadcast Equipment\XTAccess\Max
XML Jobs (default value = 6): Maximum amount of jobs simultaneously processed by
XTAccess per XML scan folder. This amount defined the maximum amount of XML
files that will be processed by an XML scan folder, possibly after several scan
processes (depending on Max Scan Running Jobs parameter – see below).
• HKEY_CURRENT_USER\Software\EVS Broadcast Equipment\XTAccess\Max
XML Jobs Per Scan (default value = 6): Maximum amount of jobs simultaneously
loaded by XTAccess per scan processes. This amount defined the maximum amount
of files that will be loaded by a scan process of the given folder.
• HKEY_CURRENT_USER\Software\EVS Broadcast Equipment\XTAccess\XML
Scan Timeout (default value = 250): Time delay (in milliseconds) between two
successive scan processes, provided that the “Max XML Jobs” parameter is not
already reached.
• HKEY_CURRENT_USER\Software\EVS Broadcast Equipment\XTAccess\XML
Scan Jobs Timeout (default value = 5000): Time delay (in milliseconds) between the
treatment of two successive XML jobs.
• HKEY_CURRENT_USER\Software\EVS Broadcast Equipment\XTAccess\IP
Retry (default value = 12): Maximum amount of attempts to connect to an IP address
of a XT server which does not reply.
• HKEY_CURRENT_USER\Software\EVS Broadcast Equipment\XTAccess\IP
Retry Timeout (default value = 5000): Time delay (in milliseconds) between two
successive attempts to connect to an IP address which does not reply.
• HKEY_CURRENT_USER\Software\EVS Broadcast Equipment\XTAccess\IP
Retry Timeout (default value = 5000): Time delay (in milliseconds) between two
successive attempts to connect to an IP address which does not reply.
• HKEY_CURRENT_USER\Software\EVS Broadcast Equipment\XTAccess\Max
Transcoding Jobs (default value = 1): Maximum amount of transcoding jobs
simultaneously processed by XTAccess (rendering of playlists included)
• HKEY_CURRENT_USER\Software\EVS Broadcast Equipment\XTAccess\Max
Meta Jobs (default value = 1): Maximum amount of Meta jobs (Backup of playlist)
simultaneously processed by XTAccess
• HKEY_CURRENT_USER\Software\EVS Broadcast Equipment\XTAccess\ Max
Page 45

XTAccess Version 1.18 – User Manual
EVS Broadcast Equipment – July 2012
Issue 1.18.A
35
Child Jobs (default value = 4): Maximum amount of child jobs simultaneously
processed by XTAccess in backup of playlist
Those parameters can be optimized for a specific workflow.
Page 46

Issue 1.18.A
XTAccess Version 1.18 – User Manual
EVS Broadcast Equipment – July 2012
36
8. Scan Folder
The scan folder allows you to restore / copy / transcode files from a folder.
XTAccess waits to have write access on the scanned files before processing them.
8.1 Scan Folder Window
On XTAccess GUI, select the Scan Folders button:
The following window is displayed:
Page 47

XTAccess Version 1.18 – User Manual
EVS Broadcast Equipment – July 2012
Issue 1.18.A
37
The main window lists all the scan folders defined by XTAccess:
Column Heading Description
Folder
• Path: path of the folder to scan.
• Check Box: if selected, this scan folder is considered when
XTAccess starts scanning.
Job Type
Target
Filter
Src Name
Delete
Column Heading Description
Add Folder
Remove
Edit
Type of Job (Copy, Restore, Graph Sequ., Transcode)
Target Path (XT FTP or Windows path)
List of file extensions to filter
Source Name to be added with the restored clip
Option to delete source file
Adds a new folder to scan (see below for details).
Removes a selected scan folder item.
Edits a selected scan folder item (see below for details).
START/STOP
CLOSE
Starts/Stops the scanning process. Only the selected folders
(checkbox) will be scanned by XTAccess.
Closes the Scan Folder window
Page 48

Issue 1.18.A
XTAccess Version 1.18 – User Manual
EVS Broadcast Equipment – July 2012
38
8.2 Add and Edit a Scan Folder Item
When adding a new scan folder item or editing a selected and existing scan folder item,
the following settings window is displayed.
Column
Heading
Job Type Restore: Select this option if you want to restore the scanned files
Scan Folder
Scan Filter
Description
Transcode: Select this option if you want to transcode the scanned
files
Graph Sequ.: Select this option if you want to create sequence with the
graphic files which are in the folder that you are scanning
Path of the folder to scan
List of file extensions to scan.
Page 49

XTAccess Version 1.18 – User Manual
EVS Broadcast Equipment – July 2012
Issue 1.18.A
39
the camera labels. First check the availability of 123A, then 123B,
Column
Heading
Source
Name
Delayed
mode
If the job
Succeeds:
Description
CLIP Source Name to be added with the restored clip.
In case this field is left blank with EVS MXF files to restore, the Source
Name included in the EVS MXF metadata will be restored.
If this option is selected, XTAccess will check the modification time of
the file and will wait until this modification time is older than the local
time + 30 seconds on the XTAccess computer.
After the scan job: XTAccess can:
• Delete the source files
• Move the source files to a specific folder (useful to do Xedio
referencing)
• Move the source files to a folder XTAScan.done in the same folder
than the scanned folder (default option)
Source
Target
Folder
Target
Server
If you have selected Move the source files to a specific folder (useful
to do Xedio referencing): it is where you can specify the folder.
Update Xedio DB with the source file after it’s moved: Select this
option if you want to update the Xedio DB with the source file. The
Xedio settings are available in the main menu of XTAccess.
If you have selected ‘Target EVS Server’ Job Target, you can specify
here the destination EVS server and location
Server IP: IP address of the target EVS server
User : FTP login of the target EVS server
Password : password of the target EVS server
Location: ClipID of the first location to check when restoring.
4 modes are considered:
• 123X: X could be A, B, C, D, E or F. In that case XTAccess will
check the availability of the clip, e.g. 123A clip.
o If not available, XTAccess will show an error message on the
main window. You will need to try again with a different location.
o If available, the transfer will be done
• 123?: In this case, the “Question Mark” allows XTAccess to check all
Page 50

Issue 1.18.A
XTAccess Version 1.18 – User Manual
EVS Broadcast Equipment – July 2012
40
123C, 123D, 123E, 123F, 124A, 124B, etc.
: Uses the filename as VarID but keeps the
Column
Heading
Description
• 123[XXXX]: X could be A, B, C, D, E or F. In that case, XTAccess will
check the availability of the clip in this range of camera.
Example: 123[ACD] XTAccess will try: 123A 123C 123D 124A
124C 124D ... ... 211A 211C
• [XXX]?: X could be 123456789 and XXX is/are the page where you
want to restore the files. In this case, the “Question Mark” allows
XTAccess to check all the camera labels but after the XXX page.
Example: [157]? XTAccess will try : [110A 111A 112A ... 199A
510A ... ... 799A 110B 111B ... 199B 510B ... ... 799B 110C ... ... ...
... ... 799F ].
These last two modes are only available with Multicam 10.01.07 or
upper.
Restore Mode:
• Copy: Generates new IDs for VarID, MaterialID and UmID (LouthID)
like a Copy Job
• Lax Rest.: Typically used for automation which needs to keep the
VarID from the source file but can regenerate the MaterialID and
UmID (LouthID).
• Restore: Keeps original IDs available in the source file like a Restore
• VarID option1 : Uses the filename as VarID and generate a new
• VarID opation2
DestinationT
arget Folder
Transcoding
Profile
If you have selected “Target File” Job Target: you can specify here the
destination path
Update CleanEditDB: Select this option if you want to update the
CleanEdit DB with the destination file. The CE settings are available in
the main menu of XTAccess.
This is the XML profile used by XTAccess which defines the codec and
parameter of the codec used by XTAccess to Transcode the file. You
can find some encoder profiles into the “C:\Program Files\EVS
Broadcast Equipment\XTAccess\Encoder Profiles” folder
Job
MaterialID and UmID
MaterialID as UmID
Only used if you have selected Transcode as job Type
Generate
XML
Metadata file
Select this option to send XML Referencing file to IPDirector (in case of
restore) or to create XML Metadata file next to the destination files (in
case of transcoding to file).
Page 51

XTAccess Version 1.18 – User Manual
EVS Broadcast Equipment – July 2012
Issue 1.18.A
41
or
These XML files allows XTAccess to add metadata (IPD Owner,
Column
Heading
Generate
XML
Referencing
file
Description
referencing High/ Low)
Target Path: Destination path where the XML referencing file/metadata
file will be sent to IPD.
Example of XML referencing
\\IPDirector180\JOBREF\EVS_TO_TODO\
Path:
Example of XML Metadata Path: \\Xstore60170\Media\
IPD Owner: IPDirector owner (user) to be referenced to IPDirector
Database. If left blank, the “XT Generic User” is pushed into IPDirector
Database.
Page 52

Issue 1.18.A
XTAccess Version 1.18 – User Manual
EVS Broadcast Equipment – July 2012
42
8.3 XEDIO Integration with the Scan Folder
8.3.1 Overview
XTAccess is able, with the scan folder, to transcode one High Res file to Low Res and
reference it into Xedio DB.
8.3.2 Workflow
1. A file is dropped in the ScanFolder (D:\myScanFolder\myFile.evs.mxf)
2. The transcoded file and its companion EVS_Metadata file is generated in
D:\CleanEdit\Low\
3. If the job succeeds, the source file (C:\myScanFolder\myFile.evs.mxf) is moved to
D:\CleanEdit\High\
4. The two files are referenced into Xedio
8.3.3 Remarks
• To use the Xedio referencing: you need to install the
CEXTAccessIntegration_vxx.xx.xx.exe and configure the CleanEdit ODBC Through
the NLE config button
Page 53

XTAccess Version 1.18 – User Manual
EVS Broadcast Equipment – July 2012
Issue 1.18.A
43
• If the source file has no EVS Metadata file, XTAccess will create, during the source
file move, a light EVS Metadata file for the referencing into the Xedio DB
8.4 ScanFolder Post Processing
XTAccess can send a XML file (post processing job) after the processing of one file in the
scan folder.
To activate this option: you have to add one valid template file in the scan folder source.
You can find some examples of post processing templates in this folder:
C:\Program Files\EVS Broadcast Equipment\XTAccess\PostProcess
The template must contain the path where XTAccess will write the post processing file
(##TPL_OUTPUT_PATH=C:\XTA_out_tpl_To_AFi\##).
• PostProcessForXedioAutoFileImporter.tlp: to reference source and destination file to
the XedioAutoFileImporter
• PostProcessForXTAccess.tpl: XTAccess will restore the source or the destination file
after the processing.
8.4.1 Workflow
1. The user adds one template file in the scan folder (MyTemplate.tpl)
2. One Video file comes in the watch folder
3. XTAccess processes the file
4. XTAccess fills in the template with the correct file name (Input and/or output filename)
5. XTAccess sends this XML file to the folder which is specified in the template file.
8.5 Remarks on the Scan Process
XTAccess processes only the files with a size bigger than 0KB
XTAccess can scan an EVS XML file. In this case you need to define *.evs.xml as filter
Page 54

Issue 1.18.A
XTAccess Version 1.18 – User Manual
EVS Broadcast Equipment – July 2012
44
and XTAccess will check the <File_Path_HiRes> tag in the evs.xml file to find the video
file.
XTAccess waits to have write access to the files before processing them. The
modification date of the file must be also 30 sec older than the current time on the
XTAccess computer. For the Graphic files:
• it is the folder containing all the graphic files that you have to scan
• XTAccess waits 10 seconds after new files in the graphic folder before starting the
processing.
Page 55

XTAccess Version 1.18 – User Manual
EVS Broadcast Equipment – July 2012
Issue 1.18.A
45
9. Backup of EVS Server Clips to Files
This section covers XML Jobs IDs:
• Job #0: Backup Clip from XT to file (IPDirector v4 onwards)
• Job #11: Short Backup Clip from XT to file (IPDirector v5 onwards)
9.1 Workflow
The following schema shows how the backup of clips is performed with the Gigabit
connection and XTAccess:
Page 56

Issue 1.18.A
XTAccess Version 1.18 – User Manual
EVS Broadcast Equipment – July 2012
46
1. An external system, for example IPDirector, sends an XML file to XTAccess to
request the backup of a given clip created on an EVS server.
2. XTAccess processes the XML file:
a. It gets the clip content that has to be backed up from EVS.
b. It generates a backup file of the clip in the format specified by the external system
c. It stores the backup file in the target folder specified by the external system. The
metadata of the clip are either included in the file (in EVS MXF) or sent via an
XML file.
Remark:
If the backup is not successful, the partial clip will be deleted from the disk.
9.2 Example of XML backup File
To identify the clip you want to back up you can use the UmID, VarID or LSM ID
<?xml version="1.0"?>
<EVS_XFile_Job_List>
<EVS_XFile_Job>
<Job_Id>2246373</Job_Id>
<Job_Creation_Time>1206001502</Job_Creation_Time>
<Job_Type>0</Job_Type>
<Job_Src_User_Nb>4</Job_Src_User_Nb>
<Job_Src_Clip_Nb>23</Job_Src_Clip_Nb>
<Job_Src_Cam>D</Job_Src_Cam>
<Job_Dest_File>\\Xstore60170\testGB\</Job_Dest_File>
<Job_Src_Id_Material>7tbq1KO0</Job_Src_Id_Material>
<Job_Src_Id>7tbq1KVW</Job_Src_Id>
<Job_Src_XT_IP_Address1>1.1.250.250</Job_Src_XT_IP_Address1>
<Job_Src_XT_Port1>21</Job_Src_XT_Port1>
<Job_Src_XT_FTP_Login>evs</Job_Src_XT_FTP_Login>
<Job_Src_XT_FTP_Password>evs!</Job_Src_XT_FTP_Password>
<Job_Src_XT_IP_Address2>1.1.251.251</Job_Src_XT_IP_Address2>
<Job_Src_XT_Port2>21</Job_Src_XT_Port2>
<Job_Src_App_Data>
<IPClipID>246373</IPClipID>
<ClipLouthID>7tbq1KVW</ClipLouthID>
<ClipMaterialID>7tbq1KO0</ClipMaterialID>
<NumUser>4</NumUser>
<BackupUnitID>92</BackupUnitID>
<JobIdHistory>2030</JobIdHistory>
</Job_Src_App_Data>
<Job_Dest_File_Format>1</Job_Dest_File_Format>
<Job_Dest_XML_Metadata_Path>\\Xstore60170\Data (G)\Scan
XML\metadata\</Job_Dest_XML_Metadata_Path>
<Job_Dest_Generate_XML_Metadata>1</Job_Dest_Generate_XML_Metadata>
<EVS_Metadatas>
<Clips_Infos>
<Clip>
<IPDirector_Clip_Infos>
<LsmSerialNumber>20140</LsmSerialNumber>
<ThumbnailTCRefPath>\\1.1.59.66\Thumbnails\246373.jpg</ThumbnailTCRefPath>
<Owner>XT Generic User</Owner>
Page 57

XTAccess Version 1.18 – User Manual
EVS Broadcast Equipment – July 2012
Issue 1.18.A
47
<TCInDate>07-Mar-2008</TCInDate>
<TCOutDate>07-Mar-2008</TCOutDate>
</IPDirector_Clip_Infos>
</Clip>
</Clips_Infos>
</EVS_Metadatas>
</EVS_XFile_Job>
</EVS_XFile_Job_List>
The description of each XML tag is described in the ”XML Jobs” document.
9.3 Local XTAccess Settings (non XML)
Some XTAccess settings are not supported by XML. They must therefore be specified in
the local settings of the XML Jobs Scan (see section 7.3.3 ‘XML Scan Settings’ on page
22).
Registry Settings
• HKEY_LOCAL_MACHINE\SOFTWARE\EVS Broadcast Equipment\Common
\FileWriter NoBuffering: Specific setting to transfer a file without any buffering.
Recommended for writing on a MacOS workstation via network (SMB). (default value
= 0)
• HKEY_CURRENT_USER\Software\EVS Broadcast Equipment\XTAccess\Max
Transfer Rate: Maximum transfer rate (Bytes/second) for the total amount of backup
jobs (all together).
• HKEY_CURRENT_USER\Software\EVS Broadcast Equipment\XTAccess\
UpdateStatusXFileIfBackupSuccessful: Update STATUSXFILE in MCCLIPTABLE
when backup is successful
0: Active
o
o
1: Not Active
9.4 Miscellaneous
• Remark 1: EVS, GigE and XTAccess activate time-outs when no data are transferred
within a specific time interval (typically 8 seconds). Typically, backing up a file on a
remote drive via UNC path with throughput lower than 5 Mbits/s per transfer job could
trigger a time-out and then cancel the job. Network and storage must be designed
accordingly.
• Remark 2: Audio Resolution
o In OP1A and Avid MXF format you can select 16 or 24 bits
o In QT and QT Ref format the audio is saved in 16 bits
o In EVS MXF format the audio is saved in 24 bits
Page 58

Issue 1.18.A
XTAccess Version 1.18 – User Manual
EVS Broadcast Equipment – July 2012
48
10. Restore/Copy of Files to EVS Server
This section covers XML Jobs IDs:
• Job #1: Restore Clip from file to EVS Server (IPDirector v5 onwards)
• Job #2: Copy Clip from file to EVS Server (IPDirector v5 onwards)
• Job #12: Short Copy Clip (IPDirector v5 onwards)
10.1 Workflow
The restore process can be set up in two different ways:
• via XML jobs sent by an external application.
• via folder scan.
The following schema shows how the restore of clips is performed with the Gigabit
connection and XTAccess:
10.1.1 Workflow (Restore via XML Jobs) Explanation
1. An external system (which can generate XML files to restore clips, for example
IPDirector) sends an XML job to XTAccess to request the restore (copy) of clips from
an archiving or backup system to a given EVS server.
Page 59

XTAccess Version 1.18 – User Manual
EVS Broadcast Equipment – July 2012
Issue 1.18.A
49
2. XTAccess processes the XML job:
a. It gets the file to restore from the external system.
b. It restores (copy) the clip on the EVS server specified in the XML file.
10.1.2 Workflow (Folder File Scan) Explanation
1. An external system places a file in a folder to be scanned by XTAccess.
2. XTAccess gets this file to be restored to EVS server
3. It restores (copy) the clip on the EVS server specified in the Scan Folder settings.
10.2 Example of XML Copy File
<?xml version="1.0"?>
<EVS_XFile_Job_List>
<EVS_XFile_Job>
<Job_Id>12384</Job_Id>
<Job_Creation_Time>0</Job_Creation_Time>
<Job_Src_File>G:\000610A_imx pal 4a.evs.mxf</Job_Src_File>
<Job_Type>2</Job_Type>
<Job_Dest_XT_IP_Address1>1.1.243.243</Job_Dest_XT_IP_Address1>
<Job_Dest_XT_Port1>21</Job_Dest_XT_Port1>
<Job_Dest_XT_IP_Address2>1.1.241.241</Job_Dest_XT_IP_Address2>
<Job_Dest_XT_Port2>21</Job_Dest_XT_Port2>
<Job_Dest_XT_FTP_Login>evs</Job_Dest_XT_FTP_Login>
<Job_Dest_XT_FTP_Password>evs!</Job_Dest_XT_FTP_Password>
<Job_Dest_Page>3</Job_Dest_Page>
<Job_Dest_ClipName>toto</Job_Dest_ClipName>
</EVS_XFile_Job>
</EVS_XFile_Job_List>
The description of each XML tag is described in the ”XML Jobs” document.
Page 60

Issue 1.18.A
XTAccess Version 1.18 – User Manual
EVS Broadcast Equipment – July 2012
50
11. Rendering of EDL to one file
This section covers XML Jobs IDs:
• Job #1O: Renders a Playlist/TimeLine from an EVS Server (XT clips only) or from
EVS EDL (XT clips and/or Media files) to a solid file.
11.1 Local XTAccess Settings (non XML)
In the XTAccess XML configuration, you have to define an XML profile that will specify
the codec and the wrapper for the destination file.
Registry Settings
• HKEY_CURRENT_USER\Software\EVS Broadcast Equipment\XTAccess\
Max Transcoding Jobs (default value = 1): Maximum amount of transcoding jobs
simultaneously processed by XTAccess (rendering of playlist included)
Page 61

XTAccess Version 1.18 – User Manual
EVS Broadcast Equipment – July 2012
Issue 1.18.A
51
11.2 XTGATEWAY
The rendering process will be in fact done by XTGateway. You can find XTGateway in the
Windows systray
Nothing has to be configured in this window, except the cache size. The cache size
depends on the number of rendering jobs that you want to execute at the same time (see
the HKEY_CURRENT_USER\Software\EVS Broadcast Equipment\XTAccess\
Max Transcoding Jobs registry key). We recommend that you set up at least 200 MB
of memory by rendering job.
Page 62

Issue 1.18.A
XTAccess Version 1.18 – User Manual
EVS Broadcast Equipment – July 2012
52
11.3 Smart Rendering
XTAccess will only transcode the effects if the source clip or file and the destination file
have the same codec: XTAccess will only render needed content
11.4 Effects
See the effect document for all the effects supported by XTAccess
Page 63

XTAccess Version 1.18 – User Manual
EVS Broadcast Equipment – July 2012
Issue 1.18.A
53
12. Rendering of EDL to one EVS Server clip
This section covers XML Jobs IDs:
• Job #24: Render a Playlist/TimeLine from An EVS Server (XT clips only) or from EVS
EDL (XT clips and/or media files) to a solid clip on an XT.
12.1 Local XTAccess Settings (non XML)
You have to define in the XTAccess XML configuration one XML profile that will define
the codec of the destination clip.
Registry Settings
• HKEY_CURRENT_USER\Software\EVS Broadcast Equipment\XTAccess\
Max Transcoding Jobs (default value = 1): Maximum amount of transcoding jobs
simultaneously processed by XTAccess (rendering of playlist included)
12.2 XTGATEWAY
XTGateway will handle the rendering process. You can find XTGateway in the Windows
systray
Page 64

Issue 1.18.A
XTAccess Version 1.18 – User Manual
EVS Broadcast Equipment – July 2012
54
Nothing has to be configured in this window, except the cache size. The cache size
depends on the number of rendering jobs that you want to execute at the same time (see
the HKEY_CURRENT_USER\Software\EVS Broadcast Equipment\XTAccess\ Max
Transcoding Jobs registry key). We recommend that you set up at least 200 MB of
memory by rendering job.
12.3 Smart Rendering
XTAccess will only transcode the effects if the source clip or file and the destination file
have the same codec: XTAccess will only render needed content
12.4 Effects
See the EVS EDL – Structure and Effects Description v1.0.pdf document for all the
effects supported by XTAccess
Page 65

XTAccess Version 1.18 – User Manual
EVS Broadcast Equipment – July 2012
Issue 1.18.A
55
13. Backup of EDL to files
This section covers XML Jobs IDs:
• Job #9: Backup Playlist from EVS Server to files with EDL creation for EVS, AVID
and FCP.
Remark:
Since the Backup Playlist job generates several files, it is forbidden to have a
"Job_Dest_File" with a full path (folder + filename). In that case, an error will be returned.
Only folders are accepted.
This Job is used to create sequence on Avid or FCP NLE.
13.1 Local XTAccess Settings (non XML)
Some XTAccess settings are not supported by XML. They must therefore be specified in
the local settings of the XML Jobs Scan (see section 7.3.3 ‘XML Scan Settings’ on page
22). See also the NLE configuration.
If you do not define a transcoding profile, all the EDLs must be in the same codec.
13.1.1 Registry Settings
• HKEY_LOCAL_MACHINE\SOFTWARE\EVS Broadcast Equipment\Common \
EDL Backup Default Guardbands: Specific the guardbands of the clip backup in
EDL backup (default value: 50 frames)
13.2 Smart Backup MODE
If the target file is already present in the EDL asset, XTAccess will not back up again the
elements.
Page 66

Issue 1.18.A
XTAccess Version 1.18 – User Manual
EVS Broadcast Equipment – July 2012
56
Short Backup:
In this case represented in the schema above, XTAccess will back up the two elements
In this case represented in the schema above, XTAccess will back up the clip1 and the
Clip3 but not the clip2.
13.3 Effects
See the EVS EDL – Structure and Effects Description v1.0.pdf document for all the
effects supported by XTAccess
Page 67
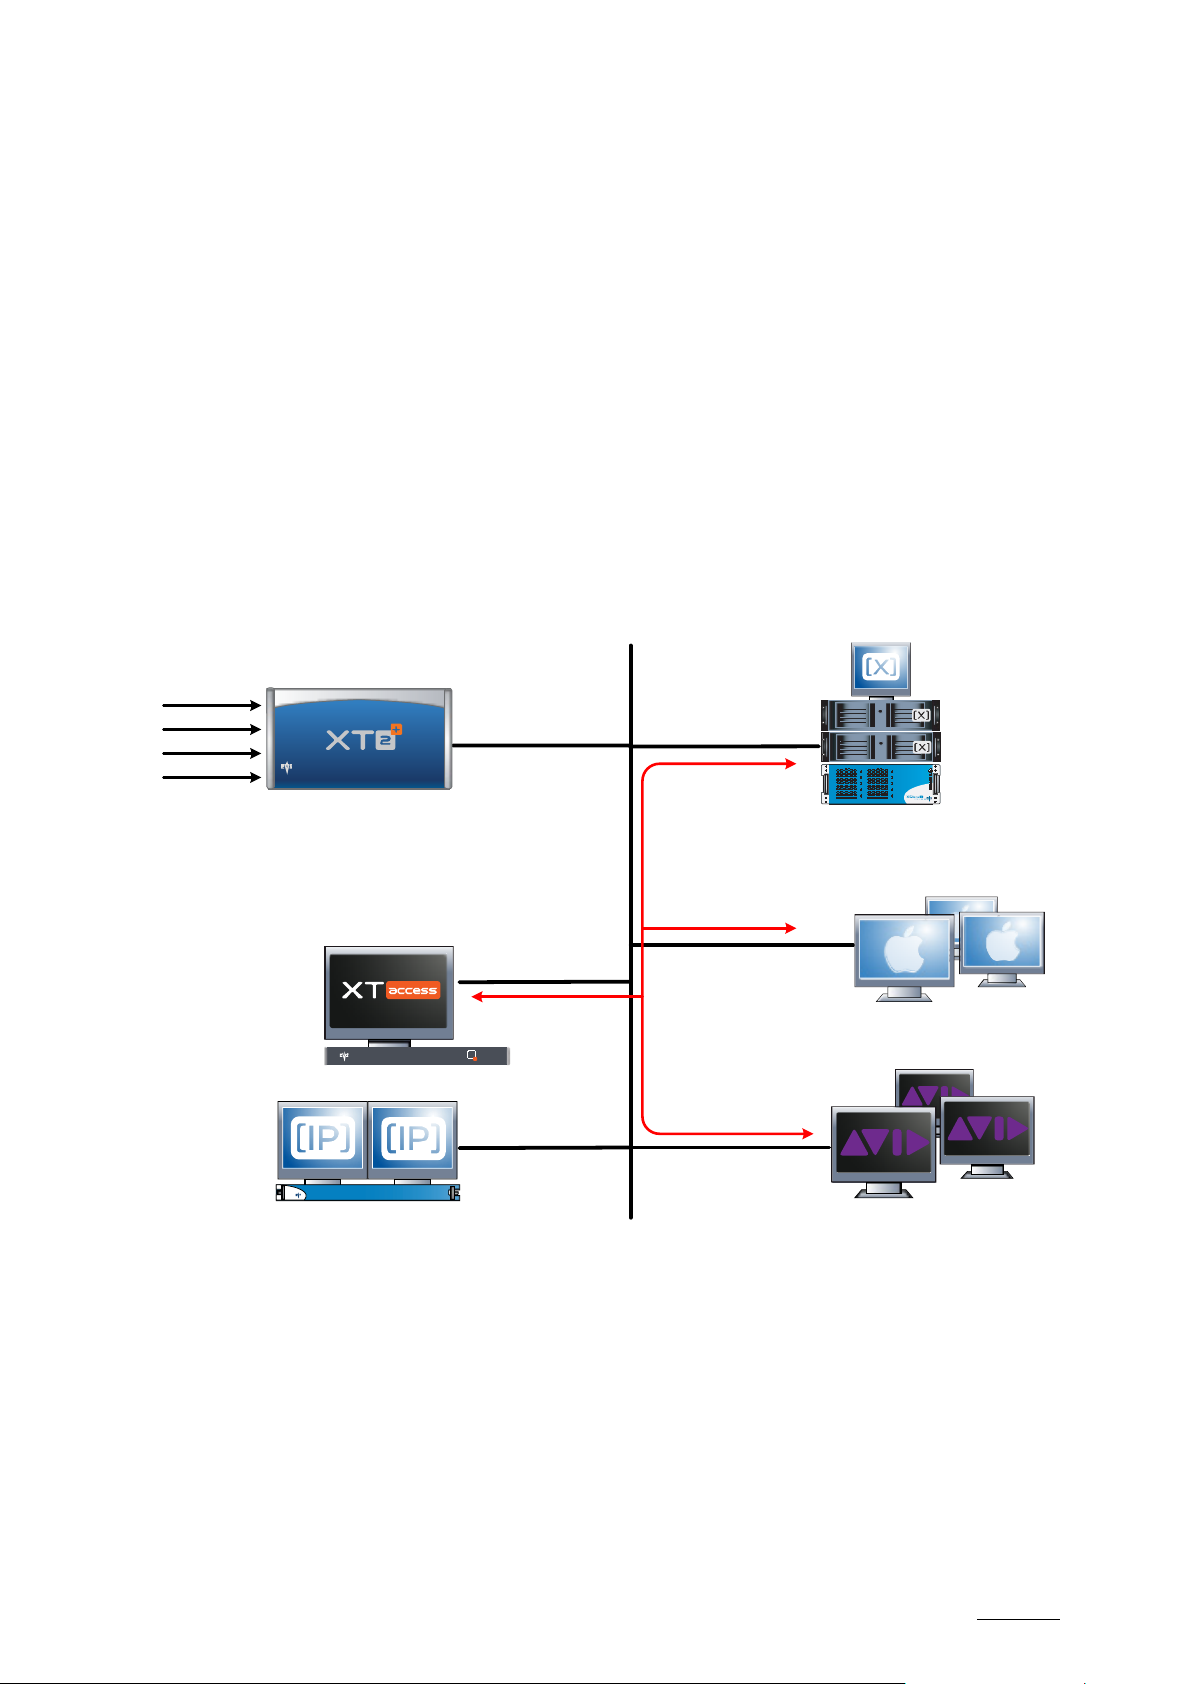
XTAccess Version 1.18 – User Manual
EVS Broadcast Equipment – July 2012
Issue 1.18.A
57
Gigabit Ethernet
Video Feeds
Apple
Final Cut Pro
GigE
Avid
Archive
14. File Rewrap
This section covers XML Jobs IDs:
• Job #40: Transfer file to file (IPDirector v5 onwards)
• Job #41: Partial transfer file to file (IPDirector v5 onwards)
14.1 Workflow
Only clips having one of the following formats can be rewrapped: EVS MXF, MXF OP-1A
or Quick Time (depending on the video codec).
The following schema shows how the restore of clips is performed with the Gigabit
connection and XTAccess:
Page 68

Issue 1.18.A
XTAccess Version 1.18 – User Manual
EVS Broadcast Equipment – July 2012
58
1. An external system (which can generate XML files for restoring clips, for example
IPDirector v5) sends an XML job to XTAccess to request the rewrap of a file from an
archiving or backup system to a new file format and archive storage.
2. XTAccess processes the XML job:
a. It gets the file to rewrap from the external system.
b. It generates a new file on the destination storage.
14.2 Example of XML File Rewrap
<?xml version = "1.0" encoding="UTF-8" ?>
<EVS_XFile_Job_List>
<EVS_XFile_Job>
<Job_Id>4942648367704751</Job_Id>
<Job_Creation_Time>1132235747</Job_Creation_Time>
<Job_Type>41</Job_Type>
<Job_Src_File>G:\770A_SDPAL_IMXD10_MXFEVS_30Mb.evs.mxf
</Job_Src_File>
<Job_Dest_File>F:\</Job_Dest_File>
<Job_Dest_File_Format>2</Job_Dest_File_Format>
</EVS_XFile_Job>
</EVS_XFile_Job_List>
The description of each XML tag is described in the ”XML Jobs” document.
Page 69

XTAccess Version 1.18 – User Manual
EVS Broadcast Equipment – July 2012
Issue 1.18.A
59
15. Additional Codec file on the fly
XTAccess can transcode on the fly a clip from EVS Server or a file to another format
(codec & wrapper).
To use the transcoding, you need to have the XTAccess Transcoding XSecure Code (see
chapter 4 ‘XSecure Management’ on page 9).
15.1 Workflow
This section does not cover XML Jobs from IPDirector yet:
The following schema shows how the clip backup / file rewrap and file transcoding are
performed with the Gigabit connection and XTAccess:
Page 70

Issue 1.18.A
XTAccess Version 1.18 – User Manual
EVS Broadcast Equipment – July 2012
60
1. As transcoding is not yet available with XML job file, you have to configure
XTAccess in transcoding mode.
2. An external system, for example IPDirector, sends an XML file to XTAccess to
request the backup of a given clip or rewrap of a given file in native EVS codec
format
3. XTAccess processes the XML file:
a. It gets the clip content from EVS or the file that has to be backed or
rewrapped up.
b. It generates a backup file of the clip or a rewrap file
At the same time, XTAccess transcodes the clip in the selected codec format.
See configuration below.
c. It stores the backup file/rewrap file in the target folder specified by the
external system. The metadata of the clip are either included in the file (in
EVS MXF) or sent via an XML file.
Remark:
There is only one status for the transcoding on the fly. So if the backup or the transcoding
fails: The whole job will fail.
15.2 Codecs supported
See XTAccess_codecs document
15.3 Local XTAccess Settings (non XML)
Transcoding XTAccess settings are not supported by XML. They must therefore be
specified in the local settings of the XML Jobs Scan (see section 7.3.3 ‘XML Scan
Settings’ on page 22).
• Create Additional Codec File: Select this option if you want to transcode on the fly.
o Target Path: This is the destination target path used for the transcoding file. This
path can be entered manually or by browsing Windows Explorer with the
associated button.
o Transcoding profile: This is the XML profile used by XTAccess which defines
the codec and parameter of the codec used by XTAccess to Transcode the file.
You can find some encoder profiles into the “C:\Program Files\EVS
Broadcast Equipment\XTAccess\Encoder Profiles\Default EVS
Profiles 2.0” folder.
Page 71

XTAccess Version 1.18 – User Manual
EVS Broadcast Equipment – July 2012
Issue 1.18.A
61
Be careful this folder is updated at each new installation of XTAccess. If you want to
create your own profile, please use the “C:\Program Files\EVS Broadcast
Equipment\XTAccess\Encoder Profiles\Custom Profiles
” folder that is not removed or
updated.
See chapter 17 ‘Example of Encoder profiles’ on page 66 for more details.
If you want to transcode only your clip or file to another format without the backed up file,
you have to select ”Transcode the source …”
Page 72

Issue 1.18.A
XTAccess Version 1.18 – User Manual
EVS Broadcast Equipment – July 2012
62
15.3.1 Smart Rendering
XTAccess automatically analyze the source and destination codec and bitrates and will
only perform a rewrapping if they are identical.
Special cases: DNxHD 100 vs. DNxHD 120/145: as XTAccess must be compliant to Avid
standards, those codecs are considered as identical with regards to the smart
transcoding criteria.
This feature is supported for all XML jobs.
15.3.2 Registry Settings
• HKEY_CURRENT_USER\Software\EVS Broadcast Equipment\XTAccess\Max
Transcoding Jobs (default value = 1): Maximum amount of jobs simultaneously
transcoded by XTAccess. Once the limit is reached, any additional job will be
“scheduled” (in Jobs_Scheduled” folder) until an “in-progress” job is over.
Page 73

XTAccess Version 1.18 – User Manual
EVS Broadcast Equipment – July 2012
Issue 1.18.A
63
Gigabit Ethernet
Video Feeds
Apple
Final Cut Pro
GigE
Avid
Archive
16. Transcoding files
XTAccess can also transcode files to another file format.
16.1 Workflow
The following schema shows how the transcoding process is performed with the Gigabit
connection and XTAccess:
1. As transcoding is not yet available with XML job file, you have to configure
XTAccess in transcoding mode.
2. An external system (which can generate XML files for restoring clips, for example
IPDirector v5) sends an XML job to XTAccess to request the rewrap of a file from
an archiving or backup system to a new file format and archive storage.
3. XTAccess processes the XML job:
a. It gets the file to transcode from the external system.
b. It generates a new file on the destination storage.
Page 74

Issue 1.18.A
XTAccess Version 1.18 – User Manual
EVS Broadcast Equipment – July 2012
64
16.2 Example of XML File Rewrap
<?xml version = "1.0" encoding="UTF-8" ?>
<EVS_XFile_Job_List>
<EVS_XFile_Job>
<Job_Id>4942648367704751</Job_Id>
<Job_Creation_Time>1132235747</Job_Creation_Time>
<Job_Type>41</Job_Type>
<Job_Src_File>G:\770A_SDPAL_IMXD10_MXFEVS_30Mb.evs.mxf
</Job_Src_File>
<Job_Dest_File>F:\</Job_Dest_File>
<Job_Dest_File_Format>2</Job_Dest_File_Format>
</EVS_XFile_Job>
</EVS_XFile_Job_List>
The description of each XML tag is described in the ”XML Jobs” document.
16.3 codecs supported
See XTAccess_codecs document.
16.4 Local XTAccess Settings (non XML)
Transcoding XTAccess settings are not supported by XML. They must therefore be
specified in the local settings of the XML Jobs Scan (see section 7.3.3 ‘XML Scan
Settings’ on page 22).
• Default File Transcoding profile: this is the XML profile used by XTAccess which
defines the codec and parameter of the codec used by XTAccess to Transcode the
file. You can find some encoder profiles into the “C:\Program Files\EVS Broadcast
Equipment\XTAccess\Encoder Profiles\Default EVS Profiles 2.0” folder.
Page 75

XTAccess Version 1.18 – User Manual
EVS Broadcast Equipment – July 2012
Issue 1.18.A
65
Be careful this folder is updated at each new installation of XTAccess. If you want to
create your own profile, please use the “C:\Program Files\EVS Broadcast
Equipment\XTAccess\Encoder Profiles\Custom Profiles
updated.
See chapter 17 ‘Example of Encoder profiles’ on page 66 for more details.
16.4.1 Smart Rendering
XTAccess automatically analyze the source and destination codec and bitrates and will
only perform a rewrapping if they are identical.
” folder that is not removed or
Special cases: DNxHD 100 vs. DNxHD 120/145: As XTAccess must be compliant to Avid
standards, those codecs are considered as identical with regards to the smart
transcoding criteria.
This feature is supported for all XML jobs.
16.4.2 Registry Settings
• HKEY_CURRENT_USER\Software\EVS Broadcast Equipment\XTAccess\Max
Transcoding Jobs (default value = 1): Maximum amount of jobs simultaneously
transcoded by XTAccess. Once the limit is reached, any additional job will be
“scheduled” (in Jobs_Scheduled” folder) until an “in-progress” job is over.
Page 76

Issue 1.18.A
XTAccess Version 1.18 – User Manual
EVS Broadcast Equipment – July 2012
66
17. Example of Encoder profiles
Encoding profiles are XML files that define the codec and codec parameters used by
XTAccess to transcode the file.
You can find bellow some examples. For more information about the transcoding profile
you can use the “Encoder Profiles.pdf” document which explains all the tags present in
the encoder profile.
17.1 MPEG-1
MPEG-1 and MPEG-2 codec use the EVSMPEG2Encoder dll encoder (C:\Program
Files\EVS Broadcast Equipment\XTAccess\EVSEncoders\EVSMPEG2Encoder.dll) which
is installed with XTAccess
You can find here an example of MPEG-2 encoder profile. This profile can be found into
C:\Program Files\EVS Broadcast Equipment\XTAccess\Encoder Profiles\Default EVS
Profiles\ folder after the installation of XTAccess.
MPEG-1_TS_XTATranscode.profile.xml:
<?xml version="1.0"?>
<EVSEncoder version="1.0">
<DllName>EVSMPEG2Encoder.dll</DllName>
<DisplayName>MPEG-1 TS</DisplayName>
<Extension>mpg</Extension>
<ResolutionMode>1</ResolutionMode>
<EVSEncoderCfg>
<FType>TS</FType>
<!-- TS / PS / ES -->
<VType>MPEG-1</VType>
<!-- MPEG-2 / MPEG-1 -->
<VRate>1500000</VRate>
<GopN>18</GopN>
<GopM>3</GopM>
<AspectRatio>Auto</AspectRatio>
<ARate>64000</ARate>
<Stereo>1</Stereo>
<Half>1</Half>
</EVSEncoderCfg>
</EVSEncoder>
All the Tags are explained into the XML Encoders Schema document into the
EVSMPEG2Encoder.dll chapter.
EVSIMXEncoder.dll chapter.
17.2 Avid DNxHD®
DNxHD® codec uses the EVSDNxHDEncoder dll encoder (C:\Program Files\EVS
Broadcast Equipment\XTAccess\EVSEncoders\EVSDNxHDEncoder.dll) which is installed
Page 77

XTAccess Version 1.18 – User Manual
EVS Broadcast Equipment – July 2012
Issue 1.18.A
67
with XTAccess.
You can find here an example of DNxHD® encoder profile. This profile can be found into
C:\Program Files\EVS Broadcast Equipment\XTAccess\Encoder Profiles\Default EVS
Profiles\ folder after the installation of XTAccess.
DNxHD_XTATranscode.profile.xml :
<?xml version="1.0"?>
<EVSEncoder version="1.0">
<DllName>EVSDNxHDEncoder.dll</DllName>
<DisplayName>Avid DNxHD</DisplayName>
<Extension>mxf</Extension>
<EVSEncoderCfg>
<VRATE>120</VRATE>
<FType>EVS</FType>
<!-- EVS / QTRef / MOV / OPAtom -->
<VType>8bitLow</VType>
<Stereo>1</Stereo>
<ResolutionMode>0</ResolutionMode>
</EVSEncoderCfg>
</EVSEncoder>
All the tags are explained into the XML Encoders Schema document into the
EVSDNxHDEncoder.dll chapter.
Page 78

Issue 1.18.A
XTAccess Version 1.18 – User Manual
EVS Broadcast Equipment – July 2012
68
XT[2] - DNxHD
XTAccess
MPEG1
Lowres
DNxHD
18. Examples of Configuration
You can find here some examples of workflows, which use the transcoding feature of
XTAccess.
18.1 Backup EVS Server native codec + Creation of LOW Res
1. Create a “standard” target destination into IPD
2. Create a Scan XML
3. Click on the XML Scan Settings button and configure the XTAccess settings.
a. Select “Create Additional Codec …"
b. Select the target Path for the Mpeg1 TS Low Res transcoded file
c. Select the Mpeg1 TS profile in the C:\Program Files\EVS Broadcast
Equipment\XTAccess\Encoder Profiles\Default EVS Profiles 2.0 folder
Page 79

XTAccess Version 1.18 – User Manual
EVS Broadcast Equipment – July 2012
Issue 1.18.A
69
Result
Each new Backup job from IPD will create:
• one transcoded file in MPEG1 in target folder defined in XTAccess
(\\172.24.1.50\Proxy Files\)
• one backed up file in the folder defined in the IPD Remote Installer
Page 80

Issue 1.18.A
XTAccess Version 1.18 – User Manual
EVS Broadcast Equipment – July 2012
70
XT[2] - DNxHD
XTAccess
IMX
18.2 Transcode Native EVS Server clip
1. Create a “standard” target destination into IPD
2. Create a Scan XML
3. Click on the XML Scan Settings button and configure the XTAccess settings
a. Select “Transcode the source ..“
b. Select the IMX profile in the C:\Program Files\EVS Broadcast
Equipment\XTAccess\Encoder Profiles\Default EVS Profiles 2.0
folder
Result
Each new Backup job from IPD will create:
• one file transcoded in IMX in the target path folder defined in the XML job
Page 81
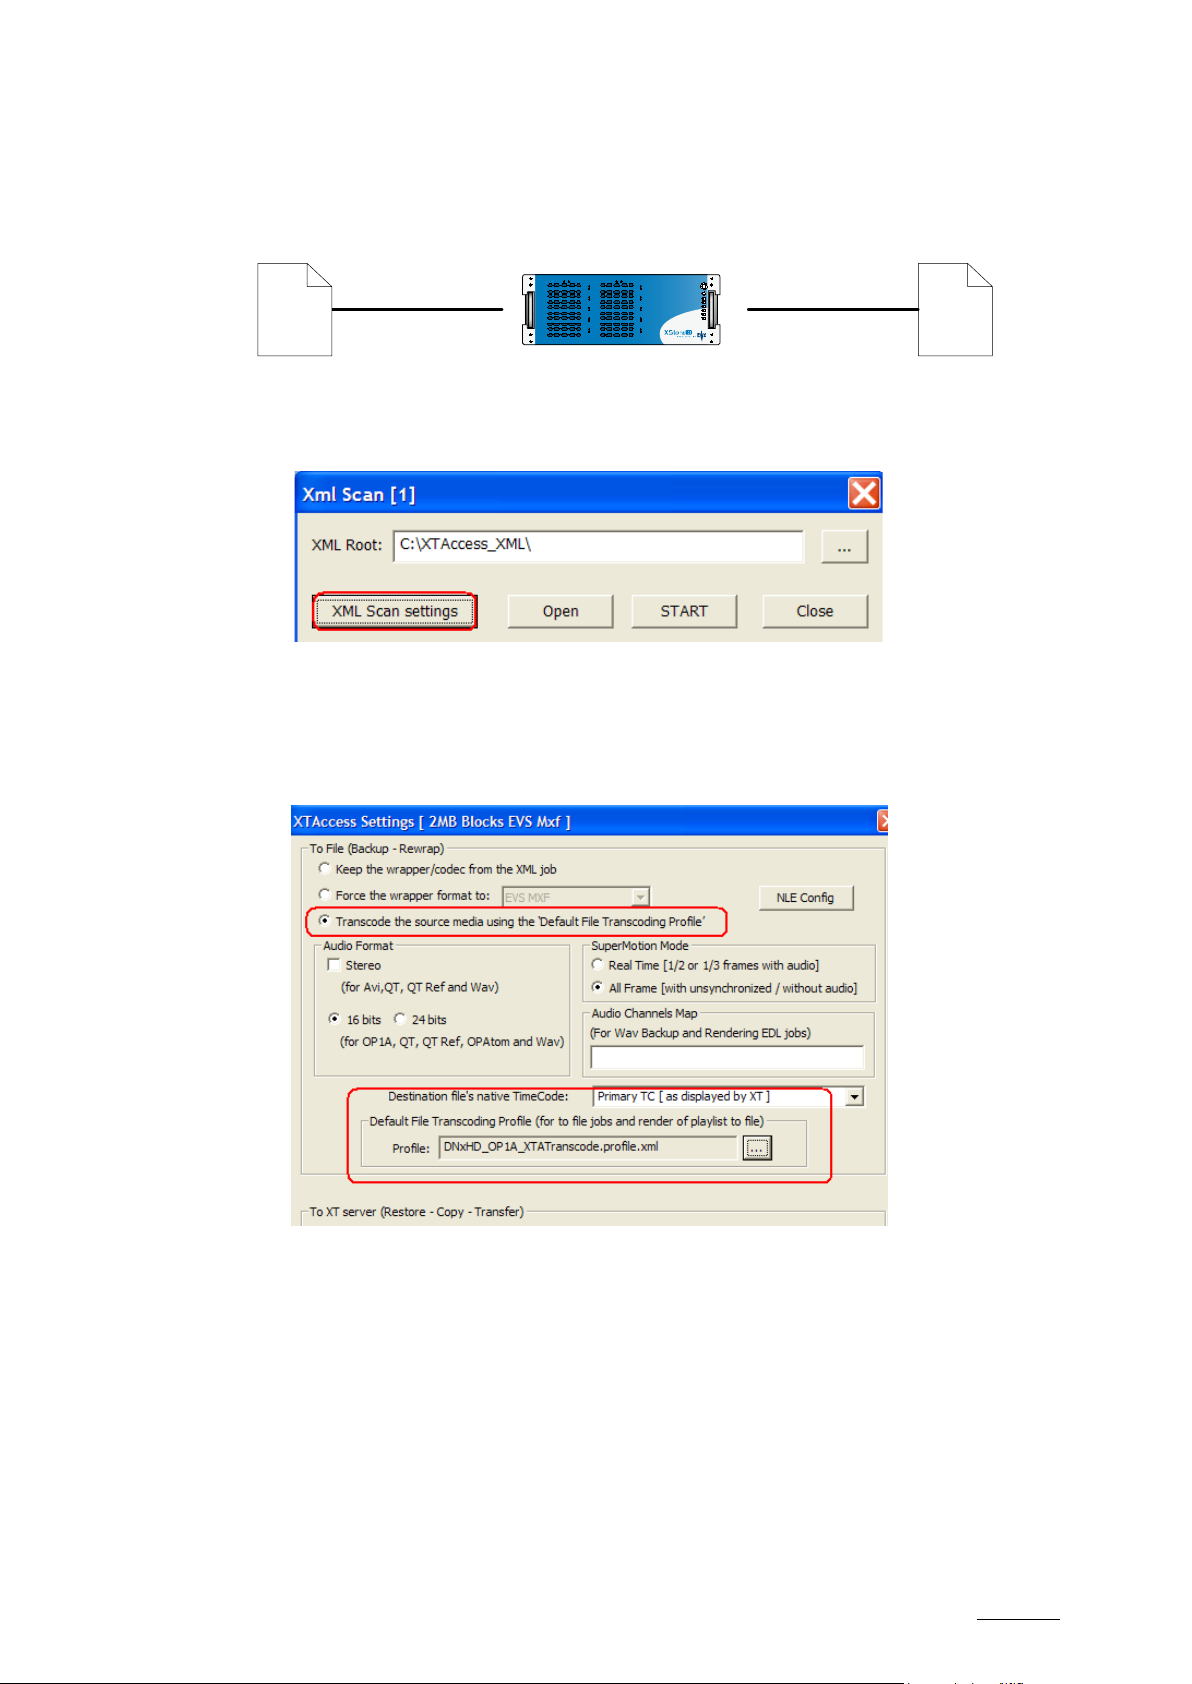
XTAccess Version 1.18 – User Manual
EVS Broadcast Equipment – July 2012
Issue 1.18.A
71
XTAccess
DNxHD
IMX
18.3 Transocode one file to file
1. Create a “standard” target destination into IPD
2. Create a Scan XML
3. Click on the XML Scan Settings button and configure the XTAccess settings
a. Select “Transcode the source …"
b. Select the DNXHD profile in the C:\Program Files\EVS Broadcast
Equipment\XTAccess\Encoder Profiles\Default EVS Profiles 2.0
folder
Result
Each new rewrap job from IPD will create:
• one DNxHD transcoded file in the target folder configured into IPD
Page 82

Issue 1.18.A
XTAccess Version 1.18 – User Manual
EVS Broadcast Equipment – July 2012
72
XTAccess
DNxHD
OP1A
MPEG1
Low Res
IMX EVS
MXF
18.4 Double Transcoding
1. Create a “standard” target destination into IPD
2. Create a Scan XML
3. Click on the XML Scan Settings button and configure the XTAccess settings
a. Select “Transcode the
source …"
b. Select the DNxHD
profile in the
C:\Program
Files\EVS
Broadcast
Equipment\XTAcces
s\Encoder
Profiles\Default
EVS Profiles 2.0
folder
c. Select “Create
Additional codec …"
d. Select the target Path
for the Mpeg1 TS Low
Res transcoded file
e. Select the Mpeg1 TS
profile in the
C:\Program
Files\EVS
Broadcast
Equipment\XTAcces
s\Encoder
Profiles\Default
EVS Profiles 2.0
folder
Result
Each new rewrap job from IPD will create:
Page 83

XTAccess Version 1.18 – User Manual
EVS Broadcast Equipment – July 2012
Issue 1.18.A
73
•
XTAccess
IMX
XT[2] - DNxHD
Select “Transcode the
Default EVS
one MPEG 1 transcoded file in the Target Path folder configured into XTAccess
(\\172.24.1.50\Proxy Files\
• one DNxHD OP1A file as asked by IPD in the folder defined into IPD
18.5 Transocode one file to EVS Server using XML job
1. Create a “standard” target destination into IPD
2. Create a Scan XML
3. Click on the XML Scan Settings button and configure the XTAccess settings
a.
source …"
b. Select the DNXHD profile in
the C:\Program Files\EVS
Broadcast
Equipment\XTAccess\Enco
der Profiles\
Profiles 2.0 folder
Result
Each new job of restore or Copy from IPD will create one DNxHD transcoded file on the
EVS. If needed you can also create additional codec at the same time
Page 84
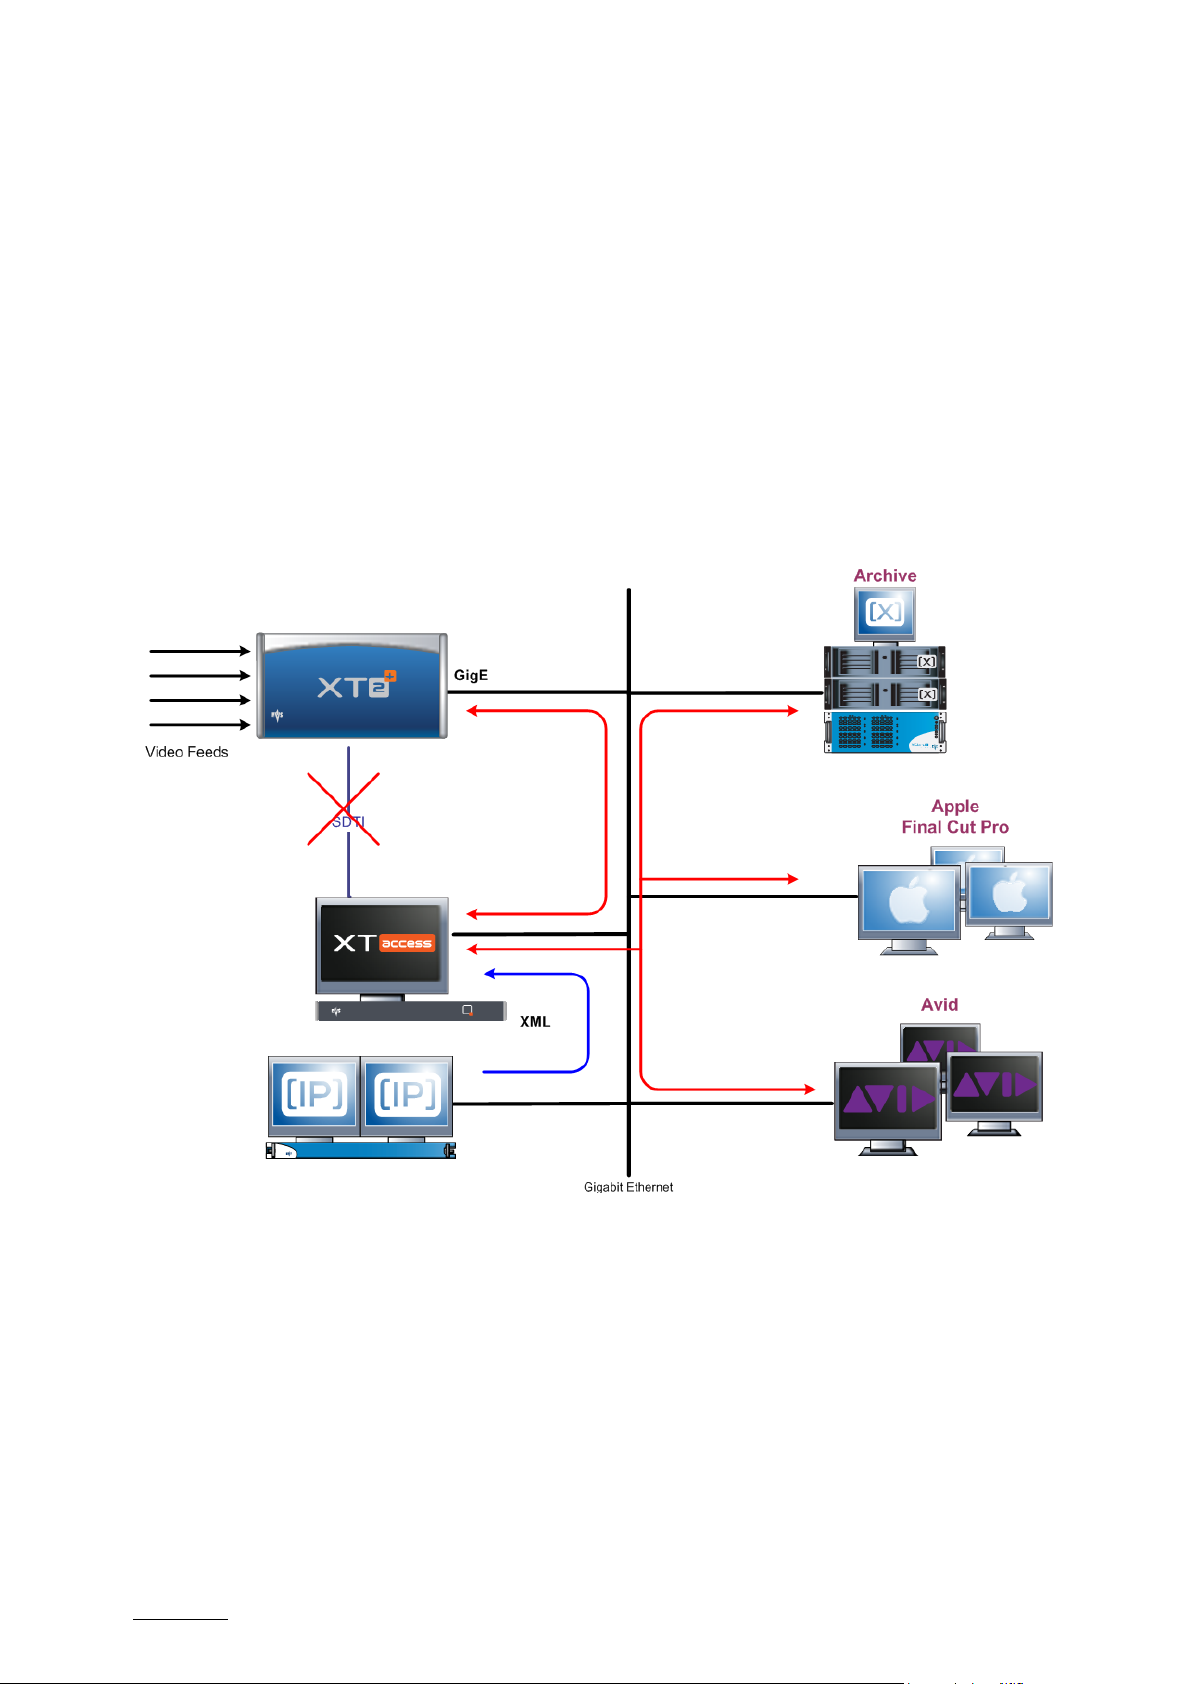
Issue 1.18.A
XTAccess Version 1.18 – User Manual
EVS Broadcast Equipment – July 2012
74
19. Backup of EVS Server Trains to Files
This section covers XML Jobs IDs:
• Job #20: Backup Train (IPDirector v5 onwards)
• Job #21: Update Backup Train Job (IPDirector v5 onwards)
19.1 Workflow
The following schema shows how the backup of trains is performed with the Gigabit
connection and XTAccess:
Page 85

XTAccess Version 1.18 – User Manual
EVS Broadcast Equipment – July 2012
Issue 1.18.A
75
1. An external system, for example IPDirector, sends an XML file to XTAccess to
request the backup of a given train available on an EVS server.
2. XTAccess processes the XML file:
a. It gets the data stream (train) from EVS that has to be backed up.
b. It generates a backup file of the train
c. It stores the backup file in the target folder specified by the external
system. The metadata of the train are either included in the file (in EVS
MXF) or sent via an XML file.
Remarks:
If the backup of the train is not successful, the partial backup file will be saved.
19.2 Example of XML backup Train to File
<?xml version="1.0" encoding="utf-8"?>
<EVS_XFile_Job_List>
<EVS_XFile_Job>
<Job_Id>15</Job_Id>
<Job_Creation_Time>1212733995</Job_Creation_Time>
<Job_Type>20</Job_Type>
<Job_Src_User_Nb>6</Job_Src_User_Nb>
<Job_Src_Cam>A</Job_Src_Cam>
<Job_Train_In_TC>2700000</Job_Train_In_TC>
<Job_Train_Out_TC>2730000</Job_Train_Out_TC>
<Job_Src_TC_System>3</Job_Src_TC_System>
<Job_Dest_File_Format>1</Job_Dest_File_Format>
<Job_Dest_File>G:\</Job_Dest_File>
<Job_Dest_ClipName>benja</Job_Dest_ClipName>
<Job_Train_Priority>1</Job_Train_Priority>
<Job_Dest_Generate_XML_Metadata>1</Job_Dest_Generate_XML_Metadata>
<Job_Src_XT_IP_Address1>1.1.230.230</Job_Src_XT_IP_Address1>
<Job_Src_XT_Port1>21</Job_Src_XT_Port1>
<Job_Src_XT_FTP_Login>evs</Job_Src_XT_FTP_Login>
<Job_Src_XT_FTP_Password>evs!</Job_Src_XT_FTP_Password>
<Job_Src_XT_IP_Address2>128.1.2.22</Job_Src_XT_IP_Address2>
<Job_Src_XT_Port2>21</Job_Src_XT_Port2>
<Job_Src_App_Data>
<AssetGuid>af97b972-d7bb-4ea4-aa9a9127274dac19</AssetGuid>
<AssetItemGuid>386881e5-8594-438d-a7d8bd49a0dfe9da</AssetItemGuid>
</Job_Src_App_Data>
</EVS_XFile_Job>
</EVS_XFile_Job_List>
The description of each XML tag is described in the ”XML Jobs” document.
Page 86

Issue 1.18.A
XTAccess Version 1.18 – User Manual
EVS Broadcast Equipment – July 2012
76
19.3 Example of XML Update Train
<?xml version="1.0" encoding="utf-8"?>
<EVS_XFile_Job_List>
<EVS_XFile_Job>
<Job_Id>633</Job_Id>
<Job_Id_To_Update>15</Job_Id_To_Update>
<Job_Type>21</Job_Type>
<Job_Train_Out_TC>3362636</Job_Train_Out_TC>
</EVS_XFile_Job>
</EVS_XFile_Job_List>
The description of each XML tag is described in the ”XML Jobs” document.
19.4 Local XTAccess Settings (non XML)
Some XTAccess settings are not supported by XML. They must therefore be specified in
the local settings of the XML Jobs Scan (see section 7.3.3 ‘XML Scan Settings’ on page
22).
19.5 Registry Settings
• HKEY_LOCAL_MACHINE\SOFTWARE\EVS Broadcast Equipment\Common
\FileWriter NoBuffering: Specific setting to transfer a file without any buffering.
Recommended for writing on a MacOS workstation via network (SMB). (default value
= 0)
• HKEY_CURRENT_USER\Software\EVS Broadcast Equipment\XTAccess\Max
Transfer Rate: Maximum transfer rate (Bytes/second) for the total amount of backup
jobs (all together).
• HKEY_CURRENT_USER\Software\EVS Broadcast Equipment\XTAccess\Safe Train
Backup: protection to avoid reaching the head of a train during backup of train:
0: Active
o
o
1: Not Active
Page 87

XTAccess Version 1.18 – User Manual
EVS Broadcast Equipment – July 2012
Issue 1.18.A
77
19.6 Miscellaneous
19.6.1 Backup/Update of Trains and Load Balancing
• It is not recommended to perform load balancing between several XML Scan folders
when requesting backup of trains.
• We recommend dedicating specific XTAccess for your Backup of train. For example
one XTAccess for two backups of train. Like this, you are sure that your backups of
train are done directly and quickly.
19.6.2 Max XML Jobs Setting
• It is recommended to set the Max XML Job registry setting with a very high value
(e.g. 100) when performing backup of trains jobs.
• In that way, all incoming jobs will be loaded by XTAccess (in the “Scheduled” folder).
In case of an update XML job, this request will be automatically loaded by XTAccess
and parsed to check which job is concerned. The backup of trains will be loaded
even if it is still in a scheduled or processing mode.
Page 88

Issue 1.18.A
XTAccess Version 1.18 – User Manual
EVS Broadcast Equipment – July 2012
78
20. Transfer to Avid Transfer Manager
This section covers XML Jobs IDs:
• Job #7: Transfer Clip to Avid TM® (IPDirector v4 onwards)
• Job #8: Transfer File to Avid TM® (IPDirector v5 onwards)
• Job #22: Stream Record train to Avid TM® (IPDirector v5 onwards)
• Job #42: Partial transfer file to Avid TM® (IPDirector v5 onwards)
• Job #43: Partial transfer clip to Avid TM® (IPDirector v5 onwards)
20.1 Workflow
The following schema shows how the transfer of clips to Avid Transfer Manager is
performed with the Gigabit connection and XTAccess:
Page 89

XTAccess Version 1.18 – User Manual
EVS Broadcast Equipment – July 2012
Issue 1.18.A
79
1. An external system, for example IPDirector, sends an XML file to XTAccess to
request the transfer of a given clip, created on an EVS server, to Avid Transfer
Manager.
XTAccess processes the XML file.
2. XTAccess sets up a connection with Avid Transfer Manager server.
3. XTAccess gets the clip content, which has to be transferred, from EVS and sets up a
FTP proxy connection between the EVS and the Avid Transfer Manager server.
4. The Avid Transfer Manager server stores the transferred file in the specified Avid
storage.
20.2 Example of XML Avid Transfer of Clip
To identify the clip you want to send to Avid you can use the UmID, VarID or LSM ID
<?xml version="1.0"?>
<EVS_XFile_Job_List>
<EVS_XFile_Job>
<Job_Id>2246373</Job_Id>
<Job_Creation_Time>1206001497</Job_Creation_Time>
<Job_Type>7</Job_Type>
<Job_Src_User_Nb>4</Job_Src_User_Nb>
<Job_Src_Clip_Nb>23</Job_Src_Clip_Nb>
<Job_Src_Cam>D</Job_Src_Cam>
<Job_Dest_File>
</Job_Dest_File>
<Job_Src_Id_Material>7tbq1KO0</Job_Src_Id_Material>
<Job_Src_Id>7tbq1KVW</Job_Src_Id>
<Job_Src_XT_IP_Address1>1.1.250.250</Job_Src_XT_IP_Address1>
<Job_Src_XT_Port1>21</Job_Src_XT_Port1>
<Job_Src_XT_FTP_Login>evs</Job_Src_XT_FTP_Login>
<Job_Src_XT_FTP_Password>evs!</Job_Src_XT_FTP_Password>
<Job_Src_XT_IP_Address2>1.1.251.251</Job_Src_XT_IP_Address2>
<Job_Src_XT_Port2>21</Job_Src_XT_Port2>
<Job_Src_App_Data>
<IPClipID>246373</IPClipID>
<ClipLouthID>7tbq1KVW</ClipLouthID>
<ClipMaterialID>7tbq1KO0</ClipMaterialID>
<NumUser>4</NumUser>
<BackupUnitID>100</BackupUnitID>
<JobIdHistory>2029</JobIdHistory>
</Job_Src_App_Data>
<Job_AvidTM_HostName>EVSDEMO</Job_AvidTM_HostName>
</EVS_XFile_Job>
</EVS_XFile_Job_List>
The description of each XML tag is described in the ”XML Jobs” document
Page 90

Issue 1.18.A
XTAccess Version 1.18 – User Manual
EVS Broadcast Equipment – July 2012
80
20.3 Example of XML Avid Transfer of Stream record train
<?xml version="1.0" encoding="utf-8"?>
<EVS_XFile_Job_List>
<EVS_XFile_Job>
<Job_Id>15</Job_Id>
<Job_Creation_Time>1212733995</Job_Creation_Time>
<Job_Type>20</Job_Type>
<Job_Src_User_Nb>6</Job_Src_User_Nb>
<Job_Src_Cam>A</Job_Src_Cam>
<Job_Train_In_TC>2700000</Job_Train_In_TC>
<Job_Train_Out_TC>2730000</Job_Train_Out_TC>
<Job_Src_TC_System>3</Job_Src_TC_System>
<Job_Dest_File_Format>1</Job_Dest_File_Format>
<Job_Dest_File>G:\</Job_Dest_File>
<Job_Dest_ClipName>benja</Job_Dest_ClipName>
<Job_Train_Priority>1</Job_Train_Priority>
<Job_AvidTM_HostName>EVSDEMO</Job_AvidTM_HostName>
</EVS_XFile_Job_List>
The description of each XML tag is described in the ”XML Jobs” document
20.4 Example of XML Avid Transfer of File
<?xml version="1.0" encoding="utf-8"?>
<EVS_XFile_Job_List>
<EVS_XFile_Job>
<Job_Id>60</Job_Id>
<Job_Type>42</Job_Type>
<Job_Src_File>X:\public\USA\_backups XTA\gloup.mxf</Job_Src_File>
<Job_AvidTM_HostName>EVSDemo</Job_AvidTM_HostName>
<Job_Dest_Short_In_TC>3006888</Job_Dest_Short_In_TC>
<Job_Dest_Short_Out_TC>3007188</Job_Dest_Short_Out_TC>
<Job_Dest_Guardband_TC>50</Job_Dest_Guardband_TC>
<Job_Status>6</Job_Status>
</EVS_XFile_Job>
</EVS_XFile_Job_List>
The description of each XML tag is described in the ”XML Jobs” document
Page 91

XTAccess Version 1.18 – User Manual
EVS Broadcast Equipment – July 2012
Issue 1.18.A
81
20.5 Local XTAccess Settings (non XML)
Some XTAccess settings are not supported by XML. They must therefore be specified in
the local settings of the XML Jobs Scan (see section 7.3.3 ‘XML Scan Settings’ on page
22).
20.6 Registry Settings
• HKEY_CURRENT_USER\Software\EVS Broadcast Equipment\XTAccess\Max
Transfer Rate: Maximum transfer rate (Bytes/second) for the total amount of backup
jobs (all together).
• HKEY_CURRENT_USER\Software\EVS Broadcast Equipment\XTAccess\Safe Train
Backup: protection to avoid reaching the head of a train during backup of train:
0: Active
o
o
1: Not Active
• HKEY_CURRENT_USER\Software\EVS Broadcast Equipment\XTAccess
\ScanXX\Super Motion: Super Motion mode for XML scan. (default Value =0)
o 0: 1 frame over 2 or 3 (following the Super Motion mode) is backed up; Audio &
TC are consistent
o 1: Each frame is backed up. Audio is cancelled and TC is not consistent
Page 92

Issue 1.18.A
XTAccess Version 1.18 – User Manual
EVS Broadcast Equipment – July 2012
82
Gigabit Ethernet
Video Feeds
GigE
Avid
21. Transfer to Avid WebService
This section covers XML Jobs IDs:
• Job #0: Backup Clip from XT to file (IPDirector v4 onwards)
• Job #11: Short Backup Clip from XT to file (IPDirector v5 onwards)
• Job #9: Backup Playlist from XT to files (cut)
21.1 Workflow
The workflow is the same as a backup file in OPAtom but XTAccess will “check in” the
clip into Avid
Page 93

XTAccess Version 1.18 – User Manual
EVS Broadcast Equipment – July 2012
Issue 1.18.A
83
1. An external system, for example IPDirector, sends an XML file to XTAccess to
request the backup of a given clip created on an EVS server.
2. XTAccess processes the XML file:
a. It gets the clip content that has to be backed up from EVS.
b. It generates a backup file of the clip in the format specified by the external system
(no transcoding feature, only native codec). In OPATOM
c. It connects to the Interplay Database to check the clip into Interplay.
Remark:
Only available in IMX, DVCPRO 50, DVCPRO HD and DNxHD.
See Avid Webservice integration document for more information.
Page 94

Issue 1.18.A
XTAccess Version 1.18 – User Manual
EVS Broadcast Equipment – July 2012
84
XT Access
Gigabit Ethernet
1
XML
GigE
²
2
Transfer
22. EVS Server Copy
This section covers XML Jobs IDs:
• Job #13: EVS Server Copy (IPDirector v4 onwards)
• Job #44: Short EVS Server Copy (IPDirector v5 onwards)
22.1 Workflow
The following schema shows how the transfer of clips between XT servers is performed
with the Gigabit connection and XTAccess:
Page 95

XTAccess Version 1.18 – User Manual
EVS Broadcast Equipment – July 2012
Issue 1.18.A
85
1. An external system, for example IPDirector, sends an XML file to XTAccess to
request the transfer of a given clip created on an EVS server to another EVS server.
XTAccess processes the XML file:
2. XTAccess gets the clip content from EVS that has to be transferred and sets up an
FTP proxy connection between both EVS servers.
3. The clip is copied to the destination EVS server through XTAccess. The metadata of
the source clip is updated on the destination server (CCLIP & IPDirector metatada).
22.2 Example of XML EVS Server Copy File
To identify the clip you want to copy you can use the UmID, VarID or LSM ID
<?xml version="1.0"?>
<EVS_XFile_Job_List>
<EVS_XFile_Job>
<Job_Id>2261335</Job_Id>
<Job_Creation_Time>1206001763</Job_Creation_Time>
<Job_Type>13</Job_Type>
<Job_Src_User_Nb>6</Job_Src_User_Nb>
<Job_Src_Clip_Nb>236</Job_Src_Clip_Nb>
<Job_Src_Cam>D</Job_Src_Cam>
<Job_Src_Id_Material>5ZLsDZ0W</Job_Src_Id_Material>
<Job_Src_Id>kuLs9cIY</Job_Src_Id>
<Job_Src_XT_IP_Address1>1.1.240.240</Job_Src_XT_IP_Address1>
<Job_Src_XT_Port1>21</Job_Src_XT_Port1>
<Job_Src_XT_FTP_Login>evs</Job_Src_XT_FTP_Login>
<Job_Src_XT_FTP_Password>evs!</Job_Src_XT_FTP_Password>
<Job_Src_XT_IP_Address2>1.2.241.241</Job_Src_XT_IP_Address2>
<Job_Src_XT_Port2>21</Job_Src_XT_Port2>
<Job_Dest_XT_IP_Address1>1.1.240.240</Job_Dest_XT_IP_Address1>
<Job_Dest_XT_Port1>21</Job_Dest_XT_Port1>
<Job_Dest_XT_IP_Address2>1.1.241.241</Job_Dest_XT_IP_Address2>
<Job_Dest_XT_Port2>21</Job_Dest_XT_Port2>
<Job_Dest_XT_FTP_Login>evs</Job_Dest_XT_FTP_Login>
<Job_Dest_XT_FTP_Password>evs!</Job_Dest_XT_FTP_Password>
<Job_Dest_Page>3</Job_Dest_Page>
<Job_Src_App_Data>
<IPClipID>261335</IPClipID>
<ClipLouthID>kuLs9cIY</ClipLouthID>
<ClipMaterialID>5ZLsDZ0W</ClipMaterialID>
<NumUser>6</NumUser>
<BackupUnitID>87</BackupUnitID>
<JobIdHistory>2031</JobIdHistory>
</Job_Src_App_Data>
<Job_Dest_XML_Metadata_Path>\\Xstore58060\data
(g)\Jobs_Done</Job_Dest_XML_Metadata_Path>
<Job_Dest_Generate_XML_Metadata>1</Job_Dest_Generate_XML_Metadata>
<EVS_Metadatas>
<Clips_Infos>
<Clip>
<IPDirector_Clip_Infos>
<LsmSerialNumber>14210</LsmSerialNumber>
Page 96

Issue 1.18.A
XTAccess Version 1.18 – User Manual
EVS Broadcast Equipment – July 2012
86
<Owner>XT Generic User</Owner>
<TCInDate>20-Mar-2008</TCInDate>
<TCOutDate>20-Mar-2008</TCOutDate>
<Keywords>
<Keyword Type="Keyword">KEY1_222</Keyword>
<Keyword Type="Keyword">KEY2_22</Keyword>
<Keyword Type="Keyword">KEY3_222</Keyword>
</Keywords>
</IPDirector_Clip_Infos>
</Clip>
</Clips_Infos>
</EVS_Metadatas>
</EVS_XFile_Job>
</EVS_XFile_Job_List>
The description of each XML tag is described in the ”XML Jobs” document
22.3 Force transcoding EVS Server to EVS Server
If you want to transcode the clip during the transfer, you need to configure XTAccess as
shown below:
Page 97

XTAccess Version 1.18 – User Manual
EVS Broadcast Equipment – July 2012
Issue 1.18.A
87
Gigabit Ethernet
Clean Edit
Storage &
Database
Clean Edit Storage
Video Feeds
GigE
XML
XTAccess
wrapping
23. Integration with XEDIO
This section covers XML Jobs IDs:
• Job #0: Backup Clip from EVS Server to file (IPDirector v4 onwards)
• Job #11: Short Backup Clip from XT to file (IPDirector v5 onwards)
• Job #20: Backup Train (IPDirector v5 onwards)
• Job #21: Update Backup Train Job (IPDirector v5 onwards)
You need to install the XedioXTAccessIntegration_x.xx.xx.exe on the XTAccess
computer to be able to use the integration with Xedio.
23.1 Workflow
The following schema shows how the backup of clips or trains is performed with the
Gigabit connection and XTAccess:
Page 98

Issue 1.18.A
XTAccess Version 1.18 – User Manual
EVS Broadcast Equipment – July 2012
88
1. An external system, for example IPDirector, sends an XML file to XTAccess to
request the backup and reference of a given clip created on an EVS server to Xedio
database.
XTAccess processes the XML file:
2. It gets the clip content, which has to be backed up, from EVS.
3. It generates a backup file
4. It stores the backup file in the target folder specified by the external system. The clip
and its metadata are referred to the Xedio database.
Remark:
If the backup is not successful, the clip will be deleted from the disk and Xedio database
except if the file is already used.
The referencing in the Xedio DB is done at the beginning of the backup and an update is
done at the end.
If the referencing fails, the job will fail
Page 99

XTAccess Version 1.18 – User Manual
EVS Broadcast Equipment – July 2012
Issue 1.18.A
89
23.2 Example of XML Transfer to Xedio File
To identify the clip you want to transfer to CleanEdit you can use the UmID, VarID or LSM
ID
<?xml version="1.0"?>
<EVS_XFile_Job_List>
<EVS_XFile_Job>
<Job_Id>2240063</Job_Id>
<Job_Creation_Time>1206541502</Job_Creation_Time>
<Job_Type>0</Job_Type>
<Job_Src_User_Nb>6</Job_Src_User_Nb>
<Job_Src_Clip_Nb>265</Job_Src_Clip_Nb>
<Job_Src_Cam>A</Job_Src_Cam>
<Job_Dest_File>\\Xstore-amd\G\CE_MEDIAS\HiResFiles\</Job_Dest_File>
<Job_Src_Id_Material>5ZLsDbd0</Job_Src_Id_Material>
<Job_Src_Id>kuLs9ev3</Job_Src_Id>
<Job_Src_XT_IP_Address1>1.1.240.240</Job_Src_XT_IP_Address1>
<Job_Src_XT_Port1>21</Job_Src_XT_Port1>
<Job_Src_XT_FTP_Login>evs</Job_Src_XT_FTP_Login>
<Job_Src_XT_FTP_Password>evs!</Job_Src_XT_FTP_Password>
<Job_Src_XT_IP_Address2>1.2.241.241</Job_Src_XT_IP_Address2>
<Job_Src_XT_Port2>21</Job_Src_XT_Port2>
<Job_Src_App_Data>
<IPClipID>240063</IPClipID>
<ClipLouthID>kuLs9ev3</ClipLouthID>
<ClipMaterialID>5ZLsDbd0</ClipMaterialID>
<NumUser>6</NumUser>
<BackupUnitID>105</BackupUnitID>
<JobIdHistory>1136</JobIdHistory>
</Job_Src_App_Data>
<Job_Dest_File_Format>1</Job_Dest_File_Format>
<Job_CleanEditDB_DSN_Name>CleanEditDB</Job_CleanEditDB_DSN_Name>
<Job_CleanEditDB_DSN_User>EVSoli</Job_CleanEditDB_DSN_User>
<Job_CleanEditDB_DSN_Password>cleanedit</Job_CleanEditDB_DSN_Password>
</EVS_XFile_Job>
</EVS_XFile_Job_List>
The description of each XML tag is described in the ”XML Jobs” document.
Page 100

Issue 1.18.A
XTAccess Version 1.18 – User Manual
EVS Broadcast Equipment – July 2012
90
23.3 XTAccess configuration
The Xedio referencing can be configured in the XML job or directly in the XML scan
settings.
Field/Button Description
Active
XEDIO DB DNS
XEDIO DB
User
XEDIO DB
Pass
Allows you to activate or not the settings.
DNS Name of Xedio database target
DNS User of Xedio database target
DNS Password of Xedio database target
 Loading...