

Page 1
USER MANUAL
Version 2.19 - November 2012
Page 2

Page 3

XFile Version 2.19 – User Manual
EVS Broadcast Equipment – November 2012
Issue 2.19.A
I
Copyright
EVS Broadcast Equipment – Copyright © 2005-2012. All rights reserved.
Disclaimer
The information in this manual is furnished for informational use only and subject to
change without notice. W hile every effort has been made to ens ure that the information
contained in this user manual is accurate, up-to-date and reliable, EVS Broadcast
Equipment cannot be h eld responsible for inaccuracies or err ors that may appear in this
publication.
Improvement Requests
Your comments will help us improve the quality of the user documentation. Do not
hesitate to send improvement requests, or report any error or inaccuracy on this user
manual by e-mail to
doc@evs.tv.
Regional Contacts
The address and pho ne number of the EVS headq uarters are usually mention ed in the
Help > About menu in the user interface.
You will find the full list of addr esses and phone num bers of local of fices either at the end
of this user manual (for manuals on hardware produ cts) or on the EVS website on the
following page:
http://www.evs.tv/contacts
User Manuals on EVS Website
The latest version of the user manual, if any, and other user manuals on EVS p roducts
can be found on the EVS download center, on the following webpage:
http://www.evs.tv/downloadcenter
Page 4

Issue 2.19.A
XFile Version 2.19 – User Manual
EVS Broadcast Equipment – November 2012
II
Page 5

XFile Version 2.19 – User Manual
EVS Broadcast Equipment – November 2012
Issue 2.19.A
III
Table of Contents
TABLE OF CONTENTS .................................................................................................... III
WHAT’S NEW IN VERSION 2.19? .................................................................................. VII
1. INTRODUCTION ...................................................................................................... 1
2. SOFTWARE INSTALLATION ...................................................................................... 3
3. XFILE MODULE ..................................................................................................... 6
3.1 System Configuration .................................................................................................. 6
3.1.1 Network Setup ........................................................................................................................ 7
3.1.2 Transfer Mode ........................................................................................................................ 8
3.1.3 Backup Channel Assignment ................................................................................................. 9
3.1.4 Storage Area.........................................................................................................................11
3.1.5 System Area .........................................................................................................................12
3.2 Startup ...................................................................................................................... 12
3.2.1 System Configuration Area ...................................................................................................13
3.2.2 Status Area ...........................................................................................................................13
3.2.3 Automatic Processes at Startup ...........................................................................................14
3.3 Session Configuration ............................................................................................... 15
3.3.1 Tab 1 - Autobackup ..............................................................................................................15
3.3.2 Tab 2 – MXF Metadata .........................................................................................................25
3.3.3 Tab 3 – Manu al Backup ........................................................................................................26
3.3.4 Tab 4 – Scan Folder .............................................................................................................30
3.3.5 Tab 5 – Grab.........................................................................................................................34
3.3.6 Tab 6 – Export ......................................................................................................................36
3.3.7 Tab 7 – XML .........................................................................................................................38
3.3.8 Tab 8 – User Parameters .....................................................................................................43
3.4 User Interface ........................................................................................................... 45
3.4.1 Overview of the main Window ..............................................................................................45
3.4.2 XFile List ...............................................................................................................................46
3.4.3 Network status ......................................................................................................................62
3.4.4 Disk Usage and Disk Mode ..................................................................................................62
3.4.5 Jobs Status Area ..................................................................................................................63
3.5 Autobackup Mode ..................................................................................................... 66
3.5.1 Purpose ................................................................................................................................66
3.5.2 Autobackup Main Window ....................................................................................................67
3.5.3 XNet List ...............................................................................................................................67
3.6 Backup Mode ............................................................................................................ 68
3.6.1 XNet List ...............................................................................................................................68
3.6.2 How to Start Manually the Backup of a File .........................................................................69
3.6.3 How to Perform a Multi-Selection for Manual Backup ..........................................................70
3.7 Restore Mode ........................................................................................................... 72
3.7.1 How to Restore a File ...........................................................................................................73
3.7.2 Clips Already Present on the XNet and Transfer Errors ......................................................74
3.7.3 How to Perform a Multi-Selection for Restore ......................................................................74
3.7.4 Restore Destination Mode ....................................................................................................76
3.8 Publish Mode ............................................................................................................ 77
3.8.1 Publish Modes ......................................................................................................................77
3.8.2 How to Publish Clips .............................................................................................................78
3.8.3 How to Un-publish a Clip ......................................................................................................80
3.9 Maintenance Mode ................................................................................................... 81
3.9.1 Accessing the Maintenance Mode Window ..........................................................................81
Page 6

Issue 2.19.A
XFile Version 2.19 – User Manual
EVS Broadcast Equipment – November 2012
IV
3.9.2 Maintenance Features ..........................................................................................................82
3.10 Clip Maintenance ...................................................................................................... 83
3.10.1 Introduction ...........................................................................................................................83
3.10.2 Media Info Area ....................................................................................................................84
3.10.3 Deleting Backup Clips and Files ...........................................................................................88
3.10.4 Converting Backup Files .......................................................................................................90
3.10.5 Transferring Backup Files to External Systems ...................................................................91
3.10.6 Importing Files from Third Party Systems ............................................................................92
3.11 Disks-Folders Maintenance ....................................................................................... 93
3.11.1 Introduction ...........................................................................................................................93
3.11.2 Folders Area .........................................................................................................................93
3.11.3 How to Copy/Move Clips to Other XFile Folders ..................................................................94
3.11.4 How to Check the Synchronization Between Paths .............................................................94
3.11.5 Maintaining Folders in the XFile Paths .................................................................................96
3.12 Playlist Maintenance ................................................................................................. 97
3.12.1 Introduction ...........................................................................................................................97
3.12.2 Overview of the Playlist Maintenanc e Window .....................................................................98
3.12.3 Settings for Playlists ...........................................................................................................100
3.12.4 Creating and Maintaining a Back up Pla ylist in XFile ..........................................................102
3.12.5 Exporting a Backup Playlist ................................................................................................105
3.12.6 Rendering a Server Playlist ................................................................................................106
3.13 Job Status ............................................................................................................... 107
3.13.1 Purpose ..............................................................................................................................107
3.13.2 XFile Job Status Window ....................................................................................................107
3.14 Re-Scan Disks ........................................................................................................ 112
3.15 Statistics ................................................................................................................. 113
4. XSTREAM ......................................................................................................... 114
4.1 Scheduler and QuickStart Modes ............................................................................ 115
4.1.1 Scheduler Mode .................................................................................................................115
4.1.2 QuickStart Mode .................................................................................................................115
4.2 Information & Menu Area ........................................................................................ 116
4.2.1 Scheduler and QuickStart Buttons .....................................................................................116
4.2.2 Network Status ...................................................................................................................116
4.2.3 Transfer Rate ......................................................................................................................117
4.2.4 Time ....................................................................................................................................117
4.3 Time Grid ................................................................................................................ 118
4.3.1 Information Displayed in the Time Grid ..............................................................................118
4.3.2 Time Display in the Time Grid ............................................................................................120
4.4 Channels Area ........................................................................................................ 121
4.5 Status Area ............................................................................................................. 122
4.5.1 Jobs Done Tab ...................................................................................................................122
4.5.2 General Tab ........................................................................................................................123
4.5.3 Other Tabs ..........................................................................................................................123
4.6 System Configuration .............................................................................................. 124
4.6.1 Storage Tab ........................................................................................................................124
4.6.2 Jobs Tab .............................................................................................................................125
4.6.3 Advanced parameters Tab .................................................................................................130
4.7 Record Grid Menu ................................................................................................... 132
4.8 Contextual Menu in the Scheduler .......................................................................... 137
4.8.1 Contextual Menu from the XNet Label ...............................................................................137
4.8.2 Contextual Menu from the Camera Names Area ...............................................................138
4.8.3 Contextual Menu from the Grid of a Camera .....................................................................139
4.8.4 Contextual Menu from the Right of the Server Name ........................................................140
4.8.5 Contextual Menu from A Job ..............................................................................................141
4.8.6 Check Timecode Integrity ...................................................................................................142
4.9 Creating and Editing Jobs in Scheduler Mode ......................................................... 143
4.9.1 General Information ............................................................................................................144
4.9.2 IN/OUT Tab ........................................................................................................................145
Page 7

XFile Version 2.19 – User Manual
EVS Broadcast Equipment – November 2012
Issue 2.19.A
V
4.9.3 Outputs Tab ........................................................................................................................147
4.10 Creating Jobs in QuickStart Mode ........................................................................... 149
4.10.1 How to Start a Backup Job in QuickStart Mode .................................................................149
4.10.2 QuickStart Window .............................................................................................................150
4.10.3 Setup in QuickStart Mode ...................................................................................................152
4.10.4 Output Tab ..........................................................................................................................152
4.10.5 Storage Tab ........................................................................................................................154
5. EXTERNAL MODULES ......................................................................................... 155
5.1 Editing a Clip ........................................................................................................... 155
5.1.1 File Info Tab ........................................................................................................................156
5.1.2 IN – OUT Tab .....................................................................................................................157
5.1.3 Clipname – Keywords Tab .................................................................................................163
5.1.4 HD Preview Tab .................................................................................................................164
5.2 ShuttlePRO Use in Edit Clip Module ....................................................................... 165
5.2.1 ShuttlePRO Installation and Configuration .........................................................................165
5.2.2 ShuttlePRO Commands in the Edit Clip Module ................................................................168
5.3 XFile Clip Info Exporter ........................................................................................... 171
5.3.1 How To Export Data to an XML, TXT or CSV File .............................................................172
5.3.2 Configuring the XFi le Cl ip Expor ter ....................................................................................173
5.3.3 Fields in the Configur at ion Window ....................................................................................174
5.3.4 How To Export The XFile Clip Exporter Configuration to a File .........................................175
5.3.5 How To Import The XFile Clip Exporter Configuration to a File .........................................176
5.4 Storyboard .............................................................................................................. 177
5.4.1 How to Export Data to HTML file (Storyboard) ...................................................................177
APPENDIX 1: XF2 HARDWARE .................................................................................... 179
Hardware Description ....................................................................................................... 179
Installing a New Hard Disk ............................................................................................... 180
Hard Disk Configuration ................................................................................................... 182
Creating and Reinstalling a Ghost of your System ........................................................... 183
NOTES ...................................................................................................................... 185
Page 8

Issue 2.19.A
XFile Version 2.19 – User Manual
EVS Broadcast Equipment – November 2012
VI
Page 9

XFile Version 2.19 – User Manual
EVS Broadcast Equipment – November 2012
Issue 2.19.A
VII
What’s New in Version 2.19?
No new or modified feature has been brought to XFile Version 2.19 (com pared to XFile
Version 2.16). The manual has been updated to add some explanations.
The following table describes the updated sections.
In the user manual, the icon has been added on left m argin to highlight inform ation
on new and updated sections.
Click the section number (or the description) in the table to jump directly to the
corresponding section.
Section Description
3.13.2 XFile Job Status W indow: Explanatio n has been added about
the background color of the IP address field in the XNet area.
Page 10

Page 11
XFile Version 2.19 – User Manual
EVS Broadcast Equipment – November 2012
Issue 2.19.A
1
1. Introduction
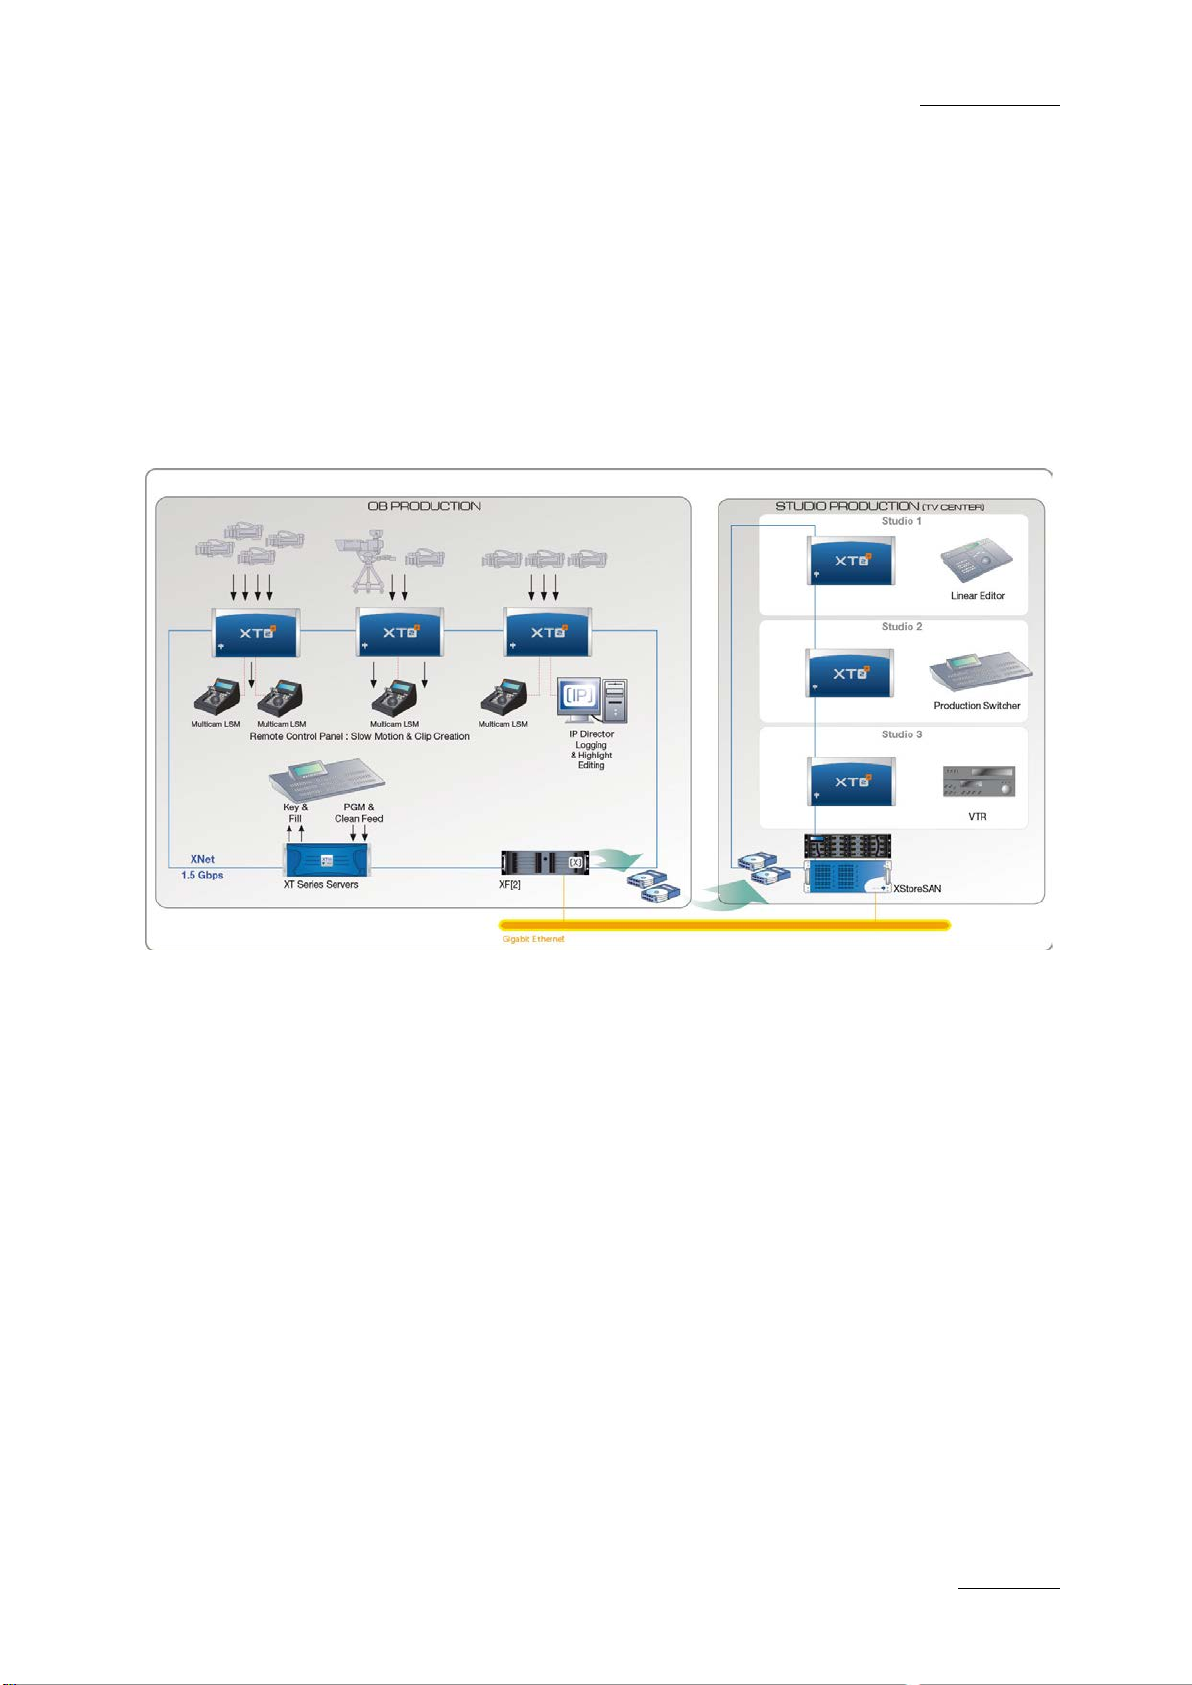
Digital Archiving on removable media
The XFile has access to all footage recorded on EVS video servers through the SDTI
network. W hen a cl ip is c reated on on e of the serv ers, a c op y is autom atic ally tra nsf erred
to XFile in the file format selected in the setup.
This copy is a back ground process, and has a lower priority on th e network c ompared to
real-time transfers between servers for remote playback, in order not to disturb the live
production in any way. If the network is not very busy, the transfer to the removable
media can be performed several times faster than real-time. As soon as real-time
transfers are required on the network, the backup process is slowed down to make
enough bandwidth availabl e to guarantee these new requests.
Each clip is saved as a separate f ile on the removable media, including no t only video,
audio and time code infor mation, but also all metadata associated wit h that clip: name,
descriptors, creation date, original location (server s/n, register), etc. The transfer
between an EVS video s erver to the XFile is a data transfer, i.e. no decoding/e ncoding
process takes place at any point, preserv ing the original quality of the footage, including
super-motion character if applicable.
The XFile is installed on a XF2 which is equipped with 2 removable media. They can
work as mirrored drives: each clip is automatically saved as 2 separate files on these
drives. This pr ovides a s ec urity cop y in case of dr ive fail ure, a nd also g ives the pos sibilit y
to send these 2 drives to 2 different locations/studios after the show. Each removable
media has a capacit y of 1 TB or 2T B, 85 or 170 hours of footage at standard bit-rate.
More XFile stations can be inserted on the network if more archive copies are required.
The XFile can also b e used as a secur ity backup of the n etwork: shou ld one server los e
its footage for any reason (ac cidental delete for ins tance), clips can be res tored from the
XFile to any other EV S vi deo server on the network.
All Super-motion c lips, created on any networked EV S video server, are stored b y XFile
amongst the normal files. The 75 fps nature of such material is maintained during
Page 12

Issue 2.19.A
XFile Version 2.19 – User Manual
EVS Broadcast Equipment – November 2012
2
archiving and is restor ed in a single pass without alteration. Theref ore, restored Supermotion clips can be re-use d as Super-m otion foota ge (pla yback at 33%) or as a standard
material (variable spe ed) jus t as if the y were captur ed fr om the super-m otion camer a just
now.
Note
The Appendix 1, on page 179, provides more technical information related to
the XF2 hardware and is intended to administrators.
Page 13
XFile Version 2.19 – User Manual
EVS Broadcast Equipment – November 2012
Issue 2.19.A
3
2. Software Installation
Important
The XFILE 2.19 installers include the X FILE a nd X STR EAM ins taller s, the Clip
Info Exporter installer, th e PCX2 drivers and the EVS Logs coll ector installer.
Prior to install XFILE 2.19 uninstall the previous versions of XFILE and
XSTREAM.
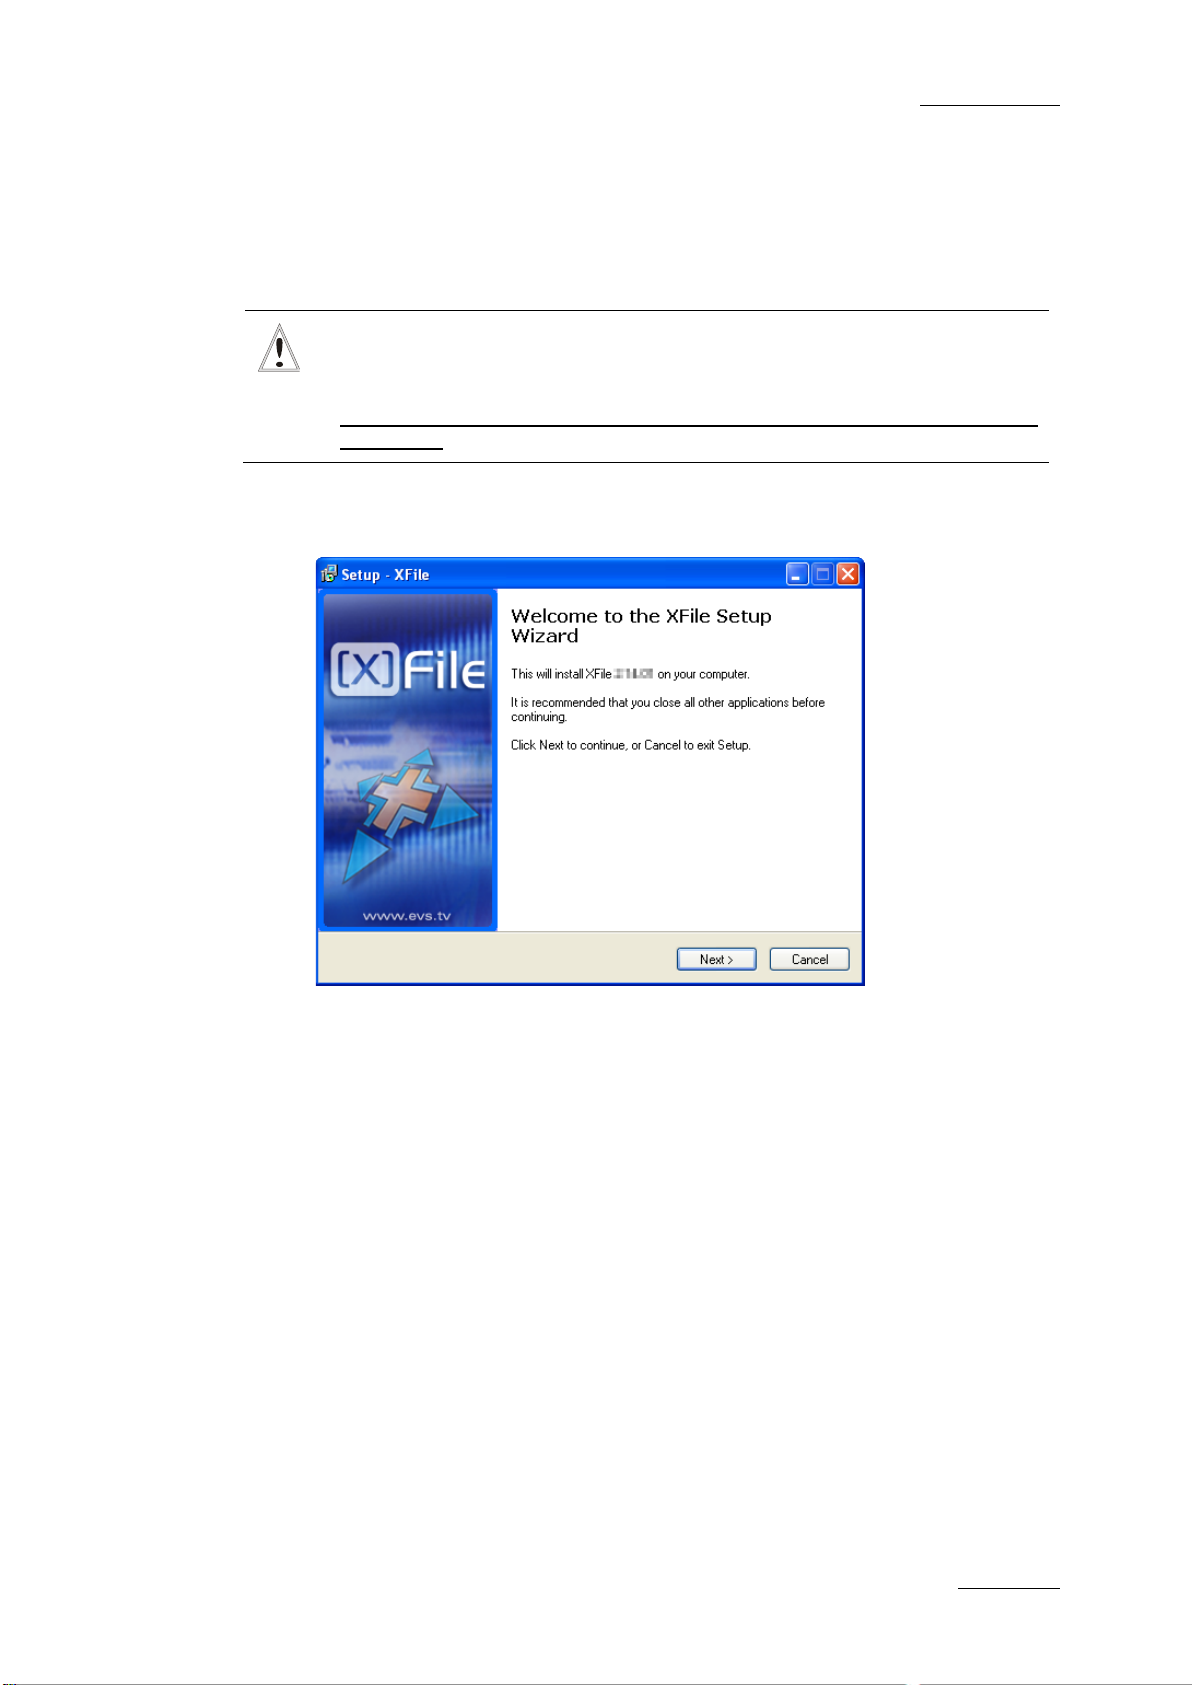
1.
Run XFILE INSTALLER and follow the steps of the Setup Wizard:
The installer includes a registry key that disables the autorun function on USB
keys to avoid virus intrusion.
2.
Accept the software license agreement.
Page 14
Issue 2.19.A
XFile Version 2.19 – User Manual
EVS Broadcast Equipment – November 2012
4
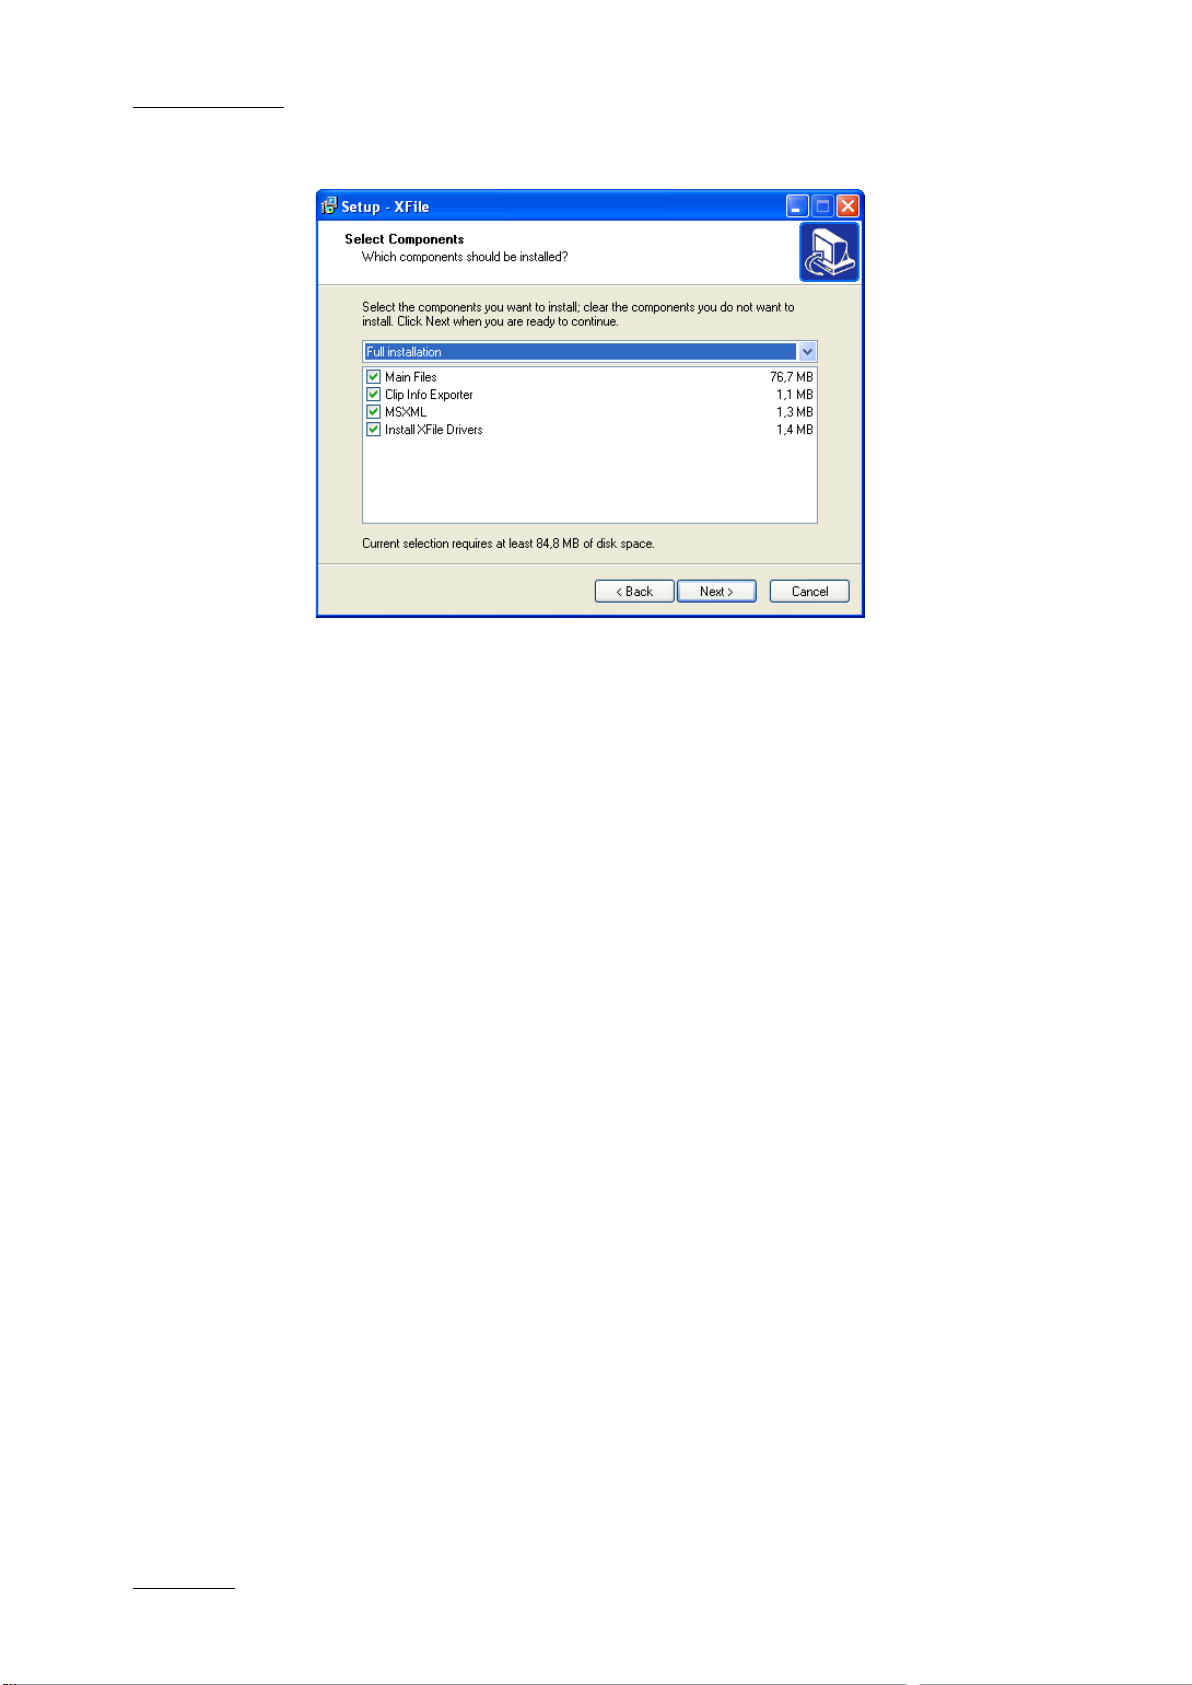
3.
Select the items to install in the Selection Components window:
• Main files which include XFILE and XSTREAM installer s
• Clip Info Exporter
• MSXML
• Drivers of PCX2 board
Click Next.
4.
In the next window, select the des tinat ion direc tor y to instal l the new sof tware and
click Next.
Page 15
XFile Version 2.19 – User Manual
EVS Broadcast Equipment – November 2012
Issue 2.19.A
5
RESET EXISTING
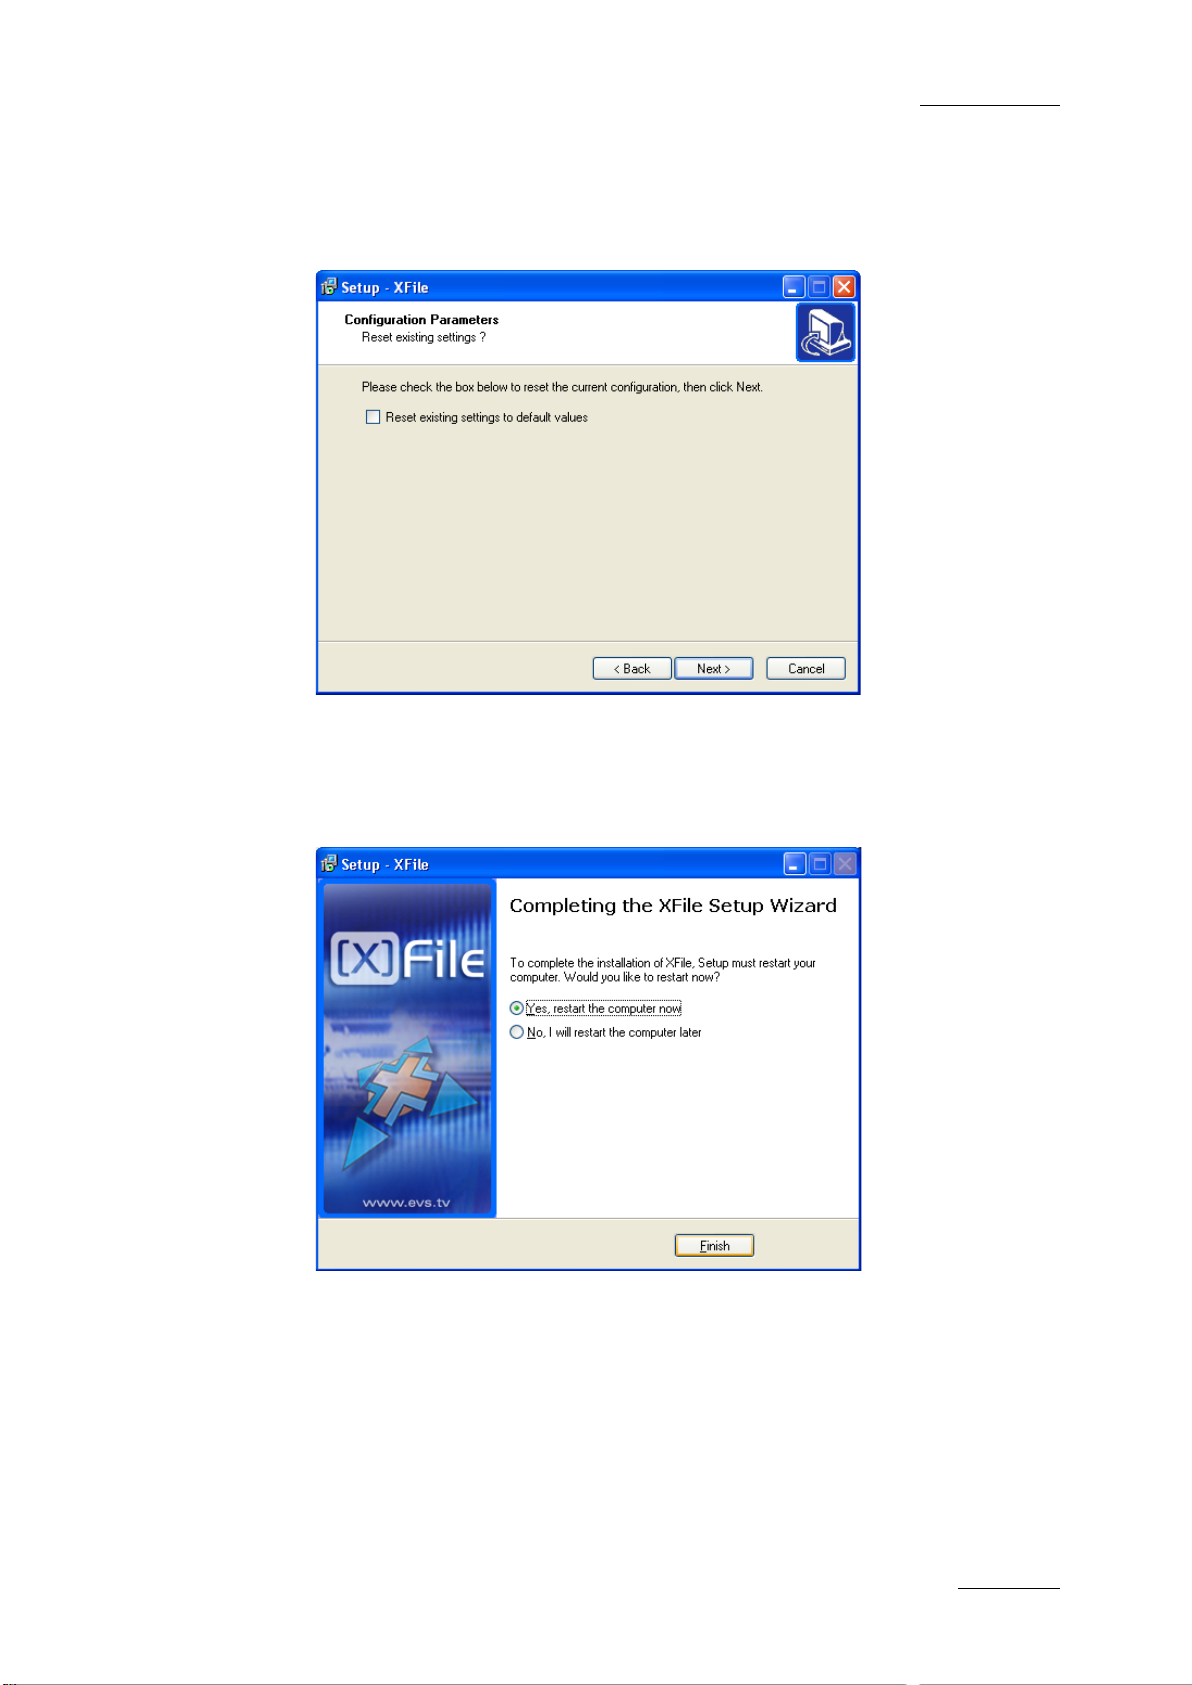
5. In the Configuration Parameters window, select the
SETTINGS option, if required, and click Next to continue.
This will reset all operational parameters (like SDTI speed, Video Standard,
database size, net name and net number, etc.) to default parameters.
6. In the Ready to Install wind ow, select INSTALL to s tart the installation of the main
files. A progress bar shows the activity of files transfer.
7.
The Setup wizard needs to restart the computer to complete the installation:
select one of the two options and then click Finish to quit the installation process.
After re-start, the XFile installation is successfully completed and an XFile
shortcut is saved to your desktop.
Page 16
Issue 2.19.A
XFile Version 2.19 – User Manual
EVS Broadcast Equipment – November 2012
6
3. XFile Module
Note
XFile and XStream applica tions work simultaneously into 2 separ ate windows
but share the same bandwidth for all operations. To access to the XFile or
XStream window select the item from the taskbar.
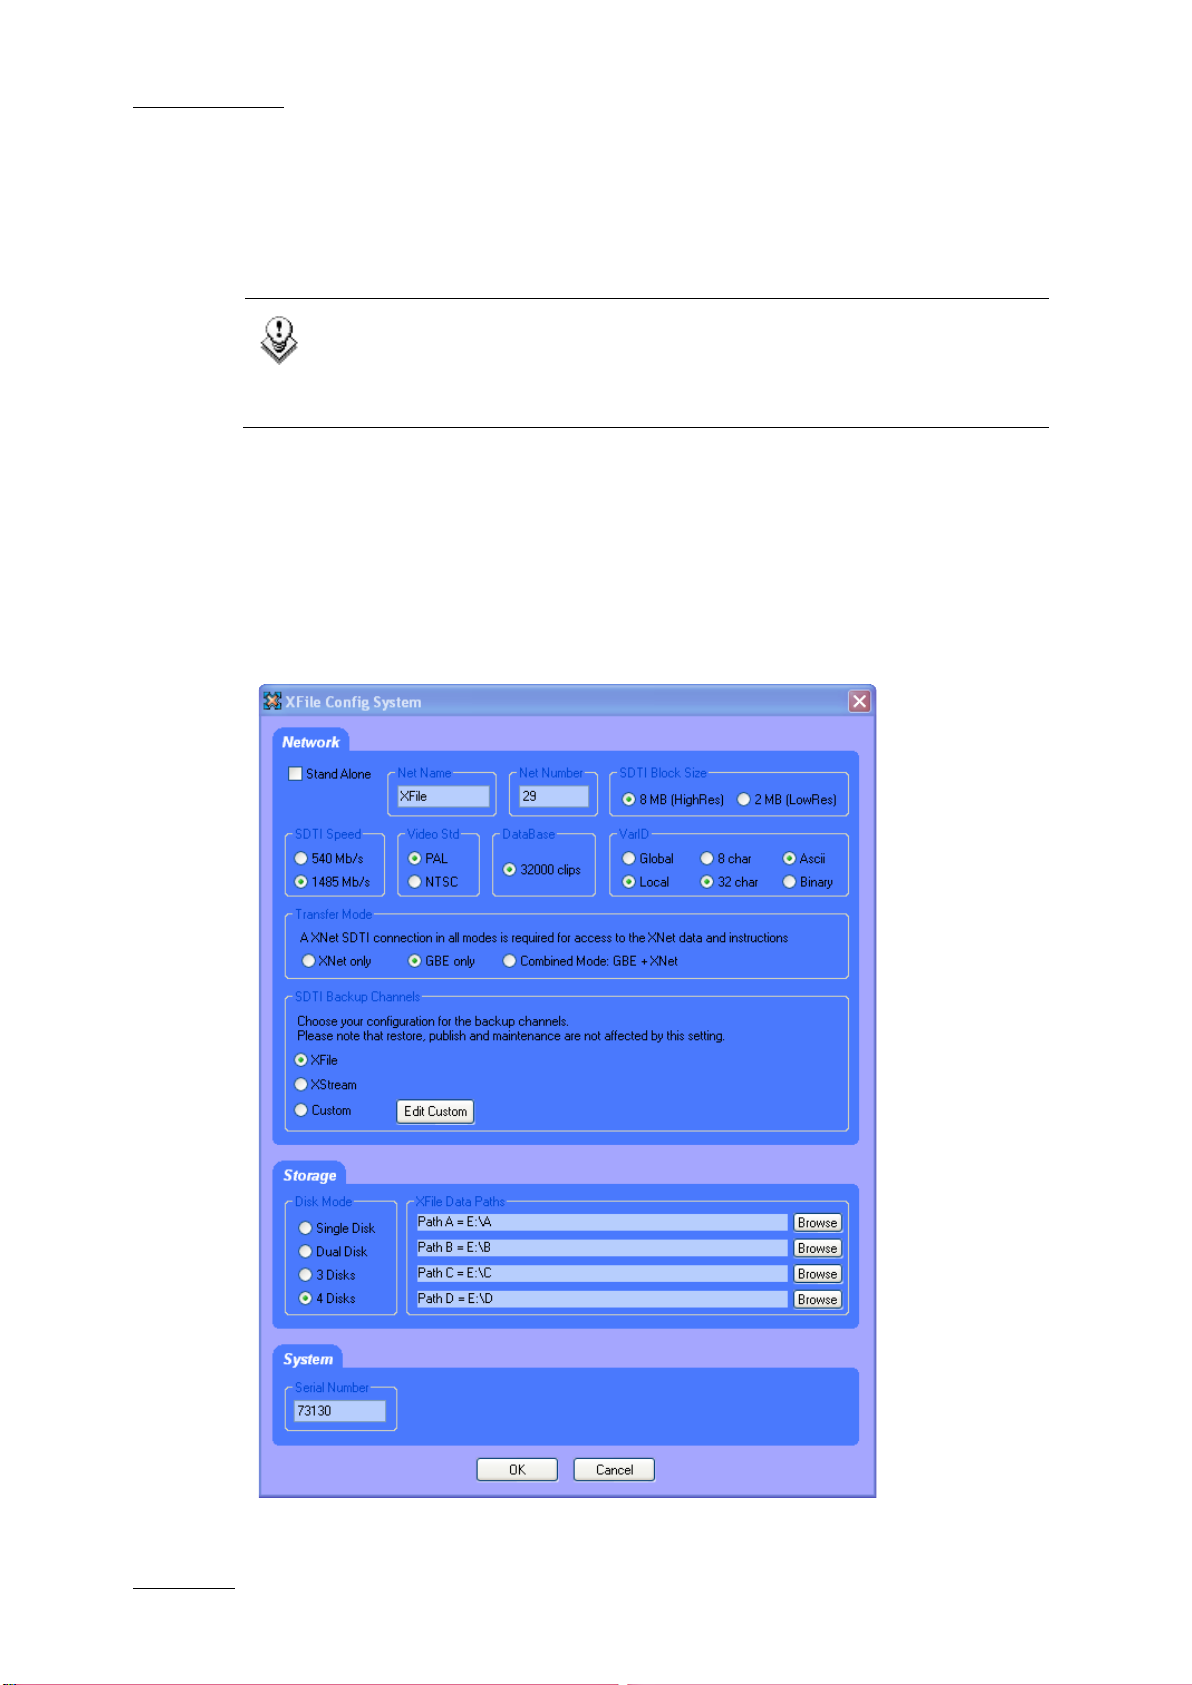
3.1 System Configuration
The system configurati on window is only availa ble for modifications from the Start page
before startup: system parameters are required to complete the boot sequence and to
connect to the XNet. Durin g operations, this windo w will be displayed in read-only mode
for information.
Page 17

XFile Version 2.19 – User Manual
EVS Broadcast Equipment – November 2012
Issue 2.19.A
7
3.1.1 Network Setup
XFile Identification on the Network
Standalone mode
Selecting this option all ows the operator to star t the XFile without being connect ed to the
XNet. In this mode only the maintenance mode is active.
Important
The bandwidth, the video standard and the Database Size must be identical on
all machines connected to the XNet. If one system is configured with a
different bandwidth, video standard or database size, it will block the entire
network.
Net Name
The Net name defines th e m achine nam e on the networ k. This name is user-def ined and
can exceed 8 characters, but only 8 characters will be visible from the XNet views.
Entering a Network Name is not mandatory because a network number is automatically
given to the system, but it is recommended to name the machines in order to easily
identify all systems connected to XNet.
Net Number
Range: [1 … 29]
The Net number defines the machine number on the network. This number is user-
defined.
Common Parameters on the XNet Network
The values defined for the following parameters need to b e the same on all EVS video
servers on the XNet network.
SDTI Block Size (8MB HighRes/2MB LowRes)
This parameter s pecifies the si ze of the m edia b lock s recor ded on the EV S video servers
of the XNet network.
In hi-res, the block size will be 8MB from Multicam V9.00.
In lo-res, the block size will be 2 MB on EVS video servers dedicated to lo-res content.
SDTI Speed (540Mbps / 1485Mbps)
This parameter specifies the bandwidth of the network.
Page 18

Issue 2.19.A
XFile Version 2.19 – User Manual
EVS Broadcast Equipment – November 2012
8
Video Standard (PAL/NTSC)
This parameter specifies the video standard. NTSC format is also applicable for HD
formats.
Database Size (32000 clips)
This parameter specifies the maximum number of clips saved to the LSM database.
VarID Uniqueness (Global / Local)
This parameter specifies at which level the VarID is unique:
• Global: the VarID is unique at the XNet network level
• Local: the VarID is unique at the EVS video server level.
VarID Length (8 char / 32 char)
This parameter specifies the VarID length:
• Fixed length of 8 bytes
• Variable length of 32 bytes
VarID Format (ASCII / Binary)
This parameter specifies the VarID format:
• ASCII
• Binary
Note
The VarID will only be displayed in the XFile app lication if this has the ASCII
format. Otherwise, the str ing <Unicode> will be displayed in the VarID c olumn
of the XFile lists in the various XFile modes.
3.1.2 Transfer Mode
Three different operational modes are available: XNet only, GBE only and a combined
mode GBE + XNet.
Note
An SDTI connection is still required in a l l modes to access the data.
XNet Only
All the transfers are processed through the XNet.
Page 19

XFile Version 2.19 – User Manual
EVS Broadcast Equipment – November 2012
Issue 2.19.A
9
GBE Only
Transfers for back up, i.e. back up clip, back up train ( XStream ), and res tore opera tions ar e
processed through the Ethernet network. However, the following operations are still
performed through th e XNe t: Publ ish, Gra b, Render Playlist, and data access. That is t he
reason why an SDTI connection is still required in GBE Only mode.
Combined Mode GBE + XNet
This combined mode perm its the trans fers through th e XNet when the Gigabit net work is
not available, e.g. in case of disconnection of one server from the Gigabit network.
3.1.3 Backup Channel Assignment
Seven backup channels are available. You will assign them according to your backup
needs.
Two predefined configurat ions are available and are described below. If the predefined
configurations do not meet your requirements, you can define a customized configuration.
The backup channel assig nment will only affect the XFile and XStream backup m odes.
They will not impact on the Restore, Publish and Maintenance modes.
Predefined Configurations
The following predefined configurations are available:
XFile Configuration
The XFile configuration provides the following backup functions:
• 1 channel for clip backups (XFile)
• 1 channel for playlist backups (XFile)
• 1 channel for thumbnail and image grabs (XFile)
• 3 channels for train backup (XStream)
• 1 channel for browsing in XStream
XStream Configuration
The XStream configuration provides the following backup functions:
• 6 channels for train backup (XStream)
• 1 channel for browsing in XStream
Page 20
Issue 2.19.A
XFile Version 2.19 – User Manual
EVS Broadcast Equipment – November 2012
10
Important
As this configuration does not provide clip and playlist backups, or grabs, no
thumbnails will be available for clips in the IPDirector application.
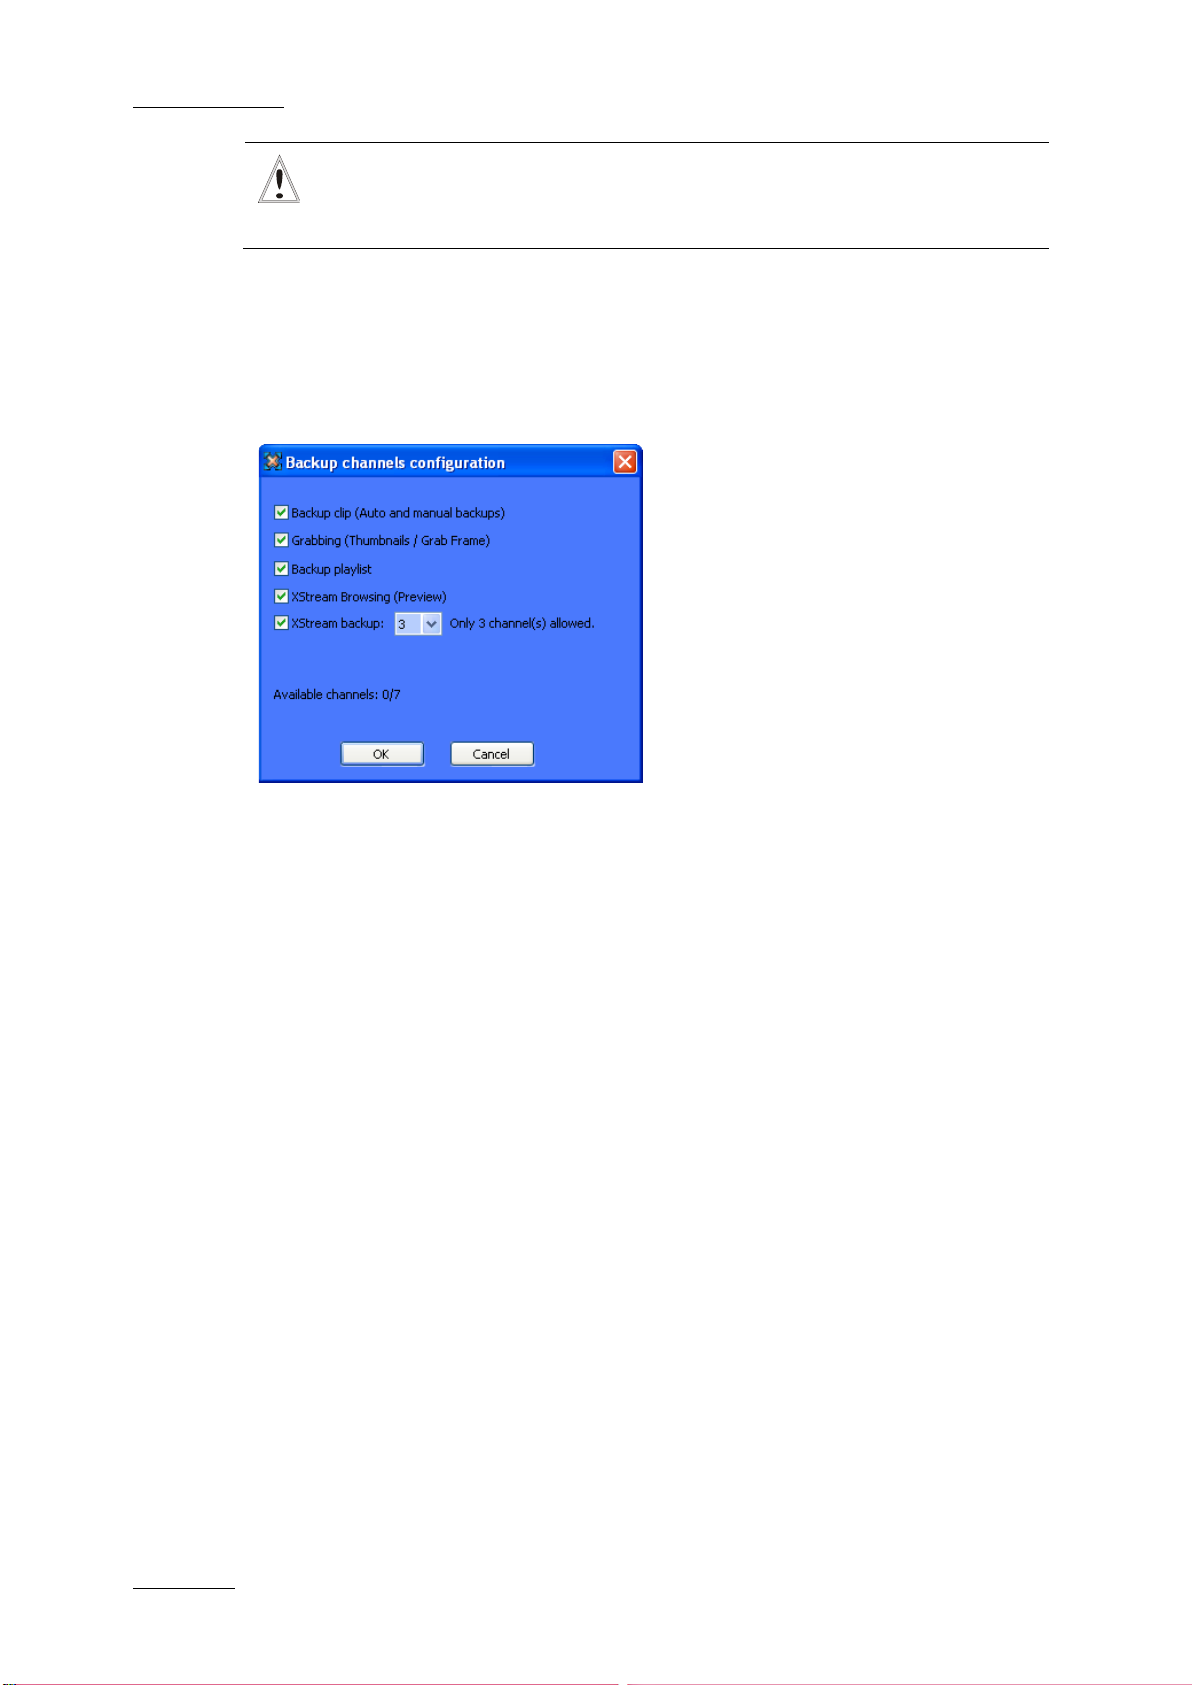
Custom Configuration
When you select the Custom radio button in the Netw ork area and click the Edit Custom
button, the Channe ls Configuration dialog box opens. It allows the users to def ine how
they want to assign the XFile backup channels:
The following fields are available in the Backup Channels Configuration dialog box:
Backup Clip
Selecting this check will enable the clip backup (auto backup or manual backup) and
assign one backup channel to the clip backup.
Grab
Selecting this check box will enable the thumbnail and image grabs and assign one
backup channel the grab function.
Backup Playlist
Selecting this check box will enable the p la ylist r en der ing a nd as s i gn o ne bac k up c hannel
to this function.
XStream Browsing
Selecting this check box will allow the user s t o bro wse in th e bac ked up trains in XStream
and will assign one backup channel to this function.
Page 21
XFile Version 2.19 – User Manual
EVS Broadcast Equipment – November 2012
Issue 2.19.A
11
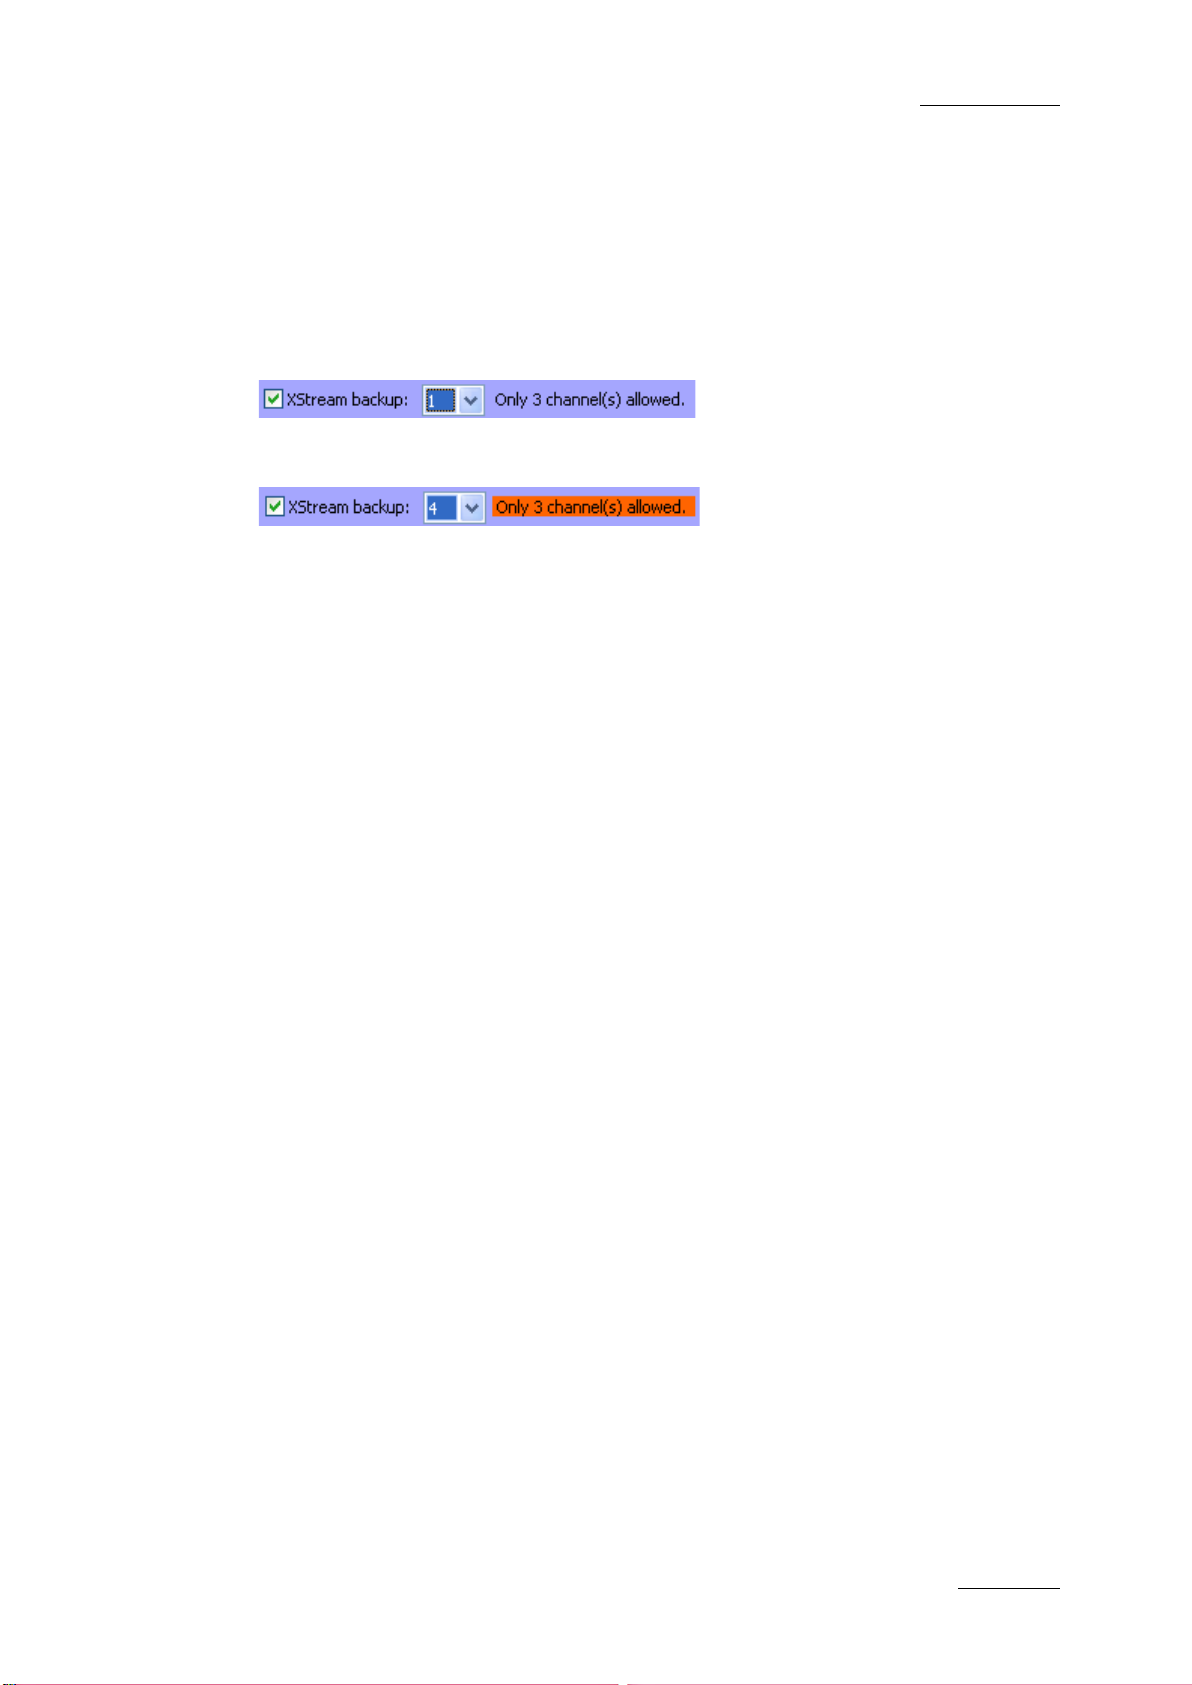
XStream Backup
Selecting this check box will enable the backup of record trains by XStream.
You also need to s elect the num ber of channels to as sign to this function with the drop-
down list on the right of the check box. Possible values are 1, 2, 3, 4 and 6.
Taking into account the backup functions selected above in the dialog box, the
application displays the maximum number of channels which can be assigned to the
XStream backup on the right of the drop-down list.
This information is highlighted in red when the number of channels assigned is higher
than the maximum supported number.
If you assign more c hannels than supported in the defined configur ation, the system will
automatically adapt the number of assigned channels when the configuration is saved.
Available Channels
Read-only display of the available channe ls depending on the backup functions selected
in the dialog box.
OK
Clicking the OK button will confirm and save the defined configuration.
Cancel
Clicking the Cancel button will cancel the chan ges an d brings the users back to the XFile
Config System window.
3.1.4 Storage Area
Disk mode
The Disk Mode defines the maximum num ber of disks, or paths, which can be used to
save the backup files. One to 4 disks can be selected.
Refer to section ‘Disk Writing Mode’ on page 28 for additional information.
Path A / B / C / D
This specifies the destinations to save the backup files. Depending on the Disk mode
selection, up to 4 paths are active for modifications.
Page 22
Issue 2.19.A
XFile Version 2.19 – User Manual
EVS Broadcast Equipment – November 2012
12
Important
At startup, only the clips saved i nto the Path(s ) are sc anned. This m eans onl y
those clips, data included, will be accessible and display in the XFile list.
3.1.5 System Area
Serial Number
The serial number of the system is defined during the first installshield process and
cannot be modified afterwards. The S/N is also written on the back plate of the
mainframe.
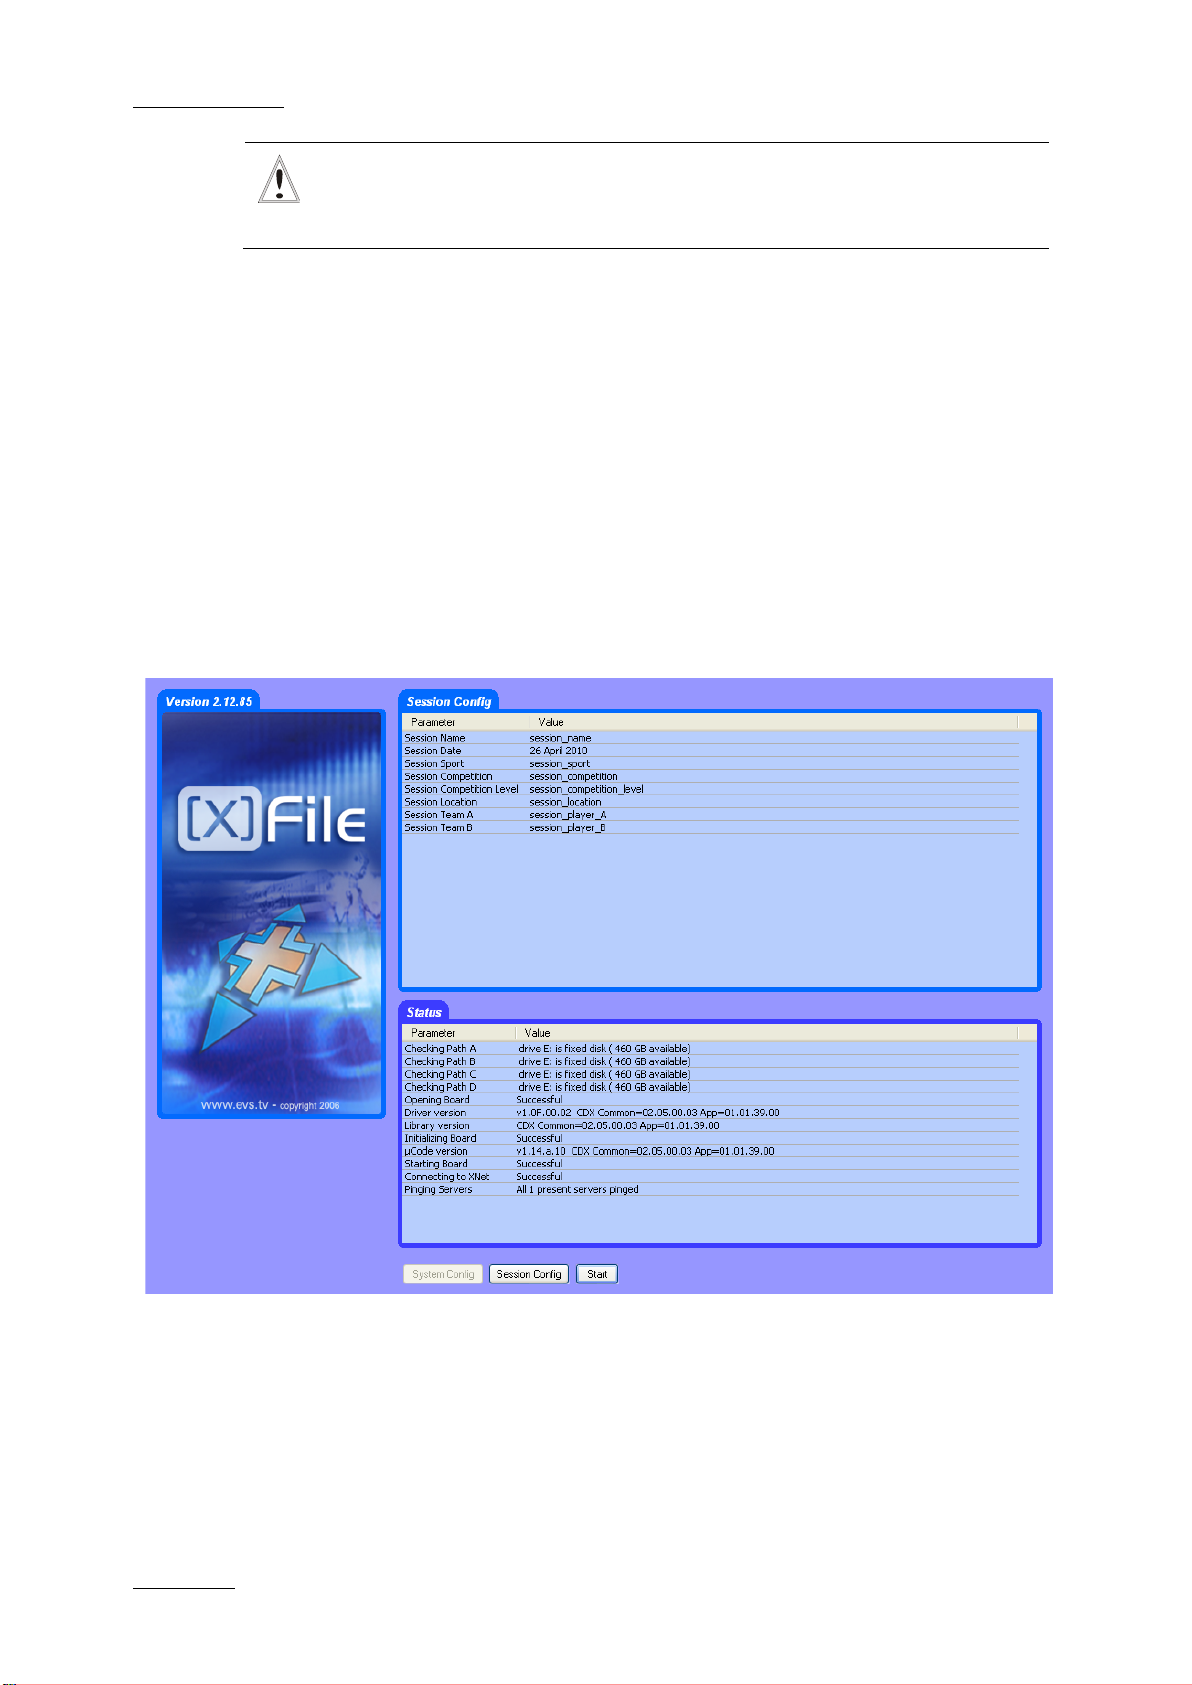
3.2 Startup
At first start the upper part of the window displays the System Configuration area.
Page 23
XFile Version 2.19 – User Manual
EVS Broadcast Equipment – November 2012
Issue 2.19.A
13
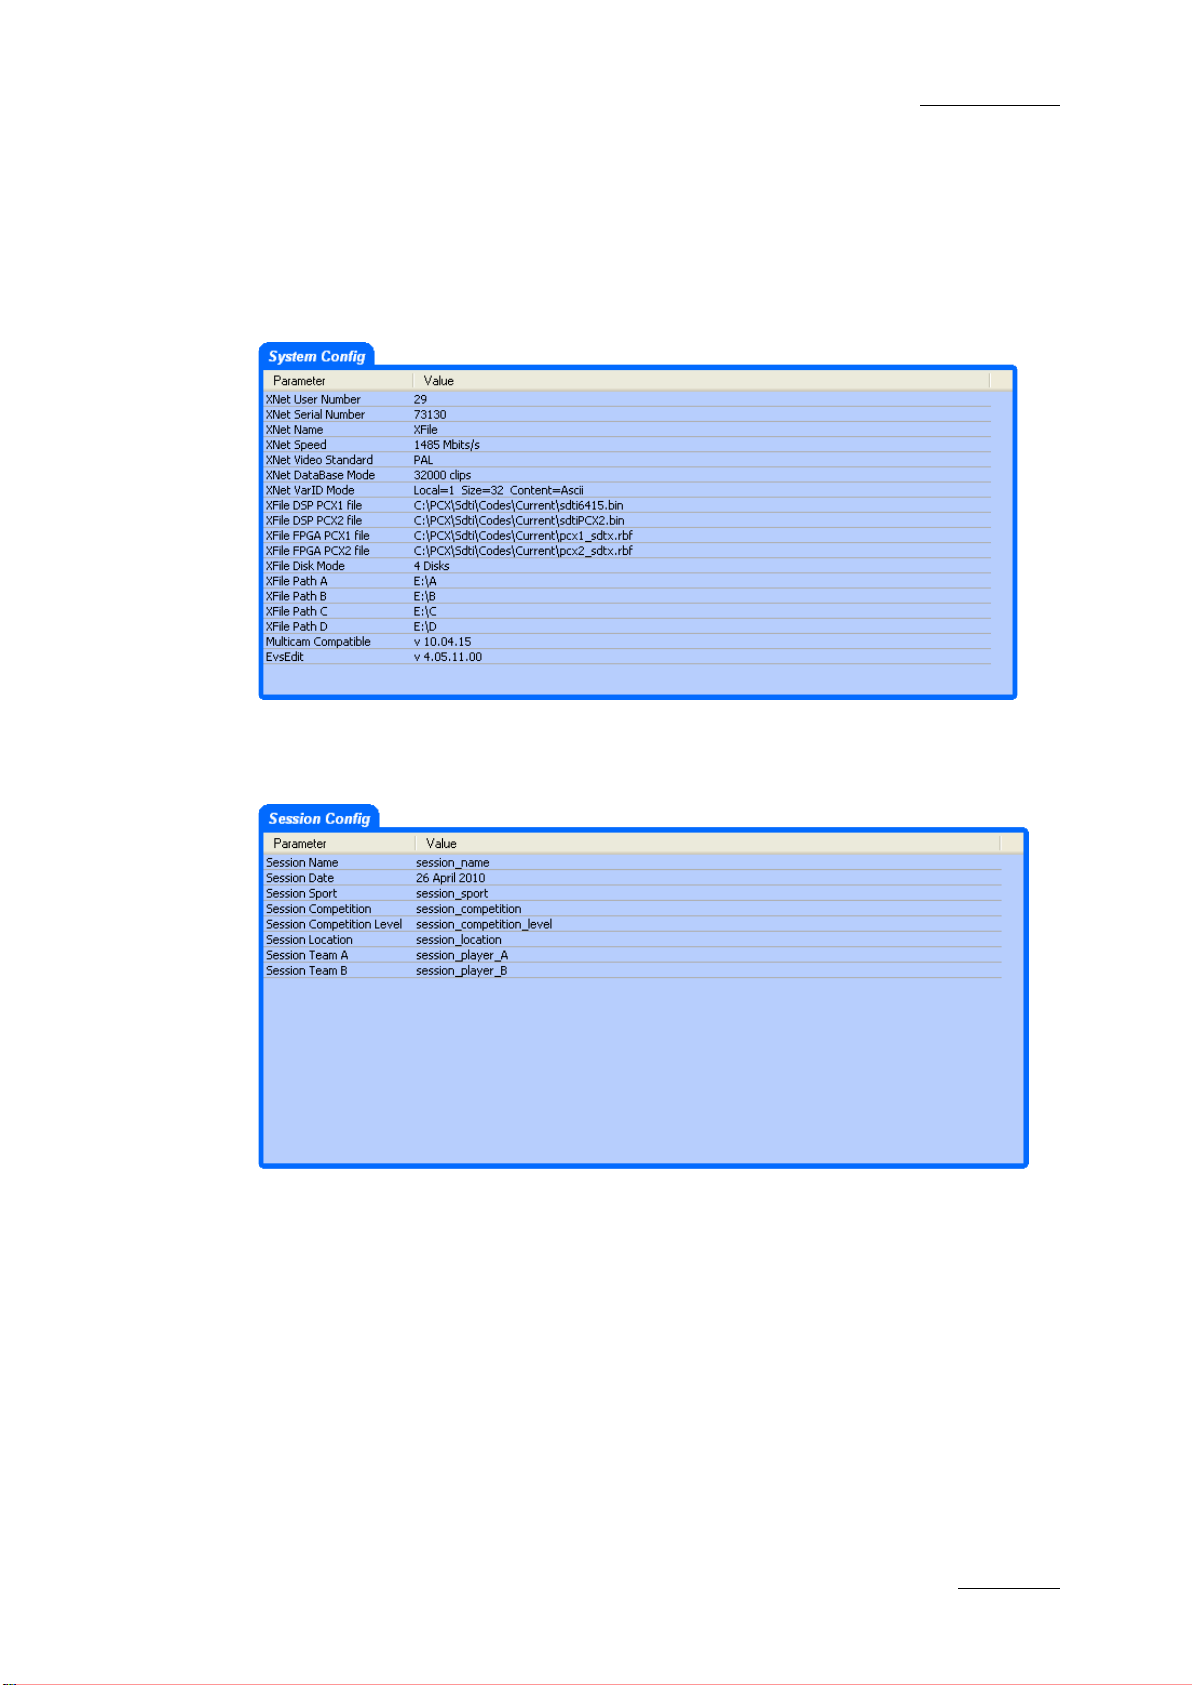
3.2.1 System Configuration Area
This field displays the cur rent parameters of the system . Some relevant parameters are
required to connect to the XNet.
If an error message is displayed facing one of the parameters, click on the System
Config button to enter the System configuration window.
If the values are coherent, click START: the System Config area is replaced by the
Session Config area:
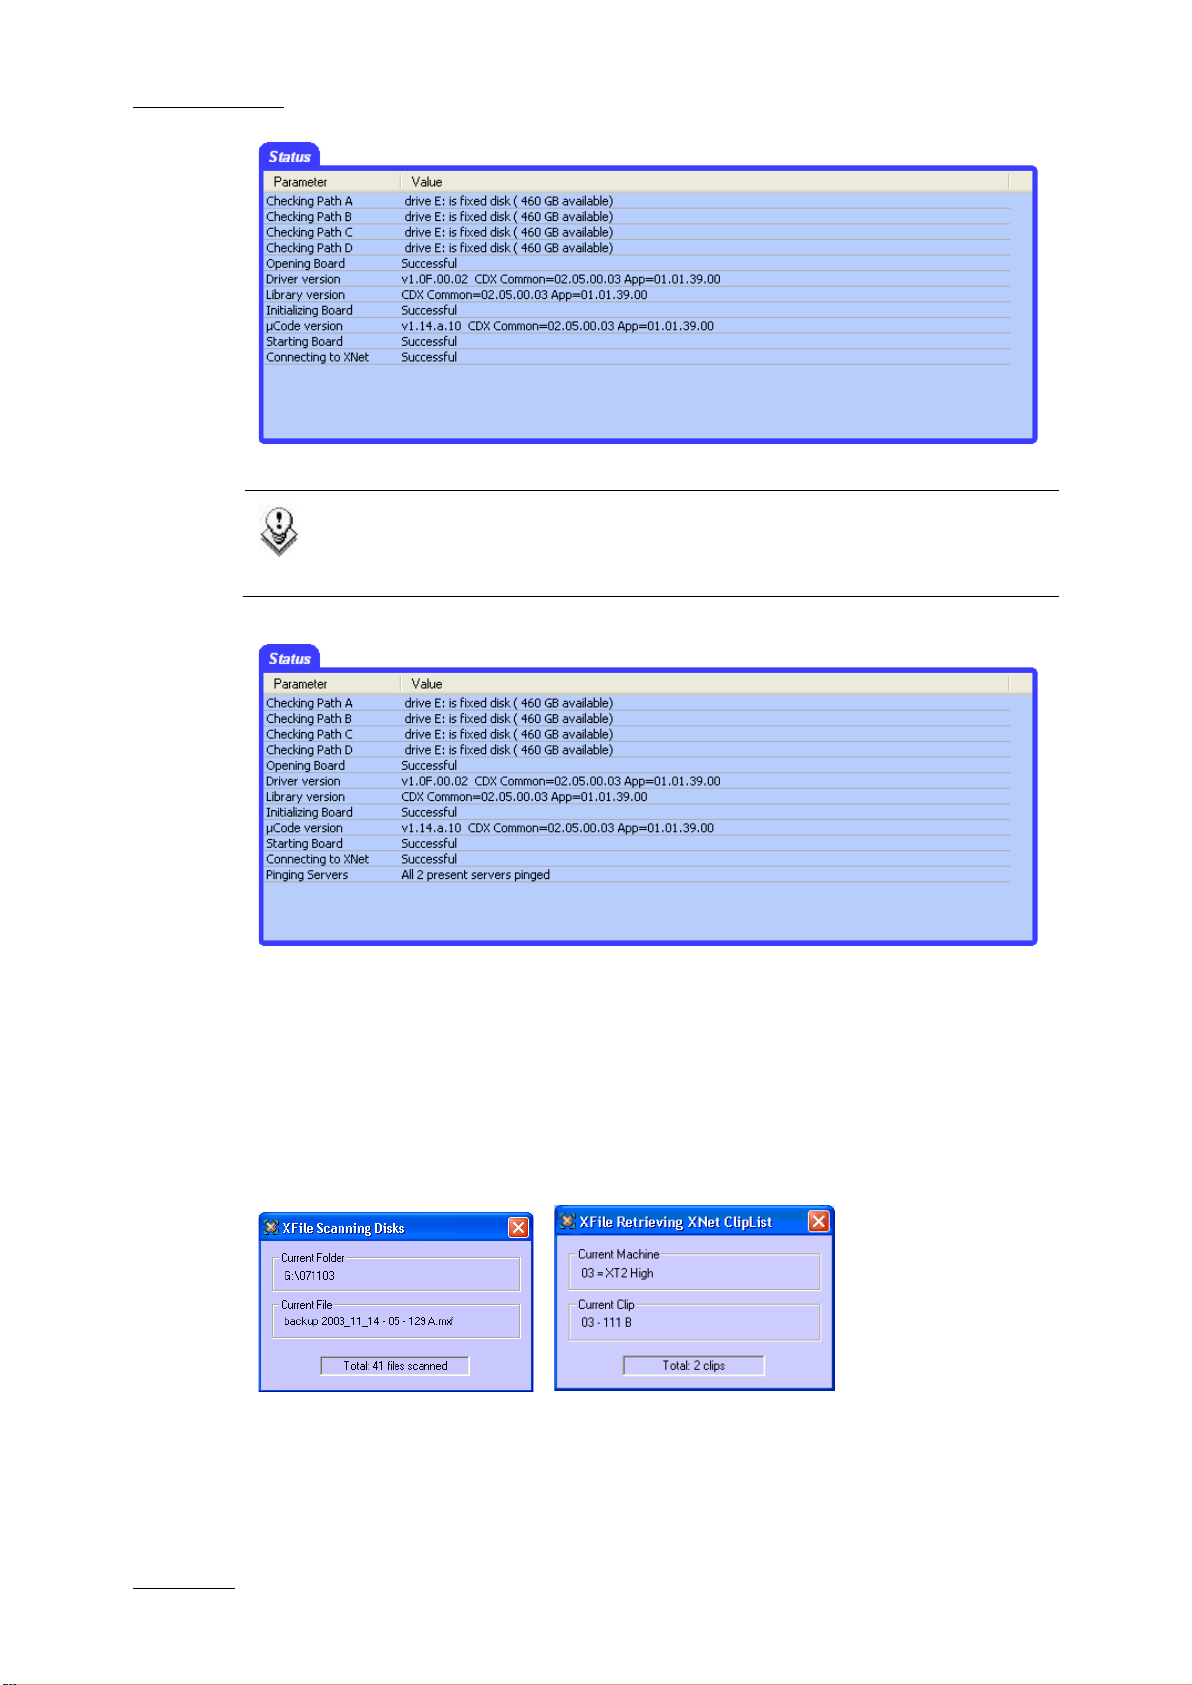
3.2.2 Status Area
The aim of this area is to c heck the hardware vali dity, the remaining capac ity of disks and
to verify the compatibility between the software, the drivers and the data recorded.
The system automatically starts the test processing. One after the other, the different
stages of the boot sequence are displayed in the Status window.
If an error occurs during one s tage, write the message down and contact E VS staff for
support.
The last test is the connection to the XNet.
Page 24
Issue 2.19.A
XFile Version 2.19 – User Manual
EVS Broadcast Equipment – November 2012
14
Note
In GBE Only mode, a longer starting sequence is needed to ping all the
servers.
If all these stages are successful, the XFile is ready to operate.
Click the Start button again to enter the application.
3.2.3 Automatic Processes at Startup
After the startup, the system automatically starts two operations: the Scanning Disk
process and the Scanning Network process.
Those operations m ight last a few seco nds dependi ng on the number of clips pres ent on
disk and the number of clips present on the XNet.
Page 25

XFile Version 2.19 – User Manual
EVS Broadcast Equipment – November 2012
Issue 2.19.A
15
3.3 Session Configuration
Once the XFile app lication is started, the users c an define the session configur ation by
selecting Configuration > Config Session from the main menu.
The session configuration window is divided into 8 tabs:
Tab 1 - Autobackup
Tab 2 – MXF Metadata
Tab 3 – Manual Backup
Tab 4 – Scan Folder
Tab 5 – Grab
Tab 6 – Export
Tab 7 – XML
Tab 8 – User Parameters
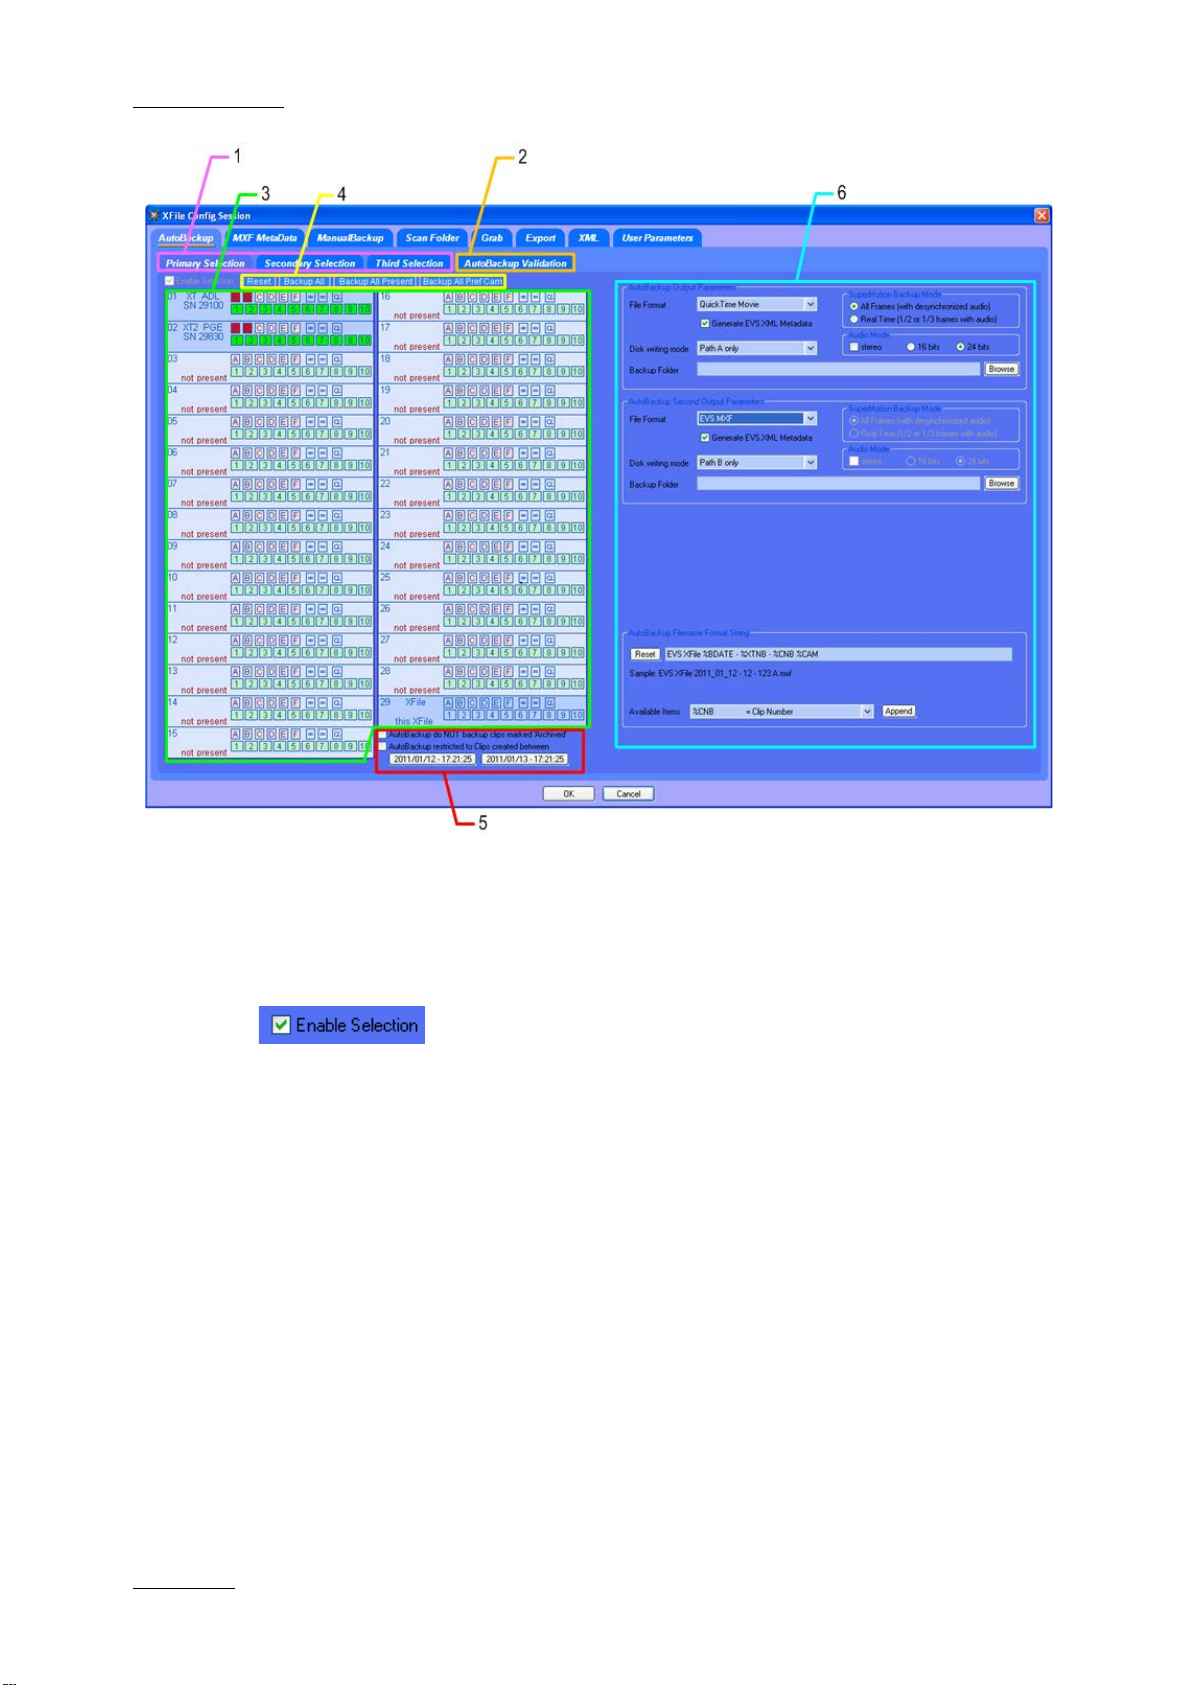
3.3.1 Tab 1 - Autobackup
XFile allows the us ers to def ine three diff erent selecti ons of servers, cameras an d pages
from which backing clips up in Autobackup mode.
For the three selections, the output files can be saved with different formats, and to
different paths.
In addition, each selection can be saved to a second output as soon as 2 disks are
available.
The Autobackup tab contains 4 sub-tabs highlighted in the next screenshot:
• Primary Selection (1)
• Secondary Selection (1)
• Third Selection (1)
• Autobackup Validation (2), displaying the current selection of Autobackup
Each of the three Selection tabs includes several areas:
• Selection list (3)
• Selection shortcuts (4)
• Additional autobackup criteria (5)
• Output parameters (6)
Page 26
Issue 2.19.A
XFile Version 2.19 – User Manual
EVS Broadcast Equipment – November 2012
16
Selection Tabs
To allow a secondar y selection and a third select ion to be back ed up, you need to select
the Enable Selection checkbox in the respective tabs.
Selection List
This selection list is only active while the Autobackup mode is disabled.
In the Autobackup Selection list, all systems connected to the XNet are listed by net
numbers.
Server Selection
When a server is selected, it is displayed on a bright blue background, as s hown in the
following screenshot.
Page 27
XFile Version 2.19 – User Manual
EVS Broadcast Equipment – November 2012
Issue 2.19.A
17
For each system s elected for the a utobackup, you c an combine se veral criteria t o select
the video material to be included in the autobackup.
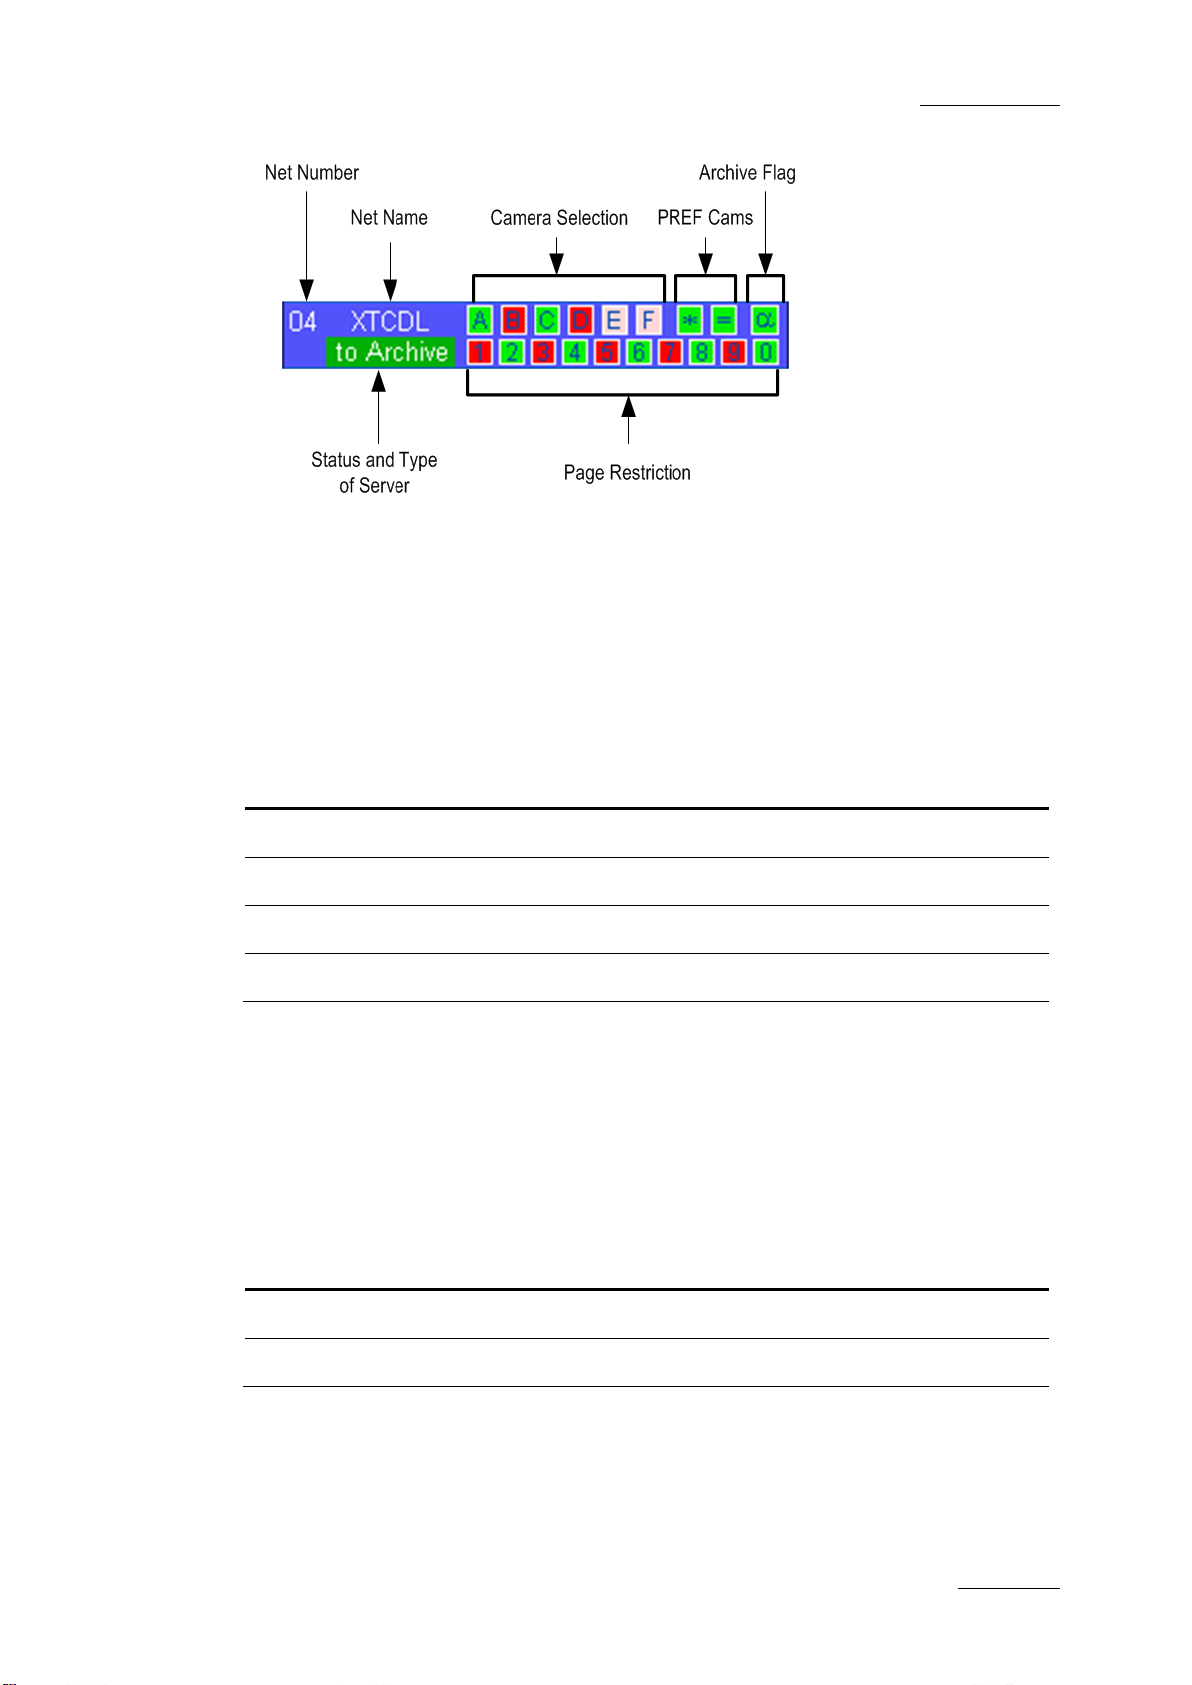
Camera Selection
The camera selection c riterion makes it possible to select the cam eras to be included in
the autobackup. By default, the cameras are not selected.
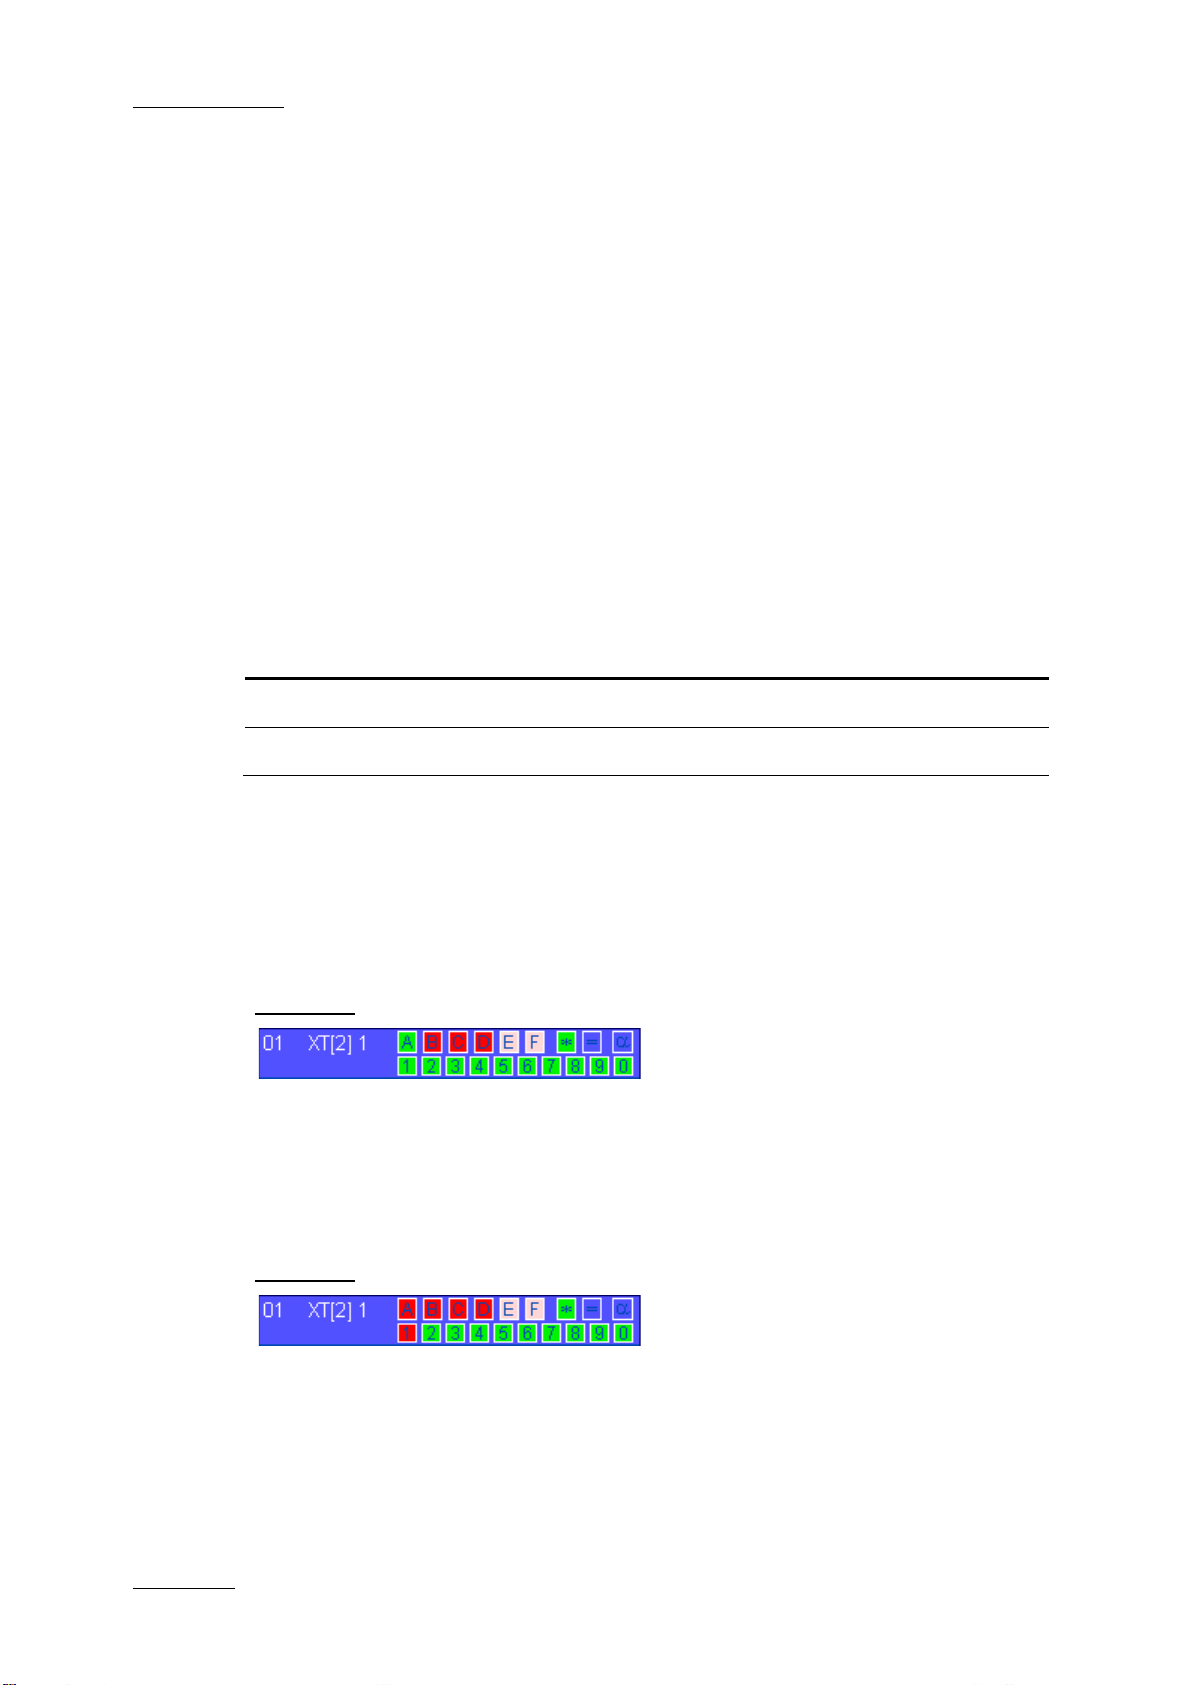
The color code used for camera selection is the following:
Background color Meaning
Bright red
Bright green
Pale red
Pale green
Camera available and not selected
Camera available and selected
Camera not available and not selected
Camera not available and selected
PREF Cams
The Pref Cams criterion makes it possible to include in the autobackup the clips that
were recorded on any camera defined as the first preferential camera (*) or on the
second preferential camera (=).
The color code used for the PREF Cams flag, as well as for the Archive flag, is the
following:
Background color Meaning
Green
Flag selected
Blue
Flag not selected
Page 28
Issue 2.19.A
XFile Version 2.19 – User Manual
EVS Broadcast Equipment – November 2012
18
Archive Flag
The Archive Flag criterion (α) makes it possible to include in the autobackup the clips for
which a backup request has been sent from a Remote panel controllin g an EVS video
server of the XNet network. The backup request is sent via the > Ar chiv e option available
in the secondary menu of the Remote panel in clip mode.
The XFile will backup such clips even if the Default XFile parameter on that Remote
Panel has not been selected. In this case, the archive flag (set to ‘1’ when the clip is
backed up on the default XFile) will not be set to ‘1’ after the backup process.
Page Restriction
By default, all pag es are included in the aut obackup process. The us er should click the
page(s) to be excluded from the autobackup.
The page restriction wi ll apply to any of the other se lection criteria defined, i.e. camera,
PREF cams and Archive flag.
The color code used for page restriction is the following:
Background color Meaning
Green
Red
Selected page
Deselected page
Criteria Combination
The criteria Camera select ion, PREF Cams and Archiv e Flag will be taken into account
individually. Refer to example 1.
The criteria Page Restriction will restrict the selection on any of the other criteria
selected. Refer to example 2.
Example 1:
If you select CAM A and * ( f irst pref erential cam er a), the f ollowing c lips wi ll be inc luded i n
the autobackup:
• all the clips recorded on CAM A
AND
• all the clips created on any other camera defined as the first preferential camera
Example 2:
If you select the f irst pr eferenti al c am era cr iterion (*) a nd excl ude p age 1, the clip s w ill be
selected as follows:
• The clips stored on a page 1 of the s elec te d ser v er and created on a CAM defined as
the first preferential camera will be excluded from the autobackup.
• All other clips created on a CAM defined as the first preferential camera will be
included in the autobackup.
Page 29
XFile Version 2.19 – User Manual
EVS Broadcast Equipment – November 2012
Issue 2.19.A
19
preferential cameras and all pages of all
How to Select the Material to Autobackup
To select the material to autobackup, proceed as follows:
1.
First select the server to backup. The selected line changes to dark blue.
2.
Select the camera an gles desired to be part of the autobackup pr ocess. Selected
cameras appear on a bright green background.
3.
Select the PREF cams or Archive Flag criteria if desired.
4.
Select the pages that you want to exc lude from the autobac kup process . Excluded
pages appear on a bright red background.
5. Click OK to confirm the selection and to close the XFile Config Session window.
6. Click the Autobackup button in the main XFile window.
Note
For the AirBox and SpotBox servers, all cameras must be selected.
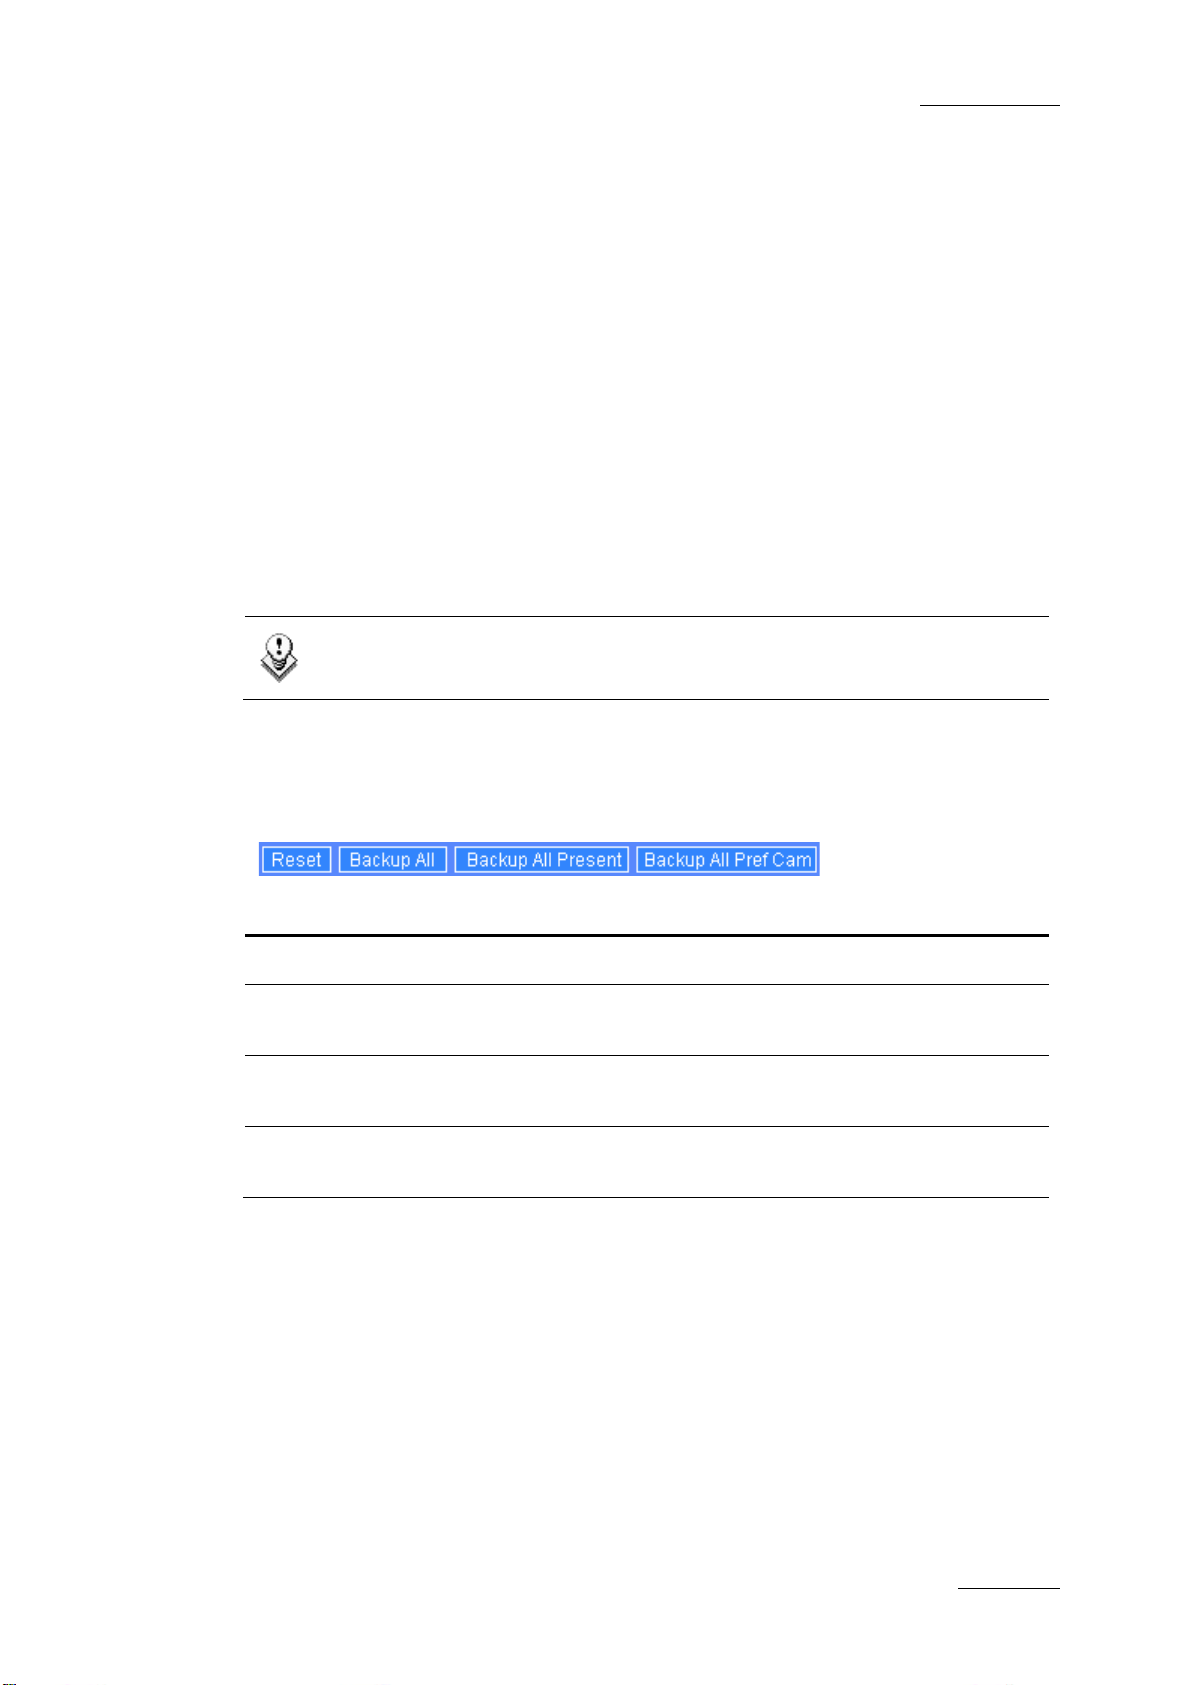
Selection Shortcuts
Different shortcuts are available to select cameras or systems with ease:
Shortcut button Description
Reset
Backup all
Backup all Present
Backup all PREF cam
It clears all selections
It selects all cameras and all pages of all systems. New
systems being connected will also be backed up.
It selects all cameras and all pages of all systems currently
connected to the network.
It selects all
systems currently connected to the network.
Additional Autobackup Criteria
Archive status
The basic working of th e X File is to c ompare the content of its dis ks with the clips pr esent
on the XNet. According to the result, the missing clips on disk will be automatically
backed up.
If several disks are required to bac k a complete session up, the Archive status must be
kept to avoid a second backup of same clips while changing the disks.
Page 30

Issue 2.19.A
XFile Version 2.19 – User Manual
EVS Broadcast Equipment – November 2012
20
server if the
Three conditions are required to validate the Archive status:
1.
Before the Autobackup session, place a checkmark in the following box:
2.
Set the ‘DEFAULT XFILE’ param eter in t he Setup menu of your EV S video server.
(See Multicam documentation for complete information).
The label appears on the line of the EVS video
‘DEFAULT XFILE’ has been correctly defined.
3.
Activate the AUTOBACKUP b y clicking t he button in the XF ile main
window.
Note
The Default XFile setting allows the user to initi ate the backup of a clip from
the EVS video server via the >ARCHIVE command (see Multicam
documentation for details).
The Archive Flag also initiates the back up of a clip as requested by the
>ARCHIVE command even if the Default XFile is not set, but the Archive
status on the EVS vid e o server is not updated.
Time Range
The autobackup session can be defined for a specific duration.
Select the check-box to activate the tim e range filter and click one of the Time Range
Selection button to access this window:
Page 31

XFile Version 2.19 – User Manual
EVS Broadcast Equipment – November 2012
Issue 2.19.A
21
The T ime Range filter requ ires a start date and time, as well as an end d ate and tim e, to
be valid:
1.
In the calendar, select the month with the lef t and right arrows, t hen the day of th e
month.
2. In the Time field, select the hour using the up and down arrows to change the
value displayed or directly type the value when the field lights green.
3. Click OK to confirm your selection.
4.
Enter the second selection window to enter the values for the end limit.
The Autobackup cr iterion is now act ive and onl y the clips created into the tim e range will
be backed up.
Output Parameters
Note
A warning message is displayed in case the same path and the same file
format are selected in the three selection tabs.
Output File Format
The following setting makes it possible to choose the format in which the backup files
from the selection will be automatically generated.
The AutoBackup Output Parameters > File Format drop-down lis t allows the user to
select the default file format for the clips backed up with the autobackup process.
The following formats are available:
• EVS MXF
• MXF OP1a (SD IMX only)
• Quick Time Movie
• Quick Time Reference
• Avid Ingest Device
• CleanEdit Reference
• Avid MXF OPAtom
• MXF OP1a (Std SMPTE)
Page 32

Issue 2.19.A
XFile Version 2.19 – User Manual
EVS Broadcast Equipment – November 2012
22
Generating an XML Metadata File
When the AutoBackup Output Parameters > Generate EVS XML Metadata check-box
is selected, an XML file with the metadata of the clips backed up in the autobackup
process is generated. T his f ile is created at t he sam e tim e as the back up f ile for all m edia
file formats.
The XM L file is saved in the sam e folder as th e backup file. It has th e sam e name as the
backup file, followed by the
With the EVS MXF file format, the metadata is included in the header of the media file
itself. As some systems cannot read the MXF header, it is possible t o generate an XML
metadata file for an EVS MXF file to gain access to the metadata. When changes are
made to the metadata, the EVS MXF header and the EVS XML files are updated
simultaneously but priority is given to the XML file to read the metadata.
<.evs.xml> extension.
Important
Always ac tivate this parameter if your backup files inc lude other formats than
EVS MXF. Otherwise, you w ill not be a ble t o view and manipulate these files in
XFile.
Disk Writing Mode
The available options in the Disk Writing Mode field depend on the Dis k Mode selected
in the Storage area of the XFile Config System window:
In Single Disk mode, only one path (Path A) will be available in the list.
In Dual Disk mode, the system can
• write on a single disk, Path A only or Path B only
• write on the fir st disk and then autom atically switch to the second disk when the first
one is full, or
• write on both disks simultaneously (mirroring).
In 3 disks m ode, all the options available in Dual Dis k Mode are available , in addition to
the Path C only option.
In 4 disk s m ode, all the opt ions available i n 3 Disks Mode are availabl e, in addition to the
Path D only option.
Page 33

XFile Version 2.19 – User Manual
EVS Broadcast Equipment – November 2012
Issue 2.19.A
23
involved paths. Otherwise, this could results in data
Important
Prior to modify the Disk Writing Mod e, it is strongl y recom mended to c heck the
synchronization between the paths, especially when clips have already been
backed up in the
inconsistencies.
Backup Folder
The Backup Folder field specifies the fold er destination to s ave the back up files. It must
be located in an XFile path. Enter a folder nam e directly in the Backup Folder field or
click the Browse button to select a folder. If you enter the nam e for a new folder in the
Backup Folder field, the folder will be created at first backup.
The system checks the clips present i nto the s es sion fold er an d its su b-f olders. If a cli p is
not present and fulfills the criteria defined in the Autobackup selection tab, this clip is
automatically backed up.
Note
In dual disk m ode, when t he f irs t disk is full, the s yste m autom atical ly switc hes
to the same folder of the second disk.
Super Motion Backup Mode
Super Slow Motion (SSL M) clips can be obt ained by generatin g a single flow fr om 2 or 3
cameras. So, 2 or 3 pictures have the same timecode and, when a SS LM clip is played
with all frames in the Edit Clip module, the duration is twice (with 2 cameras) or three
times longer and audio is no more synchronized. A clip played at 100% seems to be
played at 50 or 33%.
The SuperMotion Backup Mode > All Frames with Desynchronized Audio option
enables the backup of all the frames of the SSLM clips with the audio. In this case,
timecode reference is not consistent.
The SuperMotion Backup Mode > Ream Time ( 1/2 or 1/3 frames with audio) option
backs up 1 fram e over 2 or 3 (depe nding on the Supe r Motion Rec mode) and keeps the
audio. Audio and timecode are consistent.
The selected option will be reflected in the Media Info tab of the Maintenance Mode
window. Nb Videos = 1 (Real T ime) or 3 (All Frames) . Refer to section 3.10.2 ‘Media Inf o
Area’ on page 84.
Audio Mode
Selecting the Stereo option results in grouping EVS server mono channels in stereo
channels.
24 bits samples can be do wn converted to 16 bits b y selecting the 16 b its option or kept
as it is by selecting the 24 bits option.
Page 34

Issue 2.19.A
XFile Version 2.19 – User Manual
EVS Broadcast Equipment – November 2012
24
Second Output Parameters
This field group can only be used if at least 2 disks are available.
In Mirroring mode, fields are filled automatically with the same information as for the
primary output.
In other modes, the selection can be saved in a second file format and to a second path.
Filename Format String
The default filename automatically given to the backup file is
EVS XFILE <
number
The filename is user -defined and can be m odified as d escribed in section ‘How to Modify
the Default Filename Format String’, on page 29.
The user can reset the default filename by clicking the RESET button.
backup date> - <server user number> - <clip
> <camera name>
Autobackup Validation Tab
In the Autobackup Validation Tab, the Autobackup Validation list displays the current
selection of Autobackup.
Page 35

XFile Version 2.19 – User Manual
EVS Broadcast Equipment – November 2012
Issue 2.19.A
25
The clips displayed i n a red line wi ll not be tak en into ac count by the Aut oback up criteria
and the clips displa yed in a green line will be back ed up when starting the Autoback up
mode. The selected record will be displayed on a blue background.
The message box in the lower part of the screen displays the details of the clip selected.
3.3.2 Tab 2 – MXF Metadata
This area displays t he current param eters and values saved to the descriptive m etadata
of the MXF file for the open session.
How to Modify the Values for MXF Metadata for
the Session
To modify the values assigned to a given parameter for the open session, proceed as
follows:
1.
Click the value to modify in the left table.
The value appears in the text field edition in the Select a Parameter group box.
2.
Modify the value in the second field of the group box.
3. Click the Modify button to confirm the changes.
Page 36

Issue 2.19.A
XFile Version 2.19 – User Manual
EVS Broadcast Equipment – November 2012
26
How to Define a User Session Date
Two session date fields are defined in the metadata of the backup file:
• The PC session date comes from the PC time. This field is not editable and it is
defined in the PC settings.
• The user session date can be freely defined as explained in the following procedure.
To assign a user session date, proceed as follows:
1. Select the User Session Date field:
2.
If you want to define a dat e as user session date, select the dat e in the calendar
and select the date format in the drop-do wn list be lo w the User Session Date field.
3.
If you want to assig n a name as user ses sions date, type the reques ted name in
the User Session Date field.
The user session date defi ned will be ad ded as value for the sec ond session dat e field in
the metadata of the backup file.
3.3.3 Tab 3 – Manual Backup
Page 37

XFile Version 2.19 – User Manual
EVS Broadcast Equipment – November 2012
Issue 2.19.A
27
Output File Format
The following setting makes it possible, in a Single Disk configuration, to choose the
format in which the backup file will be manually generated.
The Manual Backu p Output Parameters > File Format drop-down list allows the user
to select the default file format for the clips backed up with the manual backup process.
The following formats are available:
• EVS MXF 2 MB
• MXF OP1a (SD IMX only)
• Quick Time Movie
• Quick Time Reference
• Avid Ingest De vice
• CleanEdit Reference
• Avid MXF OPAtom
• MXF OP1a (Std SMPTE)
Generating an XML Metadata File
When the Manual Backup Output Parameters > Ge nerate EVS XM L Metadata checkbox is selected, an XM L file with the metadata of the clips b acked up with the manual
backup process is generat ed. This file is created at t he same time as the back up file for
all media file formats.
Refer to section ‘Generating an XML Metadata File’ on page 22 for more details.
Super Motion Backup Mode
Refer to section ‘Super Motion Backup Mode’ on page 23 for more details.
Page 38

Issue 2.19.A
XFile Version 2.19 – User Manual
EVS Broadcast Equipment – November 2012
28
Audio Mode
Refer to section ‘Audio Mode’ on page 23 for more details and for a summary of the
summary of the availabil ity of the SuperMotion Mode and Audio Mode according to the
selected file format.
Disk Writing Mode
Refer to section ‘Disk Writing Mode’ on page 22 for more details
Backup Folder
Refer to section ‘Backup Folder’ on page 23 for more details
Backup Filename Format String
The default filename automatically given to the backup file is
EVS XFILE <
number
The filename is user -defined and can be m odified as d escribed in section ‘How to Modify
the Default Filename Format String’, on page 29.
The user can reset the default filename by clicking the RESET button.
backup date> - <server user number> - <clip
> <camera name>
Page 39

XFile Version 2.19 – User Manual
EVS Broadcast Equipment – November 2012
Issue 2.19.A
29
How to Modify the Default Filename Format String
To modify this default format string, proceed as follows:
1. Select the format for which the filename string should be modified in the File
Format field.
2. In the Filename f ield, delete the part of the string you do not w ant to keep in the
filename, if any.
3. To add a generic text (i.e.: WC2006_Match03…) in the Filename string, simply
type the text in the field.
4. To add an inform ation type spec ified in the Available Items drop-do wn list, select
the item in the drop-down list:
5. Click the APPEND button to add the selected item at the end of the Filename
string.
6. Reposition the av ailable item as des ired with the cut (CTRL-C) and paste (CTRL-
V) commands.
7. Repeat step 4 to 6 f or any new inform ation type you want to add in the Filename
string.
Page 40

Issue 2.19.A
XFile Version 2.19 – User Manual
EVS Broadcast Equipment – November 2012
30
3.3.4 Tab 4 – Scan Folder
Auto Restore
The Auto Restore function enables the automatic restore or copy of files from a folder to a
defined location on an EVS video server. This is done through the GBE or the SDTI
network.
The AutoRestore Mode can be activated from the main XFile window by clicking the
AutoRestore button.
Enable AutoRestore at Start
If the Enable AutoRestore at Start box is selecte d, the AutoRes tore M ode wi ll be active
as soon as XFile is started.
Enabling Configuration
Up to 5 different configurations can be pre-defined. To do so, select a configuration
number in the Config field, fill in all the other fields and click OK.
To enable one of these configurations, select it the Config field, select the Enable
Config box and click OK. Some or all of the predefined configurations can be enabled.
Scan Folder
This field defines the f older to scan for backup files to be res tored. It must differ from the
XFile data path.
Page 41

XFile Version 2.19 – User Manual
EVS Broadcast Equipment – November 2012
Issue 2.19.A
31
AutoImport
MXF and MOV Files
When working with .m xf or .mov files, not as sociated with a se parate XML f ile, select the
AutoImport box. This param eter allows the extraction of metadata inform ation and the
creation of XML files.
When the import of files into the scan folder is done manually, XML files which could have
been created must not be imported.
Video Files with XML files
When working with file formats associated with a separate XML file, do not select the
AutoImport box.
When the import of files into the scan folder is done manually, XML files must not be
copied before the video f iles, otherwise the job will s tart before the video file is present
and the job will be set as Failed in the Job Status pane. In this case, the folder will
automatically be resc anned and a second j ob line will appe ar in the Job Status pane with
the Successful status.
Parameters for Restore
Restore Mode
Two Restore Modes are available:
• Restore: keeps original IDs. In case the ID already exists, the job will fail.
• Copy: generates new UmID
Destination Server
Select the server name where you want to restore the files.
Location
The Location area indicates in which locations the files will be restored.
Page 42

Issue 2.19.A
XFile Version 2.19 – User Manual
EVS Broadcast Equipment – November 2012
32
Left-click
Right-click
Right-clickRight-click
Left-click
The following color code is used:
Background color Meaning
Bright red
Bright green
Pale green
Unauthorized location
First location which will be used when pub lish in g
Authorized location
To switch one color for another, proceed as follows:
Files Move
If the job succeeds, the files will be moved to the ‘Done_Successful’ subfolder.
If the job failed after 5 tries, the files will be moved to the ‘Done_Failed’ subfolder.
AutoPublish
The AutoPublish function enables the automatic publication of files from a folder to a
defined location on the XNet. This is done through the SDTI network.
The AutoPublish Mode can be activated from the main XFile window by clicking the
AutoPublish button.
Enable AutoPublish at Start
If the Enable AutoPublish at Start box is selected , the AutoPubl ish Mode will be acti ve
as soon as XFile is started.
Enabling Configuration
Up to 2 different configurations can be pre-defined. To do so, select a configuration
number in the Config field, f ill in all the other fields and click OK.
To enable one of these configurations, select it the Config field, select the Enable
Config box and click OK. Some or all of the predefined configurations can be enabled.
Scan Folder
This field defines the folder to scan for backup files to be published.
Page 43

XFile Version 2.19 – User Manual
EVS Broadcast Equipment – November 2012
Issue 2.19.A
33
AutoImport
This parameter allows the extraction of metadata information and the creation of XML
files when working with files not associated to XML files, such as .mxf and .mov.
Refer to section ‘AutoImport’ on page 31 for a detailed description.
Parameters for Publish
Publish Mode
Three Publish Modes are available:
• Keeps original UmID
• Defines a new UmID
• Defines a new UmID and VarID
You can choose to keep the original file UmID or to generate a new one.
As this parameter m ust be the same for manual Pub lish Mode and AutoPublish Mode,
the selection made in the Scan Folder tab will impact the one made in the User
Parameters tab:
• The Keeps original UmID option automatically selects the Publish Clips with
Original UmID box and the Publish Clips with Original VarID box, and vice versa.
• The Defines a New UmID option automatically deselects the Publish Clips with
Original UmID b ox and s elect s the Publish C lips wit h Original VarID box, a nd vice
versa.
• The Defines a New UmID and VarID option automatically deselects the Publish
Clips w ith Original UmID box an d the Publish Clips with Original VarID box , and
vice versa.
Location
The Location area indicates in which locations the files will be published.
Refer to section ‘Location’ on page 31 for a description of the color code.
Note
In the Publish process , the XML metadata file must be published pr ior to the
backup file.
Files Move
If the job failed after 5 tries, the files will be m oved to ‘Done _F ai le d’.
Page 44

Issue 2.19.A
XFile Version 2.19 – User Manual
EVS Broadcast Equipment – November 2012
34
3.3.5 Tab 5 – Grab
The Multicam operators, from their remote control panel, are able to select a video
frame/field and to grab a picture. A Def ault XFile m ust be defined in the Setup menu of
the Multicam - See Multicam documentation f or more deta ils. Those pictures are cr eated
by the XFile and stored on the disks of this XFile.
Grab Folder
Select the destination folder to save the JPG/BMP files.
Stretch Field to Frame Size
Enabling this option will automatically stretch the ‘field image’ to the original ‘frame size’.
Output Format
The automatic selection of the output format depends on the previous option. If the
images are not modif ied by stretching, the J PG format is defined and if the images are
modified by stretchi ng, the BMP form at is selected. The user can f orce the selection of
one format.
Page 45

XFile Version 2.19 – User Manual
EVS Broadcast Equipment – November 2012
Issue 2.19.A
35
Note
No compression artif act is added to this file creat ion process, so the original
quality of the image is kept.
Grab XT/XFILE Filename Format String
The default filename automatically given to the JPG/BMP file is
• EVSGRAB_<date> - <_server user number> - <_clip number> - <_c amera name> -
<_time code>. jpg/bmp, when grabbed on EVS video server
• <filename> - <time code>. jpg/bmp, when grabbed on XFile, from the Edit Clip
module.
This filename is user-defined and can be modified by typing a generic term (i.e.:
WC2006_Match03…) and/or by adding one or many available items (See screenshot
below). See also section ‘How to Modify the Default Filename Format String’, on page 29.
The user can reset the default filename by clicking the RESET button.
Available Items
XFile XT
Page 46

Issue 2.19.A
XFile Version 2.19 – User Manual
EVS Broadcast Equipment – November 2012
36
3.3.6 Tab 6 – Export
All clips backed up by the XFile can be exported to other systems for different purposes:
Xedio (CleanEdit)
The clips backed up can be automatically inserted into the Xedio Database. Place a
checkmark in the ‘Update Xedio DB’ box and enter t he DSN name, user and password
for the defined Xedio database.
Please refer to the Xedio documentation for more details.
Avid Ingest Device
The clips backed up can be automatically transferred to the AVID Ingest Device for
conversion process to AVID file format.
Transfer All Clips Backed up
To transfer all clips that are backed up in XFile and XStream, select the Transfer All
Clips Backed up check box.
Page 47

XFile Version 2.19 – User Manual
EVS Broadcast Equipment – November 2012
Issue 2.19.A
37
Default Ingest Device Host Name
Enter the host name of the default Avid Ingest Device in this field.
Please contact EVS support for details regarding the configuration of AVID Inges t Dev ice.
Default Ingest Device Media Format
The Default Ingest Device Media Format field makes it poss ible to specify the media
format to which the Avid In ges t De vice will conv ert t he backup file received fr om the XFil e
application. This inform ation is transferred as a s etting to the Avid Ingest D evice that will
perform the conversion.
The following formats are available:
• OMF
• MXF/AAF
Target Name Format String
A default filename is automatically given to the target file.
This filename is user-defined and can be modified by typing a generic term (i.e.:
WC2006_Match03…) and/or by adding one or many available items (See screenshot
below). See also section ‘How to Modify the Default Filename Format String’, on page 29.
The user can reset the default filename by clicking the RESET button.
Page 48

Issue 2.19.A
XFile Version 2.19 – User Manual
EVS Broadcast Equipment – November 2012
38
3.3.7 Tab 7 – XML
A few operations made by XFile as backup, restore, delete, copy,… are remotely
controlled via XML file by a source application (IPDirector, Automation system, …).
Two modes are available:
• XML files are put in a folder located on the same hardware than XFile and XFile
scans this folder
• XML files are p ut in a folder on the net work. Several XFile scan th is folder and the
jobs are distributed among them.
Page 49

XFile Version 2.19 – User Manual
EVS Broadcast Equipment – November 2012
Issue 2.19.A
39
XML Jobs Root Folder
When using the XML Jobs Root Folder option, the XFile only scans its local folder.
To use this option, proceed as follows:
1. Select the Scan XML Jobs Incoming Folder option above the XML Jobs Root
Folder field.
2.
Specify the local folder that will receive XML files. The default local folder is
C:\XFile_XML.
XFile will handle all XML files stored in this folder.
XML Load balancing Jobs Root Folder
The load balancing process allows spreading the XML jobs over several XFile
applications. In this cas e, all XML files are stored in a s ingle folder on the network. All
XFile applications scan this folder and the jobs are distributed among the various XFile
applications, depending on their availability.
When using the XML Load Balancing Jobs Root Folder option, all XFile applications
will scan the same folder on the network.
To use the load balancing option, proceed as follows:
1. Select the Scan XML Load Balancing Jobs Incoming Folder check box.
2. In the XML Load Balancing Jobs Root Folder field, specify the folder on the
network that will receive all XML job files.
3. In the Load Balancing XFile Identifier field, t ype an identifier for the XFile. This
When it is available, XFile will handle the XML files in this folder.
will be used in the XML files to specify which XFile has handled the job.
Page 50

Issue 2.19.A
XFile Version 2.19 – User Manual
EVS Broadcast Equipment – November 2012
40
Note
The load balancing f unction f ilters the j obs based on the pref ix of th e XML file.
It will only process t he XML files with th e same prefix as the one defined in a
dedicated registry setting. Contact your administrator to set up this function.
Subfolders Created
Four subfolders are automatically created at start up when one of the XML modes is
selected:
Subfolder Name Content
Jobs_Incoming The source application posts XML files to request jobs.
Jobs_Scheduled The XFile stores the XML jobs scheduled.
Jobs_In_Progress The XFile stores the XML jobs in progress.
Jobs_Done The XFile posts the XML f iles containing the final res ult of
the jobs.
Example of XML file for backup command
Backup Clip 112 A from EVS server n°11 to the “F:\ext_folder\clip_11_112A.mxf”
<?xml version = "1.0" ?>
<EVS_XFile_Job_List>
<EVS_XFile_Job>
<Job_Id>4942648367704751</Job_Id>
<Job_Creation_Time>1132235747</Job_Creation_Time>
<Job_Type>0</Job_Type>
<Job_Src_Clip_Nb>112</Job_Src_Clip_Nb>
<Job_Src_Cam>A</Job_Src_Cam>
<Job_Dest_File>F:\ext_folder\clip_11_112A.mxf</Job_Dest_File>
</EVS_XFile_Job>
</EVS_XFile_Job_List>
Page 51

XFile Version 2.19 – User Manual
EVS Broadcast Equipment – November 2012
Issue 2.19.A
41
Example of XML file for Restore command
Restore Clip I:\HD\backup133A.mxf to EVS server n°11 at 111A
<?xml version = "1.0" ?>
<EVS_XFile_Job_List>
<EVS_XFile_Job>
<Job_Id>1238431548774395</Job_Id>
<Job_Creation_Time>1129799945</Job_Creation_Time>
<Job_Type>1</Job_Type>
<Job_Src_File>I:\HD \backup133A.mxf</Job_Src_File>
<Job_Src_Id>9YYabjA0</Job_Src_Id>
<Job_Src_Id_Material>9YYabjA0</Job_Src_Id_Material>
<Job_Dest_User_Nb>11</Job_Dest_User_Nb>
< Job_Dest_Clip_Nb >112</ Job_Dest_Clip_Nb >
< Job_Dest_Cam >A</ Job_Dest_Cam >
<Job_Src_App_Data>Job generated by XGateway</Job_Src_App_Data>
</EVS_XFile_Job>
</EVS_XFile_Job_List>
See XFile XML jobs documentation for complete description of XML files.
XML Default Parameters
It can occur that some X ML parameters are not def ined by the source a pplication. In th is
case, XML Default Param eters mentioned in the XML T ab are taken into account for the
missing XML parameters.
XML Backup Output Parameters
The File Format drop-down list allows the user to select the default file format.
The following formats are available:
• EVS MXF
• MXF OP1a (SD IMX only)
• Quick Time Movie
• Quick Time Reference
• Avid Ingest Device
• CleanEdit Reference
• Avid MXF OPAtom
• MXF OP1a (Std SMPTE)
When the Generate EVS XML Metadata check-box is selected, an XML file with the
metadata is generated. This file is created at the same time as the backup file for all
media file formats.
Page 52

Issue 2.19.A
XFile Version 2.19 – User Manual
EVS Broadcast Equipment – November 2012
42
The SuperMotion Backup Mode allows the user to s elect the backup mode for SS LM
clips. Refer to section ‘Super Motion Backup Mode’ on page 27 for more information.
The Audio Mode allows the us er to group EVS serv er m ono channels in stere o chann els
and to down convert samples from 24 bits to 16 bits.
XML Backup Filename Format String
The default filename automatically given to the backup file is
EVS XFILE <
number
It can be modified by t yping a gener ic ter m and/or by adding one or many available items.
See also section ‘How to Modify the Default Filename Format String’, on page 29.
The user can reset the default filename by clicking the RESET button.
backup date> - <server user number> - <clip
> <camera name>
XML Grab Filename Format String
The default filename automatically given to the JPG/BMP file is:
EVSGRAB_<date> - <_server user number> - <_clip number> - <_camera
name> - <_time code>. jpg/bmp
It can be m odified b y typing a g ener ic term and/or b y adding one or m an y available item s
(See screenshot in section ‘Grab XT/XFILE Filename Format String’ on page 35). See
also section ‘How to Modify the Default Filename Format String’, on page 29.
The user can reset the default filename by clicking the RESET button.
XML Render Playlist Filename Format String
The default filename automatically given to the rendered playlist is:
EVS XFILE <
number
It can be modified by typing a generic term and/or by adding one or many available items.
See also section ‘How to Modify the Default Filename Format String’, on page 29.
The user can reset the default filename by clicking the RESET button.
backup date> - <server user number> - PLST - <clip
>
Page 53

XFile Version 2.19 – User Manual
EVS Broadcast Equipment – November 2012
Issue 2.19.A
43
3.3.8 Tab 8 – User Parameters
Autostart
This option automatically starts the XFILE software.
Autobackup at Startup
This option automatically starts the autobackup mode at startup.
Confirm Manual Backup
Enables or disables the confirmation message while initiating a Backup command.
Confirm Manual Restore
Enables or disables the confirmation message while initiating a Restore command.
Confirm Manual Update
Enables or disables the confirmation message while updating a clip previously backed
up. This command is only available in Manual backup mode.
Cancel Backups Scheduled when Stopping Autobackup
If this option is selected, all the scheduled backup jobs will be cancelled when the
autobackup mode is stopped.
Page 54

Issue 2.19.A
XFile Version 2.19 – User Manual
EVS Broadcast Equipment – November 2012
44
Use Fixed Size Font for Clipnames and Keywords
Enabling this option will display the content of clipnames and keywords columns with
fixed size font in all modes.
Publish Clips with Original UmID (Warning publish will failed if
UmID already present on XNet)
Selecting this option will preserve the clips UmID in Publish mode.
Publish Clips with Original VarID (Warning publish will failed if
VarID already published on XFile)
Selecting this option will preserve the clips VarID in Publish mode.
Import: Use Filename to fill Clipname Metadata
When this option is s elected, the f ilename is assigne d as clipname to im ported files that
do not have a clipnam e. So, if a file has a clipname, it is not replaced by the filenam e.
This rule applies to all file formats.
Dual Path Editing
When this option is selected, an y keywor d of one f ile edited thr ough the Edit Cli p m odule
is automatically edited for the other files with the same IDmaterial and file format, e.g.
files backed up in mirroring mode (paths A + B). Changes are made in the EVS.XML
metadata file, as well as in the header of the EVS MXF file, if any.
Page 55

XFile Version 2.19 – User Manual
EVS Broadcast Equipment – November 2012
Issue 2.19.A
45
3.4 User Interface
3.4.1 Overview of the main Window
The screenshot below shows the various areas of the XFile main window.
Note
The AutoRestore an d the AutoPubl ish modes c an be activat ed from this main
window.
Most of the user interface elements are common to the different modes of XFile use:
Network Status, XFile List, Disk Usage, Disk Mode, Job Status B ars, Job Status Display
and Selection Buttons. They are described in the current section.
User interface elements specific to each mode are described in the corresponding
sections: Transfer commands, XNet List.
Page 56

Issue 2.19.A
XFile Version 2.19 – User Manual
EVS Broadcast Equipment – November 2012
46
This information is provided with clips created from
i.e. EVS MXF 2 MB, MXF OP1a, QuickTime Movie,
With EVS MXF 8MB, this field will be displayed on an
3.4.2 XFile List
The XFile List area includes the following elements:
• At the top left of the area, the number of clips retrieved on the XFile is specified.
• At the top right of the area, one or m ore buttons g ive acces s to com mands or op tions
specific to the XFile List.
• In the upper part of the ar ea, the filter buttons make it possible to f ilter the list of clips
displayed in the XFile List.
• Below the filter buttons, the list of clips backed up provides information on each clip.
XFile List Information
Each rec ord of a clip displa yed in the XFile List includes c lip information. T he main fields
displayed in the XFile List are explained in the table below:
Clip Information Description
UmID
VarID
Clip ID
Markers
Publish
Rating
ClipName
Date IN
TC IN
Displays the 8-bytes ID with fixed length assigned to the
clip and used for the unique c lip identification on the SDTI
network.
Displays the 32-bytes ID with variable length assigned to
the clip.
Displays ID assigned to th e clip using its page, bank, clip
and camera number.
Displays the markers defined for the clip.
Displays the EVS video server location where the given
clip is published for the XFile session opened.
Displays the interest level assigned to the clip.
Displays the name assigned to the clip
Displays the date of the clip IN point.
Multicam v. 9.00, whatever the time code used.
Displays the TC IN of the clip f or the time code d efined as
primary time code in Multicam.
The other time code data are specified in the clip Media
Info available in the Maintenance tab.
Duration
File Format
Displays the duration of the clip without guardbands.
Displays the form at of the back up f ile that includ es th e clip,
QuickTime Reference, and AVID MXF OPAtom
Page 57

XFile Version 2.19 – User Manual
EVS Broadcast Equipment – November 2012
Issue 2.19.A
47
orange background. This draws the attention to the fact
Clip Information Description
that the Restore is not possible on these files without a
manual file conversion.
Keyword 1
Keyword 2
Keyword 3
Creation Date and Time
Displays the first keyword assigned to the clip.
Displays the second keyword assigned to the clip.
Displays the third keyword assigned to the clip.
Displays the creation date and time of the EVS video
server where the clip has been created
Backup Date and Time
Displays the date and time of the XFile when the clip
backup file has been created.
Filename
Media Full Path
Displays the name of the backup file that includes the clip.
Displays the full path where the backup file is located on
the XFile disks.
Metadata Full Path
Displays the full path wher e the metadata XML file of the
backup file is located on the XFile disks.
Sorting Clips in the XFile List
To sort a column in alphab etical or numerical order, c lick on the column label to dis play
the arrow button and click again to invert the sorting.
Page 58

Issue 2.19.A
XFile Version 2.19 – User Manual
EVS Broadcast Equipment – November 2012
48
Selecting Columns in the XFile List
Use the right-click button of the mouse ( into
the list) to access this selection menu.
All columns available are listed here.
Select or unselect the item to be displa yed or
to be hidden.
The Reset to Default option allows you to
restore the standard display.
Filters
The upper part of th e X Fil e list d ispl a ys a l ist of buttons. These buttons g iv e acc ess to the
different filters to be applied to the XFile list.
The filters are avai lable in t he five m odes : Auto back up, Ma nual Bac k up, Rest ore, Publis h
and Maintenance modes.
Filter inactive and hidden
Filter is visible bu t in a c ti ve
Filter is active
Page 59

XFile Version 2.19 – User Manual
EVS Broadcast Equipment – November 2012
Issue 2.19.A
49
: the RESET but ton is present in a ll modes and resets all filters to default va lues (=
ALL for most filters)
Click on the button to displa y/hide the filter or use the right-click button of the mouse to
access this selection menu.
Creation date
Note
The Creation date and the back up time are diff erent values. The c reation date
depends on the date and time defined on your EVS video server. Please check
the date-time of your system before operating.
‘Last Hour’ and ‘Last 24 h’ are both quic k shortcuts to display the cli ps created dur ing the
last hour or during the last 24 hours.
A range of date & time can be define d to sor t the c lips c reat ed dur ing th at per iod. Click on
the ‘Range’ button to open the following dialog box:
Page 60

Issue 2.19.A
XFile Version 2.19 – User Manual
EVS Broadcast Equipment – November 2012
50
The ‘Creation date’ filter requires a start date and time, as well as an end date and time to
be valid.
1.
For date selection, do one of the following:
• In the calendar, select the month with the left and right arro ws, then the day of
the month.
OR
• Click the Today button.
2.
For time selection, do one of the following:
• In the Time field, select the hour us ing the up and down arrows to ch ange the
value displayed or directly type the value when the field lights green.
OR
• Click the Now button.
3. Press ENTER to confirm your selection.
4.
Enter the second selection window to enter the values for the end limit.
The filter is now active and the clips created in between the time range defined are
displayed in the XFile list.
Camera selection
Select the boxes represent ing the cameras and/or the PREF cam eras of the clips to be
displayed in the XFile list. Selected cameras appear in a green box.
Page 61

XFile Version 2.19 – User Manual
EVS Broadcast Equipment – November 2012
Issue 2.19.A
51
Rating
Select the boxes represent ing the four levels of Rating. Select ed items appear in a green
box and the XFile list is refreshed to display the new selection of clips.
Folders
Autobackup Mode
In Autobackup mode, the Folders filter displays this selection:
Option Description
All Displays all the clips included in the current(s) PATH(s)
defined in the system configuration at startup.
PATH A/B/C/D Displays the content of the selected path only.
Backup Mode
In Backup mode, the Folders filter displays this selection:
A backup folder can be d efined f or sa ving the c lips m anua ll y back ed up. In this cas e onl y
one backup folder is selected and its current content is displayed in the XFile list.
Clicking on the Folder button on the right side opens the following dialog box:
Page 62

Issue 2.19.A
XFile Version 2.19 – User Manual
EVS Broadcast Equipment – November 2012
52
The user must select a folder for use in the filter. This folder will appear in the Name bar
A Backup folder is assigne d temporarily for a particular operation. As all o perations are
successive and theref ore entered in a queue, the system will keep in mem ory the folder
defined at the time of the backup’s request.
Restore Mode
In Restore mode, the Folders filter displays this selection:
Restore folders can be defined for displaying the clips to be restored on the XNet.
The difference betw een ‘Restore Folders and ‘Ex ternal Restore Folder’ depen ds on the
folders and sub-folders included in the PATH.
The selection of the ‘Resto re folders’ does not require a scanning proc ess because the
clips have already been scanned at startup.
The 'External Rest ore Folder' must be a folder not included in the PATH, therefor e the
content of this extern al folder (or exter nal disk) needs to be scanned for extrac ting the
data and making them available from the XFile list.
In the Restore Folders field, clicking on the Folder button on the right opens the
following dialog box:
The following principles are applicable in this dialog box:
• Several folders are selectable at a time.
• The sub-folders of the selected folder are selectable as well.
• The current Session Folder always lights green in the list.
Page 63

XFile Version 2.19 – User Manual
EVS Broadcast Equipment – November 2012
Issue 2.19.A
53
You will find below explanations on how to perform the most important actions in this
dialog box, i.e. including and/or removing one or more folders from the filter selection:
• To add a folder to the Filter list, select the folder from the list and click the Add
Selected Folder button.
• To include subfolders of the selected folders displayed in the Filter list, select the
Include SubFolders check-box.
• To remove a folder from the Filter list, click the Remove Selected button.
• To remove all folders from the Filter list, click the Remove All button.
• Click OK to confirm your selection and quit the dialo g box. The folders app ear in the
Filter field, in the main XFile window.
In the External Restore Folder field, clicking on the Folder button on the right side
opens the following dialog box:
Only one folder is available for selection. T his folder cannot be included into the XFile
paths.
Click on one folder, click OK to confirm your selection and to quit the dialog box. The
label of the selected folder appears in the Filter field.
The new folder is scanned and its content appears in the XFile list.
Page 64

Issue 2.19.A
XFile Version 2.19 – User Manual
EVS Broadcast Equipment – November 2012
54
Clip Names
Clicking on the icon on the right side opens the following dialog box:
Filter Based on Prefix
The Filter based on Prefix field allows defining a quick filter based on the first
character(s) of a clip name.
When you click the Add b utton t o add th e pref ix define d to the F ilter list, the s yste m adds
automatically a "*" sign af ter the prefix. This helps the user distinct the prefixes and the
full clip names in the Filter list.
Filter Based on Existing ClipName
At startup, all clip nam es assigned to the clips are ext racted from the MXF files and are
listed in the Filter Based on Existing ClipName field.
Select a clip name from the list and click Add to fill out the filter list.
Note
The number of clip names/prefix in the list is restricted to 5 items.
The filter mode is not selectable.
Remove Selected
In the Filter list, s elect an i tem and click Remov e Select ed to cancel the sel ection of this
clip name.
Page 65

XFile Version 2.19 – User Manual
EVS Broadcast Equipment – November 2012
Issue 2.19.A
55
OK/Cancel
Click OK to confirm your selecti on and to q uit the d ialo g box. T he new clip names appear
in the Filter field.
Click Cancel to come back to the main XFile window without applying any ClipName
filter.
Keywords
Clicking on the icon on the right side opens the following dialog box:
Filter Based on Prefix
The Filter based on Prefix field allows defining a quick filter based on the first
character(s) of a keyword.
When you click the Add b utton t o add the prefix define d to the F ilter list, the s yste m adds
automatically a "*" sign af ter the prefix. This helps the user distinct the prefixes and the
full keywords in the Filter list.
Filter Based on Existing Keyword
At startup all keywords assigned to the clips are extracted from the MXF files and are
listed in the Filter based on existing Keyword field.
Select a keyword from the list and click Add to fill out the filter list.
Note
The number of keywords/prefix in the list is restricted to 5 items.
Page 66

Issue 2.19.A
XFile Version 2.19 – User Manual
EVS Broadcast Equipment – November 2012
56
Filter Mode
In the Filter Mode field, s elect between the cross-selection mode ( i.e. keyword 1 AND
keyword 2) and the global selection mode (i.e. Keyword 1 OR
keyword 2).
Remove Selected
In the Filter list, select a keywor d and click Remove Selected to canc el the selection of
this keyword.
OK / Cancel
Click OK to confirm your select ion and to quit the di alog box. The ne w keywords appear
in the Filter field.
Click Cancel to come back to the main XFile window without applying any Keyword filter.
UmID
Clicking on the left button will display the UmID filter.
Clicking on the icon on the right side opens the following dialog box:
Filter Based on Prefix
The Filter based on Prefix field allows defining a quick filter based on the first
character(s) of a UmID.
When you click the Add b utton t o add th e pref ix define d to the F ilter list, the s yste m adds
automatically a "*" sign af ter the prefix. This helps the user distinct the prefixes and the
full UmIDs in the Filter list.
Page 67

XFile Version 2.19 – User Manual
EVS Broadcast Equipment – November 2012
Issue 2.19.A
57
Remove Selected
In the Filter list, select a Um ID and click Rem ove Selected to cancel the sel ection of this
UmID.
OK/Cancel
Click OK to confirm your selection and to quit the dialog b ox. The new Um ID appears in
the filter field.
Click Cancel to come back to the main XFile window without applying any UmID filter.
VarID
Clicking on the right button will display the VarID filter.
Clicking on the icon on the right side opens the following dialog box:
Filter Based on Prefix
The Filter based on Prefix field allows defining a quick filter based on the first
character(s) of a VarID.
When you click the Add b utton t o add th e pref ix define d to the F ilter list, the s yste m adds
automatically a "*" sign af ter the prefix. This helps the user distinct the prefixes and th e
full VarIDs in the Filter list.
Remove Selected
In the Filter list, select a Va rID and click Rem ove Selected to cancel the s election of this
VarID.
Page 68

Issue 2.19.A
XFile Version 2.19 – User Manual
EVS Broadcast Equipment – November 2012
58
A/V
OK/Cancel
Click OK to confirm your selection and to quit the dialog b ox. The new VarID appears in
the filter field.
Click Cancel to come back to the main XFile window without applying any VarID filter.
Media / Clips
The MXF file is the file containing all data related to a common audio/video data.
The first clip created with t his A/V data is called the Mas ter Clip and has the par ticularity
to get the same code for the ID-material and for the ID-louth.
All clips ensued f rom this masterc lip, either b y copy, or by updat e, or b y modif ying the IN
(i.e. short IN) or OUT (i.e. short OUT ) point are link ed to the MXF f ile and a diff erent IDlouth is defined for each of them.
The following options are available for selection:
Option Description
ALL Displays all the clips
MasterClip Displays only the Master Clips
Note
This filter is helpful when restoring clips, because it will only
transfer the original clips, and skip the copies.
Page 69

XFile Version 2.19 – User Manual
EVS Broadcast Equipment – November 2012
Issue 2.19.A
59
Option Description
Group D isplays both m aster clips and clips linked by a “brack et” sign in the
XFile list:
Video Standards
Select the squares repr ese nting th e diff erent vid eo sta ndards. Selec ted item s appear in a
green box and the XFile list is refreshed to display the new selection of clips.
Video Codecs
Select the boxes representing the different video codecs. Selected items appear in a
green box and the XFile list is refreshed to display the new selection of clips.
File Format
Select the boxes repr esenting t he diff erent file f ormats . Selected item s appear in a gree n
box and the XFile list is refreshed to display the new selection of clips.
Camera label
Page 70

Issue 2.19.A
XFile Version 2.19 – User Manual
EVS Broadcast Equipment – November 2012
60
Clicking on the icon on the right side opens the following dialog box:
Filter Based on Prefix
The Filter based on Prefix field allows defining a quick filter based on the first
character(s) of a camera label.
When you click the Add b utton t o add th e pref ix define d to the F ilter list, the s yste m adds
automatically a "*" sign after the prefix.
Session Filters
The session informat ion is entered via the Config session wind o w – tab 2 ‘MXF Metadata’
at startup. This inf orm ation is s aved t o the d escr iptive m etadata of all the c lips back ed up
during the ‘session’.
Clicking on the icon on the right side opens a dialog box like the following one:
Page 71

XFile Version 2.19 – User Manual
EVS Broadcast Equipment – November 2012
Issue 2.19.A
61
Filter Based on Prefix
The Filter based on Prefix field allows defining a quick filter based on the first
character(s) of the session data.
When you click the Add b utton t o add th e pref ix define d to the F ilter list, the s yste m adds
automatically a "*" sign after the prefix.
Clip Markers
The clip markers allow the users to tag clips into a global selection and to keep this
selection from one mode to another.
5 different markers are available and can be combined if necessary.
Select a clip in the XFile list and click to tag the clip or click to clear the marker.
In the XFile list the clips marked are displayed as follows:
Note
The clip markers are not saved to the h eader of the MX F file and theref ore ar e
temporary. When you quit the XFile software all markers are removed.
Counters
A counter of clips is available in all modes in the upper side of the list.
The first value is the num ber of clips displayed in the list, the s econd value is the total
amount of clips in memory (contents of path(s) + external folder + clips scheduled).
The number of item s in the different lists can affect the per formance of the system. So it
is advised to reduce the number of clips displayed in the lists.
When the total am ount of clips displayed in the list e xceeds 2000
clips, the counter lights orange.
When the total number of clips dis played in the list exceeds 4000
clips, the counter lights red.
+ 5000+ If the total number of clips exceeds 5000 clips, t he list refreshing
stops and the counter displays ‘+ 5000+’.
Page 72
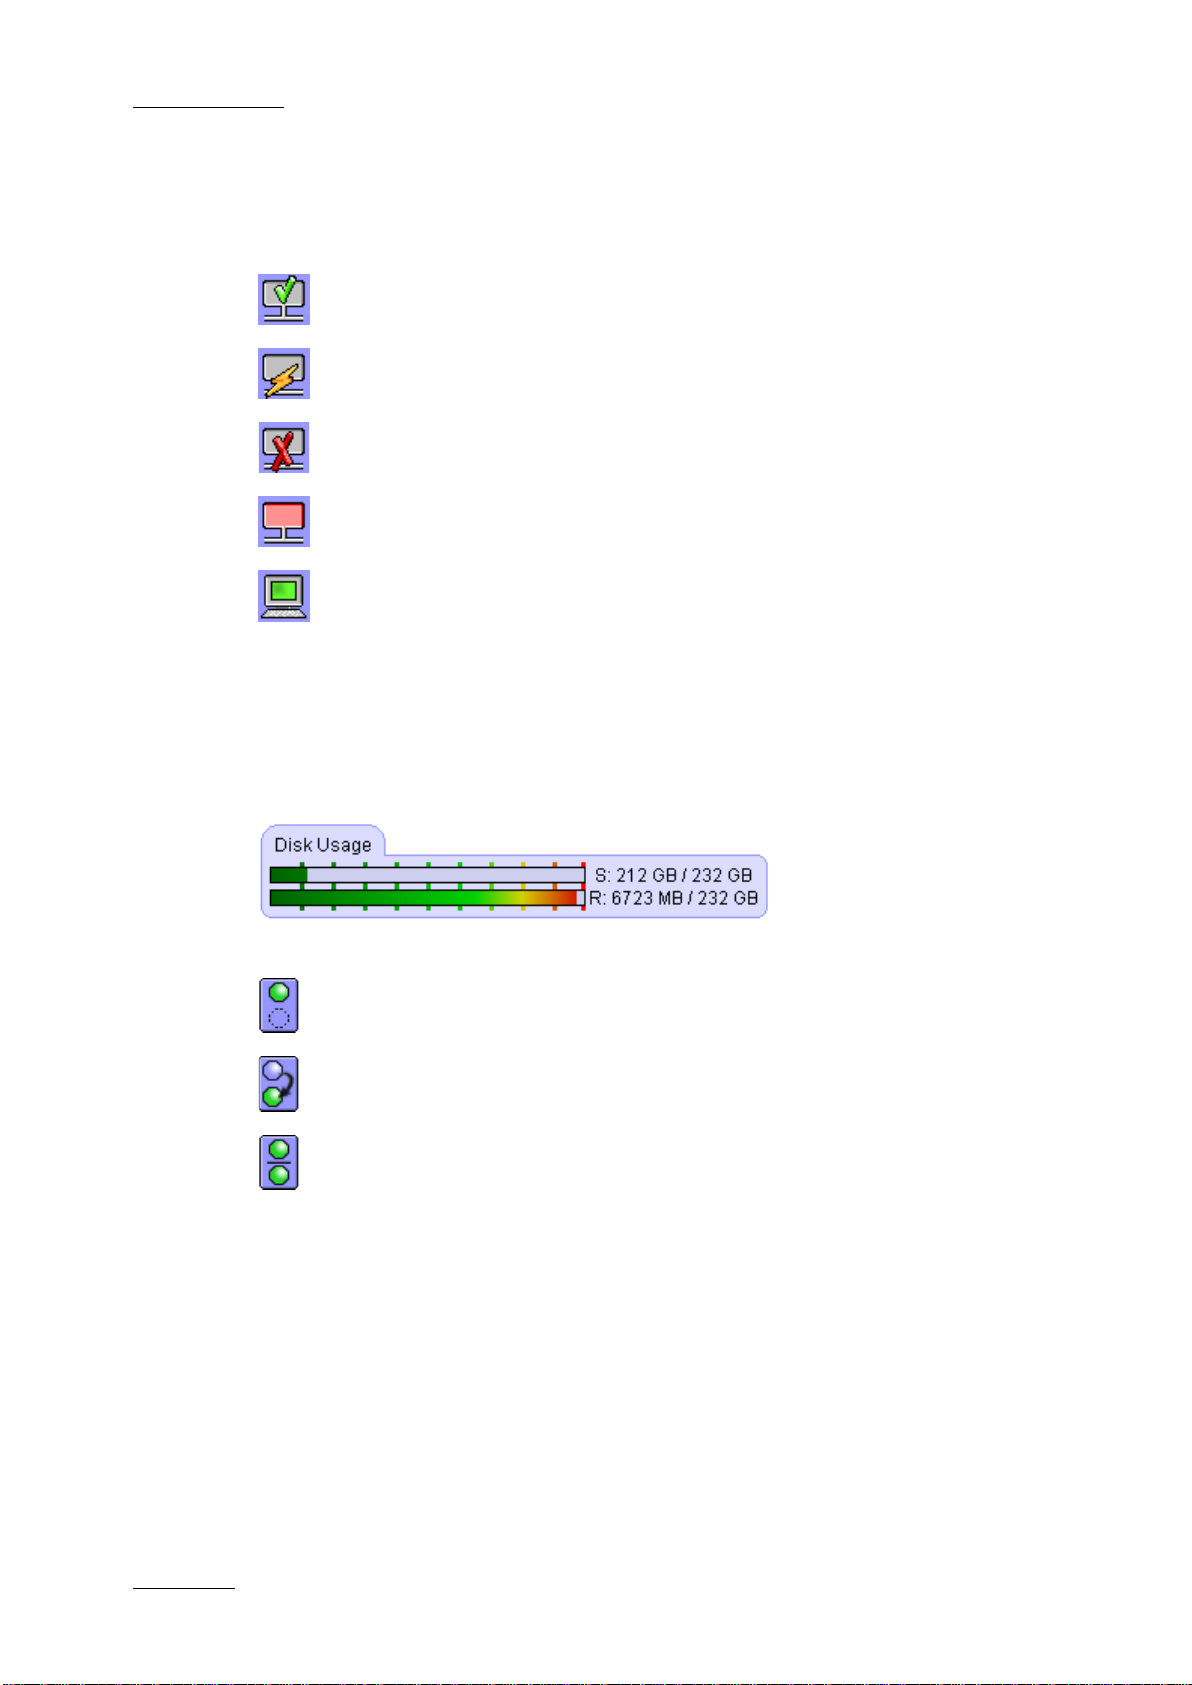
Issue 2.19.A
XFile Version 2.19 – User Manual
EVS Broadcast Equipment – November 2012
62
3.4.3 Network status
The icon displayed in the center of the screen notices the current status of XNet:
Connection to XNet is successfully done
XFile is connecting
Connection to XNet failed
Local hardware failure has been detected
Standalone mode
3.4.4 Disk Usage and Disk Mode
The remaining capacit y and the capacit y of disks are displayed in the lower part of the
window for each path.
The icon displayed in the lower part of the screen notices the current disk mode in use:
Single Disk
Dual Disk
Mirroring
Page 73

XFile Version 2.19 – User Manual
EVS Broadcast Equipment – November 2012
Issue 2.19.A
63
3.4.5 Jobs Status Area
The transfer rate of the Ba ck up and Res tore pr ocess es is perm anentl y evalu ated and the
progress bars show the activities in progress.
Depending on the operat ions in progr es s, th e opera tor has the choice between t w o status
displays:
Toggle to ‘Jobs done’ display
Toggle to ‘ Scheduled jobs’ display
Jobs Done Status Display
The different operations are divided into different tabs.
Filters
Use these filters to refine the selection:
Option Description
View All Displays all status since the startup of the system.
View Last Day Displays the operation status related to the last 24 hours.
View Last Hour Displays the operation status related to the last hour.
Hide Successful Brings out clearly the various errors occurring during a
complete session.
Page 74

Issue 2.19.A
XFile Version 2.19 – User Manual
EVS Broadcast Equipment – November 2012
64
Select Columns
From the Jobs Done Status area, you can select the columns to see in one of the
following ways:
• Use the right-clic k butt on of the mouse (into the list) to acces s this s election menu. All
columns available are listed here.
Select or unselect the item to be displayed or to be hidden.
The Reset to Default option allows you to restore the standard display
• Hide a column by dragging the border of a column header till its other border.
Scheduled Jobs Status Display
The Scheduled Jobs status display allows the oper ator to cancel one or all of the jobs in
queue.
Page 75

XFile Version 2.19 – User Manual
EVS Broadcast Equipment – November 2012
Issue 2.19.A
65
Cancelling Jobs
Select one/several it ems in the list a nd click Cancel Job, or click C ancel All Schedu led
Jobs to delete all items in the list:
The selected item s are deleted from the list and the related operations in progr ess are
stopped or the scheduled operations are cancelled.
Modifying the Priority of Backup and Restore Jobs
From the Backups and Restores tabs, the order of operations can be modified. Select
one job in the list and:
The selected item is r e-scheduled in the que ue and its new status is “Scheduled 1”. The
clip transfer will begin as soon as the current job in progress is completed.
Page 76

Issue 2.19.A
XFile Version 2.19 – User Manual
EVS Broadcast Equipment – November 2012
66
3.5 Autobackup Mode
3.5.1 Purpose
Click to activate the Autobackup Mode. In this mode, the system acts
automatically and back s up all clips according to the criteria defined in the Autoback up
selection window. Bes ides, this mode is important to take account of the different updates
made during operations.
When the users select the Autobackup mode, the application performs the Scanning
Network process again to retrieve all clips to be backed up on the XNet network.
Note
This mode MUST be enabled for the user's > ARCHIVE com mands from the
Multicam systems to be taken into account.
Thanks to the selecti on list, the autobackup process i s an automatic and self-operating
system. When a c lip is created on one of the selec ted servers, a copy is automatica lly
transferred to XFile. T he XFile oper ates with the l ower priorit y on the net work , this means
that the normal operations of other servers are not affected by the XFile activity.
If the cameras/s ystems selection ne eds to be modified, the autoback up mode must be
disabled before entering the Session Configuration window.
Page 77

XFile Version 2.19 – User Manual
EVS Broadcast Equipment – November 2012
Issue 2.19.A
67
Note
Other modes (backup, restore and maintenance) are also available during
autobackup: several modes can operate simultaneously.
3.5.2 Autobackup Main Window
The Autobackup m ain window is divided into several areas. The two main areas ar e the
XNet list which monitors the XN et activity and the XFi le list which displays the conte nts
of the XFile paths.
3.5.3 XNet List
In Autobackup mode, t he XNet tab gives an overview of the autobac kup criteria and on
the clip backup information.
When the Backup mode is ac tivated together with th e Autobackup mode, the X Net list is
displayed as described f or the Backup mode. Refer to sect ion 3.6.1 ‘XNet List ’ on page
68.
Page 78

Issue 2.19.A
XFile Version 2.19 – User Manual
EVS Broadcast Equipment – November 2012
68
Note
Working with copies of clips can affec t the value of the diff erent counters. Us e
the Refresh button in the XNet field for refining the current values.
Note
The Retry Failed butto n is act ive when er ror s occur .
3.6 Backup Mode
Click to enter the Backup mode.
3.6.1 XNet List
In Backup mode, the XNet tab shows the c lips available on the XN et depending on the
selected criteria, as displayed in the screenshot above.
Page 79

XFile Version 2.19 – User Manual
EVS Broadcast Equipment – November 2012
Issue 2.19.A
69
3.6.2 How to Start Manually the Backup of a
File
To start the backup of a file, proceed as follows:
1. Click the Backup button to activate the mode.
2.
In the XNet area, select th e server from which clips will be backed up. To display
the list of servers present on the XNet, click .
3.
Click again to change the display of the list and find the clip to back up.
4.
In the XNet list of clips, select the p age, the bank and the c amera of the c lip to be
backed up:
• To display the page/bank list, click
• To display the list of cameras, click
5.
Define any other available criteria to refine your select ion on the XNet list of clips.
See the section ‘Autobackup Mode’, on page 66 for more details on the filters.
6.
Select the clip from the list.
7.
Click to initiate the transfer.
Note
Same command can be used to manually update the files already saved to
XFile disks.
In the XNet list the clips already saved to XFile are displayed with blue characters:
Page 80

Issue 2.19.A
XFile Version 2.19 – User Manual
EVS Broadcast Equipment – November 2012
70
, the
3.6.3 How to Perform a Multi-Selection for
Manual Backup
To select multiple clips f rom an EVS video server and back them up manually, proceed
as follows:
1.
Define the selection criteria to retrieve a list of clips from the XNet.
2.
To select the clips in the XNet list of clips, do one of the following:
• To select a list of contiguous c lips, pr ess SHIFT and s elec t t he f irs t an d las t c lips
of the list.
• To select non-contiguous clips, press CTRL and select the clips.
• To select all the clips displa yed, press CTRL + A. The Select All comm and is
also available via the contextual menu on the list of clips.
3.
To validate the selection, do one of the following:
• If you want to back up the selected files in the default format, click .
• If you want to back up the selec ted files and possibly modify the default output
format, press CTRL + .
In both cases, the XFile Multi-Backup window opens. In the second case
Output Parameters field group is available at the bottom of the window:
4. If applicable, select the requested output format from the File Format field.
5.
If required, select the appr opriate Disk Writing Mode, SuperMot ion Backup Mode
and Audio Mode from the Output Parameters field group.
6.
In the XFile Multi-Backup window, the clips selected are listed with the current
status.
7. Click OK to confirm and to initiate the transfer.
Page 81

XFile Version 2.19 – User Manual
EVS Broadcast Equipment – November 2012
Issue 2.19.A
71
If no information is specified in the Status column, the backup will be performed.
If the ‘clip already on disk’ message is displa yed in the Status colum n of one or more
clips, the follo wing message will ask the user to confirm that the backup has to be do ne
again:
Note
All operations (Backup and Restore) are successive.
Page 82

Issue 2.19.A
XFile Version 2.19 – User Manual
EVS Broadcast Equipment – November 2012
72
3.7 Restore Mode
Click to enter the Restore mode.
The XFile can also be used as a securit y backup. C lips can be res tored from the XFile to
any other EVS video server on the network.
Page 83

XFile Version 2.19 – User Manual
EVS Broadcast Equipment – November 2012
Issue 2.19.A
73
3.7.1 How to Restore a File
To restore a backed up file on an EVS video server, proceed as follows:
1. Click the Restore button to activate the mode.
2.
Select the clip from the XFile list.
3.
Select the server from the XNet ar ea: to display the list of servers present on the
XNet, click .
4.
Change the display of the list to find one location where to restore the clip. To
specify this location, select the page, the bank and the camera selection :
• To display the page/bank list, click .
• To display the list of cameras, click .
5.
Select an available location in the XNet list.
6.
To restore the clip to the l ocation specif ied on an EVS video ser ver, do one of the
following:
• Click (R ESTOREclip) to in itiate the transfer of the selected clip. T he UmID
(ID-material/ID-louth) is preserved.
• Click (COPYclip) to initiate the transfer and to create a COPY of the
selected clip. In this case a new UmID is defined.
To ensure the valid ity of data during o perations, onl y one UmID c an be present
on the same network. T hen if the operator has to use identical c lips on several
machines, the COP Yclip comm and is advised to res tore several versions of the
same clip.
• Click (Short COPYclip) to initiate the transfer of a shorter copy of the
selected clip. Only the V/A m aterial incl uded bet ween the IN and the OU T points
(without guardbands) will be restored. In th is case, a new IDmater ial and a new
IDlouth are defined.
The clips being restored o n an EVS video s erver are seen in Mult icam as growing clips.
They can be played as soon as the Restore operation has started.
Page 84

Issue 2.19.A
XFile Version 2.19 – User Manual
EVS Broadcast Equipment – November 2012
74
Note
While moving/copying a clip, the ID-material is preserved.
If the user COPIES a c lip to a new locat ion (making a new I D Louth) then the
XFile will back up the new data.
If the user MOVES a c lip (ID Louth is maintained), then the XFile will update
the original clip.
3.7.2 Clips Already Present on the XNet and
Transfer Errors
In the XFile list, the clips already present on the XNet are displayed with blue characters
If a clip sel ected for restore is alread y present on the XNet networ k, the following error
message informs the operators when they choose the transfer mode:
In this case, the operators hav e to use the COPYclip command to initiate the transfer
and create a copy of the clip.
3.7.3 How to Perform a Multi-Selection for
Restore
To select multiple c lips f rom an XF ile to restor e them to an EVS vid eo server, proceed as
follows:
1.
In the XFile list on the main XFile window, do one of the following:
• To select a list of contiguous c lips, pr ess SHIFT and s elec t t he f irs t an d las t c lips
of the list.
• To select non-contiguous clips, press CTRL and select the clips.
• To select all the clips displayed in the XFile list, pres s CTRL + A. The Select All
command is also available via the contextual menu on the list of clips.
Page 85

XFile Version 2.19 – User Manual
EVS Broadcast Equipment – November 2012
Issue 2.19.A
75
2.
Select the server from the XNet list.
3.
Change the display of the list to find one location.
4.
In the XNet list, select the first location to restore the clips.
5.
Click or to open the following window:
• If the selected location is free, the clip destination lights green.
• If the selected location is already filled, the clip destination lights red. In this
case, the clip restore will b e aborte d. A secon d operat ion is n ecess ary to restor e
the clip to another location on the XNet.
6. Select a restore method from the Destination Mode drop-down list. For more
details, refer to the section ‘
Restore Destination Mode’, on page 76.
7.
Click OK.
Restored clips are displayed in the XNet list:
Page 86

Issue 2.19.A
XFile Version 2.19 – User Manual
EVS Broadcast Equipment – November 2012
76
3.7.4 Restore Destination Mode
The destination mode in the XFile Multi-Restore window allows the users to specify
where the clip will be restored:
Option Description
Original Plac e The clip returns to its prev ious loc ation on the XNet . In this
case, the selection perf ormed in the XNet list is not taken
into account. If the previous location is not free, the user
needs to select another Restore Destination mode.
Original place on another
LSM
Contiguous The group of clips is restor ed to all locations contiguo us to
Contiguous based on
camera selection
Contiguous and group
related clips
The clip returns to its previous location ( page, bank,…) on
the XNet but is restored to another system. In this case,
the selection performed in the XNet list is not taken into
account.
the location selected in the XNet list.
The group of clips is r es t ored t o locations contigu ous t o th e
location selected in the XNet list, but only on the selected
cameras.
The system will recom pose the group of related clips. For
example: Clip 111A returns to location A, clip 1 11B returns
to location B,…
Page 87

XFile Version 2.19 – User Manual
EVS Broadcast Equipment – November 2012
Issue 2.19.A
77
3.8 Publish Mode
Click to enter the Publish mode.
The Publish mode gives a direct ac cess to the c lips saved to X File disk s. A batch of clips
can be organized in a ‘page/bank/cam’ structure and can be ac cessible – for selection
and playback – via the Re mote Control panel and/or t he VGA of the Multicam, or from the
Clips > XFile node of the IPDirector Database Explorer.
In Publish mode, the counters, the filters and the selection modes are similar to the
Restore mode.
3.8.1 Publish Modes
The following Publish modes are available:
• Fast Publish, whic h corresponds to the previ ous Publish mode and disconnec ts and
• Online Publish, which is now th e default m ode and work s without the disconnect / re-
• AutoPublish: refer to section 3.3.4 ‘Tab 4 – Scan Folder’ on page 30.
re-connects the XFile from the XNet
connect process, but which takes more tim e, especially when the num ber of clips is
important.
Page 88

Issue 2.19.A
XFile Version 2.19 – User Manual
EVS Broadcast Equipment – November 2012
78
3.8.2 How to Publish Clips
To publish a clip stored on the XF ile dis k, i.e. to gi ve ac cess to it f rom the Rem ote panel,
from the VGA of the Multicam application, or from the Clips > XFile node of the
IPDirector Database Explorer, you can choose between Online Publish and Fast Publish.
Online Publish
To publish one or several clips with Online Publish, proceed as follows:
1. Click the Publish button to activate the mode.
2.
From the XFile list, select the clip you want to publish.
To select multiple clips, do one of the following:
• To select a list of contiguous c lips, pr ess SHIFT and s elec t t he f irs t an d las t c lips
of the list.
• To select non-contiguous clips, press CTRL and select the clips.
• To select all the clips displayed in the XFile list, pres s CTRL + A. The Select All
command is also available via the contextual menu on the list of clips.
3.
Change the display of the XNet list to find one location.
4.
Select the location to publish the clips in the page, the bank and the camera
selection.
5.
Click (Online Publish) to initiate the transfer of the selected clips.
6.
If you have selected multiple clips, the XFile Multi-Publish window opens:
• If the selected location is free, the clip destination lights green.
• If the selected location is already filled, the cli p dest ina t ion lig hts red. In t his c ase
the publication of this clip will be aborted.
Select a publishing m ethod from the Destination Mode drop-down list and click
OK. For more details on the various options, see section ‘
Restore Destination Mode’, on page 76).
Page 89

XFile Version 2.19 – User Manual
EVS Broadcast Equipment – November 2012
Issue 2.19.A
79
7.
You may switch to the Fast Publish mode by clicking the (Fast Publish)
button.
8.
Select other clips from the XFile list and repeat the operation.
Clips are sent to XNet. Depending on the n umber of clips, this operation can ta ke some
time.
In the XFile list and XNet list, clips are highlighted in
• light yellow when the publish is scheduled
• light orange when the publish is done
The counter and the Publish column of the XFile list are updated as clips are published.
Page 90

Issue 2.19.A
XFile Version 2.19 – User Manual
EVS Broadcast Equipment – November 2012
80
from the XNet list when the operation is
Fast Publish
To publish clips with Fas t Publish, you first need to initiate th e Onl ine Publ ish tran sf er. To
do so, proceed as follows:
1.
Repeat steps 1 to 4 from the Online Publish procedure detailed above.
2.
Click (Fast Publish) to switch to switch to the Fast Publish mode for the
transfer of the selected clip.
A message warns you that XFile will be disconnected from the XNet.
3. Click Yes.
4.
Select other clips from the XFile list and repeat the operation.
The XNet list, the count er and the Publish c olumn of the XFile list are updated as s oon
as XFile is reconnected to the XNet.
Important
The Fast Publish command will disconnect the XFile from the XNet and then
re-connect the XFile to t he X Net. Dur ing th is op erati on, the Mult icam databas e
is updated with the new publish list of the XFile.
This command will stop the current playbacks of XFILE clips.
This command will make ‘unavailable’ the XFILE clips included into a
playlist, unless the original UmID is kept, if configured in User Parameters.
Refer to section 3.3.8 ‘Tab 8 – User Parameters’ on page 43.
3.8.3 How to Un-publish a Clip
When you work with On line pub lish mode, you can re m ove publish ed c lips f rom the XNet
list. To do so, proceed as follows:
1.
Select the clip(s) from the XNet list.
2. Click Remove.
Clips are highlighted in light red in the XNet list when the remove operation is
scheduled and they disappeared
completed.
The counter and the Publish column in the XFile list are then updated.
Page 91

XFile Version 2.19 – User Manual
EVS Broadcast Equipment – November 2012
Issue 2.19.A
81
3.9 Maintenance Mode
3.9.1 Accessing the Maintenance Mode Window
Click to enter the Maintenance mode.
The Maintenance window opens :
Page 92
Issue 2.19.A
XFile Version 2.19 – User Manual
EVS Broadcast Equipment – November 2012
82
3.9.2 Maintenance Features
Four different maintenance sub-modes are available in the Maintenance window. You
select the maintenance feature you want to use by clicking the corresponding button.
The following table gives a short overview of the main actions available in the various
maintenance sub-modes:
Sub-mode Description
Clip Maintenance
Disks-Folders
Maintenance
Playlist Maintenance
The Clip Maintenance makes it possible to:
• view the metadata of a clip
• delete backup clips and files from the XFile disks
• generate a storyboard, i.e. an HTML f ile with th umbnai ls and
information on all the clips displayed in the XFile list.
• Import files from third party.
For more information, refer to the section 3.10 ‘Clip
Maintenance’, on page 83.
The Disks-Folders Maintenance makes it possible to:
• create and delete f olders in the XFile data paths to maintain
the folder structure on the XFile disks
• create and delete external folders on the XNet network
• move files to folders of the XFile data paths
• copy files to external folders.
For more information, refer to 3.11 ‘Disks-Folders
Maintenance’, on page 93.
The Playlist Maintenance makes it possible to:
• save a list of clips as a playlist on an XFile disk
• publish and restore the playlist on the XNet network (not yet
available).
• export the playlist to a single media file.
• backup a server playlist into a single media file (ren der XT
playlist)
For more information, refer to 3.12 ‘Playlist Maintenance’, on
page 97.
Page 93

XFile Version 2.19 – User Manual
EVS Broadcast Equipment – November 2012
Issue 2.19.A
83
3.10 Clip Maintenance
From XFile version 1.14, you can b ack up clips m anually and autom atically i nto different
formats of backup files.
From XFile version 2.00. 30, you can view and m aintain all the form ats of backup files in
the Clip Maintenance mode.
Important
To be able to view and maintai n the backup files having another format than
EVS MXF, you need to m ake sure that the EVS XML file including the f ile/clip
metadata is located in the same folder as the backup file.
3.10.1 Introduction
Access
Click on the Clip Maintenance button to enter the Clip Maintenance.
Available Functions
In Clip Maintenance, you can perform the following actions:
• viewing all the metadata of a clip
• deleting backup clips and files from the XFile disks
• converting backup clips to EVS MXF 2MB
• transferring backup clips to Avid I ngest D e vice or Xedio
• importing files from third parties. See als o section 3.10.6 ‘Im porting Files from Third
Party Systems’ on page 92.
• generating an HT ML file with thumbnails and i nformation on all the clips d isplayed in
the XFile list. See also the section 5.4 ‘Storyboard’, on page 177.
Page 94

Issue 2.19.A
XFile Version 2.19 – User Manual
EVS Broadcast Equipment – November 2012
84
3.10.2 Media Info Area
When you click the Clip Maintenance button, the M edi a Inf o ar ea ope ns on the left of the
window. The Media Info area displays the cur rent parameters and values saved to t he
descriptive metadata of the backup file.
Page 95
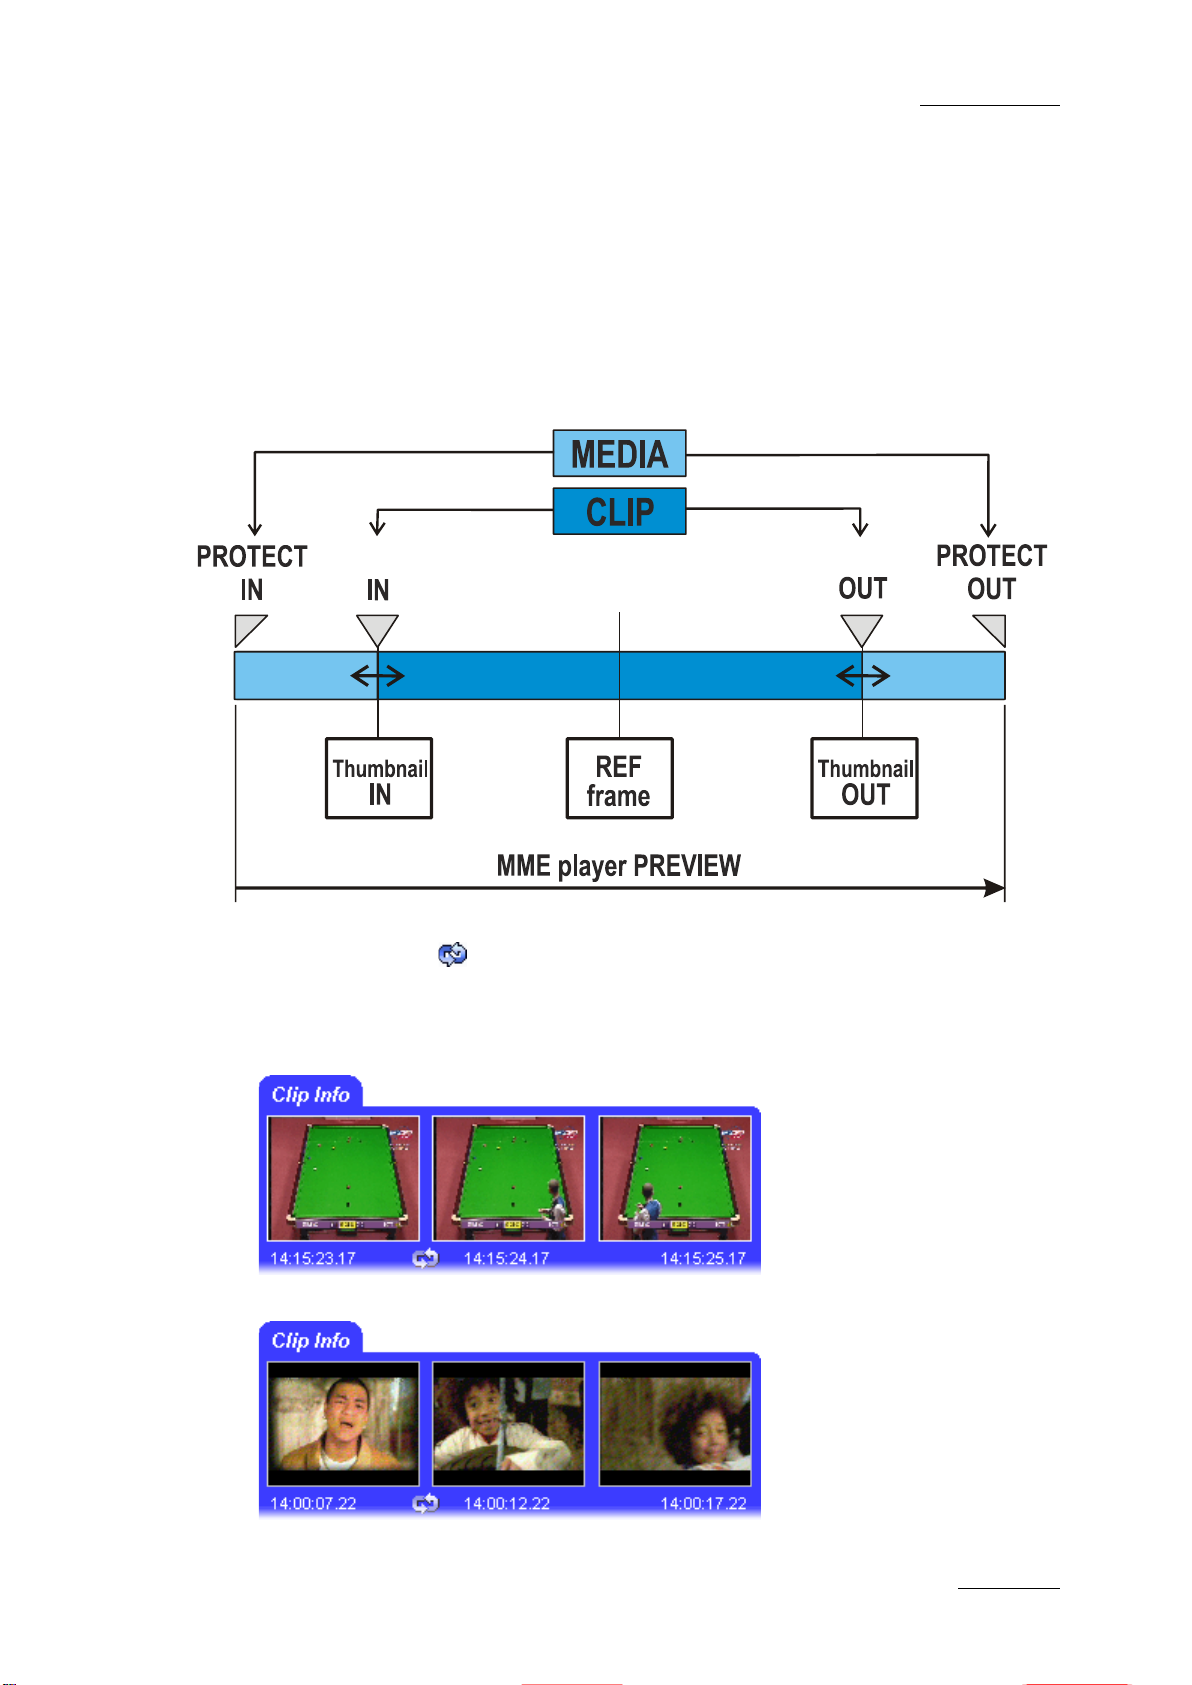
XFile Version 2.19 – User Manual
EVS Broadcast Equipment – November 2012
Issue 2.19.A
85
Thumbnails
The thumbnails defined for each file are extracted from the MJPEG files.
The thumbnail shows the following frames from left to right:
• the IN (i.e. SHORT IN) frame,
• the REF frame (automatically defined in the middle of the clip),
• the OUT (i.e. SHORT OUT) frame.
-
The XFile versions pre viou s to the v ersion 1.01.0 5 do not include the thum bnai ls c reation
process. Use the button to create new thumbnails or to update the current
thumbnails.
The thumbnail format respects the aspect ratio of the different video signals.
SD clips are displayed with 4:3 aspect ratio.
16:9 SD clips are displayed with the usual black strips.
Page 96

Issue 2.19.A
XFile Version 2.19 – User Manual
EVS Broadcast Equipment – November 2012
86
The first parameters (dark blue)
time, the
parameters can be different from
one clip to the other: the unique
LSM clip
The last parameters (dark blue)
onfiguration window.
HD clips are displayed with 16:9 aspect ratio.
File and Clip Metadata
From XFile V.1.14, clips created on EVS vi deo servers can be back ed up in different f ile
formats. The backup files having different formats can be maintained in XFile.
The metadata of the EVS MX F files
is stored in the header of the MXF
file.
The metadata of back up files having
other formats needs to be stored in
a metadata XML file.
display the file parameters, the A/V
parameters given by the XNet: clip
duration, TC IN and OUT excl., ID-
material, creation datevideo standard and format, number
of video signals ( SL SM = 3), number
of audio tracks, audio type and the
number of clips inc luded in this MXF
file.
The following paramet ers (light-blue)
are divided by clip section. These
UmID, rating, clipname,
number, SHORT IN and OUT points,
duration and the different keywords.
display the current values saved to
the Session C
These parameters are common for
each clip.
Page 97

XFile Version 2.19 – User Manual
EVS Broadcast Equipment – November 2012
Issue 2.19.A
87
Note
Depending on the time code and video system s , the time code in the column is
displayed with different characters:
The duration for NTSC clips is always calculated on non-drop-frame basis.
Note
The Nb Videos field is the onl y way to ident ify the S uper Motio n Back up Mod e
used to backup SSLM clips:
• 1 video(s) for clips backed up with 1/2 or 1/3 frames.
• 2 or 3 video(s) for clips backed up with all frames.
Page 98

Issue 2.19.A
XFile Version 2.19 – User Manual
EVS Broadcast Equipment – November 2012
88
3.10.3 Deleting Backup Clips and Files
As several clips may be linked to a backup file, the Delete comm and has been s plit in 2
buttons: Delete File and Delete Clip. Both commands are available in the upper right
part of the XFile area of the Maintenance window.
To mark the clips and th e files out, it is advised to c hange the display to 'Group' in th e
Media / Clips filter.
The group of clips is represented with brackets in the XFile list.
Associated XML files are deleted together with the backup files.
Important
Special attention m ust be b rought to MXF OPAtom file s, as all the as sociated
audio files are not always deleted.
How to Perform a Multi-Selection To Delete
Backup Files
1. Press SHIFT or CTRL and select a batch of files from the XFile list.
2.
Click to open the XFile Multi-Delete Files window:
3.
This window allo ws the op e rat or to r e view t he f iles before deletion. Pay attention to
the number of clips inc luded in each file. Deleting the f ile will delete al l the clips
included in this file.
4. Click Delete All files to confirm the command or Cancel to abort the operation.
Page 99

XFile Version 2.19 – User Manual
EVS Broadcast Equipment – November 2012
Issue 2.19.A
89
How to Perform a Multi-Selection To Delete
Clips
1. Press SHIFT or CTRL and select a batch of files from the XFile list.
2.
Click to open XFile Multi-Dele te Clips wind ow. This window allows the
operator to review the clips before deletion:
3. Click Delete All Clips to confirm the command or Cancel to abort the operation.
4.
If one/several clips is/are the last clip(s) into the MXF file, the followin g message
notices the operator:
5. Click OK to close the message box and to s witch to the Multi-D elete Files windo w
(shown on a red background).
6. Click Delete All files to confirm the command or Cancel to abort the operation.
Page 100

Issue 2.19.A
XFile Version 2.19 – User Manual
EVS Broadcast Equipment – November 2012
90
3.10.4 Converting Backup Files
From Multicam version 9.00, the A/V material and data are stored in 8MB blocks, no
longer in 2MB blocks. In XFile, the EVS MXF backup files will still be created in 2MB
block format. When the EV S MXF b ack up f iles, or a n y other bac k up file in anothe r f ormat
are restored, the y are obviousl y restored in the 8MB block s tructure on the EVS video
server.
How to Convert Manually Backup Files
Since the backup into EVS MXF files of 8 MB blocks was possible in the former version of
XFile, you will still be able to convert such backup files to 2MB backup files in the
Maintenance module. The converted backup files will be stored in a specified folder.
To convert m anually EVS MXF file s of 8 MB bloc ks to EVS MXF files of 2MB, proceed as
follows:
1.
Select the file(s) to convert in the XFile list of the Maintenance module.
2.
Right-click to open the contextual menu.
3. Select Transfer/Convert > Convert EVS MXF 8MB to 2MB.
The Browse for Folder window opens:
4.
Select the folder in which you want to save the converted files.
5. Click OK.
The converted backup f iles are generated and sa ved in the given folder with th e default
file name specif ied in the XFile C onfig. Session win dow, Advanced Parameters tab (see
section ‘Backup Filename Format String’, on page 28).
 Loading...