

Page 1
USER MANUAL
Xedio Importer
Version 4.35 - August 2013
Page 2

Page 3

USER MANUAL Xedio 4.35 XedioImporter
Copyright
EVS Broadcast Equipment SA– Copyright © 2010-2013. All rights reserved.
Disclaimer
The information in this manual is furnished for informational use only and subject to
change without notice. While every effort has been made to ensure that the information
contained in this user manual is accurate, up-to-date and reliable, EVS Broadcast
Equipment cannot be held responsible for inaccuracies or errors that may appear in this
publication.
Improvement Requests
Your comments will help us improve the quality of the user documentation. Do not
hesitate to send improvement requests, or report any error or inaccuracy on this user
manual by e-mail to doc@evs.com.
Regional Contacts
The address and phone number of the EVS headquarters are usually mentioned in the
Help > About menu in the user interface.
You will find the full list of addresses and phone numbers of local offices either at the end
of this user manual (for manuals on hardware products) or at the following page on the
EVS website: http://www.evs.com/contacts.
User Manuals on EVS Website
The latest version of the user manual, if any, and other user manuals on EVS products
can be found on the EVS download center, on the following webpage:
http://www.evs.com/downloadcenter.
I
Page 4

Page 5

USER MANUAL Xedio 4.35 XedioImporter
Table of Contents
TABLE OF CONTENTS III
WHAT'S NEW? V
1. INTRODUCTION 1
1.1. Product Description 1
1.2. Importable Media 3
1.3. General Import Process and Mandatory Fields 3
2. IMPORTING XDCAM, XDCAMEX, P2 AND CANON FILES 4
2.1. Introduction 4
2.2. Import Process 5
2.3. Fields in the XDCAM, XDCAMEX, P2 and CANON Tabs 5
2.4. Setup Window 6
2.4.1. Opening of the Setup Window 6
2.4.2. File Tab 7
2.4.3. Selection Tab 9
2.4.4. Audio Channel Assignment Tab 10
3. IMPORTING VIDEO / AUDIO / STILLS FILES 16
3.1. Introduction 16
3.2. Single File or Batch Import 16
3.2.1. Introduction 16
3.2.2. Single File Import 17
3.2.3. Batch Import 18
3.3. Setup 18
3.4. Fields in the Video/Audio/Stills Tab 19
4. IMPORTING TRANSITION EFFECTS (RTD) 21
4.1. Introduction 21
4.2. Background Information on TIFFs and RTDs 21
4.2.1. Tiff Files Required for an RTD 21
4.2.2. Requirements for TIFF Files 22
4.3. Setup 22
4.4. Fields in the RTD tab 23
5. IMPORTING FILES FROM EVS SERVERS 25
5.1. Introduction 25
Table of Contents III
Page 6

EVS Broadcast Equipment SA Issue 4.35.B- August 2013
5.1.1. Direct Access to the EVS Video Servers 25
5.1.2. Accessing Video Server Clips Versus Backup Files 25
5.2. EVS Server Tab Description 26
5.2.1. Overview 26
5.2.2. Server Structure Area 26
5.2.3. Media Properties Area 27
5.2.4. Clip/Channel Area 27
5.2.5. Setup 27
5.3. Using EVS Servers' Record Train and Clips in Xedio 28
5.3.1. Possible Actions in CleanEdit 28
5.3.2. How to Import Clips From an EVS Server 28
IV Table of Contents
Page 7

USER MANUAL Xedio 4.35 Xedio Importer
What's New?
In the user manual, the icon has been added on the left margin to highlight
information on new and updated features.
The sections updated to reflect the new and modified features in Xedio Manager from
Xedio Suite 4.03 and 4.35 (compared to Xedio Suite 4.02) are listed below.
Setting subfolder in the storage location of imported files
• Users can define the string format of the storage subfolder used when importing a
selection of XDCAM, XDCAMEX, P2 or CANON Files.
See section "File Tab" on page 7.
Setting the name format string of generated clips
• Users can define the name of the clips generated in the database when importing a
selection of clips.
See section "Selection Tab" on page 9.
Audio mono tracks can be used in the Xedio Suite.
• Possibility to define audio track assignment with mono tracks for the imported files.
See section "How to Define Audio Channel Assignment" on page 11.
See section "How to Change the Order of Channels inside a Track" on page 13.
What's New? V
Page 8

Page 9

USER MANUAL Xedio 4.35 Xedio Importer
1. Introduction
1.1. Product Description
In the Xedio suite, the Media Importer tool offers a way of acquiring media files for use
within the system. Authorized users may import, into the Xedio database, media that have
already been recorded and are in a file format that can be used by Xedio. P2, XDCAM and
XDCAM EX, music, graphics or existing mpeg and dv files are some examples.
Once the files are imported and set to "Publish", they become available in the Media
Manager.
The Media Importer tool is available as:
• a separate application: Xedio Importer
• as a module built in CleanEdit, and available in the Media Importer tab.
• as a module built in Xedio Manager, and available in the Media category.
1. Introduction 1
Page 10
EVS Broadcast Equipment SA Issue 4.35.B- August 2013
Note
The color of some user interface elements may vary with the Xedio skin
installed.
2 1. Introduction
Page 11

USER MANUAL Xedio 4.35 Xedio Importer
1.2. Importable Media
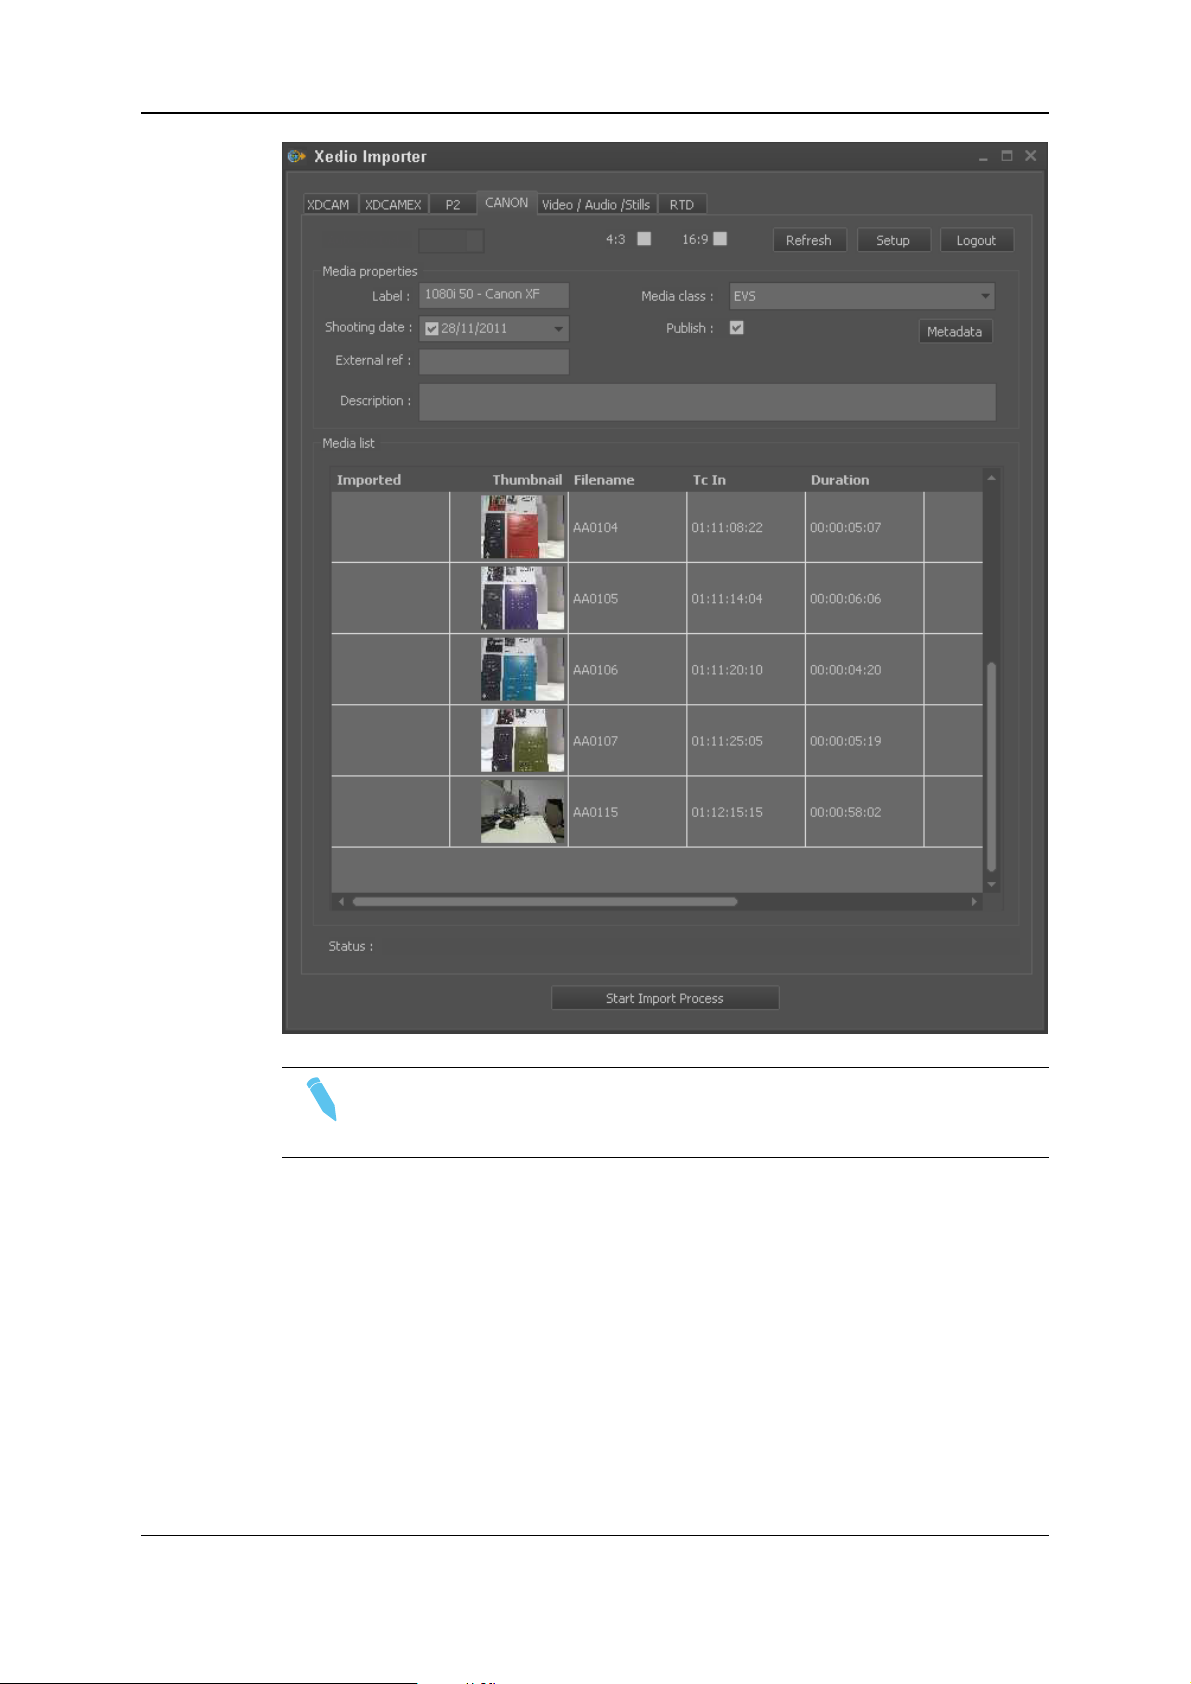
The Xedio Importer main window allows you to select media to import.
Different tabs can be displayed, provided that they have been selected from Xedio
Manager: Softwares > Parameter Profiles.
They are used to set the parameters for the different types of media which can be
imported into the system:
• XDCAM, XDCAMEX, P2 and CANON tabs: to import media files recorded on Sony
XDCAM and XDCAMEX, Panasonic P2 and CANON cameras
• Video/Audio/Stills tab: to import media files, images or audio files
• RTD tab: to import video containing transitions
• EVS Server tab: to import media files available on an EVS video server on the same
network as the Xedio suite. In this case, Xedio does not import the file content into the
Xedio storage system, but creates a reference to the server files in the Xedio
database.
1.3. General Import Process and Mandatory Fields
The import process is similar in all tabs. However, the file-related information you can
provide depends on the file to import.
The mandatory field names are displayed in red in the user interface as long as you do not
define a value for them.
Warning messages are also displayed at the bottom of the tab to tell the user which fields
should be filled in.
In each tab and for all import sessions, the mandatory steps and information are the
following:
1. Specify where Xedio Importer will find the source files to be imported.
2. Specify the Label field, that is to say the name of the media when it will be imported
into Xedio CleanEdit.
3. Tick the Published check box to make the media available and visible to all users.
4. Click the Start Import Process button at the bottom of the window.
Once imported, the files will be available in CleanEdit, in the Media Manager tab.
1. Introduction 3
Page 12
EVS Broadcast Equipment SA Issue 4.35.B- August 2013
2. Importing XDCAM, XDCAMEX, P2 and CANON Files
2.1. Introduction
The XDCAM, XDCAMEX, P2 and CANON tabs allow importing media files created with
a XDCAM, XDCAMEX, P2 or CANON camera. The source files can be retrieved from a
camera directly connected to the CleanEdit workstation or are made available via an FTP
server.
4 2. Importing XDCAM, XDCAMEX, P2 and CANON F iles
Page 13

USER MANUAL Xedio 4.35 Xedio Importer
2.2. Import Process
To be able to import files from XDCAM, XDCAMEX, P2 and CANON cameras, you need
to proceed as follows:
1. In the Setup window you can access by clicking the Setup button, define:
◦ the source and destination locations,
◦ the default values for the properties of the imported files,
◦ the audio channel assignment.
2. Specify the Label field, that is to say the name of the media when it will be imported
into Xedio CleanEdit.
3. If requested, change the file properties before you perform a given import.
4. Ensure that the Published check box is ticked to make the media available and
visible to all users.
5. Select the files you want to import from the Media List:
◦ Press CTRL + click on the files for a selection of multiple non-contiguous files.
◦ Press SHIFT + click on the first and last file for a selection of multiple contiguous
files.
6. Click the Start Import Process button at the bottom of window.
At the end of the import process, a message specifies how many files have been
successfully imported. Once imported, the files are available in CleanEdit, in the Media
Manager tab.
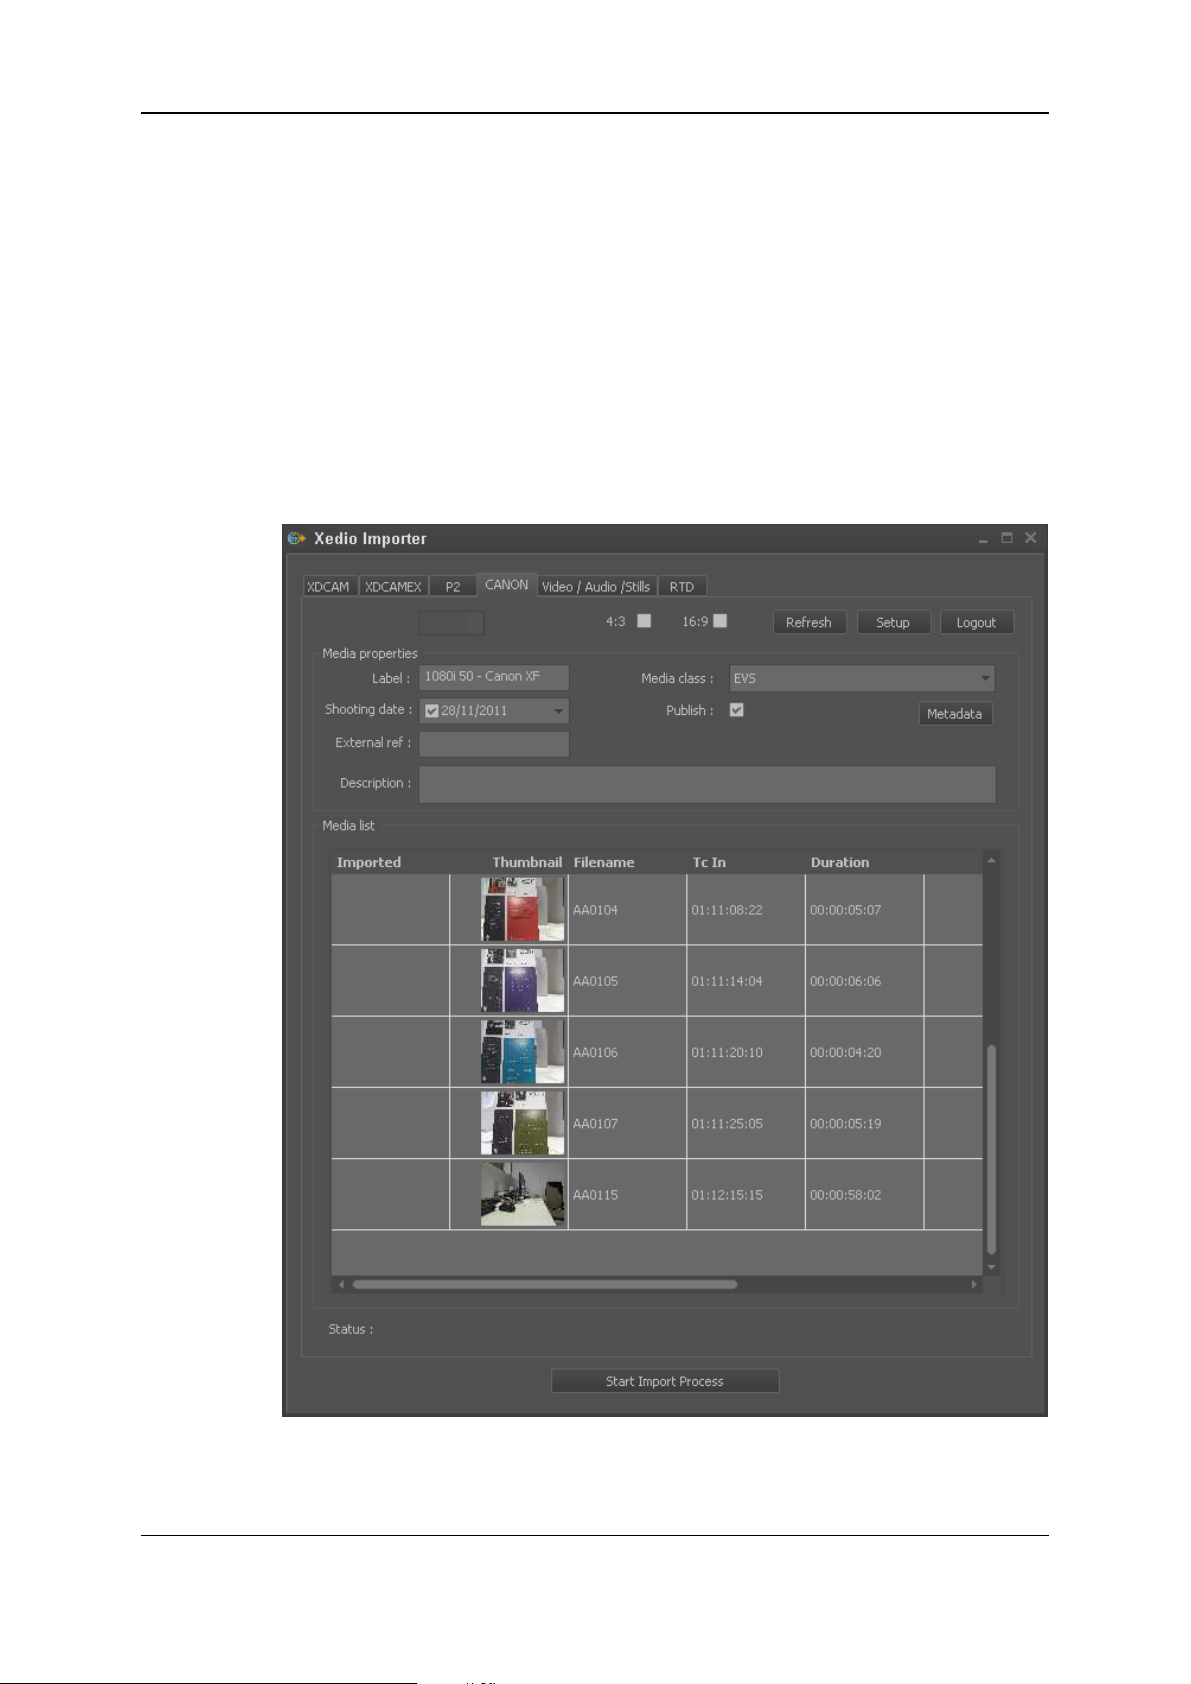
2.3. Fields in the XDCAM, XDCAMEX, P2 and CANON Tabs
General Properties
Field Description
Auto
Src
Disk
List of disks detected when the source files are searched on disks using the
Auto Src Disk process (selected in the Setup).
Aspect
Ratio
2. Importing XDCAM, XDCAMEX, P2 and CANON Files 5
Check box to select how the aspect ratio of the imported files will be chosen.
Possible values:
• 4/3: all the files with 4/3 aspect ratio are automatically imported.
• 16/9: all the files with 16/9 aspect ratio are automatically imported
• 4/3 and 16/9: all the 4/3 files and the 16/9 files are automatically
imported.
• "No aspect ratio selected": you need to manually select the files to
import in the Media List.
Page 14

EVS Broadcast Equipment SA Issue 4.35.B- August 2013
Field Description
Refresh Button to force the data to be refreshed when the setup parameters have
been changed.
Setup Button to access the setup parameters.
Media Properties
Field Description
Label (mandatory) Name assigned to the files when they are imported to the Xedio
database.
Shooting date
(mandatory)
Media Class
(mandatory)
Publish Check box that allows you to see the imported media in the client
External Ref. External reference of the source support, for example a barcode
Description Optional text to describe the media.
Date when the media was recorded by the camera.
Default: current date
Class categorizing the media as defined in Class Manager in
Xedio Manager.
Default: Undefined
workstations database lists.
You need to check it if you want to use the media in CleanEdit.
identifying a tape of a VTR.
Media List
This list automatically filled in with the detected source files that can be imported from the
source location. Select the media to import from the list and click the Start Import
Process button to import the files to the specified destination.
2.4. Setup Window
2.4.1. Opening of the Setup Window
Clicking the Setup button on the top right corner of the XDCAM, XDCAMEX, P2 or
CANON tab opens the Setup window.
6 2. Importing XDCAM, XDCAMEX, P2 and CANON F iles
Page 15

USER MANUAL Xedio 4.35 Xedio Importer
2.4.2. File Tab
Overview
The information in this tab makes it possible to specify where and how the source file will
be identified, and where the files will be imported to.
Field Description
Tools
Enable
Merger
2. Importing XDCAM, XDCAMEX, P2 and CANON Files 7
This option is only available with XDCAMfiles.
Select this option to enable the merger engine.
• Enable Merger with hi-res audio extraction: Third-party engine that
concatenates all source clips selected for import into a single media
and that replaces the audio from the lo-res media by the audio from the
hi-res media to improve the lo-res audio quality.
• Allow one-by-one import: allows the import of clips one by one (file
transfer mode) in case the merge cannot be done (clips of different
types, codec or aspect ratio detected in the selection)
Page 16

EVS Broadcast Equipment SA Issue 4.35.B- August 2013
Field Description
Generate
Import List
Select this option to generate an XML file with the list of clips at the end of
the import process.
Use the Browse button to select the destination folder to store the XML
files.
Generate
missing
Select this option to generate the proxy when it is missing on the device
during hi-res media import.
proxy
Source Select the option to be used to detect the source files:
Auto Src
Option to automatically scan the camera disks for new files to be imported.
Disk
Drive/path Drive or path to access a camera or device connected to the Xedio
workstation via a USB or FireWire connection (depending on the device).
FTP FTP server used with some cameras or devices that are connected to the
Xedio workstation via a GigE connection.
The IP address, the login and password to connect to the FTP server need
to be specified.
Destination
Hi-res
server
Media server that will be used to store the imported files. The list is
retrieved from the media servers where a hi-res folder is defined in Xedio
Manager (Media > Servers tool).
FTP FTP server where the imported hi-res files will be stored. The IP address,
the login and password to connect to the FTP server need to be specified.
Lo-res
server
Media server that will be used to store the imported files. The list is
retrieved from the media servers where a lo-res folder is defined in Xedio
Manager (Media > Servers tool).
FTP FTP server where the imported lo-res files will be stored. The IP address,
the login and password to connect to the FTP server need to be specified.
Subfolder Subfolder where the files will be stored on the Media server. The subfolders
are created automatically during the import process.
It is based on metadata fields selected from a list.
How to Define the Storage Subfolder
To define the subfolder where the files will be stored, proceed as follows:
1. Click the button next to Subfolder.
The Folder Auto Name window opens.
2. Select one of the options from the list of available items.
3. Click Append to add the selected item at the end of the folder string.
4. Repeat steps 2 and 3 for any new information type you want to add in the string.
5. Click OK.
The selected string is displayed in the File tab.
8 2. Importing XDCAM, XDCAMEX, P2 and CANON F iles
Page 17

USER MANUAL Xedio 4.35 Xedio Importer
2.4.3. Selection Tab
Overview
The Selection tab makes it possible to identify default values, which can then be modified
in the main tab.
Field Description
Mode Three options are available to set the clip type to be used in the clip list:
• All Clips
• Clips with proxy
• Clips without proxy
Properties Specifies the default values for some fields of the main XDCAM,
XDCAMEX, P2 or CANON tab.
Media
Class
2. Importing XDCAM, XDCAMEX, P2 and CANON Files 9
Default media class selected in the XDCAM, XDCAMEX, P2 or CANON
tab.
Page 18

EVS Broadcast Equipment SA Issue 4.35.B- August 2013
Field Description
Publish When this option is selected, imported media is visible in the Media lists.
When this option is not selected, imported media is only visible in Xedio
Manager.
• Without merge option: the visible media are all the clips.
• With merge option, the visible media is the merged file.
Create
CleanEdit
Project
Project
Name
Extension
Imported
Filename
Format
String
Generated
Clipnames
Format
String
When the check box is ticked, a CleanEdit project will automatically be
created for the logged user each time an import process is started. In case
of automatic import, the CleanEdit project is created for all the media
imported automatically.
At the end of the import without merge, the Media bin of the new project is
filled with all the clips transferred.
At the end of the import with merge, the Media bin of the new project is
filled with the merged file transferred and the Clips bin is filled with clips
corresponding to the clips on the device.
Extension that will be used to name the project when it is automatically
created. The project name will be the concatenation of the label and the
project extension.
String used as a template to assign a name to the imported media files.
It is based on metadata fields selected from a list.
String used as a template to assign a name to the clips generated in the
database when importing a selection of files.
It is based on metadata fields selected from a list.
How to Define the Filename or Clipname format string
To define the filename format string or the clipname format string, proceed as follows:
1. Click the button.
The Media AutoName window opens.
2. Select one of the options from the list of available items.
3. Click Append to add the selected item at the end of the name string.
4. Repeat steps 2 and 3 for any new information type you want to add in the name string.
2.4.4. Audio Channel Assignment Tab
Purpose
The Audio Channel Assignment tab makes it possible to specify how the audio stereo
channels of the source file will be assigned in the CleanEdit audio configuration.
10 2. Importing XDCAM, XDCAMEX, P2 and CANON Files
Page 19

USER MANUAL Xedio 4.35 Xedio Importer
Note
Once the audio track assignment has been defined in Xedio Importer or AutoFile
Importer, these values will always be used on the workstation instead of the
default ones defined in Xedio Manager.
How to Define Audio Channel Assignment
It is possible to define the audio channel assignment to be taken into account for the
selected type of media file, XDCAMEX in this example.
To do so, proceed as follows.
1. From the Physical Channels list, select the required number of channels.
As many blocks as audio channels selected are displayed in the window.
2. Importing XDCAM, XDCAMEX, P2 and CANON Files 11
Page 20

EVS Broadcast Equipment SA Issue 4.35.B- August 2013
2. Right-click an audio channel field.
The following contextual menu appears:
3. Select one of the options:
◦ Mono: one audio channel is used.
◦ Stereo: two audio channels are used
12 2. Importing XDCAM, XDCAMEX, P2 and CANON Files
Page 21

USER MANUAL Xedio 4.35 Xedio Importer
◦ 5.1: six audio channels are used
4. Repeat the 2 last steps for the remaining channels.
How to Change the Order of Channels inside a
Track
If required, you can re-assign the order of the channels inside a group.
To do so, proceed as follows:
1. Right-click an audio channel box.
One of the following contextual menus appears:
◦ Mono:
In this case, there is no other choice.
2. Importing XDCAM, XDCAMEX, P2 and CANON Files 13
Page 22

EVS Broadcast Equipment SA Issue 4.35.B- August 2013
◦ Stereo:
◦ 5.1:
2. Select one of the options.
Consequently, two channels will have the same name within a group. So the group
name is displayed in red.
You will not be able to save the changes until this is solved.
How to Remove a Track Assignment
To cancel the assignment of a track, proceed as follows:
1. Right-click the audio track block.
A contextual menu is displayed.
2. Select Remove Group.
The corresponding blocks are empty and available again.
14 2. Importing XDCAM, XDCAMEX, P2 and CANON Files
Page 23

USER MANUAL Xedio 4.35 Xedio Importer
How to Change the Order of Tracks Assignment
If required, you can modify order of the channels between them.
To do so, proceed as follows:
1. Right-click an audio track block.
A contextual menu is displayed.
2. Select Move Group Down to move the track after the next one, or Move Group Up
to move the track before the previous one.
2. Importing XDCAM, XDCAMEX, P2 and CANON Files 15
Page 24

EVS Broadcast Equipment SA Issue 4.35.B- August 2013
3. Importing Video / Audio / Stills Files
3.1. Introduction
To import new video in an architecture working with high resolution and low resolution
files, the two corresponding files must be imported at the same time from the
Video/Audio/Stills tab.
The high resolution file will be used for high resolution workstations and the low resolution
files will be used on the lo-resolution workstations.
The import process will reference this new media in the database based on common
timecode range in both files.
The imported low resolution files must be compatible with the high resolution files. If they
are incompatible, an error message will be generated. During a batch import, incompatible
files are not imported.
The following compatibility table lists the high resolution video standards and the
corresponding low resolution proxies
High resolution video standard Low resolution proxy video frequency
HD1080i @50 @25 or 50
HD1080i @59.94 @29.97 or 59.94
HD720p @50 @25 or 50
HD720p @59.94 @27.97 or 59.94
PAL SD @25
NTSC SD @29,97
3.2. Single File or Batch Import
3.2.1. Introduction
There are two ways to import media inside the system:
• The first one is a single file import that allows you to specify a label for the item.
• The second one, the “batch import”, allows you to import the content of entire folders
but uses the original file names as the name for the media (label).
In both cases, you can apply the general import process defined in section "General
Import Process and Mandatory Fields" on page 3 to import the requested files.
16 3. Importing Video / Audio / Stills Files
Page 25

USER MANUAL Xedio 4.35 Xedio Importer
3.2.2. Single File Import
3. Importing Video / Audio / Stills Files 17
Page 26

EVS Broadcast Equipment SA Issue 4.35.B- August 2013
3.2.3. Batch Import
3.3. Setup
Before you start importing files, you need to specify the following parameters via the
Setup button:
• The media server where the lo-res and hi-res files will be stored when they are
imported.
• How the audio tracks in the source file will be assigned in the CleanEdit audio
configuration. Up to 16 audio channels can be assigned.
18 3. Importing Video / Audio / Stills Files
Page 27

USER MANUAL Xedio 4.35 Xedio Importer
3.4. Fields in the Video/Audio/Stills Tab
The following table describes the common fields that will be used when you perform a
single file import or batch import:
Field Description
Properties sub-tab
Shooting date
(mandatory)
Media Class
(mandatory)
Publish Check box that allows you to see the imported media in the
External Ref. External reference of the source support, for example a
Description Optional text to describe the media.
Sub-folder Sub-folder to use (or create) on the storage server.
Setup Button to access the parameters for the imported files.
Metadata sub-tab
The metadata fields from the default metadata profile for media are displayed and can be
filled in with the requested values.
The following table describes the fields specific to the single file import:
Field Description
Label
(mandatory)
Date when the media was recorded by the camera.
Default: current date
Class categorizing the media as defined in Class Manager in
Xedio Manager. Default: Undefined
client workstations database lists.
barcode identifying a tape of a VTR.
Name assigned to the files when they are imported to the Xedio
database.
Low Bitrate fields The Browse button allows the selection of the lo-res file.
High Bitrate fields The Browse button allows the selection of the corresponding hi-res
file.
Note
Both hi-res and lo-res files need to have a common range
of timecode to be imported as a new media in the
system.
The following table describes the fields specific to the batch import. They allow the
definition of settings related to the source files:
3. Importing Video / Audio / Stills Files 19
Page 28

EVS Broadcast Equipment SA Issue 4.35.B- August 2013
Field Description
LowRes folder Folder where the source lo-res files are stored.
HiRes folder Folder where the source hi-res files are stored.
Scan Filter File format extension of the files to be imported. When the file
extension is specified in this field, the application will scan for and
import the files having this extension.
It is recommended to use the scan filter in case of multi-file formats.
For example, the scan filter will be *.mxf for OPAtom, and *.mov for
QuickTime Ref.
Video Ratio Video ratio of the source files, that is to say 4/3 or 16/9.
20 3. Importing Video / Audio / Stills Files
Page 29

USER MANUAL Xedio 4.35 Xedio Importer
4. Importing Transition Effects (RTD)
4.1. Introduction
An RTD is a transition effect that can be used in Xedio CleanEdit between two video
clips. RTDs are sequences of numbered files in TIFF format, designed with two keys.
This tab makes it possible to convert a sequence of TIFF pictures into a transition effect
file for CleanEdit. It is recommended to create RTDs not exceeding 1.5 seconds.
Warning
Inside an edit, the total duration of all different RTDs used in a timeline
CANNOT exceed 4 seconds! Note that the same RTD can be used as many
times as you need inside a timeline as soon as the total duration constraint is
met.
4.2. Background Information on TIFFs and RTDs
4.2.1. Tiff Files Required for an RTD
Logo or stills with a key are supported under the TIFF and TGA file formats:
The Tiff files consist of three elements:
• the visible bitmap
• the bitmap key
In the bitmap key, white represents an area of the picture which will remain visible and
black represents an area of the picture which will be transparent.
• the transition key
4. Importing Transition Effects (RTD) 21
Page 30

EVS Broadcast Equipment SA Issue 4.35.B- August 2013
In the transition key, white represents the current picture and black represents the
next picture.
This is represented in the picture below:
4.2.2. Requirements for TIFF Files
You need to have an even number of Tiff files for your RTD sequence.
The Tiff files used in an RTD sequence should be full size:
• in SD PAL: 720 x 576 pixels
• in SD NTSC: 720 x 480 pixels
• in HD: 1920 x 1080 pixels
In PAL, the 768 pixel resolution is reduced to 720 in 4:3, and the 1024 pixel resolution to
720 in 16:9 to keep the aspect ratio.
The Tiff files should be done in RGB mode, 24 bits/pixels (8 bits/color), 2 keys.
4.3. Setup
Before you start importing files, you need to specify, via the Setup button, the media
server where the lo-res and hi-res files will be stored when they are imported.
22 4. Importing Transition Effects (RTD)
Page 31

USER MANUAL Xedio 4.35 Xedio Importer
4.4. Fields in the RTD tab
To preview and import a RTD (Replay Transition Device) sequence, select the RTD tab,
complete the following fields, then click on the Start Import Process button to copy the
effect file on the storage server and add the effect in the database.
The following table describes the fields.
Field Description
Label
(mandatory)
First File The Browse button allows the selection of one file from the sequence to
Files found Number of files found in the same folder as the selected first file. You
4. Importing Transition Effects (RTD) 23
Name assigned to the files when they are imported to the Xedio database.
be imported.
need to have an even number of .tiff files to import for your RTD
sequence.
Page 32

EVS Broadcast Equipment SA Issue 4.35.B- August 2013
Field Description
Video
Standard
Preview
Button
Video standard to apply to create the transition:
PAL SD, HD 1080i @50, HD 720p @50, HD 1080p @50, NTSC drop
SD, HD 1080i @59,94, HD 720p @59,94, HD 1080p @59.94
Displays the corresponding pictures in the Bitmap, Bitmap Key and
Transition Key fields and then converts the sequence to display it in the
Result field.
24 4. Importing Transition Effects (RTD)
Page 33

USER MANUAL Xedio 4.35 Xedio Importer
5. Importing Files from EVS Servers
5.1. Introduction
5.1.1. Direct Access to the EVS Video Servers
The EVS Server tab makes it possible to have a direct visibility and access to the material
on the EVS video servers (XT, XS or XL servers) via the Ethernet connection. The media
you will import will be referenced in the Xedio Media server (but not physically imported)
and its definition will be added to the Xedio database.
To be able to view the server content in the EVS Server tab, the servers need to be
properly defined in the Linx > EVS Video Server tool in Xedio Manager.
5.1.2. Accessing Video Server Clips Versus Backup Files
When you use the direct access functionality, you will access the media directly on the
EVS video server, as long as it has not been backed up. If it has been backed up via XFile
(automatic or manual backup) or IPDirector (Send to a CleanEdit target), CleanEdit will
open the backup file, instead of the clip on the EVS video server.
Warning
As clips are not protected from a manual deletion on the EVS video server, it is
highly recommended to perform a backup in XFile or in IPDirector.
5. Importing Filesfrom EVS Servers 25
Page 34

EVS Broadcast Equipment SA Issue 4.35.B- August 2013
5.2. EVS Server Tab Description
5.2.1. Overview
The EVS Server tab contains four areas:
• Server Structure area
• Media Properties area
• Clip/Channel area
• Setup and Refresh buttons
5.2.2. Server Structure Area
In this area, the servers defined in Xedio Manager are visible, and the following items are
displayed:
• the recorder channels that can be defined on the given server (not only the active
recorder channels).
• the pages and banks where clips are available.
26 5. Importing Files from EVS Servers
Page 35

USER MANUAL Xedio 4.35 Xedio Importer
5.2.3. Media Properties Area
In this area, you will specify relevant information to identify the media in Xedio CleanEdit:
Field Description
General
Label
(mandatory)
Media Class
(mandatory)
Publish Check box that allows you to see the imported media
Description Optional text to describe the media.
Metadata
The metadata fields included in the default metadata profile defined in Xedio Manager
will be displayed. You can change the default value or assign a value to these fields.
Name assigned to the XT clips as they are defined in
the Xedio database.
If no label is specified in this field, the XT clip name
will be used. This will be Clip Name in the XT Clips
tab or Name in the Media Manager tab.
Class categorizing the media as defined in Class
Manager in Xedio Manager.
Default: Undefined
in the client workstations database lists.
5.2.4. Clip/Channel Area
In this area, you will view the clips corresponding to the selection in the Server Structure
area. In other words:
If you have selected … You will see …
a recorder channel in the Server Structure
area
a page/bank in the Server Structure area the clips stored on this page/bank.
the clips created on this recorder
channel.
5.2.5. Setup
The Setup button makes it possible to specify the hi-res and lo-res media server where
media or clips imported from the EVS servers will be referenced.
5. Importing Filesfrom EVS Servers 27
Page 36

EVS Broadcast Equipment SA Issue 4.35.B- August 2013
5.3. Using EVS Servers' Record Train and Clips in Xedio
5.3.1. Possible Actions in CleanEdit
You have several possibilities to bring the EVS server material as media or clips into a
project, using the EVS Server tab:
• Drag and drop a recorder channel from the Servers list in the EVS Server tab to the
Media area of a project.
This will make the corresponding record train available in the project as a media.
• Drag and drop a clip from the Clip/Channel area in the EVS Server tab to the Clips
area of a project.
This will make the corresponding clip available in the project as a clip.
• Import the clips created with the given camera or stored in the given page or bank.
See section "How to Import Clips From an EVS Server" on page 28.
5.3.2. How to Import Clips From an EVS Server
Importing clips from an EVS Server into Xedio does not physically import the clip in the
media server: it creates a virtual location on the media server, and stores the clip definition
in the Xedio database. Consequently, the connection to the servers needs to be
operational to be able to access the material itself.
It is possible to import all the clips created with a given camera, or stored on a given page
or bank into CleanEdit, to make them available in the Media Manager and Edit Manager
tabs.
To import clips from an EVS server, proceed as follows:
1. Select the requested camera, page or bank in the Server Structure area of the EVS
Server tab.
All the clips created with the selected channel or stored on the selected page or bank
are displayed in the Clip/Channel area.
2. Specify the Label field, that is to say the name of the media when it will be imported
into Xedio CleanEdit. By default, the clip name will be taken over.
3. Ensure that the Publish check box is ticked to make the media available and visible
to all users.
4. Click the Start Import Process button at the bottom of the window.
Once imported, the files will be available in the Media Manager tab of CleanEdit.
28 5. Importing Files from EVS Servers
Page 37

Page 38

To learn more about EVS go to www.evs.com
Corporate
+32 4 361 7000
North & Latin America
+1 973 575 7811
Asia & Pacifi c
+852 2914 2501
Other regional offi ces
www.evs.com/contact
EVS Broadcast Equipment is continuously adapting and improving its products in accordance with the ever changing
requirements of the Broadcast Industry.
The data contained herein is therefore subject to change without prior notice. Companies and product names are
trademarks or registered trademarks of their respective companies.
EVS Headquarters
Liège Science Park
16, rue Bois St Jean
B-4102 Seraing
Belgium
 Loading...