

Page 1
User’s Manual
Version 4.00 - July 2011
ENG File Import and Dynamic Reviewing
Page 2

Page 3

Xedio Dispatcher – Version 4.0 – User’s Manual
EVS Broadcast Equipment – July 2011
Issue 4.0.B
I
COPYRIGHT
EVS Broadcast Equipment – Copyright © 2010-2011. All rights reserved.
DISCLAIMER
The information in this manual is furnished for informational use only and subject
to change without notice. While every effort has been made to ensure that the
information contained in this user manual is accurate, up-to-date and reliable,
EVS Broadcast Equipment cannot be held responsible for inaccuracies or errors
that may appear in th is publication.
IMPROVEMENT REQUESTS
Your comments will help us improve the quality of the user documentation. Do not
hesitate to send improvement requests, or report any error or inaccuracy on this
user manual by e-ma il to
doc@evs.tv.
REGIONAL CONTACTS
You will find the full list of addre sses and phone numbers of local of fices either at
the end of this user manual (for manuals on hardware products) or on the EVS
website on the followi ng page:
http://www.evs.tv/contacts.
USER MANUALS ON EVS WEBSITE
The latest version of the user manual, if any, and other user manuals on EVS
products can be found on the EVS download center, on the following webpage:
http://www.evs.tv/downloadcenter.
Page 4

Issue 4.0.B
Xedio Dispatcher – Version 4.0 – User’s Manual
EVS Broadcast Equipment – July 2011
II
Page 5

Xedio Dispatcher – Version 4.0 – User’s Manual
EVS Broadcast Equipment – July 2011
Issue 4.0.B
III
Table of Contents
TABLE OF CONTENTS ................................................................................................. III
WHAT’S NEW? ............................................................................................................... V
1. INTRODUCTION ..................................................................................................... 1
1.1 PRODUCT DESCRIPTION .......................................................................................................... 1
1.2 SUPPORTED FORMATS AND CODECS .................................................................................... 1
2. INSTALLATION ...................................................................................................... 4
2.1 PREREQUISITES ........................................................................................................................ 4
2.2 HARDWARE AND SOFTWARE REQUIREMENTS ..................................................................... 4
2.3 LICENSES ................................................................................................................................... 5
2.3.1 License Codes Required ......................................................................................................... 5
2.3.2 Requesting and Importing the License Keys ........................................................................... 5
2.4 INSTALLATION PROCEDURE .................................................................................................... 6
3. CONFIGURATION AND CUSTOMIZATION ........................................................... 8
3.1 EXPORT TARGET PROFILES .................................................................................................... 8
3.1.1 Definition ................................................................................................................................. 8
3.1.2 Creating your Own Export Target Profile ................................................................................ 8
3.2 KEYWORD GRIDS .................................................................................................................... 12
3.3 CONFIGURATION PARAMETERS ............................................................................................ 13
3.3.1 Par am eter Pr ofi l es ................................................................................................................ 13
3.3.2 Keyboard Profiles .................................................................................................................. 22
4. USER INTERFACE ............................................................................................... 27
4.1 STARTING XEDIO DISPATCHER ............................................................................................. 27
4.2 OVERVIEW ................................................................................................................................ 27
4.3 MENU BAR ................................................................................................................................ 29
4.4 SOURCE DEVICE AREA ........................................................................................................... 30
4.4.1 Introduction ........................................................................................................................... 30
4.4.2 General Description .............................................................................................................. 30
4.5 WORKSPACE AREA ................................................................................................................. 31
4.5.1 Introduction ........................................................................................................................... 31
4.5.2 View Modes in the Workspace .............................................................................................. 31
4.5.3 Thumbnail View in the Workspace Area ............................................................................... 32
4.5.4 List View in the Workspace Area ........................................................................................... 33
4.5.5 Clip Player View in the Workspace Area ............................................................................... 35
4.5.6 Storyboard Player View in the Workspace Area .................................................................... 37
4.6 TOOLS AREA ............................................................................................................................ 39
4.6.1 Accessing the Tabs in the Tools Area ................................................................................... 39
4.6.2 Logger ................................................................................................................................... 39
4.6.3 Export Tool ............................................................................................................................ 41
4.7 STORYBOARD AREA ............................................................................................................... 44
4.7.1 Overview ............................................................................................................................... 44
4.8 CLIP PLAYER AND STORYBOARD PLAYER .......................................................................... 44
Page 6

Issue 4.0.B
Xedio Dispatcher – Version 4.0 – User’s Manual
EVS Broadcast Equipment – July 2011
IV
4.8.1 Overview ............................................................................................................................... 44
4.8.2 Video Display ........................................................................................................................ 46
4.8.3 Player Track Selection Buttons ............................................................................................. 47
4.8.4 Jog & Media Bars .................................................................................................................. 48
4.8.5 Transport Commands in the Clip Player ............................................................................... 50
4.8.6 Transport Commands in the Storyboard Player .................................................................... 52
4.8.7 Clip Creation Fields ............................................................................................................... 54
4.8.8 Log Buttons ........................................................................................................................... 56
4.8.9 Audio Track Monitoring Buttons ............................................................................................ 56
4.8.10 Audio Guide Track Record Butt o n ......................................................................................... 56
5. OPERATION ......................................................................................................... 57
5.1 GENERAL WORKING PROCESS ............................................................................................. 57
5.2 MANAGING THE STORYBOARDS ........................................................................................... 57
5.2.1 How to Create an Empty Storyboard ..................................................................................... 57
5.2.2 Other Pos si bl e Ac ti ons on S t or yboards ................................................................................. 58
5.3 SELECTING RELEVANT MEDIA ............................................................................................... 59
5.3.1 Displaying Folder Content in the Source Device Area .......................................................... 59
5.3.2 Listing Clips in the Workspace Area ...................................................................................... 60
5.3.3 Searching for Clips within the List View ................................................................................ 61
5.4 LOADING A SOURCE CLIP ON THE CLIP PLAYER ................................................................ 71
5.4.1 Purpose ................................................................................................................................. 71
5.4.2 How to Load a Clip in the Clip Player .................................................................................... 71
5.5 ADDING CLIPS OR SUB-CLIPS TO THE STORYBOARD ........................................................ 73
5.5.1 How to Create a Sub-Clip and Add it to the Storyboard ........................................................ 73
5.5.2 How to Add Source Clips to the Storyboard .......................................................................... 74
5.5.3 How to Replace a Clip in the Storyboard .............................................................................. 74
5.5.4 How to Modify the Storyboard Clip Boundaries ..................................................................... 74
5.6 ADDING LOGS TO A CLIP ........................................................................................................ 75
5.6.1 Introduction ........................................................................................................................... 75
5.6.2 How to Add a Log to a Clip and Associate Metadata ............................................................ 75
5.6.3 Log and Metadata Display .................................................................................................... 77
5.6.4 Other Pos si bl e Ac ti ons on L ogs ............................................................................................ 78
5.7 RECORDING AN AUDIO GUIDE TRACK .................................................................................. 79
5.7.1 Introduction ........................................................................................................................... 79
5.7.2 How to Record an Audio Guide Track ................................................................................... 79
5.8 CHECKING THE STORYBOARD .............................................................................................. 80
5.8.1 Introduction ........................................................................................................................... 80
5.8.2 How to Load a Storyboard in the Storyboard Player ............................................................. 80
5.9 EXPORTING THE STORYBOARD ............................................................................................ 81
5.9.1 Introduction ........................................................................................................................... 81
5.9.2 How to Export a Storyboard .................................................................................................. 81
5.9.3 Exporting Clips and Sub-Clips .............................................................................................. 83
5.9.4 Result of Export Job .............................................................................................................. 83
5.9.5 Other Pos si bl e Ac ti ons on E x por t Jo bs ................................................................................. 83
GLOSSARY ................................................................................................................... 85
INDEX ............................................................................................................................ 86
Page 7

Xedio Dispatcher – Version 4.0 – User’s Manual
EVS Broadcast Equipment – July 2011
Issue 4.0.B
V
Possibility to scan a drive or folder so its content is
lips displayed in Xedio Dispatcher are available to
atabase and media server as growing clips,
Updated list of supported codecs for source files and
even if no keyword grid has been loaded in Xedio
What’s New?
The following table descr ibes the sections updated to reflect the n ew and modified
features on Xedio Disp atcher from Xedio Suite 4.0 (compared to Xedio Suit e 3.1).
In the user manual, the icon has been added on left margin to highlight
information on new and updated features.
Click the section number (or the description) in the table to jump directly to the
corresponding section.
Section Description
1.1, 4.2, 4.4, 5.3.1
available for browsing , clipping and exporting.
1.1 C
Xedio d
without waiting the en d of transcoding process.
1.2 New supported HD stand ard: 720p 50/59.94Hz
export.
2.2 Xedio Dispatcher can b e used with Windows 7.
3.3.1 Updated tables of para meters profiles.
0 Tables with keyboard p rofiles have been added.
4.2, 4.5.1, 4.5.2,
4.5.4, 5.3.2
4.2, 4.6.2, 5.6.1, 5.6.2 Free text can now be a ssociated to a log.
4.2, 4.6.2, 5.6.1 The use of keyword is no more mandatory to add a log to
5.3.3 Search tools are available from the List view to quickly
5.4.2 A clip can be loaded on the Clip Player from the List
A new view is available in the Workspace area: the List
view allows to perform search on the element l ist.
a clip. Ranking and free text can be associated to a log
Dispatcher.
find requested clips.
view.
5.5.2 A clip can be added t o the Storyboard from the Lis t view.
5.9.3 A clip can be added t o the Export list from the Li st view.
Page 8

Page 9

Xedio Dispatcher – Version 4.0 – User’s Manual
EVS Broadcast Equipment – July 2011
Issue 4.0.B
1
1. Introduction
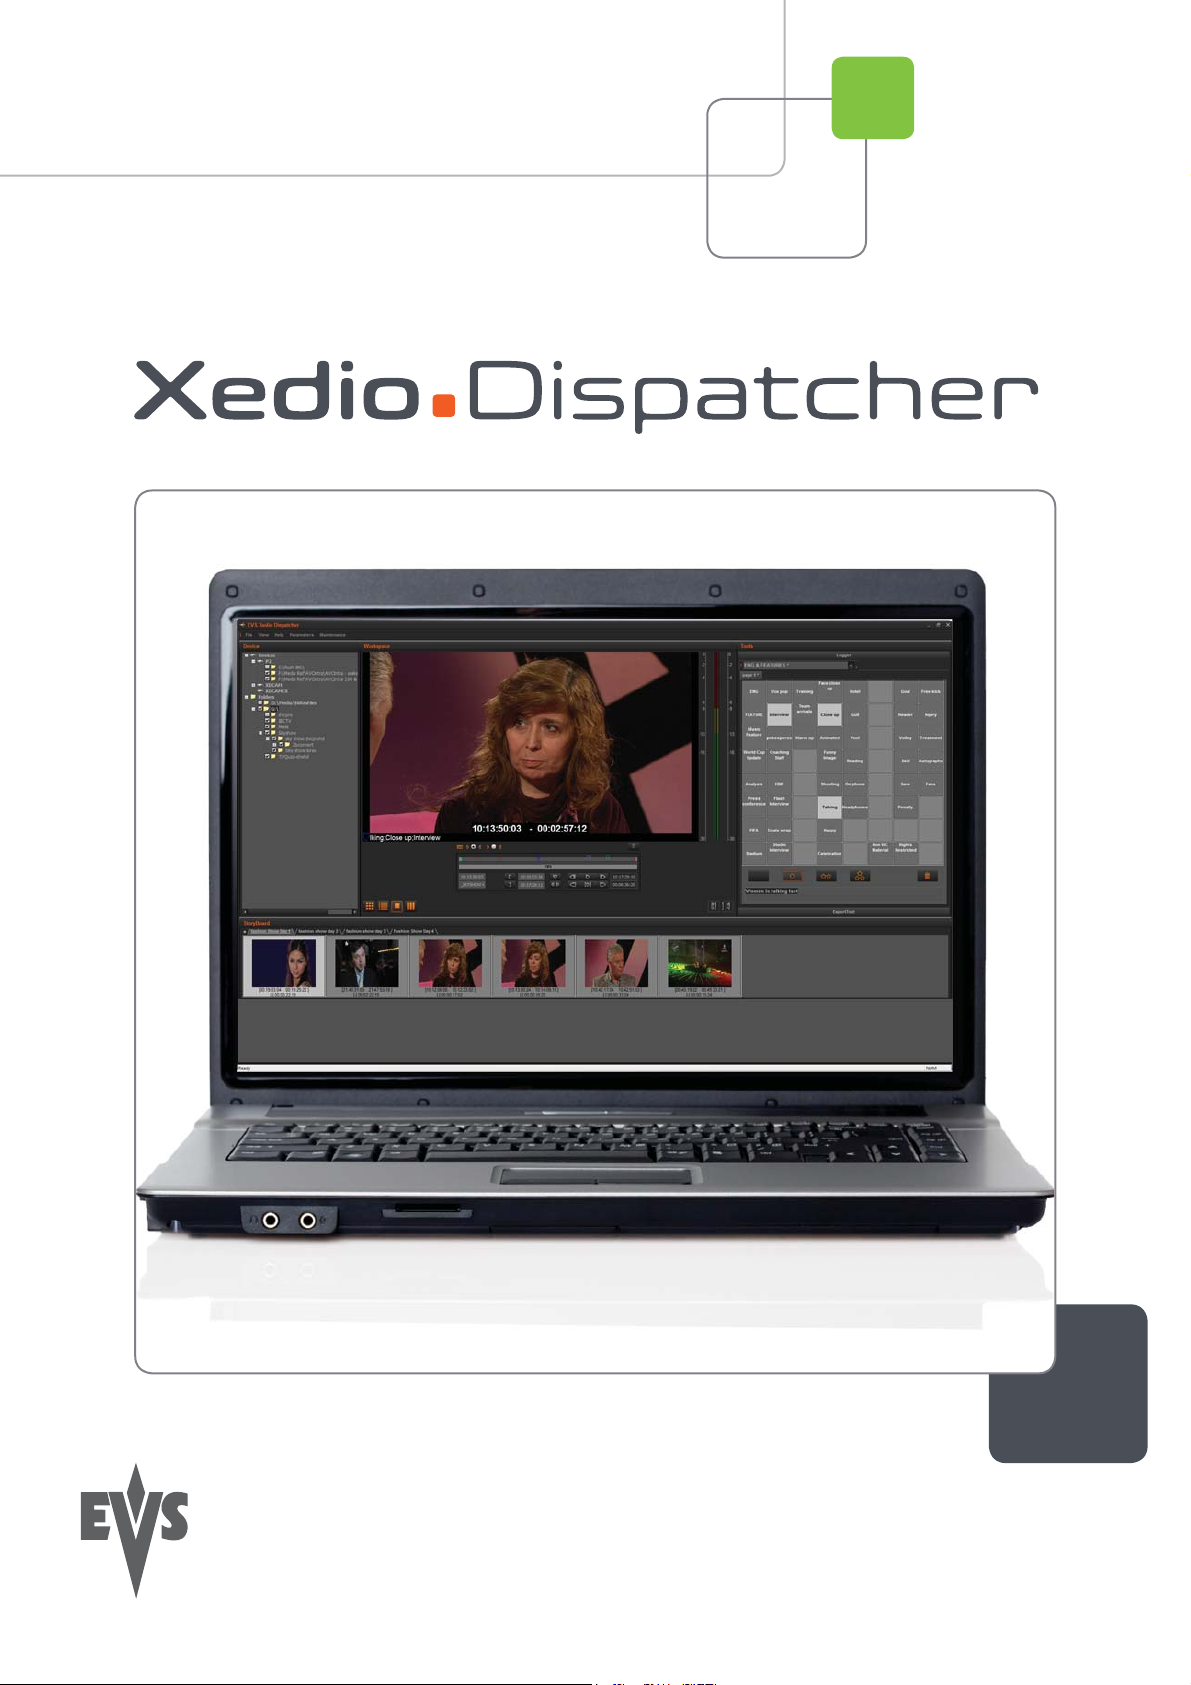
1.1 PRODUCT DESCRIPTION
Xedio Dispatcher is a software product used for importing A/V files, rough-cutting
and exporting rough-cuts to multiple desti nations and formats.
Xedio Dispatcher automa tically detects connected devices (such as P2, XDCAM or
XDCAM EX devices), and instantly displays their contents. This allows immediate
browsing of the media dir ectly on the device, whic h speeds up the shoot selecti on,
sub-clipping and/or fast rough-cut editing . Shoots, sub-clips and edits can also be
instantly logged. Xedio Dispatcher also scans drives or folders upon user request
and displays their co ntent.
As soon as clips are displayed in Xedio Dispatcher, they are available to Xedio
database and media server as growing clips, without waiting the end of
transcoding process.
Once selected or created, the sub-clips and consolidated storyboards can be
easily transferred from the device itself to any EVS video server (for example:
XT2+, XS), media server ( for example: SAN, XStore), or any ty pe of storage.
Simultaneous transfers to multiple destinations in multiple formats are supported
thanks to Xedio on-the-fly SD/HD rewr apping & transcoding capabili ties.
1.2 SUPPORTED FORMATS A ND CODECS
The following tables provide information on the currently supported source and
target codecs in SD and HD.
SD VIDEO CODECS
Supported standards
Supported codecs
for source files
• PAL
• NTSC
• Sony XDCAM hi-res & p roxy
(DV25, IMX-D10 30/40/50)
• Panasonic P2 hi-res & proxy
(DVCPRO25, DVCPRO50)
• MJPEG
Supported codecs
for export
• MPEG-1, MPEG-2
• Long GOP MPEG
(MPEG1, MPEG2)
• Sony XDCAM hi-res
Page 10

Issue 4.0.B
Xedio Dispatcher – Version 4.0 – User’s Manual
EVS Broadcast Equipment – July 2011
2
(IMX-D10 30/40/50)
• Panasonic P2 hi-res
(DV25, DVCPRO25, DVCPRO50)
• AVI
(DV25, DVCPRO25, DVCPRO50)
• QuickTime
(DV, DVCPRO25, DVCPRO50, IMX-D10
30/40/50, MJPEG)
• Raw DV
(DV, DVCPRO25, DVCPRO50)
• EVS
(DVCPRO50, MJPEG, IMX-D10 30/40/50 and
Supermotion)
• PCM
(wav audio files)
• WM9
HD VIDEO CODECS
Supported standards
Supported codecs
for source files
• H.264 AVC
(MP4, TS)
• MXF OP1A SMPTE (DVCPRO50)
• MXF OPAtom Avid
(IMX-D10 30/40/ 50 and DVCPRO50)
• 1080i 50/59.94Hz
• 720p 50/59.94Hz
• Sony XDCAM HD & Proxy
(422, 420)
• Sony XDCAM Ex
(420)
• Sony XDCAM SxS
• Panasonic P2 high-res & proxy
(AVC Intra 50/100, DVCP RO100)
• Canon XF
(MPEG-2 HD 15/35/50)
• MJPEG
• MPEG-2
Page 11

Xedio Dispatcher – Version 4.0 – User’s Manual
EVS Broadcast Equipment – July 2011
Issue 4.0.B
3
• Apple ProRes
• Avid DNxHD
Supported codecs
for export
• EVS
(AVC Intra 100, MJP EG & proxy, Avid
DNxHD®)
• QuickTime
(AVC Intra 100, DVCP RO100, Avid DNxHD®)
• XDCAM HD
(422, 420)
• Panasonic P2 high-res
(AVC Intra 50/100, DVCP RO100)
• H.264 AVC
(MP4, TS)
• Long GOP MPEG-2
(TS, PS)
• MXF OP1A SMPTE
(Avid DNxHD®, DVCPROHD, AVC Intr a 100)
• MXF OPAtom Avid
(Avid DNxHD®, DVCPROHD, AVC Intra 100)
REQUIREMENTS RELATE D TO SOURCE FILES
The source files must m eet the following requ irements:
• All video and audio source files (SD or HD) must include maximum 8 audio
channels at 48 KHz, in stereo pairs (dual mono is not supported).
• HD editing is limited to (less than) 120 Mbps codecs and should be performed
using SAS storage or e xternal disk arrays.
Page 12

Issue 4.0.B
Xedio Dispatcher – Version 4.0 – User’s Manual
EVS Broadcast Equipment – July 2011
4
2.1 PREREQUISITES
Here is the list of prerequisites to the in stallation of Xedio Dispa tcher:
• Hardware requirements must be met
• Software requirements must be met
• The XSecure application needs to be installed on the workstation with all the
required license codes
• Xedio Dispatcher has to be installed with admi nistrator rights.
• It is recommended to close all other applications before starting the Xedio
Dispatcher installati on, especially all EVS applications.
• XDCAM and/or P2 drivers must be i nstalled on the Xedio Di spatcher computer.
2. Installation
2.2 HARDWARE AND SOFTWARE REQUIREMENTS
HARDWARE REQUIREMENTS
Xedio Dispatcher can b e installed on a single l aptop or desktop computer .
The browser and player of Xedio Dispatcher use the CPU resources of the Xedio
Dispatcher workstation to decode the A/V material, depending on the source and
the target codecs.
The guidelines for th e hardware minimum require ments are:
• CPU: Core Duo 2.33GHz processor (or equivalent)
• RAM: 3GB
• Display Resolution: minimum 128 0x1024
• Gfx Card: no specific needs ( “standard” PC Gfx card)
Options:
• USB 2.0, IEEE 1394 (Firewire) and/or PCIe interface(s) depending on the
device you want to connect to Xedio Dispatcher machine (FTP access not
supported).
• For Audio monitoring and/or Audio Guide Track: Digigram Audio Board or any
other Audio Board.
Page 13

Xedio Dispatcher – Version 4.0 – User’s Manual
EVS Broadcast Equipment – July 2011
Issue 4.0.B
5
Access to the transcoding option for the export
module. If not present, only smart rendering is
SOFTWARE REQUIREMENTS
Xedio Dispatcher has to be installed on a computer running Windows XP Pro SP3
32 bits or Windows 7 32 or 64 bits.
2.3 LICENSES
2.3.1 LICENSE CODES REQUIRED
The XSecure application needs to be in stalled on the workstation. All the followin g
license codes (known as Xedio Dispatcher full option) must be requested to allow
the use of Xedio Dispatcher, except the Audio Guide Track and RTProf Wizard
which are optional.
License Code Description
Base Package 10 Base Package for Xedio Dispatcher
P2 Source 20 Access to A/V content on P2 su pport
XDCAM Source 30 Access to A/V content on XDCAM support
Storyboarding 40 Access to the Storyboarding (rough cut) module of
Xedio Dispatcher
Audio Guide
Track
Export 50 Access to the Export Module o f Xedio Dispatcher
RTProf Wizard 51 Allows the creation of a new export target profile
Logger 60 Access to the Logging (IPD Logs) module of Xedio
Transcoding 70
41 Allows the creation of an Audio Guide Track over a
storyboard
(RTProf generator)
Dispatcher
allowed.
2.3.2 REQUESTING AND IMPORTING THE LICENSE KEYS
In the XSecure Manager application installed on the Xed io Dispatcher workstation,
you need to click the Request button to generate an XML file. Email this XML file
to the EVS support and ask for the Import Key file.
Once you have received the Imp ort Key file, you need to select and impo rt the file
via the Import Key File button in XSecure M anager.
Page 14

Issue 4.0.B
Xedio Dispatcher – Version 4.0 – User’s Manual
EVS Broadcast Equipment – July 2011
6
2.4 INSTALLAT ION PROCEDURE
A Setup wizard guides you through the installatio n of Xedio Dispatcher.
To install Xedio Dispa tcher, proceed as follows :
1. Copy the installation file
FullXedioDispatcher_4.0x.xx.exe locally.
This is the full inst aller file, which you need to use for a first ins tallation. Use
XedioDispatcher_4.0x.xx.exe for upgr ades.
the
2. Double-click on th e installation file to launch the installation wizard
3. Click Next on the Welcome window.
4. Read the License agreement, click the I accept the agreement option and
click Next.
Page 15

Xedio Dispatcher – Version 4.0 – User’s Manual
EVS Broadcast Equipment – July 2011
Issue 4.0.B
7
5. Click Install on the Ready to Instal l window.
When the application i s installed, you need to res tart the computer.
The Xedio Dispatcher installer will then perform some final installation steps
before you can launch the application.
Page 16
Issue 4.0.B
Xedio Dispatcher – Version 4.0 – User’s Manual
EVS Broadcast Equipment – July 2011
8
3. Configuration and
Customization
3.1 EXPORT TARGET PROFILES
3.1.1 DEFINITION
An Export Target Profile (also called ‘RTProf’) is an .xml file that contains the
definition for rendering the storyboard created in Xedio Dispatcher into a single
file on a given desti nation or into a c lip on a given EVS server.
The Export Target Profile mainly includes the defi nition of the destinations, and of
the codecs in which th e file or clip need to be generated.
The Export Target Profiles available in Xedio Dispatcher are stored in:
C:\XedioDispatcherMS\Profiles\ RTProf.
The Export Target Profiles can be defined and customized to your needs by the
EVS Project Manager. However, you can also create your own Export Target
profiles using the Tar get Wizard.
3.1.2 CREATING YOUR OWN EXPORT TARGET PROFILE
You can create an Export Target profile from the Export Tool in Xedio Dispatcher,
by means of the Target wizard. This operation is explained in this chapter since it
should be performed as you configure your applica tion.
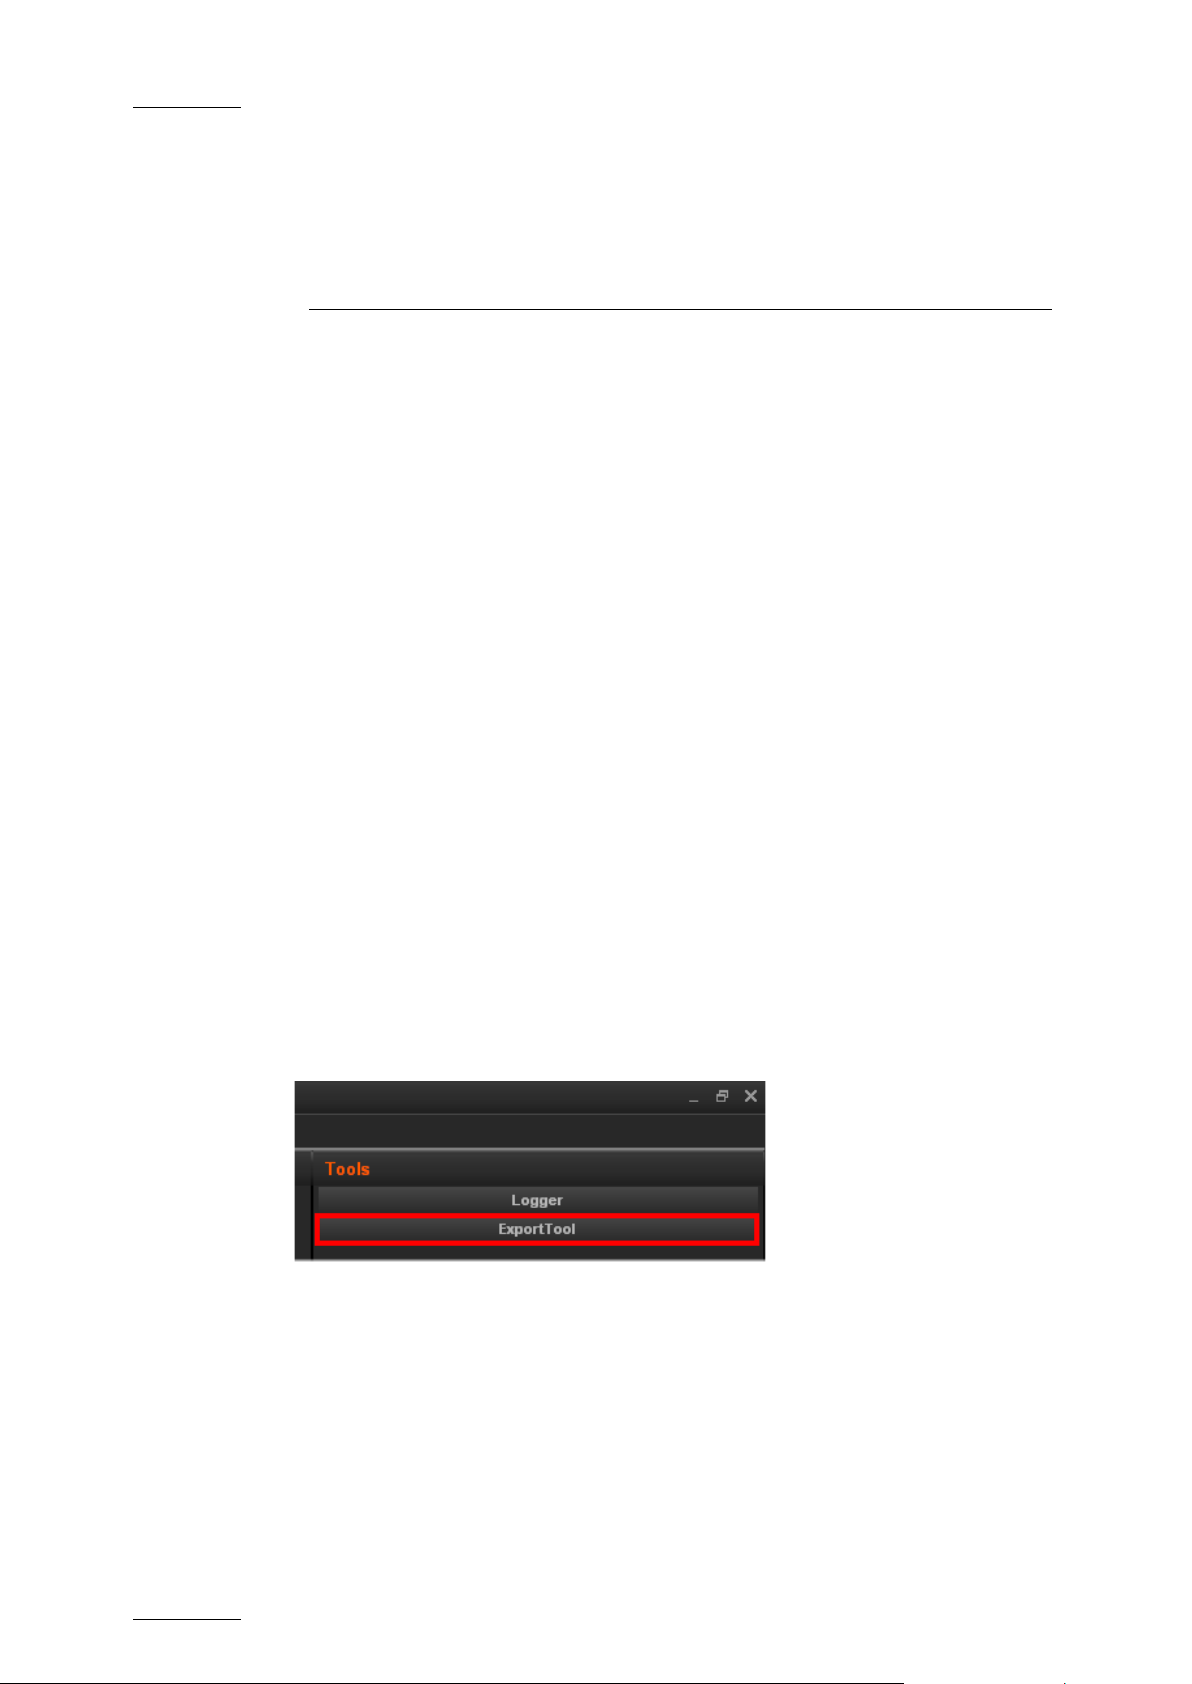
To create an Export Ta rget Profile in Xedio Di spatcher, proceed as follows:
1. In Xedio Dispatcher, c lick the ExportTool tab i n the Tools area:
2. In the Target field, click the down arrow and select <Create new target> from
the list.
Page 17
Xedio Dispatcher – Version 4.0 – User’s Manual
EVS Broadcast Equipment – July 2011
Issue 4.0.B
9
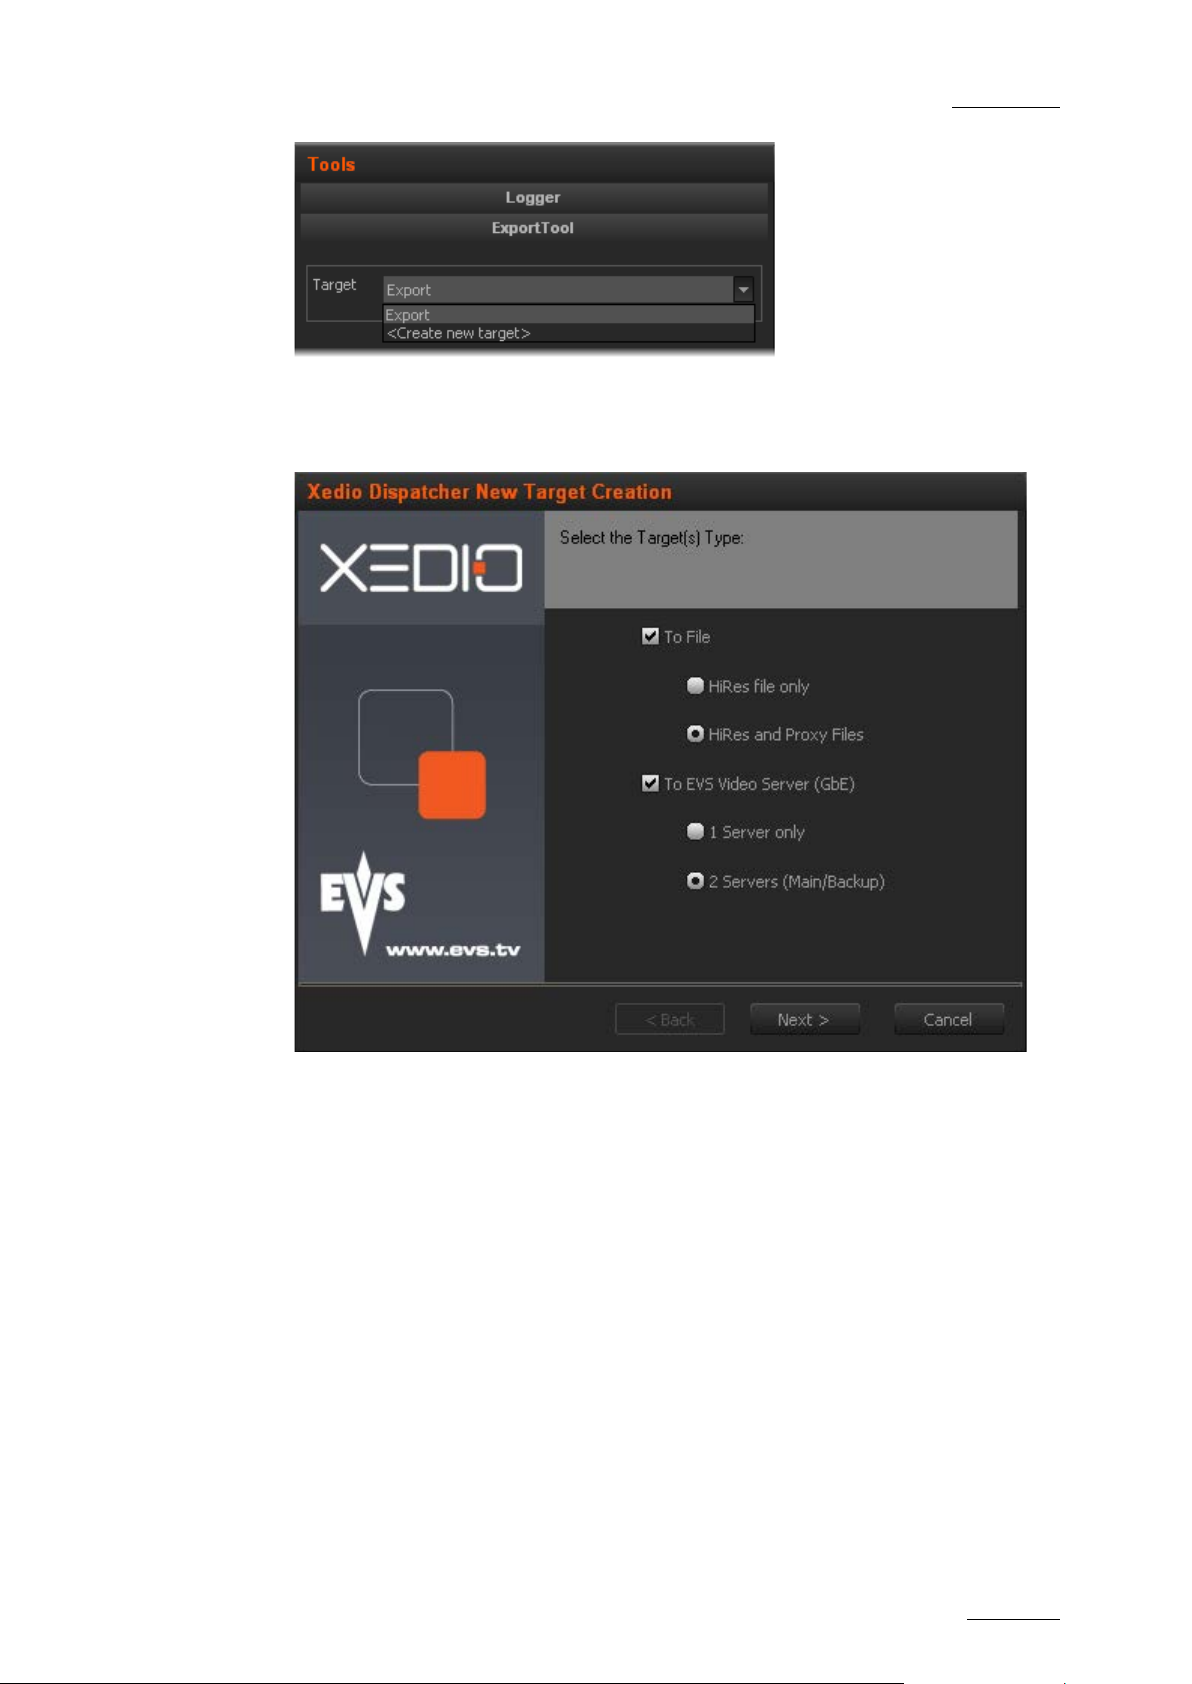
The Target wizard opens .
3. In the Target Type dialog box, select the types of targets you want to
generate, either file s stored on the network, or clips on EVS servers:
Click Next
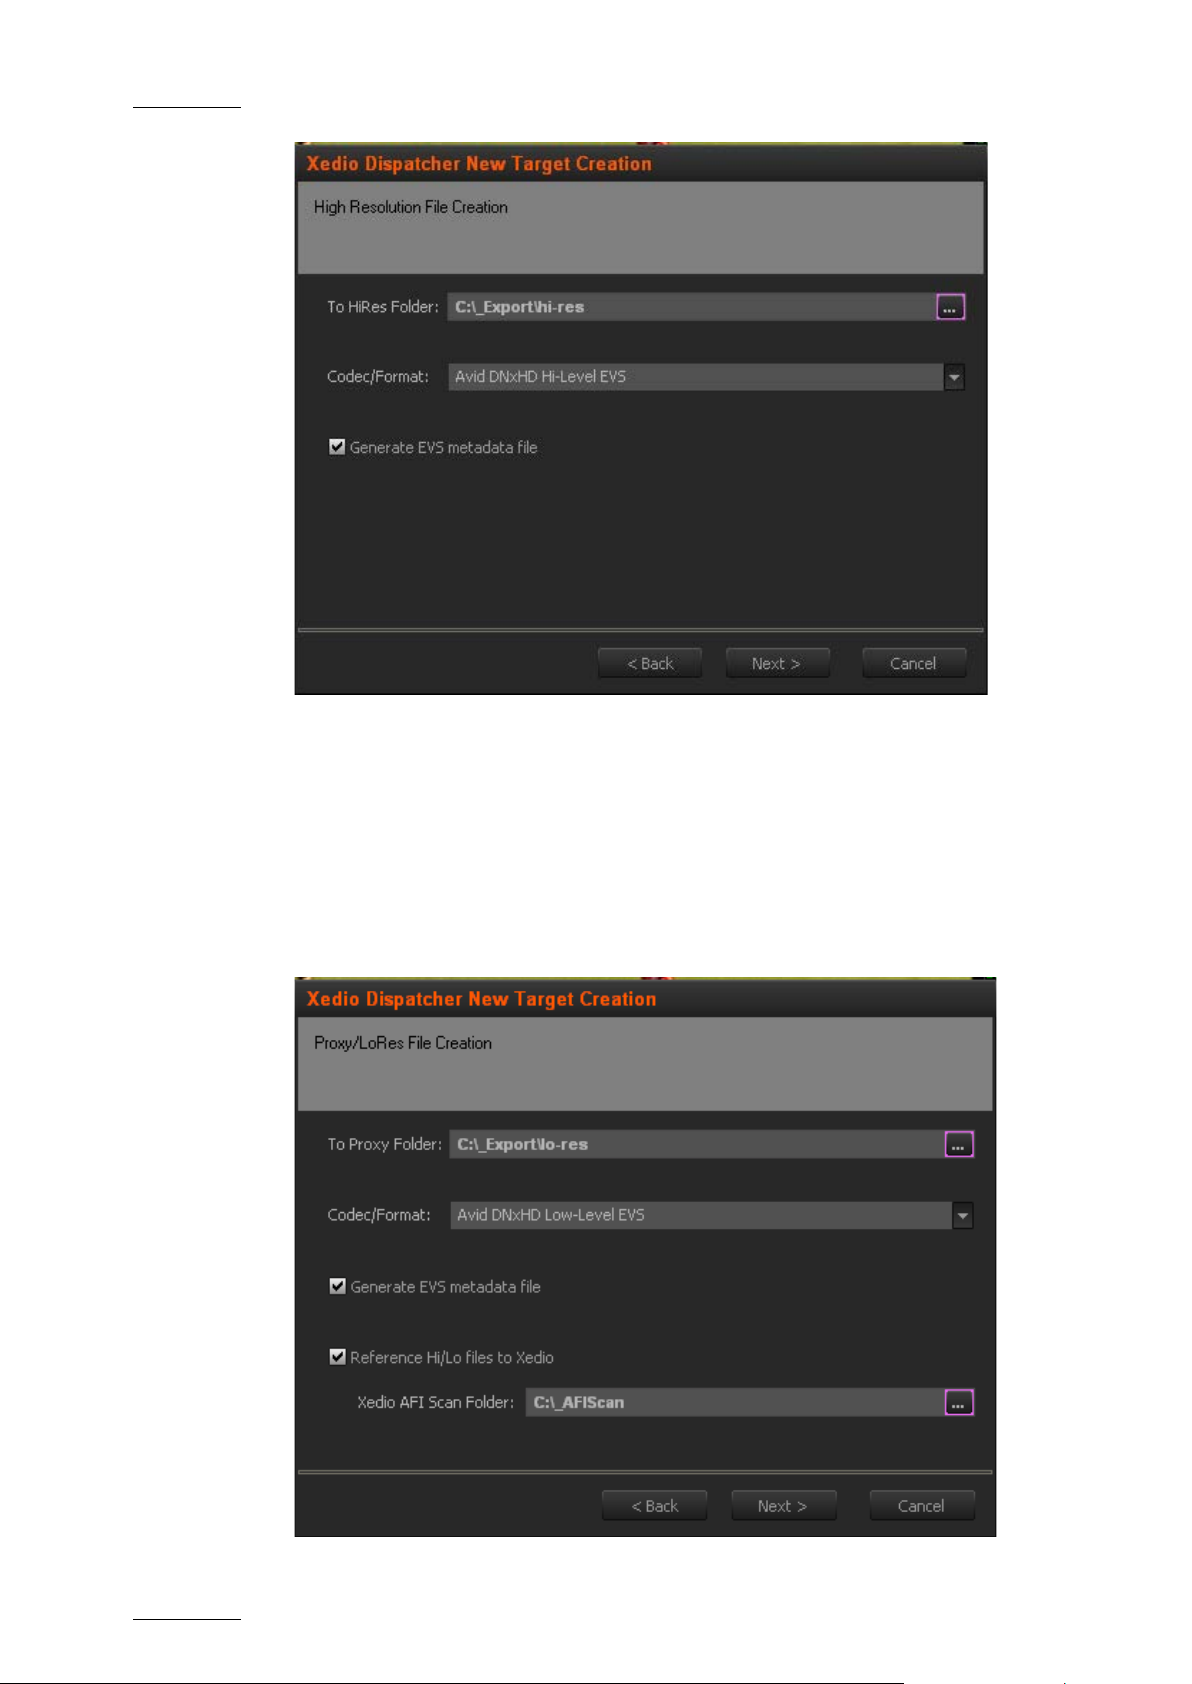
4. If you have asked to generate hi-res files, the High Resolution File Creation
dialog box will be di splayed.
Specify the folder whe re the high resolution fi les will be stored, as wel l as the
codec and format to be used to generate these fil es.
If you want to genera te an EVS metadata file (XML fil e), that will contain t he
file definition, select the Genera te EVS metadata file option. This metadata
file will be stored i n the same folder as the m edia file.
Page 18
Issue 4.0.B
Xedio Dispatcher – Version 4.0 – User’s Manual
EVS Broadcast Equipment – July 2011
10
Click Next
5. If you have asked to generate lo-res files, the Proxy/LoRes File Creation
dialog box will be di splayed.
Specify the same infor mation for the low resol ution files as for the hig h-
resolution file.
If you want the AutoF ileImporter application (AF I) to scan the generated fi les
and reference them in the Xedio database, select the Reference Hi/Lo files to
Xedio option and speci fy the folder that AFI w ill have to scan to fin d the jobs
to perform.
Page 19
Xedio Dispatcher – Version 4.0 – User’s Manual
EVS Broadcast Equipment – July 2011
Issue 4.0.B
11
Click Next
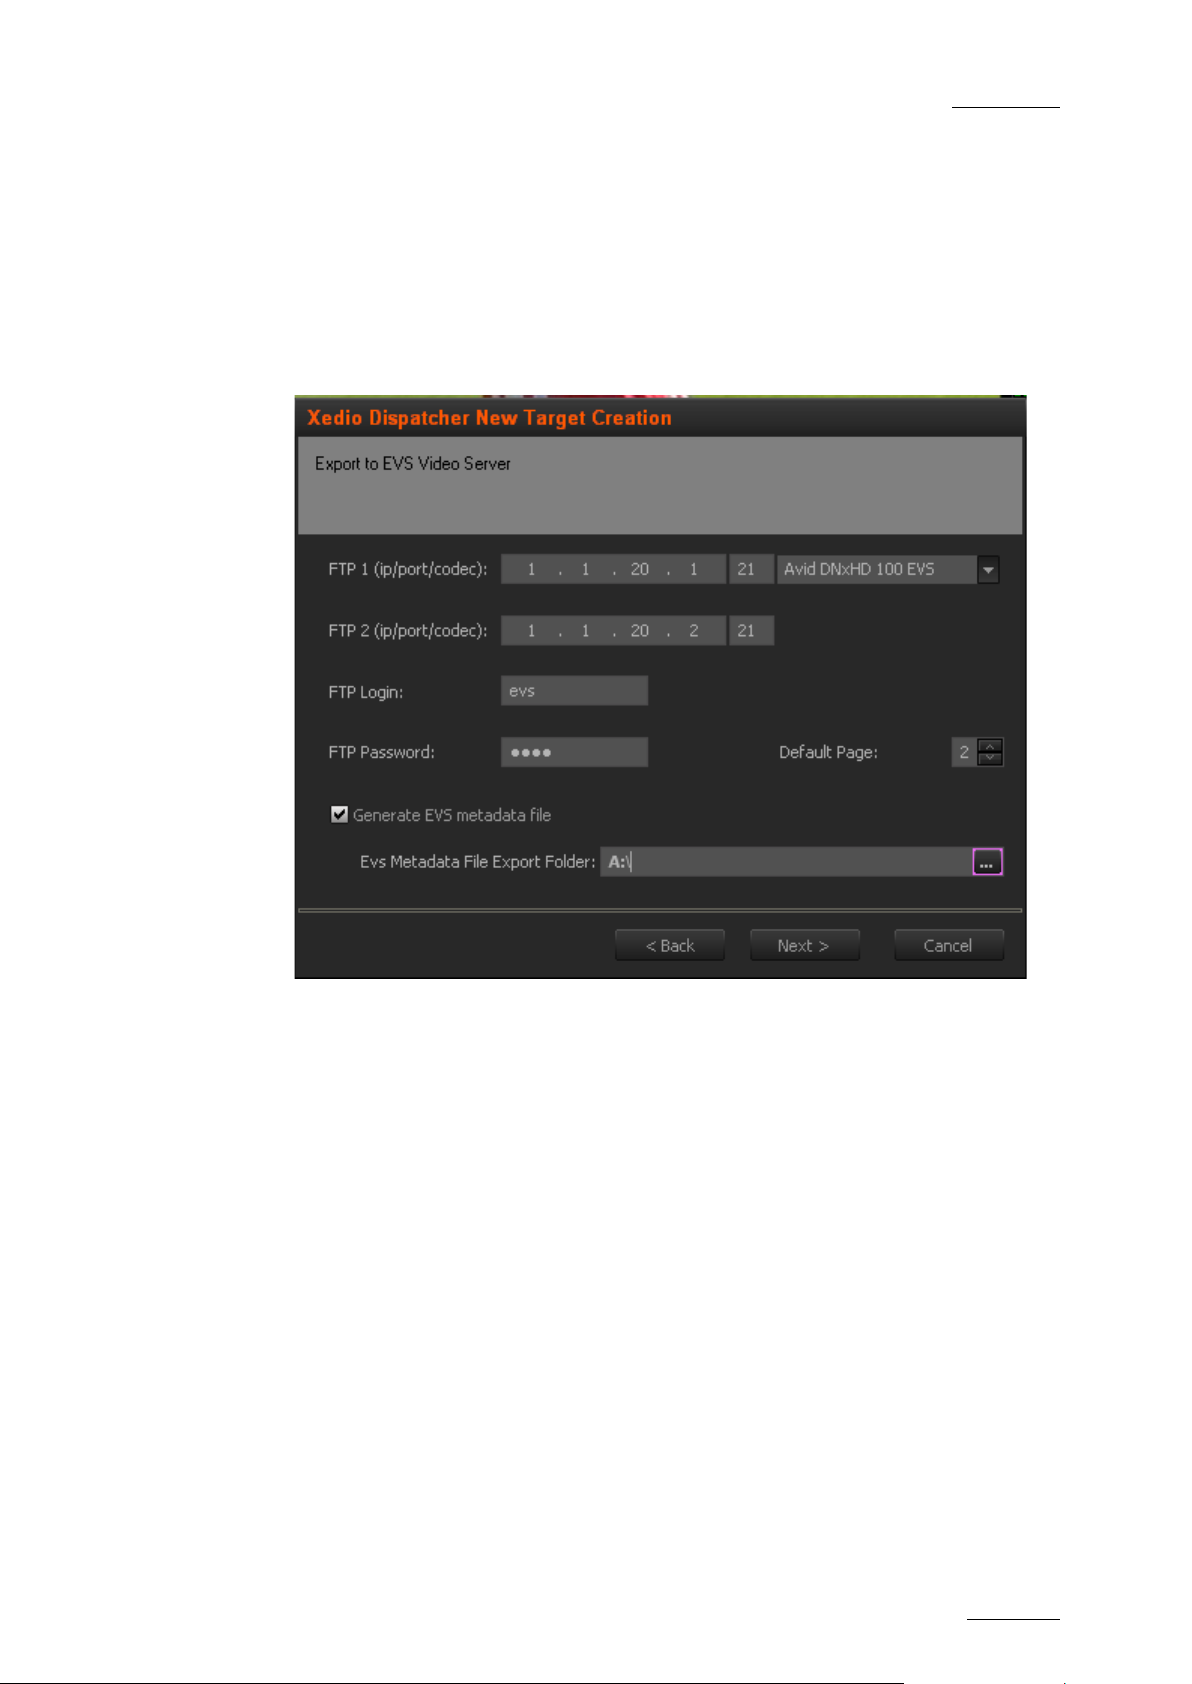
6. If you have asked to generate clips, the Export to EVS Video Server dialog
box displays.
Specify both IP addres ses of the EVS video server , the codec used on the
server, the FTP login and password, the default pa ge on which the generated
clip will be stored.
If you want to generate an EVS metadata file (XML file), that will contain the
file definition, select the Generate EVS metadata file option, and specify the
folder where the file should be stored.
Click Next
7. If you have asked to use a second EVS server as backup, the Export to 2
nd
EVS Video Server dialog displays. Provide the same information as for the
main EVS server.
Click Next.
8. The Export Logsheet File displays.
Xedio Dispatcher can g enerate a log sheet (XML fil e) that will contain the log
information available in the cl ip, sub-clip or storyboard e xported. To this end,
select the Generate EVS metadata file opti on and specify the folder whe re to
export this log sheet.
Click Next.
9. In the next dialog box, specify the name for the Target Profile you have
defined. This is the name that will be displayed in the Target field of the
Export Tool in Xedio D ispatcher.
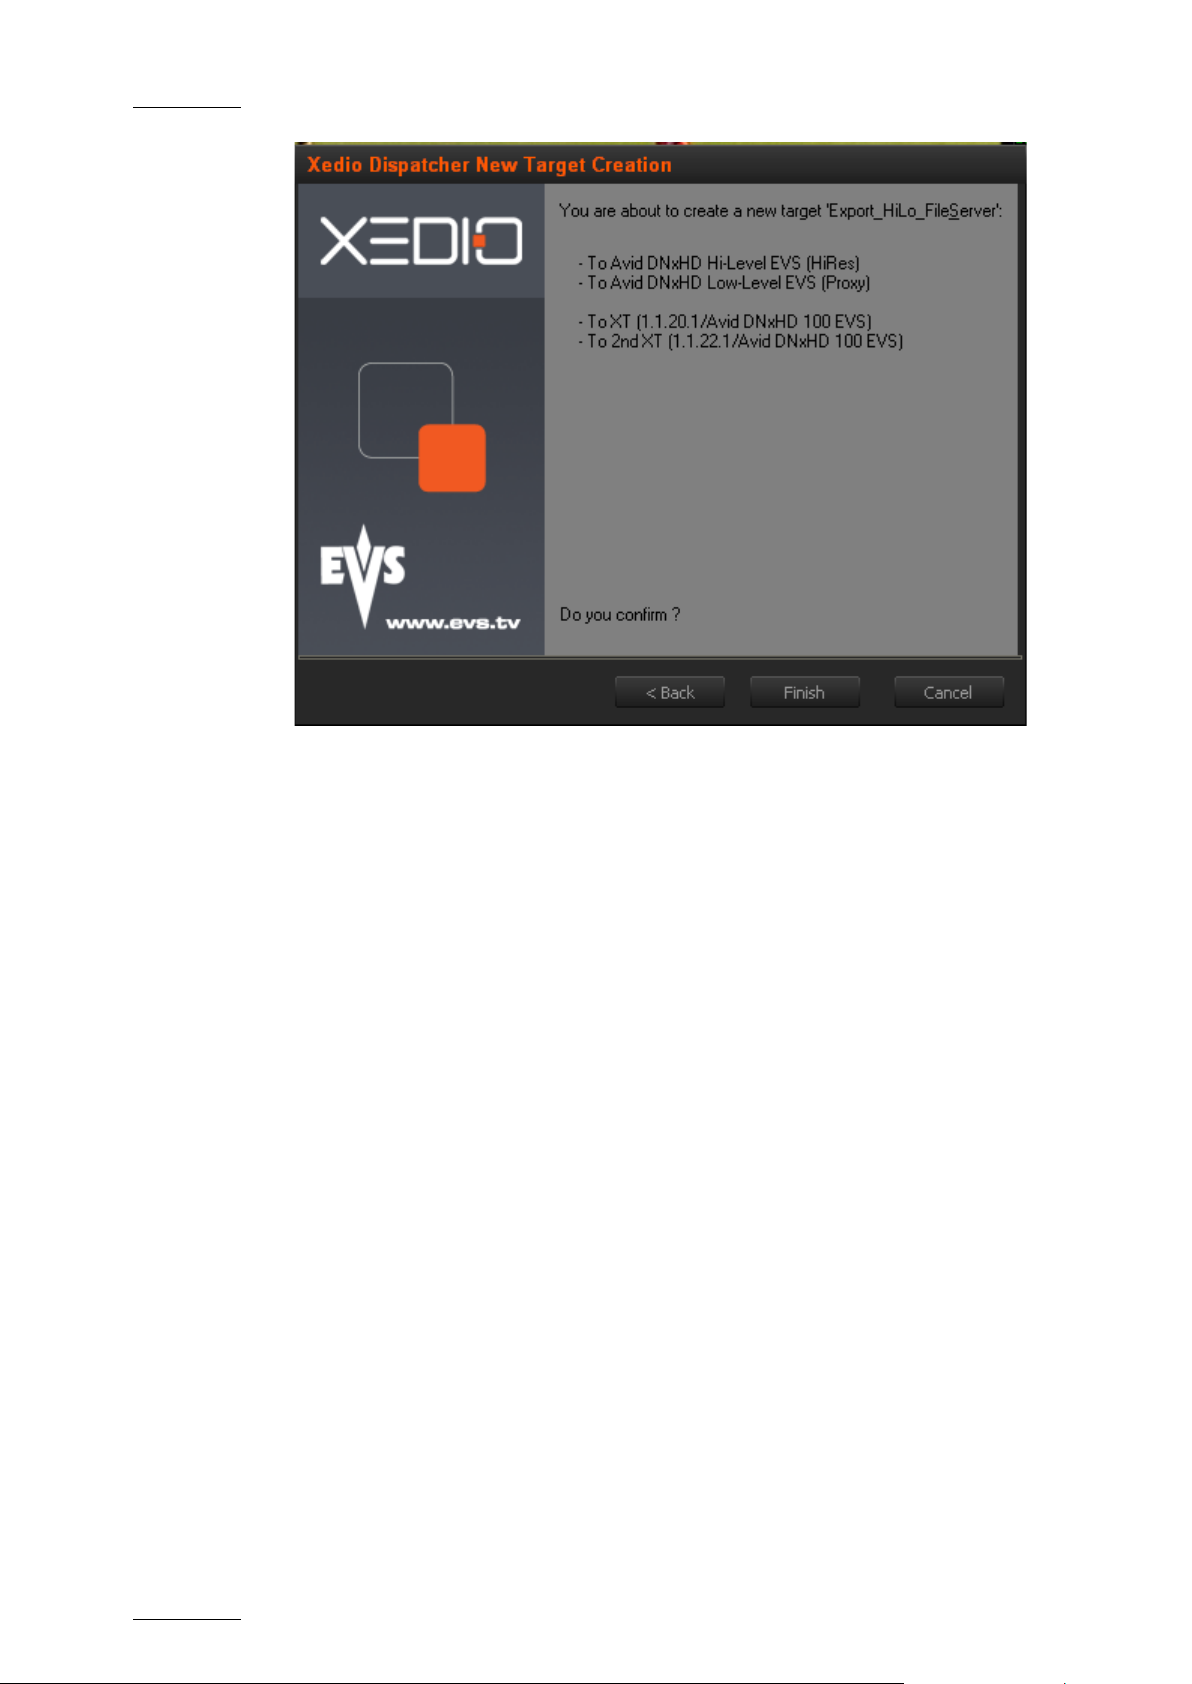
10. The last dialog box provides an overview on the target profile definition. You
can still go back to a previous dialog box, and modify the target profile
definition.
Page 20
Issue 4.0.B
Xedio Dispatcher – Version 4.0 – User’s Manual
EVS Broadcast Equipment – July 2011
12
Click Finish to co nfirm the Target Profile D efinition.
The target profile yo u have created is now avail able for use in the Target field
of the Export Tool in Xedio Dispatcher.
3.2 KEYWORD G RIDS
The keywords grids used in Xedio Dispatcher are stored as .xml files in
C:\Program Files\ EVS Broadcast Equipment\XedioDispatcher\Keyword
Grids\*.xml.
Drop the requested keyword grid files in the folder specified above and the name
of the file will be displayed as the keyword grid name in the Logger tool of Xedio
Dispatcher. The grid i s directly available in X edio Dispatcher.
They are compatible wit h IPDirector.
Page 21

Xedio Dispatcher – Version 4.0 – User’s Manual
EVS Broadcast Equipment – July 2011
Issue 4.0.B
13
When selected: the backup of EVS video server is
resulting grab
3.3 CONFIGURATION PARAMETERS
3.3.1 PARAMETER PROFILES
INTRODUCTION
You can access the parameter profiles in Xedio Dispatcher, via the menu
Parameters > Parameter Profiles.
The parameters that are not des cribed below are not used in th e current version of
Xedio Dispatcher.
LIST OF <GENERAL> PARAMETERS
General
Allows to backup EVS
video server
allowed.
Can select ClassList
node
Confirmation window
to backup EVS video
server
Default video aspect
ratio
Default high bitrate
video width
Default video
standard
Default XT Growing
Clip Duration
Grab Still Frame
Folder
When selected: enables the selection of a class list node
rather than only the deepest sub-items.
When selected: displays a confi rmation window before the
backup operation of a n EVS video server.
Video Ratio used in th umbnail generation and during
rendering operations
Possible values: 4/3 or 16/9
Free text field to define the default horizontal resolution
for hi-resolution video files (width in p ixels)
Video supported by the Dispatcher in the curre nt session
(You cannot mixed PAL a nd NTSC). This parameter is
also used during rende ring to upscale or not the m edia
Possible values: PAL SD, NTSC drop SD, HD 1080i @50,
HD 720p @50, HD 1080i @59,94, HD 720p @59,94.
Field to define the d efault duration for XT grow ing clip.
Field to define the d efault folder to store gra b image file.
Grab Still Frame
Prefix
XedioBroker address Free text field to define the IP address and port number
Field to define the default prefix for the
image file.
of Xedio Broker.
Page 22

Issue 4.0.B
Xedio Dispatcher – Version 4.0 – User’s Manual
EVS Broadcast Equipment – July 2011
14
Free text field to define the default clip name when
s the default downconversion rule for 5.1 audio
ines the default audio channel assignment for the
in Xedio Importer or AutoFile Importer, these
Defines the default audio channel assignment for
Defines the default audio channel assignment for the
media files (server clips only).The field displays the
timeline allows the user to place and manage audio
blocks from server clips, behind which a group of 6 audio
L=Left (front)
Ls=Left Surround
C=Centre
R=Right (front)
Rs=Right Surround
LFE=Low Frequency Effects
General
XT Clip creation
default clipname
creating an XT clip.
Audio
Default Down
Conversion Rule
Default Input Audio
Track Assignment
Define
output.
You can choose between the following default opt ions1:
• L=L+Center, R=R+Center
• L=L, R=R
• L=Center, R= Center
• L=Center, R=Silence
• L=Silence, R= Center
• L=Ls, R=Rs
Def
imported media files (other than server clips and encoder
ingests).
The field displays the assignments for 2, 4, 8 and 16
channels configuration s separated by a ‘|’ sign .
Note
Once the audio track ass ignment has been defined
values will be used instead of the default ones on
the workstation.
Default Rendering
Audio Track
Assignment
rendered files.
The field displays the assignments for 2, 4, 8 and 16
channels configuration s separated by a ‘|’ sign .
Default XT Input
Audio Track
Assignment
assignments for 2, 4, 8 and 16 channels configurations
separated by a ‘|’ sign.
Enable 5.1
management
Enables the creation of 5.1 tracks in CleanEdit timeline.
The 5.1 audio support in CleanEdit works only with EVS
video server clips. Each track created in the CleanEdit
1
Page 23

Xedio Dispatcher – Version 4.0 – User’s Manual
EVS Broadcast Equipment – July 2011
Issue 4.0.B
15
channels are handled.
Option list to select the restore type to be used for
Clip Type, e.g. DV_50i,
Audio
Automatic Restore
Restore Type
automatic restore process.
Possible values:
• Full Restore: restores the whole media
• Partial Restore: restores only the useful section of the
media used in the edi t for which a restore is re quested.
Import
Imported FileName
Format
Free text field to define the imported filename format for
XDCAM import.
The following items ca n be used:
%LABEL Label given by Xedio user
%NAME Clip Name
%CLASSID Class ID
%TCIN Timecode IN
%TCOUT Timecode OUT
%CLIPTYPE
P2HD_100i)
%USER Xedio Username
%DURATION Timecode Duration
%YEAR Curr ent Year
%MONTH Current Month
%DAY Current Day Number
%HOUR Current Hour
%MIN Current Minute
%SEC Current Second
%MSEC Current Millisecond
%SDYEAR Shooting Date – Year
Page 24

Issue 4.0.B
Xedio Dispatcher – Version 4.0 – User’s Manual
EVS Broadcast Equipment – July 2011
16
Import
%SDMONTH Shooting Date – Month
Number
%SDDAY Shooting Date – Day
Number
%GUID Clip GUID
Use Long Clip Name When selected: the lon g clip name is used as med ia label.
Vumeter
Bottom level of
Vumeter
Field to define the d b value of vu-meter bottom level. It is
the audio level diffe rence (in dB) compared the 0 level
(audio level of the s ource media) and correspond ing to
the bottom of the gre en zone in the audio meters
Saturation level of
Vumeter
Field to define the d b value of vu-meter saturation level.
It is the audio level difference (in dB) compared to the 0
level (audio level of the source media) and cor responding
to the bottom of the red zone in the audio mete rs
Top level of Vumeter Field to define the db value of vu-meter top level. It is the
audio level (in d B) of the source media a nd corresponds
to the top of the red zone in the audio meters.
Warning level of
Vumeter
Field to define the d b value of vu-meter warning level.
This value corresponds to the beginning of the or ange
area in the vu-meter.
Note
The default values for audio vumeter levels differ in Xedio Dispatcher
and in Final Cut Pro.
It is therefore normal to see the same media reaching the red zone in
Xedio Dispatcher wh ile it is still in the orange zone in FC P.
If you want to have the same audio meter display in both applications,
you can match the audio meter default values in Xedio Dispatcher to the
FCP values.
Page 25

Xedio Dispatcher – Version 4.0 – User’s Manual
EVS Broadcast Equipment – July 2011
Issue 4.0.B
17
LIST OF MEDIA DISPATCHER PARAMETERS
General
EVS Server Ganging
Type
Field to enter a value corresponding to a camera ganging
type.
0: XT input cameras
1: IPDirector metadata
2: mixed (first tries IPD metadata then XT input cams)
External Cue Point –
Ranking 0 Color
External Cue Point –
Ranking * Color
External Cue Point –
Ranking ** Color
External Cue Point –
Ranking *** Color
Color used, in the media bar of the Player, to represent a
log with the default ranking assigne d
Color used, in the media bar of the Player, to represent a
log with a ranking * assigned
Color used, in the media bar of the Player, to represent a
log with a ranking ** assigned
Color used, in the media bar of the Player, to represent a
log with a ranking *** assigned
ThumbnailWidth Width used for new th umbnails (Height is found according
to the 4/3 ratio)
User Cue Point Color Color used, in the media bar of the Player, to represent a
log entered by th e logged user.
Cemediaimport
Audio Track
Assignment Dialog
When selected: Enables the display of audio track
assignment dialog tab in the Setup window during an
import.
Kmt When selected: Allows import of RTD files
P2 When s elected: Allows import of files with P2 format
PlayXTClip When selected: Allows s erver clip to be viewed i n a
player
PlayXTTrain When selected: Allows s erver train to be viewe d in a
player
Stills When selected: All ows import of image (sti lls files)
Stills Keys When selected: Allows import of stills with k ey files
Video When selected: Allows import of video files
Wave When selected: Allows import of files with wave f ormat
Page 26

Issue 4.0.B
Xedio Dispatcher – Version 4.0 – User’s Manual
EVS Broadcast Equipment – July 2011
18
Cemediaimport
XDCam When selected: Allows import of files with XDCam format
XT When selected: All ows import of server clips
Db Maintenance
BackupFilename Backup prefix name of the Xedio Dispatcher DB
BackupFolder Location where the ba ckup operations save backu p files
CheckDB Checks DB during mainte nance operation
DaysBeforeDBMainten
Delay between two DB maintenances
ance
GenerateBackup Generates Xedi o Dispatcher DB backup duri ng
maintenance operation
PurgeBackupFiles Purges previous Xedio D ispatcher DB backup during
maintenance operation
PurgeBackupHistory Purges history from Xed io Dispatcher DB backup during
maintenance operation
ReorganizeIndex Re-indexes table from Xedio Dispat cher DB during
maintenance operation
ShrinkDB Shrinks Xedio Dispatche r DB during maintenance
operation
DeviceFilter
AllowCDRom When selected: Allows scanning CDRom s to find media.
This parameter needs t o be active for XDCAM disk
access.
AllowFixedDrive When selected: Allows scanning lo cal hard disks to find
media
AllowRamDisk When selected: Allows s canning Ram disks to find media
AllowRemoteDrive When selected: Allows scanning network dr ives to find
media
AllowRemovableDrive When selected: Allows scanning USB dr ives to find media
AllowToChangeExtens
ions
When selected: Allows to change the list of defau lt file
extensions supported d uring the media referencing from a
drive. Change is possibl e from the drive creation w indow
or the drive edit win dow.
Page 27

Xedio Dispatcher – Version 4.0 – User’s Manual
EVS Broadcast Equipment – July 2011
Issue 4.0.B
19
to the date when the media was recorded by the
in Xedio
the media during its
DeviceFilter
DaysBeforeMediaPurge Delay between two unuse d media purge
DelayBetweenVolume
Check
Time in seconds between automatic rescan on removable
disk if there is a ch ange
Extensions List of default file extensions supported by Xedio
Dispatcher during the media referencing f rom a drive.
This parameter is used as default value durin g the drive
creation.
MaxDepth Number of directory lev els checked when scanning for
media.
MediaClassId Class ID assigned to t he media during its referenc ing in
Xedio Dispatcher.
MediaDescription Default text to descr ibe the media and a ssigned to the
media during its refer encing in Xedio Dispatcher .
MediaExternalRef Default text for the external reference of the source
support assigned t o the media during its refer encing in
Xedio Dispatcher.
MediaGlobalShooting
Date
The global shooting d ate is assigned to the med ia during
its referencing in Xe dio Dispatcher.
This parameter is a num eric value to define h ow the
global shooting date is assigned:
Possible values:
• 0: date retrieved from the XML file and corresponding
camera.
• >0: date provided by the application .and corresponding
to the date when the media was referenced
Dispatcher.
Medialabel Default name assigned to.
referencing in Xedio D ispatcher.
MediaMetadataXML This fiel d is left empty by default.
Logger
KeywordGridFolder Folder where Xedio Disp atcher looks for Keyword grids.
Default value: C:\Program Files\EVS Broadcast
Equipment\XedioDispatcher\Keyword Grid \
Page 28

Issue 4.0.B
Xedio Dispatcher – Version 4.0 – User’s Manual
EVS Broadcast Equipment – July 2011
20
Interval (in msec) in which the browsing (using the
nowline) tries to be frame accurate (high impact on
e menu
Media List
MaxResultSelSize Field to define the maximum numb er of items which will
be displayed in the r esult list after (0 = no limit).
Player
Auto Clip IN This parameter will be used in future version.
Amount of fields before the entry point of a clip when
using the auto-cl ipping tool (Alt+Space bar ).
Auto Clip OUT This parameter will be used in future version.
Amount of fields after the out point of a clip when using
the auto-clip ping tool (Alt+Space bar ).
BrowsingIntervalAccur
acy
bandwidth)
EnableDeinterlaceMenu When working in HiRes, enable the deinterlac
when right clicking ov er player
JogAudioThresholdHI Maximum playing speed, in hi-res, above which the audio
will no longer be aud ible
JogAudioThresholdLO Maximum playing speed, in lo-res, above which the audio
will no longer be aud ible.
JogRangeHI Jog Range in HiRes (fro m -1.0 to 1.0)
JogRangeLO Jog Range in LoRes (fr om -2.0 to 2.0)
PrevNextX Field to enter the number of fields to jump when Alt key
is used with Prev and Next buttons.
ShiftSpeedMax Field to enter the speed rate for super fast forward and
rewind tools when used together with the Shift key.
SpeedMax Field to enter the speed rate for fast forward and fast
rewind tools.
XT Clip Creation Time
Tolerance
Field to enter the tolerance value (in seconds) towards
the creation time betw een two sibling XT clips .
XT Stream Creation
Time Tolerance
XT Train Only View
Field to enter the tolerance value (in seconds) towards
the creation time betw een two sibling streams.
When selected: the cli p creation on XT train i s disabled.
Enable
Page 29
Xedio Dispatcher – Version 4.0 – User’s Manual
EVS Broadcast Equipment – July 2011
Issue 4.0.B
21
key is installed in
Countdown in milliseconds before starting the record
Allows the Match Frame feature (toggle from edit to
the Match Frame button is
In the Application Selection area, select the application in which a
Storyboard
AllowAudioGuideTrack Enables the Audio Guide Track feature. If this parameter
is active and if the required license
XSecure, the Audio Guide Track button will be available
in the Storyboard player.
AudioGuideTrackOutp
ut
AudioGuideTrackPreR
oll
AutomaticSaveTime Delay (in seconds) between two storyboard save s
Workspace
AllowMatchFrame
Stereo output for Aud io Guide Track
process
media): If this is active,
available in the Stor yboard Player
HOW TO EDIT A PARAMETER PROFILE
To edit the parameters values of a profile, proce ed as follows:
1.
parameter profile should be edited.
2. Select the profile in the P rofile Selection area.
3. In the Parameters area, edit the desired parameters in the Variant Values
column
• by selecting or cleari ng the box corresponding t o a parameter (check box)
• by adding the required v alue (field to enter a val ue)
• by selecting the requir ed value (option list)
The default values can be changed by editing the <default> profile.
4. Click the Save button to save the selected profile.
A dialogue box will sh ow a successful update.
Page 30

Issue 4.0.B
Xedio Dispatcher – Version 4.0 – User’s Manual
EVS Broadcast Equipment – July 2011
22
3.3.2 KEYBOARD PROFILES
INTRODUCTION
You can access the keyboard profiles in Xedio Dispatcher, via the menu
Parameters > Keyboard Profiles.
LIST OF MEDIA DISPATCHER KEYBOARD KEYS ASSIGNMENTS
General
Player Focus Sets focus on Clip Player window
Player Full Screen Zoom Clip Player wi ndow to full screen
Recorder Focus Sets focus on Storyboard Playe r window
Recorder Full Screen Zoom Storyboard Player window to full scr een
Cemd_storyboard
Delete Edit Clip Deletes the selected edit clip
Delete Storyboard Delete s the storyboard
End Edit Clip Jumps to the last edit clip of the open storyboard
End Storyboard Jumps to the last stor yboard
Home Edit Clip Jumps to the first edit c lip of the open storyboard
Home Storyboard Jumps to the first st oryboard
Next Edit Clip Jumps to the next edit clip of the open storyboard
Next Storyboard Jumps to the next stor yboard
Previous Edit Clip Jumps to the previous edit cl ip of the open story board
Previous Storyboard Jumps to the previous storyboard
Select all edit clips Selects all the e dit clips from the op en storyboard
Exporttool
Delete Deletes the selected c lip
Page 31

Xedio Dispatcher – Version 4.0 – User’s Manual
EVS Broadcast Equipment – July 2011
Issue 4.0.B
23
Player
Drop NowLine
Drops the clip, defin ed in the player, into the storyboard.
Audio1 monitoring (a) Toggle monitoring of the player audio stereo 1
Toggle Audio1
Toggle selection of t he player audio stereo 1
Selection (a)
Audio2 monitoring (a) Toggle monitoring of t he player audio stereo 2
Toggle Audio2
Toggle selection of t he player audio stereo 2
Selection (a)
Audio3 monitoring (a) Toggle monitoring of t he player audio stereo 3
Toggle Audio3
Toggle selection of t he player audio stereo 3
Selection (a)
Audio4 monitoring (a) Toggle monitoring of t he player audio stereo 4
Toggle Audio4
Toggle selection of t he player audio stereo 4
Selection (a)
Audio5 monitoring (a) Toggle monitoring of t he player audio stereo 5
Toggle Audio5
Toggle selection of t he player audio stereo 5
Selection (a)
Audio6 monitoring (a) Toggle monitoring of t he player audio stereo 6
Toggle Audio6
Toggle selection of t he player audio stereo 6
Selection (a)
Audio7 monitoring (a) Toggle monitoring of t he player audio stereo 7
Toggle Audio7
Toggle selection of t he player audio stereo 7
Selection (a)
Audio8 monitoring (a) Toggle monitoring of t he player audio stereo 8
Toggle Audio8
Toggle selection of t he player audio stereo 8
Selection (a)
Toggle Video (a) Toggle the selection of the player video track
Fast Forward Goes fast forward the media in player window (if focus is
set to player)
Fast Rewind Fast rewinds the media in player w indow (if focus is set to
player)
Goto End Jumps to end of t he clip or media
Goto IN Jumps to t he IN point
Page 32

Issue 4.0.B
Xedio Dispatcher – Version 4.0 – User’s Manual
EVS Broadcast Equipment – July 2011
24
Sets clip OUT point to current nowline position
Jumps to next x frames (x is defined in the software
Jumps to next x frames (x is defined in the software
Player
Goto OUT Jumps to the OUT point
Goto Start Jumps to beginning of the clip or media
Insert CuePoint Inserts a cue po int (needs a number to be typed + "enter"
for a timeline cue po int)
Mark IN (a) Sets clip IN point to curr ent nowline position
Mark IN (b) Sets clip IN point to current nowline position (secondary
shortcut)
Mark OUT (a) Sets clip OUT point to current nowline pos ition
Mark OUT (b)
(secondary shortcut)
Next Frame (a) Goes to next frame
Next Frame (b) Goes to next frame (secondary shor tcut)
Next CuePoint Goes to next cue point in Player. Goes to next transition
in timeline
Next CuePoint (b) Goes to next cue point in Player. Goes to next transition
in timeline (secondary shortcut)
Next X Frames (a)
profile)
Next X Frames (b)
profile) (secondary sh ortcut)
Play/Stop Starts/stops loaded media in the Player window from the
current position
PlayClip Plays the clip to OUT point once
PlayClip_loop Plays the clip to OUT in loop mode
Play Forward Plays forward at various speed
Play Reverse Plays reverse at various speed
Previous Frame (a) Jumps to previous frame
Previous Frame (b) Jumps to previous frame (secondary shortcut)
Previous CuePoint Goes to previous cue point in Player. Goes to previous
transition in timeline
Previous CuePoint (b) Goes to previous cue point in Player. Goes to previous
transition in timeline (s econdary shortcut)
Previous X Frames (a) Jumps to previous x frames (x is defined in the software
Page 33

Xedio Dispatcher – Version 4.0 – User’s Manual
EVS Broadcast Equipment – July 2011
Issue 4.0.B
25
profile)
Jumps to previous transition (in regard to the selected
Jumps to previous transition (in regard to the selected
Jumps to next x frames (x is defined in the software
Jumps to next x frames (x is defined in the software
Player
Previous X Frames (b) Jumps to previous x frames (x is defined in the software
profile) (secondar y shortcut)
Toggle All Audio Toggle all pl ayer audio
Stop Stops play ing the media
Recorder
Audio1 monitoring (a) Toggle monitoring of the player audio stereo 1
Audio2 monitoring (a) Toggle monitoring of the player audio stereo 2
Audio3 monitoring (a) Toggle monitoring of the player audio stereo 3
Audio4 monitoring (a) Toggle monitoring of the player audio stereo 4
Audio5 monitoring (a) Toggle monitoring of the player audio stereo 5
Audio6 monitoring (a) Toggle monitoring of the player audio stereo 6
Audio7 monitoring (a) Toggle monitoring of the player audio stereo 7
Audio8 monitoring (a) Toggle monitoring of the player audio stereo 8
Goto End Jumps to the end of the edi t
Goto Next Transition Jumps to next transition (in regard to the selected tr acks)
Goto Next Transition
(b)
Jumps to next transition (in regard to the selected tracks)
(secondary shortcut)
Goto Previous
Transition
tracks)
Goto Previous
Transition (b)
tracks) (secondary shor tcut)
Goto Start Jumps to the beginning of the edit
Insert Cue Point Inser ts a cue point.
Next Frame (a) Jumps to next frame
Next Frame (b) Jumps to next fram e (secondary shortcut)
Next X Frames (a)
profile)
Next X Frames (b)
profile) (secondary sh ortcut)
Page 34

Issue 4.0.B
Xedio Dispatcher – Version 4.0 – User’s Manual
EVS Broadcast Equipment – July 2011
26
Plays from next transition (in regard to the selected
rd to the selected
fined in the software
Recorder
Play/Stop Starts/stops loaded storyboard in Storyboard Player
window
Play Forward Plays forward at vario us speed.
Play from Next
Transition
tracks) (with Preroll)
Preview Previous
Transition
Play Reverse Plays reverse at various speed.
Previous Frame (a) Jumps to previous frame
Previous Frame (b) Jumps to previous frame (secondary shortcut)
Previous X Frames (a)
Previous X Frames (b) Jumps to previous x frames (x is defined in the software
Stop Stops the Storyboard Player
Thumbnail View
Next Line Clip Select the clip on the ne xt line
End Select the last clip
Previews previous transition (in rega
tracks) (with Preroll)
Jumps to previous x frames (x is de
profile)
profile) (secondary sh ortcut)
Home Select the first clip
Next Clip Select the ne xt clip on the line
Previous Clip Select the previou s clip on the line
Select All Clips Select al l the clips
Previous Line Clip Select th e clip on the previous line
Page 35

Xedio Dispatcher – Version 4.0 – User’s Manual
EVS Broadcast Equipment – July 2011
Issue 4.0.B
27
4. User Interface
4.1 STARTING XEDIO DISPATCHE R
To start Xedio Dispatcher, select the Xedio Dispatcher application via the menu
Start > All Programs > EVS Broadcast Equipment > Xedio Dispatcher > Xedio
Dispatcher OR doubl e-click the Xedio Disp atcher shortcut on the deskt op:
4.2 OVERVIEW
The Xedio Dispatcher u ser interface consists of four areas, bes ides the Menu bar.
They are highlighted on the following sc reenshot and shortly described in the table
below:
Page 36

Issue 4.0.B
Xedio Dispatcher – Version 4.0 – User’s Manual
EVS Broadcast Equipment – July 2011
28
The menu bar gives access to general commands and to
This is the working area where you mainly perform the
It allows the selection of keywords from
keyword grids and the selection of a ranking level to
clips or
This is the area where you create and manage your
Area Description
1. Menu Bar
configuration paramete rs.
2. Source Device This area displays the plugged-in devices and the media that
has been automatically detected on the devices, as well as
media from drives and folders which have been scanned by
the users..
See also the section 4.4 ‘Source Device Area’, on page 30.
3. Workspace
following actions:
• Searching for the requested clips, potentially by applying
search filters.
• Loading, playing and edit ing the source clips to create sub-
clips that will be ad ded to a storyboard.
• Loading and playing the final storyboard to check it before
export.
See also the section 4.5 ‘Workspace Area’, on pag e 31.
4. Tools This area contains several horizontal tabs that provide the
following tools:
• Logger tool:
associate to a log.
• Export tool: It allows the export of clips, sub-
storyboards based on the settings defined in a selected
target profile.
See also the section 4.6 ‘Tools area’, on page 39.
5. Storyboard
storyboards. It displays:
• The storyboards as indi vidual tabs.
• The thumbnails of the cli ps included in the open s toryboard.
See also the section 4.7 ‘Storyboard area’, on p age 44.
Page 37

Xedio Dispatcher – Version 4.0 – User’s Manual
EVS Broadcast Equipment – July 2011
Issue 4.0.B
29
click the keyboard
To leave the window without cleaning the database, click
4.3 MENU BAR
The Menu bar gives acce ss to the following commands:
Menu item Description
File
Exit Closes Xedio Dispatcher
View
Status Bar Display s/hides the status bar at t he bottom of the window
Help
About Provides information on the application version, the support
phone number, etc.
Parameters
Parameter
Profiles
Keyboard
Profiles
Maintenance
Database
Cleanup
Opens the Parameter Pro files window where you can modify the
various parameters of Xedio Dispatcher.
For more information on the parameters, refer to the section
3.3 ‘Configura tion Parameters’, on pa ge 13.
Opens the Keyboard Profiles window where you can customize
the keyboard shortcuts .
To modify a keyboard shortcut, double-
shortcut in the Variant Keyboard Function column, type the
requested keyboard shortcut, and press OK.
Opens the Database Cleanup window where you can clean all
DB tables, delete thumbnails, and audio guide track in a single
operation.
To clean the Xedio Dispatcher database, select the check box
in the Cleanup Operati ons zone and click Start.
simply OK.
Page 38

Issue 4.0.B
Xedio Dispatcher – Version 4.0 – User’s Manual
EVS Broadcast Equipment – July 2011
30
d is
and in
4.4 SOURCE DEVI CE AREA
4.4.1 INTRODUCTION
When you open Xedio Dispatcher, the application automatically detects the
plugged-in SD or HD devices (P2, XDCAM or XDCAM EX supports), and searches
for media present on t hese supports.
USB devices and XF drives can be scanned, so their content is available for
browsing, logging, rough-cut and expor t.
4.4.2 GENERAL DESCRIPTION
The Source Device area displays:
• the identified devices as the root br anches of
an expandable tree view and the detected
media below the device o n which it is stored.
The path where the media is locate
specified.
• the folders scanned by users and their sub-
folders.
The check-boxes are used to specify the media
to be displayed in the Thumbnail view
the List view of the Workspace. See also 5.3
‘Selecting Relevan t Media’, on page 59.
Page 39

Xedio Dispatcher – Version 4.0 – User’s Manual
EVS Broadcast Equipment – July 2011
Issue 4.0.B
31
The Thumbnail view shows the thumbnails
The Storyboard Player view allows playing the
4.5 WORKSPACE AREA
4.5.1 INTRODUCTION
In the Workspace area, you will list, apply filters, browse and edit the medi a using
one of the four p ossible views.
The user interface elements in the Workspace area differ depending on the view
mode.
4.5.2 VIEW MODES IN TH E WORKSPACE
You can select the requested view by clicking one of the view buttons at the
bottom of the Workspace area:
View Description
Thumbnail view
corresponding to the various source clips of the
media selected in the Source Device area.
List view
Clip Player view
Storyboard Player
view
The List view displays the list of source cl ips from
the media selected in the Source Device area and
gives access to the different filters which can be
applied to restrict the list of clips display ed.
The Clip Player view allo ws playing source clips.
final storyboards, as we ll as recording audio guide
tracks.
Page 40

Issue 4.0.B
Xedio Dispatcher – Version 4.0 – User’s Manual
EVS Broadcast Equipment – July 2011
32
4.5.3 THUMBNAIL VIEW IN THE WORKSPACE AREA
PURPOSE
You will work in this view to select the cameras source clips you want to use to
create storyboard elem ents.
OVERVIEW
The Thumbnail view shows the thumbnails corresponding to the various source
clips of the media se lected in the Source De vice area:
For each clip, the fo llowing metadata is displ ayed:
• the clip name (above the thumbnail)
• the TC IN, TC OUT, and duration of the clip in the source media (below the
thumbnail)
Double-clicking a thumbnail opens the cor responding clip in the Cli p Player view.
SELECTING TECHNIQUES
Several source clips can be selected to move them at once to a storyboard or to
on export list. You c an select them thanks to t he usual commands:
• Press CTRL + click on the items for a selection of multiple non-contiguous
items.
• Press SHIFT + click on the first and last item for a selection of multiple
contiguous items.
• Press CTRL + A t o select all the item s from the thumbnail view.
Page 41

Xedio Dispatcher – Version 4.0 – User’s Manual
EVS Broadcast Equipment – July 2011
Issue 4.0.B
33
4.5.4 LIST VIEW IN THE WORKSPACE AREA
PURPOSE
You will preferably use this view to see the clips metadata when you work with
drives / folders in t he Device area.
OVERVIEW
The List view displays the list of all clips present in the selected media, and their
associated metadata. D ifferent filers can be appl ied to restrict the li st.
The following table provides a short de scription of the various areas highlighted in
the List view. You will find more detailed information on the List view in the
section 5.3.3 ‘Searching for Clips w ithin the List View’, on page 61:
Page 42

Issue 4.0.B
Xedio Dispatcher – Version 4.0 – User’s Manual
EVS Broadcast Equipment – July 2011
34
field and
fields to restrict the list to
to the
Opens the Render List window listing all types of
store processes that were achieved for the selected
Opens the Media Properties window which shows the
. If a default metadata
User Interface
Description See also …
Element
1. Search Tools
Provides a Quick Text Search
Advanced Filters
specific data.
2. Saved Filters
Tabs
Allows to save filters and to apply them later
on.
3. Element List Displays the list of clips corresponding
selected source in the Device area, or returns
Section 5.3.3
(pp.62 and
63)
Section 5.3.3
(p.69)
Next 2
sections
the result of a searc h applied to the list.
DISPLAYED COLUMNS
It is possible to re-arrange the columns order, and to add or remove some
columns.
Right-clicking on any of the column headings displays a contextual menu. The
Choose Displayed Columns option opens the Select Visible Columns window
allowing you to choose the columns you want to be displayed in the ele ment list.
The column width and order can be adjusted using standard computer commands
and drag and drop tech niques.
ELEMENT LIST CONTEXTUAL MENU
A contextual menu is a vailable when you right-click on an i tem in the list:
Menu Item Description
Play Loads the clip in the Clip Player window to allow the clip
to be browsed.
Render List
rendering that have b een done with the clip.
Archive History Opens the Archive History window listing the archive and
re
clip.
View Properties
properties for the selected clip
profile has been defined for the media, a metadata tab is
displayed and allows t o modify the clip me tadata values.
Page 43

Xedio Dispatcher – Version 4.0 – User’s Manual
EVS Broadcast Equipment – July 2011
Issue 4.0.B
35
4.5.5 CLIP PLAYER VIEW IN THE WORKSPACE AREA
PURPOSE
You will work in this view to perform the follow ing actions:
• Playing the source clips displayed in the thumbnail view or cor responding to a
storyboard element.
• Preparing sub-clips to be added to the storyboard.
OVERVIEW
The Clip Player view m ainly consists of a media p layer and associated commands,
and is similar to the players used in the Xedio suite:
The following table provi des a short description of the various areas highli ghted in
the Clip Player view. You will find more detailed information on the Clip Player in
the section 4.8 ‘Clip Player and Storyboard Player’, on page 44:
Page 44

Issue 4.0.B
Xedio Dispatcher – Version 4.0 – User’s Manual
EVS Broadcast Equipment – July 2011
36
io meters show the levels of the
The radio buttons displayed next to audio
channel buttons allow you to select which
in the
The Media bar represents the clip currently
from the thumbnail view, the IN and OUT
initially displayed are the ones of the
Mark the IN and OUT points of the
User Interface
Element
1. Video Display
& Audio Meters
2. Track
Selection
buttons
3. Jog and
Media bar
Description See also …
It displays the media loaded on the Player.
Parameters related to the display are availab le
Section 4.8.2
(p.46)
via a contextual menu.
The aud
various audio tracks of the clip that is being
played.
The Track Selection buttons (little camera and
triangle buttons) allow you to select the video
Section 4.8.3
(p.47)
and audio channels you want to include in the
clip/sub-clip you will place into the st oryboard.
audio track you want to monitor when you play
the loaded clip in th e Clip Player.
The jog bar allows you to move with
media at a variable sp eed.
Section 4.8.4
(p.48)
loaded on the Player:
• If the source clip is loaded on the Player
• If the source clip of a storyboard element is
4. Editing and
Transport
commands/fields
The editing and transport buttons mainly allow
you to perform the fo llowing actions:
• Browse in and play the source clip loaded
•
• Navigate between the logs created on the
5. View Mode
buttons
These buttons allow you to change the View
mode in the Workspace.
6. Next/Previous
Clip buttons
These buttons allow you to move to the next or
previous clip availab le in the Thumbnail view .
points initially displayed are the ones of the
source clip.
loaded on the Player, the IN and OUT points
storyboard element.
on the player.
storyboard element before you place it into
the storyboard.
clip loaded in the pl ayer.
Section 4.8.5
(p.50)
Section 4.8.7
(p.54)
Section 4.8.8
(p.56).
Section 4.5.2
(p.31).
Page 45

Xedio Dispatcher – Version 4.0 – User’s Manual
EVS Broadcast Equipment – July 2011
Issue 4.0.B
37
4.5.6 STORYBOARD PLAYER VIEW IN THE WORKSPACE AREA
PURPOSE
You will work in this view to perform the follow ing actions:
• Play a storyboard to see the f inal result before ex porting it.
• Add an audio guide track over the storyboard.
OVERVIEW
Page 46

Issue 4.0.B
Xedio Dispatcher – Version 4.0 – User’s Manual
EVS Broadcast Equipment – July 2011
38
Player. Parameters related to the display
The audio meters show the levels of the
Allows moving within the storyboard at a
The Media bar represents the whole
Jog &
n and play the loaded
Navigate among the logs displayed on
over on the
Allow moving to the next or previous
storyboard element and position on the
The following table provides a short description on the various areas highlighted
in the Storyboard Player view. You will find more detailed information in the
section 4.8 ‘C lip Player and Storyboard Player’, on page 44:
User Interface
Element
1. Video Display &
Audio Meters
2. Audio Track
Monitoring buttons
3. Jog and Media
bar
4. Transport
commands
Description See also the
…
It displays the video material loaded on the
Section 4.8.2
(p.46)
are available via a c ontextual menu.
various audio tracks of th e clip that is being
played.
Allow the selection of the audio track you
want to monitor.
Section 4.8.4
variable speed.
(p.48)
storyboard currently l oaded on the Player.
For more information on the job and media
bars, refer to the section 4.8.4 ‘
Media Bars’, on page 48.
Allow you to do the f ollowing actions:
• Browse i
Section 4.8.6
(p.52)
storyboard.
•
the loaded storyboard .
5. Audio Guide
Track Record
Allows you to add voicestoryboard.
button
6. View Mode
buttons
Allow changing the View mode in the
Workspace.
7. Next/Previous
Storyboard
storyboard available i n the Storyboard area.
buttons
8. Go to Match
Allows loading the source cli p of the loaded
Frame button
current frame.
Section 5.7
(p.79)
Section 4.5.2
(p. 31)
Page 47
Xedio Dispatcher – Version 4.0 – User’s Manual
EVS Broadcast Equipment – July 2011
Issue 4.0.B
39
4.6 TOOLS AREA
4.6.1 ACCESSING THE TABS IN THE TOOLS AREA
The Tools area contains several tabs that are organized horizontally. Click the
Tools tab to expand t he Tools area.
4.6.2 LOGGER
INTRODUCTION
The Logger is the panel from which you will create a log,. From the Logger tab,
you will also be able to add free text and to select keywords and/or ranking you
want to associate to a log.
When you open Xedio Dispatcher, the application checks for keyword grids stored
as .xml files in
Equipment\XedioDispatcher\Keyword Grids
automatically loaded and availa ble in the Logger tab.
C:\Program Files\ EVS Broadcast
. The detected grids are
OVERVIEW
The Logger tab displays differently depending on whether keyword grids have
been detected or not.
Logger without Associated Keyword Grids
Page 48

Issue 4.0.B
Xedio Dispatcher – Version 4.0 – User’s Manual
EVS Broadcast Equipment – July 2011
40
keyword grids are
S
C:\Program Files \EVS Broadcast
Logger with Associated Keywo rd Grids
The following table provides a short description on the various areas highlighted
in the Logger tab. You will find more detailed information in the section 5.6
‘Adding Logs to a Clip’, on page 75:
User Interface Element Description
1. Keyword Grid Selecti on
Field
This field is only present if
stored as .xml files in C:\ Program Files\ EV
Broadcast
Equipment\XedioDispatcher\Keywo rd Grids
.
This field provides the list of keyword grids from
which you can select the one you wa nt to use.
2. Keyword Grid Once a keyword grid has been selected, it opens
in the Keyword Grid area. If the keywords cannot
be displayed in one page, the page s are displayed
as tabs.
If no keyword gris is stored as .xml files in
Page 49

Xedio Dispatcher – Version 4.0 – User’s Manual
EVS Broadcast Equipment – July 2011
Issue 4.0.B
41
,
loaded clip, with all
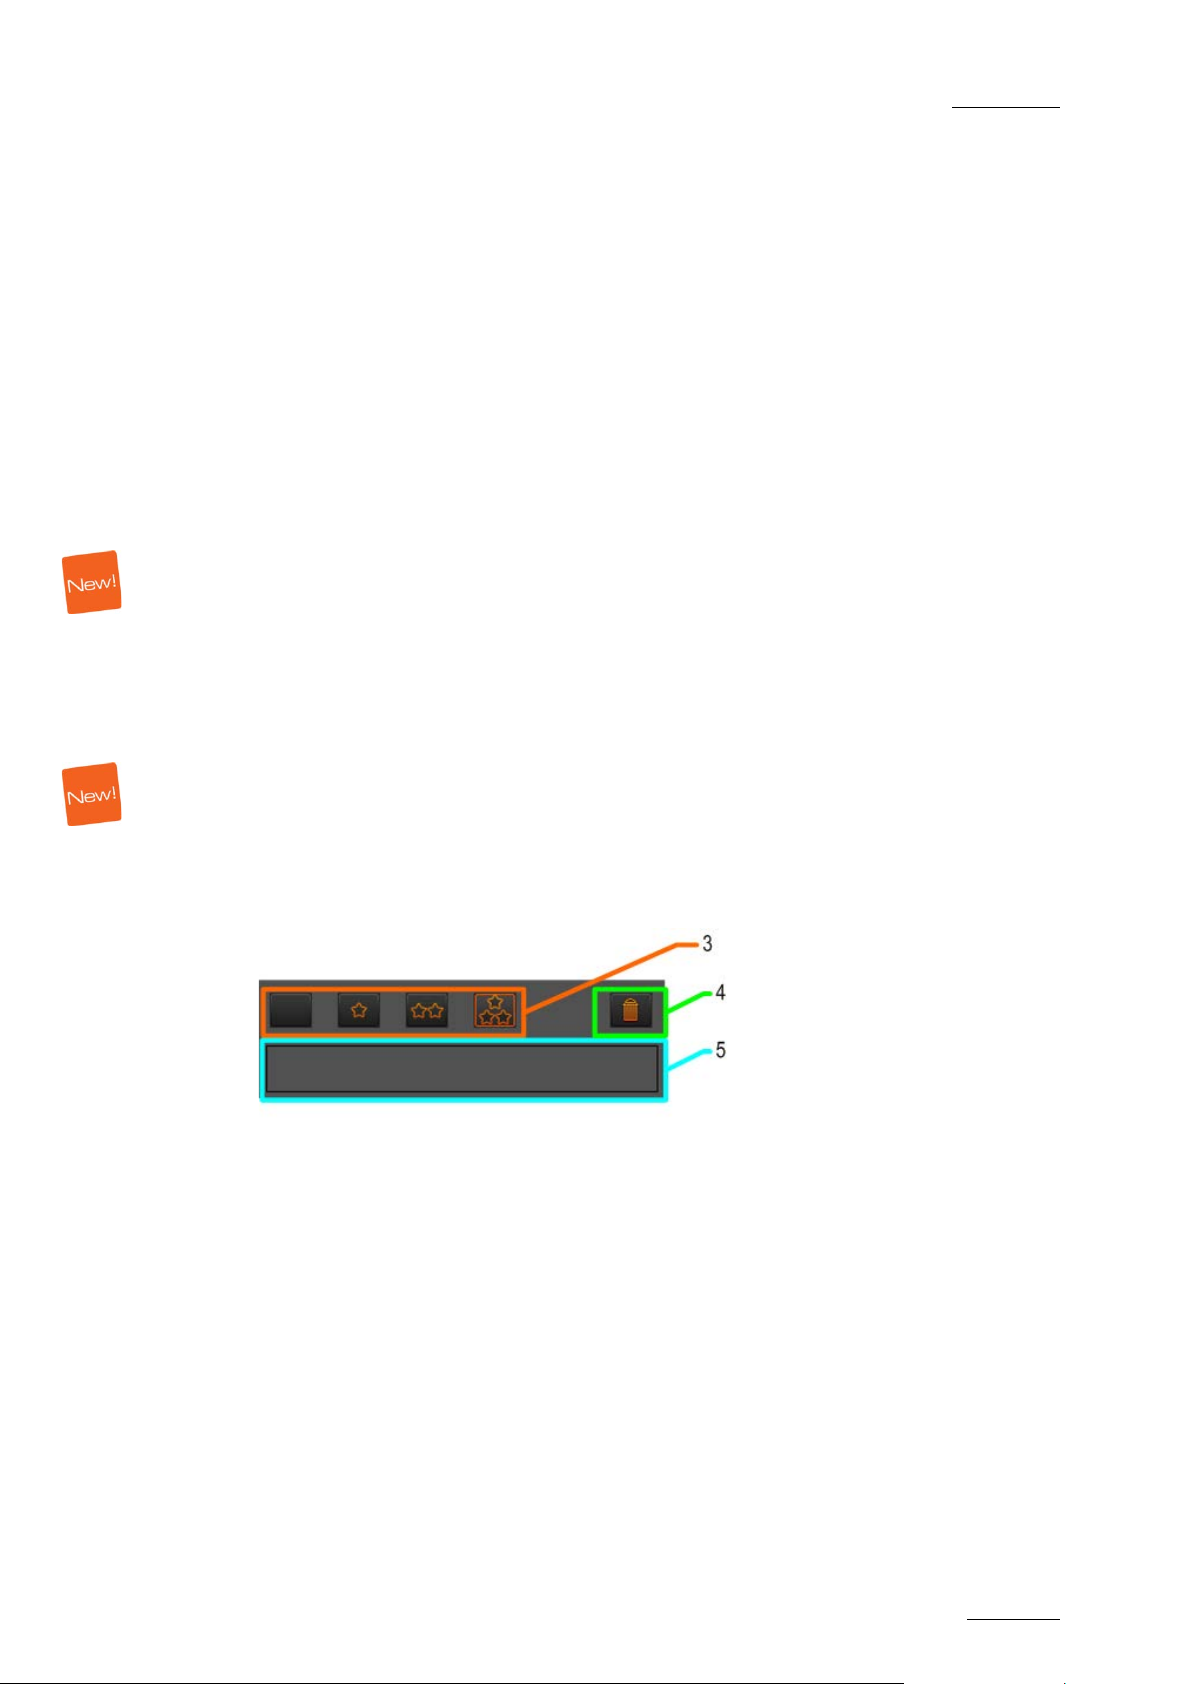
User Interface Element Description
3. Ranking Buttons Buttons that allows you to assign a ranking to the
4. Delete Log Button Button that allows you to delete the log on which
5. Free Text Field Field that allows to enter and assign free text to a
4.6.3 EXPORT TOOL
Equipment\XedioDispatcher\Keywo rd Grids
this area is not available.
log, in order to highlight i mportant moments in the
clip.
The log will have a different color depending on
the ranking assigned.
you are positioned in the
related keywords and r anking information.
log.
INTRODUCTION
The Export Tool is the panel where:
• you select the target pro file you want to use d uring the export process.
• you create a new target using the Target wizard
• you prepare and execute the export of storyboards, but also source clips, or
sub-clips.
The target profile is the def inition of the destinations and codecs that will be used
to export the selected storyboards. You select the target profile in the Target
field. Each target profile is defined in an .xml file that has to be stored in
C:\XedioDispatcherMS\Profiles\ RTProf.
Page 50

Issue 4.0.B
Xedio Dispatcher – Version 4.0 – User’s Manual
EVS Broadcast Equipment – July 2011
42
down field from which you can select the
OVERVIEW
The following table provides a short description on the various areas highlighted
in the Export Tool tab. You will find more detailed information in the section 5.9
‘Exporting the Storyboard’, on page 81:
User Interface Element Description
1. Target Selection fie ld
Droptarget profile you wan t to use or create a new one.
2. List of export jobs List of storyboards that have been added to the
export list in the curr ent session, whether they have
already been exported or not.
To add a storyboard into the export list, drag it into
the list of export jobs.
When the storyboard has not been exported yet, the
progress bar shows 0 and the background is light
grey:
Page 51

Xedio Dispatcher – Version 4.0 – User’s Manual
EVS Broadcast Equipment – July 2011
Issue 4.0.B
43
and the
When the storyboard has not been successfully
ported, the progress bar displays an error
and the
Cancels the export process. Already finalized
User Interface Element Description
When the storyboard has been successfully
exported, the progress bar displays OK
background is green:
ex
message and the backgr ound is blue:
When the Export job has been cancelled, the
progress bar displays Cancelled
background is red:
3. Start button Starts the export process for the storyboards that
are in the list and h ave not been exported yet.
4. Cancel button
exports will not be ca nceled.
5. Clear List button Clears the export list. The application asks you to
confirm this action.
It does not clear the output of export jobs stored on
the various destinati on folders.
Page 52

Issue 4.0.B
Xedio Dispatcher – Version 4.0 – User’s Manual
EVS Broadcast Equipment – July 2011
44
4.7 STORYBOARD AREA
4.7.1 OVERVIEW
In the Storyboard area, you can see all storyboards you have created in Xedio
Dispatcher. Each storyboard is displayed as a tab (1) named according to the
storyboard name.
When you click the tab corresponding to a storyboard, the storyboard opens: the
tab name becomes underlined, and the storyboard clips (2) are displayed as
thumbnails in the tab .
You can play the storyboard in the Storyboard Player view. For more information,
refer to the section 5.8 ‘Checking the Storyboar d’, on page 80.
Other actions on the storyboard are managed via the contextual menus, from the
Workspace area, Export tool or Logger tool.
4.8 CLIP PLAYE R AND STORYBOARD PLAYER
4.8.1 OVERVIEW
This section describes in details the elements of the user interface specific to the
Clip Player available in t he Workspace area. The Clip Player is accessible via the
Clip Player button .
The Storyboard player shares many user interface elements with the Clip Player.
For this reason, the section will also deal with the elements which are common to
both players, and specific to the Storyboard Player. The Storyboard Player is
accessible via the St oryboard Player button .
Besides the video display, the following fields and buttons, will be described in
this section.
Page 53
Xedio Dispatcher – Version 4.0 – User’s Manual
EVS Broadcast Equipment – July 2011
Issue 4.0.B
45
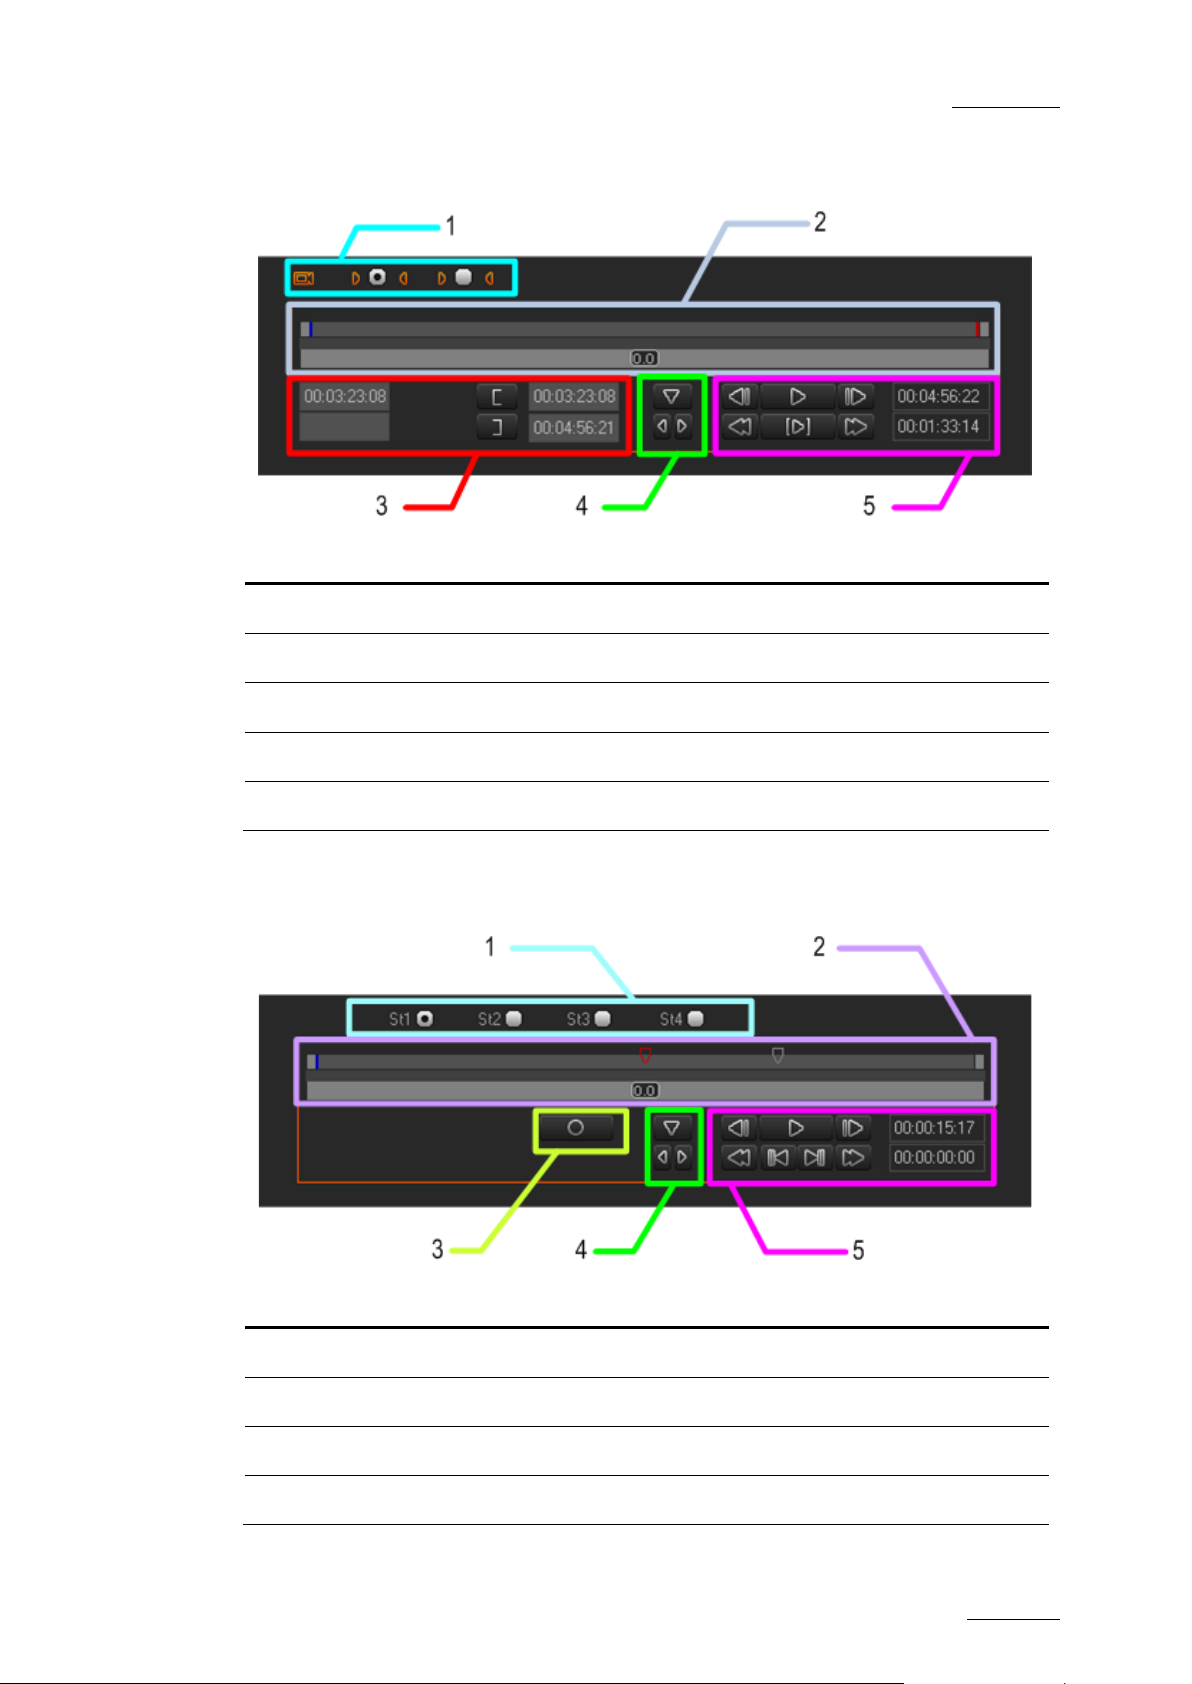
TRANSPORT AND EDITING ZON ES IN THE CLIP PLAYER
User Interface Element See also …
1. Track Selection Buttons Section 4.8.3
2. Jog and Media Bars Section 4.8.4
3. Editing Fields Sections 4.8.7, 5.5.1
4. Log Buttons Sections 4.8.8, 5.6
5. Transport Fields Section 4.8.6
TRANSPORT ZONES IN TH E STORYBOARD PLAYER
User Interface Element See also …
1.Audio Track Monitoring Radio But tons Section 4.8.9
2. Jog and Media Bars Section 4.8.4
3. Audio Guide Track Re cord Button Sections 4.8.10, 5.7
4. Log Buttons Sections 4.8.8, 5.6
Page 54

Issue 4.0.B
Xedio Dispatcher – Version 4.0 – User’s Manual
EVS Broadcast Equipment – July 2011
46
which areas of the picture will be seen and allow for
User Interface Element See also …
5. Transport Fields Section 4.8.6
4.8.2 VIDEO DISPLAY
The video display is c ommon to the Clip Player an d Storyboard Player.
ADJUSTING THE PLAYER VIDEO DISPLAY
You can adjust the Player video display via a contextual menu. You call the
contextual menu by rig ht-clicking the Vide o Display zone on the Player area.
It gives the followin g display options for t he video:
Field Description
Show Timecode This option offers different choices to display timecode on
the player window.
• none – does n ot display any timecode
• intra TC – display s the original timecode o f the media
• start TC - displays a counter starting with 0 at the first
frame of the media
• both (Intra TC – Start TC) – displays both the counter
and original timecode
Aspect Ratio Offers a choice of aspect ratios for th e display either Auto,
4:3 or 16:9.
This is also possible to use the following shortcuts:
• + to toggle between 4: 3 and 16:9
• + to reset the display to ‘Auto’
Show Safe Areas Displays a safe area cage on the window to determine
checking the size of graphics within the media for safe
display.
Best Quality Optimizes the image size to provide the best quality when
media is played.
Maximize Maximizes the image si ze to fill the display area.
Grab Image Grabs the current image, either in low resol ution or in high
resolution. The default fo lder (c:\) where the grab is stored
is defined via the menu Parameters > Parameters Profiles:
General, General tab: GrabStillFrameFolder parameter.
Page 55

Xedio Dispatcher – Version 4.0 – User’s Manual
EVS Broadcast Equipment – July 2011
Issue 4.0.B
47
MAKING THE PLAYER AREA FULL SCREEN
To view the Player are a as a full-screen im age, press F9 on the keybo ard.
Press again F9 to revert t o the normal display.
4.8.3 PLAYER TRACK SELECTION BUTTONS
All the available audio sources from a media are displayed below the Video
Display Clip Player. The Track Selection buttons are specifi c to the Clip Player.
OVERVIEW O F THE TRACK SELECTION
When you create a sub-clip, you need to select the video and requested audio
tracks using the butt ons underneath the Video Dis play zone:
VIDEO AND AUDIO SELECTION
The channel selection (camera and tr iangle buttons) allows you to select the vi deo
and audio channels you want to include in the clip/sub-clip you will add to the
storyboard.
Clicking on the Video button will remove the vide o from the Player window and
disable it so that the clip made has no video: The displayed button will turn to
white.
Clicking on the left or right triangle of an audio stereo track will disable
respectively the left or right channel of the corresponding audio track: The
displayed button w ill turn to white.
The table summarizes how the buttons look like dependi ng on the selection:
Enabled Disabled
Video
Audio
Page 56

Issue 4.0.B
Xedio Dispatcher – Version 4.0 – User’s Manual
EVS Broadcast Equipment – July 2011
48
AUDIO MONITORING SELECTION
The radio buttons displayed between each pair of stereo audio channel buttons
allow you to select which audio track you want to monitor when you play the
loaded clip in the Cl ip Player.
Audio meters located on the right side of the Video Display represent the
monitored track.
Db values are displayed on each side. They correspond to the values defined in
Parameters > Parameter Profiles > General > Vumeter for the top level, the
saturation level, the warning level and the bottom level. Values for 0, -2, -4, -8
and -16 are sh own as well if they do not overwrite the database val ues.
EXAMPLES
If a sub-clip has to be created without audio for the channels 1 and 2, disable the
2 buttons of those ch annels:
Clicking on the left audio button will remove the left audio component from the
source so that the clip made has no left audio channel. In this case, the right
channel will be outpu t on the left and right.
Clicking in addition on the right audio button will remove the right audio
component so that the clip made has no right audi o channel.
4.8.4 JOG & MEDIA BARS
The Jog and Media bars, as well as the nowlin e, mark IN and mark OUT points are
common both to the Cli p Player and Storyboard Pl ayer.
JOG
Dragging the jog bar allows you to move within the media at a variable speed
depending on:
• the position of the speed indicator
• the speed range covered by the jog area. The default range is set from -200%
to +200%. This is set via the menu Parameters > Parameters Profiles: Media
Dispatcher > Default profile > Player tab: JogRangeHI and JogRangeLO
parameters.
Audio can be heard whe n using the jog.
Page 57

Xedio Dispatcher – Version 4.0 – User’s Manual
EVS Broadcast Equipment – July 2011
Issue 4.0.B
49
MEDIA BAR
The top area on the bar represents the media, or a portion of it, currently loaded
on the Player. The mark IN, mark OUT and nowline are displayed on this top area
(See the section ‘Nowline, Mark IN and Mark OUT’, on page 49).
The middle area includes a dark grey zone. This zone shows the portion of the
media out of the whole media included in the top area and the position in the
whole media:
• When a media has just been loaded, the top area represents the whole media:
The dark grey area cov ers the whole space in the middle area.
• If you position the mouse on the middle area and rotate the mouse wheel up or
down, you respectively enlar ge or reduce the dark grey area, hence increasing
or reducing the porti on of the media included i n the top area.
• If you click on the dark grey area and drag it, you shift the portion of media
included in the top a rea.
• When a mark IN and mark OUT are defined, double-clicking on the dark grey
area will toggle the portion covered by the top area from the entire media
length to the clip l ength (portion between mark IN and mark OUT).
NOWLINE, MARK IN AND MARK OUT
In the Clip Player, the (mark) IN, (mark) OUT points, and the nowline will be used
in the media bar for transport and editing actions. In the Storyboard, only the
nowline is relevant.
Display
An IN point, or mark I N point is shown as a green line on the media.
An OUT point, or mark O UT point is shown as a red l ine on the media.
The nowline, that is to say the current position within the media, is shown as a
blue line on the media bar. To place the nowline at a given position, simply click
at the requested posi tion on the media bar.
Page 58

Issue 4.0.B
Xedio Dispatcher – Version 4.0 – User’s Manual
EVS Broadcast Equipment – July 2011
50
s via the menu
IN and OUT Points
When the source clip is loaded from the Thumbnail view into the Clip Player, the
IN point and OUT point correspond to the source c lip boundaries.
When the source clip is loaded from the Storyboard view into the Clip Player, the
IN point and OUT point correspond to the storybo ard clip boundaries.
Mark IN and Mark OUT Poin ts
In the Clip Player, click at the requested position on the media bar and click the
Mark IN button to add the mark IN of a sub-clip.
In the Clip Player, click at the requested position on the media bar and click the
Mark OUT button to add the mark OUT of a sub-clip.
Moving Points
To move the position of the mark IN, mark OUT or nowline, click on them with the
mouse and drag them to the desired position.
Nowline Outside Media Bar
When the media is being played, the nowline moves along the top area of the
media bar. If the portion of the top area covers only a part of the media, the
nowline may disappear. In this case, a red indicator, on the left side or on the
right side of the Media bar will be displayed. A click on the vertical indicator (on
the left or right side) will re-centre the top area to the nowline.
4.8.5 TRANSPORT COMMANDS IN THE CLIP PLAYER
The following table shows an overview on the various transport control fields in
the Clip Player. The table lists the most used commands when they can only be
accessed via a shortcut key.
Note:
The user can customize the keyboard shortcut
Parameters > Keyboard Profiles. See also the section 4.3 ‘Menu Bar’,
on page 29.
Field/Button Keyboard
Shortcut
Function Name and Description
(space bar)
Play/Stop
Start/stops the previ ew (video and/or audio) o f a
clip or rush.
Page 59

Xedio Dispatcher – Version 4.0 – User’s Manual
EVS Broadcast Equipment – July 2011
Issue 4.0.B
51
The button changes to a Stop icon when the
Field/Button Keyboard
Shortcut
-
-
- Fast Forward (with modified s peed)
+
Function Name and Description
media is being played.
Go to IN
Moves from the current position to the Mark IN
point.
Go to OUT
Moves from the current position to the Mark OU T
point.
Fast Forward
Plays the media forward at a preset fast speed.
The button changes to a Stop icon when the
media is being played forward.
Changes the preset spe ed to higher speed value.
The speeds are set in the menu Parameters >
Parameters Profiles: Me dia Dispatcher> Default
profile > Player tab: ShiftSpeedMax parameter.
Fast Rewind
Plays the media backwar d at a preset fast speed.
The icon changes to a Stop icon when the media
is being played backwa rd.
Fast Rewind (with modif ied speed)
+
Changes the preset spe ed to higher speed value.
The speeds are set in the menu Parameters >
Parameters Profiles: M edia Dispatcher> Default
profile > Player tab: ShiftSpeedMax parameter.
or
Go to Prev. Frame
Moves 1 frame before t he current position in
Pause mode.
or
Go to Next Frame
Moves 1 frame after th e current position in Pause
mode.
Page 60

Issue 4.0.B
Xedio Dispatcher – Version 4.0 – User’s Manual
EVS Broadcast Equipment – July 2011
52
If the clip is loaded from the storyboard, it
Field/Button Keyboard
Shortcut
-
or
-
or
Function Name and Description
Previous 10 Frames
Moves 10 frames before the current position in
Pause mode.
+
Next 10 Frames
Moves 10 frames after the current position in
Pause mode.
+
-
Playing a clip from mark I N to mark OUT
Playing a clip in loop fr om mark IN to mark OUT
+
TC OUT of the loaded cli p.
Duration from the IN p oint to the OUT point:
• If the clip is loade d from the thumbnail view , it
displays the duration of the source clip .
•
displays the duration of the storybo ard clip.
4.8.6 TRANSPORT COMMANDS IN THE STORYBOARD PLAYER
The following table shows an overview on the various transport control fields in
the Storyboard Player. The table lists the most used commands when they can
only be accessed via a shortcut key.
Page 61

Xedio Dispatcher – Version 4.0 – User’s Manual
EVS Broadcast Equipment – July 2011
Issue 4.0.B
53
Note:
The user can define the keyboard shortcuts in Xedio Manager to
perform transport cont rol commands. The keys mention ed below are the
default settings.
Field/Button Keyboard
Shortcut
(space bar)
- Fast Forward (with modified s peed)
+
Function Name and Description
Play/Stop
Start/stops playing the storyboard.
The button changes to a Stop icon when the
media is being played.
Fast Forward
Plays the media forward at a preset fast speed.
The button changes to a Stop icon when the
media is being played forward.
Changes the preset spe ed to higher speed value.
The speeds are set in the menu Parameters >
Parameters Profiles: Me dia Dispatcher> Default
profile > Player tab: ShiftSpeedMax parameter.
Fast Rewind
Plays the media backwar d at a preset fast speed.
The button changes to a Stop icon when the
media is being played backward.
Fast Rewind (with modif ied speed)
+
Changes the preset spe ed to higher speed value.
The speeds are set in the menu Parameters >
Parameters Profiles: Me dia Dispatcher> Default
profile > Player tab: ShiftSpeedMax parameter.
or
Go to Prev. Frame
Moves 1 frame before t he current position in
Pause mode.
or
Go to Next Frame
Moves 1 frame after th e current position in Pause
mode.
Page 62
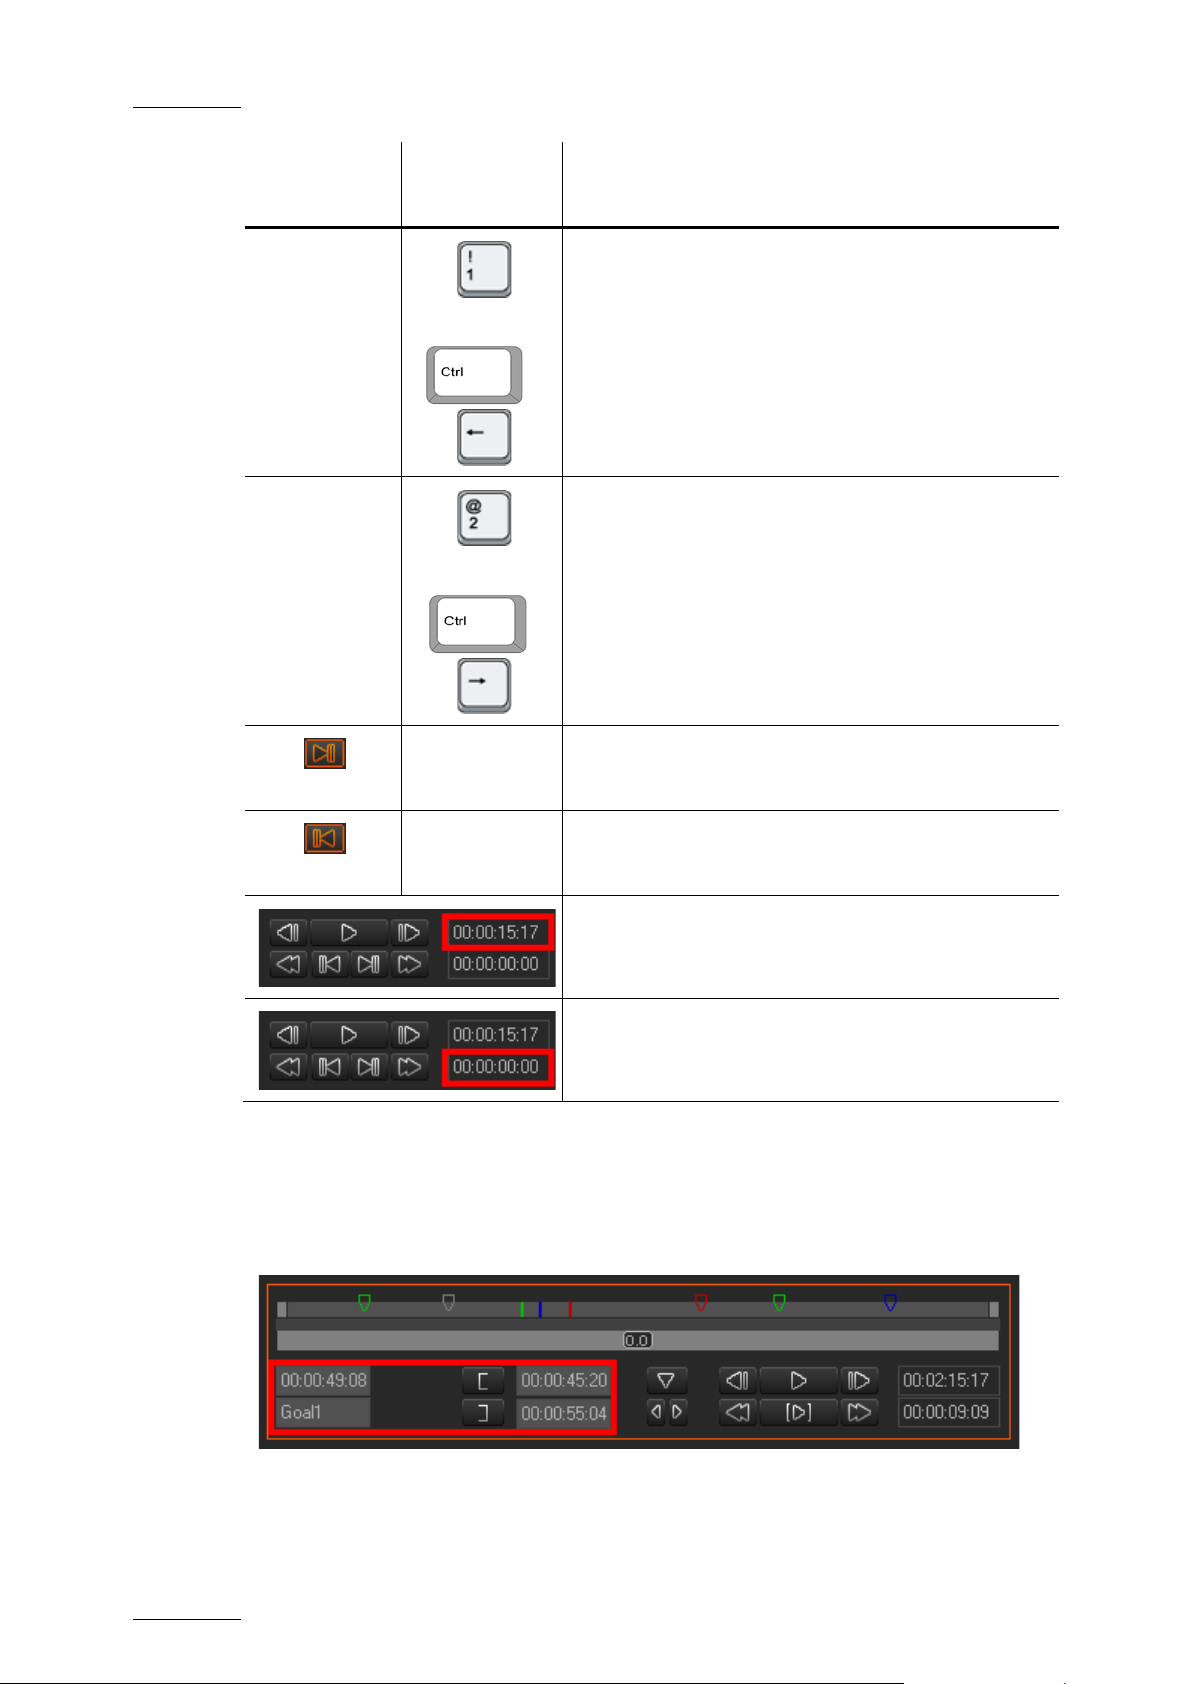
Issue 4.0.B
Xedio Dispatcher – Version 4.0 – User’s Manual
EVS Broadcast Equipment – July 2011
54
Field/Button Keyboard
Shortcut
-
or
-
or
Function Name and Description
Previous 10 Frames
Moves 10 frames before the current position in
Pause mode.
+
Next 10 Frames
Moves 10 frames after the current position in
Pause mode.
+
Go to Next Transition (Storyboar d Player only)
Go to Prev. Transition (Storyb oard Player only)
4.8.7 CLIP CREATION FIELDS
The Clip Creation fields are specific to the Clip Player. The storyboard clips can
indeed not be modifie d once they are included in the storyboard.
Moves to the next stor yboard clip.
Moves to the previous storyboard clip.
Duration of the storyb oard.
This field is not use d in the Storyboard Play er.
Page 63

Xedio Dispatcher – Version 4.0 – User’s Manual
EVS Broadcast Equipment – July 2011
Issue 4.0.B
55
The following table de scribes the various fiel ds that are used to create clips:
Field/Button Keyboard
Shortcut
or
or
Function Name and Description
Mark IN
Sets a mark IN point a t the nowline position on
the media bar:
• A timecode value is adde d in Mark IN TC field.
• A [ sign is s hown on the video display
• A green mark is added at this timecode on the
media bar.
Mark OUT
Sets a mark OUT point a t the nowline position on
the media bar:
• the timecode value is added in Mark OUT TC
field.
• A ] sign is shown on the video display
• A red mark is added at this timecode on the
media bar.
Clip Name
Field where the clip n ame can be entered.
Mark IN TC
Timecode of the Mark IN defined on the loaded
media.
Mark OUT TC
Timecode of the Mark OU T defined on the loaded
media.
Nowline TC
Timecode of the nowlin e defined on the loaded
media.
To move the mark IN, mark OUT or nowline to a given TC, type the timecode in the
corresponding field an d press ENTER.
You can edit hours, mi nutes, seconds or frames s eparately in the timecode fields:
• Double-click on the hours, minutes, seconds or frames area, and the
corresponding area wil l be activated for editi ng.
• Simple-click i n the timecode field, the cursor sho uld blink on the right and you
can type the full tim ecode value.
Page 64

Issue 4.0.B
Xedio Dispatcher – Version 4.0 – User’s Manual
EVS Broadcast Equipment – July 2011
56
4.8.8 LOG BUTTONS
The Log buttons are co mmon to the Clip Player an d Storyboard Player.
The logs are reference points to a specific frame in a video sequence. Their
purpose is to mark points of interest on the media. The log is identified by a TC
value, and relates to an action in a given event. It is associated to keywords
and/or a ranking in Xedio Dispatcher. When no metadata is associated to them,
they are named ‘cue po ints’.
The three Log buttons are used to add and delete logs, as well as to move from
one log to the other.
For more information on how to create and manage logs, refer to the section 5.6
‘Adding Logs to a Clip’, on page 75.
4.8.9 AUDIO TRACK MONITORING BUTTONS
The Audio Track Monitor ing buttons are specifi c to the Storyboard Player .
The radio buttons below the video display allow you to select the audio track you
want to monitor.
4.8.10 AUDIO GUIDE TRACK RECORD BUTTON
The Audio Guide Track R ecord button is specific t o the Storyboard Player.
The Audio Guide Track Record button allows you to record a voice-over
sequence on one track of the storyboard.
You can only record one audio guide track for one storyboard. Once the audio
guide track has been created, you cannot modify it. If you want to change it, you
need to delete it and record a new one.
For more information on how to record an Audio Guide track, refer to the section
5.7 ‘Recording an Audio Guide Track’, on page 79.
Page 65

Xedio Dispatcher – Version 4.0 – User’s Manual
EVS Broadcast Equipment – July 2011
Issue 4.0.B
57
5. Operation
5.1 GENERAL W ORKING PROCESS
When you want to create and export a storyboard, you will usually apply the
following steps. These steps are explained as simple procedures in the following
sections. Click on the step to jump directly to the corresponding secti on.
1. Creating an empty stor yboard, on page 57
2. Selecting media, o n page 59
3. Adding sub-clips t o the storyboard, on page 73
4. Adding logs to clips and/or storyboard (optional), on page 75
5. Checking the storyboar d, on page 80
6. Exporting the storyboa rd, on page 81
5.2 MANAGING THE STORYBO ARDS
5.2.1 HOW TO CREATE AN EMPTY STORYBOARD
To create a storyboard , proceed as follows:
1. Click the + sign in the t op left corner of the Stor yboard area.
This opens The Storybo ard Name window.
2. Type the name of the s toryboard in the Storyboard Name field.
3. Click OK.
The new storyboard is no w available in the Storyboard area as a new tab. The tab
name is the storyboard name. Whe n a storyboard is active, the tab is und erlined in
the Storyboard area.
Page 66

Issue 4.0.B
Xedio Dispatcher – Version 4.0 – User’s Manual
EVS Broadcast Equipment – July 2011
58
ps are
For more information on Exporting storyboards, refer to the
5.2.2 OTHER POSSIBLE ACTIONS ON STORYBOARDS
The following table de scribes the various acti ons you can perform on a st oryboard:
Action Description
Opening a
storyboard
Renaming a
storyboard
Deleting a
storyboard
Click on the tab of t he requested storyboard:
The tab name is underlined and the storyboard cli
displayed in the tab as thumbnails.
Right-click the storyboard tab and select Rename Storyboard
from the contextual me nu:
The Storyboard Name window is displayed. Type the new name
and click OK.
Right-click the storyboard tab and select Delete Storyboard
from the contextual me nu:
Sending a
storyboard to
the Export tool
A message will ask you for confirmation before deleting the
storyboard.
Right-click the storyboard tab and select Send Storyboard to
Export Tool from the co ntextual menu:
The storyboard is adde d to the list of exports:
Page 67

Xedio Dispatcher – Version 4.0 – User’s Manual
EVS Broadcast Equipment – July 2011
Issue 4.0.B
59
section 5.9 ‘Exporting the Story board’, on page 81.
Action Description
5.3 SELECTING RELEVANT MEDIA
5.3.1 DISPLAYING FOLDER CONTENT IN THE SOURCE DEVICE
AREA
XF drives or USB devices containing media backed up from EVS video servers on
an event location can be used in Xedio Dispatcher .
HOW TO ADD AND SCA N A FOLDER
To display a folder co ntent, proceed as follows :
1. In the Source Device a rea, right-click the Folders line.
A contextual menu appea rs.
2. Select Add & Scan Fold er.
A window opens.
3. Type a device name.
4. Browse for the device folder to scan.
5. Click OK.
The folder is added to the Source De vice area and its content is scanned and can
be displayed in.the Wo rkspace area.
FOLDER DISPLAY PROPERTIES
To change the root folder display, right-click the Folders area in the Source
Device area. A context ual menu gives you several display options:
Menu Option Description
Device Label This corre sponds to the device name giv en during the Add
& Scan Folder operatio n.
Folder Name This corresponds to the name of the folder/volume.
Full Path This corresponds to the folder full path (folder and its
Folder – Path This displ ays the folder name fo llowed by the folder path.
subfolders)
Page 68

Issue 4.0.B
Xedio Dispatcher – Version 4.0 – User’s Manual
EVS Broadcast Equipment – July 2011
60
MANAGING THE FOLDERS
A right-click on a folder opens a menu providing options to add a scan folder, to
rescan the selected folder, to change the properties of the selected folder or to
delete the selected f older.
5.3.2 LISTING CLIPS IN THE WORKSPACE AREA
You will create the storyboard clips on the basis of source clips included in the
available media.
In the Workspace area, two views are available to display the content of selected
devices or folders.
• the Thumbnail view
• the List view
DISPLAYING THE SOURCE CLI PS IN THE THUMBNAIL VIEW
Ticking the check box corresponding to a media in the Source Device area and
clicking the button to select the Thumbnail view will display thumbnails for
each source clip inclu ded in this media on the Workspace area.
LISTING THE SOURCE CLIPS IN THE LIST VIEW
Ticking the check box cor responding to a media in the So urce Device area and
clicking the button to select t he List view will displ ay the list of source cl ips
included in this media and their associated met adata on the Workspace are a.
Page 69

Xedio Dispatcher – Version 4.0 – User’s Manual
EVS Broadcast Equipment – July 2011
Issue 4.0.B
61
5.3.3 SEARCHING FOR CLIPS WITHIN THE LIST VIEW
INTRODUCTION
When the Xedio Dispatcher displays large amounts of clips, it may become difficult
to find a specific element. The List view offers several ways to speed up your
search:
• quick text search
• filters on parameters
By default, the columns that are taken into consideration for the Quick Text
Search are the ones cu rrently visible in the grid.
If you wish to search in other columns, and view the string you are searching for
in the columns, you can:
• add other columns to the element list view
• use Filters, as expla ined in section ‘Advanced F ilters’ on page 63
Page 70

Issue 4.0.B
Xedio Dispatcher – Version 4.0 – User’s Manual
EVS Broadcast Equipment – July 2011
62
field to apply a
These search tools are explained in detail bel ow.
All these search tools can be combined and they c an be saved for later use. These
Saved Filters can then b e applied in one click.
QUICK TEXT SEARCH
Introduction
The Quick Text Search field is always available on the top of the content list:
It allows searching fo r a string in the dis played columns.
The Quick Text Search option obeys specific rules which can be accessed via the
Help button next to the Quick Text Search field.
For more details on th ese rules, refer to the secti on ‘Quick Text Search Rules’, on
page 63.
How to Perfo rm a Quick Text Search
To perform a Quick Text search, proceed as follow s:
1. Show t he columns you wish to per form a quick search on.
2. Type a search string in the Quick Text Search field, based on Quick Text
search rules available from the Help button and detailed in section
‘Quick Text Search Rule s’ on page 63.
3. Press the Search button.
The Quick Text Search is applied and the search result is displayed in the
grid.
4. To cl ear the applied Quick Text Search, click the red "X" button to the right
of the Search field or select <empty> from the Quick Text Search
field.
5. The Quick Text Search field is a combo box that gives access to the last 10
previously searched strings. Select a filter from the list of the Quick Text Search
previous search.
Page 71

Xedio Dispatcher – Version 4.0 – User’s Manual
EVS Broadcast Equipment – July 2011
Issue 4.0.B
63
, even if in two
in Name and
‘card’, even if in two different fields
’ at the
’ at the
Quick Text Se arch Rules
The string that you enter in the Quick Text Search field is analyzed according to
the following set of rules, which can be accessed via the Help button next to
the Quick Text Sea rch field.
The free text search is not a case sensitive oper ation.
Search String Search Result
Yellow card Searches for the strings ‘yellow’ and ‘card’
different fields (columns), for example ‘yellow’
‘card’ in Keyw ords.
For example a clip named ‘The Yellow Man’ with keywords ‘Red
Card’ will be found, since it has yellow and card in 2 different
fields.
"Yellow card" Searches for s trings containing ‘Yellow card’.
Yellow | card Searches for ‘yellow’ or
(columns), for example ‘yellow’ in Name or ‘card’ in Keywords.
Spaces around the | sign are mandatory .
yell* Searches for ‘ yell’ at the beginning of a string.
*low Searches for ‘low’ at the end of a string.
Ye*low Searches for strings with ‘ye’ at the beginning and ‘low
end.
Ye*low 123 Searches for strings with ‘ye’ at the beginning and ‘low
end and which contains ‘123’.
=card Searches f or a string exactly equals t o ‘card’.
For example, if a field co ntains ‘yellow card’, the =card condition
will not return any re sult.
=”yellow card” Searches for a string exactly equals to ‘ yellow card’.
The use of quotes is required due to the space between ‘yellow’
and ‘card’.
ADVANCED FILTERS
Filters are available for more detailed search operations. The parameters
available for filtering operations are the column headings and any metadata
associated by the user .
Filter Activation
Show/Hide Filter Butto n
To display, or hide, the Filter extended area, click the Show/Hide Filter button
over the grid.
Page 72
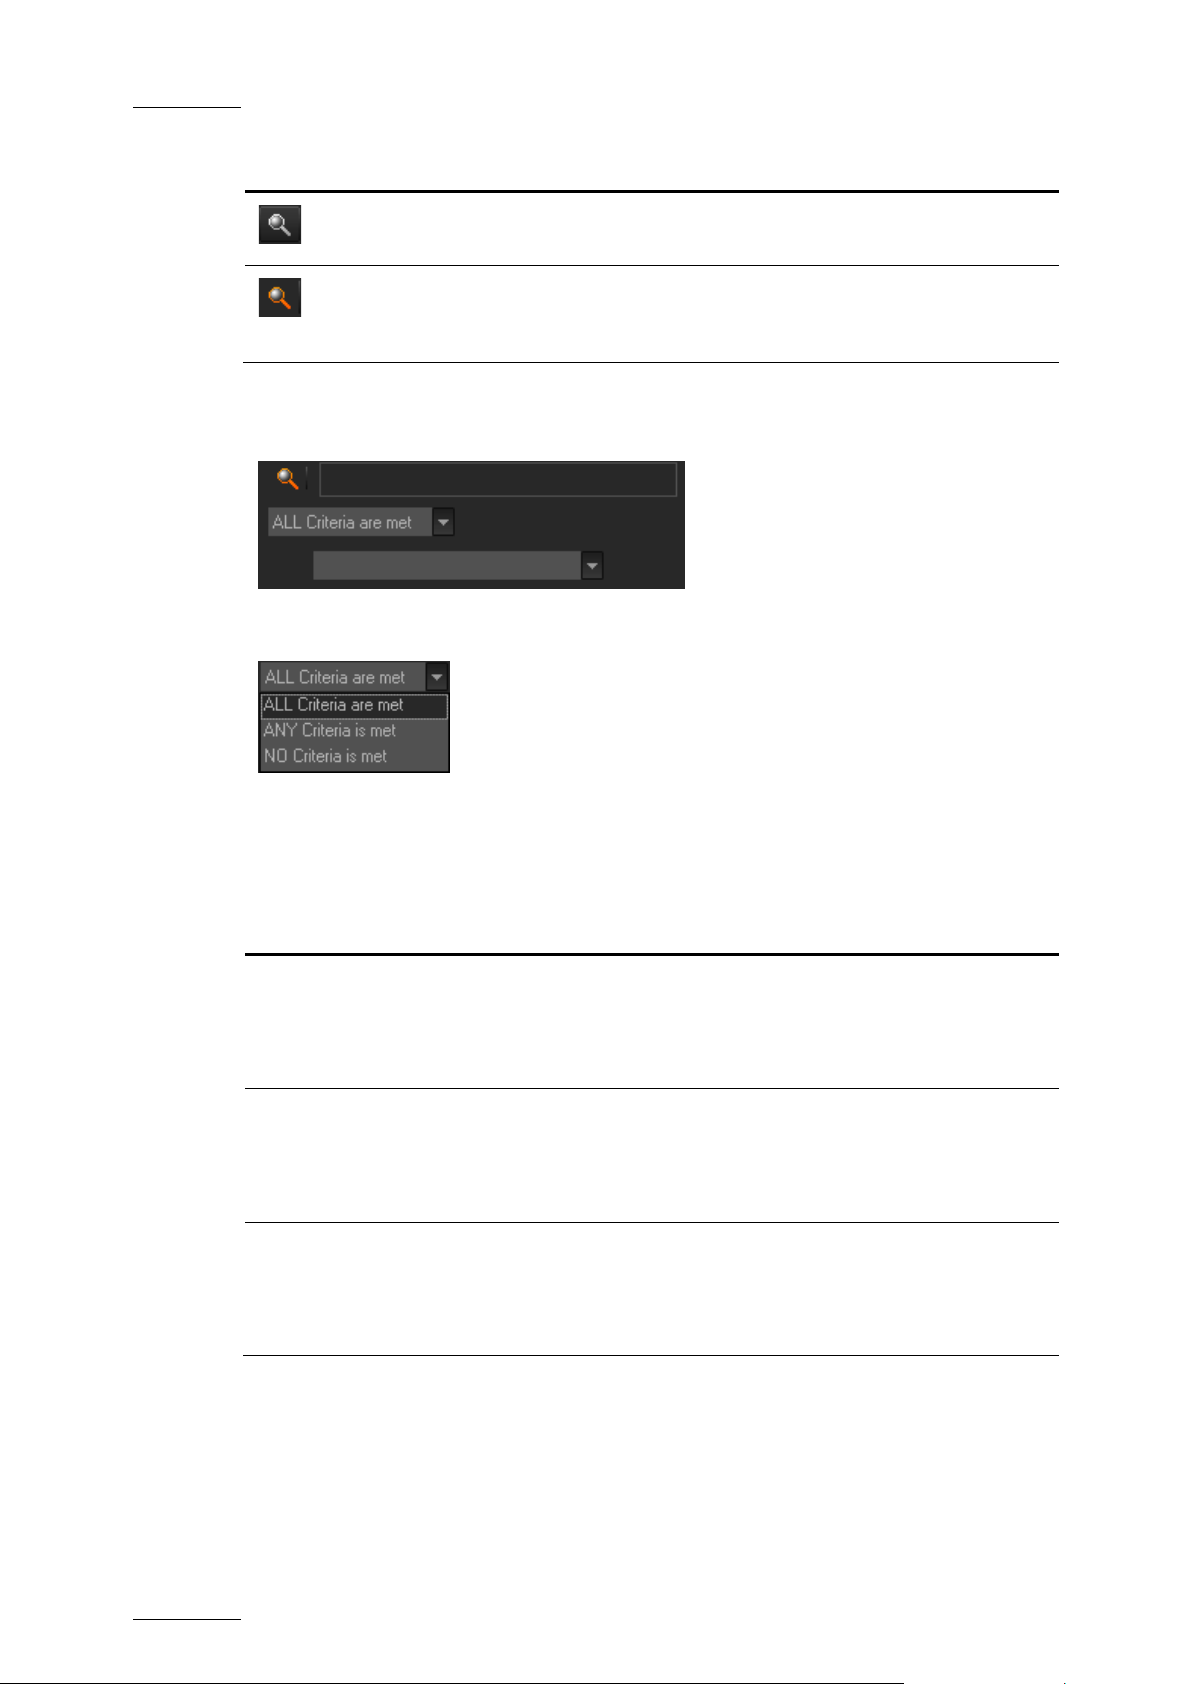
Issue 4.0.B
Xedio Dispatcher – Version 4.0 – User’s Manual
EVS Broadcast Equipment – July 2011
64
button is dimmed when all filter
button is red when the filter
fields displayed
The media displayed in the results list fulfill all the
Filter Button Display Meaning
(dimmed)
criteria are hidden. C onsequently, the filters are inactive.
The Show/Hide Filter
The Show/Hide Filter
(red)
extended area is visible, even if no filtering criterion is
applied.
Filter Extended Area
The Filter extended ar ea is as follows:
The first field under the Show/Hide Filter button lists three options for the
combination of criteri a to be taken into accoun t during the filtering op eration.
The second field is a filter field allowing the users to select a fir st filter parameter.
Criteria Combination
The available options are detailed in the table b elow:
Option Meaning
ALL criteria are met
All the criteria selected in the Filter
under the Criteria Combination field must be met.
selected filter criteria.
ANY criteria is met At least one of the criteria selected in the Filter fields
must be met.
The media displayed in the results list fulfill at least one
of the selected filt er criteria.
NO criteria is met None of the criteria sele cted in the Filter fie lds displayed
under the Criteria Combination field must be met.
The media displayed in the results list fulfill none of the
selected filter criteria.
Filter Fields
Under the Criteria Combination field, the users will be able to select as many
filter parameters as they want and to choose specific value(s) for these filter
parameters. The use of Filter fields is ex plained in the next sectio n.
Page 73

Xedio Dispatcher – Version 4.0 – User’s Manual
EVS Broadcast Equipment – July 2011
Issue 4.0.B
65
Filter Fields
The Filter field provides the list of all the parameters on which a search can be
performed. The following scr eenshot is an example of such a list. The op tions may
differ between the ap plications of the Xedio Sui te.
Once a parameter has b een selected, an entire li ne is displayed.
Interface Element Description
1 Selected filter parame ter.
2 Various fields used to enter the filter criteria. Refer to
section ‘Search Fields Types’ on page 66.
Used to remove the corr esponding filter line.
Used to add a new filt er line.
Page 74

Issue 4.0.B
Xedio Dispatcher – Version 4.0 – User’s Manual
EVS Broadcast Equipment – July 2011
66
e first field and then enter a
value. This will include, or exclude, media containing the
Search Field s Types
According to the selected filter parameter, different types of search fields will be
displayed. They are de tailed in the table below.
Filter Parameter
Type
Timecode or
Duration
Parameter
Such as TC IN,
TC OUT,
Duration…
Range
Such as
Timecode Range
Date
Such as
Creation Date
Displayed Criteria Fields
Select a logical operator in th
timecode or duration v alue in the second field.
Select an option from the first field and then enter a timecode
specified timecode val ue.
Several Date Search fi lters exist. They are des cribed below.
a. Select a condition or a logical operat or in the first field
b. This will condition the next step:
• Search based on a specific date (e.g. with is…): a calendar
will be displayed for the selection of a da te.
Page 75

Xedio Dispatcher – Version 4.0 – User’s Manual
EVS Broadcast Equipment – July 2011
Issue 4.0.B
67
…): two
no other field
Filter Parameter
Type
Displayed Criteria Fields
• Search based on an interval (e.g. with between
calendars are displaye d for the selection of t wo dates.
• Search based on a specific date calculated from the current
date (e.g. with tomorrow, last month,…):
appears.
Time
Such as Last
Rendered Date
Time
Several Date Search fi lters exist. They are des cribed below.
a. Select a condition or a logical operat or in the first field
b. This will condition the next step:
• Search based on a specific date and time (e.g. with is…):
two additional fields will be displayed, a calendar for the
selection of a date and drop-down list for the selection of
time.
• Search based on a specific date and time calculated from
the current date and time (e.g. with next hour, last
month,…): no other fiel d appears.
Page 76

Issue 4.0.B
Xedio Dispatcher – Version 4.0 – User’s Manual
EVS Broadcast Equipment – July 2011
68
and then enter a
Filter Parameter
Type
Number
Such as DB Id
Option List
Such as Video
Standard
Displayed Criteria Fields
Select a logical operator in the first field
number in the second f ield.
Note
<> means ‘differs from’
Select a condition in the first field
Click the button to displ ay the list of options available for
the selected filter p arameter.
Boolean
Such as
Published
Free Text
Such as Label
Example for the Video Standard:
Select an option from the list.
Select Yes or No from the single crit eria field
Select a condition in the first field and then enter text in the
second field.
Page 77

Xedio Dispatcher – Version 4.0 – User’s Manual
EVS Broadcast Equipment – July 2011
Issue 4.0.B
69
How to Perform a Search through Filter Fields
To enter search values in the Filter fields, p roceed as follows:
1. Choose the columns you wish t o perform a search on.
2.
Click the Show/Hide Filter button
The following Filter a rea is displayed:
3. Select a criteria combination f rom the list:
4. Select a filter parameter from t he filter parameter lis t.
An entire line, corres ponding to the selected fi lter parameter, is display ed:
5. Enter filter criteria as explained in section ‘Search Fields Types’ on page
66.
For free text fields, press ENTER to apply t he filter.
Otherwise, the results list is automatically res tricted.
6.
If required, click the button to add a filter paramet er.
USING SAVED FILTERS
Once you have defined a filter cr iterion, you may want to save it for later use. You
will then be able to apply the same filter wit h a single click.
Right-clicking in the Filter 0 tab displays a contextual menu with the following
options:
Page 78

Issue 4.0.B
Xedio Dispatcher – Version 4.0 – User’s Manual
EVS Broadcast Equipment – July 2011
70
Allows to change the name and/or description of the
Menu Option Description
Create New Filter All ows to create a new filter t ab.
Save Filter As Allows to create a new filter tab in which the current
search filter will be save d.
Filter Properties
selected filter tab.
Reset Filter Removes all search criteria on the selected filter tab.
Delete Filter Removes the filter tab.
How to Save Fi lters
To save filters, proceed as follows:
1. Define the filter or filters combination you wish to save, as explained above.
2. Right-click the Filter 0 ta b.
3. Select Save Filter As fro m the contextual menu.
The Filter Edit Dialog box opens.
4. Enter a label for the tab you are going to create and, if required, enter a
description.
5. Click OK to confirm.
The new filter tab is displayed on the left of the list.
How to Apply a Saved Filter
To apply a saved filt er, simply click the cor responding tab.
Page 79

Xedio Dispatcher – Version 4.0 – User’s Manual
EVS Broadcast Equipment – July 2011
Issue 4.0.B
71
5.4 LOADING A SO URCE CLIP ON THE CLIP PLAYER
5.4.1 PURPOSE
A clip can be loaded on the Clip Player in diff erent ways. You can then create subclips from the source clip and include them into the storyboard. For more
information, refer to the section 5.5 ‘Adding Clips or Sub-Clips to the Storyboard’,
on page 73.
5.4.2 HOW TO LOAD A CLIP IN THE CLIP PLAYER
• To load a source clip from the Thumbnail view, double-click on it and the clip
will display in the Cl ip Player.
The clip boundaries di splayed are the ones of the source clip.
• To load a source clip from the List view, double-click on it and the clip will
display in the Clip P layer.
• To load the source clip on which a storyboard clip is based, double-click the
storyboard clip in th e storyboard and the cl ip will display in the Cl ip Player.
The clip boundaries di splayed are the ones of the storyboard clip.
Page 80

Issue 4.0.B
Xedio Dispatcher – Version 4.0 – User’s Manual
EVS Broadcast Equipment – July 2011
72
When you load a clip in the Clip Player, the Clip Player becomes automatically
active, and the Clip P layer button is selected :
Page 81

Xedio Dispatcher – Version 4.0 – User’s Manual
EVS Broadcast Equipment – July 2011
Issue 4.0.B
73
5.5 ADDING CLIPS OR SUB-CLI PS TO THE STORYBOARD
You can create sub-clips of the source clips in the Clip Player, or take over the
source clips, and add them to the open storyboard .
5.5.1 HOW TO CREATE A SUB-CLIP AND ADD IT TO THE STORYBOARD
To create a sub-cl ip and add it to the story board, proceed as follows :
1. Ensure the requested storyboard is open in the Storyboard area (see section
5.2.1, on page 57).
2. Open the requested source clip in the Clip Player view (see section 5.3, on
page 59).
3. Add a mark IN point in one of the following ways:
o Use the transport control buttons (see page 50) to move the nowline to the
requested frame and pr ess mark IN button .
o Type the requested TC in the TC Mark IN field and press ENTER.
4. Add a mark OUT point in one of the following ways :
o Use the transport control buttons (see page 50) to move the nowline to the
requested frame and pr ess mark OUT button .
o Type the requested TC in the TC Mark OUT field and pre ss ENTER.
5. Enter a name in the Cl ip Name f ield, if requested.
6. Drag the sub-clip to the open storyboard and drop it either at the end of the
storyboard, or between two storyboard clips. The position where the clip will
be dropped when you re lease the mouse is shown with a vertical green bar:
Note
You cannot modify a storyboard c lip once it is included in a storyboard. If
you want to change the boundaries of the storyboard clip, you need to,
add a new one with the requested boundaries and delete the storyboard
clip (see p.74).
Page 82

Issue 4.0.B
Xedio Dispatcher – Version 4.0 – User’s Manual
EVS Broadcast Equipment – July 2011
74
5.5.2 HOW TO ADD SOURCE CLIPS TO THE STORYBOARD
To add a source clip to the storyboar d, you can drag it from the Thumbnail view or
from the List view of the workspace and drop it at the requested place in the
Storyboard area.
To add several source clips at a time, you can select them thanks to the usual
commands, as detailed in section ‘Selecting Te chniques’ on page 32.
Clips are then added i n chronological order.
5.5.3 HOW TO REPLACE A CLIP IN THE STORYBOARD
To replace a clip in the storyboard by a source clip or a sub-clip, press the CTRL
key while dragging the source clip or the sub-clip to the stor yboard.
The storyboard element that is going to be replac ed is surrounded by a gr een line:
5.5.4 HOW TO MODIFY THE STORYBOARD CLIP BOUNDARIES
You cannot edit the boundaries of a storyboard clip. In this case you need to
replace the storyboard clip.
To modify the boundari es of a storyboard clip, proceed as follows:
1. In the open storyboar d, double-click the s toryboard clip you want to re place.
This loads the source clip of the storyboard cli p on the Clip Player.
The displayed clip bou ndaries are the ones of the storyboard clip.
2. Modify the mark IN and /or mark OUT points to pr epare the new sub-clip.
3. Drag the new sub-cl ip to the storyboard and dro p it after the clip to be deleted.
4. Right-click the cl ip to be deleted in the storyboard and s elect Delete Selected
Edit Clip from the contextual menu.
Page 83

Xedio Dispatcher – Version 4.0 – User’s Manual
EVS Broadcast Equipment – July 2011
Issue 4.0.B
75
5.6 ADDING LOGS TO A CLI P
5.6.1 INTRODUCTION
Whenever you want, you can add logs to the material loaded in the Clip Play er, or
in the Storyboard Player. Even if you add the log in the Storyboard Player, the
logs are in fact adde d to the source clip.
A cue point is a log without associated metadata.
When keyword grids are stored in
Equipment\XedioDispatcher\Keyword Grids,
detected and are available in th e Logger tab. Then keywo rds can be associated to
a log.
Would keywords grids be available or not, a ranking level and/or free text can
always be associated to the log.
C:\Program Files\EVS Broadcast
the grids are automatically
5.6.2 HOW TO ADD A LOG TO A CLIP AND ASSOCIATE METADATA
The following procedure explains the different ways to add logs and to associate
metadata to them.
Preliminary Steps
You first need to loa d a clip and position the nowline at the specific timecode:
1. Load the source clip in the Clip Player or the s toryboard clip in the Storyboard
Player. For more inform ation, see the sections 5.4.2 and 5.8.2.
2. Position the nowline on the frame where you want to add a log in one of the
following ways:
o Using the transport buttons
o Dragging the nowline to t he requested frame
o Typing the requested TC in the nowline TC field (in Clip Player only) and
pressing ENTER.
Add a Cue Point
If you want to add a cue point , which is a log with no associated metada ta, simply
click the Add Log button .
A white triangle is d isplayed on the media bar at the cue point timecode.
Add a Log with Metada ta
A log can be added with one or a combination of the following met adata:, free text,
ranking level and keyw ords.A log can be enter ed in one of the following wa ys:
• In the Logger tab of the Tools area, click the requested Ranking button (from
no star to three star s) to assign a ranki ng level to the log
Page 84

Issue 4.0.B
Xedio Dispatcher – Version 4.0 – User’s Manual
EVS Broadcast Equipment – July 2011
76
A colored triangle is displayed on the media bar .
• In the Logger tab of the Tools area, enter some text in the free text field to
add free text to the log,
A white triangle is d isplayed on the media bar .
• If keywords grids have been detected by Xedio Dispatcher, they are available
from the Logger tool. Then, proceed as follow s:
1. Click the Keyword Grid Selection field.
The list of available keyword grids is displayed:
2. Select the keyword grid you wan t to use.
3. Click the keywords you want to associate to your log
A white triangle is d isplayed on the media bar .
Page 85

Xedio Dispatcher – Version 4.0 – User’s Manual
EVS Broadcast Equipment – July 2011
Issue 4.0.B
77
5.6.3 LOG AND METADATA DISPLAY
The log created is added to the media bar, but the log and its associated me tadata
are displayed in diff erent ways in the user interface.
LOG COLOR AND RANKING
The log will have a di fferent color depending o n the ranking assigned:
• White log for no-star ranking (default) or for a cue point (no associated
metadata)
• Blue log for 1-star ranking
• Green log for 2-star ranking
• Red log for 3-star rankin g
KEYWORDS ASSOCIATED TO A LOG
Player Area
Once the nowline is positioned on a l og timecode, the keywords associated to thi s
log are li sted below the video display and are displayed as a t ool tip when you roll
the mouse over the log :
Logger Area
When the nowline is positioned on a log, you can easily find back the keywords
assigned to this log in the Logger area as:
• The keyword grid and keyword grid pages that contain keywords assigned to
the selected log are displayed with an aster isk.
• The keywords assigned to the selected log are displayed on a lighter
background, like ‘Controvers y’ in the next screenshot.
Page 86

Issue 4.0.B
Xedio Dispatcher – Version 4.0 – User’s Manual
EVS Broadcast Equipment – July 2011
78
(and all its
at the
If you want to display only the logs having a
The following contextual menu is displayed.
5.6.4 OTHER POSSIBLE ACTIONS ON LOGS
The following table de scribes shortly other pos sible actions on logs:
Action Description
Moving from one log to the
other
• Click the Go to Prev. Log button to move to
the log positioned on the left of t he nowline.
• Click the Go to Next Log button to move to
the log positioned on the right of the nowline.
Deleting a log When the nowline is positioned on a log (us ing the
, buttons) you can delete it
metadata) in one o f the following ways:
• Pressing the Delete Log button
bottom of the Logger area.
• Clicking CTRL+ .in the P layer area.
Displaying only logs having
a given ranking
By default, all logs are displayed in the loaded
material.
specific ranking, right-cli ck on the log, right above
the media bars.
Select the check boxes (external) that correspond
to the ranking(s) you wan t to display.
Do the reverse operati on to redisplay all logs .
Page 87

Xedio Dispatcher – Version 4.0 – User’s Manual
EVS Broadcast Equipment – July 2011
Issue 4.0.B
79
Parameter Profiles: Media Dispatcher > Default parameter profile >
5.7 RECORDING AN AUDIO GUIDE TRACK
5.7.1 INTRODUCTION
You have the possibility to record a voice-over sequence on one track of the
storyboard.
You can only record one audio guide track for one storyboard. Once the audio
guide track has been created, you cannot modify it. If you want to change it, you
need to delete it and record a new one.
By default, the audio guide track is stored and exported on the stereo track 3 of
the storyboard. The tr ack on which it is stored is d efined via the menu Parameters
> Parameter Profiles: Media Dispatcher > Default parameter profile > Storyboard
tab: AudioGuideTrackOutput setting. Audio guide track will be mixed over any
existing audio on thi s audio track.
5.7.2 HOW TO RECORD AN AUDIO GUIDE TRACK
The storyboard on which you want to add the audio guide track is already loaded
in the Storyboard Player (see section 5.8.2 ‘How to Load a Storyboard in the
Storyboard Player’ on page 80).
To record an Audio Gui de Track on the storyboard, proceed as follows:
1. Position the nowline w here you want to start the a udio guide sequence.
2. Click the Start Audio Guide button .
A countdown (defau lt 3-second preroll) starts and is shown on the button
. It indicates the number of seconds before the rec ording process
starts and allows you to get ready for the rec ording.
3. Start speaking when th e button turns red .
4. Click the button agai n when the voiceover sequenc e is finished.
The record button bec omes the Delete Audio Guide button : click on th is
button if you are not satisfied with the recorded audio guide, and create a new
one.
Note
The default value for the Audio Track Guide Preroll can be modified in
the AudioGuideTrackPreRoll setting defined via the menu Parameters >
Storyboard tab.
Page 88

Issue 4.0.B
Xedio Dispatcher – Version 4.0 – User’s Manual
EVS Broadcast Equipment – July 2011
80
5.8 CHECKING THE STORY BOARD
5.8.1 INTRODUCTION
Once the storyboard is created, you can che ck the result by loading the storyboard
in the Storyboard Player.
5.8.2 HOW TO LOAD A STORYBOARD IN THE STORYBOARD PLAYER
To load a storyboard i n the Storyboard Player, pr oceed as follows:
1. Click the Storyboard Player button to open the Storyboard Play er.
1. Drag the tab of t he requested storyboard to th e Storyboard Player:
The storyboard is open in the Storyboard player. In play mode, the frame
around the storyboard clip will turn black when the corresponding clip is being
played:
Page 89

Xedio Dispatcher – Version 4.0 – User’s Manual
EVS Broadcast Equipment – July 2011
Issue 4.0.B
81
5.9 EXPORTING THE STORYBOARD
5.9.1 INTRODUCTION
Once your storyboard is finalized, you can export i t to multiple destinations and t o
multiple formats at th e same time. The destination fol ders and formats are defined
in the target profiles you can select before you launch the export process. For
more information on creating new target profiles, refer to the section 3.1 ‘Export
Target Profiles’, on page 8.
5.9.2 HOW TO EXPORT A STORYBOARD
To export a storyb oard open in the Storyboard area, proceed as follows:
1. Click the ExportTool t ab in the Tools area to expan d the Export Tool area.
2. In the Target field, select the name of the Target Profile you want to use to
export the storyboard.
3. From the Storyboard area, add the storyboard to the list of export jobs in one
of the following ways:
o Right-click in the Storyboard area, and select the Send Storyboard to
Export Tool command in the contextual menu:
Page 90

Issue 4.0.B
Xedio Dispatcher – Version 4.0 – User’s Manual
EVS Broadcast Equipment – July 2011
82
o Drag the storyboard tab t o the List of export jobs in the Export tool:
4. The storyboard name is added to the list of expor t jobs.
5. Click Start at the bottom of the Export too l.
The storyboard is expo rted as defined in the selec ted target profile.
The progress of the ex port job is displayed in th e List of export jobs:
When the export has be en successful, OK i s displayed on a green backgr ound:
The storyboards added to the list will remain available in the list, whether they
have been exported or not, until the end of the user session.
Page 91

Xedio Dispatcher – Version 4.0 – User’s Manual
EVS Broadcast Equipment – July 2011
Issue 4.0.B
83
he item in the list that you want to
required position. A thin red line indicates the
5.9.3 EXPORTING CLIPS AND SUB-CLIPS
You can also export individual source clips, or sub-clips using the Export tool.
Proceed in the same way as for storyboards for expor ting clips and sub-clips.
To add a source clip, drag the thumbnail of the source clip from the Thumbnail
view or from the List view of the workspace to the list of export jobs in the Export
tool. To add several source clips at a time, you can select them thanks to the
usual commands, as detailed in section ‘Selecting Techniques’ on page 32. Clips
are then added in chr onological order.
To add a sub-clip created in the Clip Player, define the IN and OUT points, and
possibly name for the sub-clip in the Clip Player, and drag it to the list of export
jobs in the Export to ol.
5.9.4 RESULT OF EXPORT JOB
Exporting a storyboard generates the following output files for each codec/format,
and destination folde r defined in the target pr ofile.
• The file that contains the A/V material. It is generated in the defined codec
and format.
• An .evs.xml file that cont ains the definition of s toryboard.
• An .xml file that contains the log information. Thi s file can then be imported to
and used in IPDirector .
5.9.5 OTHER POSSIBLE ACTIONS ON EXPORT JOBS
The following table de scribes other possible a ctions on export jobs:
Action Description
Deleting an item in the l ist
of export jobs
Clearing the list of expo rt
jobs
Right-click t
remove, and select Delet e Selected Item from the
contextual menu
OR
Select the item and pr ess the Delete key.
To clear the list of export jobs, already exported
or not, click the Clear Li st button at the bottom o f
the Export Tool area.
Moving an item in the li st of
export jobs
It does not clear the output of export jobs stored
on the various destin ation folders.
To move an item within the export list, drag it to
drop position.
Page 92

Issue 4.0.B
Xedio Dispatcher – Version 4.0 – User’s Manual
EVS Broadcast Equipment – July 2011
84
Action Description
Renaming an item in the list
of export jobs
To rename an item within the export list, select
the Name field and type a new name.
Page 93

Xedio Dispatcher – Version 4.0 – User’s Manual
EVS Broadcast Equipment – July 2011
Issue 4.0.B
85
Reference point to a specific frame in a video
Reference points to a specific frame in a video
, and possibly other
and used as source content to create another A/V
line, storyboard, etc.). This is
Glossary
Term/Acronym Definition/Explanation
Cue Point
sequence. Their purpose is to mark points of interest
on the media. The cue point is only identified by a TC
value.
Event Event that is associated to a production show. It can
be a football game, an entertainment show, a reality
show, …
Keyword Metadata attached to a log that provides information
on the media content.
Keyword grid
Level of interest
Log
Log sheet
Ranking
Source clip
Keywords displayed as icons in a grid.
See ‘Ranking’
sequence. Their purpose is to mark points of interest
on the media. The log is identified by a TC value, and
relates to an action in a given event. It is associated
to keywords and/or a ranking
metadata related to t he action.
File that contains al l logs for a given event.
importance given to th e log, and usually symbolized by
stars (no star = not important, 1 star = useful, 2 stars
= important, 3 stars = ver y important).
A/V material stored on the device that has recorded it
(for example P2, XDCAM cameras, or an EVS server),
output (playlist, time
also called ‘shoot’ o r ‘footage’.
Source file
Storyboard clip
Sub-clip
A/V material stored on a workstation or storage, and
used as source content to create another A/V output
(playlist, timeline, stor yboard, etc.).
Individual element included in a storyboard. This can
be a sub-clip or a fu ll source clip/file.
Part of a source material, defined by an IN and OUT
points, that represen ts a new A/V material.
Page 94

Issue 4.0.B
Xedio Dispatcher – Version 4.0 – User’s Manual
EVS Broadcast Equipment – July 2011
86
A
Areas
device · 30
Export tool · 41
Logger · 39
storyboard · 44
workspace · 31
Audio Guide Track
button · 38, 56
enable · 21
record · 79
C
Cleanup
DB · 29
Clip
loading · 71
Clip Player
clip creation fields · 54
description · 44
transport commands · 50
view · 31, 35
Codecs supported
for export · 1
for source files · 1
Index
Export jobs
clear output files · 83
Export Target Profile · 8
creation · 8
selection · 42
Export tool · 41
F
Fast Forward · 51
Fast Rewind · 51
Formats supported · 1
G
Go to
IN/OUT · 51
Next frame · 51
Prev. frame · 51
H
HD · 4
I
D
DB
cleanup · 29
parameters · 18
Definition
export target profile · 8
Device area · 30
E
Enable
Audio Guide Track · 21
Match Frame · 21
Export
clip · 83
result · 83
storyboard · 81
Export job
clear list · 83
delete · 83
move item · 83
rename item · 84
Import Key File · 5
IN point · 49
Installation · 6
J
Jog bar · 48
K
Keyboard profiles · 29
Keyword
display · 77
display used keywords · 77
Keyword grids · 39
availability · 12
L
Launch
Xedio Dispatcher · 27
Licenses · 5
Page 95

Xedio Dispatcher – Version 4.0 – User’s Manual
EVS Broadcast Equipment – July 2011
Issue 4.0.B
87
List view · 33
list clips · 60
Loading
clip · 71
Log
add · 75
color · 77
description · 56
display based on ranking · 78
displayed information · 77
move between logs · 78
Logger · 39
M
Mark IN point · 49, 55
Mark OUT point · 49, 55
Match Frame
button · 38
enable · 21
Media bar · 48
Menu bar · 29
Moving
points · 50, 55
N
Next/Previous
clip · 36
storyboard · 38
nowline · 49
S
SD · 4
search
grid filters · 63
Settings · 13
video display · 46
Source clips
display metadata · 60
display thumbnails · 60
load · 71
Start
Xedio Dispatcher · 27
Stop · 50
Storyboard
add clips · 73
adding to export list · 58
check · 80
create · 57
delete · 58
delete clip · 74
export · 81
modify clip · 73, 74
open · 58
overwrite clip · 74
rename · 58
selecting tracks · 47
Storyboard area · 44
Storyboard Player
description · 44
view · 31, 37
Supported formats · 1
O
OUT point · 49
P
Parameter
AllowAudioGuideTrack · 21
AllowMatchFrame · 21
JogRangeHI · 20
Parameter Profiles · 13
Play · 50, 52
R
ranking · 39
Ranking
log color · 77
Requirements
hardware · 4
software · 4
source files · 3
RTProf · 8
T
Target Profile
definition · 8
Thumbnail view · 31, 32
open clips · 60
Track selection · 47
V
Video display · 46
Views
in workspace · 31
W
Workspace area · 31
X
Xedio Dispatcher
launch · 27
overview · 27
working process · 57
Page 96

Issue 4.0.B
Xedio Dispatcher – Version 4.0 – User’s Manual
EVS Broadcast Equipment – July 2011
88
XSecure · 5
Page 97

EVS Broadcast Equipment
Liège Science Park
16, rue Bois St Jean
B-4102 Ougrée
Belgium
Corporate
Headquarters
+32 4 361 7000
North & Latin America
Headquarters
+1 973 575 7811
To learn more about EVS go to www.evs.tv
Asia & Pacific
Headquarters
+852 2914 2501
Other regional offices
available on
www.evs.tv/contact
 Loading...