

Page 1

USER MANUAL
Version 4.2 - June 2012
Page 2

Page 3

Xedio Suite Version 4.2 – User Manual – CleanEdit
EVS Broadcast Equipment – June 2012
Issue 4.2.B
I
COPYRIGHT
EVS Broadcast Equipment – Copyright © 2010-2012. All rights reserved .
DISCLAIMER
The information in this manual is furnished for informational use only and subject
to change without notice. While every effort has been made to ensure that the
information contained in this user manual is accurate, up-to-date and reliable,
EVS Broadcast Equipment cannot be held responsible for inaccuracies or errors
that may appear in th is publication.
IMPROVEMENT REQUESTS
Your comments will help us improve the quality of the user documentation. Do not
hesitate to send improvement requests, or report any error or inaccuracy on this
user manual by e-mail to
doc@evs.tv.
REGIONAL CONTACTS
You will find the full list of addres ses and phone numbers of local offices either at
the end of this user manual (for manuals on hardware products) or on the EVS
website on the followi ng page:
http://www.evs.tv/contacts.
USER MANUALS O N EVS WEBSITE
The latest version of the user manual, if any, and other user manuals on EVS
products can be found on the EVS download center, on the following webpage:
http://www.evs.tv/downloadcenter.
Page 4

Issue 4.2.B
Xedio Suite Version 4.2 – User Manual – CleanEdit
EVS Broadcast Equipment – June 2012
II
Page 5

Xedio Suite Version 4.2 – User Manual – CleanEdit
EVS Broadcast Equipment – June 2012
Issue 4.2.B
III
Table of Contents
TABLE OF CONTENTS ................................................................................................. III
ABOUT THIS MANUAL .................................................................................................. IX
WHAT’S NEW ON CLEANEDIT V4.02? ........................................................................ XI
1. INTRODUCTION ..................................................................................................... 1
1.1 GENERAL DESCRIPTION ........................................................................................................... 1
1.2 MAIN WINDOW ........................................................................................................................... 1
1.3 ZONES IN THE PROJECT AREA ................................................................................................ 3
1.4 TABS IN THE WORK AREA ........................................................................................................ 4
1.4.1 Introduction ............................................................................................................................. 4
1.4.2 Selecting a Tab in the Work Area............................................................................................ 4
2. THE BASICS .......................................................................................................... 5
2.1 INTRODUCTION .......................................................................................................................... 5
2.2 STARTING CLEANEDIT .............................................................................................................. 5
2.3 OPENING A NEW PROJECT ...................................................................................................... 6
2.3.1 Initial Window Display ............................................................................................................. 6
2.3.2 Project Definition ..................................................................................................................... 6
2.3.3 How to Create a New Project .................................................................................................. 6
2.4 FINDING MEDIA FOR THE PROJECT ........................................................................................ 7
2.4.1 Making Media Available in Xedio CleanEdit ............................................................................ 7
2.4.2 Where to Find Media in Xedio CleanEdit ................................................................................ 7
2.4.3 Viewing Media Before Adding it to the Project ........................................................................ 9
2.5 CREATING AN EDIT.................................................................................................................. 10
2.6 ADDING MEDIA TO THE PROJECT ......................................................................................... 11
2.7 REFINING MEDIA INTO CLIPS ................................................................................................. 12
2.8 PLACING CLIPS ONTO THE TIMELINE ................................................................................... 14
2.8.1 Introduction ........................................................................................................................... 14
2.8.2 Marking Position on the Timeline .......................................................................................... 15
2.8.3 Mode to Place the Clip onto the Timeline .............................................................................. 15
2.9 CHECKING THE EDIT ............................................................................................................... 16
2.10 PLAYING OUT OR EXPORTING AN EDIT ................................................................................ 18
2.10.1 Playing out the Edit ............................................................................................................... 18
2.10.2 Exporting the Edit to a File .................................................................................................... 19
3. IMPORTING MEDIA ............................................................................................. 21
3.1 INTRODUCTION ........................................................................................................................ 21
3.1.1 General ................................................................................................................................. 21
3.1.2 Importable Media .................................................................................................................. 22
3.1.3 General Import Process and Mandatory Fields ..................................................................... 22
3.2 USING EVS SERVERS’ RECORD TRAIN AND CLIPS IN AN EDIT ......................................... 23
3.2.1 Pos si bl e Acti ons .................................................................................................................... 23
3.2.2 How to Import Clips From an EVS Server ............................................................................. 23
4. SEARCHING FOR AND MANAGING MEDIA ...................................................... 24
Page 6

Issue 4.2.B
Xedio Suite Version 4.2 – User Manual – CleanEdit
EVS Broadcast Equipment – June 2012
IV
4.1 INTRODUCTION ........................................................................................................................ 24
4.2 ELEMENTS GRID ...................................................................................................................... 25
4.2.1 Displayed Columns ............................................................................................................... 25
4.2.2 Element Contextual Menu ..................................................................................................... 25
4.2.3 Special Status Display for the Elements ............................................................................... 26
4.2.4 Opening a Player to View Media ........................................................................................... 26
4.3 SEARCHING THE DATABASE .................................................................................................. 27
4.3.1 Introduction ........................................................................................................................... 27
4.3.2 Quick Text Search................................................................................................................. 27
4.3.3 Advanced Filters ................................................................................................................... 29
4.3.4 Using Saved Filters ............................................................................................................... 35
5. MANAGING PROJECTS AND PROJECT ELEMENTS ....................................... 37
5.1 PROJECT AREA ........................................................................................................................ 37
5.1.1 Overview ............................................................................................................................... 37
5.1.2 Hiding and Displaying the Project Area ................................................................................. 38
5.1.3 Selecting Items in the Zones of the Project Area .................................................................. 38
5.2 PROJECT ZONE ....................................................................................................................... 39
5.2.1 Introduction ........................................................................................................................... 39
5.2.2 Opening an Existing Project .................................................................................................. 39
5.2.3 Project Contextual Menu ....................................................................................................... 39
5.2.4 Creating a New Project ......................................................................................................... 41
5.2.5 Viewing the Project Data ....................................................................................................... 42
5.2.6 Im por ti ng a Project ................................................................................................................ 42
5.3 MEDIA ZONE ............................................................................................................................. 43
5.3.1 Introduction ........................................................................................................................... 43
5.3.2 Opening Media in the Player Area ........................................................................................ 43
5.3.3 Media Contextual Menu ........................................................................................................ 44
5.4 EDIT ZONE ................................................................................................................................ 45
5.4.1 Introduction ........................................................................................................................... 45
5.4.2 Opening an Existing Edit ....................................................................................................... 45
5.4.3 Edit Contextual Menu ............................................................................................................ 45
5.4.4 C r eati ng an Edit .................................................................................................................... 47
5.4.5 D upli c ati ng an Edi t ................................................................................................................ 50
5.4.6 C opyi ng an Edi t ..................................................................................................................... 51
5.5 CLIP ZONE ................................................................................................................................ 52
5.5.1 Introduction ........................................................................................................................... 52
5.5.2 Viewing Clips ........................................................................................................................ 52
5.5.3 Adding clips ........................................................................................................................... 53
5.5.4 Clip Contextual menu ............................................................................................................ 53
5.5.5 Assigning Colors to Clips and Filtering on Colors ................................................................. 54
6. MAIN WORKSPACE FOR EDITING ..................................................................... 57
6.1 EDIT TAB OVERVIEW ............................................................................................................... 57
6.2 PLAYER AREA .......................................................................................................................... 58
6.2.1 Overview ............................................................................................................................... 58
6.2.2 Activating the Player Area ..................................................................................................... 60
6.2.3 Making the Player Area Full Screen ...................................................................................... 60
6.2.4 Adjusting the Player Video Display ....................................................................................... 61
6.2.5 Loading Media onto the Player Area ..................................................................................... 62
Page 7

Xedio Suite Version 4.2 – User Manual – CleanEdit
EVS Broadcast Equipment – June 2012
Issue 4.2.B
V
6.2.6 Moving Within Media Loaded on the Player Area ................................................................. 62
6.2.7 Creating and Working with Clips in the Player ...................................................................... 67
6.2.8 Selecting the Tracks to be Added to the Timeline ................................................................. 69
6.2.9 Adding Logs to the Media Loaded on the Player Area .......................................................... 73
6.2.10 Creating a Clip on an EVS Video Server from the Player area ............................................. 75
6.3 RECORDER AREA .................................................................................................................... 77
6.3.1 Overview ............................................................................................................................... 77
6.3.2 Activating the Recorder Area ................................................................................................ 78
6.3.3 Making the Recorder Area Full Screen ................................................................................. 78
6.3.4 Adjusting the Recorder Video Display ................................................................................... 79
6.3.5 Playing the Edit in the Recorder Area ................................................................................... 79
6.3.6 Selecting the Monitored Audio Tracks ................................................................................... 82
6.3.7 Checking the Edit in the Recorder Area ................................................................................ 82
6.4 AUDIO METERS / TRIM AREA ................................................................................................. 83
6.5 TIMELINE AREA ........................................................................................................................ 85
6.5.1 Overview ............................................................................................................................... 85
6.5.2 Timecode Bar ........................................................................................................................ 86
6.5.3 Scale Bar and Move Bar ....................................................................................................... 87
6.5.4 Reference Positions on the Timeline Display ........................................................................ 87
6.5.5 Timeline Element on the Timeline Display ............................................................................ 88
6.5.6 Color Representation on the Timeline Display ...................................................................... 89
6.5.7 Contextual Menus for Timeline Elements .............................................................................. 90
6.5.8 Timecode and Duration Fields .............................................................................................. 94
6.5.9 Audio Track Selection and Settings in the Timeline .............................................................. 95
6.5.10 Editing Buttons in the Timeline Area ................................................................................... 102
7. GENERAL EDITING ........................................................................................... 107
7.1 MARKING POSITIONS ON THE TIMELINE ............................................................................ 107
7.1.1 Adding Marks ...................................................................................................................... 107
7.1.2 Adding Mark IN and Mark OUT Over Several Elements ..................................................... 108
7.1.3 Removing Marks ................................................................................................................. 108
7.2 SELECTING TECHNIQUES .................................................................................................... 109
7.2.1 Selecting a Clip ................................................................................................................... 109
7.2.2 Selecting Elements Depending on Nowline or Mark Positions ............................................ 109
7.3 PLACING CLIPS ONTO THE TIMELINE ................................................................................. 110
7.3.1 Introduction ......................................................................................................................... 110
7.3.2 Important Prerequisites ....................................................................................................... 110
7.3.3 Tools to Easily Position Clips in the Timeline ...................................................................... 113
7.3.4 Placing Clips in an Edit Depending on the Requested Position .......................................... 113
7.3.5 Add a Clip To Fill in a Blank Area in the Timeline ............................................................... 115
7.4 MOVING CLIPS OR ELEMENTS ON THE TIMELINE ............................................................. 118
7.4.1 Moving a Clip or Element in the Timeline ............................................................................ 118
7.4.2 Moving an Audio Clip between Tracks without Modifying its Horizontal Position ................ 118
7.4.3 Moving Several Elements in the Timeline ........................................................................... 119
7.5 REPLACING CLIPS BY LINKED CLIPS .................................................................................. 120
7.5.1 Introduction ......................................................................................................................... 120
7.5.2 How to Replac e a Cli p by a Linked Clip .............................................................................. 120
7.6 DELETING CLIPS OR ELEMENTS FROM THE TIMELINE .................................................... 121
7.6.1 Deletion Methods ................................................................................................................ 121
7.6.2 Deletion Modes ................................................................................................................... 121
Page 8

Issue 4.2.B
Xedio Suite Version 4.2 – User Manual – CleanEdit
EVS Broadcast Equipment – June 2012
VI
7.6.3 Deleting Port ions of an Edit ................................................................................................. 122
7.6.4 Deleting Timeline Elements ................................................................................................ 123
7.7 TIDYING UP AND ORGANIZING THE EDIT ........................................................................... 125
7.7.1 Resynchronizing Associated Clip Elements ........................................................................ 125
7.7.2 Removing Blank Areas on a Timeline ................................................................................. 125
7.7.3 Aligning Elements on a Reference Element ........................................................................ 126
7.7.4 Spl i tti ng an El em en t in the Timeline .................................................................................... 127
7.7.5 Grouping Elements in a Sync Group ................................................................................... 127
7.8 CUE POINTS ........................................................................................................................... 128
7.8.1 Introduction ......................................................................................................................... 128
7.8.2 How To Add Cue Points ...................................................................................................... 128
7.8.3 How To Go to and Select Cue Points .................................................................................. 129
7.8.4 Contextual Menu for Cue Points ......................................................................................... 129
7.9 EXTENDING OR SHORTENING CLIPS .................................................................................. 130
7.9.1 Introduction ......................................................................................................................... 130
7.9.2 Extend Modes ..................................................................................................................... 130
7.9.3 Ex ten di ng or Shor tening a Clip............................................................................................ 131
7.9.4 Extending a Clip with a Still Frame ...................................................................................... 133
7.9.5 Extending or Shortening a Clip by Modifying its Speed ....................................................... 134
7.10 CREATING FAST MOTION CLIPS .......................................................................................... 135
7.10.1 Various Ways to Create Fast Motion Clips .......................................................................... 135
7.10.2 Modifying the Playback Speed of a Clip Using the Speed Command ................................. 135
7.10.3 Rendering Fast Motion Clips ............................................................................................... 136
7.11 TRIMMING EDIT POINTS ON THE TIMELINE ........................................................................ 138
7.11.1 Definition and Access to Trim Area ..................................................................................... 138
7.11.2 Overview on the Trim Functions .......................................................................................... 138
7.11.3 Trimming or Rolling Around the Clip Transition ................................................................... 139
7.11.4 Rolling a Clip ....................................................................................................................... 140
7.11.5 Retrieving the Source of an Edit ed Imag e ........................................................................... 142
8. ADVANCED VIDEO EDITING ............................................................................ 143
8.1 INTRODUCTION ...................................................................................................................... 143
8.2 VIDEO TRANSITION EFFECTS .............................................................................................. 143
8.2.1 Ways to Add Video Transition Effects ................................................................................. 143
8.2.2 How to Modify the Default Video Transition Effect .............................................................. 144
8.2.3 How to Apply Video Transition Effects Manually ................................................................. 144
8.2.4 Possible Video Transition Effects ........................................................................................ 146
8.2.5 Removing Transition Effects ............................................................................................... 149
8.2.6 Inserting Blocks of Color Frames ........................................................................................ 149
8.3 VIDEO CLIP EFFECTS ............................................................................................................ 151
8.3.1 Introduction ......................................................................................................................... 151
8.3.2 How to Apply a Video Clip Effect......................................................................................... 151
8.3.3 Simple Video Clip Effects .................................................................................................... 152
8.3.4 Video Clip Effects With Key Frames ................................................................................... 155
8.3.5 Adding Key Frames for an Effect ........................................................................................ 156
8.3.6 C opyi ng an d Pas ti ng Vi de o C li p Effects .............................................................................. 158
8.4 CONVERSION EFFECTS ........................................................................................................ 160
8.4.1 Introduction ......................................................................................................................... 160
8.4.2 Changing the Mode for the Conversion Type ...................................................................... 160
9. EDITING IN PLACE ............................................................................................ 162
Page 9

Xedio Suite Version 4.2 – User Manual – CleanEdit
EVS Broadcast Equipment – June 2012
Issue 4.2.B
VII
9.1 OVERVIEW .............................................................................................................................. 162
9.2 SOURCE DEVICE AREA ......................................................................................................... 163
9.2.1 Introduction ......................................................................................................................... 163
9.2.2 General Description ............................................................................................................ 163
9.3 WORKSPACE AREA ............................................................................................................... 164
9.3.1 Introduction ......................................................................................................................... 164
9.3.2 View Modes in the Workspace ............................................................................................ 164
9.3.3 Thumbnail View in the Workspace Area ............................................................................. 165
9.3.4 List View in the Workspace Area ......................................................................................... 166
9.3.5 Clip Player View in the Workspace Area ............................................................................. 168
9.4 SELECTING RELEVANT MEDIA ............................................................................................. 170
9.4.1 Displaying Folder Content in the Source Device Area ........................................................ 170
9.4.2 Listing Clips in the Workspace Area .................................................................................... 171
9.4.3 Searching for Clips within the List View .............................................................................. 172
9.5 LOADING A SOURCE CLIP ON THE CLIP PLAYER .............................................................. 173
9.5.1 Purpose ............................................................................................................................... 173
9.5.2 How to Load a Clip in the Clip Player .................................................................................. 173
9.6 ADDING LOGS TO A CLIP ...................................................................................................... 173
9.6.1 Introduction ......................................................................................................................... 173
9.6.2 How to Add a Log to a Clip ................................................................................................. 173
9.6.3 Log Display ......................................................................................................................... 174
9.6.4 Other P os si bl e Act ions on L ogs .......................................................................................... 175
10. ADVANCED AUDIO EDITING ............................................................................ 176
10.1 OVERALL AUDIO TRACK SETTINGS .................................................................................... 176
10.2 AUDIO TRANSITION EFFECTS .............................................................................................. 177
10.2.1 Ways to Add Audio Transition Effects ................................................................................. 177
10.2.2 Adding Automatically Default Audio Transition Effects ........................................................ 177
10.2.3 Modifying the Automatic Default Transition Effect ............................................................... 177
10.2.4 Possible Audio Transition Effects ........................................................................................ 178
10.2.5 Adding Audio Transition Effects on Elements of the Same Track ....................................... 179
10.2.6 Adding Audio Transition Effects on Elements of the Same Clip .......................................... 181
10.2.7 Adjusting Audio Transitions ................................................................................................. 182
10.2.8 Removing Audio Transitions ............................................................................................... 182
10.3 AUDIO ROUTING, SWAPS AND MUTES ............................................................................... 183
10.3.1 Default and Specific Audi o Rout ing ..................................................................................... 183
10.3.2 Possible Audio Channel Functions ...................................................................................... 183
10.3.3 Copying and Pasting Audi o Rout ing Actions ....................................................................... 184
10.4 AUDIO LEVEL ADJUSTMENTS .............................................................................................. 185
10.4.1 Introduction ......................................................................................................................... 185
10.4.2 How to Adjust the Audio Level on a Single Clip .................................................................. 185
10.4.3 How to Adjust the Overall Level of a Track ......................................................................... 186
10.5 MISCELLANEOUS AUDIO FEATURES .................................................................................. 187
10.5.1 How to Generate the Waveform of an Audio Element ......................................................... 187
10.5.2 How to Remove an Audio Waveform .................................................................................. 188
10.5.3 How to Duplicate an Audio Tr ack ........................................................................................ 188
11. VOICEOVER, GRAPHICS AND TEXT GRAPHICS ............................................ 190
11.1 ADDING VOICEOVER ............................................................................................................. 190
11.1.1 Introduction ......................................................................................................................... 190
Page 10

Issue 4.2.B
Xedio Suite Version 4.2 – User Manual – CleanEdit
EVS Broadcast Equipment – June 2012
VIII
11.1.2 Voiceover Tab Overview ..................................................................................................... 190
11.1.3 Voiceover Process .............................................................................................................. 193
11.2 ADDING A LOGO OR GRAPHIC ............................................................................................. 197
11.2.1 Introduction ......................................................................................................................... 197
11.2.2 Accessing the Tag Manager Window .................................................................................. 197
11.2.3 Possible Actions in the Tag Manager Window .................................................................... 198
11.2.4 Fields in the Tag Manager Window ..................................................................................... 199
11.2.5 How to Insert a Logo or Graphic using Tags ....................................................................... 200
11.2.6 Moving Tag Points .............................................................................................................. 201
11.2.7 How to Delete Tags ............................................................................................................. 202
11.3 ADDING INTEGRATED TEXT AND GRAPHICS ..................................................................... 203
11.3.1 Introduction ......................................................................................................................... 203
11.3.2 Text Tab Overview .............................................................................................................. 203
11.3.3 Character Generator Process ............................................................................................. 204
11.3.4 Defining the Area to Insert Text/Graphics ........................................................................... 204
11.3.5 Adding Text and Graphics to the Edit .................................................................................. 205
11.3.6 Working with Template of Text and Graphics...................................................................... 211
11.3.7 Applying a Transition Effect to the CG Area ........................................................................ 213
11.3.8 Checking the Integrated Text and Graphics ........................................................................ 213
11.3.9 Editing the Character Generator Page Properties ............................................................... 214
12. HEADER MAKER ............................................................................................... 216
12.1 INTRODUCTION ...................................................................................................................... 216
12.2 HEADER MAKER TAB OVERVIEW ........................................................................................ 216
12.3 OPERATIONS .......................................................................................................................... 217
13. FINAL STAGES IN THE EDITING PROCESS .................................................... 218
13.1 CHECKING THE EDIT ............................................................................................................. 218
13.2 PLAYING OUT AN EDIT .......................................................................................................... 219
13.2.1 Introduction ......................................................................................................................... 219
13.2.2 Playout Process from the Playout Tab ................................................................................ 219
13.2.3 Playout Tab ......................................................................................................................... 220
13.3 EXPORTING AN EDIT OR A MEDIA ....................................................................................... 222
13.3.1 Introduction ......................................................................................................................... 222
13.3.2 Loading an Edit or a Media on the Export Tab .................................................................... 223
13.3.3 Export Tab .......................................................................................................................... 224
13.4 MONITORING TASKS ............................................................................................................. 231
13.4.1 Introduction ......................................................................................................................... 231
13.4.2 User Interface ..................................................................................................................... 231
13.4.3 Filtering Tasks ..................................................................................................................... 232
APPENDIX 1 – SHUTTLEPRO .................................................................................... 234
APPENDIX 2 – KEYBOARD SHORTCUTS ................................................................ 235
APPENDIX 3 – DIGIGRAM HARDWARE SETTINGS ................................................. 236
Page 11

Xedio Suite Version 4.2 – User Manual – CleanEdit
EVS Broadcast Equipment – June 2012
Issue 4.2.B
IX
About this Manual
PURPOSE
This manual is a refer ence manual to Xedio Clean Edit.
It should provide you with general contextual and conceptual information, as well
as detailed descriptive information on the various features available in Xedio
CleanEdit.
This reference manual will include procedural information on more complex
actions, even though not systematically. However, it will not contain procedures
on simple or usual act ions, which should be cover ed by video tutorials.
Some features may not be fully documented for version 3.1 Xedio CleanEdit. In
this case, the documentation will gradually be completed in the future versions.
Feel free to send your requests on features you would like to have documented in
more details to
doc@evs.tv.
SECTIONS ON MAIN AREAS ON THE USER INTERFACE
The following table shows where you can find detailed information on the various
areas of the user interface:
User Interface Area Chapter
Project area - its fo ur zones Chapter 5 ‘Man aging Projects and Proje ct
Elements
Work area - Edit tab Chapter 6 ‘Mai n Workspace for Editing’
Work area – VoiceOver tab Section 11.1 ‘Adding V oiceover’
Work area – Text tab Section 11.3 ‘Adding Integrated Text an d
Graphics’
Work area – Header Maker tab Chapter 12 ‘Header Make r’
Work area – Scheduler tab See Xedio Ingest Organ izer user manual
Work area – Control VTR tab See Xedio Ingest Organ izer user manual
Work area – Playout tab Section 13.2.3 ‘Playo ut Tab’
Work area –Medi a Manager, Edit
Manager, Project Manage r
Work area – Export tab Section 13.3 ‘Exportin g an Edit or a
Work area – Med ia Importer tab Chapter 3 ‘Imp orting Media’
Chapter 5 ‘Man aging Projects and Proje ct
Elements’
Media’
Page 12

Issue 4.2.B
Xedio Suite Version 4.2 – User Manual – CleanEdit
EVS Broadcast Equipment – June 2012
X
User Interface Area Chapter
Work area – Devices tab Chapter
9 ‘Editing in Plac e’
Page 13

Xedio Suite Version 4.2 – User Manual – CleanEdit
EVS Broadcast Equipment – June 2012
Issue 4.2.B
XI
: Everything that is
Internal and external logs associated to a loaded
initiated on the current CleanEdit
What’s New on
CleanEdit V4.02?
The following table descr ibes the sections updated to reflect the new a nd modified
features on Xedio CleanEdit from Xedio Suite 4.02 (compared to Xedio Suite
4.01).
In the user manual, the icon has been added on left margin to highlight
information on new and updated features.
Click the section number (or the description) in the table to jump directly to the
corresponding section.
Section Description
4 A Xedio LinX listener service keeps the Xedio database
up-to-date each time a server clip is de leted or a growing
server clip is closed.
5.1.2 The Project area can now be hidden or displayed with the
View > Bins option.
6.2 - 6.3 Player Area and Recorder Area
outside the video content has the skin color. Letterboxed
or pillarboxed video show black bars as these mattes are
part of the video sig nal.
6.2.4 Possibility to display the loaded media/clip or edit name
on the top of the pl ayer or recorder area.
6.2.9
media/clip are shown at the bottom or below the video
display.
6.5.10 New editing buttons can be displayed above the timeline:
Undo, Redo, Cut, Copy a nd Paste.
11.1 Possibility to recor d voiceover with an external mixer.
13.2.2 Playout: Proxy files are played out when hi-res files are
missing.
13.4 A new application is available to display t asks sent to the
TaskEngine and
workstation.
Appendix 2 –
Keyboard Shortcuts
The list of keyboard s hortcuts has been updated.
Page 14

Issue 4.2.B
Xedio Suite Version 4.2 – User Manual – CleanEdit
EVS Broadcast Equipment – June 2012
XII
Page 15
Xedio Suite Version 4.2 – User Manual – CleanEdit
EVS Broadcast Equipment – June 2012
Issue 4.2.B
1
1. Introduction
1.1 GENERAL DE SCRIPTION
Xedio CleanEdit is a non-linear editing system of fering full integration with remote
camcorders – Sony XDCAM™, XDCAM EX™ and Panasonic P2™ in SD and HD.
Xedio CleanEdit enables journalists to edit stories in standard and high-definition
from remote locations. A s soon as the editor is back in the newsroom, the edit can
be shared through this integrated news production system. In addition, Xedio
CleanEdit can be opera ted remotely on a laptop or installed on a PC.
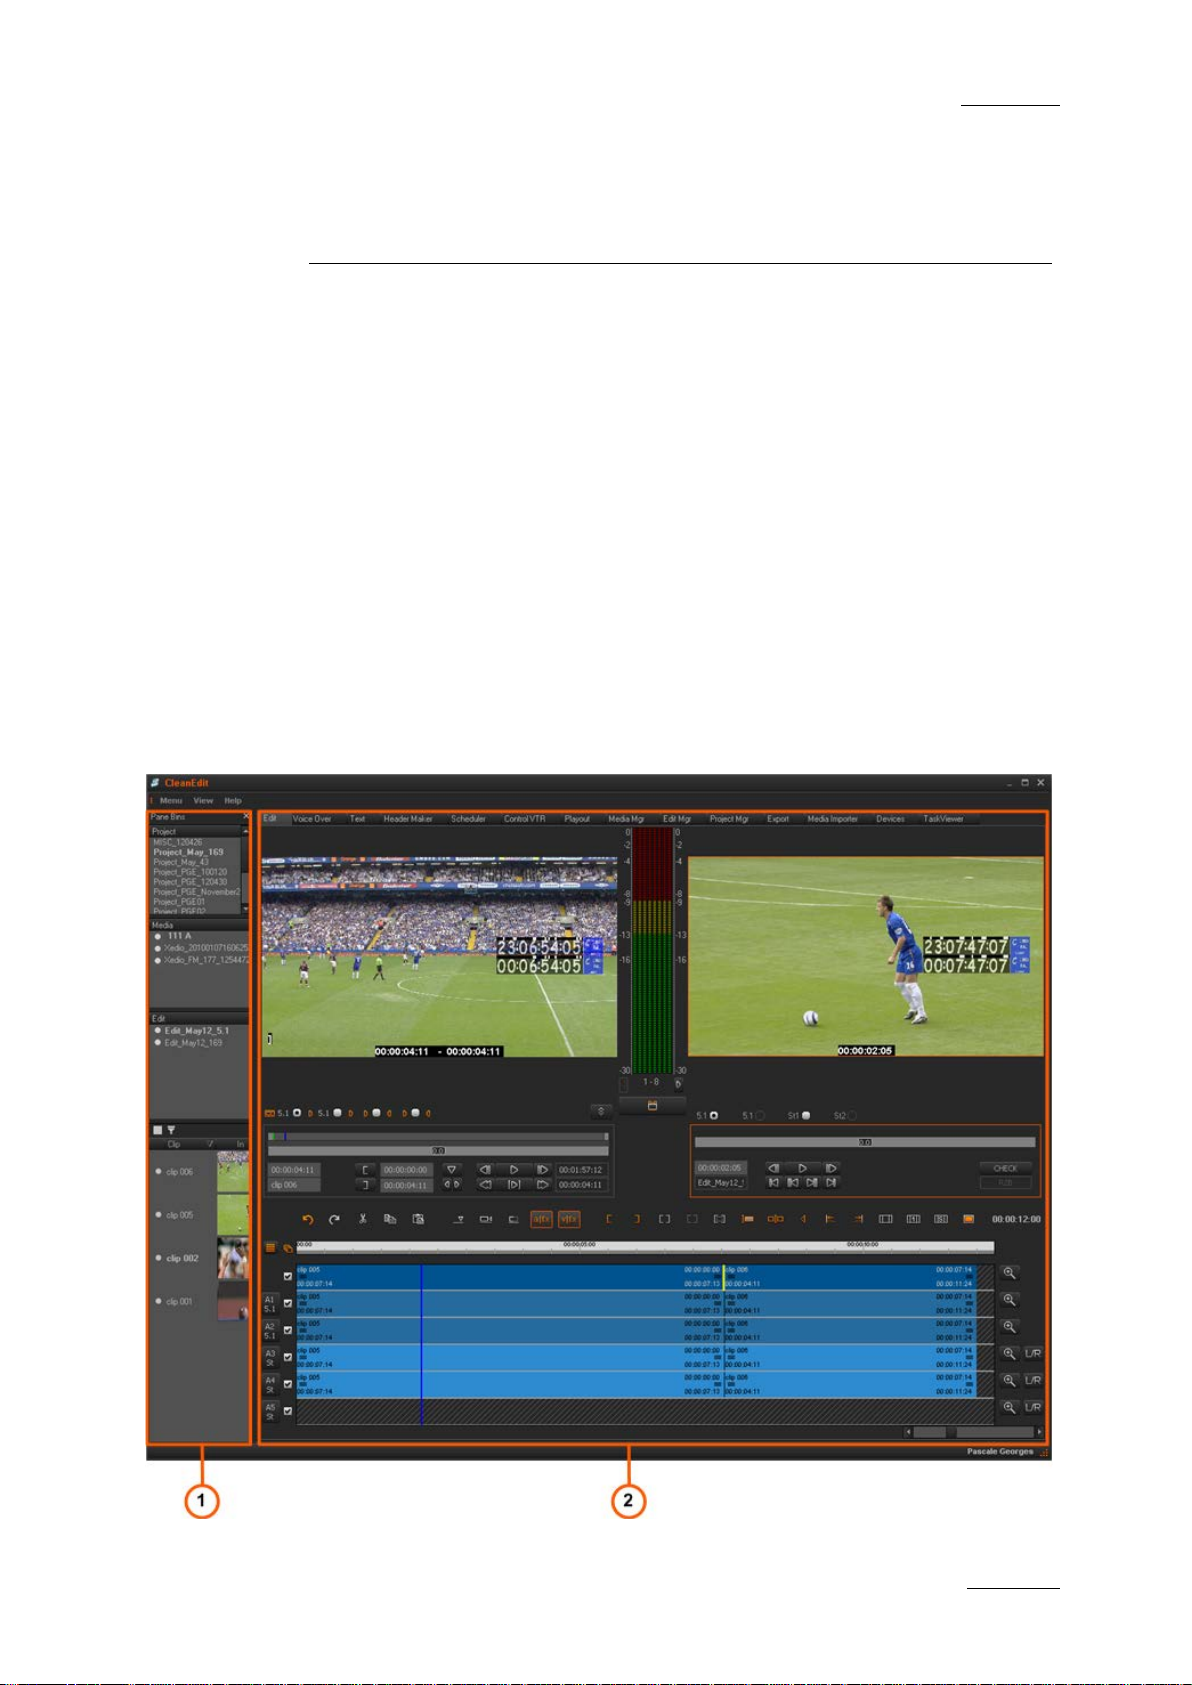
1.2 MAIN WINDOW
The CleanEdit user interf ace is composed of two distinct zones, hi ghlighted on the
image below. Each zone contains well defined functions in the workflow of the
CleanEdit application.
Page 16

Issue 4.2.B
Xedio Suite Version 4.2 – User Manual – CleanEdit
EVS Broadcast Equipment – June 2012
2
Area Number Area Name
1. Project area
See section 1.3 ‘Zones in the Proj ect Area’ on page 3.
2. Work area
See section 1.4 ‘Tabs in the Wor k Area’ on page 4.
Note
The color of some user interface elements may vary with the Xedio skin
installed.
Page 17

Xedio Suite Version 4.2 – User Manual – CleanEdit
EVS Broadcast Equipment – June 2012
Issue 4.2.B
3
manage a
project and all the elements within the projects,
tored in
1.3 ZONES IN THE PROJECT AREA
The left hand part of the interface is ca lled the Project
area. Its function is to permit the user to
multiple edits, media used within the project and clips
and media used on the timeline of edits within the
project.
The Project area contains the projects created by the
logged-on editor. The Project area is divided into four
zones to sort the dif ferent elements of each pro ject:
• The Project zone contains a list of the projects for
• The Media zone contains the original media files
• The Edit zone contains the list of edits that have
• The Clip zone contains list of clips s
the logged on user. The open project is displayed in
bold characters.
that are used in the open project. The media loaded
is displayed in bold characters.
been created on the open project. The edit loaded is
displayed in bold characters.
preparation for the e dit.
Each project only contains the elements that have been deemed to be relevant to
it. The ability to access elements from anywhere in the database of an in stallation
and declare them relevant to a project, to allow sharing of media amongst s everal
workstations, is a fun damental part of the str ucture of CleanEdit.
Page 18

Issue 4.2.B
Xedio Suite Version 4.2 – User Manual – CleanEdit
EVS Broadcast Equipment – June 2012
4
the Work Area depends on options
1.4 TABS IN THE WORK AREA
1.4.1 INTRODUCTION
The Work area has tabs for the modes that the user could be working in, such as
timeline or voiceover modes used in the edit process, or other modes which are
for other areas of the CleanEdit workflow, from media ingest and import, to
playout as video, or rendering a completed edit to one specific format for the use
of another system.
Note
The number of tabs displayed in
purchased, which allows the customers to have a system cus tomized to
their requirements and avoid working modes that are not needed in
their workflow.
1.4.2 SELECTING A TAB IN THE WORK AREA
Any tab in the Work area is automatically selected by placing the mouse over a
tab at the top of th e Work area until the tab b ecomes visible or by clic king the tab.
Page 19
Xedio Suite Version 4.2 – User Manual – CleanEdit
EVS Broadcast Equipment – June 2012
Issue 4.2.B
5
2.1 INTRODUCTION
This part will guide y ou through a simple workflow for the Cl eanEdit application to
produce a simple edit, and either play it out from the application or create a
standard file for use or playout by another syste m.
The steps are:
1. Starti ng CleanEdit
2. Openin g a New Project
3. Findin g Media for the Project
4. Adding Media to the Project
5. Refini ng Media Into Clips
2. The Basics
6. Placin g Clips onto the Timeline
7. Checki ng the Edit
8. Playin g out or Exporting an Edit
Each step is described at its most basic only using on screen controls. Any
keyboard shortcuts, which could be used, will be detailed in the following
chapters.
The edit created using the techni ques in this chapter will be video with associated
audio clips only and edited with a cut as the t ransition.
2.2 STARTING CLEANEDIT
Click on the CleanEdit icon on the des ktop to start the applicati on
1.
OR
Select the applicatio n from the Start menu.
A login screen will th en appear.
2. Enter your user name and pass word, and then click OK.
Note:
The system administrator creates login names and passwords in the
Xedio Manager application. Please refer to that product user manual for
more details.
Page 20
Issue 4.2.B
Xedio Suite Version 4.2 – User Manual – CleanEdit
EVS Broadcast Equipment – June 2012
6
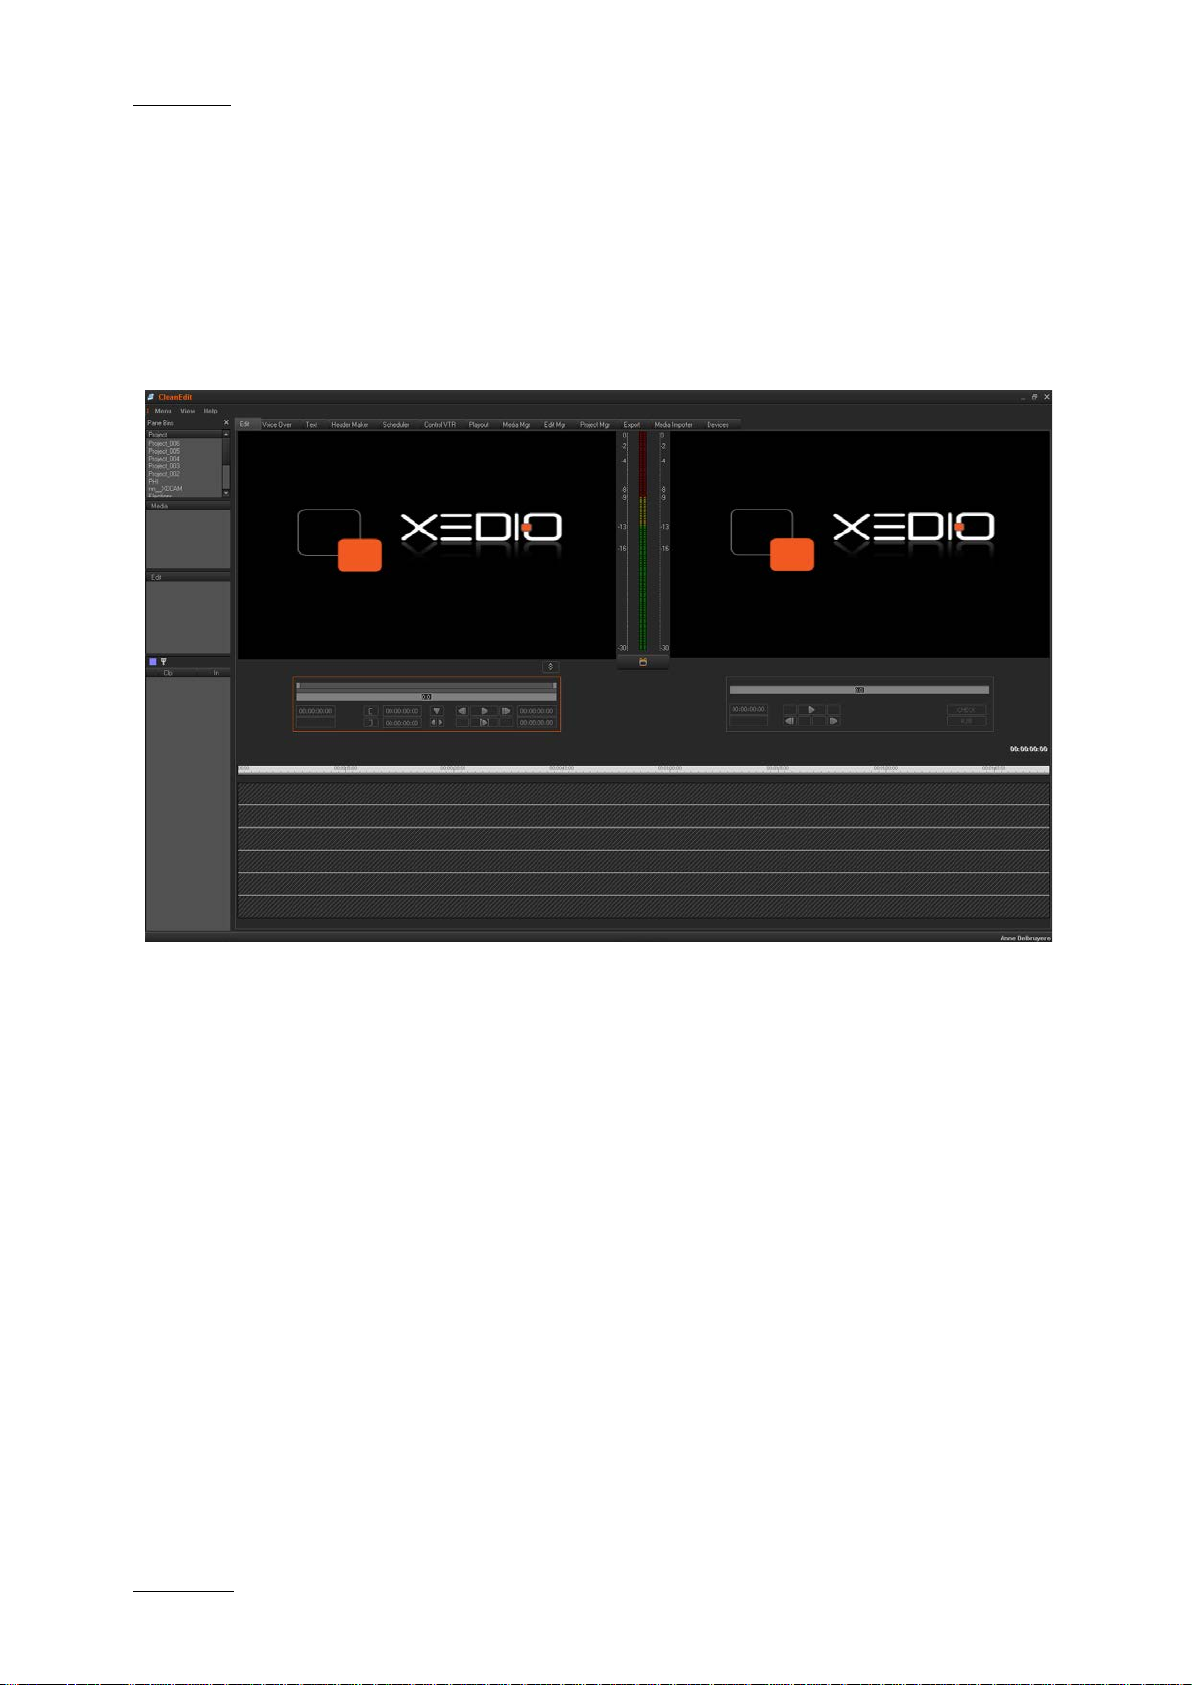
2.3 OPENING A NEW PRO JECT
2.3.1 INITIAL WINDOW DISPLAY
On startup the application will open as shown below with logos in the video
windows and all buttons disabled, showing an inactive state. There will be names
in the Project zone i f this login has been used to previously work on a Pro ject.
2.3.2 PROJECT DEFINITION
A project, in the Xedio environment, is a kind of workspace for a given story. It is
a flat structure. A project always belongs to 0 or 1 user. A project cannot be
shared between users ( duplicate is mandatory i n this case).
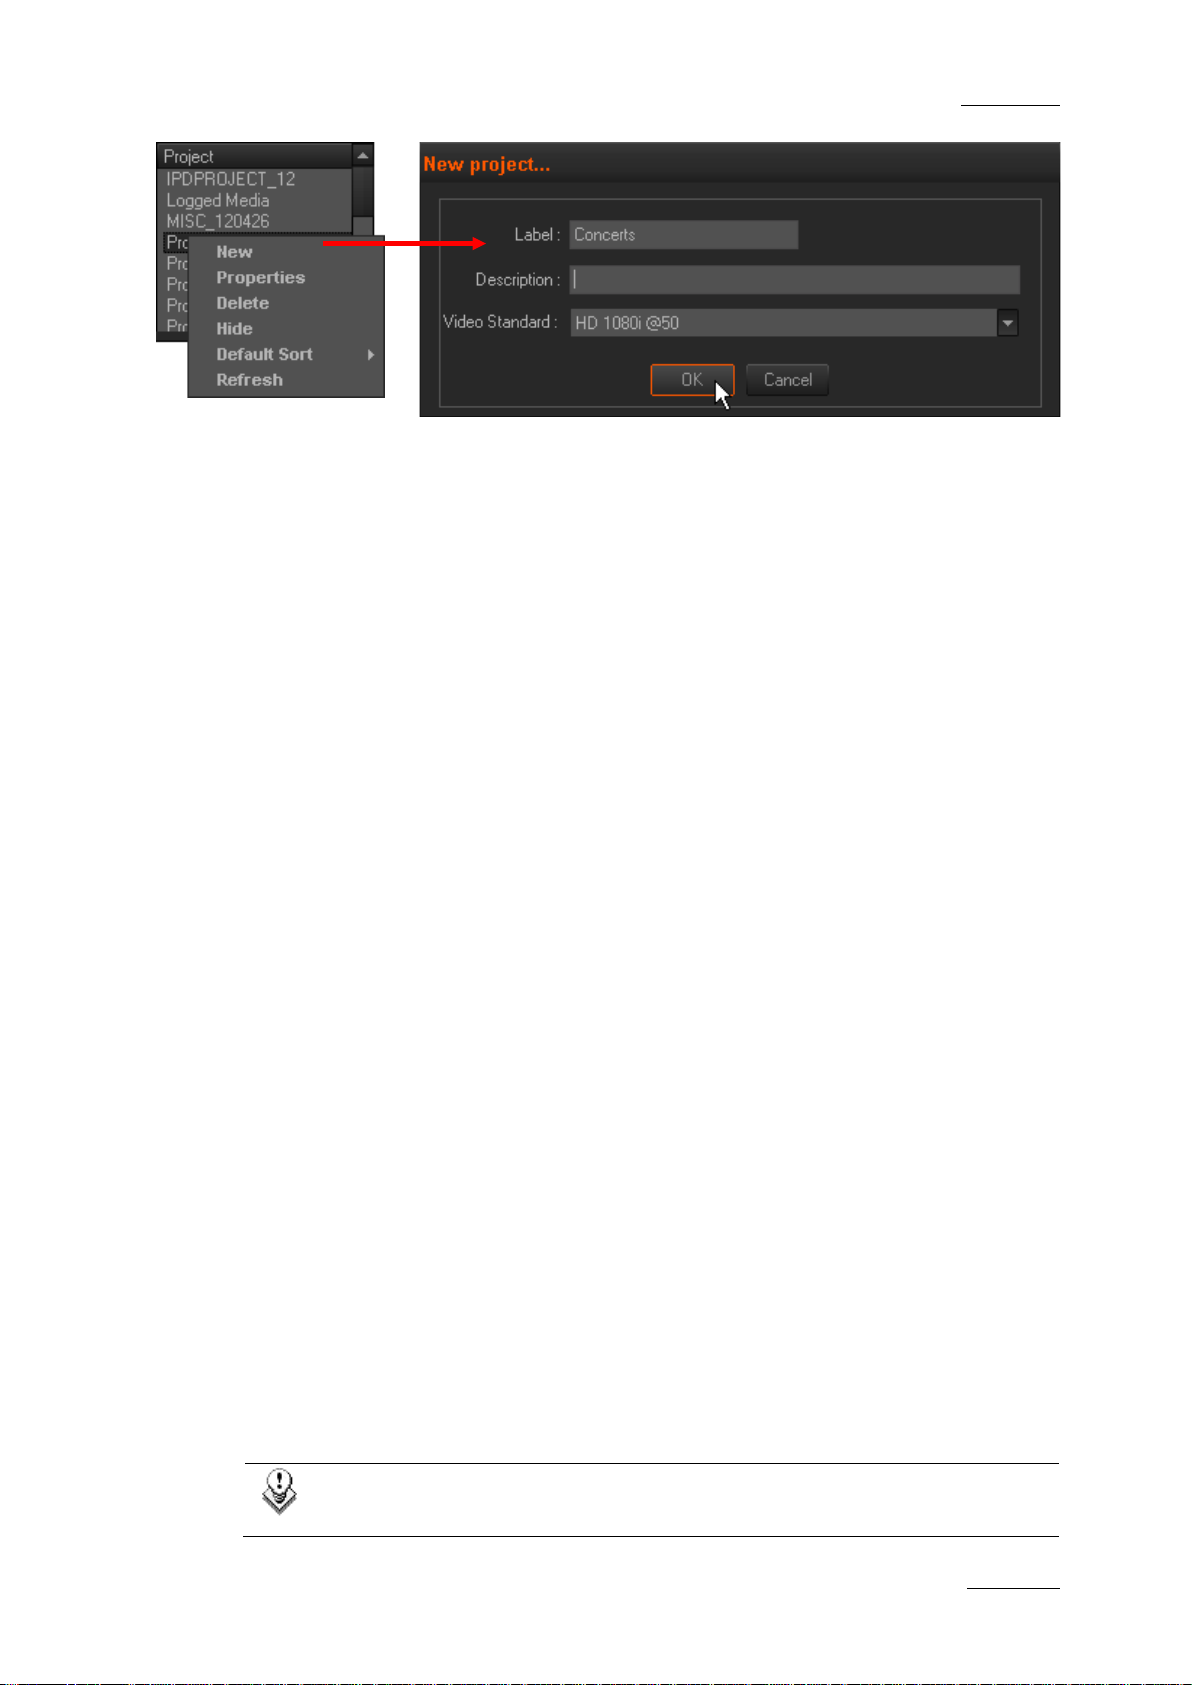
2.3.3 HOW TO CREATE A NEW PROJECT
When you right-click in the Project area and select New, the New Project dialog
box displays, which al lows you to create a new pr oject:
Page 21
Xedio Suite Version 4.2 – User Manual – CleanEdit
EVS Broadcast Equipment – June 2012
Issue 4.2.B
7
When you create a new pr oject, you have to specif y the following characterist ics:
• Projec t name
A default label for the new project is automatically assigned. You can change
it.
• Video stan dard
The video standard speci fies the resolution and frequency th at will be used for
playing out, exportin g or rendering the proj ect.
Once you click OK to validate the new project, the project characteristics are
recorded in the datab ase
When a project is open, its name is displayed in bold characters in the Project
zone.
2.4 FINDING ME DIA FOR THE PROJECT
2.4.1 MAKING MEDIA AVAILABLE IN XEDIO CLEANEDIT
During this workflow, it will be assumed that the media is available in Xedio
CleanEdit. To be available in Xedio CleanEdit, the media needs to be ‘imported’
into Xedio CleanEdit and set to ‘Publish’, in other words defined in the Xedio
database. A media which is not published is only visible through Xedio Manager,
Xedio Browse and Xedio Approval.
Importing media into CleanEdit can be done, among others, via the Media
Importer. For more information, refer to the section 3 ‘Importing Media’, on page
21. Importing media always implies that the media is defined in the Xedio
database but does not always mean that it is physically imported to the Xedio
storage system.
Other ways to import or reference a new media in Xedio are: XTAccess,
IPDGateway, Xedio Dispatcher , and Xedio AutoFileImporter.
2.4.2 WHERE TO FIND MEDIA IN XEDIO CLEANEDIT
The Media Manager tab in the Work area is used to bring the med ia that is defined
in the database into a project.
Note:
The XT clips are liste d with the other media in the Media Manager tab.
Page 22

Issue 4.2.B
Xedio Suite Version 4.2 – User Manual – CleanEdit
EVS Broadcast Equipment – June 2012
8
solution for proxy video browsing, editing and
You will search the media in this tab, then drag and drop it to the Media zone of
your project.
You will find below a general de scription on the media that can be av ailable in this
tab.
You will find more d etails on the search fil ters available and possi ble operations in
the Media Manager tab in the section 4 ‘Searching for and Managing Media’, on
page 24.
The Media Manager tab l ists the media available i n Xedio CleanEdit.
The media listed are a ll the published media that have the correct bitr ate.
This can be:
• video, stills (full frame or with a key layer) and audio files imported via the
Xedio Importer or the M edia Importer tab from an ex ternal storage system. The
metadata related to the file is added at the time of import or recording. For
more information, refe r to the Media Importer us er manual.
• media files imported via the Xedio Importer or the Media Importer tab from a
Sony XDCAM or XDCAM EX or Panasonic P2 cam eras.
• clips referenced in the Xedio database and physically stored an XT or XS
server on the network.
• clips transferred from XFile, XStream, XTAccess or IPD G ateway
• media files ingested from the Xedi o encoders using the Xedi o Ingest Organizer
• media files imported automatica lly via the Xedio AutoFile Im porter.
Note
Xedio CleanEdit can work with high resolution and low resolution media.
There is no restricti on on the resolution of th e low resolution media.
The default video re
encoding is specified in the Software parameters > General > General
tab in Xedio Manager.
Page 23
Xedio Suite Version 4.2 – User Manual – CleanEdit
EVS Broadcast Equipment – June 2012
Issue 4.2.B
9
2.4.3 VIEWING MEDIA BEFORE ADDING IT TO THE PROJECT
When you want to view any media available on these tabs prior t o adding it to the
Media zone of a projec t, select the required medi a and double-click on it:
The CleanEdit Media Player window will open with familiar controls to view the
material. A section of the media could be selected here to be placed onto the
timeline.
However, this is more usual to take the whole media into a project and select
sections of the media using the ri ght media display in the Edit tab, which is calle d
the Player area. For more information, refer to the section 6.2 ‘Player Area’, on
page 58.
Page 24
Issue 4.2.B
Xedio Suite Version 4.2 – User Manual – CleanEdit
EVS Broadcast Equipment – June 2012
10
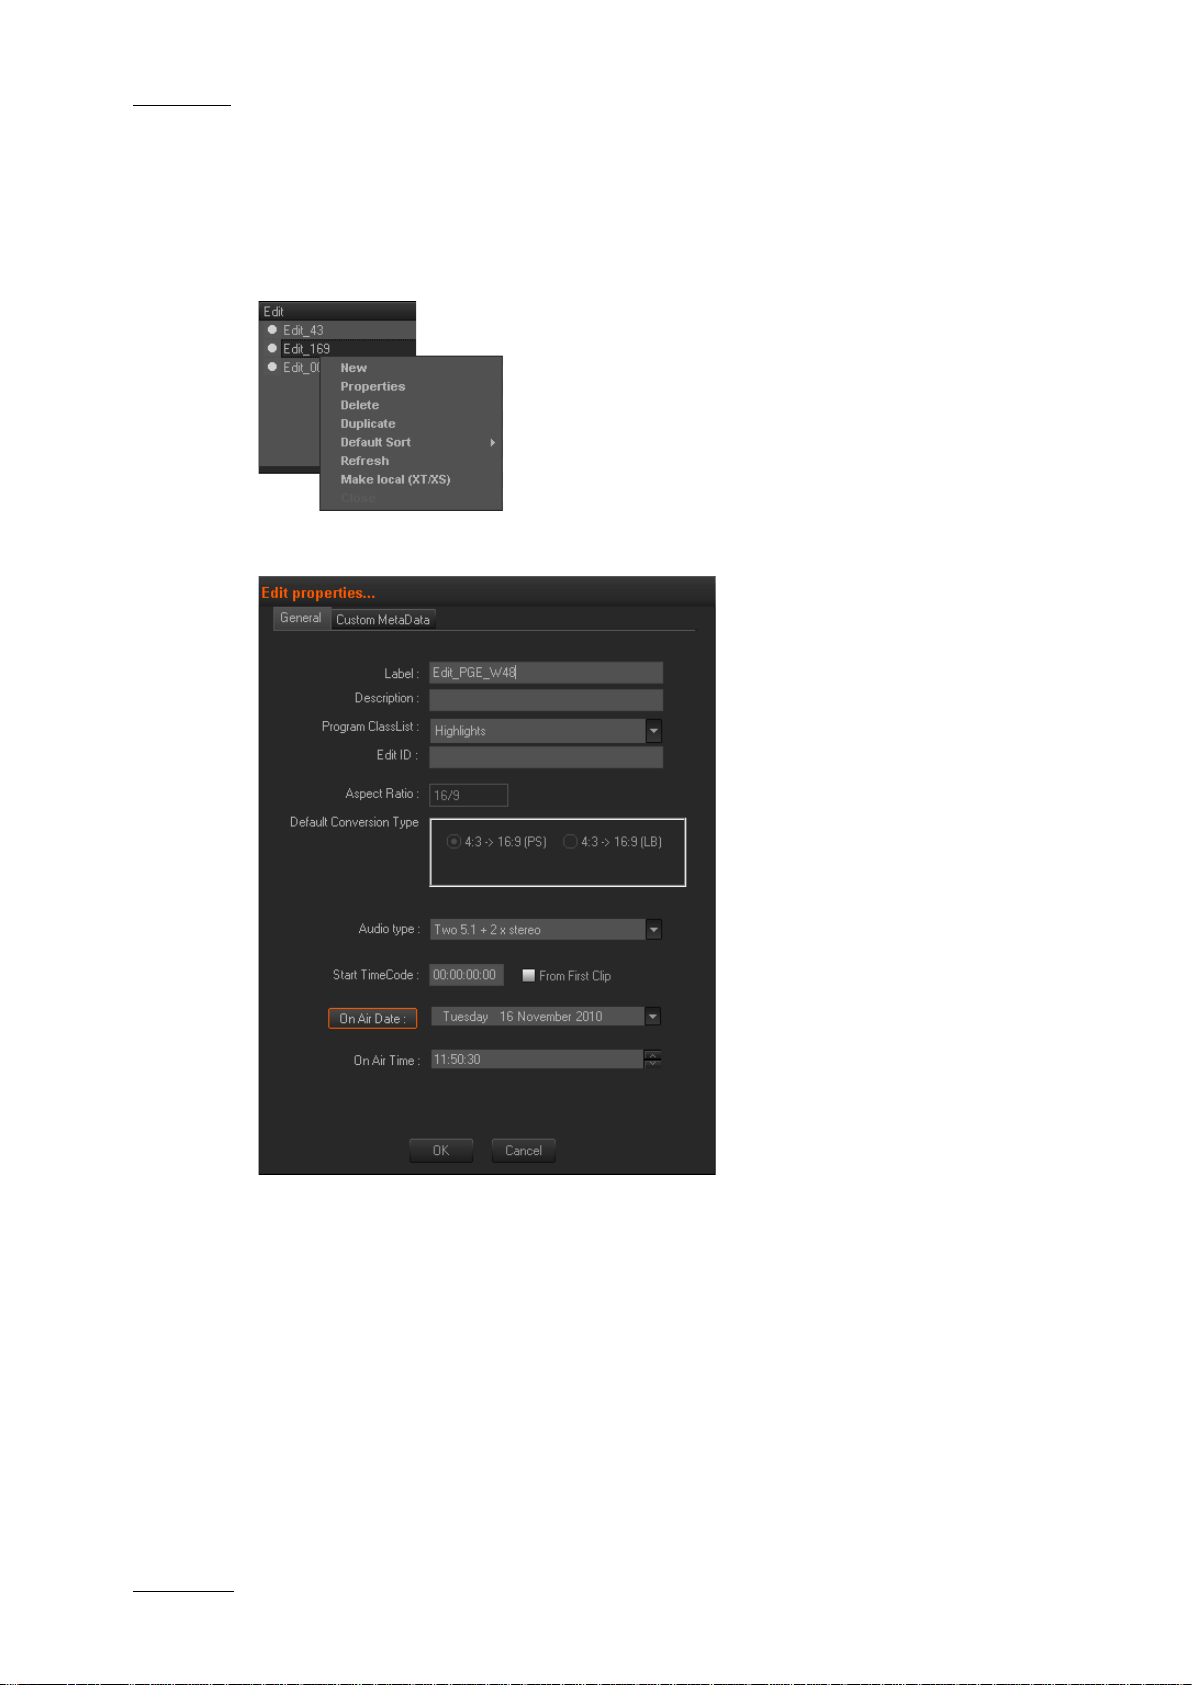
clicking in the Edit zone opens a contextual
or enter a new name. A
description and other metadata
can be saved with the Edit
the fields in the New Edit
, the edit
characteristics are recorded in
When an edit is active (open),
the Edit zone and the timeline
2.5 CREATING AN EDIT
You first need to create a new edit or open an existing edit before you can add
media to the timeline related to a given edit, or add effects on the timeline.
Rightmenu. When you select New in this menu, a New Edit
dialog box is displayed, which allows you to create a
new edit.
You can accept the defaul t name
definition into the datab ase. You
will find detailed information on
window, in the section 5.4.4
‘Creating an E dit’, on page 47.
When you validate the new edit
definition clicking OK
the database.
its name is displayed in bold in
buttons are enabled.
Page 25
Xedio Suite Version 4.2 – User Manual – CleanEdit
EVS Broadcast Equipment – June 2012
Issue 4.2.B
11
Drag and drop the media to the Media
2.6 ADDING ME DIA TO THE PROJECT
When you have identified the media required in the database using the Media
Manager tab, you can add it to your media, to your edi t, or directly to the timeline
by clicking on it and dragging it onto one of the Project sub-zones.
Each drag action produces a diffe rent result. The possible actions are exp lained in
the table below.
Note:
If you do not want to place the media directly in the timeline, ensure that
the Fill button is no t active .
You want to … You need to …
Add the media to the project, witho ut
further action.
Add the media to your project and in
the Clip zone, but no t to the timelin e.
zone.
Drag and drop the media to the Edit zone
or Clip zone without activating the Fill
button.
Add the media to your project, in the
Clip zone, and place it at the end of
Activate the Fill button, then drag and
drop the media to the Clip zone.
the timeline.
Page 26
Issue 4.2.B
Xedio Suite Version 4.2 – User Manual – CleanEdit
EVS Broadcast Equipment – June 2012
12
click on it or
2.7 REFINING MEDIA INTO CLIPS
To mark clips from the m edia in a project, it is necessar y to view the media in the
Player window on the Ed it tab.
Once you are in the Edit tab, proceed as follows to view the media and mark
sections for inclusion on the timel ine:
Select the requested media from the Media zone and double-
1.
drag it to the Player window. It will open i n the Player window.
2. Play the media using
• the transport c ontrols on the panel,
• the keyboard short cuts or
• the optional rem ote control panel (ShuttleP RO).
3.
Mark an IN point by cl icking on the button on the panel.
4. Option ally, add a name for th e clip in the text field.
5.
Mark an OUT point by cl icking on the button on the panel.
The duration of the c lip will then be display ed.
Page 27
Xedio Suite Version 4.2 – User Manual – CleanEdit
EVS Broadcast Equipment – June 2012
Issue 4.2.B
13
and dragging them to the required position, or by typing directly the
The top area represent s the whole length of the or iginal media.
The current position w ithin the clip is shown by a blue marker.
The IN point is displa yed below the Player window as a green marker.
The OUT point will be r epresented by a red marker line.
For more information on these items, refer to the section 6.2.1 ‘Overview’, on
page 58
Note
IN and OUT points can be moved by selecting the marks on the media bar
timecode fields beside s the mark IN and mark OU T buttons.
Page 28
Issue 4.2.B
Xedio Suite Version 4.2 – User Manual – CleanEdit
EVS Broadcast Equipment – June 2012
14
2.8 PLACING CLIPS ONTO THE TIMELINE
2.8.1 INTRODUCTION
There are many different ways to add clips onto your edit. The main methods for
placing a clip to you r edit are one of the foll owing:
• Dragging the clip into the Clip zone when the Fill button (next to the
Editing buttons in the t imeline area) is active .
This adds the clip to the end of the timeline.
• Draggi ng the clip from the Clip zone to a given position in the edit.
• Draggi ng the clip from the Player to a given position in the edit.
You will find comprehensive inf ormation on the various ways to place cli ps into an
edit in the section 7.3 ‘Placing Clips on to the Timeline’, on page 110.
Page 29
Xedio Suite Version 4.2 – User Manual – CleanEdit
EVS Broadcast Equipment – June 2012
Issue 4.2.B
15
2.8.2 MARKING POSITION ON THE TIMELINE
Using the buttons displayed on the screenshot below, you can mark points to edit
accurately on the timeline. You can use these marks to place your clips into the
timeline.
The following marks can be defined in the timel ine:
Name Description To define the mark, …
Nowline blue vertical line, which
displays the current
position on the timel ine
Mark IN green vertical line,
which displays the
position of a mark IN
point
Mark OUT red vertical line, which
displays the position of
a mark OUT point
click on the timeline ruler where you want
to place the nowline.
place the nowline a t the requested position
and click the Mark IN button .
place the nowline a t the requested position
and click the Mark OUT button
2.8.3 MODE TO PLACE THE CLIP ONTO THE TIMELINE
Before you drag a clip onto the timeline, you need to define the way you want to
insert it. Two modes are availa ble: Overwrite or Insert.
You select the mode by clicking the Overwrite/Insert Mode button, which allows
the user to toggle th e mode.
Page 30
Issue 4.2.B
Xedio Suite Version 4.2 – User Manual – CleanEdit
EVS Broadcast Equipment – June 2012
16
media from the selected position. In other words, the
Mode Description
Overwrite
adds the media in the timeline, overwriting the existing
(default)
(white)
media in the timeline will be removed from the insertion
point by the duration of the added media.
Insert
(colored)
adds t he media in the timeline without overwriting exi sting
media and pushes further right the existing elements of
the timeline placed after this posi tion.
In this mode, you can only insert the media on the clip
boundaries which are c ommon to all selected tr acks.
2.9 CHECKING THE EDIT
When the edit is completed it is possible to check it. Xedio CleanEdit parses the
timeline for possible errors (lack of video, for example) or missing hi-res files (if
this has been set in Xedio Manager).
To do so, click the CHECK button.
• If a ho le is discovered a dialogue box opens a nd gives a time reference on the
timeline for where the re is no video.
In this case, the R2B button will not become available.
• If missing hi-res files are discovered, a dialogue box opens and gives the list
of missing files.
Page 31

Xedio Suite Version 4.2 – User Manual – CleanEdit
EVS Broadcast Equipment – June 2012
Issue 4.2.B
17
In this case, the R2B button becomes available as soon as you click OK to
acknowledge the messag e.
A icon is di splayed on each lo-res file on the tim eline.
• If a fast moti on clip is detected a dialogue box opens via which you can render
the fast motion clip(s). The transcoding codec used for the rendering of a fast
motion clip is set in Xedio Manager.
If you choose No:
o The CHECK button remains enabled, since not-rendered fast motion clips
are still present in the edit.
o The R2B (ready to broadcast) button remai ns disabled.
If the edit is checked successfully, the CHECK button will be disabled and the
R2B (ready to broadcast) button will be enabled. See also the section 6.3.7
‘Checking the Edit in the Recor der Area’, on page 82.
Page 32

Issue 4.2.B
Xedio Suite Version 4.2 – User Manual – CleanEdit
EVS Broadcast Equipment – June 2012
18
2.10 PL AYING OUT OR EXPO RTING AN E DIT
When an edit has been completed, it can either be immediately played out as
video or rendered to a file type for tr ansfer to another system or used by the other
Xedio software suite.
2.10.1 PLAYING OUT THE EDIT
INTRODUCTION
Playing out an edit consists of ‘outputting’ the edit straight to an SDI connection.
The playout option is therefore available only on workstations equipped with an
EVS SDI output board (PCX2 or PCX3 ).
You can play out an edi t from two different ‘lo cations’:
• from t he Xedio CleanEdit applicat ion, via the Playout t ab.
You use such a solutio n when you want to playout some edits individually.
This section will cove r the playout from Playout tab.
• from t he Xedio Playout Organizer.
You use such a solution when you want to manage several edits in your
playout, and/or when a dedicated playout server i s installed on your setup .
This section is covere d in the Playout Organizer user manual.
Both playout solutions cannot be used at the same time on the same machine
because they would both try to attach to the EVS SDI output board (PCX2 or
PCX3).
PLAYOUT PR OCESS FROM THE PLAYOUT TAB
1. Activa ting the Playout tab:
Move the mouse pointer over the Playout tab.
2. Preloa ding the edit:
You can play an edit w hether it is ready to broad cast or not.
Page 33

Xedio Suite Version 4.2 – User Manual – CleanEdit
EVS Broadcast Equipment – June 2012
Issue 4.2.B
19
To preload the edit for the playout, select the edit from the Edit zone in the
Projects area and drag it anywhere onto the Play out tab work area.
The edit is ready to be played out.
3. Playin g the edit:
To play the edit, you can directly use the usual control commands available
on the right part of the window.
For more information on the Playout tab, refer to the section 13.2.3 ‘Playout
Tab’, on page 220.
2.10.2 EXPORTING THE EDIT TO A FILE
INTRODUCTION
This section presents how you can export an edit to a file in Xedio CleanEdit,
selecting:
• a form at from a list of supporte d codec
• a destination.
However, Xedio CleanEdit makes it possible to export the final edit to various
destination types:
• to Cle anEdit.
This allows you to conso lidate an edit and store it as a si ngle clip in the Xedio
storage system and Xed io database.
• to Fi le
This allows you to export an edit to a file that can be read by an external
system.
• to Device
This allows you to export an edit to an external device, either a video tape
recorder, or to an EVS server.
• to Tar get
This allows you to export an edit and to perform a predefined set o f operations
for specific workflows.
For detailed information, refer to the section 13.3 ‘Exporting an Edit or a Media’,
on page 222.
EXPORT PRO CESS TO A FILE
When you use the Export to a File feature, you can export the edit to a file in an
Mpeg2 format, even if the original edit was in a mix of many different fil e types.
This section gives you an overview on the export p rocess:
1. Activate the r elevant Export type:
Move the mouse pointer over the Export tab and s elect the To File sub-tab.
Page 34

Issue 4.2.B
Xedio Suite Version 4.2 – User Manual – CleanEdit
EVS Broadcast Equipment – June 2012
20
codec profile, which will determine the final format of the edit in the
Export tab, refer to the
2. Load th e edit to be exported:
You can export an edit whether it is ready to bro adcast or not.
Drag and drop the requested edit from the Edit zone to the open export sub-
tab. The information group box, as well as the File Name label, is filled with
the information relat ed to the file.
3. Specif y the Export settings:
Specify the destination folder where you want to export the edit to and the
destination folder. For more information on the
section 13.3 ‘Exporti ng an Edit or a Media’, on pa ge 222.
4. Launch the Expor t Process:
Click the Start button to begin the conversion p rocess.
A progress bar above the Start button allows you to monitor the progress of
the process.
Page 35

Xedio Suite Version 4.2 – User Manual – CleanEdit
EVS Broadcast Equipment – June 2012
Issue 4.2.B
21
3. Importing Media
3.1 INTRODUCTION
3.1.1 GENERAL
CleanEdit offers a way of acquiring media files for use within the sys tem. Through
the Media Importer tab, a uthorized users may import media tha t have already been
recorded and are in file format. Once the files are imported and set to ‘Publish’,
they become available in the Media Manager tab.
You can perform the same imports from:
• the Xe dio Manager application, in the Media category, Media Imp orter tool.
• the Xe dio Importer application
The common import functions are explained in the Xedio Impo rter user manual.
Page 36

Issue 4.2.B
Xedio Suite Version 4.2 – User Manual – CleanEdit
EVS Broadcast Equipment – June 2012
22
The following sections provide only an overview on the import functions, and deal
with features specific to the Media I mporter tab in CleanEdit.
3.1.2 IMPORTABLE MEDIA
When you click the Medi a Importer tab, the Media Importer window is displayed in
the work area, allowing you to select media to import. Several tabs are available
depending on the type of media you want to import:
• XDCAM, XDCAMEX, P2 a nd CANON sub-tabs
To import media files rec orded on Sony XDCAM and XDCAM EX, Panasonic P2
or CANON cameras
• Video/Audio/Stills sub-tab
To import media files, image or audio files
• RTD sub-tab
To import video contai ning transitions
• EVS Server sub-tab
To import media files available on an EVS server on the same network as the
Xedio suite. In this case, Xedio does not import the file content into the Xedio
storage system, but creates a reference to the server files in the Xedio
database.
Note
The mandatory field names are dis played in red in the user interface as
long as you do not def ine a value for them.
Warning messages are also displayed at the bottom of the tab to tell
the user which fields should be filled in.
3.1.3 GENERAL IMPORT PROCESS AND MANDATORY FIELDS
The import process is similar in all tabs. However, the file-r elated information you
can provide depends on the file to import.
In each sub-tab and for all import sessions, the mandatory steps and information
are the following:
1. Specif y where the Media Import er will find the source files to be imported.
2. Specify the Label field, that is to say the name of the media when it will be
imported into Xedio Cl eanEdit.
3. Tick the Published check box to make the media available and visible to all
users.
4. Click the Start Import Process button at the bottom of the Media Importer
tab.
Once imported, the fil es will be available in the Media Manager tab.
Page 37

Xedio Suite Version 4.2 – User Manual – CleanEdit
EVS Broadcast Equipment – June 2012
Issue 4.2.B
23
3.2 USING EVS SERVE RS’ RECORD TRAI N AND CLIPS IN A N EDIT
3.2.1 POSSIBLE ACTIONS
You have several possibilities to bring the EVS server material as media or clips
into a project, using the EVS Server tab:
• Drag and drop a recorder channel from the Servers list in the EVS Server tab
to the Media area of a project:
This will make the corresponding record train available in the project as a
media.
• Drag and drop a clip from the Clip/Channel area in the EVS Server tab to the
Clips area of a projec t:
This will make the corr esponding clip availabl e in the project as a clip .
• Import the clips created with the given camera or stored in the given page or
bank. To do this, ref er to the section below.
3.2.2 HOW TO IMPORT CLIPS FROM AN EVS SERVER
Importing clips from an EVS Server into CleanEdit does not physically import the
clip in the media server: it creates a virtual location on the media server, and
stores the clip definition in the Xedio database. Consequently, the connection to
the servers needs to b e operational to be able to access the material its elf.
It is possible to import all the clips created with a given camera, or stored on a
given page or bank into CleanEdit, to make them available in the Media Manager
and Edit Manager tabs.
To import clips from an E VS server, proceed as follows:
1. Select the requested camera, page or bank in the Server Structure area of
the EVS Server tab.
All the clips created wi th the selected channel or stored on the sele cted page
or bank are displayed in the Clip/Channel area.
2. Specify the Label field, that is to say the name of the media when it will be
imported into Xedio CleanEdit. By default , the clip name will be taken over.
3. Ensure th at the Publish check box is ticked to make the media available and
visible to all users.
4. Click the Start Import Process button at the bottom of the Media Importer
tab.
Once imported, the fil es will be available in the Media Manager tab.
Page 38

Issue 4.2.B
Xedio Suite Version 4.2 – User Manual – CleanEdit
EVS Broadcast Equipment – June 2012
24
4. Searching for and
4.1 INTRODUCTION
Within the Work Area, there are three tabs designed to quickly find and bro wse the
corresponding elements present within the database, such as media, edits and
projects.
Each tab has a similar look:
The upper part of the Work area gives access to the different filters which can be
applied to the Elements grid.
At least two tabs exist on the left of the Work area.
• The Filter 0 tab: The Elements grid displays the list of all elements present in
the database, or it r eturns the result of a sea rch applied to the lis t.
Managing Media
• The Today tab: the Elements grid shows the elements with ‘creation date =
today’.
Warning
Those filters can be modified by the user, so the results could no longer
reflect the tab label .
Additional tabs are displayed when the users have saved filters applied to the
database. Refer to sec tion ‘Using Saved Filters ’ on page 35 for m ore details.
The grid presents columns to display all meta data associated with the elements.
MEDIA MANAGER TAB
The Media Manager tab allows you to quickly find and browse the available media
present in the system. This media can be video (including XT clips), audio or still
files.
When the direct access to EVS video servers is used, a Xedio service listens to
LinX notifications sent by those servers. So, the Xedio database is notified and
updated each time a server clip is deleted from a third party (LSM remote,
IPDirector,…) or a growing server clip is c losed.
Media can be shared between all users and several workstations, enabling
multiple accesses to b rowse, select and import media into any project.
EDIT MANAGER TAB
The Edit manager tab allows users to see and browse th rough all edits currently in
the database. Edits can be deleted or undeleted and shared between users from
this tab.
Page 39

Xedio Suite Version 4.2 – User Manual – CleanEdit
EVS Broadcast Equipment – June 2012
Issue 4.2.B
25
from the Projects area. The
PROJECT MANAGER TAB
The Project manager tab allows users to see and browse through all projects
currently in the database.
Projects can be shared between users to enable several workstations to use the
same media, add new me dia and even open and modify edits within the project.
4.2 ELEMENTS GRID
4.2.1 DISPLAYED COLUMNS
It is possible to re-arrange the columns order, and to add or remove some
columns.
Right-clicking on any of the column headings displays a contextual menu. The
Choose Displayed Columns option opens the Select Visible Columns window
allowing you to choose the columns you want to be displayed in the Elements gr id.
The column width and order can be adjusted using standard computer commands
and drag and drop tech niques.
4.2.2 ELEMENT CONTEXTUAL MENU
A contextual menu is available when you right-click on an item in the grid. The
options may differ acc ording to the tab select ed.
Menu Item Description
Play
or
Run Player (CuePoint
Mgr)
Render List Opens a window listing all types of rendering that have
Archive History Displays the list of the archive an d restore processes that
View Properties Displays the properties f or the selected media or edit. If a
Hidden State Available only for th e projects whic h belong to the user.
Opens a new Player window to allow the element to be
browsed and modified. The Player window is the same as
described in the section 4.2.4 ‘Opening a Player to View
Media’, on page 26.
been done with the edit
were achieved for the selected edit
default metadata profile has been defined for the media, a
metadata tab displays the media/edit metadata va lues.
or media.
or media.
Hidden hides the project
project will still ap pear in the projects list for the user bu t
will show an ‘H’ i n the hidden column.
Not hidden unmarks the selected proje ct as hidden.
Page 40

Issue 4.2.B
Xedio Suite Version 4.2 – User Manual – CleanEdit
EVS Broadcast Equipment – June 2012
26
contents from the Projects area, but not from the
eletes the edit from the Edit
ect or edit as
Menu Item Description
Deleted State
Available only for the projects and the edits which belong
to the user.
From Project Mgr: Deleted deletes the project and all its
database. The project will still appear in the projects list
for the user but will show a “D” in the deleted column to
indicate it has been flagged as ‘to be deleted’ .
From Edit Mgr: Deleted d
area, but not from the database. The edit will still appear
in the Edits list but will show a “D” in the deleted column
to indicate i t has been flagged as ‘to b e deleted’.
Not Deleted unmarks the selected proj
deleted.
4.2.3 SPECIAL STATUS DISPLAY FOR THE ELEMENTS
The elements can be di splayed with a specific fon t to reflect a particul ar status.
Element Display Meaning
Red font Element in recording or importing state. A wrong status
may be displayed when a Xedio Ingest server cras hed.
Italic font Virtual me dia created with Xedio Br owse.
Grey font Only hi-res me dia or lo-res med ia is available.
4.2.4 OPENING A PLAYER TO VIEW MEDIA
From the Media Mgr, and Edit Mgr tabs, you can open any item on the Elements
grid by double-clicking it or right-clicking the mouse and select Play (or Run
Player).
The element opens in a Player window, which is same as the Player area in the
Edit tab. For a detailed e xplanation, refer to the section 6.2 ‘Player Area’, on page
58:
• A jog and media bar and a set of transport controls allow the manipulation of
the element in the window.
• Using the mouse, you can click wherever you wa nt inside media bar, and drag
the mouse to browse th rough the element.
• Drag and drop operations of clips and media are possible from this Player to
the Clip area or Media area of the project.
Page 41

Xedio Suite Version 4.2 – User Manual – CleanEdit
EVS Broadcast Equipment – June 2012
Issue 4.2.B
27
4.3 SEARCHING THE D ATABASE
4.3.1 INTRODUCTION
When the database contains large amount s of data, it may become difficult to find
a specific element. Th e Xedio Suite offers sever al ways to speed up your search:
• quick tex t search
• filte rs on parameters
By default, the columns that are taken into consideration for the Quick Text
Search are the ones cu rrently visible in the grid.
If you wish to search in other columns, and view the string you are searching for
in the columns, you can:
• add o ther columns to the Elements g rid view
• use Fi lters, as explained in sec tion 4.3.3 ‘Advanced Filters’ on page 29.
These search tools are explained in detail bel ow.
Quick text search and filters on parameters, as well as several filters on
parameters, can be com bined and saved for later use. All the criteria must be met
in the results list ( an ‘AND’ operator is applied). These Saved Filters can then be
applied in one click.
4.3.2 QUICK TEXT SEARCH
INTRODUCTION
The Qu ick Text Search field is always available on the top of the Elements grid :
It allows searching for a string in the dis played columns.
The Quick Text Search option obeys specific rules which can be accessed via the
Help button next to the Quick Text Search field.
For more details on thes e rules, refer to the section ‘Qu ick Text Search Rules’, on
page 28.
HOW TO PER FORM A QUICK TEXT SEARCH
To perform a Quick Text search, proceed as follow s:
1. Show t he columns you wish to per form a quick search on.
2. Type a search string in the Quick Text Search field, based on Quick Text
search rules available from the Help button and detailed in section
‘Quick Text Search Rules’ on page 28.
Page 42
Issue 4.2.B
Xedio Suite Version 4.2 – User Manual – CleanEdit
EVS Broadcast Equipment – June 2012
28
field to apply a
, even if in two
in Name and
‘card’, even if in two different fields
’ at the
3. Depending on whether the AutoRefresh Filtering setting is selected or not,
you may have to click the Search button to apply the Quick Text Search.
Refer to the tab Software > Parameter Profiles > G eneral > General.
The Quick Text Search is applied and the search result is displayed in the
grid.
4. To cl ear the applied Quick Text Search, click the red "X" button to the right
of the search field or select <empty> from the Quick Text Search
field.
5. The Quick Text Search field is a combo box that gives access to the last 10
previously searched st rings.
Select a filter from the list of the Quick Text Search
previous search.
QUICK TEXT SEARCH RULES
The string that you enter in the Quick Text Search field is analyzed according to
the following set of rules, which can be accessed via the Help button next to
the Quick Text Search field.
The free text search is not a case sensitive oper ation.
Search String Search Result
Yellow card Searches for the strings ‘yellow’ and ‘card’
different fields (columns), for example ‘yellow’
‘card’ in Keywords.
For example a clip named ‘The Yellow Man’ with keywords ‘Red
Card’ will be found, since it has yellow and card in 2 different
fields.
"Yellow card" Searches for s trings containing ‘Yellow card’.
Yellow | card Searches for ‘yellow’ or
(columns), for example ‘yellow’ in Name or ‘card’ in Keyw ords.
Spaces around the | sign are m andatory.
yell* Searches f or ‘yell’ at the beginn ing of a string.
*low Searches for ‘low’ at the end of a string.
Ye*low Searches for strings with ‘ye’ at the beginning and ‘low
end.
Page 43

Xedio Suite Version 4.2 – User Manual – CleanEdit
EVS Broadcast Equipment – June 2012
Issue 4.2.B
29
’ at the
button is dimmed when all filter
when the filter
Search String Search Result
Ye*low 123 Searches for strings with ‘ye’ at the beginning and ‘low
end and which contains ‘123’.
=card Searches for a string exactly equals to ‘card’.
For example, if a field co ntains ‘yellow card’, the =card condition
will not return any re sult.
=”yellow card” Searches for a string ex actly equals to ‘yello w card’.
The use of quotes is required due to the space between ‘yellow’
and ‘card’.
4.3.3 ADVANCED FILTERS
Filters are available for more detailed search operations from the Filter 0 tab. The
parameters available for filtering operations are the column headings and any
metadata associated by the user.
From the Today tab, th e filter ‘creation date = today’ is aut omatically applied.
FILTER ACTIVATION
Show/Hide Filter Button
To display, or hide, the Filter extended area, click the Show/Hide Filter button
over the grid.
Filter Button Display Meaning
(dimmed)
(colored)
Filter Extend ed Area
The Filter ext ended area is as fol lows:
The Show/Hide Filter
criteria are hidden. C onsequently, the filters are inactive.
The Show/Hide Filter button is colored
extended area is visible, even if no filtering criterion is
applied.
The first field under the Show/Hide Filter button lists three options for the
combination of criteri a to be taken into accoun t during the filtering op eration.
Page 44

Issue 4.2.B
Xedio Suite Version 4.2 – User Manual – CleanEdit
EVS Broadcast Equipment – June 2012
30
fields displayed
fulfill all the
The second field is a fil ter field allowing the user s to select a first fi lter parameter.
Criteria Combination
The available options are detailed in the table b elow:
Option Meaning
ALL criteria are met
All the criteria selected in the Filter
under the Criteria Combination field must be met.
The media displayed in the Elements grid
selected filter criteria.
ANY criteria is met At least one of the criteria selected in the Filter fields
must be met.
The media displayed in the Elements grid fulfill at least
one of the selected f ilter criteria.
NO criteria is met None of the criteria selected in the Filter fields displaye d
under the Criteria Combination field must be met.
The media displayed in the Elements grid fulfill none of
the selected filter criteria.
Filter Fields
Under the Criteria Combination field, the users will be able to select as many
filter parameters as they want and to choose specific value(s) for these filter
parameters. The use of Filter fields i s explained in the next se ction.
Page 45

Xedio Suite Version 4.2 – User Manual – CleanEdit
EVS Broadcast Equipment – June 2012
Issue 4.2.B
31
FILTER FIELDS
The Filter field provides the list of all the parameters on which a search can be
performed. The following sc reenshot is an example of such a list. The options ma y
differ between the applications of the Xedio Suite. Most relevant parameters are
listed at the top of the list, then, all the other fields are displayed in alphabetical
order.
Once a parameter has b een selected, an entire li ne is displayed.
Interface Element Description
1 Selected filter parame ter.
2 Various fields used to enter the filter criteria. Refer to
section ‘Search Fields Types’ on page 32.
Used to remove the corre sponding filter line.
Used to add a new filt er line.
Page 46

Issue 4.2.B
Xedio Suite Version 4.2 – User Manual – CleanEdit
EVS Broadcast Equipment – June 2012
32
value. This will include, or exclude, media containing the
SEARCH FIELDS TYPES
According to the selected filter parameter, different types of search fields will be
displayed. They are de tailed in the table below.
Filter Parameter
Type
Timecode or
Duration
Parameter
Such as TC IN,
TC OUT,
Duration…
Range
Such as
Timecode Range
Date
Such as
Creation Date
Displayed Criteria Fields
Select a logical operator in the first field and then enter a
timecode or duration v alue in the second field.
Select an option from the first field and then enter a timecode
specified timecode val ue.
Several Date Search filte rs exist. They are described be low.
a. Select a condition or a logical operat or in the first field
b. This will condition the next step:
• Search based on a specific date (e.g. with =…): a calendar
will be displayed for the selection of a da te.
Page 47

Xedio Suite Version 4.2 – User Manual – CleanEdit
EVS Broadcast Equipment – June 2012
Issue 4.2.B
33
,…): no other field
additional fields will be displayed, a calendar for the
ction of
Filter Parameter
Type
Displayed Criteria Fields
• Search based on an interval (e.g. with […] (between)…): two
calendars are displaye d for the selection of two dates.
• Search based on a specific date calculated from the current
date (e.g. with tomorrow, last month
appears.
Time
Such as Last
Rendered Date
Time
Several Date Search filte rs exist. They are described be low.
a. Select a condition or a logical oper ator in the first field
b. This will condition the next step:
• Search based on a specific date and time (e.g. with =…): two
selection of a date and drop-down list for the sele
time.
• Search based on a specific date and time calculated from
the current date and time (e.g. with next hour, last
month,…): no other fiel d appears.
Page 48

Issue 4.2.B
Xedio Suite Version 4.2 – User Manual – CleanEdit
EVS Broadcast Equipment – June 2012
34
and then enter a
Filter Parameter
Type
Number
Such as DB Id
Option List
Such as Video
Standard
Displayed Criteria Fields
Select a logical operator in the first field
number in the second f ield.
Note
<> means ‘diff ers from’
Select a condition in the first field
Click the button to dis play the list of options available for
the selected filter p arameter.
Boolean
Such as
Published
Free Text
Such as Label
Example for the Video Standard:
Select an option from the list.
Select Yes or No from the single crit eria field
Select a condition in the first field and then enter text in the
second field.
Page 49

Xedio Suite Version 4.2 – User Manual – CleanEdit
EVS Broadcast Equipment – June 2012
Issue 4.2.B
35
HOW TO PERFORM A SEARCH TH ROUGH FILTER FIELDS
To enter search values in the Filter fields, p roceed as follows:
1. Choose the columns you wish t o perform a search on.
2.
Click the Show/Hide Filter button
The following Filter a rea is displayed:
3. Select a crit eria combination from the list:
4. Select a filter parameter from t he filter parameter lis t.
An entire line, corres ponding to the selected fi lter parameter, is display ed:
5. Enter filter criteria as explained in section ‘Search Fields Types’ on page
32.
For free text fields, press ENTER to apply the filter.
Otherwise, the Elements grid is automatically rest ricted.
6.
If required, click the butt on to add a filter parame ter.
4.3.4 USING SAVED FILTERS
Once you have defined a filter cri terion, you may want to save it for later use. You
will then be able to apply the same filter wit h a single click.
Right-clicking in the Filter 0 tab displays a contextual menu with the following
options:
Page 50

Issue 4.2.B
Xedio Suite Version 4.2 – User Manual – CleanEdit
EVS Broadcast Equipment – June 2012
36
Allows to change the name and/or description of the
Menu Option Description
Create New Filter Allows to create a new filter tab.
Save Filter As Allows to create a new filter tab in which the current
search filter will be save d.
Filter Properties
selected filter tab.
Reset Filter Removes all search criteria on the selected filter tab.
Delete Filter Removes the filter tab.
HOW TO SAVE FILTERS
To save filters, proceed as fol lows:
1. Define the filter or filt ers combination you wish t o save, as explained above .
2. Right-click the Filter 0 tab.
3. Select Save Filter As from the contextu al menu.
The Filter Edit Dialog box opens.
4. Enter a label for the tab you are going to create and, if required, enter a
description.
5. Click OK to co nfirm.
The new filter tab is displayed on the left of the list.
HOW TO APP LY A SAVED FILTER
To apply a saved filt er, simply click the cor responding tab.
Page 51

Xedio Suite Version 4.2 – User Manual – CleanEdit
EVS Broadcast Equipment – June 2012
Issue 4.2.B
37
CleanEdit window. Its function is to permit the user to
The Project area contains the projects created by the
t have been
them relevant to a project, to allow sharing of media
5. Managing Projects
and Project Elements
5.1 PROJECT A REA
5.1.1 OVERVIEW
The Project area is located on the left part of the main
manage a project and all the elements within the projects,
multiple edits, media used within the project and clips and
media used on the time line of edits within the pr oject.
logged-on edit or. The Project area is divided into four zones
to sort the different elements of each project:
• The Project zone contains a list of the projects for the
logged on user. The open project is displayed in bold
characters.
• The Media zone contains the original media files that are
used in the open proj ect.
• The Edit zone contains the list of edits that have been
created on the open project. The edit loaded is displayed
in bold characters.
• The Clip zone contains list of clips stored in preparation
for the edit.
Each project only contains the elements tha
deemed to be relevant to it. The ability to access elements
from anywhere in the database o f an installation and declare
amongst several workstations, is a fundamental part of the
structure of C leanEdit.
Page 52

Issue 4.2.B
Xedio Suite Version 4.2 – User Manual – CleanEdit
EVS Broadcast Equipment – June 2012
38
5.1.2 HIDING AND DISPLAYING THE PROJECT AREA
The project area can be hidden or displayed by clearing or selecting the Bins
options from the View m enu in the main Menu bar.
If you want to extend it, move the mouse to the border between the Project area
and Work area and left -click the mouse when the mouse cursor change s to .
If you want to extend it to the whole window, so that you can see information on
the projects, media, edits and clips, move the mouse to the border between the
Project area and Work area and right-click the mouse when the mouse cursor
changes to .
To return to the normal display, place the mouse over the right hand edge of the
window to see the mouse pointe r change and drag the fram e to the desired size or
click with the right m ouse button on it.
5.1.3 SELECTING ITEMS IN THE ZON ES OF THE PROJECT AREA
The selection of items in the various zones of the Project area is do ne in the same
way as in Windows® Expl orer:
• Click on an item for a s ingle selection
• Press + click on the items for a selection of multiple non-
contiguous items.
• Press + click on the first and last item for a selection of
multiple contiguous i tems.
Page 53

Xedio Suite Version 4.2 – User Manual – CleanEdit
EVS Broadcast Equipment – June 2012
Issue 4.2.B
39
5.2 PROJECT ZONE
5.2.1 INTRODUCTION
Each time users begin to edit a new body of material, they need to create a new
project in which they will store all the elements to be used in that project. The
projects are created and displayed in the Proj ect zone.
This area will show all projects created by the user that has logged in. Other
user’s projects can only be shown in this area if they have been imported. For
more information on importing a project, refer to the section 5.2.6 ‘Importing a
Project’, on page 42.
This section presents the various possible actions on a project, either accessible
from the Project conte xtual menu or in another w ay.
5.2.2 OPENING AN EXISTING PROJECT
To open an existing project, double-click its name in the Project zone list. When
the project opens, the dif ferent elements associated to the proje ct are displayed in
the Media, Edit, and Clip zones of the Project area .
The name of an active (open) project is displ ayed in bold characters.
5.2.3 PROJECT CONTEXTUAL MENU
You can perform the main actions on a project via the Project contextual menu.
You will access it by righ t-clicking on a pr oject in the Project zone:
Page 54

Issue 4.2.B
Xedio Suite Version 4.2 – User Manual – CleanEdit
EVS Broadcast Equipment – June 2012
40
Creating a New
clicking the
from the contextual
box will ask for
llows the user to select how the projects are sorted in the
sorting options. Each sorting
Refreshes the list of projects in the Project zone. This is
The following table shows an overview on the commands from the contextual
menu:
Command Description
New Opens the New Project dialog box in which you can create a
new project. See also the section 5.2.4 ‘
Project’, on page 41.
Properties Opens the Project Properties dialog box from which you can
change the project nam e (label) or description.
The video standard cannot be changed once the project has
been created.
Delete Deletes the pr oject from the Project zone. A dialo g box will ask
for confirmation.
The project will be deleted from the user ’s Project zone, but not
from the database (it will be marked ‘DELETED’). It can be
restored in the Project Manager tab, by rightproject row and selecting Not Deleted
menu.
Hide Hides the projec t from the Project zone. This is us eful when too
many projects are displayed. A dialog
confirmation.
The project will be hidden from the user’s project zone, but is
still available in the database (i t will be marked ‘HIDDEN’). You
can display back a hidden project via the Project Manager tab,
by right-clicking the project row and selecting Not Hidden from
the contextual menu.
Default Sort A
Project zone among various
option can be combined with an ascending or des cending sort:
Refresh
relevant when projects are created automati cally by the system
or by other users.
Page 55

Xedio Suite Version 4.2 – User Manual – CleanEdit
EVS Broadcast Equipment – June 2012
Issue 4.2.B
41
5.2.4 CREATING A NEW PROJECT
Procedure
You can create a new project via the New command in the Project contextual
menu. This opens the New Project dialog box in which you define and save the
project characteristics. You need to specify a project name and video standard to
be used in your project, then click OK to validate. The project characteristics are
recorded in the datab ase.
Project Default Values
By default, the follo wing values are used:
• Project name: Project_XXXX where XXXX corresponds to an incremented
number.
The default name can be changed in Xedio Manager, Software > Parameter
Profiles tool, in the Browser tab.
• Video Standard: at first use, the displayed default value is the one set in
Xedio Manager. Afterwards, it will cor respond to the last value selected by the
user.
Project Video Standard
The video standard specifies the resolution and frequency that will be used for
playing out or rendering the project. Once a project is created, you cannot modify
the video standard.
The default value for the project video standard is set in Xedio Manager in
Software > Parameter Profiles > General > General tab: Default Video Standard
field.
In a project you ca nnot add media with a fre quency different from the project video
standard.
But you can add media having any video standard, they will be converted to the
project video standard .
Page 56

Issue 4.2.B
Xedio Suite Version 4.2 – User Manual – CleanEdit
EVS Broadcast Equipment – June 2012
42
5.2.5 VIEWING THE PROJECT DATA
By moving the mouse between the project and the work areas, the mouse pointer
will change to . Clicking with the right mouse button will expand the Project
area full screen, so that you can view information on the projects, media, edits
and clips.
To return to the normal display, place the mouse over the right hand edge of the
window to see the mouse pointe r change and drag the frame to the desired size or
click with the right m ouse button on it.
5.2.6 IMPORTING A PROJECT
If you need to work on another user’s project, you can import it from the Project
Mgr area.
To import a project, select the project in the Project list of the Project Mgr area
and drop it to the Project zone. The project will be copied and imported to your
working environment, wi th all the associated media and edits.
In some specific work flows, the users will be asked whether they want to copy the
project, or become t he project’s owner. In t he latter case, the user will work on the
original project.
Page 57

Xedio Suite Version 4.2 – User Manual – CleanEdit
EVS Broadcast Equipment – June 2012
Issue 4.2.B
43
5.3 MEDIA ZO NE
5.3.1 INTRODUCTION
The Media zone contains the list of media relating to the project. Each media is
placed in this area by dragging it from the Media Manager tab. For more
information on this tab, r efer to the section 4 ‘Se arching for and Managing Media’,
on page 24.
This section presents the various possible actions on a media, either accessible
from the Media context ual menu or in another way.
5.3.2 OPENING MEDIA IN THE PLAYER AREA
To view material available in the Media zone, you can load it to the Player of the
Edit tab, by clicking the media name or by dragging the media onto the Player
window:
Page 58

Issue 4.2.B
Xedio Suite Version 4.2 – User Manual – CleanEdit
EVS Broadcast Equipment – June 2012
44
5.3.3 MEDIA CONTEXTUAL MENU
You can perform the main actions on media via the Media contextual menu. You
will access it by right-clicking on a media in the Media zone:
The following table shows an overview on the commands from the contextual
menu:
Command Description
Delete Deletes the media from the Media zone. A dialog box will ask
for confirmation.
The media will be deleted from the user’s Media zone, but not
from the database no r from the media server. You wi ll still view
it in the Media Manager tab and be able to drag it to the Media
zone.
Default Sort Allows the user to select how the media is sorted in the Media
zone among various sorting optio ns. Each sorting option can be
combined with an ascen ding or descending sort:
Refresh Refreshes the list of media in the Media zone
Page 59

Xedio Suite Version 4.2 – User Manual – CleanEdit
EVS Broadcast Equipment – June 2012
Issue 4.2.B
45
5.4 EDIT ZONE
5.4.1 INTRODUCTION
An edit is video and audio material assembled in a timeline, to which effects and
several features may have been added, and that will be played out as a final
subject.
The Edit zone contains the list of edits related to the current project.
The edits will be disp layed differently dependi ng on their status:
• An ope n edit is in bold characte rs.
• A clos ed edit is displayed in n ormal characters.
• An edit closed and set as ‘Ready to broadcast’ is displayed in dimmed
characters.
This section present s the various possible actions on an edit, either accessibl e
from the Edit contextu al menu, or in another way.
5.4.2 OPENING AN EXISTING EDIT
To open an existing e dit, double-cli ck on its name in the Edit zone.
When an edit is active (open), its name is highlighted in bold characters and the
Timeline area shows the edit. The timeline buttons also become a ctive.
5.4.3 EDIT CONTEXTUAL MENU
You can manage your edits via the Edit c ontextual menu.
If you right click on the Edit zone, the contextual menu shows the commands
applicable to all edits.
If you right click on a specific edit in the Edit zone, the contextual menu will also
enable the commands ap plicable to the edit.
Page 60

Issue 4.2.B
Xedio Suite Version 4.2 – User Manual – CleanEdit
EVS Broadcast Equipment – June 2012
46
confirmation. Edits which have the R2B status (ready to
When this option is selected, a confirmation
The following table shows an overview on the commands from the contextual
menu:
Command Description
New Opens the New Edit window, from where you can create a new
edit.
For more information on the fields available in this window,
refer to the section 5.4.4 ‘Creating an E dit’, on page 47.
Properties Opens the Edit Properties window, from where you can modify
some properties of the edit.
See also the section 5.4.4 ‘Creating an Edi t’, on page 47.
Delete Deletes the edit from the Edit zone. A dialog box will ask for
broadcast) cannot be d eleted.
The edit will be delete d from the user’s Edit zone, but not from
the database. It can be restored in the Edit Manager tab, by
right-clicking the edit row and selecting Not Deleted from the
contextual menu.
Duplicate Allows creati ng a duplicate of the sel ected edit.
See also the section 5.4.5 ‘Duplicating an Edit’, on page 50.
Default Sort Allows the user to select how the edits are sorted in the Edit
zone among various sorting optio ns. Each sorting option can be
combined with an ascending or descending sort:
Make Local
(XT/XS)
Allows the user to arch ive all XT/XS clips used in the edit to his
local storage.
(YES/NO) info window is displayed.
Page 61

Xedio Suite Version 4.2 – User Manual – CleanEdit
EVS Broadcast Equipment – June 2012
Issue 4.2.B
47
This option is available only if the parameter Allow to Backup
in Software >
Command Description
XT/XS clip is set to true in Xedio Manager (
Parameter Profiles > CleanEdit > Cemediaimport).
Refresh Refreshes the list of edits in the Edit zon e.
5.4.4 CREATING AN EDIT
CREATION PROCEDURE
To create a new edit i n an open project, proceed a s follows:
1. Right-click in the Edit zone and select New from the con textual menu.
This opens the New Edi t window.
2. Fill in the fields in this window.
3. Click OK.
The new edit will be c reated with the label and ch aracteristics you have
defined. Its characte ristics are stored in t he database.
NEW EDIT WINDOW
You need to specify t he edit characteristics when you crea te the edit, via the New
Edit window. You will find below a description o f its fields.
The mandatory fields are filled in with default values. The values of some fields
can still be modified when the edit has been created, in the Edit Properties
window. This is specif ied in the field descrip tion.
Page 62

Issue 4.2.B
Xedio Suite Version 4.2 – User Manual – CleanEdit
EVS Broadcast Equipment – June 2012
48
predefined classes to classify an edit as belonging to a
dentifier for the edit can be entered or generated
> General tab in Xedio Manager (Read Only Edit ID,
General Tab
The following table describes the general ch aracteristics that can be defined on an
Edit.
Field Description
Label (mandatory) Name assigned to the edit. The default value for the label is
Edit_XXX where XXX corr esponds to an incremented num ber.
The default name can be change d in Xedio Manager, Software
> Parameter Profiles t ool, in the Browser tab.
Description Optional text to describe the edit.
Program ClassList Category assigned to the edit. The value is selected from
particular group or edit type. The tree values and structure
are defined in Tools > Program Class Manager tool, in Xedio
Manager.
Click the down arrow to display the classification tree and
select the requested category.
Edit ID I
automatically to make it unique. If it is entered manually and
it is already used, a warning message will appear. Two
parameters Software > P arameter Profiles > (Xedio) Clea nEdit
Automatic Edit ID Generation) make it possible to configure
how the Edit ID field will be used
Page 63

Xedio Suite Version 4.2 – User Manual – CleanEdit
EVS Broadcast Equipment – June 2012
Issue 4.2.B
49
, this setting
allows the user to define a preferred default from either
in the timeline. In this case, you cannot enter a Start
be played out. The automatic restore process uses this
Field Description
Aspect ratio Default aspect ratio to be used for the edit.
With HD video standards, the aspect ratio 16:9 is selected
and cannot be modified in Xedio CleanEdit. This does not
prevent from using a media with a differen t aspect ratio in the
edit.
With SD video standards, you can choose the aspect ratio
between 4:3 and 16:9, and you can modify this as long as the
edit is empty.
The default value is specified in the Software parameters >
General > General tab in Xedio Manager.
Default conversion
When a conversion is performed on the media
type
letterbox1 or pillarbox2/cropped (pan & scan3).
Audio type Specifies the audio type for t he edit.
Possible values: All Stereo, One 5.1 + 5x stereo, Two 5.1 + 2x
stereo. By default, All St ereo is selected.
In case the Show Audio Matrix Button is not enabled in the
Parameter Profiles of Xedio Manager, All Stereo will be the
single option available.
Start Timecode Specifies the first timecode fo r the edit.
The entered timecode i s:
• reflected on the timecode bar above the tim eline,
• stored in the dat abase,
• used for the playout and rendering proc ess.
From First Clip If this check box is ticked, the start timecode for the edit
timeline will be the timecode of the first video frame inserted
Timecode manually as th is field will be disab led.
On Air Date and
Allows specifying a date and time when the edit is planned to
On Air Time
information when the a rchive solution is part of the system.
1
The letterbox effect occurs when film shot in a widescreen aspect ratio is transferred to standard-width video formats while
preserving the film's original aspect ratio. The resulting image has black bars (mattes) above and below it.
2
The pillarbox effect occurs in widescreen video displays when black bars (mattes or masking) are placed on the sides of
the image. It becomes necessary when film or video was not originally designed for a widescreen display.
3
Pan and scan is a method of adjusting widescreen film images so that they can be shown within the proportions of a
standard definition 4:3 aspect ratio television screen, often cropping off the sides of the original widescreen image to focus
on the composition's most important aspects. (Source: Wikipedia)
Page 64

Issue 4.2.B
Xedio Suite Version 4.2 – User Manual – CleanEdit
EVS Broadcast Equipment – June 2012
50
Custom Metad ata
If only a default metadata profile is defined for edits, the metadata fields of the
default profile are d isplayed in this tab an d can be filled in.
If several metadata profiles are associated to the edits in Xedio Manager (one
default profile and one or more associated profiles), you first need to select the
requested profile in the first row of the table. Then, the metadata fields linked to
the selected profile will be displayed in the rows below and you wil l be able to fill
in the metadata field s.
5.4.5 DUPLICATING AN EDIT
You can duplicate one of your edits using the Duplicate command in the Edit
contextual menu. This op ens a dialog box showing the properties of the dup licated
edit and suggesting a name (the old name with the extension ‘_Duplicated’).
Confirm the operation w ith the OK button.
You can also use the following keyboard shortcut + to create a
duplicate for the edi t that is currently loa ded in the timeline.
Note
When you duplicate an edit, it is not possible to change the audio type
of the duplic ated edit.
Page 65

Xedio Suite Version 4.2 – User Manual – CleanEdit
EVS Broadcast Equipment – June 2012
Issue 4.2.B
51
5.4.6 COPYING A N EDIT
You can also copy an edit from the Edit Manager tab, whatever the user who
created the edit. The res ult is the same as duplicating an edit, bu t you perform the
action in a different way, and you can copy other user’s edits.
If you want to copy an edit avai lable in the Edit Manager tab, select the ed it, drag
it from the Edit Manag er tab and drop it onto:
• the Ed it zone of the Project ar ea.
In this case, the edit i s added to the open project.
• any project name in th e Project zone of the Proj ect area.
In this case, it will be added to the project on which you have dropped the
edit.
Page 66

Issue 4.2.B
Xedio Suite Version 4.2 – User Manual – CleanEdit
EVS Broadcast Equipment – June 2012
52
5.5 CLIP ZONE
5.5.1 INTRODUCTION
The Clip zone is mainl y used to store clips in preparation for edits.
It contains the list of clips made in one of the following ways:
• by selecting sections of material from the Player on the Edit tab and dragging
them to the timeline.
• by selec ting sections of material from the Player of the Media Manager tab and
dragging them to the timeline.
• by dragg ing the clips from the Media Importer, EVS Server t ab directly into the
Clip zone.
The clips shown are al l relevant to the project op en in the Project zone.
Note:
For more information on making clips and placing them on the timeline
or in the Clip zone, refer to the sections 7.3 ‘Placing Clips onto the
Timeline’, on page 110.
5.5.2 VIEWING CLIPS
To view the clip mater ial, you can load the cli p onto the Player of the E dit tab:
• by dou ble-clicking the c lip name
• by dra gging the clip name onto th e Player window
Page 67

Xedio Suite Version 4.2 – User Manual – CleanEdit
EVS Broadcast Equipment – June 2012
Issue 4.2.B
53
5.5.3 ADDING CLIPS
You can add clips to the clip zone in several ways:
• Drag the media from the Player to the Clip zone. The material defined between
the IN and OUT points, or mark IN and mark OUT points when defined, will be
added to the Clip zon e.
• Drag a media from the Media Mgr int o the Clip zone.
• Select several clips in the edit from different timeline tracks and drop them in
the clip bin: this wi ll create only one clip.
This action is possible only if the selected video and audio edit clips access
the same media with th e same timecodes.
5.5.4 CLIP CONTEXTUAL MENU
You can manage your cl ips via the Clips contextu al menu.
If you right click on the Clips zone, the contextual menu shows the commands
applicable to all cli ps.
If you right click on a speci fic clip in the Clips zone, the contextual menu will also
enable the commands ap plicable to the clip.
Page 68

Issue 4.2.B
Xedio Suite Version 4.2 – User Manual – CleanEdit
EVS Broadcast Equipment – June 2012
54
confirmation. The original media is not deleted from the
Command Description
Properties Opens the Clips Pro perties window, from where you can modify
the clip label and description and get information on other clip
parameters:
Delete Deletes the clip from the Clip zone. A dialog box will ask for
database. Once deleted, a clip cannot be recovered as the
edits can be.
Thumbnails Allows the user to display or hide the clip thumbnails showing
the IN and OUT frames i n the Clip zone.
Print Opens a dialog to print the clip details. If the workstation has
been set up and connect ed to a printer, a list can be printed.
Refresh Refreshes the list of clips in the Clip zone .
Default Sort Allows the user to select how the clips are sorted in the Clip
zone among various sorting optio ns. Each sorting option can be
combined with an ascen ding or descending sort:
5.5.5 ASSIGNING COLORS TO CLIPS AND FILTERING ON COLORS
Above the clip list, the Colored Square button and the Filter button allow
you to assign colors to the clips and filter them based on the clip c olors.
Page 69

Xedio Suite Version 4.2 – User Manual – CleanEdit
EVS Broadcast Equipment – June 2012
Issue 4.2.B
55
HOW TO ASS IGN A COLOR TO NEW CLIPS
To activate a color t o be assigned to clips, pr oceed as follows:
1. Click the Color ed Square button to open the Color dialog box.
2. Select a color you want to assign to new clips and click OK.
The Colored Square button will change to the sel ected color
From then onwards, the bullet in front of the new clips placed in the Clip zone will
inherit the active color.
HOW TO CHA NGE THE COLOR ASSIGN ED TO EXISTING CLIPS
To change the color as signed to clips, proceed as follows:
1. Activa te the color you want to assign using the Co lored Square button and the
Color dialog box.
2. Select the clips for which you w ant to change the color.
3. Simult aneously press CTRL and click the Colored Square button.
The active color will be assigned to the select ed clips.
HOW TO FILTER CLIPS BASED ON COLORS
To filter clips to wh ich a given color is ass igned, proceed as follows:
1. Activate the color on which to filter using the Colored Square button and the
Color dialog box.
2. Click the Filter button to activa te the filter
The filter button will turn colored and the clip list will be limited to the clips
corresponding to the s elected color.
Page 70

Issue 4.2.B
Xedio Suite Version 4.2 – User Manual – CleanEdit
EVS Broadcast Equipment – June 2012
56
Page 71

Xedio Suite Version 4.2 – User Manual – CleanEdit
EVS Broadcast Equipment – June 2012
Issue 4.2.B
57
6. Main Workspace for
6.1 EDIT TAB OVE RVIEW
The Edit tab is the main workspace for working and finalizing an edit. Clips and
edits are created in this tab. It consists of four areas, highlighted in the
screenshot below:
Editing
Page 72

Issue 4.2.B
Xedio Suite Version 4.2 – User Manual – CleanEdit
EVS Broadcast Equipment – June 2012
58
Area Number Area Name
1. Player area
See section 6.2 ‘Player Area’ on page 58.
2. Audio Meters area and Trim area
See section 6.4 ‘Audio Meters / Tr im Area’ on page 83.
3. Recorder area
See section 6.3 ‘Recorder Area ’ on page 77.
4. Timeline area
See section 6.5 ‘Timeline Area’ on page 85.
6.2 PLAYER AREA
6.2.1 OVERVIEW
The Player is used to lo ad and browse media on the Edit tab, c reate clips to place
onto the timeline or to drag to the clip list area. All types of media and clips can
be played in the Player: video, audio or stills.
The screenshot below h ighlights the various zones in the Player:
Page 73

Xedio Suite Version 4.2 – User Manual – CleanEdit
EVS Broadcast Equipment – June 2012
Issue 4.2.B
59
It displays the video material loaded on the Player.
show black bars as these mattes are part of the video
the display are available via a
Adjusting the Player Video
Selecting the Tracks to be
t the exact
Adding Logs to the Media
• If a clip belonging to a group of linked clips is loaded
The following table briefly describes the various zones on the Player area and
refers to the section where the fields are detai led.
Area Description
1. Video
Display
Everything that is outside the video content has the skin
color. Video such as letterboxed or pillarboxed video will
signal.
Parameters related to
contextual menu.
See also the section 6.2.4 ‘
Display’ on page 61.
2. Track
Selection
Buttons
They allow the user to select the tracks to be taken into
account when the loade d material is added to the timeline.
See also the section 6.2.8 ‘
Added to the Timeline’, on page 69.
3. Jog and
Media Bar
They allow the user to navigate in the loaded material, to
place IN, OUT and nowline points, as well as to modify the
playback speed of the material.
See also the sections ‘ Jog’, ‘Media Bar’ and ‘Nowline, M ark
IN and Mark OUT’ from page 65.
4. Clip Creation
Fields
They are used to create new clips, and ge
timecode of the nowline, IN and OUT points.
See also the section 6.2.7 ‘C reating and Working with Clips
in the Player’, on pa ge 67.
5. Log Buttons The logs make it possible to add reference points to easily
identify positions of interest in the loaded media.
See also the section 6.2.9 ‘
Loaded on the Player A rea’, on page 73.
6. Transport
Control
Buttons
They are used to play back the loaded media.
See also the section ‘Transport Con trols’, on page 62.
7. Server
Recorder
Selection
The button acts as a tog gle switch between the Track
Selection buttons
and the camera selecti on list
Several cases can occur:
• If a record train of an EVS Video Server is loaded, this
allows the user to load another record train on the given
server.
Page 74

Issue 4.2.B
Xedio Suite Version 4.2 – User Manual – CleanEdit
EVS Broadcast Equipment – June 2012
60
(for example, clips created with ganged channels in
select a clip linked to the one
Area Description
IPDirector), the list displays the various camera angles
and allows the user to
loaded.
• If an individual clip is loaded, only its recorder channel
is available.
If a media ingested from an encoder is loaded, the
button is not availab le.
You can access the various comman ds of the Player area, either using the buttons
on the user interface, or dedicated keyboard shortcuts (which are assigned in
Xedio Manager).
6.2.2 ACTIVATING THE PLAYER AREA
To be able to use the Player and the various commands it features, you need to
activate it. To activate the Player, click on the Player area or press on the
keyboard. When you drag a media to the Player, it is directly activated.
A colored rectangle displayed around the Player commands indicates that the
Player area is active:
6.2.3 MAKING THE PLAYER AREA FULL SCREEN
To view the Player are a as a full-scree n image, press on the keyboard.
Press the shor tcut key again to revert to the normal display.
Page 75

Xedio Suite Version 4.2 – User Manual – CleanEdit
EVS Broadcast Equipment – June 2012
Issue 4.2.B
61
which areas of the picture will be seen and allow for
is defined in Xedio Manager > Software > Parameter
6.2.4 ADJUSTING THE PLAYER VIDEO DISPLAY
You can adjust the Player video display via a contextual menu. You call the
contextual menu by rig ht-clicking the Video Display zone on the Pla yer area.
It gives the following display options for the video:
Field Description
Show Timecode This option offers different choices to display timecode on
the player window.
If the loaded materia l is a file:
• none – does not d isplay any timecode
• intra TC – displays the or iginal timecode of the me dia
• start TC - displays a counter starting with 0 at the first
frame of the media
• both (Intra TC – Start TC) – displays both the counter
and original timecode
If the loaded material is the record train of an EVS Video
Server (not ap plicable to the Recorder V ideo Display):
• none – does not d isplay any timeco de
• intra TC (TOD) – provides a sub-menu with two options:
Timecode, Timecode and Date.
Aspect Ratio Offers a choice of aspect ratios for the display, either
Auto, 4:3 or 16:9.
This is also possible to use the following shortcuts:
• + to toggle b etween 4:3 and 16:9
• + to reset the disp lay to ‘Auto’
Show SafeAreas Displays a safe area cage on the window to determine
checking the size of graphics within the media for safe
display.
Grab Image Grabs the curr ent image, either in low resolutio n or in high
resolution. The default folder (C:\) where the g rab is stored
Profiles > General Set tings.
(not applicable to th e Recorder Video Display)
Show Label Displays the Media or Clip name on the top of the Video
Display.
Page 76

Issue 4.2.B
Xedio Suite Version 4.2 – User Manual – CleanEdit
EVS Broadcast Equipment – June 2012
62
6.2.5 LOADING MEDIA ONTO THE PLAYER AREA
When you want to load a nd view a media or a clip available in t he project onto the
Player area, you can:
• double-click the r equested media or clip
• drag the media or clip onto the Pl ayer area
• Select two clips in the edit from different timeline tracks and drop them in the
Player to access to a media and select the correct audio tracks. This is
possible only if video an d audio edit clip access th e same media with the same
timecodes.
The media will be loaded onto the Player and the transport control commands will
become available.
6.2.6 MOVING WITHIN MEDIA LOADED ON THE PLAYER AREA
TRANSPORT CONTROLS
The following table shows an overview on the various transport control commands
in the Player.
The table lists the most used commands when they can only be accessed via a
shortcut key. For a full list of commands activated via a shortcut key, refer to the
Appendix 2 – Keyboard Shortcuts, on page 235 to this user manual for the default
settings.
Note:
The user can define the keyboard shortcuts in Xedio Manager to
perform transport cont rol commands. The keys mentioned b elow are the
default settings.
Field/Button Keyboard
Shortcut
(space bar)
Function Name and Description
Play/Stop
Start/stops the preview (video and/or audio) of a
clip or rush.
The button changes to a Stop button when the
media is being played.
+
-
-
‘Near Live’ Play Mode
Launches the p review at the end of a rush while
digitizing.
Go to IN
Moves from the current position to the Mark IN
point.
Page 77

Xedio Suite Version 4.2 – User Manual – CleanEdit
EVS Broadcast Equipment – June 2012
Issue 4.2.B
63
Field/Button Keyboard
Shortcut
-
- Fast Forward (with m odified speed)
+
Function Name and Description
Go to OUT
Moves from the current position to the Mark OU T
point.
Fast Forward
Plays the media forward at a preset fast speed.
The button changes to a Stop button when the
media is being played forward.
Changes the preset spe ed to higher speed value.
The speeds are set in Xedio Manager.
Fast Rewind
Plays the media backwar d at a preset fast speed.
The button cha nges to a Stop button when the
media is being played backward.
Fast Rewind (with mod ified speed)
+
Changes the preset spe ed to higher speed value.
The speeds are set in Xedio Manager.
or
Previous Frame
Moves 1 frame before t he current position in
Pause mode.
or
Next Frame
Moves 1 frame after th e current position in Pause
mode.
-
or
Previous 10 Frames
Moves 10 frames before the current position in
Pause mode.
+
Page 78

Issue 4.2.B
Xedio Suite Version 4.2 – User Manual – CleanEdit
EVS Broadcast Equipment – June 2012
64
If another key is pressed between the
Field/Button Keyboard
Shortcut
-
or
-
+
Function Name and Description
Next 10 Frames
Moves 10 frames after the current position in
Pause mode.
+
Playing a clip from mark I N to mark OUT
Playing a clip in loop fr om mark IN to mark OUT
The , and keyboard shortcuts are used to navigate (in a
combination of shuttle a nd scrub at the same time) backwards and forwa rds in A/V
content.
This table lists thei r different uses.
Keyboard Shortcut Function Description
Shuttles/scrubs backward at t wice the real time
speed.
Pressing repeatedly th e key will increase the
shuttling/scrubbing s peed in a loop: x2, x3, x5, x8
and then back to x2.
Note
repetitions, the shuttle/scrub speed
is reset.
Stops the preview of the A/V co ntent.
Shuttles/scrubs backward at t wice the real time
speed.
Pressing repea tedly the key will increa se the
shuttling/scrubbing s peed in a loop: x2, x3, x5, x8
and then back to x2.
Page 79

Xedio Suite Version 4.2 – User Manual – CleanEdit
EVS Broadcast Equipment – June 2012
Issue 4.2.B
65
If another key is pressed between the
Keyboard Shortcut Function Description
Note
repetitions, the shuttle/scrub speed
is reset.
Steps backward 1 frame at a time.
Hold + t ap
Steps forward 1 frame a t a time.
Hold + t ap
Plays backward at 33% of the real time speed.
Hold + ho ld
Plays forward at 33% of the real time speed.
Hold + ho ld
JOG
Dragging the jog bar allows you to move within the media at a variable speed
depending on:
• the p osition of the speed indica tor
• the speed range covered by the jog area. The default range is set from -200%
to +200%. This is set in Xedio Manager.
Audio can be heard when usin g the jog.
MEDIA BAR
The top area on the bar represents the media, or a portion of it, currently loaded
on the Player. The mark IN, mark OUT and nowline are displayed on this top area
(See the section ‘Nowl ine, Mark IN and Mark OUT’ on page 66).
The middle area includes a dark grey zone. This zone shows the portion of the
media out of the whole media included in the top area and the position in the
whole media:
• When a media has just been loaded, the top area represents the whole media:
The dark grey area cov ers the whole space in the middle area.
Page 80

Issue 4.2.B
Xedio Suite Version 4.2 – User Manual – CleanEdit
EVS Broadcast Equipment – June 2012
66
• If you position t he mouse on the middle area and r otate the mouse wheel up or
down, you respectivel y enlarge or reduce the dark gr ey area, hence increasing
or reducing the porti on of the media included i n the top area.
• If you click on the dark grey area and drag it, you shift the portion of media
included in the top a rea.
• When a mark IN and mark OUT are defined, double-clicking on the dark grey
area will toggle the portion covered by the top area from the entire media
length to the clip l ength (portion between mark IN and mark OUT).
NOWLINE, MARK IN AND MARK OUT
Three positions can be defined in the media bar:
• An IN point marked on the media is shown as a green line.
To add a mark IN, click at the requested position on the media bar and click
the Mark IN button .
• An OUT point marked on the media is s hown as a red line.
To add a mark OUT, click at the r equested position on the media bar and click
the Mark OUT button .
• The n owline, that is to say the current position within the media, is shown as a
blue line.
To place the nowline a t a given position, simply cli ck at the requested position
on the media bar.
To move their position, c lick on them with the mouse and drag them to the desired
position.
When the media is being played, the nowline moves along the top area of the
media bar. If the portion of the top area covers only a part of the media, the
nowline may disappear. In this case, a red indicator, on the left side or on the
right side of the Media bar will be displayed. A click on the vertical indicator (on
the left or right side) will re-centre the top ar ea to the nowline.
Page 81

Xedio Suite Version 4.2 – User Manual – CleanEdit
EVS Broadcast Equipment – June 2012
Issue 4.2.B
67
6.2.7 CREATING AND WORKING WITH CLIPS IN THE PLAYER
When you have defined the portion of the media you want to place into the
timeline, you can create a clip out of it and either store it in the Clip zone in the
Project area and/or pl ace it directly in the timeline.
To create a clip, you will mainly use the Clip Creation buttons available in the
Player area. These but tons are described in t he section below.
CLIP CREATION FIELDS
The following table de scribes the various fiel ds that are used to create clips:
Field/Button Keyboard
Shortcut
or
or
Function Name and Description
Mark IN
Sets a mark IN point at the nowline pos ition on
the media bar:
• A timecode value i s added in Mark IN TC field.
• A [ sign is show n on the video display
• A green mark is added at this timecode on the
media bar.
Mark OUT
Sets a mark OUT point a t the nowline position on
the media bar:
• the timecode value is added in Mark OUT TC
field.
• A ] sign is shown on the video display
• A red mark is added at this timecode on the
media bar.
Clip Name
Field where the clip n ame can be entered.
Mark IN TC
Timecode of the Mark IN defined on the loaded
media.
Page 82

Issue 4.2.B
Xedio Suite Version 4.2 – User Manual – CleanEdit
EVS Broadcast Equipment – June 2012
68
Field/Button Keyboard
Function Name and Description
Shortcut
Mark OUT TC
Timecode of the Mark OU T defined on the loaded
media.
Nowline TC
Timecode of the nowlin e defined on the loaded
media.
To move the mark IN, mark OUT or nowline to a given TC, type the timecode in the
corresponding field an d press ENTER.
You can edit hours, mi nutes, seconds or frames s eparately in the timecode fields:
• Double-click on the hours, minutes, seconds or frames area, and the
corresponding area wil l be activated for editi ng.
• Simple-click in the timecode field, the cursor should bl ink on the right and you
can type the full tim ecode value
HOW TO MAKE A CLIP
Using the transport co ntrols listed above, you can create a clip as foll ows:
1. Select the requested media from the Medi a zone and double-cli ck on it or drag
it to the Player area . It will open in the Pl ayer.
2. Play the media using the transport control commands describ ed on page 62.
3. Position the nowline at the requested position for the Mark IN point and click
the Mark IN button .
4. Positi on the nowline at the requested position for t he Mark OUT point and click
the Mark OUT button .
5. Enter a name in the Clip Name field.
6. To sav e the clip, drag i t to Clip zone.
It can then be placed later on in the timeline.
HOW TO MODI FY A CLIP
To modify a cl ip, proceed as follows:
1. Select a clip in the Clip zone an d drag it to the Player area.
2. Redefi ne the mark IN and mark OUT i n one of the following ways :
a. Set a new mark IN and/or mark OUT using the nowline and the and
buttons. The old mark IN/OUT will be r emoved.
b. Drag t he mark IN and/or mark OUT t o the new position in the Media bar.
3. Do one of the following,
Page 83

Xedio Suite Version 4.2 – User Manual – CleanEdit
EVS Broadcast Equipment – June 2012
Issue 4.2.B
69
Audio Channel Assignment of the A/V material based
defined in Xedio Manager: via Software > Parameter
The user can modify the default assignment before
importing the A/V material in Media Importer, via the
track assignment has been
defined in Xedio Manager: via Software > Parameter
The user can modify the default assignment before
importing the A/V material in Media Importer, via the
track assignment has been
a. To save the clip as a new clip in the Clip zone, drag the picture from the
Player area to the Cli p zone of the Project area.
b. To save the clip and replace the modified one, press CTRL while dragging
the picture from the Player area to the Clip zone, onto the clip to be
replaced.
6.2.8 SELECTING THE TRACKS TO BE ADDED TO THE TIMELINE
16 CHA NNELS IN STERE O AND/OR 5.1
The Xedio Suite can manage the reading, the editing and the export of files with
up to 16 audio channel s, grouped in stereo pairs and/or 5.1 groups.
Audio Channel Assignment
The audio channel assignment of the source files depends on how the source
material has been included into Xedio, and on the audio track assignment defined
when the source materia l has been imported:
Source material
Media imported from
Media Importer
Media ingested from
a Xedio encoder
Clip imported from
an EVS server
on…
… the Default Input Audio Track Assignment setting
Profiles > General > A udio tab.
Setup, Audio Channels Assignment tab.
Note
Once the audio
defined in Xedio Importer or AutoFile Importer,
these values will be used instead of the default
ones on the workstatio n.
… the audio channels defined for the given channel of the
physical encoder. This is defined in Xedio Manager, via
Encoders > Physical Man ager > Encoder Channel Profil e.
… the Default XT Input Audio Track Assignment setting
Profiles > General > A udio tab.
Setup, Audio Channels Assignment tab.
Note
Once the audio
defined in Xedio Importer or AutoFile Importer,
these values will be used instead of the default
ones on the workstatio n.
Page 84

Issue 4.2.B
Xedio Suite Version 4.2 – User Manual – CleanEdit
EVS Broadcast Equipment – June 2012
70
Audio Channel Assignment of the A/V material based
audio type defined in the EVS server application
Source material
on…
Record train of an
EVS server loaded
… the
launched.
via the direct access
in CleanEdit
Possible Audio Configurations
The possible audio con figurations are:
• up to 8 stereo pairs
• up to 5 stereo pairs and one 5.1 g roup
• up to 2 stereo pairs and two 5.1 groups.
Within the general settings of Xedio Manager, you need to check the Enable 5.1
management param eter to allow the management of 5.1 tracks in the Xedi o Suite.
When encoders ingest m edia, they only use stereo tr acks.
When importing files w ith 2, 4, 8 or 16 audio chan nels, the assignment must fol low
the default parameters s et in the database, as explained in sectio n ‘Audio Channel
Assignment’. In case the default assignments cannot be applied, all audio tracks
will be considered as stereo pairs.
The A/V content of each media is displayed in the A/V Contents column of the
Media Mgr tab. For each edit, it is displayed in the Audio Type column of the Edit
Mgr tab.
Note:
The output of 16 audio channels is managed through a multi-channel
audio board. To make sure that Xedio can use this audio board, you
need to manually change the audio board assignment in the Control
Panel of Windows (Sounds and Audio devices properties > Playback
and Recording options) .
TRACK SELECTION FOR CLIPS AND MONITORING
Overview
All the available aud io sources from a media ar e displayed below the Play er.
A stereo track is represented by .
A 5.1 track is represente d by
In stereo mode, up to 8 tracks appear as follows :
(8 stereo)
(4 stereo)
Page 85

Xedio Suite Version 4.2 – User Manual – CleanEdit
EVS Broadcast Equipment – June 2012
Issue 4.2.B
71
In 5.1 and stereo mode , up to 16 channels can be shown as follows:
(two 5.1 tracks a nd two stereo tracks)
(one 5.1 track and six
stereo tracks)
When you create a clip to be placed on a timeline, you need to select the video
and requested audio t racks using the buttons und erneath the Video Displa y zone:
Video and Audio Selection
The video and audio sele ction is taken into account when you drag a clip from the
player to the timeline:
Clicking on the Video button will remove the v ideo from the Player window and
disable it so that the clip made has no video, the displayed button will turn to
white.
Clicking on the left or right triangle of an audio stereo track will disable
respectively the left or right channel of the corresponding audio track. The
displayed button will turn to white.
A 5.1 audio track is d isabled by clicking the loudspeaker button on the right of the
radio button
The table summarizes how the buttons look like dependin g on the selection:
Enabled Disabled
Video
Audio
Page 86
Issue 4.2.B
Xedio Suite Version 4.2 – User Manual – CleanEdit
EVS Broadcast Equipment – June 2012
72
Audio Monitoring Selec tion
The radio buttons between each pair of stereo audio channel buttons or next to a
5.1 audio channel button allow t he selection of one audi o track for monitoring:
• In stereo mode: the first radio button for channels 1 and 2, the second radio
button for channels 3 and 4, the third radio button for channels 5 and 6, and
so on until channels 15 and 16.
• In 5.1 and Stereo mode: in the example, combining two 5.1 tracks and 2
stereo tracks, the first radio button selects channels 1 to 6, the second radio
button selects channels 7 to 12, the third radio button selects channels 13 and
14 and the fourth rad io button selects channels 15 and 16.
Audio meters located on the right side of the Video Display represent the
monitored track. Refer to section 6.4 ‘Audio Meters / Tri m Area’ on page 83.
Note:
When you right-click on a 5.1 radio button, a popup menu appears in
which you can select the 5.1 comp onents that should be monitored on the
left and right channels. You can choose between the following options:
Mixed, L+R, Ls +Rs or Center (output on L+R sp eakers).
Examples
If a clip has to be created without audio for the channels 1 and 2, disable the 2
buttons of those chan nels:
Clicking on the left audio button will remove the left audio component from the
source so that the clip made has no left audio channel. In this case, the right
channel will be outpu t on the left and right.
Clicking in addition on the right audio button will remove the right audio
component so that the clip made has no right audi o channel.
Page 87

Xedio Suite Version 4.2 – User Manual – CleanEdit
EVS Broadcast Equipment – June 2012
Issue 4.2.B
73
6.2.9 ADDING LOGS TO THE MEDIA LOADED ON THE PLAYER AREA
DEFINITION
The logs are reference points that can be placed wherever needed on the media
loaded on the Player. Their purpose is to mark points of interest on the media and
to facilitate rapid movement between them. The logs are managed with the
following buttons:
INTERNAL AND EXTERNAL LOGS
Definition and Display
A distinction can be drawn between internal and e xternal logs.
The internal logs are p laced by the user on the m edia loaded on the Player.
They are shown on the media bar as y ellow triangles.
When the nowline is on an internal log timecode, a yellow triangle appears at the
bottom of the video d isplay.
Example with a 16:9 as pect ratio:
Example with a 4:3 asp ect ratio:
Page 88

Issue 4.2.B
Xedio Suite Version 4.2 – User Manual – CleanEdit
EVS Broadcast Equipment – June 2012
74
The external logs correspond to logs created in and imported from IPDirector, if
the installation is p roperly set up. An inte rest ranking is assigned t o them.
They are shown on the media bar as transparent triangles. Their outline color
depends on the rating assigned to them in IPDirec tor.
There is always a black stripe below the video display when external logs are
present on the loaded media/clip. When the nowline is on an external log
timecode, a transparent triangle appears on the left of this black stripe. If
keywords have been asso ciated to the log, they ar e written next to the triangle.
Example with a 16:9 as pect ratio:
Example with a 4:3 vid eo aspect ratio display:
Logs Displa y Selection
When you right-click on a log on a media bar where the two types of logs are
displayed, a contextual menu appears and let you select the logs that should
appear:
Page 89
Xedio Suite Version 4.2 – User Manual – CleanEdit
EVS Broadcast Equipment – June 2012
Issue 4.2.B
75
ADDING A LOG
To add a log on the media, place the nowline at the requested position on the
media and click the Add Log button . The log is added on the media as a
yellow triangle on th e video frame.
MOVING BETWEEN LOGS
To move the nowline to the previous log, click th e Go to Previous Log button .
To move the nowline to the next log, click the Go to Next Log button .
REMOVING A LOG
To remove a log, move to the log to be removed u sing the or buttons. Then,
click the Add Log button simult aneously with the CTRL key on the keyboard.
6.2.10 CREATING A CLIP ON AN EVS VIDEO SERVER FROM THE PLAYER AREA
GENERAL PROCESS
When the media loaded on the Player area is a record train from an EVS Server,
you can save the created clip on the EVS Server and in the Xedio databas e at the
same time. To do this, you will click the Save button next to the Clip Name field
once you have defined your mark IN and mark OUT:
This will open the EVS Server Data window in which you can specify the
necessary information to save the clip on the EVS Server and on the Xedio
database.
EVS SERVER DATA WINDOW
EVS Video Server Tab
In the EVS Server Data window, the EVS Video Server tab allows you to specify
the clip name, IDs, ranking, type and keywords as it will be saved on the EVS
Video Server.
Page 90

Issue 4.2.B
Xedio Suite Version 4.2 – User Manual – CleanEdit
EVS Broadcast Equipment – June 2012
76
field is the only
option if
The label and Media Class
o have
The LSM ID
mandatory in this tab.
You need to select the Add to
Current CE Project
you want the clip to be added
to the project in t he Clip zone,
once the clip has bee n saved.
CleanEdit Tab
In the EVS Server Data window, the CleanEdit tab allows you to specify the clip
label (name), media class and description as it will be saved in the Xedio
database.
fields are mandatory f ields.
You need to select the Publish
option if you want t
access to the clip in Cle anEdit.
Metadata Tab
In the EVS Server Data window, the Metadata tab allows you to specify the
metadata for the clip . This metadata will be stored in the Xedio databas e.
Page 91

Xedio Suite Version 4.2 – User Manual – CleanEdit
EVS Broadcast Equipment – June 2012
Issue 4.2.B
77
Parameters related to the display are available via a
6.3 RECORDER AREA
6.3.1 OVERVIEW
The Recorder area all ows you to preview edits an d to browse through the timelin e.
The commands on the R ecorder area are only available when an edit is open. The
Recorder area interacts with the timeline as the two areas are different
representations of the sa me edit. The timeline provides a graphica l representation
and the recorder, a visual area to actually view the media represented on the
timeline.
The screenshot below h ighlights the various zones in the Recorder:
The following table briefly describes the various zones on the Recorder area and
refers to the section where the fields are detai led.
Area Description
1. Video Display It displays the video material loaded on the Timeline.
Everything that is outside the video content has the skin
color. Video such as letterboxed or pillarboxed video will
show black bars as these mattes are part of the video
signal.
contextual menu.
Page 92

Issue 4.2.B
Xedio Suite Version 4.2 – User Manual – CleanEdit
EVS Broadcast Equipment – June 2012
78
See also the section 6.2.4 ‘Adjusting the Player Video
Playing the Edit in the
Playing the Edit in the
represented in the
Playing the Edit in the
Checking the Edit in the
Area Description
Display’ on page 61.
2. Track
Monitoring
Buttons
3. Jog It allows the users to navigate in the loaded material.
4. Edit
Information
5. Transport
Control
Buttons
6. Validation
Buttons
They reflect the audio type and tracks of the loaded edit
and allow the selection of the audio track you want to
monitor.
See also the section 6.3.6 ‘Selecting t he Monitored Audio
Tracks’ on page 82.
See also the section 6.3.5 ‘
Recorder Area’ on page 79.
These fields provide general information on the loaded
edit.
See also the section 6.3.5 ‘
Recorder Area’ on page 79.
They are used to play the media
timeline.
See also the section 6.3.5 ‘
Recorder Area’ on page 79.
They are used to check the edit or flag it as ready to
broadcast.
See also the section 6.3.7 ‘
Recorder Area’ on page 82.
6.3.2 ACTIVATING THE RECORDER AREA
To be able to use the Recorder and the var ious commands it features, you need to
activate it. To activate the Recorder, cl ick on the Recorder area or press on
the keyboard.
An orange rectangle displayed around the Recorder commands indicates that the
Recorder area is activ e.
6.3.3 MAKING THE RECORDER AREA FULL SCREEN
To view the Recorder ar ea as a full-s creen image, press on the keyboar d.
Press again to revert to the n ormal display.
Page 93

Xedio Suite Version 4.2 – User Manual – CleanEdit
EVS Broadcast Equipment – June 2012
Issue 4.2.B
79
6.3.4 ADJUSTING THE RECORDER VIDEO DISPLAY
You can adjust the Recorder video display via a contextual menu. You call the
contextual menu by rig ht-clicking the Video Display zone on the Reco rder area.
The display options are similar to the ones of the Player Video Display. For more
information, refer to the section 6.2.4 ‘Adjusting the Player Video Display’, on
page 61.
6.3.5 PLAYING THE EDIT IN THE RECORDER AREA
EDIT INFORMATION
Two fields on the Recorder area highlighted on the screenshot below provide
general information on the edit loaded on the Rec order:
• The up per field specifies the n owline position in th e edit.
• The lo wer field specifies the edi t label.
TRANSPORT CONTROLS
The following table shows an overview on the various transport commands in the
Recorder area. The table lists:
• all the commands that can be accessed via the user interface or the
ShuttlePRO.
• the most used commands when they can only be accessed via a shortcut key.
For a full list of commands only activated via a shortcut key, refer to the
appendix to this user manual for the default set tings.
Note:
The user can define the keyboard shortcuts in Xedio Manager to
perform transport cont rol commands. The keys mentioned b elow are the
default settings.
Page 94
Issue 4.2.B
Xedio Suite Version 4.2 – User Manual – CleanEdit
EVS Broadcast Equipment – June 2012
80
Button Keyboard
Shortcut
(space bar)
or
Function Name and Description
Play/Stop
Start/stops the p layback or preview (video
and/or audio) of the edited material on the
timeline from the nowline position .
The button changes to a Stop button whe n the
media is being played.
Go to Beginning
Moves from the current position to the
beginning of the edit loaded on the timeline.
Go to End
Moves from the current position to the end of
the edit loaded on th e timeline.
Go to Previous Transition
Moves to the previou s edit point on the ti meline
(considering the selec ted tracks).
or
Go to Next Transition
Moves to the next edit point o n the timeline
(considering the selec ted tracks).
or
Previous Frame
Moves 1 frame before t he current position in
Pause mode.
or
Next Frame
Moves 1 frame after th e current position in
Pause mode.
The , and keyboard shortcuts are used to navigate (in a
combination of shuttle a nd scrub at the same time) backwards and forwards in A/V
content.
This table lists thei r different uses.
Keyboard Shortcut Function Description
Shuttles/scrubs backward at t wice the real time
speed.
Pressing repeatedly th e key will increase the
shuttling/scrubbing s peed in a loop: x2, x3, x5, x8
and then back to x2.
Page 95

Xedio Suite Version 4.2 – User Manual – CleanEdit
EVS Broadcast Equipment – June 2012
Issue 4.2.B
81
If another key is pressed between the
If another key is pressed between the
Keyboard Shortcut Function Description
Note
repetitions, the shuttle/scrub speed
is reset.
Stops the preview of t he A/V content.
Shuttles/scrubs backward at t wice the real time
speed.
Pressing repeatedly th e key will increase the
shuttling/scrubbing s peed in a loop: x2, x3, x5, x8
and then back to x2.
Note
Hold + t ap
Hold + t ap
Hold + ho ld
Hold + ho ld
Note
The use of ShuttlePRO keys for transport functions is detailed in the
appendix 1.
repetitions, the shuttle/scrub speed
is reset.
Steps backward 1 frame at a time.
Steps forward 1 frame a t a time.
Plays backward at 33% of the real time speed.
Plays forward at 33% of the real time s peed.
Page 96

Issue 4.2.B
Xedio Suite Version 4.2 – User Manual – CleanEdit
EVS Broadcast Equipment – June 2012
82
JOG
Dragging the jog bar allows you to move within the media at a variable speed
depending on:
• the p osition of the speed indica tor
• the speed range covered by the jog area. The default range is set from -200%
to +200%. This is set in Xedio Manager.
Audio can be heard whe n using the jog.
6.3.6 SELECTING THE MONITORED AUDIO TRACKS
At edit creation, the audio type for the edit is specified: All Stereo, One 5.1 + 5x
stereo, Two 5.1 + 2x s tereo. This selection is r eflected in the Recorder a rea:
Once clips have been loaded on the timeline, all the output tracks corresponding
to timeline tracks whi ch contain audio are acti vated:
The radio buttons below the video display allow the selection of the audio track
you want to monitor.
Examples of audio trac k displays in the Record er area:
6.3.7 CHECKING THE EDIT IN THE RECORDER AREA
The button allows you to check the edit once it is finalized. The
checks consist of identifying possible blanks in the edit or fast motion clips to be
rendered, but also missing hi-res files in the edit. You need to check your edit
before you can change its status to R2B (r eady to broadcast). The R2B but ton will
not become available in case holes are discovered in the edit or fast motion clips
are not rendered.
Refer to section 2.9 ‘Checking the Edit’ on page 16 f or the description of windows
and messages which are displayed in the differen t cases.
The button allows you to change the status of yo ur edit, and set it as
‘ready to broadcast’. You will do this when you no longer want to modify your edit
in CleanEdit.
Once you click the R2B button, th e manager can easily search for the R2B edits in
Xedio Approval to appr ove or reject them.
Some automatic processes may also be launched when you click the R2B button,
Page 97

Xedio Suite Version 4.2 – User Manual – CleanEdit
EVS Broadcast Equipment – June 2012
Issue 4.2.B
83
such as restoring the archived hi-res elements corresponding to the lo-res
elements of the R2B edit, or the automa tic rendering of the edit to various targets,
such as an EVS video s erver.
6.4 AUDIO METERS / TRIM AREA
or
The audio meters are located between the Player and Recorder areas in an area
shared with the trim o perations possible on th e timeline.
Clicking the button will toggle to the audio meter display.
Clicking the button will toggle to the trim buttons. For more information
on the trim functions, refer to the section 7.11 ‘Trimming Edit Points on the
Timeline’, on page 138.
The audio display will follow the active window, Player or Recorder, as will the
audio outputs.
When the Player area is active, the audio meters will only display the monitored
tracks:
• In stereo mode: from 1&2 to 15&16 (if 16 audio channels are present in the
media file)
• In a 5.1 and stereo mode: 6 audio channels for a 5.1 track or 2 for a stereo
track.
Page 98

Issue 4.2.B
Xedio Suite Version 4.2 – User Manual – CleanEdit
EVS Broadcast Equipment – June 2012
84
When the Recorder area is active, all enabled outputs will be displayed in the
audio meters. If 16 channels are selected, the 8 audiometers are visible at a time
and two arrow buttons allow to shift from channel s 1 to 8 to channels 9 to 16:
Db values are displayed on each side. They correspond to the values defined in
Xedio Manager > Parameter Profiles > General > Vumeter for the top level, the
saturation level, the warning level and the bottom level. Values for 0, -2, -4, -8
and -1 6 are shown as well if they do not overwrite the dat abase values.
Page 99

Xedio Suite Version 4.2 – User Manual – CleanEdit
EVS Broadcast Equipment – June 2012
Issue 4.2.B
85
Audio Output
to define which timeline track will be routed to which
Audio Track Selection for the
Clip zone is automatically placed at the end of the
allow the users to perform various
Editing Buttons in the
6.5 TIMELINE A REA
6.5.1 OVERVIEW
The Timeline is the area where, through a graphical representation of the edit in
progress, media can be manipulated to easily and efficiently make an edited
package.
The Timeline is made up of the elemen ts highlighted on the screenshot and shor tly
described in the table below:
Area Description
1.
Matrix Button
2. Fill Button When the Fill button is active, the media dragged to the
3. Editing
Commands
4. Timecode Bar The Timecode bar gives a graduation of the timecode of
This button gives access to an Audio Output Matrix used
output track.
See also the section ‘
Output’ on page 97.
timeline.
See also the section 7.3 ‘Placing Clips on to the Timeline’,
on page 110.
The Editing buttons
editing actions on th e edit loaded.
See also the section 6.5.10 ‘
Timeline Area’, on pag e 102.
the edit.
See also the section 6.5.2 ‘Timecode Bar’, on page 86.
Page 100

Issue 4.2.B
Xedio Suite Version 4.2 – User Manual – CleanEdit
EVS Broadcast Equipment – June 2012
86
on the position of the mark IN, mark OUT, full edit
Timecode and Duration
the tracks to be taken into account in an editing
Audio Track Selection and
Area Description
5. TC and
Duration
Fields
6. Track
Selection and
Audio
Settings
7. Timeline
Display
The timecode and dura tion fields provide time info rmation
duration, or duration between marks.
See also the section 6.5.8 ‘
Fields’, on page 94.
The buttons for track selection on the left of the tr ack are
used to select:
•
operation
• the audio output (and mode) in playout, rendering, and
export actions.
The buttons on the ri ght of the track are used:
• to define the aud io routing for stereo tracks
• to zoom the track , and perform fine tuning on the audio
tracks.
See also the section 6.5.9 ‘
Settings in the Timeli ne’, on page 95.
This is a graphical representation of the edit, in which
users execute and visu alize the editing actions .
See also from section 6.5.4 to section 6.5.6.
8. Scale Bar and
Move Bar
The Scale bar and Move bar allow the user to easily
navigate in the timel ine.
See also the section 6.5.3 ‘Scale Bar and Move Bar’, on
page 87.
6.5.2 TIMECODE BAR
The timecode bar, located above t he timeline display, displays a graduatio n of the
timecode in the timeline. The timecode of the first frame will start with the
timecode defin ed when the edit was created .
The most precise graduation is a graduation by frame, i.e. from frame 0 to 24 in
PAL, and from frame 0 to 29 i n NTSC.
The timecode bar displays the tags (graphics) and the cue points (reference
marks). Right-clicking the timecode bar opens th e contextual menu from which you
can define tags and cue points. For more information, refer to the sections 7.8
‘Cue Points’, on page 128 and 11.2 ‘Adding a Logo or G raphic’, on page 197.
 Loading...