

Page 1
User’s Manual
Version 3.1 - January 2011
Xedio Browse
From Xedio Suite
Page 2

Xedio Suite Version 3.1 – User’s Manual - Xedio Browse
EVS Broadcast Equipment – January 2011
COPYRIGHT
EVS Broadcast Equipment – Copyright © 2010-2011. All rights reserved.
DISCLAIMER
The information in this manual is furnished for informational use only and subject
to change without notice. While every effort has been made to ensure that the
information contained in this user manual is accurate, up-to-date and reliable,
EVS Broadcast Equipment cannot be held responsible for inaccuracies or errors
that may appear in this publication.
IMPROVEMENT REQUESTS
Your comments will help us improve the quality of the user documentation. Do not
hesitate to send improvement requests, or report any error or inaccuracy on this
user manual by e-mail to doc@evs.tv
Issue 3.1.B
.
REGIONAL CONTACTS
You will find the full list of addresses and phone numbers of the EVS headquarters
and local offices either at the end of this user manual or on the EVS website on
the following page: http://www.evs.tv/contacts
.
USER MANUALS ON EVS WEBSITE
The latest version of the user manual, if any, and other user manuals on EVS
products can be found on the EVS download center, on the following webpage:
http://www.evs.tv/downloadcenter
.
I
Page 3

Issue 3.1.B Xedio Suite Version 3.1 – User’s Manual - Xedio Browse
EVS Broadcast Equipment – January 2011
II
Page 4

Xedio Suite Version 3.1 – User’s Manual - Xedio Browse
EVS Broadcast Equipment – January 2011
Issue 3.1.B
Table of content
TABLE OF CONTENT ...................................................................................................... III
WHAT’S NEW? ................................................................................................................ IV
1. INTRODUCTION ....................................................................................................... 1
1.1 PURPOSE .................................................................................................................................... 1
1.2 USER INTERFACE ...................................................................................................................... 1
1.2.1 Opening Xedio Browse ........................................................................................................... 1
1.2.2 Overview of the Xedio Browse Window .................................................................................. 2
1.3 PROCESS OVERVIEW ............................................................................................................... 3
2. PLAYER .................................................................................................................... 4
2.1 OVERVIEW OF THE PLAYER PANE .......................................................................................... 4
2.2 VIDEO DISPLAY OF THE PLAYER ............................................................................................. 5
2.3 PLAYER CONTROLS .................................................................................................................. 6
2.3.1 Player Transport Controls ....................................................................................................... 6
2.3.2 Timecode Value Fields ............................................................................................................ 8
2.3.3 Video and Audio Monitoring Tools .......................................................................................... 8
2.3.4 Media and Jog Bars .............................................................................................................. 10
2.3.5 Loading Media on the Player Window ................................................................................... 12
2.3.6 Play Media in the Additional Player ....................................................................................... 13
3. TABS PANE ........................................................................................................... 14
3.1 THE MEDIA TAB ........................................................................................................................ 14
3.1.1 Overview of the Media Tab ................................................................................................... 14
3.1.2 Media List Area ..................................................................................................................... 15
3.1.3 Using Filters to Search the Database .................................................................................... 16
3.2 THE VIRTUAL MEDIA PROPERTIES TAB ................................................................................ 26
3.2.1 Overview of the Virtual Media Properties Tab ....................................................................... 26
3.2.2 Creating a Virtual Media ........................................................................................................ 27
3.2.3 Auto Clipping Modes ............................................................................................................. 28
4. VIRTUAL MEDIA PANE ......................................................................................... 29
4.1 INTRODUCTION ........................................................................................................................ 29
4.2 VIRTUAL MEDIA LIST DISPLAY ............................................................................................... 29
4.2.1 Displayed Columns ............................................................................................................... 29
4.2.2 Show Thumbnails.................................................................................................................. 30
4.2.3 Glossary of Column Headings .............................................................................................. 30
4.3 VIRTUAL MEDIA LIST CONTEXTUAL MENU ........................................................................... 31
5. MENU BAR ............................................................................................................. 32
III
Page 5

Issue 3.1.B Xedio Suite Version 3.1 – User’s Manual - Xedio Browse
EVS Broadcast Equipment – January 2011
What’s New?
The following table describes the sections updated to reflect the new and modified
features on Xedio Browse from Xedio Suite 3.1 (compared to Xedio Suite 3.0).
In the user manual, the icon has been added on left margin to highlight
information on new and updated features.
Click the section number (or the description) in the table to jump directly to the
corresponding section.
Section Description
3.1.1, 3.1.3 Revised area for the database search and filter.
3.1.2 New options available from the Media List contextual
menu.
2.3.3 Support of 16 audio channels.
Audio vumeters for the loaded media are displayed next
to the Video Display.
IV
Page 6
Xedio Suite Version 3.1 – User’s Manual - Xedio Browse
EVS Broadcast Equipment – January 2011
1.1 PURPOSE
The Xedio Browse application allows a user to browse and preview media within a
Xedio Suite environment.
The supported media can be either data already imported into the Xedio Suite or
files currently being ingested into the system as a ‘live feed’.
With Xedio Browse, the media can be segmented into several ‘virtual media’. This
can be useful, for example, to break down a single news feed including multiple
stories into several sections each containing an individual story. In the case of a
football match, virtual media can be produced with the goals or highlights directly
from the incoming feed.
Multiple virtual media can be created from the same source.
Issue 3.1.B
1. Introduction
The virtual media does not require any splitting of the original file as it is only
made of markers placed on the original media file. There is no new media file
created.
Specific metadata can be assigned to each virtual media.
1.2 USER INTERFACE
1.2.1 OPENING XEDIO BROWSE
To start the Xedio Browse application, click on the Xedio Browse
icon on the desktop.
This will display a login screen where you need to enter your
username and password.
1
Page 7

Issue 3.1.B Xedio Suite Version 3.1 – User’s Manual - Xedio Browse
EVS Broadcast Equipment – January 2011
1.2.2 OVERVIEW OF THE XEDIO BROWSE WINDOW
The Xedio Browse graphical interface contains three main areas highglighted in
the screenshot below:
THE PLAYER PANE (1)
This is used to play media loaded from the Tabs pane or virtual media loaded from
the Virtual Media pane. The Player pane is used together with the Tabs pane to
create virtual media.
THE TABS PANE (2)
The Tabs pane contains two tabs.
The Media tab displays the list of media available in the Xedio database.
This is used to select the media to load in the Player pane. It has the same
powerful filtering and search attributes as other parts of the Xedio Suite of
applications allowing to easily find the required material.
The Virtual Media Properties tab displays the properties and metadata of the
media, or virtual media, loaded on the Player pane.
This is also used to create virtual media within the original file and assign it
specific metadata.
2
Page 8

Xedio Suite Version 3.1 – User’s Manual - Xedio Browse
EVS Broadcast Equipment – January 2011
THE VIRTUAL MEDIA PANE (3)
The Virtual Media pane gives the list of the virtual media created from the original
file selected in the Media tab.
1.3 PROCESS OVERVIEW
The use of Xedio Browse can be summarized as follows:
Step See …
Issue 3.1.B
1. Select a media from the Media Tab of the
Tabs Pane.
2. Load it on the Player Pane Section 2.3.5 on page 12
3. Create a virtual media from the loaded media Section 3.2.2 on page 27
4. View the list of virtual media associated to a
media
Section 3.1 on page 14
Section 4 on page 29
3
Page 9
Issue 3.1.B Xedio Suite Version 3.1 – User’s Manual - Xedio Browse
EVS Broadcast Equipment – January 2011
2. Player
The Player is used to load and play media or virtual media and to create virtual
media.
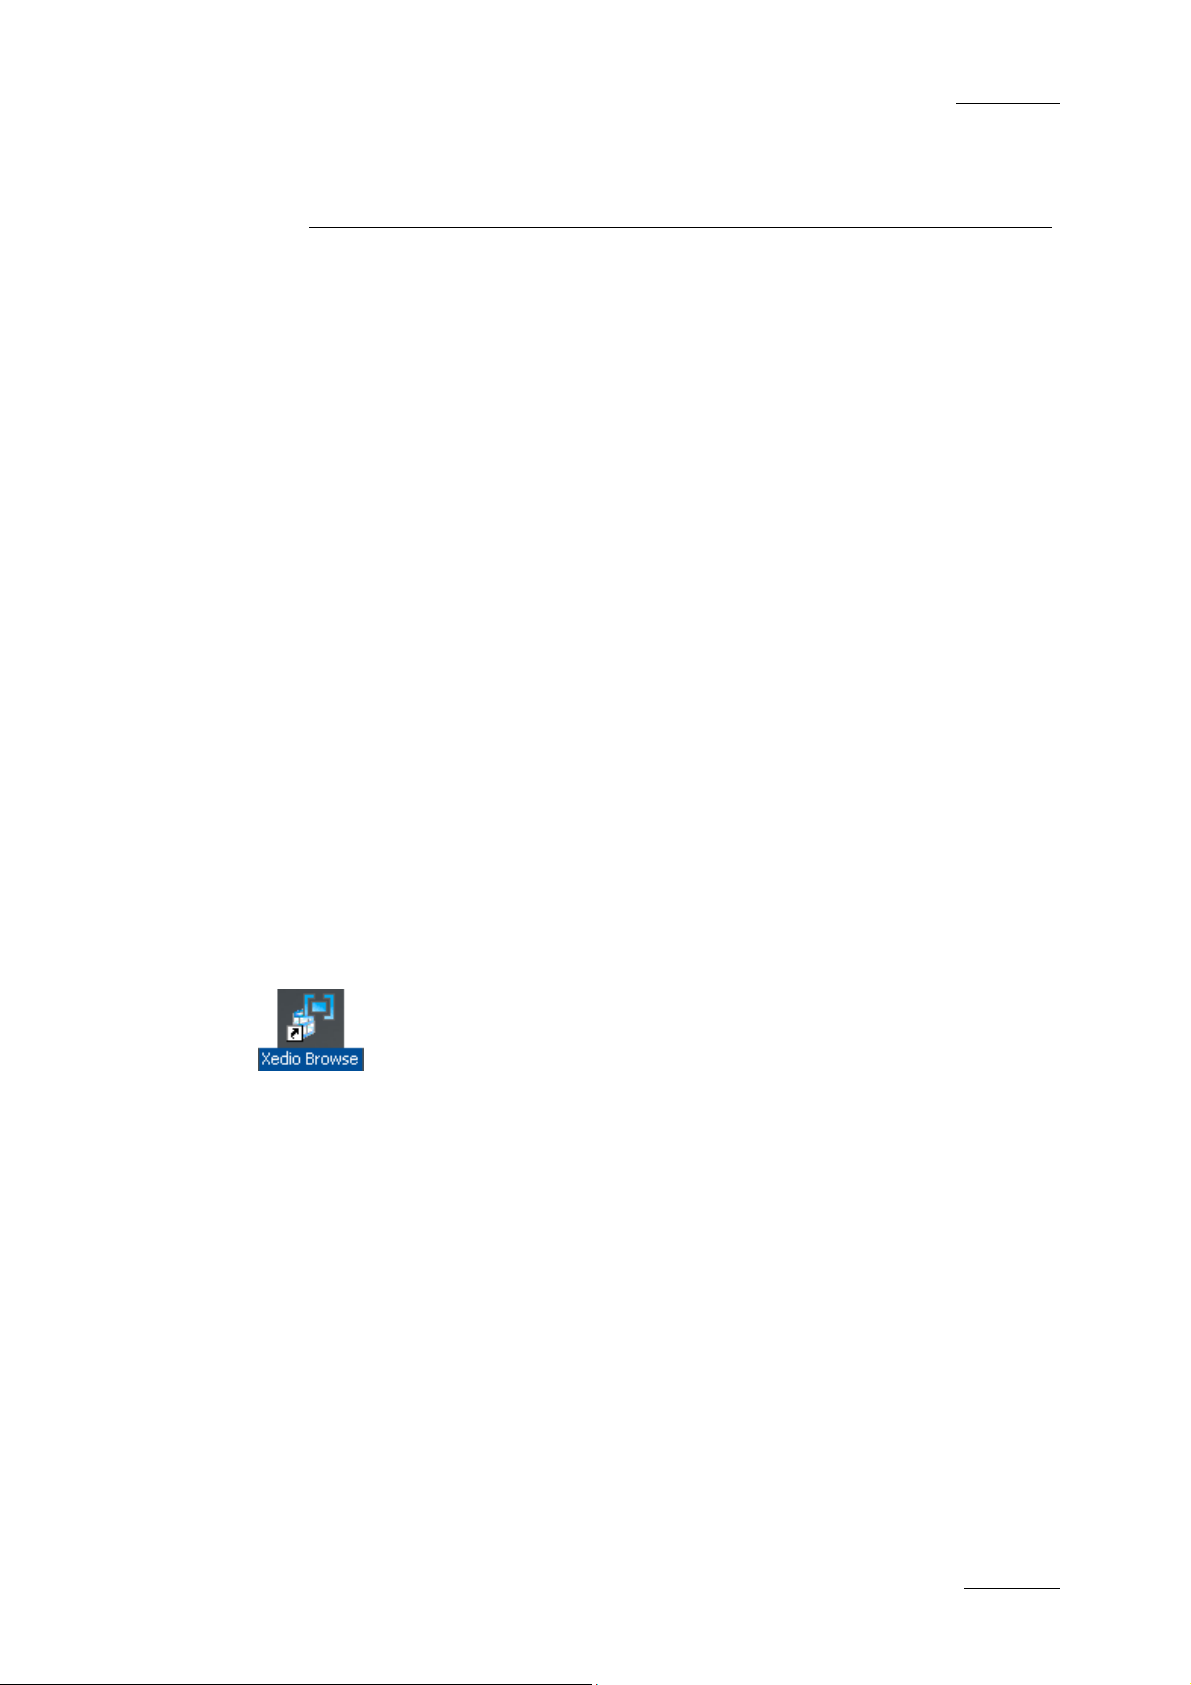
2.1 OVERVIEW OF THE PLAYER PANE
The Player pane provides a video display, a media bar and a jog bar to navigate
within the element, video and audio selection and monitoring buttons, transport
buttons and timecode fields. It slightly differs according to the element loaded.
When a media is loaded from the Tabs pane, it looks as follows:
4
Page 10
Xedio Suite Version 3.1 – User’s Manual - Xedio Browse
EVS Broadcast Equipment – January 2011
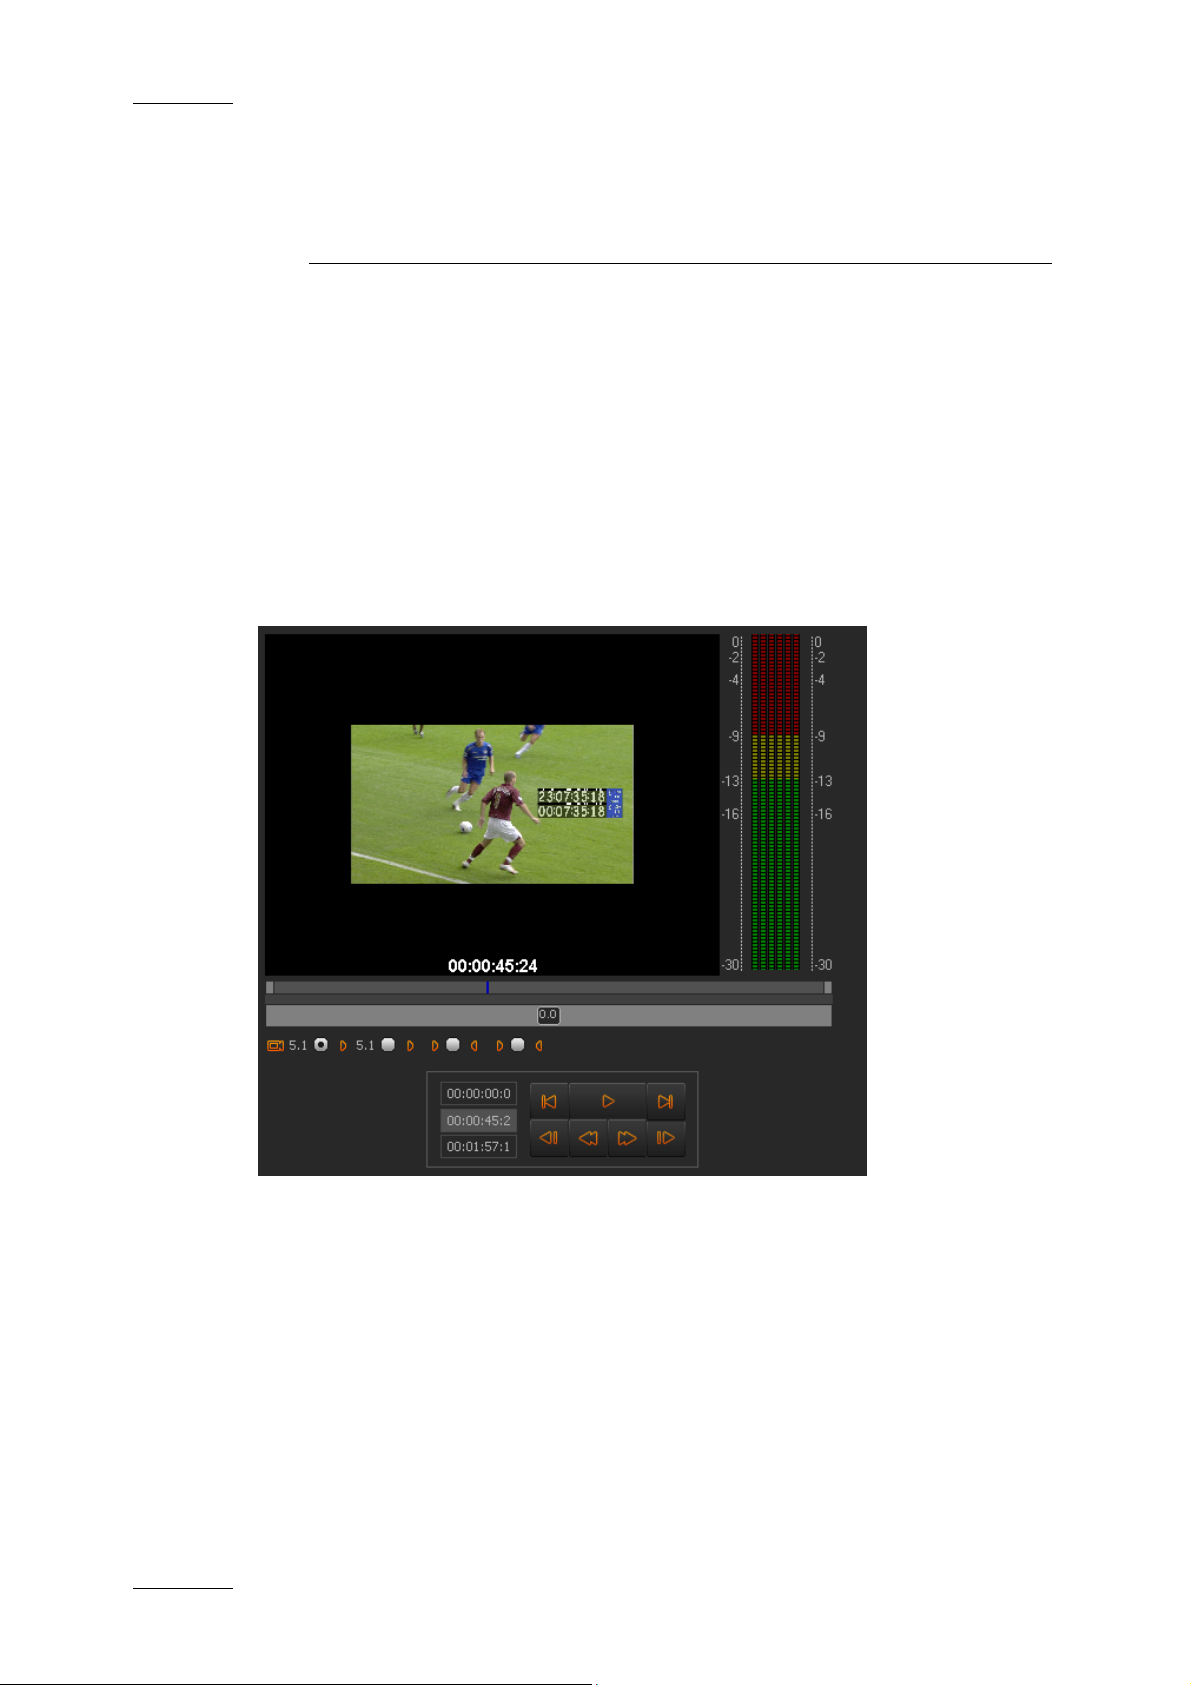
When a virtual media is loaded from the Virtual Media pane, the Player pane looks
like the following screenshot:
Issue 3.1.B
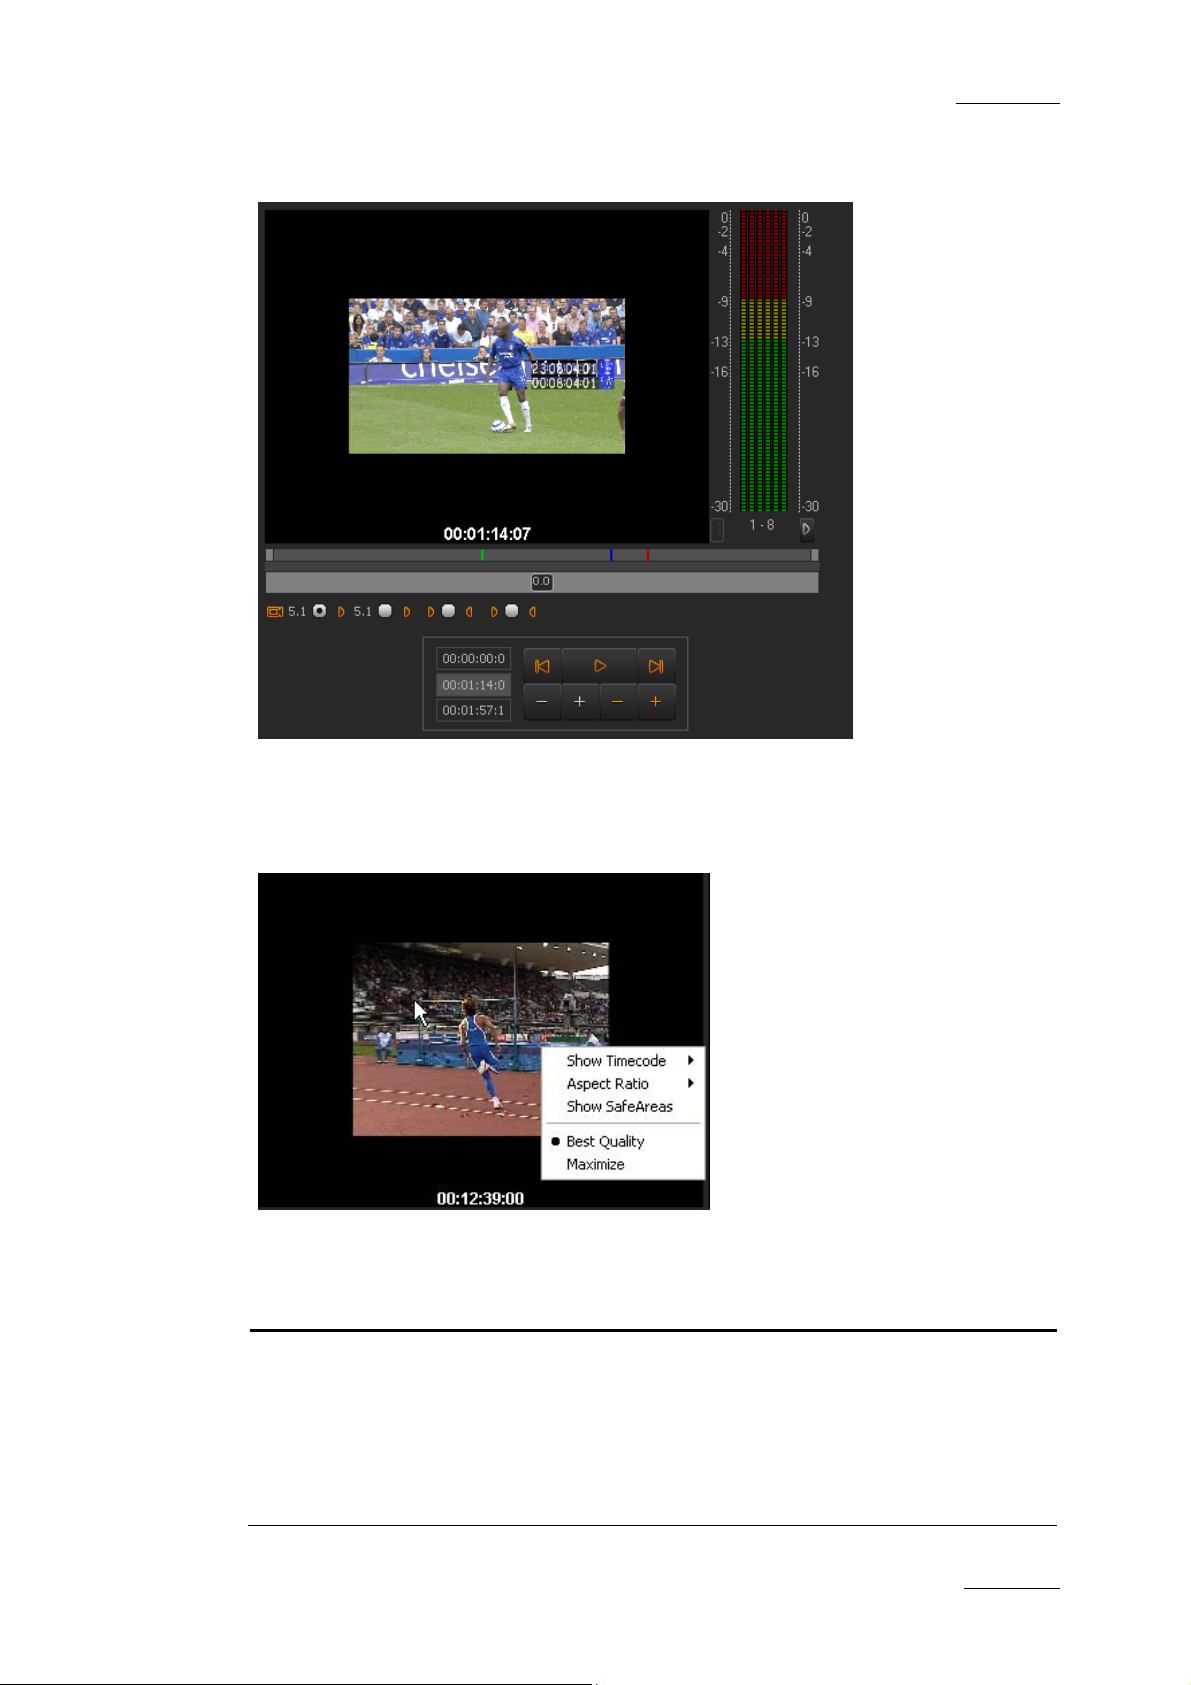
2.2 VIDEO DISPLAY OF THE PLAYER
When you right-click on the Video Display area of the Player pane, a contextual
menu appears. This gives display options for the video:
Option Description
Show Timecode This option offers four choices to display timecode on the
Player window:
None does not display any timecode
Intra TC displays the original timecode of
the media
5
Page 11

Issue 3.1.B Xedio Suite Version 3.1 – User’s Manual - Xedio Browse
EVS Broadcast Equipment – January 2011
Option Description
Start TC displays a counter starting with 0
at the first frame of the media
Both (Intra TC
– Start TC)
displays both the counter and the
original timecode
Aspect Ratio This option offers a choice of aspect ratios for the
display:
Auto uses the aspect ratio (AR)
information stored in the database
4:3 sets the display AR to 4:3 without
replacing database information
16:9 sets the aspect ratio to 16:9 without
replacing database information
Show SafeAreas This option displays a safe area cage on the window to
determine which areas of the picture will be seen. This
allows to check the size of graphics within the media for a
safe display.
[Playback Quality] It is also possible to choose the display playback quality
used by the window: Best Quality, Maximize or Stretch.
2.3 PLAYER CONTROLS
2.3.1 PLAYER TRANSPORT CONTROLS
Please refer to the Xedio Manager user manual for a comprehensive list of the
shortcuts.
CONTROLS COMMON TO MEDIA PLAYER AND VIRTUAL MEDIA PLAYER
Operation User Interface
Button
Play and Pause
↔
Play Near Live a
media while ingesting
(digitizing)
+
Shortcut
6
Page 12
Xedio Suite Version 3.1 – User’s Manual - Xedio Browse
EVS Broadcast Equipment – January 2011
Issue 3.1.B
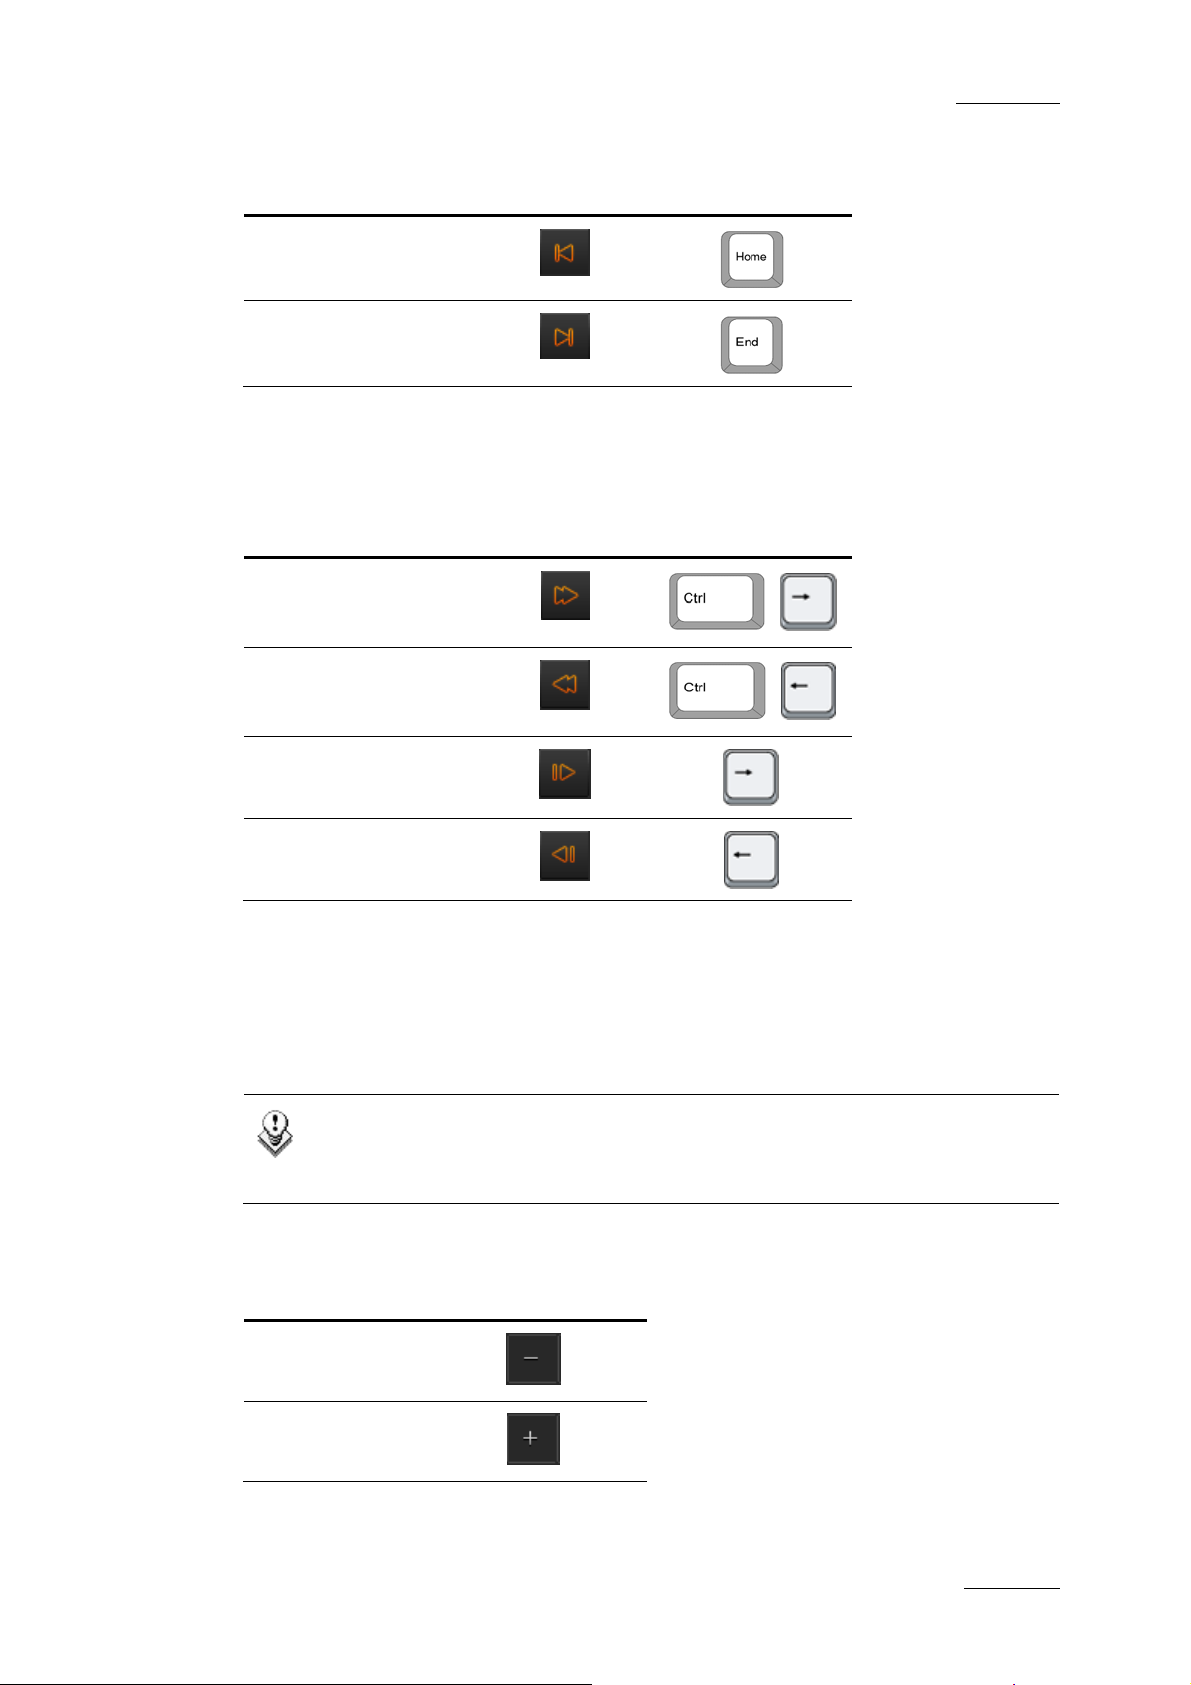
Operation User Interface
Shortcut
Button
Go to Start of Media
Go to End of Media
CONTROLS SPECIFIC TO THE MEDIA PLAYER
Operation User Interface
Button
Fast Forward
Fast Rewind
Shortcut
+
+
Goto Next Frame
Goto Previous Frame
CONTROLS SPECIFIC TO THE VIRTUAL MEDIA PLAYER
When a virtual media is loaded on the Player, the four lower transport buttons
become trim buttons for the IN and OUT points of the virtual media:
Note
If the loaded virtual media is declared as published or the original media
is declared as treated, you will not be able to use those four buttons.
Operation User Interface
Button
Remove 1 frame from
Mark IN point
(grey)
Add 1 frame to Mark
IN point
(grey)
7
Page 13

Issue 3.1.B Xedio Suite Version 3.1 – User’s Manual - Xedio Browse
Operation User Interface
Button
Remove 1 frame from
Mark OUT point
Add 1 frame to Mark
OUT point
(red)
(red)
EVS Broadcast Equipment – January 2011
2.3.2 TIMECODE VALUE FIELDS
The top box displays the media start timecode (first
virtual media is loaded.
recorded frame), even if a
The second box displays the current position (nowline).
The bottom box displays the media end timecode (last recorded frame), even if a
virtual media is loaded.
2.3.3 VIDEO AND AUDIO MONITORING TOOLS
When a media is loaded on the Player pane, the video and audio tracks to monitor
can be selected using the buttons underneath the Video Display.
OVERVIEW
All the available audio sources from a media are displayed below the Player.
The video and audio track buttons are represented as follows:
A stereo track is represented by .
A 5.1 track is represented by
8
Page 14

Xedio Suite Version 3.1 – User’s Manual - Xedio Browse
EVS Broadcast Equipment – January 2011
In stereo mode, up to 8 tracks appear as follows:
In 5.1 and stereo mode, up to 16 channels can be shown as follows:
stereo tracks)
VIDEO AND AUDIO SELECTION
Clicking on the Video button will remove the video from the Player window.
The displayed button will turn to white.
Issue 3.1.B
(8 stereo)
(4 stereo)
(two 5.1 tracks and two stereo tracks)
(one 5.1 track and six
Clicking on the left or right triangle of an audio stereo track will disable
respectively the left or right channel of the corresponding audio track. The
displayed button will turn to white.
A 5.1 audio track is disabled by clicking the loudspeaker button on the right of the
radio button
The table summarizes how the icons look like depending on the selection:
Enabled Disabled
Video
Audio
AUDIO MONITORING SELECTION
The radio buttons between each pair of stereo audio channel buttons or next to a
5.1 audio channel button allow the selection of one audio track for monitoring:
9
Page 15

Issue 3.1.B Xedio Suite Version 3.1 – User’s Manual - Xedio Browse
EVS Broadcast Equipment – January 2011
AUDIOMETERS
A set of audiometers are displayed on the right side of the Video Display. The
number of audiometers differs according to the audio track selected: 6 for a 5.1
track, 2 for a stereo track.
2.3.4 MEDIA AND JOG BARS
JOG
The lower area is the jog bar.
Dragging the jog bar allows you to move within the media at a variable speed,
shown on the icon, depending on:
• the position of the speed indicator
• the speed range covered by the jog area. The default range is set from -2 to
+2 in Xedio Manager but can be modified.
Audio can be heard when using the jog.
MEDIA BAR
The upper area of the bar represents the whole original media of the element
currently loaded in the Player window.
When a media is loaded:
When a virtual media is loaded:
The vertical lines represent the different positions:
Line color Meaning
Green line Mark IN point (only visible when a virtual media is loaded)
Red line Mark OUT point (only visible when a virtual media is loaded)
Blue line Current position within the media (Nowline)
All of these lines can be moved to a new position by selecting them with the
mouse and dragging them to the desired position.
10
Page 16

Xedio Suite Version 3.1 – User’s Manual - Xedio Browse
EVS Broadcast Equipment – January 2011
The middle area, represented by a dark grey zone, is a shuttle control. This zone
shows the portion of the media out of the whole media included in the top area
and the position in the whole media:
Issue 3.1.B
When a media
has just been loaded, the top area represents the whole media: The
dark grey area represents the whole media and covers the whole space in the
middle area.
When a virtual media
has just been loaded, the top area represents the whole
media. The dark grey area represents the whole media and covers the whole
space in the middle area.
• A double-click on the dark grey area will toggle the portion covered by the
upper area from the entire media length to the virtual media length (between
Mark IN and Mark OUT). The dark grey area is reduced to represent the virtual
media length and position with regard to the whole media.
• If you click on the dark grey area and drag it, you shift the portion of media
included in the top area. The dark grey area is enlarged or reduced
accordingly.
In this case, if the portion of the upper area covers only a part of the media,
the nowline may disappear. Then, a red indicator, on the left side or on the
right side of the media bar will be displayed.
A click on that indicator will focus on the nowline.
11
Page 17

Issue 3.1.B Xedio Suite Version 3.1 – User’s Manual - Xedio Browse
EVS Broadcast Equipment – January 2011
2.3.5 LOADING MEDIA ON THE PLAYER WINDOW
You can proceed in different ways to load a media or a virtual media on the
Player:
• Drag the virtual media from the Virtual Media pane to the Player window:
or Drag the media (or the virtual media resulted from a search) from the Media
tab to the Player window:
• From the Media tab, double-click the media to load
or
from the Virtual Media pane, double-click the virtual media to load.
At the same time, the Tabs Pane will switch to the Virtual Media Properties tab.
12
Page 18

Xedio Suite Version 3.1 – User’s Manual - Xedio Browse
EVS Broadcast Equipment – January 2011
2.3.6 PLAY MEDIA IN THE ADDITIONAL PLAYER
It is also possible to load media or virtual media on an additional Player window.
To do so, right-click on a media or virtual media and select Play from the
contextual menu. The media or virtual media cannot be modified using this player
but can be viewed while another piece of media is still loaded within the Player
pane.
Issue 3.1.B
To start or stop the playout, click within the video area of the window or press the
Space bar.
The Media and Jog bars at the bottom of the window can be used as in the Player
pane. Refer to section 2.3.4 ‘Media and Jog Bars’ on page 10.
The video and audio tools can be used as described in section 2.3.3 ‘Video and
Audio Monitoring Tools’ on page 8.
13
Page 19

Issue 3.1.B Xedio Suite Version 3.1 – User’s Manual - Xedio Browse
EVS Broadcast Equipment – January 2011
3. Tabs Pane
The Tabs pane consists of two tabs: the Media tab and the Virtual Media
Properties tab.
3.1 THE MEDIA TAB
The Media tab is used to select the media to manage.
3.1.1 OVERVIEW OF THE MEDIA TAB
The upper part of the Media tab gives access to the different filters which can be
applied to the media list.
The element list displays the list of all media present in the database, or it returns
the result of a search applied to the list. Media items are displayed in columns.
14
Page 20

Xedio Suite Version 3.1 – User’s Manual - Xedio Browse
EVS Broadcast Equipment – January 2011
3.1.2 MEDIA LIST AREA
DISPLAYED COLUMNS
It is possible to re-arrange the columns order, and to add or remove some
columns.
Right-clicking on any of the column headings displays a contextual menu. The
Choose Displayed Columns option opens the Select Visible Columns window
allowing you to choose the columns you want to be displayed in the element list.
Please see the section 4.2.3 ‘Glossary of Column Headings’ on page 30 for
detailed information on the column headings available.
The column width and order can be adjusted using standard computer commands
and drag and drop techniques.
MEDIA LIST CONTEXTUAL MENU
A contextual menu is available when you right-click on a media item in the list:
Issue 3.1.B
Menu Item Description
Published State Allows the selection of a sub-menu to change the publish
state of the media between Published and Not
Published. A published media will be displayed in the
database lists of all the software and thus available for
use.
Treated State Allows the selection of a sub-menu to change the treated
state of the media between Treated and Not Treated. A
media can be set as treated when virtual media have
been created from this media in Xedio Browse.
Play Opens a new Player window to allow the media to be
browsed. Refer to section ‘Play Media in the Additional
Player’ on page 13 for more information.
Render List Opens the Render List window listing all types of
rendering that have been done with the media
Archive History Opens the Archive History window listing the archive and
restore processes that were achieved for the selected
.
media
.
View Properties Opens the Media Properties window which shows the
properties for the selected media. If a default metadata
profile has been defined for the media, a metadata tab is
displayed and allows to modify the media metadata
values.
15
Page 21

Issue 3.1.B Xedio Suite Version 3.1 – User’s Manual - Xedio Browse
EVS Broadcast Equipment – January 2011
3.1.3 USING FILTERS TO SEARCH THE DATABASE
INTRODUCTION
When the database contains large amounts of data, it may become difficult to find
a specific element. The Xedio Suite offers several ways to speed up your search:
• quick text search
• filters on parameters
By default, the columns that are taken into consideration for the Quick Text
Search are the ones currently visible in the grid.
If you wish to search in other columns, and view the string you are searching for
in the columns, you can:
• add other columns to the element list view
• use Filters, as explained in section ‘Advanced Filters’ on page 18
These search tools are explained in detail below.
All these search tools can be combined and they can be saved for later use. These
Saved Filters can then be applied in one click.
QUICK TEXT SEARCH
Introduction
The Quick Text Search field is always available on the top of the database
content list:
It allows searching for a string in the displayed columns.
The Quick Text Search option obeys specific rules which can be accessed via the
Help button next to the Quick Text Search field.
For more details on these rules, refer to the section ‘Quick Text Search Rules’, on
page 17.
How to Perform a Quick Text Search
To perform a Quick Text search, proceed as follows:
1. Show the columns you wish to perform a quick search on.
2. Type a search string in the Quick Text Search field, based on Quick Text
search rules available from the Help button and detailed in section
‘Quick Text Search Rules’ on page 17.
16
Page 22

Xedio Suite Version 3.1 – User’s Manual - Xedio Browse
EVS Broadcast Equipment – January 2011
3. Depending on whether the AutoRefresh Filtering setting is selected or not,
you may have to press the Search button to apply the Quick Text Search.
Refer to the tab Software > Parameter Profiles > General > General.
The Quick Text Search is applied and the search result is displayed in the
grid.
4. To clear the applied Quick Text Search, click the red "X" icon to the right of
the search field or select <empty> from the Quick Text Search field.
5. The Quick Text Searc h field is a combo box that gives access to the last 10
previously searched strings.
Select a filter from the list of the Quick Text Search field to apply a
previous search.
Issue 3.1.B
Quick Text Search Rules
The string that you enter in the Quick Text Search field is analyzed according to
the following set of rules, which can be accessed via the Help button next to
the Quick Text Search field.
The free text search is not a case sensitive operation.
Search String Search Result
Yellow card Searches for the strings ‘yellow’ and ‘card’, even if in two
different fields (columns), for example ‘yellow’ in Name and
‘card’ in Keywords.
For example a clip named ‘The Yellow Man’ with keywords ‘Red
Card’ will be found, since it has yellow and card in 2 different
fields.
"Yellow card" Searches for strings containing ‘Yellow card’.
Yellow | card Searches for ‘yellow’ or ‘card’, even if in two different fields
(columns), for example ‘yellow’ in Name or ‘card’ in Keywords.
Spaces around the | sign are mandatory.
yell* Searches for ‘yell’ at the beginning of a string.
*low Searches for ‘low’ at the end of a string.
Ye*low Searches for strings with ‘ye’ at the beginning and ‘low’ at the
end.
Ye*low 123 Searches for strings with ‘ye’ at the beginning and ‘low’ at the
end and which contains ‘123’.
17
Page 23

Issue 3.1.B Xedio Suite Version 3.1 – User’s Manual - Xedio Browse
EVS Broadcast Equipment – January 2011
Search String Search Result
=card Searches for a string exactly equals to ‘card’.
For example, if a field contains ‘yellow card’, the =card condition
will not return any result.
=”yellow card” Searches for a string exactly equals to ‘yellow card’.
The use of quotes is required due to the space between ‘yellow’
and ‘card’.
ADVANCED FILTERS
Filters are available for more detailed search operations. The parameters
available for filtering operations are the column headings and any metadata
associated by the user.
Filter Activation
Show/Hide Filter Button
To display, or hide, the Filter extended area, click the Show/Hide Filter button
over the grid.
Filter Button Display Meaning
The Show/Hide Filter button is dimmed when all filter
(dimmed)
criteria are hidden. Consequently, the filters are inactive.
The Show/Hide Filter button is red when the filter
(red)
extended area is visible, even if no filtering criterion is
applied.
Filter Extended Area
The Filter extended area is as follows:
The first field under the Show/Hide Filter button lists three options for the
combination of criteria to be taken into account during the filtering operation.
The second field is a filter field allowing the users to select a first filter parameter.
18
Page 24

Xedio Suite Version 3.1 – User’s Manual - Xedio Browse
EVS Broadcast Equipment – January 2011
Criteria Combination
The available options are detailed in the table below:
Option Meaning
ALL criteria are met All the criteria selected in the Filter fields displayed
ANY criteria is met At least one of the criteria selected in the Filter fields
NO criteria is met None of the criteria selected in the Filter fields displayed
Issue 3.1.B
under the Criteria Combination field must be met.
The media displayed in the results list fulfill all the
selected filter criteria.
must be met.
The media displayed in the results list fulfill at least one
of the selected filter criteria.
under the Criteria Combination field must be met.
The media displayed in the results list fulfill none of the
selected filter criteria.
Filter Fields
Under the Criteria Combination field, the users will be able to select as many
filter parameters as they want and to choose specific value(s) for these filter
parameters. The use of Filter fields is explained in the next section.
19
Page 25

Issue 3.1.B Xedio Suite Version 3.1 – User’s Manual - Xedio Browse
EVS Broadcast Equipment – January 2011
Filter Fields
The Filter field provides the list of all the parameters on which a search can be
performed. The following screenshot is an example of such a list. The options may
differ between the applications of the Xedio Suite.
Once a parameter has been selected, an entire line is displayed.
Interface Element Description
1 Selected filter parameter.
2 Various fields used to enter the filter criteria. Refer to
section ‘Search Fields Types’ on page 21.
Used to remove the corresponding filter line.
Used to add a new filter line.
20
Page 26

Xedio Suite Version 3.1 – User’s Manual - Xedio Browse
EVS Broadcast Equipment – January 2011
Search Fields Types
According to the selected filter parameter, different types of search fields will be
displayed. They are detailed in the table below.
Issue 3.1.B
Filter Parameter
Type
Timecode or
Duration
Parameter
Such as TC IN,
TC OUT,
Duration…
Range
Such as
Timecode Range
Date
Such as
Creation Date
Displayed Criteria Fields
Select a logical operator in the first field and then enter a
timecode or duration value in the second field.
Select an option from the first field and then enter a timecode
value. This will include, or exclude, media containing the
specified timecode value.
Several Date Search filters exist. They are described below.
a. Select a condition or a logical operator in the first field
b. This will condition the next step:
• Search based on a specific date (e.g. with is…): a calendar
will be displayed for the selection of a date.
21
Page 27

Issue 3.1.B Xedio Suite Version 3.1 – User’s Manual - Xedio Browse
EVS Broadcast Equipment – January 2011
Filter Parameter
Type
Displayed Criteria Fields
• Search based on an interval (e.g. with between…): two
calendars are displayed for the selection of two dates.
• Search based on a specific date calculated from the current
date (e.g. with tomorrow, last month,…): no other field
appears.
Time
Such as Last
Rendered Date
Time
Several Date Search filters exist. They are described below.
a. Select a condition or a logical operator in the first field
b. This will condition the next step:
• Search based on a specific date and time (e.g. with is…):
two additional fields will be displayed, a calendar for the
selection of a date and drop-down list for the selection of
time.
• Search based on a specific date and time calculated from
the current date and time (e.g. with next hour, last
month,…): no other field appears.
22
Page 28

Xedio Suite Version 3.1 – User’s Manual - Xedio Browse
EVS Broadcast Equipment – January 2011
Issue 3.1.B
Filter Parameter
Type
Number
Such as DB Id
Option List
Such as Video
Standard
Displayed Criteria Fields
Select a logical operator in the first field and then enter a
number in the second field.
Note
<> means ‘differs from’
Select a condition in the first field
Click the button to display the list of options available for
the selected filter parameter.
Example for the Video Standard:
Select an option from the list.
Boolean
Select Yes or No from the single criteria field
Such as
Published
Free Text
Such as Label
Select a condition in the first field and then enter text in the
second field.
23
Page 29

Issue 3.1.B Xedio Suite Version 3.1 – User’s Manual - Xedio Browse
EVS Broadcast Equipment – January 2011
How to Perform a Search through Filter Fields
To enter search values in the Filter fields, proceed as follows:
1. Choose the columns you wish to perform a search on.
2.
Click the Show/Hide Filter button
The following Filter area is displayed:
3. Select a criteria combination from the list:
4. Select a filter parameter from the filter parameter list.
An entire line, corresponding to the selected filter parameter, is displayed:
5. Enter filter criteria as explained in section ‘Search Fields Types’ on page
21.
For free text fields, press ENTER to apply the filter.
Otherwise, the results list is automatically restricted.
6.
If required, click the button to add a filter parameter.
USING SAVED FILTERS
Once you have defined a filter criterion, you may want to save it for later use. You
will then be able to apply the same filter with a single click.
Right-clicking in the Filter 0 tab displays a contextual menu with the following
options:
24
Page 30

Xedio Suite Version 3.1 – User’s Manual - Xedio Browse
EVS Broadcast Equipment – January 2011
Menu Option Description
Create New Filter Allows to create a new filter tab.
Save Filter As Allows to create a new filter tab in which the current
Filter Properties Allows to change the name and/or description of the
Reset Filter Removes all search criteria on the selected filter tab.
Delete Filter Removes the filter tab.
How to Save Filters
Issue 3.1.B
search filter will be saved.
selected filter tab.
To save filters, proceed as follows:
1. Define the filter or filters combination you wish to save, as explained above.
2. Right-click the Filter 0 tab.
3. Select Save Filter As from the contextual menu.
The Filter Edit Dialog box opens.
4. Enter a label for the tab you are going to create and, if required, enter a
description.
5. Click OK to confirm.
The new filter tab is displayed on the left of the list.
How to Apply a Saved Filter
To apply a saved filter, simply click the corresponding tab.
25
Page 31

Issue 3.1.B Xedio Suite Version 3.1 – User’s Manual - Xedio Browse
EVS Broadcast Equipment – January 2011
3.2 THE VIRTUAL MEDIA PROPERTIES TAB
The Virtual Media Properties tab can be used to create virtual media from an
existing media. The virtual media is only made of markers placed on the original
media file. There is no new media file created.
3.2.1 OVERVIEW OF THE VIRTUAL MEDIA PROPERTIES TAB
The Virtual Media Properties tab can only be selected when a media is loaded on
the Player pane.
The tab display differs according to the type of media loaded.
If the media is a complete or currently ingesting file (‘Media’), the tab will display
the properties of the loaded media and provides buttons to create virtual media
from this media file:
26
If the loaded media is a virtual media file the tab will display its properties ready
for update:
Page 32

Xedio Suite Version 3.1 – User’s Manual - Xedio Browse
EVS Broadcast Equipment – January 2011
3.2.2 CREATING A VIRTUAL MEDIA
To create a virtual media, proceed as follows:
1. Load the required media from the Media tab to the Player pane.
2. Browse in the media until you select the Mark IN point and press the
button or the key.
The Mark In Timecode field is filled and appears in green. The thumbnail IN
is displayed.
A default label is automatically assigned into the Label field. This can be
accepted or changed at this stage or later if necessary.
Issue 3.1.B
3. Browse in the media until you select the Mark OUT point and press the
button or the key.
The Mark Out Timecode and the Duration fields are filled and the Mark
Out Timecode field appears in red. The thumbnail OUT is displayed:
4. The other fields from the General tab display the properties from the
original media. You can accept or modify these values and you can enter a
description.
5. Select the Published option if you want the other users to be able to see
the virtual media.
6. In the Metadata tab, you can click in the cell next to ‘Metadata Profile’ and
select a metadata profile; then, you can enter specific metadata values in
the fields.
7. Press the Save button to save the virtual media.
The Virtual Media is immediately displayed in the Virtual Media pane.
27
Page 33

Issue 3.1.B Xedio Suite Version 3.1 – User’s Manual - Xedio Browse
Note 1
If the virtual media has been recorded as published, it will be locked and
not available for later update. You will get the following warning message:
Note 2
There is an administrator setting which prevents creation of virtual media
that overlap each other. If this setting is active a dialogue box will open to
alert the user that the virtual media overlap:
EVS Broadcast Equipment – January 2011
3.2.3 AUTO CLIPPING MODES
To go faster when creating the Virtual Media, it is possible to avoid the action of
pressing the Save button.
From the XedioBrowse menu of the main toolbar, select Auto Clipping Modes and
then Auto Save.
Then, a virtual media will be created as soon as you have defined both the Mark
IN and the Mark OUT points.
28
Page 34

Xedio Suite Version 3.1 – User’s Manual - Xedio Browse
EVS Broadcast Equipment – January 2011
4. Virtual Media Pane
4.1 INTRODUCTION
Issue 3.1.B
As soon as a virtual media has been created it appears in the list of the Virtual
Media pane.
To display the list of virtual media associated to a media, select the media in the
Media tab of the Tabs pane.
Virtual media items are displayed in columns. Some of the details can be edited
from here, others are only for information.
Double-click the label of an unpublished virtual media to enable text entry or
update in the cell.
A virtual media can be loaded on the Player pane as explained in section 2.3.5
‘Loading Media on the Player Window’ on page 12.
4.2 VIRTUAL MEDIA LIST DISPLAY
The columns displayed can be re-ordered and re-sized using standard computer
commands.
4.2.1 DISPLAYED COLUMNS
It is possible to re-arrange the columns order, and to add or remove some
columns.
Right-clicking on any of the column headings displays a contextual menu. The
Choose Displayed Columns option opens the Select Visible Columns window
allowing you to choose the columns you want to be displayed in the element list.
Please see the section 4.2.3 ‘Glossary of Column Headings’ on page 30 for
detailed information on the column headings available.
The column width and order can be adjusted using standard computer commands
and drag and drop techniques.
29
Page 35

Issue 3.1.B Xedio Suite Version 3.1 – User’s Manual - Xedio Browse
EVS Broadcast Equipment – January 2011
4.2.2 SHOW THUMBNAILS
The Show Thumbnails option is available from the column headings contextual
menu This option adds thumbnails in the Thumbnail IN and Thumbnail OUT
columns of the Virtual Media pane, provided that those columns have been made
visible.
4.2.3 GLOSSARY OF COLUMN HEADINGS
Column Heading Description
Label A media or a virtual media can have a name added to the
label field in the tab area.
ClassList This is the overall group to which a created clip belongs;
the structure of the classes is set by the administrator
when designing a system installation.
Thumb In / Thumb
Out
Duration The item duration.
TC In The IN timecode of the item.
TC Out The OUT timecode of the item.
Shooting Date A user defined date entry for the date the media was
Published Indicates if the media has been made available to other
Treated A media that has already been worked on (browsed) for
Creation Date The date and time that the item was created; this refers
Description A field for a free text entry to describe the media.
UserName The user who ingested the media to the system.
A reference frame can be shown to visually identify the
correct material.
originally shot.
users within Xedio Suite.
virtual media creation.
to when it was entered into the database.
Group The place (defined with groups) from where the media
was ingested.
System Shows the video standard of the clip.
FeedID The original identifier of the feed (given by the press
agencies for example).
External Ref Additional reference for the media that would already be
used (bar code of a digitized tape for example).
30
Page 36

Xedio Suite Version 3.1 – User’s Manual - Xedio Browse
EVS Broadcast Equipment – January 2011
Column Heading Description
Priority A rating for the item.
Ratio Shows the video ratio of the clip, for instance 16/9 or 4/3.
4.3 VIRTUAL MEDIA LIST CONTEXTUAL MENU
A contextual menu is available when you right-click on a media item in the list,
provided that it is not in Published state:
Menu Item Description
Published State Displays a sub-menu which allows to change the publish
state of the virtual media to Published. A published
media will be displayed in the database lists of all the
software and will thus be available for use.
Issue 3.1.B
Delete Virtual Media Allows the deletion of the selected Virtual Media.
Play Opens a new Player window to allow the media to be
played. Refer to section ‘Play Media in the Additional
Player’ on page 13 for more information.
31
Page 37

Issue 3.1.B Xedio Suite Version 3.1 – User’s Manual - Xedio Browse
EVS Broadcast Equipment – January 2011
5. Menu Bar
Several commands are available from the Menu Bar at the top of the Xedio Browse
window.
A logbook can be displayed by selecting the View > Logbook bar option.
This gives information about operations performed when using the Xedio Browse
application.
The versions of the installed applications are available from the Help > About
option.
32
Page 38

EVS Broadcast Equipment
Liège Science Park
16, rue Bois St Jean
B-4102 Ougrée
Belgium
Corporate
Headquarters
+32 4 361 7000
North & Latin America
Headquarters
+1 973 575 7811
To learn more about EVS go to www.evs.tv
Asia & Pacific
Headquarters
+852 2914 2501
Other regional offices
available on
www.evs.tv/contact
 Loading...