

Page 1

XFConverter v1.3 - User Guide
(February 12, 2013)
http://www.evs-opencube.com
Page 2

http://www.evs-opencube.com
OpenCube Technologies SAS
6 rue Brindejonc des Moulinais
Bâtiment A – CS95836
31505 Toulouse Cedex 5
FRANCE
Tel : +33 (0)561 285 606
Fax : +33 (0)561 285 635
E-mail : contact@opencubetech.com
XFConverter Support : support_xfconverter@opencubetech.com
Website : http://www.opencubetech.com
XFConverter version 1.3 - User Guide
DISCLAIMER
This document has been prepared out of concern for accuracy and constitutes a copy of the specifications
when printed and delivered. However, contents and specifications may be subject to change without prior
notice. OpenCube Technologies SAS shall not be liable for any errors or omissions, or any direct or indirect
damage, financial or otherwise, that may result from the use of information contained in this document or
the software itself.
All trademarks mentioned in this document are owned by their respective holders and under no
circumstances may be used in any way by OpenCube product users.
[Microsoft, Windows and Windows Media Player are registered trademarks of Microsoft Corporation.]
[Quicktime is a registered trademark of Apple Computer, Inc.]
[eVTR and XDCam are registered trademarks of Sony Corporation.]
[P2 is a registered trademark of Panasonic Corporation.]
[Dolby E is registered trademark of Dolby Laboratories.]
[This product may include the DNxHD® codec. DNxHD® means Avid DNxHD.]
[Avid, Avid Media Toolkit (AMT), Interplay, Isis and Lanshare are registered trademarks or trademarks of
Avid Technology, Inc.]
This product includes software developed by the Apache Software Foundation (http://www.apache.org/).
All rights reserved. This publication, as well as the software and the user guides mentioned in the document,
are protected under the copyright laws currently in application. No part of this publication may be copied or
reproduced, in any form or by any means, without the prior written permission of the publisher. Any person
who does any unauthorized act in relation to this publication or these rights may be liable to criminal
prosecution and civil claims for damage.
The present document is governed by French law. In the case of a dispute, the parties shall submit to the
exclusive jurisdiction of the French courts.
2013 Edition. Questions or comments concerning this publication should be addressed to: OpenCube
Technologies SAS, 6 rue Brindejonc des Moulinais, Bâtiment A – CS95836, 31505 Toulouse Cedex 5 FRANCE, Tel: +33 (0)561 285 606.
This document is the exclusive property of OpenCube Technologies SAS and cannot be reproduced or distributed without prior authorization.
2 / 38
Page 3

T
ABLE OF CONTENTS
http://www.evs-opencube.com
1 INTRODUCTION ....................................................................................................... 6
1.1 Application Use ................................................................................................................................................ 6
1.2 Hardware Requirements ................................................................................................................................. 6
1.3 Supported Operating Systems......................................................................................................................... 6
1.4 XFConverter Installation ................................................................................................................................ 6
2 XFCONVERTER IN PRACTICE ................................................................................ 9
2.1 Overview ........................................................................................................................................................... 9
2.1.1 Source Directory ........................................................................................................................................ 9
2.1.2 Destination Directory ............................................................................................................................... 10
2.1.3 Launching the Process .............................................................................................................................. 10
2.1.4 Projects ..................................................................................................................................................... 10
2.2 Conversion Graph .......................................................................................................................................... 11
2.2.1 Input Plug-in Configuration ..................................................................................................................... 11
2.2.2 Output Plug-in Configuration ................................................................................................................... 12
2.2.3 Plug-in Connections ................................................................................................................................. 12
3 VIDEO AND AUDIO STREAM CONFIGURATION ................................................. 13
3.1 DV Stream ...................................................................................................................................................... 13
3.2 MPEG Elementary Stream ........................................................................................................................... 14
3.2.1 MPEG 1&2 video elementary stream ...................................................................................................... 14
3.2.2 AVC-Intra elementary stream .................................................................................................................. 16
3.2.3 MPEG 1&2 audio elementary stream ...................................................................................................... 17
3.3 JPEG 2000 stream .......................................................................................................................................... 18
3.4 AIFF, WAV and PCM streams ..................................................................................................................... 19
3.5 Dolby audio stream ........................................................................................................................................ 20
3.6 Timecode stream ............................................................................................................................................ 21
3.7 Metadata (XML) stream ................................................................................................................................ 22
3.8 Ancillary Data – VBI Stream ........................................................................................................................ 23
4 PLUG-IN CONFIGURATION ................................................................................... 24
4.1 AVI Plug-in ..................................................................................................................................................... 24
4.2 GXF Plug-in .................................................................................................................................................... 25
This document is the exclusive property of OpenCube Technologies SAS and cannot be reproduced or distributed without prior authorization.
3 / 38
Page 4

http://www.evs-opencube.com
4.3 QUICKTIME (MOV) Plug-in ....................................................................................................................... 26
4.4 MPEG Plug-in ................................................................................................................................................ 27
4.5 MXF Plug-in ................................................................................................................................................... 28
4.6 Wrap Plug-In .................................................................................................................................................. 30
5 XFCONVERTER CONFIGURATION ...................................................................... 32
5.1 File Management ............................................................................................................................................ 32
5.2 Application Start-up and Shutdown ............................................................................................................. 33
5.3 Watch Folder Configuration ......................................................................................................................... 34
5.1 Global Options ................................................................................................................................................ 35
5.2 Interplay Configuration (optional) ............................................................................................................... 35
6 XFCONVERTER API............................................................................................... 38
This document is the exclusive property of OpenCube Technologies SAS and cannot be reproduced or distributed without prior authorization.
4 / 38
Page 5

F
IGURES
F
IGURE 1: ABOUT DIALOG BOX (WITHOUT LICENSE
F
IGURE 2: ABOUT DIALOG BOX (WITH EXAMPLES OF LICENSE FILES
F
IGURE 3:
F
IGURE 4: FILE MENU
F
IGURE 5: CONFIGURE CONVERSION WINDOW
F
IGURE 6: DV STREAM SETTINGS
F
IGURE 7:
F
IGURE 8: FORCE ASPECT RATIO IN
F
IGURE 9:
F
IGURE
F
IGURE
F
IGURE
F
IGURE
F
IGURE
F
IGURE
F
IGURE
F
IGURE
F
IGURE
F
IGURE
F
IGURE
F
IGURE
F
IGURE
F
IGURE
F
IGURE
F
IGURE
F
IGURE
F
IGURE
F
IGURE
F
IGURE
F
IGURE
F
IGURE
F
IGURE
XFC
ONVERTER MAIN WINDOW
...................................................................................................................... 9
.................................................................................................................................................... 10
................................................................................................................................. 13
MPEG 1&2
AVC-I
10: MPEG 1&2
11: JPEG 2000
12: U
NCOMPRESSED AUDIO
13: D
OLBY STREAM SETTINGS
14: T
IMECODE STREAM SETTINGS
15: M
ETADATA STREAM SETTINGS
16: A
NCILLARY DATA –
17: AVI
18: GXF
19: Q
UICKTIME PLUG-IN SETTINGS
20: MPEG
21: MXF
22: MXF A
23: W
RAP PLUG-IN SETTINGS
24: M
UTE PLUG-IN
25: F
ILE MANAGEMENT OPTIONS
26: A
PPLICATION START-UP AND SHUTDOWN OPTIONS
27: W
ATCH FOLDER OPTIONS
28: XFC
29: I
NTERPLAY CONFIGURATION
30: L
ANSHARE SETTINGS
31: B
ROWSING INTERPLAY CATALOG
32: C
REATE NEW INTERPLAY CATALOG
VIDEO ELEMENTARY STREAM SETTINGS
MPEG
VIDEO ELEMENTARY STREAM
NTRA ELEMENTARY STREAM SETTINGS
AUDIO ELEMENTARY STREAM SETTINGS
STREAM SETTINGS
................................................................................................................... 18
(AIFF, WAV
.......................................................................................................................... 20
.................................................................................................................... 21
................................................................................................................... 22
VBI
STREAM SETTINGS
PLUG-IN SETTINGS
PLUG-IN SETTINGS
............................................................................................................................. 24
............................................................................................................................. 25
................................................................................................................... 26
PLUG-IN SETTINGS
PLUG-IN SETTINGS
VID OPATOM SETTINGS
.......................................................................................................................... 27
............................................................................................................................. 28
.................................................................................................................. 30
........................................................................................................................... 30
........................................................................................................................................... 31
...................................................................................................................... 32
........................................................................................................................... 34
ONVERTER GLOBAL OPTIONS
...................................................................................................................... 36
.................................................................................................................................. 36
) ...................................................................................................... 7
.............................................................................................................. 11
............................................................................................. 16
AND
PCM)
STREAM SETTINGS
.............................................................................................. 23
.................................................................................... 33
.............................................................................................................. 35
............................................................................................................... 37
........................................................................................................... 37
http://www.evs-opencube.com
) ............................................................................. 8
................................................................................... 14
................................................................... 15
................................................................................ 17
........................................................ 19
This document is the exclusive property of OpenCube Technologies SAS and cannot be reproduced or distributed without prior authorization.
5 / 38
Page 6

http://www.evs-opencube.com
1 Introduction
1.1 Application Use
XFConverter is a gateway solution between non-interoperable video systems. It enables users to wrap, unwrap and
convert a wide range of video and audio wrapper formats (AVI, GXF, MOV and MXF). XFConverter does not
transcode media during the conversion process, ensuring that no information is lost. The conversions can be automated
with the watch folder module, creating a seamless workflow in your networked environment.
1.2 Hardware Requirements
The minimum hardware requirements are:
- Intel Core 2 duo 2.2 GHz,
- 2 GB RAM.
The recommended hardware requirements are:
- Intel Core i5 2GHz,
- 4 GB RAM.
1.3 Supported Operating Systems
XFConverter runs under Microsoft Windows operating systems starting with Windows XP. XFConverter is a
32-bit application which can be installed on both a 32-bit and 64-bit OS. It can be executed without administrative
rights.
To use the XFConverter Quicktime plug-in, the Quicktime Player from Apple must be installed on the computer.
1.4 XFConverter Installation
If you received a CD version of XFConverter, browse down to the “XFConverter-Setup.exe” program in the
Windows directory. During the installation procedure, your antivirus software may warn you about the execution of
Windows scripts. You may safely ignore these warnings.
XFConverter is a plug-in based application. Each plug-in requires a special license file in order to be activated.
Temporary license keys for evaluation purposes are available from the OpenCube Technologies website
(http://www.opencubetech.com). After you create an account, you are given access to a download area where you can
retrieve a one-month license key file. If you purchased XFConverter, you will have received a permanent license key
file (*.lcs). The first time you launch the program, XFConverter will open the About dialog box so that you can load
your license file.
This document is the exclusive property of OpenCube Technologies SAS and cannot be reproduced or distributed without prior authorization.
6 / 38
Page 7
http://www.evs-opencube.com
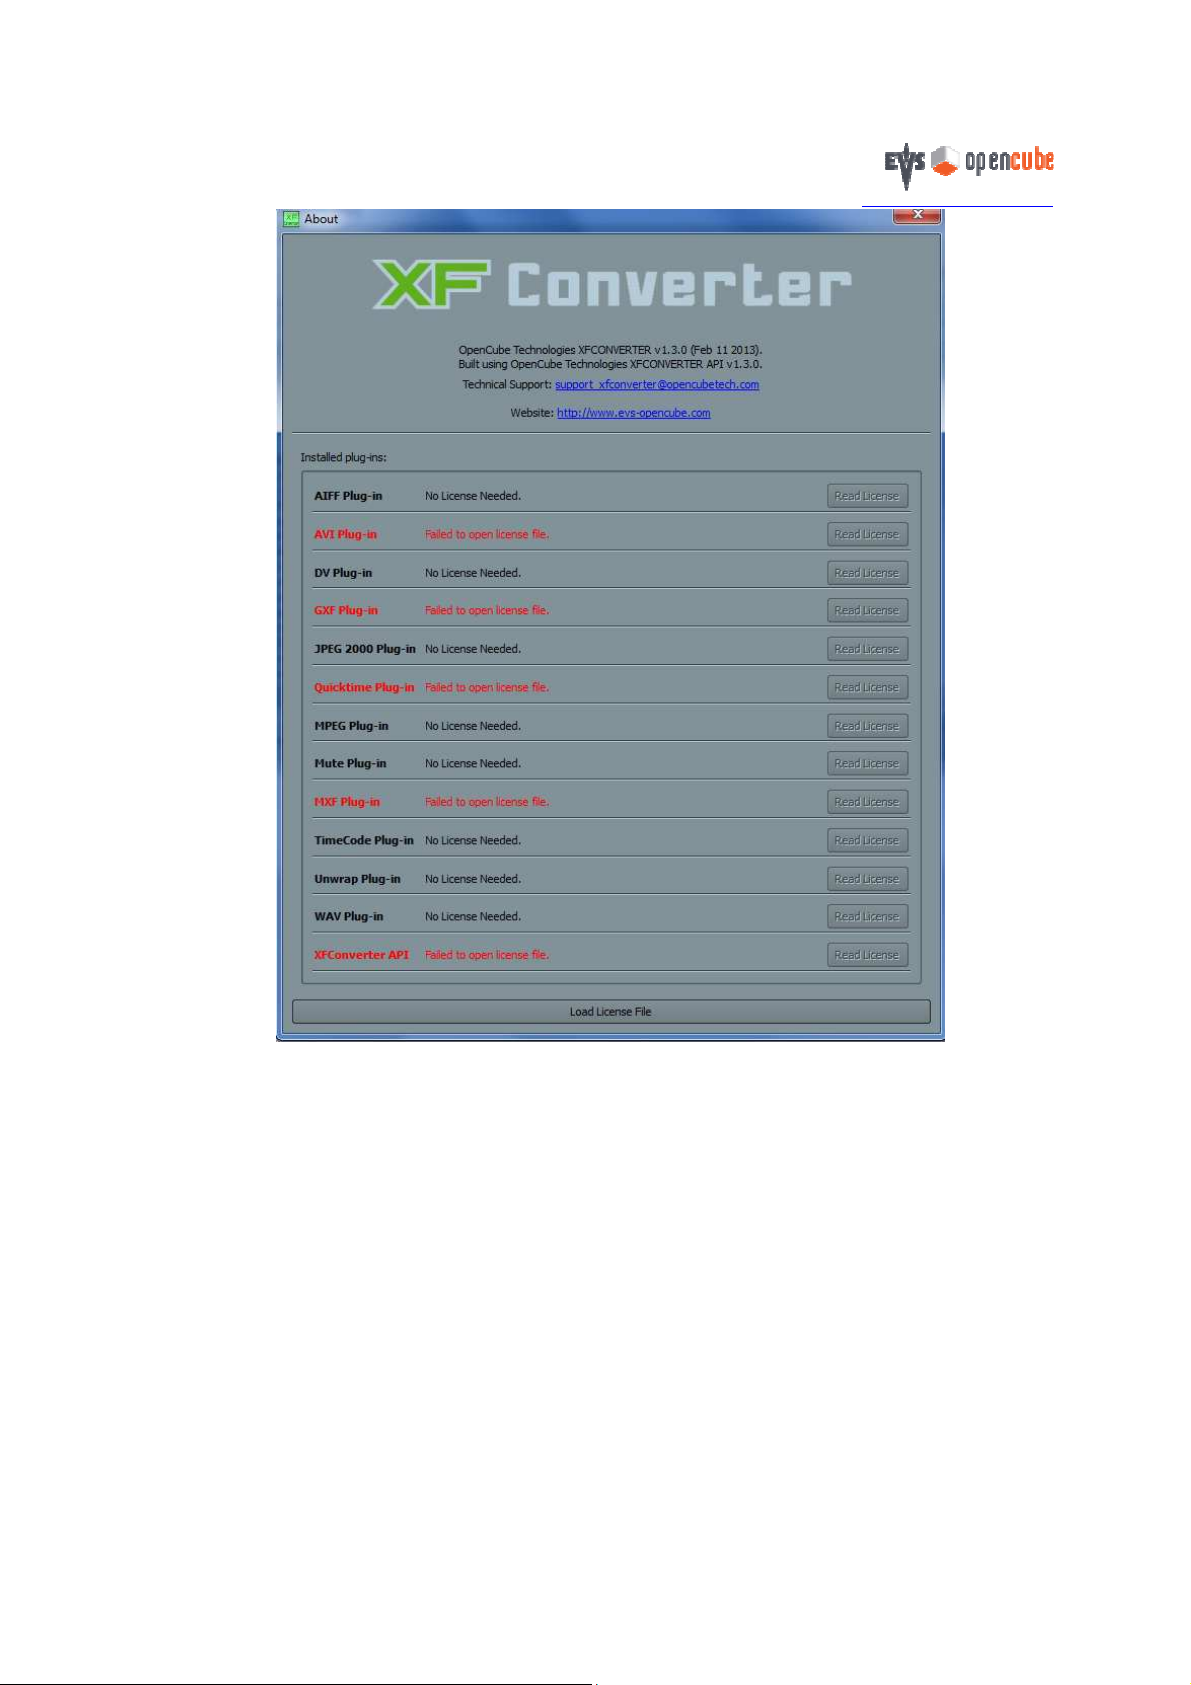
Figure 1: About dialog box (without license)
The plug-ins listed in red are not activated and require a valid license. You must provide a license for each of the
plug-ins so that the corresponding formats can be supported by XFConverter. In order to activate the plug-ins, click on
the button located at the bottom of the dialog box and select a valid .lcs file. After you load a license, the display will
change, showing the new status of the plug-in.
This document is the exclusive property of OpenCube Technologies SAS and cannot be reproduced or distributed without prior authorization.
7 / 38
Page 8
http://www.evs-opencube.com
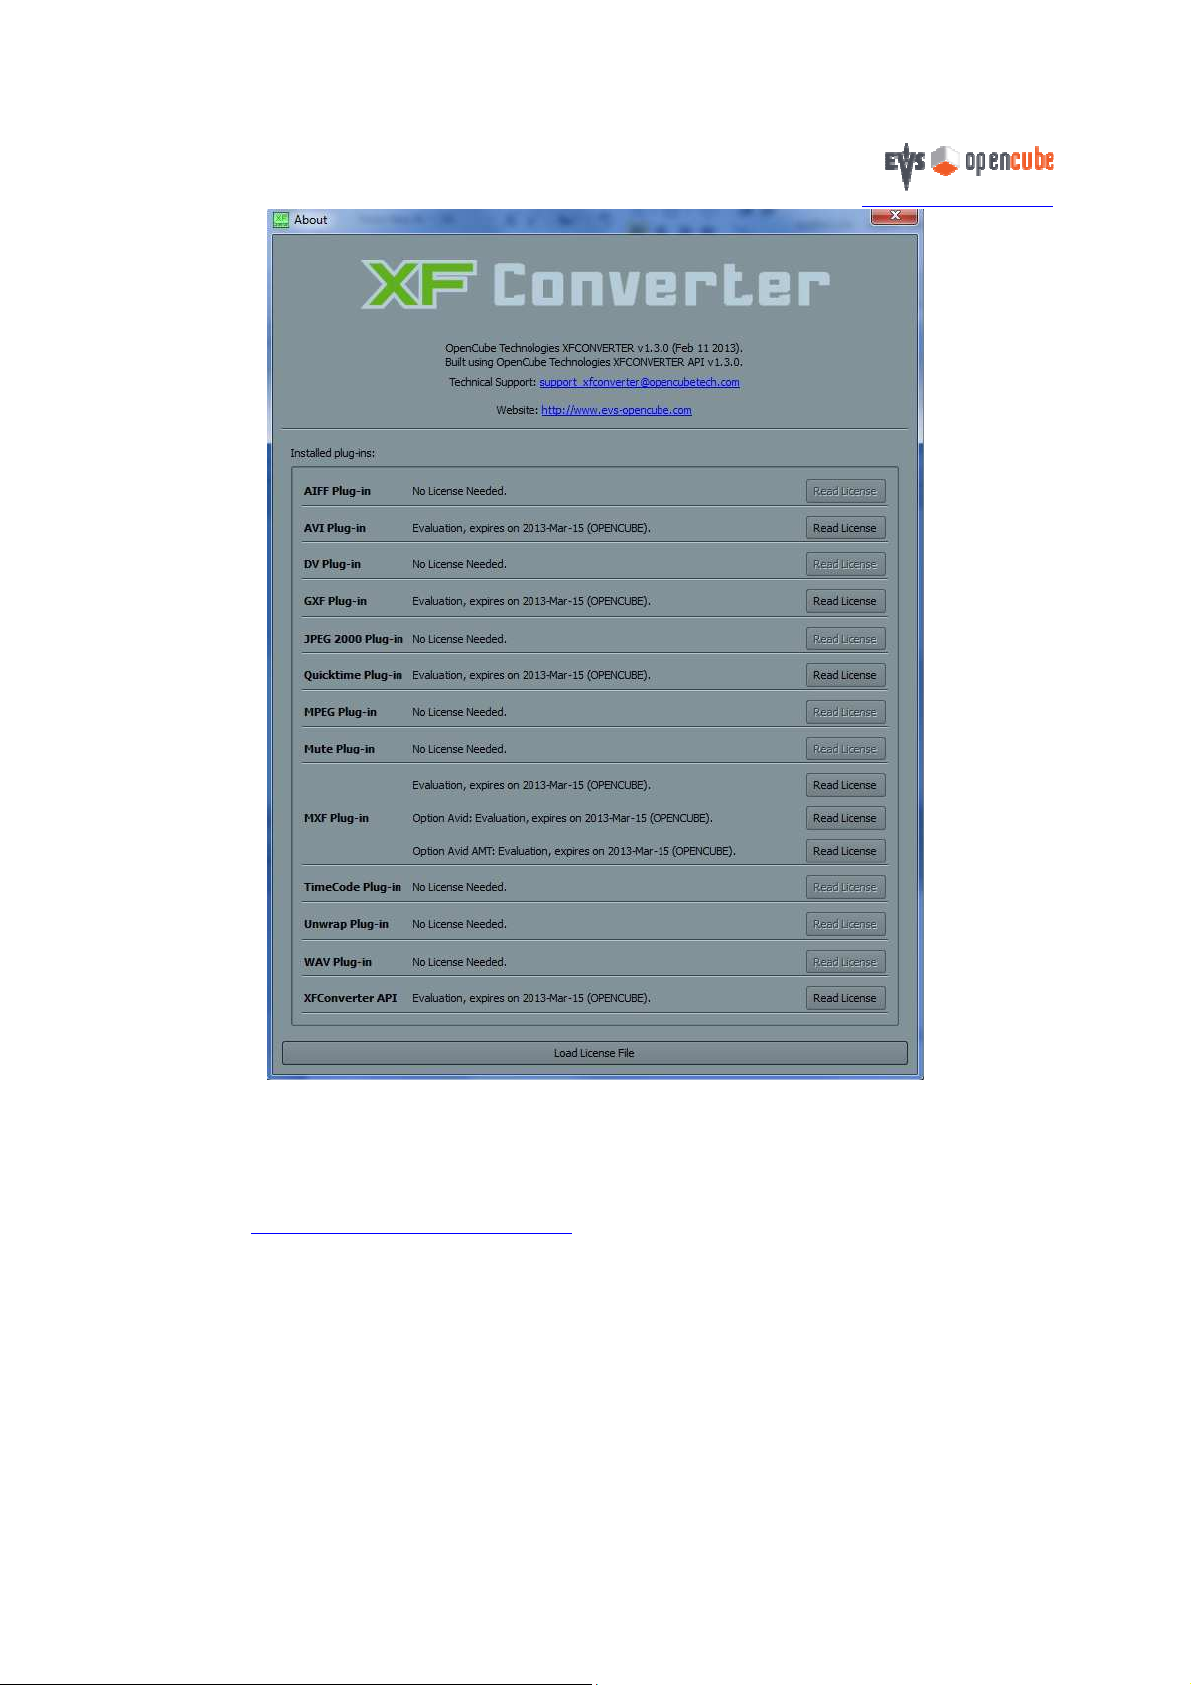
Figure 2: About dialog box (with examples of license files)
Please note that a copy of your license is available in the XFConverter program data directory if you happen to lose
it.
If you buy an XFConverter license, the product must be connected to the Internet so that the license can be
activated. If your computer does not have an Internet connection or uses a proxy, please contact the XFConverter
support team (support_xfconverter@opencubetech.com).
This document is the exclusive property of OpenCube Technologies SAS and cannot be reproduced or distributed without prior authorization.
8 / 38
Page 9
2 XFConverter in Practice
8
11
5
10
2
3
4
6
1 9 7
2.1 Overview
http://www.evs-opencube.com
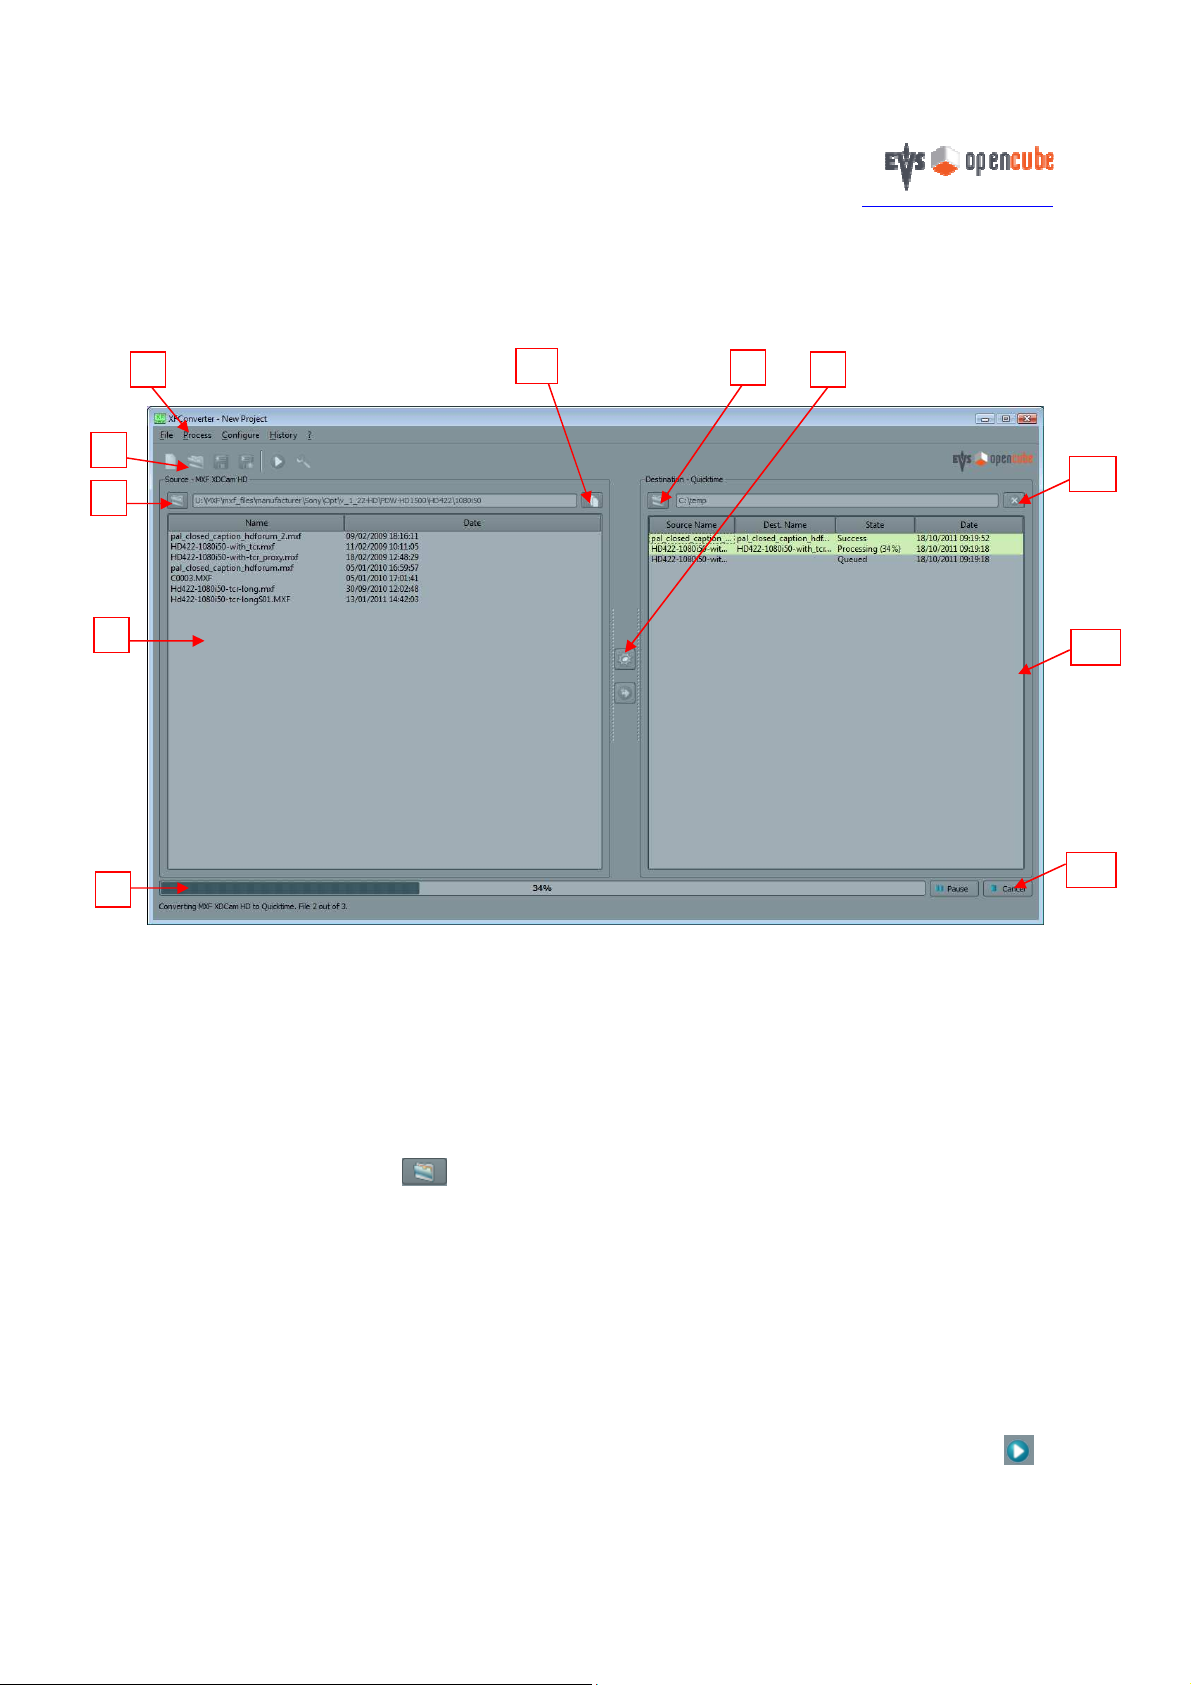
Figure 3: XFConverter main window
The main window is displayed above. The left part of the window is used to configure and display the source
directory in which the media files to be processed are located. The Explorer view (4) displays the list of files stored in
the current directory and ready for conversion. The right part of the window displays the past, current and scheduled
conversions as well as their status (8). The progress bar (6) shows the current progress and the Pause and Cancel
buttons (11) which can be used to control the process. The menu (1) can be used to load and save projects as well as to
configure them. The toolbar (2) offers easy access to the most commonly used actions.
2.1.1 Source Directory
If you click on the folder icon located in (3), it will open a browser window where you can select a directory
containing the media files you want to convert. After you select the directory, the source file list (4) is automatically
refreshed to reflect the content of the directory. The view is also updated to insert/remove the new/deleted files. Only
the files matching the input plug-in’s settings will be displayed; other files will be filtered.
When multiple input files following a source filename pattern are required (wrap plug-in, see section 4.6), a single
entry for the entire set is displayed. Note that if one or several files is (are) missing or do not have a name following the
pattern, the whole set of files will not be displayed. Clicking on the “Multi-selection” icon (5) will disable the
pattern-matching feature and display each file individually. By using that mode, you can select several files to convert
even if they do not share the same pattern naming convention.
If an entry of the list appears with a yellow background, it means that the corresponding file is currently opened in
another application or being copied or created. As XFConverter cannot process files opened in another application, you
must close the file first in order to proceed.
If you want to play a source file in a third-party application you can do so either by selecting the play icon in
This document is the exclusive property of OpenCube Technologies SAS and cannot be reproduced or distributed without prior authorization.
9 / 38
Page 10
http://www.evs-opencube.com
the toolbar (2) or by right-clicking on the file name and selecting Play. The playback will start only if you have
installed the appropriate player. To playback MXF and GXF files you can download OpenCube’s XFReader
application from www.opencubetech.com. Apple’s Quicktime Player can be downloaded at www.quicktime.com.
Most AVI files will play directly with Microsoft’s Windows Media Player; however you may have to install third-party
codecs.
2.1.2 Destination Directory
If you click on the folder icon located in (9), a browser window will pop-up enabling you to select a directory
in which to create the files. The log view (8) will contain the list of past, current and future conversion processes. Past
conversions are listed in green if successful or in red if an error occurred (usually when the source file(s) do not match
the current configuration). To remove a process from the list, you can select it with the mouse and click on the cross
icon located in (10).
To playback a newly converted file, select an entry in the list and click on the play icon in the toolbar (2) or
right-click on the entry and select Play. The playback will start only if you have installed the appropriate player.
2.1.3 Launching the Process
To start a conversion, select one or several source files in the list (4) and:
o Drag and drop them in the log window (8) or
o Right-click and select Convert Selected or
o Click on the arrow icon located in (7).
All the files will be queued and the conversion of the first file will start. A conversion process can be paused,
resumed or cancelled at any time by clicking on the buttons located in (11).
To start the watch folder process and the automatic conversion of source files, click on the dented wheel icon
located in (7). Files from the source list will be processed one by one starting from the oldest to the most recent one. As
soon as the conversion of a file is completed it is removed from the list and can no longer be converted. The conversion
status of each file is stored with the project so that when you restart the application the files that still exist but that were
converted earlier are no longer processed. These files will no longer appear in the interface. If you wish to clear the
history and enable the conversion of older files, you can select Clear current directory or Clear all directories in the
history menu (1).
The watch folder process can be paused, resumed or cancelled at any time by clicking on the buttons located in
(11).
2.1.4 Projects
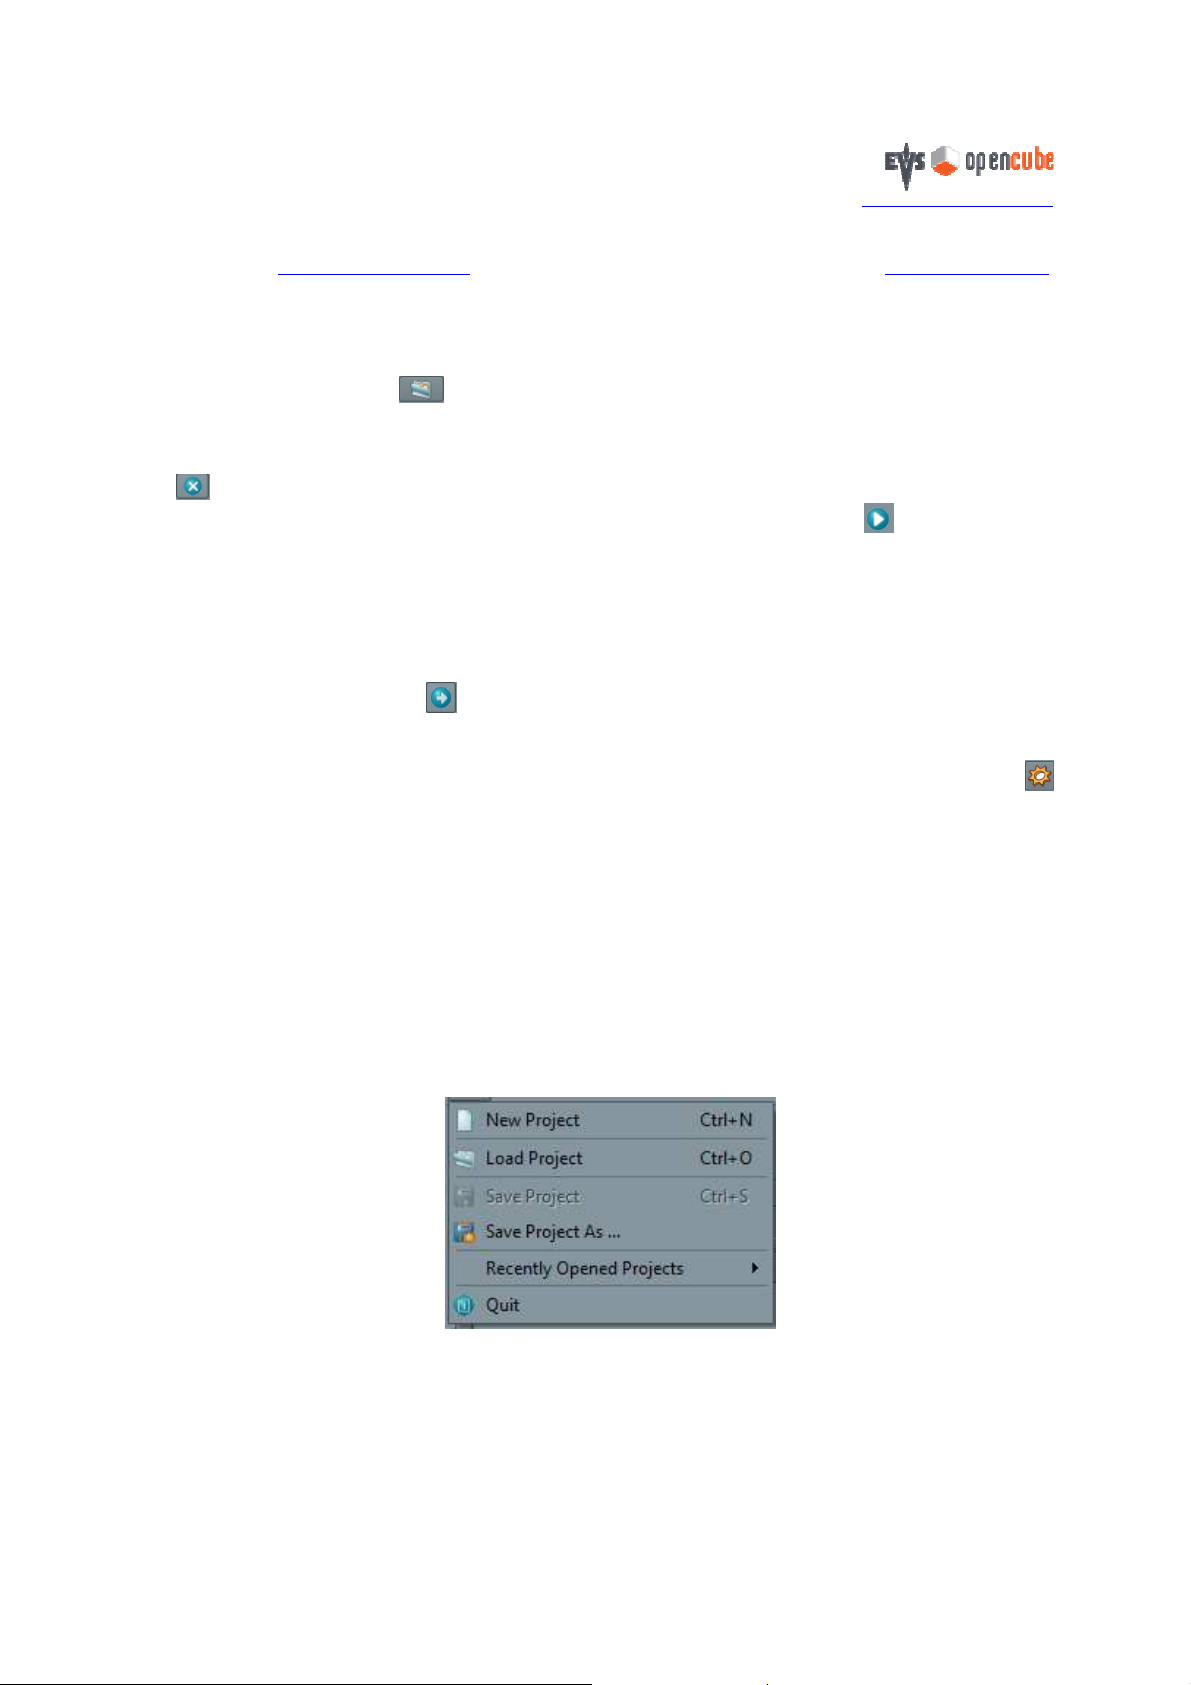
You can save the history of the conversions as well as the current conversion graph in a project file. Project
management features are accessible through the File menu:
Figure 4: File menu
New Project: Close the current project and create a new empty one (with an empty graph).
Load Project: Open an existing project.
Save Project: Save the current project under the same file project name.
Save Project As…: Save the current project as a new project file.
This document is the exclusive property of OpenCube Technologies SAS and cannot be reproduced or distributed without prior authorization.
10 / 38
Page 11
http://www.evs-opencube.com
3
4
1 6
8
5
2
7
9
Recently Opened Projects: Shortcuts to the most recently used projects.
Quit: Quit the application
2.2 Conversion Graph
To open the Configure Conversion dialog box, click on the wrench icon located in the toolbar (2) of the main
window. Or, you can open the configure menu (1) and choose configure conversion. It will open a graph view where
you can define the conversion process in detail.
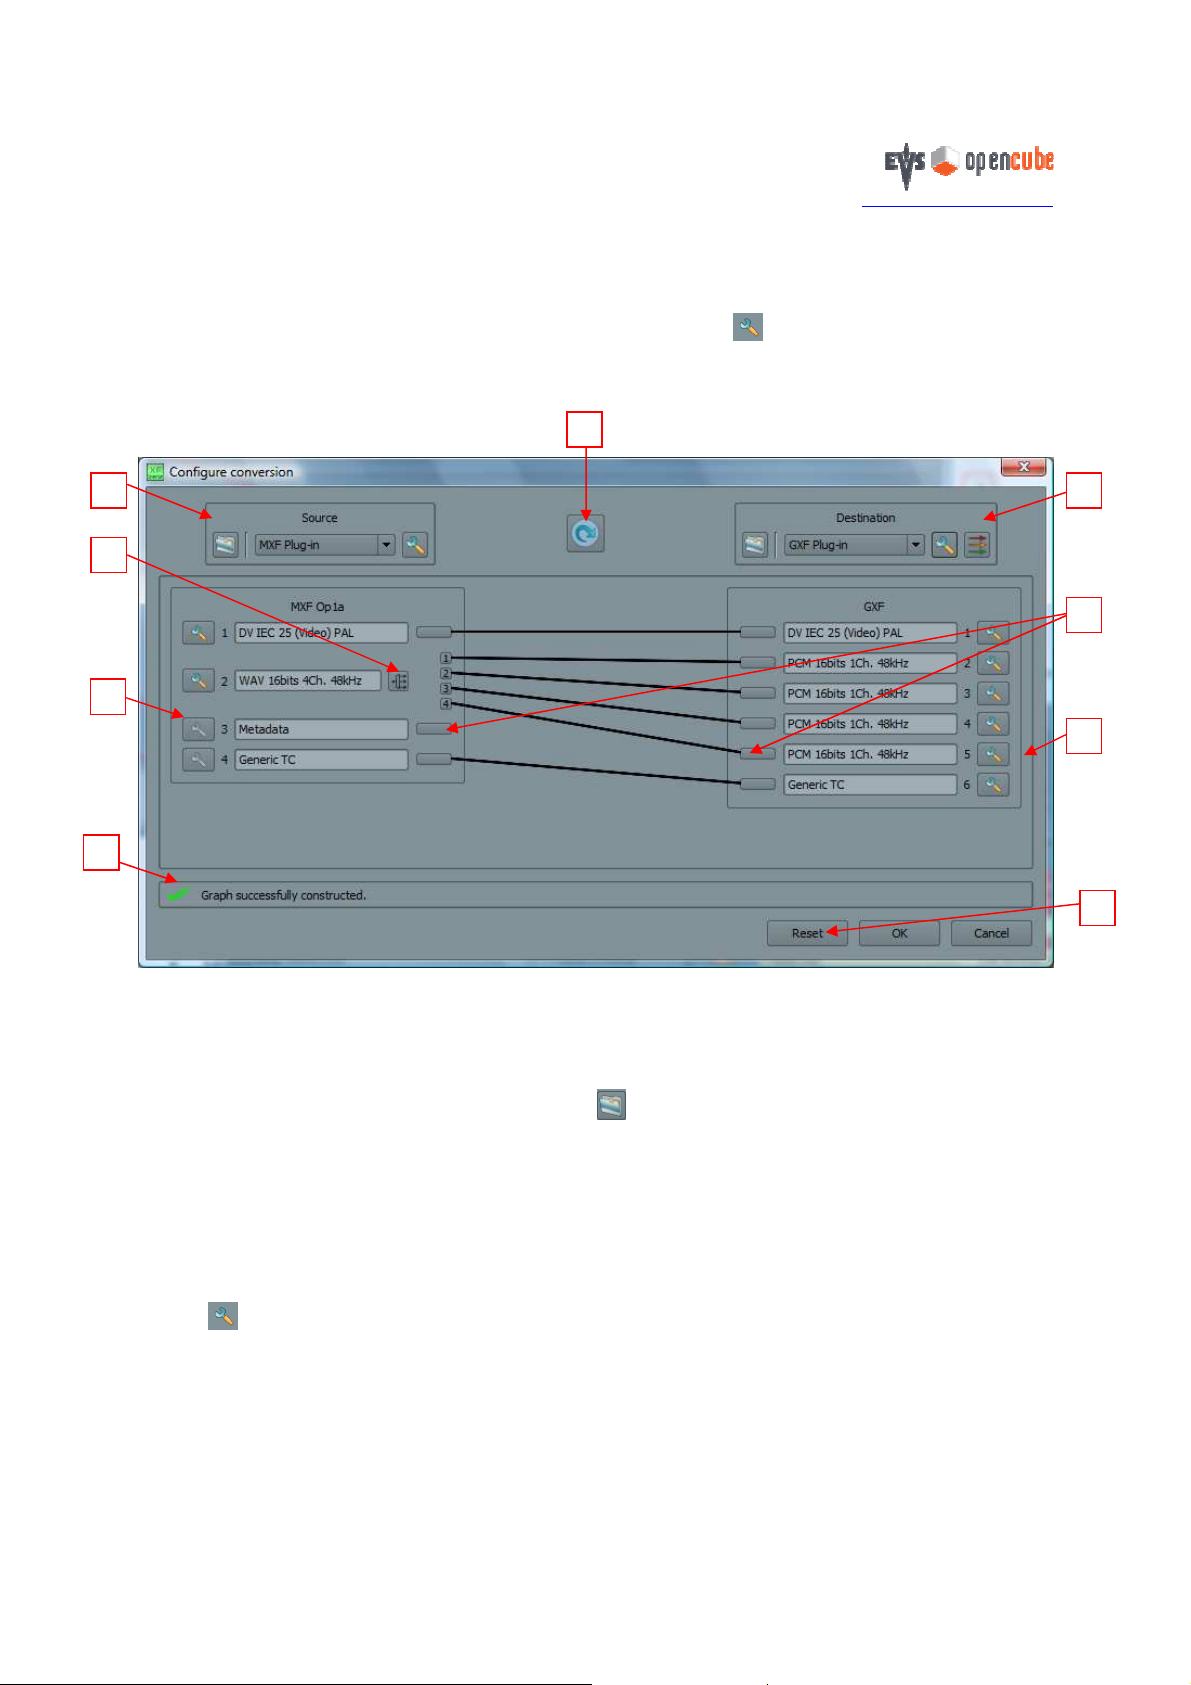
Figure 5: Configure conversion window
2.2.1 Input Plug-in Configuration
The first step consists in defining the source plug-in(s) either through an automatic or manual configuration:
Automatic Configuration: click on the folder icon located in (1). This will open a browser window where
you can select one or several files. These files should be in MPEG (Elementary, Program and Transport
Stream), DV, WAV, AIFF, AVI, GXF, MOV or MXF format. If the files are recognized by XFConverter, the
graph view will be initialized in (3) to reflect the content of the file(s) you selected. If the files are not
recognized or you do not have a valid license to use the corresponding plug-in(s), an error message will be
displayed.
Manual Configuration: In the drop-down box (1), select the input plug-in corresponding to the format of your
source file. If your conversion requires several source files, you should select “Wrap” in the drop-down box.
Once you have selected the input format, you can access the plug-in’s settings by clicking on the wrench icon
located in (1). Note that some of the plug-ins are not configurable; in that case the wrench icon will not be
displayed. Refer to the individual plug-in documentation in section 4 for a more detailed description of these
settings.
The input plug-in view shows the current plug-in(s) configuration. In the case of wrapper formats embedding
several streams, the input plug-in view (3) will display a brief description for each embedded video, audio, metadata or
timecode stream. Each stream can be individually configured with the corresponding wrench icon. If you click on this
This document is the exclusive property of OpenCube Technologies SAS and cannot be reproduced or distributed without prior authorization.
11 / 38
Page 12

http://www.evs-opencube.com
button, it will open a new dialog box whose content will vary depending on the format. Refer to the section 4 for a more
detailed description of these settings
2.2.2 Output Plug-in Configuration
When the input plug-in(s) is (are) configured, you have to define the outcome of the conversion by defining the
output plug-in. There are three ways to perform this task:
Automatic Configuration: This is similar to the automatic input plug-in configuration. Click on the folder icon
located in (6). This will open a browser window where you can select one or several files. These files
should be in MPEG (Elementary, Program and Transport Stream), DV, WAV, AIFF, AVI, GXF, MOV or
MXF format. If the files are recognized by XFConverter, the graph view will be initialized in (8) to reflect the
content of the files you selected. If the files are not recognized or you do not have a valid license to use the
corresponding plug-in(s), an error message will be displayed.
Semi-automatic Configuration: In the drop-down box (6), select the output plug-in corresponding to the
format of your target output file format. Click on the three-arrow icon to launch the semi-automatic
configuration. XFConverter will try to match the settings of your output plug-in with the settings of your input
plug-in. However, this default configuration may not correspond to the exact format you want to output. In
that case you can continue to adjust the settings of the plug-in or individual output streams.
Manual Configuration: In the drop-down box (6), select the output plug-in corresponding to the format of
your destination file(s). If your conversion requires the unwrapping of several files, you should select
“Unwrap” in the drop-down box. Once you have selected the input format, you can access the plug-in’s
settings by clicking on the wrench icon located in (6). Note that some of the plug-ins are not configurable;
in that case the wrench icon will not be displayed. Refer to the individual plug-in documentation in Section
2.2.5 for a more detailed description of these settings.
The output plug-in view shows the current plug-in(s) configuration. In the case of wrapper formats embedding
several streams, the output plug-in view (8) will display a brief description for each embedded video, audio, metadata
or timecode stream. Each stream can be individually configured with the corresponding wrench icon. If you click on
this button, it will open a new dialog box whose content will vary depending on the format. Refer to the Section 4 for a
more detailed description of these settings.
2.2.3 Plug-in Connections
After you configure the input and output plug-in(s), each of the individual media streams has to be connected. Each
stream is represented by a pin (7) and a connection is represented by a segment from an input plug-in’s pin to an output
plug-in’s pin. You can dynamically change the connections by clicking on a pin and holding the mouse button down.
Then draw a rubber band towards another pin and release the mouse. If both pins can be connected then a new line will
be drawn between them. Note that if two pins cannot be connected, the mouse cursor will switch to a forbidden signal
icon. More information on the reason for this incompatibility can be obtained by checking the message displayed on
the status bar (4).
XFConverter includes a tool to help you connect the input and output plug-ins’ pins automatically. If you click on
the “Auto Connect” button (5) , XFConverter will find the pins that are the most compatible and then connect
them.
XFConverter also permits DV and audio streams (de)multiplexing. When manipulating a DV stream with
embedded audio or an audio stream with multiple channels, you are given the opportunity of splitting each individual
channel into separate ones (the most common case is to switch from a single stereo channel to two mono channels, for
example). In order to activate the multiplexing/demultiplexing feature, click on the icon (2) . If you click repeatedly
on this icon, it will cycle through all the demultiplexing options. When you demultiplex a plug-in pin, it will be split
into several smaller pins containing the channel index (es) or “v” if it is a video channel.
The status bar (4) indicates the current validity of the graph. XFConverter will not be able to process conversions
unless the status is set to “Graph successfully constructed”. A graph is valid when all its output plug-in pins are
connected; note however that all the input plug-in pins do not necessarily have to be connected.
The “Reset” button (9) clears the windows.
This document is the exclusive property of OpenCube Technologies SAS and cannot be reproduced or distributed without prior authorization.
12 / 38
Page 13

3 Video and Audio Stream Configuration
3.1 DV Stream
http://www.evs-opencube.com
Figure 6: DV stream settings
DV Type: Use this setting to change your DV type. Note that PAL DV IEC chroma sampling is 420 while
other variants of DV have a 411 sampling.
Bit rate: DV IEC bit rate is always 25Mbps, while DV SMPTE bit rate can be 25, 50 or 100Mbps.
Video System can be PAL or NTSC (25 and 50 Mbps bit rates). DV SMPTE at 100Mbits/s (DVCProHD) can
be 720 progressive lines at 50 or 59.94 frames per second; 1080 progressive or interlaced lines at 50 or 59.94
frames per second.
Audio Embedded: Use this setting to define the status of the audio channels embedded in the DV stream. The
“Undefined” setting should be used when you want your plug-in to be able to process DV streams whether or
not they contain audio.
Nb Audio Channels: The number of audio channels embedded in the DV stream is usually constrained by
your DV type and bit rate. However, DV IEC allows 2 or 4 audio channels.
Audio Sampling Frequency: The audio sampling frequency can be set to 32, 44.1 or 48 kHz depending on
the DV type and number of audio channels.
Audio Quantization: The audio quantization is automatically configured to 12 or 16 bits depending on the
previous settings.
This document is the exclusive property of OpenCube Technologies SAS and cannot be reproduced or distributed without prior authorization.
13 / 38
Page 14

3.2 MPEG Elementary Stream
3.2.1 MPEG 1&2 video elementary stream
http://www.evs-opencube.com
Figure 7: MPEG 1&2 video elementary stream settings
Elementary Stream Content: Defines a video or audio stream.
MPEG Format: Defines a MPEG1 or MPEG2 stream.
Profile@Level: Defines the Profile and Level of the video stream. You should set this entry to “MPEG
COMPRESSION” if you do not want to constrain the Profile and Level.
Video System: Depending on the selected Profile and Level, the video system can be set to Half-PAL,
Half-NTSC, PAL, NTSC or HD(720/1080 i/p 50/59.94Hz).
I-Frame: This parameter should be set to “Yes” if the MPEG stream contains only I frames (no B or P
frames).
Bit rate: This parameter defines the video bit rate in Mbps when configuring MPEG I-Frame-only streams.
The entry “Every” should be set when you do not want to constrain the video bit rate.
NOTE: MPEG2 30/40/50 Mbps I-Frame only 422P@ML is also known as MPEG IMX (D10).
When creating MXF D10 files (Op1aD10, XDCAM IMX, e-VTR), it is possible to change the aspect ratio of MPEG
codec and MXF wrapping layer using the option “Fix aspect ratio in video stream and wrapper”. The option fixes the
field “Aspect Ratio” in the MPEG sequence header and the field “Aspect Ratio” in the MXF MPEG Descriptor.
The option can take three values:
- No change: The aspect ratio is not changed,
- Force 4/3: The aspect ratio will be set to 4/3,
- Force 16/9: The aspect ratio will be set to 16/9.
This document is the exclusive property of OpenCube Technologies SAS and cannot be reproduced or distributed without prior authorization.
14 / 38
Page 15

http://www.evs-opencube.com
Figure 8: Force Aspect Ratio in MPEG video elementary stream
This document is the exclusive property of OpenCube Technologies SAS and cannot be reproduced or distributed without prior authorization.
15 / 38
Page 16

http://www.evs-opencube.com
3.2.2 AVC-Intra elementary stream
Figure 9: AVC-Intra elementary stream settings
Video System: Depending on the selected Profile and Level, the video system can be set to 720/1080 i/p
50/59.94Hz).
Bit rate: This parameter defines the video bit rate in Mbps; it can be equal to 50 or 100Mbps.
Store AVC-Intra header on each frame: This parameter is only available on the output plug-in. Some
AVC-intra streams have the “Sequence Parameters Set” (SPS) and the “Picture Parameter Set” (PPS) repeat
on each frame, others have only them on the first frame. This option allows you to control how the SPS and
the PPS are present in the AVC-Intra stream.
o “Yes”: XFConverter is repeating the SPS and the PPS found on the first frame on each frame. It is
the default value when MXF Op1a is created.
o “No”: XFConverter only keeps the SPS and PPS on the first frame. This value is mandatory when
creating MXF Panasonic P2.
o “Keep as original”: XFConverter does not modify the AVC-Intra stream.
This document is the exclusive property of OpenCube Technologies SAS and cannot be reproduced or distributed without prior authorization.
16 / 38
Page 17

3.2.3 MPEG 1&2 audio elementary stream
http://www.evs-opencube.com
Figure 10: MPEG 1&2 audio elementary stream settings
Nb Audio Channels: Use this parameter to define the number of audio channels in the audio stream.
Audio Sampling Frequency: Use this parameter to define the sampling frequency of the audio MPEG stream
(32.0, 44.1 or 48kHz).
Audio Quantization: Use this parameter to define the quantization of the audio MPEG stream (8, 16, 24 or
32 bits/s).
This document is the exclusive property of OpenCube Technologies SAS and cannot be reproduced or distributed without prior authorization.
17 / 38
Page 18

3.3 JPEG 2000 stream
http://www.evs-opencube.com
Figure 11: JPEG 2000 stream settings
System: Use this parameter to define the video system. Values available are: PAL, NTSC, 720p, 1080p,
1080i, 2k and 4k.
Frame Rate: Use this parameter to define the frame rate depending on the selected system.
Mxf wrappring: Use this parameter to define the mxf wrapping, frame or field wrapping (i.e the number of
field by KLV). This option is available only on the MXF output plug-in and for interlaced files.
To be recognized by the XFConverter watch folder, filenames of a serie of JPEG 2000 still images must have the
basename and an index (example: my_file_basename.000.jp2). The watch folder will display only one file for all JPEG
2000 files matching the same pattern. The name displayed by the watch folder will be
my_file_basename.#[a,b,c,d].jp2, with:
a represents the number of digits for the JPEG 2000 index,
b the index of the first JPEG 2000 file,
c the index of the last JPEG 2000 file,
and d the step to find the index of the next file
While unwrapping operation, XFConverter will create files matching this naming rule.
This document is the exclusive property of OpenCube Technologies SAS and cannot be reproduced or distributed without prior authorization.
18 / 38
Page 19

http://www.evs-opencube.com
3.4 AIFF, WAV and PCM streams
Figure 12: Uncompressed audio (AIFF, WAV and PCM) stream settings
Nb Audio Channels: Use this parameter to define the number of channels in the audio stream.
Audio Sampling Frequency: Use this parameter to define the sampling frequency of the audio stream.
Audio Quantization: Use this parameter to define the quantization of the audio stream (8, 16, 24 or 32 bps).
This document is the exclusive property of OpenCube Technologies SAS and cannot be reproduced or distributed without prior authorization.
19 / 38
Page 20

3.5 Dolby audio stream
http://www.evs-opencube.com
Figure 13: Dolby stream settings
XFConverter can detect if Dolby is present on audio tracks.
Dolby Type: It can be Dolby-E or AC-3.
Audio Quantization: Use this parameter to define the quantization of the audio stream (8, 16, 24 or 32 bps).
Channels: Use this parameter to define if the stream contains the left, the right or both channels.
Manage Dolby as PCM: Use this parameter if you want to have XFConverter manage Dolby as PCM. If this
option is set to True, XFConverter will wrap Dolby as PCM.
This document is the exclusive property of OpenCube Technologies SAS and cannot be reproduced or distributed without prior authorization.
20 / 38
Page 21

http://www.evs-opencube.com
3.6 Timecode stream
Figure 14: Timecode stream settings
The output plug-in timecode pin is supported for MPEG, GXF, MXF and MOV formats. It is an easy and
convenient way to manually set a start timecode or to convey the timecode information from the input plug-in.
XFConverter currently supports continuous timecode but not discontinuous ones.
Keep Original Timecode: Set this parameter to “Yes” if you want to preserve the timecode originating from
the input plug-in. Set it to “No” if you want to manually define the start timecode.
Default Timecode: Use this parameter to define the start timecode.
Frame Rate: This parameter is useful when the frame rate is not constrained by the video system. However
the frame rate can be changed if the output plug-in embeds only audio streams.
Drop Frame: Use this parameter to define whether the timecode is drop frame or not. Note that this
parameter is not available with 50Hz timecode.
This document is the exclusive property of OpenCube Technologies SAS and cannot be reproduced or distributed without prior authorization.
21 / 38
Page 22

http://www.evs-opencube.com
3.7 Metadata (XML) stream
Figure 15: Metadata stream settings
During the MXF files extraction process, you have the option of outputting the file’s metadata as an XML file. In
order to do so you have to connect metadata pins from the input MXF file to the output Unwrap plug-in. Note that
metadata wrapping is currently not supported.
Process XML: This parameter is set to “No” by default to generate an XML. When you set this parameter to
“No” you can also create your own metadata file format according to your own scheme. Please contact
OpenCube if you wish to activate this feature.
This document is the exclusive property of OpenCube Technologies SAS and cannot be reproduced or distributed without prior authorization.
22 / 38
Page 23

http://www.evs-opencube.com
3.8 Ancillary Data – VBI Stream
The ancillary-VBI stream is available in wrapping and unwrapping modes in MXF plug-in. It allows you to extract /
wrap ST436 from/to a MXF file.
Figure 16: Ancillary Data – VBI stream settings
This document is the exclusive property of OpenCube Technologies SAS and cannot be reproduced or distributed without prior authorization.
23 / 38
Page 24

4 Plug-in Configuration
This section contains a brief summary of the settings for the different plug-ins.
4.1 AVI Plug-in
http://www.evs-opencube.com
Figure 17: AVI plug-in settings
Version: AVI version 1.0 is limited to 1GB media data size while version 2.0 is unlimited.
Type: Type 1 contains a single DV track with audio embedded in the DV chunks. Type 2 stores the audio
channels into separate AVI tracks.
Nb Audio: If AVI type 2 is selected, this parameter defines the number of PCM audio tracks.
This document is the exclusive property of OpenCube Technologies SAS and cannot be reproduced or distributed without prior authorization.
24 / 38
Page 25

4.2 GXF Plug-in
http://www.evs-opencube.com
Figure 188: GXF plug-in settings
Nb Audio: This parameter defines the number of PCM tracks embedded in the GXF file. Note that GXF
format only allows 48 kHz mono channels.
This document is the exclusive property of OpenCube Technologies SAS and cannot be reproduced or distributed without prior authorization.
25 / 38
Page 26

4.3 QUICKTIME (MOV) Plug-in
http://www.evs-opencube.com
Figure 19: Quicktime plug-in settings
Nb Audio: This parameter defines the number of PCM tracks embedded in the MOV file.
External References: If set to “Yes”, this parameter indicates that the MOV file will not embed the media
streams but will reference external raw media files. XFConverter currently does not support the creation of
MOV files with external references so this feature is only supported in the input plug-in.
This document is the exclusive property of OpenCube Technologies SAS and cannot be reproduced or distributed without prior authorization.
26 / 38
Page 27

4.4 MPEG Plug-in
http://www.evs-opencube.com
Figure 20: MPEG plug-in settings
Stream Type: The stream type can be a Transport, a Program or an Elementary Stream. If you select
Transport or Program Stream each individual elementary stream will be outputted. Note that XFConverter
currently does not support MPEG multiplexing and therefore only supports Transport and Program streams in
the input plug-in.
Nb Elementary Streams: This parameter indicates the number of video and audio elementary streams when
the stream type is set to Transport or Program. It will create a pin for each elementary stream.
This document is the exclusive property of OpenCube Technologies SAS and cannot be reproduced or distributed without prior authorization.
27 / 38
Page 28

4.5 MXF Plug-in
http://www.evs-opencube.com
Figure 21: MXF plug-in settings
Operational Pattern: This parameter defines the operational pattern of the MXF file. Possible values
include:
o Op1a: This is the most commonly used pattern. It corresponds to a set of video and audio tracks
played simultaneously. This operational pattern does not impose any restrictions on the media that
can be embedded in the MXF file.
o Op1a D10: Restricted to the standard Op1a containing a video track with IMX and a single audio
track with 8-channel AES audio.
o OpAtom: This pattern corresponds to a set of atomic MXF files containing a single video or audio
track. Although the media is stored in separate MXF files, they are linked and should be decoded
together. Note that when you want to perform automatic configuration of the input or output plug-in
when working with OpAtom files, you have to select an entire set of MXF files for your
configuration to be successful.
o Panasonic P2: Use this pattern if you want to convert/produce MXF files similar to the ones that a P2
camcorder would generate. P2 format includes a DV track (IEC or SMPTE) with 2 or 4 mono AES
channels. When you select this pattern, you can also choose between a “P2 tree” and “P2 flat” mode.
The P2 tree corresponds to the Contents directory structure produced by the camcorder while P2 flat
flattens the directory structure. Note that when you perform automatic configuration of the plug-in
you only have to select the video essence file in a P2 tree; however, when working with a flat
structure you have to select the entire set of MXF files.
o Sony XDCam DV: Use this pattern if you want to convert/produce MXF files similar to the ones that
an XDCam camcorder would generate. This format includes a DV IEC track with 4 mono AES audio
tracks. It supports XDCam SxS and XDCam optical MXF files.
o Sony XDCam IMX: Use this pattern if you want to convert/produce MXF files similar to the ones
that an XDCam camcorder would generate. This format includes an IMX track and an 8-channel
AES audio track (D10). It supports XDCam SxS and XDCam optical MXF files.
This document is the exclusive property of OpenCube Technologies SAS and cannot be reproduced or distributed without prior authorization.
28 / 38
Page 29

http://www.evs-opencube.com
o Sony eVTR: Use this pattern if you want to convert/produce MXF files similar to the ones that an
eVTR tape recorder would generate. This format includes an IMX track and an 8-channel AES audio
track (D10).
o Sony XDCamHD: Use this pattern if you want to convert/produce MXF files similar to the ones that
an XDCam HD camcorder would generate. This format includes an MPEG Long-GOP track (15, 25
or 35 Mbits/s) together with 2 or 4 mono AES tracks. It supports XDCam SxS and XDCam optical
MXF files.
o MXF Ext. Ref: Use this pattern if you want to convert/produce an Op1b file referencing atomic
OpZero MXF files. The Op1b file will not embed any media. Note that when you perform automatic
configuration of the plug-in you only need to select the Op1b file.
o Raw Ext. Ref: Use this pattern if you want to convert/produce an Op1b file referencing raw media
essence files. The Op1b file will not embed any media. Note that when you perform automatic
configuration of the plug-in you only need to select the Op1b file.
o AS-02: Use this pattern if you want to create AMWA AS-02 file.
o AS-03: Use this pattern if you want to create AMWA AS-03 file.
o AS-11: Use this pattern if you want to create AMWA AS-11 file.
o Avid OpAtom (optional): This pattern creates a MXF OpAtom file which can be natively imported
in the Avid Editing System. This format includes DV, IMX, VC-3 track and some mono WAV audio
tracks.
o Avid OpAtom AMT (optional): This pattern creates a MXF OpAtom file which can be natively
imported in the Avid Editing System using the Avid Media Toolkit (AMT). This format includes
DV, IMX, VC-3, XDCAM HD422, AVC-Intra track and some mono WAV audio tracks.
Nb Tracks: This parameter defines the number of video and audio tracks in the MXF file. Note that the
number of tracks may be constrained by the operational pattern.
Force WAV Output: This parameter is available only on the input MXF plug-in. You can set its value to
“Yes” to force the AIFF and AES tracks to be extracted as WAV files. On the output MXF plug-in, this
parameter is replaced by “Convert WAV to AES” to force the conversion of PCM and WAV streams into
AES streams.
If the destination is an Avid OpAtom MXF file (optional), two additional settings are available (Figure 22: MXF Avid
OpAtom settings):
Check-in Interplay: the master clips can be checked-in in Interplay.
Create Output Directory as Avid Systems: If this parameter is set to true, the destination file will be created
in a subfolder called “computername.x”. The maximum number of files in each directory is 10,000. When this
maximum is reached, a new subdirectory is created (“x” is incremented).
This document is the exclusive property of OpenCube Technologies SAS and cannot be reproduced or distributed without prior authorization.
29 / 38
Page 30

http://www.evs-opencube.com
Figure 22: MXF Avid OpAtom settings
4.6 Wrap Plug-In
Figure 23: Wrap plug-in settings
This document is the exclusive property of OpenCube Technologies SAS and cannot be reproduced or distributed without prior authorization.
30 / 38
Page 31

http://www.evs-opencube.com
This plug-in should be used when multiple input source files have to be wrapped together in a single wrapper
format. It can construct a graph when multiple input plug-ins are required. The configuration dialog box allows you
select the number of source files and their type using the combo boxes. The “Param” button can be clicked to open the
configuration dialog box for each plug-in. Finally the “Source filename” field contains the pattern of the filename. This
field is required in order to define the set of files that are meant to be processed together. The star “*” stands for a
variable name. For instance, the figure #16 defines a set of 4 files (1 DV, 2 WAV and 1 MXF) whose names could be
myfile.00.dv, myfile.01.wav, myfile.02.wav, myfile.03.mxf. Note that only the set of files following this pattern will
be available for conversion in the main window. However, if the feature “Enable multi-selection” is activated in the
main window (see figure 3, box (5)), the source filename patterns are ignored and you can freely select a set of files to
be wrapped together.
If you need to add mute track in the output file, you can select “Mute plug-in” in the wrap plug-in.
Figure 24: Mute plug-in
This document is the exclusive property of OpenCube Technologies SAS and cannot be reproduced or distributed without prior authorization.
31 / 38
Page 32

http://www.evs-opencube.com
5 XFConverter Configuration
To open the “Options” dialog box, select Options and then Configure… in the main window menu.
5.1 File Management
The first tab from the “Options” dialog box allows you to configure the destination file naming convention used
during the conversion process.
Figure 25: File management options
o Converted input files can be deleted by checking the corresponding box in the “Source file option” settings.
o The input files can be moved to another directory if the conversion failed using “Move source file after failed
conversion to” setting.
o You can also force the creation of write-protected files by checking the first box in the “Destination file
options”.
o If the destination filename is constructed from source file, XFConverter will extract the source filename,
remove its extension and use this base name to figure out the output filename. For instance, when you convert
“myfile.mxf” into an AVI file, the resulting file will be named “myfile.avi”.
o If the destination file already exists, you can configure XFConverter to cancel the conversion, force the
deletion of the destination or have it generate a new destination filename that will include the source file name
followed by a number.
o If the destination filename is constructed from a base name, you will have to set the desired name and
XFConverter will use it as the output filename base. When you select this option, consecutive conversions of
MXF into AVI files will produce the following file series: DefaultName_0000000.avi,
DefaultName_0000001.avi, DefaultName_0000002.avi, DefaultName_0000003.avi, etc.
o Note that when you are creating Panasonic P2 files, these settings do not apply due to the naming convention
inherent to this format.
This document is the exclusive property of OpenCube Technologies SAS and cannot be reproduced or distributed without prior authorization.
32 / 38
Page 33

http://www.evs-opencube.com
5.2 Application Start-up and Shutdown
The second tab in the “Options” dialog box enables you to configure the application’s behavior during start-up and
shutdown.
Figure 26: Application start-up and shutdown options
o Load automatically previous project upon start-up: If this option is enabled, the project that was opened
during the last session will be automatically loaded. However, the watch folder will be launched only if the
previous option is also enabled.
o Start automatically the watch folder upon start-up: If this option is enabled, XFConverter will load the
previous project file and start the watchfolder.
o Start the application upon Windows start-up: If this option is enabled, the next time Windows is started,
XFConverter will be launched automatically and will load the project that was opened during the previous
session. The watch folder will also be automatically started.
o Test Interplay connection upon start-up: If this option is enabled, XFConverter will check upon start-up to
see if the Interplay connection is available.
o Start minimized: XFConverter can be minimized in Windows’ tray task bar and can continue to run without
its graphical user interface. If this option is enabled, XFConverter will start in the tray task bar; you can then
open it by double-clicking on the GUI icon:
This document is the exclusive property of OpenCube Technologies SAS and cannot be reproduced or distributed without prior authorization.
33 / 38
Page 34

http://www.evs-opencube.com
o Get minimized when closing the application: When this option is activated and you click on the Windows’
exit icon , XFConverter will go in the tray task bar and hide the user interface. To exit the application in
this mode, you can right-click on its icon and select Quit.
5.3 Watch Folder Configuration
The third tab in the “Options” dialog box allows you to configure the watch folder.
Figure 27: Watch folder options
o Does not display older files than the latest converted: If this option is enabled, the watchfolder will not
display files older than the latest converted. Some file systems do not modify the file creation/modification
dates when files are moved. In this case, it would be helpful to disable the option.
o Watch Folder Interval: Allows you to specify the watch folder scanning interval.
o File is not opened: if this option is enabled, the conversion is started if the source files are not opened.
o File did not grow for: if this option is enabled, the conversion is started if the source files did not grow.
This document is the exclusive property of OpenCube Technologies SAS and cannot be reproduced or distributed without prior authorization.
34 / 38
Page 35

5.1 Global Options
http://www.evs-opencube.com
Figure 28: XFConverter global options
o Write log file: This option enables log file writing. You select a directory and XFConverter will automatically
create a new log file per day in the directory selected. You can specify the log level.
o Temporary directory: specify the temp directory. If XFConverter has to create some temporary files, it will
use this directory.
5.2 Interplay Configuration (optional)
The following window contains the Interplay connection settings. These settings are used for master clip check-in in
Interplay.
The window is divided into 4 parts:
- Interplay Web Services (1): XFConverter used Interplay web services to check-in master clips.
- Interplay Configuration (2): This group contains the login and password and the check-in root catalog.
- Storage (3): This group contains information about the Interplay storage. If these fields are incorrectly filled
in, the check-in will succeed but the master clip will be Offline in Interplay.
o If you used an Isis: key-in the host name of the Isis Storage.
o If you used a lanshare: choose the local mount point to the lanshare and key-in the equivalent of the
local mount on the Interplay server.
- Test Interplay Configuration (4): This group is used to test the configuration. The “Save” button will be
disabled until the connection test is successful. Warning: this test cannot detect whether the storage settings
are correct or not.
This document is the exclusive property of OpenCube Technologies SAS and cannot be reproduced or distributed without prior authorization.
35 / 38
Page 36

http://www.evs-opencube.com
1
2
3
4
Figure 29: Interplay configuration
Figure 30: Lanshare settings
This document is the exclusive property of OpenCube Technologies SAS and cannot be reproduced or distributed without prior authorization.
36 / 38
Page 37

Interplay catalogs can be browsed from the main window.
http://www.evs-opencube.com
Figure 31: Browsing Interplay catalog
New catalogs can be created from the “Catalog Browser” windows.
Figure 32: Create new Interplay catalog
This document is the exclusive property of OpenCube Technologies SAS and cannot be reproduced or distributed without prior authorization.
37 / 38
Page 38

http://www.evs-opencube.com
6 XFConverter API
XFConverter includes a C++ API (Application Programming Interface) as an option for Developers who want to
integrate XFConverter features in their applications. The API can be used as a local dll or as an RPC server/client using
SOAP protocol. This server can be used to automate the conversion processes scheduled by an automation server.
This document is the exclusive property of OpenCube Technologies SAS and cannot be reproduced or distributed without prior authorization.
38 / 38
 Loading...