

Page 1
USER MANUAL
Version 6.0 - November 2012
Page 2

Page 3

IPBrowse Version 6.0 – U ser Manual
EVS Broadcast Equipment – November 2012
Issue 6.0.B
I
Copyright
EVS Broadcast Equipment – Copyright © 2012. All rights reserved.
Disclaimer
The information in this manual is furnished for informational use only and subject to
change without notice. W hile every effort has been made to ens ure that the information
contained in this user manual is accurate, up-to-date and reliable, EVS Broadcast
Equipment cannot be h eld responsible for inaccuracies or err ors that may appear in this
publication.
Improvement Requests
Your comments will help us improve the quality of the user documentation. Do not
hesitate to send improvement requests, or report any error or inaccuracy in this user
manual by e-mail to
doc@evs.tv.
Regional Contacts
The address and pho ne number of the EVS headq uarters are usually mention ed in the
Help > About menu in the user interface.
You will find the full list of address es and ph one num bers of loc al off ices either at the end
of this user manual (f or manuals on hardware produ cts) or at the following pag e on the
EVS website:
http://www.evs.tv/contacts
User Manuals on EVS Website
The latest version of the user manual, if any, and other user manuals on EVS p roducts
can be found on the EVS download center, on the following webpage:
http://www.evs.tv/downloadcenter
Page 4

Issue 6.0.B
IPBrowse Version 6.0 – U ser Manual
EVS Broadcast Equipment – November 2012
II
Page 5

IPBrowse Version 6.0 – U ser Manual
EVS Broadcast Equipment – November 2012
Issue 6.0.B
III
Table of Contents
TABLE OF CONTENTS .................................................................................................... III
1. INTRODUCTION ...................................................................................................... 1
1.1 Purpose ...................................................................................................................... 1
1.2 Process Overview ....................................................................................................... 2
1.3 Opening IPBrowse ...................................................................................................... 2
2. USER INTERFACE .................................................................................................. 4
2.1 Overview of the IPBrowse Window ............................................................................. 4
2.2 Tree View .................................................................................................................... 6
2.2.1 Introduction ............................................................................................................................. 6
2.2.2 Tree View Elements ............................................................................................................... 7
2.2.3 Keyboard Shortcuts ................................................................................................................ 9
2.3 Quick Text Search Area .............................................................................................. 9
2.3.1 Introduction ............................................................................................................................. 9
2.3.2 Quick Text Search Associated Buttons .................................................................................. 9
2.4 Advanced Search Pane ............................................................................................ 10
2.4.1 Purpose ................................................................................................................................10
2.4.2 Overview of the Advance d Sear ch Pan e ..............................................................................10
2.5 Toolbar ..................................................................................................................... 11
2.6 Elements Grid / List ................................................................................................... 12
2.6.1 Introduction ...........................................................................................................................12
2.6.2 Selecting the View ................................................................................................................12
2.6.3 Sorting the Elements in the Grid or List ................................................................................14
2.6.4 Organizing Columns in the Grid ...........................................................................................15
2.6.5 Operations Allowed from the Elements Grid/List ..................................................................16
2.7 Player Pane .............................................................................................................. 17
2.7.1 Purpose ................................................................................................................................17
2.7.2 Overview of the Player Pane ................................................................................................17
2.7.3 Current Timecode Display ....................................................................................................19
2.7.4 Video Display ........................................................................................................................19
2.7.5 Time Information Fields ........................................................................................................19
2.7.6 Jog Bar .................................................................................................................................20
2.7.7 Player Full Screen Mode ......................................................................................................20
2.8 Bins Pane ................................................................................................................. 21
2.8.1 Purpose ................................................................................................................................21
2.8.2 Overview of the Bins Pane ...................................................................................................22
3. SEARCHING FOR MEDIA ....................................................................................... 24
3.1 Search Types ............................................................................................................ 24
3.2 Branch Selection in the Tree ..................................................................................... 24
3.3 Quick text Search ...................................................................................................... 25
3.3.1 Purpose and Context of Use ................................................................................................25
3.3.2 Search for Synonyms ...........................................................................................................25
3.3.3 Quick Text Search Field Display ..........................................................................................25
3.3.4 Quick Text Search Syntax Rules ..........................................................................................26
3.3.5 Autocomplete Function .........................................................................................................27
3.3.6 How to Perform a Quick Text Search with the Autocomplete Function ...............................28
3.4 Advanced Search ...................................................................................................... 31
3.4.1 Purpose and Context of Use ................................................................................................31
3.4.2 Advanced Search Criteria Display ........................................................................................31
3.4.3 Advanced Search Fields Types ............................................................................................32
Page 6

Issue 6.0.B
IPBrowse Version 6.0 – U ser Manual
EVS Broadcast Equipment – November 2012
IV
3.4.4 Search in Free Text Fields ...................................................................................................32
3.4.5 Search in Non-Free Text Fields............................................................................................34
3.4.6 How to Clear a Applied Advanced Search Filter ..................................................................37
3.4.7 Search for Child Ke yword Bas ed on Pare nt Keyword ..........................................................38
3.5 Using Saved Filters ................................................................................................... 40
3.5.1 Introduction ...........................................................................................................................40
3.5.2 How to Save Filters ..............................................................................................................40
3.5.3 How to Apply a Saved Filter .................................................................................................40
4. LOADING MEDIA .................................................................................................. 41
4.1 Introduction ............................................................................................................... 41
4.2 Possible Loading Actions .......................................................................................... 41
4.3 Loading a Train ......................................................................................................... 42
4.3.1 Introduction ...........................................................................................................................42
4.3.2 How to Select a Train ...........................................................................................................42
4.3.3 How to Reload the Last Loaded Train ..................................................................................43
4.3.4 How to Load the Source Media of a Clip ..............................................................................44
4.3.5 How to Load the Train from the Previous or Next Recorder Channel ..................................45
4.4 Loading a Recording Ingest ...................................................................................... 46
4.5 Loading a Clip ........................................................................................................... 46
4.5.1 How to Load a Clip from the Elements Grid/List ..................................................................46
4.5.2 How to Load a Clip from the Bins Pane ...............................................................................47
4.5.3 How to Load a Linked Clip ....................................................................................................47
4.5.4 How to Load a Clip Associated to a Log ..............................................................................48
4.6 Audio Configuration and Monitoring .......................................................................... 49
4.6.1 Audio Paramet ers .................................................................................................................49
4.6.2 Audio Configuration ..............................................................................................................49
4.6.3 Audio Level Monitoring .........................................................................................................50
5. MOVING THROUGH MEDIA .................................................................................... 52
5.1 Introduction ............................................................................................................... 52
5.2 Transport Functions .................................................................................................. 52
5.2.1 Jog Bar .................................................................................................................................52
5.2.2 Transport Buttons and Shortcuts ..........................................................................................52
5.2.3 Fast Forward and Fast Rewind Speed .................................................................................54
5.3 Jumping to a Given Timecode within the Loaded Media ........................................... 55
6. CREATIN G A CLI P AND SENDING IT TO A BIN .......................................................... 56
6.1 Introduction ............................................................................................................... 56
6.2 Clip Settings .............................................................................................................. 56
6.2.1 Define Clip Autoname ...........................................................................................................56
6.2.2 Show Save Clip Window ......................................................................................................57
6.3 Clip Creation Buttons and Shortcuts ......................................................................... 57
6.4 How to Create a Clip ................................................................................................. 59
6.5 How to Trim a Clip .................................................................................................... 60
6.6 Sending a Clip to a Bin .............................................................................................. 60
7. ORGANIZING THE BINS ......................................................................................... 61
7.1 Introduction ............................................................................................................... 61
7.2 Bins Management ..................................................................................................... 61
7.2.1 How to Add a Bin ..................................................................................................................61
7.2.2 How to Clear the Content of a Bin ........................................................................................62
7.2.3 How to Delete a Bin ..............................................................................................................62
7.3 Clips Management .................................................................................................... 63
7.3.1 Adding Clips to a Bin ............................................................................................................63
7.3.2 Deleting Clip(s) .....................................................................................................................63
7.3.3 Copying Clips........................................................................................................................64
7.3.4 Moving Clips .........................................................................................................................65
Page 7

IPBrowse Version 6.0 – U ser Manual
EVS Broadcast Equipment – November 2012
Issue 6.0.B
V
7.3.5 Editing Clips ..........................................................................................................................66
8. PUBLISHING AND TRANSFERRING CLIPS ................................................................ 69
8.1 Introduction ............................................................................................................... 69
8.2 Publishing a Bin ........................................................................................................ 69
8.2.1 Purpose and Context of Use ................................................................................................69
8.2.2 How to Publish a Bin ............................................................................................................69
8.3 Transferring Clips ...................................................................................................... 70
8.3.1 Transfer Target Destinations ................................................................................................70
8.3.2 Transfer Options ...................................................................................................................70
8.3.3 Auto Send Mode ...................................................................................................................70
8.3.4 Sending Bin as Clips ............................................................................................................71
8.3.5 Sending Bin as Edit ..............................................................................................................72
8.3.6 Sending a Selection of Clips.................................................................................................74
8.3.7 Transfer Status Monitoring ...................................................................................................74
9. SHUTTLEPRO FUNCTIONS ................................................................................... 76
9.1.1 Introduction ...........................................................................................................................76
9.1.2 Button Configuration .............................................................................................................76
9.1.3 Quick Reference ...................................................................................................................77
GLOSSARY .................................................................................................................. 78
INDEX .......................................................................................................................... 79
Page 8

Issue 6.0.B
IPBrowse Version 6.0 – U ser Manual
EVS Broadcast Equipment – November 2012
VI
Page 9

IPBrowse Version 6.0 – U ser Manual
EVS Broadcast Equipment – November 2012
Issue 6.0.B
1
s imported in the
1. Introduction
1.1 Purpose
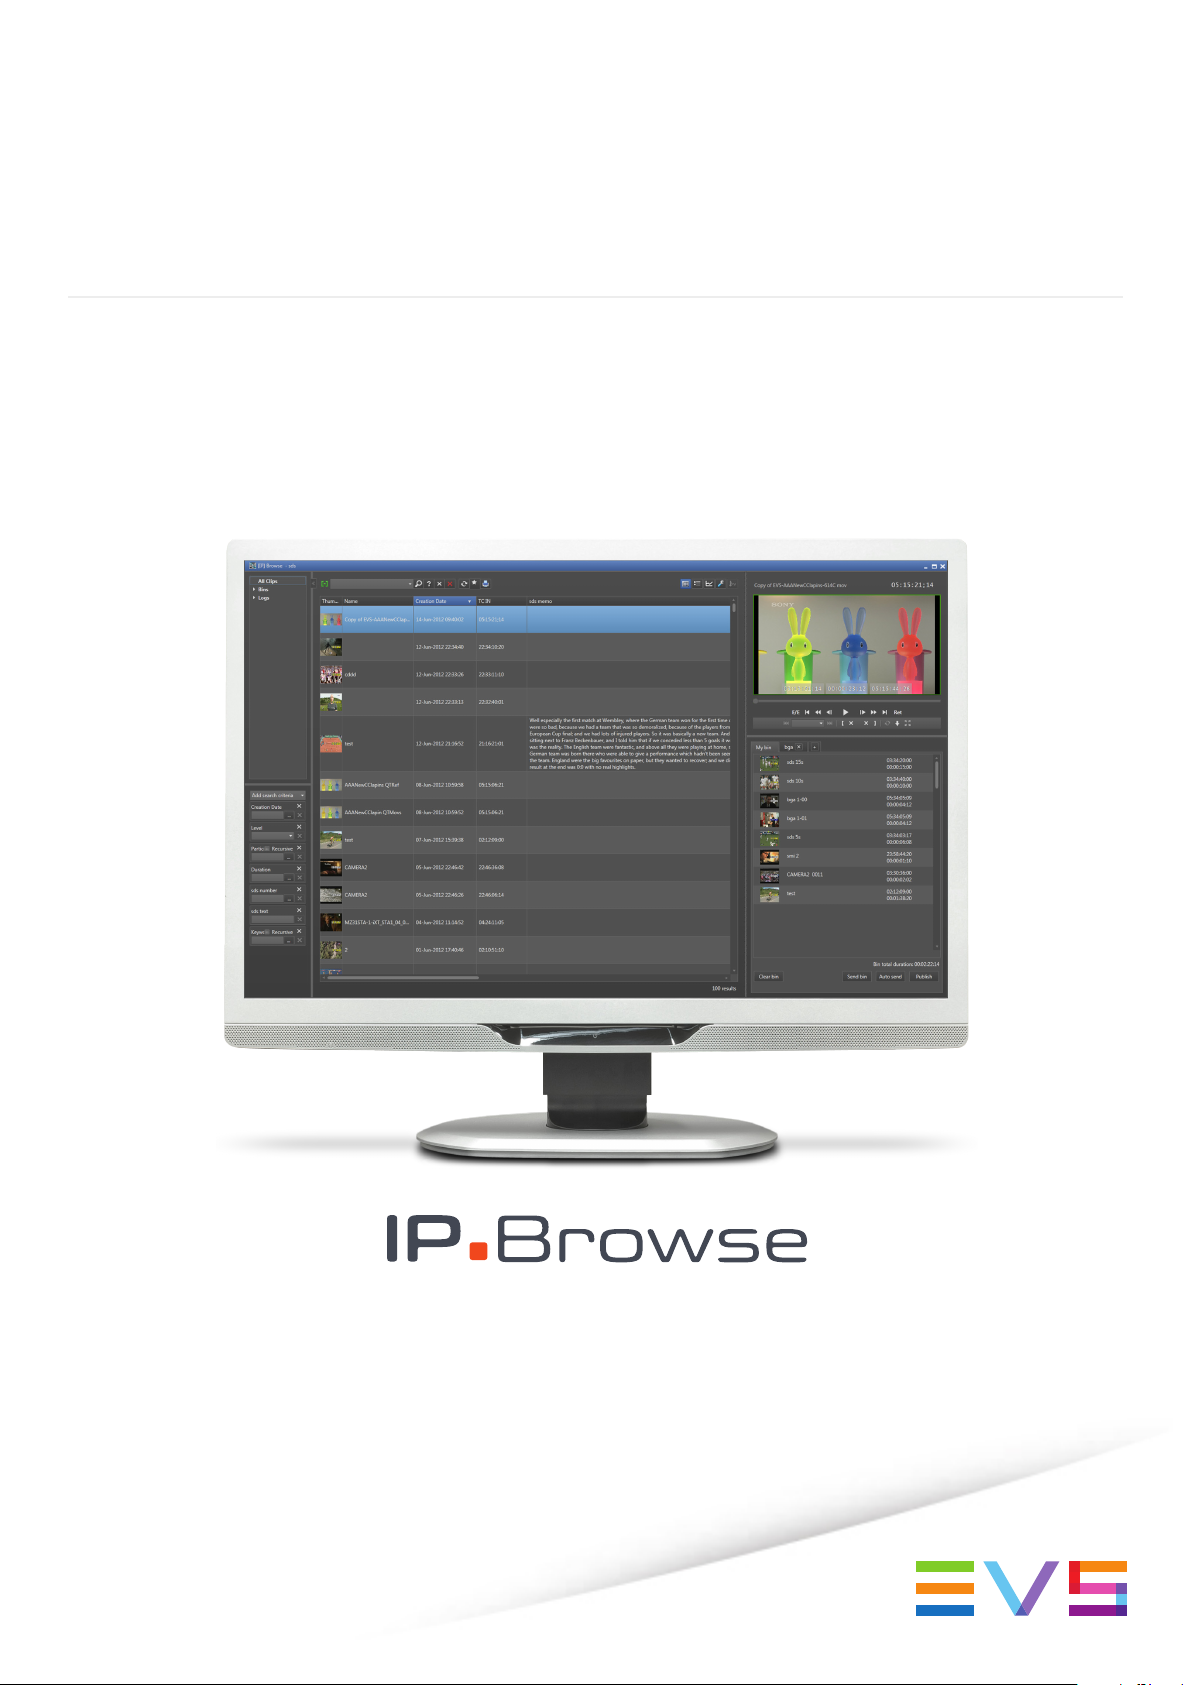
IPBrowse is a simple stand-alone application designed for browsing the lo-res content
available in the IPDirector database. Nearline storage is accessible as well. News or
sport journalists and assistant producers are users who will benefit from this application.
The IPBrowse window is an inte grated win dow from which it is possible t o perform all the
following actions. Users can ap ply different search techniques to find the right media from
the list of clips and logs. The results are clearly presented in a list, easy to consult. A
Player pane is used to displa y the selected m edia, browse it and create a clip from it if
needed. Users place the selected clips in pr edefined bins where clips can b e re-ordered.
Then, they send the bin content to target destinations, such as post-production systems.
Logs added to media are particu larly useful to easily and quickly retrieve t he interesting
moments of the recorded sequences. Logs cannot be created with IPBrowse, but they
can with IPDirector or Clip Logger. IPBrowse can be used to search for logs, preview
them on the Player pane inside the c lip(s ) as s oci ated to them and create ne w c l ips bas ed
on the logs.
Floating licenses are suppor ted, so a large number of s tations can be equipped with the
IPBrowse application.
Note
The IPBrowse application works with floating license
database.
Page 10

Issue 6.0.B
IPBrowse Version 6.0 – U ser Manual
EVS Broadcast Equipment – November 2012
2
1.2 Process Overview
The table below deta ils the different s teps of the proces s and the cor respond ing s ections
describing each step.
Step Section Page
Searching for media 3 ‘Searching for Media’ 24
Loading media 4’ Loading Media’ 41
Browsing a clip 5’ Moving through Media’ 52
Creating a clip 6 ‘Creating a Clip and Sending it to
a Bin’
Organizing the bins 7 ‘Organizing the Bins’ 61
Sending a clip to a bin 6.6 ‘Sending a Clip to a Bin’ 60
Transferring the bin content to a
target
8.3 ‘Transferring Clips’ 70
1.3 Opening IPBrowse
To open the IPBrowse, click the corresponding icon .
This will display a login screen where users need to enter their own username and
password.
Important
Users must log on with the ir own us er access codes. In c ase severa l users log
on with the same acc es s codes and work on the same user bin, chan ges made
by one user will not be seen by others.
56
Password can be changed at any time by clicking the Tools button on the main
toolbar and selecting Change Password from the menu. A window opens and allows you
to change your password:
Page 11

IPBrowse Version 6.0 – U ser Manual
EVS Broadcast Equipment – November 2012
Issue 6.0.B
3
Page 12
Issue 6.0.B
IPBrowse Version 6.0 – U ser Manual
EVS Broadcast Equipment – November 2012
4
2. User Interface
2.1 Overview of the IPBrowse Window
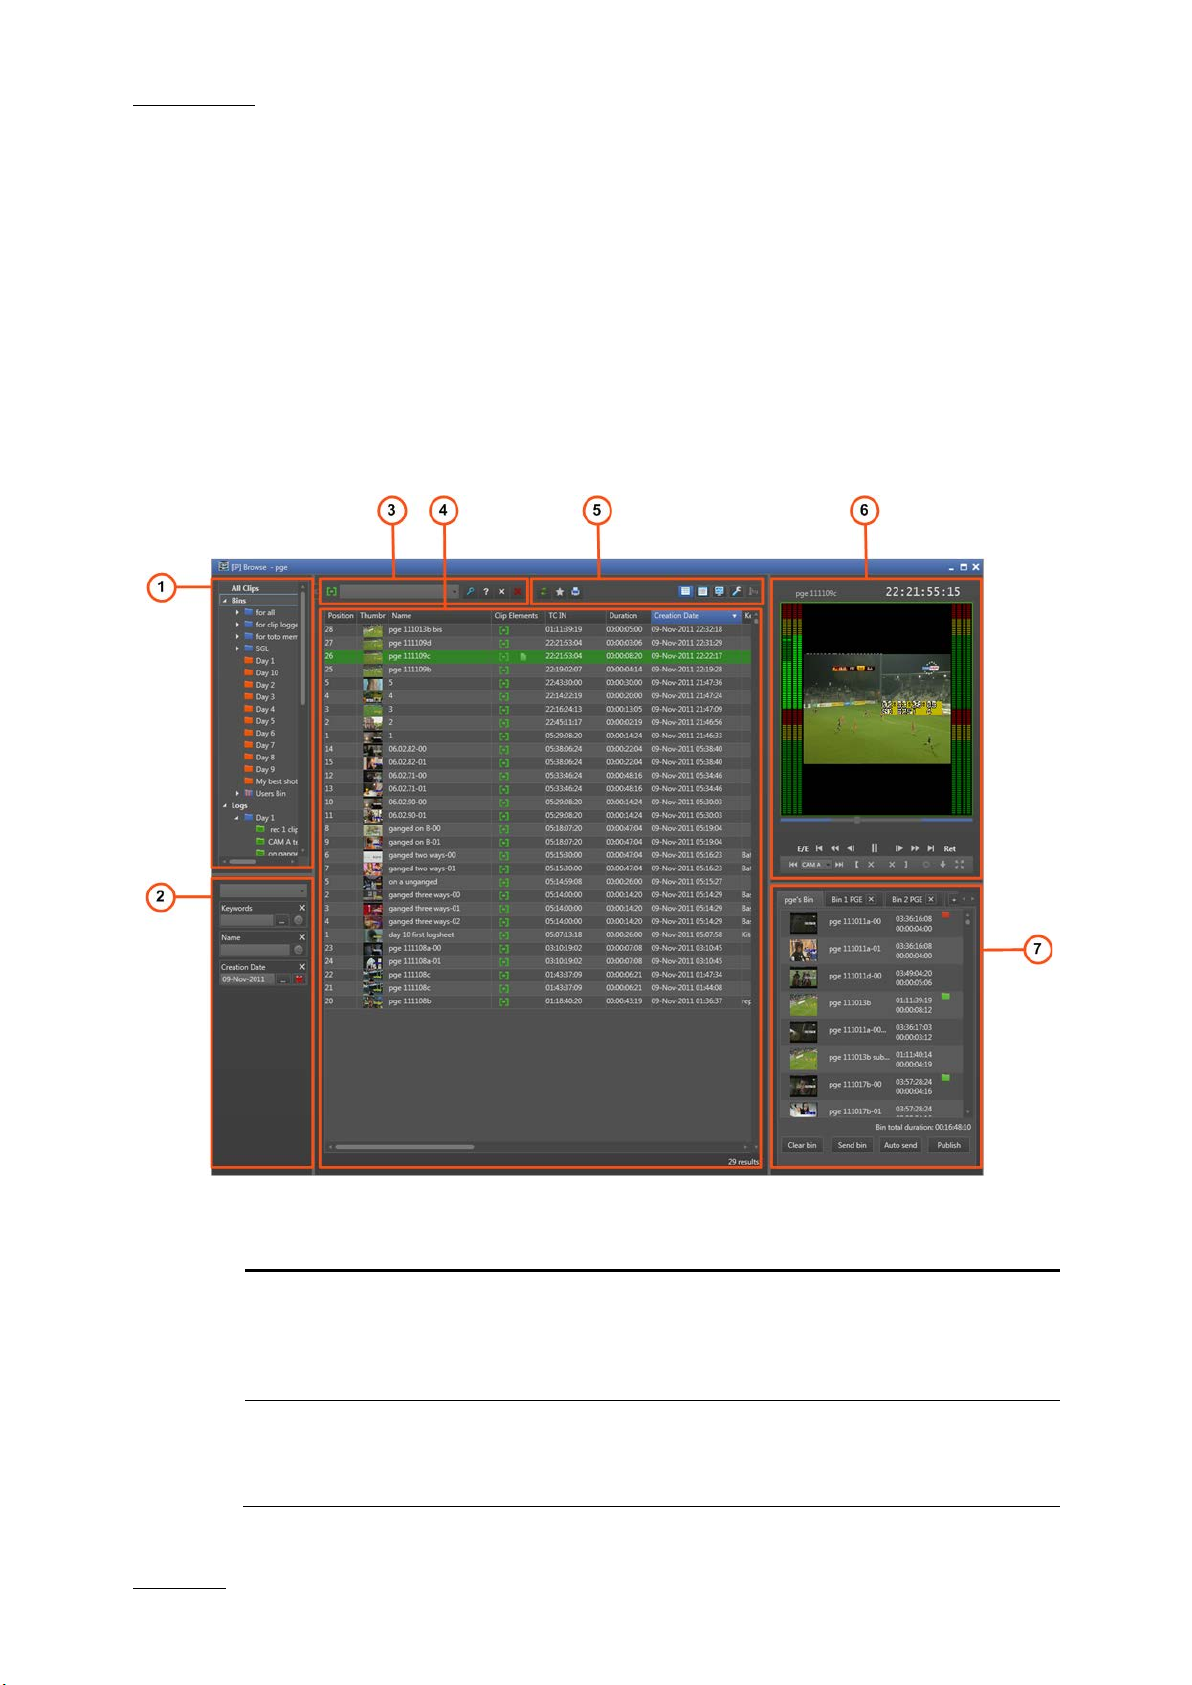
The IPBrowse window cont ains the main areas highlighted on the following screenshot
and shortly described in the table below:
Area Description
1. Tree View The Tree view shows all the c lips, bins and logs pr esent in the
database and on the nearl ine. The tree branches can be used
to filter items displayed in the Elements grid/list.
See section 2.2 for details on the interface.
2. Advanced
Search Pane
The Advanced Search area allows searches on parameters
corresponding to clips or logs metadata.
See section 2.4.
Page 13

IPBrowse Version 6.0 – U ser Manual
EVS Broadcast Equipment – November 2012
Issue 6.0.B
5
to save
provides a
Area Description
3. Quick Text
Search Area
The Quick Text Search area provides functions to perform
quick text searches. Later on, users will be able
applied filters or recall and apply saved filters to the current
search.
See section 2.3.
4. Elements Grid
or List
The Elements grid/list displays all the items included in the
selected tree branc h or resulting from a s earch. Two different
views are available: grid or list.
See section 2.6.
A bottom bar shows the number or results found.
5. Toolbar The toolbar on the top of the Elements grid/list
series of buttons and menus to define options related to the
elements vie w, transf er m onitoring, clip creation and password
management.
See section 2.5.
6. Pla yer Pane This pane is used to previ ew the loaded item, to create c lips
from the media and to send clips to a selected bin.
See section 2.7.
7. Bins Pane This pane may contain several bins. It is used to sort clips
within the bins. The transfer of clips to targets is requested
from the Bins pane.
See section 2.8.
The layout of the IPBrowse can be adapted to users’ needs:
• the T ree View and the Advanced S earch Pane can be hidden by clicking the split
box or shown by clicking the split box.
• most of the panes can be enlarged or reduced by moving the intersection line
between them
Page 14

Issue 6.0.B
IPBrowse Version 6.0 – U ser Manual
EVS Broadcast Equipment – November 2012
6
performing search in the database.
e arrow next to a tree
The selected
branch content is displayed in the
2.2 Tree View
2.2.1 Introduction
The database content is presented i n
a tree structure, much like Windows
Explorer, displayed in th e top left part
of the IPBrowse window.
The Tree view allows browsing and
Clicking th
branch expands it.
Element grid or list. Refer to section
3.2 ‘Branch Select ion in the Tree’ on
page 24.
Page 15
IPBrowse Version 6.0 – U ser Manual
EVS Broadcast Equipment – November 2012
Issue 6.0.B
7
Expanding the Users Bin view displays the [User] bin
: shows all the elements which
2.2.2 Tree View Elements
The table below mentio ns which items are displayed in th e Elements grid/list based on
the tree branch selected.
Tree Branch / SubBranch
All
Bins
Description
Shows all the clips present in the database.
Shows all the clips which are in bins and bin directories.
Expanding the Bins view shows the bins and bin directories.
Bin Directory: shows all the elements which ar e in a ll the bins
and directories under the selected directory.
Bin: shows all the elements which are in the selected bin.
Bin set as default bin.
Users Bin Directory: shows all the elem ents which are under
all the [User] bin directories.
directories for all the IPBrowse users:
This directory is created by the system. It is visible b y all the
users but no one can modify, de lete or publish it , nor add a bi n
or bin directory directly under this directory.
System [User] Bin Directory
are in the bins for the selected user.
Expanding a [User] bin directory vie w displays all the bins and
bin directories for the selected user (here: pge). Its name
contains the user logging ID.
This directory is created b y the system. It is visible by all t he
users but only the owner o f the directory and an adm inistrator
can modify, delete or publish it, or add a bin or b in directory
directly under this directory.
System [User] Bin created by the system for the selected
user. Its name contains the user logging ID.
It shows all the elements put in it by the selected user.
Page 16

Issue 6.0.B
IPBrowse Version 6.0 – U ser Manual
EVS Broadcast Equipment – November 2012
8
It is visible by all the users but onl y the o wner of the bi n and an
under its System
sheets and log
Tree Branch / SubBranch
Logs
Description
administrator can modify, delete or publish it, or move this bin.
[User] Bin created by the selected user
[User] bin directory.
It shows all the elements put in it by the selected user.
[User] Bin created by the selected user under its System
[User] bin directory and set as default bin.
It shows all the elements put in it by the selected user.
[User] Bin Directory created by the selected user under its
System [User] bin directory.
It shows all the elements put in it by the selected user.
Shows all the logs.
Expanding the Logs view shows the log
directories.
Log directory: shows all the logs f rom all the log sheets which
are in the selected directory.
Log sheet: shows all the logs which are in the selected log
sheet.
Log sheet of which all the logs are protected.
Log sheet of which some of the logs are protected.
Log sheet of which none of the logs is protected.
Logsheet which has been de-activated.
Page 17
IPBrowse Version 6.0 – U ser Manual
EVS Broadcast Equipment – November 2012
Issue 6.0.B
9
2.2.3 Keyboard Shortcuts
The following shortcuts can be used in the Tree view:
Key Action / Behavior
Up Arrow
Down Arrow
Left arrow
Right Arrow
Select the previous line
Select the next line
Collapses the branch
Expands the branch
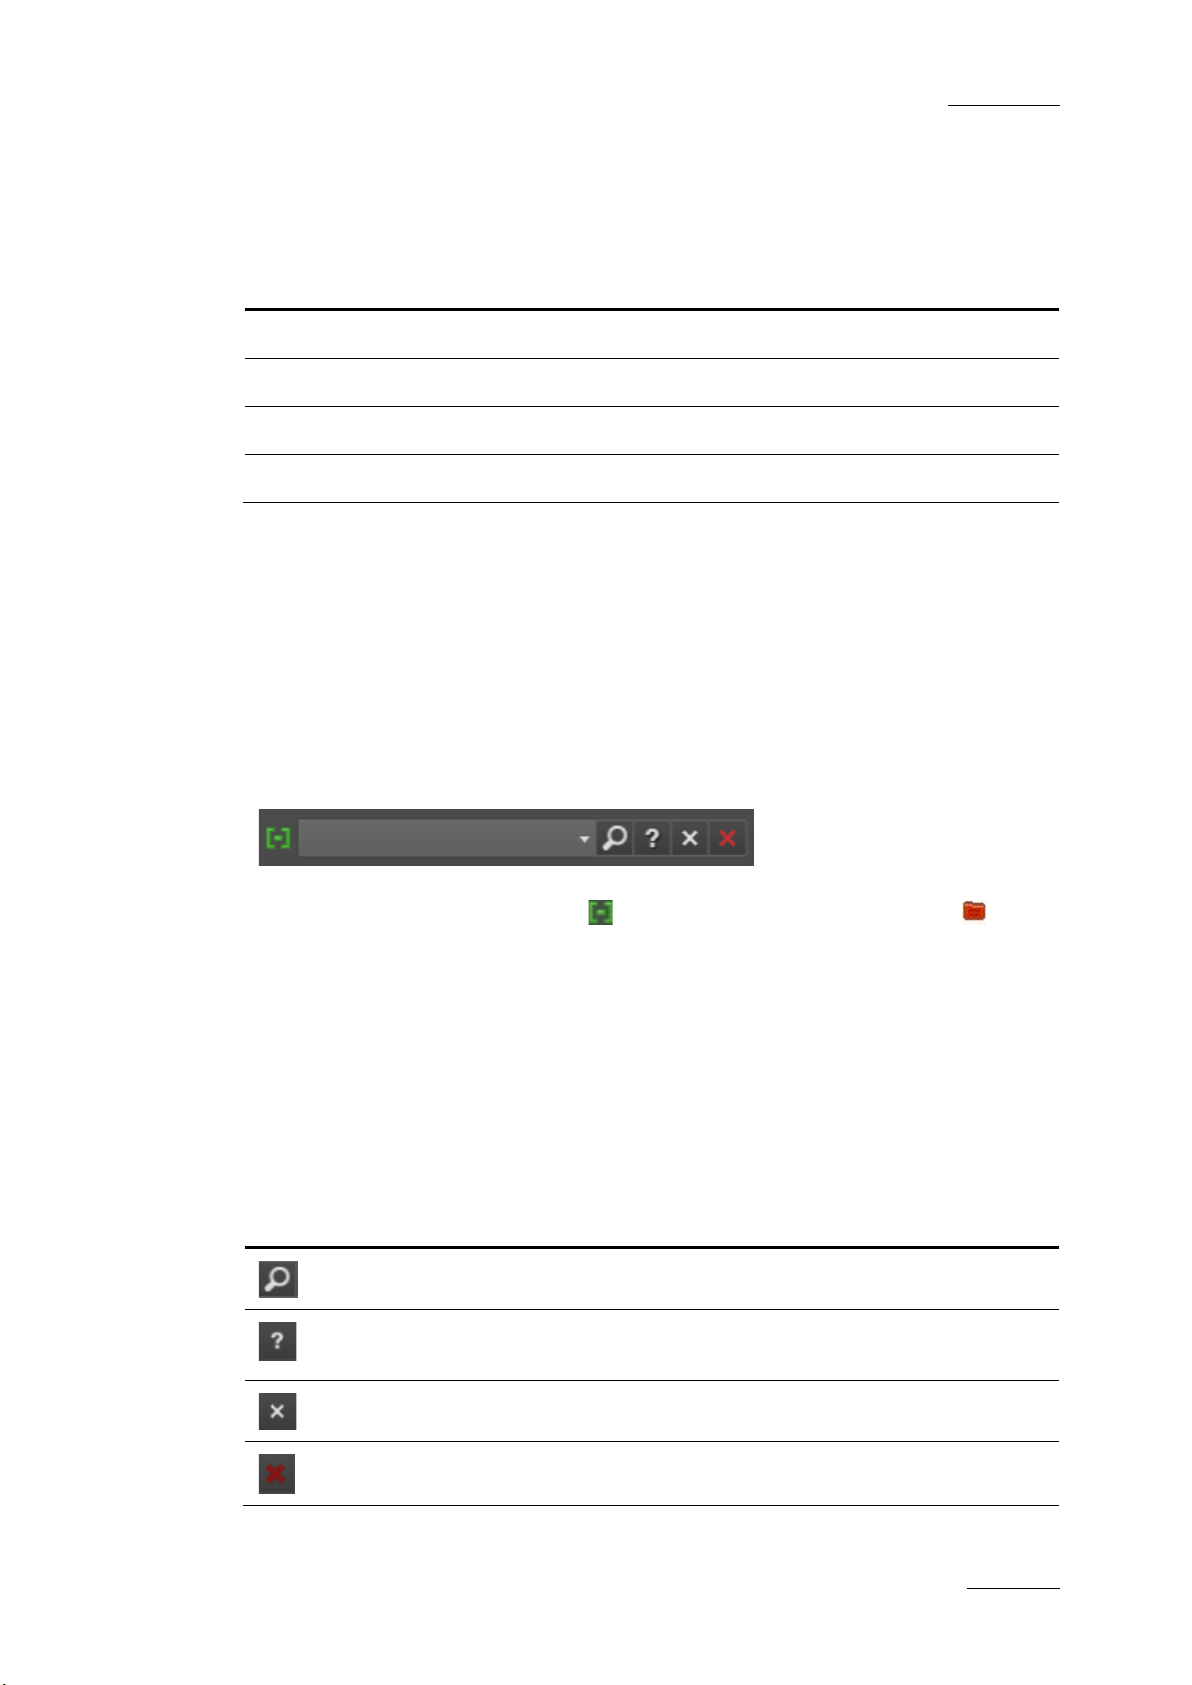
2.3 Quick Text Search Area
2.3.1 Introduction
The Quick Text Search is used to perform a search based on free text entered in the
Quick Text Search field. This field is available on the top of the Elements grid / list:
The Clip/Log icon displayed on the top left of the Elements grid/list depends on the
selection made in the tree: Clip icon f or the All or Bins br anches, Log icon f or the
Logs branch. The search is performed on the selected tree branch.
Refer to section 3.3 ‘Quick text Search’ on page 25 for details on the v arious ways to use
this function.
2.3.2 Quick Text Search Associated Buttons
The following table gives a description of the buttons located next to the Quick Text
Search field.
Button Description
Applies the search again and refreshes the Elements grid.
Displays the Syntax Rules list. See section 3.3.4 ‘Quick Text Search
Syntax Rules’ on page 26.
Clears the applied Quick Text search.
Clears all the applied searches.
Page 18
Issue 6.0.B
IPBrowse Version 6.0 – U ser Manual
EVS Broadcast Equipment – November 2012
10
2.4 Advanced Search Pane
2.4.1 Purpose
Advanced Search functions are available for detailed search operations. They allow
searches on clips or lo gs metad ata. The A dvanced Se arc h pane is loc ated o n the bottom
left part of the IPBrowse window.
Refer to section 3.4 ‘Advanced Search’ on page 31 for details on the var ious ways to use
this function.
2.4.2 Overview of the Advanced Search Pane
The Advanced Search pane contains the main areas highlighted on the following
screenshot and shortly described in the table below:
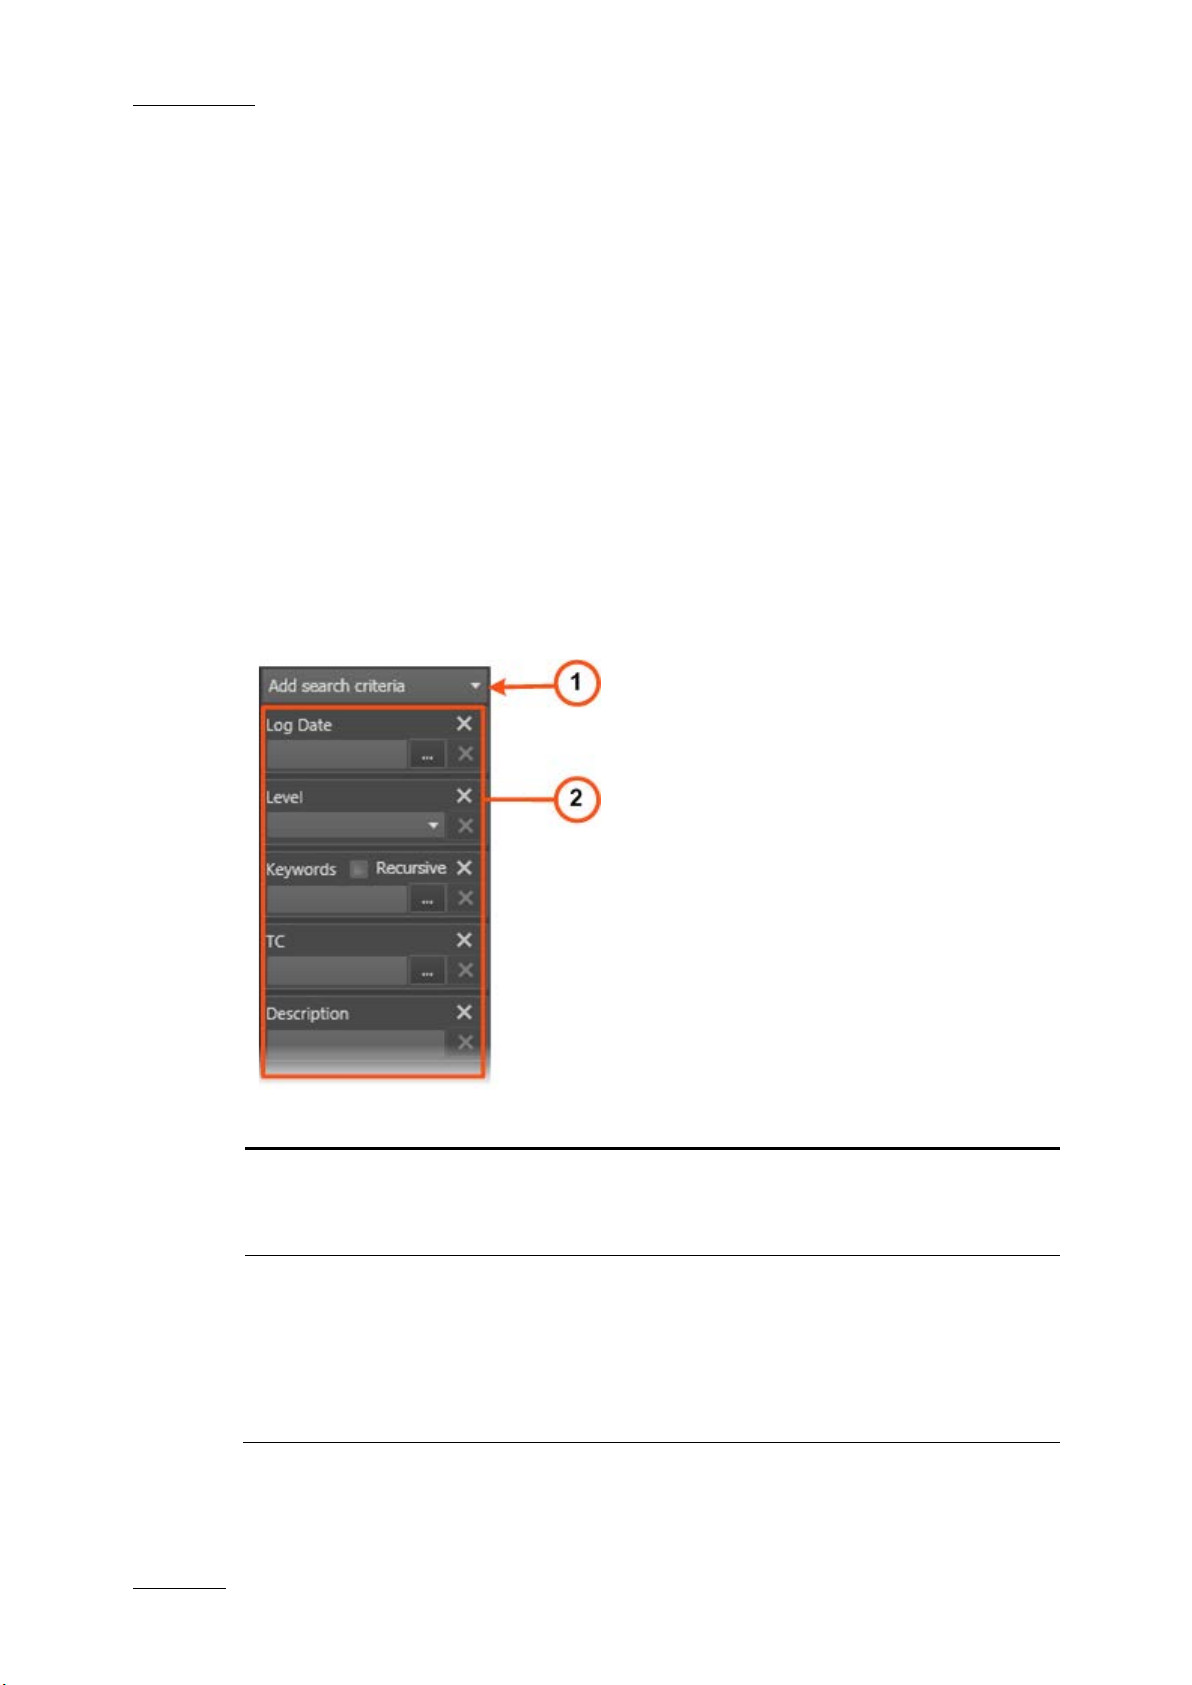
Area Description / See also…
1. Add Search
Criteria field
2. Search Criteria This area displays the l ist o f s ear ch c r iteria s elected f r om the
This field gives acc ess to the list of criteria on which us ers
may perform a search. The lists differ for clips and logs.
See section 3.4.2.
Add Search Criteria field.
Different types of search criteria exist. See section 3.4.3.
To remove an advanced s earch criterio n from the Advance d
Search pane, click the cross in the criterion box. Applied
filters are cleared as soon as a search criterion is removed.
Page 19
IPBrowse Version 6.0 – U ser Manual
EVS Broadcast Equipment – November 2012
Issue 6.0.B
11
button: displays the list of transfer job
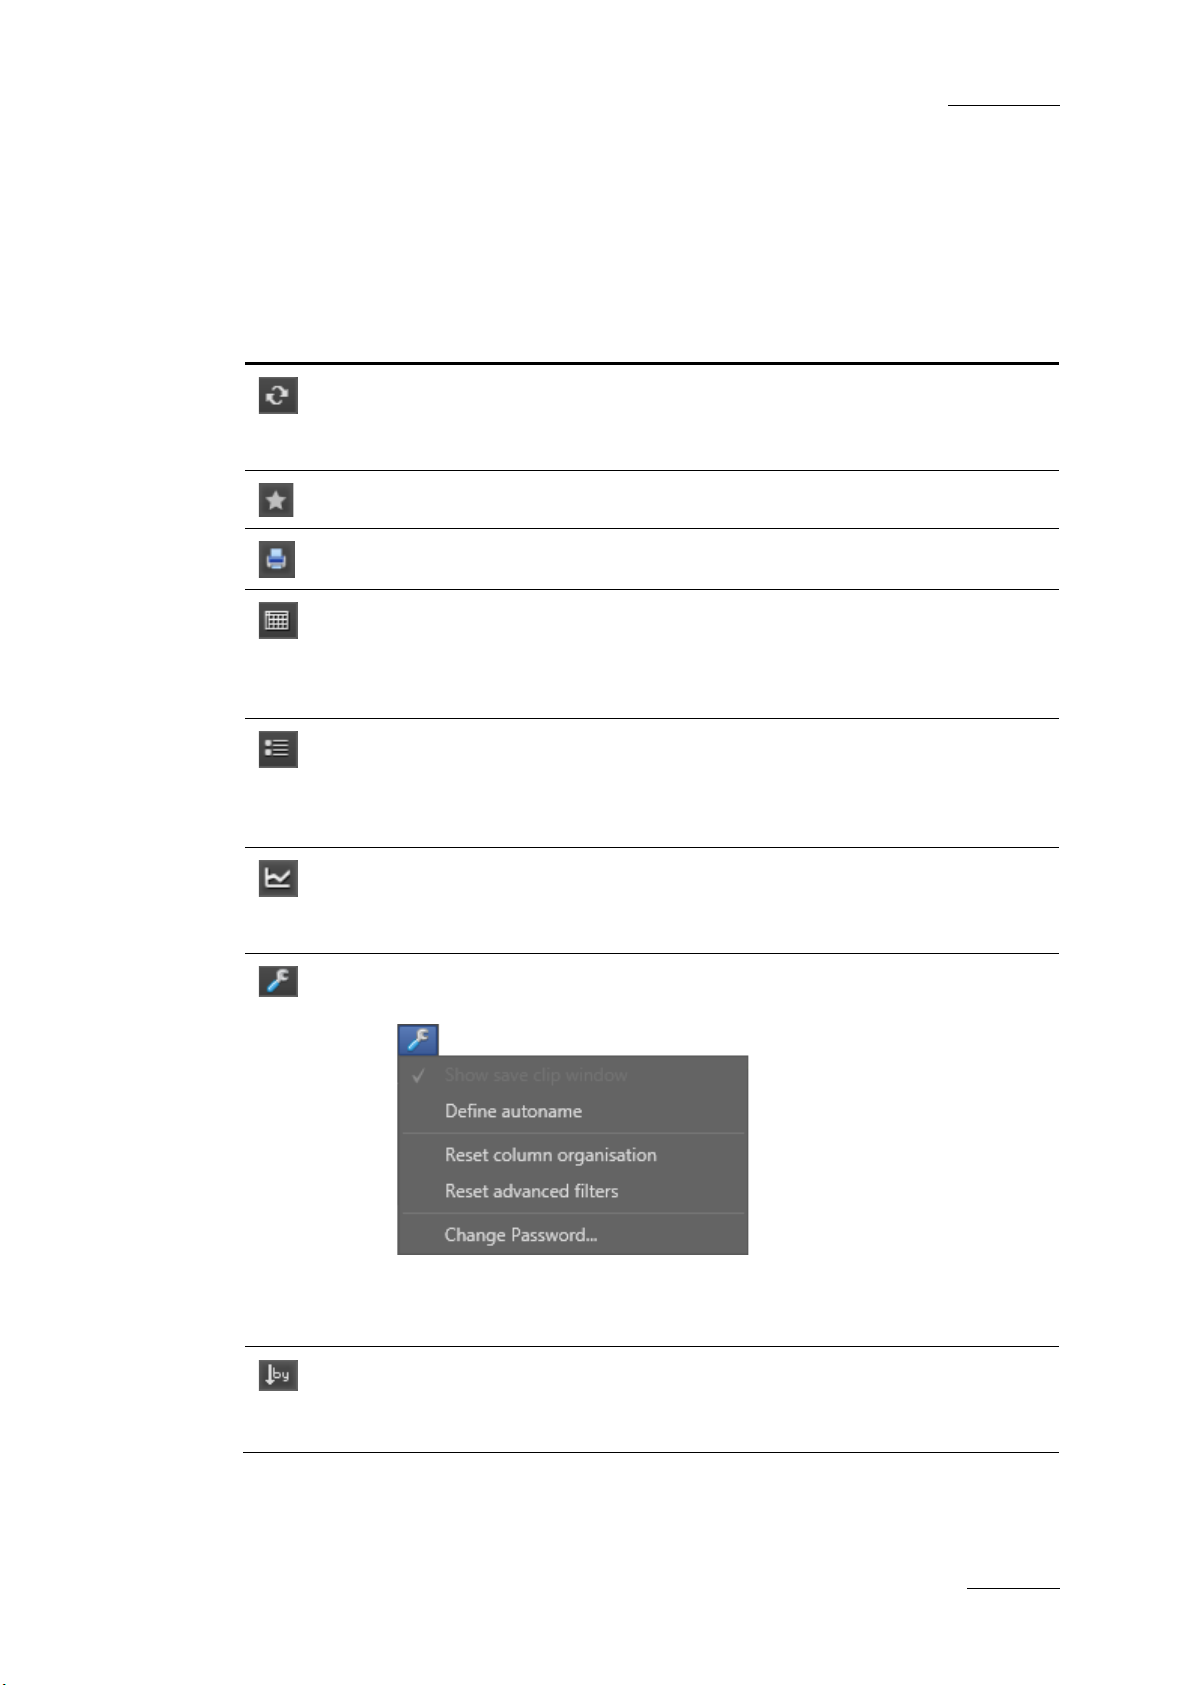
2.5 Toolbar
The toolbar is located on the top of the Elements grid/list.
The following table gives a description of the buttons located on the toolbar.
Button Description
Refreshes the whole interface: Elements grid/list, Tree view, Bins pane.
Users need to manually refresh the interface to view changes such as
new clip, new bin, deletion, changed status,…).
Favorites button: used to save applied filters or to recall a saved filter.
Print button: used to print the Elements grid or list displayed.
Show Grid Vi ew button: displays the d atabas e conte nt or the r esults of a
search in grid form.
See section ‘Grid View on page 12 under section 2.6 ‘Elements Grid /
List’.
Show List View button: d isplays the d atabase con tent or the r esults of a
search in list form.
See section ‘List view’ on page 13 under section 2.6 ‘Elements Grid /
List’.
Show Transfer Monitoring
requests, would they be scheduled, on-going, finished or failed.
See section 8.3.7 ‘Transfer Status Monitoring’ on page 74.
Tools button: displays a contextual menu with various options for the
management of IPBrowse operations.
These options are described in sections related to clip creation (6.2),
Elements grid organizat ion (2.6.4), Adva nced Se arch p ane dis pla y (3.4.2)
and IPBrowse opening (Error! Reference source not found.).
Order by butt on: onl y availabl e in List vie w. It disp la ys a contex tual m enu
listing the parameters the Elements list can be ordered by.
See section ‘How to Sort the Elements in the List’ on page 15.
Page 20
Issue 6.0.B
IPBrowse Version 6.0 – U ser Manual
EVS Broadcast Equipment – November 2012
12
2.6 Elements Grid / List
2.6.1 Introduction
The Elements grid or list repres ents the content of the tr ee branch selected in the T ree
view: XT clips an d files for the All and the Bins branches, logs for the Logs branch. It
also returns the result of a search applied to a selected element type.
The elements can be presented according to two views: a list or a grid. They are
described in the next section.
2.6.2 Selecting the View
Two buttons, located on the to olbar, a llows the s election of the Elements gri d/lis t display.
The layout differs according to the selected option.
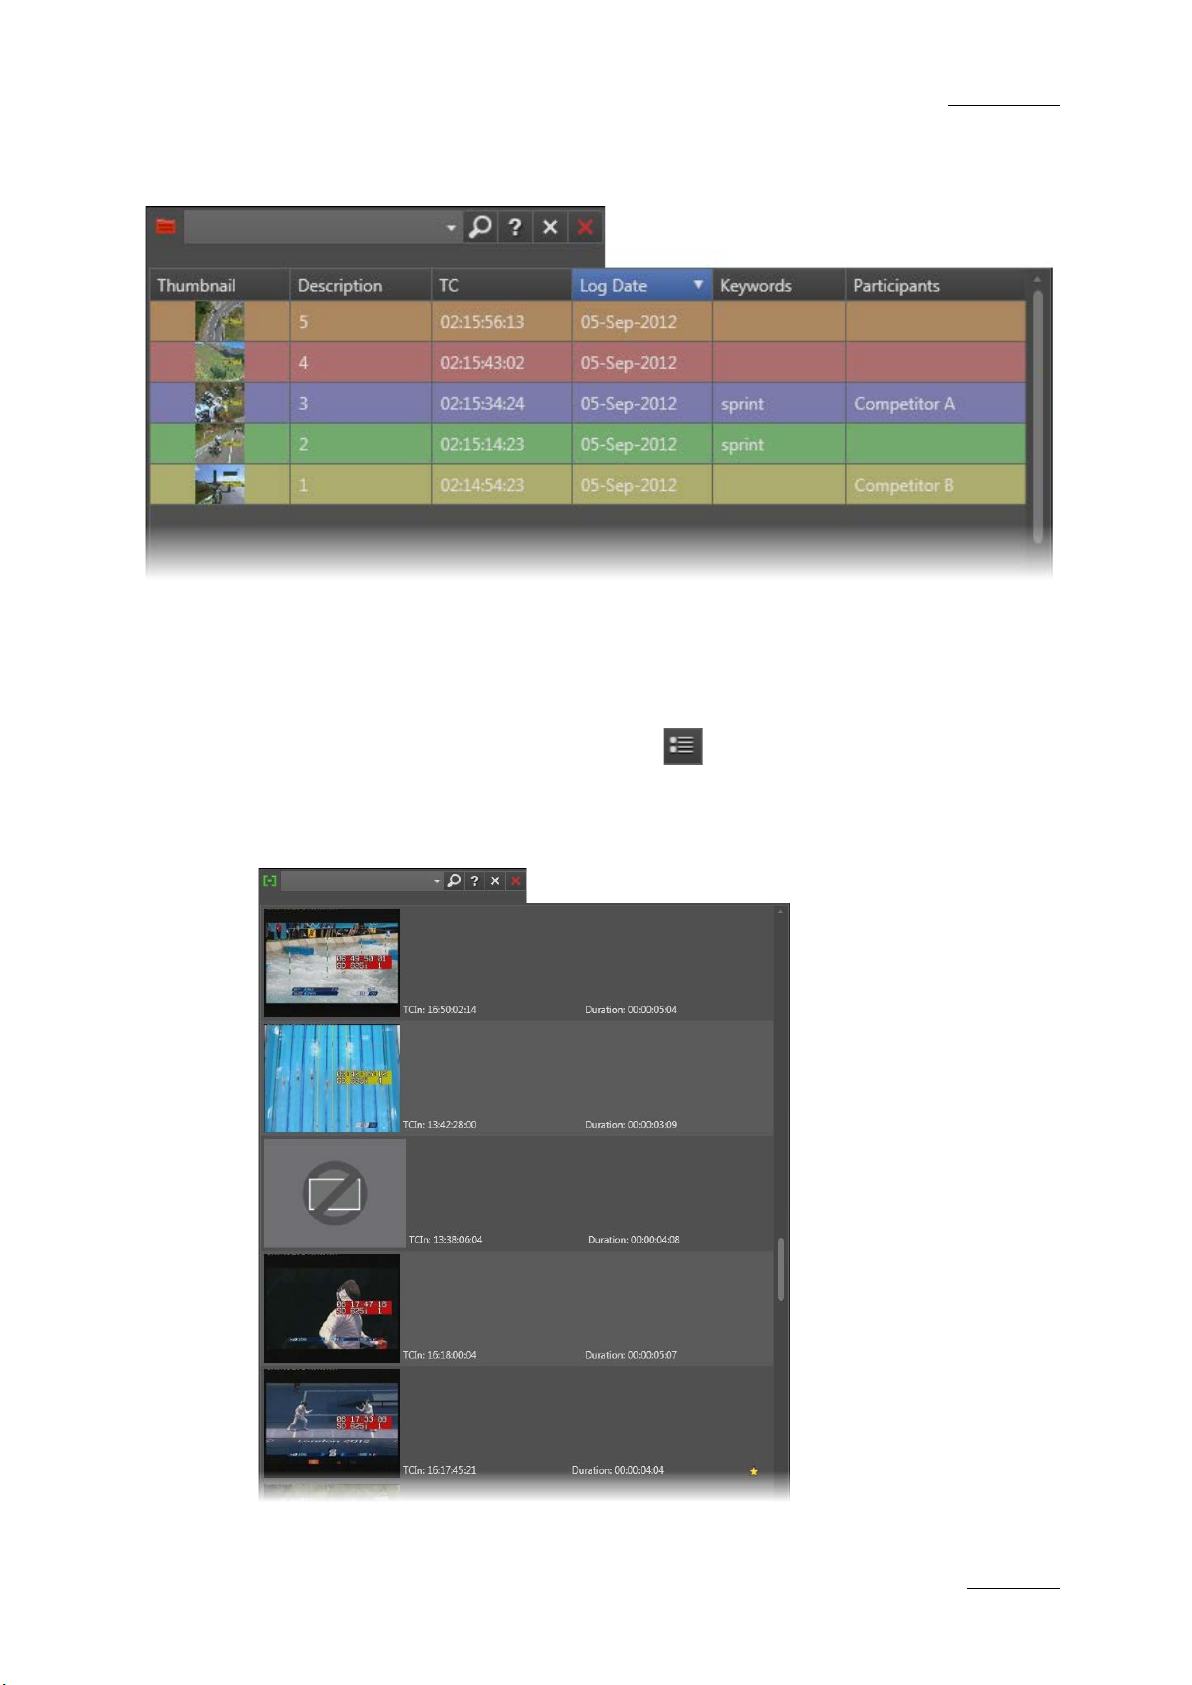
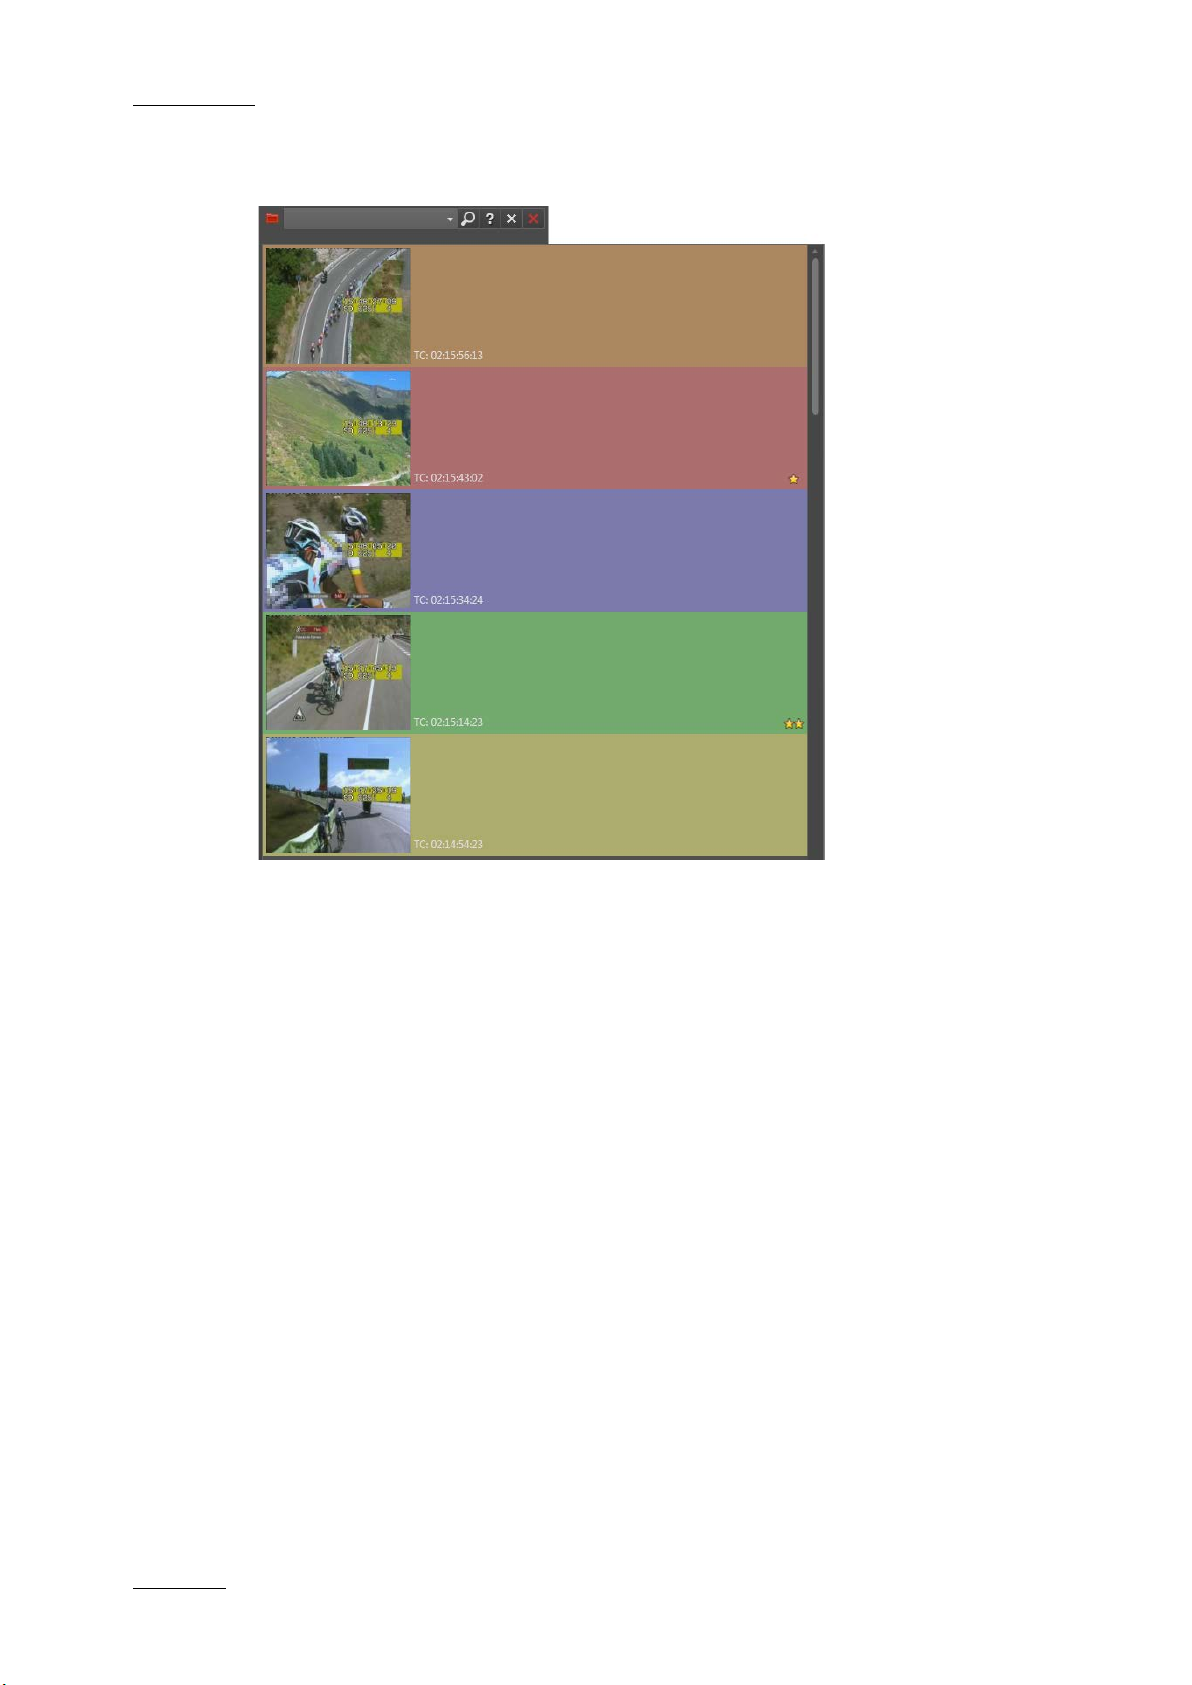
In both views, when the Logs branch is selected in the T ree view, the color of the lines
reflects the color assigned to the logs.
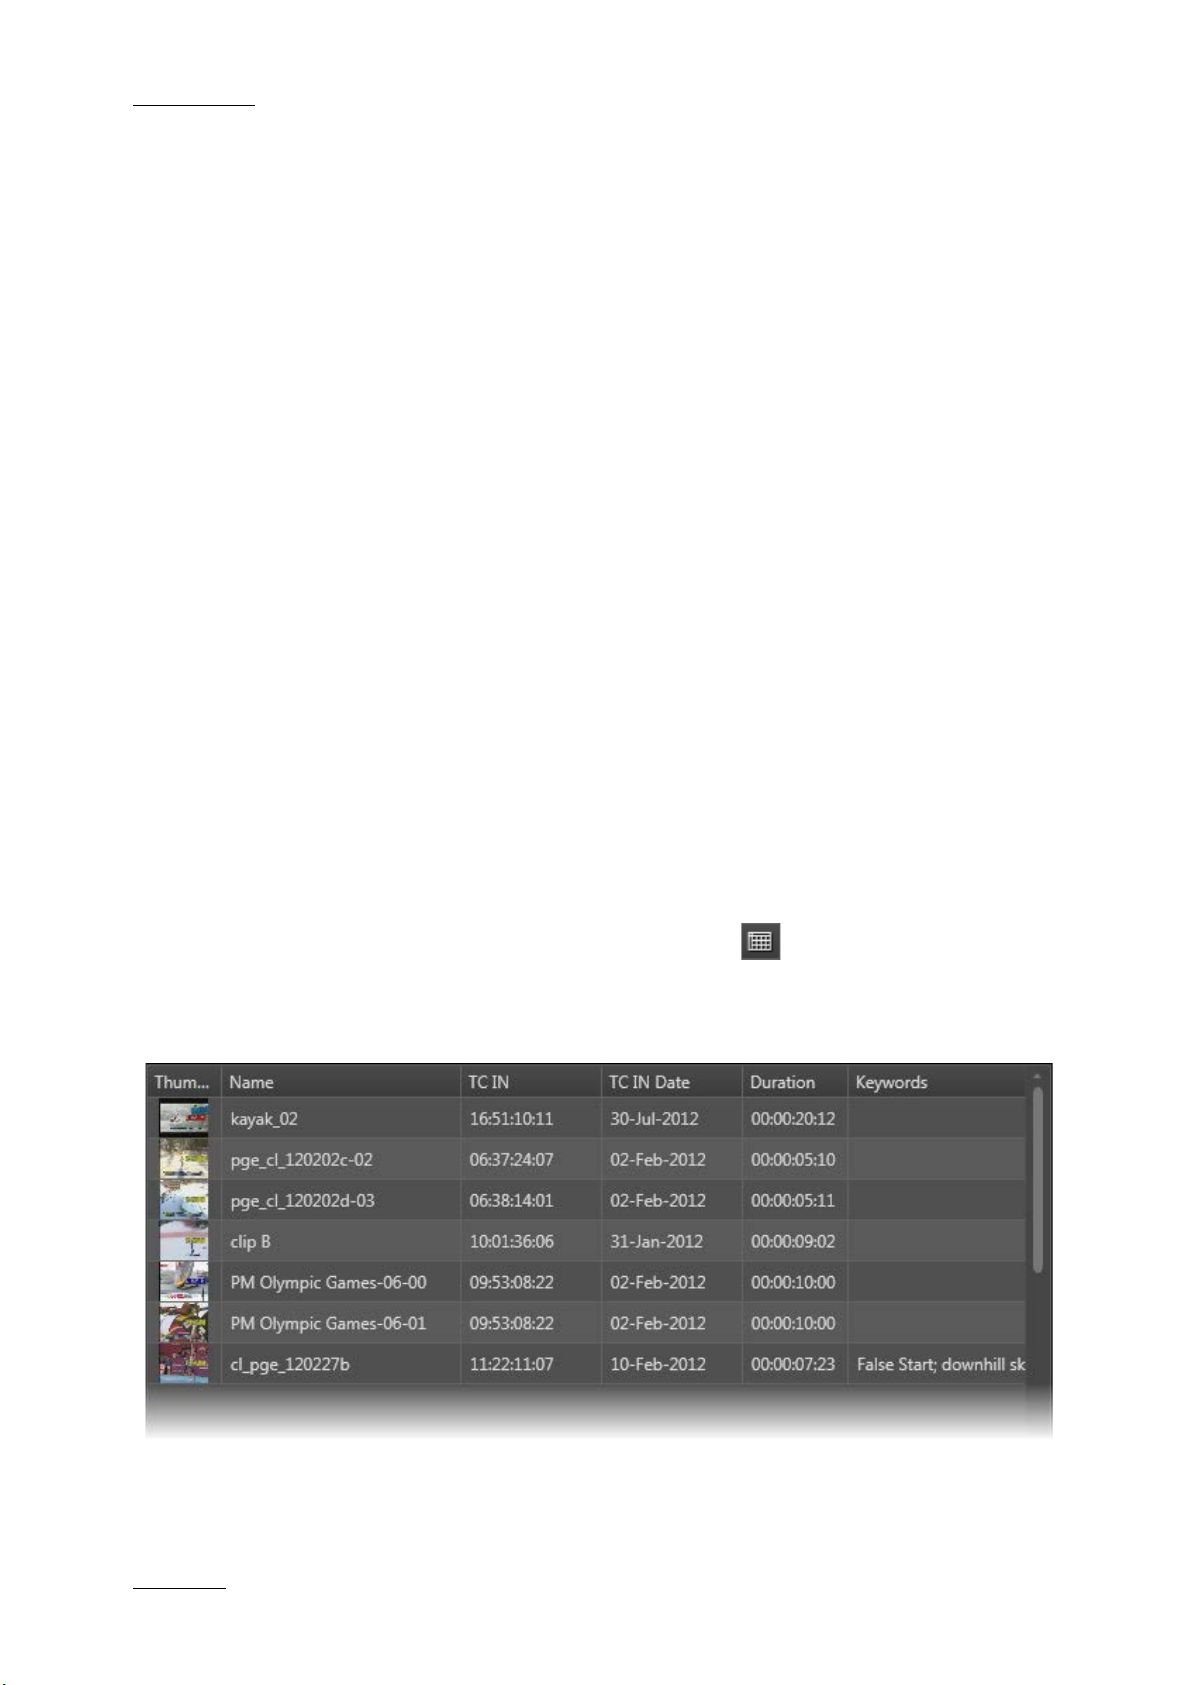
Grid View
Elements are presente d in rows and all the ir associate d parameters and metadata are i n
columns. When all of th em cannot be displa yed in the window, ver tical and/or hor izontal
scroll bars appear to fac ilitate further movem ent. A thumbnail can be displa yed for each
element if this has been set by the administrator.
This view is activated by clicking the Show Grid View button from the main toolbar.
Clips View
Page 21
IPBrowse Version 6.0 – U ser Manual
EVS Broadcast Equipment – November 2012
Issue 6.0.B
13
Logs View
List view
It shows a thumbnail and a few lines of metadata fields for each element.
It is activated by clicking the Show List View button from the main toolbar.
Clips View
Page 22
Issue 6.0.B
IPBrowse Version 6.0 – U ser Manual
EVS Broadcast Equipment – November 2012
14
Logs View
2.6.3 Sorting the Elements in the Grid or List
At start of the application, items are sorted with most recent on top.
You can change the sort order of data.
How to Sort the Elements in the Grid
In Grid view, click the column header for the parameter accordin g to which you want to
sort the elements.
The column header which is used for sorting is highlighted in blue. The little triangle
indicates the sorting order. Clicking the column header again changes the s orting order
from ascending to descending or vice versa.
Page 23
IPBrowse Version 6.0 – U ser Manual
EVS Broadcast Equipment – November 2012
Issue 6.0.B
15
How to Sort the Elements in the List
1.
Click the Order by button from the toolbar.
A menu displays all the available parameters the list can be ordered by. This
includes fixed parameters and parameters from metadata profiles associated to
clips.
2.
Select a parameter to sort the list according to it.
2.6.4 Organizing Columns in the Grid
In Grid view, columns can be resized and/or re-ordered. This new organization is
automatically saved and remembered. However, it is possible to reset the column
organization to default by clicking the Tools button on the main toolbar and
selecting Reset Column Organization.
Resizing Columns
A column can be resized by using the mouse pointer over columns intersection and
dragging it to the right or to the left.
Page 24

Issue 6.0.B
IPBrowse Version 6.0 – U ser Manual
EVS Broadcast Equipment – November 2012
16
an element
or press
on an element
operation on the Bins
Re-ordering Columns
To change the columns order, proceed in one of the following ways:
Select a column header and drag it to the left or right to the required place:
OR
1.
Right-click a column header.
A menu is displayed.
2. Select Organize.
A window opens and shows the list of columns in the current order.
3.
Re-order the columns by drag-and-drop operations .
4. Click OK.
2.6.5 Operations Allowed from the Elements
Grid/List
The following actions are possible from the Elements grid/list:
Operation Resulting action
Click on
line, clip or log
Double-click
Enter
line, clip or log
Drag-and-drop
pane
Simply selects the element.
Loads the element on the Player pane.
Refer to section 4 ‘Loading Media’, on page 41.
Copies a clip into a bin.
Refer to section ‘How to Copy Clip(s) from the Elements
Grid/List’, on page 64.
Page 25
IPBrowse Version 6.0 – U ser Manual
EVS Broadcast Equipment – November 2012
Issue 6.0.B
17
2.7 Player Pane
2.7.1 Purpose
The Player pane is the graphical interfac e used to vie w a recor d train, a clip or th e media
corresponding to a log timecode. Transport functions allow to navigate through the
loaded media. Thanks to clip creation buttons, clips can be created or trimmed, saved
and send to a bin in a few clicks.
2.7.2 Overview of the Player Pane
The Player pane contains the main areas highlighted on the following screenshot and
shortly described in the table below:
Page 26

Issue 6.0.B
IPBrowse Version 6.0 – U ser Manual
EVS Broadcast Equipment – November 2012
18
The jog bar allows you to move within the media at a
Area Description / See also…
1. Clip name This read-only field shows the name of the loaded clip or
train or the clip VarID.
2. Current Timecode
field
This field provides th e c urrent timecode of th e loa de d media.
See section 2.7.3.
It allows to jump to a specific timecode. See section 5.3.
3. Video Display This area displays the media loaded on the Player.
See section 2.7.4
It may also show audiometers for audio monitoring.
See section 4.6.
4. Time Information
fields
Those fields provide infor mation on the duration and the IN
and OUT points of the loaded item.
See section 2.7.5.
5. Jog bar
variable speed.
See section 2.7.6
6. Transport
commands
Those commands ar e us ed to browse in and play the loade d
media.
See section 5.2.2 for the list of tr ansport buttons, shortcuts
and ShuttlePro keys.
7. Maximize button This button is used to maximize the player on a second
8. Clip Creation
commands
9. Recorder Channel
Selection
commands
The E/E function and the Ret function are described in
section 4.3.
screen.
See section 2.7.7.
Those commands ar e used to create a clip from the loa ded
media.
See section 6.3 for the list of clip creation b uttons, shortcuts
and ShuttlePro keys.
Those commands ar e used to select a recorder channel or
to select a clip linked to the loaded clip.
Sections 4.5.3 and 4.3.5 respectively.
Page 27

IPBrowse Version 6.0 – U ser Manual
EVS Broadcast Equipment – November 2012
Issue 6.0.B
19
2.7.3 Current Timecode Display
Information displayed in the Current Timecode field can be changed as followed:
1. Right-click the Current Timecode field.
A contextual menu with the following options is displayed:
• Timecode
• Timecode and date
• Timecode and date and TC type (LTC or user)
• Timecode and TC type
2.
Select one of the options.
3. When the TC type is displayed, right-clicking it in the Current Timecode field
allows to shift from one type to the other (LTC or user).
2.7.4 Video Display
Video Display
The background of the Pla yer pane is gray when no media is loaded or when the loaded
media contains an on-line hi-res element.
The background of the Pla yer pane is red when the loaded media does not contain a n
on-line hi-res element.
Video Display Contextual Menu
A contextual menu is accessible by right-clicking the Video Display of the Player pane
when a media is loaded. It gives ac cess to audio param eters. Refer to section 4.6 ‘Audio
Configuration and Monitoring’ on page 49 for more information.
2.7.5 Time Information Fields
The following information is shown below the Video Display.
• TC IN (bottom left): timecode of the IN point
• TC duration (bott om centre): time interval between t he IN and OUT points, i.e. clip
duration
• TC OUT (bottom right): timecode of the OUT point
TC duration and TC OUT values may not be displayed in case of trains or growing clips.
TC values are the primary TC of the loaded media.
Page 28

Issue 6.0.B
IPBrowse Version 6.0 – U ser Manual
EVS Broadcast Equipment – November 2012
20
2.7.6 Jog Bar
When a clip is loaded, the jog bar is a graphical representation of its duration.
• The gray section represents the clip length, between the IN point and the OUT point.
• The blue sections represent the guardbands before t he IN point and after the OUT
point.
• The bullet indicator shows the current relative position in the clip.
• A green position indicator is shown when the IN button has been clicked and
represents the temporary IN point position until the UPDATE CLIP button or the NEW
CLIP button is clicked.
• A red position indicator is shown when the OUT button has been clicked and
represents the tem porary OUT point positio n until the UPDATE CLIP button or the
NEW CLIP button is clicked.
When a log is loaded, it is actually one of its associated clip which is loaded and the bullet
indicator stands on the log timecode.
When a local train is loaded, only the gray section is displayed.
2.7.7 Player Full Screen Mode
The Maximize button , or the keyboard shortcut, puts the P la yer pane in f ull-
screen mode. This mode can then be exited by press ing the key again or pressing
the Escape key.
Shortcuts remain usable. Controls appear at the bottom of the screen when keeping the
mouse over the area.
Page 29

IPBrowse Version 6.0 – U ser Manual
EVS Broadcast Equipment – November 2012
Issue 6.0.B
21
2.8 Bins Pane
2.8.1 Purpose
The Bins pane displays as m any tabs as there are bins in the [User] bin dir ectory related
to the current user. So, the Bins pane contains at least one tab for the [User] bin
automatically created b y the system for the user cur rently logged on the workstati on. T he
tab name is the bin name and contains the login identification of the user.
The following [User] bin directory from the
Tree view…
Each tab shows the bin content with one clip per line.
Only clips appear in bins. Would playlists and tim elines be present in a bin, th ey will not
be visible through IPBrowse.
…is reflected as follows in the Bins pane:
Page 30

Issue 6.0.B
IPBrowse Version 6.0 – U ser Manual
EVS Broadcast Equipment – November 2012
22
2.8.2 Overview of the Bins Pane
The Bins Pane contains the main areas highlighted on the following screenshot and
shortly described in the table below.
Area Description
1. Tab name Each tab has the name of the bin.
The first tab corresponds to the [User] bin automatically
created by the system for the current user and cannot be
deleted.
2. Delete Bin
button
This button is used to delete a bin and its content.
See section 7.2.3.
3. Add Bin button This button is used to create a new bin.
See section 7.2.1.
Page 31

IPBrowse Version 6.0 – U ser Manual
EVS Broadcast Equipment – November 2012
Issue 6.0.B
23
Thumbnail grabbed for the clip. Its display is optional. It
Area Description
4. Transfer Status
icon
This icon color gives indication on the transfer status of the
requested job. The icon layout may differ according to the
target selected for the transfer.
See section 8.3.2
5. Clip thumbnail
depends on the IPBrowse configuration.
6. Clip name Name of the clip.
7. Clip TC IN Timecode of the clip IN point.
8. Clip duration Duration of the clip.
9. Bin Total
Total duration of the bin content.
duration
10. Publish button This button is used to publish or unpublish the bin content to a
group of users.
See section 8.2.
11. Auto Send
button
This button is used to select the target destination to
automatically send a clip to a target at clip creation.
See section 8.3.3.
12. Send Bin button This button displays a contextual menu with different options
which allow to create an EDL with the bin content or to choose
the format in which the bin content will be sent (EDL or clips).
Sub-menus are used to select the target destination to send
the bin content to.
See sections 8.3.4 and 8.3.5.
13. Clear Bin button This button is used to clear the bin content.
See section 7.2.2.
Each tab shows the list of clips present in the bin and the bin total duration.
Page 32

Issue 6.0.B
IPBrowse Version 6.0 – U ser Manual
EVS Broadcast Equipment – November 2012
24
3. Searching for Media
3.1 Search Types
When the database contains large amounts of data, it may become difficult to find a
specific element. The IPBrowse offers several ways to restrict the list of elements
displayed in the Element grid/list and speed up your search:
• Branch select ion i n the T ree view - Select a branch of t he Tr ee vie w to lim it th e l is t to
some item types.
• Advanced search filter – Select specific criteria in the Advanced Search pane to
perform a search on a specific metadata of the elements.
• Quick text s ear ch - Enter free text in the Quick Text Search field to perform a s earc h
on a specific string.
These search tools are explained in detail below.
All these search tools can be combined.
Later on, users will be able to save an appl ied filter for later use and then appl y suc h a
Saved Filter in one click.
A search can also be f acilitated by order ing th e Elem ents gr id/list. Refer to section 2.6 for
more information.
3.2 Branch Selection in the Tree
The database content is presented in a tree structure, much like Windows Explorer.
The Tree view allows browsing and performing search in the database, among all the
clips, clips present in bins, or logs. Click the arrow next to a tree branch to expand a
branch. By browsin g the tr ee structure, a sel ection is m ade and displa yed in t he Element
grid/list.
If a Quick Text search has been applied to a branch and not cleared, the filter is
remembered when this branch is selected again.
Refer to section 2.2 ‘Tree View’ on page 6 for a descriptio n of t h e user int erface elements
of the Tree view.
Page 33

IPBrowse Version 6.0 – U ser Manual
EVS Broadcast Equipment – November 2012
Issue 6.0.B
25
but the user has typed another search string in the
3.3 Quick text Search
3.3.1 Purpose and Context of Use
The Quick Text Search is used to perform a search based on free text entered in the
Quick Text Search field. This field is available on the top of the Elements grid/list:
The Clip/Log icon displa yed on the top left of the Elem ents list depends on the s election
made in the tree: Clip icon for the All or Bins branches, Log icon for the Log
branch. The search is performed on the branch selected in the Tree view.
Refer to section 2.3 ‘Quick Text Searc h Area’ o n page 9 for the description of the butt ons
associated to the Quick Text Search field.
Users can enter a search string in one of the three following ways.
• They enter the search string in full in the Quick Text Search field.
• They click t he arro w next t o the Qui ck T ext Sear ch field, so the last 10 s earc hes are
displayed, and they select one of them.
• They start typi ng a s e arc h s tring i n th e Q uick Text Search fie ld, so the Autocomplete
function displays a list of proposals, and they select one of them.
3.3.2 Search for Synonyms
Users have the poss ibility to perform a sear ch for a word synon yms, provided that they
have been defined in the SQL thesaurus file and that t he correspondi ng option has been
set in the General setting Freetext searches behavior.
Then, a search perform with a search string will ret urn the predefined s ynonyms as we ll.
This function can be used to search for translated words.
3.3.3 Quick Text Search Field Display
The following table sho ws t he vario us disp la ys for the Quick T ext Sea rch field, and what
they mean:
Display Meaning
The field background is grey:
No Quick Text Search is entered or applied or
entered.
The field background is red:
The user is typing or has typed a search string, but
has not applied it yet, or a search has been applied
Page 34

Issue 6.0.B
IPBrowse Version 6.0 – U ser Manual
EVS Broadcast Equipment – November 2012
26
field and not applied it yet.
in Name or
.
Display Meaning
The field background is green:
The user has applied the search string, by pressing
ENTER. The result of the Quick Text Search is
displayed in the grid.
The down arrow next to the Quick Text Search
field gives access to the last 10 searched strings.
The lists differ from clips and logs.
3.3.4 Quick Text Search Syntax Rules
The Quick Text Search opt ion obeys specific rules which can be accessed via the
button next to the Quick Text Search field.
The string that you enter in the Quick Text Search field is analyzed according to the
following set of rules:
Search
String
Yellow card
Yellow | card
Search Result Logical
Searches for the words yellow and card, even if in
two different fields (c olumns), for exam ple yellow in
Name and card in Ke yword s.
For example a clip named “The Yellow Man” with
keywords “Red Card” will be found, since it has
yellow and card in 2 different fields.
Searches for yellow or car d, even if in two different
fields (columns), for example yellow
card in Keywords.
equivalent
“Yellow” AND
“card”
“Yellow” OR
“card”
"Yellow card"
card*
*card*
Searches for exact matches of Yellow card
Between the quotes, all characters are considered
as characters and not operators or wildcards.
Searches for card at the beginning of a word.
Searches for all words that include card.
”Yellow card”
“card”*
*”card”*
Page 35

IPBrowse Version 6.0 – U ser Manual
EVS Broadcast Equipment – November 2012
Issue 6.0.B
27
, the
: the line displays the result corresponding to the typed
Search
String
=card
Search operators may be combined.
Search Result Logical
Searches for a whole field that contains only card.
For example, if a field contains yellow card
=card condition will not return any result.
3.3.5 Autocomplete Function
Introduction
The Autocomplete function is a help service for the capture of search string.
As soon as the users start typing in the Quick Text Search field, the Autocomplete
function provides a list of matching words and sentences known by the system and
containing a word beginning with the typed letters.
equivalent
Autocomplete List
The list displayed below the Quick Text Search field is made up of different types of
results, as described in the following table.
Icon
Description
letters and …
… coming from the local search history. Se veral lines can be displayed, the
most recent are shown on the top of the list.
… coming from the 1 00 m o st po pu lar sea rche s asked to the s ystem since its
startup, and launched from the same tree branch. Several lines can be
displayed, the most frequent are shown on the top of the list.
… coming from an index of words entered in text fields, suc h as item name,
item source name, item VarID, tape ID , item metadata text. Keywords are not
indexed in this list. Several lines can be displayed, sorted alphabetically.
Page 36

Issue 6.0.B
IPBrowse Version 6.0 – U ser Manual
EVS Broadcast Equipment – November 2012
28
: the line displays the result corresponding to the typed
Icon Description
letters and …
The proposals made in the Autocomplete list for the last search, popular search and
indexed words depend on the tree branch selecte d at the t ime when a word is t yped. For
example, if the Logs v ie w is s elect ed in t he tre e v ie w, o nly the searches perform ed on the
Logs view will be proposed, as well as indexed words attac hed to logs.
Proposed keywords and participants are not linked to the selected tree branch.
… corresponding to a keyword from a keyword list.
… corresponding to a participant from a keyword list.
3.3.6 How to Perform a Quick Text Search with
the Autocomplete Function
To perform a Quick Text Search, proceed as follows:
1.
Select the tree branch you wish to perform a quick search on.
2. Type a search string in the Quick Text Search field.
A list of proposals is displayed as soon as you star t to type and it is r efined as yo u
go on typing.
3.
Select a line by using the mouse or the key.
4.
Press ENTER or click the Search button .
The search is launched with the selected proposal on the selected element type.
The search results are displa yed in the grid.
Page 37

IPBrowse Version 6.0 – U ser Manual
EVS Broadcast Equipment – November 2012
Issue 6.0.B
29
5.
To clear the applied Quick Text Search, c lick the Clear QT S button (white ) to
the right of the search field.
To clear all the filters applied, fr om the adva nced sear ch filters and f rom the Quick
Text search options, click the Clear All button (red ).
To perform a search based on two words, proceed as follows:
1.
Follow steps 1 to 4 from the previous procedure.
2.
Press and then type a second word.
A new list of proposals is displayed based on the second word.
3.
Select a line by using the mouse or the key.
4. Press ENTER or click the Search button.
The search is launched with the two selected proposals on t he selected element
type.
Page 38

Issue 6.0.B
IPBrowse Version 6.0 – U ser Manual
EVS Broadcast Equipment – November 2012
30
Page 39

IPBrowse Version 6.0 – U ser Manual
EVS Broadcast Equipment – November 2012
Issue 6.0.B
31
3.4 Advanced Search
3.4.1 Purpose and Context of Use
Advanced Search functions are available for detailed search operations. They allow
searches on clips or lo gs metad ata. The A dvanced Se arc h pane is loc ated o n the bottom
left part of the IPBrowse window.
3.4.2 Advanced Search Criteria Display
Depending on whether clips or logs are selected in the Tree view, different list of
advanced search crit eria are proposed. The y are available by clicking th e arrow next to
the Add Search Criteria field:
Some advanced searc h criteria are shown b y default. The y are set by the administrator.
To display an additional advanced search criterion, select one of the options from the
Add Search Criteri a menu. The selected c riterion is displa yed in the Advanced Sear ch
pane.
Page 40

Issue 6.0.B
IPBrowse Version 6.0 – U ser Manual
EVS Broadcast Equipment – November 2012
32
To remove an advanc ed se arch c riterion f rom the Ad vanced Se arch pa ne, c lick the cros s
in the criterion box. Applied filters are cleared as soon as a search criterion is removed.
To reset the advanced sear ch criteria to the default s election, click the Tools button and
select Reset Advanced Filters from the menu.
3.4.3 Advanced Search Fields Types
Different types of search fields exist:
• free text fields:
o in most of the cases, no button is available next to the field, e.g. Name field.
Search data can be entered directly in these fields.
o Keywords and Participants search fields
• field with an opt ion list: an ar row giving access to a list of options is available o n the
right of the field, e.g. Level field.
• field with a complex filter button on the right of the field giving access to a Select
Filter Condition window to define specific search values.
3.4.4 Search in Free Text Fields
Autocomplete Function
The Autocomplete function is a help service for the capture of search string. The
Autocomplete functio n, descr ibed in secti on 3.3.5 ‘Autocom plete Function ’ on page 27, is
also enabled during searches in free text search fields of the Advanced Search pane.
The Autocomplete list displayed under advanced free text search fields, is limited
compared to the one shown under the Quick Text Search field. No last search or
popular search is proposed.
• Only indexed words will be listed under free text fields other than Keywords or
Participants fields.
• Only keywords will be listed under the Keywords field.
• Only participants keywords will be listed under the Participants field.
Page 41

IPBrowse Version 6.0 – U ser Manual
EVS Broadcast Equipment – November 2012
Issue 6.0.B
33
Free Text Search Syntax Rules
The string that you enter i n the free text search f ield is analyzed ac cording to the sam e
set of rules as in the Quick Tex t Sear ch. R ef er to s ec tion 3.3.4 ‘Quick Text Search S yntax
Rules’ on page 26 for details on these rules.
How to Perform a Search through Free Text
Fields of the Advanced Search Pane
To enter search values in a free text field, proceed as follows:
1.
Select the tree branch in the Tree view.
2.
In the Advanced Search pane, display the search criterion.
3.
Type a search string in t he free-text field, based on the rules det ailed in section
‘Free Text Search Syntax Rules’ on page 33.
A list of proposals is displayed as soon as you star t to type and it is r efined as yo u
go on typing.
Example:
4.
Select a line by using the mouse or the key.
You can unselect a line by pressing the Escape key.
5. Press ENTER.
The search is launched on the selected tree branch.
The search results are displayed in the Elements grid/list.
Page 42

Issue 6.0.B
IPBrowse Version 6.0 – U ser Manual
EVS Broadcast Equipment – November 2012
34
3.4.5 Search in Non-Free Text Fields
Non-free text search fields of the Advanced Search pane give access to an option list to
select a search value or to a Select Filter Condition window to define specific search
values.
Search Criterion
Option List / Select Filter Condition Window
Type
Option List
(e.g. Level,…)
Click the arrow next to a search f ield to display the option list f or the
corresponding criterion.
Select one or more options.
Confirm your selection with the button or canc el and exit
by clicking the button.
Duration Click t he Complex Filter button next to a Duration field to open this
window:
Here you can enter a duration or use th e logical operators f rom the
right pane to construct a more complex search condition.
Page 43

IPBrowse Version 6.0 – U ser Manual
EVS Broadcast Equipment – November 2012
Issue 6.0.B
35
Search Criterion
Option List / Select Filter Condition Window
Type
Date Click the Complex Filter button next to a Date field to open the
calendar window.
In this window you ca n sel ect a spec ific d ate or one o f the opt ions in
the Last xx pane.
You can also use the logical operators from the right pane to
construct a more complex search condition:
• Select a logical operator on the right
• Select a date
• Select a second date
The search condition is displayed in the Condition field.
• Click OK or Cancel.
Page 44

Issue 6.0.B
IPBrowse Version 6.0 – U ser Manual
EVS Broadcast Equipment – November 2012
36
Search Criterion
Option List / Select Filter Condition Window
Type
Timecode Click the Complex Filter button next to a Timecode field to open
this window:
Here you can enter a tim ecode or use the logical oper ators f rom the
right pane to construct a more complex search condition:
• Select a logical operator on the right
• Enter a timecode value
• Click Add. It appears in the Condition field.
• Enter a second timecode value
• Click Add. The whole condition is displayed in the Condition
field.
• Click OK.
Keywords Click the Complex Filter button next to the Keywords field t o open
this window:
Page 45

IPBrowse Version 6.0 – U ser Manual
EVS Broadcast Equipment – November 2012
Issue 6.0.B
37
It appears in the Selected Keywords area and in the
Keywords which have been selected are shown with a
Search Criterion
Type
Option List / Select Filter Condition Window
1.
Select a Keyword Grid or a Dictionary in the Search For
pane, or click in the Search in Keyword List field.
The selected Keyword Grid or Dictionary, or the Keyword
List, is displayed in the right lower area of the window.
2.
Select a keyword.
Keyword Condition or Participant Condition field.
different color in the Keyword Grid, Dictionary or Keyword
List.
3.
If required, select a logical operator.
4.
Select a second keyword.
The whole condition is sho wn in the Keyword Condition or
Participant Condition field.
5.
Click OK.
The filter is applied to the Elements grid and the filter
condition is displa yed in the Keywords field.
Note
The NOT operator ma y be combined with one of the o ther
operators.
For advanced search based on a parent keyword defined in a
dictionary, refer to section 3.4.7 ‘Search for Child Keyword Based
on Parent Keyword’ on page 38.
3.4.6 How to Clear a Applied Advanced Search
Filter
To clear a filter applied on an advanced search criterion, click the button next to the
corresponding criterion:
When filters have been applied from the Advanced Search pane and from the Quick Text
Search field, all the f i lter s c an be cleared by clicking the Clear All Search Criteri a button
next to the Quick Text Search field.
Page 46

Issue 6.0.B
IPBrowse Version 6.0 – U ser Manual
EVS Broadcast Equipment – November 2012
38
3.4.7 Search for Child Keyword Based on Parent
Keyword
Context of Use
Child and parent keywords can be defined in a tree structure into the IPDirector
Dictionary tool. See s ection “Keywords Management” in the IPD irector user m anual for
more information.
During an event, you c an d ef ine a ll t he p layer names of a football team as child keywords
of the parent keyword “tea m name” or “countr y”. You can then assign a chi ld keyword to
logs or clips.
It is thereafter possib le to retrieve the m edia linked to all the ch ild keywords of th e same
parent keyword by using the recursive option.
How to Retrieve Child Keywords
To do so, proceed as follows:
1.
In the Tree view, select the tree branch you wish to perform a search on.
2. From the Add Search Criteria drop-down list, select the Keywords parameter.
The Keywords advanced search field is displayed.
3. Select the Recursive checkbox to perform a search on all the child keywords
linked to the selected parent keyword.
8.
Click the Complex Filter button .
The Select Filter Condition (Keywords) window opens.
4. In the Dictionaries field, select the dictionary name.
The keywords from the selected dictionary are displayed in the list.
Page 47

IPBrowse Version 6.0 – U ser Manual
EVS Broadcast Equipment – November 2012
Issue 6.0.B
39
5.
Select the parent keyword on which you want to perform a search.
It is displayed in the Keywords Condition field.
6.
Click the Recursive button if you have n ot selected th e Recursive optio n from the
Keywords advanced search field (step 3).
7. Click OK.
The list of elements containing a child keyword of the selected parent keyword is
displayed in the Elements grid.
Page 48

Issue 6.0.B
IPBrowse Version 6.0 – U ser Manual
EVS Broadcast Equipment – November 2012
40
3.5 Using Saved Filters
3.5.1 Introduction
Once you have defined filters and sear ch t erms, you may want to save them for later use.
You will then be able to apply the same set of filters with a single click.
3.5.2 How to Save Filters
To save filters, proceed as follows:
1.
Define the filters you wish to save, as explained above.
2.
Click the Favorites button .
A menu is displayed.
3. Select Save Current Applied Filters.
The New Filters window is displayed:
4.
Enter a name for the applied filters set.
5. Click OK to confirm.
The new filter name is listed in the menu available when clicking the Favorites
button.
3.5.3 How to Apply a Saved Filter
To apply a saved filter, proceed as follows:
1. Click the Favorites button.
A menu is displayed and lists the already saved filters.
2.
Select the desired saved filter.
Your filter is shown in the Advanced Search areas and/or Quick Text Search field
and they are applied in the grid.
Page 49

IPBrowse Version 6.0 – U ser Manual
EVS Broadcast Equipment – November 2012
Issue 6.0.B
41
by selecting a recorder
How to Load the Train from the
’ on
How to Load a Clip from the
4. Loading Media
4.1 Introduction
The meaning of loading media is explained hereafter.
A record train, or tra in, corresponds to the m edia recorded by a camer a and sent to an
EVS video server through a recorder channel. A recording ingest corresponds to the
same media for whic h an IN point has been mark ed at a specific timecode to start the
creation of a clip. To create clips on a train or a recording ingest with IPBrowse, the
corresponding record ing source mus t be selected in the Pla yer pane. In this manual, t his
action is called ‘loading a train or a recording ingest’.
The action of ‘placing’ a clip on the Player pane to previe w it, sub-clipping to it, and so on,
is called ‘loading a clip on the Player pane’.
4.2 Possible Loading Actions
Various element t ypes can be loade d on th e Pla yer pane in dif fer ent ways. T hese act ions
are the following:
Action See section…
Loading a train
channel
Loading the last loaded train (only in case
it was loaded just before the clip currently
loaded)
Loading the source train correspond ing to
the loaded clip
Loading a train from the previous or next
recorder channel
Loading a recording ingest b y selecting it
from a list.
4.3.2 ‘How to Select a Train’ on page 42.
4.3.3 ‘How to Reload the Last Loaded
Train’ on page 43.
4.3.4 ‘How to L oad the Source Media of a
Clip’ on page 44.
4.3.5 ‘
Previous or Next Recorder Channel
page 45.
4.4 ‘Loading a Recording Ingest’ on page
46.
Loading the last loaded recording ingest
(only in case it was loaded just before the
clip currently loaded)
Loading a clip from the Elements grid/list
Loading a clip from the Bins pane
4.4 ‘Loading a Recording Ingest’ on page
46.
4.5.1 ‘
Elements Grid/List’ on page 46.
4.5.2 ‘How to Load a Clip from the Bins
Pane’ on page 47.
Page 50

Issue 6.0.B
IPBrowse Version 6.0 – U ser Manual
EVS Broadcast Equipment – November 2012
42
associated to a log, or
Action See section…
Loading a clip linked to the clip currently
loaded
Loading a clip
loading a log
4.3 Loading a Train
4.3.1 Introduction
Based on the situation, there are several ways to load a train, as described below.
Thanks to the E/E f unction, us ers can q uickl y load a rec ord train or a record ing ingest on
the Player pane and play it live. They can a lso load it again in case they ha ve loaded
another media in the meantime.
4.3.2 How to Select a Train
4.5.3 ‘How to Load a Linked Clip’ on page
47.
4.5.4 ‘Ho w to Load a Clip Associated to a
Log’ on page 48.
From the E/E Contextual Menu
By right-clicking the E/E but ton a contextual menu shows the avai lab le EV S v ideo servers
with their rec order c ha nne l s and the list of clips being c ur rently ingested identified by the ir
name or VarID if any. Scheduled ingests are not shown.
Selecting a recorder channel loads the corresponding train at its current recording
position and plays it.
Selecting a recording in ges t directl y loads it at its currentl y recor ding pos ition (O UT point)
and plays it.
Page 51

IPBrowse Version 6.0 – U ser Manual
EVS Broadcast Equipment – November 2012
Issue 6.0.B
43
button is
With the ShuttlePro Key
To select a train with the ShuttlePRO, proceed as follows:
Press the Select Train key .
This calls up on the screen a list of available recorder channels:
By moving the jog dial you can move through the list to highlight the required train.
Press Select Train again to select it and exit the menu.
4.3.3 How to Reload the Last Loaded Train
If a clip is loaded on the Player pane, clicking the E/E button will unloa d it and load and
play the last loaded media (record train or recording ingest) at its current recording
position.
Note
In case the previously recording ingest is finished when the E/E
clicked, the clip is loaded on its IN point and stays in pause. If this clip has been
deleted, nothing happens.
User Interface
Button
Keyboard
Shortcut
ShuttlePRO key
Page 52

Issue 6.0.B
IPBrowse Version 6.0 – U ser Manual
EVS Broadcast Equipment – November 2012
44
4.3.4 How to Load the Source Media of a Clip
The Ret button becomes active if a clip has been loaded in the Player pane. By clicking it,
the same frame of media will be lo aded from the or iginal record train, if it is still available
(not overwritten in the rec order yet). This a llows to play be yond the clip boundar ies or to
define a new clip from the original record media.
User Interface
Button
Keyboard
Shortcut
→
ShuttlePRO key
+
Page 53

IPBrowse Version 6.0 – U ser Manual
EVS Broadcast Equipment – November 2012
Issue 6.0.B
45
4.3.5 How to Load the Train from the Previous
or Next Recorder Channel
When a train is load ed, it is possib le to lo ad a train from another recor der chan nel in o ne
of the following ways:
• Click the Prev or the Next button or shortcut.
• Click the arrow nex t to the Recorder Channel Sel ection field. A menu prov ides the
list of available recorder channels.
Select one of them to load the corresponding train.
Two situations can occur:
• The currently loaded recorder channel is not part of a ganged recorder channels
group. Then, users can select any recorder channel that they are allowed to see.
In th e example of 3 record er channels where CAM B and C ar e ganged and CAM A
is loaded, users will be able to select any of the 3 recorder channels:
• The currentl y loaded recorder channe l is part of a ganged recorder channels gr oup.
Then, users can only select one of the recorder channels from the group.
In the example of 3 r ecorder channels where CAM B and C are ganged a nd CAM B
is loaded, users will be abl e to select CAM B or CAM C with the Pre v/Next functions
or with the Recorder Channel Selection field:
Operation User Interf a ce
Button
Previous
Recorder
Keyboard
Shortcut
ShuttlePRO key
Next Recorder
Page 54

Issue 6.0.B
IPBrowse Version 6.0 – U ser Manual
EVS Broadcast Equipment – November 2012
46
Operation User Interf a ce
Button
Select
Recorder
Keyboard
Shortcut
-
ShuttlePRO key
4.4 Loading a Recording Ingest
An ingest being currently recorded may be loaded on the Player pane in one of the
following ways:
• Right-clic k the E/E button and select a recording ingest f rom the contextual menu.
Refer to section 4.3.2 ‘How to Select a Train’, on page 42.
• Click the E/E button t o load the last loaded recording ingest. Refer to s ection 4.3.3
‘How to Reload the Last Loaded Train’ on page 43.
• Select the corresponding line in the Elements grid/list and do one of the following:
o press ENTER.
o double-click the line.
o drag the recording ingest to the Player pane.
The growing clip will then be loaded on its ‘OUT’ point, currently being ingested, and
played.
4.5 Loading a Clip
4.5.1 How to Load a Clip from the Elements
Grid/List
Once you have identif ied, in the Elements grid o r list, the clip you wish to previ ew, you
can load it on the Player pane in one of the following ways:
• Select the clip line in the Elements grid/list and press ENTER.
• Double-click the clip line in the Elements grid/list.
• Drag the clip line to the Player pane
The clip is loaded on its TC IN.
Page 55

IPBrowse Version 6.0 – U ser Manual
EVS Broadcast Equipment – November 2012
Issue 6.0.B
47
4.5.2 How to Load a Clip from the Bins Pane
Once you have identif ied, in the Bins pane, t he clip you wish to prev iew, you can load it
on the Player pane in one of the following ways:
• Select the clip line in the Bins pane and press ENTER.
• Double-click the clip line in the Bins pane.
• Drag the clip line to the Player pane
The clip is loaded on its TC IN.
4.5.3 How to Load a Linked Clip
Linked clips are clips created at the same time by ganged recorder channels. They
correspond to different angles of the same recorded media.
When a clip alread y loaded on the Player pane has linked clips, it is poss ible to rapidly
load one of them in one of the following ways:
• Click the Prev or the Next button or shortcut.
Operation User Interf a ce
Element
Previous
Linked Clip
Keyboard
Shortcut
ShuttlePRO key
Next Linked
Clip
• Click the arrow nex t to the Recorder Channel Sel ection field. A menu provides the
list of recorder channels from which the linked clips have been recorded.
Select one of them to load the corresponding linked clip.
Operation User Interface
Element
Select Linked
Clip
Keyboard
Shortcut
-
ShuttlePRO key
Page 56

Issue 6.0.B
IPBrowse Version 6.0 – U ser Manual
EVS Broadcast Equipment – November 2012
48
4.5.4 How to Load a Clip Associated to a Log
Once clips containing a log timecode have been created, the IPDirector system
automatically associat es th es e c lips to th e lo g. F rom IPBrowse, it is possible to load a c li p
associated to a log at the log timecode. It can be seen as loading a log.
To do so, proceed as follows:
1.
In the Tree view, select the Logs branch or a log directory or bin.
The corresponding list of logs is displayed in the Elements grid/list.
2.
In the Elements grid/list, do one of the following:
• Select the log line and press ENTER.
• Double-click the log line
• Drag the log line to the Player pane
The clip associated to the log is loaded on the Player pane, at the log timecode.
Note
On some occasions , a log has no ass ociated c lip , so the log c annot b e
previewed.
3.
If the log has been created on a ganged recorder c hannel, it has been assoc iated
to all the linked clips. You can load another associate d clip thanks to the Prev or
Next functions or the Recorder Channel Selection field, as described in s ection
4.5.3 ‘How to Load a Linked Clip’ on page 47.
The clip is loaded on the Player pane on the log timecode.
Important
If you create a sub-clip whic h contains a log timecode, this ne w clip will
be associated to the log and it will be counted as such in the Logs
Elements list but you will not be able to load it by this way.
You can then browse the clip, create a new clip and send it to a bin.
An associated clip cannot be trimmed because the IPDirector has protected it.
Page 57

IPBrowse Version 6.0 – U ser Manual
EVS Broadcast Equipment – November 2012
Issue 6.0.B
49
Opens the Audio Output Channels window allowing the
4.6 Audio Configuration and Monitoring
4.6.1 Audio Parameters
Audio parameters are acces sible by right-clicking the Video Display of the Player pane
when a media is loaded. The table below describes the available option.
Option Meaning
OCX Audio
Configuration
4.6.2 Audio Configuration
selection of audio ch annels to be lis tened to and the s election
of the number of audio channels for the audiometers display.
Refer to section
4.6.2 ‘Audio Configuration’ on page 49.
To select the audio channels you want to listen to, proceed as follows:
1.
Right-click the Video Display.
2. Select OCX Audio Configuration from the contextual menu.
The Audio Output Channels window opens:
Page 58

Issue 6.0.B
IPBrowse Version 6.0 – U ser Manual
EVS Broadcast Equipment – November 2012
50
3. On the Left line, click the cell corresponding to the channel you want to associate to
the left ear.
4. On the Right line, click the cell corres ponding to th e channel you want to ass ociate
to the right ear.
5.
If required, adjust the input gain.
6.
For an easy retrieval of the configuration, you can save it:
enter a name in the Template Name field and press the Add button.
7. Click OK.
The audio configuration is automaticall y applied.
4.6.3 Audio Level Monitoring
The audio level can be monitored with audiometers on the sides of the Video Display
window.
To select the number of audio channels to be displayed, proceed as follows:
1.
Right-click on the Video Display.
2. Select OCX Audio Configuration from the contextual menu.
The Audio Output Channels window opens.
3.
Click the radio button corresponding to the number of audio channels to display.
The audiometers are shown in the Player pane.
Example for a selection of 2 channels:
Page 59

IPBrowse Version 6.0 – U ser Manual
EVS Broadcast Equipment – November 2012
Issue 6.0.B
51
Example for a selection of 16 channels:
Page 60

Issue 6.0.B
IPBrowse Version 6.0 – U ser Manual
EVS Broadcast Equipment – November 2012
52
Starts to play the loaded
clips, at 33% for SLSM
clips (3x) or at 50% for
Stops the preview of the
5. Moving through Media
5.1 Introduction
The Player pane provides a j og bar and more trans port buttons to na vigate in the loaded
element. In addition, se veral options a llow to direct ly jump to a gi ven timecode within the
media.
5.2 Transport Functions
5.2.1 Jog Bar
The position indic ator can be m oved with the mouse alo ng the jog bar to browse th e clip
and to play it from any position if needed.
Refer to section 2.7.6 ‘Jog Bar’ on page 20 for a des cription of the elements of the jog
bar.
5.2.2 Transport Buttons and Shortcuts
The following table gives the meaning of each transport operation. A button and/or a
keyboard shortcut can be used to perform each action. The ShuttlePro device has
buttons dedicated to most of these functions as well.
Operation User
Interface
Button
Play
↔
Pause
Keyboard Shortcut ShuttlePRO key Description
or
media at 100% for normal
SLSM clips (2x).
loaded media.
or
Page 61

IPBrowse Version 6.0 – U ser Manual
EVS Broadcast Equipment – November 2012
Issue 6.0.B
53
Starts moving backwards
Starts moving backwards
through the media at the
Starts moving forward
through the media at
Moves from the current
position to the previous
Moves from the current
position to the following
Operation User
Interface
Button
Play
Backward /
Pause
Goto IN
Goto OUT
Keyboard Shortcut ShuttlePRO key Description
+
+
through the media.
Moves the current position
+
to the IN point of a clip
Moves the current position
+
to the OUT point of a clip
Fast
Rewind
Fast
Forward
Goto
Previous
Frame
Goto Next
Frame
preset speed.
See section 5.2.3.
preset speed.
See section 5.2.3.
or
frame.
or
frame.
Page 62

Issue 6.0.B
IPBrowse Version 6.0 – U ser Manual
EVS Broadcast Equipment – November 2012
54
Moves 10 frames before
Operation User
Interface
Button
Go 10
Frames
Backward
Go 10
Frames
Forward
Keyboard Shortcut ShuttlePRO key Description
or
+
Moves 10 frames after the
or
+
the current position.
current position.
5.2.3 Fast Forward and Fast Rewind Speed
The Fast Forward speed and the Fast Rewind speed can be adapted by means of
buttons or keyboard shortcuts.
User Interface Buttons
Right-click the Fast Rewind button or the Fast Forward button and select one of the
options from the contextual menu.
Keyboard Shortcuts
Press the Fast Rewi nd (J) or the Fast Forward (L) shor tcut to start playing the m edia
backward or forward. Then, press the shortcut again to change speed.
Possible speed values are: 1x, 2x, 3x, 5x, 10x.
Page 63

IPBrowse Version 6.0 – U ser Manual
EVS Broadcast Equipment – November 2012
Issue 6.0.B
55
5.3 Jumping to a Given Timecode within
the Loaded Media
There are several ways to jump to a given timecode of a loaded media:
• Click at one position on the jog bar
• Click on the cursor and move it along the jog bar
• Enter a new timecode value in the Current Timecode field and press ENTER.
Page 64

Issue 6.0.B
IPBrowse Version 6.0 – U ser Manual
EVS Broadcast Equipment – November 2012
56
6. Creating a Clip and Sending it
to a Bin
6.1 Introduction
As soon as a media has be en lo ad ed, us er s c an create a new clip from this loaded media
thanks to the clip creation functions of the Player pane. A clip can be created from a
record train, a record ing ingest or a clip. An existing clip c an be re-trimmed on the Player
pane, if it has not been protected.
Clips are sent to a b in as soon as they are saved. So, a b in must have been selected
prior to or at clip creation. Refer to section 6.6 ‘Sending a Clip to a Bin’ on page 60.
6.2 Clip Settings
Most of the settings cannot be defined from the IPBrowse interface and are directly
applied from IPDirector.
The only settings that the us er can configure from the IPBro wse interface relate to autonaming of clip and the display of the Save Clip window.
6.2.1 Define Clip Autoname
The Define Autoname setting allows the user to define auto-naming rules for new clips.
To define a clip auto-name, proceed as follows:
1.
Click the Tools button on the main toolbar.
A contextual menu is displayed.
2. Select Define Autoname.
The Autoname window opens and lists the various possible format string options
with a brief explanation:
Page 65

IPBrowse Version 6.0 – U ser Manual
EVS Broadcast Equipment – November 2012
Issue 6.0.B
57
Sets an IN point at the
timecode shown in the
corresponding to the blue
represents the IN point on
3.
Double-click an item to append it to the format string.
4. Click OK.
The auto-name setting is saved in the IPDirector Auto-Name settings.
6.2.2 Show Save Clip Window
The Show Save Clip Window setting allows to displa y the Save Clip window when t he
users click the Save button at clip creation. This settin g is acc essed b y click ing the Tools
button on the main toolbar and by selecting Show Save Clip Window.
This setting is unavailable and automaticall y selected when no clip auto-n ame has been
defined in the Define Auto-name setting. When a clip auto-name has been def ined, the
Show Save Clip Window setting is available and can be selected or not.
The selected option for this setting is reflected in the Open Save Clip Window setting
under the Clips/General settings of IPDirector.
6.3 Clip Creation Buttons and Shortcuts
The following table gives the meaning of each clip creati on operation. A button and/or a
keyboard shortcut can be used to perform each action. The ShuttlePro device has
buttons dedicated to most of these functions as well.
Operation User
Interface
Button
Mark IN
Keyboard Shortcut ShuttlePRO key Description
or
Current Timecode field and
indicator position in the jog
bar. Then a green indicator
the jog bar.
Page 66

Issue 6.0.B
IPBrowse Version 6.0 – U ser Manual
EVS Broadcast Equipment – November 2012
58
Sets an OUT point at the
timecode shown in the
ding to the blue
bar. Then a red indicator
Clears the IN point which
has just been set and not
has just been set and not
Saves the new clip.
the Save Clip window will
clip after having marked a
Operation User
Interface
Button
Mark OUT
Clear IN
Clear OUT
Keyboard Shortcut ShuttlePRO key Description
or
Current Timecode field and
correspon
indicator position in the jog
represents the OUT point on
the jog bar.
+
yet saved.
Clears the OUT point which
+
yet saved.
Clear Marks
Save Clip
Update Clip
Clears the IN and the OUT
points which have just been
set and not yet saved.
Depending on the settings,
open or not.
Saves the new settings of a
+
new IN point and or a new
OUT point.
Page 67

IPBrowse Version 6.0 – U ser Manual
EVS Broadcast Equipment – November 2012
Issue 6.0.B
59
, the Save Clip
Note
When the cursor is l ocated in a text are a, the key can be pressed
together with a ke yboard shortcut to perform one of the following action: M ark
IN, Mark OUT, Save Clip, Update Clip.
6.4 How to Create a Clip
To create a clip from a train or a recording ing est or to create a sub-clip f rom an exis ting
clip, proceed as follows:
1.
Load a media (train, recording ingest, clip or a log) on the Player pane.
2.
If you have loaded a clip, browse through it to select the point to be marked IN
and/or the point to be marked OUT.
3.
Set an IN point at the required timecode.
4.
Set an OUT point at the required timecode.
5.
Click the Save Clip button or use the dedicated shortcut.
• If the Show Save Clip Window setting has not been selected, make sure the
bin tab where you want to send the clip has been se lected before clicking the
Save button. Refer to section 6.6 ‘Sending a Clip to a Bin’ on page 60.
The procedure is finished.
• If the Show Save Clip Window setting has been selected
window opens:
Follow steps 6 to 8.
6. Enter a name for the clip in the Name field.
7. In the Bin field, select the bin where you want to send the clip.
8. Click the Save button to save the clip from the Save Clip window.
The clip is saved in the IPDirector database and the clip is sent to the selected bin.
If the selected recorder channe l is part of a ganged group, clips are created o n each of
them and are linked. They are all sent to the bin. They all receive the same name,
followed by xx, where xx starts with 00 and increments for each additional camera angle.
Page 68

Issue 6.0.B
IPBrowse Version 6.0 – U ser Manual
EVS Broadcast Equipment – November 2012
60
6.5 How to Trim a Clip
An existing clip can be trimmed and saved with the same name, so the updated clip
replaces the previous one. A clip associated to a log cannot be trimmed because
IPDirector has protected it.
To trim a clip, proceed as follows:
1.
Load a clip on the Player pane.
2.
Browse the clip to mark a new IN point and/or a new OUT point.
3. Click the Mark IN button and/or the Mark OUT button respectively.
4.
Click the Update button to save the updated clip.
The clip is saved in the IPDirector database.
6.6 Sending a Clip to a Bin
When the Save C lip w indo w is dis p layed at clip creation, t he bi n automatically selected to
receive the new clip corresponds to the bin tab open in the Bins pane. Another
destination bin can be selected from the window at that time.
When the Save Clip window is not displa yed at clip creation, the ne w clip is aut om aticall y
sent to the bin corresp onding to the bin tab open i n the Bins pane. So, in this case, the
destination bin must be chosen by selecting the tab before clicking the Save button .
Page 69

IPBrowse Version 6.0 – U ser Manual
EVS Broadcast Equipment – November 2012
Issue 6.0.B
61
7. Organizing the Bins
7.1 Introduction
In the IPBrowse work flow, users put a selectio n of se quences int o predef ined bins where
clips can be re-ordered. T hen, they are able to publis h the bin content to a gro up or to
send it to se lected destinat ion(s), such as pos t-production s ystems. As users som etimes
work on several edits at the same time, it is useful to have a bin per edit the user is
working on.
7.2 Bins Management
7.2.1 How to Add a Bin
1.
Click the button on the right of the last tab.
The Create a New Bin window opens:
2.
Enter a name for the bin.
3. Click OK.
Created bins are sorted alphabetically on the right of the first tab, which is always the
[User] bin created by the system for the current user.
The new bin appears in the Tree view as well.
A new tab corresponding to the new bin is displayed.
Page 70

Issue 6.0.B
IPBrowse Version 6.0 – U ser Manual
EVS Broadcast Equipment – November 2012
62
7.2.2 How to Clear the Content of a Bin
1.
Select the tab you want to clear.
2. Click the Clear Bin button:
A confirmation message is displayed.
3. Click Yes.
The clips not owned by the current user are removed from the bin but remain in the
database.
The clips owned by the current user are deleted from the bin and from the database.
The bin remains but it is empty.
7.2.3 How to Delete a Bin
1.
Select the tab you want to remove.
2.
Click the button next to the selected tab.
A confirmation message is displayed.
3. Click Yes.
The clips not owned by the current user are removed from the bin but remain in the
database.
The clips owned by the current user are deleted from the bin and from the database.
Then, the bin is deleted and removed from the IPBrowse interface.
Note
The [User] bin created by the system is the only bin which can not be del ete d.
Page 71

IPBrowse Version 6.0 – U ser Manual
EVS Broadcast Equipment – November 2012
Issue 6.0.B
63
a clip from the
Copy a clip from one
Copy a clip from the
a clip from one
7.3 Clips Management
This section describes all the actions which are possible on clips within the Bins pane and
how they can be performed.
7.3.1 Adding Clips to a Bin
Clips can be added to a bin in different ways:
To See section…
Send
Player pane to a bin
bin to another one
Elements grid/list
Move
bin to another one
6.6 ‘Sending a Clip to a Bin’ on page 60.
‘How to Copy Clip(s) from One Bin to Another’ on page 64.
‘How to Copy Clip(s) from the Elements Grid/List’ on page 64.
‘How to Move Clip(s) to Another Bin’ on page 65.
7.3.2 Deleting Clip(s)
To delete one or several clips, proceed in one of the following ways.
1.
Select the clip(s) you want to delete from the bin.
2.
Right-click the list.
A contextual menu is displayed.
3. Select Delete.
4. Click Yes to confirm.
OR
1.
2. Press the Delete key.
3. Click Yes to confirm.
The clips not owned by the current user are removed from the bin.
The clips owned by the current user are removed from the bin and deleted from the
database.
Select the clip(s) you want to delete from the bin.
Page 72

Issue 6.0.B
IPBrowse Version 6.0 – U ser Manual
EVS Broadcast Equipment – November 2012
64
7.3.3 Copying Clips
How to Copy Clip(s) from One Bin to Another
To copy clips from one bin to another bin, proceed as follows:
1.
In the Bins pane, select the clip(s) you want to copy.
2.
Right-click the list.
A contextual menu is displayed.
3. Select Copy.
A sub-menu shows the list of bins from the [User] bin directory, including the
source bin:
4.
Select the bin you want to copy your clips to.
The clips are copied to the other bin.
Note
The destination b in can be the s am e as t he so urce b in. S o, dup licated clips wil l
be present in the same bin.
How to Copy Clip(s) from the Elements Grid/List
To copy one or several clips from the Elements grid/list to a bin, proceed as follows:
1.
In the Elements grid/list, select the clip(s) you want to copy.
2.
Drag them to the bin’s tab where you want to copy them.
The clips are copied into the bin.
Page 73

IPBrowse Version 6.0 – U ser Manual
EVS Broadcast Equipment – November 2012
Issue 6.0.B
65
7.3.4 Moving Clips
How to Move Clip(s) to Another Bin
To move a clip from one bin to another one, proceed as follows:
1.
In the Bins pane, select the clip(s) you want to move.
2.
Right-click the list.
A contextual menu is displayed.
3. Select Move.
A sub-menu shows the list of bins, except the source bin.
4.
Select the bin you want to move your clips to.
The clips are moved to the other bin.
How to Move Clip(s) within a Bin
You can move clips within a bin to put them in a selected order.
To do so, proceed as follows:
1.
In the Bins pane, select the clip(s) you want to move.
2.
Drag it/them to the position where you want to move. During the drag and drop
operation, a thick line will be displa yed bet ween the c lip lines where the clip(s ) will
be dropped in order to highlight the drop position.
Page 74

Issue 6.0.B
IPBrowse Version 6.0 – U ser Manual
EVS Broadcast Equipment – November 2012
66
7.3.5 Editing Clips
How to Edit a Clip
To edit the clip data, proceed as follows:
1.
Select the clip you want to edit in the Bins pane.
2.
Right-click the clip.
A contextual menu is displayed.
3. Select Edit.
The Edit Clip window opens.
4.
Add or change clip data.
For more information on the Edit Clip window, refer to section Edit Clip W indow’
below.
5. Click Save.
The clip data is updated in the database.
Edit Clip Window
In the Edit Clip window you can add or change clip data.
Page 75

IPBrowse Version 6.0 – U ser Manual
EVS Broadcast Equipment – November 2012
Issue 6.0.B
67
character ID with variable length and format. It is
automatically assigned to new clip. It is mainly used to ensure
Window Overview
The Edit Clip window is divided into two panes:
• The left pane contains the Clip Information, i.e. general clip data
It is always displayed.
• The right pane con tains the Clip Metadata, i. e. clip data based on custom er-specific
fields.
Clicking the right area in the Pane Display button will display this right pane.
Fields in the Edit Clip Window
The following table describes briefly the fields displayed in the Edit Clip Window.
The Clip Information pane contains the following fields:
Field Description
Name
VarID
LSM ID
Tape ID
UmID
Protect /
Unprotect
User-defined nam e for the clip. It can contain up to 24 alphanumeric
characters.
A name can be defined in Tools > Define Autoname.
VarID is a 32-
redundancy on the system. It can be unique for a clip on the EVS
server level or on the XNet network level, depending on EVS video
server settings.
LSM ID, i.e. location where the clip will b e stored on th e XN et network .
This numbering is based on the numbering of the LSM operational
mode.
This identifies the tape on which the clip is stored.
Unique Material Iden tification. UmID is a fix ed length 8–character ID.
The EVS server autom atically assigns a UmID to ea ch new clip. It is
used for the unique identification of a clip on an XNet network.
Button that allows the user to protect or unprotect the selected clip. A
Protect icon appears next to the Protect button when the clip is
protected.
Keywords
The Keyword area allo ws you to ass ign up to f ive k eywords to a c lip to
qualify its content.
To add a keyword, type its first letters and select it from the
Autocomplete list.
Clip Type
Type of clip in relation with the Fill and Key function.
The possible values are Normal, Fill, Key.
Page 76

Issue 6.0.B
IPBrowse Version 6.0 – U ser Manual
EVS Broadcast Equipment – November 2012
68
Field Description
Interest Level
Owner
The Clip Information pane also displays the IN point, OUT point and dur ation of the clip
as read-only information.
The Clip Metadata pane contains the following fields:
Field Description
Current
Profile
Metadata
Profile fields
User-defined rating of the clip.
Possible values are: no star, one star, two stars, three stars.
Identification of the clip owner.
Drop-down list in w hich the users can modify the metad ata profile to
be associated with the clip, if they have appropriate user rights.
Fields belonging to the Metadata Profile displayed in the Metadata
Profile drop-down list.
The user can modify the values of the Metadata profile fields. The
modifications will only apply to the clip and not impact the default
values of the profile.
Page 77

IPBrowse Version 6.0 – U ser Manual
EVS Broadcast Equipment – November 2012
Issue 6.0.B
69
8. Publishing and Transferring
Clips
8.1 Introduction
With IPBrowse, a bin content is made available to ot her users either by publis hing the bin
or by transferring the bin content.
Clips can be sent to var iou s dest inati ons , inc ludi ng t hi r d party systems (i.e. NLE systems)
and storage paths. The transfer is initiated from the Bins pane. Clips m ay automatically
be sent to a target as soon as the y are put into a b in or they can be selected later on f rom
the Bins pane. T he transfer may concern a s election of clips or c lips from an entire bin .
The choice of several targets is possible and the transfer can be monitored from the
interface.
8.2 Publishing a Bin
8.2.1 Purpose and Context of Use
Rather than sending a bin content to a t arget desti nation, users may want to simpl y show
the clips from a bin to a group of users. They can publish the bin to a selected group.
8.2.2 How to Publish a Bin
To publish a bin, proceed as follows:
1. From the bin tab you want to publish, click the Publish button.
The Publish window opens.
2. Select the user group(s) to which you want to publish the bin in the Available
Groups area on the left. Keep CTRL pressed for a multiple selection.
3. Click the Right Arrow but ton to move the s elected use r groups from the Available
Groups area to the Selected Group area on the right.
4. Click the Publish button at the bottom of the Publish window.
To un-publish a bin to a group of users, repeat steps 1 to 4 and perform the opposite
operation: select the user group in the Selected Group area and click the Left Arrow
button.
Page 78

Issue 6.0.B
IPBrowse Version 6.0 – U ser Manual
EVS Broadcast Equipment – November 2012
70
8.3 Transferring Clips
8.3.1 Transfer Target Destinations
Users can select one or more of the following targets to transfer clips:
• File on shared drive
• Final Cut Pro
• Avid
• CleanEdit (from the EVS Xedio Suite)
• XT on another network
• Target group
8.3.2 Transfer Options
IPBrowse provides four options to transfer clips. Users will select one way rather than
another depending on their role and the work they are doing on clips.
The options are:
• Auto send
• Send bin as clips
• Send bin as edit
• Send a selection of clips
8.3.3 Auto Send Mode
Purpose and Context of Use
The Auto Send mode is used to automatically send a clip to a predefined destination
target at the time of clip creation, without clicking any additional button or key.
This mode will be chosen, f or example, when an assistant c reates clips and must send
them to the editor who makes the edit on the NLE s ystem as soon as clips are being
created.
When one or s everal clips are copied or m oved to a bin f or which the Auto Send m ode is
activated, these clips are automatically sent to the predefined destination target as well.
Page 79

IPBrowse Version 6.0 – U ser Manual
EVS Broadcast Equipment – November 2012
Issue 6.0.B
71
How to Activate the Auto Send Mode on a Bin
The Auto Send mode is specific to a bin. It can be activated for some of the bins and
disabled for other ones.
To activate the Auto Send mode for a bin, proc eed as follows:
1.
Click the tab corresponding to the bin for which you want to set the Auto Send
mode.
2. Click the Auto Send button.
A contextual menu shows all the possible destinations.
3.
Select one of the targets.
The target is flagged and the Auto Send button is highlighted:
4.
Repeat steps 2 and 3 if you want to select an additional target.
Clips will be autom atically sent to the selected tar get(s) as soon as the y are put into the
bin.
The Auto send mode can be disa bled in the sam e wa y it h as bee n activated: follow steps
1 to 4 above.
8.3.4 Sending Bin as Clips
Purpose and Context of Use
Users will choose this m ode w hen th e c lips ga ther e d f or their ed it are no t in a def i ned and
final order in the bin. For example, sequences obtained at different points in time and
collected as the best moments of an event can be put in the sam e bin but need to be reorganized in the edit.
Transfer Limitation
If som e clips from the bin do not have a hi-res element, all the clips will b e transferred
except those ones.
Page 80

Issue 6.0.B
IPBrowse Version 6.0 – U ser Manual
EVS Broadcast Equipment – November 2012
72
How to Send All the Clips from a Bin
Individually
All the clips from a bin can be sent to a target destination in the form of clips.
To do so, proceed as follows:
1.
Click the tab corresponding to the bin for which you want to send all the clips.
2. Click the Send to button.
A first contextual menu is displayed.
3. Select As clips.
A sub-menu shows all the possible destinations.
4.
Select one of the targets.
The clips transfer is initiated. In this cas e, individual transfer r equests are sent for each
clip from the bin.
Transfer Status
Transfer status inform ation is displayed for each clip individua lly on each clip line in the
Bins pane.
A transfer status icon repre sents the selected target and its color gives indicat ion on the
transfer status.
Only one transfer stat us is shown for each clip. In case transf er has been requested to
several destinations, only the transfer status information related to the first transfer is
shown.
The transfer can be monitored through the Transfer Monitoring area. Refer to section
8.3.7 ‘Transfer Status Monitoring’ on page 74.
8.3.5 Sending Bin as Edit
Purpose and Context of Use
With this mode, the bin content is sent as an edit to the se lected destination. It can b e
sent to an NLE system, where it will appear as a timeline, or it can be rendered to a
storage or a server.
So, clips need to be ordered in the bin according to the same sequence they need to
appear in the final edit.
Journalists who prepare th eir ed it them selves a nd thus k now in which order c lips m ust be
organized in the bin will favor this transfer mode.
Page 81

IPBrowse Version 6.0 – U ser Manual
EVS Broadcast Equipment – November 2012
Issue 6.0.B
73
Transfer Limitations
The following limitations are applicable to the Send Bin as edit option.
• If at least one clip of the bin has no hi-res element, the edit transfer will not be
initiated.
• A bin cannot be sent as edit to an Avid Transfer Engine target.
How to Send Clips from a Bin as an Edit
All the clips fr om a bin can be sent to a targe t destination i n the form of an edit decisio n
list.
To do so, proceed as follows:
1.
Click the tab corresponding to the bin for which you want to send the content.
2. Click the Send to button.
A first contextual menu is displayed.
3. Select Send as edit.
A sub-menu shows all the possible destinations.
4.
Select one of the targets.
An edit is created with the content of the bin and its transfer is initiated.
Transfer Status
Transfer status infor mation is displayed at the botto m of the bin tab. Only one trans fer
status is shown for the wh ole bin cont ent. In cas e transf er has been reques ted to sever al
destinations, there will be as many transfer status information as selected targets.
When the transfer job is being processed, a progress bar is shown together with the
percentage of completion for the transfer of the edit.
How to Create an Edit
To create an edit, proceed as follows:
1.
Click the tab corres pond ing t o the bin f or which you want to cr eate a n edi t with the
content.
2. Click the Send to button.
3. Select C r eate Edit .
An edit is created with the content of the bin. The edit name is the bin name. The edit
description is the bin description. The ed it is put in the bin it w as created from. It is not
visible from IPBrowse but from IPDirector and it can be retrieved thanks to the IPD plugin.
A first contextual menu is displayed.
Page 82

Issue 6.0.B
IPBrowse Version 6.0 – U ser Manual
EVS Broadcast Equipment – November 2012
74
8.3.6 Sending a Selection of Clips
Purpose
If you only want to transfer s ome clips f rom a bin rather than an entire bin, you can mak e
a selection and select your target.
Transfer Limitation
If some clips from the selection do not have a hi-res element, all the clips will be
transferred except those ones.
How to Send a Selection of Clips
To send a selection of clips from a bin, proceed as follows:
1.
From the bin tab, select the clip(s) you want to transfer.
2.
Right-click the list.
A contextual menu is displayed.
3. Select Send to.
A sub-menu shows the list of targets.
4.
Select the target you want to send your clips to.
The clips transfer is initiated. In this case, individual transfer reques ts are sent for each
clip from the selection.
8.3.7 Transfer Status Monitoring
Transfer Status Information
Information on the transfer status is available from different areas:
• in the Bins pane. Refer to section 8.3.2 ‘Transfer Options’ on page 70.
• in the Transfer Monitoring view.
Transfer Monitoring View
The Transfer Monitoring view prov ides detailed information on the transfers woul d they
be scheduled, on-going, finished or failed.
Page 83

IPBrowse Version 6.0 – U ser Manual
EVS Broadcast Equipment – November 2012
Issue 6.0.B
75
It is accessed by clicking the Show Transfer Monitoring button on the main
toolbar.
Information is dis played in c olumns in place of the Elements grid/list. I t s ho ws t he tr ans f er
jobs requested by the user.
The following table describes the buttons available from the Transfer Monitoring view.
Button Description
Current Trans
This button gives access to the list of transfers currently in
progress. Its background is colored when it is enabled:
To return to the list of all the transfers, click the Current
Transfers Only butt on aga in.
Clear History
Cancel Job
This button removes all the transfers jobs from the list.
This button cancels the selec ted transfer j ob. It is avai lable for
transfers currently in progress.
Refresh
This button allows users to manually refresh the view at a point
in time. Otherwise, the system automatically refreshes the
view.
Clear Selected
Retry Job
This button removes the selected transfer job from the list.
This button allows users to resubmit selected job(s) with a
Cancelled or Error status.
Not yet implemented.
Page 84

Issue 6.0.B
IPBrowse Version 6.0 – U ser Manual
EVS Broadcast Equipment – November 2012
76
9. ShuttlePRO Functions
9.1.1 Introduction
ShuttlePRO has a Jog whe el and a Shuttle ring, and fifteen butt ons. The two top r ows of
buttons on the Shuttle PRO series have labels for quick reference as to which functions
each button is designed to perform.
9.1.2 Button Configuration
The button configuration is hard coded. Buttons may have CTRL or SHIFT from the
keyboard as a modifier to c hange the button function. T hese functions are shown in red
for CTRL and blue for SHIFT in the diagram below.
Details on the button functions are included in the respective sections of the current
manual. The diagram below is a quick reference guide to the location of the functions.
Page 85

IPBrowse Version 6.0 – U ser Manual
EVS Broadcast Equipment – November 2012
Issue 6.0.B
77
9.1.3 Quick Reference
Page 86

Issue 6.0.B
IPBrowse Version 6.0 – U ser Manual
EVS Broadcast Equipment – November 2012
78
IPDirector environment, an edit is an object
its metadata (name, profile, tape ID,...) which can be
an EDL stored in the database and which cannot be
TCP/IP network,
Glossary
Term Definition
Bin
Clip
Edit
Log
Log Sheet
Logical folder generally used as a working folder where the
users can gath er all the media they need to create t heir final
output.
Logical entity that refer s to a given A/V media and can include
several physical reso urces (clips and/or f iles) which share the
same TC IN, TC OUT.
In the
characterized by:
•
modified from the IPDirector interface
•
modified from the IPDirector interface.
The edit object is a container for an EDL.
A log is a reference point to a specific frame in a video
sequence. The log is id entified by a TC value, and relates to
an action in a given event. It can be associated to metadata
related to the event (keywords and/or a ranking, for example).
Entity that contains all logs for a given event, and can c ontain
its own metadata.
Nearline
Record Train
A nearline is a destination visible on the
which allows user to store and bac kup A/V material (files), so
that they can access them in IPD irector, or restore them later
on to EVS servers.
A/V feed recorded on an EVS video server via a recorder
channel.
Page 87

IPBrowse Version 6.0 – U ser Manual
EVS Broadcast Equipment – November 2012
Issue 6.0.B
79
Index
A
add bin button ............................................................... 22
add search criteria field ................................................. 10
advanced search pane ............................................... 4, 10
audio
configuration ............................................................ 49
level monitoring........................................................ 50
parameters ............................................................... 49
audiometers ............................................................ 18, 50
auto send button ........................................................... 23
auto send mode ............................................................ 70
B
bin
add bin ...................................................................... 61
add clip to bin ..................................................... 60, 63
clear content ............................................................. 62
definition .................................................................. 78
delete bin .................................................................. 62
publish ...................................................................... 69
send to targets .......................................................... 70
sort clips ................................................................... 65
tab name................................................................... 22
tree view ..................................................................... 7
bins pane ................................................................... 5, 21
C
clear all search filters button ........................................... 9
clear bin button ............................................................. 23
clear IN .......................................................................... 58
clear marks .................................................................... 58
clear OUT ....................................................................... 58
clear quick text search button ......................................... 9
clip
add to bin.................................................................. 63
auto-name setting .................................................... 56
browse ...................................................................... 52
copy from bin to another bin .................................... 64
copy from elements grid/list .................................... 64
create ........................................................................ 59
create linked clips ..................................................... 59
create sub-clip .......................................................... 59
definition .................................................................. 78
delete ........................................................................ 63
edit...................................................................... 60, 66
elements grid/list ...................................................... 12
load clip associated to log ......................................... 48
load from bins pane ................................................. 47
load from elements grid/list ..................................... 46
load linked clip ......................................................... 47
move from a bin to another bin ............................... 65
move within a bin ..................................................... 65
next .......................................................................... 47
previous .................................................................... 47
save .......................................................................... 59
send to bin ................................................................ 60
send to targets ......................................................... 70
tree view .................................................................... 7
trim ........................................................................... 60
update ...................................................................... 60
clip creation commands .......................................... 18, 57
clip name ............................................................18, 23, 56
clip settings ................................................................... 56
current timecode display .............................................. 19
current timecode field ............................................ 18, 55
D
define auto-name setting ............................................. 56
delete bin button .......................................................... 22
E
E/E button ..................................................................... 43
E/E menu ....................................................................... 42
edit clip window ............................................................ 66
elements grid
clips .......................................................................... 12
logs ........................................................................... 13
organize columns ..................................................... 15
sort elements ........................................................... 14
elements grid/list ...................................................... 5, 12
print .......................................................................... 11
elements list
clips .......................................................................... 13
logs ........................................................................... 14
sort elements ........................................................... 15
F
fast forward .................................................................. 53
fast forward speed ........................................................ 54
fast rewind .................................................................... 53
fast rewind speed.......................................................... 54
favorites button ............................................................ 11
Page 88

Issue 6.0.B
IPBrowse Version 6.0 – U ser Manual
EVS Broadcast Equipment – November 2012
80
G
go 10 frames backward ................................................. 54
go 10 frames forward .................................................... 54
goto IN ........................................................................... 53
goto next frame ............................................................. 53
goto OUT ....................................................................... 53
goto previous frame ...................................................... 53
growing clip ................................................................... 46
J
jog bar ......................................................... 18, 20, 52, 55
jump to TC ..................................................................... 55
L
license ............................................................................. 1
linked clips
create .................................................................. 47, 59
load ........................................................................... 47
log
definition .................................................................. 78
elements grid/list ...................................................... 12
load associated clip ................................................... 48
load log ..................................................................... 48
tree view ..................................................................... 8
log sheet
definition .................................................................. 78
M
mark IN .......................................................................... 57
mark OUT ...................................................................... 58
maximize button ........................................................... 18
N
nearline
definition .................................................................. 78
next button.............................................................. 45, 47
O
order by button ....................................................... 11, 15
publish bin button ......................................................... 23
Q
quick text search ........................................................... 25
quick text search area ................................................. 5, 9
R
recorder channel
next .......................................................................... 45
previous .................................................................... 45
select .................................................................. 42, 45
recorder channel selection field ................................... 18
recording clip ................................................................ 46
refresh button ............................................................... 11
ret button ...................................................................... 44
S
save clip button ............................................................. 58
save clip window ........................................................... 60
search
clear advanced search .............................................. 37
clear all filters ..................................................... 29, 37
clear quick text search .............................................. 29
search button .................................................................. 9
search criterion
date .......................................................................... 35
duration .................................................................... 34
free text .............................................................. 25, 32
keywords .................................................................. 32
option list ................................................................. 34
timecode .................................................................. 36
search syntax rules button .............................................. 9
search tools ................................................................... 24
advanced search fields ............................................. 31
autocomplete list ............................................... 27, 32
quick text search ...................................................... 25
selection in tree view ............................................... 24
send
auto send clip ........................................................... 70
bin as clips ................................................................ 71
bin as edit ................................................................. 72
clip selection ............................................................. 74
send bin button ............................................................. 23
show save clip window setting...................................... 57
source media of clip ...................................................... 44
sub-clip .......................................................................... 59
P
password ......................................................................... 2
pause ............................................................................. 52
play ................................................................................ 52
player pane................................................................ 5, 17
background color ...................................................... 19
maximize................................................................... 20
prev button ............................................................. 45, 47
T
toolbar ...................................................................... 5, 11
tools button .................................................................. 11
tools menu .................................................................... 11
train
definition .................................................................. 78
load........................................................................... 42
Page 89

IPBrowse Version 6.0 – U ser Manual
EVS Broadcast Equipment – November 2012
Issue 6.0.B
81
next ........................................................................... 45
previous .................................................................... 45
transfer
monitoring ................................................................ 74
target destinations ................................................... 70
transfer status icon ................................................. 23, 72
transport commands ............................................... 18, 52
tree view ..................................................................... 4, 6
U
update clip button ........................................................ 58
user bin directory ...................................................... 7, 21
V
video display ................................................................. 18
Page 90

Corporate
+32 4 361 7000
North & Latin America
+1 973 575 7811
To learn more about EVS go to www.evs.com
EVS Headquarters
Liège Science Park
Asia & Pacific
+852 2914 2501
16, rue Bois St Jean
B-4102 Seraing
Belgium
EVS Broadcast Equipment is continuously adapting and improving its products in accordance with the ever changing
requirements of the Broadcast Industry.
The data contained herein is therefore subject to change without prior notice. Companies and product names are
trademarks or registered trademarks of their respective companies.
Other regional offices
www.evs.com/contact
 Loading...