

Page 1
User Manual
Version 1.2 - October 2012
MAD Config
Archive Digitization & Exploitation
Page 2

IP2Archive- User Manual- MAD Config Version 1.2
Copyright
EVS Broadcast Equipment S.A.– Copyright © 2003-2012. All rights reserved.
Disclaimer
The information in this manual is furnished for informational use only and subject to
change without notice. While every effort has been made to ensure that the information
contained in this user manual is accurate, up-to-date and reliable, EVS Broadcast
Equipment cannot be held responsible for inaccuracies or errors that may appear in this
publication.
Improvement Requests
Your comments will help us improve the quality of the user documentation. Do not
hesitate to send improvement requests, or report any error or inaccuracy on this user
manual by e-mail to doc@evs.tv.
Regional Contacts
The address and phone number of the EVS headquarters are usually mentioned in the
Help > About menu in the user interface.
You will find the full list of addresses and phone numbers of local offices either at the end
of this user manual (for manuals on hardware products) or at the following page on the
EVS website: http://www.evs.tv/contacts.
User Manuals on EVS Website
The latest version of the user manual, if any, and other user manuals on EVS products
can be found on the EVS download center, on the following webpage:
http://www.evs.tv/downloadcenter.
I
Page 3

EVS BroadcastEquipment S.A. - October 2012 Issue 1.2.D
Table of Contents
INTRODUCTION 1
1.
1.1. About the Application 1
INSTALLING THE APPLICATION 2
2.
2.1. How to Install the Application 2
2.2. How to Modify, Repair or Remove the Installation 9
STARTING THE APPLICATION 14
3.
3.1. Start-up Procedure 14
3.1.1. After Installation 14
3.1.2. After Configuration 14
3.2. Main Window Overview 15
MANAGING RELATIONS 18
4.
4.1. Introduction 18
4.2. About Contacts and Users 18
4.3. Relations Pane 18
4.4. Creating Relations 20
4.4.1. Workflow 20
4.4.2. Creating a Company 20
4.4.3. Creating a Department 20
4.4.4. Creating a Contact 21
4.4.5. Creating a User 23
4.5. Searching Relations 24
4.5.1. Searching a Company 24
4.5.2. Searching a Contact 24
4.6. Deleting Relations 26
4.6.1. Deleting a Company 26
4.6.2. Deleting a Department 26
4.6.3. Deleting a Contact 26
MANAGING RIGHTS 27
5.
5.1. User Rights Structure 27
5.1.1. Overview 27
5.1.2. User Groups 27
5.1.3. Roles for Groups 27
5.2. Managing Roles 28
II
Page 4

IP2Archive- User Manual- MAD Config Version 1.2
5.2.1. Roles Pane 28
5.2.2. Overview Roles 28
5.2.3. Adding a Description to a Role 29
5.3. Managing Groups 31
5.3.1. Groups Pane 31
5.3.2. Creating a Group 31
5.3.3. Deleting a Group 32
5.3.4. Adding a User to a Group 33
CONFIGURING THE APPLICATION 34
6.
6.1. Settings Window 34
6.1.1. Opening the Settings Window 34
6.1.2. Overview Setup Categories 34
6.1.3. Edit Mode 35
6.2. System Settings 35
6.2.1. Accessing the System Settings 35
6.2.2. Overview System Settings Subcategories 35
6.2.3. Oracle Connection Tab 36
6.2.4. E-Mail Options Tab 38
6.2.5. Global Password Tab 40
6.2.6. Error Handling Tab 40
6.2.7. Language Tab 41
III
Page 5

EVS BroadcastEquipment S.A. - October 2012 Issue 1.2.D
IV
Page 6

IP2Archive- User Manual- MAD Config Version 1.2
1. Introduction
1.1. About the Application
MAD Config is a configuration application. It allows the system administrator to create
users and assign user rights for the IP2Archive system.
1. Introduction 1
Page 7

EVS BroadcastEquipment S.A. - October 2012 Issue 1.2.D
2. Installing the Application
2.1. How to Install the Application
To install the application, proceed as follows:
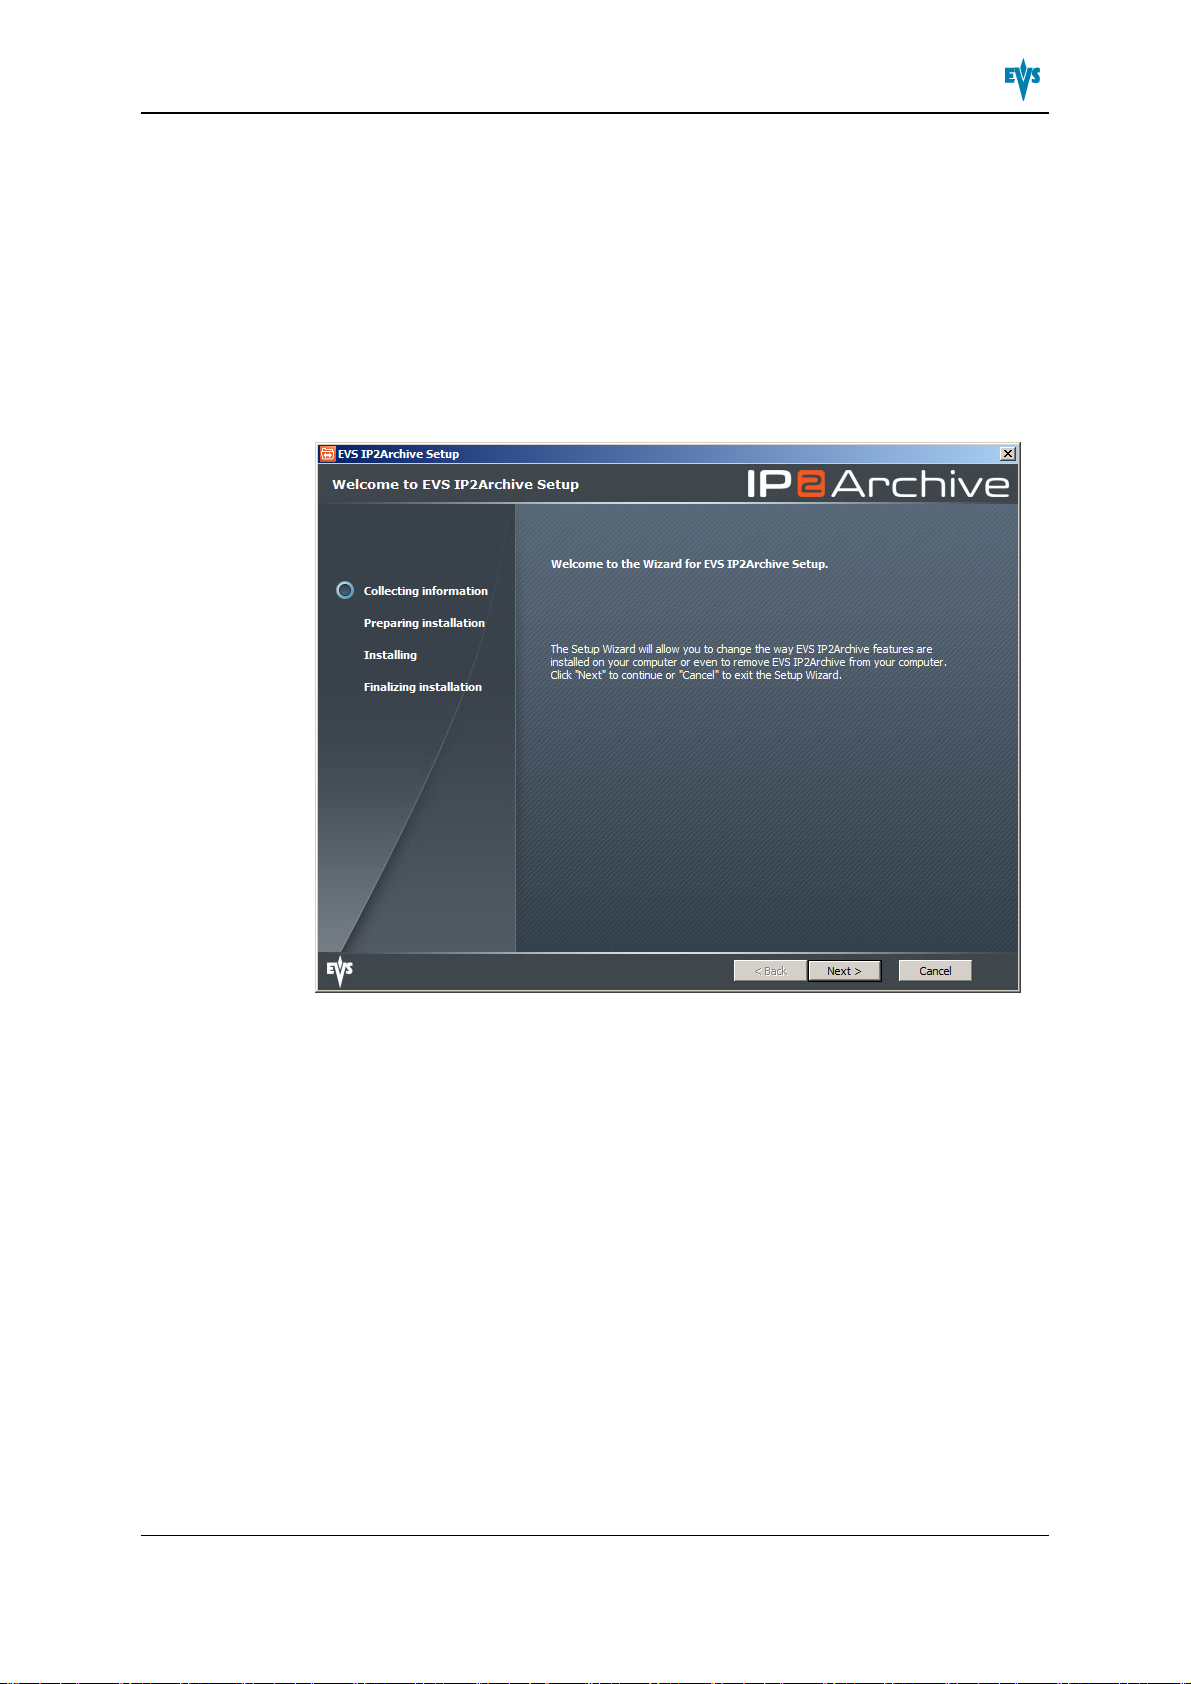
1. Double-click the EVSIP2Archive.exe to launch the IP2Archive Setup Wizard.
The Welcome screen appears.
2. Click Nextto continue.
The End-User Licence Agreement screen appears.
2 2. Installing the Application
Page 8
IP2Archive- User Manual- MAD Config Version 1.2
3. Read the license agreement on using IP2Archive in your country. Accept the
agreement and click Next to continue.
The Installation Folder screen appears.
4. Select the folder where the application has to be installed and click Next to continue.
By default, the IP2Archive applications will be installed in the following folder:
C:\Program Files\EVS Broadcast Equipment\IP2Archive\(for 32-bit
2. Installing the Application 3
Page 9
EVS BroadcastEquipment S.A. - October 2012 Issue 1.2.D
machines) or C:\Program Files (x86)\EVS Broadcast
Equipment\IP2Archive\ (for 64-bit machines).
The Setup Type screen appears.
5. Choose a setup type and click Next to continue.
You can choose one of the following setup types:
◦ Complete: Installs all IP2Archive applications. Continue to step 7.
◦ Typical: Installs the most common IP2Archive applications, i.e. the database
client software, the Deep Archive Manager and the EVS Software Player.
Continue to step 7.
◦ Custom: Allows you to select the IP2Archive applications that have to be
installed. The Custom Setup screen appears. Continue to step 6.
4 2. Installing the Application
Page 10
IP2Archive- User Manual- MAD Config Version 1.2
6. In the Custom Setup screen, select the applications that you want to install, and then
click Next to continue.
The Custom Setup screen shows a tree view of the IP2Archive applications that you
can install. By default, the database client software, Deep Archive Manager and the
EVSSoftware Player are selected. When you click a feature or subfeature, a
description of the feature will be displayed and also the disk space requirements.
To add or remove a feature, click the arrow next to the feature name, and then choose
one of the following options from the drop-down list:
◦ Will be installed on local hard drive: Installs the selected feature in the location
shown under Installation Folder.
◦ Entire feature will be installed on local hard disk: Installs the selected feature
and all subfeatures.
◦ Feature will be installed when required:The feature will be installed when you
perform an action that requires it.
◦ Entire feature will be unavailable: For a new installation of IP2Archive, this
option passes over the installation of the selected feature. For an existing
installation, this option removes the feature from the installation. After you select
this option, a red X appears on the feature tree next to the feature name.This
option cannot be selected for the database and the EVSSoftware Player.
Click the Reset button to undo your selection.
7. Do one of the following:
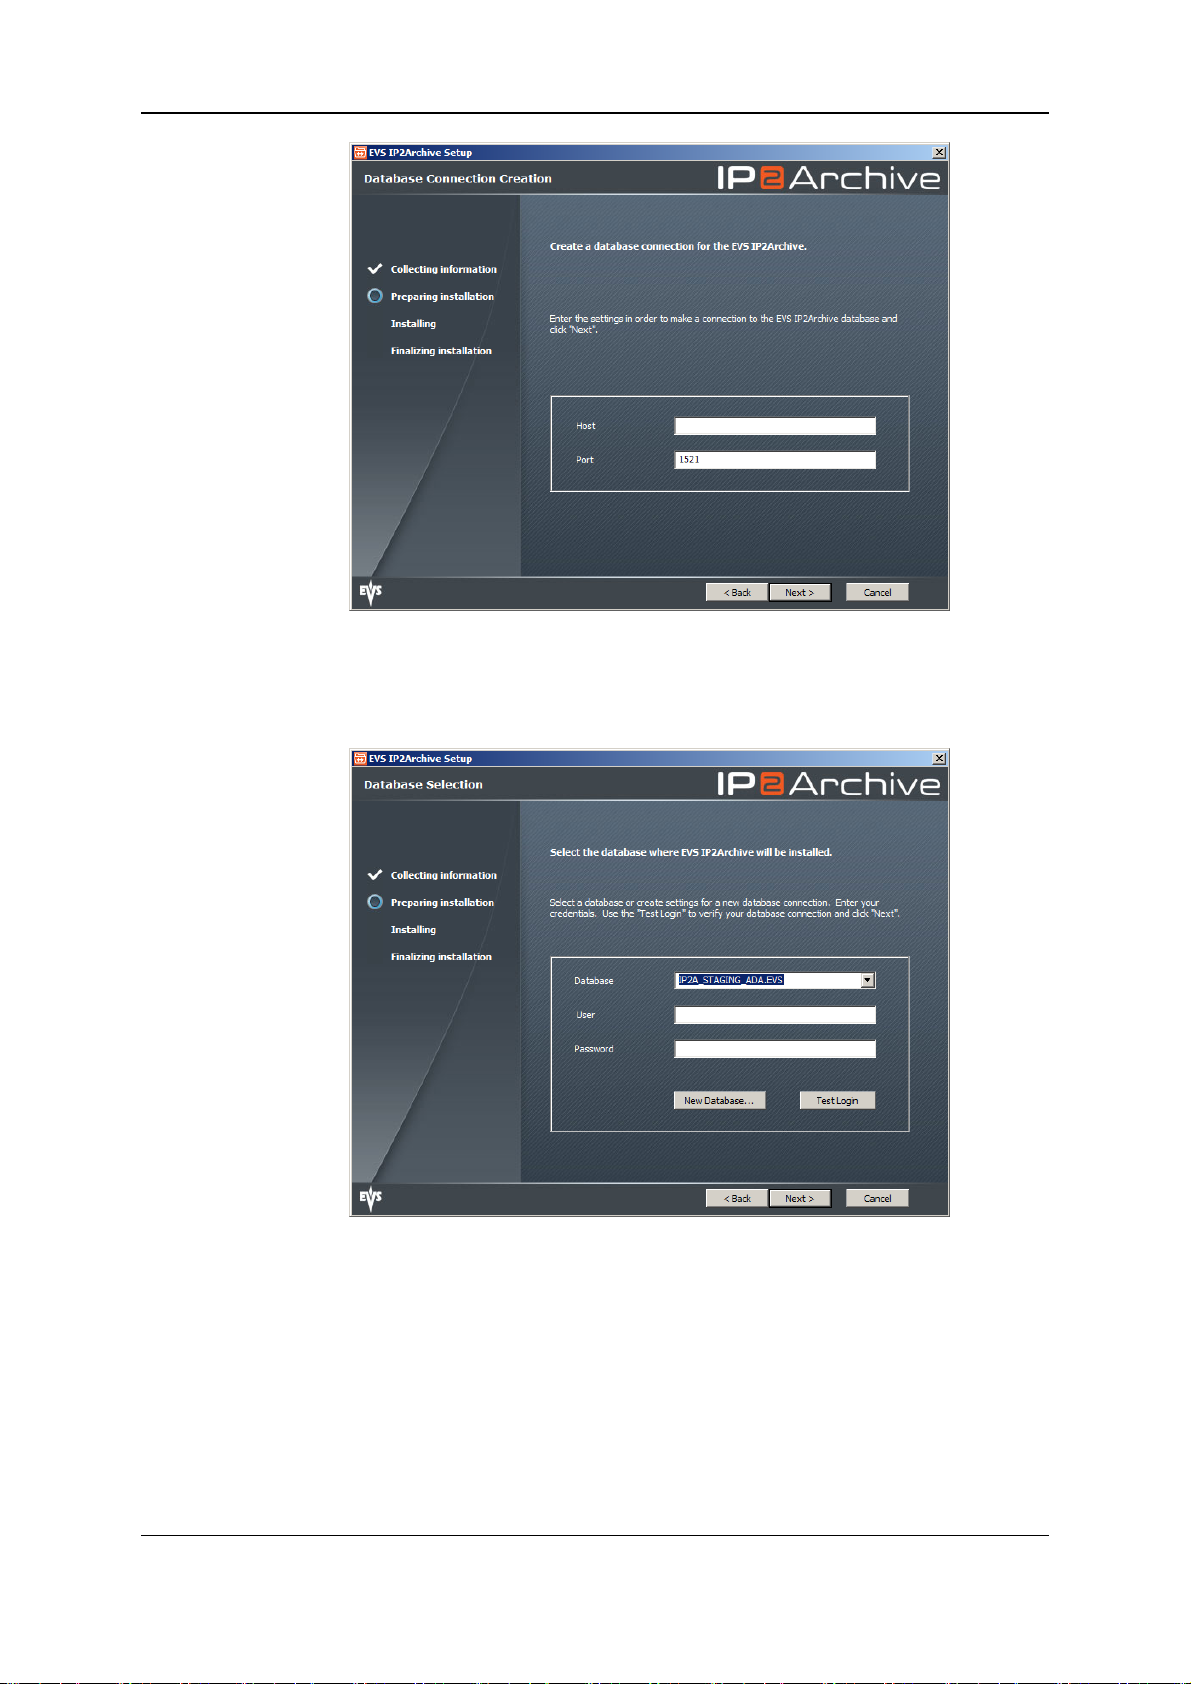
◦ If no database client software has been installed yet, the Database Connection
Creation screen appears.
2. Installing the Application 5
Page 11
EVS BroadcastEquipment S.A. - October 2012 Issue 1.2.D
Enter the IP address of the database server. The default port number, i.e. 1521,
has already been entered. Click Nextto continue.
◦ If database client software has already been installed, the Database Selection
screen appears.
Select the database name from the drop-down list and enter the username and
password necessary to log onto the database. You can test the connection with
the database by clicking the Test Login button. Click Next to continue.
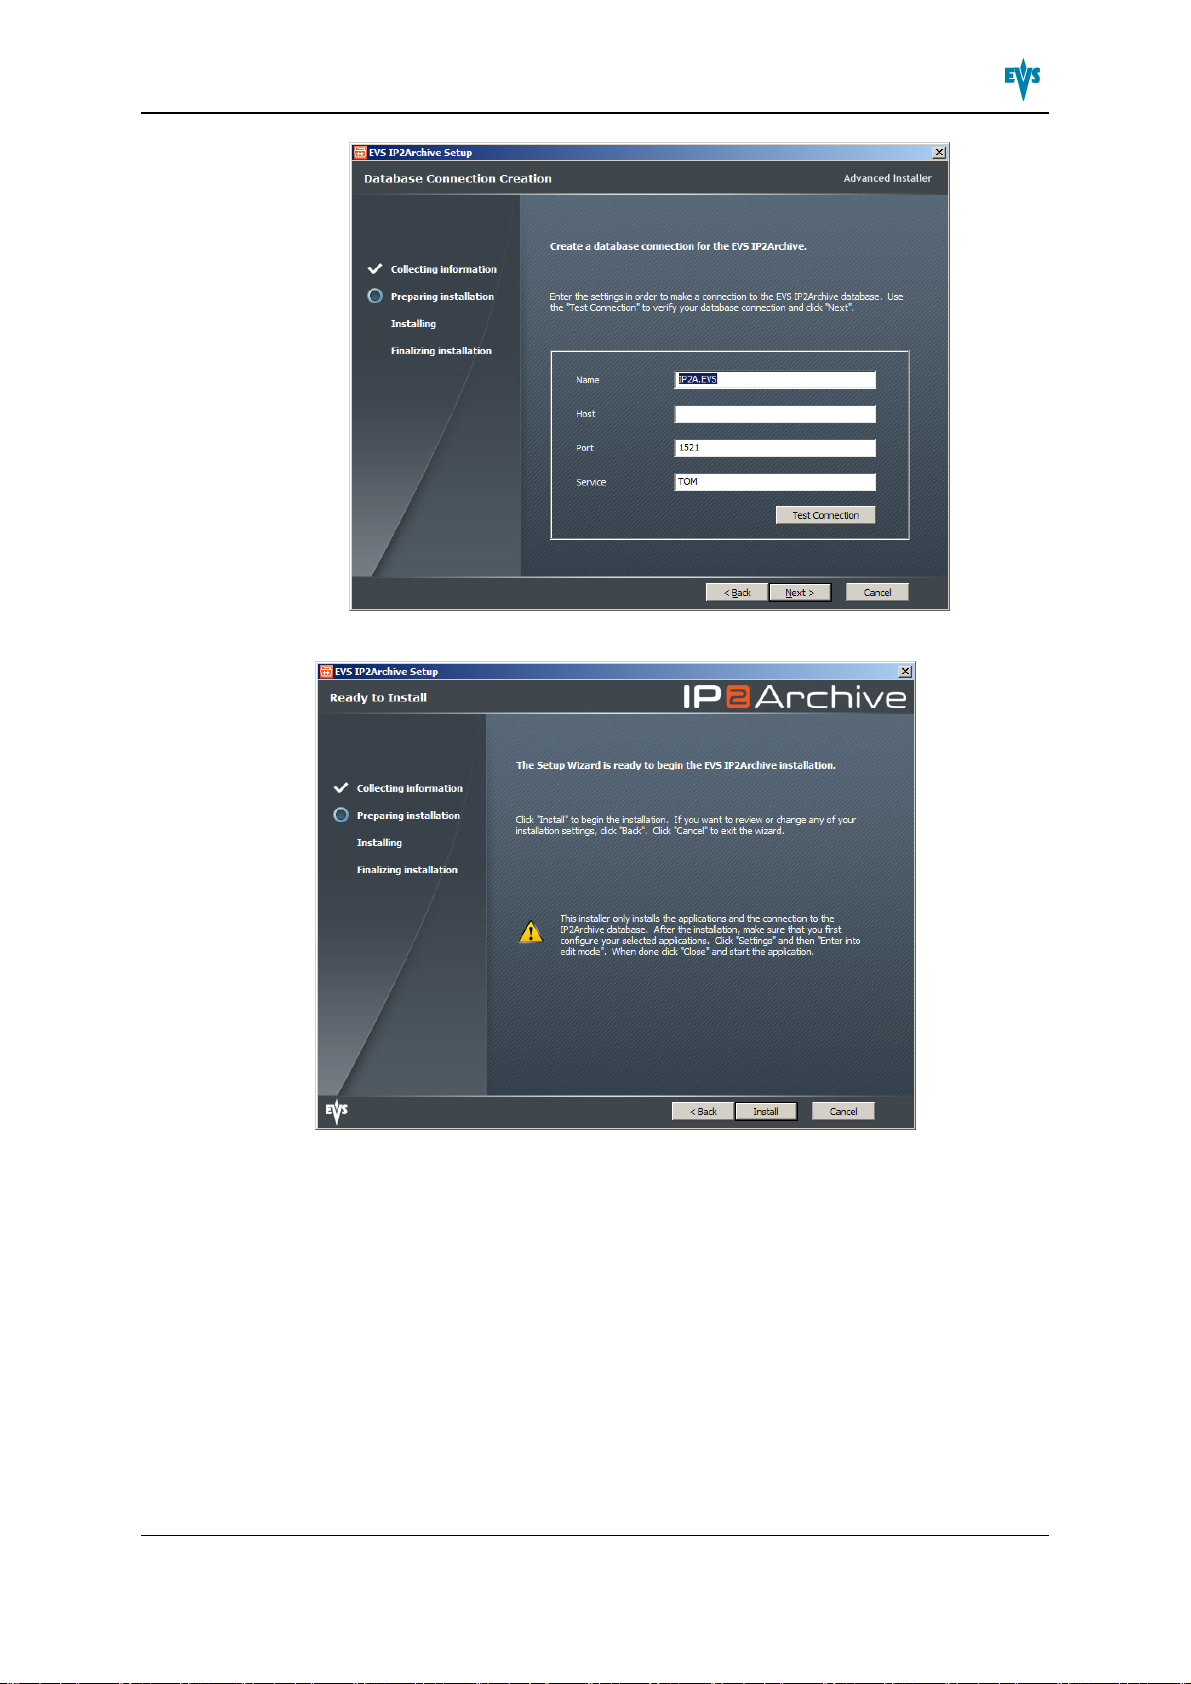
To add a new database, click the New Database button and enter the database
name (by default IP2A.EVS), the IP address and port number (by default 1521) of
the machine that hosts the database, and the service name (by default TOM). You
can test the connection with the database by clicking the Test Login button. Click
Next to continue.
6 2. Installing the Application
Page 12
IP2Archive- User Manual- MAD Config Version 1.2
8. Click Install to start the installation.
The selected applications will be installed.
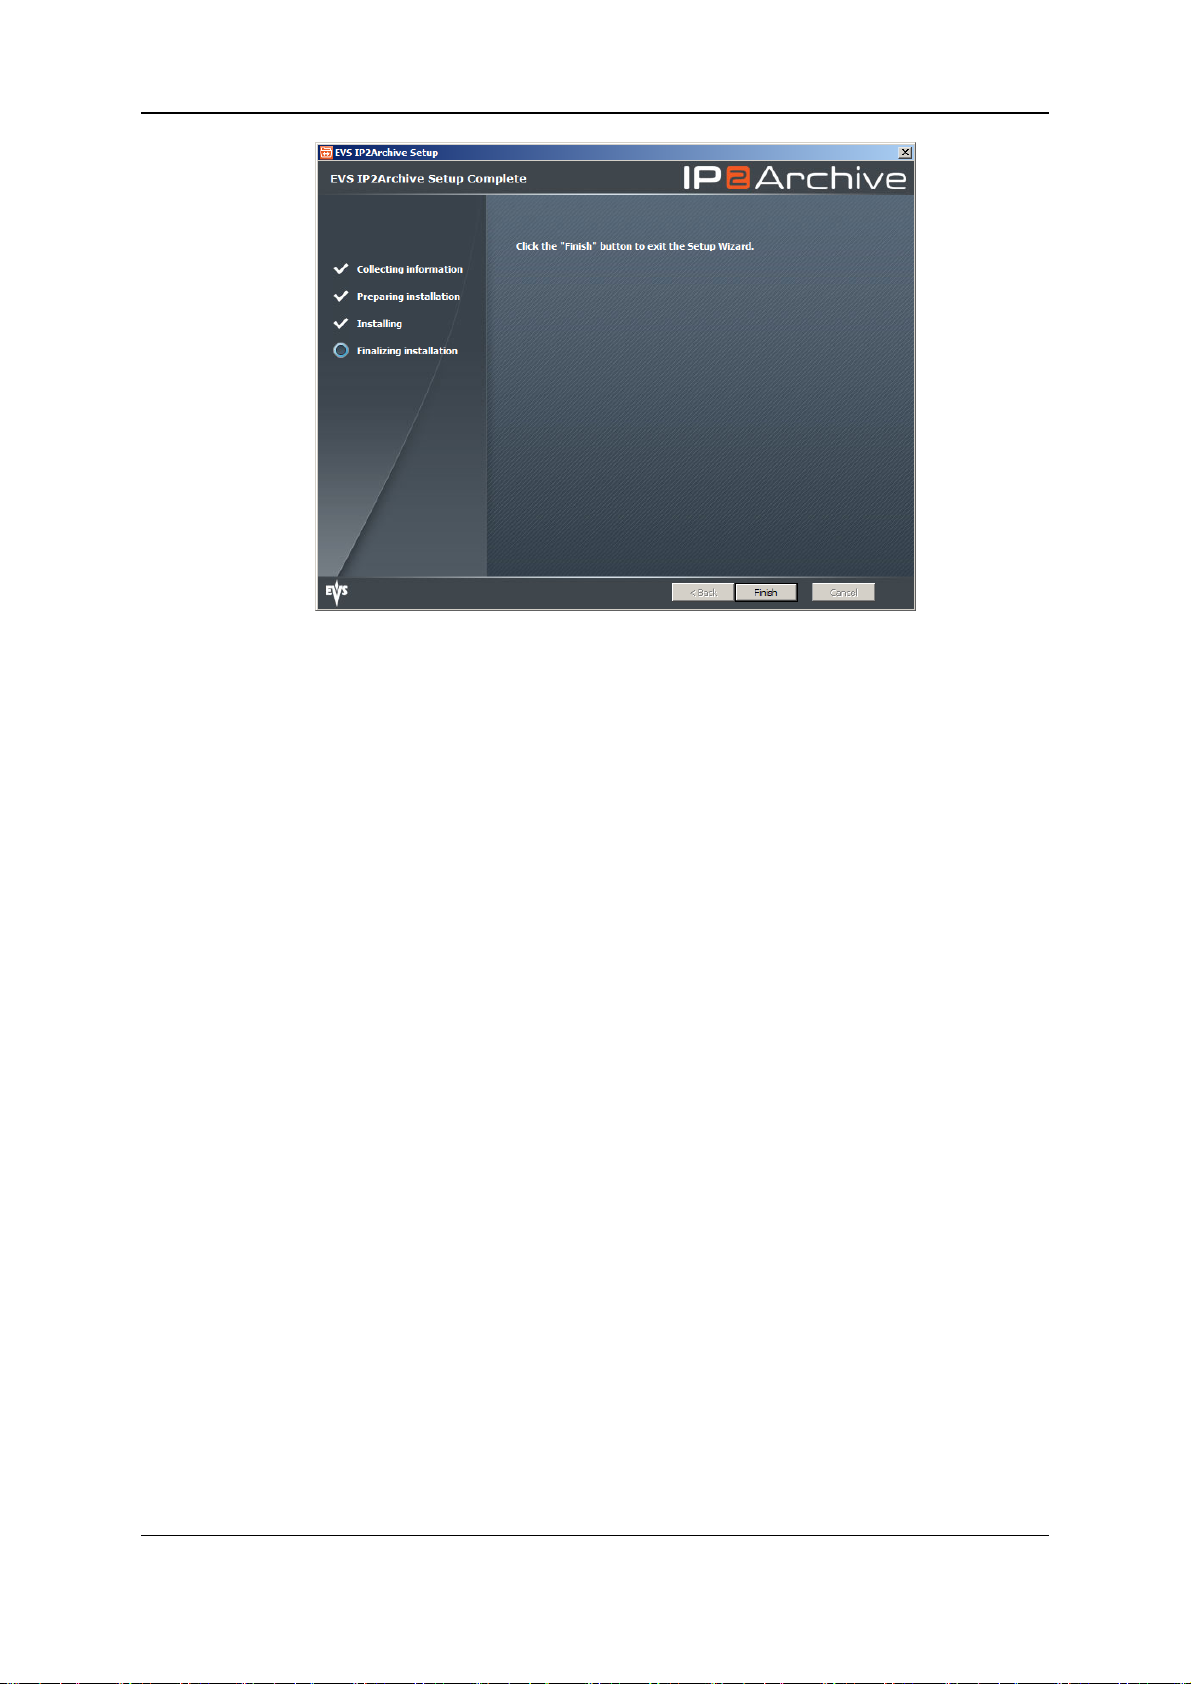
9. If the installation has been completed, click Finish to exit the Setup Wizard.
2. Installing the Application 7
Page 13
EVS BroadcastEquipment S.A. - October 2012 Issue 1.2.D
8 2. Installing the Application
Page 14
IP2Archive- User Manual- MAD Config Version 1.2
2.2. How to Modify, Repair or Remove the Installation
To modify, repair or remove the installation of the application, proceed as follows:
1. Double-click the EVSIP2Archive.exe to launch the IP2Archive Maintenance
Wizard.
The Welcome screen appears.
2. Click Next to continue.
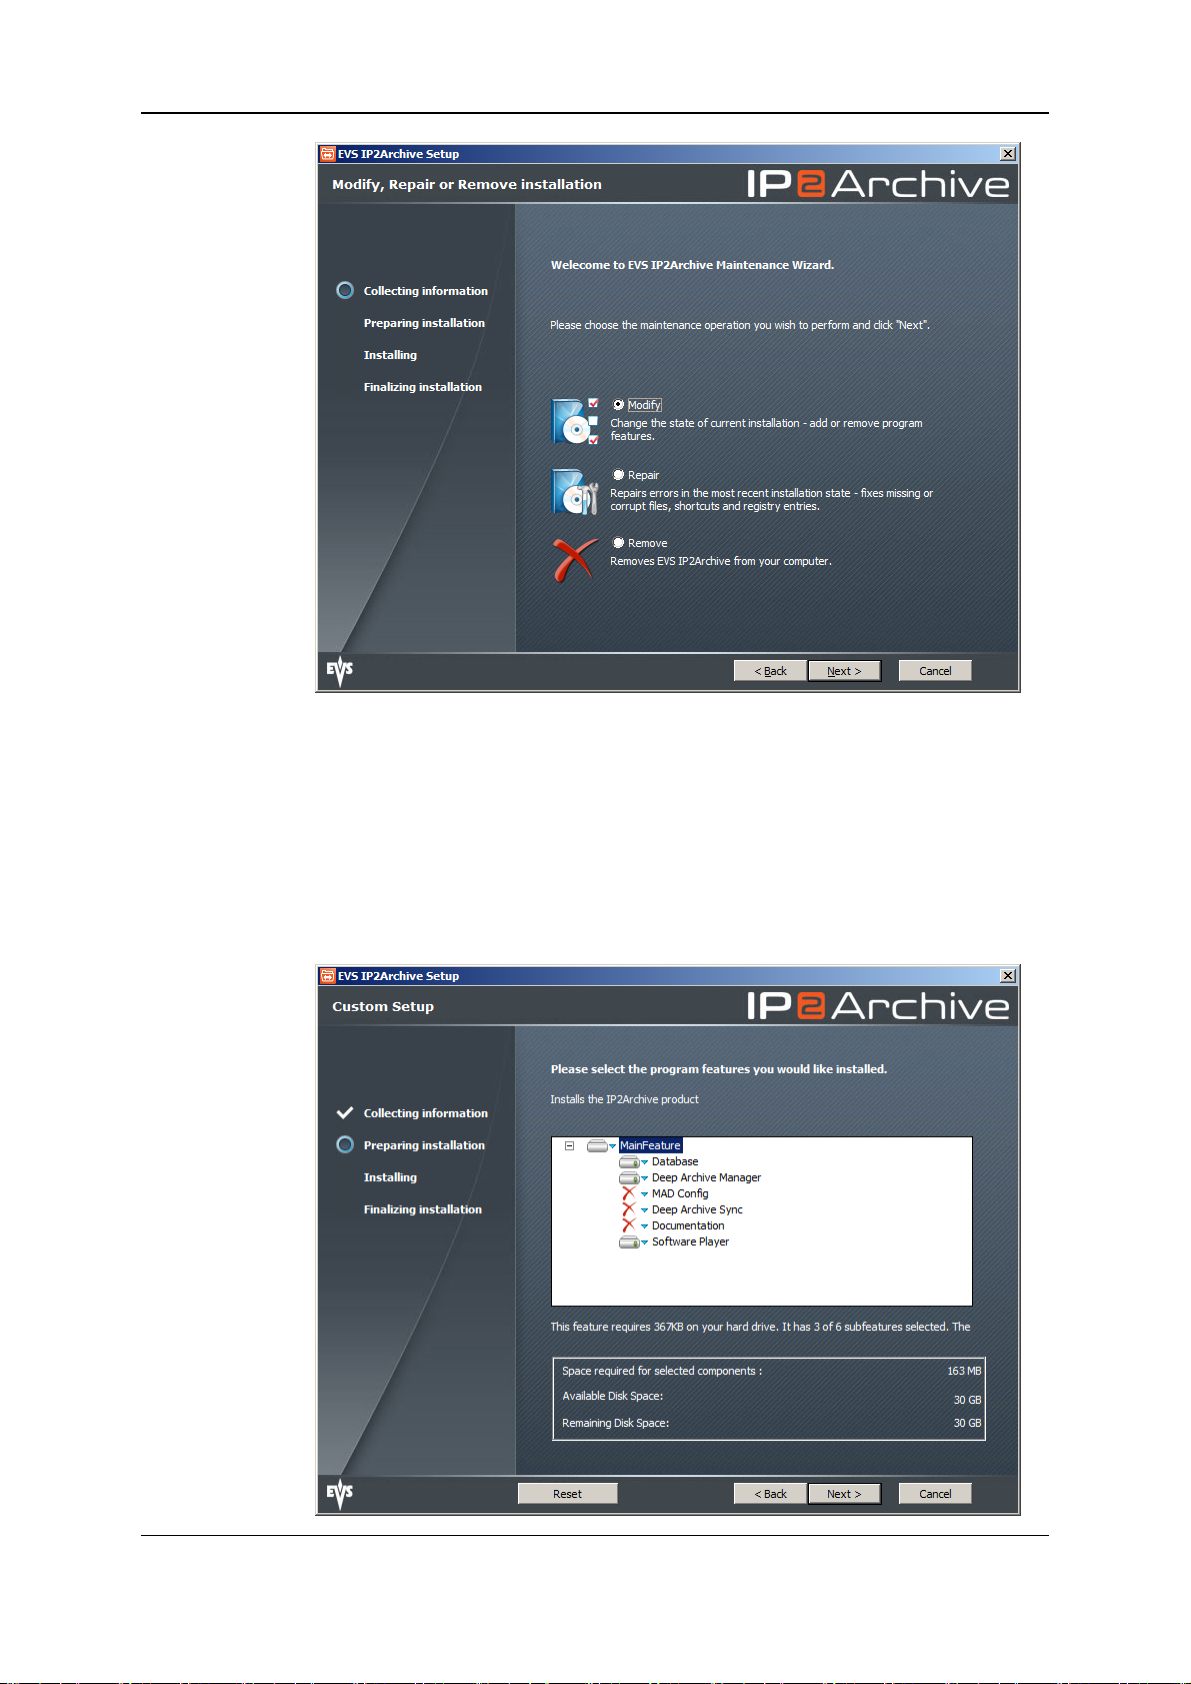
The Modify, Repair or Remove Installation screen appears.
2. Installing the Application 9
Page 15
EVS BroadcastEquipment S.A. - October 2012 Issue 1.2.D
3. Do one of the following:
◦ If you want to modify the IP2Archive installation, e.g. add or remove certain
applications, select Modify and click Next. Continue to step 4.
◦ If you want to repair the IP2Archive installation, e.g. fixing missing or corrupt files,
shortcuts and registry entries, select Repair and click Next. Continue to step 6.
◦ If you want to remove the IP2Archive installation, select Remove and click Next.
Continue to step .
4. In the Custom Setup screen, select the applications that you want to (de)install.
10 2. Installing the Application
Page 16

IP2Archive- User Manual- MAD Config Version 1.2
The Custom Setup screen shows a tree view of the IP2Archive applications that you
can install and deinstall. By default, the database client software, Deep Archive
Manager and the EVSSoftware Player are selected. When you click a feature or
subfeature, a description of the feature will be displayed and also the disk space
requirements.
To add or remove a feature, click the arrow next to the feature name, and then choose
one of the following options from the drop-down list:
◦ Will be installed on local hard drive: Installs the selected feature in the location
shown under Installation Folder.
◦ Entire feature will be installed on local hard disk: Installs the selected feature
and all subfeatures.
◦ Feature will be installed when required:The feature will be installed when you
perform an action that requires it.
◦ Entire feature will be unavailable: For a new installation of IP2Archive, this
option passes over the installation of the selected feature. For an existing
installation, this option removes the feature from the installation. After you select
this option, a red X appears on the feature tree next to the feature name.This
option cannot be selected for the database and the EVSSoftware Player.
Click the Reset button to undo your selection. Click Next to continue.
5. Click Install to start the installation.
Any features that you have added in the Custom Setup screen will be installed. Any
features that you have removed will be uninstalled. The installed features that you
haven't modified will be skipped. Continue to step 8.
6. Click Repair to repair the installation of EVS IP2Archive. Continue to step 8.
2. Installing the Application 11
Page 17

EVS BroadcastEquipment S.A. - October 2012 Issue 1.2.D
7. Click Remove to remove IP2Archive from your computer.
8. Click Finish to exit the Setup Wizard.
12 2. Installing the Application
Page 18

IP2Archive- User Manual- MAD Config Version 1.2
2. Installing the Application 13
Page 19

EVS BroadcastEquipment S.A. - October 2012 Issue 1.2.D
3. Starting the Application
3.1. Start-up Procedure
3.1.1. After Installation
Double-click the MAD Config icon on your desktop to start the application. You can
also start the application by double-clicking the executable file (.exe) in the installation
folder.
The splash screen appears.
The application logs into the database. Then, the Settings window appears allowing you to
configure the application.
See section "Settings Window" on page 34.
3.1.2. After Configuration
Double-click the MAD Config icon on your desktop to start the application. You can
also start the application by double-clicking the executable file (.exe) in the installation
folder.
The splash screen appears. The application logs into the database.
The main window opens.
14 3. Starting the Application
Page 20

IP2Archive- User Manual- MAD Config Version 1.2
3.2. Main Window Overview
The main window consists of three main areas highlighted in the screenshot below.
Menu Bar
The menu bar contains three menus: File, Settings and Help.
The File menu contains only one command: Exit. It is used to exit the application. Click
the File menu or use the keyboard shortcut keys ALT + F or F10 + F to open it. Click Exit
or use the keyboard shortcut key X to exit the application.
The Settings menu doesn’t contain any commands. It immediately gives access to the
application settings. Click the Settings menu or use the keyboard shortcut keys ALT + S
or F10 + S to access the settings.
The Help menu contains only one command: About. With this command the application
splash screen can be opened. The splash screen displays the application software
version, the name of the database the application is logged on to and the login name used.
Click the Help menu or use the keyboard shortcut keys ALT + H or F10 + H to open it.
Click About or use the keyboard shortcut key A to open the splash screen.
3. Starting the Application 15
Page 21

EVS BroadcastEquipment S.A. - October 2012 Issue 1.2.D
Navigation Bar
The Navigation bar allows you to navigate between the eight Setup
panes. They can be accessed by clicking the corresponding icon.
Selected Setup Pane
This area displays the selected Setup pane. Each Setup pane allows you to configure
specific settings.
The following table briefly describes each Setup pane:
Setup Pane Description
Relations This pane allows you to create and manage users and contacts for the
IP2Archive system, and to assign user rights and resources to them.
See section "Managing Relations" on page 18
Roles This pane gives an overview of the user rights (=roles). It allows you
to add a description to each user right. See section "Managing Rights"
on page 27.
Groups This pane gives an overview of the existing user groups. It allows you
to create new user groups and delete existing ones. See section
"Managing Rights" on page 27.
16 3. Starting the Application
Page 22

IP2Archive- User Manual- MAD Config Version 1.2
Setup Pane Description
User Rights
Matrix
This pane gives an overview of the rights on content. It allows you to
manage these rights. This pane is not used in the IP2Archive system
and will not be discussed in this manual.
Production
Configuration
This pane gives an overview of the production accounts for the Final
Cut Pro or Avid production sets. It allows you to manage these
accounts. This pane is not used in the IP2Archive system and will not
be discussed in this manual.
Local
Delivery
Destinations
This pane gives an overview of the target destinations created for the
delivery format Local Delivery. It allows you to manage these target
destinations. This pane is not used in the IP2Archive system and will
not be discussed in this manual.
Video
Formats
This pane gives an overview of the used video formats. It allows you
to add a description. This pane is not used in the IP2Archive system
and will not be discussed in this manual.
Search This pane gives an overview of the search macros that are used. It
allows you to manage these search macros. This pane is not used in
the IP2Archive system and will not be discussed in this manual.
The settings are grouped according to four setup categories:
Setup
Category
Description
Relations Settings related to the users and contacts of the IP2Archive system.
Rights Settings related to user rights.
Resources Settings related to delivery destinations and video formats. These
settings do not apply to the IP2Archive system.
Search Settings related to search macros. These settings do not apply to the
IP2Archive system.
3. Starting the Application 17
Page 23

EVS BroadcastEquipment S.A. - October 2012 Issue 1.2.D
4. Managing Relations
4.1. Introduction
The first thing you will have to do is to create contacts and users for the IP2Archive
system.
4.2. About Contacts and Users
Contacts are relations that have no access to the IP2Archive system. They are defined
by the department and the company they work for.
Users are contacts that have access to and can perform actions in the IP2Archive
system. They too are defined by the department and company they work for. Moreover,
they are member of a user group and they can perform certain tasks in the IP2Archive
system, for example for example, archive and restore certain clips.
4.3. Relations Pane
The Relations pane opens when you click the Relations icon in
the Navigation bar.
This pane allows you to search for, create and delete contacts and users.
18 4. Managing Relations
Page 24

IP2Archive- User Manual- MAD Config Version 1.2
4. Managing Relations 19
Page 25

EVS BroadcastEquipment S.A. - October 2012 Issue 1.2.D
4.4. Creating Relations
4.4.1. Workflow
When creating contacts and users, you always have to proceed in the following order:
1. Create a company.
2. Create a department for a company.
3. Create a contact.
4.4.2. Creating a Company
To create a new company, proceed as follows:
1. Open the Relations pane.
2. In the Company Data area, click the New button .
3. In the Company Name field, enter the name of the new company.
4. Click the Save button to save the new company.
4.4.3. Creating a Department
Each company can consist of one or more departments. To create a new department for a
company, proceed as follows:
1. Open the Relations pane.
2. In the Companies area, search and select the company you want to create a new
department for, or create a new company first.
3. Open the Departments tab.
The names of the existing departments are displayed under the Company field.
20 4. Managing Relations
Page 26

IP2Archive- User Manual- MAD Config Version 1.2
4. Click the New Department button .
5. In the Department field, enter the name of the new department. This field is
mandatory.
6. In the Address field, enter the address of the department.
7. In the Other field, enter the contact information.
8. Click the Save button.
4.4.4. Creating a Contact
Each department can have one or more contacts. To create a new contact for a
department, proceed as follows:
1. Open the Relations pane.
2. In the Companies area, search the company you want to create a contact for, or
create a new company first.
4. Managing Relations 21
Page 27

EVS BroadcastEquipment S.A. - October 2012 Issue 1.2.D
3. Open the Departments tab and check if a department has already been created for the
company. If not, create one first.
4. Open the Contacts tab.
5. Click the New Contact button .
6. In the Department list, select the department for which you want to create a contact.
The Department field is mandatory.
7. In the Contact field, enter the contact details. The trigram of a contact is the three-
letter abbreviation of the name of that contact.
The Last Name field is mandatory.
8. Open the Address tab.
22 4. Managing Relations
Page 28

IP2Archive- User Manual- MAD Config Version 1.2
9. Enter the address of the new contact manually if it differs from the department
address, otherwise click the Copy from Department button .
4.4.5. Creating a User
Besides contacts, a department can also have one or more users.
To turn a contact into a user, select the User check box in the Contact tab and enter a
username (mandatory) and a password. Make sure the username is unique! Repeat the
password in the Repeat Password field. The user will need this information to log into the
IP2Archive system.
As soon as you select the User check box, the Groups, Locations and Production tab
become available.
4. Managing Relations 23
Page 29

EVS BroadcastEquipment S.A. - October 2012 Issue 1.2.D
4.5. Searching Relations
4.5.1. Searching a Company
To search a company, proceed as follows:
1. In the Relations pane, open the Search Company tab.
2. In the Company field, enter the name of the company.
3. Push ENTER or click the Search button to start the search.
The company name appears in the Company list.
If you want to get an overview of all companies, leave the Company field empty.
4.5.2. Searching a Contact
To search a contact, proceed as follows:
1. In the Relations pane, open the Search Contact tab.
2. In the Company field, enter the name of the company the contact works for.
3. In the Contact field, enter the name of the contact.
If you want an overview of all contacts, leave the Contact field empty.
24 4. Managing Relations
Page 30

IP2Archive- User Manual- MAD Config Version 1.2
4. Push ENTER or click the Search button to start the search.
The name of the contact appears in the Company list. The name of the company and
department the contact works for are also displayed.
4. Managing Relations 25
Page 31

EVS BroadcastEquipment S.A. - October 2012 Issue 1.2.D
4.6. Deleting Relations
4.6.1. Deleting a Company
To delete a company, proceed as follows:
1. In the Relations pane, open the Search Company tab.
2. Search for the company you want to delete.
3. Select the company and click the Delete button .
Warning
If you delete a company, all data related to that company (departments, users)
will be lost.
4.6.2. Deleting a Department
To delete a department, proceed as follows:
1. In the Relations pane, open the Search Company tab.
2. Search for the company the department belongs to.
3. Open the Departments tab.
4. Select the department you want to delete and click the Delete Department button
.
Warning
If you delete a department, all data related to that department will be lost.
4.6.3. Deleting a Contact
To delete a department, proceed as follows:
1. In the Relations pane, open the Search Company tab.
2. Search for the company the contact works for.
3. Open the Contacts tab.
4. Select the contact you want to delete and click the Delete Contact button
.
26 4. Managing Relations
Page 32

IP2Archive- User Manual- MAD Config Version 1.2
5. Managing Rights
5.1. User Rights Structure
5.1.1. Overview
The structure of the user rights in MAD is User / Group / Role.
5.1.2. User Groups
All users in the IP2Archive system are put into groups. Each user is member of one or
more user groups. All groups have at least one role assigned.
5.1.3. Roles for Groups
A role is a user right. It allows a user to perform certain actions in the IP2Archive system.
Roles are not assigned to users, but to groups. There are various types of roles.
5. Managing Rights 27
Page 33

EVS BroadcastEquipment S.A. - October 2012 Issue 1.2.D
5.2. Managing Roles
5.2.1. Roles Pane
The Roles pane opens when you click the Roles icon in the
Navigation bar.
This pane gives an overview of the existing, predefined roles. It allows you to select a role
and add a description to it.
5.2.2. Overview Roles
The following roles have been configured in MAD Config:
28 5. Managing Rights
Page 34

IP2Archive- User Manual- MAD Config Version 1.2
User Right Meaning
Start Deep Archive
Manager
Archive The user has archive rights in the Deep Archive Manager.
Restore The user has restore rights in the Deep Archive Manager.
Remove Hires The user has remove rights in the Deep Archive Manager.
Purge The user has purge rights in the Deep Archive Manager.
Partial Restore The user has partial restore rights in the Deep Archive
Start Deep Archive
Sync
Synchronize
IPDirector
Synchronize
IPDirector Lores
Synchronize with
DIVA
The user can start the Deep Archive Manager.
Manager.
The user can start Deep Archive Sync.
The user has rights to synchronize IPDirector.
The user has rights to synchronize with IPDirector to restore
low-resolution files.
The user has rights to synchronize with DIVA.
5.2.3. Adding a Description to a Role
You cannot create new roles. They are predefined. You can only add a (new) description.
To add a description to a role, proceed as follows:
1. Open the Roles pane.
2. From the Roles list, select a role, for example 'Deep Archive - Restore'.
3. In the Role area below, enter a description in the Description field.
4. Click the Save button to save the description.
The new description appears in the Roles list.
5. Managing Rights 29
Page 35

EVS BroadcastEquipment S.A. - October 2012 Issue 1.2.D
30 5. Managing Rights
Page 36

IP2Archive- User Manual- MAD Config Version 1.2
5.3. Managing Groups
5.3.1. Groups Pane
The Groups pane opens when you click the Groups icon in the
Navigation bar.
This pane gives an overview of the existing groups. It allows you to create new and delete
existing groups. It also allows you to add roles to and remove from a group.
5.3.2. Creating a Group
To create a new group, proceed as follows:
1. Open the Groups pane.
2. Click the New button to create a new group.
3. In the General Info area, enter a name for the new group and also add a description.
5. Managing Rights 31
Page 37

EVS BroadcastEquipment S.A. - October 2012 Issue 1.2.D
4. In the Roles pane, select the roles you want to add to the group. To select a
consecutive group of roles, click the first item, press and hold down the SHIFT key,
and then click the last item. To select non-consecutive roles, press and hold down the
CTRL key, and then click each item you want to select.
5. Click the Add button .
The selected roles are added to the new group.
6. Click the Save button to save the new group.
The new group appears in the Groups list.
5.3.3. Deleting a Group
Warning
If you delete a group, the users belonging to that group will lose their user rights.
To delete a group, proceed as follows:
1. Open the Groups pane.
2. From the Groups list, select a group.
3. Click the Delete button .
A message asks you to confirm your action.
4. Click Yes to continue or No to cancel the operation. If validated, the group disappears
from the list.
32 5. Managing Rights
Page 38

IP2Archive- User Manual- MAD Config Version 1.2
5.3.4. Adding a User to a Group
Each user of the IP2Archive system belongs to at least one user group. To add a user to a
user group, proceed as follows:
1. Open the Relations pane.
2. Search for the user you want to add to a user group.
3. Open the Contacts tab and then the Groups tab.
4. Select a group from the list, for example ‘Deep Archive Manager’.
5. Click to add the selected group to the user.
5. Managing Rights 33
Page 39

EVS BroadcastEquipment S.A. - October 2012 Issue 1.2.D
6. Configuring the Application
6.1. Settings Window
6.1.1. Opening the Settings Window
The Settings window allows you to configure your application. The first time the
application is launched after it has been installed, the Settings window opens
automatically.
The Settings window can also be accessed through the Settings menu.
6.1.2. Overview Setup Categories
The settings can be divided into three setup categories. In the Settings window, a tab is
provided for each setup category. The table below briefly describes each setup category:
34 6. Configuring the Application
Page 40

IP2Archive- User Manual- MAD Config Version 1.2
Setup Category Description
User Settings These settings can be configured by each individual user.
Global Settings These settings can only be configured by the system
System Settings These settings configure the general functioning of the
Currently, only the System Settings tab contains settings. The User Settings and Global
Settings tab are still empty. They do not contain any settings.
6.1.3. Edit Mode
To be able to edit the Global and System settings, you first have to enter a password.
To put the Settings window into Edit Mode, proceed as follows:
1. Click the Enter Into Edit Mode button .
administrator and by an eventual superuser.
application. They can only be configured by the system
administrator.
A dialog box appears.
2. Enter the administrator password and then click OK.
The Settings window enters into Edit Mode.
6.2. System Settings
6.2.1. Accessing the System Settings
The System settings can be accessed by clicking the System Settings tab in the Settings
window.
6.2.2. Overview System Settings Subcategories
The System settings are divided into the following subcategories:
• Directories
• TOM Options
• Oracle Connection
• E-Mail Options
6. Configuring the Application 35
Page 41

EVS BroadcastEquipment S.A. - October 2012 Issue 1.2.D
• Global Password
• Error Handling
• Language
For each subcategory a tab is provided. The Directories tab and the TOM Options tab are
empty. They don’t contain any settings.
6.2.3. Oracle Connection Tab
The Oracle Connection tab allows you to configure the connection with the Oracle
database.
Entering the Database Name
In this field you have to enter the name of the database the application has to connect to.
If the Use This Database Name check box is selected, the name of the database will
automatically appear in the Oracle login dialog box at start-up.
Entering the Login Name
In this field you have to enter a login name. If the Use This Login Name check box is
selected, the login name will automatically appear in the Oracle login dialog box at start-
36 6. Configuring the Application
Page 42

IP2Archive- User Manual- MAD Config Version 1.2
up.
Entering a Password
In this field you have to enter a password. If the Use Auto Login check box is selected,
the application automatically logs into the selected database at start-up. The Oracle login
dialog box does not appear.
Activating Version Control
If the Use Version Control check box is selected, the software version of the application
is checked each time it logs into the database. This check box should always be
selected!!
If the software version is outdated, the following warning message appears in the splash
screen highlighted in red: ‘Obsolete – A newer version exists. May not be used anymore.’
Click the OK button to close the splash screen and update your software version.
By clicking the Application History button, you can open a chronological list of all
software versions of the application. To get more details about each version (creation
date, name of programmer, status, additional remarks), you have to click + next to the
version number.
Activating Keep Alive
If the option Keep Connection Alive is selected, a message is sent to the database at
regular time intervals to avoid idle connections from being closed by the firewall. These
intervals can be set by you.
If the option Try to Reconnect if Keep Alive Fails is selected, the application will try a
number of times to reconnect with the database.
If the option Report Status in Database Everytime Keep Alive Timer Triggers is
selected, the status of the connection is reported in the database each time the Keep
Alive Timer sends a trigger to send a Keep Connection Alive message.
If the option Report Status of Tasks is selected, the status of the tasks (ok or not ok) is
reported to the database.
Testing the Oracle Connection
The Test Oracle button allows you to check the validity of the database name, login and
username you entered.
If these data are valid, then the following message appears next to the Test Oracle
button: ‘OK’.
If the login name or password is invalid, then a message box appears with the following
message: ‘ORA-01017: invalid username/password; logon denied’.
If the database name is invalid, then a message box appears with the following message:
‘ORA-12154:TNS: could not resolve the connect identifier specified’.
If you omit the password, then a message box appears with the following message:
‘ORA-01005: null password given; logon denied’.
6. Configuring the Application 37
Page 43

EVS BroadcastEquipment S.A. - October 2012 Issue 1.2.D
If you don’t enter a database name, login and username, then a message box appears
with the following message: ‘ORA-12560: TNS: protocol adapter error’.
If the Use Version Control check box is selected, you can also check the software
version of the application by clicking the Test Oracle button. If the software version is upto-date, then the following message appears: ‘Actual – The Actual Version’. If the software
version is outdated, then the following message appears: ‘Unknown Version Application!
Please contact the EDP department.’
If you close the Settings window without testing the validity of the database name, login
and username you just entered, then a message box appears.
If you click Yes, then the Settings window is closed and the original values are restored. If
you click Cancel, then the Settings window doesn’t close and you can test the values by
clicking the Test Oracle button.
If you change the current database settings, test the connection and then close the
Settings window, a message box will appear.
If you click Yes, the application is stopped and closed. A manual restart will be required.
Click Cancel to continue.
6.2.4. E-Mail Options Tab
The E-Mail Options tab allows you to configure an e-mail account enabling the application
to e-mail error notifications to the EVS developers.
38 6. Configuring the Application
Page 44

IP2Archive- User Manual- MAD Config Version 1.2
To be able to configure the e-mail account, you have to select the Send E-Mail check
box. The fields in the Mail System Settings and Mail Message Settings group box become
available.
Configuring an E-Mail Account
In the Mail System Settings group box you have to enter the IP address and port number
of the SMTP server and specify a timeout. In the SMTP Login group box you can enter a
username and password.
Configuring a Default E-Mail Message
The Mail Message Settings group box contains two tabs: Internal Mail Settings and
External Mail Settings.
The Internal Mail Settings tab is used to configure a default e-mail message that will be
sent to the EVS developers when an error occurs.
The External Mail Settings tab is used to configure a default e-mail message that will be
sent to the customer to notify him about an error. In each tab you have to enter the
sender’s email address, the email address of the various recipients and a subject.
To test the settings and manually send an e-mail message, click the Send Mail button.
6. Configuring the Application 39
Page 45

EVS BroadcastEquipment S.A. - October 2012 Issue 1.2.D
6.2.5. Global Password Tab
The Global Password tab allows you to set a password that the superuser(s) has/have to
enter to be able to edit the Global settings of the application, if any. To apply the
password, you have to click the Apply button.
6.2.6. Error Handling Tab
The Error Handling tab is used to configure the error handling by the application. This tab
will only be used by the EVS administrator.
Handling Unhandled Errors
If the Save the Screen Dump check box is selected, a screenshot is taken of an
unhandled error message and stored in the database and in a folder on the computer
40 6. Configuring the Application
Page 46

IP2Archive- User Manual- MAD Config Version 1.2
where the application is installed. In the Not Logged Error(s) pane, errors can be typed for
which no log was created. By default, this check box is selected.
Handling Handled Errors
If the Save the Unforced Error Log’s check box is selected, the log of the error is saved
in the database and in a folder on the computer where the application is installed. By
default, this check box is selected.
If the Save the Screendump check box is selected, a screenshot is taken of the error
message and stored in the database and saved in the same folder as where the error log is
kept. By default, this check box is selected.
6.2.7. Language Tab
The Language tab allows the system administrator to change the language of the user
interface. The default language is set to English.
6. Configuring the Application 41
Page 47

EVS BroadcastEquipment S.A. - October 2012 Issue 1.2.D
42 6. Configuring the Application
Page 48

EVS Broadcast Equipment
Liège Science Park
16, rue Bois St Jean
B-4102 Ougrée
Belgium
Corporate
Headquarters
+32 4 361 7000
North & Latin America
Headquarters
+1 973 575 7811
To learn more about EVS go to www.evs.tv
Asia & Pacific
Headquarters
+852 2914 2501
Other regional offices
available on
www.evs.tv/contact
 Loading...