

Page 1
MDE E20.321-GB.fm Page 1 Mardi, 4. fÈvrier 2003 10:43 10
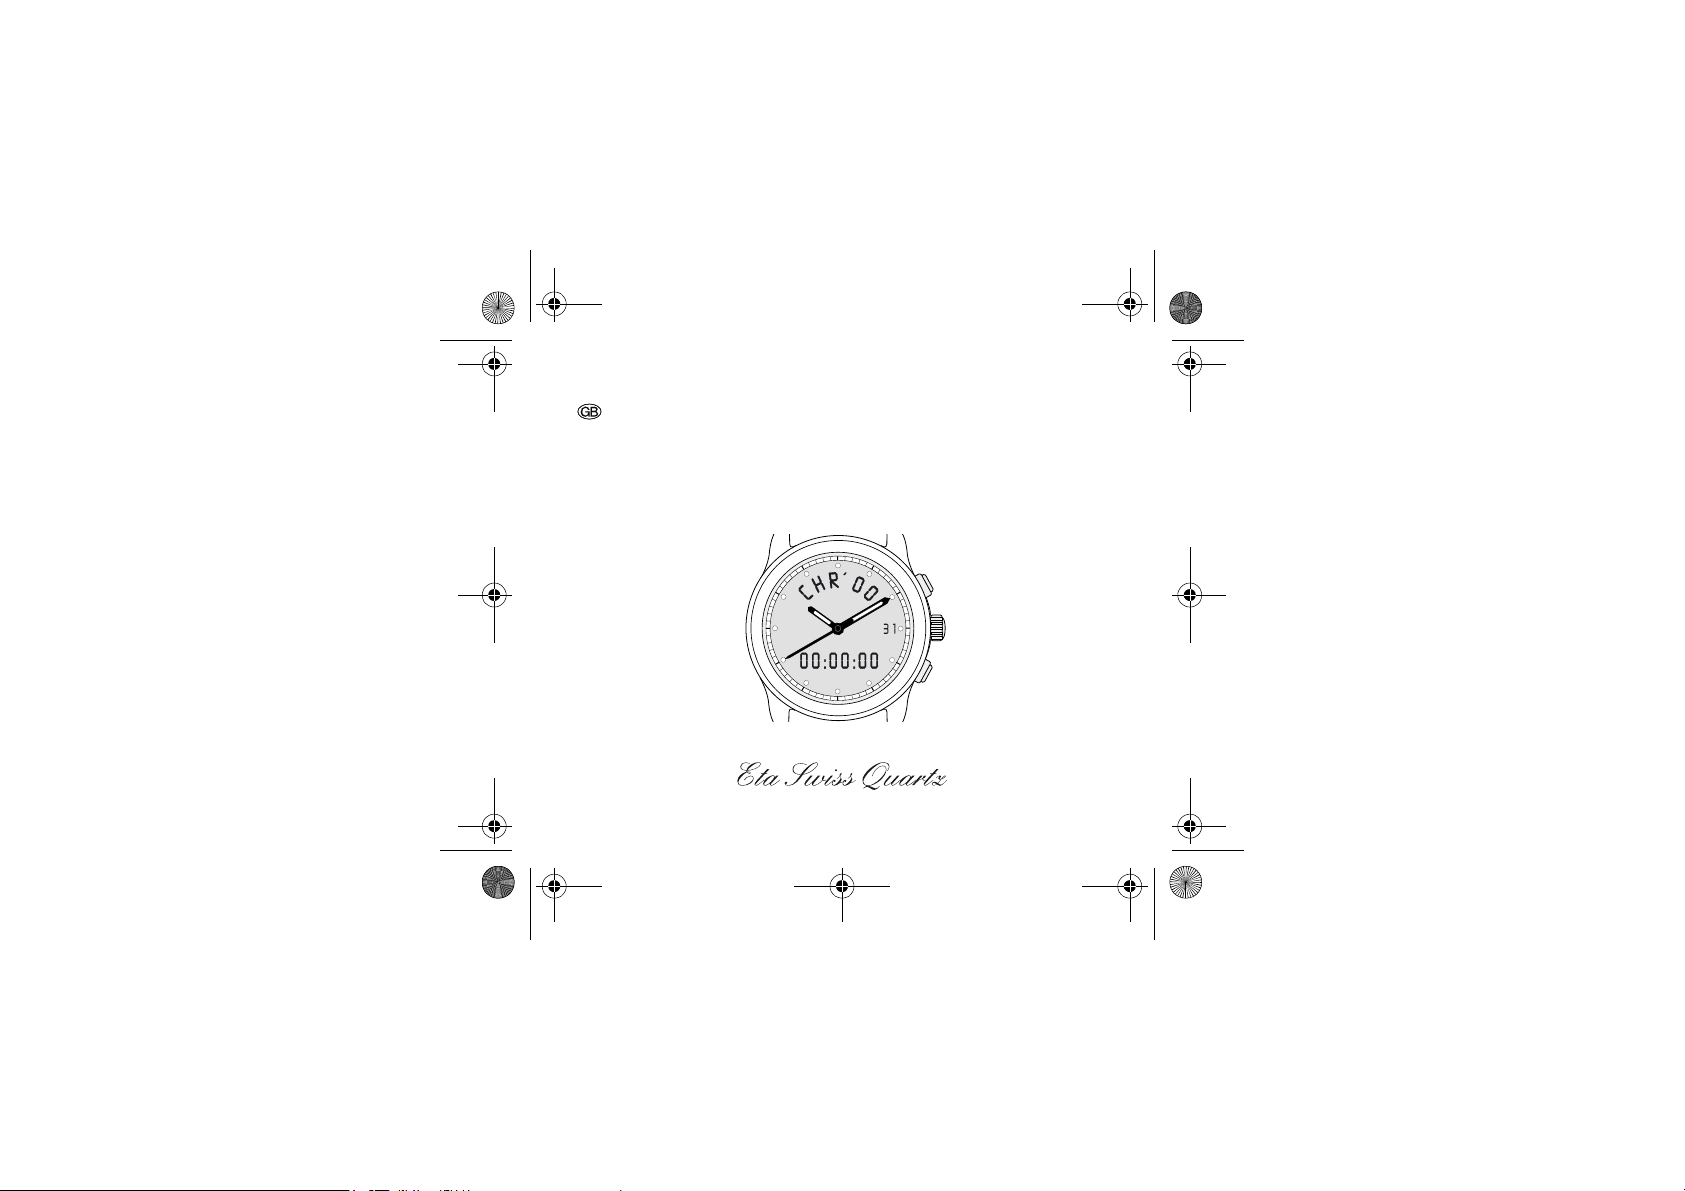
MULTIFUNCTION WATCH
ETA Calibre E20.321
Page 2
MDE E20.321-GB.fm Page 2 Mardi, 4. fÈvrier 2003 10:43 10
Page 3
MDE E20.321-GB.fm Page 3 Mardi, 4. fÈvrier 2003 10:43 10
Table of contents Page
1. Functions and displays 05 to 08
2. Settings 09 to 11
3. Automatic help for function adjustment 12
4. Dial lighting 13
5. Energy-saving mode 14 to 15
6. Synchronising the hands and digital time 16 to 17
7. Instruction for use 18
7.1 Neutral display, with or without date 18
7.2 Setting the time T1 19
7.2.1 Selecting the 24 hour or AM/PM mode 19
7.2.2 Setting the digital hours, minutes and seconds 19
7.3. Setting the full date 20
7.3.1 Setting Day/Month (D-M) or Month/Day (M-D) 20
7.3.2 Setting the date, month and year 21
7.3.3 Choosing and setting one of the four languages for
day name display 21
7.3.4 Week number 21
7.4 Setting a second time zone (or home time or
summer/winter time) 22
7.4.1 Selecting the 24 hour or AM/PM mode 22
7.4.2 Setting the digital hours, minutes and seconds 22
3
Page 4
MDE E20.321-GB.fm Page 4 Mardi, 4. fÈvrier 2003 10:43 10
Table of contents Page
7.4.3 Date of the second time zone option 23
7.4.4 Setting the date of the second time zone 23
7.5 Setting the alarm (daily alarm) 24
7.5.1 Starting the alarm 24
7.5.2 Alarm sound 24
7.5.3 Stopping the alarm 24
7.5.4 Testing the alarm sound (applicable to all alarms) 24
7.5.5 Setting the alarm time 25
7.6 Programming an annual alarm (calendar-alarm) 26
7.6.1 Selecting the calendar-alarm function 26
7.6.2 Setting the calendar-alarm function 27
7.7 Chronograph 28
7.7.1 Measuring one single time or adding several times with
automatic subtraction of intermediate stops (ADD) 28
7.7.2 Measuring the total time with intermediate time
reading SPLIT or fly-back hand 29
7.7.3 Displaying a chronometer time exceeding 24 hours 30
7.8 TIMER 31
7.8.1 Programming the TIMER duration 31 to 32
7.8.2 Using the TIMER 33
4
Page 5
MDE E20.321-GB.fm Page 5 Mardi, 4. fÈvrier 2003 10:43 10
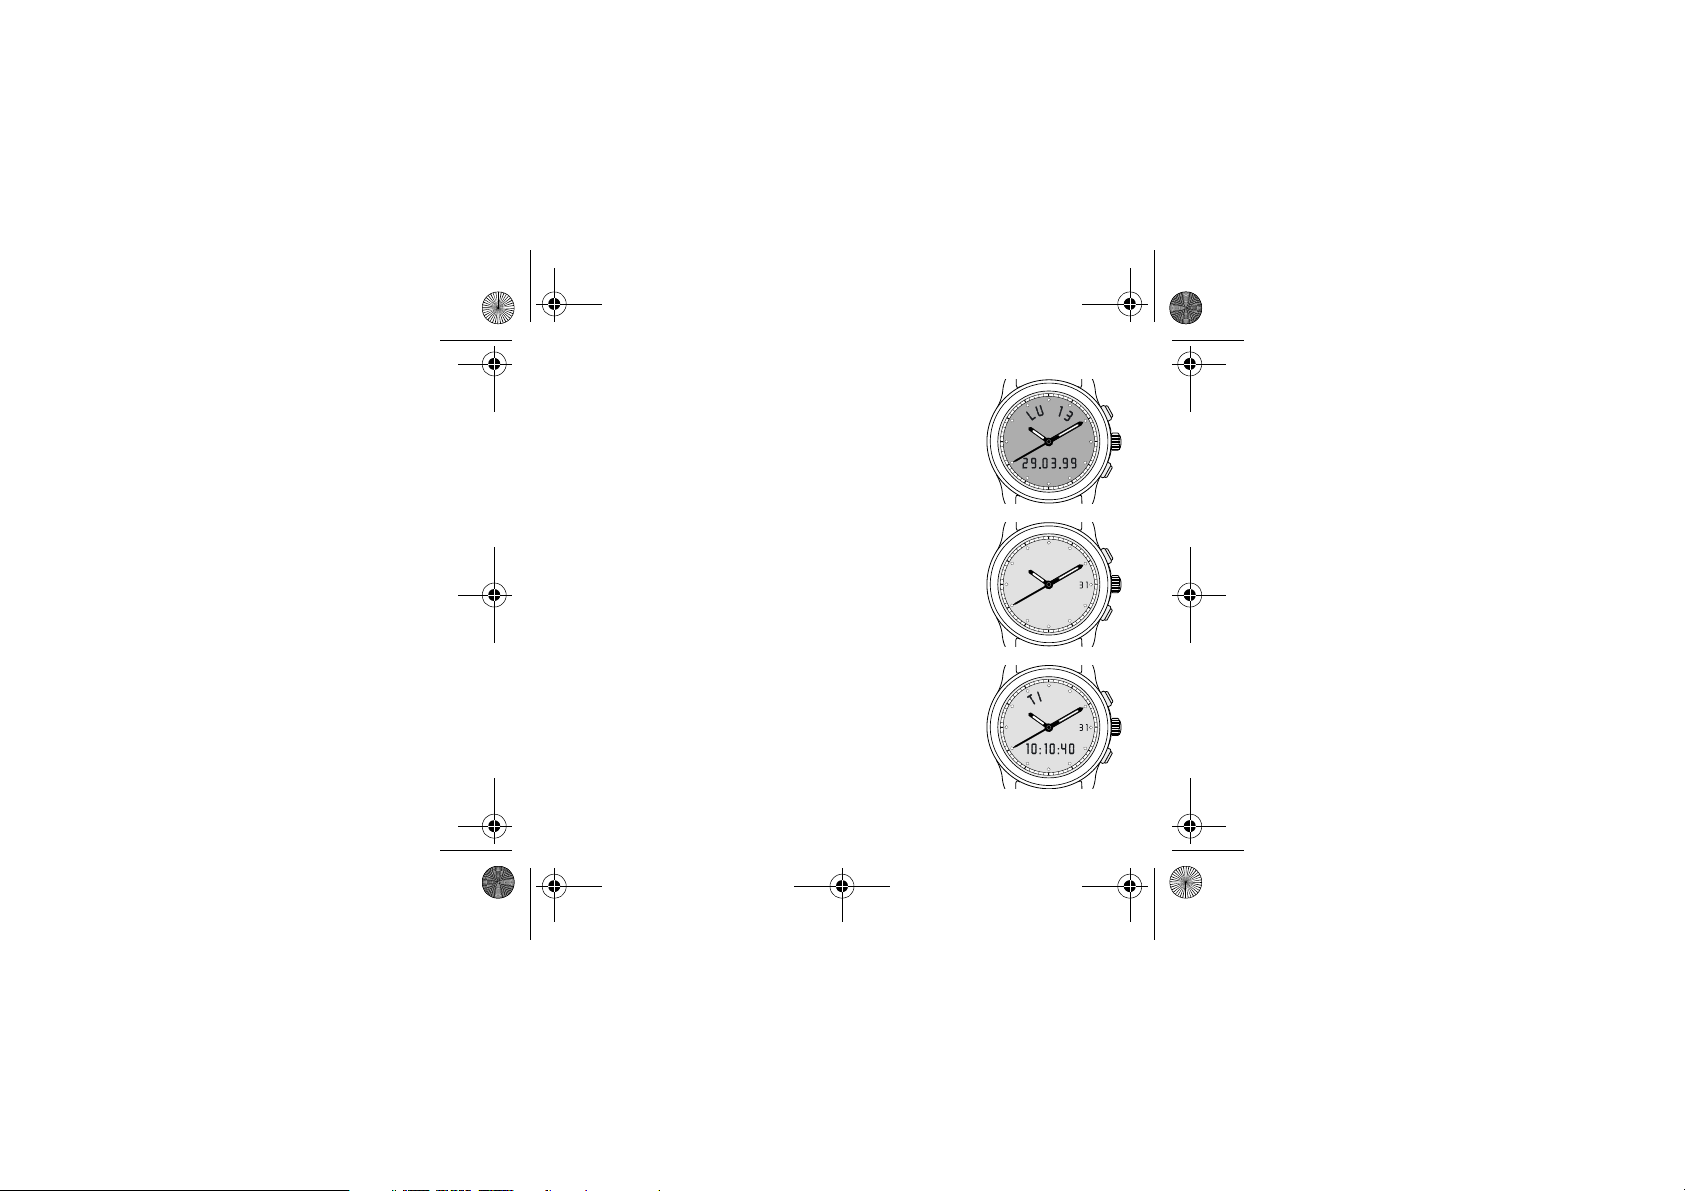
1. Functions and displays
Lighting
– Dial lighting
Hands and date only
– Analogue hour, minute and second display
(hands)
– Digital display of date only
T1 Digital local time and date
Digital display of hours, minutes, seconds and date
5
Page 6
MDE E20.321-GB.fm Page 6 Mardi, 4. fÈvrier 2003 10:43 10
T2 Second time
Digital display of a second time:
– another time zone,
– home time,
– summer/winter time.
Week number
Digital display of day, week number (may also be
hidden), date, month and year.
AL Daily alarm
Alarm time may be programmed in hours and
minutes.
6
Page 7
MDE E20.321-GB.fm Page 7 Mardi, 4. fÈvrier 2003 10:43 10
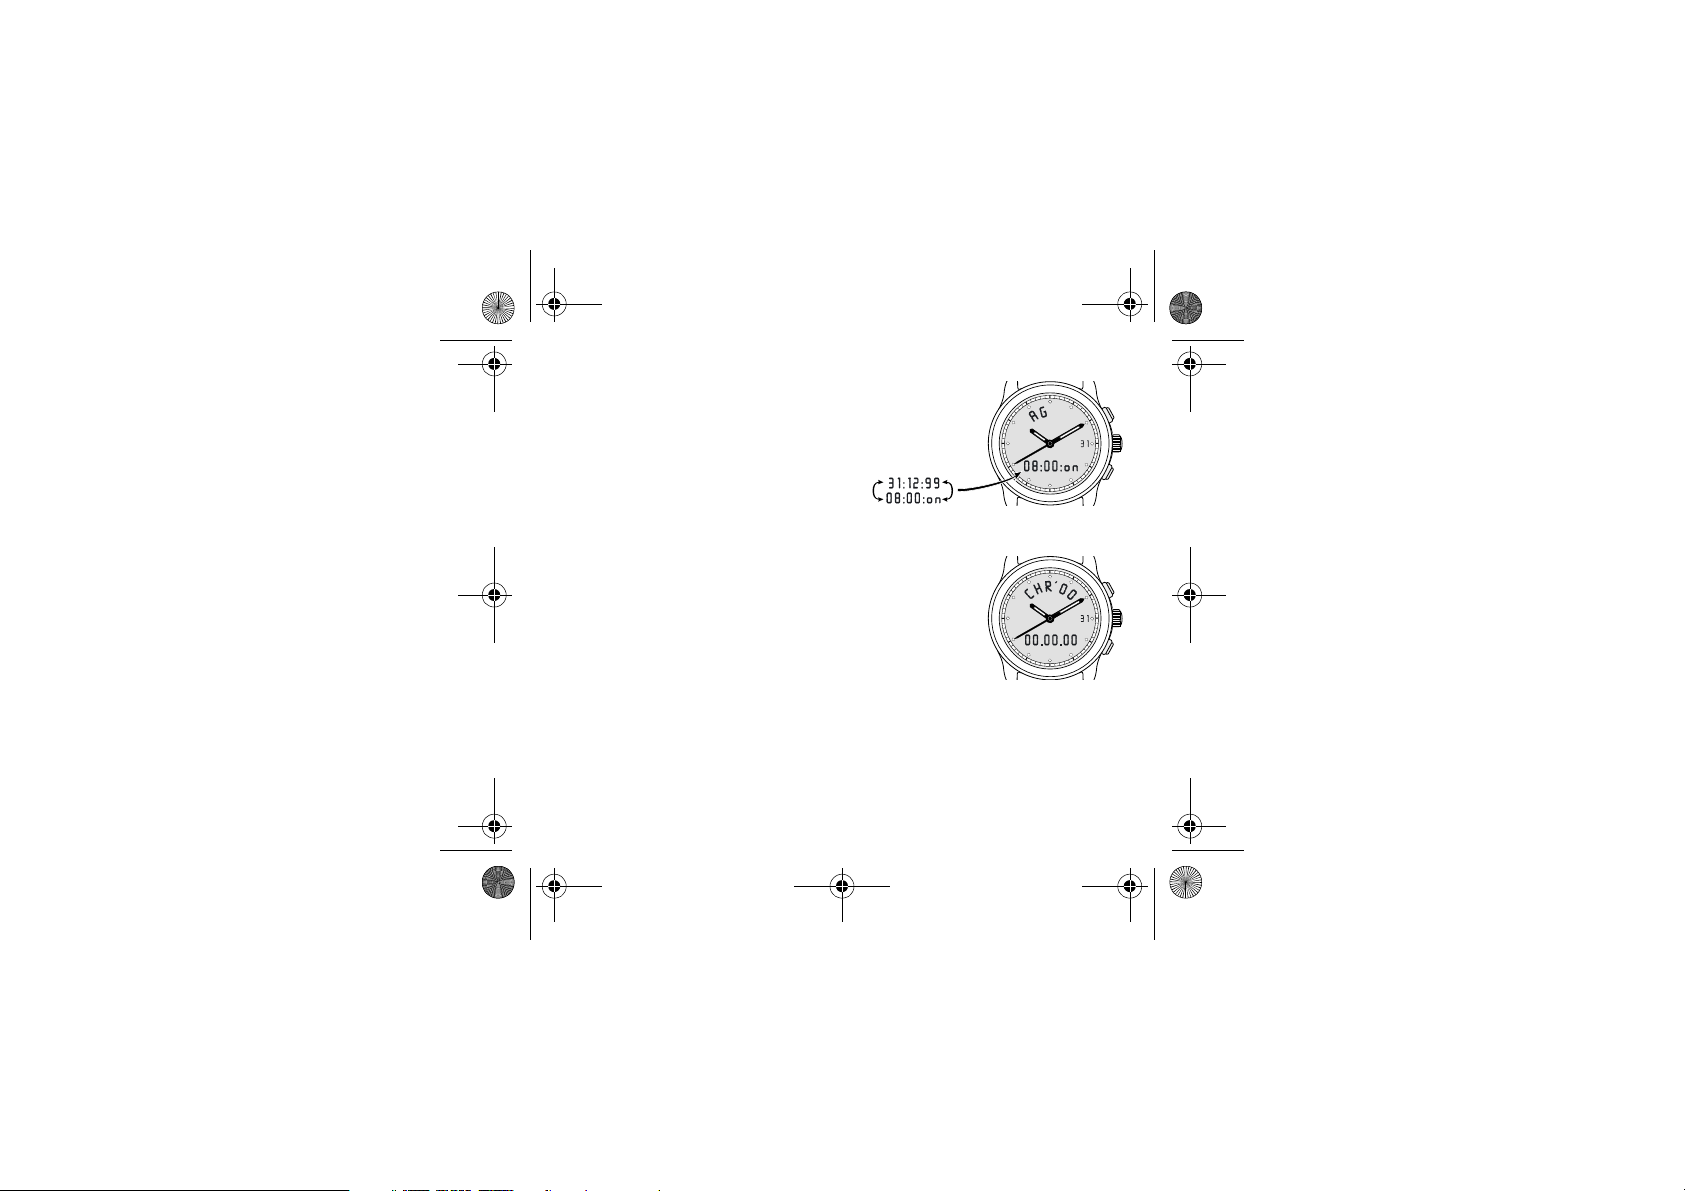
AG Annual alarm
Calendar alarm; digital display of annual alarm,
showing the date, month, year, alternating with
the hour, minutes and alarm activation.
CHR' Chronograph
Chronograph in hours, minutes, seconds, hundredths
of a second up to 24 hours and in days, hours and
minutes over 24 hours up to 99 days.
7
Page 8
MDE E20.321-GB.fm Page 8 Mardi, 4. fÈvrier 2003 10:43 10
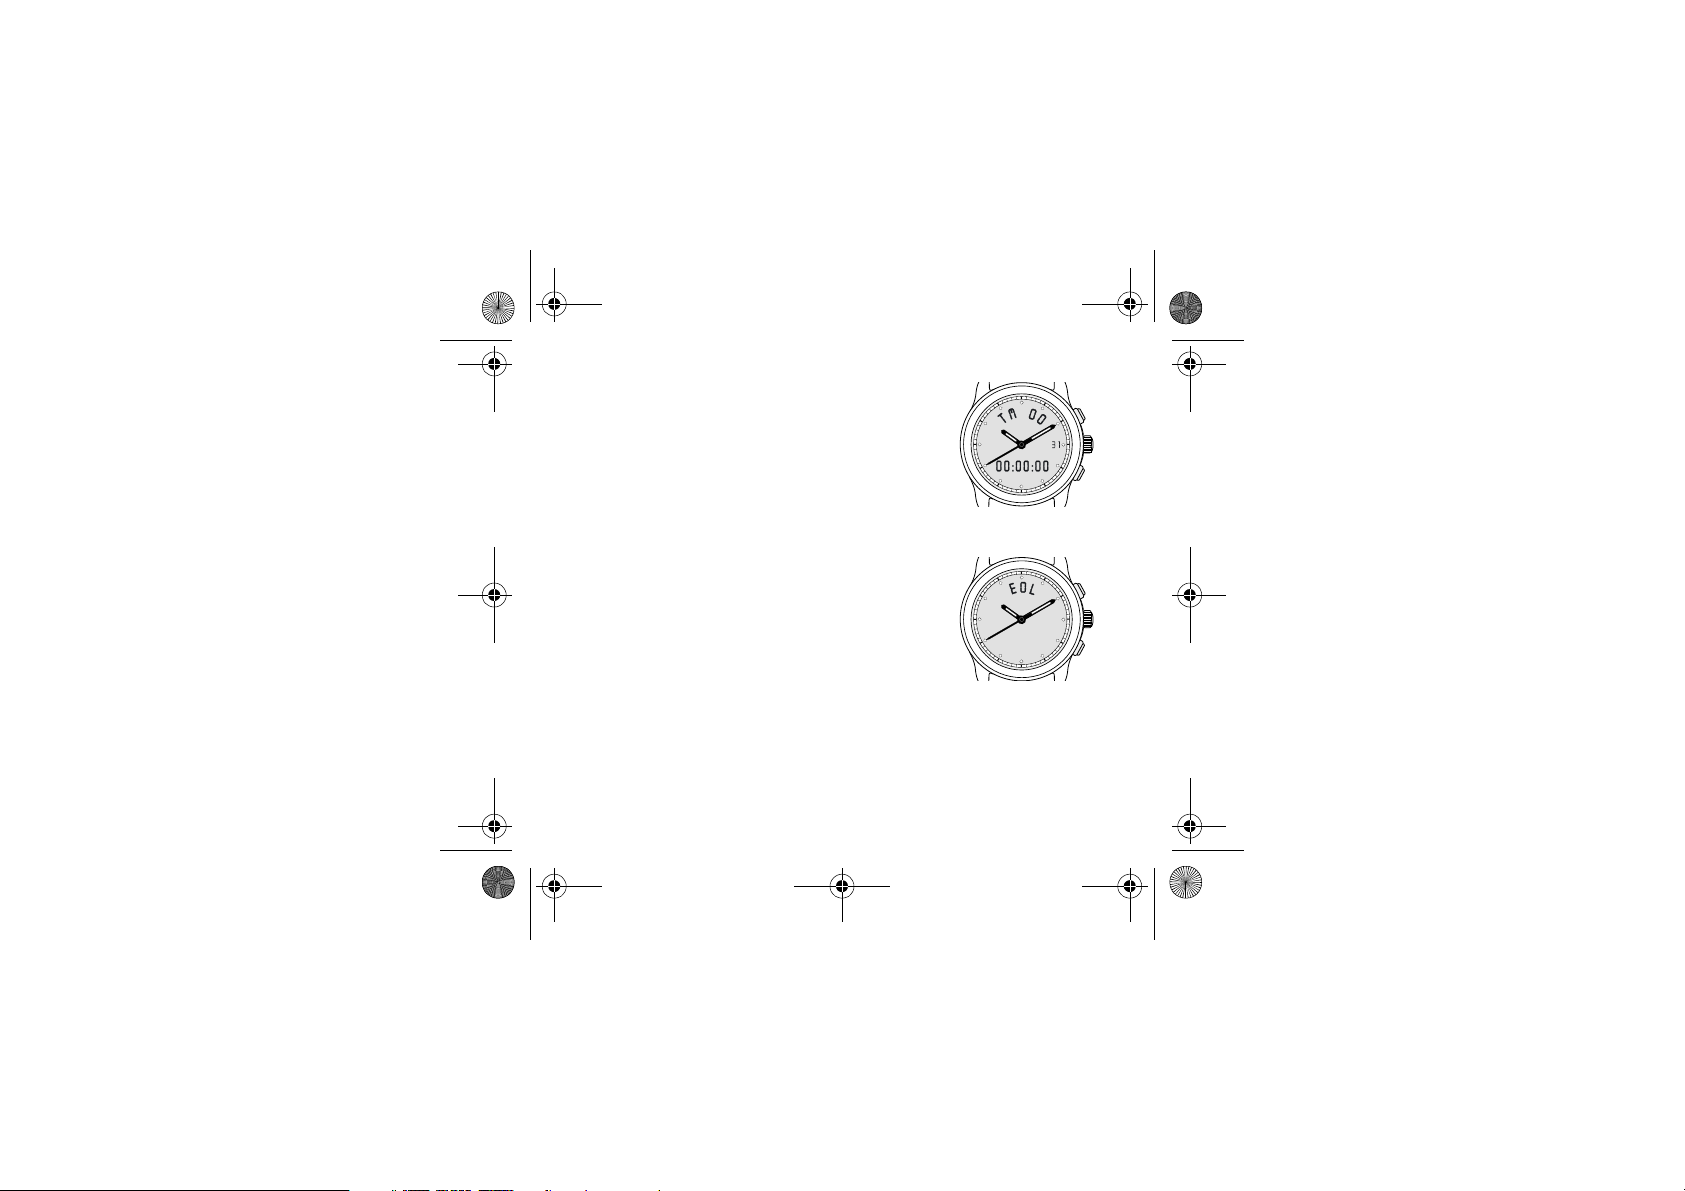
TM Timer
Timer
programmable in days, hours, minutes
and seconds up to 99 days.
EOL Battery end of life indicator
This indicator shows that the battery should be
replaced imminently (within 2 weeks). The EOL is
shown in neutral selection by the appearance of
EOL
” or by other functions flashing when the
“
crown is in neutral position.
8
Page 9
MDE E20.321-GB.fm Page 9 Mardi, 4. fÈvrier 2003 10:43 10
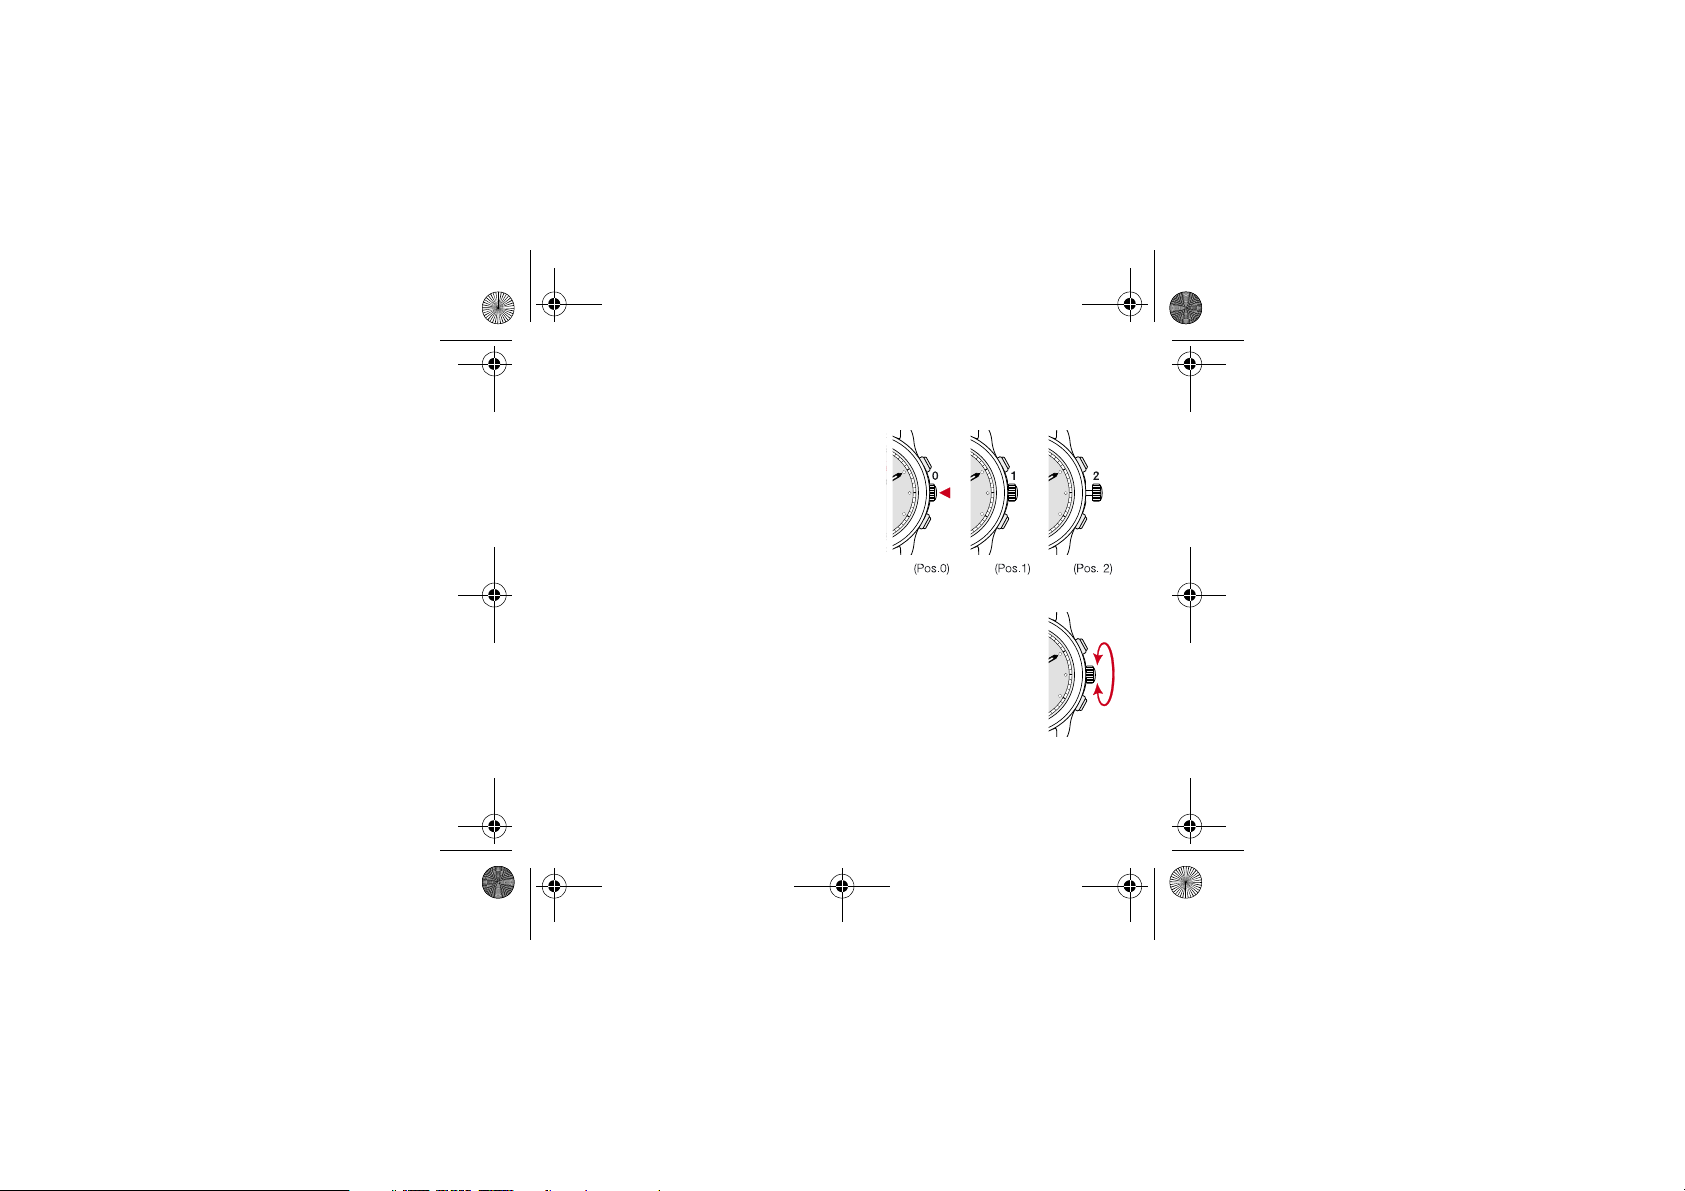
2. Settings
The various functions are selected by
turning the crown.
There are three axial positions:
– pushed in (Pos. 0)
–neutral (Pos. 1)
–pulled out (Pos. 2)
In neutral position, you can select
various functions by rotating the crown.
The crown may be turned in both directions. In pulled-out position, function
data may be adjusted by turning the
crown.
9
Page 10
MDE E20.321-GB.fm Page 10 Mardi, 4. fÈvrier 2003 10:43 10
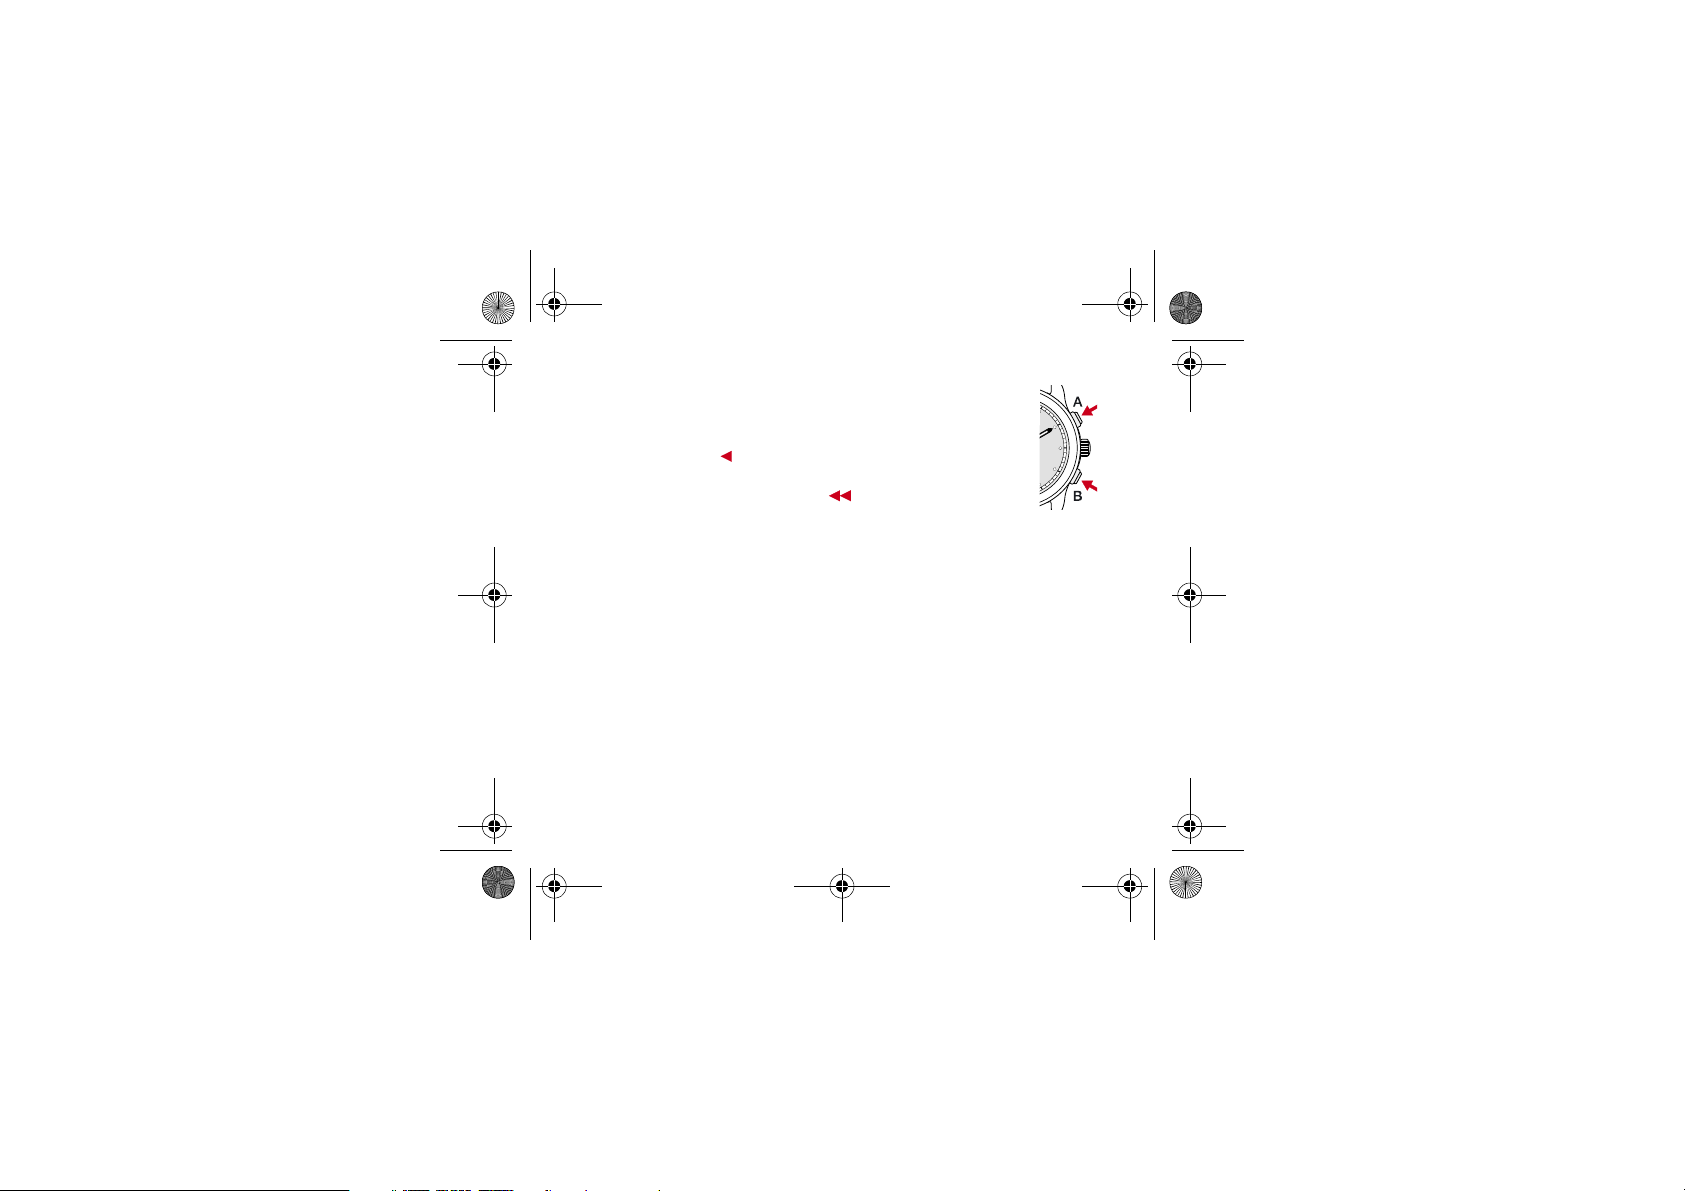
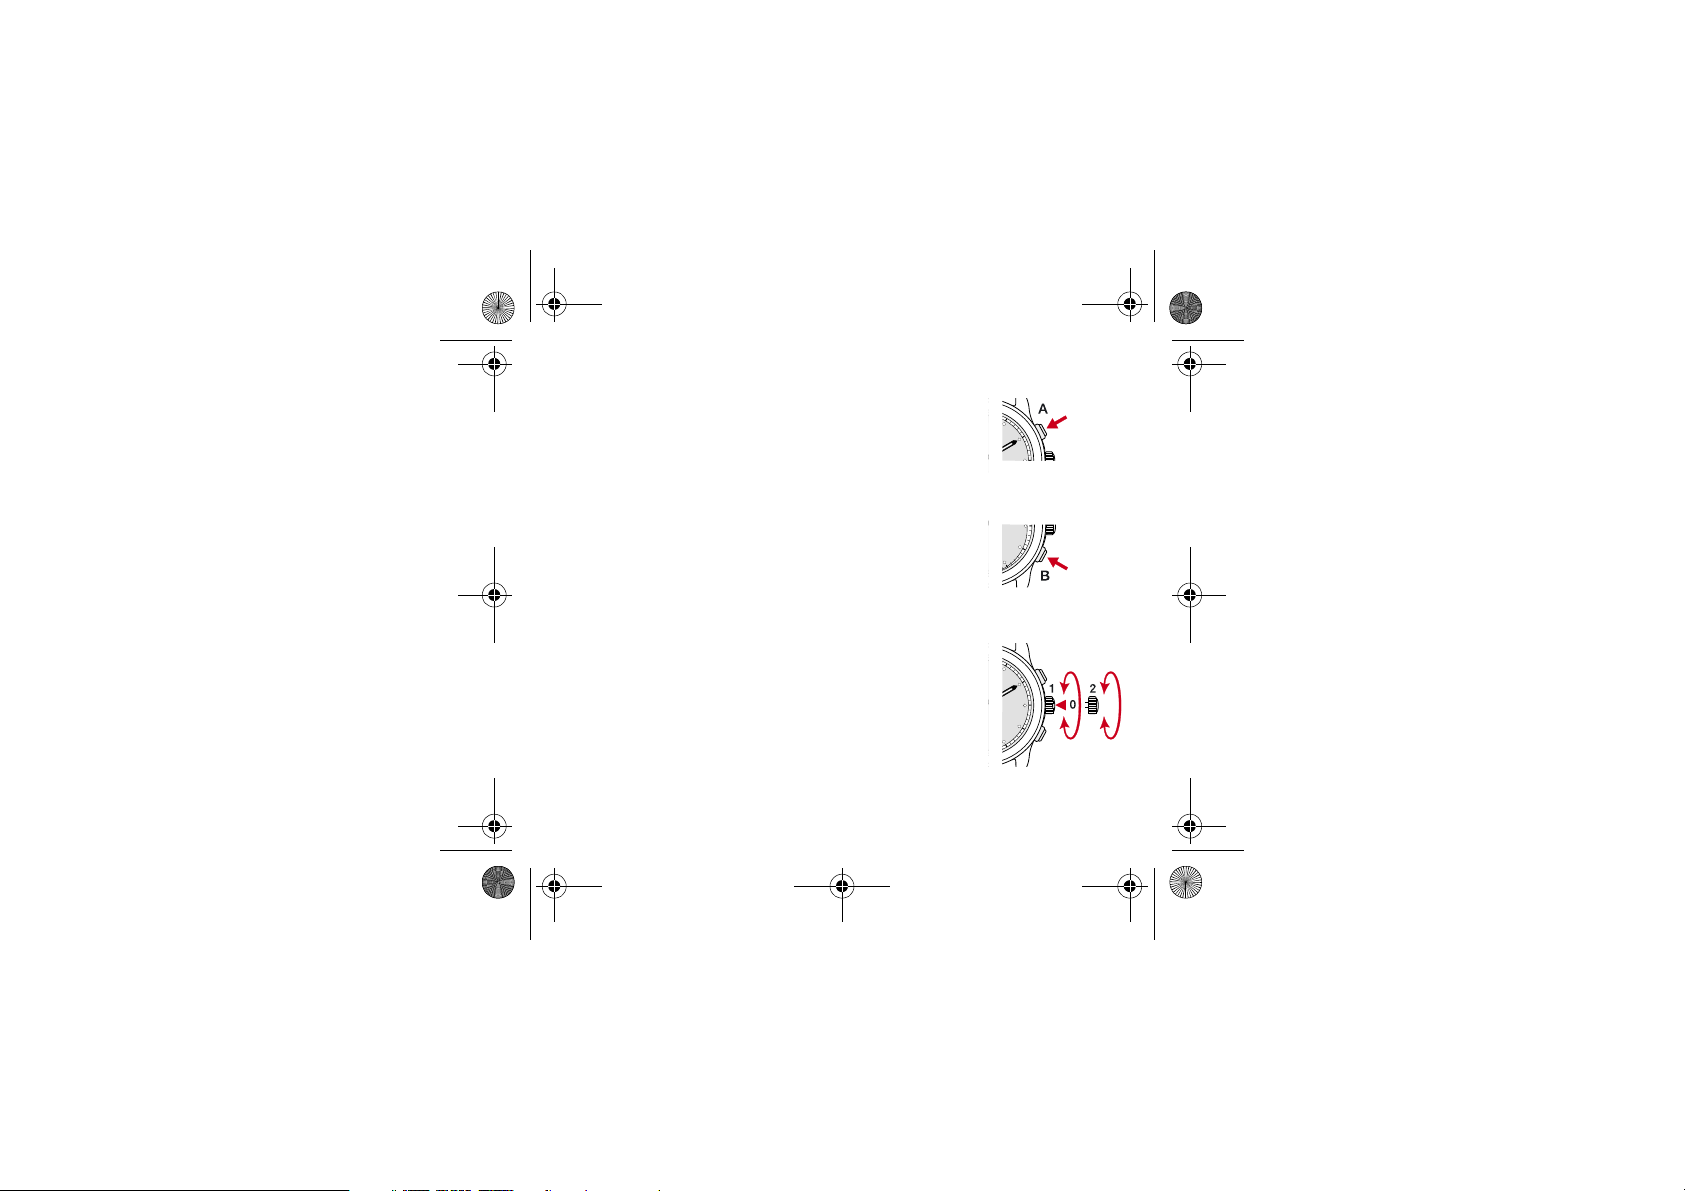
In addition to the crown, the watch has two buttons A and B
the action of which depends on the function selected.
Depending on the action required, choose either:
– brief press
or
– long press (1 to 2 seconds)
10
Page 11
MDE E20.321-GB.fm Page 11 Mardi, 4. fÈvrier 2003 10:43 10
Button A:
– selects the special functions AM/PM, ON/OFF,
START/STOP,
– date display (Date-Month / Month-Date),
– activation or deactivation of the week number
and the date.
Button B:
– selects the digits for adjustment (H-MIN-SEC...),
– audible confirmation, alarm sound test,
– selecting the T2 "additional functions" and calen-
dar alarm. Resetting the chronograph. Presetting
the timer.
Crown:
– dial lighting by pressing (0) the crown (position 1),
– selecting the functions by turning (position 1),
– adjusting the functions or language choice by
turning (position 2).
11
Page 12

MDE E20.321-GB.fm Page 12 Mardi, 4. fÈvrier 2003 10:43 10
3. Automatic help for function adjustment
The operations required for function adjustment are assisted by the automatic
display of arrows on the dial; e.g., to change the alarm time, the length of the
timer or the choice of a second time zone, etc.
These arrows indicate which button should be pressed, if the crown should be
turned, or even if a setting error causes a "NO OPERATION" message to
appear.
12
Page 13

MDE E20.321-GB.fm Page 13 Mardi, 4. fÈvrier 2003 10:43 10
4. Dial lighting
Pressing the crown (0) briefly will light up the dial for
approx. 6 seconds in each function. All the hands
stop momentarily. The exact time is reset automatically at the end of lighting.
13
Page 14

MDE E20.321-GB.fm Page 14 Mardi, 4. fÈvrier 2003 10:43 10
5. Energy-saving mode
It is possible to set the watch to "
energy-saving
mode if you do not intend to use it for several
days.
In this mode, power consumption is reduced to
conserve energy in the battery.
Select display neutral position by turning the
crown, then pull it out to position 2.
Synchronisation mode is activated.
15
(continued on page
)
14
"
Page 15

MDE E20.321-GB.fm Page 15 Mardi, 4. fÈvrier 2003 10:43 10
Energy-saving
"
holding button
" mode will be activated by pressing and
A
until the "
BAT
" (battery) message disap-
pears.
To reactivate normal operation, simply push the crown back
to position 1. The time which has elapsed since the hands
stopped is automatically regained.
15
Page 16
MDE E20.321-GB.fm Page 16 Mardi, 4. fÈvrier 2003 10:43 10
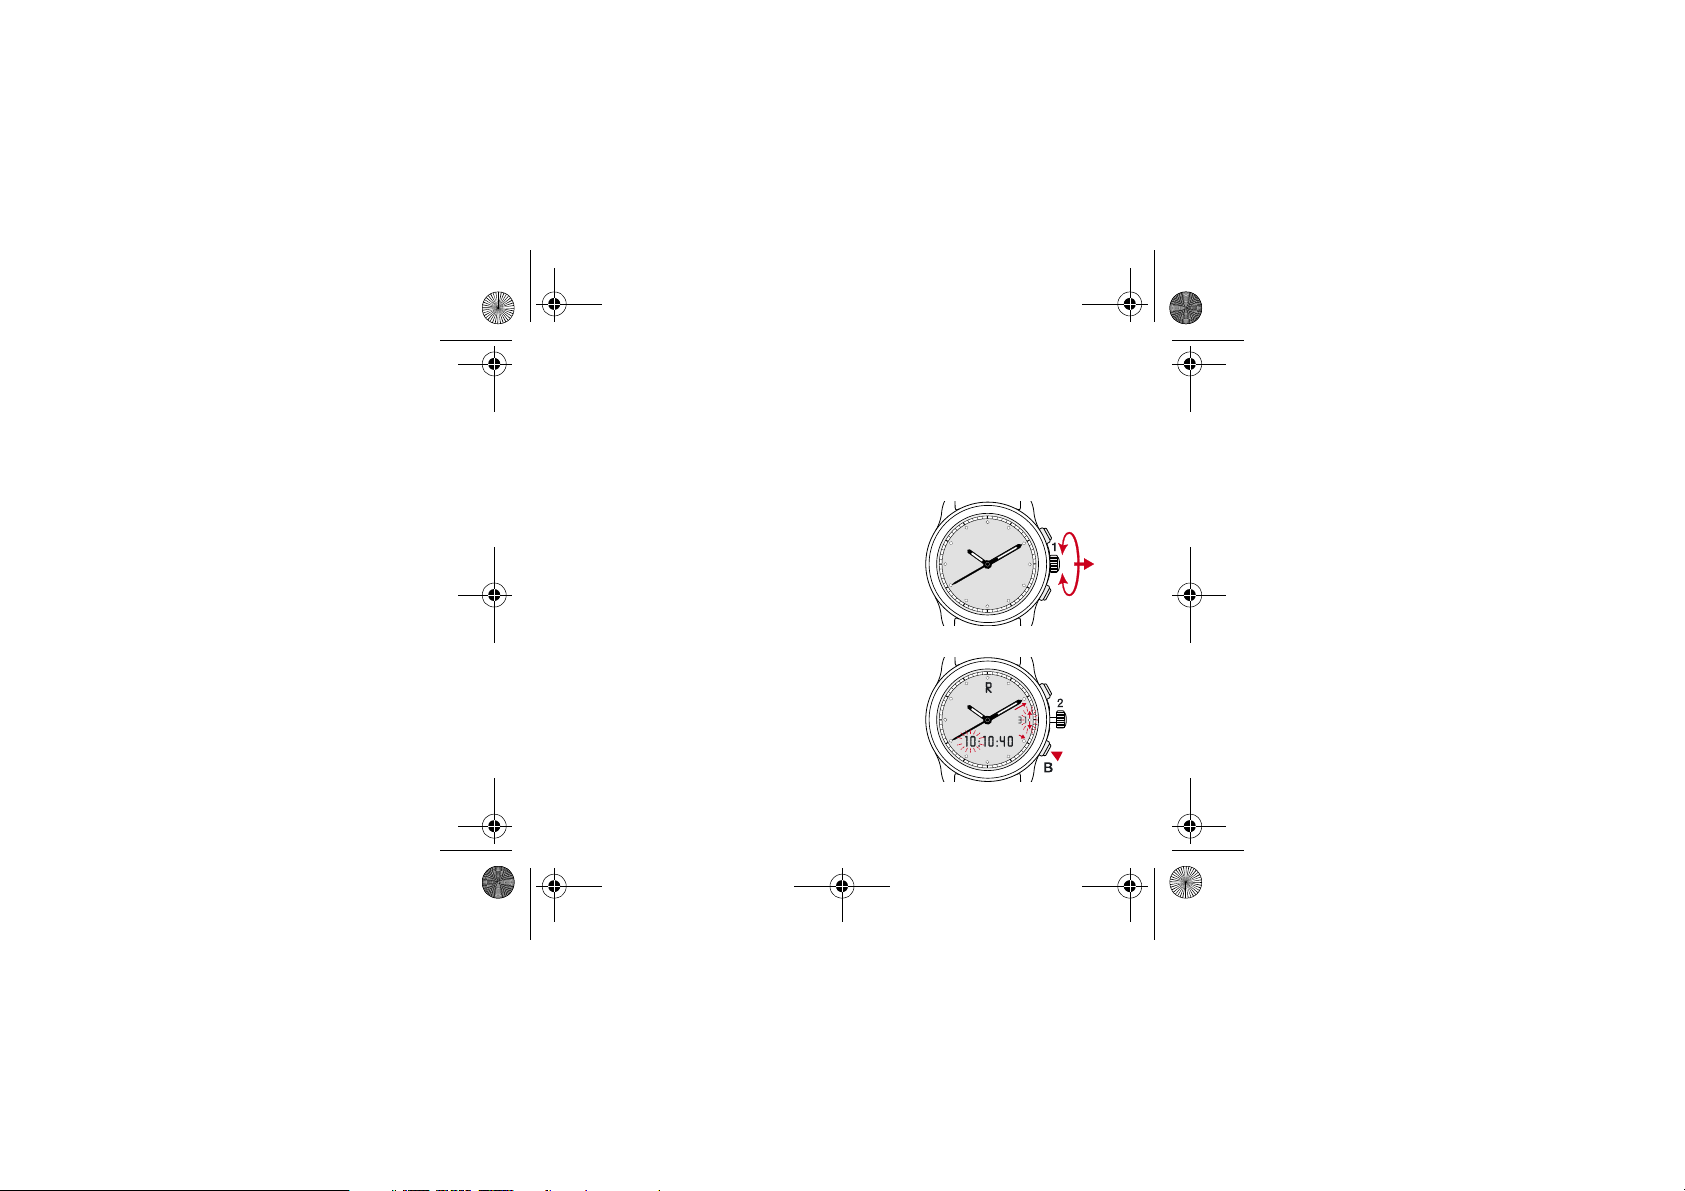
6. Synchronising the hands and digital time
The hour shown by the hands and the digital time
should be in perfect synchronisation. Any possible
loss of synchronisation between the two (battery
change, violent impact) will require the hands to
be adjusted to match the digital time displayed.
Proceed as follows:
Select the neutral display position by turning the
crown, then pull it to position 2. The letter "
be displayed.
B
Press the
button briefly; the hour, minute and
second figures are selected and will flash successively.
17
(continued on page
)
16
R
" will
Page 17
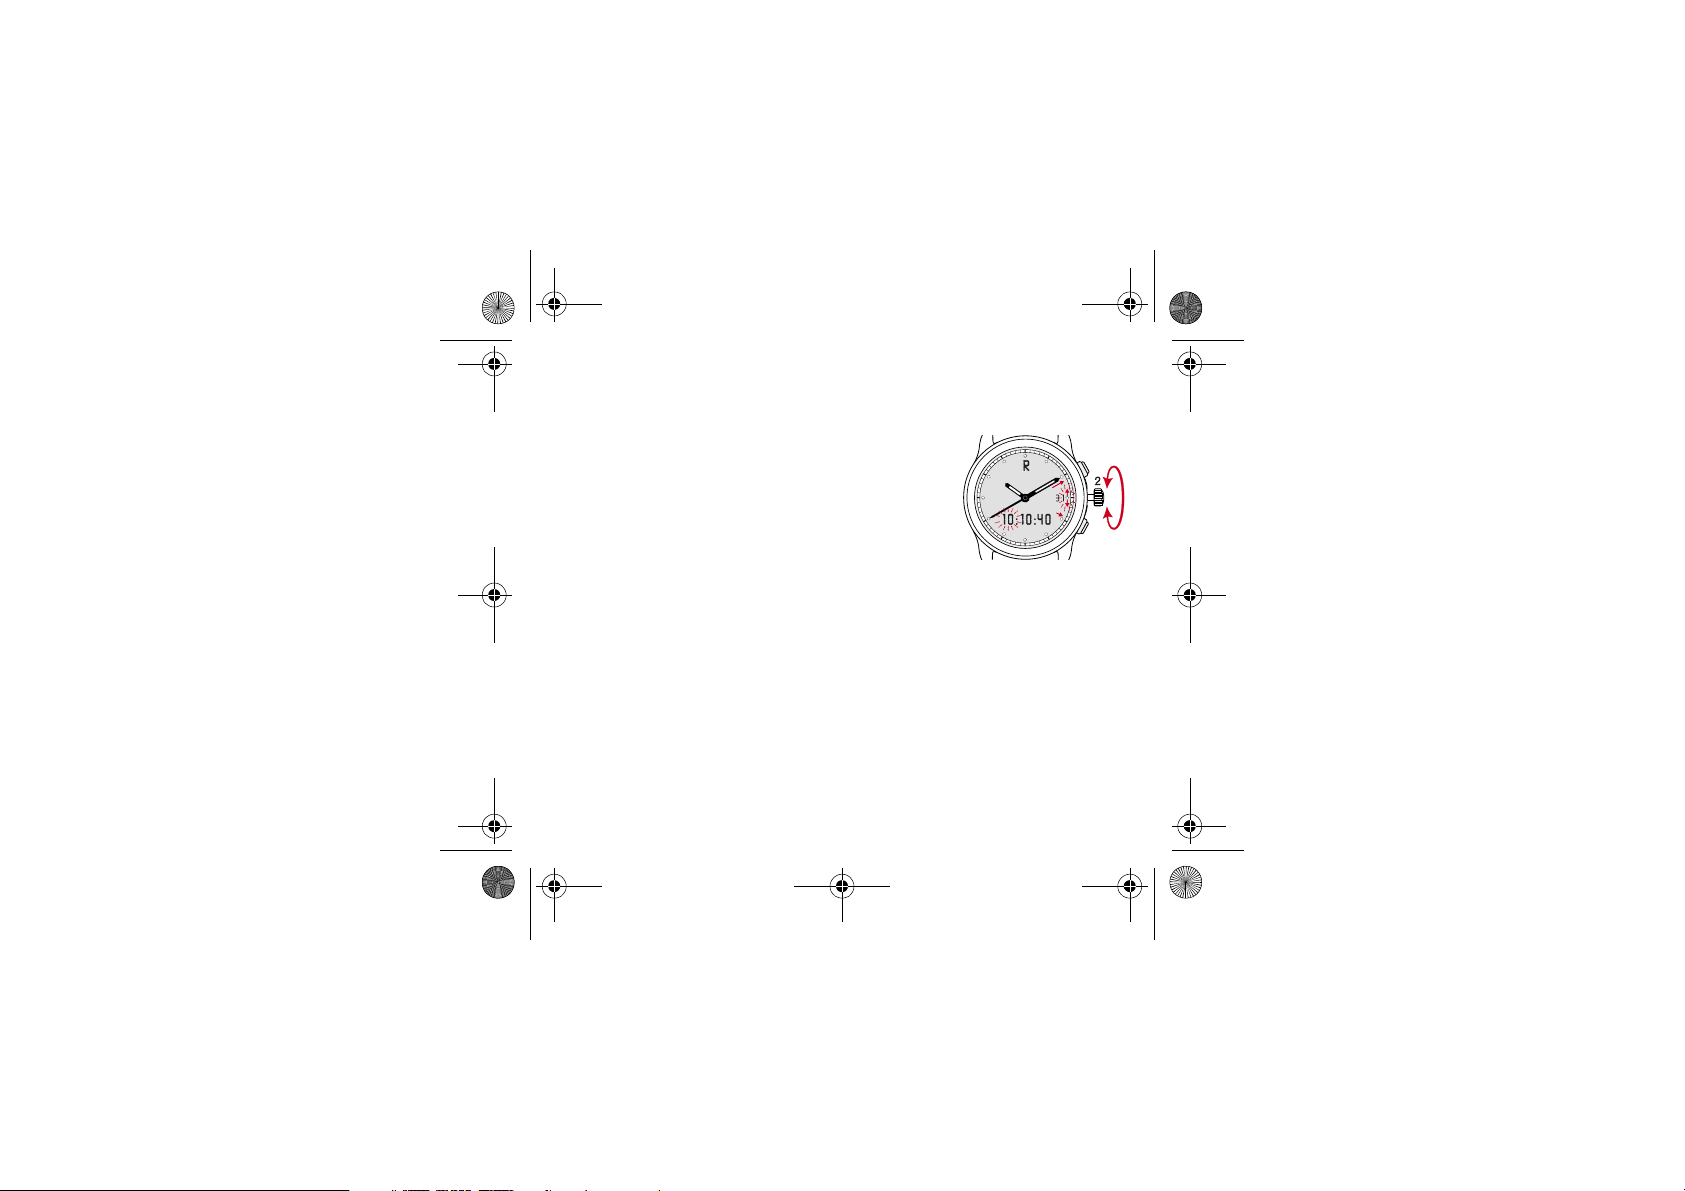
MDE E20.321-GB.fm Page 17 Mardi, 4. fÈvrier 2003 10:43 10
The hands are successively synchronised by turning the
crown.
NB:
The second hand can only be adjusted in a clockwise
direction (crown turning upwards).
Push the crown back into position 1 when the position of
the three hands corresponds to the digital time displayed.
This synchronisation only adjusts the time displayed by
T1
the hands to local time (
). For perfect synchronisation
between analogue time (hands) and digital time (figures),
firstly adjust the hands to the digital time displayed (in syn-
R
chronisation mode "
Setting
" mode as shown in the following chapter on
"
18
page
.
") and then adjust the exact time in
17
Page 18

MDE E20.321-GB.fm Page 18 Mardi, 4. fÈvrier 2003 10:43 10
7. Instruction for use
7.1 Neutral display, with or without date
Neutral display, selected by turning the crown, allows
only the hands to appear; the digital date may be displayed or hidden.
The date display may be activated or deactivated in this
A
mode by pressing button
briefly.
18
Page 19
MDE E20.321-GB.fm Page 19 Mardi, 4. fÈvrier 2003 10:43 10
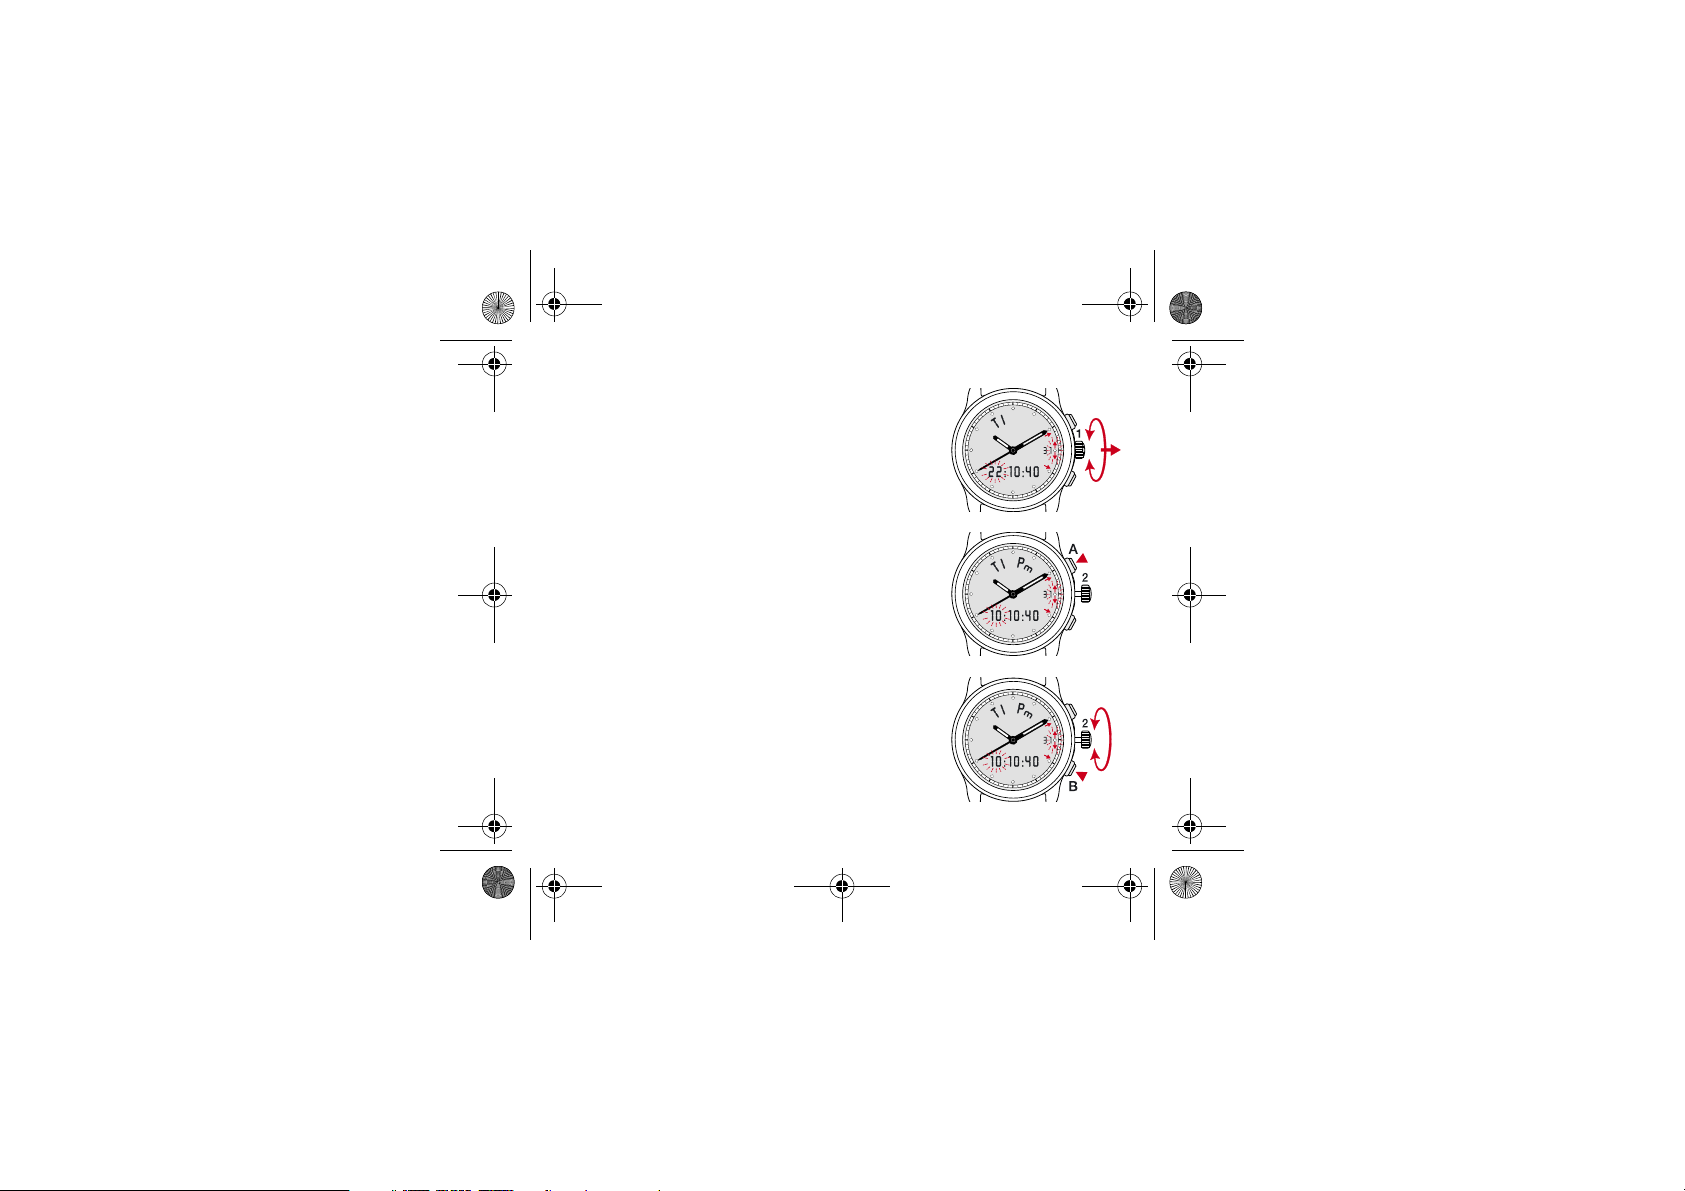
7.2 Setting the time T1
Select the T1 (
TIME
) function by turning the
crown, then pull it to position 2.
7.2.1 Selecting the 24 hour or AM/PM mode
The digital time (figures) can be changed to
display in either 24 hour or AM/PM mode by
briefly pressing button
A
.
7.2.2 Setting the digital hours, minutes and
seconds
Press button B briefly; the hour, minute and
second figures are selected and will flash
successively.
The hour, minute and second figures can be
successively adjusted by rotating the crown.
Push the crown back to position 1 after adjustment.
19
Page 20

MDE E20.321-GB.fm Page 20 Mardi, 4. fÈvrier 2003 10:43 10
7.3 Setting the full date
Select the full date function by turning the crown,
then pull it to position 2.
7.3.1 Setting Day/Month (D-M) or Month/Day (M-D)
– Briefly press button A to select date display
mode:
D
Day (
) / Month (M)
or
M
Month (
) / Day (D).
20
Page 21

MDE E20.321-GB.fm Page 21 Mardi, 4. fÈvrier 2003 10:43 10
7.3.2 Setting the date, month and year
The date (D), month (M) and year are changed by
rotating the crown. The day of the week is automatically selected according to the date. Press button B
briefly to confirm date setting (
M
month (
) and year.
D
), then confirm the
7.3.3 Choosing and setting one of the four languages
for day name display
Select one of four languages available for the day
A
display by pressing and holding button
.
Turn the crown (in position 2) to display the name of
the day in either:
F
(
)French (E)English
D
)German (S)Spanish
(
All date settings as described in
7.3.1
to
7.3.3
are
confirmed by pushing the crown back to position 1.
7.3.4 Week number
The week number display is deactivated by pressing
A
bri efl y (crown in position 1). It w ill reappear
button
after another function is selected by turning the
crown. Repeat if necessary.
21
Page 22
MDE E20.321-GB.fm Page 22 Mardi, 4. fÈvrier 2003 10:43 10
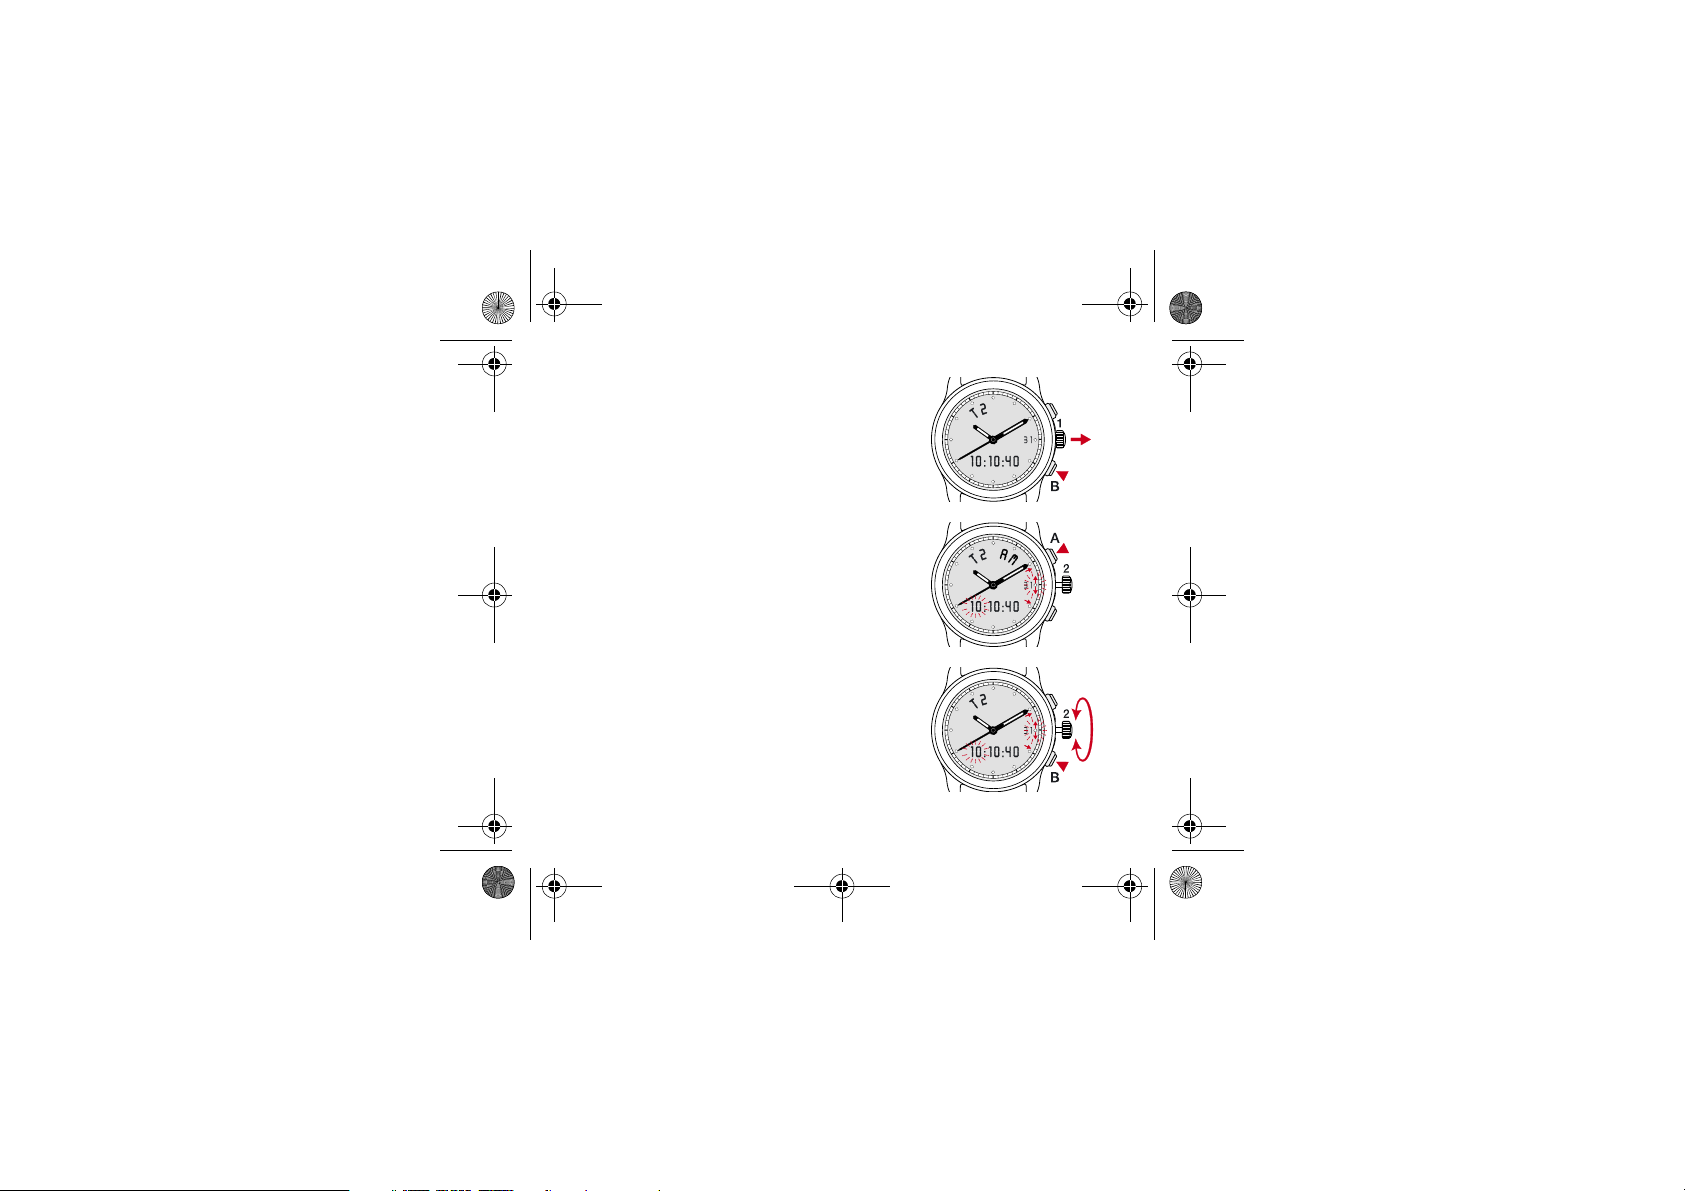
7.4 Setting a second time zone (or home time or
summer/winter time)
In "local time" (T1) display, select the second time
T2
zone (
) function by briefly pressing button B then
pulling the crown to position 2.
7.4.1 Selecting the 24 hour or AM/PM mode
The time of the second time zone (T2) may be
AM/PM
changed to display in the 24 hour or
by briefly pressing button
A
.
mode
7.4.2 Setting the digital hours, minutes and seconds
The hours and minutes are set by turning the
crown.
B
Briefly press button
hour, then adjust the
to confirm setting of the T2
T2
minutes and confirm
again.
B
Briefly press button
again to set the date for the
second time zone chosen.
7.4.3
(refer to
, page 23).
22
Page 23
MDE E20.321-GB.fm Page 23 Mardi, 4. fÈvrier 2003 10:43 10
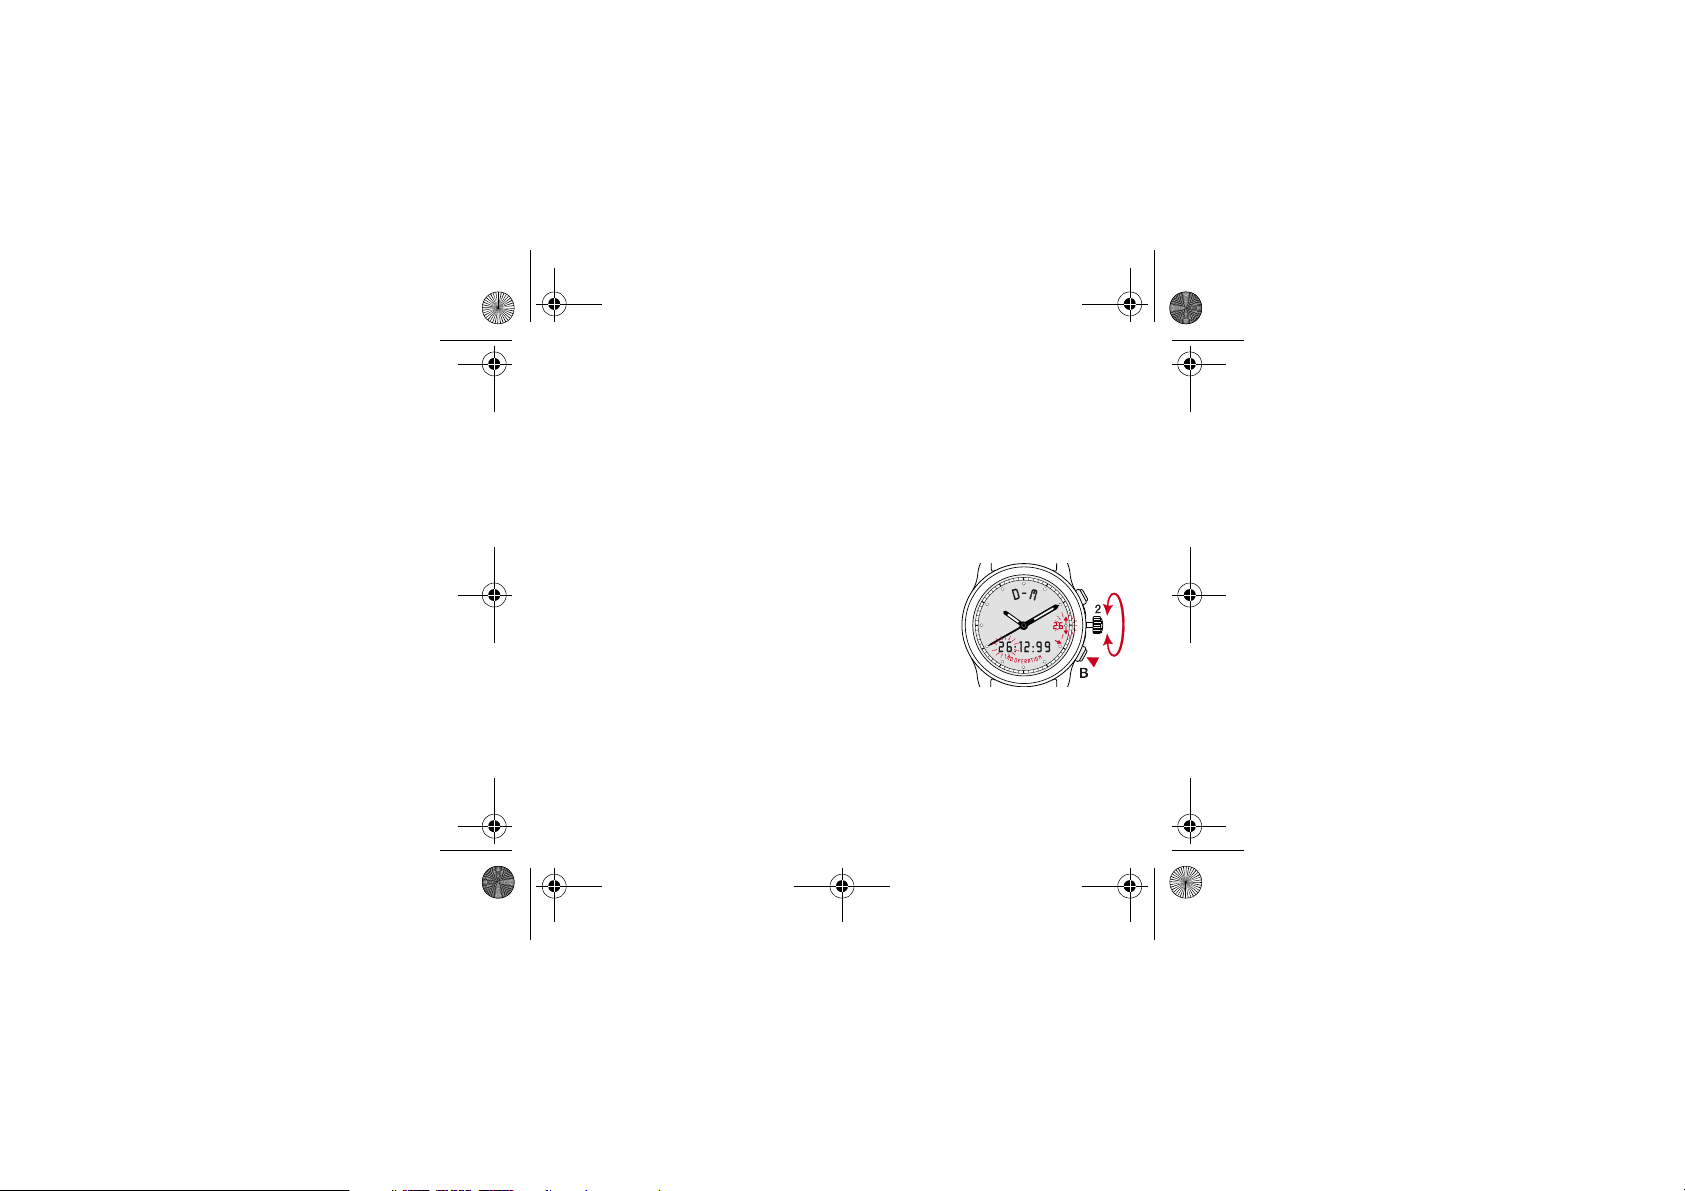
7.4.3 Date of the second time zone option
If you wish, you may set the date of the second time
zone with a variation of ± 1 day to local time (
T1
E.g.: If the date in the local time is the 25th, the date
of the second time zone is either the 24th or 26th
(maximum difference between two time zones is
one day).
7.4.4 Setting the date of the second time zone
After you have pressed button B a third time as
7.4
described in
, you may set the date of the
second time zone by turning the crown.
The message "NO OPERATION" shows that it is not
possible to adjust the date by more than ± 1 day.
Push the crown back to position 1 after adjustment.
23
).
Page 24
MDE E20.321-GB.fm Page 24 Mardi, 4. fÈvrier 2003 10:43 10
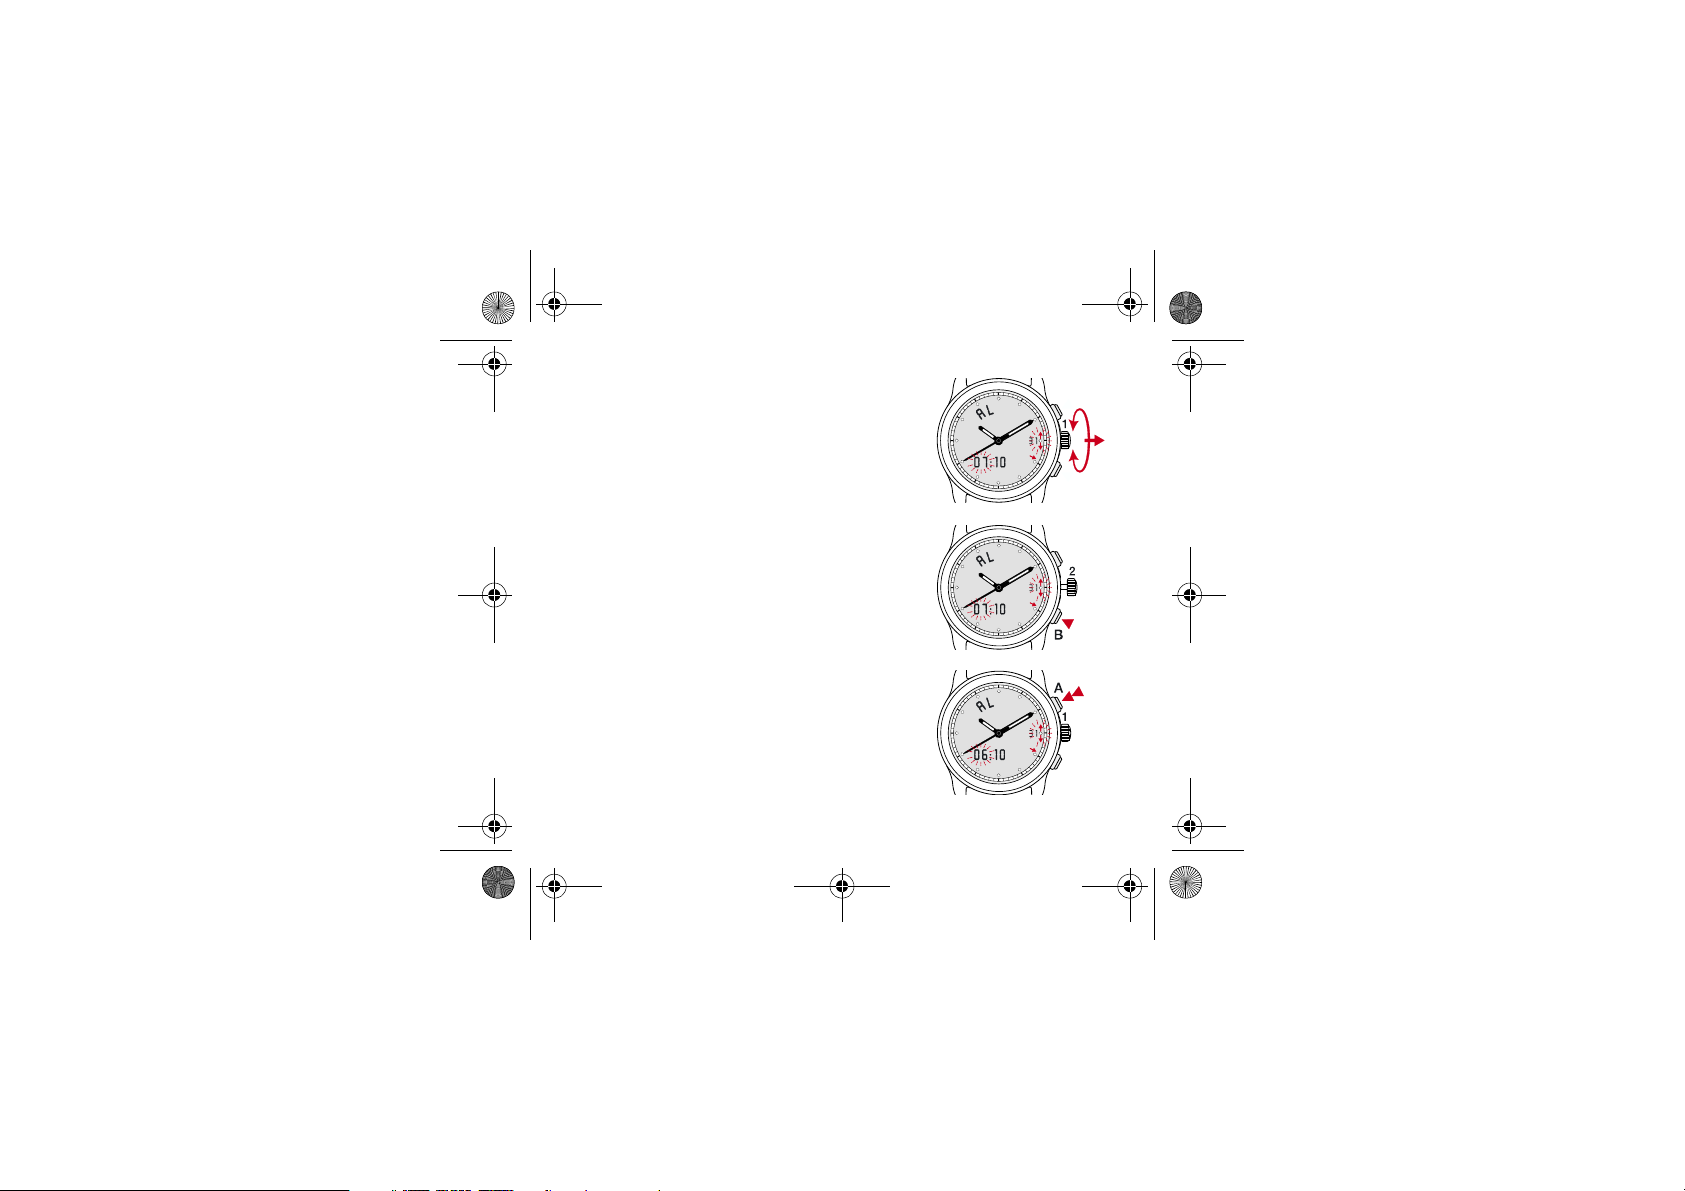
7.5 Setting the alarm (daily alarm)
7.5.1 Starting the alarm
Select the alarm function (AL) by turning the crown and pressing and holding
A
button
. The letters "ON" will appear on the dial and a "beep" will be heard.
7.5.2 Alarm sound
At the chosen alarm time, a first alarm
will sound. After 10 seconds, the alarm
will sound intermittently for 50 seconds
and then stop automatically.
7.5.3 Stopping the alarm
The alarm may be stopped at any
moment by pressing either of the buttons or the crown.
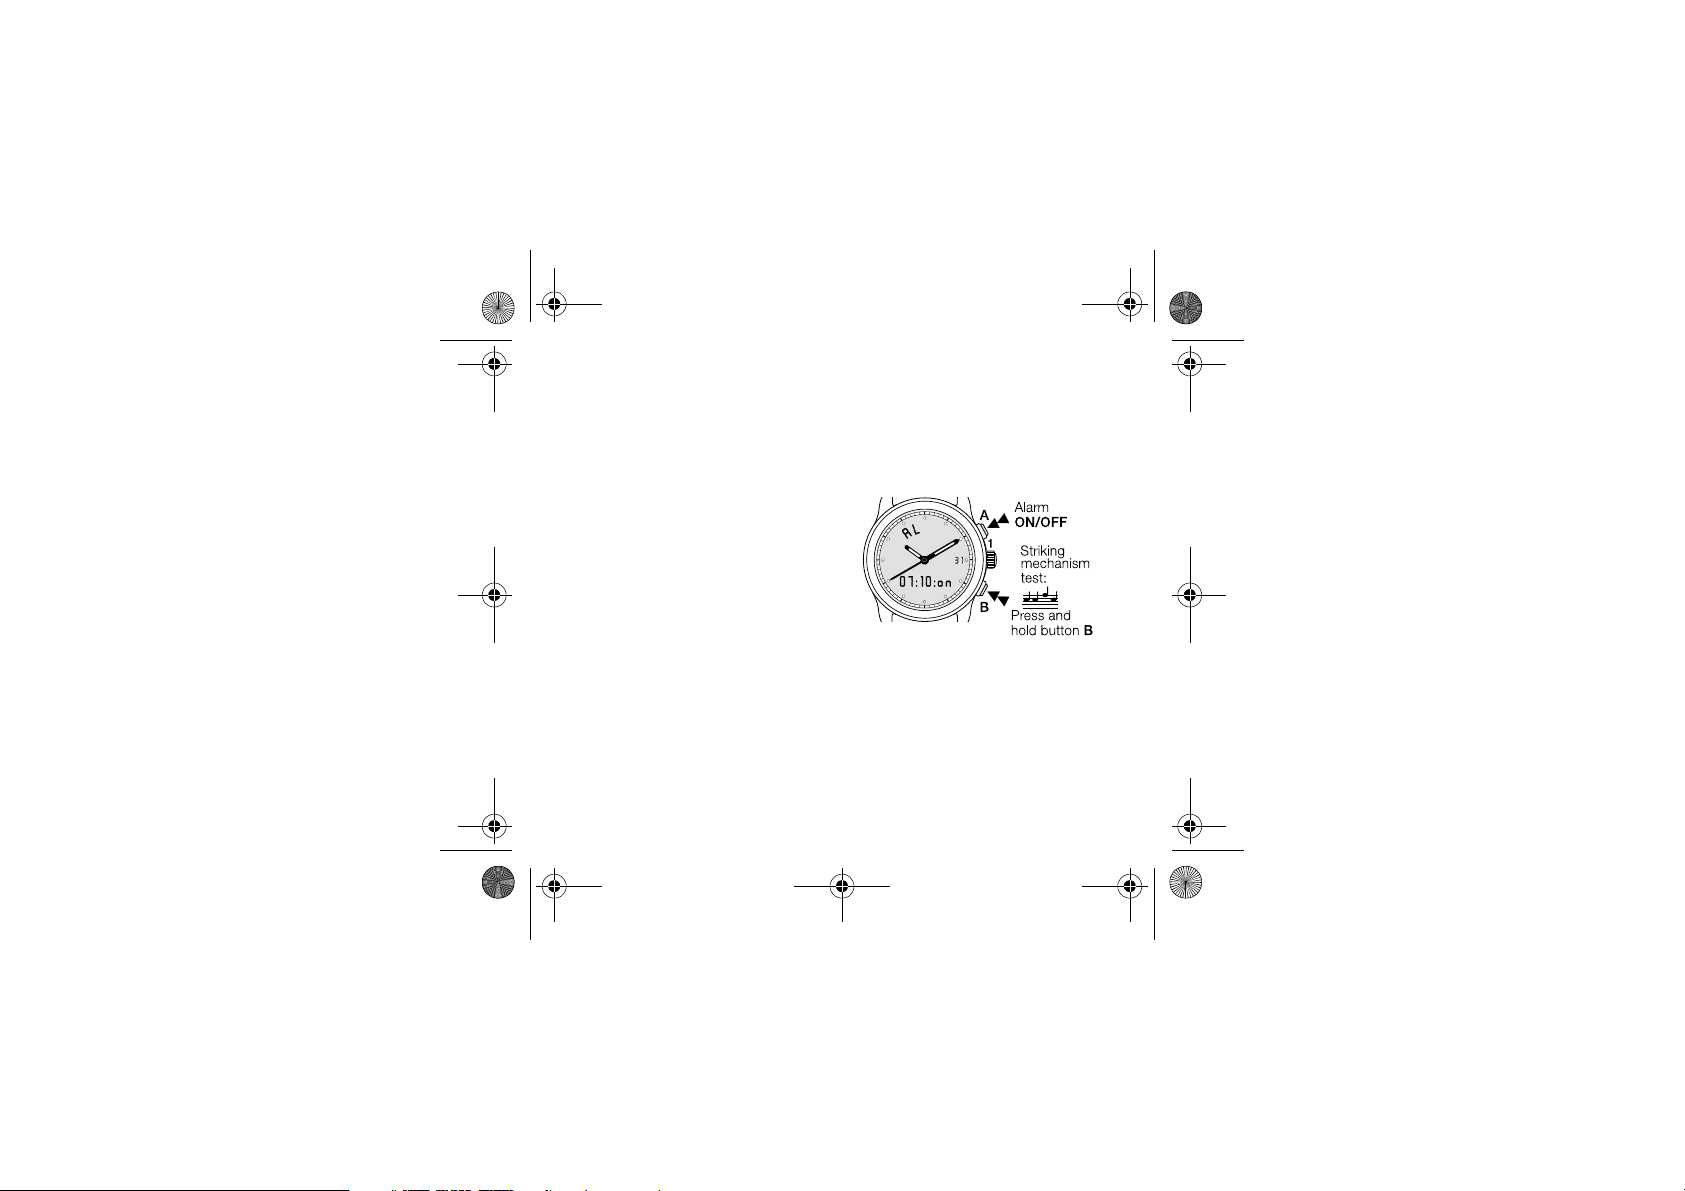
7.5.4 Testing the alarm sound (applicable to all alarms)
When the alarm (AL) function is selected, the alarm sound may be tested by
pressing and holding button
Diary
" alarms.
"
B
. The same test may be used for "
24
Timer
" and
Page 25
Alarm
ON/OFF
MDE E20.321-GB.fm Page 25 Mardi, 4. fÈvrier 2003 10:43 10
7.5.5 Setting the alarm time
The hours and minutes of the alarm can be set.
AL
Firstly select the alarm function (
) by turning
the crown and then pulling it to position 2.
Briefly press button
B
, thus selecting the figures for the hours and minutes successively.
Turn the crown to set the hours and then the
minutes.
Push the crown back to position 1 after carrying out all the adjustments. The alarm is acti-
ON
vated automatically on "
" if its values have
been modified since the last setting.
OF
" display: alarm is deactivated.
"
7.5.1
Refer to
to reactivate.
25
Page 26

MDE E20.321-GB.fm Page 26 Mardi, 4. fÈvrier 2003 10:43 10
7.6 Programming an alarm (calendar-alarm)
7.6.1 Selecting the calendar-alarm function
The calendar-alarm function (AG) is selected by briefly
pressing button
B
when the alarm function (AL) is displayed, by turning the crown in position 1. This allows
display of the calendar alarm stored or programming
of a different alarm.
The digital display located at the bottom of the dial alternately indicates the day, month and year and the hours,
ON/OF
minutes and "
" display.
To test the alarm sound:
press and hold button
B
.
26
Page 27

Alarm
ON/OFF
MDE E20.321-GB.fm Page 27 Mardi, 4. fÈvrier 2003 10:43 10
7.6.2 Setting the calendar-alarm function
Pull the crown to position 2.
B
Briefly press button
to select and flash the figures of
the hours, minutes, date , month and year successively. New date is set by turning the crown and con-
B
firming by briefly pressing button
The new date for the annual alarm (
.
AG
) is confirmed by
pushing the crown back to position 1 and confirmed by
ON
the appearance of the "
" message.
In the example opposite, the calendar-alarm will be
programmed to 29/01/99 at 12:00.
Push the crown back to position 1: the alarm is automatically switched on (
ON
)*.
* The calendar-alarm will only be switched on if the
date you have programmed is a date in the future.
* There will be no ON display if the date you have
entered is in the past.
The alarm sound is stopped by pressing one of the buttons or the crown.
Pressing and holding button A activates
ON
) or deactivates (OF) the calendar-alarm.
(
27
Page 28

MDE E20.321-GB.fm Page 28 Mardi, 4. fÈvrier 2003 10:43 10
7.7 Chronograph
Select the chronograph (
CHR'
) function by turning the
crown.
7.7.1 Measuring one single time or adding several times
with automatic subtraction of intermediate stops
(ADD)
START
–
timing by briefly pressing button
STOP
–
timing by briefly pressing button
Reading the measurement:
–
to the right of the letters
the 2 figures positioned
Add'
show the number of
A
A
hunredths of a second.
Example of reading a time:
00:01:59 Add' 36
shows that the event timed has
lasted for 0 hour,1 minute, 59 seconds and 36 hundredths of a second.
Reset
the chronograph by pressing button B briefly.
–
Add' mode
–
allows several timings to be added while
automatically subtracting the duration of intermediate
events by pressing
Total reading time
Start-Stop-Start-Stop
– resetting.
-etc.
E.g.: Total duration of journey from town A to town D
with subtraction of stops in towns B and C.
28
Page 29

MDE E20.321-GB.fm Page 29 Mardi, 4. fÈvrier 2003 10:43 10
7.7.2 Measuring the total time with intermediate time
reading (SPLIT or fly-back hand)
This function allows, for example, the total duration of a race
and the individual time taken by each individual runner to be
measured.
START
of timing by briefly pressing button A.
–
SPLIT X
–
of timing by briefly pressing button B when runner
X finishes.
SPL'
In the example opposite (
), the time taken by runner X
is 0 hour, 3 minutes, 40 seconds and 85 hundredths of a
second.
RESTART
–
timing by briefly pressing button B.
The chronograph flies back to the time passed since Split X
CHR'
and continues measurement (
SPLIT Y
–
–
of timing by briefly pressing button B at the finish
SPL'
of runner Y (
RESTART
).
timing by briefly pressing button B. The chrono-
).
graph flies back to the time passed since Split Y and con-
CHR'
tinues timing (
STOP Z
–
by briefly pressing button A. Reading time of last
).
runner Z and the total race time: 0 hour, 5 minutes, 20 sec-
Add'
onds and 56 hundredths (
Reset
–
by briefly pressing button B (
).
CHR'
).
29
Page 30

MDE E20.321-GB.fm Page 30 Mardi, 4. fÈvrier 2003 10:43 10
7.7.3 Displaying a chronometer time exceeding 24 hours
(possible duration up to 99 days).
The timing for a chronometer duration of up to 24 hours is displayed in hours,
minutes and seconds and hundredths of a second. For any time exceeding
24 hours, the result is displayed in days (instead of hundredths of a second,
max. 99 days), hours (max. 23 hours), minutes (max. 59 minutes) and
seconds (max. 59 seconds).
30
Page 31

MDE E20.321-GB.fm Page 31 Mardi, 4. fÈvrier 2003 10:43 10
7.8 TIMER
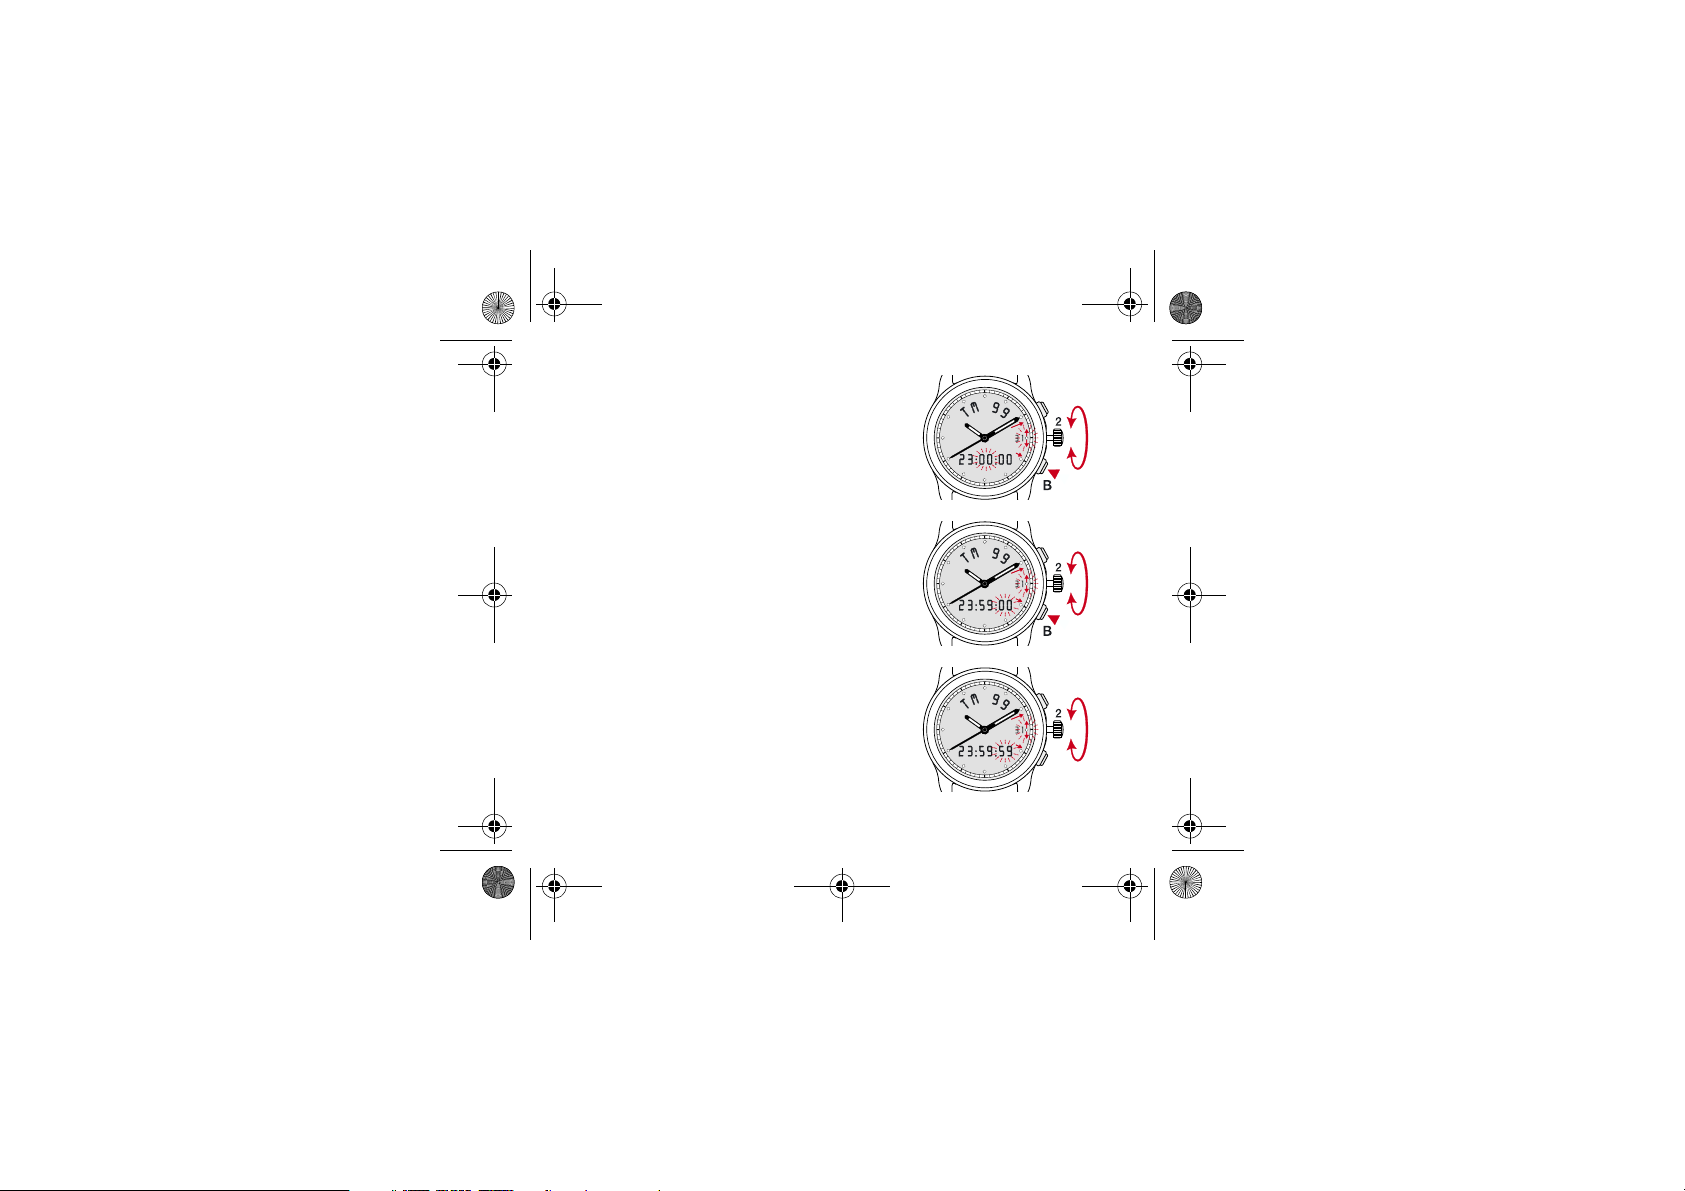
7.8.1 Programming the TIMER duration
The timer may be programmed from 1 second up
to 99 days, 23 hours, 59 minutes and 59 seconds.
TM
– Select the Timer (
) function by turning the
crown and then pulling it to position 2.
The number of days flashes on the right of the
TM
display "
" (TM 00 – 00:00:00 in example
shown opposite).
– Turn the crown forwards or backwards to
choose the required duration in days and con-
B
firm by briefly pressing button
.
The hour figures start to flash.
(TM 99 – 00:00:00 in the example shown opposite).
32
(continued on page
)
31
Page 32
MDE E20.321-GB.fm Page 32 Mardi, 4. fÈvrier 2003 10:43 10
– Turn the crown forwards or backwards to choose
the required duration in hours (max. 23 hours) and
B
confirm by briefly pressing button
.
The minute figures begin to flash.
(TM 99 – 23:00:00 in the example shown opposite).
– Turn the crown forwards or backwards to choose
the required duration in minutes (max. 59 minutes)
B
and confirm by briefly pressing button
.
The second figures begin to flash.
(TM 99 – 23:59:00 in the example shown opposite).
– Turn the crown forwards or backwards to choose
the required duration in seconds (max. 59 sec-
B
onds) and confirm by briefly pressing button
.
(TM 99 – 23:59:59 in the example shown opposite).
– Push the crown back to position 1.
(TM 99 23:59:59 in the example shown opposite).
32
Page 33
MDE E20.321-GB.fm Page 33 Mardi, 4. fÈvrier 2003 10:43 10
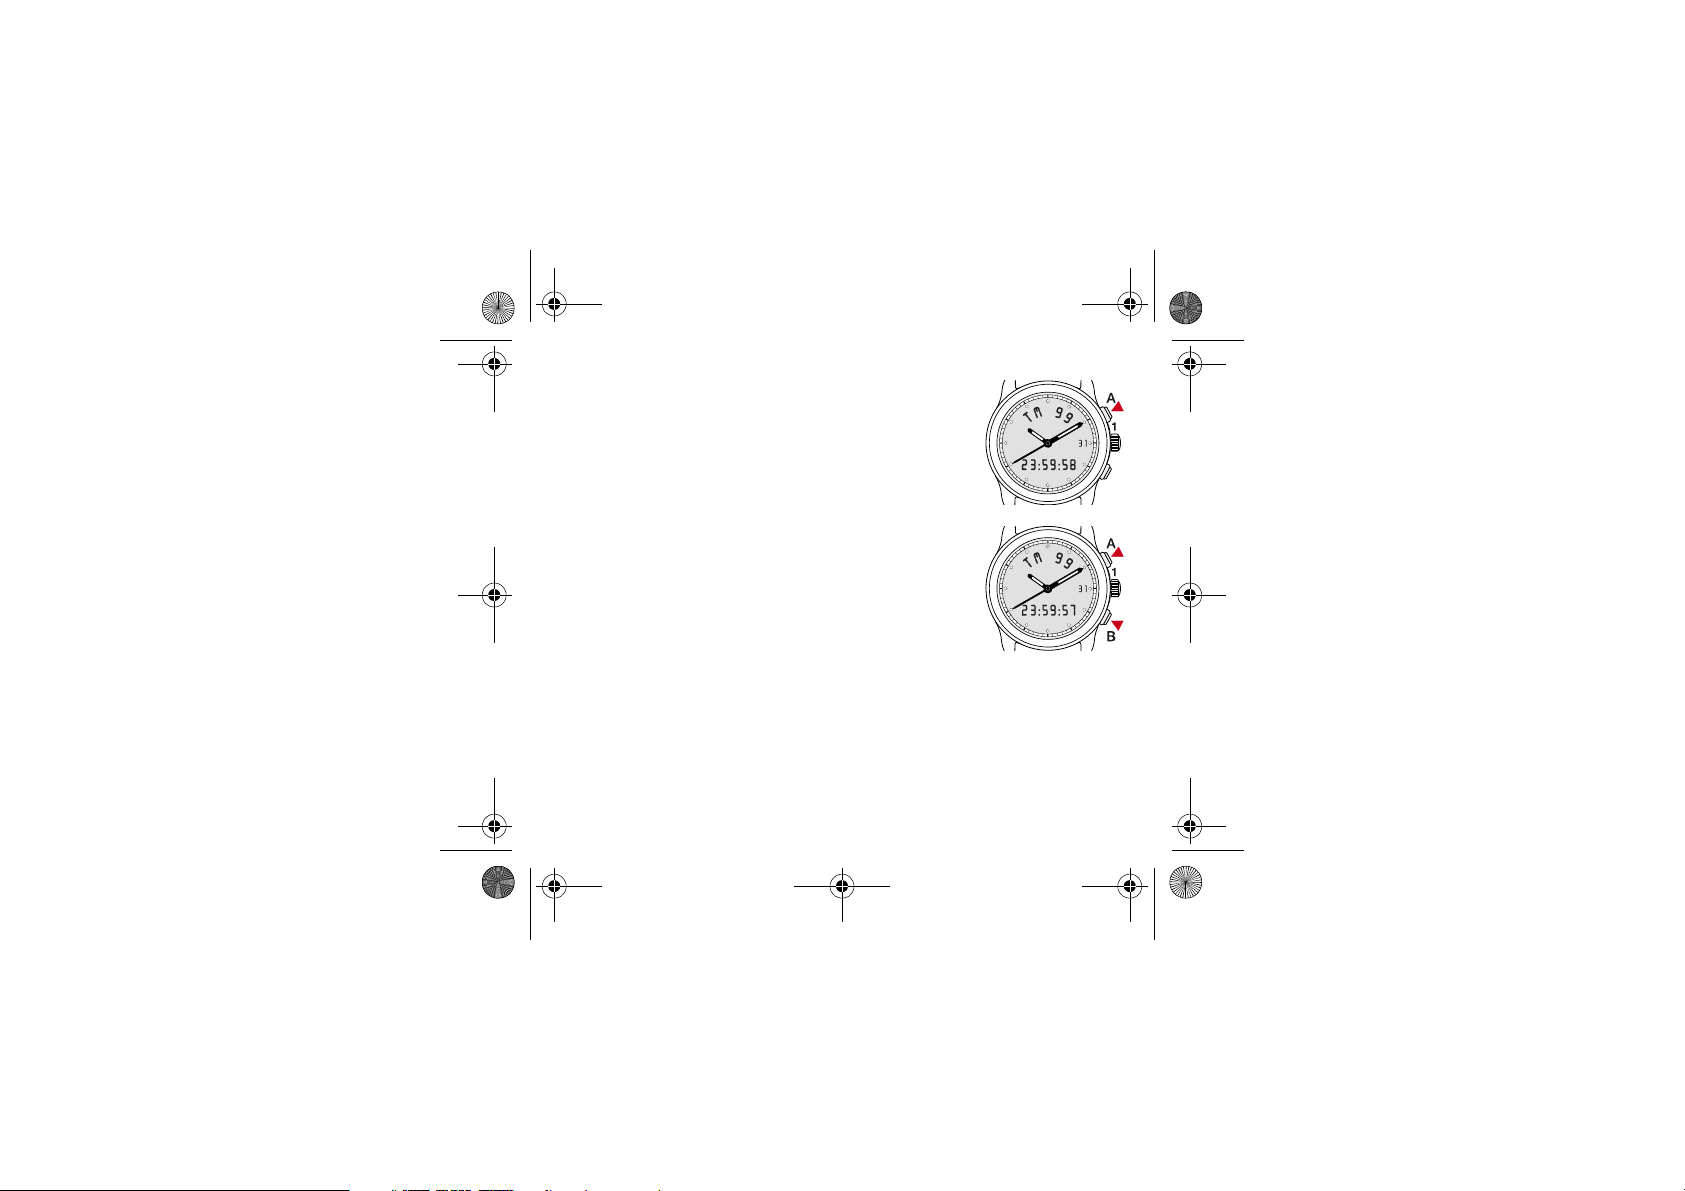
7.8.2 Using the TIMER
– Briefly press button A to start the timer.
– Pressing button
A
a second time will stop the timer
without resetting it.
A
– Pressing button
a third time will start again the
timer without resetting it.
Timer
–The
may be preset after it has been stopped
by pressing button
B
.
33
Page 34

MDE E20.321-GB.fm Page 34 Mardi, 4. fÈvrier 2003 10:43 10
Page 35
MDE E20.321-GB.fm Page 35 Mardi, 4. fÈvrier 2003 10:43 10
Page 36

MDE E20.321-GB.fm Page 36 Mardi, 4. fÈvrier 2003 10:43 10
ETA SA Manufacture Horlogère Suisse
305 559 – 4.02.200 3 / STAR / 01
 Loading...