

Esotec 102142 Operating Manual
sing Instructions
U
G
B
These instructions relate ONLY to this product and contain important
information for using the product for the first time. Please keep these
instructions for later reference and should always accompany the
product in the event of transference to a new user.
1. Introduction
ear Costumer,
D
Thank you for purchasing the solar light. With this solar light you purchased a
roduct manufactured according to the current state of technology.
p
This product fulfils all requirements of the valid European and national
egulations. The conformity was proved. The relevant declarations and
r
ocumentation are deposited with the manufacturer.
d
To maintain this state and guarantee a safe operation, you as the user will have
to follow this operating manual!
2. Safety Instructions
- In case of damages caused by not
ollowing this operating manual, the
f
arranty rights will expire! We exclude
w
!
In these cases any guarantee rights will expire.
-
ue to safety and admission reasons (CE) it is not allowed to arbitrarily recon-
D
struct and/or change the solar light.
Therefore, please keep to the operating manual.
he accident prevention rules of the association of the industrial trade coopera-
T
tive association for electric plants and working material are to be considered in
industrial environments.
liability for any consequential damages!
We exclude liability for property or
-
personal damages caused by inappropriate
handling or not following the safety instructions.
3. Usage in Accordance with Requirements
The solar spotlight is automatically switched on at darkness and switched out in
the morning light. The maximum illumination duration with a full accumulator
and without recharging is approximately 8 hours. The solar module installed in
the upper part of the housing charges the integrated accumulator.
The illumination may be switched on and off via a switch. The three solar spotlights are suitable for outdoor usage. The spotlights must not be sunk into water.
With the earth pole, it is possible to insert the spotlights into the ground or, by
means of a mounting bracket, screw them to a wall. The solar module may be
installed on a pole, inserted into the ground or screwed to the wall. The product
is designed for the application in a private environment.
Note: Please make sure that the solar module is preferably directed to the
South and that shadows are avoided. When directing the module to the North it
is not possible to use the product. The solar module shall always be free of
snow in the winter.
4. Initiation
1. Please carefully take all parts out of the package and unwrap the accessories.
2. Via an earth pole, it is possible to insert
the three LED spotlights into the
ground or, by means of an assembly
plate, screwed to a wall or floor. The
spotlight may be adjusted via the balland-socket joint.
3. Now choose an appropriate site for the assembly of the solar module within
the reach of the spotlight. Please note that the site shall be directed to the
south and that no shadow falls on the solar module. By means of an assembly plate, the spotlight may be screwed to a wall or floor, or, via an earth pole,
inserted into the ground. The spotlight may also be installed on a post. This
is done by means of a pole bracket. Via the ball-and-socket joint, it is possible to direct the spotlight to the sun.
screw
mounting
earth
pole
screw
Rohr
post mounting
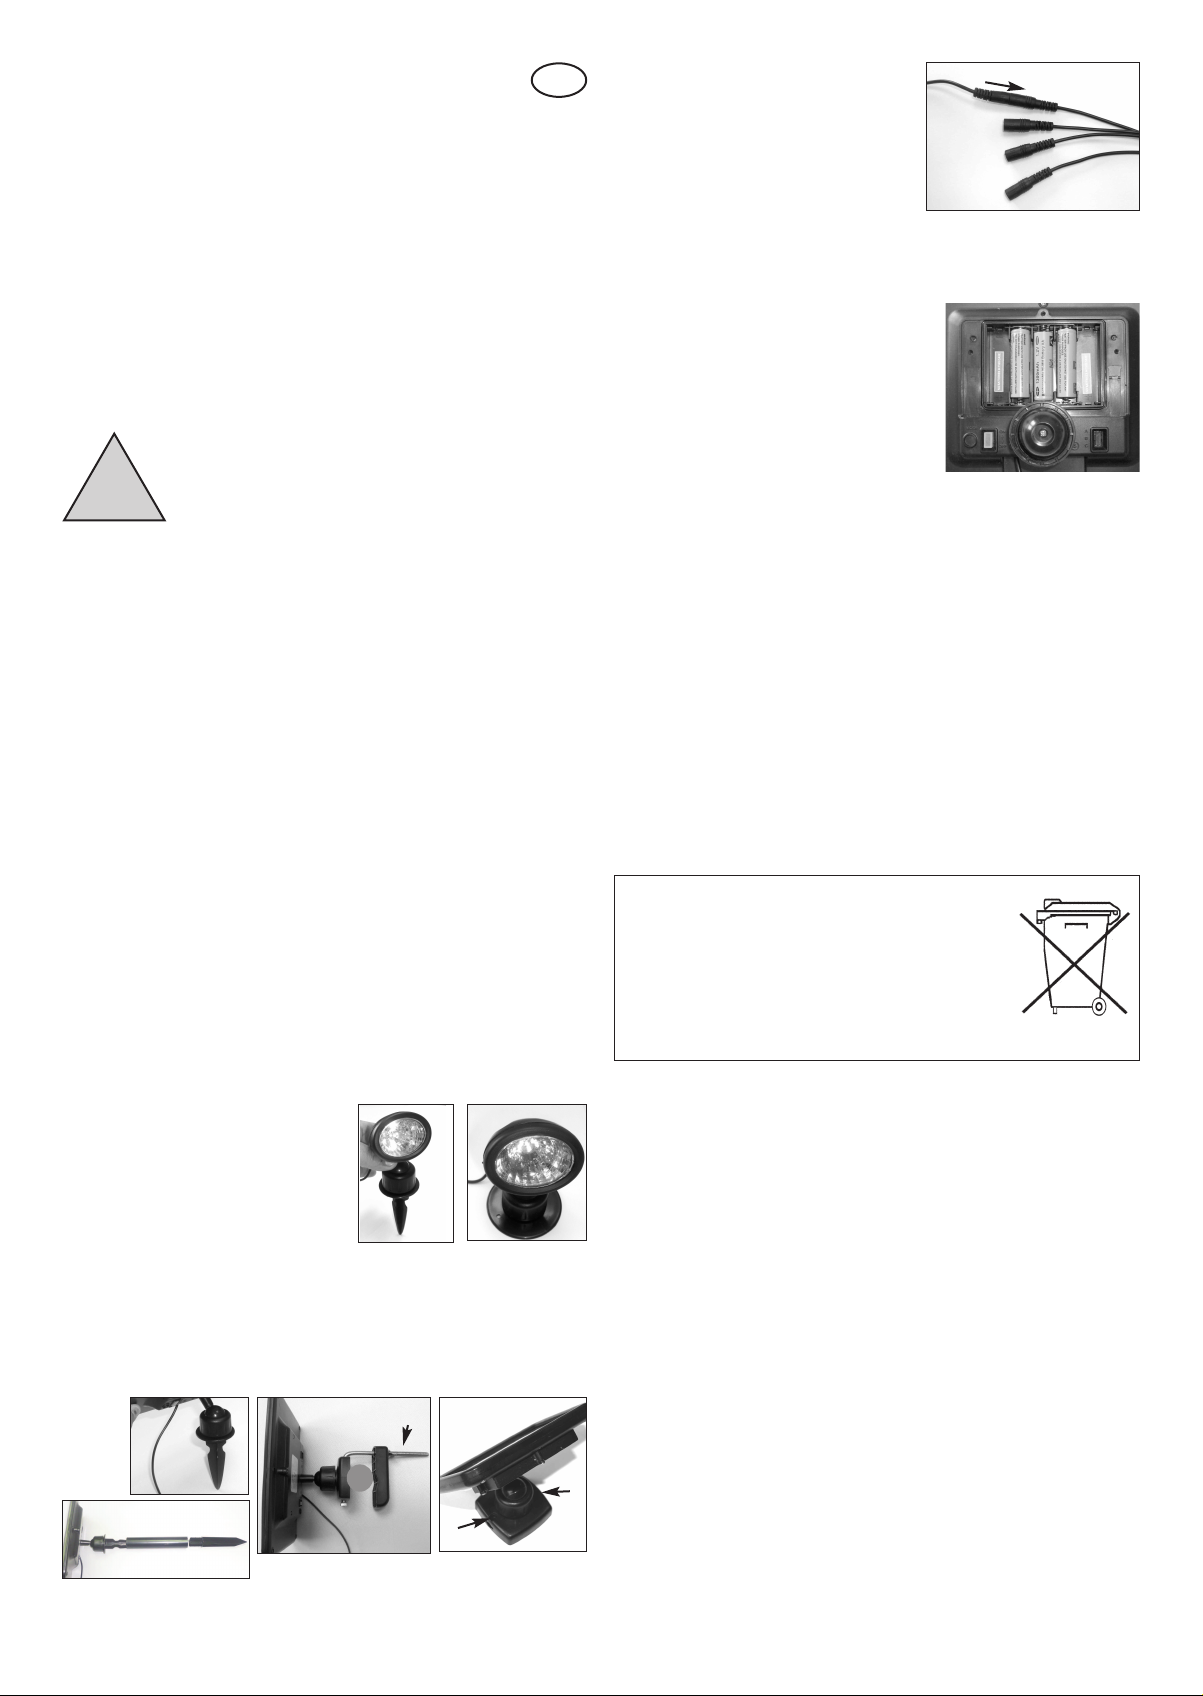
. Now, connect the 4 plugs of the spotlight
4
with the sockets on the backside cable
rom the solar module.
f
ote: Those are humidity-protected
N
plugs. Put the plugs together completely.
5. Now set the switch on the back side of the
olar module to the position “ON”. The
s
olar spotlights are now activated.
s
Note: During the winter months the duration of illumination will generally be
horter. If the lamp should not shine on the first evening, please wait for a sunny
s
day.
5. Exchange of Accumulators
fter one to two years, the capacity of the accumu-
A
ator pack will decrease. It is then required to
l
xchange the accumulators. The accumulators are
e
available in the shops or from the manufacturer.
. Unscrew the 3 screws on the back side of the
1
olar module and take off the cover.
s
2. Take the accumulator from the mounting bracket
. Insert the new accumulator with correct polarity
3
nd close the housing in reverse order.
a
ote: Use accumulators must be disposed of in a non-polluting way and do not
N
belong into the domestic waste. Your dealer is legally obliged to take back the old
ccumulators.
a
6. Malfunctions
- Lamp is not automatically switched on at darkness
An outside light source (e.g. streetlight) simulates daylight and prevents the lamp
-
rom switching on. Place the lamp at a darker location.
f
- Lamp is not switched on at darkness or only for a short period of time.
- Is the lamp connected?
Accumulator weak or defective. Exchange of the accumulators.
-
7. Specifications
perating voltage: 3,6 V
O
ower Solarmodule: 2 Wp
P
Protection class: IP 44
Battery: 3 pcs. NiMh 1.2 V/1300 mAh AA-size
lluminating units: 4 white LEDs
Illumination time: max. 8 h with a full battery
Light color: 5500 K
Luminous flux: 8 lm each spotlight
Battery take-back
- Batteries must not be discarded into domestic waste.
- The consumer is legally required to return batteries after
use, e.g. to public collecting centers or to battery distributors.
- Contaminant-containing batteries are labeled with the sign
“crossed-out trashcan“ and one of the chemical symbols.
Used batteries should be disposed environmentally friendly and should not be discarded into domestic waste. Your
dealer is legally required to take back old batteries.
Rechargeable battery notes
- Rechargeable batteries should not be played with by children. Never leave rechargeable batteries lying around; they could be swallowed by children or pets.
- Rechargeable batteries must never be short-circuited, disassembled or thrown into
fire. This leads to a danger of explosion!
- Leaking or damaged rechargeable batteries can cause chemical burns when they
come into contact with skin. For this reason, please make use of suitable protective gloves.
- Rechargeable batteries should only be replaced by structurally identical rechargeable batteries from the same manufacturer. Normal batteries must not be used
since these are not rechargeable.
- Make sure the rechargeable batteries are inserted with the correct polarity.
- For long periods of time of non-use (for example, storage), remove the inserted
rechargeable batteries to avoid damages via the leaking rechargeable batteries.
Manufacturer/Importer/Spare parts:
esotec GmbH, Weberschlag 9, D-92729 Weiherhammer
Tel.-Nr: +49 9605-92206-0, Fax.-Nr: +49 9605-92206-10,
e-mail:info@esotec.de Internet:www.esotec.de
Product item-Nr: 102142
Disposal:
Dear customer,
please cooperate in avoiding waste. When you intend to dispose of the product in
future, please consider that it contains valuable raw materials suited for recycling.
Therefore, do not dispose it of with domestic waste but bring it to a collection point for
the recycling of waste electrical and electronic equipment.
Thank you very much for your cooperation!
NiMh
Copyright, esotec GmbH Version 01-2013
 Loading...