

Escort Laser ShifterPro Owner's Manual

®®
CINCINNATI MICROWAVE
5440
West Chester Road
West Chester
/
Sales
EscortRadar
©2014 CINCINNATI MICROWAVE.
ESCORT, Laser ShifterP ro, Speed Of Light Protection and CINCIN NATI MICROWAVE are trademarks of Escort Inc.
OH 45069
Service 80
.com
0-433-3487
S P E E D O F L I G H T P R O T E C T I O N
™
LASE R S H I F TING TEC H NOL OGY • IN STA L L AT ION REQ U I R ED
T H E U L T I M A T E
L A S E R D E F E N S E S Y S T E M
In stallat io n an d Ow ner ’s Manu al

Congratulations and Important Warning
Safety Precautions
Congratulations
Your new Laser ShifterPro is the most
advanced defense system against targeting
laser guns. Laser ShifterPro comes complete
with a comprehensive owner’s and
installation manual, twin front-mounted
Laser Shifters, panel mounted On/Off
Switch, 12-volt Interface with integrated
speaker and volume control, modular
connections, complete wiring harnesses,
and mounting hardware
Please read the manual in detail to get
the most out of your new Laser ShifterPro’s
performance and features.
Please drive safely.
.
Please Note
This product may be limited or
prohibited in some jurisdictions. Check
applicable laws before using.
Important Installation Warning
The Laser ShifterPro requires professional
installation. New car dealers, and a select
group of car audio specialists can install the
Laser ShifterPro for you. Call us toll-free at
1-800-433-3487, or visit our website at
LaserShifting.com for an authorized dealer
near you.
Attempting to install the Laser
ShifterPro without expertise in automotive
electronic installations can cause personal
injury during the installation, or can
damage your Laser ShifterPro or your
vehicle. If your vehicle is damaged during
installation, its safety systems may be
compromised, which could cause personal
injury or property damage.
Laser ShifterPro was designed to meet high
performance and quality standards;
however, there are certain precautions that
must be considered before approaching
installation and operation:
Use only original Laser ShifterPro parts
•
included with your unit. Do not plug any
third-party components into your unit,
and do not plug any supplied
components into any third-party
products, as this may cause failure and
will void warranty.
Special care must be taken during
•
installation of outer sensors, as damaging
factory-installed cables or connectors
may cause damage or device malfunction
and may void warranty.
While outer sensors are specially
•
designed and manufactured to be
installed outside and to operate in harsh
environments, the control unit must be
installed and kept in a dry place,
preferably somewhere inside the driver’s
cabin. Failures due to improper
installation may void warranty.
Laser ShifterPro cannot detect glass or
•
other transparent objects, and certain
materials may absorb infared light.
Check your local laws before using Laser
•
ShifterPro, as transmitted light can
interfere with other laser equipment.
Maintenance
Once Laser ShifterPro is installed, dirt and
filth can accumulate on the front covers of
the sensors, especially during the winter. To
ensure peak performance, check front
covers of sensors often and, if necessary,
wipe clean with a cloth.
Warning
Never, under any circumstances, look at
the sensors while powered on and
operating. Do not view with optical
instruments (like magnifiers).
32
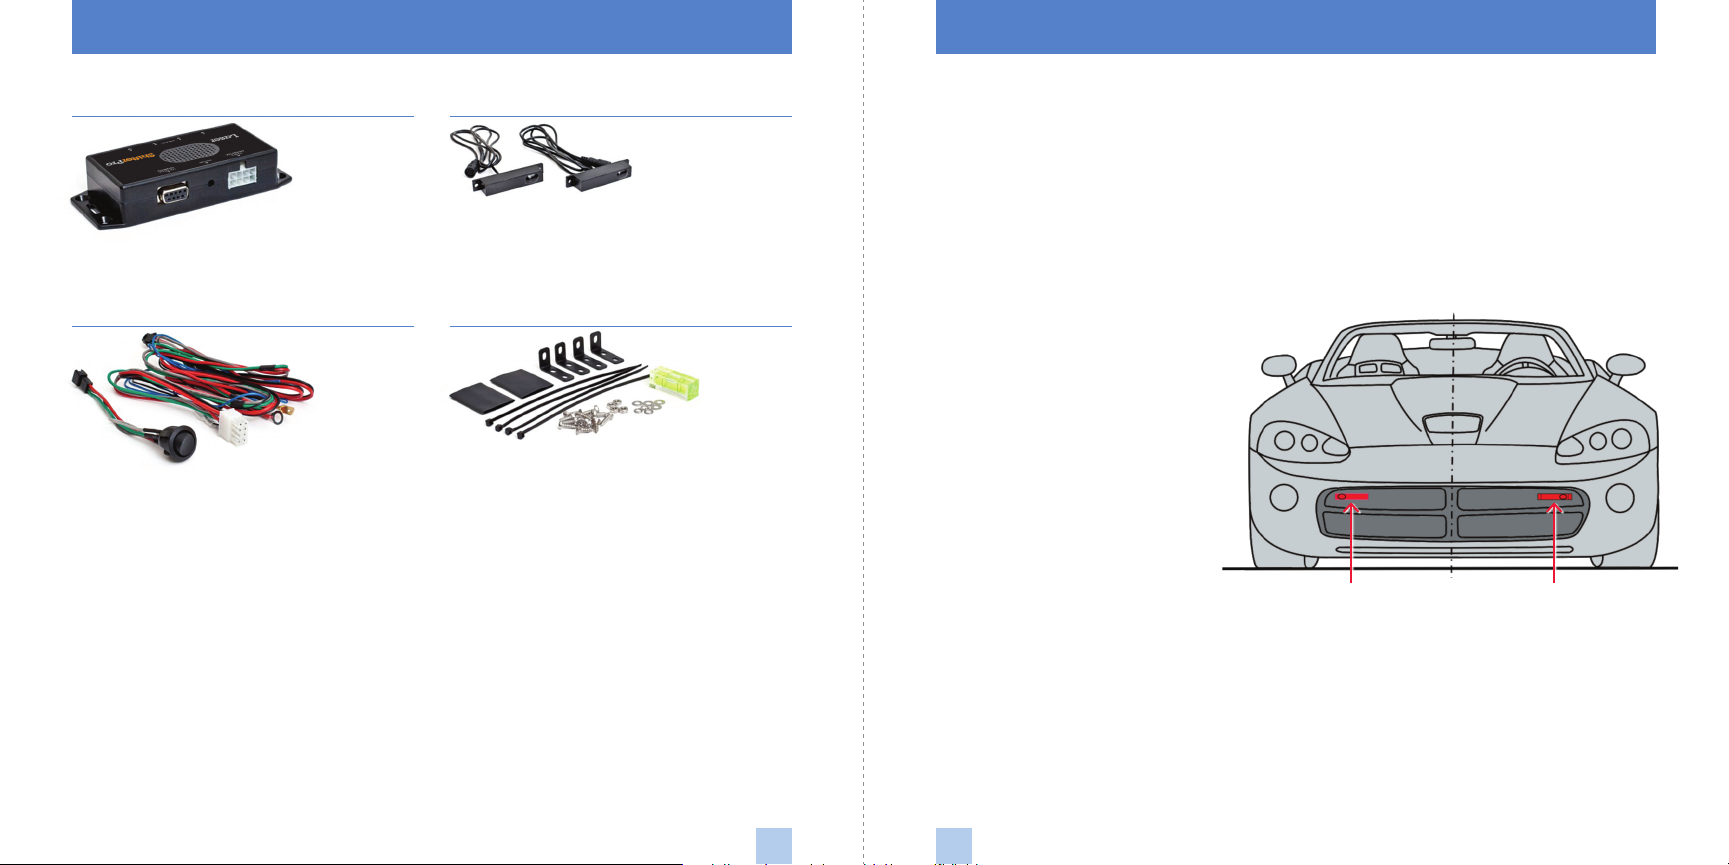
What’s Included Vehicle Sensor Installation
ShifterPro Interface
Wiring Harness
Two (2) ShifterPro Sensors
Hardware Accessories
Important!
Plan your installation carefully. It is highly
advisable to inspect the entry points from
the engine compartment into the driver’s
cabin before installation of sensors. For
optional rear sensor installation, look for
entry points behind the license plate or
lights.
If you are unable to find entry points, you
will need to drill a hole at least 0.2 in (5
mm) in diameter to route the cable into
the cabin. (If installation is performed
by a professional, consult with your
customer before drilling any holes.)
Apply rubbing alcohol if needed, so
you can easily pull cable into the
cabin without damaging it.
After installation is complete, use
cable ties to fasten sensor cables to a
solid surface, keeping them away
from heat and any moving parts.
54
 Loading...