

Eschenbach Optik Eclipse Scholar User Manual

Page 1
Rev1.0 EN
Eclipse Scholar
User Manual
© Copyright Ash Technologies Limited, 2006.
Revision 1.0 English August 2006

Page 2
Rev1.0 EN
Important Safety Information
Please read all of the following instructions before setting
up your Eclipse. Failure to follow these instructions
properly could lead to physical injury.
• The Eclipse must be used on a flat, level table. Never attempt to use it on a
sloping surface or on a table that cannot accommodate the full footprint of
the unit.
• The front of the Eclipse must be placed at least 10cms or 4 inches back from
the edge of the table. This is to prevent the unit from tipping forward if
excessive weight is placed on the reading table when fully extended. There
are warning labels placed on the reading table with arrows indicating the
maximum overhang permissible when the table is fully extended.
• Both X/Y table and Screen contain moving parts. Please take care with
folding back the screen and operating the X/Y table. If fingers get caught,
injury might occur. If you feel you cannot operate the unit safely, please seek
advice or contact your supplier.
• Never lift the Eclipse by the reading table.
• To prevent fire or electric shock please ensure this unit is kept away from all
liquids. Do not use the unit in excessively damp or wet areas and do not
expose it to rain, snow, etc.
• Before cleaning the unit, please ensure that it is unplugged. Use a slightly
damp cloth to clean the exterior. Do NOT use solvents or aerosol cleaners.
• This unit should never be opened. It contains hazardous voltages. User
servicing is confined to changing the lamps. Unauthorized servicing will
invalidate your warranty. If you encounter any problems with this unit please
contact your local dealer.
• When changing the lamps, please follow the instructions carefully.
• While we have made every effort to minimize the weight of this unit, if you
feel you cannot safely lift it, seek help when moving it.
• Before moving the unit, unplug the power adapter, ensure the screen is
folded back and the reading table is parked home with the brakes applied.
• Use only with the power adapter provided.
• Never place any object on the screen. The screen can be scratched or
broken easily and damage to it is not covered under warranty.

Page 3
Rev1.0 EN
Table of Contents
Important Safety Information ................................................................... 2
Using the Eclipse Scholar ........................................................................ 4
1. Setting up ......................................................................................... 4
2. Folding down and moving ................................................................ 4
3. The Front Panel ............................................................................... 5
4. Basic Functions................................................................................ 6
4A. Reading Table ............................................................................. 6
4B. Power button ................................................................................ 7
4C. Zooming in and out ...................................................................... 7
4D. Picture and Reading Modes ........................................................ 7
4E. Brightness Control ....................................................................... 8
5. Enhanced Functions ........................................................................ 8
5A. Overview Function ....................................................................... 8
5B. Camera select .............................................................................. 8
5C. Line marker and Blanking shutters .............................................. 9
5D.
Colours (User Defined) ............................................................. 10
5E.
Colour Kill (Photo mode only) ................................................... 10
6. The Configuration Menu ................................................................ 10
6A. The Video Controls menu .......................................................... 11
6B. The Focus Mode menu .............................................................. 12
6C. Factory Defaults ........................................................................ 12
7. Distance Camera ........................................................................... 13
7A. Distance camera controls .......................................................... 14
7B. Distance Camera Menu ............................................................. 14
7C. Description of menu commands ................................................ 15
7D. Maintenance of the Distance Camera ....................................... 16
Changing the lamps ............................................................................... 17
Specifications ........................................................................................ 18
Warranty ................................................................................................ 19

Page 4
Rev1.0 EN
Using the Eclipse Scholar
1. Setting up
Lift the Eclipse from its packaging and
place it on a solid, level desk. Raise the
screen upright.
Plug the power adapter into the mains
using the lead provided and insert the
other connector into the socket on the
rear bulkhead of the Eclipse.
Ensure the unit is placed at least 10cms
(4 inches) back from the edge of the
desk. Sit in front of the unit.
Press the red button on the right of the
front panel to turn the Eclipse on. The
Eclipse will beep to indicate power-on
and the lamps will light. After a few seconds, the image will appear on
the screen.
Release the brake on the
reading table and pull the table
out towards you. If you push
the table back in again, you will
see that the table locks home
only when located centrally
between its legs. Place some
text on the table and you should
see it on the screen.
The distance camera is discussed in a later section of this manual.
2. Folding down and moving
Turn off the unit and unplug the power adapter from the Eclipse and
also from the wall socket. Disconnect the distance camera cable and
Min 10cm / 4 inches
Lock
Unlock
Unlock
Lock
Page 5
Rev1.0 EN
Focus
Zoom
Function buttons
Brightness
Mode
Power
remove the camera from the bracket. Remove all material from the
reading table, park the table centrally between its legs and apply the
brakes. Fold the screen back.
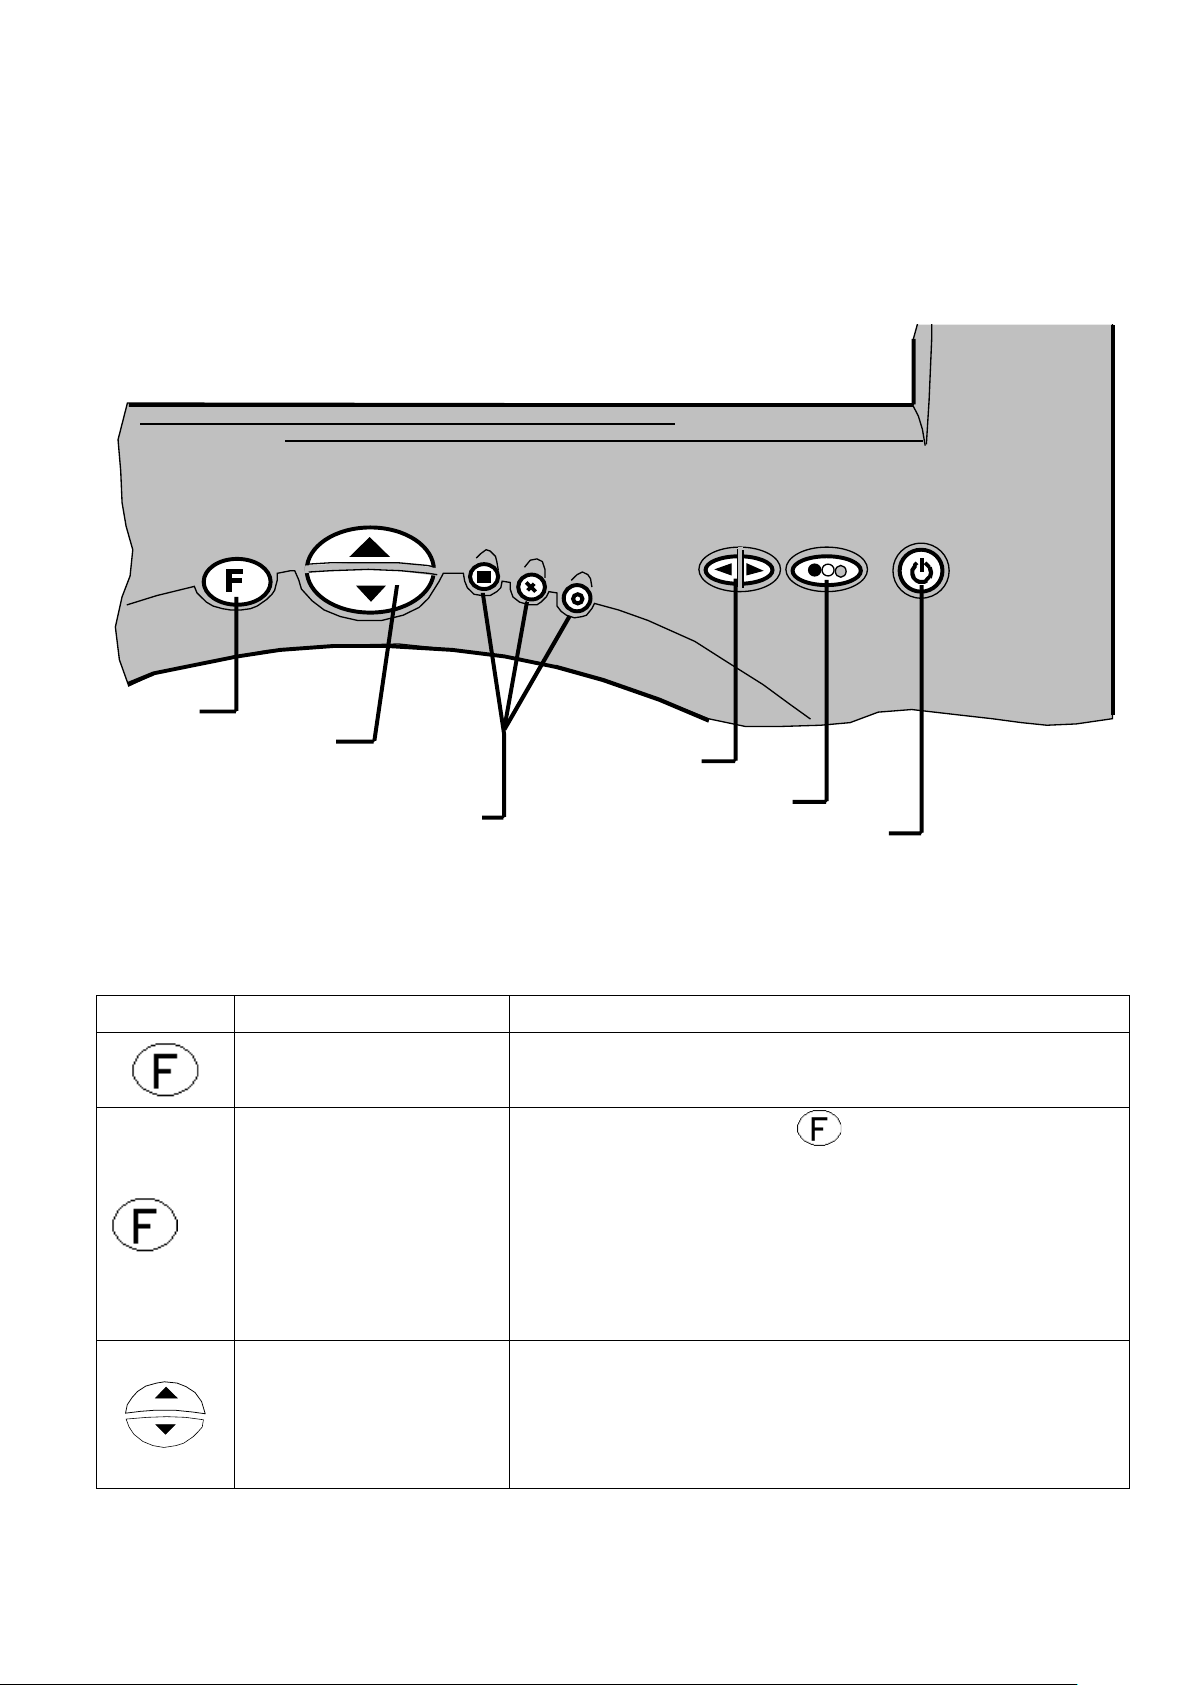
3. The Front Panel
The front panel has eight buttons that control the various function of the Eclipse. Throughout this manual the buttons will be referred to with symbols.
Symbol
Name
Basic function
Focus
Press to re-focus the camera if in "press
to focus mode" (see 6C: focus menu)
+
Shifted button
Press and hold the button and press
the button referred to after the “+”, in a
similar manner to the shift button on a
computer keyboard. Shifted buttons allow
extended functionality depending on the
mode of operation.
Zoom
Press the upper button to zoom in and
increase magnification.
Press the lower button to zoom out and
reduce magnification.
Page 6
Rev1.0 EN
Symbol
Name
Basic function
Overview
Overview mode zooms out to allow you to
find your place on the reading material
and then returns to the previous zoom
level.
Line marker &
Shutters
Places a guiding line on the screen or
dims off the top and bottom of the screen.
Semi-colours
Allows the use of different ink and paper
colours.
Brightness
Pressing this button on the right or left
increases and decreases the brightness
or contrast of the image.
Mode
The mode button switches between
picture mode (for viewing pictures and
images) and reading modes (high
contrast mode). A single press will switch
from picture mode to the last used
reading mode (positive or reversed) or
vice versa. A subsequent press within 2
seconds will switch to the other reading
mode.
Pressing and holding this button for 2
seconds will bring up the Configuration
Menu, described in Section 6 below.
4. Basic Functions
This section will describe how to use the basic features of the Eclipse to
magnify text and images. Follow the instructions in section 1 – Setting
Up before you begin using the unit. 4A. Reading Table
Unlock the table and place the material you want to read on it. The
table should slide easily in all directions. After transport, the bearing
carriers in the table slides may have moved, tending to restrict the
extent of the movement – this is normal. To correct this, extend the
table in all directions to its full extent, applying sufficient force to re-align
the bearing carriers.
 Loading...