

Page 1
Page 1
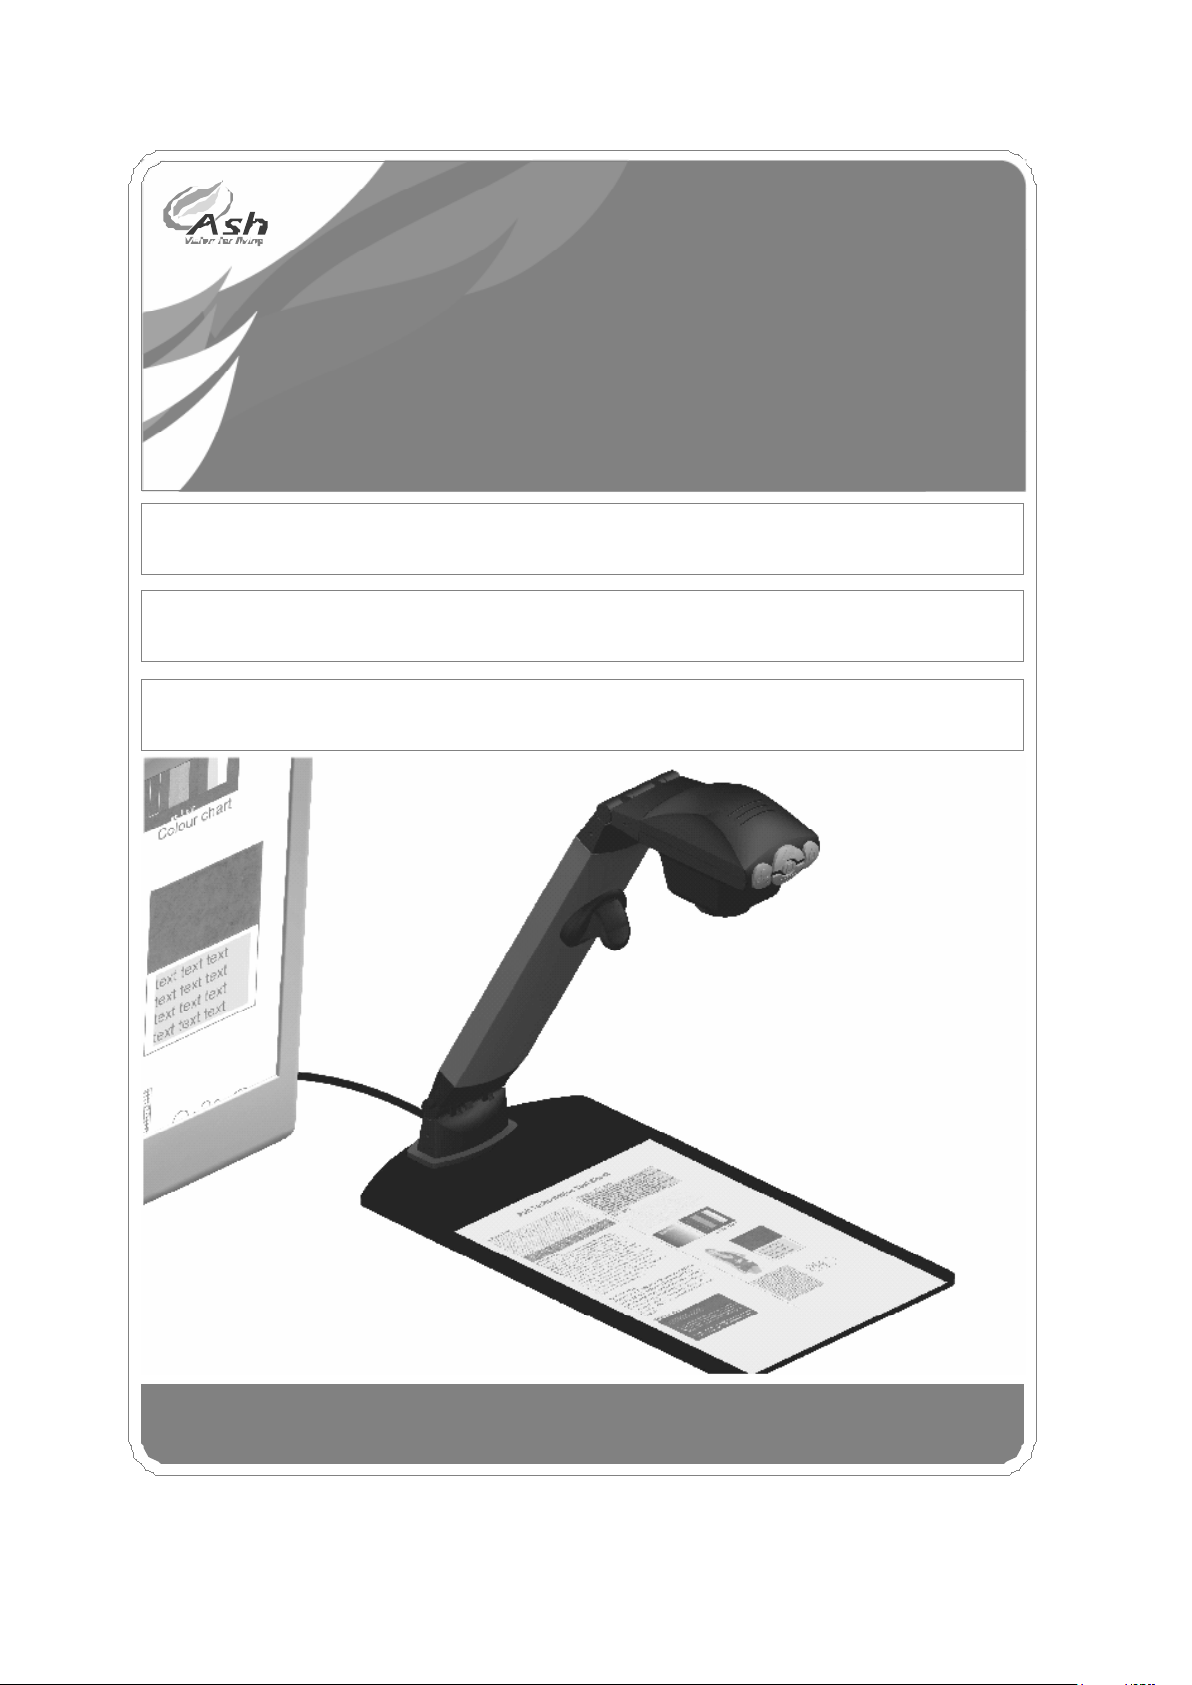
Prisma AF English Rev 1.00
USER MANUAL
ENG LISH VERS ION
Prism
A
F
Page 2

Page 2
Prisma AF English Rev 1.00
Table of Contents
Package Contents .................................................... 2
Installation ................................................................ 3
Controls .................................................................... 5
Power .................................................................... 5
Mode ..................................................................... 5
Magnification ......................................................... 5
Overview ............................................................... 6
Focus .................................................................... 6
Brightness ............................................................. 6
Using the Prisma AF ................................................. 7
Reading with the Prisma AF .................................. 7
Writing with the Prisma AF .................................... 8
Mirror view ............................................................ 8
Focus lock ............................................................. 9
Lighting on/off........................................................ 9
Sound on/off .......................................................... 9
Factory defaults ..................................................... 9
Taking Care of your Prisma AF ................................ 9
Specifications ......................................................... 11
Declaration Of Conformity ...................................... 11
Warranty ................................................................. 12
Package Contents
Your Prisma AF package should contain the
following items:
Prisma AF camera and table
Power supply
Output cable
Reading mat
Allen key for adjusting the hinge tension
Please retain the packaging in case there is a need
to return the unit for service or repair.
Page 3
Page 3
Prisma AF English Rev 1.00
Installation
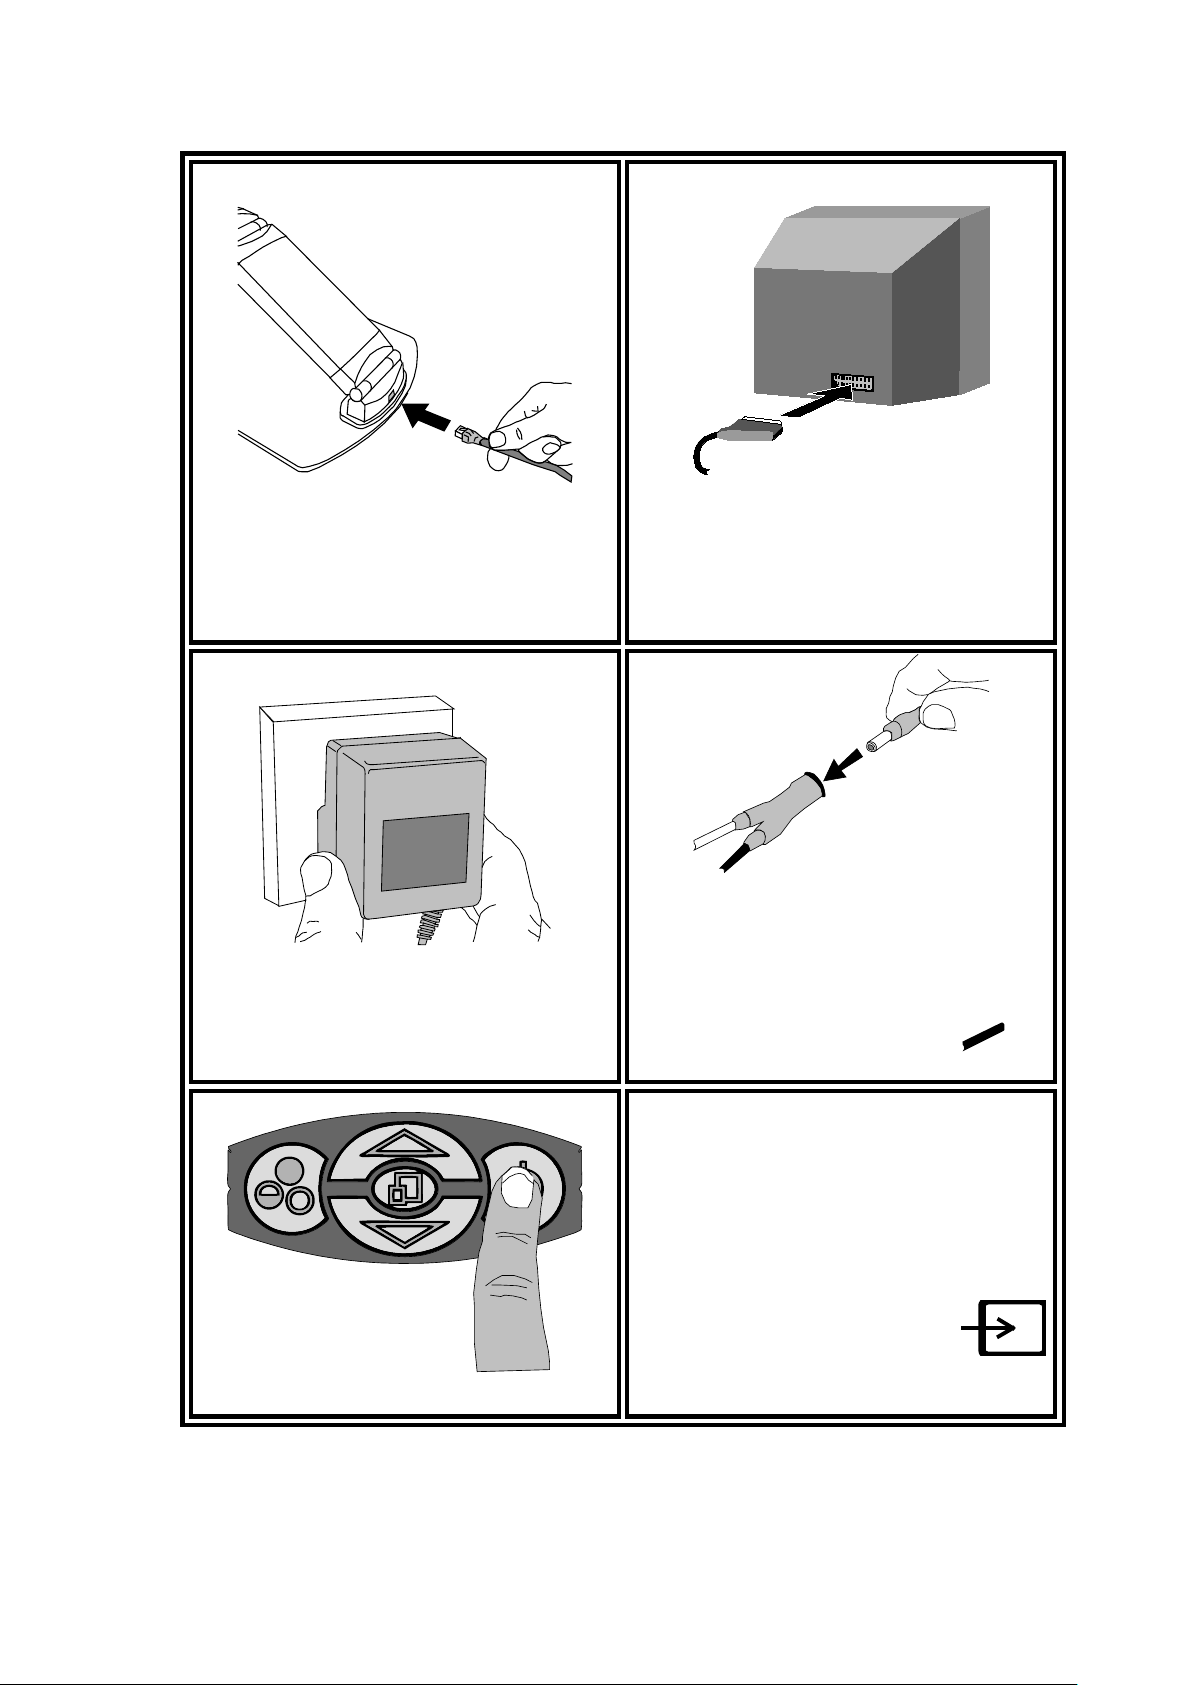
Insert the output cable
into the rear of the
camera.
Plug the SCART
connector into the
television* and power on
the television.
Plug the transformer into
a wall socket and…
…plug the power
connector into the socket
located mid-way along
the output cable.
Power on the Prisma AF.
You should have an
image on the TV. If not,
use your TV’s remote
control or control panel to
switch to “Video” or
*If you do not have a SCART input on your TV, you can use the trailing phono
cable to plug into the yellow video input jack on your TV
Page 4
Page 4
Prisma AF English Rev 1.00
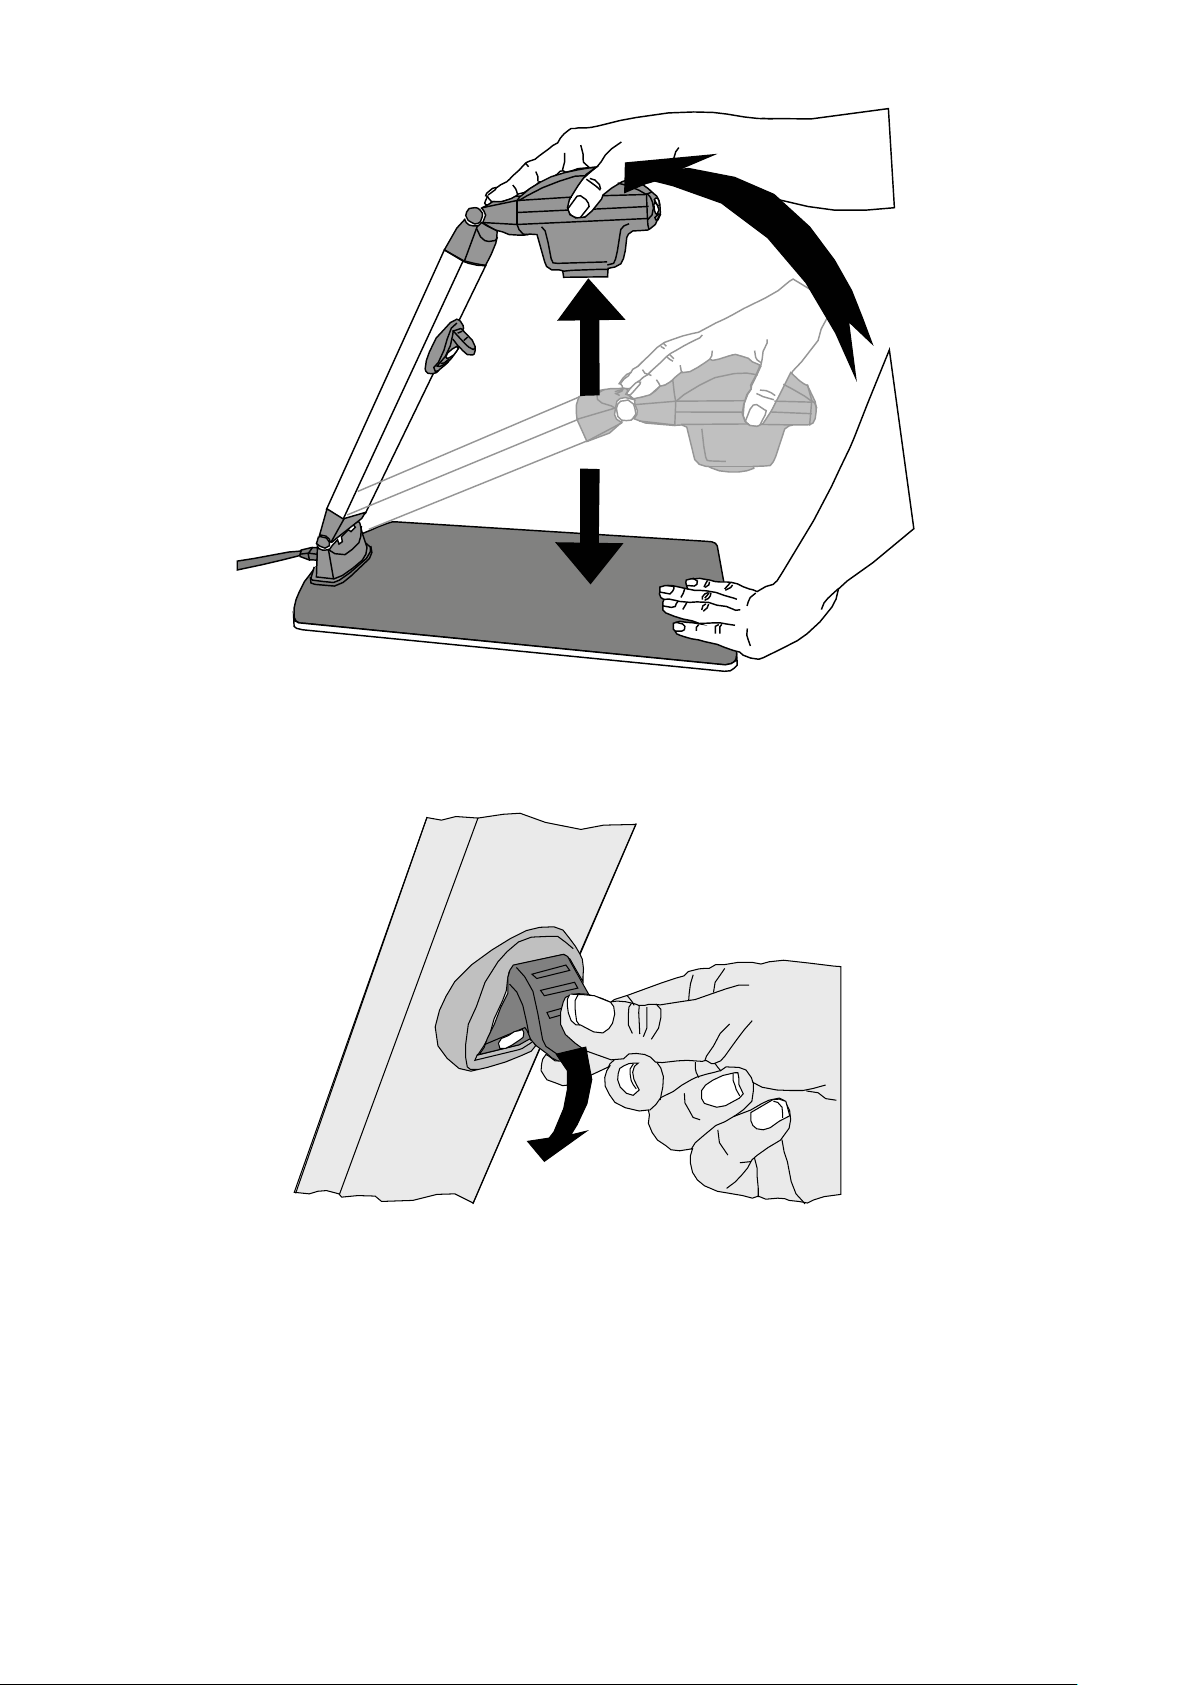
25cm - 30cm
Raise the camera so that it is roughly 25 to 30 cms
above the table. If it is too far or too close to the text
the camera will not be able to focus correctly.
The light can be rotated as shown. It should be
adjusted so that it shines on an area centred about
the camera’s image.
Page 5
Page 5
Prisma AF English Rev 1.00
Controls
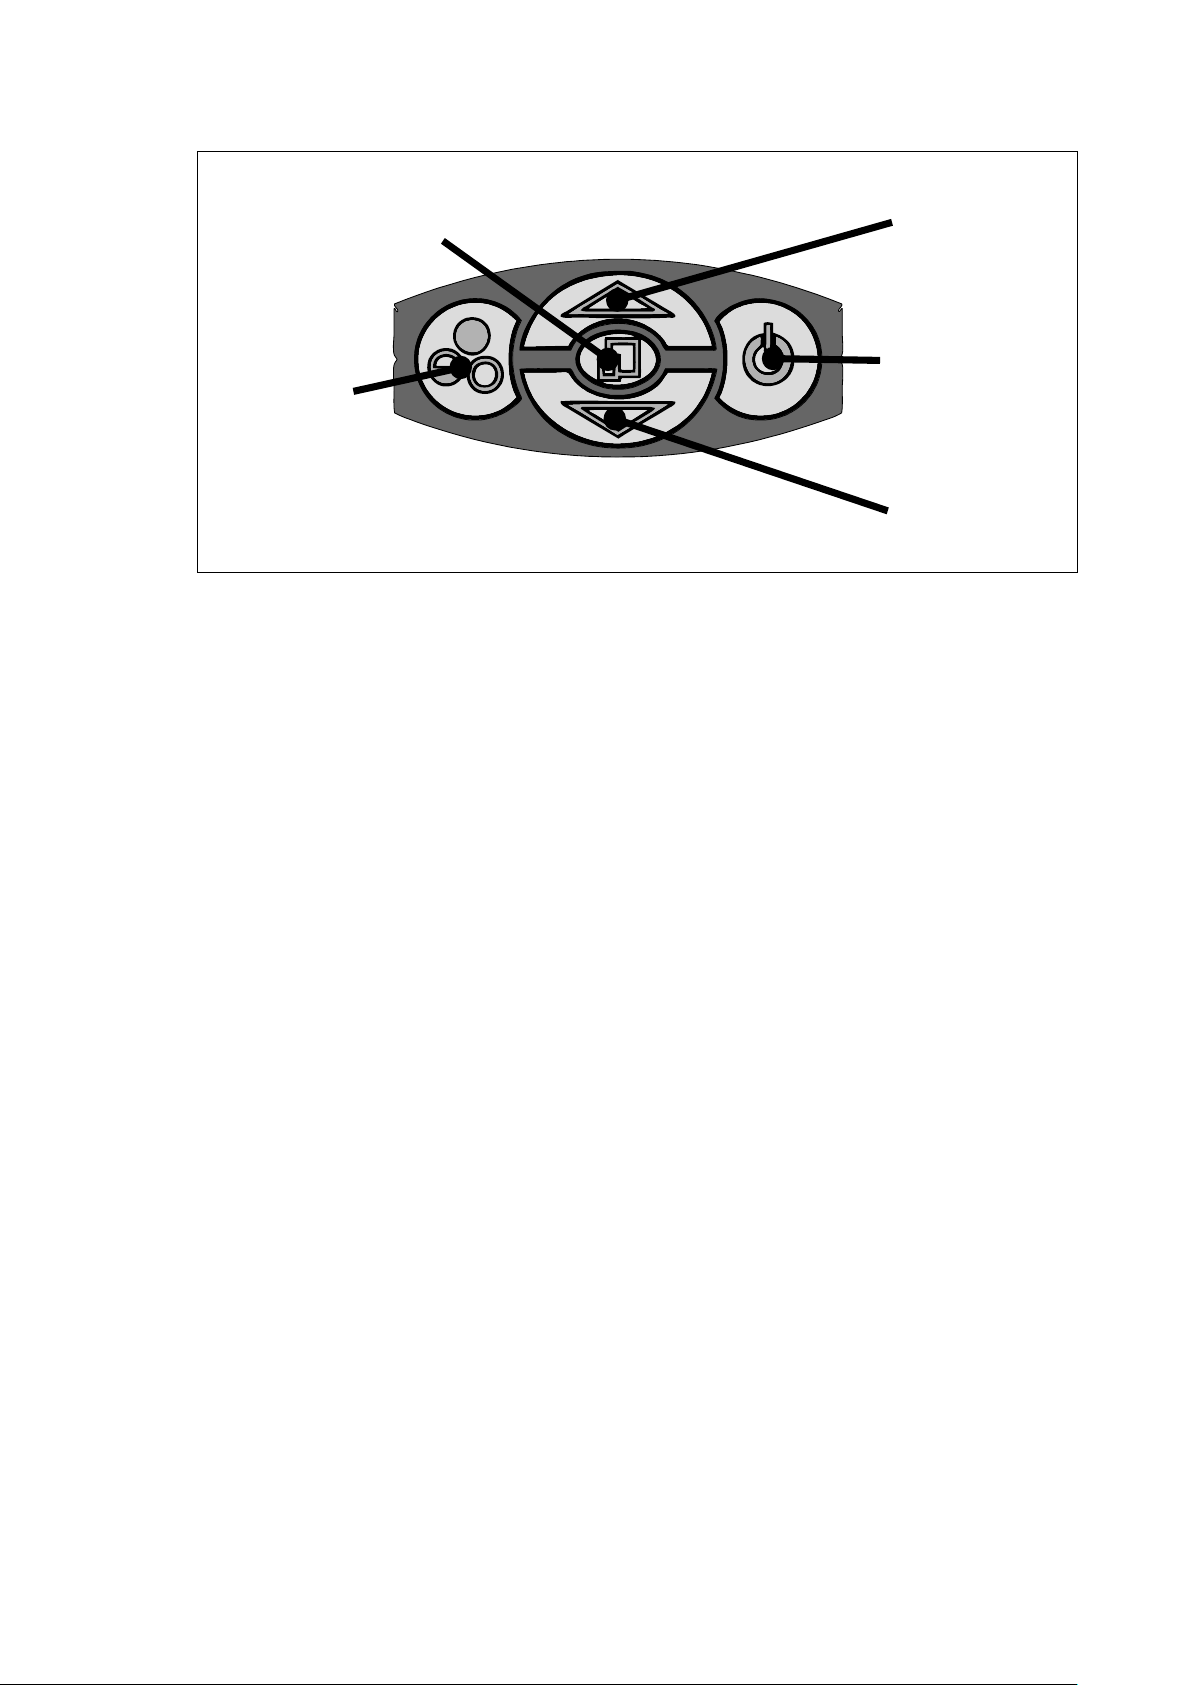
Power
Zoom
Down
Zoom
Up
Overview
Mode
Power
Push the button to turn the power on. A blue image
will appear on your TV and, after a few seconds, the
picture from the camera will appear on the TV.
Pushing the Power button again will power-off the
Prisma AF.
Mode
Repeated pressing of the Mode button will cycle
through the three available viewing modes.
• Photo mode – full colour for general viewing.
• Positive mode – high contrast black on white.
• Negative mode – white letters on a black
background.
Magnification
Press the Zoom-Up button to enlarge the image and
Zoom-Down to reduce the image size. When
reading you should generally choose the smallest
size that you can read comfortably. The Prisma AF
has limits set for each end of the magnification
range, but you can override these limits by holding in
Page 6

Page 6
Prisma AF English Rev 1.00
the zoom buttons though image quality will
deteriorate.
Overview
Overview allows you to easily locate a point of
interest on the page you are viewing. Press and
release the Overview button to make the camera
zoom out fully and revert to full-colour mode. An “X”
is displayed in the centre of the screen as an aid to
location. Place the point of interest under the “X” and
press any key to restore the magnification to the
previous level.
Focus
The camera will continuously autofocus to achieve
the sharpest image. However, please be aware that
there is a limited range over which the camera can
focus. Raising the camera too high (greater than
30cms from the base of the camera to the page) or
placing the camera too low (less than 25cms from
the page) will mean the camera cannot focus at high
magnification correctly. If the image does not appear
to be in focus, try raising or lowering the camera to
correct it.
Brightness
The image brightness can be adjusted to suit your
preference. Press and hold the Mode button for
three seconds and text of the form “Bri: 3” will
appear in the centre of the screen. Use the Zoom
Up and Zoom Down buttons to adjust the image as
desired. Press Mode again to save the setting. The
setting you choose will be saved and used
subsequently for that mode of operation.
Page 7
Page 7
Prisma AF English Rev 1.00
Using the Prisma AF
Reading with the Prisma AF
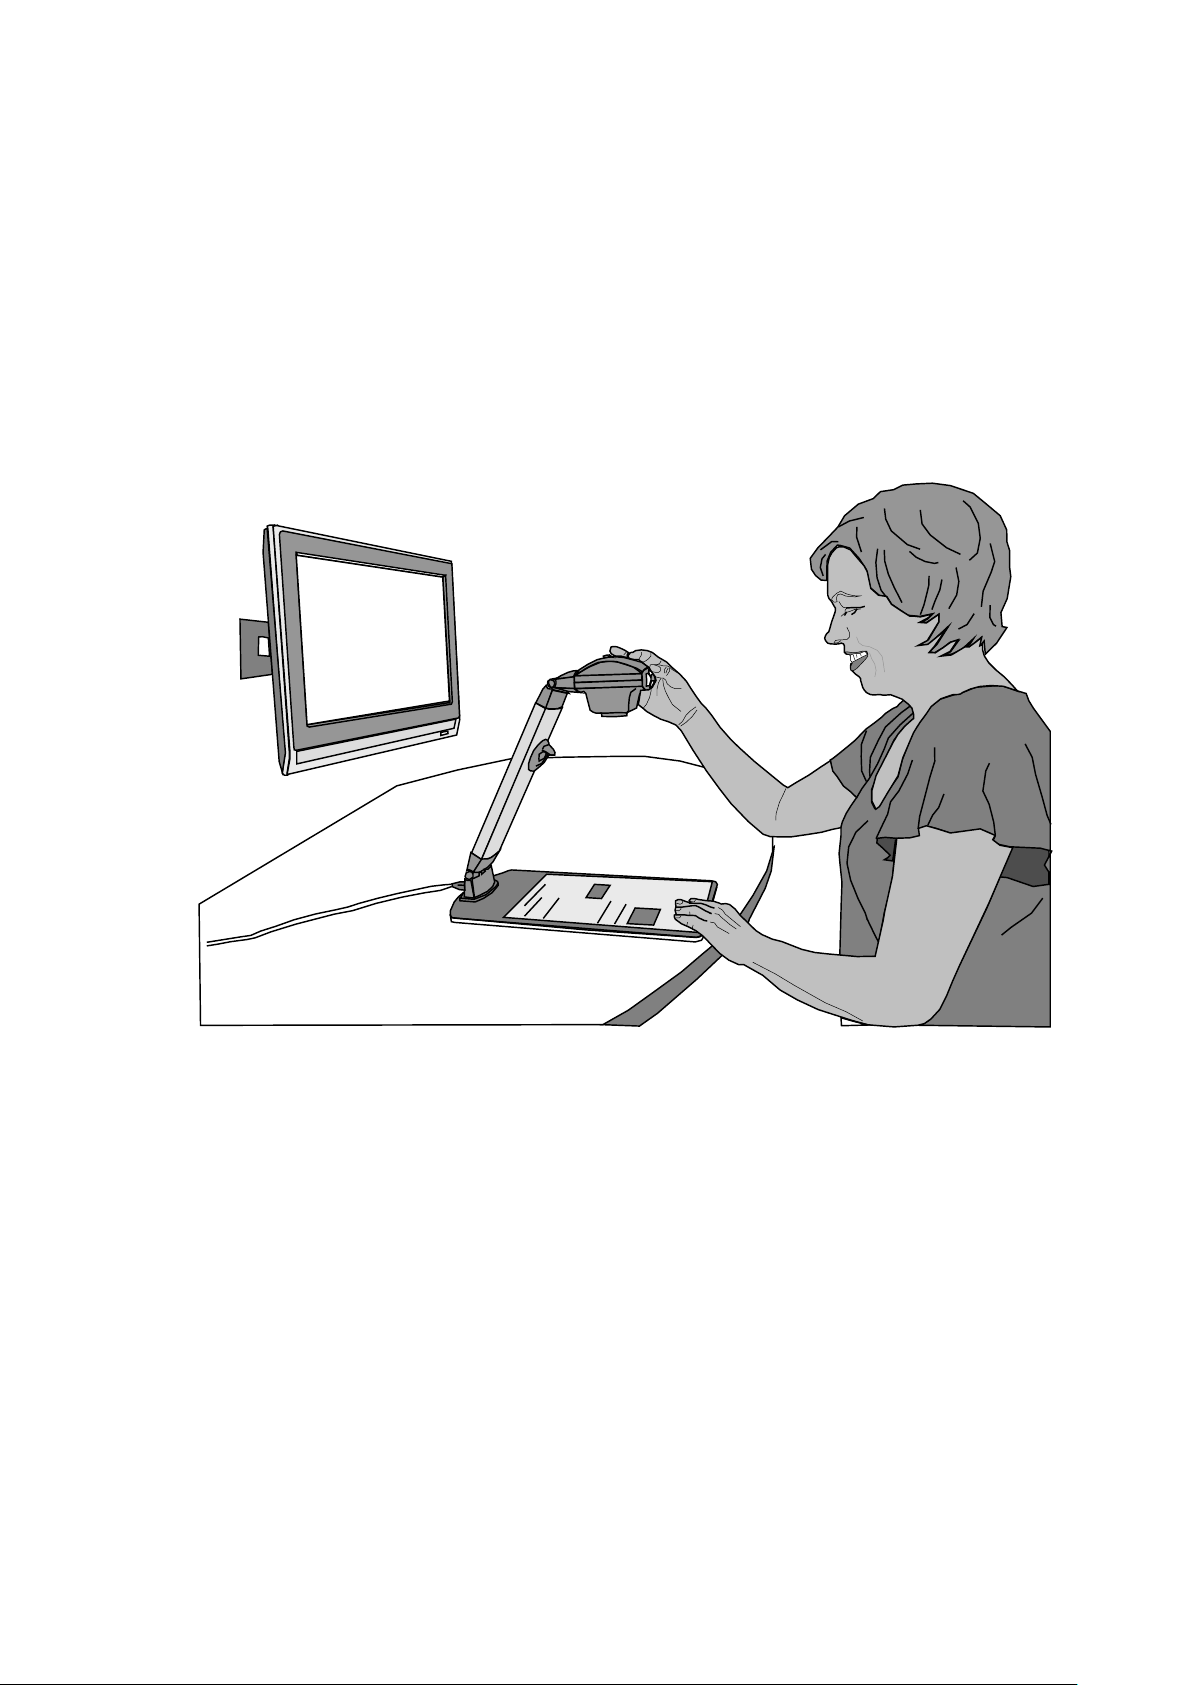
Place the Prisma AF on a suitable table near the
television and sit in front of it. Ideally the television
should be at eye level or slightly below, and the
Prisma AF reading table should be level with your
elbows when seated. A good reading position
prevents problems with your back, neck and arms.
Place the material you wish to read on the reading
table, looking at the TV screen to see where you are.
Adjust the magnification to suit. Ensure the camera
head is horizontal for optimum image quality.
Move the book on the table until you locate the top of
the page and then locate the start of the text. Simply
slide the book side to side and watch the television
screen while reading.
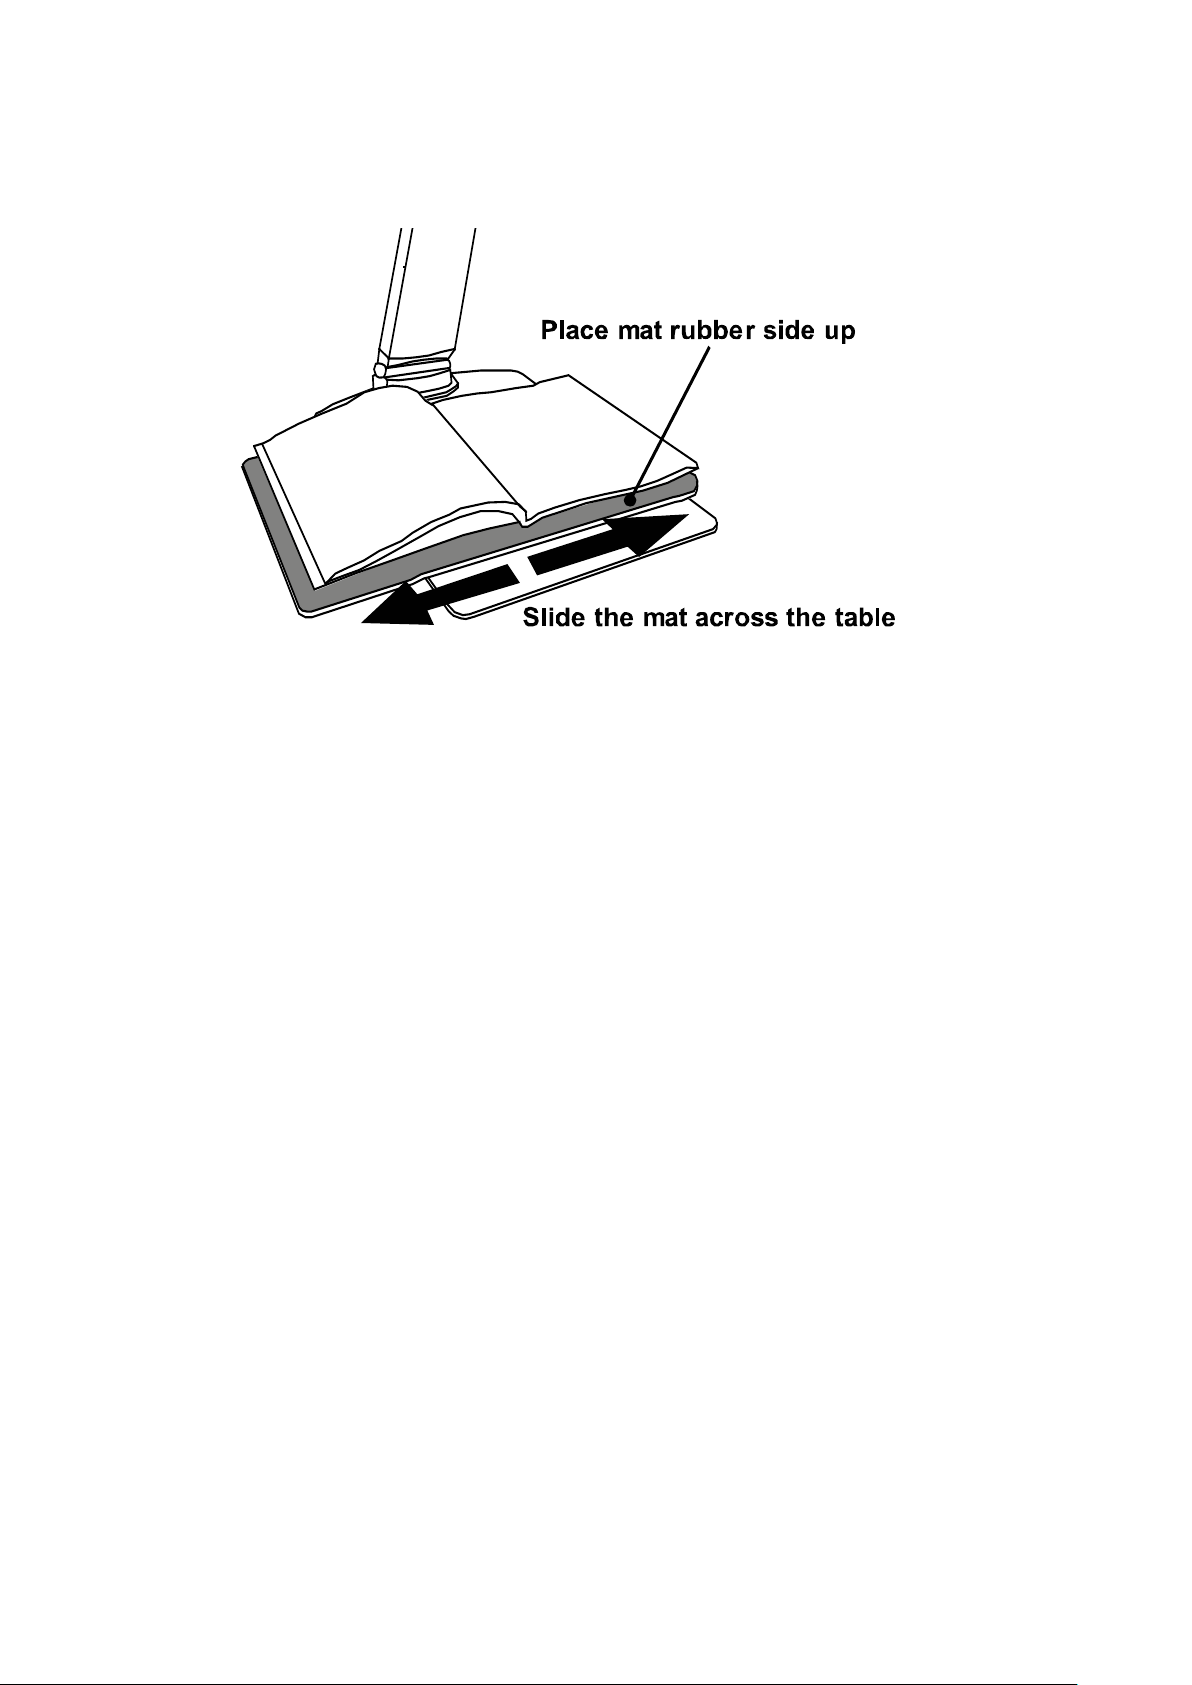
There is a mat provided with your Prisma AF to
facilitate reading heavier materials. Place the mat
Page 8
Page 8
Prisma AF English Rev 1.00
across the reading table with the rubber side
upwards. Place the book on the mat and slide the
mat from side to side.
Writing with the Prisma AF
Remove the mat from the table. Place the page
under the camera and locate the area of the page
where you wish to start writing (the overview function
is useful for this). Holding the page firmly, bring your
pen, raised well above the paper, until the nib is
visible on the screen at the point you wish to write.
Lower the pen to the paper carefully and write. You
should watch the screen as you write.
Locating the Prisma AF camera in a well-lit area will
enhance the image available from the unit. If
possible, avoid direct overhead lighting as this can
cause shadows on the page, leading to shading
differences on the screen.
Mirror view
The Prisma AF has a mirror mode that is useful for
checking your appearance. The mirror mode
engages automatically when you tilt the camera head
upwards to face the camera outwards. The unit will
Page 9

Page 9
Prisma AF English Rev 1.00
switch to photo setting when in mirror mode and
switch back to the last reading mode when returned
to the reading position. You should try to keep the
Prisma AF close to the TV screen for ease of use.
Focus lock
Press Mode and Overview simultaneously to turn off
the autofocus facility. Repeat to re-enable autofocus.
Lighting on/off
If you wish to turn off the LED lighting then, with the
unit powered off, press Zoom Up and power the unit
on. Repeat to allow the lighting to function again.
Sound on/off
The sounds can be disabled by Pressing Zoom
Down while powering on the unit. Repeat to enable
the sounds again.
Factory defaults
Press Mode while powering-on the Prisma AF to
restore factory settings for sound, lighting and
brightness settings.
Taking Care of your Prisma AF
Do not touch the lens. Dirt on the lens will appear as
a blurred or dim image or as fuzzy spots on the
screen. If you believe the lens is dirty, it can be
cleaned with a soft, dry cloth applying minimal
pressure. As the lens is polished and coated, do not
use a wet or coarse cloth, avoid detergents and
abrasive substances or solvents to clean it.
Page 10
Page 10
Prisma AF English Rev 1.00
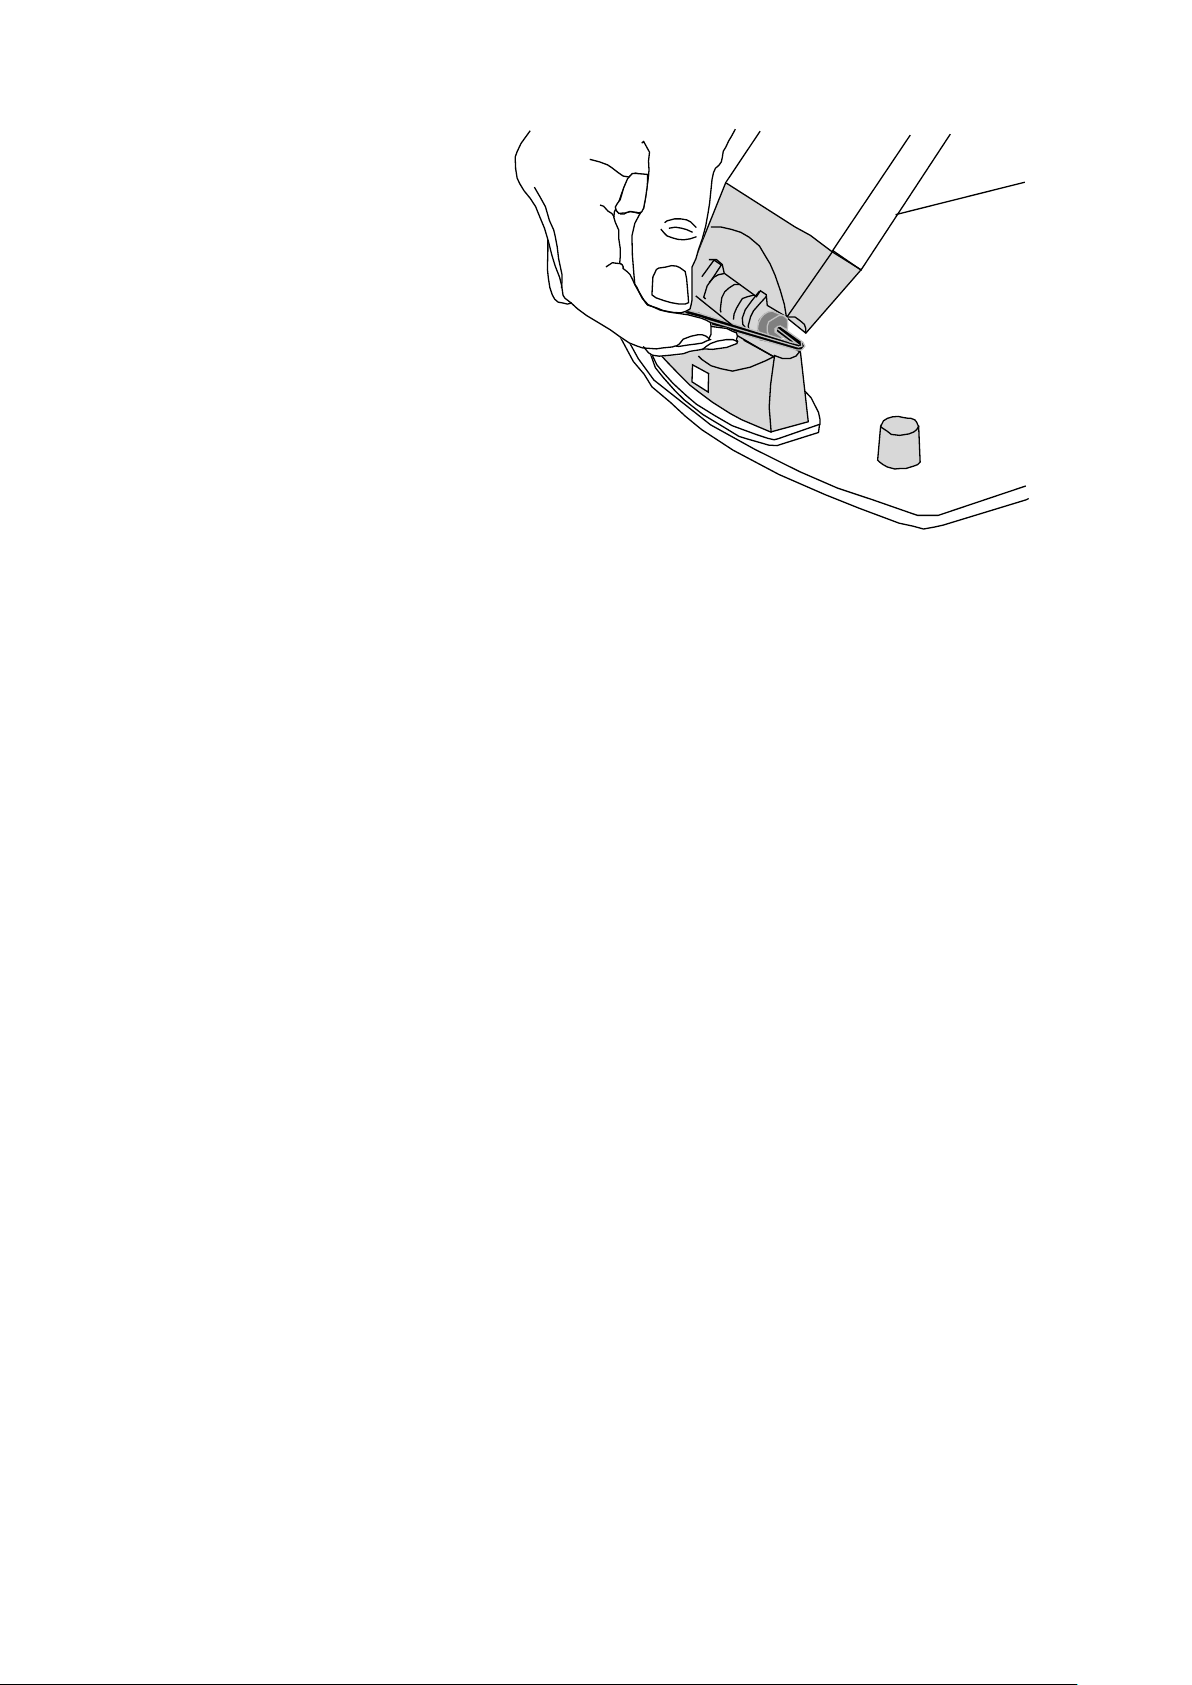
If the hinges loosen
with use they can be
tightened with the
Allen key provided.
To do this, pull off the
caps covering the
hinge screws and
insert the Allen key
into the screw head.
Turn each screw
clockwise about a
quarter turn – do not over-tighten. Replace the caps.
Use only the supplied power supply and inspect the
cabling regularly for damage. The power supply is
rated for use within your home country – if you wish
to use your Prisma AF abroad, consult your
distributor first as both voltages and television
standards vary throughout the world.
Page 11
Page 11
Prisma AF English Rev 1.00
Specifications
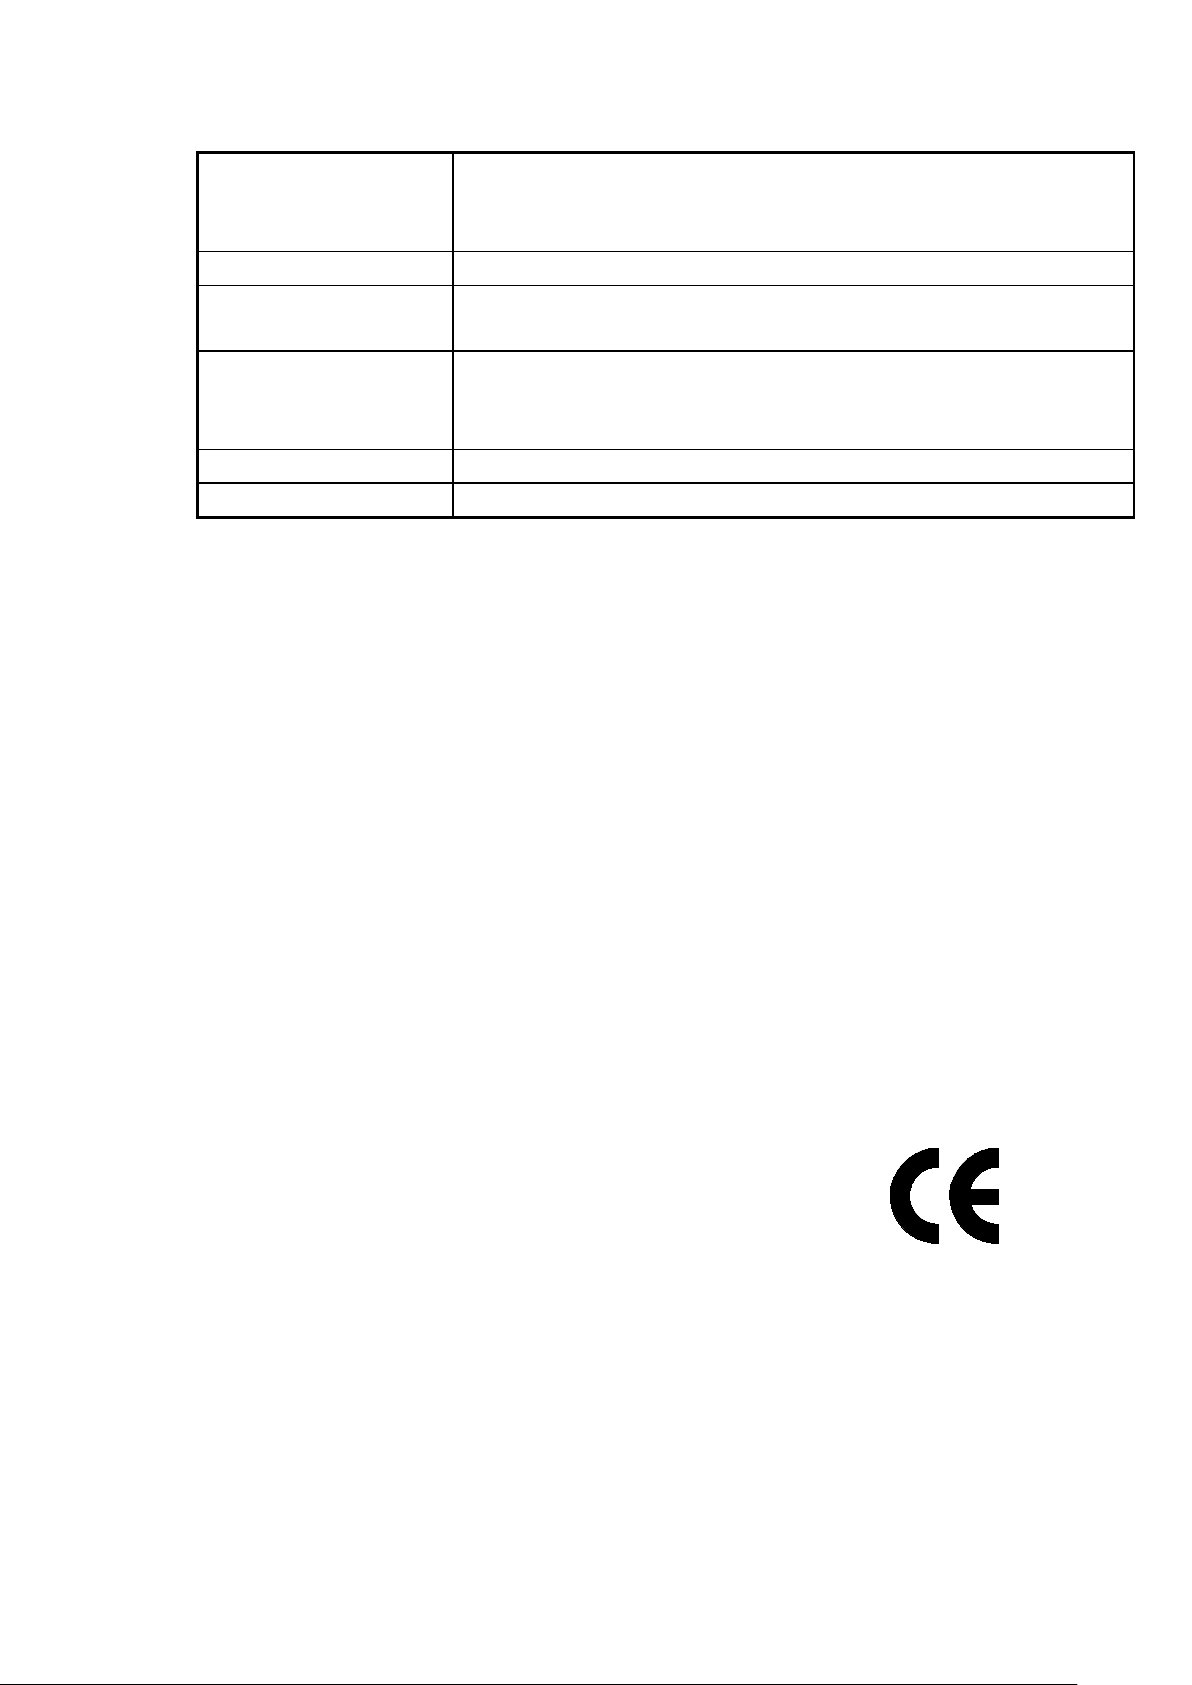
Dimensions:
Table area: 24 x 41cm Folded height: 9cm
Raised height: 40cm
Weight: 1.1kg
Power:
12V 600mA from the power supply provided.
Modes of
Operation:
High-contrast positive, high contrast negative and full
colour normal.
Magnification:
Dependent on screen size and aspect
21” 4:3 screen: 3.4x to 38x
32” widescreen: 5.6x to 62x
Temperature:
Storage: -10°C to +60°C. Operating: +5°C to +40°C
Output
1Vpp composite video colour
As we strive to constantly improve our products, this information
is subject to change without notice.
Declaration Of Conformity
We, Ash Technologies Ltd., declare under our sole responsibility
that this product Prisma AF, of the brand Ash Technologies to
which this declaration relates, is in conformity with the following
standards or other normative documents:
EN 60601-1-2:2007 Medical Electrical Equipment – Electromagnetic
Compatibility. Classification: Residential
following the provisions of EMC directive 2004/108/EC.
Signed, for and on behalf of Ash Technologies Ltd,
Alan Johnston,
Engineering Director
Naas, Ireland. 16 October 2009
Page 12

Page 12
Prisma AF English Rev 1.00
Warranty
Ash Technologies warrants the equipment, when purchased new,
to be free from defects in material and workmanship and will
repair or replace at Ash Technologies' discretion, any equipment
which exhibits such defects; provided that the equipment has
been operated under the proper conditions of installation and has
not been tampered with by any persons not authorised by Ash
Technologies or its agents and that it is solely serviced by Ash
Technologies or its agents.
In no event shall Ash Technologies or its agents be liable for
special, indirect, incidental or consequential damages; the
original user's remedies being limited to repair or replacement.
This warranty is valid only when serviced in the country of
original purchase.
Ash Technologies makes no other or further warranty,
express or implied, including and warranty of fitness for a
specific purpose or warranty of merchantability.
This warranty is valid for a period of
24 Months
effective from the date of delivery.
For warranty claims or service during or after
warranty period please contact your distributor.
Ash Technologies Limited, B5, M7 Business Park, Naas, Ireland.
[email protected] www.ashtech.ie
 Loading...