

Page 1

OPTi Verso
User Manual
Page 2

OPTi Verso User Manual
Table of Contents
Contents of the OPTi package.................4
Installation ..........................................4
Setup .................................................4
Charging OPTi Verso .............................6
OPTi software ......................................7
Keep on Top.......................................9
Sleep mode On/Off..............................9
Full colour/Reading mode ................... 10
Positive / Negative mode.................... 10
Views and the Views Manager ............. 11
Video controls .................................. 14
Overview ......................................... 16
Zoom In and Zoom Out ..................... 16
Capture ........................................... 17
Hide toolbar ..................................... 19
Exit Program .................................... 20
Main menu ....................................... 20
File......................................................21
View ....................................................21
Mode ...................................................22
Page 1 Rev B English
Page 3

OPTi Verso User Manual
Options ................................................22
Options … Preferences............................23
Options … Colours..................................25
Options … Markers.................................27
Image Quality .................................. 28
OPTi and Screen Magnification software . 29
OPTi Split windows ............................ 30
Left / Right Vertical Split mode ........... 31
Top / Bottom Horizontal Split mode ..... 32
Floating split mode............................ 33
Full screen mode............................... 34
Navigating between split modes .......... 35
Keeping OPTi active on the desktop ..... 37
Semi Colours.................................... 38
OPTi Sounds..................................... 39
Help ....................................................42
Care of your OPTi Verso ...................... 42
Warranty........................................... 43
Page 2 Rev B English
Page 4

OPTi Verso User Manual
This page is deliberately left blank
Page 3 Rev B English
Page 5

OPTi Verso User Manual
Contents of the OPTi package
• The OPTi Verso unit with integrated
base and USB cable
• Charger with mains lead
• Carry case
• OPTi CDROM with application
• The User’s manual
• Installation guide
• Quick reference guide
Installation
The OPTi requires that you first
carry out the software installation
before plugging the unit into your
computer. Please refer to the installation
guide before continuing.
Setup
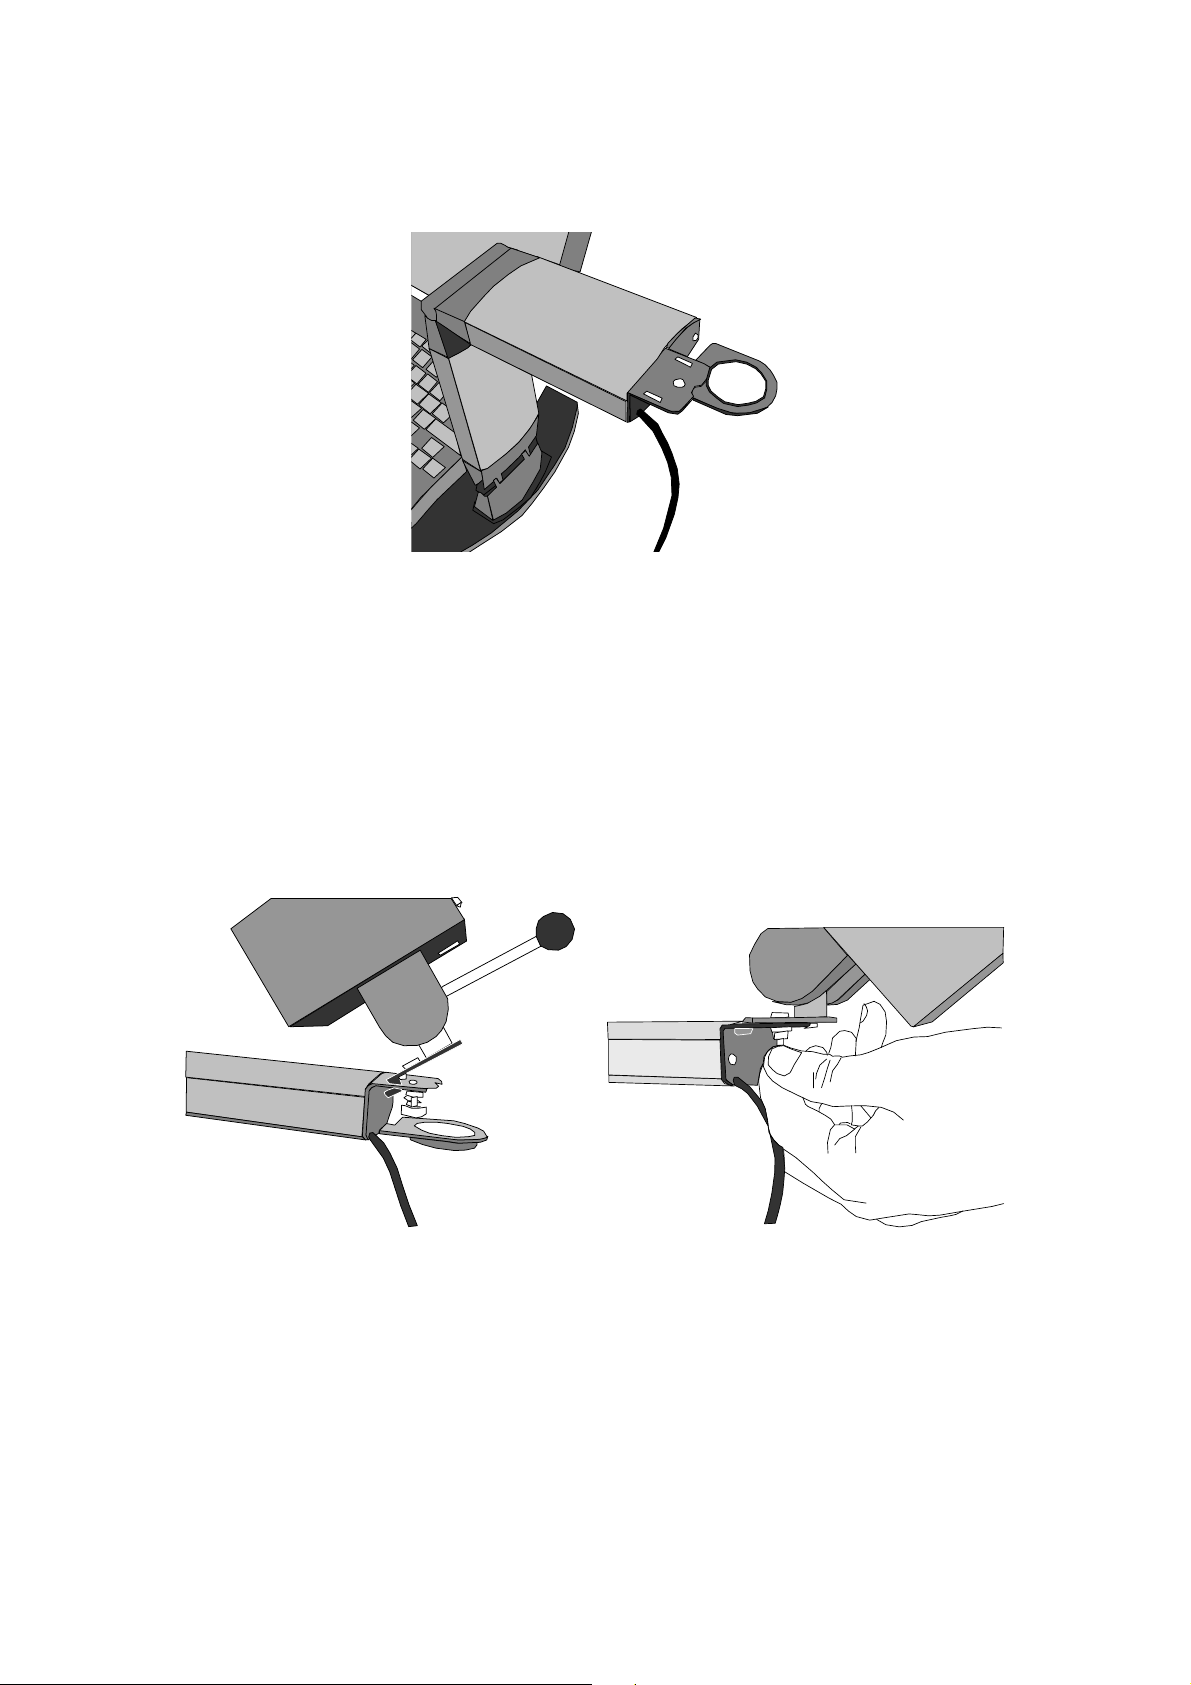
OPTi verso is designed to be used with its
base under either a laptop computer or
under the keyboard of a desktop PC; the
Page 4 Rev B English
Page 6
OPTi Verso User Manual
camera section should face sideways over
a free area of the desk.
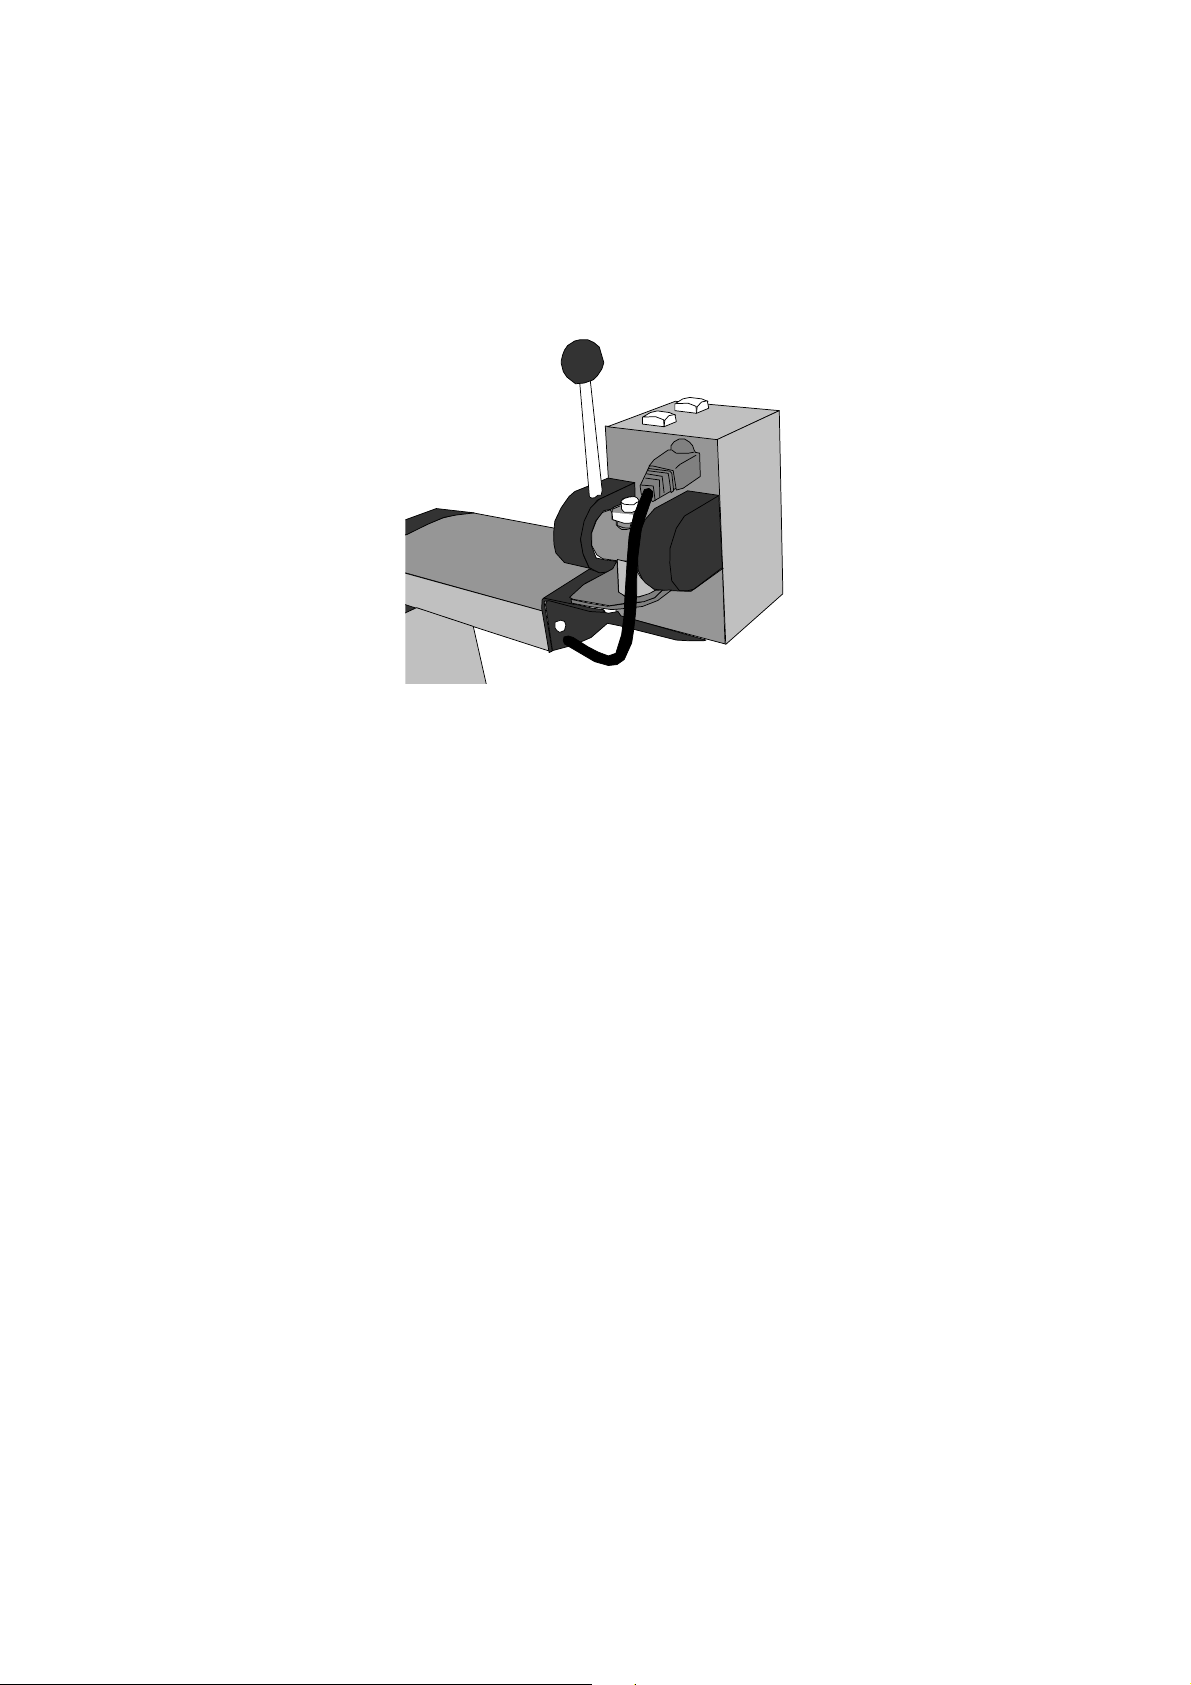
After unpacking, the camera should be
attached to the arm: place the prongs on
the camera mounting into the arm and
tighten the screw, tightening the camera
firmly to the arm. Insert the plug into the
camera
The USB lead should be connected to the
computer for the OPTi program to run. The
camera can be used for either close-up or
distant viewing. By facing it downwards,
looking through the close-up lens, at your
Page 5 Rev B English
Page 7
OPTi Verso User Manual
material on the desk below, you can
perform close-up work. Alternatively,
facing the camera forwards, you can look
around the room.
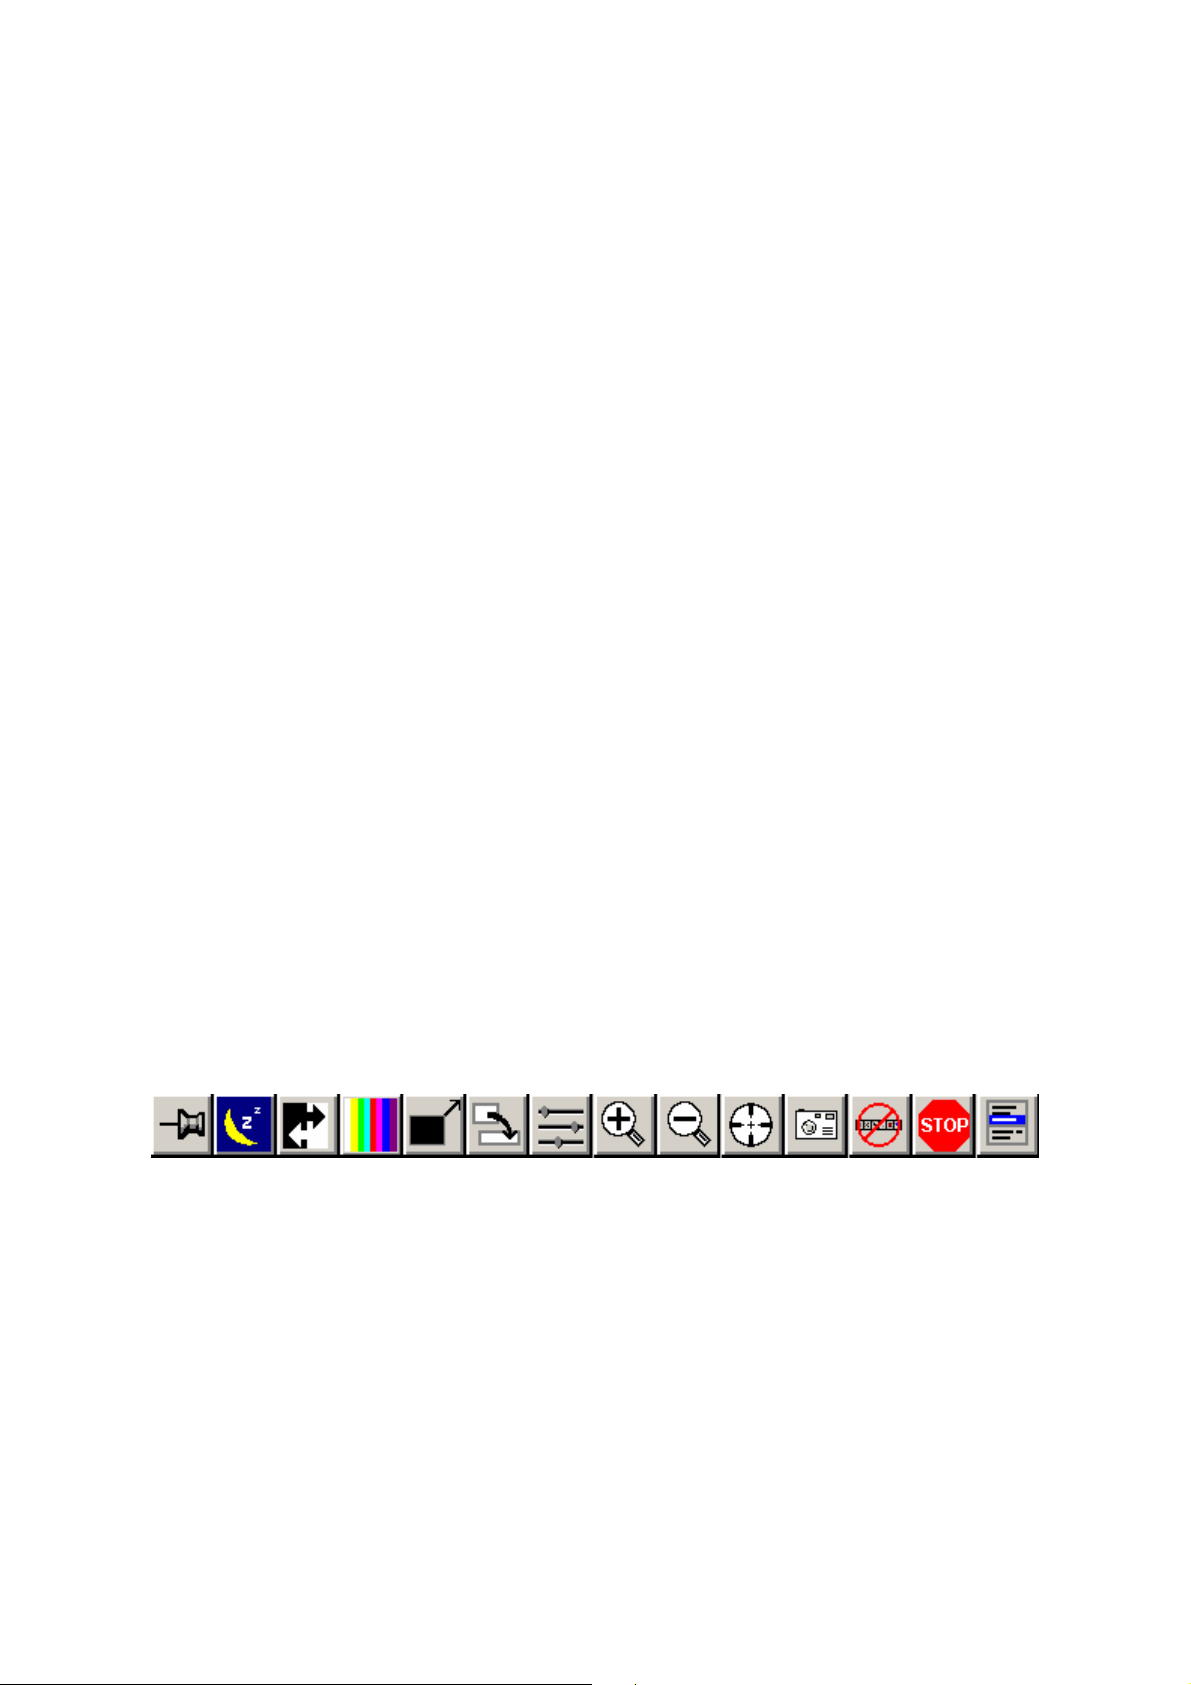
The camera has two buttons, one to zoomin (Z+) the other to zoom-out (Z-). The
zooming can also be controlled from the
OPTi program.
Charging OPTi Verso
OPTi Verso contains a rechargeable battery
that must be charged periodically if you
want to use it on the move. Simply plug
the charger into the base of the unit and a
wall socket and leave it to charge. The
battery will be fully charged in 4 hours and
should last approximately 6 hours of
usage.
Page 6 Rev B English
Page 8

OPTi Verso User Manual
The unit can be used while it is charging.
OPTi software
The OPTi software consists of the video
window and the toolbar. The video window
displays the real time video image
captured by the unit itself. The video
window is movable and resizable both
horizontally and vertically.
The toolbar window displays the main
controls for the software. This allows you
quick access to the video control features
and to the main menu.
As you move the text or image under the
OPTi’s camera, the image will be displayed
on the video window. There are many
features on the OPTi software that allow
you to optimise the display for your
particular requirements.
Shortcut keys in this manual are
described in the form “Ctrl+X”.
Page 7 Rev B English
Page 9
OPTi Verso User Manual
This means that you press and hold the
control key and press the letter (“X”).
The shortcut keys only have effect when
OPTi is the active program; they are not
trapped by OPTi and may have another
function entirely in other programs.
The one exception to this is the Scroll-Lock
button, this button is trapped by OPTi.
Pressing this button will make OPTi the
active application, and so OPTi will appear
on top of any other program that is
running.
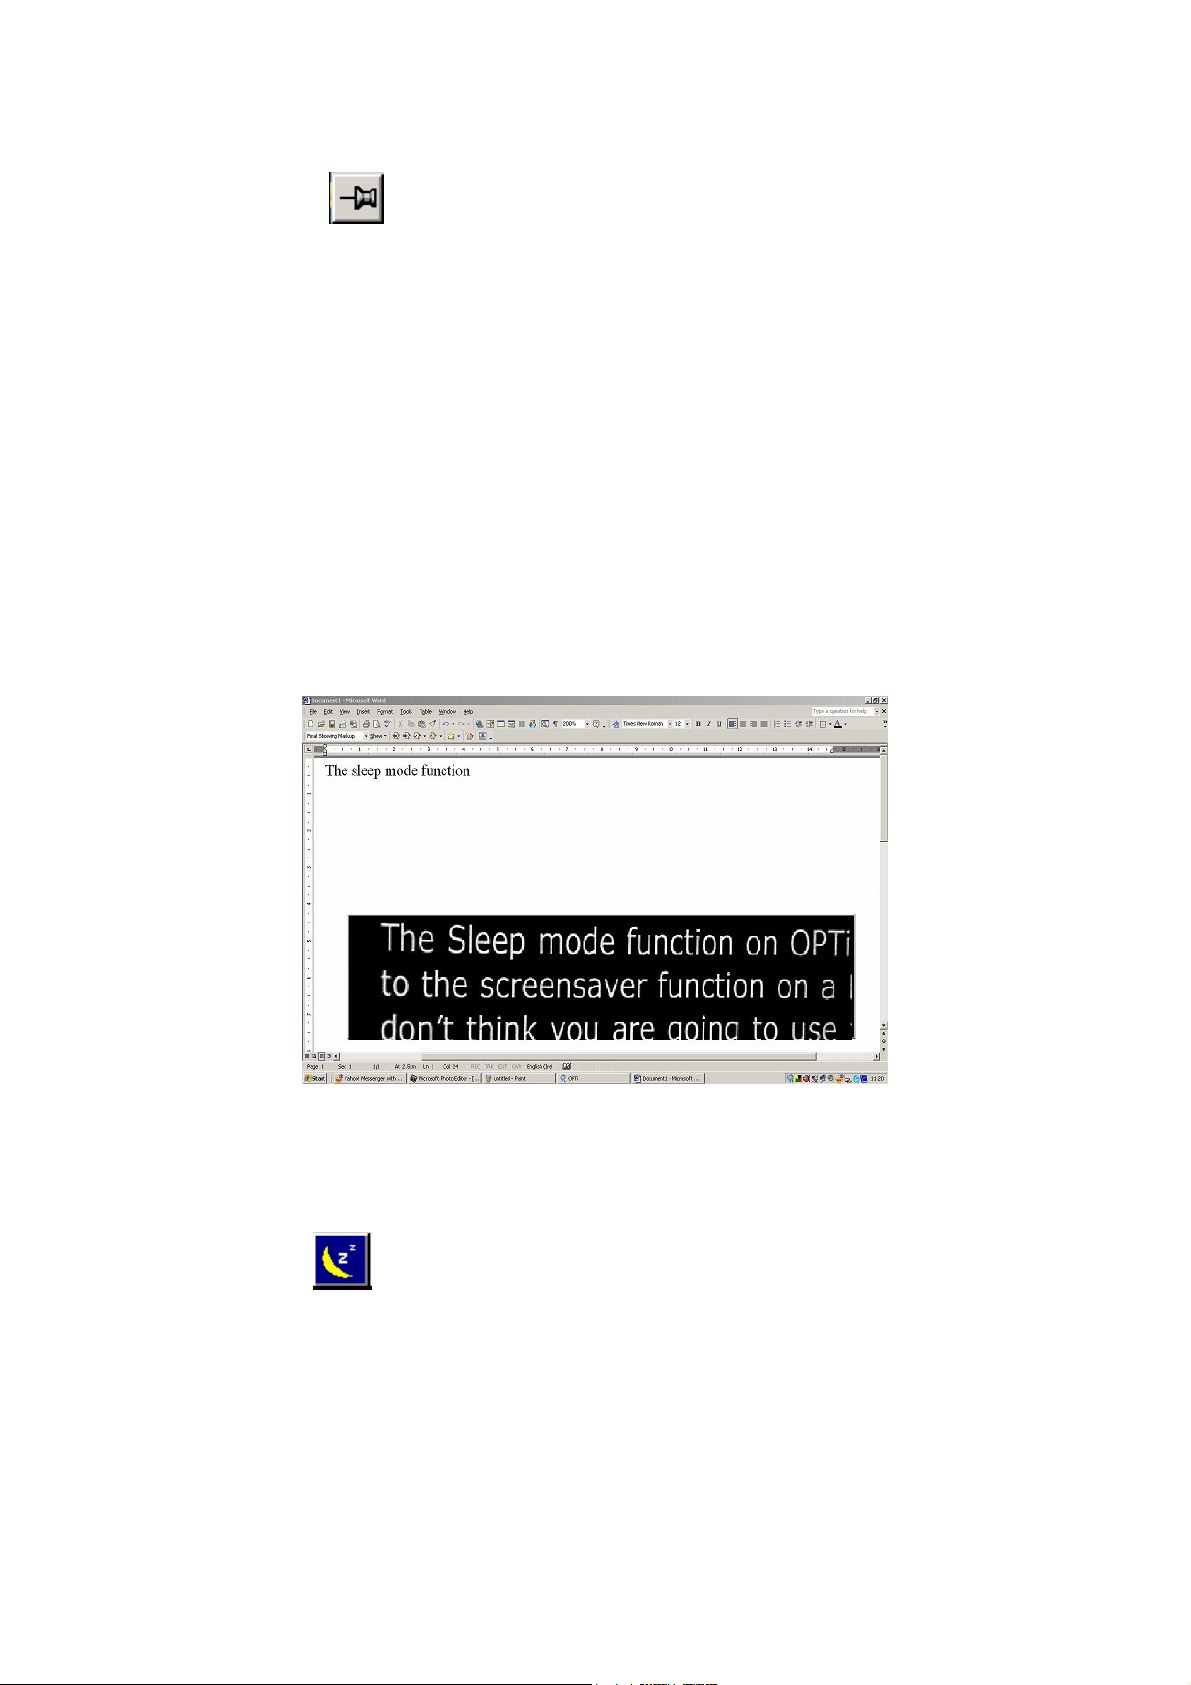
The toolbar explained
The following section explains function of
the buttons on the OPTi toolbar. The
complete toolbar is illustrated below.
Each of the buttons functions is explained
in this section along with their equivalent
keyboard shortcuts. This gives you a
choice of ways to control OPTi using the PC
mouse or the PC keyboard.
Page 8 Rev B English
Page 10
OPTi Verso User Manual
Keep on Top
Toolbar:
Keyboard: Ctrl+T
“Keep on top” forces the OPTi video
window on top of any other program
window. For example, in the image below
the user is typing in MS Word but the OPTi
video window is sitting ‘on top’ of MS Word
and is visible even though Word is the
active application.
Sleep mode On/Off
Toolbar:
Keyboard: Ctrl + S
The Sleep mode function on OPTi is similar
to the screensaver function on a PC. If you
don’t think you are going to use your OPTi
Page 9 Rev B English
Page 11

OPTi Verso User Manual
for a while but want to leave the program
running, you can save battery power by
simply putting OPTi into Sleep mode. This
causes the video window to disappear and
turns off OPTi’s internal circuitry.
Full colour/Reading mode
Toolbar: or
Keyboard: Ctrl + G
This button provides an alternative way to
switch between full colour and reading
mode.
Positive / Negative mode
Toolbar:
Keyboard: Ctrl + R
This button toggles between positive and
negative reading modes. If you are in full
colour mode pressing this will place you in
the last reading mode used.
Page 10 Rev B English
Page 12
OPTi Verso User Manual
Full Screen
Toolbar:
Keyboard: Ctrl+F
When OPTi is in full screen mode the video
window takes up the entire screen and
only the toolbar window will be visible over
the video window.
Views and the Views Manager
Toolbar: to cycle
Keyboard: Ctrl + Shift + 0…9 to save
Ctrl + 0…9 to recall
Ctrl + V to cycle the views
When you have set up the display the way
you want it, you can store the settings for
later recall. In fact you can store ten
arrangements or “views” which can be
recalled as you desire.
When you start the program for the first
time all ten views will be at the default
setting.
Page 11 Rev B English
Page 13

OPTi Verso User Manual
If you make a change to a view you can
store it as one of the ten views (View 0 to
View 9) as follows:
Ctrl + Shift + 0 to save as view 0
Ctrl + Shift + 1 to save as view 1
and so on up to
Ctrl + Shift + 9 to save as view 9
You will be prompted to confirm that you
wish to save the current layout.
Note that you cannot store a
setting at full screen. You should
instead use Page Up to enlarge the
window to the maximum size and then
save this instead.
To recall the stored views, press Ctrl + 0
to Ctrl + 9. You will be prompted to save
any changes you made to the current view
when you change to another view.
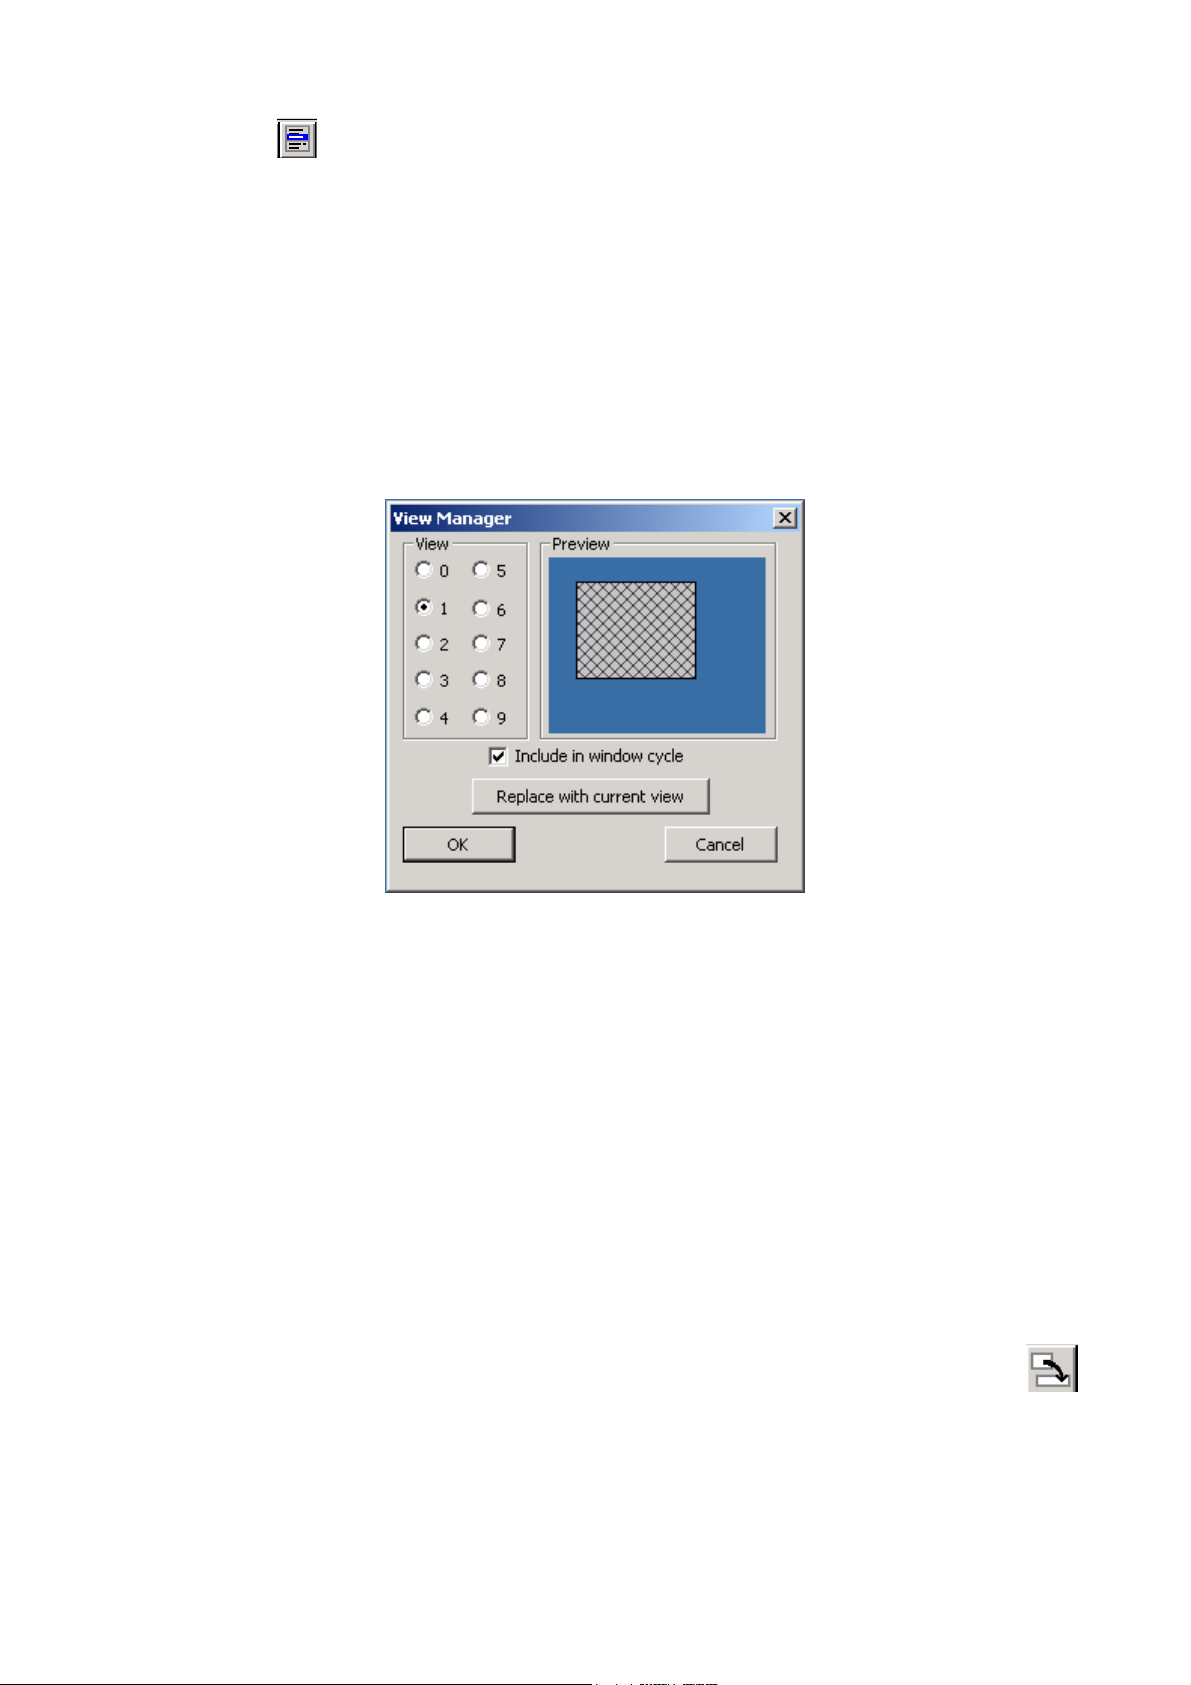
You can use the Views Manager to look at
the views you have stored. You can access
this from the menu by pressing the Menu
Page 12 Rev B English
Page 14
OPTi Verso User Manual
button (see page 20), then “Views” and
then “Views Manager”. Choosing view 0
to 9 will display a preview of the view as it
would appear on the screen in the colours
stored for that view. You can choose OK to
select a view. The image below shows
what the Views Manager looks like.
The “Replace with current view” button will
store the current screen layout into the
selected view. In the case above, view 1
would be replaced with the current view.
The “Include in window cycle” checkbox
can be set for each of the ten views. If this
box is checked for a particular view then
that view will be displayed in rotation as
you cycle through the views with the
button on the toolbar or by pressing Ctrl +
V on the keyboard, or alternatively with
Page 13 Rev B English
Page 15
OPTi Verso User Manual
one of the front panel buttons programmed to cycle views. (Programming
the front panel buttons is covered later in
this manual.)
Video controls
Toolbar:
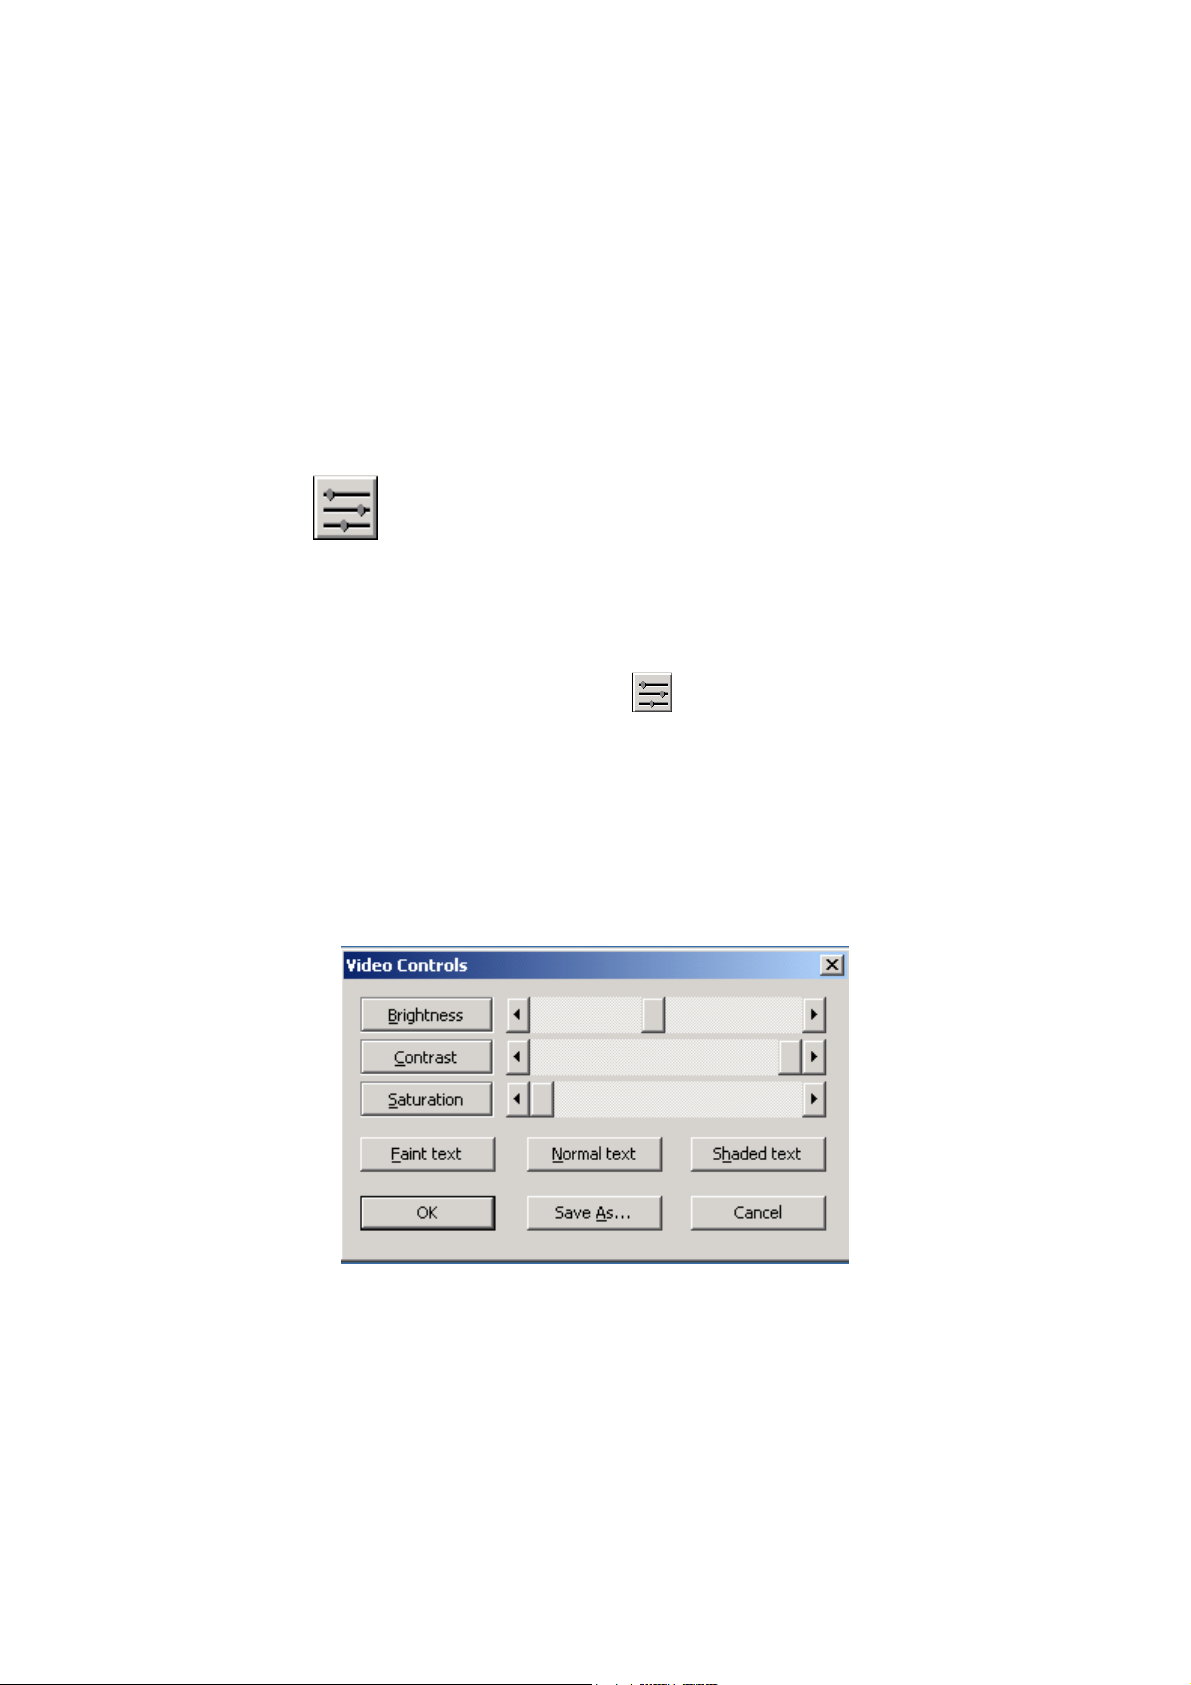
The video controls allow you to control the
brightness and contrast and saturation of
the OPTi image. Press on the toolbar or
from the menu choose “Options”, “Video
controls” (Keyboard: Ctrl + M, O, V). The
Video controls dialog box is shown on the
next page.
The slider controls can be adjusted as you
desire. You can use the mouse to move
them or you can use the keyboard. For
example to change the brightness of the
image, press “B” and then use the arrow
Page 14 Rev B English
Page 16
OPTi Verso User Manual
keys on your keyboard to move the slider
left and right. Once you are happy with the
settings press OK or press “Return”. The
“Faint text”, “Normal text” and “Shaded
text” buttons allow you to store settings
that are best suited for viewing text in
those conditions.
For example if you are reading very faint
text you may want to turn down the
contrast. When you are happy with the
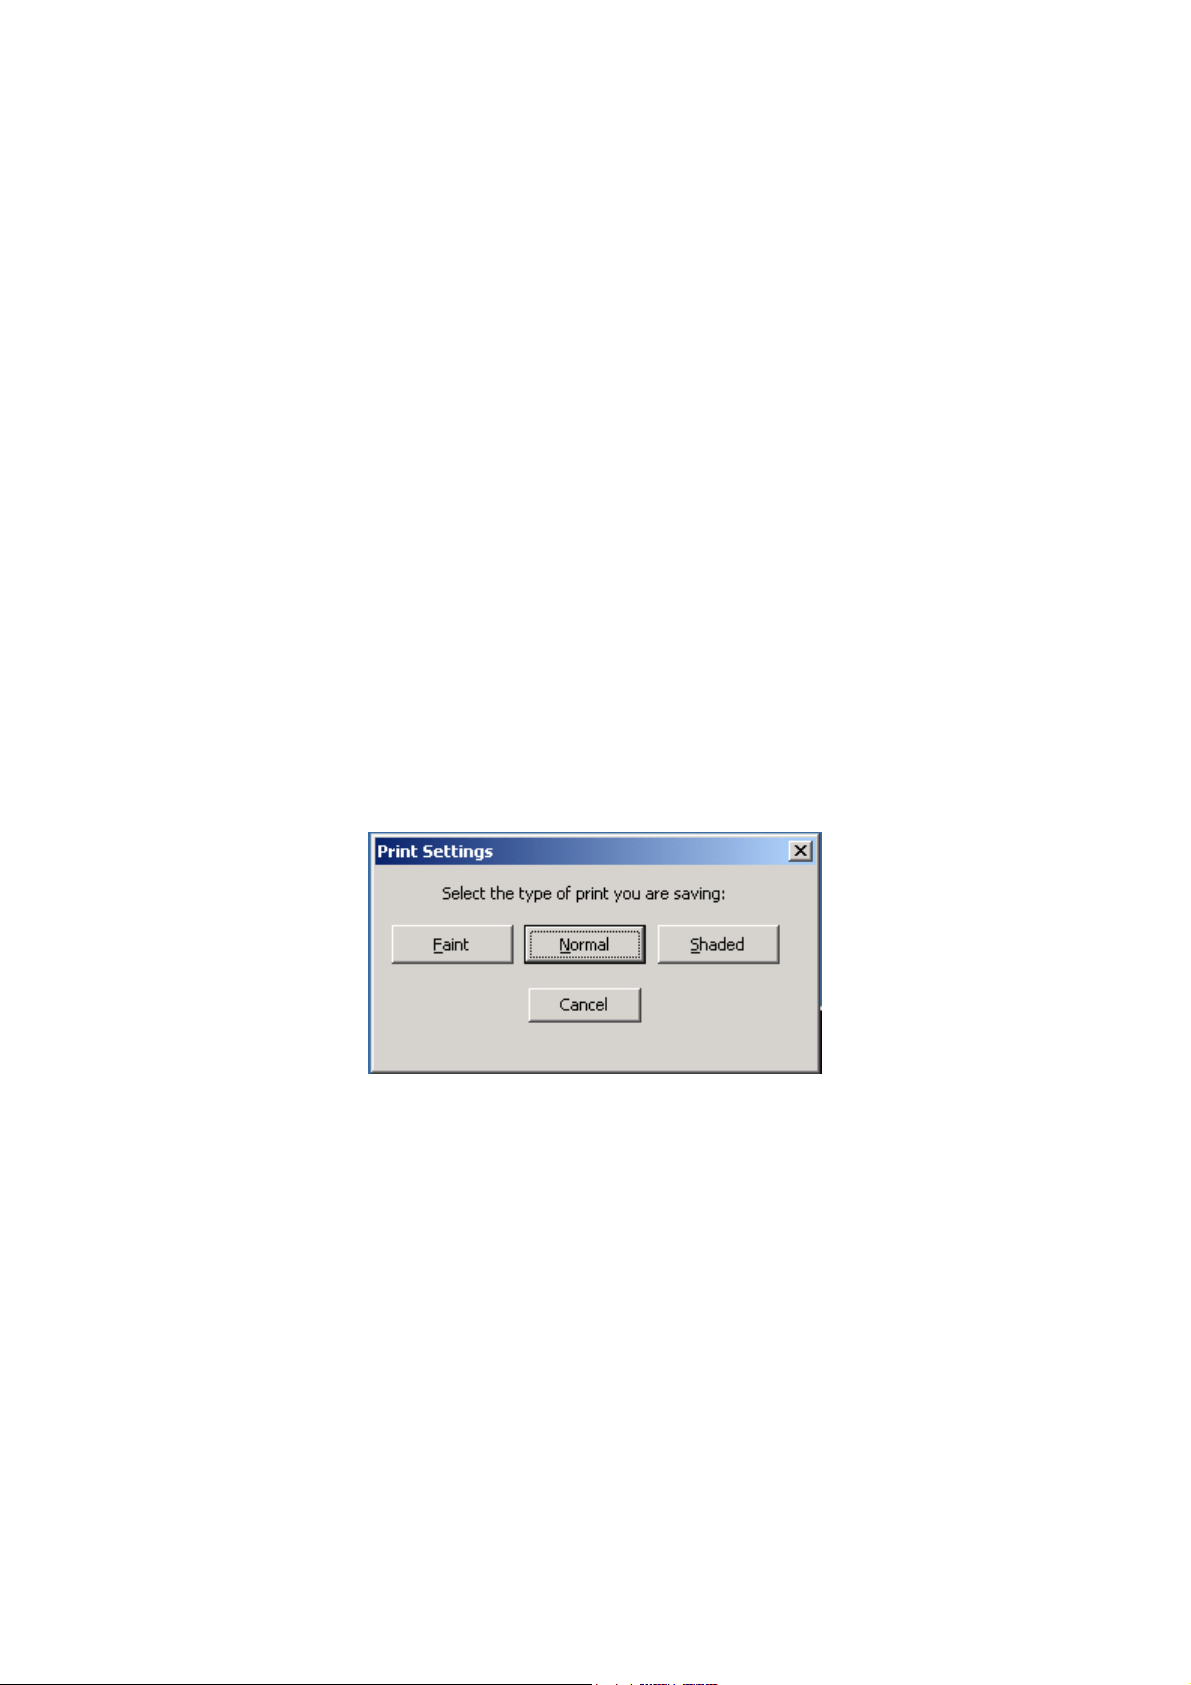
image press the “Save As” button
(Keyboard: A) you will see the following
dialog box:
If you then press the “Faint” button
(Keyboard: F) your video settings will be
stored, and the next time you are viewing
faint text you can recall them by pressing
the “Faint text” button on the video
settings dialog.
Page 15 Rev B English
Page 17
OPTi Verso User Manual
The video settings for Photo, Positive and
Negative are independent of each other.
Also these settings are saved with each
view.
Overview
Toolbar:
Keyboard: Ctrl +
or
(once)
Overview is a very useful method of
orientating yourself with the camera.
When you press this button, the camera
will zoom out fully and place a cross on the
centre of the screen. You can then move
the camera and place the cross over the
area you want to zoom in to and press the
overview button again. The camera will
return to its previous level of magnification.
Zoom In and Zoom Out
Toolbar:
Keyboard: Ctrl + ,
Page 16 Rev B English
Page 18

OPTi Verso User Manual
These functions duplicate the buttons on
the back of the camera. Click on the
toolbar button to start the zoom action and
again to stop. The keyboard shortcuts
operate while the keys are held down and
stop when released.
Capture
Toolbar:
Keyboard: Ctrl + C
The capture button allows you to take a
photograph of the image currently being
displayed on OPTi’s video window. The
image is saved as a .bmp file into a folder
on your computer hard drive. The folder is
created automatically when you install the
software. It is located in the “My Pictures”
folder on your computer and is called “OPTi
Images”. It is advisable to create a
shortcut to this folder on your desktop.
To operate the snapshot you can press the
button or from the keyboard press
Ctrl+C.
Page 17 Rev B English
Page 19
OPTi Verso User Manual
The OPTi Images folder is created
when the software is installed. It is
very important that you do not
move or rename this folder. If you do then
the snapshot function will not work.
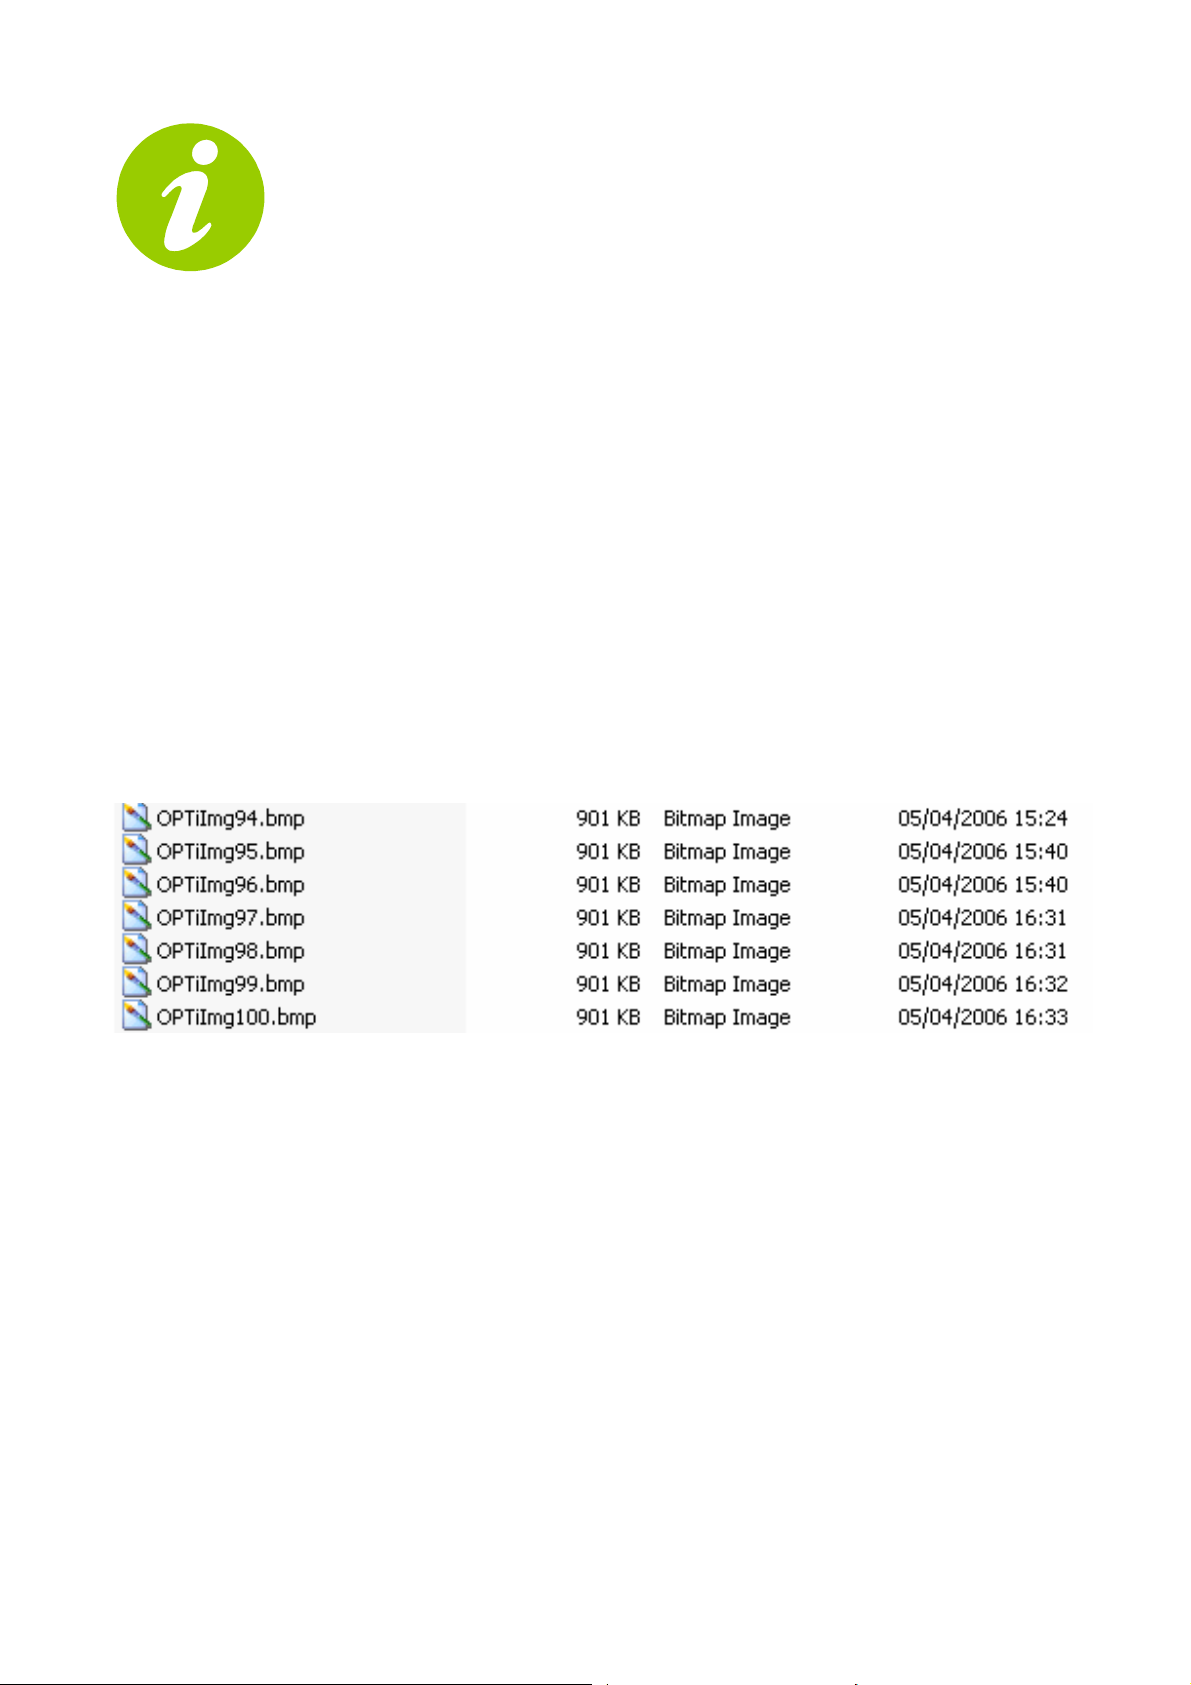
Images are saved as “OPTiImg001.bmp”.
Every time you take an image the file
name increments. The image on the next
page shows how the folder will look after
several snapshots have been taken.
As you can see the file name increments
by 1 each time a picture is taken.
Page 18 Rev B English
Page 20
OPTi Verso User Manual
Hide toolbar
Toolbar:
The hide toolbar button allows you to
remove the toolbar from the display. This
is useful if you want to view in full screen
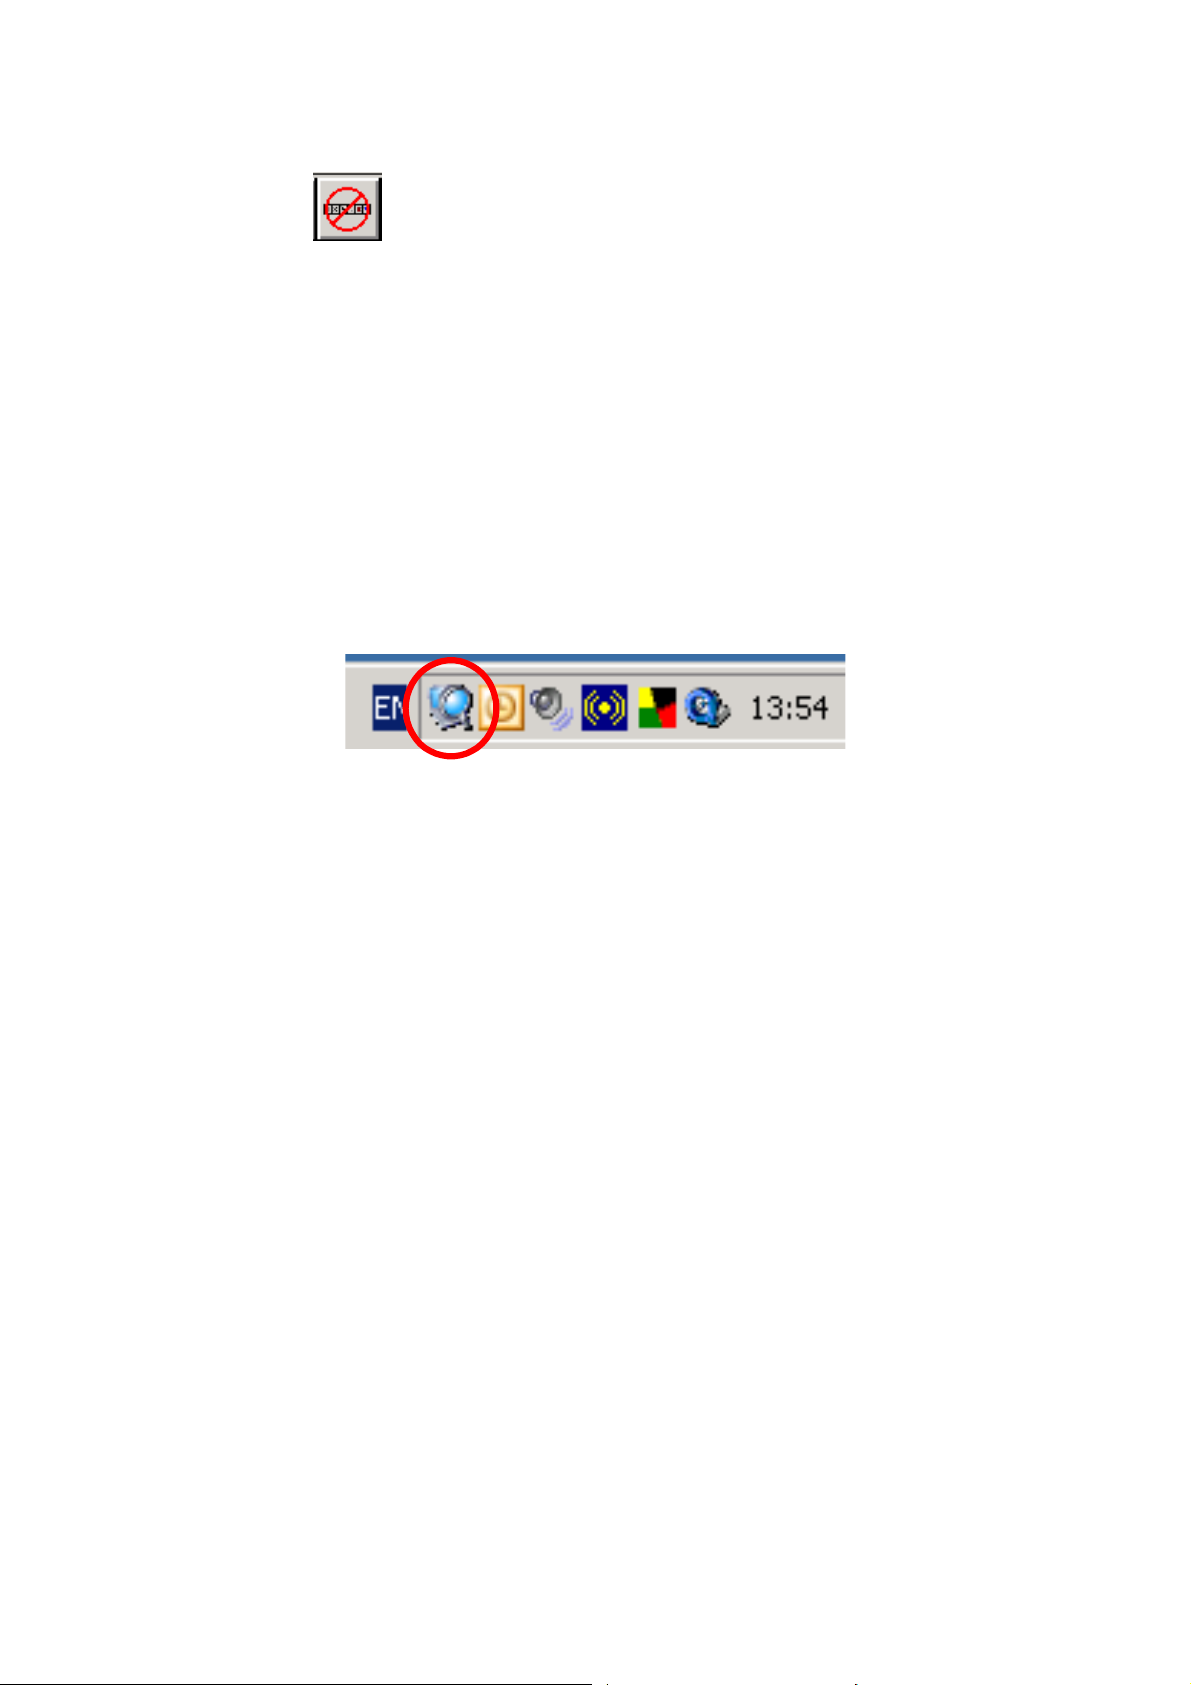
with nothing else visible. You can bring the
toolbar back by clicking on the OPTi icon in
the system tray as show in the image
below.
Alternatively, if you put the mouse cursor
on the video display and right click the
main menu will appear. From this choose
“Options”, “Preferences” and then in the
Preferences dialog box you can select
where you wish the toolbar to be placed.
(Keyboard: Ctrl+M,O,P)
(OPTi’s preferences menu will be explained
in the next section)
Page 19 Rev B English
Page 21
OPTi Verso User Manual
Exit Program
Toolbar:
Keyboard: Alt + F4
This button can be used to exit the
program. Alternatively you can use the
menu and choose “File” “Exit” by pressing
Alt+F4.
Main menu
Toolbar:
Keyboard: Ctrl + M
All of OPTi Verso’s features can be
accessed from its popup menu. To display
the menu, press the button on the
toolbar or right clicking on the video
window. You can also access the main
menu from the keyboard by pressing Ctrl
+ M.
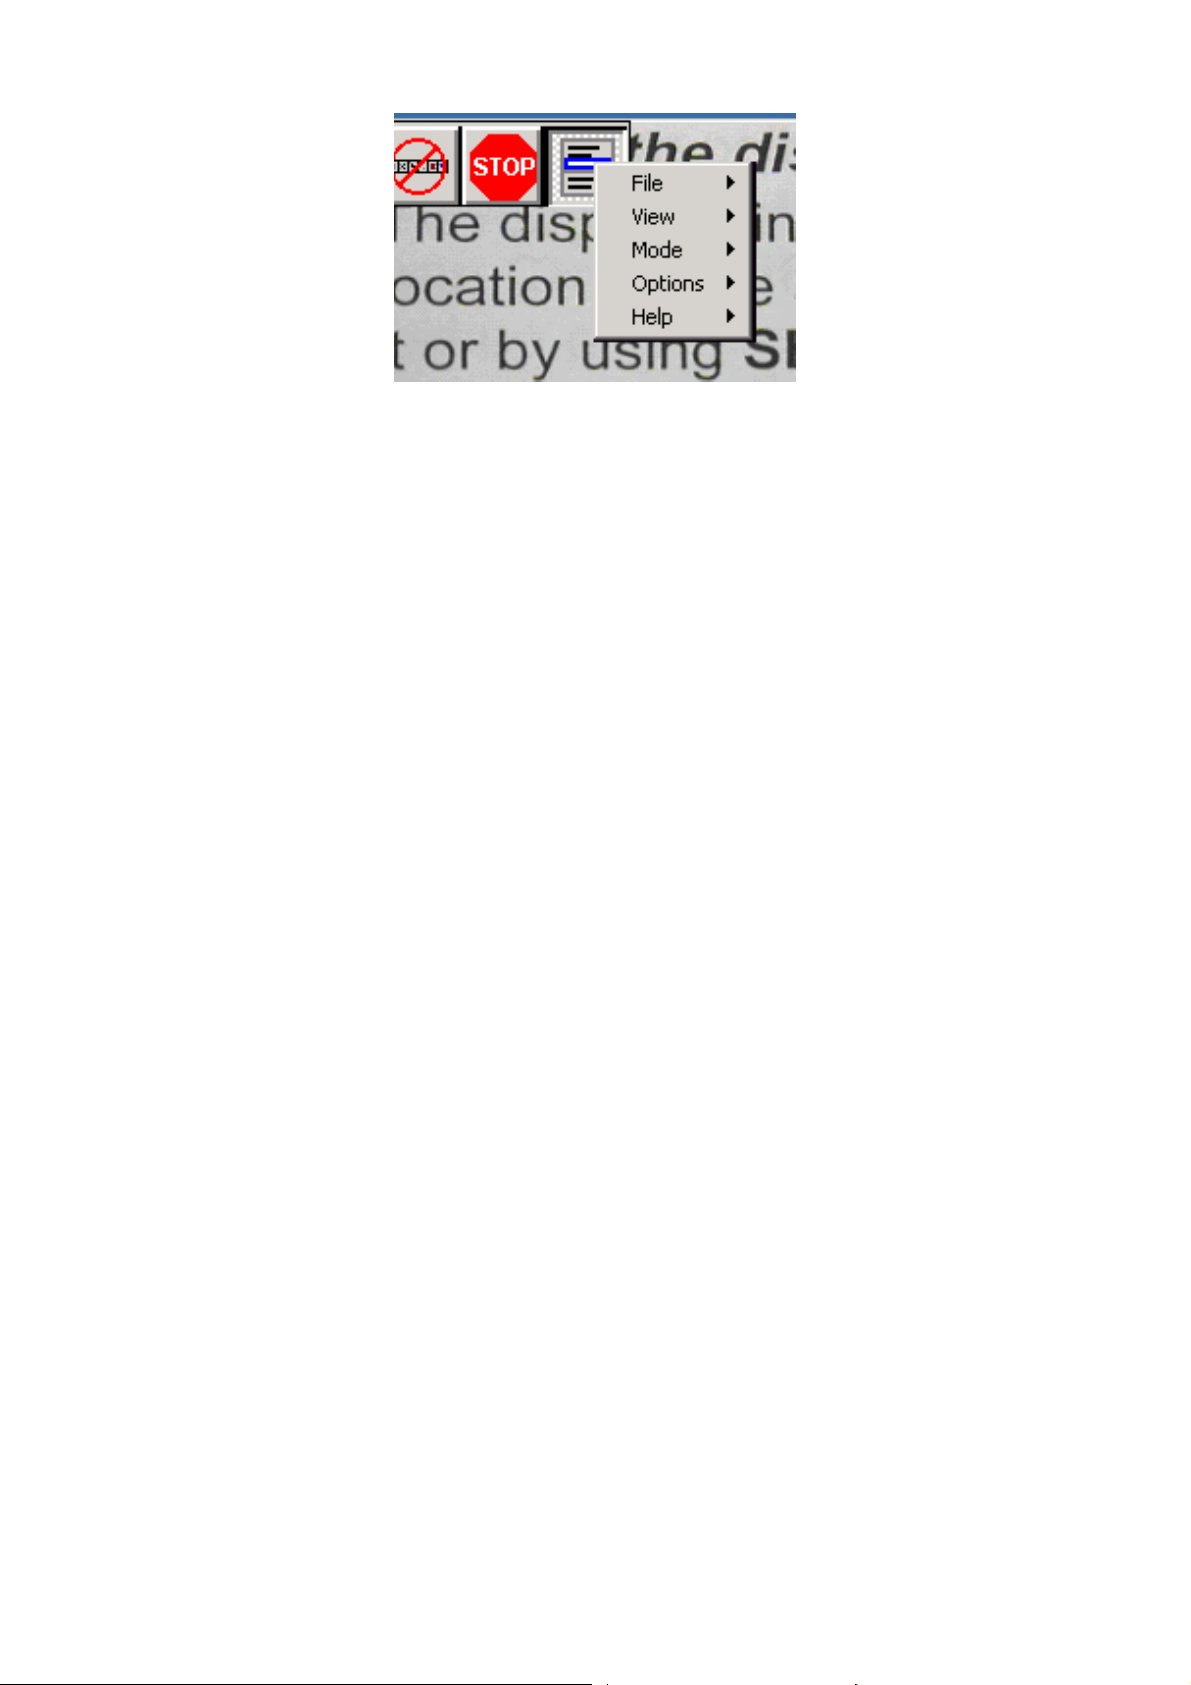
The main menu allows you to access all of
the program features and appears as
follows:
Page 20 Rev B English
Page 22
OPTi Verso User Manual
Each of the submenus allows you to access
different features in the software. Most of
these functions are accessible directly from
the toolbar, but some are not. The menu
functions are explained next.
File
The File submenu allows you to put OPTi
into Sleep mode, enable or disable the
Keep on top feature or to Exit the
program.
View
The View submenu allows you to select the
view you wish to use. This is an alternative
to pressing Ctrl+0, Ctrl+1 and so on. You
can also access the Views Manager dialog
box from here. Refer to the section on the
views manager on page 121
Page 21 Rev B English
Page 23
OPTi Verso User Manual
Mode
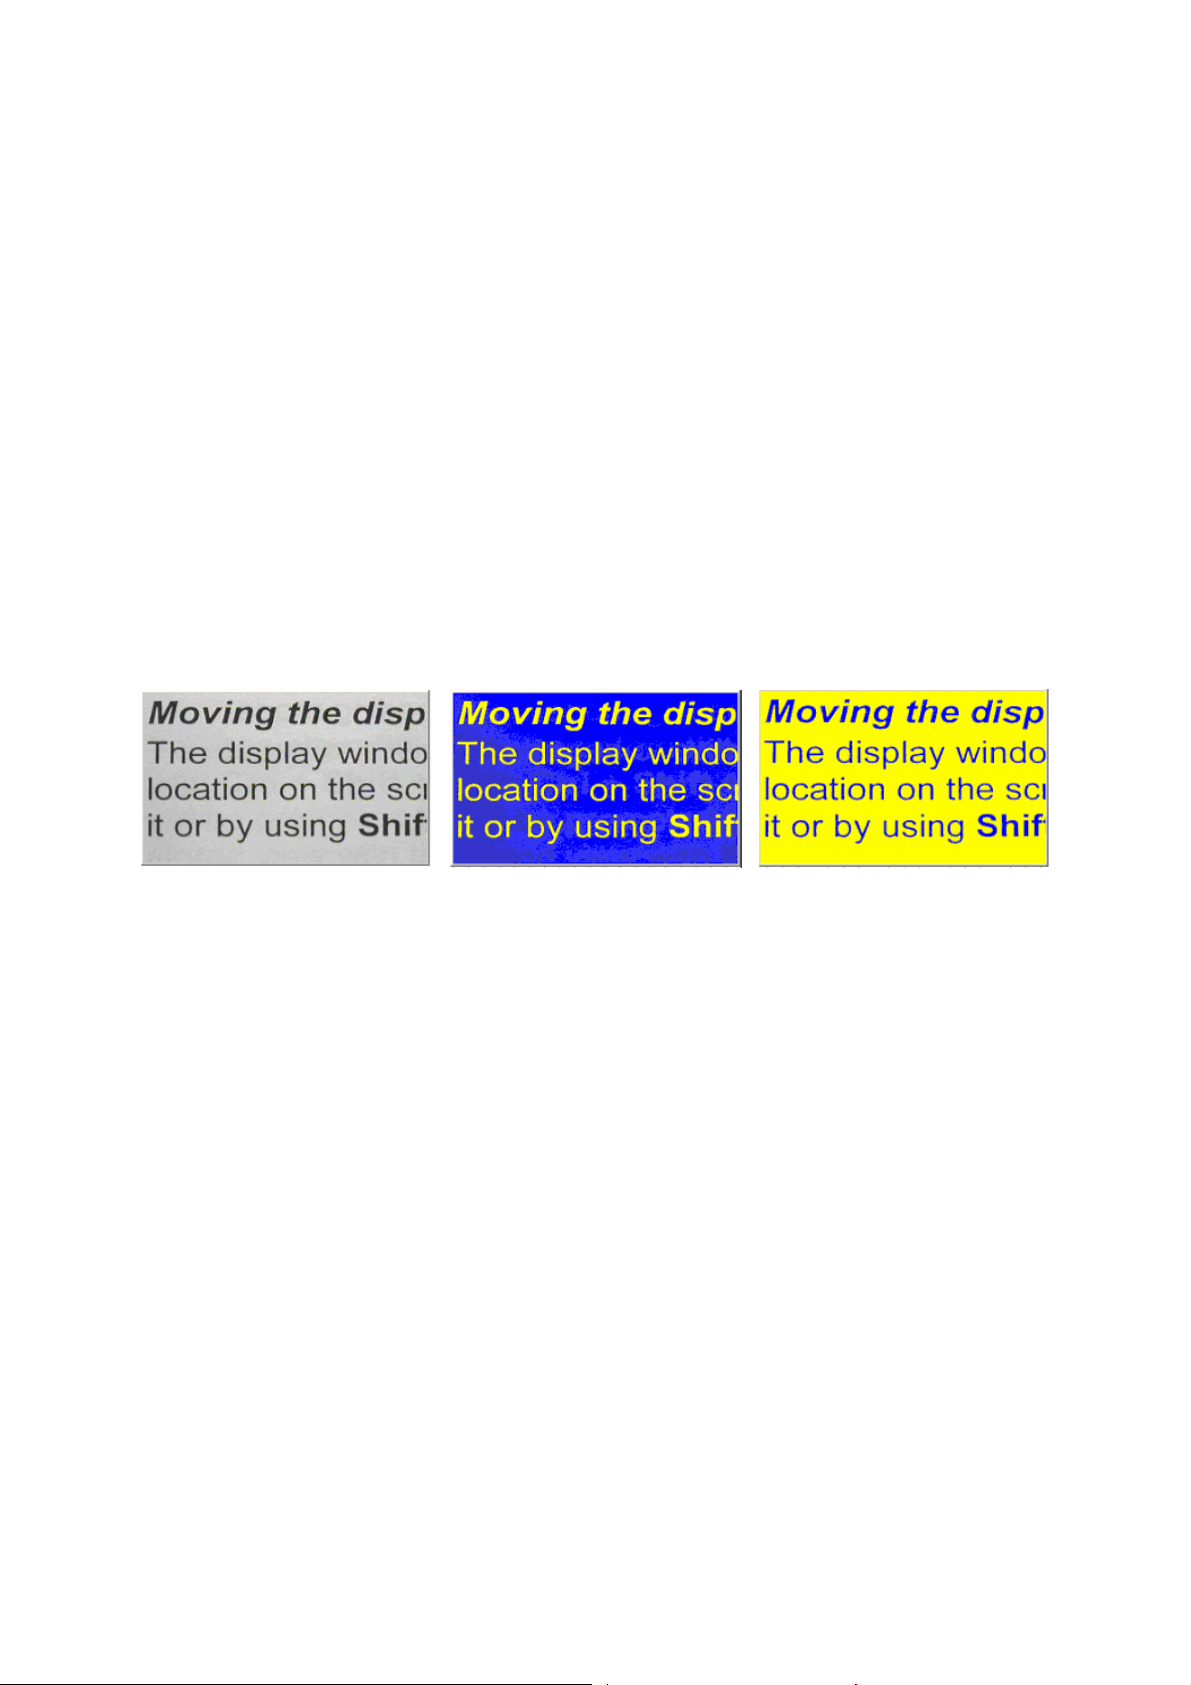
There are three image modes: full colour,
positive and negative. The positive and
negative modes are generally used for
reading while the colour mode is used for
photographs and difficult-to-read texts.
The foreground and background colours
can be changed in the reading modes, see
the section on page 255 for details.
Full-colour, Negative and Positive texts
Options
The Options submenu allows you to access
the Video Controls, Preferences Button
functions, Colours and Markers. Video
Controls have been described on page 144
and the subsequent sections will detail the
operation of the Preferences, Button
functions, Colours and Markers.
Page 22 Rev B English
Page 24
OPTi Verso User Manual
Options … Preferences
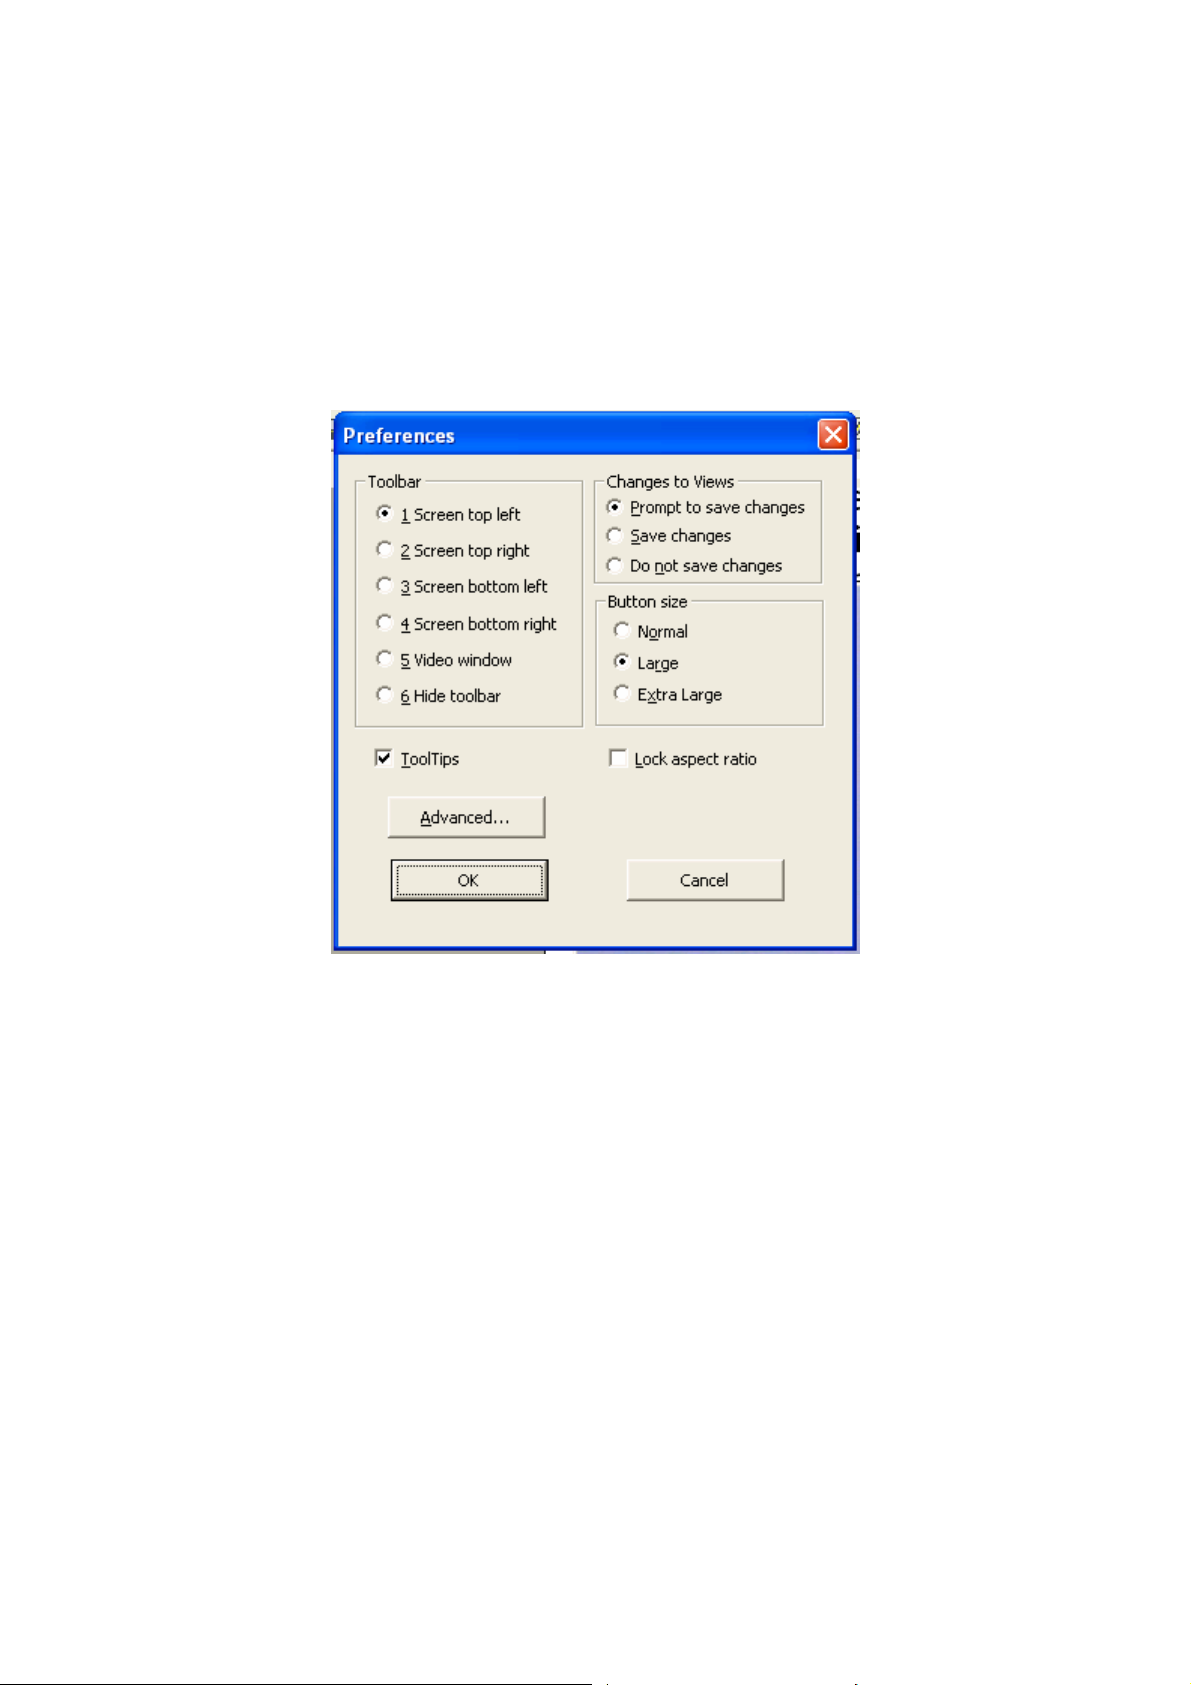
From the menu choose “Options”,
“Preferences” (Keyboard: Ctrl + M,O,P)
The preferences menu appears as follows;
• You can use the “Toolbar” controls to
select where the toolbar is displayed.
Note that the “Screen top left” and
“Screen top right” deliberately leave
room for the Windows control buttons.
Choosing “Video window” will attach the
toolbar to the top left of the display
window. You can also choose to hide
the toolbar.
Page 23 Rev B English
Page 25
OPTi Verso User Manual
• If you do not want to be prompted to
save changes to the current view you
can choose to automatically accept or
reject all changes with the “Changes to
Views” option you select.
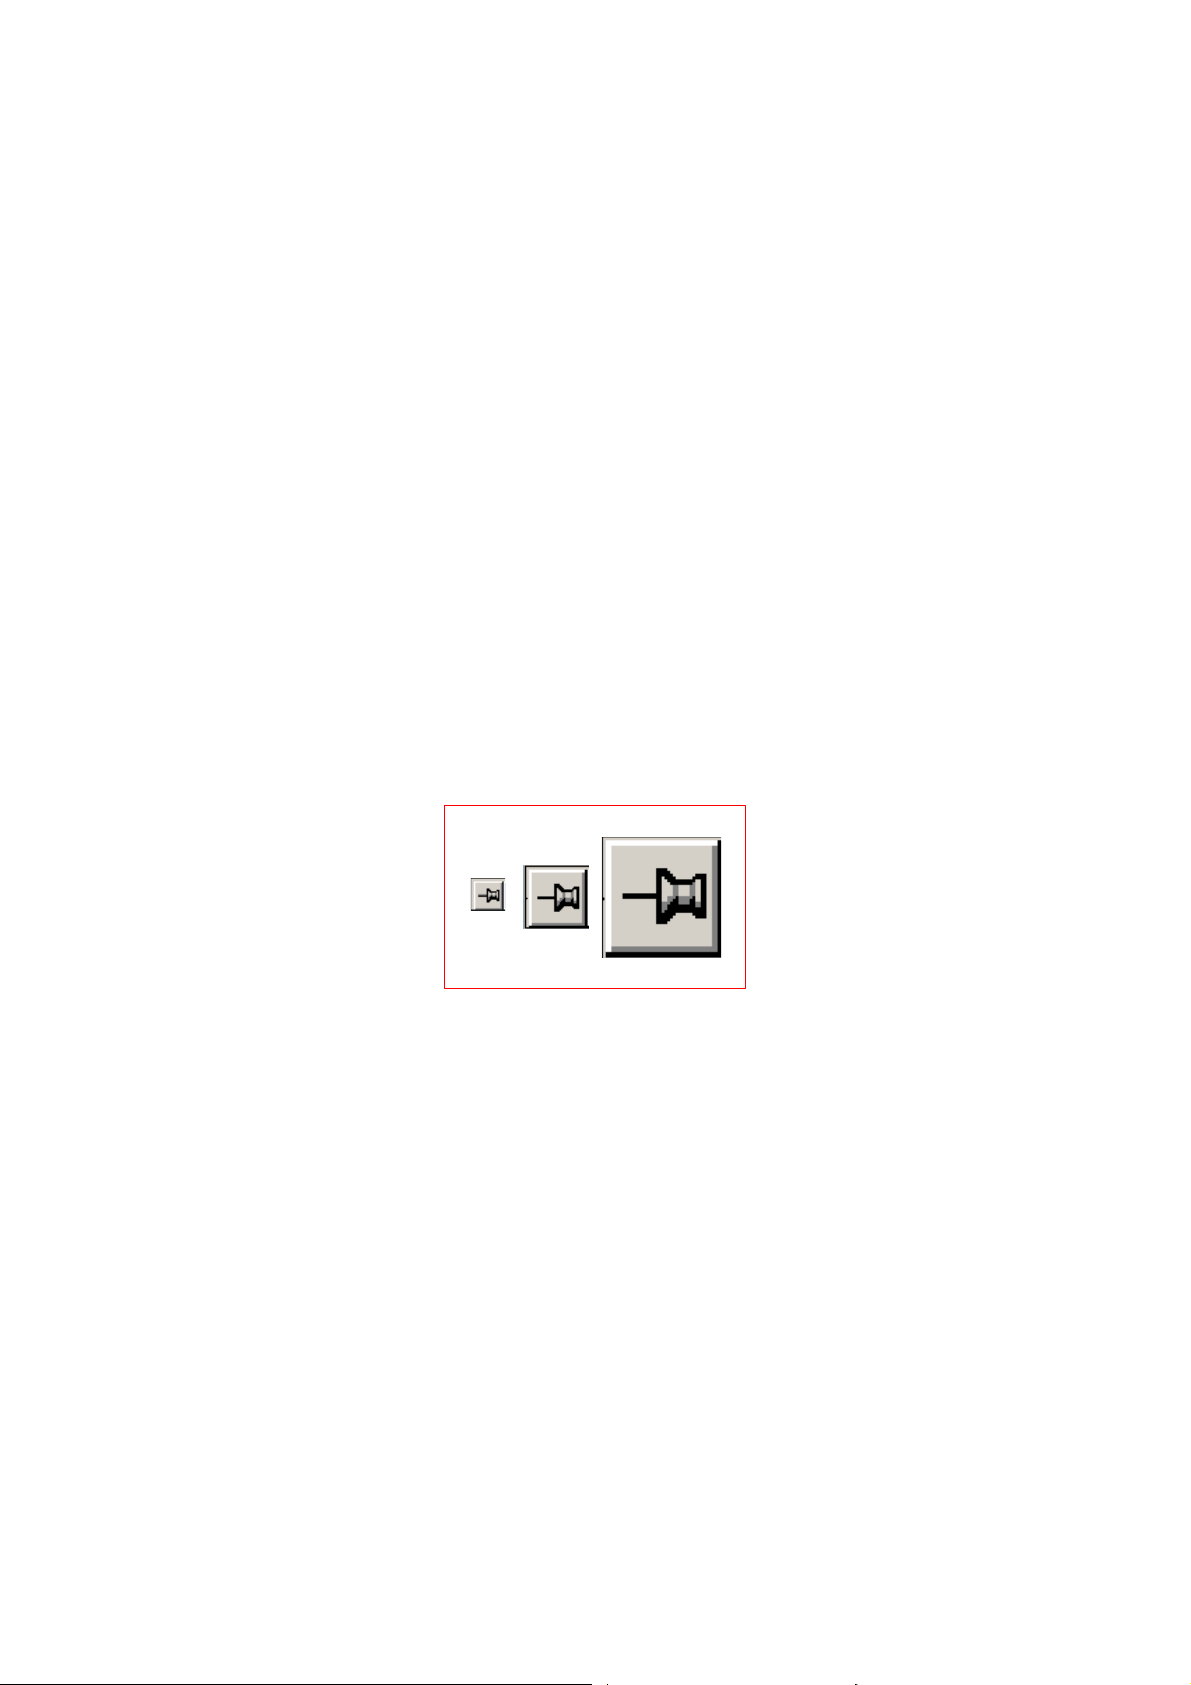
• OPTi can display the toolbar in three
different sizes, these are normal, large
and extra large, the image below shows
a comparison of how these appear from
smallest to largest
• ToolTips may be turned off by
unchecking the ToolTips checkbox.
• Un-checking the “Lock Aspect Ratio”
will allow the video to be stretched to
fill the display window. If the display
window is set to be taller than wide the
video will appear in tall, skinny
characters. If the display is much wider
than tall the video will appear fatter
than normal. This setting may produce
Page 24 Rev B English
Page 26
OPTi Verso User Manual
an image that is easier to read for
certain eye conditions.
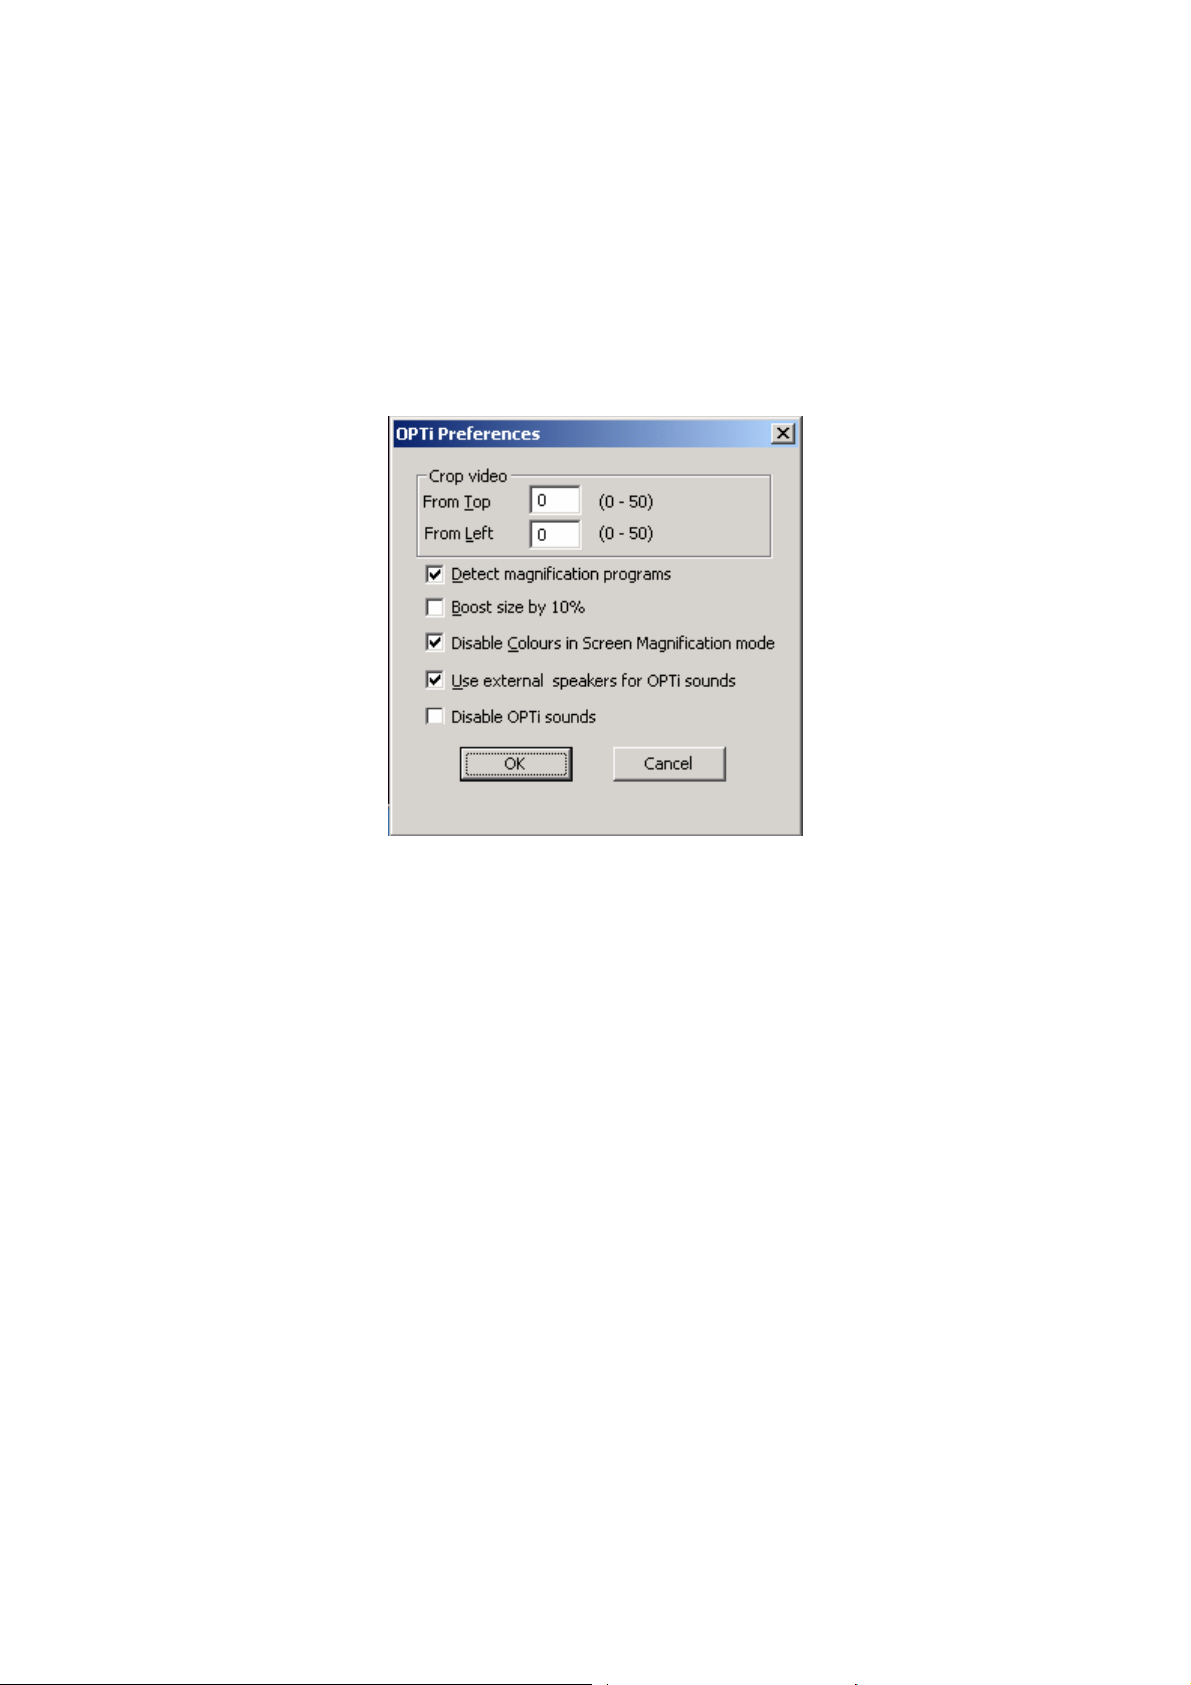
The “Advanced” button opens up another
window with the following options;
This menu allows you to crop the video
image, to boost the size of the displayed
text by 10% and to automatically detect
screen magnification programs. In normal
use these settings are not needed when
you are using OPTi.
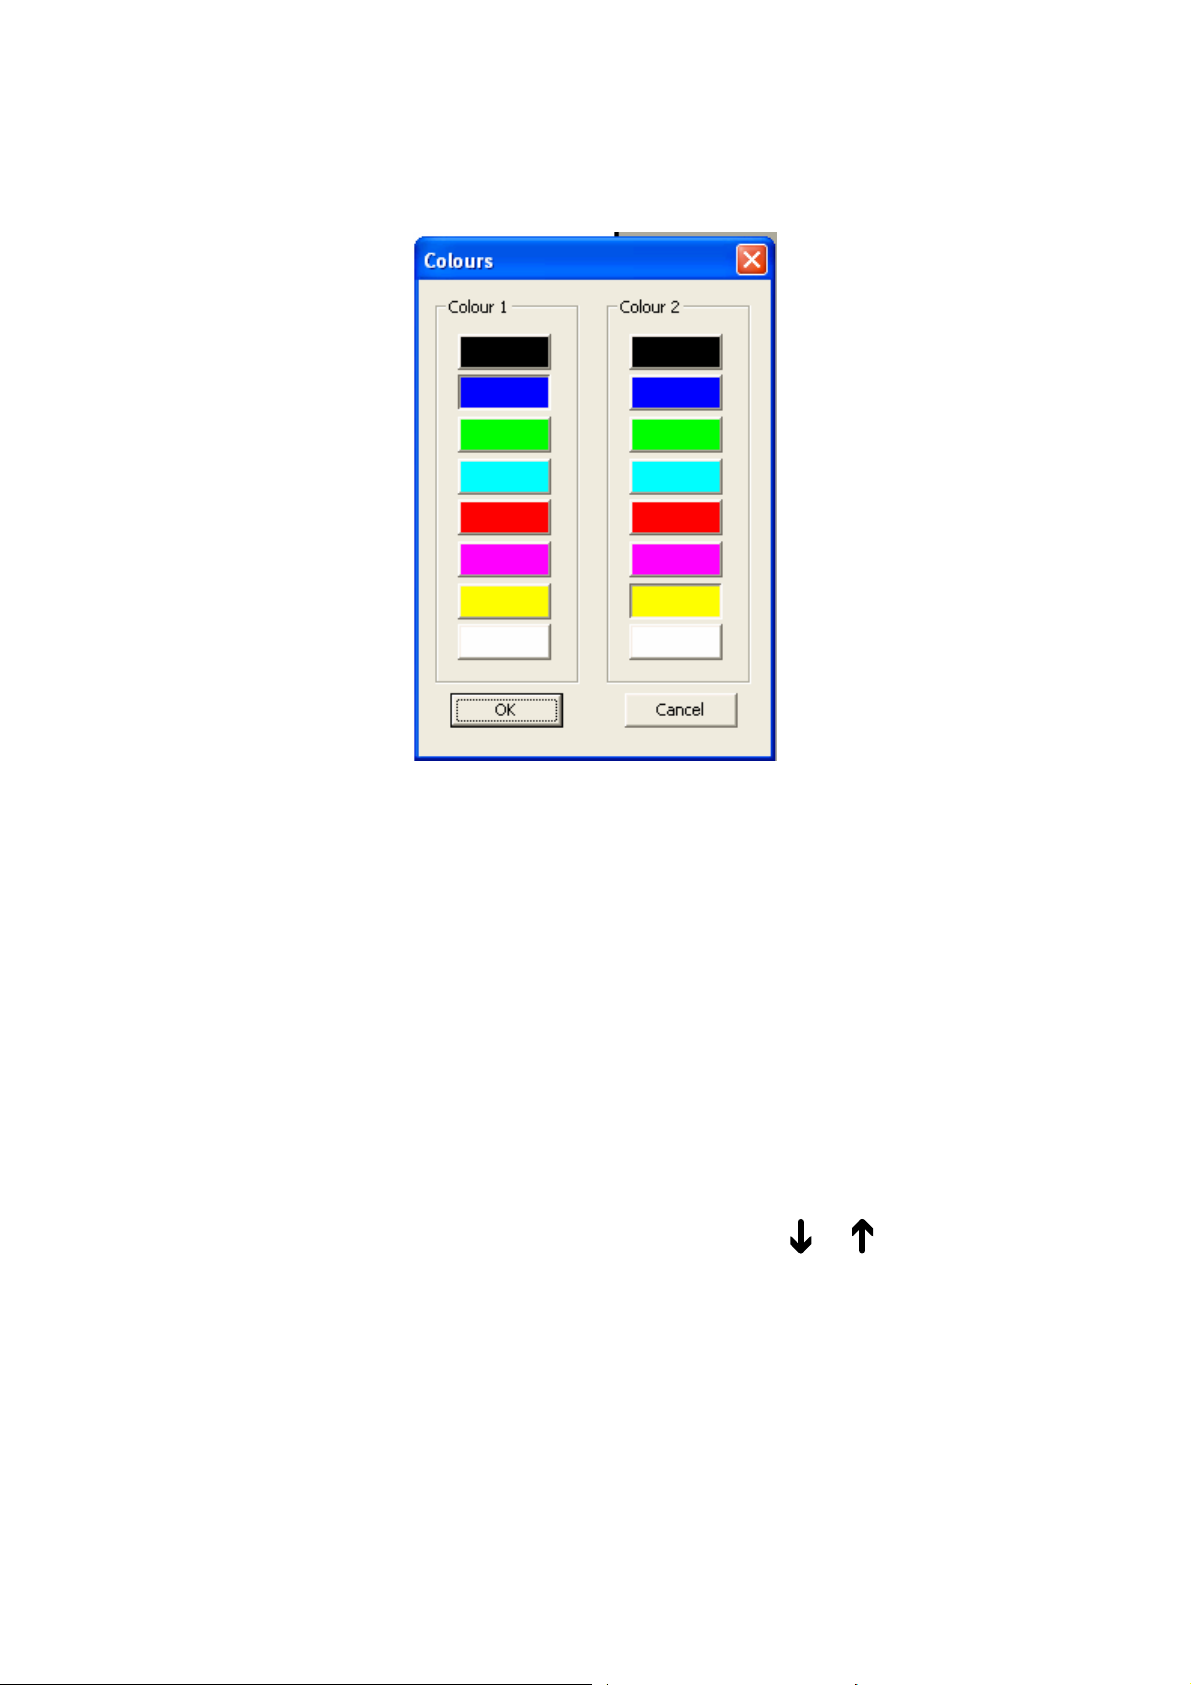
Options … Colours
The colours used to display the text and
paper can be altered. From the menu
choose “Options” and “Colours” (Keyboard:
Page 25 Rev B English
Page 27
OPTi Verso User Manual
Ctrl+ M, O ,V). A dialog box appears as
follows:
From the dialog box above you can choose
the foreground and background colour that
you require. You cannot select the same
foreground and background colour. If you
are using the keyboard, you can switch
between the colours by using the Tab key.
Alternatively you can select the required
foreground or background colour from the
keyboard. Use Alt +
,
, , to cycle
between the available colours.
You must be in Positive or Negative mode
for this menu to work. You cannot change
the foreground and background colours
Page 26 Rev B English
Page 28
OPTi Verso User Manual
when you have the unit in full colour
mode.
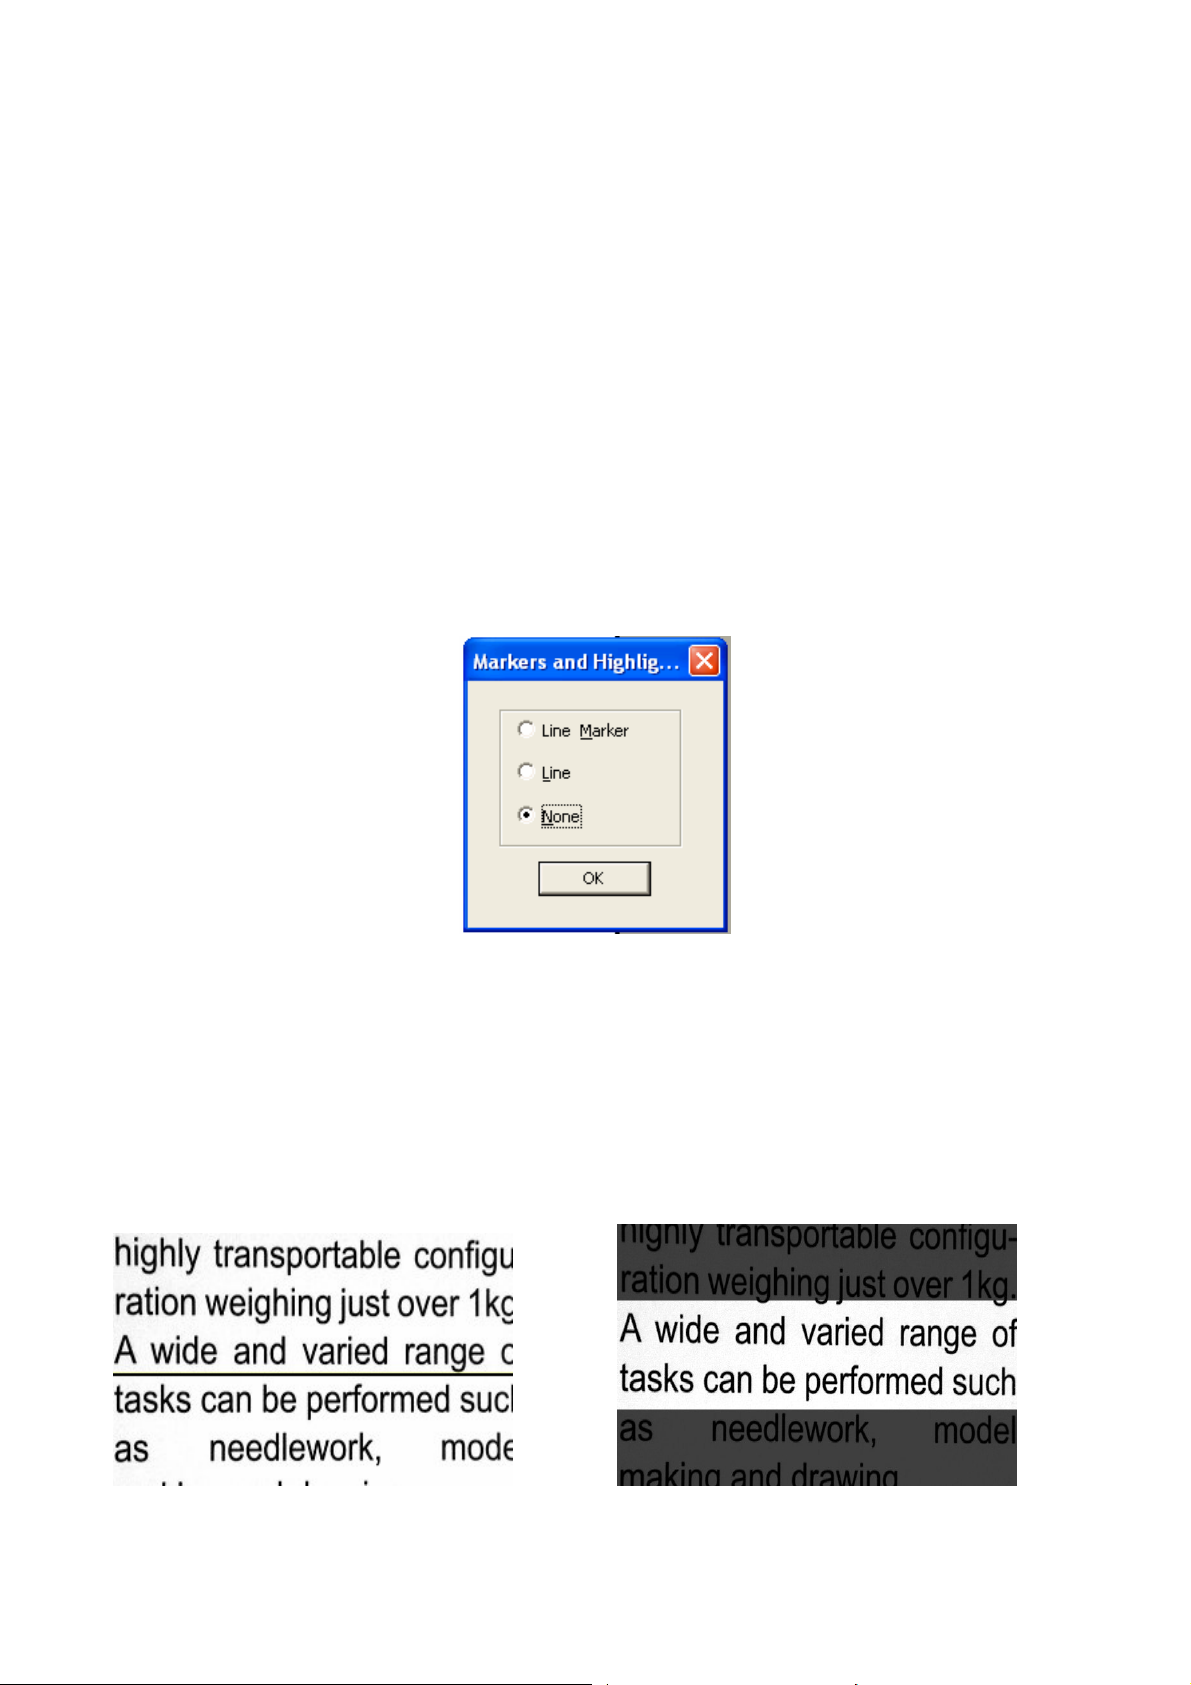
Options … Markers
OPTi also has an adjustable reading line
and line marker that you can turn on and
off as required. From the menu choose
“Options” ,“Markers” (Keyboard: Ctrl + H)
The dialog box shown below will then
appear.
The position of the line or the line marker
is adjustable from the keyboard using
Ctrl+ PgUp or Ctrl+ PgDn. The images
below show how these features appear
when viewing text.
Page 27 Rev B English
Page 29
OPTi Verso User Manual
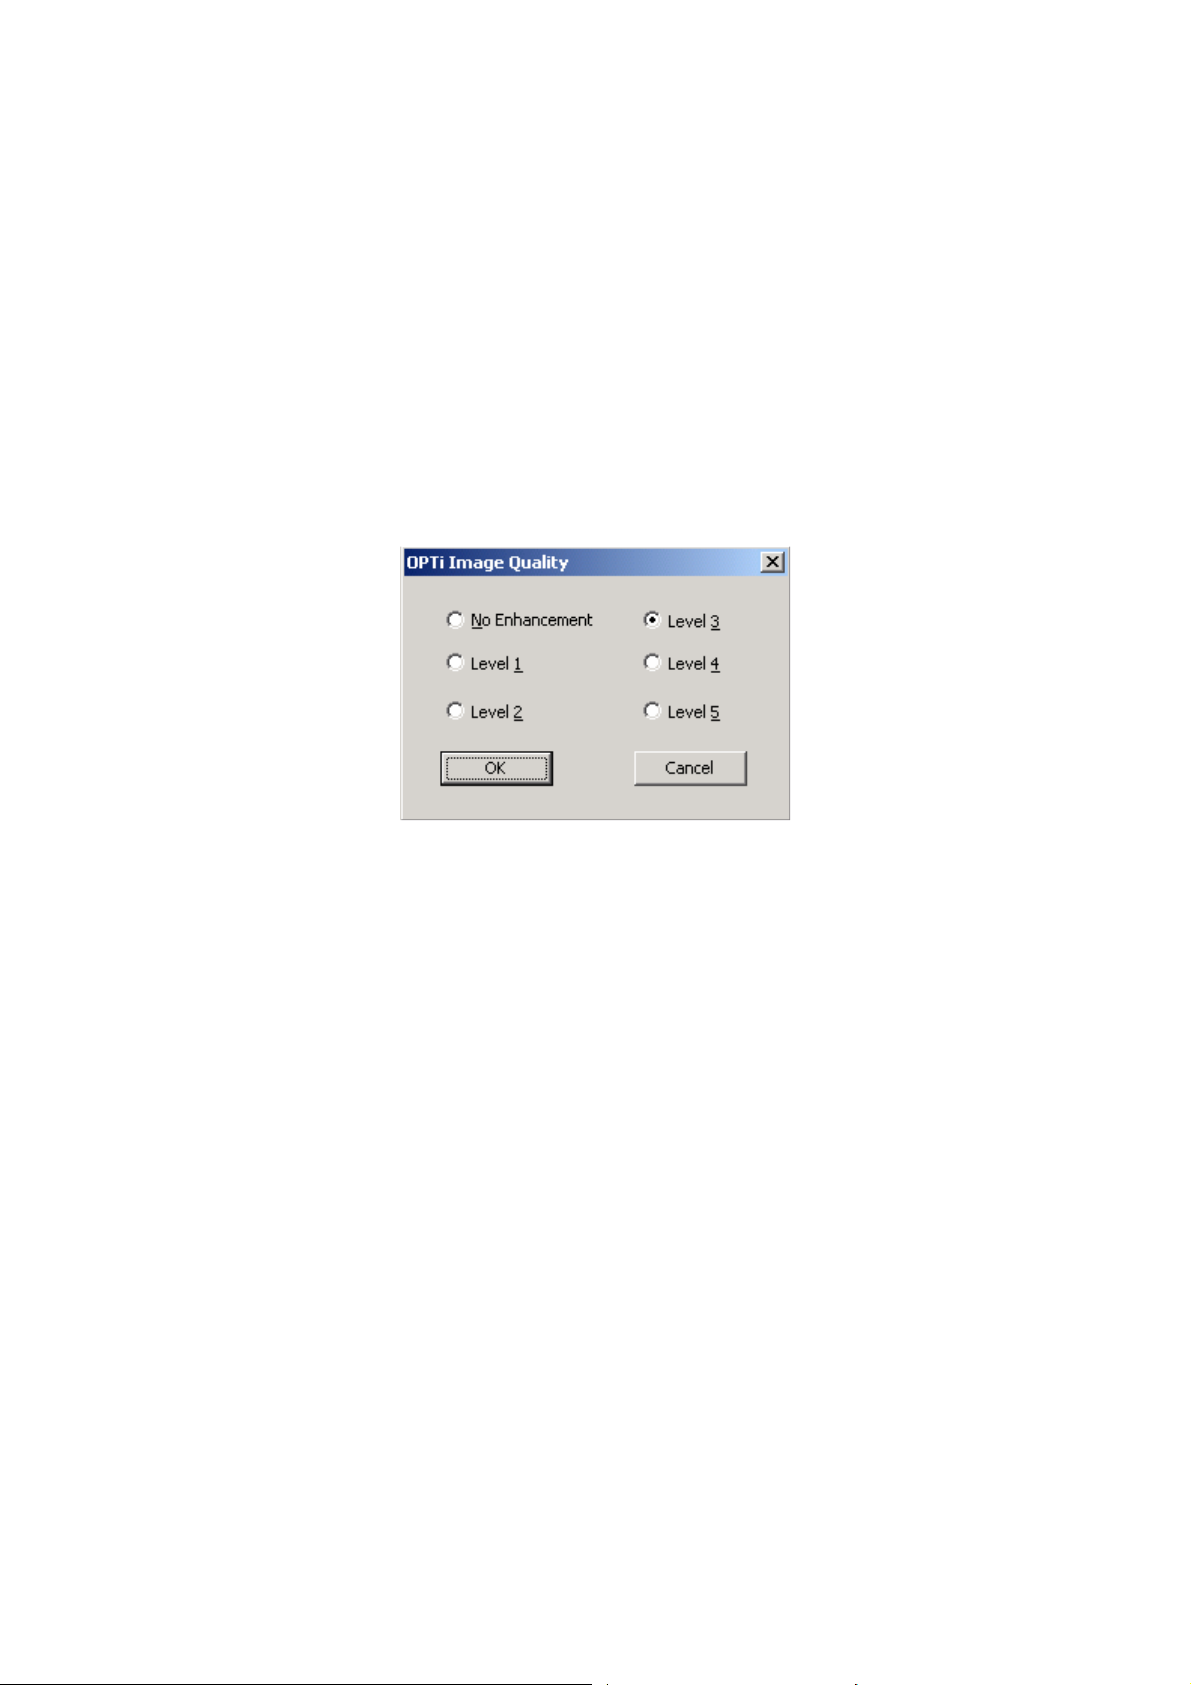
Image Quality
The quality of the video displayed on the
OPTi screen can be controlled using the
new Image Quality window. You can
access this by pressing Shift+N on the
keyboard. The window appears as follows
on the desktop:
Image quality control window
There are six levels of quality
enhancement available to the user,
starting at No Enhancement and
progressing to Level 5 enhancement. OPTi
defaults to Level 3 enhancement. This
gives excellent image quality with very
little impact on PC resources.
To change the image enhancement setting
simply select the level you desire and click
on OK. The OPTi image will disappear from
Page 28 Rev B English
Page 30

OPTi Verso User Manual
the desktop for about 4 seconds before
reappearing. When video reappears OPTi
will be operating at the new image setting.
The image enhancement control affects
how the OPTi image appears when the
camera or the object of interest is moving.
OPTi and Screen Magnification
software
OPTi Versions 1.12 and above are
compatible with the following screen
magnification software:
BRAND PRODUCT
Dolphin Oceanic Supernova V7.01 and above
Dolphin Oceanic Lunar V7.01 and above
Dolphin Oceanic Lunar Plus V7.01 and above
AI Squared Zoomtext 9.0.4 and above
OPTi works a little differently when it is
running in screen magnification mode. This
section describes how to use OPTi with
screen magnification software.
When OPTi starts it checks to see if any
supported screen magnification programs
Page 29 Rev B English
Page 31

OPTi Verso User Manual
are currently running, if they are the
software will change from normal mode to
compatible mode during start up.
Once OPTi detects the screen magnification
software it adjusts its settings to those
required for operation with screen
magnification on.
The most immediate change is that video
does not appear inside the usual OPTi
window, but will instead appear inside one
of six different ‘split’ windows. All keyboard
buttons will still work and if you call up a
particular menu, for example the video
controls menu, this will appear on the
desktop.
To swap between the OPTi video
window and the desktop you simply
press the Scroll Lock key (see
page 36)
OPTi Split windows
When OPTi is running in screen
magnification mode the video screen is
Page 30 Rev B English
Page 32
OPTi Verso User Manual
displayed in one of six different modes.
These modes are:
1. Right vertical split
2. Left vertical split
3. Top horizontal split
4. Bottom horizontal split
5. Floating split
6. Full Screen
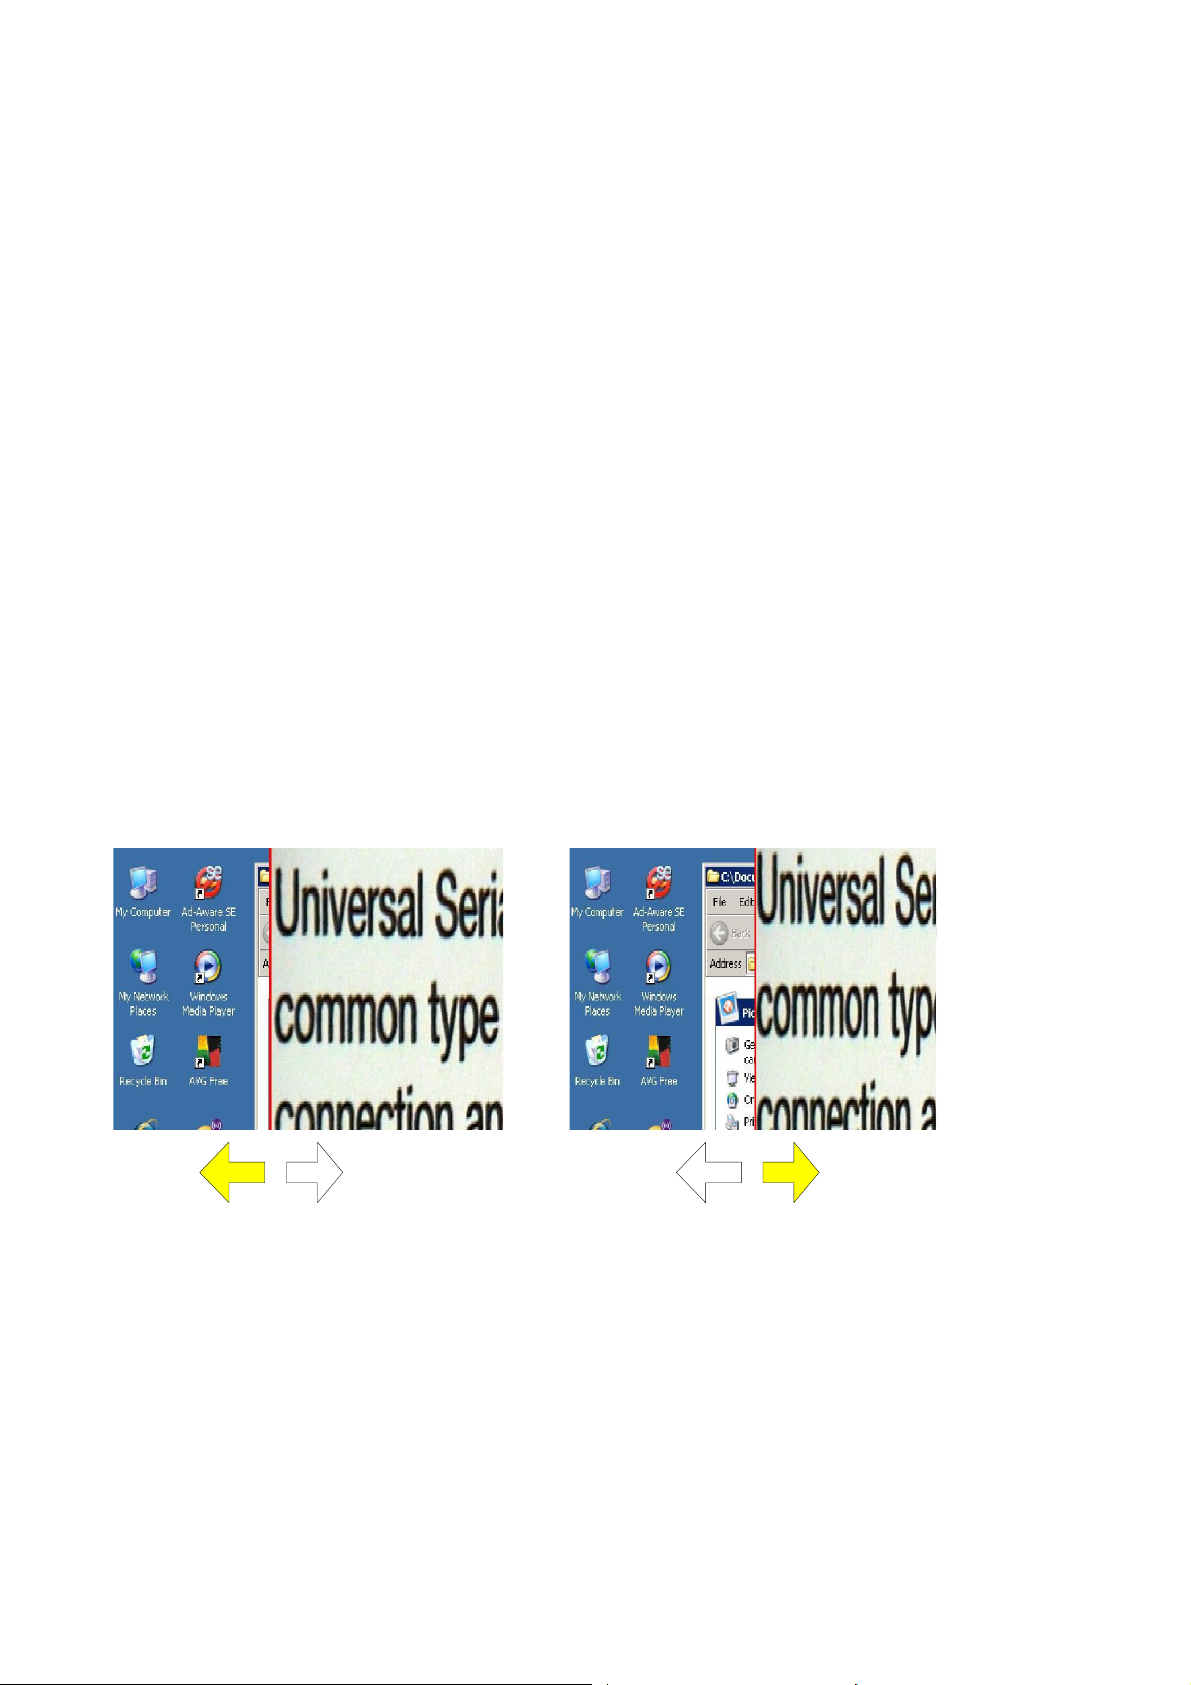
Left / Right Vertical Split mode
OPTi in right vertical split
In these modes OPTi places its video
image into a split window on the left or
right side of the desktop. The size of the
Page 31 Rev B English
Page 33
OPTi Verso User Manual
split window can be changed using the left
and right arrow keys on your keyboard. In
left split mode, pressing the right arrow
will increase the size of the OPTi split
window and pressing the left arrow key will
decrease the size of the OPTi split window.
In right split mode pressing the left arrow
key will make the OPTi split window
bigger. Pressing the right arrow key will
cause the split window to get smaller.
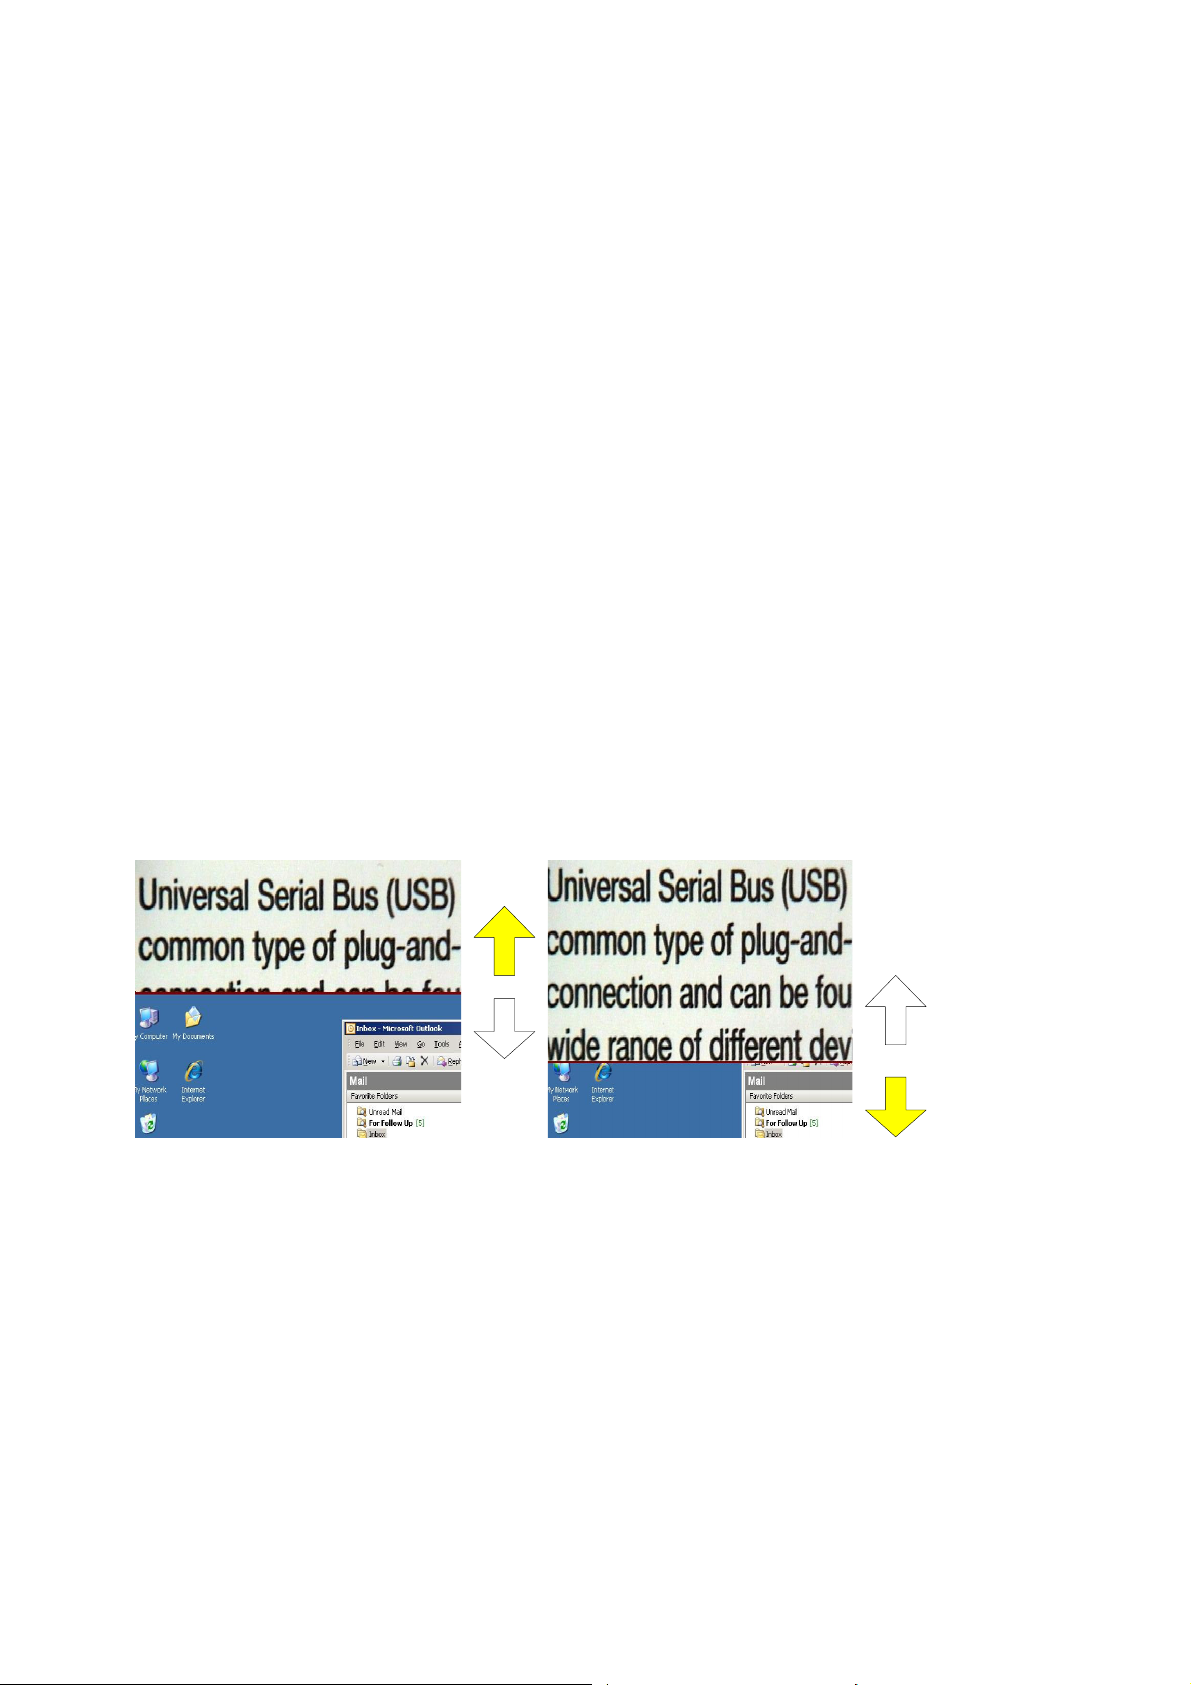
Top / Bottom Horizontal Split mode
OPTi in top horizontal split mode
As with the right and left vertical splits the
top and bottom horizontal split can also be
moved, this time up and down. The up and
down arrow keys are used to control the
size of the split in this case.
Page 32 Rev B English
Page 34
OPTi Verso User Manual
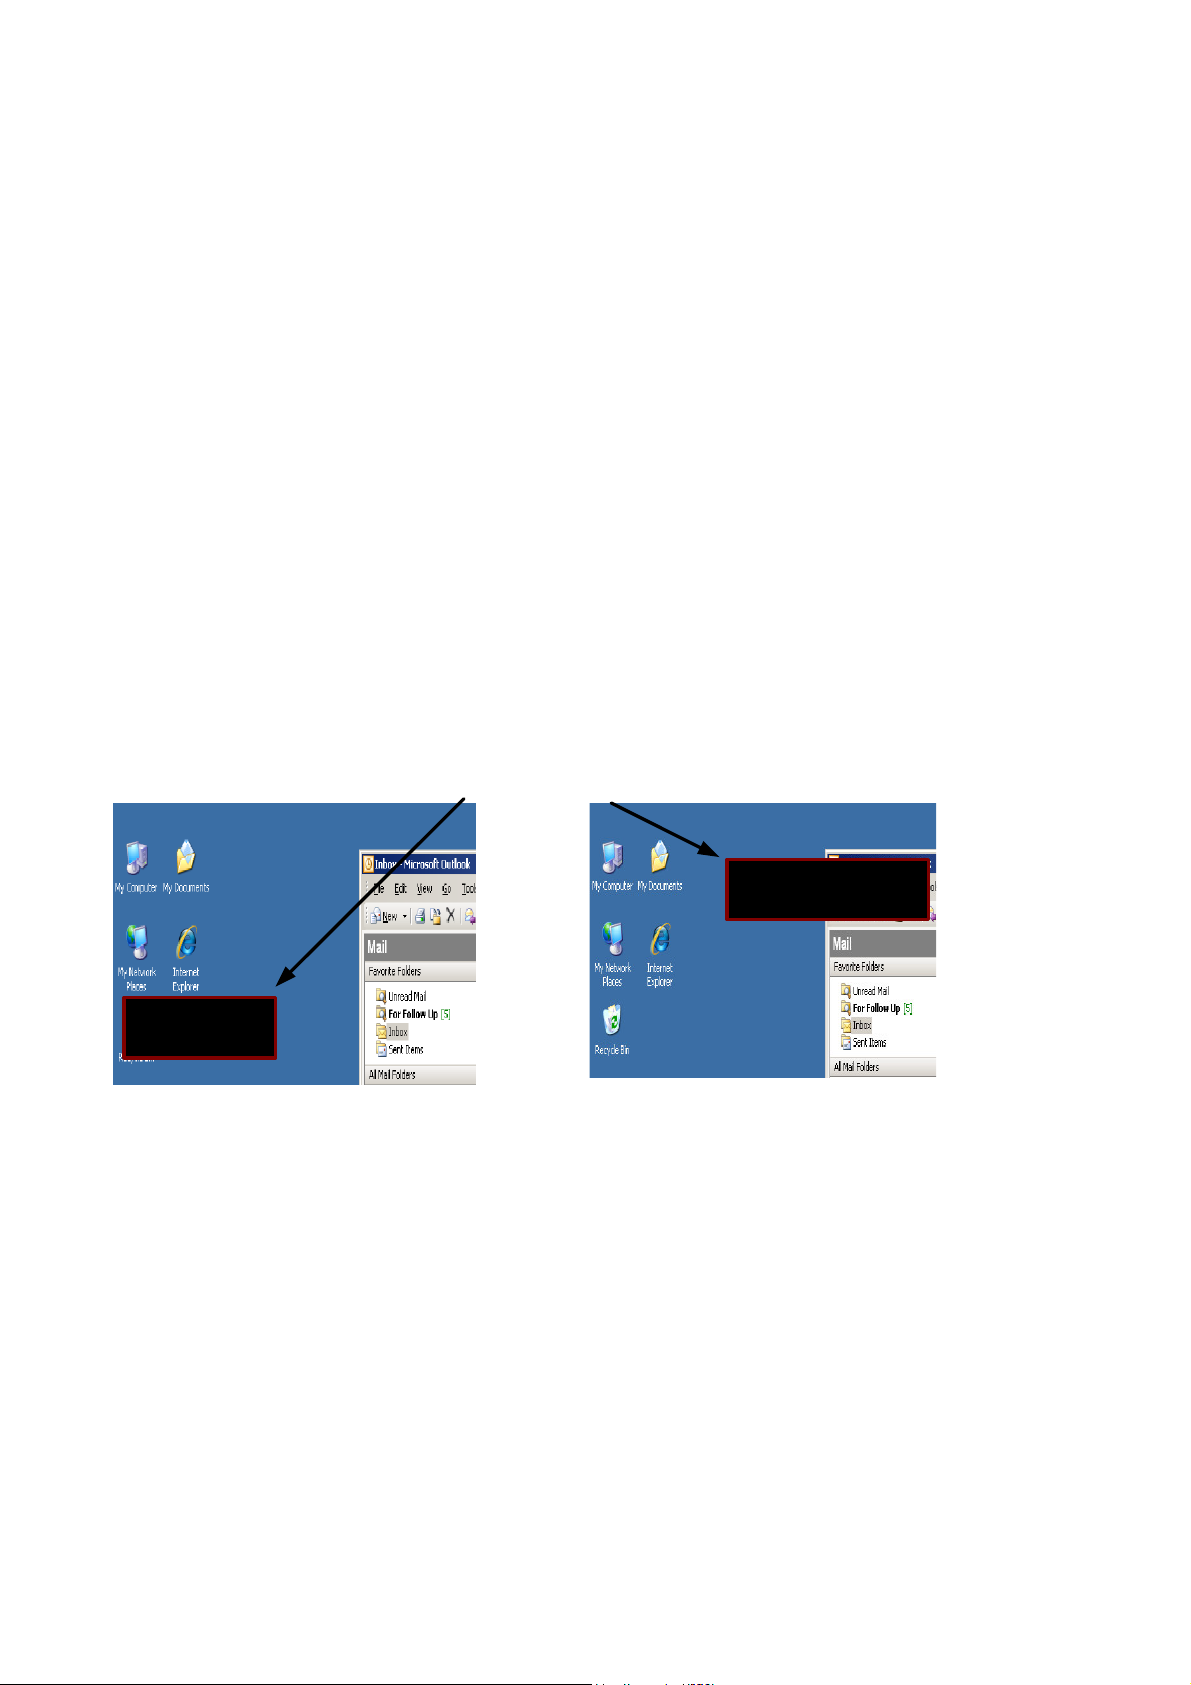
Floating split mode
You can also use OPTi in floating split
mode. In floating mode the video appears
inside a window on the screen. This
window is movable vertically and
horizontally, and can be resized vertically
and horizontally too. There is a set
maximum size that this window can be.
Unlike the normal OPTi video window it
cannot be increased to cover the entire
screen. The following image illustrates how
this window appears to the user.
OPTi video
window
85% growth in em
This will raise the
85% growth i
This will rais
To move the window around the screen
you press and hold the SHIFT key and any
one of the arrow keys. i.e. to move the
screen up vertically you would use the
following key combination:
SHIFT + up arrow. To move left press
SHIFT + right arrow and so on.
Page 33 Rev B English
Page 35

OPTi Verso User Manual
To resize the screen you simply use the
arrow keys. To increase the size of the
floating window horizontally you press the
right arrow key, to decrease the floating
window horizontally you press the left
arrow key.
Refer to the section on Views and the
Views manager to learn how to save
preferred floating window locations for
recall as desired and how to recall them
quickly using the keyboard or mouse.
Please note, when you wish to save a
floating window position in screen
magnification mode you must use the key
combination
Ctrl+Alt+ 0,1,2….9 in normal operation
you would use Ctrl+Shift+0,1,2…9
Full screen mode
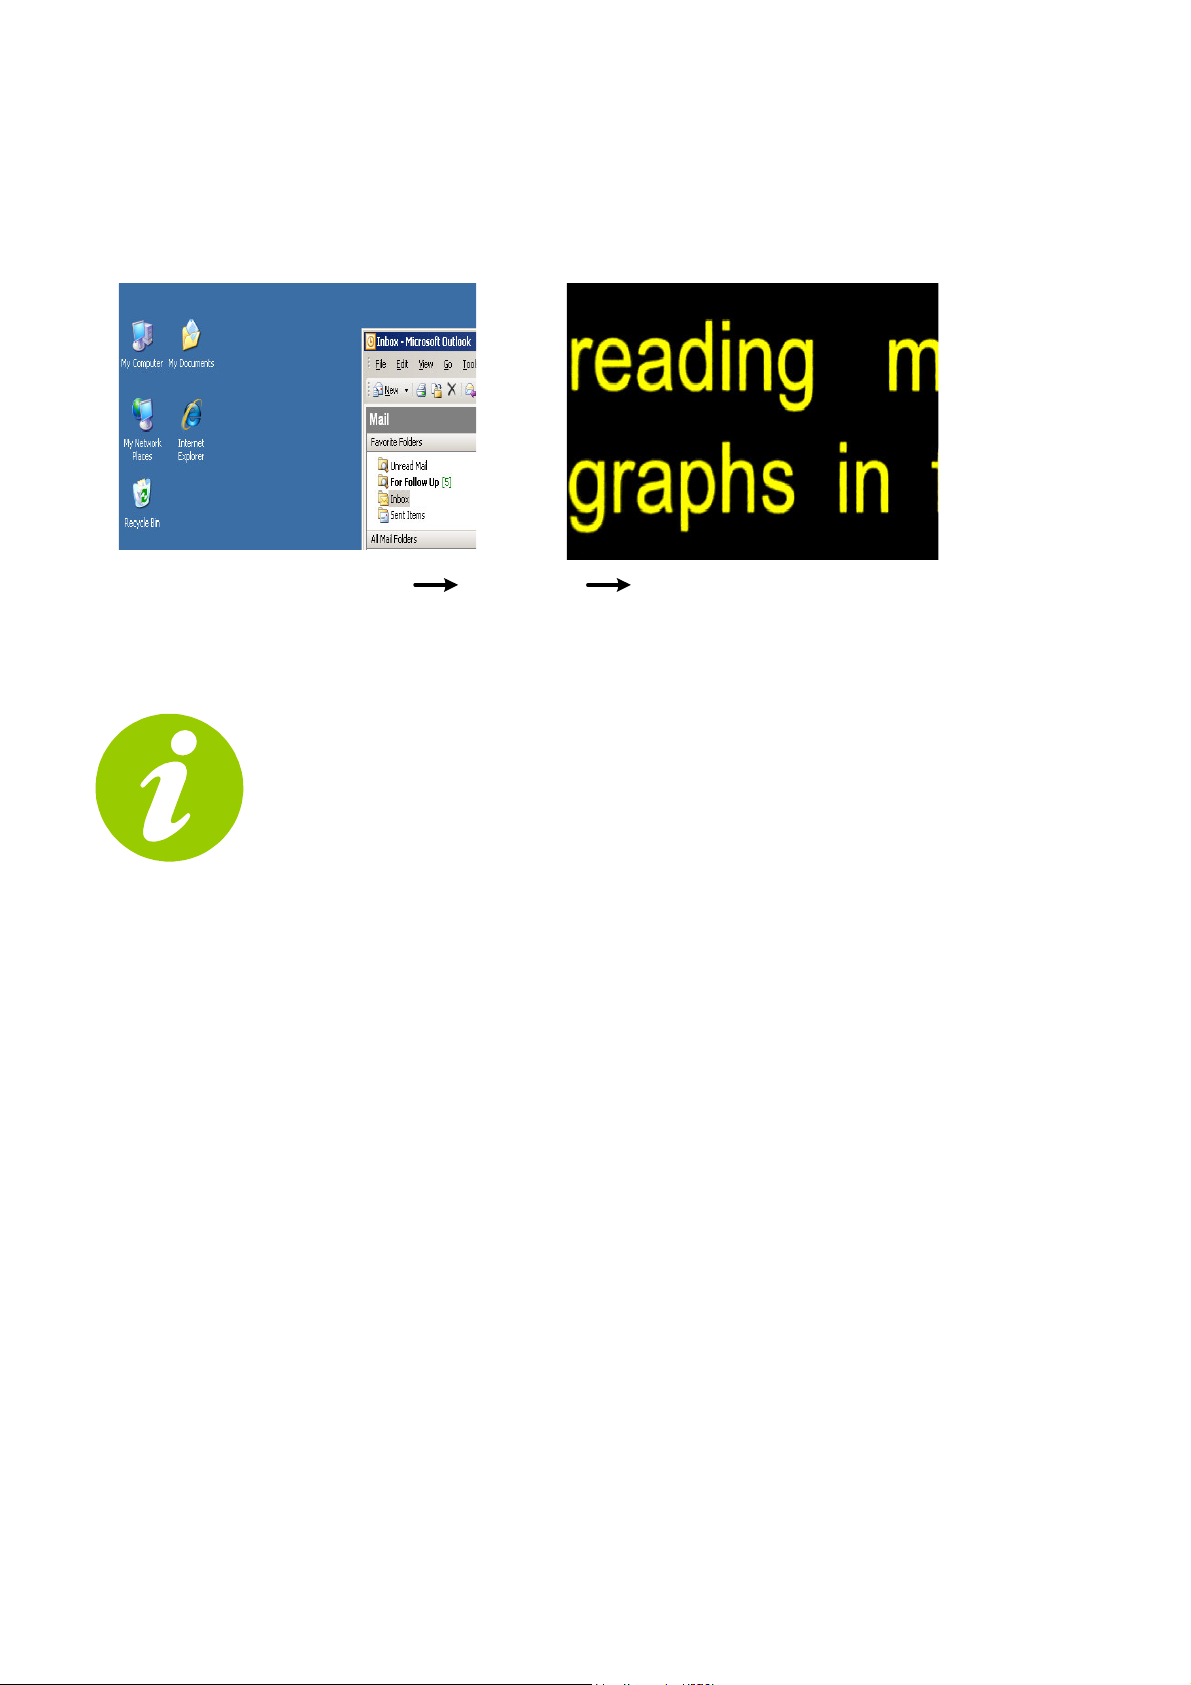
You can also use OPTi in full screen mode
with screen magnification software. When
in this mode you either have the screen
filled with OPTi video or with the desktop.
To swap between the OPTi video window
and the desktop you simply press the
Page 34 Rev B English
Page 36
OPTi Verso User Manual
video
Scroll Lock key. The image below
illustrates how this will appear.
full screen desktop
SCROLL
full screen OPTi
Floating split mode and full screen
mode are only available with
Dolphin screen magnifier software
products. (Supernova, Lunar and
LunarPlus)
Navigating between split modes
When you start up OPTi in screen
magnification mode, it will be in the last
mode that you used. The first time you run
OPTi with screen magnification it will start
up in floating split mode.
To navigate between the different split
modes use the Page Up and Page Down
Page 35 Rev B English
Page 37
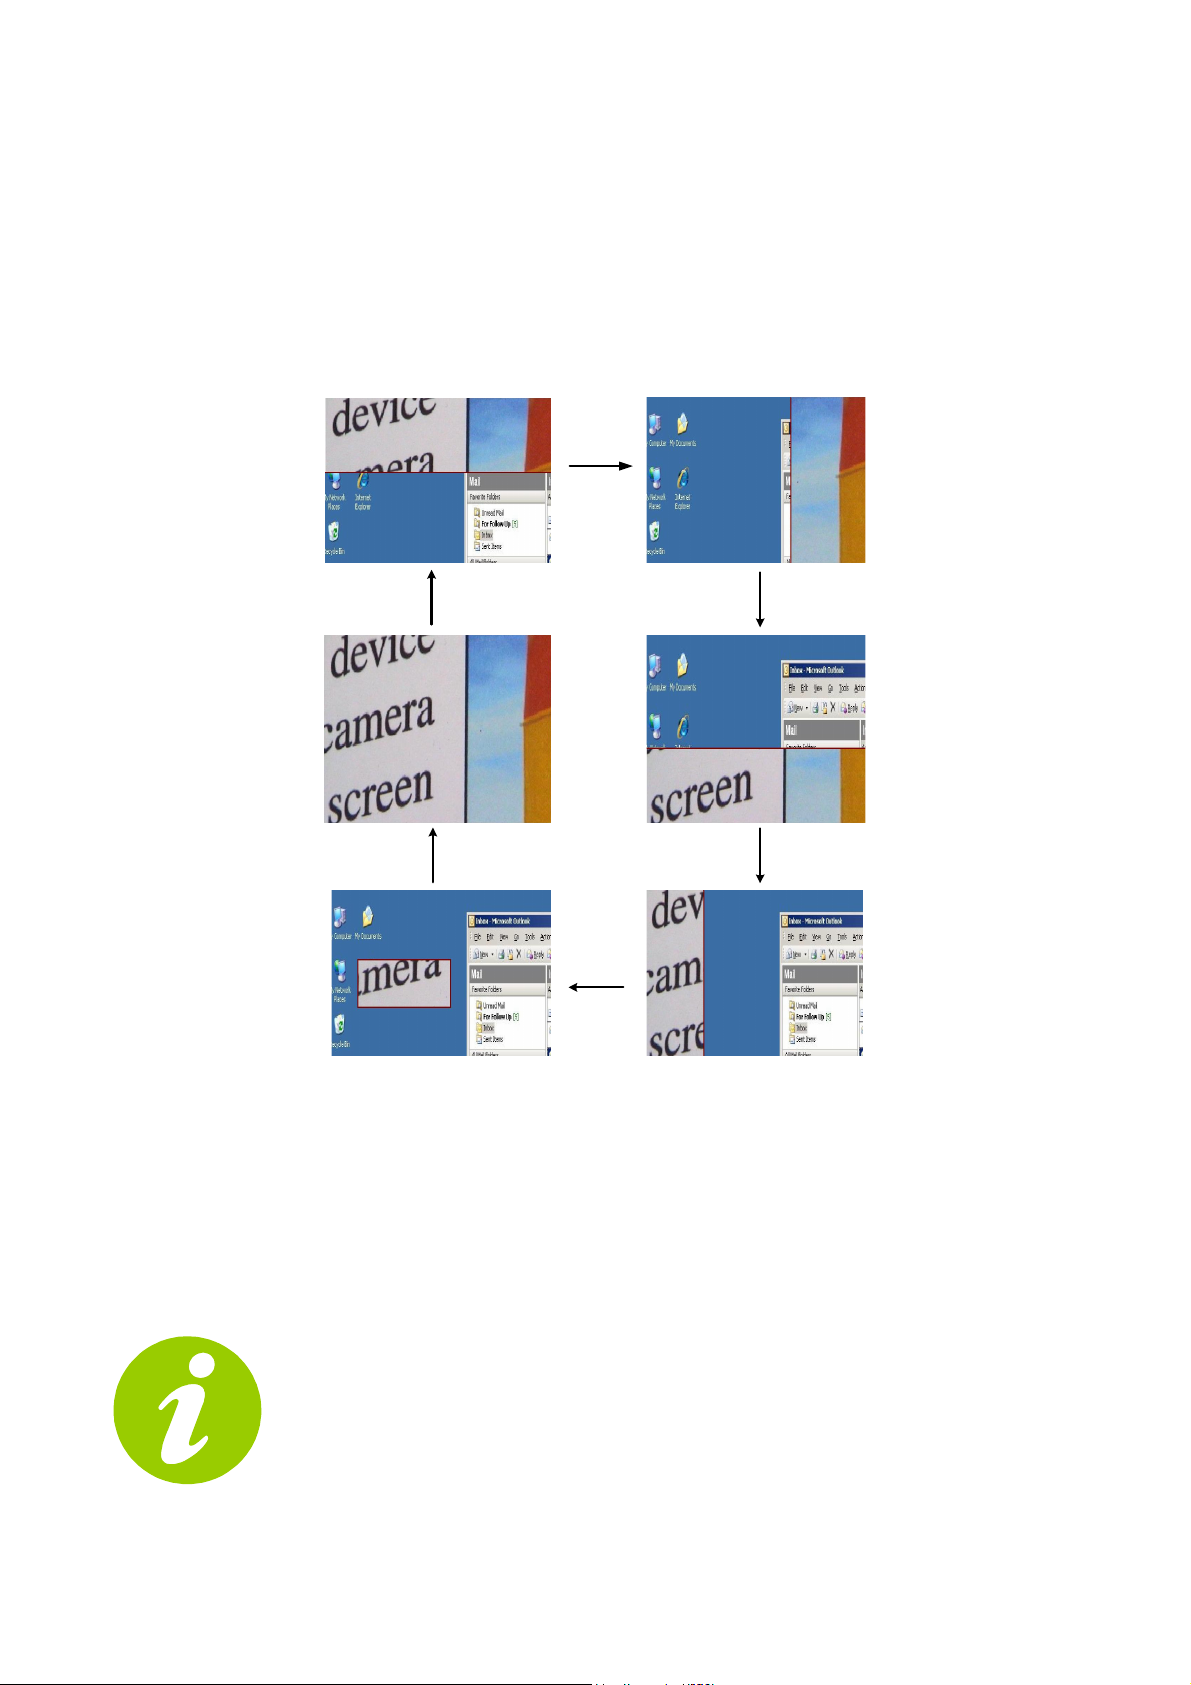
OPTi Verso User Manual
keys. Each time you press these key you
change from one split to the next. The
Page Up key will do this in a clock wise
fashion as illustrated below:
PAGE
UP
PAGE
UP
PAGE
UP
PAGE
UP
PAGE
UP
PAGE
UP
Using the Page Down key to navigate
between the split modes does exactly the
same except in reverse order.
IMPORTANT NOTE:
There is a substantial delay when
you go to and from the full screen
operation. This is normal and is not
a problem. There will be no video on the
Page 36 Rev B English
Page 38

OPTi Verso User Manual
screen during this time. Once OPTi is
ready, video will reappear and operation
can continue as normal.
Keeping OPTi active on the desktop
When you are using OPTi with screen
magnification and you wish to change the
size, position or type of split mode that
you are using, you may find that the
arrow/page up/page down keys don’t do
anything. This is because OPTi is no longer
the active program on the desktop.
In order for the keys to work you must
make OPTi the active program. This is
accomplished by simply pressing the
Scroll – Lock key on your keyboard.
When you do this, OPTi will make a sound
to indicate it is the active application. OPTi
can make two different sounds to indicate
if it is the active program. See the section
on OPTi sounds for more.
You can then press Scroll – Lock again to
return to the program you were working
in.
Page 37 Rev B English
Page 39
OPTi Verso User Manual
Semi Colours
When OPTi starts up in screen
magnification mode, the image modes
available to the user are; full colour Photo
mode, Black/White Negative and
Black/White positive. Semi colours are
switched off. The semi-colours are
defaulted to off to keep the load on the
computer low when running in screen
magnification mode. You can switch semicolours back on using the setting in the
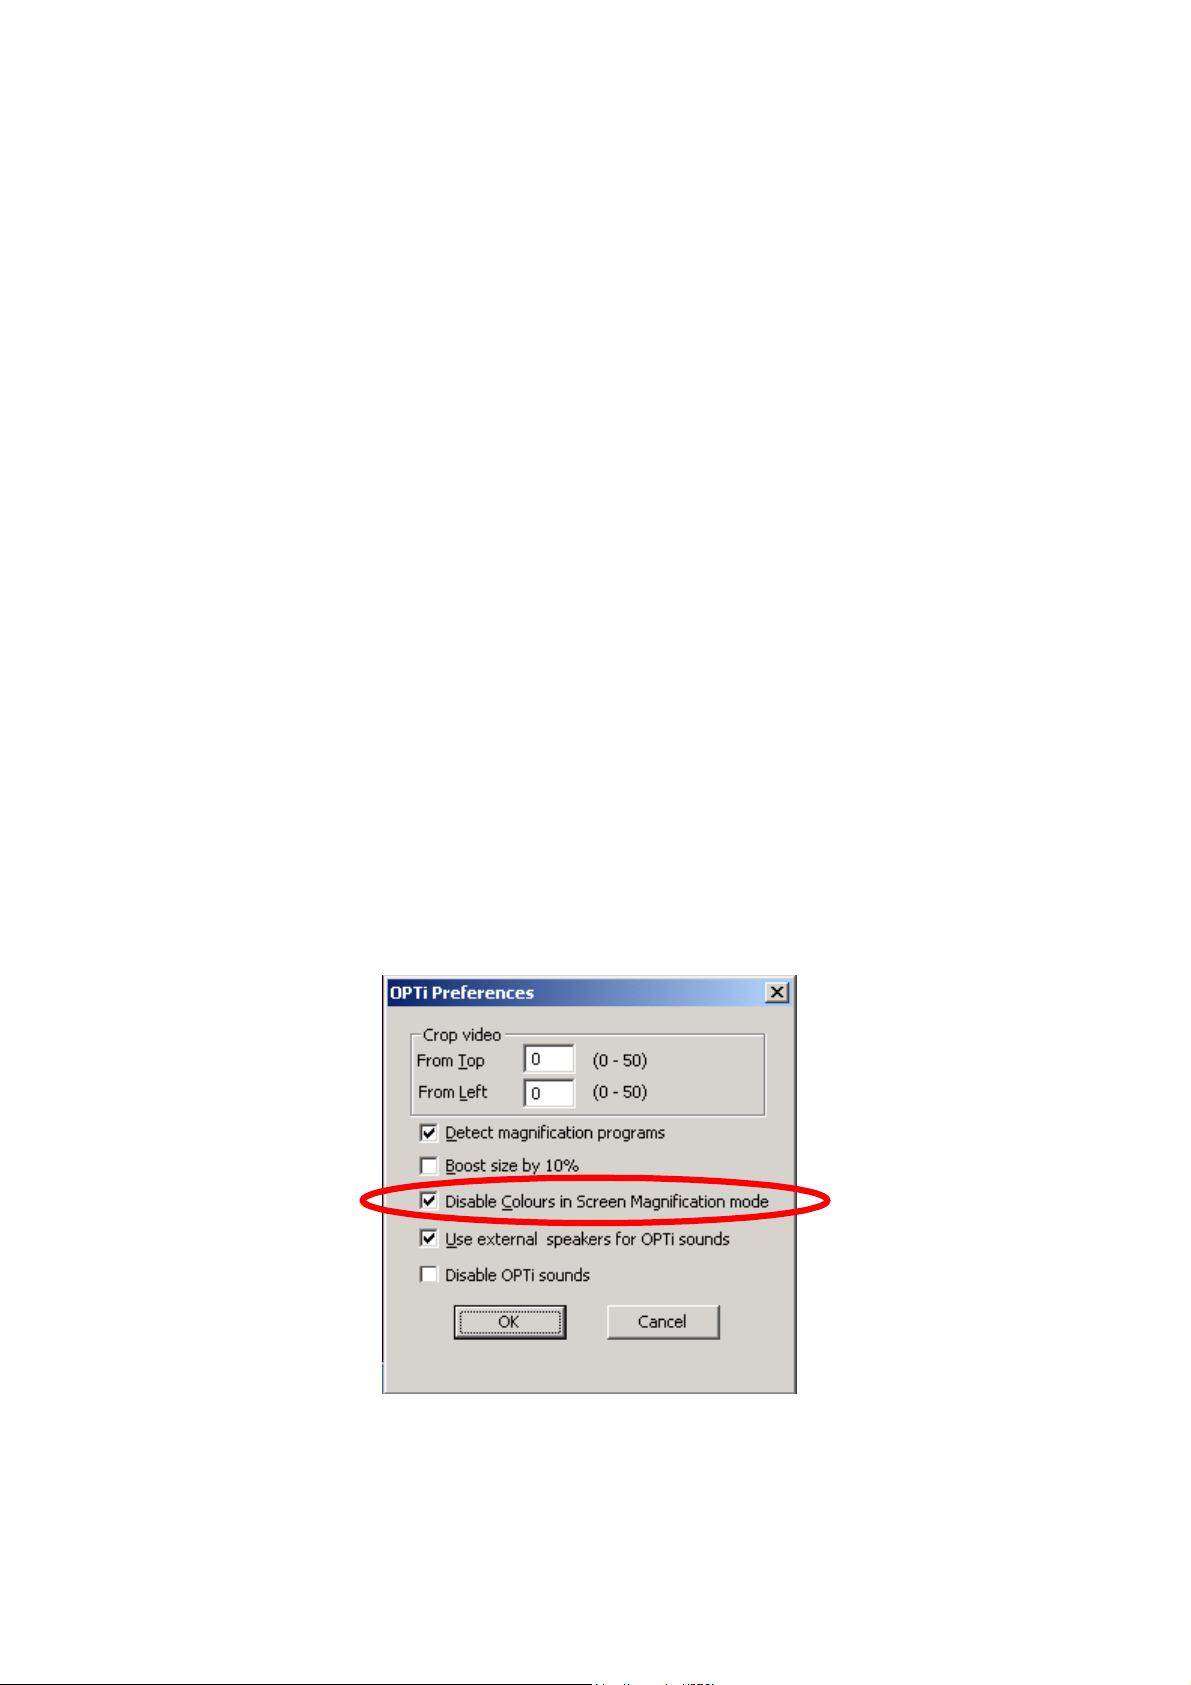
Advanced menu. This menu is accessed
from the preferences menu. From the
keyboard press Ctrl+M, O, P,A The image
below shows how this menu appears.
OPTi Preferences Advanced menu
Page 38 Rev B English
Page 40

OPTi Verso User Manual
To turn on the semi colours in screen
magnification mode, uncheck the box
circled in red on the above image. When
you do this and press the OK button, the
OPTi image will disappear from the screen
for about 5 seconds before reappearing
with the semi-colours enabled. Refer to the
Options…Colours section for more
information on using and selecting semicolours.
NOTE:
The image may lag when semi colours are
switched on in screen magnification mode.
If this is undesirable it is recommended to
disable them when using OPTi with screen
magnification software.
When you are running OPTi with screen
magnification in full screen mode, the semi
colours are always available.
OPTi Sounds
This version of OPTi software is able to
make sounds to indicate when it is the
active application. The purpose behind this
Page 39 Rev B English
Page 41

OPTi Verso User Manual
is to give an audible indication when you
press the Scroll-Lock of whether you are
making OPTi the active application or not.
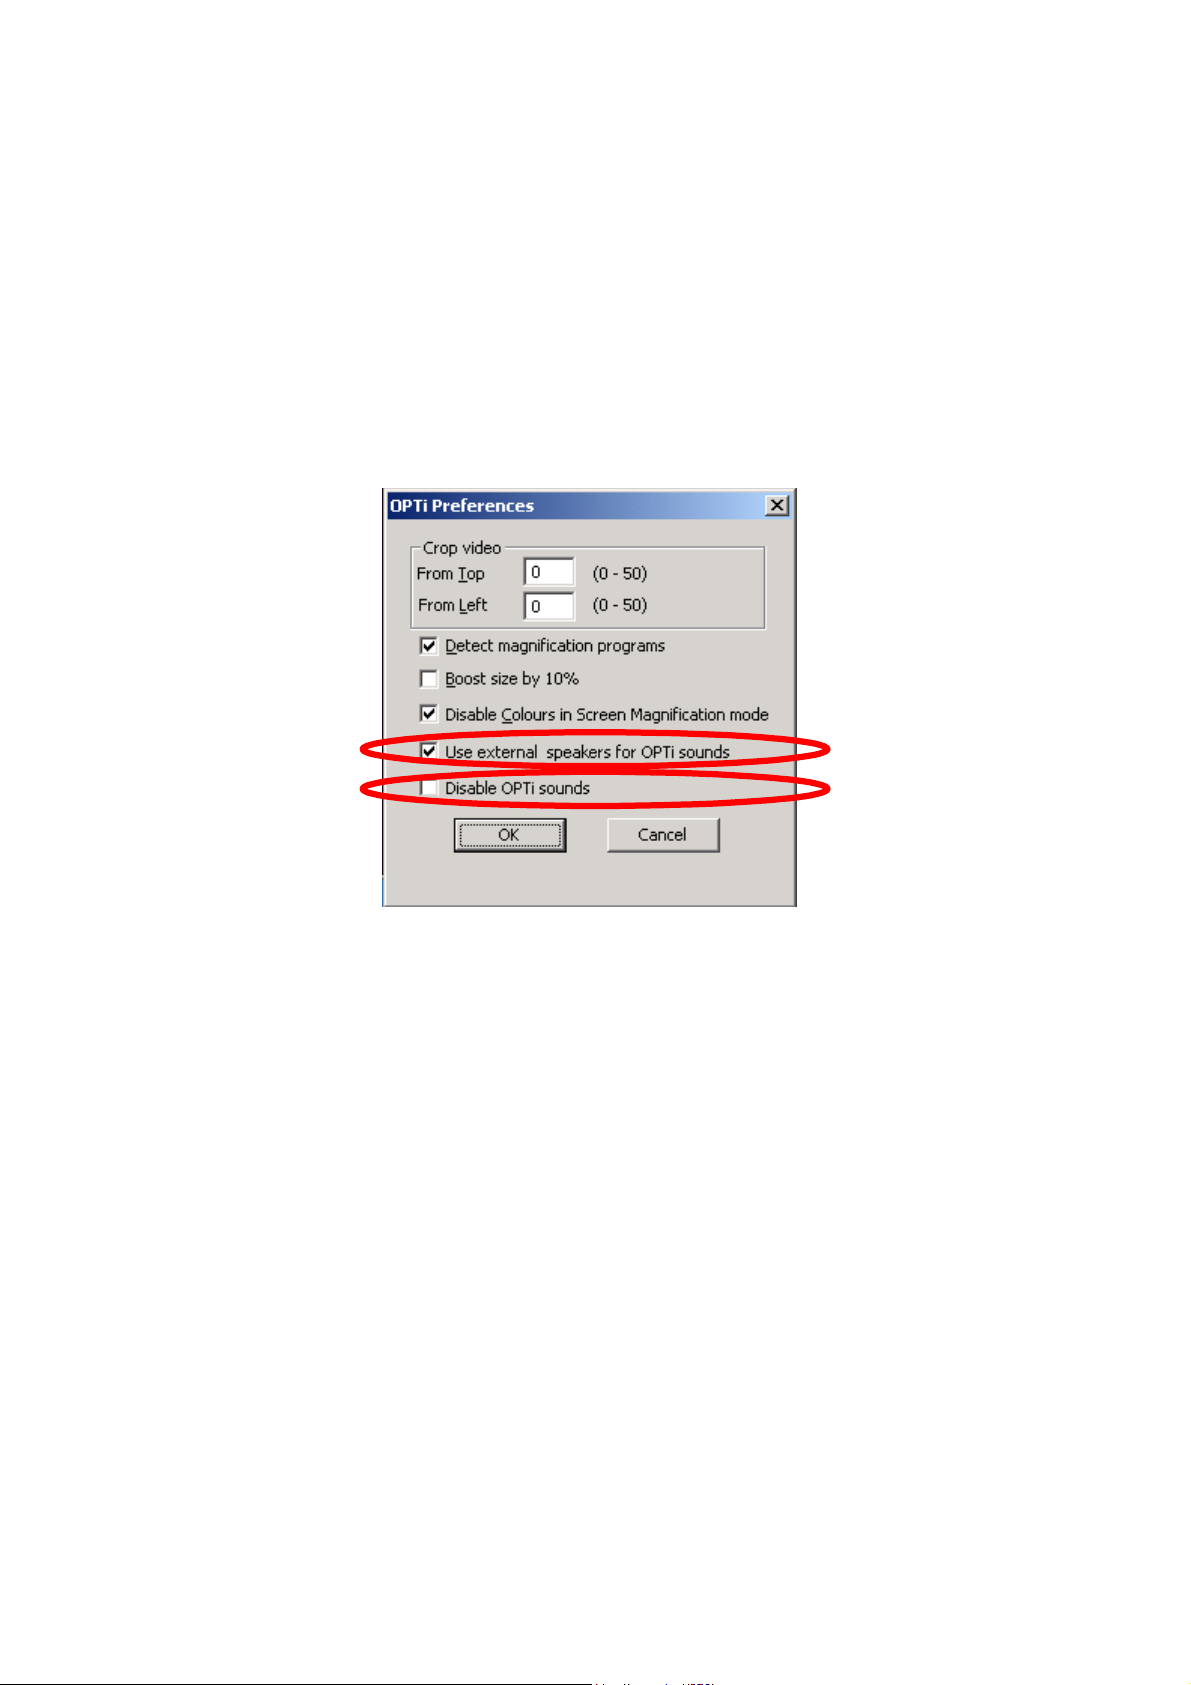
There are two different types of sound
available depending on the state of “Use
external speakers for OPTi sounds”
checkbox in the Preferences Advanced
menu.
If this box is ticked, then OPTi will use any
external speakers you have connected to
emit a double note when you press ScrollLock and make it the active application,
and a single note when you press ScrollLock and stop OPTi from being the active
application. This setting is useful for a
desktop PC with no internal speaker to
make sounds.
If this box is not ticked OPTi will use the
internal speaker on your computer. In this
case OPTi will emit a “Buh – Dee” note
when OPTi is being made the active
application and a “Dee – Buh” note when
OPTi is no longer the active application.
This setting is useful for a portable laptop
Page 40 Rev B English
Page 42
OPTi Verso User Manual
computer with no external speakers
hooked in.
Looking at the Advanced menu in the
image below, the two settings related to
OPTi sounds are circled in red.
OPTi Preferences Advanced menu
The second checkbox simply stop’s OPTi
from making any sounds at all regardless
of what state the “Use external
speakers for OPTi sounds” checkbox is
in.
Page 41 Rev B English
Page 43

OPTi Verso User Manual
Help
The help submenu allows you to access the
online help, (Keyboard: F1), reset the
programme to factory defaults and view
the About window.
Care of your OPTi Verso
Do not touch the lens. Dirt on the lens will
appear as a blurred or dim image or as
fuzzy spots on the screen. If you believe
the lens is dirty, it can be cleaned with a
soft, dry cloth applying minimal pressure.
As the lens is polished and coated, do not
use a wet or coarse cloth, detergents,
abrasive substances or solvents to clean it.
When transporting the unit we recommend
that you use the carrying case provided.
Do not allow the charger or cables to move
about within the case, as they may cause
damage.
Page 42 Rev B English
Page 44

OPTi Verso User Manual
Warranty
Ash Technologies warrants the equipment, when purchased new, to
be free from defects in material and workmanship and will repair or
replace at Ash Technologies' discretion, any equipment which
exhibits such defects, provided that the equipment has been
operated under the proper conditions of installation and has not
been tampered with by any persons not authorized by Ash
Technologies or its agents and that it is solely serviced by Ash
Technologies or its agents. This warranty shall be voided in the
event of damage or abuse to the unit caused, in the opinion of Ash
Technologies or its agents, by general wear and tear, abuse,
neglect, failure to observe stated precautions or by dropping the
unit.
Batteries are warranted for failure within a period of one year.
Non-electrical accessories are specifically excluded from warranty.
In no event shall Ash Technologies, or its agents, be liable for
special, indirect, incidental or consequential damages; the original
user's remedies being limited to repair or replacement.
Ash Technologies makes no other or further warranty, express or
implied, including and warranty of fitness for a specific purpose or
warranty of merchantability.
This warranty is valid for a period of TWO YEARS effective
from the date of delivery to the customer.
Depending on the country of sale, the warranty conditions may
differ. Contact your distributor for details.
For warranty claims or service during or after
warranty period please contact your distributor.
Page 43 Rev B English
Page 45

OPTi Verso User Manual
DECLARATION OF CONFORMITY
We, Ash Technologies Ltd., declare under our sole responsibility that this
product, OPTi Verso, of the brand Ash Technologies to which this
declaration relates, is in conformity with the following standards or other
normative documents:
EN 60601-1 Medical Electrical Equipment - Safety
EN 60601-1-2:2001 Medical Electrical Equipment – Electromagnetic
Compatibility
Following the provisions of EMC directive 89/336/EEC and Low Voltage
directive 73/23/EEC and the provisions of 93/42/EEC Medical electrical
equipment directive.
Alan Johnston
Engineering Director
Ash Technologies Ltd, Naas, Ireland.
24th April 2006
Page 44 Rev B English
Page 46

OPTi Verso User Manual
This page is deliberately left blank
Page 45 Rev B English
Page 47

OPTi Verso User Manual
OPTi Verso User Manual
Revision B English
Ash
B5, M7 Business Park
Naas, Ireland.
Made in Ireland
© Ash Technologies, 2006
Page 46 Rev B English
 Loading...