

Page 1
Page 2

Table of Contents
Package Contents .................................................... 2
Installation ................................................................ 3
Controls .................................................................... 4
Power ................................................................ 4
Lights ................................................................. 4
Mode ................................................................. 4
Magnification ..................................................... 4
Focus ................................................................. 5
Brightness Control ............................................. 5
Using the Prisma ...................................................... 6
Reading with the Prisma .................................... 6
Writing ............................................................... 7
Hints and Tips .................................................... 7
Taking Care of your Prisma ...................................... 8
Specifications ........................................................... 9
Declaration of Conformity ......................................... 9
Warranty ................................................................. 10
Package Contents
Your Prisma package should contain the following
items:
q
Prisma camera and table
q
Power supply transformer
q
Output cable
q
Reading mat
q
User’s manual
q
Allen key for adjusting the hinge tension
q
Carry case with internal padding
Please retain the packaging in case there is a
need to return the unit for service or repair.
Page 3
Installation
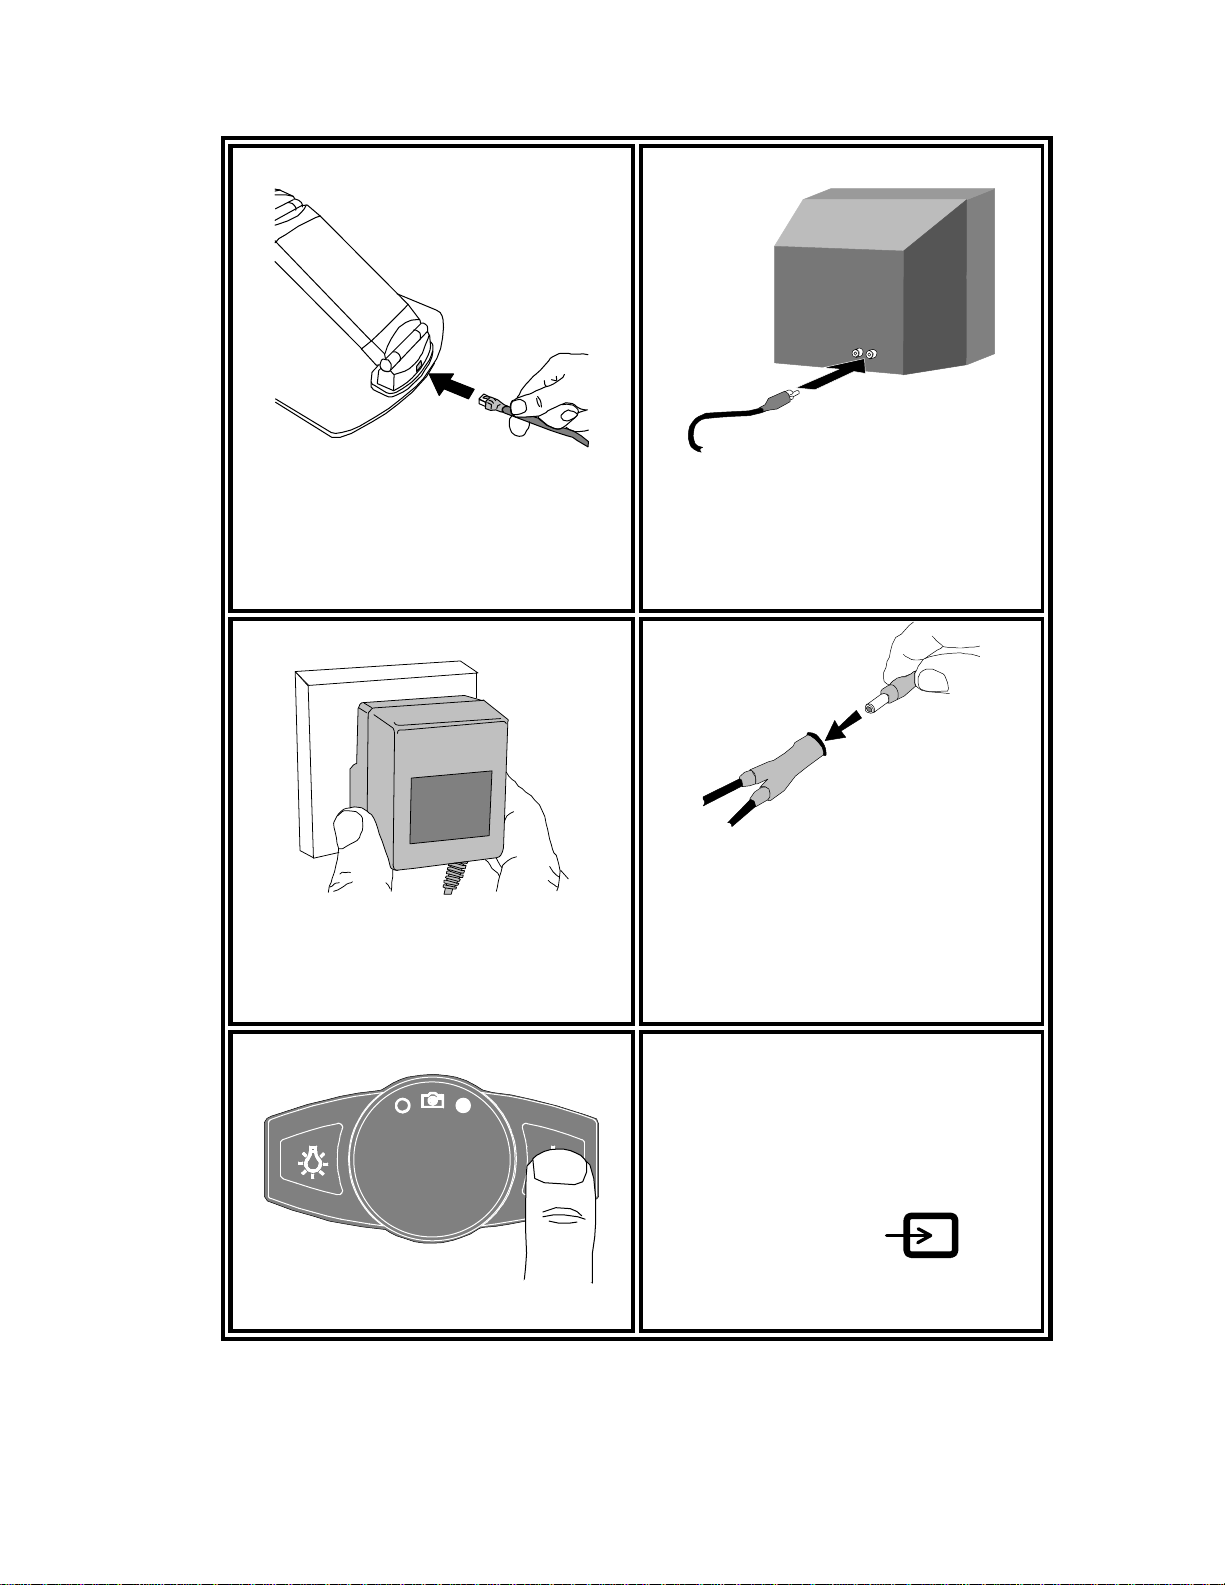
Insert the output cable
into the rear of the
camera.
Plug the video connector
into the yellow (video-in)
jack either on the front or
back of the television*.
Plug the transformer into
a wall socket and…
…plug the power
connector into the socket
located mid-way along
the output cable.
Power on the TV and use
Prisma
your remote control or
control panel to switch to
“Video” or
Power on the Prisma.
*If you do not have a direct video input on your TV
you will require an RF modulator – contact your
Prisma distributor.
Page 3
Rev G EN
Page 4
Controls
Full-color
Positive
Negative
Prisma
Lights
Mode
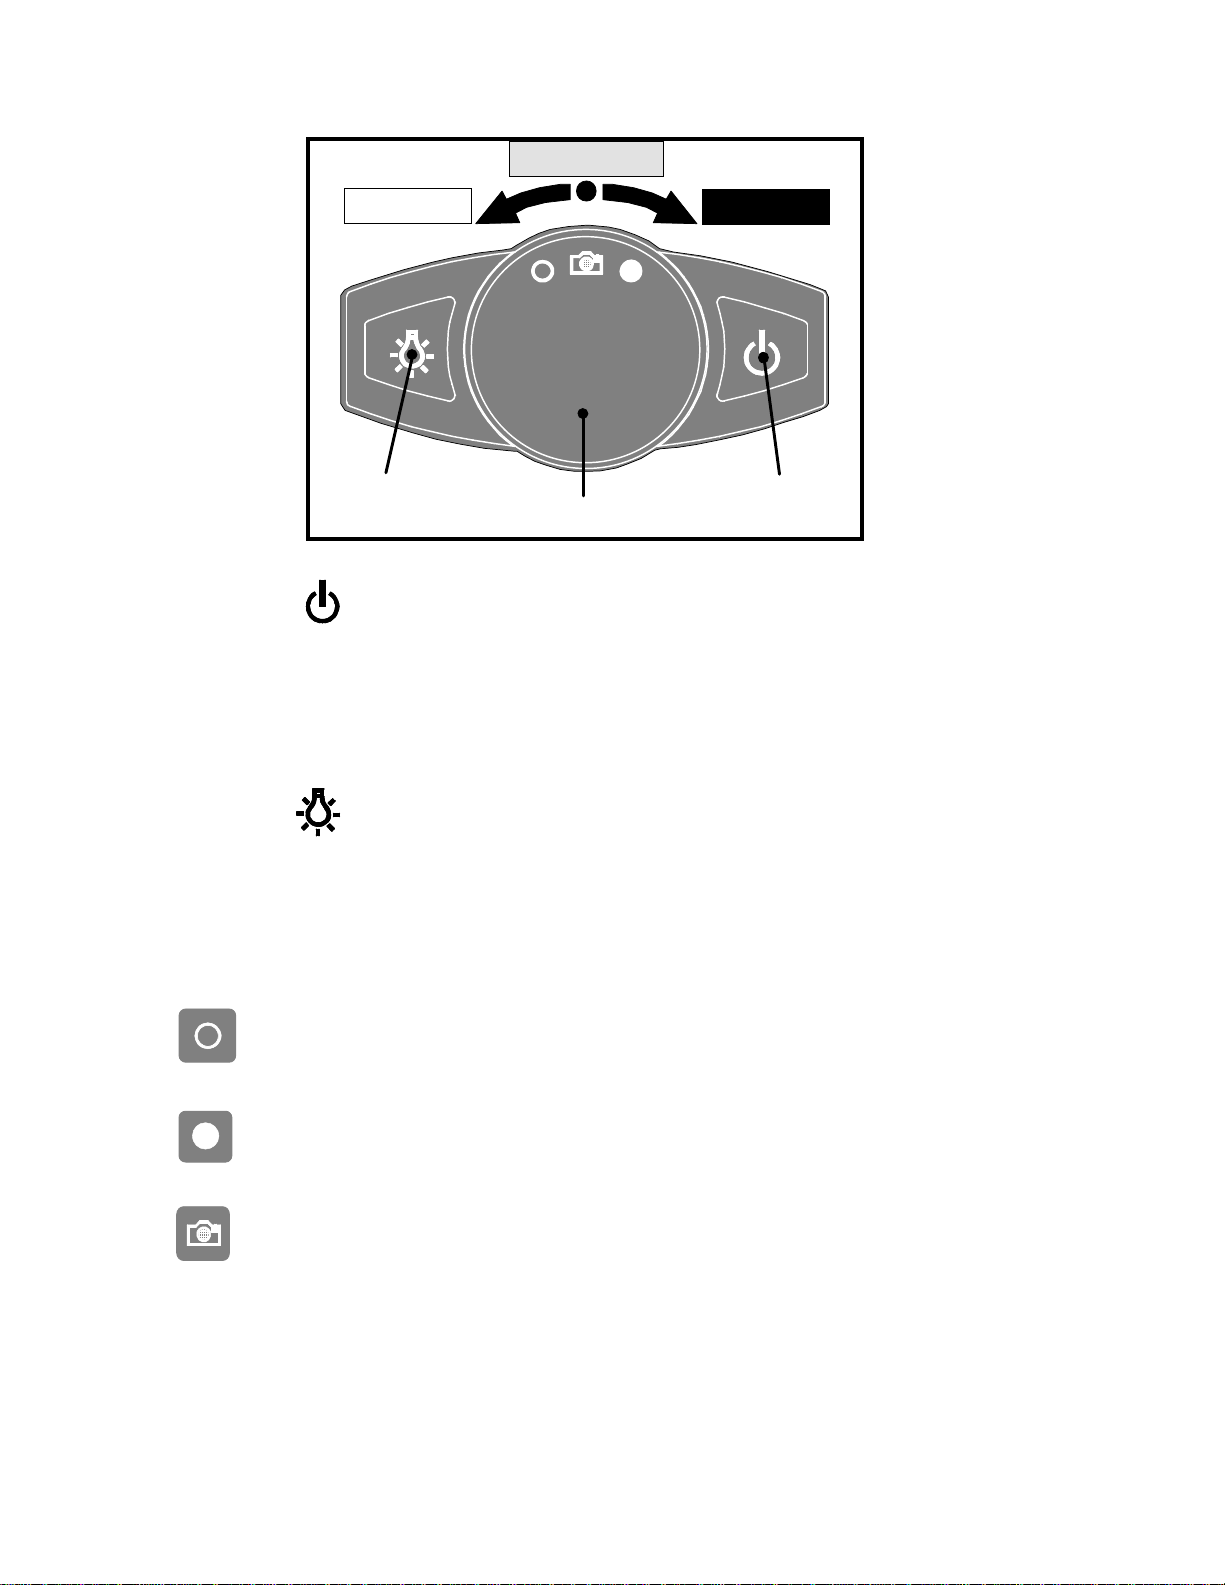
Power
Push the button to turn the power on. The lights will
flash briefly to indicate the power has been switched
on. Push the button again to turn off the power.
Power
Lights
Push to turn on the internal supplemental lights.
Push again to turn them off.
Mode
Rotate clockwise for negative mode (white
letters on a black background).
Rotate counter-clockwise for positive mode (high
contrast black on white).
The center position produces full color for
general viewing (Photo mode).
Magnification
The magnification is determined by the height of the
camera above the reading material. The best way to
adjust this is to place one hand firmly on the tabletop,
Page 4
Rev G EN
Page 5
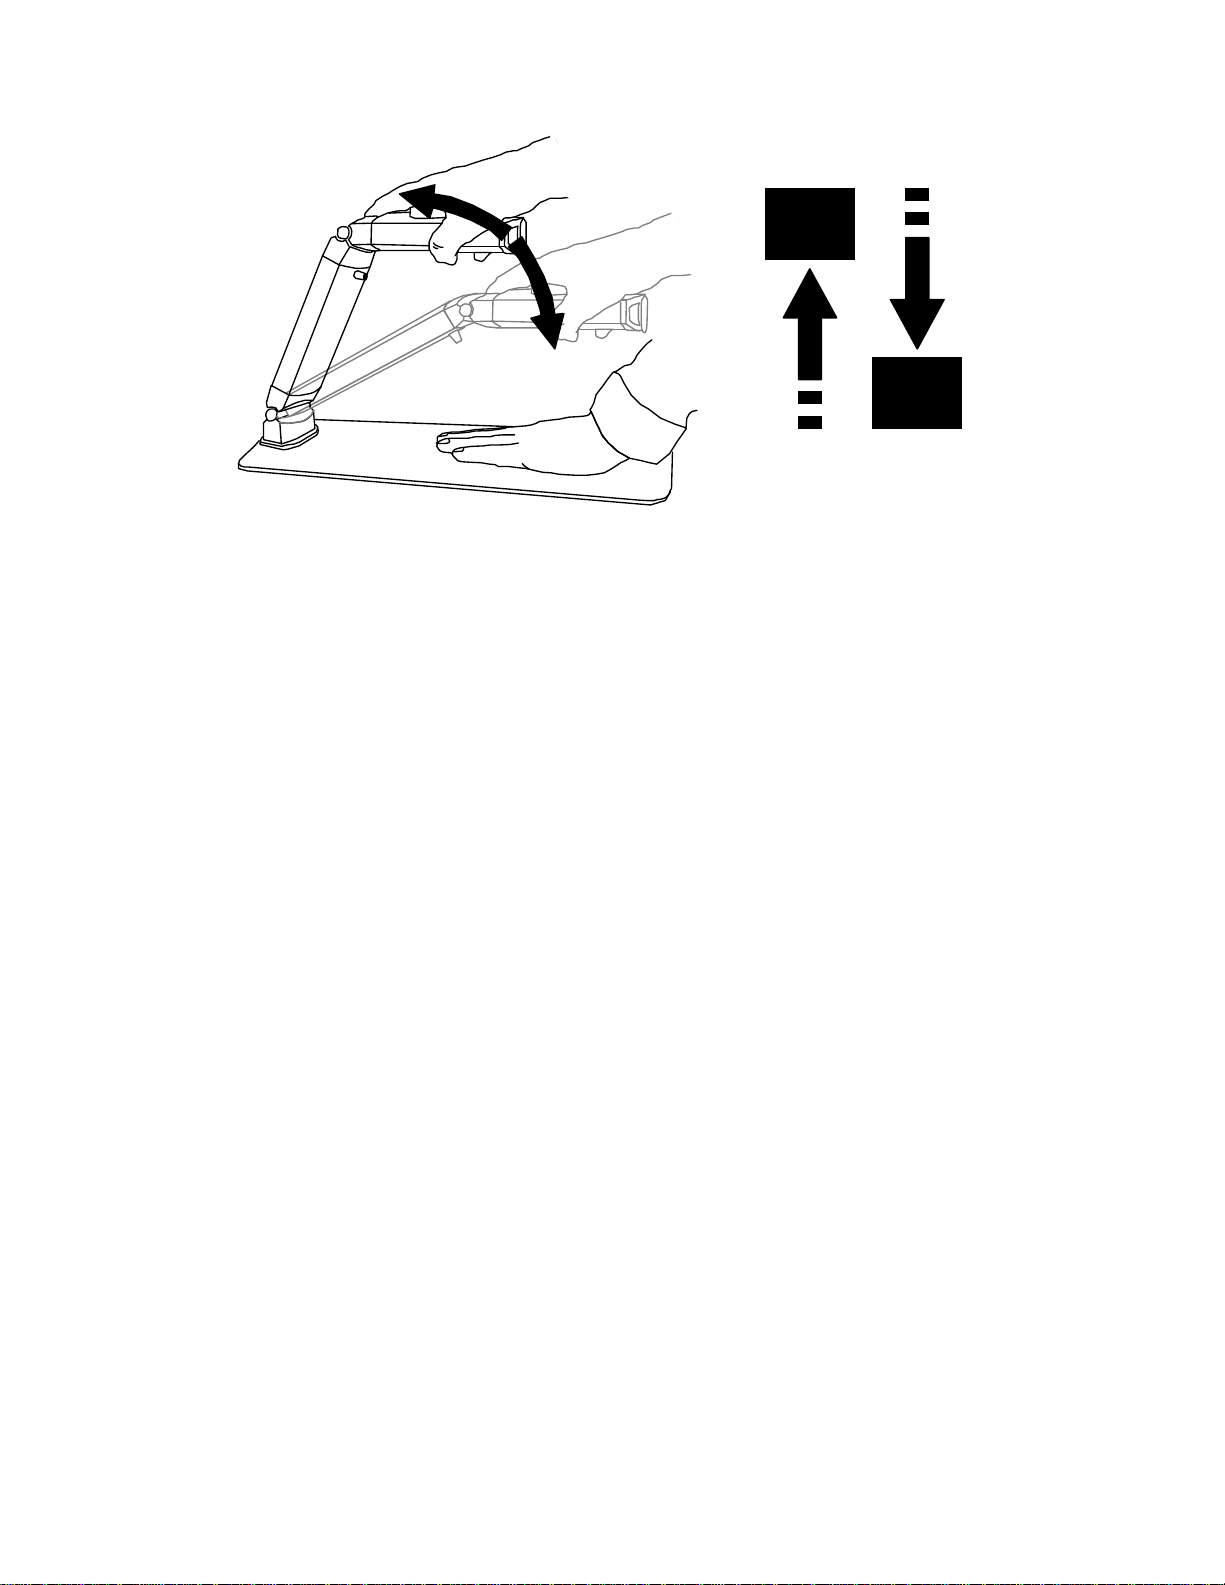
and raise or lower the camera with your other hand
as in the diagram below.
ABCDEFGHIJ
ABCDEFGHIJ
ABCDEFGHIJ
ABCDEFGHIJ
ABC
ABC
Lower the camera for higher magnification; raise it to
reduce the magnification.
Use the lowest magnification you are comfortable
with because:
∑ It is easier to locate your position on the page;
∑ There is less need to move a book on the table;
∑ The focus will work over a greater depth.
Focus
If you change the height of the camera, or if the
thickness of the material being read is changed, you
will need to re-focus the camera. Rotate the focus
control on the top of the Prisma until the image is at
its sharpest. The direction of rotation is unimportant.
Brightness Control
Located under the top hinge, this control adjusts the
image to accommodate extreme lighting conditions
so that the text does not fade into the background
when moving.
Page 5
Rev G EN
Page 6
Using the Prisma
Reading with the Prisma
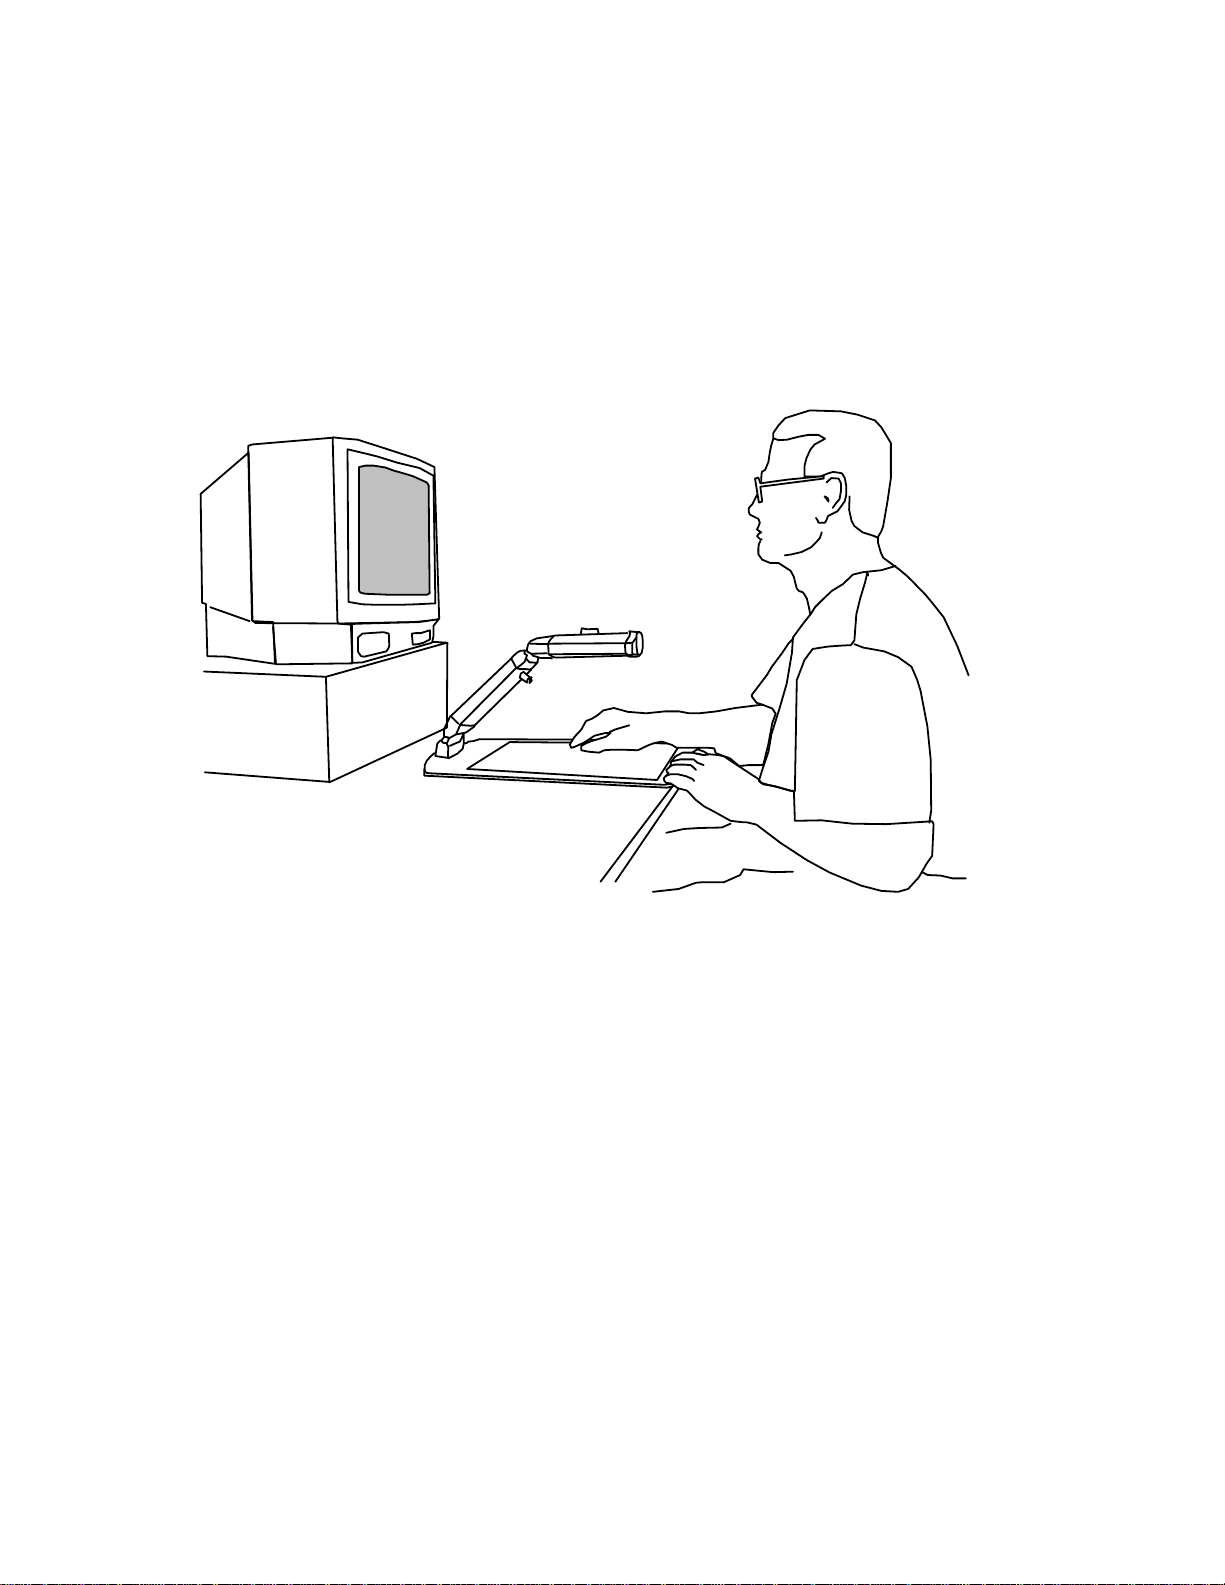
Place the Prisma on a suitable table near the
television and sit in front of it. Ideally the television
should be at eye level or slightly below, and the
Prisma reading table should be level with your
elbows when seated. A good reading position
prevents problems with your back, neck and arms.
Place the material you wish to read on the reading
table and adjust the focus knob until a sharp image is
obtained. Adjust the magnification as described
above to suit and re-focus if necessary. Ensure the
camera head is horizontal for optimum image quality.
Move the book on the table until you locate the top of
the page and then locate the start of the text. Simply
slide the book side to side and watch the television
screen while reading.
There is a mat provided with your Prisma to facilitate
reading heavier materials. Place the mat across the
reading table with the rubber side upwards. Place
Page 6
Rev G EN
Page 7
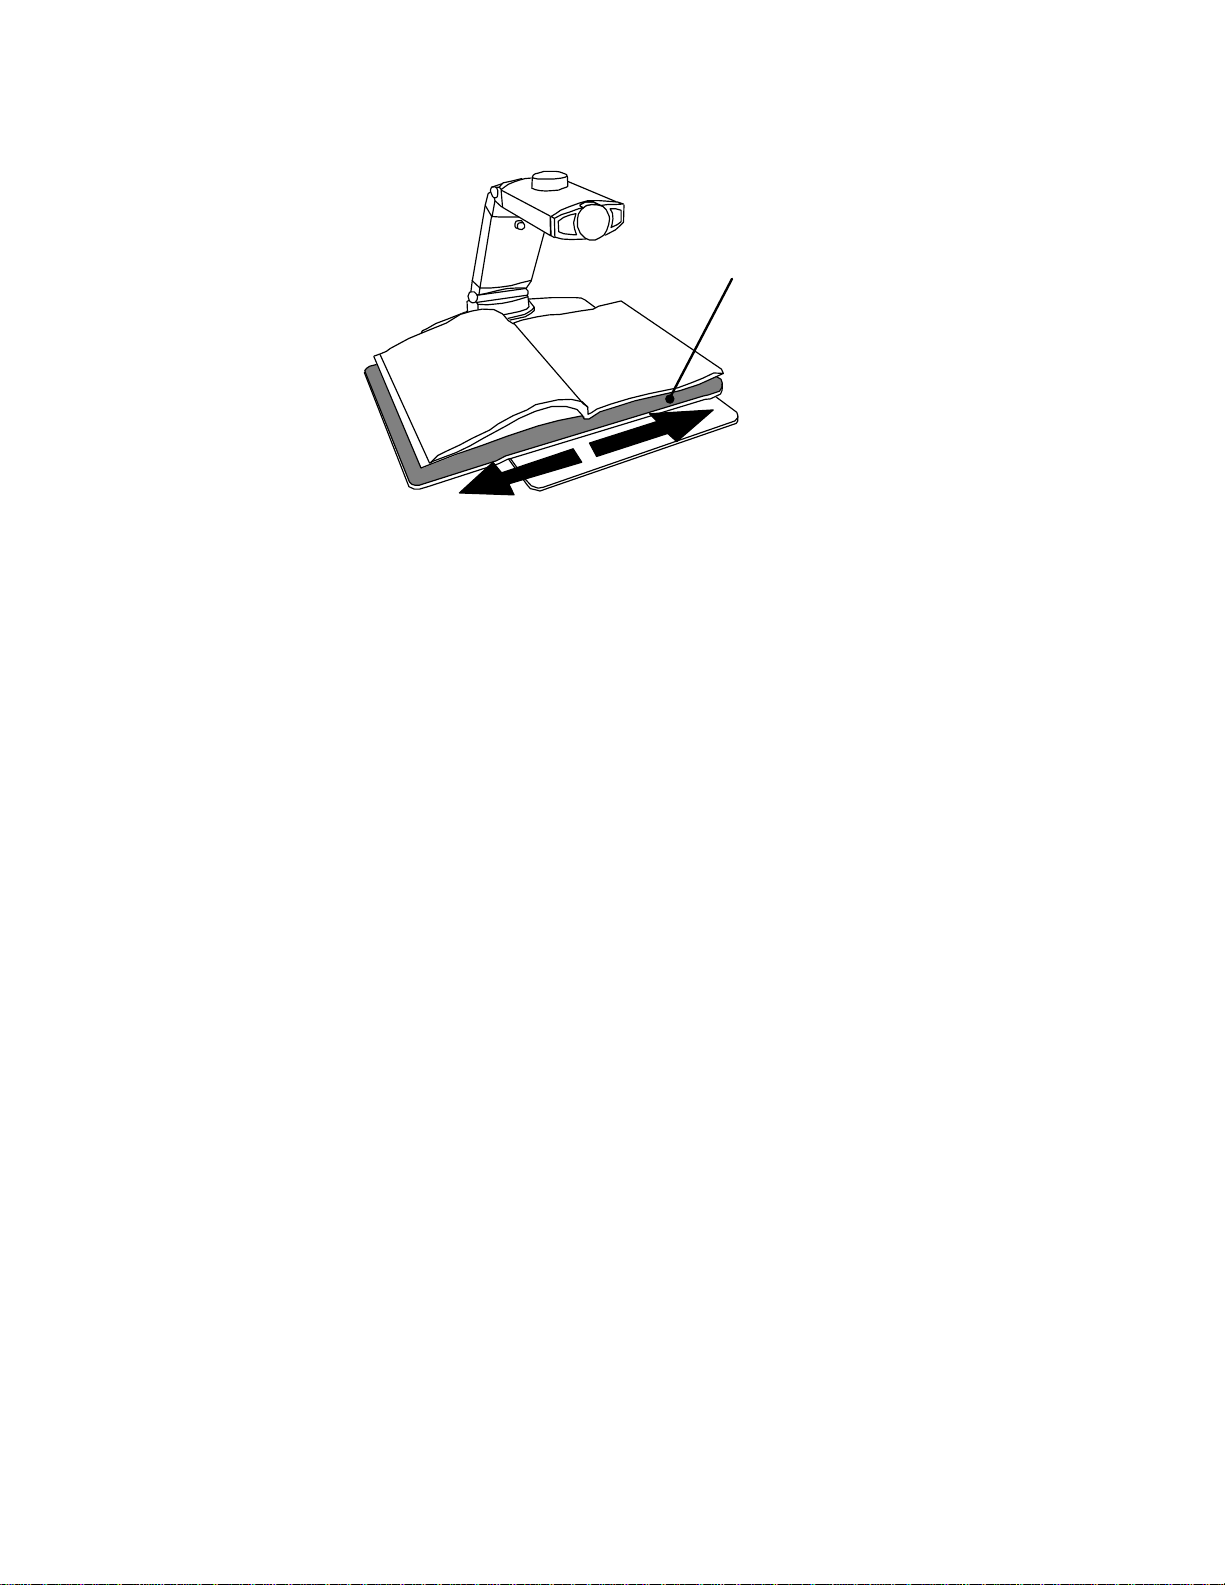
the book on the mat and slide the mat from side to
side.
Place mat rubber side up
Slide the mat across the table
Writing
Remove the mat from the table. Place the page
under the camera and locate the area of the page
where you wish to start writing. Holding the page
firmly, bring your pen, raised well above the paper,
until the nib is visible on the screen at the point you
wish to write. Lower the pen to the paper carefully
and write. You should watch the screen as you write.
Hints and Tips
Locating the Prisma camera in a well-lit area will
enhance the image available from the unit. If
possible, avoid direct overhead lighting as this can
cause shadows on the page leading to shading
differences on the screen.
If you require subdued lighting, you should switch on
the Prisma’s lights, otherwise the picture will become
noisy.
When using glossy paper, tilt the camera head
upwards slowly until the reflections move off the
screen.
Page 7
Rev G EN
Page 8
Taking Care of your Prisma
Do not touch the lens. Dirt on the lens will appear as
a blurred or dim image or as fuzzy spots on the
screen. If you believe the lens is dirty, it can be
cleaned with a soft, dry cloth applying minimal
pressure. As the lens is polished and coated, do not
use a wet or coarse cloth, detergents, abrasive
substances or solvents to clean it.
When transporting the Prisma we recommend that
you use the carrying case provided. Do not allow the
transformer or cables to move about within the case,
as they may cause damage.
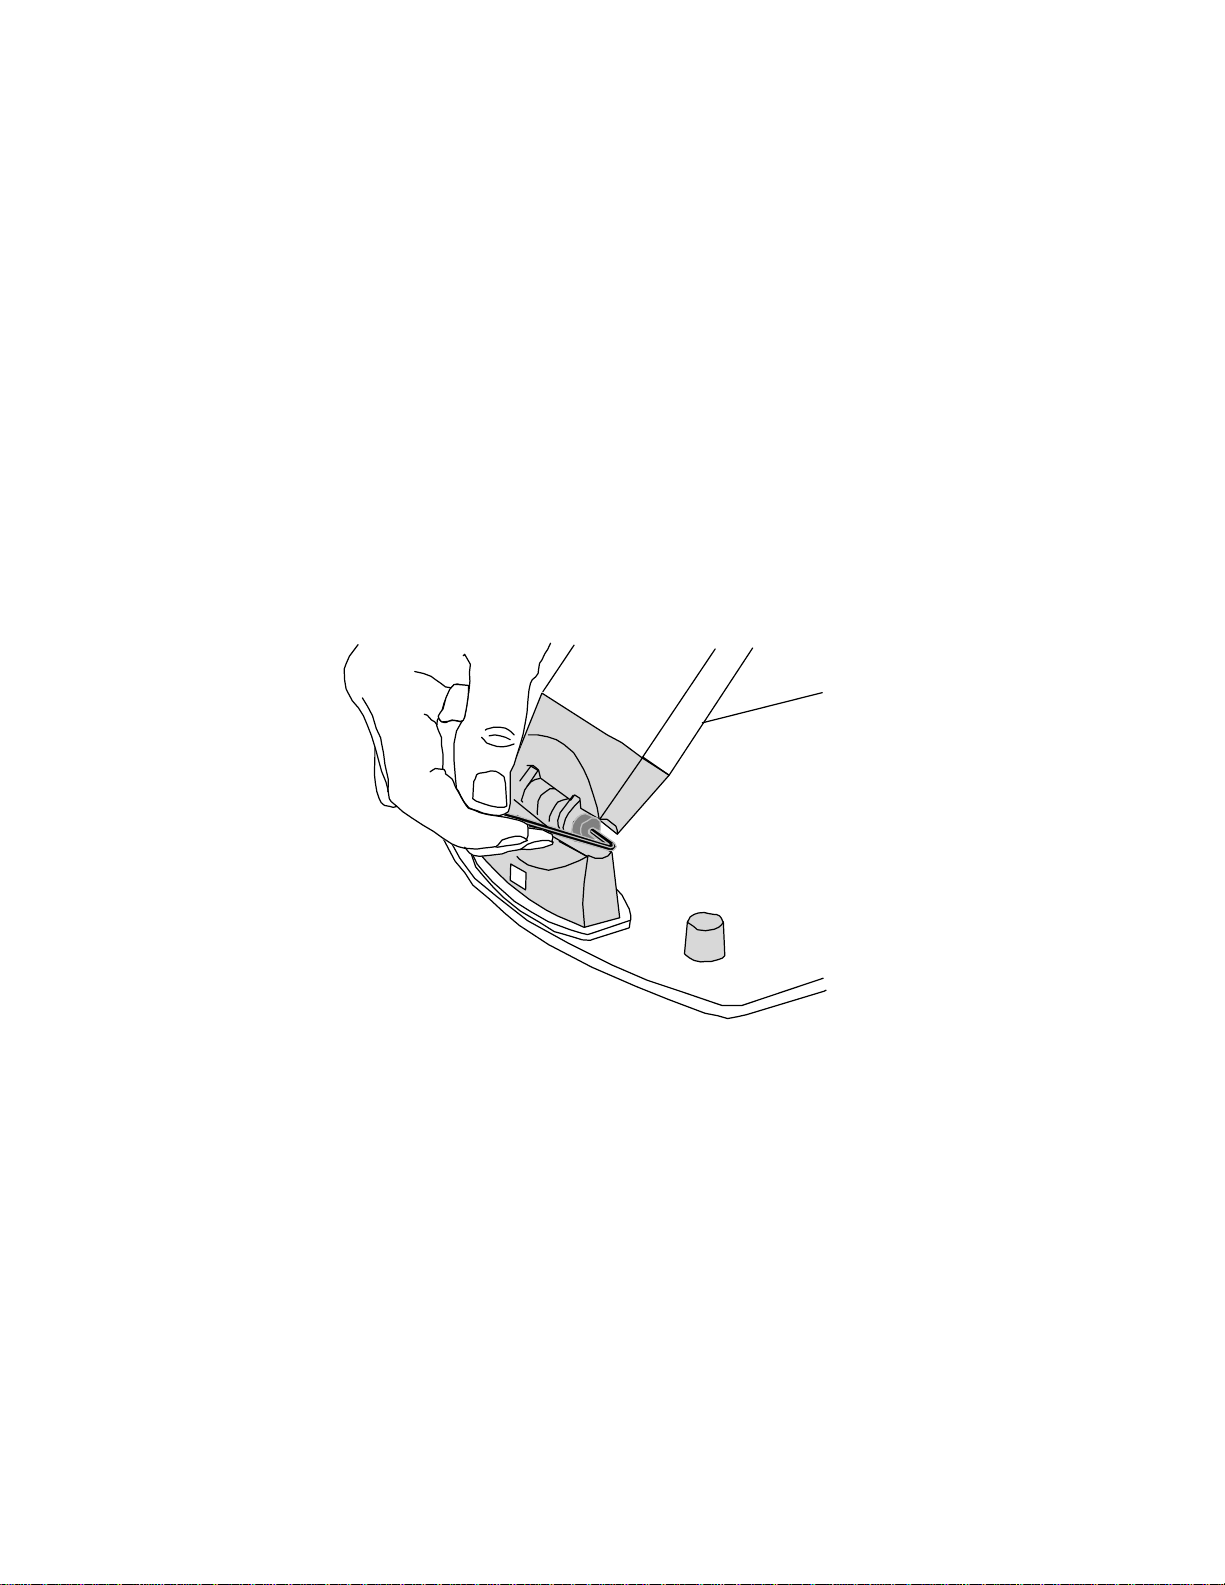
If the hinges loosen with use they can be tightened
with the Allen key provided. To do this, pull off the
caps covering the hinge screws and insert the Allen
key into the screw head. Turn each screw clockwise
about a quarter turn – do not over-tighten. Replace
the caps. Loosening of the hinges is not covered
under the terms of warranty; it is a user-maintenance
issue.
Only use the transformer supplied with the unit and
inspect the cabling regularly for damage. The
Page 8
Rev G EN
Page 9
transformer is rated for use only within your home
country – if you wish to use your Prisma abroad
consult your distributor first, as both voltages and
television standards vary throughout the world.
Specifications
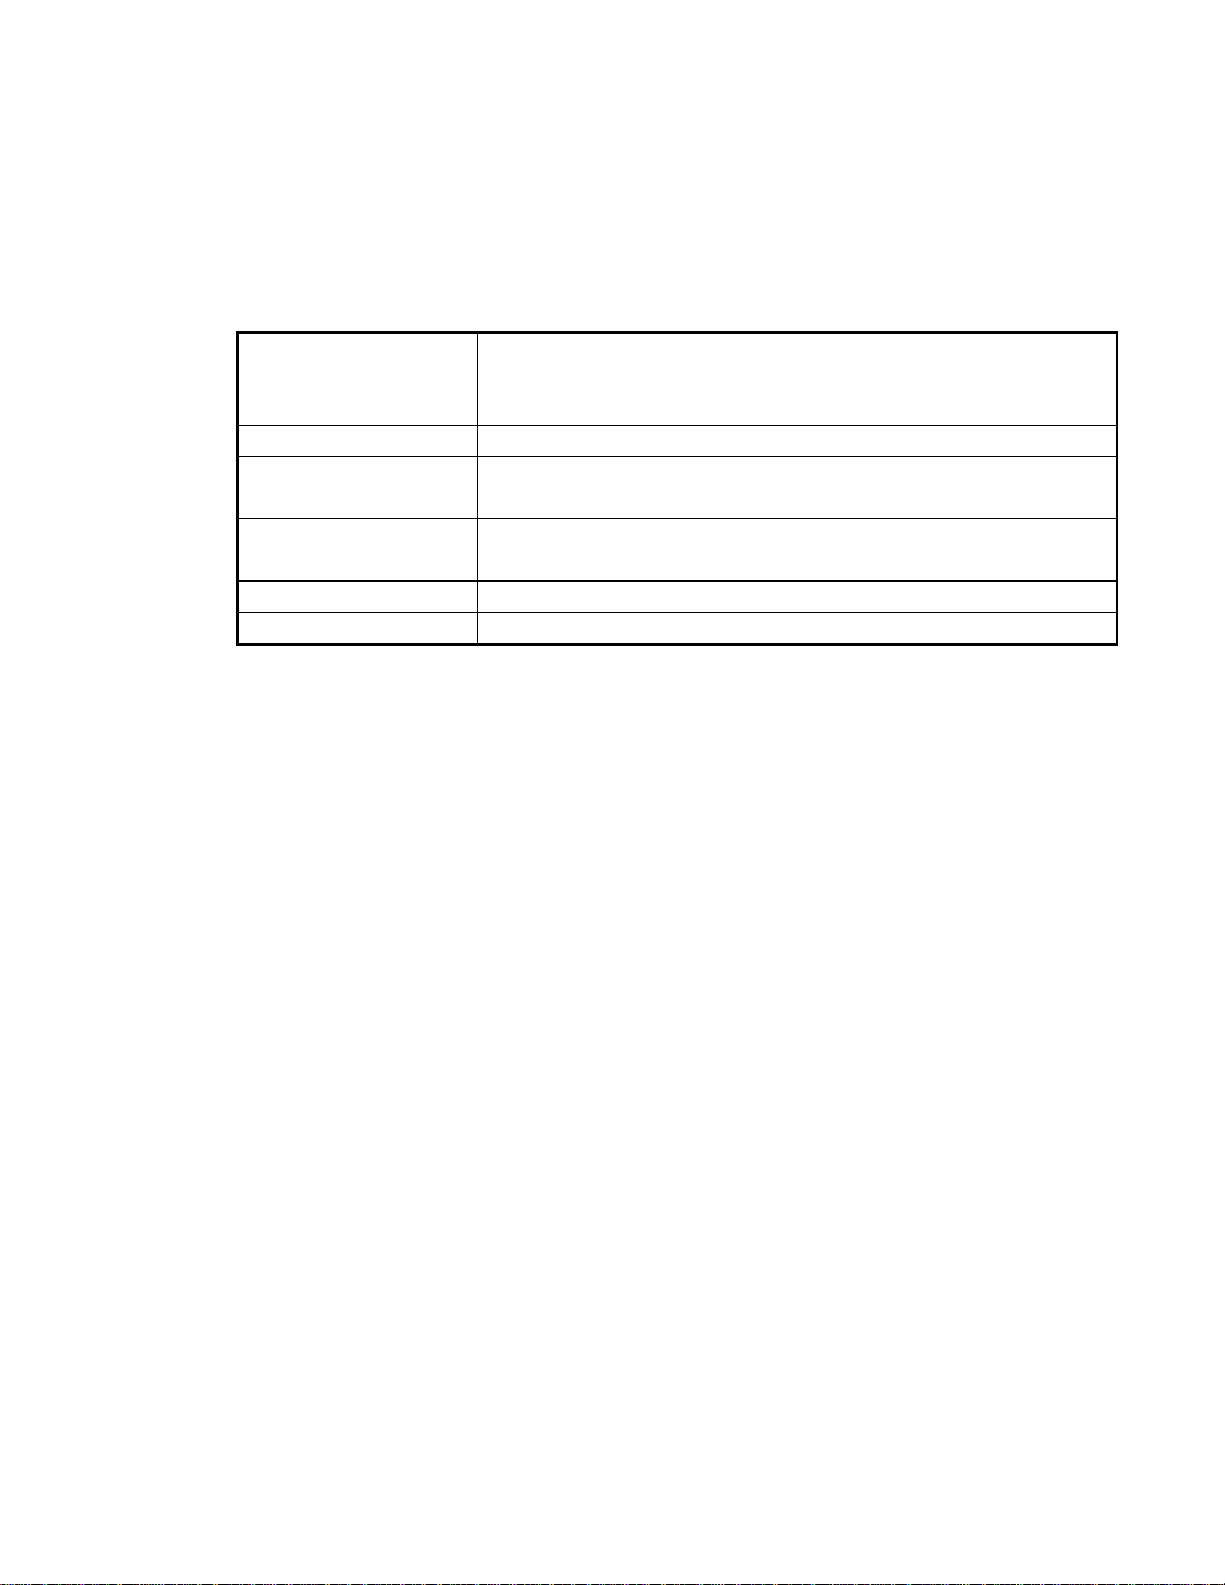
Dimensions: Table area: 9½” x 16” Folded height: 2½”
Max clearance under camera: 8½”
Weight (base unit): 2lb 6oz
Power: 12V 300mA from the transformer provided.
Modes of
Operation:
Magnification: 13” screen X3.5 to X35
Temperature: Storage: 15°F to 100°F. Operating: 40°F to 95°F
Output 1Vpp composite video NTSC 60Hz color
As we strive to constantly improve our products, this information
is subject to change without notice.
Do not use this product in damp conditions (eg the bathroom)
This device complies with Part 15 of the F.C.C. rules.
Operation is subject to the following conditions:
(1) This device may not cause harmful interference.
(2) This device must accept any interference received
including interference which may cause undesirable
operation.
High-contrast positive, high contrast negative and full
color normal.
20” screen X5 to X52
Page 9
Rev G EN
Page 10
Warranty
Ash Technologies warrants the equipment, when purchased new,
to be free from defects in material and workmanship and will
repair or replace at Ash Technologies' discretion, any equipment
which exhibits such defects; provided that the equipment has
been operated under the proper conditions of installation and has
not been tampered with by any persons not authorized by Ash
Technologies or its agents and that it is solely serviced by Ash
Technologies or its agents.
In no event shall Ash Technologies or its agents be liable for
special, indirect, incidental or consequential damages; the
original user's remedies being limited to repair or replacement.
This warranty is valid only when serviced in the country of
original purchase.
Ash Technologies makes no other or further warranty,
express or implied, including and warranty of fitness for a
specific purpose or warranty of merchantability.
This warranty is valid for a period of
12 Months
effective from the date of delivery.
For warranty claims or service during
or after warranty period please
contact your distributor.
Ash Technologies Limited, B5, M7 Business Park, Naas, Ireland.
[email protected] www.ashtech.ie
Page 10
Rev G EN
 Loading...