

Page 1

Document Camera
User's Guide
Page 2
Safety Instructions
Thank you very much for purchasing this product. Read this document carefully to use this
product safely and correctly. To allow you to solve any unknown points quickly, keep this
information close at hand.
So that you can use the product safely and correctly, symbols are applied in this User's
Guide and on the product to indicate possible harm to the user or to others and the risk of
damage to property. The indications and their meaning are as follows. Make sure you
understand them properly before reading the guide.
Warning
Caution
This symbol indicates information that, if ignored, could possibly
result in death or personal injury due to incorrect handling.
This symbol indicates information that, if ignored, could possibly
result in personal injury or physical damage due to incorrect
handling.
Warning
v If any of the following situations occur, immediately disconnect the USB cable and
contact your local dealer or Epson service center:
Smoke, unusual odor, or unusual sound is emitted from the unit.
Water or a foreign object has entered the unit.
The product was dropped or the case is damaged.
Continued use may cause a fire. Due to the potential danger, never attempt to repair
the unit yourself.
v Excluding service personnel, never open the unit case. In addition, never disassemble
or modify the unit. A fire or accident may result.
v Do not place any containers of liquid on top of the unit. If anything spills into the unit, a
fire may result.
v Do not insert any metallic objects or other foreign materials into the unit. A fire may
result.
v Do not place the unit in locations with unusually high temperatures, such as in direct
sunlight or near the outlet of an air conditioner or heater. The unit may be deformed due
to heat, the internal components of the unit may be adversely affected, or a fire may
result.
v Do not use or place the unit in locations with high humidity or locations where it may
become wet, such as outdoors or near a bath or shower.
v When using the unit, do not look into the camera lens when the LED lamp is on.
2
Page 3

Caution
v Do not place any heavy objects on the unit. It may tip over or break.
v When using the unit, be sure to extend the foot. The unit may fall, causing personal
injury if it strikes someone.
v Be careful not to pinch your fingers in the movable parts of the unit.
v Do not place the unit on an unstable location, such as a shaky table or slanted surface.
The unit may drop or tip over, causing personal injury.
v When raising the camera arm of the unit, use both hands. If you release the camera
arm before it is raised completely, the camera head may spring up, causing personal
injury.
v Do not place or store the unit where it is accessible to small children. The unit may drop
or tip over, causing personal injury.
v Do not place the unit near high-voltage power lines or sources of magnetism. The unit
may not operate properly.
v Before cleaning the unit, disconnect the USB cable to prevent possible damage.
Usage Precautions
v Do not place the unit in locations where it will be exposed to greasy smoke or steam, such
as cooking areas or near humidifiers, or in very humid or dusty locations.
v Do not store the unit in direct sunlight or near heaters.
v Do not place the unit in locations where it will be subject to a lot of vibration.
v Do not touch the camera lens with bare hands. The displayed images will not be clear if
there are fingerprints or oil from your skin on the lens surface.
v When moving the unit or when the unit is not in use, be sure to disconnect the USB cable.
v When cleaning the unit, wipe the unit with a soft dry cloth. Do not use volatile substances,
such as thinner or benzene.
v When transporting the unit, store it in the soft carrying case.
v When the unit is connected to a projector with the USB cable, the unit will not operate
properly if a USB hub is used. Use a direct connection.
v Connect the unit using the USB cable that is supplied with the unit or the projector.
v Do not use or store the unit where it will be exposed to greasy smoke or tobacco smoke,
or in very dusty locations.
3
Page 4

Supplied Items List
Check the following list to confirm that you have all of the supplied items. If by any chance
there is anything missing or damaged, please contact your dealer.
Y Document Camera Y USB cable (for use with Document
Camera only) 3.0 m
Y User's Guide (this guide) Y ELPDC06 Soft carrying case *
Y Quick Start Guide Y Setup Label
Y ArcSoft Application software for ELPDC06
* The Soft carrying case is not included when the unit is packaged together with a
projector.
Product Features
v Compact size
This document camera is compact and light, making it easy to carry and use in small
areas.
v Easy setup
You can connect the document camera directly to selected models of Epson projectors by
simply using a single USB cable. This will let you project enlarged images of printed
documents and other materials. (Check your projector User's Guide to verify
compatibility.)
v Computer compatible
You can also capture and edit images when you use the document camera with a
computer. Connecting is easy — just plug in the included USB cable (a separate power
cable is not needed).
4
Page 5

Part Names and Functions
Top/Side/Rear
Name Function
Camera head Rotate the camera head ±90° to display images of a
document or from a wall.
Foot Extend the foot on the bottom of the case when using the
document camera.
Camera arm Extend or retract the camera arm to adjust the height of the
camera head.
Security slot The security slot is compatible with the Kensington
MicroSaver security system.
[Freeze] Press the [Freeze] button to turn on the indicator light on the
button and freeze the image displayed by the document
camera.
Press the [Freeze] button again to unfreeze the image and
to turn off the indicator light.
[Focus] Press the [Focus] button to automatically focus the image.
The unit cannot focus on objects that are approximately
10 cm (4 inches) or less from the camera lens.
[][]
[ ] Press the [ ] button to turn the LED lamp on and off.
[Source Search] When you plug in the USB cable, the source from the
Press the [ ] button to enlarge the image size.
Press the [ ] button to reduce the image size.
document camera will be automatically selected.
When multiple devices are connected to the projector, press
the [Source Search] button repeatedly until the image you
want to display is shown.
This function does not work when the unit is connected to a
computer.
5
Page 6
Power indicator This indicator comes on when power is supplied from a
projector or computer.
USB terminal (type B) This terminal is used to connect the unit to a projector or
computer using the supplied USB cable.
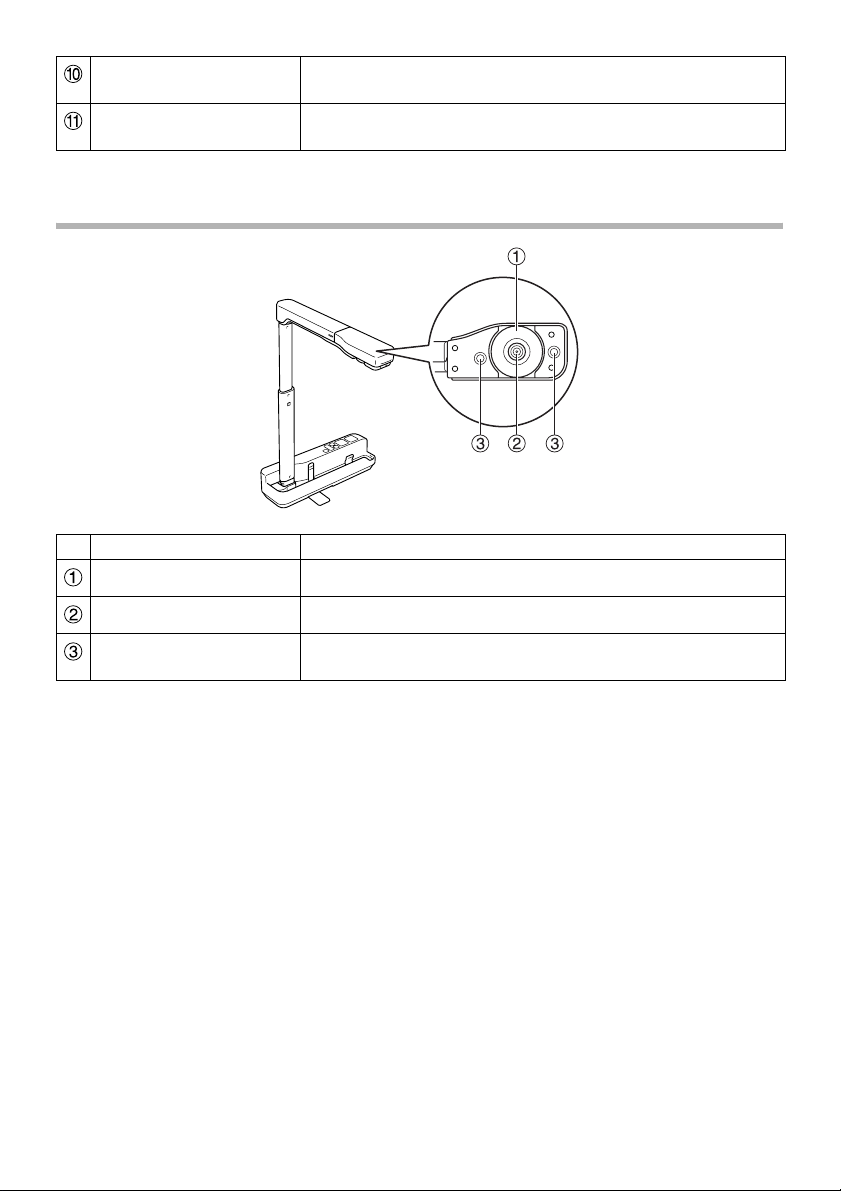
Camera Head
Name Function
Image rotation dial Turn this dial to rotate the displayed image ±90°.
Camera lens This lens captures the image.
LED lamp Turn on this lamp when there is not enough light on your
document.
6
Page 7
Connecting to a Projector to Display Images
Connect the document camera to a projector using the USB cable that is supplied with the
unit.
For information on the projectors that can be connected, see the User's Guide supplied with
the projector.
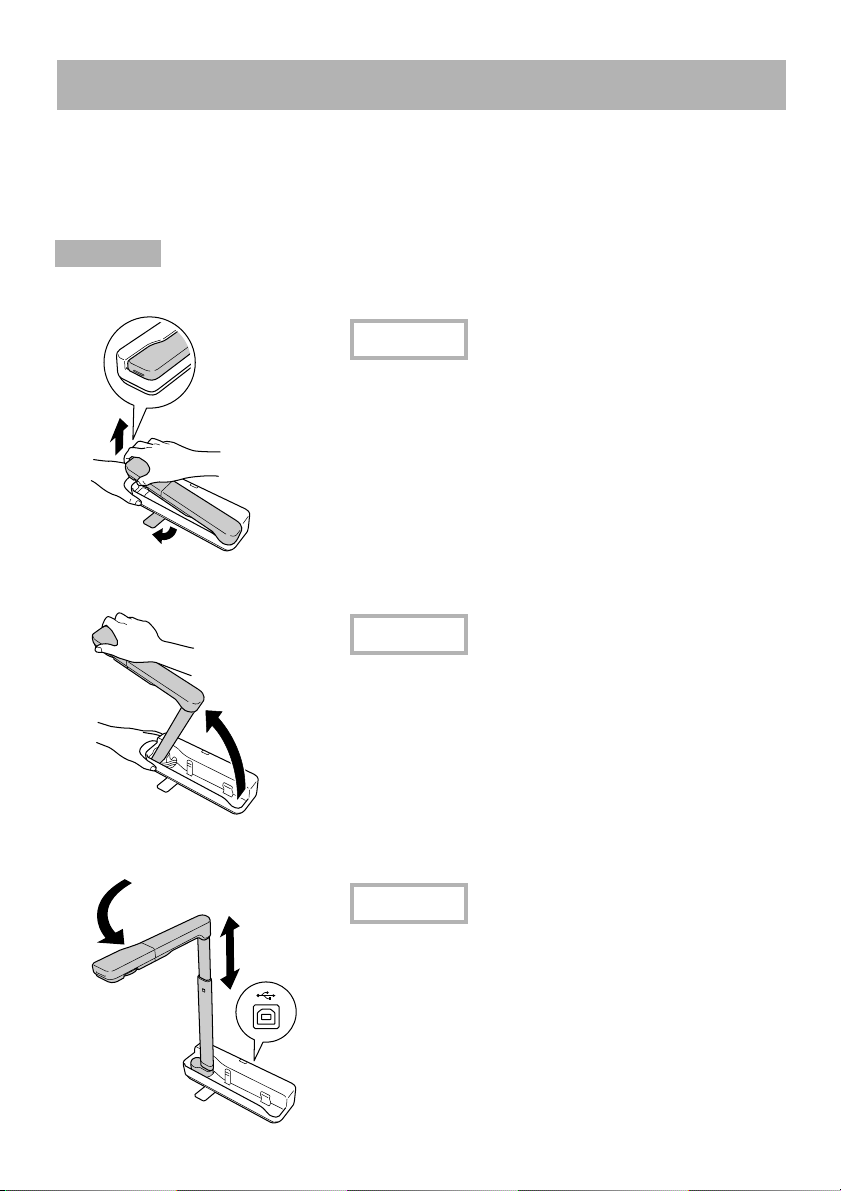
Procedure
A Extend the foot, and then hold the base and raise the camera head.
Caution
vThe document camera will not operate properly
if a USB hub is used. Connect the projector
directly to the unit.
vBe careful not to pinch your fingers in the
movable parts of the unit.
vWhen using the document camera, be sure to
extend the foot. Otherwise, the unit may fall,
causing personal injury if it strikes someone.
B While holding the camera head, raise the camera arm.
Caution
Do not release the camera head before the camera
arm is vertical. The camera head may cause
personal injury if it strikes you.
C Rotate the camera arm 90° and adjust the height according to the subject matter.
Warning
Do not look into the camera lens when the LED
lamp is on.
7
Page 8

D To display using the document camera, connect the supplied USB cable (3.0 m)
to the USB terminal (type A) identified by the Document Camera icon on the
projector.
Connecting to a Projector through a Computer
For information on connecting to a computer, see “Connecting to a Computer to Display
Images” on page 9.
Displaying Images
Displaying an Image of Printed Documents and Other Materials
Procedure
A Place the document you want to
display directly under the camera
lens.
B Extend or retract the camera arm to
adjust the image size and press the
[ ][ ] buttons to enlarge or reduce
the image size.
C Press the [Focus] button to
automatically focus the image.
If you want to rotate the image, turn the
image rotation dial.
8
Page 9

Displaying Live Action or an Image from a Whiteboard
Procedure
A Turn the camera head to display live action or an
image from a whiteboard or wall.
B If you want to rotate the image, turn the image
rotation dial.
Connecting to a Computer to Display Images
To connect the document camera to a computer, you must install the included ArcSoft
Application software for ELPDC06. When the software is installed, the computer can be
used to operate the document camera and capture images.
In addition, large images can be displayed by connecting the computer to a projector.
9
Page 10

Using the ArcSoft Application software for ELPDC06
This section explains how to operate the unit when it is connected to a computer.
In the following explanations, unless otherwise noted, Windows screen shots are used.
However, the screens will be similar even when using Macintosh.
Installing the Software
Note the following points before installing the software:
v Quit all programs that are currently running before installing the software.
v For users of Windows XP/Vista, install the software as a user with administrator rights.
v See the Appendix for the operating environment necessary for the software.
Procedure
For Windows
A Insert the CD-ROM into the computer to start the installation for ArcSoft
Application software for ELPDC06.
B When you see the license agreement, click "Yes".
C Follow the instructions to install the software.
D When the installation complete screen appears, click "Finish".
ELPDC06 Button Manager must also be installed. Do not clear the check box.
E Install ELPDC06 Button Manager.
When you see the license agreement, click "Yes".
F Follow the instructions to install the software.
G When you click "Finish", the installation is complete and the icon appears
on the computer desktop.
10
Page 11

For Macintosh
A Turn on the computer.
B Insert the CD-ROM into the computer.
C Double-click the "ArcSoft Application software for ELPDC06" icon in the EPSON
window.
Installation starts.
D When the installation complete screen appears, click "Finish".
ELPDC06 Button Manager must also be installed. Do not clear the check box.
E Install ELPDC06 Button Manager.
When you see the license agreement, click "Yes".
F Follow the instructions to install the software.
G When you click "Finish", the installation is complete.
Note
If ELPDC06 Button Manager is not installed, the [ ][ ] buttons cannot be used when the
unit is connected to a computer.
11
Page 12

Uninstalling the Software
Procedure
For Windows
Click "Add or Remove Programs" or "Uninstall a program" in "Start" - "Settings" "Control Panel" and delete the ArcSoft Application software for ELPDC06.
For Macintosh
From "Applications", delete the ArcSoft Application software for ELPDC06 folder.
Saving Displayed Images
When the unit is connected to a computer, images can be captured and displayed as a slide
show.
Procedure
A Connect the unit to the USB terminal of a computer and start the ArcSoft
Application software for ELPDC06.
For Windows
Click "Start" - "All Programs" - ArcSoft Application software for ELPDC06.
For Macintosh
Double-click the Applications folder of the hard disk volume in which ArcSoft Application
software for ELPDC06 is installed, and then double-click the "ArcSoft Application
software for ELPDC06" icon.
B The start screen appears. Click "Capture" .
12
Page 13

C The capture screen appears. See the table below for details on using the capture
screen.
This screen consists of two windows: the capture album window and the capture
preview window .
In the capture screen, you can use the document camera to capture still images or
videos. To return to the start screen, click the button.
If the unit is not connected, an error message will appear in the capture window.
Connect the unit to the computer and click the button.
For Windows
Right-click in the capture album window to display a menu with the following functions:
v "Preview": Right-click a file, then click "Preview" to display the file. Depending on the
type of file selected, the Photo Viewer or Media Player will start. You can also doubleclick a file to display it. When using the editing screen, this option is not available.
v "Properties": Right-click a file, then click "Properties" to display the file information.
Information, such as the file name, file location, file size, modified date, and type of
file, is displayed.
v "Find Target": Right-click a file, then click "Find Target" to open the folder on the hard
disk where the file is saved.
v "Refresh Contents": Update the capture album window so that any changes to the
captured files will be reflected in the window.
13
Page 14

■ Using the capture screen
Returns to the start screen.
Switches to the editing screen.
Specifies the file format and resolution for captured images.
Displays and changes the detailed settings and properties for the
camera.
Enlarges the image to fit the computer screen.
To cancel the full screen mode, press the Esc key or click the button.
Connects and disconnects the unit each time this button is clicked.
Displays or hides the capture album window.
Starts the Photo Viewer or Media Player and displays the photo or video
currently selected in the capture album.
Specifies where to save the captured images.
Sends the selected image as an e-mail.
Prints the selected image.
Deletes the selected image from the capture album.
Reduces noise in the image when the check box is selected. Move the
slider that is displayed in the preview screen to adjust the noise level.
Captures still images.
Starts capturing video. To stop recording, click this button. The recording
time is displayed in the capture preview window.
Compatible File Formats
Type Extension Remarks
Still images .jpg
.bmp
Videos .wmv Maximum 640 × 480 pixels
.mpg
.mov Maximum 640 × 480 pixels
14
Windows only
Macintosh only
Page 15

Editing Saved Images
Procedure
A Start the ArcSoft Application software for ELPDC06.
Click "Start" - "Programs" (or "All Programs") - ArcSoft Application software for
ELPDC06.
B The start screen appears. Click "Edit" .
C The editing screen appears and the saved images are displayed.
The editing screen includes functions to correct captured photos and videos, and the
edited files can be saved to a computer hard disk. To return to the start screen, click the
button.
This screen consists of two windows: the capture album window and the workspace
window . To switch the display of the capture album window, click the arrow button
between the two windows.
■ Using the editing screen
Switches to the capture screen.
Automatic adjustment Automatically adjusts the brightness, contrast,
Brightness Adjusts the brightness of the image when the
Contrast Increases and decreases the contrast of
Outline adjustment Makes the outline of the image clearer.
Enlarge/reduce Enlarges and reduces the image.
Rotation Rotates the image.
and outline.
slider is moved.
characters and lines.
This function is not displayed for videos.
15
Page 16

Reverse Reverses the image left to right.
Undo/redo Undo your last action or redo the last action you
undid.
Resize Changes the size of the selected photo. In the
displayed window, enter the dimensions for the
width and height of the photo or click "Keep
Aspect Ratio".
Cropping Deletes unwanted parts of an image. Specify a
rectangular or square area using the crop tool.
Once the area is specified, the surrounding area
will become dark.
Play/pause Plays and pauses the recorded video. Plays the
selected video file and rewinds the file to the
starting point. The button is displayed
during playback.
Editing bar Adjusts the length of the recorded video.
Snapshot Captures a still image from a movie.
Returns all of the changes to their previous settings.
The settings for the selected video file, such as file type and resolution,
can be changed in the displayed window. After the settings are
changed, the file can be saved as a new file.
Replaces the previous file with the revised one.
16
Page 17

Appendix
Solving Problems
Problem Solution
No image appears Check that the USB cable is connected properly and that the
power indicator is on.
The image is out of focus Make sure that the document (subject of the image) is not too
close to the camera lens.
The auto focus may not be able to focus in the following
situations. Press the [Focus] button again.
v Subject matter has low contrast between light and dark
areas
v Subject matter has repeated detailed patterns, such as
horizontal stripes and checkered patterns
v Image is dark overall
v Subject matter has a bright background
Problems with the ArcSoft Application software for ELPDC06
Error Message Solution
The connection to your camera
was lost.
The camera is not found. The
camera is in use by another
program or is not connected.
Make sure that the camera is
connected and working
properly, then try again.
The camera is not found or is
not working properly.
Please click Connect button
and try again.
Make sure that the USB cable is connected securely, and
then click the button again.
If a webcam or device other than the unit is connected,
disconnect it.
Make sure that the USB cable is connected securely, and
then click the button again.
Where To Get Help
If you notice any image problems or if you suspect the document camera is broken when
installing or using it, stop using the unit. Contact the Epson service center that is indicated in
the User's Guide supplied with the projector you are using with the document camera.
17
Page 18

Technical Specifications
Unit Specifications
Interface USB terminal (type B) USB 2.0 *
Power consumption Maximum 2.5 W
Dimensions When unfolded (mm) W 260 × D 76 × H 388
(W10.2 × D3.0 × H15.3 in.)
When folded (mm) W 260 × D 76 × H 60
(W10.2 × D3.0 × H2.4 in.)
Weight 0.9 kg (1.98 lb)
Operation elevation 0 to 2286 m above sea level
(0 - 7500 feet)
Operation temperature range +5 to +35°C (41 to 95°F)
(no condensation)
Storage temperature range -10 to +6°C (14 to 140°F)
(no condensation)
Camera Specifications
Output resolution When connected to a
projector
When connected to a
computer
Sensor resolution 1.92 megapixels
Image capture area Maximum W 257 mm × L 364 mm
Frame rate Maximum 15 frames per second
Zoom 4× digital
Exposure compensation Automatic
White balance Automatic
Image rotation Horizontal direction ±90°
Camera rotation Vertical direction ±90°
* The USB terminal is USB 2.0 compliant. However, operation of all USB-compatible
devices is not guaranteed.
XGA
Maximum UXGA
(10.2 × 13.7 in. max)
(When connected to a computer)
18
Page 19

Software Operating Environment
The supplied software is able to operate on computers meeting the following conditions.
Compatible operating systems Windows XP (32-bit) SP2 or later/Windows Vista (32-bit)/
Windows 7 (32-bit)*/Macintosh OS 10.4.11/10.5 (Apple
QuickTime
CPU Pentium 4 1.4 GHz or higher (Windows XP)/Pentium 4 2.4
GHz or higher (Windows Vista/Windows 7)/PowerPC G5
1.8 GHz processor or Intel Core processor
Memory 512 MB or more
Available hard disk space 300 MB or more of available hard disk space is required
before installation
Monitor SVGA (800 × 600) or higher resolution
* Ultimate/Home Premium/Starter
®
7.2 or later)
Trademarks
Epson is a registered trademark of Seiko Epson Corporation.
Microsoft, Windows, and Windows Vista are either registered trademarks or trademarks of
Microsoft Corporation in the United States and/or other countries.
Macintosh, Mac, and iMac are trademarks of Apple Inc.
ArcSoft is a registered trademark of ArcSoft Company.
General Notice: Other product names used herein are for identification purposes only and
may be trademarks of their respective owners. Epson disclaims any and all rights in those
marks.
ArcSoft Application software for ELPDC06. © 2009 ArcSoft, Inc. All rights reserved.
19
Page 20

DECLARATION of CONFORMITY
According to 47CFR, Part 2 and 15
Class B Personal Computers and Peripherals; and/or CPU Boards and Power
Supplies used with Class B Personal Computers
We: Epson America, Inc.
Located at: 3840 Kilroy Airport Way
MS: 3-13
Long Beach, CA 90806
Tel: 562-290-5254
Declare under sole responsibility that the product identified herein, complies with 47CFR
Part 2 and 15 of the FCC rules as a Class B digital device. Each product marketed, is
identical to the representative unit tested and found to be compliant with the standards.
Records maintained continue to reflect the equipment being produced can be expected to
be within the variation accepted, due to quantity production and testing on a statistical basis
as required by 47CFR 2.909. Operation is subject to the following two conditions :
Trade Name: EPSON
Type of Product: Document Camera
Model: ELPDC06
FCC Compliance Statement
For United States Users
This equipment has been tested and found to comply with the limits for a Class B digital
device, pursuant to Part 15 of the FCC Rules. These limits are designed to provide
reasonable protection against harmful interference in a residential installation. This
equipment generates, uses, and can radiate radio frequency energy and, if not installed and
used in accordance with the instructions, may cause harmful interference to radio or
television reception. However, there is no guarantee that interference will not occur in a
particular installation. If this equipment does cause interference to radio and television
reception, which can be determined by turning the equipment off and on, the user is
encouraged to try to correct the interference by one or more of the following measures.
vReorient or relocate the receiving antenna.
vIncrease the separation between the equipment and receiver.
vConnect the equipment into an outlet on a circuit different from that to which the receiver
is connected.
vConsult the dealer or an experienced radio/TV technician for help.
20
Page 21

WARNING
The connection of a non-shielded equipment interface cable to this equipment will invalidate
the FCC Certification or Declaration of this device and may cause interference levels which
exceed the limits established by the FCC for this equipment. It is the responsibility of the
user to obtain and use a shielded equipment interface cable with this device. If this
equipment has more than one interface connector, do not leave cables connected to
unused interfaces. Changes or modifications not expressly approved by the manufacturer
could void the userís authority to operate the equipment.
For Canadian Users
This Class B digital apparatus meets all requirements of the Canadian Interference-Causing
Equipment Regulations.
Cet appareil numérique de la class B respecte toutes les exingences du Règlement sur le
materiel brouilleur du Canada.
WARNING: This product contains chemicals, including lead, known to the State of
California to cause birth defects or other reproductive harm. Wash hands after handling.
(This notice is provided in accordance with Proposition 65 in Cal. Health & Safety Code §
25249.5 and following.)
© SEIKO EPSON CORPORATION 2009. All rights reserved.
21
 Loading...