

Page 1

TM-U675/U675P
User’s Manual/ ユーザーズマニュアル
/
401109703
Page 2

Manual/
マニュアル
This manual is applied to the TM-U675/TM-U675P with an
autocutter (factory option) and without an autocutter. The
illustrations used in this manual might be different from your
printer.
本書は、オートカッター付き(工場オプション)とオートカッ
ターなしの
るイラストのプリンタとお客様がご使用されるプリンタとは異な
る場合があります。
TM-U675/TM-U675P を対象としています。本書で使用す
/ /
Page 3

English
All rights reserved. No part of this publication may be reproduced, stored in a retrieval system, or transmitted in
any form or by any means, electronic, mechanical, photocopying, recording, or otherwise, without the prior
written permission of Seiko Epson Corporation. No patent liability is assumed with respect to the use of the
information contained herein. While every precaution has been taken in the preparation of this book, Seiko
Epson Corporation assumes no responsibility for errors or omissions. Neither is any liability assumed for
damages resulting from the use of the information contained herein.
Neither Seiko Epson Corporation nor its affiliates shall be liable to the purchaser of this product or third parties
for damages, losses, costs, or expenses incurred by purchaser or third parties as a result of: accident, misuse, or
abuse of this product or unauthorized modifications, repairs, or alterations to this product, or (excluding the
U.S.) failure to strictly comply with Seiko Epson Corporation’s operating and maintenance instructions.
Seiko Epson Corporation shall not be liable against any damages or problems arising from the use of any options
or any consumable products other than those designated as Original Epson Products or Epson Approved
Products by Seiko Epson Corporation.
EPSON and ESC/POS are registered trademarks of Seiko Epson Corporation.
NOTICE: The contents of this manual are subject to change without notice.
Copyright © 1999 by Seiko Epson Corporation, Nagano, Japan.
EMC and Safety Standards Applied
Product Name: TM-U675/U675P
Model Name: M146A (without autocutter)
The following standards are applied only to the
printers that are so labeled. (EMC is tested using the
EPSON power supplies.)
Europe: CE marking
North America: EMI: FCC/ICES-003 Class A
Japan: EMC: VCCI Class A
Oceania: EMC: AS/NZS 3548 Class B
China: EMC: GB9254
Taiwan: BSMI
M146B (with autocutter)
Safety: EN 60950
Safety: UL 1950/CSA C22.2 No. 950
JEIDA-52
GB17625.1
Safety: GB4943
WARNING
The connection of a non-shielded printer interface
cable to this printer will invalidate the EMC standards
of this device.
You are cautioned that changes or modifications not
expressly approved by SEIKO EPSON Corporation
could void your authority to operate the equipment.
CE Marking
The printer conforms to the following Directives and
Norms:
Directive 89/336/EEC EN 55022 Class B
EN 55024
EN 61000-4-2
EN 61000-4-3
EN 61000-4-4
EN 61000-4-5
EN 61000-4-6
Directive 90/384/EEC EN45501
EN 61000-4-11
FCC Compliance Statement
For American Users
This equipment has been tested and found to comply
with the limits for a Class A digital device, pursuant
to Part 15 of the FCC Rules. These limits are designed
to provide reasonable protection against harmful
interference when the equipment is operated in a
commercial environment.
This equipment generates, uses, and can radiate radio
frequency energy and, if not installed and used in
accordance with the instruction manual, may cause
harmful interference to radio communications.
Operation of this equipment in a residential area is
likely to cause harmful interference, in which case the
user will be required to correct the interference at his
own expense.
For Canadian Users
This Class A digital apparatus complies with
Canadian ICES-003.
TM-U675/U675P User’s Manual 1
Page 4

English
Safety Precautions
This section presents important information intended to ensure
safe and effective use of this product. Please read this section
carefully and store it in an accessible location.
WARNING:
Shut down your equipment immediately if it produces smoke, a strange
odor, or unusual noise. Continued use may lead to fire or electric shock.
Immediately unplug the equipment and contact your dealer or a SEIKO
EPSON service center for advice.
Never attempt to repair this product yourself. Improper repair work can
be dangerous.
Never disassemble or modify this product. Tampering with this product
may result in injury, fire, or electric shock.
Be sure to use the specified power source. Connection to an improper
power source may cause fire or shock.
Never insert or disconnect the power plug with wet hands. Doing so
may result in severe shock.
Do not allow foreign matter to fall into the equipment. Penetration of
foreign objects may lead to fire or shock.
If water or other liquid spills into this equipment, unplug the power cord
immediately, and then contact your dealer or a SEIKO EPSON service
center for advice. Continued usage may lead to fire or shock.
Do not place multiple loads on the power outlet (wall outlet).
Overloading the outlet may lead to fire.
Always supply power directly from a standard domestic power outlet.
Handle the power cord with care. Improper handling may lead to fire or
shock.
Do not modify or attempt to repair the cord.
Do not place any object on top of the cord.
Avoid excessive bending, twisting, and pulling.
Do not place cord near heating equipment.
Check that the plug is clean before plugging it in.
Be sure to push the prongs all the way in.
If the cord becomes damaged, obtain a replacement from your dealer
or a SEIKO EPSON service center.
2 TM-U675/U675P User’s Manual
Page 5

CAUTION:
Do not connect cables in ways other than those mentioned in this
manual. Different connections may cause equipment damage and
burning.
Be sure to set this equipment on a firm, stable, horizontal surface.
Product may break or cause injury if it falls.
Do not use in locations subject to high humidity or dust levels. Excessive
humidity and dust may cause equipment damage, fire, or shock.
Do not place heavy objects on top of this product. Never stand or lean
on this product. Equipment may fall or collapse, causing breakage and
possible injury.
To ensure safety, please unplug this product prior to leaving it unused for
an extended period.
Do not touch the print head. Wait for the head to cool. The head can
be very hot after printing for a long time. Touching it may cause burns.
Do not use aerosol sprayers containing flammable gas inside or around
this product. Doing so may cause fire.
Labels
WARNING:
Do not connect a telephone line to the drawer kick-out connector or
the display module connector; otherwise the printer and the telephone
line may be damaged.
English
CAUTION:
Do not touch the print head. Wait for the head to cool. The head can
be very hot after printing for a long time. Touching it may cause burns.
Connectors
interface
DM
drawer kick-out
TM-U675/U675P User’s Manual 3
power
Page 6

English
Opening the Paper Roll Cover
If you open the cover of an autocutter-equipped printer except to
install a paper roll, be sure to follow the steps below to prevent a
paper jam.
1. Feed the roll paper approximately 50 mm {1.97"}.
2. Cut the paper with the manual cutter.
3. Close the cover.
without an autocutter
with an autocutter
➁
➀
Installing the Paper Roll
Note:
Do not use paper rolls that have the paper glued or taped to the core
because they might cause a paper jam.
You need to install a paper roll even if you are using only the slip or
validation sections of the printer.
4 TM-U675/U675P User’s Manual
Page 7

English
Turn on the printer. Hold both edges of the paper and insert it into
the paper slot. It will be fed automatically into the printer.
For 2-ply paper, insert the journal paper into the take-up spool as
shown below. Be sure that 40mm to 60
mm {1.5" to 2.25"} of paper
extends beyond the spool and that the edge of the paper is against
the flange.
Insert the take-up spool and tear off the receipt paper, as shown
below.
If you need to remove roll paper before it is all gone, follow these
steps:
1. Lift up the take-up spool with the journal paper attached.
2. Cut the paper off behind the paper insert slot.
3. Push the release lever (located on the right side of the paper
roll).
TM-U675/U675P User’s Manual 5
Page 8

English
Then pull out the remaining paper in the paper feed direction.
Always pull paper in the paper feed direction to prevent damage to
the printer mechanism.
➀
➁
Installing the Ribbon
EPSON recommends the use of genuine EPSON ribbon cassettes.
Turn on the printer. Turn the knob on the ribbon cartridge. Open
the front cover of the printer, and insert the new ribbon. Turn the
knob two or three times and check the ribbon position.
.
➂
6 TM-U675/U675P User’s Manual
ribbon
position
Page 9

Inserting Slip Paper
Inserting Validation Paper
➁
English
➁
➀
➀
Troubleshooting
Error light on or flashing.
Make sure that the printer cover is properly closed.
Turn off the printer and check for a paper jam. After removing the
paper jam, turn on the printer.
TM-U675/U675P User’s Manual 7
Page 10

English
Opening the printer mechanism
For difficult paper jams or to remove objects that have fallen in the
printer, follow the steps below:
1. Turn off the printer and open the paper roll cover. Raise the
mechanism by pushing the levers backward in the direction
indicated by the arrows.
2. Press the paper release lever and pull the jammed paper out in
the paper feed direction or remove the object that was dropped
in the printer. Always pull paper in the paper feed direction to
prevent damage to the printer mechanism. Then push the
mechanism back into place until you feel it click.
Turn on the printer. If you cannot solve the problem, contact
your dealer or a qualified service person.
paper
release lever
MICR Option (factory option)
Reading MICR Characters On Personal Checks
CAUTION:
Do not insert checks with staples in them. This may cause paper jams,
MICR reading errors, and damage to the MICR head.
Be sure the checks are flat, without curls, folds, or wrinkles.
8 TM-U675/U675P User’s Manual
Page 11

1. Wait until the SLIP light flashes. Then insert the check face up
with the right side of the check against the right side of the
paper inlet as far as it will go. Be sure that the MICR characters
are on the right.
MICR
characters
on this side
face up
2. The printer will detect the check and start drawing it in. When
the printer starts drawing it in, let go of the check immediately.
When the printer ejects the check and the SLIP light starts
flashing again; remove the check by pulling it straight up; do
not pull it at an angle.
Cleaning the MICR Mechanism
Once a year clean the MICR head with a moistened cleaning sheet.
Use the following or an equivalent commercially available cleaning
sheet:
PRESAT brand (KIC) “CHECK READER CLEANING CARD.”
Note:
Be sure not to use an adhesive cleaning sheet.
English
Follow the steps below:
1. Load a paper roll in the printer; turn off the power; then open
the paper roll cover and turn the power back on while holding
down the RELEASE button.
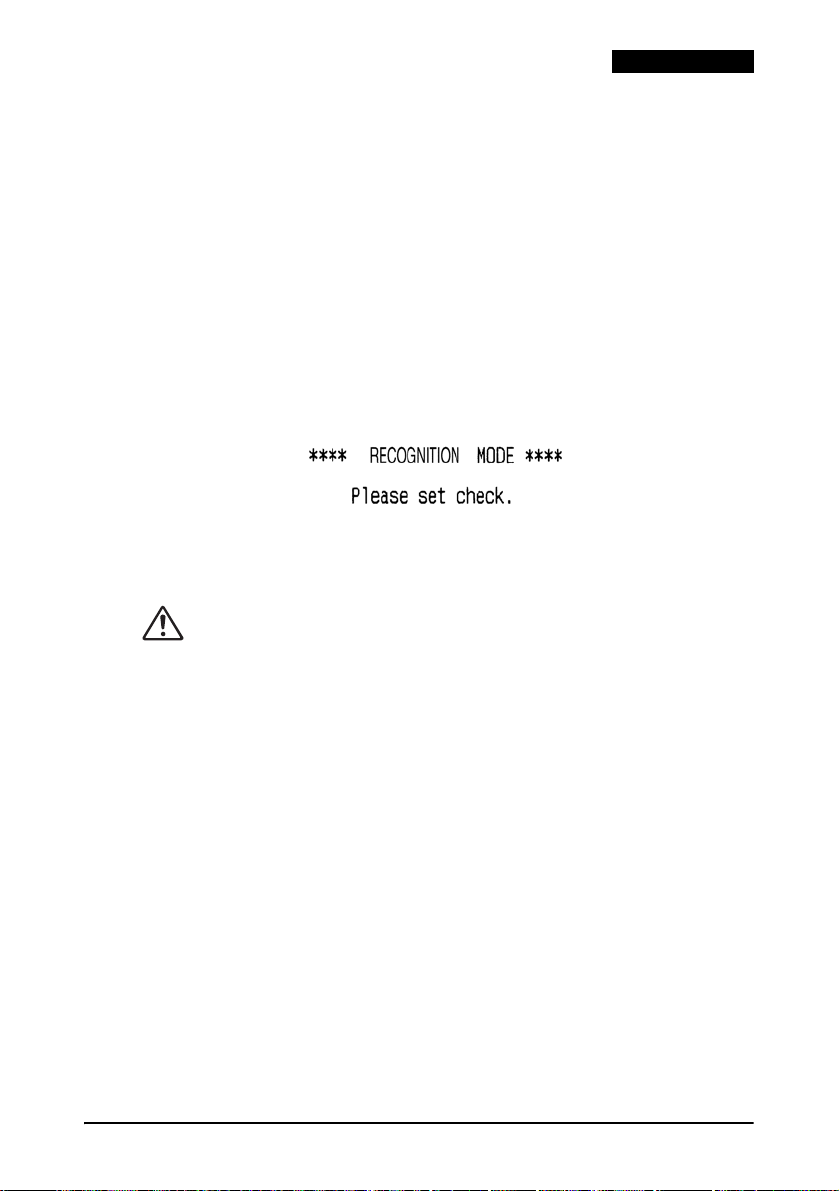
2. Press the RELEASE button seven times; then close the paper roll
cover. The printer prints the following message on receipt
paper and the SLIP light flashes.
TM-U675/U675P User’s Manual 9
Page 12
English
3. Insert the cleaning sheet like a standard check.
CAUTION:
Be sure that the sheet is inserted with the correct side up and that it is
inserted in the correct direction.
Use a cleaning sheet only one time; then discard it.
4. When the sheet is ejected, press the RELEASE button, and
remove the sheet from the printer.
Notes on Using the MICR Reader
Do not install the printer near any magnetic fields. Be especially
careful where you install your display device and be sure to check
the recognition rate of the MICR reader with the display device in
place.
Make sure that the printer is not subjected to any impact or
vibration when it is performing a MICR reading.
Attaching the Paper Guide
When you want to use a paper roll that is 76 mm wide, you need to
attach the paper holder and paper roll guide packed with the
printer. Follow the steps below.
Note:
You do not need this with standard 82-83 mm paper rolls.
1. Open the paper roll cover and remove the paper roll take-up
device.
10 TM-U675/U675P User’s Manual
Page 13
2. Insert the paper holder at an angle as shown below.
paper
holder
3. Slide the holder in the direction indicated by the arrow in the
illustration above until you feel it click. It should now be in the
position shown in the illustration below.
English
TM-U675/U675P User’s Manual 11
Page 14

English
4. Attach the paper roll guide as shown below. Be sure that the
rectangular hole in the guide fits over the tab on the printer.
Push the guide until you feel it click into place.
tab paper roll
guide
5. Install a paper roll; then close the cover.
12 TM-U675/U675P User’s Manual
Page 15

English
TM-U675/U675P Specifications
Print method: 9-pin serial impact dot matrix
Print font: 5 × 9 / 7 × 9
Columns: 37 / 50 columns (receipt)
Character size: 1.56 mm × 3.1 mm / 1.24 mm × 3.1 mm {0.006” × 0.12” / 0.49” ×
Character sets: 95 alphanumeric, 37 international characters
Print speed: Approximately 5.14 LPS* (40 columns at 17.8 CPI**)
Paper dimensions:
Receipt: paper width: 76 mm ± 0.5 mm {2.99” ± 0.0197”} or 82.5 mm ± 0.5
Slip: 68 mm -230 mm × 100 mm - 297 mm {2.68” - 9.06” × 3.94” - 11.69”}
Validation: 68 mm -230 mm × 68 mm - 230 mm {2.68” - 9.06” × 2.68” - 9.06”}
Paper thickness (1-ply): Receipt: 0.06 mm - 0.085 mm {0.0024” - 0.0033”}
Copy capability: Receipt: 1 original + 2 copies
Inked ribbon: ERC-32
Ribbon life: 4 million characters
Interface (compatible): RS-232C / Bidirectional parallel / RS-485 (dealer option)
Data buffer: Selectable for 45 bytes or 4 Kbytes using DIP switch
D.K.D. function: 2 drives
Power supply: +24 VDC ± 10%
Current consumption: 1.8 A (mean)
Temperature: Operating: 5°C to 45 °C {41 °F to 113 °F}
Humidity: 10 to 90 % without condensation
Reliability: MTBF: 180,000 hours
Overall dimensions: 195 mm × 186 mm × 298 mm {7.68” × 7.32” × 11.73”} (H×W×D)
Weight: Approximately 4.8 Kg. {10.6 lb}
45 / 60 columns (slip/validation)
0.12”}
128 × 12 pages extended graphic characters
mm {3.25” ± 0.0197”}
outside diameter: 60 mm {2.36”} or less for single-ply journal
89 mm {3.50”} or less for single-ply receipt
83 mm {3.27”} or less for 2-ply or 3-ply
spool diameter (inside): 10 mm {0.39”} or more
(W × L)
(W × L)
Slip/validation: 0.09 mm - 0.2 mm {0.0035” - 0.0079”}
Slip/validation: 1 original + 2 copies
Storage: −10 °C to 50 °C {14 °F to 122 °F}
MCBF: 37 million lines
With an autocutter: approximately 5.8 Kg. {12.8 lb}
* LPS: Lines Per Second
** CPI: Characters Per Inch, CPI means the number of characters per 25.4 mm
TM-U675/U675P User’s Manual 13
Page 16

English
14 TM-U675/U675P User’s Manual
Page 17

日本語
日本語
TM-U675/U675P
ユーザーズマニュアル
イラストについて
本取扱説明書は4部に分かれています。イラストは第1部の英語版に掲載されていますのでそちらをご覧くだ
さい。
ご注意
(1) 本書の内容の一部または全部を無断で転載、複写、複製、改ざんすることは固くお断りします。
(2) 本書の内容については、予告なしに変更することがあります。
(3) 本書の内容については、万全を期して作成いたしましたが、万一ご不審な点や誤り、記載もれなど、お気
づきの点がありましたらご連絡ください。
(4) 運用した結果の影響については、上項にかかわらず責任を負いかねますのでご了承ください。
(5) 本製品がお客様により不適切に使用されたり、本書の内容に従わずに取り扱われたり、またはエプソン
およびエプソン指定の者以外の第三者により修理・変更されたことなどに起因して生じた損害などにつきま
しては、責任を負いかねますのでご了承ください。
(6) エプソン純正品およびエプソン品質認定品以外のオプションまたは消耗品を装着してトラブルが発生した
場合には、責任を負いかねますのでご了承ください。
EPSON®はセイコーエプソン株式会社の登録商標です。
ESC/POS®はセイコーエプソン株式会社の登録商標です。
© セイコーエプソン株式会社 1999
TM-U675/U675P
ユーザーズマニュアル
15
Page 18

日本語
ご使用の前に
ご使用の際は、必ず「設置マニュアル」をよくお読みのうえ、正しくお使いく
ださい。
「設置マニュアル」は、不明な点をいつでも解決できるように、すぐ取り出して
見られる場所に保管してください。
安全にお使いいただくために
このマニュアルおよび製品には、製品を安全に正しくお使いいただき、お客様や他
の人々への危害や財産への損害を未然に防止するために、以下の記号が使われてい
ます。
その意味は次のとおりです。内容をよく理解してから本文をお読みください。
警告
この表示を無視して、誤った取り扱いをすると、人が死亡または重傷を負う
可能性が想定される内容を示しています。
注意
この表示を無視して、誤った取り扱いをすると、人が傷害を負う可能性が想
定される内容および物的損害のみの発生が想定される内容を示しています。
警告
• 煙が出たり、変な臭いや音がするなど異常状態のまま使用しないでください。
そのまま使用すると、感電・火災の原因となります。すぐに電源を切り、電源プ
ラグをコンセントから抜いて、販売店またはサービスセンターにご相談くださ
い。
• お客様による修理は危険ですから絶対におやめください。
• 分解や改造はしないでください。けがや火災・感電の恐れがあります。
• 必ず指定されている電源をお使いください。他の電源を使うと、火災・感電の恐
れがあります。
• 濡れた手で電源プラグを抜き差ししないでください。感電の恐れがあります。
• 本製品の内部に異物を入れたり、落としたりしないでください。火災・感電の恐
れがあります。
• 万一、水などの液体が内部に入った場合は、すぐに電源スイッチを切り、電源
コードをコンセントから抜き、販売店またはサービスセンターにご相談くださ
い。そのまま使用すると、感電
16 TM-U675/U675P
ユーザーズマニュアル
・火災の原因となります。
Page 19

日本語
警告
• 電源コードのたこ足配線はしないでください。火災の恐れがあります。家庭用
電源コンセント(交流100 V) から電源を直接取ってください。
• 電源コードの取り扱いには注意してください。誤った取り扱いをすると火災・感
電の恐れがあります。
・ 電源コードを加工しない。
・ 電源コードの上に重いものを乗せない。
・ 無理に曲げたり、ねじったり、引っ張ったりしない。
・ 熱器具の近くに配線しない。
・ 電源プラグはホコリなどの異物が付着したまま差し込まない。
・ 電源プラグは刃の根元まで確実に差し込む。
電源コードが傷んだら販売店またはサービスセンターに交換をご依頼ください。
注意
• 各種ケーブルは、本マニュアルで指示されている以外の配線はしないでくださ
い。誤った配線をすると、故障や火災の恐れがあります。
• 不安定な場所(ぐらついた台の上や傾いた所など)に置かないでください。落
ちたり、倒れたりして、けがをする恐れがあります。
• 湿気やほこりの多い場所に置かないでください。故障や火災・感電の恐れがあり
ます。
• 本製品の上に乗ったり、重いものを置かないでください。倒れたり、こわれた
りしてけがをする恐れがあります。
• 本製品を長時間ご使用にならないときは、安全のため必ず電源プラグをコンセ
ントから抜いてください。
• プリントヘッドには決して触れないでください。プリントヘッドが低温となっ
てから作業を始めてください。長時間印字後は、プリントヘッドが高温となっ
ているのでやけど等の恐れがあります。
• 本製品の内部や周囲で可燃性ガスのスプレーを使用しないでください。ガスが
滞留して、引火による火災などの原因となる恐れがあります。
電波障害自主規制について
注意
この装置は、情報処理装置等電波障害自主規制協議会 (VCCI) の基準に基づく
クラス A 情報技術装置です。この装置を家庭環境で使用すると電波妨害を引き起
こすことがあります。この場合には使用者が適切な対策を講ずるよう要求される
ことがあります。
TM-U675/U675P
ユーザーズマニュアル
17
Page 20

日本語
ラベル
警告 :
ドロワーキックアウトコネクタまたはカスタマディスプレイコネクタに、電
話線を差し込まないでください。電話回線またはプリンタを破損する恐れが
あります。
注意 :
プリントヘッドは高温になっています。
インタフェースコネクタ
インタフェース
コネクタ
18 TM-U675/U675P
カスタマディス
プレイコネクタ
ドロワーキック
アウトコネクタ
ユーザーズマニュアル
パワーコネクタ
Page 21

ロール紙カバーを開ける
ロール紙を装着するとき以外にオートカッター付きのプリンタのカバーを開
ける場合、次の手順に従い、紙詰まりを起こさないようにしてください。
1. ロール紙を約 50 mm 送ります。
2. マニュアルカッターで紙を切ります。
3. カバーを閉じます。
ページ 4 のイラストを参照してください。
ロール紙の挿入
注記:
紙の終端がロール芯に接着されている、またはテープ止めされているロール
紙を使用すると、紙詰まりを起す原因となりますので、使用しないでくださ
い。
スリップ紙またはバリデーション紙だけを使用する場合でも、ロール紙を挿
入してください。
4. プリンタの電源を入れます。ロール紙の両端を持ち、紙挿入口に入れる
と、自動的に紙送りされます。
5. 感圧紙を使用する場合は、巻き取り軸にジャーナル紙を挿入します。こ
の時40 mm から60 mm の紙が軸より
ンジ板に寄っているかを確認します。
6. 巻き取り軸をプリンタにセットし、レシート紙をマニュアルカッタで切
ります。
ロール紙の挿入方法については、ページ5のイラストを参照してください。
出ていること、紙の端がフラ
日本語
ロール紙がなくなる前に交換したい場合は、以下の手順を行ってください。
1. 巻き取り軸を取ります。
2. 紙挿入口側のロール紙を切ります。
3. ロール紙の右側にあるレリーズレバーを押し、紙を紙送り方向から取り
外します。この時、紙送り方向の逆方向から取り外さないようにしてく
ださい。プリンタメカの故障の原因となります。
リボンカセットの挿入
セイコーエプソンの純正リボンカセットをご使用ください。
4. プリンタの電源を入れます。リボンカセットのノブを回します。フロン
トカバーを開け、新しいリボンカセットを取り付けます。ページ 6 のイ
ラストを参照してください。
TM-U675/U675P
ユーザーズマニュアル
19
Page 22

日本語
5. ノブを2、3回まわし、リボンカセットが確実に取り付けられているこ
とを確認します。
スリップ紙、バリデーション紙の挿入
スリップ紙、バリデーション紙の挿入については、ページ7のイラストを参
照してください。
トラブルシューティング
エラーの点灯または点滅
プリンタカバーが正しく閉じられているか確認します。
プリンタの電源を切り、紙が詰まっていないかチェックしてください。紙詰
まりをなくしてから、プリンタの電源を入れてください。
プリンタメカを開ける場合
複雑な紙詰まりの場合、またはプリンタ内部に異物が落ちてしまった場合は、
以下の手順で取り除いてください。
1. プリンタの電源を切り、ロール紙カバーを開けます。レバーを後方に押
し、メカを開けます。メカの開け方については、ページ8のイラストを
参照してください。
2. レリーズレバーを押し、紙送り方向から詰まった紙を取り除きます。ま
たは落ちた異物をプリンタから取り除きます
けるため、必ず紙送り方向から紙を取り除いてください。メカを元の位
置に戻します。
プリンタの電源を入れます。問題が解決しない場合には、販売店または
認定整備担当者にご連絡ください。
。プリンタメカの故障を避
MICR 印字 (工場オプション)
MICR 文字読み取り
注意 :
ホッチキスでとめられているチェック紙は使用しないでください。紙詰まり、
MICR の誤読、または MICR ヘッドの損傷が起こる場合があります。
チェック紙は折れ、しわ、曲りのないものを使用してください。
1. SLIP LED が点滅したらチェック紙を挿入します。チェック紙は MICR 文
字を上にし、用紙挿入口の右側に当てながら、プリンタの奥に突き当た
るまで差し込んでください。MICR 文字が用紙の右端にあることを確認し
てください。ページ9のイラストを参照してください。
20 TM-U675/U675P
ユーザーズマニュアル
Page 23
2. プリンタがチェック紙を検出すると、用紙は自動的に引き込まれます。
この時、用紙を持っている手をすばやく放して下さい。プリンタが用紙
を排出し、SLIP LED が再び点滅したら、まっすぐに用紙を取り除いてく
ださい。斜め方向に用紙を引っ張らないようにしてください。
MICR 機構のクリーニング
MICR ヘッドは湿式クリーニングシートを使用し、約 1 年に一回クリーニング
を行ってください。
クリーニングシートは以下のもの(市販品)を使用してください。
PRESAT brand (KIC) [CHECK READER CLEANING CARD または相当品 ]
注記:粘着式シートは使用しないでください。
クリーニングは以下の方法で行ってください。
1. ロール紙をプリンタにセットし、電源をオフにします。ロール紙カバー
を開け、RELEASE ボタンを押しながら電源をオンにします。
2. RELEASE ボタンを7回押し、ロール紙カバーを閉じます。プリンタは以
下のメッセージをロール紙に印字します。SLIP LED が点滅します。
日本語
3. チェック紙の挿入と同じようにクリーニングシートを挿入します。
注意 :
クリーニングシートを挿入する時は、正しい面が上になっていること、正し
い方向で挿入されていることを確認してください。
クリーニングシートは1回使用したら破棄してください。
4. クリーニングシートが排出されたら、RELEASE ボタンを押し、プリンタ
からシートを取り除いてください。
MICR リーダーの取り扱い上の注意
磁界を発生する電子機器等に近接してプリンタを配置しないでください。特
にディスプレイ装置の配置については注意してください。ディスプレイ装置
の近接配置については、認識率の確認をしてください。
MICR 読み取り中に、プリンタに衝撃、振動を加えないようにしてくださ
い。
TM-U675/U675P
ユーザーズマニュアル
21
Page 24

日本語
紙案内の取り付けについて
76mm 幅のロール紙を使用する場合は、同梱されているロール紙ホルダー
と、ロール紙ガイドを下記に手順に従って取り付けてください。
注記:82 - 83mm 幅のロール紙を使用する場合は、紙案内を取り付ける必
要はありません。
1. ロール紙カバーを開け、巻き取り軸を取り除きます。
2. ロール紙ホルダーを挿入します。ページ 11 のイラストを参照してくださ
い。
3. ロール紙ホルダーをスライドさせ、しっかりとはめます。ページ 11 のイ
ラストを参照してください。
4. ロール紙ガイドをはめます。ロール紙ガイドの長方形の穴が、プリンタ
のタブにしっかりとはまるように取り付けます。ページ 12 のイラストを
参照してください。
5. ロール紙をセットし、ロール紙カバーを閉じてください。
22 TM-U675/U675P
ユーザーズマニュアル
Page 25

TM-U675/U675P 仕様
印字方式 9 ピン・シリアル・インパクト・ドット・マトリックス
印字フォント 5 x 9/7 x 9
桁数 37/50 桁(レシート)
文字サイズ(WxH) 1.56 mm x 3.1 mm/1.24 mm x 3.1 mm
文字セット 英数字 95 文字、国際文字 37 文字
印字速度 約 5.14 lps(17.8 cpi で40桁)
用紙寸法
レシート 用紙幅:76 mm ± 0.5 mm または 82.5 mm ± 0.5 mm
スリップ 68 mm - 230 mm x 100 mm - 297 mm(WxL)
バリデーション 68 mm - 230 mm x 68 mm - 230 mm(WxL)
用紙厚さ レシート:0.06 mm - 0.085 mm
複写能力 レシート:オリジナル 1 枚+複写 2 枚
インクリボン ERC-32
リボンの寿命 400 万文字
インタフェース(互換) RS-232C/ 双方向パラレル /RS-485(販売店オプション)
データバッファ DIP スイッチを使って 45 バイトまたは 4K バイトの選択が可能
D.K.D. 機能 2 ドライブ
電源 +24VDC ± 10%
消費電流 1.8A(平均)
温度 動作:5 ℃~ 45 ℃
湿度 10 ~ 90%、結露なし
信頼性 MTBF:180,000 時間
最大寸法 195 mm x 186 mm x 298 mm(HxWxD)
重量 約 4.8kg
45/60 桁(スリップ / バリデーション)
128 x 12 ページの拡張グラフィック文字
外径:1 枚紙・ジャーナルに対して 60 mm 以下
1 枚紙レシートに対して 89 mm 以下
2 枚紙または 3 枚紙に対して 83 mm 以下
ロール紙巻芯(内側):10 mm 以上
スリップ / バリデーション:0.09 mm - 0.2 mm
スリップ / バリデーション:オリジナル 1 枚+複写 2 枚
保管:-10 ℃~ 50 ℃
MCBF:3700 万行
オートカッター付き約 5.8kg
日本語
[lps:1 秒間あたりの行数(lines per second)]
[cpi:25.4 mm あたりの文字数(characters per inch)]
TM-U675/U675P
ユーザーズマニュアル
23
Page 26

日本語
24 TM-U675/U675P
ユーザーズマニュアル
Page 27

中文 ( 簡體 )
TM-U675/U675P
使用說明書
本手冊分為四個部分,請參看第一部分的圖示 (中文)。
有關圖示的注釋
注意:
版權所有。未經 Seiko Epson Corporation 事先書面許可,不可以電子、機械、複印、錄制或以任何形式和任
何方式複制、保存在檢索系統中或傳遞本手冊的任何部分。對于使用此處包含的信息,將不承擔任何專利責
任。在准備此手冊時,Seiko Epson Corporation 已經至臻完善,故此對其中的錯誤或遺漏不承擔任何責任。
同時對任何由于使用此處包含的信息而造成的損失將不承擔任何責任。
由于意外、誤用、或違章操作本產品,以及未經授權而對產品進行改裝、修理、或改造本產品、或 (除了美
國)未能嚴格按照 Seiko Epson Corporation 的操作和維護規程而對購買者或第三方造成損壞、損失、花費或
開支,Seiko Epson Corporation 及其附屬公司對購買者或第三方將不承擔任何責任。
對于由于使用任何非 Epson 原產或 Epson 授權生產的選件或耗材而造成的任何損失或故障,Seiko Epson
Corporation 將不負有任何責任。
EPSON 和 ESC/POS 是 Seiko Epson Corporation 的注冊商標。
聲明﹕本手冊中的內容若有變動將不另行通知。
版權所有 © 1999 年,Seiko Epson Corporation,日本長野。
Page 28
中文 ( 簡體 )
EMC 和適用的安全標准
產品名稱:TM-U675 / TM-U675P
型號名稱: M146A (不具自動裁紙器)
以下標准只適用于有此標記的打印機。(使用 Epson 電源對 EMC 進行測試)
歐洲: CE 標記
安全性﹕ EN 60950
北美洲: EMI: FCC / ICES-003 A 級
日本: EMC: VCCI A 級
大洋洲: EMC: AS / NZS 3548 B 級
中國: EMC: GB9254
台灣: BSMI
警告
使用無屏蔽打印機接口電纜連接本打印機,將使此設備的 EMC 標准無效。
未經 SEIKO EPSON Corporation 明確認可而進行更改或修改,將被取消操作本設備的權利。
CE 標記
本打印機符合以下指令和標准﹕
指令 89/336/EEC EN55022 B 級
指令 90 / 384 / EEC EN45501
M146B (具自動裁紙器)
安全性﹕UL 1950 / CSA C22.2 No. 950
JEIDA-52
GB17625.1
安全﹕GB4943
EN 55024
EN 61000-4-2
EN 61000-4-3
EN 61000-4-4
EN 61000-4-5
EN 61000-4-6
EN 61000-4-11
安全注意事項
此部分介紹了有關確保安全和有效使用本產品的重要信息。請仔細閱讀此部分,并妥
善保管。
警告:
如果此設備冒煙、或產生強烈的氣味、或發出不正常的噪聲,應立即關閉設備的
電源。繼續使用將會導致火災或電擊,請立即拔下電源插頭,然后與經銷商或
SEIKO EPSON 的維修中心聯系。
不要試圖自行修理本產品。不正確的修理將是非常危險的。
不要拆開或修改本產品,本產品的損壞將可能導致人體受傷、火災或電擊。
確定使用專用的電源,使用不正確的電源連接可能會引起火災或電擊。
26 TM-U675/U675P 使用說明書
Page 29

中文 ( 簡體 )
警告:
不要用濕手拔插電源插頭,這樣可能會導致嚴重的電擊。
不可將外物掉入設備中,外物掉入可能會導致火災或電擊。
如果有水或其他液體濺入本設備,應立即拔下電源插頭,然后與經銷商或
SEIKO EPSON 的維修中心聯系。繼續使用會導致火災或電擊。
不要在電源插座 (牆上插座)上插多個插頭,插座的過載可能會引起火災。
總是將電源直接連接到標准的家用插座上。
應小心操作電源線,不正確的操作可能會導致火災或電擊。
不要修改或試圖修理電源線。
不要在電源線上放置任何物體。
避免過分的彎曲、纏繞和拉拽。
不要將電源線靠近發熱的設備放置。
在插入插頭前應確保插頭清潔。
確保將插頭完全插入。
如果電源線破損,應從經銷商或 SEIKO EPSON 的維修中心處更換。
注意:
不要使用在本手冊中沒有提到的方法連接電纜,不同的連接方法可能會導致設備
損壞或燒毀。
確定將本設備放置在穩固,穩定的水平面上,如果摔落,將導致破裂或引致受
傷。
不要在高濕度或過多灰塵的環境中使用。過多的濕氣和灰塵會導致設備損壞,起
火或電擊。
不要在本產品上放置重物,也不要站在或靠在本產品上,設備可能會摔落或滑
倒,造成破裂和可能引致受傷。
為確保安全,在較長時間不使用前應拔下插頭。
不要觸摸打印頭,等待打印頭冷卻。在長時間打印后打印頭會非常熱,觸摸這些
部份會造成燙傷。
請勿在本產品的內部及周圍使用可燃性氣體的噴霧器。否則可能造成火災。
TM-U675/U675P 使用說明書 27
Page 30

中文 ( 簡體 )
標記
警告:
不可將電話線連接到插拔式連接器或顯示模塊連接器上;否則打印機和電話線
可能會損壞。
注意:
打印頭非常熱。
連接器
接口
顯示模塊
插拔式連接器
電源
28 TM-U675/U675P 使用說明書
Page 31

打開紙卷蓋
如果您要打開有自動切割配備的打印機的紙卷蓋,除非是您想安裝卷筒紙,并
確保按以下步驟執行以防止夾紙。
1. 送入卷筒紙大約 50 毫米。
2. 使用手動切割器切下紙張。
3. 關閉紙卷蓋。
請參見頁 4 的圖示說明。
安裝紙卷
註:
請不要使用由粘膠或膠貼將紙固定于軸芯上的卷軸,如果這樣會造成夾紙。
即使只使用票據紙或驗証紙,也請裝入整卷紙。
1. 開啟打印機電源。抓住紙捲的兩端,將一端送入進紙槽,它將會自動送入。
2. 當使用壓敏紙時,將記錄紙插入卷軸。確定從卷軸處紙伸出 40 至 60 毫
米,并且紙張的末端向著凸緣。
3. 將卷軸安裝進打印機,并且手動切掉接收到的紙。
有關如何裝載紙捲的詳細信息,請參閱第 5 頁的圖示。
按照如下的步驟,在紙捲用完之前進行更換。
1. 取出卷軸。
2. 切開紙捲和裝入進紙槽。
3. 按釋放杆 (在紙卷的右邊),沿進紙的方向取出紙張。確定不要按照與進
紙方向相反的方向拉紙,否則會造成機械損壞。
中文 ( 簡體 )
裝載色帶盒
只可使用 EPSON 原廠的色帶盒。
4. 開啟打印機的電源。轉動色帶盒旋鈕。打開前蓋,裝載新的色帶盒。有關
細節,請參閱第 6 頁的圖示。
5. 轉動旋鈕兩圈或三圈,并且確認色帶盒可靠地安裝妥當。
裝載票據紙或驗証紙
有關安裝票據紙或驗証紙的細節,請參閱第 7 頁的圖示。
TM-U675/U675P 使用說明書 29
Page 32
中文 ( 簡體 )
故障排除
出錯警告燈亮或閃爍
關閉打印機電源,檢查打印機是否夾紙。
清除夾紙後,請重新開啟打印機。
打開打印機的機械裝置
如果不能正常清除夾紙,或者如果有異物落入打印機中,則您可以按照以下的
步驟檢查打印機﹕
1. 關閉打印機並打開紙卷蓋。向后按控制杆,以便打開機械裝置 (有關細
節,請參閱第 8 頁的圖示)。
2. 按釋放杆,按照進紙方向取出夾紙。不可以相反的方向拉紙,否則會損壞
機械裝置。完成后,將機械裝置放回到原來的位置。
開啟打印機。如果問題仍未能解決,請與您的銷售商或合資格的技術人員
聯繫。
磁性墨水字符識別打印 (出廠選件)
讀取磁性墨水字符識別字符
注意:
不可使用有訂書釘的支票,否則會造成夾紙,磁性墨水字符識別讀取錯誤,甚
至損壞磁性墨水字符識別頭。不可使用卷曲,褶皺或太硬不易屈曲的支票。
1. 當 SLIP (票據紙)燈開始閃爍時,將支票插入,并保証磁性墨水字符識
別字符面向上,而且將它對齊進紙槽的右邊完全插入。核實磁性墨水字符
識別字符在支票的右邊 (請參閱第 9 頁的圖示)。
2. 當打印機檢測到支票時,它會自動送入支票。此時應立即松手放開支票。
當打印機退出支票并且 SLIP(票據紙)燈再次閃爍時,應筆直拉出支票,
不要以一個角度拉出。
30 TM-U675/U675P 使用說明書
Page 33

中文 ( 簡體 )
清潔磁性墨水字符識別機件
每年需要使用一張沾濕的清潔頁清洗磁性墨水字符識別頭一次。PRESAT 牌
(KIC)“CHECK READER CLEANING CARD (支票閱讀器清潔卡)或
同等的產品。
註:不可使用帶粘性的清潔頁。
按照以下的步驟進行清潔﹕
1. 將紙捲安裝到打印機中,關閉電源。打開紙捲蓋,并且在開啟電源的同
時,按住 RELEASE (釋放)按鈕。
2. 按住 RELEASE (釋放)按鈕 7 秒鐘,然后關閉紙捲蓋。將在紙捲上打
印出如下信息,并且 SLIP (票據紙)燈將閃爍。
3. 將清潔頁以與支票相同的方向插入。
注意:
確定在插入清潔頁時保証正確的面向上,并且以正確的方向插入。不可再次使
用清潔紙﹔每次都需要使用一張新的紙。
4. 當退出清潔紙后,按 RELEASE (釋放)按鈕,從打印機中取出清潔頁。
使用磁性墨水字符識別閱讀器的注意事項
不可在任何磁場源的附近使用打印機,如其他電子設備,特別要注意避免將打
印機放置在計算機顯示器的附近。確定磁性墨水字符識別閱讀器能正常輸入字
符。
避免在進行磁性墨水字符識別閱讀時給打印機施加撞擊或震動。
TM-U675/U675P 使用說明書 31
Page 34

中文 ( 簡體 )
安裝紙張導軌
當使用 76 毫米寬的紙捲時,需要按下面所述的步驟安裝紙捲支撐器和紙捲導
軌(內附)。
注﹕當使用寬度為 82 至 83 毫米的紙捲時,不需要使用紙張導軌。
1. 打開紙捲蓋,并且取出卷軸。
2. 插入紙捲支撐器 (有關細節,請參閱第 11 頁的圖示)。
3. 滑入紙捲支撐器,并且將它牢固地安裝到位 (有關細節,請參閱第 11 頁
的圖示)。
4. 將紙捲導軌安裝到位。導軌上橢圓型的孔應該牢固地安裝在打印機的小片
上 (有關細節,請參閱第 12 頁的圖示)。
5. 將紙捲安裝到位,並關閉紙捲蓋。
32 TM-U675/U675P 使用說明書
Page 35

TM-U675/U675P 規格表
打印方法 9 針連續打擊點陣
打印字體﹕ 5 × 9/7 × 9
欄﹕ 37/50 欄 (票據)
字符大小﹕ 1.56 毫米× 3.1 毫米 / 1.24 毫米× 3.1 毫米
字符集﹕ 95 字母數字混編集,37 國際字符集
打印速度﹕ 大約 5.14LPS* (以 17.8CPI** 打印 40 欄)
紙張尺寸:
票據﹕ 紙張寬度﹕76 毫米± 0.5 毫米或 82.5 毫米± 0.5 毫米
傳票﹕ 68 毫米 -230 毫米× 100 毫米 -297 毫米 (寬×長)
有效尺寸﹕ 68 毫米 -230 毫米× 68 毫米 -230 毫米 (寬×長)
紙張厚度 (單層)﹕ 票據:0.06 毫米 -0.085 毫米
複印能力 票據﹕1原稿+2複印件
色帶﹕ ERC-32
色帶壽命: 4 百萬字符
接口 (兼容)﹕ RS-232C/ 雙向并行接口 /RS-485 (經銷商處選擇)
數據緩沖器﹕ 使用 DIP 開關可選擇 45 字節或 4K 字節
D.K.D 功能: 2驅動
電源: +24 VDC ± 10%
電流消耗﹕ 1.8 安 (平均)
溫度: 工作﹕5℃ 至 45℃
濕度: 10 至 90% 無冷凝
可靠性: MTBF:180,000 小時
整體尺寸﹕ 195 毫米× 186 毫米× 298 毫米 (高×寬×深)
重量: 大約 4.8 千克
45/60 欄 (傳票 / 有效尺寸)
128 × 12 頁面擴展圖形字符
外圍直徑﹕60 毫米或少于單層日記帳式
89 毫米或少于單層票據式
83 毫米或少于雙層或三層
卷筒直徑 (內部)﹕10 毫米或以上
傳票 / 背書:0.09 毫米 -0.2 毫米
傳票 / 有效尺寸﹕1 原稿 +2 複印
保存﹕-10℃ 至 50℃
MCBF:3 千 7 百萬行
附有一個自動切割器:太約 5.8 千克
中文 ( 簡體 )
* LPS:行 / 秒
** CPI:字符 / 英寸。CPI 等於字符的數目 /25.4 毫米。
TM-U675/U675P 使用說明書 33
Page 36

中文 ( 簡體 )
34 TM-U675/U675P 使用說明書
Page 37

中文 ( 繁體 )
TM-U675/U675P
使用說明書
本使用手冊共可分為四大部份。請參考第一部份 (中文)之圖例。
有關圖例之注意事項
注意:
版權所有。在獲得 Seiko Epson Corporation 的書面同意前,皆不得以電子、機械、複印、錄製、或其他任何
形式或方式複製、存放於資訊檢索系統、或加以傳送本使用手冊之任何部份。至於使用本手冊中所含之資料,
無須負擔任何專利責任。然本手冊在籌備時即已至臻完善,故 Seiko Epson Corporation 將不為錯誤或遺漏負
擔任何責任,亦不為使用本手冊中所含之資料而造成之損壞負擔任何賠償責任。
本產品之購買人或第三者因意外、誤用或濫用本產品,或對本產品進行未經授權之修改、修理、或以任何形式
更改本產品,或 (美國除外)沒有嚴格遵守 Seiko Epson Corporation 之操作及維修指示,而對購買人或第
三者所造成之損害、損失、費用、或支出,Seiko Epson Corporation 及其附屬機構皆不須負責。
Seiko Epson Corporation 不須為使用 Epson 原廠產品或由 Seiko Epson Corporation 認可之 Epson 產品以
外之選購品或耗材所造成之損害或問題負責。
EPSON 及 ESC/POS 為 Seiko Epson Corporation 之註冊商標。
注意:本使用手冊內容將隨時加以編修更動,恕不另行通知。
版權所有 © 1999 年,Seiko Epson Corporation,日本長野。
Page 38

中文 ( 繁體 )
符合 EMC 與安規標準之聲明
產品名稱:TM-U675 / TM-U675P
型號名稱: M146A (不具自動裁紙器)
下列標準僅適用於貼有相同標籤的印表機。(EMC 之測試是以使用 EPSON 的電源供應器為準。)
歐洲: CE 標示
北美洲: EMI: FCC / ICES-003 A 級
日本: EMC: VCCI A 級
大洋洲: EMC: AS / NZS 3548 B 級
中國: EMC: GB9254
台灣: BSMI
警告
將無屏蔽式的印表機介面傳輸線連接至印表機上,即不符合本產品之 EMC 標準。
未經 SEIKO EPSON Corporation 明確認可之更改或修改,將可能使您無權操作本產品。
CE 標示
本印表機符合下列的規範與標準:
指令 89 / 336 / EEC EN 55022 B 級
指令 90 / 384 / EEC EN45501
M146B (具自動裁紙器)
安規: EN 60950
安規: UL 1950 / CSA C22.2 No. 950
JEIDA-52
GB17625.1
安全﹕GB4943
EN 55024
EN 61000-4-2
EN 61000-4-3
EN 61000-4-4
EN 61000-4-5
EN 61000-4-6
EN 61000-4-11
安全注意事項
本節詳述如何安全且有效使用本產品的重要資料,故請仔細閱讀本節內容,並將之妥
善存放於易取得之地點。
警告:
若本產品有冒煙、異味或怪聲等情形發生時,請立即關閉其電源。若繼續使用,
可能會導致火災或電擊。因此,請即刻拔出本產品之電源線,並洽詢您的經銷商
或 SEIKO EPSON 服務中心。
切勿自行嘗試維修本產品。不當的維修作業可能會造成危險。
切勿拆解或修改本產品。擅自改動本產品之結構,可能對人體造成傷害,或導致
火災或電擊。
務必使用專用的電源,便用不正確的電源連接可能會引起火災或電擊。
36 TM-U675/U675P 使用說明書
Page 39
中文 ( 繁體 )
警告:
切勿以潮濕的雙手連接或拔出電源線,否則可能會遭受嚴重的電擊。
請勿讓外物掉入本產品中,否則可能會導致火災或電擊。
若水或其他液體潑灑至本產品,請即刻將電源線拔出,並洽詢您的經銷商或
SEIKO EPSON 服務中心。若繼續使用,可能會導致火災或電擊。
請勿讓電源插座 (牆上插座)負載過多電量,負荷過重可能會導致火災。
務必從標準的室內電源插座直接供應電力。
請小心操作電源線。不當的操作可能會導致火災或電擊。
切勿修改或嘗試修理電源線。
切勿在電源線上置放任何物體。
避免過度屈曲、扭曲及拉扯電源線。
請勿將電源線置放於加熱設備旁。
將電源線插入插座前,請先檢查插頭部份是否乾淨。
請確認插頭之接腳已完全插入插座中。
若電源線受損,請向經銷商或 SEIKO EPSON 服務中心購買新的電源線。
注意:
請勿以本使用手冊所述以外之方式連接線路。不同的線路連接方式可能會對設備
造成損害或引發火災。
務必將本產品置放於穩固之平面上。若掉落,可能導致產品碎裂或對人體造成傷
害。
請勿在潮濕或多塵處使用本產品。過重的濕氣或過多的灰塵,可能對本產品造成
損壞或引發火災或電擊。
請勿將重物置放在本產品之上。切勿站立或依靠在本產品上,否則本產品可能會
掉落或倒下,進而導致產品碎裂,可能對人體造成的傷害。
為了安全起見,若長時間不使用本產品,請先將電源插頭拔出。
請勿觸摸印表頭,請先等待印表頭冷卻。即使在列印過後很久,印表頭可能仍然
非常燙,不慎觸摸可能會導致灼傷。
請勿在本品的部及周圍使用可燃性氣體的噴霧器。否則可能造成火災。
TM-U675/U675P 使用說明書 37
Page 40

中文 ( 繁體 )
標籤
警告:
請勿將電話線連接至插拔式連接器或顯示模組連接器上,否則可能導致印表機
及電話線受損。
注意:
印表頭溫度很高。
連接器
介面
顯示模組
插拔式連接器
電源
38 TM-U675/U675P 使用說明書
Page 41

開啟紙筒上蓋
在安裝紙筒以外的情形下,若要開啟具有自動裁紙器之印表機的上蓋時,請務
必遵照以下步驟以避免卡紙。
1. 將紙筒的紙張送入約 50 公釐。
2. 以手動裁紙器裁紙。
3. 關閉上蓋。
請參閱第 4 頁的圖例。
安裝紙筒
註:
請勿使用紙張以黏著物或膠貼固定於筒芯的紙筒,否則可能會造成卡紙的情形
發生。
即使您只使用收據紙或存根聯用紙,亦請裝入整捲紙筒。
1. 開啟印表機電源。握住紙筒的兩端,將一端送入進紙槽,接著印表機便會
自動進紙。
2. 當您使用的是壓敏紙時,請將記錄紙放入上紙軸。請確定紙張突出於軸外
有 40 至 60 公釐,且紙張尾端朝向輪緣。
3. 將上紙軸置入印表機中,並以手動方式裁切收到的紙張。
有關如何安裝紙筒的細節,請參考第 5 頁的圖例。
依照下列步驟更換即將用盡的紙筒。
1. 取出上紙軸。
2. 割開紙筒及裝入進紙槽。
3. 按下釋放桿 (位於紙筒的右側),並順著進紙方向取下紙張。請勿逆著進
紙方向將紙張抽出,否則可能會對機械裝置造成損害。
中文 ( 繁體 )
安裝色帶匣
請使用 EPSON 原廠色帶匣
4. 開啟印表機電源。旋轉色帶匣調節鈕。打開印表機前蓋並安裝新的色帶
匣。細節請參考第 6 頁的圖例。
5. 將調節鈕轉兩或三圈,以確定色帶匣已完全安裝至正確位置。
安裝收據紙及存根聯用紙
有關裝入收據紙張及存根聯用紙之細節,請參考第 7 頁的圖例。
TM-U675/U675P 使用說明書 39
Page 42

中文 ( 繁體 )
疑難排解
Error (錯誤)燈亮起或閃爍
請檢查印表機外蓋是否已完全關閉。
關閉印表機電源,並檢查是否有卡紙的情形。清除卡紙後,請重新啟動印表機。
打開印表機機械裝置
若卡紙狀況嚴重而無法正常排除,或有異物掉入印表機中,請依照下列步驟打
開印表機。
1. 關閉印表機並打開紙筒外蓋。將推桿往後壓以開啟機械裝置(細節請參考
第 8 頁的圖例)。
2. 按下釋放桿,並順著進紙的方向取出卡紙的紙張。請勿逆著進紙方向將紙
張抽出,否則可能會對機械裝置造成損害。故障排除後,請將機械裝置推
回原位。
啟動印表機。如果問題仍未能解決,請與您的經銷商或合資格的技術人員
聯繫
磁性墨水字符識別之列印 (原廠之選購品)
讀取磁性墨水字符識別的字元
注意:
請勿使用釘有釘書針的支票,否則可能會造成卡紙、磁性墨水字符識別讀取錯
誤,甚至對磁性墨水字符識別讀取頭造成傷害。請勿使用摺疊、皺摺、或太硬
而不易屈曲的支票。
1. 當 SLIP (收據紙)燈號開始閃爍時,請插入支票。插入支票時,請將帶
有磁性墨水字符識別字元的一面朝上,並將支票緊抵著進紙槽的右側滑
入。請確認磁性墨水字符識別字元位於支票的右側邊緣(請參考第 9 頁的
圖例)。
2. 當印表機偵測到支票時便會自動進行進紙的動作,此時請立即鬆手放開支
票。當印表機退出支票,且 SLIP (收據紙)燈號又再度閃爍時,請將支
票筆直往上抽出,切勿斜向抽出。
40 TM-U675/U675P 使用說明書
Page 43
中文 ( 繁體 )
清潔磁性墨水字符識別裝置
請每戎 H 沾濕的清潔紙張清潔磁性墨水字符識別讀取頭一次。建議使用下列的
清潔紙張:PRESAT 廠牌(KIC)的 "CHECK READER CLEANING PAD
(支票讀取器清潔卡)" 或同級的產品。
註:請勿使用具黏著性的清潔紙張。
請依照下列步驟進行清潔作業:
1. 將紙筒放入印表機中,並關閉電源。打開紙筒外蓋,並在開啟電源的同時
按下 RELEASE (釋放)鍵。
2. 連按七秒 RELEASE (釋放)鍵,之後關上紙筒外蓋。捲紙上將會列印
出以下訊息,且 SLIP (收據紙)燈號將會開始閃爍。
3. 將清潔紙張依標準支票的方式放入印表機中。
注意:
請確定清潔紙張在放入時,是正確的一面朝上,且放入時的方向無誤。請勿重
複使用清潔紙張;每次清潔時請務必使用新的清潔紙張。
4. 當印表機退出清潔紙張時,請按下 RELEASE (釋放)鍵,並從印表機
中取出清潔紙張。
使用磁性墨水字符識別讀取頭時的注意事項
操作本印表機時,請勿靠近任何磁場來源,例如其它電子設備,特別應避免放
置在電腦螢幕旁。請確定磁性墨水字符識別讀取頭可正常輸入字元。
請確定印表機在執行磁性墨水字符識別讀取的動作時,不會受到撞擊或搖晃等
影響。
TM-U675/U675P 使用說明書 41
Page 44

中文 ( 繁體 )
安裝紙張導板
當您使用 76 公釐寬的紙筒時,請安裝紙筒支撐架及紙筒導板 (內含),如下
所示。
註:若使用 82 至 83 公釐寬的紙筒時,則不需要紙筒導板。
1. 開啟紙筒外蓋,並取出上紙軸。
2. 插入紙筒支撐架 (細節請參考第 11 頁的圖例)。
3. 滑入紙筒支撐架,並將之牢牢卡入定位 (細節請參考第 11 頁的圖例)。
4. 將紙筒導板裝入定位。導板上的橢圓孔應牢牢卡在印表機上的定位凸榫
(細節請參考第 12 頁的圖例)。
5. 將整個紙筒裝入定位,並關閉紙筒外蓋。
42 TM-U675/U675P 使用說明書
Page 45
TM-U675/U675P 規格表
列印方式: 9 針連續撞擊點陣式
列印字型: 5×9 / 7×9
欄位: 37/50欄 (收據)
字元大小: 1.56 公釐×3.1 公釐 / 1.24 公釐×3.1 公釐
字元設定: 95 個英數字元、37 個國際字元
列印速度: 大約 5.14 LPS* (17.8 CPI** 時有 40 欄)
紙張尺寸:
收據: 紙張寬度:76 公釐±0.5 公釐 or 82.5 公釐±0.5 公釐
連續報表紙: 68 公釐-230 公釐×100 公釐-297 公釐 (寬×長)
確認單: 68 公釐-230公釐×68 公釐-230 公釐 (寬×長)
紙張厚度 (單層): 收據:0.06公釐-0.085公釐
拷貝功能: 收據:1 張原稿 + 2 張拷貝
墨水色帶: ERC-32
色帶壽命: 4百萬個字元
介面 (相容): RS-232C / 雙向並行介面 / RS-485 (經銷商處選購)
資料緩衝區: 使用 DIP 跳線,可選擇 45 位元組到 4K 位元組
D.K.D 功能: 2驅動
電源: +24 VDC ±10%
消耗電流: 1.8 A (平均值)
溫度: 操作時: 5℃ 到 45 ℃
濕度: 在無凝結物下時,10 到 90 %
可靠性: MTBF:180,000 小時
材積: 195公釐×186公釐×298公釐 (高×寬×深)
重量: 大約 4.8 公斤
45/60欄 (連續報表紙/確認單)
128×12頁擴充圖形字元
外圈直徑|:60 公釐或以下的單層報表紙
89 公釐或以下的單層收據
83 公釐或以下的 2 層或 3 層紙張
滾筒直徑 (內側):10 公釐或以上
連續報表紙/背書:0.09公釐-0.2公釐
連續報表紙/確認單:1 張原稿 + 2 張拷貝
存放時: -10℃ 到 50 ℃
MCBF:3千7百萬行
具有一個自動裁紙器:太約5.8公斤
中文 ( 繁體 )
* LPS:每秒列印線條數
** CPI:每英吋列印字元。CPI 等於每 25.4 公釐的字元數目。
TM-U675/U675P 使用說明書 43
Page 46

中文 ( 繁體 )
44 TM-U675/U675P 使用說明書
Page 47

Labels /
ラベル
/ /
Page 48

Printed in China
2000.01
 Loading...