

Wireless Networking Basics
This booklet helps you setup a wireless connection between your printer and computers.
See the “Networking Guide” in the Online User’s Guide if you want help with other
network connections such as Wired LAN or Ad Hoc Mode.
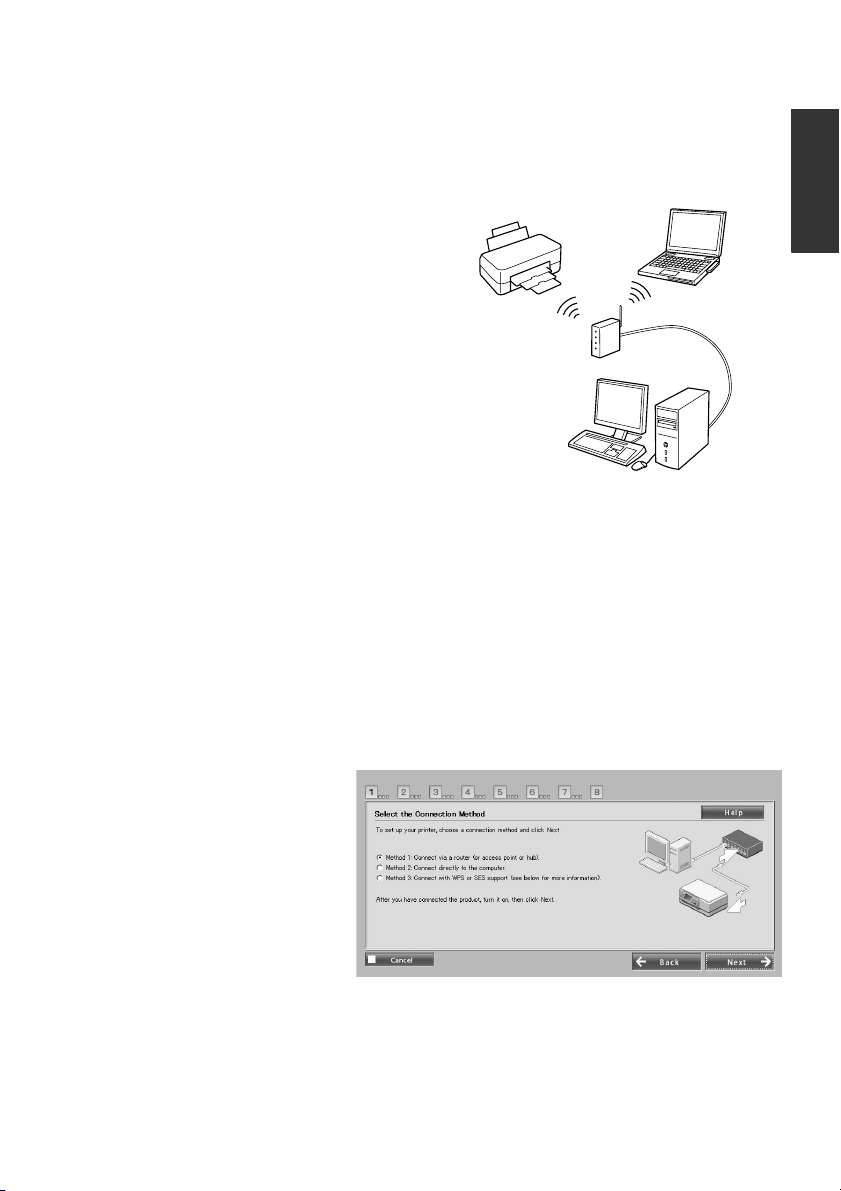
Wireless LAN Connection
By using an access point (such as a wireless
router), computers and printers can
communicate wirelessly.
Setup Check Points
Before starting Wireless setup, check that
the access point (or wireless router) is
turned on.
Point 1. Firewall warning
Your firewall or anti-spyware software may display warnings during installation.
Create an exception for EpsonNet EasyInstall to allow it to carry out network
configurations.
For Windows XP Service Pack 2 or later
Confirm that the publisher is SEIKO EPSON, and then click Unblock.
For Mac OS X 10.5.1 or later
Configure the Application Firewall to allow access for EpsonNet EasyInstall.
Point 2. Select a connection method
You need an Ethernet (wired)
connection during installation.
Select the first or second
method depending on your
environment, and then click
Next.
English
Using SES or WPS (Wireless Auto-Set)
To use SES or WPS, they must be supported by your access point (or wireless router).
Complete the following steps without connecting an Ethernet cable.
1. Select the third method.
2. Enable SES or WPS on your access point.
3. Press and hold the WiFi button for three seconds, and then release. Check the two
LED lights flash alternately.
4. After checking that wireless auto setup is complete and the two LED lights are lit,
click Next.
Once you have finished making wireless settings, select a printer and then skip to Point
8.
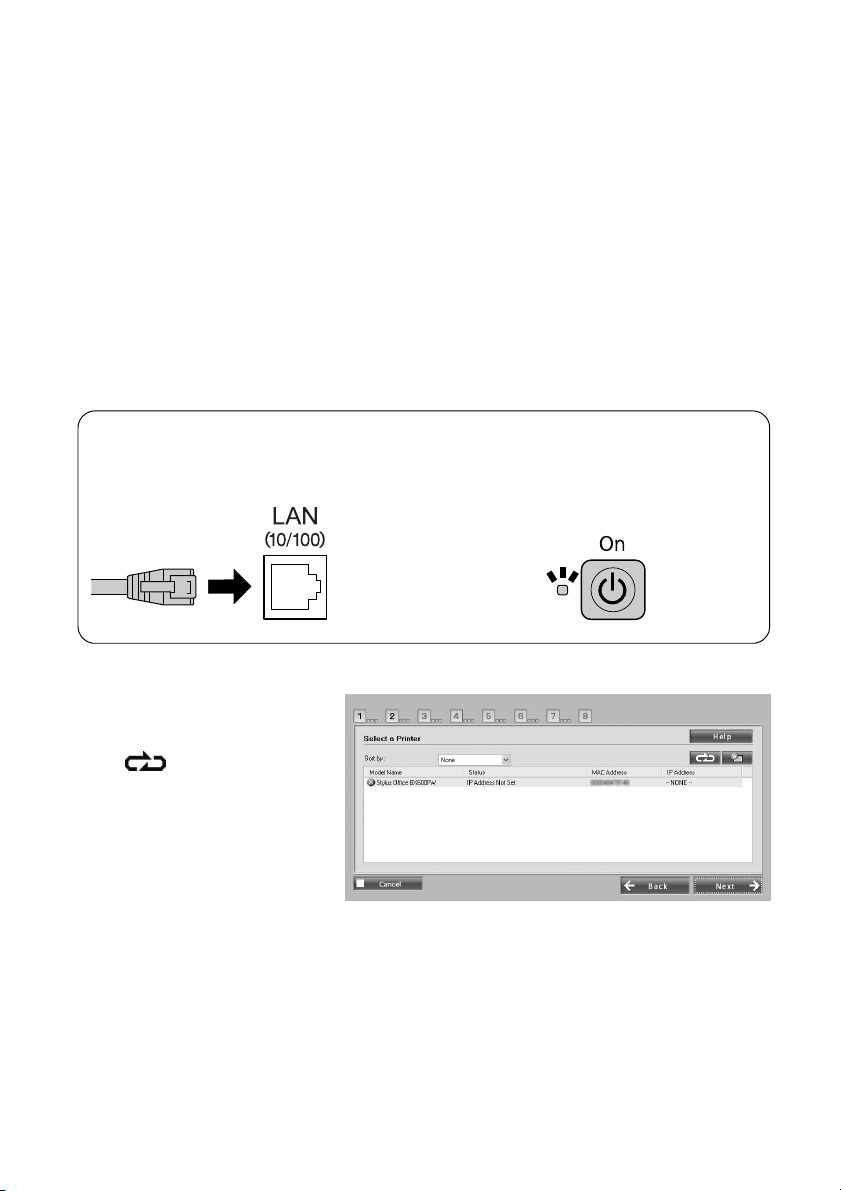
Point 3. Connect an Ethernet cable
Connect the access point (or wireless router) or your computer to the printer with an
Ethernet cable.
Check the Ethernet cable is inserted in the
Ethernet port.
Point 4. Select a printer
The software searches for and
displays printers on the
network. Select your printer.
Click to refresh the
printer list.
Check that the printer is turned on.
❏ Check! ❏ Check!

Point 5. Select a connection type
Select Wireless and then click
Next.
Point 6. Choose a wireless network
The software displays available
Networks.
Select the same SSID (Network
name) as used for your access
point (or wireless router).
If the access point is running in
stealth mode, enter the SSID
directly.
Point 7. WEP/WPA security settings
Enter the same WEP Key or WPA passphrase as used for your access point (or wireless
router). Both are case-sensitive. Enter the same values as used for your access point.
To obtain these settings, see the documentation that came with your access point (or
wireless router).
English
Point 8. Current IP address status
Check that Method for
Acquiring IP Address is set to
Automatic.
If you want to manually assign
a unique IP address, click
Change and then enter the IP
Address, Subnet Mask, and
Default Gateway.

Point 9. Remove the Ethernet cable
Remove the Ethernet cable when a message instructing you to do so is displayed.
Point 10. Confirm settings are complete
When network connection
settings are completed
successfully, a yellow or
green indicator is displayed.
When network connection
settings fail, a red indicator
is displayed.
Check all of the points or see
Troubleshooting, and then
reset the settings.
Point 11. Adding the printer (for Mac)
After setting up a network connection, EasyInstall closes. Then you can add the printer
from Printer Setup Utility.
Point 12. Installation complete (for Windows)
When printer settings are
complete, a green indicator
is displayed.

Troubleshooting
Cannot connect printer to the network
❏ Check the printer is turned on.
❏ Check the power cable is connected to the printer and the electrical outlet.
❏ Check the Ethernet cable is plugged in to the printer and the router.
Cannot find printer on the network
❏ Firewall or anti-spyware software may block EpsonNet EasyI nstall. Create an exception
for EpsonNet EasyInstall to allow it to carry out network configurations.
❏ If access restrictions are set on the access point (or wireless router), register the printer’s
Media Access Control (MAC) address or IP address to the access point. Check the MAC
address on the network status sheet by pressing the button.
Cannot communicate using wireless LAN
❏ Check the printer is turned on.
❏ Check the access point (or wireless router) is turned on.
❏ After making network settings, check that the Ethernet cable is removed from the
printer.
❏ Check the SSID (Network name) used on the access point is selected or entered
correctly.
❏ The WEP Key or WPA Passphrase is case-sensitive. Check the WEP key or WPA
passphrase is entered correctly.
❏ Move the printer closer to the access point or adjust the access point's external antenna.
❏ Radio wave interference from other wireless devices may interrupt wireless connection.
Check that other wireless devices nearby are not turned on.
English

LED lights and buttons
LED lights on the printer indicate the network communication status.
See the online Networking Guide for details.
Status Indication
Wireless Wired
Warming up $ (orange) $ (green)
Disconnected
Connected " (orange) # (green) # (orange) " (green)
Connecting to network " (orange) $ (green) # (orange) $ (green)
Wireless auto setup in
progress
Wireless auto setup
completed
Wireless auto setup error $ (orange) " (green) -
Wireless auto setup error
(No IP address set)
" = off, # = on, $ = flashing
*1 The Network status light (orange) turns off after five minutes.
Network Buttons
WiFi Press and hold for three seconds to make easy wireless LAN settings.
Press to release an easy wireless LAN setting error.
Press and hold for about 10 seconds to initialize network settings.
$ (orange) $ (green)
Flashing alternately
PIN: Flashing at the same
time
# (orange) # (green)
# (orange) " (green)
Flashing alternately
" (orange) " (green)
-
*1
*1
-
-
Press to print a network status sheet.
WiFi +
While holding down the WiFi button, press and hold the button for about three
seconds to make easy wireless LAN settings in WPS PIN mode.
About the OPEN SOURCE SOFTWARE LICENSE
In addition to software program rights owned by Seiko Epson Corporation, this product
also includes open source software. Refer to the “OPEN SOURCE SOFTWARE
LICENSE TERMS” in the Online User's Guide for a list of open source software and
software license terms applied to this printer.
 Loading...