


Stylus Color 440
Table of contents
 Loading...
EPSON Stylus COLOR 440
Manual

Copyright Notice
All rights reserved. No part of this publication may be reproduced, stored in a retrieval system, or transmitted
in any form or by any means, electronic, mechanical, photocopying, recording, or otherwise, without the prior
written permission of SEIKO EPSON CORPORATION. The information contained herein is designed only for
use with this EPSON printer. EPSON is not responsible for any use of this information as applied to other
printers.
Neither SEIKO EPSON CORPORATION nor its af filiates shall be liable to the purchaser of this product or
third parties for damages, losses, costs, or expenses incurred by purchaser or third parties as a result of:
accident, misuse, or abuse of this product or unauthorized modifications, repairs, or alterations to this product,
or (excluding the U.S.) failure to strictly comply with SEIKO EPSON CORPORATION’s operating and
maintenance instructions.
SEIKO EPSON CORPORATI ON shall not be liable for any damages or problems arising from the use of any
options or any consumable products other than those designated as Original EPSON Product s or EPSON
Approved Products by SEIKO EPSON CORPORATION.
EPSON and EPSON Stylus are r e g ist e r e d tr adema rks and Micro Piezo is a trademark of SEIKO EPSON
CORPORATION.
SoundAdvice is a service mark and PhotoEnhance and EPSON FaxAdvice are tra demar ks of Eps on Ameri ca,
Inc.
General Notice
of their respective owners. EPSON disclaims any and all rights in those marks.
NERGY STAR
The E
Copyright © 1999 by Epson America, Inc. ESC4400999
: Other product names used herein are for identification purposes only and may be trademarks
emblem does not represent EPA endorsement of any product or service.
9/99

FCC Compliance Statement
For United States Users
This equipment has been tested and found to comply with the limits for a Class B digital device, pursuant to
Part 15 of the FCC Rules. These limits are designed to provide reasonable protection against harmful
interference in a residential installation. This equipment generates, uses, and can radiate radio frequency
energy and, if not installed and used in accordance with the instructions, may cause harmful interference to
radio or television reception. However, there is no guarantee that interference will not occur in a particular
installation. If this equipment does cause interference to radio and television reception, which can be
determined by turning the equipment off and on, the user is encouraged to try to correct the interference by
one or more of the following measures.
◗ Reorient or relocate the receiving antenna.
◗ Increase the separation between the equipment and receiver.
◗ Connect the equipment into an outlet on a circuit different from that to which the receiver is connected.
◗ Consult the dealer or an experienced radio/TV technician for help.
WARNING
The connection of a non-shielded equipment interface cable to this equipment will invalidate the FCC
Certification of this device and may cause interference levels which exceed the limits established by the FCC
for this equipment. It is the responsibility of the user to obtain and use a shielded equipment interface cable
with this device. If this equipment has more than one interface connector, do not leave cables connected to
unused interfaces. Changes or modifications not expressly approved by the manufacturer could void the
user’s authority to operate the equipment.
For Canadian Users
This Class B digital apparatus complies with Canadian ICES-003.
Cet appareil numérique de la classe B est conforme à la norme NMB-003 du Canada.
Page 3

Contents
Introduction
System Requirements 10
How To Use Your Manual 11
Warnings, Cautions, Notes, and Tips 12
ENERGY STAR Compliance 12
Year 2000 Ready 13
Important Safety Instructions 13
Identifying Printer Parts 16
Basic Printing
Printing from Windows Applications 17
Setting Printer Options from Windows Applications 18
Setting Default Printer Options 21
Checking Printer Status 25
17
9
Page 4

Advanced Printing
Using Predefined Advanced Settings 29
Customizing Print Quality and Special Effects 32
Adjusting Color Settings 36
Adjusting Colors in Photos and Scanned Images
(Windows 95, 98, and NT only) 36
Making Custom Color Corrections 38
Selecting Paper Size and Orientation 41
Selecting Print Layout Options 47
Reducing and Enlarging Your Document Size 48
Using Multiple Print Layouts and Page Frames 52
Adding a Watermark 54
Saving Custom Settings 58
Redefining Custom Settings 59
Deleting Custom Settings 60
28
Page 5

Printing on Special Media
Selecting Special Media 62
Media Loading and Handling Guidelines 64
Letterhead, Preprinted Forms, and Legal-size Paper 66
Envelopes 67
EPSON Photo Quality Ink Jet Cards 69
EPSON Ink Jet Paper 69
EPSON Photo Quality Glossy Paper, Film, and
Transparencies 70
EPSON Ink Jet Transparencies 76
EPSON Photo Quality Self Adhesive Sheets 76
EPSON Photo Stickers 77
EPSON Iron-On Cool-Peel Transfer Paper 78
61
Managi ng Print Jobs
Managing Print Jobs in Windows 95, Windows 98, and
Windows NT 4.0 80
Selecting the Speed & Progress Options 81
Using the Spool Manager 83
Using Status Monitor 2 85
79
Page 6

Managing Print Jobs in Windows 3.1x 94
Using the Spool Manager 95
Network Printing in Windows 95 and Windows 98 97
Setting Up Your Printer as a Shared Printer 100
Maintenance and Transportation
Cleaning the Print Head 103
Using the Head Cleaning Utility 103
Using the Control Panel 105
Examining the Nozzle Check Pattern 106
Replacing an Ink Cartridge 107
Removing an Empty Ink Cartridge 108
Installing the New Cartridge 110
Replacing an Outdated Ink Cartridge 113
Aligning the Print Head 114
Cleaning the Printer 115
Transporting the Printer 116
102
Page 7

Troubleshooting
Diagnosing Problems 118
Checking the Control Panel Lights 119
Running a Printer Check 122
Improving Print Quality 124
Solving Printing Problems 130
Solving Printer Software Problems 134
Fixing Paper Problems 138
Solving Miscellaneous Printout Problems 141
Uninstalling Printer Software 143
Where To Get Help 145
117
Specifications
Glossary
Index
147
158
163
Page 8

/
Introduction
Your EPSON Stylus® COLOR 440 printer is the perfect printer for
small office or home use. You can print anything from reports and
resumes to photos and greeting cards. With resolutions up to 720
by 720 and EPSON ’s Micr o P iezo™ t echnology, you get amazingly
realistic photogr aphi c im ages, vivid col or gr aphi cs, a nd r azor-shar p
black text.
EPSON’s speciall y form ulated ink car tri dge s an d wide var iety of ink
jet papers offer the greatest flexibility for getting the results you
want.
This chapter gives you general information about your printer in
these sections:
◗ System Requirements
◗ How To Use Your Manual
◗ ENERGY STAR Complian ce
◗ Year 2000 Ready
◗ Important Safety Instructions
◗ Identifying Printer Parts
Page 9

System Requirements
To use your printer and its software with a PC, your system should
have:
◗ Windows® 3.1x, Windo w s 95, Windows 98 , or W indo ws N T® 4.0
◗ An IBM
for Windows 95 and Windows NT 4.0; 486/66 MHz processor
for Windows 98; and 386/25 MHz processor for Windows 3.1.
A Pentium® processor or its equivalent is recommended.
◗ 16MB RAM (32MB recommended)
◗ At least 50MB of free hard disk space for storing images
(100MB recommended)
◗ VGA or better display adapter and monitor
◗ Double-speed CD-ROM drive (quad-speed or faster
recommended)
◗ A high-speed, bi directional , IEEE-1284 complian t paral lel cable
(6 to 10 feet long) to connect your computer to the printer. The
cable must have a D-SUB, 25-pin, male connector for your
computer and a 36-pin, Centronics® compatible connector for
the printer.
®
compatible PC with at least a 486/25 MHz processor
Introduction Page 10

How To Use Your Manual
This manual contains the following information:
Basic Printing covers the basics of printing with Windows.
Advanced Printing tells you how to print special projects with
custom settings for print quality, col or man agement, and distinct ive
layouts.
Printing on Special Media gives guidelines for selecting and using
the right paper or other media for your print job and instructions for
loading it in your printer.
Managing Print Jobs explains how to manage print jobs, check
printer status, and handle network printing.
Maintenance and Tr ansportatio n gives ins tructions for replacing ink
cartridges, cleaning and aligning the print heads, and cleaning and
transporting the printer.
Troubleshooting provides sol utio ns fo r a ny pr oblem s you ma y hav e
with your printer software.
Specifications provides the technical details of your printer, ink
cartridges, and EPSON media.
A Glossary and an Index are included at the end of the manual.
Introduction Page 11

Warnings, Cautions, Notes, and Tips
You’ll find this information throughout your manual:
Warnings must be followed carefully to avoid bodily injury.
Cautions must be observed to avoid damage to your equipment.
Notes contain important information about your printer.
Tips contain additional hints for great printing.
ENERGY STAR Complianc e
As an E
product meets the E
The EPA E
partnership with the computer and office equipment industry to
promote the introduction of energy-efficient personal computers,
monitors, printers, fax machines, and copiers in an effort to reduce
air pollution caused by power generation.
Introduction Page 12
NERGY STAR
NERGY STAR
Partner, EPSON has determined that this
NERGY STAR
Office Equipment program is a voluntary
guidelines for energy efficiency.

Year 2000 Ready
Your EPSON printer is
the other parts of your computer system are also ready for the
year 2000.
Year 2000 Ready
. However, be sure
Important Safety Instructions
Before using your printer, read the following safety instructions to
make sure you use the printer safely and effectively.
◗ Always use the
Never use an external switch—such as a power strip—to turn
off the printer.
◗ Turn off and unplug the printer before cleaning. Clean with a
damp cloth only. Do not spill liquid on the printer.
◗ Do not place the printer on an unstable surface or near a
radiator or heating vent.
◗ Do not block or cover the openings in the printer’s cabinet or
insert objects through the slots.
◗ Use only the type of power source indicated on the printer’s
label.
P power button to turn the printer on or off.
◗ Connect all equipment to properly grounded power outlets.
Avoid using outlets on the same circuit as photocopiers or air
control systems that regularly switch on and off.
Introduction Page 13

◗ Place the printer near a wall outle t where the plug can be ea sily
unplugged.
Placez l’imprimante près d’une prise de contacte où la fiche
peut être débranchée facilement.
◗ Do not let the power cord become damaged or frayed.
◗ If you use an extension cord with the printer, make sure the
total ampere rating of the devices plugged into the extension
cord does not exceed the cord’s ampere rating. Also, make
sure the total of all devices pl ugged into the wall outlet does not
exceed 15 amperes.
◗ Except as specifically explained in this
Manual
, do not attempt
to service the printer yourself.
◗ Unplug the printer and refer servicing to qualified service
personnel under the following conditions:
If the power cord or plug is damaged; if liquid has entered the
printer; if the p rinter has b een dropped or the cabi net damag ed;
if the printer does not operate normally or exhibits a distinct
change in performance. Adjust only those controls that are
covered by the operating instructions.
◗ Do not put your hand inside the printer or touch the cartridge
during printing.
◗ Under normal circumstances, ink will not come out of the
cartridge. If it does get on your skin, wash it off with soap and
water. If it gets in your eyes, flush them immediately with water.
Introduction Page 14

◗ Keep ink cartridges out of the reach of children.
◗ Do not dismantle the ink cartridges or try to refill them. This
could result in damage to the print head.
◗ Once you install an ink cartridge, do not open the clamp or
remove the cartridge except to replace it with a new one. The
cartridge may become unusable otherwise.
◗ Install the ink cartridge immediately after you remove it from its
foil package. Leaving the cartridge unpacked for a long time
before use may result in reduced print quality.
◗ Do not use an ink cartridge beyond the date printed on the
cartridge carton. For best results, use up the ink cartridges
within six months of installing them.
◗ Do not shake an ink cartridge; this can cause leakage.
◗ Always turn the printer off using the
button is pressed, the
Ppower light flashes briefly then goes
Ppower button. When this
out. Do not unplug the printer or turn off the power to the outlet
until the
Ppower light is off.
◗ Before transporting the printer, make sure the print head is
capped in the far right position and the ink cartridges are in
place.
Introduction Page 15
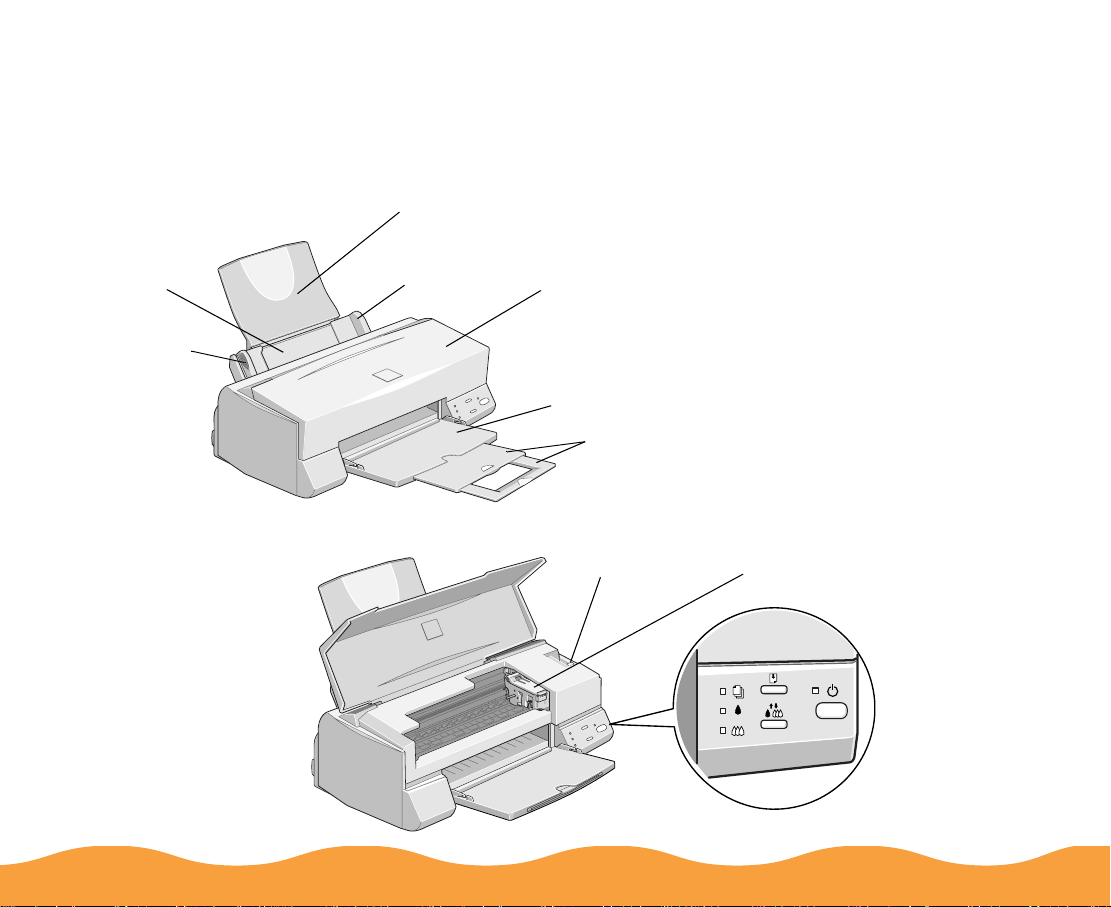
Identifying Printer Parts
If you need help identifying the parts of the printer, refer to the
following illustrations:
paper support
sheet
feeder
left edge
guide
right edge
guide
printer cover
output tray
output t ray ext ension s
thickness
lever
ink cartridge
clamp
control panel
Introduction Page 16

Basic Printing
It’s easy to print with your new EPSON Stylus COLOR 440. First
set up and install the printer software, following the instructions in
the
Printer Basics
◗ Printing from Windows Applications
◗ Checking Printer Status
Printing from Windo ws Applications
To print from your Windows application, click the print icon or
choose Print from the File menu. You can then choose which
pages to print, the number of copies, and other options. The
settings that describe your print job—whe ther you want to use color
or black ink, for example—are part of your printer driver software.
The following sections tell you how to set printer options from
Windows applications, how to change the default printer settings,
and how to check your printer’s status.
guide. Then read this chapter to learn about:
Page 17

Note:
The settings you
select th rough your
applicat ion usuall y
apply only until you
exit that application.
Setting Printer Options from Windows Applications
This section describes the settings you’ll need to make for all your
everyday printouts. See Using Predefined Advanced Settings for
information about special settings like PhotoEnhance3
(PhotoEnhance in Windows 3.1).
Follow these steps to check printer settings from your graphics
application or other Windows software:
1 Choose Print, Print Setup, or Page Setup from the Fil e menu .
You see a printing dialog box.
If you choose Print, you first see a Print dialog box that
contains the settings you change most often, including the
number of copies and the pages you want printed.
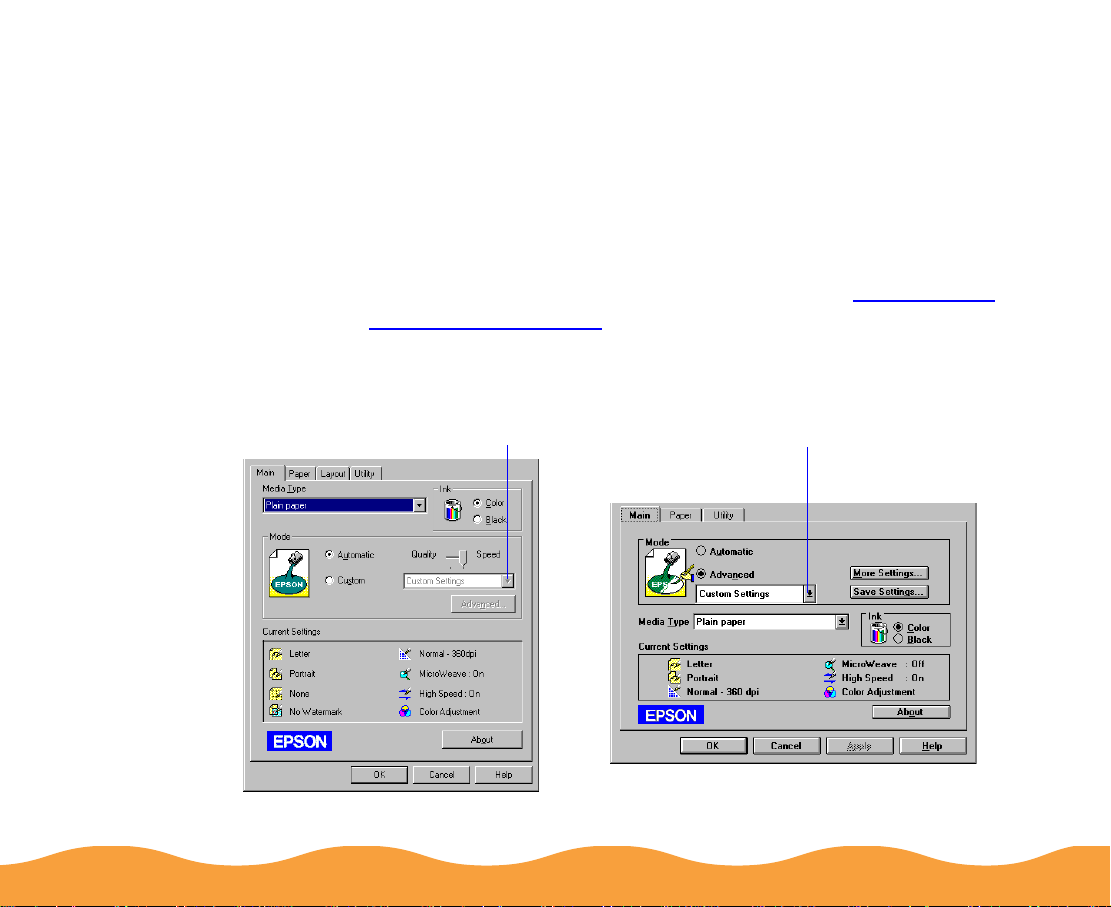
Basic Printing Page 18
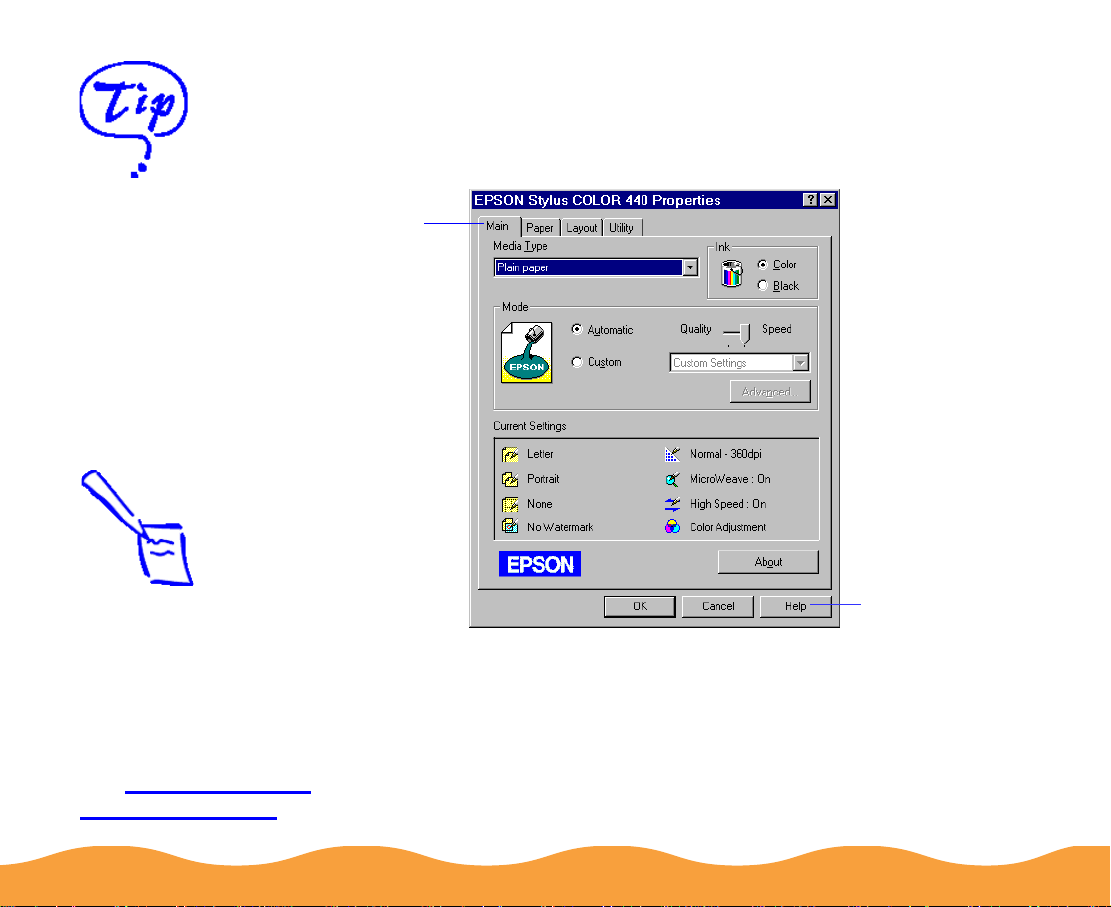
2 Make sure your E PSON Stylus C OL OR 440 p rinter i s selecte d,
and then click the Printer, Setup, Properties, or Options
button. (You may have to click a sequence of these buttons.)
You see a dialog box like the following:
For more in fo rm ation
about print er settings,
click the Help button.
You can right-click
any item on the
screen an d t hen click
What’s Th is ? (N ot
available in
Windows 3.1.)
Note:
Choose Automatic for
your ever yd ay print jobs.
If you want to print a
special jo b, su c h as a
photograph on special
paper, ch oos e Custom.
Using Predefined
See
Advanced Settings
.
Main
tab
Click for more
informa ti on
If you don’t see the d ialog box show n above, click the Main tab.
(The Windows 3.1 dialog box is slightly different.)
3 Make sure the Mode option is set to Automatic. This lets the
printer software determine the best settings for your print job
and is the easiest way to get good printing results on all types
of paper.
Basic Printing Page 19

4 Choose the M e di a T ype you want to print on from the following
list. If you are not sure which setting to select, refer to Media
Loading and Handling Guidelines.
◗ Plain paper
◗ 360 dpi Ink Jet Paper
◗ Photo Qualit y Ink Jet Paper
◗ Photo Paper
◗ Photo Quality Glossy Film
◗ Ink Jet Transparencies
Your media choice may restrict the available range of settings
such as print quality or resolution.
5 For the Ink setting, choose Color or Black.
If you’re printing
grayscale images,
choose Black as the
Ink setting for faster
output or choose
Color for higher
quality.
6 Set the slider in the Mode box to Quality or Speed. This lets
you choose between the highest resolution or the fastest
printing for the media you’re using. (The slider only appears
when Plain paper is selected.)
7 If necessary, click the Paper tab and choose your paper size,
number of copies, orientation, and printable area. See
Selecting Paper Size and Orientation for detailed instructions.
8 If you’re using Windows 95, Windows 98, or Windows NT 4.0,
click the Layout tab and check the reduce/enlarge
(proportional printing), print layout, and watermark options to
make sure they’re cor rect fo r your prin t job. S ee Selecting Print
Layout Options for details.
Basic Printing Page 20

Note:
Some application
settings override
default printer settings
(such as Paper Size
or Orientat ion), so it’s
a good ide a t o c hec k
the settin gs in y our
application before you
print.
9 Click OK when you’re finished checking your settings.
10 Click OK or Print in your application’s printing dialog box. You
may need to click a sequence of these buttons, depending on
the application you are using.
While your document is printing, the EPSON Progress Meter
(Windows 95 and Windows 98) or the EPSON Despooler
dialog box (Windows 3.1) appears, showing the printing
progress and the status of your printer. (See Checking Printer
Status for more information.)
Setting Default P ri n te r O p tions
When you change printer settings through your software
application, the settings apply only to the application you’re using.
To adjust the default setting s for all your Windows app lications, you
can access the dialog box through the Windows 95, Windows 98,
or Windows NT 4.0 Printers utility or the Windows 3.1 Control
Panel.
Make sure all your software applications are closed before you
start. If not, you’ll have to close and then reopen them to have the
new default settings take effect.
Basic Printing Page 21

Setting Default Options in Windows 95, Windows 98,
or Windows NT 4.0
Follow these steps:
Note:
If you’re printing over
a network, you can
access the default
Window s NT printer
software settings only
if you have the
appropr iat e network
access pr iv ileges,
such as Administrator
or Power U s er.
1 Click Start, point to Settings, and then select Printers.
2 Right-click the EPSON Stylus COLOR 440 icon in the Prin ter s
window.
3 Select Properties (Document Defaults in Windows NT). Then
click the Main tab.
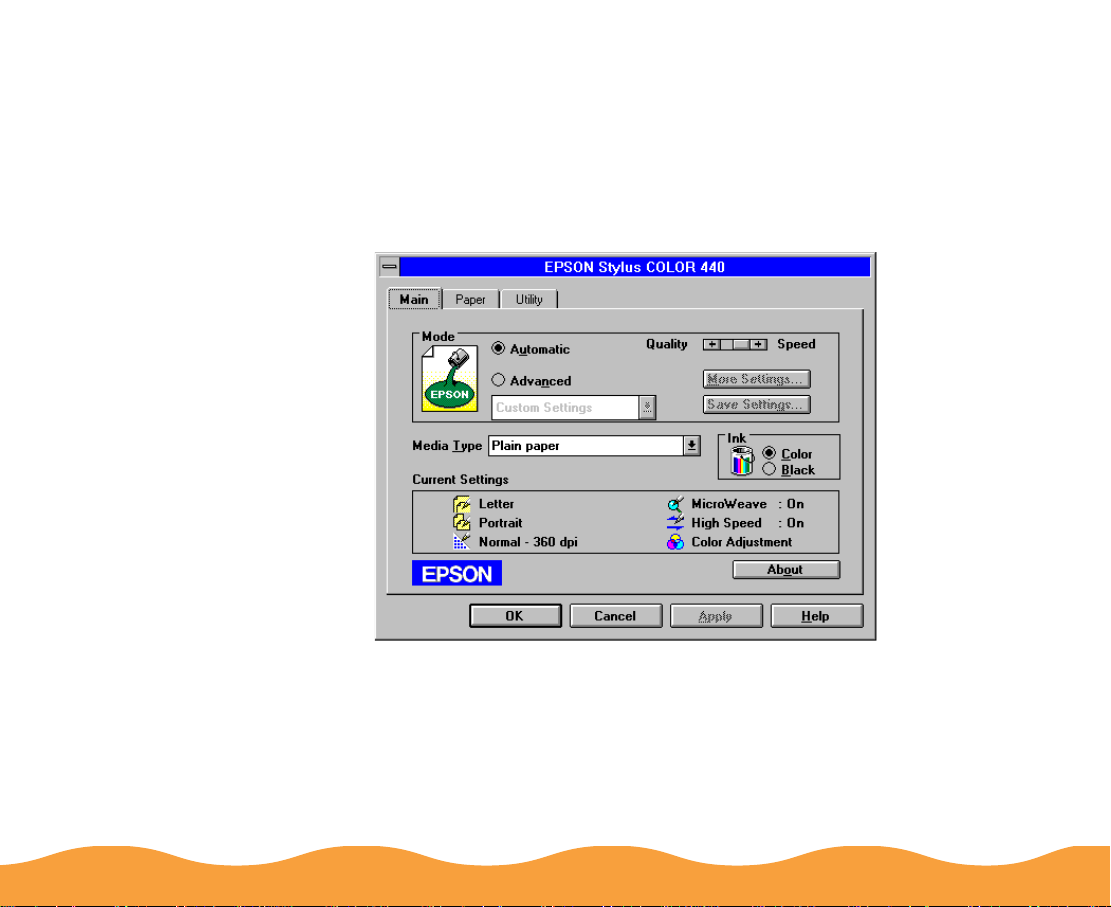
Basic Printing Page 22

You see the Main dialog box, as shown below. Any changes
you make will become the default settings for all your
applications and documents. Click OK when finished.
Windows 95, Windows 98, and Windows NT 4.0
Basic Printing Page 23
Setting Default Options in Windows 3.1
1 Double-click the Control Panel icon in the Main group.
2 Double-click the Printers icon.
3 Select EPSO N Styl us COLOR 44 0 from the list of installed
printers and click Setup. You see the dialog box, shown below.
4 Make any changes you want to become the def ault settings for
all your applications and documents, and click OK when you
are finished.
Basic Printing Page 24
Checking Printer Status
While your document is printing, your printer software reports how
the job is doing. See the section for your operating system below.
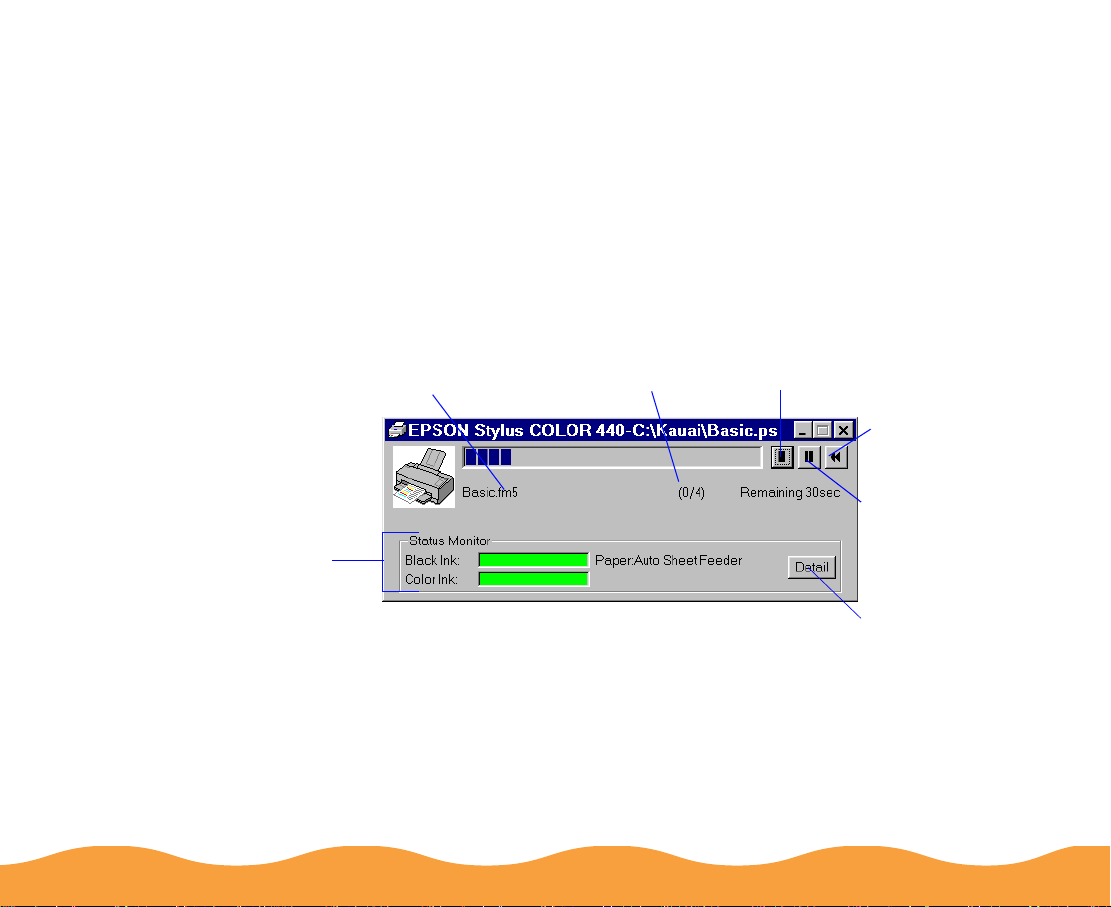
Windows 95, Windows 98 and Windows NT 4.0
After you send a pri nt job in Windows 95, Windows 98, or Window s
NT 4.0, the Progress Meter dialog box appears on your screen:
The name of th e f ile
you’re printing
This information
appears only if
you installed
Status M onitor 2
and are not
printing over a
network
Basic Printing Page 25
Pages print ed/
pages in job
Click to cancel
printing
Click to
reprint the
current pa ge
Click to pause
and resume
printing
Click to view
the Print er
Status Window
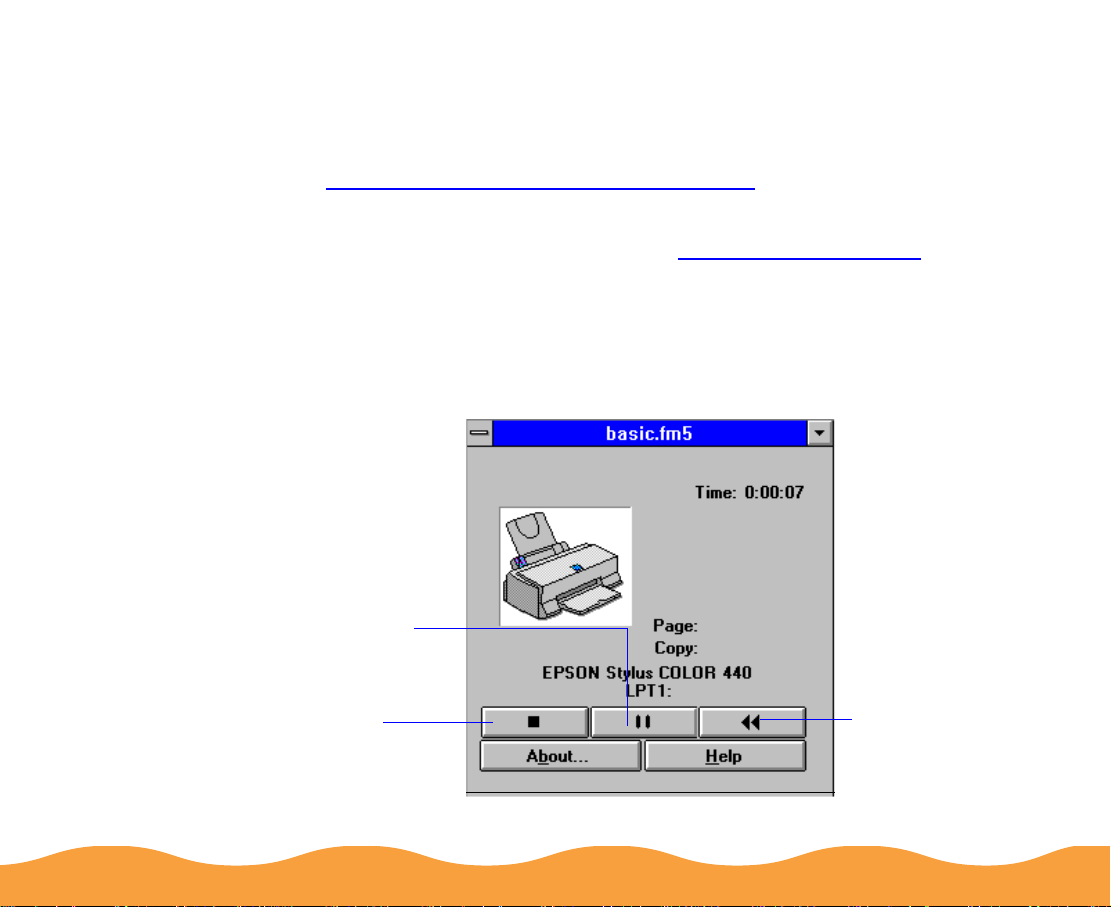
The Progress Meter shows the progress of your print job and the
status of your printer. You can use the buttons to cancel, pause,
and restart your print job, or to reprint a page. You can select
whether to display the Progress Meter dialog box or not; see
Selecting the Speed & Progress Options for instructions.
If you installed Status Monitor 2, you also see information about
how much ink you have left. See Using Status Monitor 2.
Windows 3.1
After you send your print job, the EPSON Despooler dialog box
appears on your screen:
Click to
pause and
resume
printing
Click to
stop
printing
Basic Printing Page 26
Click to re print
or reque ue a
document

This dialog box shows the progress of your print job and the status
of your printer. If you run out of paper while printing, for example,
the Despooler warns you. You can use the buttons to cancel,
pause, and restart your print job, requeue your document for later
printing, or reprint all or part of the document.
Windows NT 4.0
Windows NT 4.0 servers and workstations include a messenger
service to ale rt yo u to pr inter er rors or let you know when a pr int job
is finished. If you have appropriate network access privileges or
you’re controlling printing from the server, you can also cancel,
pause, or restart print jobs and set other options. See your
Windows NT documentation for details.
Basic Printing Page 27

Advanced Printing
When your presentation graphics, photographs, or other projects
have special printing requirements, you can use the custom
settings in your EPSON Stylus COLOR 440 software. You can
choose predefined settings or adjust individual options like
brightness, contrast, sharpness, and halftoning.
Your printer software’s print layout options let you print almost any
size image on your printer, print multiple pages on one sheet of
paper, and add watermarks (not available with Windows 3.1).
This chapter includes the following information:
◗ Using Predefined Advanced Settings
◗ Customizing Print Quality and Special Effects
◗ Adjusting Color Settings
◗ Selecting Paper Size and Orientation
◗ Selecting Print Layout Options
◗ Saving Custom Settings
Page 28
Using Predefined Advanced Settings
Predefined settings provide an easy way to fine-tune your printer’s
operation for special image types, such as graphics downloaded
from the Internet or images produced by a digital camera. Follow
these steps to print with predefined settings:
1 Create your image or document in your application software.
2 Access your printer software, as described in Printing from
Windows Applications. You see one of the following dialog
boxes:
Click Custom, then click here
to see a list of p roject types
Windows 95, 98, NT
Advanced Printing Page 29
Click Advanced, then click here
to see a list of project types
Windows 3.1

Note:
Choose your Media
Type and Ink settings
before you se lec t a
project from t he
Custom Settings list.
Some settings may not
be available with the
Media Type or Ink
setting you c hoose.
Printing with Advanced
Photo, Ph ot oEnhance ,
or PhotoEnhance3
may take lo nger,
dependin g on your
computer system and
image.
3 Choose the Media Type you want to prin t on. (If yo u’re not sur e
which setting to select, see Media Loading and Handling
Guidelines.)
4 Choose Color or Black ink.
5 Click Custom (in Windows 3.1, click Advanced), and the n click
Custom Settings. You see the list of project types.
6 Choose the right setting for your project and Medi a Typ e
following these guidelines:
◗ PhotoEnhance3 (Windows 95, 98, NT) or
PhotoEnhance (Windows 3.1)
For printing images captured using a video camera, digital
camera, or scanner. Produces sharper images and more
vivid colors by automatically adjusting the contrast,
saturation, and brightness. Corrects for overall under- and
over-exposure of the original image.
◗ Digital Camera (not available with Windows 3.1)
For printing images taken with a digital camera. Corrects
noise or other flaws common to digital camera images.
◗ Text/Graph
For printing graphics-intensive documents like presentation
pages with charts and graphs. Intensifies colors and
lightens the midtones and highlights.
◗ Economy
For rough drafts of text only. Saves ink (only available when
you set Media Type to Plain paper).
Advanced Printing Page 30
Loading...