

Page 1
\
\
USER'S GUIDE
Page 2
Page 3

®
EPSON
Professional Series II
20”
User’s Guide
Monitor
Page 4
Y73599I00500
Page 5

Important Safety Instructions
Read all of these instructions and save them for later reference.
Never push objects of any kind into the monitor through cabinet
slots.
Do not expose the monitor to liquids, such as rain or spills.
Because of the monitor’s weight, two people are required to lift it;
do not lift it alone. Do not place the monitor on the computer.
Do not place the monitor on an unstable cart, stand, or tabIe, and
be careful not to drop it.
Do not place the monitor near heating appliance or in direct
sunlight. Intense heat can damage the monitor’s circuitry.
Slots and openings on the top and back of the cabinet are provided
for ventilation; do not block or cover these openings.
I0. Be careful not to damage the power cord or plug.
11. Voltages outside the monitor’s specified line voltage range may
harm the monitor. The monitor should be operated from the type
of power source indicated on the rear panel marking Iabel.
12. Plug the power cord only into a grounding-type wall outlet.
13. Make sure the combined amperage rating for all products
plugged into the
exceed the amperage rating of the wall outlet.
11. Do not replace the interface cable with a non-shielded cable.
15. Unplug the monitor from the wall outlet and the computer before
cleaning. Use a damp cloth for cleaning.
wall outlet used for the monitor does not
Page 6

16. Excessive brightness for long periods may permanently imprint
an image on the screen.
17. To avoid picture distortion or color disturbance, do not put
devices that generate magnetism (such as telephones, televisions,
speakers, or magnetic screwdrivers) near the monitor.
18. When you finish using the monitor, turn it off by pressing the
power button. (Always wait at least five seconds before you turn
it back on.) When the monitor will not be used for a long period
of time, unplug the power cord.
19. Unplug the monitor from the wall outlet and refer servicing to
authorized service personnel under the following conditions:
A.
If the power cord or plug is damaged.
B.
If the monitor has come into contact with any liquids, such as
rain or spills.
C. If the monitor does not operate normally when the operating
instructions are followed. Adjust only those controls that are
covered by the operating instructions; improper adjustment
of other controls may result in damage and will often require
extensive work by a qualified technician to restore the
product to normal operation.
D.
If the monitor has been dropped or the cabinet or glass
faceplate has been damaged.
E.
If the monitor exhibits a distinct change in performance
Professional Series II Monitor
iv
Page 7

Contents
Introduction
Where to Get Help
Unpacking the Monitor
Setting Up the Monitor
Connecting the Monitor to Your Computer
Connecting Two or More Monitors to
One Video Controller
Turning On the Monitor
The Control Panel
Setting the Type of Video Input
Adjusting the Brightness and Contrast
Using Video Modes
Modifying a Video Mode
Recalling a Factory-set Video Mode
Creating a User-defined Video Mode
Adjusting the Vertical and Horizontal Convergence
Selecting the Color Temperature
Defining Your Own Color Temperature
Reducing Color Impurity
Cleaning the Monitor
Troubleshooting
The screen and the LCD do not come on
The screen is blank and the LCD displays
H/V SYNC OFF, H SYNC OFF, or V SYNC OFF
The screen is blank and the LCD does not display
a SYNC OFF error message
There is an image on the screen but the LCD is dim
The LCD displays Mode not found
The image is not centered on the screen
The image is too big or too small for the screen
The image on the screen is fuzzy
You want to change the shade of white on the screen
.............................
.......................
.......................
.......................
.........
....................
......................
..........................
..................
..............
.........................
....................
..............
.............
.................
...........
......................
........................
...........................
...........
.................
..............
...........
...............
......
....
....
.......
...
1
3
4
5
6
10
16
18
20
21
22
25
27
28
31
33
36
37
38
38
39
39
40
40
40
41
41
41
41
Professional Series
II Monitor
vii
Page 8

There are colored spots on the screen or the image
is distorted
One or two colors are missing
...........................
..................
You connected two or more monitors to one video
controller and the image quality is poor
Additional error messages
Factory-set Video Modes
Specifications
Trinitron CRT
Display
.............................
...........................
...............................
Interfacing Requirements
AC Line Voltage
.........................
Environmental Requirements
Reliability
Safety Standards
External Controls
.............................
.........................
.........................
Adjustable Display Parameters
Physical Characteristics
Interface Connectors
....................
.......................
....................
..................
.................
.....................
.......................
..........
41
42
42
43
44
49
49
49
50
51
51
51
51
52
52
52
54
viii
Professional Series II Monitor
Page 9

Introduction
Your Epson®Professional Series II monitor is a highperformance, multifrequency, autoscan color monitor for use
with graphic video controllers. The monitor is ideal for
applications that require a large screen size and high resolution,
such as CAD/CAM/CAE and desktop publishing. It offers the
following features:
20-inch Trinitron® color CRT display with superior
U
brightness and resolution
High-resolution display of up to 1280 x 1024 pixels at a
-I
fast, stable, flicker-free refresh rate (vertical frequency) of
up to 76 Hz
Fourteen factory-set video modes, including VGA,
IU
132 column, Super VGA 800 x 600, interlaced 1024 x 768
(8514/A), non-interlaced 1024 x 768, and 1280 x 1024 with
a refresh rate of up to 76 Hz
Storage space for up to eight user-defined video modes
-I
Automatic scanning of all horizontal frequencies from 30 to
!J
82 KHz and all vertical frequencies from 50 to 160 Hz
LCD display which allows you to view the number of the
-1
current video mode, easily adjust display parameters, and
perform other tasks
Three video sync formats: composite sync on green,
U
composite horizontal and vertical sync at TTL level, or
separate horizontal and vertical sync at TTL level
Three color temperatures which let you determine the
J
shade of white displayed on the screen: 9300° K (Kelvin),
6500° K, or a user-defined color temperature
Professional Series II Monitor
1
Page 10

‘A
Compliance with the latest Swedish magnetic emissions
guidelines (MPR-2, VLF/ELF)
IU
Anti-glare HEA panel
-I Tilt and swivel base
il
One 15-pin, D-Sub miniature, VGA connector and five BNC
connectors, which provide a variety of video interface cable
connection options and the possibility of connecting two or
more monitors to one video controller.
This manual provides instructions on how to set up and use the
monitor. It describes how to use the control panel buttons to
modify, recall, and create video modes, adjust the vertical and
horizontal convergence, select or define a color temperature,
and perform other tasks. It also lists the monitor’s 14 factory-set
video modes and provides troubleshooting information and
specifications.
Professional Series II Monitor
2
Page 11

Where to Get Help
If you purchased your monitor in the United States, Epson
America provides local customer support and service through a
nationwide network of authorized Epson dealers and Service
Centers. Epson also provides the following support services
through the Epson Customer Support Center at (800) 922-8911:
Technical assistance with the installation, configuration,
J
and operation of Epson products
Assistance in locating your nearest Authorized Epson
-I
Reseller or Service Center
Sales of ribbons, supplies, parts, documentation, and
J
accessories for your Epson product
J
Customer Relations
Epson Fax Back technical information service-also
J
available directly by calling the toll number (310) 782-3214
Product literature with technical specifications on our
J
current and new products
J User group locations.
If you purchased your monitor outside the United States,
please contact your dealer or the marketing location nearest
you for customer support and service. International marketing
locations are listed inside the back cover of this manual.
Professional Series II Monitor
3
Page 12
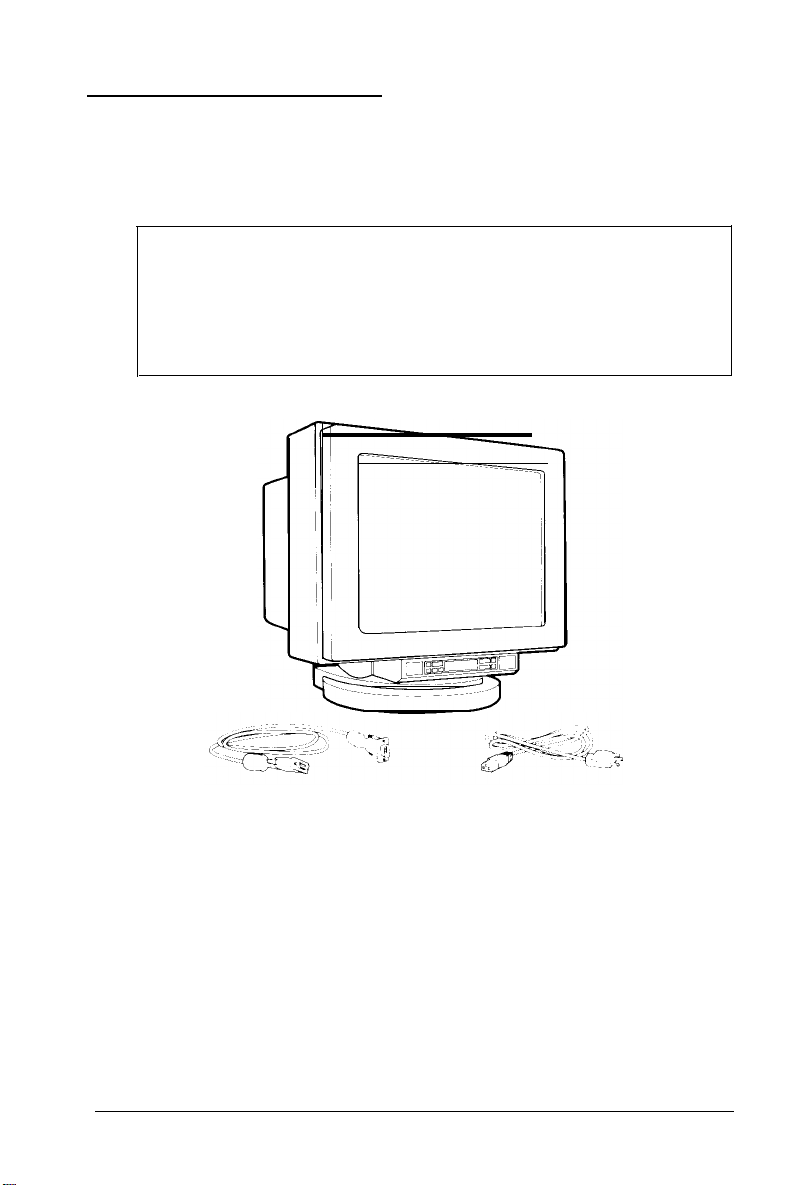
Unpacking the Monitor
When you unpack your monitor, make sure you have the items
shown below.
WARNING
Because the monitor weighs approximately 81 lbs, two
people are needed to lift it. To avoid injury, do not lift the
monitor alone. Place the monitor only on a strong table or
desk; do not place it on your computer.
monitor
video interface cable
AC power cord
If anything is missing or looks damaged, contact your Epson
dealer immediately.
In addition, make sure you have a warranty card and a
registration card. Complete the registration card and return it
to Epson so you’ll receive update information. Keep the
warranty card for your records.
Professional Series II Monitor
4
Page 13

Note
Be sure to keep the monitor’s original box and packing
materials in case you need to transport the monitor later.
Setting Up the Monitor
When you select a location for the monitor, keep the following
in mind:
‘9
Follow the safety instructions listed at the beginning of this
manual.
J
Use one or more sturdy desks that are strong enough to
support the weight of your computer, monitor, and
peripheral devices and provide ample space to hold your
equipment and work materials.
J
Do not place the monitor on your computer.
IJ For your comfort, it is best to place the monitor directly in
front of you and sit about an arm’s length away from it.
J
To minimize glare and reduce eye fatigue, position the
monitor so that sunlight, desk lamps, or overhead lights do
not shine directly on the screen.
The monitor has one D-Sub (VGA) connector and five BNC
connectors. The video interface cable that comes with the
monitor has a VGA connector on each end; you can connect it
to the monitor’s VGA connector and to a VGA connector on
your computer.
Professional Series II Monitor 5
Page 14

Alternatively, you can purchase your own video interface cable
and connect it to the monitor’s BNC connectors. See the BNC
connector signals table on page 54 to determine which video
interface cable(s) and BNC connectors to use with your system.
If your computer or video adapter card does not have a VGA
connector, you cannot use the video interface cable that comes
with the monitor. Determine the sync requirements of your
video controller, see the BNC connector signals table on
page 54, if necessary, and purchase the appropriate interface
cable(s). Consult your dealer if you need help. Then connect the
interface cable(s) to the appropriate connector(s).
Connecting the Monitor to Your Computer
Before you connect the monitor to your computer, you need to
make sure your computer and/or video adapter card is set up
for use with the monitor. If necessary, install an appropriate
video adapter card in your computer and set any DIP switches
or jumpers on the card to match the monitor. You may also
need to change jumper settings inside the computer. See your
computer and/or video adapter card manual for instructions.
Note
If you want to connect two or more monitors to one video
controller, see page 10 for instructions.
Follow these steps to connect the monitor to your computer:
1.
Before you connect any cables, make sure the monitor,
computer, and all other peripheral devices are turned off.
The monitor is off when the power button on the left side of
the control panel extends out from the panel, as shown in
the following illustration.
6 Professional Series II Monitor
Page 15
power button
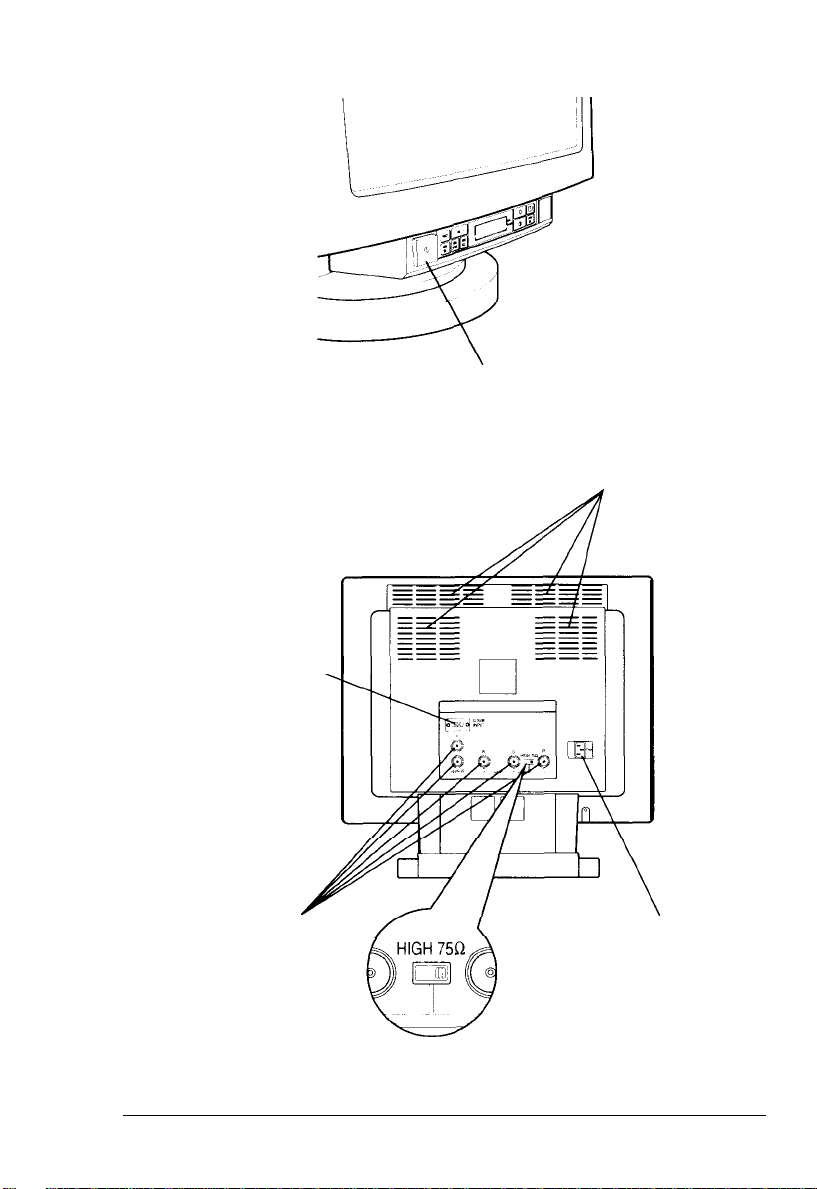
Turn the monitor around so you can see the back panel.
2.
vents
VGA connector
BNC COn
nectors
/
high impedance/
75 Ohm switch
AC power
Professional Series II Monitor
inlet
7
Page 16
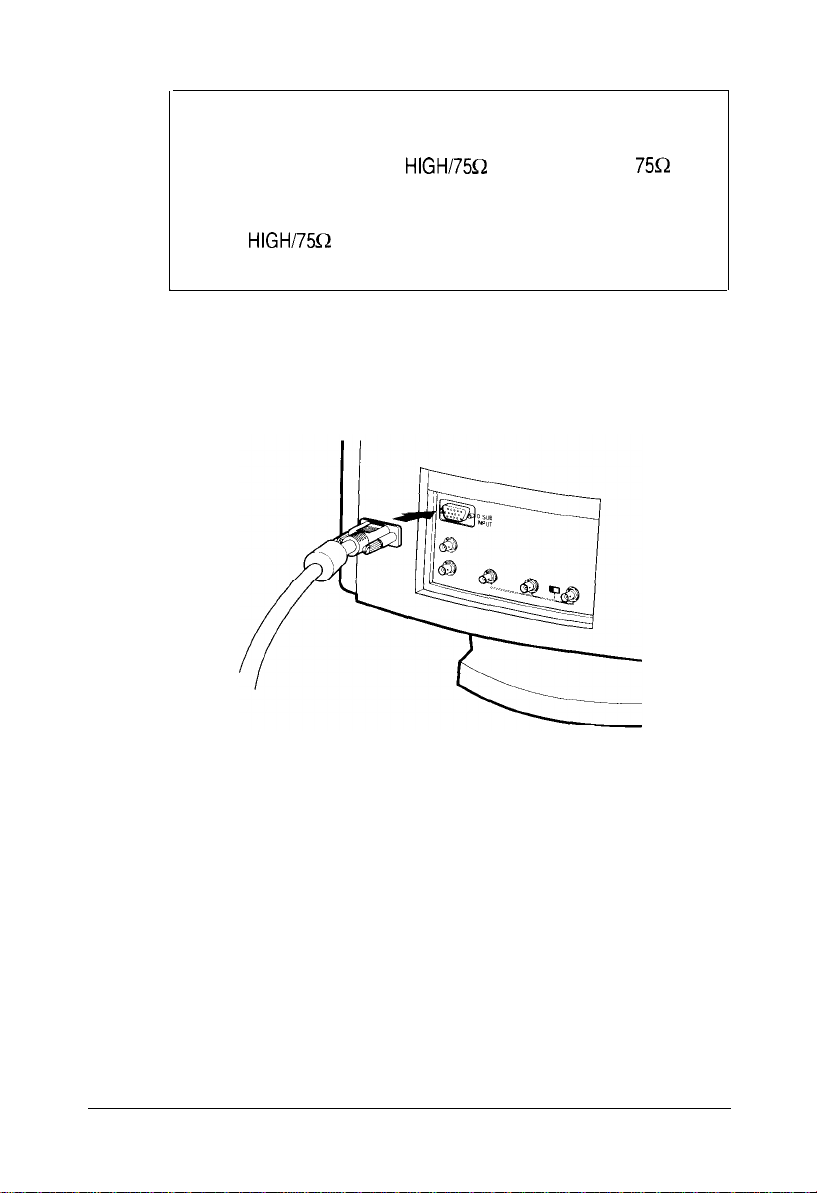
Note
If you are connecting only one monitor to the video
interface, make sure the
(the factory setting). As long as you use only one
monitor with your computer’s video controller, do not
set the
excessive brightness and lowers the resolution.
3.
Plug one end of the video interface cable that comes with the
monitor into the VGA connector labeled D-SUB INPUT and
tighten the screws on the cable connector.
HIGHi75Q
switch to HIGH because this causes
HIGH/75SZ
switch is set to
75Q
4.
Plug the other end of the video cable into the video interface
on your computer and tighten the connector screws. (See
your computer and/or video adapter card manual for more
detailed instructions.)
5.
Plug the monitor’s power cord into the AC power inlet on
the back panel and then into a grounded (earthed) electrical
outlet. The monitor contains a universal (90 to 264 VAC)
power supply, so you do not need to check the voltage of
your power supply.
8 Professional Series II Monitor
Page 17
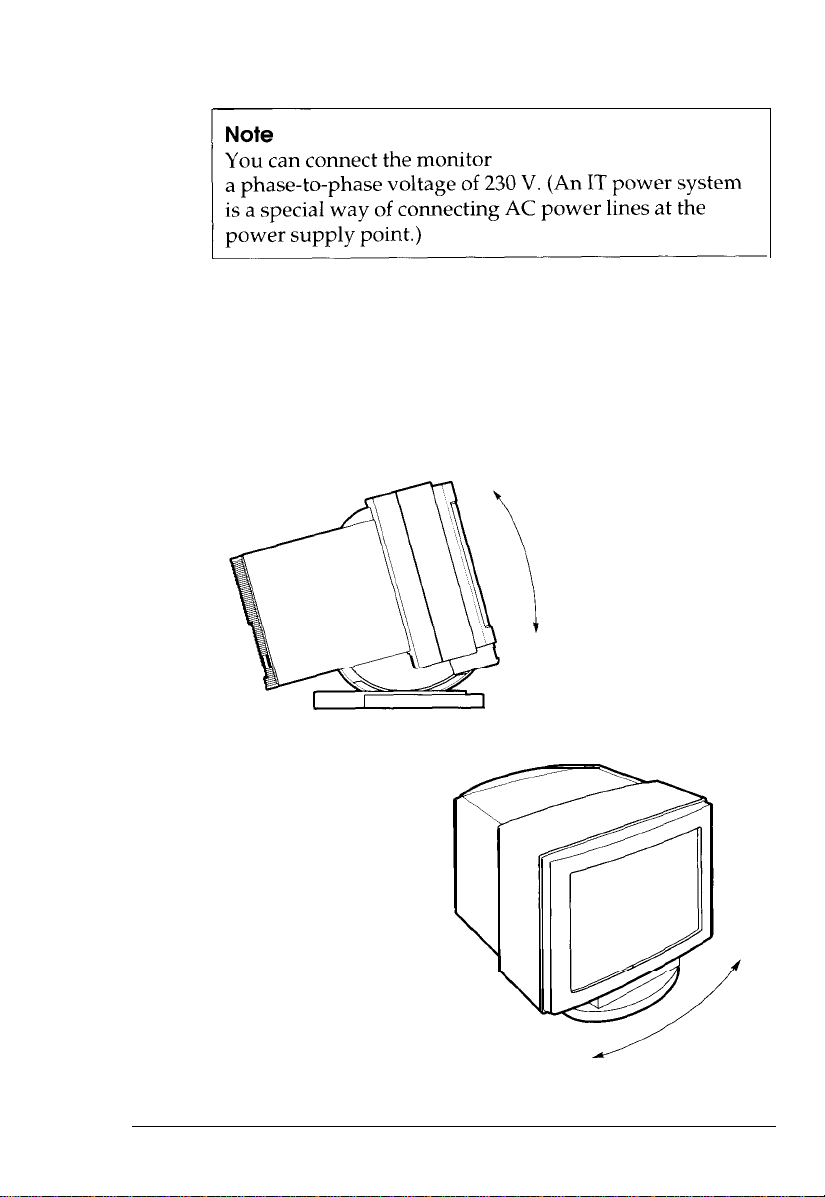
to an IT power system with
6.
Turn the monitor around so the screen faces you and use the
tilt and swivel base to position the screen at a good viewing
angle. For comfortable viewing, the top of the screen should
be slightly below eye level when you are sitting in front of
the monitor. (Your line of sight to the screen should be
about 10° to 20° below the horizontal.)
Professional Series II Monitor
9
Page 18
Connecting Two of More Monitors to One Video Controller
Using the monitor’s BNC connectors, you can connect two or
more monitors to a single video controller for demonstrations
and other applications. To connect two or more monitors to one
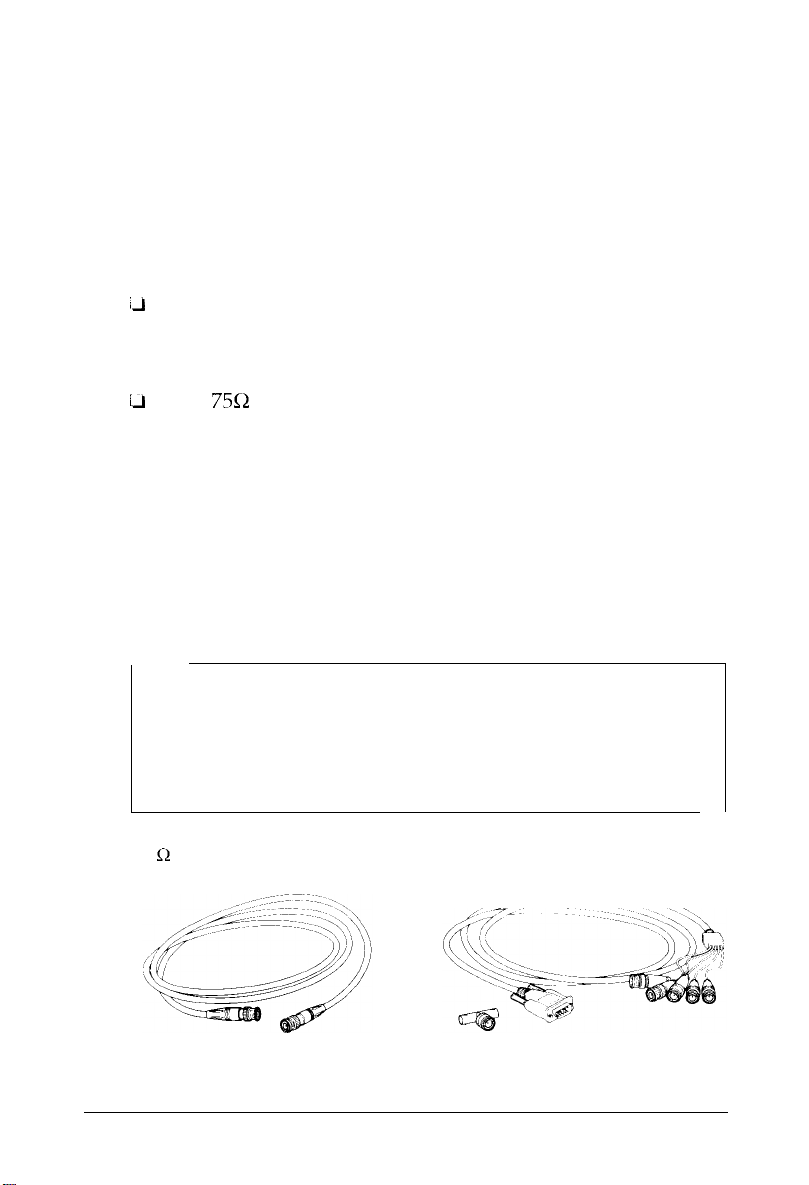
video controller, you need the following:
#-I
One video interface cable with a VGA connector on one end
and five color-coded cables with BNC connectors on the
other
il
Five
732
video interface cables with BNC connectors on
both ends and five T-BNC connectors (called T connectors
here) for each additional monitor.
These cables and connectors are available at computer and
electronics stores. For best results, make sure the video
interface cables for connecting the monitors to each other are
the same length and impedance. Also, avoid using very long
cables because this may affect the quality of the images
displayed on the additional monitor(s).
Note
It is best to connect no more than three monitors to one
video controller. If you connect more than three monitors,
the image may deteriorate slightly on each additional
monitor you connect.
75 Q video Interface cable with
one BNC connector on each end
Professional Series II Monitor
10
video interface cable with one
VGA and five BNC connectors
T connector
Page 19
To connect two monitors to the video interface on your
computer, follow the steps below. If you want to connect three
monitors to the video interface, you can follow these steps, but
first see “Connecting three monitors” on page 15.
1.
Make sure your monitors, the computer, and all other
peripheral devices are turned off.
If one monitor is already connected to your computer,
2.
unplug its power cord from the electrical outlet and the AC
power inlet. Then disconnect the video interface cable(s)
from the monitor and the computer.
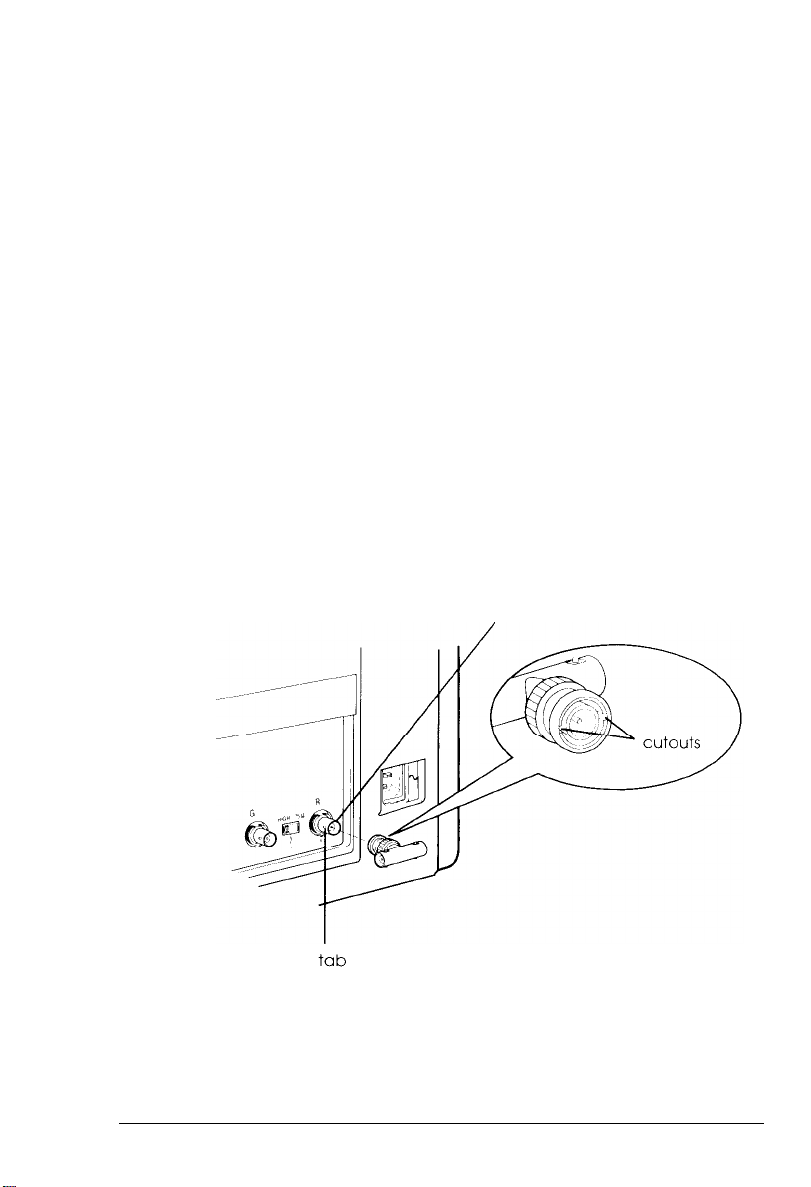
Connect each of the five T connectors to the first monitor’s
3.
five BNC connectors, as shown below. To do this, align the
cutouts in the T connector with the tabs on the monitor
connector and plug in the T connector. Then push it in
while turning it clockwise as far as possible until it fits in
place.
tab
Professional Series II Monitor
11
Page 20

4.
Using the same method as described in step 3, connect each of
the five color-coded cables to the appropriate
T connector on the first monitor, as shown below. The table
following the illustration shows how to match each colorcoded cable with the appropriate T connector.
red cable
I connector
Connecting the co/or-coded cables
Cable
Black
White or grey H/(H+V)
Blue
Green
Red
Professional Series II Monitor
12
Connect cable to the T connector labeled
v
B
G
R
Page 21

5.
Plug the VGA connector on the color-coded video cable into
the computer’s VGA interface and tighten the connector
screws.
6.
Connect one 75Q video interface cable to each T connector
on the first monitor, as shown below.
T connector
7.
Then connect each 75Q video interface cable to the
appropriate BNC connector on the second monitor.
Connect the cable from the T connector labeled V to the
BNC connector labeled V, the cable from the T connector
labeled H/(HtV) to the BNC connector labeled H/(H+V), and so
on. The illustration on the next page shows two monitors
connected to the computer’s video interface.
Professional Series II Monitor
de0
ce cable
13
Page 22

8.
Set the first monitor’s
monitor’s
HIGHi75Q
HIGH/75Q
switch to
switch to HIGH and the second
750,
as shown below.
--e-
_---
----
----
----
---
---
---
---
---
---
---
---
i
----
-s-
;I
___-
---
---
---
---
---
---
---
---
---
_I
-I--=-
_---
----
-E-~ ~
---
---
--- ---
--
IEzz
i’
II
----
_---
___-
---
---
---
---
---
---
r~ I ---I
--II
Professional Series II Monitor
14
Page 23

To maximize the brightness of all the monitors you connect,
always set the
HIGHi75Q
switches to HIGH on all the monitors
except the last one and set the last monitor’s switch to 75R.
For example, if you connect three monitors to one video
controller, set the switches on the monitors as shown below.
If one of the monitors you are connecting does not have a
HIGHI75R
switch, it is probably permanently set to 7512; use
it only as the last monitor (monitor 3 below).
computer monitor 1
9.
Plug each monitor’s power cord into the AC power inlet on
monitor 2
its back panel and then into a grounded (earthed) electrical
outlet.
Connecting three monitors
To connect three monitors to one video interface, follow the
appropriate steps above as well as these general guidelines:
U
Connect T connectors to the BNC connectors on the first
and second monitors.
U
Connect the color-coded video interface cable to the
computer’s video interface and the appropriate
T connectors on the first monitor.
U
Use
75Q
video interface cables to connect the first monitor
to the second monitor and the second monitor to the third
monitor.
U
Set the monitors’
of this page.
HIGHi75Q
switches as described at the top
monitor 3
Professional Series II Monitor 15
Page 24

Turning On the Monitor
Follow these steps to turn on your computer and monitor(s):
1.
Turn on your computer. (If you turn on the monitor before
the computer, the monitor’s LCD may display an error
message until you turn on the computer.)
2.
To turn on the monitor, press the power button on the
left side of the control panel. The LCD first displays
Wait....
where n.nn is your monitor’s firmware release number.
Then you see the message Test
three seconds while the monitor performs internal tests.
Start up and then F/w release n.nn,
in progress for two or
control panel
power button
Professional Series II Monitor
16
I
LCD
Page 25

If the monitor recognizes your computer’s video mode, the
LCD displays Video Mode : n, where n is the number of
current video mode.
If the monitor does not recognize the current video mode, the
LCD displays the message Mode not found. This means the
display parameter settings for the current video mode have not
been stored in the monitor’s memory. If you want to store
display parameter settings for the current video mode, you can
create a user-defined video mode, as described on page 28. (The
monitor operates properly even if you do not create a
user-defined video mode and the LCD continues to display
Mode not found.)
If the LCD displays H/V SYNC OFF, H SYNC OFF, or
V SYNC OFF, see page 39 in “Troubleshooting.” If it displays
another error message, see the appropriate section in
“Troubleshooting.”
You first see an image on the screen when the LCD displays the
number of the current video mode or Mode not found.
Note
If you do not touch the power button or any control panel
buttons for about 30 seconds, the monitor automatically
turns off the LCD. When the LCD is off, you can still see a
dim image on it.
To turn the LCD back on when it dimly displays the number
of the current video mode or Mode not found, press
the - or + (left or right) side of the Brightness or Contrast
button. To turn the LCD back on when it dimly displays
Mem Select, press MEM SEL.
Professional
Series
II
Monitor
17
Page 26

The Control Panel
The control panel buttons are shown below. The table after the
illustration describes their functions.
Adjustment
Function
button
Memory
select
button
button
If
I
Memory
store
button
Control panel buttons
Memory
recall
button
Brightness
button
#I
/’
Contrast
button
Degauss
button
/
I
\
I
Input
select
button
Professional Series II Monitor
18
Page 27

Control pane/ buttons (continued)
The following sections provide detailed information on how to
use the control panel buttons.
Note
While you are using the control panel buttons to adjust the
image, the LCD display changes. If you do not press any
buttons for 10 seconds, however, the LCD redisplays the
number of the current video mode or Mode not
return to the adjustment you were making, press FUNCT.
found. To
Professional Series II Monitor 19
Page 28

Setting the Type of Video lnput
The Input select button allows you to change the monitor’s
video input setting to match the type of video input the
monitor is using. The monitor has two possible video input
settings: D-SUB or BNC. If your video interface cable is connected
to the monitor’s VGA connector, the video input setting should
be D-SUB. If your video interface cable(s) are connected to the
monitor’s BNC connectors, the video input setting should
be BNC.
The arrow at the right end of the LCD points to the current
video input setting. (If the LCD is off, press the Brightness or
Contrast button to turn it back on.) For example, in the
illustration below, the arrow points to D-SUB.
If the video input setting matches the type of video input the
monitor is using, the LCD displays the number of the current
video mode, such as Video Mode: 3, or Mode not found.
For example, if you connected your video interface cable to the
monitor’s VGA connector and the video input setting is D-SUB,
the arrow points to D-SUB, as shown above.
If the video input setting does not match the type of video
input the monitor is using, the LCD flashes the error message
H/V SYNC OFF. Press
video input setting. You briefly see the correct setting and then
the LCD displays the number of the current video mode or
Mode not found. If you do not touch any control panel
buttons for 20 seconds, the monitor saves the new video input
setting.
INPUT SEL once to
select the correct
Page 29

Note
If the LCD still flashes H/V SYNC OFF after you press
INPUT SEL, see page 39 in “Troubleshooting.”
Adjusting the Brightness and Contrast
To make the image on the screen clear and easy-to-read, use the
Brightness and Contrast buttons (shown below) to adjust and
save the monitor’s brightness and contrast settings. The
Brightness button controls the screen’s background (raster)
intensity and the Contrast button controls the intensity of the
displayed image.
Brightness button
Contrast button
To adjust the brightness and contrast, follow these steps:
1.
To adjust the brightness, press the - or + side of the
Brightness button. The LCD displays a scale composed of
vertical bars, such as Brght :
11111.
Press and hold down the + side of the Brightness button to
increase the brightness or the - side to decrease it. When
you reach the minimum brightness setting, a small square
replaces the scale of vertical bars. At the maximum setting,
an arrow appears on the right side of the scale.
Professional Series II Monitor
21
Page 30

2.
When you are satisfied with the brightness of the image,
release the Brightness button. After 10 seconds, the LCD
displays the number of the current video mode or
Mode not
buttons for 20 seconds, the monitor saves your brightness
setting. Your setting remains in effect (even after you turn
off the monitor) until you adjust the brightness again.
3.
To adjust the contrast, repeat steps 1 and 2 using the
Contrast button.
found. If you do not touch any control panel
Using Video Modes
A video mode is a collection of display parameter settings that
define how the monitor displays an image. The Epson
Professional Series II monitor is a multifrequency monitor that
can use up to 22 industry-standard and user-defined video
modes.
The monitor’s memory contains fourteen factory-set video
modes (described on page 44). In addition, you can create up to
eight user-defined video modes.
When the monitor is using a factory-set or user-defined video
mode, the LCD displays Video Mode :
number of the current video mode. (If the LCD is off, press
the Brightness or Contrast button to turn it back on.) The
factory-set video modes are 1 through 14 and the user-defined
video modes are 15 through 22.
To customize the screen image, you can modify the display
parameter settings for any factory-set or user-defined video
mode. If you don’t want to keep your changes to a factory-set
video mode, you can recall the original factory settings.
Professional Series II Monitor
22
n, where n is the
Page 31

The monitor automatically selects which video mode to use. It
analyzes the signal input (the frequency and polarity of the
horizontal and vertical sync pulses) from the computer, checks
the video modes stored in its memory, and uses the most
appropriate mode. The signal input depends on the computer,
display adapter card, and application program you are using.
The sections below explain how to modify a video mode, recall
a factory-set video mode, and create a user-defined video
mode. For each mode, you can set any of the four display
parameters listed in the following table. Refer to this table as
you follow the steps below.
Display parameters
Parameter Function
HorizontaltCenters the image horizontally. Press and hold down the
phase
side of the Adjustment button to move the image left, or the
+ side to move the image right.
1
Width
Adjusts the width of the image. Press and hold down the
side of the Adjustment button to reduce the width of the
image, or the + side to increase its width. l
I
El-II-
I
Professional Series II Monitor
23
Page 32

Display parameters (continued)
Parameter
w--p
Vertical
shift
Height
* A scale of 0 to 9 is available.
Function
Centers the image vertically. Press and hold down the - side
of the Adjustment button to move the image downward, or
the + side to move the image upward l
Adjusts the height of the image. Press and hold down the
side of the Adjustment button to reduce the height of the
image, or the + side to increase its height. l
Note
In addition to the horizontal phase, width, vertical shift, and
height, you can also adjust the monitor’s vertical and
horizontal convergence and color temperature. Changes you
make to the settings of these parameters, however, affect the
monitor as a whole and apply to all video modes. Sections
later in this manual describe how to set the monitor’s vertical
and horizontal convergence and color temperature.
24 Professional Series II Monitor
Page 33

Modifying a Video Mode
When the monitor is using a factory-set or user-defined video
mode, you can customize the screen image by adjusting the
mode’s display parameter settings. When the LCD displays the
number of the current video mode, follow the steps below to
modify its display parameter settings. (If the LCD is off, press
the Brightness or Contrast button to turn it back on.)
To customize the screen image when the LCD displays
1.
Press FUNCT. The LCD displays the name of a display
parameter you can adjust, such as Hor Phase : 4. The
number next to the display parameter name indicates the
current setting.
2.
You can adjust the displayed parameter as described in
step 3 or press FUNCT until you see the name of a parameter
you want to adjust. For example, if you want to center the
image vertically, press FUNCT until the LCD displays
Vert Shift.
Professional Series II Monitor
25
Page 34

Pressing FUNCT accesses the display parameters in the order
listed in the table below. You can press MEM RCL to move
backward through the parameters.
Display parameter order
/----
Parameter
LCD message
Horizontal phase
r---
i"Yh
Vertical shift
Height
~ Vertical convergence l
I--
Horizontal convergence
l Changes you make to these parameters apply to all video modes.
Sections later in this manual describe how to set them.
T-
Hor Phase
~
Width
, Vert Shift
Note
If you press FUNCT when the LCD displays
Color Temp :3, the LCD displays a message such as
RED adjust :
MEM SEL
3.
Adjust the image using the Adjustment button as described
twice.
in the table on pages 23 and 24.
5. To exit from this display, press
4.
Press FUNCT until you see the name of the next parameter
(if any) you want to change and then adjust the image.
5.
Repeat steps 3 and 4 until you are satisfied with the image
you see.
26 Professional Series II Monitor
Page 35

6.
When you are finished adjusting the image, press MEM SEL.
The LCD displays Mem Select :
number of the current video mode. (If you do not want to
save your changes to the current video mode, press
nt,
where n is the
MEM SEL again. The LCD displays the number of the current
video mode.)
7.
To save your setting(s), press
the number of the current video mode. (If you modified a
factory-set video mode and you want to restore the factory
settings, see the next section.)
MEM STORE.
Note
You cannot store the same display information for two
different factory-set video modes.
Recalling a Factory-set Video Mode
When the monitor is using a factory-set video mode you
modified, you can recall the original settings for the mode.
When the LCD displays a factory-set video mode number
(1 through 14), follow the steps in this section to restore its
factory settings. (If the LCD is off, press the Brightness or
Contrast button to turn it back on.)
The LCD displays
Note
You can recall the original settings only for factory-set video
modes. If you press MEM RCL when the LCD displays a
user-defined video mode number (15 through 22) or Mode
not found, you see the message Rcl unavailable!
For factory-set video modes, you can recall only the original
horizontal phase, width, vertical shift, and height settings.
You cannot recall vertical convergence, horizontal
convergence, or color temperature settings.
Professional Series II Monitor
27
Page 36

1.
Press MEM SEL. The LCD displays Mem Select :
(where n is a number from 1 through 14 and indicates the
current factory-set video mode).
2.
Press MEM RCL. You see the message Recall Confirm ?.
3.
To confirm that you want to recall the factory settings for
the current video mode, press MEM RCL again. You briefly
see the message Recall Update while the monitor
restores the factory settings. Then the LCD displays the
number of the current video mode.
Creating a User-defined Video Mode
When the LCD displays Mode not found, you can enter and
save your own display parameter settings to create a userdefined video mode. (If the LCD is off, press the Brightness or
Contrast button to turn it back on.)
nt
Follow these steps to create a user-defined video mode:
1.
Press FUNCT. The LCD displays the name of a display
parameter you can adjust, such as Hor Phase : 4. The
number next to the parameter name indicates the current
setting.
2.
You can adjust the displayed parameter as described in
step 3 or press FUNCT until you see the name of a parameter
you want to adjust. For example, if you want to center the
image vertically, press FUNCT until the LCD displays
Vert Shift.
28 Professional Series II Monitor
Page 37

Pressing FUNCT accesses the display parameters in the order
listed in the table below. You can press MEM RCL to move
backward through the parameters.
Display parameter order
~
LCD
Parameter
Horizontal phase
message
1
~ Hor Phase
Width
Vertical shift
Height
Vertical convergence l
Horizontal convergence l
Color temperature l
Changes you make to these parameters apply to all video modes
*
Sections later in this manual describe how to set them
------A~
Width
!
Vert Shift
~~ i------
Vert Conv
~7
~~
Horiz
I--
Color Temp
~~~
Height
Conv
~~
~~
Note
If you press FUNCT when the LCD displays
Color Temp:
RED adjust :
MEM SEL twice.
Adjust the image using the Adjustment button as described
3.
in the table on pages 23 and 24.
4.
Press FUNCT until you see the name of the next parameter
(if any) you want to change and then adjust the image.
3, the LCD displays a message such as
5. To exit from this display, press
5
Repeat steps 3 and 4 until you are satisfied with the image
you see.
Page 38

6.
When you are finished adjusting the image, press MEM SEL.
The LCD displays Mem Select : n (where n is a number
from 15 through 22 and represents the first available
user-defined video mode). If no arrow appears after the
user-defined video mode number, there is currently no
display information for this mode stored in the monitor’s
memory.
Note
If the LCD displays Mem Select :
number from 15 through 22), the monitor already
contains eight user-defined video modes. The arrow
after the user-defined video mode number indicates that
display information for this mode is stored in the
monitor’s memory.
If you want to store your settings over the previous
display information for this mode, go to step 7. If you
want to store your settings over another user-defined
video mode, select another mode by pressing the + or side of the Adjustment button.
Before you go to step 7, make sure you want to store
your settings over the previous settings for the mode
you select. After you store new display information for a
user-defined video mode, you cannot recall the previous
display information for the mode.
nt(where
n is a
(If you do not want to create a user-defined video mode at
this time, press MEM SEL again. The LCD redisplays
Mode not found.)
7.
To save your settings for the displayed user-defined video
mode, press
the current user-defined video mode.
30 Professional Series II Monitor
MEM STORE.
The LCD displays the number of
Page 39

Adjusting the Vertical and Horizontal Convergence
You can adjust the monitor’s vertical and horizontal
convergence to sharpen the screen image. Optimum
convergence produces the highest resolution and occurs
when the red, green, and blue beams overlap.
Note
Changes you make to the monitor’s vertical and horizontal
convergence apply to all video modes.
To adjust the vertical and horizontal convergence settings,
follow these steps:
Press FUNCT. The LCD displays the name of a display
1.
parameter you can adjust, such as Hor Phase : 4. The
number next to the display parameter name indicates the
current setting.
To adjust the vertical convergence, press FUNCT until the LCD
2.
displays Vert
Conv. Pressing
parameters in the order listed in the table below. You can
press MEM RCL to move backward through the parameters.
FUNCT
accesses the display
Display parameter order
Parameter
Horizontal phase
Width
Vertical shift
Height
Vertical convergence
Horizontal convergence
Color temperature
LCD message
Hor Phase
Width
Vert Shift
Height
Horiz Conv
Color Temp
Professional Series II Monitor
I
31
Page 40

If you
press
FUNCT when the
LCD displays
5. To exit from this display, press
3.
Using a horizontal green line as your reference, adjust the
red and blue beams until the line is sharp, distinct, and
completely white. To do this, press and hold down the
-
or + side of the Adjustment button to separate the red and
blue beams or move them closer together, as shown in the
table below. (The green beams remain in place.) A scale
of 0 to 9 is available and the factory setting is 4.
Adjusting the vertical convergence
~ Adjustment button Red beams move
1
i----
4.
+
~~
-
red
blue
horizontal lines
UP
/
____------------
_... -1.............:
To adjust the horizontal convergence, press FUNCT until
Blue beams move
UP
Down
\
/
the LCD displays Horiz Conv.
green
32 Professional Series II Monitor
Page 41

5.
Using a vertical green line as your reference, adjust the
red and blue beams until the line is sharp, distinct, and
completely white. To do this, press and hold down the
-
or + side of the Adjustment button to separate the red and
blue beams or move them closer together, as shown in the
table below. (The green beams remain in place.) A scale
of 0 to 9 is available and the factory setting is 4.
Adjusting the horizontal convergence
Adjustment button
/
-8
green
I
j
I
j
I-
\
Blue beams move
I I
:
I
: 1
: ’
I ’
I I
red
I
\
blue
\
/
vertical lines
After 10 seconds, the LCD displays the number of the current
video mode or Mode not
found. If you do not touch any
control panel buttons for 30 seconds, the monitor saves
your vertical and horizontal convergence settings. Your
settings remain in effect (even after you turn off the
monitor) until you adjust the convergence again.
Professional
Series
II
Monitor
33
Page 42

Selecting the Color Temperature
The color temperature of the image determines the mix of red,
green, and blue and therefore the shade of white on the screen.
If you want to change the shade of white, you can choose
between two factory-set color temperatures or define your own
color temperature as described on page 36.
Of the factory-set color temperatures, color temperature 1
(9300° K) provides a bluer shade of white and color
temperature 2 (6500° K) provides a more reddish shade of
white.
Note
Changes you make to the monitor’s color temperature apply
to all video modes.
To select a color temperature, follow these steps:
1.
Press FUNCT. The LCD displays the name of a display
parameter you can adjust, such as Hor Phase : 4. The
number next to the display parameter name indicates the
current setting.
2.
Press FUNCT until the LCD displays Color Temp. Pressing
FUNCT accesses the display parameters in the order listed in
the following table.
backward through the parameters.
34 Professional Series II Monitor
You
can press
MEM RCL to move
Page 43

Display parameter order
Parameter
LCD message
c
i
Horizontal phase
i
Width
Vertical shiftVertical shift
r------
1 Height
’
Vertical convergence
’
Vertical convergence
Horizontal convergenceHorizontal convergence
~~
Color temperatureColor temperature
Width
I
I
~ Vert Shift
~ Vert Shift
Height
Height
vert Conv
+
i
~ Horiz Conv
~ Horiz Conv
1
Color Temp
1 Color Temp
If you press FUNCT when the LCD displays
When the LCD displays Color Temp : 1, the color
3.
temperature setting is 9300° K. When the LCD displays
Color Temp :
When the LCD displays Color Temp :
2, the color temperature setting is 6500° K.
3, the user-defined
color temperature takes effect. (The next section describes
how to define your own color temperature.)
To select the color temperature you want, press the - side of
the Adjustment button to decrease the displayed number,
or the + side to increase it. The shade of white on the screen
changes when you change the color temperature setting.
Professional Suies II Monitor
35
Page 44

After 10 seconds, the LCD displays the number of the current
video mode or Mode notfound. If you do not touch any
control panel buttons for 30 seconds, the monitor saves
your color temperature setting. Your setting remains in
effect (even after you turn off the monitor) until you select
another color temperature.
Defining Your Own Color Temperature
To define your own color temperature, follow these steps:
1.
Follow steps 1 and 2 on page 34 to select Color Temp.
2.
To select the user-defined color temperature, press the - or +
side of the Adjustment button until the LCD displays
Color Temp: 3.
3.
Press
FUNCT.
RED adjust :
you want to adjust, press FUNCT until the LCD displays its
name.
4.
To adjust the amount of the color the monitor displays,
press and hold down
button. A scale of 0 to 9 is available. As you adjust the
amount of a color, the shade of white on the screen changes.
The LCD displays a message such as
5. To select the color (red, green, or blue)
the - or + side of the Adjustment
5.
Press FUNCT to select the next color (if any) you want
to adjust. Then adjust
in step 4.
WARNING
It is best not to use the primary color blue on a dark
background because the contrast between the characters
and the background is poor. This makes the screen
difficult to read and can cause eyestrain.
36 Professional Series II Monitor
the amount of the color as described
Page 45

6.
When you are satisfied with the shade of white you see, do
not touch any control panel buttons for at least 30 seconds.
After 10 seconds, the LCD displays the number of the
current video mode or Mode not found. After 30
seconds, the monitor saves the color temperature you
defined as color temperature 3.
7.
Press MEM SEL twice to exit from defining a color temperature.
After 10 seconds, the LCD displays the number of the
current video mode or Mode not found.
Reducing Color Impurity
You can use the Degauss button (shown below) to minimize
distortion and color impurity, such as colored spots on the
screen, caused by magnetic fields. If you notice distortion or
color impurity on your screen, electromagnetic interference is
present. Press the Degauss button to improve the screen image.
Degauss button
To avoid electromagnetic interference, move any devices
Professional Series II Monitor
37
Page 46

CIeaning the Monitor
To keep the monitor operating at its best, it is important to
clean it regularly. Follow these steps:
1.
Turn off the monitor.
2.
Use a damp, lint-free cloth to wipe the monitor cabinet; do
not use a wet cloth.
3.
To clean the screen, spray a household glass cleaner on a
cloth; then wipe the screen.
Troubleshooting
This section gives solutions to monitor problems you may
encounter. If these procedures do not solve the problem, see
page 3 for information on where to get help.
Note
Some of the error messages in this section are marked with
an asterisk (*). The LCD may display these error messages
for only one or two seconds. Depending on the sync
switching procedure of your computer or display adapter
card, you may also see any of these messages when the
monitor changes from one video mode to another. If an error
message appears for only one or two seconds, this does not
indicate a problem with the monitor.
Professional Series II Monitor
38
Page 47

The screen and the LCD do not come on.
1.
The monitor’s power may not be on. Press the power button.
The power is on when the button is pressed in.
2.
Make sure the power cord is fully plugged into the AC inlet
on the monitor’s back panel and the electrical outlet.
3.
Check the operation of the electrical outlet by plugging in a
lamp or other electrical device to see if it works.
4.
Contact your dealer or service representative; the monitor
needs repair.
The screen is blank and
H/V SYNC OFF*,
1.
Make sure the computer is turned on.
2.
Make sure the video interface cable is properly connected to
the monitor’s VGA connector and to the computer’s video
interface. If you are using the monitor’s BNC connectors,
make sure all your video interface cables are properly
connected. See “Connecting the Monitor to Your
Computer” on page 6 or “Connecting Two or More
Monitors to One Video Controller” on page 10.
3.
Press INPUT SEL (on the monitor’s control panel) once to
change the monitor’s video input setting. See “Setting the
Type of Video Input” on page 20.
4.
Make sure your computer’s video adapter is set up for use
with the monitor and that any DIP switches or jumpers in
the computer or on a display adapter card are set properly.
See your computer and /or video adapter card manual for
instructions.
H sync OFF*, or v SYNC OFF*.
the
LCD displays
Professional Series II Monitor 39
Page 48

5.
Check if you need to set up your application program(s) to
match your monitor.
6.
Contact your dealer or service representative; the monitor
needs repair.
The screen is blank and the LCD does not display a
SYNC OFF error message.
1.
Adjust the brightness and contrast as described on page 21.
2.
Contact your dealer or service representative; the monitor
needs repair.
There is an image on the screen but the LCD is dim.
The monitor is operating properly. If you do not touch the
power button or any control panel buttons for about
30 seconds, the monitor automatically turns off the LCD. When
the LCD is off, you can still see a dim image on it.
To turn the LCD back on when it dimly displays the number of
the current video mode or Mode not
side of the Brightness or Contrast button. To turn the LCD back
on when it dimly displays
Mem Select, press
found,
press the - or +
MEM SEL.
The LCD displays Mode not found.
The display parameter settings for the current video mode have
not been stored in the monitor’s memory. You may create a
user-defined video mode, as described on page 28, or continue
working. The monitor operates properly even if you do not
create a user-defined video mode and the LCD continues to
display Mode not found.
Professional Series II Monitor
40
Page 49

The image is not centered on the screen.
Adjust the horizontal phase and/or vertical shift settings as
described in “Using Video Modes” on page 22.
The image is too big or too small for the screen.
Adjust the width and/or height settings as described in “Using
Video Modes“ on page 22.
The image is fuzzy.
1.
Adjust the vertical and horizontal convergence as described
on page 31.
2.
The monitor may need servicing.
You want to change the shade of white on the screen.
Select another color temperature as described on page 34 or
define your own color temperature as described on page 36.
There are colored spots on the screen or the image is
distorted.
There is bad color purity or distortion because electromagnetic
interference is present. Press the Degauss button. Also move
any devices that generate magnetism away from the monitor.
See “Reducing Color Impurity” on page 37.
Professional Series II Monitor 42
Page 50

One of two colors are missing.
1.
Make sure your video interface cable(s) are properly
connected to the monitor connector(s).
2.
Check your application program color settings.
You connected two or more monitors to one video controller and the image quality is poor.
1.
If you connected two monitors, set their
according to step 8 on page 14. If you connected more than
two monitors, set their
the top of page 15.
2.
Make sure the interface cables connecting the monitors to
each other are the same length and impedance and as short
as possible.
3.
To maintain image quality, it is best to connect no more than
three monitors to one video controller.
HIGHi75Q
switches as described at
HIGHi75Q
switches
Professional Series II Monitor
42
Page 51

Additional error messages
Error message
displayed on LCD
T-
[ Description
Solution
H OUT OF RANGE*
V OUT OF RANGE*
PLL UNLOCKED
V DEF FAILURE
H DEF FAILURE
HI VOL FAILURE
GEN FAILURE
The horizontal input
signals are out of
range.
I
~~
The vertical input
signals are out of
i
range.
There is a local failure
in the vertical
deflection.
I
~-
I
There is a local failure
in the horizontal
deflection.
-~
There is a local failure
in the high voltage
generator
i
There are two or
more problems with
(
the monitor
Make sure the horizontal
input signals of the
computer’s display
adapter are within the
monitor’s horizontal
frequency range (30 to
82 KHz).
Make sure the vertical
input signals of the
computer’s display
adapter are within the
monitor’s vertical
frequency range (50 to
160 Hz).
Contact your dealer or
service representative:
the monitor needs repair
Contact your dealer or
service representative;
the monitor needs repair
Contact your dealer or
service representative;
the monitor needs repair.
Turn off the monitor, wait
five seconds, and then
turn it back on. If this does
not solve the problem,
contact your dealer or
service representative;
the monitor needs repair
Contact your dealer or
service representative,
the monitor needs repair.
* See the note on page 38
Page 52

Factory-set Video Modes
The table below lists the parameter settings for the 14
factory-set video modes.
Factory-set video modes
VGA
Parameter
Clock freq. MHz
Horizontal freq.
Vertical freq. Hz
-
Horizontal
Total
Active
Blanking
Front porch
Sync width
Back porch
Unit 132 column
KHz
psec
wc
.-
pet
pet
psec
psec
1056x400
32.600 1304 31.778 800
26.400 1056 25.422 640
--
0.636 16
Total
Total msec 14.637 449
Active
Active msec 13.040 400
C
Blanking msec 1.597 4949
Front porch msec 0.424
Sync width msec 0.065 22
Back porch msec 1.108 3434
Sync polarity
-
44 Professional Series II Monitor
Lines
449
400
13
13
lines
I
I
t
449
400
49
12
2
Page 53

factory-set video modes (continued)
-
Horizontal
c
Total
c
Active
L
Blanking
Front porch
Sync width
L.
Back porch
Vertical
Total
L
Active
Blanking
Front porch
Sync width
Back porch
i
Video mode
1
c
psec
c
I
pet
pet
I
Pet
I
Pet
msec’ 16.683 / 525 / 17.778
msec
msec
msec
msec 1 0.064 1 2
msec 1 1.05 ~ 33 I 0.626
Time I PixelsI Time 1 Pixels ~ Time I Pixels
’
31.778 800
~psec 25.422 640
6.356 160
1 0.636
3.813 96
~~~
1.907 48
I Time I Lines I Time
16
~-~~
I 0.028
/
0.057
5
17.067
0.771
Lines 1 Time
625 1 16.579
600 15.840
25 0.739
1
2 1 0.106
6
0.026
1
I
I
-+
L
7
Lines
628
600
28
1
4
23
.~
Professional Series II Monitor
45
Page 54

factory-set video modes (continued)
I-
~ Parameter
I ~~~~~
~ Clock freq.
-Horizontal freq. ! KHz
--f--~
Horizontal
Total
Active
Blanking
Front porch
Sync width
Bock porch
~~~~~~~
---t
600
i
10.802
1024 x 768
65.0
Professional Series II Monitor
46
23
I
0.5631
/
0.577
z
\
0.600
-t-
1
29
Page 55

Factory set video modes (continued)
-
Professional Series II Monitor
47
Page 56

Factory-set video modes (continued)
Parameter
c
Clock freq.
t
Horizontal freq.
Vertical freq. Hz
Horizontal
Total
t
Active
Blanking
Front porch
c
Sync width
c
Back porch
Vertical
---
t
Blanking
Front porch
t
Sync width
Back porch
1 Unit
MHz
KHz
.-
psec
-.
1
psec 1
psec
1 msec 1 0.511 / 38
msec/ 0.040 1 3 1 0.024 1 2
I
msec I 0.081 I 6
msec
1280x1024
1
125.0
74.405
70.062 76.109
Time
13.440
1.000 1 125 1 0.770 / 104
1.944
Time
0.390 29
243
/
1280 x 1024
I
Pixels Time Pixels
1680 12.326
1,837
Lines Time
1 0.518 1 42
I
0.099 I 8
0.395 1 32
135.0
81.129
1664
248
Lines
Sync polarity
Horizontal
Vertical
Video mode
48
Professional Series II Monitor
I
I
I+ I - I -
I* I - I -
I
I
13
I
14
Page 57

Specifications
Trinitron CRT
Size
Pitch
Phosphor persistence
Light transmission
Deflection angle
Anti-glare treatment
Display
Image size
(landscape mode)
Aspect ratio
Video bandwidth
20 inches (508 mm) diagonal,
19 V (visible phosphor)
0.31 mm
Medium short
39%
90°
HEA panel with antistatic coating
13.8 inches x 10.3 inches
(350 mm x 263 mm) or
13.4 inches x 10.6 inches
(342 mm x 270 mm),
depending on video mode
4:3 or 5:4, depending on video mode
150 MHz, 3.5 ns (nanosecond) rise
and fall time
Resolution
Misconvergence
Intensity
Up to 1280 x 1024 at 76 Hz refresh
rate
0.3 mm in center; 0.4 mm in comers
25 fL ± 3 fL
Professional Series II Monitor 49
Page 58

Interfacing Requirements
Input signals
Video: RGB analog
Input impedance: high or
(switch-selectable)
Sync: Composite sync on green,
composite horizontal and vertical
sync at TTL level, or separate
horizontal and vertical sync at
TTL level
Video input
Horizontal frequency
0 to 0.714 V maximum
30 to 82 KHz; continuous range,
autoscan
Vertical frequency
50 to 160 Hz; continuous range,
(refresh rate) autoscan
Signal connectors
One 15-pin, D-Sub miniature,
VGA connector; five BNC connectors:
V, H/(H+V), B, G, and R (vertical,
horizontal/ combined, blue, green,
and red)
75R
Professional Series II Monitor
50
Page 59

AC fine Voltage
Input power
135 Watts maximum; universal power
supply and automatic line voltage
selection
Input ranges
Frequency
90 to 132 VAC and 180 to 264 VAC
48 to 63 Hz
Line voltage connector CEE 22-6A
Environmental Requirements
Operating range
20% to 80% RH
(non-condensing)
i
10,000 ft (3.000 m)
Reliability
-4°F to +140°F
5% to 90% RH
40,000 ft (12.000 m)
----I
,
MTBF
Safety Standards
UL, CSA, DHHS, and VDE approved
Over 50,000 hours
Professional Series II Monitor
51
Page 60

External Controls
Front
Back
Power button, Function button,
Adjustment button, Memory select
button, Memory store button,
Memory recall button, Brightness
button, Contrast button, Degauss
button, Input select button
HIGHi75Q
switch
Adjustable Display Parameters
Horizontal phase, width, vertical shift, height, vertical
convergence, horizontal convergence, color temperature
Physical Characteristics
Weight 81 lbs (37 kg)
Width 19.6 inches (498 mm)
Height 19.0 inches (485 mm)
Depth 21.2 inches (538 mm)
Professional Series II Monitor
52
Page 61

Dimensions
21.2" (538 mm)
*
- *
15.2' (385 mm)
(
15.0" (380 mm)
5.2'
(132 mm)
*
19.6' (498 mm)
15.4" (392 mm)
4
t
.
w
Tilt and swivel base
13.0" (330
mm)*
Professional Series II Monitor
53
Page 62

lnferface Connectors
Video interface cable
connectors
Mini D-sub connector pin signals
If you want to use the monitor’s BNC connectors, check the
table below to determine which video interface cable(s) and
BNC connectors to use with your system.
15-pin, D-Sub miniature, VGA
BNC connector signals
54 Professional Series II Monitor
Blue
Page 63

MADE IN ITALY A804341
l00-240V~ 50-60Hz 2.6-1.6A
T1185U
I
lllllll
Ill lllll lllll lllll lllll lllll Ill1
AN069247 001009
I lllllll
llllll
II
llllll
lllll lllll llllllllll
I II II
lllll lllll llllll
lllll lllll lllll lllll lllll Ill1
I~11111
IIII
III lllll
*311920612491*
lllll llll Ill1
III1
IllI Ill11
III lllll IIll 1l111
llll
III III II11
 Loading...