

Page 1
User’s Guide
NPD6416-00 EN
Page 2

PLQ-50/PLQ-50CS/PLQ-50M/PLQ-50CSM/PLQ-50CSK User’s Guide
Copyrights and Trademarks
No part of this publication may be reproduced, stored in a retrieval system, or transmitted in any form or by any means,
electronic, mechanical, photocopying, recording, or otherwise, without the prior written permission of Seiko Epson
Corporation. The information contained herein is designed only for use with this Epson printer. Epson is not responsible for any
use of this information as applied to other printers.
Neither Seiko Epson Corporation nor its affiliates shall be liable to the purchaser of this product or third parties for damages,
losses, costs, or expenses incurred by the purchaser or third parties as a result of: accident, misuse, or abuse of this product or
unauthorized modifications, repairs, or alterations to this product, or (excluding the U.S.) failure to strictly comply with Seiko
Epson Corporation’s operating and maintenance instructions.
Seiko Epson Corporation shall not be liable for any damages or problems arising from the use of any options or any consumable
products other than those designated as Original Epson Products or Epson Approved Products by Seiko Epson Corporation.
EPSON is a registered trademark, EPSON EXCEED YOUR VISION, EXCEED YOUR VISION, ESC/P, and ESC/P2 are
trademarks of Seiko Epson Corporation.
Microsoft
United States and/or other countries.
IBM
General Notice: Other product names used herein are for identification purposes only and may be trademarks of their respective
owners. Epson disclaims any and all rights in those marks.
The contents of this manual and the specifications of this product are subject to change without notice.
© 2020 Seiko Epson Corporation
, Windows®, Windows Server®, and Windows Vista® are registered trademarks of Microsoft Corporation in the
®
is a registered trademark of International Business Machines Corporation.
®
Copyrights and Trademarks 2
Page 3

PLQ-50/PLQ-50CS/PLQ-50M/PLQ-50CSM/PLQ-50CSK User’s Guide
Contents
Getting to Know Your Printer
Features............................................................................... 6
About This Manual
Where to Find Information ............................................................... 7
Descriptions Used in this Manual.......................................................... 7
Operating System Versions............................................................... 7
Important Instructions
Safety Instructions....................................................................... 9
Warnings, Cautions, and Notes........................................................ 9
Hot Parts Caution Symbol............................................................ 9
Important Safety Instructions......................................................... 9
For Users in Russia, Belarus, and Kazakhstan........................................... 13
Restrictions on Copying................................................................. 14
When using the USB hub (for USB hub models only)......................................... 14
Chapter 1 Printer Basics
Printer Parts........................................................................... 15
Control Panel.......................................................................... 17
Control Panel Buttons and Lights..................................................... 17
Guide to the LCD Screens........................................................... 18
Consumable information................................................................ 20
Genuine Epson ribbon cartridge...................................................... 20
Chapter 2 Paper Handling
Acceptable Paper Condition. . . . . ......................................................... 22
Loading Passbooks..................................................................... 23
Loading Single Sheets................................................................... 24
Contents 3
Page 4

PLQ-50/PLQ-50CS/PLQ-50M/PLQ-50CSM/PLQ-50CSK User’s Guide
Loading ID Card....................................................................... 25
Chapter 3 Printer Software
About Your Printer Software............................................................. 27
Using the Printer Driver................................................................. 27
Accessing the printer driver from Windows applications.................................. 28
Accessing the printer driver from the Start menu........................................ 30
Changing the printer driver settings................................................... 32
Printer Driver Settings Overview.......................................................... 34
Print settings...................................................................... 34
Uninstalling the Printer Software......................................................... 36
Uninstalling the printer driver and EPSON Status Monitor 3.............................. 36
Chapter 4 Maintenance
Replacing the Ribbon Cartridge........................................................... 39
Replacing the ribbon cartridge....................................................... 39
Cleaning the Printer.................................................................... 45
Cleaning the Scanner Glass (for Scanning Models Only).................................. 46
Transporting the Printer................................................................. 47
Chapter 5 Troubleshooting
Diagnosing the Problem................................................................. 49
Printing Your Printer’s Current Settings................................................... 49
LCD Model....................................................................... 49
Models Without LCD Screens........................................................ 50
Checking Messages on the LCD Screen or Error Indicators.................................... 51
Problems and Solutions................................................................. 53
Power Supply...................................................................... 53
Printing.......................................................................... 53
Scanning......................................................................... 57
Paper Handling.................................................................... 57
Clearing a Paper Jam.................................................................... 58
Printing a Self Test..................................................................... 60
Contents 4
Page 5

PLQ-50/PLQ-50CS/PLQ-50M/PLQ-50CSM/PLQ-50CSK User’s Guide
Chapter 6 Where To Get Help
Technical Support Web Site.............................................................. 62
Contacting Customer Support............................................................ 62
Before Contacting Epson............................................................ 62
Help for Users in Europe............................................................ 63
Help for Users in Singapore.......................................................... 63
Help for Users in Thailand. . ......................................................... 63
Help for Users in Vietnam........................................................... 63
Help for Users in Indonesia.......................................................... 64
Help for Users in Malaysia........................................................... 66
Help for Users in India. ............................................................. 66
Help for Users in the Philippines..................................................... 67
Chapter 7 Product Information
Printer Specifications................................................................... 68
System Requirements............................................................... 68
Mechanical....................................................................... 68
Electronic......................................................................... 71
Electrical......................................................................... 74
Environmental.................................................................... 75
Paper/Media...................................................................... 75
Magnetic stripe reader/writer (Magnetic stripe reading and writing models only)............. 82
Scanner Specifications (Scanning Models Only)............................................. 92
General........................................................................... 92
Scannable Area.................................................................... 93
USB Hub Specification (USB hub models only).............................................. 94
Standards and Approvals................................................................ 94
Safety approvals.................................................................... 94
Contents 5
Page 6

PLQ-50/PLQ-50CS/PLQ-50M/PLQ-50CSM/PLQ-50CSK User’s Guide
Getting to Know Your Printer
Features
Your EPSON PLQ-50/PLQ-50CS/PLQ-50M/PLQ-50CSM/PLQ-50CSK 24-pin flatbed dot matrix
printer provides high-quality printing and superior performance in a compact design. Its features
include:
❏ PLQ-50M and PLQ-50CSM can also read and write magnetic stripes. These models are referred to
as magnetic stripes reading and writing models in this manual.
❏ PLQ-50CS, PLQ-50CSM and PLQ-50CSK have scanning capability. These models are referred to
as scanning models in this manual.
❏ PLQ-50, PLQ-50CS, PLQ-50M, and PLQ-50CSM have LCD screen which displays printer status
and guidance messages. These models are referred to as LCD models in this manual.
❏ PLQ-50CSM has two USB Hub connectors and can connect multiple USB devices. This model is
referred to as USB Hub model in this manual.
❏ The ability to handle a wide range of paper types, including passbook, single sheets, multipart
forms with one original and up to six copies, and ID card (scanner models only).
Getting to Know Your Printer 6
Page 7

PLQ-50/PLQ-50CS/PLQ-50M/PLQ-50CSM/PLQ-50CSK User’s Guide
About This Manual
Where to Find Information
The following manuals are supplied with your Epson printer.
Start Here (paper manual)
Provides information on setting up the printer and installing the software.
User's Guide (this manual)
Provides overall information and instructions on using the printer.
Descriptions Used in this Manual
❏ Screenshots of the printer software screens are from Windows 10 unless otherwise specified. The
content displayed on the screens varies depending on the model and situation.
❏ Screenshots of the printer LCD screens on LCD models are subject to change without notice. The
contents may vary depending on the product.
❏ Illustrations of the printer used in this manual are examples only. Although there may be slight
differences depending on the model, the method of operation is basically the same unless stated.
Operating System Versions
Regarding the operating systems, the explanations in this manual are mainly for Windows users and
terms such as "Windows 10", "Windows 8.1", "Windows 8", "Windows 7", "Windows Vista",
"Windows XP", "Windows Server 2019", "Windows Server 2016", "Windows Server 2012 R2",
"Windows Server 2012", "Windows Server 2008 R2", "Windows Server 2008", "Windows Server 2003
R2", and "Windows Server 2003" refer to the following operating system. Additionally, "Windows" is
used to refer to all versions.
❏ Microsoft
❏ Microsoft
❏ Microsoft
Windows® 10 operating system
®
Windows® 8.1 operating system
®
Windows® 8 operating system
®
About This Manual 7
Page 8

PLQ-50/PLQ-50CS/PLQ-50M/PLQ-50CSM/PLQ-50CSK User’s Guide
❏ Microsoft® Windows® 7 operating system
❏ Microsoft
❏ Microsoft
❏ Microsoft
❏ Microsoft
❏ Microsoft
❏ Microsoft
❏ Microsoft
❏ Microsoft
❏ Microsoft
❏ Microsoft
❏ Microsoft
Windows Vista® operating system
®
Windows® XP operating system
®
Windows® XP Professional x64 Edition operating system
®
Windows Server® 2019 operating system
®
Windows Server® 2016 operating system
®
Windows Server® 2012 R2 operating system
®
Windows Server® 2012 operating system
®
Windows Server® 2008 R2 operating system
®
Windows Server® 2008 operating system
®
Windows Server® 2003 R2 operating system
®
Windows Server® 2003 operating system
®
About This Manual 8
Page 9
PLQ-50/PLQ-50CS/PLQ-50M/PLQ-50CSM/PLQ-50CSK User’s Guide
Important Instructions
Safety Instructions
Warnings, Cautions, and Notes
Warnings
!
must be followed carefully to avoid bodily injury.
Cautions
!
must be observed to avoid damage to your equipment.
Notes
contain important information and useful tips on the operation of your printer.
Hot Parts Caution Symbol
This symbol is placed on the print head and other parts to indicate that
they may be hot. Never touch those parts just after the printer has been
used. Let them cool for a few minutes before touching them.
Important Safety Instructions
Read all of these safety instructions before using the printer. In addition, follow all warnings and
instructions marked on the printer itself.
Some of the symbols used on your product are to ensure safety and proper use of the product. Visit the
following Web site to learn the meaning of the symbols.
http://support.epson.net/symbols
When setting up the printer
❏ Do not place the printer on an unstable surface or near a radiator or heat source.
❏ Place the printer on a flat, stable surface. The printer will not operate properly if it is tilted or placed
at an angle.
Important Instructions 9
Page 10

PLQ-50/PLQ-50CS/PLQ-50M/PLQ-50CSM/PLQ-50CSK User’s Guide
❏ Do not place this product on a soft, unstable surface like a bed or a sofa, or a small, enclosed area, as
this restricts ventilation.
❏ Do not block or cover the slots and openings in the printer’s cabinet, and do not insert objects
through the slots.
❏ Leave adequate room around the printer for easy operation and maintenance.
❏ When connecting this product to a computer or other device with a cable, ensure the correct
orientation of the connectors. Each connector has only one correct orientation. Inserting a
connector in the wrong orientation may damage both devices connected by the cable.
❏ Use only the type of power source indicated on the printer’s label. If you are not sure of the power
supply specifications in your area, contact your local power company or consult your dealer.
❏ Connect all equipment to properly grounded electrical outlets. Avoid using outlets on the same
circuit as photocopiers or air control systems that regularly switch on and off.
❏ Do not use a damaged or frayed power cord.
❏ The power cord should be placed to avoid abrasions, cuts, fraying, crimping, kinking, and other
damage.
❏ If you use an extension cord with the printer, make sure the total ampere rating of all devices
plugged into the extension cord does not exceed the cord’s ampere rating. Also, make sure the total
ampere of all devices plugged into the electrical outlet does not exceed the electrical outlet’s
ampere rating.
❏ Use only the power cord that comes with this product. Use of another cord may result in fire or
electric shock.
❏ This product’s power cord is for use with this product only. Use with other equipment may result
in fire or electric shock.
❏ Be sure the AC power cord meets the relevant local safety standards.
❏ Avoid using or storing the printer in places subject to rapid changes in temperature and humidity.
Also keep it away from direct sunlight, strong light, heat sources, or excessive moisture or dust.
❏ Avoid places subject to shocks and vibrations.
❏ Place the printer near a wall outlet where you can easily unplug the power cord.
❏ Keep the entire computer system away from potential sources of electromagnetic interference,
such as loudspeakers or the base units of cordless telephones.
Important Instructions 10
Page 11
PLQ-50/PLQ-50CS/PLQ-50M/PLQ-50CSM/PLQ-50CSK User’s Guide
❏ Avoid electrical outlets controlled by wall switches or automatic timers. An interruption in power
can erase information in the memory of your printer or computer. Also avoid outlets on the same
circuit as large motors or other appliances that can cause voltage fluctuations.
❏ Use a grounded power outlet; do not use an adapter plug.
❏ If you plan to use a printer stand, follow these guidelines:
- Use a stand that can support at least twice the weight of the printer.
- Never use a stand that tilts the printer. The printer should always be kept level.
- Position your printer’s power cord and interface cable so they do not interfere with paper
feeding. If possible, secure the cables to a leg of the printer stand.
❏ Do not place near the CRT display which emits strong electromagnetic wave.
When maintaining the printer
❏ Unplug the printer before cleaning it, and always clean it with a piece of damp cloth only.
❏ Do not spill liquid onto the printer.
❏ Do not attempt to service the printer yourself except as specifically explained in this guide.
❏ Unplug the printer and refer servicing to qualified service personnel under the following
conditions:
i. If the power cord or plug is damaged.
ii. If liquid has entered the printer.
iii. If the printer has been dropped or the cabinet damaged.
iv. If the printer does not operate normally or exhibits a distinct change in performance.
❏ Do not use aerosol blowers which contain flammable gas inside or around this product. Doing so
may cause fire.
❏ Adjust only those controls that are covered by the operating instructions.
❏ Do not touch the white cable inside the printer.
Important Instructions 11
Page 12

PLQ-50/PLQ-50CS/PLQ-50M/PLQ-50CSM/PLQ-50CSK User’s Guide
When loading paper
❏ Use passbooks and paper that have more than 60% reflectance.
❏ When you use a passbook, set Passbook mode to On and set Binding mode to the method for the
passbook’s binding in the default setting mode.
❏ Do not load passbooks that are creased or have ripped seam.
❏ Do not use a passbook that has any metallic parts such as staplers or metal clips.
❏ Do not use a passbook with sticky parts such as stamps or seals.
❏ Do not use a passbook that has any pages smaller than the cover page.
❏ Do not print on the front or back cover of a passbook. Printing can be done only when the
passbook is opened.
❏ When you use paper that is shorter than 110.0 mm, set the paper eject direction to front. The
factory set default is front. Please access http://www.epson.com for information.
❏ Do not insert paper that is curled or has been folded into the slot when you load it.
❏ Do not punch holes in the area from 25.0 to 40.0 mm from the left edge of paper.
❏ Always use the printer with the ribbon cartridge installed. Otherwise, paper jam may occur.
When operating the printer
❏ Avoid using or storing the printer in places subject to rapid changes in temperature and humidity.
Keep it away from direct sunlight, strong light, heat sources or excessive moisture or dust.
❏ Adjust only those controls that are covered in the user documentation. Improper adjustment of
other controls may result in damage requiring extensive repair by a qualified technician.
❏ Whenever you turn off the printer, wait at least five seconds before turning it back on; otherwise,
you may damage the printer.
❏ Do not turn off the printer while it is printing the self test. Always press the Offline button to stop
printing and then turn off the printer.
❏ Do not reconnect the power cord to an electrical outlet that has the wrong voltage for your printer.
❏ Never replace the print head yourself; you may damage the printer. Also, other parts of the printer
must be checked when the print head is replaced.
❏ You need to move the print head by hand to replace the ribbon cartridge. If you have just used the
printer, the print head may be hot; let it cool for a few minutes before touching it.
Important Instructions 12
Page 13

PLQ-50/PLQ-50CS/PLQ-50M/PLQ-50CSM/PLQ-50CSK User’s Guide
❏ If ink gets on your skin, wash it off with soap and water. If it gets in your eyes, flush them
immediately with water.
❏ If you plan to use the printer in Germany, observe the following:
To provide adequate short-circuit protection and over-current protection for this printer, the
building installation must be protected by a 16-amp circuit breaker.
Beim Anschluss des Druckers an die Stromversorgung muss sichergestellt werden, dass die
Gebäudeinstallation mit einer 16-A-Sicherung abgesichert ist.
Restriction of Use
When this product is used for applications requiring high reliability/safety such as transportation
devices related to aviation, rail, marine, automotive etc.; disaster prevention devices; various safety
devices etc.; or functional/precision devices etc., you should use this product only after giving
consideration to including fail-safes and redundancies into your design to maintain safety and total
system reliability. Because this product was not intended for use in applications requiring extremely
high reliability/safety such as aerospace equipment, main communication equipment, nuclear power
control equipment, or medical equipment related to direct medical care etc., please make your own
judgment on this product's suitability after a full evaluation.
For Users in Russia, Belarus, and Kazakhstan
Customer information
The model complies with the Technical regulation of Customs Union "About the safety of low voltage
equipment" (TP TC 004/2011); with the Technical regulation of Customs Union "On Electromagnetic
Compatibility of Technical Devices" (TP TC 020/2011)
Manufacturer: SEIKO EPSON CORPORATION
Address: 3-5, Owa 3-chome, Suwa-shi, Nagano-ken 392-8502 Japan
Telephone: 81-266-52-3131
Official representative in CIS countries:
LLC "EPSON CIS"
Address: Moscow, 129110, ul. Schepkina, 42, Bldg. 2a, Fl. 3 Business Center Chaika Plaza
Telephone: +7 (495) 777-0355/56
web: http://www.epson.ru/
email: info_CIS@epson.ru
EPSON EUROPE B.V. MOSCOW REPRESENTATIVE OFFICE
Address: Moscow, 129110, ul. Schepkina, 42, Bldg. 2a, Fl. 3 Business Center Chaika Plaza
Telephone: +7 (495) 777-0355/56
web: http://www.epson.ru/
Important Instructions 13
Page 14

PLQ-50/PLQ-50CS/PLQ-50M/PLQ-50CSM/PLQ-50CSK User’s Guide
Production month and year: Labeled on the product with 8 numbers: YYYY.MM.DD
Country of production: Labeled on the product
Restrictions on Copying
Observe the following restrictions to ensure responsible and legal use of your product.
Copying of the following items is prohibited by law:
❏ Bank bills, coins, government-issued marketable securities, government bond securities, and
municipal securities
❏ Unused postage stamps, pre-stamped postcards, and other official postal items bearing valid
postage
❏ Government-issued revenue stamps, and securities issued according to legal Procedure
Exercise caution when copying the following items:
❏ Private marketable securities (stock certificates, negotiable notes, checks, etc.), monthly passes,
concession tickets, etc.
❏ Passports, driver’s licenses, warrants of fitness, road passes, food stamps, tickets, etc.
Note:
Copying these items may also be prohibited by law.
Responsible use of copyrighted materials
Products can be misused by improperly copying copyrighted materials. Unless acting on the advice of a
knowledgeable attorney, be responsible and respectful by obtaining the permission of the copyright
holder before copying published material.
When using the USB hub (for USB hub models only)
❏ Do not connect multiple printers to each other.
❏ The USB hub only supports bus power, and therefore cannot exceed more than 500 mA of power
consumption. If this is exceeded, a warning is sent to the host computer and the host computer
turns off the connection for all ports.
Important Instructions 14
Page 15

Chapter 1
Printer Basics
Printer Parts
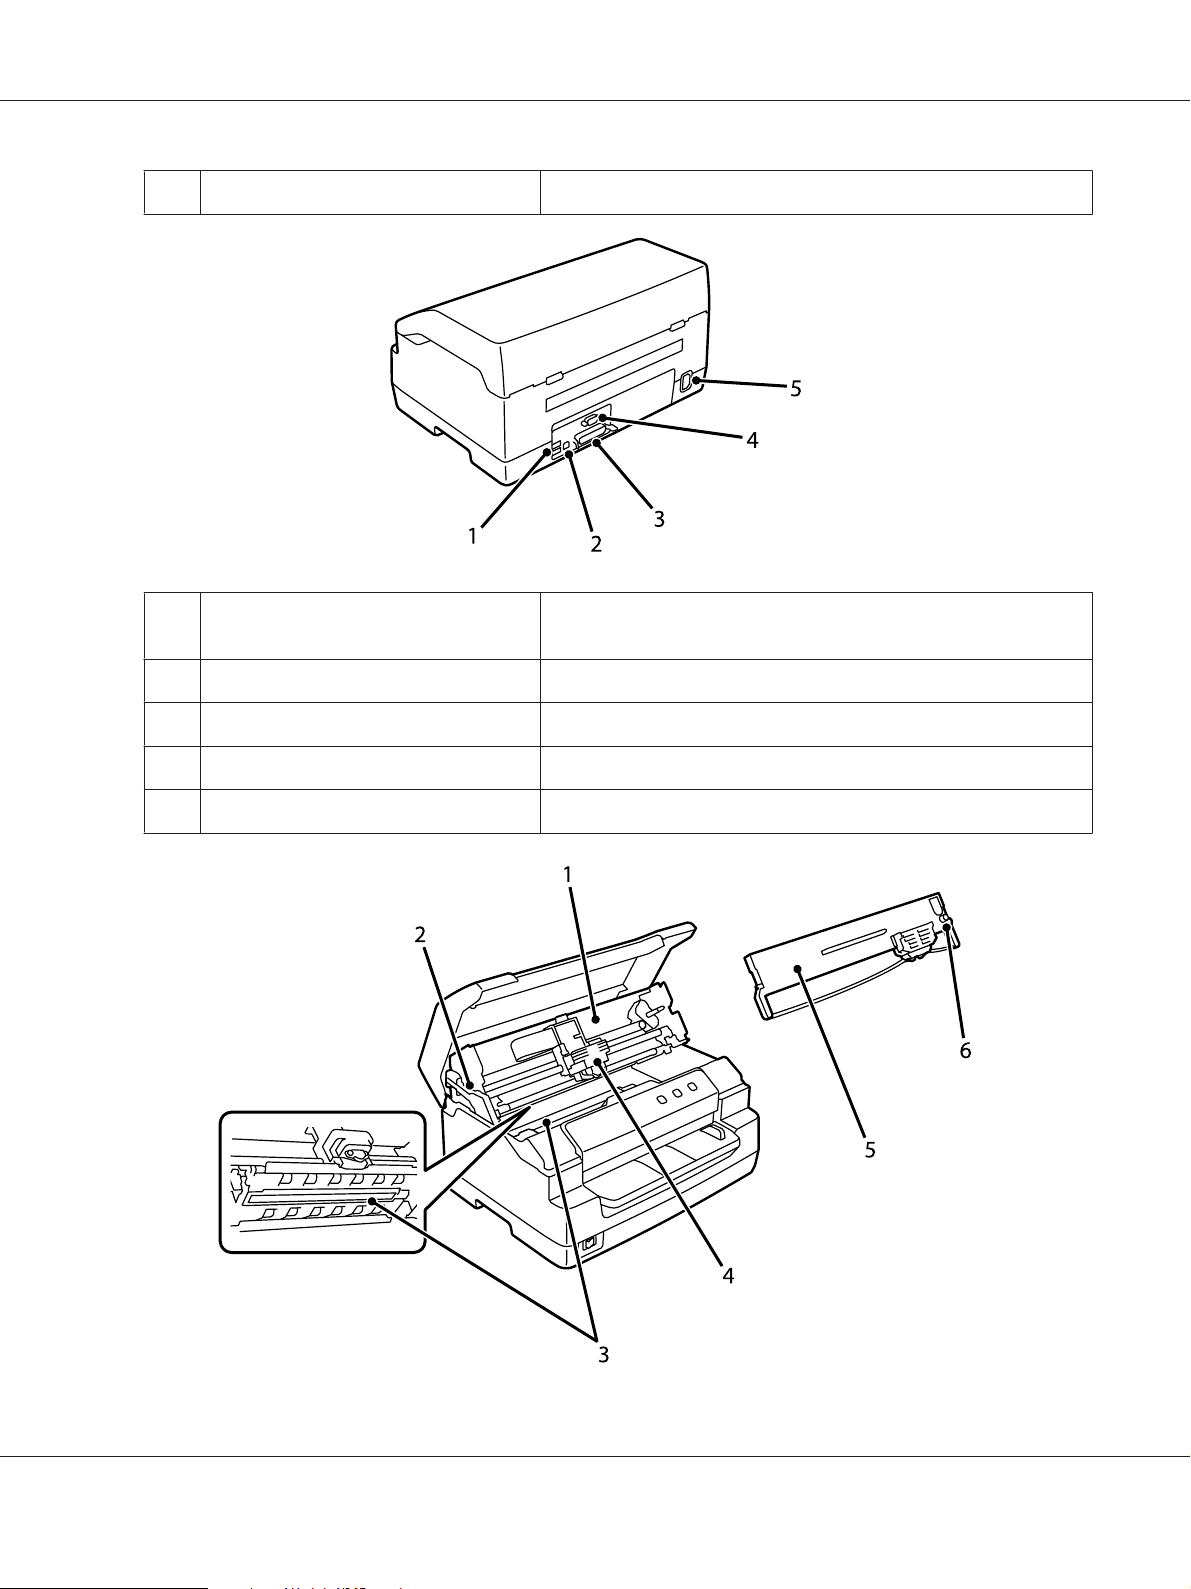
PLQ-50/PLQ-50CS/PLQ-50M/PLQ-50CSM/PLQ-50CSK User’s Guide
1 printer cover Open this when replacing ribbon cartridge or removing jammed
paper.
2 control panel The printer’s operation panel.
3 power switch Turn the printer on or off.
4 front slot Loads the paper or the passbook. On scanner models, you can also
load originals or ID cards you want to scan.
5 ID card guide Load ID cards here (scanning models only)
Printer Basics 15
Page 16
PLQ-50/PLQ-50CS/PLQ-50M/PLQ-50CSM/PLQ-50CSK User’s Guide
6 scanner edge guide Insert your document to the left of this guide (scanning models only)
1 USB hub port Two USB type A ports for PC peripherals. Only available on USB hub
models.
2 USB port Connects a USB cable.
3 parallel interface connector Connects the parallel interface cable.
4 serial interface connector Connects the serial interface cable.
5 AC inlet Connects the power cable.
Printer Basics 16
Page 17
1 upper mechanism The unit that prints on paper.
2 release lever Releases the upper mechanism to make it easier to remove paper
3 scanner unit Scanning device available only on the scanner models.
4 print head Prints on paper.
5 ribbon cartridge Contains ink ribbon.
6 ribbon-tightening knob Turn this to remove any slack in the ribbon.
Control Panel
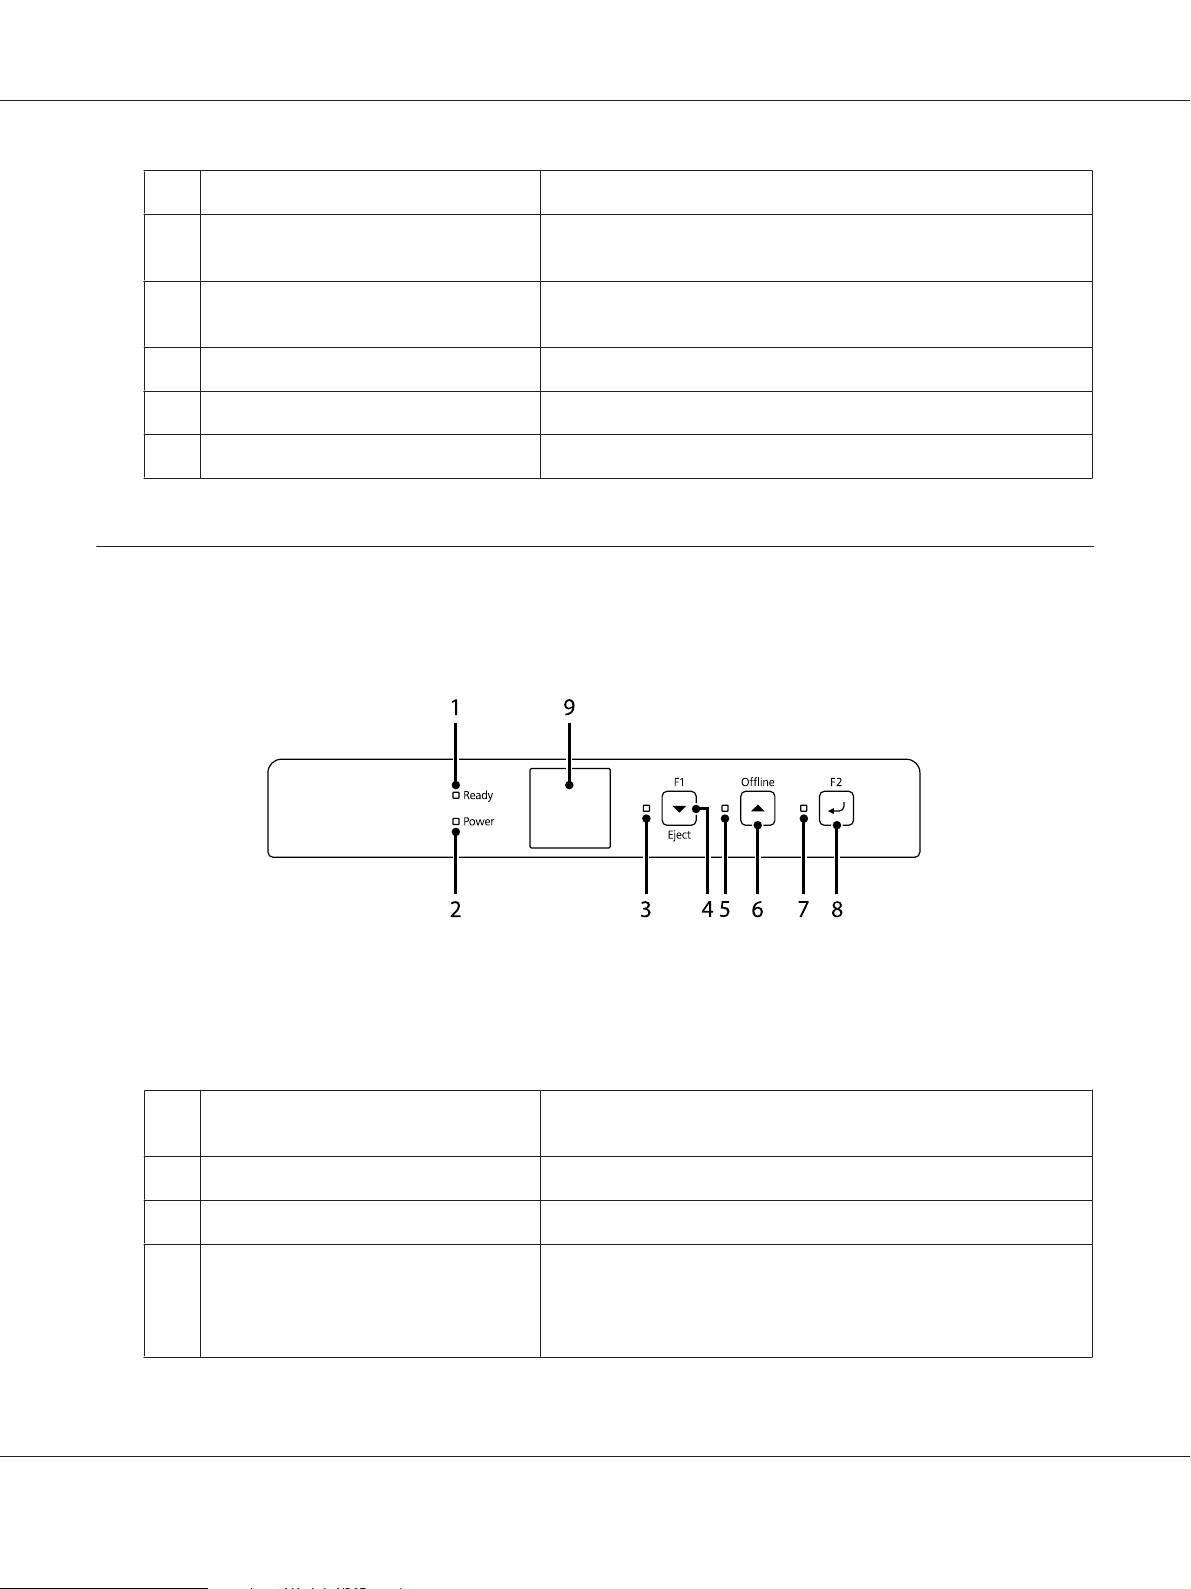
PLQ-50/PLQ-50CS/PLQ-50M/PLQ-50CSM/PLQ-50CSK User’s Guide
when the paper is jammed.
The PLQ-50CSK only has the lower side.
Control Panel Buttons and Lights
Factory Default Setting
The explanation below is based on the factory default settings and the buttons and the lights functions
may vary from the explanations below depending on the printer settings implemented to your printer.
1
Ready light (Orange)
2
Power light (Blue)
3
F1/Eject light (Orange)
On when output data is in buffer, or is being printed.
Flashes when an error has occurred during a printing operation.
On when the power is turned on.
On when the serial interface is selected to use.
4
F1/Eject button
No function is assigned when printing using the serial interface
connection.
Ejects paper when printer is offline and printing using USB interface
connection.
Printer Basics 17
Page 18
PLQ-50/PLQ-50CS/PLQ-50M/PLQ-50CSM/PLQ-50CSK User’s Guide
5
Offline light (Orange)
6
Offline button
7
F2 light (Orange)
8
F2 button
9 LCD screen (available only on the LCD
models)
On when the printer is offline.
Alternates the printer activity between offline and online.
On when the USB interface is selected to use.
No function is assigned.
Displays printer status and messages. For the typical screen displays
shown, see “Guide to the LCD Screens” on page 18.
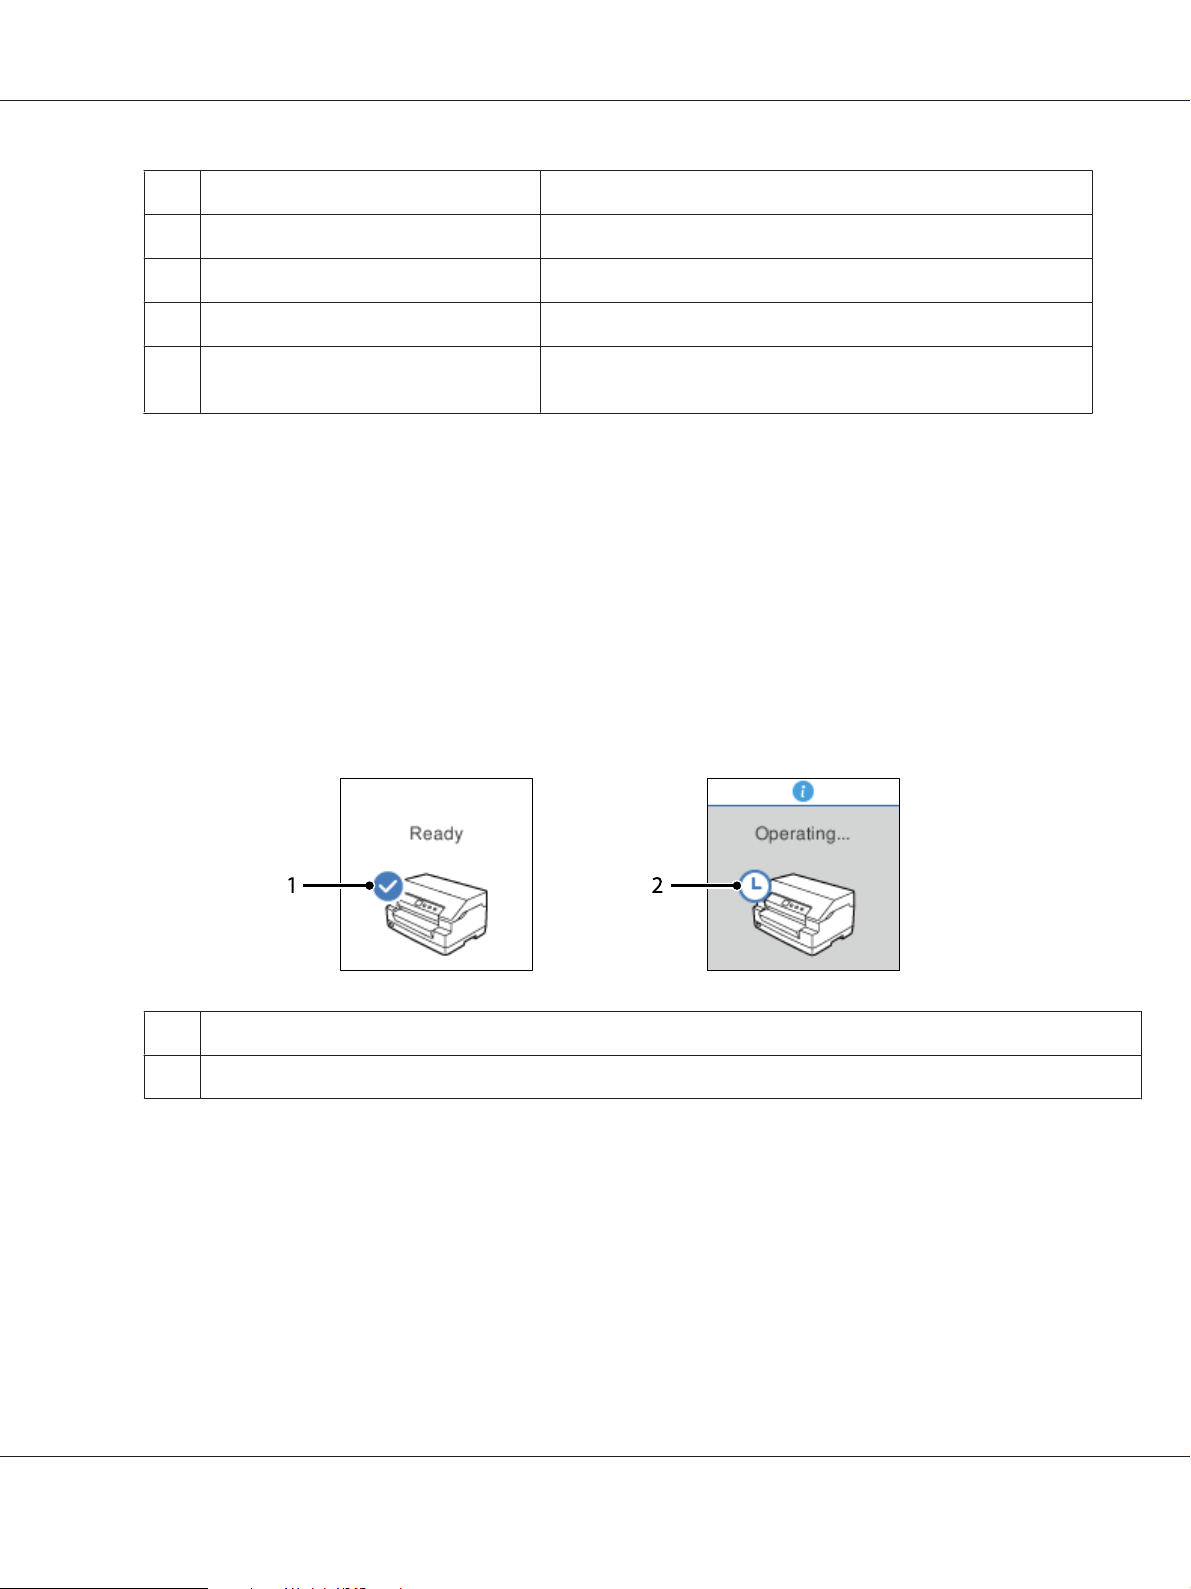
Guide to the LCD Screens
This section provides an overview of menus and controls for the LCD screens.
Note:
The LCD screen is available only on the LCD models.
Status Information Screen
Printer displays the current printer status. The examples are shown below.
1 The printer is ready to print.
2 The printer is busy. Wait for a while till the printer becomes ready.
Job Information Screen
Your printer can display job information when it receives print jobs in Windows. You can enter a
short note in the printer driver as a Driver Note which allows you to identify the print job. See “Printer
Driver Settings Overview” on page 34.
Printer Basics 18
Page 19
PLQ-50/PLQ-50CS/PLQ-50M/PLQ-50CSM/PLQ-50CSK User’s Guide
The information or message displayed may differ depending on the print data sent from the Windows
application.
1 The information icon indicates that information is available.
2
Displays the Driver Note entered in the printer driver.
3 Displays available buttons and controls.
Error Display Screen
The printer displays the error status when an error has occurred. The following is an example.
1 An error has occurred.
2 Displays error information.
3 Displays available buttons and instructions.
Printer Basics 19
Page 20
PLQ-50/PLQ-50CS/PLQ-50M/PLQ-50CSM/PLQ-50CSK User’s Guide
Note:
Follow the onscreen instructions to recover from the error.
Consumable information
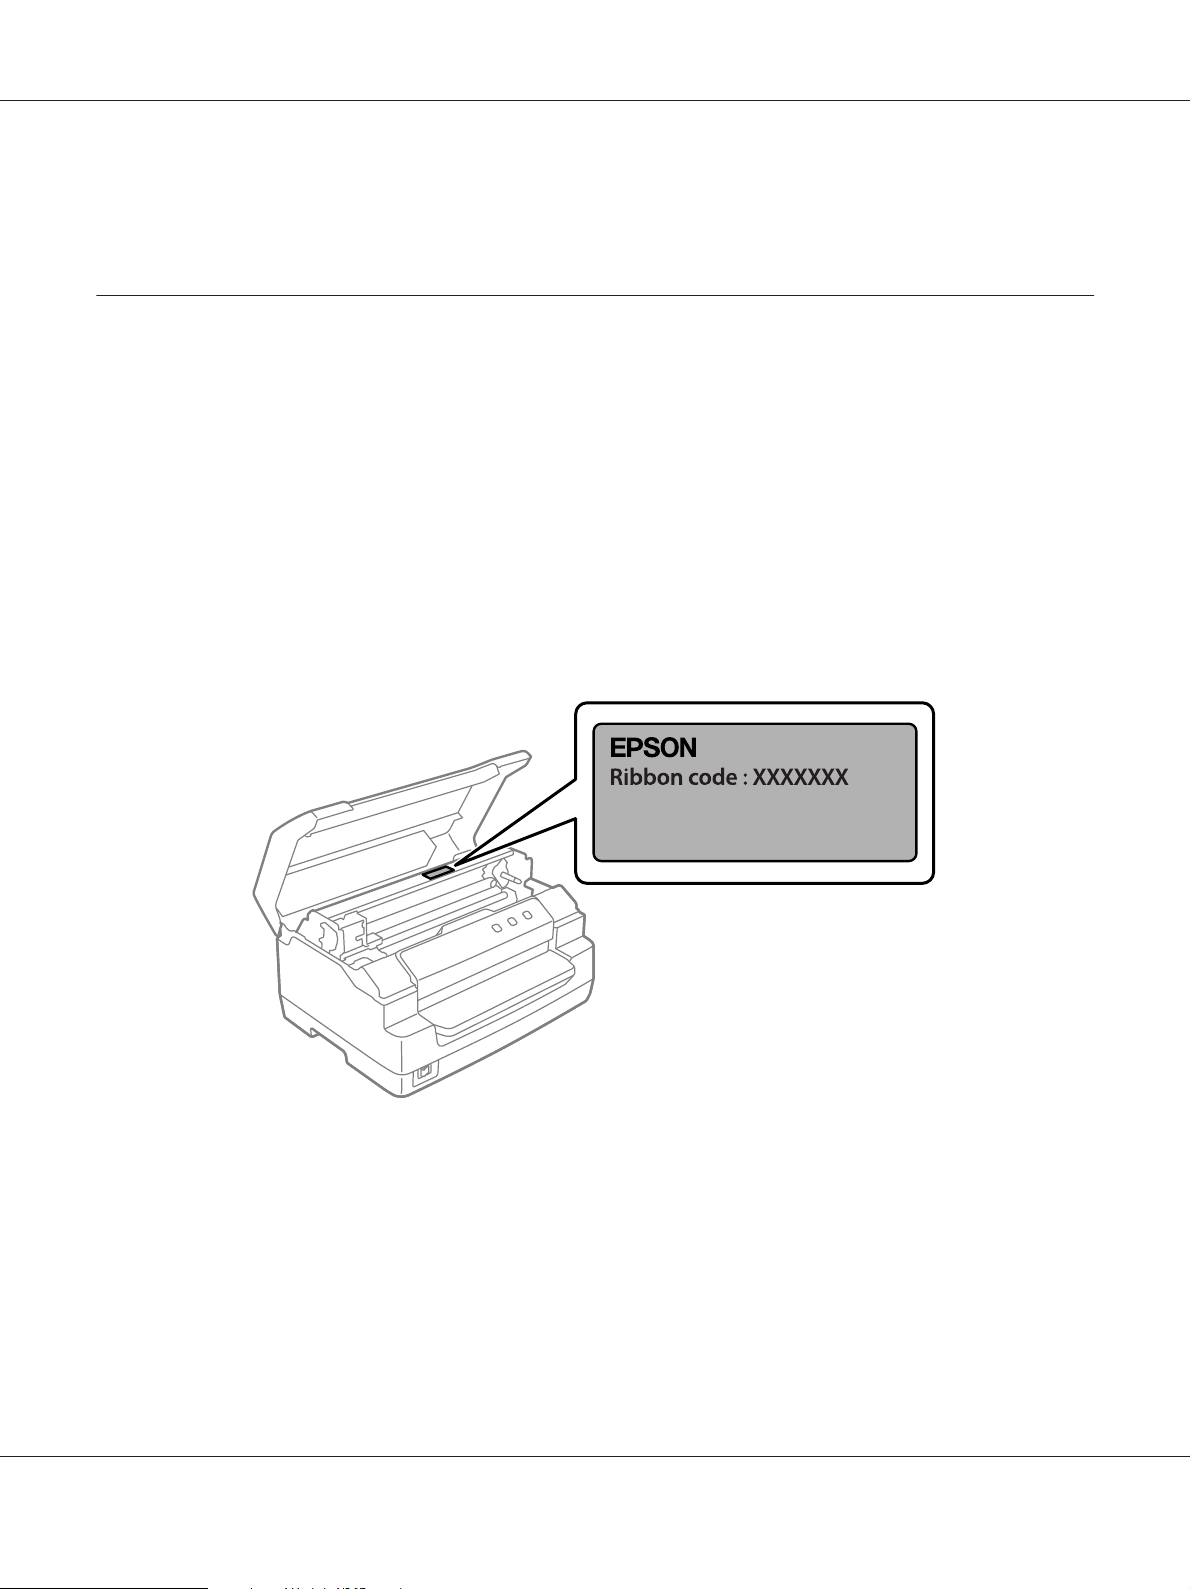
Genuine Epson ribbon cartridge
When printing becomes faint, you need to replace the ribbon cartridge. Genuine Epson ribbon
cartridges are designed and manufactured to work properly with your Epson printer. They ensure
proper operation and long life of the print head and other printer parts. Other products not
manufactured by Epson may cause damage to your printer, which is not covered by Epson’s
warranties.
The model number for the genuine Epson ribbon cartridges for your printer is printed on the label
inside the printer.
See “Replacing the ribbon cartridge” on page 39 for the instruction on replacing the ribbon
cartridge.
Printer Basics 20
Page 21

Chapter 2
Paper Handling
PLQ-50/PLQ-50CS/PLQ-50M/PLQ-50CSM/PLQ-50CSK User’s Guide
Paper Handling 21
Page 22
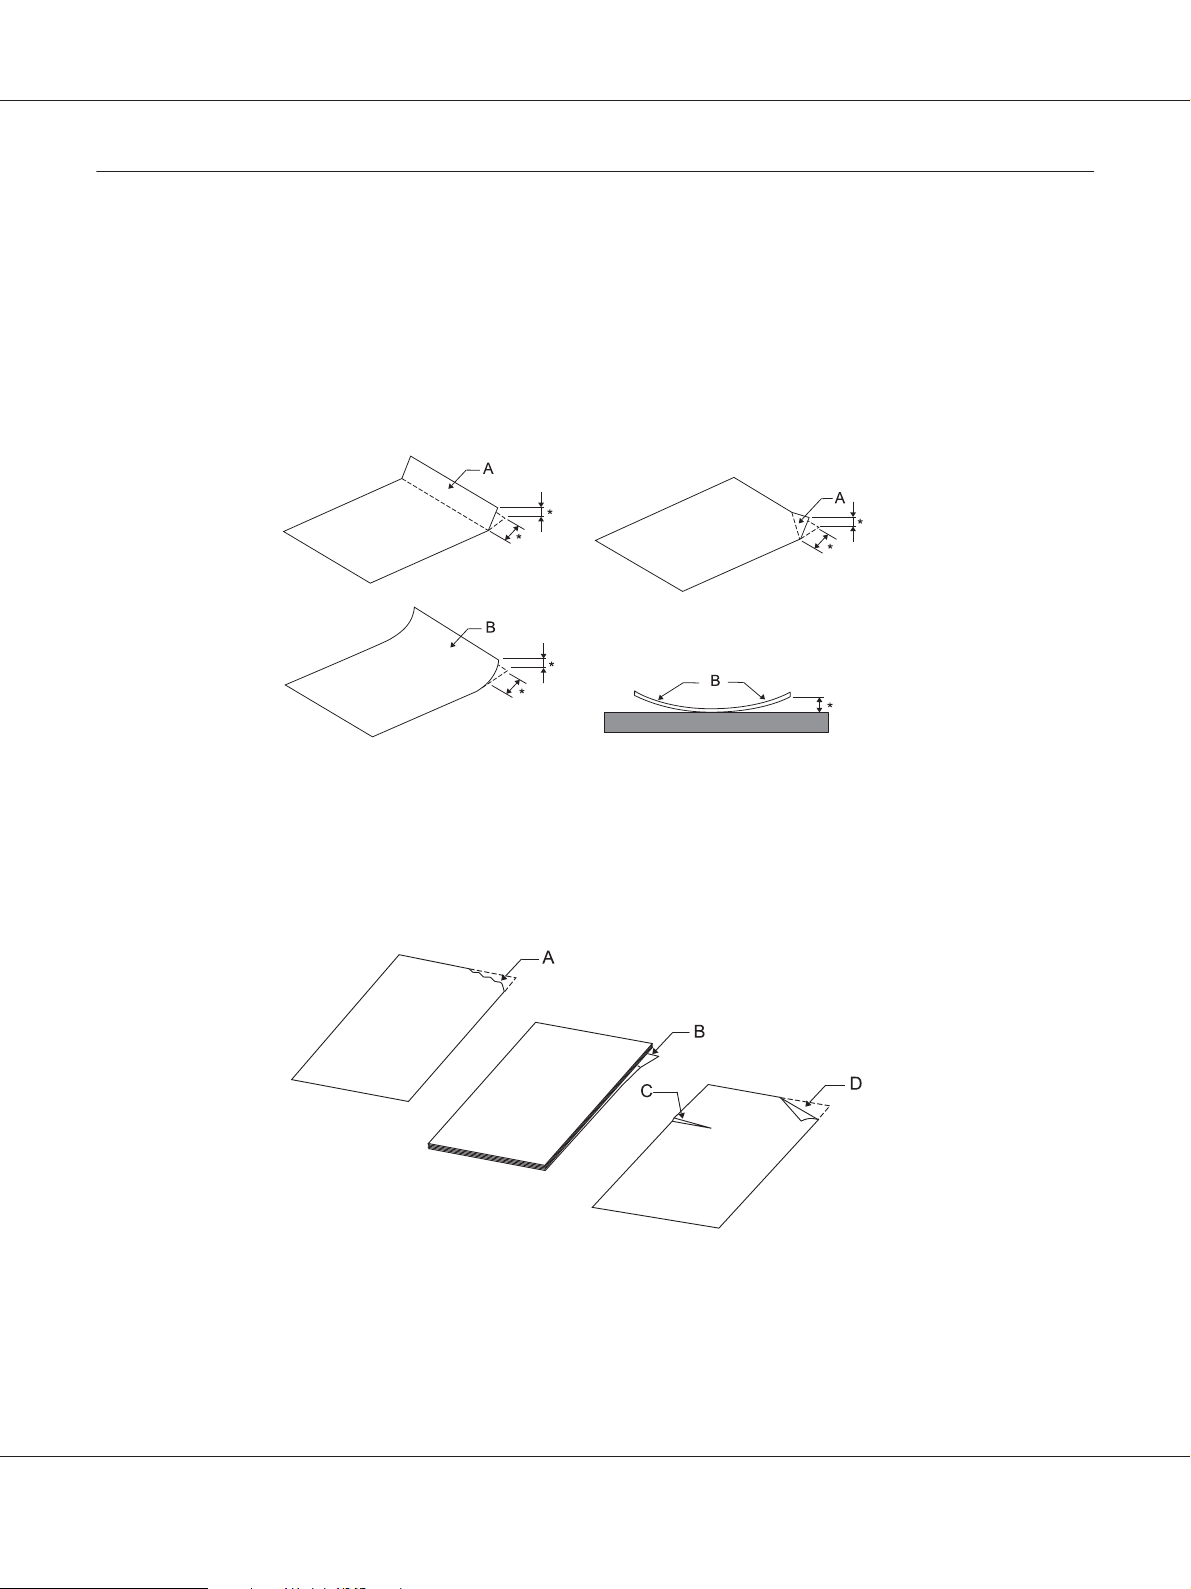
Acceptable Paper Condition
Caution:
!
❏ Do not use paper that is folded, creased, curled, torn, stained, or stamped. Use the paper that
meets the paper specifications. See “Paper/Media” on page 75 for more detailed information.
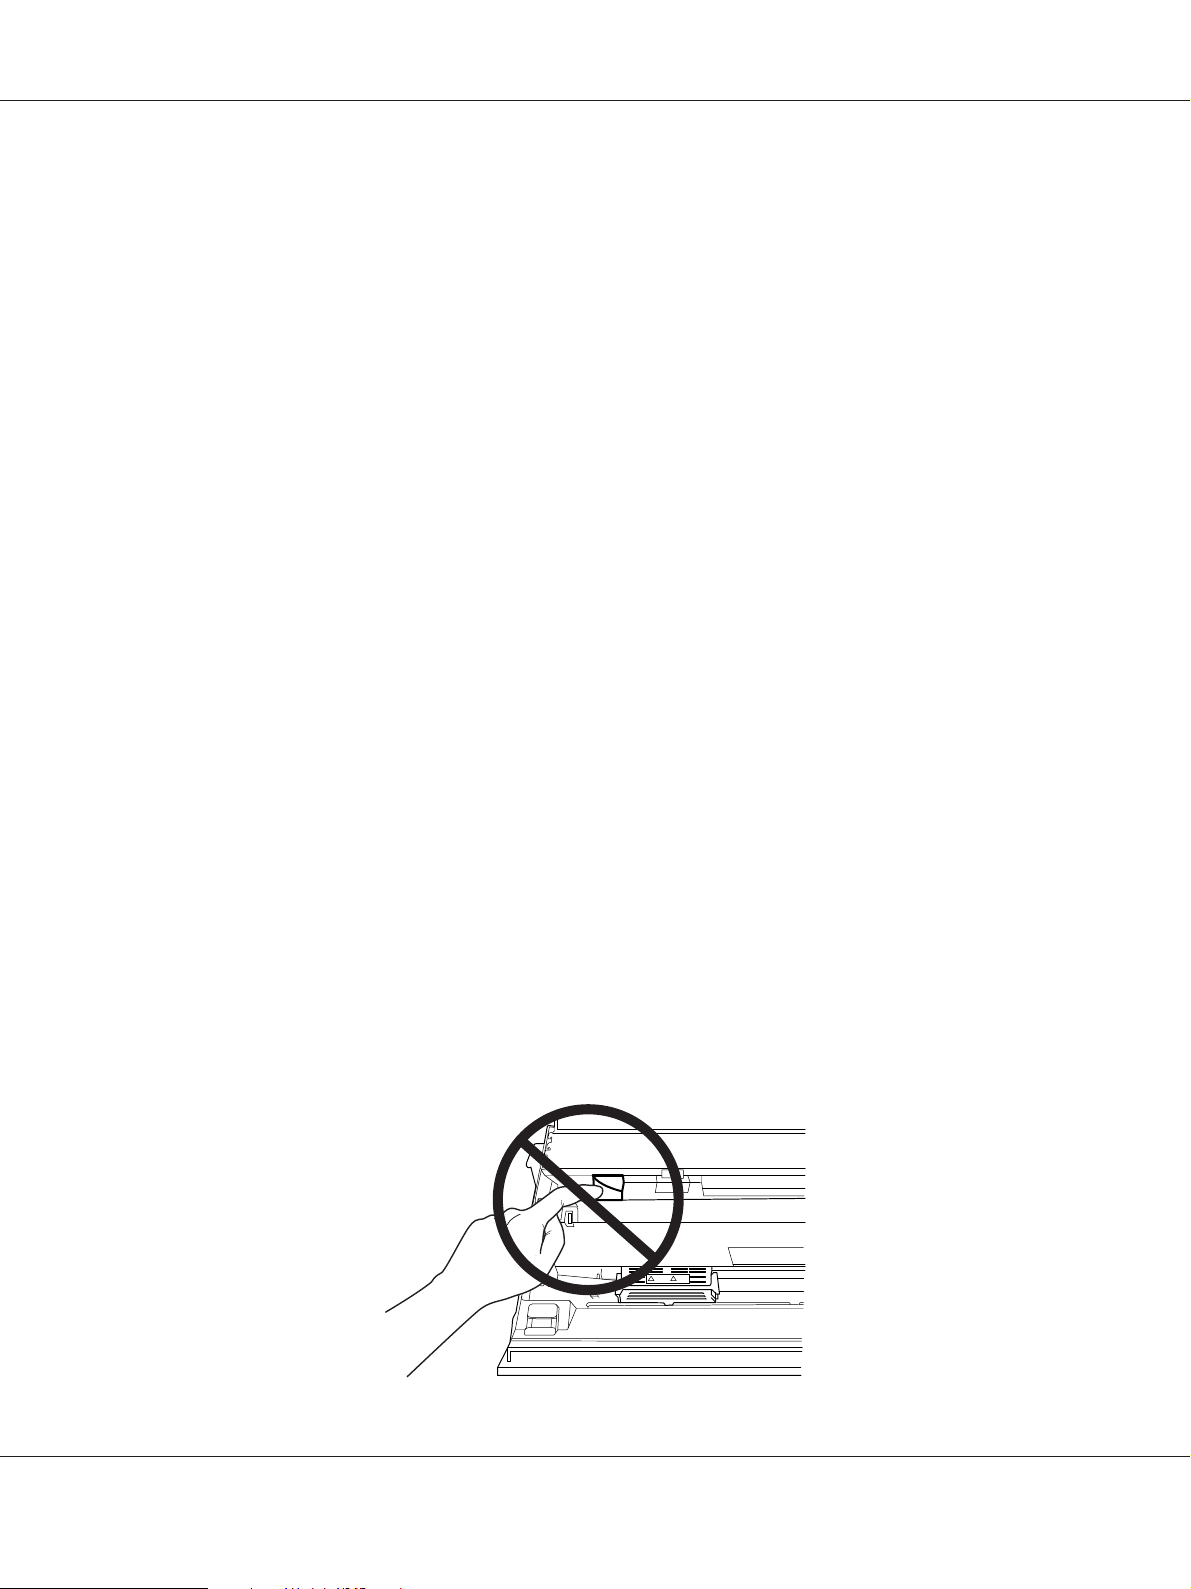
❏ Illustrations below describe the condition of paper that can be used and cannot be used with
the printer. Make sure to use the paper that is acceptable for use with the printer.
Acceptable
PLQ-50/PLQ-50CS/PLQ-50M/PLQ-50CSM/PLQ-50CSK User’s Guide
A: Folded
B: Curled
*: 3 mm or less
Insert paper after flattening the fold or curl.
Not Acceptable
A: Torn
B: Curled
C: Creased
D: Folded
Paper Handling 22
Page 23
PLQ-50/PLQ-50CS/PLQ-50M/PLQ-50CSM/PLQ-50CSK User’s Guide
Loading Passbooks
Caution:
!
Always use the printer with the ribbon cartridge installed. Otherwise, paper jam may occur.
You can load vertical-fold and horizontal-fold passbooks. Follow the steps shown below to load
passbooks.
1. Turn on the printer.
2. Open your passbook to the page to be printed.
Note:
Make sure that you press any bulging parts of the folded passbook down to 0.6 mm or less before
inserting it into the front slot. For information on the thickness of passbooks you can print, see
“Paper/Media” on page 75.
3. Insert the passbook into the front slot with the printable side face up and the magnetic stripe facing
away from the printer until the top part of it reaches the roller inside. The printer loads it
automatically to the correct position and the passbook is ready to be printed.
Paper Handling 23
Page 24

PLQ-50/PLQ-50CS/PLQ-50M/PLQ-50CSM/PLQ-50CSK User’s Guide
Caution:
!
❏ When you use a passbook, set Passbook mod e to On an d set Binding mode to the method for
the passbook’s binding in the default setting mode.
❏ Use a passbook that has more than 60% reflectance.
❏ Do not load passbooks that are creased or have ripped seam.
❏ Do not use a passbook that has any metallic parts such as staplers or metal clips.
❏ Do not use a passbook with sticky parts such as stamps or seals.
❏ Do not use a passbook that has any pages smaller than the cover page.
❏ Do not print on the front or back cover of a passbook. Printing can be done only when the
passbook is opened.
❏ Always close the printer cover before printing. The printer does not print when the printer
cover is open.
❏ When printing a vertical passbook in USD mode and HSD mode, the difference in thickness
between the right page and the left page should be within 1 mm. If the difference in thickness is
more than 1 mm, the print results may be blurred.
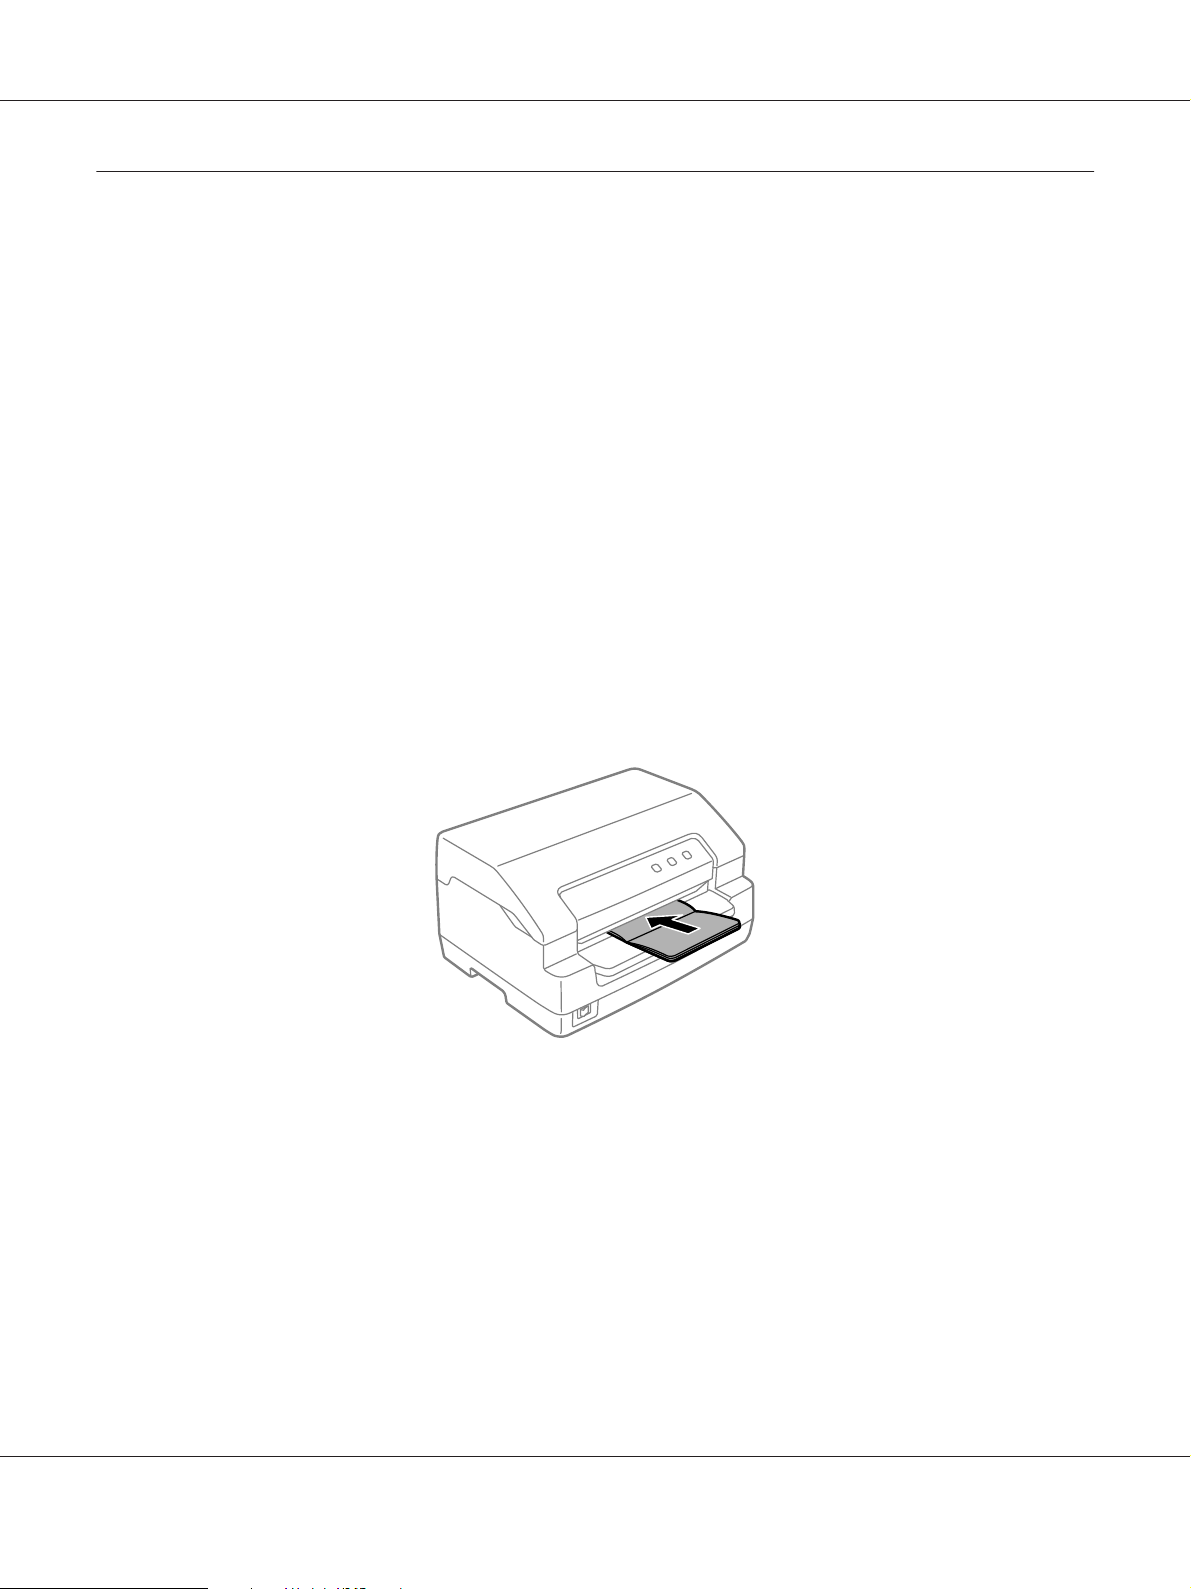
Loading Single Sheets
Caution:
!
Always use the printer with the ribbon cartridge installed. Otherwise, paper jam may occur.
You can load single sheets and carbonless single sheet multipart forms up to 7 parts (one original and
six copies). Follow these steps to load single sheets.
1. Turn on the printer.
Paper Handling 24
Page 25
PLQ-50/PLQ-50CS/PLQ-50M/PLQ-50CSM/PLQ-50CSK User’s Guide
2. Insert a single sheet into the front slot with the printable side face up until the top part of the paper
reaches the roller inside. The printer loads the paper automatically to the correct position and the
paper is ready to be printed.
Note:
❏ Use paper that has more than 60% reflectance.
❏ Do not load paper that is curled or has been folded.
❏ Do not punch holes in the area from 25.0 to 40.0 mm from the left edge of paper.
❏ When you use paper that is shorter than 110.0 mm, set the paper eject direction to front. The factory
set default is front. Please access http://www.epson.com for information.
❏ When you print a multipart form that is glued at the top, load the glued part first.
❏ Be sure your multipart forms do not exceed 0.53 mm (0.021 inch) in thickness.
❏ Always close the printer cover before printing. The printer does not print when the printer cover is
open.
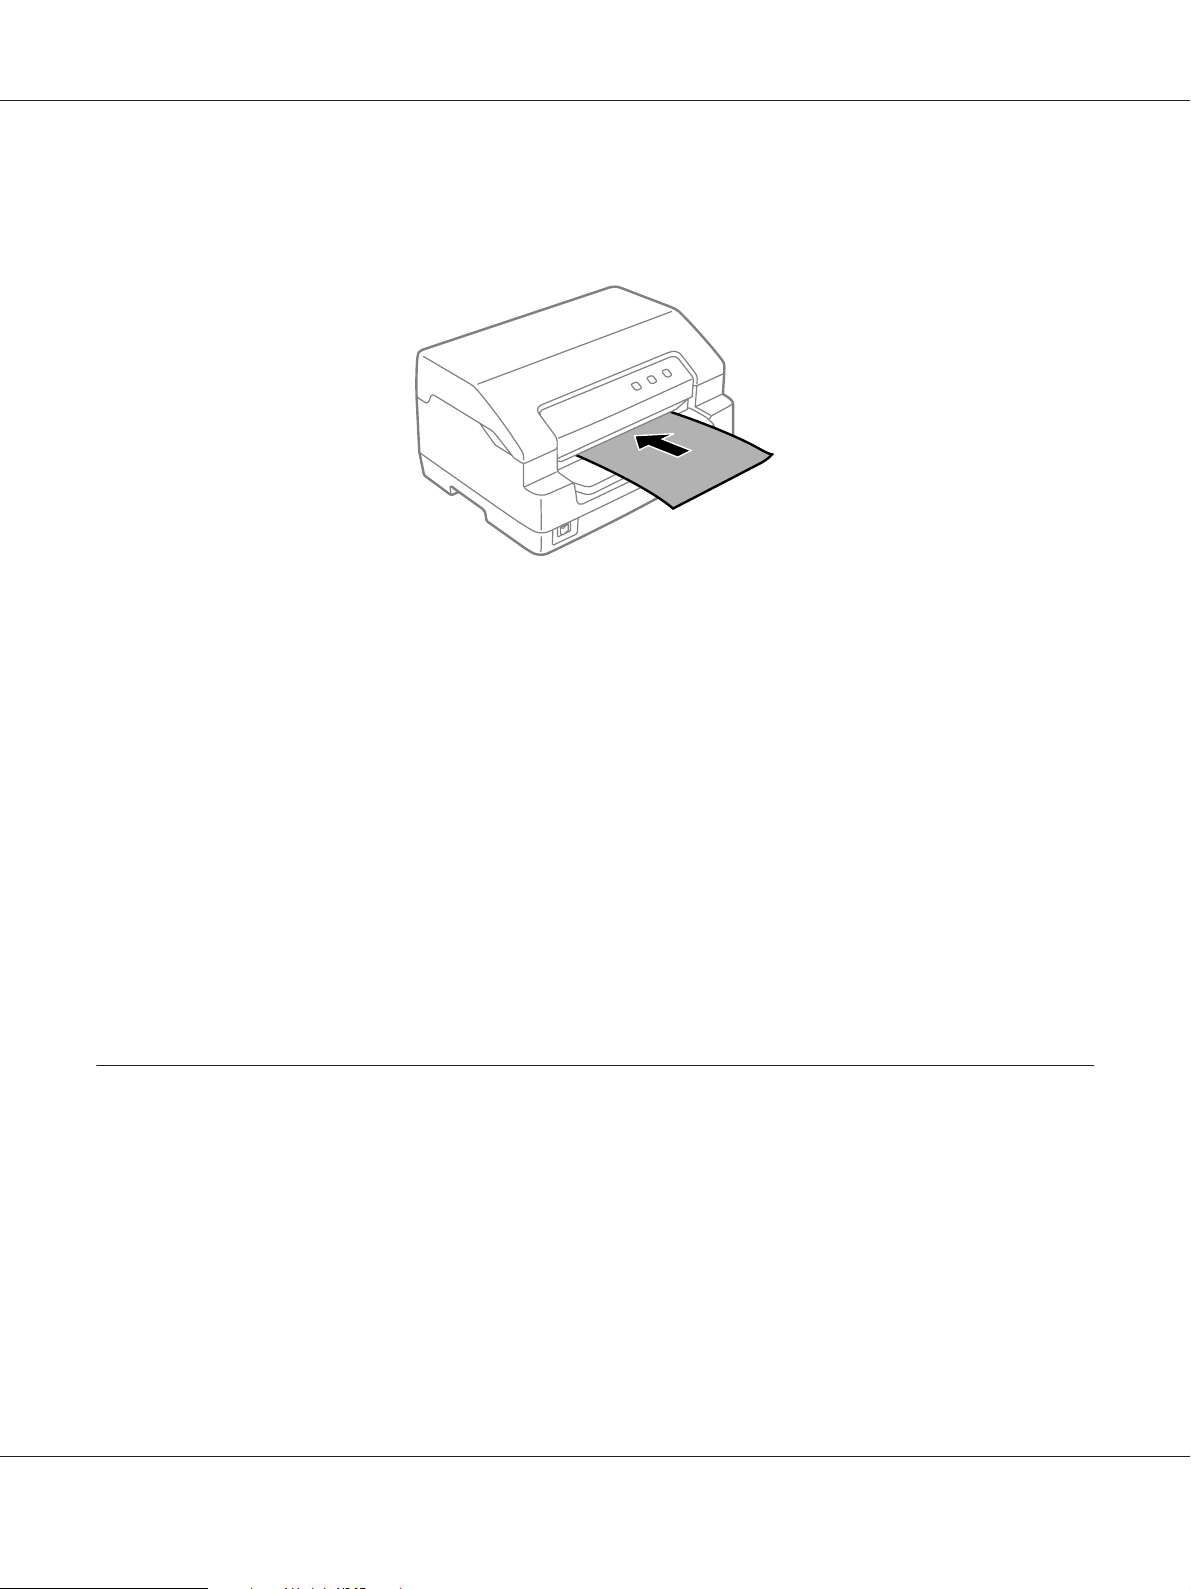
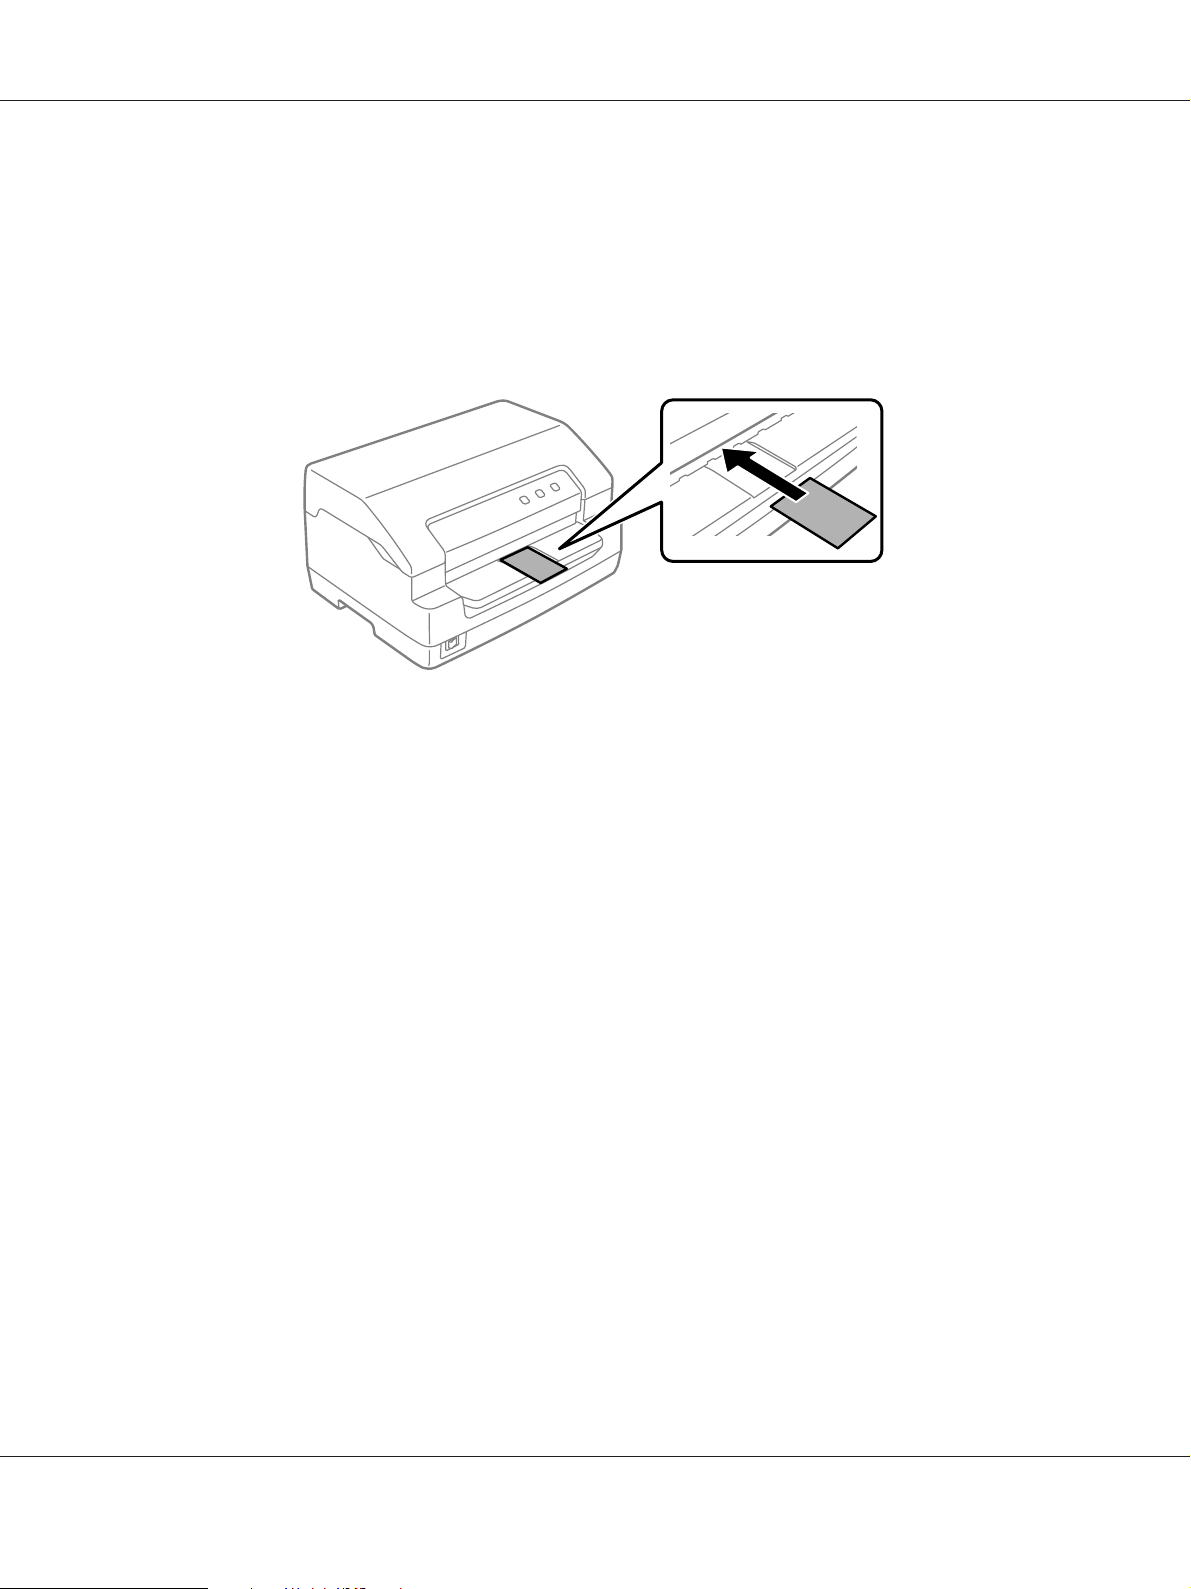
Loading ID Card
Caution:
!
Always use the printer with the ribbon cartridge installed. Otherwise, paper jam may occur.
Note:
❏ Scanning is only available for scanning models.
❏ Use the ID card for scanning only. It cannot be used for printing, magnetic stripe reading and
writing.
Paper Handling 25
Page 26
PLQ-50/PLQ-50CS/PLQ-50M/PLQ-50CSM/PLQ-50CSK User’s Guide
You can load ID card. Follow these steps to load ID card.
1. Turn on the printer.
2. Insert an ID card as shown below until the top part of the ID card reaches the roller inside. When
using horizontal ID cards, insert them with the top facing to the right. When using vertical ID
cards, insert them from the top.
Note:
❏ Laminated ID cards are supported but embossed ID cards are not supported.
❏ Always close the printer cover before scanning. The printer does not scan when the printer cover is
open.
❏ When scanning, insert the card with the scanning side face down. When scanning both sides, the first
page should be inserted face down.
Paper Handling 26
Page 27

PLQ-50/PLQ-50CS/PLQ-50M/PLQ-50CSM/PLQ-50CSK User’s Guide
Chapter 3
Printer Software
About Your Printer Software
Note:
When using the printer connected over a USB interface, you can print using the Epson software on a
Windows computer. When using the printer over another connection, contact your administrator.
The Epson software includes the printer driver software and EPSON Status Monitor 3.
The printer driver is software that allows your computer to control the printer. You need to install the
printer driver so your Windows software applications can take full advantage of the printer’s
capabilities.
When installing the printer driver, you can also install EPSON Status Monitor 3 along with other
utilities from the software disc.
Note:
❏ Before proceeding, make sure you have installed the printer driver on your computer.
❏ The on-screen displays on the following pages may differ depending on the version of Windows OS.
Using the Printer Driver
You can access the printer driver from your Windows applications or from the Start menu.
Screens and procedures that appear in this manual are mostly from Windows 10 unless otherwise
specified.
❏ When you access the printer driver from a Windows application, any settings you make apply only
to the application you are using. See “Accessing the printer driver from Windows applications” on
page 28 for more information.
❏ When you access the printer driver from the Start menu, the printer driver settings you make apply
to all your applications. See “Accessing the printer driver from the Start menu” on page 30 for
more information.
See “Changing the printer driver settings” on page 32 to check and change printer driver settings.
Printer Software 27
Page 28
PLQ-50/PLQ-50CS/PLQ-50M/PLQ-50CSM/PLQ-50CSK User’s Guide
Note:
While many Windows applications override the settings made with the printer driver, some do not, so
you must verify that the printer driver settings match your requirements.
Accessing the printer driver from Windows applications
Follow these steps to access the printer driver from a Windows application:
Note:
The screen shots used in this procedure are from the Windows 10 operating system. The content on the
screen may vary depending on your computer's environment.
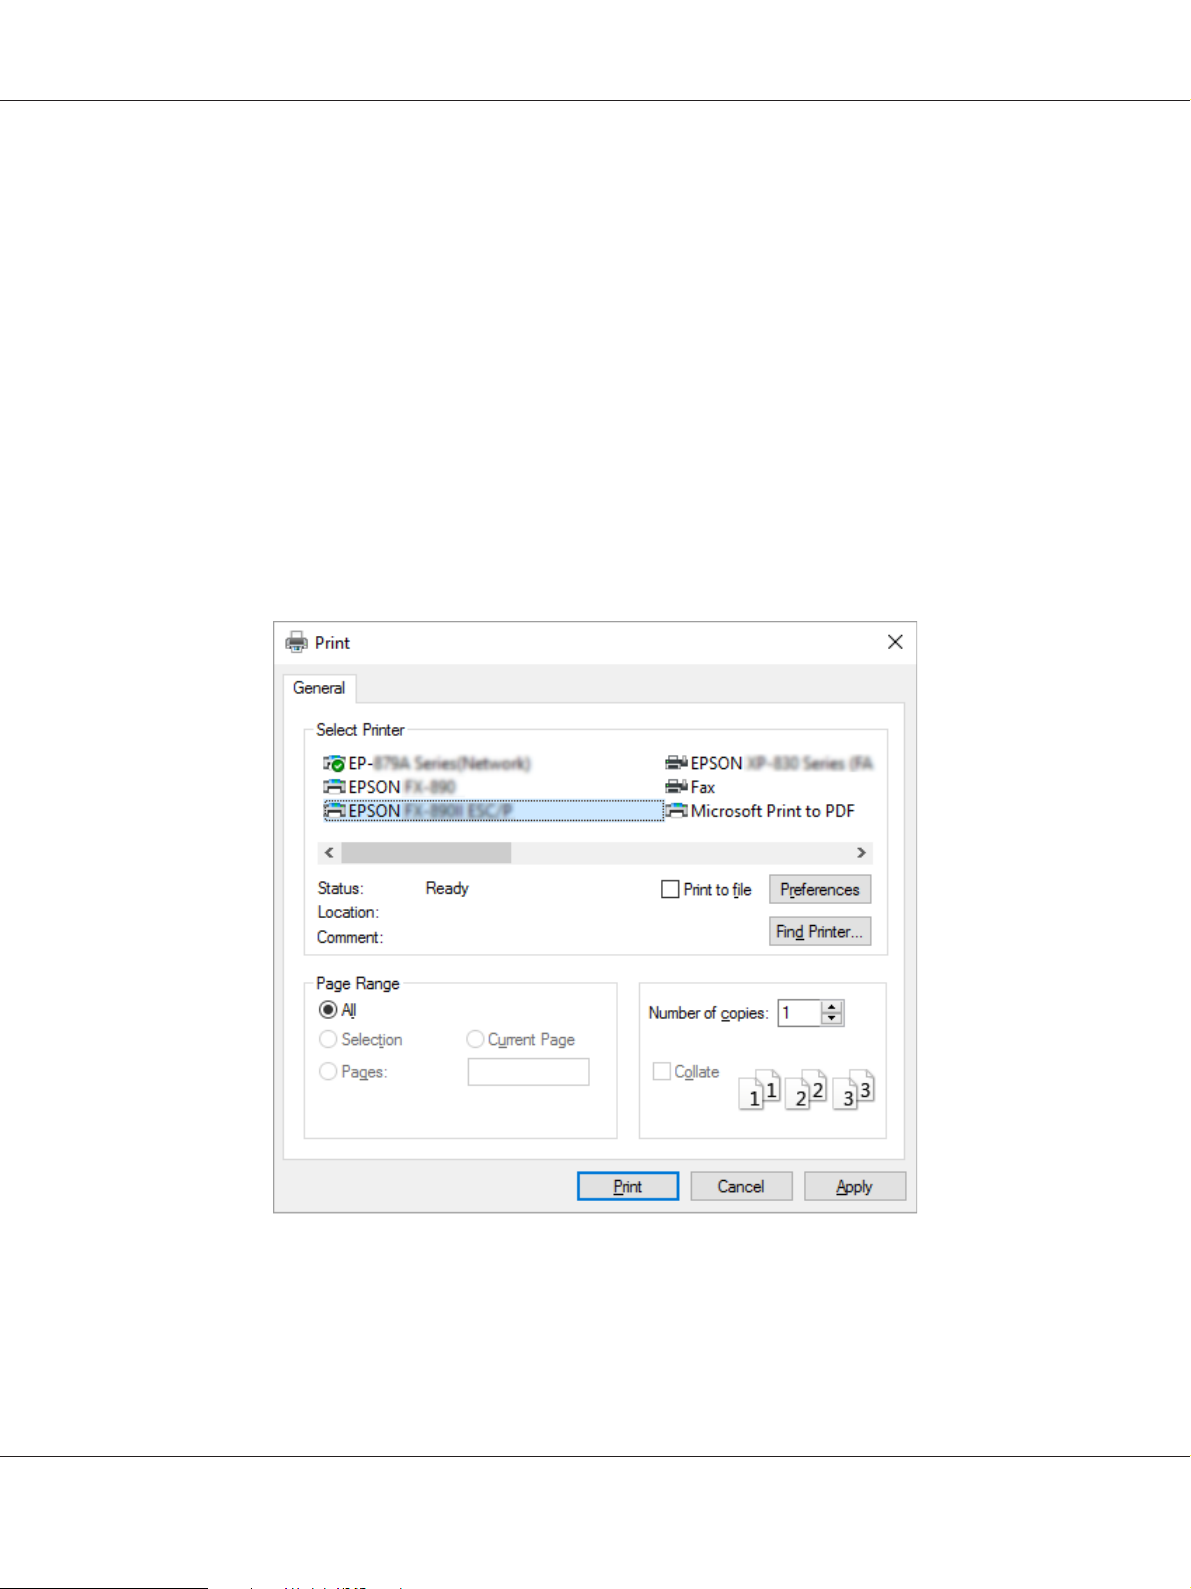
1. Select Print from the File menu of your application software. Make sure that your printer is
selected in the Select Printer of Print dialog box.
Printer Software 28
Page 29
PLQ-50/PLQ-50CS/PLQ-50M/PLQ-50CSM/PLQ-50CSK User’s Guide
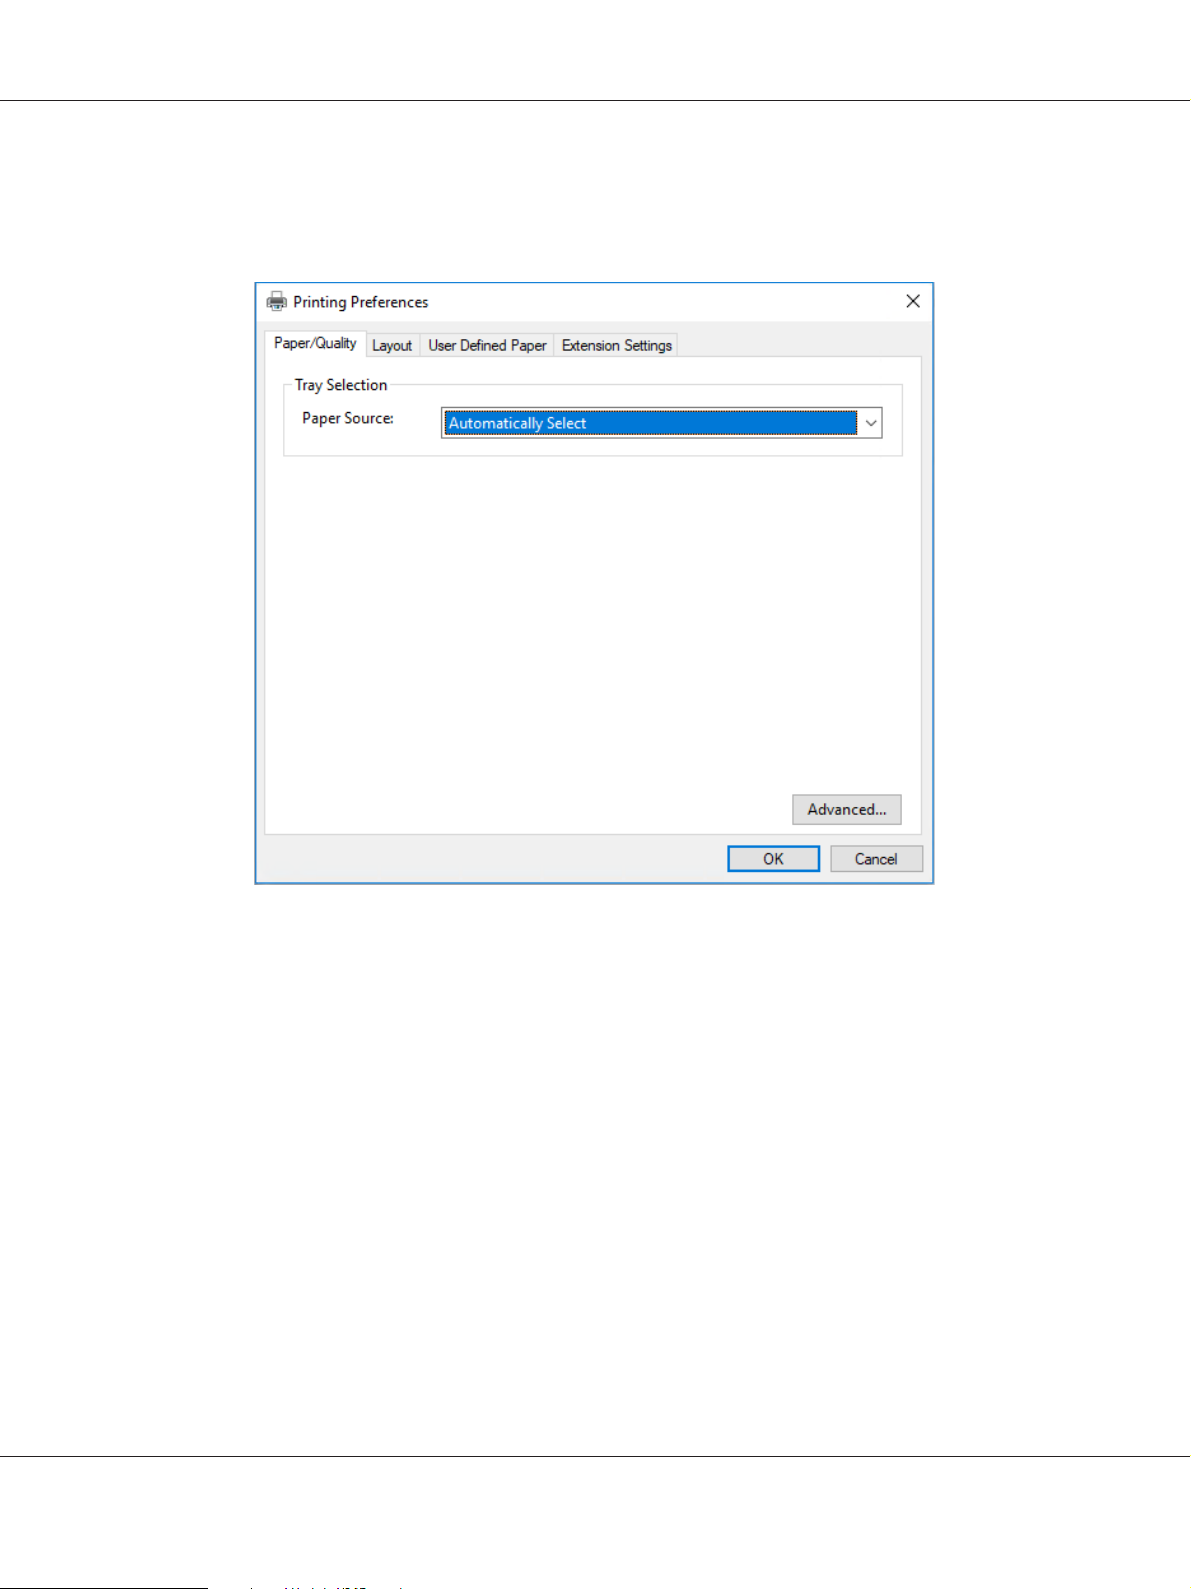
2. Click Preferences. The Printing Preferences window appears, and you see the Paper/Quality,
Layout, User Defined Paper, and Extension Settings menus. These menus contain the printer
driver settings.
Printer Software 29
Page 30

PLQ-50/PLQ-50CS/PLQ-50M/PLQ-50CSM/PLQ-50CSK User’s Guide
3. To view a menu, click the corresponding tab at the top of the window. See “Changing the printer
driver settings” on page 32 to change the settings.
Accessing the printer driver from the Start menu
Follow these steps to access the printer driver from the Start menu:
Note:
The screen shots used in this procedure are from the Windows 10 operating system. The content on the
screen may vary depending on your computer's environment.
1. For Windows 10/Windows Server 2019/Windows Server 2016:
Click on the Start button, and then select Windows System > Control Panel > View devices
and printers in Hardware and Sound.
For Windows 8.1/Windows 8/Windows Server 2012 R2/Windows Server 2012:
Click Desktop on the Start screen, move the cursor to the top-right corner of the screen, click
Settings, and then click Control Panel. Next, click View devices and printers from the
Hardware and Sound category.
Printer Software 30
Page 31

PLQ-50/PLQ-50CS/PLQ-50M/PLQ-50CSM/PLQ-50CSK User’s Guide
For Windows 7/Windows Server 2008 R2:
Click Start, and click Devices and Printers.
For Windows Vista/Windows Server 2008:
Click Start, click Control Panel, click Hardware and Sound, and then click Printers.
For Windows XP/Windows Server 2003 R2/Windows Server 2003:
Click Start, and click Printers and Faxes.
2. Right-click your printer icon, and click Printing Preferences. The screen displays the Paper/
Quality, Layout, User Defined Paper and Extension Settings menus. These menus display
the printer driver settings.
Printer Software 31
Page 32

PLQ-50/PLQ-50CS/PLQ-50M/PLQ-50CSM/PLQ-50CSK User’s Guide
When you click Printer properties in the menu displayed by right-clicking the printer icon, the
Properties window appears, which includes menus used to make the printer driver settings.
3. To view a menu, click the corresponding tab at the top of the window. See “Printer Driver Settings
Overview” on page 34 for more information.
Changing the printer driver settings
Your printer driver has two menus from which you can change the printer driver settings; Layout,
Paper/Quality. You can also change settings on the Utility menu in the printer software. For an
overview of the available settings, see “Printer Driver Settings Overview” on page 34.
Printer Software 32
Page 33

PLQ-50/PLQ-50CS/PLQ-50M/PLQ-50CSM/PLQ-50CSK User’s Guide
Note:
For Windows XP/Windows Server 2003 R2/Windows Server 2003, you can also view online help by
right-clicking items in the driver and selecting What’s this?.
Click the Help button on the Printer Driver screen.
When you finish making your printer driver settings, click OK to apply the settings, or click Cancel to
cancel your changes.
Once you have checked your printer driver settings and changed them if necessary, you are ready to
print.
Printer Software 33
Page 34

PLQ-50/PLQ-50CS/PLQ-50M/PLQ-50CSM/PLQ-50CSK User’s Guide
Printer Driver Settings Overview
The following tables show the Windows printer driver settings. Note that not every setting is available
in all versions of Windows. For more details, see Help for the printer driver.
Print settings
Settings Explanations
Orientation
Page Order
Pages per Sheet
Draw Borders
Paper Source Select the paper source you want to use.
User Defined Paper If your paper is not included in the Paper Size drop-down list, you can add the size to the
Offset This setting allows you to offset the image on the page. That is, you can adjust the
Driver Note
Paper Size Select the size of the paper you want to use. If you do not see your paper size, use the
Copy Count
*1
*1
*1
*2
*1
Select Portrait or Landscape.
Select whether to print from front to back or back to front.
Select the number of pages that you want to print onto a single page.
Select to print a border around the pages.
list. For more details, see Help for the printer driver.
position of the printed image. If the offset you specify moves a portion of the image out
of the printer’s printable area, that portion will not be printed.
You can add short notes to the printing data to help you identify the print job.
scroll bar to scroll through the list. If your paper size is not included in the list, see
“Definition of Custom Paper Size” on page 35 for instructions.
Select the number of copies you want to print. When you select more than one, this
check box is displayed and you can select whether to collate the copies.
Graphic - Print Quality Select the printing resolution you want. The higher the resolution you select, the more
detailed your printout will be; however, increasing the resolution slows printing.
Advanced Printing
Features
Pages per Sheet Layout
Halftoning Select the type of halftoning to use when printing graphics. To let the printer deter-
Print Optimizations
*1
*1
*1
Select Enable or Disable for the metafile Spooling.
Select the layout direction for the pages you want to print.
mine the best halftone quality, use Auto Select.
Select Disable when the printer does not use the device fonts and select Enable when
the printer uses the device fonts.
Printer Software 34
Page 35

Settings Explanations
PLQ-50/PLQ-50CS/PLQ-50M/PLQ-50CSM/PLQ-50CSK User’s Guide
Print Speed
Print Direction
Top Margin Priority Select which setting for the print start position is to be used; driver setting or printer
Printer Font Setting Select a character table group to use. You can select one of three character table
Packet mode Ordinarily, there is no need to change this setting. If you change the printer’s Packet
This setting allows you to select print speed. When Standard is selected, prints in
standard printing mode. When High Speed is selected, prints in high speed printing
mode.
This setting allows you to select bidirectional printing. Selecting the Printer Setting
will use the setting stored in the printer. Selecting Bidirectional will print in bidirectional printing mode. Selecting Unidirectional will print in unidirectional printing
mode.
Make sure that Bi-D is selected as the Print Direction setting stored in the printer.
Otherwise this setting is ignored by the printer.
setting. For more details, see Help for the printer driver.
groups, Standard, Expanded, and None (Bit Image printing).
When Standard or Expanded is selected, the printer uses the device fonts. Expanded
includes more fonts than Standard.
When None is selected, the printer uses bit map images instead of the device fonts.
For details on the fonts which are included in each table, see “Electronic” on
page 71.
mode settings, change this setting to match. If the printer and printer driver settings
are different, you may not be able to print correctly. For more details, see Help for the
printer driver.
*1 For details, see Windows help.
*2 LCD models only.
Definition of Custom Paper Size
If your paper is not included in the Paper Size drop-down list, you can add the size to the list.
1. For Windows 10/Windows Server 2019/Windows Server 2016:
Click on the Start button, and then select Windows System > Control Panel > View devices
and printers in Hardware and Sound.
For Windows 8.1/Windows 8/Windows Server 2012 R2/Windows Server 2012:
Click Desktop on the Start screen, move the cursor to the top-right corner of the screen, click
Settings, and then click Control Panel. Next, click View devices and printers from the
Hardware and Sound category.
Printer Software 35
Page 36

PLQ-50/PLQ-50CS/PLQ-50M/PLQ-50CSM/PLQ-50CSK User’s Guide
For Windows 7/Windows Server 2008 R2:
Click Start, and click Devices and Printers.
For Windows Vista/Windows Server 2008:
Click Start, click Control Panel, click Hardware and Sound, and then click Printers.
For Windows XP/Windows Server 2003 R2/Windows Server 2003:
Click Start, and click Printers and Faxes.
2. Right click your printer icon, and click Printing Preferences.
3. Select the User Defined Paper menu.
4. Enter the paper size in the Paper Size fields.
5. Click Apply and then click OK.
Note:
For more details, see Help for the printer driver.
Uninstalling the Printer Software
When you wish to reinstall or upgrade the printer driver, uninstall the printer driver that has been
installed already.
Note:
When uninstalling EPSON Status Monitor 3 from a multi-user Windows XP/Windows Server 2003
R2/Windows Server 2003 environment, remove the shortcut icon from all clients before uninstalling.
You can remove the icon by clearing the Shortcut Icon check box in the Monitoring Preferences dialog
box.
Uninstalling the printer driver and EPSON Status Monitor 3
1. Turn off the printer.
2. Quit all running applications.
3. Open Control Panel:
❏ Windows 10/Windows Server 2019/Windows Server 2016
Printer Software 36
Page 37

PLQ-50/PLQ-50CS/PLQ-50M/PLQ-50CSM/PLQ-50CSK User’s Guide
Click on the Start button, and then select Windows System > Control Panel.
❏ Windows 8.1/Windows 8/Windows Server 2012 R2/Windows Server 2012
Select Desktop > Settings > Control Panel.
❏ Windows 7/Windows Vista/Windows XP/Windows Server 2008 R2/Windows Server 2008/
Windows Server 2003 R2/Windows Server 2003
Click the start button and select Control Panel.
4. Open Uninstall a program (or Add or Remove Programs):
❏ Windows 10/Windows 8.1/Windows 8/Windows 7/Windows Vista/Windows Server 2019/
Windows Server 2016/Windows Server 2012 R2/Windows Server 2012/Windows Server 2008
R2/Windows Server 2008
Select Uninstall a program in Programs.
❏ Windows XP/Windows Server 2003 R2/Windows Server 2003
Click Add or Remove Programs.
5. Select the software you want to uninstall.
6. Uninstall the software:
❏ Windows 10/Windows 8.1/Windows 8/Windows 7/Windows Vista/Windows Server 2019/
Windows Server 2016/Windows Server 2012 R2/Windows Server 2012/Windows Server 2008
R2/Windows Server 2008
Click Uninstall/Change or Uninstall.
❏ Windows XP/Windows Server 2003 R2/Windows Server 2003
Click Change/Remove or Remove.
Note:
If the User Account Control window is displayed, click Continue.
Printer Software 37
Page 38

PLQ-50/PLQ-50CS/PLQ-50M/PLQ-50CSM/PLQ-50CSK User’s Guide
7. Click the Printer Model tab, select the icon of the printer you want to uninstall, then click OK.
Note:
Make sure that nothing is selected in the Printer Model tab. Open Utility tab and select EPSON
Status Monitor 3 (for EPSON XXXXXX ESC/P) and click OK. You can uninstall only the EPSON
Status Monitor 3.
8. Follow the on-screen instructions.
Printer Software 38
Page 39
PLQ-50/PLQ-50CS/PLQ-50M/PLQ-50CSM/PLQ-50CSK User’s Guide
Chapter 4
Maintenance
Replacing the Ribbon Cartridge
Replacing the ribbon cartridge
Follow these steps to install or replace the ribbon cartridge:
Warning:
!
If you have just used the printer, the print head may be hot; let it cool for a few minutes before
replacing the ribbon cartridge.
1. Make sure the printer is turned on.
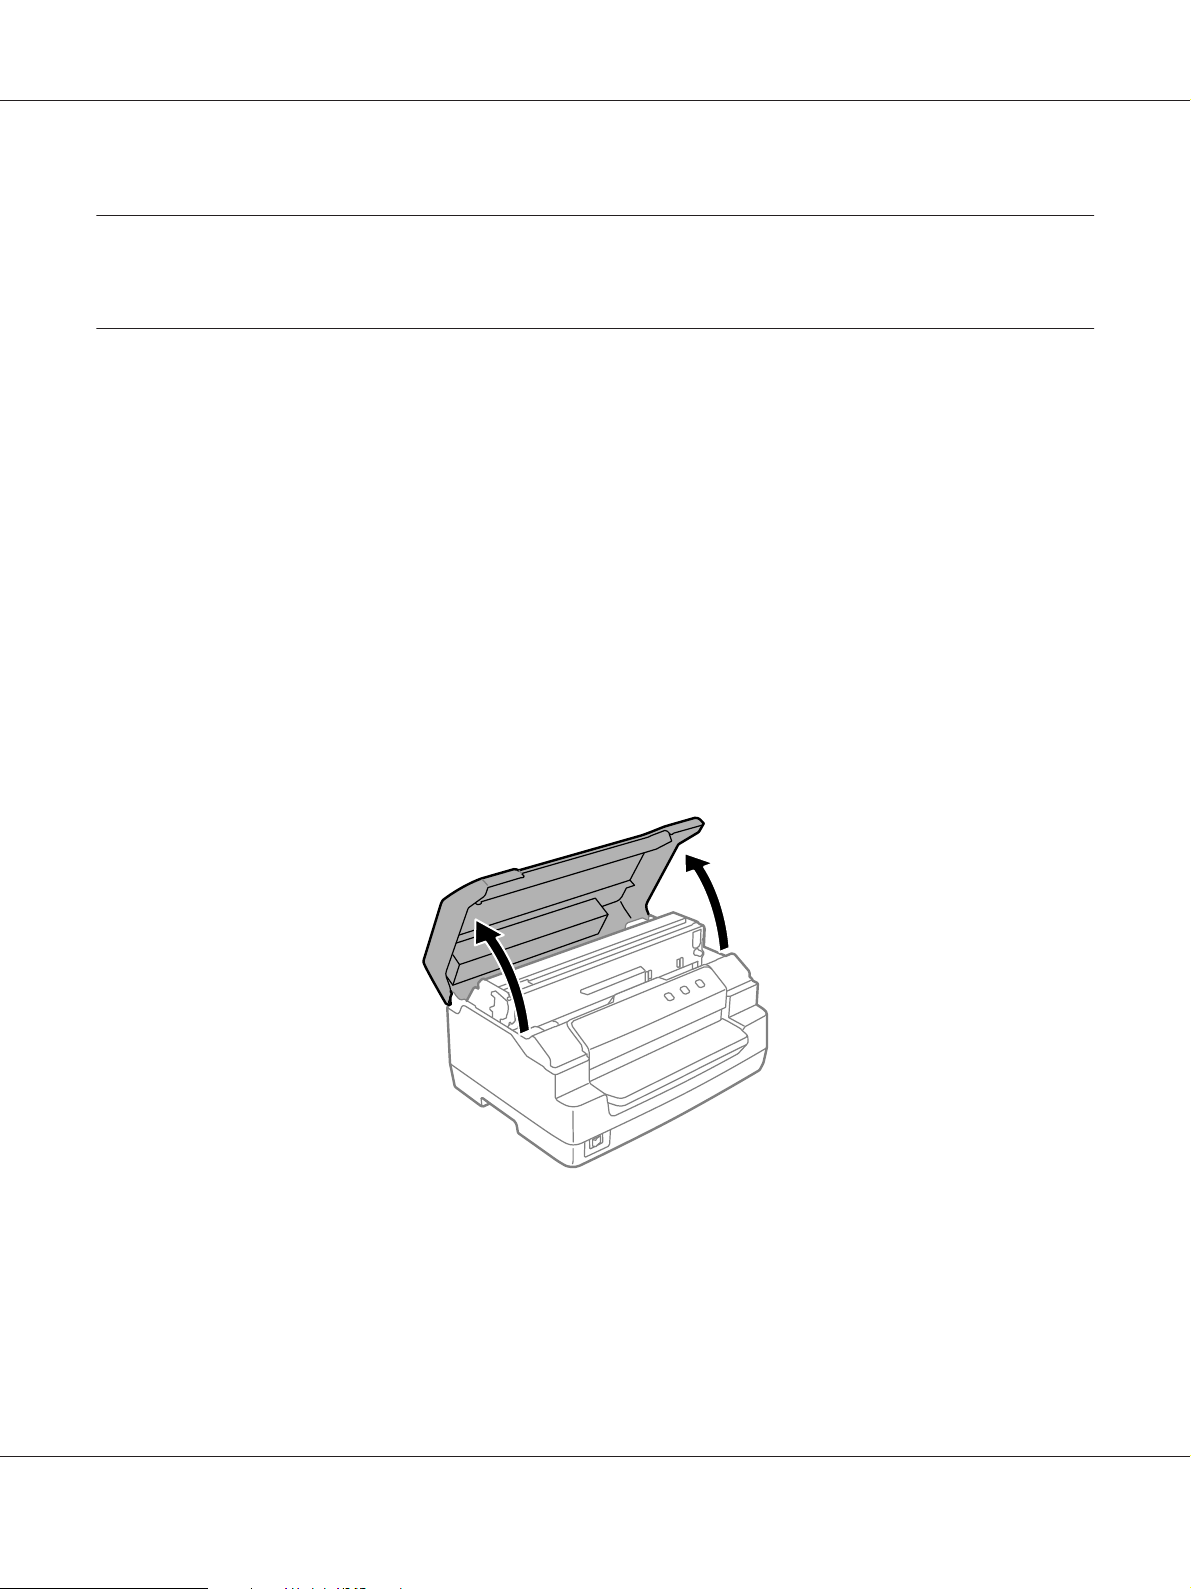
2. Hold both sides of the printer cover and move it upward to open it.
The print head moves to the ribbon cartridge replacement position.
3. Turn the printer off.
4. Push the release lever to move the upper mechanism up. Make sure that you push the lever to the
guide mark until it clicks and locks into place.
Maintenance 39
Page 40

PLQ-50/PLQ-50CS/PLQ-50M/PLQ-50CSM/PLQ-50CSK User’s Guide
Note:
If the upper mechanism is not locked, it may drop down while you are replacing the ribbon.
*: Guide mark
5. Make sure that the print head is in the middle of the printer.
Maintenance 40
Page 41

PLQ-50/PLQ-50CS/PLQ-50M/PLQ-50CSM/PLQ-50CSK User’s Guide
6. Hold both sides of the ribbon guide and pull it down until it is out of the print head.
7. Hold both sides of the ribbon cartridge with both hands and rotate it on the plastic hooks. Then
pull it up until it is out of the printer.
Maintenance 41
Page 42

PLQ-50/PLQ-50CS/PLQ-50M/PLQ-50CSM/PLQ-50CSK User’s Guide
Caution:
!
Do not touch the white cable inside the printer.
8. Remove the new ribbon cartridge from the package.
9. Place the plastic hooks on the ribbon cartridge into the slots of the printer. Then press the cartridge
until it clicks into place.
Maintenance 42
Page 43

PLQ-50/PLQ-50CS/PLQ-50M/PLQ-50CSM/PLQ-50CSK User’s Guide
10. Hold both sides of the ribbon guide and pull it down until it is out of the cartridge.
11. Put the ribbon guide at the bottom of the print head and push it up until it clicks.
Maintenance 43
Page 44

PLQ-50/PLQ-50CS/PLQ-50M/PLQ-50CSM/PLQ-50CSK User’s Guide
12. Turn the ribbon-tightening knob to help feed the ribbon into place.
Caution:
!
The ribbon should not be twisted or creased.
13. Pull the release lever back to move the upper mechanism to its original position. Make sure that
you pull the lever to the guide mark until it clicks and locks into place.
*: Guide mark
Maintenance 44
Page 45

PLQ-50/PLQ-50CS/PLQ-50M/PLQ-50CSM/PLQ-50CSK User’s Guide
Caution:
!
Make sure that you move the upper mechanism by pulling the release lever. Do not pull the
mechanism by hand. It may damage the printer.
14. Close the printer cover.
Cleaning the Printer
To keep your printer operating at its best, you should clean it thoroughly several times a year.
Follow these steps to clean your printer:
1. Make sure there is no paper loaded in the printer, and then turn off the printer.
2. Hold both sides of the printer cover and move it upward to open it.
3. Push the release lever to move the upper mechanism up. Make sure that you push the lever to the
guide mark until it clicks and locks into place.
Note:
If the upper mechanism is not locked, it may drop down while you are cleaning the printer.
4. Use a soft brush to carefully brush away all dust and dirt from the outer case.
5. If the outer case is still dirty or dusty, clean them with a soft, clean cloth dampened with a mild
detergent dissolved in water. Keep the printer cover closed to prevent water from getting inside the
printer and be careful not to get water in the front slot.
Caution:
!
❏ Never use alcohols or thinners to clean the printer; these chemicals can damage the printer
components as well as the case.
❏ Be careful not to get water onto the printer mechanism or electronic components.
❏ Do not use a hard or abrasive brush.
❏ Do not spray the inside of the printer with lubricants; unsuitable lubricants can damage the
printer mechanism. Contact an Epson dealer if you think lubrication is needed.
Maintenance 45
Page 46

PLQ-50/PLQ-50CS/PLQ-50M/PLQ-50CSM/PLQ-50CSK User’s Guide
Cleaning the Scanner Glass (for Scanning Models Only)
To keep your scanner operating at its best, you should clean it periodically (every three months).
Follow these steps to clean your printer:
Caution:
!
❏ Be careful not to injure your hand on parts inside the printer.
❏ Do not press the glass surface of the scanner with any force.
❏ Be careful not to scratch or damage the glass surface of the scanner, and do not use a hard or
abrasive brush to clean it. A damaged glass surface can decrease the scan quality.
❏ Do not touch the thin plastic strips inside the printer.
❏ Never use alcohol, thinner, or corrosive solvent to clean the scanner. These chemicals can
damage the scanner components.
❏ Be careful not to spill liquid into the scanner mechanism or electronic components. This could
permanently damage the mechanism and circuitry.
❏ Do not spray lubricants inside the scanner.
1. Make sure there is no paper loaded in the printer, and then turn off the printer.
2. Hold both sides of the printer cover and move it upward to open it.
3. Push the release lever to move the upper mechanism up. Make sure that you push the lever to the
guide mark until it clicks and locks into place.
Note:
If the upper mechanism is not locked, it may drop down while you are cleaning the printer.
Maintenance 46
Page 47

PLQ-50/PLQ-50CS/PLQ-50M/PLQ-50CSM/PLQ-50CSK User’s Guide
4. Use a soft, dry, lint-free cloth to carefully wipe away all dirt from the surface of the glass on the
upper and lower sides.
Note:
The PLQ-50CSK has scanner glass only on the lower side.
Transporting the Printer
If you need to transport your printer for some distance, carefully repack it using the original box and
packing materials.
Follow these steps to repack the printer in its original packing materials:
Warning:
!
You need to move the print head by hand to remove the ribbon cartridge. If you have just used the
printer, the print head may be hot; let it cool for a few minutes before touching it.
1. Remove any paper loaded in the printer.
2. Turn off the printer.
Maintenance 47
Page 48

PLQ-50/PLQ-50CS/PLQ-50M/PLQ-50CSM/PLQ-50CSK User’s Guide
3. Unplug the power cord from the electrical outlet; then disconnect the interface cable from the
printer.
4. Make sure that the print head is not hot. Then remove the ribbon cartridge as described in
“Replacing the ribbon cartridge” on page 39.
5. Make sure that the printer cover is closed.
6. Repack the printer, ribbon cartridge, and power cord (if necessary) in their original packing
materials and place them in the printer’s original box.
Maintenance 48
Page 49

PLQ-50/PLQ-50CS/PLQ-50M/PLQ-50CSM/PLQ-50CSK User’s Guide
Chapter 5
Troubleshooting
Diagnosing the Problem
Troubleshooting printer problems is best handled in two easy steps; first diagnose the problem, then
apply likely solutions until the problem is fixed.
The information you need to diagnose and solve most common problems is provided by the printer’s
control panel, or by printing a self-test. Refer to the appropriate section below.
If you have a specific problem relating to print quality, a printout problem not related to print quality,
or a paper feeding problem, or if the printer does not print at all, refer to the appropriate section in this
chapter.
To solve a problem, you may need to cancel printing.
Printing Your Printer’s Current Settings
It is also useful to know your printer’s current setting status, especially the printer mode that your
printer is operating in to identify the problem.
Follow these steps to enter the printer default setting mode to print the printer’s current default
settings:
Note:
❏ Prepare an A4 size sheet of paper before entering the default setting mode.
❏ You need to load a new sheet of paper each time the printer ejects a printed sheet from the front
slot.
❏ Always close the printer cover before printing. The printer does not print when the printer cover is
open.
LCD Model
Follow the steps below if your printer has an LCD screen on the control panel.
Troubleshooting 49
Page 50

PLQ-50/PLQ-50CS/PLQ-50M/PLQ-50CSM/PLQ-50CSK User’s Guide
1. Turn off the printer.
2. Turn on the printer while holding the F1/Eject and F2 buttons on the control panel. The Menu
screen is displayed.
3. If the Main Menu is not selected, use the F1/Eject or Offline button to select Main Menu, and
then press the F2 button to display the Main Menu screen.
4. If Print All Settings is not selected, use the F1/Eject or Offline button to select Print All
Settings, insert a sheet of A4 paper into the front slot, and then press the F2 button to print the
printer's current settings.
The setting that is currently selected for each item is underlined.
5. Turn off the printer to exit the default setting mode.
Models Without LCD Screens
If your printer does not have LCD screen on the control panel, follow the instructions below.
Troubleshooting 50
Page 51

PLQ-50/PLQ-50CS/PLQ-50M/PLQ-50CSM/PLQ-50CSK User’s Guide
1. Turn off the printer.
Caution:
!
Whenever you turn off the printer, wait at least five seconds before turning it back on;
otherwise you may damage the printer.
2. Turn on the printer while holding the F1/Eject and F2 buttons on the control panel.
3. When the Ready light turns on, insert a sheet of A4 paper into the front slot. The printer prints the
version number, and depending on the location, the language selection for the default settings
menu. The selected language is underlined. Select the language by pressing the F1/Eject button.
Press the F2 button to set the language.
4. The printer prints a message asking if you want to print the current settings. Press the F2 button to
start printing. The setting that is currently selected for each item is underlined.
5. Turn off the printer to exit the default setting mode.
Checking Messages on the LCD Screen or Error Indicators
You can identify common printer problems by checking the messages on the LCD screen or using the
lights on the control panel. If your printer stops working and an error message is displayed, or if one or
more control panel lights are on or flashing or the printer beeps, use the following table to diagnose
and fix the problem. If you cannot fix your problem using this table, see “Problems and Solutions” on
page 53.
Note:
The printer beeps once if you press a control panel button when the corresponding function is not
available.
Messages Problems and Solutions
State of Lights Beep pattern
Load paper. ❏ There is no paper loaded in the slot. Load a paper into the front slot.
N Power
F Ready
N Offline
❏ Paper is not loaded correctly. Remove the paper and reload it
correctly. See “Loading Passbooks” on page 23 or “Loading Single
Sheets” on page 24.
Troubleshooting 51
Page 52

PLQ-50/PLQ-50CS/PLQ-50M/PLQ-50CSM/PLQ-50CSK User’s Guide
Messages Problems and Solutions
State of Lights Beep pattern
Remove paper.
N Power
F Ready
N Offline
Printer error There can be a variety of causes. It can also be due to your application
N Power
F Ready
Close the printer cover. The printer cover is open. Stop the operation and close the printer cover.
N Power
N Offline
Printing stops due to overheating of the print
head. Wait till the head cools.
N Power
F Offline
or —
—
❏ Paper is not fully ejected. Press the F1/Eject button to eject paper or
see “Clearing a Paper Jam” on page 58 for instructions on ejecting
paper.
❏ Paper is jammed in the printer. Clear the paper jam, see “Clearing a
Paper Jam” on page 58 or press the Offline button to clear the error.
❏ The paper size setting may not match the size of the paper you are
using. Check if they match.
software. Contact your administrator for help.
The print head is overheated. Wait for a few minutes; the printer resumes
printing automatically once the print head cools.
Printer error. Contact Epson Support.
Non-printing features are available.
N Power
F Ready
F F1/Eject
F Offline
F F2
N = on, F = flashing
= short series of beeps (three beeps)
= long series of beeps (five beeps)
= short series of beeps (five beeps ×2)
An unknown printer error has occurred. Turn off the printer and leave it off
for several minutes; then turn on the printer again. If the error recurs,
contact your dealer.
Troubleshooting 52
Page 53
PLQ-50/PLQ-50CS/PLQ-50M/PLQ-50CSM/PLQ-50CSK User’s Guide
Problems and Solutions
Most problems you may encounter while operating your printer have simple solutions.
You can check the operation of your printer using the self test. See “Printing a Self Test” on page 60. If
the self test works properly the problem probably lies in the computer, the application software, or the
interface cable. If the self test does not work, contact your dealer or a qualified service person for
assistance.
Power Supply
Power is not being supplied
The lights come on briefly and then go off. The lights stay off even when the power is turned on again.
Cause What to do
The voltage ratings of the printer and electrical
outlet may not match.
The printer does not work and the control panel lights are off even when you turn on the printer.
Cause What to do
The power cord is not properly plugged into the
electrical outlet or your printer.
The electrical outlet does not work. Use a different outlet.
Printing
Printing or printout quality problems
The printer is on but it doesn’t print.
Cause What to do
Check that the printer’s voltage rating matches the voltage of your
electrical outlet. If the voltages do not match, unplug the printer
and contact your dealer immediately. Do not reconnect the power
cord to an electrical outlet.
Turn off the printer, and make sure the power cord is firmly
plugged into the electrical outlet and the printer, if necessary.
Then turn on the printer.
The interface cable is broken or twisted. Check that the interface cable is not broken or twisted. If you have
another interface cable, replace the cable and check whether the
printer works correctly.
Troubleshooting 53
Page 54

PLQ-50/PLQ-50CS/PLQ-50M/PLQ-50CSM/PLQ-50CSK User’s Guide
The printer is not connected directly to your
computer.
The printer driver is not installed correctly. Check that the printer driver is installed properly. If necessary,
Paper is jammed or the ribbon or guard
mechanism is stuck.
The printer is hung-up (stopping in abnormal
situations).
The cable used in the WNI4915 mode is not the
one shipped with the printer.
The printer does not print when the computer sends data.
Cause What to do
The printer is paused.
The interface cable is not plugged in securely. Check that both ends of the cable between the printer and the
When you use a printer changer, printer buffer, or a extension
cable, the printer does not print correctly due to the combination
of these devices. Make sure that the printer works correctly when it
is connected to your computer without these devices.
reinstall the printer driver.
Turn the printer off, open the printer cover and remove the
jammed paper or things that are stuck. To eject the jammed paper,
see “Clearing a Paper Jam” on page 58.
Turn the printer off and wait for a while. Then, turn the printer on
again, and start printing.
Ensure that the correct dedicated cable is always used.
Press the Offline button to turn off the Power light.
computer are plugged in securely. If the cable is connected
correctly, run a self-test as described in “Printing a Self Test” on
page 60.
Your interface cable does not meet the printer
and/or computer specifications.
Your software is not properly set up for your
printer.
The printer makes noise, but nothing prints or printing stops abruptly.
Cause What to do
The ribbon has too much slack, the ribbon has
come loose, or the ribbon cartridge is not installed
properly.
The printout is pale.
Cause What to do
The ribbon is worn out. Replace the ribbon cartridge as described in “Replacing the ribbon
The printout is faint.
Use an interface cable that meets the requirements of both the
printer and computer. See “Electronic” on page 71 and your
computer documentation.
Select your printer from the Windows desktop or in your
application. If necessary, install or reinstall the printer driver
software.
Remove any slack in the ribbon by turning the ribbon-tightening
knob, or reinstall the ribbon cartridge as described in the section
under “Replacing the ribbon cartridge” on page 39.
cartridge” on page 39.
Troubleshooting 54
Page 55

PLQ-50/PLQ-50CS/PLQ-50M/PLQ-50CSM/PLQ-50CSK User’s Guide
Cause What to do
The ribbon is worn out. Replace the ribbon cartridge as described in “Replacing the ribbon
cartridge” on page 39.
Part of the printout is missing, or dots are missing in random positions.
Cause What to do
The ribbon has too much slack, the ribbon has
come loose, or the ribbon cartridge is not installed
properly.
The ribbon is worn out. Replace the ribbon cartridge as described in “Replacing the ribbon
Lines of dots are missing in the printout.
Cause What to do
The print head is damaged. Print the current settings in the default setting mode and check the
Caution:
Never replace the print head yourself; you may damage the printer. Also, other parts of the printer must be checked when
the print head is replaced.
All the text is printed on the same line.
Cause What to do
No line feed command is sent at the end of each
line of text.
Remove any slack in the ribbon by turning the ribbon-tightening
knob, or reinstall the ribbon cartridge as described in “Replacing
the ribbon cartridge” on page 39.
cartridge” on page 39.
pin condition. See “Printing Your Printer’s Current Settings” on
page 49 to see how to print them.
If some pins are broken, stop printing and contact your dealer to
have the print head replaced.
Set the Auto Line Feed setting to On in the default setting mode
so that the printer automatically adds a line feed code to each
carriage return. Contact your administrator for help.
The printout has extra blank lines between lines of text.
Cause What to do
Two line feed commands are being sent at the end
of each lin e of text, becau se the print er’s a uto li ne
feed setting is on.
The line space setting in your application software
is incorrect.
The printer prints strange symbols, incorrect fonts, or other inappropriate characters.
Cause What to do
Set the Auto Line Feed setting to Off in the default setting mode.
Contact your administrator for help.
Adjust the line space setting in your application software.
Troubleshooting 55
Page 56

PLQ-50/PLQ-50CS/PLQ-50M/PLQ-50CSM/PLQ-50CSK User’s Guide
Your printer and computer are not
communicating correctly.
The wrong character table is selected in your
software.
The printer you want to use is not selected in your
software.
Your application software is not configured
correctly for your printer.
Software settings override settings you make
using the default setting mode or the control
panel buttons.
Vertical printed lines are not aligned.
Cause What to do
Bidirectional printing, which is the printer’s
standard printing mode, is out of alignment.
Make sure that you use the correct interface cable and that the
communications protocol is correct. See “Electronic” on page 71
and your computer documentation.
Select the correct character table using your software or the
default setting mode. The character table setting in your software
overrides settings made in the default setting mode. Contact your
administrator for help.
Choose the correct printer from the Windows desktop or in your
application before printing.
Make sure that your application software is configured correctly
for your printer. See your application documentation. If necessary,
install or reinstall the printer driver software.
Use your application software to select the font.
Use the printer’s bidirectional adjustment mode to correct this
problem. Contact your administrator for help.
Printing position problems
Your printing appears too high or low on the page.
Cause What to do
The paper size setting in your application software
or printer driver does not match the size of the
paper you are using.
The top margin or top-of-form position setting is
incorrect.
The printer driver settings you want to use are not
selected in your software.
Check the paper size setting in your application or printer driver.
Check and adjust the margin or top-of-form position settings in
your application software. For information about recommended
printable area, refer to the “Paper/Media” on page 75.
You can also adjust the top-of-form position using the Micro
Adjust function. However, settings made in Windows applications
override settings made in the Micro Adjust mode. Contact your
administrator for help.
Choose the correct printer driver setting from the Windows
desktop or in your application before printing.
Troubleshooting 56
Page 57

Scanning
Scan quality problem
Scanned image have streaks or it is dirty.
Cause What to do
Glass surface of the scanner is dirty. Clean it with a soft dry lint-free cloth.
Paper Handling
PLQ-50/PLQ-50CS/PLQ-50M/PLQ-50CSM/PLQ-50CSK User’s Guide
If the glass surface is stained with grease or some other
hard-to-remove material, use a small amount of glass cleaner with
a soft cloth to remove it. Wipe off all remaining liquid. See
“Cleaning the Scanner Glass (for Scanning Models Only)” on
page 46 for details.
Paper loading or feeding problems
The printer does not load single-sheet paper or does not feed it properly.
Cause What to do
Single-sheet paper is not loaded properly. See “Loading Single Sheets” on page 24 for instructions on loading
Paper is creased, old, too thin, or too thick. See the “Paper/Media” on page 75 for information about the
The printer does not fully eject a single sheet.
Cause What to do
Paper is too long. When the printer is in the PR2 mode, see “Clearing a Paper Jam” on
The printer does not load passbook or does not feed it properly.
single-sheet paper.
printable paper and use new, clean sheets of paper.
page 58 for instructions on ejecting paper. When you are in the
WNI4915 or EPSON Mode, press the F1/Eject button. When you
are in IBM4722 mode, press the Offline button and then the F1/
Eject button. Make sure the page length of your paper is within the
range specified for single-sheet paper in “Paper/Media” on
page 75. Also check and adjust the paper size setting in your
application or printer driver. Contact your administrator for help.
Cause What to do
Troubleshooting 57
Page 58

PLQ-50/PLQ-50CS/PLQ-50M/PLQ-50CSM/PLQ-50CSK User’s Guide
Passbook is not loaded properly. See “Loading Passbooks” on page 23 for instructions on loading
passbooks.
Clearing a Paper Jam
If paper is not automatically ejected in the situations noted below, a paper jam may have occurred
inside the printer.
❏ When anything except for PR2 is selected as the Software or Software2 while Dual is selected as the
I/F Mode in Olivetti Mode, press the Offline button and then the F1/Eject button.
❏ Press the F1/Eject button in EPSON Mode.
❏ When Dual is selected as the I/F Mode in Wincor Nixdorf Mode or IBM Mode, press the Offline
button and then the F1/Eject button.
Follow the steps noted below to clear the paper jam.
Warning:
!
If you have just used the printer, the print head may be hot; let it cool for a few minutes before
touching it.
Caution:
!
Do not touch the white cable inside the printer.
1. Turn off the printer.
Caution:
!
Whenever you turn off the printer, wait at least five seconds before turning it back on;
otherwise you may damage the printer.
Troubleshooting 58
Page 59

PLQ-50/PLQ-50CS/PLQ-50M/PLQ-50CSM/PLQ-50CSK User’s Guide
2. Open the cover and press the release lever to move the upper mechanism. Then hold the jammed
paper with both hands and pull it out of the printer. If you can clear the paper jam, move the upper
mechanism to its original position by pulling the release lever and then close the printer cover. If it
is difficult to do so, go to the next step.
Caution:
!
Make sure that you move the upper mechanism by pulling the release lever. Do not pull the
mechanism by hand. It may damage the printer.
3. Turn on the printer while pressing the F1/Eject button. The printer is in the paper removing mode
and ready to start feed operations. See the table below to find out how the F1/Eject and Offline
buttons work in this mode and execute the appropriate operation.
Paper removing mode operation
Situation Button Operation
Paper jams when feeding
paper
Paper jams when ejecting
paper to the front
F1/Eject
Offline
Press to feed paper to the front a few lines every time you press
the button.
Hold for a few seconds to eject paper to the front.
Press to feed paper to the back a few lines every time you press
the button.
Hold for a few seconds to eject paper to the rear.
Troubleshooting 59
Page 60

PLQ-50/PLQ-50CS/PLQ-50M/PLQ-50CSM/PLQ-50CSK User’s Guide
If you can clear the paper jam, turn off the printer, move the upper mechanism to its original
position by pulling the release lever, and then close the printer cover to finish the operation. If you
cannot clear the paper jam with this function, stop the operation and contact your administrator.
Caution:
!
Make sure that you move the upper mechanism by pulling the release lever. Do not pull the
mechanism by hand. It may damage the printer.
Printing a Self Test
Running the printer’s self test helps you determine whether the printer or the computer is causing the
problem:
❏ If the self test results are satisfactory, the printer is working properly and the problem is probably
caused by your printer driver settings, application settings, computer, or interface cable. (Be sure
to use a shielded interface cable.)
❏ If the self test does not print properly, there is a problem with the printer. See “Problems and
Solutions” on page 53 for possible causes and solutions to the problem.
Note:
❏ Prepare an A4 size sheet of paper before entering the self-test printing mode.
❏ Always close the printer cover before printing. The printer does not print when the printer cover is
open.
Follow these steps to perform a self test:
1. Turn off the printer.
Caution:
!
Whenever you turn off the printer, wait at least five seconds before turning it back on;
otherwise you may damage the printer.
2. Turn on the printer while holding the F2 button. Then press the F1/Eject and F2 button while the
F1/Eject, Offline, and F2 lights are flashing.
Self test screens are only displayed on LCD models. Follow the on-screen instructions.
3. When the Ready light turns on, insert a sheet of A4 paper into the front slot.
Troubleshooting 60
Page 61

PLQ-50/PLQ-50CS/PLQ-50M/PLQ-50CSM/PLQ-50CSK User’s Guide
4. The printer prints the self-test pattern in the font selected in the default setting mode.
Note:
To stop the self-test temporarily, press the Offline button. To resume the test, press the Offline
button again.
Caution:
!
Do not turn off the printer while it is printing the self-test. Always press the Offline button to
pause printing. Then turn off the printer.
Troubleshooting 61
Page 62

PLQ-50/PLQ-50CS/PLQ-50M/PLQ-50CSM/PLQ-50CSK User’s Guide
Chapter 6
Where To Get Help
Technical Support Web Site
If you need further help, visit the Epson support website shown below. Select your country or region
and go to the support section of your local Epson website. The latest drivers, FAQs, manuals, or other
downloadables are also available from the site.
http://support.epson.net/
http://www.epson.eu/Support (Europe)
If your Epson product is not operating properly and you cannot solve the problem, contact Epson
support services for assistance.
Contacting Customer Support
Before Contacting Epson
If your Epson product is not operating properly and you cannot solve the problem using the
troubleshooting information in your product documentation, contact customer support services for
assistance. If customer support for your area is not listed below, contact the dealer where you
purchased your product.
Epson support will be able to help you much more quickly if you give them the following information:
❏ Product serial number
(The serial number label is usually on the back of the product.)
❏ Product model
❏ Product software version
(Click About, Version Info, or similar button in the product software.)
❏ Brand and model of your computer
❏ Your computer operating system name and version
Where To Get Help 62
Page 63

PLQ-50/PLQ-50CS/PLQ-50M/PLQ-50CSM/PLQ-50CSK User’s Guide
❏ Names and versions of the software applications you normally use with your product
Help for Users in Europe
Check your Pan-European Warranty Document for information on how to contact Epson
Customer support.
Help for Users in Singapore
Sources of information, support, and services available from Epson Singapore are:
World Wide Web (http://www.epson.com.sg)
Information on product specifications, drivers for download, Frequently Asked Questions (FAQ),
Sales Enquiries, and Technical Support via e-mail are available.
Help for Users in Thailand
Contact for information, support, and services are:
World Wide Web (http://www.epson.co.th)
Information on product specifications, drivers for download, Frequently Asked Questions (FAQ),
and e-mail are available.
Help for Users in Vietnam
Contacts for information, support, and services are:
Epson Service Center
65 Truong Dinh Street, District 1, Hochiminh City, Vietnam.
Phone(Ho Chi Minh City): 84-8-3823-9239, 84-8-3825-6234
29 Tue Tinh, Quan Hai Ba Trung, Hanoi City, Vietnam.
Phone(Hanoi City): 84-4-3978-4785, 84-4-3978-4775
Where To Get Help 63
Page 64

PLQ-50/PLQ-50CS/PLQ-50M/PLQ-50CSM/PLQ-50CSK User’s Guide
Help for Users in Indonesia
Contacts for information, support, and services are:
World Wide Web
http://www.epson.co.id
❏ Information on product specifications, drivers for download
❏ Frequently Asked Questions (FAQ), Sales Enquiries, questions through e-mail
Epson Hotline
Phone: +62-1500-766
Fax: +62-21-808-66-799
Our Hotline team can help you with the following over the phone or fax:
❏ Sales enquiries and product information
❏ Technical support
Epson Service Center
Province Company Name Address Phone
DKI JAKARTA ESS JAKARTA
MANGGADUA
NORTH
SUMATERA
DI
YOGYAKARTA
ESC MEDAN Jl. Bambu 2 Komplek Graha Niaga
ESC
YOGYAKARTA
Ruko Mall Mangga Dua No. 48 Jl. Arteri
Mangga Dua, Jakarta Utara - DKI
JAKARTA
Nomor A-4, Medan - North Sumatera
YAP Square, Block A No. 6 Jl. C
Simanjutak Yogyakarta - DIY
E-mail
(+6221) 62301104
jkt-admin@epson-indonesia.co.i
d
(+6222) 4207033
bdg-admin@epson-indonesia.c
o.id
(+62274) 581065
ygy-admin@epson-indonesia.co
.id
EAST JAWA ESC SURABAYA Hitech Mall Lt. 2 Block A No. 24 Jl.
Kusuma Bangsa No. 116 - 118 Surabaya
- JATIM
(+6231) 5355035
sby-admin@epson-indonesia.co
.id
Where To Get Help 64
Page 65
PLQ-50/PLQ-50CS/PLQ-50M/PLQ-50CSM/PLQ-50CSK User’s Guide
SOUTH
SULAWESI
WEST
KALIMANTAN
RIAU ESC PEKANBARU Jl. Tuanku Tambusai No.459A
DKI JAKARTA ESS JAKARTA
EAST JAWA ESS SURABAYA Ruko Surya Inti Jl. Jawa No 2-4 Kav. 29
BANTEN ESS SERPONG Ruko Mall WTC Matahari No. 953,
CENTRAL
JAWA
ESC MAKASSAR Jl. Cendrawasih NO. 3A, kunjung mae,
mariso, MAKASSAR - SULSEL 90125
ESC PONTIANAK Komp. A yani Sentra Bisnis G33, Jl.
Ahmad Yani - Pontianak Kalimantan
Barat
Pekanbaru Riau
Wisma Keiai Lt. 1 Jl. Jenderal Sudirman
SUDIRMAN
ESS SEMARANG Komplek Ruko Metro Plaza Block C20 Jl.
Kav.3 Jakarta Pusat - DKI JAKARTA
10220
Surabaya - Jawa Timur
Serpong-Banten
MT Haryono No 970 Semarang - JAWA
TENGAH
(+62411) 8911071
mksr-admin@epson-indonesia.c
o.id
(+62561) 735507 / 767049
pontianak-admin@epson-indon
esia.co.id
(+62761) 8524695
pkb-admin@epson-indonesia.c
o.id
(+6221) 5724335
ess@epson-indonesia.co.id
(+6231) 5014949
esssby@epson-indonesia.co.id
(+6221) 53167051 / 53167052
esstag@epson-indonesia.co.id
(+6224) 8313807 / 8417935
esssmg@epson-indonesia.co.id
EAST
KALIMANTAN
SOUTH
SUMATERA
EAST JAVA ESC JEMBER JL. Panglima Besar Sudirman Ruko no.
NORTH
SULAWESI
ESC SAMARINDA Jl. KH. Wahid Hasyim (M. Yamin)
Kelurahan Sempaja Selatan
Kecamatan Samarinda UTARA SAMARINDA - KALTIM
ESC PALEMBANG Jl. H.M Rasyid Nawawi No. 249
Kelurahan 9 Ilir Palembang Sumatera
Selatan
1D Jember-Jawa Timur (Depan Balai
Penelitian & Pengolahan Kakao)
ESC MANADO Tekno Megamall Lt LG 11 TK 21,
Kawasan Megamas Boulevard, Jl Piere
Tendean, Manado - SULUT 95111
For other cities not listed here, call the Hot Line: 08071137766.
(+62541) 7272904
escsmd@epson-indonesia.co.id
(+62711) 311330
escplg@epson-indonesia.co.id
(+62331) 488373 / 486468
jmr-admin@epson-indonesia.co
.id
(+62431) 8890996
MND-ADMIN@EPSON-INDONES
IA.CO.ID
Where To Get Help 65
Page 66

PLQ-50/PLQ-50CS/PLQ-50M/PLQ-50CSM/PLQ-50CSK User’s Guide
Help for Users in Malaysia
Contacts for information, support, and services are:
World Wide Web (http://www.epson.com.my)
❏ Information on product specifications, drivers for download
❏ Frequently Asked Questions (FAQ), Sales Enquiries, questions through e-mail
Epson Call Center
Phone: +60 1800-8-17349
❏ Sales enquiries and product information
❏ Product usage questions or problems
❏ Enquiries on repair services and warranty
Head Office
Phone: 603-56288288
Fax: 603-5628 8388/603-5621 2088
Help for Users in India
Contacts for information, support, and services are:
World Wide Web (http://www.epson.co.in)
Information on product specifications, drivers for download, and products enquiry are available.
Helpline
❏ Service, product information, and ordering consumables (BSNL Lines)
Toll-free number: 18004250011
Accessible 9am to 6pm, Monday through Saturday (Except public holidays)
❏ Service (CDMA & Mobile Users)
Where To Get Help 66
Page 67

PLQ-50/PLQ-50CS/PLQ-50M/PLQ-50CSM/PLQ-50CSK User’s Guide
Toll-free number: 186030001600
Accessible 9am to 6pm, Monday through Saturday (Except public holidays)
Help for Users in the Philippines
T o o bt ai n t ech ni ca l s up po rt a s w el l a s o th e r a ft er sales services, users are welcome to contact the Epson
Philippines Corporation.
World Wide Web (http://www.epson.com.ph)
Information on product specifications, drivers for download, Frequently Asked Questions (FAQ),
and E-mail Enquiries are available.
Where To Get Help 67
Page 68

PLQ-50/PLQ-50CS/PLQ-50M/PLQ-50CSM/PLQ-50CSK User’s Guide
Chapter 7
Product Information
Printer Specifications
System Requirements
Windows 10 (32-bit, 64-bit)/Windows 8.1 (32-bit, 64-bit)/Windows 8 (32-bit, 64-bit)/Windows 7
(32-bit, 64-bit)/Windows Vista (32-bit, 64-bit)/Windows XP SP3 or later (32-bit)/Windows XP
Professional x64 Edition SP2 or later/Windows Server 2019/Windows Server 2016/Windows Server
2012 R2/Windows Server 2012/Windows Server 2008 R2/Windows Server 2008/Windows Server
2003 R2/Windows Server 2003 SP2 or later
Mechanical
Printing method: 24-pin impact dot matrix
Printing speed: PR2:
Ultra speed draft 630 cps at 10 cpi
High speed draft 560 cps at 10 cpi
Draft 420 cps at 10 cpi
NLQ 210 cps at 10 cpi
LQ 140 cps at 10 cpi
ESC/P2 + ESC/MC:
Ultra speed draft 630 cps at 10 cpi
High speed draft 560 cps at 10 cpi
Draft 420 cps at 10 cpi
LQ 140 cps at 10 cpi
Product Information 68
Page 69

PLQ-50/PLQ-50CS/PLQ-50M/PLQ-50CSM/PLQ-50CSK User’s Guide
Printing direction: Bidirectional logic seeking for text and graphics printing. Uni‐
directional text or graphics printing can be selected using soft‐
ware commands.
Line spacing: 1/6 inch
PR2:
Programmable in increments of 1/240 inch or 1/216 inch
WNI4915, ESC/P2, ESC/P2+ESC/MC:
Programmable in increments of 1/360 inch
IBM4722, IBM PPDS:
Programmable in increments of 1/216 or 1/180 inch
Printable columns: 94 columns (at 10 cpi)
Resolution:
Maximum 360 × 180 dpi (letter quality)
Paper feed methods: Friction (front)
Reliability: Total print volume 7 million lines
(except print head)
Print head life 600 million strokes/wire
MSRW Head 7 hundred thousand strokes
(Magnetic stripes reading and
writing models only.)
Dimensions and weight: Width 384 mm (15.1 inches)
Depth 280 mm (11.0 inches)
Height 203 mm (8.0 inches)
Product Information 69
Page 70

PLQ-50/PLQ-50CS/PLQ-50M/PLQ-50CSM/PLQ-50CSK User’s Guide
Weight approx. 7.9 kg (17.4 lb)
(PLQ-50)
approx. 8.9 kg (19.6 lb)
(PLQ-50M)
approx. 8.1 kg (17.9 lb)
(PLQ-50CS)
approx. 9.1 kg (20.1 lb)
(PLQ-50CSM)
approx. 8.0 kg (17.6 lb)
(PLQ-50CSK)
Ribbon: Black ribbon cartridge S015339
Ribbon life approx. 5 million characters (LQ,
10 cpi, 48 dots/character)
Acoustic noise:
Printing on A4 paper PLQ-50/PLQ-50CS/
PLQ-50CSK
PLQ-50M/PLQ-50CSM Approx. 58 dB (A) (ISO 7779
Printing on passbook PLQ-50/PLQ-50CS/
PLQ-50CSK
PLQ-50M/PLQ-50CSM Approx. 55 dB (A) (ISO 7779
approx. 10 million characters
(Draft, 10 cpi, 24 dots/character)
Approx. 55 dB (A) (ISO 7779
pattern)
pattern)
Approx. 52 dB (A) (ISO 7779
pattern)
pattern)
Product Information 70
Page 71

Electronic
Interfaces: Three built-in interface slots;
Bidirectional, 8-bit, parallel interface with IEEE 1284 nibble mode support,
USB (ver 2.0) interface,
EIA-232D Serial interface
Buffer: 128KB
Fonts: PR2 emulation
Bitmap fonts:
EPSON Super Draft 10 cpi, proportional
EPSON Draft 10 cpi, proportional
EPSON Roman 10, 12, 15 cpi, proportional
EPSON Sans Serif 10 cpi, proportional
EPSON OCR-B 10 cpi
PLQ-50/PLQ-50CS/PLQ-50M/PLQ-50CSM/PLQ-50CSK User’s Guide
Scalable fonts:
Not supported
Bar code fonts:
EAN-13, EAN-8, Interleaved 2 of 5, UPC-A, UPC-E, Code 39, Coda
bar (NW-7), Industrial 2 of 5
WNI4915, ESC/P2, IBM PPDS, ESC/P2+ESC/MC emulations
Bitmap fonts:
EPSON Draft 10, 12, 15 cpi
EPSON Roman 10, 12, 15 cpi, proportional
EPSON Sans Serif 10, 12, 15 cpi, proportional
EPSON Courier 10, 12, 15 cpi
EPSON Prestige 10, 12 cpi
EPSON Script 10 cpi
EPSON OCR-B 10 cpi
EPSON Orator 10 cpi
EPSON Orator-S 10 cpi
EPSON Script C proportional
Product Information 71
Page 72

Scalable fonts:
EPSON Roman 10.5 pt., 8-32 pt. (every 2 pt.)
EPSON Sans Serif 10.5 pt., 8-32 pt. (every 2 pt.)
EPSON Roman T 10.5 pt., 8-32 pt. (every 2 pt.)
EPSON Sans Serif H 10.5 pt., 8-32 pt. (every 2 pt.)
Bar code fonts:
EAN-13, EAN-8, Interleaved 2 of 5, UPC-A, UPC-E, Code 39, Code
128, POSTNET
IBM4722 emulation
Bitmap fonts:
EPSON Draft 10 cpi
EPSON Roman 10, 12, 15 cpi
EPSON Sans Serif 10, 12, 15 cpi
EPSON Courier 10, 12, 15 cpi
EPSON Prestige 10, 12 cpi
EPSON OCR-B 10 cpi
PLQ-50/PLQ-50CS/PLQ-50M/PLQ-50CSM/PLQ-50CSK User’s Guide
Character
tables:
Scalable fonts:
Not supported
Bar code fonts:
Not supported
PR2 emulation
ASCII
(Olivetti) 22 graphics character tables:
International, Germany, Portugal, Spain 1, Denmark/Norway,
France, Italy, Sweden/Finland, Switzerland, Great Britain, USA
ASCII, Greece, Israel, Spain 2, USSR, Yugoslavia, Olivetti TCV 370,
Canada, SDC, Turkey, Arabic, CIBC
Product Information 72
Page 73

PLQ-50/PLQ-50CS/PLQ-50M/PLQ-50CSM/PLQ-50CSK User’s Guide
(ISO) 9 graphics character tables:
ISO 8859-1 Latin 1, ISO 8859-9 Latin 5, ISO 8859-2 Latin 2, ISO
8859-5 Cyrillic, ISO 8859-15, ISO 8859-6 Latin Arabic, ISO 8859-7
Greek, ISO 8859-8 Hebrew, OLI-UNIX
(PC) 19 graphics character tables:
PC-437 International, PC-220 Spain 2, PC-865 Nordic,
PC-Denmark/Norway, PC-Denmark OPE, PC-860 Portugal, PC-863
Canadian French, PC-850 Latin 1, PC-858 Latin Euro, PC-857
Turkish Latin 5, PC-852 Latin 2, PC-851 Greek, PC-210 Greek,
PC-855 Cyrillic, PC-862 Israel, PC-864 Arabic, PC-866 Cyrillic,
PC-1252 PC-WIN Latin 1, PC-1250 PC-WIN Latin 2
WNI4915 emulation
ASCII One Italic and 8 graphics character tables:
Italic table,
PC 437 (US, Standard Europe), PC 850 (Multilingual), ISO 8859-2,
ISO 8859-5, ISO 8859-7, ISO 8859-8, ISO 8859-9, ISO 8859-15
IBM4722 emulation
ASCII 35 graphics character tables:
CP 437 (Standard), CP808 (Russian), CP813 (Greek), CP819 (Latin
1), CP850 (US Multilingual), CP851 (Greek), CP852 (Latin 2), CP855
(Cyrillic 1), CP857 (Turkish Latin 5), CP858 (Multilingual), CP860
(Portuguese), CP862 (Hebrew), CP863 (Canadian French), CP864
(Arabic), CP865 (Nordic), CP866 (Russian :Cyrillic 2), CP867
(Hebrew), CP869 (Greek), CP872 (Cyrillic 1), CP874 (Thai with TIS
extended), CP876 (OCR A), CP877 (OCR B), CP912 (Latin 2), CP913
(Latin 3), CP915 (Cyrillic), CP916 (Hebrew), CP920 (Latin
5 :Turkey), CP923 (Latin 9 :Latin 1 with Euro), CP1161 (Thai),
CP1250 (Latin 2), CP1251 (Cyrillic), CP1252 (Latin 1), CP1253
(Greek), CP1254 (Turkish), CP1257 (Baltic Rim)
ESC/P2, IBM PPDS, and ESC/P2+ESC/MC emulations
Product Information 73
Page 74

PLQ-50/PLQ-50CS/PLQ-50M/PLQ-50CSM/PLQ-50CSK User’s Guide
Character
sets:
Electrical
ASCII
(Expanded
European
model
only)
One italic and 39 graphics character tables:
Italic table, PC437 (US, Standard Europe), PC850 (Multilingual),
PC437 Greek, PC853 (Turkish), PC855 (Cyrillic), PC852 (East
Europe), PC857 (Turkish), PC866 (Russian), PC869 (Greek),
MAZOWIA (Poland), Code MJK (CSFR), ISO 8859-7 (Latin/Greek),
ISO Latin 1T (Turkish), Bulgaria (Bulgarian),
PC 774 (LST 1283:1993), Estonia (Estonia), ISO 8859-2, PC 866 LAT.
(Latvian), PC 866 UKR (Ukraina), PC860 (Portuguese), PC861
(Icelandic), PC865 (Nordic), PC864 (Arabic), PC APTEC (Arabic),
PC 708 (Arabic), PC 720 (Arabic), PCAR864 (Arabic),
PC863 (Canadian-French), BRASCII, Abicomp, Roman 8, ISO Latin
1, PC858, ISO 8859-15, PC771 (Lithuania), PC437 Slovenia, PC MC,
PC1250, PC1251, KZ 1048
14 international character sets and one legal character set:
USA, France, Germany, UK, Denmark I, Sweden, Italy, Spain I, Japan, Norway,
Denmark II, Spain II, Latin America, Korea, Legal
100 - 240 V Model 220 - 240 V Model
Rated voltage range AC 100 - 240 V AC 220 - 240 V
Input voltage range AC 90 - 264 V AC 165-264 V
Rated frequency range 50 - 60 Hz
Input frequency range 49.5 - 60.5 Hz
Rated current 2.0 - 1.0 A (maximum 5.0 - 1.9 A depending
on the character type)
1.0 A (maximum 2.6 A depending on the
character type)
Product Information 74
Page 75

PLQ-50/PLQ-50CS/PLQ-50M/PLQ-50CSM/PLQ-50CSK User’s Guide
100 - 240 V Model 220 - 240 V Model
Power consumption
(USB connection)
*
When the configured time passes in the following condition, the printer enters sleep mode.
- not error.
- There is no data in input buffer.
AC 100 - 120 V:
Approx. 78 W (ISO/IEC 10561 letter
pattern)
Approx. 16.2 W in ready mode
Approx. 0.7 W in sleep mode
0.1 W in power-off
AC 220 - 240 V:
Approx. 78 W (ISO/IEC 10561 letter
pattern)
Approx. 16.3 W in ready mode
Approx. 0.8 W in sleep mode
0.1 W in power-off
*
*
Note:
Check the label on the back of the printer for the voltage of your printer.
Environmental
Approx. 77 W (ISO/IEC 10561 letter
pattern)
Approx. 16.6 W in ready mode
Approx. 0.8 W in sleep mode
0.1 W in power-off
*
Temperature Humidity
(without condensation)
Operation (passbook, plain paper,
recycled paper, and multipart
forms)
Storage -30 to 60 ˚C (-22 to 140 ˚F) 0 to 85 % RH
5 to 38 ˚C (41 to 100.4˚F) 10 to 85 % RH
Paper/Media
Available Paper
Note:
❏ Use passbooks, plain paper, recycled paper, and multipart forms under the temperature and
humidity conditions described below:
Temperature: 5 to 38 ˚C (41 to 100.4 ˚F)
Humidity: 10 to 85 % RH
❏ Use passbooks and paper that have more than 60% reflectance.
Product Information 75
Page 76
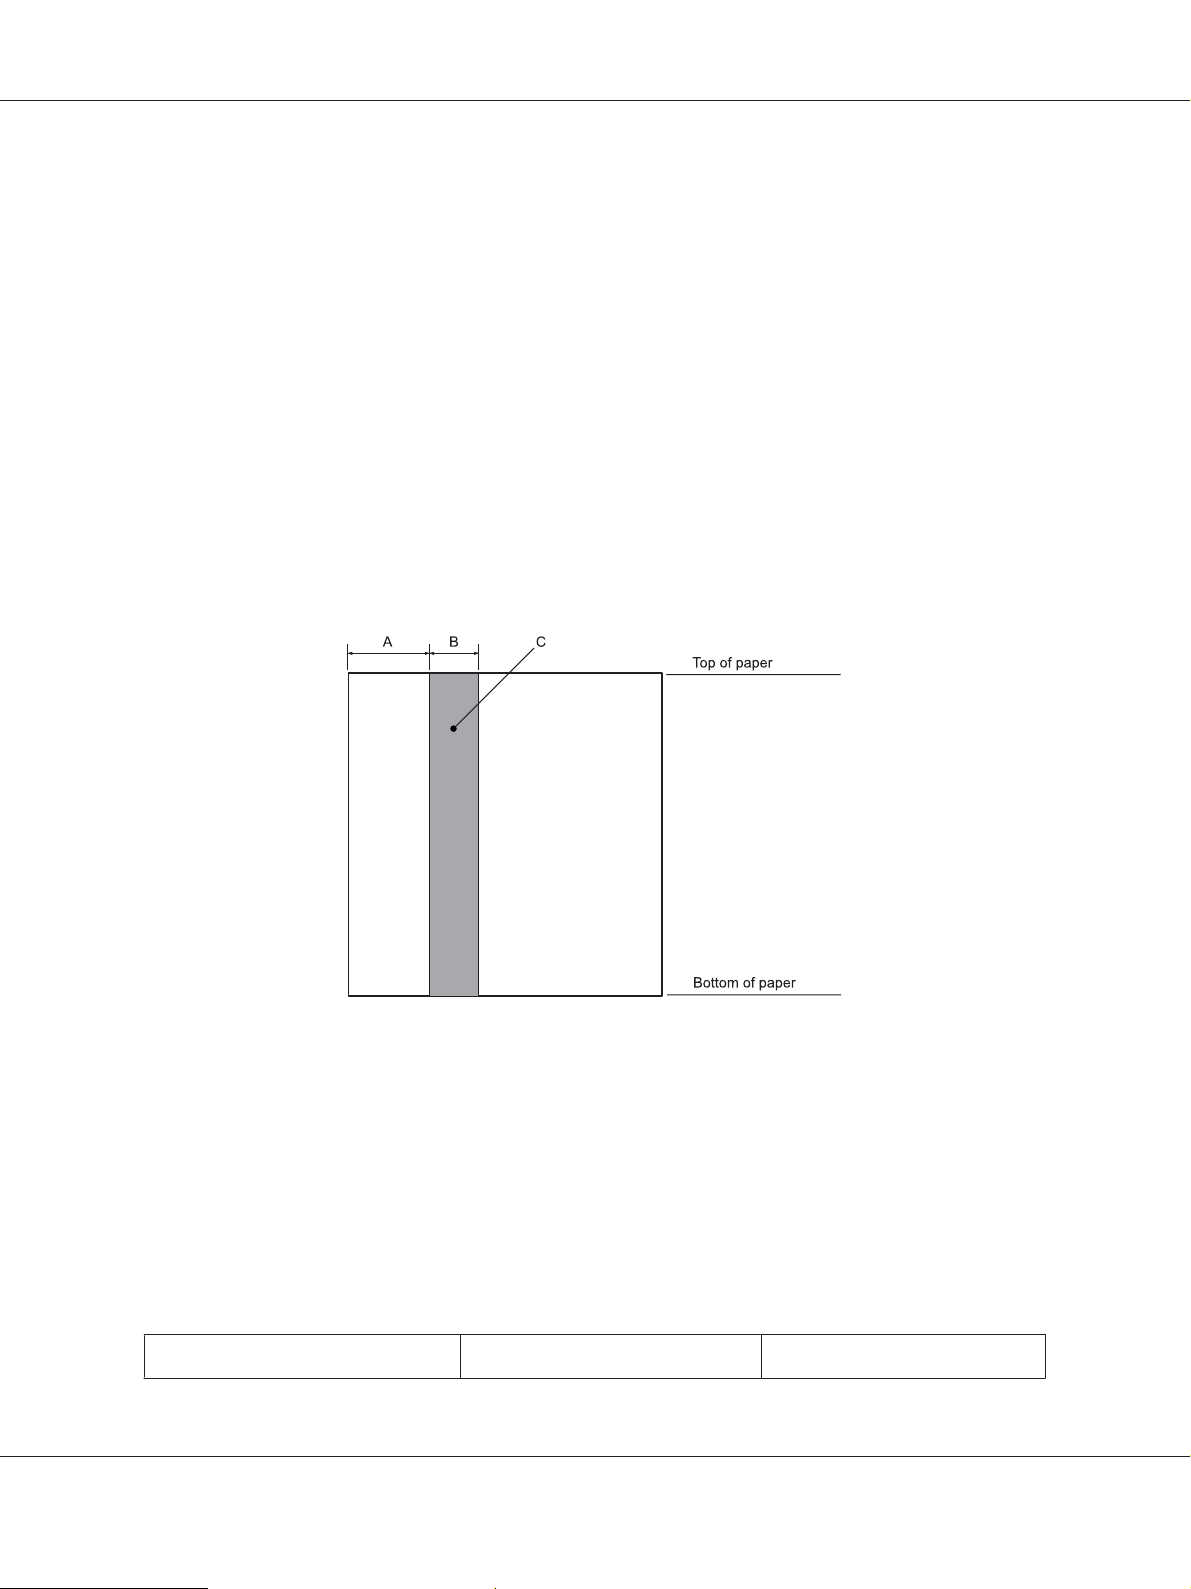
PLQ-50/PLQ-50CS/PLQ-50M/PLQ-50CSM/PLQ-50CSK User’s Guide
❏ Do not load passbooks that are creased or have ripped seams.
❏ Do not use a passbook that has metallic parts such as staplers or metal clips.
❏ Do not use a passbook with sticky parts such as stamps or seals.
❏ Do not use a passbook that has any pages smaller than the cover page.
❏ Do not print on the front or back cover of a passbook. Printing can be done only when the passbook is
opened.
❏ When you use paper that is shorter than 110.0 mm, set the paper eject direction to front. The factory
set default is front. Please access http://www.epson.com for information.
❏ Do not load paper that is curled, folded, or crumpled.
❏ Do not punch holes in the area from 25.0 to 40.0 mm from the left edge of paper. See the illustration
below.
A25.0 mm
B15.0 mm
C Do not punch holes in this area.
❏ When using the printer driver, the minimum achievable top and bottom margins are 1.0 mm (0.04
inch) and 9.0 mm (0.36 inch) respectively.
Passbook
Horizontal-fold Vertical-fold
Product Information 76
Page 77

PLQ-50/PLQ-50CS/PLQ-50M/PLQ-50CSM/PLQ-50CSK User’s Guide
Minimum Maximum Minimum Maximum
Width (mm)
(inch)
Length (mm)
(inch)
Thickness of cover
page
Thickness of each page (mm)
Weight
Quality Plain paper
(mm)
(inch)
(inch)
(g/m
(lb)
2
)
110
4.33
127
5.0
0.2
0.008
0.1
0.004
95
25
Thickness of passbook
241.3
9.5
220
8.66
0.5
0.025
0.15
0.006
116
31
110
4.33
85
3.35
0.2
0.008
0.1
0.004
95
25
241.3
9.5
220
8.66
0.5
0.02
0.15
0.006
116
31
ALess than 1.5 mm
B 0.1 ~ 0.15 mm
CLess than 0.6 mm
D 0.2 ~ 0.5 mm
ELess than 2.0 mm
Fprintable side
G Do not print on this side.
Product Information 77
Page 78

Degree of passbook
ALess than 0.3 mm
B R2 ~ 5 mm
CLess than 0.3 mm
PLQ-50/PLQ-50CS/PLQ-50M/PLQ-50CSM/PLQ-50CSK User’s Guide
Product Information 78
Page 79

Magnetic stripe position
PLQ-50/PLQ-50CS/PLQ-50M/PLQ-50CSM/PLQ-50CSK User’s Guide
A Magnetic stripe minimum area
B Seam or Right edge
Single sheets
Width (mm)
(inch)
Length (mm)
(inch)
Front Ejection Rear Ejection
Minimum Maximum Minimum Maximum
65
2.6
67
2.64
245
9.6
297/(450)*
11.69/(17.72)*
65
2.6
142
5.59
245
9.6
297/(450)*
11.69/(17.72)*
Product Information 79
Page 80

PLQ-50/PLQ-50CS/PLQ-50M/PLQ-50CSM/PLQ-50CSK User’s Guide
Thickness (mm)
(inch)
Weight
Quality Plain paper and recycled paper
*
Figures in ( ) are the maximum possible lengths.
(g/m
(lb)
2
)
Single-sheet multipart forms
Width (mm)
(inch)
Length (mm)
(inch)
Copies 1 original + 6 copies
Total thickness (mm)
(inch)
0.065
0.0025
52
14
Front Ejection Rear Ejection
Minimum Maximum Minimum Maximum
65
2.6
67
2.64
0.12
0.0047
0.19
0.0074
157
42
245
9.6
297
11.69
0.53
0.021
0.065
0.0025
52
14
65
2.6
142
5.59
0.12
0.0047
0.19
0.0074
157
42
245
9.6
297
11.69
0.53
0.021
Weight per sheet
of multipart
Quality Carbonless multipart forms with a line of glue at the top side or along one side of
(g/m
(lb)
2
)
Recommended printable area
Passbooks (horizontal-fold)
40
12
the form
58
15
40
12
58
15
Product Information 80
Page 81

PLQ-50/PLQ-50CS/PLQ-50M/PLQ-50CSM/PLQ-50CSK User’s Guide
A The minimum top margin of the upper page is 1.0 mm (0.04 inch).
B The minimum top margin of the lower page is 4.7 mm (0.19 inch).
C The minimum bottom margins of the upper and lower pages are 5.0 mm (0.2 inch).
D The minimum left and right margins are 3.0 mm (0.12 inch).
*Minimum of 2.54 mm (0.1 inch) for WNI4915 emulation.
Passbooks (vertical-fold)
A The minimum top margin is 1.0 mm (0.04 inch).
B The minimum bottom margin is 5.0 mm (0.2 inch).
C The minimum left and right margins inside the printable areas are 3.8 mm (0.15 inch).
D The minimum left and right margins outside the printable areas are 3.0 mm (0.12 inch).
*Minimum of 2.54 mm (0.1 inch) for WNI4915 emulation.
Product Information 81
Page 82

Single sheets (including multipart forms)
PLQ-50/PLQ-50CS/PLQ-50M/PLQ-50CSM/PLQ-50CSK User’s Guide
A The minimum top margin is 1.0 mm (0.04 inch).
B The minimum bottom margin is 3.1 mm (0.12 inch).
C The minimum left and right margins are 3 mm (0.12 inch).
*Minimum of 2.54 mm (0.1 inch) for WNI4915 emulation.
Magnetic stripe reader/writer (Magnetic stripe reading and writing models only)
The horizontal magnetic stripe reader/writer is used to read and write data on the magnetic stripe on
bank passbooks. See the following specifications of this device for details.
Note:
The magnetic stripe reader and writer is installed only horizontally.
Recording code BCD Binary Coded decimal, 4 data bits,
1 VRC parity control bit
Recordable characters column 3 of the ASCII table
Product Information 82
Page 83

PLQ-50/PLQ-50CS/PLQ-50M/PLQ-50CSM/PLQ-50CSK User’s Guide
Recordable formats IBM3604, DIN/ISO, ISO7811, IBM4746, ANSI, HT-2751-CIZ,
ISO8484
Recorded track width 9.7 mm
Read track width 1.1 mm
Speed of medium 340 mm/second
Number of retries 1 or 3
Field duplication YES or NO
Recordable area
Back Cover:
*: Magnetic stripe area
**: Recordable area
DIN/ISO, ANSI
IBM3604
ISO7811
IBM4746
ISO8484
F (max) G H (min) I J (max)
12.5 13.9 15.5 9.5 85
8.9 10.4 11.9 10.4 81.3
8.9 10.4 11.9 14.8 —
8.9 10.4 11.9 9.8 —
12.5 13.9 15.3 9.5 85
Product Information 83
Page 84

PLQ-50/PLQ-50CS/PLQ-50M/PLQ-50CSM/PLQ-50CSK User’s Guide
F (max) G H (min) I J (max)
HT-2751-CIZ
7.4 8.8 10.2 12.6 —
Recordable formats specification
PR2 emulation and ESC/P2+ESC/MC mode
DIN/ISO, ISO8484 IBM3604 ANSI
Bit density
Recording direction
Preamble
SOM (Start sentinel)
Recordable characters
EOM (End sentinel)
LRC Parity
Postamble
210 bpi ± 5% 210 bpi ± 5% 210 bpi ± 5%
Left to Right Left to Right Left to Right
20 bits 20 bits 20 bits
DB B
0-9, A, B, C, D, E 0-9, A, B, D, E 0-9, A, B, C, D, E
FF or CF
even even even
20 bits 20 bits 20 bits
Maximum number of
recordable characters
(1 block)
Maximum number of
recordable characters
(2 block)
Number of separator
Center of vertical position
Horizontal start position
(from the left edge)
Bit density
Recording direction
Preamble
SOM (Start sentinel)
105 characters 105 characters 105 characters
45 characters 45 characters 45 characters
60 bits 120 bits 60 bits
13.9 mm 10.4 mm 13.9 mm
9.5 mm 10.4 mm 9.5 mm
ISO7811 IBM4746 HT-2751-CIZ
75 bpi ± 5% 210 bpi ± 5% 105 bpi ± 5%
Left to Right Left to Right Right to Left
20 bits 20 bits 55 bits
BBAF
Product Information 84
Page 85

PLQ-50/PLQ-50CS/PLQ-50M/PLQ-50CSM/PLQ-50CSK User’s Guide
ISO7811 IBM4746 HT-2751-CIZ
Recordable characters
EOM (End sentinel)
LRC Parity
Postamble
Maximum number of
recordable characters
(1 block)
Maximum number of
recordable characters
(2 block)
Number of separator
Center of vertical position
Horizontal start position
(from the left edge)
WNI4915 emulation
0-9, A, D, E 0-9, D 0-9
FF or CF
even even odd
20 bits 20 bits 40 bits
37 characters 105 characters 60 characters
23 characters 45 characters 27 characters
120 bits 120 bits 10 bits
10.4 mm 10.4 mm 8.8 mm
14.8 mm 9.8 mm 12.6 mm
Bit density
Recording direction
Preamble
SOM (Start sentinel)
Recordable characters
EOM (End sentinel)
LRC Parity
Postamble
Maximum number of
recordable characters
(1 block)
Maximum number of
recordable characters
(2 block)
DIN IBM1 IBM2
210 bpi ± 5% 210 bpi ± 5% 210 bpi ± 5%
Left to Right Left to Right Left to Right
61 bits 61 bits 61 bits
DB B
0-9, A, B, C, D, E 0-9, A, B, D, E 0-9, A, B, D, E
FC F
even even even
64 bits 154 bits 154 bits
—— —
45 characters 36 characters 36 characters
Product Information 85
Page 86

PLQ-50/PLQ-50CS/PLQ-50M/PLQ-50CSM/PLQ-50CSK User’s Guide
DIN IBM1 IBM2
Number of separator
Center of vertical position
Horizontal start position
(from the left edge)
Bit density
Recording direction
Preamble
SOM (Start sentinel)
Recordable characters
EOM (End sentinel)
LRC Parity
Postamble
Maximum number of
recordable characters
(1 block)
60 bits 60 bits 60 bits
14.0 mm 11.0 mm 11.0 mm
14.8 mm 14.8 mm 14.8 mm
105 characters ISO7811
210 bpi ± 5% 75 bpi ± 5%
Left to Right Left to Right
61 bits 21 bits
DB
0-9, A, B, C, D, E 0-9, A, E
FF
even even
64 bits 24 bits
105 characters 35 characters
Maximum number of
recordable characters
(2 block)
Number of separator
Center of vertical position
Horizontal start position
(from the left edge)
——
——
14.0 mm 14.0 mm
14.8 mm 14.8 mm
Character conversion table
PR2 emulation and ESC/P2+ESC/MC mode
Function Recording codes
Crt ASCII Line
code
DIN/ISO,
ISO8484
IBM3604 VRC BIT4 BIT3 BIT2 BIT1
Product Information 86
Page 87

PLQ-50/PLQ-50CS/PLQ-50M/PLQ-50CSM/PLQ-50CSK User’s Guide
0030Hcrt crt 10000
1131Hcrt crt 00001
2232Hcrt crt 00010
3333Hcrt crt 10011
4434Hcrt crt 00100
5535Hcrt crt 10101
6636Hcrt crt 10110
7737Hcrt crt 00111
8838Hcrt crt 01000
9939Hcrt crt 11001
A : 3AHcrt crt 11010
B ; 3BH SOM 01011
crt crt
C < 3CH EOM 11100
crt —
D = 3DHSOM 01101
crt crt
E > 3EHcrt crt 01110
F ? 3FHEOM EOM 11111
* crt means character.
Function Recording codes
Crt ASCII Line
code
0 0 30Hcrt crt 10000
1 1 31Hcrt crt 00001
ANSI ISO7811 VRC BIT4 BIT3 BIT2 BIT1
2 2 32Hcrt crt 00010
3 3 33Hcrt crt 10011
4 4 34Hcrt crt 00100
Product Information 87
Page 88

PLQ-50/PLQ-50CS/PLQ-50M/PLQ-50CSM/PLQ-50CSK User’s Guide
5 5 35Hcrt crt 10101
6 6 36Hcrt crt 10110
7 7 37Hcrt crt 00111
8 8 38Hcrt crt 01000
9 9 39Hcrt crt 11001
A : 3AHcrt crt 11010
B ; 3BHSOM SOM 01011
crt —
C < 3CH 11100
crt —
D = 3DHcrt crt 01101
E > 3EHcrt crt 01110
F ? 3FHEOM EOM 11111
* crt means character.
Function Recording codes
Crt ASCII Line
code
0 0 30Hcrt crt 10000
1 1 31Hcrt crt 00001
2 2 32Hcrt crt 00010
3 3 33Hcrt crt 10011
4 4 34Hcrt crt 00100
5 5 35Hcrt crt 10101
6 6 36Hcrt crt 10110
7 7 37Hcrt crt 00111
8 8 38Hcrt crt 01000
IBM4746 HT-2751-CIZ VRC BIT4 BIT3 BIT2 BIT1
9 9 39Hcrt crt 11001
Product Information 88
Page 89

PLQ-50/PLQ-50CS/PLQ-50M/PLQ-50CSM/PLQ-50CSK User’s Guide
A : 3AHSOM 11010
——
B ; 3BHSOM 01011
——
C < 3CHEOM 11100
——
D = 3DHcrt — 01101
E > 3EH— — 01110
F ? 3FH SOM 11111
EOM EOM
* crt means character.
WNI4915 emulation
Crt ASCII Line
0 0 30H crt crt crt 1 0 0 0 0
1 1 31H crt crt crt 0 0 0 0 1
2 2 32H crt crt crt 0 0 0 1 0
3 3 33H crt crt crt 1 0 0 1 1
4 4 34H crt crt crt 0 0 1 0 0
5 5 35H crt crt crt 1 0 1 0 1
6 6 36H crt crt crt 1 0 1 1 0
7 7 37H crt crt crt 0 0 1 1 1
8 8 38H crt crt crt 0 1 0 0 0
9 9 39H crt crt crt 1 1 0 0 1
Function Recording codes
DIN IBM1 IBM2 VRC BIT4 BIT3 BIT2 BIT1
code
A : 3AH crt crt crt 1 1 0 1 0
Product Information 89
Page 90

PLQ-50/PLQ-50CS/PLQ-50M/PLQ-50CSM/PLQ-50CSK User’s Guide
B ; 3BH SOMSOM01011
crt crt crt
C < 3CHSOMEOM 11100
crt — —
D = 3DH crt crt crt 0 1 1 0 1
E > 3EH crt crt crt 0 1 1 1 0
F ? 3FHEOM— EOM11111
* crt means character.
Function Recording codes
Crt ASCII Line
code
0030Hcrt crt 10000
1131Hcrt crt 00001
2232Hcrt crt 00010
3333Hcrt crt 10011
4434Hcrt crt 00100
5535Hcrt crt 10101
6636Hcrt crt 10110
7737Hcrt crt 00111
8838Hcrt crt 01000
9939Hcrt crt 11001
A : 3AHcrt crt 11010
B ; 3BHcrt SOM 01011
105
characters
ISO7811 VRC BIT4 BIT3 BIT2 BIT1
—
C < 3CHSOM 11100
crt —
D = 3DHcrt — 01101
E > 3EHcrt crt 01110
Product Information 90
Page 91

PLQ-50/PLQ-50CS/PLQ-50M/PLQ-50CSM/PLQ-50CSK User’s Guide
F ? 3FHEOM EOM 11111
* crt means character.
Recording layout of magnetic stripe
DIN/ISO, IBM3604, ANSI, ISO7811, IBM4746, and ISO8484
1 block format
2 block format
Direction of bit pattern
Product Information 91
Page 92

HT-2751-CIZ
1 block format
2 block format
PLQ-50/PLQ-50CS/PLQ-50M/PLQ-50CSM/PLQ-50CSK User’s Guide
Direction of bit pattern
Scanner Specifications (Scanning Models Only)
General
Scanner Type Document Feed
Scan Method Moving paper and fixed scan head
Photoelectric device CIS
Product Information 92
Page 93

PLQ-50/PLQ-50CS/PLQ-50M/PLQ-50CSM/PLQ-50CSK User’s Guide
Maximum effective pixels 5,100 pixels (600 dpi)
Document size Max: 215.9 x 355.6 mm (8.5 x 14.0 inches)
Min: 65.0 x 67.0 mm (2.6 x 2.6 inches)
Output resolution 600 dpi/300 dpi/200 dpi (Hardware)
Light source LED (Red, Green, Blue)
Scan life 2 hundred thousand scanning
Scannable Area
Note:
❏ When scanning, insert the paper with the left edge aligned with the left side of the slot.
❏ You can scan paper up to 216 mm (8.5 inch) wide.
❏ The area to the right of the scanner edge guide cannot be scanned.
A Left edge of paper path
B Right edge of paper path
C 245 mm
D Scannable area (219.38 mm)
Product Information 93
Page 94

PLQ-50/PLQ-50CS/PLQ-50M/PLQ-50CSM/PLQ-50CSK User’s Guide
E Scan enabled pixel area (216 mm)
FCIS
G scanner edge guide
Hpaper
I scanning area
USB Hub Specification (USB hub models only)
Interface Type Universal Serial Bus Specification Revision 2.0
Electrical Standard Full Speed mode (12 Mbits per second) and Hi-Speed mode (480
Mbits per second) of Universal Serial Bus Specification Revision 2.0
Connector Type Two Type A ports
Power Supply Bus power (maximum 100mA for each port)
Standards and Approvals
Warning:
!
❏ This is a Class A product. In a domestic environment this product may cause radio interference
in which case the user may be required to take adequate measures.
❏ The connection of a non-shielded printer interface cable to this printer will invalidate the EMC
standards of this device.
❏ You are cautioned that changes or modifications not expressly approved by Seiko Epson
Corporation could void your authority to operate the equipment.
Safety approvals
Safety IEC/EN62368-1
Product Information 94
Page 95

PLQ-50/PLQ-50CS/PLQ-50M/PLQ-50CSM/PLQ-50CSK User’s Guide
EMC EN55032 (CISPR pub.32) class A
For users in U.S. and Canada
Safety UL60950-1
CAN/CSA-C22.2 No. 60950-1
EMC FCC Part 15 Subpart B Class A
CAN/CSA-CEI/IEC 22.2 CISPR pub.32 class A
Note:
❏ This equipment has been tested and found to comply with the limits for a Class A digital device,
pursuant to Part 15 of the FCC Rules. These limits are designed to provide reasonable protection
against harmful interference when the equipment is operated in a commercial environment.
❏ This equipment generates, uses, and can radiate radio frequency energy and, if not installed and
used in accordance with the instruction manual, may cause harmful interference to radio
communications. Operation of this equipment in a residential area is likely to cause harmful
interference in which case the user will be required to correct the interference at his own expense.
For users in Europe
The following models are CE marked and in compliance with all the applicable EU Directives. For
further details, visit the following website to access the full declaration of conformities containing
reference to the Directives and harmonized standards used to declare conformity.
https://www.epson.eu/conformity
PB51A
Product Information 95
 Loading...