

Page 1

®
24-pin Dot Matrix Printer
All rights reserved. No part of this publication may be reproduced, stored in a retrieval
system, or transmitted in any form or by any means, electronic, mechanical, photocopying,
recording, or otherwise, without the prior written permission of Seiko Epson Corporation.
The information contained herein is designed only for use with this Epson printer. Epson is
not responsible for any use of this information as applied to other printers.
Neither Seiko Epson Corporation nor its affiliates shall be liable to the purchaser of this
product or third parties for damages, losses, costs, or expenses incurred by the purchaser or
third parties as a result of: accident, misuse, or abuse of this product or unauthorized
modifications, repairs, or alterations to this product, or (excluding the U.S.) failure to strictly
comply with Seiko Epson Corporation’s operating and maintenance instructions.
Seiko Epson Corporation shall not be liable for any damages or problems arising from the
use of anyoptions orany consumable products otherthan thosedesignated asOriginalEpson
Products or Epson Approved Products by Seiko Epson Corporation.
EPSON and EPSON ESC/P are registered trademarks of Seiko Epson Corporation.
Microsoft, Windows, and Windows NT are registered trademarks of Microsoft Corporation.
IBM is a registered trademark of International Business Machines Corporation.
General Notice: Other product names used herein are for identification purposes only and may be
trademarks of their respective owners. Epson disclaims any and all rights in those marks.
Copyright © 2004 by Seiko Epson Corporation, Nagano, Japan.
Reference Guide
NPD0748-00
Page 2

Contents
Chapter 1 SettingupthePrinter
UnpackingthePrinter...................................... 7
Removetheprotectivematerials ........................ 7
AssemblingthePrinter..................................... 8
ConnectingthePrintertoYourComputer.................... 12
Connectingtheprinter................................ 12
PlugginginthePrinter................................ 13
InstallingthePrinterSoftware.............................. 13
Installing the software in Windows XP, Me, or 2000. . . .... 13
Installing the software in Windows 98
orWindowsNT4.0 ................................ 14
ForDOSprograms................................... 18
Chapter 2 Safety Instructions
Warnings,Cautions,andNotes............................. 20
HotPartsCautionSymbol ................................. 20
ImportantSafetyInstructions............................... 20
Chapter 3 Paper Handling
LoadingPassbooks ....................................... 28
LoadingSingleSheets..................................... 29
Adjustingthetop-of-formposition.......................... 31
Adjustingtheprintingstartposition......................... 33
2
Page 3

Chapter 4 Printer Software
AboutYourPrinterSoftware............................... 36
UsingthePrinterDriverwithWindowsMeand98............ 36
Accessing the printer driver from Windows applications . . 37
AccessingtheprinterdriverfromtheStartmenu......... 39
Changingtheprinterdriversettings.................... 40
Using the Printer Driver with Windows XP, 2000,
andWindowsNT4.0 ................................... 41
Accessing the printer driver from Windows applications . . 42
AccessingtheprinterdriverfromtheStartmenu......... 44
Changingtheprinterdriversettings.................... 46
PrinterDriverSettingsOverview........................... 47
UsingEPSONStatusMonitor3............................. 49
SettingupEPSONStatusMonitor3..................... 50
AccessingEPSONStatusMonitor3..................... 51
SettingUpYourPrinteronaNetwork....................... 52
Sharingtheprinter ................................... 52
Settingupyourprinterasasharedprinter............... 54
Settingfortheclients ................................. 58
InstallingtheprinterdriverfromtheCD-ROM........... 65
CancelingPrinting........................................ 67
UninstallingthePrinterSoftware ........................... 68
Uninstalling the printer driver
andEPSONStatusMonitor3........................ 68
Chapter 5 Control Panel
ButtonsandLights........................................ 74
Functionsauxiliary................................... 77
CompressPrintingMode .................................. 79
AboutYourPrinter’sDefaultSettings ....................... 79
Understandingdefaultsettings ........................ 80
Changingdefaultsettings............................. 94
AligningVerticalLinesinYourPrintout..................... 96
3
Page 4

Chapter 6 Problem Solver
DiagnosingtheProblem................................... 99
Usingtheerrorindicators ............................. 99
EPSONStatusMonitor3............................. 102
PrintingaSelf-Test.................................. 102
PrintingHexDump ................................. 103
ProblemsandSolutions .................................. 105
Powersupplyproblems.............................. 106
Paperloadingorfeedingproblems.................... 107
Printingpositionproblems........................... 108
Printingorprintoutqualityproblems.................. 109
Networkproblems.................................. 114
CorrectingUSBProblems................................. 115
ClearingPaperJams ..................................... 119
ContactingCustomerSupport............................. 120
ForusersinNorthAmerica........................... 121
ForusersinAustralia................................ 122
ForusersinSingapore............................... 124
ForusersinThailand ................................ 124
ForusersinIndonesia ............................... 125
ForusersinHongKong.............................. 126
ForusersinMalaysia................................ 127
ForusersinIndia ................................... 128
ForusersinthePhilippines........................... 130
Chapter 7 Options and Consumables
RibbonCartridge........................................ 132
GenuineEpsonribboncartridge....................... 132
Replacingtheribboncartridge........................ 132
RollPaperHolder ....................................... 138
Assemblingtherollpaperholder...................... 138
Installingtherollpaperholder........................ 139
Loadingrollpaper .................................. 140
Removingrollpaper................................. 143
PrintServer............................................. 143
Others.................................................. 144
4
Page 5

Appendix A Product Information
PrinterandRibbonCartridgeParts......................... 146
Printerparts........................................ 146
Ribboncartridgeparts............................... 147
PrinterSpecifications..................................... 148
Mechanical......................................... 148
Electronic.......................................... 150
Electrical........................................... 155
Environmental...................................... 156
Paper.............................................. 156
Magnetic stripe reader/writer
(horizontallyinstalledonly)........................ 156
CommandLists ......................................... 168
StandardsandApprovals................................. 169
CleaningthePrinter...................................... 170
TransportingthePrinter.................................. 171
Glossary
Index
5
Page 6

Chapter 1
Setting up the Printer
UnpackingthePrinter...................................... 7
Removetheprotectivematerials ........................ 7
AssemblingthePrinter..................................... 8
ConnectingthePrintertoYourComputer.................... 12
Connectingtheprinter................................ 12
PlugginginthePrinter................................ 13
InstallingthePrinterSoftware.............................. 13
Installing the software in Windows XP, Me, or 2000. . . .... 13
Installing the software in Windows 98
orWindowsNT4.0 ................................ 14
ForDOSprograms................................... 18
Chapter 1 Setting up the Printer 6
Page 7
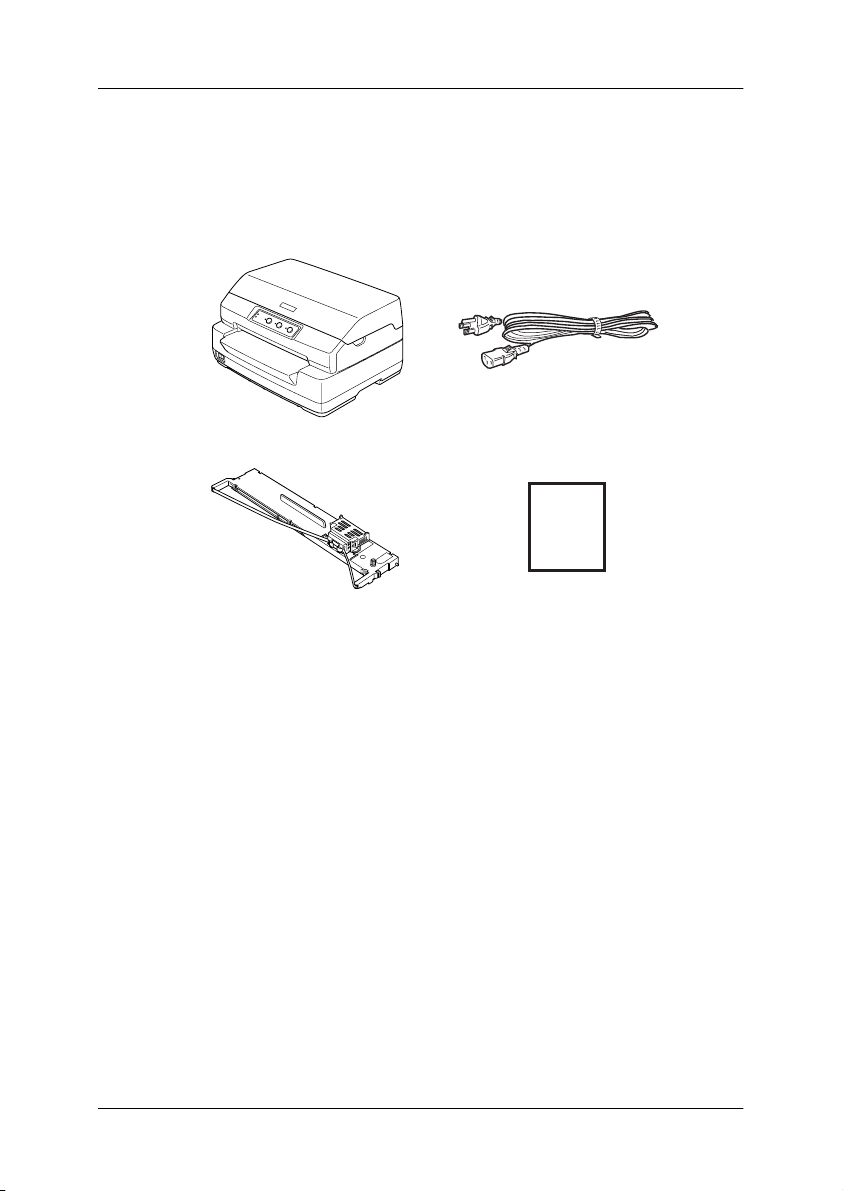
Unpacking the Printer
These items are included in the box with your printer.
printer
ribboncartridge User’s Guide
power code
Remove the protective materials
Follow the directions writtenon the cardboard box to removethe
protective materials.
Save all packing and protective materials in case you need to ship
the printer in the future.
Chapter 1 Setting up the Printer 7
Page 8
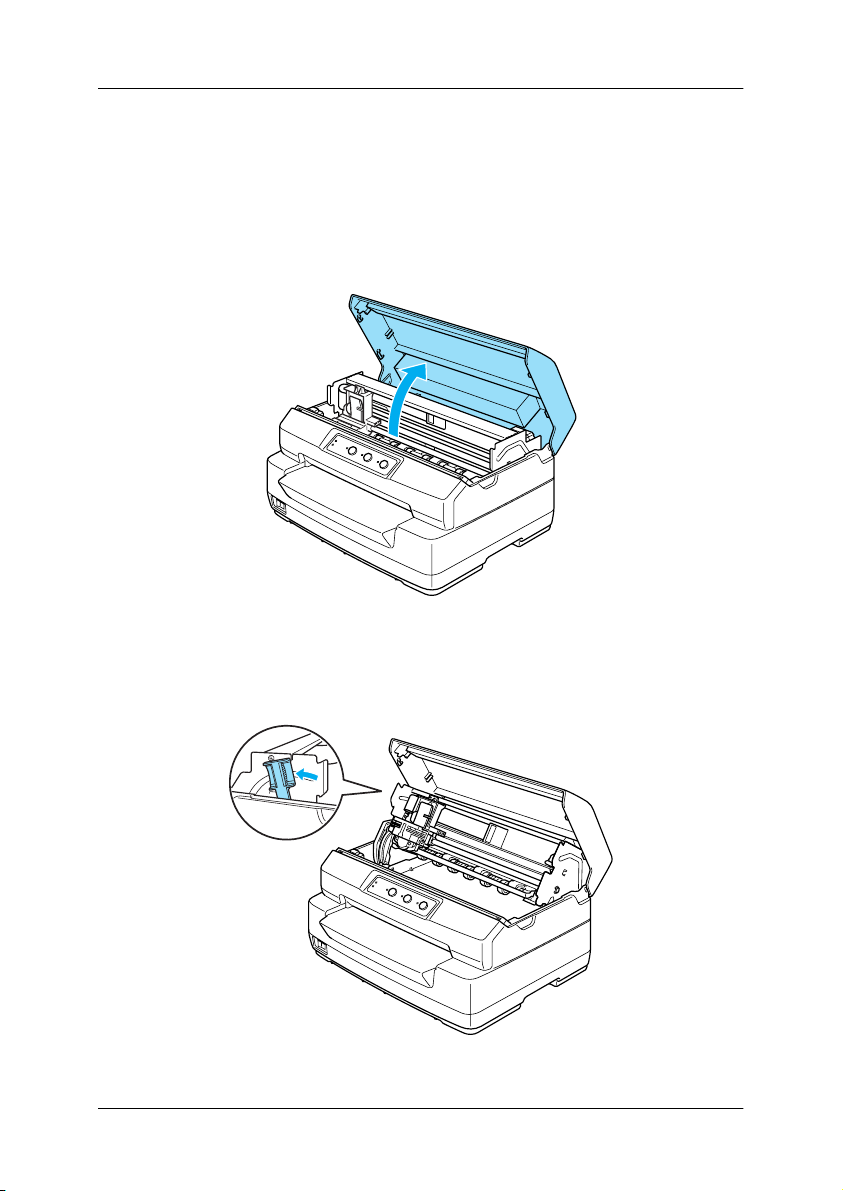
Assembling the Printer
1. Make sure the printer is turned off and unplugged.
2. Hold both sides of the printer cover and move it upward to
open it.
3. Push therelease lever tomove the uppermechanism forward.
Make sure that you push the lever until it clicks.
Chapter 1 Setting up the Printer 8
Page 9

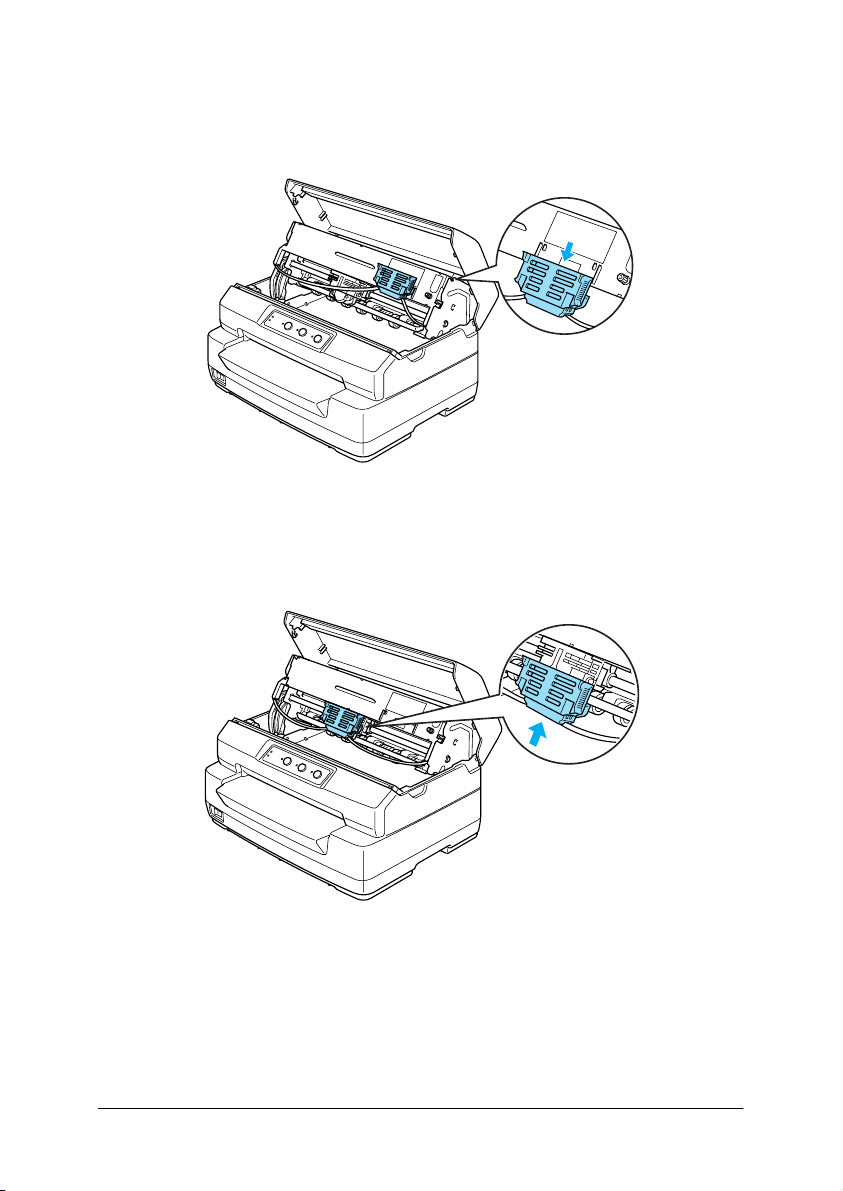
4. Slide the print head to the middle of the printer by hand.
5. Remove the ribbon cartridge from the package.
6. Place the plastic hooks on the ribbon cartridge into the slots
of the printer. Then press both sides of the cartridge until it
clicks into place.
Chapter 1 Setting up the Printer 9
Page 10
7. Hold both sides of the ribbon guide and pull it down until it
is out of the cartridge.
8. Put the ribbon guide at the bottom of the print head and push
it up until it clicks into place.
Chapter 1 Setting up the Printer 10
Page 11
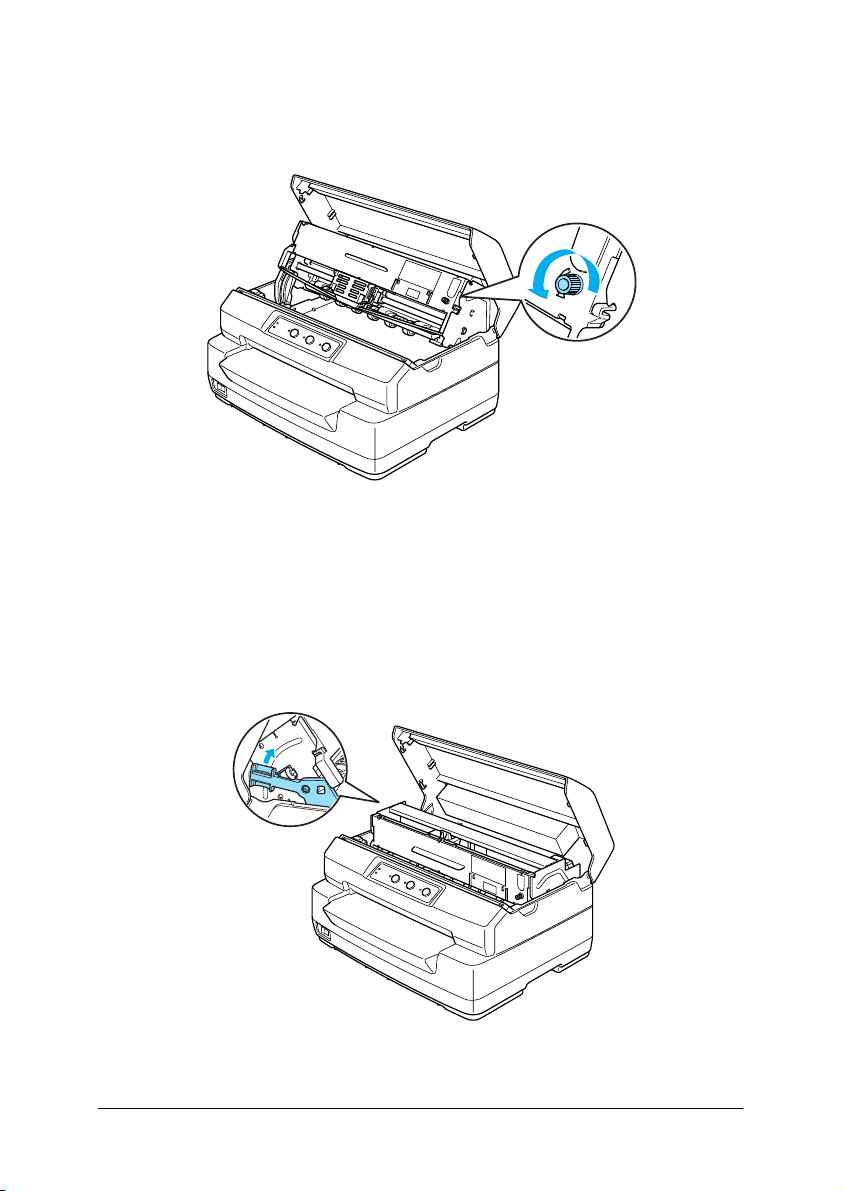
9. Turn the ribbon-tightening knob to help feed the ribbon into
place.
Caution:
The ribbon should not be twisted or creased.
c
10. Pull the release lever back to move the upper mechanism to
its original position. Make sure that you pull the lever until it
clicks.
Chapter 1 Setting up the Printer 11
Page 12
Caution:
Make sure that you move the upper mechanism by pulling
c
the release lever. Do not pull the mechanism by hand. It may
damage the printer.
11. Close the printer cover.
Connecting the Printer to Your Computer
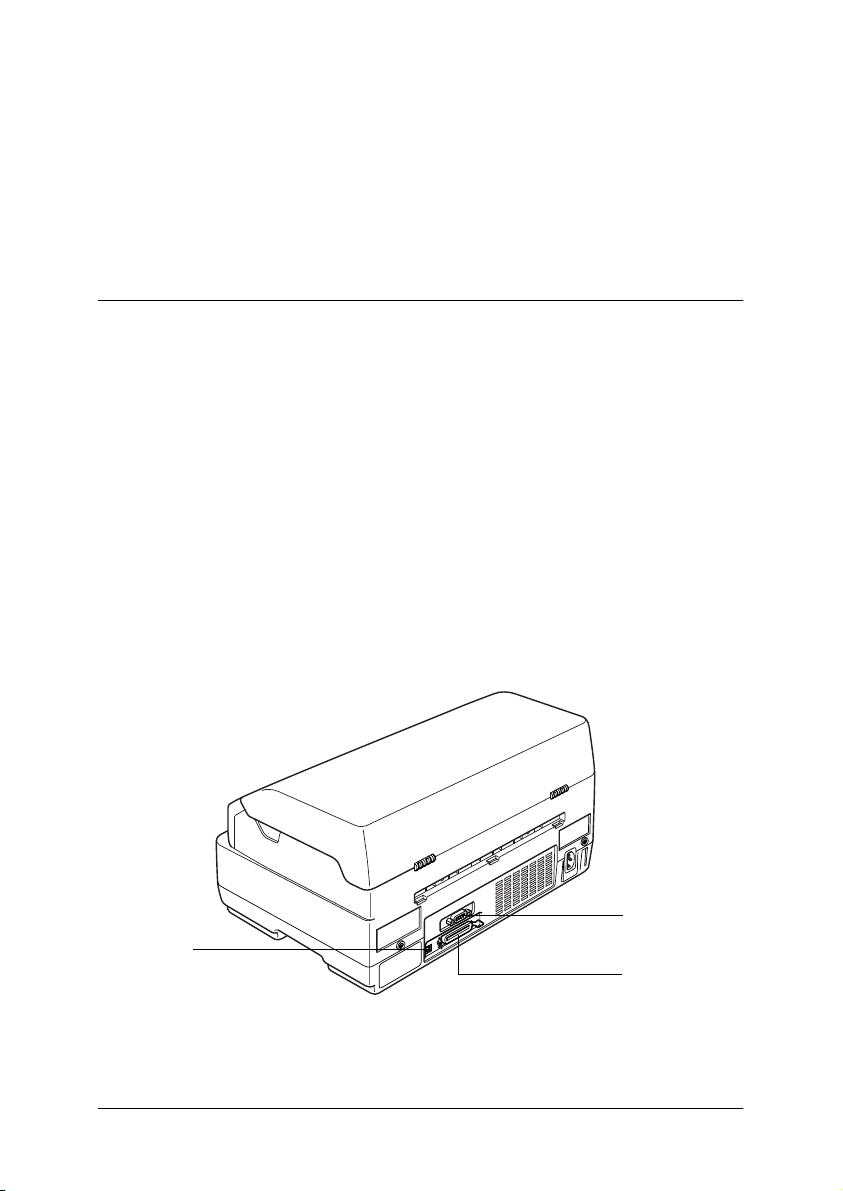
Connecting the printer
Make sure both the printer and computer are turned off, then
connect the interface into the printer and computer. Use USB,
Serial, or Parallel cable to connect the printer and computer.
Note:
The interface cable connectors have only one correct orientation. Ensure
the correct orientation of a connector before inserting it into the
appropriate port.
USB
Serial
Parallel
Chapter 1 Setting up the Printer 12
Page 13

Plugging in the Printer
Make sure the printer is turned off, then plug the power cord into
the printer’s AC inlet and a properly grounded electrical outlet.
Installing the Printer Software
Installing the software in Windows XP, Me, or 2000
Note:
❏ Installing theprinter softwarefor Windows XP or 2000may require
administrator privileges. If you have problems, ask your
administrator for more information.
❏ Turn off all virus protection programs before installing the printer
software.
1. Make sure that the printer is turned off, then insert the User
CD-ROM into the CD-ROM drive.
The SOFTWARE LICENSE AGREEMENT dialog box
appears.
Chapter 1 Setting up the Printer 13
Page 14

Note:
If the SOFTWARE LICENSE AGREEMENT dialog box does not
appear, double-click Epsetup.exe in the CD-ROM.
2. Read the license agreement. If you agree with the terms, click
Agree.
3. Click Install and then follow the on-screen instructions.
4. After you install the driver, change the software setting from
PR2 to ESC/P. See“Changing default settings”on page94 for
details.
Installing the software in Windows 98 or Windows NT 4.0
Note:
❏ Installing the printer software for Windows NT 4.0 may require
administrator privileges. If you have problems, ask your
administrator for more information.
Chapter 1 Setting up the Printer 14
Page 15

❏ The examples in the following section are from the Windows 98
operating system. They may vary in appearance from what actually
appears on your screen; however, the instructions are the same.
1. Make sure that the printer is turned off, then insert the User
CD-ROMinto the CD-ROMdrive.The SOFTWARELICENSE
AGREEMENT dialog box appears.
Note:
If the SOFTWARE LICENSE AGREEMENT dialog box does not
appear, double-click Epsetup.exe in the CD-ROM.
2. Read the license agreement. If you agree with the terms, click
Agree.
3. Click the name of the printer that you have.
4. Click Install and then follow the on-screen instructions.
5. When prompted, insert your Windows CD-ROM, and click
OK.
When the Windows installation screen is displayed, close the
screen to continue with the driver installation.
Note:
❏ If your PC shipped with Windows pre-installed, Setup may
complete without requiring the Windows CD-ROM, and your
printer is ready to use.
❏ If you receive a message saying the drive is not accessible, click
Cancel and try again.
❏ If you are using Windows NT, go to step 7.
Chapter 1 Setting up the Printer 15
Page 16
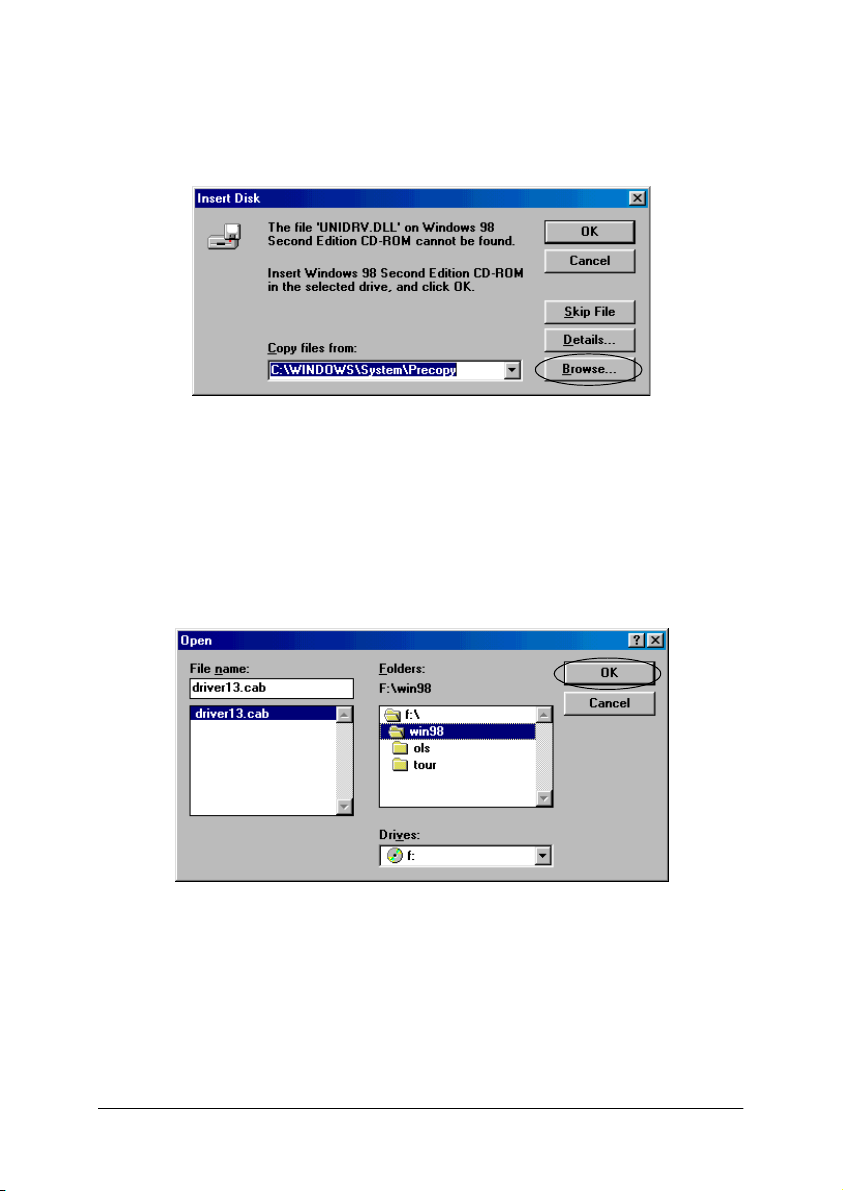
6. Click Browse to select the appropriate path for the printer
driver, then click OK and follow the instruction on the screen.
Note:
If you are using Windows NT, insert your Windows CD-ROM
when prompted on the screen.
7. Select the appropriate file in the folder, then click OK.
Chapter 1 Setting up the Printer 16
Page 17
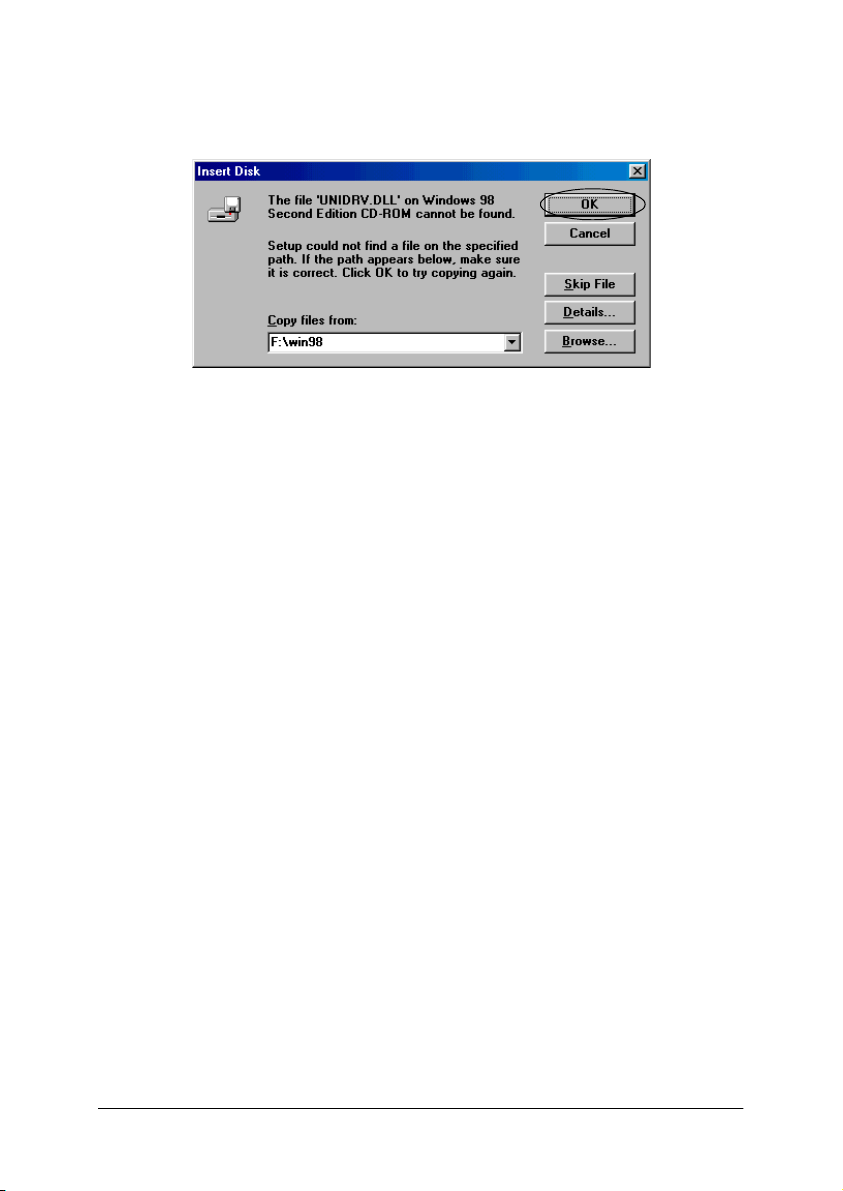
8. When prompted, insert the User CD-ROM, then click OK.
Note:
❏ If you receive a message saying the drive is not accessible, click
Cancel and try again.
❏ If a “System Error” message appears, click Cancel.Theexact
message differs depending on your version of Windows.
❏ If you are using Windows NT, you do not need to specify a path.
❏ If you are using Windows 98, the Printer Utility Setup may
start. If it does, follow the instructions on the screen.
9. Setup is complete. Your printer is ready to use.
10. After you install the driver, change the software setting from
PR2 to ESC/P. See“Changing default settings”on page94 for
details.
Chapter 1 Setting up the Printer 17
Page 18
For DOS programs
To control the printer from DOS application programs, you need
to select the printer you are using.
If thelist in yourapplication doesnot include your printer, choose
the first available printer from the list below.
Choose the Epson printer at the appropriate step in the
installation or setup procedure. If the listin yourapplication does
not include your printer, choose the first available printer from
the list below:
PLQ-20 LQ-510/550/1010
LQ-2090 LQ-200
LQ-2080/2180 LQ-500
LQ-2070/2170 LQ-860+/1060+
LQ-1070/1070+ LQ-2550
LQ-870/1170 LQ-2500
LQ-850+/1050+ LQ-800/1000
LQ-850/1050 LQ-1500
Note:
The printer on this list are also available for PLQ-20M printers.
Once the printer software has been successfully installed onto
your computer, your printer is ready to use.
Chapter 1 Setting up the Printer 18
Page 19

Chapter 2
Safety Instructions
Warnings,Cautions,andNotes............................. 20
HotPartsCautionSymbol ................................. 20
ImportantSafetyInstructions............................... 20
Chapter 2 Safety Instructions 19
Page 20

Warnings, Cautions, and Notes
Warnings must be followed carefully to avoid bodily injury.
w
Cautions must be observed to avoid damage to your equipment.
c
Notes contain important information and useful tips on the operation
of your printer.
Hot Parts Caution Symbol
This symbol is placed on the print head and other
K
parts toindicate that they may behot. Never touch
those parts just after the printerhas been used. Let
them cool for a few minutes before touching them.
Important Safety Instructions
Read all of these safety instructions before using the printer. In
addition, follow all warnings and instructions marked on the
printer itself.
When setting up the printer
Caution:
Be sure the AC power cord meets the relevant local safety
c
standards.
❏ Do not place the printer on an unstable surface or near a
radiator or heat source.
Chapter 2 Safety Instructions 20
Page 21

❏ Place the printer on a flat surface. The printerwill not operate
properly if it is tilted or placed at an angle.
❏ Donotplacethisproductonasoft,unstablesurfacelikeabed
or a sofa, or a small, enclosed area, as this restricts ventilation.
❏ Do not block or cover the slots and openings in the printer’s
cabinet, and do not insert objects through the slots.
❏ Use only the type of power source indicated on the printer’s
label. If you are not sure of the power supply specifications in
your area, contact your local power company or consult your
dealer.
❏ Connect all equipment to properly grounded electrical
outlets. Avoid using outlets on the same circuit as
photocopiers or air control systems that regularly switch on
and off.
❏ Do not use a damaged or frayed power cord.
❏ The power cord should be placed to avoid abrasions, cuts,
fraying, crimping, kinking, and other damage.
❏ If you use an extension cord with the printer, make sure the
total ampere rating of all devices plugged into the extension
cord does not exceed the cord’s ampere rating. Also, make
sure the total ampere of all devices plugged into the electrical
outlet does not exceed the electrical outlet’s ampere rating.
❏ Use only the powercord that comes with this product. Use of
another cord may result in fire or electric shock.
❏ This product’s power cord is for use with this product only.
Use with other equipment may result in fire or electric shock.
Chapter 2 Safety Instructions 21
Page 22

❏ When connecting this product to a computer or other device
with a cable, ensure the correct orientation of the connectors.
Each connector has only one correct orientation. Inserting a
connector in the wrongorientation may damage both devices
connected by the cable.
❏ Place the printer where you can easily connect it to anetwork
interface cable, if necessary.
❏ Leave adequate room around the printer for easy operation
and maintenance.
❏ Avoid places subject to shocks and vibrations.
❏ Place the printer near a wall outlet where you can easily
unplug the power code.
❏ Keep theentire computersystem awayfrom potentialsources
of electromagnetic interference, such as loudspeakers or the
baseunitsofcordlesstelephones.
❏ Avoid electrical outlet controlled by wall switches or
automatic timers. An interruption in power can erase
information in the memory of your printer or computer. Also
avoid outlets on the same circuit as large motors or other
appliances that can cause voltage fluctuations.
❏ Use a grounded power outlet; do not use an adapter plug.
❏ If you plan to use a printer stand, follow these guidelines:
Use a stand that can support at least 15 kg (33.1 lb) for PLQ-20
or 17 kg (37.5 lb) for PLQ-20M.
Never use a stand that tilts the printer. The printer should
always be kept level.
Chapter 2 Safety Instructions 22
Page 23

Position yourprinter’s power cord andinterface cable so they
do not interfere with paper feeding. If possible, secure the
cables to a leg of the printer stand.
When maintaining the printer
❏ Unplug theprinter before cleaningit, and alwaysclean it with
a piece of damp cloth only.
❏ Do not spill liquid onto the printer.
❏ Except as specifically explained in this guide, do not attempt
to service the printer yourself.
❏ Unplug the printer and refer servicing to qualified service
personnel under the following conditions:
i. If the power cord or plug is damaged.
ii. If liquid has entered the printer.
iii. If the printer has been dropped or the cabinet damaged.
iv. If the printer does not operate normally or exhibits a
distinct change in performance.
❏ Adjust only those controls that are covered by the operating
instructions.
❏ If you plan to use the printer in Germany, observe the
following:
To provide adequate short-circuit protection and
over-current protection for this printer, the building
installation must be protected by a 10- or 16-amp circuit
breaker.
Chapter 2 Safety Instructions 23
Page 24

When loading paper
❏ Use passbooks and paper that have more than 60%
reflectance.
❏ When you use a passbook, set Passbook mode to On and set
Binding mode to the method for the passbook’s binding in the
default settings mode.
❏ Do not load passbooks that are creased or have ripped seam.
❏ Do not use a passbook that has any metallic parts such as
staplers or metal clips.
❏ Do not use a passbook with sticky parts such as stamps or
seals.
❏ Do not use a passbook that has any pages smaller than the
cover page.
❏ Do not print onthe frontor back cover ofa passbook. Printing
can be done only when the passbook is opened.
❏ When you use paper that is shorter than 110.0 mm, set the
paper eject direction to front. The factory set default is front.
Refer to the Programming Guide for details.
❏ Do not insert paper that is curled or has been folded into the
slot when you load it.
❏ Do not punch holes in the area from 25.0 to 40.0 mm from the
left edge of paper.
When operating the printer
❏ Avoid using or storing the printer in places subject to rapid
changes in temperature and humidity. Keep it away from
direct sunlight, strong light, heat sources or excessive
moisture or dust.
Chapter 2 Safety Instructions 24
Page 25

❏ Adjust only those controls that are covered in the user
documentation. Improper adjustment of other controls may
result in damage requiring extensive repair by a qualified
technician.
❏ Whenever you turn off the printer, wait at least five seconds
before turning it back on; otherwise, you may damage the
printer.
❏ Do not turn off the printer while it is printing the self-test.
Always press the Offline button to pause printing. Then turn
off the printer.
❏ Do not turn off the printer while it is printing the hex dump.
Always press the Offline button to pause printing. Then turn
off the printer.
❏ Do not reconnect the power cord to an electrical outlet that
has the wrong voltage for your printer.
❏ Never replace the print head yourself; you may damage the
printer. Also,other parts of the printer mustbe checkedwhen
the print head is replaced.
❏ You need to move theprint head by hand toreplace the ribbon
cartridge. If you have just used the printer, the print head may
be hot; let it cool for a few minutes before touching it.
Note for German-speaking users:
Bei Anschluss des Druckers an die Stromversorgung muss
sichergestellt werden, dass die Gebaudeinstallation mit einer 10 Aoder 16 A-Sicherung abgesichert ist.
Chapter 2 Safety Instructions 25
Page 26

ENERGY STAR
®
Compliance
As an
ENERGY STAR
has determined that this product meets
ENERGY STAR
the
energy efficiency.
The InternationalENERGY STAR®Office Equipment Program is
an international program that promotes energy saving through
the penetration of energy efficient computers and other office
equipment. The program backs the development and
dissemination of products with functions that effectively reduce
energy consumption. It is an open system in which business
proprietors can participate voluntarily. Thetargeted products are
office equipment such as computers, monitors, printers,
facsimiles, copiers, scanners, and multifunction devices. Their
standards and logos are uniform among participating nations.
®
Partner, Epson
®
guidelines for
Chapter 2 Safety Instructions 26
Page 27

Chapter 3
Paper Handling
LoadingPassbooks ....................................... 28
LoadingSingleSheets..................................... 29
Adjustingthetop-of-formposition.......................... 31
Adjustingtheprintingstartposition......................... 33
Chapter3 PaperHandling 27
Page 28
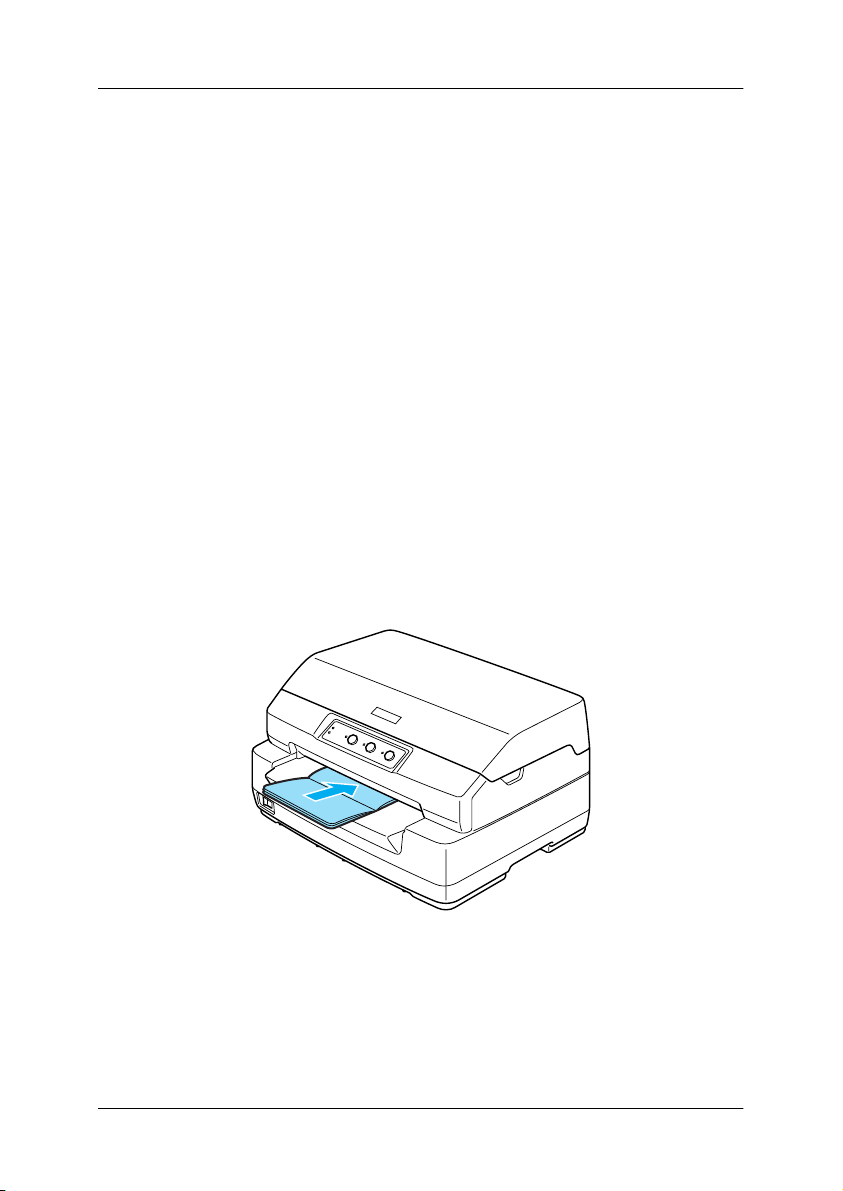
Loading Passbooks
You can load vertical-fold and horizontal-fold passbooks. Follow
the steps shown below to load passbooks.
1. Turn on the printer.
2. Open your passbook to the page to be printed.
Note:
Make sure that you press any bulging parts of the folded passbook
down to 0.6 mm or less before inserting it into the front slot. For
information on the thickness of passbooks you can print, see the
Paper Specification that is included on the User CD-ROM.
3. Insert the passbook printable side up into the front slot until
the top part of it reaches the roller inside. The printer loads it
automatically to the correct position and the passbook is
ready to be printed.
Chapter3 PaperHandling 28
Page 29

Caution:
❏ When you use a passbook, set Passbook mode to On and set
c
Binding mode to the method for thepassbook’s bindingin the
default settings mode.
❏ Use a passbook that has more than 60% reflectance.
❏ Do not load passbooks that are creased or have ripped seam.
❏ Do not use a passbook that has any metallic parts such as
staplers or metal clips.
❏ Do not use a passbook with sticky parts such as stamps or
seals.
❏ Do not use a passbook that has any pages smaller than the
cover page.
❏ Do not print onthe front orback coverof a passbook.Printing
can be done only when the passbook is opened.
❏ Always close the printer cover before printing. The printer
does not print when the printer cover is open.
Loading Single Sheets
You can load single sheets and carbonless single sheet multipart
forms up to 7 parts (one original and six copies). Follow these
steps to load single sheets.
1. Turn on the printer.
Chapter3 PaperHandling 29
Page 30
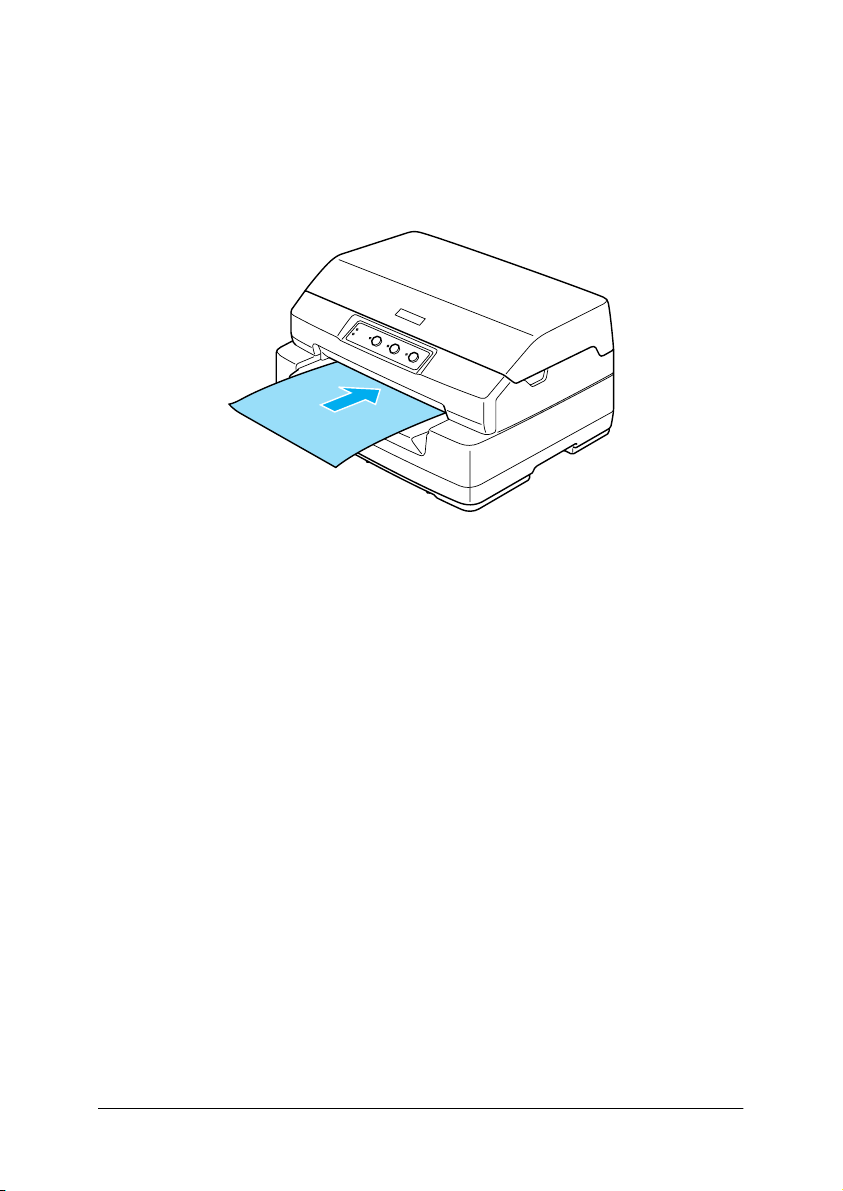
2. Insert a single sheet printable side up into the front slot until
the top part of the paper reaches the roller inside. The printer
loads the paper automatically to the correct position and the
paper is ready to be printed.
Note:
❏ Use paper that has more than 60% reflectance.
❏ Do not load paper that is curled or has been folded.
❏ Do not punch holes in the area from 25.0 to 40.0 mm from the left
edge of paper.
❏ When you use paper that is shorter than 110.0 mm, set the paper
eject direction to front. The factory set default is front. Refer to the
Programming Guide for details.
❏ When you print a multipart form that is glued at the top, load the
glued part first.
❏ Be sure your multipart forms do not exceed 0.53 mm (0.021 inch)
in thickness.
❏ Always close the printer cover before printing. The printer does not
print when the printer cover is open.
Chapter3 PaperHandling 30
Page 31

Adjusting the top-of-form position
The top-of-form positionis thevertical position onthe pagewhere
the printer starts printing. If the printout appears too high or low
on the page, you can use this function to adjust the top-of-form
position.
Follow these steps to adjust the top-of-form position:
Note:
❏ The factory set default for the top-of-form position is set as shown
below.
PR2: 4.2 mm
ESC/P and IBM PPDS: 8.5 mm
❏ This mode can be used even when the printer cover is open.
❏ If you wish to change the top-of-form position in PR40+, make sure
that you set the TOF position for PR40+ to Off.
❏ Your top-of-form position setting remains ineffect until you change
it, even if you turn off the printer.
❏ The top margin setting made insome application software overrides
the top-of-form position setting you make with this function. If
necessary, adjust the top-of-form position in your software.
❏ Prepare an A4 size sheet of paper before using this function.
1. Turn off the printer.
Caution:
Whenever you turn off the printer, wait at least five seconds
c
before turning it back on; otherwise you may damage the
printer.
2. Turn on the printer while holding the F2 button.
Chapter3 PaperHandling 31
Page 32

3. Press the Offline button while the F1/Eject, Offline,andF2
lights are flashing.
4. When theReady lightturns on, inserta sheetof A4 paperinto
the front slot. The printer prints triple H in capitals (HHH) on
the current top-of-form position and ejects the sheet.
5. Press the F1/Eject button to move the top-of-form position
up on the page,or press theF2 button to move thetop-of-form
position down on the page. Each time you press the F1/Eject
or F2 button, the printer makes a short beep. Pressing these
buttons executes micro feed in 0.282 mm (1/90-inch)
increments.
Note:
The top-of-form position can be set from 1.0 mm to 33.8 mm in the
PR2 mode and from 1.0 mm to 33.9 mm in the ESC/P and IBM
PPDS modes.
6. Insert a sheetof A4paper into the front slot. Theprinter prints
triple H in capitals (HHH) on thecurrent top-of-form position
and ejects the sheet. You may continue to adjust the position
by pressing the F1/Eject and F2 buttons and checking the
position by inserting another sheet.
7. After finishing the adjustment,turn offthe printer.The setting
does not change even if the printer is turned off.
Chapter3 PaperHandling 32
Page 33

Adjusting the printing start position
The printing start position is the horizontal position on the page
where the printer starts printing. If the printout appears too for
the left or right on the page, you can use this function to adjust
the printing start position.
Follow these steps to adjust the printing start position:
Note:
❏ Your printing start position setting remains in effect until you
change it, even if you turn off the printer.
❏ Prepare an A4 size sheet of paper before using this function.
❏ Always close the printer cover before printing. The printer does not
print when the printer cover is open.
1. Turn off the printer.
Caution:
Whenever you turn off the printer, wait at least five seconds
c
before turning it back on; otherwise you may damage the
printer.
2. Turn on the printer while holding the F2 button.
3. Press the F2 button while the F1/Eject, Offline,andF2 lights
are flashing.
4. When theReady lightturns on, inserta sheetof A4 paperinto
the front slot. The printer prints the guide to adjust the
printing start position and position patterns.
Chapter3 PaperHandling 33
Page 34

5. Press the F1/Eject button for the next pattern or F2 button for
the previous pattern to select the printing start position. Each
time you press the F1/Eject or F2 button, the printer makes a
short beep. The F1/Eject, Offline and F2 lights show the
pattern which is selected at that time.
6. After youselect theprinting startposition, turnoff the printer.
The setting does not change even if the printer is turned off.
Chapter3 PaperHandling 34
Page 35

Chapter 4
Printer Software
AboutYourPrinterSoftware............................... 36
UsingthePrinterDriverwithWindowsMeand98............ 36
Accessing the printer driver from Windows applications . . 37
AccessingtheprinterdriverfromtheStartmenu......... 39
Changingtheprinterdriversettings.................... 40
Using the Printer Driver with Windows XP, 2000,
andWindowsNT4.0 ................................... 41
Accessing the printer driver from Windows applications . . 42
AccessingtheprinterdriverfromtheStartmenu......... 44
Changingtheprinterdriversettings.................... 46
PrinterDriverSettingsOverview........................... 47
UsingEPSONStatusMonitor3............................. 49
SettingupEPSONStatusMonitor3..................... 50
AccessingEPSONStatusMonitor3..................... 51
SettingUpYourPrinteronaNetwork....................... 52
Sharingtheprinter ................................... 52
Settingupyourprinterasasharedprinter............... 54
Settingfortheclients ................................. 58
InstallingtheprinterdriverfromtheCD-ROM........... 65
CancelingPrinting........................................ 67
UninstallingthePrinterSoftware ........................... 68
Uninstalling the printer driver
andEPSONStatusMonitor3........................ 68
Chapter 4 Printer Software 35
Page 36

About Your Printer Software
The Epson software includes the printer driver software and
EPSON Status Monitor 3.
The printer driver is software that allows your computer to
control the printer. You need to install the printer driver so your
Windows software applications can take full advantage of the
printer’s capabilities.
EPSON Status Monitor 3 program allows you to monitor the
status of your printer, alertsyou when errors occur, and provides
you with troubleshooting tips. Status Monitor 3 is automatically
installed when you install the printer driver.
Note:
❏ Before proceeding, make sure you have installed the printer driver
on your computer as described in “Installing the Printer Software”
on page 13.
❏ Make sure the software setting is set to ESC/P. The printer driver
software andEPSON Status Monitor3 canonly function in ESC/P
mode.
Using the Printer Driver with Windows Me and 98
You can access the printer driver from your Windows
applications or from the Start menu.
❏ When you access the printer driver from a Windows
application, any settings you make apply only to the
application you are using. See “Accessing the printer driver
from Windows applications” on page 37 for more
information.
Chapter 4 Printer Software 36
Page 37

❏ When you access the printer driver from the Start menu, the
printerdriversettingsyoumakeapplytoallyour
applications. See “Accessing the printer driver from the Start
menu” on page 39 for more information.
See “Changing the printer driver settings” on page 40 to check
and change printer driver settings.
Note:
❏ The printer driver is designed for PLQ-20, but is compatible and
can be installed for PLQ-20M.
❏ While many Windows applications override the settings made with
the printer driver, some do not, so you must verify that the printer
driver settings match your requirements.
Accessing the printer driver from Windows applications
Follow these steps to access the printer driver from a Windows
application:
Chapter 4 Printer Software 37
Page 38

1. Select PrintSetup or Print from the File menu of your
application software. In the Print or Print Setup dialog box
displayed,make sure thatyour printeris selected inthe Name
drop-down list.
Chapter 4 Printer Software 38
Page 39

2. Click Printer, Setup, Properties,orOptions.(Youmayneed
to click a combination of these buttons.) The Properties
window appears, and you see the Paper, Graphics, and
Device Options menu. These menus contain the printer driver
settings.
3. To view a menu, click the corresponding tab at the top of the
window. See “Changing the printer driver settings” on page
40 for information on how to change the settings.
Accessing the printer driver from the Start menu
Follow these steps to access the printer driver from the Start
menu:
1. Click the Start button, and then point to Settings.
2. Click Printers.
Chapter 4 Printer Software 39
Page 40

3. Right-clickyour printer icon,and click Properties. The screen
displays the Properties window, which contains the Paper,
Graphics, Device Options, and Utility menus. These menus
display the printer driver settings.
4. To view a menu, click the corresponding tab at the top of the
window. See “Changing the printer driver settings” on page
40 for information on how to change the settings.
Changing the printer driver settings
Your printer driver has four menus: Paper, Graphics, Device
Options, andUtility. For an overview of theavailable settings, see
“Printer DriverSettings Overview” onpage 47. You canalso view
online help by right-clicking items in the driver and selecting
What’sthis?
Chapter 4 Printer Software 40
Page 41

When you finishmaking printer driver settings, click OK to apply
the settings, or click Restore Defaults to return the settings to
their default values.
Once youhave checkedyour printer driversettings andmade any
necessary changes, you are ready to print.
Using the Printer Driver with Windows XP, 2000, and Windows NT 4.0
You can access the printer driver from your Windows
applications or from the Start menu.
❏ When you access the printer driver from a Windows
application, any settings you make apply only to the
application you are using. See “Accessing the printer driver
from Windows applications” on page 42 for more
information.
❏ When you access the printer driver from the Start menu, the
printerdriversettingsyoumakeapplytoallyour
applications. See “Accessing the printer driver from the Start
menu” on page 44 for more information.
To check and change printer driver settings, see “Changing the
printerdriversettings”onpage46.
Note:
❏ The printer driver is designed for PLQ-20, but is compatible and
can be installed for PLQ-20M.
❏ While many Windows applications override the settings made with
the printer driver, some do not, so you must verify that the printer
driver settings match your requirements.
Chapter 4 Printer Software 41
Page 42

Accessing the printer driver from Windows applications
Follow these steps to access the printer driver from a Windows
application:
Note:
The examples in the following section are from the Windows 2000
operating system. They may vary in appearance from what actually
appears on your screen; however, the instructions are the same.
1. Select PrintSetup or Print from the File menu of your
application software. In the Print or Print Setup dialog box
displayed,make sure thatyour printeris selected inthe Name
drop-down list.
Chapter 4 Printer Software 42
Page 43

2. Click Printer, Setup, Properties,orOptions. (You may need
to click a combination of these buttons.) The Document
Properties window appears, and you see the Layout and
Paper/Quality menus. These menus contain the printer
driver settings.
Chapter 4 Printer Software 43
Page 44

3. To view a menu, click the corresponding tab at the top of the
window. See “Changing the printer driver settings” on page
46 to change the settings.
Accessing the printer driver from the Start menu
Follow these steps to access the printer driver from the Start
menu:
Note:
The screen shots used in this procedure are from the Windows 2000
operating system. They may vary in appearance from what actually
appears on your screen; however, the instructions are the same.
1. Click the Start button, and then point to Settings.
2. Click Printers.
Chapter 4 Printer Software 44
Page 45

3. Right-click your printer icon, and click PrintingPreferences
(in Windows XP or 2000) or DocumentDefaults (in
Windows NT 4.0). The screen displays the Default Document
Properties window, which contains the Layout and
Paper/Quality menus. These menus display the printer
driver settings.
Chapter 4 Printer Software 45
Page 46

When you click Properties in the menu displayed by
right-clicking the printer icon, the printer software window
appears, which includes menus used to make the printer
driver settings.
4. To view a menu, click the corresponding tab at the top of the
window. See “Printer Driver Settings Overview” on page 47
for information on how to change the settings.
Changing the printer driver settings
Your printer driver has two menus from which you can change
the printer driver settings; Layout and Paper/Quality. You can
also change settings on the Utility menu in the printer software.
For an overview of the available settings, see “Printer Driver
Settings Overview” on page 47. You can also view online help by
right-clicking items in the driver and selecting What’sthis?
Chapter 4 Printer Software 46
Page 47

When you finish making your printer driver settings, click OK to
apply the settings, or click Cancel to cancel your changes.
Once you have checked your printer driver settings and changed
them if necessary, you are ready to print.
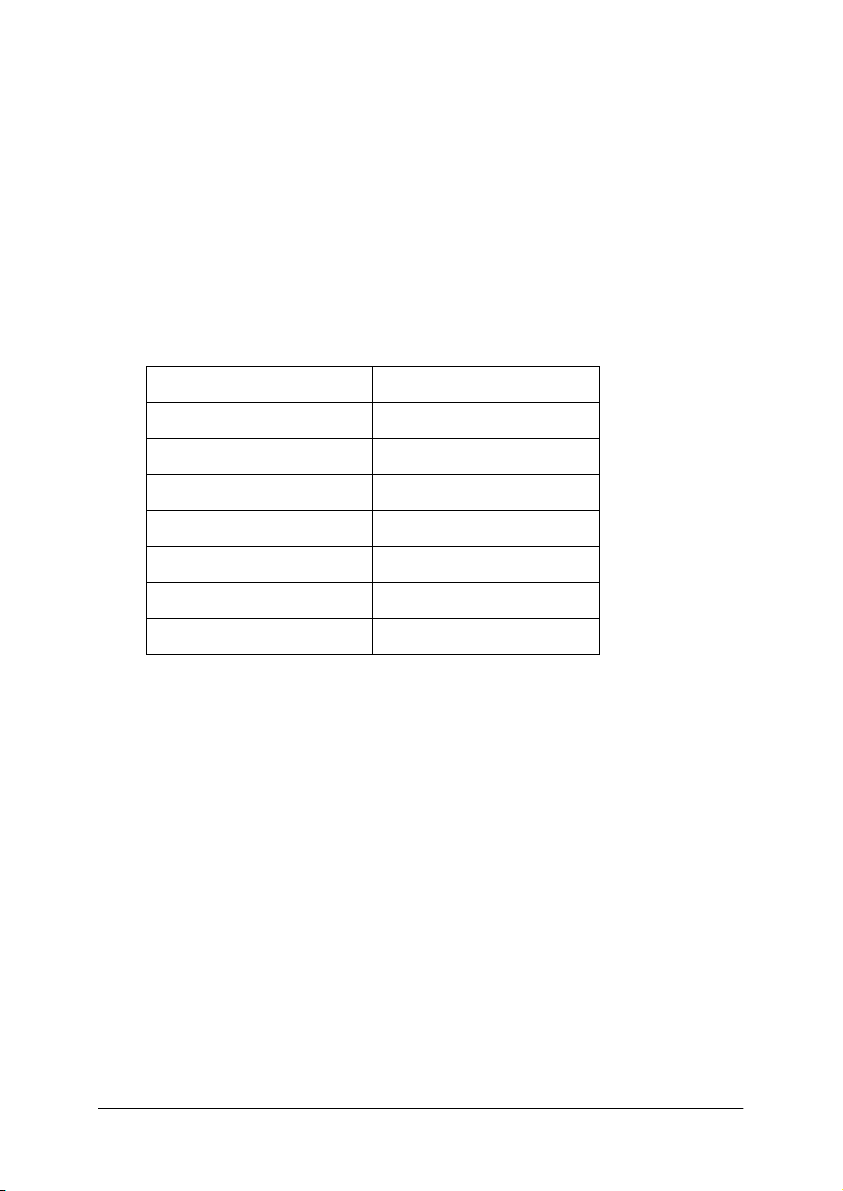
Printer Driver Settings Overview
The following tables show the Windows printer driver settings.
Note that not everysetting isavailable in all versionsof Windows.
Printer settings
Settings Explanations
Paper size Selectthe size of the paper you wanttouse.If you
Orientation SelectPortraitor Landscape.
Paper source Selectthe paper source you wanttouse.
Resolution/
Graphics
Resolution
DitheringYoucan leave thisoption settoFine,which isthe
Intensity/
Intensity Control
Printquality Selectaprintquality optionfrom the Printquality list.
do not see your paper size, use the scroll bar to scroll
through the list.
Selectthe printing resolutionyou want.The higherthe
resolution you select, the more detailed your printout
will be;however, increasingtheresolution slows
printing.
default setting, or selectanother ditheringpattern
dependingon the kind of printoutyou want.
Move the slider to make your printoutlighter or
darker.
If you setHi-speed to On,you will enter bidirectional
printingmode and printingspeed will increase.
SettingHi-speed to Off will return the printer to
unidirectional printingmode.Printingspeed will
decrease,butprintingprecision will improve.Printing
with thedefault settings usesthe settingsstored inthe
printer.
Chapter 4 Printer Software 47
Page 48

Settings Explanations
EPSON Status
Monitor 3
Monitoring
Preferences
Paper/OutputCheckthe Paper Size,Orientation,and Paper Source
Halftone Clickthisbutton to setthe brightness and contrast,
HalftoningSelectthe type of halftoningtouse when printing
Printer Fonts
Support
Youcan access EPSON StatusMonitor 3when you
clickthisbutton.Tomonitor the printer,make surethe
Monitor the printingstatus checkboxisselected.
Clickthisbutton to open the MonitoringPreferences
dialog box where youcan make settings for EPSON
StatusMonitor 3.
settings you made on the Page Setupmenu and
change them if necessary. Selectthe settingand
then choose an optionfrom the Change Settinglist
box.
inputtheRGBgamma,or make other settings. The
Halftone Color Adjustment dialog box appears. For
details, clickthe Help buttoninthis dialog box.
graphics. To letthe printer determine the best
halftone quality, use Auto Select.
Selectacharacter tablegrouptouse.Youcan select
one of three character table groups, Standard,
Expanded,and None (BitImage printing).
When Standard or Expanded isselected,the printer
usesthedevice fonts. Expanded includesmore fonts
than Standard.
When None isselected,the printer usesbitmap
images instead of thedevice fonts.
Fordetails on thefonts whichare included in each
table,see “Electronic” on page 150.
Chapter 4 Printer Software 48
Page 49

Monitoring settings
Settings Explanations
EPSON Status
Monitor 3
Monitoring
Preferences
Youcan access EPSON StatusMonitor 3when you
clickthisbutton.Tomonitor the printer,make surethe
Monitor the printingstatus checkboxisselected.
Clickthisbutton to open the MonitoringPreferences
dialog box where youcan make settings for EPSON
StatusMonitor 3. See “Setting upEPSONStatus
Monitor 3” on page 50 for more information.
Using EPSON Status Monitor 3
EPSON Status Monitor 3 is available for Windows XP, Me, 98,
2000,and Windows NT 4.0. Itallows youto monitoryour printer’s
status, alerts you when printer errors occur, and provides
troubleshooting instructions when needed.
EPSON Status Monitor 3 is available only when:
❏ The printer is connected directly to the host computer via the
parallel port [LPT1].
❏ Your system is configured to support bidirectional
communication.
EPSON Status Monitor 3 is installed when you install the printer
driver as described in“Installing the Printer Software”on page 13.
Note:
If you install the driver using the “Point and Print” method, EPSON
Status Monitor3 may not functionproperly. Ifyou wantto use EPSON
Status Monitor 3, reinstall the driver as described in “Installing the
Printer Software” on page 13.
Chapter 4 Printer Software 49
Page 50

Before using EPSON Status Monitor 3, be sure to read the
README file on the User CD-ROM. This file contains the latest
information on the utility.
Setting up EPSON Status Monitor 3
Follow these steps to set up EPSON Status Monitor 3:
1. Open the Utility menu as described in “Using the Printer
Driver with Windows Me and 98” on page 36 or “Using the
PrinterDriver with Windows XP,2000, and WindowsNT 4.0”
on page 41.
2. Click the MonitoringPreferences button. The Monitoring
Preferences dialog box appears.
Chapter 4 Printer Software 50
Page 51

3. The following settings are available:
SelectNotification Displays theerroritem checkboxOn/Off status.
Turn on this checkboxtodisplay the selected
errornotification.
SelectShortcut
Icon
Receiveerror
notificationfor
shared printers
Allow monitoring
of shared printer
The selected iconis displayed in the systemtray
on the taskbar on thecomputer screen.The
setting’s exampleisshown on theright window.
By clickingthe shortcut icon,youcan access
the MonitoringPreferences dialog box easily.
Errornotificationfor ashared printer can be
received when this checkboxisselected.
When this checkboxisselected,ashared
printer can be monitored by other PCs.
Note:
Click the Default button to revert all items to the default settings.
Accessing EPSON Status Monitor 3
Do one of the following to access EPSON Status Monitor 3;
❏ Double-click the printer-shaped shortcut icon on the taskbar.
To add a shortcut icon to the taskbar, go to the Utility menu
and follow the instructions.
❏ Open the Utility menu, then click the EPSON StatusMonitor
3 icon. To find out how to open the Utility menu, See “Using
the Printer Driver with Windows Me and 98” on page 36 or
“Using the Printer Driver with Windows XP, 2000, and
Windows NT 4.0” on page 41.
Chapter 4 Printer Software 51
Page 52

When youaccess EPSON StatusMonitor 3 asdescribed above, the
following printer status window appears.
You can view printer status information in this window.
Setting Up Your Printer on a Network
Sharing the printer
This section describes how to share the printer on a standard
Windows network.
The computers on a network can share a printer that is directly
connected toone ofthem. Thecomputer that is directly connected
to the printer is the printer server, and the other computers are
the clients which need permission to share the printer with the
printer server. The clients share the printer via the printer server.
According to the versions of Windows OS and your access rights
on the network, perform the appropriate settings of the printer
server and clients.
Setting the printer server
❏ For Windows Me or 98, see “With Windows Me or 98” in
“Setting up your printer as a shared printer” on page 54.
Chapter 4 Printer Software 52
Page 53

❏ For Windows XP, 2000, or Windows NT 4.0, see “With
Windows XP, 2000, or Windows NT 4.0” in “Setting up your
printer as a shared printer” on page 56.
Setting the clients
❏ For Windows Me or 98, see “With Windows Me or 98” in
“Setting for the clients” on page 58.
❏ For Windows XP or 2000, see “With Windows XP or 2000” in
“Setting for the clients” on page 60.
❏ For Windows NT 4.0, see “With Windows NT 4.0” in “Setting
for the clients” on page 63.
Note:
❏ When sharing the printer, be sure to set EPSON Status Monitor 3
so that the shared printer can be monitored on the printer server.
See “Setting up EPSON Status Monitor 3” on page 50.
❏ When you are Windows shared printer user in a Windows Me or
98 environment, on the server, double-click the Network icon in
Control panel and make sure that the “File and printer sharing for
Microsoft Networks” component is installed. Then, on the server
and clients, make sure that the “IPX/SPX-compatible Protocol” or
the “TCP/IP Protocol” is installed.
❏ The printer server and clients should be set on the same network
system, and they should be under the same network management
beforehand.
❏ The on-screen displayson the following pages may differ depending
on the version of Windows OS.
Chapter 4 Printer Software 53
Page 54

Setting up your printer as a shared printer
With Windows Me or 98
When the printer server’s OS is Windows Me or 98, follow these
steps to set the printer server.
1. Click Start,pointtoSettings, and click Control Panel.
2. Double-click the Network icon.
3. Click File and PrintSharing on the Configuration menu.
4. Select the Iwanttobe able to allow otherstoprinttomy
printer(s). check box, then click OK.
5. Click OK to accept the settings.
Note:
❏ When “Insert the Disk” appears, insert the Windows Me or 98
CD-ROM in the computer. Click OK and then follow the
on-screen instructions.
❏ When the prompt to restart the computer appears, restart the
computer and continue with the settings.
6. Double-click the Printers icon on the control panel.
7. Right-click your printer icon, and click Sharing in the menu
that appears.
Chapter 4 Printer Software 54
Page 55

8. Select Shared As, type the name in the Share Name box, and
click OK. Type a Comment and Password if needed.
Note:
❏ Do not use spaces or hyphens for the share name, or an error
may occur.
❏ When sharing the printer, be sure to set EPSON Status
Monitor 3 so that the shared printer can be monitored on the
printer server. See “Setting up EPSON Status Monitor 3” on
page 50.
You need to set the client computers so that they can use the
printer on a network. See the following pages for details.
❏ “With Windows Me or 98” in “Setting for theclients” on page
58
❏ “With Windows XP or 2000” in “Setting for the clients” on
page 60
❏ “With WindowsNT 4.0”in “Setting for the clients” onpage 63
Chapter 4 Printer Software 55
Page 56

With Windows XP, 2000, or Windows NT 4.0
When the printer server’s OS is Windows XP, 2000, or Windows
NT 4.0, follow these steps to set the printer server.
Note:
You must access Windows XP, 2000, or Windows NT 4.0 as the
Administrators of the local machine.
1. For a Windows 2000 or Windows NT 4.0 printer server, click
Start,pointtoSettings,andclickPrinters.
For a Windows XP printer server, click Start,pointtoPrinters
and Faxes. For Windows XP Home edition users, point to
Control panel first, then click Printersand Faxes.
2. Right-click your printer icon, and click Sharing in the menu
that appears.
For Windows XP, if the following menu appears, click either
NetworkSetupWizard or If youunderstand the security
risks butwanttoshare printerswithout runningthe wizard,
clickhere.
In either case, follow the on-screen instructions.
Chapter 4 Printer Software 56
Page 57

3. For a Windows 2000 or Windows NT 4.0 printer server, select
Shared (for Windows 2000) or Shared as (for Windows NT
4.0), then type the name in the Share name box and click OK.
For a Windows XP printer server, select Share thisprinter,
then type the name in the Share name box and click OK.
Note:
Do not use spaces or hyphens for the share name, or an error may
occur.
You need to set the client computers so that they can use the
printer on a Network. See the following pages for details:
❏ “With Windows Me or 98” in “Setting for theclients” on page
58
❏ “With Windows XP or 2000” in “Setting for the clients” on
page 60
Chapter 4 Printer Software 57
Page 58

❏ “With WindowsNT 4.0”in “Setting for the clients” onpage 63
Setting for the clients
This section describes how to install the printer driver by
accessing the shared printer on a network.
Note:
❏ To share the printer on a Windows network, you need to set the
printer server. For details, see “Setting up your printer as a shared
printer” on page 54 (Windows Me or 98) or “With Windows XP,
2000, or Windows NT 4.0” on page 56 (Windows XP, 2000, or
Windows NT 4.0).
❏ This section describes how to accessthe shared printer on a standard
network system using the server (Microsoft workgroup). If you
cannot access the shared printer due to the network system, ask the
administrator of the network for assistance.
❏ This section describes how to install the printer driver by accessing
the shared printer from the Printers folder. You can also access the
shared printer from Network Neighborhood or My Network on the
Windows desktop.
❏ When you want to use the EPSON Status Monitor 3 at clients,you
have to install both of the printer driver and the EPSON Status
Monitor 3 in each client from the CD-ROM.
With Windows Me or 98
Follow these steps to set Windows Me or 98 clients.
1. Click Start,pointtoSettings, and click Printers.
2. Double-click the Add Printer icon, then click Next.
3. Select Networkprinter,thenclickNext.
Chapter 4 Printer Software 58
Page 59

4. Click Browse, and the Browse for Printer dialog box appears.
Note:
You can also type “\\(the name of the computer that is locally
connected to theshared printer)\(the sharedprinter’s name)” inthe
Network path or queue name.
5. Click the computer or server that is connected to the shared
printer, and the name of the shared printer. Then click OK.
Note:
The name of the shared printer may be changed by the computer or
server that is connected to the shared printer. To make sure of the
name of the shared printer, ask the administrator of the network.
6. Click Next.
Note:
❏ If the printer driver is installed in the client beforehand, you
need to select the new printer driver or the current printer
driver. When the prompt to select the printer driver appears,
select the printer driver according to the message.
❏ If the printer server’s OS is Windows Me or 98, go to the next
step.
Chapter 4 Printer Software 59
Page 60

❏ If the printer server’s OS is not Windows Me or 98, go to
“Installing the printer driver from the CD-ROM” on page 65.
7. Make sure of the name of the shared printer, and select
whether to use the printer as the default printer or not. Click
OK, and then follow the on-screen instructions.
Note:
You canchange the shared printer’s name so that it appears only on
the client computer.
With Windows XP or 2000
Follow these steps to set Windows XP or 2000 clients.
You can install the printer driver ofthe sharedprinter, if you have
Power Users or more powerful access rights even if you are not
the Administrator.
1. For Windows 2000 clients, click Start,pointtoSettings,and
click Printers.
For Windows XP clients, click Start,pointtoPrintersand
Faxes. ForWindows XP Homeedition users, pointto Control
panel first, then click Printersand Faxes.
2. For Windows 2000, double-click the Add Printer icon, then
click Next.
For Windows XP, click the Add aprinter in the Printer Tasks
menu.
Chapter 4 Printer Software 60
Page 61

3. Select Networkprinter (for Windows 2000) or A network
printer,or aprinter attached to another computer (for
Windows XP), then click Next.
4. For Windows 2000, select Type the printer name,orclick
Next to browsefor aprinter and type the nameof theshared
printer, then click Next.
Note:
❏ You can also type “\\(the name of the computer that is locally
connected to the shared printer)\(the shared printer’s name)”
in Network path or queue name.
❏ You do not necessarily need to type the name of the shared
printer.
Chapter 4 Printer Software 61
Page 62

For Windows XP, select Browsefor aprinter.
5. Click the icon of the computer or server that is connected to
the shared printer, and the name of the shared printer. Then
click Next.
Note:
❏ The name of the shared printer may be changedby the computer
or server that is connected to the shared printer. To make sure
of the name of the shared printer, ask the administrator of the
network.
Chapter 4 Printer Software 62
Page 63

❏ If the printer driver is installed in the client beforehand, you
need to selecteither thenew printer driver or the currentprinter
driver. When the prompt to select the printer driver appears,
select the printer driver according to the message.
❏ If the printerserver’s OSis WindowsXP or 2000, goto thenext
step.
❏ If the printer server’s OS is not Windows XP or 2000, or is
Windows Me or 98, go to “Installing the printer driver from
the CD-ROM” on page 65.
6. For Windows 2000, select whether to use the printer as the
default printer or not, then click OK.
7. Make sure of the settings, then click Finish.
.
With Windows NT 4.0
Follow these steps to set Windows NT 4.0 clients.
You can install the printer driver ofthe sharedprinter, if you have
Power Users or more powerful access rights even if you are not
the Administrator.
1. Click Start,pointtoSettings, and click Printers.
2. Double-click the Add Printer icon.
Chapter 4 Printer Software 63
Page 64

3. Select Networkprinter server,thenclickNext.
4. Click the icon of the computer or server that is connected to
the shared printer and the name of the shared printer. Then
click OK.
Note:
❏ You can also type “\\(the name of the computer that is locally
connected to the shared printer)\(the shared printer’s name)”
in Network path or queue name.
❏ The name of the shared printer may be changedby the computer
or server that is connected to the shared printer. To make sure
of the name of the shared printer, ask the administrator of the
network.
❏ If the printer driver is installed in the client beforehand, you
need to select the new printer driver or the current printer
driver. When the prompt to select the printer driver appears,
select the printer driver according to the message.
❏ If the printer server’s OS is Windows NT 4.0, go to the next
step.
Chapter 4 Printer Software 64
Page 65

❏ If theprinter server’sOS isnot WindowsNT 4.0,or isWindows
Me or 98, go to “Installing the printer driver from the
CD-ROM” on page 65.
5. Select whether to use the printer as the default printer or not,
then click OK.
6. Click Finish.
Installing the printer driver from the CD-ROM
This section describes how to install the printer driver in the
clients when the computers of the server and clients use different
OS.
The on-screen displays on the following pages may differ
depending on the version of Windows OS.
Note:
❏ When installingin Windows XP, 2000,or Windows NT 4.0clients,
you must access Windows XP, 2000, or Windows NT 4.0 with the
Administrator.
❏ If the computers of the server and clients use the same OS, you do
not have to install the printer drivers from the CD-ROM.
1. Access the shared printer and a prompt may appear. Click
OK, and then follow the on-screen instructions to install the
printerdriverfromtheCD-ROM.
Chapter 4 Printer Software 65
Page 66

2. Insert the CD-ROM, then the EPSON Installation Program
dialog box appears. Cancel the dialog box by clicking
Cancel, then type the appropriate drive and folder names in
which the printer driver for clients is located, then click OK.
When installing drivers in Windows XP or 2000, “Digital
Signature is not found.” may appear. Click Yes (for Windows
2000) or Continue Anyway (for Windows XP) and continue
installing.
The folder name differs depending on the OS being used.
Client’s OS Folder Name
Windows Me or 98 \<Language>\WIN98
Windows XP, 2000 \<Language>\WIN2000
Windows NT 4.0 \<Language>\WINNT40
3. Select the name of the printer, then click OK.Thenfollowthe
on-screen instructions.
Chapter 4 Printer Software 66
Page 67

Canceling Printing
If the printouts are not what you expected and display incorrect
or garbled characters or images, you may need to cancel printing.
When the printer icon is displayed on the taskbar, follow the
instructions below to cancel printing.
1. Double-click the printer iconon the taskbar, thenclick Purge
PrintDocuments on the Printer menu.
2. When canceling all printing documents, select Purge Print
Documents (For Windows Me or 98) or CancelAll
Documents (For Windows XP, 2000, or Windows NT 4.0) on
the Printer menu.
When canceling a specified document,select a document you
want to cancel and select CancelPrinting (For Windows Me
or 98) or Cancel (For Windows XP, 2000, or Windows NT
4.0) on the Document menu.
The printing job is canceled.
Chapter 4 Printer Software 67
Page 68

Uninstalling the Printer Software
When you wish to reinstall or upgrade the printer driver,
uninstall the printer driver that has been installed already.
Uninstalling the printer driver and EPSON Status Monitor 3
1. Quit all applications.
2. Click Start,pointtoSettings, and click Control Panel.
3. Double-click the Add/Remove Programs icon.
Chapter 4 Printer Software 68
Page 69

4. Select EPSON Printer Software, and click the Add/Remove.
1
2
Note:
When using the Windows XP or Windows 2000 computer, click
Change or Remove Programs, select the EPSON Printer
Software, then click Change/Remove.
Chapter 4 Printer Software 69
Page 70

5. Click the Printer Model menu, select the EPSON PLQ-20
Advanced icon, then click OK.
Note:
The printer driver is designed for PLQ-20, but is compatible and
can be installed for PLQ-20M.
6. If you uninstallMonitored Printers, clickYes in the displayed
dialog box.
Note:
You can uninstall only the Monitored Printers utility of EPSON
Status Monitor 3. When the utility is uninstalled, you cannot
change the setting of Monitored Printers from EPSON Status
Monitor 3.
7. If you uninstall EPSON Status Monitor 3, click Yes in the
displayed dialog box.
8. Follow the on-screen instructions.
Chapter 4 Printer Software 70
Page 71

Uninstalling the USB device driver
When you connect the printer to your computer with a USB
interface cable, the USB device driver is also installed. When you
uninstalled the printer driver, you also need to uninstall the USB
device driver.
Follow these steps to uninstall the USB device driver.
Note:
❏ Uninstall the printer driver before uninstalling the USB device
driver.
❏ Once you uninstalled theUSB device driver, you cannot access any
other Epson printers connected with a USB interface cable.
1. Follow steps 1 through 3 of “Uninstalling the Printer
Software” on page 68.
Chapter 4 Printer Software 71
Page 72

2. Select EPSON USB Printer Devices,andclickAdd/Remove.
1
2
Note:
❏ EPSON USB Printer Devices appears only when the printer is
connected to Windows Me or 98 with a USB interface cable.
❏ If the USB device driver is notinstalled correctly, EPSON USB
Printer Devices may not appear. Follow these steps to run the
“Epusbun.exe” file in the CD-ROM.
1. Insert the CD-ROM in your computer’s CD-ROM drive.
2. Access the CD-ROM drive.
3. Double-click the Win98 folder.
4. Double-click the Epusbun.exe icon.
3. Follow the on-screen instructions.
To reinstall a printer driver, see “Installing the Printer Software”
on page 13.
Chapter 4 Printer Software 72
Page 73

Chapter 5
Control Panel
ButtonsandLights........................................ 74
Functionsauxiliary................................... 77
CompressPrintingMode .................................. 79
AboutYourPrinter’sDefaultSettings ....................... 79
Understandingdefaultsettings ........................ 80
Changingdefaultsettings............................. 94
AligningVerticalLinesinYourPrintout..................... 96
Chapter 5 Control Panel 73
Page 74

Buttons and Lights
a
a Readylight (Yellow)
❏ On when the printer is ready to receive or already
receiving data.
❏ Flashes when an error has occurred during a printing
operation.
cd eb
bPower light (Green)
❏ On for a few seconds when the printer is turned on.
❏ On when the printer is paused.
Chapter 5 Control Panel 74
Page 75

c F1/Ejectbutton
❏ Executesfunctions whichare assigned to the F1/Eject
button when the printer is in the PR2 mode. You can
assign optional functions to it by programming them
in the PR2 mode.
❏ Ejects paper when the printer is in the ESC/P or IBM
PPDS mode.
❏ When the printer enters the default setting mode, the
button works as a button to select the menu. You can
select the next menu by pressing this button. See
“Changing default settings” on page 94.
F1/Ejectlight (Yellow)
❏ Works as programmed onlywhen the printer is in the
PR2 mode. You can program it when it is on, off or
flashes in the PR2 mode.
d Offline button
❏ Alternates the printer activity between offline and
online.
❏ When the printer enters the default setting mode, the
button works as a button to select the menu. You can
select the previous menu by pressing this button. See
“Changing default settings” on page 94.
Offline light (Yellow)
❏ On when the printer is offline.
Chapter 5 Control Panel 75
Page 76

e F2 button
❏ Executes functions which are assigned to the F2
button when the printer is in the PR2 mode. You can
assign optional functions to it by programming them
in the PR2 mode.
❏ When theprinter enters thedefault settingmode, you
can change the setting by pressing this button. See
“Changing default settings” on page 94.
F2 light (Yellow)
❏ Works as programmed onlywhen the printer is in the
PR2 mode. You can program it when it is on, off or
flashes in the PR2 mode.
Chapter 5 Control Panel 76
Page 77

Functions auxiliary
This section describes functions executed by turning on the
printer while holding one or more buttons. These functions are
shown in the following table and explained in detail after the
table.
Switch Function
F2* Self-test
F1/Eject&F2 Default setting
F1/Eject&Offline Compress printingmode
Offline Data dump
Open thecover &F1/EjectPaper removing
F2** Bidirectional adjustment
F2*** Top-of-formadjustment
F2**** Printingstartposition adjustment
*Toenter thismode,press the F1/Ejectand F2 button while the F1/Eject,
Offline,and F2 lights are flashing.
** To enter thismode,press theF1/Ejectbutton whilethe F1/Eject, Offline,and
F2 lights are flashing.
*** To enter thismode,press the Offline button while the F1/Eject, Offline,and
F2 lights are flashing.
**** To enter thismode,press the F2 button while the F1/Eject, Offline,and F2
lights are flashing.
Self-test
Prints theself-test. See “Printinga Self-Test” on page 102for more
information.
Default setting
Starts the default setting mode. See “Changing default settings”
on page 94 for more information.
Chapter 5 Control Panel 77
Page 78

Compress printing mode
Starts the compress printing mode. See “Compress Printing
Mode” on page 79 for more information.
Data dump
Starts the data dump mode, in which all input data is printed as
hexadecimal numbers and corresponding characters. See
“Printing Hex Dump” on page 103 for more information.
Paper removing
Starts the paper removing mode. See “Clearing Paper Jams” on
page 119 for instruction on feeding paper.
Bidirectional adjustment
Starts the bidirectional adjustment mode. See “Aligning Vertical
Lines in Your Printout” on page 96 for more information.
Top-of-form adjustment
Starts the top-of-form position adjustment mode. See“Adjusting
the top-of-form position” on page 31 for more information.
Printing start position adjustment
Starts theprinting startposition adjustmentmode. See“Adjusting
the printing start position” on page 33 for more information.
Chapter 5 Control Panel 78
Page 79

Compress Printing Mode
You can compress your printing data to the ratio of 75% by
following the steps below.
Note:
Compress printing mode is effective only when the printer is in the
ESC/P mode.
1. Turn off the printer.
Caution:
Whenever you turn off the printer, wait at least five seconds
c
before turning it back on; otherwise you may damage the
printer.
2. Turn on the printer while holding the F1/Eject and Offline
buttons. The printer makes two short beeps and enters the
compress printing mode.
About Your Printer’s Default Settings
The default settings control many printer functions. While you
can often set these functions through your software or printer
driver, you may sometimes need to change a default setting from
the printer’s control panel using the default-setting mode.
For a detailed description of the settings you can change in the
default-setting mode, see “Understanding default settings” on
page 80. For instructions on changing the settings,see “Changing
default settings” on page 94.
Chapter 5 Control Panel 79
Page 80

Understanding default settings
This section describes the settings and options available in the
default-setting mode.
All items available in the default setting mode are divided into
three groups depending on the applications. You can select the
threemainmenuswhilemakingthedefaultsettingsandthen
change the setting of each item which belongs to the menu you
selected. On the Common Settings menu, you can change the
settings which are effective in all three application modes. On the
PR2Mode Settings menu, you can change the settingswhich are
active in the PR2 mode. Then you can change the settings active
in the ESC/P and IBM PPDS modes on the Other Emulation
Settings menu.
These settings are shown in the following tables and explained in
detail after the each table.
To access and change a setting, see “Changing default settings”
on page 94.
Chapter 5 Control Panel 80
Page 81

Default-setting mode
Common Settings
Menu Values (default in bold)
Software PR2, ESC/P2, IBM PPDS
High speed draft Off,On
I/F mode * Auto,Parallel, Serial, USB
Auto I/F waittime (Seconds) 10,30
ParallelI/Fbidirectional mode Off, On
Packetmode ** Auto,Off
Baud rate (bps) 19200, 9600, 4800, 2400, 1200, 600, 300
Data length (bit) 8,7
Parity None,Odd,Even
DSR (PR2) Off,On
DCD (PR2) Off,On
Passbook Off, On
Binding Horizontal,Vertical
Thin paper Off,On
Buzzer Off, On
Paper width measurement After loading,Before printing
Right paper edgedetection Off, On
Low-noise mode Off,On
Broken pin compensation Off,On
Broken pin number 1, 2, 3, 4, 5, 6, 7, 8, 9, 10, 11, 12, 13, 14, 15,
16, 17, 18, 19, 20, 21, 22, 23, 24
Roll Paper Off,On
Rear Paper Guide Off,On
Chapter 5 Control Panel 81
Page 82

*When the printer turnsoninAuto I/F mode and PR2mode,thismode isset
to Serial.
** When the printer turnsoninthe PR2mode,Packetmode issetOff.
Software
This setting allows you to select the software format. When you
select ESC/P2, the printer operates in the EPSON ESC/P mode.
When youselect PR2 or IBM PPDS, theprinter emulates anOlivetti
or IBM printer.
High speed draft
In PR2 mode, this option is available in any pitch.
In other modes, this option is available when the pitch is 10 or 12
cpi (characters per inch). When you choose On,theprinterprints
up to 480 cps (characters per second) at 10 cpi. When you choose
Off, the printer prints up to 360 cps at 10 cpi.
I/F mode
The printer provides built-in slots for three kinds of interfaces;
Parallel, Serial, and USB. You can choose Auto (automatic),
Parallel, Serial,orUSB, for the interface mode. When you select
Auto, the printer automatically selects the interface that is
receiving data, and uses that interface until the end of the print
job. The Auto setting allows you to share the printer among
multiple computers without changing the interface mode. When
the printer turns on in Auto I/F mode and PR2 mode, this mode
is set to Serial.
If only one computer is connected to the printer, you can select
Parallel, Serial,orUSB depending on which interface your
computer uses.
Chapter 5 Control Panel 82
Page 83

Auto I/F wait time (Seconds)
When the printer is in the auto interface mode and it receives no
data from the currently selected interface for the amount of time
specified with this setting, it determines which interface is
receiving data and switches to that interface. You can specify
either 10 or 30 for the auto interface wait time. When the printer
turns on in the PR2 mode, this mode is not activated.
Parallel I/F bidirectional mode
The Parallel Interface bidirectional transfer mode is used when
this feature is set to On. If bidirectional transfer mode is
unnecessary, select Off.
Packet mode
Make sure to select Auto when you print from Windows
applications using the printer driver included on the User
CD-ROM. Set this feature to Off if you have connection troubles
while printing from applications based on other operating
systems such as DOS. When the printer turns on in the PR2 mode,
this mode is set to Off.
Baud rate (bps)
Usethisoptiontosetthedatatransferrate(baud)fortheserial
interface. The baud rate is measured in bits per second (bps).
Data length (bit)
Set the data length of the serial interface to 7 or 8.
Parity
When this option is set to None, parity checking is disabled. The
parity bit, if used, provides a basic form of error detection.
Chapter 5 Control Panel 83
Page 84

DSR (PR2)
When you select On, DSR (Data Set Ready) is activated.
This option is available only in the PR2 mode.
DCD (PR2)
When you select On, DCD (Data Carrier Detector) is activated.
This option is available only in the PR2 mode.
Passbook
When you use single sheet or passbook, set this option to On.
When you use multipart forms, set this option to Off.
Binding
You need to set themethod for bindingwhen you usea passbook.
Select Horizontal for a horizontal-fold passbook or Vertical for a
vertical-fold passbook.
Thin paper
When you use thin paper, set this option to On.Thismodeis
activated when you select On and the Passbook mode is set to
Off.
Buzzer
If you set this feature to On, the printer beeps when an error
occurs. See “Using the error indicators” on page 99 for more
information on printer errors. If you do not want the printer to
beep, select Off.
Chapter 5 Control Panel 84
Page 85

Paper width measurement
You can set the timing when the printer measures the width of
the paper. When you select After loading,theprintermeasures
the width just after it loads the paper. When you select Before
printing, it makes the measurement just before printing the first
line.
Right paper edge detection
This setting allows you to determine whether the printer prints
excess data when the data is longer than the paper width. When
you select On, the excess data isnot printed.When you selectOff,
the printer prints the excess data on the next line.
Low-noise mode
When thismode is setto On, the noise is reduced,but theprinting
speed is slower.
Broken pin compensation
When this feature is On, printing is done at normal quality if one
of the 24 pins is broken. You need to set the broken pin number
at the Broken pin number setting.
Broken pin number
Select the pin number of the broken pin. The broken pin number
is shown on the sheet of current default settings that can be
printed in the default settings mode. The gap on the sloping line
above the pin numbers shows the broken pin number.
Chapter 5 Control Panel 85
Page 86

Roll Paper
When you use roll paper with the optional roll paper holder, set
this option to On. This mode is activated when you selectOn and
the Passbook mode is set to Off.
When this option is set to Off and paper is left in the printer, the
printer ejects the paper when the printer is turned on or the cover
is opened. When this option is set to On, the printerdoes not eject
the paper.
Rear Paper Guide
When you use theoptional rearpaper guide,set thisoption toOn.
When you select On and the Roll Paper mode is also set to On,
the Roll Paper mode is not available.
PR2 Mode Settings
Menu Values (default in bold)
Emulation PR2,PR40+, PR54+
FontDraft, NLQ1, NLQ2, LQ2, OCR-A, OCR-B
Pitch(cpi) 10, 12, 15, 16.6, 13, 17.1
Character table Olivetti,PC,ISO
Chapter 5 Control Panel 86
Page 87

Menu Values (default in bold)
Olivetticharacter table ST15INT (International), ST15ITA (Italy),
ST15P (Portugal), ST15USSR (USSR),
ST15SDC (SDC),ST15E (Spain 1),
ST15E2 (Spain 2),
ST15S/SF (Sweden/Finland),
ST15CH (Switzerland),
ST31 (Olivetti TCV 370), ST15TR (Turkey),
ST15USA (U.S.A.),
ST15YU (Yugoslavia),
ST15ARABIC (Arabic),
ST15CND (Canada),
ST15CIBC (CIBC),
ST15DK/N (Denmark/Norway),
ST15IL (Israel), ST15F (France),
ST15UK (Great Britain),
ST15D (Germany), ST15GR (Greece)
PC character table PC437 (INT), PC210 (GR), PC220 (E),
PC850 (LATIN 1), PC851 (GREEK),
PC 852 (LATIN 2),
PC855 (CYRILLIC), PC857 (LATIN 5),
PC858 (LATIN EURO), PC860 (P),
PC862 (IL),
PC863 (CANADIAN FRENCH),
PC864 (ARABIC), PC865 (NORDIC),
PC866 (CYRILLIC),
DK/N (Denmark/Norway), DK (Denmark),
PC1252 (PC-WIN LATIN1),
PC1250 (PC-WIN LATIN2)
ISO character table CPOLUNIX, ISO 8859/15, ISO 8859/1,
8-pin bit imageresolution 72, 96
Condensed pitch(cpi) 16.6, 17.1
Vertical resolution 1/216", 1/240"
Auto CR Off,ON
Columns 90, 94
TOF positionfor PR40+ Off,On
Magnetic standard * DIN/ISO, ANSI, IBM3604, IBM4746,
ISO 8859/2, ISO 8859/5, ISO 8859/6,
ISO 8859/7, ISO 8859/8, ISO 8859/9
ISO7811, HT2751CIZ, ISO8484
Chapter 5 Control Panel 87
Page 88

Menu Values (default in bold)
End sentinel*** C,F
Displacement* Standard, +10, +20
Duplicate * Off,On
Retry* 1,3
*These settings are available only for PLQ-20M.
** Thissetting is effective,when theformat of IBM3604 or IBM4746 isselected.
Emulation
You can select emulation of PR2, PR40+,orPR54+.
Font
This setting allows you to set one of the six fonts.
Pitch (cpi)
This setting allows you to set one of six pitches.
Character table
You can set one of the three character tables; Olivetti, PC, ISO.
Olivetti character table
You canselect afont. The settingyou select in thistable is effective
only when you have chosen Olivetti in the Character table
setting.
PC character table
You canselect afont. The settingyou select in thistable is effective
only when you have chosen PC in the Character table setting.
Chapter 5 Control Panel 88
Page 89

ISO character table
You canselect afont. The settingyou select in thistable is effective
only when you have chosen ISO in the Character table setting.
8-pin bit image resolution
You can select 72 or 96 as the default value of the 8 pin bit image
resolution.
Condensed pitch (cpi)
You can set the pitch that is used in the condensed mode.
Vertical resolution
This setting allows you to select the vertical resolution.
Auto CR
When auto carriage return is set to On, each line feed (LF) code
is accompanied by a carriage return (CR) code so the printer
moves the next printing start position to the left margin. When
this setting is set to Off, you must send a CR code after the line
feed code to move the printing start position to the left margin.
Columns
You can select the number of columns in one line.
TOF position for PR40+
When you select On in this option and PR40+ in Emulation,the
top-of-form position is set to 6.5 mm which is unique to the PR40+
mode. When you select Off and PR40+, the top-of-form position
is set to the same position as in the PR2 and PR54+ modes (the
factory set default is 4.2 mm).
Chapter 5 Control Panel 89
Page 90

Magnetic standard
You can select the magnetic standard in this setting.
This feature is available only for PLQ-20M.
End sentinel
You can select C or F as the letter which will be attached to the
end of the data recorded on magnetic stripes.
This setting is effective only when the format for IBM3604 or
IBM4746 is selected in the Magnetic standard setting.
This feature is available only for PLQ-20M.
Displacement
This option allows you to select the displacement value of the
magnetic stripe.
This feature is available only for PLQ-20M.
Duplicate
Whenthis featureis setto On,the magnetic stripesrecord the data
in duplicate.
This feature is available only for PLQ-20M.
Retry
This setting allows you to set the number of times the printer tries
to receive data before it fails.
This feature is available only for PLQ-20M.
Chapter 5 Control Panel 90
Page 91

Other Emulation Settings
Menu Values (default in bold)
Print direction Bi-D., Uni-D., Auto
0slash 0,
FontDraft, Roman,SansSerif,Courier,
Pitch(cpi) 10, 12, 15, 17.1, 20, Proportional
Prestige,Script, OCR-B, Orator,Orator-S,
Script C, Roman T, SansSerif H
Character table Standard model: Italic, PC437, PC850,
International character set for
Italic table
Auto line feed Off,On
Auto CR (IBM PPDS) * Off,On
AGM(IBMPPDS)* Off,On
IBM character table
(IBM PPDS) *
Columns 80, 90, 94
PC860, PC863, PC865, PC861, BRASCII,
Abicomp, Roman 8, ISO Latin 1, PC858,
ISO 8859-15
All other models: Italic, PC437, PC850,
PC437 Greek, PC853, PC855, PC852,
PC857, PC866, PC869, MAZOWIA, Code
MJK, ISO 8859-7, ISO Latin IT, Bulgaria,
PC774, Estonia, ISO 8859-2, PC 866 LAT.,
PC 866 UKR,PC860,PC861, PC865, PC864,
PC APTEC, PC708, PC720, PC AR864,
PC863, BRASCII, Abicomp, Roman 8,
ISO Latin 1, PC858, ISO 8859-15, PC 771,
PC437 Slovenia, PC MC, PC 1250,
PC 1251
Italic U.S.A.,Italic France,Italic Germany,
Italic U.K., Italic Denmark1,Italic Sweden,
Italic Italy, Italic Spain 1
Table2,Table1
Paper loading Auto loading,Dataexists
*These settings are effective when IBM PPDS emulationisselected.
Chapter 5 Control Panel 91
Page 92

Print direction
You can select auto print direction (Auto), bidirectional printing
(Bi-D), or unidirectional printing (Uni-D). Printing is normally
bidirectional; however, unidirectional printing allows for precise
vertical printing alignment.
When set to Auto, the printer analyzes the data and uses
unidirectional printing for any lines which require vertical
printing alignment.
0slash
The zero character has a slash ( ) when this feature is set to On;
it has no slash (0) when set to Off. The slash allows you to easily
distinguish between the uppercase letter “O” and a zero.
Font
This setting allows you to set one of the 12 fonts.
Pitch (cpi)
This setting allows you to set one of six pitches.
Character table
You canselect among variouscharacter tables.This setting isused
when you print without using the printer driver.
When using the printer driver, change the settings on the printer
driver. For details, see “Printer Driver Settings Overview” on
page 47.
International character set for italic table
You can select among several international character sets for the
italic character table. Each character set contains eight characters
that vary depending on the country or language, so you can
customize the italic table to suit your printing needs.
Chapter 5 Control Panel 92
Page 93

Auto line feed
When auto line feed is set to On, the printer accompanies each
carriage return (CR) code received with a line feed (LF) code.
Auto CR (IBM PPDS)
When auto carriage return is set to On, each line feed (LF) code
or ESC J code is accompanied by a carriage return (CR) code so
the printer moves the next printing start position to the left
margin. When this setting is set to Off, you must send a CR code
after the line feed code to move the printing start position to the
left margin.
This feature is available only in IBM PPDS emulation mode.
A.G.M. (IBM PPDS)
When the alternate graphic mode (A.G.M.) is set to On,theESC
3, ESCA, ESCJ, ESC K,ESC L,ESC Y, ESCZ, andESC * commands
inIBMPPDSemulationmodeworkthesamewayasinESC/P
mode.
This feature is available only in IBM PPDS emulation mode.
IBM character table (IBM PPDS)
Select table2 or table1 for the IBM character table.
This feature is available only in IBM PPDS emulation mode.
Columns
You can select the number of columns in one line.
Paper loading
When you set Auto load,theprinterloadspaperjustafteritis
inserted. When you set Data exists, the printer does not load the
paper until it receives the data.
Chapter 5 Control Panel 93
Page 94

Changing default settings
The following table shows the basic function of each button in the
default setting mode.
Button Basic function
F1/EjectSelects thenext menu parameter.
Offline Selects the previousmenu parameter.
F2 Changesthe value in the selected menu.
Follow these steps to enter the default-setting mode and change
the printer’s default settings:
Note:
❏ Prepare an A4 size sheet of paper before entering the default setting
mode.
❏ You need to load a new sheet of paper each time the printer ejects a
printed sheet from the front slot.
❏ Always close the printer cover before printing. The printer does not
print when the printer cover is open.
1. Turn off the printer.
Caution:
Whenever you turn off the printer, wait at least five seconds
c
before turning it back on; otherwise you may damage the
printer.
2. Turn onthe printer whileholding the F1/Eject andF2 buttons
on the control panel.
Chapter 5 Control Panel 94
Page 95

3. When theReady lightturns on, inserta sheetof A4 paperinto
the front slot. The printer prints the version number and the
language selection for the default settings menu. The
underline shows the selected language. Select the language
by pressing the F1/Eject button.
4. Press the F2 button to set the language. The printer prints a
message asking ifyou wishto print thecurrent settings. If you
wish to print the current settings, press the F2 button. The
printer prints the current settings. The underline shows the
setting value that is currently selected for each item. You can
also bypass printing the current setting by pressing the
F1/Eject button.
5. The printer prints thesetting method andthe first selection of
the main setup menu.
Common Settings menu
PR2Mode Settings menu
Other Emulation Settings menu
You can select the main setup menu by pressing F2.Then
press the F1/Eject to set it.
6. Select the menu parameters which you wish to change by
pressing the F1/Eject button (for the next item) or the Offline
button (for the previousitem). The printer printsthe itemand
the current setting value of that item is underlined.
7. Press the F2 button to change the value and the printer prints
the next value.
8. You mayeither continue to makechanges to otherparameters
bypressing theF1/Eject or Offline button.The menu selection
will returnto the selectionof the threemain setup menusafter
the selection of the last parameter on each menu is done.
Chapter 5 Control Panel 95
Page 96

Note:
When you press the Offline button at the first item selection of each
menu, the menu selection will also return to the main setup menu
selection.
9. After you finish the default setting, turn off the printer to exit
the default setting mode.
Aligning Vertical Lines in Your Printout
If you notice that the vertical lines in your printout are not
properly aligned, you can use the printer’s bidirectional
adjustment mode to correct this problem.
During bidirectional adjustment,the printer printsthree sheets of
alignment patterns, labeled Draft, Bit image (ESC * 26H), and LQ
(letter quality). As described below, you select the best alignment
patternfromeachsheet.
Note:
Prepare an A4 size sheet of paper before entering the bidirectional
adjustment mode.
Follow these steps to perform the bidirectional adjustment:
1. Turn off the printer.
Caution:
Whenever you turn off the printer, wait at least five seconds
c
before turning it back on; otherwise you may damage the
printer.
2. Turn on the printer while holing the F2 button.
3. Press the F1/Eject button while the F1/Eject, Offline,andF2
lights are flashing.
Chapter 5 Control Panel 96
Page 97

4. When theReady lightturns on, inserta sheetof A4 paperinto
the front slot. The printer prints the guide to adjust the
bidirectionalalignment andthe first set ofalignment patterns.
5. As described in the instructions, compare the alignment
patterns and select the pattern with the best alignment. You
can select the alignment pattern by pressing the F1/Eject
button (for the next pattern) and the F2 button (for the
previous pattern). The F1/Eject, Offline and F2 lights show
the pattern which is selected at that time. Each time you press
the F1/Eject or F2 button, the printer makes a short beep.
6. Set the pattern by pressing the Offline button. The printer
prints the next set of alignment patterns.
7. After you select the best pattern in the final set of alignment
patterns and set it by pressing the Offline button, turn off the
printer. The setting does not change even if the printer is
turned off.
Chapter 5 Control Panel 97
Page 98

Chapter 6
Problem Solver
DiagnosingtheProblem................................... 99
Usingtheerrorindicators ............................. 99
EPSONStatusMonitor3............................. 102
PrintingaSelf-Test.................................. 102
PrintingHexDump ................................. 103
ProblemsandSolutions .................................. 105
Powersupplyproblems.............................. 106
Paperloadingorfeedingproblems.................... 107
Printingpositionproblems........................... 108
Printingorprintoutqualityproblems.................. 109
Networkproblems.................................. 114
CorrectingUSBProblems................................. 115
ClearingPaperJams ..................................... 119
ContactingCustomerSupport............................. 120
ForusersinNorthAmerica........................... 121
ForusersinAustralia................................ 122
ForusersinSingapore............................... 124
ForusersinThailand ................................ 124
ForusersinIndonesia ............................... 125
ForusersinHongKong.............................. 126
ForusersinMalaysia................................ 127
ForusersinIndia ................................... 128
ForusersinthePhilippines........................... 130
Chapter 6 Problem Solver 98
Page 99

Diagnosing the Problem
For problems that may be related to USB connections, see
“Correcting USB Problems” on page 115 for details.
If your problem is not USB related, troubleshooting printer
problems is best handled in two easy steps; first diagnose the
problem, then apply likely solutions until the problem is fixed.
The information that you need to diagnose and solve most
commonproblemsisprovidedbytheprinter’scontrolpanel,
EPSON Status Monitor 3, or by printing a self-test or hex dump.
Refer to the appropriate section below.
If you have a specific problem relating to print quality, a printout
problem not related to print quality, or a paper feeding problem,
or if the printer does not print at all, refer to the appropriate
sectioninthischapter.
To solve a problem, you may need to cancel printing. For details,
see “Canceling Printing” on page 67.
Using the error indicators
You can identify many common printerproblems usingthe lights
on the control panel. If your printer stops working and one or
morecontrolpanellightsareonorflashingortheprinterbeeps,
use the following table to diagnose and fix the problem. If you
cannot fix your printer problem using this table, see “Problems
and Solutions” on page 105.
Note:
The printer beeps once if you press a control panel button when the
corresponding function is not available.
Chapter 6 Problem Solver 99
Page 100

PR2 mode
State of panel
lights
O Power
F Ready
O Power
O Offline
O Power
F Offline
Beep
pattern
— There is nopaper loaded in the slot.
— Paper is not loaded correctly.
— Paper is not fully ejected.
— Paper isjammed in the printer.
— The printer cover isopen.
— The printheadisoverheated.
Problem
Solution
Load apaper into thefrontslot.
Remove the paper and reloadit correctly. See
“Loading Passbooks” on page 28, or“Loading
Single Sheets” on page 29.
See “ClearingPaper Jams” on page 119 for
instruction onejectingpaper.
To clear the paper jam, see“ClearingPaper
Jams” on page 119.
Stop the operation and close the printer cover.
Wait for a fewminutes; the printer resumes
printingautomatically once the printhead
cools.
O Pause
F Ready
F F1/Eject
F Offline
F F2
O =on, F = flashing
••• =shortseriesof beeps (three beeps),••••• =longseriesof beeps (five beeps)
••••• Anunknown printer error has occurred.
Turn off the printer and leaveitoff for several
minutes; then turn on the printer again.If the
errorrecurs, contactyour dealer.
Chapter 6 Problem Solver 100
 Loading...