

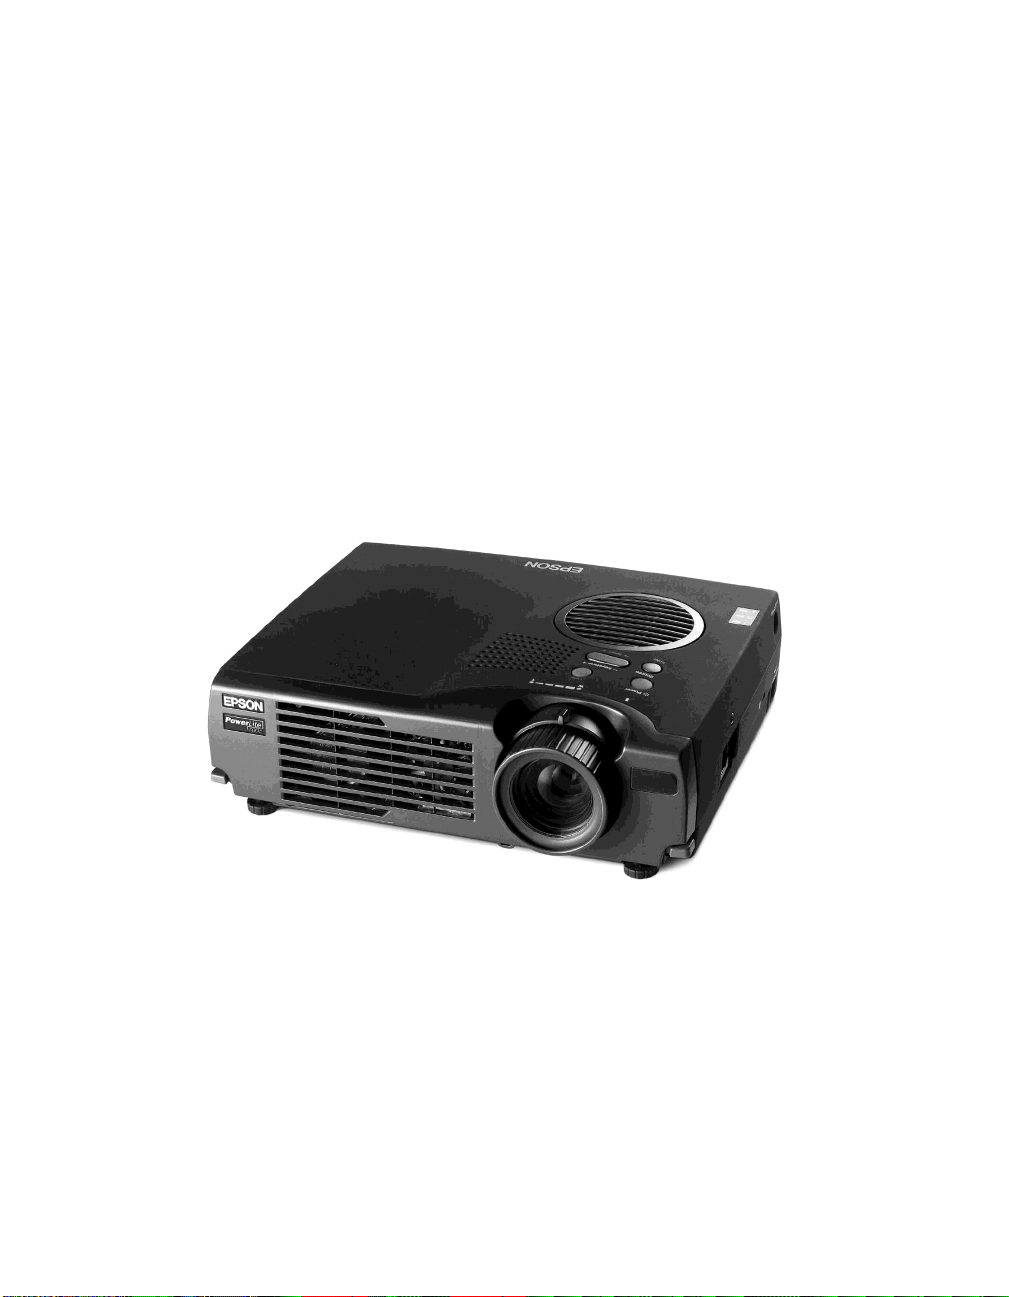
EPSON® PowerLite® 500c/700c/710c
Multimedia Projector
User’s Guide
Supplement

Important Safety Information
WARNING
Never let children look into the lens when it is on. Never open any cover on the projector, except the lamp and
filter covers. Dangerous electrical voltages inside the projector can severely injure you. Except as specifically
explained in the User’s Guide or this Supplement, do not attempt to service this product yourself. Refer all
servicing to qualified service personnel.
WARNING
children to avoid any risk of suffocation.
Caution
the oil on your hands may shorten the lamp life. Use a cloth or glove to handle the new lamp.
: Never look into the projector lens when the lamp is turned on; the bright light can damage your eyes.
: The projector and its accessories come packaged in plastic bags. Keep plastic bags away from small
: When you replace the lamp, never touch the new lamp with your bare hands; the invisible residue left by
Copyright Notice
All rights reserved. No part of this publication may be reproduced, stored in a retrieval system, or transmitted in
any form or by any means, electronic, mechanical, photocopying, recording, or otherwise, without the prior
written permission of SEIKO EPSON CORPORATION. The information contained herein is designed only for
use with this EPSON printer. EPSON is not responsible for any use of this information as applied to other
printers.
Neither SEIKO EPSON CORPORATION nor its affiliates shall be liable to the purchaser of this product or third
parties for damages, losses, costs, or expenses incurred by purchaser or third parties as a result of: accident, misuse,
or abuse of this product or unauthorized modifications, repairs, or alterations to this product, or (excluding the
U.S.) failure to strictly comply with SEIKO EPSON CORPORATION’s operating and maintenance instructions.
SEIKO EPSON CORPORATION shall not be liable for any damages or problems arising from the use of any
options or any consumable products other than those designated as Original EPSON Products or EPSON
Approved Products by SEIKO EPSON CORPORATION.
EPSON is a registered trademark of SEIKO EPSON CORPORATION.
PowerLite is a registered trademark of Epson America, Inc.
General Notice: Other product names used herein are for identification purposes only and may be trademarks of
their respective owners. EPSON disclaims any and all rights in those marks.
PL500700710C
Copyright © 2000 by Epson America, Inc. 1/00
2

C
Connecting to a
A
Desktop
Computer
Contents
Positioning the Projector . . . . . . . . . . . . . . . . . . . . . . . . . . . . 5
Identifying the Projector Ports . . . . . . . . . . . . . . . . . . . . . . . . 7
Connecting to a PC Desktop Computer . . . . . . . . . . . . . . . . 7
Connecting the Computer Cable . . . . . . . . . . . . . . . . . . 8
Connecting the Audio Cable . . . . . . . . . . . . . . . . . . . . . . 9
Connecting the Cable for Remote Mouse Control . . . . . 9
Connecting to a Desktop Macintosh . . . . . . . . . . . . . . . . . . 10
Connecting the Computer Cable . . . . . . . . . . . . . . . . . 11
Connecting the Audio Cable . . . . . . . . . . . . . . . . . . . . . 13
Connecting the Cable for Remote Mouse Control . . . . 13
Turning the Projector On and Off . . . . . . . . . . . . . . . . . . . 14
Turning On Other Equipment . . . . . . . . . . . . . . . . . . . 16
Using the
B
Projector
Menus
Changing Menu Settings . . . . . . . . . . . . . . . . . . . . . . . . . . . 18
Video Menu (Computer Image Source) . . . . . . . . . . . . . . . . 20
Video Menu (Video Image Source) . . . . . . . . . . . . . . . . . . . 22
Audio Menu . . . . . . . . . . . . . . . . . . . . . . . . . . . . . . . . . . . . 23
Effect Menu . . . . . . . . . . . . . . . . . . . . . . . . . . . . . . . . . . . . 24
Setting Menu . . . . . . . . . . . . . . . . . . . . . . . . . . . . . . . . . . . . 25
User’s Logo Feature . . . . . . . . . . . . . . . . . . . . . . . . . . . . . . . 26
Capturing the Image . . . . . . . . . . . . . . . . . . . . . . . . . . . 26
Assigning the Image to the No-Signal Message
and/or A/V Mute Button . . . . . . . . . . . . . . . . . . . . 29
Advanced Menu . . . . . . . . . . . . . . . . . . . . . . . . . . . . . . . . . 30
About Menu (Computer Image Source) . . . . . . . . . . . . . . . 31
About Menu (Video Image Source) . . . . . . . . . . . . . . . . . . . 32
Reset All Feature . . . . . . . . . . . . . . . . . . . . . . . . . . . . . . . . . 32
3

Technical
C
Specifications
Index
General . . . . . . . . . . . . . . . . . . . . . . . . . . . . . . . . . . . . . . . . 33
Projection Lamp . . . . . . . . . . . . . . . . . . . . . . . . . . . . . . . . . 34
Remote Control . . . . . . . . . . . . . . . . . . . . . . . . . . . . . . . . . . 34
Mouse Compatibility . . . . . . . . . . . . . . . . . . . . . . . . . . . . . . 34
Remote IR Receiver . . . . . . . . . . . . . . . . . . . . . . . . . . . . . . . 34
Mechanical . . . . . . . . . . . . . . . . . . . . . . . . . . . . . . . . . . . . . 34
Electrical . . . . . . . . . . . . . . . . . . . . . . . . . . . . . . . . . . . . . . . 34
Environmental . . . . . . . . . . . . . . . . . . . . . . . . . . . . . . . . . . . 34
Safety . . . . . . . . . . . . . . . . . . . . . . . . . . . . . . . . . . . . . . . . . . 35
CE Marking . . . . . . . . . . . . . . . . . . . . . . . . . . . . . . . . . . . . 35
Supported Monitor Displays . . . . . . . . . . . . . . . . . . . . . . . . 35
Computer Connector Pin Assignments . . . . . . . . . . . . . . . . 37
4

Appendix A:
Connecting to a Desktop
Computer
A
note
For instructions on
connecting to a laptop
computer or to external
speakers, see your User’s
Guide.
This appendix describes how to connect the projector to your
desktop computer and turn everything on. The projector must
be connected to a computer or a video source such as a VCR,
camcorder, digital camera, DVD player, or laser disc player
before it can project any images. You may also want to set up
the projector for one or more of the following:
■ Connect the mouse cable to use the remote control as a
wireless mouse. Except for some laptops, this disables your
computer’s mouse. You use the remote control’s pointer to
control the screen cursor.
■ Provide audio for one or both image sources. The audio
source can be the computer, video source, or another device
such as a stereo.
■ Connect to an external speaker or PA system to amplify the
audio (see your User’s Guide for instructions).
Positioning the Projector
Before you can set up the projector, you need to decide where
to place it. Keep the following in mind:
Place the projector on a sturdy, level surface.
■
Make sure the projector is within 10 feet of a grounded
■
electrical outlet or extension cord.
Place the computer and/or video source within 5 feet of the
■
projector.
Make sure the projector is at right angles to the screen.
■
Otherwise, your image will be distorted.
Connecting to a Desktop Computer 5

note
It is easier to position the
projector when the screen is
directly in front of the room.
If the screen is placed
diagonally in a corner, it is
much more difficult to
position the projector
perpendicular to the screen
and get a non-distorted
image.
Most presenters find it convenient to place the projector (and
computer) in the front of the room. With this arrangement, the
projector is placed close to the screen. You need to raise the
front of the projector (by extending the legs) in order to
position the image high enough on the screen. Then you can
use the projector’s keystone control to correct the distortion
caused by tilting up the front of the projector.
The distance between the projector and the screen determines
the actual image size. Use the general guidelines in the table
below to determine the proper distance.
Horizontal distance from projector to
screen
Image size
(diagonal)
2.2 feet (0.7 meter) — 3.6 feet (1.1 meters)
2.5 feet (0.8 meter) 3.6 feet (1.1 meters) 4.3 feet (1.3 meter)
3.3 feet (1.0 meter) 4.8 feet (1.5 meters) 5.6 feet (1.7 meters)
5.0 feet (1.5 meters) 7.5 feet (2.3 meters) 8.9 feet (2.7 meters)
6.7 feet (2.0 meters) 9.8 feet (3.0 meters) 11.8 feet (3.6 meters)
8.3 feet (2.5 meters) 12.5 feet (3.8 meters) 14.8 feet (4.5 meters)
12.5 feet (3.8 meters) 18.7 feet (5.7 meters) 22.6 feet (6.9 meters)
16.7 feet (5.1 meters) 25.3 feet (7.7 meters) 30.2 feet (9.2 meters)
25 feet (7.6 meters) 37.7 feet
Minimum
(lens set to W)
(11.5 meters)
Maximum
(lens set to T)
45.3 feet
(13.8 meters)
6 Connecting to a Desktop Computer
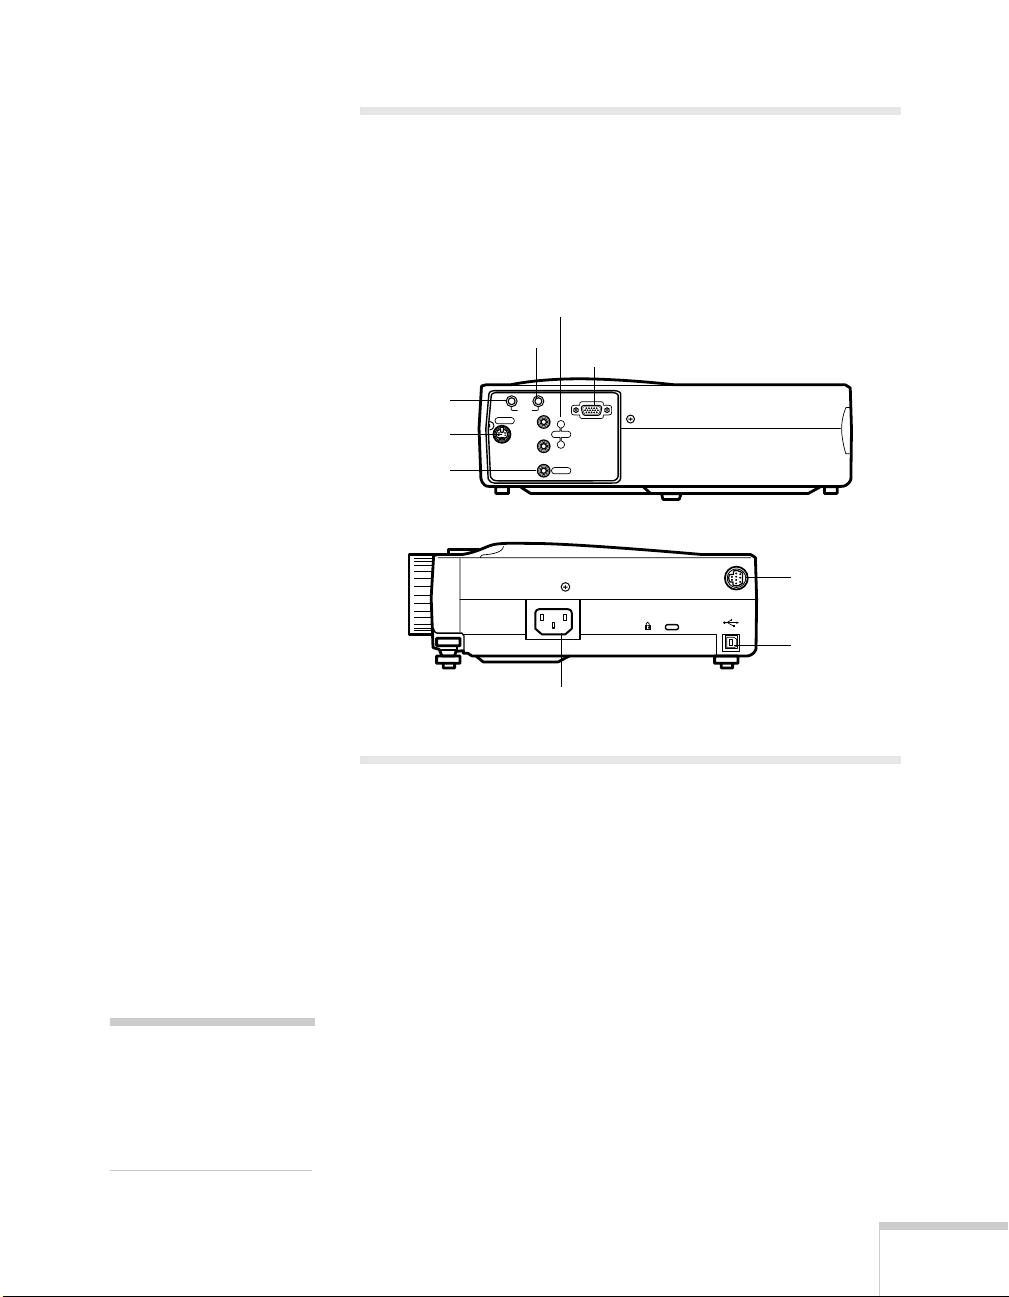
Identifying the Projector Ports
y
The following illustrations identify all the interface ports on the
back and side of the projector; you may want to refer to them as
you connect your computer or other equipment to the
projector.
L-Audio-R
Audio Out
S-Video
Video
Audio In
Audio
S-Video
Computer
Computer
InOut
R
Audio
L
Video
Power Inlet
Mouse/Com
Mouse/Com
USB Mouse
USB Mouse
Connecting to a PC Desktop
Computer
To connect the projector to your PC desktop computer, you
need to:
Connect the computer cable
■
■ Connect the audio cable (if you’ll be projecting with audio)
Connect the mouse cable (if you want to use the remote
■
note
control as a mouse)
Computer configurations
vary. See your computer
manual for the location of
If you connect the projector to your desktop computer, you
cannot view your images on the computer monitor.
the ports needed to connect
our projector.
Follow the steps in each section for the cables you need to
connect.
Connecting to a Desktop Computer 7
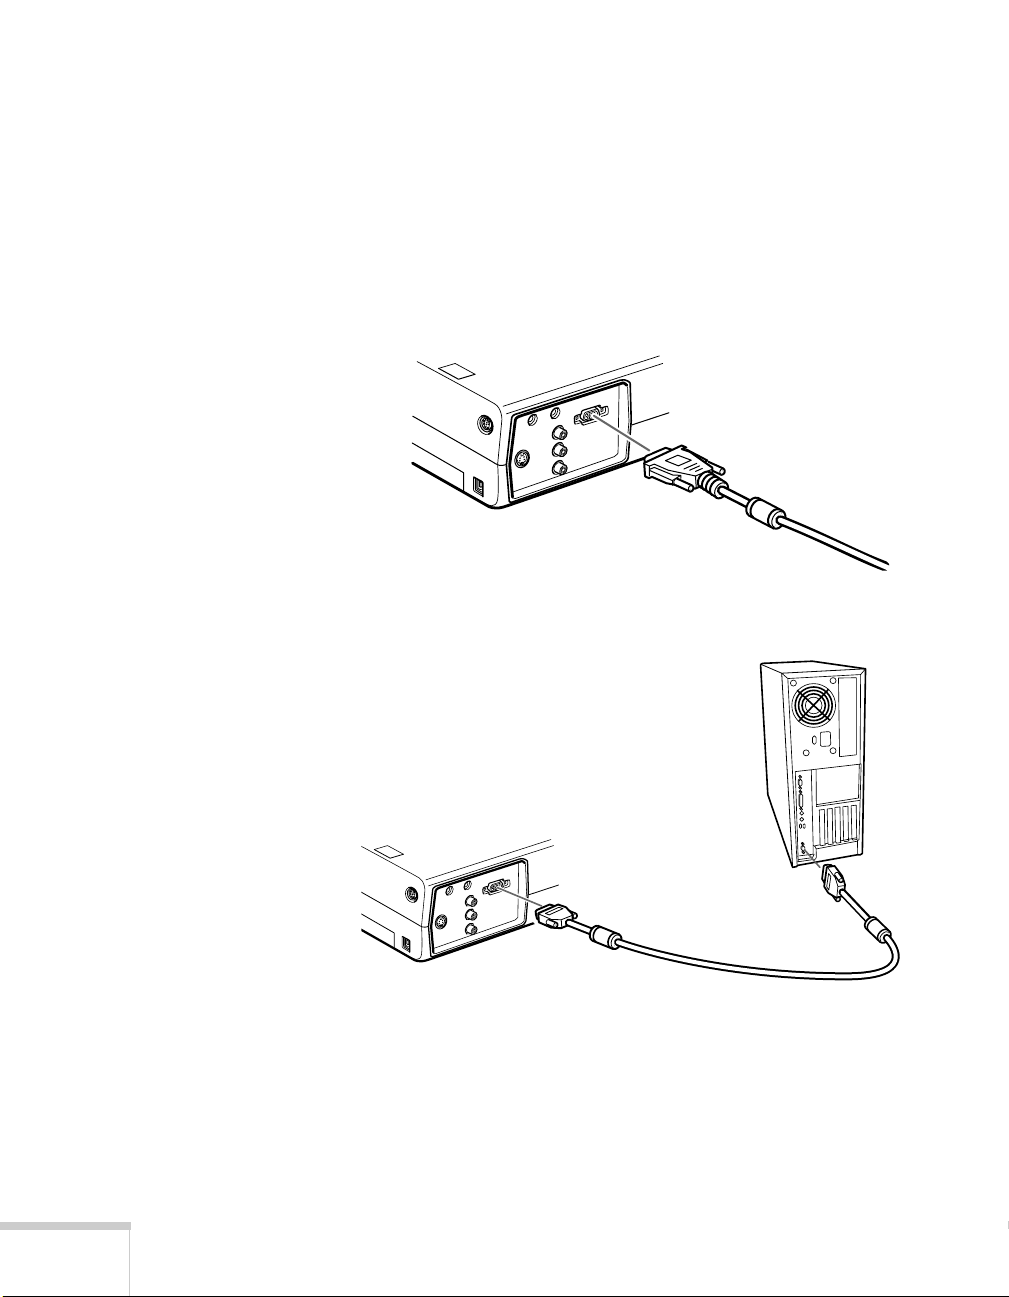
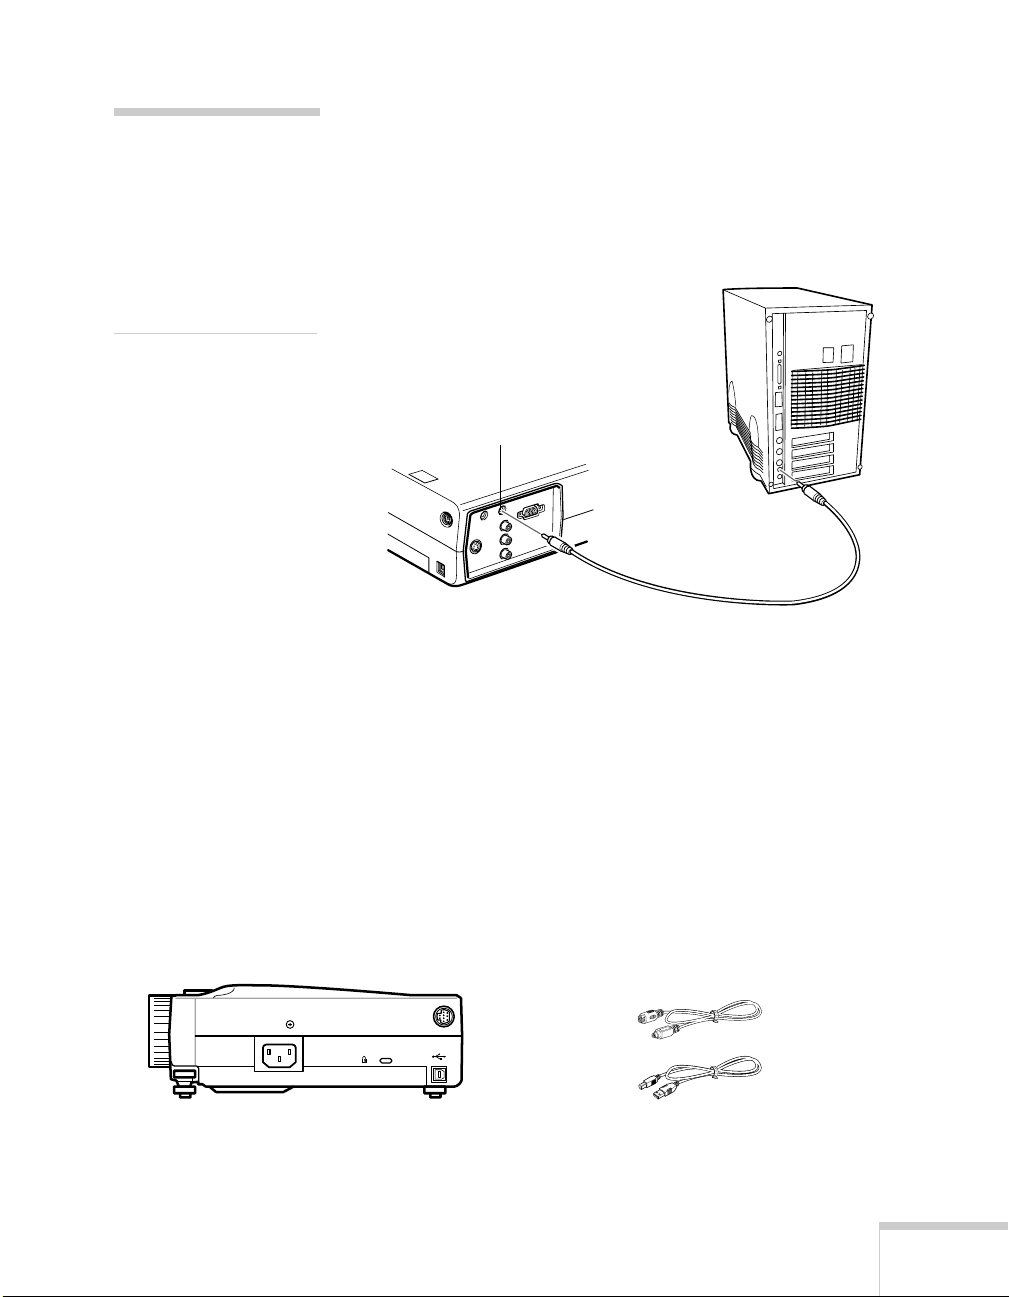
Connecting the Computer Cable
Before you start, make sure your projector, computer, and all
peripherals are all turned off.
1. Disconnect the monitor cable from the monitor port on the
back of your computer.
2. Connect one end of the projector’s computer cable to the
projector’s Computer port.
3. Connect the other end of the cable to your computer’s
video (monitor) port.
4. Tighten the screws on all connectors.
If you don’t need to make any other connections, you can plug
in your projector and turn it on. See page 14 for instructions.
8 Connecting to a Desktop Computer
note
If you need maximum
volume (in a large
auditorium, for example),
you can also connect
external speakers or a public
address system to the
projector. See your User’s
Guide for instructions.
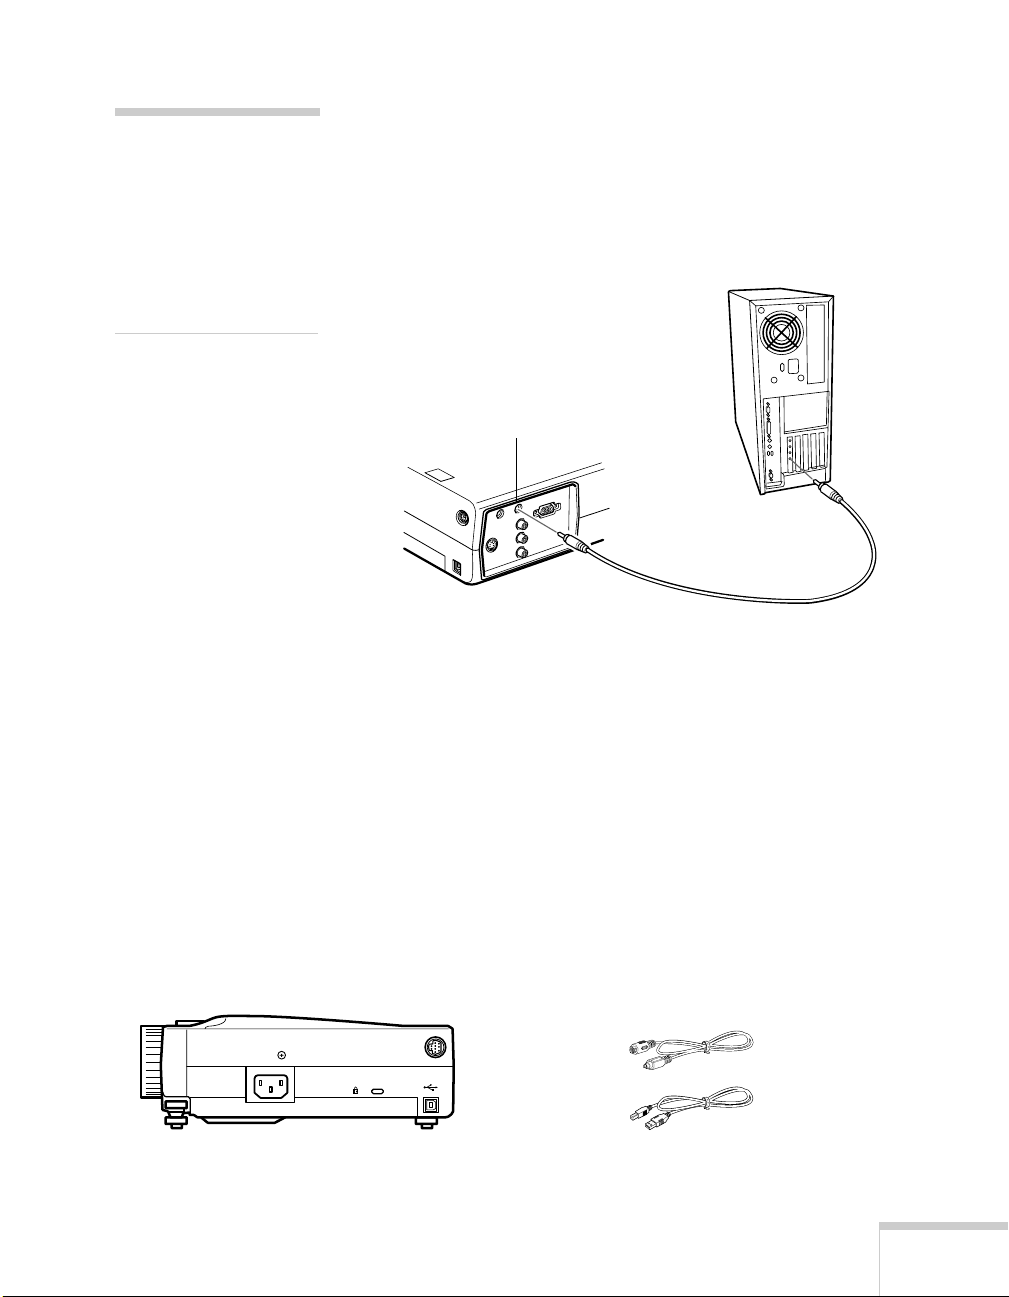
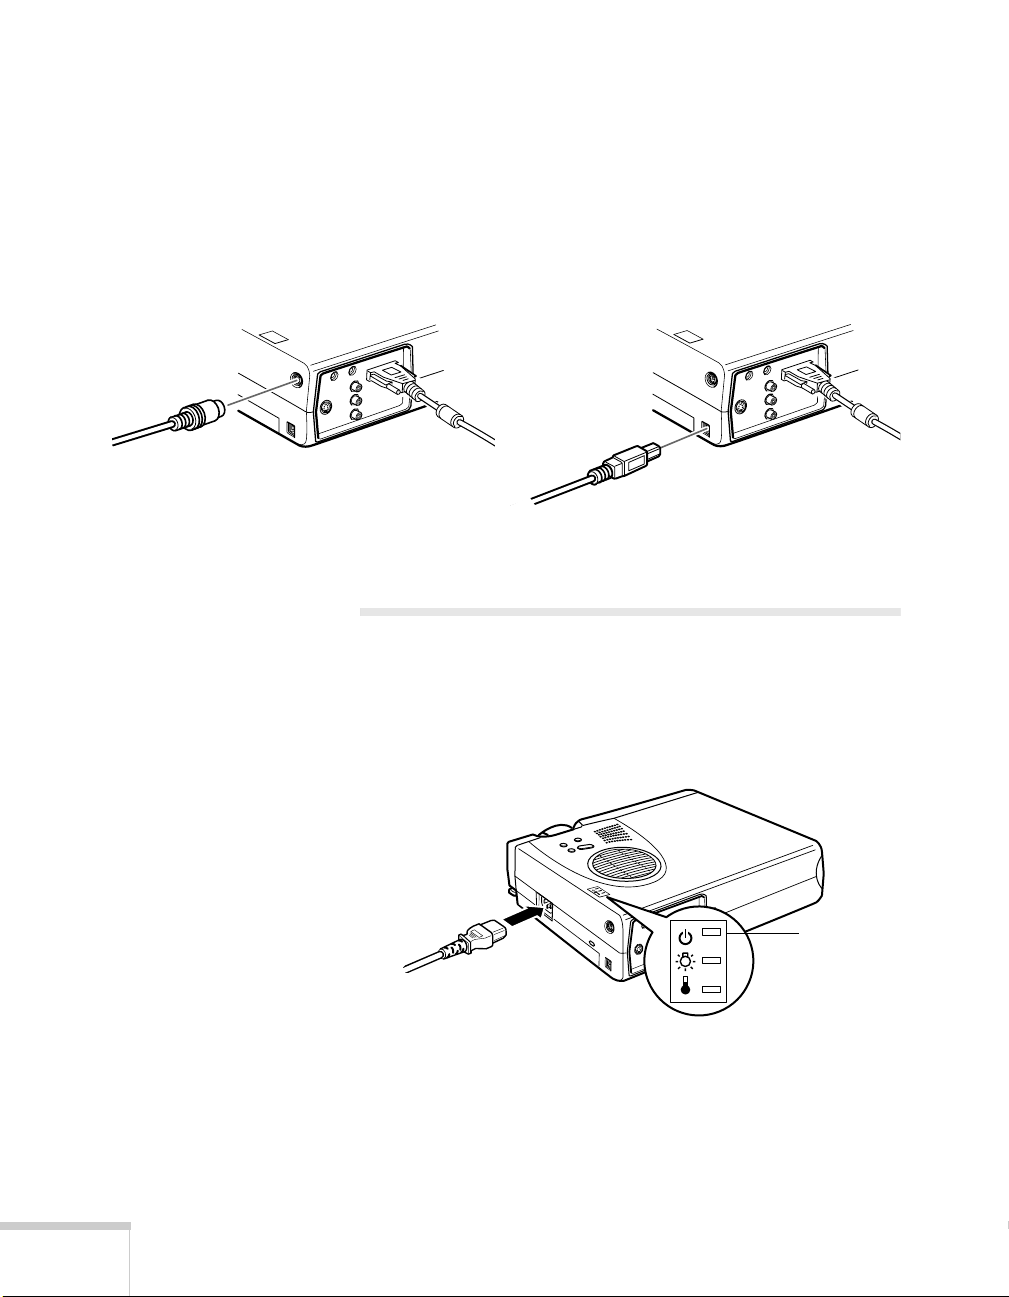
Connecting the Audio Cable
If your presentation includes sound effects or other types of
computer audio, you need to connect the audio cable.
1. Connect one end of the audio cable to the
the projector.
Audio in jack
2. Connect the other end of the audio cable to the speaker or
audio out port on your computer’s sound card.
Audio In jack on
audio cable
Connecting the Cable for Remote Mouse
Control
Using the remote control as a wireless mouse gives you more
flexibility. You can deliver your presentation from anywhere in
the room and interact with the audience. You don’t need to
stand near your computer or near the projector.
You’ll use different cables and different ports on the projector,
depending on whether your computer has a round PS/2 mouse
port or a flat USB mouse port.
Mouse/Com
PS/2 mouse port
USB Mouse
USB mouse port USB mouse cable
Connecting to a Desktop Computer 9
PS/2 mouse cable
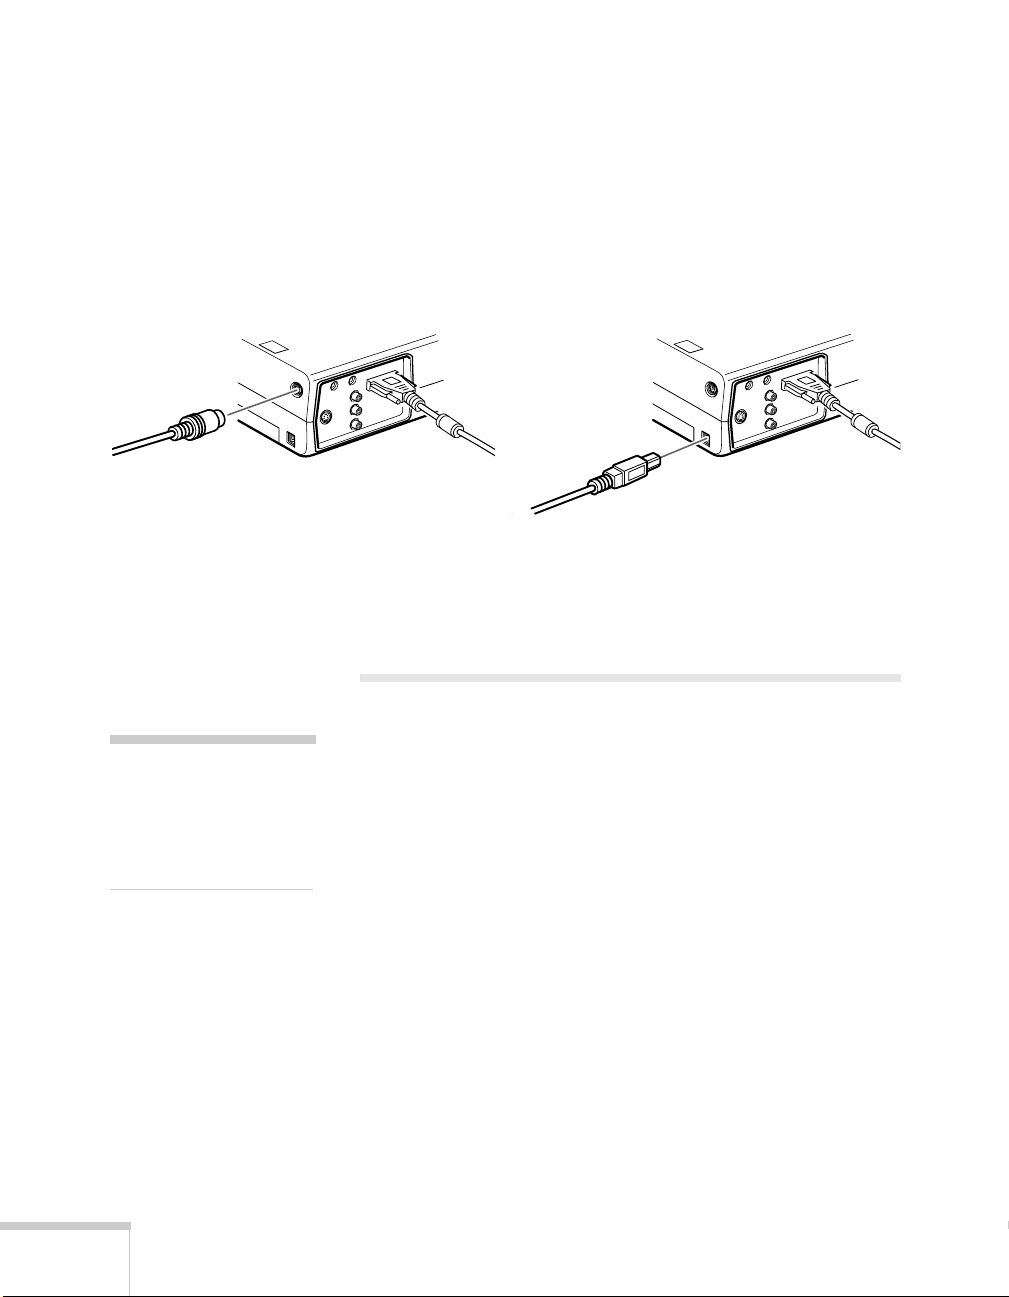
1. Determine which type of mouse port your computer has:
■ Round PS/2 mouse port
■ Flat USB mouse port
2. Connect one end of the appropriate mouse cable to the
Mouse/Com port or the USB Mouse port on the
PS/2
projector.
connecting PS/2 mouse cable connecting USB mouse cable
3. Connect the other end to the mouse port on your
computer. (Your computer’s mouse will be disabled while
you are using the remote control as a mouse.)
Connecting to a Desktop Macintosh
note
Macintosh configurations
vary. See your computer
manual for the location of the
ports needed to connect your
projector.
To connect the projector to your desktop Macintosh,® you
need to:
■ Connect the computer cable
■ Connect the audio cable (if you’ll be projecting with audio)
Connect the mouse cable (if you want to use the remote
■
control as a mouse)
If you connect the projector to your Macintosh, you cannot
view your images on the computer monitor.
Follow the steps in each section for the cables you need to
connect.
10 Connecting to a Desktop Computer

note
If you have an older
Macintosh, you may need to
use a Macintosh adapter
(available from Apple
Check the documentation for
your Macintosh to determine
what type of connections are
available.
®
).
Connecting the Computer Cable
Before you start, make sure your projector, computer, and all
peripherals are all turned off.
1. Disconnect the monitor cable from the monitor port on the
back of your Macintosh.
2. Connect one end of the computer cable to the projector’s
Computer port.
3. Connect the other end to the monitor port on your
Macintosh.
Macintosh adapter,
if necessary
Connecting to a Desktop Computer 11
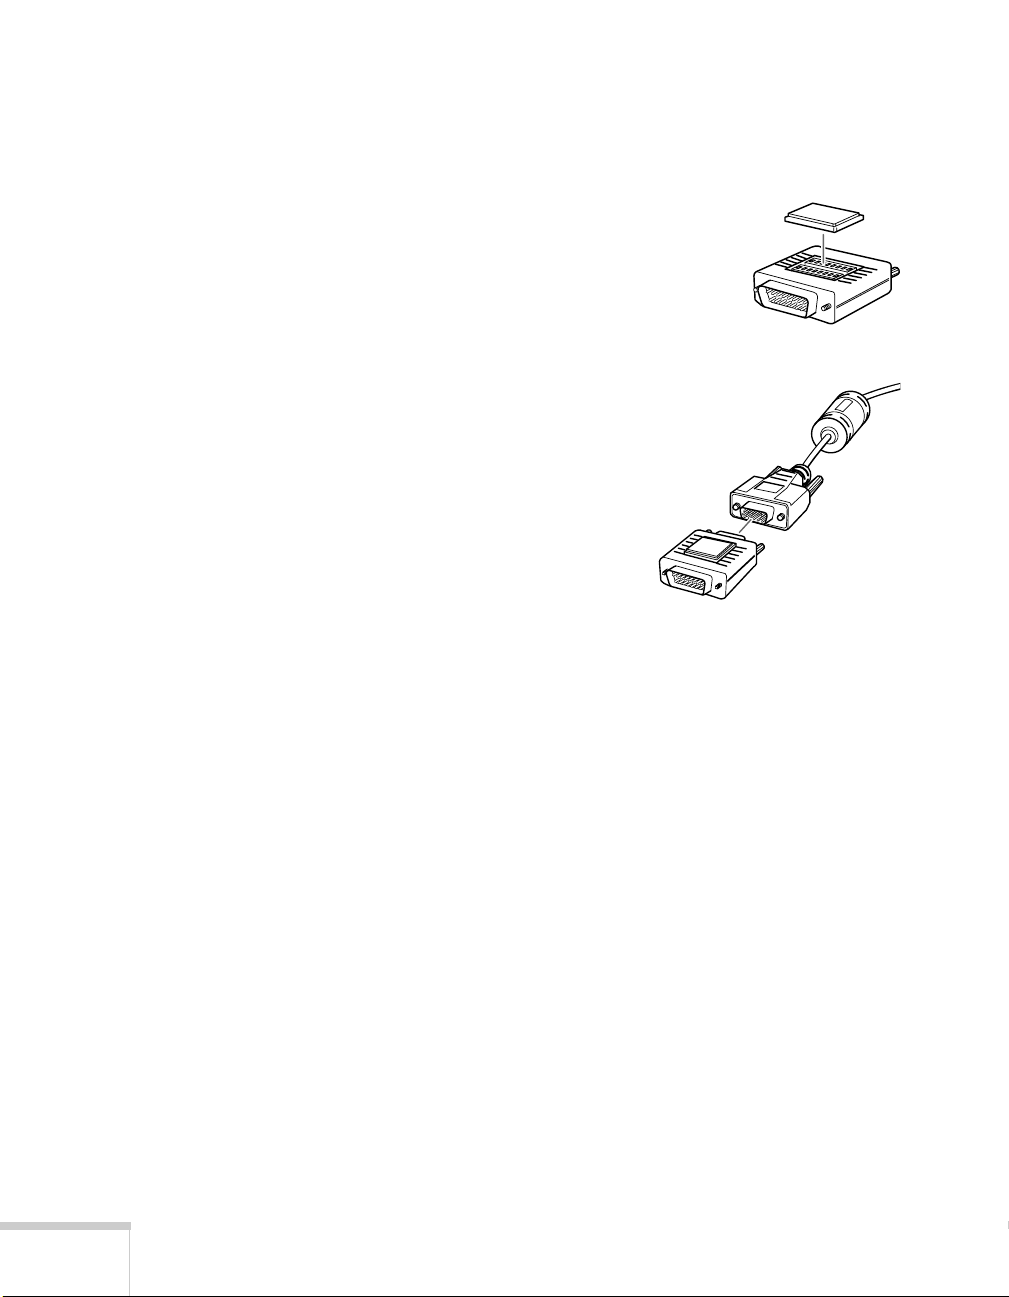
If you can’t connect the projector’s computer cable to your
Macintosh, you may need to use a Macintosh adapter
(available from Apple).
■ Remove the small cover on the
Macintosh adapter and set its DIP
switches according to the resolution
you want to use (such as 16-inch
mode). See your Macintosh
documentation for instructions.
■ Connect the small end
of the Macintosh adapter
to the computer cable.
■ Connect the computer
cable (with the
Macintosh adapter
attached) to the monitor
port on your Macintosh.
4. Tighten the screws on all the connectors.
If you don’t need to make any other connections, you can plug
in your projector and turn it on. See page 14 for instructions.
12 Connecting to a Desktop Computer
note
If you need maximum
volume (in a large
auditorium, for example),
you can also connect
external speakers or a public
address system to the
projector. See your User’s
Guide for instructions.
Connecting the Audio Cable
If your presentation includes sound effects or other types of
computer audio, you need to connect the audio cable.
1. Connect one end of the audio cable to the
the projector.
Audio in jack
audio cable
2. Connect the other end of the audio cable to the speaker
jack on your Macintosh.
Audio In jack on
Connecting the Cable for Remote Mouse
Control
Using the remote control as a wireless mouse gives you more
flexibility. You can deliver your presentation from anywhere in
the room and interact with the audience. You don’t need to
stand near your Macintosh or near the projector.
You’ll use different cables and different ports on the projector,
depending on what type of mouse your Macintosh has.
Mouse/Com
standard mouse port
USB Mouse
USB mouse port USB mouse cable
Connecting to a Desktop Computer 13
Mac mouse cable
1. Determine which type of mouse port your Macintosh has:
■ Round mouse port
■ Flat USB mouse port
2. Connect one end of the appropriate mouse cable to the
standard
Mouse/Com port or the USB Mouse port on the
projector.
connecting Mac mouse cable connecting USB mouse cable
3. Connect the other end to the port on your Macintosh.
Turning the Projector On and Off
After you have connected your computer and other equipment,
you can plug in the projector and turn it on.
1. Connect the power cable to your projector’s power inlet.
2. Plug the other end of the cable into a grounded electrical
outlet.
The power light on top of the projector turns orange. This
indicates that the projector is receiving power, but is not yet
turned on.
14 Connecting to a Desktop Computer
power light
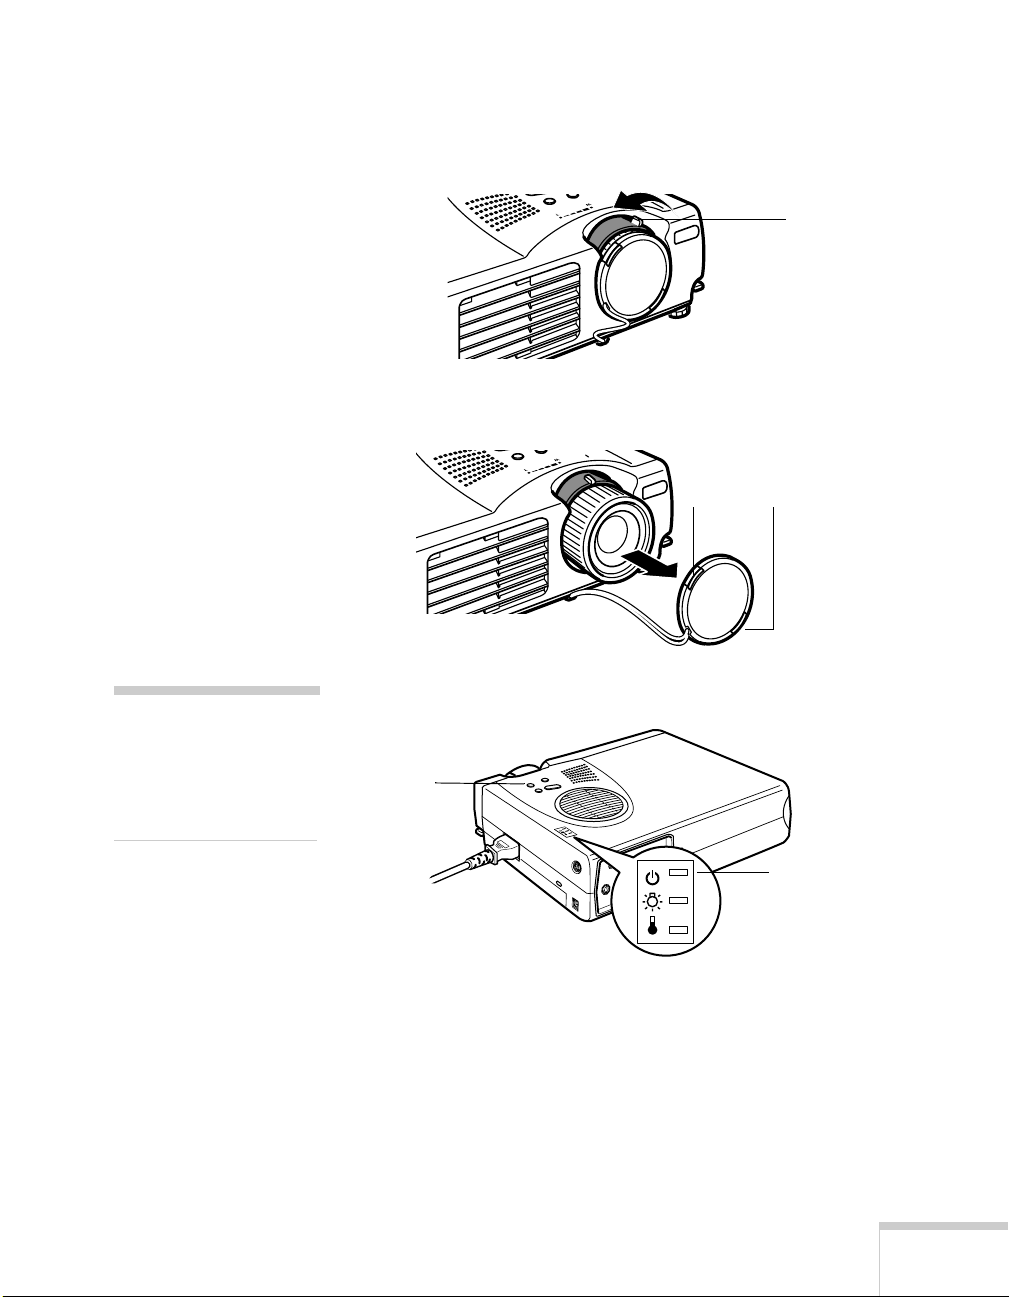
3. Use the tab on the lens ring to rotate the ring and pop out
the lens.
tab
4. Squeeze the lens cap tabs and remove the lens cap.
Squeeze here
warning
Never look into the lens
when the lamp is on. This
can damage your eyes, and
is especially dangerous for
children.
5. Press the red
power
button
Power button on top of the projector.
power light
The power light flashes green, and then stays on. You may
see a blue screen with the message
No Signal displayed.
This is normal.
6. Turn on or restart your computer. In a few moments, you
should see the computer display projected.
Connecting to a Desktop Computer 15

When you are ready to turn off the projector, follow these steps:
caution
To avoid damaging the
lamp, never unplug the
power cord when the power
light is green.
1. Press the red
Power button on top of the projector. You
see a confirmation message. (If you don’t want to turn it
off, press any other button.)
2. Press the
Power button again. The Power light flashes
orange for about a minute and the fan gets louder as the
projector cools down. When the projector has cooled, the
orange light stays on and the fan shuts off.
If you want to turn the projector on again, wait until the
orange light stops flashing. Then press the
Power button.
3. When you are finished using the projector, replace the lens
cap, retract the lens, and unplug the power cord.
Turning On Other Equipment
If you’re using a VCR, other external video source, or
additional equipment with the projector, turn on the
equipment in this order:
1. Video source
2. External audio source
3. Projector
4. External speakers or PA system
5. Computer
When you’re ready to shut down, turn off the equipment in the
reverse order.
16 Connecting to a Desktop Computer

Appendix B:
Using the Projector
Menus
B
The on-screen menus let you customize and adjust projector
features. The following 8 menus and features are available:
■ Video
Controls the look and quality of the projected image (from
a computer or video source).
■ Audio
Adjusts the volume and tone (treble/bass).
■ Effect
Customizes the drawing tools available on the remote
control.
■ Setting
Adjusts features such as the keystone setting, blank screen
color, message prompt, and power management system.
■ User’s Logo
Lets you capture and store an image to be displayed with
the A/V Mute button, or as the startup screen.
■ Advanced
Controls settings such as menu language, use of startup
screen, color temperature, and rear or ceiling projection.
■ About
■ Reset All
Provides information about lamp usage and the current
display settings.
Restores the factory defaults for all the projector settings.
Using the Projector Menus 17
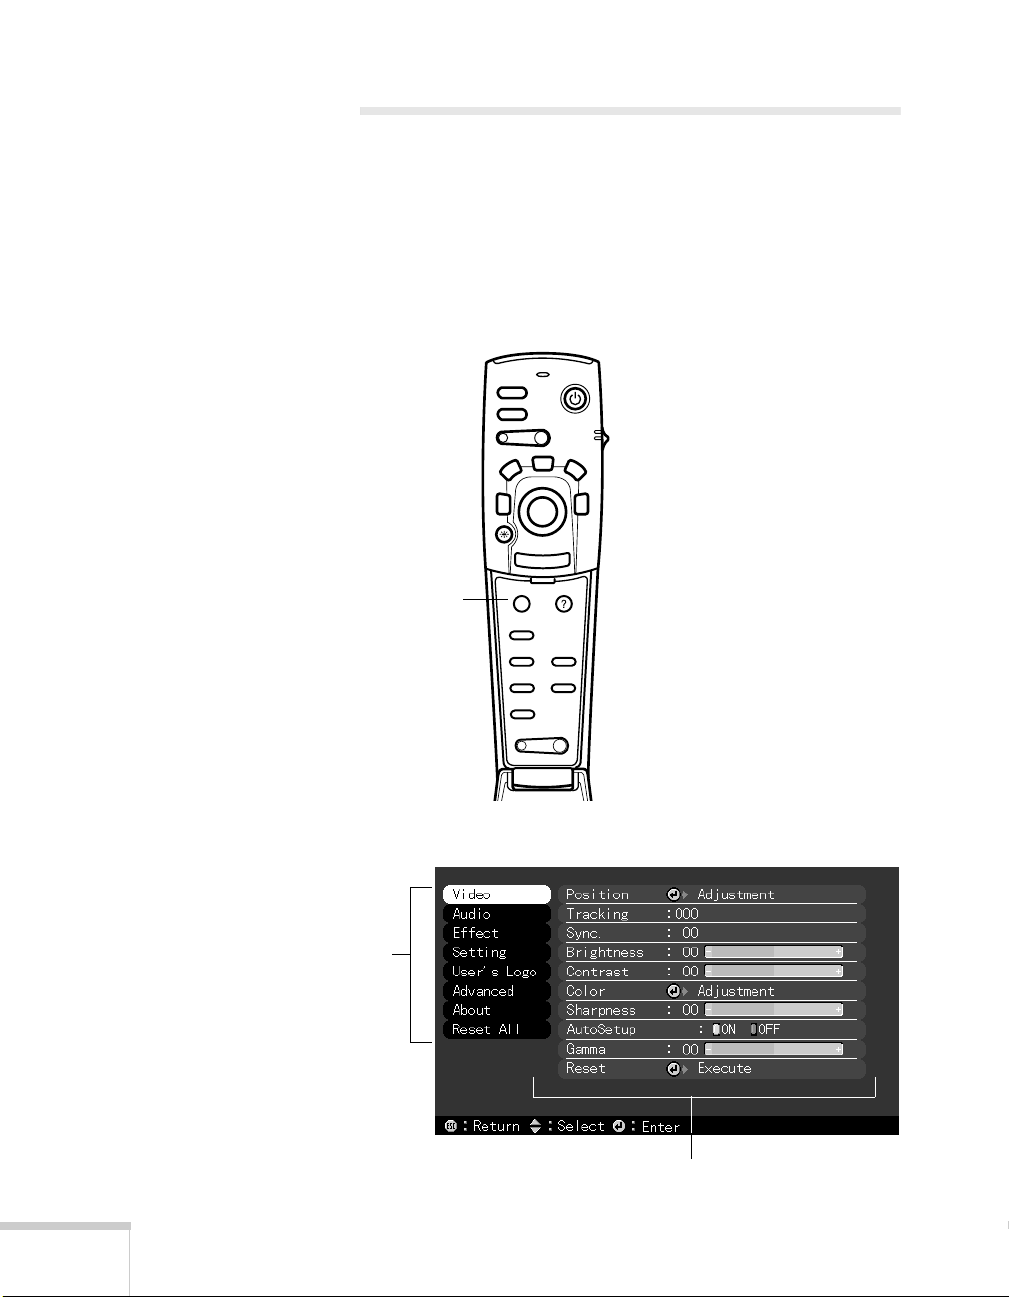
Changing Menu Settings
You use the Menu, Enter and Esc buttons on the remote
control to change menu settings.
To change a menu setting:
1. To access the menu system, open the cover on the lower
part of the remote control and press the
Menu button.
menus
E-Zoom
2
1
Menu
Comp
S-Video
Auto
P in P
Power
R/C ON
3
Enter
Esc
Help
Video
Resize
- Volume +
Freeze
A/V Mute
Menu
button
You see the following:
OFF
4
5
18 Using the Projector Menus
Video menu options
note
The options available in
some submenus vary,
depending on whether the
current image source is the
computer or a video source.
As you select a menu, a submenu of options appears to the
right.
2. Press the bottom of the
Enter button (or grasp it between
your thumb and finger and tilt it down) to scroll through
the menus.
When you highlight a menu, its options are shown on the
right.
3. When the menu you want is highlighted, press the center of
Enter button to select it.
the
The highlight moves to the first option for that menu.
4. Press the bottom of the
Enter button (or grasp it between
your thumb and finger and tilt it down) to scroll through
the options.
5. Press the right or left side of the
Enter button (or grasp it
between your thumb and finger and tilt it to the side) to
change the setting.
6. If you want to go back to the default settings on any menu,
select
7. Press the
Reset
Esc
, press
Enter
, select
, and then press
Yes
Enter
button on the remote to go back to the main
menu display. Your changes are saved automatically.
.
button to exit the menu system.
8. Press the
Menu
The settings available in each of the menus are described below.
Using the Projector Menus 19
note
p
Some options are limited to
being enabled (turned on)
or disabled (turned off).
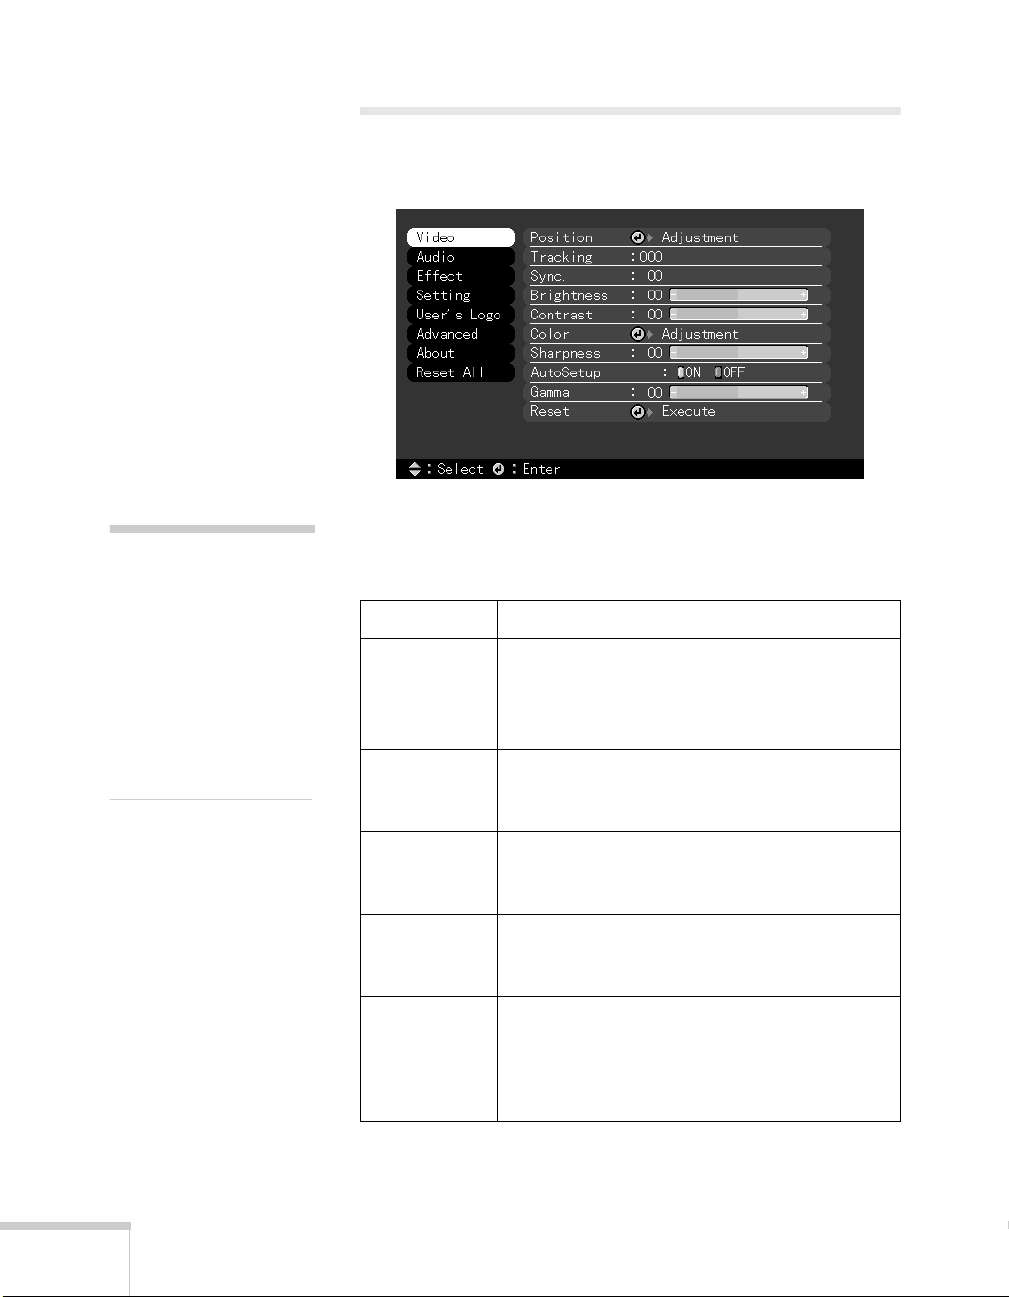
Video Menu (Computer Image
Source)
The Video menu lets you make adjustments to the projected
image. The following options are available when the image
source is your computer.
Menu item Description
The computer must be
connected and operating,
and the image source on the
rojector must be set to
Computer for you to access
these menu options.
20 Using the Projector Menus
Position Use the Enter button to move the screen
position in the corresponding direction.
When you finish making adjustments, press the
Esc button.
Tracking Matches the projector’s internal clock to
various computer graphic signals. Adjust this
setting to remove vertical lines from the image.
Sync Synchronizes with the tracking signal sent from
the computer. Adjust this setting to correct
fuzziness or screen flicker.
Brightness Lightens or darkens the overall image. Increase
brightness to lighten an image, or decrease it to
darken the image.
Contrast Adjusts the difference between light and dark
areas. Increase the contrast to make light areas
lighter and dark areas darker. Decrease it to
minimize the difference between light and dark
areas.

Menu item Description
Color Adjusts the color balance (red:green:blue) of
the input source.
Increase the color setting for more intense
color on the screen, and lower the setting for
less intense color.
When you finish making adjustments, press the
Esc button.
Sharpness Adjusts the sharpness of the screen image.
Auto Setup Set to On to have the computer automatically
optimize the image for projection.
Gamma Adjusts the projected image for natural
coloration.
Reset Returns all menu items to their initial factory
defaults.
Using the Projector Menus 21

note
f
p
y
The projector’s image
source must be set to
Video, and the video
source (such as a VCR or
camcorder) must be
connected and operating
or you to access these
menu options. For
example, the projector
must actually be
rojecting the image from
our video tape if you’re
using a VCR.
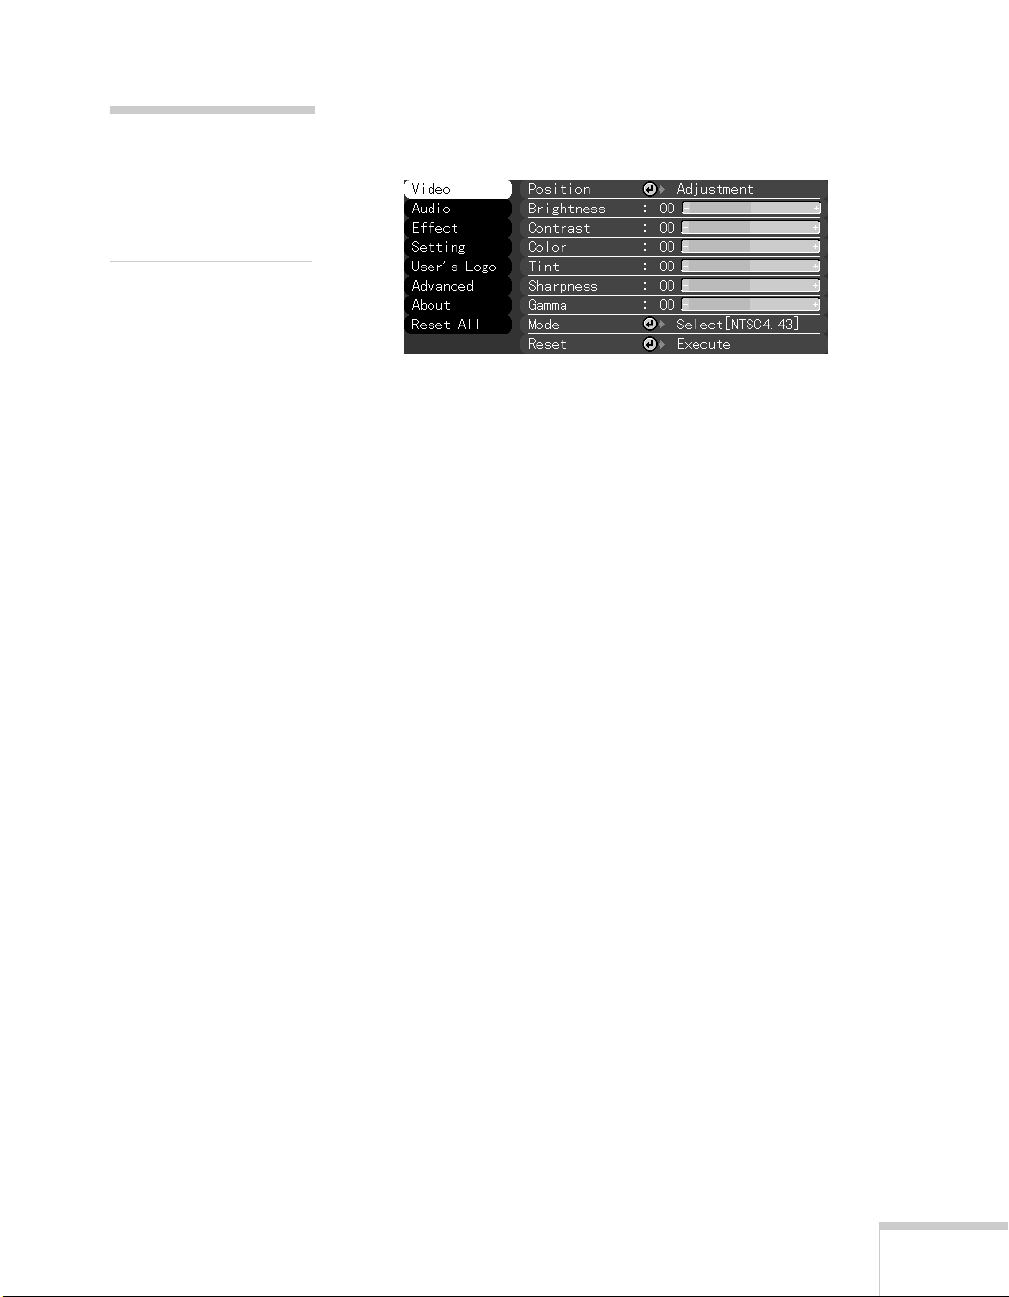
Video Menu (Video Image Source)
The Video menu lets you make adjustments to the projected
image. The following options are available when the image
source is Video.
Menu item Description
Position Use the Enter button to move the screen
position in the corresponding direction.
When you finish making adjustments, press the
Esc button.
Brightness Lightens or darkens the overall image. Increase
brightness to lighten an image, or decrease it to
darken the image.
Contrast Adjusts the degree of difference between light
and dark areas. Increase the contrast to make
light areas lighter and dark areas darker.
Decrease it to minimize the difference between
the lightest and darkest areas of the image.
Color Adjusts color density. Increase the setting for
darker and more opaque colors. Decrease it for
lighter and less opaque colors.
Tint
(NTSC only)
Sharpness Adjusts the sharpness of the screen image.
Gamma Adjusts the projected image for natural
Mode Specifies the image signal mode: Auto, NTSC,
Reset Returns all menu items to their initial factory
Adjusts the red-green color balance of the
screen. Increase tint to add more green, or
decrease it to add more red.
coloration.
NTSC4.43, PAL, M-PAL, N-PAL, PAL 60,
SECAM.
defaults.
22 Using the Projector Menus
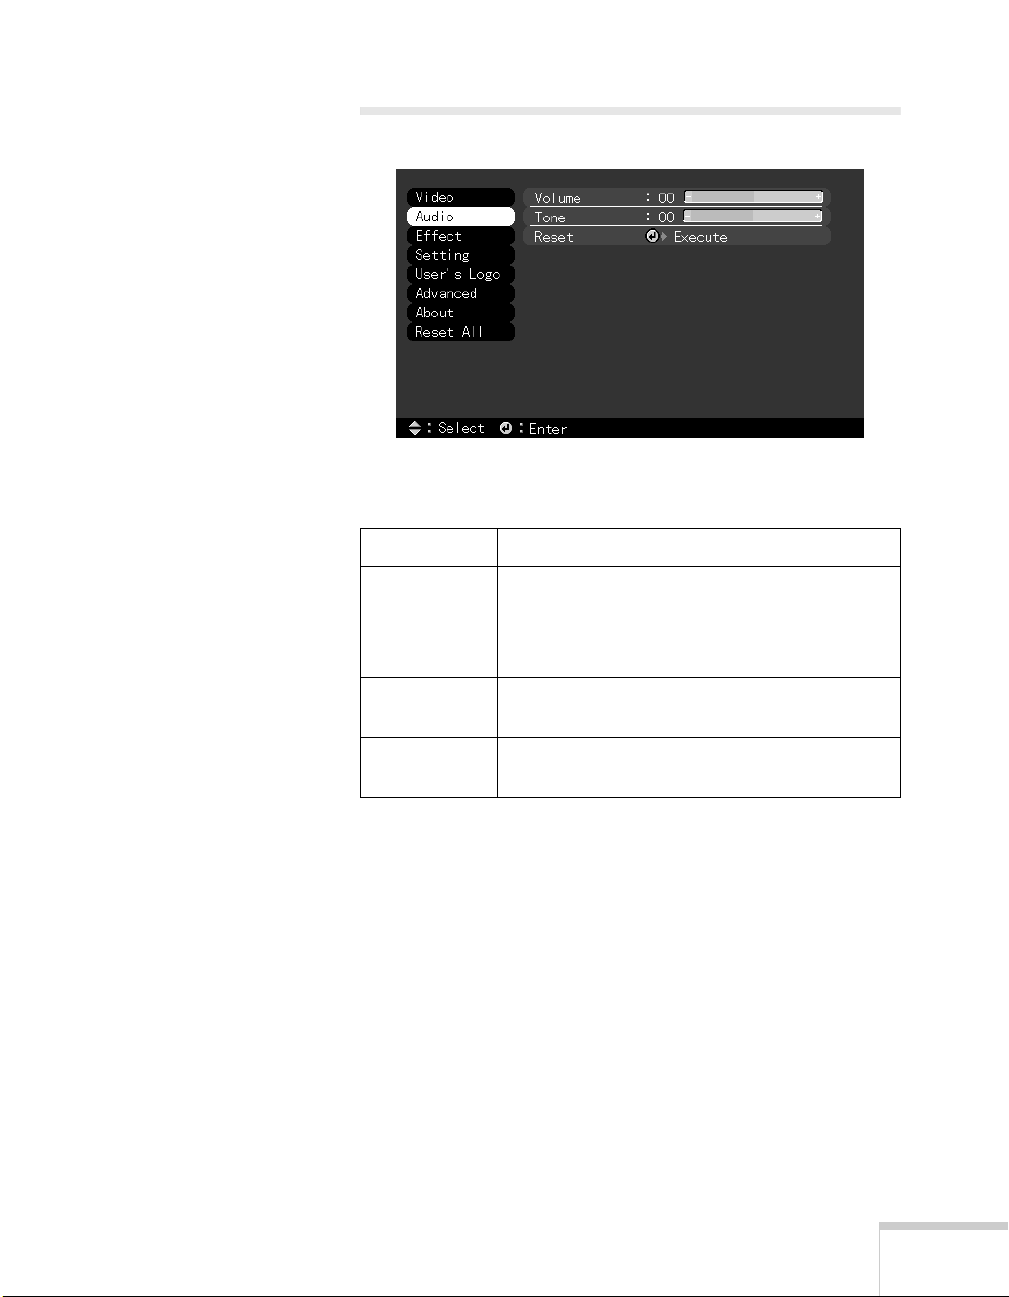
Audio Menu
Use the Audio menu to adjust the sound volume and quality of
your audio.
Menu item Description
Volume Adjusts the volume level for the projector’s
speaker and audio-out terminal.
Increase the setting to raise the volume, or
decrease it to lower the volume.
Tone Adjusts the sound quality. Move left to increase
bass and right to increase treble.
Reset Returns all menu items to their initial factory
defaults.
Using the Projector Menus 23

Effect Menu
The Effect menu lets you customize the drawing tools available
on the remote control.
Menu item Description
Cursor/
Stamp
Box Selects a box color and shape.
Marker Selects the marker (horizontal or vertical lines)
Freehand Selects the color and width for freehand lines
Cursor Speed Adjusts the cursor speed to Low, Middle, or
Reset Returns all menu items to their initial factory
Selects the stamp you want to use as the
cursor graphic and lets you enlarge it.
color and width (from 2 to 32 pixels).
(2 to 148 pixels).
High.
defaults.
24 Using the Projector Menus

Setting Menu
The Setting menu allows you to set or adjust various projector
options.
Menu item Description
Keystone Adjusts a trapezoid (distorted) image to a 4:3
rectangle, correcting up to a ± 15° tilt.
P-in-P Selects the image source (composite or
S-Video) for the picture-in-picture subscreen.
No-Signal
Msg
Prompt Turns off the message identifying the image
A/V Mute Specifies whether a blue, black, or user logo
Power Mgmt
Sys
Reset Returns all menu items to their initial factory
Specifies whether no screen, a black screen, a
blue screen, or a user logo is displayed when
the projector is not receiving a signal.
source (computer or video).
screen is displayed when the A/V mute button
is pressed.
Turns on the power management system
which works with your computer’s power
management.
defaults.
Using the Projector Menus 25

User’s Logo Feature
The User’s Logo feature allows you to transfer any image on
your computer to the projector, and then use it as the screen
displayed when the projector is not receiving a signal. You can
also set it as a startup screen or to be displayed when you press
A/V Mute button on the remote. The image can be a
the
company logo, slogan, photograph, or another other image you
want to use.
Capturing the Image
26 Using the Projector Menus
You start by displaying the image you want to use on the
projector. You can use an image from either a computer or
video source such as a VCR or digital camera. Then follow these
steps to capture the image and transfer it to the projector:
1. Press the
with the Video menu highlighted.
2. Press the bottom edge of the
down) to highlight the
button. You see the main menu listing,
Menu
button (or move it
Enter
User’s Logo
menu.
3. Press Enter to select this feature. You see the following
message:
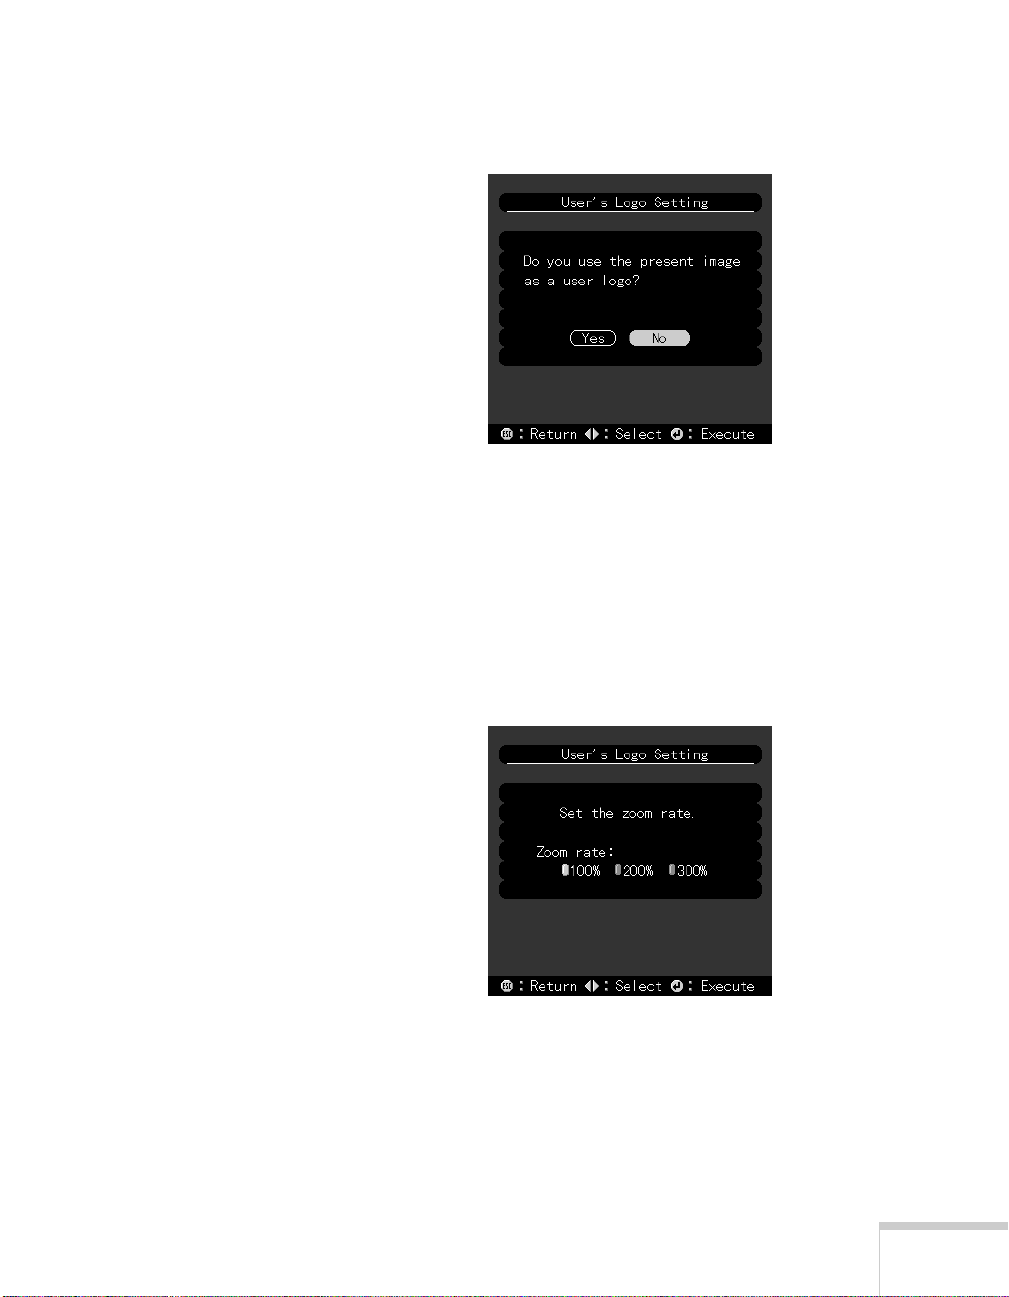
4. Select
Yes and press Enter. A selection box displays over
the image.
5. Use the
Enter button on the remote control to select the
area of the image you want to use. Once you have selected
the entire area, press Enter.
6. When you see the message “Do you use this image?” select
Yes and press Enter. If you want to change the area
selected, select
No and repeat step 5. You see the following:
7. Use the Enter button on the remote control to select a
zoom rate (display size), and then press
Enter.
Using the Projector Menus 27
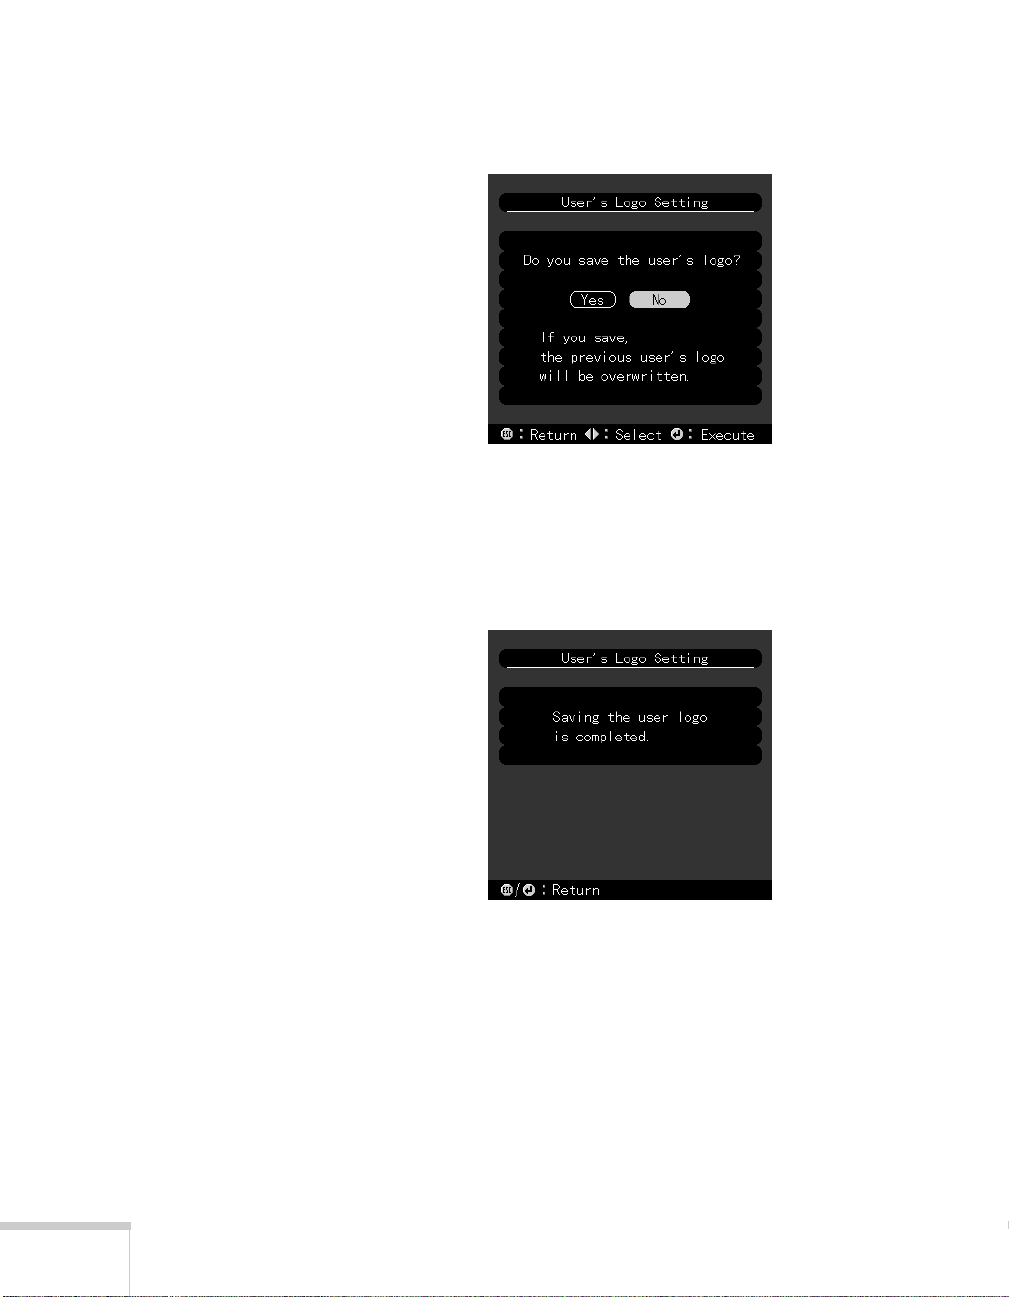
8. When the following message appears, select
Enter.
Yes and press
Saving the logo may take a few moments. Do not use the
projector or other sources (computer, video, speaker, etc.)
while the logo is being saved.
9. When you see the following message, press the
Enter button to redisplay the main menu.
Menu or
28 Using the Projector Menus

note
You can also set up your
image as a startup screen.
Use the Advanced menu to
enable the startup screen.
Assigning the Image to the No-Signal
Message and/or A/V Mute Button
After your image is saved, you can set it up as the no-signal
message and/or the screen that’s displayed when you press the
A/V Mute button.
1. Press the
Menu button. You see the main menu listing,
with the Video menu highlighted.
2. Press the bottom edge of the
to highlight the
3. Press the
Setting menu.
Enter button to select the Setting menu.
4. Press the bottom edge of the
to highlight
No-Signal Msg.
5. Press the right side of the
Enter button (or tilt it down)
Enter button (or tilt it down)
Enter button to select Logo. This
sets your image as the screen displayed when the projector
is not receiving a signal.
6. If you want to set up your image as the A/V mute display,
press the bottom edge of the
to highlight
A/V Mute.
7. Press the right side of the
Enter button (or tilt it down)
Enter button to select Logo. This
sets your image as the screen displayed when you press the
AV/Mute button.
8. When you’re finished, press
To test your setting, press the
Esc or Menu.
A/V Mute button to display your
image. Press it again to turn off the image.
Using the Projector Menus 29

Advanced Menu
The Advanced menu lets you set additional projector options.
Menu item Description
Language Selects the language to be used in the menus:
Japanese, English, French, German, Italian,
Spanish, Portuguese, Chinese, or Korean.
Startup
Screen
Color Temp Adjusts the whiteness of the screen. Positive
Rear Proj. Mirrors the projected image so it looks correct
Ceiling Flips the projected image so it looks correct
Reset Returns all Advanced menu items to their initial
Displays the image you have saved as a user
logo during the projector’s startup.
color temperature values provide a cold white;
negative values provide a warmer white.
when you’re projecting from behind onto a
translucent screen. Selecting ON turns
mirroring on, while OFF turns it off (for a normal
image).
when the projector is mounted upside-down
from the ceiling. Selecting ON turns the feature
on, while OFF turns it off (for a normal image).
factory defaults.
30 Using the Projector Menus
 Loading...