

Page 1

®
24-Pin Dot Matrix Printer
All rights reserved. No part of this publication may be reproduced , stored in a retrieval
system, or transmitted in any form or by any means, electronic, mechanical, photocopying,
recording, or otherwise, without the p rior written permiss ion of SEIKO EPSON
CORPORATION. The information contained herein is designed only for use with this EPSON
printer. EPSON is not responsible for any use of this information as applied to other printers.
Neither SEIKO EPSON CO RPORATION nor its affiliates sh all be liable to the purchaser of
this product or third parties for damages, losses, costs, or expenses incurred by the purchaser
or third parti e s as a result of: ac cident, misuse, or abuse of this product or unau t horized
modificati ons, re pairs , or alte rati ons to th is prod uct, o r (excl uding t he U.S.) f ailur e to stri ctly
comply with SEIKO EPSON CORPORATION’s operating and maintenance instructions.
SEIKO EPSON CORPORATION shall not be liable for any damages or problems arising from
the use of any options or any consumable products other than those designated as Original
EPSON Products or EPSON Approved Products by SEIKO EPSON CORPORATION.
EPSON and EPSON ESC/P are registered trademarks of SEIKO EPSON CORPORATION.
Microsoft, Windows, and Windows NT are registered trademarks of Microsoft Corporation.
IBM is a registered tradema rk of International Business Ma ch in e s Corporation.
General Notice: Other product names used herein are for identification purposes only and may be
trademarks of their respective owners. EPSON disclaims any and all rights in those marks.
Copyright © 2000 by SEIKO EPSON CORPORATION, Nagano, Japan.
User’s Guide
Page 2

Contents
Getting to Know Your Printer
Important Safety Instructions . . . . . . . . . . . . . . . . . . . . . . . . . . . . .2
Print Head Caution Symbol. . . . . . . . . . . . . . . . . . . . . . . . . . . . . . .4
ENERGY STAR Compliance . . . . . . . . . . . . . . . . . . . . . . . . . . . . . .4
Warnings, Cautions, and Notes. . . . . . . . . . . . . . . . . . . . . . . . . . . .4
Chapter 1 Setting Up the Printer
Unpacking the Printer. . . . . . . . . . . . . . . . . . . . . . . . . . . . . . . . . . . .1-2
Choosing a Place for the Printer . . . . . . . . . . . . . . . . . . . . . . . . . . .1-3
Assembling the Printer. . . . . . . . . . . . . . . . . . . . . . . . . . . . . . . . . . .1-5
Attaching the paper guide . . . . . . . . . . . . . . . . . . . . . . . . . . .1-5
Plugging in the Printer . . . . . . . . . . . . . . . . . . . . . . . . . . . . . . . . . . .1-5
Connecting the Printer to Your Computer . . . . . . . . . . . . . . . . . .1-6
Installing or Replacing the Ribbon Cartridge . . . . . . . . . . . . . . . .1-8
Installing the Printer Software. . . . . . . . . . . . . . . . . . . . . . . . . . . . .1-12
Installing the printer software in Windows Me, 98, 95,
2000, or NT 4.0 . . . . . . . . . . . . . . . . . . . . . . . . . . . . . . . . . . .1-13
Installing the printer softw are in Windows 3 .1
or NT 3.5x . . . . . . . . . . . . . . . . . . . . . . . . . . . . . . . . . . . . . . .1-14
For DOS programs . . . . . . . . . . . . . . . . . . . . . . . . . . . . . . . . . .1-17
Chapter 2 Paper Handling
Selecting a Paper Source. . . . . . . . . . . . . . . . . . . . . . . . . . . . . . . . . .2-2
Paper source and paper types. . . . . . . . . . . . . . . . . . . . . . . . .2-3
Setting the paper release lever (LQ-680). . . . . . . . . . . . . . . .2-4
Setting the Paper Source button (LQ-680Pro) . . . . . . . . . . .2-5
Adjusting the Paper Thickness Lever . . . . . . . . . . . . . . . . . . . . . . .2-6
Using Continuous Paper . . . . . . . . . . . . . . . . . . . . . . . . . . . . . . . . .2-8
Positioning your continuous paper supply . . . . . . . . . . . . .2-8
Loading continuous paper with the tractor . . . . . . . . . . . . .2-9
Contents i
Page 3

Using the tear-off function. . . . . . . . . . . . . . . . . . . . . . . . . . . 2-14
Removing continuous paper . . . . . . . . . . . . . . . . . . . . . . . . . 2-17
Using Continuous Multipart Forms . . . . . . . . . . . . . . . . . . . . . . . 2-17
Using Over lapping Multipart Forms
(LQ-680Pro). . . . . . . . . . . . . . . . . . . . . . . . . . . . . . . . . . . . . . . . . . 2-18
Using Labels . . . . . . . . . . . . . . . . . . . . . . . . . . . . . . . . . . . . . . . . . . . 2-19
Using Single Sheets . . . . . . . . . . . . . . . . . . . . . . . . . . . . . . . . . . . . . 2-20
Using Single-Sheet Multipart Forms . . . . . . . . . . . . . . . . . . . . . . . 2-23
Using Envelopes. . . . . . . . . . . . . . . . . . . . . . . . . . . . . . . . . . . . . . . . 2-24
Using Postcards . . . . . . . . . . . . . . . . . . . . . . . . . . . . . . . . . . . . . . . . 2-25
Switching Between Continuous Paper and Single Sheets . . . . . 2-26
Switching to single sheets . . . . . . . . . . . . . . . . . . . . . . . . . . . 2-26
Switching to continuous paper . . . . . . . . . . . . . . . . . . . . . . . 2-28
Using Micro Adjust . . . . . . . . . . . . . . . . . . . . . . . . . . . . . . . . . . . . . 2-28
Adjusting the loading position . . . . . . . . . . . . . . . . . . . . . . . 2-28
Adjusting the tear-off position . . . . . . . . . . . . . . . . . . . . . . . 2-31
Adjusting the printing position. . . . . . . . . . . . . . . . . . . . . . . 2-32
Chapter 3 Using the Printer Software
About Your Printer Software . . . . . . . . . . . . . . . . . . . . . . . . . . . . . 3-2
Using the Printer Driver With Windows Me, 98 or 95 . . . . . . . . 3-3
Accessing the printer driver
from Windows applications . . . . . . . . . . . . . . . . . . . . . . . 3-3
Accessing the printer driver from the Start menu . . . . . . . 3-5
Changing the printer driver settings . . . . . . . . . . . . . . . . . . 3-6
Using the Printer Driver With Windows 3.1 . . . . . . . . . . . . . . . . 3-7
Accessing the printer driver
from Windows applications . . . . . . . . . . . . . . . . . . . . . . . 3-7
Accessing the printer driver from the Control Panel. . . . . 3-9
Changing the Printer driver settings . . . . . . . . . . . . . . . . . . 3-9
Using the Printer Driver With Windows 2000 and NT 4.0 . . . . 3-10
Accessing the printer driver
from Windows applications . . . . . . . . . . . . . . . . . . . . . . . 3-10
Accessing the printer driver from the Start menu . . . . . . . 3-12
Changing the printer driver settings . . . . . . . . . . . . . . . . . . 3-13
Using the Printer Driver With Windows NT 3.5x. . . . . . . . . . . . 3-14
Accessing the printer driver
ii Contents
Page 4

from Windows applications. . . . . . . . . . . . . . . . . . . . . . . .3-14
Accessing the printer driver from the Control Panel . . . . .3-16
Changing the Printer driver settings. . . . . . . . . . . . . . . . . . .3-17
Printer Driver Settings Overview . . . . . . . . . . . . . . . . . . . . . . . . . .3-18
Using the EPSON Remote! Utility . . . . . . . . . . . . . . . . . . . . . . . . .3-20
Installing EPSON Remote! . . . . . . . . . . . . . . . . . . . . . . . . . . .3-20
Accessing EPSON Remote!. . . . . . . . . . . . . . . . . . . . . . . . . . .3-20
Using the EPSON Status Monitor 3 Utility . . . . . . . . . . . . . . . . . .3-21
Setting up EPSON Status Monitor 3 . . . . . . . . . . . . . . . . . . .3-21
Accessing EPSON Status Monitor 3. . . . . . . . . . . . . . . . . . . .3-23
Chapter 4 Changing Printer Settings From the Printer’s Control
Panel
Selecting a Built-In Font and Pitch . . . . . . . . . . . . . . . . . . . . . . . . .4-2
About Your Printer’s Default Settings . . . . . . . . . . . . . . . . . . . . . .4-3
Changing default settings . . . . . . . . . . . . . . . . . . . . . . . . . . . .4-9
Chapter 5 Troubleshooting
Using the Error Indicators . . . . . . . . . . . . . . . . . . . . . . . . . . . . . . . .5-2
Problems and Solutions . . . . . . . . . . . . . . . . . . . . . . . . . . . . . . . . . .5-4
Power supply problems. . . . . . . . . . . . . . . . . . . . . . . . . . . . . .5-5
Single-sheet paper loading or feeding problems. . . . . . . . . 5-6
Continuous paper loading or feeding problems . . . . . . . . .5-8
Printing position problems. . . . . . . . . . . . . . . . . . . . . . . . . . .5-9
Printing or printout quality problems. . . . . . . . . . . . . . . . . .5-11
Clearing Paper Jams . . . . . . . . . . . . . . . . . . . . . . . . . . . . . . . . . . . . .5-16
Aligning Vertical Lines in Your Printout. . . . . . . . . . . . . . . . . . . .5-17
Printing a Self Test. . . . . . . . . . . . . . . . . . . . . . . . . . . . . . . . . . . . . . .5-18
Printing a Hex Dump . . . . . . . . . . . . . . . . . . . . . . . . . . . . . . . . . . . .5-19
Contents iii
Page 5

Appendix A Enhancing Your Printer With Options
Cut-Sheet Feeders. . . . . . . . . . . . . . . . . . . . . . . . . . . . . . . . . . . . . . . A-2
Installing the cut-sheet feeder . . . . . . . . . . . . . . . . . . . . . . . . A-3
Loading paper from the cut-sheet feeder. . . . . . . . . . . . . . . A-6
Switching between the tractor
and the cut-sheet feeder. . . . . . . . . . . . . . . . . . . . . . . . . . . A-13
Loading paper manually from the paper guide. . . . . . . . . A-15
Roll Paper Holder. . . . . . . . . . . . . . . . . . . . . . . . . . . . . . . . . . . . . . . A-17
Installing the roll paper holder . . . . . . . . . . . . . . . . . . . . . . . A-17
Loading a roll of paper. . . . . . . . . . . . . . . . . . . . . . . . . . . . . . A-18
Removing roll paper. . . . . . . . . . . . . . . . . . . . . . . . . . . . . . . . A-20
Optional interface cards . . . . . . . . . . . . . . . . . . . . . . . . . . . . . . . . . A-21
Installing an interface card. . . . . . . . . . . . . . . . . . . . . . . . . . . A-22
Appendix B Cleaning and Transporting the Printer
Cleaning the Printer. . . . . . . . . . . . . . . . . . . . . . . . . . . . . . . . . . . . . B-2
Transporting the Printer . . . . . . . . . . . . . . . . . . . . . . . . . . . . . . . . . B-3
Appendix C Specifications
Printer Specifications. . . . . . . . . . . . . . . . . . . . . . . . . . . . . . . . . . . . C-2
Mechanical . . . . . . . . . . . . . . . . . . . . . . . . . . . . . . . . . . . . . . . . C-2
Electronic . . . . . . . . . . . . . . . . . . . . . . . . . . . . . . . . . . . . . . . . . C-4
Electrical . . . . . . . . . . . . . . . . . . . . . . . . . . . . . . . . . . . . . . . . . . C-6
Environmental . . . . . . . . . . . . . . . . . . . . . . . . . . . . . . . . . . . . . C-6
Paper . . . . . . . . . . . . . . . . . . . . . . . . . . . . . . . . . . . . . . . . . . . . . C-6
Printable area. . . . . . . . . . . . . . . . . . . . . . . . . . . . . . . . . . . . . . C-11
Safety approvals . . . . . . . . . . . . . . . . . . . . . . . . . . . . . . . . . . . C-14
CE marking. . . . . . . . . . . . . . . . . . . . . . . . . . . . . . . . . . . . . . . . C-14
Command Lists. . . . . . . . . . . . . . . . . . . . . . . . . . . . . . . . . . . . . . . . . C-15
EPSON ESC/P2 control codes. . . . . . . . . . . . . . . . . . . . . . . . C-15
IBM 2390 Plus emulation control codes. . . . . . . . . . . . . . . . C-16
Contacting Customer Support
iv Contents
Page 6

Glossary
Index
Contents v
Page 7
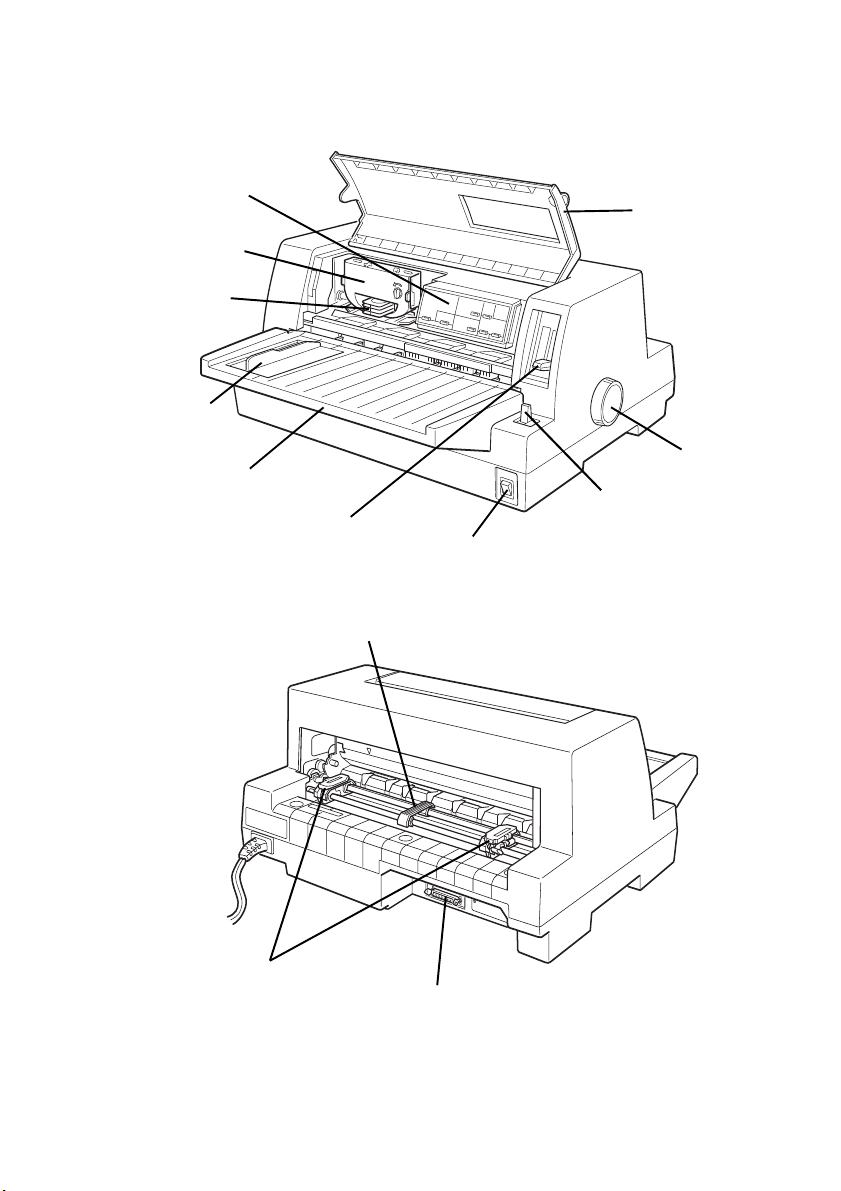
Printer Parts
control panel
ribbon cartridge
print head
edge guide
paper guide
paper thickness lever
printer cover
knob
paper release lever
(LQ-680 only)
power switch
paper support
sprocket units
parallel interface
Page 8
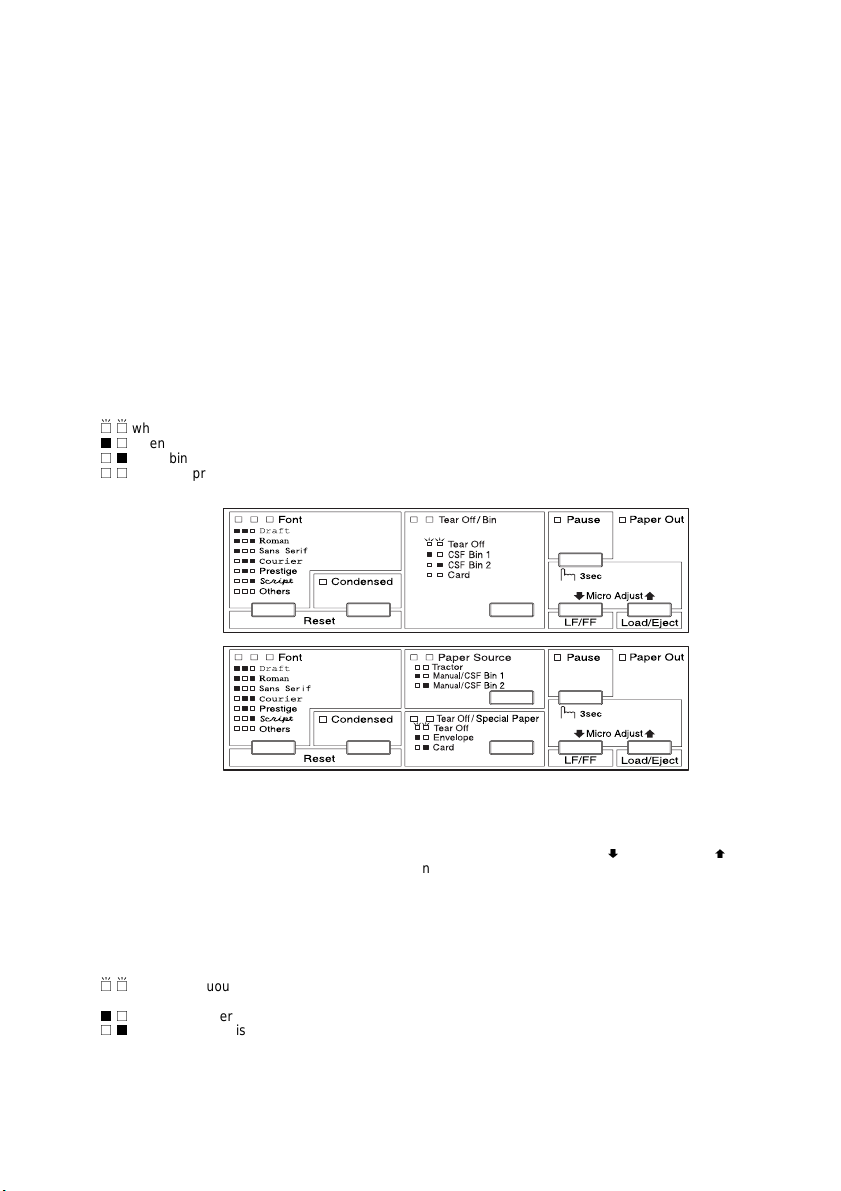
Control Panel Buttons and Lights
Font button
Selects the font.
Condensed button
Turns on and off the condensed mode.
Reset
When you press both the Font and Condensed buttons
simultaneously, the printer clears its buffer and return to its
default settings.
Tear Off/Bin button (LQ-680)
● Advances continuous paper to the tear-off position.
● Feeds continuous paper backward from the tear-off
position to the top-of-form position.
● Selects a cut-sheet feeder bin.
● Turns on the card mode to print on postcards and envelopes.
Tear Off/Bin lights (LQ-680)
●
f f
when continuous paper is in the tear-off position.
●
o n
when bin 1 of the optional cut-sheet feeder is selected.
●
n o
when bin 2 of the optional cut-sheet feeder is selected.
●
n n
when the printer is in the card mode.
LQ-680
Pause button
Stops printing temporarily, and
resumes printing when pressed again.
When pressed for three seconds,
turns on the *micro adjust mode. To
turn off, press again.
Pause light
● On when the printer is paused.
● Flashes when the printer is in the
*micro adjust mode.
● Flashes when the print head has
overheated.
Paper Out light
● On when no paper is loaded in
the selected paper source or
paper is not loaded correctly.
● Flashes when paper has not
been fully ejected or a paper
jam has occurred.
LQ-680Pro
Paper Source button & lights (LQ-680Pro)
Select a paper source. See Chapter 2.
Tear Off/Special Paper button (LQ-680Pro)
● Advances contin uous pape r to the tear-o ff
position.
● Feeds continuous paper backward from
the tear-off position to the
top-of-form position.
● Turns on the card mode or envelope mode.
Tear Off/Special Paper lights (LQ-680Pro)
●
f f
when continuous paper is in the tear-
off position.
●
o n
when the printer is in the card mode.
●
n o
when the printer is in the envelope
mode.
*Micro Adjust mode
When you hold down the Pause button for three
seconds, the printer enters the micro adjust mode. In
this mode , y o u c a n p re s s t h e L F/ FF
buttons to adjust the top-of-form or tear-off position. See
Chapter 2.
LF/FF button
● Feeds paper line by line when pressin g shortly.
● Ejects a single sheet or advances continuous paper
to the next top-of-form position when held down.
Load/Eject button
● Loads a single sheet of paper.
● Ejects a single sheet of paper if a sheet is loaded.
● Loads continuous paper from the standby position.
● Feeds continuous paper backward to the standby
position.
D
and Load/EjectU
Page 9

Getting to Know Your Pri nter
Your EPSON® LQ-680/LQ-680Pro 24-pin dot matrix printer
provides high-quality printing and great perform ance in a
compact design.
Features include:
❏ The ability to handle a wide range of paper types, including
continuous paper, mult ip art form s wit h one original and up
to five copies, labels, single sheets, envelopes, and postcards
❏ High-speed printing of up to 413 cps (charac ters per second)
at 10 characters per inch
Your printer also comes with printer driver software, the EPSON
Status Monitor 3 utili ty for Microsoft
and NT 4.0, that lets you check the statu s of your prin ter quic kly
and easily, and other software. In addition, many other options
are available to suit your individual needs.
®
Windows® Me, 98, 95, 2000
Getting to Know Your Printer 1
Page 10

Important Safety Instructions
Read all of these instructions and save them for later reference.
Follow all warnings and instructions marked on the printer.
❏ Do not place the printer on an unstable surface or near a
radiator or heat source.
❏ Place the printer on a flat surf ace. The printer will not opera te
properly if it is tilted or at an angle.
❏ Do not block or cover the openings in the printer’s cabinet.
Do not insert objects through the slots.
❏ Use only the type of power source indicated on the p ri nter ’s
label.
❏ Connect all equipment to properly ground ed power outl ets.
Avoid using outlets on the same circuit as pho tocopiers or air
control systems that regularly switch on and off.
❏ Do not use a damaged or frayed power cord.
❏ If you use an extension cord with the printer, make sure the
total ampere rating of all devices plugged int o the exte nsion
cord does not exceed the cord’s ampere rating. Also, make
sure the total of all d evices p lu gged i nt o t he wa ll ou tl et do es
not exceed the wall outlet’s ampere rating.
❏ Unplug the printer before cl eaning, and clean it with a damp
cloth only.
❏ Do not spill liquid on the printer.
❏ Except as specifically explained in this guide, do not attempt
to service the printer yourself.
2 Getting to Know Your Printer
Page 11

❏ Unplug the printer and refer servicing to qualified
K
personnel under the following conditions:
If the power cord or pl ug is damaged; if liqui d has entered the
printer; if the printer has been dropped or the cabinet
damaged; or if the printer does not operate normally or
exhibits a distinct change in performance. Adjust only those
controls that are covered by the operating instructions.
❏ Printer part s m arked with this symbol may be hot .
Turn off the printer and let it cool for a fe w minutes
before you touch any printer part marked with this
symbol.
❏ If you plan to use the printer in Germany, observe the
following:
To provide adequate short-circuit protection and overcurrent protection for this printer, the building installation
must be protected by a 10 or 16 amp circuit breaker.
Getting to Know Your Printer 3
Page 12
Print Head Caution Symbol
K
The symbol on the print head indicates that this
part may be hot. Never touch the print head just
after the printer has been used. Let the print head
cool for a few minutes before touching it.
ENERGY STAR Compliance
As an ENERGY STAR Partner, EPSON has
determined that this produc t meets the
ENERGY STAR guidelines for energy efficiency.
The International ENERGY STAR Office Equipment program is
a voluntary partnership with the computer and office equipment
industry to promote the introduction of e nergy-efficient pers onal
computers, monitors, printers, fax machines, copiers, and
scanners in an effort to reduce air pollution caused by power
generation.
Warnings, Cautions, and Notes
This guide uses the following conventions:
Warnings must be followed to avoid bodily injury.
w
Cautions must be observed to avoid d amage to your equ ipment.
c
Notes contain important information and useful tips on the operation
of your printer.
4 Getting to Know Your Printer
Page 13

Chapter 1
Setting Up the Printer
Unpacking the Printer. . . . . . . . . . . . . . . . . . . . . . . . . . . . . . . . . . . .1-2
Choosing a Place for the Printer . . . . . . . . . . . . . . . . . . . . . . . . . . .1-3
Assembling the Printer. . . . . . . . . . . . . . . . . . . . . . . . . . . . . . . . . . .1-5
Attaching the paper guide . . . . . . . . . . . . . . . . . . . . . . . . . . .1-5
Plugging in the Printer . . . . . . . . . . . . . . . . . . . . . . . . . . . . . . . . . . .1-5
Connecting the Printer to Your Computer . . . . . . . . . . . . . . . . . .1-6
Installing or Replacing the Ribbon Cartridge . . . . . . . . . . . . . . . .1-8
Installing the Printer Software. . . . . . . . . . . . . . . . . . . . . . . . . . . . .1-12
Installing the printer software in Windows Me, 98, 95,
2000, or NT 4.0 . . . . . . . . . . . . . . . . . . . . . . . . . . . . . . . . . . .1-13
Installing the printer softw are in Windows 3 .1
or NT 3.5x . . . . . . . . . . . . . . . . . . . . . . . . . . . . . . . . . . . . . . .1-14
For DOS programs . . . . . . . . . . . . . . . . . . . . . . . . . . . . . . . . . .1-17
Setting Up the Printer 1-1
Page 14
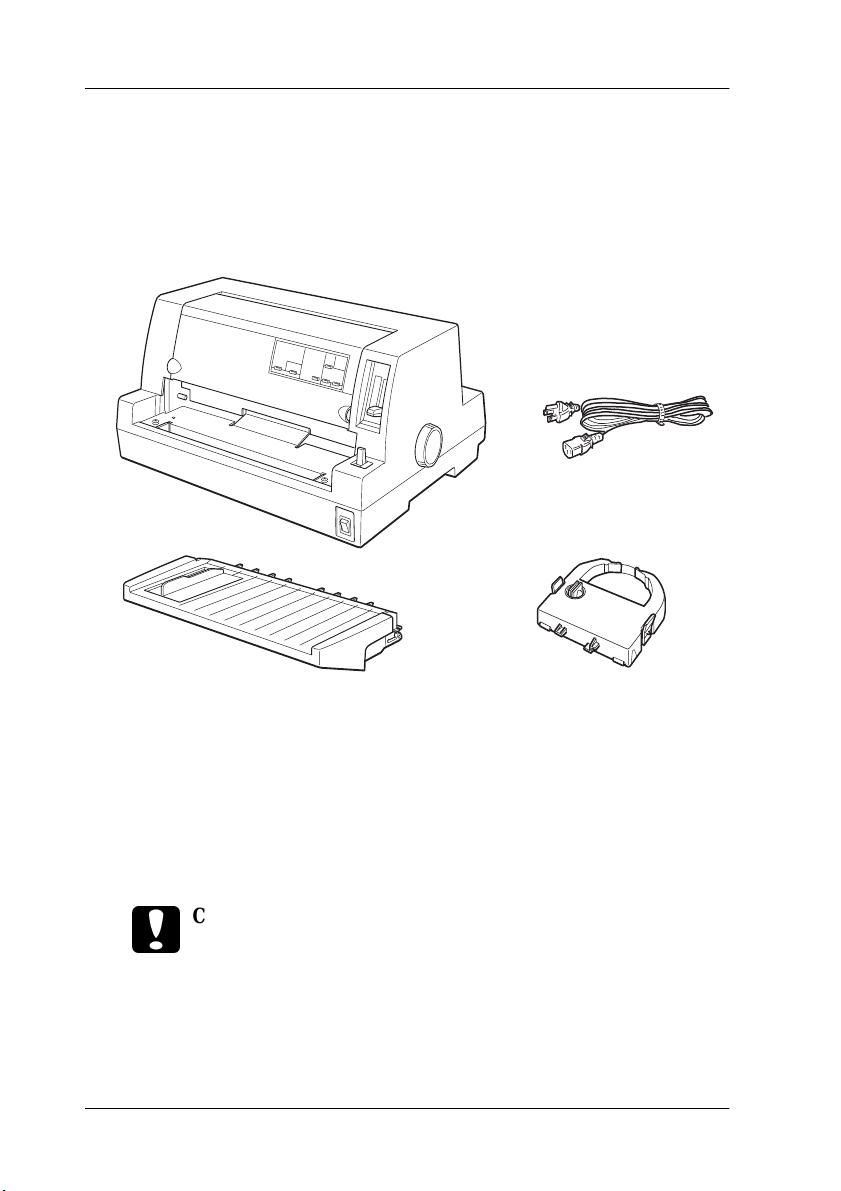
Unpacking the Pr inter
Besides this guide, your printer box should include an EPSON
printer software CD-ROM, a Notice Sheet, and the following
items:
power cord
printer
paper guide ribbon cartridge
Note:
Depending on your printer model, the power cord may be permanently
attached to the printer. Also, the shape of the power cord plug varies
depending on the country of purchase; be sure the plug you have is the
right one for your location.
Caution:
c
1-2 Setting Up the Printer
There are several models of the printer designed for different
voltages, and it is not possible to adjust the printer for use with
another voltage. If the label on the back of the printer does not
show the correct voltage for your country, contact your dealer.
Page 15

You must remove all protective materials packed around and
inside your printer before you set it up and turn on the power.
Follow the directions on the Notice Sheet (packed with the
printer) to remove these materials.
Save all packing and pro tective materials in case you need to ship
the printer in the future. It sh ould always be transported in its
original packaging or equivalent materials.
Choosing a Place for the Printer
Follow the guidelines below when selecting a location for your
printer.
❏ Place the printer on a flat, stable surface. The printer will not
operate properly if it is tilted or at an angle.
❏ Leave adequate room around the printer for easy operation
and maintenance.
❏ Avoid using or storing the pr inter in places subject to rapid
changes in temperature and humidity. Keep it away from
direct sunlight, strong light, heat sources, or excessive
moisture or dust.
❏ Avoid places subject to shocks and vibrations.
❏ Place the printer near a wall outlet where you can easily
unplug the power cord.
❏ Avoid electrical outlets controlled by wall switches or
automatic timers. An interruption of power can erase
information in the memory of your printer or compu ter.
Also avoid outlets on the same cir cuit as large motors or other
appliances that can cause voltage fluctuations.
Setting Up the Printer 1-3
Page 16

❏ Keep the entire computer system away from pot ential sources
of electromagnetic interference, such as loudspeakers or the
base units of cordless telephones.
❏ Use a grounded power outlet; do not use an adapter plug.
❏ Make sure the paper path is clear and unobstructed before
you print on continuous paper.
❏ Position your printer’s p ower cord and interface cable so they
do not interfere with paper feeding.
If you plan to use a printer stand, follow these guidelines:
❏ Use a stand that supports at least 20 kg.
❏ Never use a stand that tilts the printer. The pr inter should
always be kept level.
❏ If possible, secure the printer’s power cord and interface cable
to a leg of the printer stand so they do not interfere with paper
feeding.
1-4 Setting Up the Printer
Page 17
Assembling the Printer
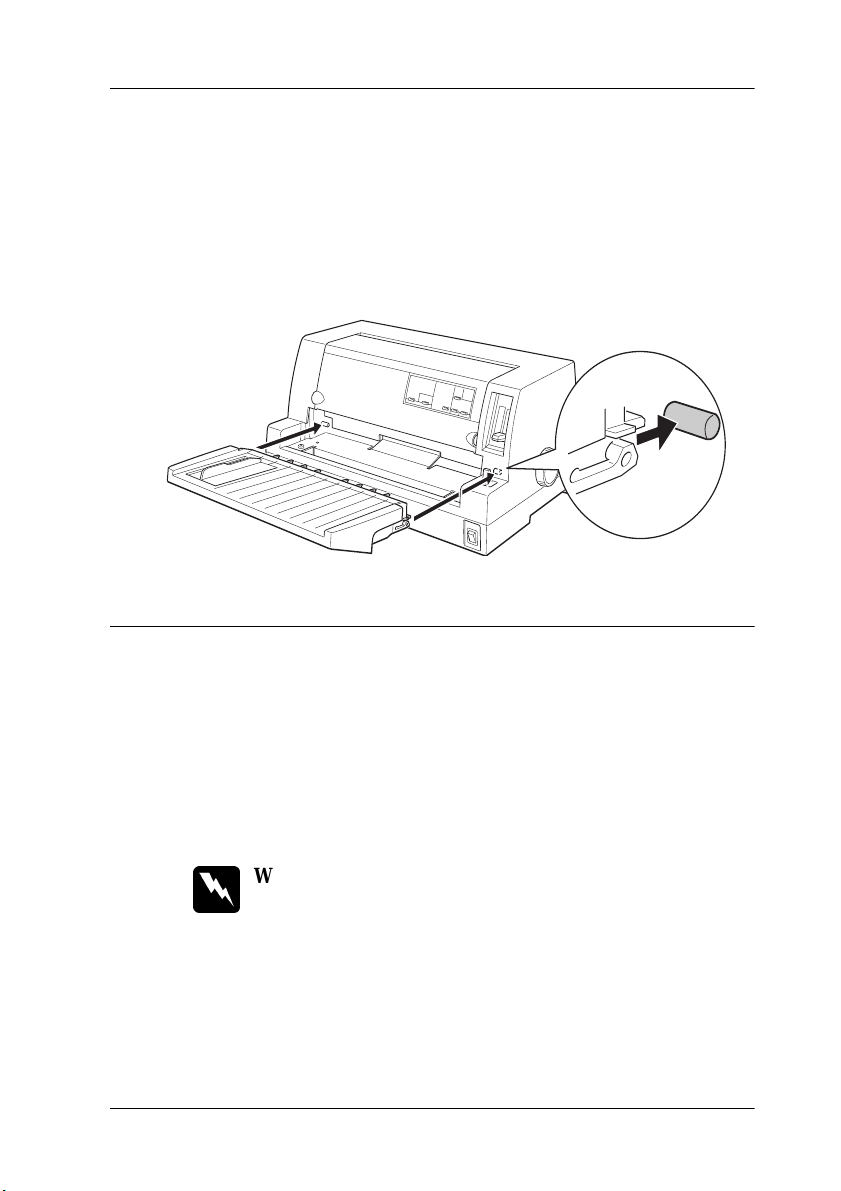
Attaching the paper guide
To attach the paper guide, slide the slots on the paper guide all
the way onto the mounting pegs in the printer as shown below.
Plugging in the Printer
1. Make sure the printer is turned off.
2. Check the label on the back of the printer to make sure its
voltage matches that of your electrical outl et. Also make sure
the plug on your printer’s power cord matches your electrical
outlet.
Warning:
w
It is not possible to change the printer’s voltage. If the rated
voltage and your outlet voltage do not match, contact your
dealer for assistance. Do not plug in the power cord.
Setting Up the Printer 1-5
Page 18
3. If the power cord is not attached to the printer, plug the
appropriate end into the AC inlet on the back of the printer.
4. Plug the power cord into a properly grounded electrical
outlet.
Connecting the Printer to Your Computer
Your printer has a standard IEEE-1284 compatible parallel
interface connection and an optional interface.
If your computer requires a dif ferent type of print er interface, try
one of the Type B optional interfaces described in “Optional
interface cards” on page A-21.
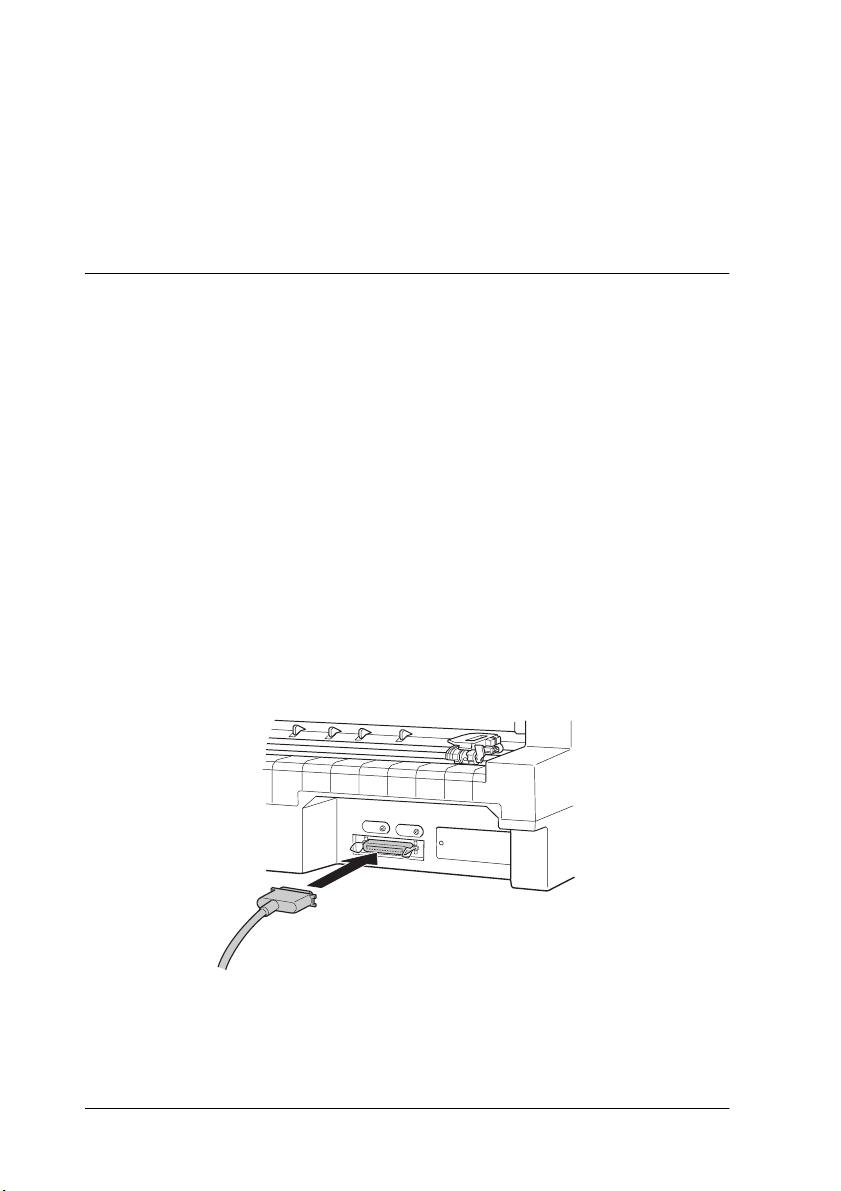
Follow the steps below to connect the printer to your computer
using a parallel interface connector, or a ground wire connector.
1. Make sure both the printe r and computer a re turned off.
2. Plug the cable connector securely into the parallel interface
connector.
.
1-6 Setting Up the Printer
Page 19
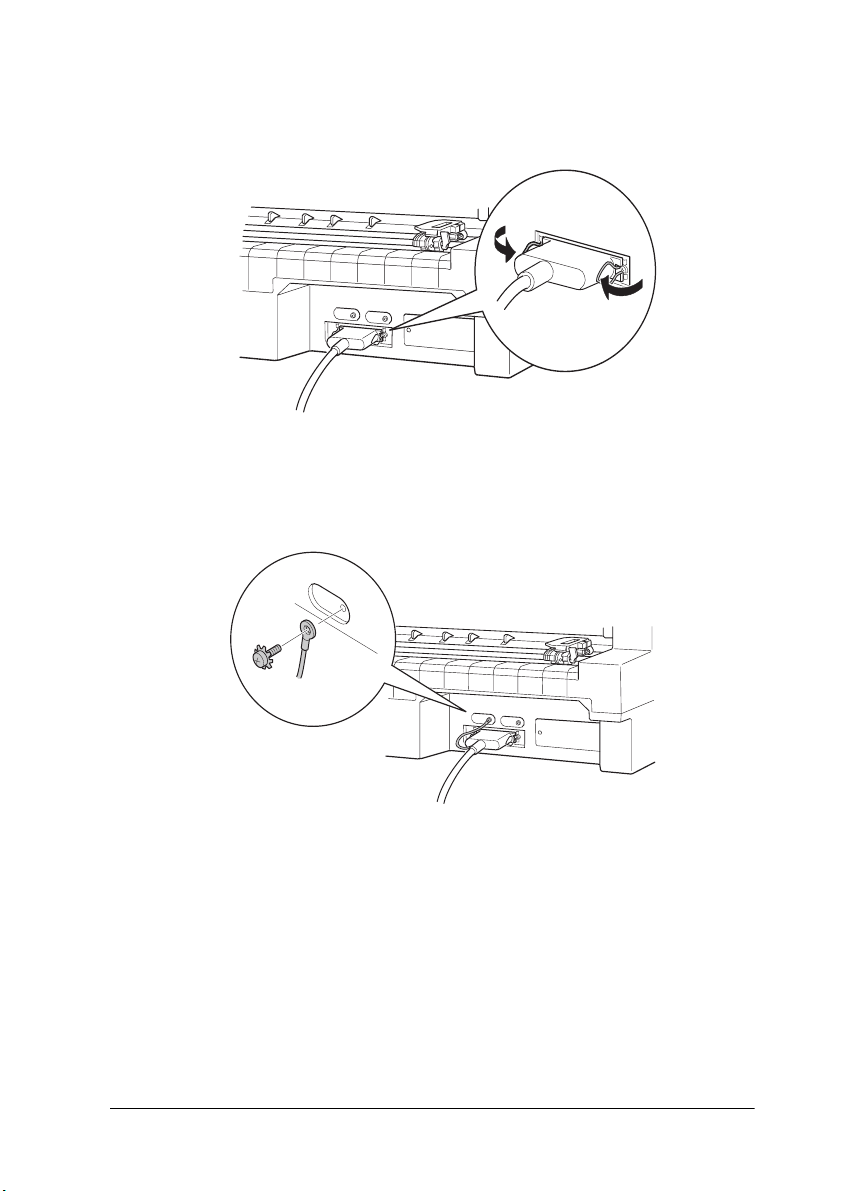
3. Squeeze the wire clips together unti l they lock in place on both
sides of the connector.
4. If your cable has a ground wire, connect it to the printer’s
ground connector as shown below.
5. Plug the other end of the cable into the computer.
Setting Up the Printer 1-7
Page 20
Installing or Replacing the Ribbon Cartridge
EPSON recommends the use of genuine EPSON Ribbon
Cartridges (S015016).
Warning:
w
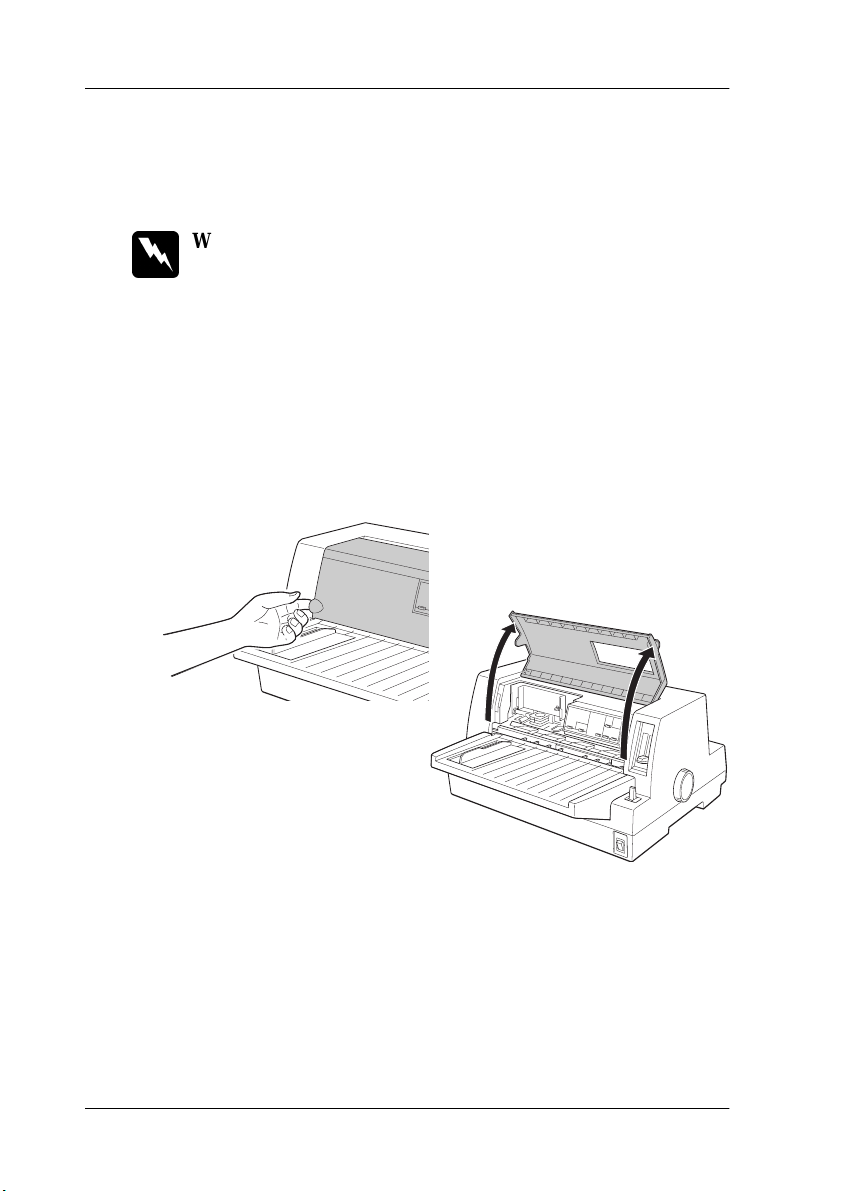
1. Make sure the printer is turned off.
2. Open the printer cover by gently lifting up the notch on the
You may touch the print head by hand to install or replace the
ribbon cartridge. If you have just used the printer, the print head
may be hot; let it cool for a few minutes before proceeding.
both sides.
1-8 Setting Up the Printer
Page 21

3. The print head should be in the replacement position
indicated by an indentation in the front metal plate, as shown
below.
If it is not, close the printer cover and turn the printer on to
move the print head to the repl acem ent position. Wait a few
seconds, then turn the printer off ag ain and open the printer
cover.
Caution:
c
Following the steps below while the printer is turned on can
damage the printer.
Setting Up the Printer 1-9
Page 22
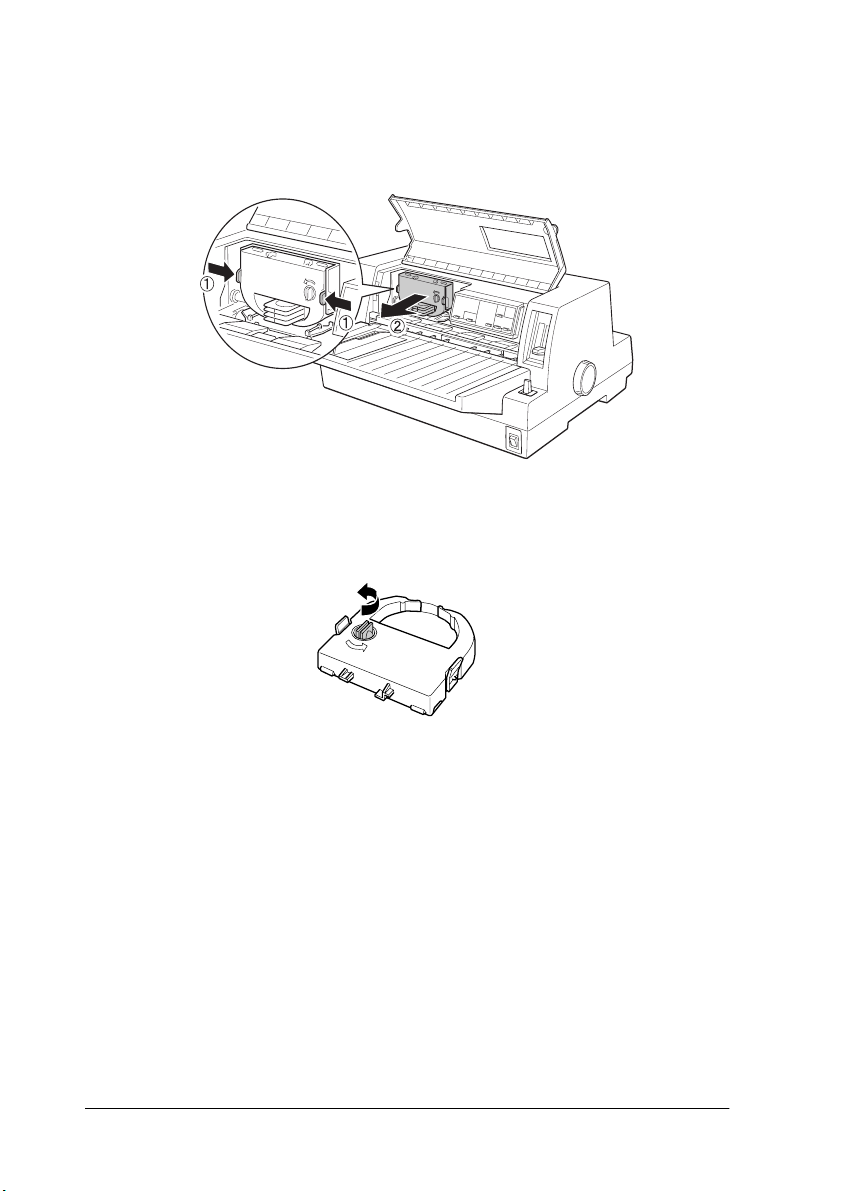
4. If a used ribbon cartridge i s already installed, squeeze the t abs
on each side of the cartridge, and pull the car tridge out of the
printer. Properly dispose the used ribbon and cartridge.
5. Turn the ribbon-tightening knob on the new car tr idge i n the
direction of the arrow to take up any slack in the ribbon.
6. Hold the ribbon cartridge with th e exposed ribbon down and
the ribbon-tightening knob facing you, and gui de the ri bbon
under the print head. Then snap the cartridge into place so
that the tabs on both sides of the cartridge fit into the notches
in the cartridge holder.
1-10 Setting Up the Printer
Page 23
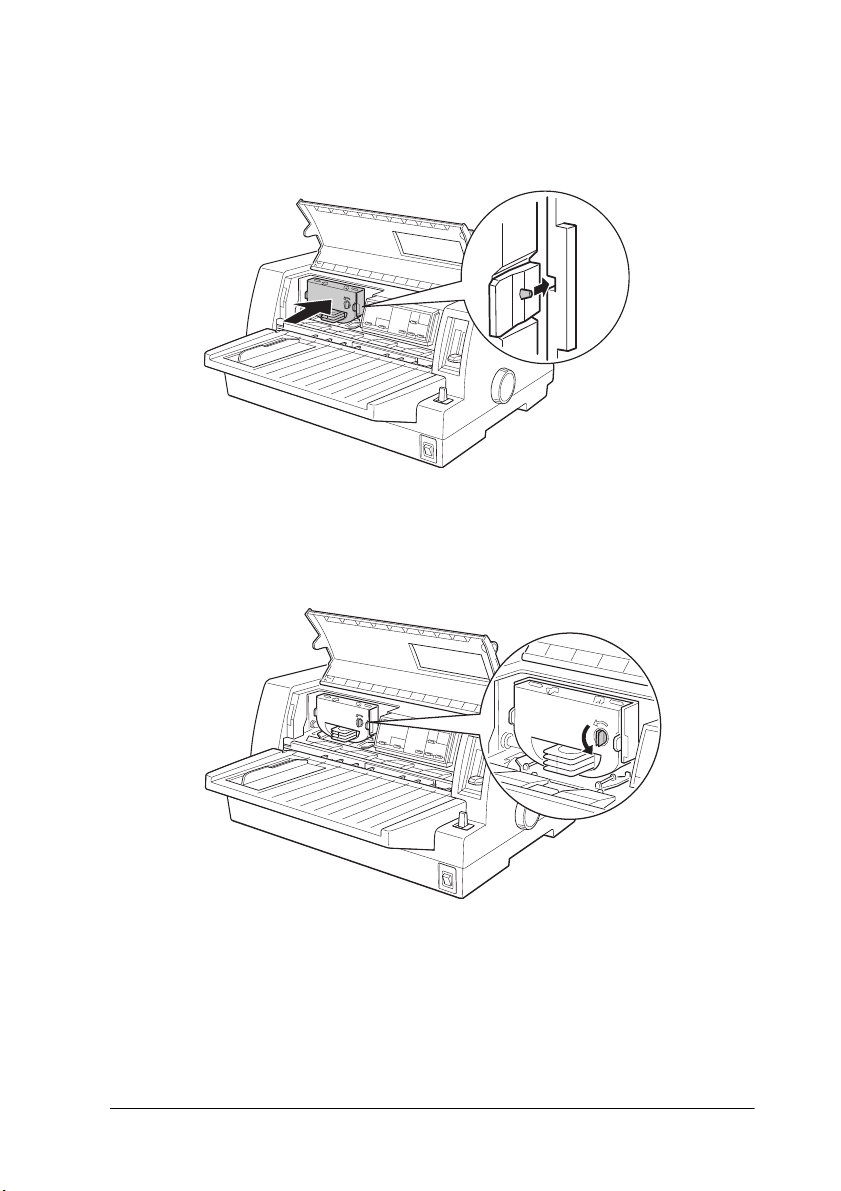
7. Hold the ribbon cartridge by its handle and push it firmly
down into position; then press on both ends of the cartridge
to make sure the plastic hooks fit into the slots.
8. Turn the ribbon-tightening kn ob again to remove any slack in
the ribbon and to make sure the ribbon moves freely.
9. Close the printer cover.
Note:
The printer pauses and cannot print when the printer cover is open.
Setting Up the Printer 1-11
Page 24

Installing the Printer Software
After you connect the printer to your computer, you need to
install the software included on the EPSON printer software
CD-ROM shipped with your printer.
Your printer software includes:
❏ Printer driv er
The printer driver is the softwa re that runs, or “d rives,” your
printer. With it, you can make printer settings such as print
quality, resolution, and paper size.
❏ EPSON Status Monitor 3 (for Windows Me, 98, 95, 2000 and
NT 4.0)
The EPSON Status Monitor 3 not ifies you of printer errors and
displays printer status information.
❏ EPSON Remote! (a DOS-based printer setup utility)
The EPSON Remote! utility allows you to easily change the
printer’s default settings from the computer screen. See
“Using the EPSON Remote! Utility” on page 3-20.
To install the printer software, see “Installing the printer software
in Windows Me, 98, 95, 2000, or NT 4.0” or “Installing the printer
software in Windows 3.1 or NT 3.5x” in this section. If you are
using DOS, see “For DOS programs” on page 1-17.
1-12 Setting Up the Printer
Page 25

Installing the printer software in Windows Me, 98,
95, 2000, or NT 4.0
Follow the steps below to ins tall the printer software in
Windows Me, 98, 95, 2000, or NT 4.0:
Note:
❏ Installing the printer software for Windows 2000 or NT 4.0 may
require administrator privileges. If you have problems, ask your
administrator for more information.
❏ If you wish to make a diskette version of the printer software on your
CD-ROM, insert the CD and run the EPSETUP program. In the
dialog box that appears, click the Driver disk creation utility
button and follow the on-screen instructions.
❏ If you are using the diskette version of the EPSON software, make
a backup copy of the EPSON printer software disk or disks before
you begin installation.
❏ If the New Hardware Found screen or any other wizard appears
when you turn on your computer, click Ca ncel and follow the steps
below.
❏ If the Digital Signature Not Found screen appears, click Yes. If you
click No, you must reinstall the printer driver as described below.
❏ Installation time varies depending on your computer.
1. Make sure that the printer and computer are switched off.
2. Switch the PC on. Windows start s automatically. Then swi tch
the printe r on.
3. Insert the CD-ROM containing the printer software int o the
CD-ROM drive. TheAutoPlay fun ction of the CD-ROM d rive
automatically starts the installation
program on the CD-ROM.
Setting Up the Printer 1-13
Page 26

If the installat ion pr ogram d oes not s tar t auto mati cally, click
on Start and then on Run. In the Run dialog box, enter the
drive letter of your CD-ROM drive in the command l ine (e.g.
E:\), followed by the command START.EXE (e.g.
E:\START.EXE) and click on the OK button.
Note:
If your CD-ROM drive has a drive letter other than "E", substitute
the appropriate letter. The installation program starts. The
subsequent procedure is menu-driven, i.e., you can select the
relevant options from a list simply by clicking with the mouse. The
remainder of the installation is automatic and you do not need to
enter any more information.
4. Select the desired options and follow the on-screeen
instructions.
5. After the printer software has been successfully installed,
click on the button identified by a door icon to exit the
installation program.
When you install the printer driver on Windows 98, 95, 2000 or
NT 4.0, EPSON Status Monitor 3 will also be installed.
For information on opening and using the software, see Chapter 3,
“Using the Printer Software.”
Installing the printer software in Windows 3.1 or NT 3.5x
Follow the steps b elow to install the printer software in
Windows 3.1 or NT 3.5x systems.
Note:
Installing the printer software on Windows NT 3.5x may require
administrator privileges. If you have problems, ask your administrator
for more information.
1-14 Setting Up the Printer
Page 27
1. Make sure Windows 3.1 is running and the Program
Manager window is open.
2. Insert the EPSON printer software CD shipped with your
printer in the CD-ROM
drive.
Note:
If your system does not have a CD-ROM drive, you can make a
floppy disk version from which to install the printer software.
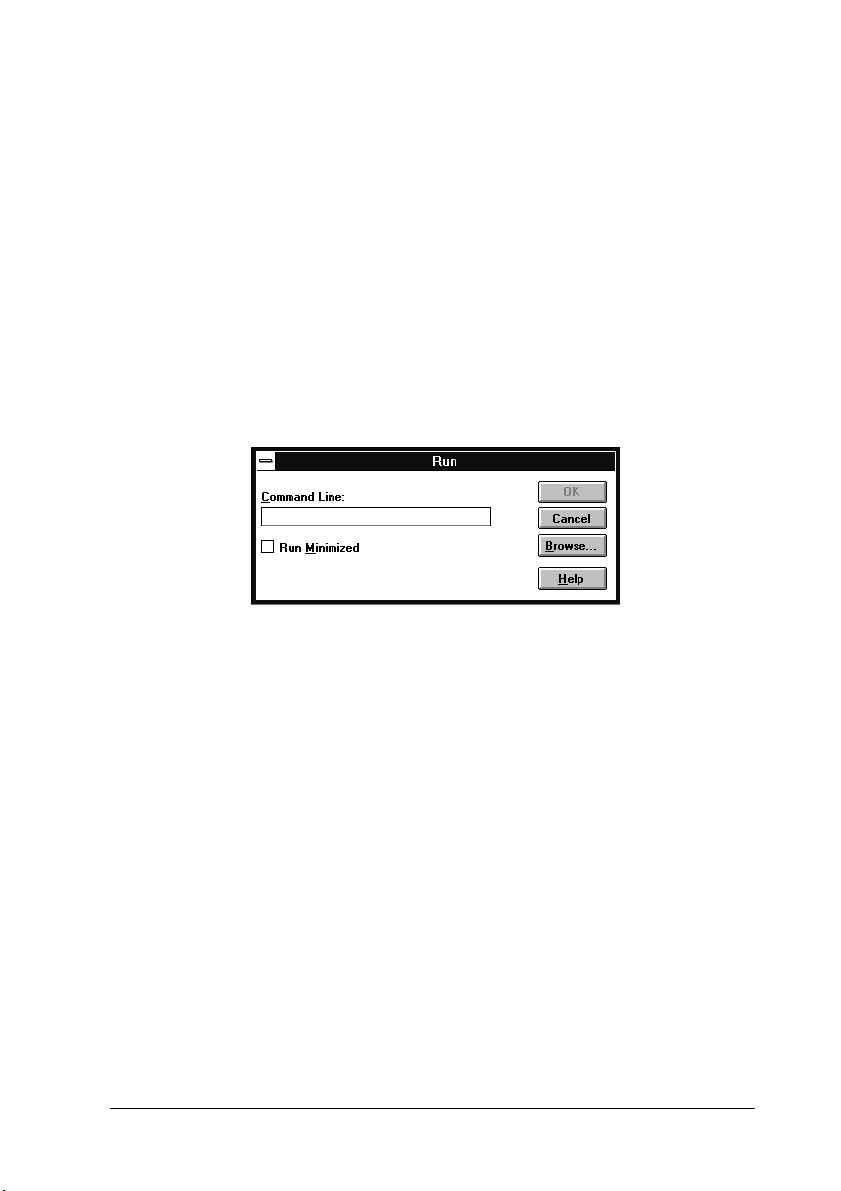
3. From the File menu, choose Run. The Run dialog box
appears. In the Com mand Line bo x, type
E:\START and click
OK.
Note:
If your CD-ROM drive has a drive letter other than “E” , substitute
appropriate letter.
the
The installation program starts. The subsequent pr ocedure is
menu-driven, i.e., you can select the relevant options from a
list simply by clicking with t he mouse. The r emaind er of the
installation is automatic and you do not need to enter any
more information.
4. Select the desired options and follow the on-screen
instructions.
Setting Up the Printer 1-15
Page 28

5. After the printer software has been successfully installed,
click on the button identified by a door icon to exit the
installation progr am. The installation pr ogram automatically
selects this printer as the default pr inter for Windows
applications.
The installation program automatically selects the LQ-680/LQ680Pro as the default printer for Windows applications. For
information on opening and using the software, see Chapter 3,
“Using the Printer Software.”
1-16 Setting Up the Printer
Page 29

For DOS programs
To control the printer fro m DOS applicatio n programs, you need
to select the printer you are using or another available printer
from the prin ter list of your application.
Choose the EPSON LQ-680/LQ-68 0Pro printer at the appropriat e
step in the setup or installation procedure of your DOS
applicati on program. If the list in your application does not
include the LQ-680/LQ-680Pro pri nter, choose the first availa ble
printer from this list:
LQ-670
LQ-580/LQ-570e
LQ-2070/LQ-2080
LQ-2170/LQ-2180
LQ-870/LQ-1170
LQ-570/1070/570+/1070+
DLQ-3000/DLQ-3000+
DLQ-2000
LQ-1060
LQ-1050
LQ-2550
LQ-2500
Note:
If your application does not list a suitable alternative, contact the
software manufacturer to see if an update is available.
Setting Up the Printer 1-17
Page 30

Chapter 2
Paper Handling
Selecting a Paper Source. . . . . . . . . . . . . . . . . . . . . . . . . . . . . . . . . .2-2
Paper source and paper types. . . . . . . . . . . . . . . . . . . . . . . . .2-3
Setting the paper release lever (LQ-680). . . . . . . . . . . . . . . .2-4
Setting the Paper Source button (LQ-680Pro) . . . . . . . . . . .2-5
Adjusting the Paper Thickness Lever . . . . . . . . . . . . . . . . . . . . . . .2-6
Using Continuous Paper . . . . . . . . . . . . . . . . . . . . . . . . . . . . . . . . .2-8
Positioning your continuous paper supply . . . . . . . . . . . . .2-8
Loading continuous paper with the tractor . . . . . . . . . . . . .2-9
Using the tear-off function . . . . . . . . . . . . . . . . . . . . . . . . . . .2-14
Removing continuous paper. . . . . . . . . . . . . . . . . . . . . . . . . .2-17
Using Continuous Multipart Forms . . . . . . . . . . . . . . . . . . . . . . . .2-17
Using Overlapping Multip art Forms
(LQ-680Pro) . . . . . . . . . . . . . . . . . . . . . . . . . . . . . . . . . . . . . . . . . .2-18
Using Labels. . . . . . . . . . . . . . . . . . . . . . . . . . . . . . . . . . . . . . . . . . . .2-19
Using Single Sheets . . . . . . . . . . . . . . . . . . . . . . . . . . . . . . . . . . . . . .2-20
Using Single-Sheet Multipart Forms . . . . . . . . . . . . . . . . . . . . . . .2-23
Using Envelopes . . . . . . . . . . . . . . . . . . . . . . . . . . . . . . . . . . . . . . . .2-24
Using Postcards . . . . . . . . . . . . . . . . . . . . . . . . . . . . . . . . . . . . . . . . .2-25
Switching Between Continuous Paper and Single Sheets. . . . . . 2-26
Switching to single sheets . . . . . . . . . . . . . . . . . . . . . . . . . . . .2-26
Switching to continuous paper. . . . . . . . . . . . . . . . . . . . . . . .2-28
Using Micro Adjust. . . . . . . . . . . . . . . . . . . . . . . . . . . . . . . . . . . . . .2-28
Adjusting the loading position. . . . . . . . . . . . . . . . . . . . . . . .2-28
Adjusting the tear-off position . . . . . . . . . . . . . . . . . . . . . . . .2-31
Adjusting the printing position . . . . . . . . . . . . . . . . . . . . . . .2-32
Paper Handling 2-1
Page 31

Your printer can print on a wide variety of paper ty pes, including
single sheets, continuous paper, multipart forms, labels,
envelopes, postcards, and roll paper. This chapter explains how
to use these paper types with your printer.
Note:
See Appendix C for detailed specifications on the paper types the printer
can use.
Selecting a Paper Source
Your printer can accommodate a variety of paper typ es thro ugh
four paper sources: paper guide, tractor, optional cut-sheet
feeder, or optional roll pap er holder. The paper source you should
select depends on the type of paper yo u want to use. See “Pap er
source and paper types” on page 2-3.
For LQ-680 users:
To select a paper sourc e, use the paper r elease le ver. See “Setting
the paper re lease lever (L Q-680)” on page 2-4.
For LQ-680Pro users:
To select a paper source, use the Paper Source button on the
control panel. See “Sett ing the Paper Source button (LQ-680Pro)”
on page 2-5.
2-2 Paper Handling
Page 32

Paper source and paper types
The table below shows which paper source t o use for each paper
type.
Paper source
Paper type
Continuous
paper
Continuous
multipart forms
Labels
Single sheets –
Single-sheet
multipart forms
Envelopes –
Postcards –
Roll paper – – –
N
:You can use this paper type with this paper source.
– : You cannot use this paper type with this paper source.
* You can use only carbonless single-sheet multipart forms that are glued at the top
of the forms.
** The optional roll paper holder is not available in some countries.
Tractor
N
N
N
–
Paper
guide
–– –
–– –
–– –
NN
NN
NN
NN
Optional cut-
sheet feeder
*
(bin 1 o n ly)
(bin 1 o n ly)
(bin 1 o n ly)
Optional roll
paper holder**
–
–
–
–
N
Paper Handling 2-3
Page 33

Setting the paper release lever (LQ-680)
Set the paper release lever to select the paper-feedi ng method you
want the printer to use. The paper rele ase lever has two positions:
for tractor feeding and for single-sheet feeding, as explaine d
below.
Single-sheet feeding position – to use the paper
guide, the optional cut-sheet feeder, or the
optional roll paper holde r.
2-4 Paper Handling
Tractor feeding position – to use the tractor.
Page 34

Setting the Paper Source button (LQ-680Pro)
Set the Paper Source button on the control panel to select the
paper source you want the printer to use. There are t hree settings:
Tractor for tractor feeding, Manual/CSF Bin1 for single-sheet
feeding including the cut-sheet feeder bin 1, and
Manual/CSF BIN2 for single-sheet feeding including cut-sheet
feeder bin 2, as explained below.
Paper Source button
Tractor Tractor feeding position – to use the tractor.
Manual/CSF Bin1 Single-sheet feeding positio n 1 – to use the
paper guide, the optional cut-sheet feeder
bin 1, or the optional roll paper holder.
Manual/CSF Bin2 Single-sheet feeding positio n 2 – to use the
paper guide, the optional cut-sheet feeder
bin 2, or the optional roll paper holder.
Paper Handling 2-5
Page 35

Adjusting the Paper Thickness Lever
You need to set the paper thickness lever to match the thickness
of your paper.
There are nine lever positions, from -1 to 7. The Auto position is
also available on the LQ-680Pro.
For LQ-680 users:
Set the paper thickness lever manual ly to the appropriate position
from -1 to 7, as described in the table below.
For LQ-680Pro users:
We recommend using the Auto position for all types of paper.
When the Auto position is selected, the printer automatically
adjusts itself to match the thickne ss each time it loads new paper,
but your printing time may be slowed. If you use the same type
of paper every time, you may want to set the paper thi ckness lever
to the appropriate manual posi tion as described in the table below
to speed-up printing.
2-6 Paper Handling
Page 36

The following table provides guidelines for selecting the
appropriate lever position for the type of paper you are using.
Paper thickness lever
Paper type
position
(single sheets or continuous paper)
Ordinary paper
Multipart forms
(single sheets or continuous paper)
2 parts (original plus + 1 copy)
3 parts (original plus + 2 copies)
4 parts (original plus + 3 copies)
5 parts (original plus + 4 copies)
6 parts (original plus + 5 copies)
Labels 2
Postcards 2
Envelopes* 2 to 6
* For thin envelopes, such as airmail envelopes, select position 2 or 3; for regular
envelopes, select position 4; for thick envelopes, select position 4, 5, or 6.
** LQ-680Pro only.
-1 or 0
1
2
3
5
7
Auto**
Caution:
c
If you set the paper thickness lever to 1 or higher, be sure to set
the lever back to the 0 (or Auto position for LQ-680Pro) before
you print on ordinary paper again.
Paper Handling 2-7
Page 37

Using Continuous P aper
You can load continuous paper from the built-in tractor unit
located on the back of the printer.
Note:
See Appendix C for detailed specifications on continuous paper.
Positioning your continuous paper supply
When you load continuous paper, make sure you align your
paper supply with the tractor so the paper feeds smoothly into
the printer, as shown below.
2-8 Paper Handling
Page 38

Loading continuous paper with the tractor
1. Make sure the printer is turned off.
2. For LQ-680 users:
Select tractor feeding with the paper release lever, and make
sure the paper thickness lever is set to 0 if you are using
ordinary continuous paper.
For LQ-680Pro users:
Select tractor feeding with the Paper Source button, and
make sure the paper thick ness lev er is s et to Auto or 0 if you
are using ordinary continuous paper.
3. Slide the edge guide out as far as it will go.
Paper Handling 2-9
Page 39

4. Release the sprocket lock levers by pushing them up.
5. Facing the back of the printer, position the left sprocket unit
so that the sprocket pins are to the left of the “0” on t he scale
and the arrow mark on the p rinter. Then push do wn the lock
lever to lock the sprocket in place.
arrow mark
Note:
Printing starts at the arrow mark on the printer and the “0” mark
on the scale. The unprintable area is to the left of the arrow mark
and the “0”.
2-10 Paper Handling
scale
Page 40

6. Slide the right sprocket unit to roughly match the width of
your paper, but do not lock it.
7. Slide the paper support midway between the two sprocket
units.
Paper Handling 2-11
Page 41

8. Open the sprocket covers.
9. Fit the first three holes of the continuous paper over the
sprocket pins on both sides. Be sure to load your paper
printable side up.
Caution:
c
2-12 Paper Handling
Make sure the first sheet of your continuous paper has a
clean, straight edge so that it can feed smoothly into the
printer.
Page 42

10. Close the sprocket covers. If necessary, u nlock and reposition
the left sprocket unit so that the perforation aligns with the
arrow mark on the printer. Then lock the sprocket in place.
11. Slide the right sprocket unit to remove any slack in the paper.
Then push down the sprocket lock lever t o l ock the sp roc ket
in place.
12. Turn on the printer. When the printer receives data, it
automatically loads the paper before printing.
Paper Handling 2-13
Page 43

When using continuous paper, you can use the tear-off function
to tear off printed page s not wastin g any bla nk pa ges next t o the
printed pages. For more information, see the next section.
Note:
❏ You can advance the paper to the loading position by pressing the
Load/Eject bu tton before the printer receives data.
❏ Always make sure there is at least one more sheet than required,
because continuous paper may not feed properly if it is not fed
through the sprocket.
Caution:
c
Use the knob on the right side of the printer only to clear paper
jams when the printer is off. Otherwise, you may damage the
printer or cause it to lose the top-of-form position.
Using the tear-off function
After you have finished printing, you can use the tear-off function
to advance continuous p aper on the tract or to the tear -off edge of
the printer. You can then easily tear off prin ted sheets. When you
resume printing, the pr inter automatically feed s paper back to the
loading position so you can save paper that would normally be
lost between documents.
You can use the tear-off function in two ways: by pressing the
button on the control panel, or by using the control panel’s
default-setting mode or the EPSON Remote! utility to select auto
tear-off. (See “About Your Printer ’s Default Settings” on p age 4-3
for information on the printer’s default-setting mode.)
2-14 Paper Handling
Page 44

If the perforation between pages is not aligned with the tear-off
edge, you can adjust the tear-off position using the micro-adjust
feature as d escribed later in this chapter.
Caution:
c
Using the Tear Off button
You can use the Tear Off button (the Tear Off/Bin button on the
LQ-680 or the Tear Off/Special Paper button on the LQ-680Pro)
to advance continuous paper to the tear-o ff position by following
the steps below:
1. Make sure printing has finished. Then press the Tear Off
Never use the tear-off function to feed labels backwards; they may
come off their backing and jam the printer.
button until the two lights on the control panel start flashing.
The printer advances the paper to the tear-off edge.
tear-off edge
Paper Handling 2-15
Page 45

2. Tear off all printed pages at the tear-off edge. If the perforation
is not aligned with the tear-off edge, adjust the tear-off
position using the micro-adjust feature. See “Adjusting the
tear-off position” later in this chapter.
3. When you resume printing, the printer feeds the pape r back
to the top-of-form position and begins printing. (You can also
manually feed the paper back to the top-of-form position by
pressing the same button used to advance the paper.)
Using auto tear-off mode
When you turn on the auto tear-off function in the printer’s
default-setting mode or the EP SON Remote! utility, the printer
advances continuous paper to the tear-off position when you
finish printing.
The printer advances paper to the tear-off position only when it
receives a full page of data or a form-feed command and then
receives no more data for three seconds.
2-16 Paper Handling
Page 46

For instructions on how to activate the auto tear-off function, see
“About Your Printer’s Default Setting s” on page 4-3 or open the
EPSON Remote! utilit y as d es cri bed in Chapter 3 and fo ll ow t he
on-screen instructions. While using the default-setting mode or
the utility, also make sure the page length i s set correctly for your
continuous paper.
After the paper has been advanced, tear off all printed pages and
resume printing as described in “Using the Tear Off button”
earlier in this chapter.
You can leave the auto tear-off mode on even when you are using
single sheets. The mode is disabled while you are using single
sheets.
Removing continuous paper
1. After you finish printing, tear-off all printed pages using the
tear-off function.
2. Press the Load/Eject button to feed the continuous paper
backward out of the printer and into the standby position.
3. To completely remove continuous paper from the printer,
open the sprocket covers. Remove the paper from th e tractor
unit, and then close the sprocket covers.
Using Continuous Multipart Forms
Your printer can use continuous multipart forms with up to six
parts including the original. You can use carbonless or carbonbacked multipart forms.
Caution:
c
Do not use carbon-interleaved multipart forms.
Paper Handling 2-17
Page 47

Before printing, set the paper thickness lever to the correct
position for your multipart forms. LQ-680 users should set the
lever as described in the table on page 2-7. LQ-680Pro users
should make sure the lever is set to the Auto position.
You can load continuous multi part forms in the same way as you
load ordinary continuous paper. For instructions, see “Using
Continuou s Paper” earlier in this chapter.
Caution:
c
When printing on multipart forms, make sure that your software
settings keep the printing entirely within the printable area of the
forms. Printing on the edge of a multipart form can damage the
print head. For information about the printable area, see the paper
specifications in Appe ndix C.
Using Overlapping Multipart Forms (LQ-680Pro)
LQ-680Pro users can print on overlapping multipart forms
backed with continuous pa per. The page length of the mult ip art
forms is longer than that of the backing continuous paper. So
when extended, one page's multipart forms overlap the next
page's multipart forms. The thi cknes s of this overl apping area is
thicker than the printable area.
Before printing, set the paper thickness lever to the Auto position.
Also turn on both the overlappin g-forms and the skip-overperforation settings using the default setting mode. See
“Adjusting the Paper Thickness L ever” earlier in this chapter and
“Changing default settings” on page 4-9 for more information.
You can load continuous multi part forms in the same way as you
load ordinary continuous paper. For instructions, see “Using
Continuou s Paper” earlier in this chapter.
2-18 Paper Handling
Page 48

Caution:
c
❏ When printing on overlapping multipart forms, make sure
that your software settings keep the printing entirely within
the printable area of the forms. Printing on the edge of a
multipart form can damage the print head. For information
about the printable area, see the paper specifications in
Appendix C.
❏ Never feed overlapping multipart forms backward with the
Load/Eject or T ear Off/ Sp ecial Paper butt ons. Doi ng
so may cause paper jams or damage to the printer.
❏ To remove overlapping multipart forms from the paper path
after you finish printing, first tear off the paper at a point
before the paper slot. Then use the LF/FF button to advance
the remaining paper out of the printer.
Using Labels
When selecting labels for printing, always choose labels mounted
on continuous backing sheets with sprocket holes for use with a
tractor. Do not use labels on shiny single-sheet backi ng, because
the backing sheet tends to slip and may not feed properly.
Labels ar e loaded in the same way as you load ordinary
continuous paper, except for the paper thickness lever setting.
LQ-680 users should set the lever to 2. LQ-680Pro users are
recommended to use the Auto setting, or set it manually to 2 for
faster throughput. For instructions on loading, see “Using
Continuous Paper” earlier in this chapter. For instructions on
paper thickness lever setting, see “Adjusting the Paper Thickness
Lever” earlier in this ch apter.
Paper Handling 2-19
Page 49

c
Caution:
❏ When printing on labels, make sure that your software
settings keep the printing entirely within the printable area.
Printing on the edge of a label can damage the print head.
For information about the printable area, see the paper
specifications in Appe ndix C.
❏ Never feed labels backward with the Load/Eject, Tear
Off/Bin (LQ-680), or Tear Off/Special Paper (LQ-
680Pro) buttons. Labels can easily peel off their backing and
jam the printer.
❏ To remove labels from the paper path after you finish
printing, first tear off the labels at a point before the paper
slot. Then use the LF/FF button to advance the remaining
labels out of the printer.
❏ Because labels are especially sensitive to temperature and
humidity, use them only under normal operati ng conditions.
❏ Do not leave labels loaded in the printer between print jobs;
they tend to curl and may come off their ba cking and jam the
printer when you resume printing.
Using Single Sheets
You can load one sheet of paper at a time int o the pap er gui de at
the front of the printer, or you can load a stack of paper in the
optional cut-sheet feeder. (See Ap pendix A for more i nformation
on the optional cut-sheet feeder.)
Note:
❏ See Appendix C for detailed single-sheet paper specifications.
❏ If you load long paper (for example, legal size paper), leave enough
space at the back of the printer so that the paper is not obstructed.
2-20 Paper Handling
Page 50

Follow these steps to load single sheets from the paper guide:
1. Make sure that the printer is off and the paper guide is
attached as described in Chapter 1. Then close the sprocket
covers and push down the sprocket lock levers to lock the
sprocket units in place.
2. For LQ-680 users:
Select single-sheet feeding with the paper release lever as
described in “Selecting a Paper Source” on page 2-2. Also
make sure the paper thickness lever is set to 0 if you are using
ordinary single-sheet paper.
For LQ-680Pro users:
Select single-sheet feeding with the Paper Source button as
described in “Selecting a Paper Source” on page 2-2. Also
make sure the paper thi ckness l ever i s set t o Auto or 0 if you
are using ordinary single-sheet paper.
3. Turn on the printer.
Paper Handling 2-21
Page 51

4. Slide the edge guide until it rests against the guide mark, as
shown below.
guide mark
5. Insert a sheet of paper, following the edge gui de, until it meets
resistance. Be sure to load your paper printable side up and
top edge first.
After a few seconds, the printer automatically advances the
paper to the loading position. The printer is ready to accept
data from your computer and print.
Note:
If the rollers rotate but the printer does not load the paper, remove
the paper completely and reinsert it.
2-22 Paper Handling
Page 52

After printing a sheet, t he printer ejects the printed sheet ont o the
paper guide . If you are printing a multiple-p age document,
remove the printed sheet and insert a new sheet into the paper
guide. The printer automatically advances the pap er and resumes
printing.
Note:
If the printer does not eject the printed sheet, press the Load/Eject
button.
Caution:
c
Use the knob on the right side of the printer only to clear paper
jams when the printer is off. Otherwise, you may damage the
printer.
Using Single-Sheet Multipart Forms
Your printe r can use single-s heet multipart forms with up to six
parts including the original. You can use carbonless multipart
forms, or carbon-backed multipart forms using the paper guide.
Caution:
c
Before printing, set the pape r thickness lever to the correct
position for your multipart forms as described in the table on page
2-7, or to the Auto position (LQ-680Pro only).
You can load single-sheet multipart forms i n the same way as you
load ordinary single sheet. For instructions, see “Using Single
Sheets” earlier in this chapter or Appendix A, “Loading paper
from the cut-sheet feeder.”
Do not use carbon-interleaved multipart forms.
Paper Handling 2-23
Page 53

Caution:
c
❏ When printing on multipart forms, make sure that your
software settings keep the printing entirely within the
printable area of the forms. Printing on the edge of a
multipart form can damage the print head. For inf ormation
about the printable area, see the paper specifications in
Appendix A.
❏ Load single-sheet multipart forms glued at the side of the
form only from the paper guide, not from the optional cutsheet feeder.
Using Envelopes
You can print on a variety of envelopes, load ing them in the same
way as you load single sheets: from the paper guide or with the
optional cut-sheet feeder. For information on lo ading envelo pes,
read this section and see “Using Single Sheets” earlier in this
chapter or Appendix A, “Loading paper from the cut-sheet
feeder.”
For LQ-680 users:
Before printing, set the paper thickness lever to the correct
position for your envelopes as described in the t able on page 2-7.
For LQ-680Pro users:
Before printing, make sure the paper thickness lever is set to Auto
or the correct position fo r your envelopes as described in the ta ble
on page 2-7. Then select Envelope by pressing the Tear
Off/Special Paper button.
Load envelopes face up, flap-edge first.
2-24 Paper Handling
Page 54

Caution:
c
❏ When printing on envelopes, make sure that your software
settings keep the printing entirely within the printable area.
Printing on the edge of an envelope can damage the print
head. For information on the printable area, see the paper
specifications in Appendix C.
❏ Use envelopes only under normal operating conditions.
Using Postcard s
You can print on a variety of postcards, loading t hem in the same
way as you load single sheets: from the paper guide or with the
optional cut-sheet feeder. For instructions on loading single
sheets, see “Using Single Sheets” on page 2-20 or “Loading paper
from the cut-sheet feeder” on page A-6.
For LQ-680 users:
Before printing, set the pape r thickness lever to 2. Then select
Card by pressing the Tear Off/Bin button on the control panel.
For LQ-680Pro users:
Before printing, make sure the paper thickness lever is set to Auto
or 2. Then select Card by pressing the Tear Off/ Special Paper
button on the control panel.
Load postcards printable side up, top edge first.
Paper Handling 2-25
Page 55

Caution:
c
❏ Card mode is available only when the paper thickness lever
is set to Auto or 2 or higher on the scale.
❏ When printing on postcards, make sure that your software
settings keep the printing entirely within the printable area.
Printing on the edge of a postcard can damage the print head.
For information about the printable area, see the paper
specifications in Appe ndix C.
❏ Use postcards only under normal operating conditions.
Switching Between Continuous Paper and Single Sheets
When using the tractor , you can easily switch between conti nuous
paper and single sheets (including envelopes or postcards)
without removing the continuous paper from the tractor.
Switching to single sheets
To switch from continuous pape r to single sheets, follow the steps
below.
Caution:
c
2-26 Paper Handling
When using continuous paper with labels, never follow the steps
to feed labels backward. Labels can easily peel off their backing
and jam the printer. For information on removing labels from the
paper path, see “Using Labels” earlier this chapter.
Page 56

1. When you have finished printing on continuous paper, press
the Tear Off/Bin button (LQ-680) or the Tear Off/Special
Paper button (LQ-680Pro) to advance the paper to the
tear-off position. (If you selected auto tear-off in the printer’s
default-setting mode or the EPSON Remote! utility, the
printer advances the paper perforatio n to the tear-off position
automatically.)
2. Tear off the printed pages.
Caution:
c
3. Press the Load/Eject button to feed the continuous paper
back to the standby position. The p aper is sti ll attached t o the
tractor, but no longer in the paper path.
4. Select single-sheet feeding with the paper release lever
(LQ-680) or with the Paper Source button (LQ-680Pro) as
described in “Paper source and paper types” on page 2-3.
Now you can load single sheets from the paper guide. For
instructions, see “Using Single Sheets” on page 2-20.
Always tear off paper before feeding it backwards; feeding too
many sheets backwards can cause a paper jam.
Paper Handling 2-27
Page 57

Switching to continuous paper
To switch from single sheets to continuous p aper, follow the steps
below.
1. If necessary, press the Load/Eject button to eject the last
printed single sheet.
2. Make sure continuous paper is loaded in the printer as
described in “Loadi ng continuous paper with the tractor ” on
page 2-9.
3. Select tractor feeding w ith the paper release l ever (LQ-680) or
with the Paper Source button (LQ-680Pro) as described in
“Paper source and paper types” on page 2-3.
The printer automatically advances the continuous paper from
the standby position to the l oading position when it recei ves data.
Using Micro Adjust
The micro-adjust feature allows you to move paper forward or
backward in 1/180-inch increments. You can use this feature to
adjust the loa ding, printing, and tear-off positions.
Adjusting the loading position
The loading position is the posi tion of t he paper after the p rinte r
loads it. If your printing appea rs too high or low o n the page, you
can change the loading posi ti on wi th the micro-adjust feature as
follows:
Note:
Top margin settings made in some application software override
adjustments you make to the loading position with the micro adjust
feature. If necessary, adjust the loading position in your software.
2-28 Paper Handling
Page 58

1. Make sure the printer is turned on. If necessary, lift up the
printer cover so you can see the paper position.
2. Load either continuous or single-sheet paper. (Press the
Load/Eject butto n to load co ntinuous pa per from the tractor
or a single sheet from the optional cut-sheet feeder.)
3. Hold dow n the Pause button for about three seconds. The
Pause light starts flashing and the printer enters the microadjust mode.
D
4. Press the LF/FF [
of the printer, or press the Load/Eject [
] button to move the paper toward the fro nt
U
] button to move the
paper toward the rear. The new loading position is set to the
position where you release the buttons.
Paper Handling 2-29
Page 59

Note:
D
❏ Pressing the LF/FF [
] button moves the loading position
toward the top of the page when loading a sheet from the front
D
(from the paper guide). Pressing the LF/FF [
] button moves
the loading position toward the bottom of the page when loading
a sheet from the rear (from the cut-sheet feeders or the tractor).
❏ The printer has a minimum and a maximum loa di ng posi tion .
If you try to adjust the loading position beyond these limits, the
printer beeps and stops moving the paper.
❏ When the paper reaches the factory-set loading position, the
printer beeps and paper feeding pauses briefly. Use the factory
setting as a reference point when adjusting the loading position.
❏ If you want to eliminate the top margin and print at the very
top of the page, adjust the loading position so that the top of the
paper lines up with the raised line on the ribbon mask, as shown
below.
raised line
5. After you set the loadi ng position , press the Pause button to
turn off micro-adjust mode.
For both single-sheet and continuous paper, your loading
position setting remains in effect until you change it, even if you
turn off the printer.
2-30 Paper Handling
Page 60

Adjusting the tear-off position
If your continuo us paper perfo ratio n i s not aligned wit h t he tear off edge, you can use the micro-adjust feature to move the
perforation to the tear-off position as follows:
1. Make sure both Tear Off lights are flashing (the paper is at
the current tear-off position). You may need to press the Tear
Off button. (See “Using the Tear Off button ” on page 2-15 for
more information.)
2. Hold dow n the Pause button for about three seconds. The
Pause light begins fl ashing and the pr int er ent ers t he micr oadjust mode.
D
3. Press the LF/FF [
Load/Eject [
paper perforation is aligned with the tear-off edge.
] button to feed paper forward, or press the
U
] button to feed paper backward, until the
Note:
The printer has a minimum and a maximum tear-off posi tion. If you
try to adjust the tear-off position beyond these limits, the printer
beeps and stops moving the paper.
Paper Handling 2-31
Page 61

4. Tear off the printed pages.
5. Press the Pause button to turn off micro-adjust mode.
When you resume printing, the printer automatically feeds the
paper back to the top-of-form position and begins printing. Your
tear-off position setting remai ns in effect until you change it, ev en
if you turn o ff the printer.
Adjusting the printing position
The printing position is the position on the page where the print
head actually prints during a print job. You can change the curr ent
vertical printing position temporarily by using the micro-adjust
feature as described in the steps below.
Note:
Your printing position setting is in effect only until the next time you
load paper or turn off the printer.
1. Make sure that the printer is not prin ting. If it is, press the
Pause button to stop printing.
2. Hold down the Pause button for about three seconds. The
Pause light begins flashing and the printer enters the microadjust mode.
3. If necessary, open the printer cover to check the printing
D
position, and press the LF/FF [
forward or the Load/Eject [
4. When your paper is positioned correctly, press the Pause
button to turn off micro-adju st mode and resum e printing.
] button to feed paper
U
] button to feed paper backward.
2-32 Paper Handling
Page 62

Chapter 3
8VLQJWKH3ULQWHU6RIWZDUH
About Your Printer Software. . . . . . . . . . . . . . . . . . . . . . . . . . . . . .3-2
Using the Printer Driver With Windows Me, 98 or 95. . . . . . . . .3-3
Accessing the printer driver
from Windows applications. . . . . . . . . . . . . . . . . . . . . . . .3-3
Accessing the printer driver from the Start menu. . . . . . . .3-5
Changing the printer driver settings. . . . . . . . . . . . . . . . . . .3-6
Using the Printer Driver With Windows 3.1. . . . . . . . . . . . . . . . .3-7
Accessing the printer driver
from Windows applications. . . . . . . . . . . . . . . . . . . . . . . .3-7
Accessing the printer driver from the Control Panel . . . . .3-9
Changing the Printer driver settings. . . . . . . . . . . . . . . . . . .3-9
Using the Printer Driver With Windows 2000 and NT 4.0 . . . . .3-10
Accessing the printer driver
from Windows applications. . . . . . . . . . . . . . . . . . . . . . . .3-10
Accessing the printer driver from the Start menu. . . . . . . .3-12
Changing the printer driver settings. . . . . . . . . . . . . . . . . . .3-13
Using the Printer Driver With Windows NT 3.5x . . . . . . . . . . . .3-14
Accessing the printer driver
from Windows applications. . . . . . . . . . . . . . . . . . . . . . . .3-14
Accessing the printer driver from the Control Panel . . . . .3-16
Changing the Printer driver settings. . . . . . . . . . . . . . . . . . .3-17
Printer Driver Settings Overview . . . . . . . . . . . . . . . . . . . . . . . . . .3-18
Using the EPSON Remote! Utility . . . . . . . . . . . . . . . . . . . . . . . . .3-20
Installing EPSON Remote! . . . . . . . . . . . . . . . . . . . . . . . . . . .3-20
Accessing EPSON Remote!. . . . . . . . . . . . . . . . . . . . . . . . . . .3-20
Using the EPSON Status Monitor 3 Utility . . . . . . . . . . . . . . . . . .3-21
Setting up EPSON Status Monitor 3 . . . . . . . . . . . . . . . . . . .3-21
Accessing EPSON Status Monitor 3. . . . . . . . . . . . . . . . . . . .3-23
Using the Printer Software 3-1
Page 63

About Your Printer Software
The EPSON printer software th at comes with your printer
includes the printer driver software, the EPSO N Remote! util ity,
and the EPSON Status Monitor 3 util ity for Windows Me, 98, 95,
2000 and NT 4.0.
A printer driver is software th at allows your computer to co ntrol
the printer. You need to install the printer driver so your
Windows software applications can take full advantage of the
printer’s capabilities.
Note:
Before proceeding, make sure you have installed the printer driver on
your PC as described in Chapter 1.
EPSON Remote! is a DOS-based printer setup utility that allows
you to easily change the printer’s default settings from the
computer screen. To use the EPSON Remote! utility with DOS,
see “Using the EPSON Remote! Utility” on page 3-20.
The EPSON Status Monitor 3 utility program is ava ilable for
Windows Me, 98, 95, 2000 and NT 4.0. It allows you to monitor
the status of your printer, alerts you when errors occur, and
provides you with troubleshooting tips. To use the Status
Monitor, see “Accessing EPSON Status Monitor 3” on pa ge 3-23.
For an overview of the available settings, see “Printer Driver
Settings Overview” on page 3-18.
To access the printer driver, see the appropriate page below,
depending on your Windows version.
Windows Me, 98 and 95 . . . . . . . . . . . . . page 3-3
Windows 3.1 . . . . . . . . . . . . . . . . . . . . . . . page 3-7
Windows 2000 and NT 4.0 . . . . . . . . . . . page 3-10
Windows NT 3.5x. . . . . . . . . . . . . . . . . . . page 3-14
3-2 Using the Printer Software
Page 64

Using the Printer Dr iver With Windows Me, 98
or 95
You can access the printer driver from your Windows
applications or from the Sta rt menu. When you access the printer
driver from a Windows appl ication, any settings yo u make apply
only to the application you are using. See “Accessing the pr int er
driver from Windows applications” below. When you access t he
printer driver from the Start menu, the printer driver settings you
make apply to all your applications. See “Accessing the printer
driver from the Start menu” on page 3-5. To check and change
printer driver settings, see “ Changing the printer driver settings”
on page 3-6.
Note:
While many Windows applications override the settings made with the
printer driver, some do not, so you must verify that the printer driver
settings match your requirements.
Accessing the printer driver from Windows applications
To access the printer driver from a Windows application, follow
the steps on the next page.
Note:
The steps on the next page provide general guidelines on accessing the
printer driver. How you access the printer driver may differ depending
on your application. See your application manual for details.
Using the Printer Software 3-3
Page 65

1. Select Print Setup or Print from the File menu of your
application software. The Print or Print Setup dialog box
appears.
3-4 Using the Printer Software
Page 66

2. Make sure that your printer is sel ected and then click Printer,
Setup, Properties, or Options. (You may need to click a
combination of these buttons.) The Properties window
appears, and you see the Paper, Graphics, and Device
Options menu. These menus contain the printer driver
settings.
3. To view a menu, click the co rresponding tab at the top of the
window. See “Changing the printer dri ver settings” below to
change the settings.
Accessing the printer driver from the Start menu
To access the printer driver from the Start menu, follow these
steps:
1. Click the Start button, and then point to Settings.
2. Click Printers.
Using the Printer Software 3-5
Page 67

3. Right-click your printer icon, and click Properties. The screen
displays the Properties window, which contains the Paper,
Graphics, Device Options, and Utility menus. These menus
display the prin ter driver settings.
4. To view a menu, click the corresponding tab at the top of the
window. See the next section to change the settings.
Changing the printer driver settings
Your printer driver has four menus: Paper, Graphics, Device
Options, and Utility. For an overview of the available settings,
see “Printer Driver Sett ings Overview” on page 3-18. You ca n also
view online help by right-clicking items in the driver and selecting
What’s this?.
When you finish making printer driver settings, click OK to apply
the settings, or click Restore Defaults to return the settings to
their default values.
Once you’ve checked your printer dr iver set ti ngs and made a ny
necessary changes, you are ready to print.
3-6 Using the Printer Software
Page 68

Using the Printer Driver With Windows 3.1
You can access the printer driver from your Windows
applications or from the Control Panel. When you access the
printer driver from a Windows application, any settings you
make apply only to t he application you are using. See “Accessi ng
the printer driver from Windows applications” below. When you
access the printer driver from the Control Panel, the pri nter driver
settings you make apply to all your ap plic ations. S ee “Accessing
the printer driver from the Control Panel” on page 3-9. To check
and change printer driver settings, see “Changing the Printer
driver settings” on page 3-9.
Note:
While many Windows applications override the settings made with the
printer driver, some do not, so you must verify that the printer driver
settings match your requirements.
Accessing the printer driver from Windows applications
To access the printer driver from a Windows application, follow
the steps on the next page.
Note:
The steps on the next page provide general guidelines on accessing the
printer driver. How you access the printer driver may differ depending
on your application. See your application manual for details.
Using the Printer Software 3-7
Page 69

1. Select Print Setup or Print from the File menu of your
application software. The Print or Print Setup dialog box
appears. See “Changing the Printer driver settings” on page
3-9 for deta iled information about the settings in this dialog
box.
2. Make sure that your printer is selected and then click Printer,
Setup, or Options. (You may need to click a combination of
these buttons.) The Options dialog box appears. See
“Changing the Printer dri ver settings” on page 3-9 to change
the settings.
3-8 Using the Printer Software
Page 70

Accessing the printer driver from the Control Panel
To access the printer driver fr om the Cont rol Pa nel, fol low these
steps:
1. In the Main window, double-click the Control Panel icon .
2. Double-click the Printers icon. The Printers dialog box
appears.
3. Make sure your printer is highlighted, t hen click Setup. The
Print Setup dialog box appears. To access more settings, you
may need to click Options. See the next section to change the
settings.
Changing the Printer driver settings
You can change printer driver settings in the Print (or Print
Setup) dialog box and the Options dialog box. For an overview
of the available settings, see “Printer Driver Settings Overview”
on page 3-18.
When you finish making your printer driv er settings, click OK to
apply the settings, or click Cancel to cancel your changes.
Once you’ve checked your printer driver settings and changed
them if necessary, you are ready to print.
Using the Printer Software 3-9
Page 71

Using the Printer Driver With Windows 2000 and NT 4.0
You can access the printer driver from your Windows
applications or from the Start menu. When you access the printer
driver from a Windows app lication, any settings y ou make apply
only to the applicat io n y ou are using. See “Accessing the pr inter
driver from Windows applicatio ns” below. When you acc ess the
printer driver from the St art menu, the printer driver settings you
make apply to all your applications. See “Accessing the printer
driver from the Start menu” on page 3-12. To check and change
printer driver settings, see “Changing the printer dri ver settings”
on page 3-13.
Note:
While many Windows applications override the settings made with the
printer driver, some do not, so you must verify that the printer driver
settings match your requirements.
Accessing the printer driver from Windows applications
To access the printer dri ver fr om a Windows application, follow
the steps on the next page.
Note:
❏ The steps on the next page provide general guidelines on accessing
the printer driver. How you access the printer driver may differ
depending on your application. See your application manual for
details.
❏ The screen shots in the following section are from the Windows
NT 4.0 operating system. They may vary in appearance from what
actually appears on your screen, however the instructions are the
same.
3-10 Using the Printer Software
Page 72

1. Select Print Setup or Print from the File menu of your
applicatio n software. The Print or Print Setup dialog box
appears.
2. Make sure that your printer is sel ected and then click Printer,
Setup, Properties, or Options. (You may need to click a
combination of these buttons.) The Document Properties
window appears, and you see the Page Setup and Advanced
menus. These menus contain the printer driver settings.
Using the Prin ter Software 3-11
Page 73

3. To view a menu, click the corresponding tab at the top of the
window. See “Changing the printer driver settings” below to
change the settings.
Accessing the printer driver from the Start menu
To access the printer driver from the Start menu, follow these
steps:
Note:
The screen shots in the following section are from the Windows NT 4.0
operating system. They may vary in appearance from what actually
appears on your screen, however the instructions are the same.
1. Click the Start button, and then point to Settings.
2. Click Printers.
3-12 Using the Printer Software
Page 74

3. Right-click your printer icon, and click Document Defaults.
The screen displays the Default Document Properties
window, which contains the Page Setup and Advanced
menus. These menus display the printer d ri ver set tin gs.
When you click Properties, the printer software window
appears, which includes Utility menu.
4. To view a menu, click the co rresponding tab at the top of the
window. See the next section to change the settings.
Changing the printer driver settings
Your printer driver has two menus from which you can change
the printer driver settings, Page Setup and Advanced. You can
also change settings on the Utility menu in the printer software.
For an overview of the available settings, see “Printer Driver
Settings Overview” on page 3-18. You can also view online help
by right-clicking items in the driver and selecting What’s this?.
Using the Prin ter Software 3-13
Page 75

When you finish making yo ur printer d river setting s, click OK to
apply the settin gs, or click Cancel to cancel your changes.
Once you’ve checked your printer driver settings and changed
them if necessary, you are ready to print.
Using the Printer Driver With Windows NT 3.5x
You can access the printer driver from your Windows
applications or from the Control Panel. When you access the
printer driver from a Windows application, any settings you
make apply only to t he application yo u are using. See “Acc essing
the printer driver fro m Windows applications” below. When you
access the printer dri ver from the Control Panel, the printer driver
settings you make can apply to all your applications. See
“Accessing the printer driver from the Control Panel” on page
3-16. To check and change print er driver set tings, see “Chan ging
the Printer driver settings” on page 3-17.
Note:
While many Windows applications override the settings made with the
printer driver, some do not, so you must verify that the printer driver
settings match your requirements.
Accessing the printer driver from Windows applications
To access the printer dri ver fr om a Windows application, follow
the steps on the next page.
Note:
The steps on the next page provide general guidelines on accessing the
printer driver. How you access the printer driver may differ depending
on your application. See your application manual for details.
3-14 Using the Printer Software
Page 76

1. Select Print Setup or Print from the File menu of your
applicatio n software. The Print or Print Setup dialog box
appears.
2. Make sure that your printer is sel ected and then click Printer,
Setup, Properties, or Options. (You may need to click a
combination of these buttons.) The screen displays the
Document Properties dialog box, which contains the Form
and Orientation printer driver settings. See “Changing the
Printer driv er settings” on pa ge 3-17 to chang e the settings.
Using the Prin ter Software 3-15
Page 77

3. Click Optio ns (o r a similar butto n) to view the Advanced
Document Properties dialog box, which includes the
Graphics Resolution , Color, and Optimizations printer dr iver
settings. See “Changing the Printer driver settings” on page
3-17 to change the settings.
Accessing the printer driver from the Control Panel
To access the printer dr iv er from t he Con trol Panel, follow these
steps:
1. In the Main window, double-click the Print Manager icon.
The Print Manager window opens.
2. Make sure your printer is highlighted, then click Printer and
select Properties. The Printer Properties dialog box ap pears.
3-16 Using the Printer Software
Page 78

3. Click the Details button, then click Job Default. You see the
Document Propertie s dialog box, which includes the Form
and Orientation printer driver settings. See “Changing the
Printer driv er settings” below to change the settings.
4. Click Options to open the Advanced Document Properties
dialog box, which contains the Graphics Resolution, Color,
and Optimizations printer driv er settings. See “Changing the
Printer driv er settings” below to change the settings.
Changing the Printer driver settings
You can change printer driver settings in the Document
Properties dialog box and the Advanced Document Prop erties
dialog box. For an overview of the available sett ings, see “Printer
Driver Settings Overview” on page 3-18. To open these dialog
boxes, see the previous sections on accessing the printer driver.
When you finish making your printer driv er settings, click OK to
apply the settings, or click Cancel to cancel your changes.
Once you’ve checked your printer driver settings and changed
them if necessary, you are ready to print.
Using the Prin ter Software 3-17
Page 79

Printer Driver Settings Overview
The following ta bles show the Windows printer drive r se ttings.
Note that not every setting is available in all versions of Windows.
The printing settings are shown below.
Settings Explanations
Paper size Select the size of the paper you want to use. If you don’t
Orientation Select Portrait or Landscape.
Paper Source Select the paper source you want to use.
Resolution/
Graphics
Resolution
Dithering You can leave this option set to Fine, which is the default
Intensity/
Intensity Control
Print quality Select a print quality option from the Print quality list.
EPSON Status
Monitor 3
see your paper size, use the scroll bar to scroll through
the list. If your paper size is not included in the list, click
Custom or User Defined Size and enter the paper size
in the dialog box that appears.
Select the printing resolution you want. The higher the
resolution you select, the more detailed your printout will
be; however, increasing the resolution slows printing. If
you are using Windows 3.1, this option is only available
from the Control panel.
setting, or select another dithering pattern depending on
the kind of printout you want.
Move the slider to make your printout lighter or darker.
If you turn on Hi-speed, you will enter bi-directional
printing mode and printing speed will increase. Turning
Hi-speed off will return the printer to uni-directional
printing mode. Printing speed will decrease, but printing
precision will improve. Default printing uses the settings
stored in the printer.
You can access EPSON Status Monitor 3 when you click
this button. To monitor the printer, make sure the
Monitor the printing status check box is selected.
Monitoring
Preferences
Click this button to open the Monitoring Preferences
dialog box where you can make settings for EPSON
Status Monitor 3.
3-18 Using the Printer Software
Page 80

Settings Explanations
Paper/Output Check the Paper Size, Orientation, and Paper Source
Halftone Click this button to set the brightness and contrast, input
settings you made on the Page Setup menu and change
them if necessary. Select the setting and then choose
an option from the Change Setting list box.
the RGB gamma, or make other settings. The Halftone
Color Adjustment dialog box appears. For details, click
Help in this dialog box.
The monitoring settings are shown below.
Settings Explanations
EPSON Status
Monitor 3
Monitoring
Preferences
You can access EPSON Status Monitor 3 when you click
this button. To monitor the printer, make sure the
Monitor the printing status check box is selected.
Click this button to open the Monitoring Preferences
dialog box where you can make settings for EPSON
Status Monitor 3. For more information, see “Setting up
EPSON Status Monitor 3” on page 3-21.
Using the Prin ter Software 3-19
Page 81

Using the EPSON Remote! Utility
The EPSON Remote! utility allows you to easily change the
printer’s default settings from your computer’s DOS prompt.
Installing EPSON Remote!
Follow the steps b elow to install EPSON Remote!
Note:
If you want to install EPSON Remote!, you must start your computer
in DOS mode. Do not open a DOS window from Windows.
1. Insert the printer software CD-ROM in a disk drive.
2. At the DOS prompt, type D:\ENGLISH\SETUP. (If you
inserted the disk in a dr ive other t han dri ve D, substitu te the
appropriate letter.) Then press Enter.
3. Select your printer’s name in the Printer Model window and
press Enter. C:\EPUTIL appears as the default directory.
4. Press Enter again. The EPSON Remote! u tility is copied to th e
C:\EPUTIL directory.
Accessing EPSON Remote!
To access EPSON Remote!, ty pe C:\EPUTIL\PRNSET at the DOS
prompt and press Enter. Then follow the on-screen instructions
to use this utility. You can also access EPSON Remote! by typing
C:\EPUTIL\PANEL at the DOS prompt and pressing Enter. The
PRNSET and PANEL access methods differ slightly. The PANEL
method opens a condensed version of EPSON Remote! that only
provides the most often used settings.
3-20 Using the Printer Software
Page 82

Using the EPSON Status Mon it or 3 Utility
The EPSON Status Monitor 3 utilit y that comes with your printe r
is available for Windows Me, 98, 95, 2000 and NT 4.0. It allows
you to monitor your printer’s status, alerts you when printer
errors occur, and provides troubleshooting instructions when
needed.
The EPSON Status Monitor 3 utility is available only when:
❏ The printer is connected directly to the host computer v ia the
parallel p ort [LPT1].
❏ Your system is configured to support bidirectional
communication.
The EPSON Status Monitor 3 u tility is insta lled when yo u instal l
the printer driver as described in Chapter 1.
Note:
If you install the driver using Add Printer in the Printers folder, or using
the “Point and Print” method, EPSON Status Monitor 3 may not
function properly. If you want to use EPSON Stat us Monitor 3, reinstall
the driver as described in Chapter 1.
Before using EPSON Status Mo nitor 3, be sure to read the
README file on the driver disk. This file contains the latest
information on the utility.
Setting up EPSON Status Monitor 3
Follow the steps below to setup EPSON Status Monitor 3.
1. Open the Utility menu as described in “Using the Printer
Driver With Windows Me, 98 or 95” on page 3-3 or “Using
the Printer Driver With Windows 2000 and NT 4.0” on page
3-10.
Using the Prin ter Software 3-21
Page 83

2. Click the Monitoring Preferences button. The Monitoring
Preferences dialog box appears.
3. The following settings are available:
Select Notification Displays the error item check box ON/OFF
Select Shortcut
icon
Receive error
notification for
shared printers
Allow monitoring
of shared printer
status.
Turn on this check box to display the selected
error notification.
The selected icons are displayed in the task tray
on the PC screen. The setting example is shown
on the right window. By clicking the shortcut icon,
you can access the Monitoring Preferences
dialog easily.
Error notification for a shared printer can be
received when this check box is turned on.
When this check box is turned on, a shared
printer can be monitored by other PCs.
Note:
Click the Default button to revert all items to the default settings.
3-22 Using the Printer Software
Page 84

Accessing EPSON Status Monitor 3
To access EPSON Status Monitor 3:
❏ Double-click the printer- shaped shortcut icon on the taskbar.
To add a shortcut icon to the taskbar, see Utility menu.
❏ Open the Utility menu, then click EPSON Status Monitor 3.
To find out how to open the Utility menu, See “Using the
Printer Driver With Windows Me, 98 or 95” on page 3-3 or
“Using the Printer Driver With Windows 2000 and NT 4.0”
on page 3-10.
When you access EPSON Status Mo nitor 3 as described above, the
following printer status window appears.
You can view printer status information in the window.
Using the Prin ter Software 3-23
Page 85

Chapter 4
Changing Printer Settings From the
Printer’s Control Panel
Selecting a Built-In Font and Pitch . . . . . . . . . . . . . . . . . . . . . . . . .4-2
About Your Printer’s Default Settings . . . . . . . . . . . . . . . . . . . . . .4-3
Changing default settings . . . . . . . . . . . . . . . . . . . . . . . . . . . .4-9
Changing Printer Settings From the Printer’s Control Panel 4-1
Page 86

Selecting a Built-In Font and Pitch
Your printer comes with the twelve built-in fonts. See “Built-in
fonts:” on page C-4 for information of fonts you can select. You
can also change the pitch by turning the condensed mode on or
off. You can select the font and pitch using the buttons on the
printer’s control panel as described below.
Note:
Settings you make in your application programs usually override
settings you make from the printer’s control panel. For best results, use
your application to select a font and pitch.
Follow these steps to select a built-in font or pitch using the
buttons on the printer’s control panel:
1. Make sure that the printer is not prin ting. If it is, wait until
printing has finished.
2. To select a font, press the Font button until the three Font
lights indicate the font you want with a patt ern shown on the
control panel.
Note:
❏ The Font button cannot directly select OCR-B, Orator, Orator-
S, Script-C, Roman-T, or Sans Serif H. To select one of these
fonts, you must first use the default-setting mode to register it
as the “other” font and then select Others using the Font
button.
❏ Barcode fonts can not be selected via the control panel.
3. Press the Condensed button to turn the condensed mod e on
or off.
4-2 Changing Printer Settings From the Printer’s Control Panel
Page 87

About Your Prin ter’s Default Settings
The default settings control many printer functions. While you
can often set these functions through your software or printer
driver, you may sometimes need to chang e a default setting from
the printer’s c ontrol panel using the default-setting mode.
The following table lists the defaul t settin gs and the opt ions you
can select in the default-setting mod e. The setting s are explained
in detail after the table. For instructions on changing the d efault
settings, see “Changing default settings” on page 4-9.
Settings Options
Page length for tractor* Length in inches: 3, 3.5, 4, 5.5, 6, 7, 8, 8.5,
Skip over perforation On, Off
Auto tear off On, Off
Auto line feed On, Off
Print direction Bi-D, Uni-D, Auto
Software ESC/P2, IBM 2390 Plus
0 slash 0,
High speed draft On, Off
I/F mode Auto, Parallel, Option
Auto I/F wait time 10 seconds, 30 seconds
Parallel I/F bidirectional
mode
Packet mode Auto, Off
Auto CR (IBM 2390 Plus)** On, Off
A.G.M. (IBM 2390 Plus)** On, Off
* The options available vary depending on the country of purchase.
** These settings take effect only when IBM 2390 Plus emulation is selected.
***This option is available with the LQ-680Pro only.
11, 70/6, 12, 14, 17
0
On, Off
Changing Printer Settings From the Printer’s Control Panel 4-3
Page 88

Settings Options
Character table* Standard model:
International character set
for Italic table
Font OCR-B, Orator, Orator-S, Script C,
Manual feed wait time 0.5 second, 1 seconds,
Buzzer On , O ff
Overlapping forms*** On, Off
Italic, PC 437, PC 850, PC 860, PC 863,
PC 865, PC 861, BRASCII, Abicomp,
Roman 8, ISO Latin 1, PC 858,
ISO 8859-15
All other models:
Italic, PC 437, PC 850, PC 437 Greek,
PC 853, PC 855, PC 852, PC 857,
PC 864, PC 866, PC 869, MAZOWIA,
Code MJK , ISO 8859-7, ISO Latin 1T,
Bulgaria, PC 774, Estonia, ISO 8859-2,
PC 866 LAT, PC 866 UKR, PC APTEC,
PC 708, PC 720, PC AR864, PC 860,
PC 863, PC 865, PC 861, BRASCII,
Abicomp, Roman 8, ISO Latin 1, PC 858,
ISO 8859-1 5, PC 771
Italic U.S.A., Italic France,
Italic Germany, Italic U.K.,
Italic Denmark1, Italic Sweden,
Italic Italy, Italic Spain1
Roman T (PS), Sans Serif H (PS)
1.5 seconds, 2 seconds
* The options available vary depending on the country of purchase.
** These settings take effect only when IBM 2390 Plus emulation is selected.
***This option is available with the LQ-680Pro only.
4-4 Changing Printer Settings From the Printer’s Control Panel
Page 89

Page length for tractor
This setting allows you to set t he page length f or continuous
paper.
Skip over perforation
This feature is availabl e only when conti nuous pap er is selected.
When you select On, the printer provides a one-inch (25.4 mm)
margin between the last line printed on one page and the fir st line
printed on the next page. Because the program margin settin gs in
most applications override margin settings made from the control
panel, you should use this set ting onl y if you ca nnot set your top
and bottom margins using your application.
Auto tear off
When auto tear off is on and you are using continuous paper wi th
the tractor, the printer automatically advances the paper
perforation to the tear-o ff posi ti on, wher e yo u can easily tear off
the printed pages. When the printer receives the next pri nt job, it
automatically moves the unused paper back to the top-of-form
position and starts printing, so you can use all of the next page.
When auto tear off is off and you are using continuous paper wi th
the tractor, you need to move the perforation to the tear-off
position by pressing the c ontrol panel button. See “U sing the Tear
Off button” on page 2-15 for more information.
Auto line feed
When auto line feed is on, the printer accompanies each carriage
return (CR) code received with a line feed code, and the print
position moves to the next line. If the printer adds an extra line
after every carriage return, select Off.
Changing Printer Settings From the Printer’s Control Panel 4-5
Page 90

Print directio n
0
You can select auto print directi on (Auto), bidirectional printing
(Bi-D), or unidirectional printing (Uni-D). Printing is normally
bidirectional for faster printing; however, unidir ectional printing
allows for precise vertical pr inting align ment, which is useful for
printing graphics.
When set to Auto, the printer analyzes the data and uses
unidirectional printing only for any lines which req uire vertical
printing alignment.
Software
When you select ESC/P2, the printer operates in the EPSON
ESC/P2 mode. When you select IBM 2390 Pl us, the printer
emulates an IBM printer.
0 slash
The zero character has a slash ( ) when this feature is on. It has no
slash (0) when this feature is off. The slash allows you to easily
distinguish between the uppercase letter “O” and a zero.
High speed draft
When you choose On, the printer prints up to 413 cps (characters
per second) at 10 cpi (characters per inch). When you choose Off,
the printer prints up to 310 cps at 10 cpi.
4-6 Changing Printer Settings From the Printer’s Control Panel
Page 91

I/F (interface) mode
The printe r comes with a b uilt-in parallel interface and an
interface slot in which y ou ca n in stal l one op ti onal i nter f ace. F or
information on using an optional int erface, see “Optional
interface cards” on page A-21.
If your printer is connected to only one co mputer, select Parallel
or Optional for the interface mode, depending on the interface
you use. If your printer is connected to t wo computers, select Auto
(automatic) to allow the printer to automati cally switch between
interfaces depending on which one is receiving data.
Auto I/F (interface) wait time
This setting takes effect only if an optional interface is installed
and the auto interface mode is selected. This setting determines
how long the printer waits when it no longer receives data from
an interface before it checks whether a print job is being sent
through the other interface. You can specify 10 seconds or 30
seconds for the auto interface wait time.
Parallel I/F bidirectional mode
The Parallel Interface bidirectional transfer mode is used when
this feature is on. If bidirectional transfer mode is unnecessary,
turn this off.
Packet mode
Select Auto to use the IEEE-1284.4 packet t ransfer mode. If packet
transfer mode is unnecessary, or if yo u ca nnot connect , t urn this
off.
Changing Printer Settings From the Printer’s Control Panel 4-7
Page 92

Auto CR (carriage return)
This setting is available only in IBM 2390 Plus emulation mode.
When auto carriage return is on, e ach line feed (LF) cod e or ESC
J code is accompanied by a carriage return code. This moves the
print position to the beginning of the next line. If the printer adds
an extra li ne after eve r y carriage return, select Off.
A.G.M. (Alternate Graphic Mode)
When A.G.M. is on, the printer can use some advanced graphics
commands like those available in ESC/P2 mode. When you select
IBM 2390 Plus mode, this setting is available.
Character table
You can select from among 13 to 36 standard character tables,
depending on the count ry of purchase. See “ Character tables:” on
page C-5 for more information of the tables.
International character set for Italic table
You can select among se ve ral i nter national character sets fo r t he
Italic character table. Each character set contains eig ht characters
that vary depending on the country or language, so you can
customize the Italic table to suit your printing needs.
Font
You can select six fonts in default-setti ng mode. The font selected
here appears under Others in the control panel. The following
fonts are indicated on the control panel and can’t be selected by
default settings: Draft, Roman, Sans Seri f , Cour ier , Pr esti ge, and
Script.
4-8 Changing Printer Settings From the Printer’s Control Panel
Page 93

Manual feed wait time
This sets the amount of wait time between when paper is i nserted
into the paper guide and it is fed. If the paper feeds before you
can adjust its position to your satisfaction, you can increase the
wait time.
Buzzer (beeper)
The printer beeps when an error occurs. (See “Using the Error
Indicators” on page 5-2 for mo re information on printer errors.)
If you do not want the printer to beep when an error occurs, turn
this setting off.
Overlapping forms (LQ-680Pro only)
This setting takes effect only when the skip-over-perforation
setting is on. When overlapping-forms setting is on, the printer
lifts up the print head each t ime it makes a o ne-inch margin wi th
the skip-over-perforation feature. You need to turn on both the
overlapping-forms and the skip-over-perforation settings when
you use overlapping forms. This setting is availabl e only on
LQ-680Pro.
Changing default settings
Follow the steps below to enter the default-setting mode and
change the printer’s default settings.
Note:
❏ To print the language selection and default-setting mode
instructions, you need five sheets of A4 or letter size single-sheet
paper, or five pages of continuous paper that is at least 279 mm
(11 inches) long and 210 mm (8.27 inches) wide.
❏ If you use single sheets without an optional cut-sheet feeder, you
need to feed a new sheet of paper each time the printer ejects a printed
sheet.
Changing Printer Settings From the Printer’s Control Panel 4-9
Page 94

1. Make sure paper is loaded and the printer is turned off.
Caution:
c
2. While holding down the Font button, tu rn on the printer. The
printer ente rs the default-setting mode and prints the
language selection instructions.
3. Press the Font button until the Font lights indicate the
language you want, as described in the language selection
instructions.
4. Press the Tear Off/Bin button (LQ-680) or Tear Off/Special
Paper button (LQ-680Pro) to print the default-setting mode
instructions (four pages) in the language you selected.
The printed instructions list the defau lt settings you can
change, describe how to change them, and sho w you how the
control panel lights help you make settings. Follow these
instructions to change the default settings using the buttons
on the print er’s control panel.
Whenever you turn off the printer, wait at least five seconds
before turning it back on; otherwise you may damage the
printer.
Note:
The arrows on the instruction sheets indicate the printer’s current
settings.
5. When you finish making settin gs, turn off the printe r and exit
the default-setting mode. Any settings you have made remain
in effect until you change them again.
Note:
To exit the default-setting mode, turn off the printer when it has
finished printing.
4-10 Changing Printer Settings From the Prin te r’s Control Panel
Page 95

Chapter 5
Troubleshooting
Using the Error Indicators . . . . . . . . . . . . . . . . . . . . . . . . . . . . . . . .5-2
Problems and Solutions . . . . . . . . . . . . . . . . . . . . . . . . . . . . . . . . . .5-4
Power supply problems. . . . . . . . . . . . . . . . . . . . . . . . . . . . . .5-5
Single-sheet paper loading or feeding problems. . . . . . . . . 5-6
Continuous paper loading or feeding problems . . . . . . . . .5-8
Printing position problems. . . . . . . . . . . . . . . . . . . . . . . . . . .5-9
Printing or printout quality problems. . . . . . . . . . . . . . . . . .5-11
Clearing Paper Jams . . . . . . . . . . . . . . . . . . . . . . . . . . . . . . . . . . . . .5-16
Aligning Vertical Lines in Your Printout. . . . . . . . . . . . . . . . . . . .5-17
Printing a Self Test. . . . . . . . . . . . . . . . . . . . . . . . . . . . . . . . . . . . . . .5-18
Printing a Hex Dump . . . . . . . . . . . . . . . . . . . . . . . . . . . . . . . . . . . .5-19
Troubleshooting 5-1
Page 96

Using the Error Indicators
You can identify many common printer problems using the lights
on the control panel. If your printer stops working and one or
more control panel lights are on or fla sh ing or th e pri nte r beeps,
use the following table to diagnose and fix the problem. If you
can’t fix your problem using this table, go to the next section.
Panel light
state
n
Pause – The printer is paused.
n
Paper Out
n
Pause
Beep
pattern
••• Paper from another paper source is currently in
••• The printer cover is open.
••• No paper is loaded in the selected paper source.
••• The paper is not loaded correctly.
Problem
Solution
Press the Pause button to resume printing.
the paper path. (LQ-680 only)
Move the paper release lever back to the
appropriate position and press the Load/Eject
button to clear the paper from the paper path. Then
set the lever to the position you want to use. Press
the Pause button to turn off the Pause light, if
necessary.
Close the printer cover and press the Pause button.
Load paper in the printer. Then press the Pause
button to turn off the Pause light, if necessary.
Remove your paper and reload it. See Chapter 2 for
instructions on loading paper. Then press the
Pause button to turn off the Pause light, if
necessary.
5-2 Troubleshooting
••• Paper is jammed in the printer.
Clear the paper jam as described “Clearing Paper
Jams” on page 5-16.
Page 97

Panel ligh t
state
Beep
pattern
Problem
Solution
f
Paper Out
n
Pause
f
Paper Out
f
Pause
f
Pause – The print head is overheated.
••• Continuous paper is not fed back to the standby
position.
Tear off the printed document at the perforation;
then press the Load/Eject button. The printer feeds
the paper to the standby position. Press the Pause
button to turn off the Pause light.
••• A single sheet of paper is not fully ejected.
Press the Load/Eject button to eject the sheet.
Then press the Pause button to t urn off the Pause
light, if necessary.
••• Paper is jammed in the printer.
Clear the paper jam as described in “Clearing Paper
Jams” on page 5-16.
••• The printer was unable to switch between paper
sources because of a paper jam or other paper
problems. (LQ-680Pro only)
Remove any paper from the paper path and clear
the paper jam as described in “Clearing Paper
Jams” on page 5-16. Then retry the paper source
selection.
Wait a few minutes; the printer resumes printing
automatically once the print head has cooled.
f
All the lights on
the control panel
n
= on, f = flashing
••• = short series of beeps (three beeps)
• • • • • = long series of beeps (five beeps)
Note:
The printer beeps once if you press a control panel button when the corresponding function
is not available.
• • • • • An unknown printer error has occurred.
Turn off the printer and leave it off for several
minutes; then turn on the printer again. If the error
recurs, contact your dealer.
Troubleshooting 5-3
Page 98

Problems and Solutions
Most printer problems are easy to solve. Use the information in
this section to find the cause and solution to any printer problems
that occur.
Determine what type of problem occurred, and see the
appropriate page listed below:
Power supply problems. . . . . . . . . . . . . . . . page 5-5
Single-sheet paper loading or
feeding problems . . . . . . . . . . . . . . . . . . . . . page 5-6
Continuous paper loading or
feeding problems . . . . . . . . . . . . . . . . . . . . . page 5-8
Printing position problems. . . . . . . . . . . . . page 5-9
Printing or printout quality problems. . . . page 5-11
You can also use the self test feature to determine whether the
printer or the computer is causing the problem. See “Printing a
Self Test” on page 5-18 for instructions.
To pinpoint communication problems, experienced users may
want to use the printer ’s hex dump mode, described i n “Print ing
a Hex Dump” on page 5-19.
To clear a paper jam, see “Clearing Paper Jams” on page 5-16.
5-4 Troubleshooting
Page 99

Power supply problems
The control panel lights come on briefly, but then go off and
stay off.
Cause What to do
The printer’s voltage rating
does not match the voltage of
your elec trical outle t.
w
Warning:
Do not reconnect the power cord to an electrical outlet that has the wrong
voltage for your printer.
Check the printer and the outlet
voltage ratings. If the voltages do not
match, unplug the printer
immediately and contact your dealer.
The printer does not work and the control panel li ghts are off
even though you turned on the printer.
Cause What to do
The power cord is not
properly plugged into the
electrical outlet or your
printer.
The electrical outlet does not
work.
Turn off the printer, and make sure the
power cord is firmly plugged into the
electrical outlet and the printer, if
necessary. Then turn on the printer.
Use a different outlet.
Troubleshooting 5-5
Page 100

Single-sheet paper loading or feeding problems
The printer does not load single -s heet paper or does not feed
it properly.
Cause What to do
Tractor feeding is selected. Select single-sheet feeding. For more
information, see “Selecting a Paper
Source” on page 2-2.
The paper on the paper
guide is positioned too far to
the left or right for the paper
sensor to detect that it is
there.
Single-sheet paper is not
loaded properly.
The paper thickness lever is
not set correctly.
Your paper is creased, old,
too thin, or to o thick.
Move the paper a little to the left or
right.
See “Using Single Sheets” on page
2-20 for instructions on loading singlesheet paper.
See “Adjusting the Paper Thickness
Lever” on page 2-6.
See the paper specifications in
Appendix C and use new, clean sheets
of paper.
The printer does not fully eject a single sheet.
Cause What to do
Your paper is too long. Press the Load/Eject button to eject
the sheet. Make sure the page length
of your paper is within the range
specified for single-sheet paper in
Appendix C. Also check and adjust
the paper size setting in your
application or printer driver.
5-6 Troubleshooting
 Loading...