

Page 1

24-Pin Dot Matrix Printer
All rights reserved. No part of t his publication may be rep roduced, stored in a retriev al syste m , or
transmitted in any form or by any means, electronic, me chanical, photocopying, recording, or
otherwise, without the prior written permission of SEIKO EPSON CORPORATION. The information
contained herein is designed only for use with this EPSON printer. EPSON is not responsible for any
use of this informati on as applied to other prin ters.
Neither SEIKO EPSON CORPORATION nor its affiliates shall be liable to the purc hase r of this
product or third parties for damages, losses, costs, or expenses incurred by the purchaser or third parties
as a result of: acciden t, mis use, or abuse of this product or unaut horized modifications, repa irs, or
alterations to this product, or (excluding the U.S.) failure to strictly com ply with SEI KO EPSON
CORPORATION’s operating and ma int enance instructions.
SEIKO EPSON CORPORATION shall not be liable for any damages or problems arising from the
use of any options or any consumable products other than those designated as Original EPSON Products
or EPSON Approved Products by SEIKO EPSON CORPORATION.
EPSON and EPSON ESC/P are registered trademarks of SEIKO EPSON CORPORATION.
Microsoft, Windows, and Windows NT are registered tradem arks of Microsoft Corporation.
English
IBM is a registered tradem ark of International Business Machines Co rporation.
Adobe and PostScript are trad em a rks of Adobe Systems Incorporated , which ma y be regi ste re d in
certain jurisdictio ns. Ac robat Reader is a trademark of Adobe Systems Incorporated.
General Notice: Other product names used herein are for identification purposes only and may be
trademarks of their respective owners. EPSON disclaims any and all rights in those marks.
Copyright © 2000 by SEIKO EPSON CORPORATION, Nagano, Japan.
Page 2

Where to Find Information
■ Quick Start Manual (this manual)
Contains information about how to set up the printer, install the printer software and
access your online documentation. It also provides instructio ns for daily operation.
Keep this manual near your printer.
■ Online Documentation
The CD-ROM supplied with the printer inc ludes a set of onlin e document ation in PDF
format containing further information and reference tips.
■ Online Help
Provides you with detailed informatio n and instru c tio ns on the Wind o ws printe r
software that controls your printer. Online help will be automatically installed when
you install the printer software.
Page 3

■ Contents
Important Safety Instructions . . . . . . . . . . . . . . . . . . . . . . . . . . . . . . . . . . . . . 4
Print Head Caution Symbol. . . . . . . . . . . . . . . . . . . . . . . . . . . . . . . . . . . . . . . 5
ENERGY STAR Compliance . . . . . . . . . . . . . . . . . . . . . . . . . . . . . . . . . . . . . 5
Symbols used in the Manual . . . . . . . . . . . . . . . . . . . . . . . . . . . . . . . . . . . . . . 5
Setting Up the Printer. . . . . . . . . . . . . . . . . . . . . . . . . . . . . . . . . . . . . . . . . . . . 6
Unpacking the Printer. . . . . . . . . . . . . . . . . . . . . . . . . . . . . . . . . . . . . . . . 6
Choosing a Place for the Printer. . . . . . . . . . . . . . . . . . . . . . . . . . . . . . . . 7
Positioning the Continuous Paper Supply . . . . . . . . . . . . . . . . . . . . . . . . 8
Installing or Replacing the Ribbon Cartridge. . . . . . . . . . . . . . . . . . . . . . 8
Attaching the Paper Guide . . . . . . . . . . . . . . . . . . . . . . . . . . . . . . . . . . . . 12
Plugging in the Printer . . . . . . . . . . . . . . . . . . . . . . . . . . . . . . . . . . . . . . . 12
Connecting the Printer to Your Computer . . . . . . . . . . . . . . . . . . . . . . . . 12
Installing the Printer Software . . . . . . . . . . . . . . . . . . . . . . . . . . . . . . . . . . . . 15
Installing the Printer Software in Windows Me, 98, 95, 2000
or NT 4.0 . . . . . . . . . . . . . . . . . . . . . . . . . . . . . . . . . . . . . . . . . . . . . . . . . 15
Installing the Printer Software in Windows 3.1 or NT 3.5x. . . . . . . . . . . 16
For DOS programs. . . . . . . . . . . . . . . . . . . . . . . . . . . . . . . . . . . . . . . . . . 17
Printing . . . . . . . . . . . . . . . . . . . . . . . . . . . . . . . . . . . . . . . . . . . . . . . . . . . . . . . 19
Printing under Windows Me/98/95/2000 and NT 4.0 . . . . . . . . . . . . . . . 19
Printing under Windows 3.1 and NT 3.5x . . . . . . . . . . . . . . . . . . . . . . . . 19
Using the Online Manual . . . . . . . . . . . . . . . . . . . . . . . . . . . . . . . . . . . . . . . . . 20
Installing the Adobe Acrobat Reader. . . . . . . . . . . . . . . . . . . . . . . . . . . . 20
Accessing the Online Manual. . . . . . . . . . . . . . . . . . . . . . . . . . . . . . . . . . 21
Customer Support. . . . . . . . . . . . . . . . . . . . . . . . . . . . . . . . . . . . . . . . . . . . . . . 22
Page 4

■ Important Safety Instructions
Read all of these instructions and save them for later reference. Follow all warnings
and instructions marked on the printer.
■ Do not place the printer on an unstable surface or near a radiator or heat source.
■ Place the printer on a flat surface. The printer will not operate properly if it is tilted
or at an angle.
■ Do not block or cover the openings in the printer’s cabinet. Do not insert objects
through the slots.
■ Use only the type of power source indicated on the printer’s labe l.
■ Connect all equipment to properly grounded power outlets. Avoid using outlets on
the same circuit as photocopiers or air control systems that regularly switch on and
off.
■ Do not use a damaged or frayed power cord.
■ If you use an extension cord with th e printer, make sure the total a mpere ra ting o f
all devices plugged into the extension cord does not exceed the cord’s ampere rating.
Also, make sure the total of all devices plugged into the wall outlet does not exceed
the wall outlet’s ampere rating.
■ Unplug the printer before cleaning, and clean it with a damp cloth only.
■ Do not spill liquid on the printer.
■ Except as specifically expla ined in this guid e, do n ot attem pt to service the prin ter
yourself.
■ Unplug the printer and refer servicing to qualified personnel under the following
conditions:
If the power cord or plu g is damaged; if liquid has entered the p rinter; if th e printer
has been dropped or the cabinet damaged; or if the printer does not operate normally
or exhibits a distinct change in performance. Adjust only those controls that are
covered by the op erating instructio ns.
■ Printer parts marked with this symbol may be hot. Turn off the
K
■ If you plan to use the printer in Germany, observe the following:
To provide adequate short-circuit protection and over-current protection for this
printer, the building installation must be protected by a 10 or 16 amp circuit breaker.
printer and let it cool for a few minutes be fore you touch any printe r
part marked with this symbol.
4
Important Safety Instructions
Page 5

■ Print Head Caution Symbol
K
The symbol on the print head indicates that this part may be hot.
Never touch the print head just after the printer has been used. Let
the print head cool f or a few minutes before touching it.
■ ENERGY STAR Compliance
As an ENERGY STAR Partner, EPSON has determined that
this product meets the ENERGY STAR guidelines for energy
efficiency.
The International ENERGY STAR Office Equipment pro-
gram is a voluntary partnership with the computer and office
equipment indu stry to promote the intr oduction of energy-ef ficient personal com puters,
monitors, printers, fax machines, copiers, and scanners in an effort to reduce air
pollution caused by power generation.
■ Symbols used in the Manual
This guide uses the following conv e nti on s:
Warnings
w
must be followed to avoid bodily injury.
English
Cautions
c
Notes
contain important information and useful tips on the operation of your printer.
Print Head Caution Symbol
must be observed to avoid damage to your equipment.
5
Page 6
■ Setting Up the Printer
❚ Unpacking the Printer
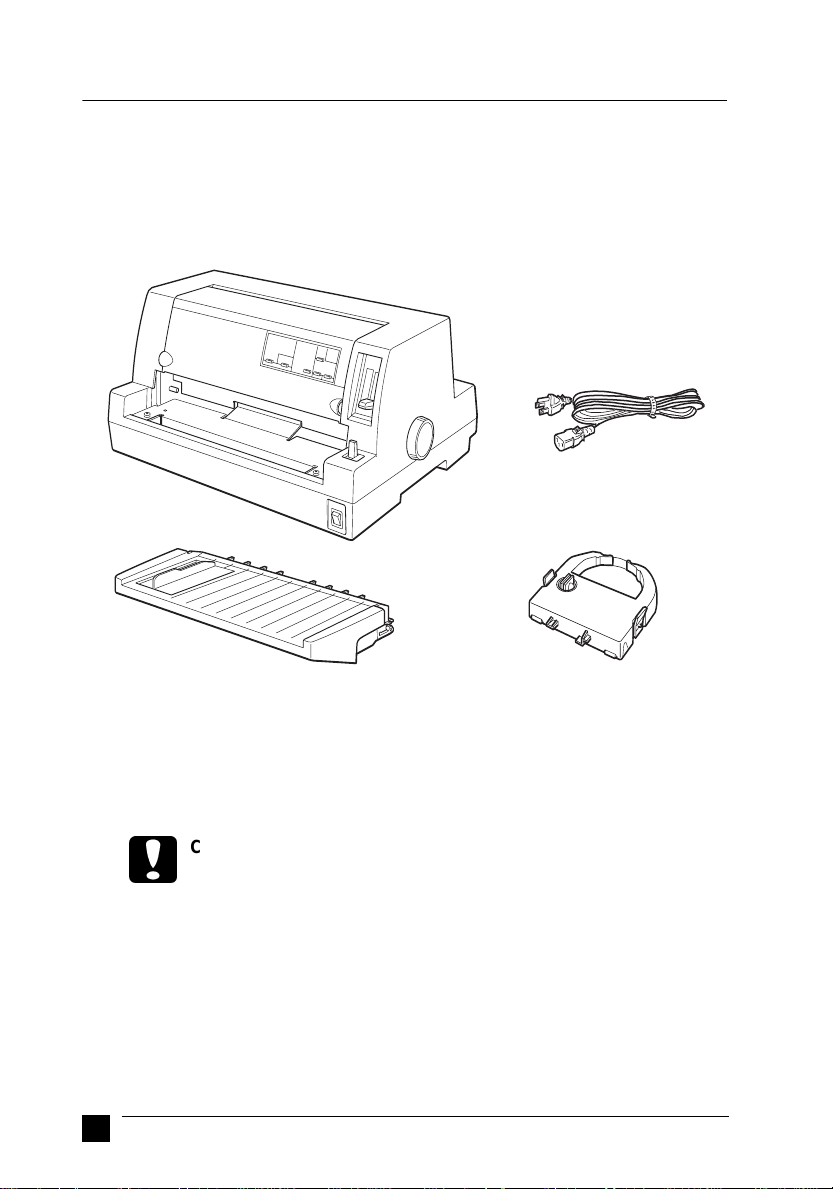
Besides this guide, your printer box should include an EPSON printer software CDROM, a Notice Sheet, and the followi ng items:
power cord
printer
paper guide ribbon cartridge
Note:
Depending on yo ur printe r mode l, the pow er cor d may be permane ntly att ached to the
printer. Also, the shape of the power cord plug varies depending on the country of
purchase; be sure the plug you have is the right one for your location.
Caution:
c
You must remove all protective materials packed around and inside your printer before
you set it up and turn on the power. Follow the directions on the Notice Sheet (packed
with the printer) to remove these materials.
Save all packing and protective materials in case you need to ship the printer in the
future. It should always be transported in its ori ginal packaging or equivalent materials.
6
There are several models of the printer designed for different voltages, an d
it is not possible to adjust the printer for use with another voltage. If the
label on the back of the printer does not show the correc t vo ltage for your
country, contact your dealer.
Setting Up the Prin te r
Page 7

❚ Choosing a Place for the Printer
Follow the guidelines below when selecting a location for your printer.
■ Place the printer on a flat, stable su rface. The printe r will not op erate pr operly if it
is tilted or at an angle.
■ Leave adequate room around the printer for easy operation and maintenance.
■ Avoid using or storing th e printer in places subject to rapid c hanges in temper ature
and humidity. Keep it away from direct sunlight, strong light, heat so urces, or
excessive moisture or dust.
■ Avoid places subject to shocks and vibrations.
■ Place the printer near a wall outlet where you can easily unplug the po wer cord.
■ Avoid electrical outlets cont rolled by wall switches or automatic timers. An
interruption of power can erase information in the memory of your printer or
computer.
Also avoid ou tlets on the same c ircuit a s larg e mot ors or ot her ap plian ces that can
cause voltage fluctuations.
■ Keep the entire computer system aw ay from potential sources of electromagn etic
interference, such as loudspeakers or t he base units of cordless telephones.
■ Use a grounded power outlet; do not use an adapter plug.
■ Make sure the paper path is clear and unobstructed before you print on continuous
paper.
■ Position your printer’s power cord and interface cable so they do not interfere with
paper feeding.
If you plan to use a printer stand, follow these guidelines:
■ Use a stand that supports at least 20 kg.
■ Never use a stand that tilts the printer. The printer should always be kept level.
■ If possible, secure the printer’s power cord and interface cable to a leg of the printer
stand so they do not interfere with paper feeding.
English
Setting Up the Printer
7
Page 8

❚ Positioning the Continuous Paper Supply
When you load continuous paper, make sure you align your paper supply with the tractor
so the paper feeds smoothly into the printer, as shown below.
❚ Installing or Replacing the Ribbon Cartridge
EPSON recommends the use of genuine EPSON Ribbon Cartridges (S015016).
Warning:
w
1. Make sure the printer is turned off.
8
You may touch the print head by hand to install or replace the ribbon
cartridge. If you have just used the printer, the print head may be hot; let it
cool for a few minutes before pro ceeding.
Setting Up the Prin te r
Page 9

2. Open the printer cover by gently lifting up the notch on the both sides.
3. T he print head shoul d be in the replacement position indicate d by an indentation
in the front metal plate, as shown below.
English
If it is not, close the printer cover and turn the printer on to move the prin t head to
the replacement position. Wait a few seconds, then turn the printer off again and
open the printer cover.
Caution:
c
Setting Up the Printer
Following t he steps below whil e the printer is turned on can damage
the printer.
9
Page 10

4. If a used ribbon cartridge is already installed, squeeze the tabs on each side of the
cartridge, and pull the cartridg e out of the printer. Properly dispose the used ribbon
and cartridge.
5. Turn the ribbon-tightening knob on the new cartridge in the direction o f the arrow
to take up any slack in the ribbon.
6. Hold the ribbon cartridge with the exposed ribbon down and the ribbon-tightening
knob facing yo u, and guide the ri bbon under the print head. Then snap th e cartridge
into place so that the tabs on both sides of the car tridg e fit in to the notc hes in th e
cartridge holder.
10
Setting Up the Prin te r
Page 11

7. Hold the ribbon cartridge by its handle and push it firmly down into position; then
press on both ends of the cartridge to make sure the plas tic hooks fit into th e slots.
8. T urn the ribbon-ti ghtening knob again to remove any slac k in the ribbon and to
make sure the ribb on moves freely.
English
9. Close the printer cover.
Note:
The printer pauses and cannot print when the printer cover is open.
Setting Up the Printer
11
Page 12

❚ Attaching the Paper Guide
To attach the paper guide, slide the slots on the paper guide all the way onto the
mounting pegs in the printer as shown below.
❚ Plugging in the Printer
1. Make sure the printer is turned off.
2. Check the label on the back of the printer to make sure its voltage matches that of
your electrical o utlet. Also make sure the plug on your printer’s power cord
matches your electrical outlet.
Warning:
w
3. If the power cord is not attached to the printer, plug the appropriate end into the
AC inlet on the back of the printer.
4. Plug the power cord into a properly grounded electrical outlet.
It is not possible to change the printer’s voltage. If the rated voltage
and your outlet voltage do not match, contact your dealer for assistance. Do not plug in the power cord.
❚ Connecting the Printer to Your Computer
Your printer has a standard IE EE-1284 compatible p arallel interface conn ection and an
optional interface.
If your compute r requires a differe nt type of printer interface, try one o f the Type B
optional interfa ces d escri bed i n Ap pendix A, “Enhan cing You r Printer Wi th Optio ns”
in the online User’s Guide.
Follow the steps below to connect the printer to your computer using a parallel interface
connector, or a ground wire connector.
1. Make sure both the printer and comput er are turned off.
12
Setting Up the Prin te r
Page 13

2. P lug the cable connector securely in to the parallel interface connector.
.
3. S queeze the wire clips together until they lock in place on both sides of the
connector.
English
Setting Up the Printer
13
Page 14

4. If your cable has a ground wire, connect it to th e printer’s ground connector as
shown below.
5. Plug the other end of the cable into the computer.
14
Setting Up the Prin te r
Page 15

■ Installing the Printer Software
After you connect the printer to your computer, you need to install the software included
on the EPSON printer sof tw a re CD -R O M ship pe d w ith your printer.
Your printer software includes:
■ Printer driver
The printer driver is the software that runs, or “drives,” your printer. With it, you
can make printer settings such as print quality, resolution, and paper size.
■ EPSON Status Monitor 3 (for Window s Me, 98, 95, 2000 and NT 4.0)
The EPSON Status Monitor 3 notifies you of printer errors and displays printer
status information.
■ EPSON Remote! (a DOS-based printer setup utility)
The EPSON Remote! utility allows you to easily change the printer’s default
settings from the computer screen. See Chapter 3, “Using the Printer Software” in
the online User’s Guide.
To install the printer software, see “Ins talling the Printer Software in Windows Me, 98,
95, 2000 or NT 4.0” or “Installing the Printer Software in Windows 3.1 or NT 3.5x” in
this section. If you are using DOS, see "For DOS programs" on page 17.
❚ Installing the Printer Software in Windows Me, 98, 95, 2000 or
NT 4.0
Follow the steps below to install the p rinter software i n Windows Me, 98, 95, 2000, or
NT 4.0:
Note:
❏ Installing the printer software for Windows 2000 or NT 4.0 may require ad mi-
nistrator privileges. If you have problems, ask your administrator for more
information.
❏ If you wish to make a diskette version of the printer softwar e on your CD-ROM,
insert the CD and r un the EP SETU P pro gram . In th e dialo g box th at appe ars,
click the Driver disk creation utility button and follow the on-screen
instructions.
❏ If you are using the diskette version of the EPSON software, make a backup
copy of the EPSON printer software disk or disks before you begi n installation.
❏ If the New Hardware Found screen or any other wizard appears when you
turn on your computer, click Cancel and follow the steps be low.
❏ If the Digital Signature Not Found screen appears, click Yes. If you click
No, you must reinstall the printer driver as described below.
❏ Installati on time varies depending on y our computer.
1. M ake sure that the printer and compute r are switched off.
English
Installing the Printer Software
15
Page 16

2. Switch the PC on. Windows starts automatically. Then switch the printer on.
3. Insert the CD-ROM containing the printer software into the CD-ROM drive.
TheAutoPlay function of th e CD-ROM dri ve a ut oma tical ly star ts t he in stal lation
program on the CD-ROM.
If the installation program d oes not start auto matically, click o n Start and then on
Run. In the Run dialog box, enter the drive letter of your CD-ROM drive in the
command line (e.g. E:\), followed by the command START.EXE (e.g.
E:\START.EXE) and click on the OK butt on.
Note:
If your CD-ROM drive has a drive letter other than "E", substitute the appro-
priate letter. The installation program starts. The subsequen t proc e dure is
menu-driven, i.e., you can select the relevant options from a list simply by
clicking with the mouse. The remain der of the installation is au tomatic and you
do not need to enter any more information.
4. S e lect the desired optio ns and follow the on- s creeen instructions.
5. After the printer software has been successfully installed, click on the button
identified by a door icon to exit the installation program.
When you install the pr in te r dr iv e r on Wind ow sMe , 98, 95, 2000 or NT 4.0, EPS ON
Status Monitor 3 will also be installed.
For information on opening and usin g the software, see Chapter 3, “Using the Printer
Software” in the online User’s Guide.
❚ Installing the Printer Software in Windows 3.1 or NT 3.5x
Follow the steps below to install the printer software in Windows 3.1 or NT 3.5x
systems.
Note:
Installing the printer software on Windows NT 3.5x may require administrator privileges. If you have problems, ask your administrator for more information.
1. Make sure Windows 3.1/ NT 3.5x is running and the Program Manager window
is open.
2. Insert the EPSON printer software CD shipped with your printer in the CD-ROM
drive.
Note:
If your system does not hav e a CD-ROM drive, you can make a floppy disk
version from which to install the printer software.
16
Installing the Printer Software
Page 17

3. From the File menu, choose Run. The Run dialog box appears. In the Command
Line box, type E:\START and click OK.
Note:
If your CD-ROM drive has a drive letter other than “E” , substitute the
appropriate letter.
The installation program starts. The subsequent procedure is menu-driven, i.e., you
can select the relevant options from a list simply by clicking with the mouse. The
remainder of the installation is automatic and you do not need to enter any more
information.
4. Select the desired options and follow the on-screen instructions.
5. After the printer software has been successfully installed, click on the button
identified by a door ic on to exit the in stallation p rogram. The insta llation program
automatically selects this printer as the default printer for Windows applications.
The installation program automatically selects the LQ-680/LQ-680Pro as the default
printer for Windows applicatio ns. Fo r infor mation on o pening a nd using the sof tware,
see Chapter 3, “Using the Prin ter Software” in the online User’s Guide.
❚ For DOS programs
To control the printer from DOS application programs, you need to select the printer
you are using or another available printer from the printer list of your application.
Choose the EPSON LQ-680/LQ-680Pro printer a t the appro p riate step in the set up or
installation procedure of your DOS application program. If the list in your application
does not include the LQ-680 /LQ-680Pro printer, ch oose the first available pr inter from
this list:
English
Installing the Printer Software
17
Page 18

LQ-670
LQ-580/LQ-570e
LQ-2070/LQ-2080
LQ-2170/LQ-2180
LQ-870/LQ-1170
LQ-570/1070/570+/1070+
DLQ-3000/DLQ-3000+
DLQ-2000
LQ-1060
LQ-1050
LQ-2550
LQ-2500
Note:
If your application does not list a suitable alternative, contact the software manufacturer to see if an update is available.
18
Installing the Printer Software
Page 19

■ Printing
❚ Printing under Windows Me/98/95/2000 and NT 4.0
1. Select Print Setup or Print from the File menu of you r applicat ion sof tware. The
Print or Print Setup dialog box appears.
2. Make sure that your printer is selected and then click Printer, Setup, Properties,
or Options. (You may need to click a combination of these buttons.) The Prop-
erties or Document Properties window appears, and you see the Paper and
Graphics menus (Windows Me/98/95/2000) or the Page Setup and Advanced
menus (Windows NT 4.0). These menus contain the printer driver settings.
3. T o view a menu, click the corresponding tab at the top of the wi ndow.
4. When you finish making your pr inter driver settin gs, click OK to apply th e settings,
or click Restore Defa ults (Windows M e/98/95 /2000) or Cancel (Windows NT)
to return the settings to their previous values.
5. Click OK in the Print or Print Setup dialog box to issue the pr int job .
❚ Printing under Windows 3.1 and NT 3.5x
1. Select Print Setup or Print from the File menu of you r applica tion sof tware. The
Print or Print Setup dialog box appears.
2. Make sure that your printer is selected and then click Printer, Setup, Properties
or Options (You may need to click a combination of these buttons.) The Options
dialog box (Windo w s 3. 1) or the Doc u me nt Prope rties dia lo g box (Windows
NT 3.5x) appears.
3. When you finish making your printer driver setting s, click OK to apply the setting s,
or click Cancel to cancel your changes.
4. Click OK in the Print or Print Setup dialog box to issue the pr int job .
English
Printing
19
Page 20

■ Using the Online Manual
The CD-ROM shipped with your printer includes an online manual in PDF format
(PDF = Portable Document Format ). PD F files can be used on various platfo rm s
(e.g. Windows, Macintosh, Unix etc.) and are electronic manuals with the same layout,
illustrations, tables etc. to be found in a printed manual. You can display the online
manual on your computer screen and print it out on any connected printer, if required.
The following online manual is ava ila bl e:
■ User’s Guide
Contains complete information on the printer’s functions, maintenance, troubleshooting and technical specifications. Read this manual, if you require detailed
information on the LQ-680.
To access the online manual you need to install Adobe®Acrobat®Reader™ on your
system. The Adobe Acrobat Reader program is an easy-to-use application program for
displaying an d pr intin g onlin e ma nua ls. I t of fer s a wide ra nge of fea ture s whic h al low
you to use online manuals without difficulty to find any desired information. You can
read the information online on your computer screen or print it out on your printer for
later reference. If you need complete information on the Adobe Acrobat Reader, refer
to its online help.
If the Acrobat Reader is already installed on your system, you can skip the next section.
Note:
If the Adobe Acrobat Reader is not insta lled on your system, the manual will n ot open
and an error message will be displayed.
❚ Installing the Adobe Acrobat Reader
1. Insert the EPSON printer software CD-ROM into your computer's CD-ROM drive.
Windows Me/98/95/2000/NT 4.0:
The setup program on the CD-ROM will be started a utomatically and displays the
start screen. If the setup p rogram is not started automa tically, click the Start button,
then click Run and enter the command E:\Start.exe to start the setup program.
Note:
If your CD-ROM drive has a drive letter other than E, substitute the a ppropriate
letter.
Windows 3.1x/NT 3.51:
Select Run from the File menu and ent er the command E:\Start.exe to start the
setup program.
Note:
If your CD-ROM drive has a drive letter other than E, substitute the a ppropriate
letter.
2. S elect the preferred language.
20
Using the Online Manual
Page 21

3. Select Online manuals, followed by Install Acrobat Reader and follow the on-
screen instructions.
After the Acrobat Reader has been installed on your system, you can access the online
manual.
❚ Accessing the Online Manual
The setup program on the CD-ROM offers two possibilities to access the online manual:
from the CD-ROM or from your computer hard disk.
Note:
Before you can access an online manual from your hard disk, you first have to install
it on your system.
1. Insert the EPSON printer software CD-ROM into your computer’ s CD-ROM drive.
Windows Me/98/95/2000/NT 4.0:
The setup program on the CD-ROM will be started automatically and d isplays the
start screen. If the setup program is not started automatically, clic k the Start button,
then click Run and enter the command E:\Start.exe to start the setup program.
Note:
If your CD-ROM drive has a drive letter other than E, substitute the appropriate
letter.
Windows 3.1x/NT 3.51:
Click Run on the File menu and enter the command E:\Start.exe to start the setup
program.
Note:
If your CD-ROM drive has a drive letter other than E, substitute the appropriate
letter.
2. Select the preferred language.
3. Select Online manuals. The setup program displays the nam es of the av ail ab l e
online manuals. Select the preferred online manual.
Select manual name - Read if you wish to open the manual from the CD-ROM.
The Acrobat Reader will be started automatically and the online manual opened.
Note:
If you wish to copy the online manual to your system’s hard disk, select manual
name - PC installation. You can delete the manual from the hard disk at a
later date. Follow the instructions on the CD-ROM.
Once the manual has been installed on the hard disk, proceed as follows:
❏ Windows Me/98/95/2 00 0/N T 4.0:
Click the Start button, point to Programs, then point to EPSON. Cl ick on
the name of the online manua l. The Acrobat Reader will be started
automatically and the online manual opened.
English
Using the Online Manual
21
Page 22

❏ Windows 3.1x/NT 3.51:
Open the program group EPSON. Click on the name of the online manual.
The Acrobat Reader will be started automatically and the online manual
opened.
■ Customer Support
EPSON’s Service and Support hotline is availab le should you require urg ent help. You
will find the telephone number and further important information for your country in
the Service and Support brochure provid e d with yo ur prin ter.
22
Customer Support
 Loading...