

Page 1

Stylus Pro 10600 Field Repair Guide 7/29/04
Table of Contents
Table of Contents - - - - - - - - - - - - - - - - - - - - - - - - - - - - - - 1
Control Panel Map - - - - - - - - - - - - - - - - - - - - - - - - - - - - - 3
Air Pressure System (Ink Cartridges) - - - - - - - - - - - - - - - - - - - - 8
Carriage Belt Adjustment - - - - - - - - - - - - - - - - - - - - - - - - - - 10
Carriage Mechanism Replacement - - - - - - - - - - - - - - - - - - - - - 11
Carriage Timing Strip Replacement - - - - - - - - - - - - - - - - - - - - - 39
Communication Errors PC - - - - - - - - - - - - - - - - - - - - - - - - - - 40
Driver Board Replacement - - - - - - - - - - - - - - - - - - - - - - - - - 43
Epson Pro Graphics 24” Test Print Directions - - - - - - - - - - - - - - - - 47
Error Codes - - - - - - - - - - - - - - - - - - - - - - - - - - - - - - - - - 52
Firmware History - - - - - - - - - - - - - - - - - - - - - - - - - - - - - - 57
Firmware: Updating From DOS - - - - - - - - - - - - - - - - - - - - - - - 58
Firmware: Updating From Windows (WinPRN Utility) - - - - - - - - - - - - - 59
Glossary - - - - - - - - - - - - - - - - - - - - - - - - - - - - - - - - - - 61
Image Quality Diagnosis and Repair - - - - - - - - - - - - - - - - - - - - - 67
Ink/Cleaning Cartridges - - - - - - - - - - - - - - - - - - - - - - - - - - - 75
Missing Nozzle Diagnosis and Repair - - - - - - - - - - - - - - - - - - - - 77
New Print Head for DYE Printers - - - - - - - - - - - - - - - - - - - - - - 80
Operational Sequences - - - - - - - - - - - - - - - - - - - - - - - - - - - 81
Paper Feed Belt Tension Adjustment - - - - - - - - - - - - - - - - - - - - 83
Paper Jam Errors - - - - - - - - - - - - - - - - - - - - - - - - - - - - - - 84
Paper Loading Errors (Roll) - - - - - - - - - - - - - - - - - - - - - - - - - 85
Paper Thickness Sensor Actuator Repair - - - - - - - - - - - - - - - - - - 91
Pause, to save Paper (Print Head Alignments) - - - - - - - - - - - - - - - - 92
Print Head Replacement - - - - - - - - - - - - - - - - - - - - - - - - - - 93
Table of Contents Printer Component, Software Item, LCD Display, Printer Button Page 1.
Page 2

Stylus Pro 10600 Field Repair Guide 7/29/04
Print Head Cable Replacement - - - - - - - - - - - - - - - - - - - - - - 103
Sensors, Motors, Fans, Solenoids - - - - - - - - - - - - - - - - - - - - - 105
Starter Cartridge / Ink Information - - - - - - - - - - - - - - - - - - - - - 107
Waste Ink Maintenance (Service Request 00000100) - - - - - - - - - - - 108
What’s New? - - - - - - - - - - - - - - - - - - - - - - - - - - - - - - - 109
Wrong Ink Cartridge Error - - - - - - - - - - - - - - - - - - - - - - - - - 111
Vertical Yellow Lines - - - - - - - - - - - - - - - - - - - - - - - - - - - 113
Revision History - - - - - - - - - - - - - - - - - - - - - - - - - - - - - - 114
Table of Contents Printer Component, Software Item, LCD Display, Printer Button Page 2.
Page 3
Stylus Pro 10600 Field Repair Guide 7/29/04
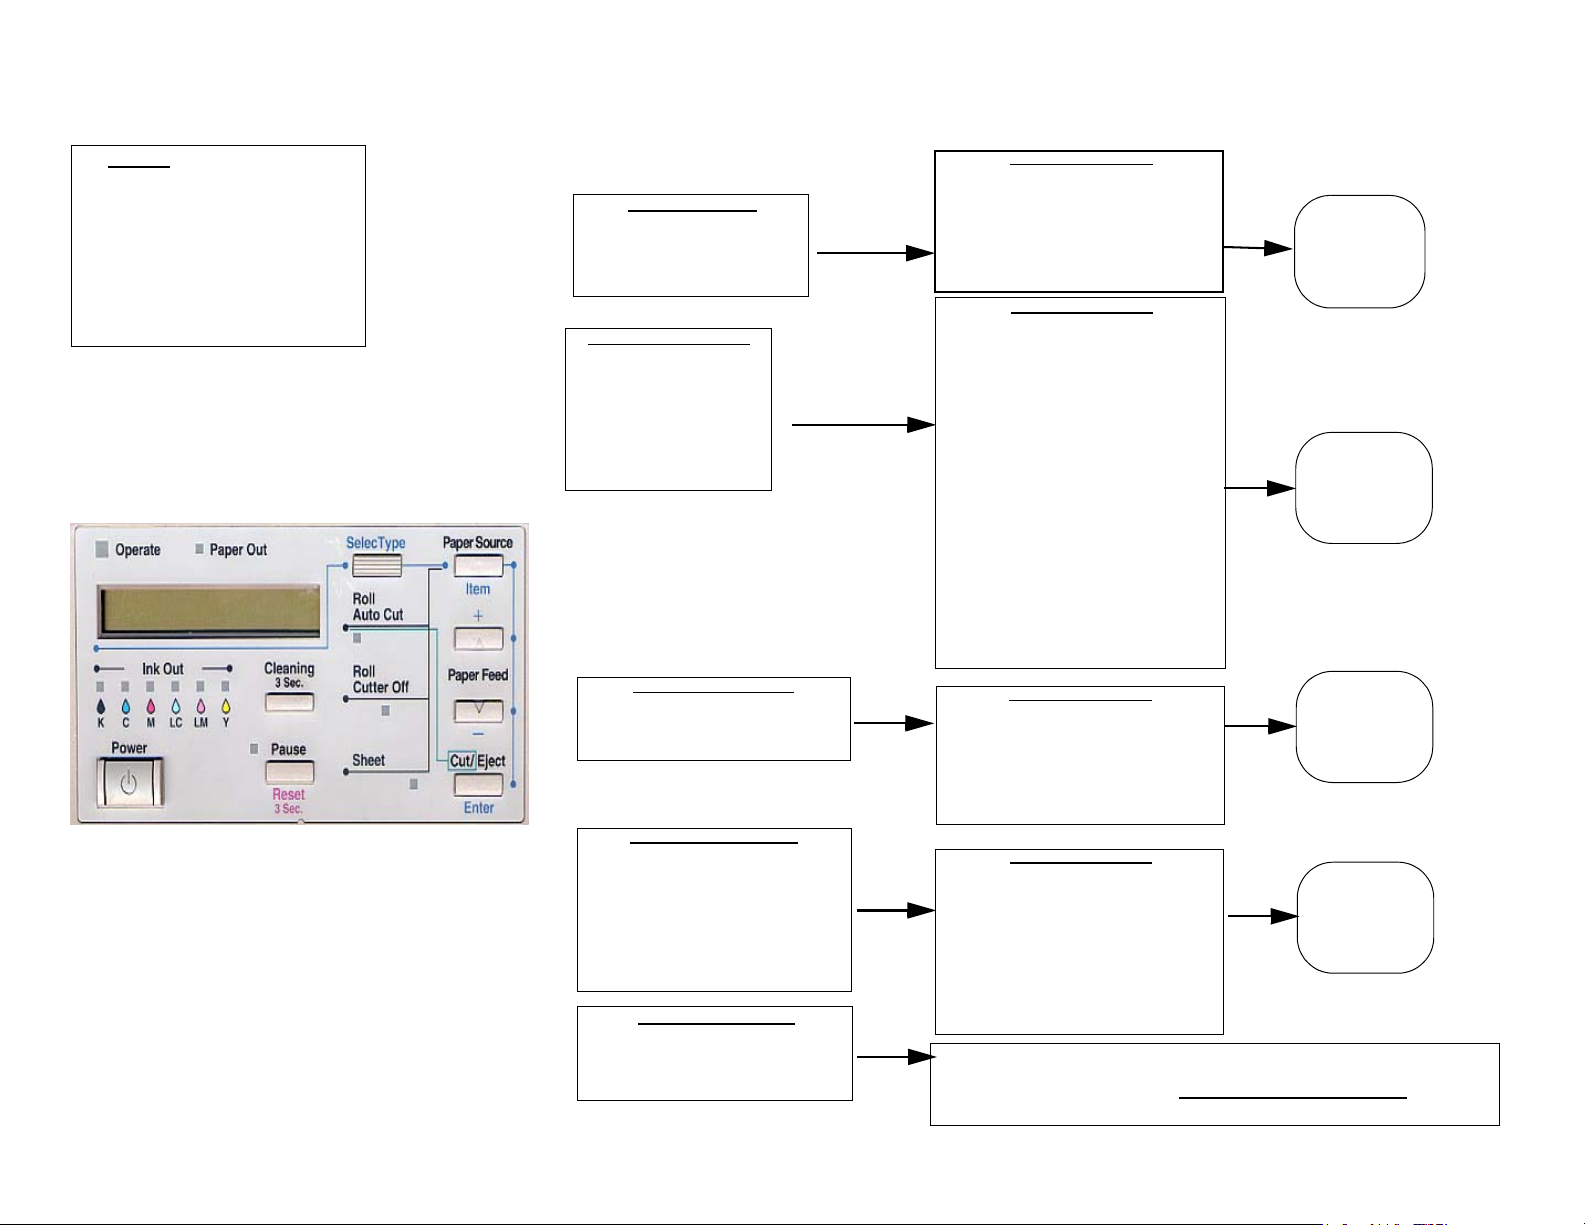
Control Panel Map
NOTE: Although this is a
guideline to navigate through the
Service and User Menus, the
Service Manual, Technical
Bulletins or Users Guide may still
be needed to reference detailed
information on a setting or
adjustment listed.
SelecType Mode:
While printer LCD shows Ready,
pressing the [SelecType] button
will cycle through each menu
selection.
Maintenance Mode 1:
Press [Pause] button while
powering on printer.
Pressing the [Item] button
will cycle through each
menu selection..
1. PRINTER SETTING MENU:
2. TEST PRINT MENU:
3. PRINTER STATUS MENU:
4. PAPER CONFIG MENU:
5. MAINTENANCE MENU:
6. HEAD ALIGNMENT MENU:
1. HEX DUMP MODE:
2. LANGUAGE MODE]
3. UNITS :
4. Parallel I/F
5. IEEE1284.4 MODE:
6. INTERNAL JOB OOUNT:
7. AUTO NOZZLE CHECK MODE]
8.SSCL B/C : -
9.SSCL LC/LM
10.SSCL M/Y:
11. MW7=A
12. MW7 BALANCE MODE:
13. MW1 SELECT MODE:
14. MW2 SELECT MODE:
15. DEFAULT PANEL:
16. CARTRIDGE INFORMATION
17. SN Menu FACTORY USE
Settings Available:
For navigation
and details on
menu items, go
to page 6.
Settings Available:
For navigation
and details on
menu items, go
to page 7.
Maintenance Mode 2:
Press [Paper Source] + [Cut/Eject] +
[Paper Feed -] buttons while
powering on printer.
Self Diagnostic Mode:
Press [Paper Feed+] + [Paper Feed -
] + [Cut/Eject] buttons while powering
on printer.
** While in this mode, pressing the
[Cleaning] button will Auto Cut roll fed
media
Firmware Download:
Press [Paper Source] + [Cut/Eject] +
[Cleaning] buttons while powering on
printer.
1. VIEW COUNTERS MENU:
Settings Available:
2. CLEAR COUNTERS MENU:
3. SERVICE CONFIG MENU:
**All other menus are for factory use**
Settings Available:
1. Check: Test.
2. Check: Adjustment.
3. Check: Cleaning.
4. Check: Print.
5. Check: Parameter.
6. Check: Life.
Use the [Paper Feed-] or [Paper
Feed+] to move up or down the menu.
Once in this mode, the LCD will display F/W Download. At this point send the
IPL Data file (TPxxxx.IPL) to the printer via the copy command from a DOS
prompt using the following syntax: COPY /B Filename.UPG LPT1:
download is complete, the LCD will display F/W Update Complete.
For navigation
and details on
menu items, go
to page 7.
For navigation
and details on
menu items, go
to page 8.
Once the
Control Panel Map Page 3.
Page 4
Stylus Pro 10600 Field Repair Guide 7/29/04
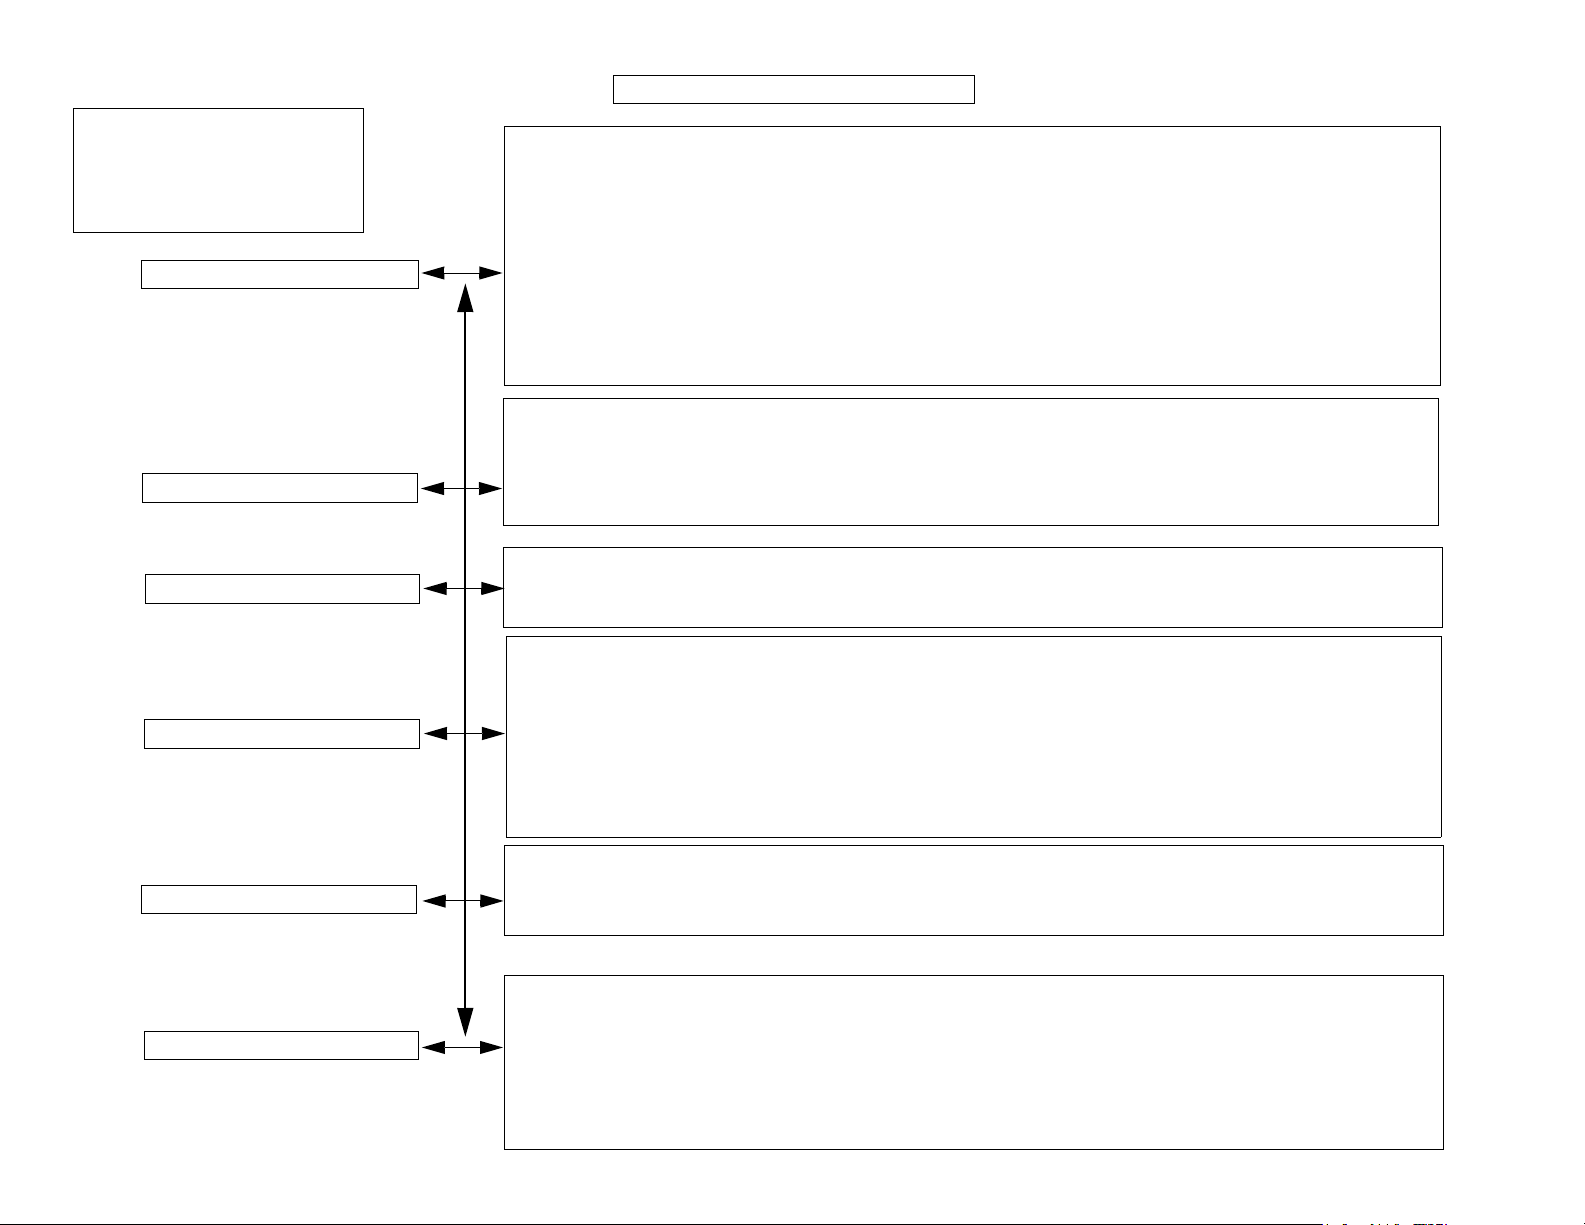
SelecType Menu Options
1. Use the [SelecType] or [Paper
Source] to move up or down the menu.
2. Pressing the [Enter] button will move
you into the sub menu.
3. Pressing the [Pause] button will
move you back one menu item.
1. PRINTER SETTING MENU:
1. [PLATTEN GAP] - *AUTO, WIDE, NARROW,
2. [PAGE LINE] - *ON, OFF
3. [INTERFACE] - *AUTO, PARALLEL, USB, OPTION1, OPTION2
4. [CODE PAGE] - *PC437, PC850
5. [ROLL MARGIN] - *T/B 15MM, 3MM, 15MM
6. [PAPER SIZE CHK] - *ON, OFF
7. [PAPER ALIGN CHK] - *ON, OFF
8. [INIT. SETUP] - Exec. (This will reset the Printer Setup options to default values)
* DENOTES Default Values
Use [Paper Feed +] or [Paper Feed -] to change a value. Use [Cut/Eject] to confirm, save or execute the item.
1. [NOZZLE CHECK] - Print, press [Cut/Eject] to execute.
2. [STATUS CHECK] - Print, press [Cut/Eject] to execute.
3. [JOB INFO] - Print, press [Cut/Eject] to execute.
2. TEST PRINT MENU:
3. PRINTER STATUS MENU:
4. PAPER CONFIG MENU:
5. MAINTENANCE MENU:
6. HEAD ALIGNMENT MENU:
Use [Paper Feed +] or [Paper Feed -] to change a value. Use [Cut/Eject] to confirm, save or execute the item.
This menu allows you to view all the Status Check items on the LCD display without printing the Status Check page from the Test
Print menu.
Use [Paper Feed +] or [Paper Feed -] to move up or down the menu.
1. [Paper Number] - *Standard (range is 1-10)
2. [Cut Pressure] - *100% (range is 0% - 150%)
3. [Cut Method] - *3 Step, 4 Step
4. [Ppr Feed Adj.] - *0.00% (range is -1.00% - +1.00%)
5. [Drying Time] - *0.0sec. (range is 0.0sec. - 10.0sec.)
6. [Suction] - *Normal,Weak, Weakest
7. [Print Adj.] - *5 (range is 1-9)
** DENOTES Default Values
Use [Paper Feed +] or [Paper Feed -] to change a value. Use [Cut/Eject] to confirm, save or execute the item.
1. [BLACK INK CHANGE] - EXEC. press [Cut/Eject] to execute. (Executes the mode to change black ink).
2. [CUT REPLACE] - EXEC. press [Cut/Eject] to execute. (Executes the cutter replacement process).
Use [Cut/Eject] to confirm, save or execute the item.
1. [PAPER THICK.] - STD, XMM (where X= 0MM - 1.6MM)
1a. Once the thickness has been set, you can choose the head alignment pattern you want to perform. The options are:
a) Bi D ALL
b) BI-D LC
c) UNI-D
Use [Paper Feed +] or [Paper Feed -] to change a value. Use [Cut/Eject] to confirm, save or execute the item.
Control Panel Map Page 4.
Page 5

Stylus Pro 10600 Field Repair Guide 7/29/04
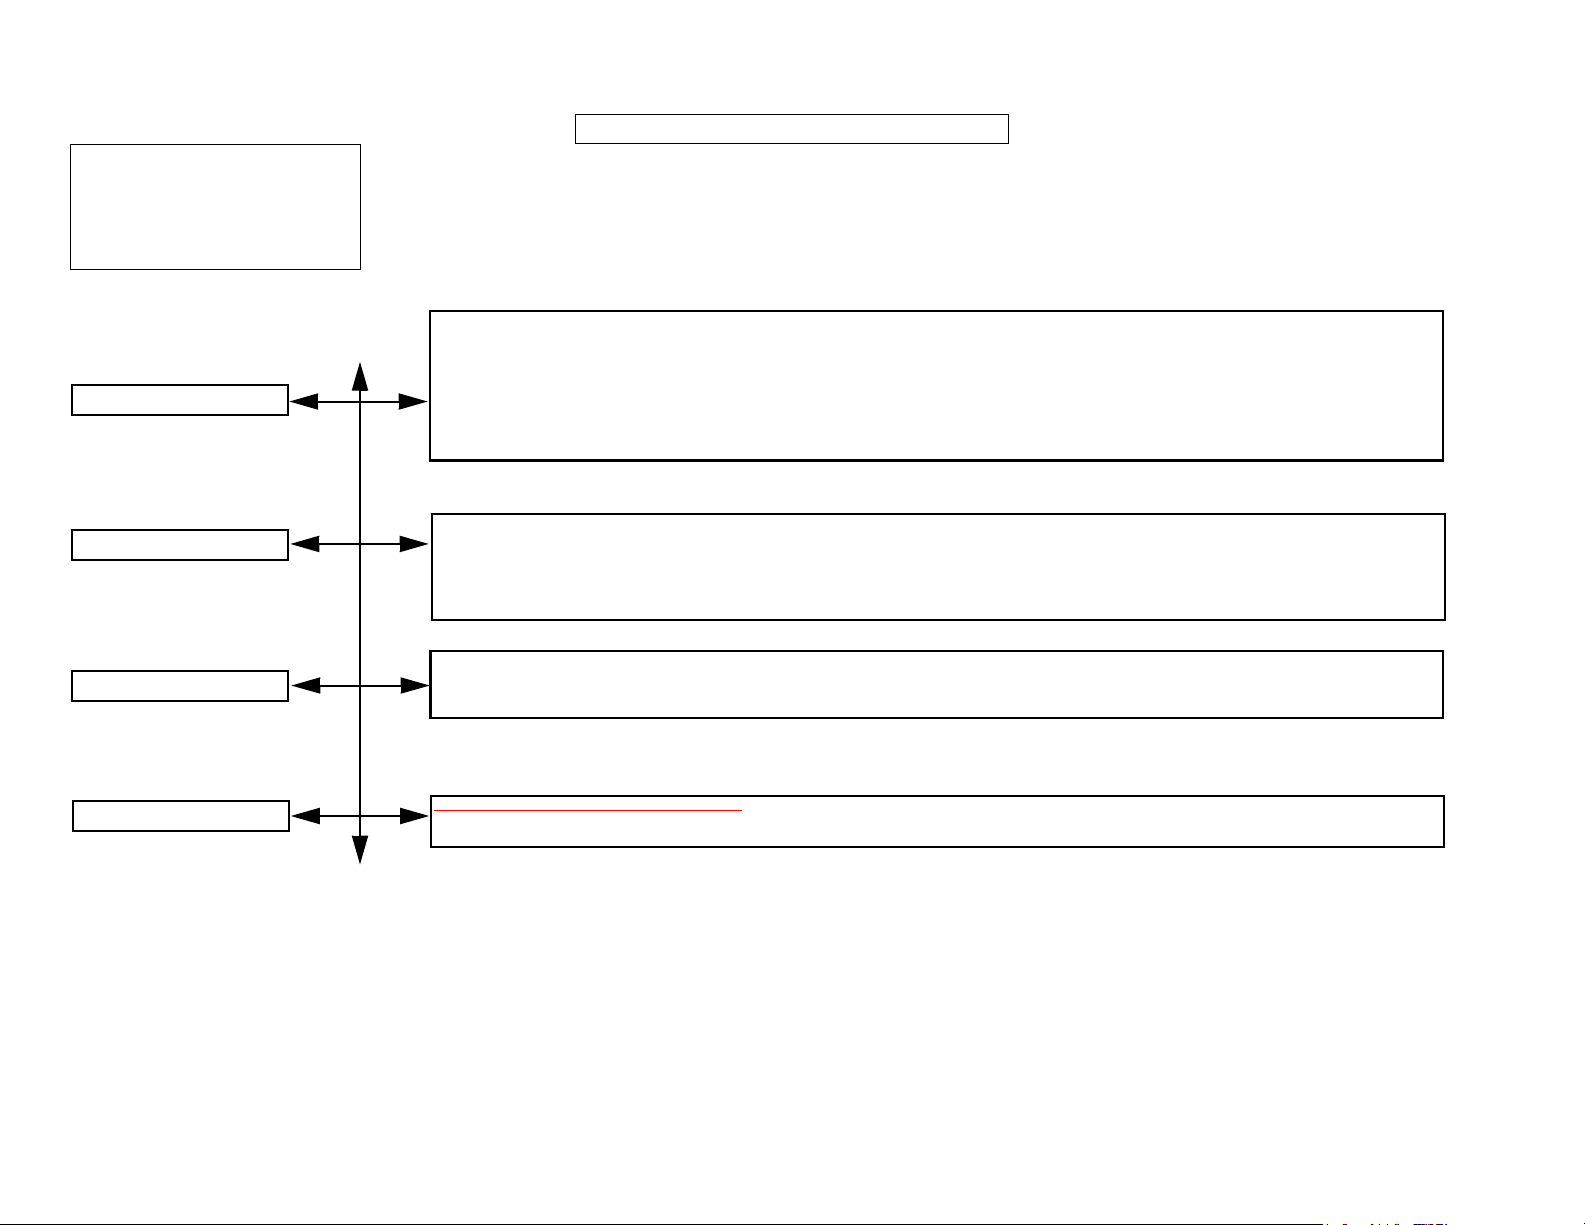
Maintenance Mode 1 Options
1. Use the [Paper Source] to move
down the menu.
2. Pressing the [Enter] button will move
you into the sub menu.
3. Pressing the [Pause] button will
move you back one menu item.
1. Use the [SelecType] to move down
the menu.
2. Pressing the [Paper Source] button
will move you into the sub menu.
3. Pressing the [SelecType] button will
move you back one menu item.
1. HEX DUMP MODE: - Prints data in Hexadecimal format for troubleshooting control codes.
2. LANGUAGE MODE: - Determines the language used for the LCD Display. [English, Potuguese, Spanish, German, Italian, French]
3. UNITS : - Set to Metric of Inches/Feet
4. Parallel I/F: - Sets the parallel interface mode. [Compatible or ECP]
5. IEEE1284.4 MODE: - [On or Off]
6. INTERNAL JOB OOUNT: - [On or Off]
7. AUTO NOZZLE CHECK MODE: - [On or Off]
8.SSCL B/C : - Super Strong Cleaning for Black/Cyan
9.SSCL LC/LM : - Super Strong Cleaning for Light Cyan / Light Magenta
10.SSCL M/Y: - Super Strong Cleaning for Magenta/Yellow
11. MW7=A - . Range is A thru C.
12. MW7 BALANCE MODE: - Adjust MW7 feeding in mode B when printing. [-30 to +30]
13. MW1 SELECT MODE: - Used to set the M/W value [1 to 10] 720 mode
14. MW2 SELECT MODE: - Used to set the M/W value [1 to 7] 1440 mode
15. DEFAULT PANEL: - Used to reset the panel to default settings
16. CARTRIDGE INFORMATION MENU: - Gives details about ink cartridges (type and usage).
17. SN Menu - For Factory Use only.
Paper Feed] + or [Paper Feed -] to change value. Use [Cut/Eject] to Confirm, Save or Execute the item/value.
Maintenance Mode 2 Options
1. View Counters Menu
2. Clear Counters
3. Service Config.
4. FACTORY USE ONLY!
While in this menu option, you are capable of viewing all the counter information for the following components:
Cutter, Cutter Total, Total Pages, Waste Ink A/B, CR Motor, CR Motor Total, PF Motor, Head K, Head C, Head M, Head LC, Head LM,
Head Y, Cleaner.
While in this menu option, you are capable of initializing the following items:
RTC, Cutter, CR Motor, CR Total, PF Motor, Head, Cleaner, Total Pages, Ink, Waste Ink Tank, Flushing Box, NVRAM, All.
1 - 6 . TABLES XX1 to XX5, XXS. - Used to set the paper feed adjustment mode for tables 1 through 5.
7. NZL_AY: - [0 to 45
8. NZL_HC2: - [0 to 45
9. NZL_HCD: - [0 to 45
10. NZL_PPI: - [0 to 45
11. [NPD] - 1 (Pigment), 2 (Dye), *3 (UltraChrome),0 (Neutral).
12.ED Mode - *X (all CSIC info is read), O (all CSIC info is read except market), N (no CSIC info is read)
13. FLBL DET: - [ON or OFF]
The following menus are for factory use: - P3 DUMP, MENU E, MENU R, MENU S, MENU C, MENU A, MENU B, MENU P, MENU M, MENU
O, MENU F, MENU N, MENU X,
Control Panel Map Page 5.
Page 6

Stylus Pro 10600 Field Repair Guide 7/29/04
Self Diagnostic Mode Options
1. Use the [SelecType] or [Paper
Source] to move up or down the menu.
2. Pressing the [Enter] button will move
you into the sub menu.
3. Pressing the [Pause] button will
move you back one menu item.
1. Check: Test
2. Check: Adjustment
1. [Version] - (Checks firmware version, dip sw. settings and control panel & main board versions.
2. [Panel] - (Checks control panel buttons, LCD display and LED indicators.
3. [Sensor] - (Checks all optical and physical switches - On/Off, Open/Close)
4. [Encoder] - (Checks CR and PF motor encoders)
5. [Fan] - (Checks fans - On/Off)
6. [Elec.] - (Checks maintenance record and fatal error history)
7. [D/A Revision.] - (Factory Use Only - head voltage correction)
8. [Head Signal] - (Factory Use Only - head pulse check)
9. [CSIC] - Checks the CSIC information for the ink cartridges and maintenance tank
10. [Actuator] - Checks the cutter actuator
11. [Actuator 2] - Checks the cutter solenoid and pump motor
When in the sub menu of each item, pressing the [Pause] button will back up one menu.
1. [Check Skew] - Checks for paper skew.
2. [Input Rank]: - Allows you to input the Head Rank.
3. [Check Nozzle]: - Prints a detailed nozzle check, horizontal and vertical pattern.
4. [Adj:Offset Adj.]: - Calibrates the laser system used in nozzle detection.
5. [Adj:Det. Res.]: - Tests and prints the results of the nozzle detection system.
6. [Cut Adj.]: - Allows adjustment of cutter pressure.
7. [Adj:A13 Slant]: -Head Angular magenta against black .
8. [Adj:A123 Slant]: - Head linear test.
9. [Adj: B123 Slant]: - Head linear test.
10. [Bi-D]: - Prints a pattern to allow for adjustment for Bi-D (Double Weight Matte, VSD1).
11. [Head LR Adj.]: - Prints a pattern to allow for adjustment of the Head Gap (Head LR).
12. [Copy Param.]: - Copies parameters to backup area of NVRAM.
13. [Bi-D2]: - Prints a pattern to allow for adjustment for Bi-D2 (Photo Glossy Paper, VSD2).
14. [Feed Adj. T&B]: - Prints a pattern and allows adjustment for 1000mm feed length.
15. [Adj: Top & Bottom]: - Prints a pattern to allow adjustment for top and bottom margin.
16. [Adj: Rear Sensor Pos.] - Allows for adjustment of the rear sensor.
17. [Test Print] - Prints pattern of all adjustment variables.
18. [Clean Head] - Performs ink drain function. This process should only be done during refurbishment of product.
19. [Counter Clear] - Clears ink flag counter to 0.
When in the sub menu of each item, pressing the [Pause] button will back up one menu.
3. Check: Cleaning
4. Check: Print
5: Check: Parameter
6. Check: Life
Go to Page 9
Control Panel Map Page 6.
Page 7
Stylus Pro 10600 Field Repair Guide 7/29/04
Self Diagnostic Mode Options, cont.
1. Use the [SelecType] or [Paper
Source] to move up or down the menu.
2. Pressing the [Enter] button will move
you into the sub menu.
3. Pressing the [Pause] button will
move you back one menu item.
1. [KK0] - Normal Cleaning Cycle is performed, volume of ink cleared = Low.
2. [KK1] - Strong Cleaning Cycle is performed, volume of ink cleared = Med./Rubbing = Off.
3. [KK2] - Strong Cleaning Cycle is performed, volume of ink cleared = High/Rubbing = On.
3. Check: Cleaning
4. [Mnt. K/C]: -
5. [Mnt. LC/LM]: -
6. [Mnt. M/Y]: -
4. [Init. Fill] - Perfoms initial fill cycle.
4. Check: Print
5. Check: Parameter
6. Check: Life
1. [Check Ptn] - Prints out the current adjustment patterns.
2. [Adj. Variables] - Prints out the adjustment variables. Also lists feed length, firmware, error information.
3. [Check Ptn V1] - Prints out the current adjustment patterns for Variable Shot 1.
4. [Check Ptn V2] - Prints out the current adjustment patterns.for Variable Shot 2
1. [Initialize] - Initializes specific or all parameter items. Refer to the service manual for list.
2. [Update] - Allows you to update certain parameter items. Refer to the service manual for list.
3. [Display] - Displays parameter items. Refer to service manual for list
THIS MENU IS FOR FACTORY USE ONLY. This menu tests the operation of printer components and should not be performed during field ser-
vice.
Control Panel Map Page 7.
Page 8
Stylus Pro 10600 Field Repair Guide 7/29/04
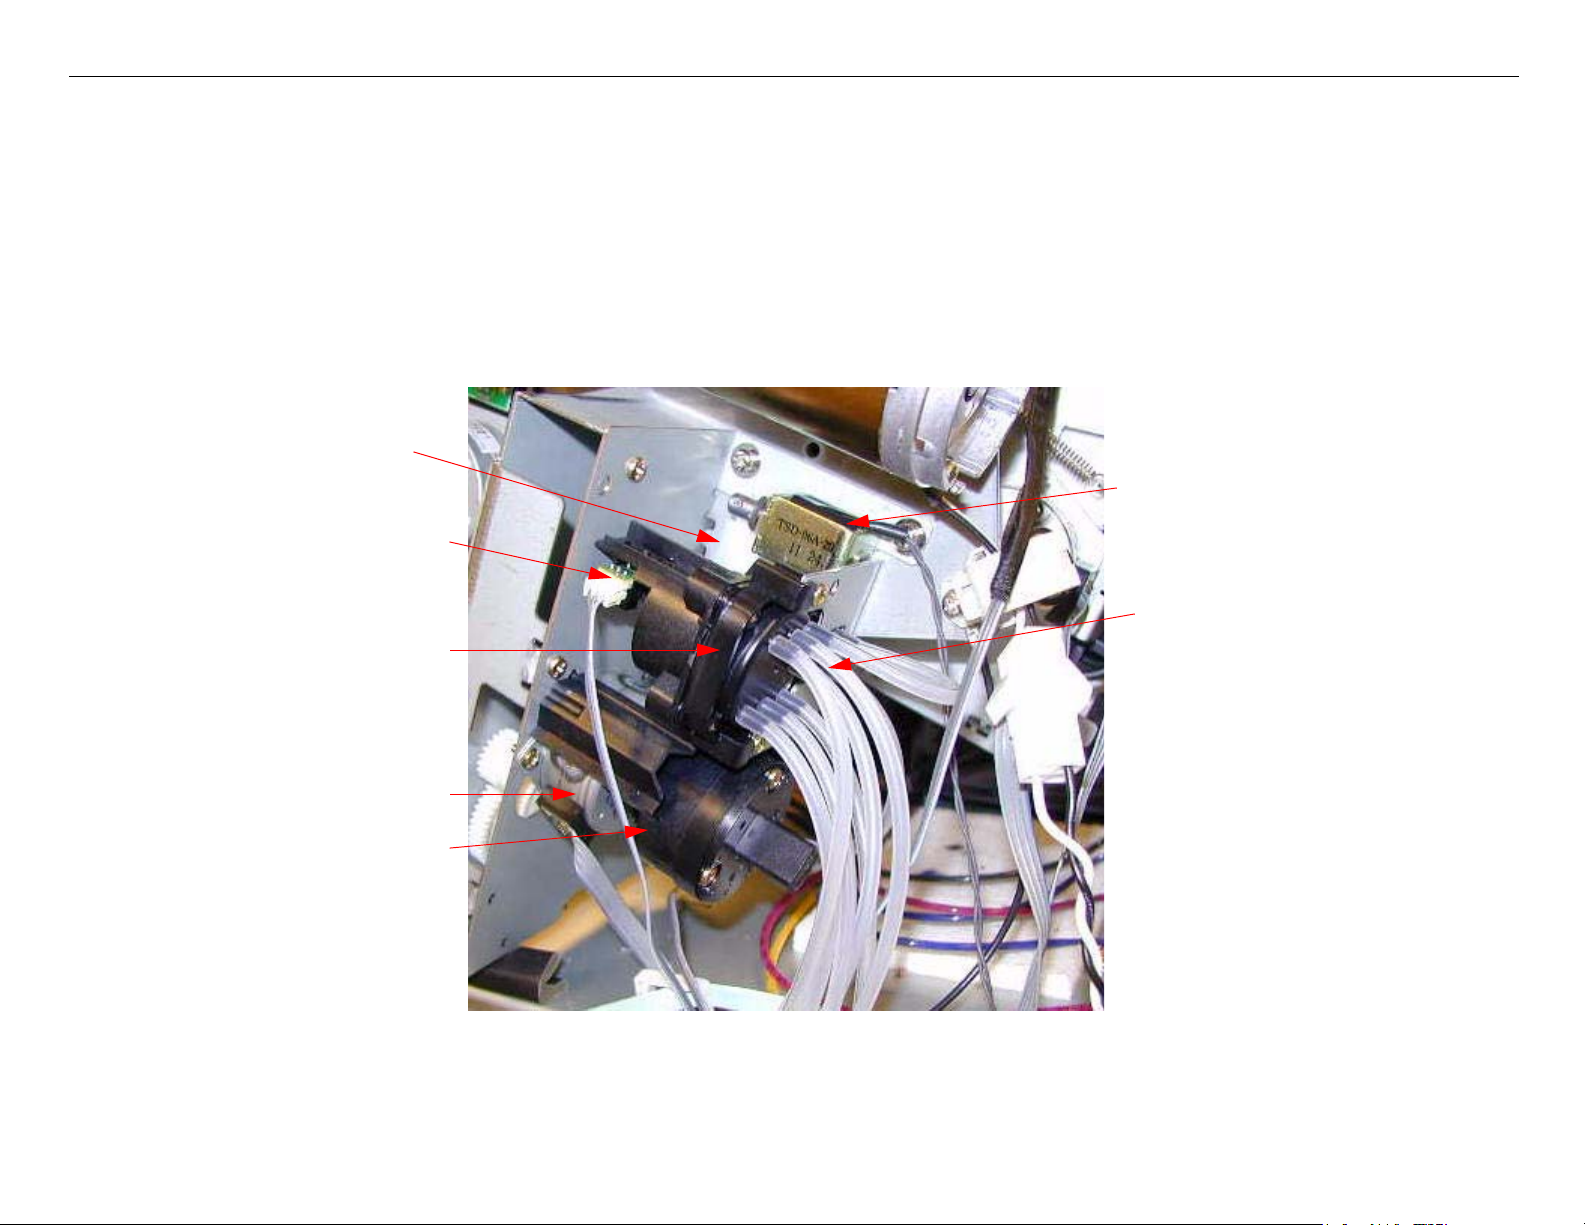
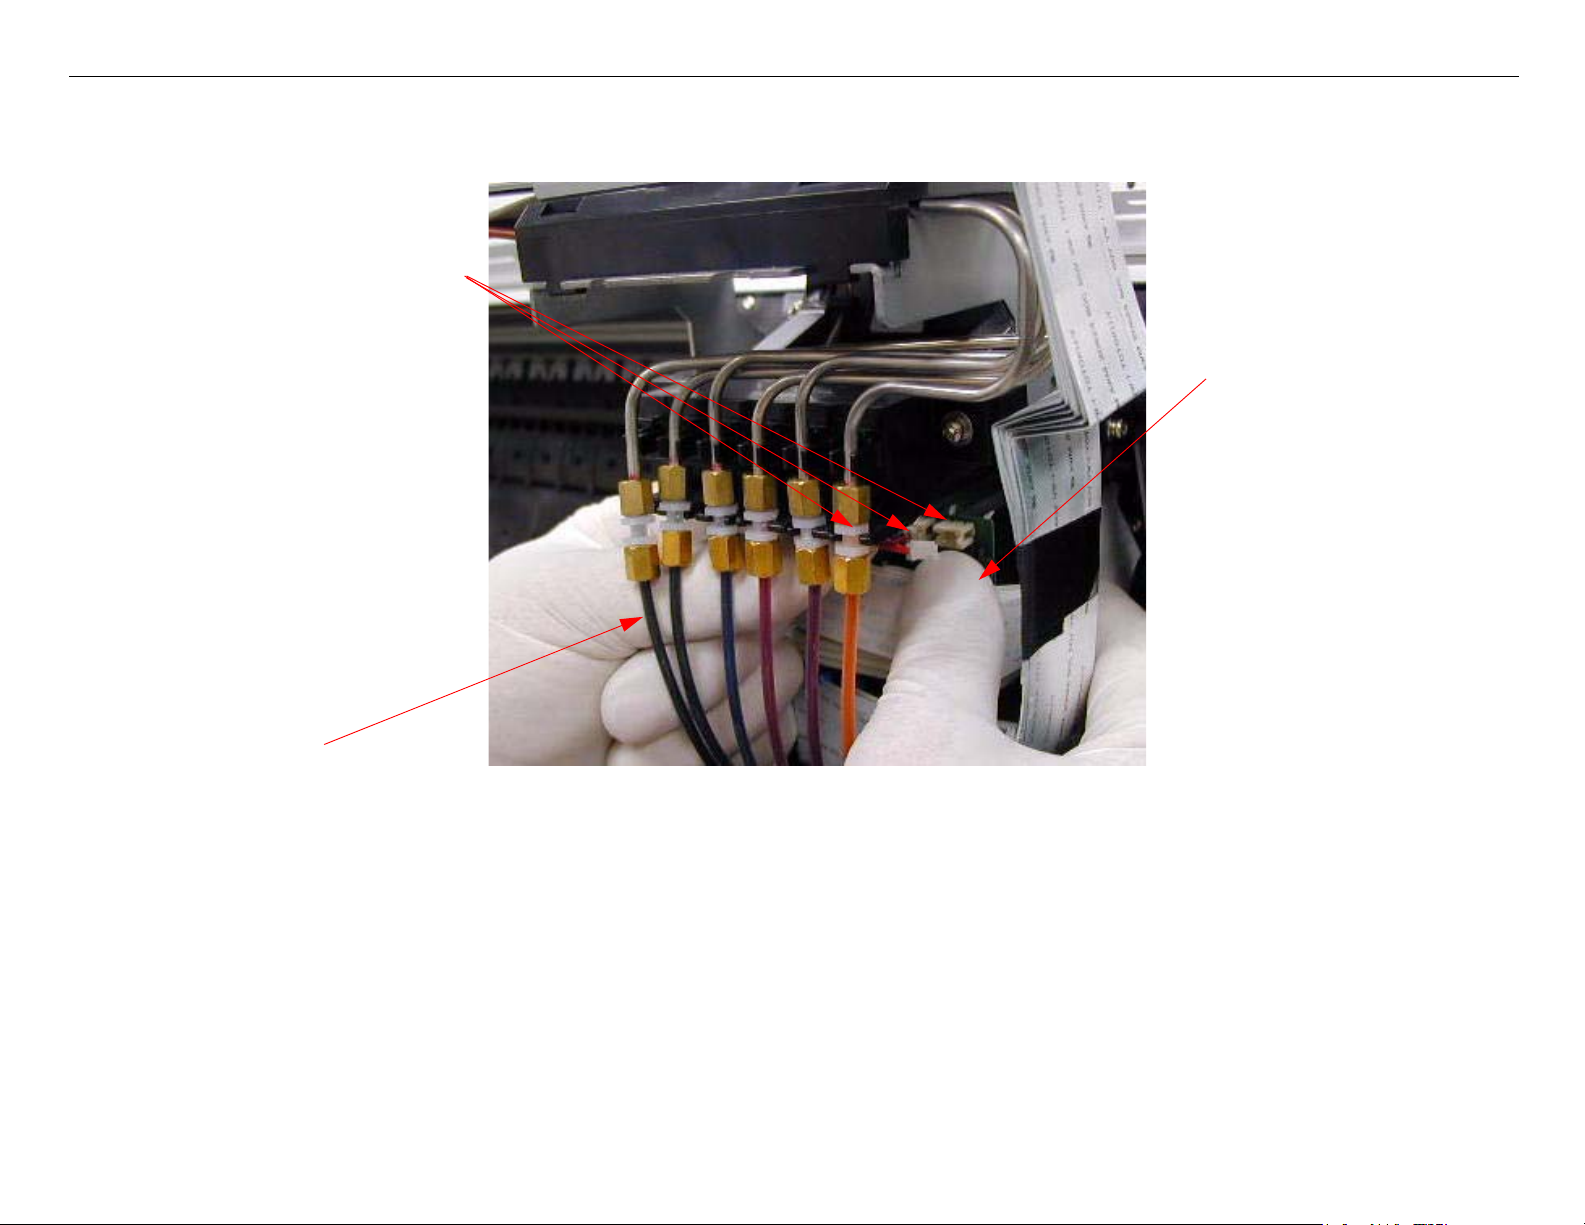
Air Pressure System (Ink Cartridges)
Purpose:
The air pressure system for the Ink Cartridges inflates the Ink Cartridges to 1.1 atmospheres to pump ink from the
Cartridges to the Print Head Sub Tanks.
Components:
Air Pressure Release
Valve
Air Pressure Sensor
Air Pressure Distributor
Air Pump Motor
Air Pump
Air Pressure
Release Solenoid
Hoses
Ink Cartridges (not
shown, but part of the
system)
Air Pressure System (Ink Cartridges) Printer Component, Software Item, LCD Display, Printer Button Page 8.
Page 9
Stylus Pro 10600 Field Repair Guide 7/29/04
Operation:
1. When the Printer is turned on, the Air Pressure Release Solenoid energizes, closing the Air
Pressure Release Valve, sealing the system.
2. The Air Pump Motor runs the Air Pump until the air pressure in the entire system is high enough
to activate the Air Pressure Sensor.
3. Any time that the air pressure in the system drops below 1.1 atmospheres, the Pump Motor runs
until the air pressure is back to the proper level.
4. The Air Pressure Release Solenoid opens the Air Pressure Valve when the Ink Cartridge Bay
Door is opened, or the Printer is turned off, depressurizing the system.
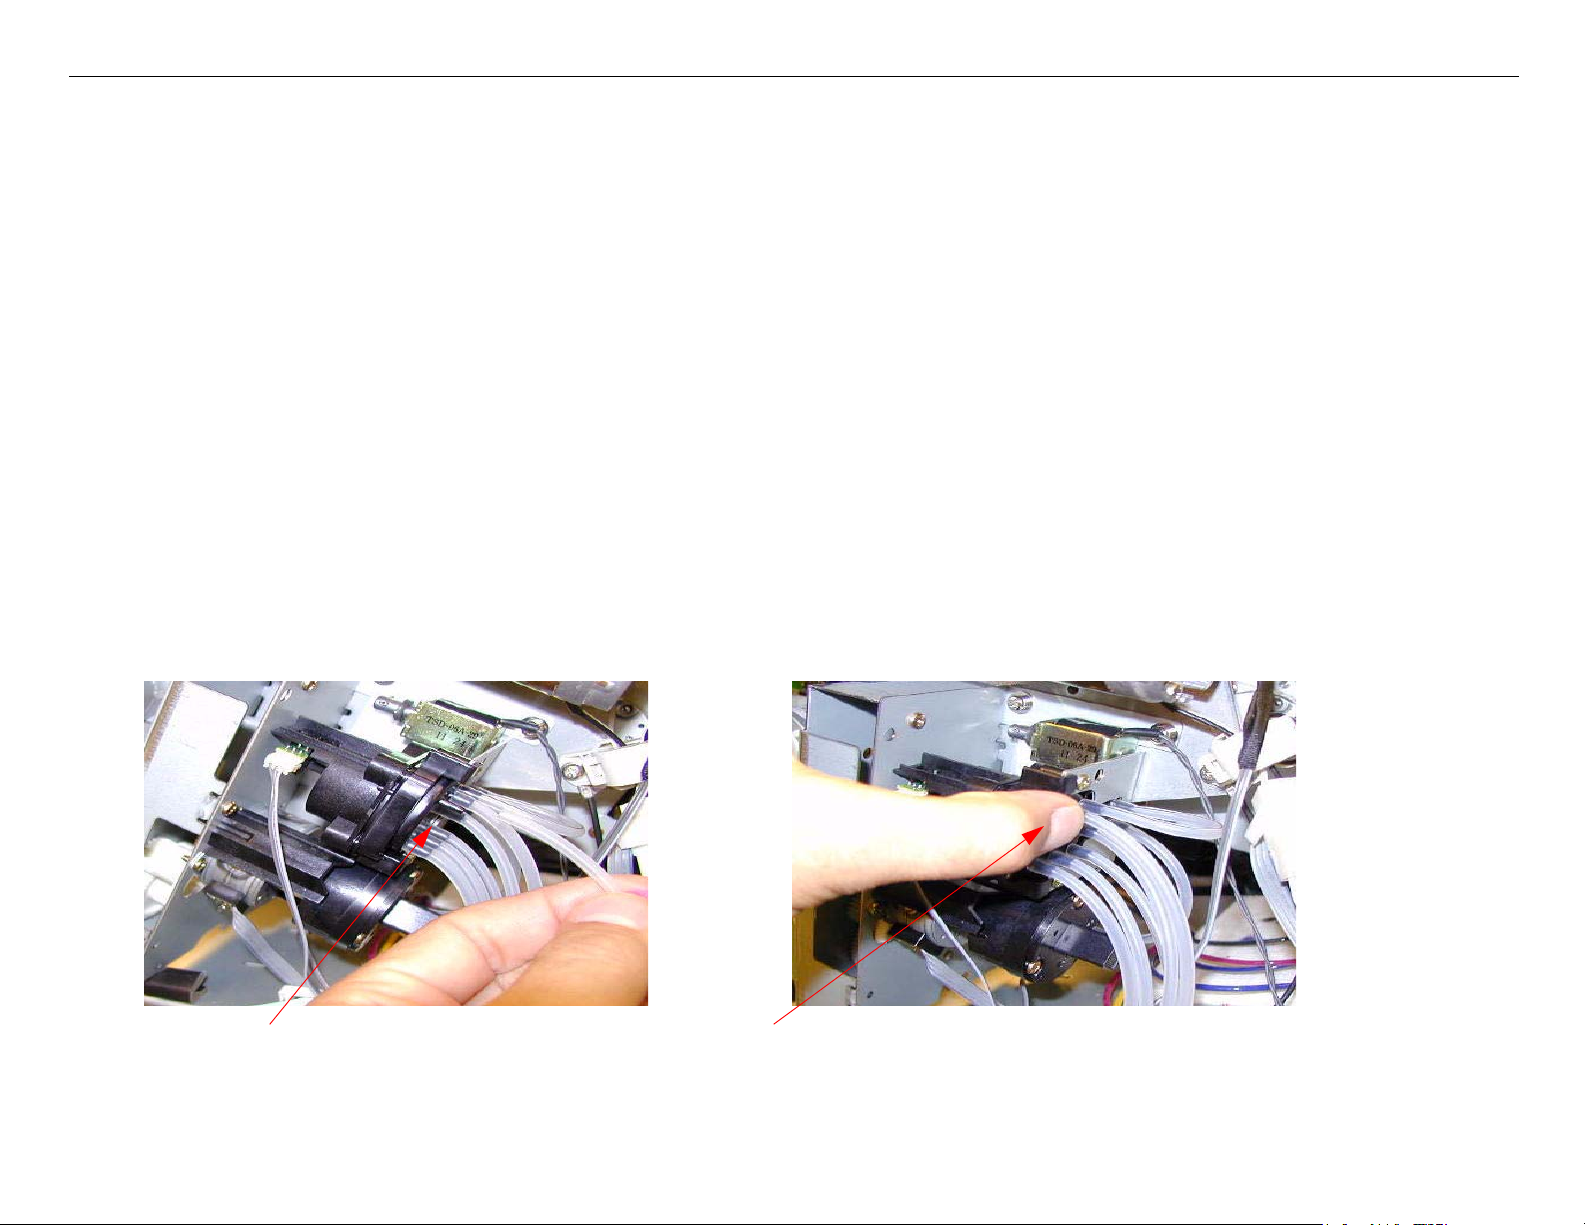
Troubleshooting:
Determine where the leak in the system exists.
1. Remove one of the Hoses running
to the Ink Cartridges.
The cartridge connected to the tube that corresponds to the leaking tube is the most likely cause of the leak.
Air Pressure System (Ink Cartridges) Printer Component, Software Item, LCD Display, Printer Button Page 9.
2. Cover the outlet with a finger,
and see if the system presurizes.
3. Repeat until the leak is found
Page 10
Stylus Pro 10600 Field Repair Guide 7/29/04
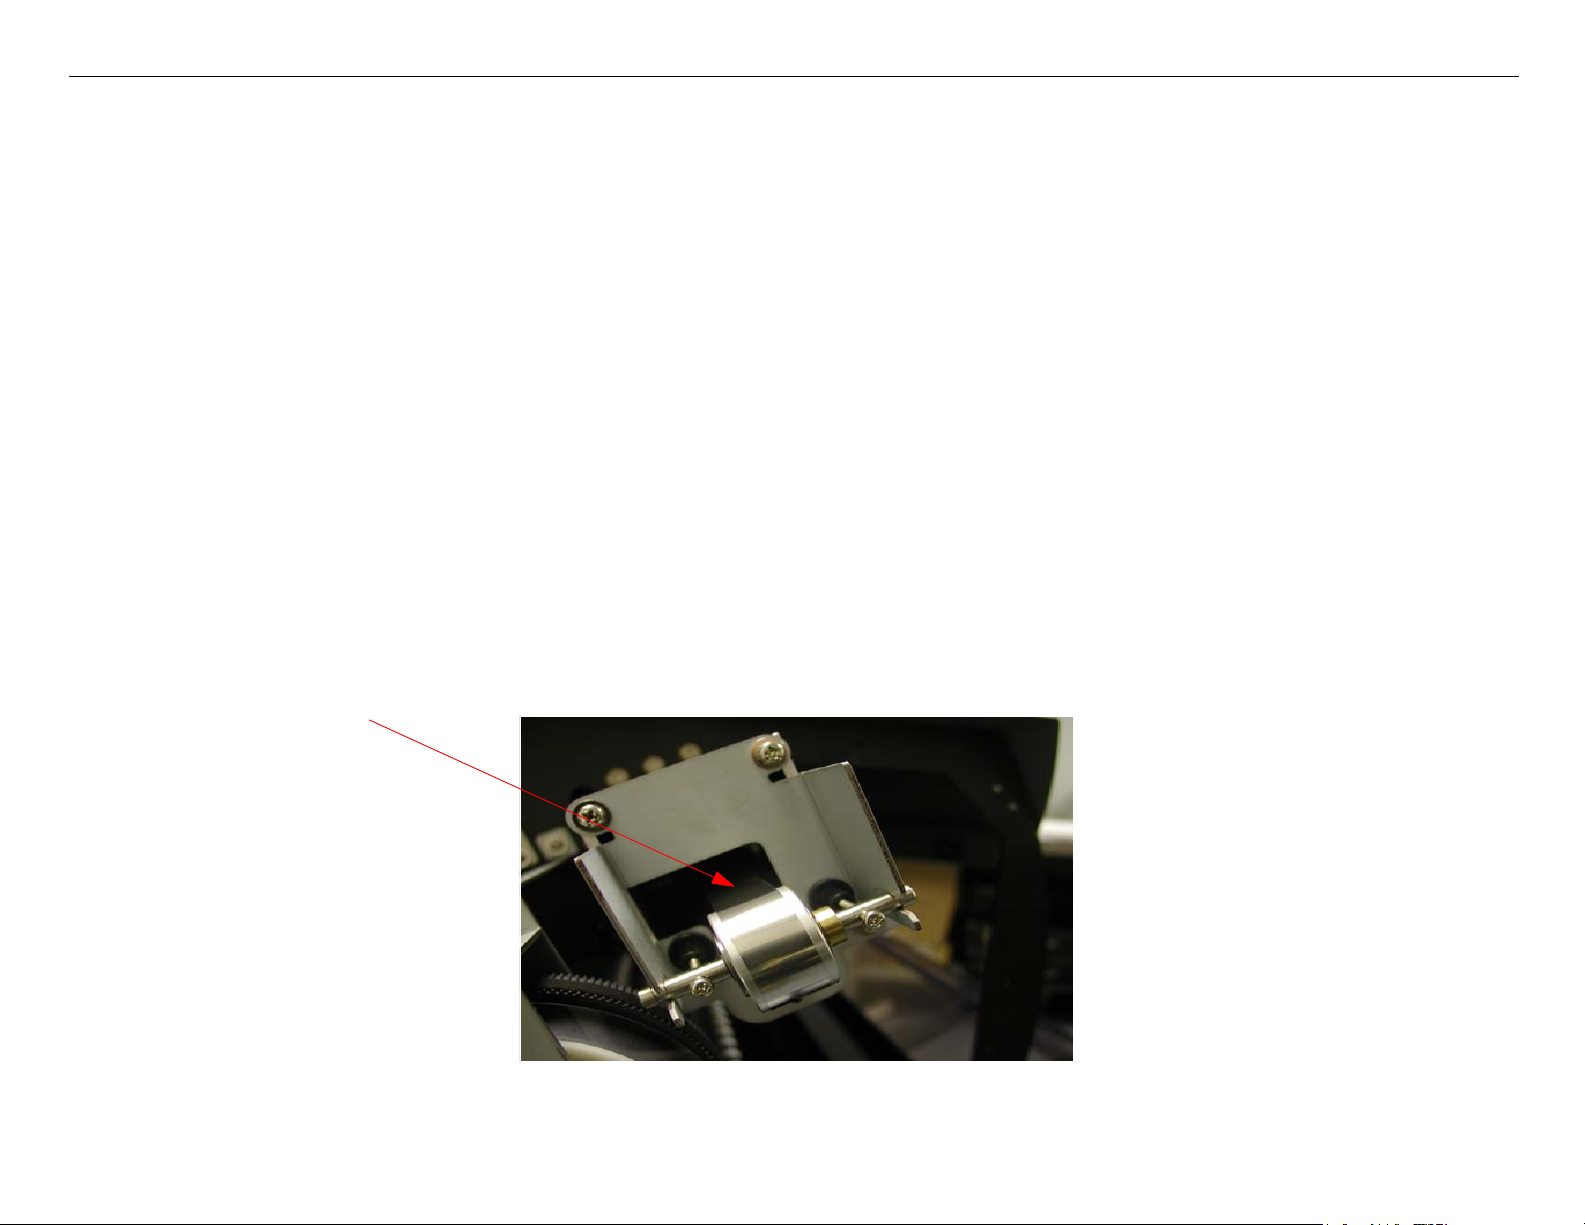
Carriage Belt Adjustment
The following instructions are for the purpose of performing the belt tension adjustment when the 300g
Tension Gauge is not available. Recommended tension is 100g.
1. Remove the Left Side cover. (6 Screws)
2. If replacing or removing the belt, place a mark on the current position of the adjustment screws.
3. Tighten or loosen the screws evenly to increase or decrease the belt tension.
3.1 The belt should be in the center of the pulley and remain in the center when moving the CR assembly left to
right the distance of the mechanism.
4. Check the belt tension by pressing on the belt at the side frame in the area indicated.
4.1 The belt will flex approximately 1/8" before tension is felt.
Press Here
NOTE: If the CR Timing belt tension is to loose, you may encounter carriage errors. A slight vibration may occur
on the far left side of the mechanism, tighten belt until vibration is eliminated.
Carriage Belt Adjustment Printer Component, Software Item, LCD Display, Printer Button Page 10.
Page 11
Stylus Pro 10600 Field Repair Guide 7/29/04
Carriage Mechanism Replacement
New Carriage Part # : CR ASSY 1277733
1. Unplug the Printer.
2. Remove the Control Panel.
3. Remove the Top Cover.
4. Remove the Left Side Cover.
5. Remove the Right Side Cover.
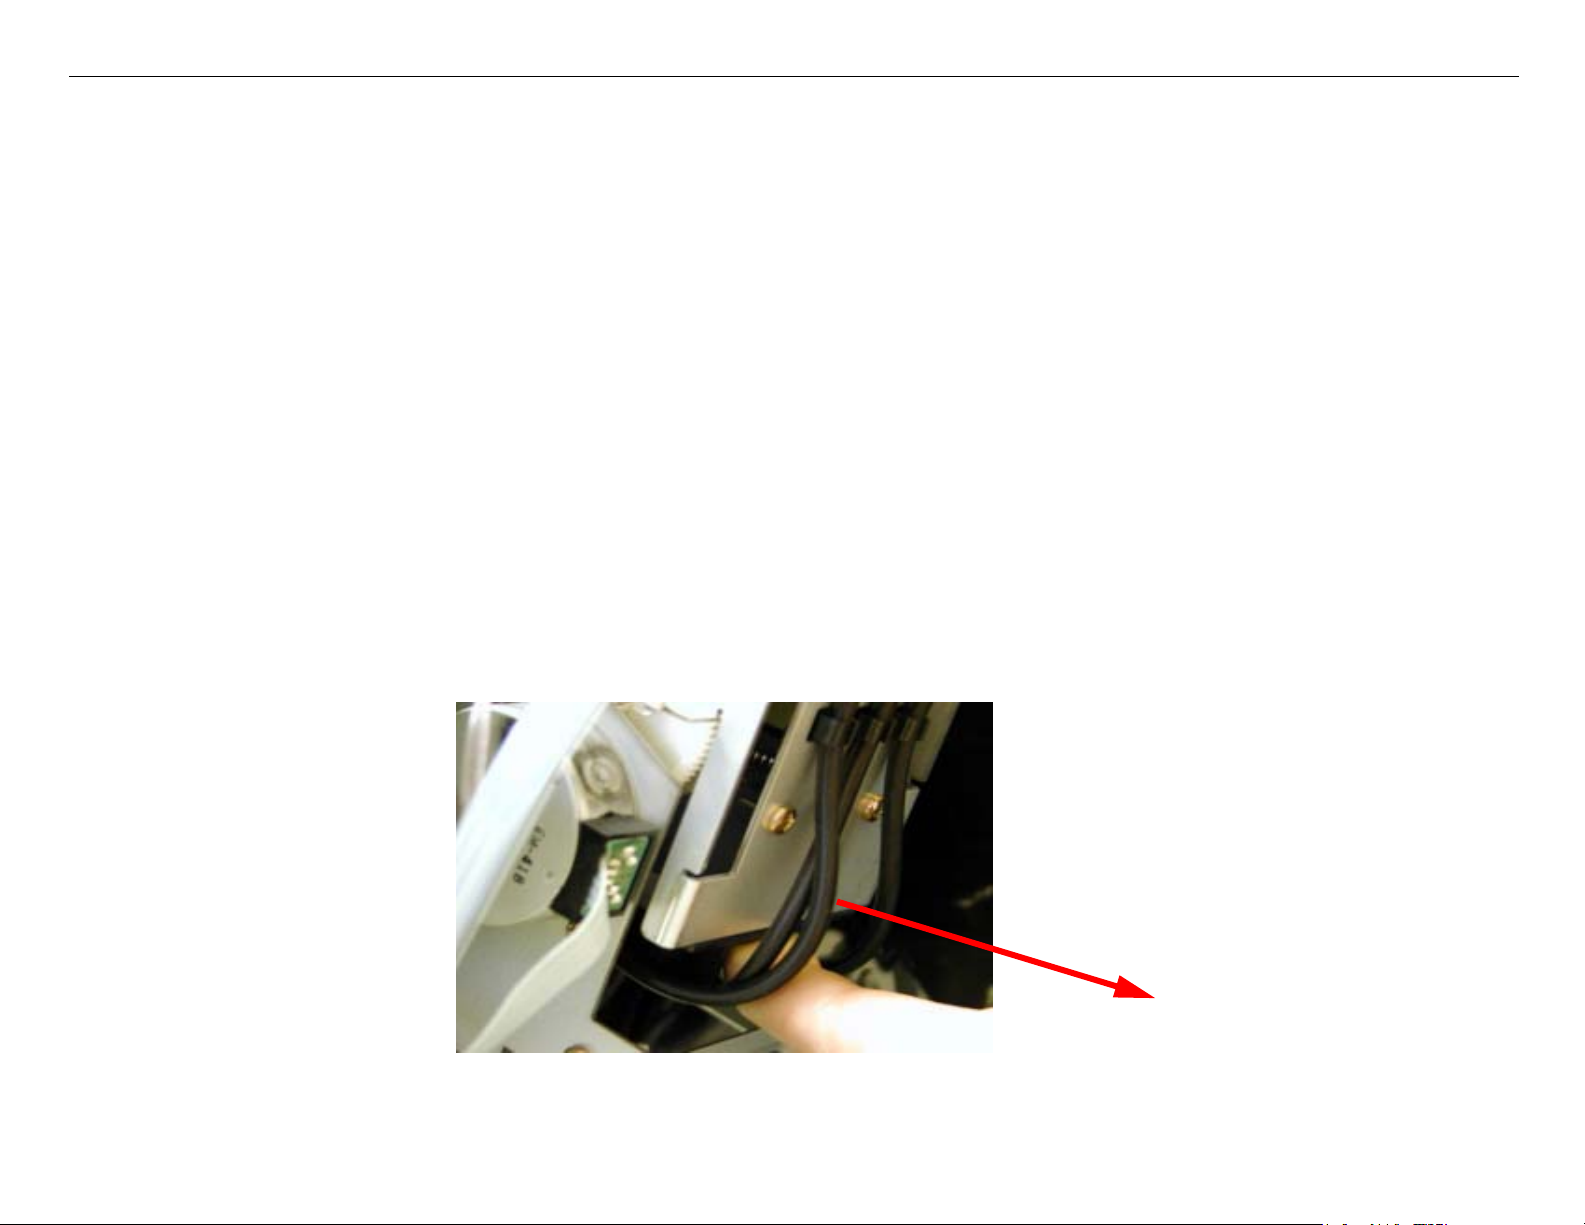
6. Place a drop cloth under the center of the Printer.
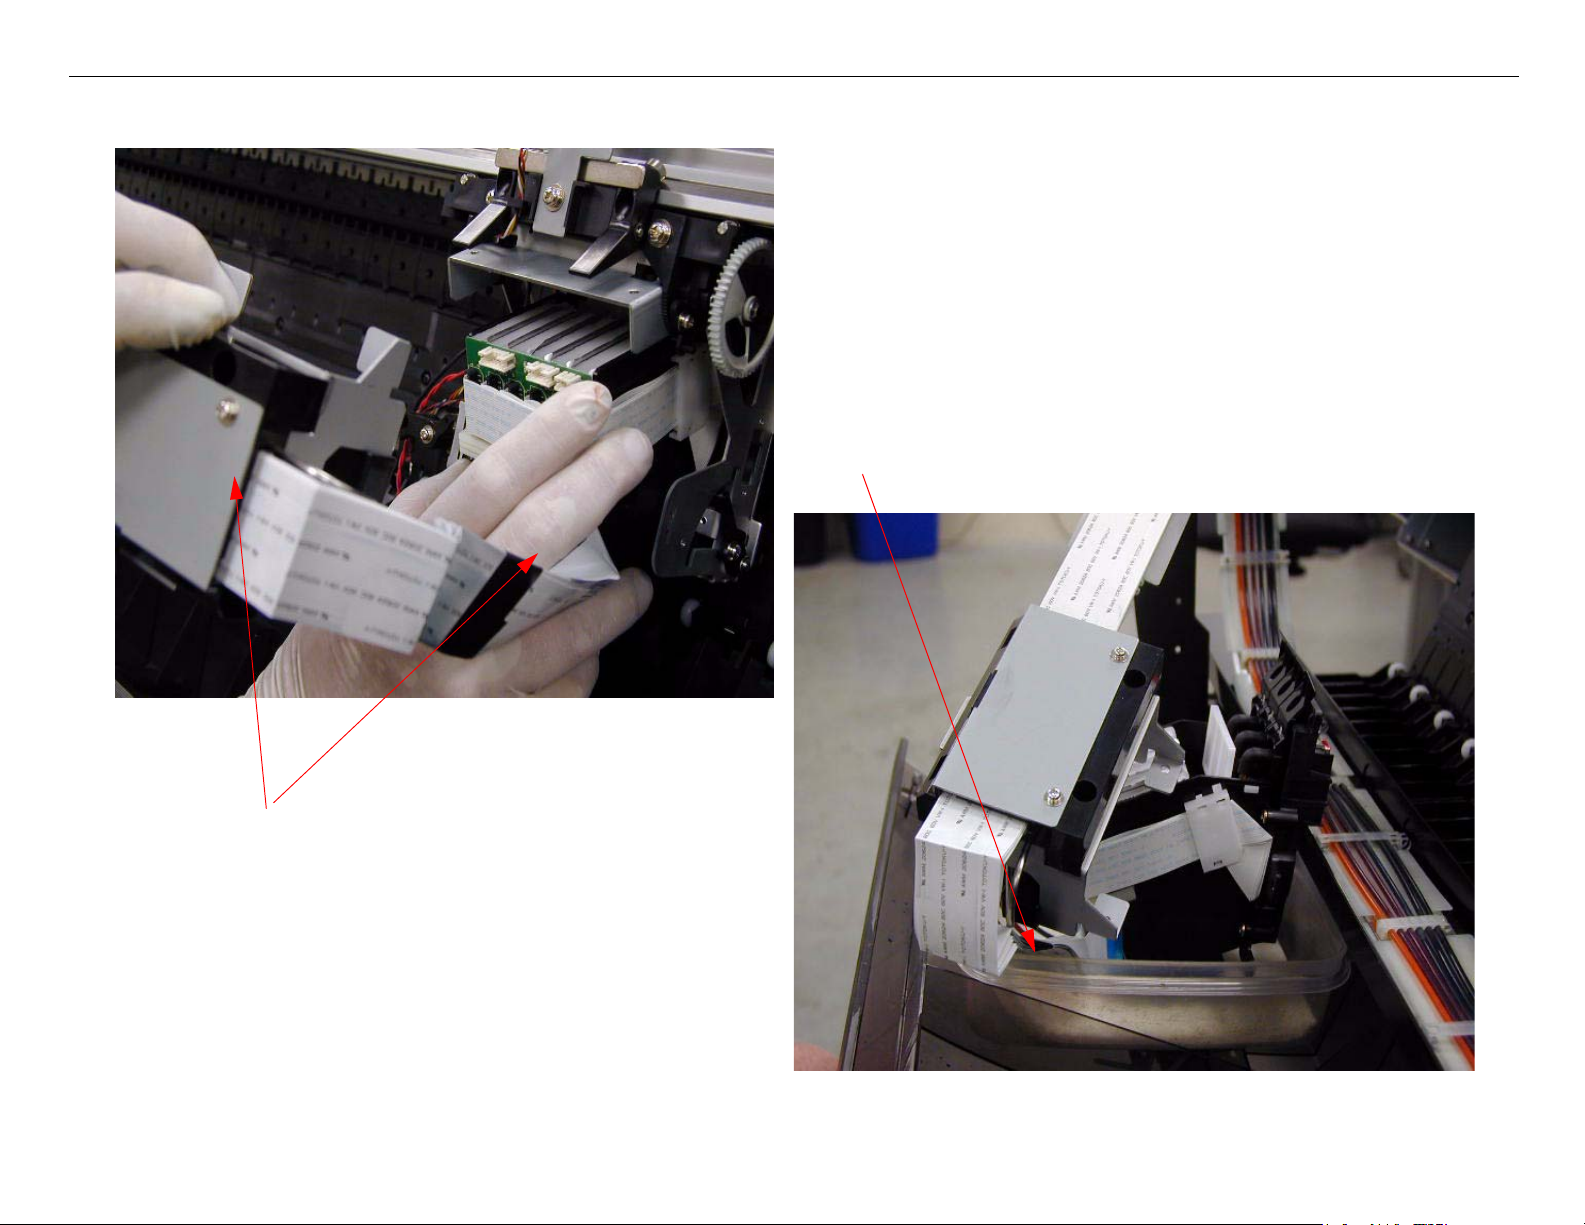
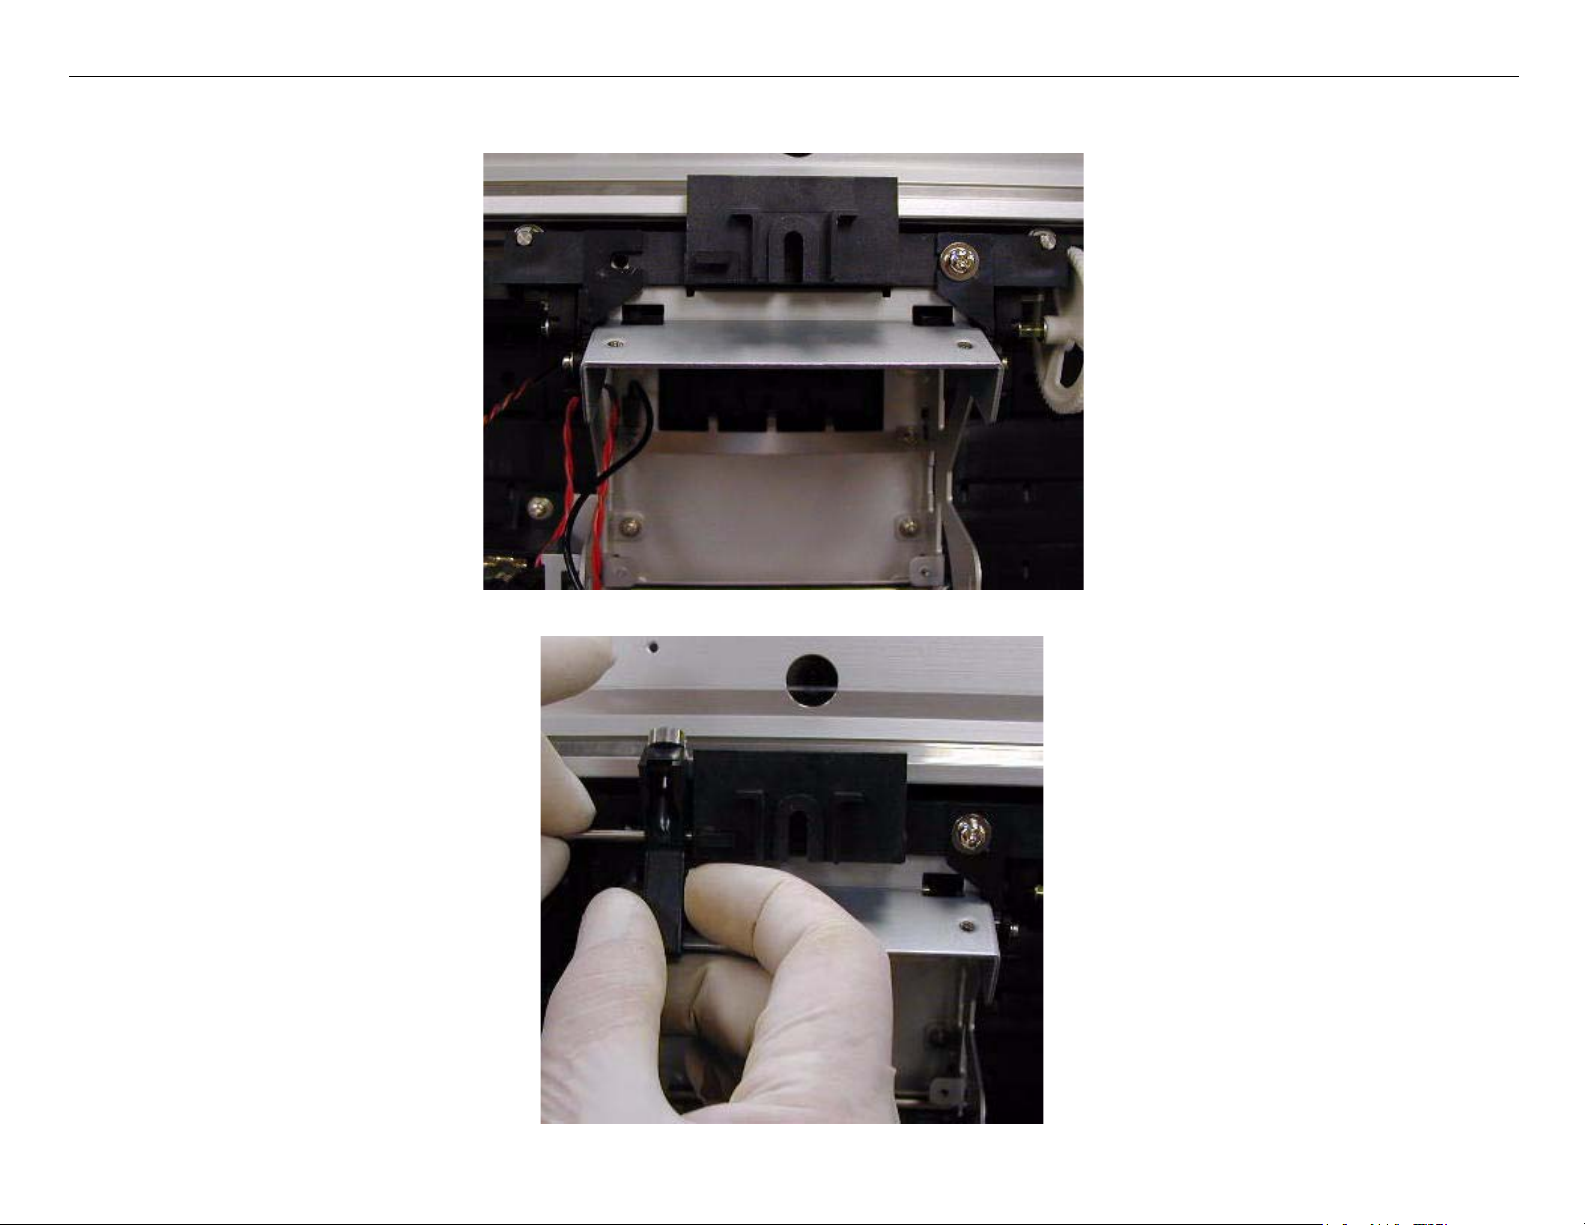
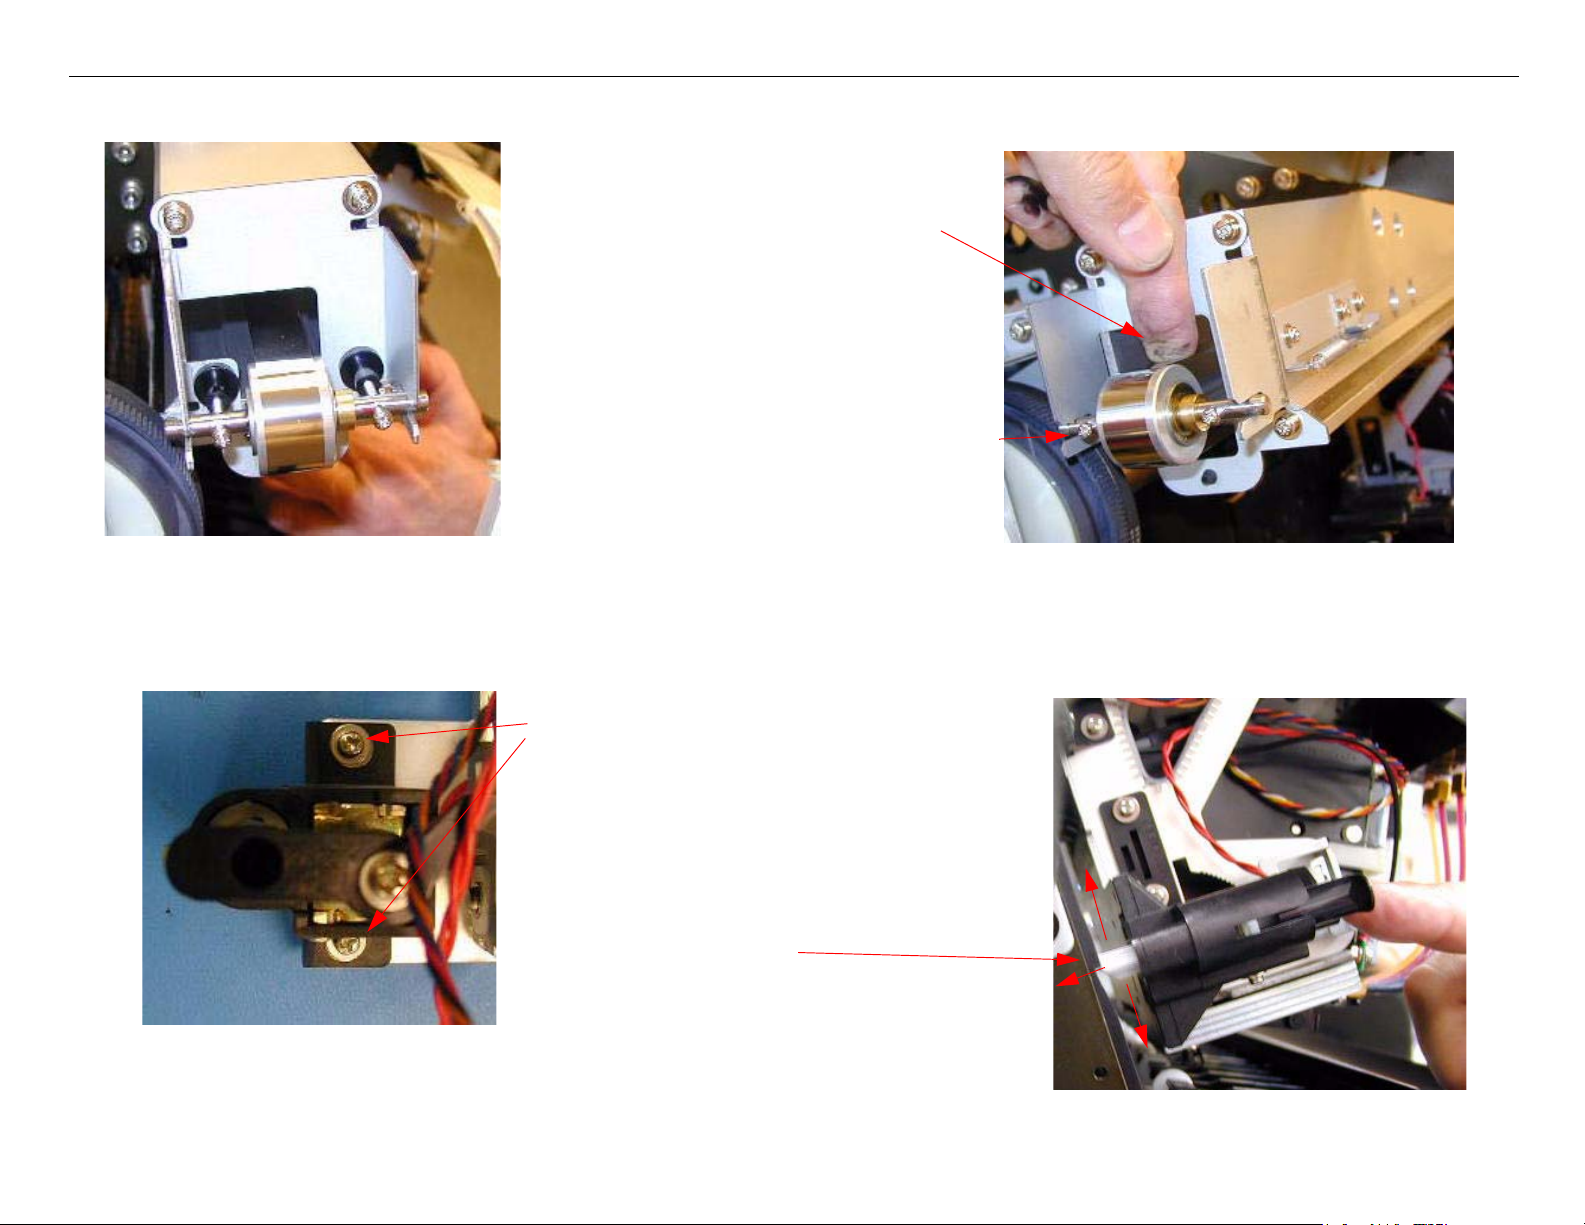
7. Release the Print Head by pulling back on the Cap Assembly as shown below.
8.
9. Move the Print Head to the center of the Printer.
Carriage Mechanism Replacement Printer Component, Software Item, LCD Display, Printer Button Page 11.
Page 12
Stylus Pro 10600 Field Repair Guide 7/29/04
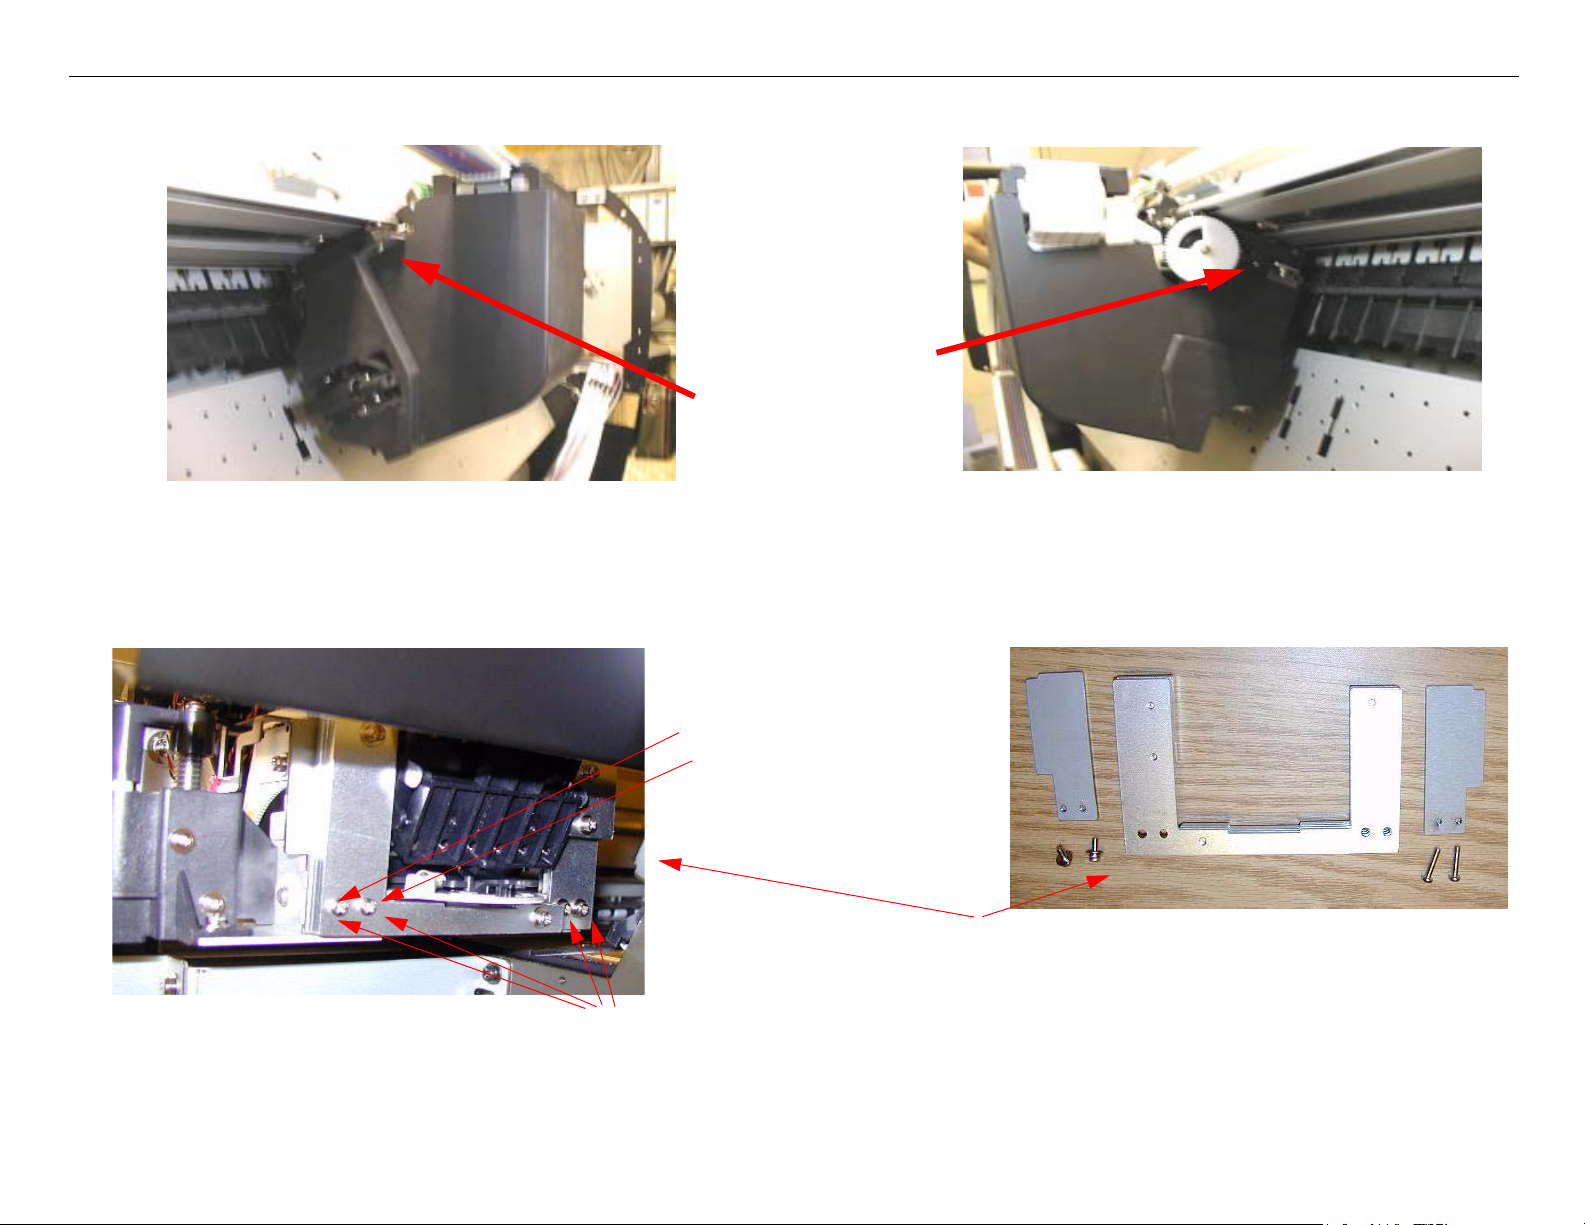
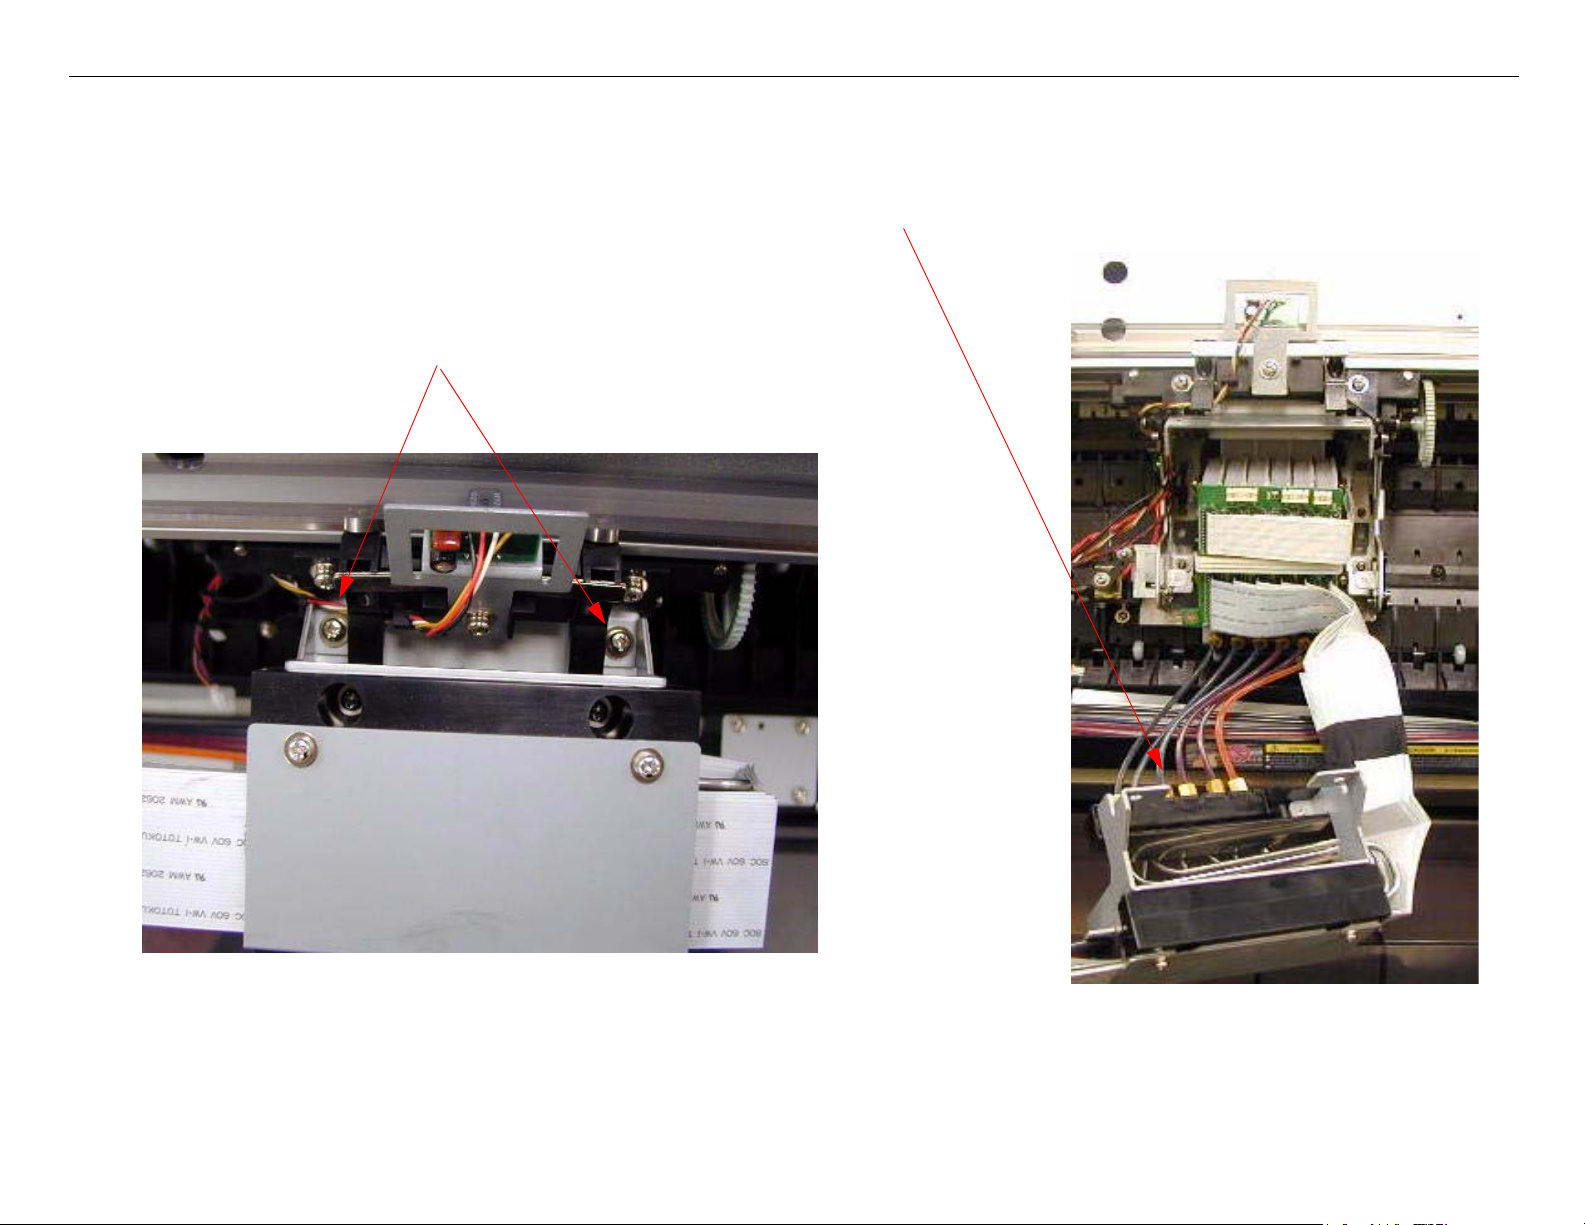
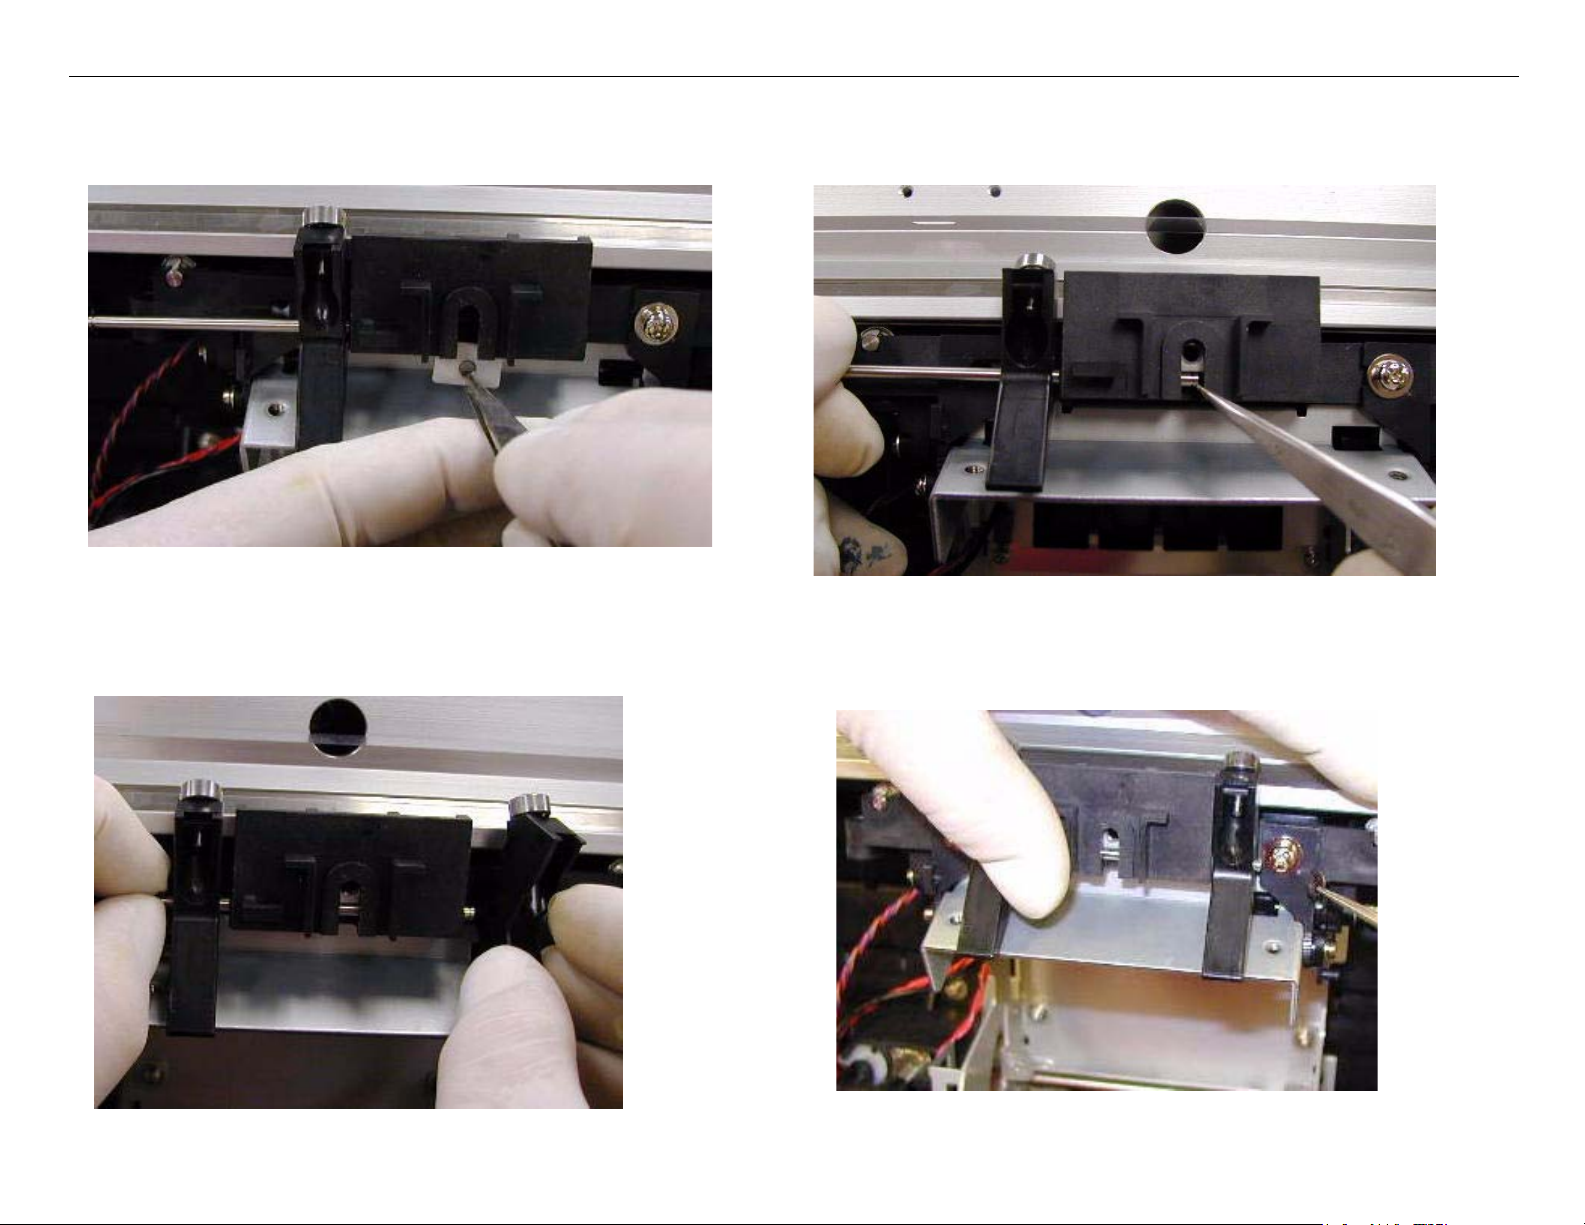
10. Remove the Print Head Cover by removing the two Screws as shown below.
Right side
Screw
Left side
Screw
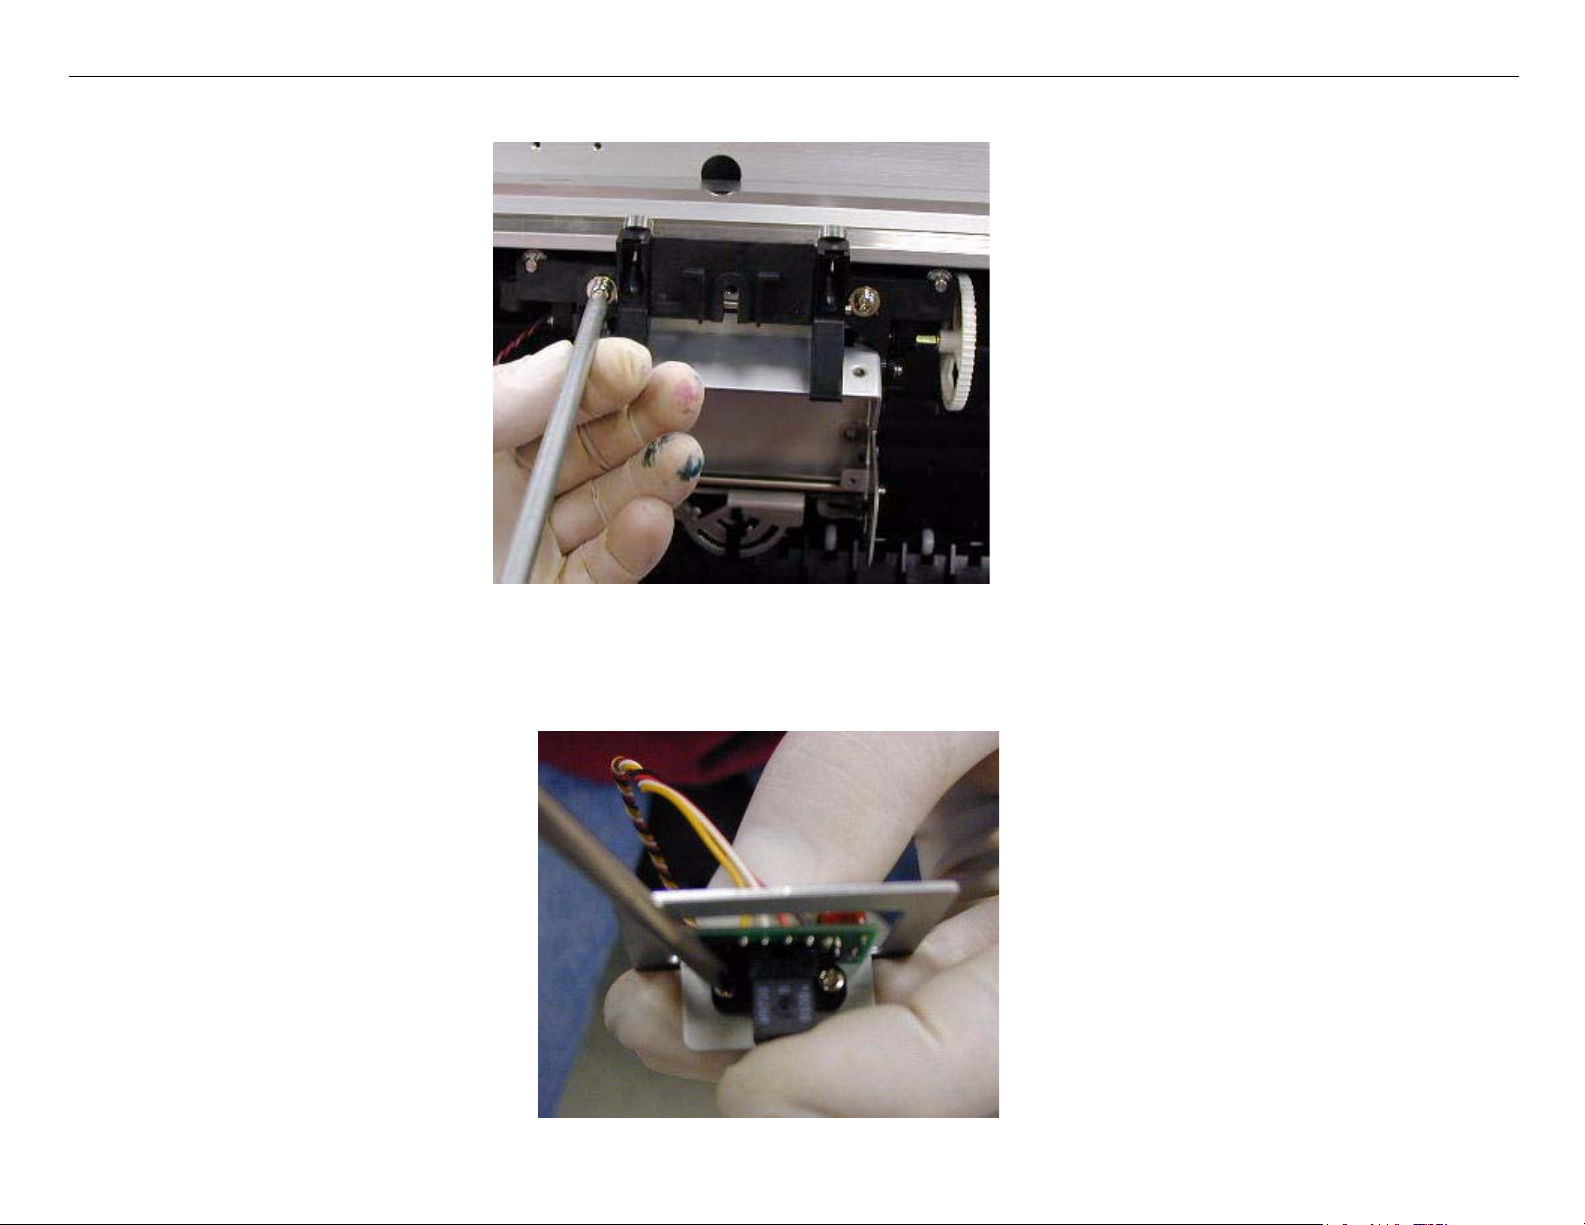
11. Remove the Print Head Weights.
11.1 Move the Print Head to the far left side of the Carriage Rail.
11.2 Remove the 4 Screws pictured below.
2 long Screws
go here
This picture is reversed
Weights and Screws
from the one on the left.
View from below
Carriage Mechanism Replacement Printer Component, Software Item, LCD Display, Printer Button Page 12.
Remove 4 Screws
Page 13
Stylus Pro 10600 Field Repair Guide 7/29/04
12. Unplug the 3 Connectors, and disconnect the Ground Wire, on the Print Head. Ensure that the
Connector Board is supported by your thumb when you unplug the Connectors.
Unplug the 3 Connectors.
Thumb for support.
The Ground Wire is fastened on this side. Disconnect from the Print
Head by removing 1
Screw.
Carriage Mechanism Replacement Printer Component, Software Item, LCD Display, Printer Button Page 13.
Page 14
Stylus Pro 10600 Field Repair Guide 7/29/04
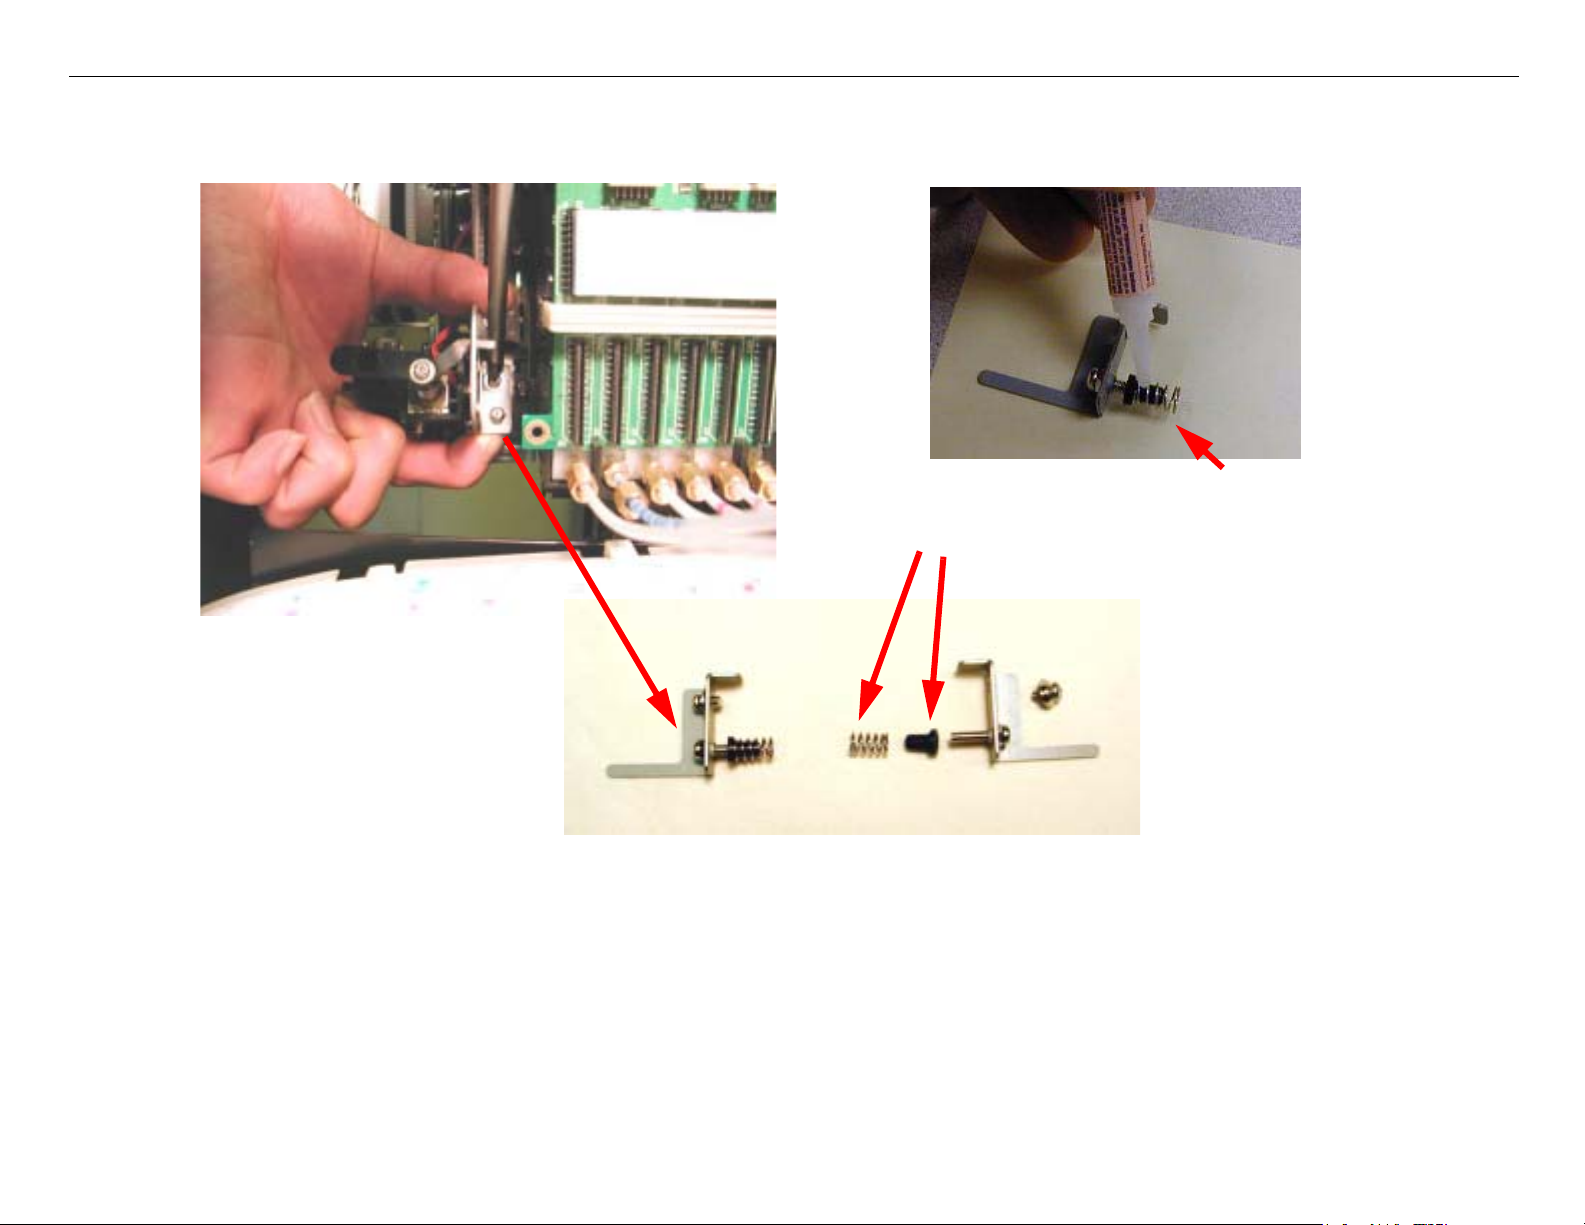
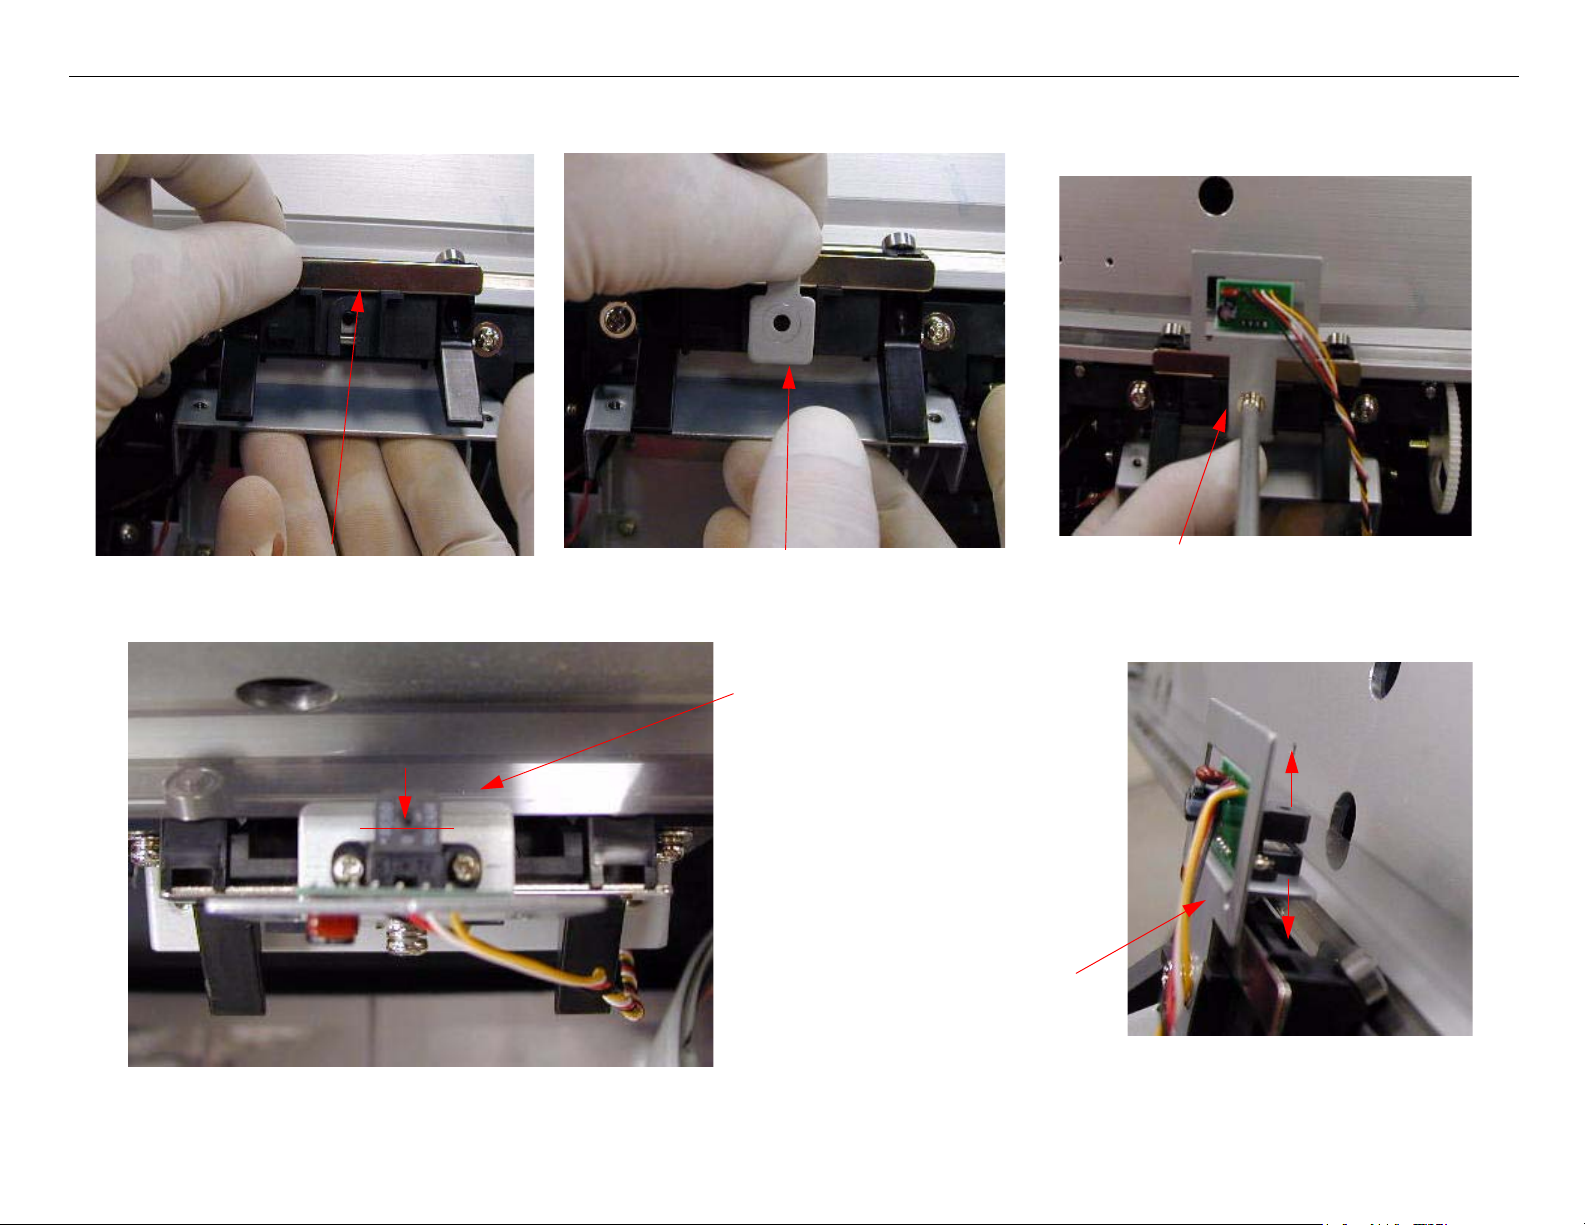
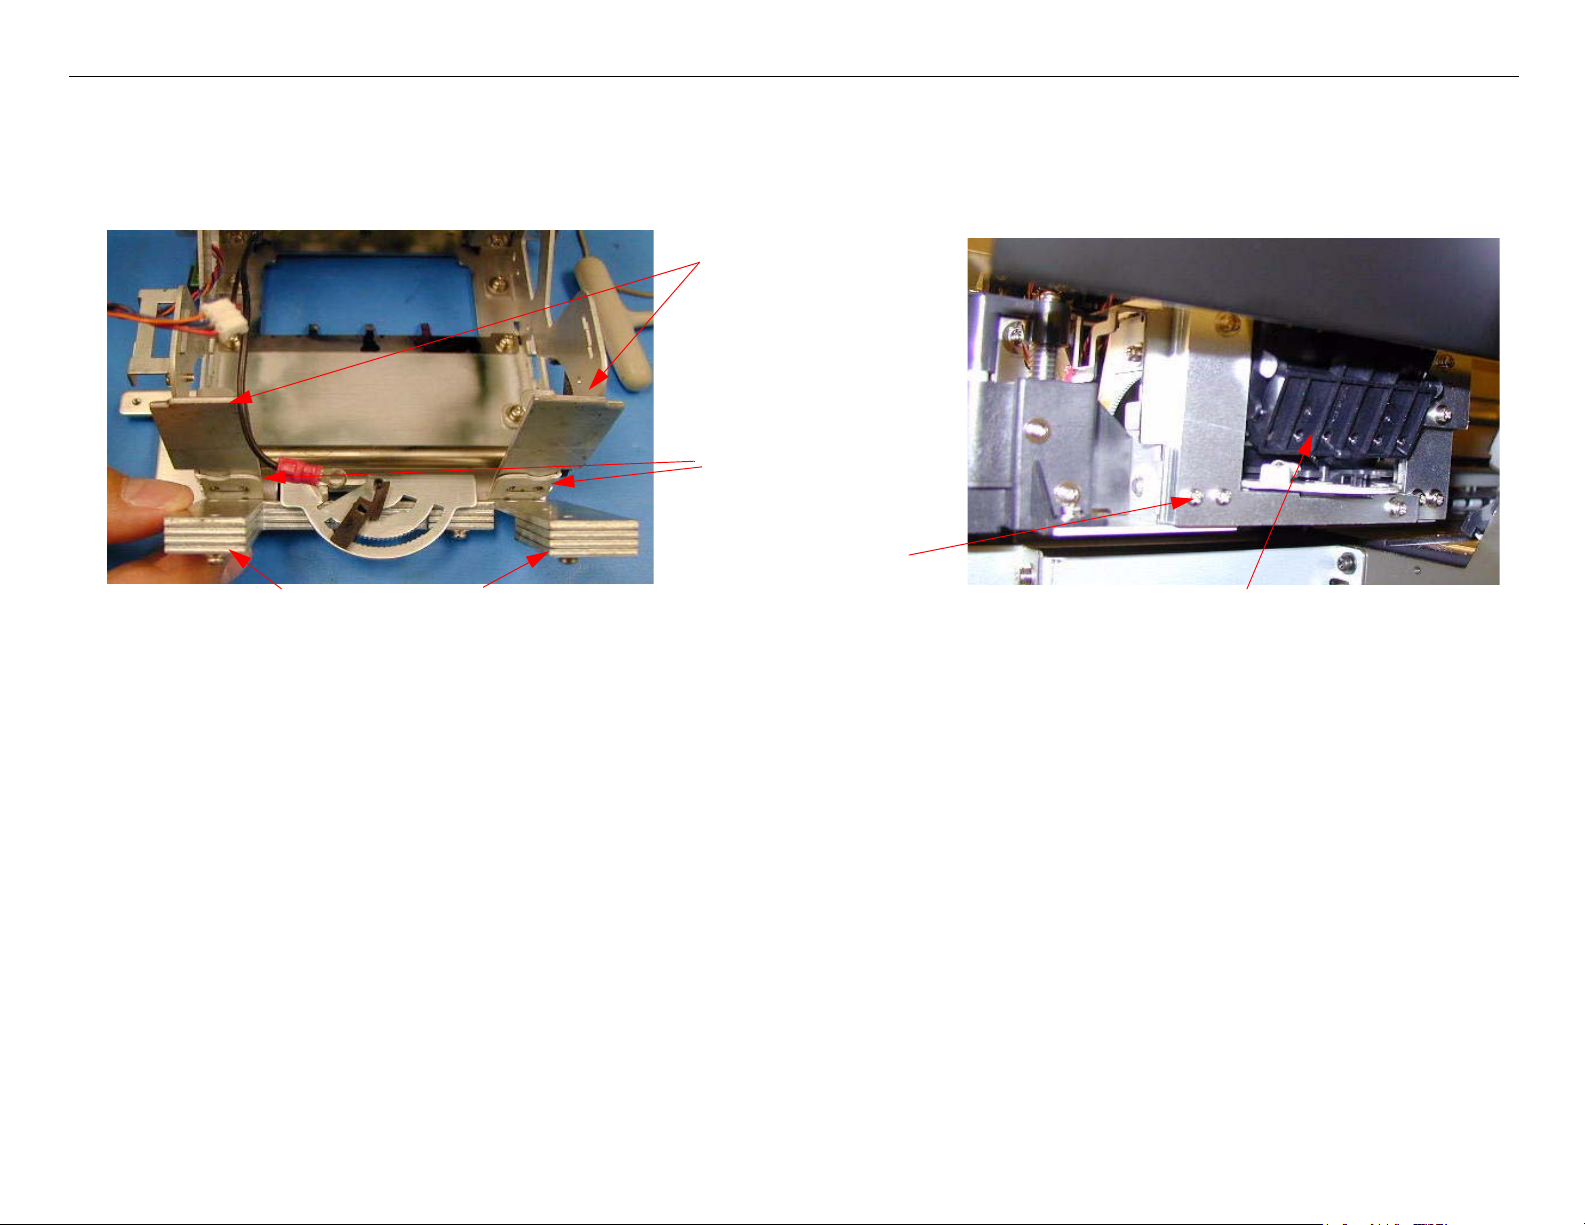
13. Remove the small metal Spring Tension Bracket Assemblies from the left and right side of the
Print Head.
Glue the Spring to the black plastic piece
for easier re-assembly.
Carriage Mechanism Replacement Printer Component, Software Item, LCD Display, Printer Button Page 14.
Page 15

Stylus Pro 10600 Field Repair Guide 7/29/04
14. Remove the 2 Silver Plastic Screws shown below.
Silver Plastic
Silver Plastic
15. Remove the 2 Screws from the left and right Print Head Mounts, and slide out the Mounts.
Left side is shown here
2 Screws
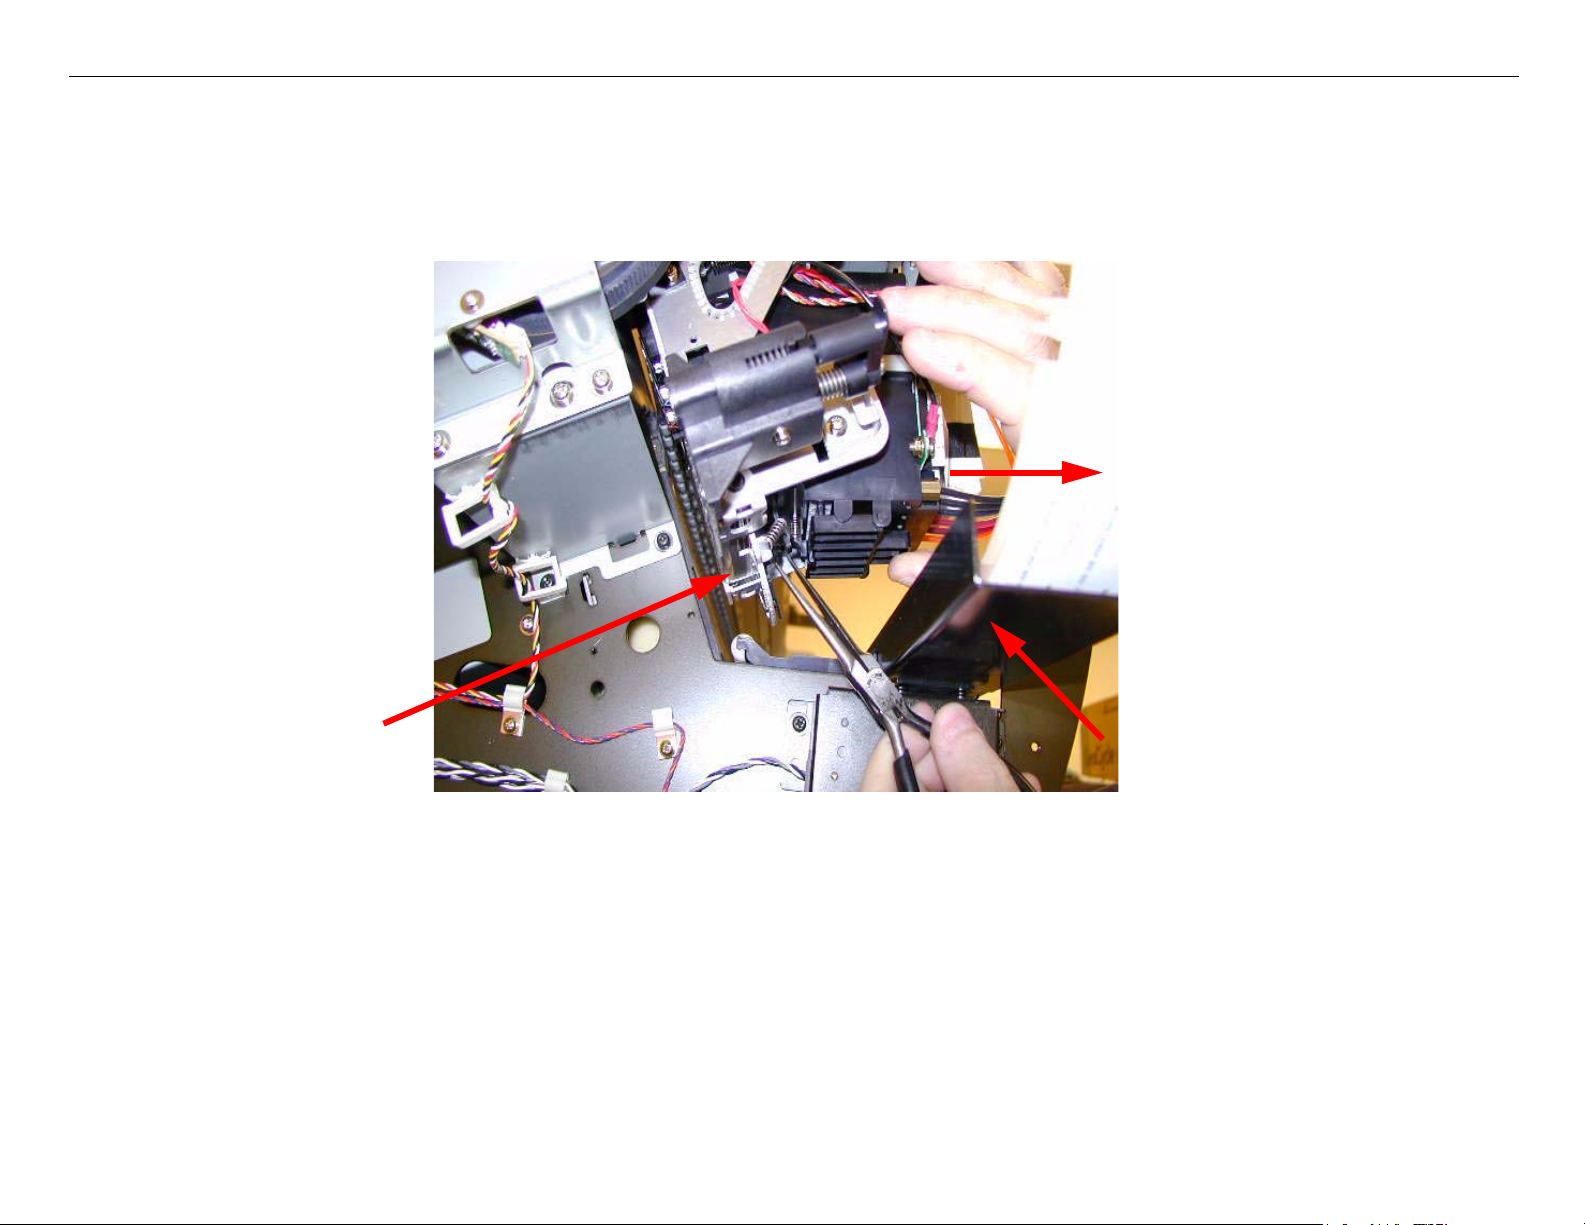
16. Remove the Print Head Alignment Tension Spring.
Carriage Mechanism Replacement Printer Component, Software Item, LCD Display, Printer Button Page 15.
Page 16
Stylus Pro 10600 Field Repair Guide 7/29/04
16.1 Move the Print Head Alignment Lever (A13 Slant) to the right, to release pressure on the Spring.
16.2 Gently grab the Spring with a pair of needle nose pliers.
16.3 Pivot the bottom of the Print Head away from the Carriage Mechanism to release pressure on the Spring.
16.4 Remove the Spring, but leave the Print Head in the Carriage Mechanism.
Pivot the Print Head in
this direction to release
the Spring.
Spring
View is from the floor looking
up at the Print Head
Carriage Mechanism Replacement Printer Component, Software Item, LCD Display, Printer Button Page 16.
Page 17
Stylus Pro 10600 Field Repair Guide 7/29/04
17. Remove top Print Head Tube/Cable Bracket.
The Bracket will detach like this.
Remove 2 Screws.
Carriage Mechanism Replacement Printer Component, Software Item, LCD Display, Printer Button Page 17.
Page 18
Stylus Pro 10600 Field Repair Guide 7/29/04
18. Remove the Print Head Assembly, and place to the right side.
Place Both Assemblies on the right side of
the Front Cover. The Print Head should not
leak, but placing the Assemblies in a container is prudent.
Support the Tube/Cable Bracket with one
hand, while removing the Print Head with
the other.
Carriage Mechanism Replacement Printer Component, Software Item, LCD Display, Printer Button Page 18.
Page 19
Stylus Pro 10600 Field Repair Guide 7/29/04
19. Disconnect the Carriage Belt from the Carriage Assembly.
19.1 Mark the Carriage Belt Tension Screws to record the current position, and turn the Screws to release the
Carriage Belt tension.
Mark the Screws
Release the tension on
the Belt by loosening
the Screws.
20. Disconnect the Carriage Belt by removing the 2 hex/allen Screws (2.5mm).
Left Side hex/allen Screw
(2.5mm)
Right Side hex/allen
Screw (2.5mm)
Right Side Belt, and Fastener
Carriage Mechanism Replacement Printer Component, Software Item, LCD Display, Printer Button Page 19.
Page 20

Stylus Pro 10600 Field Repair Guide 7/29/04
21. Secure the Carriage Belt, to protect it.
Securing the Carriage Belt
ensures that the Belt will not be
nicked, or twisted.
Left Side (be prepared to remove the
left over adhesive, if tape is used).
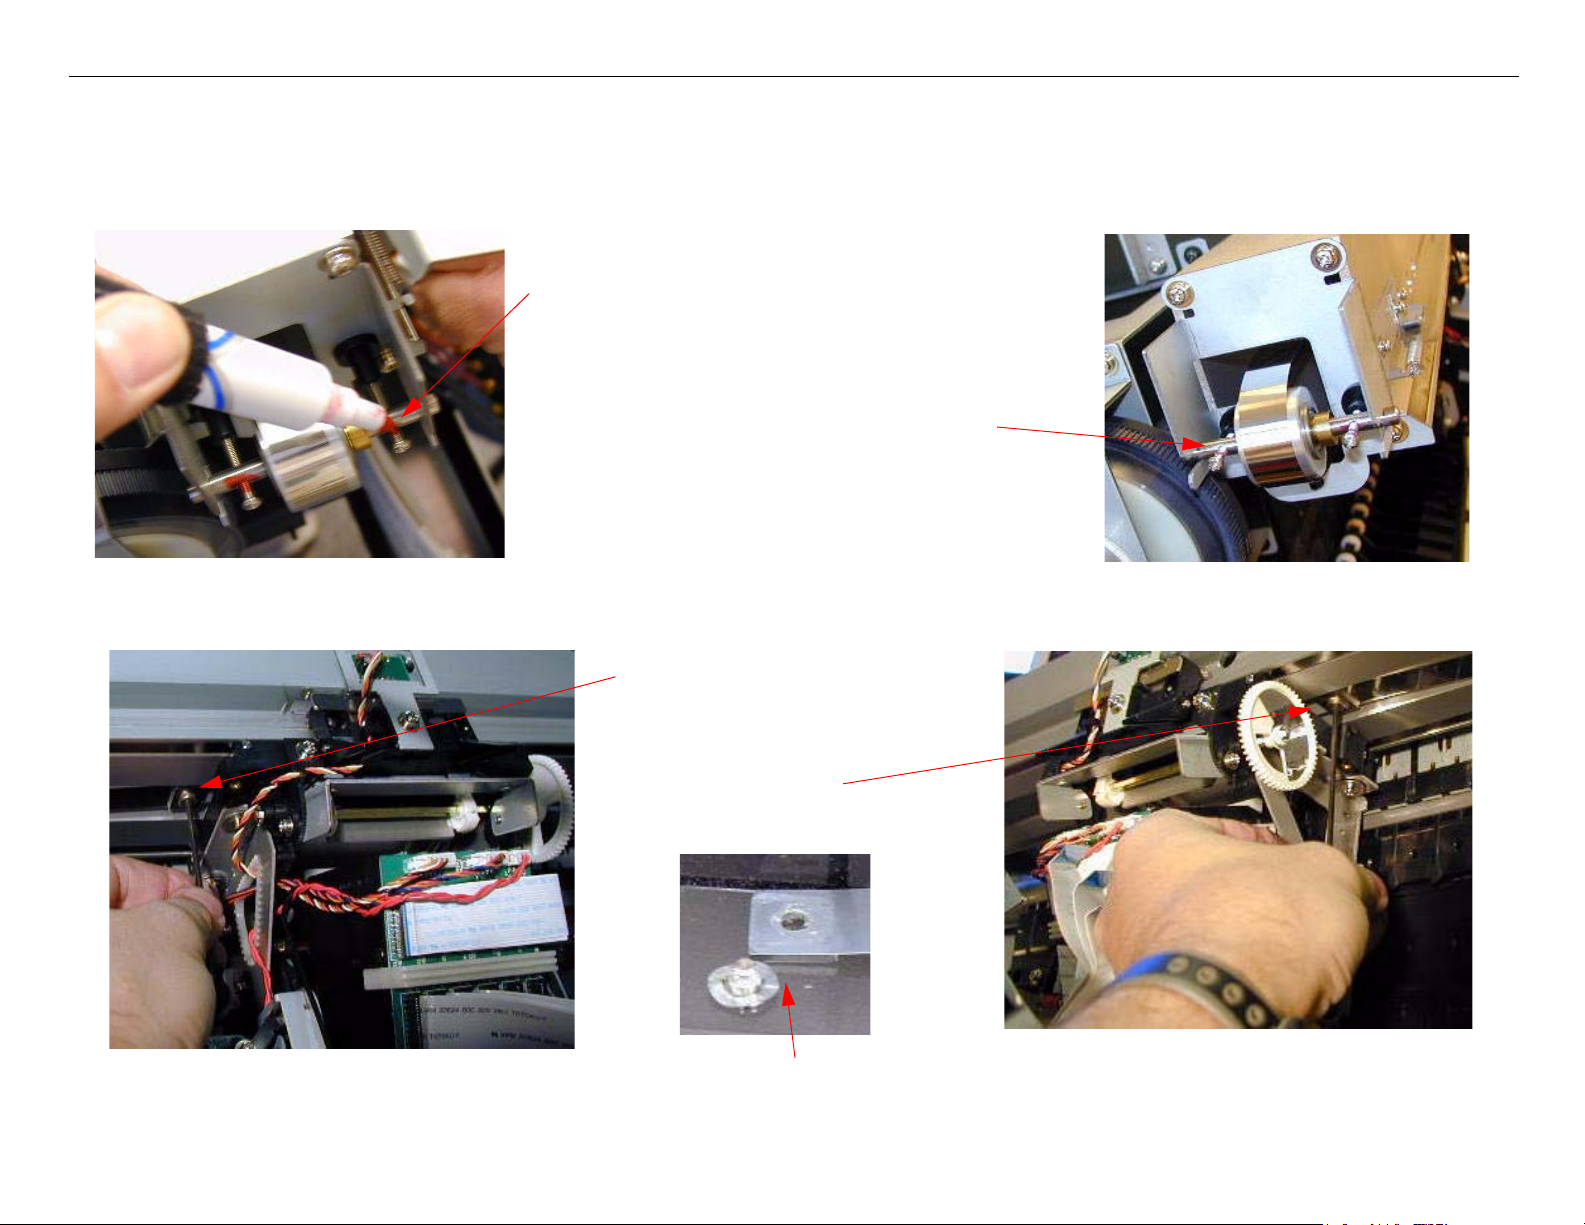
22. Remove the Carriage Encoder.
Right Side
Free the Encoder Sensor Wire.
Remove 1 Screw and the Sensor.
Carriage Mechanism Replacement Printer Component, Software Item, LCD Display, Printer Button Page 20.
Page 21
Stylus Pro 10600 Field Repair Guide 7/29/04
23. Remove 2 Top Bearings Assemblies.
3. Remove 1 Screw.
1. Remove 1 Screw.
2. Remove the right E-Ring.
6. Remove the Bracket, that is held
in place by the Bearing Shaft.
5. Remove the Shaft and 2 Bear-
ing Assemblies.
4. Slide the Shaft to the left.
Carriage Mechanism Replacement Printer Component, Software Item, LCD Display, Printer Button Page 21.
Page 22

Stylus Pro 10600 Field Repair Guide 7/29/04
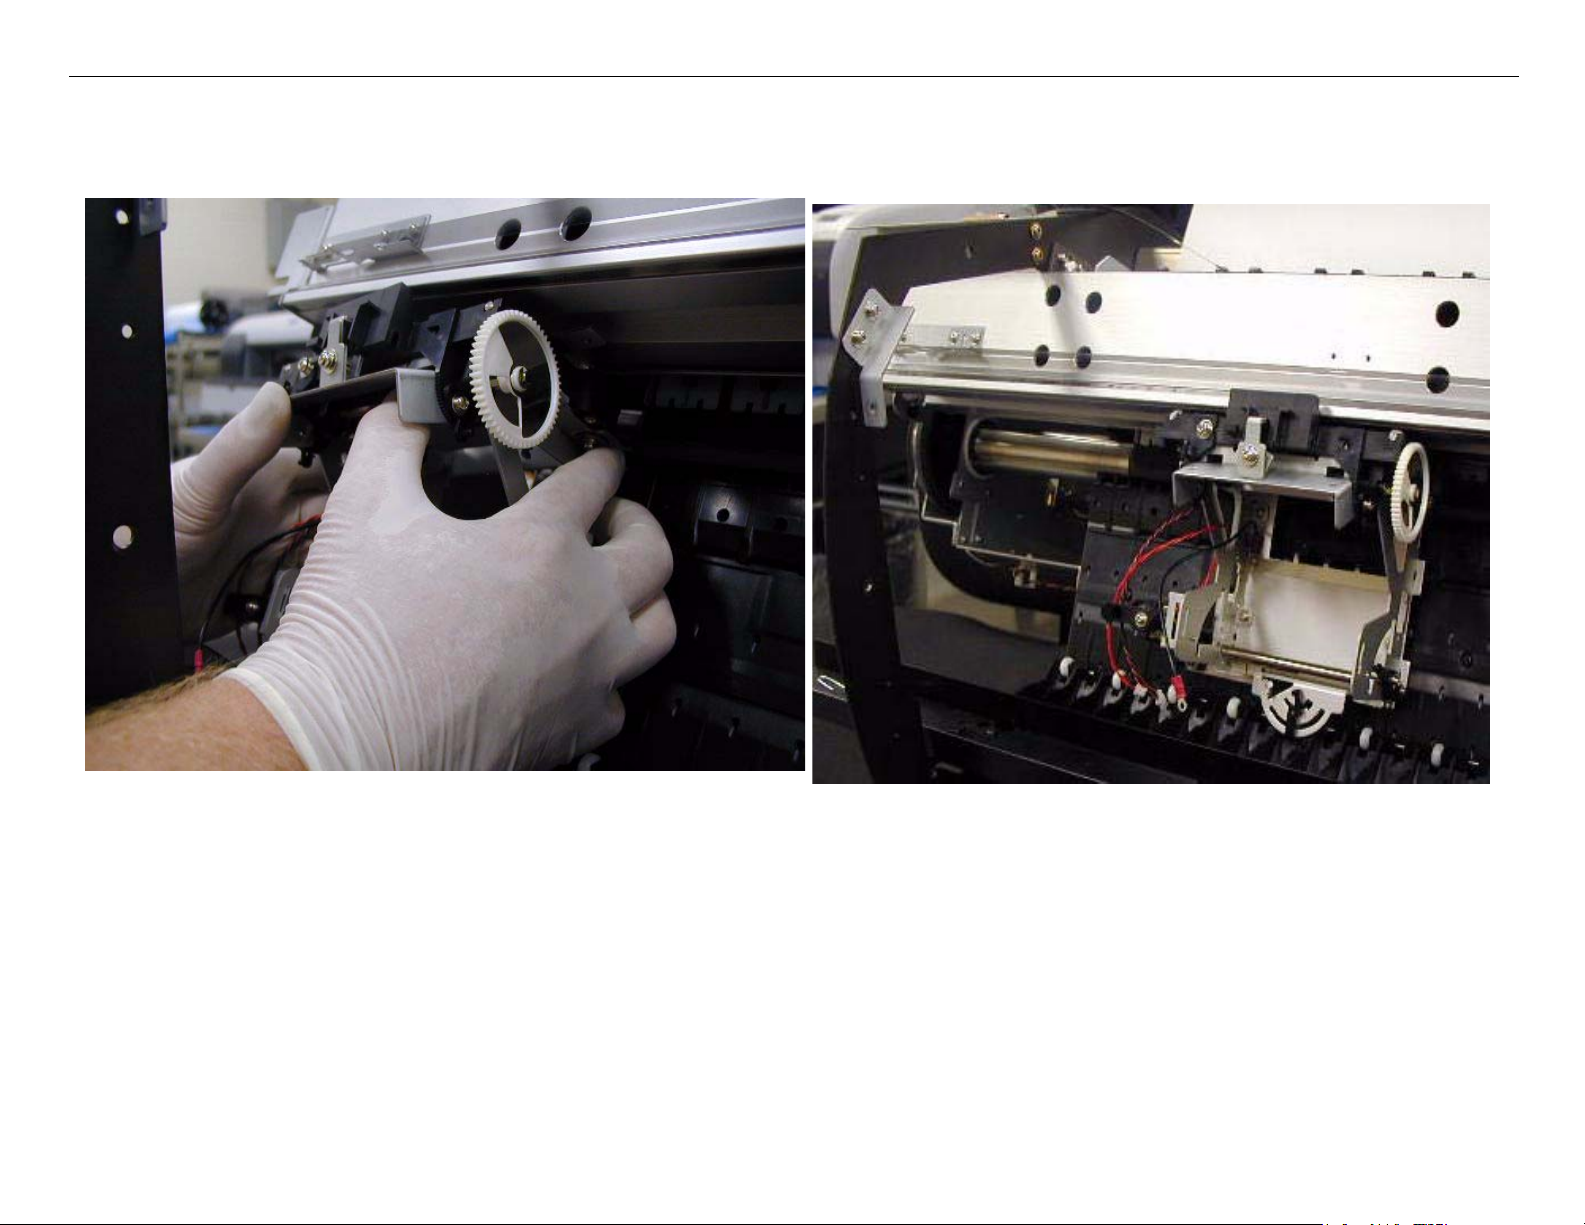
24. Remove the Carriage.
1. Move the Carriage Assembly
to the far left of the Carriage
Rail.
2. Maneuver the Carriage
Assembly to release the Rear
Carriage Bearings.
3. Remove from the Printer.
Left Side Frame.
Carriage Mechanism Replacement Printer Component, Software Item, LCD Display, Printer Button Page 22.
Page 23

Stylus Pro 10600 Field Repair Guide 7/29/04
25. Place the old Carriage Mechanism next to the new Carriage Mechanism, and transfer
components.
New Carriage Assembly.
1. Transfer the Solenoid from the old
Carriage to the new Carriage.
2. Remove the Top Bearing Assem-
blies from the new Carriage.
Carriage Mechanism Replacement Printer Component, Software Item, LCD Display, Printer Button Page 23.
Page 24
Stylus Pro 10600 Field Repair Guide 7/29/04
26. Install the New Carriage Assembly on the left side of the Carriage Rail, and slide to the middle.
1. Install the New Carriage Assembly, on the far
2. Slide to the right side of the Left Side Frame.
left side of the Carriage Rail.
27. Install the Top Bearing Assemblies.
Carriage Mechanism Replacement Printer Component, Software Item, LCD Display, Printer Button Page 24.
Page 25
Stylus Pro 10600 Field Repair Guide 7/29/04
27.1 .Ensure that the new Carriage Assembly is disassembled to this level.
27.2 Install the left Bearing Assembly and Shaft, part of the way.
Carriage Mechanism Replacement Printer Component, Software Item, LCD Display, Printer Button Page 25.
Page 26
Stylus Pro 10600 Field Repair Guide 7/29/04
27.3 Install the threaded Base, and slide in the Shaft, until it supports the threaded Base.
27.4 Install the right Bearing Assembly and E- Ring
Carriage Mechanism Replacement Printer Component, Software Item, LCD Display, Printer Button Page 26.
Page 27
Stylus Pro 10600 Field Repair Guide 7/29/04
27.5 Install the left Screw.
28. Install the Carriage Encoder.
28.1 Loosen the Encoder Sensor so that the Sensor can be moved on it’s Bracket.
Carriage Mechanism Replacement Printer Component, Software Item, LCD Display, Printer Button Page 27.
Page 28
Stylus Pro 10600 Field Repair Guide 7/29/04
28.2 Install the Top Bearing Tension Bar, Bracket, Encoder, and fasten loosely with 1 Screw.
3. Encoder and Screw
1. Tension Bar
2. Bracket
28.3 Position the Encoder so that the Strip is 3/4 of the way in to the Sensor, and vertically centered.
3/4 of the way into the Sensor,
and tighten the 2 Screws.
Centered so that the Strip
does not touch to top or
bottom of the Sensor, and
tighten 1 Screw
28.4 Move the Carriage the entire length of the Carriage Rail and verify that the Sensor is not rubbing, and
centered along the entire length of the Encoder Strip.
Carriage Mechanism Replacement Printer Component, Software Item, LCD Display, Printer Button Page 28.
Page 29

Stylus Pro 10600 Field Repair Guide 7/29/04
29. Attach the Carriage Belt to both sides of the Carriage.
29.1 Route the Carriage Belt around the Belt Roller, through the loop on the bottom of the Carriage Rail, and
attach to the left side of the Carriage.
Screw and Belt go
Around the Roller and
through this loop.
29.2 Carefully move the right side of the Carriage Belt until it can be attached to the right side of the Carriage.
Carriage Mechanism Replacement Printer Component, Software Item, LCD Display, Printer Button Page 29.
Page 30
Stylus Pro 10600 Field Repair Guide 7/29/04
30. Tighten the Carriage Belt to the marks on the Screws made in step 19(do not over tighten)
Press here, and verify that
the Belt has about 1/8”
deflection
It is very important that you move
the Carriage Mechanism back and
forth while observing the Belts
position on the wheel. Adjust the
two tension Screws until the Belt
tracks with no drift (a little drift is
acceptable).
Tighten Screws to the marks made in Step 19.
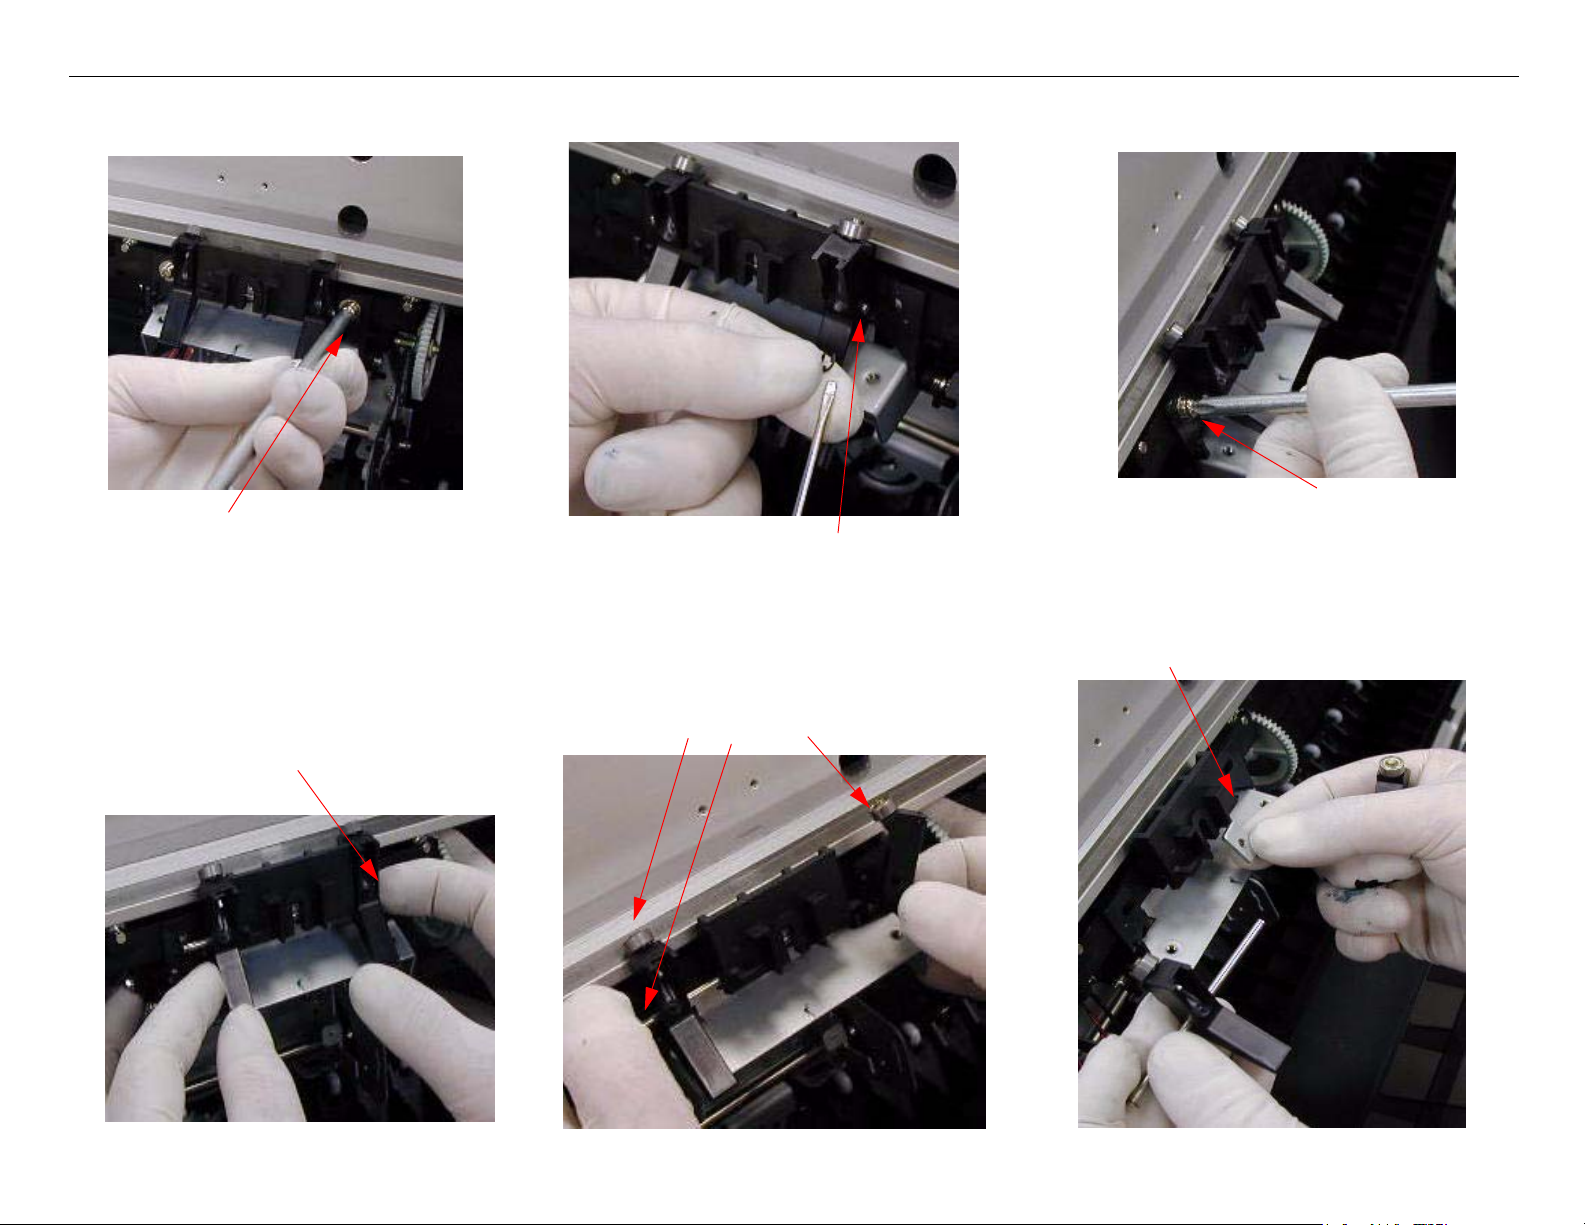
31. Adjust the Cutter Blade’s position, against the Cutter Guide (the thickness of a piece of paper.)
These Screws allow the
Cutter’s position to be
moved vertically.
Verify that the Cutter Blade
(when manually depressed) is
close to, but not touching, the
Cutter Guide.
Verify the Cutter Blade / Cutter
Guide position is good on both sides,
and in the middle of the Mechanism
Carriage Mechanism Replacement Printer Component, Software Item, LCD Display, Printer Button Page 30.
Page 31

Stylus Pro 10600 Field Repair Guide 7/29/04
32. Route the Sensor/Solenoid wires on the Carriage Mechanism.
33. Place the Print Head in the Carriage Mechanism.
Carriage Mechanism Replacement Printer Component, Software Item, LCD Display, Printer Button Page 31.
Page 32

Stylus Pro 10600 Field Repair Guide 7/29/04
34. Position and attach the Tube / Bracket Assembly with 2 Screws.
35. Verify that the Flexible Print Head Cables are seated properly.
Carriage Mechanism Replacement Printer Component, Software Item, LCD Display, Printer Button Page 32.
Page 33

Stylus Pro 10600 Field Repair Guide 7/29/04
36. Replace the Print Head Alignment Tension Spring.
36.1 Pivot the Print Head away from the Carriage Mechanism.
36.2 Place the Spring in position with a pair of needle nose pliers.
36.3 Pivot the Print Head back into position, compressing the Spring.
Pivot the Print Head in
this direction to insert
the Spring.
Spring
View is from the floor looking
up at the Print Head
Carriage Mechanism Replacement Printer Component, Software Item, LCD Display, Printer Button Page 33.
Page 34

Stylus Pro 10600 Field Repair Guide 7/29/04
37. Install the Print Head Fastening Brackets, tighten and back off 1/4 turn.
Install the left and right Silver Spring
Brackets (Do not fully tighten).
Install the left and right Black Plas-
tic Brackets (Do not fully tighten).
Screw the Print Head to the Black Plas-
tic Brackets (Do not fully tighten).
38. Route and install the Sensor/Solenoid Cables, and the Ground Wire.
Carriage Mechanism Replacement Printer Component, Software Item, LCD Display, Printer Button Page 34.
Page 35
Stylus Pro 10600 Field Repair Guide 7/29/04
39. Install the Print Head Weights.
39.1 Move the Print Head to the far left side of the Carriage Rail.
39.2 Install the left side of the Weights first, and leave loose until the right side Weights are installed.
Top Weights
Carriage Frame
2 long Screws
Bottom Weights
View from the floor, looking up.
40. Perform cleaning cycles and nozzle checks, until the Print Head’s nozzles recover.
41. Perform the A13 Slant adjustment.
41.1 Enter Self Diagnostic Mode.
41.1.1 Turn on the Printer while depressing Paper Feed + + Paper Feed - + Enter.
41.2 Press the SelecType button to display Check: Adjustment.
41.3 Press the Enter button time to display Adj: Check Skew.
41.4 Press the SelecType button to display Adj: A13 Slant.
Carriage Mechanism Replacement Printer Component, Software Item, LCD Display, Printer Button Page 35.
Page 36

Stylus Pro 10600 Field Repair Guide 7/29/04
41.5 Press the Enter button to execute.
A13 Slant Adjustment Lever
(Shown without Print Head)
41.5.1 Move the A13 Slant Adjustment Lever to the left to move the Magenta lines closer to the leading
edge of the paper.
41.5.2 Move the A13 Slant Adjustment Lever to the right to move the Magenta lines farther from the
leading edge of the paper.
41.6 Adjust the A13 Slant Adjustment Lever until the magenta and black lines are linear.
42. Tighten the Print Head Fasteners.
It is important to tighten the Print Head Fasteners in the exact order listed below or the A13 alignment
will be altered. Do not over tighten.
42.1 Tighten the 2 Screws that fasten the 2 Spring Tension Brackets.
42.2 Tighten the 4 Screws that fasten the 2 Print Head Mounts.
42.3 Tighten the 2 Silver Plastic Screws that fasten the Print Head to the Print Head Mounts.
43. Perform the PF Slant Adjustment using the Bi d, V1, 240,K alignment pattern for reference.
43.1 Enter Self Diagnostic Mode.
43.1.1 Turn on the Printer while depressing Paper Feed + + Paper Feed - + Enter.
43.2 Press the SelecType button to display Check: Adjustment.
Carriage Mechanism Replacement Printer Component, Software Item, LCD Display, Printer Button Page 36.
Page 37

Stylus Pro 10600 Field Repair Guide 7/29/04
43.3 Press the Enter button time to display Adj: Check Skew.
43.4 Press the SelecType button to display Adj: Bi-d.
43.5 Press the Enter button to display [Enter] Adjust Print
43.6 Press the Pause button to display Bi-d V1, 240, K: nn (nn = current Bi-d value)
43.7 Press the + button to increase the Bi-d value by 1 (this forces the Printer to print the Bi-d V1, 240, K
alignment pattern. (To re-print decrease the Bi-d value by 1, etc.)
43.8 Compare one of the center Bi-d patterns against the images below, and adjust until the lines are as linear
as possible.
Linear at the top
If the pattern is like this, move
the PF Slant Lever Down
Non-Linear at the bottom
Non-Linear at the top
If the pattern is like this, move
the PF Slant Lever Up
PF Slant Lever
Paper Feed Direction.
Linear at the Bottom
Carriage Mechanism Replacement Printer Component, Software Item, LCD Display, Printer Button Page 37.
Page 38

Stylus Pro 10600 Field Repair Guide 7/29/04
43.9 Repeat steps 43.7 and 43.8 until the lines are as linear as possible. It might be necessary to change the Bid adjustment variable and the A13 adjustment to achieve the best results.
44. Perform the PF Slant Adjustment using the Bi d, V1, 240,K alignment pattern for reference.
44.1 Enter Self Diagnostic Mode.
44.1.1 Turn on the Printer while depressing Paper Feed + + Paper Feed - + Enter.
44.2 Press the SelecType button to display Check: Adjustment.
44.3 Press the Enter button time to display Adj: Check Skew.
44.4 Press the SelecType button to display Adj: Top + Bottom.
44.5 Press the Enter button to print the adjustment pattern.
44.6 Measure the printed pattern and input the data when prompted by the Printer.
45. Check all electronic and mechanical alignments.
Carriage Mechanism Replacement Printer Component, Software Item, LCD Display, Printer Button Page 38.
Page 39

Stylus Pro 10600 Field Repair Guide 7/29/04
Carriage Timing Strip Replacement
Prior to removing the Carriage Timing Strip Bracket Screws, place a bead of glue along the top of each
of the bottom Brackets, to fasten the Bracket to the Carriage Rail.This will maintain the current Timing
Strip / Encoder Sensor alignment.
Carriage Timing Strip Replacement Printer Component, Software Item, LCD Display, Printer Button Page 39.
Page 40

Stylus Pro 10600 Field Repair Guide 7/29/04
Communication Errors PC
Description:
Status Monitor 3 reports a Communication Error.
Reason:
The Printer and the Driver / Computer are not communicating.
Troubleshooting process:
1. Check the Printer’s Control Panel and verify.
1.1 The Printer is turned on.
1.2 The Printer is Ready (If the Printer displays Ink Low or a Maintenance Error, the Printer is still ready).
1.2.1 The Printer is not Paused.
1.2.2 No Error Lights or messages on the LCD.
2. Verify that the Printer is not connected USB and Parallel at the same time. The two connections
will conflict.
3. Check the Printer Driver.
3.1 Is the Printer set as the Default Printer.
3.1 Is the proper Port assigned to the Printer.
3.2 Does the Port see the Printer.
3.2.1 Does not apply to Parallel Ports.
3.3 Does the Driver match the Printer (Ink Type).
3.3.1 Verify the ink type of the Printer by checking the part number of an Ink Cartridge.
Communication Errors PC Printer Component, Software Item, LCD Display, Printer Button Page 40.
Page 41

Stylus Pro 10600 Field Repair Guide 7/29/04
4. Check the Printer’s settings.
4.1 Is the Printer’s proper Interface is enabled.
4.1.2 If the Interface is set to Auto, try setting the Port to the connected type.
4.2 Set the Printer name to Stylus Pro 10600DYE, Stylus Pro 10600CF, or Stylus Pro 10600UC.
4.2.1 Move the Paper Release Lever to the released position.
4.2.2 Turn on the Printer with the SelecType and Paper Feed + buttons depressed.
4.2.2.1 Verify name displayed on LCD is the Stylus Pro 10600DYE, Stylus Pro 10600CF, or
Stylus Pro 10600UC (the name will be only displayed for a short time).
4.2.2.2 Turn off the Printer, and repeat steps 2 and 3 until Stylus Pro 10600DYE, Stylus Pro
10600CF, or Stylus Pro 10600UC is displayed.
5. Send a test print from a simple application, such as Wordpad.
6. Verify the I/F Cable is working properly.
6.1 Reseat I/F Cable on both ends.
6.2 Verify that the I/F Cable is not excessively long (over 10 -15 feet) (Spec. is 10 feet).
6.3 Remove any HUBS or Switch Boxes from the Cabling.
6.4 Verify that the I/F Cable is not the problem.
6.4.1 Use another Cable or test the Cable with another Device.
6.5 If the Interface is Ethernet, verify that the Cable is:
6.5.1 A “straight through” Cable for most connections
6.5.2 A ‘”crossover” Cable for direct Computer to Printer connections.
7. If the Printer is connected by a Parallel Port, check the Port driver in Device Manager.
7.1 If an Epson Port Driver is not installed:
7.1.1 Delete the Port Driver
Communication Errors PC Printer Component, Software Item, LCD Display, Printer Button Page 41.
Page 42

Stylus Pro 10600 Field Repair Guide 7/29/04
7.1.2 Delete the Printer Driver, and reinstall.
8. Delete the Driver and reinstall.
9. Verify that the Port on the Computer is not the problem.
9.1 Use another device to test the Port on the Computer, or use another Computer.
Other Considerations
• Custom Dongles attached to RIP Servers could cause a problem.
• Epson Large Format Printers use USB 2.0. Computer Ports that use USB 1.0, may cause a problem.
• Status Monitor 3 can report an error on a Windows 2000 system, that does not exsist. Turn off the Error
Monitoring (Printer Driver: Utility: Speed & Progress: Monitoring Preferences Uncheck the Error box).
Communication Errors PC Printer Component, Software Item, LCD Display, Printer Button Page 42.
Page 43

Stylus Pro 10600 Field Repair Guide 7/29/04
Driver Board Replacement
Caution: Do not remove any cable, card, or component without first unplugging the
Printer from the AC power source.
Caution: Failure to up load and down load parameters requires that all electronic
adjustments be performed, the Head Rank for both print heads be entered,
and the Waste Ink Pads be replaced.
Caution: Failure to insert foil cables correctly (fully and straight) will result in com-
ponent damage.
Verify that the Board has the following part # stamped on it:
2077149
1. Up load parameters to the “Parameter” flash card
1.1 Unplug Printer.
1.2 Insert the parameter flash card (Part # 1070167SP10K).
1.3 Plug in Printer.
1.4 Turn on the Printer and do not press any key. The up load will be performed.
2. Remove the old Board.
3. Install the new Board.
Caution: be careful not to damage any components on the bottom of the board. The
“mounting areas” that the board attaches too can scrape off small components.
Driver Board Replacement Printer Component, Software Item, LCD Display, Printer Button Page 43.
Page 44

Stylus Pro 10600 Field Repair Guide 7/29/04
4. Install the vertically mounted Sub-Board Assembly
5. Erase the exsisting firmware on the Driver Board.
5.1 Insert the “All Erase” flash card (Part # 1070167ER10K)
5.2 Plug in Printer.
5.3 Turn on the Printer and do not press any key. The erase function will be performed.
5.1 Unplug Printer.
5.2 Remove the “All Erase” flash card
6. Install firmware to replace the erased firmware using the firmware flash card
6.3 Insert the “Firmware” flash card (Part # 1070167FM16K)
6.4 Plug in Printer.
6.5 Turn on the Printer and do not press any key. The firmware up load function will be performed.
6.1 Unplug Printer.
6.2 Remove the “Firmware” flash card
7. Download latest firmware.
7.1 Connect the Printer to your PC with a parallel cable.
7.2 Prepare your computer to send the correct firmware file to the Printer.
7.2.1 Use the DOS copy command or WinPRN.exe.
7.2.1.1 See the DOS Copy for Firmware section of the Field Repair Guide.
7.2.1.2 See the WinPrn Utility Section of the Field Repair Guide.
7.3 Turn on Printer while depressing the (Paper Source) + (Cut Eject) + (Cleaning) buttons.
7.4 Send the firmware to the Printer.
8. Initialize the RTC (Real Time Clock).
Driver Board Replacement Printer Component, Software Item, LCD Display, Printer Button Page 44.
Page 45

Stylus Pro 10600 Field Repair Guide 7/29/04
8.1 Enter Maintenance Mode 2.
8.2 Turn on Printer while depressing (Paper source) + (Cut/ Eject) + (Paper Feed -).
8.3 Press SelecType 2 times to display the Clear Counters Menu.
8.4 Press Paper Source one time to display RTCINIT = YY / MM / DD/ HH.
8.5 Enter the current Year, Month, Day, and Hour.
8.5.1 The Cleaning button shifts between year, month, day and hour.
8.5.2 The Paper feed + or Paper feed - buttons change the values.
9. Download previously uploaded parameters.
9.1 Unplug Printer.
9.2 Insert the “Parameter” flash card (Part # 1070167SP10K).
9.3 Plug in the Printer.
9.4 Turn on the Printer and press any key. The download will be performed.
9.1 Unplug Printer.
9.2 Remove the “Parameter” flash card
10. Load Paper.
10.1 If the paper does not load properly:
10.1.1 Adjust the Paper Sensor Trim Potentiometers.
10.1.1.1 Turn VR1 - VR6 clockwise 1/4 turn and load the paper again.
10.1.1.2 Repeat if necessary.
11. Print the adjustment patterns.
11.1 Enter Self Diagnostic Mode.
11.1.1 Turn on the Printer while depressing Paper Feed + + Paper Feed - + Enter.
11.2 Press the SelecType button to display Check: Adjustment.
Driver Board Replacement Printer Component, Software Item, LCD Display, Printer Button Page 45.
Page 46

Stylus Pro 10600 Field Repair Guide 7/29/04
11.3 Press the Enter button time to display Adj: Check Skew.
11.4 Press the SelecType button to display Adj: Test Print.
11.5 Press the Enter button to execute.
12. Verify that all alignment patterns are correct.
13. Perform all necessary electronic alignments.
14. Verify that the Head Rank Information is correct.
Driver Board Replacement Printer Component, Software Item, LCD Display, Printer Button Page 46.
Page 47

Stylus Pro 10600 Field Repair Guide 7/29/04
Epson Pro Graphics 24” Test Print Directions
The Purpose of the Test Print File:
The 24” Test Print File is designed to provide a “Standard” test print to evaluate the operation of an Epson Printer
in relation to it’s expected performance.
About the Test Print File:
1. The Test Print file was created in Quark Xpress 4.11r0 on a PC. All Quark elements are RGB. All
Image files are RGB Tiff at 100%. No files were scaled or rotated. The file was distilled with
Acrobat 5.05 to create the final PDF file.
2. This Test Print is not intended for use with CMYK PostScript workflows: EPSON Fiery RIPS or
3rd Party RIPS. Use of anything other than the standard EPSON Driver will yield undetermined
results.
Before Printing the Test Print File:
1. Verify that Acrobat Reader 5.0 or above is installed on the Computer.
1.1 Acrobat Reader 5.0 is available free from WWW.Adobe.com.
2. Verify that the latest Printer Driver is installed.
2.1 Please check the Epson Web site for the current driver specific to your model and Operating System.
2.1.1 WWW.Epson.com
3. Verify that all the Printer’s Nozzles are performing correctly.
3.1 Run a Nozzle Check test print from the Utility Tab of the Printer Driver.
Epson Pro Graphics 24” Test Print Directions Printer Component, Software Item, LCD Display, Printer Button Page 47.
Page 48

Stylus Pro 10600 Field Repair Guide 7/29/04
3.2 Inspect the Nozzle Check Test Print.
3.2.1 Verify that each Nozzle is firing.
3.2.1.1 Pay special attention to the Yellow Nozzles (they are hard to see, but will make a
difference in the quality of the test print).
3.2.2 Verify that each Nozzle is firing straight (not deflected)
3.2.2.1 Using a magnifier to compare the spacings of each Nozzle, to the spacing of the others.
3.2.3 If there are missing or deflected Nozzles, perform a cleaning cycle.
3.3 Repeat steps 3.1 and 3.2 until the Nozzle Check Pattern is perfect.
If submitting prints to EPSON for evaluation, please include the final nozzle check pattern.
4. Verify that the Printers Electronic Adjustments are correct.
4.1 Perform the Print Head Alignment function located on the Utility Tab of the Printer Driver.
If submitting prints to EPSON for evaluation, please include a print out of the final adjustment patterns.
Printing the Test Print File
The Test Print file requires Acrobat Reader 5.0 or later. The Security Level is set on the Test Print File to
allow opening, filling in the form, and printing only. Attempting to use an earlier version of Acrobat will
result in an Error Message.
The screen shot examples taken from the STYLUS Pro 7600 may not be similar to your specific model
and driver, however all the features described are available in all EPSON Drivers.
1. Fill out the Form.
1.1 Use the Acrobat Magnifying Tool to enlarge the Form section of the Test Print.
1.2 Use the Acrobat Hand Tool to check boxes and select fields for entering text.
1.3 It is important that all the information requested by the form is filled out completely and accurately.
Epson Pro Graphics 24” Test Print Directions Printer Component, Software Item, LCD Display, Printer Button Page 48.
Page 49

Stylus Pro 10600 Field Repair Guide 7/29/04
Fill out this form.
2. Select the Print command from the Acrobat File menu.
2.1 Follow the directions below.
Select the correct Printer.
Verify that these boxes are not checked.
If these boxes are checked the Horizontal and Vertical lined patterns of the test image will exhibit strong irregularities.
Acrobat will not display the final page size, designated by the
EPSON driver as 24x12, in the Acrobat print dialog preview Window (area 2). This can be ignored. The file will print accurately.
Select Properties to access the Epson Printer Driver.
Epson Pro Graphics 24” Test Print Directions Printer Component, Software Item, LCD Display, Printer Button Page 49.
Page 50

Stylus Pro 10600 Field Repair Guide 7/29/04
3. Adjust the Printer Driver Paper Settings.
Select the Paper Tab.
Scroll to the bottom of the Paper Size list and select
User Defined.
Enter 24x12 for the Paper Size Name.
Enter 2400 for the Paper Width.
Enter 1200 for the Paper Height.
Select 0.01 inch.
Click the Save Button.
Select Roll Paper.
Click OK.
Select 24x12.
Do not select Auto Rotate.
Select Portrait.
Click OK.
Epson Pro Graphics 24” Test Print Directions Printer Component, Software Item, LCD Display, Printer Button Page 50.
Page 51

Stylus Pro 10600 Field Repair Guide 7/29/04
4. Adjust the Printer Driver Quality Settings
Select Custom.
Click on Advanced.
Select 720dpi.
Select High Speed.
Select the correct media.
Select Color Con-
Select Photo-realistic.
Click OK when fin-
Epson Pro Graphics 24” Test Print Directions Printer Component, Software Item, LCD Display, Printer Button Page 51.
Page 52

Stylus Pro 10600 Field Repair Guide 7/29/04
Error Codes
00000100 Waste ink pads are full
00000101 CR motor life (Ink Tube Life)
00000102 Nozzle check error
00000103 RTC battery back up end
00000104 Auto nozzle check error
1. Perform offset adjustment.
2. Replace Dot Detector mechanism and perform offset adjustment.
00000105 Print Head life end
00000106 Cleaning unit life end
00010000 PF motor encoder check error
00010001 PF motor out of step
00010002 PF motor overcurrent
00010003 PF motor in-position time-out
00010004 CR motor encoder check error
00010005 CR motor out of step
00010006 CR motor overcurrent
00010007 CR motor in-position time-out
00010008 Servo interrupt watchdog time-out
00010009 System interrupt watchdog time-out
1. Reboot printer.
2. If reboot does not repair, exchange Driver Board.
Error Codes Printer Component, Software Item, LCD Display, Printer Button Page 52.
Page 53

Stylus Pro 10600 Field Repair Guide 7/29/04
00010010 PF motor PWM output faulty
00010011 Paper Jam Error
1. Exchange Driver Board
00010012 Cap Home Sensor Error
00010013 Providing System Home Sensor Error
00010014 Pressurization Error
00010015 Sub Tank Overfill (K)
00010016 Sub Tank Overfill (C)
00010017 Sub Tank Overfill (M)
00010018 Sub Tank Overfill (LC)
00010019 Sub Tank Overfill (LM)
00010020 CSIC reed/right error
00010021 Starter Cartridge error
1. Check Ink Cartridge connection.
2. Verify the Ink Cartridge is a starter cartridge.
3. Replace Ink Cartridge.
00010022 Ink type error (setting on printer body side)
00010023 RTC access error
1. Secure paper lever.
2. Start up maintenance mode 2.
3. Counter initialize menu ---> Initialize RTC, input date.
4. Turn off.
00010024 Module communication time out error
Check all connections between boards ( Especially HJFK board ).
Error Codes Printer Component, Software Item, LCD Display, Printer Button Page 53.
Page 54

Stylus Pro 10600 Field Repair Guide 7/29/04
00010025 CSIC ROM communication error
1. Check Ink Cartridge connection.
2. Replace Ink Cartridge.
00010026 RTC access error:
1. Remove battery ( Power OFF state ).
2. Attach battery after several seconds.
3. Turn on.
4. Repeat 1-3 until an error does not occur.
5. Start up maintenance mode2.
6. Counter initialize menu ---> Initialize RTC, input date.
7. Turn off.
00010027 Pressurization error (displayed only in Self Diagnostics Mode)
00020000 NVRAM error
00020001 NVRAM comparison error
00020002 SDRAM error
00020003 Flash Memory sum error
00020004 ASIC version error
00020005 Firmware ASIC mismatch error (ver. a.)
00020006 Firmware ASIC mismatch error (ver. b.)
00020007 Head ASIC mismatch error
1. Exchange Driver Board
00020009 Flash memory check SUM error
0003000000030013
Error Codes Printer Component, Software Item, LCD Display, Printer Button Page 54.
Debug Error
1. Exchange Driver Board
Page 55

Stylus Pro 10600 Field Repair Guide 7/29/04
00030015 Ink supply defective (K)
00030016 Ink supply defective (C)
00030017 Ink supply defective (M)
00030018 Ink supply defective (LC)
00030019 Ink supply defective (LM)
10000100 CPU address error (storage misalignment)
10000180 CPU reserve command code exception error
0001000A CR home position sensor error
0001000C Head slide (PG) home position sensor error
0001000D Cover Sensor malfunction
0001000E Cover Sensor malfunction
0001000F CR motor PWM output faulty
0001001A Sub Tank Overfill (Y)
0001001B Head driver (TG) temperature error
0001001C Shutter Box home positon error
0001001D CR servo parameter error
0001001E PF servo parameter error
0001002D Reset the Cleaner Counter in Maintenance Mode 2
0001FFFF Reset the Print Head Counter in Maintenance Mode 2
0002000B Internal memory shortage error
0002000C Review error
Error Codes Printer Component, Software Item, LCD Display, Printer Button Page 55.
Page 56

Stylus Pro 10600 Field Repair Guide 7/29/04
0003001A Ink supply defective (Y)
0003001B Gap Adjustment range error
0003001C Time out in case of no print finishing with ASIC
1. Exchange Driver Board
100000E0 CPU address error (load misalignment)
100001A0 CPU slot illegal command exception error
100005C0 CPU DMA address error
10000xxx CPU error
D0120013 Module communication error
D012001E Engine side ASIC command transmition overflow error
1. Exchange Driver Board
D012001F Engine side ASIC command receiption overflow error
1. Exchange Driver Board
D0xxxxxxxx Program error
FFFFxxxx OS kernel detection error
Error Codes Printer Component, Software Item, LCD Display, Printer Button Page 56.
Page 57

Stylus Pro 10600 Field Repair Guide 7/29/04
Firmware History
Stylus Pro 10600 Current Firmware Ver. TP01627.2527.1726
Release date :February 12th, 2002
1. A 90 second wait time was added between cuts to allow the Cutter Solenoid to cool.
2. The installation information for the Photo Accelerator Module and Type-B interface Card was
added to the Adjustment Variable Print sheet, in Self-diagnostics mode.
3. The Print Head is now capped if AC power is removed when in the Self-diagnostics mode,
preventing damage to the Print Head and the Cleaning/Capping Station .
4. Horizontal banding was resolved by modifying the paper feed value for the following media.
4.1 Enhanced Matte
4.2 Poster Board
4.3 Smooth Fine Art Paper (Sheet)
4.4 Textured Fine Art Paper (Sheet)
5. Service request 00010006 is resolved when executing the Test -> Sensor in the Self-diagnostics
mode. During initializing of the Printer, the Carriage no longer hits against the Right Side Frame.
6. The default value for the Bi-d adjustment is changed to the center value used in the production
line.
Firmware History Printer Component, Software Item, LCD Display, Printer Button Page 57.
Page 58

Stylus Pro 10600 Field Repair Guide 7/29/04
Firmware: Updating From DOS
Firmware File Example: MP_231A_181A_0517.IPL
The latest Firmware file may be different than the example use in this procedure.
The latest Firmware file should always be used.
1. Connect the Printer to the PC via a Parallel Printer Cable.
2. Copy the firmware file to the ROOT directory of you Hard Drive.
3. Boot your Computer in DOS mode.
4. Ensure that you are logged to C:\
5. Type: copy (name of firmware file.extension) lpt1:/b (do not press the Enter key)
5.1 Example: copy MP_231A_181A_0517.IPL lpt1:/b
Note: Step 4 prepares the computer to send the firmware. It is important to send the file quickly after
preparing the printer to receive it. At this point, when the Enter key is pressed, the file will be sent.
6. Turn on the Printer while holding down the Cleaning + Paper Source + Cut/Eject buttons.
6.1 The display will read F/W Download
7. Press the Enter key on the PC key to start the firmware update.
7.1 Once completed, the display will read Update Complete and all Control Panel LED’s will be ON.
8. Turn off the Printer.
Firmware: Updating From DOS Printer Component, Software Item, LCD Display, Printer Button Page 58.
Page 59

Stylus Pro 10600 Field Repair Guide 7/29/04
Firmware: Updating From Windows (WinPRN Utility)
Firmware File Example: MP_231A_181A_0517.IPL
The latest Firmware file may be different than the example use in this procedure.
The latest Firmware file should always be used.
1. Execute WINPRN.EXE Located in the Utilities folder on your Epson Resource CD.
2. Click Open.
OPEN
3. Locate Firmware File
Firmware File (MP_231A_181A_0517.IPL)
File Type *.*
Open
3.1 Change File Type to *.*
Firmware: Updating From Windows (WinPRN Utility) Printer Component, Software Item, LCD Display, Printer Button Page 59.
Page 60

Stylus Pro 10600 Field Repair Guide 7/29/04
3.2 Highlight Firmware file (MP_231A_181A_0517.IPL)
3.3 Click on Open
4. Turn on the Printer while holding down the Cleaning + Paper Source + Cut/Eject buttons.
4.1 The display will read F/W Download.
5. Click START PRINT to copy file to printer.
Start Print
5.1 Once completed, the display will read Update Complete and all Control Panel LED’s will be ON.
6. Turn off the Printer.
Firmware: Updating From Windows (WinPRN Utility) Printer Component, Software Item, LCD Display, Printer Button Page 60.
Page 61

Stylus Pro 10600 Field Repair Guide 7/29/04
Glossary
Artifact A defect, that is within an image. It can mean something on the graphic that was not
intended, or something missing that was intended. All image quality defects are artifacts.
Bi-Directional Adjustment: An electronic adjustment, that ensures that a printer can coordinate left to right, with
right to left, printing.
Capped Position: The print head at it’s stand by position, with the cap mechanism sealing the nozzles.
Coating: The top layer of graphics paper (media) that consists of a special substance
designed to trap ink and keep it from being absorbed into the paper fibers. Non-paper
based ink jet media uses coating to allow the ink to bond with the surface. A coatings
purpose is to minimize dot gain, and control saturation.
Color Shift: An unintended change of a gradient or tone.
Continuous Tone: The qualities of a photograph that makes an image appear real. The smooth and life-
like transition from one color shade to the next, like in a photograph. Epson Ink Jet
printers are not continuous tone printers. But when working properly, their printed
images fool the human eye into seeing continuous tone transitions.
Debris: A term that refers to unintended ink on the page deposited by debris dropping from
the print head.
Deflected Nozzle: A nozzle is firing, but the ink drop is not landing where it is intended too. Irregular
spacing on the nozzle check pattern indicates this condition.
Dithering: The dot pattern placed on the printed surface to create and image. Also known as
screening.
Dot Gain: A drop of ink tends to travel out from its point of impact, as the media absorbs it. The
purpose of the coating (on the media) is to minimize dot gain.
Glossary Printer Component, Software Item, LCD Display, Printer Button Page 61.
Page 62

Stylus Pro 10600 Field Repair Guide 7/29/04
Drop of Ink: Ink that appears to have dripped from the print head, or any other component of the
ink supply.
Dye Ink: Ink that colors the printed surface with dye. It is less durable than pigment ink, but
has a wider color range (gamut).
Electronic Alignments: Printer adjustments, which are performed using software routines that, allow the
printer to compensate for physical variations in its mechanism.
Error Diffusion: The type of dithering (screening) proprietary to Epson, that employs a random dot
pattern to ensure that the human eye can discern no pattern.
Flight Time: The time it takes a drop of ink to travel from the print head to the printable surface.
Gamut: The range of colors that a printer can produce.
Ghosting: A term that refers to components of an image that are intended to be on top of each
other (or adjacent), but are offset.
Gradient: A smooth transition between one color shade, and the next. A continuous tone image
requires a smooth gradient for all its tonal shifts.
Grainy: A breakdown of the “illusion of continuous tone”. A printed image that does not have
smooth tonal transition, and sharp detail.
Head Angular Adjustment:
Glossary Printer Component, Software Item, LCD Display, Printer Button Page 62.
A term that refers to a mechanical print head alignment that ensures that an ink jet’s print heads
nozzles are on the same vertical plane. (Also known as the B head slant or the C head slant.) The
head is rotated until it is vertically linear.
Page 63

Stylus Pro 10600 Field Repair Guide 7/29/04
Head Gap Adjustment:
An electronic print head adjustment that ensures that the printer knows the exact distance between
nozzle sets on separate heads. Also known as Head L/R and Uni-Di..
Head ID: The calibration value written on the print head that allows the printers electronics to
compensate for the print heads “personality” (inaccuracies).
Head Linear Adjustment:
A mechanical print head alignment that ensures that on a two-head ink jet printer that all the nozzles are on the same horizontal plane. (Also known as Head Height and BC Head Slant.) The right
head is moved in relation to the left head.
Home Position: The print head’s horizontal reference position, as determined by the Home Position
Sensor
Horizontal Banding: An image defect that extends from the left, to the right margin (parallel to the direction
of print head movement). The defect could be a lighter or darker “band” than is
intended. It usually repeats, with the same interval, from the top margin to the bottom.).
Horizontal Over-lap: A type of horizontal banding, where multiple print head passes overlap while printing.
The banding looks darker than the intended image. Multiple passes of the print head
should place ink on the paper next to, but not on top of earlier passes.
Glossary Printer Component, Software Item, LCD Display, Printer Button Page 63.
Page 64

Stylus Pro 10600 Field Repair Guide 7/29/04
Horizontal Under-lap: A type of horizontal banding, where multiple print head passes have a space
between them. The banding looks lighter than the intended image. Multiple passes of
the print head should place ink on the paper exactly next to earlier passes with no
space in between.
Illusion of Continuous Tone. A term that refers to “fooling” the human eye into perceiving a dot matrix image as a
photograph (continuous tone image). Epson ink jet printers are not continuous tone
printers. However, when working properly, their printed images fool the human eye
into seeing continuous tone transitions
Ink Color Contamination: The intended color of the ink supply has been altered.
Ink Impurities: Foreign objects in the ink supply.
Margin Shift: A term that refers to an image with irregular right and left side margins.
Mechanical Alignments: Printer adjustments, that requires physically moving parts of the mechanism.
Media: The surface that is being printed on, usually paper.
Metamerism: The different appearance of colors caused by different light sources and viewing
angles
Micro Weave: The way an Epson Ink Jet printer interlaces (weaves) bands of and image during
printing.
Moiré Pattern: A repetitive pattern, within an image, which is not intended. I can appear like a pais-
ley or herringbone pattern.
Over Saturation: Too much ink has been applied to the printable surface for the media to support.
Paint Brush Effect: Something horizontally across the printed surface, that was not intended. Usually
caused by an ink soaked fiber hanging off the print head.
Pigment Ink: Ink that deposits colored particles (pigment) on the printed surface to create an
image. It is more durable than dye based ink, but does not have as wide a color
range (gamut).
Glossary Printer Component, Software Item, LCD Display, Printer Button Page 64.
Page 65

Stylus Pro 10600 Field Repair Guide 7/29/04
Pixilated: An image quality issue that is caused by a low-resolution image printed at high reso-
lution.
Platen Gap: The distance between the print head, and the printable surface.
Rippling: A term that refers to a condition caused by over saturated paper warping.
Saturation: The amount of ink applied to the printed surface.
Screening: The dot pattern placed on the printed surface to create and image. Also known as
dithering.
Skew: Crooked paper in the printer.
Smear: An image that has been rubbed by something, causing it to be deformed, or
smeared. The direction or any repetition of the smear should be noted.
Smudge: Something on the printed surface, that was not intended. Usually transferred to the
page because of contact with a dirty roller or the print head. Any repetition should be
noted and measured.
Sublimation Ink: Ink that is first printed on thermal transfer media, and then transferred using heat to
another surface.
Sympathetic Nozzle: A nozzle that is not intended to fire, firing in conjunction with an intended nozzle.
Tone: The specific shade of a color.
Under Saturation: Not enough ink has been applied to the printable surface to properly saturate the
media.
UN-sharp: “Fuzzy “qualities in an image usually caused by too much dot gain.
Vertical Banding, Irregular: Vertical bands perpendicular to the direction of print head movement, that are not lin-
ear. Usually created by paper “rippling”, caused by over saturation.
Glossary Printer Component, Software Item, LCD Display, Printer Button Page 65.
Page 66

Stylus Pro 10600 Field Repair Guide 7/29/04
Vertical Banding, Linear: An image defect that extends from the top, to the bottom margin (perpendicular to the
direction of print head movement). It usually repeats, with the same interval, from the
left margin to the right.
White Specks: A term that indicates that the intended image has small missing areas where no ink
has been deposited.
Glossary Printer Component, Software Item, LCD Display, Printer Button Page 66.
Page 67

Stylus Pro 10600 Field Repair Guide 7/29/04
Image Quality Diagnosis and Repair
Horizontal Banding:
1. Perform a Nozzle Check from the Adjustment menu within Self-Diagnostic Mode.
1.1 Inspect printed pattern for missing, deflected or sympathetic nozzle(s).
1.1.1 Perform 2 Cleaning Cycles then reprint Nozzle Check.
1.1.1.1 Missing or deflected nozzle(s)
1.1.1.1.1 Clean the three Caps, Wipers, and Wiper Cleaners and repeat cleaning
cycles.
1.1.1.1.2 Inspect the Cap Assemblys and replace if it is damaged.
1.1.1.1.3 Replace the Print Head.
1.1.1.2 Sympathetic nozzle(s)
1.1.1.2.1 Replace the Print Head.
2. Verify that the paper is not binding:
2.1 While loading.
2.2 While ejecting.
2.3 On the spindle.
3. Verify the Head Slant alignment is correct (A13 Slant)
3.1 Print and inspect the pattern.
3.2 Perform adjustment if required.
4. Verify Platen Gap, with the Printer Settings section, of the SelecType Menu.
4.1 Two settings are available: Standard and Wide.
Image Quality Diagnosis and Repair Printer Component, Software Item, LCD Display, Printer Button Page 67.
Page 68

Stylus Pro 10600 Field Repair Guide 7/29/04
4.2 Set to the appropriate setting to match the media (default is Standard)
4.3 Verify that the platen gap is being set to the proper position by observing the Platen Gap HP Flag.
4.3.1 Inspect Thickness Sensor Actuator for proper position.
4.3.2 Adjust if required.
5. Verify the Printer’s Driver type and settings.
5.1 Non-Epson RIPS and Drivers
5.1.1 Verify that they support paper types.
5.1.1.1 If they do not, saturation and banding issues are probable.
5.1.1.1.1 Adjust paper settings using the SelecType Paper Config menu.
5.1.2 Verify that they support MicroWeave
5.1.2.1 If they do not orizontal banding is probable.
5.2 Epson Printer Driver settings.
5.2.1 Set Resolution (1440 High Speed- OFF for best quality)
5.2.1.1 Slight banding may occur at lower resolutions. That is within the printer's specifications.
5.2.2 Verify that MicroWeave is enabled.
5.2.3 Verify Screening Method (Error Diffusion is the best choice).
5.2.4 Verify Paper settings.
5.2.4.1 Type (Plain, Semi-Gloss, Luster, etc.)
5.2.4.2 Configuration (Paper Thickness, Suction, etc.)
6. Verify media and ink vendors.
6.1 Non-Epson ink and media can result in saturation and banding issues.
7. Inspect Paper Feed Encoder Disc for cleanliness.
Image Quality Diagnosis and Repair Printer Component, Software Item, LCD Display, Printer Button Page 68.
Page 69

Stylus Pro 10600 Field Repair Guide 7/29/04
8. Perform Paper Feed Belt Tension Adjustment.
9. Perform the Feed Length Adjustment.
10. Verify that the printer doesn't pause during printing (caused by a slow computer).
10.1 If the printer pauses, it can create a horizontal band (especially on pigment ink printers). To minimize the
problem:
10.1.1 Verify that the Printer’s Interface is sufficiently fast.
10.1.1.1 Use Fire Wire when not using the Photo Accelerator option ( Non Epson Rips or Drivers)
10.1.2 Set Spool Settings within the Driver Properties
10.1.2.1 Select Start printing after last page is spooled
10.1.3 Set High Speed OFF within the printer driver.
11. For UltraChrome Printers only, perform the Paper Feed Adjustment (Driver or SelecType).
NOTE: (This adjustment is the responsibility of the User. Adjustment must be performed from the
customer’s computer. The compensation value is attached to the driver.)
12. Verify correct Head ID (Print Head calibration value)
12.1 Compare the label on the Print Head and “Head ID” value located in the Adjustment section of the SelfDiagnostic Mode.
13. Verify that the printer doesn't pause during printing (caused by a slow computer).
13.1 If the printer pauses, it can create a horizontal band (especially on pigment ink printers). To minimize the
problem:
13.1.1 Set Spool Settings within the Driver Properties
13.1.1.1 Select Start printing after last page is spooled
13.1.2 Set High Speed OFF within the printer driver.
Image Quality Diagnosis and Repair Printer Component, Software Item, LCD Display, Printer Button Page 69.
Page 70

Stylus Pro 10600 Field Repair Guide 7/29/04
14. Replace the Paper Feed Motor (very rare)
Vertical Banding, Linear
1. Print with High Speed turned off (Uni-directional).
1.1 If the quality improves perform a Bi-directional adjustment.
2. Verify the Printer Driver settings.
Note: Non-Epson drivers may need to have a custom profile created to ensure optimum print quality.
Non-Epson drivers may not support MicroWeave. Use the Epson driver, supplied media, and image to
eliminate customer media, driver and application issues.
2.1 Set Resolution (1440 High Speed- OFF for best quality)
2.1.1 Slight banding may occur at lower resolutions. That is within the printer's specifications.
2.2 Verify that MicroWeave is enabled.
2.3 Verify Screening Method (Error Diffusion is the best choice).
2.4 Verify Paper settings.
2.4.1 Type (Plain, Semi-Gloss, Luster, etc.)
2.4.2 Configuration (Paper Thickness, Suction, etc.)
3. Perform the Head LR Adjustment
4. Verify Platen Gap, with the Printer Settings section, of the SelecType Menu.
4.1 Two settings are available: Standard and Wide.
4.2 Set to the appropriate setting to match the media (default is Standard)
4.3 Verify that the platen gap is being set to the proper position by observing the Platen Gap HP Flag.
4.3.1 Inspect Thickness Sensor Actuator for proper position.
4.3.2 Adjust if required.
Image Quality Diagnosis and Repair Printer Component, Software Item, LCD Display, Printer Button Page 70.
Page 71

Stylus Pro 10600 Field Repair Guide 7/29/04
Vertical Banding, Irregular: (Paper Rippling)
1. Verify Printer Driver settings.
Note: Non-Epson drivers may need to have a custom profile created to ensure optimum print quality.
Non-Epson drivers may not support MicroWeave
1.1 Set Resolution (1440 High Speed- OFF for best quality)
1.1.1 Slight banding may occur at lower resolutions. That is within the printer's specifications.
1.2 Verify that MicroWeave is enabled.
1.3 Verify Screening Method (Error Diffusion is the best choice).
1.4 Verify Paper settings.
1.4.1 Type (Plain, Semi-Gloss, Luster, etc.)
1.4.2 Configuration (Paper Thickness, Suction, etc.)
Note: Very High humidity may contribute to the issue (wet paper). Use the Epson driver, supplied
media, and image to eliminate customer media, driver and application issues.
2. Verify correct Head ID (Print Head calibration value)
2.4.1 Compare Label on the Print Head with the value displayed in the Check: Adjustment section of
Self Diagnostic Mode.
Over or Under Saturation: (See Vertical Banding Irregular
Grainy:
3. Verify Platen Gap, with the Printer Settings section, of the SelecType Menu.
3.1 Four settings are available: Standard and Wide.
3.2 Set to the appropriate setting to match the media (default is Standard)
3.3 Verify that the platen gap is being set to the proper position by observing the Platen Gap HP Flag.
Image Quality Diagnosis and Repair Printer Component, Software Item, LCD Display, Printer Button Page 71.
Page 72

Stylus Pro 10600 Field Repair Guide 7/29/04
3.3.1 Inspect Thickness Sensor Actuator for proper position.
3.3.2 Adjust if required.
4. Perform the Head Angular Adjustment.
5. Perform the Bi-directional Adjustment.
6. Perform the Head LR Adjustment.
Un-sharp: Caused by to much dot gain: (See Vertical Banding Irregular)
Smear: typically caused by one or more of the following reasons.
1. Slow dry time caused by 3rd party media.
1.1 Try with the Epson supplied media, image and driver.
2. Slow dry time caused by 3rd party ink.
3. Slow dry time caused by over saturated media.
3.1 Try with the Epson supplied media, image and driver.
Debris:
1. Clean the edges (metal) of the Print Head (DO NOT touch Print Head nozzle area).
2. Clean the 3 Caps, Wiper Blades, and Wiper Cleaners.
Note: Look for fibers from cotton or rag based media, attracted to the Print Head and saturated with ink.
It collects and drops onto the media.
Image Quality Diagnosis and Repair Printer Component, Software Item, LCD Display, Printer Button Page 72.
Page 73

Stylus Pro 10600 Field Repair Guide 7/29/04
Smudge:
1. Clean the Paper Feed Rollers.
1.1 (Ink or dirt accumulation)
2. Ensure the Print Head is in the cap position while loading paper.
2.1 (Paper contact with the Print Head during loading)
3. Increase Suction to Normal or feed paper an extra 3 inches.
3.1 (To much curl on the leading edge of the media for the Suction Fan to over come, results in contact
between the media and the Print Head)
Drop of Ink:
1. Inspect the Ink Supply Tubes for damage (Leakage).
2. Inspect Dampers for correct installation or damage (Leakage).
2.1 Inspect the O-ring inside the Joint Screw (fitting that joins the Ink Supply Tube to the Damper).
2.1.1 Look for a deformed O-ring caused by over tightening the Joint Screw
Paint Brush Effect: Ink saturated fibers on the Printhead being dragged across the media.
3. Clean the edges (metal) of the Print Head (DO NOT touch the Print Head nozzle area)
3.1 Clean Cap, Wiper Blade, and Wiper Cleaner Assembly
Note: Look for fibers from cotton or rag based media, attracted to the Print Head and saturated with ink.
It collects and drops onto the media.
Pixilated:
Image Quality Diagnosis and Repair Printer Component, Software Item, LCD Display, Printer Button Page 73.
Page 74

Stylus Pro 10600 Field Repair Guide 7/29/04
1. Use the Epson supplied image to eliminate the following:
1.1 Application
1.2 Low quality (resolution) image
2. Perform a Bi-Directional Adjustment
Image Quality Diagnosis and Repair Printer Component, Software Item, LCD Display, Printer Button Page 74.
Page 75

Stylus Pro 10600 Field Repair Guide 7/29/04
Ink/Cleaning Cartridges
Cartridge, Cleaning 1214261
Cartridge, Draining 1060627
Cartridge, Ink, Dye, Black 1062232
Cartridge, Ink, Dye, Cyan 1062235
Cartridge, Ink, Dye, Light Cyan 1062237
Cartridge, Ink, Dye, Light Magenta 1062236
Cartridge, Ink, Dye, Magenta 1062234
Cartridge, Ink, Dye, Yellow 1062233
Cartridge, Ink, Archival, Black 1062244
Cartridge, Ink, Archival, Cyan 1062247
Cartridge, Ink, Archival, Light Cyan 1062249
Cartridge, Ink, Archival, Light Magenta 1062248
Cartridge, Ink, Archival, Magenta 1062246
Cartridge, Ink, Archival, Yellow 1062245
Cartridge, Ink, UltraChrome, Black, Matte 1155887
Cartridge, Ink, UltraChrome, Black, Photo 1155881
Cartridge, Ink, UltraChrome, Cyan 1155882
Cartridge, Ink, UltraChrome, Light Cyan 1155885
Cartridge, Ink, UltraChrome, Light Magenta 1155886
Cartridge, Ink, UltraChrome, Magenta 1155883
Ink/Cleaning Cartridges Printer Component, Software Item, LCD Display, Printer Button Page 75.
Page 76

Stylus Pro 10600 Field Repair Guide 7/29/04
Cartridge, Ink, UltraChrome, Yellow 1155884
Ink/Cleaning Cartridges Printer Component, Software Item, LCD Display, Printer Button Page 76.
Page 77

Stylus Pro 10600 Field Repair Guide 7/29/04
Missing Nozzle Diagnosis and Repair
Note: Inspect the printer and media for dust or fiber accumulation. Excessive “dirt” will cause missing
nozzles.
Some Missing Nozzles, One or more Colors
1. Check Cap Assembly for mechanical problems and “dirt”.
1.1 Clean the three individual Caps.
1.2 Check Wiper Blades for flaws.
1.3 Clean the Wiper Blades.
1.4 Clean Wiper Blade Cleaners.
2. Puddle the Caps and park the Print Head for 30 minutes.
2.1 Fill the Caps with as much water as possible.
2.2 Park the Printhead on the Cap Assembly.
3. Perform 2 cleaning cycles.
3.1 Re-test the Nozzles.
3.2 Repeat step 3 if there is progress.
4. Replace the Print Head.
Note: Inspect the printer and media for dust or fiber accumulation. Excessive “dirt” will cause missing
nozzles.
Missing Nozzle Diagnosis and Repair Printer Component, Software Item, LCD Display, Printer Button Page 77.
Page 78

Stylus Pro 10600 Field Repair Guide 7/29/04
All Nozzles Missing, One or More Non-Paired Colors (B,DC) (LC,LM) (DM,Y)
1. Determine the Waste Ink Tube that corresponds to the missing color.
2. Perform a cleaning cycle.
3. Compare the Waste Ink Tube that relates to the missing color against the other two tubes. There
should be equal ink volume on all three tubes.
4. Determine whether the Ink Cartridge Solenoid that corresponds to the missing color activates to
refill the sub tank on the Print Head. (It may take up to 4 cleaning cycles to activate a solenoid.)
4.1 If the ink flow is lower than the other tubes, and the related solenoid does not activate:
4.1.1 Replace the Print Head.
4.2 If the ink flow is equal on all three tubes, and the related solenoid does activate:
4.2.1 Replace the Driver Board.
All Nozzles of One or More Color Pair(s) Missing (B,DC) (LC,LM) (DM,Y)
1. Determine the Waste Ink Tube that corresponds to the missing color.
2. Perform a cleaning cycle.
3. Compare the Waste Ink Tube that relates to the missing color against the other two tubes. There
should be equal ink volume on all three tubes.
4. Determine whether the Ink Cartridge Solenoid that corresponds to the missing color activates to
refill the sub tank on the Print Head. (It may take up to 4 cleaning cycles to activate a solenoid.)
4.1 If the ink flow is substantially lower than the other tubes, and the related solenoid does not activate:
Missing Nozzle Diagnosis and Repair Printer Component, Software Item, LCD Display, Printer Button Page 78.
Page 79

Stylus Pro 10600 Field Repair Guide 7/29/04
4.1.1 Replace the Cap Assembly and check for proper operation.
4.1.2 If the Cap Assembly does not repair the Printer, replace the Print Head.
4.2 If the ink flow is equal on all three tubes, and the related solenoids activate:
4.2.1 Replace the Driver Board.
All Nozzle Pairs Missing
1. Perform a cleaning cycle.
2. Determine whether the Waste Ink Tubes are passing ink. There should be and substantial volume
on all three tubes.
3. Determine whether all six Ink Cartridge Solenoids are activating to refill the sub tanks on the
Print Head. (It may take up to 4 cleaning cycles to activate a solenoid.)
4. If there is no or uneven ink flow on all three tubes, and the related solenoids do not activate:
4.2.1 Replace the Cap Assembly and check for proper operation.
4.2.2 If the Cap Assembly does not repair the Printer, replace the Print Head
4.2.3 If there is substantial ink flow on all three tubes, and the related solenoids activate
4.2.1 Replace the Driver Board.
Missing Nozzle Diagnosis and Repair Printer Component, Software Item, LCD Display, Printer Button Page 79.
Page 80

Stylus Pro 10600 Field Repair Guide 7/29/04
New Print Head for DYE Printers
A new Print Head and a new part number is available to address the issues listed below. The new Print Head is for
DYE model Stylus Pro 10600 inkjet printers ONLY.
• One or more nozzles fail.
• Horizontal banding caused by nozzle issues.
• One or more colors completely missing.
• Service Request 0001001B, Head Driver Temperature error.
Interchangeability:
For the Archival model of this printer continue using the original print head part number (F086030) until this inventory
is depleted. When the inventory of the original print head is depleted the New Style print head part number (F086031)
will automatically be substituted.
Updated Print Head Part Numbers:
New Part Number Part Description Replaces Part Number
Stylus Pro 10600:
F086031 Print Head Set ARC/DYE/
UCM
F086030
Note:
Stylus Pro 10600 DYE Model - Inventory of the New Style print head will be available as of
5/8/03.
Continue using existing Print Head until then.
Stylus Pro 10600 Print Head is not compatible or interchangeable with Stylus Pro 10000 Print Head. DO
NOT substitute these parts.
Field Instructions:
Perform nozzle checks and cleaning’s when ever a nozzle issue is observed to recover the Print Head. Only when
standard nozzle recovery procedures fail to recover nozzle issues should the Print Head be replaced.
New Print Head for DYE Printers Printer Component, Software Item, LCD Display, Printer Button Page 80.
Page 81

Stylus Pro 10600 Field Repair Guide 7/29/04
Operational Sequences
Compare the Printers operation to the following sequences.
1.
Technician Action What You Should See
2.
Turn on power, no paper
loaded, and the Paper
Note: the following
sequence and the
1. The Cap Assembly drops to release the Print Head.
2. The Shutter Box initializes and finds it’s home posi-
Release Lever in the
“Secured” position.
sequence to the
right, occur
simultaneously.
Any failure of one
sequence is
reported after
completion of both
sequences
1. The Air valve Solenoid
closes.
2. The Air Compressor
pressurizes the Ink Car-
tridges.
3. The Air Pressure Sen-
sor detects 1.1 atmospheres of pressure.
4. The Compressor Motor
tion.
3. The Paper Release Solenoid locks the Paper
Release Lever.
4. The Print Head goes to it’s home position.
5. The Platen Gap Mechanism finds it’s home position.
6. The Print Head moves away from home position.
7. The Wiper Blades clean themselves.
8. The Print Head moves back to it’s home position.
9. The platen gap is set.
10.The Cap Assembly engages and cleans the Print
Head.
11. The Flushing Box Fan turns on.
12. The Printer performs an Auto nozzle check.
13. The Platen Gap is set.
14. The Paper Release Solenoid unlocks the Paper
Release Lever.
16. The Printer displays the Paper Out Light.
turns off.
Operational Sequences Printer Component, Software Item, LCD Display, Printer Button Page 81.
Page 82

Stylus Pro 10600 Field Repair Guide 7/29/04
3.
Technician Action What You Should See
4.
Load roll paper
17. The Printer displays press pause.
18. The paper loads to P-front sensor.
19. The platen gap is set.
20. The P-Edge sensor checks the media width.
21. The P-Edge sensor checks the leading edge of the
media.
22. The Platen Gap is set.
23. The paper is moved to the “top of form” position.
24. The Printer displays Ready.
Operational Sequences Printer Component, Software Item, LCD Display, Printer Button Page 82.
Page 83

Stylus Pro 10600 Field Repair Guide 7/29/04
Paper Feed Belt Tension Adjustment
Note: The following instructions are for the purpose of performing the belt tension adjustment when
the 4000g Tension Gauge is not available. Recommended tension is 3500g
1. Remove the Left Side Cover (7 Screws).
2. Loosen the 4 screws on the Fixing Bracket circled in FIG. 1.
3. Slide the Fixing Bracket in the direction indicated in FIG. 1.
4. While holding the Bracket in place, tighten the bottom left and top right screws to secure
Bracket evenly.
5. Secure remaining 2 screws.
6. Inspect the Belt tension by pressing with your finger as shown in FIG. 2.
7. The Belt will flex approximately a 1/8”. Refer to red circle in FIG. 2.
8.
Fig.1 Fig. 2
NOTE: If the Paper Feed Timing belt tension is to loose, Horizontal Banding will appear. Refer to the
Image Quality Diagnosis Document for more details on Horizontal Banding.
Paper Feed Belt Tension Adjustment Printer Component, Software Item, LCD Display, Printer Button Page 83.
Page 84

Stylus Pro 10600 Field Repair Guide 7/29/04
Paper Jam Errors
Paper Jam Errors do not relate to the Paper Feed Mechanism.
A Paper Jam Error indicates a Carriage motion issue
1. Check for mechanical binding of the Carriage Mechanism across the entire length of the
Carriage Rail.
2. Check the Carriage Encoder for proper operation using the Carriage Encoder test located in
Self Diagnostic Mode:Check Test section.
3. Check the Carriage Belt for the proper tension.
4. Replace the Carriage Encoder Strip.
5. Replace the Carriage Motor.
Paper Jam Errors Printer Component, Software Item, LCD Display, Printer Button Page 84.
Page 85

Stylus Pro 10600 Field Repair Guide 7/29/04
Paper Loading Errors (Roll)
1. Verify media type and vendor.
1.1 Epson or Non-Epson media.
1.2 Verify the media characteristics.
1.2.1 Not too transparent.
1.2.1.1 Media that is too transparent may not be recognized by the Paper Sensors.
1.2.2 Not too thin.
1.2.2.1 Thin media may skew.
1.2.2.2 Thin media may crease.
1.2.2.3 Thin media requires a High Tension Spindle.
1.2.3 Not too thick.
1.2.3.1 Thick media may retain its curl and:
1.2.3.1.1 “Hang up” while inserting.
1.2.3.1.2 Strike the Print Head when the media’s width is being verified.
1.3 Measure the width of the media.
1.3.1 The media must be exactly one of the supported widths.
1.3.1.1 10”, 24”, 36”, 44”
1.3.2 A slight size variation (1/4”) could cause a Paper Loading Error.
1.4 Verify that there is no printing on either side of the media that could confuse the Edge Sensor, causing a
loading error.
1.5 Try a different media for contrast.
2. The Reload Paper error can be generated when a print job is sent:
2.6 If the image’s page size is larger than the loaded media.
Paper Loading Errors (Roll) Printer Component, Software Item, LCD Display, Printer Button Page 85.
Page 86

Stylus Pro 10600 Field Repair Guide 7/29/04
2.7 If the Driver is set to Roll and the Printer’s Control Panel is set to Sheet (or vice versa).
3. Verify that the media is loaded correctly.
Leading edge
marks
Verify that the light colored Spindle Edge is on the
right side of the Printer.
Right edge marks
Verify that the Media is mounted on the Spindle
so that it feeds from the front of the Spindle.
Verify that the alignment marks are being
used as shown, when loading paper.
4. Blow the dust off of 2 Paper Sensors.
Insert a piece of paper, and bend it
forward. Look down through the
top right side of the Printer where
the paper is inserted.
Look on the left side of the
Print Head Mechanism.
Paper Loading Errors (Roll) Printer Component, Software Item, LCD Display, Printer Button Page 86.
Page 87

Stylus Pro 10600 Field Repair Guide 7/29/04
5. Clean the Timing Strip.
Open the Front Cover, and look up.
The Timing Strip is a long plastic strip that is supported by multiple metal brackets.
Metal Brackets
Timing Strip
5.1 Gently wipe the Timing Strip on both sides with a lightly moistened soft cloth.
Do not apply pressure, the Timing Strip scratches easily.
Do not pull the Timing Strip off of it’s Mounting Brackets.
6. Verify that there is not strong direct light shining on either Paper Sensor.
7. Verify that the Paper Sensors work.
7.1 Turn on the Printer while holding the Paper Feed +, Paper Feed -, and the Cut/Eject buttons.
7.1.1 The LCD will display Check:Test.
7.1.2 Press the Enter button.
7.1.3 Press the Paper Source button until the LCD displays Test: Sensor.
Paper Loading Errors (Roll) Printer Component, Software Item, LCD Display, Printer Button Page 87.
Page 88

Stylus Pro 10600 Field Repair Guide 7/29/04
7.1.4 Press the Enter button.
7.1.5 Press the Paper Source button until the LCD Displays Sen: RearAD.
Place a piece of paper in
the paper path on the right
side of the Printer.
Watch the 6 digits on the right side of the Control Panel LCD.
Remove the piece of paper, and look for a significant change in
the 6 digits on the right side of the display.
7.1.1 Press the Paper Source button until the LCD Displays Sen: FrontAD.
Place a piece of paper over the
paper sensor located on the bottom, right side of the paper path.
Watch the 6 digits on the right side of the Control Panel
LCD. Remove the piece of paper, and look for a significant
change in the 6 digits.
Paper Loading Errors (Roll) Printer Component, Software Item, LCD Display, Printer Button Page 88.
Page 89

Stylus Pro 10600 Field Repair Guide 7/29/04
7.1.2 Press the Paper Source button until the LCD Displays Sen: EdgeAD.
Place a business card under
the Sensor.
Watch the 6 digits on the right side of the Control Panel
LCD. Remove the business card, and look for a significant
change in the 6 digits on the right side of the display.
8. If the Edge AD Sensor does not react to media:
8.1 Re-seat the Print Head Foil Cables at both ends, that carry the signal to the Driver Board.
9. Edge Sensor adjustment:
9.1 Enter Self Diagnostics Mode by powering on the Printer while holding the Paper Source + Cut/Eject +
Paper Feed - buttons. The Display will indicate Check:Test
9.2 Press the Enter button once then navigate through the menus until the display indicates Test:Sensor.
9.2.3 Press the Enter button once then navigate to Sen:Edge AD xxx xxx.
9.2.4 Leaving the Front Cover open, Load plain photo copy paper into the Printer.
9.2.5 Release and move the print head over the paper and observe the changes to the Right Value
“XXX”
9.2.6 Confirm that the Right Value is within the range of 0C0 - 0CF with the Values.
Paper Loading Errors (Roll) Printer Component, Software Item, LCD Display, Printer Button Page 89.
Page 90

Stylus Pro 10600 Field Repair Guide 7/29/04
9.2.6.1 Adjust VR3 (rough) and VR6(fine) adjustment pots within the range stated above.
10. Top Margin adjustment: Perform Top/Side and bottom margin adjustments.
10.1 Enter Self Diagnostics Mode by powering on the Printer while holding the Paper Source + Cut/Eject +
Paper Feed - buttons. The Display will indicate Check:Test
10.2 Load Roll Paper into the Printer.
10.3 Navigate to Check:Adjustment and press the Enter button. The display will indicate ADJ:Check Skew
10.4 Navigate to ADJ: Top & Bottom and press the Enter button. The display will indicate ENTER:PRINT
10.4.1 Press the Enter button to print the adjustment pattern.
10.4.2 Measure the distance from the leading edge, the side(closest to the home postion) and the bottom
and record the measurements. Input the measured values into the respective areas.
The required measurements are as follows: Top and Side = 3mm: Bottom = 14mm. Once the printed
pattern measures the above values, no adjustments are required.
10.4.1 The LCD should display RearAD: followed by xxx xxx xxx (Example: 07F 040 04E).
11. If the above symptoms still occur, perform the following Mechanical Adjustment for the Edge
Sensor and then repeat Step 3: Top Margin adjustment.
11.1 Ensure that the Edge sensor is installed correctly. refer to figures below. If any changes have been made to
the physical position of the sensor steps 1 and 2 must be performed.
Correct Installation
Adjustment Point
Paper Loading Errors (Roll) Printer Component, Software Item, LCD Display, Printer Button Page 90.
Improper Installation
Page 91

Stylus Pro 10600 Field Repair Guide 7/29/04
Paper Thickness Sensor Actuator Repair
1. Remove the Screw and the Actuator pictured below.
Actuator and Screw
Pull the Actuator Bracket down and out,
Screw
in the direction of the arrow. The device
should be rotated 90 degrees to free
the “hockey stick” end.
2. Installation requires rotation of the “hockey stick” end to finesse the “end” through the paper path.
Paper Thickness Sensor Actuator Repair Printer Component, Software Item, LCD Display, Printer Button Page 91.
Page 92

Stylus Pro 10600 Field Repair Guide 7/29/04
Pause, to save Paper (Print Head Alignments)
While performing electronic Print Head adjustments:
1. When the Control Panel LCD displays Enter to Print:
1.1 If you press the Enter Button, all the existing alignment patterns will be printed.
1.1.1 No alignment is possible, just pattern accuracy verification. A lot of paper and time will be used.
1.2 If you press the Pause Button, the Control Panel will display the current value for pattern #1.
1.2.1 If you modify the value, and press Enter, pattern #1 will be printed using the new value.
1.2.2 If you do not modify the value, and press Enter, pattern #2 will be displayed.
1.2.3 Etc., etc…….
Current alignment pattern verification and alignment is possible at the same time. A lot of paper and
time can be saved.
Pause, to save Paper (Print Head Alignments) Printer Component, Software Item, LCD Display, Printer Button Page 92.
Page 93

Stylus Pro 10600 Field Repair Guide 7/29/04
Print Head Replacement
Many technicians prefer to enter the Head Rank Information (Print Head Calibration Information) before
installing the Print Head. If that is the case, enter the information before step 1, following the directions
listed in steps 33 and 34.
1. Unplug the Printer.
2. Remove the Control Panel.
3. Remove the Top Cover.
4. Remove the Left Side Cover.
5. Remove the Right Side Cover.
6. Place a drop cloth under the center of the Printer.
7. Release the Print Head by pulling back on the Cap Assembly as shown below.
8.
Print Head Replacement Printer Component, Software Item, LCD Display, Printer Button Page 93.
Page 94

Stylus Pro 10600 Field Repair Guide 7/29/04
9. Move the Print Head to the center of the Printer.
10. Remove the Print Head Cover by removing the two Screws as shown below.
Right Side
Screw
Left Side
Screw
11. Remove the Print Head Weight.
11.1 Move the Print Head to the far left side of the Carriage Rail.
11.2 Remove the 4 Screws pictured below.
2 long screws go
here
Weights and screws
View from below
Print Head Replacement Printer Component, Software Item, LCD Display, Printer Button Page 94.
Remove 4 screws
Page 95

Stylus Pro 10600 Field Repair Guide 7/29/04
12. Place a trash can with a liner under the Print Head as shown below.
Absorbent material to catch ink
Trash Can with liner, ready
Ink proof floor covering
13.
for the Print Head
14. Gently disconnect all Cables that connect the Print Head to the Printer.
14.1 6 foil Print Head Cables.
14.2 3 Multi Pin Connectors.
14.3 1 Ground Wire.
Print Head Replacement Printer Component, Software Item, LCD Display, Printer Button Page 95.
Page 96

Stylus Pro 10600 Field Repair Guide 7/29/04
15. Remove the small metal Spring Tension Bracket Assemblies from the left and right side of the
Print Head.
Glue the spring to the black plastic piece
for easier re-assembly.
16.
17.
Print Head Replacement Printer Component, Software Item, LCD Display, Printer Button Page 96.
Page 97

Stylus Pro 10600 Field Repair Guide 7/29/04
18. Remove the 2 Silver Plastic Screws shown below.
Silver Plastic Screw
Silver Plastic Screw
19. Remove the 2 Screws from the left and right Print Head Mounts, and slide out the Mounts.
Left side is shown here
2 Screws
20. Move the Carriage Mechanism to the left side of the Carriage Rail.
Print Head Replacement Printer Component, Software Item, LCD Display, Printer Button Page 97.
Page 98
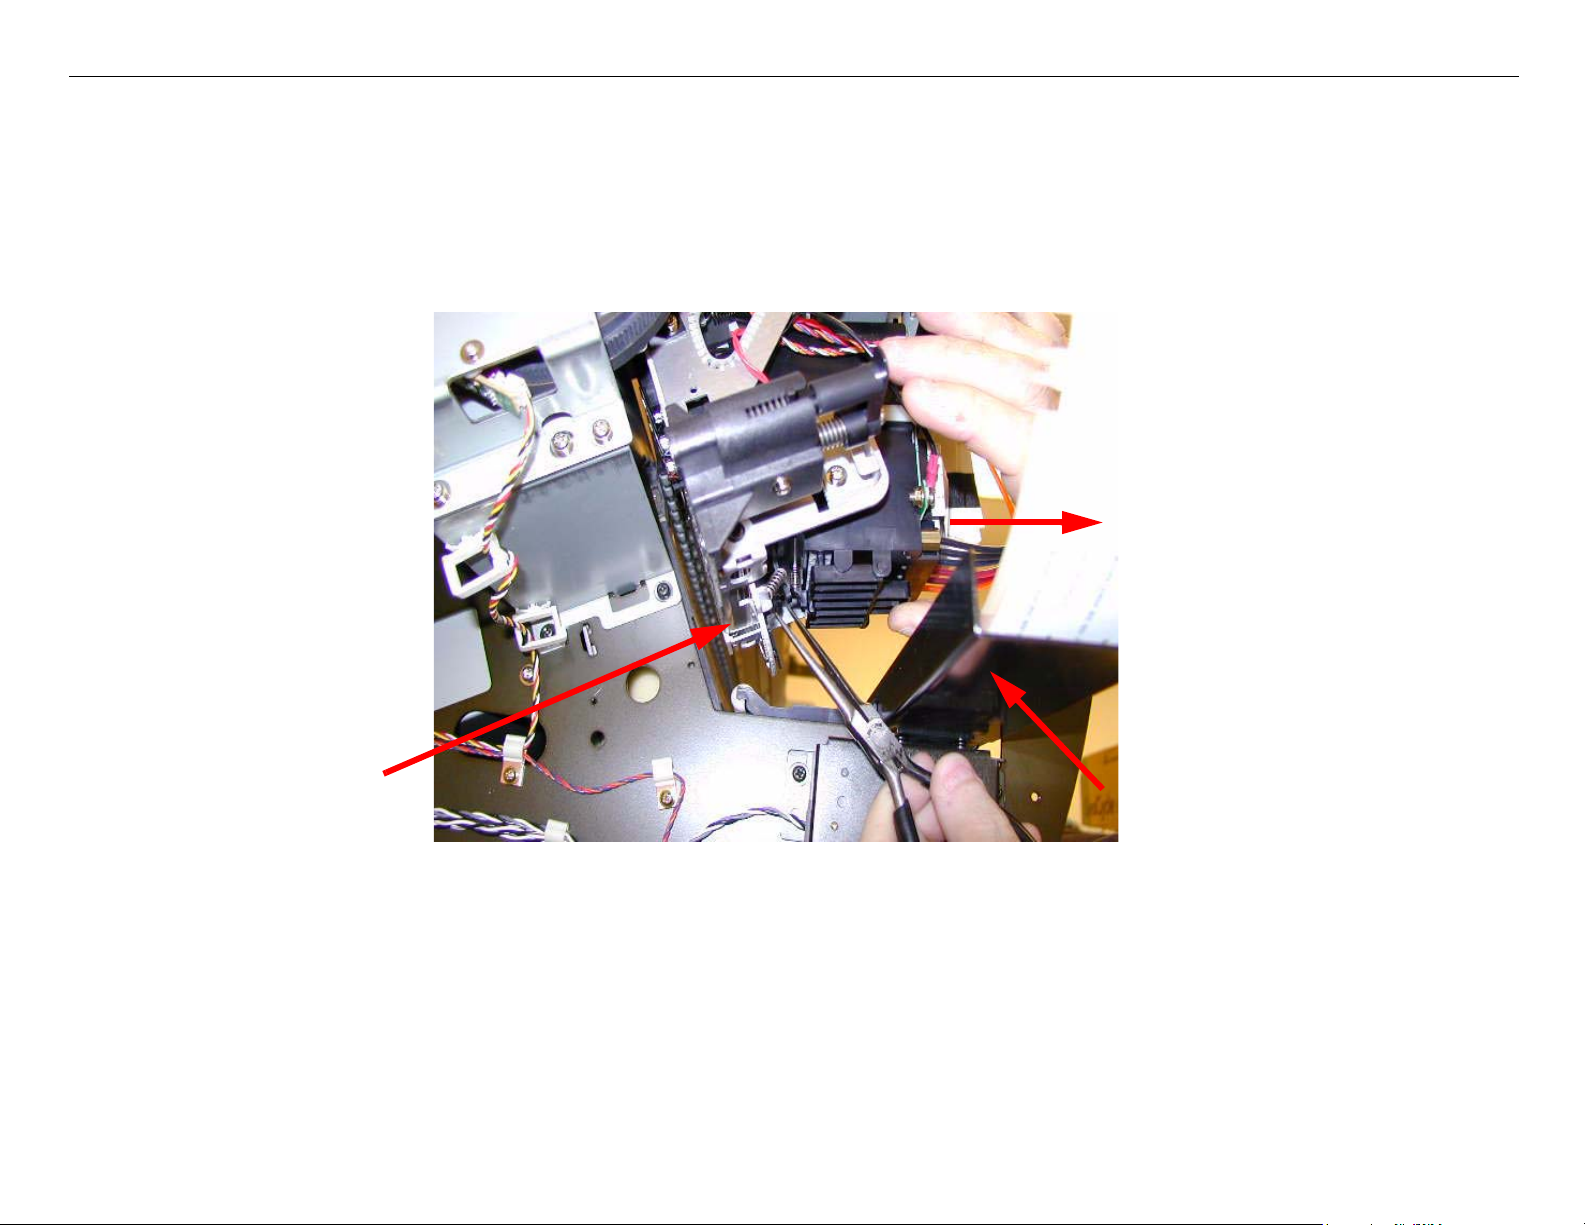
Stylus Pro 10600 Field Repair Guide 7/29/04
21. Remove the Print Head Alignment Tension Spring.
21.1 Move the Print Head Alignment Lever (A13 Slant) to the right, to release pressure on the Spring.
21.2 Gently grab the Spring with a pair of needle nose pliers.
21.3 Pivot the bottom of the Print Head away from the Carriage Mechanism to release pressure on the Spring.
21.4 Remove the Spring, but leave the Print Head in the Carriage Mechanism.
Pivot Print Head in this
direction to release the
spring.
Spring
View is from the floor looking
up at the Print Head
Print Head Replacement Printer Component, Software Item, LCD Display, Printer Button Page 98.
Page 99

Stylus Pro 10600 Field Repair Guide 7/29/04
22. Loosen the 6 Nuts shown below, and separate the Plastic Ink Tubes from the Plastic Fittings.
Six Nuts
23.
The Print Head is filled with Ink. It is important to keep the Print Head Nose and the Ink Tubes at their
current level (angle) while removing the Print Head.
24. Remove the Print Head.
24.1 Place paper towels in the waste basket.
24.2 Pour the ink in the Print Head into the paper towels in the waste basket.
24.3 Place the Print Head in a water tight baggie, and set aside.
Print Head Replacement Printer Component, Software Item, LCD Display, Printer Button Page 99.
Page 100

Stylus Pro 10600 Field Repair Guide 7/29/04
25. Photo copy the Print Head ID information on the new Print Head.
Head ID #2Head ID #3
26. Install the new Print Head.
26.1 Be careful not to scratch the nose of the Print Head when installing.
27. Replace the Print Head Weights.
28. Replace the Print Head Alignment Tension Spring.
28.1 Rock the Print Head away from the Carriage Mechanism.
28.2 Place the Spring in position with a pair of needle nose pliers.
28.3 Rock the Print Head back into position, compressing the Spring.
29. Replace Print Head Fasteners, but do not tighten any of them fully.
If you completely tighten any of the eight Screws, the Print Head will not align (A13 Slant).
Head ID #1
29.1 The 2 Print Head Mounts, and 4 Screws.
29.2 The 2 Sprint Tension Brackets.
29.3 The 2 course Screws that fasten the Print Head to the Print Head Mounts.
Print Head Replacement Printer Component, Software Item, LCD Display, Printer Button Page 100.
 Loading...