

Page 1

Color Image Scanner
All rights reserved. No part of t his publication may be rep roduced, stored in a retriev al syste m, or
transmitted in any form or by any means, electronic, me chanical, photocopying, recording, or
otherwise, without the prior written permission of SEIKO EPSON CORPORATION. No patent
liability is a ssumed with respec t to th e use o f the in forma tion con taine d here in. Neit her is any li abilit y
assumed for damages resulting from the use of the inform at ion contained herein.
Neither SEIKO EPSON CORPORATION nor its affiliates shall be liable to the purc hase r of this
product or third parties for damages, losses, costs, or expenses incurred by purchase r or thi rd parties
as a result of: acciden t, mis use, or abuse of this product or unaut horized modifications, repa irs, or
alterations to this product.
SEIKO EPSON CORPORATION and its affiliates shall not be liable against any damages or problems
arising from the use of any options or any consumable products other than those designated as Original
EPSON Products or EPSON Approved Products by SEIKO EPSON CORPORATION.
EPSON is a registered trademark of SEIKO EPSON CORPORATION.
IBM and PS/2 are registered tra demarks of International Busine ss M ac hi ne s C orporation.
Macintosh is a register ed trademark of Apple Compu te r, In c.
Microsoft and Wind ows are registered tradema rks of Mi crosoft Corporation in the Uni te d States of
America and other countries.
Presto! is a trademark of Ne wSoft Technology Corporati on.
Adobe and Acrobat ar e registered trademarks and Acrobat Reader is a trademark of Adobe Systems
Incorporated.
English
General Notice: Other product names used herein are for identification purposes only and may be
trademarks of their respe ct ive companies.
Copyright © 2000 by SEIKO EPSON CORPORATION, Nagano, Japan.
Page 2

Where to Find Information
■ Quick Start manual (this manual)
This guide provides you with information and instructions on how to unpack and set
up your scanner. It also provides instructions on using the online documentation
provided on CD-ROM.
■ Online Documentation
The CD-ROM shipp ed with you r scanner in cludes the following onl ine docume ntation
in PDF format.
Setup Guide
The Setup Guide shows how to set up the scanner and calibarate the screen, how to
install the scanner software and opti ons, and how to use the scanner and make basic
scans. It also shows how to make basic software settings and use the Start Button
function.
EPSON Scan Server & EPSON TWAIN Pro Network User’s Guide
Provides detailed instructions for installi ng and using EPSON Scan Server and EPSON
TWAIN Pro Network software.
EPSON Scanner Software Reference Guide
Provides basic information about scanning and details on EPSON TWAIN Pro and
other EPSON scanner software. Descriptions of EPSON TWAIN Pro also apply to
EPSON TWAIN Pro Network. Finally, it offers troubleshooting tips and customer
support information.
■ Information on EPSON TWAIN Pro and EPSON TWAIN Pro Network
Online help provides you with detailed information on EPSON TWAIN Pro and
EPSON TWAIN Pro Network. Click the ? button in the EPSON TWAIN Pro or EPSON
TWAIN Pro Network dialog box.
■ Information on PageManager and other Software
See the PageManager for EPSON, and other software documentation provided on the
EPSON Scanner Software CD-ROM.
Page 3

■ Contents
Safety Instructions . . . . . . . . . . . . . . . . . . . . . . . . . . . . . . . . . . . . . . . . . . . . . . 4
ENERGY STAR Compliance . . . . . . . . . . . . . . . . . . . . . . . . . . . . . . . . . . . . . 4
Warnings, Cautions, and Notes. . . . . . . . . . . . . . . . . . . . . . . . . . . . . . . . . . . . 5
System Requirements. . . . . . . . . . . . . . . . . . . . . . . . . . . . . . . . . . . . . . . . . . . . 5
For PCs. . . . . . . . . . . . . . . . . . . . . . . . . . . . . . . . . . . . . . . . . . . . . . . . . . . 5
For Macintosh. . . . . . . . . . . . . . . . . . . . . . . . . . . . . . . . . . . . . . . . . . . . . . 6
Unpacking the Scanner. . . . . . . . . . . . . . . . . . . . . . . . . . . . . . . . . . . . . . . . . . . 7
Attaching the Document Guide Strip. . . . . . . . . . . . . . . . . . . . . . . . . . . . 8
Scanner Parts . . . . . . . . . . . . . . . . . . . . . . . . . . . . . . . . . . . . . . . . . . . . . . 10
Setting Up the Scanner. . . . . . . . . . . . . . . . . . . . . . . . . . . . . . . . . . . . . . . . . . . 11
Choosing a Place for the Scanner. . . . . . . . . . . . . . . . . . . . . . . . . . . . . . . 11
Releasing the Transportation Lock. . . . . . . . . . . . . . . . . . . . . . . . . . . . . . 11
Plugging In the Scanner . . . . . . . . . . . . . . . . . . . . . . . . . . . . . . . . . . . . . . 12
Initialization . . . . . . . . . . . . . . . . . . . . . . . . . . . . . . . . . . . . . . . . . . . . . . . 12
Connecting the Scanner to Your Computer. . . . . . . . . . . . . . . . . . . . . . . . . . 13
Connecting the Scanner t o Your Computer Using the SCSI Interface . . 13
Connecting the Scanner to Your Computer Using the USB Interface. . . 19
Using the Online Manuals . . . . . . . . . . . . . . . . . . . . . . . . . . . . . . . . . . . . . . . . 21
Installing the Adobe Acrobat Reader. . . . . . . . . . . . . . . . . . . . . . . . . . . . 22
Accessing the Online Manuals. . . . . . . . . . . . . . . . . . . . . . . . . . . . . . . . . 22
Customer Support. . . . . . . . . . . . . . . . . . . . . . . . . . . . . . . . . . . . . . . . . . . . . . . 23
English
3
Page 4

■ Safety Instructions
Read all these instructions and save them for later reference. Follow all warnings and
instructions marked on the scanner.
■ Unplug the scanner before cleaning. Clean with a damp cloth only. Do not spill
liquid on the scanner.
■ Do not place the scanner on an unstable surface, or near a radiator or heat source.
■ Use only the type of power source indicated on the scanner’s label.
■ Connect all equipment to properly grounded power outlets. Avoid using outlets on
the same circuit as photocopiers or air control systems that regularly switch on and
off.
■ Do not allow the power cord become damaged or frayed.
■ If you use an extension cord with the scanner, make sure the total ampere rating
of the devices plugged into the extension cord does not exceed the cord’s ampere
rating. Also, make sure the total ampere rating of all d evices plugged into the wall
outlet does not exceed the wall outlet’s ampere rating .
■ Except as specifically explained in the documentation provided with this scanner,
do not attempt to service the scanner yourself.
■ Unplug the scanner and refer servicing to qualified service personne l under the
following conditions:
If the power cord or plug is damaged; if liquid has entered the scanner; if the
scanner has been dropped or the case damaged; if the scanner does not operate
normally or exhibits a distinct change in performance. (Do not adjust controls that
are not covered by the operating instructions.)
■ If you plan to use the scanner in Germany, observe the following:
To provide adequate short-circuit prote c tio n and ov er- cu rrent pro t ec tion for this
scanner, the building installation must be protected by a 10 or 16 Amp circuit
breaker.
■ ENERGY STAR Compliance
As an ENERGY STAR Partner, EPSON has determined that this product meets the
ENERGY STAR guidelines for energy efficiency.
The International ENERGY STAR Office Equipment Program is a voluntary partnershi p with the computer and
office equipment industry to promote the introduction of
energy-efficient personal computer s, mo nitors, printers,
fax machines, copiers, and scanners, in an effort to reduce
air pollution caused by power generatio n.
4
Safety Instructions
Page 5

■ Warnings, Cautions, and Notes
Warnings:
w
c
Notes:
contain import ant information and usef ul tips on the operation of your scanner.
must be followed carefully to avoid bodily injury.
Cautions:
must be observed to avoid damage to your equipment.
■ System Requirements
Before installing the scanner software, make sure that your system meets the following
requirements.
❚ For PCs
■ For Windows SCSI users
Scanner: EPSON EXPRESSION 1640XL
English
System: Microsoft® Windows® 2000, Windows® 98, Windows®95, or
Windows NT
Interface: Adaptec
Display: VGA or higher resolution monitor 640 × 480 screen resolution
(800 × 600 or higher recommende d) , and 256 color (65,000
color or higher recommended)
Note:
Color and tone re pro duc tion a re sub jec t to t he di spla y ca pa bility of your computer system, including the video card,
display monitor, and software. See the product documentation for details.
Warnings, Cautions, and Notes
®
4.0
®
SCSI adapter
5
Page 6

■ For Windows USB users
Scanner: EPSON EXPRESSION 1640XL
System: Microsoft® Windows® 2000 or Windows® 98 preinstalled
Interface: The computer’s USB port (TYPE A receptacle)
Display: VGA or higher resolution monitor 640 × 480 screen resolut ion
(800 × 600 or higher recommended), and 256 color (65,000
color or higher recommended)
Note:
Color and tone reproductio n ar e subject to the d isplay ca pability of your computer system, including the video card,
display monitor, and software. See the product documentation for details.
❚ For Macintosh
■ For Macintosh SCSI users
Scanner: EPSON EXPRESSION 1640XL
®
System: Apple
Interface: SCSI adapter
Display: Color Monitor, 640 ×480 screen resolution
Macintosh® with a PowerPC processor (excluding the
PowerBook 100) running OS 8.0 or l a ter
Note:
The included software ca nnot be used with the Multiple Users
function of Mac OS 9.
(or higher recommended), and 256 color (32,000 color or higher
recommended)
Note:
Color and tone reproductio n ar e subject to the d isplay ca pability of your computer system, including the video card,
display monitor, and software. See the product documentation for details.
6
System Requirements
Page 7

■ For Macintosh USB users
Scanner: EPSON EXPRESSION 1640XL
System: A USB-equipped Macintosh with OS 8.5 or later
Note:
The included software cannot be use d with the Multiple Users
function of Mac OS 9.
Interface: USB port
Display: Color Monitor, 640 × 480 screen resolution
(or higher recommended), and 256 color (32,000color or
higher recommended)
Note:
Color and tone re pro duc tion a re sub jec t to t he di spla y ca pa bility of your computer system, including the video card,
display monitor, and software. See your product documentation for details.
■ Unpacking the Scanner
Your EPSON EXPRESSION 1640XL comes shipped with CD-ROMs which include
the driver software that runs your scanner, and some additional items, depending on
the place of purchase.
English
Unpacking the Scanner
7
Page 8

scanner
power cord
USB interface cable
Document Guide and adjust pins
Document Guide Strip
❚ Attaching the Document Guide Strip
The document guide strip is designed to help you properly align your documents when
placing them on the document table.
8
Unpacking the Scanner
Page 9

Peel off the backing from the document guide strip, then place the strip directly on the
horizontal ruler of the document table as shown in the illustration.
English
Note:
Be sure to remove the document guide strip from the document table before using the
optional Automatic Document Feeder.
Unpacking the Scanner
9
Page 10

❚ Scanner Parts
document cover
carriage
(at the home position)
document table
operate button
USB interface
connector
SCSI ID rotary
switch
SCSI terminator
switch
optional interface slot
SCSI interface
connectors
ERROR light
READY lightstart button
option interface
connector
RESET button
operate light
transportation
lock lever
AC socket
10
Unpacking the Scanner
Page 11
■ Setting Up the Scanner
❚ Choosing a Place for the Scanner
Follow the guidelines below when selecting a location for your scanner:
■ Place the scanner on a flat, stable surface. The scanner will not operate properly
if it is tilted at an angle.
■ Place the scanner close enough to the comput er for th e in terface cable to reach it
easily.
■ Place the scanner near a wall outlet where the power cord can be easily unplugged.
■ Allow space behind the scanner for the cables, and space above the scanner so that
you can fully raise the document cover.
■ Keep the scanner away from high temperatures, humidity and excessive dirt or
dust. Also avoid using or storing the scanner in places subject to rapid changes of
temperature and humi dity.
■ Keep the scanner away from direct sunligh t an d strong light sources.
■ Avoid places subject to shocks and vibrations.
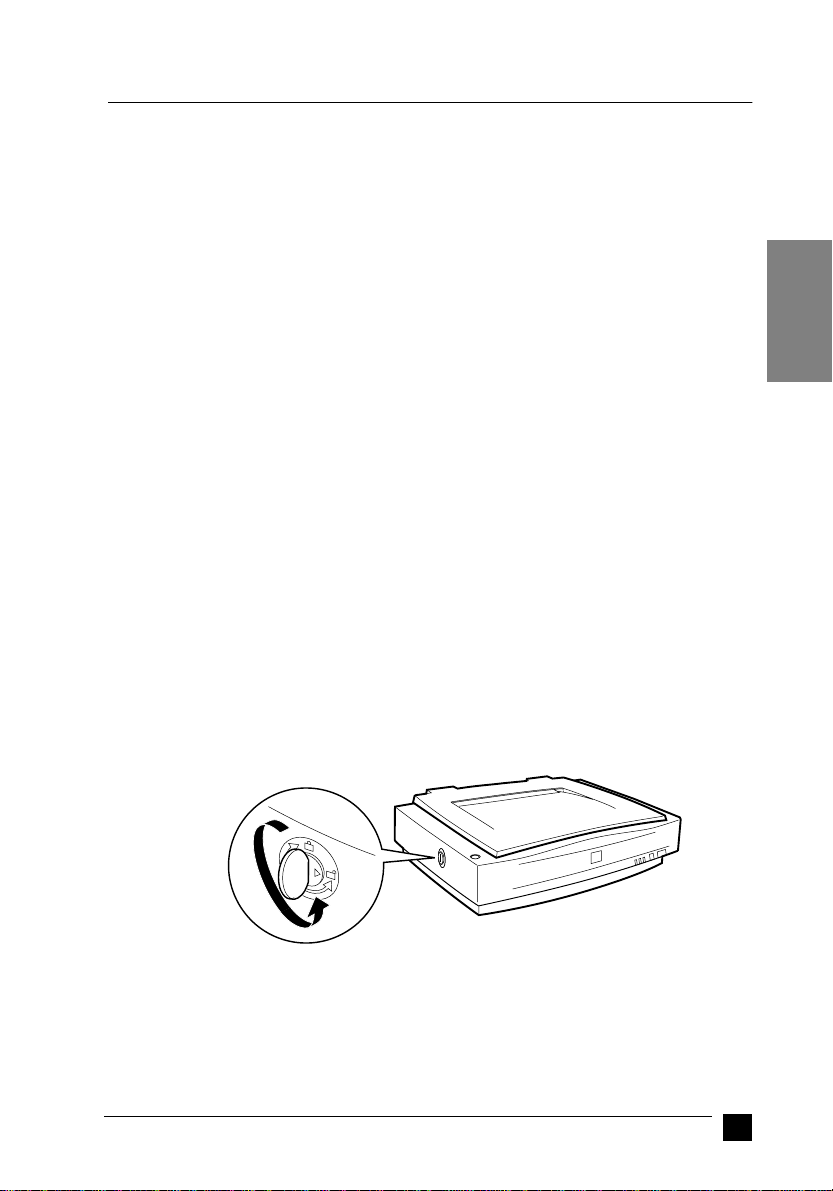
❚ Releasing the Transportation Lock
When the scanner is unpacked, the carriage is locked in the home positi on to prevent
damage from shaking or vibration during transpo r tatio n. You must releas e the transportation lock before you can use the scan ner.
1. Place the scanner on a flat, stable surface with its left side facing you.
2. Turn the transportation lock to the unlocked position using a coin or a similar
object, as shown below.
English
Note:
Before you transport the scanner or store it for an extended period of time, secure the
carriage by turning the transportation lock back to the locked position. For more
information, see “Maintena nce and Troubleshoo ting” in your Online Referen ce Guide.
Setting Up the Scanner
11
Page 12

❚ Plugging In the Scanner
1. Make sure that the scanner is turned off. The scanner is off when the POPERATE
button is raised.
2. If the power cord is not attached to the scanner, connect it to the AC inlet on the
back of the scanner, and plug th e other end into a properly grounded el ectrical
outlet.
Caution:
c
It is not possible to change the scan ner’s voltage. If the label on the back of
the scanner does not show the correct voltage for your location, contact
your dealer. Do not plug in the power cord.
❚ Initialization
By observing the scanner’s initialization , you can make sure that the scanner is operating
properly before you connect it to your computer.
1. Open the docu ment cover so you can see the operation of t he scanner during
initialization.
12
Setting Up the Scanner
Page 13
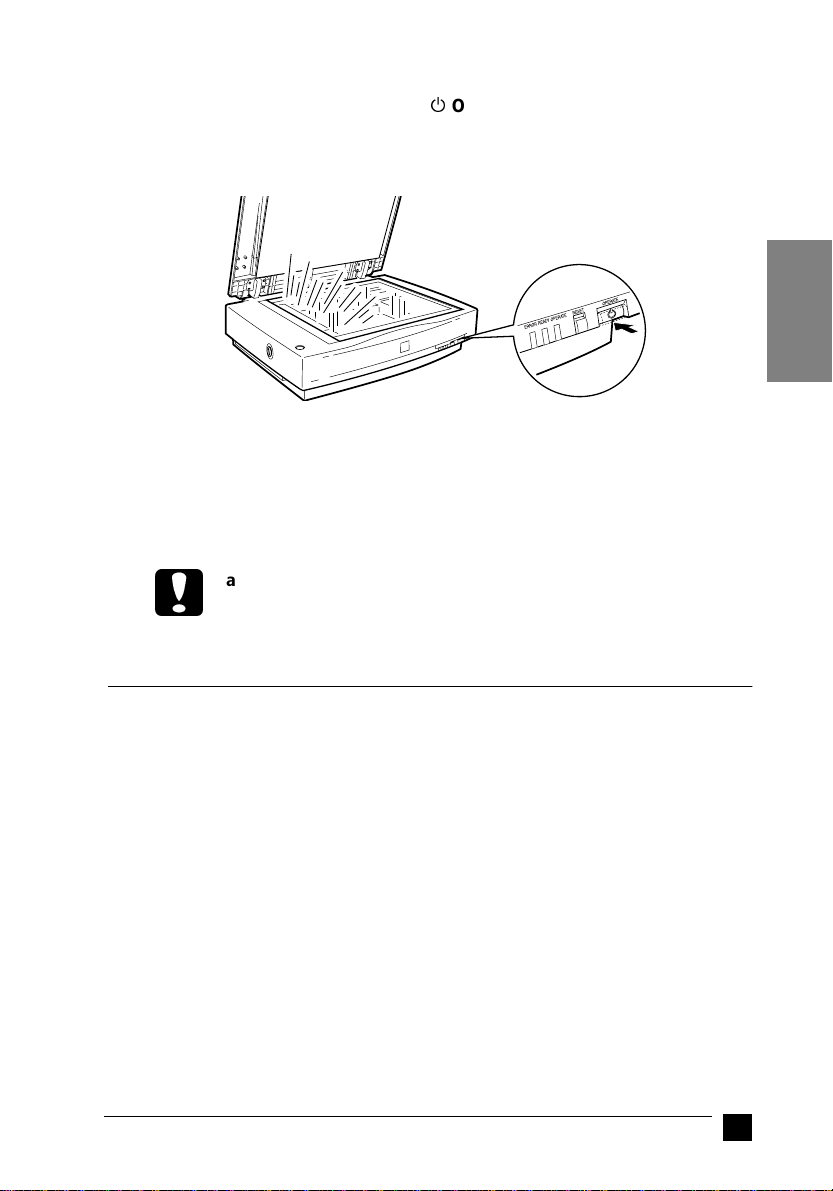
2. Turn on the scanner by pressing the POPERATE button.
While the scanner initializes, the fl uorescent lamps on the ca rriage flash. If the carriage
is not at the home position (the left of the scanner), it moves to the home position.
When the scanner has completed its initialization, the READY light comes on. If the
scanner does not work as described, turn it off. Make su re that the power cord is firmly
plugged in and tha t you have released the transportation lo ck screw, then turn it o n again.
Caution:
c
Whenever you turn off the scanner, wait at leas t 10 second s before turning
it back on. Rapidly turning the scanner on and off can damage the scanner.
English
■ Connecting the Scanner to Your Computer
❚ Connecting the Scanner to Your Computer Using the SCSI
Interface
For instructions on conn ecting the sca nner to your compu ter usi ng the S CSI inte rface,
read this section.
Note for Macintosh Users:
Be sure to install the scanner software b efore connecting the scanner to your computer.
See Chapter 3, "Installing the Scan ner So ftwa r e for Macin to sh" in your o nlin e Setup
Guide for details.
■ For PC users:
Unless your PC alre ady has a SCSI bo ard inst alled, yo u need to in stall on e, alon g with
SCSI driver software. Install the SCSI board according to the direc tions included with it.
Connecting the Scanner to Your Computer
13
Page 14

If your PC has a SCSI board up and running, connect the scanner as descr ibed in the
next section.
Note:
You will need to install the SCSI dri ver that is no rmally inclu ded with W indows 20 00,
98, 95, or NT (see yo ur system docu mentation fo r instructions) , or the driver de scribed
in the SCSI board installation documentation.
■ For Macintosh users:
Your Macintosh may or may not have SCSI ports, depending on which model you own.
If you have a Macintosh that does not have a SCSI port, you need to install a SCSI
board and driver. Follow the directions below to connect your scanner and computer.
Note:
The latest driver may be available for download from the Web site of the SCSI board
manufacturer.
■ Setting the SCSI ID number
scanner’s default SCSI ID number is 2.
The SCSI ID rotary switch is
located at the back of the
scanner.
If you add the scanner to a system in which one of your SCSI devices already has a
SCSI ID of 2, change the ID number to an unused num ber using the rotary switch. See
the table below as a guide.
ID Availability Description
0 Not available for Macintosh Used for hard disk
Not recommended for Windows
1 Not recommended Usually used for hard disk
2 Factory setting of the scanner
14
Usually used for hard disk
Connecting the Scanner to Your Computer
Page 15

3 Not available if your Macintosh
4
5
6
has a built-in CD-ROM
7 Not available for Macintosh Always used for the Macintosh
May not be available for Windows
Caution:
c
■ Setting the terminator switch
The scanner has a built-in terminator, which allows SCSI devices to communicate
properly with each other. You may need to change the terminator switch setting
according to your computer system.
Note:
Do not use an external terminator.
Do not set the SCSI ID to an ID number that is already assigned to another
device otherwise the computer, scanne r, and other devi ces will not operate
properly.
The terminator switch is
located at the back of the
scanner.
itself
Usually used for the SCSI board
English
Connecting the Scanner to Your Computer
15
Page 16

Only the scanner is connected
terminator on
The scanner is the last device in the daisy chain
(other SCSI device)
The scanner is in the middle of the daisy chain
terminator on
(other SCSI device)
terminator off
■ Connecting the scanner
Connect the scanner to your computer or to another SCSI device as follows:
Note:
The combinatio n of connect ors on the SC SI interfa ce cable yo u need var ies depen ding
on the maker of your SCSI device and SCSI interface board.
16
Connecting the Scanner to Your Computer
Page 17

1. Make s ur e the scanner, computer, and all other SCSI devi ces
are turned off and unplugged from the power source.
Caution:
c
2. Connect one end of the interface cable to one of the scanner SCSI connectors until
the locks on both sides snap in.
Note:
❏ To connect the scanner to a PC or any other SCSI device, the total length
❏ Make sure no other interface is used.
Do not connect the scanner to the computer or other devices while they
are turned on as damage may occu r.
of cable in the daisy chain must not exceed 3 meters; otherwise the system
may not work properly.
English
3. Conn ect the other end of the cable to the SCSI port of y our computer or anothe r
SCSI device.
Note:
The SCSI port on the Macintosh is the larger port with the SCSI icon over it.
4. Plug in th e power cords of your computer, scanner, an d other external SCSI
devices.
Note:
Before turning on your system, be sure to read “Power-on sequence” following.
■ Power-on sequence
Keep the following in mind every time you turn on your computer and SCSI devices,
including the s canner.
■ Be sure to turn on the SCSI device which is connected at the farthest end of the
daisy chain first, then the second farthest and so on, until finally your computer.
If you attempt to use a SCSI device which has been turned on after the computer,
it may not work properly, or the computer may not work properly.
Connecting the Scanner to Your Computer
17
Page 18

■ For Windows 2000, 98, or 95 users:
The first time you turn on the computer after turning on the scanne r, on e of the
following dialog boxes or similar may appear.
Windows 95
Windows 98 Windows 2000
If you see one of these, follow the install ation instructions in Chapte r 3, “Installing
the Software,” in your online Setup Guide, then see “Power-off sequence”
following.
■ Power-off sequence
Keep the following in mind every time you tur n off your computer and SCSI devices.
■ When you are finishe d using your system, tur n off your computer first, then the
scanner and other SCSI devices in reverse order of the power-on sequence.
■ While using your comput er, do not turn off any SCSI device which ha s a terminator
that is active (on).
■ Do not turn the scanne r off a nd back on w hile us ing yo ur com puter, o therwis e the
scanner may not work properly.
When the connection is complete, you need to install the scanner software. See Chapter
3, “Installing the Software,” in your online Setup Guide for instructions.
18
Connecting the Scanner to Your Computer
Page 19

❚ Connecting the Scanner to Your Computer Using the USB
Interface
Your PC must have been purchased with Windows 2000 or Windows 98 preinstalled,
and have a work ing US B port.
Your Macintosh computer must be running system 8.5 or later and have a built-in USB
port.
Note for Macintosh Users:
Be sure to install the scanner software before connecting the scanner to your Macintosh.
See Chapter 3, “Installing the Scanner Software for Macintosh,” in your online Setup
Guide for details.
■ Understanding USB connections
USB Cables
USB cables enable you to connect or remove peripherals to and from yo ur computer
easily, without having to shut down and restart the system each time a peri pheral is
plugged in or unplugged. You do no t have to set an ID number or a terminator.
Note:
Do not connect or d isconnect USB cables when the scanner is in use.
USB cables have 2 different connectors at each end.
Type A connects to your computer.
English
Type B connects to your scanner.
USB hub
You can also use a USB hub, allowing you to increase the number of USB ports and
therefore connect several peripher al s.
Note:
If you connect your scanner through more than one hub, your system may not work
properly. In this case, try co nnect ing the scanne r directly to th e compu ter’s USB port.
Also, your system may not work properly if you use a USB cable other than that supplied
by EPSON.
Connecting the Scanner to Your Computer
19
Page 20
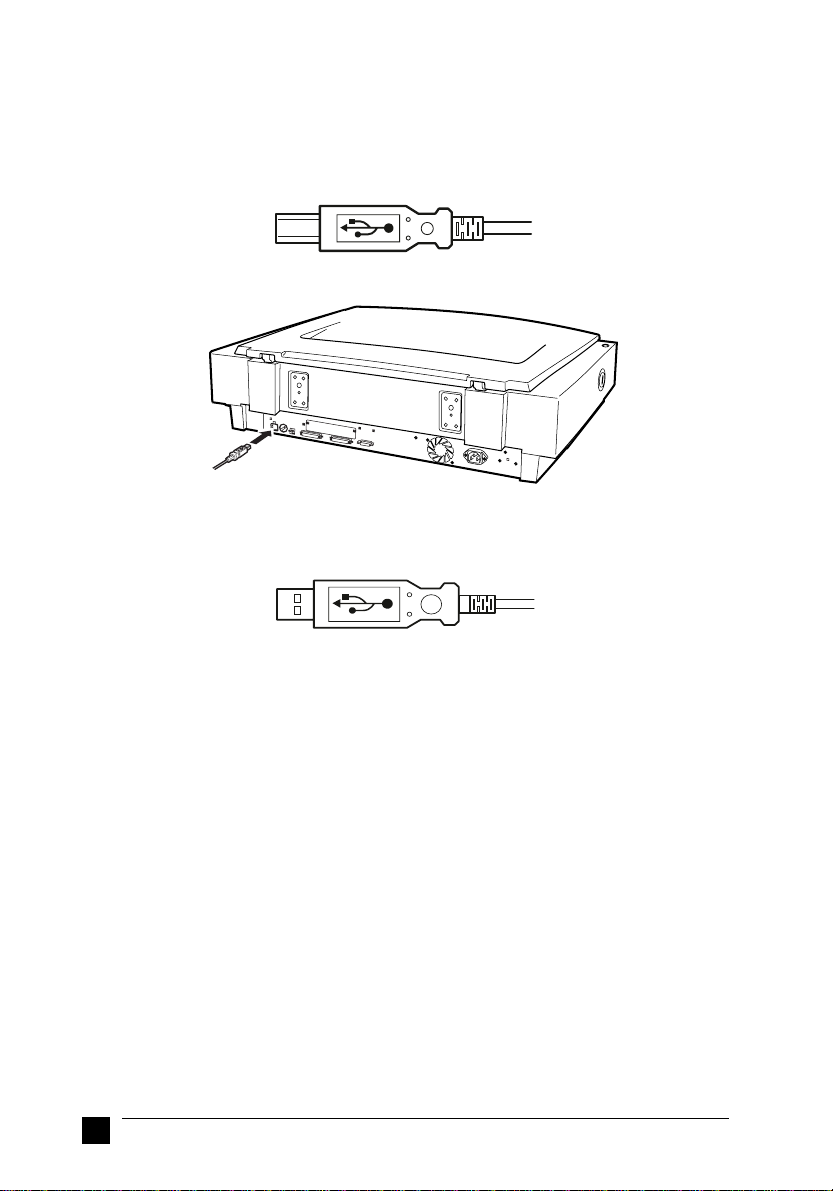
■ Connecting the scanner
To connect the scanner to your comp uter or USB hub:
1. Connect one end of the cable (Type B) to the USB port on the back of the scanner.
2. Connect the other end of the cable (Type A) to the USB port on your computer, or
USB hub.
Note:
❏ USB cables enable you to connect the scanner whether your computer is on or
off. If you connect the scanner while your computer is on, the “Add New
Hardware Wizard” dialog box (Windows) or a message t elling you that the
scanner driver needs to be installed (Macintosh) will appear. When this
happens, follow the instructions in Chapter 3 in the online Setup Guide, then
install the software.
❏ Connect the USB cable to your computer, then install or start the scanner
software. Do not connect or disconnect the USB cab le while the scanner
software is open.
❏ Make sure no other interface is used.
20
Connecting the Scanner to Your Computer
Page 21

■ Using the Online Manuals
The CD-ROM shipped with your scanner includes three different online manuals in
PDF format (PDF = Portable Document Format). PDF files can be used on various
platforms (e.g. Windows, Macintosh, Unix etc.) and are electron ic manuals with the
same layout, illustrations, tables etc. to be found in a printed manual. You can display
the online manuals on your c om p ute r sc r e e n an d pr in t them on any c o nnected printe r,
if required.
The following three manual s are available:
■ Setup Guide
The Setup Guide shows how to set up the scanner and calibarate the screen, how
to install the scanner software and options, and ho w to u se th e scann er and m a ke
basic scans. It also shows how to make basic software settings and use the Start
Button function.
■ EPSON Scanner Server & EPSON TWAIN Pro Network User’s Guide
Provides detailed instructions for installing and using EPSON Scan Server and
EPSON TWAIN Pro Network software.
■ EPSON Scanner Software Reference Guide
Provides basic information about scanning and details on EPSON TWAIN Pro and
other EPSON scanner software. Descriptions of EPSON TWAIN Pro also apply
to EPSON TWAIN Pro Network. Finally, it offers troubleshooting tips and
customer support information.
To access these manuals you need to install the Adobe® Acrobat® Reader™ software,
which is also provided on the CD-R OM.
English
Note:
The Adobe Acrobat Reader pro gram is an easy-to-use applicatio n program for displaying and printing online manuals. It offers a wide range of features which allow you to
use the online manuals without difficulty to find any de sired information. You can read
the information online on your computer screen or print it out for later reference. If
you need complete information on the Adobe Acrobat Reader, refer to its online help.
If the Acrobat Reader is already installed on your system, you can skip the next section.
Note:
If you are not sure whether the Acrobat Reader is installed on your system, please
contact your system administrator or double-click on the menu item for reading the
online manual in the setup program. If the Adobe Acrobat Reader is not installed on
your system, the manual will not open and an error message will be displayed.
Using the Online Manuals
21
Page 22

❚ Installing the Adobe Acrobat Reader
1. Insert the EPSON Online manual CD-ROM into your computer’s CD-ROM drive.
Windows 95/98/NT 4.0/2000:
The setup program on the CD-ROM will be started a utomatically and displays the
start screen. If the setup p rogram is not started automa tically, click the Start button,
then click Run and enter the command E:\Start.exe to start the setup program.
Note:
If your CD-ROM drive has a drive letter other than E, substitute the a ppropriate
letter.
Macintosh:
Display the contents of the CD-ROM on your computer screen and branch to the
Acrobat Reader folder.
2. Select the preferred language.
3. Windows 95/98/NT 4.0/2000:
Select Online manuals, follo wed by Install Acrobat Reader and follow the on -
screen instructions.
Macintosh:
Start the Installer and follow the on-screen instructions.
After the Acrobat Reader has been installed on your system, you can access the online
manuals.
❚ Accessing the Online Manuals
The setup program on the CD-ROM offers two possibilities to access the online
manuals: from the CD-ROM or from your computer hard disk.
Note:
Before you can access the online manuals from your hard disk, you first have to install
them on the hard disk.
1. Insert the EPSON Online manual CD-ROM into your computer’s CD-ROM drive.
Windows 95/98/NT 4.0/2000:
The setup program on the CD-ROM will be started a utomatically and displays the
start screen. If the setup pr ogram is not started automatically, click the Start button,
then click Run and enter the command E:\Start.exe to start the setup program.
Note:
If your CD-ROM drive has a drive letter other than E, substitute the a ppropriate
letter.
Macintosh:
Display the contents of the CD-ROM on your computer screen and branch to the
Acrobat Reader folder.
22
Using the Onlin e M anuals
Page 23

2. Select the preferred language.
3. Windows 95/98/NT 4.0/2000:
Select Online manuals. The setup progra m dis pl ay s the na m es of the av ailable
online manuals. Select the preferred online manual.
❏ Select manual name - Read if you wish to open the manual from the CD-
ROM. The Acrobat Reader will b e started automatic ally and the on line manual
opened.
❏ If you wish to copy the online manuals to your system’s hard disk, select
manual name - PC installation.
Note:
You can delete the manuals from the hard disk at a later date if required.
Once the manuals have been installed on the hard disk, proceed as follows: Click
the Start button, point to Programs, then point to EPSON. Click on the na me o f
an online manual. The Acrobat Reader will be started automatically and the online
manual opened.
Macintosh:
Start the Installer and double-click on the preferred online manual to open the
manual from the CD-ROM. To install the online manual on your com puter’s hard
disk, select the manual and drag it onto your computer’s desktop.
■ Customer Support
EPSON’s Service and Support hotline is av ailable should you requ ire urgent help. You
will find the telephone number and further important information for your country in
the Service and Support brochure provided with your scanner.
English
Customer Support
23
 Loading...