

Page 1
This is an Acrobat version of
the Online Reference Guide
in HTML format supplied on
CD with the scanner.
Scanner Software
Reference Guide
Page 2

Scanner Software
All rights reserved. No part of this publication may be reproduced, stored in a retrieval
system, or transmitted in any form or by any means, electronic, mechanical, photocopying,
recording, or otherwise, without the prior written permission of SEIKO EPSON
CORPORATION. No patent liability is assumed with respect to the use of the information
contained herein. Neither is any liability assumed for damages resulting from the use of the
information contained herein.
Neither SEIKO EPSON CORPORATION nor its affiliates shall be liable to the purchaser of
this product or third parties for damages, losses, costs, or expenses incurred by the purchaser
or third parties as a result of: accident, misuse, or abuse of this product or unauthorized
modifications, repairs, or alterations to this product.
SEIKO EPSON CORPORATION and its affiliates shall not be liable against any damages or
problems arising from the use of any options or any consumable products other than those
designated as Original EPSON Products or EPSON Approved Products by SEIKO EPSON
CORPORATION.
EPSON is a registered trademark of SEIKO EPSON CORPORATION.
IBM and PS/2 are registered trademarks of International Business Machines Corporation.
Macintosh is a registered trademark of Apple Computer, Inc.
Microsoft and Windows are registered trademarks of Microsoft Corporation in the United
States of America and other countries.
Presto! is a trademark of NewSoft Technology Corporation.
General Notice: Other product names used herein are for identification purposes only and may be
trademarks of their respective companies.
Copyright © 1999 by SEIKO EPSON CORPORATION, Nagano, Japan.
Reference Guide
Page 3

ii
Page 4

Contents
Introduction
Features. . . . . . . . . . . . . . . . . . . . . . . . . . . . . . . . . . . . . . . . . . . . . . . . 1
About This Guide . . . . . . . . . . . . . . . . . . . . . . . . . . . . . . . . . . . . . . . 2
Chapter 1 Scanning Basics
Main Window and Preview Window. . . . . . . . . . . . . . . . . . . . . . .1-2
Main window . . . . . . . . . . . . . . . . . . . . . . . . . . . . . . . . . . . . . . 1-2
Preview window. . . . . . . . . . . . . . . . . . . . . . . . . . . . . . . . . . . . 1-3
Optimizing Image Scanning . . . . . . . . . . . . . . . . . . . . . . . . . . . . . .1-4
Manually optimizing images . . . . . . . . . . . . . . . . . . . . . . . . .1-5
Displaying a preview image. . . . . . . . . . . . . . . . . . . . . . . . . . 1-6
Adjusting the Highlight Setting . . . . . . . . . . . . . . . . . . . . . . . . . . . 1-7
Adjusting the Shadow Setting . . . . . . . . . . . . . . . . . . . . . . . . . . . . . 1-8
Adjusting the Gamma Setting . . . . . . . . . . . . . . . . . . . . . . . . . . . . .1-9
Applying a Preset Tone Curve . . . . . . . . . . . . . . . . . . . . . . . . . . . .1-10
Adjusting the Gray Balance Intensity Setting . . . . . . . . . . . . . . . . 1-13
Adjusting the Saturation Setting. . . . . . . . . . . . . . . . . . . . . . . . . . . 1-15
Using the Tone Curve . . . . . . . . . . . . . . . . . . . . . . . . . . . . . . . . . . . .1-15
Saving your own tone curve. . . . . . . . . . . . . . . . . . . . . . . . . .1-18
Deleting a customized tone curve . . . . . . . . . . . . . . . . . . . . .1-19
Closing the Tone Correction dialog box . . . . . . . . . . . . . . . . 1-19
Optimizing OCR Scanning. . . . . . . . . . . . . . . . . . . . . . . . . . . . . . . .1-19
Scanning text . . . . . . . . . . . . . . . . . . . . . . . . . . . . . . . . . . . . . . . 1-19
Improving character recognition . . . . . . . . . . . . . . . . . . . . . . 1-20
If you still have problems.... . . . . . . . . . . . . . . . . . . . . . . . . . . 1-21
Potential text recognition problems. . . . . . . . . . . . . . . . . . . . 1-22
Chapter 2 Understanding EPSON TWAIN Pro Features
Overview . . . . . . . . . . . . . . . . . . . . . . . . . . . . . . . . . . . . . . . . . . . . . . 2-2
EPSON TWAIN Pro Main Window . . . . . . . . . . . . . . . . . . . . . . . . 2-3
iii
Page 5

Document Sources . . . . . . . . . . . . . . . . . . . . . . . . . . . . . . . . . . . . . . 2-4
Image Types . . . . . . . . . . . . . . . . . . . . . . . . . . . . . . . . . . . . . . . . . . . 2-5
Image Type list. . . . . . . . . . . . . . . . . . . . . . . . . . . . . . . . . . . . . 2-5
Image Type button . . . . . . . . . . . . . . . . . . . . . . . . . . . . . . . . . 2-7
Destinations. . . . . . . . . . . . . . . . . . . . . . . . . . . . . . . . . . . . . . . . . . . . 2-10
Destination list. . . . . . . . . . . . . . . . . . . . . . . . . . . . . . . . . . . . . 2-11
Destination button. . . . . . . . . . . . . . . . . . . . . . . . . . . . . . . . . . 2-12
Changing Resolution . . . . . . . . . . . . . . . . . . . . . . . . . . . . . . . . . . . . 2-14
Source and Target image sizes . . . . . . . . . . . . . . . . . . . . . . . . . . . . 2-14
Previewing Images. . . . . . . . . . . . . . . . . . . . . . . . . . . . . . . . . . . . . . 2-17
Using the Preview Window Preview Buttons . . . . . . . . . . . . . . . 2-19
Zoom preview button. . . . . . . . . . . . . . . . . . . . . . . . . . . . . . . 2-19
Return to full preview button . . . . . . . . . . . . . . . . . . . . . . . . 2-19
Return to zoom preview button . . . . . . . . . . . . . . . . . . . . . . 2-20
Marquees . . . . . . . . . . . . . . . . . . . . . . . . . . . . . . . . . . . . . . . . . . . . . . 2-20
Making and modifying marquees . . . . . . . . . . . . . . . . . . . . 2-20
Marquee buttons . . . . . . . . . . . . . . . . . . . . . . . . . . . . . . . . . . . 2-23
Delete marquee button . . . . . . . . . . . . . . . . . . . . . . . . . . . . . . 2-23
Duplicate marquee button . . . . . . . . . . . . . . . . . . . . . . . . . . . 2-23
Auto locate button. . . . . . . . . . . . . . . . . . . . . . . . . . . . . . . . . . 2-24
Marquee number indicator . . . . . . . . . . . . . . . . . . . . . . . . . . 2-25
Using the Adjust Buttons . . . . . . . . . . . . . . . . . . . . . . . . . . . . . . . . 2-26
Auto Exposure . . . . . . . . . . . . . . . . . . . . . . . . . . . . . . . . . . . . . 2-26
Image Controls. . . . . . . . . . . . . . . . . . . . . . . . . . . . . . . . . . . . . 2-27
Tone Correction . . . . . . . . . . . . . . . . . . . . . . . . . . . . . . . . . . . . 2-29
Color Adjustment . . . . . . . . . . . . . . . . . . . . . . . . . . . . . . . . . . 2-32
Reset . . . . . . . . . . . . . . . . . . . . . . . . . . . . . . . . . . . . . . . . . . . . . 2-33
Focus . . . . . . . . . . . . . . . . . . . . . . . . . . . . . . . . . . . . . . . . . . . . . 2-33
Settings. . . . . . . . . . . . . . . . . . . . . . . . . . . . . . . . . . . . . . . . . . . . . . . . 2-34
Configuration . . . . . . . . . . . . . . . . . . . . . . . . . . . . . . . . . . . . . . . . . . 2-36
Scan. . . . . . . . . . . . . . . . . . . . . . . . . . . . . . . . . . . . . . . . . . . . . . . . . . . 2-39
Scan All . . . . . . . . . . . . . . . . . . . . . . . . . . . . . . . . . . . . . . . . . . . . . . . 2-39
Chapter 3 Calibrating Your System
Overview . . . . . . . . . . . . . . . . . . . . . . . . . . . . . . . . . . . . . . . . . . . . . . 3-2
Calibrating Your Screen . . . . . . . . . . . . . . . . . . . . . . . . . . . . . . . . . 3-2
For Windows 98 users . . . . . . . . . . . . . . . . . . . . . . . . . . . . . . 3-3
iv
Page 6

For Windows 95 and NT 4.0 users: . . . . . . . . . . . . . . . . . . . . 3-5
For Macintosh users . . . . . . . . . . . . . . . . . . . . . . . . . . . . . . . . . 3-7
Using ICM (For Windows 98/95 Users) . . . . . . . . . . . . . . . . . . . .3-7
For Windows 98 users . . . . . . . . . . . . . . . . . . . . . . . . . . . . . . . 3-8
For Windows 95 users . . . . . . . . . . . . . . . . . . . . . . . . . . . . . . . 3-8
Using ColorSync (For Macintosh Users) . . . . . . . . . . . . . . . . . . . .3-9
Chapter 4 Troubleshooting
Problems and Solutions . . . . . . . . . . . . . . . . . . . . . . . . . . . . . . . . . .4-2
Scanning Problems . . . . . . . . . . . . . . . . . . . . . . . . . . . . . . . . . . . . . .4-2
Image is dark, with little or no detail. . . . . . . . . . . . . . . . . . . 4-2
You cannot scan an image or you only get a few dots for the
scanned image . . . . . . . . . . . . . . . . . . . . . . . . . . . . . . . . . . . 4-3
Moiré (cross-hatch) patterns appear in the scanned image 4-3
Scanned image is too large.. . . . . . . . . . . . . . . . . . . . . . . . . . . 4-3
Colors differ from the original.. . . . . . . . . . . . . . . . . . . . . . . . 4-4
Poor character recognition during OCR scanning. . . . . . . . 4-4
Software Operation Problems . . . . . . . . . . . . . . . . . . . . . . . . . . . . . 4-5
You cannot start EPSON TWAIN Pro. . . . . . . . . . . . . . . . . . 4-5
You can’t select optional equipment (Auto Document Feeder or
Transparency Unit).. . . . . . . . . . . . . . . . . . . . . . . . . . . . . . .4-5
Pressing the Start button does not start Scanning. . . . . . . . 4-5
Glossary
Index
v
Page 7

vi
Page 8

Introduction
Features
The CD-ROM that comes with your scanner contains the EPSON
scanner software suite, including EPSON TWAIN Pro and
TWAIN Pro Network (The network version of EPSON TWAIN
Pro). The software suite is the perfect companion for your EPSON
scanner. Using your scanner and the software from the CD-ROM,
you can scan images in color, grayscale, or black and white, and
save them as files or print them out. Other software such as
EPSON Scanner Monitor and PageManager for EPSON support
the Start Button feature to make scanning much easier. EPSON
Scan Server allows your scanner to be used over a network.
The software supports the following EPSON scanners:
❏
EPSON Expression 1600/1600Pro
EPSON TWAIN Pro and EPSON TWAIN Pro Network
❏
directly control all of the features of your EPSON scanner.
This program is the standard cross-platform interface for
other applications.
The CD-ROM also contains other applications that let you use
your scanner in exciting new ways. For detailed information, refer
to the supporting documentation.
EPSON Scanner Monitor allows your scanner to access
❏
software that supports the Start Button feature.
EPSON Screen Calibration utility allows you to calibrate your
❏
scanner and monitor to reproduce images identical to the
originals.
Introduction
1
Page 9

PageManager for EPSON is TWAIN-compliant software that
❏
supports the Start Button feature. This feature allows you to
scan and send data to a target application with a single push
of the Start button. For more information on PageManager,
see your PageManager documentation.
About This Guide
The information in this guide is divided into six chapters, with a
glossary and index provided for your reference.
Chapter 1 explains the basic steps of scanning.
❏
Chapter 2 provides a complete description of EPSON TWAIN
❏
Pro and TWAIN Pro Network features. Refer to Chapter 2
when making scanning settings.
Chapter 3 explains how to calibrate your monitor to match
❏
your EPSON scanner. If you notice that colors on your screen
or in your printout do not match the original image, see this
chapter.
Chapter 4 contains troubleshooting information. If your
❏
software does not operate properly or scanned images are not
what you expect, see this chapter.
Notes
contain important information and useful tips about your
scanner and software.
To set up and use the scanner, see your scanner's
EPSON TWAIN Pro and EPSON TWAIN Pro Network online
help can also provide you with information on making settings
in EPSON TWAIN Pro or EPSON TWAIN Pro Network.
2
Introduction
User's Guide
.
Page 10

Chapter 1
Scanning Basics
Main Window and Preview Window. . . . . . . . . . . . . . . . . . . . . . .1-2
Main window . . . . . . . . . . . . . . . . . . . . . . . . . . . . . . . . . . . . . .1-2
Preview window . . . . . . . . . . . . . . . . . . . . . . . . . . . . . . . . . . . .1-3
Optimizing Image Scanning. . . . . . . . . . . . . . . . . . . . . . . . . . . . . . .1-4
Manually optimizing images . . . . . . . . . . . . . . . . . . . . . . . . .1-5
Displaying a preview image . . . . . . . . . . . . . . . . . . . . . . . . . .1-6
Adjusting the Highlight Setting. . . . . . . . . . . . . . . . . . . . . . . . . . . .1-7
Adjusting the Shadow Setting . . . . . . . . . . . . . . . . . . . . . . . . . . . . .1-8
Adjusting the Gamma Setting . . . . . . . . . . . . . . . . . . . . . . . . . . . . .1-9
Applying a Preset Tone Curve. . . . . . . . . . . . . . . . . . . . . . . . . . . . .1-10
Adjusting the Gray Balance Intensity Setting . . . . . . . . . . . . . . . .1-13
Adjusting the Saturation Setting . . . . . . . . . . . . . . . . . . . . . . . . . . .1-15
Using the Tone Curve . . . . . . . . . . . . . . . . . . . . . . . . . . . . . . . . . . . .1-15
Saving your own tone curve . . . . . . . . . . . . . . . . . . . . . . . . . .1-18
Deleting a customized tone curve . . . . . . . . . . . . . . . . . . . . .1-19
Closing the Tone Correction dialog box . . . . . . . . . . . . . . . .1-19
Optimizing OCR Scanning . . . . . . . . . . . . . . . . . . . . . . . . . . . . . . . .1-19
Scanning text . . . . . . . . . . . . . . . . . . . . . . . . . . . . . . . . . . . . . . .1-19
Improving character recognition . . . . . . . . . . . . . . . . . . . . . .1-20
If you still have problems... . . . . . . . . . . . . . . . . . . . . . . . . . . .1-21
Potential text recognition problems . . . . . . . . . . . . . . . . . . . .1-22
Scanning Basics
1-1
Page 11
Main Window and Preview Window
EPSON TWAIN Pro and EPSON TWAIN Pro Network have two
main windows. The EPSON TWAIN Pro window or the EPSON
TWAIN Pro Network window (main window) and the Preview
window.
Note:
All settings and functions available from the two main windows are the
same for both EPSON TWAIN Pro and EPSON TWAIN Pro Network.
Although most of the illustrations and explanations in this guide are for
the EPSON TWAIN Pro, they also apply to EPSON TWAIN Pro
Network.
Main window
1-2
Scanning Basics
Page 12
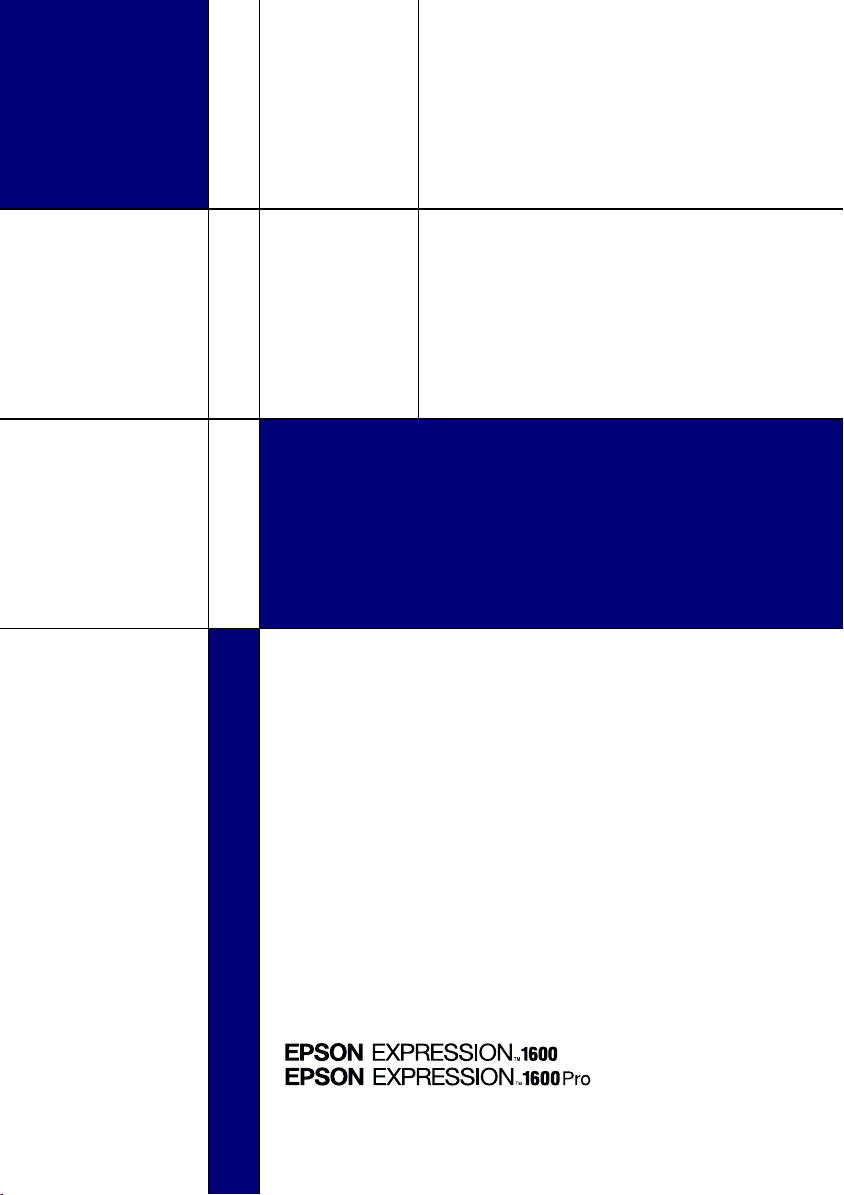
The main window gives you access to the controls, where you can
make basic settings, such as Document Source, the type of the
material you are scanning, how you are scanning, output
destination, scanned image size, and so on. If you want to specify
the areas of the images to scan or you want to see the effects of
your settings before scanning, click
window and display the preview images in the window.
Preview
to open the Preview
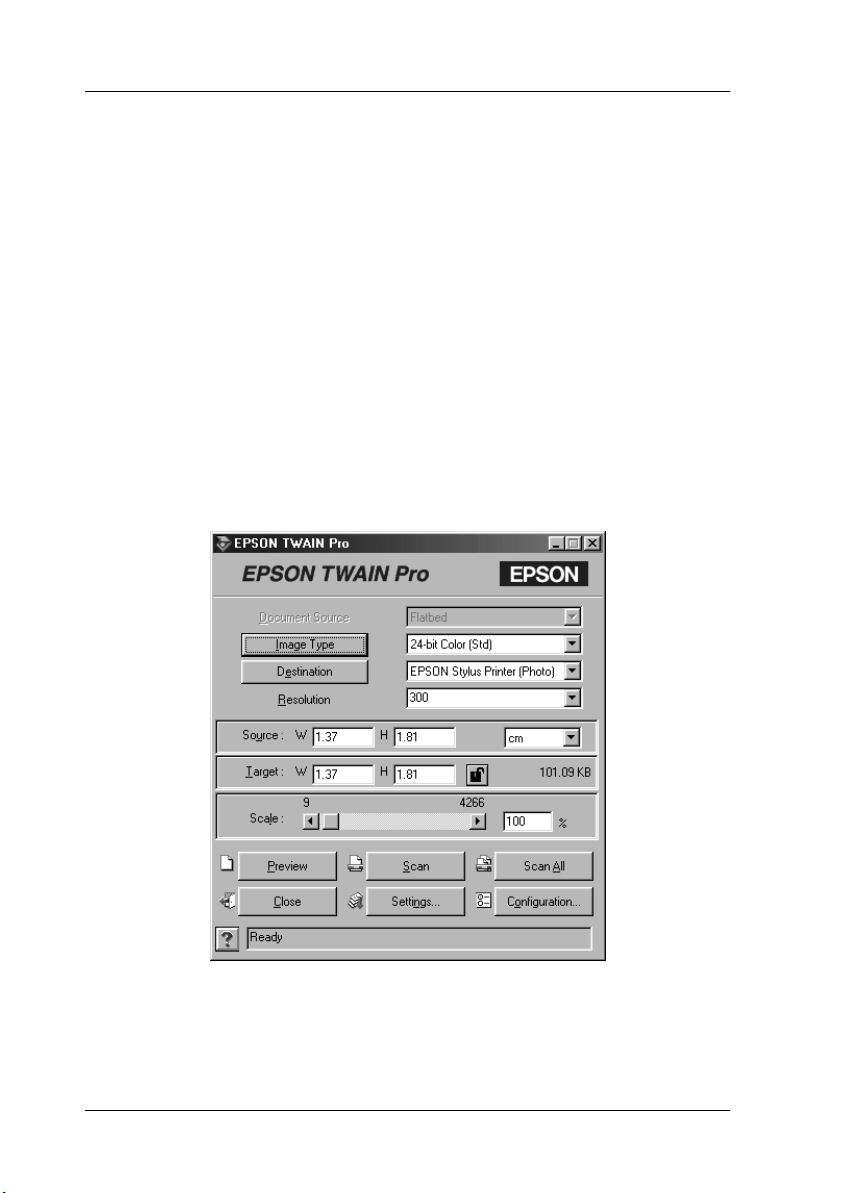
Preview window
In the Preview window, there are more options available to give
you greater controls over your scanning image. Powerful tools are
available to help you adjust tones, colors, focus and other
elements to optimize your images.
Scanning Basics
1-3
Page 13
Optimizing Image Scanning
EPSON TWAIN Pro can automatically adjust and optimize the
exposures and colors of scanned images during scanning. You can
also make adjustments manually with the image quality
adjustment tools in EPSON TWAIN Pro’s Preview window. This
section provides general information on optimizing images with
these tools.
EPSON TWAIN Pro Preview window
Note for Macintosh users:
Most illustrations shown in this section are for Windows, so they may
vary in appearance from what actually appears on your screen. The
instructions are the same, except as noted.
1-4
Scanning Basics
Page 14

Manually optimizing images
To optimize images manually, adjust the following EPSON
TWAIN Pro settings in the order specified below:
Adjust the brightness and contrast
1. Adjust the Highlight and Shadow settings in the Image
Controls dialog box. See “Adjusting the Highlight Setting” on
page 1-7 and “Adjusting the Shadow Setting” on page 1-8.
2. Adjust the Gamma setting in the Image Controls dialog box.
See “Adjusting the Gamma Setting” on page 1-9.
3. Adjust the tone curve with a predefined tone correction
setting in the Tone Correction dialog box. See “Applying a
Preset Tone Curve” on page 1-10.
Make color adjustments
4. Adjust the Gray Balance Intensity setting in the Color
Adjustment dialog box. See “Adjusting the Gray Balance
Intensity Setting” on page 1-13.
5. Adjust the Saturation setting in the Color Adjustment dialog
box. See “Adjusting the Saturation Setting” on page 1-15.
6. Manually adjust the tone curve for individual colors in the
Tone Correction dialog box. See “Using the Tone Curve” on
page 1-15.
To make the following adjustments in EPSON TWAIN Pro, you
need to display a preview image in the Preview window. See the
following section for details.
Scanning Basics
1-5
Page 15
Displaying a preview image
The EPSON TWAIN Pro Preview window shows you how your
adjustments will affect the image as you make them. The Preview
window is also the starting point for accessing the Image Controls
and Color Adjustment dialog boxes that contain tools for
optimizing your image.
Note:
See “Previewing Images” on page 2-17 for Preview window options, and
“Configuration” on page 2-36 for information about how to control
preview image quality.
1. After selecting the
Destination
prescanning. If the Preview window is not open, it opens and
begins prescanning. A preview image of the document
appears on your screen.
Note:
Make sure the Fast Preview check box is clear in the Configuration
dialog box to ensure a high-quality preview.
2. Click one of the buttons below to open the dialog box with the
image optimization tools you need.
Document Source, Image Type
in the main window, click
Image Controls button
Color Adjustment button
Tone Correction button
Preview
, and
to start
1-6
Scanning Basics
Page 16
Adjusting the Highlight Setting
Highlights are the brightest areas of an image.
1. In the Image Controls dialog box, click the eyedropper button
under
Highlight
.
The pointer changes to an eyedropper, with movement
restricted to within the Preview window.
2. Move the eyedropper to the location you want to select as the
highlight point and click it.
The brightness of the pixel at the point you click is set as the
highlight level, and the other parts of the image are adjusted
accordingly.
Scanning Basics
1-7
Page 17

3. To change the highlight level (brightness) of the point you
selected, move the
value in the text box. You can enter a value between 61 and
490 for the highlight.
Note:
See “Image Controls” on page 2-27 for further information on
adjusting the highlight level.
Highlight
slider left or right, or enter a
Adjusting the Shadow Setting
Shadows, the darkest areas of an image, are the opposite of
highlights.
1. In the Image Controls dialog box, click the eyedropper button
under
Shadow
.
1-8
The pointer changes to an eyedropper, with movement
restricted to within the Preview window.
Scanning Basics
Page 18
2. Move the eyedropper to the location you want to select as the
shadow point, and then click.
The brightness of the pixel at the point you click is set as the
shadow level, and the other parts of the image are adjusted
accordingly.
3. To change the shadow level (darkness) of the point you
selected, move the
in the text box. You can enter a value between 0 and 60 for the
shadow.
Note:
See “Image Controls” on page 2-27 for further information on
adjusting the shadow level.
Shadow
slider left or right, or enter a value
Adjusting the Gamma Setting
Gamma is the difference in contrast between the light tones and
dark tones of an image. Any change you make in the gamma level
only affects the mid-tones of the image.
Scanning Basics
1-9
Page 19
To change the gamma level of the image, move the
slider left or right, or enter a value in the text box.
You can enter a value between 50 and 500 for the gamma.
Note:
See “Image Controls” on page 2-27 for further information on adjusting
the gamma level.
Gamma
Applying a Preset Tone Curve
You can finely adjust the contrast within an image by applying
one of the preset tone curves. This allows more control over the
image when used in conjunction with the Auto Exposure settings
in the Image Controls dialog box. The tone correction list in the
Tone Correction dialog box provides the six most common tone
correction curves, described below.
Linear
A linear tone curve has no tone correction. Use this setting if you
are satisfied with the tone of the preview image.
1-10
Scanning Basics
Page 20
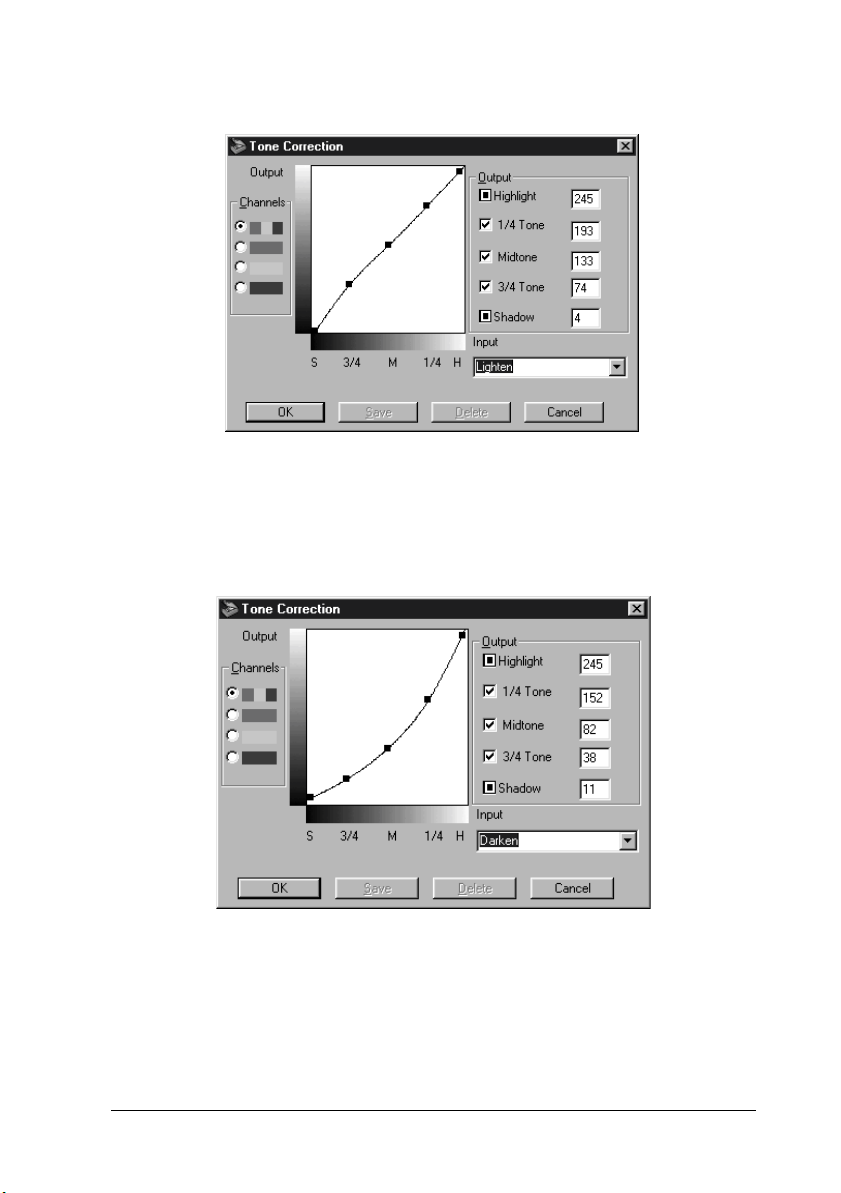
Lighten
Adjusts darker images (like underexposed film) to make them
slightly brighter.
Darken
Adjusts brighter images (like overexposed film) to make them
slightly darker.
Scanning Basics
1-11
Page 21
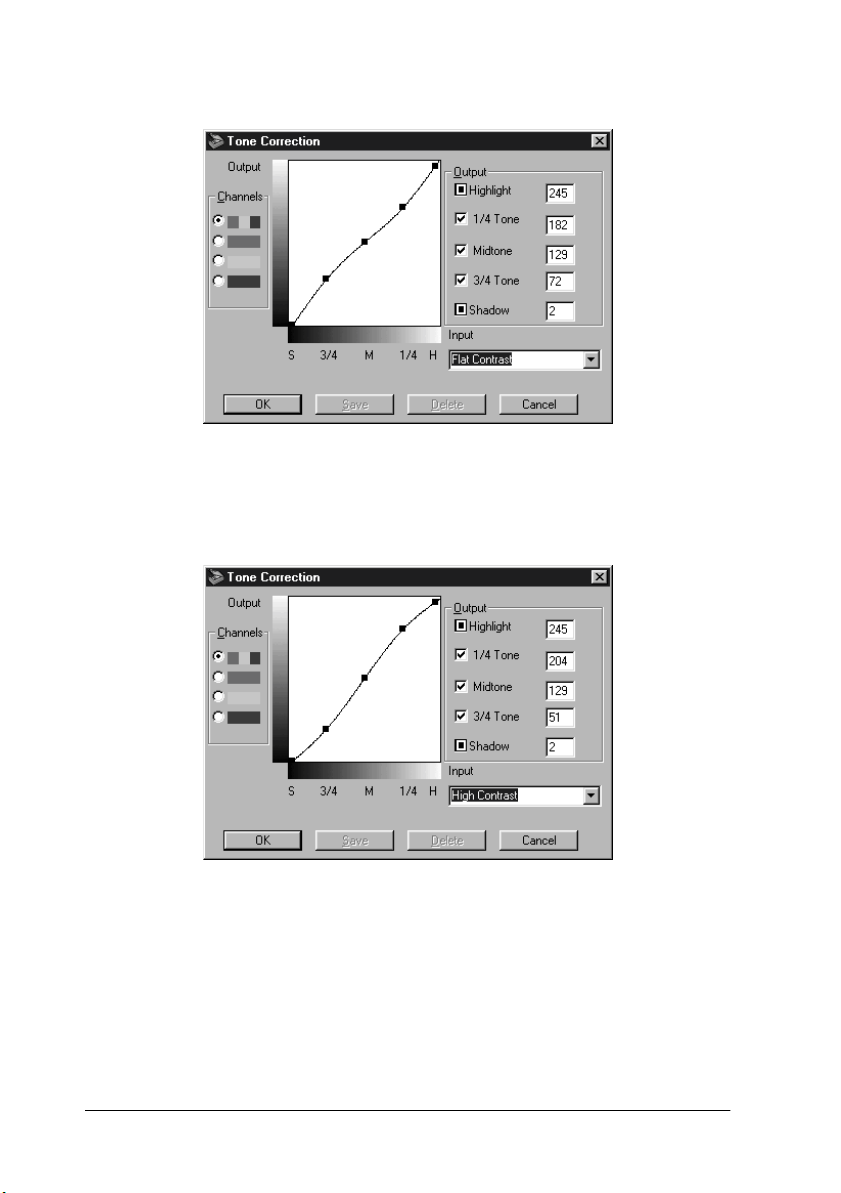
Flat Contrast
Flattens high contrast images to make them look more natural.
High Contrast
Increases the contrast of dull images.
1-12
Scanning Basics
Page 22
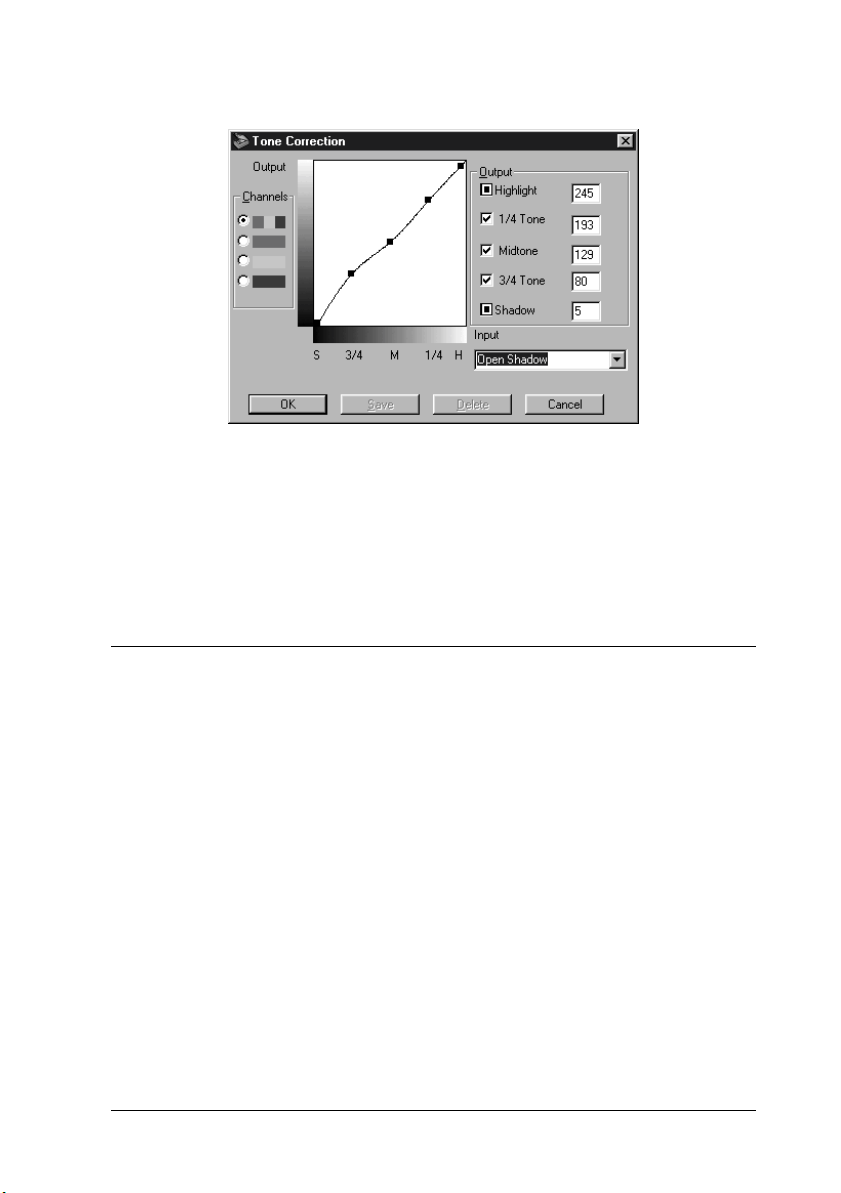
Open Shadow
Improves details in the dark areas of images.
Note:
See “Using the Tone Curve” on page 1-15 and “Tone Correction” on
page 2-29 for more information on tone correction.
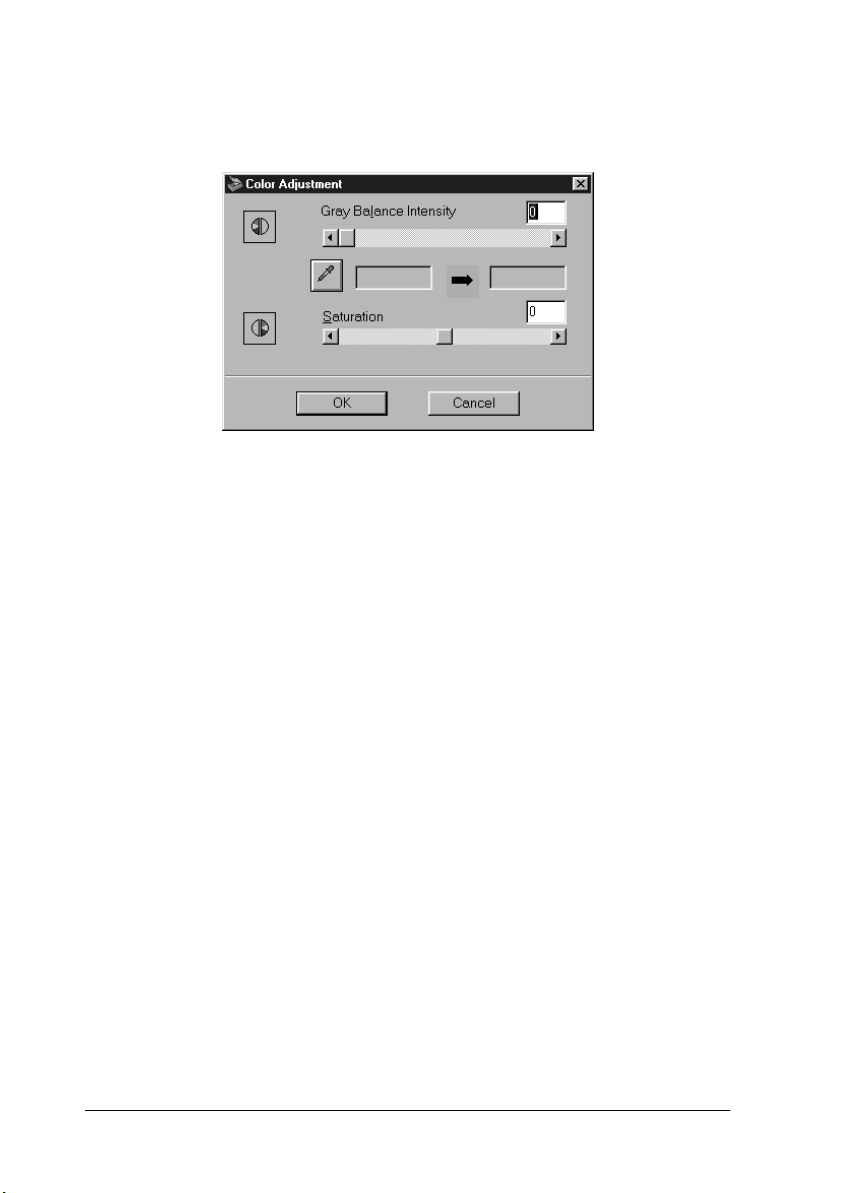
Adjusting the Gray Balance Intensity Setting
Gray balance makes it possible to remove a cast (tint) from a
specific color.
Scanning Basics
1-13
Page 23
1. In the Color Adjustment dialog box, click the eyedropper
button under
The pointer changes to an eyedropper, with movement
restricted to within the Preview window.
2. Move the eyedropper to a location that contains the color
whose gray balance intensity you want to adjust, and then
click.
The color you selected appears in the two boxes below the
Gray Balance Intensity
Gray Balance Intensity
slider.
.
3. To change the gray balance intensity level of the color you
selected, move the slider left or right, or enter a value in the
text box.
You can enter a value between 0 and 100. Changing the value
causes the color in the right hand box to change accordingly.
Your changes are also reflected in the image in the Preview
window.
Note:
See “Color Adjustment” on page 2-32 for more information on
adjusting the gray balance intensity level.
1-14
Scanning Basics
Page 24

Adjusting the Saturation Setting
Saturation is the density of a color. Higher saturation makes the
color appear richer, while lower saturation makes it appear paler.
To change the saturation level of the image, move the
slider left or right, or input a value in the text box.
You can enter a value between -100 (lowest color density) and 100
(highest color density).
Note:
See “Color Adjustment” on page 2-32 for more information on adjusting
the saturation level.
Using the Tone Curve
The tone curve provides you with a versatile means for adjusting
the intensity of the colors of the image being scanned. You can
adjust the shadow, mid-tone, and highlight values, which helps
to ensure well-balanced coloring of the image.
Saturation
Scanning Basics
1-15
Page 25

Note:
❏
Use of the tone curve is recommended for fine adjustments after you
have previewed the image and adjusted the highlights and the
shadows using Auto Exposure and the Image Controls dialog box.
Use of the tone curve to make initial settings is not recommended.
❏
The Tone Correction button is unavailable whenever
is selected as the Pixel Depth and
White
None
Black &
is selected for the
Halftone.
The tone curve is located in the Tone Correction dialog box, which
appears when you click the Tone Correction button in the EPSON
TWAIN Advanced menu window. How to use each of the
controls in the Tone Correction dialog box is described below.
Tone Correction button
1-16
Tone Correction dialog box
Scanning Basics
Page 26

Channels
Click an option button under channels to select the color whose
tone curve you want to adjust. When the master channel at the
top is selected, your adjustments affect all three colors. Selecting
one of the other channels allows you to adjust red, green, or blue
only.
Tone curve editor
Moving the mouse pointer into the tone curve editor causes it to
change to a finger. Use this pointer to drag any of the five points
in the curve and change its shape. The x-axis of the curve is the
brightness of the original (input values) while the y-axis is the
brightness of the scanned image (output values).
To change the tone curve back to its default, select
tone correction list.
Linear
Output values
These are the current values for output data in accordance with
the current locations of the points inside the tone curve editor.
These values change when you drag points in the tone curve
editor, or you can enter in values here to change the shape of the
tone curve. Each value can be adjusted within the range of 0 to 255.
Note:
❏
Each output value name has a check box to the left of it. Highlight
and Shadow are always selected, but you can select or clear 1/4 Tone,
Midtone, and 3/4 Tone by clicking their check boxes.
❏
When a value’s check box is clear, its point on the tone curve editor
automatically shifts to smooth out the tone curve when one of the
other points is moved.
❏
When a value’s check box is selected, it means that its point is fixed
and it will not shift when other points are moved.
in the
Scanning Basics
1-17
Page 27

Tone correction list
Use this list box to select a preset tone curve. There are six preset
tone curves shown below, and you can add your own curves to
the list using the procedure in the next section, “Saving Your Own
Tone Curve.”
Curve
Name
Linear 245 192 128 64 8 Default
Lighten 245 193 133 74 4 Lightens dark
Darken 245 152 82 38 11 Darkens
Flat
Contrast
High
Contrast
Open
Shadow
Highlight 1/4
Tone
245 182 129 72 2 Reduces
245 204 129 51 2 Increases
245 193 129 80 5 Lightens dark
Midtone 3/4
Tone
Shadow Description
When you select a curve from the tone correction list, the settings
in the Tone Correction dialog box change accordingly.
Saving your own tone curve
Use the following procedure to assign a name to a tone curve you
customized and to save it for later use:
1. Make the tone curve settings you want. This causes the name
shown in the tone correction list to change to
User Defined
curve
image
bright image
contrast
contrast
shadows
.
2. After customizing the tone curve, enter a name for the new
curve (up to 32 characters) in the list box.
3. Click
to save your new tone curve settings under the
Save
name you specified.
1-18
Scanning Basics
Page 28

Deleting a customized tone curve
Use the following procedure to delete a custom tone curve. You
cannot delete the six preset tone patterns.
1. Use the tone correction list to select the custom tone curve you
want to delete.
2. Click
3. In the confirmation dialog box that appears, click
Delete
the curve.
.
Yes
Closing the Tone Correction dialog box
You can close the Tone Correction dialog box by clicking either
or
OK
❏
❏
Cancel
Clicking OK applies the current Tone Correction dialog box
settings and closes the dialog box.
Clicking
current dialog box settings. Clicking the
upper right corner of the dialog box has the same affect as
clicking
.
Cancel
Cancel
closes the dialog box without applying the
button in the
close
.
Optimizing OCR Scanning
This section gives you suggestions and recommended settings in
order to improve OCR (optical character recognition) scanning
results.
to delete
Scanning text
Make sure you select
in the EPSON TWAIN Pro window.
OCR
for both
Image Type
Scanning Basics
and
Destination
1-19
Page 29

If the recognition rate is not satisfactory with the default settings,
follow these steps to change settings:
Improving character recognition
1. In the EPSON TWAIN Pro main window, make sure
selected in both the Image Type and Destination list boxes.
Then click the
box appears.
2. In the Image Type dialog box, select
and then click OK.
3. In the EPSON TWAIN Pro window, click
the Image Controls button to display the Image Controls
dialog box.
Image Type
Image Controls button
button. The Image Type dialog
for
None
B/W Option
Preview
. Then click
OCR
is
,
1-20
Scanning Basics
Page 30

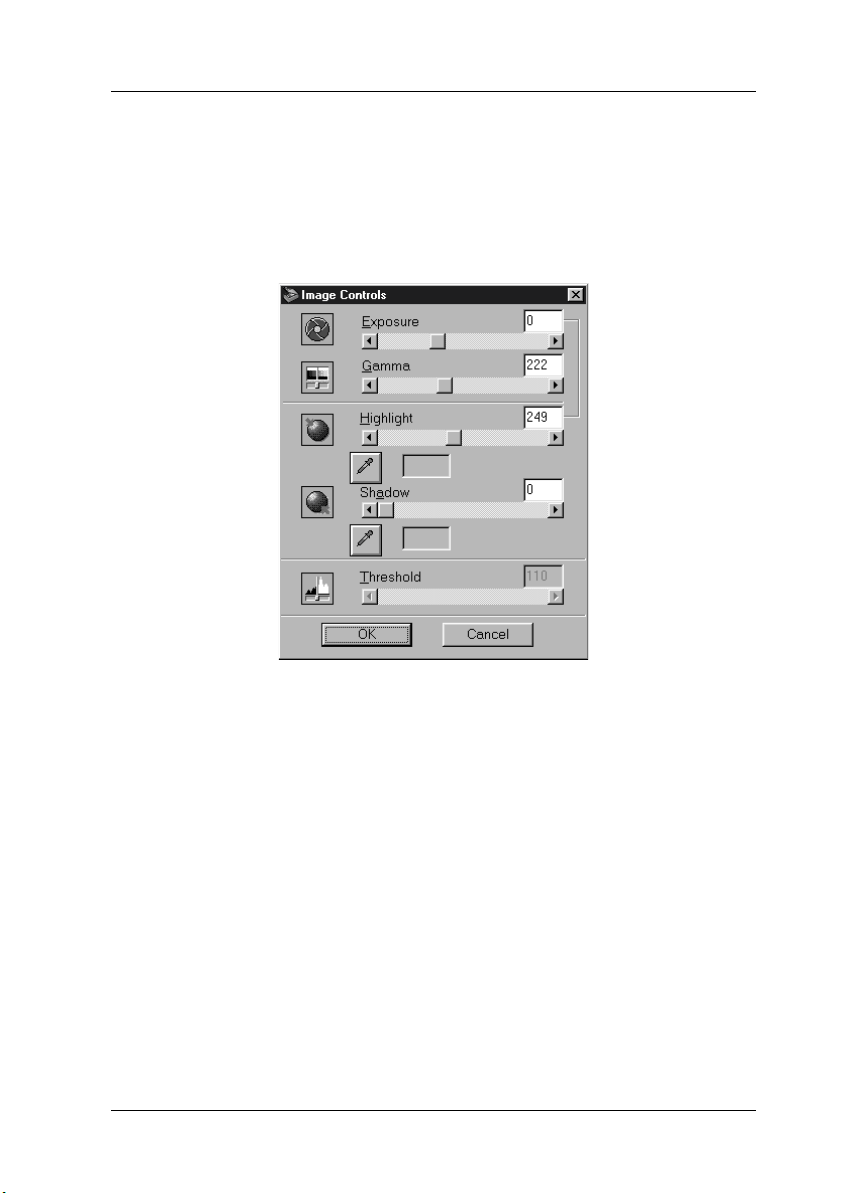
Image Controls dialog box
4. Use the
Threshold
slider to change the threshold value,
monitoring the results of your changes in the Preview
window. Adjusting the threshold value can make it easier for
OCR to recognize characters.
If you still have problems...
1. In the EPSON TWAIN Pro window, increase the Resolution
value to 400. Remember that scanning at higher resolution
takes longer and may not greatly increase the recognition rate.
2. If you still have problems, try using the enhancement tools in
your OCR software to make adjustments.
Scanning Basics
1-21
Page 31

Potential text recognition problems
The quality of the text in your original document greatly effects
OCR results.
The following types of originals can make recognition difficult
and should be avoided if possible:
Items that have been copied from other copies
❏
Faxes
❏
Text with tightly-spaced characters or line pitch
❏
Text that is in tables or underlined
❏
Cursive or italic fonts, and font sizes less than 8 points
❏
Remember that OCR software cannot recognize handwritten
characters.
1-22
Scanning Basics
Page 32

Chapter 2
Understanding EPSON TWAIN Pro Features
Overview. . . . . . . . . . . . . . . . . . . . . . . . . . . . . . . . . . . . . . . . . . . . . . .2-2
EPSON TWAIN Pro Main Window . . . . . . . . . . . . . . . . . . . . . . . .2-3
Document Sources . . . . . . . . . . . . . . . . . . . . . . . . . . . . . . . . . . . . . . .2-4
Image Types . . . . . . . . . . . . . . . . . . . . . . . . . . . . . . . . . . . . . . . . . . . .2-5
Image Type list . . . . . . . . . . . . . . . . . . . . . . . . . . . . . . . . . . . . .2-5
Image Type button . . . . . . . . . . . . . . . . . . . . . . . . . . . . . . . . . .2-7
Destinations . . . . . . . . . . . . . . . . . . . . . . . . . . . . . . . . . . . . . . . . . . . .2-10
Destination list. . . . . . . . . . . . . . . . . . . . . . . . . . . . . . . . . . . . . .2-11
Destination button . . . . . . . . . . . . . . . . . . . . . . . . . . . . . . . . . .2-12
Changing Resolution. . . . . . . . . . . . . . . . . . . . . . . . . . . . . . . . . . . . .2-14
Source and Target image sizes. . . . . . . . . . . . . . . . . . . . . . . . . . . . .2-14
Previewing Images . . . . . . . . . . . . . . . . . . . . . . . . . . . . . . . . . . . . . .2-17
Using the Preview Window Preview Buttons. . . . . . . . . . . . . . . .2-19
Zoom preview button. . . . . . . . . . . . . . . . . . . . . . . . . . . . . . . .2-19
Return to full preview button . . . . . . . . . . . . . . . . . . . . . . . . .2-19
Return to zoom preview button . . . . . . . . . . . . . . . . . . . . . . .2-20
Marquees. . . . . . . . . . . . . . . . . . . . . . . . . . . . . . . . . . . . . . . . . . . . . . .2-20
Making and modifying marquees . . . . . . . . . . . . . . . . . . . . .2-20
Marquee buttons . . . . . . . . . . . . . . . . . . . . . . . . . . . . . . . . . . . .2-23
Delete marquee button. . . . . . . . . . . . . . . . . . . . . . . . . . . . . . .2-23
Duplicate marquee button. . . . . . . . . . . . . . . . . . . . . . . . . . . .2-23
Auto locate button . . . . . . . . . . . . . . . . . . . . . . . . . . . . . . . . . .2-24
Marquee number indicator . . . . . . . . . . . . . . . . . . . . . . . . . . .2-25
Using the Adjust Buttons . . . . . . . . . . . . . . . . . . . . . . . . . . . . . . . . .2-26
Auto Exposure. . . . . . . . . . . . . . . . . . . . . . . . . . . . . . . . . . . . . .2-26
Image Controls . . . . . . . . . . . . . . . . . . . . . . . . . . . . . . . . . . . . .2-27
Tone Correction. . . . . . . . . . . . . . . . . . . . . . . . . . . . . . . . . . . . .2-29
Color Adjustment . . . . . . . . . . . . . . . . . . . . . . . . . . . . . . . . . . .2-32
Reset . . . . . . . . . . . . . . . . . . . . . . . . . . . . . . . . . . . . . . . . . . . . . .2-33
Focus . . . . . . . . . . . . . . . . . . . . . . . . . . . . . . . . . . . . . . . . . . . . . .2-33
Settings . . . . . . . . . . . . . . . . . . . . . . . . . . . . . . . . . . . . . . . . . . . . . . . .2-34
Configuration . . . . . . . . . . . . . . . . . . . . . . . . . . . . . . . . . . . . . . . . . . .2-36
Scan . . . . . . . . . . . . . . . . . . . . . . . . . . . . . . . . . . . . . . . . . . . . . . . . . . .2-39
Scan All . . . . . . . . . . . . . . . . . . . . . . . . . . . . . . . . . . . . . . . . . . . . . . . .2-39
Understanding EPSON TWAIN Pro Features
2-1
Page 33

Overview
When you start EPSON TWAIN Pro or EPSON TWAIN Pro
Network through a TWAIN-compliant application, the following
window appears on the screen:
Note for Macintosh users:
Most illustrations shown in this section are for Windows, so they may
vary in appearance from what actually appears on your screen. The
instructions are the same, except as noted
Note for EPSON TWAIN Pro Network users:
Although most illustrations and explanations of settings and functions
in this guide are for EPSON TWAIN Pro, they also apply to EPSON
TWAIN Pro Network.
The following sections describe the features of EPSON TWAIN
Pro and EPSON TWAIN Pro Network.
Note:
Some settings may appear dimmed depending on your choice of settings
and the features supported by your scanner.
2-2
Understanding EPSON TWAIN Pro Features
Page 34

EPSON TWAIN Pro Main Window
The main window
The main window is the starting point to make detailed settings.
You can select parameters for a setting or select special functions
provided with EPSON TWAIN Pro to attain the highest quality
scanned images.
Note:
❏
Online help also provides you with information on settings. Click
the? button to access online help.
❏
You cannot scan an image that exceeds the available memory or disk
space. If you attempt to scan an image that is too large, an alert
appears on the screen.
❏
Before you begin scanning, you should calibrate your screen. For
details, see Chapter 3, “Calibrating Your System.”
❏
After an image is scanned, be sure to save or export it.
Understanding EPSON TWAIN Pro Features
2-3
Page 35

Document Sources
When scanning a reflective document placed on the document
table of the scanner, leave the Document Source set to
Other selections are available depending on what options are
installed. These are the optional
and
TPU for Neg. Film
is optional with the Expression 1600).
Note:
Uninstalled options are not displayed.
or
TPU for Pos. Film
Flatbed:
Choose this setting to use the document table of the scanner.
Auto Document Feeder:
Automatic Document Feeder
(the Transparency Unit
Flatbed
.
,
2-4
Choose this setting to use the optional Automatic Document
Feeder.
Multi-page support with the Automatic Document Feeder
If you select Auto Document Feeder as the Document Source
and click the
Understanding EPSON TWAIN Pro Features
button, the following dialog box appears.
Scan
Page 36

If you select
Single Page
, only one page is fed from the
Automatic Document Feeder and scanned.
If you select
All Pages
(default), all the pages are fed from the
Automatic Document Feeder and scanned. The All Pages
option may not work with some applications.
TPU for Neg. Film, TPU for Pos. Film:
Select one of these settings when using the Transparency Unit.
If you are scanning negative film, select
TPU for Neg. Film
and if you are scanning positive film (or slides), select the
for Pos. Film
setting.
Image Types
Use the Image Type list or button to select the type of image to be
scanned.
,
TPU
Image Type list
The Image Type list provides the following predefined settings.
EPSON recommends you use the predefined settings first, then
later improve the quality of the scanned image manually by
making the detailed settings described in the following pages, if
necessary. Click the arrows on the right to view all of the available
settings.
Understanding EPSON TWAIN Pro Features
2-5
Page 37

36-bit Color (HiFi):
36-bit colors, best quality
Note:
This setting is available only with certain applications, such as
®
Adobe
PhotoShop®.
24-bit Color (Std):
24-bit colors, high quality
24-bit Color De-screening:
24-bit colors, high quality with de-screening to remove moiré
patterns
Note:
A moiré is a cross-hatch pattern that appears on scanned images
when scanning printed material. It is a result of interference that
occurs due to the difference between the pitches of the scanning and
the halftone screens.
12-bit Gray (HiFi):
12-bit gray, best quality
Note:
This setting is available only in certain applications, such as Adobe
PhotoShop.
8-bit Gray (Std):
256 grays, high quality, and de-screening
Line Art:
Black and white, draft quality
2-6
Understanding EPSON TWAIN Pro Features
Page 38

OCR:
Black and white, best quality, Text Enhancement Technology
Copy & Fax:
Black and white, hard halftone, draft quality, Auto Area
Segmentation
Image Type button
The Image Type button allows you to customize the Image Type
settings. If you want to make detailed settings manually, use this
feature.
Click the
Image Type
button. The following dialog box appears.
Understanding EPSON TWAIN Pro Features
2-7
Page 39

Image Type Name:
The names of predefined settings and any custom settings you
have saved appear in the Image Type Name list.
Pixel Depth:
Select the scanning depth from:
36-bit Color, 24-bit Color, 12-bit Gray, 8-bit Gray, and
Black & White
Scanning Mode:
.
Use this setting to select between speed and quality.
provides the best quality image, while
scanning with some loss of quality. Note that you can also
change the scanning mode of the preview image using the
procedure under "Configuration".
De-screening:
Select either On or
are automatically removed from scanned images, but
scanning takes longer.
Note:
A moiré is a cross-hatch pattern that appears on scanned images
when scanning printed material. It is a result of interference that
occurs due to the difference between the pitches of the scanning and
the halftone screens.
Dropout:
Select a color to subtract from a black and white scan of a
colored original. Proper use of dropout can improve the
quality of your black and white scans. Available dropout
options are:
None, Red, Green
provides faster
Draft
. When On is selected, moiré patterns
Off
, and
Blue
.
Best
2-8
Understanding EPSON TWAIN Pro Features
Page 40

Note:
❏
Dropout is available only when Pixel Depth is set to
or
❏
Depending on the image you scan, you may need to adjust the
Threshold setting in the Image Controls dialog box to enable
this feature.
B/W Options:
Select from:
Text Enhancement Technology, Auto Area
Segmentation
Text Enhancement Technology
To improve recognition accuracy during OCR (Optical
Character Recognition) scanning, select this option. This
function eliminates the document background from scans.
Auto Area Segmentation
To make grayscale images clearer and text recognition more
accurate, select this option. This function separates text from
graphics.
Black & White
, or
None
8-bit Gray
.
.
Note:
❏
The B/W Option setting is available only when
is selected as the Pixel Depth setting.
❏
When you need neither TET nor AAS, select
❏
Default is set to
To apply the settings you made, click OK. The Preview
window displays the effects of the current settings except for
(Text Enhance Technology) and
TET
Segmentation) settings.
Understanding EPSON TWAIN Pro Features
None
.
AAS
Black & White
.
None
(Auto Area
2-9
Page 41
Halftone:
Select a halftone or dither setting to reproduce images using
special dot patterns:
Mode A (Hard Tone), Mode B (Soft Tone), Mode C (Net
Screen), Dither A (4 × 4 Bayer), Dither B (4 × 4 Spiral), Dither
C (4 × 4 Net Screen), Dither D (8 × 4 Net Screen)
Note:
Halftone is available only when Pixel Depth is set to
.
White
, or
None
Black &
.
To cancel the settings, click
To save the settings you made as a group of custom settings, type
a new name in the Image Type Name box, then click
To delete an Image Type setting, select the setting name to be
deleted in the Image Type Name menu, then click
Cancel
.
Delete
Destinations
Select the destination, or output device, where the scanned image
is to be printed or displayed using the Destination list or button.
Save
.
.
2-10
Understanding EPSON TWAIN Pro Features
Page 42

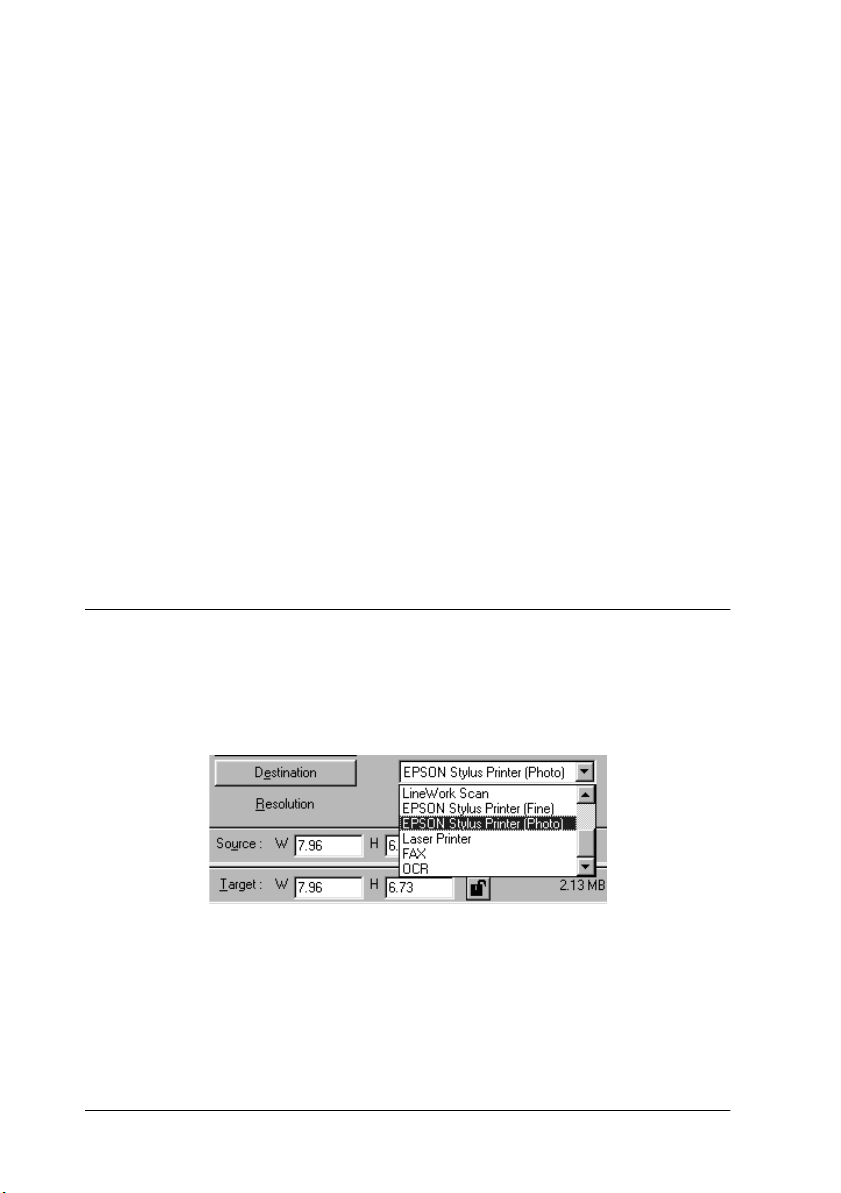
Destination list
The Destination list contains the following predefined settings
and any custom settings you have saved in the Destination dialog
box. Click the arrows on the right to view all the available settings.
Resolution Unsharp
Destination
name
Screen/
Web
Prepress
175 lpi
Prepress
150 lpi
Prepress
133 lpi
Prepress
120 lpi
LineWork
Scan
EPSON
Stylus Prin ter
(Fine)
EPSON
Stylus Prin ter
(Photo)
Laser Printer 600 dpi 200 dpi on
Line drawings and
halftone images
96 dpi (for Windows)
72 dpi (for Macintosh)
350 dpi 350 dpi off
300 dpi 300 dpi off
266 dpi 266 dpi off
240 dpi 240 dpi off
1200 dpi 600 dpi on
360 dpi 150 dpi on
720 dpi 300 dpi on
Photos
96 dpi (for Windows)
72 dpi (for Macintosh)
Mask
on
Fax 200 dpi 200 dpi off
OCR 300 dpi 300 dpi off
If you are using an EPSON Stylus printer and are printing scanned
images with the Economy, Normal, or Fine Print Quality settings
in your printer software, selecting EPSON Stylus Printer (Fine) is
recommended. If you are printing with the SuperFine or Photo
Print Quality settings, select EPSON Stylus Printer (Photo).
Understanding EPSON TWAIN Pro Features
2-11
Page 43

Note:
The effects of the Destination settings cannot be viewed in the Preview
window.
Destination button
The Destination button allows you to customize the Destination
settings. To make your own settings, such as scanning resolution,
click this button.
The following dialog box appears.
Destination Name:
Predefined and custom setting names appear in the
Destination menu.
Resolution:
Specify a scanning resolution for line drawing and halftone
images, or photos.
Note:
❏
When the Pixel Depth setting in the Image Type dialog box is
set to
Black & White
effect and the Photo setting becomes irrelevant. For other Pixel
Depth settings, the Photo setting takes effect and the Drawing/
Halftone setting becomes irrelevant.
2-12
Understanding EPSON TWAIN Pro Features
, the Drawing/Halftone setting takes
Page 44

❏
To print your scanned document when Resolution is set to
Drawing/Halftone
the list as you select in the printer driver. To print your scanned
document when Resolution is set to
between 150 and 300 dpi. If you select a higher resolution, the
Photo
the output quality
❏
The Resolution setting is closely related to the Image Size and
Scale settings. If you change them arbitrarily, the resulting
image may not be what you expected.
❏
The range of resolution values depends on your scanner.
setting requires longer to print, but does not improve
, select the same resolution setting from
, select a resolution
Photo
.
Unsharp Mask
You can select or deselect the Unsharp Mask setting. Selecting
the check box improves image sharpness.
To apply the settings you made, click OK. To cancel the settings,
click
Cancel
To save the settings you made, type a new name in the Destination
Name box, and then click
.
.
Save
To delete a Destination setting, select the target setting name to
be deleted in the Destination Name menu, then click
Understanding EPSON TWAIN Pro Features
Delete
.
2-13
Page 45

Changing Resolution
The resolution for the current scanning operation can be changed
by selecting a resolution or typing in the value. This setting
overrides the resolution setting you make in the Destination
dialog box.
Source and Target image sizes
The Source fields indicate the size of the image that is displayed
or selected in the Preview window.
The Target fields indicate what size the image will be when it is
output.
Note:
The image size setting is closely related to the Resolution. If you change
either setting arbitrarily, the resulting image may not be what you
expect.
2-14
Understanding EPSON TWAIN Pro Features
Page 46

Width and Height menu:
The width and height of an image are indicated in the selected
unit of measure. You can type new values directly in the
indicator fields, or you can change the image area in the
Preview window by creating a marquee, or frame. Do this by
dragging the mouse over the desired area. See“Previewing
Images” on page 2-17 for more information on marquees.
Units menu:
Select a unit of measurement. You can select either
inches
, or cm.
Storage size indicator:
The storage size of an image is indicated in KB or MB. As you
change the image area in the Preview window, this value also
changes.
pixels
,
Understanding EPSON TWAIN Pro Features
2-15
Page 47

Lock button:
The current size of width-to-height of the target image can be
locked, allowing the ratio of width-to-height of the Source
image to change according to the scale value, or the scale
value to change according to the ratio of width-to-height of
the Source image. This is especially useful in cases where the
size of an image does not fit the size of the paper on which
you want to print the image, but you want to keep the image's
original proportions. Enter the size of the paper in the Width
and Height fields of the Target box and then click the lock
button. The scale value is automatically changed, maintaining
the current ratio of width-to-height to fit the paper.
Scale slider:
locked
unlocked
An image can be reduced or enlarged by moving the Scale
slider. You can also click the left or right arrow to change the
image size in 1% increments.
The range of possible reduction or enlargement varies
depending on the current resolution setting.
Scale indicator:
The percentage of enlargement or reduction is shown in the
Scale indicator field. You can type a new value directly into
this field, or use the Scale slider to determine the value.
2-16
Understanding EPSON TWAIN Pro Features
Page 48

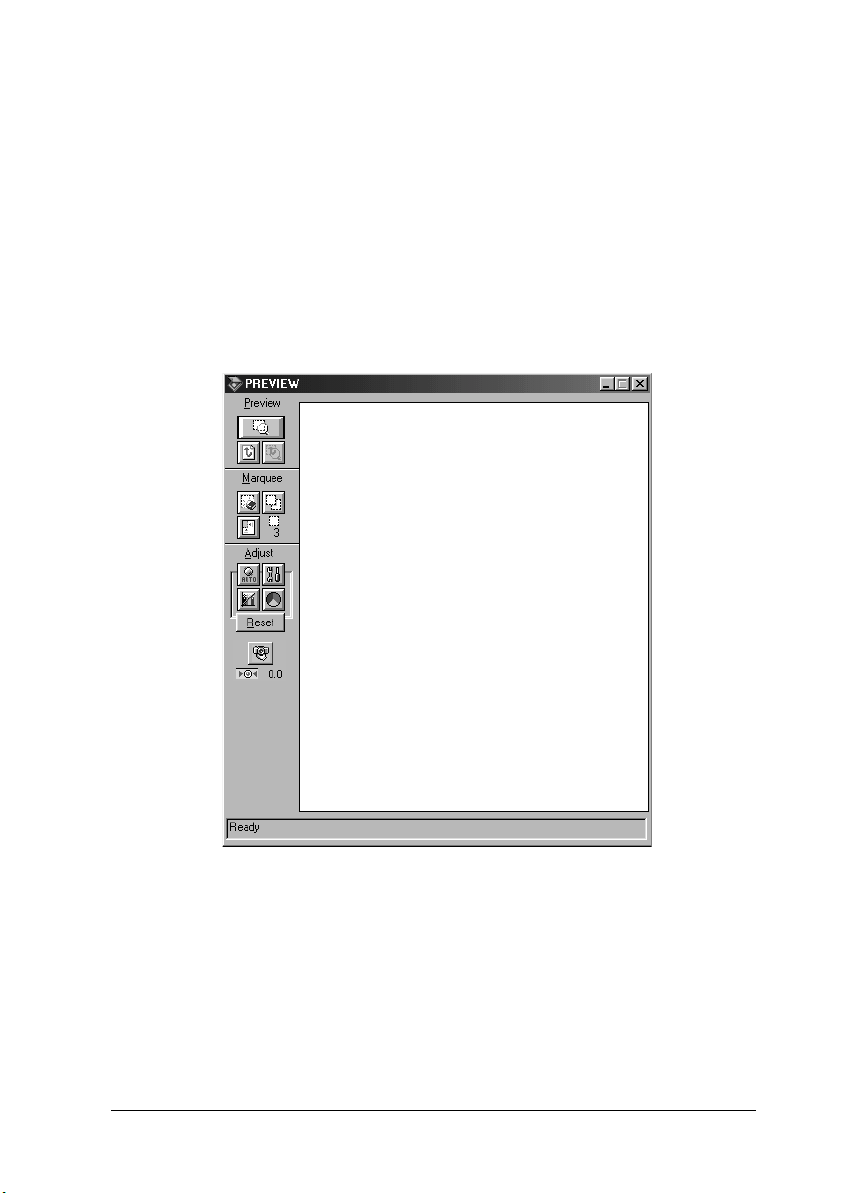
Previewing Images
Before you scan and save an image, you can preview it in the
Preview window. The Preview feature displays your image in the
Preview window and allows you to see the effects of your settings
before scanning. You can also use the Preview feature to
determine the width and height of the scanning image and the file
size of the image to be saved. See the section on Image Size in this
chapter.
Note:
You cannot preview an image that exceeds available memory or disk
space.
To preview an image, click
main dialog box.
The following window appears.
Preview
in the EPSON TWAIN Pro
Understanding EPSON TWAIN Pro Features
2-17
Page 49

preview window
You can see the effects to the preview image of any of the
following settings.
Pixel Depth, Halftone, and Dropout in the Image Type dialog
❏
box
Unsharp Mask in the Destination dialog box
❏
Exposure, Gamma, Highlight, Shadow, and Threshold in the
❏
Image Controls dialog box
Tone Correction in the Tone Correction dialog box
❏
Gray Balance, and Saturation in the Color Adjustment dialog
❏
box
2-18
Understanding EPSON TWAIN Pro Features
Page 50

Focus position on the Preview window when zoom preview
❏
is carried out
Note:
Although the image in the Preview window changes as you make
settings, the settings do not affect the real image until you scan or rescan
the image.
For more information on image settings, see “Image Controls” on
page 2-27, “Tone Correction” on page 2-29, “Color Adjustment”
on page 2-32, and “Configuration” on page 2-36.
Using the Preview Window Preview Buttons
Zoom preview button
To preview a part of the image that is already in the Preview
window, click and drag the mouse to create a marquee over the
area you want to see in detail, then click the zoom preview button.
See “Marquees” for information about marquees.
Return to full preview button
Understanding EPSON TWAIN Pro Features
2-19
Page 51

Clicking the return to full preview button restores the image to a
full preview. This button is available only when the marquee is
zoomed as described above.
Return to zoom preview button
Clicking the return to zoom preview button restores the image to
the previous zoom. This button is available only when a marquee
has been previously zoomed. This restores the zoom preview
from memory, which is quicker than rescanning the same zoomed
area by clicking the zoom preview button again.
Marquees
A marquee is a frame around an image, or a part of an image.
Marquees are often used in scanning and image-editing software
to select only the most important part of an image.
Making and modifying marquees
Move the pointer over the image in the Preview window. The
pointer becomes a set of cross-hairs. Drag (move the mouse while
holding down the mouse button) the cross-hairs over any area of
the image, and a dotted frame appears. The point where you first
clicked is anchored, but the rest of the frame is sizable and
movable. After you finish creating a marquee, you can resize and
move it as described below.
2-20
Understanding EPSON TWAIN Pro Features
Page 52

Multiple marquees
You can make multiple marquees in one image to scan the most
important parts while ignoring the rest. It is also useful to set
several items on the document table and scan all of them in one
time. Marquees can be different sizes, and they can overlap. Extra
marquees can be made anywhere except on the frame of another
marquee. You can make settings on each marquee.
You can begin a marquee anywhere the pointer appears as crosshairs. To distinguish the active marquee from other marquees,
look at the marquee frames. The active marquee has moving
dotted line of the frame as shown below. If you created multiple
marquees and want to make a inactive marquee active, just point
the cursor at the edge of the marquee and click. The marquee
becomes active.
Understanding EPSON TWAIN Pro Features
2-21
Page 53

Resizing marquees
When you move the pointer over the edge of the active marquee,
the pointer will change to a double-headed arrow as shown
below. You can then resize the marquee to the direction of the
arrow is pointing, up, down, sideways, or diagonally, by
dragging the arrow. The double-headed arrows only appear on
the active marquee.
If you drag an arrow while pressing the
will be resized proportionally.
key, the marquee
Shift
Moving marquees
To move an active marquee, move the pointer in the frame of the
marquee, and when the pointer changes into a hand, drag the
marquee to move it.
If you drag a hand while pressing the
be limited to vertical or horizontal movement.
key, the marquee will
Shift
2-22
Understanding EPSON TWAIN Pro Features
Page 54

Note:
If you want to create a marquee inside the active marquee, first make a
marquee outside the active marquee. The newly created marquee becomes
the active marquee and you can move it into the other marquee.
Marquee buttons
There are buttons available on the preview window to help you
manage the marquees.
Delete marquee button
Clicking the delete marquee button removes the active marquee.
Note:
You can also delete the active marquee by pressing the
your keyboard.
Delete
Duplicate marquee button
Clicking the duplicate marquee button creates another marquee
the same size as the active marquee. Use this button to make
multiple marquees.
Understanding EPSON TWAIN Pro Features
key on
2-23
Page 55

Clicking the duplicate marquee button while holding down the
keys noted in the table below causes the duplicate marquee(s) to
appear in a specific direction next to the original marquee.
Horizontal Vertical
Windows Ctrl key Alt key
Macintosh Command key option key
Auto locate button
Click the
Auto Locate
button to cause the scanner to
automatically locate and select the target image. The image
appears without white borders in the Preview window.
entire preview area located image
Note:
The Auto Locate feature is automatically activated when scanning
without previewing.
2-24
Understanding EPSON TWAIN Pro Features
Page 56

If a document contains more than one image, select a target image
by placing the mouse pointer over the image and clicking the
Auto Locate
button
The selected target image is located
.
automatically.
target image and other image located and
non-located images
Marquee number indicator
This shows the number of marquees in the Preview window. To
create more marquees, see “Duplicate marquee button” on page
2-23.
Understanding EPSON TWAIN Pro Features
2-25
Page 57

Using the Adjust Buttons
Before you scan an image, you can make adjustments manually
with the powerful image quality adjustment tools on the Preview
window. The following adjust buttons are available.
auto exposure button
image controls button
tone correction button
Auto Exposure
2-26
Understanding EPSON TWAIN Pro Features
color adjustment button
focus button
Page 58

Click the
automatically optimize the exposure for an image. The Gamma,
Highlight and Shadow settings in the Image Controls dialog box
are automatically set.
Note:
❏
❏
Auto Exposure
The Auto Exposure button appears dimmed and is not available
when the Pixel Depth is set to
selected
The Auto Exposure feature is automatically activated when
scanning without previewing.
in the Image Type dialog box.
button on the Preview window to
Black & White
and
AAS
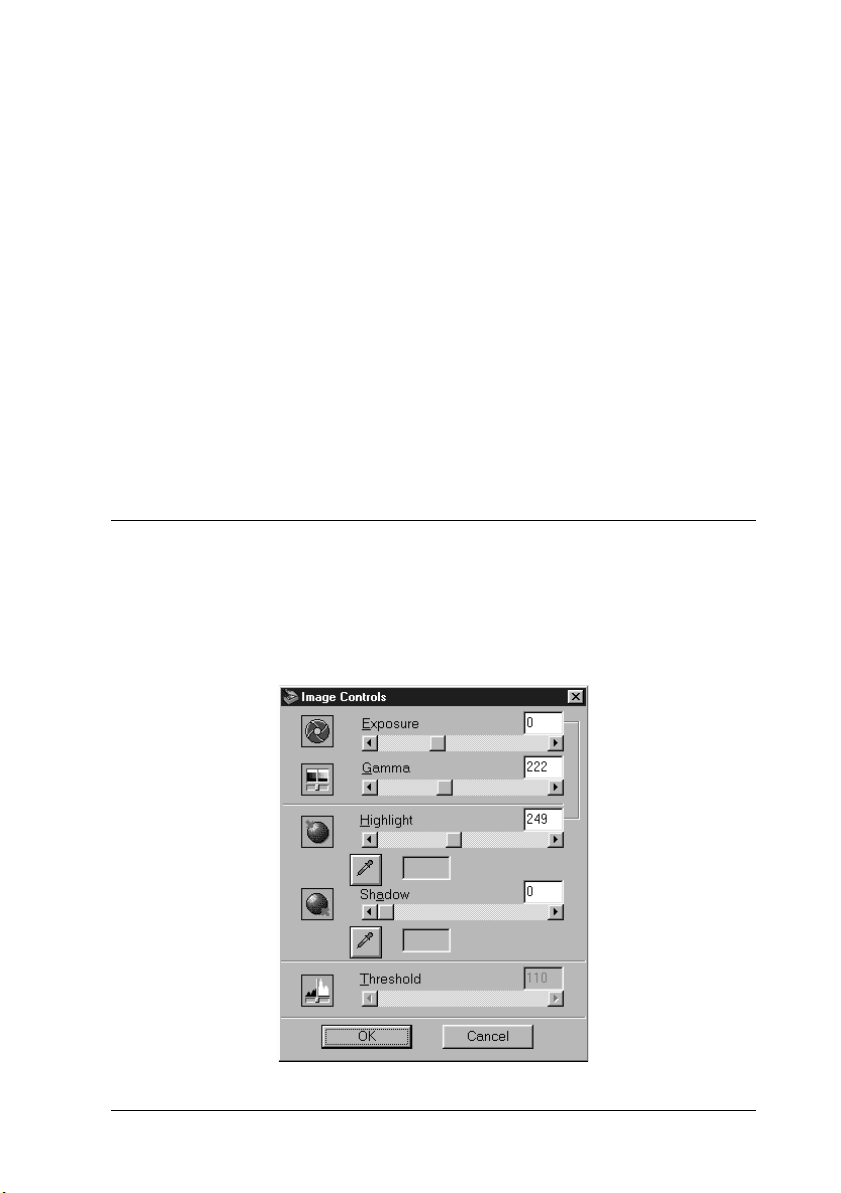
Image Controls
is not
Click the
the following dialog box.
Image Controls
Understanding EPSON TWAIN Pro Features
button on the Preview window to view
2-27
Page 59

Note:
❏
The Image Controls button appears dimmed and is not available
when
Type dialog box.
❏
The Image Controls settings are optimized automatically when you
scan without previewing.
❏
If Pixel Depth is set to
in the Image Type dialog box, all the settings except Threshold
appear dimmed and cannot be selected.
❏
You can see the effects of the Image Controls settings in the Preview
window.
Exposure:
The Exposure setting lightens or darkens an image. You can
select from -10 (darkest) to 20 (brightest) by moving (clicking
and dragging) the slider.
The Exposure and Highlight controls are related. When the
Exposure setting is changed, the Highlight value is
automatically set.
(Text Enhancement Technology) is selected in the Image
TET
Black & White
and Halftone is set to
None
Gamma:
Highlight:
2-28
Understanding EPSON TWAIN Pro Features
The Gamma control allows you to adjust the mid-tones in an
image. You can select from 50 (darkest) to 500 (brightest) by
moving the slider.
The Highlight control allows you to adjust the brightness
level of the brightest parts of an image. You can select from
61 to 490 by moving the slider.
Page 60

Click the eyedropper button beneath the slider, and the
mouse pointer changes to an eyedropper. Move the
eyedropper over the preview image, and click a bright area.
The eyedropper “picks up” the color from that area, and uses
it as the highlight for the entire image. This effect appears
immediately in the preview image. Click
the original image.
Shadow:
The Shadow control allows you to adjust the darkness level
of the darkest parts of an image. You can select from 0 to 60
by moving the slider.
Click the eyedropper button beneath the slider, and the
mouse pointer changes to an eyedropper. Move the
eyedropper over the preview image, and click a dark area.
The eyedropper “picks up” the color from that area, and uses
it as the shadow for the entire image. This effect appears
immediately in the preview image. Click
the original image.
Threshold:
Cancel
Cancel
to restore
to restore
Available only when Pixel Depth is set to
Halftone is set to
scanner scans gray shades as either black or white using this
setting.
You can select from 0 (lightest) to 255 (darkest) by moving the
slider.
Tone Correction
Black & White
in the Image Type dialog box. The
None
Understanding EPSON TWAIN Pro Features
and
2-29
Page 61

Click the
the following dialog box.
Note:
❏
❏
Tone Correction
The default Tone Correction settings are the Linear.
The Tone Correction button appears dimmed and is not available
when Pixel Depth is set to
and
Type dialog box.
(Text Enhancement Technology) is selected in the Image
TET
button in the Preview window to view
Black & White
, Halftone is set to
None
,
❏
You can see the effects of the Tone Correction settings in the Preview
window.
The tone value represents the contrast in the tonal relationship
between an original image and its reproduction on a monitor or
printer.
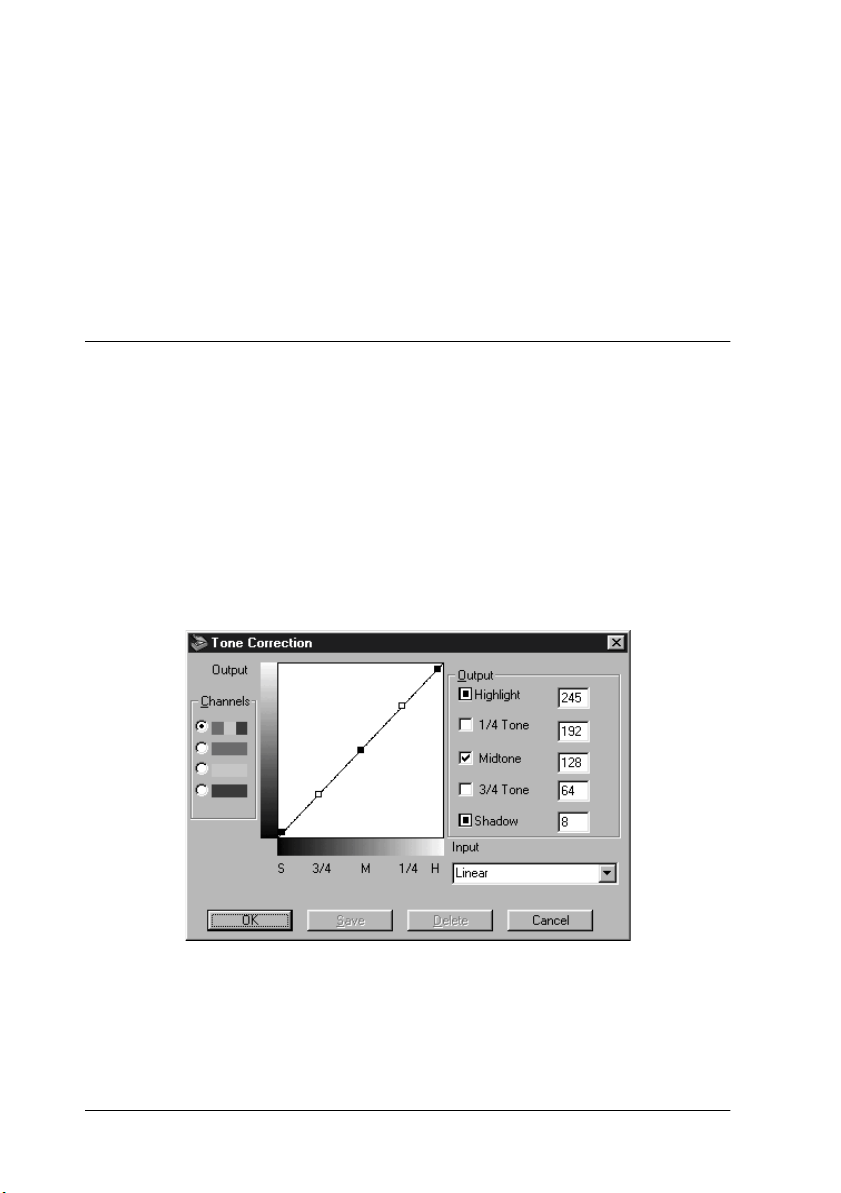
Tone Curve editor:
The editor allows you to customize tone correction. Drag
points on the tone curve to adjust the tone value. You can edit
up to five tonal elements.
2-30
Understanding EPSON TWAIN Pro Features
Page 62

Output options:
If you select the check box for a specific point, such as 1/4
Tone or Midtone, you can move that point and it will remain
where you leave it; it will not be affected by the movement of
other points on the curve. If the check box is cleared, the point
will be affected by the movement of other points.
Channels options:
You can select the combined red, green, and blue (RGB)
channel to modify all colors, or select these colors separately.
Note:
If Pixel Depth is set to
Type dialog box, you can only select the combined RGB channel
option.
Black & White
Tone correction list:
Select a tone correction setting from this list. The custom
settings you have saved appear in this list.
OK/Save/Delete/Cancel buttons:
or
8-bit Gray
in the Image
To accept the defining Tone Correction or close the dialog box,
click OK.
After you correct tone, type a name for your custom settings
in the tone correction list and click
To delete a setting, select the name of the setting you want to
delete in the tone correction list and click
To cancel the operation, click
Understanding EPSON TWAIN Pro Features
Cancel
Save
.
.
Delete
.
2-31
Page 63

Color Adjustment
Click the
view the following dialog box.
Note:
❏
❏
Color Adjustment
If Image Type setting is not
screening
the Color Adjustment button appears dimmed and these settings
cannot be selected.
You can see the effects of the Color Adjustment settings in the
Preview window.
, or Pixel Depth is set to
button in the Preview window to
Color Photo
8-bit Gray
or
Color Photo De-
or
Black & White
,
Gray Balance Intensity:
Gray Balance Intensity removes unwanted color casts and
tints by balancing color saturation.
2-32
Understanding EPSON TWAIN Pro Features
Page 64

Click the eyedropper button beneath the slider. The mouse
pointer changes to an eyedropper. Then click the color you
want to represent gray. The eyedropper “picks up” the color
and displays it in the box beside the eyedropper button. You
can then correct the cast level for that color from 0 to 100 by
moving the slider. The corrected color appears in the box on
the right, and the effect shows up immediately in the preview
image. Click
Cancel
to restore the original image.
Saturation:
Saturation is the property that defines color depth. Select a
saturation level from -100 (less color) to 100 (more color) by
moving the slider.
Reset
Use the Reset Button to return any image control settings you
made back to their default settings. If you did not alter any image
control settings, this button appears dimmed and is not available.
Focus
Click the focus button on the Preview window to set the focus
position to either 2.5 or 0.0. The setting is indicated under the
button.
If TPU (for Neg. Film or for Pos. Film) is selected as the Document
Source, the value of the focus position is automatically set to 2.5.
If you set the film to be scanned using film holders, you do not
need to change the focus setting. If you set the film directly on the
scanner’s document table, it is recommended to change the focus
position to 0.0.
Understanding EPSON TWAIN Pro Features
2-33
Page 65

If Flatbed or ADF (Single-sided or Double-sided) is selected, the
value is automatically set to 0.0. It is recommended not to change
the setting unless you want to have the scanned images out of
focus or want to scan an object that is not flat.
Settings
Click the
following dialog box. You can view all the settings for the current
preview image in this dialog box. Also, you can save all of the
currently selected settings as a group of custom settings with a
name you specify. Later, you can apply any custom settings you
have saved. Note that only user defined settings related to the
Document Source currently selected will appear in the User
defined settings field.
Depending on your scanner model, the preset settings for using
film holders with positive films may appear in the User defined
settings field when the optional Transparency Unit is installed.
Settings
button on the main window to view the
2-34
Understanding EPSON TWAIN Pro Features
Page 66

To save the currently selected settings, type a new name in the
User defined settings
field, then click
Save
.
To apply saved settings, select a setting name from the list, then
click OK. The preview image will reflect the settings you saved.
To restore the previous settings, click
Cancel
.
To delete a setting, select the setting name in the list, then click
Delete
.
Understanding EPSON TWAIN Pro Features
2-35
Page 67

Configuration
Click the
Configuration
button on the Advanced menu to view
the following dialog box. You can make settings that affect the
Preview window.
Windows
2-36
Macintosh
Understanding EPSON TWAIN Pro Features
Page 68

Preview Window Size:
Select the size of the Preview window. Your choices are Large,
Medium, and Small.
Save Preview Image and Settings:
Select this check box to automatically save the preview image
and all the image settings when you exit EPSON TWAIN (quit
scanning). The next time you restart EPSON TWAIN, the
image and settings will reappear.
Fast Preview:
Enables high-speed loading of the preview image. If this is
selected, the preview image is scanned in Draft mode. If this
is not selected, the preview image is scanned in Best mode,
and you can get accurate values for the Highlight, Shadow,
and Gray Balance Intensity by sampling with the eyedropper
in the preview image.
Do not select the check box when quality is more important
than speed.
Auto Exposure on Preview:
Displays the preview image with automatically optimized
exposure settings. The result is the same as if you clicked the
Auto Exposure
button.
ICM (for Windows):
Depending on your Windows version, this setting may not be
available or may have options. Select ICM to reproduce the
colors in your image using the Windows ICM color
management system.
Understanding EPSON TWAIN Pro Features
2-37
Page 69

For Windows 98 users:
When the sRGB option is selected, the sRGB profile is used to
reproduce colors. When the Display option is selected, the
color profile selected for your monitor in the Display
Properties dialog box is used to reproduce colors.
Note:
❏
If your printer and monitor do not support ICM, be sure this
check box is cleared.
❏
See “Using ICM (For Windows 98/95 Users)” on page 3-7 for
more details.
ColorSync (for Macintosh):
Reproduces the colors in your image using ColorSync color
management system. ColorSync uses a special color matching
scheme to make sure the colors in your output match the
colors in the original image. This setting appears only in
Macintosh.
Note:
If your printer and monitor do not support ColorSync, leave this
check box clear.
Eyedropper Sampling Area:
Allows you to select one of the three following size settings
for the Eyedropper Sampling Area: 1 × 1 pixel, 3 × 3 pixel, and
5 × 5 pixel. The Eyedropper feature can sample the average
Highlight, Shadow, and Gray Balance Intensity values of the
target area.
2-38
Understanding EPSON TWAIN Pro Features
Page 70

Scan
Clicking the
the Preview window. The scanned image is transferred to the
application software you used to open EPSON TWAIN Pro so that
you can work with the image from within that application.
While scanning, a progress indicator appears. If necessary, click
the
Cancel
Note:
❏
You cannot scan an image whose size exceeds available memory or
disk space. If you attempt to scan an image that is too large, an error
message appears on the screen.
❏
Before you begin scanning, you should calibrate your display
monitor. For more information, see Chapter 3, “Calibrating Your
System.”
❏
After an image is scanned, be sure to save it.
button scans the image or active marquee in
Scan
button to cancel the operation.
Scan All
Clicking the
images, one at a time. This button is available only when there are
multiple marquees.
Scan All
button scans all of the marquees as separate
Understanding EPSON TWAIN Pro Features
2-39
Page 71

2-40
Understanding EPSON TWAIN Pro Features
Page 72

Chapter 3
Calibrating Your System
Overview. . . . . . . . . . . . . . . . . . . . . . . . . . . . . . . . . . . . . . . . . . . . . . .3-2
Calibrating Your Screen . . . . . . . . . . . . . . . . . . . . . . . . . . . . . . . . . .3-2
For Windows 98 users . . . . . . . . . . . . . . . . . . . . . . . . . . . . . . .3-3
For Windows 95 and NT 4.0 users: . . . . . . . . . . . . . . . . . . . .3-5
For Macintosh users . . . . . . . . . . . . . . . . . . . . . . . . . . . . . . . . .3-7
Using ICM (For Windows 98/95 Users). . . . . . . . . . . . . . . . . . . . .3-7
For Windows 98 users . . . . . . . . . . . . . . . . . . . . . . . . . . . . . . .3-8
For Windows 95 users . . . . . . . . . . . . . . . . . . . . . . . . . . . . . . .3-8
Using ColorSync (For Macintosh Users) . . . . . . . . . . . . . . . . . . . .3-9
Calibrating Your System
3-1
Page 73

Overview
When you install EPSON TWAIN Pro, the EPSON Screen
Calibration utility is automatically installed.
EPSON Screen Calibration calibrates your monitor to ensure the
tone and contrast on your screen match the original image. Be sure
to calibrate your screen before using your scanner.
For more information regarding color and output device
calibration, see the
Color Guide
.
Calibrating Your Screen
You need to calibrate your screen when you first install the
scanner software, and anytime you switch to a different monitor.
3-2
Calibrating Your System
Page 74

For Windows 98 users
1. Double click the
Panel. The Scanners and Cameras Properties dialog box
appears. Click the
Scanners and Cameras
Properties
button.
icon in Control
Calibrating Your System
3-3
Page 75

2. Click the
tab, then click the
Utility
Screen Calibration Utility
icon. The Screen Calibration dialog box appears.
3-4
Calibrating Your System
Page 76

The gray stripes will not blend together perfectly; however,
try to make the different tones match as closely as possible.
3. Click OK to finish calibrating your scanner and monitor.
The setting is automatically saved as the Screen profile in the
Calibration list in EPSON TWAIN's Destination dialog box. The
screen profile contains calibration information for the preview
image as well as the scanned image.
For Windows 95 and NT 4.0 users:
1. Double-click the
window.
The EPSON TWAIN Pro setup dialog box appears.
EPSON TWAIN Pro
icon in the Control Panel
Calibrating Your System
3-5
Page 77

2. Click
Screen Calibration Utility
The following screen appears:
in the dialog box.
3. Look at the screen and move the slider to the right or left until
the two tones almost match.
4. Click OK to finish calibrating your scanner and monitor.
Note:
The gray stripes will not blend together perfectly; however, you should
try to make the different tones match as closely as possible.
3-6
Calibrating Your System
Page 78

For Macintosh users
1.
Click th
Scanner folder to view the Screen Calibration dialog box.
2. Look at the screen from a distance and move the slider right
or left until the two tones almost match.
3. Click OK to finish calibrating your scanner and monitor.
Note:
The gray stripes will not blend together perfectly; however, you should
try to make the different tones match as closely as possible.
e
EPSON Screen Calibration
icon in the EPSON
Using ICM (For Windows 98/95 Users)
If you use Windows 98 or 95 and your output devices (printer and
monitor) support the ICM color management system, you can use
the ICM calibration method.
Calibrating Your System
3-7
Page 79

For Windows 98 users
Note:
If your output devices do not support sRGB, leave the check box empty.
Follow the steps below:
1. Run PageManager for EPSON and select
File menu to start EPSON TWAIN Pro.
2. Click
3. Select either the sRGB or Display option.
4. Make any other settings you want.
5. Click
Configuration
box.
When the sRGB option is selected, the sRGB profile is used to
reproduce colors. When the Display option is selected, the
color profile selected for your monitor in the Display
properties dialog box is used to reproduce colors.
.
Scan
. Select
in the Configuration dialog
ICM
Acquire
For Windows 95 users
Note:
If your output devices do not support ICM, leave the check box empty.
Follow the steps below:
from the
1. Run PageManager for EPSON and select
File menu to start EPSON TWAIN Pro.
2. Click
3. Make any other settings you want.
3-8
Calibrating Your System
Configuration
box.
. Select
ICM
Acquire
in the Configuration dialog
from the
Page 80

4. Click
profile.
. The scanner scans an image using the ICM
Scan
Using ColorSync (For Macintosh Users)
If your output devices (printer and monitor) support the Apple
ColorSync color management system, you can use the ColorSync
calibration method.
Note:
If your output devices do not support ColorSync, leave the check box
empty.
Follow the basic steps below:
1. Run TWAIN-compliant software and select
similar command to start EPSON TWAIN Pro.
2. Click
3. Make any other settings you want.
4. Click
When the scanned image is printed or displayed with an output
device calibrated for the scanner, the image reproduced is
identical to the original.
Configuration
Configuration dialog box.
. The scanner scans an image using the ColorSync
Scan
profile.
. Select the
ColorSync
Acquire
check box in the
or a
Calibrating Your System
3-9
Page 81

3-10
Calibrating Your System
Page 82

Chapter 4
Troubleshooting
Problems and Solutions . . . . . . . . . . . . . . . . . . . . . . . . . . . . . . . . . .4-2
Scanning Problems. . . . . . . . . . . . . . . . . . . . . . . . . . . . . . . . . . . . . . .4-2
Image is dark, with little or no detail. . . . . . . . . . . . . . . . . . .4-2
You cannot scan an image or you only get a few dots
for the scanned image . . . . . . . . . . . . . . . . . . . . . . . . . . . . .4-3
Moiré (cross-hatch) patterns appear in the
scanned image. . . . . . . . . . . . . . . . . . . . . . . . . . . . . . . . . . . .4-3
Scanned image is too large. . . . . . . . . . . . . . . . . . . . . . . . . . . .4-3
Colors differ from the original.. . . . . . . . . . . . . . . . . . . . . . . .4-4
Poor character recognition during OCR scanning. . . . . . . .4-4
Software Operation Problems . . . . . . . . . . . . . . . . . . . . . . . . . . . . .4-5
You cannot start EPSON TWAIN Pro.. . . . . . . . . . . . . . . . . .4-5
You can’t select optional equipment
(Auto Document Feeder or Transparency Unit).. . . . . . .4-5
Pressing the Start button does not start Scanning.. . . . . . . .4-5
Troubleshooting
4-1
Page 83

Problems and Solutions
Most problems you encounter while operating your scanner and
software have simple solutions. This section divides the problems
into two categories:
Scanning problems 4-2
Software operation problems 4-5
Read the appropriate section to find your problem; then follow
the recommended steps.
Note:
If some settings appear dimmed in EPSON TWAIN Pro, they cannot be
selected because of the capability of your scanner or your choice of other
settings.
If you cannot solve a problem after reading and following the
information in this section, contact your dealer or a qualified
customer support person for assistance.
Scanning Problems
Image is dark, with little or no detail.
Calibrate the screen as described in “Calibrating Your Screen”
❏
on page 3-2.
Change the Destination setting. Select
❏
“Destinations” on page 2-10. Selecting a printer may cause onscreen colors to be different from the colors of the original,
however colors will be reproduced correctly when it is
printed.
4-2
Troubleshooting
Screen/Web
as the
Page 84

You cannot scan an image or you only get a few dots for the scanned image
Make sure you have placed a document on the document
❏
table of the scanner.
Change the Threshold setting. When
❏
Image Type, change
from the B/W Option in the Image Type dialog box.
None
Then change the
dialog box.
Or change
in the Image Control dialog box. See “Image Controls” on
page 2-27.
OCR
Text Enhancement Technology
Threshold
to
Line Art
setting in the Image Controls
, then change the
is selected as the
OCR
Threshold
to
setting
Moiré (cross-hatch) patterns appear in the scanned image
Change the Image Type settings. Turn the De-screening
❏
setting
Place a transparency sheet between the document and
❏
document table.
Reposition the document slightly.
❏
Make the Image Size setting slightly smaller.
❏
Change the focus position setting.
❏
in the Image Type dialog box.
On
Scanned image is too large.
Change the Destination setting. Select
❏
“Destinations” on page 2-10. If you select a printer as the
Destination setting, the print size will be correct, although the
image may appear enlarged on the screen of some
applications.
Screen/Web
Troubleshooting
as the
4-3
Page 85

Colors differ from the original.
Calibrate the screen. See “Calibrating Your Screen” on page
❏
3-2.
Change the Image Type and Destination settings. See “Image
❏
Types” on page 2-5 and “Destinations” on page 2-10 to make
sure your settings are correct.
Printed colors will not exactly match the colors on your
❏
monitor, since printers and monitors use different color
systems: monitors use RGB (red, green, and blue), while
printers typically use CMYK (cyan, magenta, yellow, and
black).
Poor character recognition during OCR scanning.
Change the Image Type setting. Select
❏
“Image Types” on page 2-5.
Try adjusting the Threshold setting in the Image Controls
❏
dialog box.
Select
❏
❏
Text Enhancement Technology
the Image Type dialog box to eliminate background noise.
See “Optimizing Image Scanning” on page 1-4 for more
information.
as described in
OCR
fr om B/ W O pti on in
4-4
Troubleshooting
Page 86

Software Operation Problems
You cannot start EPSON TWAIN Pro.
Make sure the scanner is turned on.
❏
Make sure the interface cable meets the requirements of your
❏
interface board. See the manual that comes with the interface
board.
Turn off the scanner and computer and check the connection
❏
between the scanner and the computer.
Make sure the interface board is installed correctly.
❏
Make sure that EPSON TWAIN Pro is selected in your
❏
application software.
You can’t select optional equipment (Auto Document Feeder or Transparency Unit).
Make sure the optional equipment is installed correctly. See
❏
your scanner manual.
Pressing the Start button does not start Scanning.
❏ For Windows 95, NT 4.0, and Macintosh
Make sure the Scanner Monitor software is running and check
the Scanner Monitor’s Launch Application path is set
correctly.
❏ For Windows 98
Click the
and make sure the
And make sure the Start button is selected as the
events
application in the
Events
, and at least one scanner event recognizable
tab in your scanner’s Properties dialog box
Disable device events
Send to this application
check box is clear.
Scanner
box is selected.
Troubleshooting
4-5
Page 87

4-6
Troubleshooting
Page 88

Glossary
additive primary colors
The colors of red, green and blue (RGB) - which give the perception of white when
combined equally. These are the colors of the color system used by monitors and
scanners.
bi-level data
Image data that is composed of 1 bit per pixel. A pixel is represented by a single
bit of digital data that can be expressed as only 1 (light) or 0 (dark).
bit
Sho rt fo r binar y dig it. The small est uni t of d ata in c ompute r pro cessi ng . A b it c an
represent one of two values: on, represented by a 1, or off, represented by a 0.
bit/pixel
The unit that indicates the number of bits allocated for a pixel. The larger the bit
value, the more detail of a pixel will be reproduced.
brightness
A scanner function to lighten or darken the output image data.
byte
A unit of information consisting of eight bits. A byte can represent a control code
or character.
carriage
A component of the scanner that contains the optical sensor and light source for
scanning.
color correction
A method of adjusting the color image data for a particular type of device so that
the reproduction results are as close as possible to the original colors.
color separation
A process of converting full-color images into a limited number of primary colors.
Additive primary colors (red, green, and blue) are used by the scanner, and the
subtractive primary colors (cyan, magenta, and yellow) plus black are used for
printing press separation.
daisy chain
A SCSI bus arrangement that allows several devices to be connected
simultaneously in a line to a single computer. See SCSI.
default
A set of values used when no other selections have been made. These are
sometimes called factory defaults if the original values have not been changed
since the scanner left the factory.
Glossary
-1
Page 89

dithering
A process in which software or an output device simulates continuous tones with
groups of dots.
document
The item, such as a sheet of paper or a book, that is placed on the document table
for the scanner to read.
dpi
Short for dots per inch. A unit of measurement for resolution. The higher the
value, the higher the resolution.
dropout color
A color the scanner does not recognize and ignores. You can select and deselect
dropout colors in the scanner software.
ESC/I
Abbreviation for EPSON Standard Code for Image scanners. A system of
commands that allows you to control image scanners from your software.
ESC/P
Abbreviation for EPSON Standard Code for Printers. A system of commands that
allows you to control printers from your software.
gamma
Gamma is a value that expresses the relationship between the input and output
of a device. By adjusting the gamma, the brightness of the mid-tones of an image
can be changed without affecting the shadows and highlights.
grayscale
Images represented with various shades of gray in addition to black and white.
halftoning
A method of reproducing images with patterns of dots to improve the quality of
the output.
home position
The position at the rear (nearest the cover hinge position) of the scanner where
the carriage rests before a scanning operation.
imagesetter
A device that uses computer files to produce high-resolution text and graphics
output on film or paper. These are usually found in service bureaus and printing
companies.
impact dot printer
A printer that transfers ink onto the pap er by striking an ink ribbon with a number
of small pins.
-2
Glossary
Page 90

ink jet printer
A printer that transfers ink onto the paper by spraying the ink through a number
of small nozzles.
interface
A piece of hardware, a method, or a standard used for connection between or
among computer devices.
line sequence
A type of color scanning that separates primary colors line by line. The carriage
makes only one pass.
moir
éééé
A moiré is a cross-hatch pattern that appears on scanned images when scanning
printed material. It is a result of interference that occurs due to the difference
between the pitches of the scanning and the halftone screens.
monochrome
Black and white images, or images represented only by the intensity of
luminosity.
OCR
Optical Character Recognition.
The technology that allows computers to "read" text from physical objects. OCR
requires a graphical representation of text to interpret, which usually comes from
a scanned image.
page sequence
The type of color scanning in which the entire image is scanned once for each
separate color.
pixel
Short for picture element. Each image is composed of a number of pixels. Pixels
are also counted in units of dots.
plain bi-level
Bi-level image data without the halftoning process.
port
An interface channel through which data is transmitted between devices.
primary colors
Basic colors. See
additive primary colors
and
subtractive primary colors
.
resolution
Indication of how finely an image is resolved into pixels. Can be measured in
dots per inch (dpi), pixels per inch (ppi), or samples per inch (spi).
scan
An operation performed by the sensor and the carriage. The image is divided
into pixels by scanning.
Glossary
-3
Page 91

scanning area
The physical size of the image that can be scanned by the scanner.
SCSI
Small Computer System Interface. This is one method used to connect your
computer to peripherals such as scanners, hard disk drives, CD-ROM drives, and
others.
SCSI ID
The numbers that all devices in a SCSI connection (see daisy chain) use to identify
ea ch oth er. I f the s am e ID numb er is u sed by two dev ices i n th e same d aisy ch ain,
the devices cannot operate properly.
subtractive primary colors
The colors of cyan, mag enta, and yellow (CMY) which prod uce black when mixed
in certain amounts. In printing, black is often added to give more definition as
mixing of actual inks cannot produce pure black.
terminator
A device that stops electronic signals, and prevents them from proceeding or
returning to other devices. This is necessary to stop a signal from continuously
reflecting between devices.
threshold
A reference point that is used to determine whether data will be processed as
"on" or "off". In the case of color image data, "on" means that a certain color will
appear in a pixel or dot, and "off" means that color will not appear there.
tone correction
A method of adjusting the tone curve so that the reproduction results on different
types of output devices have gradations similar to the original image.
tone curve
The graph that shows the contrast ratio between the input (original image) and
output (image data) in image processing.
unsharp mask
Originally a photographic process in which a sharply focussed and a slightly outof-focus image are combined to produce a sharper image. This process is
simulated by software to produce the same effect.
-4
Glossary
Page 92

Index
Numerics
12-bit Gray (HiFi), 2-5, 2-6
24-bit Color (Std), 2-5, 2-6
24-bit Color De-screening, 2-5, 2-6
36-bit Color (HiFi), 2-5, 2-6
8-bit Gray (Std), 2-5, 2-6
A
AAS, 2-9
Active marquee, 2-21
Adjusting
focus, 2-33
Gamma, 1-9
Gray Balance Intensity, 1-13
Highlight, 1-7
Saturation, 1-15
Shadow, 1-8
Applying preset tone curve, 1-10
Auto area segmentation, 2-9
Auto exposure, 2-27
Auto Exposure on Preview, 2-37
Auto locate, 2-24
Automatic Document Feeder, 2-4
B
B/W Options, 2-7, 2-9
Button
Auto exposure, 2-27
Auto locate, 2-24
Color Adjustment, 2-32
Configuration, 2-36
Delete marquee, 2-23
Destination, 2-12
Duplicate marquee, 2-23
Focus, 2-33
Image Controls, 2-27
Image Type, 2-7
locking image size, 2-14, 2-16
Preview, 2-17
Reset, 2-33
Return to full preview, 2-20
Return to zoom preview, 2-20
Scan, 2-39
Scan All, 2-39
Settings, 2-34
Tone Correction, 2-30
Zoom preview, 2-19
C
Calibration utility, 3-2
Channels, 1-17
Channels options, 2-30, 2-31
Color adjustment, 2-32
Color cast (tinting), 1-13
Color management system
Macintosh, 3-9
Windows, 2-37, 3-7
ColorSync, 3-9
Copy & Fax, 2-5, 2-7
Cross hatch patterns, 4-3
Curve name, 1-18
D
Darken, 1-10, 1-18
Delete marquee, 2-23
De-screening, 2-7, 2-8
Destination, 2-10
Destination Name, 2-12
Destination name, 2-12
Dialog
Color Adjustment, 2-32
Configuration, 2-36
Destination, 2-12
Image Controls, 2-27
Image Type, 2-7
Settings, 2-34
Display, 2-37, 3-7
IN-
1
Page 93

Displaying the preview images, 1-6
Document source, 2-4
Dropout, 2-7, 2-8
Duplicate marquee, 2-23
E
EPSON Stylus Printer (Fine), 2-11
EPSON Stylus Printer (Photo), 2-11
EPSON TWAIN Pro, 2-2
EPSON TWAIN Pro main window, 2-
3
EPSON TWAIN Pro Network, 2-2
EPSON TWAIN Pro Network
window, 1-2
EPSON TWAIN Pro window, 1-2
Exposure, 2-27, 2-28
Eyedropper Sampling Area, 2-38
F
Fast Preview, 2-37
Fax, 2-11
File size, 2-15
Flatbed, 2-4
Flat Contrast, 1-10, 1-18
Focus position, 2-33
G
Gamma, 1-9, 2-27, 2-28
Gray balance intensity, 1-13, 2-32
H
Halftone, 2-7, 2-10
Height, 2-15
High Contrast, 1-10, 1-18
Highlight, 1-7, 2-27, 2-28
I
ICM, 2-37, 3-7
Image Controls, 2-27
Image quality adjustment tools, 2-26
Image sizes, 2-14
Image Type, 2-5
Image Type Name, 2-7, 2-8
Indicator
focus position, 2-33
marquee number, 2-25
scale, 2-16
L
Laser Printer, 2-11
Lighten, 1-10, 1-18
Linear, 1-10, 1-18
Line Art, 2-5, 2-6
LineWork Scan, 2-11
List
Destination, 2-11
Document Source, 2-4
Image Type, 2-5
User defined settings, 2-34
Lock button, 2-14, 2-16
M
Main window, 1-3, 2-3
Manually optimizing images, 1-5
Marquee, 2-20
active, 2-21
making and modifying, 2-20
moving, 2-22
resizing, 2-22
Marquee number indicator, 2-25
Moiré, 4-3
Moving marquees, 2-22
Multiple marquees, 2-21
O
OCR (Optical Character Recognition),
1-19, 2-5, 2-7, 2-11
OCR scanning
improving character recognition, 1-
20
potential text recognition
problems, 1-22
IN-2
Page 94

scanning text, 1-19
Open Shadow, 1-10, 1-18
Optimizing image, 1-4
Output options, 2-30, 2-31
Output values, 1-17
P
Pixel Depth, 2-7, 2-8
Prepress 120 lpi, 2-11
Prepress 133 lpi, 2-11
Prepress 150 lpi, 2-11
Prepress 175 lpi, 2-11
Preview button, 2-17
Previewing images, 1-6, 2-17
Preview window, 1-3
Preview Window Size, 2-37
sRGB, 2-37, 3-7
Storage size, 2-14, 2-15
T
Target image size, 2-14
TET, 2-9
Text enhancement technology, 2-9
Threshold, 2-27, 2-29
Tone Correction, 2-30
Tone Correction dialog box, 1-16
Tone correction list, 1-18, 2-30, 2-31
Tone curve, 1-10, 1-15, 1-19
Tone curve editor, 1-17, 2-30
TPU for Neg. Film, 2-4, 2-5
TPU for Pos. Film, 2-4, 2-5
Transparency unit, 2-4
R
Reset, 2-33
Resetting image control settings, 2-33
Resizing marquees, 2-22
Resolution, 2-12, 2-14
Return to full preview, 2-20
Return to zoom preview, 2-20
S
Saturation, 1-15, 2-32, 2-33
Save Preview Image and Settings, 2-37
Scale, 2-14, 2-16
Scale bar, 2-16
Scale indicator, 2-16
Scan, 2-39
Scan All, 2-39
Scanning
negative film, 2-5
positive film (or slides), 2-5
text, 1-19
Scanning Mode, 2-7, 2-8
Screen/Web, 2-11
Screen Calibration utility, 3-2
Shadow, 1-8, 2-27, 2-29
Source image size, 2-14
U
Unit, 2-14
Unit of measurement, 2-15
Unsharp mask, 2-12, 2-13
Using tone curve, 1-15
W
Width, 2-15
Width and height of image, 2-14
Window
EPSON TWAIN Pro, 1-2
EPSON TWAIN Pro Network, 1-2
main, 1-3
Preview, 1-3
Z
Zoom preview, 2-19
IN-
3
Page 95

EPSON OVERSEAS MARKETING LOCATION S
EPSON AMERICA, INC.
20770 Madrona Ave.
P.O. Box 2842
Torrance, CA 90509-2842
Phone: (800) 922-8911
Fax: (310) 782-5220
EPSON DEUTSCHLAND GmbH
Zülpicher Straße 6,
40549 Düsseldorf Germany
Phone: (0211) 56030
Fax: (0211) 5047787
EPSON AUSTRALIA PTY. LTD.
70 GIBBES STREET, CHATSWOOD 2067 NSW.
Phone: 2-9903-9000
Fax: 2-9903-9177
EPSON HONG KONG LTD.
Rooms 4706-10, 47/F,
China Resources Bldg.,
26 Harbour Road, Wanchai, Hong Kong
Phone: 2585-4300
Fax: 2827-7083
EPSON ITALIA S.p.A.
V.le F.lli Casiraghi 427
20099 Sesto S.Giovanni
MI, Italy
Phone: 2-262331
Fax: 2-2440750
EPSON UK LTD.
Campus 100, Maylands Avenue,
Hemel Hempstead, Herts,
HP2 7TJ, U.K.
Phone: (+44) 01442 261144
Fax: (+44) 01442 227227
EPSON FRANCE S.A.
68 bis, rue Marjolin
92300, Levallois-Perret, France
Phone: 33.1.40.87.37.37
Telex: 610657
EPSON SINGAPORE PTE. LTD.
No. 1 Temasek Avenue #36-00
Millenia Tower, Singapore 039192
Phone: (065) 33 77 911
Fax: (065) 33 41 185
EPSON TAIWAN TECHNOLOGY &
TRADING LTD.
10F, No. 287 Nanking E. Road, Sec. 3,
Taipei, Taiwan, R.O.C.
Phone: (02) 717-7360
Fax: (02) 712-9164
EPSON IBERICA S.A.
Av. de Roma, 18-26
08290 Cerdanyola del Valles
Barcelona, Spain
Phone: 582. 15.00
Fax: 582. 15.55
SEIKO EPSON CORPORATION
(Hirooka Office)
80 Harashinden, Hirooka
Shiojiri-shi, Nagano-ken
399-0785 Japan
EPSON PORTUGAL, S.A.
R. do Progresso, 471, 1° Perafita
4460 Matosinhos, Portugal
Phone: (02) 996 14 02
Fax: (02) 996 14 11
1998 February
Page 96

Reference Guide
EPSON (UK) LTD 12012000
 Loading...