

Page 1

1
Where to Find Information
Daily Use guide
"Setup Guide" of this guide will help you set up and begin using
your printer. It includes information on setting up your printer
and installing the printer software. And this guide provides
information on normal printer operation. It also contains
troubleshooting tips and customer support information.
Reference Guide included on the CD-ROM
The Reference Guide contained on the CD-ROM included with
your printerprovidesdetailedinformationaboutprinter software
settings, printing on special paper, maintenance, and problem
solving.
Opening the Reference Guide:
Insert the printer software CD in the CDROM drive. Select Online Guide from
the Installer dialog box and click .
Then click View Reference Guide to
open the guide.
Installing the Reference Guide:
To install the Reference Guide on your hard disk, click Install
Reference Guide and follow the on-screen instructions. When
installation is complete, an ESC480 Guide icon appears in the
EPSON folder. Double-click the icon to open the guide.
Note:
If your hard disk does not have enough space to install the Reference
Guide, view it directly from the CD.
Page 2

2
All rights reserved. No part of this publication may be reproduced, stored in a retrieval
system, or transmitted in any form or by any means, electronic, mechanical, photocopying,
recording, or otherwise, without the prior written permission of SEIKO EPSON
CORPORATION.The informationcontained hereinis designed onlyfor usewith this EPSON
printer. EPSON is not responsible for any use of this information as applied to other printers.
Neither SEIKO EPSON CORPORATION nor its affiliates shall be liable to the purchaser of
this product or third parties for damages, losses, costs, orexpenses incurred by the purchaser
or third parties as a result of: accident, misuse, or abuse of this product or unauthorized
modifications, repairs, or alterations to this product, or (excluding the U.S.) failure to strictly
comply with SEIKO EPSON CORPORATION's operating and maintenance instructions.
SEIKO EPSON CORPORATIONshall notbe liable for any damagesor problemsarising from
the use of any options or any consumable products other than those designated as Original
EPSON Products or EPSON Approved Products by SEIKO EPSON CORPORATION.
SEIKOEPSONCORPORATIONshallnotbeheldliableforanydamageresultingfrom
electromagnetic interference that occurs from the use of any interface cables other than those
designated as EPSON Approved Products by SEIKO EPSON CORPORATION.
EPSON is a registered trademark and EPSON Stylus is a trademark of SEIKO EPSON
CORPORATION.
Microsoft and Windows are registered trademarks of Microsoft Corporation.
General Notice: Other product names used herein are for identification purposes only and may be
trademarks of their respective owners. EPSON disclaims any and all rights in those marks.
Copyright © 2000 by SEIKO EPSON CORPORATION, Nagano, Japan.
Page 3

3
Contents
Safety Instructions
Safety InstructionsSafety Instructions
SafetyInstructions ............................
........................................................
............................1111
ImportantSafetyInstructions .............................1
AFewPrecautions ......................................2
ENERGYSTARCompliance..............................4
Warnings,Cautions,andNotes ...........................4
Setup Guide
Setup GuideSetup Guide
SetupGuide ................................
................................................................
................................5555
CheckingthePackageContents ...........................5
Unpackingtheprinter ...................................6
AttachingthePaperSupport .............................6
ConnectingthePrinter...................................7
InstallingthePrinterSoftware ............................7
InstallingandCheckingtheInkCartridges .................9
PrintingYourFirstPage .................................12
Printer Parts and Functions
Printer Parts and FunctionsPrinter Parts and Functions
PrinterPartsandFunctions.....................
..........................................
.....................15
1515
15
PrinterParts............................................15
Loading Special Paper, Envelopes, and Other Media
Loading Special Paper, Envelopes, and Other MediaLoading Special Paper, Envelopes, and Other Media
Loading Special Paper, Envelopes, and Other Media 17
1717
17
LoadingSpecialPaperandOtherMedia ...................17
LoadingEnvelopes ......................................19
Using the Printer Software
Using the Printer SoftwareUsing the Printer Software
UsingthePrinterSoftware .....................
..........................................
.....................21
2121
21
PrinterSoftwareIntroduction.............................21
MakingChangestoPrinterSettings .......................22
Previewingyourprintout ................................30
GettingInformationThroughOnlineHelp .................33
Checking Printer Status
Checking Printer StatusChecking Printer Status
CheckingPrinterStatus .......................
..............................................
.......................35
3535
35
UsingEPSONStatusMonitor3 ...........................35
Page 4

4
Replacing Ink Cartridges
Replacing Ink CartridgesReplacing Ink Cartridges
ReplacingInkCartridges ......................
............................................
......................37
3737
37
Maintenance
MaintenanceMaintenance
Maintenance ...............................
..............................................................
...............................41
4141
41
CheckingthePrintHeadNozzles......................... 41
CleaningthePrintHead................................. 42
AligningthePrintHead ................................. 43
Troubleshooting
TroubleshootingTroubleshooting
Troubleshooting..............................
............................................................
..............................45
4545
45
ErrorMessages......................................... 45
TypicalProblemsandSolutions .......................... 45
CancellingPrinting ..................................... 47
WheretoGetHelp...................................... 48
Consumable Products
Consumable ProductsConsumable Products
ConsumableProducts ........................
................................................
........................49
4949
49
ConsumableProducts................................... 49
Printer Specifications
Printer SpecificationsPrinter Specifications
PrinterSpecifications .........................
..................................................
.........................51
5151
51
SystemRequirements ................................... 51
Page 5

1
Safety Instructions
Important Safety Instructions
Read all of these instructions before using your printer. Also, be
sure to follow all warnings and instructions marked on the
printer.
❏ Do not block or cover the openings in the printer’s cabinet.
Do not insert objects through the slots.
❏ Take care not to spill liquid on the printer.
❏ Use only the type of power source indicated on the printer’s
label.
❏ Connect all equipment to properly grounded power outlets.
Avoid using outlets on the same circuit as photocopiers or air
control systems that regularly switch on and off.
❏ Avoid electrical outlets controlled by wall switches or
automatic timers.
❏ Keep the entire computer system away from potential sources
of electromagnetic interference, such as loudspeakers or the
base units of cordless telephones.
❏ Do not use a damaged or frayed power cord.
❏ Unplug the printer’s power cord from the electrical outlet
when you do not use the printer for a long period of time.
❏ If you use an extension cord with the printer, make sure the
total ampere rating of the devices plugged into the extension
cord does not exceed the cord’s ampere rating. Also, make
sure the total ampere rating of all devices plugged into the
wall outlet does not exceed the wall outlet’s ampere rating.
Page 6

2
❏ Do not attempt to service the printer yourself.
❏ Unplug the printer and refer servicing to qualified service
personnel under the following conditions:
The power cord or plug is damaged; liquid has entered the
printer; the printer has been dropped or the cabinet damaged;
the printer does not operate normally or exhibits a distinct
change in performance.
A Few Precautions
Take note of the following when using the printer, handling the
ink cartridges, or choosing a location for the printer.
When using the printer
❏ Do not put your hand inside the printer or touch the ink
cartridges during printing.
❏ Do not move the print head by hand; otherwise, you may
damage the printer.
❏ Before transporting the printer, make sure the print head is in
thehome(farright)positionandtheinkcartridgesarein
place.
When handling the ink cartridges
❏ Keep ink cartridges out of the reach of children. Do not allow
children to drink from or otherwise handle the cartridges.
❏ If ink gets on your skin, wash it off with soap and water. If it
gets in your eyes, flush them immediately with water.
❏ Do not shake an ink cartridge; this can cause leakage.
Page 7

3
❏ Install the ink cartridge immediately after you remove it from
its package. Leaving the cartridge unpacked for a long time
before use may result in reduced print quality.
❏ Once you install an ink cartridge, do not open the clamp or
remove the cartridge except to replace it with a new one.
Otherwise, the cartridge may become unusable.
❏ Do not use an ink cartridge beyond the date printed on the
cartridge carton. For best results, use up the ink cartridges
within six months of installing them.
❏ Do not dismantle the ink cartridges or try to refill them. This
could damage the print head.
When choosing a place for the printer
❏ Place the printer on a flat, stable surface that extends beyond
the printer base in all directions. The printer will not operate
properly if it is tilted or at an angle.
❏ Leave enough space in front of the printer for paper to be
ejected smoothly.
❏ Avoid places subject to rapid changes in temperature and
humidity. Also, keep the printer away from direct sunlight,
strong light, or heat sources.
❏ Avoid places subject to shocks and vibrations.
❏ Leave enough room around the printer to allow for sufficient
ventilation.
❏ Placetheprinternearawalloutletwheretheplugcanbe
easily unplugged.
❏ Avoid places subject to dust.
Page 8

4
ENERGY STAR Compliance
As an ENERGY STAR Partner, EPSON hasdetermined
that this product meets the ENERGY STAR guidelines
for energy efficiency.
The International ENERGY STAR Office Equipment Program is
a voluntary partnership with the computer and office equipment
industry to promote the introduction of energy-efficient personal
computers, monitors, printers, fax machines, and copiers in an
effort to reduce air pollution caused by power generation.
Warnings, Cautions, and Notes
w
Warnings
must be followed carefully to avoid bodily injury.
c
Cautions
must be observed to avoid damage to your equipment.
Notes
contain important information and useful tips on the operation of your
printer.
Page 9
5
Setup Guide
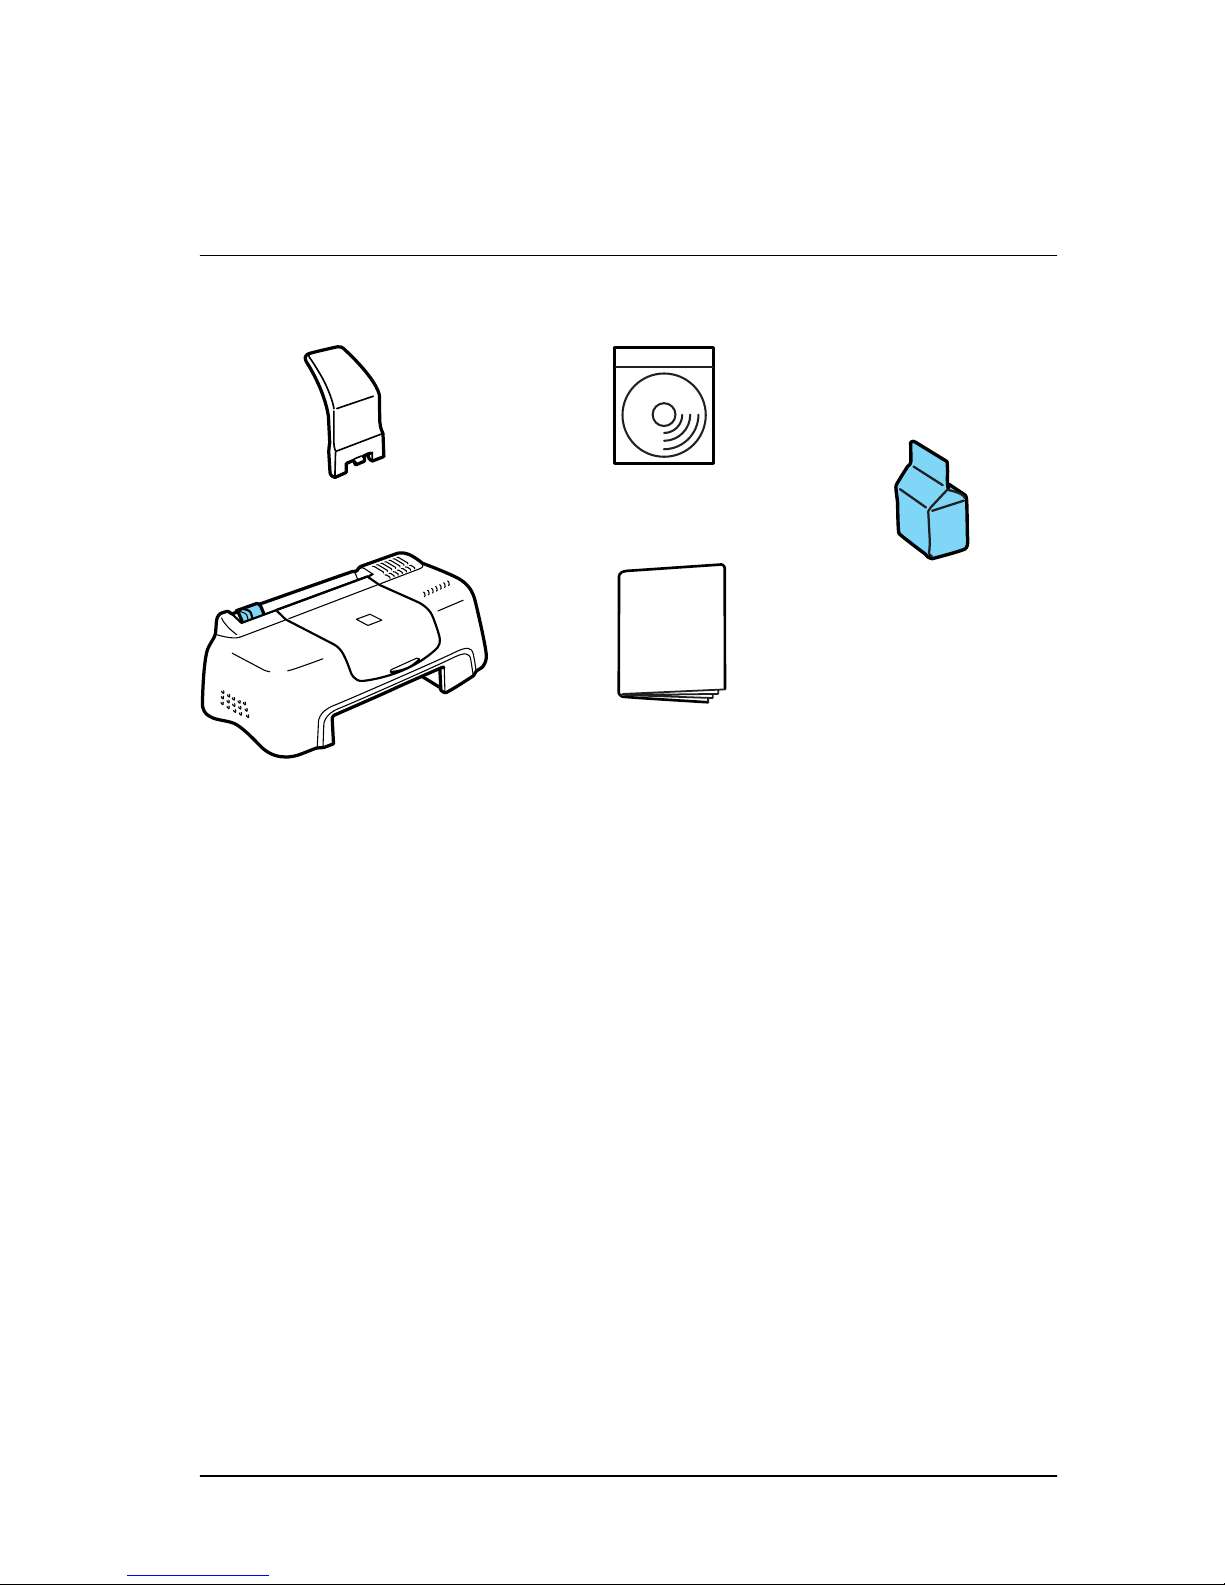
Checking the Package Contents
paper support
paper manuals
Daily Use
printer
printer software &
Reference Guide CDROM
The package contents may vary in certain locations.
The ink cartridges packed with your printer are for initial setup.
In order to maintain high quality printouts, your printer will use
large quantities of ink during the setup process. As a result, the
ink cartridges used for setup will empty faster than normal.
ink cartridge package
(contains both black and
color ink cartridges.)
Follow "Checking the Package Contents" section through
"Installing the Printer Software" section in this manual to install
the printer software. After the software installation is complete,
follow the on-screen messages and proceed to "Installing and
Checking the Ink Cartridges" section. To ensure that your printer
is operating correctly, proceed to "Printing Your First Page"
section after an on-screen message informs you that the setup is
complete.
Page 10
6
Unpacking the printer
Remove all tape and protective materials attached to the printer.
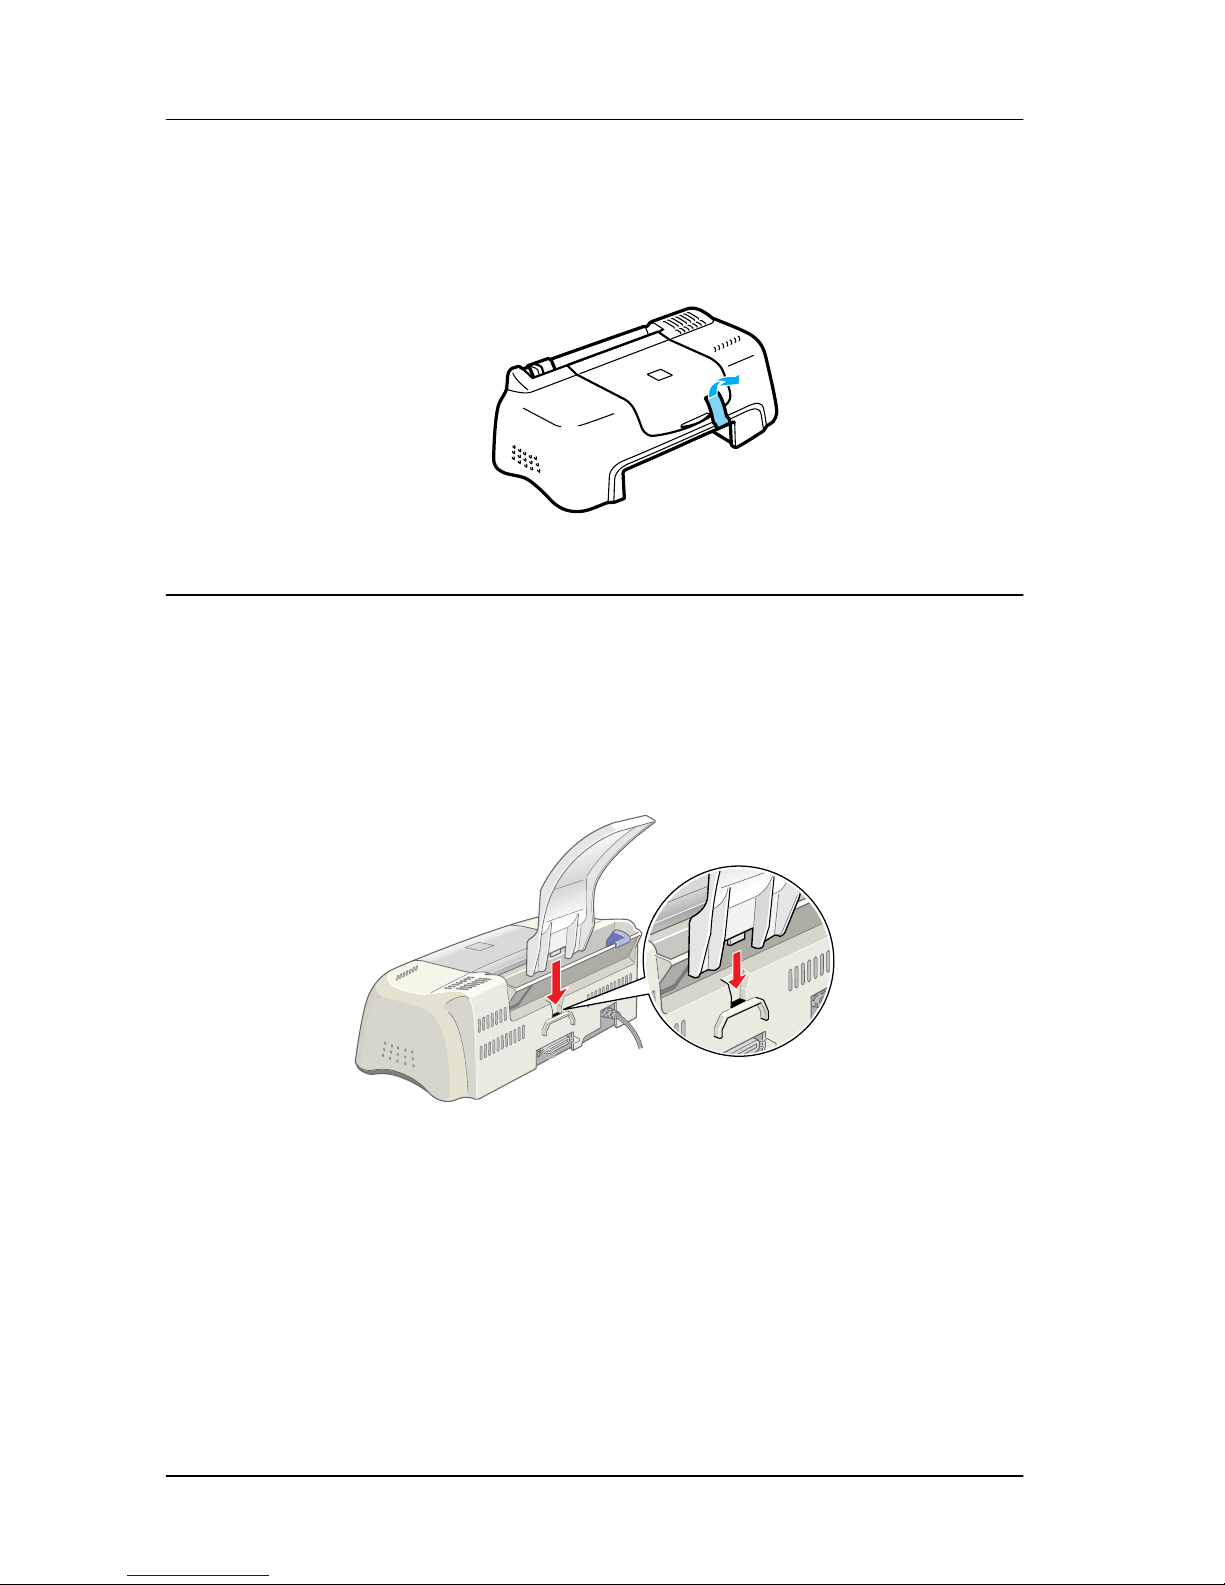
Attaching the Paper Support
Insert the paper support into the slots at the rear of the printer and
place the printer on a flat, stable surface. Leave enough space in
front of the printer for paper to be ejected smoothly.
*Th
enumber oftape stripusedmay varyfrom whatisshown.
Page 11
7
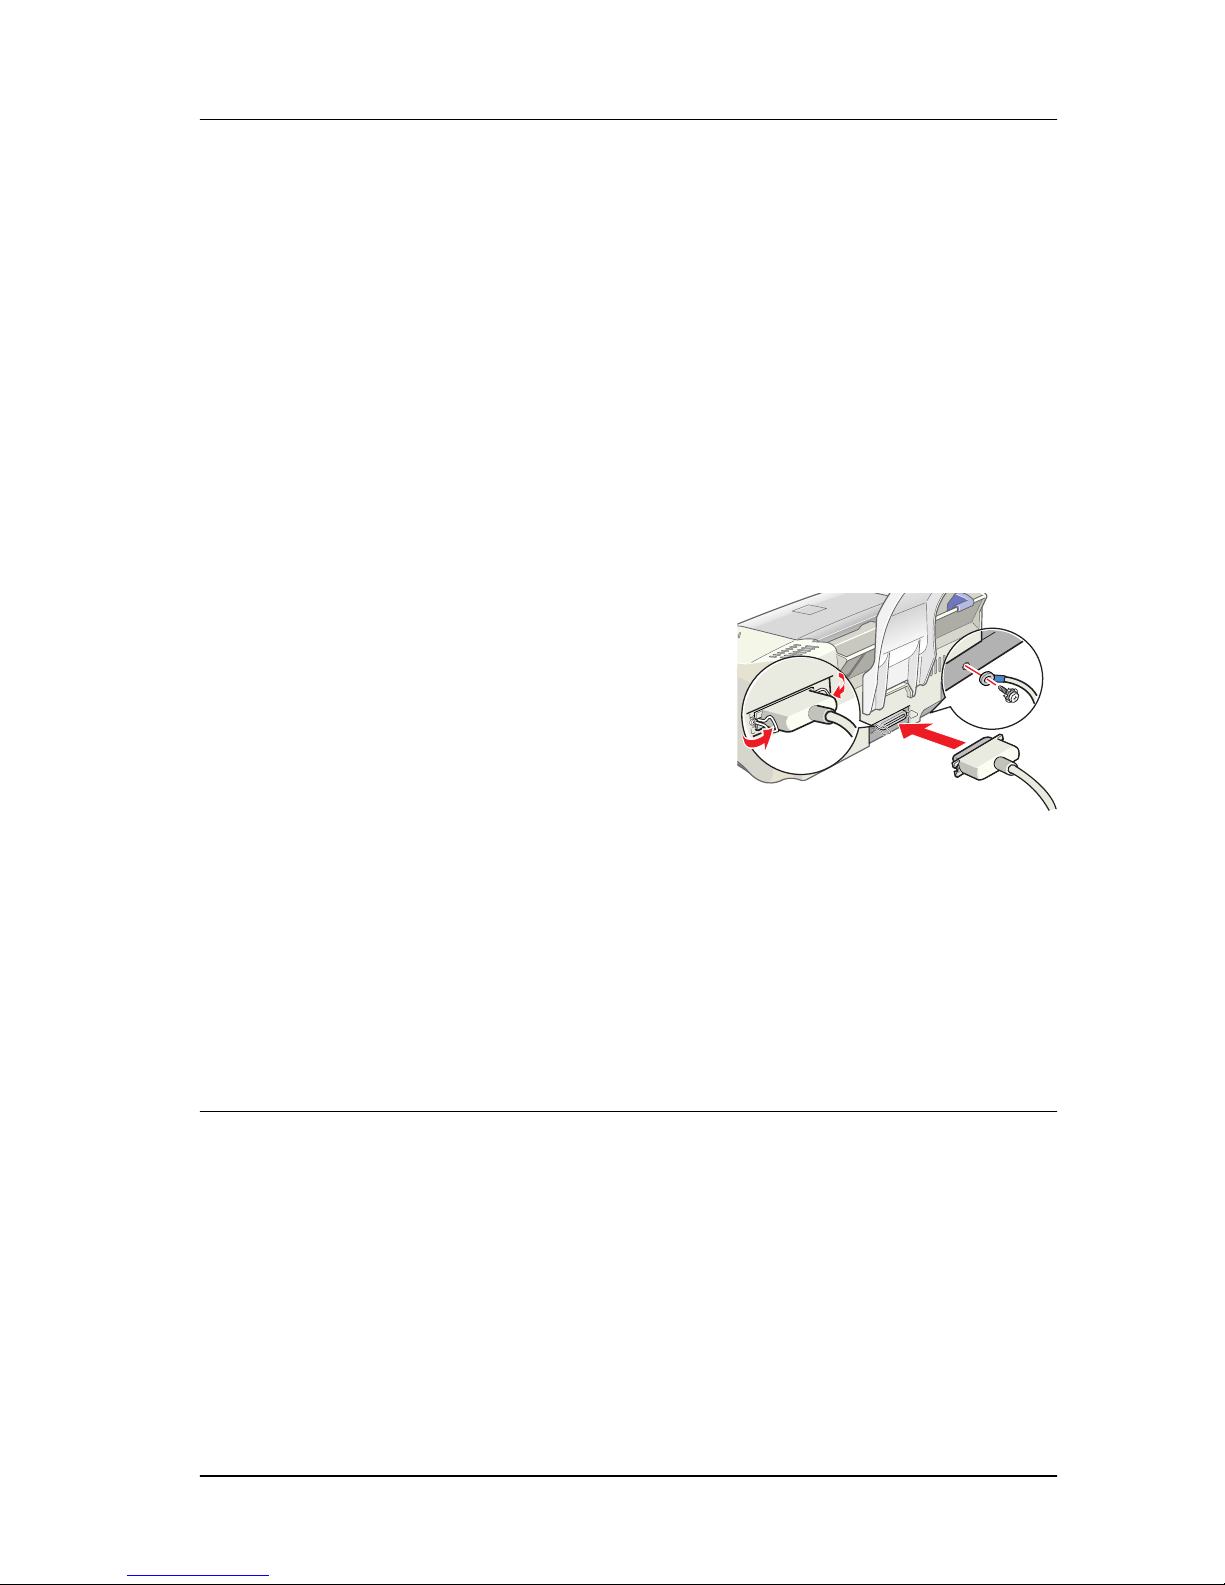
Connecting the Printer
Your printer connects to your computer via a shielded, twistedpair parallel interface. Make sure that the parallel cable supports
bidirectional communication. Otherwise, the printer will not
work. Depending upon your geographic location, you may need
to obtain the appropriate cable. See "Options and Consumable
Products" in the Daily Use guide for details.
Follow these steps to connect the printer to your PC.
1. Make sure that the computer is turned off, and the printer’s
power cord is unplugged.
2. Plug the cable connector securely
into the printer's interface
connector. Then squeeze the wire
clips together until they lock in
place on both sides. If your cable
has a ground wire, connect it to
the ground connector below the
interface connector.
3. Plug the other end of the cable into the computer's parallel
interface. If there is a ground wire at the computer end of the
cable, connect it to the ground connector at the back of the
computer.
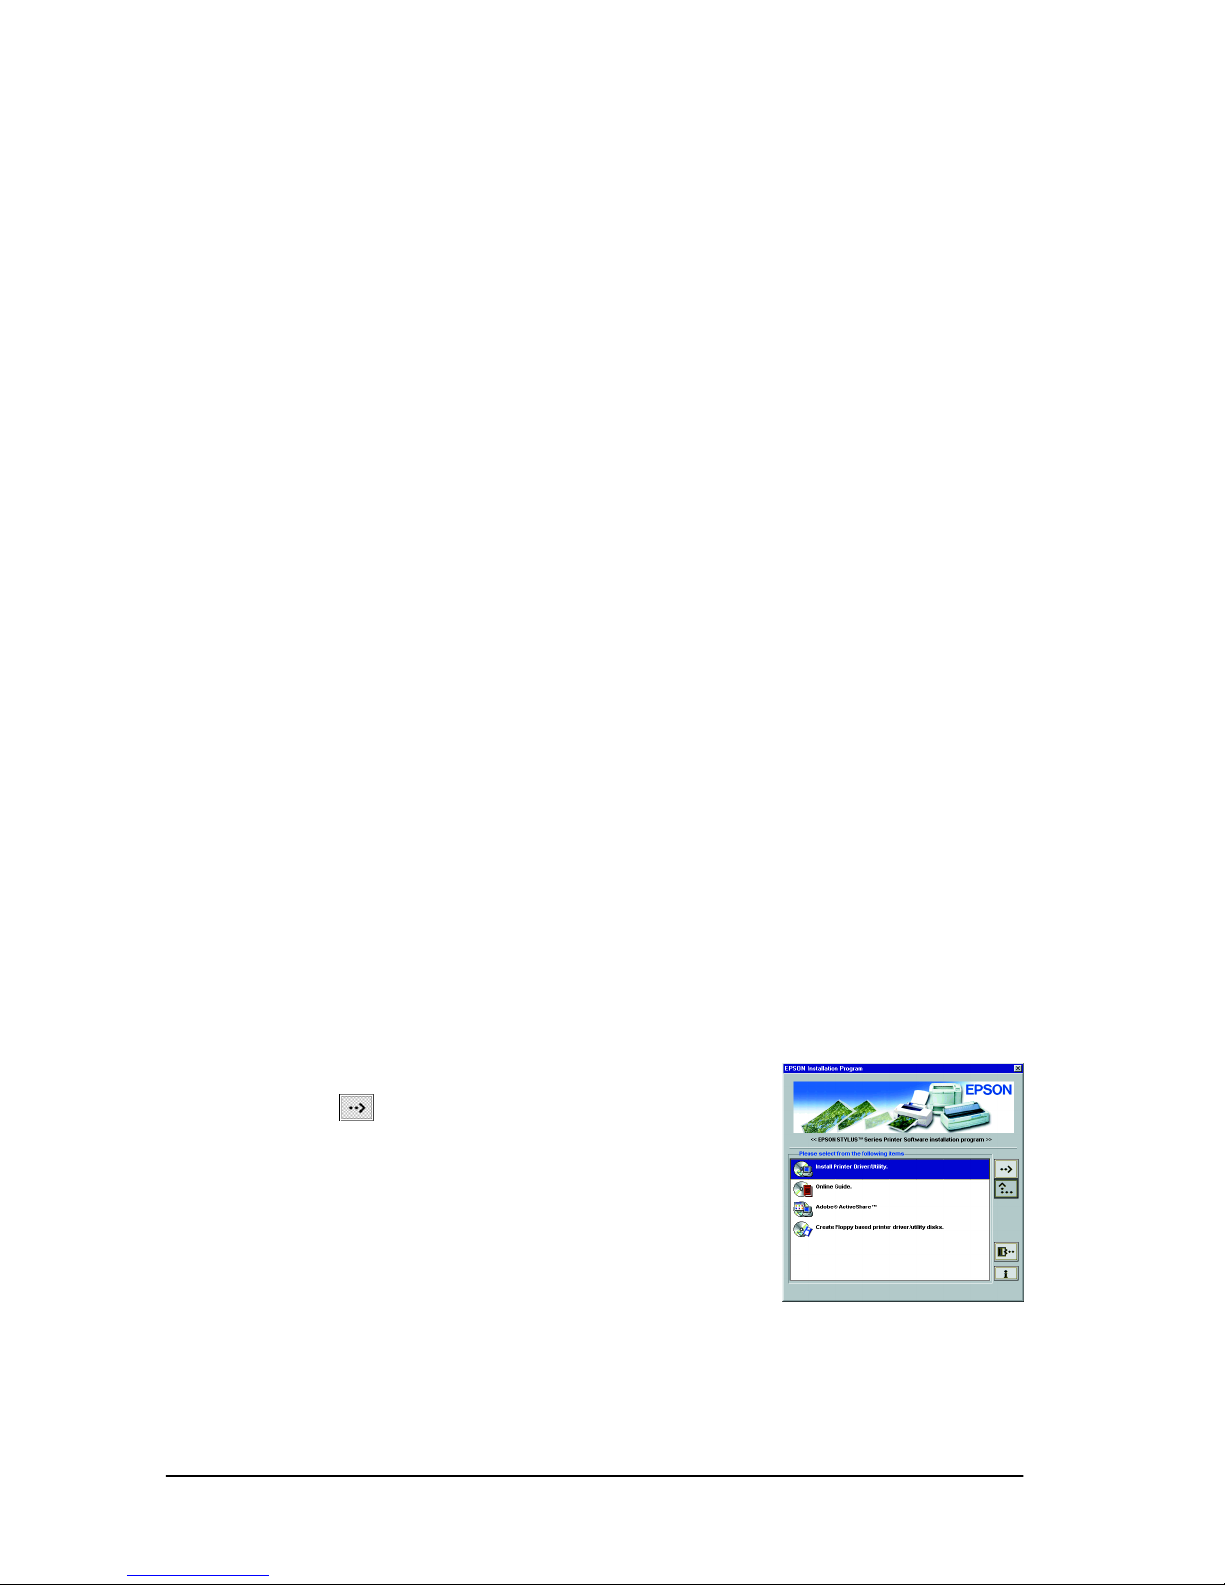
Installing the Printer Software
After connecting the printer to your computer, you need to install
thesoftwareincludedonthe“Printer Software for EPSON Stylus
COLOR 480” CD-ROM shipped with your printer.
If you wish to make a floppy disk version of the printer software
on your CD-ROM, you can use the driver disk creation utility
included on the CD.
Page 12
8
Note:
❏ When using Windows 2000, if you do not follow the steps below to
install the printer software, Microsoft’s Universal driver may be
installed instead. To see if the Universal driver has been installed,
right click anywhere in the printer driver window and then click
About in the list that appears. If a screen containing the words
Unidrv Printer Driver is displayed, follow the steps below to
reinstall the printer driver.
❏ If the Digital Signature Not Found dialog box appears during the
installation process, click Yes.IfyouclickNo, you must reinstall
the printer software as described below.
Follow these steps to install your printer software.
1. Make sure that your printer is unplugged.
2. Turn on your computer and start Windows. If the New
Hardware Found dialog box or any other Wizard appears,
click Cancel.
3. Insert the printer software CD shipped with your printer in
the CD-ROM drive. The Installerdialogbox appears. If it does
not, double-click the My Computer icon. Click the CD-ROM
icon, then select open from the File menu. Then double-click
Epsetup.exe.(Forfloppydiskusers,insertthediskinadisk
drive and double-click the My Computer icon, then the
floppy disk drive icon, and then Setup.exe.)
4. Select Install Printer Driver/Utility,and
click . Then click OK in the dialog box
thatappearsto start the printer software
installation.
Page 13

9
5. Follow the on-screen instructions to plug the power cord into
a properly grounded electrical outlet. Before plugging in the
cord, check the label on the back of the printer to make sure
the voltage required by the printer matches that of the
electrical outlet you will plugging it into. Also, make sure that
you have the correct power cable for your power source.
c
Caution:
It is not possible to change the printer’s voltage. If the rated
voltage and your outlet voltage do not match, contact your
dealer for assistance. Do not plug in the power cord.
Note:
If the power cord is not attached to the printer, connect it to the AC
inlet on the back of the printer.
6. After plugging in the power cord, the
Setup utility opens automatically. If a
message informs you to restart your
computer, follow the instructions.
Installing and Checking the Ink Cartridges
When your printer software installation is complete, the Setup
utility opens automatically. The Setup utility leads you through
the ink cartridge installation process and then prints nozzle and
print head alignment check patterns to ensure that your printer
is operating correctly. Follow the on-screen instructions.When an
on-screen message informs you that the ink cartridge installation
is complete, click OK and proceed to "Printing Your First Page"
section.
Page 14

10
Note:
❏ After the setup process is complete, a printer-shaped shortcut icon
appears on the Windows taskbar. For details on how to use this icon
see "Monitoring Preferences" in your online Reference Guide.
❏ If you did not use the Setup utility to install ink cartridges, use
EPSON Status Monitor3 to install them. To access EPSON Status
Monitor3, right click the printer shortcut icon on the taskbar, and
choose EPSON Stylus COLOR 480. Then click the How to button.
Installing the Ink Cartridges
Please pay attention to the following information when installing
the ink cartridges.
w
Warning:
The ink cartridges are self-contained units. Under ordinary use,
ink will not leak from a cartridge. If ink does get on your hands,
wash them thoroughly with soap and water. If ink gets into your
eyes, flush them immediately with water.
c
Caution:
❏ You must remove the yellow tape seals from the cartridges
before installing them; otherwise,the cartridges will become
unusable.
❏ Do not remove the blue portion of the tape seals from the
cartridges; otherwise, the cartridges may become clogged and
unable to print.
❏ Do not remove the tape seals from the bottom of the
cartridges; otherwise, ink will leak.
❏ Once you install the ink cartridges, do not open their clamps
again until you replace the ink cartridges; otherwise, the
cartridges may become unusable.
❏ Do not move the print head by hand; otherwise, you may
damage the printer.
Page 15

11
Note:
❏ Do not open the ink cartridge packages until just before you install
them, or the ink may dry up.
❏ Install both ink cartridges. If either of the cartridges is not installed,
the printer will not work.
Checking the printer
After installing the ink cartridges, the Setup utility automatically
guides you through the nozzle check and print head alignment
check. Follow the on-screen instructions.
Nozzle check
The printer will print a test pattern, allowing you to check if any
nozzles are clogged.
Herearesampleprintouts.
If the printout is satisfactory, proceed to the next section, “Print
head alignment.”
If the nozzle check page does not print satisfactorily (for example,
if any segment of the printed lines is missing), click Cleaning to
clean the print heads.
If print quality hasn’t improved after repeating the nozzle
checking and cleaning procedures four or five times, contact your
dealer.
Segments are missing
Good sample Print head needs to be cleaned.
Page 16

12
Print head alignment
The printer will print test patterns,
allowing you to check if the print head is
aligned.
Here are sample printouts.
From each pattern on the printed test
sheet, choose the vertical line that is
aligned best. For each pattern, select the
corresponding line number from the
appropriate drop-down list box in the Print Head Alignment
dialog box, then click Finish to put the new settings into effect.
Note:
If you cannot find a line which is aligned
correctly, select the number of the line which
is the closest to being correct and click
Realignment. The alignment test sheet will
be printed again.
Printing Your First Page
After making sure your printer is operating correctly, you are
ready to print your first page. To familiarize yourself with the
printer software, we recommend printing one of the sample files
provided with your printer software. To print a sample file, follow
the instructions in this section.
If you choose to print your own document instead, open the
document in your application, then proceed to step 4 in the
relevant section below, making changes where appropriate.
Page 17
13
Note:
❏ See your software manual for details on how to use your application
software.
❏ Depending on the type of document you are printing and the type
of paper you are using, youmay have to make settings different from
those described in this section.
Follow these steps to print the sample file.
1. Make sure A4 or letter size plain paper is loaded in the printer.
2. Insert the printer driver CD-ROM. If the Installer dialog box
appears, click Quit.
3. Double-click the My Computer icon. Right-click the CD-
ROM icon and click Open.
4. Double-click the sample.bmp file to open it.
5. To change the printer driver settings, open
theFilemenuandclickPrint.APrint
dialog box similar to the one below opens
(This example is from Paint).
6. Make sure EPSON Stylus COLOR 480 is selected in the Name
list box, then click Properties. The printer driver opens.
7. Click the Main tab, then click anywhere in the Media Type
box and select Plain Paper.
Page 18

14
Note:
The printer driver lets you choose from a wide variety of settings to
get the best results. See your online Reference Guide for detailed
information.
8. Click Close, Print,orOK to print. You may need to click a
combination of these buttons.
While printing, the EPSON Progress Meter will appear, showing
the printing progress and the status of your printer.
The setup process for this printer is now complete.
See the Daily Use guidewhenyouwantinformationonregular
printer operations. See the Reference Guide included on the printer
software CD-ROM for detailed information on making printer
driver settings, printing on special paper, and troubleshooting.
Page 19

15
Printer Parts and Functions
Printer Parts
sheet feeder
edge guides
printer cover
paper support
ink cartridge clamps
print head
Page 20

16
Page 21

17
Loading Special Paper, Envelopes,
and Other Media
Loading Special Paper and Other Media
You can print on a wide variety of special media, including ink
jet paper, photo quality glossy film, photo paper, transparencies,
index cards, and adhesive sheets.
When loading special media distributed by EPSON, read the
instruction sheets packed with the media first and keep the
following points in mind. For more details on using such media,
see “Paper Handling” in the online Reference Guide.
❏ Make sure the printable side of the paper is facing up when
loading media into the sheet feeder. See the instruction sheets
packed with the media to determine which side is the
printable surface. Some media have cut corners to help
identify the correct loading direction, as shown in the
illustration.
printable
side up
cut corner
Page 22

18
❏ Make sure the paper stack fits under the arrow mark located
ontheinsidesurfaceoftheleftedgeguide.
❏ The loading capacity for EPSON special media is explained
below.
*Take care not to print on support sheets loaded under special media.
About special media cleaning sheets
Cleaning sheets packaged with EPSON special media should not
be used with this printer. The cleaning function performed by
these sheets is not necessary with this type of printer, and the
sheets could jam in the printer.
360 dpi Ink Jet Paper and Photo
Quality Ink Jet Paper
Up to 30 sheets.
Photo Quality Ink Jet Cards, Ink
Jet Note Cards, and Ink Jet
Greeting Cards
Up to 30 index cards.
Always place the included
support sheet* under the cards.
Photo Quality Glossy Film One sheet at a time.
ForA4orLttersizeglossyfilm,
always put a sheet of plain paper
under the film.
For A6 size glossy film, always put
the included support sheet* under
the film.
Ink Jet Transparencies One sheet at a time.
Always put a sheet of plain paper
under the transparency.
Photo Quality Self Adhesive
Sheets
One sheet at a time.
Photo Paper One sheet at a time.
Photo Stickers 16 and Photo
Stickers 4
One sheet at a time.
Panoramic Photo Paper and
Iron-On Cool Peel Transfer Paper
One sheet at a time.
Matte Paper-Heavyweight One sheet at a time.
Page 23

19
Loading Envelopes
When printing on envelopes, please note the following:
❏ You can load up to 10 envelopes into the sheet feeder.
Note:
The folding quality and thickness of envelopes varies widely. If the
total thickness of the stack of envelopes exceeds 10 mm, press each
envelope in the stack flat before loading. If print quality declines
when a stack of envelops is loaded, load one envelope at a time.
❏ Load envelopes flap edge first with the flap side down, as
shownintheillustration.
❏ Do not use envelopes that are curled or folded. Make sure to
flatten the envelope flaps before loading. Avoid using
envelopes that are too thin; they may curl during printing.
❏ Select Plain Paper as the Media Type setting in the printer
driver.
Available envelopes sizes are:
No.10, DL, C6, 132 mm×220 mm
Page 24

20
Page 25

21
Using the Printer Software
Printer Software Introduction
The printer software which comes with your printer includes a
printer driver and printer utilities. The printer driver lets you
choose from a wide variety of settings to get the best results from
your printer. The printer utilities help you check the printer and
keep it in top operating condition.
Getting more information
For information on using the printer driver, see “Making Changes
to Printer Settings” on page 22.
For information on using the printer utilities, see “Using the
Printer Utilities” in the online Reference Guide.
Note:
The specific features available in the printer software vary depending on
the version of Windows you are using.
Online help provides more information about the printer
software. See “Getting Information Through Online Help” on
page 33 for instructions on accessing help.
Accessing the printer software
You can access the printer software from most Windows
applications, or from the Windows Start menu (Windows 98, 95,
2000 and NT 4.0).
When you access the printer software from a Windows
application, the settings you make apply only to the application
you are using.
Page 26

22
When you access the printer software from the Start menu, the
settings you make apply to all of your Windows applications.
From Windows applications
1. From the File menu, click Print or Print Setup.
2. In the dialog box that appears, click Printer, Setup, Options,
or Properties.(Dependingonyourapplication,youmayneed
to click a combination of these buttons.) The printer driver
opens.
From the Windows Start menu
1. Click Start,pointtoSettings, then click Printers.
2. For Windows 95 and 98, select your printer, then click
Properties on the File menu. For Windows 2000, select your
printer, then click Printing Preferences ontheFilemenu.For
NT 4.0, select your printer, then clickDocument Defaults on
theFilemenu.Theprinterdriveropens.
Making Changes to Printer Settings
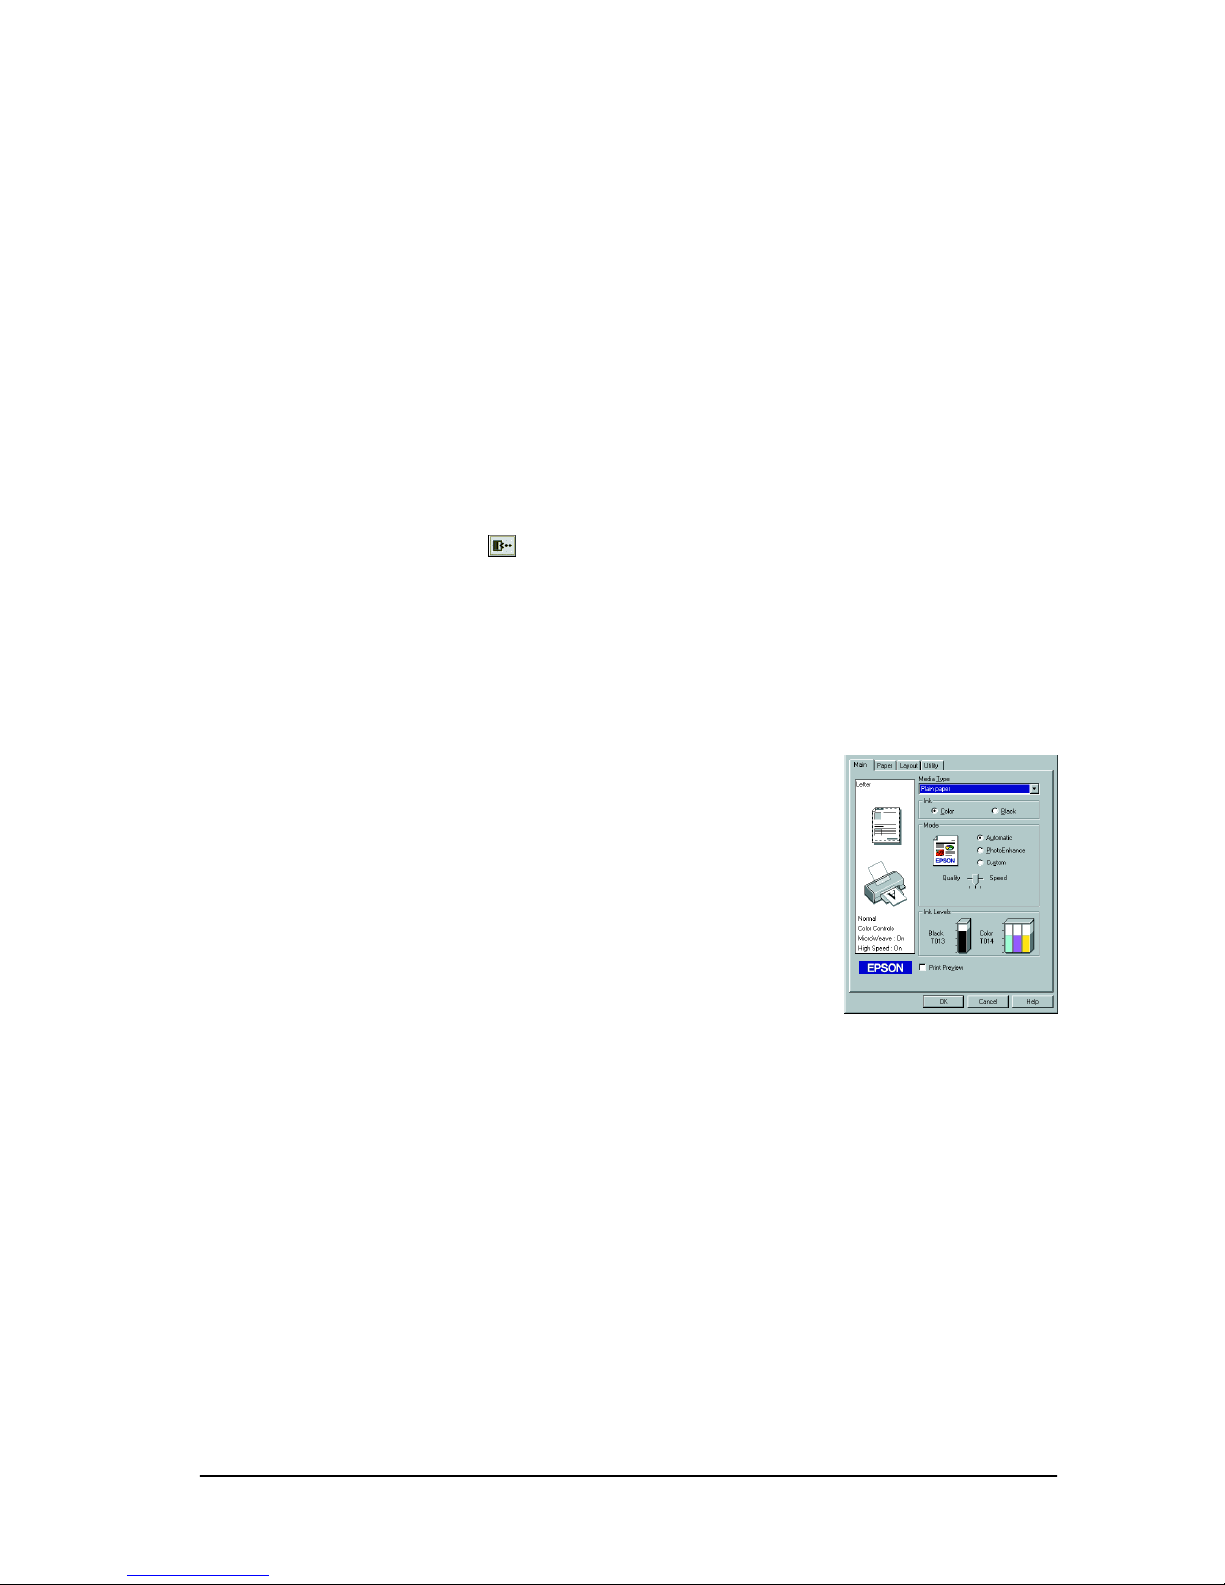
The printer driver features the following menus and settings.
Main: Media Type, Ink, Mode
Paper: Paper Size, Copies, Orientation, Printable Area
Layout: Reduce/Enlarge, Multi-Page, Watermark
Page 27

23
TheModesettingsontheMainmenuarearrangedtogiveyou
four levels of control over the printer driver, as explained below.
In addition to making comprehensive Mode settings that affect
overall print quality, you can also modify individual aspects of
your printout using the Paper and Layout menus. For more
information about the Paper and Layout menus, see your online
Reference Guide.
Making the Media Type setting
The Media Type setting determines what other settings are
available, so you should always make this setting first.
Automatic This mode provides the quickest and
easiest way to start printing. See “Using
the Automatic mode” on page 26.
PhotoEnhance This mode lets you choose from a variety
of image-correction settings specially
designed for photos. See “Using the
PhotoEnhance mode” on page 27.
Custom This mode lets you choose from a list of
ready-made or personalized settings
suited to the kind of document you want
to print. When Custom is selected, the
Advanced button is enabled, allowing
you to access the Advanced dialog box.
See “Using the Custom mode” on page
28.
Advanced This button opens the Advanced dialog
box, where you can make detailed
settings to fit your individual needs. From
the Advanced dialog box, you can add
your personalized settings to the Custom
Settings list.
Page 28

24
On the Main menu, select the Media Type setting that matches
the media which is loaded in the printer. To find out what Media
Type you are using, find your media in the list below, and refer
to the corresponding Media Type under which it is grouped
(shown in larger type). For some media, there are several Media
Type settings to choose from.
Plain Paper
360 dpi Ink Jet Paper
Photo Quality Ink Jet Paper
Plain paper
Envelopes
EPSON Premium Ink Jet Plain Paper (A4) S041214
EPSON 360 dpi Ink Jet Paper (A4) S041059
EPSON Iron-On Cool Peel Transfer Paper (A4) S041154
EPSON Photo Quality Ink Jet Paper (A4) S041061
EPSON Photo Quality Ink Jet Cards (A6) S041054
EPSON Photo Quality Ink Jet Cards (5 × 8”) S041121
EPSON Photo Quality Ink Jet Cards (8 × 10”) S041122
EPSON Photo Quality Self Adhesive Sheets (A4) S041106
EPSON Ink Jet Note Cards A6 (with envelopes) S041147
EPSON Ink Jet Greeting Cards 5 × 8”
(with envelopes)
S041148
EPSON Ink Jet Greeting Cards 8 × 10”
(with envelopes)
S041149
Page 29

25
Matte Paper-Heavyweight
Photo Paper
Photo Quality Glossy Film
Ink Jet Transparencies
Note:
The availability of special media varies by location.
EPSON Matte Paper-Heavyweight (A4) S041259
EPSON Photo Paper (A4) S041140
EPSON Photo Paper (4 × 6”) S041134
EPSON Panoramic Photo Paper (210 × 594 mm) S041145
EPSON Photo Paper Cards (A4) S041177
EPSON Photo Quality Glossy Film (A4) S041071
EPSON Photo Quality Glossy Film (A6) S041107
EPSON Photo Stickers 16 (A6) S041144
EPSON Photo Stickers 4 (A6) S041176
EPSON Ink Jet Transparencies (A4) S041063
Page 30

26
Using the Automatic mode
When Automatic is selected as the Mode setting on the Main
menu, the printer driver takes care of all detailed settings based
on the current Media Type and Ink settings. To make the Ink
setting, click Color to print in color, or Black to print in blackand-whiteorgrayscale.TomaketheMediaTypesetting,see
“Making the Media Type setting” on page 23.
Note:
❏ Depending on the media selected in the Media Type list (while
Automatic is selected), a slider appears under the Custom radio
button that lets you choose from Quality or Speed settings. Select
Quality when print quality is more important than speed.
❏ MostWindowsapplicationsfeaturepapersizeandpagelayout
settings that override similar settings on the printer driver.
However, if your application does not have these settings, verify the
settings on the printer driver’sPapermenu.
Page 31

27
Using the PhotoEnhance mode
The PhotoEnhance mode provides a variety of image-correction
settings that you can apply to your photo images before printing.
PhotoEnhance does not affect your original data.
Note:
❏ This mode is only available when printing 16-, 24-, or 32-bit color
data.
❏ Printing with PhotoEnhance selected may increase the time
required for printing, depending on your computer system and the
amount of data contained in your image.
You can select from the following settings.
Standard This setting provides standard image correction for
most photos. Try this first.
People This setting is best for photos of people.
Nature This setting is best for outdoor scenery such as
mountains, sky, and oceans.
Page 32

28
Selecting PhotoEnhance also enables the Digital Camera
Correction check box. Select this check box when you are
printing photos taken with a digital camera to give your printed
images the smooth, natural appearance of photographs taken
with a film camera.
Using the Custom mode
The Custom mode offers ready-made settings designed for
printing text and graphs and for applying a color-matching
method. You can also create and save your own custom settings.
Soft Focus
This setting makes your photos look as if they were
taken with a soft-focus lens.
Sepia This setting applies a sepia tone to your photos.
Page 33

29
You can select from the following ready-made settings.
Follow the steps below to select a Custom setting.
1. Select Custom astheModesettingontheMainmenu.
2. Click anywhere in the list box to open it, then select the most
appropriate setting for the type of document or image you
wish to print.
3. When you select a Custom setting, other settings such as Print
Quality and Color Adjustment are made automatically.
Changes to these settings are reflected in the display on the
left side of the Main menu.
4. Before printing, be sure to verify the Media Type and Ink
settings, as they may be affected by the Custom setting you
select. See “Making the Media Type setting” on page 23.
ICM
(For Windows 98, 95
and 2000)
This setting automatically adjusts printout
colors to match colors on your screen.
ICM stands for Image Color Matching.
sRGB This setting is best for color matching with
other sRGB devices.
Page 34

30
Previewing your printout
Select the Print Preview check box on the Main menu when you
wish to view a preview of your document before printing.
Page 35

31
When you send a print job to the printer, the Print Preview
window opens, allowing you to make changes before printing.
The Preview dialog box contains several icon buttons which you
can use to perform the following functions:
Drag’n’Drop Thisbuttonletsyouselectandmove
watermarks.
Zoom This button enlarges or reduces the size
of the previewed page.
Fit-to-screen This button scales the previewed page
so that it fits the size of the window.
Select this option if you want to see the
entire page at one time.
Maximum
zoom
This button displays the previewed page
at the maximum possible zoom ratio.
Printable
area on/off
This button displays a rectangle on the
page being previewed. This rectangle is
the printable area for the page. The
printer cannot print anything which
exceeds this rectangle. Press the icon
buttonagaintoturnthisfeatureoff.
Page 36

32
You can also manipulate the previewed document in the
following ways:
❏ Select and preview individual pages.
❏ Reduce or enlarge the size of the preview.
❏ Select and print any or all pages.
❏ Apply watermarks. The watermark you select will appear in
the previewed image. For detailed information on
customizing watermarks, see “Printing a watermark on your
document” in the online Reference Guide.
❏ Specify which pages in the document you would like printed
using the Add and Remove features. To addor removea page,
you must first click the page icon in the list appearing on the
left side of the preview window. Then add or remove it using
the commands in the Print Options menu.
Watermark This button opens the watermark
settings dialog box, where you can
change any of the current watermark
settings.
Reset
watermark
settings
This button returns all watermark settings
to what they were when the Print
Preview window was first opened. If
nothing has been changed, this feature
is not available.
Previous
page
This button displays the page previous to
the one currently being previewed. If
thereisnopreviouspagethenthis
feature is not available.
Next page This button displays the next page in the
document. If there is no next page then
this feature is not available.
Add page This button will add the highlighted
pages to the list of pages to be printed.
Page 37

33
After you have previewed the document, click Print to print the
document, or click Cancel to cancel printing.
Getting Information Through Online Help
Your printer software has an extensive online help feature, which
provides you with instructions on printing, making printerdriver
settings, and using printer utilities.
Accessing help from your application
OpentheFilemenuandchoosePrint or Print Setup.Thenclick
Printer, Setup, Options,orProperties.(Dependingonyour
application, you may need to click a combination of these
buttons.)ClickHelp at the bottom of the Main, Paper, Layout, and
Utility menus for help related to the items on that menu.
You can get specific help related to any item on a menu by rightclicking the item, then clicking the What's This? command
.
Accessing help from the Windows Start menu
Click the Start button, point to Programs and Epson (for
Windows 98 and 95) or EPSON Printers (for Windows 2000 and
NT 4.0), then click EPSON Stylus COLOR 480 Help. The help
contents window opens.
Remove
page
This button will remove the highlighted
pages from the list of pages to be
printed.
Page 38

34
Page 39

35
Checking Printer Status
Using EPSON Status Monitor 3
EPSON Status Monitor 3 displays detailed information on the
printer status.
Note:
Before using EPSON Status Monitor 3, be sure to read its README
file. To open this file, click Start,pointtoPrograms and then EPSON
or EPSON Printers,thenclickEPSON Stylus COLOR 480 Readme.
Accessing EPSON Status Monitor 3
There are two ways to access EPSON Status Monitor 3.
❏ Double-click the printer-shaped shortcut icon on the
Windows taskbar. See “Monitoring Preferences” on page 61.
❏ Open the printer driver, click the Utility tab, then click EPSON
Status Monitor 3.
When you access EPSON Status Monitor 3, the following window
appears.
Page 40

36
Page 41

37
Replacing Ink Cartridges
The Status Monitor 3 utility lets you monitor the remaining ink
levels from your computer and view on-screen instructions for
replacing a low or empty ink cartridge.
When an ink cartridge is low or empty, click the How to button
in the Status Monitor’s Printer Status window; the print head
moves to the ink cartridge replacement position. Follow the onscreen instructions to replace the cartridge.
For more information on using the Status Monitor, see “Using
EPSON Status Monitor 3” in the online Reference Guide.
Note:
If you need to replace an ink cartridge before it is empty, use the Ink
Cartridge Replacement utility from the Utilities menu in your EPSON
printer driver.
Please read the following information regarding ink cartridges
and the print head before replacing the ink cartridges.
Page 42

38
w
Warning:
❏ Keep ink cartridges out of reach of children. Do not allow
children to drink from or otherwise handle the cartridges.
❏ If ink gets on your hands, wash them thoroughly with soap
and water. If ink gets into your eyes, flush them immediately
with water. If discomfort or vision problems remain after a
thorough flushing, see a doctor immediately.
c
Caution:
❏ EPSON recommends the use of genuine EPSON ink
cartridges. Other products not manufactured by EPSON
may cause damage to your printer not covered by EPSON’s
warranties.
❏ Do not remove the used cartridge from the printer until you
have obtained a replacement. Otherwise, the ink remaining
in the print head nozzles may dry out.
❏ You must remove the yellow tape seal from the cartridge
before installing it; otherwise, a fatal error will occur and the
cartridge will become unusable.
❏ Do not remove the blue portion of the tape seal from the top
of the cartridge; otherwise, the print head may become
clogged and unable to print.
❏ Do not remove the tape seals from the bottom of the cartridge;
otherwise, ink will leak.
❏ Once you install the ink cartridges, do not open the ink
cartridge clamps again until you replace the cartridges;
otherwise, the cartridges may become unusable.
❏ Do not move the print head by hand; otherwise, you may
damage the printer.
Note:
❏ Do not continue to print when one ink cartridge is empty, even if
the other cartridge still contains ink. Before printing, replace the
empty cartridge.
Page 43

39
❏ In addition to the ink used during document printing, ink is
consumed during print head cleaning, ink cartridge replacement,
and the self-cleaning cycle which is performed when the printer is
turned on.
Page 44

40
Page 45

41
Maintenance
Checking the Print Head Nozzles
If you find that the printed image is unexpectedly faint or dots in
theprintedimagearemissing,youmaybeabletoidentifythe
problem by checking the print head nozzles.
You can check the print head nozzles from your computer with
the Nozzle Check utility, accessed through the printer software
or the shortcut icon.
Using the Nozzle Check utility
Note:
❏ Before using the utility, make sure that A4 or Letter size paper is
loaded in the sheet feeder.
❏ Do not use the Nozzle Check utility while printing is in progress;
otherwise, your printout may be marred.
There are two ways to access the utility:
❏ Right-click the printer-shaped icon on the Windows taskbar
and select Nozzle Check.
❏ Access the printer software and click the Utility tab, then click
the Nozzle Check button.
After opening the utility, follow the on-screen instructions.
Page 46

42
The printer prints a nozzle check page. Below are sample
printouts.
The above sample is in black and white, but the actual test prints in color
(CMYK).
If the nozzle check page does not print satisfactorily (for example,
if any segment of the printed lines is missing) there is a problem
with the printer. This could be a clogged ink nozzle or a
misaligned print head. See the next section for details on cleaning
the print head. For information on aligning the print head, see
“Aligning the Print Head” on page 43.
Cleaning the Print Head
If you find that the printed image is unexpectedly faint or dots in
theprintedimagearemissing,youmaybeabletosolvethese
problems by cleaning the print head, which ensures that the
nozzles are delivering ink properly.
YoucancleantheprintheadfromyourcomputerusingtheHead
Cleaning utility, accessed through the printer software or the
shortcut icon.
Note:
❏ Print head cleaning uses both color and black ink. To avoid wasting
ink, clean the print head only if print quality declines; for example,
if the printout is blurry or the color is incorrect or missing.
Good sample Print head needs to be cleaned
segments are
missing
Page 47

43
❏ Use the Nozzle Check utility first to confirm that the print head
needs to be cleaned. This saves ink.
❏ Do not start the Head Cleaning or Nozzle Check utility while
printing is in progress; otherwise, your printout may be marred.
Using the Head Cleaning utility
Note:
If the Status Monitor or Progress Meter displays a message indicating
that the ink cartridges need replacing, you cannot clean the print head.
Replace the appropriate ink cartridge first.
There are two ways to access the utility:
❏ Right-click the printer-shaped icon on the Windows taskbar
and select Head Cleaning.
❏ Access the printer software and click the Utility tab, then click
the Head Cleaning button.
After opening the utility, follow the on-screen instructions.
Aligning the Print Head
If you notice a misalignment of vertical lines, you may be able to
solve this problem from your computer with the Print Head
Alignment utility, accessed through your printer software or the
shortcut icon.
Note:
Do not start the Print Head Alignment utility while printing is in
progress; otherwise, your printout may be marred.
There are two ways to access the utility:
Page 48

44
❏ Right-click the printer-shaped icon on the Windows taskbar
and select Print Head Alignment.
❏ Access the printer software and click the Utility tab, then click
the Print Head Alignment button.
After opening the utility, follow the on-screen instructions.
Page 49

45
Troubleshooting
Error Messages
The Status Monitor 3 utility provides status messages and a
graphic display showing the current state of the printer.
If a problem occurs while printing, an error message appears in
the Progress Meter window. Click the How To button to have the
Status Monitor provide instructions for dealing with the problem.
Typical Problems and Solutions
Most printer problems have simple solutions. Find the problem
in the list below and apply the recommended solution. For more
information, see “Troubleshooting” in the online Reference Guide.
Print quality problems
If you are having print quality problems, try the solutions offered
here.
Horizontal banding
Try one or more of these solutions:
❏ Make sure the printable side of thepaper is face up in thesheet
feeder.
❏ Run the Nozzle Check utility. If any segments are missing in
the nozzle check pattern, run the Head Cleaning utility to
clear any clogged ink nozzles.
Page 50

46
Vertical misalignment
Try one or more of these solutions:
❏ Make sure the printable side of the paper is face up in the sheet
feeder.
❏ Run the Print Head Alignment utility.
❏ Clear the High Speed check box in the Advanced dialog box
of your printer driver. For instructions,see the printerdriver’s
online help.
Color gaps
Try one or more of these solutions:
❏ Make sure your paper is not damaged, dirty, or too old.
❏ Run the Head Cleaning utility to clear any clogged ink
nozzles.
❏ Make sure there are no error messages displayed. If an error
message indicates that the ink cartridges need replacing, click
the How To button and follow the on-screen instructions.
Blurry or smeared printout
Try one or more of these solutions:
❏ Make sure the printable side of the paper is face up in the sheet
feeder.
❏ Make sure your paper is not damaged, dirty, or too old.
Paper feed or paper jam problems
If the printer doesn’t feed paper, feeds multiple pages, or the
paper isjammed,anerrormessageappears.Click the Eject button
to eject any jammed paper. Also make sure of the following:
Page 51

47
❏ The paper isn’t too old or creased.
❏ Paper isn’tloadedabovethearrowontheleftedgeguide.
❏ The edge guides are set correctly.
❏ The paper isn’t too thin or rough. Use paper that meets the
paper requirements for the printer. See the online Reference
Guide for paper specifications.
Note:
Print quality may not be what you expect on the first page printed after
a paper jam. If print quality is a problem, try printing the page again.
Cancelling Printing
If the printouts are not what you expected and contain incorrect
or garbled characters or images, you may need to cancel printing.
To cancel printing, follow the instructions below.
When you send a print job to the printer, the Progress Meter
appears on your computer screen.
Click the Stop button to cancel printing.
Page 52

48
Where to Get Help
If your printer is not operating properly and you cannot solve the
problem using the troubleshooting information in your printer
documentation, contact customer support services for assistance.
Customer support will be able to help you much more quickly if
you provide them with the following information.
❏ Serial number of your printer
(The serial number label is on the back of the printer)
❏ Printer model
❏ Brand and model of your computer
❏ Printer software version
(Click About in your printer driver)
❏ Windows version you are using
❏ Software application(s) you normally use with your printer
and their version number(s)
Page 53

49
Consumable Products
Consumable Products
The following ink cartridges and EPSON special media are
available for your printer.
Ink cartridges
You can use the following cartridges with your printer.
Note:
The product numbers of ink cartridges may vary by location.
EPSON special media
EPSON offers specifically designed media for ink jet printers to
meet most high-quality printing needs.
Black ink cartridge T013051
Color ink cartridge T014051
EPSON Premium Ink Jet Plain Paper (A4) S041214
EPSON 360 dpi Ink Jet Paper (A4) S041059
EPSON Photo Quality Ink Jet Paper (A4) S041061
EPSON Photo Quality Ink Jet Cards (A6) S041054
EPSON Photo Quality Ink Jet Cards (5×8”) S041121
EPSON Photo Quality Ink Jet Cards (8×10”) S041122
EPSON Photo Quality Self Adhesive Sheets (A4) S041106
EPSON Ink Jet Note Cards A6 (with envelopes) S041147
EPSON Ink Jet Greeting Cards 5 × 8” (with envelopes) S041148
EPSON Ink Jet Greeting Cards 8 × 10” (with envelopes) S041149
Page 54

50
Note:
The availability of special media varies by location.
EPSON Photo Quality Glossy Film (A4) S041071
EPSON Photo Quality Glossy Film (A6) S041107
EPSON Ink Jet Transparencies (A4) S041063
EPSON Photo Paper (A4) S041140
EPSON Photo Paper (4×6”) S041134
EPSON Photo Paper Cards (A4) S041177
EPSON Photo Stickers 16 (A6) S041144
EPSON Photo Stickers 4 (A6) S041176
EPSON Panoramic Photo Paper (210×594 mm) S041145
EPSON Iron-On Cool Peel Transfer Paper (A4) S041154
EPSON Matte Paper-Heavyweight (A4) S041259
Page 55

51
Printer Specifications
System Requirements
For using the printer
To use your printer, you need Microsoft®Windows®98,
Windows
®
95, Windows®2000 or Windows NT®4.0 installed
and a shielded, twisted-pair parallel cable connected.
Your computer should also meet the following system
requirements.
Your computer dealer can help you update your system if it does
not meet these requirements.
Minimum System Requirements Recommended System
i486/25 MHz for Windows 95 and NT 4.0
i486/66 MHz for Windows 98
Pentium 133 MHz for Windows 2000
Pentium or higher processor
for Windows 98, 95 and NT
4.0
133 MHz or higher processor
for Windows 2000
16 MB RAM for Windows 98, 95 and NT
4.0
32 MB RAM for Windows 2000
32 MB RAM or more for
Windows 98 and 95
64 MB or more for Windows
2000 and NT 4.0
20 MB hard disk space for Windows 98
and 95
40 MB for Windows 2000 and NT 4.0
50 MB or more hard disk
space for Windows 98 and
95
100 MB or more for Windows
2000 and NT 4.0
VGA monitor VGA or better monitor
Page 56

52
For using the online Reference Guide
System Microsoft Windows®95, 98, 2000 or NT 4.0
CPU i486/25 MHz (for Windows 95 and NT 4.0)
i486/66 MHz (for Windows 98)
(Pentium or better recommended)
Pentium 133 MHz for Windows 2000
Memory 16 MB for Windows 95, 98, and NT 4.0
(32 MB or more recommended)
32 MB for Windows 2000
Hard disk space 2 MB to install the Reference Guide
CD-ROM drive Double-speed
(Quad-speedorbetterrecommended)
Display 640×480 pixel or 800×600 pixel
resolution, with High Color (16 bit) or True Color
(32 bit) setting
Browser Web browser
(Microsoft Internet Explorer 4.0 or later
recommended)
 Loading...