

Page 1

ES-50/ES-60W/ES-55R/ES-65WR
User's Guide
Page 2

Page 3

Contents
ES-50/ES-60W/ES-55R/ES-65WR User's Guide......................................................................................... 7
Scanner Basics............................................................................................................................................ 8
Loading Originals...................................................................................................................................... 13
Wi-Fi Networking ....................................................................................................................................... 23
Scanner Parts Locations ...................................................................................................................... 8
Scanner Parts.................................................................................................................................. 8
Scanner Buttons and Lights............................................................................................................. 9
User Replaceable Epson Scanner Accessories ............................................................................ 10
Changing the Power Save Settings.................................................................................................... 10
Charging the Battery (ES-60W/ES-65WR)......................................................................................... 12
Loading Originals in the Input Slot...................................................................................................... 13
Original Document Specifications ...................................................................................................... 20
Receipt Specifications........................................................................................................................ 21
Special Original Specifications ........................................................................................................... 22
Plastic Card Specifications................................................................................................................. 22
Network Security Recommendations ................................................................................................. 23
Connecting to an Existing Wi-Fi Network .......................................................................................... 24
Manually Connecting to a Wi-Fi Network....................................................................................... 25
Wi-Fi Protected Setup (WPS) ........................................................................................................ 25
Using WPS to Connect to a Network......................................................................................... 25
Using WPS PIN Mode to Connect to a Network........................................................................ 26
Direct Wi-Fi Mode Setup .................................................................................................................... 27
Enabling a Direct Wi-Fi Connection............................................................................................... 28
Disabling Wi-Fi .............................................................................................................................. 28
Restoring Default Network Settings............................................................................................... 28
Epson DocumentScan App for iOS/Android....................................................................................... 29
Scanning .................................................................................................................................................... 30
Scanning a Document in Epson ScanSmart....................................................................................... 30
Saving a Scan ............................................................................................................................... 33
Attaching a Scan to E-mail ............................................................................................................ 34
3
Page 4

Sending a Scan to a Cloud Service ............................................................................................... 35
Printing a Scan .............................................................................................................................. 36
Saving a Scan as a Microsoft Office Format File ........................................................................... 38
Selecting Epson ScanSmart Settings................................................................................................. 39
Changing the Scanner................................................................................................................... 39
Changing the Scan Settings .......................................................................................................... 41
Changing the File Name Settings .................................................................................................. 43
Changing the Save Settings .......................................................................................................... 44
Save Settings ................................................................................................................................ 46
Customizing Action Icons .............................................................................................................. 47
Scanning Using Receipt Manager...................................................................................................... 49
Starting a Free Trial (ES-50/ES-60W) ........................................................................................... 49
Hiding the Receipt Manager Trial Icons .................................................................................... 54
Activating Receipt Manager (ES-50/ES-60W) ............................................................................... 55
Scanning Receipts and Using Receipt Manager ........................................................................... 59
Exporting Receipts to QuickBooks Online ................................................................................ 62
Exporting Receipts to QuickBooks Desktop.............................................................................. 63
Saving or Exporting Receipts to Quicken.................................................................................. 63
Saving Receipt Data as a TurboTax File................................................................................... 64
Saving Receipt Data as a CSV File........................................................................................... 65
Scanning Receipts as an Image File......................................................................................... 65
Selecting Receipt Manager Settings .................................................................................................. 66
Exporting or Importing the Receipt Database ................................................................................ 66
Changing Column Settings............................................................................................................ 67
Changing Currency and Language Settings.................................................................................. 68
Importing Categories from QuickBooks Desktop or Quicken......................................................... 70
Scan Resolution Guidelines ............................................................................................................... 72
Cleaning and Transporting Your Scanner............................................................................................... 74
Cleaning Your Scanner ...................................................................................................................... 74
Cleaning Inside Your Scanner............................................................................................................ 74
Calibrating Your Scanner ................................................................................................................... 76
Transporting Your Scanner ................................................................................................................ 77
4
Page 5

Solving Problems ...................................................................................................................................... 78
Scanner Light Status.......................................................................................................................... 78
Solving Scanning Problems ............................................................................................................... 81
Scanner Does Not Turn On or Off or Turns Off Unexpectedly ....................................................... 82
Scanner Button Does Not Start Scanning...................................................................................... 83
Scanning Software Does Not Operate Correctly ........................................................................... 83
Original Feeds Incorrectly in Scanner............................................................................................ 84
Original Jams in Scanner............................................................................................................... 85
Scanning is Slow ........................................................................................................................... 86
Cannot Send Scans to a Cloud Service......................................................................................... 86
Solving Network Scanning Problems ................................................................................................. 86
Cannot Scan Over a Network ........................................................................................................ 87
Scanner Cannot Connect to a Wireless Router ............................................................................. 87
Solving Scanned Image Quality Problems ......................................................................................... 89
Back of Original Image Appears in Scanned Image ...................................................................... 89
Scanned Characters are Blurry ..................................................................................................... 89
Characters are not Recognized During Conversion to Editable Text (OCR) ................................. 90
Ripple Patterns Appear in an Image .............................................................................................. 91
Spots or Lines Appear in All Scanned Images............................................................................... 91
Straight Lines in an Image Appear Crooked .................................................................................. 91
Scanned Image is Cropped ........................................................................................................... 91
Resetting the Epson Scan 2 Settings ............................................................................................ 92
Solving Receipt Manager Problems ................................................................................................... 92
Cannot Access an Accounting Service.......................................................................................... 93
Cannot Import Receipt Database .................................................................................................. 93
License Key is Disabled................................................................................................................. 93
Uninstall Your Scanner Software........................................................................................................ 93
Uninstalling Scanner Software - Windows..................................................................................... 94
Uninstalling Scanner Software - Mac............................................................................................. 94
Where to Get Help.............................................................................................................................. 95
Technical Specifications .......................................................................................................................... 97
Windows System Requirements ........................................................................................................ 97
Mac System Requirements ................................................................................................................ 97
5
Page 6

General Specifications ....................................................................................................................... 98
Dimension Specifications ................................................................................................................... 99
Electrical Specifications ................................................................................................................... 100
Environmental Specifications ........................................................................................................... 101
Network Interface Specifications (ES-60W/ES-65WR) .................................................................... 101
Safety and Approvals Specifications ................................................................................................ 102
Notices ..................................................................................................................................................... 104
Important Safety Instructions............................................................................................................ 104
Battery Safety Instructions (ES-60W/ES-65WR).............................................................................. 106
Restrictions on Copying ................................................................................................................... 106
Default Delay Times for Power Management for Epson Products .................................................... 107
Binding Arbitration and Class Waiver ............................................................................................... 107
Trademarks...................................................................................................................................... 110
Copyright Notice............................................................................................................................... 111
libTIFF Software Acknowledgment.............................................................................................. 111
A Note Concerning Responsible Use of Copyrighted Materials................................................... 112
Copyright Attribution.................................................................................................................... 112
6
Page 7

ES-50/ES-60W/ES-55R/ES-65WR User's Guide
Welcome to the ES-50/ES-60W/ES-55R/ES-65WR User's Guide.
For a printable PDF copy of this guide, click here.
7
Page 8
Scanner Basics
See these sections to learn about the basic features of your scanner.
Scanner Parts Locations
Changing the Power Save Settings
Charging the Battery (ES-60W/ES-65WR)
Scanner Parts Locations
See these sections to identify the parts on your scanner.
Scanner Parts
Scanner Buttons and Lights
User Replaceable Epson Scanner Accessories
Parent topic: Scanner Basics
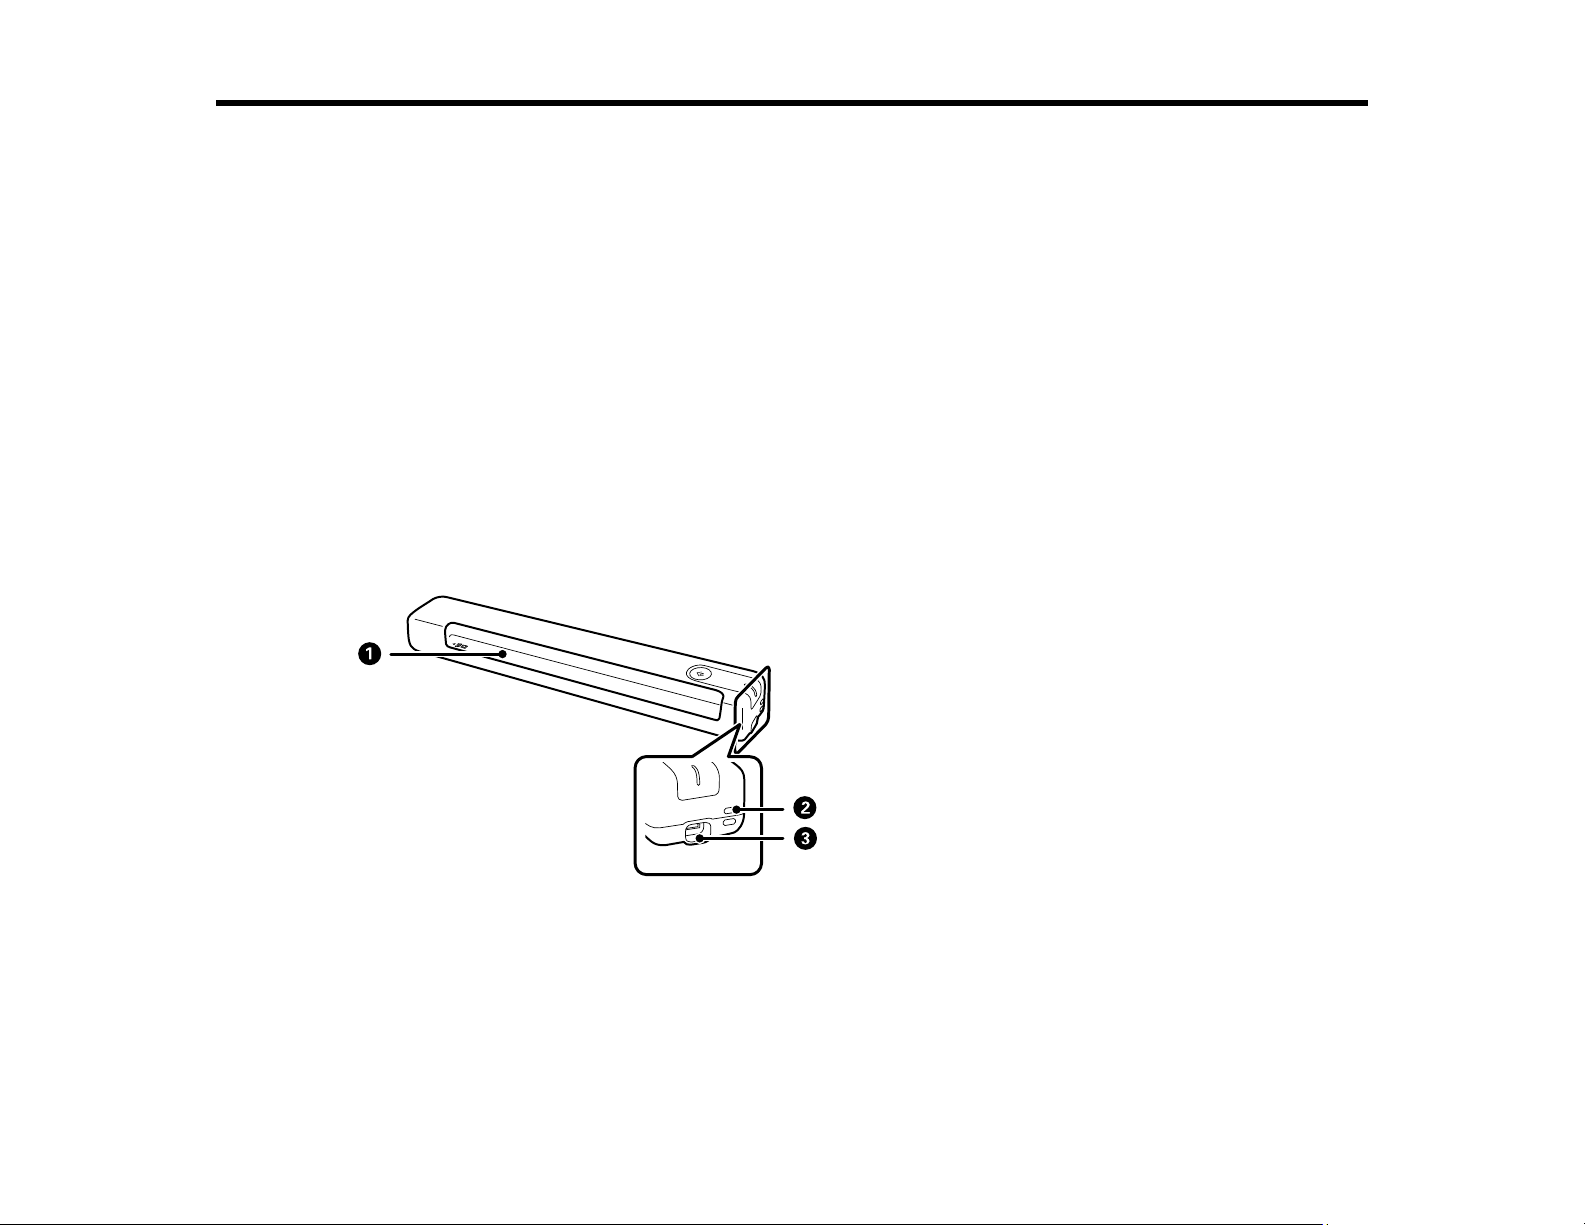
Scanner Parts
Note: The illustrations show the ES-50/ES-55R, but the parts are the same for the ES-60W /ES-65WR.
1 Input slot
2 Loophole
3 USB port
8
Page 9
Parent topic: Scanner Parts Locations
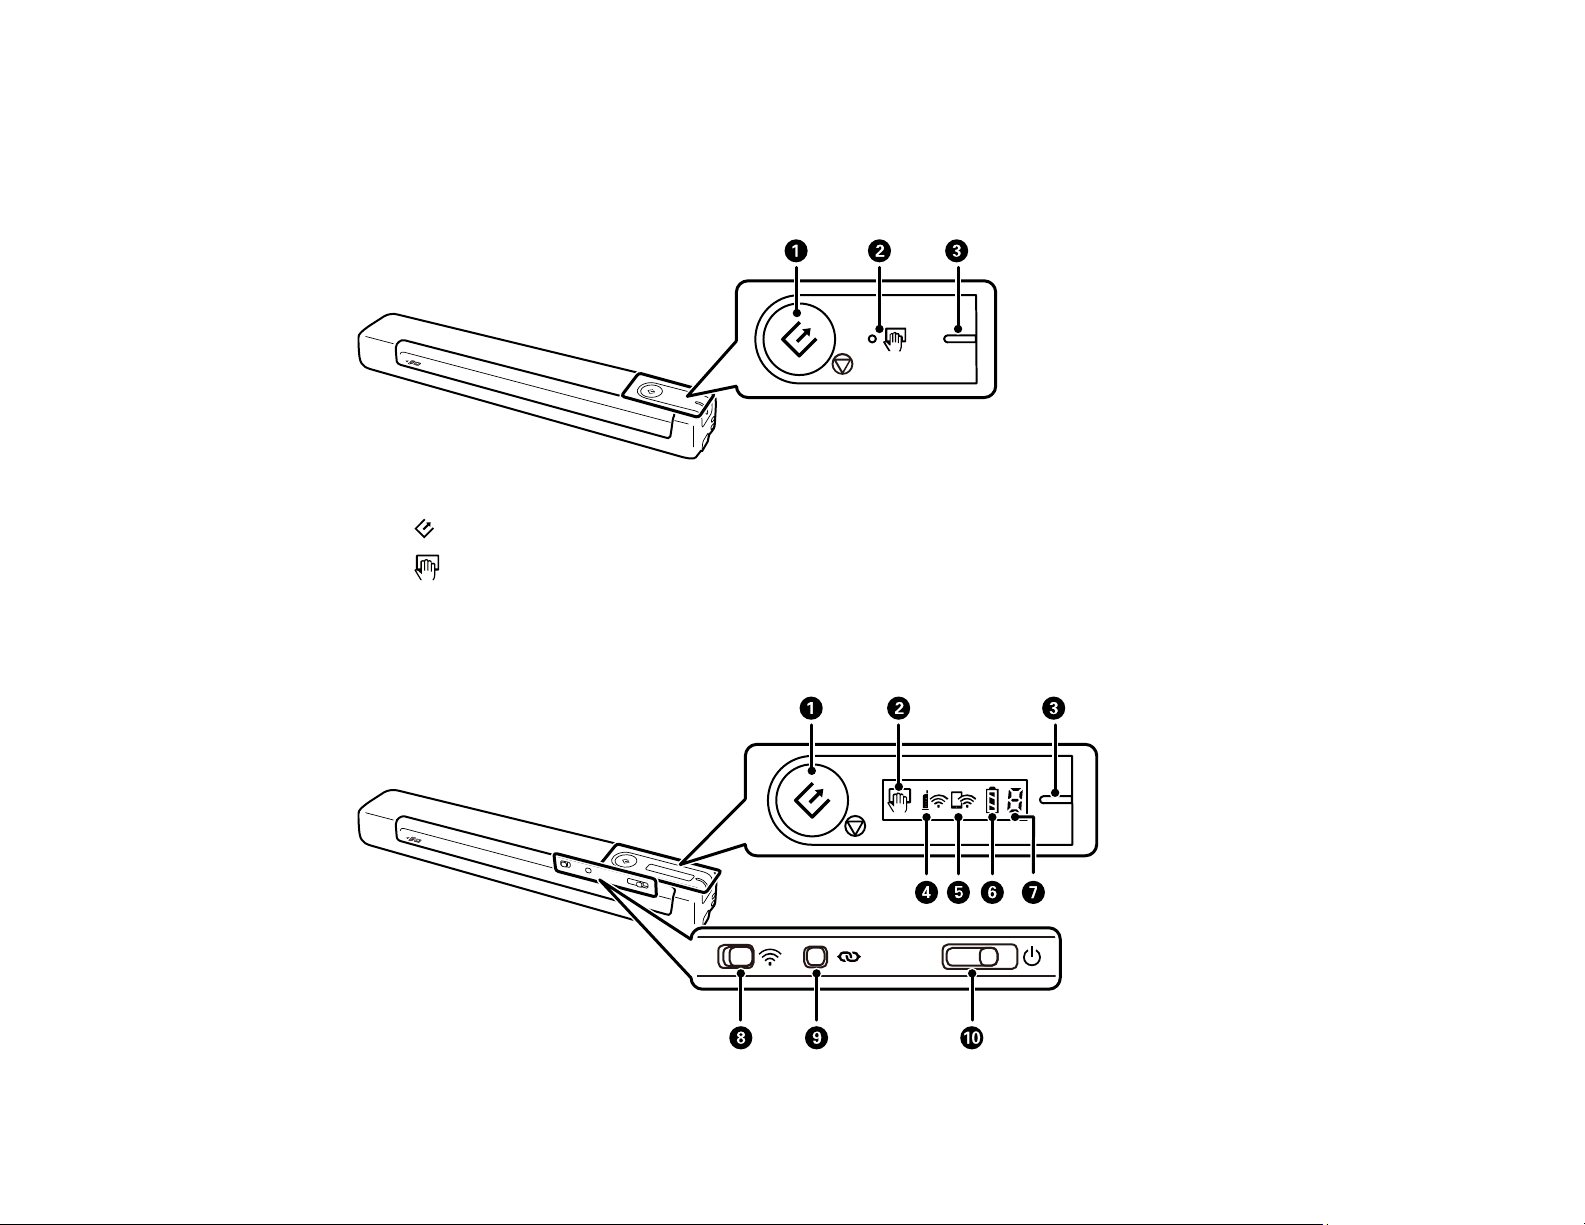
Scanner Buttons and Lights
ES-50/ES-55R
1 start button
2
3 Ready light
ES-60W/ES-65WR
automatic feeding mode light
9
Page 10
1 start button
2
3 Ready light
4
5
6
7 Error status light
8
9 Wi-Fi connect button
10
Parent topic: Scanner Parts Locations
automatic feeding mode light
Wi-Fi light
Wi-Fi AP light
battery light
Wi-Fi switch
power switch
User Replaceable Epson Scanner Accessories
You can purchase genuine Epson accessories at epson.com (U.S. sales), epson.ca (Canadian sales), or
epson.com.jm (Caribbean sales). You can also purchase accessories from an Epson authorized reseller.
To find the nearest one, call 800-GO-EPSON (800-463-7766) in the U.S. or 800-807-7766 in Canada.
Part Part number
Carrier sheet for portable scanners B12B819451
Maintenance sheet kit 2 B12B819481
Parent topic: Scanner Parts Locations
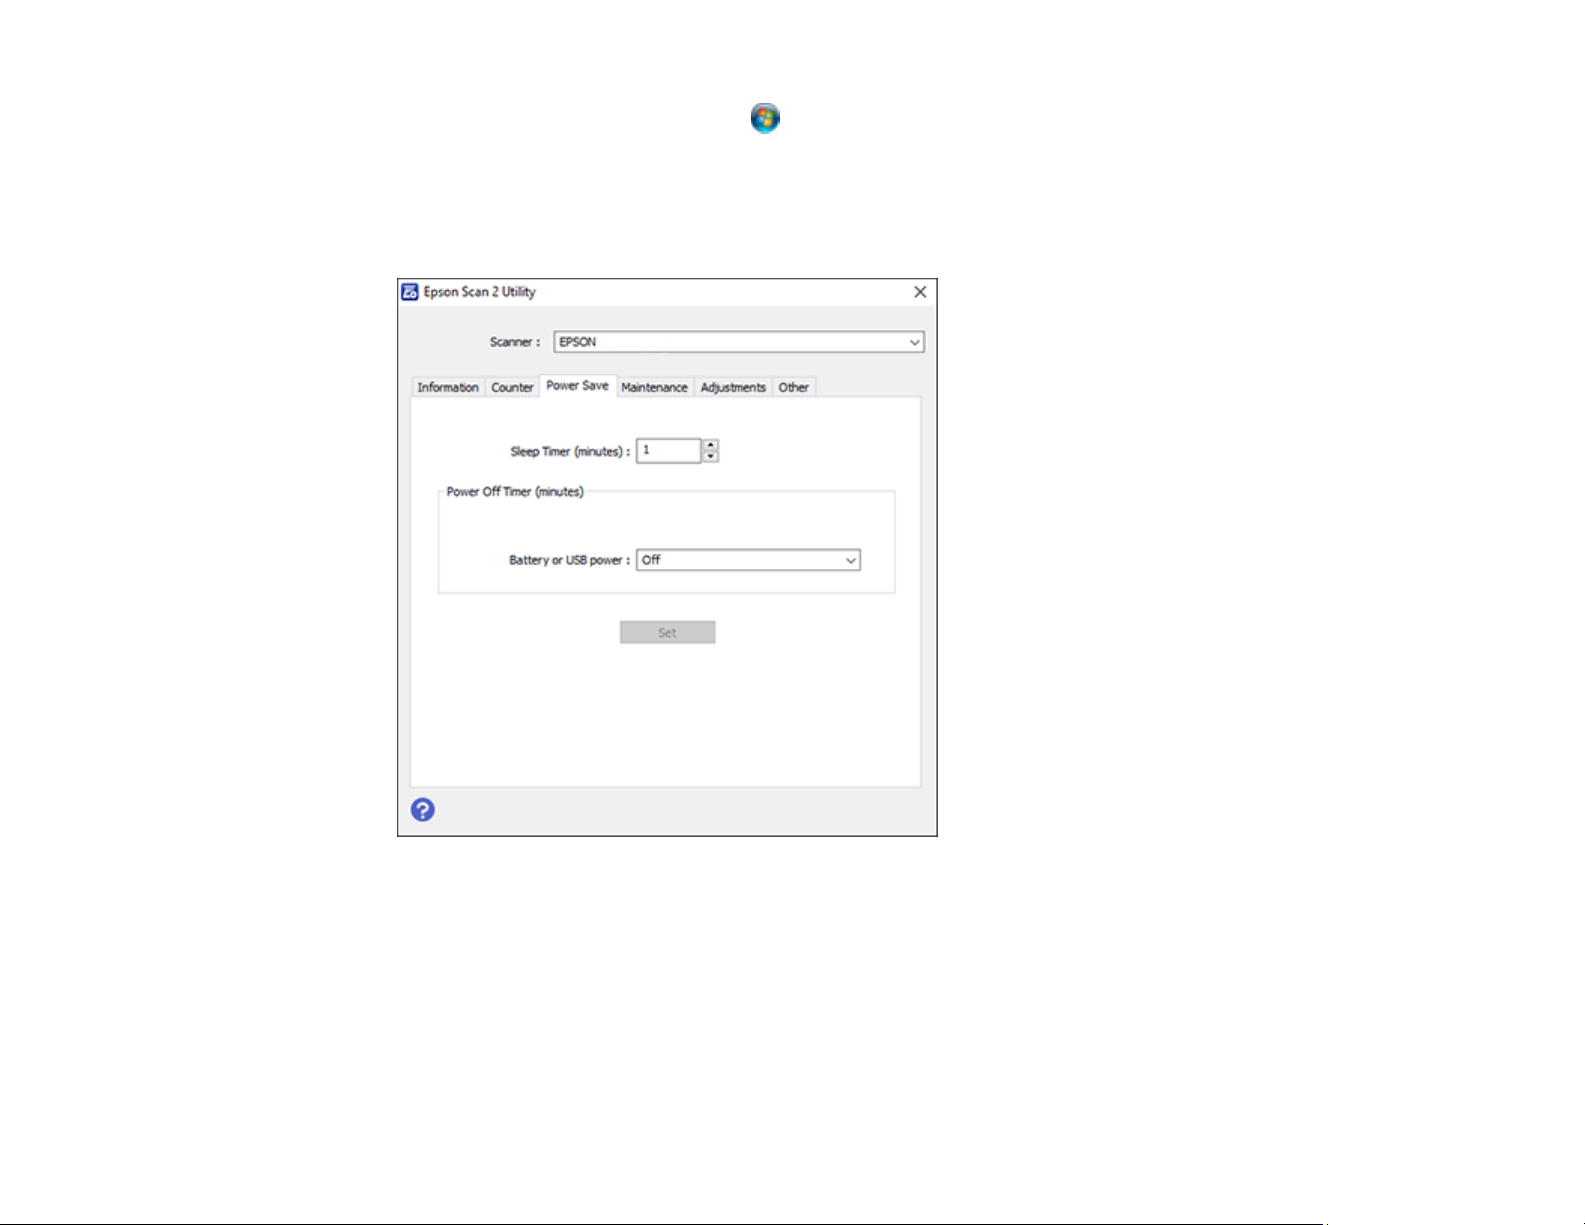
Changing the Power Save Settings
You can use the Epson Scan 2 Utility to change the time period before the scanner enters sleep mode
and turns off automatically.
1. Do one of the following to access the Epson Scan 2 Utility:
• Windows 10: Click and select EPSON > Epson Scan 2 Utility.
• Windows 8.x: Navigate to the Apps screen and select Epson Scan 2 Utility.
10
Page 11
• Windows (other versions): Click or Start, and select All Programs or Programs. Select
EPSON > Epson Scan 2 Utility.
• Mac: Open the Applications folder, open the Epson Software folder, and select Epson Scan 2
Utility.
2. Click the Power Save tab.
3. Select the length of time after which you want the scanner to go to sleep as the Sleep Timer setting.
4. Select a power off timer setting for the Battery or USB power setting (ES-60W/ES-65WR).
5. Click Set.
6. Close the Epson Scan 2 Utility.
Parent topic: Scanner Basics
11
Page 12
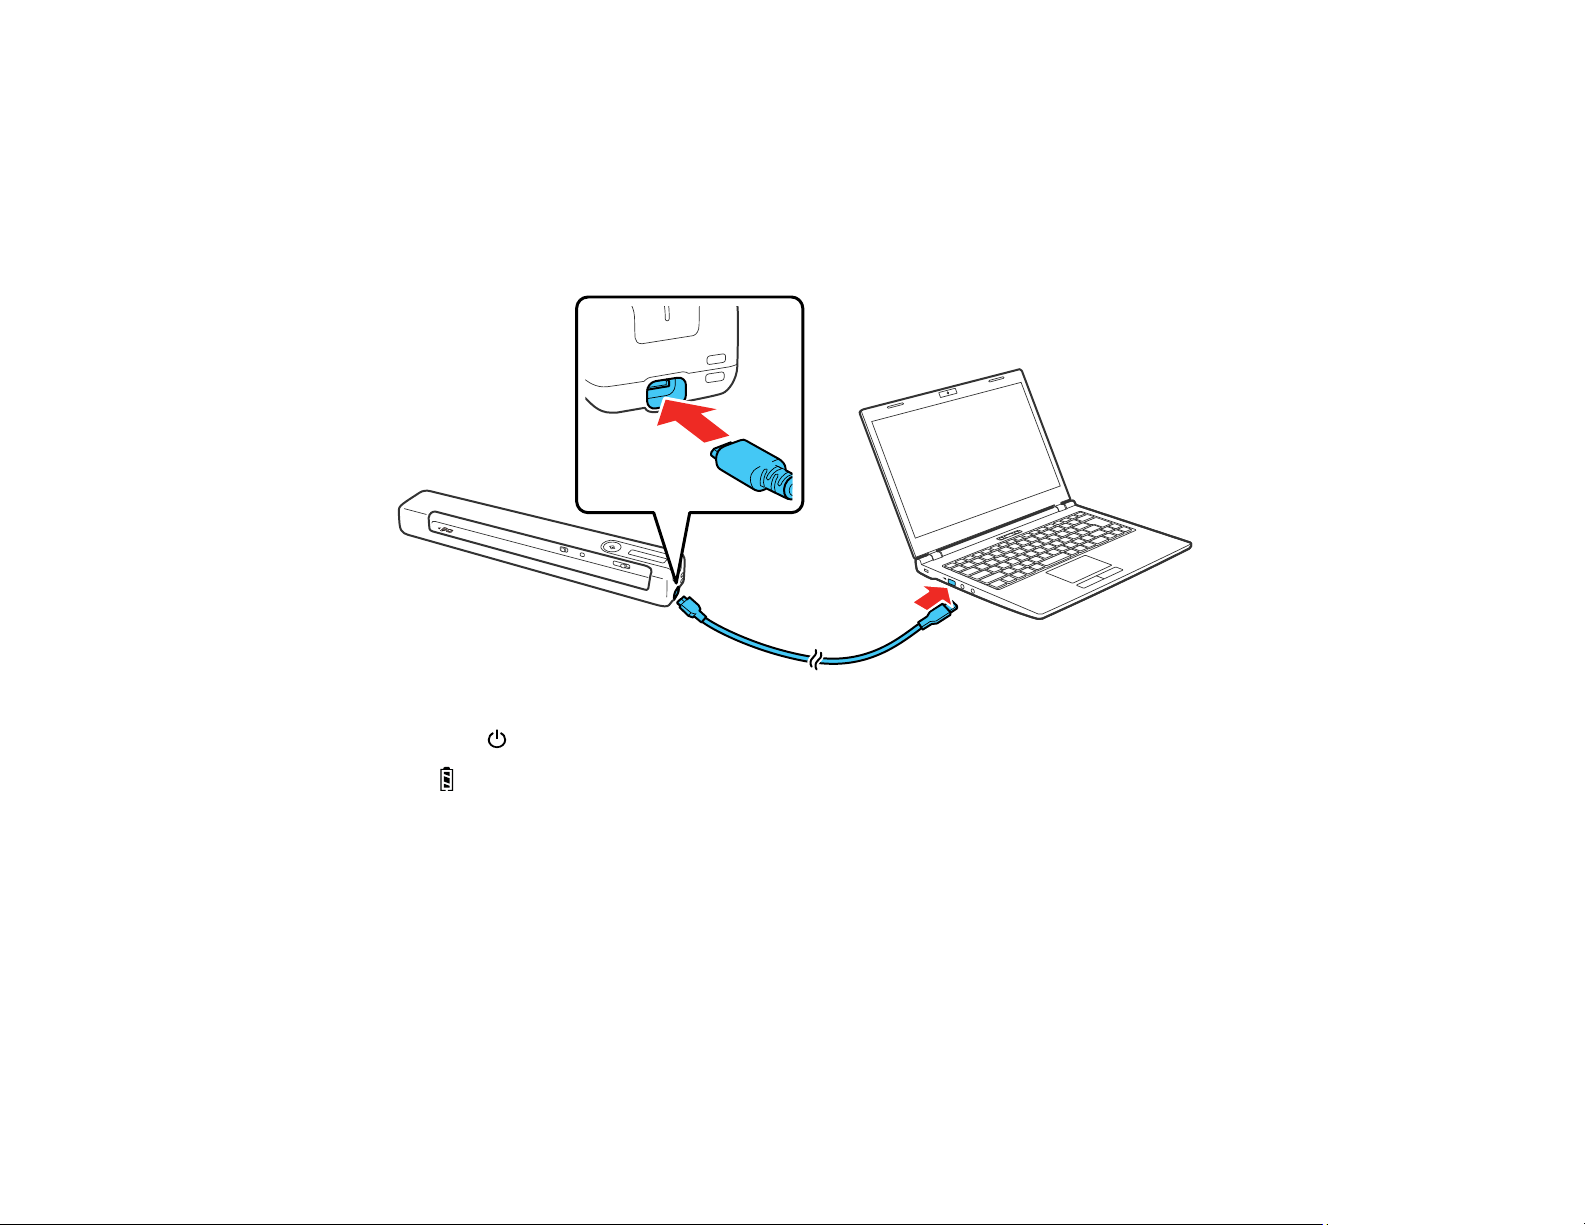
Charging the Battery (ES-60W/ES-65WR)
The scanner runs on battery power when it is not connected to the computer with a USB cable, or if it is
connected via Wi-Fi. You can charge the battery from a computer with a USB connection to the scanner.
1. Make sure that the computer is turned on and not in sleep mode.
2. Connect the scanner to the computer using the micro USB cable that came with the scanner.
3. Slide the power switch to turn on the scanner.
The battery light flashes and shows the battery level while the battery is charging. When charging
is complete, the battery level is shown as full. If the scanner is off when charging completes, the
battery light turns off.
Note: The battery takes about 3.5 hours to fully charge. Charging times increase if the scanner is on
during the charging process.
Parent topic: Scanner Basics
12
Page 13

Loading Originals
Follow the instructions here to load your originals into the scanner.
Loading Originals in the Input Slot
Original Document Specifications
Receipt Specifications
Special Original Specifications
Plastic Card Specifications
Loading Originals in the Input Slot
You can load an original that meets the document specifications in the input slot.
Caution: Do not load photos, or valuable original documents or artwork, directly into the scanner. This
may wrinkle or damage the original.
Note: The illustrations show the ES-50/ES-55R model, but the steps are the same for the ES-60W/ES65WR.
13
Page 14
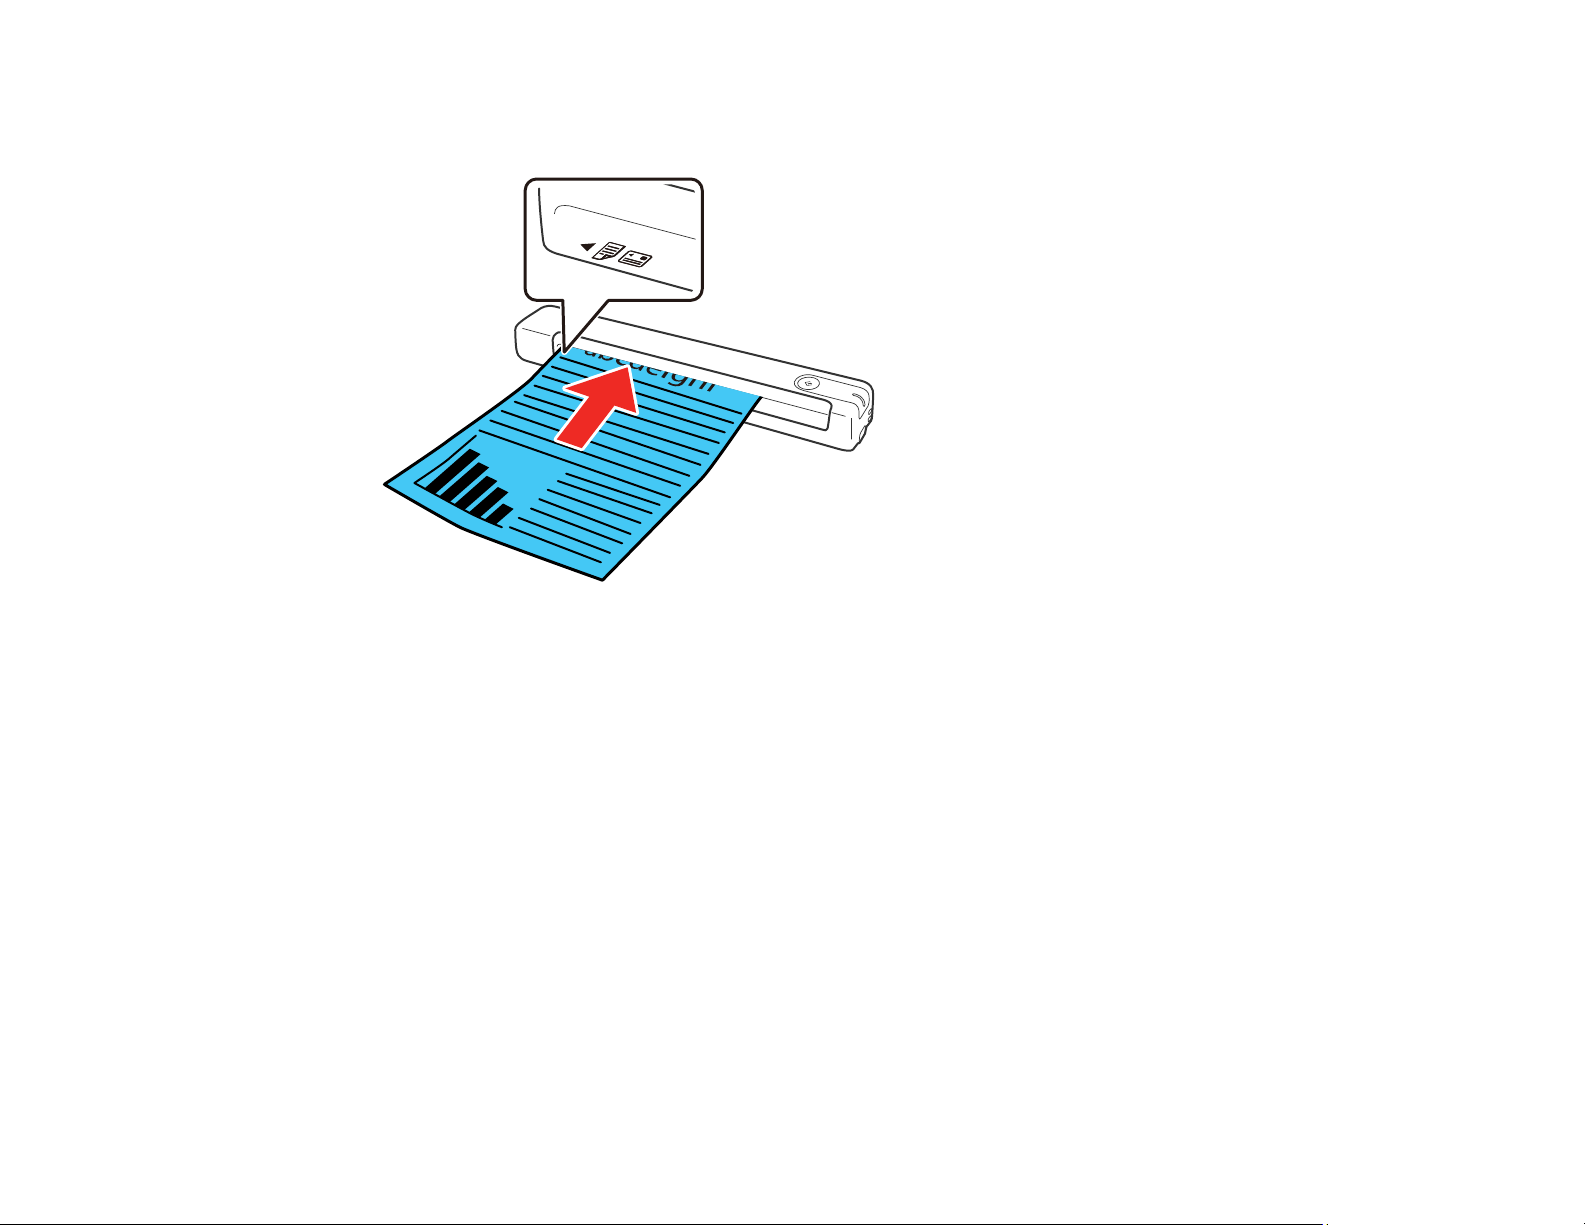
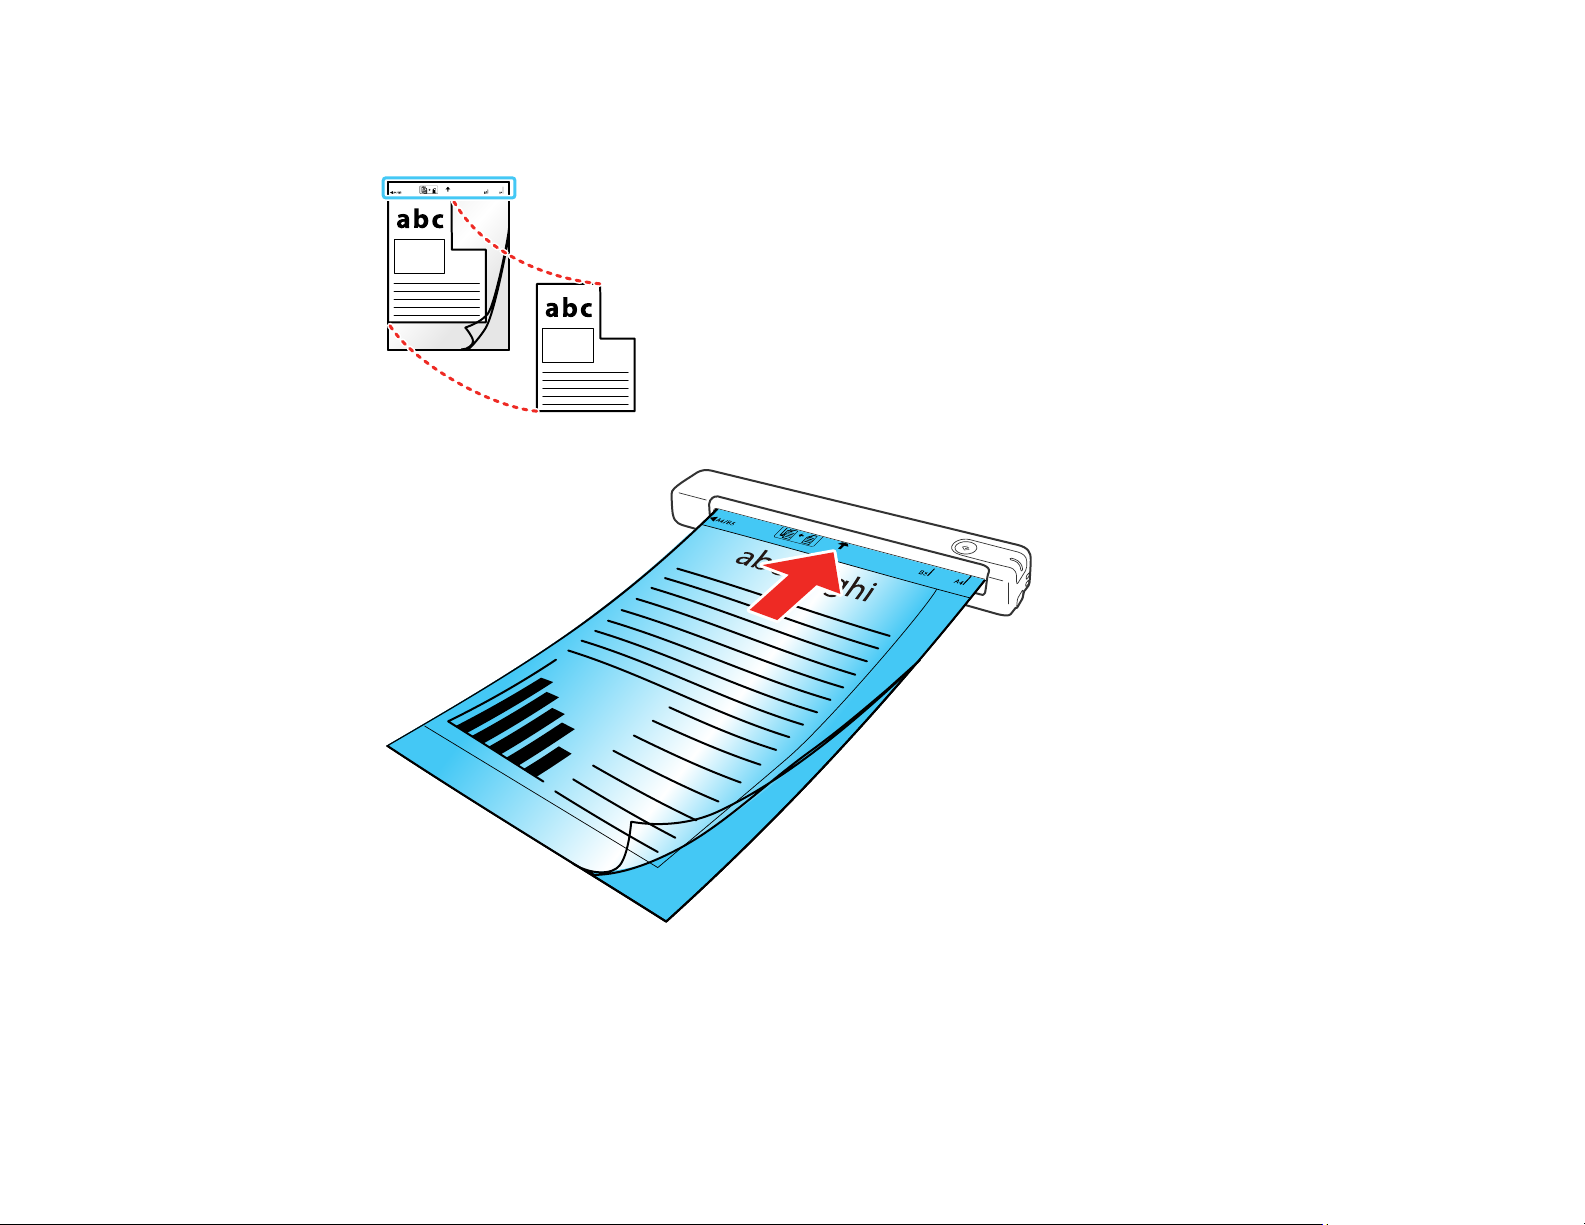
• For standard size originals, slide your original into the input slot against the left side as shown until it
meets resistance. Make sure the printed side is faceup and top edge first.
14
Page 15
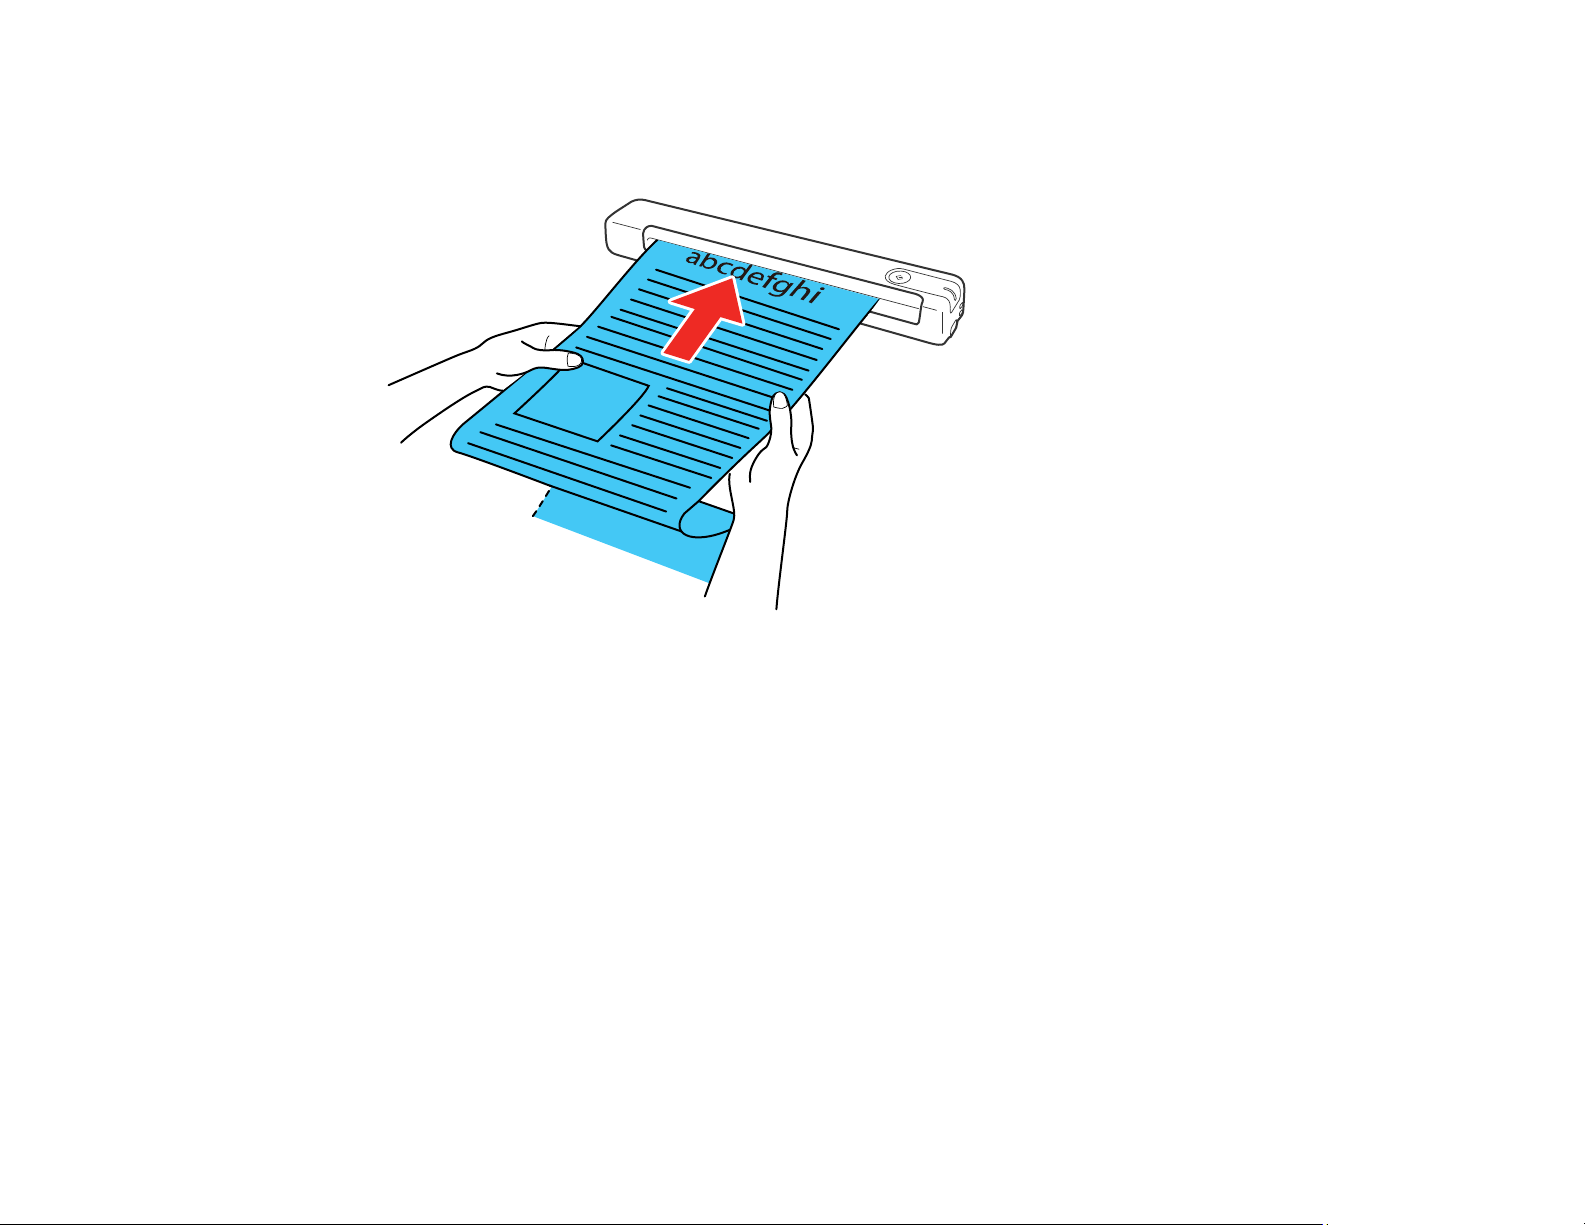
• For longer originals, slide your original into the input slot against the left side as shown until it meets
resistance. Make sure the printed side is faceup and top edge first. Set the paper size in the scanning
program and support the original as it enters into and ejects from the scanner.
15
Page 16
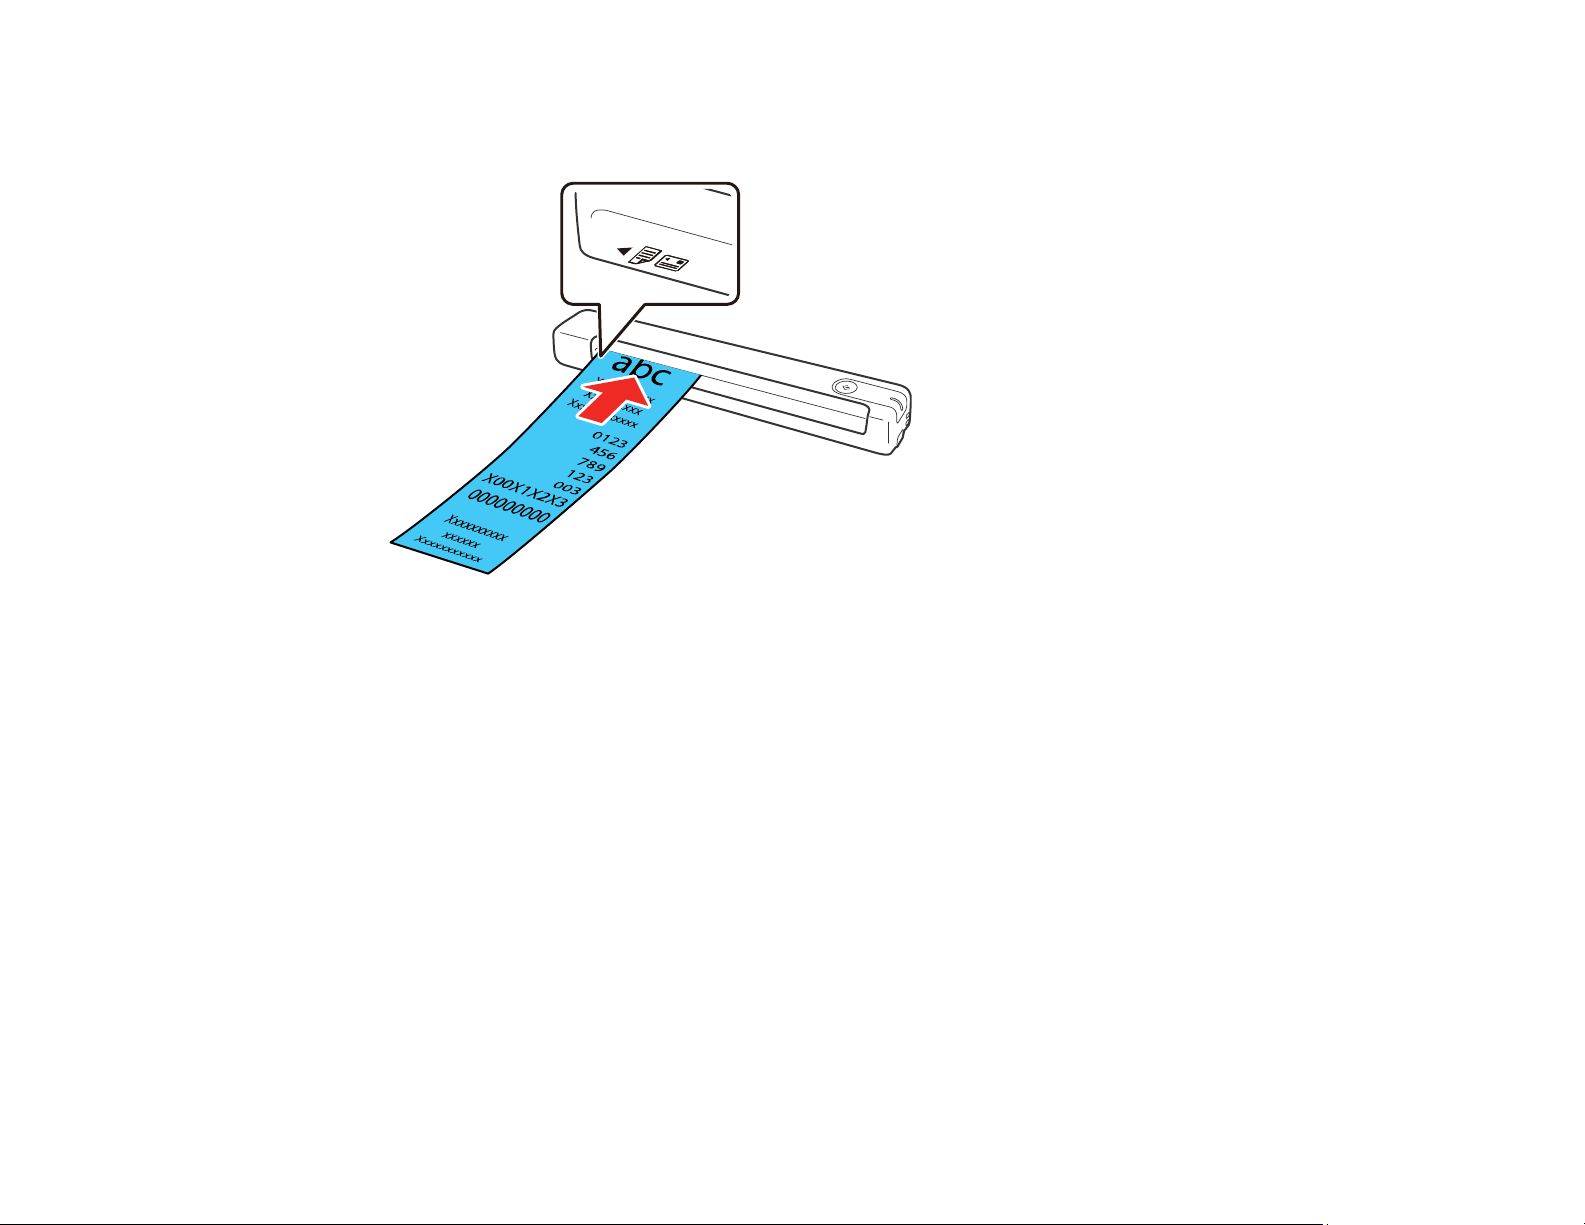
• For receipts, support the original by hand and load it into the input slot against the left side as shown
until it meets resistance. Make sure the printed side is faceup and top edge first.
16
Page 17
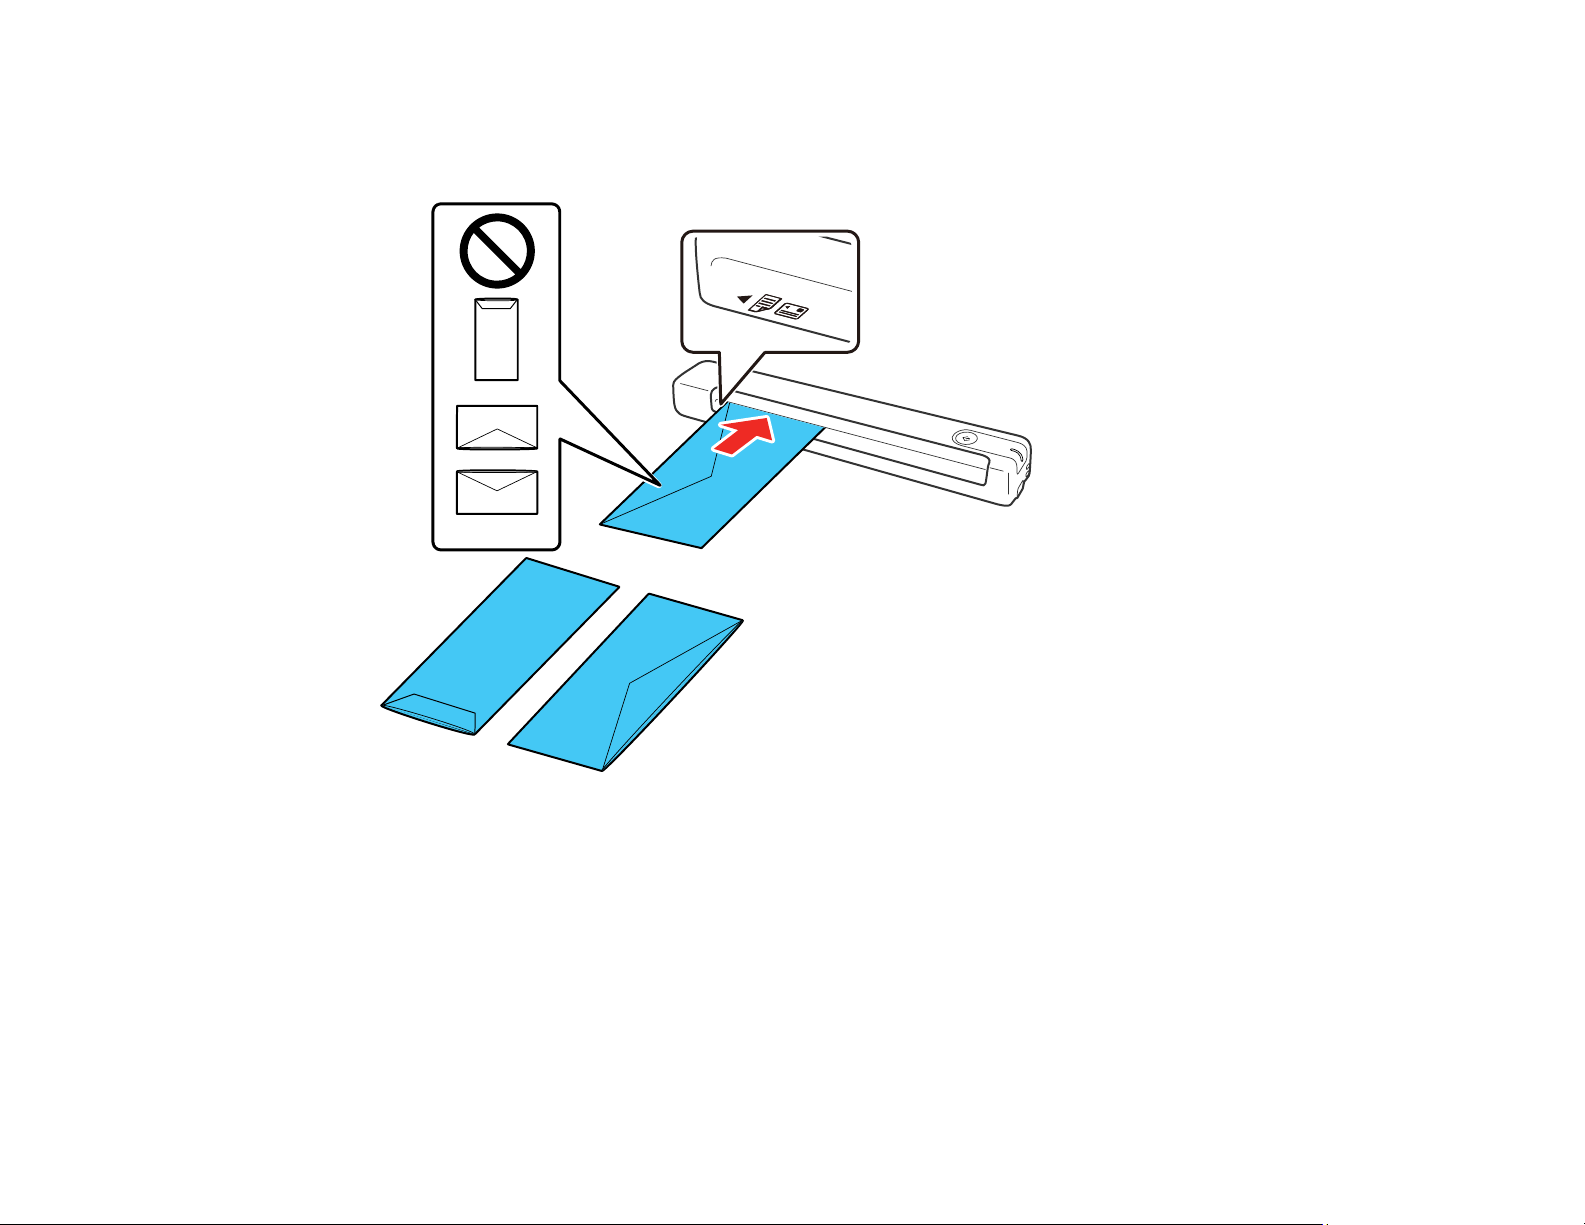
• For envelopes, slide the original into the input slot against the left side as shown until it meets
resistance. Make sure the printed side is faceup and the flap is facing as shown. For envelopes with
the flap on the shorter side, load the envelope with the flap side last.
Caution: Do not load envelopes with adhesives on them.
17
Page 18
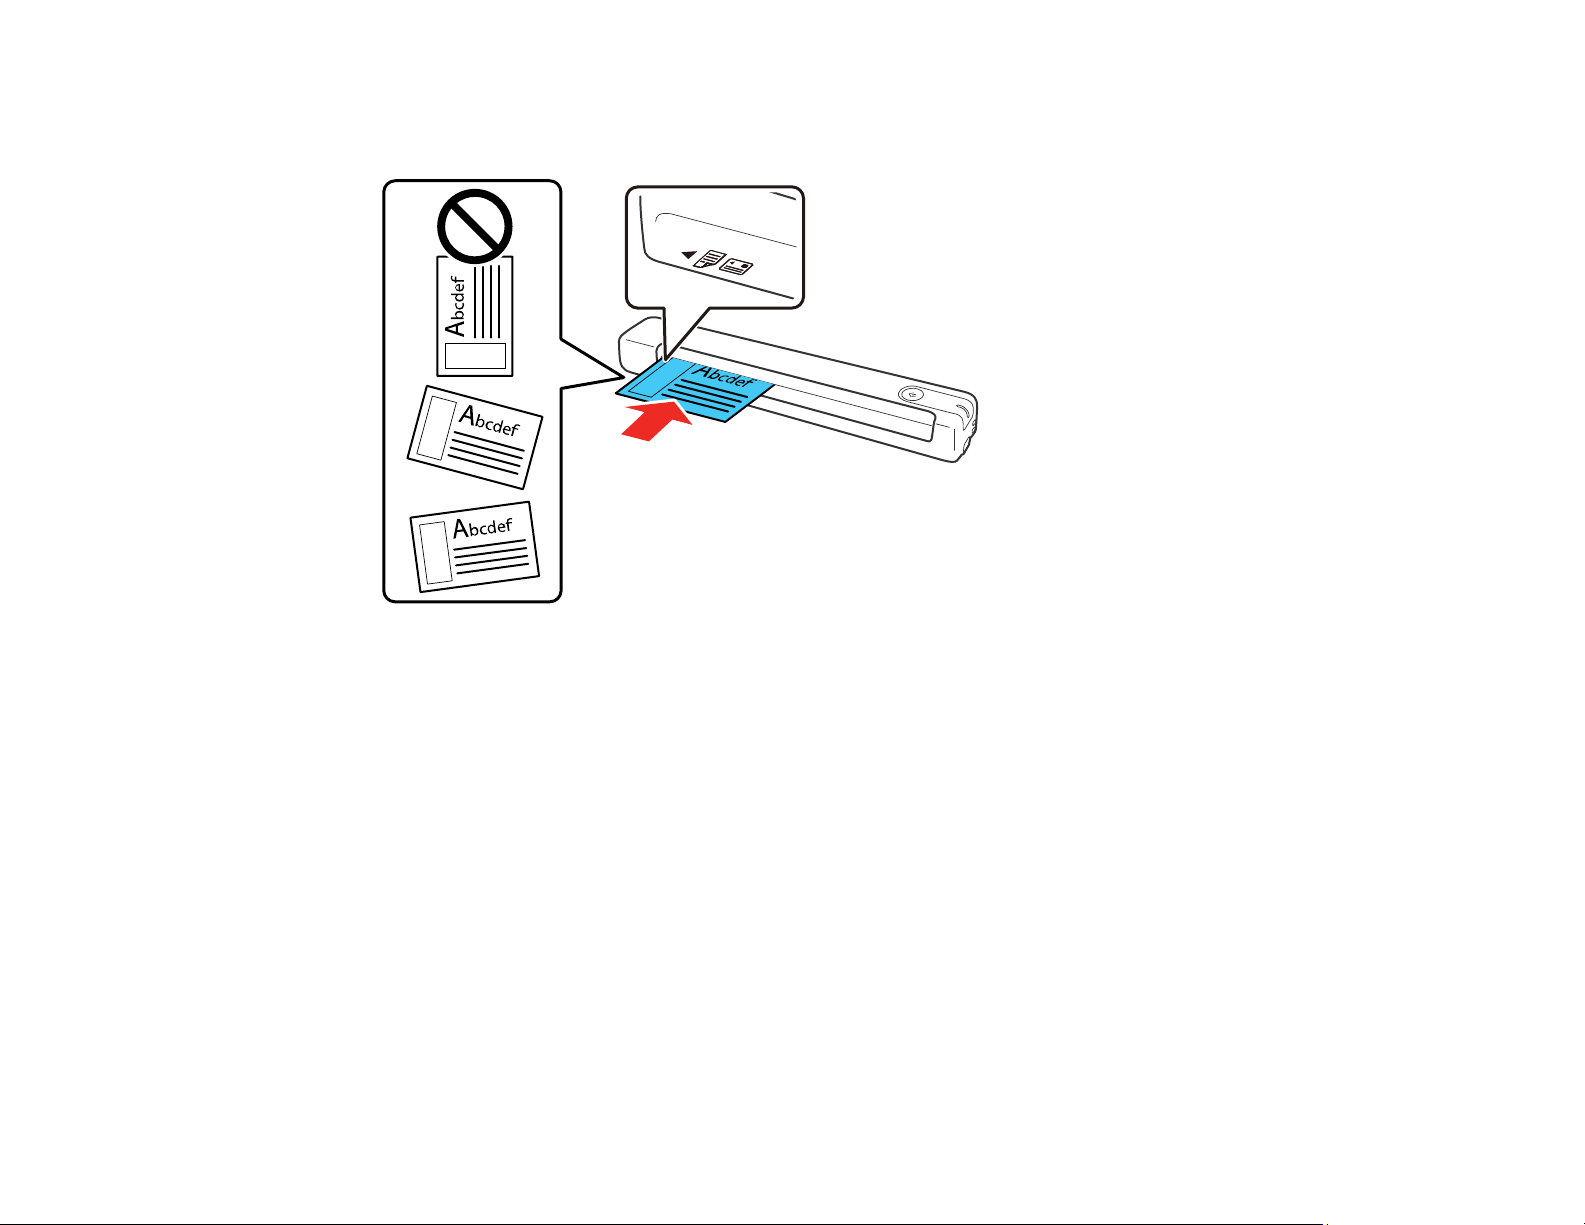
• For plastic cards, load the card horizontally into the input slot against the left side as shown until it
meets resistance. Make sure the printed side is faceup.
Caution: Do not load plastic cards vertically or at an angle.
• For irregularly shaped originals, use an optional carrier sheet (part number B12B819451). Make sure
the illustration on the front edge of the carrier sheet is faceup with the original faceup against the left
18
Page 19
side. Slide the carrier sheet top edge first into the input slot against the left side as shown until it meets
resistance.
Note: Only use the carrier sheet designed for your scanner. If the carrier sheet is scratched or has
been scanned more than 3,000 times, stop using it and obtain a new one.
Parent topic: Loading Originals
19
Page 20
Related references
Original Document Specifications
Receipt Specifications
Special Original Specifications
Plastic Card Specifications
User Replaceable Epson Scanner Accessories
Original Document Specifications
You can load original documents that meet these specifications in your scanner.
Note: To scan delicate originals or originals that are easily wrinkled, use an optional carrier sheet (part
number B12B819451).
Paper type Paper size Paper weight
Plain paper
Fine paper
Recycled paper
Long paper Width: 2.0 to 8.5 inches (50.8 to 216 mm)
Postcards 3.9 × 5.8 inches (100 × 148 mm) 9 to 72 lb (35 to 270 g/m²)
Paper business cards 2.1 × 3.4 inches (55 × 89 mm) 12 to 72 lb
Letter (8.5 × 11 inches [216 × 279 mm]) 9 to 72 lb (35 to 270 g/m²)
Legal (8.5 × 14 inches [216 × 356 mm])
A4 (8.3 × 11.7 inches [210 × 297 mm])
A5 (5.8 × 8.2 inches [148 × 210 mm])
B5 (7.2 × 10.1 inches [182 × 257 mm])
B6 (5 × 7.2 inches [128 × 182 mm])
A6 (4.1 × 5.8 inches [105 × 148 mm])
A7 (2.9 × 4.1 inches [74 × 105 mm])
A8 (2.1 × 2.9 inches [52 × 74 mm])
Height: 2.0 to 72 inches (50.8 to 1828.8
mm)
12 to 72 lb
(46 to 270 g/m²)
9 to 72 lb (35 to 270 g/m²)
(46 to 270 g/m²)
20
Page 21

Caution: Do not load the following types of originals in the scanner, or they may be damaged or may
damage the scanner:
• Originals with an uneven surface such as letterhead paper
• Originals with crinkles or fold lines
• Curled originals
• Coated paper
• Originals with punch holes
• Originals with folded corners
• Photos or photo paper*
• Originals with labels or stickers*
• Originals with staples or paper clips
• Originals with sticky notes attached*
• Ripped originals*
• Originals with carbon paper backing*
• Perforated originals*
• Booklets
• Non-paper originals such as clear files, fabric, and metal foil
• Originals with glue attached
• Heavily wrinkled or curled originals
• Transparent originals such as overhead projector film
• Originals with wet ink
*You can only scan these originals by using the carrier sheet.
Parent topic: Loading Originals
Receipt Specifications
You can load 1 receipt at a time that meets these specifications in your scanner.
21
Page 22

Paper type Paper size Paper thickness
Receipts (plain paper, fine
paper, or recycled paper)
Note: Scan receipts one at a time using automatic feeding mode. Support a long original receipt by hand
as it enters and exits the scanner.
Parent topic: Loading Originals
Special Original Specifications
You can load 1 envelope or irregularly shaped original that meets these specifications in your scanner.
Paper type Paper size Paper thickness
Envelopes 4.72 × 9.25 inches (120 × 235 mm)
Irregularly shaped original (in
carrier sheet)
Parent topic: Loading Originals
Plastic Card Specifications
3 × 3 inches (76.2 × 76.2 mm) to 3 × 14
inches (76.2 × 355.6 mm)
3.62 × 6.50 inches (92 × 165 mm)
Up to A4 (8.3 × 11.7 inches
[210 × 297 mm])
12 to 72 lb (46 to 270 g/m²)
0.015 inch (0.38 mm) or less
0.012 inch (0.3 mm) or less
(excluding the thickness of
the carrier sheet)
You can load 1 plastic card that meets these specifications in your scanner.
Card type Card size Card thickness
With embossing ISO7810 ID-1 compliant: 2.1 × 3.3
Without embossing 0.04 inch (1.0 mm) or less
Note: ISO7810 ID-1 size laminated cards (thickness of 0.02 inch [0.6 mm] or less) may not be scanned
successfully.
Parent topic: Loading Originals
inches (54 × 85.6 mm)
22
0.05 inch (1.24 mm) or less
Page 23

Wi-Fi Networking
See these sections to use your scanner over a Wi-Fi network (ES-60W/ES-65WR).
Network Security Recommendations
Connecting to an Existing Wi-Fi Network
Direct Wi-Fi Mode Setup
Epson DocumentScan App for iOS/Android
Network Security Recommendations
To help deter unauthorized access to your product over a network, you should protect your network
environment using appropriate security measures.
Security measures such as these can help deter threats such as loss of user data, use of telephone and
fax lines, and other intrusions:
• Enable security on your wireless LAN
Enable the appropriate security on the wireless LAN you plan to use with your product. Network
security such as a network password can deter interception of traffic over the wireless LAN. Your
router may already have a default password enabled by your Internet service provider (ISP). See your
ISP and router documentation for instructions on how to change the default password and better
secure your network.
• Connect your product only to a network protected by a firewall
Connecting your product directly to the Internet may leave it vulnerable to security threats. Instead,
connect it to a router or other network connection protected by a firewall. Your router may already
have a firewall set up by your Internet service provider; check with your ISP for confirmation. For best
results, set up and use a private IP address for your network connection.
• Change the default administrator password on your product
If your product has an option to set an administrator password, change the default administrator
password to deter access by unauthorized users to personal data stored on your product, such as IDs,
passwords, and contact lists.
Parent topic: Wi-Fi Networking
23
Page 24
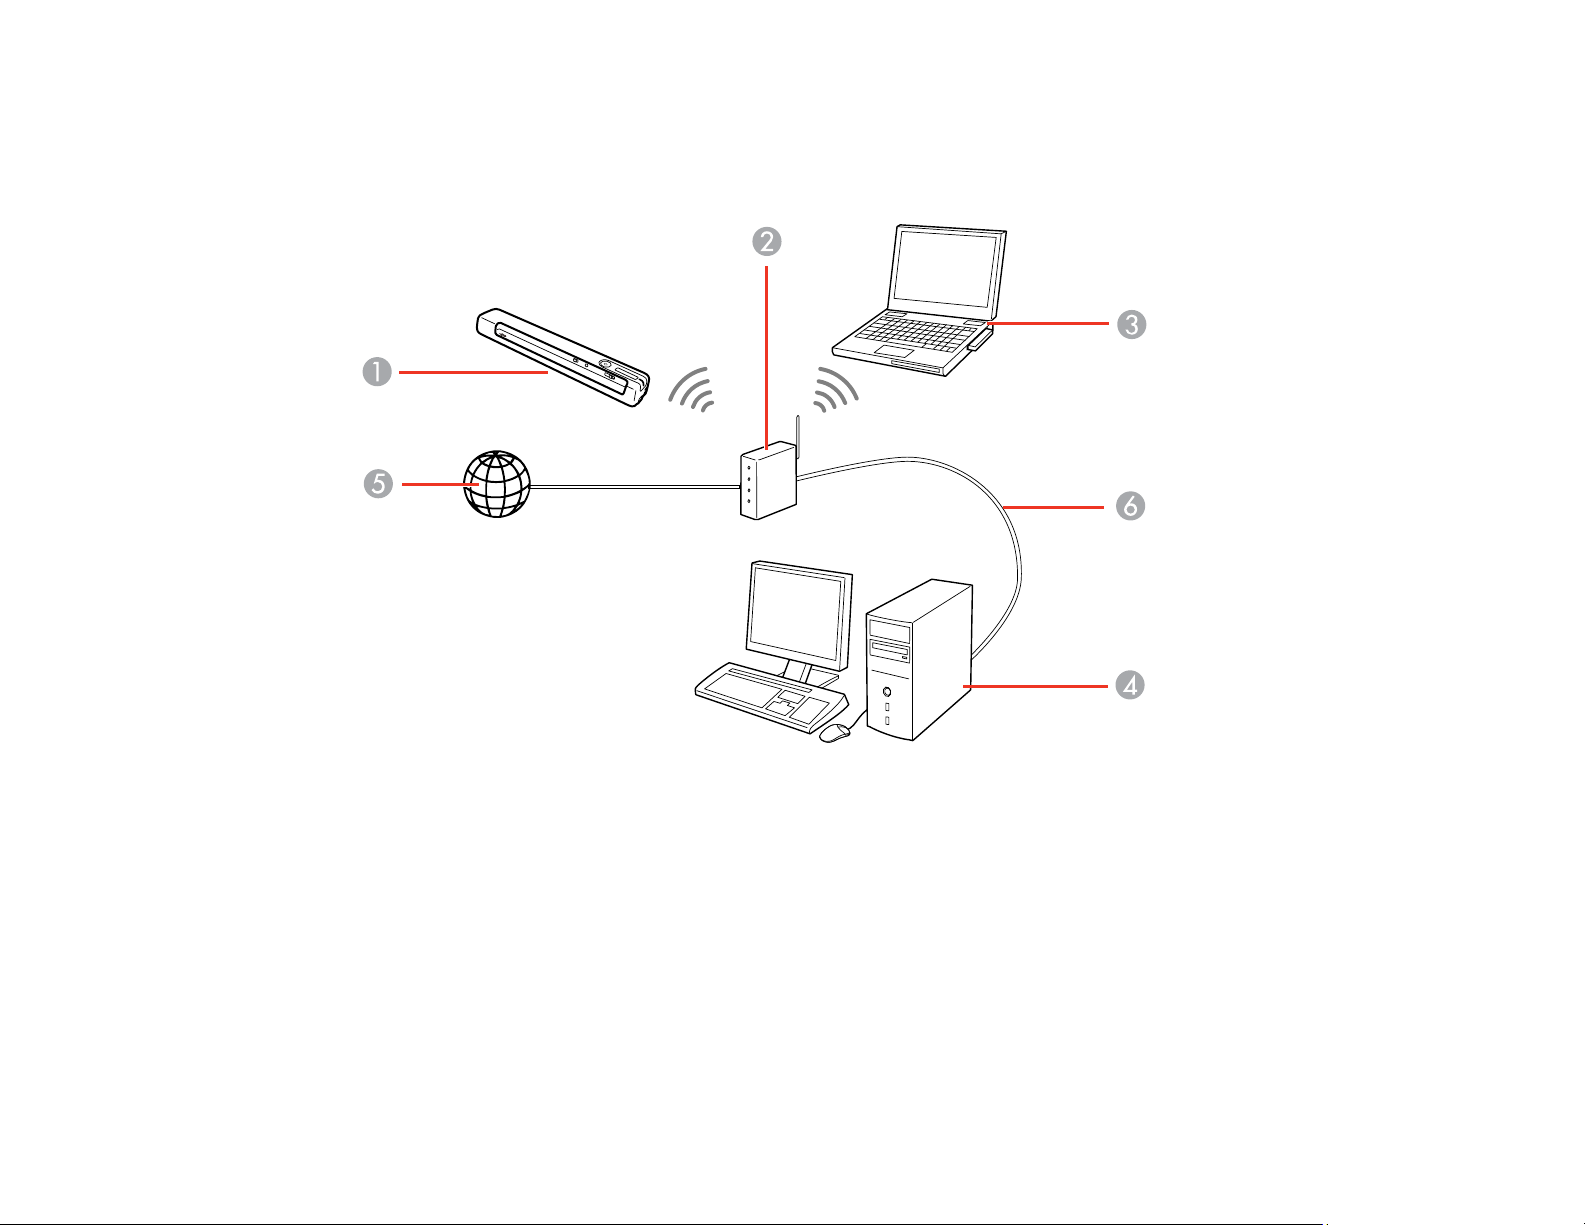
Connecting to an Existing Wi-Fi Network
You can set up your scanner to communicate with your computer using a wireless router. The wireless
router can be connected to your computer over a wireless or wired network.
1 Epson scanner
2 Wireless router
3 Computer with a wireless interface
4 Computer
5 Internet
6 Ethernet cable (used only for wired connection from the computer to the wireless router)
Manually Connecting to a Wi-Fi Network
Wi-Fi Protected Setup (WPS)
24
Page 25

Parent topic: Wi-Fi Networking
Manually Connecting to a Wi-Fi Network
You can use your product's software installer to connect the scanner to a Wi-Fi network.
Note: You must have a computer with a wireless adapter to set up the connection.
1. See the Start Here sheet for instructions on downloading and installing your scanner's software.
Note: The scanner powers off after 1 minute of inactivity. If the scanner turns off during the
procedure, you may need to repeat some of the steps.
2. Select the wireless connection method for the scanner when prompted.
The scanner is added to the network and connected to the computer for network scanning.
Parent topic: Connecting to an Existing Wi-Fi Network
Wi-Fi Protected Setup (WPS)
If your network uses a WPS-enabled wireless router, you can quickly connect your scanner to the
network using Wi-Fi Protected Setup (WPS).
Note: To check if your router is WPS-enabled, look for a button labeled WPS on your router. If there is
no hardware button, there may be a WPS setting in the software for the device. Check your network
product documentation for details.
Using WPS to Connect to a Network
Using WPS PIN Mode to Connect to a Network
Parent topic: Connecting to an Existing Wi-Fi Network
Using WPS to Connect to a Network
If you have a WPS-enabled wireless router, you can use Wi-Fi Protected Setup (WPS) to connect your
scanner to the network.
1. Follow the instructions on the Start Here sheet to install the scanner software on your computer.
2. Make sure the scanner is turned on.
3. Set the Wi-Fi switch to the Wi-Fi position.
25
Page 26
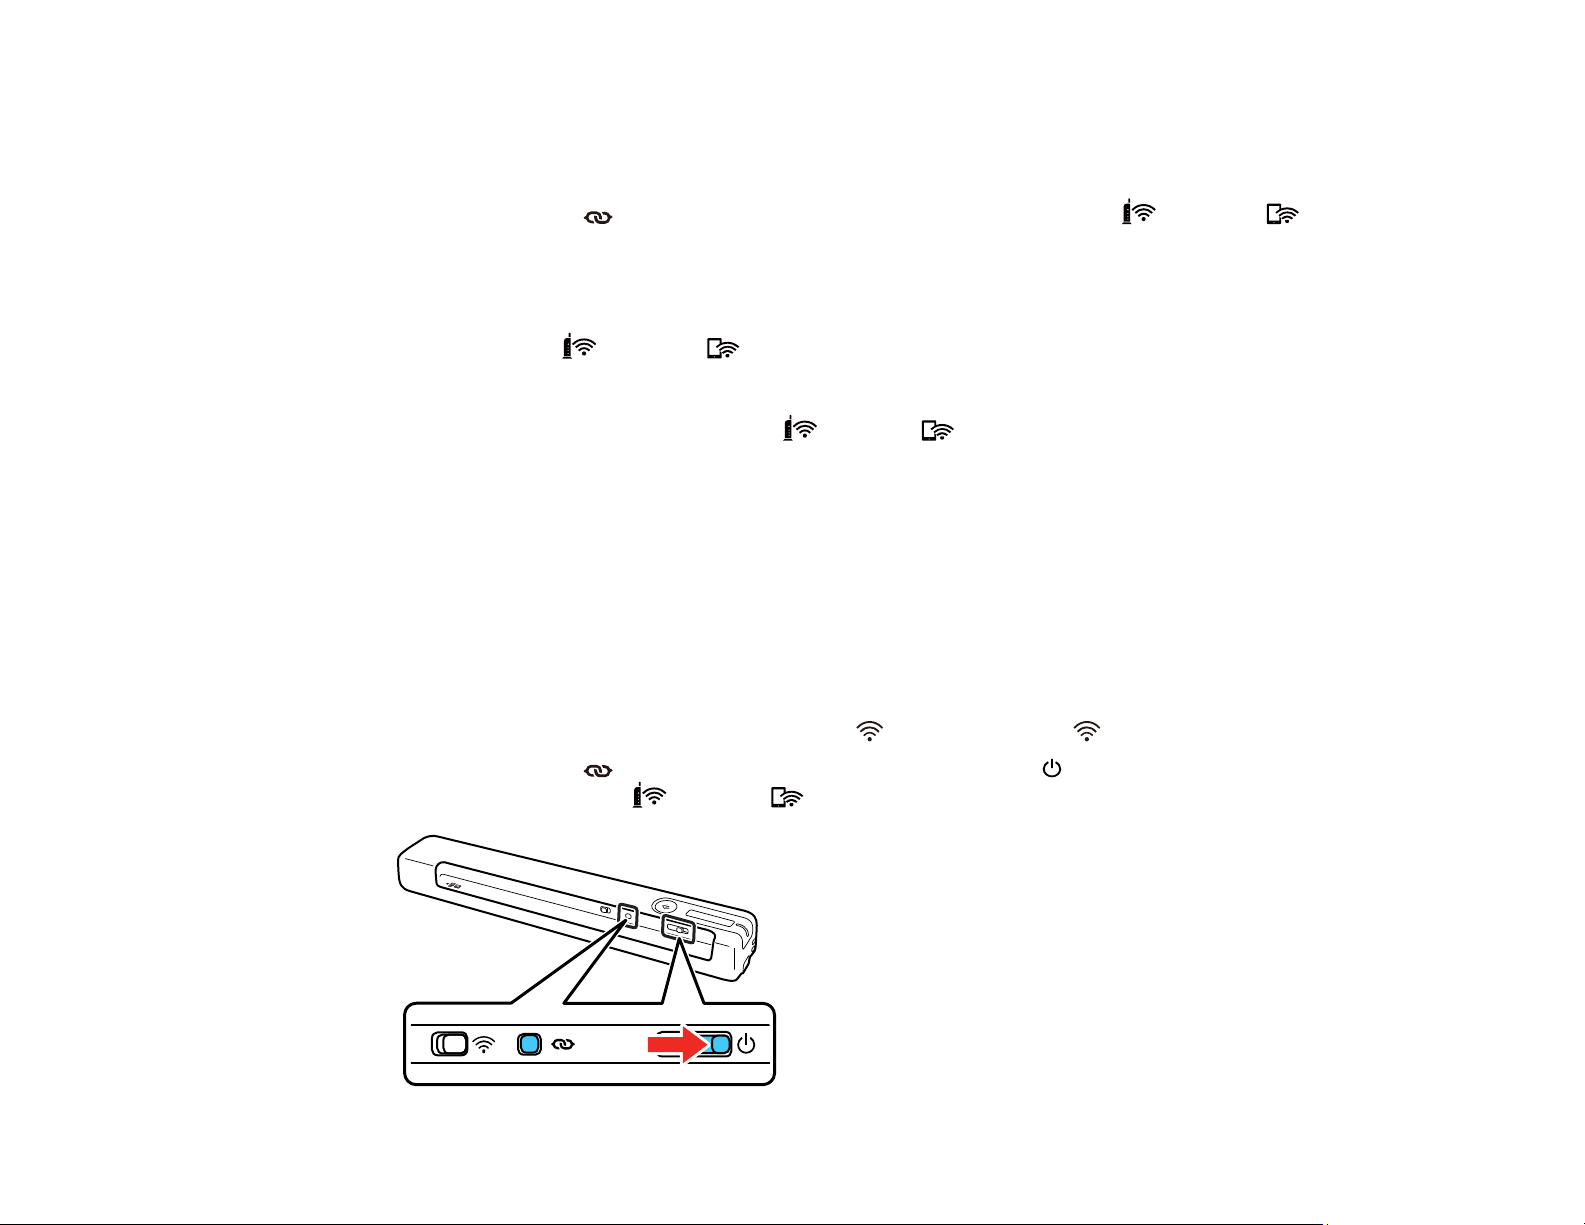
4. Enable WPS on your router by pressing the WPS button or enabling the WPS setting in your router
firmware.
The router enters WPS discovery mode for 2 minutes.
5. Press and hold the Wi-Fi connect button on the scanner until the ready, Wi-Fi, and Wi-Fi
AP lights flash alternately.
Note: If you do not complete this step within 2 minutes, repeat these steps to try again.
When the ready, Wi-Fi, and Wi-Fi AP lights on the scanner stay on, the scanner is
connected to the network.
Note: If the ready light stays on, but the Wi-Fi and Wi-Fi AP lights flash simultaneously,
connection has failed. Restart the scanner and router, move them closer together, and repeat these
steps to try again.
Parent topic: Wi-Fi Protected Setup (WPS)
Using WPS PIN Mode to Connect to a Network
If you have a WPS-enabled wireless router that supports PIN mode, you can use Wi-Fi Protected Setup
(WPS) PIN mode to connect your scanner to the network.
1. Follow the instructions on the Start Here sheet to install the scanner software on your computer.
2. Find the WPS PIN number setting in your router's firmware.
3. Make sure the scanner is turned off and set the Wi-Fi switch to the Wi-Fi position.
4. Press and hold the Wi-Fi connect button and slide and hold the power switch for about ten
seconds until the ready, Wi-Fi and Wi-Fi AP lights flash alternately.
26
Page 27
The scanner enters WPS discovery mode for two minutes.
5. Use your computer to enter the PIN code 01234565 into the WPS PIN number setting in the router
firmware within two minutes.
Note: If you do not enter the code within 2 minutes, repeat the steps to try again.
Connection setup starts when the ready light flashes, and the Wi-Fi and Wi-Fi AP lights flash
alternately. When the ready, Wi-Fi, and Wi-Fi AP lights on the scanner stay on, the scanner
is connected to the network.
Parent topic: Wi-Fi Protected Setup (WPS)
Direct Wi-Fi Mode Setup
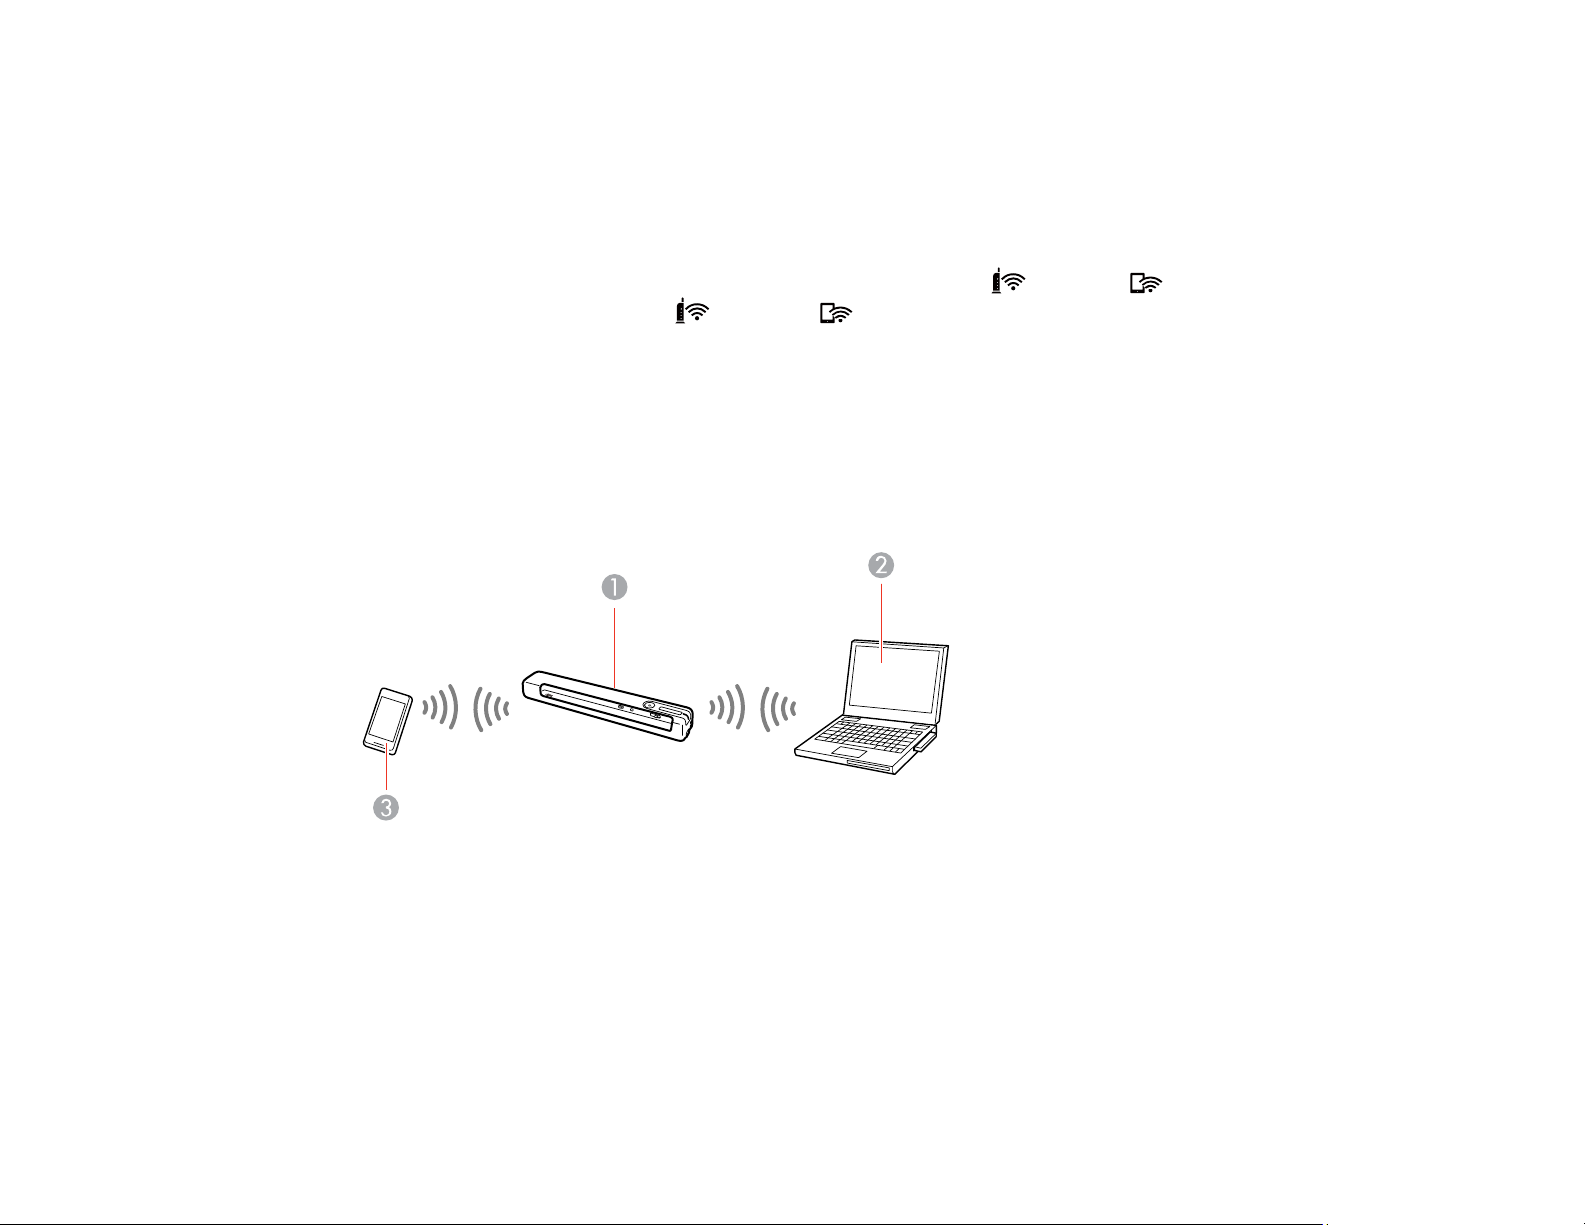
You can set up your scanner to communicate directly with your computer or another device without
requiring a wireless router. If your product is not already connected to a wireless network, it enters
access point mode and the scanner itself acts as the network access point.
1 Epson scanner
2 Computer with a wireless interface
3 Other wireless device
Enabling a Direct Wi-Fi Connection
Disabling Wi-Fi
Restoring Default Network Settings
27
Page 28

Parent topic: Wi-Fi Networking
Enabling a Direct Wi-Fi Connection
You can enable a direct Wi-Fi connection to allow direct communication between your scanner and
computer or other devices without a wireless router.
Note: While you are connected to the scanner, your computer cannot access the internet.
1. Set the Wi-Fi switch on the scanner to the Wi-Fi position.
2. Turn on the scanner.
3. From your computer or device, search for and select the SSID shown on the label on the bottom of
the scanner.
Note: It may take a few minutes for the scanner SSID to appear in the list.
4. Enter the password shown on the label on the bottom of the scanner.
The computer connects to the scanner's wireless network. If the connection is unsuccessful, make
sure you entered the password correctly.
Parent topic: Direct Wi-Fi Mode Setup
Disabling Wi-Fi
You may need to disable your product's Wi-Fi if you need to solve a problem with your network
connection.
Note: Before disabling Wi-Fi, make a note of any network settings selected for Epson DocumentScan.
Set the Wi-Fi switch on the scanner to the off position.
Parent topic: Direct Wi-Fi Mode Setup
Restoring Default Network Settings
If you need to solve a problem with your network connection, you can restore all network settings to their
defaults.
1. Make sure the scanner is turned off.
2. Set the Wi-Fi switch on the scanner to the Wi-Fi position.
28
Page 29
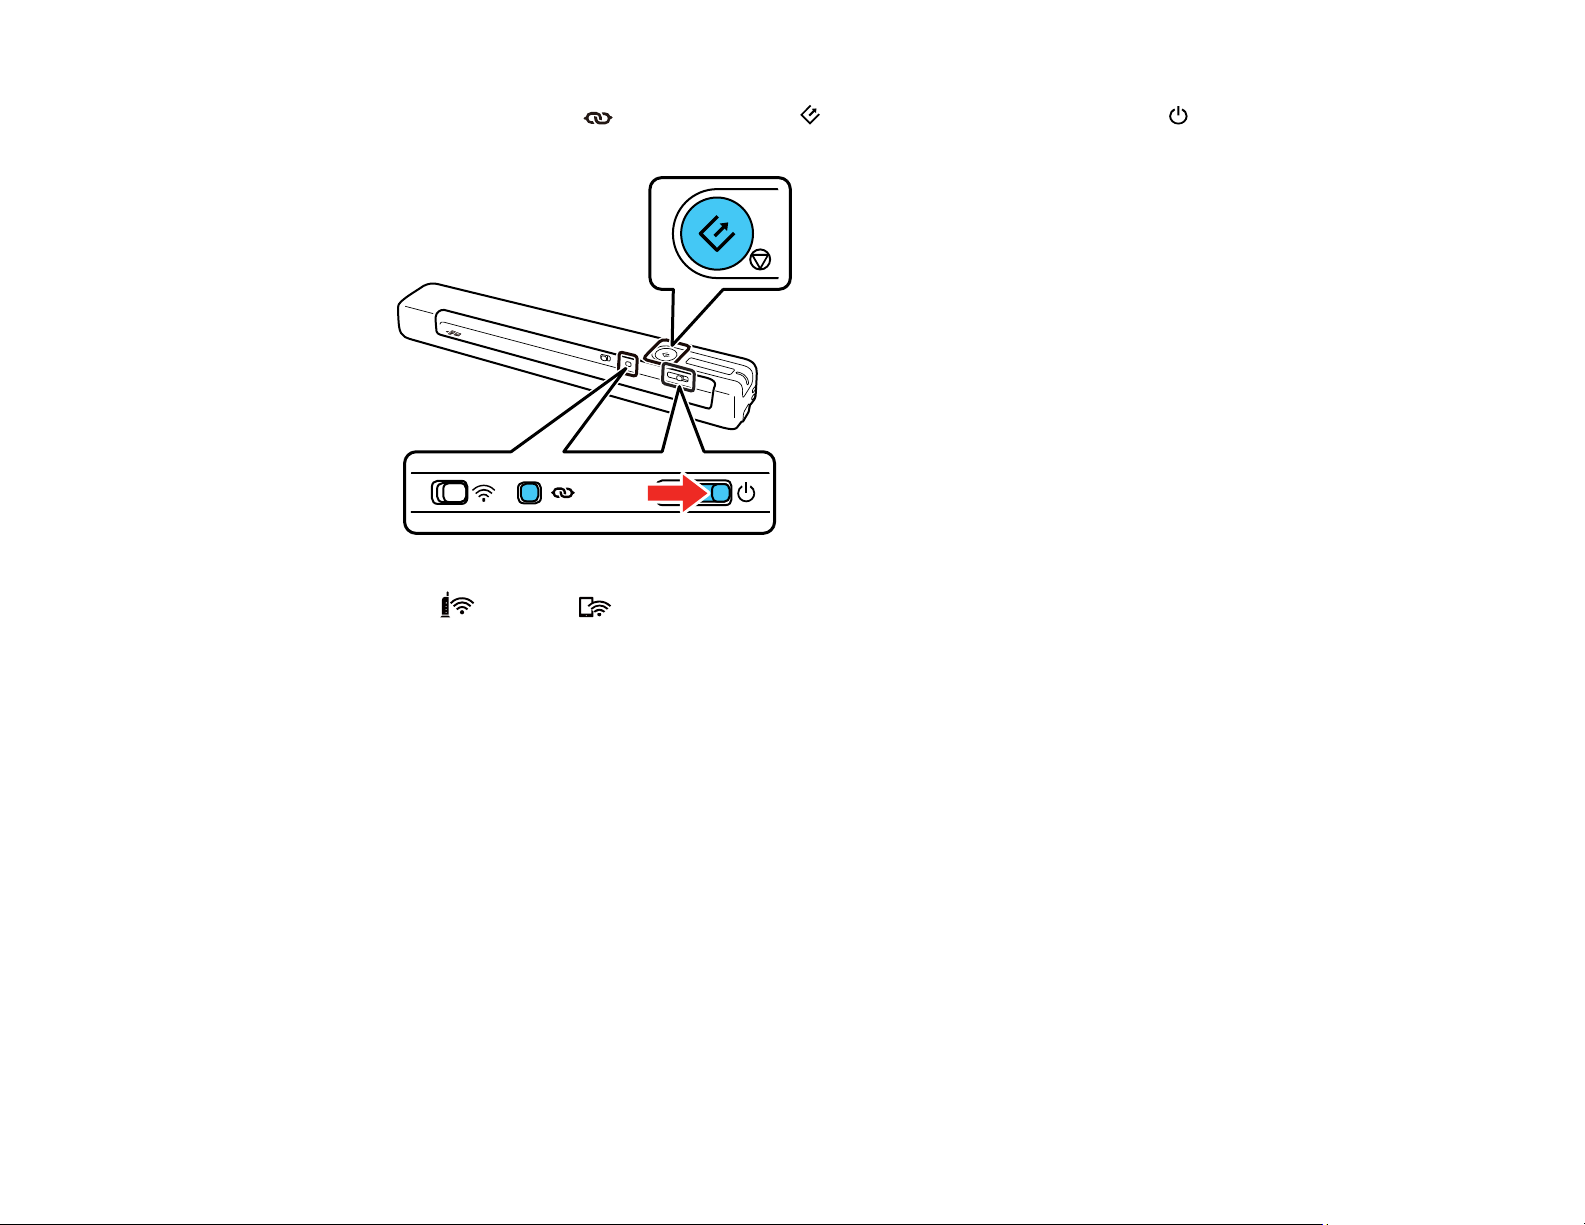
3. Press and hold the Wi-Fi connect and start buttons and slide and hold the power switch for
about ten seconds to turn on the scanner.
The Wi-Fi and Wi-Fi AP lights flash alternately and the ready light flashes. The default
network settings are restored when the lights stop flashing.
Parent topic: Direct Wi-Fi Mode Setup
Epson DocumentScan App for iOS/Android
You can use the Epson DocumentScan app to scan from a network scanner to an iOS or Android device
over a direct Wi-Fi connection (ES-60W/ES-65WR).
For more information about Epson DocumentScan, search for the app on the App Store (iOS) or Google
Play (Android).
Parent topic: Wi-Fi Networking
29
Page 30

Scanning
You can scan your originals and save them as digital files.
Scanning a Document in Epson ScanSmart
Selecting Epson ScanSmart Settings
Scanning Using Receipt Manager
Selecting Receipt Manager Settings
Scan Resolution Guidelines
Scanning a Document in Epson ScanSmart
You can scan and review documents in Epson ScanSmart.
Note: The images show Windows screens; Mac screens may be slightly different.
1. Load your original into the scanner.
2. Start the scan by doing one of the following:
• Press the start button on the scanner. Epson ScanSmart automatically opens on your computer
and the scan job begins.
Note: You can change the scanning button default in the Settings menu.
• Open Epson ScanSmart on your computer. Do one of the following:
• Windows 10: Click > Epson Software > Epson ScanSmart.
• Windows 8.x: Navigate to the Apps screen and select Epson ScanSmart.
• Windows (other versions): Click or Start, and select All Programs or Programs. Select
Epson Software > Epson ScanSmart.
• Mac: Open the Applications folder, open the Epson Software folder, and select Epson
ScanSmart.
30
Page 31

You see a screen like this:
3. Select the scan option.
31
Page 32

The scan job begins and your original feeds through the scanner. When scanning is complete, you
see a screen like this:
4. You can review, edit, or reorder the scanned image(s) as follows:
• Select Scan more to scan more originals.
• Select Delete to delete selected scanned images.
• Select a rotate option to rotate each scanned image.
5. When you are finished reviewing the scanned images, click Next.
32
Page 33

You see a screen like this:
6. Select an option to save, send, or print the scanned images. See the links below.
Saving a Scan
Attaching a Scan to E-mail
Sending a Scan to a Cloud Service
Printing a Scan
Saving a Scan as a Microsoft Office Format File
Parent topic: Scanning
Related tasks
Customizing Action Icons
Loading Originals in the Input Slot
Saving a Scan
You can save a scanned image to your computer as a PDF, searchable PDF, or JPEG file.
1. Make sure your originals are scanned and reviewed. See the link below.
2. In the Select Action window, click Save.
33
Page 34

You see a screen like this:
3. Change the settings as follows:
• The document type and scan date for the file name are automatically detected. You can change
them as necessary.
• You can save the scanned image as a PDF, JPEG, or searchable PDF file. If you select
searchable PDF, you can select the OCR (Optical Character Recognition) language.
• Select the folder on your computer where the document is saved.
4. Click Save.
Parent topic: Scanning a Document in Epson ScanSmart
Attaching a Scan to E-mail
You can attach a scanned image to an e-mail as a PDF or JPEG file attachment.
Note: Your e-mail app and account settings should be configured before scanning.
1. Make sure your originals are scanned and reviewed. See the link below.
2. In the Select Action window, click Attach to Email.
34
Page 35

You see a screen like this:
3. Change the settings as follows:
• The document type and scan date for the file name are automatically detected. You can change
them as necessary.
• You can save the scanned image as a PDF, JPEG, or searchable PDF file. If you select
searchable PDF, you can select the OCR language.
• If you also want to save a copy of the scanned image to your computer, make sure the checkbox
is selected and select the folder on your computer where the document is saved.
4. Click Attach to E-mail.
Your e-mail program opens with the file attached to a new e-mail.
Parent topic: Scanning a Document in Epson ScanSmart
Sending a Scan to a Cloud Service
You can upload scanned images to a cloud service.
1. Make sure your originals are scanned and reviewed. See the link below.
2. In the Select Action window, click one of the cloud service send options.
35
Page 36

You see a screen like this:
3. Log in to your account.
Note: You may need to allow Epson ScanSmart access to your account. The first time you log in,
you may be prompted to enter an authentication code.
4. Change the settings as follows:
• Select the folder in your account where you want to send the document.
• The document type and scan date for the file name are automatically detected. You can change
• You can save the scanned image as a PDF, JPEG, or searchable PDF file. If you select
• If you also want to save a copy of the scanned image to your computer, click the checkbox.
5. Click Send.
Parent topic: Scanning a Document in Epson ScanSmart
Printing a Scan
You can print your scanned image and save the scanned file to your computer.
them as necessary.
searchable PDF, you can select the OCR language.
36
Page 37

Note: Printing scanned images is available only with Epson printers.
1. Make sure your originals are scanned and reviewed. See the link below.
2. In the Select Action window, click Print.
You see a screen like this:
3. Change the settings as follows:
• Select the Epson printer and change the print settings, if necessary.
• Select the number of copies you want to print.
• If you also want to save a copy of the scanned image to your computer, click the checkbox.
• The document type and scan date for the file name are automatically detected. You can change
them as necessary.
• You can save the scanned image as a PDF, JPEG, or searchable PDF file. If you select
searchable PDF, you can select the OCR language.
• Select the folder on your computer where the document is saved.
4. Click Print.
Parent topic: Scanning a Document in Epson ScanSmart
37
Page 38

Saving a Scan as a Microsoft Office Format File
You can save your scans in one of the following editable Microsoft Office file formats: Microsoft Word
(.docx), Microsoft Excel (.xlsx), or Microsoft PowerPoint (.pptx).
Note: The Save to PowerPoint option is only available for Windows.
1. Make sure your originals are scanned and reviewed. See the link below.
2. In the Select Action window, click one of the save to options.
Note: A first-time prompt may appear asking you to download a Microsoft Office plug-in. Click Yes
and follow any on-screen instructions.
You see a screen like this:
3. Change the settings as follows:
• The document type and scan date for the file name are automatically detected. You can change
them as necessary.
• Select the OCR language (the default is English).
• Select the folder on your computer where you want to save the document.
38
Page 39

4. Click Save.
Parent topic: Scanning a Document in Epson ScanSmart
Selecting Epson ScanSmart Settings
After starting Epson ScanSmart, you can change various scanning settings.
Changing the Scanner
Changing the Scan Settings
Changing the File Name Settings
Changing the Save Settings
Save Settings
Customizing Action Icons
Parent topic: Scanning
Changing the Scanner
If you are using more than one scanner, you can change the scanner that you are using with your
computer.
Note: A scanner connected to your computer via USB takes priority over a scanner with a Wi-Fi
connection.
1. Click the Settings button.
39
Page 40

You see a screen like this:
2. On the Scanner Settings tab, click Change.
You see a screen like this:
40
Page 41

3. Select the scanner you want to use with your computer and click OK.
Parent topic: Selecting Epson ScanSmart Settings
Changing the Scan Settings
You can change detailed scan settings such as the resolution, document size, and more.
1. Click the Settings button.
You see a screen like this:
2. On the Scanner Settings tab, click Scan Settings.
41
Page 42

You see a screen like this:
3. Change the settings as necessary and click Save.
Parent topic: Selecting Epson ScanSmart Settings
42
Page 43

Changing the File Name Settings
You can change the default file naming method for your scans.
1. Click the Settings button.
You see a screen like this:
2. Click the File Name Settings tab.
43
Page 44

You see a screen like this:
3. Change the settings as necessary:
• Make sure the Automatic file naming checkbox is selected if you want OCR to automatically
detect the subject and date and add them to the file name. You can enter a file name that will be
used if OCR cannot detect the subject.
• Select the OCR language.
• Select the date format.
4. Click Close.
Parent topic: Selecting Epson ScanSmart Settings
Changing the Save Settings
You can change the file type options for saving your scans.
1. Click the Settings button.
44
Page 45

You see a screen like this:
2. Click the Save Settings tab.
45
Page 46

You see a screen like this:
3. Click Options for PDF or JPEG and change the settings as necessary.
4. Click Close.
Parent topic: Selecting Epson ScanSmart Settings
Save Settings
You can change the settings for how scanned images are saved as PDFs or JPEGs.
PDF Options
Setting Options Description
General Generate PDF/A File Creates a PDF that conforms to
PDF/A-1 standards
Create file with all pages Saves all pages as one file
Compression Level Selects the compression level for color
or grayscale images
46
Page 47

Setting Options Description
Security Open File Password Sets a password to open the file
Protect Property Settings Sets a password to protect file
properties and allows for restrictions on
file editing and printing
JPEG Options
Setting Options Description
Image Quality Options — Sets a compression level by moving a
slider or entering a value. File size
increases when high resolution is
selected.
Encoding (Windows only) Standard Images load from top to bottom in a
web browser. It takes longer to load the
entire image.
Progressive Images first load completely at low
resolution and then adjust to high
resolution in a web browser
Embed ICC Profile (Windows
only)
Parent topic: Selecting Epson ScanSmart Settings
Customizing Action Icons
You can customize how the scan action icons are displayed on the Select Action window.
Note: You can also customize them by clicking the Customize icon on the Select Action screen.
1. Click the Settings button.
— Allows you to add ICC profiles to the
image
47
Page 48

You see a screen like this:
2. Click the Customize Actions tab.
48
Page 49

You see a screen like this:
3. Choose which action icons to display by selecting or deselecting each checkbox. Click the arrow
icons to move the icons up or down in the display order you want.
4. Click Close.
Parent topic: Selecting Epson ScanSmart Settings
Scanning Using Receipt Manager
Receipt Manager software for Epson ScanSmart is included with ES-55R and ES-65WR models, and is
available as an upgrade for ES-50 and ES-60W models. See these sections to activate Receipt Manager
software (ES-50/ES-60W) and start scanning receipts.
Starting a Free Trial (ES-50/ES-60W)
Activating Receipt Manager (ES-50/ES-60W)
Scanning Receipts and Using Receipt Manager
Parent topic: Scanning
Starting a Free Trial (ES-50/ES-60W)
You can start a 30-day free trial of Receipt Manager.
49
Page 50

1. Do one of the following to start your free trial:
• Click the Manage Receipts icon on the main Epson ScanSmart screen.
50
Page 51

• Click the Manage Receipts icon on the Select Action screen.
51
Page 52

2. Select Start Trial.
Note: If you are ready to purchase a license key now, click Purchase License Key. The Epson
support page opens in your web browser. When you receive the license key, click Enter License
Key and enter it on the screen that appears, then click Activate. You can also click the link below for
instructions on activating Receipt Manager from the Settings menu.
52
Page 53

3. Make sure the scanner and serial number listed match your product and click OK.
4. Receipt Manager opens and you can begin using its features.
53
Page 54

When the 30-day trial expires, you can purchase a license key to continue using Receipt Manager
features.
Hiding the Receipt Manager Trial Icons
Parent topic: Scanning Using Receipt Manager
Hiding the Receipt Manager Trial Icons
You can hide the Receipt Manager trial icons from the Epson ScanSmart screens.
1. Click the Settings button in Epson ScanSmart.
You see a screen like this:
2. Click the Other Settings tab.
54
Page 55

You see a screen like this:
3. Click the Display Try Receipt Manager icon toggle button to hide or display the trial icon on the
main Epson ScanSmart screen.
Note: You can also hide or display the trial icon from the Select Action screen on the Customize
Actions tab.
4. Click Close.
Parent topic: Starting a Free Trial (ES-50/ES-60W)
Activating Receipt Manager (ES-50/ES-60W)
You can purchase a license key to activate Receipt Manager.
Note: The license key can only activate one scanner.
1. Click the Settings button.
55
Page 56

You see a screen like this:
2. Click the License Management tab.
56
Page 57

You see a screen like this:
3. To purchase a new license key, click Purchase License Key.
The Epson support page opens in your web browser where you can purchase the license key. If you
already have a license key, go to step 4.
4. Make sure the scanner you want to activate the license key for is displayed at the top of the screen.
Click Change if you want to select a different scanner.
5. Click Enter License Key.
57
Page 58

You see a screen like this:
6. Enter the license key you purchased and click Activate.
7. Click Yes on the next screen (Windows only).
8. When you see a message indicating that activation was successful, click OK.
The activated scanner and license key appear in the License Management List.
58
Page 59

Parent topic: Scanning Using Receipt Manager
Scanning Receipts and Using Receipt Manager
You can scan receipts and manage the data in Receipt Manager.
1. Load your original receipts into the scanner.
2. Press the start button on the scanner.
Epson ScanSmart automatically opens on your computer and the scan job begins. The receipts feed
through the scanner. When scanning is complete, you see a screen like this:
3. You can review or reorder the scanned images as follows:
• Select Scan more to scan more receipts.
• Select Delete to delete selected scanned images.
• Select a rotate option to rotate scanned images.
4. When you are finished reviewing the scanned images, click Next.
59
Page 60

You see a screen like this:
5. Click Manage Receipts.
You see a screen like this:
60
Page 61

Note: You can also click Manage Receipts from the main Epson ScanSmart screen to begin
scanning receipts.
Note: If you are using the trial version of Receipt Manager, you must click Continue Trial each time
you click Manage Receipts.
6. In the Edit window, review the receipt data against the scanned image and make sure it is correct.
You can also choose the following options:
• Select Scan & Add to scan more receipts.
• Select Delete to delete selected scanned images. Make sure the blue checkbox in the receipt list
is selected for the receipts you want to delete.
• Select Combine to combine receipt data. Make sure the blue checkboxes in the receipt list are
selected for the receipts you want to combine.
Note: You cannot separate receipts once they are combined. You must delete and re-scan them if
you need to separate them.
• Select Duplicate to duplicate receipts. You can only duplicate one receipt at a time. Make sure
the receipt you want to duplicate is selected.
• Select Repeat OCR and select a language if the data fields were not populated.
Note: Some fields may need to be entered manually.
7. When you are finished reviewing the data for the first receipt, click Mark Reviewed.
The next receipt appears and you can review the data. Repeat for each receipt.
Note: Make sure the blue checkboxes in the receipt list are selected for the receipts you want to
export or save.
8. When you have finished reviewing data for all receipts, click Export and Save.
61
Page 62

You see a screen like this:
9. Select an option. See the links below.
Exporting Receipts to QuickBooks Online
Exporting Receipts to QuickBooks Desktop
Saving or Exporting Receipts to Quicken
Saving Receipt Data as a TurboTax File
Saving Receipt Data as a CSV File
Scanning Receipts as an Image File
Parent topic: Scanning Using Receipt Manager
Related references
Characters are not Recognized During Conversion to Editable Text (OCR)
Exporting Receipts to QuickBooks Online
You can export receipt data to QuickBooks Online.
Note: Make sure you have a current QuickBooks account and your login information is available.
1. Make sure your receipts are scanned and reviewed. See the link below.
62
Page 63

2. In the Export and Save window, click QuickBooks Online.
The QuickBooks window appears.
3. Enter your QuickBooks login information. Follow the on-screen instructions to continue.
Parent topic: Scanning Receipts and Using Receipt Manager
Exporting Receipts to QuickBooks Desktop
You can export receipt data to QuickBooks Desktop (Windows only).
Note: Make sure the QuickBooks Desktop software is installed and opened on your computer.
1. Make sure your receipts are scanned and reviewed. See the link below.
2. In the Export and Save window, click QuickBooks Desktop.
You see a screen like this:
3. Click Browse and select the QBW company file that you want to export the data to.
Note: The QBW company file must already be created.
The scanned receipt data is exported.
Parent topic: Scanning Receipts and Using Receipt Manager
Saving or Exporting Receipts to Quicken
You can save receipt data as a QIF file or export it for use in Quicken.
63
Page 64

1. Make sure your receipts are scanned and reviewed. See the link below.
2. In the Export and Save window, click Quicken File.
You see a screen like this:
3. Do one of the following:
• Select Cash transaction and click Continue to save the receipt data as a QIF file.
• Select Select the Quicken account and click Continue to export the receipt data to a QIF file
previously saved on your computer.
The scanned receipt data is saved or exported.
Parent topic: Scanning Receipts and Using Receipt Manager
Saving Receipt Data as a TurboTax File
You can save receipt data as a TurboTax file.
1. Make sure your receipts are scanned and reviewed. See the link below.
Note: The tax category needs to be selected for each receipt to be recognized by TurboTax.
2. In the Export and Save window, click TurboTax File.
3. Save the file as a TXF file to your computer.
64
Page 65

Parent topic: Scanning Receipts and Using Receipt Manager
Saving Receipt Data as a CSV File
You can save receipt data as a CSV file to use in a spreadsheet program such as Microsoft®Excel®.
1. Make sure your receipts are scanned and reviewed. See the link below.
2. In the Export and Save window, click CSV File.
3. Choose the folder on your computer where you want to save the CSV file.
Parent topic: Scanning Receipts and Using Receipt Manager
Scanning Receipts as an Image File
You can save scanned receipts as an image file.
1. Make sure your receipts are scanned and reviewed. See the link below.
2. In the Export and Save window, click Image File.
You see a screen like this:
3. Review the file naming fields, select the file type (JPEG or PDF), select the destination folder, and
click Save.
Parent topic: Scanning Receipts and Using Receipt Manager
65
Page 66

Selecting Receipt Manager Settings
Receipt Manager software for Epson ScanSmart is included with ES-55R and ES-65WR models, and is
available as an upgrade for ES-50 and ES-60W models. After starting Receipt Manager, you can export
or import the receipt database and change various settings.
Exporting or Importing the Receipt Database
Changing Column Settings
Changing Currency and Language Settings
Importing Categories from QuickBooks Desktop or Quicken
Parent topic: Scanning
Exporting or Importing the Receipt Database
You can export or import the receipt database. This is useful if you change computers.
Note: Make sure each computer has the same version of Epson ScanSmart installed.
1. Click the Settings button in Receipt Manager.
You see a screen like this:
66
Page 67

2. Choose one of these options:
• Click Export to export the receipt database. A file is created that can be saved to a folder on your
computer.
• Click Import to import the receipt database. Choose the file that was created when you exported
the database. The current database is overwritten.
3. Click Close.
Parent topic: Selecting Receipt Manager Settings
Related tasks
Scanning Receipts and Using Receipt Manager
Changing Column Settings
You can choose which columns are displayed in the receipt list.
1. Click the Settings button in Receipt Manager.
You see a screen like this:
2. Click the Column Settings tab.
67
Page 68

You see a screen like this:
3. Choose which columns to display by selecting or deselecting each checkbox. Click the arrow icons
to move the items up or down in the display order you want.
4. Click Close.
Parent topic: Selecting Receipt Manager Settings
Related tasks
Scanning Receipts and Using Receipt Manager
Changing Currency and Language Settings
You can change the currency and OCR language for data in Receipt Manager.
1. Click the Settings button in Receipt Manager.
68
Page 69

You see a screen like this:
2. Click the Currency and Language tab.
69
Page 70

You see a screen like this:
3. Select a currency type and OCR language.
4. Click Close.
Parent topic: Selecting Receipt Manager Settings
Related tasks
Scanning Receipts and Using Receipt Manager
Importing Categories from QuickBooks Desktop or Quicken
You can import categories from QuickBooks Desktop or Quicken to use in Receipt Manager.
1. Click the Settings button in Receipt Manager.
70
Page 71

You see a screen like this:
2. Click the Classification Settings tab.
71
Page 72

You see a screen like this:
3. Click Import for one of the options and follow the on-screen instructions.
4. After categories are imported, select the categories you want to display in the Receipt Manager Edit
window from the Classification List and click Close.
Parent topic: Selecting Receipt Manager Settings
Scan Resolution Guidelines
The resolution setting in your scanning software, measured in dpi (dots per inch), controls the amount of
detail captured in your scans. Increasing the resolution raises the amount of detail captured but comes
with the following disadvantages:
• Larger file sizes
• It takes longer to scan your originals, send/receive your scans by email or fax, and to print your scans
• The image may become too large to fit on your display or print on paper
If you plan to enlarge a scanned image so you can print it at a larger size, you may need to increase the
resolution from the default resolution set by the software. Follow these guidelines to determine the
resolution setting you need:
• You will scan the image at its original size but enlarge it later in an image-editing program.
72
Page 73

Increase the resolution setting in your scanning software. Increase the resolution by the same amount
you will increase the image size to retain a high image quality. For example, if the resolution is 300 dpi
(dots per inch) and you will double the image size later, change the resolution setting to 600 dpi.
• You will scan the image at 100% or smaller size.
Select the resolution setting based on how you will use the scanned image:
• Email/view on a computer screen/post on the web: 96 to 200 dpi
• Print/fax/convert to editable text (OCR)/create searchable PDF: 200 to 300 dpi
Parent topic: Scanning
73
Page 74

Cleaning and Transporting Your Scanner
See these sections if you need to clean or transport your scanner.
Cleaning Your Scanner
Cleaning Inside Your Scanner
Calibrating Your Scanner
Transporting Your Scanner
Cleaning Your Scanner
To keep your product working at its best, you should clean it several times a year.
Caution: Do not use a hard brush, alcohol, or paint thinner to clean the product or you may damage it.
Do not use oil or other lubricants inside the product or let water get inside it. Do not open the product's
outer case.
1. Turn off the scanner (ES-60W/ES-65WR).
2. Disconnect the USB cable, if connected.
3. Clean the outer case with a soft, dry cloth. Do not use liquid or chemical cleansers.
Note: If the outer case still requires additional cleaning, use a slightly damp cloth to wipe the outer
case. Then wipe the case with a soft, dry cloth.
Parent topic: Cleaning and Transporting Your Scanner
Cleaning Inside Your Scanner
Clean your scanner regularly using the dry cleaning sheet that came with your scanner. Dust on the
scanning surface can cause spots or lines in your scanned images. If spots or lines remain, a wet
cleaning sheet is available as part of the optional maintenance sheet kit (part number B12B819481).
Note: The illustration shows the ES-50/ES-55R, but the steps are the same for the ES-60W/ES-65WR.
Caution: Use the dry or wet cleaning sheets to clean your scanner. Do not disassemble your product
and do not use a hard brush, alcohol, or paint thinner to clean the product or you may damage it. Do not
use oil or other lubricants inside the product or let water get inside it.
74
Page 75

You can purchase genuine Epson accessories at epson.com (U.S. sales), epson.ca (Canadian sales), or
epson.com.jm (Caribbean sales). You can also purchase accessories from an Epson authorized reseller.
To find the nearest one, call 800-GO-EPSON (800-463-7766) in the U.S. or 800-807-7766 in Canada.
1. Turn on the scanner and make sure it is connected to the computer.
2. Load the dry cleaning sheet into the scanner.
3. Do one of the following to start the Epson Scan 2 Utility:
• Windows 10: Click > EPSON > Epson Scan 2 Utility
• Windows 8.x: Navigate to the Apps screen and select Epson Scan 2 Utility.
• Windows (other versions): Click or Start > All Programs or Programs > EPSON > Epson
Scan 2 > Epson Scan 2 Utility.
• Mac: Open the Applications folder, click Epson Software, and click Epson Scan 2 Utility.
4. Click Maintenance.
5. Click Cleaning.
Note: Cleaning does not start if the battery level is low (ES-60W/ES-65WR).
The scanner feeds and ejects the cleaning sheet. Cleaning takes about 30 seconds.
6. If spots or lines remain, repeat these steps to clean it again.
Note: You can use the same dry cleaning sheet multiple times.
75
Page 76

7. If the scanner is not clean after multiple cleanings with the dry cleaning sheet, repeat these steps
using the wet cleaning sheet from the optional maintenance sheet kit.
Note: You can use the wet cleaning sheet only once. If the scanner is still not clean after using the
wet cleaning sheet, contact Epson for support.
Parent topic: Cleaning and Transporting Your Scanner
Related references
User Replaceable Epson Scanner Accessories
Calibrating Your Scanner
If you notice any of the following image quality problems, you can calibrate the scanner using the
calibration sheet that came with it:
• Scanned images are blurry.
• Scanned colors differ from the colors in the original.
• Scanned images are darker or lighter than the original.
• Scanned images contain vertical lines.
Note: The illustration shows the ES-50/ES-55R, but the steps are the same for the ES-60W/ES-65WR.
1. Turn on the scanner and make sure it is connected to the computer.
Note: Make sure the scanner battery is not low or calibration will not start (ES-60W/ES-65WR).
2. Load the calibration sheet into the scanner with the arrows at the trailing edge of the sheet pointing
into the input slot.
76
Page 77

3. Do one of the following to start the Epson Scan 2 Utility:
• Windows 10: Click > EPSON > Epson Scan 2 Utility.
• Windows 8.x: Navigate to the Apps screen and select Epson Scan 2 Utility.
• Windows (other versions): Click or Start > All Programs or Programs > EPSON > Epson
Scan 2 > Epson Scan 2 Utility.
• Mac: Open the Applications folder, click Epson Software, and click Epson Scan 2 Utility.
4. Click Maintenance.
5. Click Calibration.
The scanner feeds and ejects the calibration sheet. Calibration takes about 20 seconds.
Note: You can use the calibration sheet multiple times. If calibrating the scanner does not improve
the image quality, contact Epson for support.
Parent topic: Cleaning and Transporting Your Scanner
Transporting Your Scanner
If you need to ship your product, transport it a long distance, or store it for an extended period, prepare it
for transportation as described here.
1. Turn off the scanner (ES-60W /ES-65WR).
2. Disconnect the USB cable, if connected.
3. Place the scanner in its original packing materials, if possible, or use equivalent materials with
cushioning around the product.
Caution: Strong impacts may damage the scanner. Do not expose the scanner to direct sunlight or
leave it near heaters or in locations subject to high temperatures. Heat may cause the body to
deform.
Note: If you are taking the scanner with you on a flight, first confirm with the airline if you can take
the scanner on the airplane. We recommend you take the scanner in your carry-on luggage as the
scanner can be damaged by a strong impact depending on how your checked luggage is handled at
the airport.
Parent topic: Cleaning and Transporting Your Scanner
77
Page 78

Solving Problems
Check these sections for solutions to problems you may have using your product.
Scanner Light Status
Solving Scanning Problems
Solving Network Scanning Problems
Solving Scanned Image Quality Problems
Solving Receipt Manager Problems
Uninstall Your Scanner Software
Where to Get Help
Scanner Light Status
You can often diagnose problems with your scanner by checking its lights.
ES-50/ES-55R
1 Ready light
78
Page 79

Light status Condition/solution
The ready light is orange Check the following:
• Make sure there are no originals jammed in the scanner.
• Make sure the scanner is connected to your computer securely.
• If a firmware update fails and the scanner enters recovery mode,
update the firmware again using a USB connection.
• Disconnect and re-connect the USB cable to the computer. If this
does not solve the problem, the scanner may be malfunctioning or
the light source in the scanner unit may need to be replaced. Contact
Epson for support.
ES-60W/ES-65WR
1
2
3
Wi-Fi light
Wi-Fi AP light
battery light
4 Error status light
5 Ready light
79
Page 80

Light status Condition/solution
The error status light shows
the letter J and the ready light
is orange
The error status light shows
the letter F and the ready light
is orange
The error status light shows
the letter U and the ready light
is orange
The error status light shows
the letter P and the ready light
is orange
A paper jam has occurred. Remove and reload the original.
One of the following has occurred:
• A fatal error has occurred. Turn the scanner off and on again. If the
error continues, contact Epson for support.
• The battery cannot be fully charged even if you are charging the
battery within the guaranteed charging temperature range. It may be
damaged or has reached the end of its service life. Contact Epson for
support.
The firmware update has failed.
• Connect the computer and the scanner with a USB cable (during
recovery mode, you cannot update the firmware over a network
connection)
• Contact Epson for instructions on updating the firmware again.
The scanner has started in recovery mode.
• Connect the computer and the scanner with a USB cable (during
recovery mode, you cannot update the firmware over a network
connection)
• Contact Epson for instructions on updating the firmware again.
The error status light shows
the letter H, and all other
lights are on
The error status light shows
the letter C, and all other
lights are on
The Wi-Fi and Wi-Fi
AP lights flash simultaneously
The battery stopped charging because it became too hot. Charge the
battery within an ambient temperature range of 46 to 95 °F (8 to 35 °C).
The battery stopped charging because it became too cold. Charge the
battery within an ambient temperature range of 46 to 95 °F (8 to 35 °C).
An access point settings error has occurred. Restart the scanner and
router, move them closer together, and connect to the network again.
80
Page 81

Light status Condition/solution
The error status light shows
three horizontal lines and the
Wi-Fi and Wi-Fi AP
lights flash simultaneously.
Parent topic: Solving Problems
Related references
Original Jams in Scanner
Where to Get Help
Related tasks
Loading Originals in the Input Slot
Charging the Battery (ES-60W/ES-65WR)
Related topics
Scanning
Wi-Fi Networking
Epson ScanSmart did not launch after pressing the scanner's start
button while connected over a network.
• Check the Wi-Fi connection. Try turning the wireless router off and on
again.
• Make sure the correct scanner is selected in Epson ScanSmart.
• Make sure another computer is not connected to the scanner using a
USB cable. A USB connection takes priority over a Wi-Fi connection.
If another computer is connected by USB, disconnect it.
• If you are using a Mac computer, make sure you select the network
that has priority on it.
Solving Scanning Problems
Check these solutions if you have problems scanning with your product.
Scanner Does Not Turn On or Off or Turns Off Unexpectedly
Scanner Button Does Not Start Scanning
Scanning Software Does Not Operate Correctly
Original Feeds Incorrectly in Scanner
Original Jams in Scanner
Scanning is Slow
Cannot Send Scans to a Cloud Service
81
Page 82

Parent topic: Solving Problems
Scanner Does Not Turn On or Off or Turns Off Unexpectedly
If the scanner does not turn on or off or if it turns off unexpectedly, try these solutions:
• Wait a second after connecting the USB cable. It may take a few seconds until the scanner turns on.
• If the scanner turns off unexpectedly, you may need to adjust the Power Save settings.
• Use the scanner within the operating temperature range. The scanner may turn off suddenly under low
or high temperatures.
• Use the USB cable that came with the scanner.
• Make sure the USB cable is securely connected to the scanner and the computer.
• Connect the scanner directly to the computer. The scanner may not work properly when connected
through a USB hub.
• If the scanner is running on the battery under temperatures that are too low or too high, the scanner
will not turn on. Use the scanner within the operating temperature range (ES-60W/ES-65WR).
• Make sure the battery has enough power (ES-60W/ES-65WR).
• Make sure the Wi-Fi switch is in the Wi-Fi position or connect to the computer using the USB
cable. Otherwise, the scanner may turn off (ES-60W/ES-65WR).
• If the scanner does not turn off when running on the battery, disconnect the USB cable and press the
reset button on the bottom of the scanner (ES-60W/ES-65WR).
Parent topic: Solving Scanning Problems
Related tasks
Changing the Power Save Settings
82
Page 83

Charging the Battery (ES-60W/ES-65WR)
Scanner Button Does Not Start Scanning
If pressing the start button on your scanner does not start a scan, try these solutions:
• Restart your computer.
• Make sure your scanner is turned on and any interface cables are securely connected at both ends.
• If you are connecting your scanner over a network, make sure the Wi-Fi connection is working
correctly. Try turning the wireless router off and on again, and make sure the router cable is securely
connected.
• If you are connecting your scanner via USB, use only the USB cable that came with the scanner.
Make sure it is connected directly to your computer and not to a USB hub.
• For Wi-Fi scanning, confirm that your scanner is paired with your computer. In Epson ScanSmart, click
Settings > Scanner Settings > Change and select the scanner you want to use.
• Make sure your scanner is not connected to another computer via USB. A USB connection takes
priority over a Wi-Fi connection.
• Make sure Epson ScanSmart and Epson Scan 2 are installed correctly. Reinstall the software, if
necessary.
Parent topic: Solving Scanning Problems
Related references
Scanner Light Status
Related tasks
Customizing Action Icons
Scanning Software Does Not Operate Correctly
If your scanning software does not operate correctly, try these solutions:
• Make sure your computer has adequate memory and meets the system requirements for your
operating system.
• Make sure your computer is not running in a power-saving mode, such as sleep or standby. If so,
wake your system and restart your scanning software.
• Make sure the scanner is turned on.
• Make sure the connection between the scanner and your computer is secure.
• If you upgraded your operating system but did not reinstall your scanning software, try reinstalling it.
83
Page 84

• In Windows, be sure that the scanner is listed under Imaging Devices in the Device Manager.
• Make sure the scanning software is installed.
• Use the USB cable that came with the scanner.
• Connect the scanner directly to the computer. The scanner may not work properly when connected
through a USB hub.
• If you are using a TWAIN-compliant program, make sure that the correct product is selected as the
Scanner or Source setting.
• Check that the Wi-Fi connection is working correctly. Try turning the wireless router off and on (ES60W/ES-65WR).
• Make sure another computer is not connected to the scanner using a USB cable. A USB connection
takes priority over a Wi-Fi connection. If another computer is connected by USB, disconnect it.
• If you are using a Mac computer, make sure you select the network that has priority on it.
Parent topic: Solving Scanning Problems
Related references
Windows System Requirements
Mac System Requirements
Related tasks
Uninstalling Scanner Software - Windows
Uninstalling Scanner Software - Mac
Original Feeds Incorrectly in Scanner
If you have problems feeding originals in your scanner, try these solutions:
• Load only an original that meets the specifications for your scanner.
• Clean inside the scanner using a cleaning sheet.
Parent topic: Solving Scanning Problems
Related references
Original Document Specifications
Receipt Specifications
Special Original Specifications
Plastic Card Specifications
84
Page 85

Related tasks
Loading Originals in the Input Slot
Cleaning Inside Your Scanner
Original Jams in Scanner
If an original has jammed inside the scanner, follow these steps:
1. Gently pull out the jammed original in the direction that offers the least resistance.
Note: If paper gets stuck in the roller and remains inside the scanner, carefully remove it with a pair of
tweezers in the direction of the output slot. If you cannot remove it, contact Epson for support.
2. Carefully follow all loading instructions when you reload your original.
Parent topic: Solving Scanning Problems
Related references
Original Document Specifications
Receipt Specifications
Special Original Specifications
Plastic Card Specifications
Where to Get Help
85
Page 86

Related tasks
Loading Originals in the Input Slot
Cleaning Inside Your Scanner
Scanning is Slow
If scanning becomes slow, try these solutions:
• Scan your original at a lower resolution, if possible.
• Make sure your system meets the requirements for your operating system. If you are scanning a highresolution image, you may need more than the minimum requirements. If necessary, increase your
system's memory or reduce the resolution.
• If you are scanning over a wireless network, factors such as interference, network traffic, or weak
signal strength may affect your scanning speed (ES-60W/ES-65WR).
• Computers with USB 2.0 (Hi-Speed) ports can scan faster than those with USB 1.1 ports. If you are
using a USB 2.0 port with the scanner, make sure it meets the system requirements.
• Scanning may take longer if the battery is low. Charge the battery from a computer with a USB
connection (ES-60W/ES-65WR).
Parent topic: Solving Scanning Problems
Related references
Windows System Requirements
Mac System Requirements
Cannot Send Scans to a Cloud Service
If you cannot send a scan to a cloud service, try these solutions:
• Make sure the login information you entered for the cloud service is correct.
• Make sure the cloud service is not down for system maintenance. Check the cloud service website for
more information.
Parent topic: Solving Scanning Problems
Solving Network Scanning Problems
Check these solutions if you have problems scanning over a network (ES-60W/ES-65WR).
Cannot Scan Over a Network
Scanner Cannot Connect to a Wireless Router
86
Page 87

Parent topic: Solving Problems
Cannot Scan Over a Network
If you cannot scan over a network (ES-60W/ES-65WR) with Epson ScanSmart or start the Epson Scan 2
Utility, try these solutions:
• Make sure the Wi-Fi switch is set to the Wi-Fi position.
• Make sure the computer and scanner are connected to the same network (or network
segment/VLAN).
• Move the scanner and computer or smart device closer to the router or access point.
• If you cannot scan using the start button on the scanner, make sure you restarted your computer
after installing the scanning software.
• If you are scanning a large original at a high resolution, a network communication error may occur. Try
scanning again at a lower resolution.
• Check the network connection setting in the Epson Scan 2 Utility.
• You may need to disable the firewall and any anti-virus software on your wireless router or access
point.
• If you see the message "Network product is not available: currently being used by user", there may be
a communication error between the scanner and computer. Restart the scanner.
• If the Firewall function is active, the scanner may not be discovered by the Epson Scan 2 Utility. Open
the Epson Scan 2 Utility, enter the IP address for your scanner, and click Add.
• If the scanner and computer cannot communicate and are connected to the same network (or network
segment/VLAN), the privacy separator on your router must be disabled. Follow the instructions in your
router documentation to disable the privacy separator.
Parent topic: Solving Network Scanning Problems
Related topics
Wi-Fi Networking
Scanner Cannot Connect to a Wireless Router
If your scanner has trouble finding or connecting to a wireless router (ES-60W/ES-65WR), try these
solutions:
• If you did not successfully connect to a network while installing your product software, select the link at
the end of this topic and follow the steps in "Manually Connecting to a Wi-Fi Network".
87
Page 88

• If you are connecting the scanner via Wi-Fi Protected Setup (WPS), make sure you activate WPS on
your scanner within 2 minutes of activating WPS discovery mode on the router by pressing the WPS
button or enabling the WPS setting in your router firmware.
• Make sure to place your scanner within contact range of your router. Avoid placing your scanner near
a microwave oven, 2.4 GHz cordless phone, or large metal object, such as a filing cabinet.
Note: If you are using a 5 GHz wireless router, set the router to operate in dual band (2.4 GHz and
5 GHz) mode. If your router uses a single network name (SSID) for both the 2.4 GHz and 5 GHz band,
give each band its own network name (SSID) instead, such as Home Network 2.4 GHz and Home
Network 5 GHz. See your router documentation or contact your internet service provider for
instructions. Be sure to connect your computer and scanner only to a 2.4 GHz network name (SSID).
• Verify that your router is operating correctly by connecting to it from your computer or another device.
• You may need to temporarily disable your firewall and any anti-virus software on your wireless router.
Then try scanning again. You can also unblock your scanner driver or network address in your firewall
or anti-virus software.
• Check to see if access restrictions, such as MAC address filtering, are set on the router. If access
restrictions are set, add your scanner's MAC address to your router's address list. To obtain your
scanner's MAC address, check the label on the back or bottom of your scanner. Then follow the
instructions in your router documentation to add the address to the list.
• If your router does not broadcast its network name (SSID), follow the instructions that came with your
scanner to enter your wireless network name manually.
• If your router has security enabled, determine the kind of security it is using and any required
password or passphrase for connection. Then make sure to enter the exact WEP key or WPA
passphrase correctly.
• Check if your computer is restricting the available wireless channels. If so, verify that your wireless
access point is using one of the usable channels and change to a usable channel, if necessary.
• The scanner may not be able to communicate with a computer with multiple network interfaces.
Disable all network interfaces except for the interface connected to the scanner.
• Enable the DHCP function on the access point or router.
• Check that the scanner's IP address is set correctly.
Parent topic: Solving Network Scanning Problems
Related tasks
Manually Connecting to a Wi-Fi Network
88
Page 89

Related topics
Wi-Fi Networking
Solving Scanned Image Quality Problems
Check these sections if a scanned image on your computer screen has a quality problem.
Back of Original Image Appears in Scanned Image
Scanned Characters are Blurry
Characters are not Recognized During Conversion to Editable Text (OCR)
Ripple Patterns Appear in an Image
Spots or Lines Appear in All Scanned Images
Straight Lines in an Image Appear Crooked
Scanned Image is Cropped
Resetting the Epson Scan 2 Settings
Parent topic: Solving Problems
Back of Original Image Appears in Scanned Image
If an image from the back of a thin original appears in your scanned image, make sure you selected the
correct Image Type setting for your original and select the Text Enhancement setting in Epson Scan 2.
You can also select the Remove Background setting in Epson Scan 2.
Note: If you select Color as the Image Type setting, you can change the level from Standard to High to
remove more of the background.
Parent topic: Solving Scanned Image Quality Problems
Related tasks
Changing the Scan Settings
Scanned Characters are Blurry
If characters in your scanned images are blurry, try these solutions:
• Make sure you do not move the scanner or original while scanning.
• Operate the scanner on a flat, stable surface.
• Make sure the originals are ejecting properly.
89
Page 90

• In Epson ScanSmart, click Settings > Scanner Settings > Scan Settings and try adjusting these
settings and scanning again:
• On the Main Settings tab, make sure you select the correct Image Type for your original.
• On the Main Settings tab, try increasing the Resolution setting.
• On the Advanced Settings tab, select Text Enhancement and choose a setting.
Note: The Text Enhancement setting depends on the selected Image Type.
• If the Image Type is set to Black & White, adjust the Threshold setting on the Advanced Settings
tab. (The Image Option must be set to None.)
Parent topic: Solving Scanned Image Quality Problems
Related tasks
Changing the Scan Settings
Characters are not Recognized During Conversion to Editable Text (OCR)
If characters in your scanned images are not recognized during OCR conversion, try these solutions:
• Make sure your original is loaded straight on your product.
• Use an original with clear text.
• Adjust these Epson Scan 2 settings (if available) and try scanning again:
• Select the correct Image Type setting.
• If the Image Type is set to Black & White, adjust the Threshold setting.
• Set the Image Type to Grayscale.
• Set the scanning resolution between 200 and 600 dpi.
• If the original document is in landscape mode, set the Rotate setting to Auto in Epson Scan 2.
• If you are using OCR software, check the manual for any additional adjustments.
Parent topic: Solving Scanned Image Quality Problems
Related tasks
Changing the Scan Settings
90
Page 91

Ripple Patterns Appear in an Image
You may see a ripple pattern (called a moiré) in scanned images of printed documents. This is caused
by interference from differing pitches in the scanner's screen and your original's halftone screen. To
reduce this effect, adjust these Epson Scan 2 settings (if available) and try scanning again:
• Select the Descreening setting.
• Select a lower Resolution setting.
Parent topic: Solving Scanned Image Quality Problems
Spots or Lines Appear in All Scanned Images
If spots or lines appear in all your scanned images, try these solutions:
• Clean inside the scanner using a cleaning sheet.
• Calibrate the scanner using a calibration sheet.
• Make sure the surface of your original is clean.
• Avoid scanning in direct sunlight.
Note: If you are scanning a plastic card with a shiny surface, a line may appear in the scan.
Parent topic: Solving Scanned Image Quality Problems
Related tasks
Cleaning Inside Your Scanner
Calibrating Your Scanner
Straight Lines in an Image Appear Crooked
If straight lines in an original appear crooked in a scanned image, try these solutions:
• Make sure to load your original straight when you scan it.
• Clean inside the scanner using a cleaning sheet.
Parent topic: Solving Scanned Image Quality Problems
Scanned Image is Cropped
If the edges of a scanned image are cropped, try the following solutions:
• Select Auto Detect as the Document Size setting in Epson Scan 2.
91
Page 92

• In Epson Scan 2, select the Main Settings tab. Select Document Size > Settings and adjust the
cropping area shown in the Crop Margins for Size "Auto" setting.
• In Epson Scan 2, select the Advanced Settings tab. Set the Edge Fill setting to None.
Parent topic: Solving Scanned Image Quality Problems
Resetting the Epson Scan 2 Settings
If you continue to experience image quality problems after trying all possible solutions, you may need to
reset the Epson Scan 2 settings using the Epson Scan 2 Utility.
1. Do one of the following to start the Epson Scan 2 Utility:
• Windows 10: Click > EPSON > Epson Scan 2 Utility.
• Windows 8.x: Navigate to the Apps screen and select Epson Scan 2 Utility.
• Windows (other versions): Click or Start, and select All Programs or Programs. Select
EPSON > Epson Scan 2 Utility.
• Mac: Open the Applications folder, open the Epson Software folder, and select Epson Scan 2
Utility.
2. Click the Other tab.
3. Click Reset.
Note: If resetting the Epson Scan 2 settings does not solve your problem, uninstall your scanner
software and re-install it.
Parent topic: Solving Scanned Image Quality Problems
Related concepts
Uninstall Your Scanner Software
Solving Receipt Manager Problems
Check the solutions in these sections if you have problems scanning using Receipt Manager.
Cannot Access an Accounting Service
Cannot Import Receipt Database
License Key is Disabled
Parent topic: Solving Problems
92
Page 93

Cannot Access an Accounting Service
If you cannot access an accounting service, try these solutions:
• Make sure the login information you entered for the accounting service is correct.
• Make sure the accounting service is not down for system maintenance. Check the accounting service
website for more information.
• Make sure the desktop accounting service and its company file are opened on your computer.
Parent topic: Solving Receipt Manager Problems
Cannot Import Receipt Database
If you cannot import a receipt database, make sure the Epson ScanSmart software version installed on
your computer is up to date. Run Epson Software Updater or visit the Epson support website for your
product.
Parent topic: Solving Receipt Manager Problems
License Key is Disabled
If you have problems entering a license key, try these solutions:
• Make sure the license key is valid and correctly entered.
• The license key is only available for one scanner. Make sure you selected the correct scanner.
• If you need to replace your scanner under warranty, Epson can issue you a new license key. Contact
Epson Support if you have trouble with the new license key.
Parent topic: Solving Receipt Manager Problems
Related tasks
Changing the Scanner
Uninstall Your Scanner Software
If you have a problem that requires you to uninstall and re-install your software, follow the instructions for
your operating system.
Uninstalling Scanner Software - Windows
Uninstalling Scanner Software - Mac
Parent topic: Solving Problems
93
Page 94

Uninstalling Scanner Software - Windows
You can uninstall and then re-install your scanner software to solve certain problems.
1. Exit all applications currently running on your computer.
2. Turn off the scanner (ES-60W /ES-65WR).
3. Disconnect any interface cables.
4. Do the following to uninstall each of your scanning software programs and follow any on-screen
instructions:
• Windows 10: Click and select (Settings) > Apps > Apps & features. Select the scanner
software program and click Uninstall.
• Windows 8.x: Navigate to the Apps screen and select Control Panel > Programs > Programs
and Features. Select the scanner software program and click Uninstall/Change.
• Windows 7: Open the Windows Control Panel utility. Select Programs and Features. (In
Classic view, select Programs and click Uninstall a program.) Select the scanner software
program and click Uninstall/Change.
5. Restart your computer, then see the Start Here sheet to re-install your software.
Note: If you find that re-installing your scanner software does not solve a problem, contact Epson.
Parent topic: Uninstall Your Scanner Software
Uninstalling Scanner Software - Mac
In most cases, you do not need to uninstall your scanner software before re-installing it. However, you
can download the Uninstaller utility from the Epson support website to uninstall your scanner software as
described here.
1. To download the Uninstaller utility, visit epson.com/support (U.S.), epson.ca/support (Canada), or
epson.com.jm/support (Caribbean) and select your product.
2. Follow the instructions on the screen to install the Uninstaller utility.
3. Quit all applications currently running on your Mac.
4. Double-click the Uninstaller icon.
5. In the Epson Uninstaller screen, select the checkbox for each software program you want to
uninstall.
6. Click Uninstall.
94
Page 95

7. Follow the on-screen instructions to uninstall the software.
8. To reinstall your scanner software, see the Start Here sheet for instructions.
Note: If you find that re-installing your scanner software does not solve a problem, contact Epson.
Parent topic: Uninstall Your Scanner Software
Where to Get Help
If you need to contact Epson for technical support services, use the following support options.
Internet Support
Visit Epson's support website at epson.com/support (U.S.), epson.ca/support (Canada), or
epson.com.jm/support (Caribbean) and select your product for solutions to common problems with your
product. You can download utilities and documentation, get FAQs and troubleshooting advice, or e-mail
Epson with your questions.
Speak to a Support Representative
Before you call Epson for support, please have the following information ready:
• Product name
• Product serial number (located on a label on the product)
• Proof of purchase (such as a store receipt) and date of purchase
• Computer configuration
• Description of the problem
Then call:
• U.S.: (562) 276-4382, 6 AM to 8 PM, Pacific Time, Monday through Friday, and 7 AM to 4 PM, Pacific
Time, Saturday
• Canada: (905) 709-3839, 6 AM to 8 PM, Pacific Time, Monday through Friday, and 7 AM to 4 PM,
Pacific Time, Saturday
Days and hours of support are subject to change without notice. Toll or long distance charges may
apply.
Note: For help using any other software on your system, see the documentation for that software for
technical support.
95
Page 96

Purchase Supplies and Accessories
You can purchase genuine Epson accessories at epson.com (U.S. sales), epson.ca (Canadian sales), or
epson.com.jm (Caribbean sales). You can also purchase accessories from an Epson authorized reseller.
To find the nearest one, call 800-GO-EPSON (800-463-7766) in the U.S. or 800-807-7766 in Canada.
Parent topic: Solving Problems
96
Page 97

Technical Specifications
These sections list the technical specifications for your scanner.
Note: Epson offers a recycling program for end of life Epson products. Please go to this site (U.S) or this
site (Canada) for information on how to return your Epson products for proper disposal.
Windows System Requirements
Mac System Requirements
General Specifications
Dimension Specifications
Electrical Specifications
Environmental Specifications
Network Interface Specifications (ES-60W/ES-65WR)
Safety and Approvals Specifications
Windows System Requirements
To use your product and its software, your computer should use one of these Microsoft operating
systems:
• Windows 10
• Windows 8.x
• Windows 7
Note: For the latest product software available for your operating system, visit the Epson support site at
epson.com/support (U.S.), epson.ca/support (Canada), or epson.com.jm/support (Caribbean), select
your product, and select Downloads.
Parent topic: Technical Specifications
Mac System Requirements
To use your product and its software, your Mac should use one of these operating systems:
• macOS 10.14.x
• macOS 10.13.x
97
Page 98

• macOS 10.12.x
• OS X 10.11.x
Note: The UNIX File System (UFS) for OS X is not supported.
Note: For the latest product software available for your operating system, visit the Epson support site at
epson.com/support (U.S.), epson.ca/support (Canada), or epson.com.jm/support (Caribbean), select
your product, and select Downloads.
Parent topic: Technical Specifications
General Specifications
Scanner type Portable, sheet feed, simplex color A4
Photoelectric device CIS
Effective pixels 5100 × 8400 pixels at 600 dpi (maximum)
Document size Maximum: 8.5 × 72 inches (215.9 × 1828.8 mm)
2550 × 21600 pixels at 300 dpi (maximum - long paper)
Documents scanned at 301 dpi or more: up to 8.5 × 14 inches (215.9
× 355.6 mm)
Minimum: 2 × 2 inches (50.8 × 50.8 mm)
Paper input Faceup loading
Paper output Faceup ejection
Paper capacity 1 sheet of paper at up to 21 lb (80 g/m2) weight
Scanning resolution 600 dpi (main scan)
600 dpi (sub scan)
Output resolution 50 to 1200 dpi (in 1 dpi increments)
50 to 300 dpi for scans from 14 to 72 inches (355.6 to 1828.8 mm)
98
Page 99

Color depth Color
Interface One USB 2.0 port (Hi-Speed)
Light source RGB LED
Parent topic: Technical Specifications
Dimension Specifications
• 48 bits per pixel internal (16 bits per pixel per color internal)
• 24 bits per pixel external (8 bits per pixel per color external)
Grayscale
• 16 bits per pixel internal
• 8 bits per pixel external
Black and white
• 16 bits per pixel internal
• 1 bit per pixel external
IEEE802.11b/g/n (ES-60W/ES-65WR)
(You cannot use a USB and network connection at the same time
[ES-60W/ES-65WR].)
Height
Width 10.7 inches (272 mm)
Depth 1.9 inches (47 mm)
Weight ES-50/ES-55R:
Parent topic: Technical Specifications
1.4 inches (34.3 mm)
0.6 lb (270 g)
ES-60W/ES-65WR:
0.7 lb (300 g)
99
Page 100

Electrical Specifications
Scanner
Note: Check the label on the scanner for voltage information. Power consumption varies depending on
operating conditions.
Rated input voltage DC 5 V
Rated input current 0.5 A
Power consumption
(approximate)
Battery (ES-60W/ES-65WR)
ES-50/ES-55R:
Operating: 2.1 W or less
Ready mode: 1.1 W
Sleep mode: 0.4 W
Power off mode: 0.1 W or less
ES-60W/ES-65WR (connected via USB):
Operating: 2.7 W or less
Ready mode: 1.6 W
Sleep mode: 1.0 W
Power off mode: 0.2 W or less
ES-60W/ES-65WR (connected via Wi-Fi with fully charged battery):
Operating: 3.1 W or less
Ready mode: 2.4 W
Sleep mode: 1.9 W
Power off mode: 0.2 W or less
Type Li-ion
Rated voltage 3.6 V
Rated capacity 1140mAh
100
 Loading...