

Page 1

Printed on recycled paper with at least 10% post-consumer content
.
Page 2

A Note Concerning Responsible Use o f
Copyrighted Materials
Like photocopiers, scanners can be misused by improper
copying of copyrighted material. Although Section 107 of the
U.S. Copyright Act of 1976 (Ti tle 17, United Stat es Co de), the
“fair use” doctrine, permits limited copying in certain
circumstances, those circumstances may not be as broad as
some people assume. Unless you have the advice of a
knowledgeable attorney, be responsible and respectful by not
scanning published material without the permission of the
copyright holder.
Copyright Notice
All rights reserv ed. No part of this publi cat io n may be
reproduced, stored in a retrieval system, or transmitted in any
form or by any means, electronic, mechanical, photocopying,
recording, or otherwise, without the prior written permission of
Seiko Epson Corporation. No patent liability is assumed with
respect to the use of the information contained herein. Neither
is any liability assumed for damages resulting from the use of
the information contained herein.
Neither Seiko Epson Corporation nor its affiliates shall be liable
to the purchas er of this prod uct or third partie s for damages,
losses, costs, or expenses incurred by purchaser or third parties
as a result of: accident, misuse, or abuse of this product or
unauthoriz ed modification s, r epai rs, or alterations to this
product.
Seiko Epson Corporation and its affiliates shall not be liable
against any damages or problems arising from the use of any
options or any consumable products other than those
designated as Or ig inal EPSO N Pro ducts or EPSO N App roved
Products by Seiko Epson Corporation.
Page 3

Introduction
This package contains everything you need for professional
quality document scanning and processing:
❑ EPSON
®
Personal Document Station (ES-300GS) scanner,
which scans in 8-bit monochrome grayscale at up to 400 dpi
and includes a built-in document feeder and an attachable
business card guide
❑ SCSI system cable
❑ e•Paper
the Apple
Document Management & Archival Suite for
®
Macintosh,® an integrated software package
providing file creation and management, optical character
recognition (OCR), and document mark-up capabilities.
This software also links to your existing fax and e-mail
applications.
To fax or e-mail your scanned images, you must have one of
the following application programs and access to a fax/modem.
Fax applications E-mail applications
STF Technologie s FaxSTF
®
Delrina
Fax PRO or Fax LITE CE Software QuickMail
MS® Mail
Lotus® cc:Mail
Note:
Other programs may be supported; see the release notes that come
with your e•Paper software user’s guide.
Getting Started
1
Page 4

This booklet tells you how to set up your scanner, install the
software, and scan a document . For add it ional in st ruct io ns , se e
the manual for the ES-300GS scanner, Balloon Help, and the
manual and on-line help utilities for the e•Paper Document
Management & Archival Suite.
System and Memory Requirements
For the scanner and your software to work properly, your
system must include the following minimum configuration:
❑ An Apple Macintosh or Power Macintosh computer with a
68030, 68040, or PowerPC processor
❑ Apple system software 7.5 or higher
❑ 8MB or more of syste m RAM; 4MB of applica t ion RAM
❑ At least 25MB of free hard disk space; a removable drive is
recommended for document archiving
❑ A color monitor.
Getting Started
2
Page 5
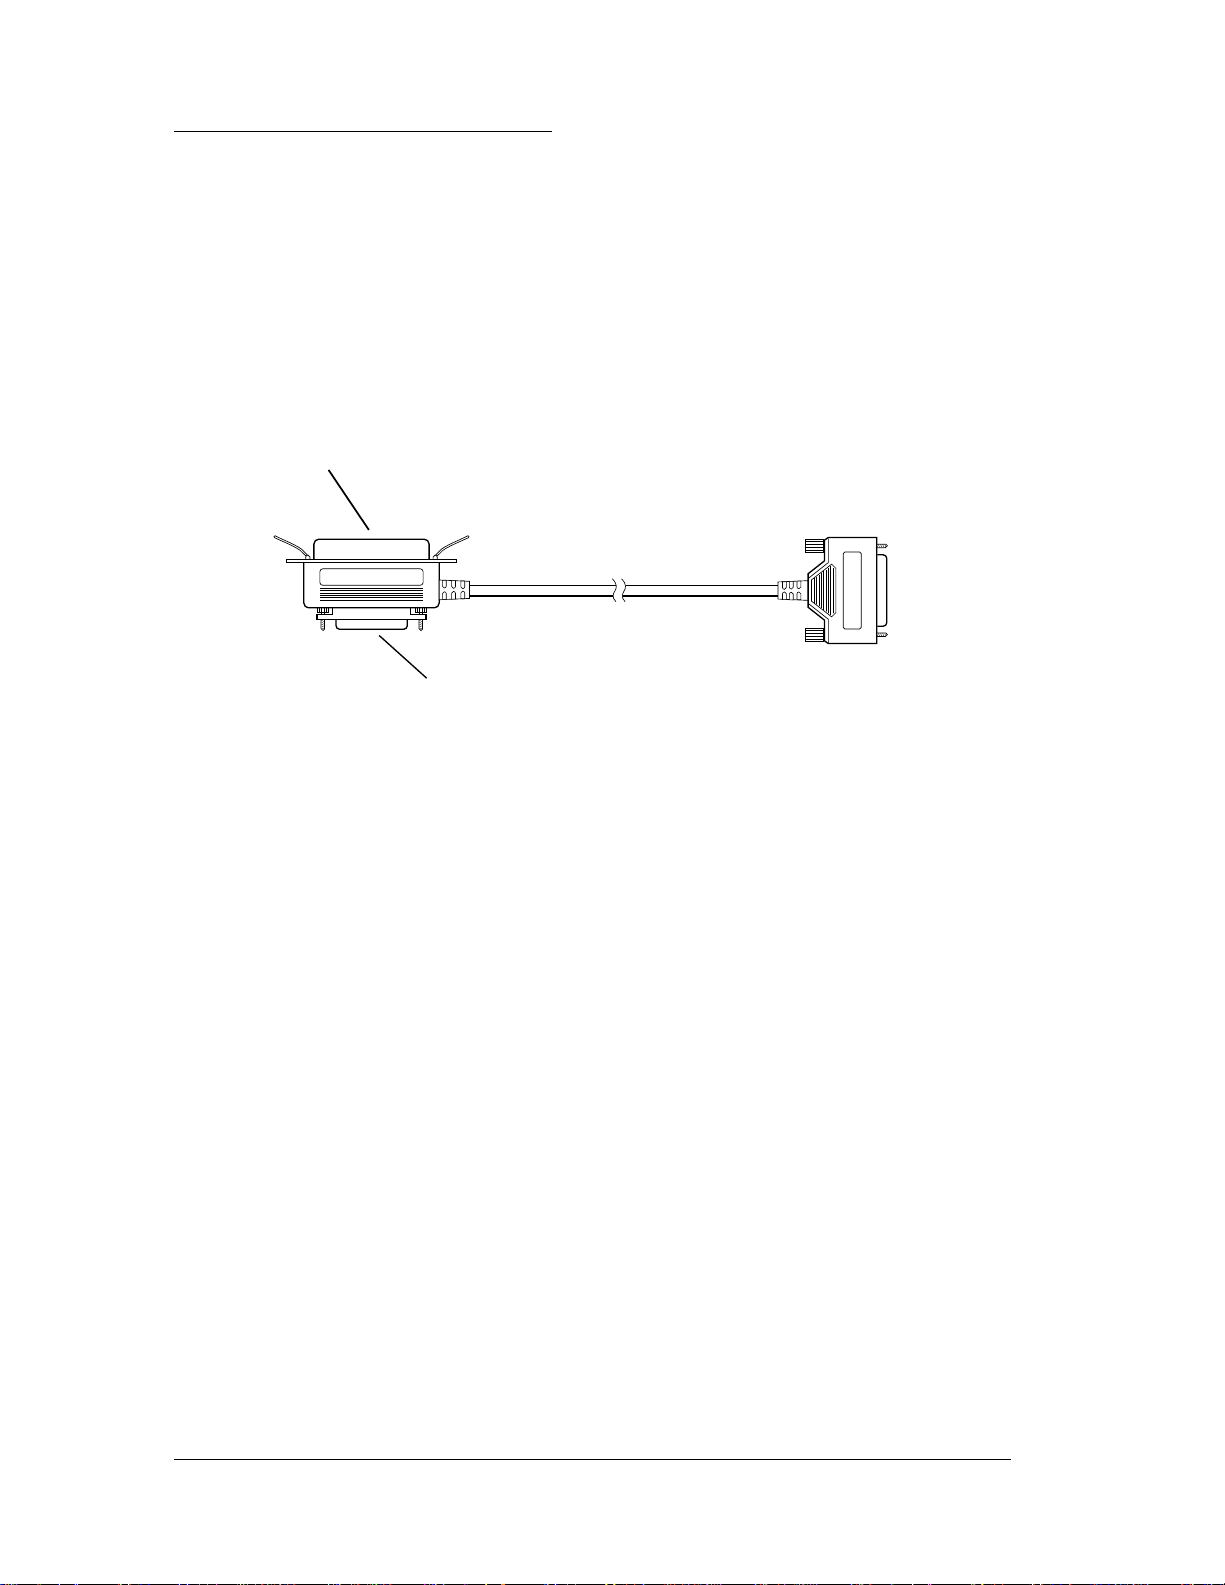
Setting Up the Scanner
Follow the steps below to set up the scanner and connect it to
the SCSI port on your Macintosh or to another SCSI device.
The SCSI cable included with the scanner has a 25-pin
connector on one end and a dual 25-/50-pin connector on the
other.
50-pin connector for an additional device
25-pin connector to the scanner
1. Take the scanner out of its box and place it on a flat, stable
surface with the rear panel facing you.
2. Remove the tape securing the scanner cover and pull out
any packing ma terial from un derneath the c over.
3. Turn off your Macintosh, sc anner, and any other peri pheral
devices. The scanner is turned off when the O side of the
power switch on the rear panel is pressed down.
Caution:
c
4. The scanner’s default SCSI ID setting is 2. If you need to
change the scanner to another SCSI ID, press the plus or
minus button next to the SCSI port until yo u see the desired
number in the display. (Be sure you do not select a number
assigned to another device.)
Be sure that your Macintosh, scanner, and any other
peripheral devices are turned off before you plug in any
cables.
Getting Started
3
Page 6
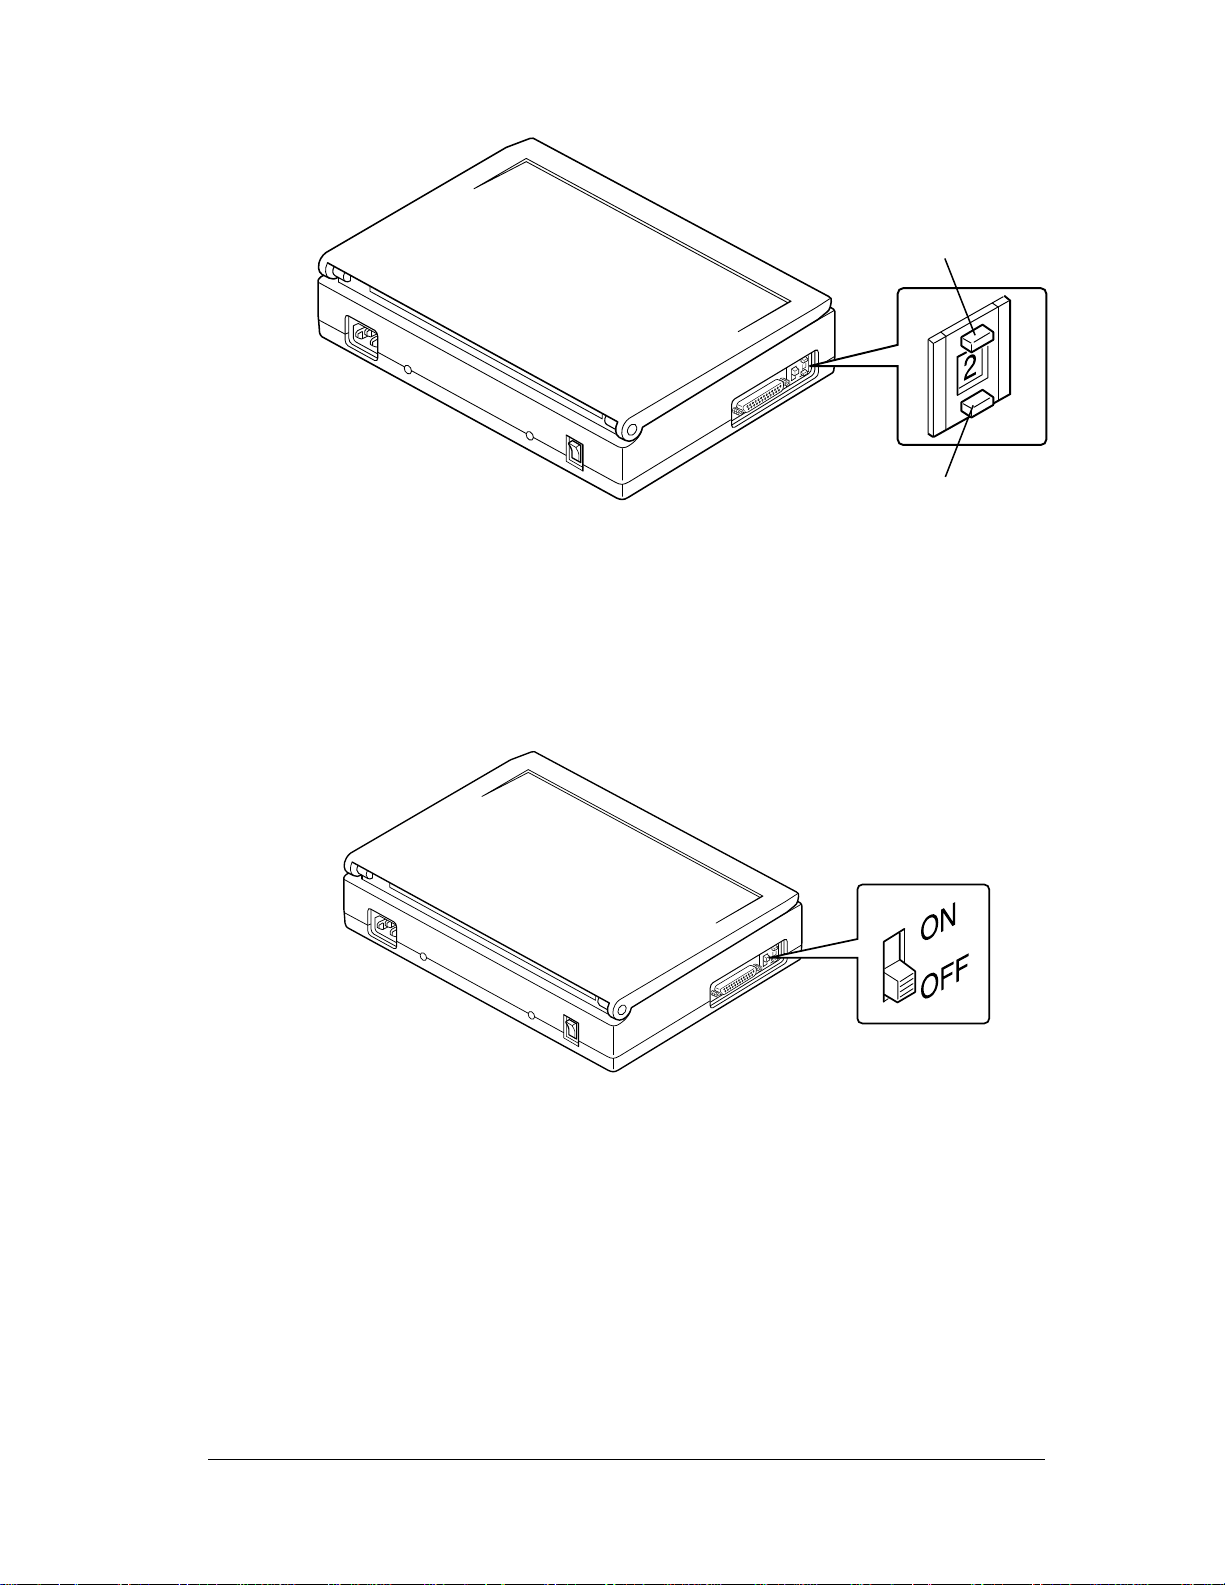
plus button
minus button
5. The scanner’s SCSI terminator is set to
at the factory.
ON
If the scanner is the only or last device in the SCSI
daisy-chain, leave the terminator at this setting. If the
scanner is at the beginning or in the middle of a
daisy-chain , turn the te rminator swit ch
OFF
.
6. Connect the 25-pin connector to the SCSI connector on the
scanner and tighten the screws on each side.
Getting Started
4
Page 7

7. If you are connecting the scanner directly to your Macintosh,
connect the 25-pin connector on the dual-connector end of
the cable to the SCSI port on the Macintosh; this port has
a icon above it. Tighten the two screws on the sides of
the connector.
If you are connecting the scanner to another SCSI device in a
daisy-chain, connect the 50-pin connector on the cable to
the SCSI device.
Getting Started
5
Page 8

8. Connect the scanner’s power cable to the power inlet on the
rear of the scanner and plug the other end into a grounded
electrical outlet.
9. Raise the scanner cover.
10. Turn on the scanner by pressing the | side of the power
switch, which is on the back of the scanner. The green
Power
The
light on the top right side of the scann er comes on.
Ready
light flashes while the scanner warms up.
Getting Started
6
Page 9

11. Turn on any other external devices you will use before you
turn on the Macintosh. (Always turn on the scanner before
turning on the computer.)
The scanner’s
computer, flashes for a moment , and t hen comes on
again once the computer boots.
Ready
light g oes o ut wh en y o u t urn on the
Installing the e•Paper Software Suite
Before you install the e•Paper software suite, it’s a good idea to
make backup copies of your disks.
Make sure your Macintosh is turned off and then follow these
steps to install the suite:
1. Turn on yo ur sca nner.
2. Hold down th e
your Macintosh to turn off its system extensions and virus
protection programs. Release the
the “Welcome to Macintosh Extensions off” screen.
key on you r keyboar d as you turn on
Shift
key when you see
Shift
3. Insert the Installation Disk 1 into your diskette drive. (If the
e•Paper Install 1 screen does not appear, double-click the
e•Paper Install 1
4. Double-click the
initial ins ta llat io n p rog ram s creen, click
5. Click
6. Click
7. Click
Getting Started
7
disk icon.)
e•Paper Installer
Continue
to restart your Macintosh after installation.
Yes
Hard disk
to accept the license agreement.
.
icon. When you see the
Continue.
Page 10

8. Click
to complete th e installati on and re start your Maci ntosh.
(Once installed, e•Paper will reside in a folder on the
desktop.)
After installation, a small floating window will appear on
your screen. This window resides in the background awaiting
document tasks. The ‘e’ icon on the window shows you the
current status of your scanner at a glance. See your software
guide for more information.
Install into Hard disk
Scanning Documents
Now you’re ready to start scanning using your scanner’s
built-in document feeder. For instructions on using the
attachable business card guide, see your ES-300GS User’s Guide.
. Follow the prompts on the screen
When scanning documents, respect the rights of the copyright
holders. Do not scan published materials without checking the
copyright status.
1. First, select a document to scan. (You can scan up to 10
standard bond pages at a time.) Make sure all the pages are
the same size and paper weight. Also remove any paper
clips, staples, tape, glue, or other foreign objects from the
document.
Caution:
c
2. Raise the scanner cover.
Scanning documents that contain foreign objects, such as
paper clips or staples, can damage the scanner mechanism
and the glass scanning window.
Getting Started
8
Page 11
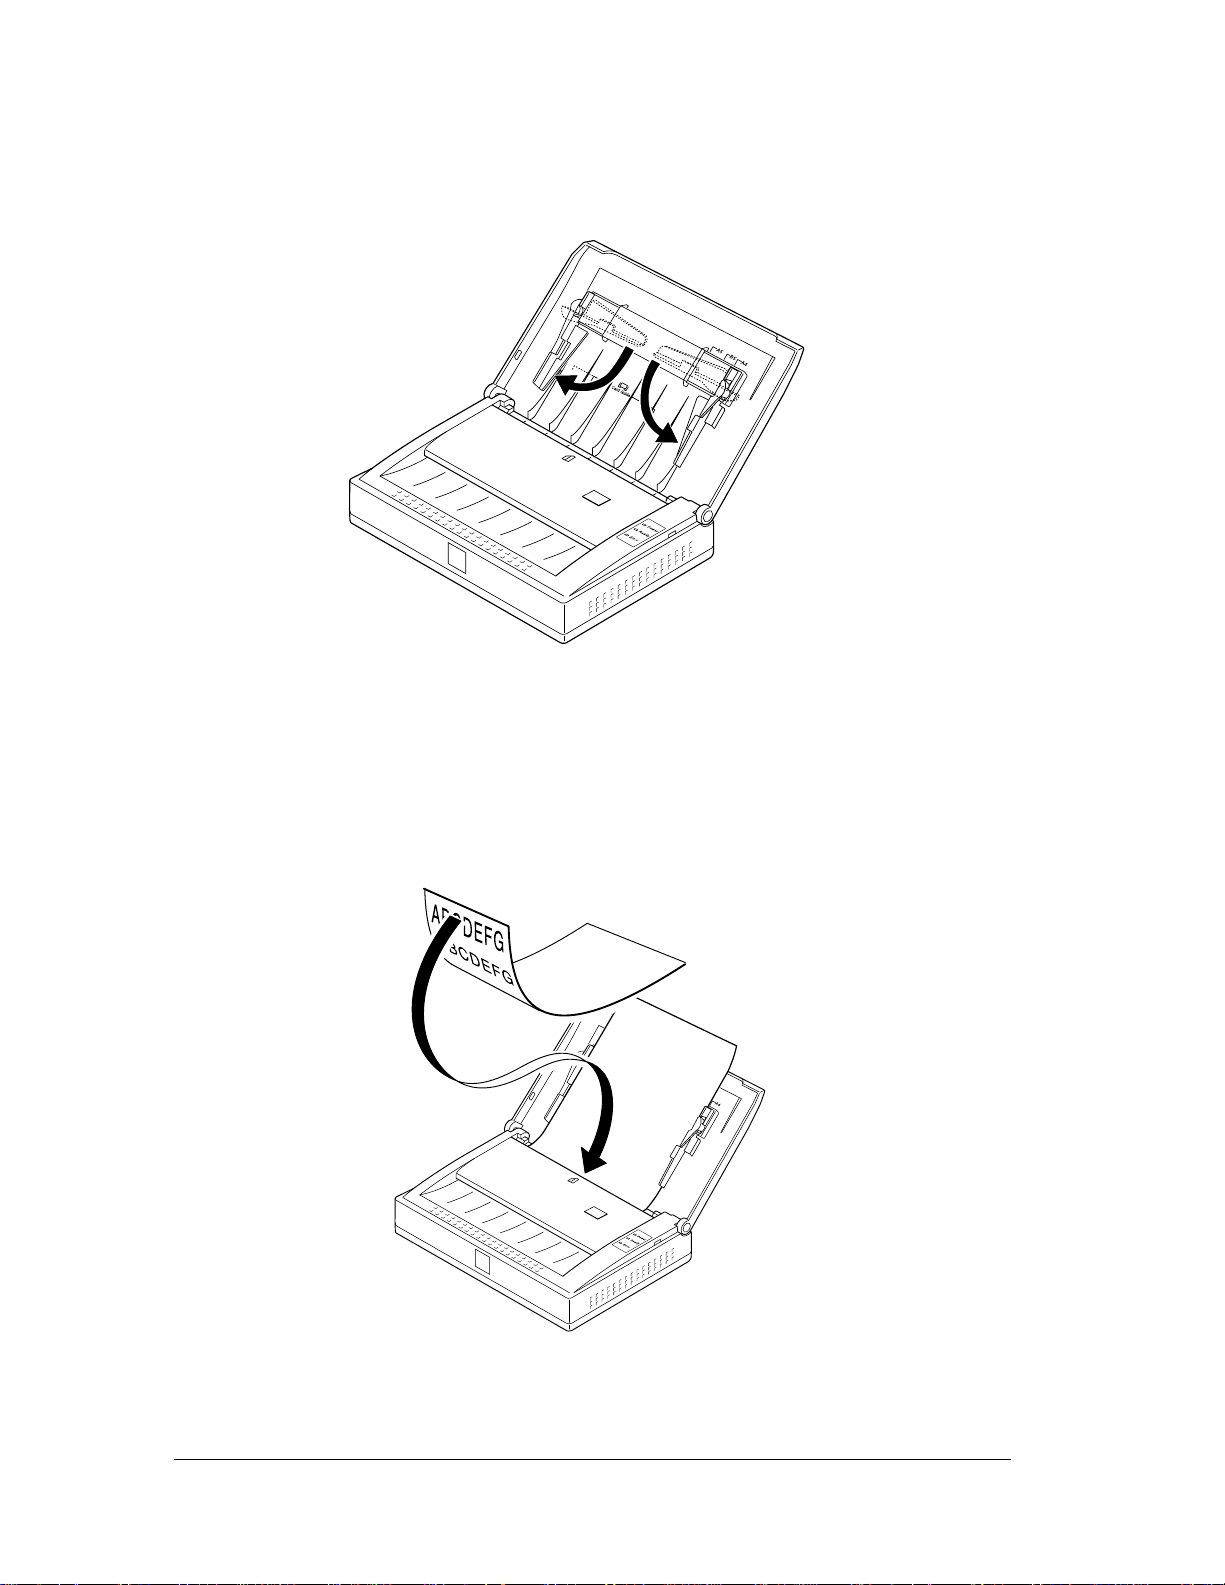
3. Fl ip down the two paper guides to the operating pos ition, as
shown below.
4. Fan the edges of your document if you are scanning multiple
pages; then level the stack by tapping it on a flat surface.
5. Hold the document with the side to be scanned facing down
and guide it into the scanner’s document feeder, as shown.
Getting Started
9
Page 12

6. Adjust the paper guides to fit the width of the paper.
The scanner automatically feeds the first page of your
document to the scanning position.
Note:
If e•Paper is not currently running, first make sure that the
scanner’s
Ready
double-click the
light is on. Then open the e•Paper folder and
e•Paper
program icon. The following floating
window appears.
e••Find:
Click here to
search for an
archived e•Paper
document.
7. After you load a docum ent in the scann er, e•Paper scans it
automatically. While the document is being processed the
Control/Status
icon changes to the following:
Control/Status
Icon:
Shows the
condition of
your scanner.
8. The scanner displays the scanned image in the e•Scan
window. As the scan progresses, you may enter text in the
File Name or Keyword fields.
From this window, you can also straighten, rotate, or crop
unneeded portions of the document before processing it
further.
Getting Started
10
Page 13

Note:
After cropping an image, the new settings are used to scan the
remaining pages of your document. You may need to reset the
cropping area before scanning additional pages of your document.
See your e•Paper user’s guide for more information.
9. To stop a scan in progress, hold down the command key and
type a period (.). You can also cancel the scan in progress
by clicking the cancel button.
10. After scanning a document, you can save it by selecting
Save
from the File menu. Another option is to print or fax
the document by clicking on the printer or fax icon that
appears in the Action Palette in the lower portion of the
screen.
Note:
To fax your document, you must have a communications
program and access to a fax/modem.
Your e•Paper software suite offers you a comprehensive array
of document processing and archiving functions. See your
e•Paper user’s guide for information on saving, printing,
faxing, or processing your document. The e•Paper system also
provides a powerful OCR program that converts your
documents into text files that you can edit.
Getting Started
11
Page 14

Where to Get Help
EPSON provides customer support and service through a
network of Authorized EPSON Customer Care Centers and
provides the following services when you dial
❑ EPSON Fax-On-Demand technical information library
❑ Product literature on current and new products
❑ Assistance in locating your nearest Authorized EPSON
Reseller or Customer Care Center
❑ Technical information on the installation, configuration,
and operation of EPSON products
❑ Custo mer rela tio ns .
You can purchase ink cartridges, paper, parts, printed
manuals, and accessories for your EPSON products from
EPSON Accessories at (800) 873-7766 (U.S. sales only). In
Canada, call (800)
GO-EPSON
(800) 922-8911:
for sales locations
If you purchased your scanner outside the United States or
Canada, contact your EPSON dealer or the marketing location
nearest you for customer support and service.
If you need help with any software pro g ram you are using,
see that program’s documentation for technical support
information.
Electronic Support Services
If you have a modem, the fastest way to access helpful tips,
specifications, drivers, application notes, DIP switch or jumper
settings, and bulletins for EPSON products is through the
online services below.
Getting Started
12
Page 15

World Wide Web
If you are connected to the Internet and have a Web browser,
you can access EPSON’s World Wide Web site at
http://www.epson.com. EPSON’s home page links users to
What’s New, EPSON Products, EPSON Connection,
Corporate Info, and EPSON Contacts. Link to the EPSON
Connection for the latest drivers and FAQs (Frequently Asked
Questions) and th e EPSO N Ch at ar ea. To get in touch with
EPSON around the world, EPSON Contacts includes contact
information for local EPSON subsidiaries.
EPSON Internet FTP Site
If you have access to the Internet and an FTP client, you can
download drivers, FAQs, and sample files from EPSON’s FTP
site. Use your FTP client or Web browser to log onto
ftp.epson.com with the user name anonymous and your e-mail
address as the password (guest access is limited).
SM
EPSON Fax- On -D emand Service
You can access the EPSON Fax-On-Demand technical
informati on libr ar y by call in g (800) 922-2891 or (800) 442-2110.
To receive information, you must provide a return fax number.
EPSON Download Service
You can call the EPSON Download Service at (800) 422-2007.
Make sure you communications software is set to 8 data bits
with 1 stop bit, no parity, and a modem speed up to 28.8 Kpbs.
See your communication software documentation for more
information.
Getting Started
13
Page 16

EPSON Forum on CompuServe
CompuServe members can access the Epson America Forum
on CompuServe. If you are already a member, simply type
EPSON
currently a member, you are elibible for a free introductiory
membership as an owner of an EPSON product.
This membership entitles you to:
❑ An introductory credit on CompuServe
❑ Your own user ID and password
❑ A complimentary subscription to CompuServe Magazine,
To take advantag e of th is o ffer , call (800) 848-8199 in the
United States and Canada and ask for representative #529. In
other countries, call the following U.S. telephone number:
(614) 529-1611, or your local CompuServe access number.
at the menu prompt to reach the forum.If you are not
CompuServe’s monthly publication.
®
GO
Getting Started
14
 Loading...