

Page 1
Page 2
Quick Reference Guide
This
contains information on
clearing paper jams, understanding printer error
messages and changing the imaging cartridge.
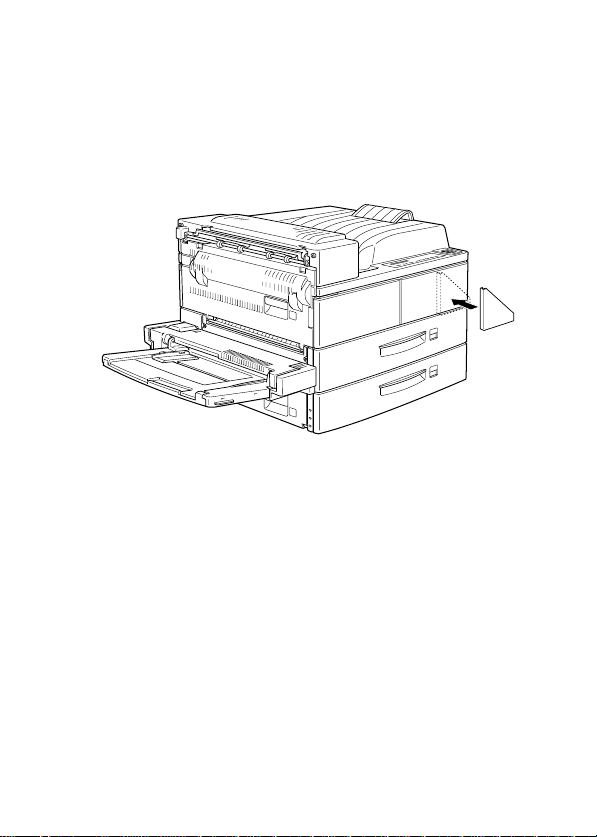
Attach the included quick reference box to the front of
your printe r as s hown below as a convenie nt place to
keep this guide.
For more details on the items covered in this guide and
about your printer in general, see the
Reference Guide
.
Page 3

Preventing Paper Feed and P aper Jam
Problems
To prevent frequent paper feed or paper jam problems,
use this checklist of corrective measures.
❏
Use a higher-quality paper, one that is not too thin
or rough.
❏
Fan a stack of paper and tap it on a flat surface to
even its edges before you load it.
❏
Be sure that you do not load too much paper in the
paper sources.
❏
Be sure to adjust the paper guides so that the paper
can slide in and out freely.
❏
Never let the amount of accumulated sheets exceed
the total output capacity of any output tray or bin.
❏
Make sure you l oad paper with the correct s ide u p.
Most packages of paper indicate t he top side of the
paper with an arrow at the side of the package.
Paper Jam Problems
1
Page 4
Clearing Paper Jams
When a paper ja m occurs,
Jam xxx xxx xxx xxx message
appears on t he cont rol panel. Xxx indicates areas where
jams may be o ccurring, such as LC1(lower ca ssette 1). See
the messages below for instructions on clearing paper
jams in each area.
Note:
❏ Check for ja ms a t a ll pa per sourc e s o r path s i ndi cat ed o n
the contr ol pane l. The pri nter c an not resum e prin ti ng i f
the jams ar e not cleared.
❏ The con trol panel shows up t o four pa per sources or path s
at the same time. Oth er areas whe re jams may be
occurring will be shown on the control panel after you
have checked all indicated jams.
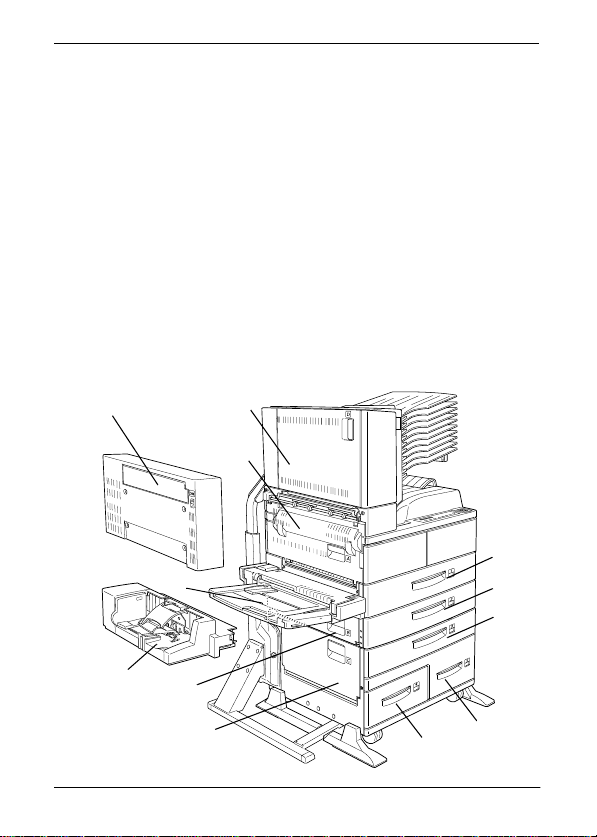
DM
MP
ENV
D
A
LC1
LC2
LC3
B
C
2
LC4
LC5
Page 5
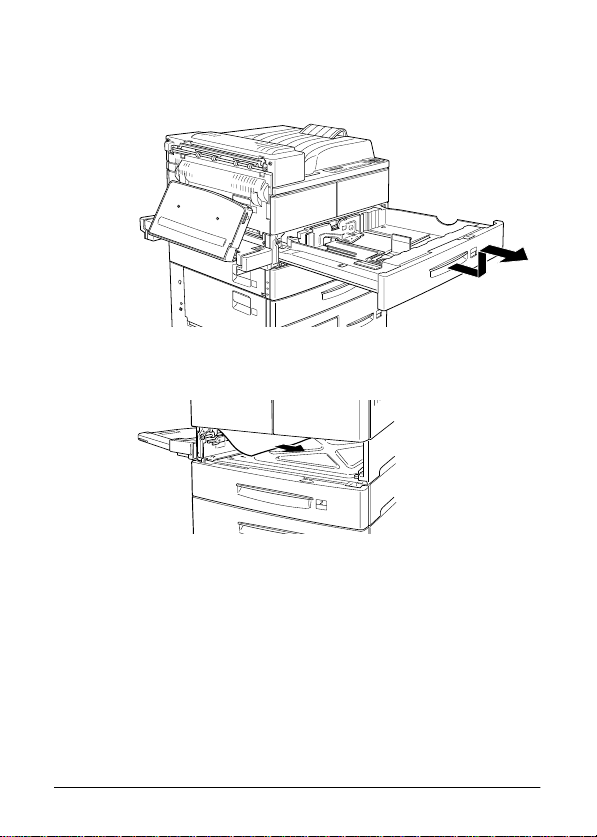
Jam LC1
Jam L C2 or Jam LC3 (LC3 is part of an option)
,
This message ind icates that paper jam may be o ccurring
in lower cassette 1, 2, or 3 (
Large Capacity Paper Unit is installed).
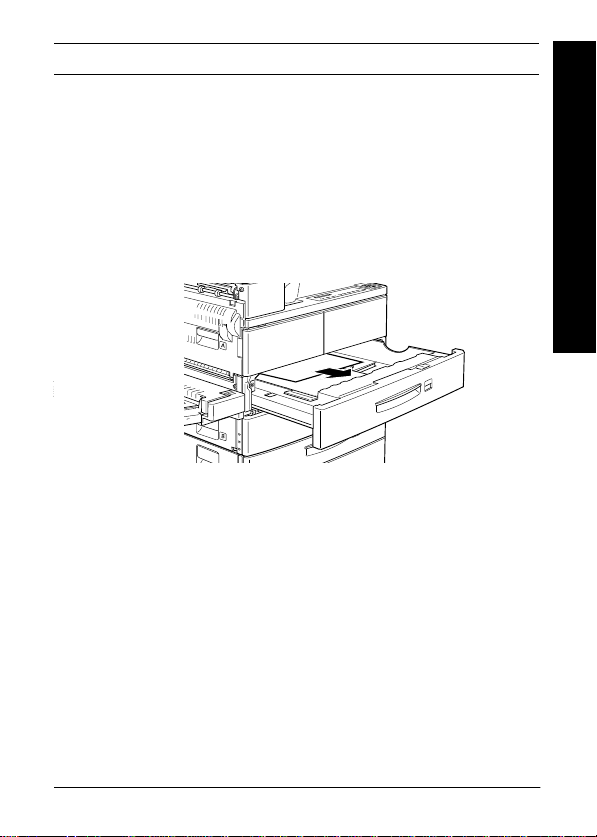
1. Pull out the indicated cassette (lower cassette 1, 2,
or 3).
2. Carefully remove any paper you find jammed
inside the cassette or printer.
3. Remove the stack of paper from the cassett e . Even
its edges by tapping the paper on a flat surface.
Then reinsert the stack into the cassette making sure
the paper is evenly aligned and rests below the
maximum paper mark.
Make sure you are using the correc t paper siz e and
that your paper meets the specifications for this
printer.
LC3
appears if the optional
Paper Jam Problems
4. Reinstall the cassette.
5. Clear other paper jams that are indicated on the
control panel.
3
Page 6
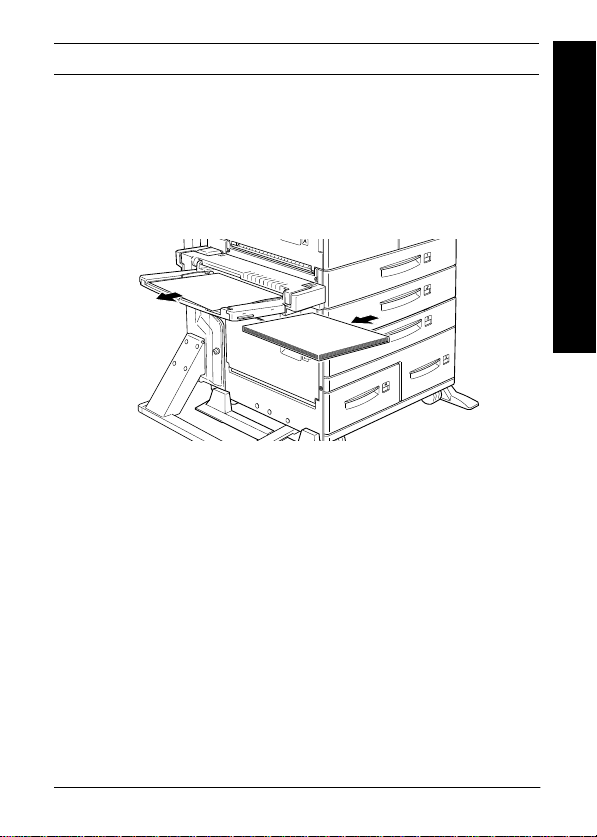
6. After that, if the control panel still indicates
LC2 or LC3
cassette.
7. Carefully remove any sheets that have fed part way
into the printer.
8. Reinstall the removed cassette.
c
, completely remove the indicated
Caution:
if you comp letely removed a casset te, be sure t o
put it back into its original position. Changing
cassette 1 with cassette 2 (or cassette 3, if
installed) causes im proper paper feeding.
LC1
,
9. The jammed page’s print data is automatically
reprinted.
4
Page 7
Jam M P
This message in dicates t hat the re may be a paper jam i n
the MP (Multi Purpose) Tray.
1. Move the paper guide on the MP tray outwards.
2. Remove all the paper from the tray, and discard any
wrinkled or folded sheets.
3. Tap the edges of the paper stack on a flat surface.
Then reload the paper in the MP tray, making sure
it is evenly aligned and rests below the maximum
paper mark.
Make sure you are using the correc t paper siz e and
that your paper meets the specifications for this
printer.
4. Clear any other paper jams indicated on the control
panel.
Paper Jam Problems
5
Page 8
5. After that, if the control panel still indicates
completely remove the MP tray.
6. Carefully remove any sheets that have fed part way
into the printer.
7. Reinstall the removed tray and reinsert the paper.
Jam A
This message indicates that there may be a paper jam
inside cover A.
1. Open cover A on the left side of the printer. If the
optional Duplex Unit is installed, open cover DM
first, then ope n cover A. If the op tion a l Enve lop e
Feeder is also installed, remove it before opening
the Duplex Unit.
Jam MP
,
Warning:
When op e ni n g the print er , do no t to u c h the hot
w
areas ind icat ed on the c au tion l ab els in si de cover
A.
6
Page 9
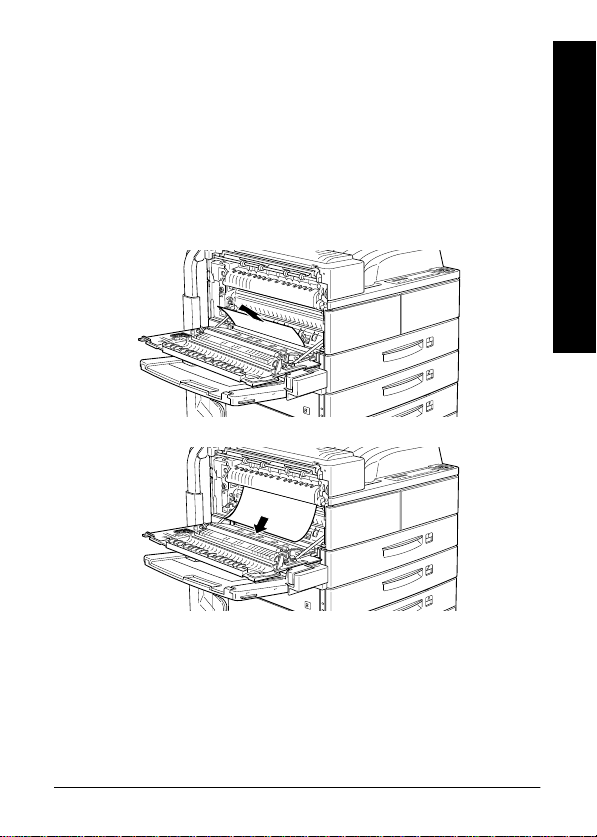
2. Remove any paper you find jammed inside the
printer.
Note:
Because the toner on the pap er inside the pr inter may not
have been fixed on the page, toner ma y come off on your
hands when you remove the paper. If you spill toner on
your clothing, rinse it off with cold water. Using hot
water may leave a perman ent stain.
Paper Jam Problems
7
Page 10
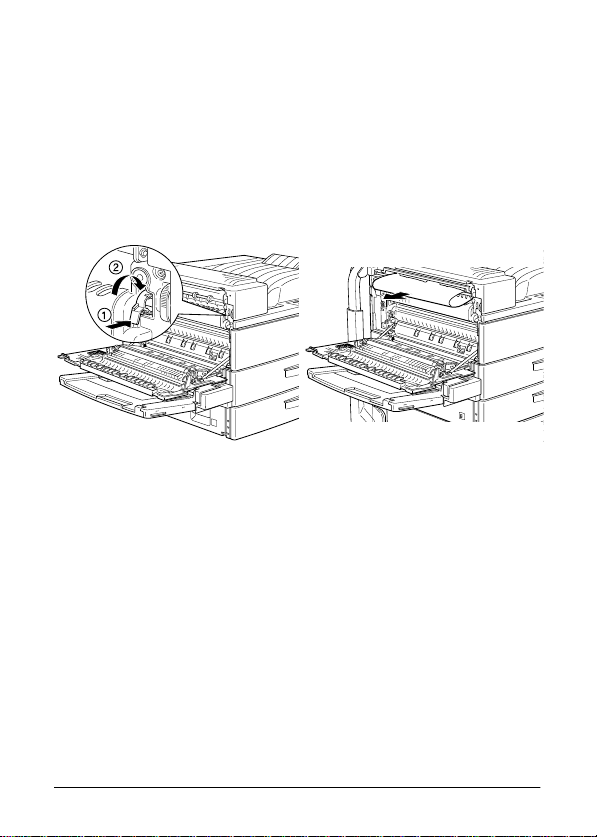
3. If the paper is difficult to remove, use the gear lever
inside cover A shown below. Push the lever in and
up repeatedly to feed the jammed paper back out
cover A.
Warning:
When op e ni n g the print er , do no t to u c h the hot
w
areas ind icat ed on the c au tion l ab els in si de cover
A.
4. If necessary, open the front cover to remove the
imaging cartridge and any paper left in the paper
feed path, and then reinsert the imaging cartrid ge.
If you do not find any jammed paper , it may be in
another area.
5. Close the fr ont cover, if opened, t hen c lose c over A.
Close the Duplex Unit, then reinstall the Envelope
Feeder, if you have these options.
6. When the paper jam is cleared completely, the
jammed page’s print data is automatically
reprinted.
8
Page 11
If the con trol panel indicates anothe r area, c heck for
paper jam there .
Jam B
Jam C
or
This message indicates that there may be a paper jam
inside cover B or C.
1. Open the indicated cover (B or C on left side of the
2. Carefully remove any paper you find jammed
3. Close the cover.
4. When the paper jam is cleared completely, the
(C is part o f an o ption)
printer).
inside the cover. I f you do not fin d any, paper may
be jammed in another area.
jammed page’s print data is automatically
reprinted.
If the control panel indicates another area, clear the
paper jam there .
Paper Jam Problems
9
Page 12
Jam LC4
or LC5 (LC4 and LC5 are both part of an opt ion)
This message in dicates t hat ther e may be a paper jam i n
optional lo wer paper cassette 4 or 5.
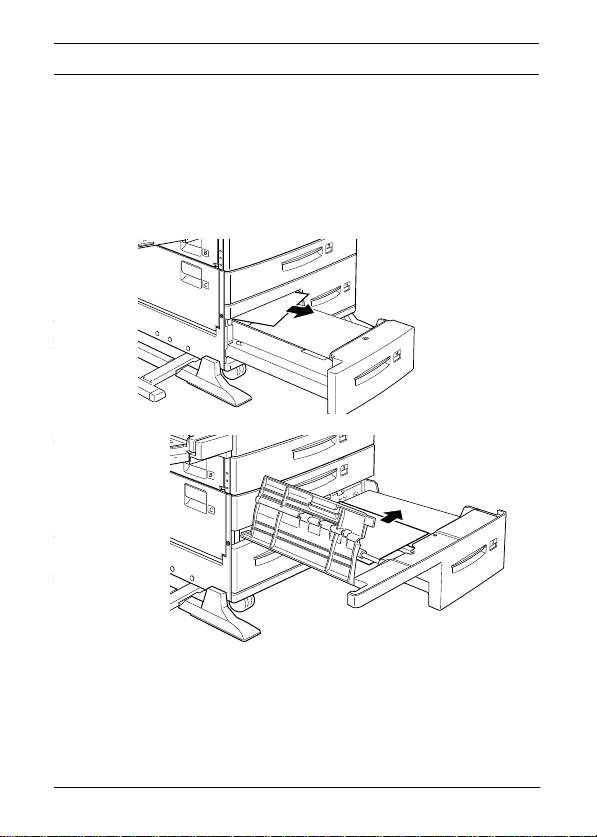
1. Pull out the indicated cassette ( lower paper ca ssette
4 or 5).
2. Remove any wrinkled or folded sheets.
3. Tap the edges of the paper stack on a flat surface.
Then reload the paper in the lower casset te, making
sure it is evenly aligned and rests below the
maximum paper mark.
10
Page 13

Make sure you are using the correc t paper siz e and
that your paper meets the specifications for this
printer.
If you do not find any jammed paper, rein sta ll th e
tray into the cassette.
4. Clear other paper jams that are indicated on the
control panel.
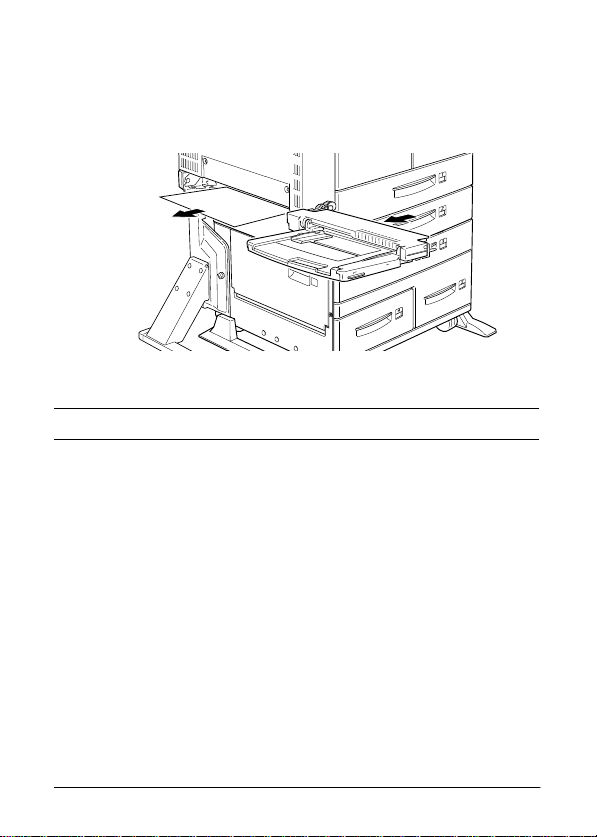
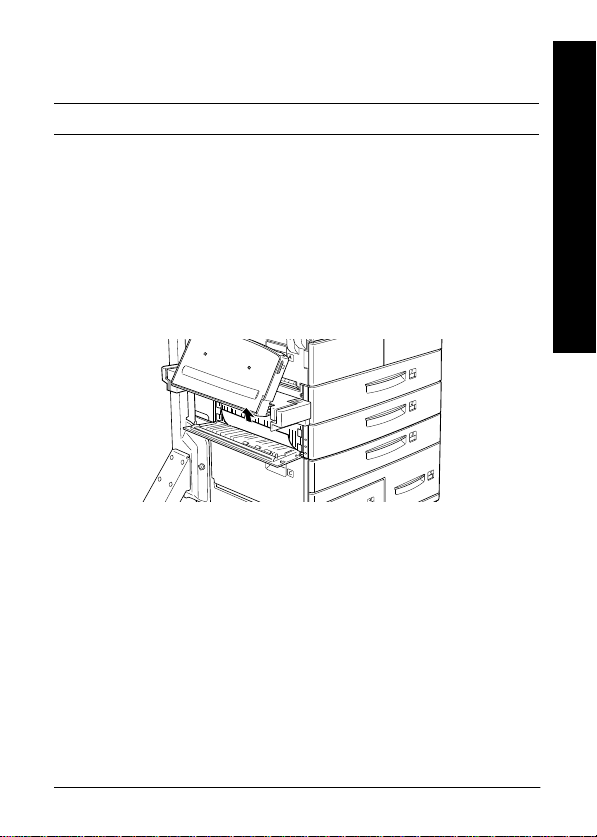
5. After that, if the control panel still indicates
LC5
, completely remove lower cassette 3, and pull
out both the lower cassette 4 and 5 as far as they will
go.
6. Carefully remove any sheets that have fed part way
into the printer.
Warning:
Be care fu l not to touch any of th e sharp pa rts
w
inside the printer.
LC4
or
Paper Jam Problems
7. Reinstall lower cassette 3 and push all the cassettes
back into the unit.
When the paper jam is cleared completely, the jammed
page’s print data is automatically reprinted.
11
Page 14

Jam E NV
(ENV is an option)
This message in dicates t hat ther e may be a paper jam i n
the optional Envelope Feeder.
1. Carefully pull out the jammed paper, along with all
the loaded envelopes.
2. Tap the edges of the envelop e stack on a flat surface.
Then reload the envelopes in the envelope tray,
making sure they are evenly aligned and rest below
the maximum paper mark.
Make sure you are using the correct envelope size
and that your envelopes meet the specif ications for
this printer.
3. Clear any other paper jams indicated on the control
panel.
4. After that, if the control panel still indicates
completely remove the envelope feeder.
Jam ENV
,
12
Page 15

5. Carefully remove any envelopes that have f ed part
way into the printe r .
6. Reinstall the removed feeder and reinsert the
envelopes.
Jam D
(D is part of an o p tion)
This message ind icates that paper jam may be o ccurring
inside of cover D, or the optional Multibin Unit.
1. Open cover D on left side of the optional Multibin
Unit.
2. Carefully remove any paper you find jammed in
cover D or the Multibin Unit.
Paper Jam Problems
13
Page 16

If you do not find any jammed paper , it may be in
other area.
3. Close cover D.
4. Check the bins for any jammed paper and remove it.
5. When the paper jam is cleared completely, the
jammed page’s print data is automatically
reprinted.
If the control panel indicates another area, clear the
paper jam there .
Jam D M (DM is part of an o p tion)
This message indicates that there may be a paper jam
inside cover DM, or the optional Duplex Unit. If the
optional Envelope Feeder is also installed, remove it
before opening the Duplex Unit.
14
Page 17

1. Open cover DM on left side of the Duplex Unit.
2. Open the trans par ent cove r insi de.
3. Carefully remove any paper you find jammed in
cover DM. If you canno t find any j ammed paper, it
may be in another area.
4. Close cover DM. If you removed the Envelope
Feeder, reinstall it.
Paper Jam Problems
5. When the paper jam is cleared completely, the
jammed page’s print data is automatically
reprinted.
If the con trol panel indicates anothe r area, c heck for
a paper jam there.
15
Page 18

Status and Error Messages
This sectio n contains a n alphabe tical lis t of stat us, error ,
and warning messages that appear in the co ntrol panel
display.
Can’t Print Duplex
The printer cannot work in double-printing feature.
Make sure you are usi ng an appropriate type and si ze
paper for the Duplex Unit.
Check Paper Type
The paper type setting in the printer driver, or in
SelecType, is different from the type of paper loaded in
the printer. Make sure t he correct type of paper is loaded
in the printer; then press the
the message.
Collate was disabled
The printer does not have sufficient memory to collate
print jobs. Only one set of copies will be printed. Add
more memory in your printer.
Press the
Continue
button to clear the message.
Continue
button to clear
16
Page 19

Cover A Open
Cover A, on the left side of the printer, is open. Pull up
the latch on cover A, then c lose the cover by pushing it
into the printer.
Warning:
Do not touch the hot areas indicated on the caution
w
labels inside cover A.
If you still cannot clo se the cover, t he imaging cartridge
may not be installed correctly. Reinstall the imaging
cartridge as described in “Replacing the Imaging
Cartridge” on page 28.
Cover B Open
Cover B, on the left side of the printer, is open. Pull up
the latch on cover B, then close the cover by pushing it
into the printer.
Cover C Open
Cover C, on the left side of the optional Large Capacity
Paper Unit, is open. Pull the latch on cover C, th en close
the cover by pushing it into the unit.
Cover D Open
Status and Error Messages
Cover D, on the left side of the optional Multibin Unit,
is open. Pull the latch on cover D, then close the cover
by pushing it into the unit.
17
Page 20

Cover DM Open
Cover DM, on the lef t side of the optio nal Duplex Unit,
is open. Pull the latch on cover DM and push back to
close.
DM Error xxx
An error has occurred on the optional Duplex Unit. Turn
off the printer, wait 5 seconds, then turn the printer back
on.
If the message still appears, call your dealer or a
qualified service person.
Duplex Mem Overfl ow
There is not enough memory for duplex printing. The
printer prints only on the top side and ejects th e pa per.
To correct this error, follow the directions below.
Auto Cont
If
Continue
press
ALT
and
Auto Cont
If
Off
is
in the SelecType Config menu, (1)
or (2) reset the printer by pressing the
Reset
at the same time.
is On in the SelecType Config menu, the
error is corrected automatically.
Face-down Full
The face-down tray is full wit h p rinted sheets. Remove
the sheets from the fac e-down tray and press
18
Continue
.
Page 21

Form Feed
When the printer is off line and data remains in the
printer’s memory, press the
out the data and clear the buffer. After printing,
appears on the display.
Image Cr tg ID E rror
The printer recognizes th at the imag ing cartridge
installed in your printer is not correct. Make sure you
are using the proper EPSON imaging cartridge and
replace it if needed. See “Replacing the Imaging
Cartridge” on page 28.
Image Crtg R/W Error
An error occurred with the ima ging c artridge. Rein stall
it correctly.
If the message still appears, replace it with a new
cartridge. See “Replacing th e Imaging Cartridge” on
page 28.
Image Optimum
The printer cannot print at the requested quality level
because of insuffic ient memory, and t he printer reduc es
the quality automatically so that it can continue printing .
Check to see if the printout is acceptable. If not, add more
memory (for a permanent solution) or temporarily set
Device Resolution to
Auto
in the driver.
Form Feed
Low (300 dpi)
button to print
and Page Protect to
Ready
Status and Error Messages
19
Page 22

Insert Imaging Crtg
The imaging cartridge is not correctly installed. See
“Replacing the Imagi ng Cartridge” on page 28 to
reinstall it.
Invalid Aux I/F Card
The printer cannot read the installed optional interface
card. Turn off the printer, then remove the card.
Reinstall a proper card.
Invalid Option
An option is installed incorrectly or is invalid for this
printer. See “Print er Options” on page 3-2 of your
Reference Guide
to make sure you are u sing options made
for this printer, or see “Installing and Removing
Options” on page 3-3 of your
Refere nce Guid e
the options.
Invalid ROM x
The ROM module in slot A or B is not installed c orrectly
or is invalid for this printer. Make sure you are using a
proper ROM module or reinstall the module. See
“Installing a memory module” on page 3-48 of your
Reference Guid e
for installation instructions.
to rei nst all
20
Page 23

Invalid Size LC x
You selected a paper size which is unavailable in lower
cassette x (1 to 5). Change the paper size or paper source
to continue the print job.
Jam xxx xxx xxx xxx
Paper is jammed in the tray, cassettes, covers, or other
devices indicated by xxx. Check fo r and remove the
jammed paper. See “Cleari ng Paper Jams” on page 2 f or
help with clearing the jam. See “Preventing Paper Feed
and Paper Jam Problems” on page 1 for advice on
preventing this problem.
Job Cancel
The printer job sen t to your pr in te r is canc e le d.
LC x Error yyy
An error occurred with the lower cassett e x (1 to 5).
Reset the printer by pressing the
SelecType
the printer, waiting 5 seconds, then turning it back on.
If the message still appears, contact your dealer or a
qualified service person.
buttons simultaneously, or by turning off
Continue
Status and Error Messages
and
21
Page 24

Manual Feed xxx yyy
Manual Feed mode is specified for the current print jo b.
Make sure the paper size indicated by yyy is loaded in
xxx paper source, then press
On Line
.
If you do not want to print this job in manual mode,
Continue
press
. The printer feeds paper according to
the Paper Source setting.
For detailed inf ormat ion on t he M anual F eed mode, se e
“Printing one she e t at a time” on page 1-12 of your
Reference Guid e
.
Mem Overflow
The printer has insufficient memory available for the
current task. To correct the erro r, press
message remains, press
Reset
.
Continue
You can also clear this error by turning the printer off
and back on again. However, it may be necessary to
reduce the number or size of fonts, reduc e the number
or size of graphics, lower the resolution, or add more
memory to the printer.
Menus Locked
SelecType, which is usually ac cessible from the printer’s
control panel, has been disabled. This message can be
cleared in the Remote Control Panel utility by clearing
Panel Lock
the
check box on the Panel menu. To change
this setting, consult your printer’s administrator.
22
. If the
Page 25

Multib in E rror xxx
An error occurred with the optional Multib in Unit. Turn
off the printer, wait 5 seconds, then turn it back on.
If the message still appears, contact your dealer or a
qualified service person.
Multib in x F u ll
The bin x (1 to 10) on the optional Multibin Unit is full
with printed sheets. Remove the sheets from bin x and
Continue
press
Need Memory
Your printer lacks the amount of the printer memory
required to print your print job. Reduce the images or
texts on the print job, or install an optional memory
module. See “Memory modules” on page 3-47 of your
Reference Guid e
Offline
The printer is not ready to print. Press the
button.
Outbin Select Error
The printer cann o t feed pa pe r to th e ou tp ut tray yo u
selected, because of a paper size discrepancy or other
problem. The pr inted sheet is fed to the face-do wn tray.
.
.
On Line
Status and Error Messages
23
Page 26

Paper Out xxx yyy
There is no paper in the specified paper source (xxx).
Load paper of the indicated si ze (yyy) into the paper
source. See “Basic Printing Operations” on page 1-4 of
Reference Guid e
your
3-57 of your
Reference Guid e
or “Using the Options” on page
for instructions on loading
paper.
Paper Set xxx yyy
The paper loaded in the paper source (xxx) does not
match the required pap er size (yyy). Replace the paper
with the correct size of paper and press
Continue
Print Overr un
The time required to process data exceeds the print
engine speed because the volume of data is too great.
Continue
Press
to resume printing. If this message
appears agai n, change the Page Protect setting in
SelecType Config Menu.
Ready
The printer is ready to receive data and print.
.
Reset
The printer’s current interface has been reset and the
buffer is cleared. However, other interfaces are still
active and retain their settings and data.
24
Page 27

Reset All
All printer settings have been reset to the user default
configuration, or the last settings that were saved.
Reset to Save
You have changed the SelecType setting but the new
setting is not activated immediately after exiting
SelecType. To activate the new setting, do one of the
following: (1) exit SelecType by pressing
On Line
print job is finished), or (2 ) reset the pri nter by pressing
ALT
RAM Check
The printer is checking the RAM.
ROM Check
The printer is checking the ROM.
Self Test
The printer is performing a quick internal check.
(the new setting is activated after the current
Reset
and
at the same time.
Continue
or
Status and Error Messages
25
Page 28

Service Req xyyy
A controller error or a print eng i ne error has been
detected. Write down the error number listed on the
display and turn off the printer. Wait at least five
seconds and then turn it back on. If the error message
still appears, turn off the printer, unplug the power cord,
and contact a qualified service person.
Set ENV Tray
The optional Envelope Feeder, is not installed or is
installed incorrectly. Install or reinstall the optional
Envelope Feeder. See “Installing the Envelope Feeder”
on page 3-2 9 of your
Reference Gu id e
. Then turn off the
printer, wait 5 seconds, and turn the printer back on.
Set MP Tray
The MP tray is not installed or is installed incorrectly.
Install or reinstall the MP tray. See “Removing the
Envelope Feed er” on page 3-30 of your
Reference Guide
Then turn off the pri nt er, wait 5 secon d s, and turn the
printer back on.
Standby
The printer is in its low power state; however, it is still
on line if the On Line light is on.
.
26
Page 29

Toner Low
The printer is almos t ou t of ton er . Pre pa re a new
imaging cartridge to replace the current one with.
Toner Out
You must replace t he imaging car tridge. See “Rep lacing
the Imaging Cart ri dge ” on page 28.
Continue
Press
Turn Paper LC x
The paper in the indicated lower cassette has been
loaded incorrectly. See “Loading p aper in the lower
cassettes” on page 1-6 of your
reinsert the paper correctly.
Warming Up
The printer is warming up.
to print one more pa ge.
Reference Guide
Status and Error Messages
, and
27
Page 30

Replacing the Imaging Cartridge
If your printed images bec ome faint, enter the SelecType
Setup menu and use the Toner functi on to find out
approximately how much to ner remain s in t he imaging
cartridge.
Simply count the asterisks between the E (empty) and
the F (full) on the display. Ea ch asterisk represent s about
25% o f the total tone r capacity. If you see only on e
asterisk on the display indicating that there is less th an
25% toner left, prepare a replacement imaging cartridge .
Replace the cartridge with the S051060 imaging
cartridge even if the cart ridge you remove has a different
part number. Orde r the S051060 cartridge t hat is
specially designed for your hig h-quality 600-dpi printer.
1. Make sure the printer is turned off.
2. Gently open the p rinter cover. Remove the imaging
cartridge by pulling the tab on the front of the
cartridge up and towar d you.
3. Dispose of the used imaging cartridge as a
nonburnable i tem.
Warning:
Do not dispose of used imaging cartridges in fire,
w
as they can expl od e and caus e inj ury . Dis pose of
them according to local regulations.
Caution:
Do not turn the ima gin g c artri dge ups id e down .
c
Do not ex pos e t he im ag ing c ar trid ge to li ght a ny
longer than necessary.
28
Page 31

4. While holding the new imaging cartridge
horizontally, gently shake it a few times to
distribute the toner evenly.
5. Remove the attached sheet.
6. Open cover A by pulling the latch, then open the
front cover.
latch
Warning:
When op e ni n g the print er , do no t to u c h the hot
w
areas ind icat ed on the c au tion l ab els in si de cover
A.
Status and Error Messages
29
Page 32

7. Holding the grip and the tab on the imaging
cartridge, insert it into the printer until it is housed
completely.
8. Make sure the tab is pushed down and flush with
the imaging cartridge. Otherwise, you cannot c lose
the front cover or cover A.
tab
9. Slowly pull the clear seal all the way out with firm,
even force.
30
Page 33

10. Release the front cover; it will close automatically.
11. Close cover A by p ushing i t up and into t he printer .
Warning:
Do not touch the hot areas indicated on the caution
w
labels inside cover A.
Caution:
Never tra nsport the pr inter with t he imaging car tridge
c
installed.
Replacing Imaging Cartridge
31
Page 34

32
Page 35

 Loading...