

Page 1
Page 2

FCC Compliance Statement
For United States Users
This equipment has been tested and found to comply with the limits for a Class B digital
device, pursuant to Part 15 of the FCC Rules. These limits are designed to provide rea sonable
protection against harmful inter ference in a residential installation. This equipment
generates, uses and can radiate radio frequency energy and, if not installed and used in
accordance with the instructions, may cause harmful interference to radio and television
reception. Howe ve r , th ere is no guarantee that interference will not o ccu r in a particular
installation. If this equipment does cause interference to radio and televi sion reception, which
can be determined by turning the equipment off and on, the user is encouraged to try to
correct the interference by one or more of the following measures:
Reorient or relocate the receiving antenna
❏
Increase the separation between the equipment and receiver
❏
Connect the equipment into an outlet on a circuit different f r om that to which the
❏
receiver is connected
Consult an experienced radio/TV technician for help.
❏
WARNING
The connection of a non-shielded equipment in terface cable to this eq uipment will invalidate
the FCC Certification of t his device a nd may cause interf erence levels which ex ceed the limits
established by the FCC for th is equipment. It is the responsibility of the user to obtain an d
use a shielded equipment interface cable with this device. If this equipment has more than
one interface connector, do not leave cables connected to unused interfaces.
Changes or modifications not expressly approved by the manufacturer could void the user’s
authority to operate the equipment.
For Canadian Users
This digital apparatus does not exceed the Class B limits for radio noise emissions from digital
apparatus as set out in the radio interference regulations of the Canadian Department of
Communications.
Le présent appareil numérique n’émet pas de bruits radioélectriques dépassant les limites
applicables aux appareils numériques de Classe B prescrites dans le règlement sur le
brouillage radioélectri qu e é dicté par le Ministère des Co mmunications d u Can ada.
Page 3

®
Laser Printer
All rights reserved. No part of this publication may be reproduced, stored in a retrieval
system, or transmitted in any form or by any means, mechanical, photocopying, recording,
or otherwise, without the prior written permissi on of SEIKO EPSON CORPORA T ION . No
patent liability is assumed with respect to the us e of the information c ontained herein. Neither
is any liability assumed for damages resulting fr om the use of the information contained
herein.
Neither SEIKO EPSON CORPORATION nor its affiliates shall be liable to the purchaser of
this product or third parties for damages, losses, costs, or expenses incurred by purchaser or
third parties as a result of: accident, misuse, or abuse of this product or unauthorized
modifications, repairs, or alterations to this product, or (excluding the U.S.) failure to strictly
comply with SEIKO EPSON CORPORATION's operating and maintenance instructions.
SEIKO EP SON CORP ORATI ON shall not be li abl e agains t any d amages o r probl ems ar ising
from the use of any options or any consumable products other than those designated as
Original Epson Products or Epson Approved Products by SEIKO EPSON CORPORATION.
EPSON and EPSON ESC/P are registered trademarks and EPSON ESC/P 2 is a trademark
of SEIKO EPSON CORPORATION.
Microsoft, Windows, Windows NT, and MS-DOS are registered trademarks of Microsoft
Corporation.
NEST Office Kit Copyright © 19 96, Novell, Inc. All Rights Reserved.
General Notice: Other product names used herein are for identification purposes only and may be
trademarks of their respective owners. EPSON disclaims any and all rights in those marks.
Copyright © 1998 by SEIKO EPSON CORPORATION, Nagano, Japan.
Administrator’s Guide
Page 4

Contents
Introduction
About This Guide . . . . . . . . . . . . . . . . . . . . . . . . . . . . . . . . . . . . . . .2
Terms and Concepts . . . . . . . . . . . . . . . . . . . . . . . . . . . . . . . . . . . . .3
Supported Network Protoc o ls and Fea tures. . . . . . . . . . . . . . . . .4
Environment for EPSON Net!2 for Intranet . . . . . . . . . . . . .6
Operation Modes for Novell NetWare. . . . . . . . . . . . . . . . . . . . . .6
Chapter 1
System Requirements . . . . . . . . . . . . . . . . . . . . . . . . . . . . . . . . . . . .1-2
Installing the Printer Driver. . . . . . . . . . . . . . . . . . . . . . . . . . . . . . .1-3
Installing EPSON Status Monitor 2. . . . . . . . . . . . . . . . . . . . . . . . .1-4
Installing Screen Fonts . . . . . . . . . . . . . . . . . . . . . . . . . . . . . . . . . . .1-4
Making Basic Driver Settings. . . . . . . . . . . . . . . . . . . . . . . . . . . . . .1-5
Making Remote Control Pa nel Settings . . . . . . . . . . . . . . . . . . . . .1 - 9
Accessing Online Help . . . . . . . . . . . . . . . . . . . . . . . . . . . . . . . . . . .1- 11
Installing the Printer Software
For Windows 95 / 98 and Windows NT 4.0 users . . . . . . .1-6
For Windows 3.1 and Windows 3.11
for Workgroups users . . . . . . . . . . . . . . . . . . . . . . . . . . . . .1-7
For Windows NT 3.51 user s . . . . . . . . . . . . . . . . . . . . . . . . . .1-8
Accessing online help from the Windows printer driver. .1-11
Accessing online help from Windows applications . . . . . .1-11
ii
Page 5

Chapter 2
Ethernet Operation. . . . . . . . . . . . . . . . . . . . . . . . . . . . . . . . . . . . . . 2-1
Connecting the Network Device to the Network . . . . . . . . . . . . 2-3
Setting the IP Address on the Printer’s Control Panel . . . . . . . . 2-5
Changing the IP Address Using EPSON Net!2 for Intranet . . . 2-6
Setting the IP Address Using the ARP Comm a nd . . . . . . . . . . . 2-9
Setting Up EPSON Net!2 for Intranet . . . . . . . . . . . . . . . . . . . . . . 2 -11
Connecting to the Network
LEDs . . . . . . . . . . . . . . . . . . . . . . . . . . . . . . . . . . . . . . . . . . . . . 2-1
Printing a status sheet. . . . . . . . . . . . . . . . . . . . . . . . . . . . . . . 2-2
Initializing and resetting the network dev ice . . . . . . . . . . . 2-2
Making the interface connection setting . . . . . . . . . . . . . . . 2-4
Setting a password . . . . . . . . . . . . . . . . . . . . . . . . . . . . . . . . . 2-11
Chapter 3
Configuring the Netwo rk D evice for NetWare 3.1x . . . . . . . . . . 3-2
Configuring the Netwo rk D evice for NetWare 4.1x . . . . . . . . . . 3-10
Configuring the Netwo rk D evice for TCP/IP . . . . . . . . . . . . . . . 3-25
Settings for Windows
Instructions for using NetWare. . . . . . . . . . . . . . . . . . . . . . . 3 -2
Setting up the printer envi ro nment with PCONSOLE . . . 3-3
Configurin g the network de vice using EPSON Net!2
for Intranet . . . . . . . . . . . . . . . . . . . . . . . . . . . . . . . . . . . . . . 3-7
Instructions for using NetWare. . . . . . . . . . . . . . . . . . . . . . . 3 -10
Setting up the environment with Bindery Emulation . . . . 3-12
Setting up the environment with ND S mo de . . . . . . . . . . . 3-15
Configurin g the Network de vice using EPSON Net!2
for Intranet . . . . . . . . . . . . . . . . . . . . . . . . . . . . . . . . . . . . . . 3-22
Installing LPR software in Window s NT 3.51. . . . . . . . . . . 3-25
Installing LPR software in Window s NT 4.0. . . . . . . . . . . . 3-26
Configurin g the network de vice using EPSON Net!2
for Intranet . . . . . . . . . . . . . . . . . . . . . . . . . . . . . . . . . . . . . . 3-26
Setting up the printer in Windows 95 /98 . . . . . . . . . . . . . . 3-27
Setting up the printer in Windows NT 3 .5 1 . . . . . . . . . . . . 3 -28
Setting up the printer in Windows NT 4 .0 . . . . . . . . . . . . . 3 -30
FTP Printing . . . . . . . . . . . . . . . . . . . . . . . . . . . . . . . . . . . . . . . 3-32
iii
Page 6

Configuring the Network Device for NetBIOS . . . . . . . . . . . . . . .3-33
Configurin g the network de vice using EPSON Net!2
for Intranet. . . . . . . . . . . . . . . . . . . . . . . . . . . . . . . . . . . . . . .3-33
Setting up your printer in Win dows 95/98 . . . . . . . . . . . . .3-35
Setting up the printer in Windows NT 3 .5 1 . . . . . . . . . . . . .3-36
Setting up the printer in Windows NT 4 .0 . . . . . . . . . . . . . .3-36
Using the NET USE command to set up the printer . . . . . .3-37
Configurin g the Network De vice for AppleT alk
Using EPSON Net!2 for Intranet . . . . . . . . . . . . . . . . . . . . . . . . .3-38
Chapter 4
Applicable Systems . . . . . . . . . . . . . . . . . . . . . . . . . . . . . . . . . . . . . .4-2
Configurin g the Network De vice for AppleT alk
Using EPSON Net!2 for Intranet . . . . . . . . . . . . . . . . . . . . . . . . .4-2
Chapter 5
Applicable Systems and Protoc ols . . . . . . . . . . . . . . . . . . . . . . . . .5-1
TCP/IP Printing. . . . . . . . . . . . . . . . . . . . . . . . . . . . . . . . . . . . . . . . .5-1
SMB Printing . . . . . . . . . . . . . . . . . . . . . . . . . . . . . . . . . . . . . . . . . . .5 -7
Settings for Macintosh
Choosing the printer on Macintosh . . . . . . . . . . . . . . . . . . . .4-5
Settings for OS/2
Configurin g the network de vice using EPSON Net!2
for Intranet. . . . . . . . . . . . . . . . . . . . . . . . . . . . . . . . . . . . . . .5-1
Setting up the printer. . . . . . . . . . . . . . . . . . . . . . . . . . . . . . . .5-4
Configurin g the network de vice using EPSON Net!2
for Intranet. . . . . . . . . . . . . . . . . . . . . . . . . . . . . . . . . . . . . . .5-7
Setting up the printer. . . . . . . . . . . . . . . . . . . . . . . . . . . . . . . .5-9
iv
Page 7

Chapter 6
Setting Up Different UNIX Systems Using the lpr Command . 6-1
Configuring the Network Dev ic e Using EPSON Net!2
for Intranet. . . . . . . . . . . . . . . . . . . . . . . . . . . . . . . . . . . . . . . . . . . 6-9
Settings for UNIX
Setting up with SunSoft Solaris 2.4 or hight e r . . . . . . . . . . 6-2
Setting up with SunOS 4.1.4 or higher . . . . . . . . . . . . . . . . . 6 -3
Setting up with IBM AIX 3.2.5 or higher . . . . . . . . . . . . . . . 6-4
Setting up with HP-UX 9.05 or hi gher . . . . . . . . . . . . . . . . . 6-5
Setting up with SCO UNIX 4.2 or higher (Open Server). . 6-6
Using the ftp command . . . . . . . . . . . . . . . . . . . . . . . . . . . . . 6-8
Chapter 7
Environment for EPSON Status Monitor 2. . . . . . . . . . . . . . . . . . 7-2
Installing EPSON Status Monitor 2 . . . . . . . . . . . . . . . . . . . . . . . . 7-7
Selecting a Printer to Monitor. . . . . . . . . . . . . . . . . . . . . . . . . . . . . 7-12
Making Status Monitor Settings. . . . . . . . . . . . . . . . . . . . . . . . . . . 7-15
Starting EPSON Status Monito r 2 . . . . . . . . . . . . . . . . . . . . . . . . . 7-16
Basic Operating Procedure . . . . . . . . . . . . . . . . . . . . . . . . . . . . . . . 7-17
Background Monitoring Icon and Status Alert . . . . . . . . . . . . . . 7-29
Stopping Monitoring . . . . . . . . . . . . . . . . . . . . . . . . . . . . . . . . . . . . 7-31
Uninstalling EPSON Status Monitor 2 . . . . . . . . . . . . . . . . . . . . . 7-32
Tips for Using EPSON Status Mo nitor 2. . . . . . . . . . . . . . . . . . . . 7-36
EPSON Status Monitor 2 (Windows only)
Windows 95/98 . . . . . . . . . . . . . . . . . . . . . . . . . . . . . . . . . . . . 7-13
From Windows 95/ 9 8 an d N T 4.0 . . . . . . . . . . . . . . . . . . . . 7-16
From Windows NT 3.51 . . . . . . . . . . . . . . . . . . . . . . . . . . . . . 7-16
Main window. . . . . . . . . . . . . . . . . . . . . . . . . . . . . . . . . . . . . . 7-19
Adding uninstalled network printers . . . . . . . . . . . . . . . . . 7-24
Getting detailed information about printer status . . . . . . . 7-25
Setting monitoring preferences . . . . . . . . . . . . . . . . . . . . . . . 7-28
Background monitoring icon. . . . . . . . . . . . . . . . . . . . . . . . . 7-29
Status Alert. . . . . . . . . . . . . . . . . . . . . . . . . . . . . . . . . . . . . . . . 7-30
From Windows 95/ 9 8 an d N T 4.0 . . . . . . . . . . . . . . . . . . . . 7-33
From Windows NT 3.51 . . . . . . . . . . . . . . . . . . . . . . . . . . . . . 7-35
Controlling the packet traffic on the network. . . . . . . . . . . 7-36
Monitoring printers beyond routers. . . . . . . . . . . . . . . . . . . 7-36
About uninstalled network pr inters. . . . . . . . . . . . . . . . . . . 7-37
v
Page 8

Chapter 8
General Problems . . . . . . . . . . . . . . . . . . . . . . . . . . . . . . . . . . . . . . .8- 1
Problems Specific to Your Network Environment. . . . . . . . . . . .8-2
Problems Using EPSON St a tus Mo nitor 2. . . . . . . . . . . . . . . . . . .8-6
Troubleshooting
Windows NT Env ironment. . . . . . . . . . . . . . . . . . . . . . . . . . .8-2
Windows 95/98 Environment . . . . . . . . . . . . . . . . . . . . . . . .8-3
NetWare Environment. . . . . . . . . . . . . . . . . . . . . . . . . . . . . . .8-4
Macintosh Environment . . . . . . . . . . . . . . . . . . . . . . . . . . . . .8-5
Appendix A
Using a dial-up network in ea ch mode . . . . . . . . . . . . . . . . . . . . .A-1
When there is a primary server at dial-up destination . . . . . . . .A-2
When the local network has a file server . . . . . . . . . . . . . . .A-2
When the local network has no file server . . . . . . . . . . . . . .A- 3
When there is a primary server in the local network. . . . . . . . . .A-4
Appendix B
Network Software . . . . . . . . . . . . . . . . . . . . . . . . . . . . . . . . . . . . . . .B-1
Network Connectors. . . . . . . . . . . . . . . . . . . . . . . . . . . . . . . . . . . . .B -1
Instructions for Dial-Up Network
Specifications
Index
vi
Page 9

vii
Page 10

Introduc tion
The EPL-N4000 printer contains a parall el interface connect or, an
Ethernet int erface connector, a nd an optional Type B interface slot
for use on your network. This manual covers information about
the network device that is built-in to your printer and the EPSON
Net!2 for Intranet utility that configures it for network printing.
For inform ation about the printer, see yo ur printer guide .
The network device automatically selects the correct interface
when it connects to a network. In addition, it supports and
automatically selects IEEE 802.2, IEEE 802.3, Ethernet II, and
Ethernet SNAP network protocols.
Because the network device supports multiple protocols and
automatically detects the protocols on your network, you can
print from Microsof t
®
OS/2 applications.
IBM
Use EPS O N Net!2 for In tranet, the setup utility that runs on the
browser, to quickly and easily configure the ne twork device to
use protocols such as Novell
Microsoft TCP/IP , Eth erTalk
IP for OS/ 2 Warp and Warp Connect.
®
Window s®, Apple® Macintosh®, UNIX, and
®
NetWare®, Microsoft IPX/SPX,
®
, NetBEUI, and Net BIOS and TCP/
Note:
The EPSON Net!2 for Intranet utility configures the network device to
work only with the protocols that exist on your network. This does not
imply that you can use all of the above mentioned protocols in your
network or operating system. The protocols that the network device can
use may vary depending on the operating systems used and netwo rk
configuration.
The following are the feature of the network device and EPSON
Net!2 for Intranet.
❏ The network device
100BASE-TX when it is connected to a network.
automatically selects either 10BASE-T or
Introduction
1
Page 11

❏ After setting the IP address for the network device on your
printer’s control panel, you can configure the network device
for TCP/IP, NetWare, AppleT alk, or NetBIOS usin g EPSO N
Net!2 for Intranet.
❏ You can select to either enable or disable the protocols from
EPSON N et!2 for Intranet.
❏ Suppo rte d browsers are Microsoft Internet Explorer versio n
4.0 or higher and Netscape Navigator version 3.02 or higher.
About This Guide
This guide contains information about using your printer on a
network, including installing the printer software and making
network sett ing s.
Note:
❏
This manual is written for network administrators, and many of the
steps included here require detailed network knowledge and
administrator rights.
❏
The term network administrator refer to the person responsible for
maintaining the customer netw or k. “Administrator” is
synonymous wit h “Supervisor” in this manual.
Cautions and Notes
Cautions
c
Notes
contain important information and useful tips on the operation of
the network devi ce.
2
Introduction
must be observed to avoid damage to your equ ipme nt.
Page 12

Term s and Concepts
The follow i ng terms and concepts are defined here to help you
understand this guide .
A
configu r ation
of a device.
with protocols available on a network.
A
file serve
as a print server.
A
print queue
the print server sends the job to the assigned printer.
A
print server
A
remote printer
network, but under th e control of a Ne tWare print server.
EtherTalk
Ethernet transmissions.
A
protocol
exchanged through a network. There are many different la yers of
protocols for different aspects of hardware and software
operation. Computers and software cannot communicate with
each other using different protocols.
is a prepared set of conditions for proper operati on
Configuring
r stores data required for the network device to operate
is an area where a print job is stored as a file, until
moves jobs from print queues to printers .
is a shared printer connected elsewhere on the
is AppleTalk’s communication protocol governing
is a rule that controls how data or information is
the network device is to prepare it to work
TCP/IP
layer of protocols that prov ides communicat ion s bet ween nodes
on a network.
ftp
lpd
(Transmission Control Protocol/Internet Protocol) is a
is a TCP/IP application protocol for file transfer.
is a TCP/IP remote printing protocol application.
Introduction
3
Page 13

Supported Network Protocols and Features
The network device supports the following network protocols
and features. It cannot us e protocol s that are not availabl e or are
not installed in your operating system.
NetWare in Windows 3.1, Windows 95/98, Windows NT 3.51/4.0
❏ Supports IPX/SPX protocols that are configured for N etWare
3.x, NetWare 4.x, and IntranetWare . (Supports both Bindery
emulation and NDS mode on NetWare 4 .x and IntranetWare.)
❏ Uses Microsoft IPX with Windows 95/98, and Windows NT
3.51/4.0 for NetWare.
❏ Provides the same func tions as NetWare’s PSERVER program
in print server mode and RPRINTER in remote printer mode.
❏ Services up to 32 print queue s on up to 8 file servers in print
server mode.
❏ It is easy to confi g ure the network device for NetWare using
EPSON N et!2 for Intranet.
Windows
❏ Supports Microsoft TCP/IP in Windows NT 3.51/4.0.
❏ Supports Microsoft Windows Network (NetBIOS over TCP/
IP and NetBEUI).
❏ It is easy to configure and change the IP address and other
settings with EPSON Net!2 for Intranet.
4
Introduction
Page 14

Macintosh
❏ Macintosh OS
Supported System 7.1, 7.5.3, 7.5.5, 8.0, 8.1
❏ Supports EtherTalk Phase II communication
❏ Supports OpenTransport 1.1.1, 1.1.2, 1.2
❏ Supports AppleTalk
❏ It is easy to set the AppleTalk zone, rename the printer, and
change other settings with EPSON Net!2 for Intranet.
OS/2
❏ Supports IBM OS/2 Warp (OS/2 Warp Connect and OS/2
Warp Serv e r).
❏ Supports TCP/ IP, NetB EUI, and NetBIOS over TCP/IP.
UNIX
❏ Suppo rt s m ost ma jor c omm and s, i ncl ud ing lp r, f t p, and pi ng
over TCP/IP.
❏ Requires no setup utility. The IP address is allocated by
sending the arp and ping commands directly from the host
computer.
❏ Supported systems:
SunSoft Solaris 2.4 or higher
Sun OS 4.1.4 or higher
IBM AIX 3.2.5 or higher
HP/UX 9.05 or higher
SCO UNIX 4.2 or higher
Introduction
5
Page 15

Environment for EPSON Net!2 for Intranet
You can configure th e network device for TCP/IP , N e tWare,
AppleTalk, and NetBIOS using EPSON Net!2 for Intranet, the
utility that runs on the brow ser.
❏ Applicable operating systems:
Windows 95 / 98
Windows NT 3.51 Server & Workstation
Windows NT 4.0 Server & Workstation
Macintosh System 7.1, 7.5.3, 7.5.5, OS 8.0, OS 8.1
❏ Applicable browser:
Microsoft Internet Explorer version 4.0 or later
Netscape Navigator version 3.02 or later
Operation Modes for Novell NetWare
If you are setting up the network device for use in a NetWare
environment, you will need to determine whether you want to set
it up in Print Server mode or Remote Prin ter m o de. For more
details, fi nd the appropriate chapter for your op e rating system
and read the NetWare section in that chapter. The factory default
operating mode for the network device in a NetWare
environment is Print S erver mode.
6
Note:
❏
If you use the network device in a NetWare and WAN (Wide Area
Network) environm ent and connect it to a general phone line
(including I SDN), t he n e twork device may open the dial-up-router
and packets may be sent to the WA N . To avoid this problem and
extra phone fees, see the instructions in Appendix A.
❏
The factory default NetWare condition of the network device is
disabled. You must configure t h e network device with EPSON
Net!2 for Intranet to work on a N etWa re network.
Introduction
Page 16

Print Server mode
In Print Server mode, the network device performs all print server
functio ns and can se rvice up to 32 queues and 8 file servers. No
VAP (Value-Added Process) or NLM (NetWare Loadable
Module) is required. When you send a print job from your
application, the file server assigns the print job to a print queue.
When the corresponding printer is ready, the print server (which
is the printer) requests the jobs from the file server.
The network device operates like any Novell NetWare print
server, servicing the assigned queues in a round robin fashion. In
queues of the same priority, the network devi ce servic es the f ir st
job in a queue before those in a lower priority queue. The network
device also supports encrypted passwords.
This mode provides the highest printing speed while retaining
the control, security , and convenience of a NetWare print server.
Remote Printer mode
As a remote printer, the network device emulates a workstation
running Novell’s RPRINTER program, and operates under the
control of a Novell NetWare print server. The print server can be
either a dedicated workstation running PSERVER or a file server.
At power-up, the interface will attempt to attach to a print server
(elsewhere on the netw ork) and ac t as a partic u lar pri nter of that
print server. To do th is , it needs to know which print server to
attach to, and which printer of that print server to use. This is
similar to the need to specify these parameters in the RPRINTER
command line (or to interactivel y choose them from the
RPRINTER progr a m).
You can set these parameters on the network device with EPSON
Net!2 for Intranet. Once the network device is set up, it will store
these settings, which m eans that you w ill normally only need to
do this once at the time of installation. However, as with all Novell
remote printers, the n etwork device’s print spe e d i s slower in
Remote Printer mode than in Print Server mode.
Introduction
7
Page 17

The main advantage o f Remote Prin te r mode is that connection
to a file server is not req uired, makin g this mode de sirable in
installations with limited available file server connections. Each
NetWare pri nt server can supp ort up to 16 printers for NetWare
3.1x and up to 255 for NetWare 4.1x and requires only one file
server connection.
Note:
In Remote Printer mode, user account is temporarily used when turning
on the printer. If there is no room in the user account, turn the printer
on before connecting the client to the network.
8
Introduction
Page 18

Chapter 1
Installing the Pr int e r So ftwa r e
The CD-R OM that comes with your pri nte r contains u ti lity
program s a nd a printer dri ver for Micros oft
Windows 3.11 fo r Workgroups, Wind ows 95, Windows 98, Win dows
®
3.51, and NT 4.0.
NT
After you have connected the printer to a computer via the
parallel port or to the network using either the network device or
the optional interface card, install the printer driver. The printer
driver is s oftware that runs, or “dr ives”, y our print er, tran slati ng
the software’s fonts, margin settings, etc. into commands that can
be understood by the printer.
With the driver software supplied with the printer, you can make
settings such as paper si ze, paper source, ori entation, and output
tray. You can also refer to the printer driver’s onl ine help for
detailed information about printer settings.
In addition to installing th e printer soft ware in the administ rator’s
compu ter, the administrator must also instruct the us ers how to
install the printer software on their own machine s.
®
Windows® 3.1,
1
Installing the Printer Software
1-1
Page 19

System Requ irements
Your computer must meet the following requirements in order to
be able to us e the Windows driver includ e d with the prin te r:
❏ Windows 3.1, Windows for Workgroups (3.11):
i386/16MHz or higher, 16MB RAM or more, 10MB or more
hard disk space, VGA greater than 640
❏ Windows 95/98:
i486/25 MHz (for W indows 95) , i4 86/66 MHz (for Wi ndows
98), or higher, 16MB RAM or more, 10MB or more hard disk
space, Greater than 800
× 600 pixel monitor
❏ Windows NT 3.51/4.0:
i486/25 MHz or higher, 16MB RAM or more, 20MB or more
hard disk space, Greater than 800
× 480 pixel monitor
× 600 pixel monitor
1-2
Installing the Printer Softwa re
Page 20

Installing the Printer Driver
Follow these steps to install the printer driver:
1. Make sure the printer is turned off and Windows is running.
2. Insert the CD-ROM that comes with your printer into yo ur
CD-ROM drive.
3. If you are using Wi ndows 3.1, Windows 3.11 f or Workgroups
or Windows NT 3 .51, make sure the Program M ana ger
window is open; then choos e
are using Win dows 95, Windows 98, or Windows NT 4.0, click
Start
, then choose
Run
.
Run
from the File menu. If you
1
4. Type
5. In the dialog box that appears, double-click
6. In the dialog box that ap pears, select
7. When installation is complete, click OK.
The printer driver is now installed on your computer.
D:\EPSETUP.EXE
appropriate drive letter).
Driver
; or you can also in stall by selecting
and then clicking the arrow at the top right.
The printer driver is installed automatically.
, then click OK (or substitute the
Install Printer Driver
EPL-N4000
Install Printer
and click OK.
Installing the Printer Software
1-3
Page 21

Installing EPSON Status Monitor 2
To learn how to install EPSON Status Monitor 2, see page 7-7.
Note:
The EPSON Remote Control Panel utility is automatically installed in
your computer when you install EPSON S ta tus Monitor 2. For
information about EPSON Remote Control Panel utility, see "Making
Remote Control Panel Settings" on page 1-9 and online help.
Installing Screen Fonts
Follow these steps to install the screen fonts:
1. Make sure Windows is running and the printer is turned off.
2. Insert the CD-RO M that comes with your printer into your
CD-ROM dri ve D (or E).
3. If you are using Wi ndows 3.1, Windows 3.11 for Workgroups
or NT 3.51, make sure the Progr am Manager windows is open;
then choose
95/98, or NT 4.0, click
Run
on the File menu. If you are using Windows
Start
, then choose
Run
.
4. Type
5. [Excluding Windows NT 3.51 users]: In the dialog box that
6. Follow the on-screen instructions.
The screen fonts are now installed on your computer.
1-4
Installing the Printer Softwa re
D:\EPSETUP.EXE
appears, double-click
install by selecting
the arrow at the top right.
[For Windows NT 3.51 users only]: In the dialog box that
appears, double-cli ck
by selecting
at the top right.
Install Screen Fonts
Install Font Manager
E:\EP S ETUP.EXE
(or
Install Font Manager
and then clicking
Install Screen Fonts
and then clicking the arro w
; or you can install
); the n click OK.
; or you can
Page 22

Making Basic Driver Settings
Before y ou start printi ng, you shoul d make sure t hat the driver
settings match your document requirements . While many
Windows applications override the printer settings made with the
driver, some do not.
Be sure to check the following:
❏ Paper The size of the paper loaded in the
printer
❏ Orient atio n The dir ecti on of prin ting on the page
(portrait or landscape)
❏ Print Quality The print resolution in dots per inch
(dpi)
❏ Paper Source Auto Selection, MP/ENV Tray,
Lower Cassette 1, Lower Cassette 2,
or Lower Cassette 3 to 5 (if installed)
❏ Output Tray Face-down Tray, Face-up Tray,
Mailbox n, Sorter, Stacker, or
Multiple Sorter (The list of the output
tray will be different depending on
the mode you select in the Multibin
Mode Settings dialog box.)
1
❏ Printer Memory The a mount of m e mory installe d in
the printe r
(standard memory is 16 MB).
Installing the Printer Software
1-5
Page 23

For Windows 95 / 98 and Windows NT 4.0 users
Follow these steps to make the required settings:
1. Click the
2. Right-click your printer icon and choose
3. Click the
Equipment
4. Set the amount of installed memory in your printer.
5. If you have install ed the optiona l Large Capacity Paper Unit,
highlight the word
allow you to select Lower Cassettes 3 to 5 as paper sources.
6. Select the optional output tray. When you select
the
7. Click the
Multibin Unit Settings in the driver to the Multibin Unit
Settings in SelecType and the Remote Control Panel.
8. [For Windows NT 4.0 users only]: You need to right-click
your printer icon again and choose
9. Click the
Start
button, p o int to
Options
Multibin Mode Settings
Multibin Mode Settings
Basic Settings
tab (in Windows 95/98) or
(in Windows NT 4.0).
Large Capacity Paper Unit
tab.
Settings
button will be available.
; then click
Properties
button to match the
Document Defaults
Printers
.
Option
. This will
Multibin Unit
.
.
,
10. Select the paper size you loaded in the print er from the
list.
11. Select
12. Select the resolution from Print Quality, paper source, paper
Make any oth e r settings you wish, and click OK when you are
finished.
1-6
Installing the Printer Softwa re
Portrait
printing on the diagra m on the screen changes according to
the orientation you select.
type, or output tray.
Landscape
or
orientation. The direction of
Paper
Page 24

For Windows 3.1 and Windows 3.11 for Workgroups users
Follow these steps to access the driver and make the required
settings:
1. In the Main window, double-click the
2. Double-click the
3. Make sure your printer is hi ghlighted, and click the
button.
4. Select the paper size you loaded in the printer fro m Paper. If
you don’t see your paper size on the li st, use the arrow on the
right to scroll through the list.
5. Select
6. Select the resolution from Print Quality.
7. Select the paper source.
Make any oth e r settings you wish, an d click OK when you are
finished.
Portrait
direction of the scree n illustration changes according to the
orientation you se lect.
Printers
Landscape
or
icon.
orientation. The printing
Control Pa nel
icon.
Setup
1
Installing the Printer Software
1-7
Page 25

For Windows NT 3.51 users
Follow these steps to access the driver and make the required
settings:
1. In the Main window, double-click the
2. Double-click the
3. Double-click your printer icon.
4. Select
5. Make sure your printer is selected and click the
6. In the
7. Click the Option Equipment tab.
8. If you selec t
9. Click the
Make any oth e r settings you wish, and click OK when you are
finished.
Properties
Printer Setup
size.
Multibin Mode Settings
Multibin Mode Settings
Multibin Unit Settings in the driver to the Multibin Unit
Settings in SelecType and the Remote Control Panel.
Printers
from the Printers me nu.
Multibin Unit
icon.
tab, select the paper s ource and paper
for the Optional Output Trays, the
button will become available.
Control Panel
button to match the
Setup
icon.
button.
1-8
Installing the Printer Softwa re
Page 26

Making Remote Control Panel Sett ings
You can make some printer control panel settings with the EPSON
Remote Control Panel utility.
This utility is supported by Windows 95/98 and Windows NT
3.51/4.0 Server & Workstation.
Note:
Windows NT 3.51 does not support local printers with this utility.
There are some options for which users cannot make s ettings
themse lves. For tho se options, the administrator mus t make
setting s for the users .
Be sure to check the following:
❏ Paper tab The size and types of the paper
loaded in the printer Multibin Mode
settings
❏ Panel tab Standby, Offset Stacking, Auto
Continue , Avoid Error, Panel Lock,
Time Out, Parallel Speed, Par allel Bi D, Parallel Buffer Size, and Network
Buffer Size
1
❏ Optio n ta b Optional P aper Sources, Optional
Output Trays, and Duplex Print Unit
For more i nformation, see the EPSON Remote Co ntrol Panel
online help.
Installing the Printer Software
1-9
Page 27

Follow these steps to access the EPSON Remote Control Panel and
make the re quired settings:
1. Click the
EPSON Remote Control Panel Utility
Start
button,
select
Programs
.
, then
Epson.
Click
The EPSON Remote Control Panel dialog box appears.
2. If you are the administrator, click t he Administrator button
(the third button from left) in the tool bar.
3. Double-click the target printer name in the list.
The printer s e tting dialog box appears.
4. Make any settings you wish on the
Paper, Panel
, and
Option
tabs, and click OK when you are finished.
For more i nformation on making the R emote Control Panel
settings, see the EPSON Remote Control Panel online help.
1-10
Installing the Printer Software
Page 28

Accessing Online Help
Your Windows printer driver has an extensive online help feature
that includes detailed informati on and instructions on the driver
settings. Online help will answer most of your questions about
the driver.
Note:
Online help is only available for W indows applicat ions.
Accessing online help from the Windows printer driver
To access online help from the printer driver, follow the
instructi ons on pag e 1- 6 to access the driver; then click the
button at the bottom of the window that appears.
Accessing online help from Windows applications
To access help from your application, open the File menu and
choose
Properties
depending on the software you are using. Then click the ? or
button in the window that appears.
Print
Print Setup
or
(you may need to clic k a combination of these butto ns)
. The click
Printer, Setup, Options
Help
Help
1
, or
Installing the Printer Software
1-11
Page 29

1-12
Installing the Printer Software
Page 30
Chapter 2
Connecting to the Networ k
This chapter explain s how to connect the network device to t he
network, setti ng the IP addr es s, an d set tin g up EPSON Net! 2 for
Intranet.
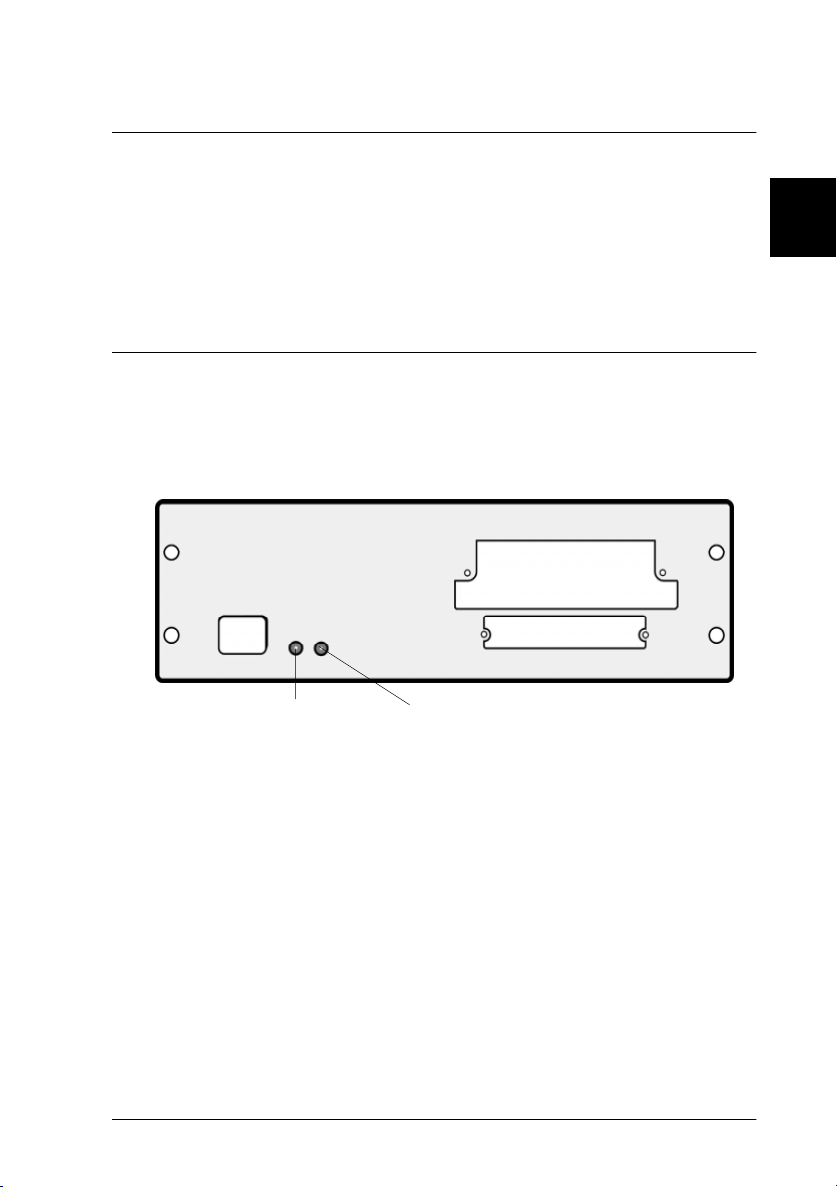
Ethernet Operation
The LED lights can provide you with important information
about the operation of the network device.
100Base/ 10Base LED
LEDs
Data Transmis sion LED
2
The interface bracket has two LEDs (1 orange and 1 green). The
orange light is a 100Base/10Base LED that indicates the
connection status, whether 10Base-T or 100Base-TX is used. The
LED is on when t he network device i s connected with the 10 0BaseTX, and t he LED is off when the network device is con nected wi th
the 10Base-T.
The green light is a data transmission light which blinks when the
host int erface receives data.
Connecting to the Network
2-1
Page 31

Printing a status sheet
Before you start configuring the network device, be sure to print
a network status sheet. To print a network status sheet, press the
SelecType
SelecType mode and then press the
Status Sheet
The status sheet contains important information such as curren t
configuration and the MAC address of the network device.
Note:
See the Reference Guide for more information about printer’s control
panel.
button on the printer’s co ntrol panel to e nter
Item
button until
appears in the display, then press the
Enter
Initializing and resetting the network device
You can initialize and re set the network device usi ng EPSON
Net!2 for I ntranet.
Note:
See the section “Changing the I P A d d ress U s ing EPSON Net!2 for
Intranet” on page 2-6 to start EPSON Net!2 for Intranet.
Initialization:
Network
button.
Reset
Click
button. All the settings you have made wi ll be replaced by the
default s e ttings.
Reset:
Click
simulate turning the power on and off. It makes the changes take
effect.
2-2
Connecting to the Network
Reset
under
under
Optional
Optional
, then click the
, then clic k the
RETURN TO DEFAULT
RESET
button to
Page 32

Connecting the Network Device to the Network
This printer has the fo llowing three host interfaces: a parallel
interface, a network device, and an optional Type B inter face. You
can use these host interfaces to connect the printer to the network.
Interface br ac ket
2
Ethernet I/F
connector
Parall el interface
The interface type is an IEEE 1284 bi- directional parallel interfac e.
You can connect the printer directl y to the computer, and any
client ca n print through the computer.
Ethernet interface
The network device automatically selects either 10Base-T or
100Base-TX when the printer is turned on. You must use a
shielded twisted-pair cable (Cate gory 5).
Optional Type B
interface slot
Parallel I/F
connector
c
Caution:
Make sure to use a shielded twist ed -pair cable (Category-5) to
connect the network device, ot herwise the network device may
malfunction.
Connecting to the Network
2-3
Page 33

Type B interface card
The printer has an opti onal Type B interface slot. See the Referen ce
Guide for what interface card models you can use with this printer
and how install them in your printer. For instruc tions on using
the interf ace card, see your interface card manual.
Making the interface connection setting
If the printer is set to the auto interface mode by default, you do
not ha ve to ma ke th e i nt erf ace c on nect io n set ti ng on th e pr int er ’s
control panel.
The following table shows the available host interfaces.
Parallel I/F Ethernet I/F Type B I/F
Auto O O O
Parallel O X X
Ethernet X O X
AUX X X O
Note:
AUX
❏
appears in the menu on th e pri nter’s control panel when the
Type B interface card is installed in the printer.
❏
2-4
To learn more about the interface connection setting, see the section
on SelecType settings in th e Referenc e Guide.
Connecting to the Network
Page 34

Setting the IP Address on the Printer’s Control Panel
After connecting the printer to the ne twork, you ne ed to set the
IP addre ss for the network device o n the printer’s control panel .
Follow the steps below to set the IP address, Subnet Mask, and
Gateway.
2
1. Press the
2. Then, press the
3. Press the
4. Press the
press the
Note:
To decrease the value, press the
SelecType
5. Repeat steps 3 and 4 to set the IP address, Subnet Mask, and
Gateway.
6. Resta rt the printer so that the settings take effect.
Note:
❏
You must first set the IP address on the printer’s control panel before
you can use EPSON Ne t !2 for Intranet. See the next section for
information and instructions about changing the IP address using
EPSON Net!2 for Intranet.
SelecType
Item
Value
Enter
button.
button to enter SelecType mode.
Menu
button until
button until
button until the desired value appears. Then
button to se t the value.
IP Byte 1*
Ethernet Menu
appears.
Value
button while pressing the
appears.
❏
See the Reference Guide for more information about settings on the
printer’s control panel.
Connecting to the Network
2-5
Page 35

Changing the IP Address Using EPSON Net!2 for Intranet
Read this section only if y ou need to change the IP addr ess of the
network device with EPSON Net!2 for Intranet.
Note:
You can also change the IP address on the printer’s control panel.
Follow the steps below to change the IP address.
1. Make sure the printer is turned on.
2. Open your Web browser. Ty pe the following URL and press
Enter
.
URL: http://<the IP address of the EPL-N4000>/
Example: http://192.168.100.201/
3. Click
4. The Enter Network Password dialog box appears. Input the
2-6
Connecting to the Network
TCP/IP
password and click OK. See “Setting a password” on page 211 for mo re information about passw ords.
under
Configuration.
Page 36

5. The TCP/IP screen appears.
6. Configure for TCP/IP as follows.
Get IP Address:
Select either
IP Address:
Input the IP address of the EPL -N4000. Mak e sur e to give a n
IP addre ss which does not conflict o n the network.
Panel, DHCP
, or
PING
.
2
Subnet Mask:
Input the subnet m ask.
Default Gatewa y:
Input the gateway address. If there is a server or router which
serves as a gateway, input the IP address of the server or
router. If there is no gateway, type the IP address of your
computer.
Note:
When you don’t need to set an IP address, subnet mask, or default
gateway, input 0.0.0.0 in the appropriate box.
Connecting to the Network
2-7
Page 37

Host Name:
Give a unique name for the host on th e network (up to 32
characters).
7. Click
8. After clicking
Note:
Since the IP address you set becomes available after you click the
button, you need to reopen the browser. Type the new IP address as the
URL to restart EPSON N et!2 for I nt r anet.
SUBMIT
RESET
the
minutes to update the changes. Do not exit the Web browser
while updating the changes.
to send the settings to the networ k device.
SUBMIT
button to reset the network device. It takes a few
, click
Reset
under
Optional
. Then click
RESET
2-8
Connecting to the Network
Page 38

Setting the IP Address Using the ARP Command
If you are us i ng U NIX or OS/2, you can use the A R P command
to set the IP address of the network device, and the ping command
to check that you have set it correctly. You can also use these
commands in Windows 9 5 or Wind ows NT, if you hav e correct ly
installed TCP/IP networking on these systems.
Before y ou start, you w ill need the fol lowing information:
❏ A valid IP address fo r the network device. Ask y our system
administrator for an IP address which will not cause conflicts
with any other device on the network. If you are the system
administrator, choose an address within your subnet which
will not c onflict with any other device.
❏ The MAC address of the network devi ce. This is the hardware
serial number of the interface, which cannot be changed. You
can check the MAC address on the status sheet.
❏ If the host from which you will be setting up the network
device is o n a different LAN segment, ma ke sure that th e
gateway to the netwo rk device (rou ter or routing host) is
correct ly configured o n your machine.
2
Setting and checking the new IP add ress
To set the new IP address which you have obtained from your
system administrator, use the ARP command, with the -s flag
(create ARP entry).
Note:
In the following, we will assume that the MAC address of your network
device is 00:00:48:93:00:00 (hexadecimal); that the IP address which you
will be assigning is 192.135.223.6 (decimal); and a computer IP address
is 192.135.223.10 (decimal). Substitute your values for t hese a ddresses
when you type in t he commands.
Connecting to the Network
2-9
Page 39

1. Check the LAN by “pinging” any computer on the network.
If it is reachable, you should see results something like the
following (the exact form of the message depends on your
operating system, and the times probably vary from those
shown here):
64 bytes from 192:135:223:10:icmp_seq=0. Time=34.ms
64 bytes from 192:135:223:10:icmp_seq=1. Time=4.ms
64 bytes from 192:135:223:10:icmp_seq=2. Time=4.ms
64 bytes from 192:135:223:10:icmp_seq=3. Time=4.ms
2. From the command line, type the IP address of the network
device and its MAC address:
Example
3. You can now check the new IP address, by “pinging” it:
Example:
4. The network device sh ould now respond to the ping. If it does
not, you may have mistyped the MAC address or the IP
address in the ARP -s command. Double-check and try again.
If all else fails, re-initialize the network device and try again.
5. You can check whether the IP address has been set on the
status sheet.
: arp -s 192.1 35.223.6 00:00:48:93:00:00
ping 192.135.223.6
Note:
❏
❏
2-10
To change the subnet ma sk or gateway of the network device, use
the EPSON Net!2 for Intranet running on Windows (95/98 or NT),
or Macintosh to change th ese p aramet ers.
If the network device or the computer is unreachable, you should
check the following:
The address is correct in the ping co mmand.
The Ethernet connection to the printer and to the host has been made
correctly, and all hubs, routers, etc. are sw itche d on.
Connecting to the Network
Page 40

Setting Up EPSON Net!2 for Intranet
After setting the IP address for the network device on the printer’s
control panel, you can configure the network device using EPSON
Net!2 for Intranet, the utility that runs on the browser.
See the appropriate se ction for configuring the n etwork device
using EPSON Net!2 for Intranet.
Setting a password
You can protect the se ttings you make in EPSON Net!2 for
Intranet by setting a password.
2
To set a password, click
pas sword and click
Reset
click
First time you click any items und er
asked for a user name and the password. Input the user nam e
(default is “Administrator”) and the password you set in the
Password screen (just like you did above).
Note:
Do not forget your passwo rd; otherwise, you have to return all the
settings to the default va lue. To do this, click
and click the
under
RETURN TO DEFAULT
Password
SUBMIT
Optional
under
. Then reset the printer. To do this ,
and then click the
button.
Optional
RESET
Configuration
Reset
under
. Input th e
button.
, you will be
Optional
Connecting to the Network
2-11
Page 41

2-12
Connecting to the Network
Page 42

Chapter 3
Settings for Windows
This chapter describes how to configure the network device using
EPSON Net!2 for Intranet to operate with multiple protocols on
the netw ork.
EPSON Net!2 for Intranet, the utility that runs on the browser, can
configure the network d e vice for NetW are, TCP/IP, AppleTalk,
and NetBIOS.
Note:
The EPSON Net!2 for Intranet utility configures the network device to
work only with the protocols that exist on your network. This does not
imply that you can use all of the above mentioned protocols in your
network or operating system. The protocols that the network device can
use may vary depending on the operating systems used and netwo rk
configuration.
Before you start configuring the network device, make sure of the
following points.
3
❏ To use Novell Ne tWare 3.1x/4.1x or Novel l Intra netWare for
Windows 3.1, Windows 95/98, and Windows NT 3.51/ 4.0,
you must set up print services on the network. For details
about setup, see the foll owing sections or the Novell NetWare
documentation.
❏ Decide whether you want to use the network device in Print
Server mode or Remote Printer mode under Novell NetWare.
❏ To use TCP/IP with Windows NT 3.51/4.0, you must ins tall
TCP/IP protocol and Microsoft TCP/IP Printing.
❏ To use TCP/IP with Windows 95/98, you must install TCP/
IP and EPSON TCP/IP printer protocol. The Status Monitor
installer program automati cally prompts you when to insta ll
EPSON TCP/IP, a s desc ribed on page 7-7.
Settings for Window s
3-1
Page 43

Configuring the Network Device for NetWare 3.1x
To use the printer on a NetWare environment, you need to
configu re the network device for NetWare.
To use NetWare 3.1x, you need to set up the printer environment
using PCONSOLE, and then configure the network device for
NetWare using EPSON Net!2 for In tranet.
With EPSON Net!2 for Intranet, you can configure the network
device in one of two operating modes, Print Server or Remote
Printer.
Instructions for using NetWare
❏ Printing a text file
When you print a text file using the NPRINT command of
NetWare or DOS redirection, misconversion or a gap in
characters might occur depending on the client environment.
❏ PCONSOLE limitation
To set up the network device in Print Server mode, you cannot
use the Print Server status display control in PCONSOLE.
❏ Time required to recognize the network device
It takes two minutes or less for the NetWare se rver to
recogniz e the network device after turning on the printer.
During this start-up time, EPSON Net!2 for Intranet and th e
status sheet do not show the co rrect information.
❏ When not using NetWare
When you are not using NetWare environment, set NetWare
Disab le d
c
3-2
to
Caution:
Make sure to read Append ix A for instructions on using a dialup network to prevent from being charged for the line connection
(depending on the numb er of hops you set).
Settings for Windows
. See page 3-8 for more inf ormation.
Page 44

Setting up the printer environment with PCONSOLE
You need to create a print server and print queue to use the printer
in Print Server mode or Remote Printer mode.
Follow the steps below to create a print server and print queue
and assign them to the network devic e.
Note:
It is a good idea to write down the print server name and the printer port
number to which y ou will assign the network device. They will be
required for configuring the network device using EPSO N Net!2 for
Intranet.
Creating print queues in a file server
1. From any NetWare client, log in to the network with
supervisor or equivalent right.
2. Type PCONSOLE at the DOS prompt.
3. From the Available Options screen, select
Information
4. Press the
queue name. Press
Insert
and press
key on you r ke yboard and en te r the print
Enter
Enter
.
.
Print Queue
3
5. From the Print Queue list, select the print queue name that
you just entered and press
Information list, select
EVERYONE
select
press
Insert
from the list. If
and select
Enter
. From the Print Queue
Queue Users
EVERY ONE
EVERYONE
from the queue users list.
and press
Settings for Window s
Enter
. Next,
is not in the list,
3-3
Page 45

Creating a print server
1. From the Available Options screen, select
Information
2. Press the
Insert
serv e r name. Press
and press
key on your ke yboard and type the print
Enter
.
Enter
. It is a good idea to write down the
Print Server
print ser ver name for later use.
3. From the Print Se rver list, select the print server name that
you just entered and press
Then, from the Print Server Information list, select
Server Configuration
Enter
and press
.
Enter
Print
.
4. Select
3-4
Printer Configuration
Configuration Menu and press
Settings for Windows
from the Print Server
Enter
.
Page 46

5. From the Configured Printers list, select
number = 0) and press
6. From the Printer configuration screen, type the printer name.
Then, high light
Local Parallel, LPT1
Select
Remote P arallel, LPT1
Type
Enter
.
and press
for Remote Printer mod e.
Enter
for Print Server mode, or select
Not Installed
.
(port
3
Note:
Make sure to select
Server mode, and make sure to select
you are using Remote P rinter mode.
Local Parallel, LPT1
if you are using Prin t
Remote Parallel, LPT1
Settings for Window s
if
3-5
Page 47

7. Press
Esc
; then press
Enter
to save changes.
8. Press
9. Select
10. Sele ct the printer th at you want to u se from the Defined
11. Press the
12. Specify the priority level between 1 to 10. One is top priority.
13. Press
14. For Remote Printer mode only:
Esc
.
Queues Serviced by P rinter
Configuration menu and press
Printers list and press
Insert
key and assign a queue to the print server port
from the Available Queues list.
Esc
to exit PCONSOLE.
Load the print server you just created.
Enter
.
from the Print Server
Enter
.
❏ For a file server as a print server
>LOAD PSERVER the print server name
❏ For a dedicated print server
>PSERVER the print server name
Note:
Announce the print queue name to the clients so they will be able to know
which printer to use on the netw ork.
3-6
Settings for Windows
Page 48

Configuring the network device using EPSON Net!2 for
Intranet
Follow the steps below to configure the network device in Print
Server mode or Remote Printer mode using EPSON Ne t!2 for
Intranet.
1. Mak e sure the pri nter is turned on.
2. Open your Web browser. Type the foll owing URL and pres s
Enter
.
URL: http://<the IP address of the EPL-N4000>/
Example: http://192.168.100.201/
3
3. Click
4. The Enter Network Password dialog box appears. Input the
5. The NetWare screen appears.
NetWare
pas sword and click OK. (See “Setting a password” on page
2-11 for more information about passwords.)
under
Configuration
.
Settings for Window s
3-7
Page 49

6. Make NetWare settings as follows.
NetWare Basic Configuration:
NetWare:
Select ei ther
NetWare.
Primary Frame Type:
Automatically selects the primary frame type.
Mode:
Select the mode either
Printer
NDS Tree Nam e:
Do not type any name in thi s box.
NDS Context:
Do not type any context in this box.
Print Server Mode:
Note:
Make the following settings when you select
for the mode.
Enabled
.
Disabled
or
Bindery Print Server
. Choose
Enabled
Remote
or
Bindery Print Server
to use
3-8
Primary File Server Name:
Type the file server name (up to 47 charac ters) which this print
server logs in.
Print Server Name:
Type the pri nt server name (up to 47 characters) which is
created by PCONSOLE.
Polling Interval (5-90):
Type the polling interval in seconds.
Settings for Windows
Page 50

NetWare Password:
Type the password (up to 19 characters) which you use to log
in to the primary file server.
Remote Prin ter Mo de:
Note:
Remote Printer
Make the following settings when you select
the mode.
Primary Print Server Name:
Type the primary print se rver name (up to 47 character s)
which was created with PCONSOLE.
Print Port Number:
Type the pr in t port number from 0 to 15.
for
3
7. Click
8. After clicking
9. After configuring the network device using EPSON Net!2 for
SUBMIT
RESET
the
minutes to update the changes. Do not exit the Web browser
while updating the changes.
Intranet, confirm the settings as follows.
For Print Server Mode:
Select the Connection Information from the File Server
Console’s MONITOR.NLM, and check if the print server
name assigned to the network device has been logged i n to
the Active Connections list. It takes five minute s or less to
comple te this.
For Remote Printer Mode:
Switch to the Print Server screen of the File Server Console,
and check if the status is
to send the settings to the network device.
SUBMIT
button to reset the network device. It takes a few
Reset
, click
Waiting for job
under
Optional
.
. Then click
Settings for Window s
3-9
Page 51

Configuring the Network Device for NetWare 4.1x
To use the printer in a NetWare environment, you need to
configu re the network device for NetWare.
To use NetWare 4.1x, you need to set up the printer environment
using Nwadmin or P CONSOLE, and then configure t he network
device fo r N e tWare using EPSON Ne t!2 for Intran e t.
With EPSON Net!2 for Intranet, you can configure the network
device in one of two operating modes, Print Server or Remote
Printer. You can use either NDS mode or Bindery emulation
mode.
Instructions for using NetWare
❏ Printing a text file
When you print a text file using the NPRINT command in
NetWare or DOS redirection, misconversion or a gap in
characters might occur depending on the client environment.
❏ Bindery and NDS
When pri nting on the ne twork printer from the no n-NDS
client (Bindery correspondence), it is necessary to make the
object rel ated to the prin t right under the Bindery context in
the directory tree.
Bindery context path can be confirmed from the server
console by the SET BINDERY CONTEXT command.
If the bindery context path has not been set, or if you want to
use the print environme nt of another context fro m the nonNDS clie nt, it is neces sary to specify the context for the
Bindery context. Use SET BINDERY CONTEXT command to
set the context in the AUTOEXEC . N CF file.
See your Netware 4.1 x doc ument ation for more information.
3-10
Settings for Windows
Page 52

❏ IPX routing protocol “NLSP”
It is possible to set the IPX routing protocols “NLSP” from
NetWare4.1x; however, the network device does not support
NLSP. RIP/SAP controls the communication.
You can select the routing protocol from a) NLSP with RIP/
SAP Compatibility or b) RIP/ SA P Only. If you arbitrarily
remove the bind of RIP or SAP w hen NLSP with RIP/SAP
Compatibility is specified, the network device is not able to
communicate with the file server and NDS. (Reference:
“Protocols” and “Bindings” in the task of the Utility
INETCFG.)
❏ Time required to recognize the network device
It takes two minutes or less for the NetWare server to
recognize the network device after turning on the printer.
During this start-up time, the EP SON Net!2 and the status
sheet do not show the correct information.
❏ When not using N etWare
When you are not using NetWare environment, set NetWare
Disab le d
c
to
Caution:
Make sure to read Append ix A for instructions on using a dialup network to prevent from being charged for the line connection
(depending on the num ber of hops you set).
. See page 3-23 for more information.
3
Settings for Windows
3-11
Page 53

Setting up the environment with Bindery Emulation
This sect ion explains how to set up the printer in Print Server
mode or Re mote Printer mode with Bindery Emulation.
Follow th e steps below to se t up the printer environment when
using Binde ry Emulation m ode in NetWare 4.x.
Making settings in P rint Se rver m ode
1. Log in to the s erver as a SUP ERVISOR. Make sure t o log in as
Bindery correspondence.
2. Run PCONSOLE.
3. From the Available Options screen, select
4. Type the Print Serv e r and Print Qu e u e name, and select
Parallel
(polled mode)
5. Press
6. Usin g EPSON Net!2 for Intranet, configure the network
device in Print Server mode. Make sure to use the print server
created in step 4.
Note:
❏
❏
for Printer type,
for Interr upt, or
Esc
to exit PCONSOLE.
To configure the network d evi ce in Print Server mode, see
“Configuring the network device using EPSON Net!2 for
Intranet” on page 3-7.
Assign Trustee status to each u ser if nec essary.
Manual load
LPT1
Quick Setup
for Location,
for Port.
None
.
3-12
Settings for Windows
Page 54

Making settin gs in Remote Printer m ode
1. Log in to the se rver as a SUPERVISOR . Make sure to log in as
Bindery correspondence.
2. Run PCONSOLE.
3. From the Available Options screen, sele ct
Enter
press
press
4. Press
5. From the Available Options screen, select
press
press
6. Press
7. Then, log in to the server as an ADMIN. Make s ure t o log in
with NDS connection.
8. Start Nwadmin.
9. To create the Printer Object, cl ick the container specified as
the Bindery context and select
Printer
10. To assign the print queue, double-clic k the Printer object icon
(created in step 9). The Printer dialog box appear.
11. Click
list, select the queue (created in step 3) and click OK.
. Press
Enter
.
Esc
.
Enter
. Press
Enter
.
Esc
to exit PCONSOLE, and log out from the server.
. Type the pri nter name and click
Assignments
Insert
and type the print queue name. Then
Insert
and type the print server name. Then
Object
and then click
Add
Print Queues
Print Servers
Create
, then
Create
. From the print queue
.
and
and
, and then
3
12. Click
13. Then, click
Configuration
Parallel
Polled
from Print Server)
from the Printer type pull-down menu.
for Interrup ts; and check
in the Printer dialog box, and select
Communication
as the Connection type.
. Select
LPT1
for Port; check
Manual Load (Remote
Settings for Windows
3-13
Page 55

14. Click OK to close the dialog box, then click OK in the Printer
dialog box.
15. To assign the printer, double-click the Print Server object icon
(created in step 5). The Print Server dialog appears.
16. Click
17. In the Print Server dialog box, s elect the assigned printer from
18. To confirm the objects you have assigned, double-click the
19. From the System Console of the file server, load the print
20. Using EPSON Net!2 for Intranet, configure the network
Assignments
object list, select the printer object (creat ed in step 9) and click
OK
.
the printer object list, an d click the
set a printer number from 0 to 15. Then click OK.
Print Server object icon. Clic k
print server, printer, and print queue are connected.
server module by the following command:
>LOAD PSERVER the print serv er name
device in Remote Printe r mode. Make sure to use the print
server name created in step 5 and the printer number set in
step 17.
Note:
To configure the network d evi ce in Rem ot e Printer mode, see
“Configuring the network devi ce using EPSON Net !2 for Intra net”
on page 3-7.
and then click
Add
. From the printer
Printer Number
Print Layout
button to
, and check that the
3-14
Settings for Windows
Page 56

Setting up the environment with NDS mode
This section explains how to se t up the printer in Print Server
mode or Remote Printer mode using the Nwadmin.
Follow th e steps below to set up the printer envir onment when
using NDS mo de in NetWare 4.x .
1. Log in to the NetWare 4.x server as an ADMIN. Make sure to
log in wit h the NDS connection.
2. Start Nwadmin.
3. Create a printer:
Click the directory context icon, and select
Create
Create
and then
,
.
Printer
Type the printer name and click
.
Object
, then
3
Settings for Windows
3-15
Page 57

4. Create a print server:
Click the directory context icon, and select
Create
Create
click
and then
,
.
Print Ser ver
Type the print server name and
.
5. Create a print queue:
Click the directory context icon, and select
Create
and then
,
Print Queue
. Type the print queue name
and select the print queue volume. Then click
Object
Object
Create
then
,
then
,
.
3-16
Note:
Announce the print queue name to the clients so they will be able to
know which printer to use on the network.
Settings for Windows
Page 58

6. The objects you have just created are added to the directory
context.
Printer Object
Print Server Object
Print Queue Object
7. Double-click the Printer Object icon in the NetWare
Admin is trator screen.
3
Settings for Windows
3-17
Page 59

8. The Printer dialog box appears. Click
Add
click
.
Assignments
and then
9. From the print queue list, select the queue you want to assign
and click
OK
.
10. For Remote Printer mode only:
Configuration
Click
and select
,
Printer type box and click
OK.
Other/Unknown
for the
3-18
Settings for Windows
Page 60

11. Doubl e-click the Print Server Obje ct icon in the Ne tWare
Admin is trator screen.
3
12. The Print Serv er dialog box app ears. Cl ic k
then click
13. From the printer object list, s elect the prin ter object you want
to assign and click OK.
Add
.
Assignments
and
Settings for Windows
3-19
Page 61

14. For Remote Printer mode only:
Go back to the screen in step 12, and cli ck the
Printer Number
button to set the printer number from 0 to 254. Then click
15. Double -click the Print Que ue Object icon in the NetWare
Administrator scr e en.
OK.
3-20
Settings for Windows
Page 62

16. To confirm the objects you have assigned, double-click the
Print Server object icon. Click
print server, printer, and print queue are connected.
17. For Remote Printer mode only:
Load the print server only if you are using Remote Printer
mode. From the System Console of the file server in which
you set the print queue, load the print server module by the
followin g command. Type the print server name which you
assigned using Nwadmin.
Print Layout
, and check that the
3
>LOAD PSERVER the print server name
See your NetWare 4.1x documentation for more detailed
information.
Settings for Windows
3-21
Page 63

Configuring the Network device using EPSON Net!2 for
Intranet
Follow the steps below to configure the network d e vice in Print
Server m od e or Remote Printer mod e using EPSON Net!2 for
Intranet.
1. Make sure the printer is turned on.
2. Open your Web browser. Ty pe the following URL and press
Enter
.
URL: http://<the IP address of the EPL-N4000>/
Example: http://192.168.100.201/
3. Click
4. The Enter Network Password dialog box appears. Input the
5. The NetWare screen appears.
NetWare
password and click OK. (See “Setting a password” on page 211 for mo re information about passw ords.)
under
Configuration
.
3-22
Settings for Windows
Page 64

6. Configure for NetWare as follows.
NetWare Basic Configuration:
NetWare:
Select either
NetWare.
Enabled
Disabled
or
. Choose
Enabled
to use
Primary Frame type:
Automatically selects the primary frame type.
Mode:
Select the mode either
NDS Tree Name:
Type the same NDS tree name (up to 31 characters) as you set
in Nwadmin.
NDS Context:
NDS context is the Object position in the Directory tree. Type
the container object name (up to 255 characters) from the
Object to the Root.
Example:
Print Server Mode:
Note:
Make the following settings when you select
the mode.
Primary File Server N ame:
Type the file server name (up to 47 characters) which this print
server logs in.
OU=OFFICE.O=EPSON
NDS Print Server
Remote Printer
or
NDS Print Server
3
.
for
Print Server Name:
Type the leaf (printer) object name (up to 47characters).
Polling Interval (5-90):
Type the polling interval in seconds.
Settings for Windows
3-23
Page 65

NetWare Pass word:
Type the password (up to 19 characters) which you use to log
in to the primary file server.
Remote Printer Mode:
Note:
Remote Printer
Make the following settings when you select
the mode.
Primary Print Server Name:
Type the primary print se rver name (up to 47 characters)
which wa s created with N wadmin.
Print Port Number:
Type the print port number (between 0 and 254).
for
7. Click
8. After clicking
9. After configuring the network device using EPSON Net!2 for
SUBMIT
RESET
the
minutes to update the changes. Do not exit the Web browser
while updating the changes.
Intranet, confirm the settings as f ollows.
For Print Server Mode:
Select the Connection Information from the File Server
Console’s MONITOR.NLM, and check if the print server
name assigned to the network device has been logged into the
Active Connections list. It takes five minutes or less to
comple te this.
For Remote Printer Mode:
Select Printer Status from the Print Server Cons ole screen.
Select the printer from the list, then check the sta tus.
to send the settings to the networ k device.
SUBMIT
button to reset the network device. It takes a few
, click
Reset
under
Optional
. Then click
3-24
Settings for Windows
Page 66

Configuring the Network Device for TCP/IP
To use the printer in a TCP/IP environment, you need to
configu re the network device for TCP/IP.
Before using the network device with TCP/IP, you need to install
the TCP/IP Protocol and EPSON Status Monitor 2 in Windows
95/98; and the TCP/IP Protocol and Microsoft TCP/IP Printing
in Windows NT.
Note:
In most cases, Windows 3.1 can’t use TCP/IP to share network printers.
Installing LPR software in Windows NT 3.51
Follow the steps below to install LPR software in Windows NT
3.51. If you have already installed
can skip these steps.
Microsoft TCP/IP Pr inting
3
, you
.
.
Network
icon in the Control Panel to open
is in the Installed Software list
. Then click
Settings for Windows
1. Double-click the
the Netw ork Settings dia l og box.
Microsoft TCP/IP Printing
2. If
box, you can skip to the next section. Otherwise, click
Software
3. Select
Contin ue
4. Select
Continue
5. Follo w the instruc tions on the screen.
For more information, see your Windows NT 3.51
documentation.
.
TCP/IP Protocol and r elated compon ents
TCP/IP Network Printing Support
Add
and click
3-25
Page 67

Installing LPR software in Windows NT 4.0
Follow the steps below to install LPR software in Windows NT
4.0. If you have already installed Microsoft TCP/IP Print ing, you
can skip these steps.
1. Double-click the
Add
on the Services menu.
2. Select
3. Follow the instructions on the screen.
For more information, see y our Windows NT 4.0 documentatio n.
Microsoft TCP/IP Printing
Netwo r k
icon in the Control Panel a nd click
and click OK.
Configuring the network device using EPSON Net!2 for
Intranet
To us e TCP /IP on t he net work , y ou ne e d to s et th e IP ad dre ss for
the netw ork device.
See “Changing the IP address using EPSON Net!2 for Intranet”
on page 2-11 to configure the network device for TCP/IP.
In addition to the TCP/IP settings, set the
TCP/IP setting screen of EPSON Net!2 for Intranet.
Note:
Make sure you have installed TCP/IP in your operating system. For
information on installing TCP/IP, see your opera tin g system
documentation.
LPD
Enabled
to
in the
3-26
Settings for Windows
Page 68

Setting up the printer in Windows 95/98
After configuring the network device, you need to set up the
network printer. In Windows 95/ 98, u se the Add P ri nter wizar d
as follows:
Note:
Windows 95/98 do not support LPR printing. Before setting up y our
printer in Windows 95/98, you must install the EPSON TCP/IP printer
protocol. The Status Monitor installer program automatically prompts
you when to install EPSON TCP/IP, see “Installing EPSON Status
Monitor 2” on page 7-7 for instructions.
3
1. Double-click the
Printers
2. Double-click
3. Select the
4. Click
icon. If you do not see the icon, EPSON Status Monitor 2 has
not been installed. See Chapter 7 for installation.
5. Double -click the target printer icon.
6. Follow the on-screen i nstructions to set up the printe r.
You can change the pr inter driver settings from the Propertie s
dialog box at any time.
folder.
Network Printer
Browse
My Comput er
Add Print er
; then double-click the
and click
icon, then double-click the
radio button and click
Next.
Next.
EPSON_TCPIP_Printers
Settings for Windows
3-27
Page 69

Setting up the printer in Windows NT 3.51
After configuring t he network device, you need to set up the
network printer. Follow these steps to set up the printer in
Windows NT 3.51.
Note:
Make sure you have installed the correct printer driver in your computer
before starting these steps. If you haven’t installed the printer driver yet,
see “Installing the Pri nter Driver” in Chapter 1 for installation.
1. Double-click
2. Click the target print e r ic on and select
Printer m enu.
3. To share the printer on a network, select the
on the network
location.
4. Choose
Destinations dialog box appears.
Print Manager
check box. Type the share name and the
Other
from the Print To pull-down menu. The Print
in the Main program group.
Properties
from the
Share this printer
5. Select
6. Type the previously specified IP address of the network
3-28
Settings for Windows
LPR Port
OK
. The Add LPR compatible printer dialog box appears.
device and the appropriate printer name. Then click OK.
from th e Avail able Pri nt Monitor s list a nd click
Page 70

7. Verify that all your settings a nd are corre ct in the Cre ate
Printer dialog box. Make changes if necessary.
Note:
When you share the printer, announce the printer name and the location
to the clients so they will be able to know wh ic h printer to use on the
network.
Change the type of ac cess of the spool directory
You need to change the access rights of the spool direct ory when
you create a shared p rinter on the Windows NT 3.51 Ser ver (if you
have set up your computer to use a NTFS file system, rather than
a FAT file system).
1. Start the File Manager and point the cursor at
\WINNT35\SYSTEM32\SPOOL\PRINTERS
2. Choose
3. Change the type of access of
(RWX)(RX)
Permissions
, and click OK.
from the Security me nu.
Everyone
to
.
ADD
&
3
READ
Settings for Windows
3-29
Page 71

Setting up the printer in Windows NT 4.0
After configuring t he network device, you need to set up the
network printer. Follow these steps to set up the printer in
Windows NT 4.0.
Note:
Make sure you have installed the correct printer driver in your computer
before starting these steps. If you haven’t installed the printer driver yet,
see “Installing the Pri nter Driver” in Chapter 1 for installation.
1. Double-click the
Printer
2. Righ t-click the target printer’s icon, and select
3. Click the
4. Select
the
folder.
Port
LPR Port
New Port
My computer
tab, and then click the
from the Available Prin t er Port list , an d cl ick
button.
icon, then double-click the
Add Port
Properties
button.
.
3-30
Settings for Windows
Page 72

5. The Add LPR compatible printer dialog box appears. Type
the IP address of the network device in the first text box and
an appropriate printer name in the second text box, and click
OK
.
6. Follow the on-screen instruction if it appears.
Note:
When you share the printer, announce the printer name and the location
to the clients so they will be able to know wh ic h printer to use on the
network.
3
Settings for Windows
3-31
Page 73

FTP Printing
You can prin t using FTP com ma nd from Win dows. First, you
need to s et the IP address for the network devi ce.
See “Changing the IP address using EPSON Net!2 for Intranet”
on page 2-6 to configure th e n etwork devic e for TCP/IP.
In addition to the TCP/IP settings, set the
TCP/IP setting screen of EPSON Net!2 for Intranet.
The following is a n example of pr inti ng usi ng th e F TP command
(User input is shown underlined).
C:Windows>ftp 22.33.44.55
Connected to 22.33.44.55
220 FTP server (EPSON FTPD version 1.01) ready.
User (22.33.44.55:(none)):
230 VUser (none) logged in.
ftp> put c:\testdata\aa.txt ftp15
150 About to open data connection.
226 File transferred.
ftp> bye
FTPD
Enabled
to
in the
3-32
Settings for Windows
Page 74

Configuring the Network Device for NetBIOS
To use the printer for SMB printing, you ne ed to configure the
network device for NetBIOS.
Before you follow these steps, make sure that the following
protocols and services are installed in your computer. See your
operating system documentation for installing the protocols.
For Windows 95:
TCP/IP protocol, NetBEUI protocol, and Client for Microsoft
Networks
For Windows NT 3.51/4.0:
TCP/IP protocol, NetBEUI protocol, and Workstation service
Configuring the network device using EPSON Net!2 for
Intranet
Follow these steps to configure the network device for NetBIOS.
1. Mak e sure the pri nte r is turned on .
2. Open your Web browser. Type the foll owing URL and pres s
Enter
.
3
URL: http://<the IP address of the EPL-N4000>/
Example: http://192.168.100.201/
3. Click
4. The Enter Network Password dialog box appears. Input the
NetWare
password and click OK. (See “Setting a password” on page 211 for more information about passwords.)
under
Configuration
Settings for Windows
.
3-33
Page 75

5. The NetBIOS screen appears.
6. Configure for NetBIOS as follows.
NetBIOS:
Select ei ther
NetBIOS.
NetBIOS Name:
Type a NetBIOS name (up to 15 characters). The NetBIOS
name is the computer’s name o n the network. Make sure to
use a uniq ue name on the ne twork.
Enabled
Disabled
or
. Choose
Enabled
to use
7. Click
3-34
Workgroup Name:
Type the workgroup name (up to 15 ch ar acters). The
workgroup name is the domain name or the workgroup name
used in a Windows network environment.
Device Name:
Type the device name (up to 12 ch a racters), except LPT1,
LPT2, LPT3, and COM.
SUBMIT
Settings for Windows
to send the settings to the networ k device.
Page 76

8. After clicking
RESET
the
minutes to update the changes. Do not exit the Web browser
while updating the changes.
SUBMIT
button to reset the network device. It takes a few
, click
Reset
under
Optional
Setting up your printer in Windows 95/98
. Then click
This sectio n explains how to set up the printer with the network
device.
1. Double-click the
Printers
2. Double-click
3. Click the
4. Click
5. When you cannot browse the printer, t
Network path or queue name box.
\\(NetBIOS name of the network dev ic e)
(Device name of the network device)
folder.
Network Printer
Browse
My Comput er
Add Print er
, and double-click the target pri nter.
and click
radio button and click
icon, then double-click the
Next
.
ype the following at the
\
Next
.
3
6. Follow the on-screen i nstructions to set up the printe r.
Settings for Windows
3-35
Page 77

Setting up the printer in Windows NT 3.51
To print from a shared printer on the network, you need to
connect to the printer. Fo llo w the steps below.
1. Double-click
Connect to Printer
select
2. Select the target printer from the
OK
.
If you cannot select the printer, type directly in the Printer box
as follows.
\\ (NetBIOS name of the network dev ice)
(Device name of the network device)
3. Follow the on-screen instructions.
Print Manager
from the Printer menu.
from the Main dialog box, and
Shared Printe rs
list and click
Setting up the printer in Windows NT 4.0
1. Double-click
2. Click the
Printer Wizard dialog box.
3. Type th e printer name directly in the Printer box as fo llows:
\\ (NetBIOS name of the network d e v ice)
(Device name of the network device)
Add Printer
Network printer server
in the Printe rs dialog box.
radio button in the Add
\
4. Follow the on-scr e en instructions to set up the printer.
3-36
Settings for Windows
Page 78

Using the NET USE command to set up the printer
When you are using Windows NT server and NetBIOS to connect
with the network device, we recommend that you use the NE T
USE command, as outlined below.
You can also use the NET USE command with Windows 95/98.
1. For Windows NT only:
Double-click
following services are installed.
[Windows NT 3.51]
Check that
Installed Network Software list.
[For Windows NT 4.0]
Check that
Services menu.
2. Open the Windows command prompt and type in the
following command.
NET USE (printer port): \\(NetBIOS name o f the ne twork
device)\(Device nam e of the network device)
3. [Windows 95/98]:
Open the target printer’s Properties and click the
Select the po rt you entered in step2.
[Windows NT 3.51]:
Select the target printe r in the Print Manager, and choose
Printer Information
port from the
step 2.
Network
Server
Server
Print to
in Control Panels and check that the
and/or
and/or
from the Printer menu. Then, select the
Workstation
Workstation
pull-down menu which you entered in
are listed in the
are listed in the
Details
3
tab.
[Windows NT 4.0]:
Open the target printer’s Properties and click the
Check the port you have entered in step 2.
Settings for Windows
Port
tab.
3-37
Page 79

Configuring the Network Device for AppleTalk Using
EPSON Net!2 for Intranet
To use the printer on an AppleTalk network, you need to
configure the network device for AppleTalk.
1. Make sure the printer is turned on.
2. Open your Web browser. Ty pe the following URL and press
Enter
.
URL: http://<the IP address of the EPL-N4000>/
Example: http://192.168.100.201/
3. Click
4. The Enter Network Password dialog box appears. Input the
5. The AppleTalk screen appears.
AppleTalk
password and click OK. (See “Setting a password” on page 211 for mo re information about passw ords.)
under
Configuration
.
3-38
Settings for Windows
Page 80

6. Configure for
AppleTalk:
Select either
AppleTalk.
Printer Name:
Type the printer name (up to 31 characters).
Entity Types:
Shows t he printer’s entity type.
Zone Name:
Type the zone name (up t o 31 charac t ers). I f y ou are not s ure
of the default zone name, input the asterisk (✽).
Node ID:
Type the Node ID (between 0 and 255).
Network Numbe r Set:
Select the network number setting. Usually y ou should select
Auto
.
Network Numbe r for Manual Mode:
When you s e lec t
need to type the network number manually (between 0 and
65535).
AppleTalk
Enabled
Manual
as follows.
Disabled
or
for the Network Number Set, you
. Choose
Enabled
to use
3
7. Click
8. After clicking
SUBMIT
RESET
the
minutes to update the changes. Do not exit the Web browser
while updating the changes.
to send the settings to the network device.
SUBMIT
button to reset the network device. It takes a few
, click
Reset
under
Optional
Settings for Windows
. Then click
3-39
Page 81

Note:
If you cannot see the printer in the Chooser, check whether any AppleTalk
routers have been set incorrectly. If you cannot change the router
settings, select
number in the Network Number fo r M anual Mode box as a temporary
solution. In this case, you must type the c orrect z one and the network
number of the zone.
Manual
for the Network Number Set and type a network
3-40
Settings for Windows
Page 82

Chapter 4
Settings for Ma cintosh
This chapter describes how to con fi gure the network device fo r
TCP/IP or AppleTalk using EP SON Net!2 f or Intranet , th e utility
that runs on the browser.
Note:
❏
The EPSON Net!2 for Intranet utility configures the network device
to work only with the protocols that exist on your network. This does
not imply that you can use all of the above mentioned p rotocols in
your network or operating system. The p rotocol s that the network
device can use may vary depen d ing on the operating systems used
and netwo r k configuration.
❏
Do not use EPSON N am er with the network device.
Before you start configuring the network device, make sure of the
following points:
❏ The correct printer driver must be i nstalled i n th e Macintosh
system.
4
❏ EPSON Ne t!2 for Intra ne t can configure the netw ork device
for AppleTalk and TCP/IP.
Before c ontinuing, be sure to connect the network device to the
network, turn on the pri nter, and set the IP addre ss for the
network device using the printer’s control panel.
Settings for Macintosh
4-1
Page 83

Applicable Systems
❏ Macintosh OS
System 7.1, 7.5.3, 7.5.5, OS 8.0, OS 8.1
❏ Apple network driver
EtherTalk Phase 2
OpenTransport 1.1.1, 1.1.2, 1.3
❏ Apple prin te r driver
LaserWriter, LaserWriter 8
Configuring the Network Device for AppleTalk Using
EPSON Net!2 for Intranet
To use the printer on an AppleTalk network, you need to
configure the network device for AppleTalk.
1. Make sure the printer is turned on.
2. Open your Web browser. Ty pe the following URL and press
Enter
.
URL: http://<the IP address of the EPL-N4000>/
Example: http://192.168.100.201/
3. Click
4. The Enter Network Password dialog box appears. Input the
4-2
Settings for Macintosh
AppleTalk
password and click OK. (See “Setting a password” on page 211 for mo re information about passw ords.)
under
Configuration
.
Page 84

5. The AppleTalk screen appears.
4
6. Configure for
AppleTalk:
Select either
AppleTalk.
Printer Name:
Type the printer name (up to 31 characters).
Entity Types:
Shows t he printer’s entity type.
Zone Name:
Type the zone name (up t o 31 charac t ers). I f y ou are not s ure
of the default zone name, input an asterisk (✽).
Node ID:
Type the Node ID (between 0 and 255).
Network Numbe r Set:
Select the network number setting. Usually y ou should select
Auto
.
AppleTalk
Enabled
as follows.
Disabled
or
. Choose
Enabled
to use
Settings for Macintosh
4-3
Page 85

Network Numbe r for Manual Mode:
When you sel e ct
need to type the network number manually (between 0 and
65535).
Manual
for the Network Number Set, you
7. Click
8. After clicking
Note:
If you cannot see the printer in the Chooser, check whether any AppleTalk
routers have been set incorrectly. If you cannot change the router
settings, select
number in the Network Number fo r M anual Mode box as a temporary
solution. In this case, you must type the c orrect z one and the network
number of the zone.
SUBMIT
RESET
the
minutes to update the changes. Do not exit the Web browser
while updating the changes.
to send the settings to the networ k device.
SUBMIT
button to reset the network device. It takes a few
Manual
for the Network Number Set and type a network
, click
Reset
under
Optional
. Then click
4-4
Settings for Macintosh
Page 86

Choosing the printer on Macintosh
To print to the new printer, use the Chooser to select the printer.
Select the options you have specified with EPSON Net!2 for
Intranet.
Make sure the following points before going through the steps
below;
❏ For models w ithout Open Transport :
EtherTalk
Select
in the Network Contro l Panel.
❏ For models with Open Transport:
EtherTalk
Select
1. Open the
2. Click the printer driver icon.
3. If there is a zone, click the AppleTalk zone that contains the
printer.
4. Click the printer nam e.
5. Make sure AppleTalk is active.
6. Close the
in the AppleTalk Control Panel.
Chooser
Chooser
from the Apple menu.
.
4
Settings for Macintosh
4-5
Page 87

4-6
Settings for Macintosh
Page 88

Chapter 5
Settings for OS/2
This chapter describes how to con fi gure and use the network
device with an IBM OS/2 System, which includes OS/2 Warp3
and 4 (OS/2 Warp Connect and OS/2 Warp Server).
Applicable Systems and Protocols
❏ OS/2 War p3, OS/2 Warp4
❏ lprportd (TCP/IP)
❏ NetBIOS over TCP/IP
TCP/IP Printing
This section explains about TCP/IP printing using the lprportd
supported by standard OS/2. First of all, you need to configure
the network device using EPSON Net!2 for Intranet through any
other cli e nt. Then set up the printer.
Configuring the network device using EPSON Net!2 for
Intranet
First, you need to make the following settings using EPSON Net!2
for Intranet throug h any other client such as Windows 95/98 or
Windows NT.
Follow th ese steps to configure the network device for TCP/IP.
1. Mak e sure the pri nte r is turned on .
5
Settings for OS/2
5-1
Page 89

2. Open your Web browser. Ty pe the following URL and press
Enter
.
URL: http://<the IP address of the EPL-N4000>/
Example: http://192.168.100.201/
3. Click
4. The Enter Network Password dialog box appears. Input the
5. The TCP/IP screen appears.
6. Configure for TCP/IP as follows.
TCP/IP
password and click OK. (See “Setting a password” on page 211 for mo re information about passw ords.)
under
Configuration
.
5-2
Get IP Address:
Select ei ther
IP Address:
Input the IP address of the EPL-N 4000 . Make sure to giv e an
IP address which does not conflict on the network.
Settings for OS/2
Panel, DHCP
, or
PING
.
Page 90

Subnet Mask:
Input the subnet m ask.
Default Gatewa y:
Input the gateway address. If there is a server or router which
serves as a gateway, input the IP address of the server or
router. If there is no gateway, type the IP address of your
computer.
Note:
When you don’t need to set an IP address, subnet mask, or default
gateway, input 0.0.0.0 in the appropriate box.
Host Name:
Give a unique name for the host on the network (up to 32
characters).
5
7. Click
8. Select
9. After clicking
SUBMIT
Enabled
you use.
RESET
the
minutes to update the changes. Do not exit the Web browser
while updating the changes.
to send the settings to the network device.
to use LPD or FTPD depending on the port
SUBMIT
button to reset the network device. It takes a few
, click
Reset
under
Optional
. Then click
Settings for OS/2
5-3
Page 91

Setting up the printer
Follow th e steps below to se t up the printer.
1. Double-click the OS/2 System folder, then the
folder, and then double-click the
2. Click the
device at the Remote print server box and the name of the
remote pri nt server's printer at the second text bo x. Type a
value greater than or equal to 1 in th e Maximum number of
LPD ports box.
Printing
tab. Type the IP address of the network
TCP/IP Confi guration
System Setup
icon.
5-4
Settings for OS/2
Page 92

3. Click the
Hostnames
tab. Go to Page 2 by clicking the arrow.
4. Click
5. Click
6. Click the
Add
. In the HOSTS Entry dialog box, type the IP
address and hostname of your machine. Then click
Add
again. In the HOST Entry dialog box, type the IP
address and hostname of the printer. Then click
Autostart
autostart list. Check the Autostart serv ice check box, a nd
select the
Detached
tab. Select
radio button.
lprportd
from the Services to
Add
Add
.
.
5
7. Save the settings yo u made in the TCP/IP Configuration
dialog box, and restart your computer.
8. Double-click
Printer
click
9. Double-click the
Note:
If you haven’t set up the printer, see your OS/2 documentation for
instructions.
Template
and drag it to your desktop to create a prin te r.
Printer
from the OS/2 System folder. Right-
icon to link lprportd to the printer.
Settings for OS/2
5-5
Page 93

10. Select
Properties
Output Port
from the control menu, then click the
tab.
11. From the Output Port list box, doubl e-click a port from
\PIPE\LPD0 to \PIPE\LPDn (where n is the maximum
number of LPD ports).
12. Type the IP address of the network device at the LPD server
box. Type the printer name set in step 2 at the LPD printer box.
13. Close the Printer icon to exit printer configuration.
5-6
Settings for OS/2
Page 94

SMB Printing
This section explains a bout SMB printing. First of al l, you n eed to
configu re the network device using EPSON Net!2 for Intranet
through any other client. Then set up the printer.
Configuring the network device using EPSON Net!2 for
Intranet
First, you need to make the following setting using EPSON Net!2
for Intranet throug h any other client such as Windows 95/98 or
Windows NT.
Follow these steps to configure the network device for NetBIOS.
1. Mak e sure the pri nte r is turned on .
2. Open your Web browser. Type the foll owing URL and pres s
Enter
.
URL: http://<the IP address of the EPL-N4000>/
Example: http://192.168.100.201/
3. Click
4. The Enter Network Password dialog box appears. Input the
NetBIOS
password and click OK. (See “Setting a password” on page 211 for more information about passwords.)
under
Configuration
.
5
Settings for OS/2
5-7
Page 95

5. The NetBIOS screen appears.
6. Configure for NetBIOS as follows.
NetBIOS:
Select ei ther
NetBIOS.
NetBIOS Name:
Type a NetBIOS name (up to 15 characters). The NetBIOS
name is the computer’s name o n the network. Make sure to
use a uniq ue name on the ne twork.
Enabled
Disabled
or
. Choose
Enabled
to use
7. Click
5-8
Workgroup Name:
Type the workgroup name (up to 15 ch ar acters). The
workgroup name is the domain name or the workgroup name
used in a Windows network environment.
Device Name:
Type the device name (up to 12 ch a racters), except LPT1,
LPT2, LPT3, and COM.
SUBMIT
Settings for OS/2
to send the settings to the networ k device.
Page 96

8. After clicking
RESET
the
minutes to update the changes. Do not exit the Web browser
while updating the changes.
SUBMIT
button to reset the network device. It takes a few
, click
Reset
under
Optional
Setting up the printer
Follow the steps below to set up the pri nte r for SMB prin ting.
1. Create a printer.
2. Right-click the target printer icon to open th e Properties
dialog bo x. Th en click th e
Output Port
tab.
. Then click
3. Select the port.
4. Connect to the printer from the command line.
Example: Connect the printer to LPT1.
net use LPT1: \\ (NetBIOS name of the network device)
\(Devic e name of the ne twork devic e )
5
Settings for OS/2
5-9
Page 97

5-10
Settings for OS/2
Page 98

Chapter 6
Settings for UNIX
This chapter explains how to set up the printer for different UNIX
systems using the lpr or lp c ommand (depending on t he system).
The network device supports many standard UNIX commands
and can be configured from a host computer.
The netwo rk device is able to functio n a s a remote p rinter on
systems using TCP/IP Ethernet transfer with lpr remote printing
protocol, or standard ftp (file transfer protocol).
Note:
Because this net work device does not conve rt data into the printer co ntrol
language, a printer driv er and filter are necessary for each system.
Setting Up Different UNIX Systems Using the lpr Command
6
The following UNIX systems can print using the standard lpr
command.
SunSoft Solaris 2.4 or higher
SunOS 4.1.4 or higher
IBM AIX 3.2.5 or higher
HP-UX 9.05 or higher
SCO UNIX 4.2 or higher
Settings for UNIX
6-1
Page 99

Setting up with SunSoft Solaris 2.4 or higher
In the foll owing step s, subs titu te th e name that the pr inte r will be
known by for HOSTNAME, and the name by which you want the
printer to be known for Rp ri nter.
1. Register the IP address and host name in the \etc\hosts file.
For example:
22.33.44.55 HOSTNAME
2. Register the host name as a print server.
For example:
lpsystem -t bsd HOS TNA ME
3. Create the printer.
For example:
lpadmin -p Rprinter -s HOSTNAME\aux-T unknown-1
any
4. Make the printer available for printing.
For example:
accept RPrinter
enable Rprinter
Print a file using the “lp” command.
For example:
lp -d RPrinter Print-File-Name
6-2
Settings for UNIX
Page 100

Setting up with SunOS 4.1.4 or higher
In the following steps, s ubstitute the name that the printer will be
known by for HOSTNAME, and the name by which you want the
printer to be known for R printer.
1. Register the IP address and host name in the \etc\hosts file.
For example:
22.33.44.55 HOSTNAME
2. Create a spool directory.
For example:
mkdir\var\spool\lpd\PRIFx
3. Add the printer en try to the \etc\printcap fi le.
For example:
RPrinter |
LP-1700:lp=:rm=HOSTNAME:rp =aux:sd=/var/spool/
lpd/PRIFx
Print a file using the “lpr” command.
For example:
lpt -s -PRPrinter Print-File-Name
Note:
Files that exceed 1MB may not be p rinted unless the -s option is used.
6
Settings for UNIX
6-3
 Loading...