

Page 1
Page 2
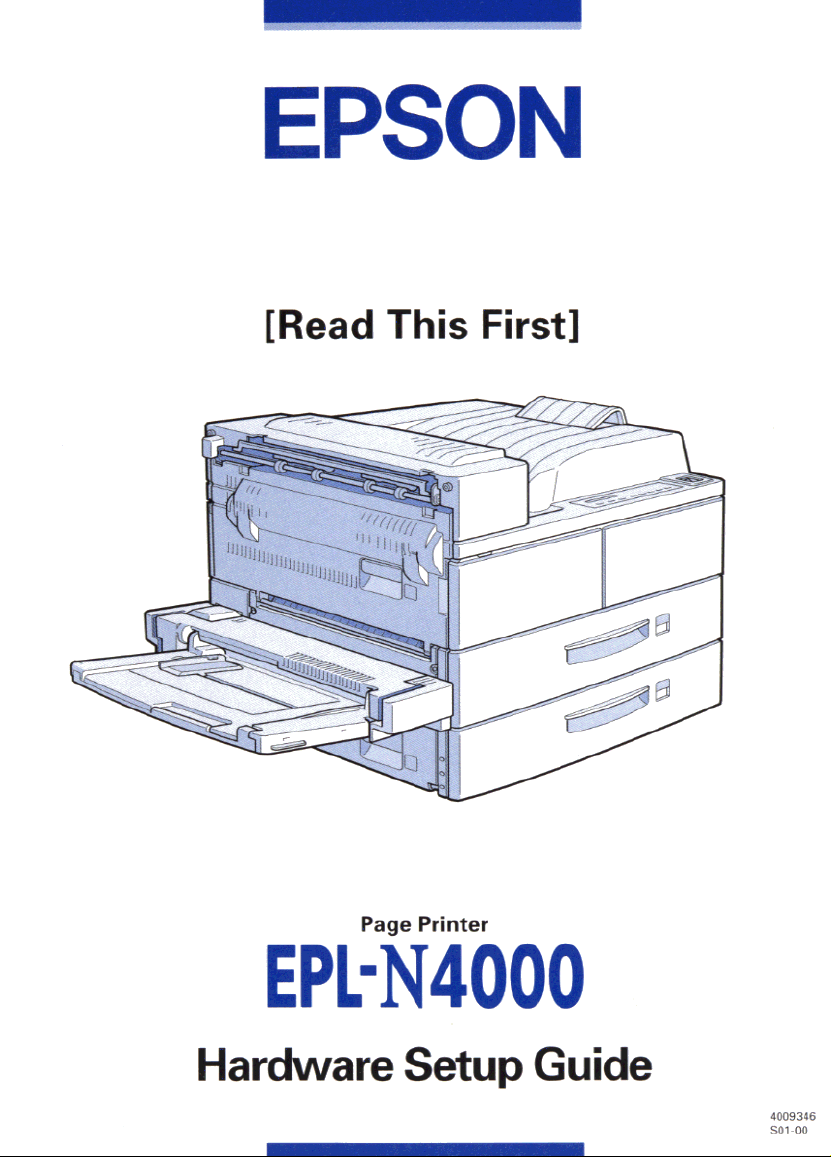
Printer Parts
power switch
cover A
paper guide
MP tray
extention
face-down tray
cover B
stopper
contr o l pan e l
front cover
lower cassette 1
lower cassette 2
Ethernet interface
connec tor
Type-B
interface
connector
parallel
interface
connector
AC inlet
optional Duplex Unit
connector
optional Multibin Unit
connector
optional Large
Capacity Paper Unit
connector
Page 3

Contents
1 Installing the Large Capacity Paper Unit. . . . . . . . . . . . . 1
2 Installing the Imaging Cartridge . . . . . . . . . . . . . . . . . . . 8
3 Loading Paper . . . . . . . . . . . . . . . . . . . . . . . . . . . . . . . . . 12
4 Attaching the Power Cord . . . . . . . . . . . . . . . . . . . . . . . . 17
5 Test Printing. . . . . . . . . . . . . . . . . . . . . . . . . . . . . . . . . . . 18
6 Connecting the Printer to a Computer . . . . . . . . . . . . . . . 19
7 After Setting Up the Hardware. . . . . . . . . . . . . . . . . . . . . 20
Hardware Setup Guide
Page 4

This booklet helps y ou set up your pr inter and begi n printing quickly.
See the Reference Guid e for information on using your printer and its
options, or if you have problems printing.
EPSON is a registered trad emark of SEIKO EPSON CORPORATI ON.
General Notice: Other product names used herein are for identification purposes only and
may be trademarks of their respective owners. EPSON disclaims any and all rights in those
marks.
Copyright © 1998 by SEIKO EPSON CORPORATION, Nagano, Japan.
ii
Page 5
1
Installing the Large Capacity Paper Unit
Install the Large Capacity Paper Unit when setting up the printer.
Skip this section if you will not use this option.
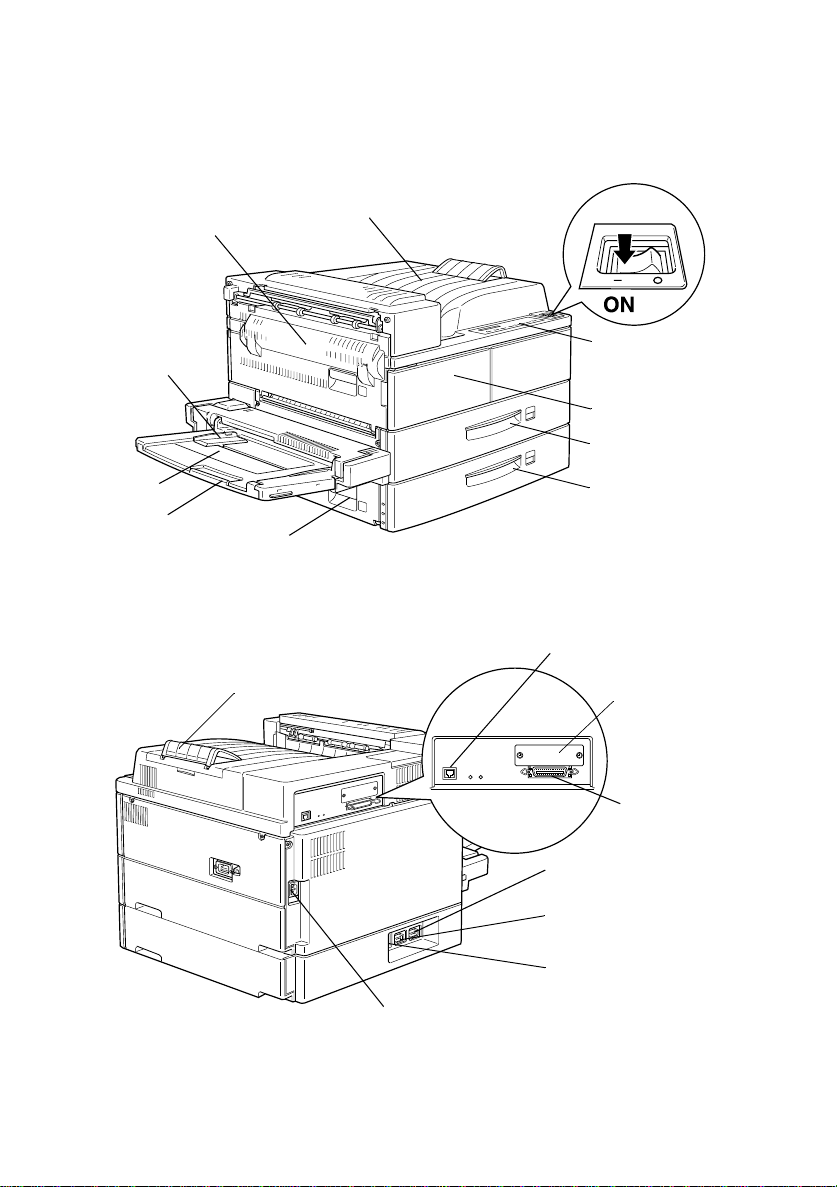
1. Open and unpack the shipping carton.
2. Cut the tape that h olds the cardboard inserts.
cut here
3. Remove the inserts and all other protective materials inside
the box. Make sure the contents of the package match the
items on the included document. Remove the packaging
materials from the Large Capacit y Paper Unit and store them
for future use.
1
Page 6
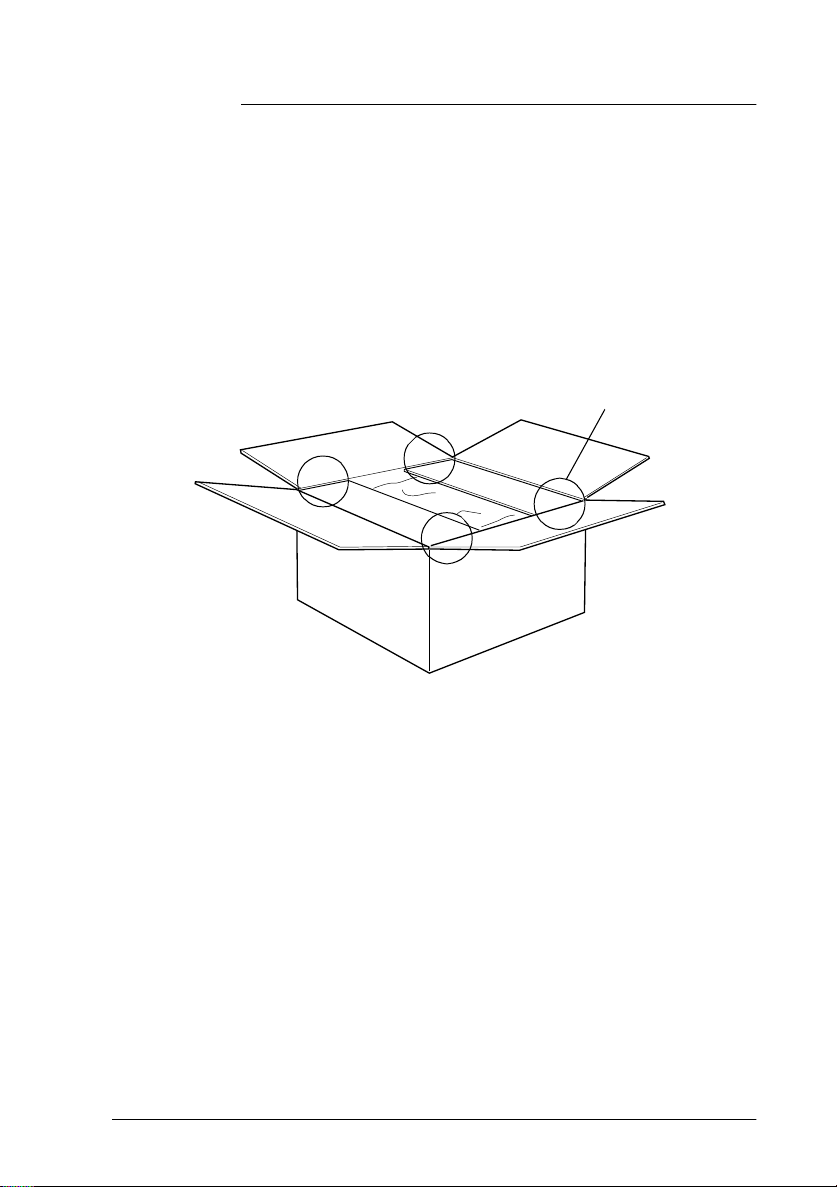
4. Carefully lift the Large Capacity Paper Unit out of the box
with two or more people, a nd place it near the printer.
5. Lock the casters at the bottom of the unit by pushing their
levers down.
2
Page 7
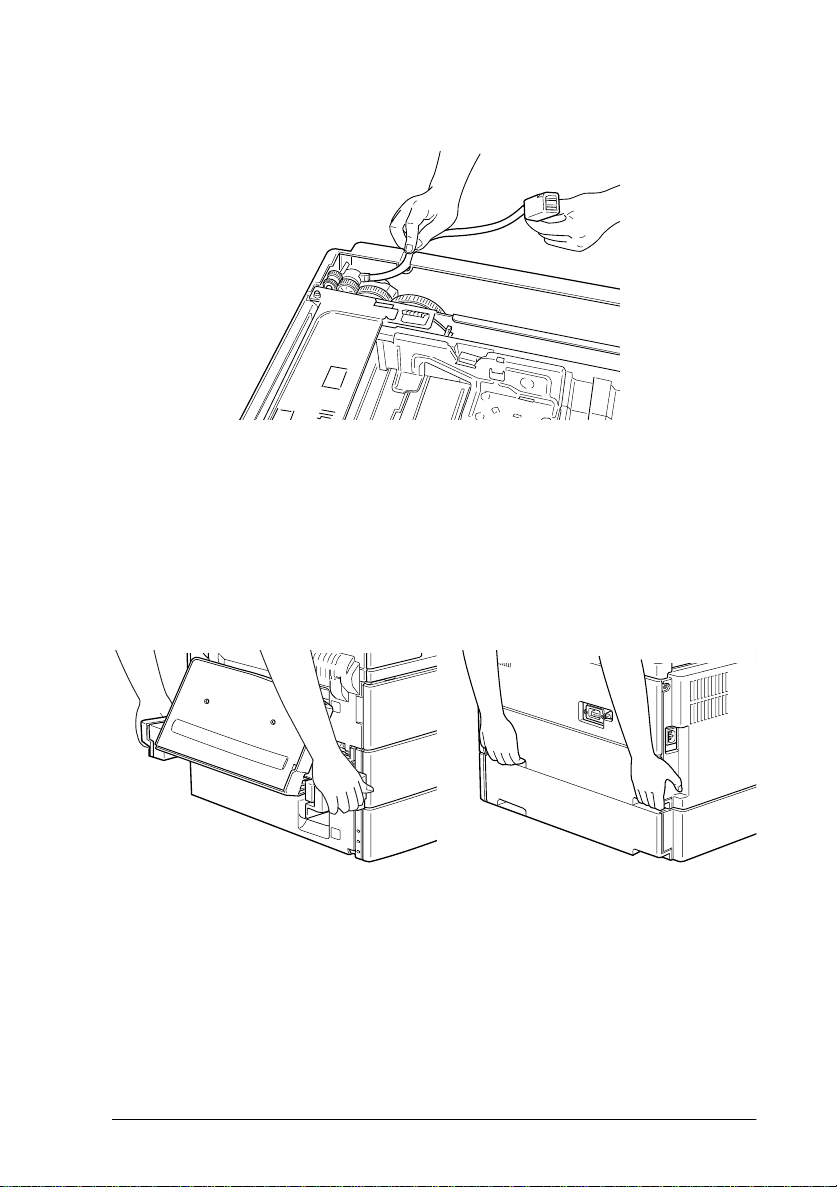
6. At the back of the unit, push the cable into the slot.
7. Carefully lift the printer with two or more people.
Caution:
c
❏ The printer weighs about 50 kg (110.2 lb); always lift it
with two or more people.
❏ Grasp the printer at the locations indicated below.
left side right side
3
Page 8
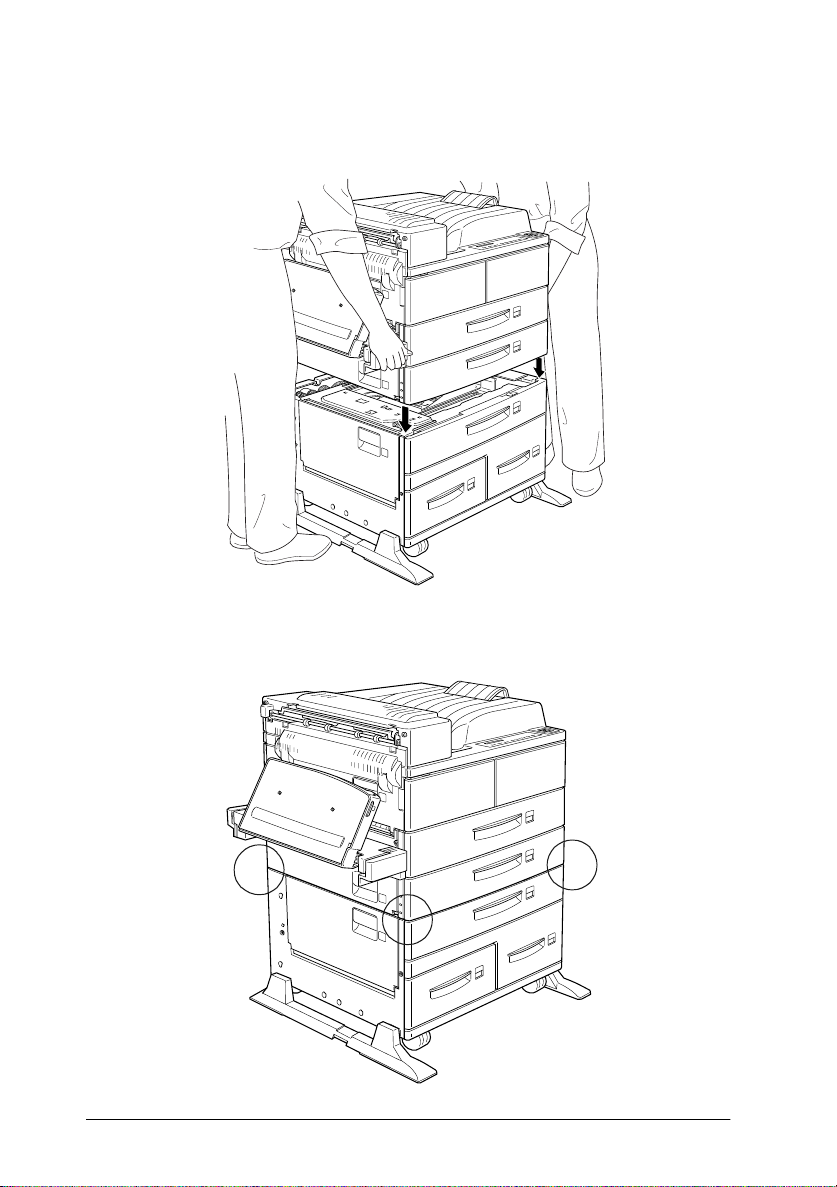
8. Align each of the printer’s corners with those of the unit, then
lower the printer until it rests securel y on the unit.
9. Make sure all corners of the printer fit fir mly onto the unit.
4
Page 9

10. Pull out lower cassette 2 as far as it will go. Then, lift it up
slightly, and completely remove it.
11. Pull out lower cassette 3. Take out and open the included
package of metal fittings and screws.
5
Page 10

12. Attach the two metal fittings with the screws as shown below.
Note that the shape of the two fittings are different.
13. Push cassette 3 back into the unit, then replace cassette 2.
14. Pull out cassette 4 an d remove the protecti ve materials insi de.
6
Page 11

15. Pull out lower cassette 5 and remove the protective materials
inside. Be sure to open the inside cover and remove the
protectiv e insert.
16. Plug the cable from the Large Capa city Paper Unit into the
appropri ate connector at the back of the printer .
7
Page 12

2
c
Installing the Imaging Cartridge
Caution:
❏ Do not turn the imaging cartridge upside down.
❏ Do not open the drum's prot ective cover and avoid exposing
the imaging cartridg e to roo m light any longer than
necessary. Overexposing the cartrid g e may cause
abnormally da rk or lig ht areas t o appea r on the prin ted page
and reduce the life of the cart rid ge.
1. Whil e holding the imaging cartri dge horizontally, gently
shake it a fe w times to d is tribute the to ne r evenly.
8
Page 13

2. Remove the attached sheet.
3. Open cover A by pulling the latch.
latch
4. Open the cover on the front of the pr inter.
9
Page 14

5. Holding the grip and tab on the imaging cartridge, insert the
cartridge into the printe r until it is housed completely.
Note:
Make sure the tab is pushed dow n and flush with the imaging
cartridge. Otherwise, you can not close the front cover or cover A.
tab
6. Slowly pull the clear seal all the way out with firm, even force.
10
Page 15

7. Release the front cover; it close s a utomaticall y.
8. Close cover A by pushing it up and in to the printer.
latch
c
Caution:
Never transport the printer with the imaging cartridge installed.
11
Page 16

3
Loading Paper
This section includes instructions on loading paper in lower
cassettes 1 and 2.
Lower Cassette 1
Loading Orientation Paper Size
Vertical A4, A5, Executive, Letter, Half-Letter
Horizontal A3, Ledger, Legal, Government Legal
Lower Cassette 2
Loading Orientation Paper Size
Vertical A4, Executive, Letter
Horizontal A3, Ledger, Legal, Government Legal
To confirm paper size dimensions, see Appendix A, “Paper Specifications” in
your
Reference Guide
.
Vertical loading orientation Horizontal loading orientation
To load paper in a lower paper cassette, follow the steps below.
12
Page 17

1. Pull out the casse tte you want to load.
2. While pulling up the vertic al paper gui de, slide it outward as
far as it will go.
13
Page 18

3. While pushing down the lever on the horizont al paper guide,
slide the guide outward as far as it will go.
4. Fan a stack of paper and tap it on a flat surface to even the
edges. Insert the paper face up into the cassette, placing the
corners of the paper on the arrow mark inside the cassette.
printable side up
14
Note:
Be sure not to load paper higher than the arrow marks.
Page 19

5. Adjust the vertical and horizontal paper guides to match the
size of your paper.
Caution:
c
6. Take out the card with paper sizes printed on it. Fold it
appropriately and insert it into the cassette to show the paper
size that you loaded.
Make sure to adjust the paper guides to the paper size you
load; otherwise, the print er will not print properly.
15
Page 20

7. Push the cassette back into the printer.
s
16
Page 21

4
1. Make sure the power switch on the top of the printer is turned
Attaching the Power Cord
off, as shown below.
2. Insert the power cord into the AC inl et at the back of the
printer. Then plug the other end into a properly grounded
outlet.
Caution:
❏
c
Avoid using outlet s that ot her appliances are plugged in to .
❏
Only use an outlet that meets the p ower requirements for
this printer.
17
Page 22

5
1. Make sure the imaging cartridge is installed. Turn on the
Test Printing
printer. Several messages appear on the display as the printer
perform s i nternal tes ts. After about 60 seconds, the Ready
message appears.
Caution:
c
Do not turn the printer off for about 60 seconds after turning
on the printer. Wait unti l the p rinter finishes performing
internal tests and the On Line lig h t comes back on.
2. Make sure the On Line light is on. This indicates that the
printer is ready to accept and print data. If it isn’t on, press
the On Line button .
3. Press the Enter button two times. The printe r prints a statu s
sheet, showing the current pri nter settings.
18
Enter
button
Page 23

6
Connecting the Printer to a
Computer
Though this printer is intended to be used on a network, you can
use the parallel interfa ce to connect the printer directly to a
computer.
Note:
Your printer also has room for a n optional interface connector. See
“Optional interfaces” on page 3-54 of your Reference Guide for more
information.
To connect the parallel interface, follow the steps below.
1. Make sure both the printer and the computer are o ff .
2. Connect the parallel cable to the parallel interface connector.
Note:
Use only a shielded, twist e d -pair parallel cable.
par a ll e l interface
connector
19
Page 24

3. Secure the connector by pushing the two wire clips to gether
until they l ock in place o n both sides of the connector.
4. Connect the other end of the cable to your computer, and
fasten it as required.
5. Turn o n the printer, then turn on your computer.
7
After completing the ha rdware setup, check the following items.
❏ To install options, see the Reference Guide.
❏ Have your network administrator refer to the Administrator’s
❏ Attach the small box included in your printer package to the
❏ See the Reference Guide for detailed information about your
20
After Setting Up the Hardware
Guide to make netw ork settings. Also see the Administrator’s
Guide for instructions on installing printer software.
front of the printer. Keep the Quick Reference Guide in this box
for help o n understand ing printer me ssages, clea ring paper
jams, and re placing the imaging cartridge.
printer and i ts options.
Page 25

EPSON OVERSEAS MARKETING LOCATIONS
EPSON AMERICA, INC.
20770 Madrona Ave.
P.O. Box 2842
Torrance, CA 90509-2842
Phone: (800) 922-8911
Fax: (310) 782-5220
EPSON DEUTSCHLAND GmbH
Zülpicher Straße 6,
40549 Düsseldorf Germany
Phone: (0211) 56030
Fax: (0211) 5047787
EPSON AUSTRALIA PTY. LTD.
70 GIBBES STREET, CHATSWOOD 2067 NSW.
Phone: 2-9903-9000
Fax: 2-9903-9177
EPSON HONG KONG LTD.
Rooms 4706-10, 47/F,
China Resources Bldg.,
26 Harbour Road, Wanchai, Hong Kong
Phone: 2585-4300
Fax: 2827-7083
EPSON ITALIA S.p.A.
V.le F.lli Casiraghi 427
20099 Sesto S.Giovanni
MI, Italy
Phone: 2-262331
Fax: 2-2440750
EPSON UK LTD.
Campus 100, Maylands Avenue,
Hemel Hempstead, Herts,
HP2 7TJ, U.K.
Phone: (+44) 01442 261144
Fax: (+44) 01442 227227
EPSON FRANCE S.A.
68 bis, rue Marjolin
92300, Levallois-Perret, France
Phone: 33.1.40.87.37.37
Telex: 610657
EPSON SINGAPORE P TE. LTD.
No. 1 Temasek Avenue #36-00
Millenia Tower, Singapore 039192
Phone: (065) 33 77 911
Fax: (065) 33 41 185
EPSON TAIWAN TECHNOLOGY &
TRADING LTD.
10F, No. 287 Nanking E. Road, Sec. 3,
Taipei, Taiwan, R.O.C.
Phone: (02) 717-7360
Fax: (02) 712-9164
EPSON IBERICA S.A.
Av. de Roma, 18-26
08290 Cerdanyola del Valles
Barcelona, Spain
Phone: 582. 15.00
Fax: 582. 15.55
SEIKO EPSON CORPO RATION
(Hirooka Office)
80 Harashinden, Hirooka
Shiojiri-shi, Nagano-ken
399-0785 Japan
EPSON PORTUGAL, S.A.
R. do Progresso, 471, 1º Perafita
4460 Matosinhos, Portugal
Phone: (02) 996 14 02
Fax: (02) 996 14 11
1998 February
Page 26

 Loading...