

Page 1
Reference Guide
NPD2541-00
Page 2

Where to Find Information
Setup Guide
Provides you with information on assembling the printer and
installing the printer software.
Reference Guide (this manual)
Provides you with detailed information on the printer’s functions,
optional products, maintenance, troubleshooting, and technical
specifications.
Note:
❏ This guide includes information for both the EPL-6200 and
EPL-6200L models. Unless stated, the information applies to both
printer models.
❏ The majority of the illustrations and screen shots used in this guide
show the EPL-6200 model. Specific illustrations and screen shots of
the EPL-6200L model are included in places where the differences
between the two models result in different instructional
information.
Network Guide
Provides network administrators with information on both the
printer driver and network settings. You need to install this guide
from the software CD-ROM to your computer’s hard disk before
referring it.
2
Page 3

Laser Printer
No part of this publication may be reproduced, stored in a retrieval system, or transmitted
in any form or by any means, mechanical, photocopying, recording, or otherwise, without
the prior written permission of Seiko Epson Corporation. No patent liability is assumed with
respect to the use of the information contained herein. Neither is any liability assumed for
damages resulting from the use of the information contained herein.
Neither Seiko Epson Corporation nor its affiliates shall be liable to the purchaser of this
product or third partie s for damages, losses, costs, or expenses incur red by purchaser or third
parties as a result of: accide nt, misuse, or abuse of this product or unauthorize d modifications,
repairs, or alterations to this product, or (excluding the U.S.) failure to strictly comply with
Seiko Epson Corporation’s operating and maintenance instructions.
Seiko Epson Corp oration and its affiliates sha ll not be liable against any d amages or problems
arising from the use of any options or any consumable products other than those designated
as Original Epson Products or Epson Approved Products by Seiko Epson Corporation.
PCL is the registered trademark of Hewlett-Packard Company.
Features Zoran Corporation Integrated Print System (IPS) for print language emulation.
NEST Office Kit Copyright © 1996, Novell, Inc. All rights reserved.
IBM and PS/2 are registered trademarks of International Business Machines Corporation.
Microsoft
States of America and other countries.
Apple
EPSON and EPSON ESC/P are registered trademarks and EPSON ESC/P 2 is a trademark
of Seiko Epson Corporation.
Coronet is a trademark of Ludlow Industries (UK) Ltd.
Marigold is a trademark of Arthur Baker and may be registered in some jurisdictions.
®
and Windows® are registered trademarks of Microsoft Corporation in the United
®
and Macintosh® are registered trademarks of Apple Computer, Inc.
3
Page 4

CG Times and CG Omega are trademarks of Agfa Monotype Corporation and may be
registered in certain jurisdictions.
Arial, Times New Roman and Albertus are trademarks of The Monotype Corporation and
may be registered in certain jurisdictions.
ITC Avant Garde Gothic, ITC Bookman, ITC Zapf Chancery and ITC Zapf Dingbats are
trademarks of International Typeface Corporation and may be registered in some
jurisdictions.
Antique Olive is a trademark of Fonderie Olive.
Helvetica, Palatino, Times, Univers, Clarendon, New Century Schoolbook, Miriam and
David are trademarks of Heidelberger Druckmaschinen AG which may be registered in
certain jurisdictions.
Wingdings is a trademark of Microsoft Corporation and may be registered in some
jurisdictions.
HP and HP LaserJet are registered trademarks of the Hewlett-Packard Company.
Adobe, the Adobe logo and PostScript3 are trademarks of Adobe Systems Incorporated,
which may be registered in certain jurisdictions.
General Notice: Other product names used herein are for identification purposes only and
may be trademarks of their respective owners. Epson disclaims any and all rights in those
marks.
Copyright © 2006 Seiko Epson Corporation. All rights reserved.
4
Page 5

Contents
Safety Information. . . . . . . . . . . . . . . . . . . . . . . . . . . . . . . . . . . . . . . . .14
Warnings, Cautions, and Notes . . . . . . . . . . . . . . . . . . . . . . . . .14
Safety Precautions . . . . . . . . . . . . . . . . . . . . . . . . . . . . . . . . . . . .14
Important Safety Instructions. . . . . . . . . . . . . . . . . . . . . . . . . . .18
Safety Information . . . . . . . . . . . . . . . . . . . . . . . . . . . . . . . . . . . .20
Power On/Off Cautions . . . . . . . . . . . . . . . . . . . . . . . . . . . . . . .23
Chapter 1 Product Information
Printer Parts . . . . . . . . . . . . . . . . . . . . . . . . . . . . . . . . . . . . . . . . . . . . . .24
Front view . . . . . . . . . . . . . . . . . . . . . . . . . . . . . . . . . . . . . . . . . . .24
Rear view . . . . . . . . . . . . . . . . . . . . . . . . . . . . . . . . . . . . . . . . . . . .26
Control Panel . . . . . . . . . . . . . . . . . . . . . . . . . . . . . . . . . . . . . . . . . . . . .27
Indicator lights . . . . . . . . . . . . . . . . . . . . . . . . . . . . . . . . . . . . . . .28
Buttons (EPL-6200 only) . . . . . . . . . . . . . . . . . . . . . . . . . . . . . . .30
Options and Consumable Products . . . . . . . . . . . . . . . . . . . . . . . . . .30
Options (EPL-6200 only) . . . . . . . . . . . . . . . . . . . . . . . . . . . . . . .31
Consumable products . . . . . . . . . . . . . . . . . . . . . . . . . . . . . . . . .32
Features at a Glance . . . . . . . . . . . . . . . . . . . . . . . . . . . . . . . . . . . . . . .33
Adobe PostScript 3 (EPL-6200 only) . . . . . . . . . . . . . . . . . . . . .33
Resolution Improvement Technology and
Enhanced MicroGray technology (EPL-6200 only). . . . . . .33
Toner Save mode . . . . . . . . . . . . . . . . . . . . . . . . . . . . . . . . . . . . .33
Duplex printing (EPL-6200 only) . . . . . . . . . . . . . . . . . . . . . . . .34
Fit-to-page printing . . . . . . . . . . . . . . . . . . . . . . . . . . . . . . . . . . .34
Printing multiple pages on a sheet. . . . . . . . . . . . . . . . . . . . . . .34
Watermark printing . . . . . . . . . . . . . . . . . . . . . . . . . . . . . . . . . . .34
Overlay printing (EPL-6200 only) . . . . . . . . . . . . . . . . . . . . . . .34
High-quality printing. . . . . . . . . . . . . . . . . . . . . . . . . . . . . . . . . .35
5
Page 6

Chapter 2 Paper Handling
Paper Sources. . . . . . . . . . . . . . . . . . . . . . . . . . . . . . . . . . . . . . . . . . . . .36
MP tray. . . . . . . . . . . . . . . . . . . . . . . . . . . . . . . . . . . . . . . . . . . . . .36
500-Sheet Lower Paper Cassette Unit A4
(EPL-6200 only) . . . . . . . . . . . . . . . . . . . . . . . . . . . . . . . . . . . .37
Manual feed slot (EPL-6200 only) . . . . . . . . . . . . . . . . . . . . . . .37
Loading Paper . . . . . . . . . . . . . . . . . . . . . . . . . . . . . . . . . . . . . . . . . . . .37
MP tray. . . . . . . . . . . . . . . . . . . . . . . . . . . . . . . . . . . . . . . . . . . . . .38
500-Sheet Lower Paper Cassette Unit A4
(EPL-6200 only) . . . . . . . . . . . . . . . . . . . . . . . . . . . . . . . . . . . .43
Manual feed slot (EPL-6200 only) . . . . . . . . . . . . . . . . . . . . . . .48
Loading a custom paper size . . . . . . . . . . . . . . . . . . . . . . . . . . .50
Printing on Special Media . . . . . . . . . . . . . . . . . . . . . . . . . . . . . . . . . .51
Labels . . . . . . . . . . . . . . . . . . . . . . . . . . . . . . . . . . . . . . . . . . . . . . .51
Envelopes. . . . . . . . . . . . . . . . . . . . . . . . . . . . . . . . . . . . . . . . . . . .51
Thick paper . . . . . . . . . . . . . . . . . . . . . . . . . . . . . . . . . . . . . . . . . .53
Transparencies . . . . . . . . . . . . . . . . . . . . . . . . . . . . . . . . . . . . . . .53
Chapter 3 Using the Printer Driver For Windows
About the Printer Software . . . . . . . . . . . . . . . . . . . . . . . . . . . . . . . . .54
System Requirements . . . . . . . . . . . . . . . . . . . . . . . . . . . . . . . . . . . . . .54
Installing the Printer Software. . . . . . . . . . . . . . . . . . . . . . . . . . . . . . .55
Installing the printer driver. . . . . . . . . . . . . . . . . . . . . . . . . . . . .55
Installing the EPSON Status Monitor 3 (EPL-6200 only) . . . .55
Installing the PostScript printer driver (EPL-6200 only) . . . .57
Using the Printer Driver. . . . . . . . . . . . . . . . . . . . . . . . . . . . . . . . . . . .67
Accessing the printer driver . . . . . . . . . . . . . . . . . . . . . . . . . . . .68
Printer driver settings . . . . . . . . . . . . . . . . . . . . . . . . . . . . . . . . .69
Accessing the PostScript printer driver (EPL-6200 only) . . . .84
PostScript printer driver settings (EPL-6200 only) . . . . . . . . .85
Using online help . . . . . . . . . . . . . . . . . . . . . . . . . . . . . . . . . . . .114
Monitoring Your Printer with EPSON Status Monitor 3. . . . . . . .114
About EPSON Status Monitor 3. . . . . . . . . . . . . . . . . . . . . . . .114
Accessing the EPSON Status Monitor 3 . . . . . . . . . . . . . . . . .114
Getting printer status details . . . . . . . . . . . . . . . . . . . . . . . . . .116
Using the Job Management function. . . . . . . . . . . . . . . . . . . .118
6
Page 7

Setting monitoring preferences . . . . . . . . . . . . . . . . . . . . . . . .120
Status Alert window . . . . . . . . . . . . . . . . . . . . . . . . . . . . . . . . .124
Stopping monitoring . . . . . . . . . . . . . . . . . . . . . . . . . . . . . . . . .125
Selecting printers to be monitored (EPL-6200 only) . . . . . . .126
Setting for the USB Connection. . . . . . . . . . . . . . . . . . . . . . . . . . . . .126
Canceling Printing. . . . . . . . . . . . . . . . . . . . . . . . . . . . . . . . . . . . . . . .128
From the control panel (EPL-6200 only) . . . . . . . . . . . . . . . . .128
From the computer. . . . . . . . . . . . . . . . . . . . . . . . . . . . . . . . . . .128
Uninstalling Printer Software . . . . . . . . . . . . . . . . . . . . . . . . . . . . . .130
Uninstalling the printer driver and EPSON Status
Monitor 3. . . . . . . . . . . . . . . . . . . . . . . . . . . . . . . . . . . . . . . . .130
Uninstalling only the EPSON Status Monitor 3
(EPL-6200 only) . . . . . . . . . . . . . . . . . . . . . . . . . . . . . . . . . . .133
Chapter 4 Using the Printer Driver For Macintosh
About the Printer Software . . . . . . . . . . . . . . . . . . . . . . . . . . . . . . . .136
System Requirements . . . . . . . . . . . . . . . . . . . . . . . . . . . . . . . . . . . . .136
Mac OS 8.6 to 9.x Users. . . . . . . . . . . . . . . . . . . . . . . . . . . . . . . . . . . .137
Installing the printer driver. . . . . . . . . . . . . . . . . . . . . . . . . . . .137
Selecting the printer driver . . . . . . . . . . . . . . . . . . . . . . . . . . . .138
Printer driver settings . . . . . . . . . . . . . . . . . . . . . . . . . . . . . . . .138
Installing the PostScript printer driver (EPL-6200 only) . . .149
Selecting the PostScript printer driver . . . . . . . . . . . . . . . . . .152
PostScript printer driver settings . . . . . . . . . . . . . . . . . . . . . . .155
Using online help . . . . . . . . . . . . . . . . . . . . . . . . . . . . . . . . . . . .167
Mac OS X Users . . . . . . . . . . . . . . . . . . . . . . . . . . . . . . . . . . . . . . . . . .168
Installing the printer driver. . . . . . . . . . . . . . . . . . . . . . . . . . . .168
Selecting the printer driver . . . . . . . . . . . . . . . . . . . . . . . . . . . .168
Printer driver settings . . . . . . . . . . . . . . . . . . . . . . . . . . . . . . . .177
Installing the PostScript printer driver (EPL-6200 only) . . .180
Selecting the PostScript printer . . . . . . . . . . . . . . . . . . . . . . . .182
Changing the printer setup settings . . . . . . . . . . . . . . . . . . . .193
PostScript printer driver settings . . . . . . . . . . . . . . . . . . . . . . .193
Monitoring Your Printer with EPSON Status Monitor 3. . . . . . . .200
About the EPSON Status Monitor 3 . . . . . . . . . . . . . . . . . . . .200
Accessing the EPSON Status Monitor 3 . . . . . . . . . . . . . . . . .200
Getting printer status details . . . . . . . . . . . . . . . . . . . . . . . . . .201
7
Page 8

Setting Monitoring Preferences . . . . . . . . . . . . . . . . . . . . . . . .204
Status Alert window . . . . . . . . . . . . . . . . . . . . . . . . . . . . . . . . .205
Setting for a USB Connection. . . . . . . . . . . . . . . . . . . . . . . . . . . . . . .205
Canceling Printing. . . . . . . . . . . . . . . . . . . . . . . . . . . . . . . . . . . . . . . .208
From the control panel (EPL-6200 only) . . . . . . . . . . . . . . . . .208
From the computer. . . . . . . . . . . . . . . . . . . . . . . . . . . . . . . . . . .209
Uninstalling Printer Software . . . . . . . . . . . . . . . . . . . . . . . . . . . . . .209
Mac OS 8.6 to 9.x users . . . . . . . . . . . . . . . . . . . . . . . . . . . . . . .209
Mac OS X users . . . . . . . . . . . . . . . . . . . . . . . . . . . . . . . . . . . . . .210
Chapter 5 Setting Up Your Printer on a Network (EPL-6200)
For Windows . . . . . . . . . . . . . . . . . . . . . . . . . . . . . . . . . . . . . . . . . . . .211
Sharing the printer . . . . . . . . . . . . . . . . . . . . . . . . . . . . . . . . . . .211
Setting up your printer as a shared printer . . . . . . . . . . . . . .212
Using an additional driver . . . . . . . . . . . . . . . . . . . . . . . . . . . .214
Setting up a clients . . . . . . . . . . . . . . . . . . . . . . . . . . . . . . . . . . .220
Installing the printer driver from the CD-ROM . . . . . . . . . .228
Using AppleTalk Under Windows 2000 or
Windows NT 4.0. . . . . . . . . . . . . . . . . . . . . . . . . . . . . . . . . . .230
For Macintosh. . . . . . . . . . . . . . . . . . . . . . . . . . . . . . . . . . . . . . . . . . . .230
Sharing the printer . . . . . . . . . . . . . . . . . . . . . . . . . . . . . . . . . . .230
Setting up your printer as a shared printer . . . . . . . . . . . . . .231
Accessing the shared printer. . . . . . . . . . . . . . . . . . . . . . . . . . .232
For Mac OS X. . . . . . . . . . . . . . . . . . . . . . . . . . . . . . . . . . . . . . . .234
Chapter 6 Setting Up Your Printer on a Network (EPL-6200L)
For Windows . . . . . . . . . . . . . . . . . . . . . . . . . . . . . . . . . . . . . . . . . . . .235
Sharing the printer . . . . . . . . . . . . . . . . . . . . . . . . . . . . . . . . . . .235
Setting up your printer as a shared printer . . . . . . . . . . . . . .236
Using an additional driver . . . . . . . . . . . . . . . . . . . . . . . . . . . .238
Setting up a clients . . . . . . . . . . . . . . . . . . . . . . . . . . . . . . . . . . .244
Installing the printer driver from the CD-ROM . . . . . . . . . .252
Using AppleTalk Under Windows 2000 or
Windows NT 4.0. . . . . . . . . . . . . . . . . . . . . . . . . . . . . . . . . . .254
For Macintosh. . . . . . . . . . . . . . . . . . . . . . . . . . . . . . . . . . . . . . . . . . . .254
8
Page 9

Sharing the printer . . . . . . . . . . . . . . . . . . . . . . . . . . . . . . . . . . .254
Setting up your printer as a shared printer . . . . . . . . . . . . . .255
Accessing the shared printer. . . . . . . . . . . . . . . . . . . . . . . . . . .256
For Mac OS X. . . . . . . . . . . . . . . . . . . . . . . . . . . . . . . . . . . . . . . .258
Chapter 7 Using the Remote Control Panel Utility (EPL-6200 only)
For DOS. . . . . . . . . . . . . . . . . . . . . . . . . . . . . . . . . . . . . . . . . . . . . . . . .259
Remote Control Panel utility overview. . . . . . . . . . . . . . . . . .259
Making printer settings . . . . . . . . . . . . . . . . . . . . . . . . . . . . . . .265
Choosing printer emulation . . . . . . . . . . . . . . . . . . . . . . . . . . .278
Other special settings. . . . . . . . . . . . . . . . . . . . . . . . . . . . . . . . .280
Printing font samples. . . . . . . . . . . . . . . . . . . . . . . . . . . . . . . . .288
For Macintosh Users . . . . . . . . . . . . . . . . . . . . . . . . . . . . . . . . . . . . . .288
Remote Control Panel utility overview. . . . . . . . . . . . . . . . . .288
Making printer settings . . . . . . . . . . . . . . . . . . . . . . . . . . . . . . .292
Resetting the photoconductor counter . . . . . . . . . . . . . . . . . .297
Chapter 8 Installing and Removing Options (EPL-6200 only)
500-Sheet Lower Paper Cassette Unit A4. . . . . . . . . . . . . . . . . . . . .299
Installing the 500-Sheet Lower Paper Cassette Unit A4 . . . .299
Removing the 500-Sheet Lower Paper Cassette Unit A4 . . .303
Duplex Unit . . . . . . . . . . . . . . . . . . . . . . . . . . . . . . . . . . . . . . . . . . . . .303
Installing the Duplex Unit. . . . . . . . . . . . . . . . . . . . . . . . . . . . .303
Removing the Duplex Unit . . . . . . . . . . . . . . . . . . . . . . . . . . . .310
Memory Module . . . . . . . . . . . . . . . . . . . . . . . . . . . . . . . . . . . . . . . . .310
Installing a memory module. . . . . . . . . . . . . . . . . . . . . . . . . . .311
Removing a memory module . . . . . . . . . . . . . . . . . . . . . . . . . .315
Interface Cards. . . . . . . . . . . . . . . . . . . . . . . . . . . . . . . . . . . . . . . . . . .315
Installing an interface card . . . . . . . . . . . . . . . . . . . . . . . . . . . .316
Removing an interface card . . . . . . . . . . . . . . . . . . . . . . . . . . .318
Chapter 9 Replacing Consumable Products
Precautions During Replacement . . . . . . . . . . . . . . . . . . . . . . . . . . .319
9
Page 10

Developer Cartridge . . . . . . . . . . . . . . . . . . . . . . . . . . . . . . . . . . . . . .319
Photoconductor Unit. . . . . . . . . . . . . . . . . . . . . . . . . . . . . . . . . . . . . .327
Chapter 10 Cleaning and Transporting the Printer
Cleaning the Printer . . . . . . . . . . . . . . . . . . . . . . . . . . . . . . . . . . . . . .334
Cleaning the printer case. . . . . . . . . . . . . . . . . . . . . . . . . . . . . .334
Cleaning the inside of the printer . . . . . . . . . . . . . . . . . . . . . .334
Cleaning the paper path rollers . . . . . . . . . . . . . . . . . . . . . . . .338
Removing spilled toner . . . . . . . . . . . . . . . . . . . . . . . . . . . . . . .341
Transporting the Printer. . . . . . . . . . . . . . . . . . . . . . . . . . . . . . . . . . .341
Chapter 11 Troubleshooting
Status and Error Lights (EPL-6200 only) . . . . . . . . . . . . . . . . . . . . .344
Ready and Error Lights (EPL-6200L only). . . . . . . . . . . . . . . . . . . .364
Printing a Status Sheet . . . . . . . . . . . . . . . . . . . . . . . . . . . . . . . . . . . .378
EPL-6200 . . . . . . . . . . . . . . . . . . . . . . . . . . . . . . . . . . . . . . . . . . .378
EPL-6200L . . . . . . . . . . . . . . . . . . . . . . . . . . . . . . . . . . . . . . . . . .378
Clearing Jammed Paper . . . . . . . . . . . . . . . . . . . . . . . . . . . . . . . . . . .379
Precautions for clearing jammed paper . . . . . . . . . . . . . . . . .380
Preventing paper feed and paper jam problems . . . . . . . . . .380
Paper jam — inside the printer. . . . . . . . . . . . . . . . . . . . . . . . .381
Paper jam — output cover . . . . . . . . . . . . . . . . . . . . . . . . . . . .384
Paper jam — MP tray (EPL-6200 only) . . . . . . . . . . . . . . . . . .386
Paper jam — MP tray (EPL-6200L only) . . . . . . . . . . . . . . . . .389
Paper jam — Duplex Unit (EPL-6200 only) . . . . . . . . . . . . . .391
Paper jam — manual feed slot (EPL-6200 only). . . . . . . . . . .395
Paper jam — 500-Sheet Lower Paper Cassette Unit A4
(EPL-6200 only) . . . . . . . . . . . . . . . . . . . . . . . . . . . . . . . . . . .398
Operational Problems . . . . . . . . . . . . . . . . . . . . . . . . . . . . . . . . . . . . .402
Printout Problems . . . . . . . . . . . . . . . . . . . . . . . . . . . . . . . . . . . . . . . .403
Print Quality Problems. . . . . . . . . . . . . . . . . . . . . . . . . . . . . . . . . . . .405
Memory Problems . . . . . . . . . . . . . . . . . . . . . . . . . . . . . . . . . . . . . . . .409
Paper Handling Problems . . . . . . . . . . . . . . . . . . . . . . . . . . . . . . . . .410
Problems Printing in the PostScript 3 Mode (EPL-6200 only) . . .411
Windows Users. . . . . . . . . . . . . . . . . . . . . . . . . . . . . . . . . . . . . .411
10
Page 11

Macintosh Users . . . . . . . . . . . . . . . . . . . . . . . . . . . . . . . . . . . . .421
Problems Using Options (EPL-6200 only) . . . . . . . . . . . . . . . . . . . .426
Appendix A Technical Specifications
Paper . . . . . . . . . . . . . . . . . . . . . . . . . . . . . . . . . . . . . . . . . . . . . . . . . . .429
Available paper types . . . . . . . . . . . . . . . . . . . . . . . . . . . . . . . .429
Specifications. . . . . . . . . . . . . . . . . . . . . . . . . . . . . . . . . . . . . . . .432
Printable area . . . . . . . . . . . . . . . . . . . . . . . . . . . . . . . . . . . . . . .433
Printer . . . . . . . . . . . . . . . . . . . . . . . . . . . . . . . . . . . . . . . . . . . . . . . . . .434
General . . . . . . . . . . . . . . . . . . . . . . . . . . . . . . . . . . . . . . . . . . . . .434
Environmental . . . . . . . . . . . . . . . . . . . . . . . . . . . . . . . . . . . . . .435
Standards and approvals. . . . . . . . . . . . . . . . . . . . . . . . . . . . . .435
Mechanical. . . . . . . . . . . . . . . . . . . . . . . . . . . . . . . . . . . . . . . . . .436
Electrical. . . . . . . . . . . . . . . . . . . . . . . . . . . . . . . . . . . . . . . . . . . .437
PostScript . . . . . . . . . . . . . . . . . . . . . . . . . . . . . . . . . . . . . . . . . . .438
Interfaces. . . . . . . . . . . . . . . . . . . . . . . . . . . . . . . . . . . . . . . . . . . . . . . .439
Parallel interface . . . . . . . . . . . . . . . . . . . . . . . . . . . . . . . . . . . . .439
USB interface. . . . . . . . . . . . . . . . . . . . . . . . . . . . . . . . . . . . . . . .440
Ethernet interface . . . . . . . . . . . . . . . . . . . . . . . . . . . . . . . . . . . .440
Options and Consumables . . . . . . . . . . . . . . . . . . . . . . . . . . . . . . . . .440
500-Sheet Lower Paper Cassette Unit A4 (C12C802042)
(EPL-6200 only) . . . . . . . . . . . . . . . . . . . . . . . . . . . . . . . . . . .440
Duplex Unit (C12C802051) (EPL-6200 only). . . . . . . . . . . . . .441
Memory module (EPL-6200 only) . . . . . . . . . . . . . . . . . . . . . .442
Developer Cartridge (S050166). . . . . . . . . . . . . . . . . . . . . . . . .442
Developer Cartridge (S050167). . . . . . . . . . . . . . . . . . . . . . . . .443
Photoconductor unit (S051099). . . . . . . . . . . . . . . . . . . . . . . . .443
Appendix B Symbol Sets (EPL-6200 only)
Introduction to Symbol Sets. . . . . . . . . . . . . . . . . . . . . . . . . . . . . . . .445
In the LJ4 Emulation Mode . . . . . . . . . . . . . . . . . . . . . . . . . . . . . . . .445
International character sets for ISO . . . . . . . . . . . . . . . . . . . . .449
In the ESC/P 2 or FX Modes . . . . . . . . . . . . . . . . . . . . . . . . . . . . . . .450
International character sets. . . . . . . . . . . . . . . . . . . . . . . . . . . .452
Characters available with the ESC (^ command . . . . . . . . . .453
11
Page 12

In the I239X Emulation Mode . . . . . . . . . . . . . . . . . . . . . . . . . . . . . .453
In the EPSON GL/ 2 Mode . . . . . . . . . . . . . . . . . . . . . . . . . . . . . . . .454
Appendix C Working with Fonts
Available Fonts . . . . . . . . . . . . . . . . . . . . . . . . . . . . . . . . . . . . . . . . . .455
LJ4/GL2 mode . . . . . . . . . . . . . . . . . . . . . . . . . . . . . . . . . . . . . .455
ESC/P 2 and FX modes . . . . . . . . . . . . . . . . . . . . . . . . . . . . . . .457
I239X mode . . . . . . . . . . . . . . . . . . . . . . . . . . . . . . . . . . . . . . . . .458
PS 3 mode (EPL-6200 only) . . . . . . . . . . . . . . . . . . . . . . . . . . . .459
Printing font samples. . . . . . . . . . . . . . . . . . . . . . . . . . . . . . . . .459
Adding More Fonts . . . . . . . . . . . . . . . . . . . . . . . . . . . . . . . . . . . . . . .459
For Windows users. . . . . . . . . . . . . . . . . . . . . . . . . . . . . . . . . . .460
For Macintosh users . . . . . . . . . . . . . . . . . . . . . . . . . . . . . . . . . .460
Selecting Fonts . . . . . . . . . . . . . . . . . . . . . . . . . . . . . . . . . . . . . . . . . . .462
Downloading Fonts. . . . . . . . . . . . . . . . . . . . . . . . . . . . . . . . . . . . . . .462
EPSON Font Manager (Windows only). . . . . . . . . . . . . . . . . . . . . .462
System requirements . . . . . . . . . . . . . . . . . . . . . . . . . . . . . . . . .463
Installing the EPSON Font Manager . . . . . . . . . . . . . . . . . . . .463
EPSON BarCode Fonts (Windows only) . . . . . . . . . . . . . . . . . . . . .465
System requirements . . . . . . . . . . . . . . . . . . . . . . . . . . . . . . . . .467
Installing EPSON BarCode Fonts. . . . . . . . . . . . . . . . . . . . . . .467
Printing with EPSON BarCode Fonts . . . . . . . . . . . . . . . . . . .469
BarCode Font specifications . . . . . . . . . . . . . . . . . . . . . . . . . . .474
Appendix D Where To Get Help
Contacting Customer Support. . . . . . . . . . . . . . . . . . . . . . . . . . . . . .488
Before Contacting Epson . . . . . . . . . . . . . . . . . . . . . . . . . . . . . .488
Help for Users in North America. . . . . . . . . . . . . . . . . . . . . . .489
Help for Users in Latin America . . . . . . . . . . . . . . . . . . . . . . .490
Help for Users in Europe. . . . . . . . . . . . . . . . . . . . . . . . . . . . . .490
Help for Users in Australia . . . . . . . . . . . . . . . . . . . . . . . . . . . .491
Help for Users in Singapore . . . . . . . . . . . . . . . . . . . . . . . . . . .492
Help for Users in Thailand . . . . . . . . . . . . . . . . . . . . . . . . . . . .492
Help for Users in Vietnam . . . . . . . . . . . . . . . . . . . . . . . . . . . .493
Help for Users in Indonesia . . . . . . . . . . . . . . . . . . . . . . . . . . .493
12
Page 13

Help for Users in Hong Kong. . . . . . . . . . . . . . . . . . . . . . . . . .495
Help for Users in Malaysia . . . . . . . . . . . . . . . . . . . . . . . . . . . .496
Help for Users in India . . . . . . . . . . . . . . . . . . . . . . . . . . . . . . .497
Help for Users in the Philippines. . . . . . . . . . . . . . . . . . . . . . .499
Glossary
Index
13
Page 14

Safety Information
Warnings, Cautions, and Notes
Warnings
must be followed carefully to avoid bodily injury.
w
Cautions
must be observed to avoid damage to your equipment.
c
Notes
contain important information and useful tips on the operation of your
printer.
Safety Precautions
Be sure to follow these precautions carefully to ensure safe,
efficient operation:
14
Page 15
❏ Be careful not to touch the fuser, which is marked CAUTION
Hot Surface, or the surrounding areas. If the printer has been
in use, the fuser and the surrounding areas may be very hot.
*
* CAUTION Hot Surface
❏ Avoid touching the components inside the printer unless
instructed to do so in this guide.
❏ Never force the printer’s components into place. Although the
printer is designed to be sturdy, rough handling can damage
it.
15
Page 16
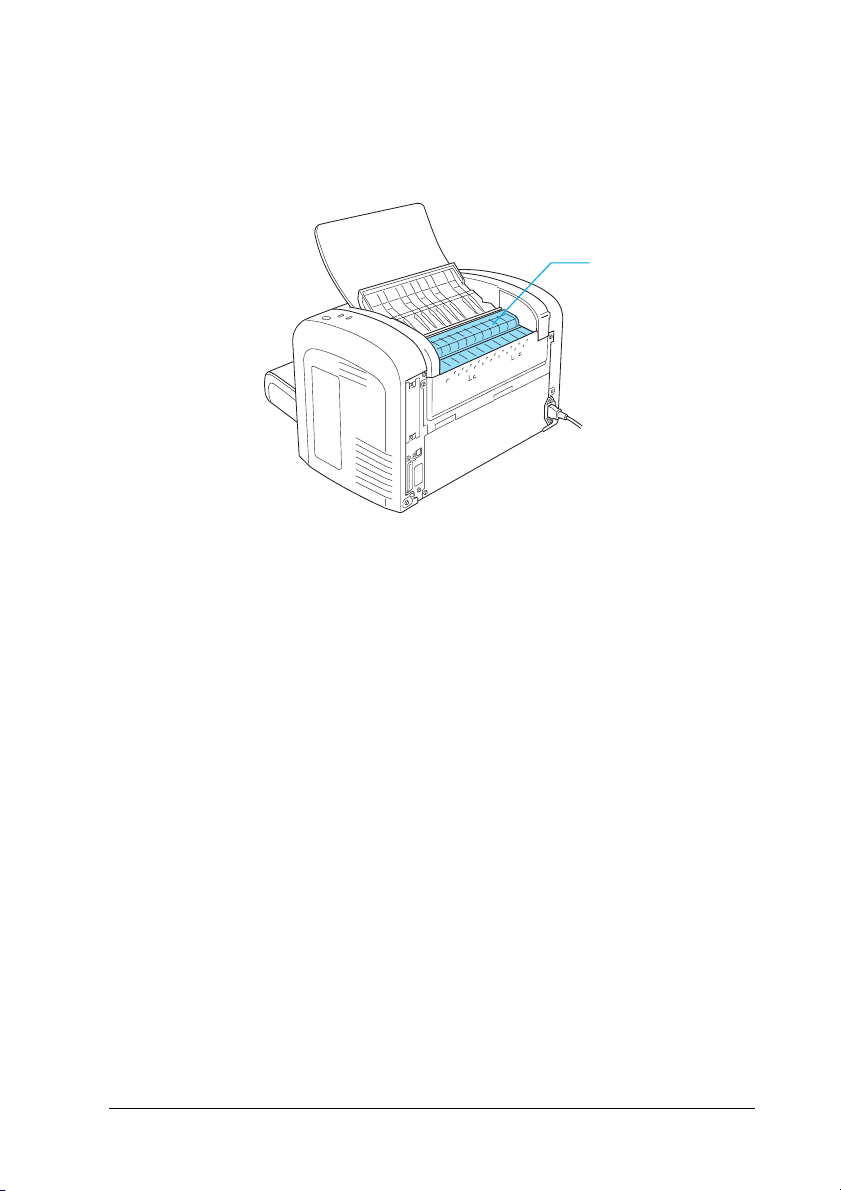
❏ When removing the developer cartridge, never touch the
developing roller under the flap; otherwise, print quality will
decline.
❏ When handling the developer cartridge, always place it on a
clean, smooth surface.
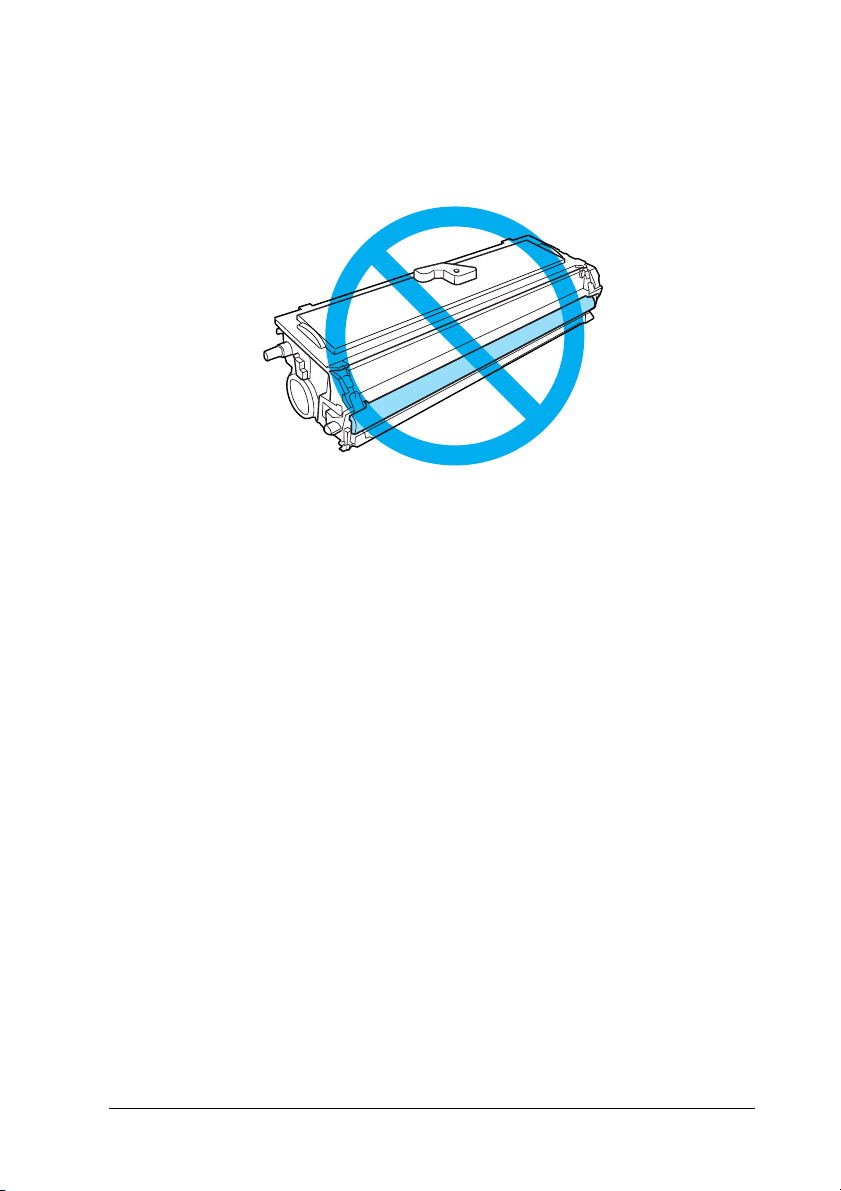
❏ Do not turn the developer cartridge upside down or stand it
on its ends.
❏ Do not attempt to modify or take the developer cartridge
apart. It cannot be refilled.
❏ Do not touch the toner and avoid all contact with your eyes.
❏ If toner is spilled, use a broom and dustpan or a damp cloth
with soap and water to clean it up. Because the fine particles
can cause a fire or explosion if they come into contact with a
spark, do not use a vacuum cleaner.
16
Page 17
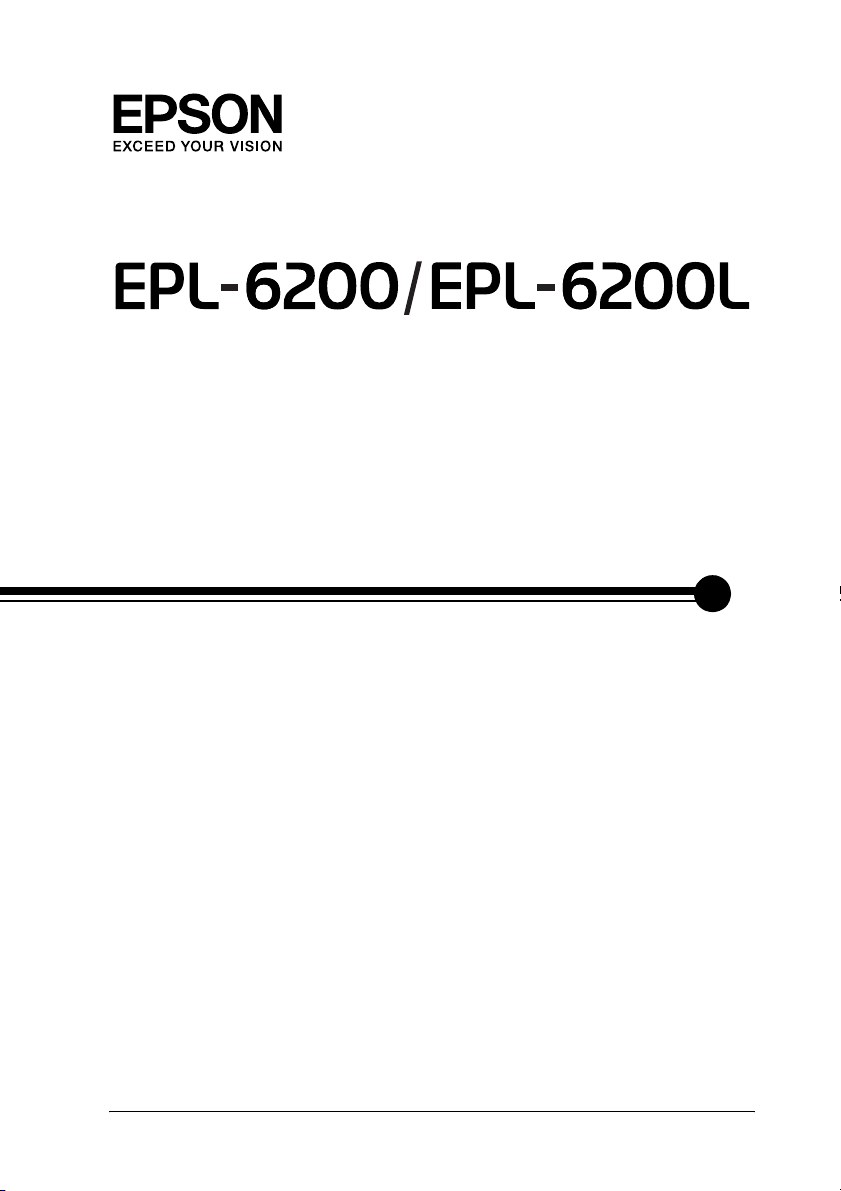
❏ When removing or installing a photoconductor unit, protect
the light-sensitive drum from exposure to light any longer
than necessary. The light-sensitive drum is the green cylinder
visible through the openings in the unit. Overexposing the
drum might cause abnormally dark or light areas to appear
on the printed page and may shorten the service life of the
unit.
❏ Be careful not to scratch the surface of the drum. When you
remove the photoconductor unit from the printer, always
place the unit on a clean, smooth surface. Avoid touching the
drum, since oils from your skin can permanently damage its
surface and affect print quality.
❏ To get the best print quality, do not store the photoconductor
unit in an area subject to direct sunlight, dust, salt air, or
corrosive gases (such as ammonia). Avoid locations subject to
extreme or rapid changes in temperature or humidity.
❏ Wait for at least one hour before using a developer cartridge
or a photoconductor unit after moving it from a cool to a warm
environment to prevent damage from condensation.
❏ Do not dispose of developer cartridges or photoconductor
units in fire, as they can explode and cause injury. Dispose of
them according to local regulations.
17
Page 18

❏ Be sure to keep consumable components out of the reach of
children.
❏ Do not leave jammed paper inside the printer. This can cause
the printer to overheat.
❏ Avoid using electrical outlets that other appliances are
plugged into.
❏ Use only an outlet that meets the power requirements of this
printer.
Important Safety Instructions
❏ Follow all warnings and instructions marked on the printer.
❏ Unplug the printer from the wall outlet before cleaning.
❏ Use a well-wrung cloth for cleaning and do not use liquid or
aerosol cleaners.
❏ Do not use this printer in a damp environment.
❏ Place the printer near an electrical outlet where you can easily
plug in and unplug the power cord.
❏ Do not place the printer on an unstable surface.
❏ Do not put your printer where the cord will be stepped on.
❏ Slots and openings in the cabinet and the back or bottom are
provided for ventilation. Do not block or cover them. Do not
put the printer on a bed, sofa, rug, or other similar surface, or
in a built-in installation unless proper ventilation is provided.
18
Page 19

❏ Connect your printer to an electrical outlet that meets the
power requirements of this printer. Your printer’s power
requirements are indicated on a label attached to the printer.
If you are not sure of the power supply specifications in your
area, contact your local power company or consult your
dealer.
❏ If you are unable to insert the AC plug into the electrical
outlet, contact an electrician.
❏ Avoid using outlets that other appliances are plugged into.
❏ Use the type of power source indicated on the label. If you are
not sure of the type of power available, consult your dealer or
local power company.
❏ If you are unable to insert the plug into the outlet, contact a
qualified electrician.
❏ Adjust only those controls that are covered by the operating
instructions, as improper adjustment of other controls may
result in damage and may require repairs by a qualified
service representative.
❏ If you use an extension cord, make sure that the total of the
ampere ratings on the products plugged into the extension
cord does not exceed the extension cord ampere rating.
❏ Never push objects of any kind through cabinet slots as they
may touch dangerous voltage points or short out parts that
could result in a fire or electric shock.
❏ Never spill liquid of any kind on the printer.
19
Page 20

❏ Except as specifically explained in this guide, do not attempt
to service this product yourself. Opening or removing covers
that are marked
Do Not Remove may expose you to dangerous voltage
points or other risks. Refer all servicing in those
compartments to service personnel.
❏ Unplug this printer from the wall outlet and refer servicing
to qualified service personnel under the following conditions:
A. When the power cord or plug is damaged or frayed.
B. If liquid has been spilled into it.
C. If it has been exposed to rain or water.
D. If it does not operate normally when the operating
instructions are followed. Adjust only those controls that
are covered by the operating instructions since improper
adjustment of other controls may result in damage and will
often require extensive work by a qualified technician to
restore the product to normal operation.
E. If it has been dropped or the cabinet has been damaged.
F. If it exhibits a distinct change in performance, indicating a
need for service.
Safety Information
Power cord
Caution:
Be sure the AC power cord meets the relevant local safety
c
standards.
20
Page 21
Use only the power cord that comes with this product. Use of
other cords may result in fire or electric shock. This product’s
power cord is for use with this product only. Use with other
equipment may result in fire or electric shock.
Laser safety labels
Warning:
The performance of procedures and adjustments other than those
w
specified in this guide may result in hazardous radiation
exposure.
Your printer is a Class 1 laser product as defined in the IEC60825
specifications.
The label shown on the right is attached to the back of the printer
in countries where required.
Internal laser radiation
Max. Average Radiation Power: 15 mW at laser aperture of the
print head unit
Wavelength: 770 to 800 nm
This is a Class III b Laser Diode Assembly that has an invisible
laser beam. The printer head unit is NOT A SERVICE ITEM,
Therefore, the printer head unit should not be opened under any
circumstances.
21
Page 22

CDRH regulations
For information about the Center for Devices and Radiological
Health of the U.S. Food and Drug Administration, see the
Reference Guide on the CD-ROM.
Ozone safety
Ozone emission
Ozone gas is generated by laser printers as a by-product of the
printing process. Ozone is produced only when the printer is
printing.
Ozone exposure limit
The recommended exposure limit for ozone is 0.1 parts per
million (ppm), expressed as an average time-weighted
concentration over an 8-hour period.
The EPSON EPL-6200/EPL-6200L laser printer generates less
than 0.1 ppm for 8 hours of continuous printing.
Minimize the risk
To minimize the risk of exposure to ozone, you should avoid the
following conditions:
❏ Use of multiple laser printers in a confined area
❏ Operation in conditions of extremely low humidity
❏ Poor room ventilation
❏ Long, continuous printing together with any of the above
Printer location
The printer should be located so that the exhaust gases and heat
generated are:
22
Page 23

❏ Not blown directly into the user’s face
❏ Vented directly out of the building whenever possible
Power On/Off Cautions
Caution:
Do not turn off the printer:
c
❏ Until the Ready light (green) comes on and is not flashing.
❏ While the Data ( Ready light for EPL-6200L) light (yellow)
is flashing.
❏ While printing.
23
Page 24

Chapter 1
Product Information
Printer Parts
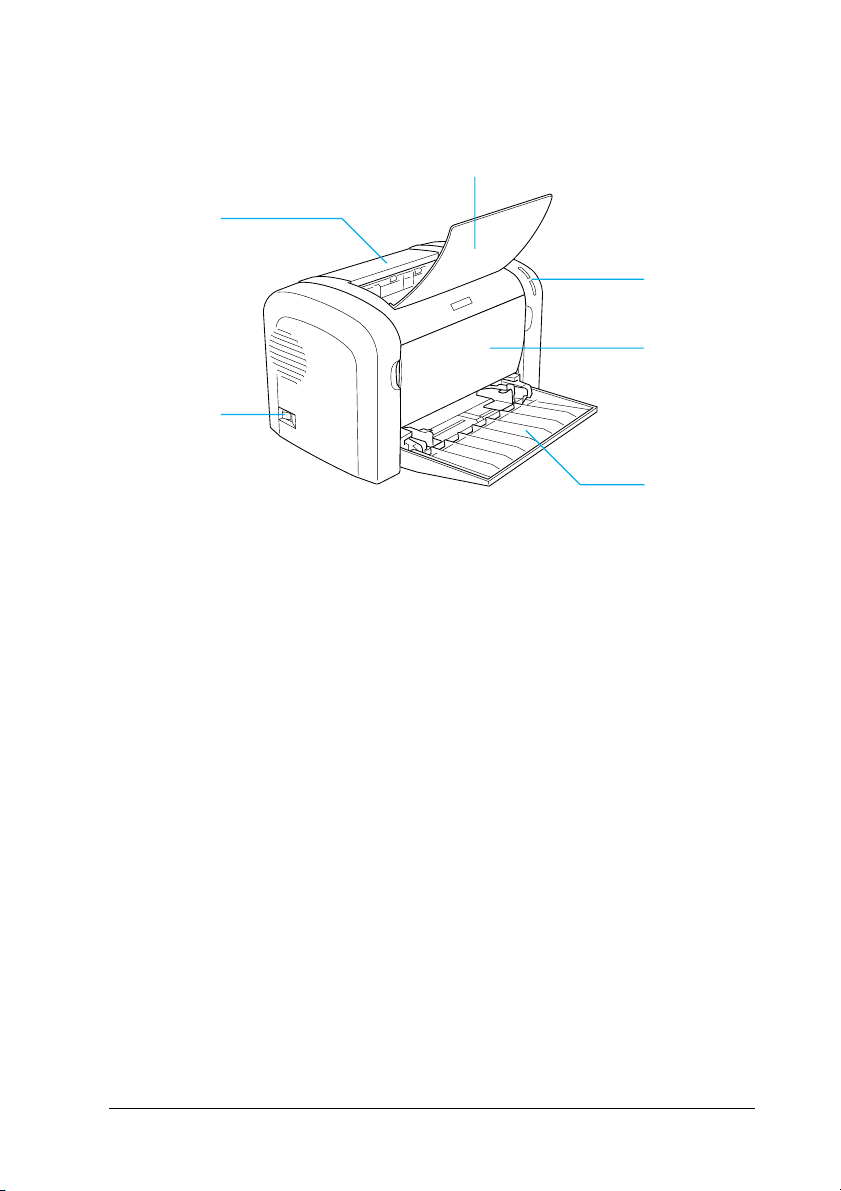
Front view
EPL-6200
a
1
1
1
1
1
b
c
1
1
1
d
g
e
f
1
1
1
1
Product Information 24
Page 25
EPL-6200L
1
b
a
g
a. Output cover
b. Output tray
c. Control panel
d. Front cover
e. MP (Multi-Purpose) tray
f. Manual feed slot (EPL-6200 only)
g. Power switch
1
c
1
d
1
1
e
1
1
1
1
Product Information 25
1
1
1
Page 26

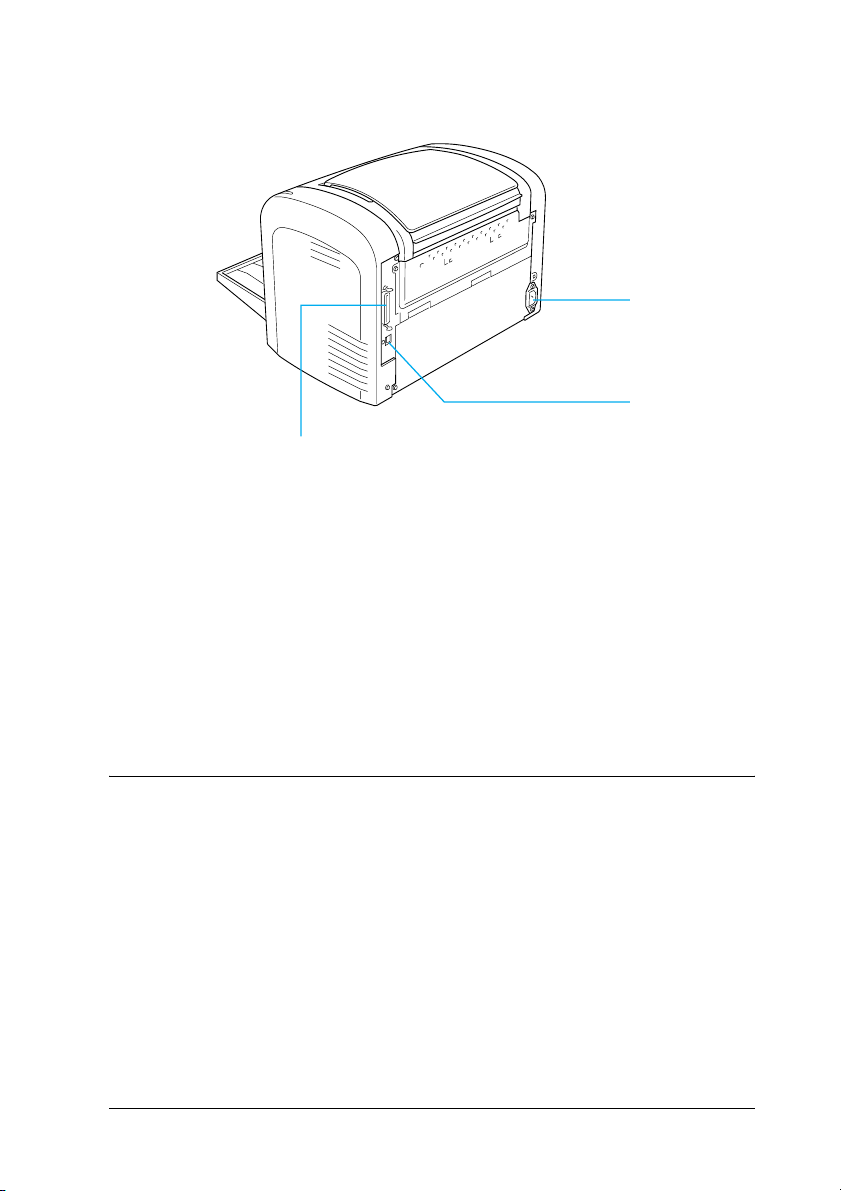
Rear view
EPL-6200
g
1
1
1
a
1
e
EPL-6200 Network model
g
f
b
cd
1
1
1
1
a
1
b
cd
1
1
1
Product Information 26
Page 27
EPL-6200L
1
1
a
b
d
a. AC inlet
b. USB interface connector
c. Duplex Unit connector (EPL-6200 only)
d. Parallel interface connector
e. Type B interface slot (EPL-6200 only)
f. Ethernet interface connector (EPL-6200 Network model
only)
g. Right side cover (EPL-6200 only)
Control Panel
The EPL-6200 has six indicator lights and three buttons, while the
EPL-6200L comes with two indicator lights. The indicator lights
inform you of basic printer status, errors, and warnings. The
buttons allow you to control a number of basic printer operations.
1
1
1
1
1
1
1
1
1
Product Information 27
1
Page 28
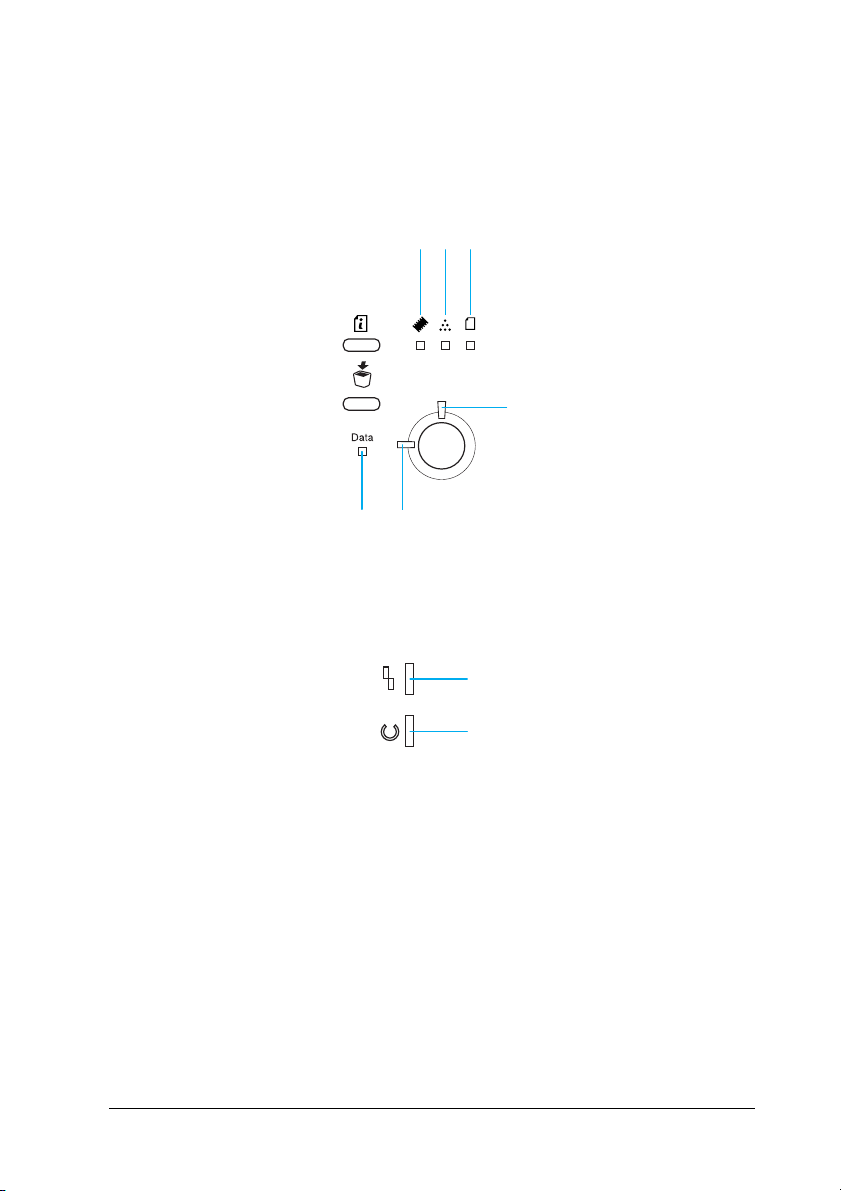
Indicator lights
EPL-6200
EPL-6200L
abc
ef
1
1
1
1
d
1
1
1
d
1
e
aMemory Usually turns on or flashes in
combination with other lights to indicate
a memory-related error or warning.
Product Information 28
1
1
1
1
Page 29

bToner On when the printer’s developer
cartridge has run out of toner. Flashes to
indicate that toner is running low. If this
light is flashing, have a new developer
cartridge ready.
cPaper Turns on or flashes, and when in
combination with the Error light, usually
indicates a paper-related problem. On
usually indicates a paper jam, while
flashing usually indicates a
paper-related error or warning, such as
when the paper source is empty.
1
1
1
1
d Error On or flashes when an error is detected.
eReady On when the printer is ready, indicating
that the printer is ready to receive and
print data. When the printer is not ready,
this light is off. This light also comes on
in combination with other lights to
indicate error situations.
fData On when data is received and stored in
the print buffer (the section of memory
reserved for receiving data) but not yet
printed. Flashing indicates that the
printer is processing data. When no data
remains in the print buffer, this light is
off.
For details on the errors indicated by these lights, see “Status and
Error Lights (EPL-6200 only)” on page 344.
1
1
1
1
1
1
1
1
Product Information 29
Page 30

Buttons (EPL-6200 only)
c
b
1
1
a
aStart/Stop Switches the printer between ready and
offline status.
bJob Cancel Deletes the oldest print job stored in the
printer. Deletes one job when pressed once.
Pressing it down for more than two seconds
deletes all data in the print buffer, all jobs, and
all data the printer is receiving or currently
printing.
cInformation Prints status sheets when the Error light is off
and no warning is indicated. Prints a status
sheet when pressed once. If your printer is a
network model, pressing this button for more
than two seconds prints a network status
sheet. Clears the warning when a warning is
indicated.
1
1
1
1
1
1
1
1
Options and Consumable Products
To purchase options or consumable products, contact your dealer
or a qualified service representative in your area.
Product Information 30
1
1
Page 31

Options (EPL-6200 only)
500-Sheet Lower Paper Cassette Unit A4 (C12C802042)
1
This unit increases paper feeding capacity (up to 500 sheets of A4
size paper). For details, see “500-Sheet Lower Paper Cassette Unit
A4” on page 299.
Duplex Unit (C12C802051)
The Duplex Unit provides for automatic printing on both sides of
the paper. For details, see “Duplex Unit” on page 303.
Note:
The optional 500-Sheet Lower Paper Cassette Unit A4 must be installed
to use the Duplex Unit. You cannot use the Duplex Unit on its own.
Memory Module
This option expands the printer’s memory by allowing you to
print complex and graphics-intensive documents. For details, see
“Memory Module” on page 310.
Note:
Make sure that the DIMM you purchase is compatible with EPSON
products. For details, contact the store where you purchased this printer
or an EPSON qualified service representative.
Interface Card
1
1
1
1
1
1
1
1
Optional interface cards and modules provide a variety of
interfaces, allowing you to use your EPL-6200 with an Ethernet
network, a Macintosh, and IBM mainframe and other specialized
interfaces. For details, see “Interface Cards” on page 315.
Note:
Optional interface slot may not be available depending on the printer
model.
Product Information 31
1
1
1
Page 32

Consumable products
Developer Cartridge (S050166) (EPL-6200 only)
1
This cartridge includes the toner that is used to create the image
on paper. The service life of the cartridge is approximately 6,000
printed pages.
Developer Cartridge (S050167)
This cartridge includes the toner that is used to create the image
on paper. The service life of the cartridge is approximately 3,000
printed pages.
Note:
The EPL-6200 comes with this cartridge already installed, while
EPL-6200L is packaged with a cartridge that prints approximately 1,500
pages.
Photoconductor Unit (S051099)
The photoconductor unit contains a light-sensitive drum that
permanently fixes the toner onto paper. The printer comes with
this unit already installed. This unit requires replacement after
approximately 20,000 pages of printing.
1
1
1
1
1
1
1
1
Product Information 32
1
1
1
Page 33

Features at a Glance
1
Adobe PostScript 3 (EPL-6200 only)
The printer’s Adobe PostScript 3 provides you with the ability to
print documents formatted for PostScript printers. One hundred
and thirty-six fonts in 17 font families are included. IES
(Intelligent Emulation Switch) and SPL (Shared Printer
Language) support allow the printer to switch between the
PostScript mode and other emulations as print data is received at
the printer.
Resolution Improvement Technology and
Enhanced MicroGray technology (EPL-6200
only)
Resolution Improvement Technology (RITech) is an original
EPSON printer technology that works by smoothing out the
jagged edges of diagonal and curved lines in both text and
graphics. Enhanced MicroGray improves the halftone quality of
graphics. With the driver provided, the printer’s 600 dpi (dots per
inch) resolution is enhanced by RITech and Enhanced MicroGray
technology.
1
1
1
1
1
1
1
1
Toner Save mode
To reduce the amount of toner used in printing documents, you
can print rough drafts using the Toner Save mode.
Product Information 33
1
1
1
Page 34

Duplex printing (EPL-6200 only)
The optional Duplex Unit enables you to easily print on both sides
of the page. You can produce professional quality double-sided
documents. Use this feature with any print job to cut costs and
save resources.
Fit-to-page printing
The Fit to Page function allows you to have your documents
enlarged or reduced during printing according to the specified
paper size.
Printing multiple pages on a sheet
Using the Print Layout setting, you can specify to print either two
or four pages of a document onto a single sheet of paper. You can
also specify the printing order, and select whether to print a frame
around the pages. Each page is automatically resized to fit the
specified number of pages onto the selected paper size.
1
1
1
1
1
1
1
1
Watermark printing
Your printer comes with a list of predefined watermarks that you
can add to your documents. You can also create your own original
text or bitmap watermarks.
Overlay printing (EPL-6200 only)
Overlay printing allows you to prepare standard forms, or
templates, that you can use as overlays when printing other
documents. This feature is useful for creating corporate
letterheads or invoices.
Product Information 34
1
1
1
1
Page 35

High-quality printing
When using the standard driver provided, the EPL-6200 provides
1200 dpi printing at a speed of up to 10 pages per minute, while
the EPL-6200L provides 600 dpi printing at a speed of up to 20
pages per minute when printing on A4 paper. You’ll appreciate
the professional print quality produced by your printer and its
quick processing speed.
Note:
A memory overflow error may occur when printing at 1200 dpi if the
EPL-6200 only has the default amount of memory installed because
printing at 1200 dpi uses a lot of memory. If you print regularly at 1200
dpi, the printer should have at least 16 MB of memory installed. If you
print at 1200 dpi in the PostScript mode regularly, it is recommended
that you increase your memory to 32 MB.
1
1
1
1
1
1
1
1
Product Information 35
1
1
1
1
Page 36

Chapter 2
Paper Handling
Paper Sources
This section describes the combinations of paper sources and
paper types that you can use.
MP tray
Paper Type Capacity Paper Size
Plain paper EPL-6200
Letterhead
Labels Up to 10 sheets
Thick paper
Up to 250 sheets of
75 g/m² paper
(Weight: 60 to 90 g/m²,
16 to 24 lb)
EPL-6200L
Up to 150 sheets of
75 g/m² paper
(Weight: 60 to 90 g/m²,
16 to 24 lb)
(Weight: 90 to 163 g/m²,
24 to 43 lb)
A4, A5, B5, Letter (LT),
Legal (LGL), F4,
Half-Letter (HLT),
Executive (EXE),
ISO-B5 (IB5)
Government Letter (GLT),
Government Legal (GLG),
Custom-size paper:
76.2 × 127.0 mm (3.0 × 5.0 in.)
minimum
216.0 × 355.6 mm (8.5 × 14.0
in. maximum
2
2
2
2
2
2
2
2
2
Transparencies Up to 5 Sheets
Envelopes Up to 10 sheets
(Weight: 85 to 105 g/m²,
23 to 28 lb)
Monarch (MON),
Commercial 10 (C10), DL,
C6, C5, ISO-B5 (IB5)
Paper Handling 36
2
2
2
Page 37

500-Sheet Lower Paper Cassette Unit A4
(EPL-6200 only)
The optional 500-Sheet Lower Paper Cassette Unit A4 gives you
a second paper source in addition to the MP tray. For details on
the specifications of the 500-Sheet Lower Paper Cassette Unit A4,
see “500-Sheet Lower Paper Cassette Unit A4 (C12C802042)
(EPL-6200 only)” on page 440.
2
2
2
Manual feed slot (EPL-6200 only)
The manual feed slot enables you to feed paper manually, one
sheet at a time. Use the manual feed slot when you need to print
on special media that you do not usually print on. By doing so,
you can avoid the trouble of removing paper that is loaded in the
MP tray and replacing it with the media that you want to print
on. This is particularly convenient when you only need to print
one sheet or very few sheets.
Loading Paper
This section describes how to load paper into the standard and
optional paper sources available to your printer.
Please note the following points when choosing paper:
❏ Paper should be of high quality and be relatively smooth, with
a weight between 60 and 90 g/m² (16 to 24 lb).
❏ The printer is extremely sensitive to moisture. Be sure to store
your paper in a dry environment.
2
2
2
2
2
2
2
2
❏ The use of colored paper is acceptable, but coated paper
should be avoided.
Paper Handling 37
2
Page 38

❏ You may use paper with preprinted letterheads, provided
that the paper and ink are both laser-printer compatible.
2
MP tray
The MP tray is the standard paper source for both the EPL-6200
and EPL-6200L.
EPL-6200
You can load up to 250 sheets of plain paper into the MP tray of
the EPL-6200.
Follow these steps to load paper into the MP tray:
1. Lift off the tray cover, and then pinch the paper guide tab to
slide the paper guide outward to accommodate the paper you
are loading.
2
2
2
2
2
2
2
2
Note:
Lift the paper guide slightly to move it.
2
2
2
Paper Handling 38
Page 39

2. Fan a stack of paper and tap it on a flat surface to even the
edges, and set the paper into the MP tray with the printable
surface facing up. Then adjust the paper guide to the size of
the paper.
Note:
❏ Make sure to load the paper as far as it will go inside the MP tray
❏ Make sure that you do not load paper beyond the limit mark.
2
2
2
2
2
2
2
Paper Handling 39
2
2
2
2
2
Page 40

3. Replace the MP tray cover.
2
2
2
2
4. Raise the output tray.
Note:
❏ Before printing, make sure that the Paper Size setting in your
printer driver matches the paper you load.
❏ If you want to print on paper heavier than 90 g/m² (24 lb) or on
special paper (such as envelopes, labels, transparencies, or thick
paper), see “Printing on Special Media” on page 51.
2
2
2
2
2
2
2
2
Paper Handling 40
Page 41

EPL-6200L
You can load up to 150 sheets of plain paper into the MP tray of
the EPL-6200L.
Follow these steps to load paper into the MP tray:
1. Open the MP tray.
2. Pinch the paper guide tab, then slide the paper guide outward
to accommodate the paper you are loading.
2
2
2
2
2
2
2
2
Note:
Lift the paper guide slightly to move it.
2
2
2
2
Paper Handling 41
Page 42

3. Fan a stack of paper and tap it on a flat surface to even the
edges, and set the paper into the MP tray with the printable
surface facing up. Then adjust the paper guide to the size of
the paper.
2
2
2
2
2
Note:
❏ Make sure to load the paper as far as it will go inside the MP
tray.
❏ Make sure that you do not load paper beyond the limit mark.
2
2
2
2
2
2
2
Paper Handling 42
Page 43

4. Raise the output tray.
Note:
❏ Before printing, make sure that the Paper Size setting in your
printer driver matches the paper you load.
2
2
2
2
2
2
❏ If you want to print on paper heavier than 90 g/m² (24 lb) or on
special paper (such as envelopes, labels, transparencies, or thick
paper), see “Printing on Special Media” on page 51.
500-Sheet Lower Paper Cassette Unit A4
(EPL-6200 only)
You can load up to 500 sheets of plain paper into the 500-Sheet
Lower Paper Cassette Unit A4.
Follow these steps to load paper into the 500-Sheet Lower Paper
Cassette Unit A4:
Paper Handling 43
2
2
2
2
2
2
Page 44

1. Pull the paper tray out from the cassette unit.
2
2
2
2
2
2
2
Paper Handling 44
2
2
2
2
2
Page 45

2. Lift off the tray cover.
3. Press down on the plate in the paper tray until it locks into
position.
2
2
2
2
2
2
2
Paper Handling 45
2
2
2
2
2
Page 46

4. Fan a stack of paper and tap it on a flat surface to even the
edges. Then load it into the paper tray.
Note:
❏ Make sure that you do not load paper beyond the limit mark.
2
2
2
2
2
2
2
❏ Load letterheads with the printable side facing up and with the
letterhead portion at the top.
Paper Handling 46
2
2
2
2
2
Page 47

5. Replace the tray cover.
2
2
2
2
2
6. Insert the loaded paper tray back into the unit.
2
2
2
2
2
2
2
Paper Handling 47
Page 48

7. Raise the output tray.
2
2
2
2
2
2
Note:
❏ Before printing, make sure that the Paper Size setting in your
printer driver matches the paper you load.
❏ If you want to print on paper heavier than 90 g/m² (24 lb) or on
special paper (such as envelopes, labels, transparencies, or thick
paper), see “Printing on Special Media” on page 51.
Manual feed slot (EPL-6200 only)
You can load 76 to 216 × 148 to 356 mm (3.0 to 8.5 × 5.8 to 14.0 in.)
size paper into the manual feed slot.
Follow these steps to load a single sheet of paper into the manual
feed slot.
Paper Handling 48
2
2
2
2
2
2
Page 49

1. Make sure the cover is in place on the MP tray, then move the
paper guides outward to accommodate the paper you are
loading.
2. Insert a single sheet of paper, with the printable side up, as
far as it will go into the manual feed slot above the tray cover.
Adjust the paper guides to match the paper size you are using.
2
2
2
2
2
2
2
Paper Handling 49
2
2
2
2
2
Page 50

Note:
Load letterheads with the printable side facing up and with the
letterhead portion at the top, toward the printer.
3. Make sure that Manual Feed is selected in your printer
driver settings.
Note:
If you are printing from a DOS application, turn Manual Feed
on using the Remote Control Panel utility instead. For more details,
see “Page Setup button” on page 266.
4. Send the print data from the computer. The Error, Ready, and
Paper lights on the control panel start flashing slowly.
2
2
2
2
5. Press the N Start/Stop button. The printer loads the paper
from the manual feed slot.
Note:
When you no longer need to feed paper manually, be sure to clear
the Manual Feed setting in the printer driver settings before
printing from the MP tray or the optional 500-Sheet Lower Paper
Cassette Unit A4.
Loading a custom paper size
You can load any custom paper size into the MP tray as long as it
is within 76.2 × 127.0 mm (3.0 × 5.0 in.) and 216.0 × 355.6 mm (8.5
× 14.0 in.) in dimension.
The manual feed slot can accommodate any custom paper size
from 76.2 × 148.0 mm (3.0 × 5.8 in.) to 216.0 × 355.6 mm (8.5 × 14.0
in.).
Note:
When you print on a custom paper size, make sure to select Thick Wide
or Thick[W], Thick Narrow or Thick[N], or Transparency for the
Paper Type setting in the printer driver.
2
2
2
2
2
2
2
2
Paper Handling 50
Page 51

Printing on Special Media
Note:
Since the quality of any particular brand or type of paper may be changed
by the manufacturer at any time, EPSON cannot guarantee the quality
of any type of paper. Always test samples of paper stock before purchasing
large quantities or printing large jobs.
The EPL-6200 and EPL-6200L can print on special paper stock
such as labels, envelopes, thick paper, and transparencies.
Labels
You can load up to 10 sheets of labels into the MP tray. However,
you may need to feed some types of labels one sheet at a time.
To prevent the adhesive from coming into contact with printer
parts, always use labels that completely cover the backing sheet
such that no gaps occur between the individual labels.
You should test the label sheet for leaking adhesive by pressing a
sheet of paper on top of a sheet of labels. If the paper sticks to the
label sheet when you lift it off, do not use the labels.
2
2
2
2
2
2
2
2
When printing on labels, make sure to choose Labels (EPL-6200)
or Thick Wide (EPL-6200L) from the Paper Type drop-down list
in the printer driver.
Envelopes
You can load up to 10 envelopes into the MP tray, depending on
the envelope thickness (85 to 105 g/m²). Load envelopes with the
flap side down and short edge first.
Paper Handling 51
2
2
2
2
Page 52

EPL-6200
2
2
2
2
2
EPL-6200L
To print on envelopes, choose Thick Narrow (Windows) or
Thick[N] (Macintosh) from the Paper Type drop-down list in the
printer driver.
2
2
2
2
2
2
2
Paper Handling 52
Page 53

The print quality on envelopes may be irregular because different
parts of an envelope have different thicknesses. Print one or two
envelopes to check the print quality. If the printing is too light,
adjust the print density as described in “Print Quality Problems”
on page 405.
Do not use window envelopes unless they are specially designed
for laser printers. The plastic on most window envelopes will melt
when it comes into contact with the hot fuser.
2
2
2
Thick paper
You can load up to 10 sheets of thick paper into the MP tray.
However, you may need to feed some types of thick paper one
sheet at a time. Use thick paper between 90 and 163 g/m² (24 to
43 lb) in weight.
To print on thick paper, be sure to change the Paper Type setting
in the printer driver settings. Choose Thick Narrow (Windows)
or Thick[N] (Macintosh) for thick paper which is less than 160 mm
wide. Choose Thick Wide (Windows) or Thick[W] (Macintosh)
when printing on thick paper which is 188 mm or wider.
Transparencies
You can load up to 5 transparencies into the MP tray. However,
you may need to feed some types of transparencies one sheet at a
time.
You can only use overhead projector transparencies and adhesive
drafting film made for use with laser printers or plain-paper
copiers.
2
2
2
2
2
2
2
2
When printing on transparencies, make sure to choose
Transparency from the Paper Type drop-down list in the printer
driver.
Paper Handling 53
2
Page 54

Chapter 3
Using the Printer Driver For Windows
About the Printer Software
The CD-ROM that shipped with your printer includes all the
software that you will need to use the printer’s features. The
printer driver lets you choose from a wide variety of settings to
get the best results from your printer, while the EPSON Status
Monitor 3 lets you check the status of your printer. The EPL-6200
also comes with a PostScript printer driver for printing files
formatted in PostScript 3.
System Requirements
To use the printer software, your computer must be running one
of the following operating systems:
Microsoft Windows 98/95
Microsoft Windows Millennium Edition
Microsoft Windows NT 4.0
Microsoft Windows 2000
Microsoft Windows XP
3
3
3
3
3
3
3
3
3
Using the Printer Driver For Windows 54
3
3
3
Page 55

Installing the Printer Software
3
Installing the printer driver
The printer driver is included in the CD-ROM that shipped with
your printer. For instructions on installing the printer driver, see
the Setup Guide.
Installing the EPSON Status Monitor 3 (EPL-6200
only)
Note:
The EPSON Status Monitor 3 is automatically installed together with
the printer driver for the EPL-6200L.
If you did not install EPSON Status Monitor 3 after the installation
of the printer driver, install EPSON Status Monitor 3 according to
the following steps:
1. Make sure that the printer is off and that Windows is running
on your computer.
2. Insert the printer software CD-ROM into the CD-ROM drive.
Note:
❏ If the language selection window appears, select your country.
❏ If the EPSON Installation Program screen does not appear
automatically, double-click the My Computer icon, right-click
the CD-ROM icon, and click OPEN in the menu that
appears.Then double-click Epsetup.exe.
3
3
3
3
3
3
3
3
3
3
3. Click Continue. When the software license agreement screen
appears, read the statement, and then click Agree.
Using the Printer Driver For Windows 55
3
Page 56

4. In the dialog box that appears, click Custom.
5. Select the EPSON Status Monitor 3 check box, and then click
Install.
3
3
3
3
3
3
3
Using the Printer Driver For Windows 56
3
3
3
3
3
Page 57

6. In the dialog box that appears, make sure that your printer’s
icon is selected, and click OK. Then follow the on-screen
instructions.
7. When the installation is complete, click OK.
Installing the PostScript printer driver (EPL-6200
only)
To print files in the Adobe PostScript 3 format in Windows
Me/98/95, Windows NT 4.0, or Windows XP/2000, you will have
to install the PostScript printer driver included in the CD-ROM
that shipped with your printer. See the appropriate sections
below for installation instructions according to the operating
system that you are using.
3
3
3
3
3
3
3
3
3
Windows Me, Windows 98, Windows 95 Users
Follow the installation instructions for the interface that you are
using to print.
Note:
The USB interface is not available for printing under Windows 95.
Using the Printer Driver For Windows 57
3
3
3
Page 58

Installing the PostScript printer driver for the parallel interface
Follow the steps below to install the PostScript printer driver for
the parallel interface:
Note:
You must have at least 6 MB of free space on your hard disk drive to
install the PostScript printer driver.
1. Insert the CD-ROM that shipped with your printer into the
CD-ROM drive.
2. Click Start, then Settings, and finally Printers.
3. Double-click the Add Printer icon.
4. The Add Printer Wizard will be displayed. Follow the
on-screen instructions until the screen asking you to select the
printer model is displayed.
5. Click Have Disk and specify the path to the appropriate INF
file necessary for installation. If your CD-ROM drive is D:, the
path will be D:\AdobePS\english\win9x\ps_setup
(change the drive letter as needed for your system).
6. Select the INF file for the version of the Windows operating
system that you are running and continue with the
installation according to the on-screen instructions until the
screen asking you to select the port the printer is connected to
is displayed.
3
3
3
3
3
3
3
3
3
7. Select LPT1 as the port the printer is connected to, and then
click Next. Follow the on-screen instructions for the rest of the
installation.
8. When installation is done, click Finish.
Using the Printer Driver For Windows 58
3
3
3
Page 59

Installing the printer driver for the USB interface
Follow the steps below to install the PostScript printer driver for
the USB interface:
Note:
❏ The USB interface is not available for printing under Windows 95.
❏ If the Windows driver and the Adobe PS driver for an Epson printer
with a USB connection have already been installed on your
computer, follow the installation procedure explained in the
previous section, “Driver installation for the parallel interface
connection,” but make sure to select USB as the port in step 7. If
you have not installed an Epson USB printer driver on your
computer, follow the installation procedure below.
❏ You must have at least 6 MB of free space on your hard disk drive
to install the PostScript printer driver.
1. Without connecting the printer to your computer, turn on
both the computer and the printer.
2. Once Windows has started, connect your computer to the
printer with a USB cable.
3. The Add New Hardware Wizard will launch automatically.
Click Next to start the installation of the USB printer driver.
3
3
3
3
3
3
3
3
4. Select Search for best driver for your device
(Recommended), and then click Next.
5. Insert the CD-ROM that shipped with your printer into the
CD-ROM drive.
6. Select only the Specify a location check box, and then
specify the following path on the CD-ROM. You can click
Browse to select the path. If your CD-ROM drive is D:, the
path will be D:\AdobePS\english\win9x\ps_setup
(change the drive letter as needed for your system).
Using the Printer Driver For Windows 59
3
3
3
3
Page 60

7. Click Next to continue with the installation.
8. If the USB PostScript printer driver file is correctly
recognized, the message “EPSON USB Printer” will appear.
Click Next to continue with the installation.
9. When installation of the USB PostScript printer driver is done,
click Finish.
10. After the USB printer driver installation is done, the Add
Printer Wizard will launch automatically. Follow the
on-screen instructions to continue with the installation until
the screen asking you to select the printer model is displayed.
11. Click Have Disk and specify the path to the appropriate INF
file necessary for installation. If your CD-ROM drive is D:, the
path will be D:\AdobePS\english\win9x\ps_setup
(change the drive letter as needed for your system).
12. Select the INF file for the version of the Windows operating
system that you are running and continue with the rest of the
installation according to the on-screen instructions.
13. When installation is done, click Finish.
3
3
3
3
3
3
3
3
Installing the PostScript printer driver for the network interface
Follow the steps below to install the PostScript printer driver for
the network interface:
Note:
❏ To connect using a network interface, you must install the optional
interface card into the printer.
❏ You must have at least 6 MB of free space on your hard disk drive
to install the PostScript printer driver.
1. Insert the CD-ROM that shipped with your printer into the
CD-ROM drive.
Using the Printer Driver For Windows 60
3
3
3
3
Page 61

2. Click Start, then Settings, and finally Printers.
3. Double-click the Add Printer icon.
4. The Add Printer Wizard will be displayed. Click Next.
5. Select Network Printer when the screen asking How is this
printer attached to your computer? appears.
6. Enter the printer’s network path in the Network path or
queue name field. You can also select the network printer
by clicking Browse.
7. When the screen asking you to select the printer model is
displayed, click Have Disk and specify the path to the
appropriate INF file necessary for installation. If your
CD-ROM drive is D:, the path will be
D:\AdobePS\english\win9x\ps_setup (change the drive
letter as needed for your system).
8. Select the INF file for the version of the Windows operating
system that you are running and continue with the rest of the
installation according to the on-screen instructions.
9. When installation is done, click Finish.
3
3
3
3
3
3
3
3
Notice for Windows Me/98/95 Users
The printer may not print normally if the computer is connected
to the printer via the parallel interface and the ECP mode is set. If
this is the case, disable bi-directional support in the PostScript
printer driver. To do so, display the printer’s Properties dialog
box, click the Details tab, then click the Spool Settings button. In
the Spool Settings dialog box that appears, Select Disable
bi-directional support for this printer, then click the OK button.
Using the Printer Driver For Windows 61
3
3
3
3
Page 62

Windows NT 4.0 Users
Follow the installation instructions for the interface that you are
using to print.
Note:
The USB interface is not available for printing under Windows NT 4.0.
Installing the printer driver for the parallel interface
Follow the steps below to install the PostScript printer driver for
the parallel interface:
Note:
You must have at least 6 MB of free space on your hard disk drive to
install the PostScript printer driver.
1. Insert the CD-ROM that shipped with your printer into the
CD-ROM drive.
2. Click Start, then Settings, and finally Printers.
3. Double-click the Add Printer icon.
4. The Add Printer Wizard will be displayed. Follow the
on-screen instructions until the screen asking you to select the
printer model is displayed.
3
3
3
3
3
3
3
3
5. Click Have Disk and specify the path to the appropriate INF
file necessary for installation. If your CD-ROM drive is D:, the
path will be D:\AdobePS\english\winnt4\ps_setup
(change the drive letter as needed for your system).
6. Select the INF file for the version of the Windows operating
system that you are running and continue with the
installation according to the on-screen instructions.
7. When installation is done, click Finish.
Using the Printer Driver For Windows 62
3
3
3
3
Page 63

Installing the printer driver for the network interface
Follow the steps below to install the PostScript printer driver for
the network interface:
Note:
❏ To connect using a network interface, you must install the optional
interface card into the printer.
❏ You must have at least 6 MB of free space on your hard disk drive
to install the printer driver.
1. Insert the CD-ROM that shipped with your printer into the
CD-ROM drive.
2. Click Start, then Settings, and finally Printers.
3. Double-click the Add Printer icon.
4. The Add Printer Wizard will be displayed. Select Network
printer server, and then click Next.
5. Enter the name of the printer or select the printer from the list
of available printers on the network, and then click OK.
6. Click OK once the following message appears.
3
3
3
3
3
3
3
3
“The server on which the XXX printer resides does not have the
correct printer driver installed.”
7. Click Have Disk and specify the path to the appropriate INF
file necessary for installation. If your CD-ROM drive is D:, the
path will be D:\AdobePS\english\winnt4\ps_setup
(change the drive letter as needed for your system).
8. Select the INF file for the version of the Windows operating
system that you are running and continue with the
installation according to the on-screen instructions.
9. When installation is done, click Finish.
Using the Printer Driver For Windows 63
3
3
3
3
Page 64

Notice for Windows NT 4.0 Users
Unavailable paper sizes may appear in the paper size list for the
selected paper source. See “Paper” on page 429 to confirm the
available paper sizes.
Windows XP, Windows 2000 Users
Follow the installation instructions for the interface that you are
using to print.
Installing the printer driver for the parallel interface
Follow the steps below to install the PostScript printer driver for
the parallel interface:
Note:
You must have at least 6 MB of free space on your hard disk drive to
install the printer driver.
1. Insert the CD-ROM that shipped with your printer into the
CD-ROM drive.
2. Click Start, then Settings, and finally Printers.
Note:
If your computer is running Windows XP, click Start and then click
Printers and Faxes.
3
3
3
3
3
3
3
3
3
3. Double-click the Add Printer icon.
Note:
If your computer is running Windows XP, click Add a printer
under Printer Tasks.
4. The Add Printer Wizard will be displayed. Follow the
on-screen instructions until the screen asking you to select the
printer model is displayed.
Using the Printer Driver For Windows 64
3
3
3
Page 65

5. Click Have Disk and specify the path to the appropriate INF
file necessary for installation. If your CD-ROM drive is D:, the
path will be D:\AdobePS\english\win2k-xp\ps_setup
(change the drive letter as needed for your system).
3
6. Select the INF file for the version of the Windows operating
system that you are running and continue with the
installation according to the on-screen instructions.
7. When installation is done, click Finish.
Installing the printer driver for the USB interface
Follow the steps below to install the PostScript printer driver for
the USB interface:
Note:
You must have at least 6 MB of free space on your hard disk drive to
install the printer driver.
1. Without connecting the printer to the computer, turn on both
the computer and the printer.
2. Once Windows has started, connect the computer to the
printer with a USB cable.
3. The Add New Hardware Wizard will launch automatically.
Click Next to start the installation of the USB printer driver.
3
3
3
3
3
3
3
3
4. After the USB printer driver installation is done, the Add
Printer Wizard will launch automatically. Follow the
on-screen instructions to continue with the installation until
the screen asking you to select the printer model is displayed.
5. Click Have Disk and specify the path to the appropriate INF
file necessary for installation. If your CD-ROM drive is D:, the
path will be D:\AdobePS\english\win2k-xp\ps_setup
(change the drive letter as needed for your system).
Using the Printer Driver For Windows 65
3
3
3
Page 66

6. Select the INF file for the version of the Windows operating
system that you are running and continue with the rest of the
installation according to the on-screen instructions.
7. When installation is done, click Finish.
Installing the printer driver for the network interface
3
3
Follow the steps below to install the PostScript printer driver for
the network interface:
Note:
❏ To connect using a network interface, you must install the optional
interface card into the printer.
❏ You must have at least 6 MB of free space on your hard disk drive
to install the printer driver.
1. Insert the CD-ROM that shipped with your printer into the
CD-ROM drive.
2. Click Start, then Settings, and finally Printers.
Note:
If your computer is running Windows XP, click Start and then click
Printers and Faxes.
3. Double-click the Add Printer icon.
Note:
If your computer is running Windows XP, click Add a printer
under Printer Tasks.
3
3
3
3
3
3
3
3
4. The Add Printer Wizard will be displayed. Click Next.
5. Select Network printer in the screen that appears.
Note:
If your computer is running Windows XP, click A network
printer, or a printer attached to another computer.
Using the Printer Driver For Windows 66
3
3
Page 67

6. Click Next to browse for and select the printer on the network.
7. Click OK when the following message appears:
“The server on which the XXX printer resides does not have
the correct printer driver installed.”
8. When the screen asking you to select the printer model is
displayed, click Have Disk and specify the path to the
appropriate INF file necessary for installation. If your
CD-ROM drive is D:, the path will be
D:\AdobePS\english\win2k-xp\ps_setup (change the
drive letter as needed for your system).
9. Select the INF file for the version of the Windows operating
system that you are running and continue with the rest of the
installation according to the on-screen instructions.
10. When installation is done, click Finish.
Notice for Windows XP/2000 users
Unavailable paper sizes may appear in the Paper Size list in the
printer driver. See “Paper” on page 429 to confirm the available
paper sizes.
3
3
3
3
3
3
3
3
Using the Printer Driver
The printer driver lets you choose from a wide variety of settings
to get the best results from your printer.
Using the Printer Driver For Windows 67
3
3
3
3
Page 68

Note:
❏ To ensure proper operation, a computer name must be entered into
your computer’s settings. Make sure that there are no invalid
characters in the name. If your printer is shared, the computer name
must be unique to your computer. For instructions on how to set
the computer name, see the documentation for your operation
system.
3
3
❏ The screen shots used in this section show the EPL-6200. If your
printer is the EPL-6200L, your screen may look slightly different.
❏ The EPSON Status Monitor 3 is automatically installed together
with the printer driver for the EPL-6200L.
Accessing the printer driver
You can access the printer driver from any application program,
or directly from your Windows operating system.
The printer settings made from many Windows applications
override settings made when the printer driver is accessed from
the operating system, so you should access the printer driver from
your application to make sure you get the result you want.
Note:
Online help provides details on printer driver settings.
❏ To access the printer driver from your application, click the
Print or Page Setup command on the File menu. You also
need to click Setup, Options, Properties, or a combination of
these buttons.
3
3
3
3
3
3
3
3
❏ To access the printer driver from Windows, click Start, point
to Settings, and click Printers. Next, right-click the EPSON
EPL-6200/EPL-6200L Advanced icon and click Properties
(in Windows Me, 98, or 95), Printing Preferences (in
Windows XP or 2000) or Document Defaults (in Windows
NT 4.0).
Using the Printer Driver For Windows 68
3
3
Page 69

Printer driver settings
Choosing the print quality (EPL-6200 only)
3
Note:
The print quality setting for the EPL-6200L cannot be changed. It prints
at 600 dpi only.
You can change the print quality or resolution of printouts to
favor speed or detail. If you need high quality output, choose a
higher number. Please note that doing so reduces the print speed.
There are three levels of print output; 600 dpi, Class 1200 dpi, and
True 1200 dpi. Class 1200 dpi provides high quality printing
results on par with 1200 dpi with the Enh. MG and RITech
functions (under 600 dpi).
1. Click the Basic Settings tab.
3
3
3
3
3
3
3
3
Using the Printer Driver For Windows 69
3
3
3
Page 70

2. Select the desired printing resolution from the Print Quality
drop-down list.
3. Click OK to accept the setting.
3
3
3
3
3
3
3
Note:
❏ For details about the Enh. MG or RITech functions, see the
Online Help.
❏ If printing is unsuccessful or a memory-related error message
appears, selecting a lower resolution may allow printing to
proceed.
Resizing printouts
You can have your document enlarged or reduced automatically
during printing.
Using the Printer Driver For Windows 70
3
3
3
3
3
Page 71

To automatically resize pages to fit the output paper
1. Click the Layout tab.
2. Select the Zoom Options check box.
3. Select the desired paper size from the Output Paper
drop-down list. The page will be printed to fit on the paper
you have selected.
3
3
3
3
3
3
3
3
3
4. Select Upper Left for Location to print the enlarged or
reduced page image at the upper left corner of the paper.
Select Center to print the enlarged or reduced page image
with centering.
5. Click OK to accept the settings.
To resize pages by a specified percentage
1. Click the Layout tab.
Using the Printer Driver For Windows 71
3
3
3
Page 72

2. Select the Zoom Options check box.
3. Select the Zoom To check box.
4. Specify the magnification percentage in the box, then click
OK. The percentage can be set between 50% and 200% in 1%
increments.
3
3
3
3
3
3
3
3
If necessary, select the paper size to be printed from the Output
Paper drop-down list.
Modifying the print layout
“Layout printing” prints either 2 or 4 pages onto a single page and
specifies the printing order, automatically resizing each page to
fit the specified paper size. You can also choose to print
documents surrounded by a frame.
1. Click the Layout tab.
Using the Printer Driver For Windows 72
3
3
3
3
Page 73

2. Select the Print Layout check box, and click Print Layout
Settings. The Print Layout Settings dialog box appears.
3
3
1
2
3. Select the number of pages you want to print on one sheet of
paper.
3
3
3
3
3
3
3
3
Using the Printer Driver For Windows 73
3
3
Page 74

4. Select the Page Order in which the pages are printed on each
sheet.
Note:
The Page Order choices depend on the Pages selected above, and the
paper orientation (Portrait or Landscape) selected on the Basic
Settings menu.
3
3
5. Click OK to close the Print Layout Settings dialog box.
6. Click OK on the Layout menu to accept the settings.
Using watermarks
Follow the steps to use a watermark on your document. In the
Watermark dialog box, you can select from a list of predefined
watermarks, or you can select a bitmap (.BMP) or text (.TXT) file
as your own custom watermark. The Watermark dialog box also
allows you to make a variety of detailed watermark settings. For
example, you can select the size, intensity, and position of your
watermark.
1. Click the Special tab.
3
3
3
3
3
3
3
3
Using the Printer Driver For Windows 74
3
3
Page 75

2. Select the Watermark check box.
3
3
3
3
3
3
3. Click Watermark Settings. The Watermark dialog box
appears.
Using the Printer Driver For Windows 75
3
3
3
3
3
3
Page 76

4. Select a watermark from the Watermark Name drop-down
list.
3
3
3
3
3
5. Select the location on the page where you want to print the
watermark from the Location list box.
6. Adjust the horizontal or vertical Offset position.
7. Adjust the image intensity of the watermark with the
Intensity slider bar.
8. Adjust the size of the watermark with the Size slider bar.
9. Select Front (to print the watermark on the face of the
document) or Back (to print the watermark on the backside
of the document) for the Position setting.
10. Click OK to accept the settings.
Making a new watermark
You can make a new watermark as follows:
1. Click the Special tab.
3
3
3
3
3
3
3
Using the Printer Driver For Windows 76
Page 77

2. Select the Watermark check box.
3. Click Watermark Settings. The Watermark dialog box
appears.
4. Click New/Delete. The User Defined Watermarks dialog box
appears.
5. Select Text or BMP and type a name for the new watermark
in the Name box.
6. If you select Text, type the watermark text in the Text box. If
you select BMP, click Browse, and select the BMP file you
want to use, then click OK.
Note:
Before making a custom watermark, you should prepare a bitmap
(.bmp) file.
7. Click Save to close the User Defined Watermarks dialog box.
Your watermark will appear in the list box.
8. Click OK to register the new watermark settings.
Note:
You can register up to 10 watermarks.
3
3
3
3
3
3
3
3
Using an overlay (EPL-6200 only)
The Overlay settings dialog box allows you to print form data
overlaid with data made by another application.
Note:
The overlay function is available only when the High Quality (Printer)
is selected for the Graphic Mode in the Extended Settings dialog box from
the Optional Settings menu.
Using the Printer Driver For Windows 77
3
3
3
3
Page 78

Creating an overlay
You can create form data and save it as a file.
1. Open the application that you will use to create the overlay.
2. From the application, access the printer driver. Open the File
menu and choose Print or Print Setup. Then click Printer,
Setup, Options, or Properties, or click a combination of these
buttons, depending on the application you use.
3. Select the Special tab.
4. Select the Form Overlay check box, and click Overlay
Settings to open the Overlay Settings dialog box.
1
2
3
3
3
3
3
3
3
3
Using the Printer Driver For Windows 78
3
3
3
3
Page 79

5. Click Create Overlay Data.
3
3
3
3
6. Click Settings.
7. Select the Use Form Name check box. Then click Add Form
Name. The Add Form dialog box appears.
8. In the Add Form dialog box, type the form name in the Form
Name box and its description in the Description box.
3
3
3
3
3
3
3
3
Using the Printer Driver For Windows 79
Page 80

9. Click To Front (to print the overlay on the face of the
document) or To Back (to print the overlay on the back side
of the document).
10. In the Add Form dialog box, click Register.
11. In the Form Settings dialog box, click OK.
3
3
12. In the Overlay Settings dialog box, click OK. If you want to
stop the procedure, click Cancel.
Note:
The file you send to the printer after step 10, from an application
program such as Windows Notepad or Word, will be saved as an
overlay using the form name you entered at step 8.
13. Print the file saved as overlay data. It is possible to save any
kind of file as an overlay. The overlay data is created.
Printing with an overlay
Follow the steps to print a document with overlay data.
1. Open the file to print with overlay data.
2. From the application, access the printer driver. Open the File
menu and choose Print or Print Setup. Then click Printer,
Setup, Options, or Properties, or click a combination of these
buttons, depending on the application you use.
3. Select the Special tab.
3
3
3
3
3
3
3
3
4. Select the Form Overlay check box, and click Overlay
Settings to open the Overlay Settings dialog box.
5. In the Overlay Settings dialog box, choose the form from the
Form list, then click OK.
6. Click OK to print the data.
Using the Printer Driver For Windows 80
3
3
Page 81

Different printer settings overlay data
The overlay data is made with the current printer settings such as
Resolution: 600 dpi. If you want to make the same overlay with
different printer settings such as 1200 dpi, follow the instructions
below.
1. Re-access the printer driver as described in step 2 in “Creating
an overlay” on page 78.
2. Make the printer settings and exit the printer driver.
3. Send the same data that you made by application to the
printer as in step 12 in “Creating an overlay” on page 78.
This setting is available only for Form Name data.
Resetting the photoconductor counter
After replacing a photoconductor unit, reset the photoconductor
counter by using the printer driver. When you are finished
installing a new a photoconductor unit, see “Resetting the
photoconductor counter” on page 81.
Resetting the photoconductor counter
3
3
3
3
3
3
3
3
1. Click the Optional Settings tab, and then click Printer
Settings. The Printer Settings dialog box appears.
2. Click Reset OPC Level. The photoconductor clear dialog box
appears.
Using the Printer Driver For Windows 81
3
3
3
3
Page 82

EPL-6200
3
3
3
3
3
EPL-6200L
3. Click OK to reset the OPC level counter.
3
3
3
3
3
3
3
Using the Printer Driver For Windows 82
Page 83

Printing with the Duplex Unit (EPL-6200 only)
Duplex printing prints on both sides of the paper. When printing
for binding, the binding edge can be specified as required to
produce the desired page order.
1. Click the Layout tab.
2. Select the Duplex check box. Then select the Left, Top, or
Right button as Binding position.
3. Click Duplex Settings to open the Duplex Settings dialog box.
4. Specify the Binding Margin for the front and back sides of the
paper. Then select whether the front or back side of the paper
is to be printed as the Start Page.
5. When printing for binding as a booklet, click the Binding
Method check box and make appropriate settings. For details
about each setting, see online help.
6. Click OK to accept the settings and return to the Layout menu.
Avoiding Insufficient Memory Error (EPL-6200L only)
When you print graphics or a large amount of data, the printer
may stop due to insufficient memory. Follow the steps below to
avoid memory errors and continue printing.
3
3
3
3
3
3
3
3
3
Note:
Print quality will decrease when you use this function.
1. Click the Optional Settings tab.
Using the Printer Driver For Windows 83
3
3
3
Page 84

2. Click Extended Settings. The following dialog box appears.
Note:
This screen is a Windows XP, 2000, and NT 4.0 screen.
3. Select the Avoid Insufficient Memory Error check box.
3
3
3
3
3
3
4. Click OK to accept the settings.
Accessing the PostScript printer driver (EPL-6200
only)
When you want to print PostScript-formatted files, use the
PostScript printer driver to print. For instructions on installing the
PostScript printer driver that shipped with your printer, see
“Installing the PostScript printer driver (EPL-6200 only)” on page
57.
Using the Printer Driver For Windows 84
3
3
3
3
3
3
Page 85

You can access the PostScript printer driver either from the
application that you are printing from, or directly from your
operating system. If you access the PostScript printer driver
through an application, any changes made to print settings apply
only to the current print job. To make permanent print setting
changes, access the PostScript printer driver directly from the
operating system.
PostScript printer driver settings (EPL-6200 only)
3
3
3
The PostScript printer driver enables you to change the settings
for your PostScript print job. The settings are grouped into
various categories that you can access by clicking the appropriate
tab in the printer’s Properties dialog box.
Windows Me, Windows 98, WIndows 95 users
Online help is also available to help you with the settings. There
are two online help options. Click the Help button for procedural
help on the settings. If you want help on a particular item, click
the “?” icon on the top-right corner of the dialog box’s title bar
and then click the name of the setting that you want more
information on. An explanation of the setting and its options will
be displayed.
Paper tab settings
Paper size
Select the desired paper size. This setting must match the size of
the paper loaded in the printer. The paper sizes that are available
will differ according to the printer. The default setting is either A4
or Letter, depending on your country of purchase.
Orientation
3
3
3
3
3
3
3
3
Specify how the document is to be positioned on the page. The
options are Portrait (vertical) and Landscape (horizontal).
Using the Printer Driver For Windows 85
3
Page 86

Collate
Select this check box to print multiple copies of the document in
page order. If this check box is not selected, each page is printed
out the specified number of times before the following page is
printed.
Note:
If you select the Collate option in the printer driver, do not set the
Collate option in the application itself.
Duplex
Select the desired duplex print style. Flip on long edge produces
two-sided printouts that turn like a book, while Flip on short
edge produces two-sided printouts that turn like a calendar. This
feature is available only if the optional Duplex unit is installed.
Paper source
Select the paper source for your print job. The options are
AutoSelect Tray, MP Tray, Cassette 1, Manual Feed 1st Page,
and Manual Feed EachPage. However, the actual paper
sources that are available will differ according to the printer and
the options installed.
Paper type
3
3
3
3
3
3
3
3
Select the desired paper type to print on. The options are Normal,
Thick W, Thick N, and Transparency. Make sure to select the
correct paper type to avoid smearing or wasting ink.
Margins
Click this button to set the margins for your printout. You can
select to specify in Inches or Millimeters.
Restore Defaults
Click this button to reset the settings on this sheet to their default
values.
Using the Printer Driver For Windows 86
3
3
3
3
Page 87

Graphics tab settings
Resolution
Select the resolution that you want to print in. The options are
Fast, Quality, and Super. The Quality and Super settings print
at higher resolutions, but the printing time will be longer.
Print as a negative image
Select this check box if you want to print the document as a
negative image. This feature prints by reversing the RGB or
black-and-white values of the image, and is useful for printing
black-and-white or coarse RGB images.
Print as a mirror image
Select this check box if you want to print the document as a mirror
image. This feature prints by reversing the horizontal coordinates
of the image.
Layout
Specify how many pages of your document to print on one sheet
of paper. The options are 1-up, 2-up, 4-up, 6-up, 9-up, and
16-up.
Print page border
3
3
3
3
3
3
3
3
Select this check box if you want the borders of the pages to be
printed when printing more than one page of the document on
one sheet of paper.
Scaling
This setting enables you to shrink or enlarge the image to print.
You can enter any percentage from 25% to 400%. To shrink the
image, specify a percentage that is lower than 100%. To enlarge
the image, specify a percentage that is higher than 100%.
However, if you can shrink or enlarge the image to print in the
application that you are printing from, do so in the application
and not through the printer driver.
Using the Printer Driver For Windows 87
3
3
3
3
Page 88

Restore Defaults
Click this button to reset the settings on this sheet to their default
values.
Fonts tab settings
Send TrueType fonts to printer according to the Font
Substitution Table
Select this radio button to have the computer download TrueType
fonts to the printer according to the settings in the Font
Substitution Table. This setting can speed up printing.
Edit the Table
Click this button to edit the Font Substitution Table.
Always use TrueType fonts
Select this radio button to have the computer always download
all the TrueType fonts used in the document to be printed to the
printer. This will slow down printing, but the fonts in the printout
will be identical to that shown on the screen.
Add Euro Currency Symbol to PostScript Fonts
Select this check box to add the symbol for the Euro currency to
the set of PostScript fonts residing on the printer.
3
3
3
3
3
3
3
3
Update Soft Fonts
Click this button to update the list of installed PostScript Type 1
fonts so that they are printed correctly.
Send Fonts As
Click this button to specify advanced settings for the
downloading of fonts to the printer. See online help for details on
each of the available settings.
Using the Printer Driver For Windows 88
3
3
3
3
Page 89

Restore Defaults
Click this button to reset the settings on this sheet to their default
values.
Device Options tab settings
Available printer memory (in KB)
Specify the amount of available printer memory. If the entered
value does not match the actual amount of memory on the printer
and printing problems occur, change the setting.
Available font cache (in KB)
Displays the amount of font cache memory available to Type 32
fonts. The printer driver automatically adjusts the font cache size
according the memory setting specified under Installable options.
Density
Specify the density to print in. The options are Lightest, Light,
Medium, Dark, and Darkest.
RITech
Select whether to use RITech when printing. RITech improves the
appearance of printed lines, text, and graphics. The options are
On and Off.
3
3
3
3
3
3
3
3
Toner Save Mode
Select whether to use the Toner Save Mode when printing. When
the Toner Save Mode is turned on, the printer uses about 50% less
toner than normal. The options are On and Off.
Image Protect
This setting enables you to specify whether to use lossy
compression when memory runs low during printing. The
options are On and Off. When Image Protect is set to On, lossy
compression is not used. If it is set to Off, lossy compression is
used when memory resources are too low.
Using the Printer Driver For Windows 89
3
3
3
3
Page 90

Start Page
Specify whether to start printing from the first page or second
(back) page. The options are Front and Back. If Back is selected,
the first page is left blank. This setting is enabled only when Print
on Both Sides is selected.
Separations
This setting enables you to select the color for separation printing.
The options are None, Cyan, Magenta, Yellow, and Black.
Installable options
The settings available under Installable options enable you to
specify whether certain options are installed into the printer, and
if so, what they are. Use the Change setting for drop-down list
to specify the details of the options installed.
Restore Defaults
Click this button to reset the settings on this sheet to their default
values.
PostScript tab settings
PostScript output format
Specify the format for PostScript files. The options are PostScript
(optimize for speed), PostScript (optimize for
portability-ADSC), Encapsulated PostScript (EPS), and
Archive format. See online help for details on each of these
formats.
3
3
3
3
3
3
3
3
3
PostScript header
This setting enables you to specify how header information is sent
to the printer. The options are Download header with each
print job and Assume header is downloaded and retained.
Using the Printer Driver For Windows 90
3
3
3
Page 91

Send Header Now
Click this button to send the PostScript header information to the
printer immediately. This button is available only when the
Download header with each print job radio button is selected.
If you click the Send Header Now button and then click OK, the
Assume header is downloaded and retained radio button is
automatically selected.
Print PostScript error information
Select this check box to have the printer automatically print out a
page with PostScript error messages when an error occurs in the
print job. Turn this option on if you are having printing problems.
Job timeout
Specify the maximum number of seconds that can elapse for a
print job to get from the computer to the printer before the printer
stops trying to print the document. If you enter “0” (zero), the
printer will continue trying to print indefinitely.
Wait timeout
Specify the maximum number of seconds that the printer will wait
to get more PostScript information from the computer before the
print job is automatically canceled. After the specified time
elapses, the printer will stop trying to print the document and
prints an error message instead. If you enter “0” (zero), the printer
will wait indefinitely.You may want to increase this value when
printing complicated documents.
3
3
3
3
3
3
3
3
3
This setting enables you to prevent the printer from stalling if and
when the computer that sends the print job stalls.
Advanced
Click this button to specify the following advanced PostScript
options:
Using the Printer Driver For Windows 91
3
3
3
Page 92

PostScript language level
Specify the PostScript language level to use. Select the highest
PostScript language level that your printer supports to optimize
its features. Use a lower PostScript language level only if you are
experiencing printing problems or if you intend to print the file
using another printer.
Data format
Select the data format to use. The options are ASCII data, Binary
communications protocol, Tagged binary communications
protocol, and Pure binary data. However, only ASCII data and
Tagged binary communications protocol can be selected
when running under Windows Me/98/95.
3
3
3
3
If you select ASCII data, print data is sent in the ASCII (7-bit)
format, which may take longer to print, but which can be sent
through any I/O channel, including serial, parallel, and Ethernet.
If you select Tagged binary communications protocol, all data
except for special control characters is sent in binary (8-bit)
format. The binary format can be sent over parallel or serial
communications ports and are faster then sending data in the
ASCII format.
Note:
The Tagged binary communications protocol cannot be used with
AppleTalk.
Send CTRL+D before job
Select this check box to specify for the CTRL+D character to be
sent at the beginning of every PostScript document. CTRL+D at
the beginning-of-file (BOF) will reset your printer to its default
settings to ensure that prior print jobs will not affect the current
print job. However, activating this setting may cause the print job
to fail if it is connected through a network instead of the parallel
or serial interface.
3
3
3
3
3
3
3
3
Using the Printer Driver For Windows 92
Page 93

Send CTRL+D after job
Select this check box to specify for the CTRL+D character to be
sent at the end of every PostScript document. CTRL+D at the
end-of-file (EOF) will reset your printer to its default settings to
ensure that the current print job will not affect future print jobs.
However, activating this setting may cause the print job to fail if
it is connected through a network instead of the parallel or serial
interface.
Display alert for applications incompatible with driver features
Select this check box if you want the printer driver to display
messages to alert you to incompatibilities between the printer’s
features and those of the application that you are using to print.
3
3
3
3
Restore Defaults
Click this button to reset the settings on this sheet to their default
values.
Watermarks tab settings
Select a watermark
Specify whether to use a watermark when printing. The options
are None, CONFIDENTIAL, COPY, and DRAFT.
Edit
Click this button to edit the selected watermark. This button is not
available when None is selected under Select a watermark.
New
Click this button to create a new watermark.
Delete
Click this button to delete the selected watermark. This button is
not available when None is selected under Select a watermark.
3
3
3
3
3
3
3
3
Using the Printer Driver For Windows 93
Page 94

Print watermark
Specify how the selected watermark should be printed. The
options are On first page only, In background, and As outline
only.
Job Settings tab settings
Quick Print Job
Re-Print Job
Select whether the printer reprints a job. The options are On and
Off.
Verify Job
Select whether a job is verified or not. The options are On and Off.
Stored Job
Select whether a job is stored or not. The options are On and Off.
Confidential Job
Specify whether the job is a confidential job. The options are On
and Off.
Password
If the job is a confidential job, set a password for it. This setting is
available only if On is selected for Confidential Job.
3
3
3
3
3
3
3
3
User Name
Specify a user name for the reserve job.
Job Name
Specify a job name for the reserve job.
Preview
Select whether to use the Preview function or not. This setting is
available only when Quick Print Job is specified. The options are
On and Off.
Using the Printer Driver For Windows 94
3
3
3
3
Page 95

Job Management On
Select whether to use the Job Management function. The options
are On and Off. If the Job Management On check box is selected,
information on the job is sent to the printer.
3
Windows NT 4.0 users
The Print dialog box, which is accessed by selecting Print on the
File menu of the application that you are using, enables you to
specify print settings for the current document. The available
settings are grouped under the Page Setup and Advanced tabs.
In addition, settings specific to your printer are available through
the Device Settings tab of the printer’s Properties dialog box. See
below for a brief description of each available setting.
Online help is available to help you with the settings. If you want
help on a particular item, click the “?” icon on the top-right corner
of the dialog box’s title bar and then click the name of the setting
that you want more information on. An explanation of the setting
and its options will be displayed.
Page Setup tab settings
Paper Size
Select the desired paper size. This setting must match the size of
the paper loaded in the printer. The paper sizes that are available
will differ according to the printer. The default setting is either A4
or Letter, depending on your country of purchase.
3
3
3
3
3
3
3
3
Paper Source
Select the paper source for your print job. The options are
Automatically Select, MP Tray, Cassette 1, Manual Feed 1st
Page, and Manual Feed EachPage. However, the actual paper
sources that are available will differ according to the printer and
the options installed.
Copy Count
Specify the number of copies to print.
Using the Printer Driver For Windows 95
3
3
3
Page 96

Collate Copies
This check box appears only if more than one copy is specified for
Copy Count. Select this check box to print multiple copies of the
document in page order. If this check box is not selected, each
page is printed out the specified number of times before the
following page is printed.
Note:
If you select the Collate option in the printer driver, do not set the
Collate option in the application itself.
Orientation
Specify how the document is to be positioned on the page. The
options are Portrait (vertical), Landscape (horizontal), and
Rotated (rotated 90° counterclockwise).
Color Appearance
Specify whether to print the document in grayscale or color. The
options are Monochrome and Color.
Advanced tab settings
EPSON EPL-6200 PS3 Document Settings
Undo Changed Option/s
Click this button to undo all the changes that have been made to
the settings. The settings return to their default values. This
button is enabled only if one or more of the default values have
been changed.
3
3
3
3
3
3
3
3
3
About Adobe PostScript Printer Driver
Click this button to view information on the currently installed
PostScript printer driver.
Using the Printer Driver For Windows 96
3
3
3
Page 97

Paper/Output
Paper Size
If you specified the Paper Size setting on the Page Setup sheet,
that setting is reflected here. To change this setting, select the
desired paper size from the options displayed at the bottom of the
dialog box. For more information on this setting, see “Paper Size”
on page 95.
Orientation
If you specified the Orientation setting on the Page Setup sheet,
that setting is reflected here. To change this setting, select the
desired orientation from the options displayed at the bottom of
the dialog box. For more information on this setting, see
“Orientation” on page 96.
Paper Source
If you specified the Paper Source setting on the Page Setup sheet,
that setting is reflected here. To change this setting, select the
desired paper source from the options displayed at the bottom of
the dialog box. For more information on this setting, see “Paper
Source” on page 95.
Media
Select the desired paper type to print on. The options are Normal,
Thick, Extra Thick, and Transparency. Make sure to select the
correct paper type to avoid smearing or wasting ink.
3
3
3
3
3
3
3
3
Copy Count
If you specified the Copy Count setting on the Page Setup sheet,
that setting is reflected here. To change this setting, enter the
desired number of pages to print into the text box at the bottom
of the dialog box. For more information on this setting, see “Copy
Count” on page 95.
Using the Printer Driver For Windows 97
3
3
3
3
Page 98

Graphic
Resolution
Select the resolution that you want to print in. The options are
Fast and Quality. The Quality setting prints at a higher resolution,
but the printing time will be longer.
Color Appearance
If you specified the Color Appearance setting on the Page Setup
sheet, that setting is reflected here. To change this setting, select
the desired setting from the options displayed at the bottom of
the dialog box. For more information on this setting, see “Color
Appearance” on page 96.
Scaling
This setting enables you to shrink or enlarge the image to print.
You can enter any percentage from 1% to 1000%. To shrink the
image, specify a percentage that is lower than 100%. To enlarge
the image, specify a percentage that is higher than 100%. When
you enlarge a document, only the portion of the document that
fits on the selected paper will be printed. If you can shrink or
enlarge the image to print in the application that you are printing
from, do so in the application.
TrueType Font
Specify how TrueType fonts in the document are printed. Select
Substitute with Device Font to use equivalent PostScript fonts
for printing documents that contain TrueType fonts. Select
Download as Softfont to download TrueType fonts to the
printer instead of using PostScript fonts.
3
3
3
3
3
3
3
3
3
If your document has overlapping text and graphics, select
Substitute with Device Font. Using downloaded TrueType fonts
to print when text and graphics overlap may cause output errors.
Using the Printer Driver For Windows 98
3
3
3
Page 99

Document Options
Page Layout (N-up) Option
Specify how many pages of your document to print on one sheet
of paper. The options are Normal (one-up), Two-up (1x2),
Four-up (2x2), Six-up (2x3), Nine-up (3x3), and Sixteen-up
(4x4).
PostScript Options
PostScript Output Option
Specify the format for PostScript files. The options are Optimize
for Speed, Optimize for Portability, Encapsulated PostScript
(EPS), and Archive Format. See online help for details on each of
these formats.
TrueType Font Download Option
Specify how TrueType fonts are downloaded to the printer. The
options are Automatic, Outline (scalable outline font), Bitmap
(bitmap font), and Native TrueType (outline font).
PostScript Language Level
Specify the PostScript language level to use. The options are 2 and
3.
Send PostScript Error Handler
Specify whether the printer automatically prints out a page with
PostScript error messages when an error occurs in the print job.
The options are Yes and No.
3
3
3
3
3
3
3
3
3
Mirrored Output
Specify whether the document is printed as a mirror image by
reversing the horizontal coordinates of the image. The options are
Yes and No.
Printer Features
Density
Specify the density to print in. The options are Lightest, Light,
Medium, Dark, and Darkest.
Using the Printer Driver For Windows 99
3
3
3
Page 100

RITech
Select whether to use RITech when printing. RITech improves the
appearance of printed lines, text, and graphics. The options are
On and Off.
3
Toner Save Mode
Select whether to use the Toner Save Mode when printing. When
the Toner Save Mode is turned on, the printer uses about 50% less
toner than normal. The options are On and Off.
Image Protect
This setting enables you to specify whether to use lossy
compression when memory runs low during printing. The
options are On and Off. When Image Protect is set to On, lossy
compression is not used. If it is set to Off, lossy compression is
used when memory resources are too low.
Start Page
Specify whether to start printing from the first page or second
(back) page. The options are Front and Back. If Back is selected,
the first page is left blank. This setting is enabled only when Print
on Both Sides is selected.
Separations
This setting enables you to select the color for separation printing.
The options are None, Cyan, Magenta, Yellow, and Black.
Device Settings tab settings
3
3
3
3
3
3
3
3
EPSON EPL-6200 PS 3 Device Settings
Undo Changed Option/s
Click this button to undo all the changes that have been made to
the settings. The settings return to their default values. This
button is enabled only if one or more of the default values have
been changed.
About Adobe PostScript Printer Driver
Click this button to view information on the currently installed
PostScript printer driver.
Using the Printer Driver For Windows 100
3
3
3
 Loading...