

Page 1

Where to Find Information
Setup Sheet
Provides you with information on assembling the printer’s parts
and installing the printer’s software.
Reference Guide (this manual)
Providesyouwithdetailedinformationontheprinter’sfunctions,
optional products, maintenance, troubleshooting, and technical
specifications.
Online Help
Provides you with detailed information and instructions on the
printer software that controls your printer. Online help is
automatically installed when you install the printer’s software.
Page 2

ii
Page 3

Laser Printer
All rights reserved. No part of this publication may be reproduced, stored in a retrieval
system, or transmitted in any form or by any means, mechanical, photocopying, recording,
or otherwise, without the prior written permission of SEIKO EPSON CORPORATION.
No patent liability is assumed with respect to the use of the information contained herein.
Neither is any liability assumed for damages resulting from the use of the information
contained herein.
Neither SEIKO EPSON CORPORATION nor its affiliates shall be liable to the purchaser of
this product or third parties for damages, losses, costs, or expenses incurred by purchaser or
third parties as a result of: accident, misuse, or abuse of this product or unauthorized
modifications, repairs, or alterations to this product, or (excluding the U.S.) failure to strictly
comply with SEIKO EPSON CORPORATION’s operating and maintenance instructions.
SEIKO EPSON CORPORATION shall not be liable against any damages or problems arising
from the use of any options or any consumable products other than those designated as
Original EPSON Products or EPSON Approved Products by SEIKO EPSON
CORPORATION.
EPSON and EPSON ESC/P are registered trademarks and EPSON ESC/P2 is a trademark
of SEIKO EPSON CORPORATION.
The PCL6 compatible interpreter is a customized version of IPS-PRINT SIX (c) developed by
Xionics Document Technologies, Inc., a subsidiary of Oak Technology, Inc.
Copyright © 2002 by SEIKO EPSON CORPORATION, Nagano, Japan
General Notice: Other product names used herein are for identification purposes only and may be
trademarks of their respective owners. EPSON disclaims any and all rights in those marks.
Reference Guide
Page 4

iv
Page 5

Contents
Warnings,Cautions,andNotes...............................1
SafetyPrecautions..........................................1
ImportantSafetyInstructions................................5
PowerOn/OffCautions.....................................6
Chapter 1 Product Information
PrinterParts...............................................7
ControlPanel..............................................8
Indicatorlights........................................9
Buttons..............................................10
AboutYourPrinter........................................11
Features.............................................12
OptionsandConsumableProducts..........................13
Options..............................................13
Consumableproducts.................................14
Chapter 2 Paper Handling
PaperSources.............................................15
MPtray..............................................15
LoadingPaper............................................15
LoadingtheMPtray ..................................16
LoadingtheManualFeedslot..........................19
PrintingonSpecialMedia..................................20
Labels...............................................21
Envelopes............................................21
Thickpaper..........................................22
Transparencies.......................................22
LoadinganUncommonPaperSize ..........................23
v
Page 6

Chapter 3 Using the Printer Driver with Windows
AboutthePrinterDriver...................................25
AccessingthePrinterDriver................................25
MakingChangestoPrinterSettings.........................26
Choosingtheprintquality.............................26
Resizingprintouts....................................27
Modifyingtheprintlayout ............................29
Usingwatermarks....................................31
Usinganoverlay.....................................34
Resettingthetonerandthephotoconductorcounters......38
MonitoringYourPrinter(EPSONStatusMonitor3)...........41
AboutEPSONStatusMonitor3........................41
InstallingtheESPONStatusMonitor3..................41
AccessingtheEPSONStatusMonitor3..................43
Gettingprinterstatusdetails...........................45
SettingMonitoringPreferences.........................47
StatusAlertwindow..................................48
Stoppingmonitoring..................................49
SettingMonitoredPrinters.............................50
CancelingPrinting........................................51
UninstallingPrinterSoftware...............................51
Uninstall the printer driver and the EPSON Status Monitor 351
UninstallonlytheEPSONStatusMonitor3..............54
Chapter 4 Setting Up Your Printer on a Network
AbouttheSharedPrinter ..................................57
SettingUpYourPrinterasaSharedPrinter...................58
UsinganAdditionalDriver ................................60
SettingfortheClients......................................66
WithWindowsMe,98,or95...........................67
WithWindowsXPor2000.............................68
WithWindowsNT4.0 ................................72
InstallingthePrinterDriverfromtheCD-ROM...............74
Chapter 5 UsingthePrinterDriverwithMacintosh
vi
Page 7

AboutthePrinterDriver ...................................77
AccessingthePrinterDriver................................77
MakingChangestoPrinterSettings..........................78
Choosingtheprintquality .............................78
Resizingprintouts ....................................79
Modifyingtheprintlayout.............................81
Usingwatermarks ....................................83
MonitoringYourPrinter(EPSONStatusMonitor3)............87
About the EPSON Status Monitor 3 . ....................87
AccessingtheEPSONStatusMonitor3..................88
Gettingprinterstatusdetails ...........................89
SettingMonitoringPreferences.........................90
StatusAlertwindow ..................................91
CancelingPrinting.........................................91
UninstallingPrinterSoftware...............................91
Chapter 6 Installing and Removing Options
500-Sheet Lower Paper Cassette Unit A4. . .....................1
Installing the 500-Sheet Lower Paper Cassette Unit A4 . . . . . .1
Removing the 500-Sheet Lower Paper Cassette Unit A4 . . . . .6
Face-upTray...............................................7
InstallingtheFace-uptray...............................7
UsingtheFace-uptray..................................9
RemovingtheFace-uptray..............................9
MemoryModule..........................................10
Installingamemorymodule............................10
Removingamemorymodule...........................16
ROMModule.............................................19
InstallingaROMmodule..............................19
RemovingaROMmodule .............................25
InterfaceCards............................................29
Installinganinterfacecard.............................29
Removinganinterfacecard ............................31
PrintingaStatusSheet .....................................32
vii
Page 8

Chapter 7 Using the Remote Control Panel Utility
ForDOSUsers............................................33
RemoteControlPanelutilityoverview..................33
Makingbasicprintersettings ..........................38
Choosingprinteremulation............................50
Otherspecialsettings.................................52
Printingfontsamples.................................60
ForMacintoshUsers ......................................60
RemoteControlPanelutilityoverview..................60
Makingprintersettings ...............................64
Resettingthetonerandthephotoconductorcounters......69
Chapter 8 Replacing Consumable Products
PrecautionsDuringReplacement ...........................73
ReplacingtheDeveloperCartridge..........................73
ReplacingthePhotoconductorUnit .........................80
Chapter 9 Cleaning and Transporting
CleaningthePrinter.......................................87
Cleaningtheinsideoftheprinter.......................87
Cleaningthepaperpathrollers.........................88
Cleaningtheprintercase..............................90
Removingspilledtoner ...............................91
TransportingthePrinter...................................91
Chapter 10 Troubleshooting
StatusandErrorLights....................................93
Indicatorlights.......................................93
PrintingaStatusSheet....................................104
ClearingJammedPaper...................................105
Precautionsforclearingjammedpaper.................105
Preventingpaperfeedandpaperjamproblems .........105
viii
Page 9

Paper jam — insidetheprinter.........................106
Paperjam-MPtray..................................111
PaperJam-ManualFeedslot..........................113
PaperJam-Optionalpapercassette....................115
OperationalProblems.....................................118
PrintoutProblems........................................119
PrintQualityProblems....................................120
MemoryProblems........................................125
Appendix A Symbol Sets
IntroductiontoSymbolSets................................127
IntheLJ4EmulationMode/EPSONGL2Mode...............128
InternationalcharactersetsforISO.....................131
IntheESC/P2orFXModes................................132
Internationalcharactersets............................133
CharactersavailablewiththeESC(^command..........133
IntheI239XEmulationMode..............................134
Appendix B Working with Fonts
AvailableFonts ..........................................135
AddingMoreFonts.......................................139
SelectingFonts...........................................139
DownloadingFonts.......................................139
EPSONFontManager.....................................140
InstallingtheEPSONFontManager....................140
EPSONBarCodeFonts....................................141
Systemrequirements.................................143
InstallingEPSONBarCodeFonts.......................143
PrintingwithEPSONBarCodeFonts...................145
EPSONBarCodeFontspecifications....................149
Appendix C Contacting Customer Support
ForNorthAmericanusers.................................162
ix
Page 10

ForLatinAmericanusers.................................163
ForEuropeanUsers......................................164
For United Kingdom and the Republic of Ireland Users . . 164
ForUsersinGermany................................166
France .............................................166
Spain..............................................166
Italy...............................................167
Portugal............................................167
Austria.............................................167
Netherlands........................................167
Belgium&Luxemburg...............................168
Switzerland.........................................168
Glossary
Index
x
Page 11

Warnings, Cautions, and Notes
Warnings
must be followed carefully to avoid bodily injury.
w
Cautions
must be observed to avoid damage to your equipment.
c
Notes
contain important information and useful tips about the operation of
your printer.
Safety Precautions
Be sure to follow these precautions carefully to ensure safe,
efficient operation:
1
Page 12
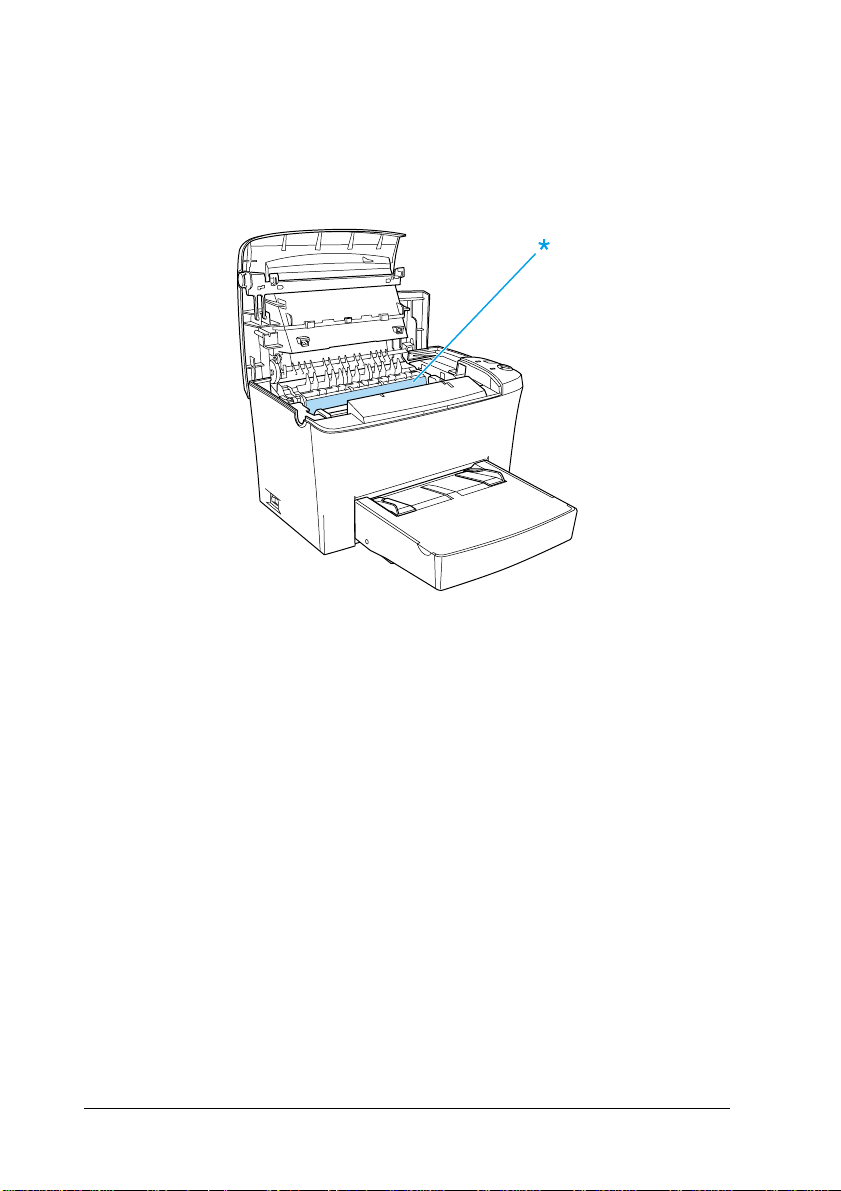
❏ Be careful not to touch the fuser, which is marked CAUTION
Hot Surface Avoid Contact, or the surrounding areas. If the
printer has been in use, the fuser and the surrounding areas
maybeveryhot.
❏ Avoid touching the components inside the printer unless
instructed to do so in this guide.
❏ Neverf orce the printer’s components into place. Althoughthe
printer is designed to be sturdy, rough handling can damage
it.
2
Page 13
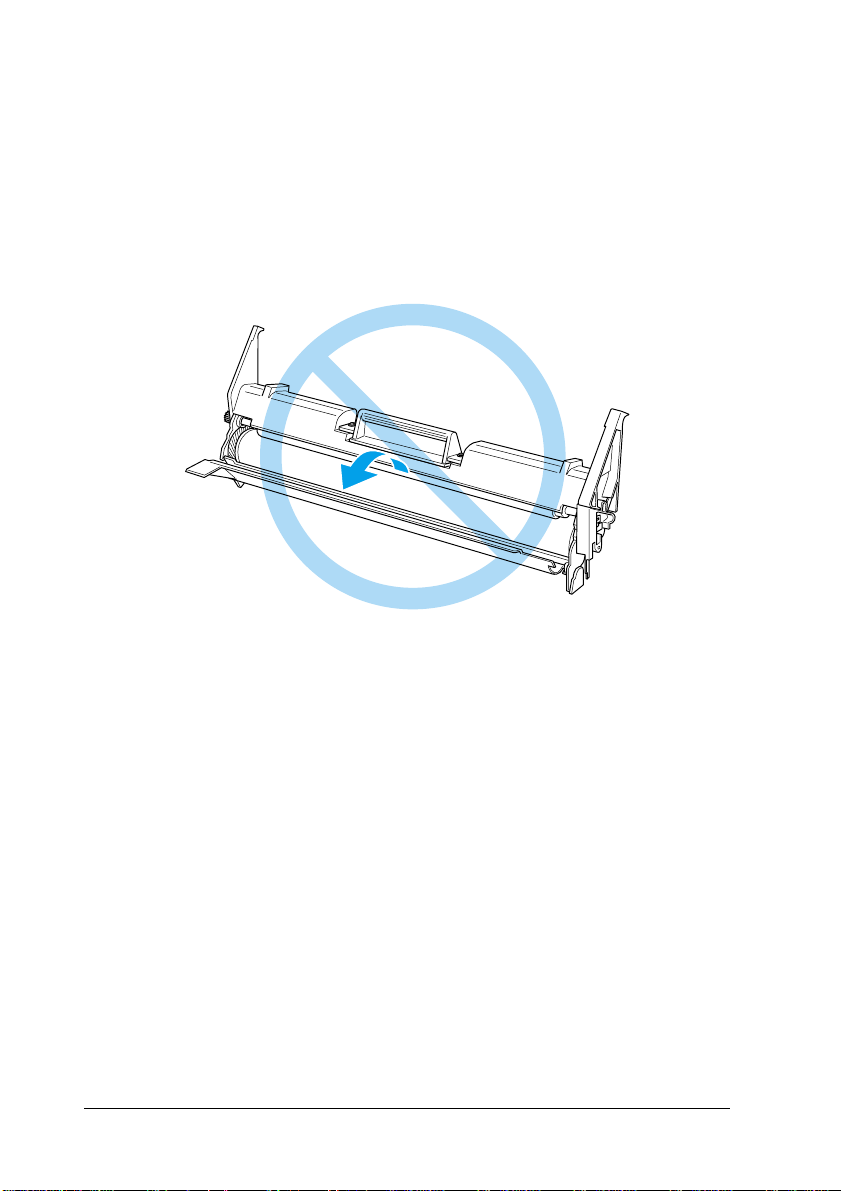
❏ When removing the developer cartridge, never touch the
developing roller under the flap; otherwise, print quality will
decline.
❏ When handling the developer cartridge, always place it on a
clean, smooth surface.
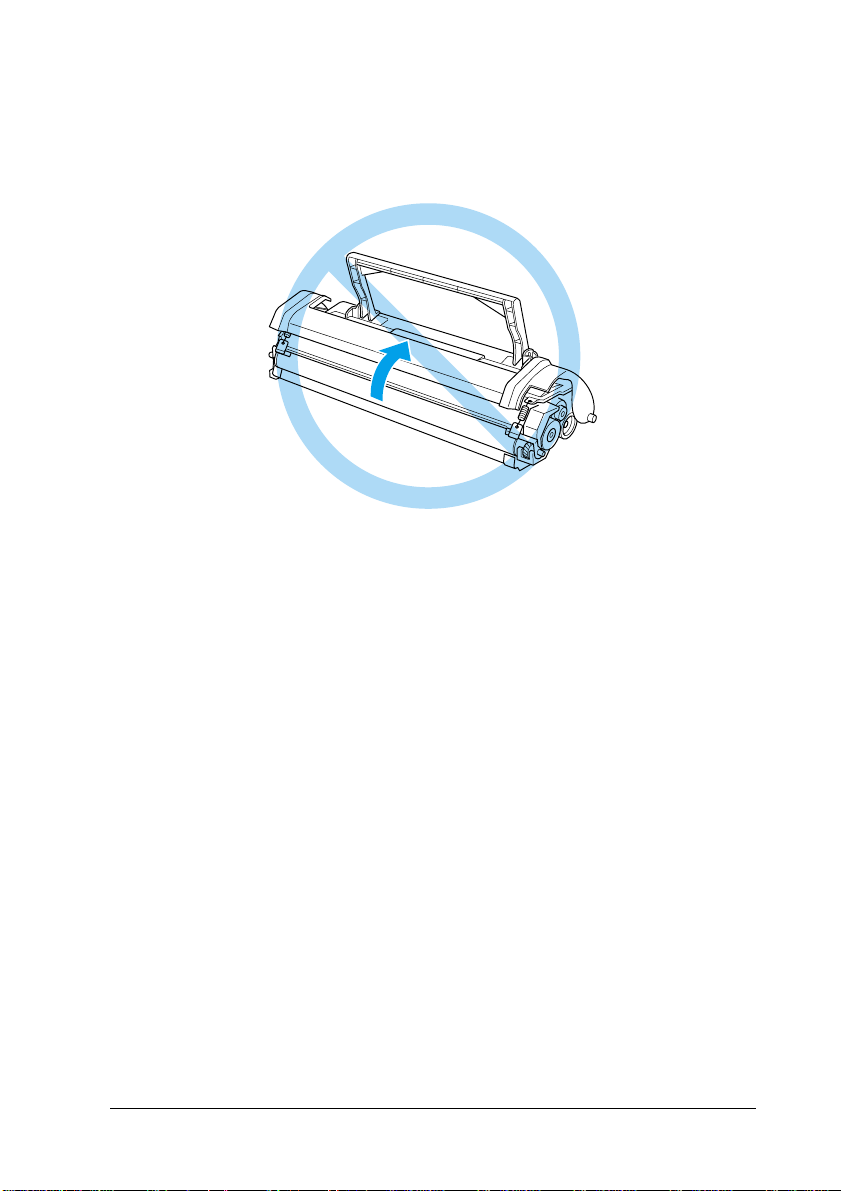
❏ Do not turn the developer cartridge upside down or stand it
on its ends.
❏ Do not attempt to modify or take the developer cartridge
apart. It cannot be refilled.
❏ Do not touch the toner and avoid all contact with your eyes.
3
Page 14
❏ When removing or installing a photoconductor unit, protect
the light-sensitive drum from exposure to light any longer
thannecessary. Thelight-sensitive drum isthe green cylinder
visible through the openings in the unit. Overexposing the
drum might cause abnormally dark or light areas to appear
on the printed page and may shorten the service life of the
unit.
❏ Be careful not to scratch the surface of the drum. When you
remove the photoconductor unit from the printer, always
place the unit on a clean, smooth surface. Avoid touching the
drum, since oils from your skin can permanently damage its
surface and affect print quality.
❏ To get the best print quality, do not store the photoconductor
unit in an area subject to direct sunlight, dust, salt air, or
corrosivegases (such asammonia). Avoid locationssubjectto
extreme or rapid changes in temperature or humidity.
❏ Wait for at least one hour before using a developer cartridge
oraphotoconductorunitaftermovingitfromacooltoawarm
environment to prevent damage from condensation.
4
Page 15

Warning:
Do not dispose of developer cartridges or photoconductor
w
units in fire, as they can explode and cause injury. Dispose
of them according to local regulations.
❏ Be sure to keep consumable components out of the reach of
children.
❏ Do not leave jammed paper inside the printer. Thiscan cause
the printer to overheat.
❏ Avoid using outlets that other appliances are plugged into.
❏ Use only an outlet that meets the power requirements of this
printer.
Important Safety Instructions
❏ Connect your printer to an electrical outlet that meets the
power requirements of this printer. Your printer’spower
requirements are indicated on a label attached to the printer.
If you are not sure of the power supply specifications in your
area, contact your local power company or consult your
dealer.
❏ If you are unable to insert the AC plug into the electrical
outlet, contact an electrician.
❏ Adjust only those controls that are covered by the operating
instructions, as improper adjustment of other controls may
resultindamageandmayrequirerepairsbythequalified
service representative.
5
Page 16

NERGYSTAR®Compliance
E
As an InternationalENERGYSTAR®Partner, EPSON has
determined that this product meets the International
TAR®Program guidelines for energy efficiency.
S
NERGY
E
Power On/Off Cautions
Caution:
Do not turn off the printer:
c
❏ Until the Ready light (green) comes on and is not flashing.
❏ While the Data light (yellow) is flashing.
The International
TAR®Office Equipment
S
Program is a voluntary
partnership with the computer
and office equipment industry to
promote the introduction of
energy-efficient personal
computers,monitors,printers,fax
machines, copiers, and scanners,
in an effort to reduce air pollution
caused by power generation.
NERGY
E
❏ While printing.
6
Page 17
Chapter 1
Product Information
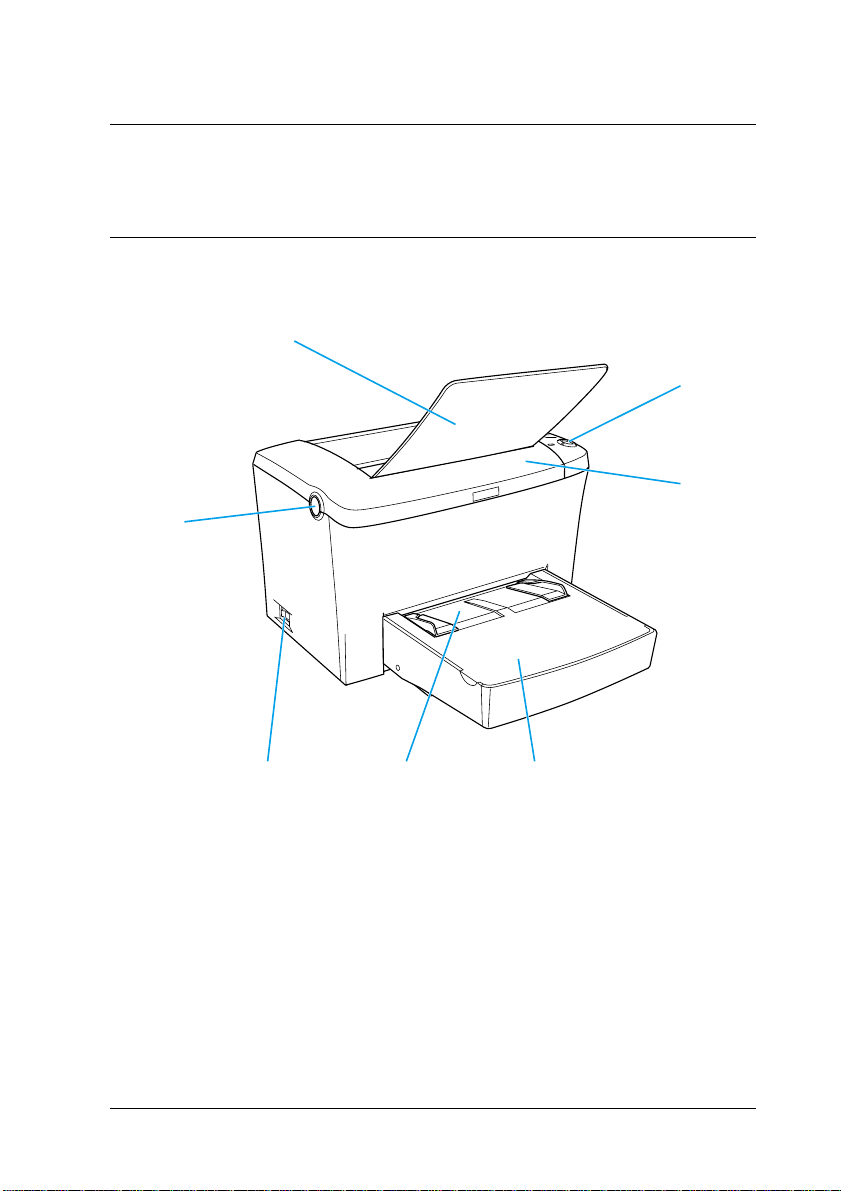
Printer Parts
7
6
1
1
1
1
1
1
2
1
1
1
1. Control panel
2. Printer cover
3. MP (Multi-Purpose) tray
4. Manual feed slot
5. Power switch
6. Latch
7. Face-down tray
345
Product Information
1
1
1
1
7
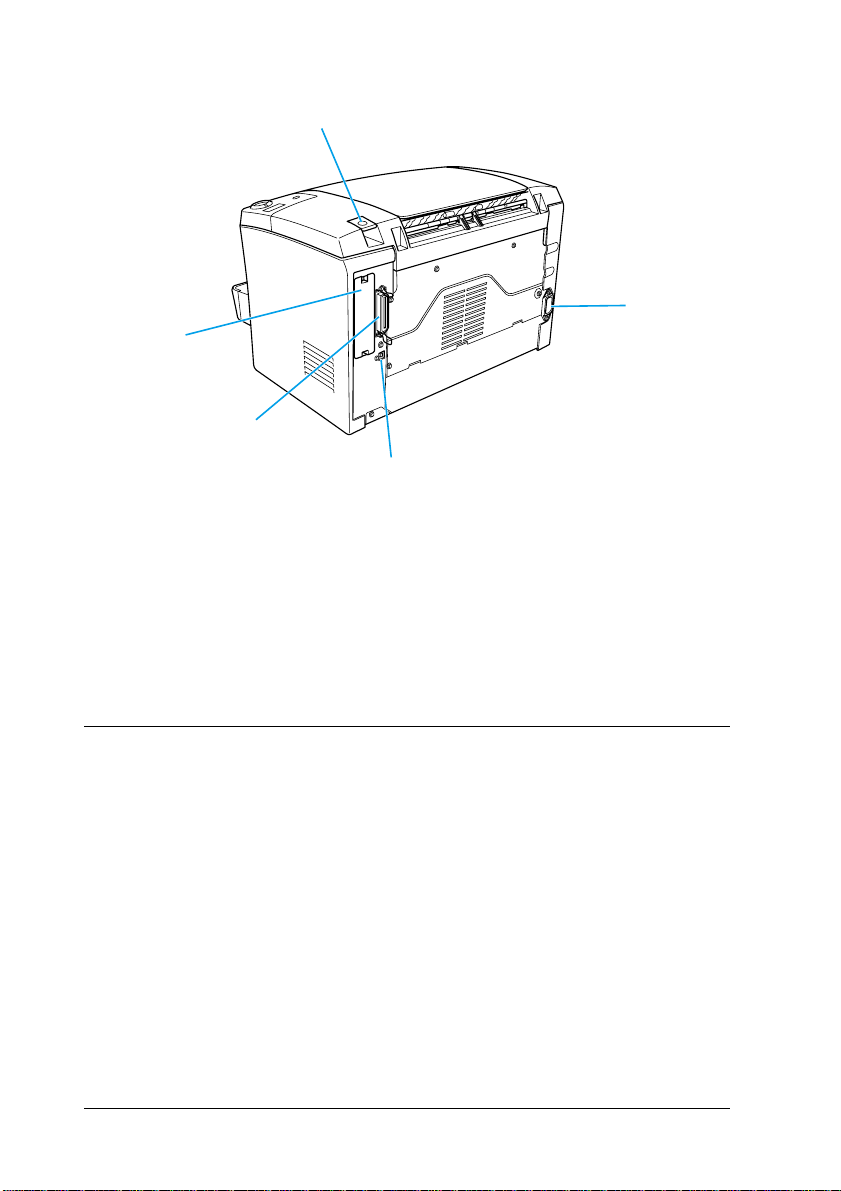
Page 18
5
4
3
1. AC inlet
2. USB interface connector
3. Parallel interface connector
4. Type B interface slot
5. Paper path selector
1
2
Control Panel
The printer’s control panel has six indicator lights and three
buttons. The indicator lights inform you of basic printer status,
errors, and warnings. The buttons allow you to control a number
of basic printer operations.
8
Product Information
Page 19
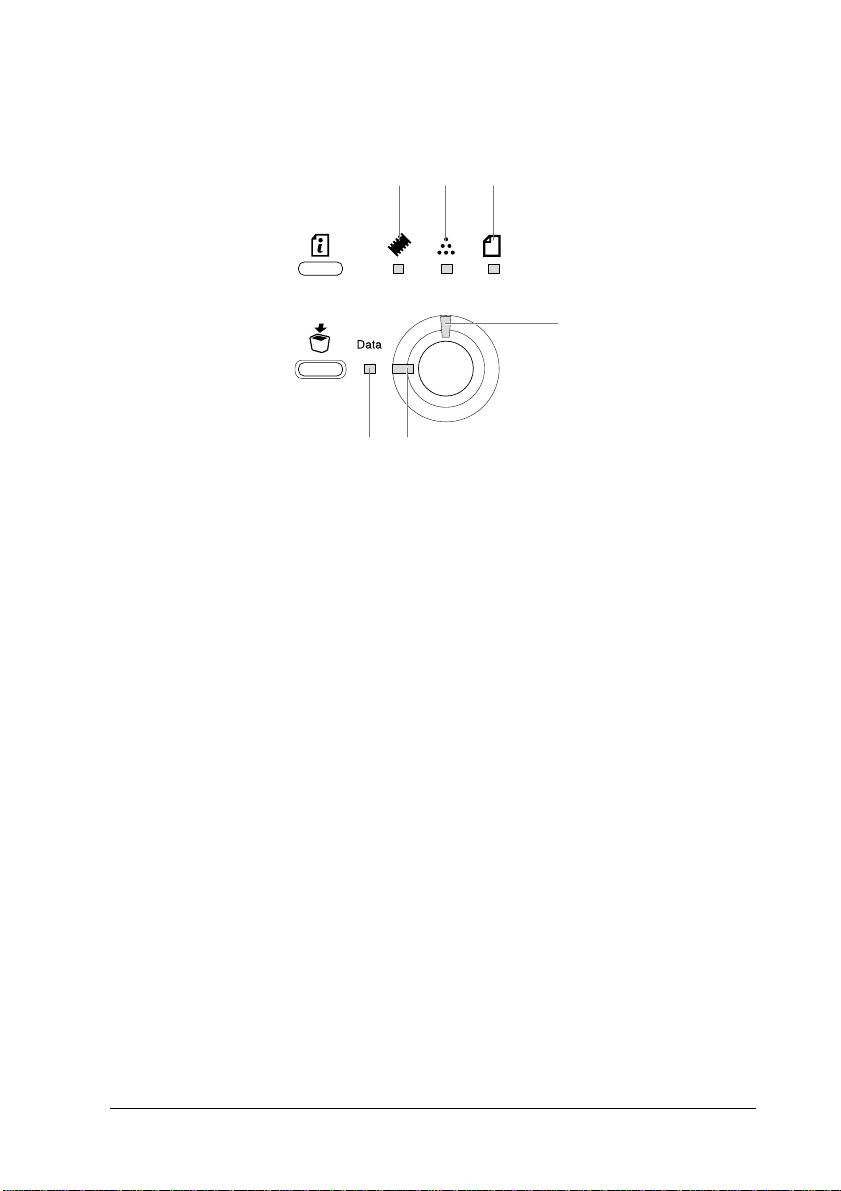
Indicator lights
1
65 4
1
1
1
1
1Error
2 Ready
3Data
23
On or flashes when an error is detected.
On when the printer is ready, indicating
that the printer is ready to receive and
print data.
When the printer is not ready, this light
is off.
On when data is received and stored in
the print buffer (the section of memory
reserved for receiving data) but not yet
printed. Flashing indicates that the
printeris processingdata. When nodata
remains in the print buffer, this light is
off.
1
1
1
1
1
1
1
1
Product Information
9
Page 20
4 Paper Turnson orflashes, in combination with
the Error light, usually indicates a
paper-related problem. On usually
indicates a paper jam, while flashing
usually indicates an error or a warning
with the paper, such as when the paper
source is empty.
5 Toner On when the printer’s developer
cartridge has run out of toner.Flashes to
indicate that toner isrunning low. If this
light is flashing, have a new developer
cartridge ready.
6 Memory Usually turns on or flashes in
combinationwithotherlightstoindicate
anerrororawarningthatis
memory-related.
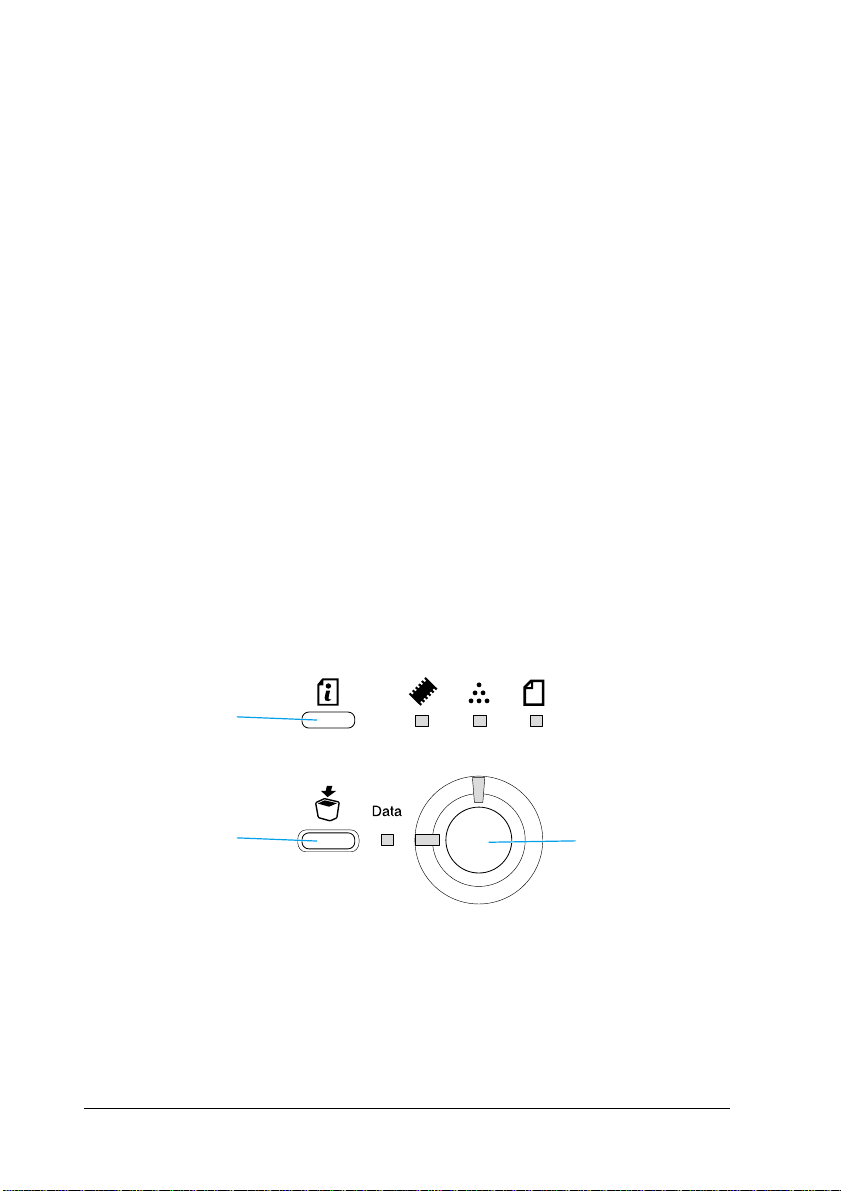
Buttons
10
2
3
Product Information
1
Page 21

1 Start/Stop
Switches the printer between ready and
offline status.
1
2 Information
3 Job Cancel
Forthedetailsabout the errors indicatedbylights,see “Status and
Error Lights” on page 93.
Printsa statussheet whenthe
and no warning is indicated.
Clears the warning when a warning is
indicated.
Deletes the oldest print job stored in the
printer. Deletes one job when pressed once.
Pressing it down more than two seconds
deletes all data in the print buffer, jobs, and
data the printer is receiving, and data the
printer is currently printing.
Error
About Your Printer
Your printer is the latest in EPSON’sadvancedlineoflaser
printers.
Theprinteriseasytoinstallanduse.Yousimplysetuptheprinter,
connect it to your computer, and install the printer driver as
described in the
Theprinter supportsECP modein Microsoft
95, XP, 2000, and NT
transfer and bidirectional communication with your computer.
Setup Sheet
®
.
®
Windows®Me,98,
4.0. ECP mode supports high-speed data
lightis off
1
1
1
1
1
1
1
1
1
1
Product Information
1
11
Page 22

Features
The printer comes with a full set of features that contributes to
easeofuse and consistent,high-qualityoutput. The mainfeatures
are described below.
High-quality printing
When using the driver provided, your printer provides 1200 dpi
printing at a speed of up to 8 pages per minute when printing on
A4 paper. You’ll appreciate the professional print quality
produced by your printer and its quick processing speed.
Note:
The memory overflow error may occur when printing at 1200 dpi with
a printer which has only a default memory because printing at 1200 dpi
uses a lot of memory. When you print at 1200 dpi, install more memory
than 16 MB to avoid this error.
Toner Save mode
To reduce the amount of toner used in printing documents, you
can print rough drafts using the Toner Save mode.
Resolution Improvement Technology and Enhanced
MicroGray technology
Resolution Improvement Technology (RITech) is an original
EPSON printer technology that works by smoothing out the
jagged edges of diagonal and curved lines in both text and
graphics. Enhanced MicroGray improves the halftone quality of
graphics.With the driverprovided, the printer’s600dpi(dotsper
inch)resolution isenhanced by RITech and Enhanced MicroGray
technology.
12
Product Information
Page 23

Options and Consumable Products
Topurchase options orconsumableproducts, contact yourdealer
or the qualified service representative in your area.
Options
500-Sheet Lower Paper Cassette Unit A4 (C12C813791)
1
1
1
This unit increases paper feeding capacity (up to 500 sheets of A4
size). For details, see “500-Sheet Lower Paper Cassette Unit A4”
on page 1.
Face-up Tray (C12C813801)
The Face-up tray is recommended for printing on media that
requirea straight-throughpaper path,such asthick paper,labels,
and transparencies. For details, see “Face-up Tray” on page 7.
Memory Module
The printer comes with8 MB of memory, which can be expanded
uptoatotalof136 MB. For details, see“Memory Module”onpage
10.
Note:
Make sure that the DIMM you purchase is compatible with EPSON
products. For details, contact the store where you purchased this printer
or the EPSON qualified service representative.
ROM Module (C12C832521)
The Adobe®PostScript®3™ Kit (C12C832521) ROM module is a
useful option that generates crisp output. For details, see “ROM
Module” on page 19.
1
1
1
1
1
1
1
1
1
Product Information
13
Page 24

Interface Card
Optional interface cards and modules provide a variety of
interfaces, allowing you to use your EPL-6100 with an Ethernet
network, a Macintosh, andIBM mainframe and other specialized
interfaces. For details, see “Interface Cards” on page 29.
Consumable products
Developer Cartridge (S050087)
This cartridge includes the toner that is used to create the image
on paper. The service life of the cartridge is approximately 6,000
printed pages.
Developer Cartridge (S050095)
This cartridge includes the toner that is used to create the image
on paper. The printer comes with this cartridge already installed.
The service life of the cartridge is approximately 3,000 printed
pages.
Photoconductor Unit (S051055)
The photoconductor unit contains a light-sensitive drum that
permanently fixes the toner onto paper. The printer comes with
this unit already installed. This unit requires replacement after
approximately 20,000 pages of printing.
14
Product Information
Page 25

Chapter 2
Paper Handling
Paper Sources
This section describes the combinations of paper sources and
paper types that you can use.
MP tray
Paper Type Capacity Paper Size
Plain paper Up to 250 sheets of
Letterhead
Labels Up to 10 sheets
Thick paper
Transparencies Up to 5 Sheets
75 g/m² paper
(Weight: 60 to 90g/m², 16
to 24 lb)
(Weight: 90 to 163 g/m²,
24 to 43 lb)
A4, A5, B5, Letter (LT),
Legal (LGL), F4,
Half-Letter (HLT),
Executive (EXE),
Government Letter (GLT),
Government Legal (GLG),
Custom-size paper:
76 × 127 mm (3.0 × 5.0 in.)
minimum
216× 356 mm (8.5 × 14.0 in.
maximum
2
2
2
2
2
2
2
2
Envelopes Upto10sheets
(Weight: 85 to 105 g/m²,
23 to 28 lb)
Monarch (MON), Commercial
10 (C10), DL, C6, C5, ISO-B5
(IB5)
Loading Paper
The printer can feed paper from the MP tray.
Please note the following points when choosing paper:
Paper Handling
2
2
2
2
15
Page 26
❏ Papershouldbeofhighqualityandberelativelysmooth,with
a weight between 60 and 90 g/m² (16 to 24 lb).
❏ Theprinter is extremely sensitive tomoisture. Be sureto store
your paper in a dry environment.
❏ The use of colored paper is acceptable, but coated paper
should be avoided.
❏ You may use paper with preprinted letterheads, provided
that the paper and ink are both laser-printer type.
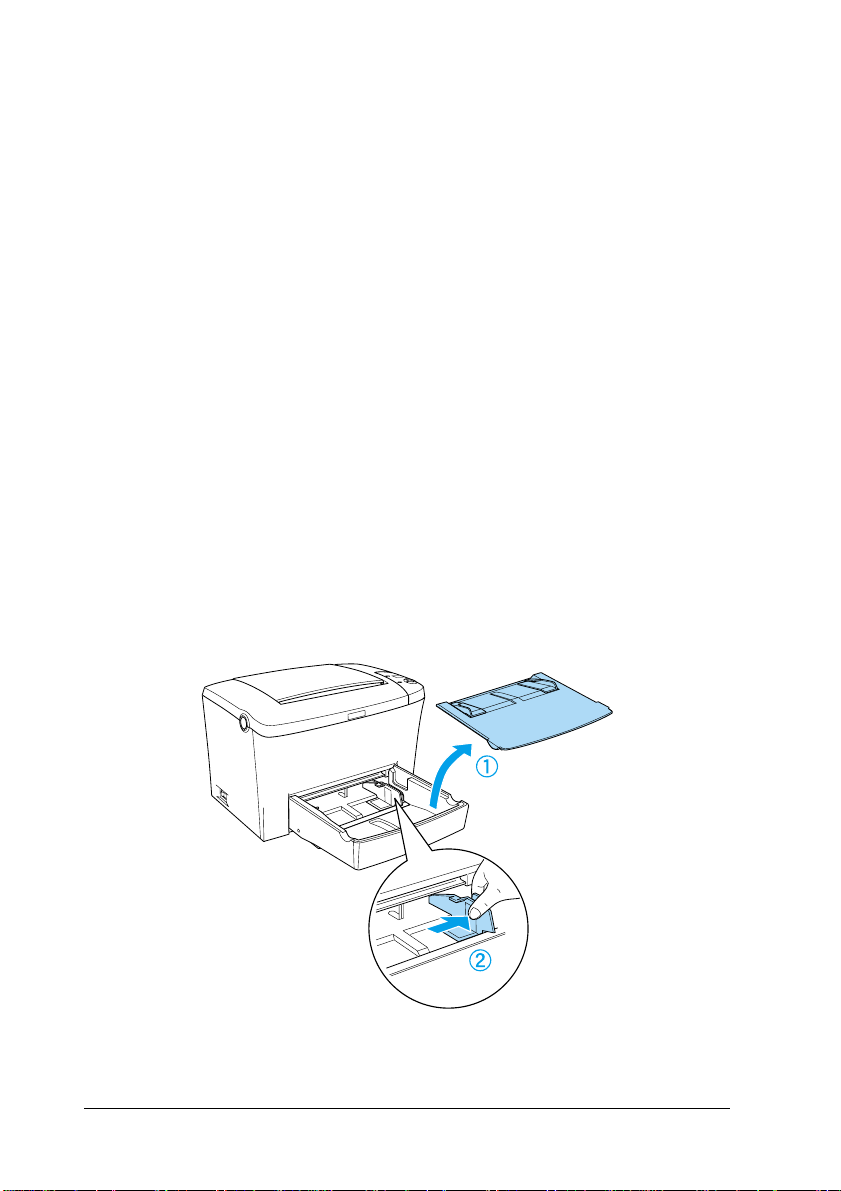
Loading the MP tray
You can load up to 250 sheets of plain paper into the MP tray.
Follow these steps to load paper into the MP tray:
1. Lift off the tray cover, then slide the paper guide to
accommodate the paper you are loading.
16
Paper Handling
Page 27
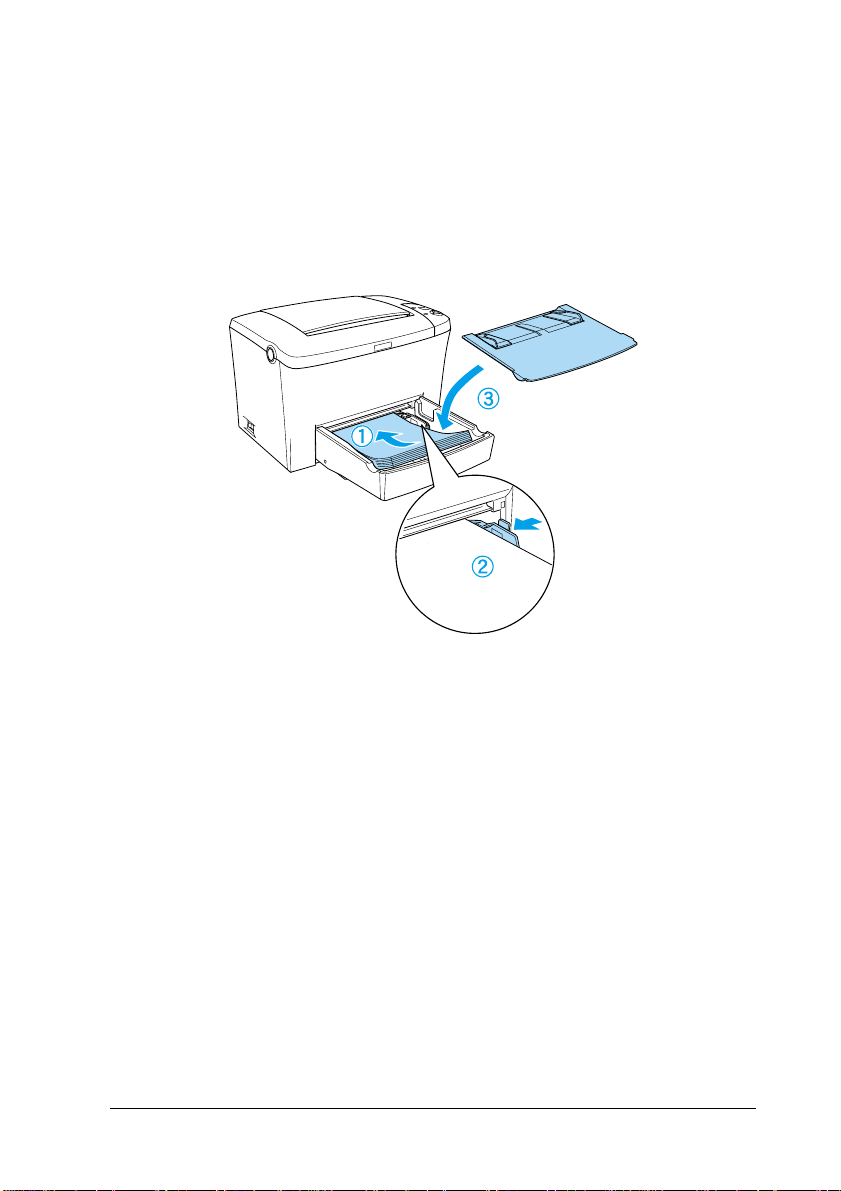
Note:
Lift the paper guide slightly to move it.
2. Fan a stack of paper and tap it on a flat surface to even the
edges, and set the paper into the MP tray with the printable
surface facing up. Then adjust the paper guide to the size of
the paper, and then replace the MP tray cover.
2
2
2
2
2
2
2
Note:
Make sure to load the paper as far as it will go inside the MP tray.
Paper Handling
17
2
2
2
2
2
Page 28
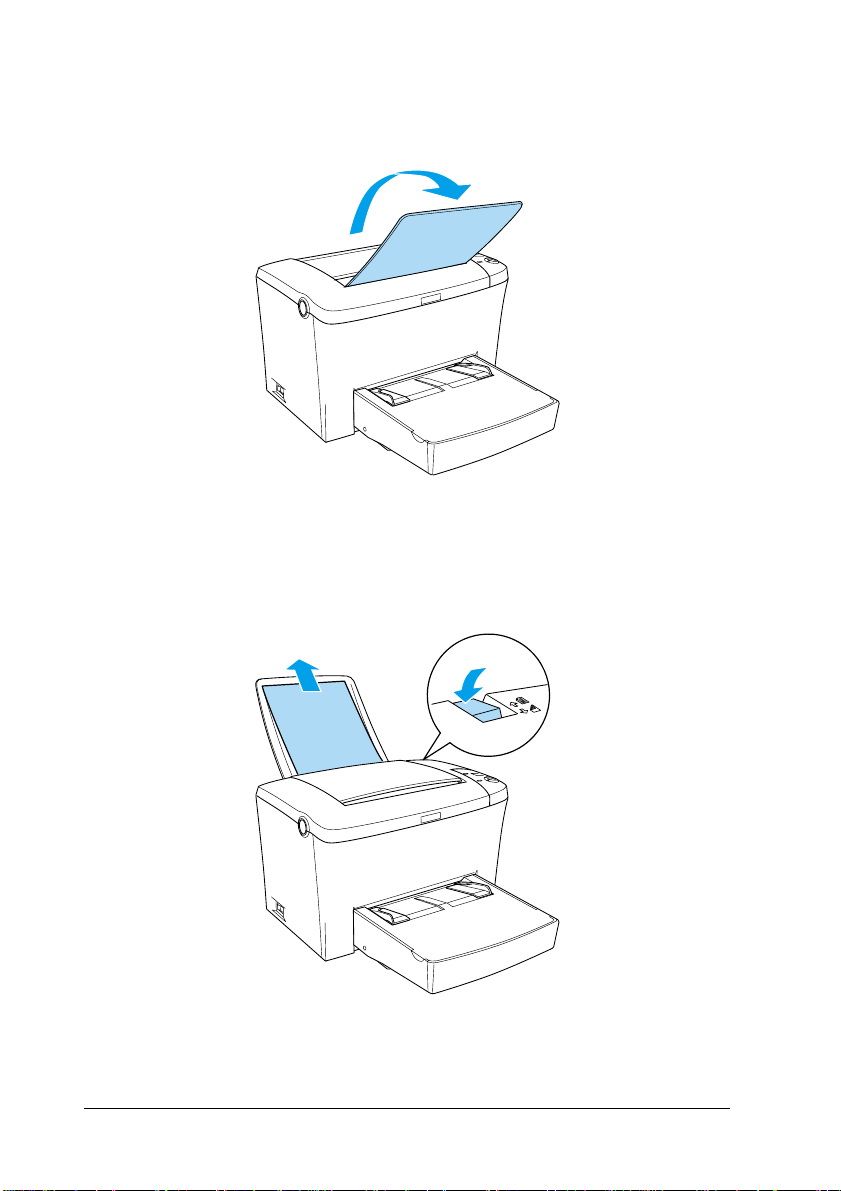
3. Raisethe Face-down trayto prevent paperfrom falling offthe
edge.
Ifyou installedthe optionalFace-up trayand youwant the sheets
to come out face-up, then raise the Face-up tray instead, and set
the paper path selector down.
18
Paper Handling
Page 29
Note:
❏
Before printing, make sure that the Paper Size setting in your
printer driver matches the paper you load.
❏
If you want to print on paper heavier than 90 g/m² (24 lb) or on
special paper (such as envelopes, labels, transparencies, or thick
paper), see “Printing on Special Media” on page 20.
Loading the Manual Feed slot
2
2
2
You can use the 76 to 216×148 to 356 mm (3.0 to 8.5×5.8 to 14.0
in.) size paper when using the Manual Feed slot.
Followthese steps toload a singlesheet of paperfrom the Manual
Feed slot.
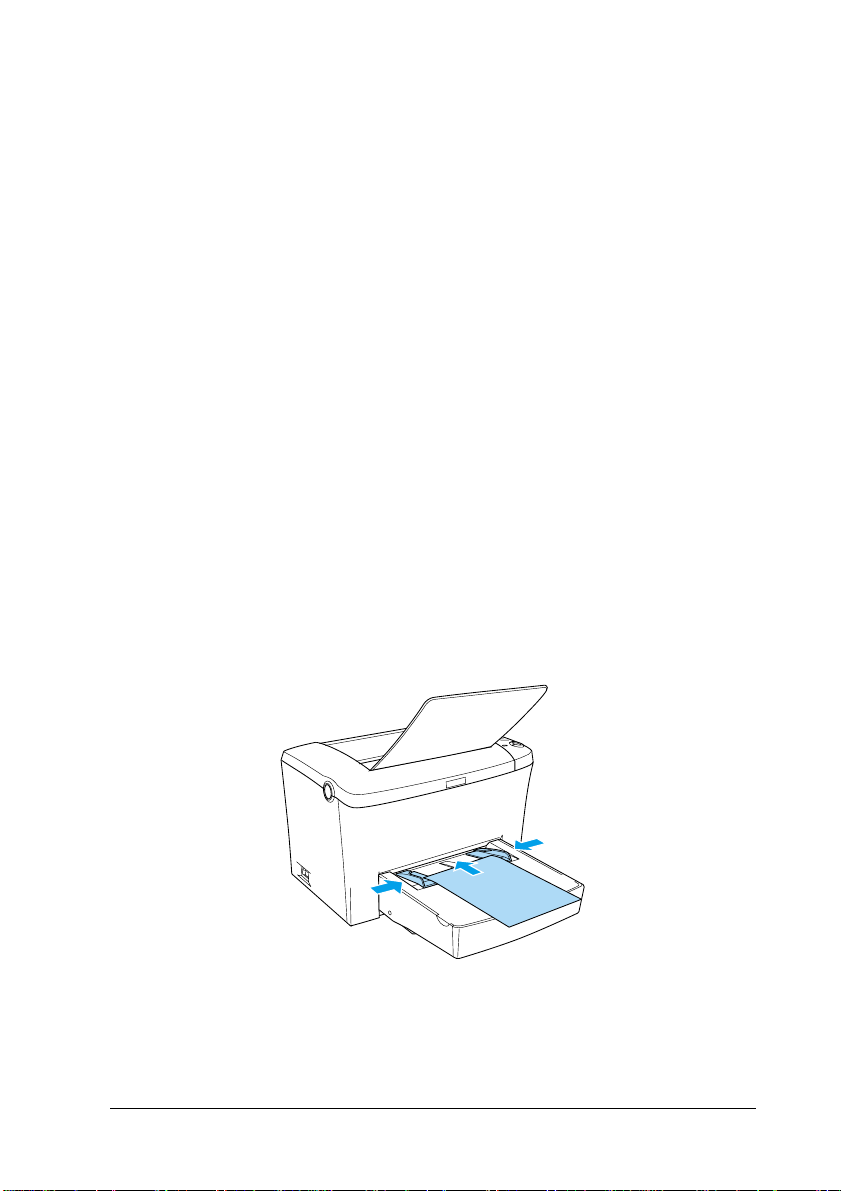
1. Make sure the cover is in place on the MP tray.
2. Insert a single sheet of paper, with the printable side up, as
faras it willgo intothe Manual Feedslot above thetray cover.
Adjustthepaper guides tomatchthe paper sizeyouare using.
2
2
2
2
2
2
2
2
Paper Handling
2
19
Page 30

Note:
Load letterheads printable side up and with their letterhead toward
the printer.
3. Make sure that the Manual Feed check box in your printer
driver’s Basic Settings menu (Windows) or Basic Settings
dialog box (Macintosh) is selected.
Note:
If you are printing from a DOS application, turn ManualFeedon
in the Remote Control Panel utility instead. For more details, see
“Page Setup button” on page 39.
4. Sendthe p rint datafrom the computer.The Error, Ready,and
Paper lights on the control panel start flashing slowly.
5. Press the
from the Manual Feed slot.
Note:
Whenyounolongerneedtofeedpapermanually,besuretoclear
the Manual Feed check box in the printer driver’sBasicSettings
menu (Windows) or Basic Settings dialog box (Macintosh) before
printing from the MP tray or the optional 500-sheet Lower Paper
Cassette Unit A4.
Start/Stop button. The printer loads the paper
N
Printing on Special Media
Note:
Sincethequality of anyparticularbrandor type ofpapermaybe changed
by the manufacturer at any time, EPSON cannot guarantee the quality
ofanytype of paper. Always test samples ofpaperstockbeforepurchasing
large quantities or printing large jobs.
EPL-6100 Laser Printer can print on special paper stock such as
envelopes, labels, transparencies, and thick paper.
20
Paper Handling
Page 31

Labels
You can load up to 10 sheets of labels into the MP tray. However,
you may need to feed some types of labels one sheet at a time.
To prevent the adhesive from coming into contact with printer
parts, always use labels that completely cover the backing sheet
such that no gaps occur between the individual labels.
You should test the label sheet for leaking adhesive by pressing a
sheet of paper on top of a sheet of labels. If the paper sticks to the
label sheet when you lift it off, do not use the labels.
Envelopes
You can load up to 10 envelopes into t he MP tray, depending on
the envelope thickness (85 to 105 g/m²). Load envelopes with the
flap side down and short edge first.
2
2
2
2
2
2
2
2
To print on envelopes, choose
Thick[N]
Basic settings menu (Windows) or Basic Settings dialog box
(Macintosh).
(Macintosh) from the Paper Type drop-down list in the
Thick Narrow
(Windows) or
Paper Handling
2
2
2
2
21
Page 32

The printing quality on envelopes may be irregular because
differentparts of an envelope havedifferentthicknesses.Printone
or two envelopes to check the print quality. If the printing is too
light, adjust the print density as described in “Print Quality
Problems” on page 120.
Do not use window envelopesunless they are specially designed
forlaserprinters.Theplasticon most window envelopes willmelt
when it comes into contact with the hot fuser.
Thick paper
You can load 5 to 10 sheets of thick paper into the MP tray.
However, you may need to feed some types of thick paper one
sheet at a time. Use thick paper of a weight between 90 and 163
g/m² (24to43lb).
To print on thick paper, be sure to change the Paper Type Setting
in the printer driver’s Basic Settings menu (Windows) or Basic
Settingsd ialog box (Macintosh). Choose ThickNarrow(Windows)
orThick[N] (Macintosh)for thickpaper which is less than 188 mm
wide. Choose Thick Wide (Windows) or Thick[W] (Macintosh)
when printing on thick paper which is 188 mm or wider.
Transparencies
Youcanload up tofivetransparenciesinto the MPtray.However,
you may need to feed some types of transparencies one sheet at a
time.
Youcan only use overheadprojectortransparencies and adhesive
drafting film made for use with laser printers or plain-paper
copiers.
22
Paper Handling
Page 33

When printing on transparencies, make sure to choose
Transparency
Settings menu (Windows) or Basic Settings dialog box
(Macintosh).
LoadinganUncommonPaperSize
You can use an uncommon, or custom, paper size from 76
127 mm (3.0×5.0 in.) to 216×356 mm (8.5×14.0 in.).
When you use a manual feed, you can use an uncommon paper
sizefrom 76× 148mm (3.0× 5.8in.) to216×356mm (8.5×14.0in.).
Note:
Choose paper type (such as Thick Wide or Thick[W], Thick Narrow or
Thick[N],orTransparency)inthe printer driver’s Basic Settingsmenu
(Windows) or Basic Settings dialog box (Macintosh) depending on the
media you use.
fromthePaperTypedrop-downlistintheBasic
2
2
2
×
2
2
2
2
Paper Handling
2
2
2
2
2
23
Page 34

24
Paper Handling
Page 35

Chapter 3
Using the Printer Driver with Windows
About the Printer Driver
The printer driver lets you choose from a wide variety of settings
to get the best results from your printer. The printer driver also
includes EPSON Status Monitor 3, which is accessed through the
Utility
tab. EPSON Status Monitor 3 lets you check the status of
your printer. See “Monitoring Your Printer (EPSON Status
Monitor 3)” on page 41 for more information.
Accessing the Printer Driver
You can access the printer driver directly from any application
programs, from your Windows operating system.
The printer settings made from many Windows applications
override settings made when the printer driver is accessed from
theoperatingsystem,soyoushould access the printer driverfrom
your application to make sure you get the result you want.
Note:
Online help provides details on printer driver settings.
❏
To access the printer driver from your application, click the
PrintorPageSetup
to click
buttons.
Setup,Options,Properties
commandontheFile menu. You also need
, or a combination of these
3
3
3
3
3
3
3
3
3
3
3
Using the Printer Driver with Windows
3
25
Page 36

❏ To access the printer driver from Windows, click Start,point
to Settings, and click Printers. Next, right-click the EPSON
EPL-6100 Advanced icon and click Properties (in Windows
Me, 98, or 95), Printing Preferences (in Windows XP or 2000)
or Document Defaults (in Windows NT 4.0).
Making Changes to Printer Settings
Choosing the print quality
You can change the print quality or resolution of printouts to
favor speed or detail. If you need high quality output, choose a
highernumber. Pleasenote thatdoing so reduces the printspeed.
Thereare threelevels ofprint output,600 dpi,Class 1200 dpi, and
1200 dpi. Class 1200dpi provides high quality printingresults on
par with 1200 dpiwith the Enh. MG and RITech functions (under
600 dpi).
1. Click the Basic Settings tab.
26
Using the Printer Driver with Windows
Page 37

2. Select the desired printing resolution from the Print Quality
drop-down list.
3
3
3
3
3
3
3
3. Click
Resizing printouts
You can have your document enlarged or reduced automatically
during printing.
OK
to accept the setting.
Note:
❏
For details about the Enh. MG or RITech functions, see the
Online Help.
❏
If printing is unsuccessful or a memory-related error message
appears, selecting a lower resolution may allow printing to
proceed.
Using the Printer Driver with Windows
3
3
3
3
3
27
Page 38

To automatically resize pages to fit the output paper
1. Click the Layout tab.
2. Select the Zoom Options check box.
3. Select the desired paper size from the Output Paper
drop-down list. The page will be printed to fit on the paper
you have selected.
4. SelectUpperLeftforLocationto print theenlargedor reduced
pageimage atthe upper leftcorner of thepaper. SelectCenter
to print the enlarged or reduced page image with centering.
5. Click OK to accept the settings.
To resize pages by a specified percentage
1. Click the Layout tab.
28
Using the Printer Driver with Windows
Page 39

2. Select the
Zoom Options
check box.
3. Select the
4. Specify the magnification percentage in the box, then click
OK
. The percentage can be set between 50%and 200%in 1
increments.
Zoom To
check box.
%
3
3
3
3
3
3
3
3
If necessary, select the paper size to be printed from the Output
Paper drop-down list.
Modifying the print layout
“Layoutprinting”prints either 2or4pages onto a singlepageand
specifies the printing order, automatically resizing each page to
fit the specified paper size. You can also choose to print
documents surrounded by a frame.
Using the Printer Driver with Windows
3
3
3
3
29
Page 40

1. Click the Layout tab.
2. Select the Print Layout check box, and click Print Layout
Settings. The Print Layout Settings dialog box appears.
1
2
3. Select the number of pages you want to print on one sheet of
paper.
30
Using the Printer Driver with Windows
Page 41

4. Select the Page Order in which the pages are printed on each
sheet.
Note:
The Page Order choices depend on the Pages selected above, andthe
paper orientation (Portrait or Landscape) selected on the Basic
Settings menu.
3
3
5. Click
6. Click
Using watermarks
Follow the steps to use a watermark on your document. In the
Watermark dialog box, you can select from a list of predefined
watermarks, or you can select a bitmap (.BMP) or text (.TXT) file
as your own custom watermark. The Watermark dialog box also
allows you to make a variety of detailed watermark settings. For
example, you can select the size, intensity, and position of your
watermark.
1. Click the
OK
to close the Print Layout Settings dialog box.
OK
on the Layout menu to accept the settings.
Special
tab.
3
3
3
3
3
3
3
3
Using the Printer Driver with Windows
3
3
31
Page 42

2. Select the Watermark check box.
3. Click Watermark Settings. The Watermark dialog box
appears.
32
Using the Printer Driver with Windows
Page 43

4. Select a watermark from the Watermark Name drop-down
list.
3
3
3
3
3
5. Select the location on the page where you want to print the
watermark from the Location list box.
6. Adjust the horizontal or vertical Offset position.
7. Adjust the image intensity of the watermark with the
Intensity slider bar.
8. Adjust the size of the watermark with the Size slider bar.
9. Select
10. Click
Making a new watermark
You can make a new watermark as follows:
1. Click the
Front
(to print the watermark on the face of the
document) or
of the document) for the Position setting.
OK
Back
(to print the watermark on the backside
to accept the settings.
Special
tab.
3
3
3
3
3
3
3
Using the Printer Driver with Windows
33
Page 44

2. Select the Watermark check box.
3. Click Watermark Settings. The Watermark dialog box
appears.
4. Click New/Delete. The User Defined Watermarks dialog b ox
appears.
5. Select Text or BMP and type a name for the new watermark
in the Name box.
6. If you select Text, type the watermark text in the Text box. If
you select BMP, click Browse, and select the BMP file you
want to use, then click OK.
Note:
Before making a custom watermark, you should prepare a bitmap
(.bmp) file.
7. Click Save to close the User Defined Watermarks dialog box.
Your watermark will appear in the list box.
8. Click OK to register the new watermark settings.
Using an overlay
The Overlay settings dialog box allows you to print form data
overlaid with data made by another application.
Note:
The overlay function is available only when the High Quality (Printer)
isselectedfortheGraphicMode in the Extended Settingsdialog boxfrom
the Optional Settings menu.
Creating an overlay
You can create form data and save it as a file.
34
Using the Printer Driver with Windows
Page 45

1. Open the application that you will use to create the overlay.
2. From the application, access the printer driver. Open the File
menu and choose
Setup,Options
buttons, depending on the application you use.
3. Select the
4. Select the
to open the Overlay Settings dialog box.
Special
FormOverlay
PrintorPrint Setup
Properties
,or
tab.
, or click a combination of these
checkbox, andclick
. Then click
Printer
OverlaySettings
1
2
,
3
3
3
3
3
3
3
3
Using the Printer Driver with Windows
3
3
3
3
35
Page 46

5. Click Create Overlay Data.
6. Click Settings.
7. Select the Use Form Name check box. Then click Add Form
Name. The Add Form dialog box appears.
8. In the Add Form dialog box, type the form name in the Form
Name box and its description in the Description box.
36
Using the Printer Driver with Windows
Page 47

9. Click
To Front
document) or
of the document).
(to print the overlay on the face of the
To Back
(to print the overlay on the back side
3
10. In the Add Form dialog box, click
11. In the Form Settings dialog box, clickOK.
12. In the Overlay Settings dialog box, clickOK. If you want to
stop the procedure, click
Note:
The file you send to the printer after step 10, from an application
program such as Windows Notepad or Word, will be saved as an
overlay using the form name you entered at step 8.
13. Print the file saved as overlay data. It is possible to save any
kind of file as an overlay. The overlay data is created.
Printing with an overlay
Follow the steps to print a document with overlay data.
1. Open the file to print with overlay data.
2. From the application, access the printer driver. Open the File
menu and choose
Setup,Options
buttons, depending on the application you use.
PrintorPrint Setup
Properties
,or
Cancel
Register
.
, or click a combination of these
.
. Then click
Printer
3
3
3
3
3
3
3
,
3
3. Select the
4. Select the
to open the Overlay Settings dialog box.
5. In the Overlay Settings dialog box, choose the form from the
Form list, then clickOK.
6. Click
Special
FormOverlay
OK
to print the data.
tab.
checkbox, andclick
Using the Printer Driver with Windows
OverlaySettings
37
3
3
3
Page 48

Different printer settings overlay data
The overlay data is made with the current printer settings such as
Resolution: 600 dpi. If you want to make the same overlay with
different printer settings such as 1200 dpi, follow the instructions
below.
1. Re-accesstheprinter driver asdescribedinstep 2 in“Creating
an overlay” on page 34.
2. Make the printer settings and exit the printer driver.
3. Send the same data that you made by application to the
printer as in step 12 in “Creating an overlay” on page 34.
This setting is available only for Form Name data.
Resetting the toner and the photoconductor counters
After replacing a developer cartridge or a photoconductor unit,
reset the toner counter or the photoconductor counter. You can
reset these counters from the printer driver or the control panel.
When you have installed a photoconductor unit, see “Resetting
the photoconductor counter” on page 40. When you have
installed a developer cartridge, see “Resetting the toner counter”
on page 38.
Resetting the toner counter
1. Click the Optional Settings tab, and then c lick Printer Setting.
The Printer Setting dialog box appears.
38
Using the Printer Driver with Windows
Page 49

2. Click
3. Click
S050087
(S050087) or click
developer cartridge (S050095). The toner clear dialog box
appears.
OK
whenyouhaveinstalled a developer cartridge
S050095
to reset the toner level counter.
when you have installed a
3
3
3
3
3
3
3
Using the Printer Driver with Windows
3
3
3
3
3
39
Page 50

Resetting the photoconductor counter
1. Click the Optional Settings tab, and then c lick Printer Setting.
The Printer Setting dialog box appears.
2. Click OPC Level Clear. The photoconductor clear dialog box
appears.
3. Click OK to reset the OPC level counter.
40
Using the Printer Driver with Windows
Page 51

MonitoringYour Printer(EPSONStatus Monitor
3)
3
About EPSON Status Monitor 3
EPSON Status Monitor 3 is a utility program that monitors your
printer and gives you information about its current status. For
example,youcan find outtheamountof remaining toner through
this utility. If a print error occurs, the utility provides you with a
messagedescribingtheerror. EPSON Status Monitor3 isaccessed
from within the printer driver. See the following section formore
information.
Before using EPSON Status Monitor 3, be sure to read the printer
driver’sREADME file.This filecontains the latest information on
the printer driver and EPSON Status Monitor 3.
Installing the ESPON Status Monitor 3
Ifyoudidnot install EPSON StatusMonitor3after the installation
ofthe printerdriver, installEPSON StatusMonitor 3according to
the following steps:
3
3
3
3
3
3
3
3
Using the Printer Driver with Windows
3
3
3
41
Page 52

1. Insert the printer software CD-ROM in the CD-ROM drive.
The Installation Program screen appears as shown below:
Note:
If the EPSON Installation Program screen does not appear
automatically, double-click the My Computer icon, right-click the
CD-ROM icon, and click Open in the menu that appears. Then
double-click Setup.exe.
2. In the Installation Program screen, double-click Install
EPSON Status Monitor 3. Alternatively, you can install it by
selecting Install EPSON Status Monitor 3 and then clicking
the arrow at the top right.
42
Using the Printer Driver with Windows
Page 53

3. In the dialog box that appears, make sure that your printer’s
icon is selected, and clickOK. This automatically installs the
utility program.
4. When the installation is complete, clickOK.
Accessing the EPSON Status Monitor 3
3
3
3
3
3
You can access the EPSON Status Monitor 3 directly from any
application programs, from your Windows operating system.
❏
The EPSON Status Monitor 3 appears automaticallywhen an
error occurs.
❏
Toaccess theEPSON StatusMonitor 3 from your application,
clickthe
Properties
Status Monitor 3
PrintorPageSetup
and then click the
icon to start the EPSON Status Monitor 3.
commandonthe File menu,click
Utility
tab, and click the
EPSON
3
3
3
3
3
3
3
Using the Printer Driver with Windows
43
Page 54

❏ To access the EPSON Status Monitor 3 from Windows, click
Start,pointtoSettings, and click Printers. Next, right-click
The EPL-6100 advanced icon and click Properties (in
Windows Me, 98, or 95), Printing Preferences (in Windows
XP or 2000) or Document Defaults (in Windows NT 4.0).
Then click the Utilitytab, and click the EPSON Status Monitor
3 icon to start the EPSON Status Monitor 3.
Note:
Do not clear the Monitor the printing statuscheck box. If you clear the
check box, the Status Alert window no longer comes up to notify you
whenan error occursandyour printer maynot recover fromsomeerrors.
44
Using the Printer Driver with Windows
Page 55

Getting printer status details
You can monitor printer status and obtain information on
consumable products using the EPSON Status Monitor 3 dialog
box.
12
3
4
5
1. Icon/Message: Shows the printer status.
6
7
3
3
3
3
3
3
3
3
2. Printer image: The image at the upper left
shows the printer status
graphically.
3. Text box: The text box next to the printer
image displays the current
status of the printer. When a
problem occurs, the most
probable solution is displayed.
Close
4.
button: Closes the dialog box.
Using the Printer Driver with Windows
45
3
3
3
3
Page 56

5. Paper: Displays the paper size, paper
type, and the approximate
amount of paper remaining in
the paper source. Information
for the optional cassettes are
displayed only if this option is
installed.
6. Toner: Indicates the amount of
remaining toner. The toner icon
flashesiftoneris low (10 percent
or less) or out.
7. Photoconductor unit life: Indicates the remaining
functional life of the
photoconductor unit.
46
Using the Printer Driver with Windows
Page 57

Setting Monitoring Preferences
To make specific monitoring settings, click
Preferences
Monitoring Preferences dialog box appears.
in the Utility menu of the printer driver. The
1
3
4
567
Monitoring
2
3
3
3
3
3
3
3
3
The following settings and buttons appear in the dialog box:
1. Select Notification: Use the check boxes in this area to
select the types of error that you wish
to be notified about.
Default
2.
button: Restores default settings.
Using the Printer Driver with Windows
3
3
3
3
47
Page 58

3. Select Shortcut Icon: To use the shortcut icon, select the
Shortcut Icon check box and choose
an icon. The icon you select appears
on the right side of the task bar.
Once the shortcut icon is in the task
bar, you can double-click it to open
the Status Monitor 3 dialog box.
Alternatively, you can right-click the
shortcut icon and select Monitoring
Preferences to open the Monitoring
Preferences dialog box, and EPSON
EPL-6100 Advanced to open the
EPSON Status Monitor 3 dialog box.
4. Allow monitoring of
shared printers check
box:
5. OK button: Saves new changes.
6. Cancel button: Cancels any changes.
7. Help button: Opensonline helpfor the Monitoring
To monitor a shared printer, select
this box. You need to make this
setting on the server.
Preferences dialog box.
Status Alert window
The Status Alert window appears automatically when an error
occurs.It i ndicates what type oferror hasoccurred and offersyou
a possible solution. It closes automatically once the problem is
cleared.
48
Using the Printer Driver with Windows
Page 59

The Status Alert window opens when an error has occurred. The
window does not open when the error is set to do not notify in
the Monitoring Preferences dialog box.
3
3
3
If you wish to see information about printer consumables, click
Consumables
window will not disappear even after a problem is cleared. To
close the box, you need to click
Stopping monitoring
You can stop monitoring the printing status by clearing the
MonitorthePrinting Status
menu if you don’t need to monitor the printer at all.
Note:
❏
The Monitor the Printing Status check box is displayed in the
Utility menu of Document Defaults in Windows NT 4.0, or in the
Utility menu of Printing Preference in Windows XP or 2000.
❏
YoucanfindoutthecurrentprinterstatusbyclickingtheEPSON
Status Monitor 3 icon in the printer driver’s Utility menu.
. Once this button is clicked, the Status Alert
Close
.
checkboxinthe printer driver’s Utility
3
3
3
3
3
3
3
3
Using the Printer Driver with Windows
3
49
Page 60

Setting Monitored Printers
You can use “Monitored Printers” utility, to change the type of
printers that EPSON Status Monitor 3 will monitor. When you
install the EPSON Status Monitor 3, this utility is also installed.
Usually,itis not necessary tochangeasetup. Use this utilitywhen
you want to change the settings for some reason.
1. Click Start,pointtoProgram,pointtoEPSON Printers,then
click Monitored Printers.
2. Clear the check box of the printers which are not monitored.
3. Click OK.
50
Using the Printer Driver with Windows
Page 61

Canceling Printing
If the printouts are not what you expected and contain incorrect
or garbled characters or images, you may need to cancel printing.
Job Cancel
To cancel printing, press the
panel. The current job is cancelled.
q
button on the control
3
3
Note:
❏
Youcan cancelall the printjobs by holdingdown the
button more than 2 seconds.
❏
You can also cancel printing from your computer. Double-click the
printer icon on the task bar, then on the Printer menu click Purge
Print Documents. (for Windows XP or 2000 users, select Cancel
All Documents.)
Uninstalling Printer Software
JobCancel
q
3
3
3
3
3
3
3
3
Uninstallthe printerdriver and the EPSON Status Monitor 3
1. Quit all applications.
Using the Printer Driver with Windows
51
3
3
Page 62

2. Click Start, p oint to Settings, then click Control Panel.
3. Double-click the Add/Remove Programs icon.
4. Select the EPSON Printer Software,thenclickAdd/Remove.
1
52
2
Note:
When using Windows XP or 2000, click Change or Remove
Programs, select EPSON Printer Software, then click
Change/Remove.
Using the Printer Driver with Windows
Page 63

5. Click the
Printer Model
tab, then select the printer icon.
3
3
3
6. Click the
check box is selected.
Note:
Select the EPSON Status Monitor 3 check box on only when
uninstalling the EPSON Status Monitor 3.
7. If you uninstall the Monitored Printers utility, select the
EPSON Status Monitor 3: Monitored Printers
clickOK.
Utility
tab, confirm the
EPSON Status Monitor 3
check box and
3
3
3
3
3
3
3
3
Using the Printer Driver with Windows
3
53
Page 64

Note:
You can uninstall only the Monitored Printers utility of EPSON
Status Monitor 3. When the utility is uninstalled, you cannot
change the setting of Monitored Printers from the EPSON Status
Monitor 3 of other printers.
8. Follow the on-screen instructions.
Uninstall only the EPSON Status Monitor 3
1. Quit all applications.
2. Click Start, p oint to Settings, then click Control Panel.
3. Double-click the Add/Remove Programs icon.
54
Using the Printer Driver with Windows
Page 65

4. Select
EPSON Printer Software
,thenclick
Add/Remove
.
3
3
3
1
2
Note:
When using Windows XP or 2000, click Change or Remove
Programs, select EPSON Printer Software,thenclick
Change/Remove.
5. To not uninstall the printer driver, click the white space to
select no icon in the Printer Model menu.
3
3
3
3
3
3
3
3
Using the Printer Driver with Windows
3
55
Page 66

6. Click the Utilitytab, select the EPSON Status Monitor 3check
box, then click OK.
Note:
Select the EPSON Status Monitor 3 check box on only when
uninstalling the EPSON Status Monitor 3.
7. If you uninstall the Monitored Printers, select the EPSON
Status Monitor 3: Monitored Printers check box and click OK.
Note:
You can uninstall only the Monitored Printers utility of EPSON
Status Monitor 3. When the utility is uninstalled, you cannot
change the setting of Monitored Printers from the EPSON Status
Monitor 3 of other printers.
8. Follow the on-screen instructions.
56
Using the Printer Driver with Windows
Page 67

Chapter 4
Setting Up Your Printer on a Network
About the Shared Printer
This section describes how to share the printer on a standard
Windows network.
The computers on a network can share the printer that is directly
connectedto one ofthem.The computer thatisdirectly connected
to the printer is the printer server, and the other computers are
the clients which need permission to share the printer with the
printer server. The clients share the printer via the printer server.
According to the versions of Windows OS and your access right
on a network, perform the appropriate settings of the printer
server and clients.
Setting the printer server
❏
For Windows Me, 98, or 95, see “Setting Up Your Printer as a
Shared Printer” on page 58
4
4
4
4
4
4
4
4
❏
For Windows XP, 2000, or NT 4.0, see “Using an Additional
Driver” on page 60
Setting the clients
❏
For Windows Me, 98, or 95, see “With Windows Me, 98, or
95” on page 67
❏
For Windows XP or 2000, see “With Windows XP or 2000”on
page 68
❏
For Windows NT 4.0, see “With Windows N T 4.0” on page 72
Setting Up Your Printer on a Network
4
4
4
4
57
Page 68

Note:
❏ When sharing the printer, be sure to set EPSON Status Monitor 3
so that the shared printer can be monitored on the printer server.
See “Setting Monitoring Preferences” on page 47.
❏ The printer server and clients should be set on the same network
system, and they should be under the same network management
beforehand.
❏ The on-screen displays on the followingpages maydiffer depending
on the version of Windows OS.
Setting Up Your Printer as a Shared Printer
When the printer server’s OS is Windows Me, 98, or 95, follow
these steps to set the printer server:
1. Click Start, p oint to Settings, and click Control Panel.
2. Double-click the Network icon.
3. Click File and Print Sharing on the Configuration menu.
4. Select the I want to be able to allow others to print to my
printer(s). check box, then click OK.
5. Click OK to accept the settings.
Note:
❏ When “Insert the Disk” appears, insert the Windows Me, 98,
or 95 CD-ROM in the computer. Click OK and then follow the
on-screen instructions.
❏ When the prompt to restart the computer appears, restart the
computer and continue the setting. See “For users restarting
the computer” on page 59.
58
Setting Up Your Printer on a Network
Page 69

For users restarting the computer
1. Double-click the
2. Right-click the
Sharing
3. Select
clickOK. Type Comment and Password if needed.
Note:
❏
❏
in the menu that appears.
Shared As
Do not use spaces or hyphens for the share name, or an error
may occur.
When sharing the printer, be sure to set EPSON Status
Monitor 3 so that the shared printer can be monitored on the
printer server. See “Setting Monitoring Preferences” on page
47.
Printers
EPSON EPL-6100 Advanced
, type the name in the Share Name box, and
icon on the control panel.
4
icon, and click
4
4
4
4
4
4
4
4
You need to set the client computers so that they can use the
printer on a network. See the following pages for details:
❏
“With Windows Me, 98, or 95” on page 67
❏
“With Windows XP or 2000” on page 68
❏
“With Windows NT 4.0” on page 72
Setting Up Your Printer on a Network
4
4
4
59
Page 70

Using an Additional Driver
Whenthe printer server’s OS isWindows XP, 2000,or NT 4.0,you
can install the additional drivers in the server. The additional
driversare thedrivers for theclient computers thathave different
OS from the server.
Follow these steps to set a Windows XP, 2000, or NT 4.0 as a
printer server, and install the additional drivers:
Note:
You must access Windows XP, 2000, or NT 4.0 as the Administrators
of the local machine.
1. For the Windows 2000 or NT 4.0 printer server, click Start,
point to Settings, and click Printers.
For the Windows XP printer server, click Start, point to
Printers and Faxes. For Windows XP Home edition users,
point to Control panel first, then click Printers and Faxes.
2. Right-click the EPSON EPL-6100 Advanced icon, and click
Sharing in the menu that appears.
60
For the Windows XP, if the following menu appears, click If
you understand the security risks but want to share printers
without running the wizard, click here.
Setting Up Your Printer on a Network
Page 71

3. For the Windows 2000 or NT 4.0 printer server,select
(forWindows 2000),or
type the name in the Share Name box.
Sharedas
(forWindows NT 4.0),then
Shared
4
4
4
4
For the Windows XP printer server, select Share this printer,
then type the name in the Share name box.
Note:
Do not use spaces or hyphens for the share name, or an error may
occur.
4
4
4
4
4
4
4
4
Setting Up Your Printer on a Network
61
Page 72

4. Select the additional drivers.
Note:
When the computers of the server and clients use the same OS, you
donothaveto install the additionaldrivers.Justclick OKafter step3.
On the Windows NT 4.0 printer server
Select Windows being used for clients. For example, select
Windows 95 to install the additional driver for the Windows
Me, 98, or 95 clients. Then click OK.
1
62
2
Note:
❏ You do not have to select Windows NT 4.0x86, because that
driver has been already installed.
❏ Do not select additional drivers other than Windows 95.The
other additional drivers are not available.
Setting Up Your Printer on a Network
Page 73

On the Windows XP or 2000 printer server
Additional Drivers
Click
Select Windows being used for clients then clickOK.
Forthe Windows Me,98,or
95 clients
For the Windows NT 4.0
clients
For the Windows XP or
2000 clients
.
Intel Windows 95 or
Select
98 (and Me)
IntelWindowsNT4.0
Select
or 2000
IntelWindows 2000 (orXP)
may been already selected.
4
4
4
4
4
4
4
4
Setting Up Your Printer on a Network
4
4
4
4
63
Page 74

Note:
❏ You do not have to install the additional driver for Intel
Windows2000 (orXP) only, because that driveris preinstalled.
❏ Do not select additional drivers other than Intel Windows 95
or 98 (and Me) and Intel Windows NT 4.0 or 2000. The other
additional drivers are not available.
5. When a prompt appears, insert the CD-ROM that comes with
yourprinterinyourCD-ROMdrive,thenclickOK.
64
Setting Up Your Printer on a Network
Page 75

6. According to the message, type the appropriate drive and
folder names in which the printer driver for clients is located,
then clickOK.
Depending on the client’s OS, the displayed message may
differ.
The folder name differs depending on the OS being used.
4
4
4
4
4
Client'sOS FolderName
Windows Me, 98, or 95 \<Language>\WIN9X
Windows NT 4.0 \<Language>\WINNT40
When installing drivers in Windows XP or 2000, “Digital
Signatureis not found.”may appear. Click
2000) or
installing.
7. When installing in Windows XP or 2000, click
installing in Windows NT 4.0, the property window closes
automatically.
Note:
Confirm the following items when sharing the printer.
❏
Continue Anyway
Be sure to set EPSON Status Monitor 3 so that the shared
printer can be monitored on the printer server. See “Setting
Monitoring Preferences” on page 47.
(for Windows XP) and continue
Yes
(forWindows
Close
.When
4
4
4
4
4
4
4
Setting Up Your Printer on a Network
65
Page 76

❏ Set the security for the shared printer (access right for clients).
Clientscannot use the sharedprinterwithoutright. For details,
see Windows help.
You need to set the client computers so that they can use the
printer on a Network. See the following pages for details:
❏ “With Windows Me, 98, or 95” on page 67
❏ “With Windows XP or 2000” on page 68
❏ “With Windows NT 4.0” on page 72
Setting for the Clients
This section describes how to install the printer driver by
accessing the shared printer on a network.
Note:
❏ TosharetheprinteronaWindowsnetwork,youneedtosetthe
printerserver. For details,see “Setting UpYour Printer asa Shared
Printer” on page 58 (Windows Me, 98, or 95) or “Using an
Additional Driver” on page 60 (Windows XP, 2000, or NT 4.0).
❏ Thissection describes howto access theshared printer ona standard
networksystem usingthe server(Microsoft workgroup).When you
cannot access the shared printer due to the network system, ask the
administrator of the network.
❏ This section describes how to install the printer driver by accessing
the shared printer from the Printers folder. You can also access the
shared printer from Network Neighborhood or My Network on the
Windows desktop.
❏ When you want to use EPSON Status Monitor 3 at clients, you
havetoinstallbothoftheprinter driver and EPSON Status Monitor
3 in each client from the CD-ROM.
66
Setting Up Your Printer on a Network
Page 77

With Windows Me, 98, or 95
Follow these steps to set Windows Me, 98, or 95 clients:
1. Click
2. Double-click the
3. Select
4. Click
5. Click the computer or server that is connected to the shared
Start
, point to
Network printer
Browse
Note:
You can also type “\\(the name of the computer that is locally
connected to the shared printer)\(the shared printer’s
name)” in Network path or queue name.
printer, and the name of the shared printer. Then clickOK.
, and the Browse for Printer dialog box appears.
Settings
Add Printer
, then click
Next
Printers
.
, and click
icon, then click
.
Next
.
4
4
4
4
4
4
4
4
Note:
The name of the shared printer may be changed by the computer or
server that is connected to the shared printer. To make sure of the
name of the shared printer, ask the administrator of the network.
6. Click
Next
.
Setting Up Your Printer on a Network
4
4
4
4
67
Page 78

Note:
❏ When the printer driver is installed in the client beforehand,
you need to select the new printer driver or the current printer
driver. When the prompt to select the printer driver appears,
select the printer driver according to the message.
❏ When the printer server’s OS is Windows Me, 98, or 95 or the
additional driver for Windows Me, 98, or 95 is installed in the
Windows XP, 2000, or NT 4.0 printer server, go to the next
step.
❏ When the additional driver for Windows Me, 98, or 95 is not
installed in the Windows XP, 2000, or NT 4.0 printer server,
go to “Installing the Printer Driver from the CD-ROM” on
page 74.
7. Make sure of the name of the shared printer, and select
whether to use the printer as the default printer or not. Click
OK, and then follow the on-screen instructions.
Note:
You can change theshared printer’s name so thatit appears only on
the client computer.
With Windows XP or 2000
Follow these steps to set Windows XP or 2000 clients:
You can install the printer driver of the shared printer, when you
have the Power Users or more powerful access right even if you
do not have the Administrator.
When the printer server’s OS is Windows NT 4.0, confirm the
following items:
68
Setting Up Your Printer on a Network
Page 79

❏
In Windows NT 4.0 printer server, the additional driver for
WindowsXPor2000clientsisthe“Windows NT 4.0 x86”
driver which is installed beforehand as the printer driver for
Windows NT 4.0. When installing the printer driver in the
Windows XP or 2000 clients from Windows NT 4.0 printer
server, the driver for Windows NT 4.0 is installed.
❏
You can not install the printerdriver for Windows XP or 2000
asthe additional driverinthe W indows NT4.0 printer server.
To install the printer driver for Windows XP or 2000 in the
Windows XP or 2000 clients, the administrator installs the
local printer driver in the clients from the CD-ROM which
comes with the printer, then performs the following
procedure.
4
4
4
4
Start
AddPrinter
.
Start
,pointto
1. For the Windows 2000 clients, click
and click
For the Windows XP clients, click
Faxes
panel
2. ForWindow2000,double-clickthe
Next
For Windows XP, click the
menu.
3. Select
printer, or a printer attached to another computer
Windows XP), then click
Printers
.For WindowsXP Homeedition users,point to
first, then click
.
Network printer
.
Printers and Faxes
Add a printer
(for Windows 2000) or
Next
, point to
.
in the Printer Tasks
Settings
Printers and
Control
icon,thenclick
Anetwork
(for
,
4
4
4
4
4
4
4
4
Setting Up Your Printer on a Network
69
Page 80

4. For Windows 2000, type the name of the shared printer, then
click Next.
Note:
❏ Youcanalsotype“\\(thenameofthecomputer thatislocally
connected to the shared printer)\(the shared printer’s
name)” in Network path or queue name.
❏ You do not necessarily need to type the name of the shared
printer.
70
For Windows XP, select Browse for a printer.
Setting Up Your Printer on a Network
Page 81

5. Click the icon of the computer or server that is connected to
the shared printer, and the name of the shared printer. Then
clickOK.
Note:
❏
Thename ofthe shared printer may bechanged bythe computer
or server that is connected to the shared printer. To make sure
of the name of the shared printer, ask the administrator of the
network.
❏
When the printer driver is installed in the client beforehand,
you need to select using the new printer driver or the current
printer driver. When the prompt to select the printer driver
appears, select the printer driver according to the message.
When the local printer driver for Windows XP or 2000 is
installed beforehand, you can select the printer driver for
Windows XP or 2000 as the current printer driver instead of
the alternative driver in Windows NT 4.0 server.
❏
When the additional driver for Windows XP or 2000 (NT 4.0)
is installed inthe WindowsXP, 2000,or NT4.0 printerserver,
go to the next step.
4
4
4
4
4
4
4
4
4
4
4
❏
When the additional driver isnot installed in the Windows NT
4.0 printer server or the printer server’s OS is Windows Me,
98, or 95, go to “Installing the Printer Driver from the
CD-ROM” on page 74.
Setting Up Your Printer on a Network
4
71
Page 82

6. For Windows 2000, select whether to use the printer as the
default printer or not, then click OK.
7. Make sure of the settings, then click Finish.
With Windows NT 4.0
Follow these steps to set Windows NT 4.0 clients:
You can install the printer driver of the shared printer, when you
have the Power Users or more powerful access right even if you
do not have the Administrator.
1. Click Start, p oint to Settings, and click Printers.
2. Double-click the Add Printer icon.
3. Select Network printer server, then click Next.
72
Setting Up Your Printer on a Network
Page 83

4. Click the icon of the computer or server that is connected to
the shared printer and the name of the shared printer. Then
clickOK.
4
4
4
4
4
Note:
❏
Youcanalsotype“\\(thenameofthecomputer thatislocally
connected to the shared printer)\(the shared printer’s
name)” in Network path or queue name.
❏
Thename ofthe shared printer may bechanged bythe computer
or server that is connected to the shared printer. To make sure
of the name of the shared printer, ask the administrator of the
network.
❏
When the printer driver is installed in the client beforehand,
you need to select the new printer driver or the current printer
driver. When the prompt to select the printer driver appears,
select the printer driver according to the message.
❏
When the additional driver for Windows NT 4.0 is installed in
the Windows XP or 2000 printer server, go to the next step.
4
4
4
4
4
4
4
Setting Up Your Printer on a Network
73
Page 84

❏ Whenthe additional driverfor Windows NT4.0 isnot installed
intheWindowsXPor 2000 printer server or the printer server’s
OS is Windows Me, 98, or 95, go to “Installing the Printer
Driver from the CD-ROM” on page 74.
5. Select whether to use the printer as the default printer or not,
then click OK.
6. Click Finish.
Installing the Printer Driver from the CD-ROM
This section describes how to install the printer driver in the
clients when setting the network system as follows:
❏ The additional drivers are not installed in the Windows XP,
2000, or NT 4.0 printer server.
❏ The printer server’sOSistheWindowsMe,98,or95andthe
client’s OS is the Windows XP, 2000, or NT 4.0.
The on-screen displays on the following pages may differ
depending on the version of Windows OS.
Note:
❏ Wheninstalling in WindowsXP, 2000, orNT 4.0 clients,you must
access Windows XP, 2000, or NT 4.0 with the Administrator.
❏ When the additional drivers are installed or the computers of the
server and clients use the same OS, you do not have to install the
printer drivers from the CD-ROM.
1. Access the shared printer and a prompt may appear. Click
OK, and then follow the on-screen instructions to install the
printer driver from the CD-ROM.
74
Setting Up Your Printer on a Network
Page 85

2. Insert the CD-ROM, then type the appropriate drive and
folder names in which the printer driver for clients is located,
then clickOK.
4
4
4
When installing drivers in Windows XP or 2000, “Digital
Signatureis not found.”may appear. Click
2000) or
installing.
The folder name differs depending on the OS being used.
Client's OS Folder Name
Windows Me, 98, or 95 \<Language>\WIN9X
Windows XP or 2000 \<Language>\WIN2000
Windows NT 4.0 \<Language>\WINNT40
3. Select the name of the printer, then clickOK. Then follow the
on-screen instructions.
Continue Anyway
(for Windows XP) and continue
Yes
(forWindows
4
4
4
4
4
4
4
4
Setting Up Your Printer on a Network
4
75
Page 86

76
Setting Up Your Printer on a Network
Page 87

Chapter 5
Using the Printer Driver with Macintosh
About the Printer Driver
The printer driver lets you choose from a wide variety of settings
to get the best results from your printer. The printer driver also
includes the EPSON Status Monitor 3 which is accessed through
the Apple menu. The EPSON Status Monitor 3 lets you check the
status of your printer. See “Monitoring Your Printer (EPSON
Status Monitor 3)” on page 87 for more information.
You cannot usually make settings in the printer driver such as
resetting the toner and photoconductor counter. The Remote
Control Panel utility allows you to make such settings. To install
of the Remote Control Panel utility, see “Installing the Remote
Control Panel utility” on page 61.
Accessing the Printer Driver
5
5
5
5
5
5
5
5
To control your printer and change its settings, use the printer
driver. The printer driver allows you to easily make all the print
settings, including paper source, paper size, and orientation. To
access the driver menus, see below.
To access the printer driver from Macintosh, Choose
from the Apple menu. Then click the
Setup
.
❏
To open the Paper Setting dialogbox, select
the File menu on any application.
Using the Printer Driver with Macintosh
EPL-6100
Chooser
icon and click
PageSetup
from
77
5
5
5
5
Page 88

❏ Toopenthe Basic Settings dialogbox,selectPrintfrom theFile
menu on any application.
❏ To open the Layout dialog box, click the layout icon on the
Basic Settings dialog box.
Accessing Online Help
You can access the Online Help from the printer driver. The
Online Help provides you with detailed information and
instructions on the printer driver that controls your printer. It is
automatically installed when you install the printer driver.
Making Changes to Printer Settings
Choosing the print quality
You can change the print quality or resolution of printouts to
favor speed or detail. If you need high quality output, choose a
higher number. Please note that doing so reduces the print speed.
Thereare threelevels ofprint output,600 dpi,Class 1200 dpi, and
1200 dpi. Class 1200dpi provides high quality printingresults on
par with 1200 dpi with the Enh.MG and RITech functions (under
600 dpi).
1. Open the Basic Settings dialog box.
78
Using the Printer Driver with Macintosh
Page 89

2. Select
Automatic
printing resolution from the Resolution drop-down list.
Note:
❏
If printing is unsuccessful or a memory-related error message
appears, selecting a lower resolution may allow printing to
proceed.
on Print Quality, and select the desired
5
5
5
5
5
❏
FordetailsoftheEnh.MGorRITechfunctions,seetheOnline
Help.
Resizing printouts
The Fit to page function in the Layout dialog box allows you to
have your documents enlarged or reduced during printing
according to the specified paper size.
Note:
❏
The enlarging or reducing rate is automatically specified according
to the paper size selected in the Paper Setting dialog box.
❏
The modifying or reducing rate selected in the Paper Setting dialog
box is not available.
1. Open the Layout dialog box.
5
5
5
5
5
5
5
Using the Printer Driver with Macintosh
79
Page 90

2. Select the Fit to Page check box.
3. Select the desired paper size from the Output Paper
drop-down list. The page will be printed to fit on the paper
you have selected.
4. Click OK to accept settings.
80
Using the Printer Driver with Macintosh
Page 91

Modifying the print layout
“Layout printing” prints either two or four pages onto a single
page and to specify the printing order, automatically resizing
each page to fit the specified paper size. You can also choose to
print documents surrounded by a frame.
1. Open the Layout dialog box.
2. Select the
Settings
Print Layout
. The Print Layout Settings dialog box appears.
check box, then click
Print Layout
1
2
5
5
5
5
5
5
5
5
Using the Printer Driver with Macintosh
5
5
5
5
81
Page 92

3. Select the number of pages you want to print on one sheet of
paper.
4. Select the page order in which the pages are printed on each
sheet.
Note:
Page Order choices depend on Pages selected in Orientation.
5. Click OK to close the Print Layout Settings dialog box.
6. Select the Print theFramecheck box in the Layout dialog box
when you want to print the pages surrounded by a frame.
7. Click OK in the Layout dialog box to accept the settings.
82
Using the Printer Driver with Macintosh
Page 93

Using watermarks
Follow the steps to use a watermark on your document. In the
Layout dialog box, you can select from a list of predefined
watermarks, or you can select a bitmap (PICT) file or a text file as
your own custom watermark. The Layout dialog box also allows
you to make a variety of detailed watermark settings. For
example, you can select the size, intensity, and position of your
watermark.
1. Open the Layout dialog box.
2. Select the
Watermark Settings
check box.
5
5
5
5
5
5
5
5
3. Select a watermark from the Watermark drop-down list.
4. Select the location on the page where you want to print the
watermarkbydraggingthewatermarkimageonthepreview
window. Also, when you want to resize the watermark, drag
its handle.
5. Adjust the image intensity of the watermark with the
Intensity slider bar.
Using the Printer Driver with Macintosh
5
5
5
5
83
Page 94

6. Fora text watermark,youcan rotate it byenteringthe degrees
in the Angle box. Or, select the Rotate by mouse check box,
androtatethe text watermarkwiththe pointer onthepreview
window.
7. Click OK to accept the settings.
Making a new watermark
To make a text watermark, follow the instructions below:
1. Open the Layout dialog box.
2. Select the Watermark Settings check box.
3. Click New/Delete.
84
Using the Printer Driver with Macintosh
Page 95

4. TypethefilenameintheNamebox,andclick
1
Add Text
.
5
5
2
5. Type the watermark text in the Text box, and select the Font
and Style, and then clickOK.
6. Click
Save
.
Note:
❏
To edit the saved text watermark, select it from List, and click
Edit Text. After editing, be sure to click OK to close the dialog
box.
❏
To remove the saved text watermark, select it from List, and
click Delete. After editing, be sure to click Save to close the
dialog box.
5
5
5
5
5
5
5
5
5
7. Click
To make a bitmap watermark, follow the instructions below:
OK
on the Layout dialog box. The saved watermark is
displayed on the preview window.
Using the Printer Driver with Macintosh
5
85
Page 96

Note:
Before making a custom watermark, you should prepare a bitmap
(PICT) file.
1. Open the Layout dialog box.
2. Click New/Delete.
3. TypethefilenameintheNamebox,andclickAdd PICT.
1
86
2
Using the Printer Driver with Macintosh
Page 97

4. Select the PICT file and click
the watermark is displayed on the preview window.
Convert
. When you click
Create
,
5
1
2
5. TypethefilenameintheNamebox,andclick
Note:
Toremovethesavedwatermark, select it fromList,andclickDelete.
After removing it, be sure to click Save to close the dialog box.
6. Click
OK
on the Layout dialog box. The saved watermark is
displayed on the preview window.
Save
Monitoring Your Printer (EPSON Status Monitor 3)
About the EPSON Status Monitor 3
5
5
.
5
5
5
5
5
5
The EPSON Status Monitor 3 is a utility program that monitors
your printer and gives you information about its current status.
For example, you can find out the amount of remaining toner or
the remaining functional life of the developer cartridge through
this utility. If a print error occurs, the utility provides you with a
message describing the error. The EPSON Status Monitor 3 is
accessed from within theprinter driver. See the following section
for more information.
Using the Printer Driver with Macintosh
87
5
5
5
Page 98

Accessing the EPSON Status Monitor 3
You can access the EPSON Status Monitor 3 by selecting the
EPSON Status Monitor 3 alias in the Apple menu.
Note:
❏ TheEPSON Status Monitor3appears automatically whenan error
occurs.
❏ Theappropriate printerport must alreadybe selectedin the Chooser
so that necessary information can be received from the selected
printer driver when the EPSON Status Monitor 3 starts. If the
printer port is not correct, an error will occur.
❏ If you change the printer driver in the Chooser while the spool file
is printing in the background, output to the printer may be
disrupted.
❏ Printer and consumable productsstatus information appears in the
status window only if the Chooser is acquiring status normally.
88
Using the Printer Driver with Macintosh
Page 99

Getting printer status details
12
5
3
4
6
7
You can monitor printer status and obtain information on
consumable products using the EPSON Status Monitor 3 dialog
box.
1. Icon/Message: Shows the printer status.
5
5
5
5
5
5
5
5
2. Printer image: The image at the upper left shows the
printer status graphically.
3. Text box: The text box next to the printer image
4. Close button: Closes the dialog box.
5. Paper: Displays the paper sources, paper size and
displays the current status of the printer.
When a problem occurs, the most probable
solution is displayed.
the approximate amount of paper
remaining in each paper source.
Using the Printer Driver with Macintosh
5
5
5
5
89
Page 100

6. Toner: Indicates the amount of remaining toner.
The toner icon flashes if toner is low (10
percent or less) or out.
7. Photoconductor
Unit life:
Indicatestheremainingfunctionallifeofthe
photoconductor unit.
Setting Monitoring Preferences
To make specific monitoring settings, select the Monitor Setup
from File menu of the EPSON Status Monitor 3. The Monitoring
Preferences dialog box appears.
1
2
34
The following settings and buttons appear in the dialog box.
1. Error Notification
Selection:
Selectsthetypesoferrorsthatyouwish
to be notified about.
2. Default button: Restores default settings.
3. Cancel button: Cancels any changes.
4. OK button: Saves new changes.
90
Using the Printer Driver with Macintosh
 Loading...