

Page 1
Page 2

®
Laser Printer
All rights reserved. No part of this publication may be reproduced, stored in a retrieval
system, or transmitted in any form or by any means, mechanical, photocopying, recording,
or otherwise, without the prior written permission of SEIKO EPSON CORPORATION.
No patent liability is assumed with respect to the use of the information contained herein.
Neither is any liability assumed for damages resulting from the use of the information
contained herein.
Neither SEIKO EPSON CORPORATION nor its affiliates shall be liable to the purchaser of
this product or third parties for damages, losses, costs, or expenses incurred by purchaser or
third parties as a result of: accident, misuse, or abuse of this product or unauthorized
modifications, repairs, or alterations to this product, or (excluding the U.S.) failure to strictly
comply with SEIKO EPSON CORPORATION’s operating and maintenance instructions.
SEIKO EPSON CORPORATION shall not be liable against any damages or problems arising
from the use of any options or any consumable products other than those designated as
Original Epson Products or Epson Approved Products by SEIKO EPSON CORPORATION.
General Notice:
trademarks of their respective owners. EPSON disclaims any and all rights in those marks.
Copyright © 2000 by SEIKO EPSON CORPORATION, Nagano, Japan
Other product names used herein are for identification purposes only and may be
2
Page 3

Contents
Getting Started
About This Guide. . . . . . . . . . . . . . . . . . . . . . . . . . . . . . . . . . . . . . . .7
Warnings, Cautions, and Notes. . . . . . . . . . . . . . . . . . . . . . . . . . . .8
Safety Precautions . . . . . . . . . . . . . . . . . . . . . . . . . . . . . . . . . . . . . . .9
Power On/Off Cautions . . . . . . . . . . . . . . . . . . . . . . . . . . . . . . . . . .12
Chapter 1 Product Information
Printer Parts . . . . . . . . . . . . . . . . . . . . . . . . . . . . . . . . . . . . . . . . . . . .14
Panel lights. . . . . . . . . . . . . . . . . . . . . . . . . . . . . . . . . . . . . . . . .15
About Your Printer . . . . . . . . . . . . . . . . . . . . . . . . . . . . . . . . . . . . . .16
Features . . . . . . . . . . . . . . . . . . . . . . . . . . . . . . . . . . . . . . . . . . .16
Options and consumable products . . . . . . . . . . . . . . . . . . . .17
Chapter 2 Paper Handling
Available Media . . . . . . . . . . . . . . . . . . . . . . . . . . . . . . . . . . . . . . . . .19
Paper that should not be used. . . . . . . . . . . . . . . . . . . . . . . . .20
Paper Sources . . . . . . . . . . . . . . . . . . . . . . . . . . . . . . . . . . . . . . . . . . .21
MP tray . . . . . . . . . . . . . . . . . . . . . . . . . . . . . . . . . . . . . . . . . . . .21
500-Sheet Lower Paper Cassette Unit . . . . . . . . . . . . . . . . . .21
Loading Paper . . . . . . . . . . . . . . . . . . . . . . . . . . . . . . . . . . . . . . . . . .22
MP tray . . . . . . . . . . . . . . . . . . . . . . . . . . . . . . . . . . . . . . . . . . . .22
Manually loading paper. . . . . . . . . . . . . . . . . . . . . . . . . . . . . .26
500-Sheet Lower Paper Cassette Unit . . . . . . . . . . . . . . . . . .27
Printing on Special Media. . . . . . . . . . . . . . . . . . . . . . . . . . . . . . . . .28
Envelopes . . . . . . . . . . . . . . . . . . . . . . . . . . . . . . . . . . . . . . . . . .29
Labels . . . . . . . . . . . . . . . . . . . . . . . . . . . . . . . . . . . . . . . . . . . . .30
Transparencies. . . . . . . . . . . . . . . . . . . . . . . . . . . . . . . . . . . . . .30
Thick paper . . . . . . . . . . . . . . . . . . . . . . . . . . . . . . . . . . . . . . . .31
3
Page 4

Chapter 3 Using the Printer Driver
Using the Printer Driver with Windows . . . . . . . . . . . . . . . . . . . .33
Accessing the printer driver . . . . . . . . . . . . . . . . . . . . . . . . . .33
EPSON Status Monitor 3 Utility . . . . . . . . . . . . . . . . . . . . . . .34
Increasing the Printing Speed . . . . . . . . . . . . . . . . . . . . . . . . .43
Note for using shared printers in Windows 2000
and NT 4.0 . . . . . . . . . . . . . . . . . . . . . . . . . . . . . . . . . . . . . . .44
Choosing the printer port . . . . . . . . . . . . . . . . . . . . . . . . . . . .49
Using Printer Driver with Macintosh . . . . . . . . . . . . . . . . . . . . . . .55
Accessing the printer driver . . . . . . . . . . . . . . . . . . . . . . . . . .55
EPSON Status Monitor 3 Utility . . . . . . . . . . . . . . . . . . . . . . .55
Chapter 4 Installing and Removing Options
Printer Options. . . . . . . . . . . . . . . . . . . . . . . . . . . . . . . . . . . . . . . . . .61
500-Sheet Lower Paper Cassette Unit. . . . . . . . . . . . . . . . . . . . . . .62
Installing. . . . . . . . . . . . . . . . . . . . . . . . . . . . . . . . . . . . . . . . . . .62
Removing . . . . . . . . . . . . . . . . . . . . . . . . . . . . . . . . . . . . . . . . . .63
Face-up Tray . . . . . . . . . . . . . . . . . . . . . . . . . . . . . . . . . . . . . . . . . . . .64
Installing. . . . . . . . . . . . . . . . . . . . . . . . . . . . . . . . . . . . . . . . . . .65
Using. . . . . . . . . . . . . . . . . . . . . . . . . . . . . . . . . . . . . . . . . . . . . .66
Removing . . . . . . . . . . . . . . . . . . . . . . . . . . . . . . . . . . . . . . . . . .66
Memory Module . . . . . . . . . . . . . . . . . . . . . . . . . . . . . . . . . . . . . . . .67
Installing. . . . . . . . . . . . . . . . . . . . . . . . . . . . . . . . . . . . . . . . . . .67
Removing . . . . . . . . . . . . . . . . . . . . . . . . . . . . . . . . . . . . . . . . . .72
Chapter 5 Replacing Consumables
Replacing the Developer Cartridge. . . . . . . . . . . . . . . . . . . . . . . . .77
Replacing the Photoconductor Unit . . . . . . . . . . . . . . . . . . . . . . . .82
4
Page 5

Chapter 6 Troubleshooting
Ready and Error Lights. . . . . . . . . . . . . . . . . . . . . . . . . . . . . . . . . . .88
Problems and Solutions . . . . . . . . . . . . . . . . . . . . . . . . . . . . . . . . . .89
Preventing paper-feed and paper-jam problems . . . . . . . . .89
Clearing paper jams . . . . . . . . . . . . . . . . . . . . . . . . . . . . . . . . .90
Operational problems. . . . . . . . . . . . . . . . . . . . . . . . . . . . . . . .100
Printout problems. . . . . . . . . . . . . . . . . . . . . . . . . . . . . . . . . . .101
Print quality problems . . . . . . . . . . . . . . . . . . . . . . . . . . . . . . .102
Memory problems. . . . . . . . . . . . . . . . . . . . . . . . . . . . . . . . . . .107
Option problems . . . . . . . . . . . . . . . . . . . . . . . . . . . . . . . . . . . .108
Printer driver and utility problems . . . . . . . . . . . . . . . . . . . .109
Communication errors . . . . . . . . . . . . . . . . . . . . . . . . . . . . . . .110
Chapter 7 Cleaning and Transporting the Printer
Cleaning the Printer. . . . . . . . . . . . . . . . . . . . . . . . . . . . . . . . . . . . . .113
Cleaning the inside of the printer. . . . . . . . . . . . . . . . . . . . . .113
Removing spilled toner . . . . . . . . . . . . . . . . . . . . . . . . . . . . . .115
Cleaning the printer case . . . . . . . . . . . . . . . . . . . . . . . . . . . . .116
Transporting the Printer . . . . . . . . . . . . . . . . . . . . . . . . . . . . . . . . . .117
Appendix A Technical Specifications
Paper . . . . . . . . . . . . . . . . . . . . . . . . . . . . . . . . . . . . . . . . . . . . . . . . . .119
Specifications . . . . . . . . . . . . . . . . . . . . . . . . . . . . . . . . . . . . . . .119
Printer . . . . . . . . . . . . . . . . . . . . . . . . . . . . . . . . . . . . . . . . . . . . . . . . .121
General . . . . . . . . . . . . . . . . . . . . . . . . . . . . . . . . . . . . . . . . . . . .121
Environmental. . . . . . . . . . . . . . . . . . . . . . . . . . . . . . . . . . . . . .122
Safety approvals . . . . . . . . . . . . . . . . . . . . . . . . . . . . . . . . . . . .122
Mechanical . . . . . . . . . . . . . . . . . . . . . . . . . . . . . . . . . . . . . . . . .123
Electrical . . . . . . . . . . . . . . . . . . . . . . . . . . . . . . . . . . . . . . . . . . .123
Interface. . . . . . . . . . . . . . . . . . . . . . . . . . . . . . . . . . . . . . . . . . . . . . . .124
Parallel interface . . . . . . . . . . . . . . . . . . . . . . . . . . . . . . . . . . . .124
USB interface . . . . . . . . . . . . . . . . . . . . . . . . . . . . . . . . . . . . . . .124
5
Page 6

Options and Consumables . . . . . . . . . . . . . . . . . . . . . . . . . . . . . . . .125
500-Sheet Lower Paper Cassette Unit (C81336✽). . . . . . . . .125
Face-up Tray (C813372) . . . . . . . . . . . . . . . . . . . . . . . . . . . . . .126
Developer cartridge (S050010) . . . . . . . . . . . . . . . . . . . . . . . .126
Photoconductor unit (S051055). . . . . . . . . . . . . . . . . . . . . . . .127
Appendix B Working with Fonts
EPSON BarCode Fonts . . . . . . . . . . . . . . . . . . . . . . . . . . . . . . . . . . .129
System requirements . . . . . . . . . . . . . . . . . . . . . . . . . . . . . . . .130
Installing EPSON BarCode fonts . . . . . . . . . . . . . . . . . . . . . .131
Printing with EPSON BarCode fonts. . . . . . . . . . . . . . . . . . .133
BarCode Font specifications . . . . . . . . . . . . . . . . . . . . . . . . . .136
Appendix C Contacting Customer Support
For Users in the United Kingdom and the Republic
of Ireland. . . . . . . . . . . . . . . . . . . . . . . . . . . . . . . . . . . . . . . . . . . . .150
For Users in Australia . . . . . . . . . . . . . . . . . . . . . . . . . . . . . . . . . . . .151
For Users in Singapore . . . . . . . . . . . . . . . . . . . . . . . . . . . . . . . . . . .153
For Users in Hong Kong . . . . . . . . . . . . . . . . . . . . . . . . . . . . . . . . . .154
For Users in Malaysia . . . . . . . . . . . . . . . . . . . . . . . . . . . . . . . . . . . .155
For users in India . . . . . . . . . . . . . . . . . . . . . . . . . . . . . . . . . . . . . . . .155
For Users in the Philippines . . . . . . . . . . . . . . . . . . . . . . . . . . . . . . .156
Glossary
Index
6
Page 7

Getting Started
Your EPSON EPL-5800L Advanced printer combines high
performance and reliability with a wide range of features.
To get started with your printer, please:
Read the safety information, laser printer precautions, and
❏
important safety instructions in the
Setup Guide
.
Use your
❏
See this
printer.
Setup Guide
Reference Guide
to set up and test your new printer.
for detailed information about your
About This Guide
This guide contains information about using your printer. For
information about installing and setting up the printer, see the
Setup Guide
Chapter 1, “Product Information,” introduces the printer’s parts
and features, and options. It explains how to operate the printer.
It also contains information on how to optimize print quality.
Chapter 2, “Paper Handling,” tells you what special paper and
media is available for your printer, plus how to load and print on
it.
Chapter 3, “Using the Printer Driver,” gives you the information
about the print quality settings and information about the
software that comes with the printer.
.
Chapter 4, “Installing and Removing Options,” gives step-by-step
instructions for installing and removing printer options.
Getting Started
7
Page 8

Chapter 5, “Replacing Consumables,” explains how to replace
consumable products
Chapter 6, “Troubleshooting,” tells you what to do if you
encounter problems.
Chapter 7, “Cleaning and Transporting the Printer,” provides
instructions on how to clean and transport your printer.
Appendix A, “Technical Specifications,” contains the technical
specifications for the printer.
Appendix B, “Working with Fonts,” describes the steps you need
to follow to add EPSON BarCode fonts. It also lists and shows
samples of the available fonts.
Appendix C, “Contacting Customer Support,” contains customer
support information.
Warnings, Cautions, and Notes
Warnings
must be followed carefully to avoid bodily injury.
w
Cautions
must be observed to avoid damage to your equipment.
c
Notes
operation of your printer.
contain important information and useful tips about the
Getting Started
8
Page 9
Safety Precautions
Be sure to follow these precautions carefully to ensure safe,
efficient operation:
Be careful not to touch the fuser, which is marked
❏
Hot Surface Avoid Contact,
or the surrounding areas. If the
CAUTION
printer has been in use, the fuser and the surrounding areas
may be very hot.
CAUTION Hot Surface
Avoid Contact
Avoid touching the components inside the printer unless
❏
instructed to do so in this guide.
Never force printer components into place. Although the
❏
printer is designed to be sturdy, rough handling can damage
it.
Getting Started
9
Page 10

When removing the developer cartridge, never touch the
❏
developing roller under the flap; otherwise, print quality will
decline.
Do not turn the cartridge upside down or stand it on its ends.
❏
When handling the cartridge, always place it on a clean,
❏
smooth surface.
Do not attempt to modify the cartridge or take it apart. It
❏
cannot be refilled.
Avoid touching the toner or getting it in your eyes.
❏
Getting Started
10
Page 11
When removing or installing a photoconductor unit, protect
❏
the light-sensitive drum from exposure to light any longer
than necessary. The light-sensitive drum is the green cylinder
visible through the openings in the unit. Overexposing the
drum might cause abnormally dark or light areas to appear
on the printed page and may shorten the service life of the
unit.
Be careful not to scratch the surface of the drum. When you
❏
remove the photoconductor unit from the printer, always
place the unit on a clean, smooth surface. Avoid touching the
drum, since oils from your skin can permanently damage its
surface and affect print quality.
To get the best print quality, do not store the photoconductor
❏
unit in an area subject to direct sunlight, dust, salt air, or
corrosive gases (such as ammonia). Avoid locations subject to
extreme or rapid changes in temperature or humidity.
Wait for at least one hour before using a developer cartridge
❏
or a photoconductor unit after moving it from a cool to a warm
environment to prevent damage from condensation.
Warning:
w
Do not dispose of used developer cartridges or
photoconductor units in fire, as they can explode and cause
injury. Dispose of them according to local regulations.
Getting Started
11
Page 12

Be sure to keep the consumable components out of the reach
❏
of children.
Do not leave jammed paper in the printer. It can cause the
❏
printer to overheat.
Avoid using outlets that other appliances are plugged into.
❏
Use only an outlet that meets the power requirements of this
❏
printer.
Power On/Off Cautions
Caution:
c
Do not turn off the printer:
❏
For at least 22 seconds after turning on the printer. Wait
until the
Ready
(green) light comes on and is not flashing.
❏
While the
❏
While printing.
Ready
(green) light is flashing.
Getting Started
12
Page 13

Chapter 1
Product Information
Printer Parts . . . . . . . . . . . . . . . . . . . . . . . . . . . . . . . . . . . . . . . . . . . .14
Panel lights. . . . . . . . . . . . . . . . . . . . . . . . . . . . . . . . . . . . . . . . .15
About Your Printer . . . . . . . . . . . . . . . . . . . . . . . . . . . . . . . . . . . . . .16
Features . . . . . . . . . . . . . . . . . . . . . . . . . . . . . . . . . . . . . . . . . . .16
Options and consumable products . . . . . . . . . . . . . . . . . . . .17
Chapter 1 Product Information
13
Page 14
Printer Parts
Printer cover
ready light (green)
Latch
Power switch
error light (red)
Manual feed slot
MP (Multi Purpose) tray
Face-down tray
Paper path selector
Parallel interface
connector
AC inlet
USB interface
connector
Chapter 1 Product Information
14
Page 15
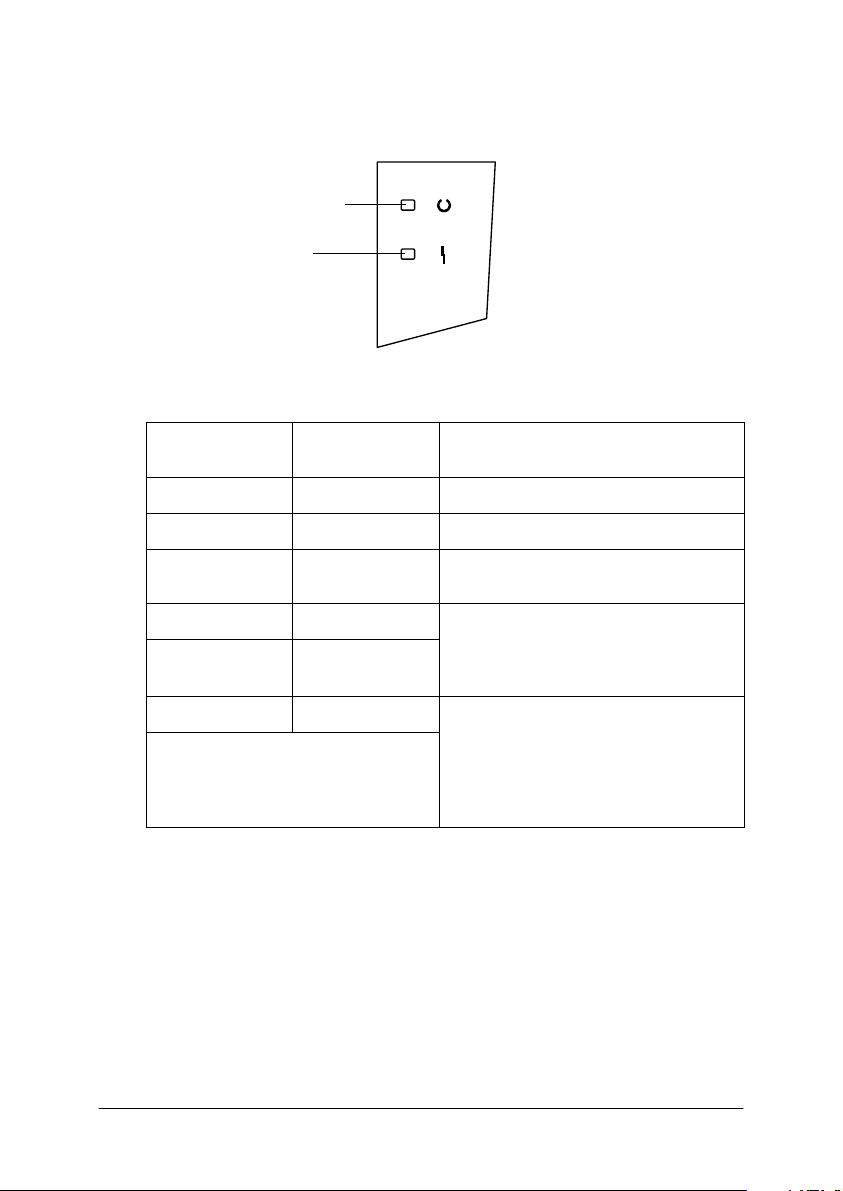
Panel lights
ready light (green)
error light (red)
Ready Light
(green)
Off Off Printer is off.
On Off Printer is ready to print.
Flashing Off Printer is warming up or receiving
Off Flashing The printer is out of paper or has an
Flashing On
Off On An error has occurred. Try turning
Flashing alternately.
Error Light
(red)
Printer Status
data.
error that can be easily cleared.
See “Problems and Solutions” on
page 89.
off the printer, waiting a few
minutes and then turning it back
on. If this does not clear the error,
contact your dealer or a qualified
service person.
Chapter 1 Product Information
15
Page 16

About Your Printer
Your printer is the latest in EPSON’s advanced line of laser
printers.
The printer’s 600/300-dpi (dots per inch) resolution is enhanced
by EPSON’s Resolution Improvement Technology (RITech) and
Enhanced MicroGray technology. RITech works by smoothing
out the jagged edges of diagonal and curved lines in both text and
graphics, while Enhanced MicroGray improves the halftone
quality of graphics.
The printer is easy to install and use. You simply set up the printer,
connect it to your computer, and install the printer driver as
described in the
The printer supports ECP mode in Microsoft
95, 2000, and NT
transfer and bi-directional communication with your computer.
Setup Guide
®
4.0. ECP mode supports high-speed data
Features
The printer comes with a full set of features that enhance ease of
use and provide consistent, high-quality output. The main
features are described below.
.
®
Windows® Me, 98,
High-quality printing
Your printer provides 600-dpi/300-dpi printing at a speed of up
to 10 pages per minute. You’ll appreciate the professional print
quality produced by your printer and its quick processing speed.
Toner Save mode
To reduce the amount of toner used in printing documents, you
can print drafts using the Toner Save mode.
Chapter 1 Product Information
16
Page 17

Options and consumable products
Options and consumable products are sold separately, and can be
installed easily. To purchase options or consumable products,
contact your dealer or the customer support representative in
your area. The last digit of the product number, represented by
an asterisk (✽), varies by country. Be sure to mention the product
number when placing your order.
Memory
The printer comes with 2 MB of memory, which can be expanded
up to a total of 13 MB.
500-Sheet Lower Paper Cassette Unit (C81336✽)
This unit installs onto the bottom of the printer. It automatically
feeds up to 500 sheets of paper without reloading, and serves as
a second paper source to your printer. Depending on the country
of purchase, the unit takes either A4 or Letter-size paper.
Face-up Tray (C813372)
The Face-up Tray is recommended for printing on media that
require a straight-through paper path, such as labels and
transparencies.
Developer Cartridge
This cartridge includes the toner that creates the image on paper.
The printer comes with this cartridge already installed. The
service life of the cartridge is approximately 6,000 printed pages.
Photoconductor Unit
The photoconductor unit contains a light-sensitive drum that
permanently fixes the toner onto paper. The printer comes with
this unit already installed. This unit requires replacement after
approximately 20,000 pages of printing.
Chapter 1 Product Information
17
Page 18

Chapter 2
Paper Handling
Available Media . . . . . . . . . . . . . . . . . . . . . . . . . . . . . . . . . . . . . . . . .19
Paper that should not be used. . . . . . . . . . . . . . . . . . . . . . . . .20
Paper Sources . . . . . . . . . . . . . . . . . . . . . . . . . . . . . . . . . . . . . . . . . . .21
MP tray . . . . . . . . . . . . . . . . . . . . . . . . . . . . . . . . . . . . . . . . . . . .21
500-Sheet Lower Paper Cassette Unit . . . . . . . . . . . . . . . . . .21
Loading Paper . . . . . . . . . . . . . . . . . . . . . . . . . . . . . . . . . . . . . . . . . .22
MP tray . . . . . . . . . . . . . . . . . . . . . . . . . . . . . . . . . . . . . . . . . . . .22
Manually loading paper. . . . . . . . . . . . . . . . . . . . . . . . . . . . . .26
500-Sheet Lower Paper Cassette Unit . . . . . . . . . . . . . . . . . .27
Printing on Special Media. . . . . . . . . . . . . . . . . . . . . . . . . . . . . . . . .28
Envelopes . . . . . . . . . . . . . . . . . . . . . . . . . . . . . . . . . . . . . . . . . .29
Labels . . . . . . . . . . . . . . . . . . . . . . . . . . . . . . . . . . . . . . . . . . . . .30
Transparencies. . . . . . . . . . . . . . . . . . . . . . . . . . . . . . . . . . . . . .30
Thick paper . . . . . . . . . . . . . . . . . . . . . . . . . . . . . . . . . . . . . . . .31
Chapter 2 Paper Handling
18
Page 19
Available Media
This section explains what kinds of paper and media you can use
with your printer. Do not use paper or media not mentioned in
this section.
Note:
The printer is extremely sensitive to moisture. Be sure to store your paper
in a dry environment.
Paper Type Description
Plain paper Recycled paper is acceptable*
Weight: 60 to 90 g/m² (16 to 24 lb)
Envelopes No paste and no tape
No plastic window (unless specifically designed
for laser printers)
Labels The backing sheet should be covered
Thick paper Weight: 90 to 163 g/m² (24 to 43.4 lb)
Colored paper Non-coated
Letterhead Paper with preprinted letterhead, provided
* Use recycled paper only under normal temperature and humidity
conditions. Poor quality paper may reduce print quality, cause paper jams
and other problems.
** Gaps between labels may cause the labels to peel off inside the printer and
damage the printer.
completely, with no gaps between labels**
that the paper and ink are both compatible
with laser printers. Paper which printed with
laser printer, ink Jet printer, or other printers
cannot be used.
Note:
Since the quality of any particular brand or type of media may be changed
by the manufacturer at any time, EPSON cannot guarantee the quality
of any type of media. Always test samples of media stock before
purchasing large quantities or printing large jobs.
Chapter 2 Paper Handling
19
Page 20

Paper that should not be used
You cannot use the following paper in this printer. They may
cause printer damage, paper jams, and poor print quality.
Media meant for other color laser printers, black-and-white
❏
laser printers, color copiers, black-and-white copiers, or ink
jet printers
Previously printed paper from any other color laser printer,
❏
black-and-white laser printer, color copier, black-and-white
copier, ink jet printer, or thermal transfer printer
Carbon paper, no-carbon paper, thermal-sensitive paper,
❏
pressure-sensitive paper, acid paper, or paper that uses hightemperature-sensitive ink (around 190° C)
Labels that peel easily or labels that do not cover the backing
❏
sheet completely
Coated paper or special surface-colored paper
❏
Paper that has binder holes or is perforated
❏
Paper that has glue, staples, paper clips, or tape on it
❏
Paper that attracts static electricity
❏
Moist or damp paper
❏
Paper of uneven thickness
❏
Overly thick or thin paper
❏
Paper that is too smooth or too rough
❏
Paper that is different on the front and back
❏
Paper that is folded, curled, wavy, or torn
❏
Paper of irregular shape, or paper that does not have right
❏
angle corners
Chapter 2 Paper Handling
20
Page 21
Paper Sources
This section describes the combinations of paper sources and
paper types that you can use.
MP tray
Paper Type Capacity Paper Size
Plain paper Up to 150 sheets of
Letterhead
Labels Up to 10 sheets
Thick paper
Transparencies
Envelopes Up to 10 sheets
75 g/m² paper
(Weight: 60 to 90 g/m²)
(Weight: 90 to 163 g/m²)
(Weight: 60 to 90 g/m²)
A4, A5, B5, Letter (LT),
Legal (LGL), F4,
Half-Letter (HLT),
Executive (EXE),
Government Letter (GLT),
Government Legal (GLG),
Custom-size paper:
76.2 × 127 mm minimum
215.9 × 355.6 mm maximum
Monarch (MON),
Commercial 10 (C10), DL,
C6, C5, International B5
500-Sheet Lower Paper Cassette Unit
Paper Type Capacity Paper Size
Plain paper Up to 500 sheets A4 or Letter, depending on
Letterhead
the country of purchase
Chapter 2 Paper Handling
21
Page 22
Loading Paper
The printer can feed paper from either of two sources: the MP tray
or the optional 500-Sheet Lower Paper Cassette Unit.
Please note the following points:
Paper should be of high quality and be relatively smooth, with
❏
a weight between 60 and 90 g/m² (16 to 24 lb).
The printer is extremely sensitive to moisture. Be sure to store
❏
paper in a dry environment.
Use of colored paper is acceptable, but coated paper should
❏
be avoided.
You may use paper with preprinted letterheads, provided
❏
that the paper and ink are both of laser-printer type.
MP tray
You can load up to 150 sheets of plain paper into the MP tray. To
load paper, follow these steps:
1. Lift off the tray cover.
Chapter 2 Paper Handling
22
Page 23
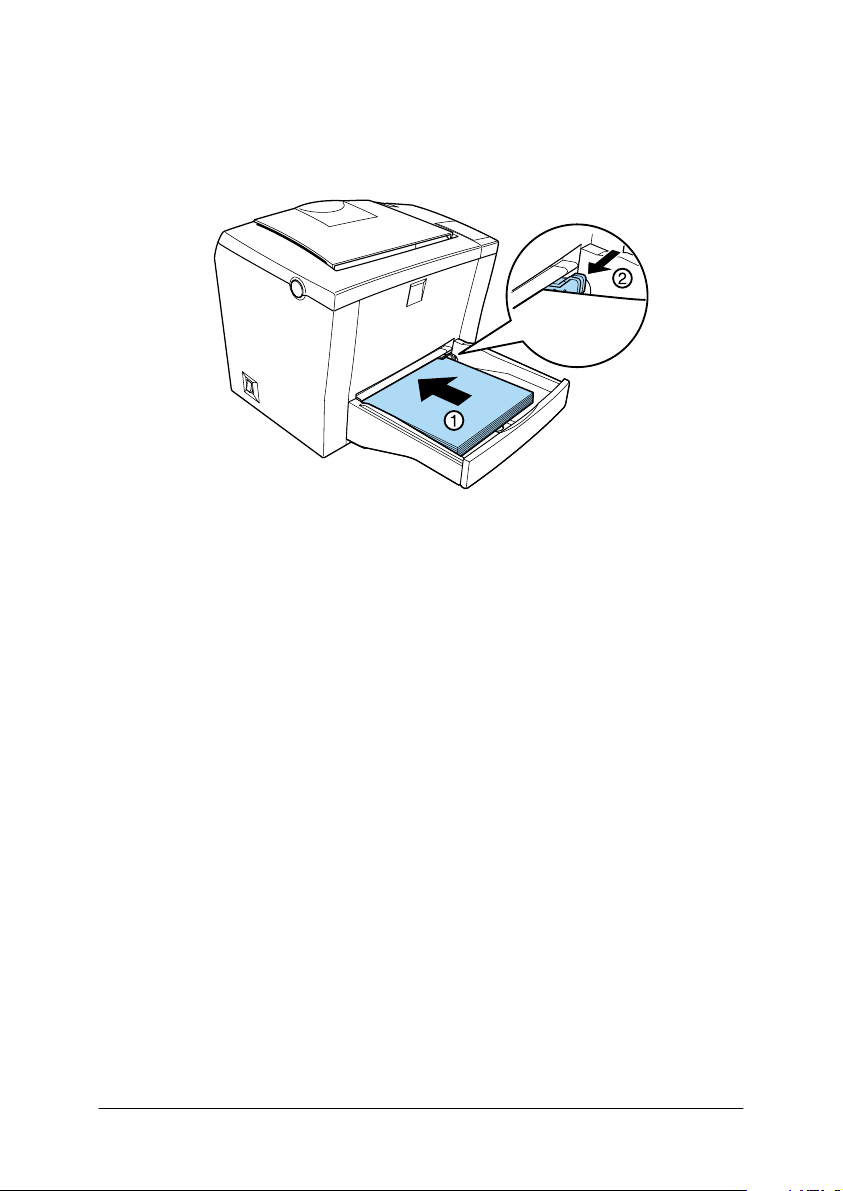
2. Fan a stack of paper and tap it on a flat surface to even the
edges. Insert the paper printable side up into the tray and
adjust the paper guides.
Note:
❏
To widen the paper guides, press on the lever of the right paper
guide while sliding it outwards.
❏
Load letterheads printable side up and with the letterhead
portion toward the printer.
Chapter 2 Paper Handling
23
Page 24
3. Place the cover back on the MP tray as the protection against
the dust and for manual-feed printing, as shown below.
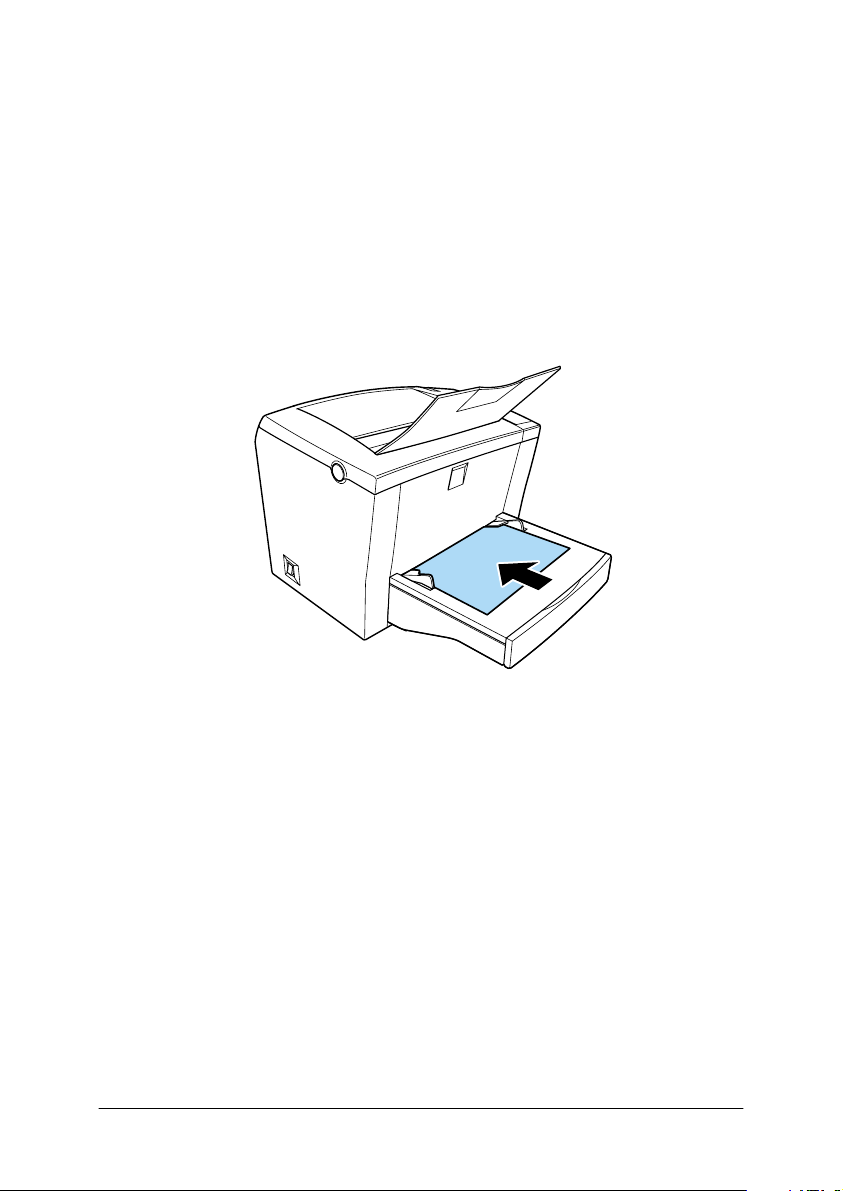
4. Raise the face-down tray and lift up the paper support on the
top to prevent paper from falling off the edge.
Chapter 2 Paper Handling
24
Page 25
If you installed the optional Face-up Tray and you want the sheets
to come out face-up, then raise the Face-up Tray instead, and set
the paper path selector down.
Note:
❏
Before printing, make sure that the Paper Size setting in your
printer driver matches the paper you load.
❏
If you want to print on paper heavier than 90g/m² (24 lb) or on
special paper (such as envelopes, labels, transparencies, or thick
paper), see “Printing on Special Media” on page 28.
Chapter 2 Paper Handling
25
Page 26
Manually loading paper
Follow these steps to load a single sheet of paper from the manual
feed slot:
1. Make sure the cover is in place on the MP tray.
2. Insert a single sheet, with the printable side up, as far as it will
go into the manual feed slot above the tray cover. Adjust the
paper guides to match the paper size you are using.
Note:
Load letterheads printable side up and with the letterhead portion
toward the printer.
3. Make sure to change the
the printer driver’s Basic Settings menu.
4. Send the print data from the computer. The printer loads the
paper from the manual feed slot.
Paper Source
Chapter 2 Paper Handling
setting to
MP Tray
in
26
Page 27
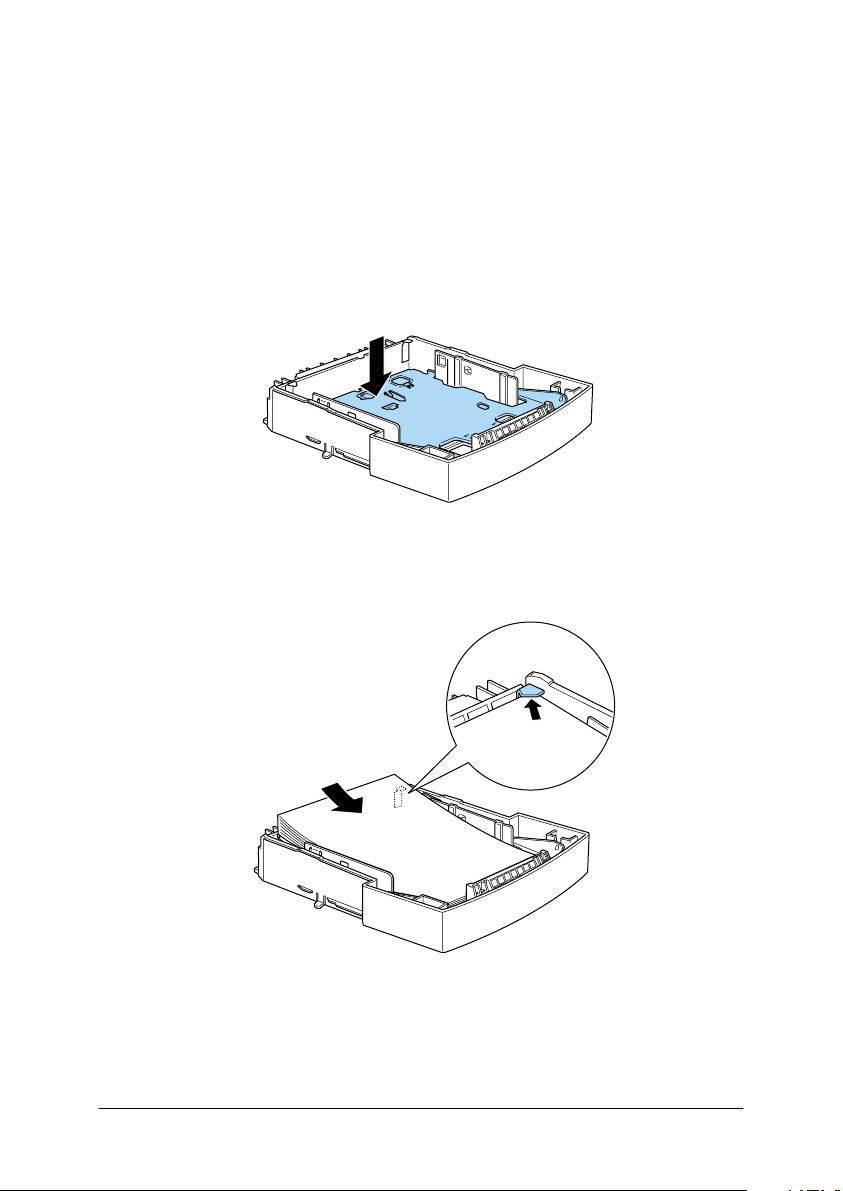
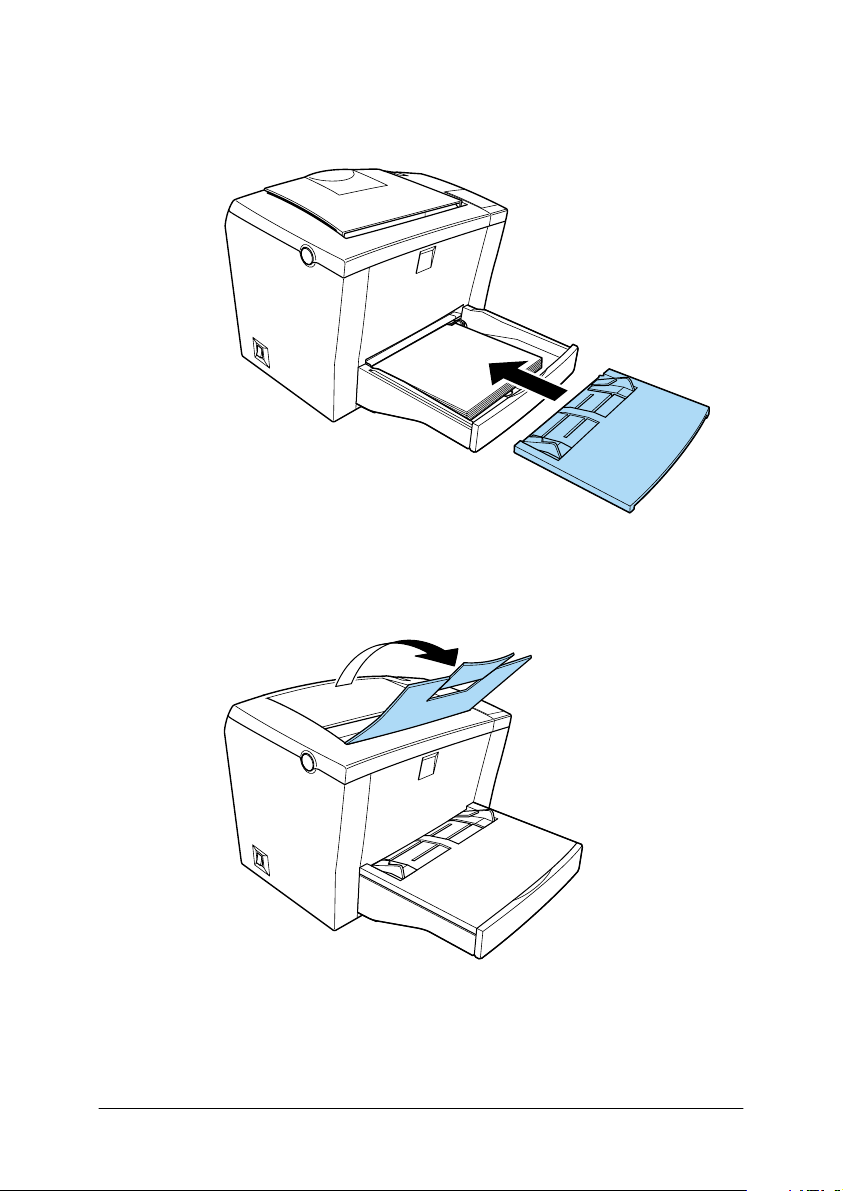
500-Sheet Lower Paper Cassette Unit
Follow the steps below to load paper into the 500-Sheet Lower
Paper Cassette Unit.
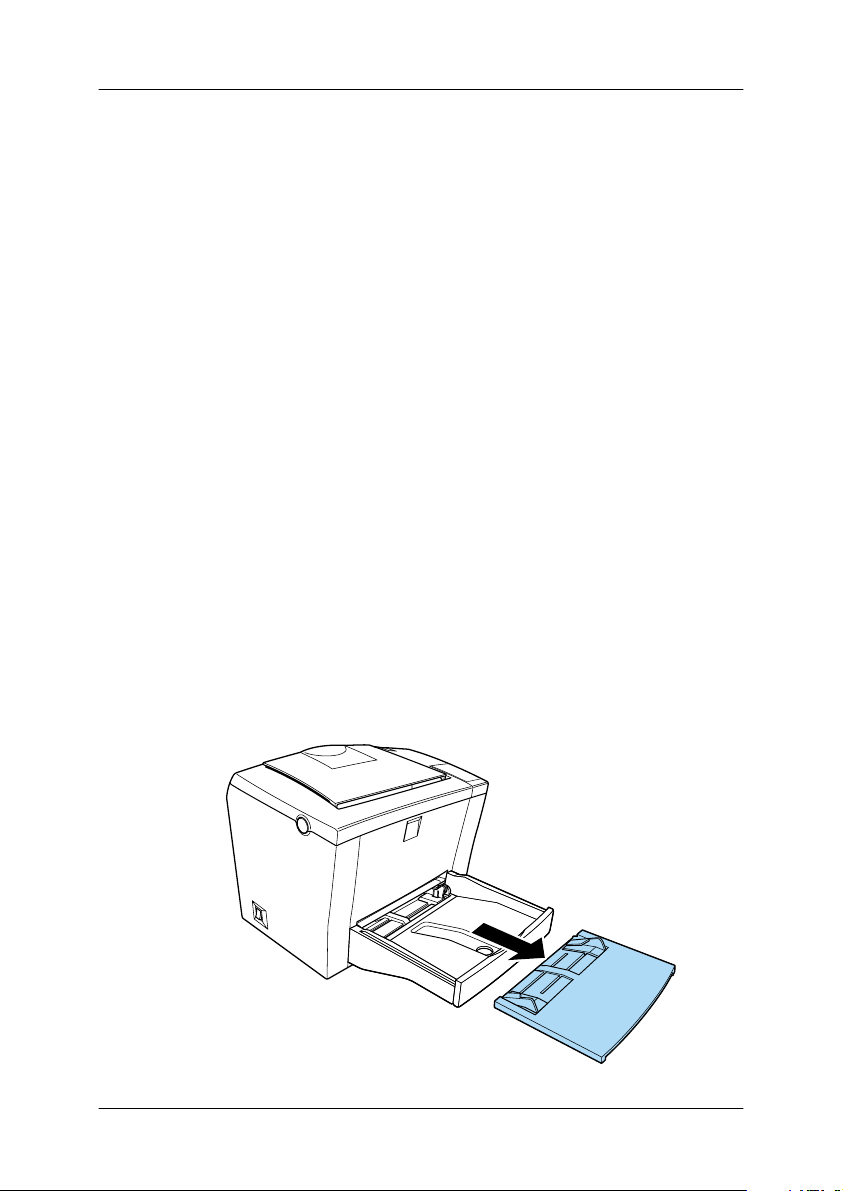
1. Pull the paper-tray out from the cassette unit.
2. Press down the plate in the paper-tray until it locks into
position.
3. Fan a stack of paper and tap it on a flat surface to even the
edges. Insert the paper printable-side up into the tray.
Note:
Load letterheads printable side up and with the letterhead portion
toward the printer.
Chapter 2 Paper Handling
27
Page 28
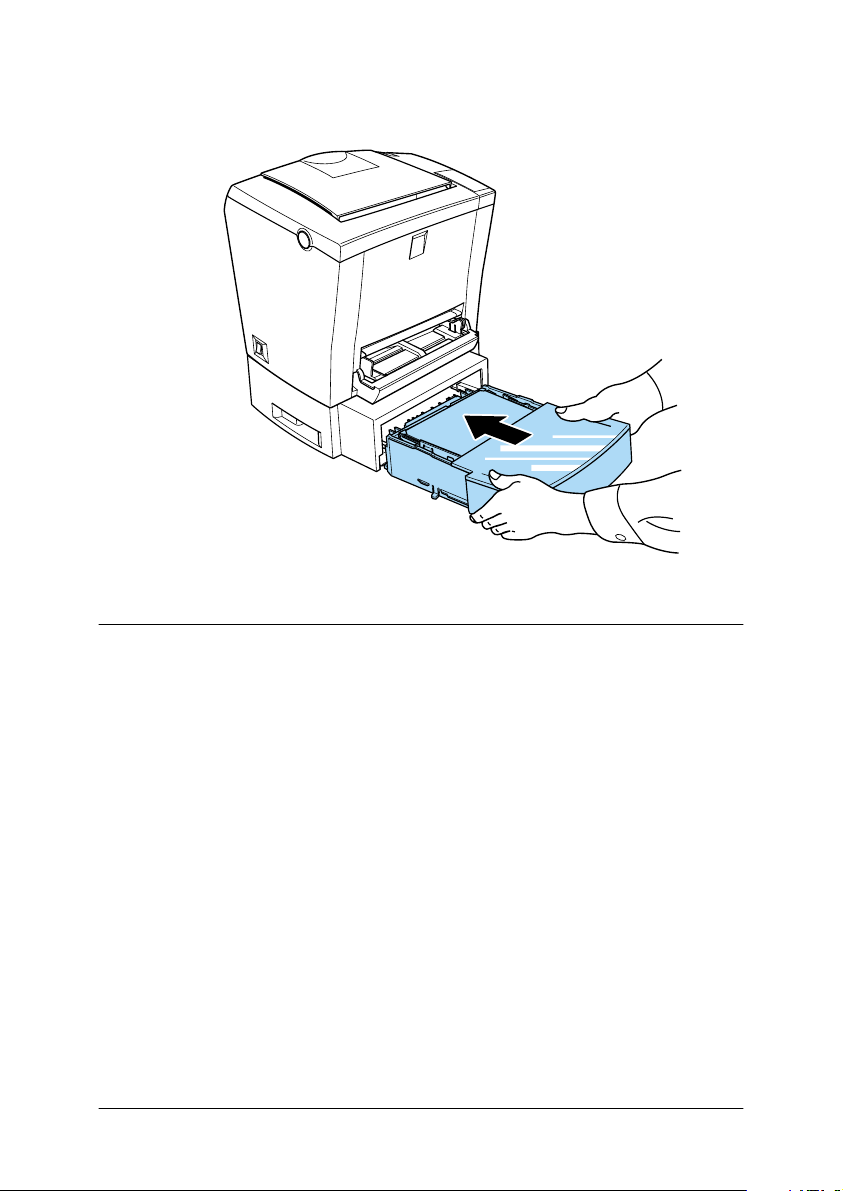
4. Insert the loaded paper-tray back into the unit.
Printing on Special Media
Note:
Since the quality of any particular brand or type of paper may be changed
by the manufacturer at any time, EPSON cannot guarantee the quality
of any type of paper. Always test samples of paper stock before purchasing
large quantities or printing large jobs.
The EPL-5800L Laser Printer can print on special paper stock such
as envelopes, labels, transparencies, and thick paper.
Chapter 2 Paper Handling
28
Page 29
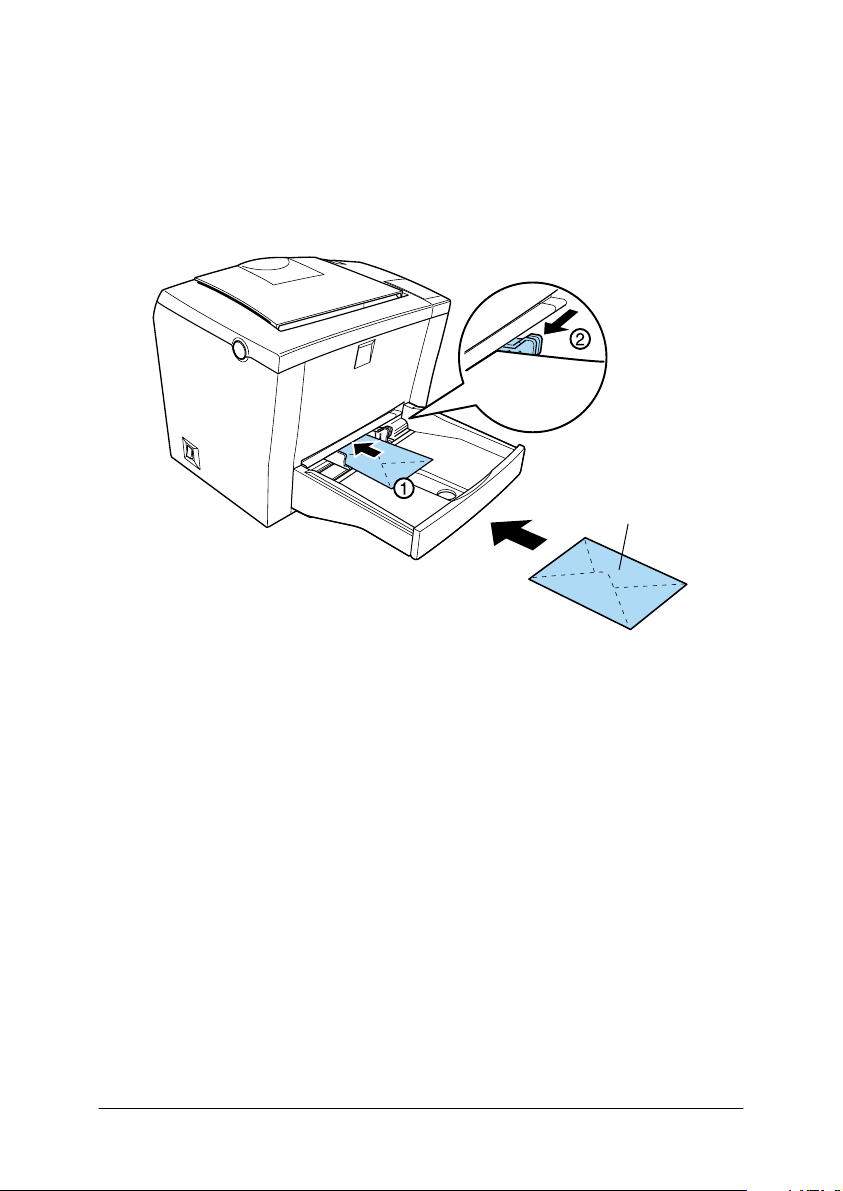
Envelopes
You can load five to ten envelopes into the MP tray, depending
on the envelope thickness (60 to 90 g/m²). Load envelopes with
the flap side down and short edge first.
printable side up
To print on envelopes, choose
Paper setting found in the Extended Settings dialog box. This
dialog box is accessed through the printer driver’s Optional
Settings tab.
The printing quality on envelopes may be irregular because
different parts of an envelope have different thicknesses. Print one
or two envelopes to check the print quality. If the printing is too
light, adjust the print density as described in “Using the Printer
Driver with Windows” on page 33.
Do not use window envelopes unless they are specially designed
for laser printers. The plastic on most window envelopes will melt
when it comes into contact with the hot fuser.
Thick Narrow
Chapter 2 Paper Handling
in the printer driver’s
29
Page 30

Labels
You can load five to ten sheets of labels into the MP tray. However,
you may need to feed some types of labels one sheet at a time.
Use only labels designed for laser printers or plain-paper copiers.
To prevent the adhesive from coming into contact with printer
parts, always use labels that completely cover the backing sheet,
with no gaps between the individual labels.
You should test the label sheet for leaking adhesive by pressing a
sheet of paper on top of a sheet of labels. If the paper sticks, do
not use the labels.
Transparencies
You can load up to five transparencies into the MP tray. However,
you may need to feed some types of transparencies one sheet at a
time.
You can only use overhead projector transparencies and adhesive
drafting film made for use with laser printers or plain-paper
copiers.
When printing on transparencies, make sure to change the
setting to
driver’s Optional Settings menu.
Transparency
in the Extended Settings on the printer
Chapter 2 Paper Handling
Paper
30
Page 31

Thick paper
You can load five to ten sheets of thick paper into the MP tray.
However, you may need to feed some types of thick paper one
sheet at a time. Use the thick paper of a weight between 90 and
163 g/m² (24 to 43 lb).
W he n p r in t in g o n t h ic k pa pe r , b e s u re to c ha ng e th e
on the Extended Settings on the printer driver’s Optional Settings
menu. Choose
188 mm wide. Choose
which is 188 mm or wider.
Thick Narrow
for thick paper which is less than
Thick Wide
when printing on thick paper
Paper
setting
Chapter 2 Paper Handling
31
Page 32

Chapter 3
Using the Printer Driver
Using the Printer Driver with Windows . . . . . . . . . . . . . . . . . . . .33
Accessing the printer driver . . . . . . . . . . . . . . . . . . . . . . . . . .33
EPSON Status Monitor 3 Utility . . . . . . . . . . . . . . . . . . . . . . .34
Increasing the Printing Speed . . . . . . . . . . . . . . . . . . . . . . . . .43
Note for using shared printers in Windows 2000
and NT 4.0 . . . . . . . . . . . . . . . . . . . . . . . . . . . . . . . . . . . . . . .44
Choosing the printer port . . . . . . . . . . . . . . . . . . . . . . . . . . . .49
Using Printer Driver with Macintosh . . . . . . . . . . . . . . . . . . . . . . .55
Accessing the printer driver . . . . . . . . . . . . . . . . . . . . . . . . . .55
EPSON Status Monitor 3 Utility . . . . . . . . . . . . . . . . . . . . . . .55
Chapter 3 Using the Printer Driver
32
Page 33

Using the Printer Driver with Windows
To control your printer and change its settings, use the printer
driver. The printer driver allows you to easily make all the print
settings, including paper source, paper size, and orientation. To
access the driver menus, see below.
Accessing the printer driver
You can access your printer driver directly from most Windowsbased applications, or from your Windows operating system, as
explained below. The printer driver settings made from many
Windows applications override settings made when the driver is
accessed from the operating system, so in most cases you should
access the driver from your application to make sure you get the
results you want.
To access the printer driver from your application software,
❏
click the
You also may need to click
combination of these buttons.
To access the printer driver from Windows Me, 98, 95, 2000
❏
or NT 4.0, click
Next, right-click the
and click
Printing Preferences
Defaults
or
Print
Properties
(in Windows NT 4.0).
Page Setup
Setup, Options, Properties
, point to
Start
EPSON EPL-5800L Advanced
(in Windows Me/98/95/2000) or
(in Windows 2000) or
command on the File menu.
Settings
, and click
Document
, or a
Printers
icon
.
Accessing Online Help
You can access Online Help from the printer driver. Online Help
provides you with detailed information and instructions on the
printer driver that controls your printer. It is automatically
installed when you install the printer driver.
Chapter 3 Using the Printer Driver
33
Page 34

EPSON Status Monitor 3 Utility
About the EPSON Status Monitor 3 utility
EPSON Status Monitor 3 is a utility program that monitors your
printer and gives you information about its current status. For
example, you can find out the amount of remaining toner or the
remaining functional life of the photoconductor unit through this
utility. If a print error occurs, the utility provides you with a
message describing the error. The Status Monitor 3 utility is
accessed from within the printer driver. See “Accessing EPSON
Status Monitor 3” on page 36 for more information.
Before using Status Monitor 3, be sure to read the printer driver’s
README file. This file contains the latest information on the
printer driver and Status Monitor 3.
Environment for the EPSON Status Monitor 3
Protocols
The protocols that must be installed to run EPSON Status
Monitor 3 vary depending on your operating system and printer
type. The following table divides printers into two categories:
local printers and Windows shared printers.
Use this table to determine what protocols you need to install
according to your operating system and printer type, then see the
corresponding section for your operating system.
Local Printer Windows Shared
Windows Me/98/2000 LPT/USB LPT/USB
Windows 95 LPT LPT
Windows NT 4.0 LPT LPT
Macintosh USB --
Chapter 3 Using the Printer Driver
Printers
34
Page 35

Local Printer
Connect the printer directly to the printer port of your computer.
(1) local printer
(2) Windows Me/98/95/2000/NT 4.0/Macintosh
(3) Parallel cable/USB cable
Windows shared printer
To monitor a shared printer from the client through the server
machine, you have to make a setting change on the printer driver
installed on the server machine. The change involves selecting the
Allow monitoring of shared printers
Preferences dialog box. You can access the Monitoring
Preferences dialog box through the Utility tab of the printer
driver’s Properties dialog box.
check box in the Monitoring
(1) client machine
(2) server machine
(3) Windows shared printer
Chapter 3 Using the Printer Driver
35
Page 36

See the README file for more information about support for
Windows shared printers.
Windows Me/98/95/2000 Windows NT 4.0
Bi-directional support is necessary. No special settings needed.
For Windows Me/98/95/2000:
You need to enable bi-directional support in the printer’s
Properties dialog box. For Windows Me/98/95 users, click the
Details
users, click the
tab and then click
tab. Make sure the
Ports
support for this printer
Spool Settings
check box is selected.
. For Windows 2000
Enable bi-directional
Accessing EPSON Status Monitor 3
EPSON Status Monitor 3 monitors the p rinter during printing and
while the EPSON Status Monitor 3 dialog box is open.
Follow these steps to access EPSON Status Monitor 3:
1. Double-click the
2. Double-click the
My Computer
Printers
folder.
icon.
3. Right-click the icon for your printer, and click
Chapter 3 Using the Printer Driver
Properties
.
36
Page 37

4. Click the
Utility
tab.
5. Click the
EPSON Status Monitor 3
icon to start the EPSON
Status Monitor 3 utility.
Note:
Clearing the
Monitor the printing status
check box during normal
operation causes the Status Alert window to stop monitoring some
errors. See “Status Alert Window” on page 41 for more information on
this function.
Chapter 3 Using the Printer Driver
37
Page 38
Getting Printer Status Details
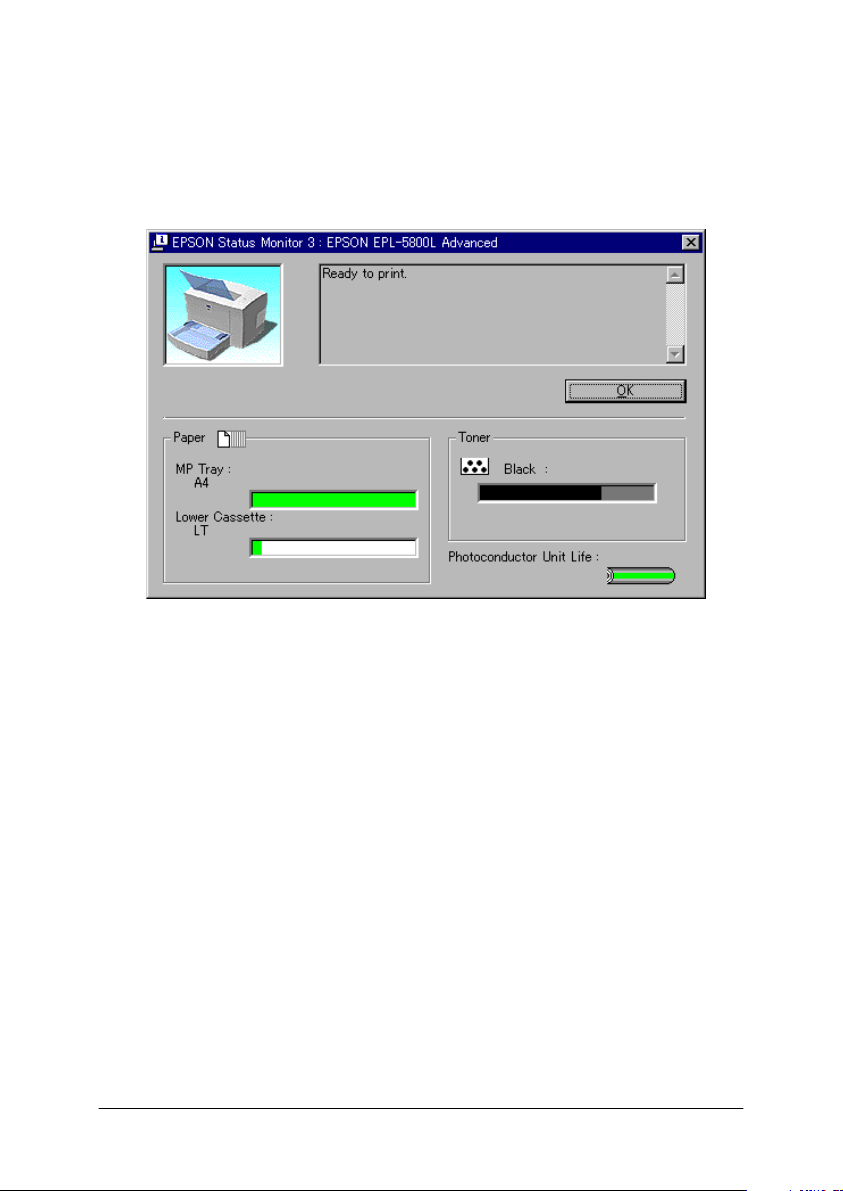
You can monitor printer status and obtain information on
consumable products using the EPSON Status Monitor 3 dialog
box.
Printer image: The image at the upper left shows the
printer status graphically.
Text box: The text box next to the printer image
displays the current status of the printer.
If a problem occurs, the most probable
solution is displayed.
button: Clicking this button closes the dialog
OK
box.
Chapter 3 Using the Printer Driver
38
Page 39

Paper: Displays the paper size and the
approximate amount of paper
remaining in the paper source.
Information for the optional 500-Sheet
Lower Paper Cassette Unit is displayed
only if this option is installed.
Toner: Indicates the amount of remaining toner.
The toner icon flashes if toner is low
(10 percent or less).
Photoconductor Unit
Life:
Indicates the remaining functional life of
the photoconductor unit.
Chapter 3 Using the Printer Driver
39
Page 40

Setting Monitoring Preferences
To make specific monitoring settings, click the
Preferences
button in the Utility tab of the printer driver’s
Monitoring
Properties dialog box. The Monitoring Preferences dialog box
appears.
The following settings and buttons appear in the dialog box:
Select Notification: Use the check boxes to select the types of
error that you wish to be notified about.
Default
button: Restores default settings.
Chapter 3 Using the Printer Driver
40
Page 41

Select Shortcut Icon: To use the shortcut icon, select the
Shortcut Icon
icon. The icon you select appears on the
right side of the task bar.
Once the shortcut icon is in the task bar,
you can double-click it to open the Status
Monitor 3 dialog box. You can also rightclick the shortcut icon and select
Monitoring Preferences
Monitoring Preferences dialog box, and
EPSON EPL-5800L Advanced
the EPSON Status Monitor 3 dialog box.
check box and choose an
to open the
to open
Allow monitoring of
shared printers
box:
button: Saves new changes.
OK
Cancel
Help
button: Cancels any changes.
button: Opens the Help screen for the
check
To monitor a shared printer, check this
b ox . Y ou n ee d to ma ke t hi s s et ti ng on t he
server machine.
Monitoring Preferences dialog box.
Status Alert Window
This window indicates what type of error has occurred and offers
you a possible solution. It closes automatically once the problem
is cleared.
Chapter 3 Using the Printer Driver
41
Page 42

The Status Alert window opens under the conditions you select
in the Monitoring Preferences dialog box.
If you wish to see information about printer consumables, click
the
Consumable Details
dialog box will not disappear even after the problem is cleared.
To close the box you need to click the OK button.
button. If you click this button, the
Stopping Monitoring
The EPSON Status Monitor 3 utility monitors the printer during
printing and while the EPSON Status Monitor 3 dialog box is
open.
To monitor during printing only, close the EPSON Status
Monitor 3 dialog box.
To stop monitoring completely, clear the
check box in the Utility tab of the printer driver’s Properties
status
dialo g b ox. You may w an t to d o th is to sp eed u p pr inti ng o r if you
don’t need to monitor the printer.
If you clear the
Alert window no longer comes up to notify you when an error
occurs. However, you can still find out the current printer status
by clicking the EPSON Status Monitor 3 icon in the Utility tab of
the printer driver’s Properties dialog box.
Note:
In Windows NT 4.0, the
displayed in the Utility tab of Document Defaults.
Monitor the printing status
Monitor the printing status
Chapter 3 Using the Printer Driver
Monitor the printing
check box, the Status
check box is
42
Page 43

Increasing the Printing Speed
Faster printing with Direct Memory Access (DMA) is possible if
your printer is connected to your computer through an Extended
Capability Port (ECP), a type of parallel port with expanded
specifications. With DMA and ECP, you can send print-job data
directly to the printer without going through the CPU, which
increases the effectiveness of data flow.
Before using DMA to transmit a print job confirm the following
points.
Check if your computer supports DMA. To confirm if your
❏
computer has an ECP chip installed, contact the manufacturer
or look in the computer’s documentation.
Confirm the parallel port setting is “ECP” or “ENHANCED”
❏
through the BIOS Setup. Refer to your computer’s
documentation to set the BIOS. However, before setting the
BIOS, uninstall the EPL-5800L printer driver. After setting the
BIOS, re-install the printer driver.
Confirming availability of DMA
Using DMA increases your printing speed. You can confirm if
your computer can use DMA by checking the
dialog box on the
your Printer driver.
Optional Settings
Chapter 3 Using the Printer Driver
menu of the
Driver Settings
Properties
of
43
Page 44

Note for using shared printers in Windows 2000 and NT 4.0
If you are using a shared printer in Windows 2000 or NT 4.0, it is
important that you follow the instructions below carefully,
especially “Accessing the printer through a network,” which
describes how to install the printer driver on Windows 2000 and
NT 4.0 clients. If you do not follow these instructions, you may
not be able to properly install or use the printer driver.
First, you need to set up the printer as a shared printer on the
computer to which the printer is connected. Then, you must
specify the network path to the printer from each computer that
will use it, and install the printer software on those computers.
Setting up your printer as a shared printer
Follow these steps to share a printer that is connected directly to
your computer with others on a network.
1. Click
2. Select your printer, then click
Start
, point to
Settings
Chapter 3 Using the Printer Driver
, and click
Sharing
Printers
on the File menu.
.
44
Page 45
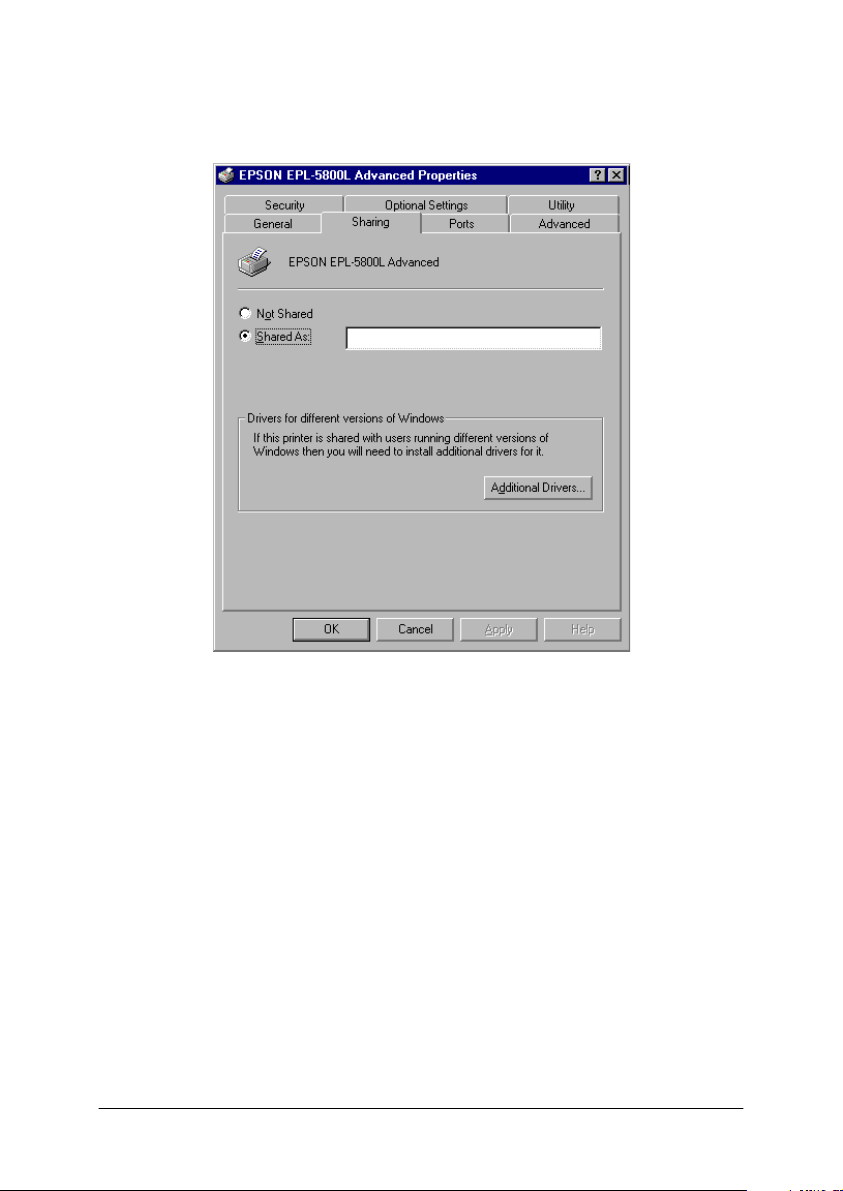
3. Click
Shared
(for Windows 2000 users, select
then type the Shared Name.
Shared as
),
4. Click OK.
Note:
For Windows NT 4.0 users, do not select a driver from the Alternate
Drivers list. For Windows 2000 users, do not select the driver from the
Additional Drivers list in the Additional Drivers dialog box.
Chapter 3 Using the Printer Driver
45
Page 46
Accessing the printer through a network
To access your printer from another computer on the network,
follow these steps.
Note:
Your printer must be set up as a shared resource on the computer to
which it is directly connected before you can access it from another
computer.
1. Install the printer driver to the client computer from the
software CD-ROM.
2. Open the Printer folder from the Control Panel, then open the
Properties
for your printer.
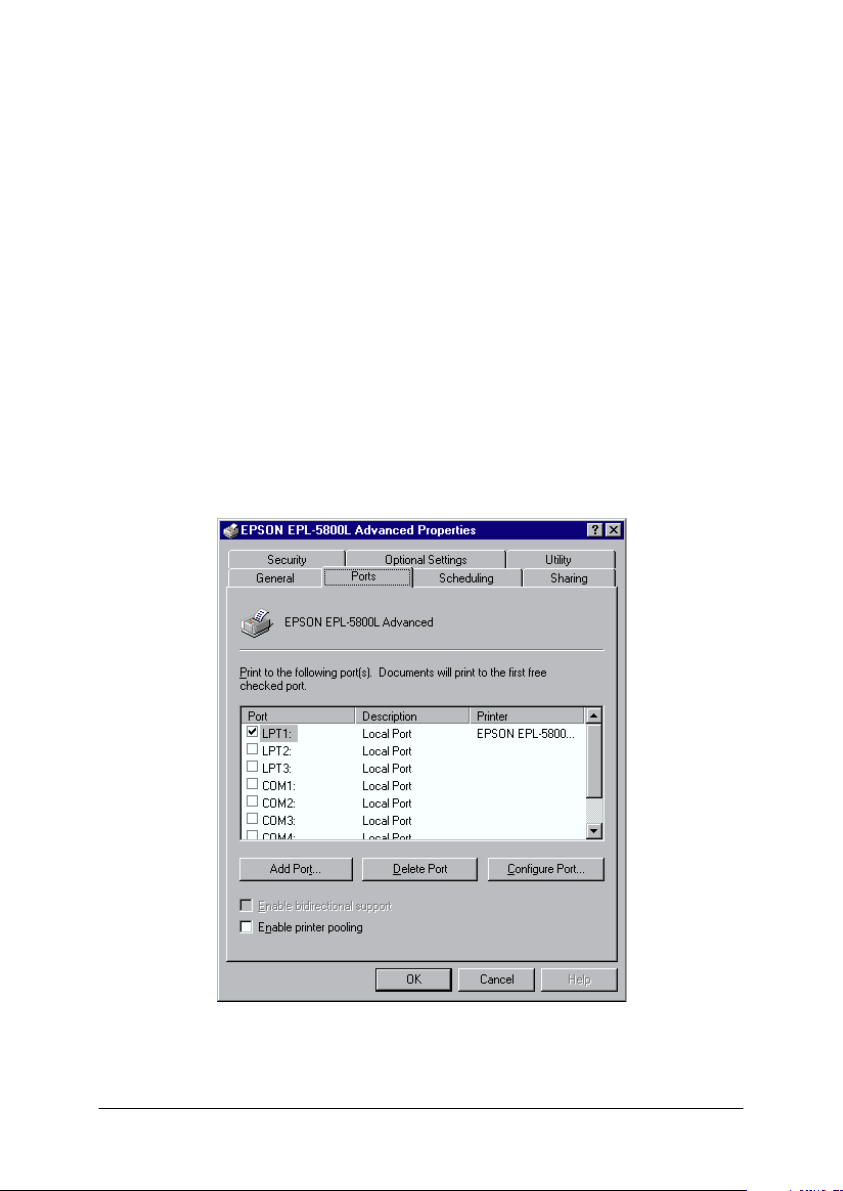
3. Click the
tab, then click
Ports
Add Port
.
Chapter 3 Using the Printer Driver
46
Page 47
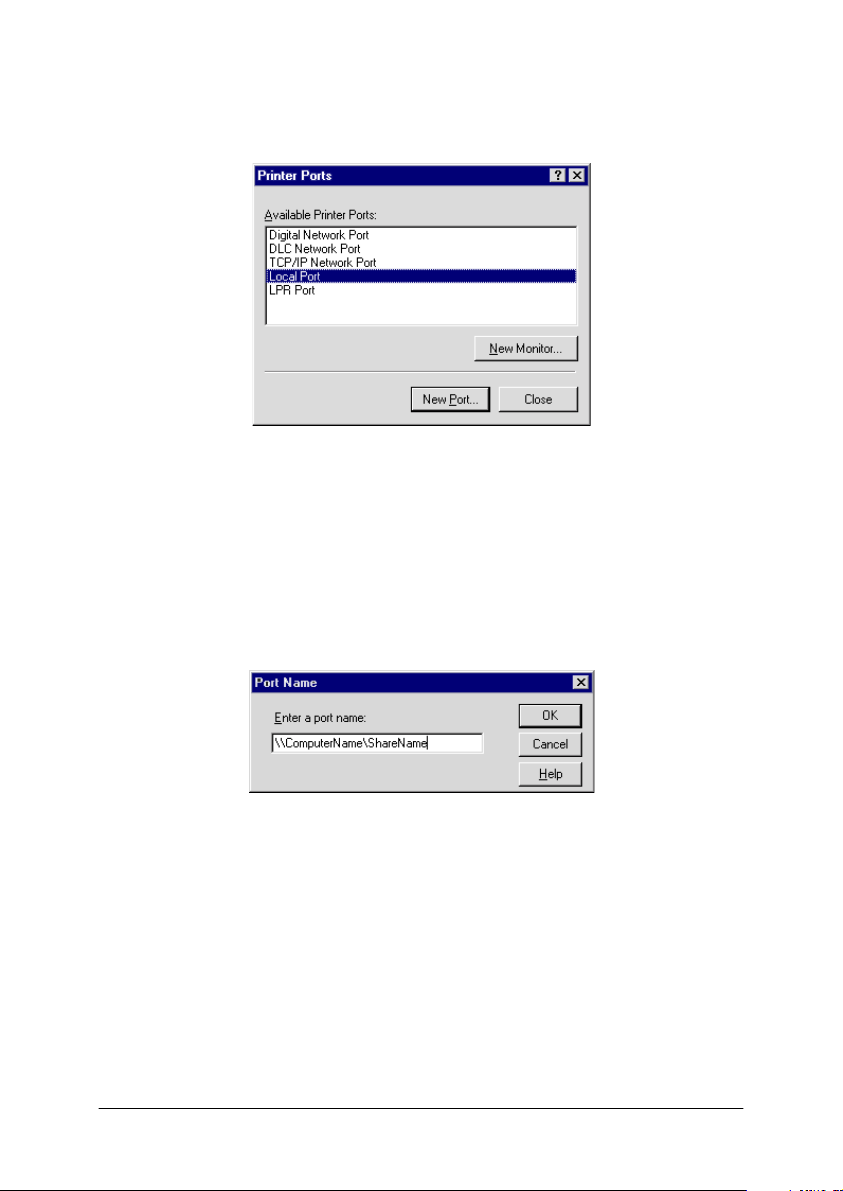
4. The following dialog box appears. Select
click
New Port
.
Local Port
, then
5. The following dialog box appears. In the text box, type the
following information:
\\name of computer that is connected to the
printer\name of the shared printer
Then click OK.
Chapter 3 Using the Printer Driver
47
Page 48

6. In the Printer Ports dialog box, click
to return to the
Close
Ports menu.
7. On the Ports menu, make sure that the new port is added and
the check box is selected. Click OK to close the printer driver.
Chapter 3 Using the Printer Driver
48
Page 49

Choosing the printer port
You have to specify the interface you are using to print. The
standard interfaces that come with your printer are parallel and
USB. To specify the interface, you need to choose the appropriate
printer port setting in the printer driver.
Parallel connection
The Windows platform supports the parallel interface. The
instructions given below are for Windows 98, but the procedure
is similar on other Windows operating systems.
1. Click the
Printers
2. Right-click the
Properties
3. Select the
Start
.
in the menu that appears.
Details
button, point to
EPSON EPL-5800L Advanced
tab.
Settings
, and then click
icon, and click
Chapter 3 Using the Printer Driver
49
Page 50

4. Click the arrow next to the Print to the following port drop-
down list, then select
LPT1: (ECP Printer Port)
.
5. Click OK to save this setting.
Chapter 3 Using the Printer Driver
50
Page 51

Using the ECP mode
To use the ECP mode with a parallel (IEEE 1284-B compliant)
connection, your computer must support ECP mode.
To use the ECP mode, follow these steps:
1. Make the ECP mode settings in the BIOS setting program that
comes with your computer. (For details of the settings and the
program, see your computer manual.)
2. Click the
Control Panel
3. Right-click the
button, point to
Start
.
System
Settings
icon, and click
, and then click
Open
in the menu that
appears.
4. Select the
5. Select
ECP Printer Port
the
Properties
6. Select the
Device Manager
button.
Resources
tab.
tab.
under Ports [COM & LPT], then click
7. Make the appropriate setting in the Resource settings dialog
box. (This setting depends on your computer system. For
details, see your computer manual.)
8. Click OK to save the settings.
Chapter 3 Using the Printer Driver
51
Page 52

USB connection
The USB interface that comes with your printer complies with
Microsoft Plug and Play (PnP) USB specifications.
Note:
®
Only Macintosh
running Mac
and PC systems equipped with a USB connector and
®
OS 8.1 (or later) or Windows Me/98/2000 respectively
support the USB interface.
For Windows Me/98/2000
1. Click the
Printers
.
2. Right-click the
Properties
3. Select the
button, point to
Start
EPSON EPL-5800L Advanced
in the menu that appears.
Details
tab.
Settings
, and then click
icon, and click
Chapter 3 Using the Printer Driver
52
Page 53

4. Click the arrow next to the
Print to the following port
drop-down list. In Windows Me or 98, select
(EPSON EPL-5800L)
. In Windows 2000, check
list on the Ports menu.
EPUSB1:
USB001
in the
5. Click OK to save this setting.
Chapter 3 Using the Printer Driver
53
Page 54

For Macintosh
Note:
❏
The USB interface is not compatible with the Macintosh operating
system’s QuickDraw GX.
❏
If you are connecting the USB cable to your Macintosh through a
USB hub, be sure to connect using the first hub in the chain. The
USB interface may be unstable depending on the hub used. If you
experience problems with this type of setup, connect the USB cable
directly to your computer’s USB connector.
1. Select
Chooser
from the Apple menu. Click your printer’s
icon and then click the USB port your printer is connected to.
2. Click the
Background Printing
radio buttons to turn
background printing on or off.
Note:
❏
Background printing must be turned on for the EPSON Status
Monitor 3 to manage print jobs.
❏
When background printing is on, you can use your Macintosh
while it is preparing a document for printing.
3. Close the Chooser.
Chapter 3 Using the Printer Driver
54
Page 55

Using Printer Driver with Macintosh
Accessing the printer driver
To control your printer and change its settings, use the printer
driver. The printer driver allows you to easily make all the print
settings, including paper source, paper size, and orientation. To
access the driver menus, see below.
To access the printer driver from Macintosh, Choose
from the Apple menu. Then click the
.
Setup
EPL-5800L
icon and click
Accessing Online Help
You can access the Online Help from the printer driver. The
Online Help provides you with detailed information and
instructions on the printer driver that controls your printer. It is
automatically installed when you install the printer driver.
EPSON Status Monitor 3 Utility
About the EPSON Status Monitor 3 utility
EPSON Status Monitor 3 is a utility program that monitors your
printer and gives you information about its current status. For
example, you can find out the amount of remaining toner or the
remaining functional life of the photoconductor unit through
this utility. If a print error occurs, the utility provides you with a
message describing the error. The Status Monitor 3 utility is
accessed from within the printer driver. See “Accessing EPSON
Status Monitor 3” on page 56 for more information.
Chooser
Before using Status Monitor 3, be sure to read the printer driver’s
README file. This file contains the latest information on the
printer driver and Status Monitor 3.
Chapter 3 Using the Printer Driver
55
Page 56

Accessing EPSON Status Monitor 3
EPSON Status Monitor 3 monitors the p rinter during printing and
while the EPSON Status Monitor 3 dialog box is open.
You can access the EPSON Status Monitor 3 utility by selecting
the EPSON Status Monitor 3 alias in the Apple menu.
Note:
❏
The appropriate printer port must already be selected in the Chooser
so that necessary information can be received from the selected
printer driver when the EPSON Status Monitor 3 starts. If the
printer port is not correct, an error will occur.
❏
If you change the printer driver in the Chooser while the spool file
is printing in the background, output to the printer may be
disrupted.
❏
Printer and consumable products status information appears in the
status window only if the Chooser is acquiring status normally.
Getting printer status details
You can monitor printer status and obtain information on
consumable products using the EPSON Status Monitor 3 dialog
box.
Chapter 3 Using the Printer Driver
56
Page 57

For Macintosh Users
z
Printer image: The image at the upper left shows the
printer status graphically.
Text box: The text box next to the printer image
displays the current status of the printer.
When a problem occurs, the most
probable solution is displayed.
button: Clicking this button closes the dialog
Close
box.
Paper: Displays the paper size and the
approximate amount of paper
remaining in each paper source.
Information for the optional 500-Sheet
Lower Paper Cassette Unit is displayed
only if this option is installed.
Chapter 3 Using the Printer Driver
57
Page 58

Toner: Indicates the amount of remaining toner.
The toner icon flashes if toner is low
(10 percent or less).
Photoconductor Unit
Life:
Indicates the remaining functional life of
the photoconductor unit.
Monitor Setup
To make specific monitoring settings, click the
button when you start the status monitor. The Monitor Setup
dialog box appears.
The following settings and the buttons appear in the dialog box.
Monitor Setup
Error Notification Selection Use the check boxes to select the
types of error that you wish to be
notified about.
Default
Cancel
OK
button: Restores default settings.
button: Cancels any changes.
button: Saves new changes.
Chapter 3 Using the Printer Driver
58
Page 59

Status Alert window
This window indicates what type of error has occurred and offers
you a possible solution. It closes automatically once the problem
is cleared.
If you wish to see information about printer consumables, click
the
Show details
will not disappear even after the problem is cleared. To close the
box you need to click the OK button.
Note:
The Status Alert window automatically appears when a problem occurs
with your printer.
button. If you click this button, the dialog box
Chapter 3 Using the Printer Driver
59
Page 60

Chapter 4
Installing and Removing Options
Printer Options. . . . . . . . . . . . . . . . . . . . . . . . . . . . . . . . . . . . . . . . . .61
500-Sheet Lower Paper Cassette Unit. . . . . . . . . . . . . . . . . . . . . . .62
Installing. . . . . . . . . . . . . . . . . . . . . . . . . . . . . . . . . . . . . . . . . . .62
Removing . . . . . . . . . . . . . . . . . . . . . . . . . . . . . . . . . . . . . . . . . .63
Face-up Tray . . . . . . . . . . . . . . . . . . . . . . . . . . . . . . . . . . . . . . . . . . . .64
Installing. . . . . . . . . . . . . . . . . . . . . . . . . . . . . . . . . . . . . . . . . . .65
Using. . . . . . . . . . . . . . . . . . . . . . . . . . . . . . . . . . . . . . . . . . . . . .66
Removing . . . . . . . . . . . . . . . . . . . . . . . . . . . . . . . . . . . . . . . . . .66
Memory Module . . . . . . . . . . . . . . . . . . . . . . . . . . . . . . . . . . . . . . . .67
Installing. . . . . . . . . . . . . . . . . . . . . . . . . . . . . . . . . . . . . . . . . . .67
Removing . . . . . . . . . . . . . . . . . . . . . . . . . . . . . . . . . . . . . . . . . .72
Chapter 4 Installing and Removing Options
60
Page 61

Printer Options
You can add to your printer’s capabilities by installing any of the
following options:
500-Sheet Lower Paper Cassette Unit (C81336✽) increases
❏
paper feeding capacity.
Face-up Tray (C813372) enables face-up output.
❏
Optional memory module expands your printer’s memory.
❏
Note:
The asterisk (✽) is a substitute for the last digit of the product number,
which varies by country.
Each of these options is discussed in its own section.
If you purchased your printer and the options at the same time,
first set up the printer and run the print test by following the
instructions in the
Setup Guide
. Then install the options.
c
Caution:
Before installing an option, carefully read the documentation that
comes with the option.
Chapter 4 Installing and Removing Options
61
Page 62

500-Sheet Lower Paper Cassette Unit
The optional 500-Sheet Lower Paper Cassette Unit gives you a
second paper source in addition to the MP tray. This section
describes how to install the cassette unit.
Installing
Follow the instructions below to install the 500-Sheet Lower Paper
Cassette Unit:
1. Turn off the printer.
2. Unplug the printer’s power cord from the electrical outlet and
from the printer.
3. Remove all interface cables from the interface connectors.
4. Make sure that the printer and the cassette unit are facing the
same way. Lift the printer and align the pins on the cassette
unit with the holes on the bottom of the printer, then lower
the printer until it rests securely on the cassette unit.
Chapter 4 Installing and Removing Options
62
Page 63

5. Reconnect any interface cables you removed.
6. Make sure that the printer’s power switch is turned off before
plugging the power cord into the printer and into an electrical
outlet.
7. Turn on the printer.
To confirm that the 500-Sheet Lower Paper Cassette Unit is
installed correctly, print a status sheet. See “Testing the Printer
Connection” in the
Paper Cassette Unit is listed under the Paper Source section of the
status sheet. If it is not listed on the status sheet, try reinstalling it.
To use the 500-Sheet Lower Paper Cassette Unit as the paper
source, be sure to choose
the Paper Source setting.
If your computer is running Windows Me, 98, 95, 2000 or NT 4.0,
you can also confirm that the 500-Sheet Lower Paper Cassette Unit
is correctly installed by checking the information displayed in the
Optional Settings tab of the printer driver.
Setup Guide
. Confirm that the 500-Sheet Lower
Lower Cassette
in the printer driver as
Removing
Follow the instructions below to remove the 500-Sheet Lower
Paper Cassette Unit:
1. Turn off the printer.
2. Unplug the printer’s power cord from the electrical outlet.
3. Remove all interface cards from the interface connectors.
4. Carefully lift the printer off the 500-Sheet Lower Paper
Cassette Unit and place it on a flat, stable surface.
Chapter 4 Installing and Removing Options
63
Page 64

5. Repack the optional 500-Sheet Lower Paper Cassette Unit in
its original carton.
6. Reconnect all the interface cables.
7. Plug the printer’s power cord into an electrical outlet.
8. Turn on the printer.
Face-up Tray
The printer normally outputs paper face-down on top of the
printer. If you want face-up output, you can install the optional
Face-up Tray (C813372). This tray gives you immediate viewing
of your printed output and is recommended for printing on media
that requires a straight-through paper path, such as labels and
transparencies.
Chapter 4 Installing and Removing Options
64
Page 65
Installing
Follow the instructions below to attach the Face-up Tray to the
printer:
1. Turn off the printer.
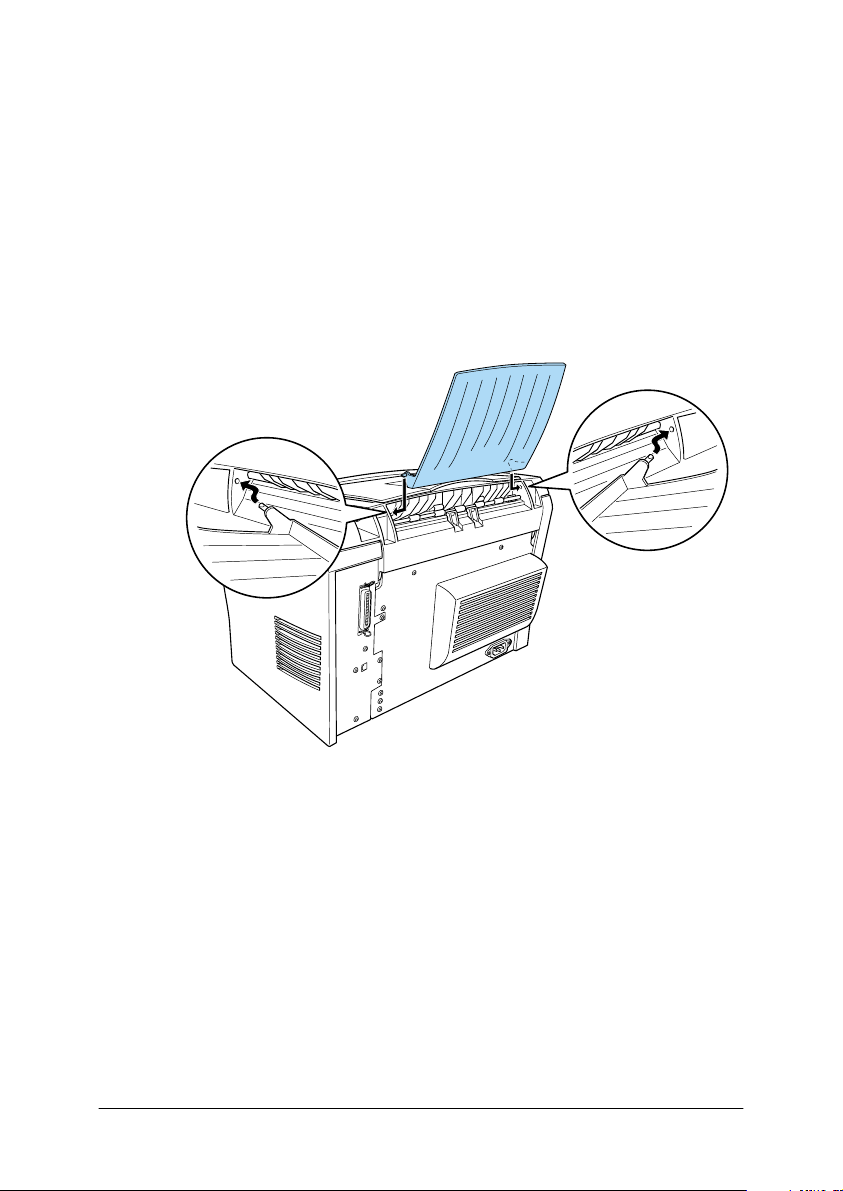
2. Attach the Face-up Tray by sliding the mounting pins into the
corresponding holes, one at a time. Do not force both sides in
at once.
Chapter 4 Installing and Removing Options
65
Page 66

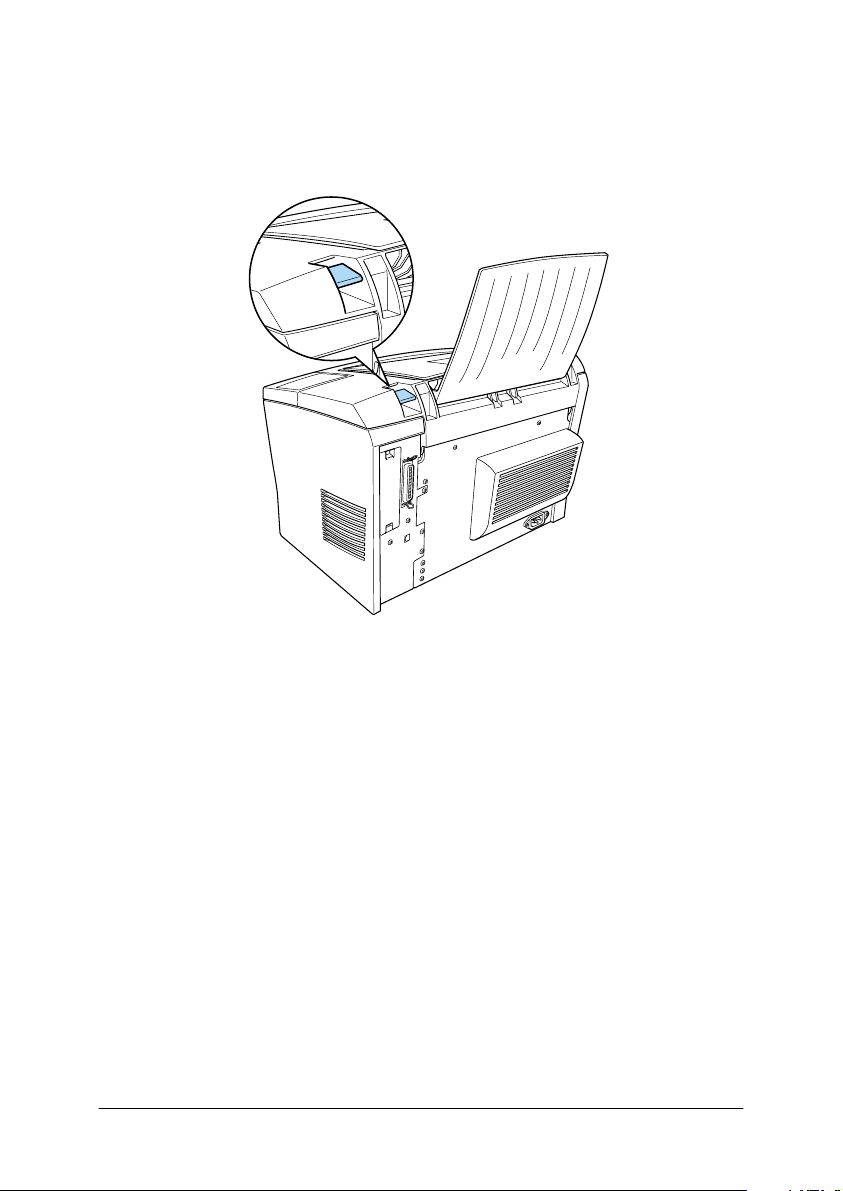
Using
The printer is factory set for face-down output. After installing
the Face-up tray, you can switch the paper path from face-down
to face-up by pushing the paper path selector down. The paper
path selector is located on the right side of the printer, near the
back.
Removing
1. Turn off the printer.
2. Remove the Face-up tray.
3. Switch the paper path selector up.
Chapter 4 Installing and Removing Options
66
Page 67

Memory Module
By installing a Single In-line Memory Module (SIMM), you can
incr eas e pr inte r m emo ry u p to 13 M B (pr int er s tan dard 2 M B p lus
optional 8, 16, or 32 MB). You may want to add additional
memory if you are having difficulty printing complex graphics.
Note:
The maximum expandable memory is 13 MB. Even with 16 or 32 MB
installed, only 13 MB are accessible.
You can purchase SIMMs from various vendors. Be sure that the
SIMM you purchase meets the following requirements:
72pin, EDO type
❏
8, 16, or 32 MB
❏
Access speed of 60 ns or less
❏
Dimensions within 108 mm (4.25 inches) × 26 mm (1.02 inches),
❏
with a thickness of 10 mm (0.4 inch)
Installing
Follow the instructions below to install a SIMM in the printer:
Warning:
w
1. Make sure that the printer is not plugged in.
To avoid electrical shock, do not attempt to install a SIMM unless
the printer is turned off.
Chapter 4 Installing and Removing Options
67
Page 68

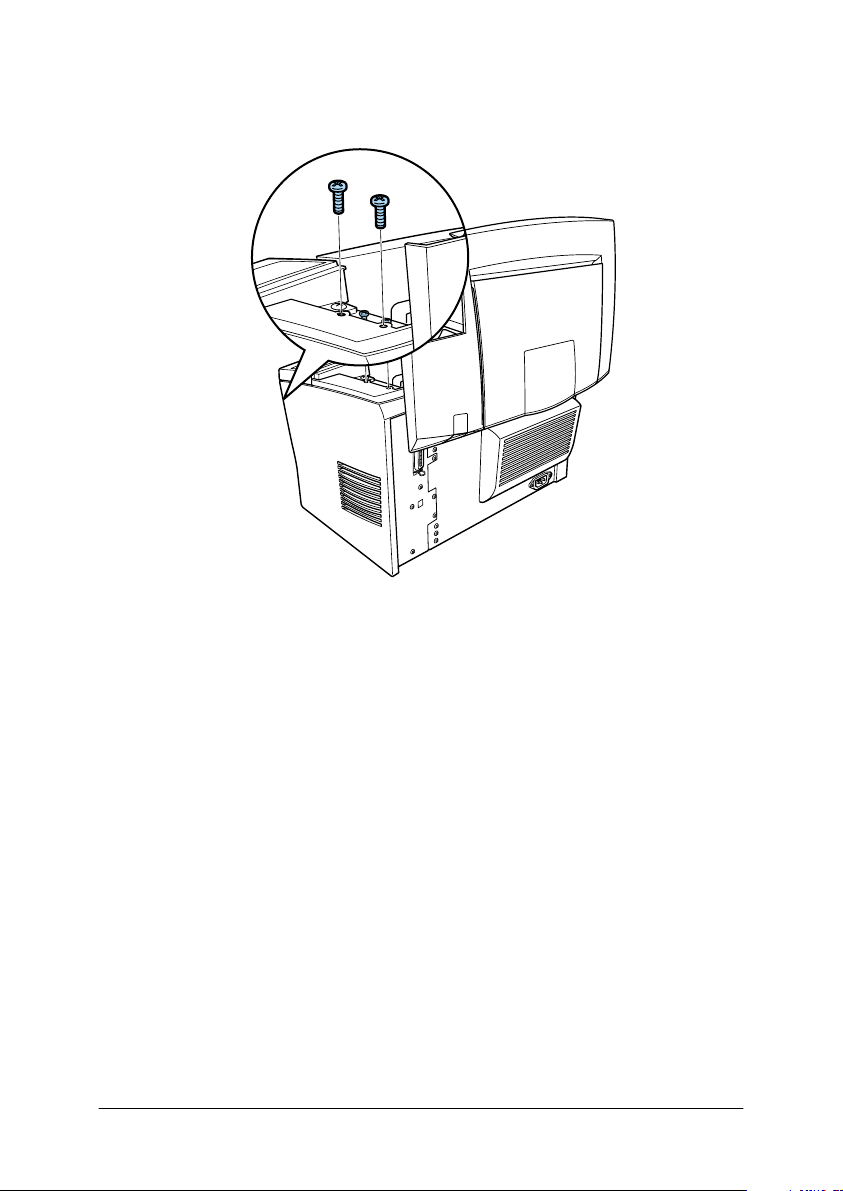
2. Press the latch on the left side of the printer, and raise the
printer cover.
3. Face the right side of the printer, and using a cross-head
screwdriver, remove the two screws holding the side cover in
place. Remove the side cover by pulling it toward you.
Note:
Be careful to avoid dropping screws into the printer when removing
them. It may be helpful to use a magnetic screwdriver.
Chapter 4 Installing and Removing Options
68
Page 69

4. Identify the slot into which the SIMM is to be installed—the
long slot with the two clips at the ends. Make sure that the
clips are open (leaning away from the slot).
Clips must be open.
This is the slot.
Warning:
w
Avoid touching the electrical components that are exposed
after you remove the side cover. Be aware that these
components may become hot while the printer is in use.
c
Caution:
Before you install the module, be sure to discharge any static
electricity by touching a grounded piece of metal. Otherwise,
you may damage static-sensitive components.
Chapter 4 Installing and Removing Options
69
Page 70

5. Firmly insert the SIMM into the slot at an angle from the right
side, as shown below. Hold both sides of the SIMM and turn
it to the perpendicular to lock it into place.
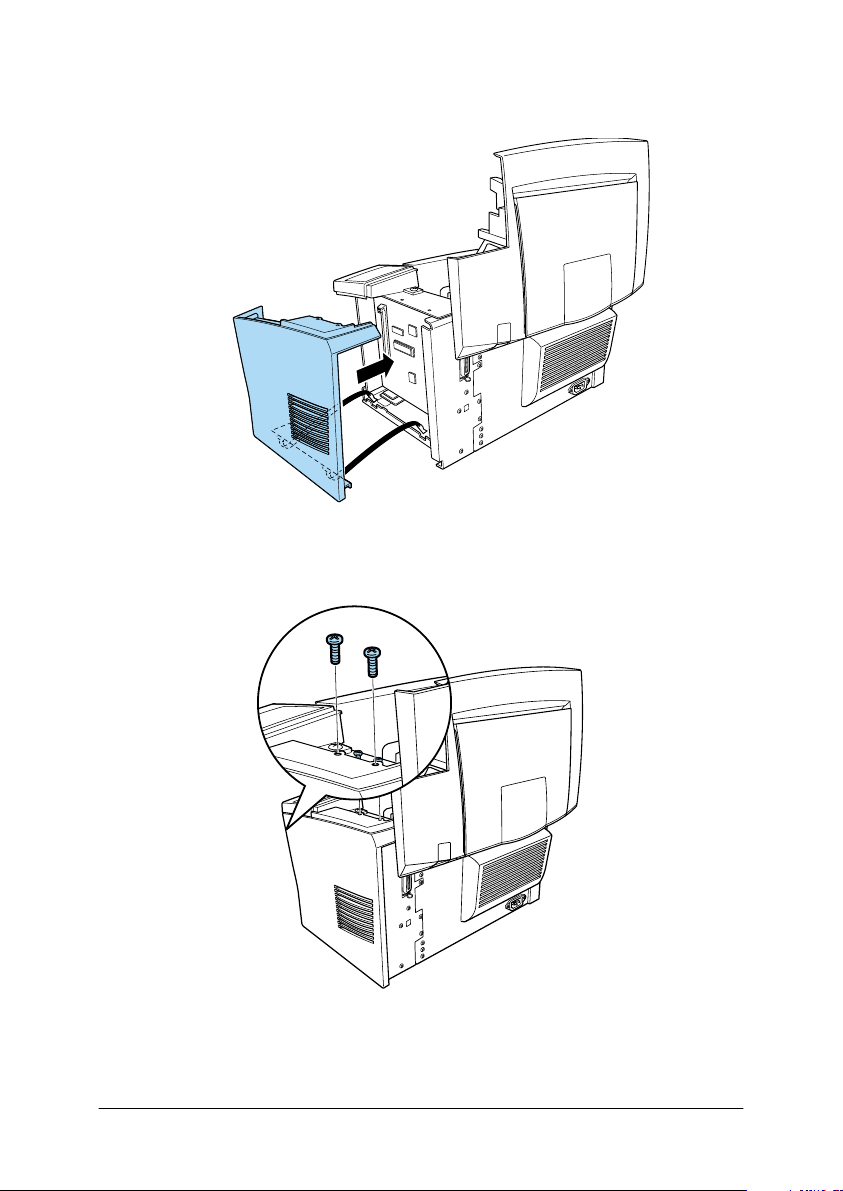
6. Set the side cover back into place.
Chapter 4 Installing and Removing Options
70
Page 71
7. Fasten the side cover with the two screws.
8. Gently close the printer cover.
9. Plug in the printer and turn it on.
Note:
After installing the printer driver, you can confirm the optional memory
is installed correctly. Windows users can check in the Printer Driver by
selecting the Optional Settings tab under Properties.
To verify that memory is correctly installed, print a status sheet.
See “Testing the Printer Connection” in the
Chapter 4 Installing and Removing Options
Setup Guide
.
71
Page 72

If an incorrect amount of memory is shown on the status sheet,
turn off the printer and review the steps above to make sure you
correctly installed the SIMM. If the amount of memory is still
incorrect, contact your dealer or a qualified service representative
for assistance.
If your computer is running Windows Me, 98, 95, 2000 or NT 4.0,
you can also confirm that the memory module is correctly
installed by checking the information displayed in the Optional
Settings tab of the printer driver.
Removing
Follow the instructions below to remove the SIMM:
1. Make sure that the printer is not plugged in.
2. Press the latch on the left side of the printer, then raise the
printer cover.
Chapter 4 Installing and Removing Options
72
Page 73

3. Face the right side of the printer, and using a crosshead
screwdriver, remove the two screws holding the side cover in
place. Remove the side cover by pulling it toward you.
4. Push the clips on each side of the SIMM slot outward to
release the memory module.
5. Grasp the SIMM firmly on both ends and pull it out.
Chapter 4 Installing and Removing Options
73
Page 74
6. Set the side cover back into place.
7. Fasten the side cover with the two screws.
8. Gently close the printer cover.
Chapter 4 Installing and Removing Options
74
Page 75

Chapter 5
Replacing Consumables
Replacing the Developer Cartridge. . . . . . . . . . . . . . . . . . . . . . . . .77
Replacing the Photoconductor Unit . . . . . . . . . . . . . . . . . . . . . . . .82
Chapter 5 Replacing Consumables
75
Page 76

Your printer uses two consumable components, which are listed
below along with their approximate service lives.
Developer cartridge (S050010)
Up to 6,000 pages at 5% print ratio on A4 or Letter size paper,
depending on the complexity of print jobs.
Photoconductor unit (S051055)
Up to 20,000 pages at 5% print ratio.
You can view the condition of the consumables using the EPSON
Status Monitor 3 utility.
Replace the developer cartridge if you notice a decline in print
quality. Replace the photoconductor unit only if print quality
problems remain after replacement of the developer cartridge.
Chapter 5 Replacing Consumables
76
Page 77
Replacing the Developer Cartridge
Follow these steps to replace the developer cartridge:
1. Make sure the printer is turned off.
2. Make sure the output tray on top of the printer is lowered.
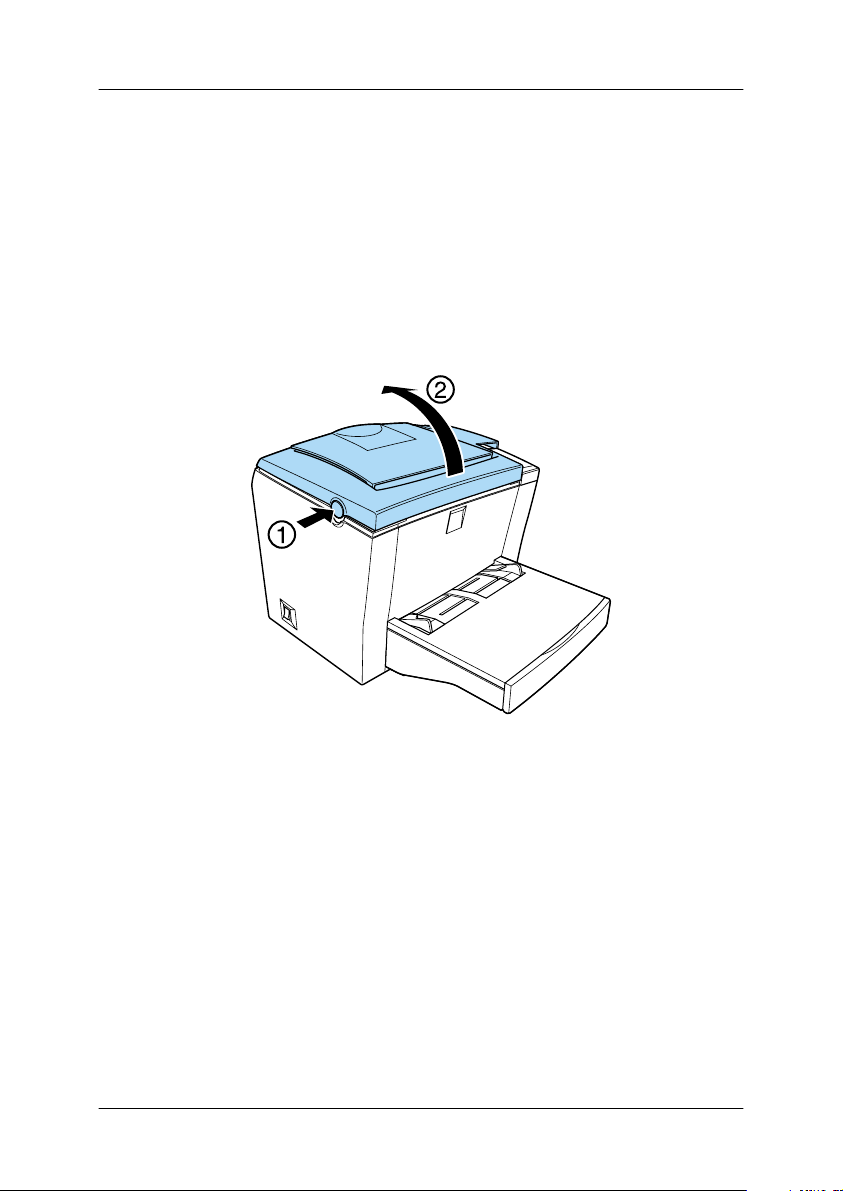
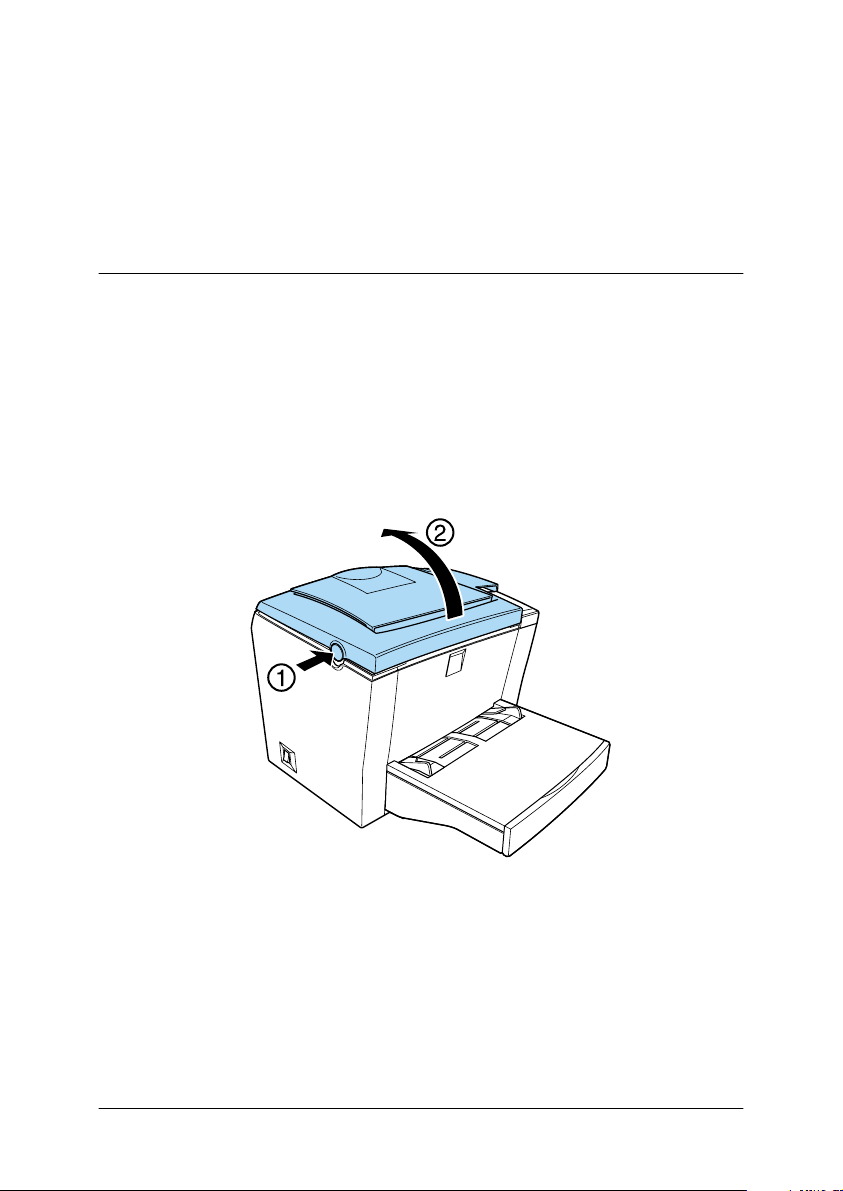
3. Open the printer cover by pressing the latch on the left side
of the printer and lifting the cover up all the way.
c
Caution:
You must completely open the printer cover when replacing
the developer cartridge; otherwise, you may damage the
printer.
Chapter 5 Replacing Consumables
77
Page 78

4. Hold the cartridge by the handle and pull it straight up and
out of the printer.
Warning:
w
c
5. Dispose of the used developer cartridge properly.
Do not touch the fuser, which is marked
Surface Avoid Contact
the fuser may be very hot.
Caution:
Be careful not to spill any remaining toner from the used
developer cartridge. If toner is spilled inside the printer, clean
it with a clean, dry, lint-free cloth or with a vacuum-cleaning
device.
Chapter 5 Replacing Consumables
. If the printer has been in use,
CAUTION Hot
78
Page 79
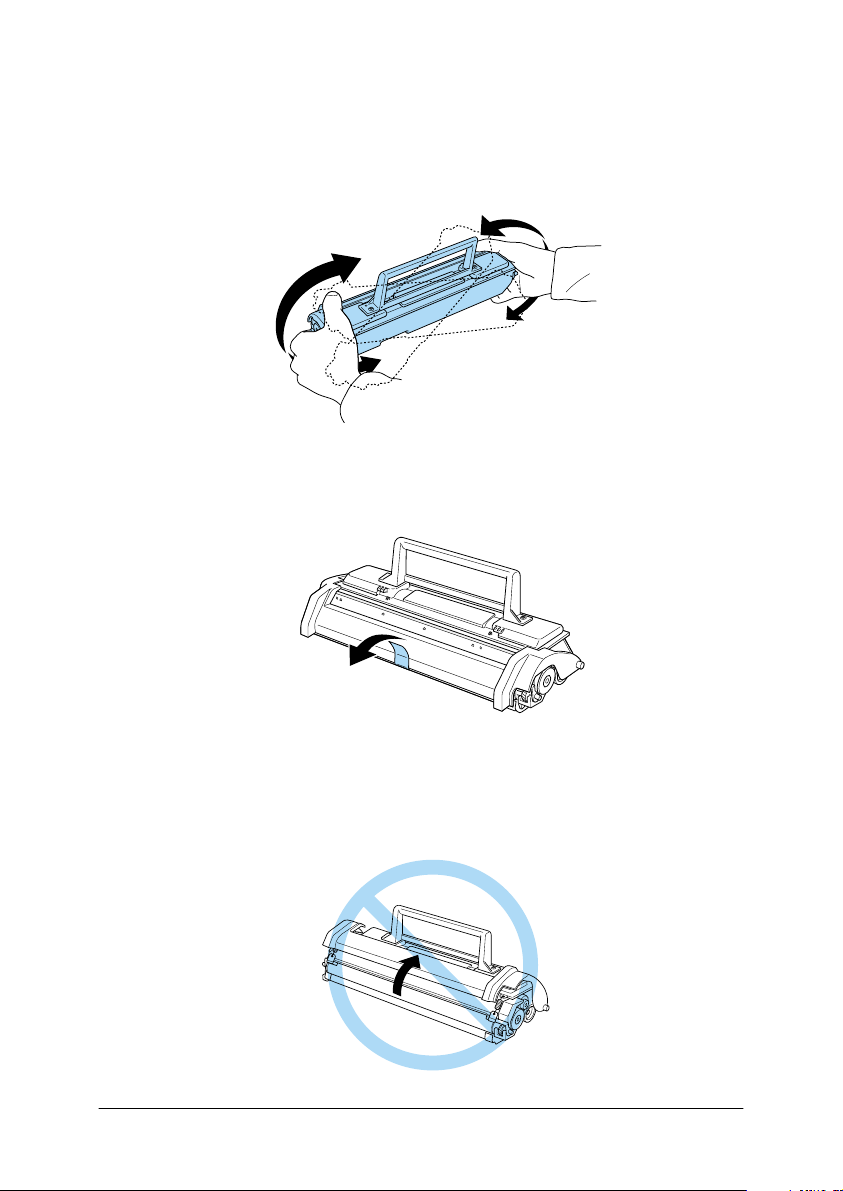
6. Remove the new developer cartridge from its bag. While
holding the cartridge horizontally, gently shake it a few times
from side to side and then from front to back to distribute the
toner evenly.
7. Remove the protective tape seal from the developer cartridge
completely.
c
Caution:
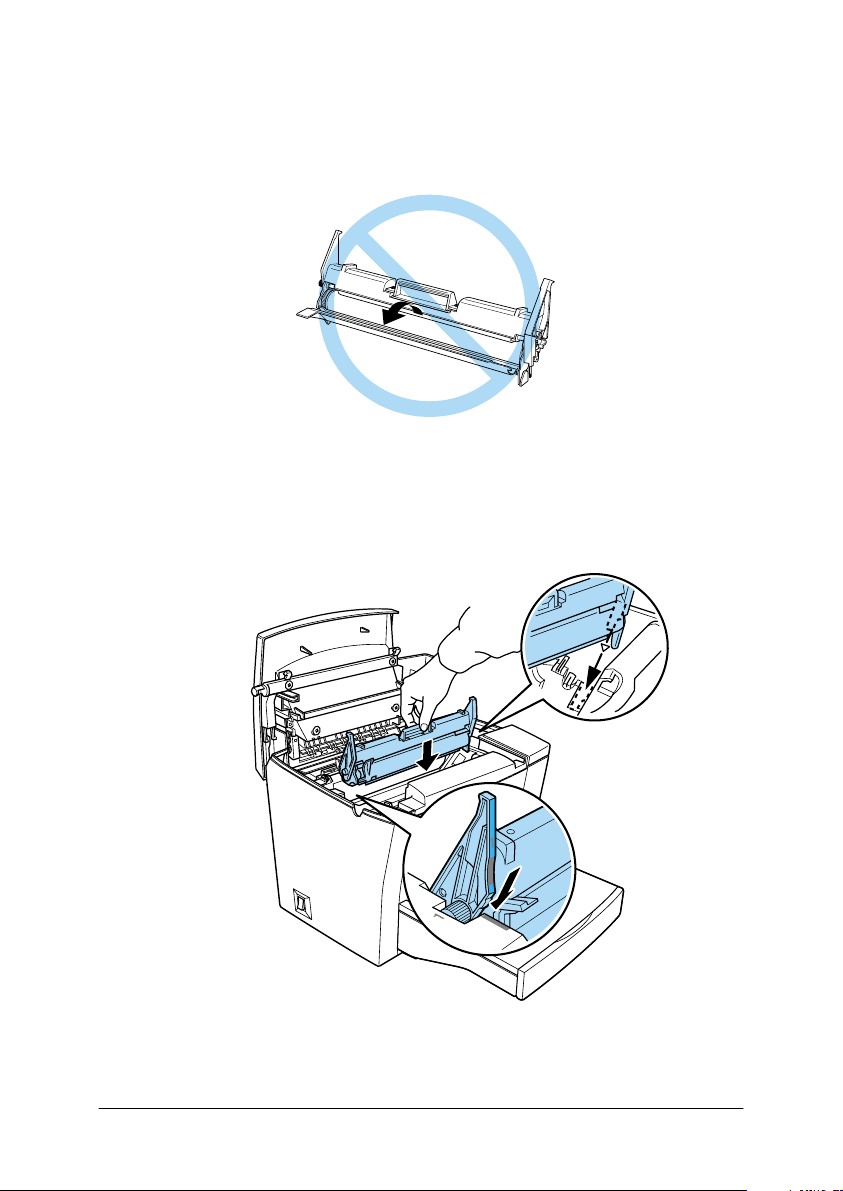
Never touch the developing roller under the flap; otherwise,
print quality may decline.
Chapter 5 Replacing Consumables
79
Page 80

8. Hold the cartridge by its handle and lower it into the printer,
making sure that the pins on both sides of the cartridge fit into
the grooves inside the printer. Slide the cartridge gently into
the opening until it locks into place.
9. Lower the printer cover. Press it gently until it clicks shut.
Chapter 5 Replacing Consumables
80
Page 81

10. When you turn on the printer, access the Printer Settings
dialog box in the printer in the Optional Settings tab of the
printer driver in Windows, or click the Setup button in the
Chooser dialog box, and click the Printer Settings button in
Macintosh. Click the
Toner Level Clear
button. The toner
clear dialog box is displayed.
If the Status Monitor 3 window displays a warning message,
click the
click the
Consumable Details
Toner Level Clear
button in Macintosh, then
button in the dialog box that
appears.
Chapter 5 Replacing Consumables
81
Page 82
11. Click OK to reset the toner level counter.
Whenever you replace the developer cartridge, you should clean
the paper roller as described in “Cleaning the Printer” on page
113.
Replacing the Photoconductor Unit
1. Make sure the printer is turned off.
2. Make sure the output tray at the top of the printer is lowered.
3. Open the printer cover by pressing the latch button on the left
side of the printer and lifting the cover up all the way.
Caution:
c
4. Remove the developer cartridge.
You must completely open the printer cover to replace the
photoconductor unit; otherwise, you may damage the
printer.
Chapter 5 Replacing Consumables
82
Page 83

5. Slide the photoconductor unit gently out of the printer, as
shown below.
Warning:
w
6. Properly dispose of the used photoconductor unit.
7. Remove the new photoconductor unit from its bag.
Do not touch the fuser, which is marked
Surface Avoid Contact
the fuser may be very hot.
Chapter 5 Replacing Consumables
. If the printer has been in use,
CAUTION Hot
83
Page 84
Caution:
c
8. Insert the pins on both sides of the new photoconductor unit
into the grooves inside the printer. Slide the unit gently into
the opening until it locks into place.
Never touch the photoconductor unit’s light-sensitive drum;
otherwise, print quality may decline.
Chapter 5 Replacing Consumables
84
Page 85

9. Reinstall the developer cartridge.
10. Lower the printer cover. Press it gently until it clicks shut.
Chapter 5 Replacing Consumables
85
Page 86

11. When you turn on the printer, access the Printer Settings
dialog box in the Optional Settings tab of the printer driver of
Windows, or click the Setup button in the Chooser dialog box,
and click the Printer Settings in Macintosh. Click
button. The OPC Level Clear dialog box appears.
Clear
OPC Level
12. Click OK to reset the Photoconductor level counter.
Chapter 5 Replacing Consumables
86
Page 87

Chapter 6
Troubleshooting
Ready and Error Lights. . . . . . . . . . . . . . . . . . . . . . . . . . . . . . . . . . .88
Problems and Solutions . . . . . . . . . . . . . . . . . . . . . . . . . . . . . . . . . .89
Preventing paper-feed and paper-jam problems . . . . . . . . .89
Clearing paper jams . . . . . . . . . . . . . . . . . . . . . . . . . . . . . . . . .90
Operational problems. . . . . . . . . . . . . . . . . . . . . . . . . . . . . . . .100
Printout problems. . . . . . . . . . . . . . . . . . . . . . . . . . . . . . . . . . .101
Print quality problems . . . . . . . . . . . . . . . . . . . . . . . . . . . . . . .102
Memory problems. . . . . . . . . . . . . . . . . . . . . . . . . . . . . . . . . . .107
Option problems . . . . . . . . . . . . . . . . . . . . . . . . . . . . . . . . . . . .108
Printer driver and utility problems . . . . . . . . . . . . . . . . . . . .109
Communication errors . . . . . . . . . . . . . . . . . . . . . . . . . . . . . . .110
Chapter 6 Troubleshooting
87
Page 88
Ready and Error Lights
The ready (green) and error (red) lights on the top of the printer
may be the first indication of trouble. The status of the lights, on,
off or flashing, indicates your printer status, as described below.
The Status Alert window in the EPSON Status Monitor 3 utility
indicates what type of error has occurred and offers you a possible
solution. Look through this section to find the kind of problem
you have, then try the recommended solutions in the order they
are presented until your problem is solved.
Ready Light
(green)
Off Off Printer is off.
On Off Printer is ready to print.
Flashing Off Printer is warming up or receiving
Off Flashing Either the pri nter is out of paper or
Flashing On
Off On An error has occurred. Try turning
Flashing alternately.
Error Light
(red)
Printer Status
data.
there is an error that can be easily
remedied.
off the printer and then turning it
back on. If this does not clear the
error, contact your dealer or a
qualified service person.
Note:
If the problem remains after trying the suggestions in this section,
contact your dealer for assistance.
Chapter 6 Troubleshooting
88
Page 89

Problems and Solutions
Look through this section to find the type of problem you have,
and try the recommended solutions in the order they are
presented. You will also be alerted to errors by the Status Alert
window of the EPSON Status Monitor 3 utility according to the
settings you make in the Monitoring Preferences dialog box. In
addition, indicator lights on the printer’s built-in control panel
will light up in different combinations to inform you of basic
printer status, errors and warnings. See “Ready and Error Lights”
on page 88 for more information.
Note:
If the problem remains after trying the suggestions in this section,
contact your dealer for assistance.
Preventing paper-feed and paper-jam problems
If you have frequent paper-feed or paper-jam problems, the
suggestions listed below can help eliminate them.
Fan the stack of paper and then tap its edges to align the paper
❏
before loading.
Do not load more than the recommended amount of paper.
❏
Be sure to adjust the paper guides so that paper feeds freely.
❏
Never allow more than 100 sheets to accumulate on the
❏
face-down tray, or more than 20 sheets to accumulate on the
Face-up Tray.
Try turning over the stack of paper in the paper-tray. Most
❏
paper packages indicate which side is best for printing.
Chapter 6 Troubleshooting
89
Page 90

Clearing paper jams
If the jammed sheet is inside the printer, remove the sheet as
follows:
1. Make sure that the printer is turned off.
2. Close the output tray, and open the printer cover by pressing
the latch on the left side of the printer and lifting the cover up
all the way.
Chapter 6 Troubleshooting
90
Page 91

Warning:
w
Opening the printer cover exposes the fuser, which is marked
CAUTION Hot Surface Avoid Contact
to touch the fuser. If the printer has been in use, the fuser
may be very hot.
CAUTION Hot Surface
Avoid Contact
. Be careful not
Chapter 6 Troubleshooting
91
Page 92

3. Remove the developer cartridge.
c
Caution:
When removing the developer cartridge, never touch the
developing roller under the flap; otherwise, print quality may
decline.
Chapter 6 Troubleshooting
92
Page 93
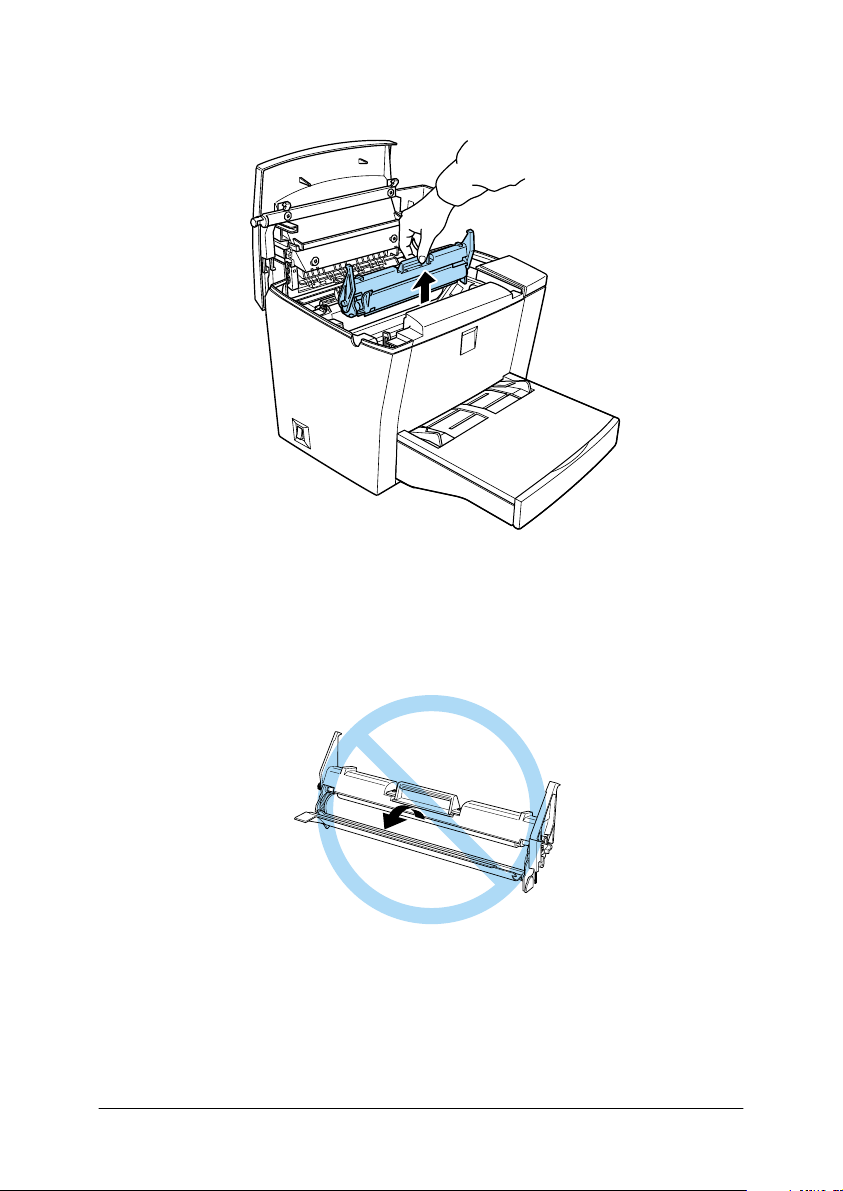
4. Remove the photoconductor unit.
c
Caution:
Never touch the photoconductor unit’s light-sensitive drum;
otherwise, print quality may decline.
Chapter 6 Troubleshooting
93
Page 94

5. Remove the paper from the paper path.
Note:
If paper is jammed at the fuser, grasp the bottom of the paper and
pull it out.
Chapter 6 Troubleshooting
94
Page 95
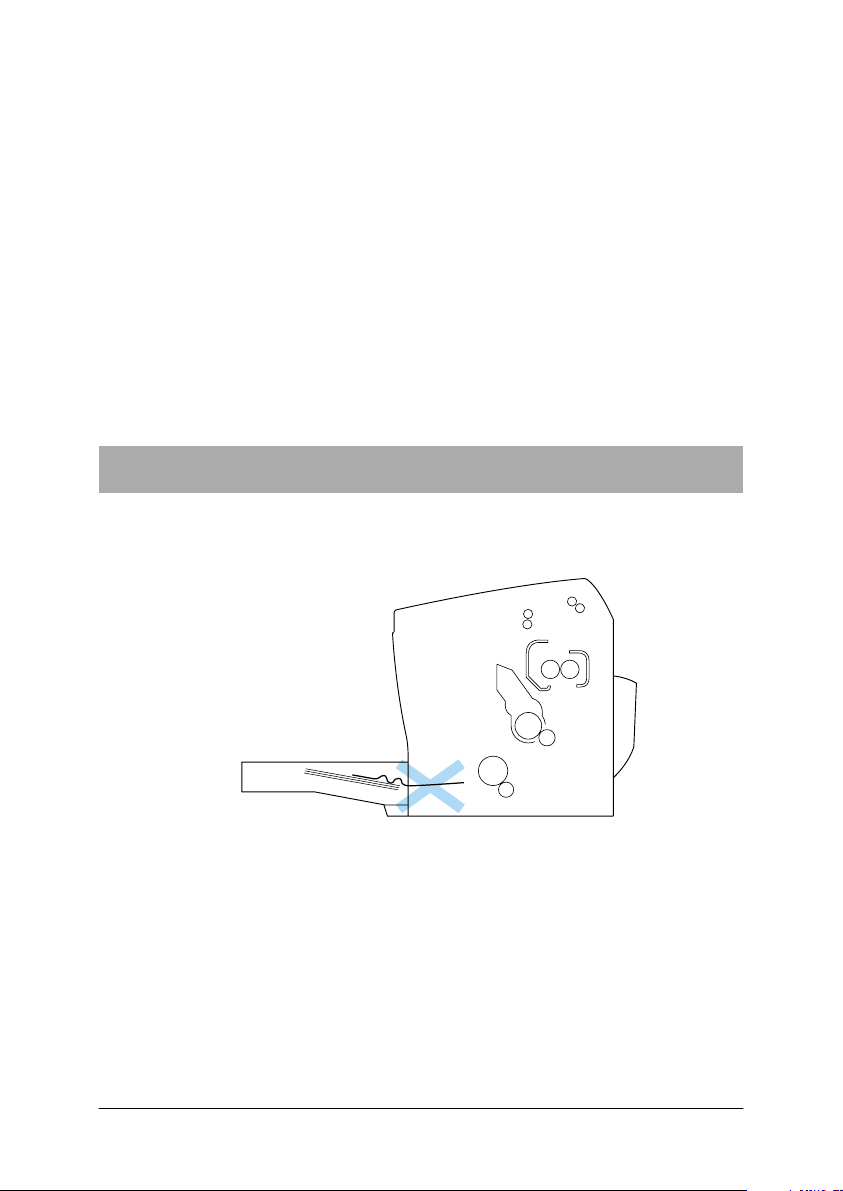
6. Reinstall the photoconductor unit, and then the developer
cartridge.
7. Close the printer cover.
8. Tap the edges of the stack of paper on a flat surface and
carefully reload it into the MP tray. (Do not reload curled or
wrinkled sheets.)
Printing automatically restarts from the page that jammed. If the
error light (red) continues flashing after removing all jammed
paper, open and close the printer cover to clear the error.
Feed jam occurs at the MP tray
The following illustration shows what this type of jam looks like:
Follow the steps below to clear a feed jam at the MP tray:
Chapter 6 Troubleshooting
95
Page 96

1. Remove the MP tray cover and any stacked paper.
2. Gently pull out any sheets that have fed part way into the
printer.
3. Open the printer cover. Be sure to remove any pieces of paper
that may have torn off or are remaining in the printer.
If necessary, take out the developer cartridge and the
photoconductor unit and remove any paper left in the paper
feed path. Reinsert the unit and then the cartridge.
Chapter 6 Troubleshooting
96
Page 97
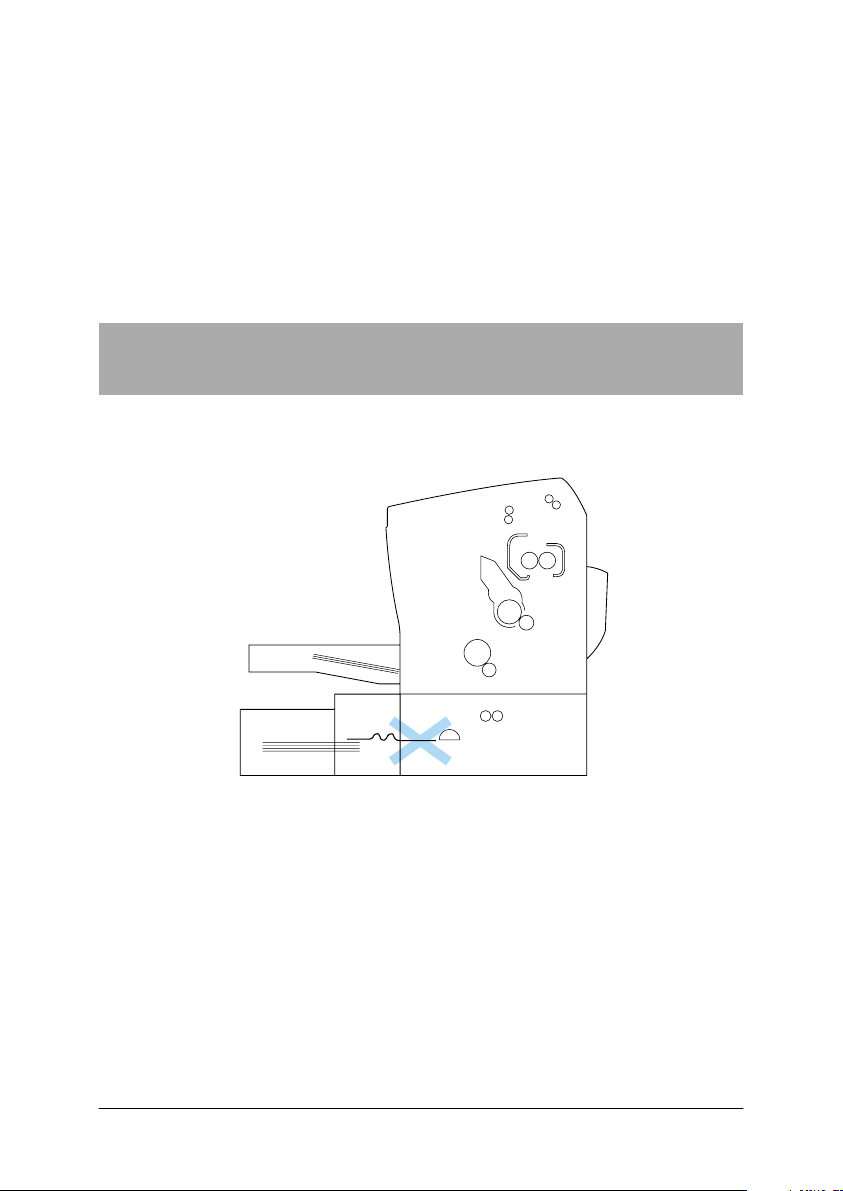
4. Tap the edges of the paper stack on a flat surface and carefully
reload it. (Do not reload curled or wrinkled sheets.)
5. Reinstall the MP tray cover.
6. Close the printer cover. The jammed page’s print data is
automatically reprinted.
Feed jam occurs when using the optional 500-Sheet Lower
Paper Cassette Unit
The following illustration shows what this type of jam looks like:
Chapter 6 Troubleshooting
97
Page 98

Follow the steps below to clear a feed jam in the 500-Sheet Lower
Paper Cassette Unit:
1. Remove the paper-tray from the 500-Sheet Lower Paper
Cassette Unit.
2. Remove any folded or jammed paper from the paper-tray and
from the inside of the cassette unit, and discard any curled or
wrinkled sheets.
Chapter 6 Troubleshooting
98
Page 99

3. Remove all paper from the paper-tray and press down on the
plate until it locks into position.
4. Tap the edges of the paper stack, then set it back into the
paper-tray, making sure the paper is evenly aligned and that
the top sheet is below the maximum paper mark.
5. Make sure you are using the correct paper size. The tray can
accommodate only A4 or Letter size paper, depending on the
country where you purchased the option. Also make sure you
are using paper that meets the specifications for this printer.
6. Set the paper-tray back into the 500-Sheet Lower Paper
Cassette Unit.
7. Open and then close the printer cover. The jammed page’s
print data is automatically reprinted.
Chapter 6 Troubleshooting
99
Page 100

Operational problems
The
Ready
light (green) does not turn on when you turn the
printer on
Turn off the printer and check the power cord connection between
the printer and the electrical outlet. Then turn the printer back on.
If the electrical outlet is controlled by an outside source such as a
wall switch, make sure the switch is turned on. Try plugging
another electrical device into the outlet to check whether the outlet
is operating properly.
The
Ready
Your computer may not be properly connected to the printer.
Perform the procedure described in “Connecting to the
Computer” in the
The interface cable may not be plugged in securely. Check both
ends of the cable between the printer and the computer. If
connecting through the parallel interface, be sure to secure the
connector using the wire retaining clips.
light is on but nothing prints
Setup Guide
.
Make sure you use a double-shielded, twisted-pair interface cable
no more than six feet in length.
The developer cartridge may be empty. To replace the cartridge,
see “Replacing the Developer Cartridge” on page 77.
Chapter 6 Troubleshooting
100
 Loading...