

Page 1
Laser Printer
Reference Guide
4011133
C01-00
Page 2
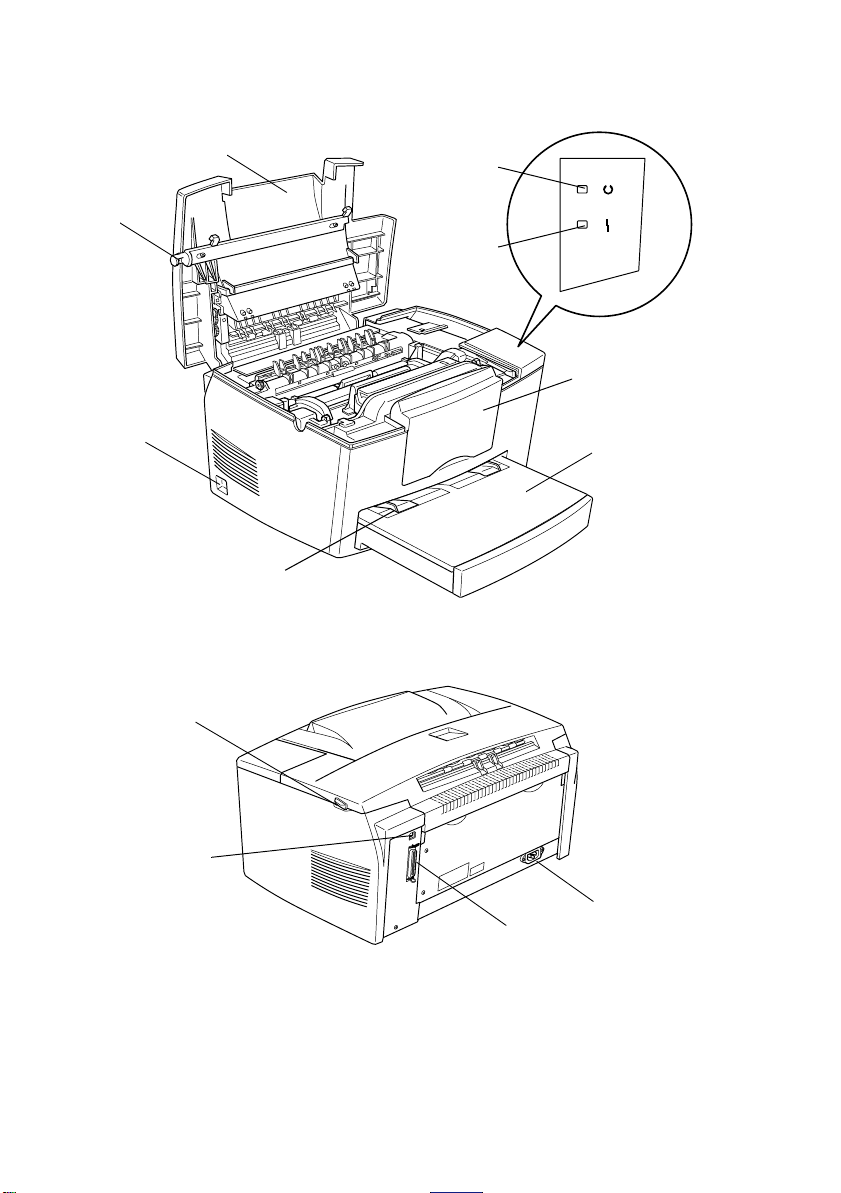
Printer Parts
printer cover
latch
power switch
manual feed
slot
paper path selector
ready light
(green)
error light
(red)
extension
output tray
paper-tray
USB interface
connector
AC inlet
Parallel interface
connector
Page 3

®
Laser Printer
All rights reserved. No part of this publication may be reproduced, stored in a retrieval
system, or transmitted in any form or by any means, mechanical, photocopying, recording,
or otherwise, without the prior written permission of SEIKO EPSON CORPORATION.
No patent liability is assumed with respect to the use of the information contained herein.
Neither is any liability assumed for damages resulting from the use of the information
contained herein.
Neither SEIKO EPSON CORPORATION nor its affiliates shall be liable to the purchaser of
this product or third parties for damages, losses, costs, or expenses incurred by purchaser or
third parties as a result of: accident, misuse, or abuse of this product or unauthorized
modifications, repairs, or alterations to this product, or (excluding the U.S.) failure to strictly
comply with SEIKO EPSON CORPORATION’s operating and maintenance instructions.
SEIKO EPSON CORPORATION shall not be liable against any damages or problems arising
from the use of any options or any consumable products other than those designated as
Original Epson Products or Epson Approved Products by SEIKO EPSON CORPORATION.
General Notice: Other product names used herein are for identification purposes only and may be
trademarks of their respective owners. EPSON disclaims any and all rights in those marks.
Copyright © 1999 by SEIKO EPSON CORPORATION, Nagano, Japan
Reference Guide
Page 4

Declaration of Conformity
According to ISO/IEC Guide 22 and EN 45014
Manufacturer:
Address:
Representative:
Address:
Declares that the Product:
Product Name:
Model:
Conforms to the following Directive(s) and Norm(s):
Directive 89/336/EEC:
SEIKO EPSON CORPORATION
3-5, Owa 3-chome, Suwa-shi,
Nagano-ken 392 Japan
EPSON EUROPE B.V.
Prof. J. H. Bavincklaan 5 1183
AT Amstelveen
The Netherlands
Laser Printer
L270-D
EN 55022 Class B
EN 50082-1
IEC 801-2
IEC 801-3
IEC 801-4
EN 61000-3-2
EN 61000-3-3
ii
Directive 73/23/EEC:
EN 60950
October 1999
Y. Ishii
President of EPSON EUROPE B.V.
Page 5

Contents
Getting Started
About This Guide . . . . . . . . . . . . . . . . . . . . . . . . . . . . . . . . . . . . . . . 1
About Your Printer . . . . . . . . . . . . . . . . . . . . . . . . . . . . . . . . . . . . . . 2
Features . . . . . . . . . . . . . . . . . . . . . . . . . . . . . . . . . . . . . . . . . . . 2
Options. . . . . . . . . . . . . . . . . . . . . . . . . . . . . . . . . . . . . . . . . . . .3
Warnings, Cautions, and Notes. . . . . . . . . . . . . . . . . . . . . . . . . . . . 3
Chapter 1 Using Your Printer
Ready and Error lights . . . . . . . . . . . . . . . . . . . . . . . . . . . . . . . . . . . 1-2
Controlling the Printer . . . . . . . . . . . . . . . . . . . . . . . . . . . . . . . . . . . 1-2
Accessing the printer driver . . . . . . . . . . . . . . . . . . . . . . . . . . 1-3
Note for using shared printers in Windows NT 4.0 . . . . . .1-4
Using the DMA. . . . . . . . . . . . . . . . . . . . . . . . . . . . . . . . . . . . .1-9
Paper Handling . . . . . . . . . . . . . . . . . . . . . . . . . . . . . . . . . . . . . . . . . 1-10
Loading the paper-tray . . . . . . . . . . . . . . . . . . . . . . . . . . . . . .1-10
Printing on special media . . . . . . . . . . . . . . . . . . . . . . . . . . . . 1-13
Optimizing Print Quality . . . . . . . . . . . . . . . . . . . . . . . . . . . . . . . . . 1-14
Using RITech. . . . . . . . . . . . . . . . . . . . . . . . . . . . . . . . . . . . . . .1-14
Adjusting print density . . . . . . . . . . . . . . . . . . . . . . . . . . . . . . 1-15
Enhanced MicroGray . . . . . . . . . . . . . . . . . . . . . . . . . . . . . . . .1-15
Chapter 2 Using Options
Printer Options. . . . . . . . . . . . . . . . . . . . . . . . . . . . . . . . . . . . . . . . . .2-2
500-Sheet Lower Cassette Unit . . . . . . . . . . . . . . . . . . . . . . . . . . . . 2-2
Installing . . . . . . . . . . . . . . . . . . . . . . . . . . . . . . . . . . . . . . . . . . 2-3
Loading paper. . . . . . . . . . . . . . . . . . . . . . . . . . . . . . . . . . . . . . 2-4
Face-up Tray. . . . . . . . . . . . . . . . . . . . . . . . . . . . . . . . . . . . . . . . . . . . 2-5
Installing . . . . . . . . . . . . . . . . . . . . . . . . . . . . . . . . . . . . . . . . . . 2-5
Using . . . . . . . . . . . . . . . . . . . . . . . . . . . . . . . . . . . . . . . . . . . . .2-6
Memory Module . . . . . . . . . . . . . . . . . . . . . . . . . . . . . . . . . . . . . . . . 2-7
iii
Page 6

Installing . . . . . . . . . . . . . . . . . . . . . . . . . . . . . . . . . . . . . . . . . . 2-7
Removing . . . . . . . . . . . . . . . . . . . . . . . . . . . . . . . . . . . . . . . . . 2-12
Chapter 3 EPSON Status Monitor 3 Utility
About the EPSON Status Monitor 3 . . . . . . . . . . . . . . . . . . . . . . . 3-2
Environment for EPSON Status Monitor 3 . . . . . . . . . . . . . 3-2
Accessing the EPSON Status Monitor 3 . . . . . . . . . . . . . . . . . . . . 3-4
For Windows users . . . . . . . . . . . . . . . . . . . . . . . . . . . . . . . . . 3-4
For Macintosh users . . . . . . . . . . . . . . . . . . . . . . . . . . . . . . . . 3-5
Getting Printer Status Details. . . . . . . . . . . . . . . . . . . . . . . . . . . . . 3-6
Setting Monitoring Preferences . . . . . . . . . . . . . . . . . . . . . . . . . . . 3-9
For Windows users . . . . . . . . . . . . . . . . . . . . . . . . . . . . . . . . . 3-9
Status Alert Window . . . . . . . . . . . . . . . . . . . . . . . . . . . . . . . . . . . . 3-11
For Windows users . . . . . . . . . . . . . . . . . . . . . . . . . . . . . . . . . 3-11
For Macintosh users . . . . . . . . . . . . . . . . . . . . . . . . . . . . . . . . 3-11
Stopping Monitoring (Windows only) . . . . . . . . . . . . . . . . . . . . . 3-12
Chapter 4 Troubleshooting
Problems and Solutions. . . . . . . . . . . . . . . . . . . . . . . . . . . . . . . . . . 4-2
Ready and Error Lights . . . . . . . . . . . . . . . . . . . . . . . . . . . . . 4-2
Preventing paper feed and paper jam problems . . . . . . . . 4-3
Clearing paper jams . . . . . . . . . . . . . . . . . . . . . . . . . . . . . . . . 4-3
Operational problems. . . . . . . . . . . . . . . . . . . . . . . . . . . . . . . 4-12
Printout problems . . . . . . . . . . . . . . . . . . . . . . . . . . . . . . . . . . 4-12
Print quality problems . . . . . . . . . . . . . . . . . . . . . . . . . . . . . . 4-13
Memory problems. . . . . . . . . . . . . . . . . . . . . . . . . . . . . . . . . . 4-18
Option problems . . . . . . . . . . . . . . . . . . . . . . . . . . . . . . . . . . . 4-18
Problems Using EPSON Status Monitor 3. . . . . . . . . . . . . . 4-19
Chapter 5 Maintenance and Transportation
Replacing Consumable Products . . . . . . . . . . . . . . . . . . . . . . . . . . 5-2
Replacing the developer cartridge . . . . . . . . . . . . . . . . . . . . 5-2
Replacing the photoconductor unit . . . . . . . . . . . . . . . . . . . 5-6
iv
Page 7

Cleaning the Printer . . . . . . . . . . . . . . . . . . . . . . . . . . . . . . . . . . . . . 5-9
Cleaning the inside of the printer . . . . . . . . . . . . . . . . . . . . .5-9
Removing spilled toner . . . . . . . . . . . . . . . . . . . . . . . . . . . . . . 5-10
Cleaning the printer case. . . . . . . . . . . . . . . . . . . . . . . . . . . . .5-11
Transporting the Printer. . . . . . . . . . . . . . . . . . . . . . . . . . . . . . . . . . 5-12
Appendix A Technical Specifications
Paper . . . . . . . . . . . . . . . . . . . . . . . . . . . . . . . . . . . . . . . . . . . . . . . . . . A-2
Specifications. . . . . . . . . . . . . . . . . . . . . . . . . . . . . . . . . . . . . . . A-2
Printer . . . . . . . . . . . . . . . . . . . . . . . . . . . . . . . . . . . . . . . . . . . . . . . . . A-4
General . . . . . . . . . . . . . . . . . . . . . . . . . . . . . . . . . . . . . . . . . . . . A-4
Environmental . . . . . . . . . . . . . . . . . . . . . . . . . . . . . . . . . . . . .A-5
Mechanical. . . . . . . . . . . . . . . . . . . . . . . . . . . . . . . . . . . . . . . . .A-5
Electrical. . . . . . . . . . . . . . . . . . . . . . . . . . . . . . . . . . . . . . . . . . . A-5
Interface. . . . . . . . . . . . . . . . . . . . . . . . . . . . . . . . . . . . . . . . . . . . . . . .A-6
Parallel interface . . . . . . . . . . . . . . . . . . . . . . . . . . . . . . . . . . . . A-6
Using the ECP mode . . . . . . . . . . . . . . . . . . . . . . . . . . . . . . . . A-12
USB interface. . . . . . . . . . . . . . . . . . . . . . . . . . . . . . . . . . . . . . .A-13
Options and Consumables . . . . . . . . . . . . . . . . . . . . . . . . . . . . . . . .A-14
500-Sheet Lower Cassette Unit (C81287✽/C81288✽) . . . . . A-14
Face-up Tray (C81286✽) . . . . . . . . . . . . . . . . . . . . . . . . . . . . . A-14
Developer cartridge (S050010) . . . . . . . . . . . . . . . . . . . . . . . .A-15
Photoconductor unit (S051055). . . . . . . . . . . . . . . . . . . . . . . . A-15
Appendix B Contacting Customer Support
Where to Get Help. . . . . . . . . . . . . . . . . . . . . . . . . . . . . . . . . . . . . . .B-2
For United Kingdom and the Republic of Ireland Users. . . . . . . B-2
For Australian Users . . . . . . . . . . . . . . . . . . . . . . . . . . . . . . . . . . . . . B-4
For Singapore Users . . . . . . . . . . . . . . . . . . . . . . . . . . . . . . . . . . . . .B-6
For Hong Kong Users . . . . . . . . . . . . . . . . . . . . . . . . . . . . . . . . . . . . B-6
For Philippines Users . . . . . . . . . . . . . . . . . . . . . . . . . . . . . . . . . . . . B-7
Glossary
v
Page 8

Index
vi
Page 9

Getting Started
The EPSON EPL-5700L/EPL-5700i printer combines high
performance and reliability with a wide range of features.
To get started with your laser printer, please:
Read the laser printer precautions and important safety
❏
instructions in the
Getting Ready
guide.
Use your
❏
software.
See this Reference Guide for detailed information about your
printer.
Getting Ready
guide to install the options and printer
About This Guide
This guide contains information about using your printer. For
information about installing and setting up the printer, see the
Getting Ready
Chapter 1, “Using Your Printer,” describes how to operate the
printer. It also contains information on loading paper and setting
up the printer for paper type and size.
Chapter 2, “Using Options,” gives step-by-step instructions for
installing the options available for the printer.
Chapter 3, “EPSON Status Monitor 3 Utility,” allows you to view
printer status information such as the remaining amount of toner
and check for any printer errors.
guide.
Chapter 4, “Troubleshooting,” gives helpful information for what
to do if you encounter problems.
Getting Started
1
Page 10

Chapter 5, “Maintenance and Transportation,” provides
instructions on how to clean and transport your printer.
Appendix A, “Technical Specifications,” contains the technical
specifications about the printer.
Appendix B, “Contacting Customer Support,” explains customer
support information.
About Your Printer
Your printer is the latest in EPSON’s advanced line of laser
printers.
The printer’s 600/300-dpi (dots per inch) resolution is enhanced
by EPSON’s Resolution Improvement Technology (RITech),
which smooths the jagged edges of diagonal and curved lines in
both text and graphics. This gives your documents a clean, crisp
professional appearance.
The printer is easy to install and use. You simply set up the printer,
connect it to your computer, and install the printer driver as
described in the
Getting Ready
guide.
The printer supports ECP mode in Windows 95/98 and Windows
NT 4.0. ECP mode is useful for high-speed data transfer and
bidirectional communication with your computer.
Features
The printer comes with a full set of features that contributes to
ease of use and consistent, high-quality output. The main features
are described below.
2
Getting Started
Page 11

High-quality printing
Your printer provides 600/300-dpi printing at a speed of up to
eight pages per minute. You’ll appreciate the professional print
quality produced by your printer and its quick processing speed.
Toner Save Mode
To reduce the amount of toner used in printing documents, you
can print drafts using the Toner Save Mode.
Options
The printer comes with built-in bidirectional parallel interface,
USB interface, and 2 MB of memory, which can be expanded up
to 13 MB. The 500-Sheet Lower Cassette Unit (C81287✽ for A4 size
paper, C81288✽ for Letter size paper), automatically feeds up to
500 A4 and Letter size sheets without reloading. The Face-up Tray
(C81286✽) is recommended for printing on media such as labels
and transparencies that require a straight-through paper path.
Warnings, Cautions, and Notes
Warnings
w
Cautions
c
Notes
of your printer.
contain important information and useful tips on the operation
must be followed carefully to avoid bodily injury.
must be observed to avoid damage to your equipment.
Getting Started
3
Page 12

4
Getting Started
Page 13

Chapter 1
Using Your Printer
Ready and Error lights . . . . . . . . . . . . . . . . . . . . . . . . . . . . . . . . . . . .1-2
Controlling the Printer . . . . . . . . . . . . . . . . . . . . . . . . . . . . . . . . . . . . 1-2
Accessing the printer driver . . . . . . . . . . . . . . . . . . . . . . . . . . .1-3
Note for using shared printers in Windows NT 4.0 . . . . . . . 1-4
Using the DMA . . . . . . . . . . . . . . . . . . . . . . . . . . . . . . . . . . . . . .1-9
Paper Handling . . . . . . . . . . . . . . . . . . . . . . . . . . . . . . . . . . . . . . . . . . 1-10
Loading the paper-tray . . . . . . . . . . . . . . . . . . . . . . . . . . . . . . .1-10
Printing on special media . . . . . . . . . . . . . . . . . . . . . . . . . . . . .1-13
Optimizing Print Quality . . . . . . . . . . . . . . . . . . . . . . . . . . . . . . . . . .1-14
Using RITech . . . . . . . . . . . . . . . . . . . . . . . . . . . . . . . . . . . . . . . .1-14
Adjusting print density . . . . . . . . . . . . . . . . . . . . . . . . . . . . . . .1-15
Enhanced MicroGray . . . . . . . . . . . . . . . . . . . . . . . . . . . . . . . . . 1-15
1
Using Your Printer
1-1
Page 14
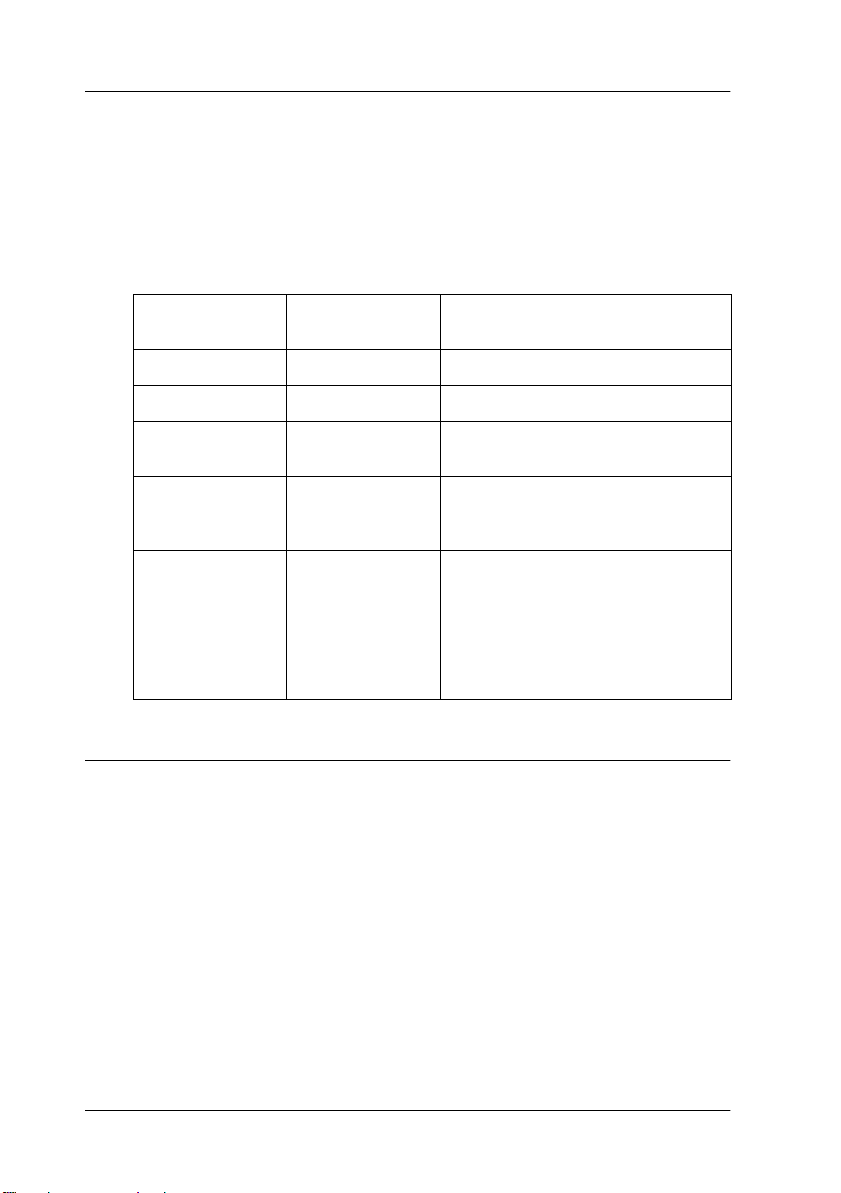
Ready and Error lights
The ready (green) and error (red) lights on the top of the printer
indicate the printer status. Whether the lights are flashing or not
indicates different things, as described below. More detailed
information can be found in the Alert window in the EPSON
Status Monitor 3.
Ready Light
(green)
Not lighted Not lighted Printer is off.
Lighted Not lighted Printing is possible.
Flashing Not lighted Printer i s warming up or receiving
Not lighted Flashing Either the printer is out of paper
Not lighted Lighted This is an error that requires a
Error Light
(red)
Printer Status
data.
or there is an error that can be
easily remedied.
service call. Alternatively,
try turning off the printer and
then turning it back on.
If this does not remedy the error,
contact your dealer or a
qualified service person.
Controlling the Printer
To control your printer and change its settings, use the printer
driver. The printer driver allows you to easily make all the print
settings, including paper source, paper size, and orientation. To
access the driver menus, see below.
1-2
Using Your Printer
Page 15

Accessing the printer driver
You can access your printer driver directly from most Windowsbased applications, or from your Windows operating system, as
explained below. The printer driver settings made from many
Windows applications override settings made when the driver is
accessed from the operating system, so in most cases you should
access the driver from your application to make sure you get the
results you want.
To access the printer driver from your application software,
❏
click the
also may need to click
combination of these buttons.
To access the printer driver from Windows 98/95 and
❏
Windows NT 4.0, click
Printers
Advanced
Document Defaults
To access the printer driver from Macintosh, Choose
❏
from the Apple menu. Then click the
icon and click
or
Print
. Next, right-click the
Page Setup
Setup, Options, Properties
Start
icon and click
(in Windows NT 4.0).
.
Setup
Properties
command on the File menu. You
, point to
EPSON EPL-5700L/EPL-5700i
Settings
(in Windows 98/95) or
EPL-5700L/EPL-5700i
, and click
Accessing Online Help
, or a
Chooser
1
You can access the Online Help from the printer driver. The
Online Help provides you with detailed information and
instructions on the printer driver that controls your printer. It is
automatically installed when you install the printer driver.
Using Your Printer
1-3
Page 16

Note for using shared printers in Windows NT 4.0
If you are using a shared printer in Windows NT 4.0, it is
important that you follow the instructions below carefully,
especially “Accessing the printer through a network,” which
describes how to install the printer driver on NT 4.0 clients. If you
do not follow these instructions, you may not be able to properly
install or use the printer driver.
First, you need to set up the printer as a shared printer on the
computer to which the printer is connected. Then, you must
specify the network path to the printer from each computer that
will use it, and install the printer software on those computers.
Setting up your printer as a shared printer
Follow these steps to share a printer that is connected directly to
your computer with others on a network.
1. Click
2. Select your printer, then click
1-4
Using Your Printer
Start
, point to
Settings
, and click
Sharing
Printers
on the File menu.
.
Page 17
3. Click
Shared
and enter the Share Name.
1
4. Click OK.
Note:
Do not choose any drivers from the Alternate Drivers list.
Accessing the printer through a network
To access your printer from another computer on the network,
follow these steps.
Note:
Your printer must be set up as a shared resource on the computer to
which it is directly connected before you can access it from another
computer.
Using Your Printer
1-5
Page 18
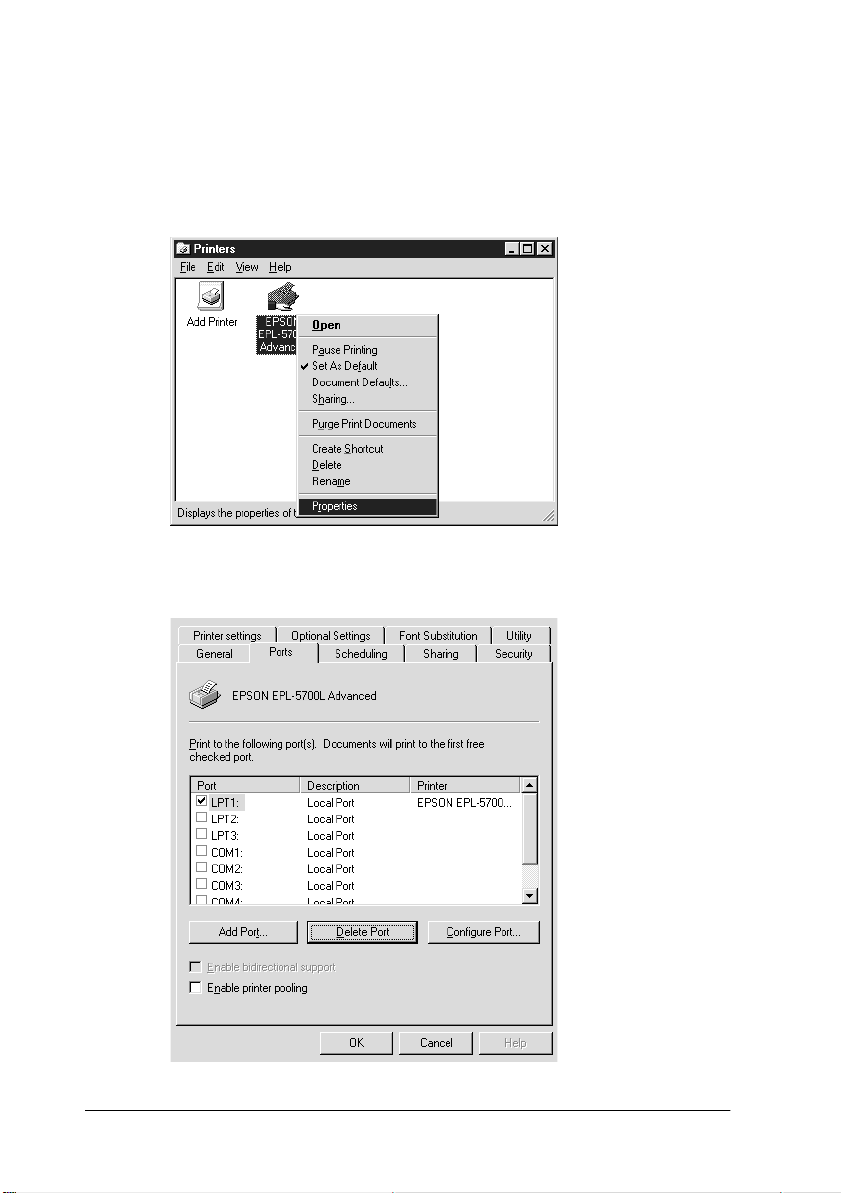
1. Install the printer driver to the client computer from the
software CD-ROM.
2. Open the Printer folder from the Control Panel, then open the
Properties
for your printer.
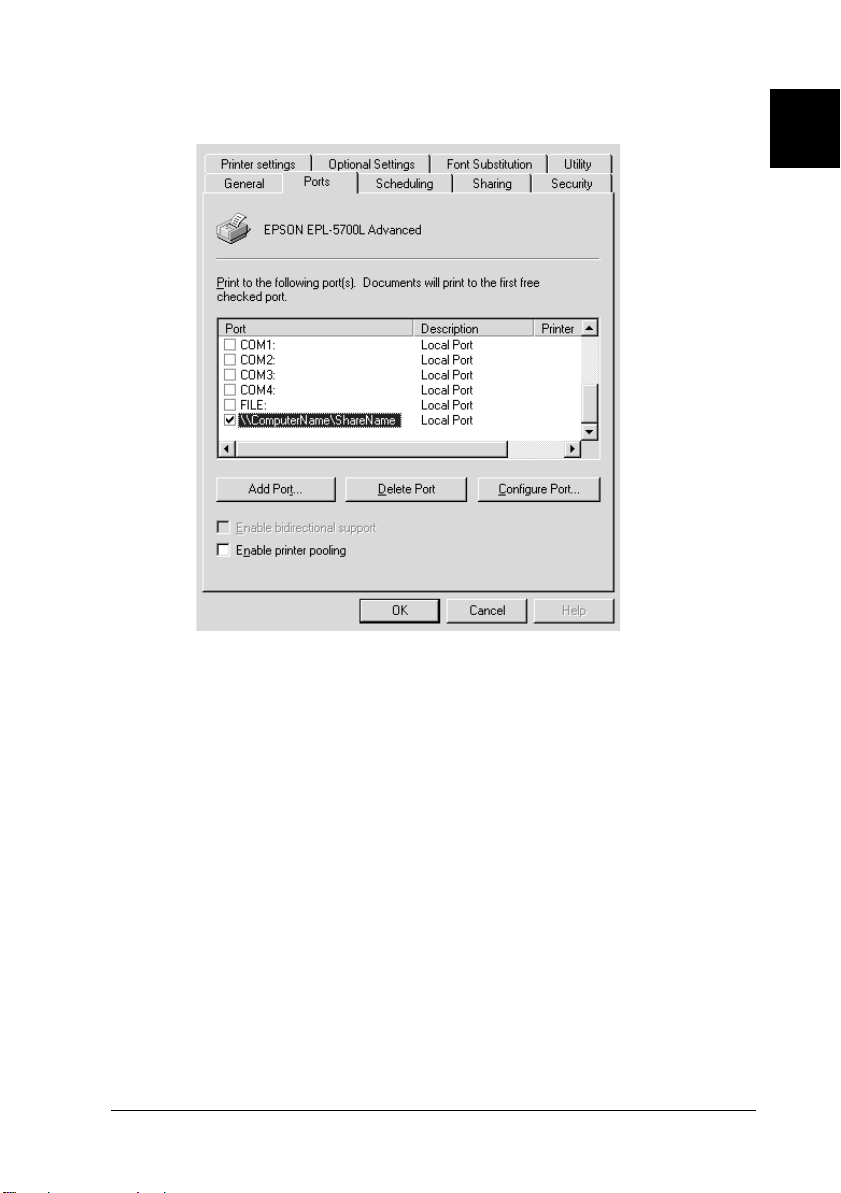
3. Click the
1-6
Ports
Using Your Printer
tab, then click
Add Port
.
Page 19
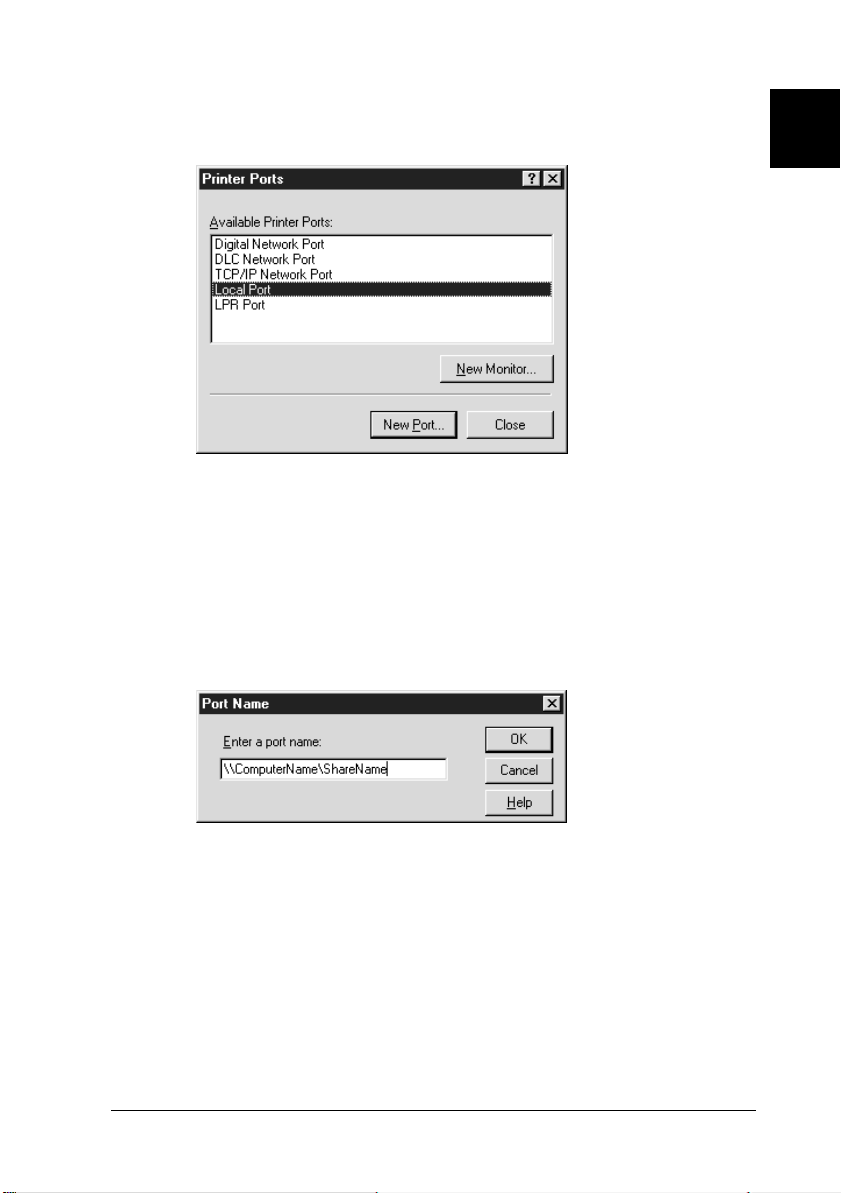
4. The following dialog box appears. Select
click
New Port
5. The following dialog box appears. In the text box, type the
following information:
\\name of computer that is connected to the printer\name of
the shared printer
Then click OK.
.
Local Port
, then
1
Using Your Printer
1-7
Page 20
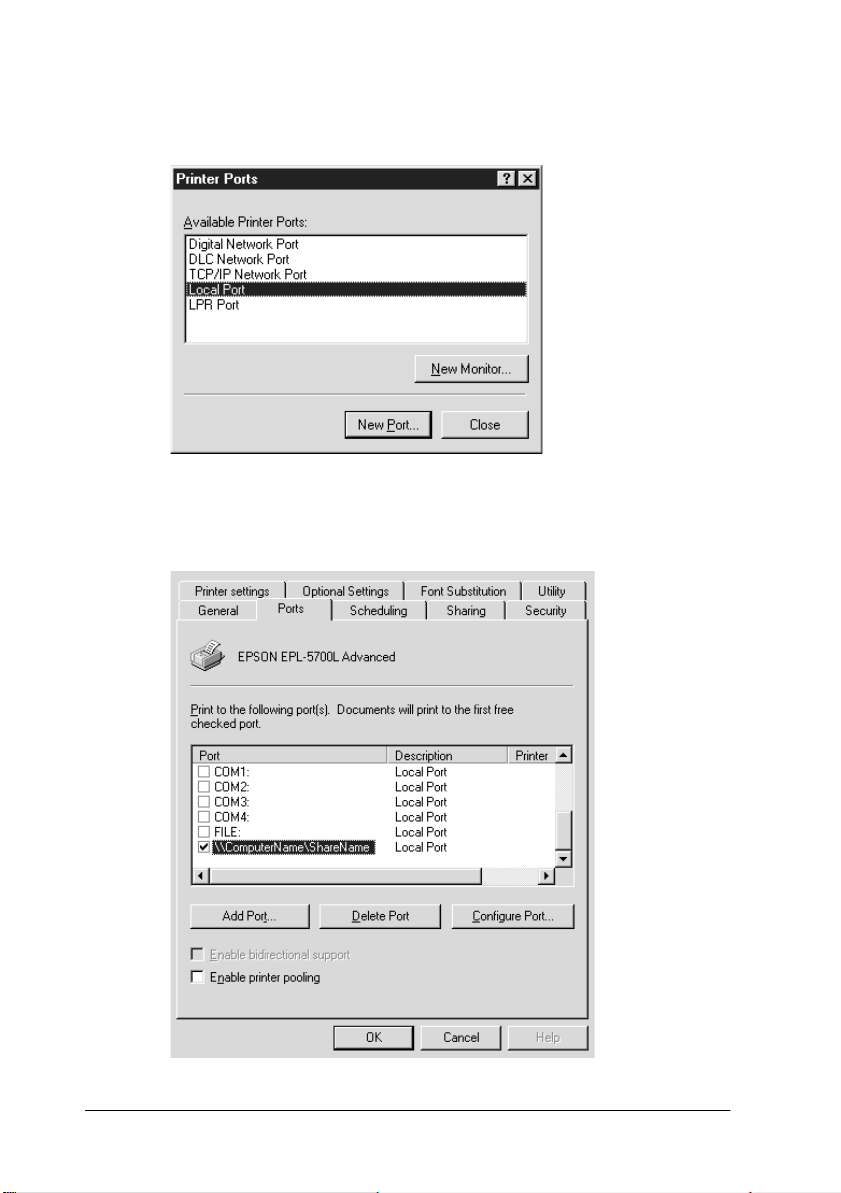
6. In the Printer Ports dialog box, click
to return to the
Close
Ports menu.
7. On the Ports menu, make sure that the new port is added and
the check box is selected. Click OK to close the printer driver.
1-8
Using Your Printer
Page 21

Using the DMA
Faster printing with a Direct Memory Access (DMA) is possible
if your printer is connected to your computer through an
Extended Capability Port (ECP), a type of parallel port with
expanded specifications. With the DMA and the ECP, you can
send print-job data directly to the printer without going through
the CPU, which increases the effectiveness of data flow.
Before using DMA to transmit a print job confirm the following
points.
Check if your computer supports DMA. To confirm if your
❏
computer has an ECP chip installed, contact the manufacturer
or look in the computer’s documentation.
Confirm the parallel port setting is “ECP” or “ENHANCED”
❏
through the BIOS Setup. Refer to your computer’s
documentation to set the BIOS. However, before setting the
BIOS, uninstall the EPL-5700L/EPL-5700i printer driver.
After setting the BIOS, re-install the printer driver.
Confirming if you can use DMA
Using DMA increases your printing speed. You can confirm if
your computer can use DMA by checking the
tab under
Properties
in your Printer driver.
Optional Settings
1
Using Your Printer
1-9
Page 22
Paper Handling
The printer can feed paper from either of two sources: the
standard paper-tray or the optional lower cassette.
Please note the following points:
Paper should be high quality and relatively smooth with a
❏
weight between 60 and 90 g/m² (16 to 24 lb).
The printer is extremely sensitive to moisture. Be sure to store
❏
your paper in a dry environment.
Use of colored paper is acceptable, but coated paper should
❏
be avoided.
You may use paper with preprinted letterheads, provided
❏
that the paper and ink are both laser-printer type.
Loading the paper-tray
You can load up to 150 sheets of plain paper into the paper-tray.
To load paper, follow these steps:
1. Lift off the tray cover.
1-10
Using Your Printer
Page 23

2. Fan a stack of paper and tap it on a flat surface to even the
edges. Insert the paper printable side up into the tray and
adjust the paper guides.
2
1
Note:
Before printing make sure the Paper Size setting in your printer
driver matches the paper you load.
3. Place the cover on the paper-tray.
1
Using Your Printer
1-11
Page 24
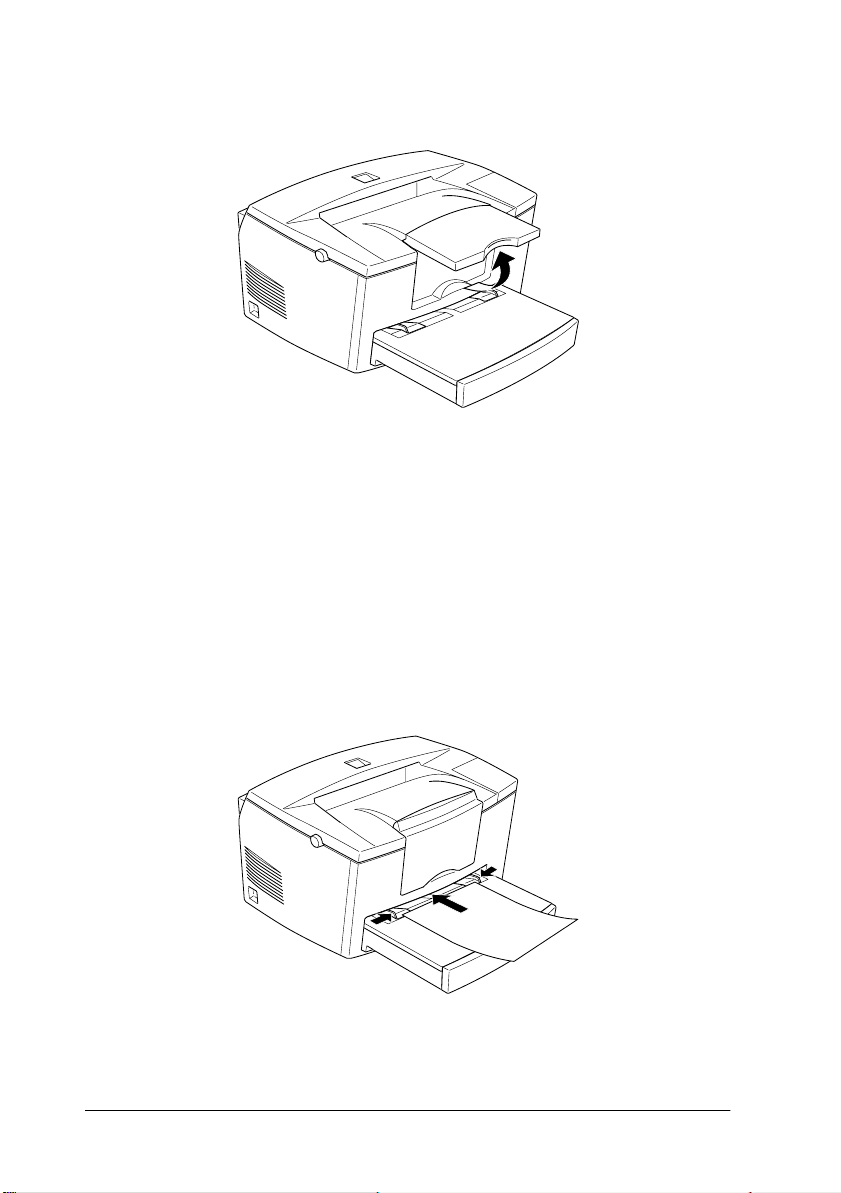
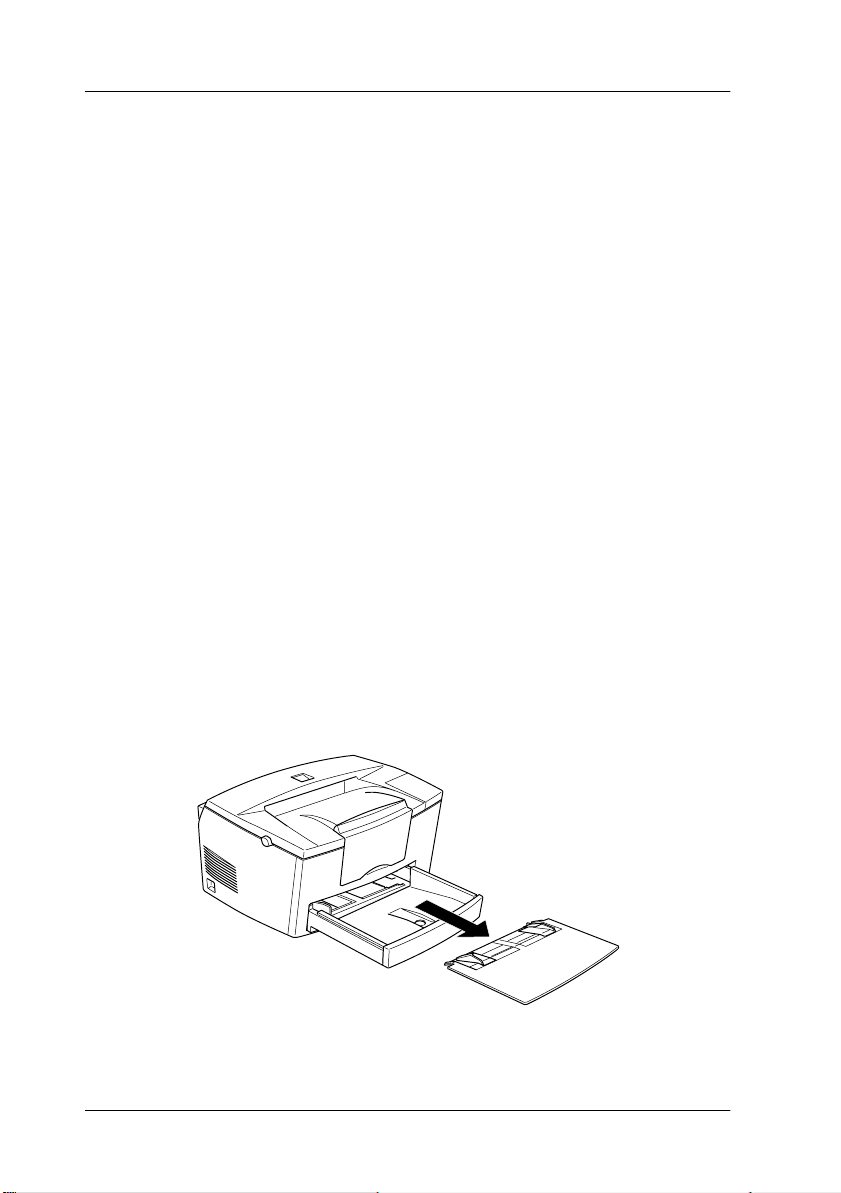
4. Raise the extension output tray.
Note:
❏
If you want to print on paper heavier than 90g/m2 (24 lb) or on
special paper (such as envelopes, labels, or transparencies), see
“Printing on special media” on page 1-13.
❏
When you feed paper manually, be sure to change the
Source
feed slot. Insert a single sheet with the printable side up, as far as it
will go into the manual feed slot above the paper-tray cover. Adjust
the paper guides to match the paper size you are using.
setting to the
MP tray
before printing from the manual
Paper
1-12
Using Your Printer
Page 25

Printing on special media
Note:
Since the quality of any particular brand or type of paper may be changed
by the manufacturer at any time, EPSON cannot guarantee the quality
of any type of paper. Always test samples of paper stock before purchasing
large quantities or printing large jobs.
The EPL-5700L/EPL-5700i Laser Printer can print on special
paper stock such as heavy paper, envelopes, labels, and
transparencies.
Envelopes
You can load five to ten envelopes depending on thickness (60 to
90 g/m²) in the paper-tray. Load envelopes with the flap side
down and short edge first.
The printing quality on envelopes may be irregular because
different parts of an envelope have different thicknesses. Print one
or two envelopes to check the print quality. If the printing is too
light, adjust the print density as described in “Adjusting print
density” on page 1-15.
Do not use window envelopes unless they are specially designed
for laser printers. The plastic on most window envelopes will melt
when it comes into contact with the hot fuser.
1
Labels
You can load five to ten sheets of labels in the paper-tray.
However, you may need to feed some types of labels one sheet at
a time in the paper-tray.
Use only labels designed for laser printers or plain-paper copiers.
To prevent the adhesive from coming into contact with printer
parts, always use labels that completely cover the backing sheet,
with no gaps between the individual labels.
Using Your Printer
1-13
Page 26

You should test the label sheet for leaking adhesive by pressing a
sheet of paper on top of a sheet of labels. If the paper sticks, do
not use the labels.
Transparencies
You can load up to five transparencies in the paper-tray.
However, you may need to feed some types of Labels one sheet
at a time in the paper-tray.
You can use only overhead projector transparencies and adhesive
drafting film made for use with laser printers or plain-paper
copiers.
Optimizing Print Quality
Using RITech
Resolution Improvement Technology (RITech) is EPSON’s
original printer technology that improves the appearance of
printed lines, text, and graphics.
The RITech setting
The factory setting for RITech is on. The RITech gives the best
quality text and graphics for nearly all purposes. You may not
need to turn the setting off. However, if you are printing gray
shading or screen patterns, change the setting to
To change the RITech setting, follow these steps:
Using the printer driver:
Check or uncheck the RITech check box on the Panel menu in the
printer driver.
1-14
Using Your Printer
Off
.
Page 27
If the pattern still needs to be improved, you may also have to
change the print density setting. See the next section for more
information.
Adjusting print density
Do not change the print density unless it is necessary. Changing
the print density affects all text and graphics, so check the new
setting by printing several pages with various kinds of text and
graphics.
If your printout is too light or too dark, adjust the print density
by using the printer driver. Change the Density setting on the
Panel menu in the printer driver.
Note:
Increasing the print density increases toner consumption. If you select
darker print, you may need to replace the developer cartridge more often.
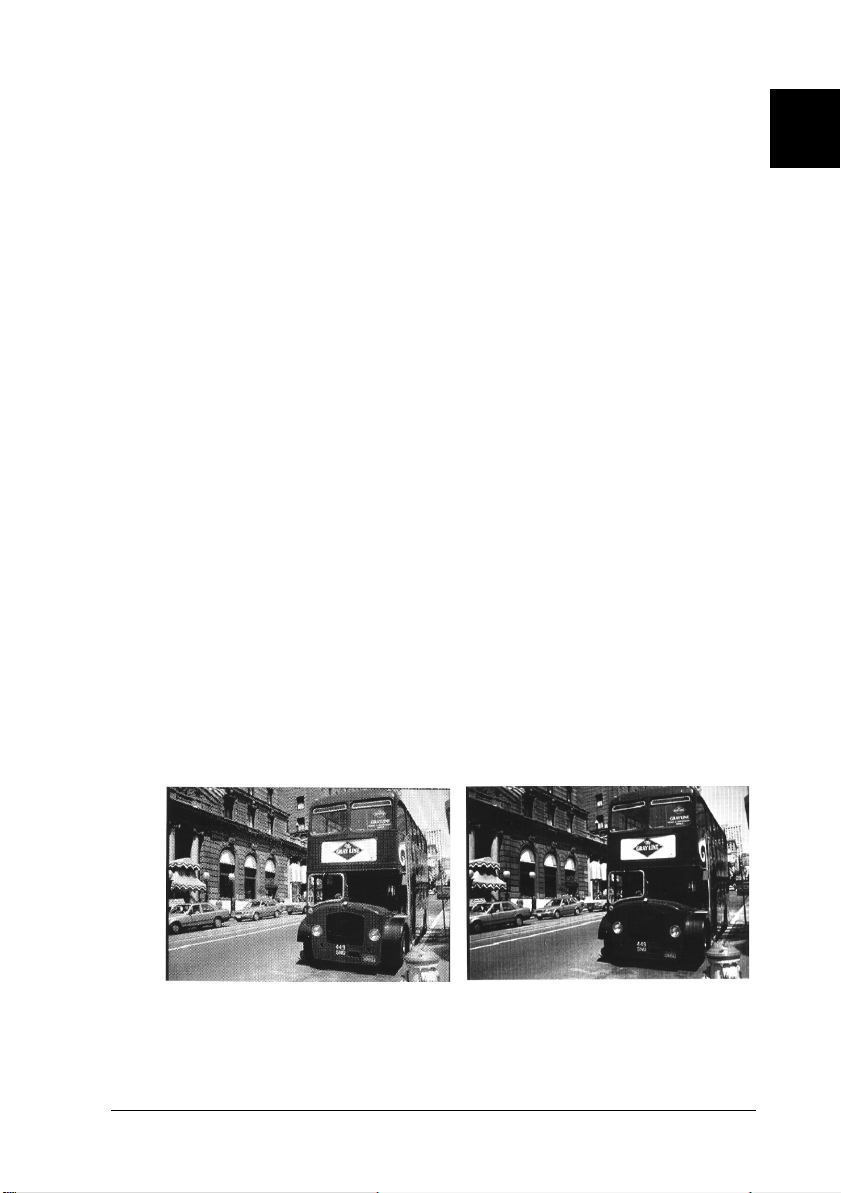
Enhanced MicroGray
Enhanced MicroGray (Enh. MG) is EPSON’s new printer
technology created especially for high quality output of photos
and other images with smooth tonal changes.
1
Enh. MG off Enh. MG on
To use the Enhanced MicroGray function, select
printer driver’s Graphics menu.
Using Your Printer
Enh. MG
on the
1-15
Page 28

1-16
Using Your Printer
Page 29

Chapter 2
Using Options
Printer Options. . . . . . . . . . . . . . . . . . . . . . . . . . . . . . . . . . . . . . . . . . . 2-2
500-Sheet Lower Cassette Unit . . . . . . . . . . . . . . . . . . . . . . . . . . . . . 2-2
Installing. . . . . . . . . . . . . . . . . . . . . . . . . . . . . . . . . . . . . . . . . . . . 2-3
Loading paper . . . . . . . . . . . . . . . . . . . . . . . . . . . . . . . . . . . . . . .2-4
Face-up Tray. . . . . . . . . . . . . . . . . . . . . . . . . . . . . . . . . . . . . . . . . . . . .2-5
Installing. . . . . . . . . . . . . . . . . . . . . . . . . . . . . . . . . . . . . . . . . . . . 2-5
Using. . . . . . . . . . . . . . . . . . . . . . . . . . . . . . . . . . . . . . . . . . . . . . . 2-6
Memory Module . . . . . . . . . . . . . . . . . . . . . . . . . . . . . . . . . . . . . . . . .2-7
Installing. . . . . . . . . . . . . . . . . . . . . . . . . . . . . . . . . . . . . . . . . . . . 2-7
Removing. . . . . . . . . . . . . . . . . . . . . . . . . . . . . . . . . . . . . . . . . . . 2-12
2
Using Options
2-1
Page 30

Printer Options
You can add to your printer’s capabilities by installing any of the
following options:
500-Sheet Lower Cassette Unit (C81287✽ for A4 size paper,
❏
C81288✽ for Letter size paper) increases paper feeding
capacity, up to 500 sheets of paper.
Face-up Tray (C81286✽) enables face-up output.
❏
Optional memory module expands your printer’s memory.
❏
Note:
The asterisk (✽) is a substitute for the last digit of the product number,
which varies by country.
Each of these options is discussed in its own section.
If you purchased your printer and options at the same time, first
set up the printer and run the print test by following the
instructions in the
Caution:
c
Before installing an option, carefully read the manual that comes
with the option.
Getting Ready
guide. Then install the options.
500-Sheet Lower Cassette Unit
The optional 500-Sheet Lower Cassette Unit gives you a second
paper source in addition to the standard paper-tray. This section
describes how to install the cassette and load paper.
2-2
Using Options
Page 31

Installing
1. Turn off the printer.
2. Unplug the printer’s power cord from the electrical outlet and
from the printer.
3. Remove all interface cables from the interface connectors.
4. Make sure the printer and cassette are facing the same way.
Lift the printer and align the pins on the cassette with the holes
on the bottom of the printer. Then, lower the printer until it
rests securely on the Lower Cassette Unit.
2
5. Reconnect any interface cables you removed.
6. Make sure the printer’s power switch is turned off, then plug
the power cord into the printer and into an electrical outlet.
7. Turn on the printer.
Using Options
2-3
Page 32
Note:
After installing the printer driver, you can confirm the optional 500Sheet Lower Cassette Unit is installed correctly. Windows users can
check in the Printer Driver by selecting the
under
Properties
installation in the EPSON Status Monitor 3.
Be sure to select the paper source in your application program.
Since the selection method varies from application to application,
see your software documentation for more information.
, and Macintosh users can check the memory
Optional Settings
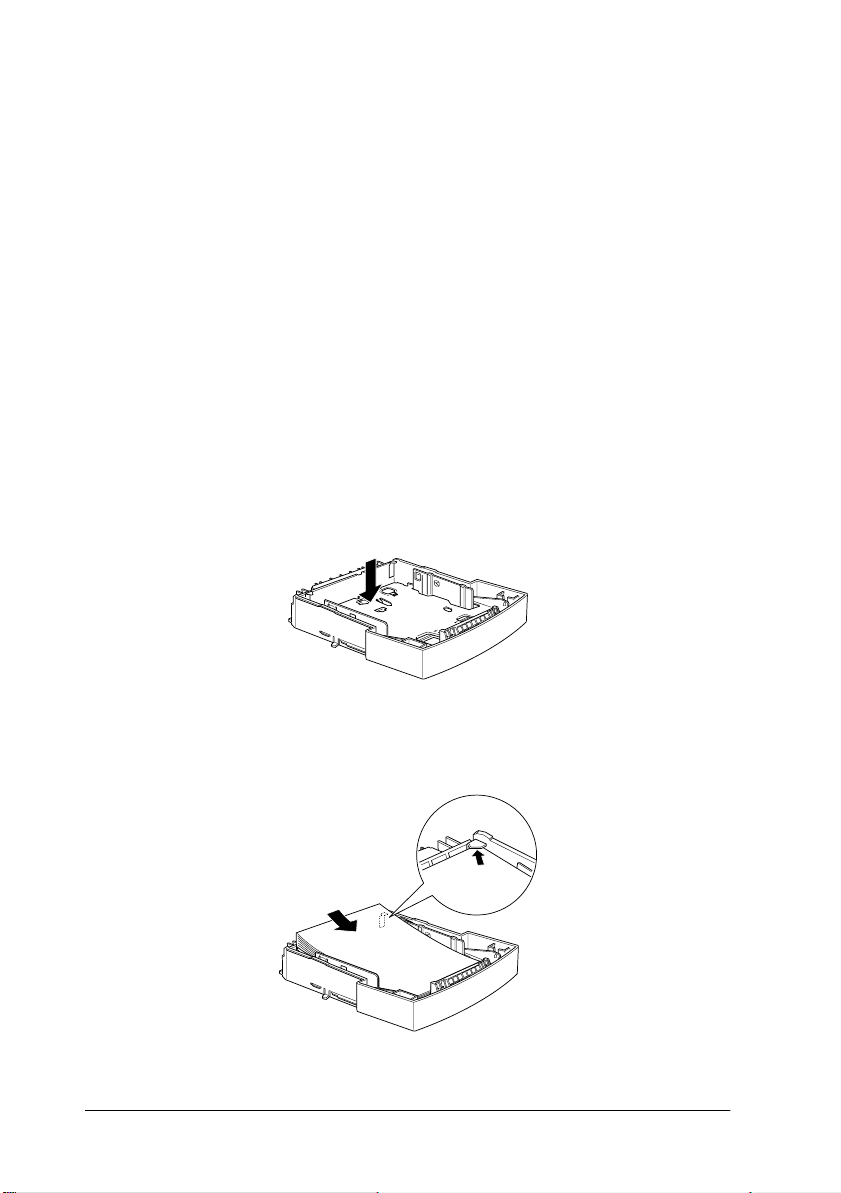
Loading paper
1. Pull out the paper-tray from the paper cassette.
2. Press down the plate in the paper-tray until it locks into
position.
tab
3. Fan a stack of paper and tap it on a flat surface to even the
edges. Insert the paper printable side up into the tray.
2-4
Using Options
Page 33
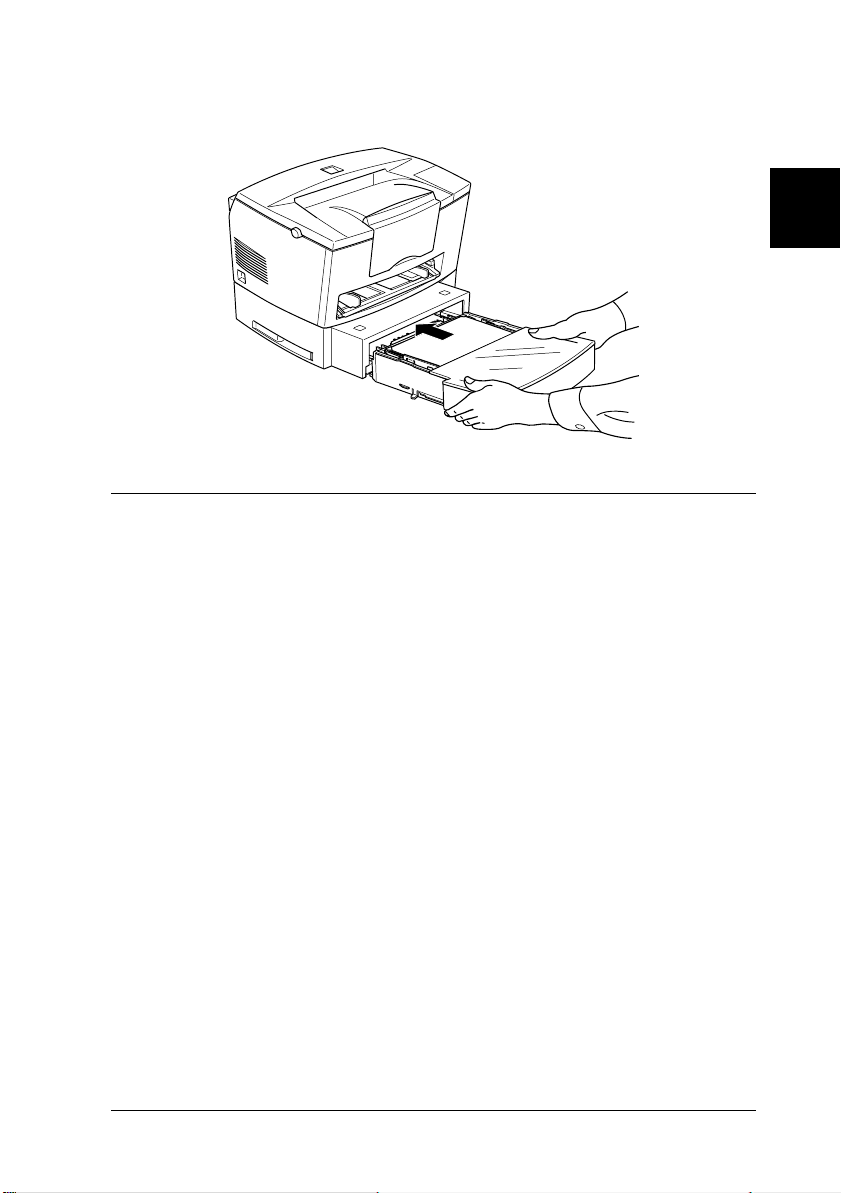
4. Insert the paper-tray in the paper cassette.
Face-up Tray
The printer normally outputs paper face down on top of the
printer. If you want face-up output, you can install the optional
Face-up Tray (C81286✽). This tray gives you immediate viewing
of your printed output and is recommended for printing on media
such as labels and transparencies that require a straight-through
paper path.
2
Installing
1. Turn off the printer.
Using Options
2-5
Page 34
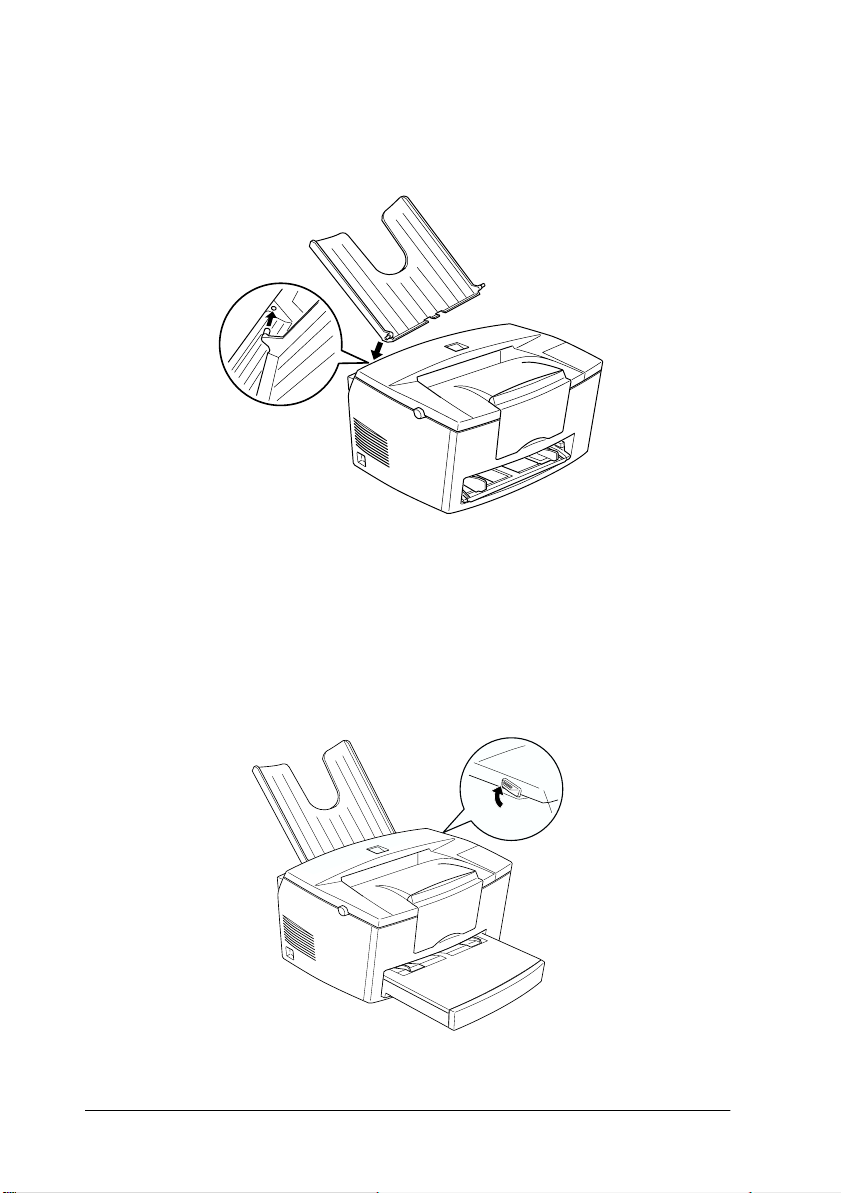
2. Install the Face-up Tray by sliding the mounting pins into the
designated slots, one at a time. Do not force both sides in at
once.
Using
The printer is factory set for face-down output. After installing
the Face-up Tray, you can switch the paper path from face-up to
face-down. The selector is located on the right side of the printer
near the back.
2-6
Using Options
Page 35

Memory Module
By installing a Single In-line Memory Module (SIMM), you can
increase printer memory up to 13 MB (printer default 2MB +
optional 4, 8, 16 or 32 MB). You may want to add additional
memory if you are having difficulty printing complex graphics or
if you regularly use numerous downloaded fonts.
Note:
The maximum amount of memory is 13 MB. Even though a 16 or 32
MB SIMM is installed, only 13 MB is accessible.
You can purchase SIMMs from various vendors. Be sure that the
SIMM you purchase meets the following requirements:
72-pin, EDO type
❏
Capacity of 4, 8, 16 or 32 MB
❏
Access speed of 60 ns or less
❏
Dimensions within 108 mm (4.25 inches) × 26 mm (1.02
❏
inches), with a thickness of 10 mm (0.4 inch)
2
Installing
1. Turn off the printer.
Warning:
To avoid electrical shock, do not attempt to install a SIMM
w
unless the printer is turned off.
2. Unplug the power cord from the electrical outlet.
3. Turn the printer so that its right side faces you.
4. Open the printer cover by pressing the latch on the left side
of the printer.
Using Options
2-7
Page 36
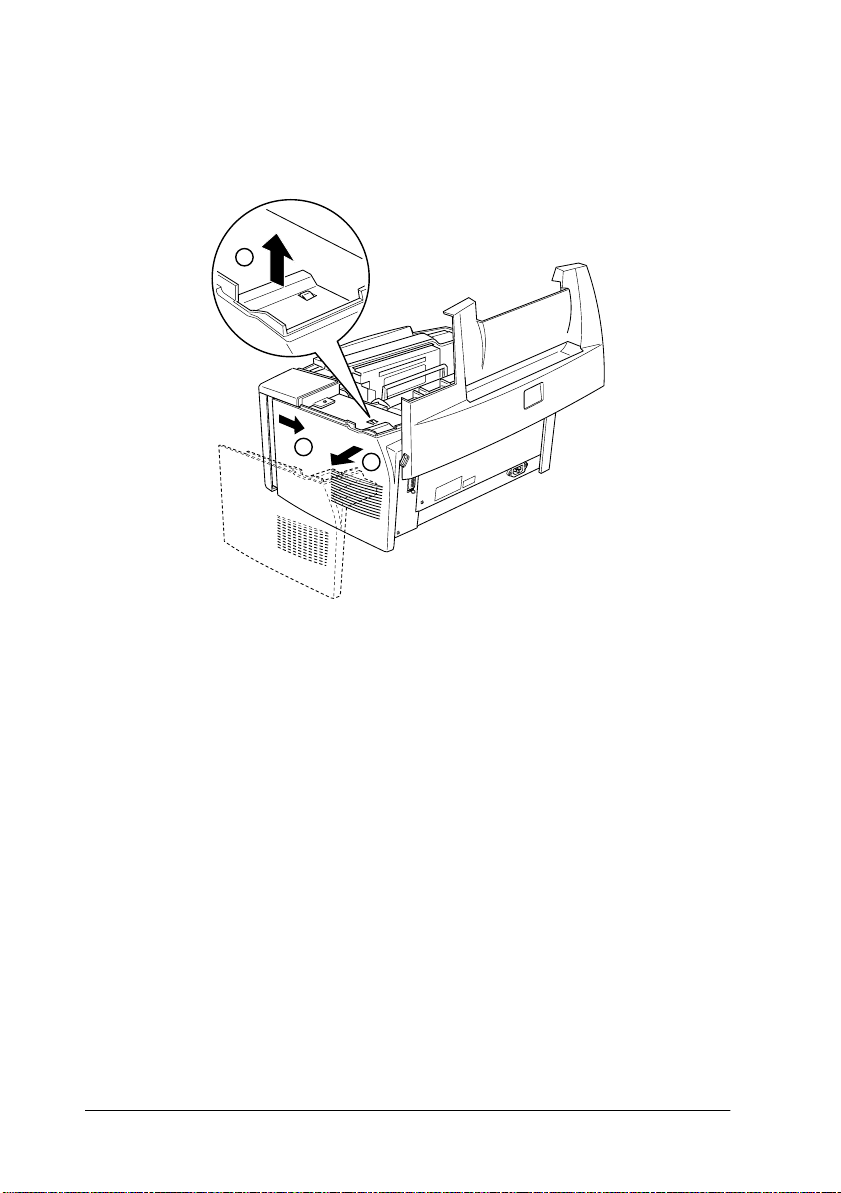
5. Remove the printer’s side cover by lifting the clip and sliding
the side cover backward. Then lift the side cover away from
the printer.
1
2
3
2-8
Using Options
Page 37

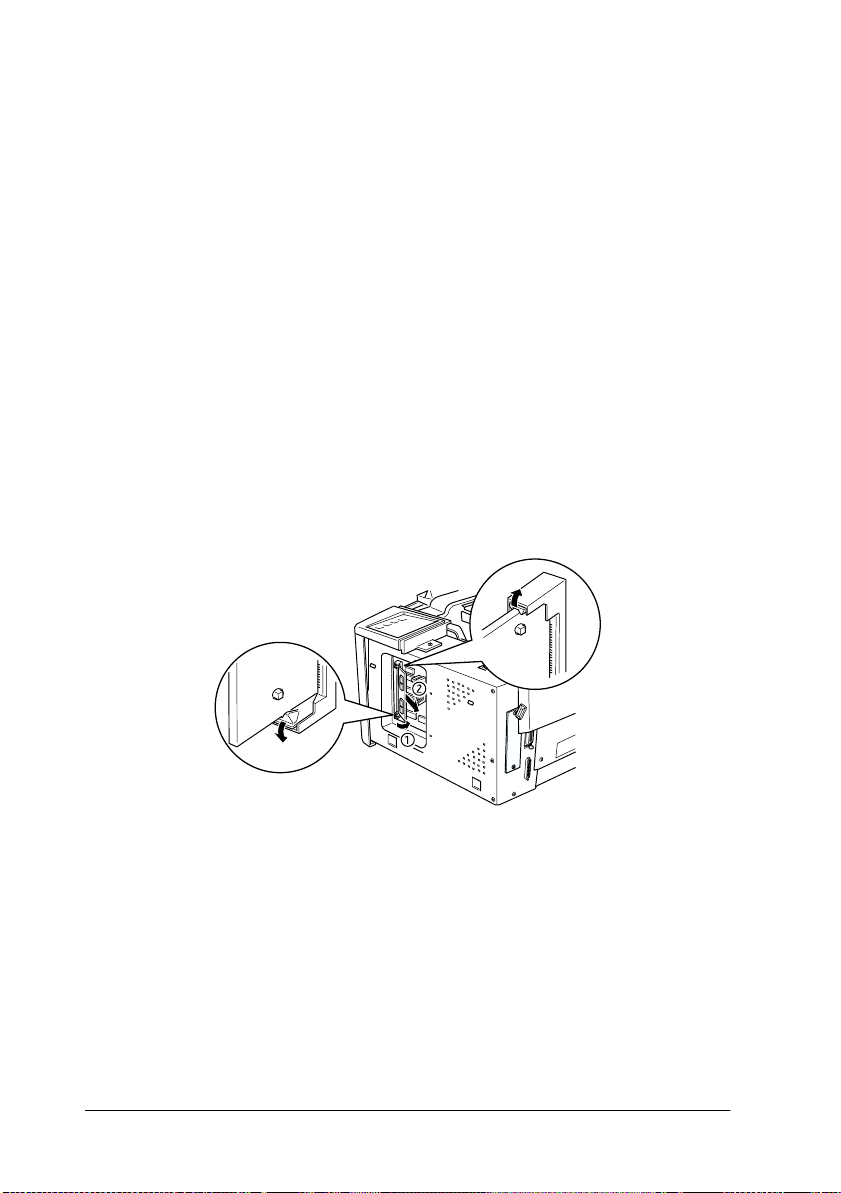
6. Loosen the retaining screws securing the shield cover, and
remove the cover.
1
2
2
c
Caution:
Before you install the module, be sure to discharge any static
electricity by touching the printer’s shield cover. Otherwise, you
may damage static-sensitive components.
Using Options
2-9
Page 38
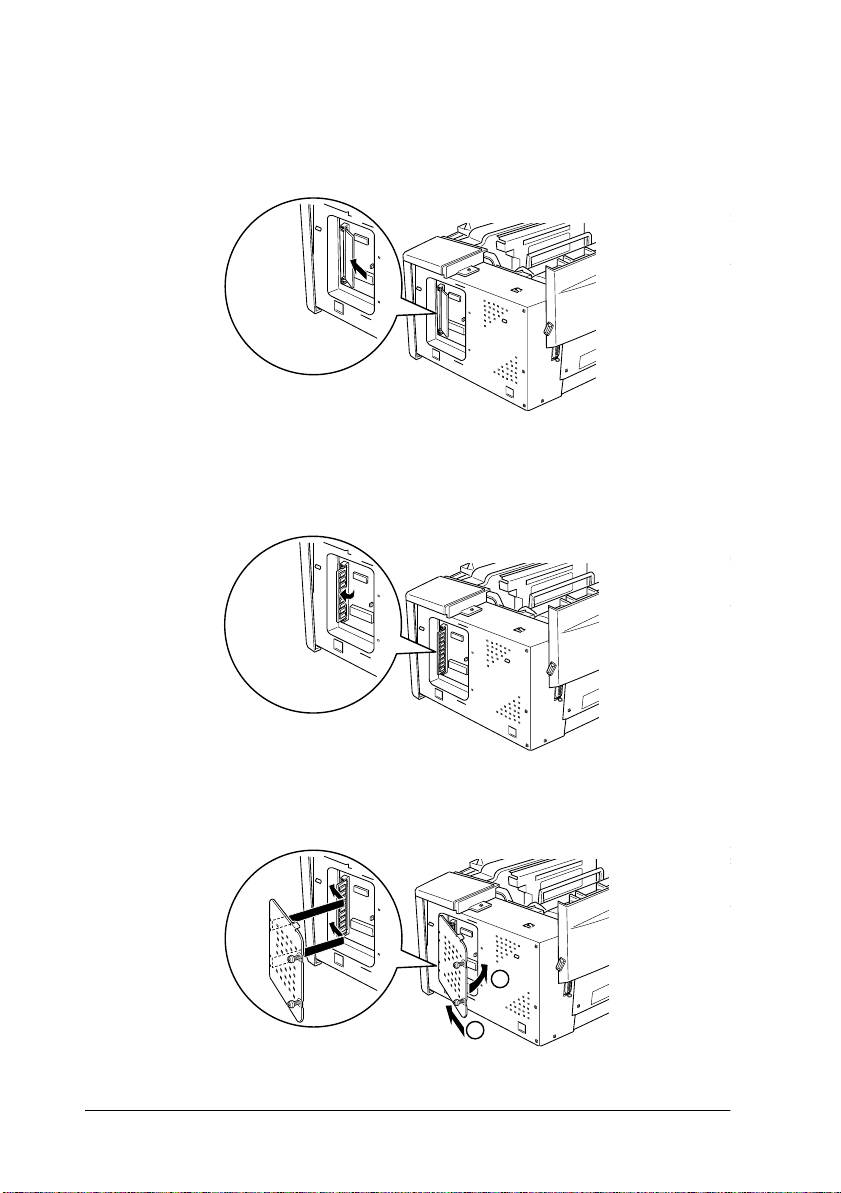
7. Insert the SIMM module into the RAM slot at an angle,
making sure the pin numbers either 1 or 72 of the slot and the
SIMM match.
8. Press the module down until it clicks into place at right angles
to the slot. Do not apply too much force.
9. Replace the shield cover and tighten its screws.
1
2-10
Using Options
2
Page 39
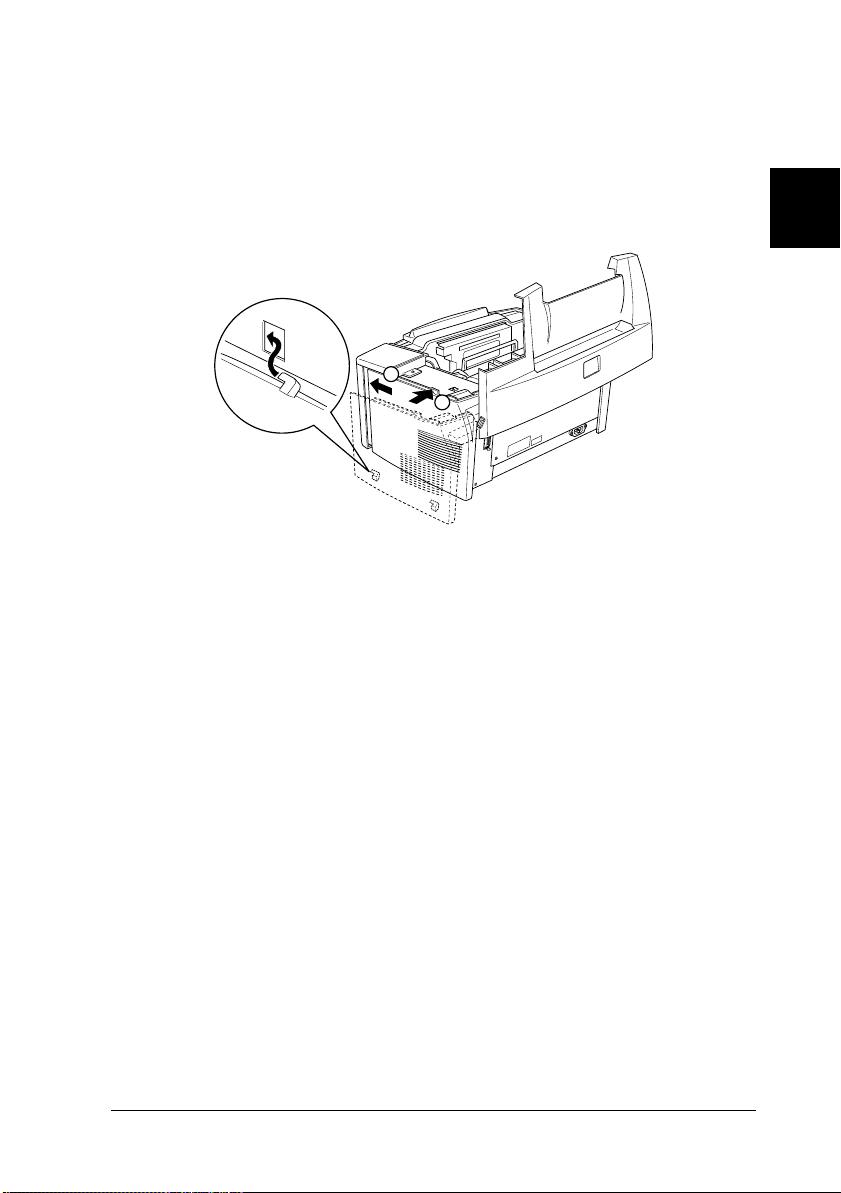
c
Caution:
When replacing the shield cover, be sure not to pinch wires in the
printer between the case and the shield cover.
10. Replace the printer’s side cover.
2
1
11. Gently close the printer cover.
12. Plug the power cord back in and turn on the printer.
Note:
After installing the printer driver, you can confirm the optional memory
is installed correctly. Windows users can check in the Printer Driver by
selecting the
users can check the memory installation in the EPSON Status Monitor
3.
Optional Settings
tab under
Properties
, and Macintosh
2
Using Options
2-11
Page 40
If an incorrect amount of memory is shown on the status sheet,
turn off the printer and review the steps above to make sure you
correctly installed the SIMM. If the amount of memory is still
incorrect, contact your dealer or a qualified service person for
assistance.
Note:
The maximum amount of memory is 13 MB. Even though a 16 or 32
MB SIMM is installed, only 13 MB is accessible.
Removing
1. To access the printer’s RAM slots, perform steps 1 through 7
in “Memory Module” on page 2-7.
2. Pull the clips on each side of the RAM slot outward to release
the memory module.
3. Grasp both sides of the SIMM and pull it out.
4. To complete the procedure, follow steps 8 through 11 in
“Memory Module” on page 2-7.
2-12
Using Options
Page 41

Chapter 3
EPSON Status Monitor 3 Utility
About the EPSON Status Monitor 3 . . . . . . . . . . . . . . . . . . . . . . . . .3-2
Environment for EPSON Status Monitor 3. . . . . . . . . . . . . . .3-2
Accessing the EPSON Status Monitor 3 . . . . . . . . . . . . . . . . . . . . . . 3-4
For Windows users. . . . . . . . . . . . . . . . . . . . . . . . . . . . . . . . . . .3-4
For Macintosh users . . . . . . . . . . . . . . . . . . . . . . . . . . . . . . . . . . 3-5
Getting Printer Status Details. . . . . . . . . . . . . . . . . . . . . . . . . . . . . . . 3-6
Setting Monitoring Preferences . . . . . . . . . . . . . . . . . . . . . . . . . . . . . 3-9
For Windows users. . . . . . . . . . . . . . . . . . . . . . . . . . . . . . . . . . .3-9
Status Alert Window. . . . . . . . . . . . . . . . . . . . . . . . . . . . . . . . . . . . . . 3-11
For Windows users. . . . . . . . . . . . . . . . . . . . . . . . . . . . . . . . . . .3-11
For Macintosh users . . . . . . . . . . . . . . . . . . . . . . . . . . . . . . . . . . 3-11
Stopping Monitoring (Windows only). . . . . . . . . . . . . . . . . . . . . . . 3-12
3
EPSON Status Monitor 3 Utility
3-1
Page 42

About the EPSON Status Monitor 3
EPSON Status Monitor 3 is a utility program that monitors your
printer and gives you information about its current status,
including the amount of remaining toner. If a print error occurs,
the Status Monitor also provides you with a message describing
the error. You can access EPSON Status Monitor 3 from your
printer driver.
Before using Status Monitor 3, be sure to read the printer driver’s
README file. This file contains the latest information on the
printer driver including Status Monitor 3.
Environment for EPSON Status Monitor 3
Protocols
The protocols that must be installed to run EPSON Status
Monitor 3 vary depending on your operating system and printer
type. The following table divides printers into two categories:
Local printers and Windows shared printers.
Use this table to determine what protocols you need to install
according to your operating system and printer type, then see the
corresponding section for your operating system.
Local Printer Windows Shared
Windows 98 LPT/USB LPT/USB
Windows 95 LPT LPT
Windows NT 4.0 LPT LPT
Macintosh USB —
3-2
EPSON Status Monitor 3 Utility
Printers
Page 43

Windows shared printer
To monitor a shared printer from the client through the server
machine, select
Allow monitoring of shared printer
Monitoring Preference dialog box in the server machine. For
information, see “Setting Monitoring Preferences” on page 3-9.
in the
(1)
1: client machine
2: server machine
3: Windows shared printer
(2)
See the README file for more information about support for
Windows shared printers.
Local Printer
Connect the printer directly to the printer port of your computer.
(1)
(3)
(2)
(3)
3
1: local printer
2: Windows 98/95/NT4.0
3: Parallel cable/USB cable
Windows 98/95 Windows NT 4.0
Bi-directional
support is necessary.
Do not need any
special settings.
EPSON Status Monitor 3 Utility
3-3
Page 44

For Windows 98/95:
You need to set the bi-directional support in the printer’s
properties dialog box. Click the
Settings
printer
. Then click the
radio button.
Enable bi-directional support for this
Details
tab and click
Accessing the EPSON Status Monitor 3
EPSON Status Monitor 3 monitors the printer during printing or
when the EPSON Status Monitor 3 dialog box is opened.
For Windows users
Follow these steps to access EPSON Status Monitor 3.
Spool
1. Double-click the
2. Double-click the
3. Right-click the icon of your printer, and click
you are using Windows NT 4.0, you can choose either
Document Defaults
My Computer
Printers
folder.
or
Properties
icon.
.
Properties
. If
3-4
EPSON Status Monitor 3 Utility
Page 45

4. Click the
Utility
tab.
3
5. Click
Note:
Unchecking the Monitor the Printing Status check box during normal
operation causes the Status Alert window to stop monitoring some
errors.
EPSON Status Monitor 3
Monitor 3.
to start EPSON Status
For Macintosh users
You can find the
by selecting the EPSON Status Monitor 3 (alias) in the Apple
5700i
menu.
EPSON Status Monitor 3
EPSON Status Monitor 3 Utility
for
EPL-5700L
and
EPL-
3-5
Page 46

Note:
❏
The appropriate printer port must be selected in the
receive the necessary information from the selected printer driver
when the EPSON Status Monitor 3 starts. If the printer port is not
correct an error will occur.
❏
If you change the printer driver in the
is being printed in background printing, the output to the printer
may be disrupted.
❏
The printer status and display of the consumables, in the status
window, can only be seen when the status is normally acquired in
the
Chooser
.
Chooser
Chooser
, while the spool file
Getting Printer Status Details
You can monitor the current status and consumable information
of the printer in the EPSON Status Monitor 3 dialog box.
to
3-6
EPSON Status Monitor 3 Utility
Page 47

For Windows Users
Printer image: The image at the upper left shows the
printer status graphically.
Text box: The text box next to the printer image
displays the current status of the printer.
When a problem occurs, the most likely
solution is displayed.
OK button: Click OK to close the dialog box.
3
Paper: Displays th e paper size and approxim ate
amount of remaining paper in each
paper source. Optional cassettes are
displayed only if they are installed.
Toner: Displays the amount of toner remaining.
The toner icon flashes when the toner is
low (10 percent or less).
Photoconductor Unit
Life:
Displays the Photoconductor unit’s
remaining functional life.
EPSON Status Monitor 3 Utility
3-7
Page 48

For Macintosh Users
Printer image: The image at the upper left shows the
printer status graphically.
Text box: The text box next to the printer image
displays the current status of the printer.
When a problem occurs, the most likely
solution is displayed.
Close button: Click
Simple display Reduces the display and shows only the
status details screen.
Paper: Displays the paper size and approximate
amount of remaining paper in each
paper source. Optional cassettes are
displayed only if they are installed.
Toner: Displays the amount of toner remaining.
The toner icon flashes when the toner is
low (10 percent or less).
3-8
EPSON Status Monitor 3 Utility
to close the dialog box.
Close
Page 49
Photoconductor Unit
Life:
Displays the Photoconductor unit’s
remaining functional life.
Setting Monitoring Preferences
For Windows users
To make specific monitoring settings, click the
Preferences
properties dialog box. The Monitoring Preferences dialog box
appears.
button in the
menu of the printer driver’s
Utility
Monitoring
3
Note:
This utility is only available in Windows.
EPSON Status Monitor 3 Utility
3-9
Page 50

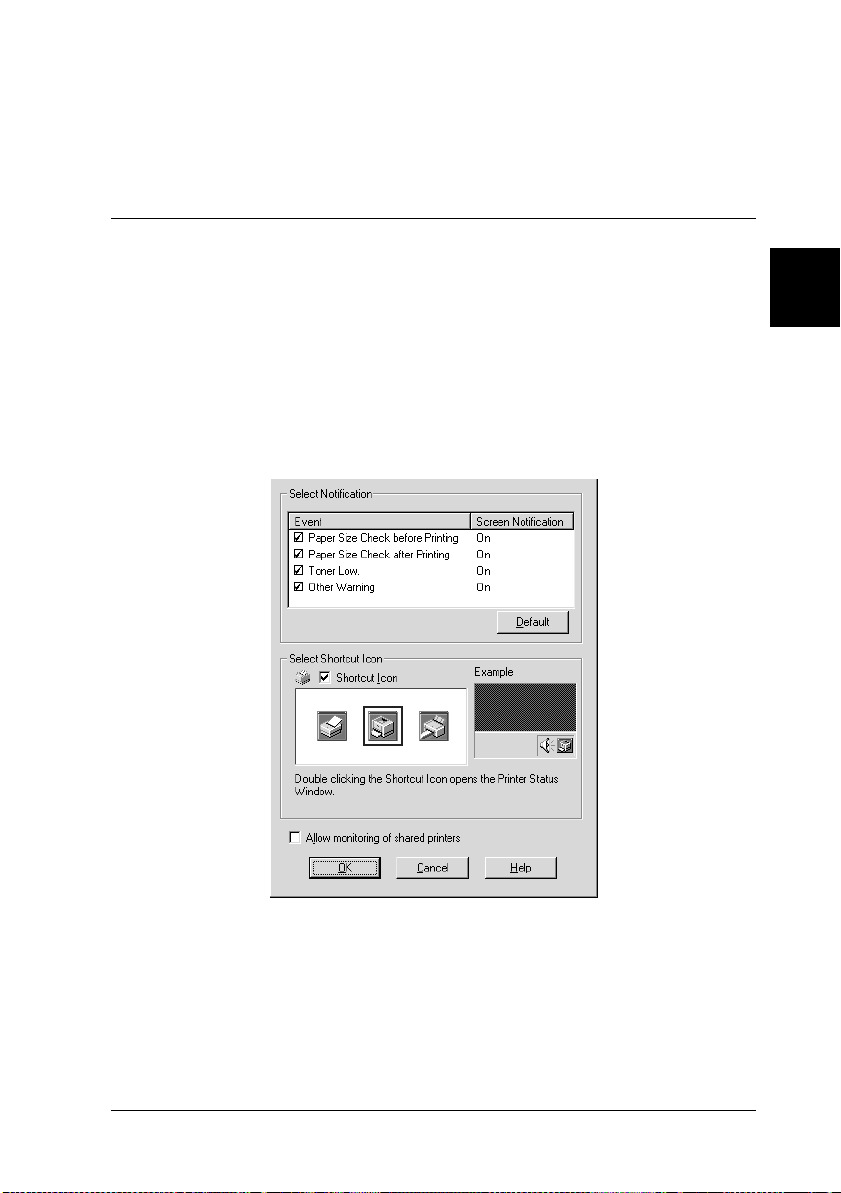
Settings:
Select Notification: Select the error notification type you
want.
Default button: Restores default settings.
Select Shortcut Icon: To use the shortcut icon, check the
Shortcut Icon
icon. The icon you select appears on the
right side of the task bar. Right-click the
shortcut icon and select
Preferences
Preferences dialog box; and
5700i/L Advanced
Status Monitor 3 dialog box. Doubleclicking the shortcut icon also opens the
EPSON Status Monitor 3 dialog box.
check box and select the
Monitoring
to open the Monitoring
EPSON EPL-
to open the EPSON
Allow monitoring of
shared printers:
OK button: Saves new changes.
Cancel button: Cancels any changes.
Help button: Opens the Help screen of the Monitoring
3-10
EPSON Status Monitor 3 Utility
To monitor shared printer, check this
box. You need to make this setting with
EPSON Status Monitor 3 on the server.
Preferences dialog box.
Page 51
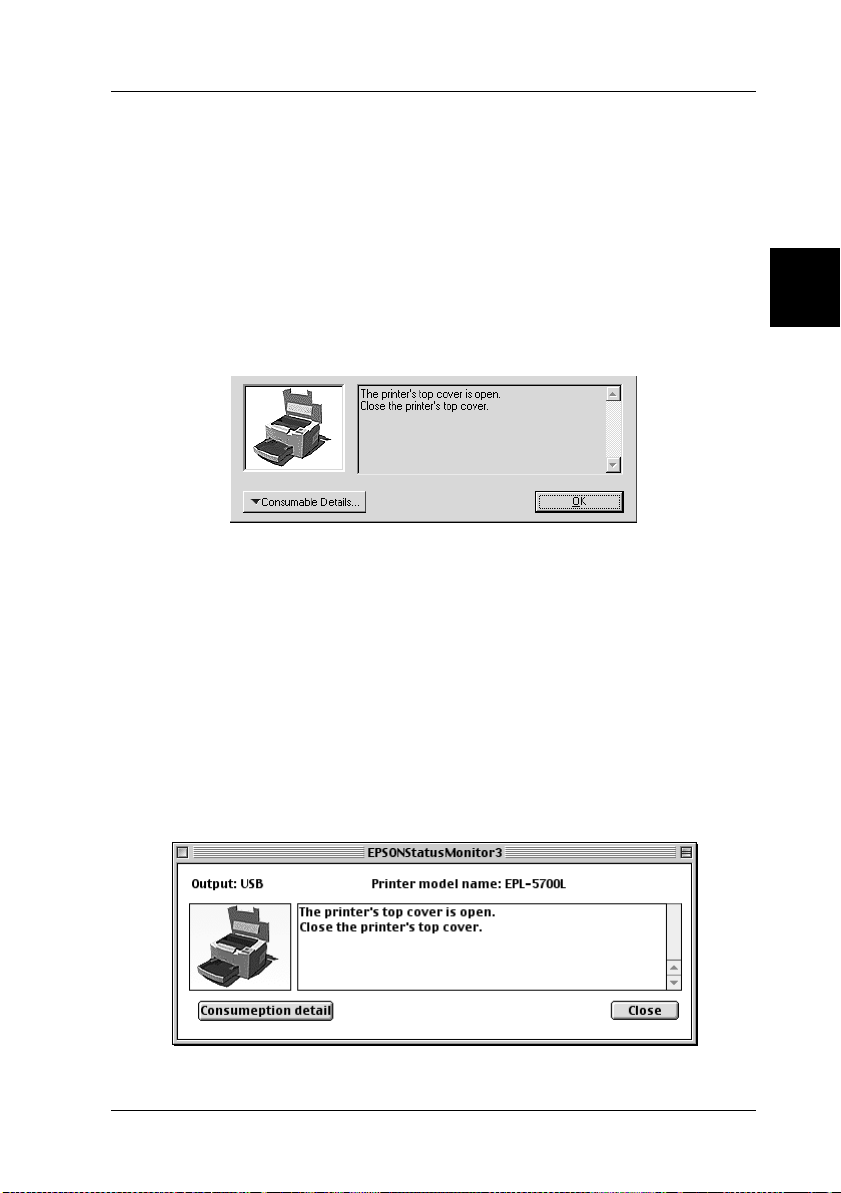
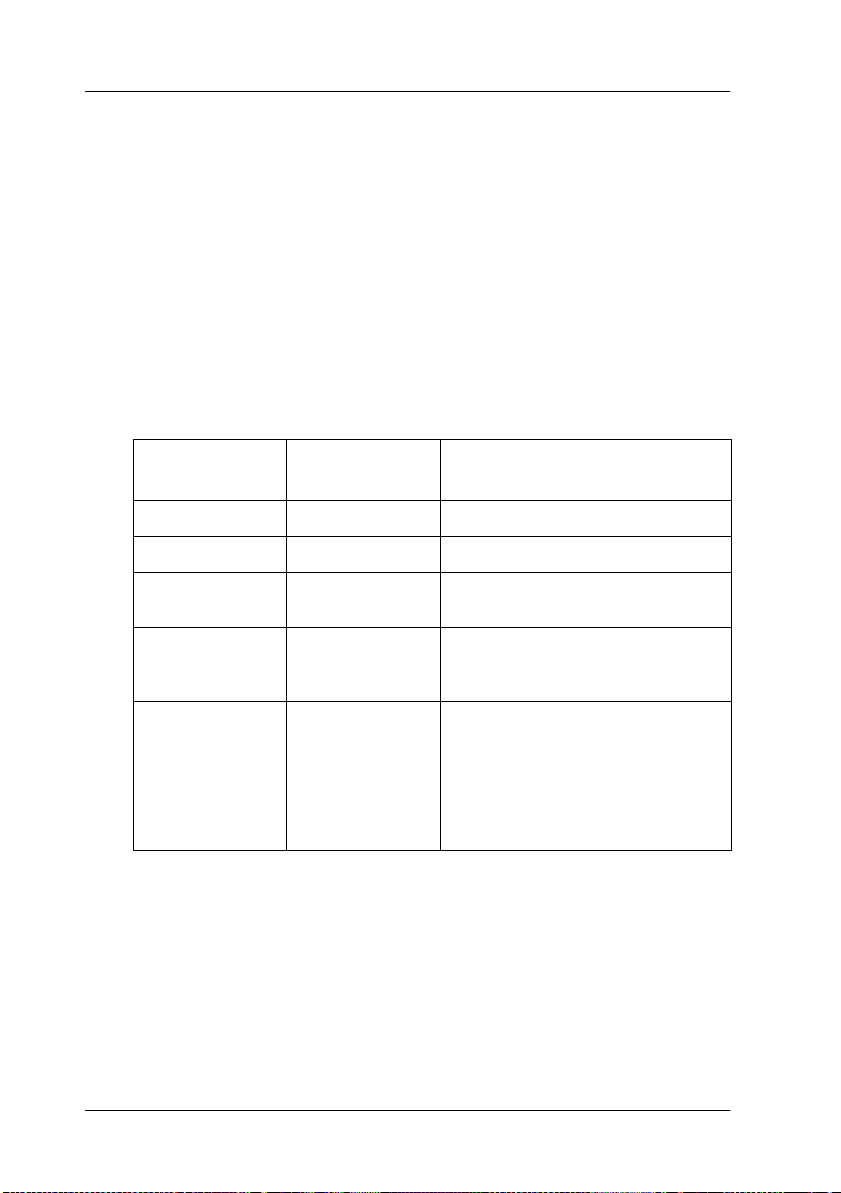
Status Alert Window
The Status Alert window opens under the conditions you select
in the Monitoring Preferences dialog box. This Status Alert
window indicates what type of error has occurred and offers you
a possible solution. The Status Alert window automatically closes
when the problem is cleared.
For Windows users
If you want to see the consumable information of the printer, click
the
Consumable Details
dialog box will no longer disappear even if the problem is cleared
unless you click the OK button.
button. If you click this button, this
3
For Macintosh users
The EPSON Status Monitor 3 automatically appears when a
problem occurs with your printer, if background printing is ON.
EPSON Status Monitor 3 Utility
3-11
Page 52

Stopping Monitoring (Windows only)
EPSON Status Monitor 3 monitors the printer during printing or
when the EPSON Status Monitor 3 dialog box is opened.
To monitor during printing only, close EPSON Status Monitor 3.
To stop monitoring a printer completely, clear the
Printing Status
up printing or you don’t need to monitor the printer at all, clear
this item.
If you clear the
window no longer notifies you when errors occur; however, you
can still monitor the current printer status by clicking the EPSON
Status Monitor 3 icon on the Utility menu.
Note:
For Windows NT 4.0, the
displayed in the Utility menu of Document Defaults.
check box in the Utility menu. If you want to speed
Monitor the Printing Status
Monitor the Printing Status
check box, the Alert
Monitor the
check box is
3-12
EPSON Status Monitor 3 Utility
Page 53

Chapter 4
Troubleshooting
Problems and Solutions . . . . . . . . . . . . . . . . . . . . . . . . . . . . . . . . . . . 4-2
Ready and Error Lights . . . . . . . . . . . . . . . . . . . . . . . . . . . . . . .4-2
Preventing paper feed and paper jam problems . . . . . . . . . .4-3
Clearing paper jams . . . . . . . . . . . . . . . . . . . . . . . . . . . . . . . . . .4-3
Operational problems . . . . . . . . . . . . . . . . . . . . . . . . . . . . . . . . 4-12
Printout problems. . . . . . . . . . . . . . . . . . . . . . . . . . . . . . . . . . . .4-12
Print quality problems . . . . . . . . . . . . . . . . . . . . . . . . . . . . . . . .4-13
Memory problems . . . . . . . . . . . . . . . . . . . . . . . . . . . . . . . . . . . 4-18
Option problems. . . . . . . . . . . . . . . . . . . . . . . . . . . . . . . . . . . . .4-18
Problems Using EPSON Status Monitor 3 . . . . . . . . . . . . . . .4-19
4
Troubleshooting
4-1
Page 54
Problems and Solutions
Ready and Error Lights
The ready (green) and error (red) lights on the top of the printer
may be the first indication of trouble. Whether the lights are
flashing or not indicates different things, as described below.
The StatusAlert window in the EPSON Status Monitor 3 utility
indicates what type of error has occurred and offers you a possible
solution. Look through this section to find the kind of problem
you have, then try the recommended solutions in the order they
are presented until your problem is solved.
Ready Light
(green)
Not lighted Not lighted Printer is off.
Lighted Not lighted Printing is possible.
Flashing Not lighted Printer i s warming up or receiving
Not lighted Flashing Either the printer is out of paper
Not lighted Lighted This is an error that requires a
Error Light
(red)
Printer Status
data.
or there is an error that can be
easily remedied.
service call. Alternatively, try
turning off the printer and then
tu rn ing it back on. If this does not
remedy the error, contact your
dealer or a qualified service
person.
Note:
If the problem remains after you work through the suggestions in this
section, contact your dealer for assistance.
4-2
Troubleshooting
Page 55
Preventing paper feed and paper jam problems
If you have frequent paper feed or paper jam problems, use this
checklist of corrective measures:
Fan the stack of paper and then tap its edges to align them
❏
before loading.
Be sure you do not load too much paper in the tray.
❏
Be sure to adjust the paper guides so that the paper feeds
❏
freely.
Never allow more than 100 sheets to accumulate on the
❏
extension output tray.
Try turning over the stack of paper in the paper-tray. Most
❏
paper packages indicate the best side for printing.
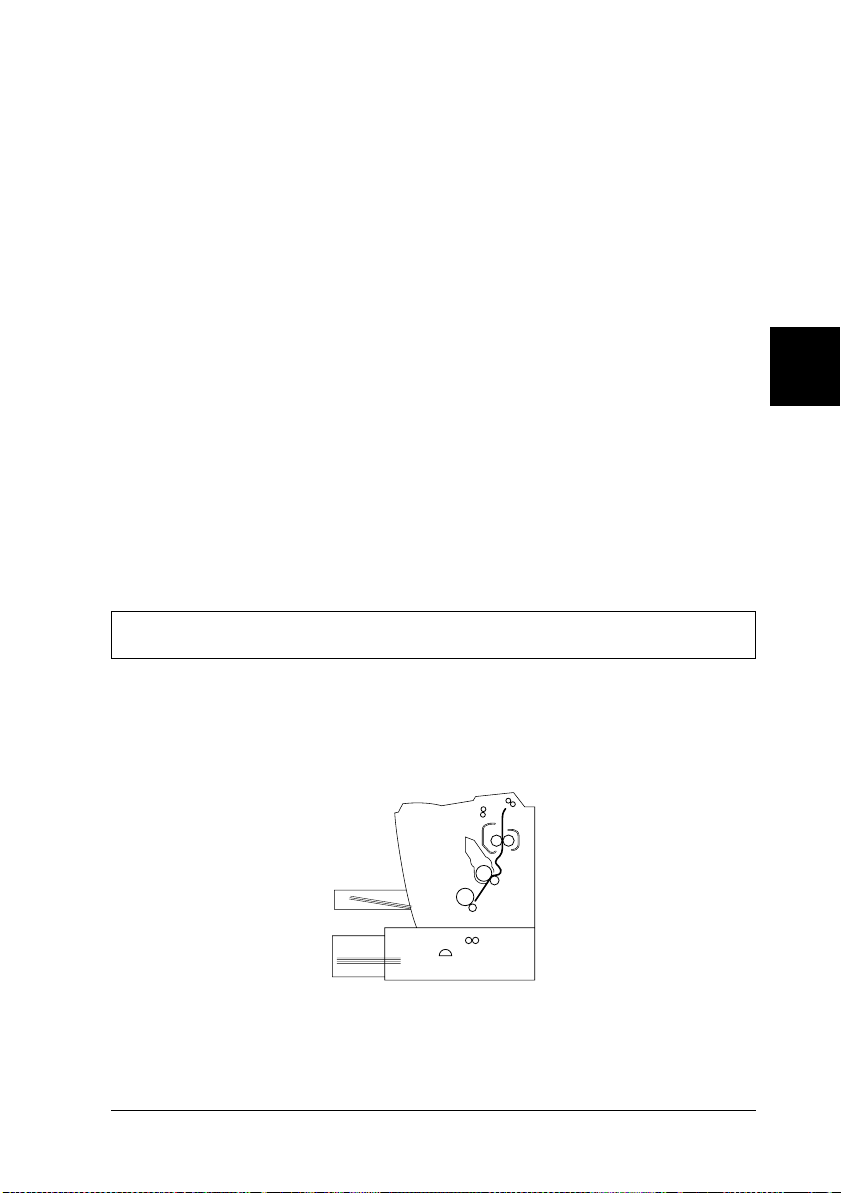
Clearing paper jams
The printer stops and the error light (red) is flashing
4
The following steps describe how to remove paper when it is
jammed in the manner shown. Other types of paper jams are
described later in the chapter.
1. Make sure the printer is turned off.
Troubleshooting
4-3
Page 56
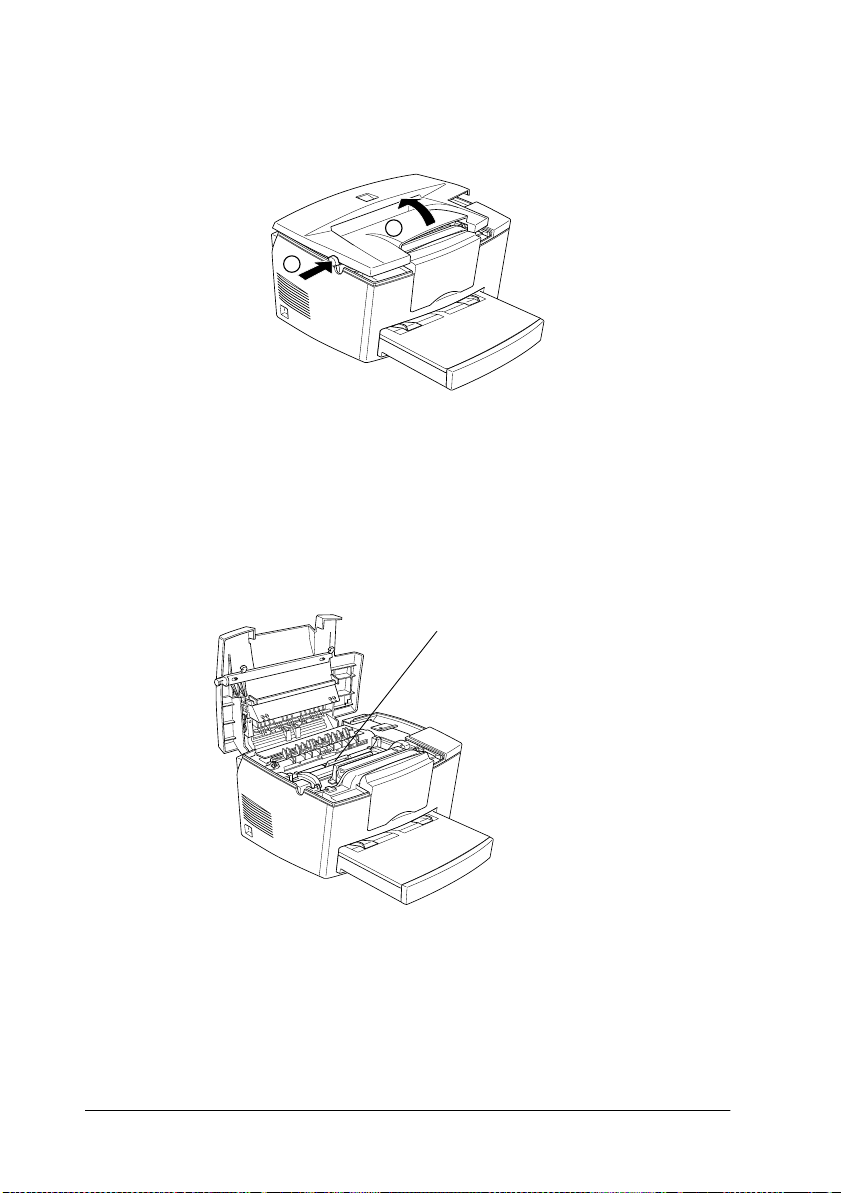
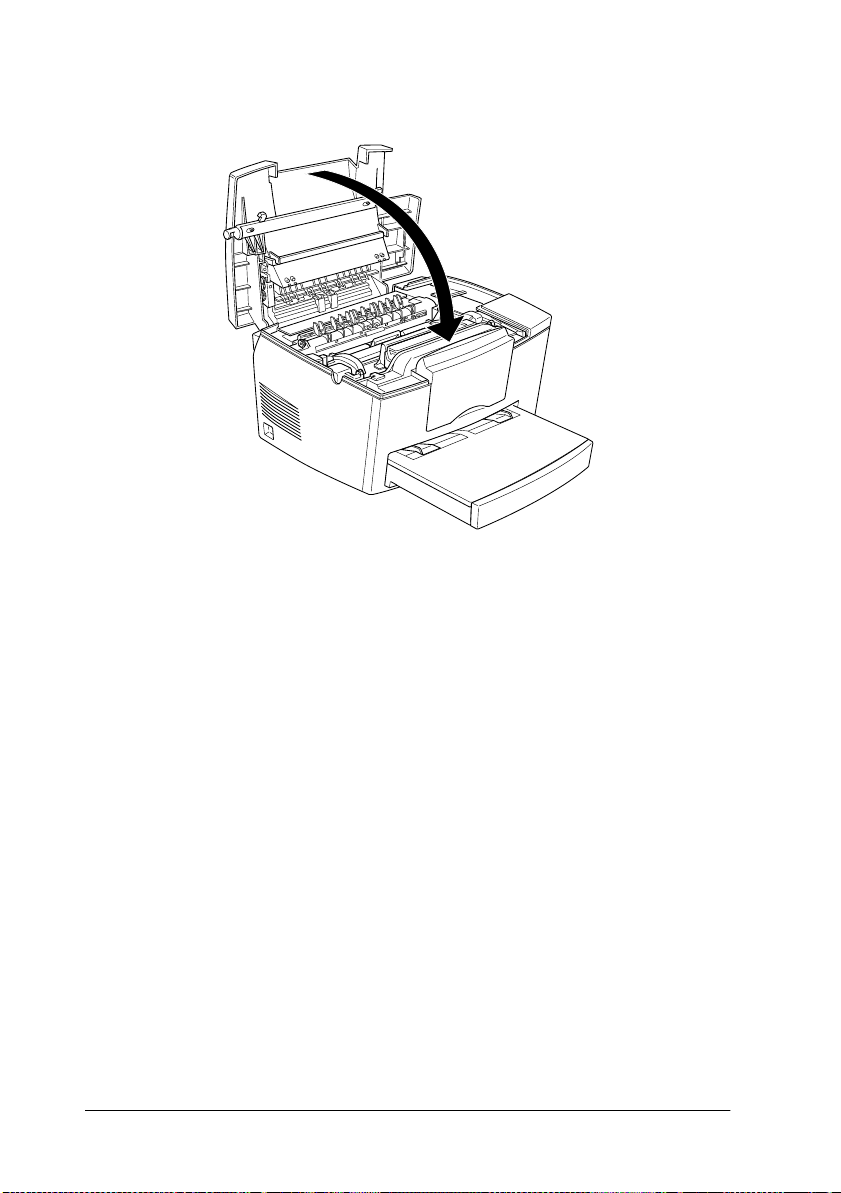
2. Open the printer cover by pressing the latch on the left side
of the printer and lifting the cover up all the way.
2
1
Warning:
w
Opening the printer cover exposes the fuser, which is marked
CAUTION Hot Surface Avoid Contact. Be careful not to
touch the fuser. If the printer has been in use, the fuser may
be very hot.
CAUTION Hot Surface Avoid Contact
4-4
Troubleshooting
Page 57

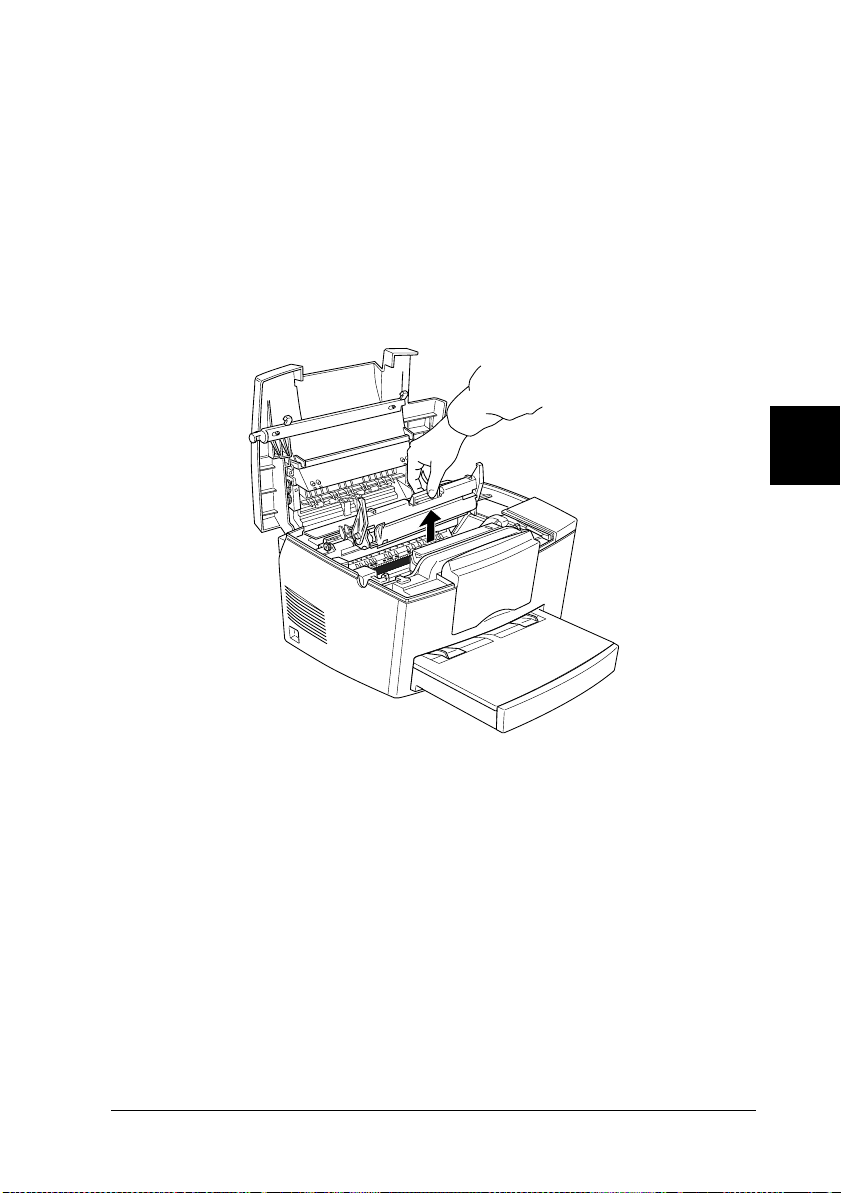
3. Remove the developer cartridge.
Caution:
When removing the developer cartridge, never touch the
c
developing roller under the flap; otherwise, the print quality
may be impaired.
4
Troubleshooting
4-5
Page 58

4. Remove the photoconductor unit.
Caution:
c
Never touch the photoconductor unit’s light-sensitive drum;
otherwise, the print quality may be impaired.
4-6
Troubleshooting
Page 59

5. Remove any paper from the paper path.
Note:
If paper is jammed at the fuser, grasp the bottom of the paper and pull it
out.
4
6. Reinstall the photoconductor unit, then the developer
cartridge.
Troubleshooting
4-7
Page 60

7. Close the printer cover.
8. Tap the edges of the paper on a flat surface and carefully
reload it into the paper-tray. (Do not reload curled or
wrinkled sheets.)
Printing automatically restarts from the page that jammed. If the
error light (red) continues flashing after removing all jammed
paper, open and close the printer cover to clear the error.
Feed Jams
Note:
Feed jams are shown in the illustration below.
4-8
Troubleshooting
Page 61

1. Remove the paper-tray cover and the stack of paper.
2. Carefully remove all the paper from the paper-tray along with
any sheets that have fed part way into the printer.
4
3. Open the printer cover. Be sure to remove any pieces of paper
that may have torn off or are remaining in the printer.
If necessary, remove the developer cartridge and
photoconductor unit, and any paper left in the paper feed
path. Then reinsert the cartridge and the unit.
4. Tap the edges of the paper stack on a flat surface and carefully
reload it into the paper-tray. (Do not reload curled or
wrinkled sheets.) Then reinstall the paper-tray cover.
Troubleshooting
4-9
Page 62

5. Close the printer cover. The jammed page’s print data is
automatically reprinted.
Feed Jam when using the optional 500-Sheet Lower Cassette
Unit
Note:
When a feed jam occurs, the jammed paper looks like the illustration
below.
1. Remove the cassette from the 500-Sheet Lower Cassette Unit.
4-10
Troubleshooting
Page 63

2. Remove any jammed paper from the paper-tray or the
cassette, and discard any curled or wrinkled sheets.
3. Remove all paper from the cassette and press down the plate
in the cassette until it locks into position.
4
4. Tap the edge of the stack of paper, then replace it in the
cassette, making sure the paper is evenly aligned and the top
sheet is below the maximum paper mark.
5. Make sure you are using the correct paper size. The cassette
(C81287✽) accomodates A4 size paper, and the cassette
(C81288✽) accomodates Letter size paper. Also make sure you
are using paper that meets the specifications for this printer.
6. Reinstall the cassette to the 500-Sheet Lower Cassette Unit.
7. Open then close the printer cover. The jammed page’s print
data is automatically reprinted.
Troubleshooting
4-11
Page 64

Operational problems
The ready light (green) does not turn on when you turn the
printer on
Turn off the printer and check the power cord connections
between the printer and the electrical outlet; then turn the printer
back on.
If the electrical outlet is controlled by an outside source such as a
wall switch, make sure the switch is turned on or plug another
electrical device into the outlet to check whether the outlet is
operating properly.
The ready light (green) is on but nothing prints
Your computer may not be properly connected to the printer.
Perform the procedure described in “Connecting to the
computer” in the
Getting Ready
guide.
The interface cable may not be plugged in securely. Check both
ends of the cable between the printer and the computer. Be sure
to secure the connector using the wire retaining clips.
Make sure you use a double-shielded, twisted-pair interface cable
no more than six feet in length.
The developer cartridge may be empty. To replace the cartridge,
see “Replacing the developer cartridge” on page 5-2.
4-12
Troubleshooting
Page 65

Printout problems
Some or all of the printout is garbled or printed as asterisks
Make sure both ends of the interface cable are plugged in securely.
Make sure you use a double-shielded, twisted-pair interface cable
no more than six feet in length.
If the printer still does not print correctly, contact your dealer or
a qualified service person.
Position of the printout is not correct
Make sure you are using the correct page length, margin settings
and offset settings in your software program.
Graphics don’t print correctly
4
Graphics require large amounts of memory; see “Option
problems” on page 4-18.
Print quality problems
The background is dark or dirty
Turn off the printer. Clean the paper path inside the printer using
a soft, dry, lint-free cloth.
Clean internal printer components by printing three pages with
only one character per page.
Troubleshooting
4-13
Page 66

You may not be using the correct type of paper for your printer.
If the surface of your paper is too coarse, printed characters may
appear distorted or broken. Smooth, high-quality copier paper is
recommended for best results. See “Specifications” on page A-2
for information on choosing paper.
There may be a problem with the developer cartridge. Remove
the cartridge and shake it gently from side to side and then from
front to back to distribute the toner evenly, then reinstall it. If this
does not solve the problem, replace the developer cartridge. For
more information, see “Replacing the developer cartridge” on
page 5-2.
You may need to replace the photoconductor unit. For more
information, see “Replacing the photoconductor unit” on page
5-6.
Black or white bands appear in the printout
Turn off the printer. Clean the paper path inside the printer using
a soft, dry, lint-free cloth.
Clean internal printer components by printing three pages with
only one character per page.
There may be a problem with the developer cartridge. Remove
the cartridge and shake it gently from side to side and then from
front to back to distribute the toner evenly, then reinstall it. If this
does not solve the problem, see “Replacing the developer
cartridge” on page 5-2.
You may need to replace the photoconductor unit. For more
information, see “Replacing the photoconductor unit” on page
5-6.
4-14
Troubleshooting
Page 67

Uneven darkness
Your paper may be moist or damp. Do not store your paper
❏
in a humid or damp environment.
Make sure the paper type is correct.
❏
Check whether the printer is in Toner Save mode.
❏
Confirm if the density setting is light.
❏
Turn off the printer. Take out the developer cartridge, shake it
gently from side to side and then from front to back to distribute
the toner evenly, and then reinstall it.
If this does not solve the problem, install a new cartridge. For
more information, see “Replacing the developer cartridge” on
page 5-2. Then print several pages to check the print quality.
Toner smudges
Your paper may be moist or damp. Do not store your paper in a
humid or damp environment.
You may not be using the correct type of paper for your printer.
If the surface of your paper is too rough, printed characters may
appear distorted or broken. Smooth, high-quality copier paper is
recommended for best results. See “Specifications” on page A-2
for information on choosing paper.
4
Turn off the printer. Remove the developer cartridge, shake it
from side to side to distribute the toner, and wipe the cartridge’s
bottom with a clean, dry, lint-free cloth.
Troubleshooting
4-15
Page 68

Clean the paper path inside the printer using a clean, soft, dry,
lint-free cloth.
Clean internal printer components by printing three pages with
only one character per page.
If the problem remains, replace the developer cartridge. For more
information, see “Replacing the developer cartridge” on page 5-2.
Missing areas on printed image
Your paper may be moist or damp. Printing is sensitive to
moisture absorbed by the paper. The higher the moisture content
in the paper, the lighter the printed output. Do not store your
paper in a humid or damp environment.
You may not be using the correct type of paper for your printer.
If the surface of your paper is too coarse, printed characters may
appear distorted or broken. Smooth, high-quality copier paper is
recommended for best results. See “Specifications” on page A-2
for information on choosing paper.
Completely blank pages
If, after checking the toner status in the EPSON Status Monitor 3,
the Toner LOW message indicates that the amount of toner is low,
see “Replacing the developer cartridge” on page 5-2.
To check that the photoconductor unit and the developer
cartridge are correctly installed, see “Replacing the developer
cartridge” on page 5-2.
4-16
Troubleshooting
Page 69

The problem may be with your software program or interface
cable. Print out a status sheet through the printer driver. If blank
pages continue to print, the problem may be with the printer. Turn
off the printer and contact your dealer.
The printed image is light or faint
Darken the
driver.
You may be using the wrong type of paper.
Your paper may be moist or damp. The higher the moisture
content in the paper, the lighter the printed output. Do not store
your paper in a humid or damp environment.
Take out the developer cartridge, shake it gently from side to side
to distribute the toner, and then reinstall it. If the problem persists,
see “Replacing Consumable Products” on page 5-2.
The
Toner Save
using the printer driver.
Density
setting on the Panel menu of your printer
mode may be on. Turn off the
Toner Save
The image is too dark
Lighten the
driver.
If the problem persists, see “Replacing Consumable Products” on
page 5-2.
Density
setting on the Panel menu of your printer
4
mode
Troubleshooting
4-17
Page 70

Non-printed side of the page is dirty
Toner may have spilled in the paper feed path. Turn off the
printer. Remove the developer cartridge and the photoconductor
unit and then clean the paper path of the printer using a clean,
soft, lint-free cloth.
Caution:
Opening the printer exposes the fuser, which is marked by a
c
CAUTION Hot Surface Avoid Contact label. Be careful not to
touch the fuser.
Memory problems
Under Run Error
This message indicates that there is not enough memory available
for the print job. The printer may not print correctly or an
run error
window in the EPSON Status Monitor 3. For information on
installing more memory, see “Memory Module” on page 2-7.
may occur. The under run error is displayed in the alert
under
Option problems
Paper does not feed from the optional 500-Sheet Lower
Cassette Unit
Make sure you have selected the proper paper source in your
software.
There may be no paper in the 500-Sheet Lower Cassette Unit. Load
it with paper.
4-18
Troubleshooting
Page 71

Be sure that the 500-Sheet Lower Cassette Unit is properly
installed and that you have not tried to load it with too many
sheets of paper. The cassette can hold a maximum of 500 sheets
of 75g/m² (20lb) paper.
The 500-Sheet Lower Cassette Unit may not be installed properly.
See Chapter 2, “Using Options,” for instructions on installing the
500-Sheet Lower Cassette Unit.
Feed Jam when using the optional 500-Sheet Lower Cassette
Unit
See “Feed Jam when using the optional 500-Sheet Lower Cassette
Unit” on page 4-10.
Problems Using EPSON Status Monitor 3
The Status Alert Window in the EPSON Status Monitor 3 shows
the various troubles and the methods to solve them. To solve your
particular problem open the EPSON Status Monitor 3, find the
trouble and solve the problem. For Macintosh users, the EPSON
Status Monitor 3 automatically appears when a problem occurs
with your printer, if background printing is on.
A communication error has occurred
The printer may be turned off, check to see that your printer is
turned on. If it is, then check the power cord to see if it is plugged
into the electrical outlet. Then turn on the printer.
4
The printer may be running a self-test or initializing itself. If this
is the case, allow the computer enough time to finish initialization.
Troubleshooting
4-19
Page 72

The problem may be that the printer is not ready to print. Make
sure the printer is ready to print. For more information, see the
Getting Ready
Guide.
The status information does not match the real status of the
printer
EPSON Status Monitor 3 monitors the printer at regular intervals.
You may need to wait until EPSON Status Monitor 3 monitors the
printer again, and automatically changes the status.
Windows shared printers cannot be monitored
Monitoring of shared printers is set internally by EPSON Status
Monitor 3. To monitor Windows shared printers, right-click the
Network Neighborhood and then click Properties. Verify that file
and printer sharing for Microsoft Networks is shown in the list of
installed components.
Also, verify that EPSON Status Monitor 3 is installed in the
computer hosting the Windows shared printer, and be sure that
the
Allow monitoring of shared printers
the Monitoring Preferences dialog box.
In Windows 98/95, IPX/SPX compatible protocols cannot be set
on the network module.
check box is checked in
Cannot install the printer driver in Windows
4-20
Troubleshooting
Page 73

If your computer did not have Windows 98 pre-installed, it is an
upgrade from Windows 95 to 98. It may not support USB
connectors, and may not print. Confirm whether your computer
supports USB connectors by calling the manufacturer.
The printer driver is installed as an "unknown device" in the
device manager
During plug-and-play installation, some problem disrupted the
installation. While the printer is connected through the USB cable
and the power is on, check the
Computer
unknown device
Disconnect the USB cable from the printer, then reconnect it and
reinstall the printer driver.
menu. If USB printer or EPL 5700L/i is installed in
, then the printer hasn’t been properly installed.
Device Manager
in the
Cannot print from Windows
The driver’s printer port may be incorrect. To check the setting of
the printer port, select
dialog box in the
program
properties
group.
in the
menu of the printer
file
Your printer is not displayed in the selector dialog box
Make sure that the printer’s power is on. The printer port does
not appear on the menu because the computer does not recognize
the printer connection. Try disconnecting and then re-connecting
the USB cable.
4
My
Troubleshooting
4-21
Page 74

Although connected to the USB hub, the printer does not
operate correctly
The printer may not be connected to the first level USB hub. There
are five levels of USB connectors, make sure that your printer is
connected to the first level.
Make sure that the computer has correctly recognized the USB
hub. Check the USB hub under universal serial bus in the device
manager.
4-22
Troubleshooting
Page 75

Chapter 5
Maintenance and Transportation
Replacing Consumable Products. . . . . . . . . . . . . . . . . . . . . . . . . . . . 5-2
Replacing the developer cartridge . . . . . . . . . . . . . . . . . . . . . . 5-2
Replacing the photoconductor unit . . . . . . . . . . . . . . . . . . . . .5-6
Cleaning the Printer . . . . . . . . . . . . . . . . . . . . . . . . . . . . . . . . . . . . . . 5-9
Cleaning the inside of the printer. . . . . . . . . . . . . . . . . . . . . . . 5-9
Removing spilled toner . . . . . . . . . . . . . . . . . . . . . . . . . . . . . . .5-10
Cleaning the printer case. . . . . . . . . . . . . . . . . . . . . . . . . . . . . .5-11
Transporting the Printer . . . . . . . . . . . . . . . . . . . . . . . . . . . . . . . . . . .5-12
5
Maintenance and Transportation
5-1
Page 76

Replacing Consumable Products
Your printer uses two consumable components, which are listed
below along with their approximate life expectancies.
Developer cartridge (S050010)
Up to 6000 pages depending on the complexity of print jobs
Photoconductor unit (S051055)
Up to 20000 pages
The conditions of the consumable products are displayed in the
Status Monitor 3.
Replace the developer cartridge if you notice a decline in print
quality. Replace the photoconductor unit only if print quality
problems remain after replacing the developer cartridge.
Replacing the developer cartridge
Follow these steps to replace the developer cartridge.
1. Make sure the printer is turned off.
2. Open the printer cover by pressing the latch on the left side
of the printer and lifting the cover up all the way.
2
1
5-2
Maintenance and Transportation
Page 77

Caution:
You must completely open the printer cover when replacing
c
the developer cartridge; otherwise, you may damage the
printer.
3. Hold the cartridge by the handle and pull it straight up and
out of the printer.
5
Warning:
Do not touch the fuser, which is marked CAUTION Hot
w
Surface Avoid Contact.
4. Dispose of the used developer cartridge properly.
Caution:
Do not turn the developer cartridge upside down.
c
Maintenance and Transportation
5-3
Page 78

5. Remove the new developer cartridge from its bag. While
holding the cartridge horizontally, gently shake it a few times
from side to side and then from front to back to distribute the
toner evenly.
6. Remove the protective tape seal from the cover of the
developer cartridge.
5-4
Maintenance and Transportation
Page 79

Caution:
Never touch the developing roller under the flap. Otherwise,
c
the print quality may be impaired.
7. Hold the cartridge by its handle and lower it into the printer,
making sure that the pins on each side of the cartridge fit into
the grooves inside the printer. Slide the cartridge gently into
the opening until it locks into place.
5
Maintenance and Transportation
5-5
Page 80
8. Gently press down on the printer cover until it clicks shut.
9. When turning on the printer, access the printer settings dialog
box in the printer driver, and click the
button. The Toner level clear dialog box is displayed.
10. Click OK to reset the toner level counter.
Toner Level Clear
Whenever you replace the developer cartridge, you should
clean the paper roller as described in “Cleaning the inside of
the printer” on page 5-9.
Replacing the photoconductor unit
1. Make sure the printer is turned off.
2. Open the printer cover by pressing the latch on the left side
of the printer and lifting the cover up all the way.
5-6
Maintenance and Transportation
Page 81
Caution:
You must completely open the printer cover to replace the
c
photoconductor unit; otherwise, you may damage the
printer.
3. Remove the developer cartridge.
4. Slide the photoconductor unit gently out of the printer as
shown below.
5
Warning:
Do not touch the fuser, which is marked CAUTION Hot
w
Surface Avoid Contact.
5. Remove the new photoconductor unit from its bag.
Maintenance and Transportation
5-7
Page 82

Caution:
c
6. Insert the pins on each side of the new photoconductor unit
into the grooves inside the printer. Slide the unit gently into
the opening until it locks into place.
Never touch the photoconductor unit’s light-sensitive drum;
otherwise, print quality may be impaired.
5-8
Maintenance and Transportation
Page 83

7. Reinstall the developer cartridge.
8. Press down the printer cover until it clicks shut.
9. When turning on the printer, access the printer settings dialog
box in the printer driver, and click the
button. The OPC level clear dialog box is displayed.
10. Click OK to reset the Photoconductor level counter.
OPC Level Clear
Cleaning the Printer
The printer needs only minimal cleaning. If you notice a decline
in print quality, clean the inside of the printer as described in this
section.
You should also clean the paper cassette and the printer cover
every few months. These procedures are described later in this
section.
Cleaning the inside of the printer
5
Fine particles of dust can collect inside the printer. Follow the
steps below to clean the inside of the printer and the paper feeder:
1. Make sure the printer is turned off.
2. Open the printer cover.
Warning:
Opening the printer exposes the fuser, which is marked
w
CAUTION Hot Surface Avoid Contact.
3. Remove the developer cartridge and the photoconductor unit
as each are described in “Replacing Consumable Products”
on page 5-2.
Maintenance and Transportation
5-9
Page 84
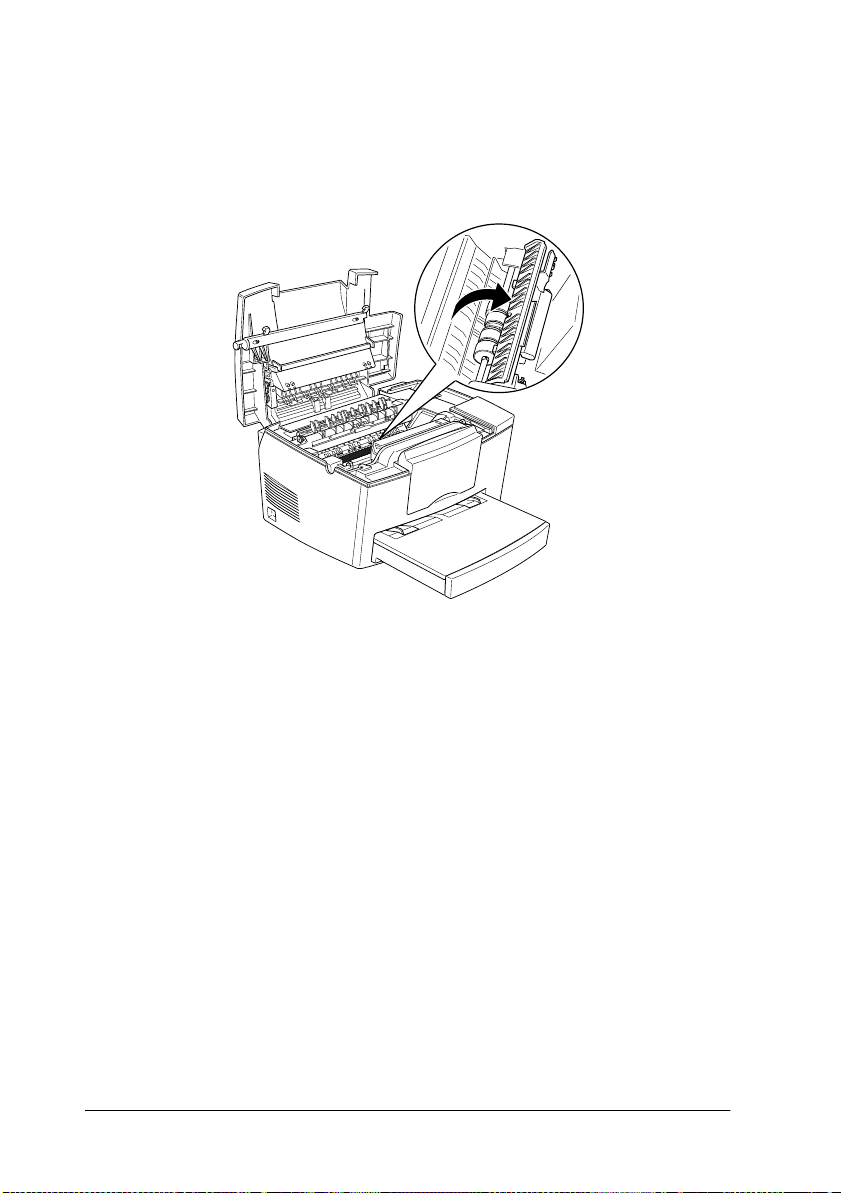
4. Remove any dirt inside the printer with a clean, dry, lint-free
cloth. Do not use compressed air. If you have paper feed
problems, clean the paper roller by opening the roller cover,
and wiping the roller with a clean, dry, lint-free cloth.
5. Replace the photoconductor unit, then replace the developer
cartridge.
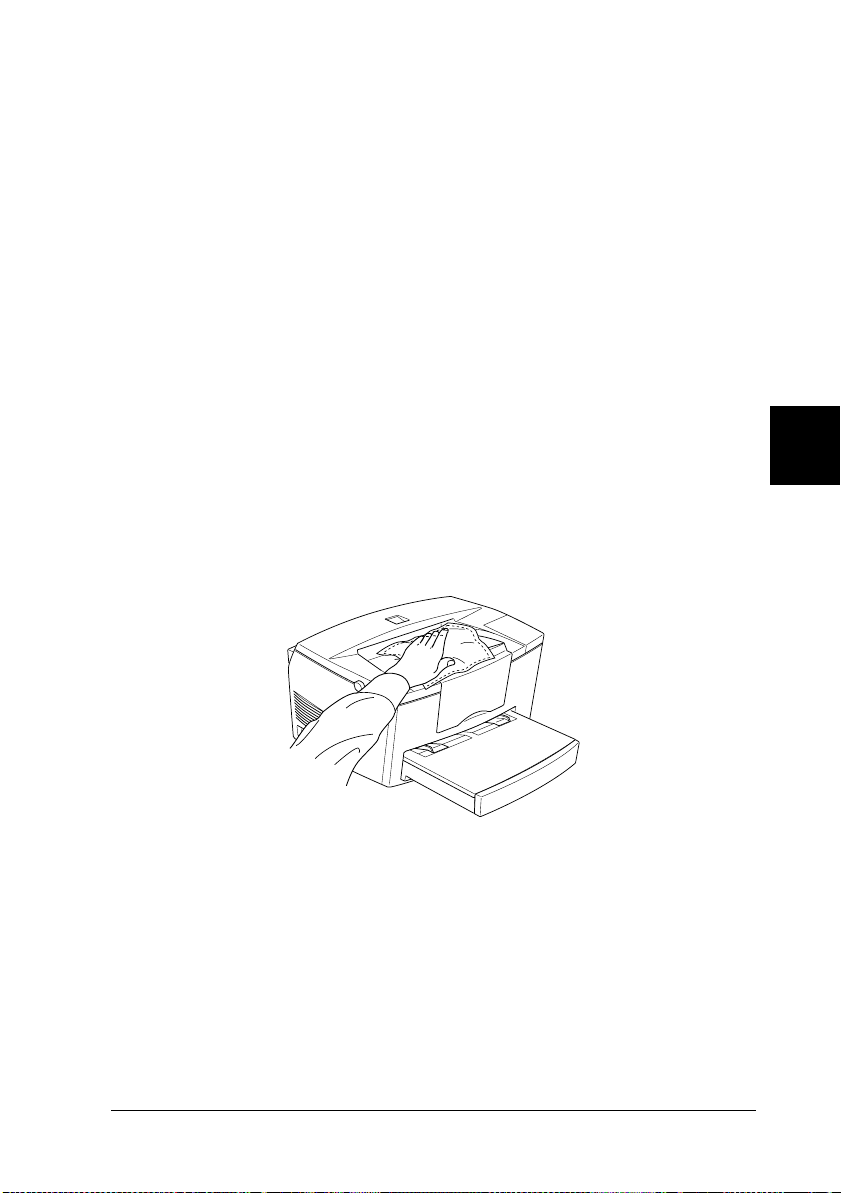
6. Close the printer cover.
7. Remove all the paper from the paper-tray and clean the tray
with a clean, dry, lint-free cloth.
Removing spilled toner
If toner spills inside the printer, do not use the printer until you
remove all the spilled toner.
If only a small amount of toner is present, carefully wipe out the
inside of the printer with a clean, dry, lint-free cloth.
5-10
Maintenance and Transportation
Page 85
If a large amount of toner is present, use a small vacuum cleaner
(available from computer supply stores) to remove it. Then
carefully wipe with a clean, dry, lint-free cloth.
Caution:
c
Note:
If you spill toner on your clothing, rinse it off with cold water. Do not
use hot water as it may cause the toner to leave a permanent stain.
Toner and other fine powders can damage some vacuum cleaners.
Be sure to read the instructions for your vacuum cleaner before
you use it on spilled toner.
Cleaning the printer case
If the printer’s outer case is dirty or dusty, turn off the printer and
clean it with a clean, dry, lint-free cloth, dampened with a mild
detergent.
Caution:
c
Never use alcohol or thinner to clean the printer cover; these
chemicals can damage the components and the case. Be careful
not to get water on the printer mechanism or any electronic
components.
5
Maintenance and Transportation
5-11
Page 86
Transporting the Printer
If you need to transport your printer, carefully repack it using the
original box and packing materials as follows:
1. Turn off the printer.
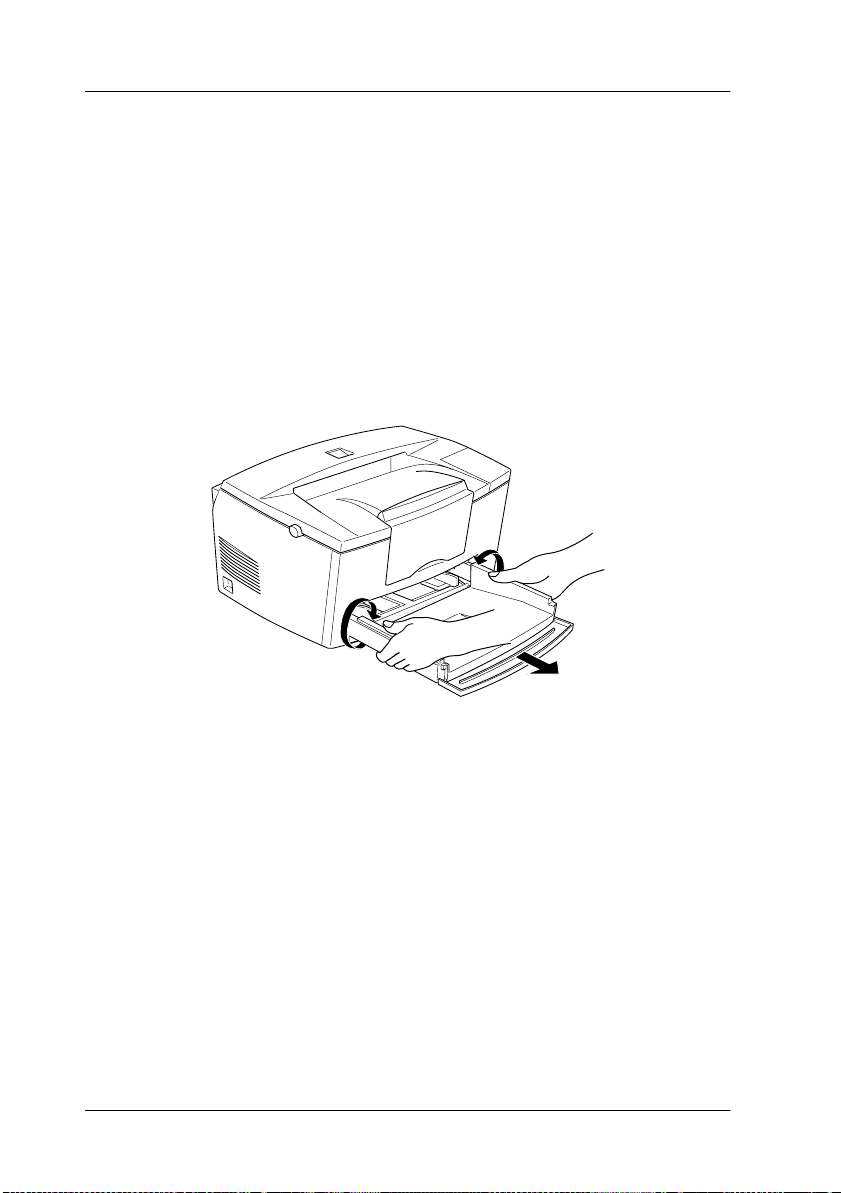
2. Lift off the paper-tray cover. Remove all paper from the
paper-tray.
3. Grasp the base part of the paper-tray with both hands, press
inward on the edges, and pull it out of the printer.
X
4. Unplug the power cord from the electrical outlet; then
disconnect the interface cable from the printer.
5. Remove the optional 500-Sheet Lower Cassette Unit, if
installed.
6. Replace the printer’s protective materials, then repack the
printer in its original box.
Caution:
Do not expose the photoconductor unit and the developer
c
cartridge to light any longer than necessary.
5-12
Maintenance and Transportation
Page 87

Appendix A
Technical Specifications
Paper . . . . . . . . . . . . . . . . . . . . . . . . . . . . . . . . . . . . . . . . . . . . . . . . . . .A-2
Specifications. . . . . . . . . . . . . . . . . . . . . . . . . . . . . . . . . . . . . . . . A-2
Printer . . . . . . . . . . . . . . . . . . . . . . . . . . . . . . . . . . . . . . . . . . . . . . . . . .A-4
General . . . . . . . . . . . . . . . . . . . . . . . . . . . . . . . . . . . . . . . . . . . . .A-4
Environmental. . . . . . . . . . . . . . . . . . . . . . . . . . . . . . . . . . . . . . . A-5
Mechanical. . . . . . . . . . . . . . . . . . . . . . . . . . . . . . . . . . . . . . . . . . A-5
Electrical. . . . . . . . . . . . . . . . . . . . . . . . . . . . . . . . . . . . . . . . . . . .A-5
Interface. . . . . . . . . . . . . . . . . . . . . . . . . . . . . . . . . . . . . . . . . . . . . . . . . A-6
Parallel interface . . . . . . . . . . . . . . . . . . . . . . . . . . . . . . . . . . . . . A-6
Using the ECP mode . . . . . . . . . . . . . . . . . . . . . . . . . . . . . . . . . A-12
USB interface . . . . . . . . . . . . . . . . . . . . . . . . . . . . . . . . . . . . . . . .A-13
Options and Consumables . . . . . . . . . . . . . . . . . . . . . . . . . . . . . . . . . A-14
500-Sheet Lower Cassette Unit (C81287✽/C81288✽) . . . . . .A-14
Face-up Tray (C81286✽). . . . . . . . . . . . . . . . . . . . . . . . . . . . . . .A-14
Developer cartridge (S050010) . . . . . . . . . . . . . . . . . . . . . . . . . A-15
Photoconductor unit (S051055). . . . . . . . . . . . . . . . . . . . . . . . .A-15
A
Technical Specifications
A-1
Page 88

Paper
Specifications
Note:
Since the quality of any particular brand or type of paper may be changed
by the manufacturer at any time, EPSON cannot guarantee the quality
of paper. Always test samples of paper stock before purchasing large
quantities or printing large jobs.
Paper Types: Plain paper, recycled paper, labels,
envelopes, transparencies, colored paper,
card stock, letterhead
Note:
Use recycled paper under normal temperature and humidity conditions
only. Poor quality paper may reduce print quality, cause paper jams and
other problems.
Paper weight:
Paper size:
A-2
Plain paper
Card stock
Paper A4 (210 mm × 297 mm)
Technical Specifications
60 to 90 g/m², 16 to 24 lb
90 to 157 g/m², 24 to 42 lb
A5 (148 mm × 210 mm)
B5 (182 mm × 257 mm)
Le tte r (8 1/2 in . × 11 in.)
Ha lf L et ter ( 5 1/2 × 8 1/2 i n.)
Le gal ( 8 1/2 × 14 in.)
Executive (7 1/4 × 10 1/2 in. )
Go ver nme nt Leg al ( 8 1/2 × 13 in.)
Government Letter ( 8 × 10 1/2 in. )
F4 (210 mm × 330 mm)
Custom
(76 mm × 127 mm to 215 mm × 355 mm,
3 × 5 in. to 8.5 × 14 in.)
Page 89

En vel ope s: M o na rch (3 7/8 × 7 1/2 i n.)
Commercial 10 (4 1/8 × 9 1/2 i n.)
DL (110 mm × 220 mm)
C5 (162 mm × 229 mm)
C6 (114 mm × 162 mm)
International B5 (176 mm × 250 mm)
Caution:
c
Printable area: The area on a page contained within a 4
Only load paper sizes that are listed above.
mm minimum margin on all sides
A
Technical Specifications
A-3
Page 90

Printer
General
Printing method: Laser beam scanning and dry
electrophotographic process
Resolution: 600 × 600 dpi, 300 × 300 dpi
Printing speed: Up to 8 pages per minute depending on
the font and quantity of data
First print: Less than 19 seconds with A4/letter
Warm-up time: About 20 seconds at normal temperature
Paper feed: Automatic
Paper feed alignment: Center alignment for all sizes
Input paper supply
(75g/m² paper): Up to 150 sheets in the tray
Up to 500 sheets per optional 500-Sheet
Lower Cassette Unit
Up to 10 envelopes, depending on
thickness
Paper output: Face-down or face-up (optional) selection
Paper output capacity
(75g/m² paper): Face-down 100 sheets
Face-up 20 sheets with the optional Faceup Tray
RAM: 2 MB, expandable up to 13 MB
A-4
Technical Specifications
Page 91
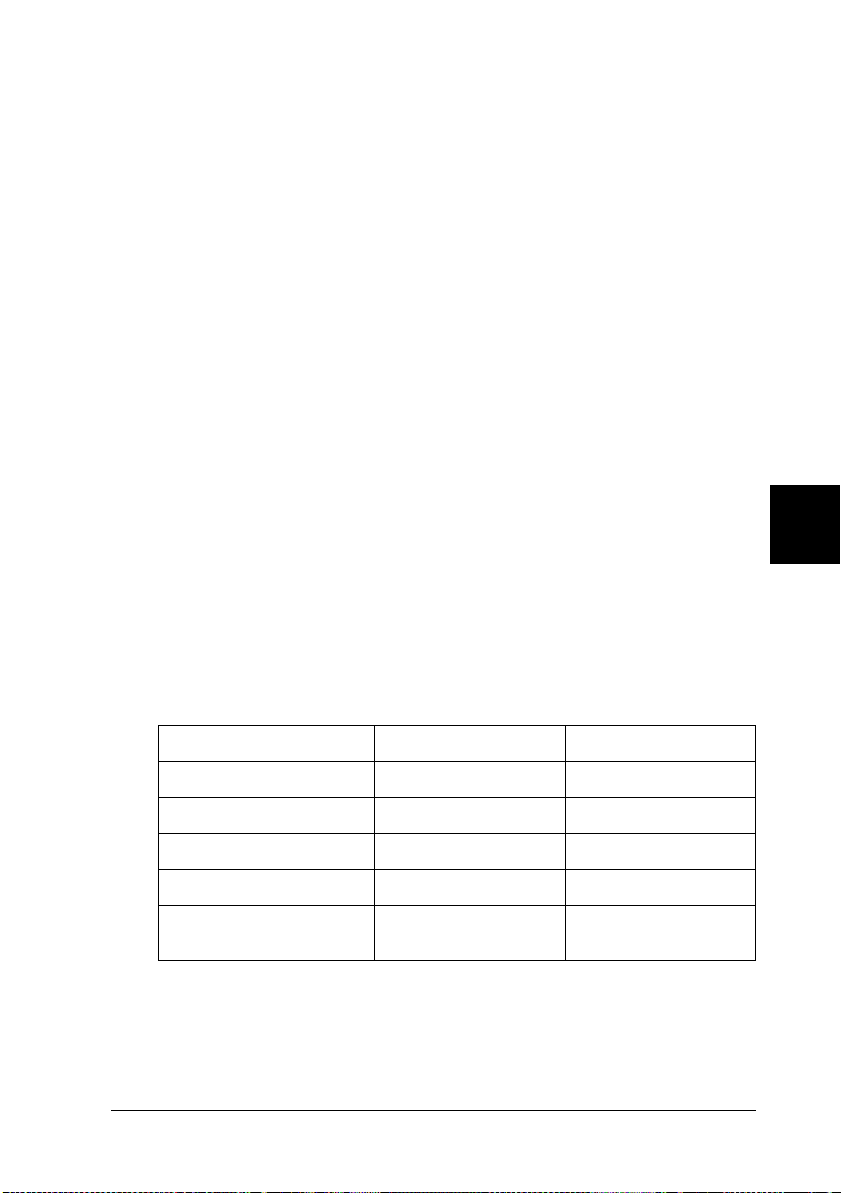
Environmental
Temperature: Operation:
Storage:
Humidity: Operation:
Storage:
10 to 35 °C (50 to 95 °F)
0 to 35 °C (32 to 95 °F)
15 to 85% RH
30 to 85% RH
Altitude: Maximum 2,500 meters (8200 feet)
Mechanical
Dimensions and
weight: Height:
Width:
Depth:
Weight:
251 mm (9.9 in.)
397 mm (15.6 in.)
463 mm (18.2 in.)
Approx. 7.5 kg (14.5 lb)
not including the developer
cartridge and the photoconductor
unit
Durability: 5 years or 180,000 sheets, whichever comes first
Electrical
A
110 V model 230 V model
Voltage 90 V to 132 V 198 V to 264 V
Rated frequency 50 Hz to 60 Hz ± 3 Hz 50Hz to 60Hz ± 3Hz
Rated current 5.3 A 3.0 A
Power consumption Less than 580 W Less than 580 W
Power consumption *
in Standby mode
* No option installed
Less than 30 W Less than 30 W
Note:
Check the label on the back of the printer for its specified voltage.
Technical Specifications
A-5
Page 92

Interface
Parallel interface
The parallel (IEEE 1284-B compliant) interface connector pin
assignments are shown in the table below.
Note
Windows 98/95 and NT 4.0 support the parallel interface.
Pin No. Direction IEEE 1284-B connector
Compatibility Nibble ECP
1INnStorbe HostClk
2 IN/OUT DATA1
3 IN/OUT DATA2
4 IN/OUT DATA3
5 IN/OUT DATA4
6 IN/OUT DATA5
7 IN/OUT DATA6
8 IN/OUT DATA7
9 IN/OUT DATA8
10 OUT nACK PtrClk PeriphClk
11 OUT Busy PrtBusy PeriphAck
12 OUT PError AckDataReq nAckReverse
13 OUT Select Xflag
14 IN nAutoFd HostBusy HostAck
15 NC
16 GND
17 CG
A-6
Technical Specifications
Page 93

Pin No. Direction IEEE 1284-B connector
Compatibility Nibble ECP
18 OUT PeripheralLogicHigh
19 - 30 GND
31 IN nlnit nReverse
Request
32 OUT nFault nDataAvail nPeriphRequest
33 GND
34 NC
35 OUT +5V
36 IN nSelectln IEEE1284 Active
Note:
The column heading ”Direction” refers to the direction of signal flow in
to or out of the printer.
nStrobe/HostClk
Compatibility mode: Latch pulse used to read in print data. When
low, DATA is valid
Negotiation phase: Latch pulse used to read in extensibility
request values
Nibble mode: Always high
A
ECP mode: Used to transfer data and addresses from the host to
the printer with handshaking via PeriphAck (Busy)
DATA1 to DATA8 (bidirectional, but may always be an input if
ECP or EPP mode is not supported)
Compatibility mode: Forward channel data
Negotiation phase: Extensibility request value
Technical Specifications
A-7
Page 94

Nibble mode: Not used
ECP mode: Bi-directional data
nACK/PtrClk/PeriphClk
All modes: DTA8 is the MSB, DATA1 is the LSB
Compatibility mode: Acknowledgment low pulse in order to
indicate that data was transferred from the host
Negotiation phase: Low signal indicates IEEE 1284 is supported;
Set to high afterwards to indicate that the Xflag and ”data
available” flag are valid
Reverse data transfer phase: In nibble mode, a low signal indicates
that the nibble data is valid
Reverse idle phase: When switched from low to high, generates
an interrupt that notifies the host that there is data available.
ECP mode: Used to transfer data from the printer to the host with
handshaking via HostAck (nAutoFd)
Busy/PtrBusy/PeriphClk
Compatibility mode: High signal indicates that the printer is not
ready to receive data
Negotiation phase: Reflects the BUSY status of the forward
channel
Reverse data transfer phase: In nibble mode, this signal serves as
nibble data bit 3 and then 7
Reverse idle phase: Reflects the BUSY status of the forward
channel
ECP mode: Used for forward direction flow control. In reverse
direction, this signal is used as a ninth data bit that indicates
whether the data signals indicate a command or data.
A-8
Technical Specifications
Page 95

PError/AckDataReq/nAckReverse
Compatibility mode: High signal indicates that a feed jam
occurred in the paper supply section, or that there is no paper in
the paper-tray or cassette.
Negotiation phase: High signal indicates whether or not IEEE
1284 is supported or not. Afterwards, this signal conforms with
nDataAvail (nFault).
Reverse data transfer phase: In nibble mode, this signal serves as
nibble data bit 2 and then 6.
Reverse idle phase: High until the host requests a data transfer.
Afterwards, this signal conforms with nDataAvail (nFault).
ECP mode: Low signal authorizes nReverseRequest. The host
looks at this signal in order to determine whether or not it has
permission to drive the data signals.
Select/Xflag
Compatibility mode: Always high
Negotiation phase: Xflag indicates the extensibility flag. Used to
respond to the extensibility request value sent from the host.
A
Reverse data transfer phase: In nibble mode, this signal serves as
nibble data bit 1 and then 5.
Reverse idle phase: Same as negotiation phase
ECP mode: Same as negotiation phase
nAutoFd/HostBusy/HostAck
Compatibility mode: Not used
Negotiation phase: In order to request 1284 mode, this signal is
set low and IEEE 1284active (nSelectln) is set high. Afterwards,
this signal is set high when PtrClk (nAck) is set low.
Technical Specifications
A-9
Page 96

Reverse data transfer phase: In nibble mode, setting this signal
low indicates to the printer that the host is ready to receive data.
When this signal is subsequently set high, it indicates that the host
received the data.
Reverse idle phase: This signal is set high in response to a PtrClk
(nAck) low pulse in order to return to the reverse data phase. If
this signal is set high at the same time that IEEE 1284active
(nSelectln) is set low, the IEEE 1284 idle phase is aborted and the
interface returns to compatibility mode.
ECP mode: Used for reverse direction flow control. Also used for
handshaking via PeriphClk (nAck).
NC
Not used
PeripheralLogicHigh
Parallel B: NC
Parallel C: Pull up to +5V with 3.9 K
Ω
nlnit/nReverseRequest
Compatibility mode: When a low signal is detected, the printer is
deemed to be BUSY until the low signal is released.
Negotiation phase: Always high
Reverse data transfer phase: Always high
ECP mode: Low when switching to reverse direction. The
peripheral device has permission to drive the data signals only
when this signal is low and 1284 active is high.
nFault/nDataAvail/nPeriphRequest
Compatibility mode: Low signal indicates that an error occurred.
A-10
Technical Specifications
Page 97

Negotiation phase: This signal is set high in order to authorize
1284 compatibility. In nibble mode, after the host sets HostBusy
(nAutoFd) high, this signal is set low in order to indicate that the
transmission data is ready.
Reverse data transfer phase: This signal is set low in order to
indicate to a nibble mode host that the transmission data is ready.
Afterwards, this signal serves as nibble data bit 0 and then 4.
Reverse idle phase: Indicates whether or not the data is valid.
ECP mode: This signal is set low to request communications with
the host. Valid in both forward and reverse directions.
nSelectln/IEEE1284active
Compatibility mode: Always low
Negotiation phase: This signal is set high at the same time that
HostBusy is low in order to request 1284 mode.
Reverse data transfer phase: This signal is set high to indicate that
the bus direction is from the printer to the host. This signal is set
low to terminate 1284 mode, setting the bus direction from the
host to the printer.
Reverse idle phase: Same as reverse data transfer phase
ECP mode: Always high. This signal is set low to terminate ECP
mode and return to compatibility mode.
GND
Twisted pair return signal
CG
Connected to the printer chassis. This signal and GND are
connected.
A
Technical Specifications
A-11
Page 98

+5V
Pull up to +5V with 1 k
Ω
Using the ECP mode
To use the ECP mode with a parallel (IEEE 1284-B compliant)
connector, your computer must support the ECP mode.
Note:
The ECP mode is available with Windows 98/95 and Windows NT4.0.
To use the ECP mode, follow these steps:
1. Make the ECP mode settings in the BIOS setting program that
comes with your computer. (For details of the settings and the
program, see your computer manual.)
2. Click the
Control Panel
3. Right-click the
appears.
4. Select the
button, point to
Start
.
System
Device Manager
icon, and click
Settings
tab.
, and then click
Open
in the menu that
5. Select the
click the
6. Select the
7. Make the appropriate setting in the Resource settings dialog
box. (This setting depends on your computer system. For
details, see your computer manual.)
8. Click OK to save the settings.
A-12
Technical Specifications
ECP Printer Port
Properties
Resources
button.
under Ports [COM & LPT], then
tab.
Page 99

USB interface
Universal Serial Bus 1.0 compliant.
Note:
Only Macintosh and Windows 98 pre-installed PCs support the USB
interface.
For Windows 98
1. Click the
Printers
2. Right-click the
Properties
3. Select the
4. Click the arrow next to the Printer Port drop-down list. Then
select a
5. Click OK to save this setting.
c
.
EPUSB
Caution:
The USB interface is not compatible with QuickDraw GX in
Macintosh OS version.
button, point to
Start
EPSON EPL-5700L/EPL-5700i
in the menu that appears.
Details
tab.
1 port.
Settings
, and then click
icon, and click
A
Technical Specifications
A-13
Page 100

Options and Consumables
500-Sheet Lower Cassette Unit (C81287
Paper size: A4 (Unit C81287✽)
Letter (Unit C81288✽)
Paper weight: 60 to 90 g/m
Paper feed: Automatic feed delivery system
Tray capacity up to 500 sheets (75 g/m
20 lb paper)
Paper feed speed: For the first sheet, 21 seconds or less;
subsequent sheets, 8 pages per minute
Paper types: Plain paper, such as copier paper, and
recycled paper
Power supply: 5Vdc supplied by the printer
Dimensions and weight:
Height 120 mm (4.7 in.)
Width 397 mm (15.4 in.)
Depth 472 mm (18.6 in.) including the tray
Weight 4.2 kg (9.3 lb) including the tray
(16 to 24 lb)
²
✽✽✽✽
/C81288
✽✽✽✽
)
or
²
✽✽✽✽
Face-up Tray (C81286
Dimensions (including printer) and weight:
Height 433 mm (17.0 in.)
Width 397 mm (15.4 in.)
Depth 580 mm (22.8 in.)
Weight 0.3 kg (0.7 lb)
Paper output capacity: 20 sheets (75 g/m
A-14
Technical Specifications
)
or 20 lb paper)
²
 Loading...