

Page 1
Page 2

Supplement
This supplement includes update information for the EPL-5700.
Installing the Printer Driver
Please change
Getting Ready! manual.
Replace:
If you inserted the CD-ROM
With:
In you inserted the CD-ROM in drive D, type D: \ WIN95 and
click OK.
the
first sentence of step 6 at page 13 of your
in drive
D,
click
OK.
lnstalling Screen fonts
Follow these steps to install the screen fonts:
1.
Make sure Windows is running and the printer is turned off.
2.
Insert the CD-ROM that comes with your printer into your
CD-ROM drive D(or E).
3.
If you are using Windows 3.1, Windows 3.11 for Workgroups
or Windows NT 3.51, make sure the Program Manager
window is open; then choose
are using Windows 95, or Windows NT 4.0, click Start, then
choose
Run,
Run
on the File menu. If you
4.
Type
D:\EPSETUP
Copyright 0 1998 by SEIKO EPSON CORPORATION, Nagano,
Japan
(or
E:\EPSETUP);
then click
OK.
40008983
M01-00
Page 3

5.
[Excluding Windows NT 3.51 users]: In the dialog box that
appears, double-click Install Font Manager; or you can
install by selecting Install Font Manager and then clicking
the arrow at the top right.
[For Windows NT 3.51 users only]: In the dialog box that
appears, double-click Install Screen Fonts; or you can install
by selecting Install Screen Fonts and then clicking the arrow
at the top right.
6.
Follow the on-screen instructions.
7.
When installation is complete, click OK.
The screen fonts are now installed on your computer.
EPSON Status Monitor
Though the EPSON Status Monitor utility that comes with your
printer can monitor a local printer, it can not monitor a network
printer. Please disregard the description about networks in
chapter 4 of your
Please use the EPSON Status Monitor 2 utility that comes with
the optional Ethernet Interface Card
monitor or get the current status of a network printer.
Please note even if you select
the Advanced menu, it is treated as
Remote Control Panel
Please replace the Paper Type description at page 5-14 of your
Reference Guide
Paper Type
Allows you to use various types of paper. Thick is useful for
thick paper with a width less than 132 mm wide.
Transparency is useful for transparencies. Always use Normal
unless print quality problems occur.
with the following:
Utility
Reference Guide.
Thin as the Paper Type setting in
Utility
(C82357*
Normal.
or
C82362*)
to
Page 4

Replacing the developer
Please disregard the “Toner Out” description in chapter 6 (such
as on pages 6-3 or 6-26) of your
developer cartridge, when the “Toner Low” message appears
and the printed image becomes light or faint.
cartridge
Reference Guide. Replace the
Safety Information
Please change the appropriate part of your Reference Guide.
at page 5, line 15-16:
This is a semiconductor laser. The maximum power of the laser
diode is 5 mW and the wavelength is 770-810 nm
at page 6, line 21-22:
Dette er en halvleder laser. Maksimal effeckt til laserdiode er 5
mW og bolgelengde er 770-810 nm.
Please add the following description at the bottom of page 6.
Warning:
Use of controls or adjustments or performance of procedures
other than those
hazardous radiation exposure.
specified
in this guide may result in
Also please change the lines 1 to 7 on page 8 to the following.
Maximum Radiation Power: 0.73 mW at laser aperture of the
print head unit
Wavelength:
This product employs a Class IIIb Laser Diode. The Laser
Diode and Scanning Polygon Mirror are incorporated in the
print head unit. The print head unit is NOT A FIELD SERVICE
ITEM. The print head unit should not be opened under any
circumstance.
770-810
nm
Page 5
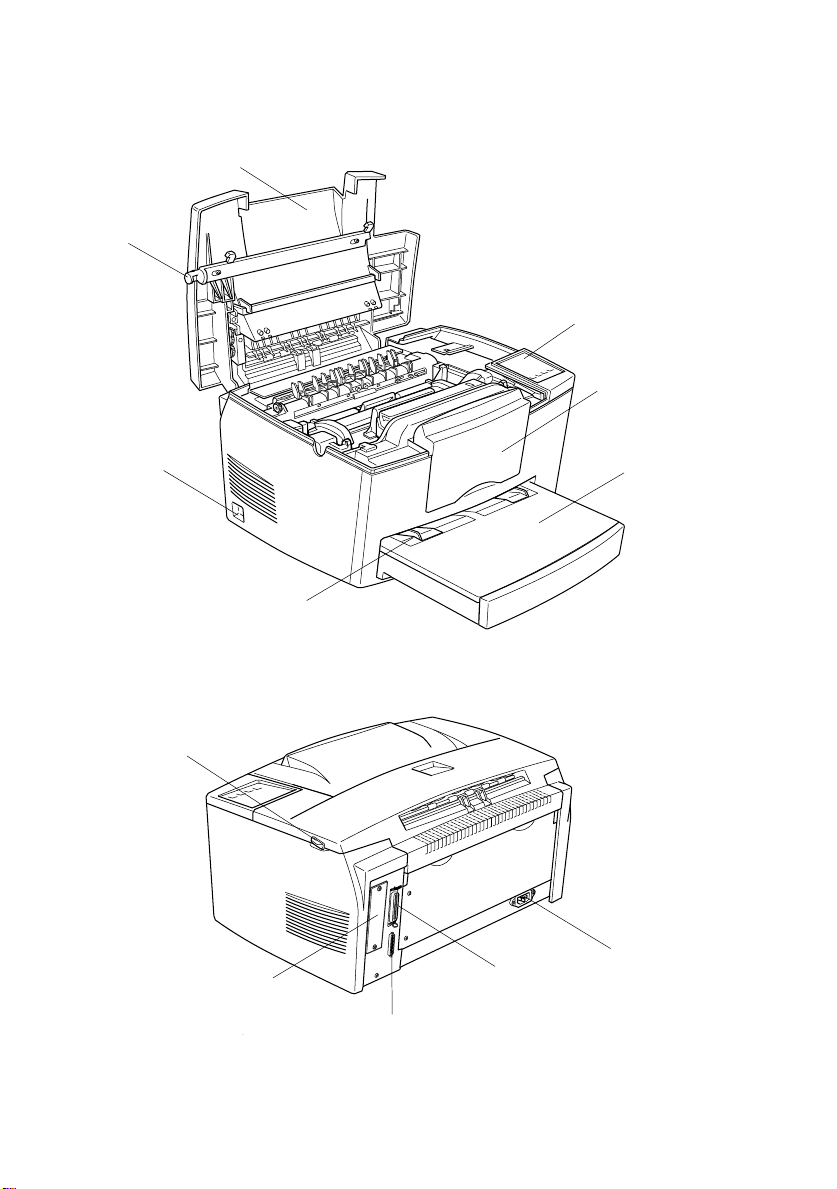
Printer Parts
printer cover
latch
control p anel
extension
output tray
power switch
manu al feed
slot
paper path selector
Type B interface
connector
(option)
paper tray
AC inlet
Parallel interface
connector
Serial interface
connector
Page 6

Contents
1 Finding a place for the printer . . . . . . . . . . . . . . . . . 1
2 Unpacking . . . . . . . . . . . . . . . . . . . . . . . . . . . . 3
3 Removing the protective tape . . . . . . . . . . . . . . . . . 4
4 Installing the 500 Sheet Lower Paper Cassette . . . . . . . . 5
5 Loading paper . . . . . . . . . . . . . . . . . . . . . . . . . . 6
6 Attaching the power cord . . . . . . . . . . . . . . . . . . . 8
7 Testing the printer . . . . . . . . . . . . . . . . . . . . . . . . 9
8 Connecting the printer to the computer . . . . . . . . . . . 10
9 Installing the printer driver . . . . . . . . . . . . . . . . . . 11
10 Making Basic Driver Settings . . . . . . . . . . . . . . . . . 15
11 Accessing Online Help . . . . . . . . . . . . . . . . . . . . 18
Getting Ready!
Page 7

EPSON is a registered tradem ark of SEIKO EPSON CORPORATION.
HP and LaserJet are registered trademarks of Hewlett-Packard Company.
Microsoft, Windows, and MS-DOS are registered trademarks of Microsoft Corporation.
General Notice: Oth er pr oduct names used herein are for identification purposes only and may be
trademarks of their respective owners. EPSON disclaims any and all ri gh ts in those marks.
Copyright © 1997 by SEIKO EPSON CORPORATION, Nagano, Japan.
ii
Page 8
This booklet helps you set up your printer and begin printing
quickly. If you need detailed information on printer use or if
you have problems printing, see your Reference Guide.
Finding a place for the printer
1
q
Place your printer close enough to the computer or
workstation for the printer cable to reach both.
q
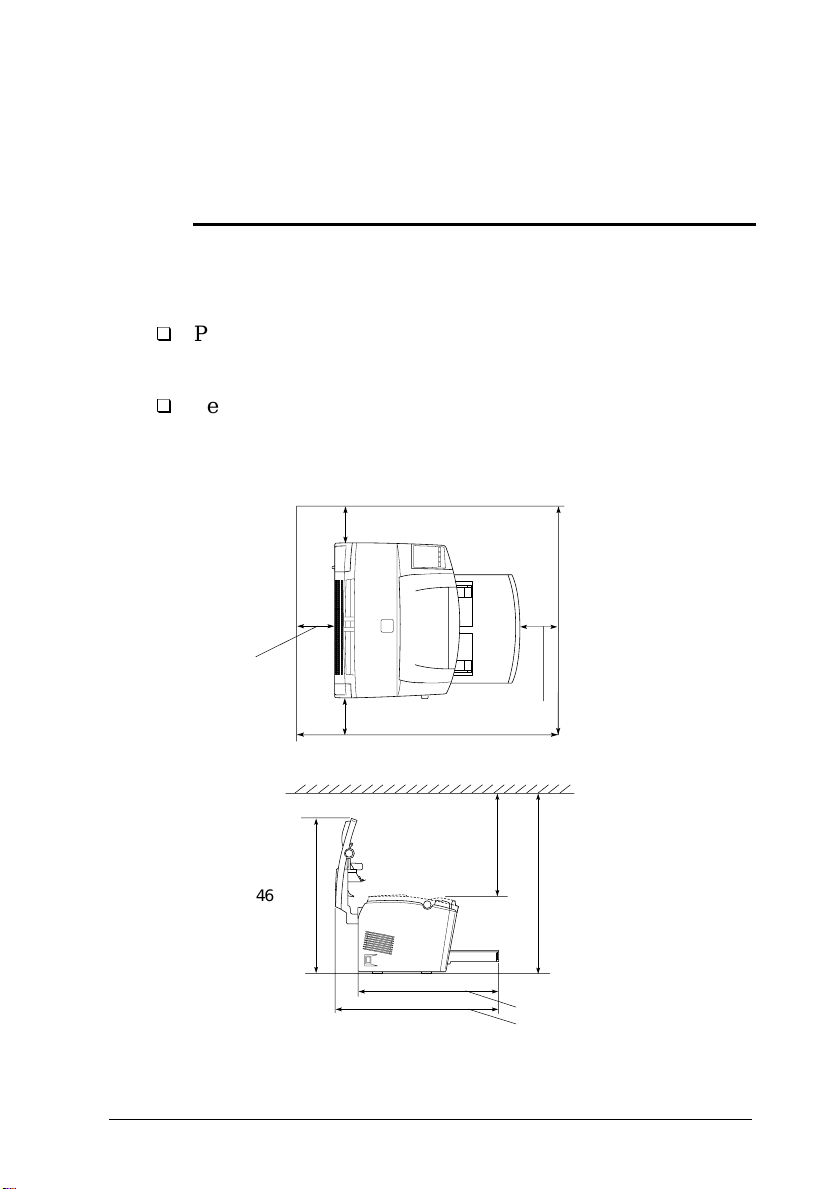
Leave adequate room around the printer to allow easy
operation and maintenance and sufficient ventilation. The
diagram below shows the recommended amount of space.
100 mm
590 mm
100 mm
460 mm
100 mm
340 mm
300 mm
460 mm
550 mm
560 mm
1
Page 9
q
If you install the optional lower paper cassette, you will
need an additional 130 mm (5.1 inches) in height. If you
install the optional Face up tray, you will need an
additional 200 mm (7.9 inches) in back of the printer.
Caution:
q
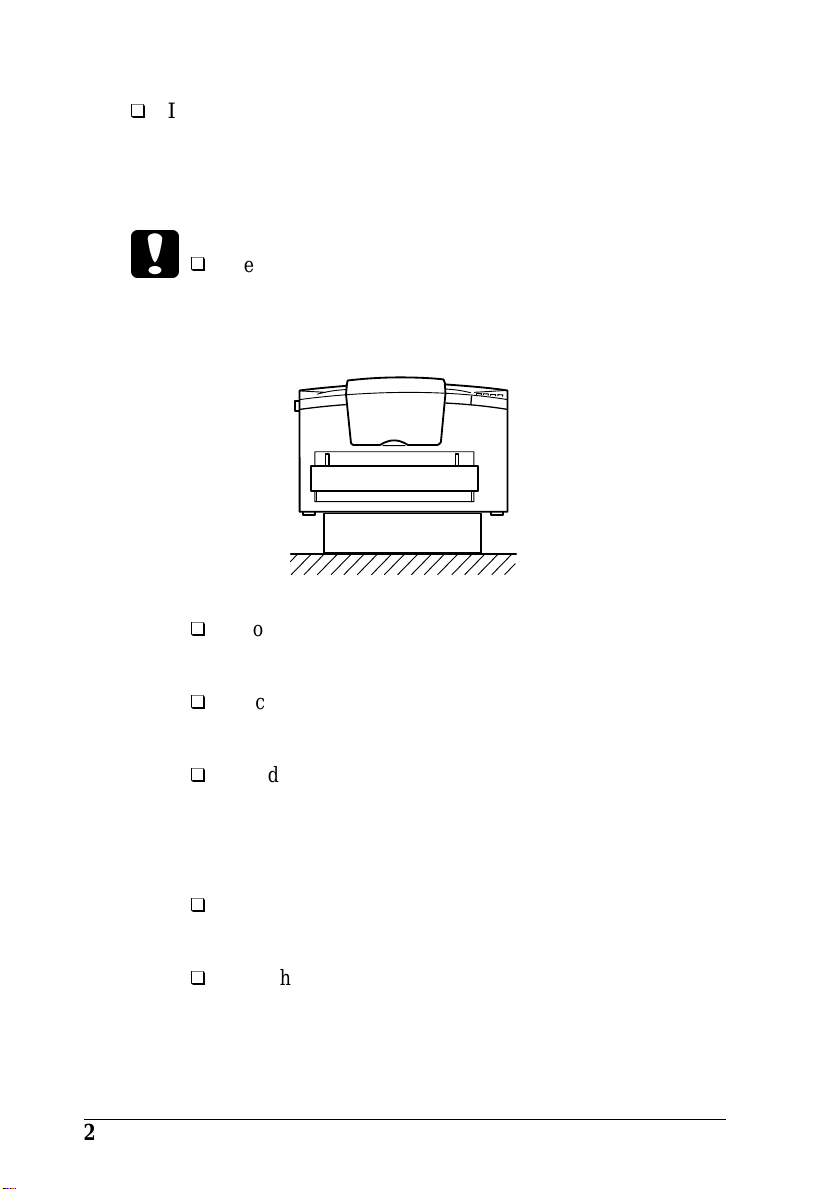
c
Never place the printer on a stand that is narrower than
the printer’s width like that in the illustration below,
otherwise printer may be damaged.
q
Avoid locations that are subject to direct sunlight,
excessive heat, moisture, or dust.
2
q
Place the printer where you can easily unplug the power
cord.
q
Avoid using an electrical outlet that is controlled by wall
switches or automatic timers. Accidental disruption of
power can wipe out valuable information in your
computer’s or printer’s memory.
q
Avoid using outlets on the same circuit with large motors
or other appliances that might disturb the power supply.
q
Keep the entire computer and printer system away from
potential sources of interference, such as loudspeakers or
the base units of cordless telephones.
Page 10

Unpacking
2
1. Remove the accessories and printer from the shipping carton.
Note:
The printer weighs about 7 kg (15.4 lb) and should be lifted
with care.
2. Set the printer on a flat, stable surface.
3. Remove the packing material from the printer and it’s
accessories and store it for future use.
4. Make sure you have the items shown below, plus one
CD-ROM containing a printer driver, and utility programs.
developer cartridge
paper tray
printer
photoconductor unit
power cord
3
Page 11

Note:
q
The shape of the AC power cord plug varies by country; be sure
the plug included is the right shape for your location.
q
The photoconductor unit and the developer cartridge are
preinstalled in the printer.
Removing the protective tape
3
Before using your printer, you must first remove the two
prot e c tive ta pe stri p s a s sh o w n belo w .
4
Page 12

Installing the 500 Sheet Lower
4
Paper Cassette
Note:
This section is for those users installing the optional 500 Sheet Lower
Paper Cassette.
Lift the printer. Make sure the printer and cassette are facing
the same direction. Align the pins on the cassette with the holes
on the bottom of the printer, and then lower the printer until it
rests secu r ely on th e casset te .
5
Page 13

Loading paper
5
1. Insert the paper tray under the slots at the front of the printer,
as shown below, then push it all the way into the printer.
2. Fan a stack of paper (up to 150 sheets), then align the edges
by tapping the stack on a flat surface. With the paper’s
printable side facing up, place the stack into the tray and
push it all the way in. Slide the paper guide against the
right side of the paper stack.
6
Page 14

3. Place the cover on the paper tray, as shown below.
4. Pull up the paper support on the front of the printer.
Note:
q
The front of the paper tray can be lowered to accommodate paper
longer than A4 size. See “Loading the paper tray” in Chapter 1 of
Reference Guide
your
q
You can also use the manual feed slot to load single sheets of
.
paper. To load paper from the manual feed s lot, see “Loading
paper manually” in Chapter 1 of your Reference Guide.
7
Page 15

q
To load thick envelopes, heavy paper, or other media such as labels
and transparencies, feed sheets one at a time. See “Printing on
special paper” in Chapter 1 of your Reference Guide.
q
By default, the printer is set up to print A4-size paper. If you are
printing on any other size of paper, you need to change the
printer’s paper size setting. See “Making Basic Driver Settings”
on page 15.
Attaching the power cord
6
1. Make sure the printer is turned off. It is off when the
of the power switch on the left side of the printer is pushed in.
2. Insert the power cord into the back of the printer. Then plug
the other end into a properly grounded electrical outlet.
side
N
8
Page 16

Testing the printer
7
To test whether the printer is set up correctly, print a status
sheet. The status sheet contains information about the printer,
including the current settings. Follow the steps below.
1. Make sure the protective tapes are removed as described in
"Removing the protective tapes" on page 4.
2. Turn on the printer as shown below.
9
Page 17

3. Press the
and the
Alt
Form Feed
buttons on the top right
corner of the printer simultaneously. The printer prints a
status sheet.
Paper
Toner
Memory
ContinueAlt
Form Feed
Reset
Status Sheet
Connecting the printer to the
8
On Line
computer
Your printer comes with two standard interface connectors:
Parallel and Serial. To use the Parallel interface, see the
interface connection instructions below. To use the Serial
interface, follow the instructions below and substitute Serial for
Parallel where appropriate.
Your printer also has a room for an optional interface
connector: a Type-B interface connector. See Chapter 3,
“Options,” in your
Reference Guide
and other options.
1. Make sure both the printer and the computer are off.
for more information on this
10
Page 18

2. Connect the parallel cable to the Parallel connector, and
secure the connector to the printer by squeezing the wire
clips together until they lock in place on either side of the
connector.
Note:
Use only a shielded, twisted-pair parallel cable.
3. Connect the other end of the cable to your computer.
4. Turn on the printer and then turn on your computer.
Installing the printer driver
9
The CD-ROM that comes with your printer contains utility
programs and a printer driver for Microsoft
Windows 3.11 for Workgroups, Windows 95, Windows NT
3.51, and NT 4.0.
After connecting the printer to your computer, install the
printer driver. The printer driver is software that runs, or
“drives”, your printer. With it, you can make settings such as
paper size, paper source, and orientation. You can also refer to
the printer driver’s online help for detailed information about
printer settings.
®
Windows® 3.1,
®
11
Page 19

If you are running DOS, you must use a driver other than the
one included with the printer.
For All Windows Users
Follow these steps to install the printer driver:
1. Make sure the printer is off and Windows is running.
2. Insert the CD-ROM that comes with your printer into your
CD-ROM drive D (or E).
3. If you are using Windows 3.1, Windows 3.11 for
Workgroups or Windows NT 3.51, make sure the Program
Manager window is open; then choose
menu. If you are using Windows 95, or Windows NT 4.0,
click
, then choose
Start
Run
.
on the File
Run
4. Type
5. In the dialog box that appears, double-click
6. In the dialog box that appears, select
7. When insta llatio n is co mple te, clic k OK.
The printer driver is now installed on your computer.
D:\EPSETUP
; or you can also install by selecting
Driver
and then clicking the arrow on the top right.
Driver
The printer driver is installed automatically.
(or
E:\EPSETUP
); then cli ck OK.
Install Printer
Install Printer
EPL-5700
For Windows 95 plug-and-play
Follow these steps to install the printer driver using Windows
95 plug-and-play capabilities:
12
and click OK.
Page 20

Note:
To install the driver using Windows 95 plug-and-play capabilities,
your computer’s parallel port must be an IEEE 1284 (ECP or Nibble
compatible) bidirectional parallel port. See your computer
documentation for more information.
1. Turn off your printer and computer, if necessary.
2. Turn on the printer first; then turn on the computer. Your
computer begins loading Windows 95.
3. If you defined a password, enter it at the prompt. You see the
New Hardware Found screen.
Note:
If you do not see the New Hardware Found screen, see “For All
Windows Users” on the previous page for installation
instructions.
4. Click the
manufacturer
Driver from disk provided by hardware
button. Do not select any other buttons.
5. Click OK. You see the Install From Disk screen.
6. Insert the CD-ROM that comes with your printer into the
CD-ROM drive.
7. If you inserted the CD-ROM in drive D, click OK. Otherwise,
change the dr ive r lett er in the
box and click OK. The printer driver is installed
from
Copy manufacturer ’s files
automatically.
8. At the next screen you can type a unique name for the printer
in the Printer name box. We recommend you keep the
model name as show n . The prog r am will co py the file s to
your hard disk and add an icon to the Printers folder using
the printer name you assign. To use this printer as the
default printer for Windows 95 applications, select
Yes
.
(No is the default setting.)
13
Page 21

9. Click
The printer driver is now installed on your computer.
Note:
The next time you turn on your computer after installing the driver,
Windows 95 may display the New Hardware Found screen again. In
this case, click the
OK
. This screen does not appear again.
Finish
.
Do not install a driver
radio button; then click
For DOS programs
Since DOS application programs differ in their driver selection
procedures, there is no standard way to select the printer
driver. See your software manual for information on how to
select the printer.
When asked to select a printer, pick the first printer available in
the list below.
EPL-5700
EPL-5500/5500+
EPL-N1200
EPL-N2000
EPL-5600
EPL-3000
EPL-5200/5200+
HP LaserJet III/IIIP/IIID
HP LaserJet III Si
HP LaserJet 4L
EPL-9000
HP LaserJet 4
If you choose a printer other than the EPL-5700, you may not be
able to use some printer features.
14
Page 22

Note:
The CD-ROM contains the Remote Control Panel utility. When you
are running DOS, you can use this utility to access the printer’s
control panel settings. See Chapter 5 of your
details.
Reference Guide
for
10
Making Basic Driver Settings
Before you start printing, you should make sure that the driver
settings match your document requirements. While many
Windows applications override the printer settings made with
the driver, some do not.
Be sure to check the following:
q
Paper The size of the paper loaded in the
printer
q
Orientation The direction of printing on the page
(portrait or landscape)
q
Print Quality The print resolution in dots per inch
(dpi)
q
Paper Source Auto Selection, MP Tray, Manual
Feed, or Lower Cassette (if installed)
15
Page 23

For Windows 95 and Windows NT 4.0 users
Follow these steps to make the required settings:
1. Click the
2. Point to
3. Right-click your printer icon and choose
Windows 95) or
Be sure to right-click.
4. Click the
5. Select the paper size you loaded in the printer from the
Paper. If you don’t see your paper size on the list, use the
arrow on the right to scroll through the list.
6. Select
7. Select the resolution from the Print Quality.
8. Select the paper source.
Make any other settings you wish, and click OK when you are
finished.
Portrait
printing on the diagram on the screen changes according to
the orientation you select.
button.
Start
Settings
Basic Settings
; then click
Document Defaults
or
Landscape
Printers
tab.
.
Properties
(in Windows NT 4.0).
orientation. The direction of
(in
For Windows 3.1 and Windows 3.11 for Workgroups
users
Follow these steps to access the driver and make the required
settings:
1. In the Main window, double-click the
2. Double-click the
Printers
icon.
16
Control Panel
icon.
Page 24

3. Make sure your printer is highlighted, and click the
button.
4. Select the paper size you loaded in the printer from Paper.
If you don’t see your paper size on the list, use the arrow
on the right to scroll through the list.
Setup
5. Select
6. Select the resolution from Print Quality.
7. Select the paper source.
Make any other settings you wish, and click OK when you are
finished.
Portrait
direction of the screen illustration changes according to the
orientation you select.
or
Landscape
orientation. The printing
For Windows NT 3.51 users
Follow these steps to access the driver and make the required
settings:
1. In the Main window, double-click the
2. Double-click the
3. Double-click your printer icon.
4. Select Properties from Printers menu.
Printers
icon.
Control Panel
icon.
5. Make sure your printer is selected and click the
6. Select the paper source.
7. Select the paper size.
Make any other settings you wish, and click OK when you are
finished.
Setup
button.
17
Page 25

11
Accessing Online Help
Your Windows printer driver has an extensive online help
feature that includes detailed information and instructions on
the driver settings. Online help will answer most of your
questions about the driver.
Note:
Online help is not available for DOS applications.
Accessing online help from Windows printer driver
To access online help from the printer driver, folow the
instructions on page 16 to access the driver; then click the
buton at the bottom of the window that appears.
Accessing online help from Windows applications
To access help from your application, open the File menu and
choose
or
Properties
buttons) depending on the software you are using. Then click
the ? or
or
Print
Help
Print Se tup
(you may need to click a combination of these
button in the window that appears.
. The click
Printer, Setup, Options
Help
,
18
Page 26

EPSON OVERSEAS MARKETING LOCATIONS
EPSON AMERICA, INC.
20770 Madrona Ave.
P.O. Box 2842
Torrance, CA 90509-2842
Phone: (800) 922-8911
Fax: (310) 782-5220
EPSON DEUTSCHLAND GmbH
Zülpicher Straße 6,
40549 Düsseldorf Germany
Phone: (0211) 56030
Fax: (0211) 5047787
EPSON AUSTRALIA PTY. LTD.
70 GIBBES STREET, CHATSWOOD 2067 NSW.
Phone: 2-9903-9000
Fax: 2-9903-9177
EPSON HONG KONG LTD.
Rooms 4706-10, 47/F,
China Resources Bldg.,
26 Harbour Road, Wanchai, Hong Kong
Phone: 2585-4300
Fax: 2827-7083
EPSON ITALIA S.p.A.
V.le F.lli Casiraghi 427
20099 Sesto S.Giovanni
MI, Italy
Phone: 2-262331
Fax: 2-2440750
EPSON UK LTD.
Campus 100, Maylands Avenue,
Hemel Hempstead, Herts,
HP2 7TJ, U.K.
Phone: (+44) 01442 261144
Fax: (+44) 01442 227227
EPSON FRANCE S.A.
68 bis, rue Marjolin
92300, Levallois-Perret, France
Phone: 33.1.40.87.37.37
Telex: 610657
EPSON SINGAPORE PTE. LTD.
No. 1 Temasek Avenue #36-00
Millenia Tower, Singapore 039192
Phone: (065) 33 77 911
Fax: (065) 33 41 185
EPSON TAIWAN TECHNOLOGY &
TRADING LTD.
10F, No. 287 Nanking E. Road, Sec. 3,
Taipei, Taiwan, R.O.C.
Phone: (02) 717-7360
Fax: (02) 712-9164
EPSON IBERICA S.A.
Av. de Roma, 18-26
08290 Cerdanyola del Valles
Barcelona, Spain
Phone: 582. 15.00
Fax: 582. 15.55
SEIKO EPSON CORPORATION
(Hirooka Office)
80 Harashinden, Hirooka
Shiojiri-shi, Nagano-ken
399-0785 Japan
EPSON PORTUGAL, S.A.
R. do Progresso, 471, 1º Perafita
4460 Matosinhos, Portugal
Phone: (02) 996 14 02
Fax: (02) 996 14 11
1998 February
Page 27

 Loading...