

Page 1
Color Laser Printer
Setup Guide
4012361-00
XXX
Page 2

Where to Find Information
Unpacking Guide
Provides you with information and instructions on how to
unpack and place the printer. Before using the printer, you need
to remove all protective materials as described in the instructions
contained in this guide.
Setup Guide (this manual)
Provides you with information on assembling the printer’s parts
and installing the printer’s software.
Reference Guide
Provides you with detailed information on the printer’s functions,
optional products, maintenance, troubleshooting, and technical
specifications.
Administrator’s Guide (online guide)
Provides network administrators with information on both the
printer driver and network settings.
Quick Reference
Provides you with a list of LCD panel messages and information
on replacing consumables and clearing jammed paper. This guide
can be hung on the printer with the hook provided.
Online Help
Provides you with detailed information and instructions on the
printer software that controls your printer. Online help is
automatically installed when you install the printer’s software.
Page 3

Color Laser Printer
All rights reserved. No part of this publication may be reproduced, stored in a retrieval system, or
transmitted in any form or by any means, mechanical, photocopying, recording, or otherwise,
without the prior written permission of SEIKO EPSON CORPORATION. No patent liability is
assumed with respect to the use of the information contained herein. Neither is any liability
assumed for damages resulting from the use of the information contained herein.
Neither SEIKO EPSON CORPORATION nor its affiliates shall be liable to the purchaser of this
product or third parties for damages, losses, costs, or expenses incurred by purchaser or third
parties as a result of: accident, misuse, or abuse of this product or unauthorized modifications,
repairs, or alterations to this product, or (excluding the U.S.) failure to strictly comply with SEIKO
EPSON CORPORATION’s operating and maintenance instructions.
SEIKO EPSON CORPORATION shall not be liable against any damages or problems arising from
the use of any options or any consumable products other than those designated as Original EPSON
Products or EPSON Approved Products by SEIKO EPSON CORPORATION.
EPSON and EPSON ESC/P are reg istered trademarks and EPSON ESC/P 2 is a trademark of SEIKO
EPSON CORPORATION.
Speedo, Fontware, FaceLift, Swiss, and Dutch are trademarks of Bitstream Inc.
CG Times and CG Omega are registered trademarks of Miles, Inc.
Univers is a registered trademark of Linotype AG and/or its subsidiaries.
Antique Olive is a trademark of Fonderie Olive.
Albertus is a trademark of Monotype Corporation plc.
Coronet is a trademark of Ludlow Industries (UK) Ltd.
Arial and Times New Roman are registered trademarks of Monotype Corporation plc.
Dutch and Swiss are trademarks of Bitstream Inc.
Times, Helvetica and Palatino are reg istered trademarks of the Linotype AG and/or its subsidiaries.
ITC Avant Garde Gothic, ITC Bookman, ITC Zapf Chancery and ITC Zapf Dingbats are registered
trademarks of the International Typeface Corporation.
Century SchoolBook is registered trademark of the Kingsley-ATF Type Corporation.
New Century Schoolbook is a trademark of the Linotype AG and/or its subsidiaries.
HP and HP LaserJet are registered trademarks of Hewlett-Packard Company.
Adobe and PostScript are trademarks of Adobe Systems Incorporated, which may be registered in
certain jurisdictions.
NEST Office Kit Copyright © 1996, Novell, Inc. All rights reserved.
General Notice: Other product names used herein are for identification purposes only and may be
trademarks of their respective owners. EPSON disclaims any and all rights in those marks.
Copyright © 2000 by SEIKO EPSON CORPORATION, Nagano, Japan.
Setup Guide
Page 4

ii
Page 5

Contents
1 Safety Instructions
Laser Printer Precautions . . . . . . . . . . . . . . . . . . . . . . . . . . . . . . . . .1
Important Safety Instructions . . . . . . . . . . . . . . . . . . . . . . . . . . . . .4
Warnings, Cautions, and Notes. . . . . . . . . . . . . . . . . . . . . . . . . . . . 6
2 System Requirements
3 Assembling the Printer
Installing the Developer Cartridges . . . . . . . . . . . . . . . . . . . . . . . .8
Installing the Photoconductor Unit and Waste Toner Collector 12
Installing the Fuser Oil Roll . . . . . . . . . . . . . . . . . . . . . . . . . . . . . . .17
4 Installing the Options
Installing the 500-Sheet Paper Cassette Unit. . . . . . . . . . . . . . . . .21
Installing the Duplex Unit . . . . . . . . . . . . . . . . . . . . . . . . . . . . . . . .25
Installing the Hard Disk Drive . . . . . . . . . . . . . . . . . . . . . . . . . . . .32
Installing a Memory Module . . . . . . . . . . . . . . . . . . . . . . . . . . . . . .35
Installing a ROM Module. . . . . . . . . . . . . . . . . . . . . . . . . . . . . . . . .40
Installing an Interface Card . . . . . . . . . . . . . . . . . . . . . . . . . . . . . . .43
5 Testing and Connecting the Printer
Plugging in the Printer . . . . . . . . . . . . . . . . . . . . . . . . . . . . . . . . . . .46
Testing the Printer. . . . . . . . . . . . . . . . . . . . . . . . . . . . . . . . . . . . . . .47
Loading paper. . . . . . . . . . . . . . . . . . . . . . . . . . . . . . . . . . . . . . 47
Printing a status sheet . . . . . . . . . . . . . . . . . . . . . . . . . . . . . . . 48
Connecting to the Computer . . . . . . . . . . . . . . . . . . . . . . . . . . . . . .49
iii
Page 6

6 Installing the Printer Software
About the Printer Driver . . . . . . . . . . . . . . . . . . . . . . . . . . . . . . . . . 52
For All Windows Users . . . . . . . . . . . . . . . . . . . . . . . . . . . . . . . . . . 52
Installing the printer driver . . . . . . . . . . . . . . . . . . . . . . . . . . 52
Installing the EPSON Font Manager . . . . . . . . . . . . . . . . . . 55
For DOS Programs . . . . . . . . . . . . . . . . . . . . . . . . . . . . . . . . . . . . . . 56
7 Accessing Online Help
Accessing from the Printer Driver. . . . . . . . . . . . . . . . . . . . . . . . . 57
Accessing from Windows Applications . . . . . . . . . . . . . . . . . . . . 58
8Printing with Windows
Starting to Print. . . . . . . . . . . . . . . . . . . . . . . . . . . . . . . . . . . . . . . . . 59
Canceling Printing . . . . . . . . . . . . . . . . . . . . . . . . . . . . . . . . . . . . . . 61
9 After This...
What to do Next . . . . . . . . . . . . . . . . . . . . . . . . . . . . . . . . . . . . . . . . 63
Using the Online Guide. . . . . . . . . . . . . . . . . . . . . . . . . . . . . . . . . . 63
10 Safety Information
ENERGY STAR Compliance. . . . . . . . . . . . . . . . . . . . . . . . . . . . . . 70
For United Kingdom Users. . . . . . . . . . . . . . . . . . . . . . . . . . . . . . . 70
Index
iv
Page 7
1
Safety Instructions
Laser Printer Precautions
This printer uses laser technology. The following precautions
apply whenever you use the printer. Even if you are familiar with
other types of printers, be sure to follow these precautions
carefully to ensure safe, efficient operation.
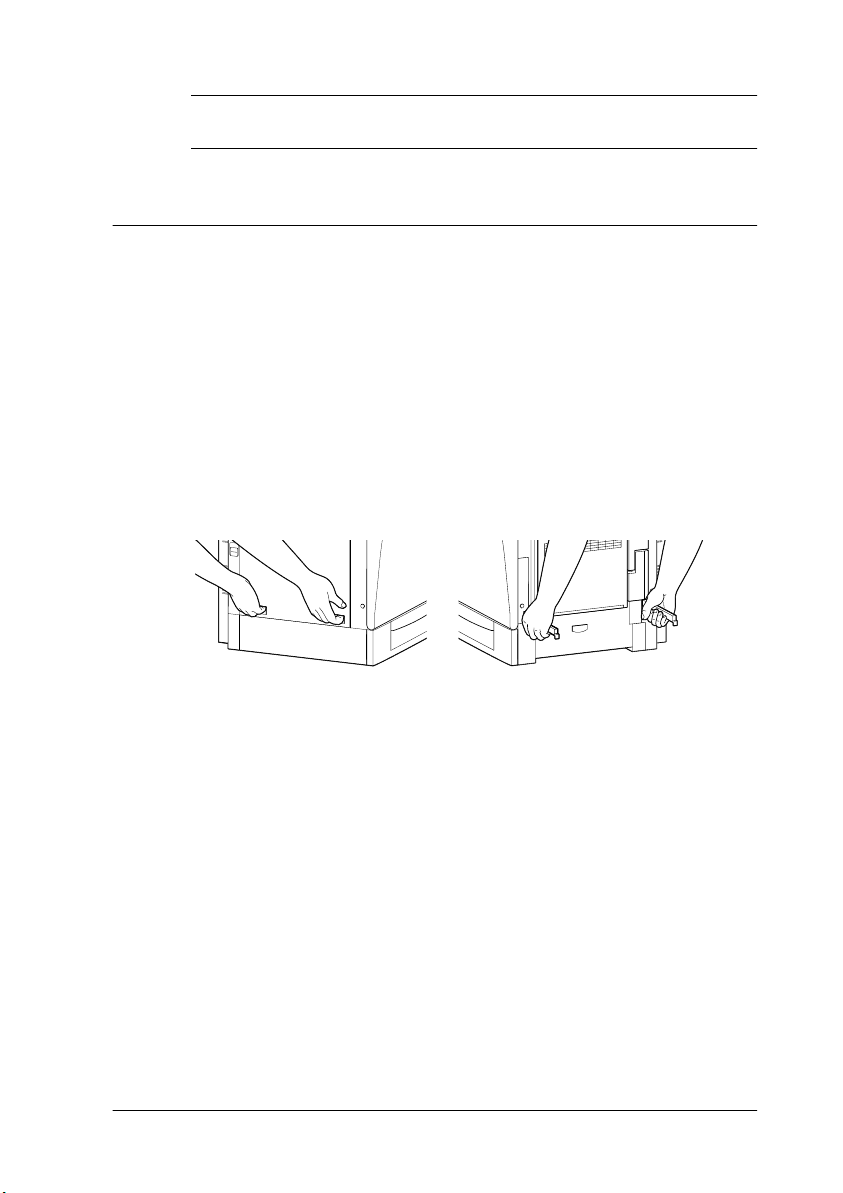
❏ Because the printer weighs approximately 39.5 kg (87 lb)
without the consumables installed , you should not lift or carry
it by yourself. Two or more people should carry it, lifting it at
the correct positions.
left right
❏ Be careful not to touch the fuser, which is marked CAUTION
Hot Surface Avoid Contact, or the surrounding areas. If the
printer has been in use, the fuser and the surrounding areas
may be very hot.
Safety Instructions
1
Page 8
CAUTION Hot Surface
Avoid Contact
❏ Avoid touching the components inside the printer unless
instructed to do so in this guide.
❏ Never force the printer’s components into place. Although the
printer is designed to be sturdy, rough handling can damage
it.
❏ When handling the developer cartridges, always place them
on a clean, smooth surface.
❏ Do not attempt to modify or take the developer cartridge
apart. It cannot be refilled.
❏ Do not touch the toner and avoid all contact with your eyes.
❏ Do not dispose of used developer cartridges, photoconductor
units, fuser oil rolls, or waste toner collectors in fire, as they
can explode and cause injury. Dispose of them according to
local regulations.
❏ Wait for at least one hour before using a developer cartridge
or a photoconductor unit after moving it from a cool to a warm
environment to prevent damage from condensation.
2
Safety Instructions
Page 9
❏ Keep the fuser oil roll horizontal at all times. Do not tilt it or
lean it against something, as it can cause oil to leak and reduce
print quality.
❏ When removing the photoconductor unit, avoid exposing it
to room light any longer than necessary. The unit contains a
green-colored light-sensitive drum. Exposure to light can
damage the drum, causing dark or light areas to appear on
the printed page and reducing the service life of the drum. If
you need to keep the unit out of the printer for long periods,
cover it with an opaque cloth.
❏ Be sure not to scratch the surface of the drum. When you
remove the photoconductor unit from the printer, always set
the unit on a clean, smooth surface. Also, avoid touching the
drum, since oil from your skin can permanently damage its
surface and may affect print quality.
❏ To get the best print quality, do not store the photoconductor
unit in an area subject to direct sunlight, dust, salty air, or
corrosive gases (such as ammonia). Avoid locations subject to
extreme or rapid changes in temperature or humidity.
❏ Be sure to keep consumable components out of the reach of
children.
❏ Do not leave jammed paper inside the printer. This can cause
the printer to overheat.
Safety Instructions
3
Page 10

Hinweis:
Die Geräteanschlußleitung muß den einshlägigen Normen genügen.
Es muß eine dreiadrige Leitung verwendet werden.
Die Anshlußleitung darf nicht leichter als H05VV-F order H05VVH2F sein.
Maschinenlärminformations-Verordnung-3. GSGV, 18. 01. 1991: Der
arbeitsplatzbezogene schalldruckpegel beträgt 70 dB (A) oder weniger
gemäß ISO 7779.
Important Safety Instructions
Read all of the following instructions before operating your
printer:
❏ Follow all warnings and instructions marked on the printer.
❏ Unplug the printer from the electrical outlet before cleaning.
Use a damp cloth for cleaning and do not use liquid or aerosol
cleaners.
❏ Do not use the printer near water.
❏ Do not place the printer on an unstable surface.
❏ Slots and openings, located on the sides of the printer, are
provided for ventilation. Keep these slots and openings clear
to allow proper ventilation. Avoid placing the printer on a soft
surface like a bed or a sofa, or in a small enclosed area, as this
restricts proper ventilation.
❏ Connect your printer to an electrical outlet that meets the
power requirements of this printer. Your printer’s power
requirements are indicated on a label attached to the printer.
If you are not sure of the power supply specifications in your
area, contact your local power company or consult your
dealer.
4
Safety Instructions
Page 11

❏ If you are unable to insert the AC plug into the electrical
outlet, contact an electrician.
❏ Do not put your printer where the cord will be stepped on.
❏ Avoid using outlets that other appliances are plugged into.
❏ When using an extension cord, be careful not to exceed its
recommended amperage limit. Also, be sure that all items
plugged into the electrical outlet do not exceed a total of 15
amperes.
❏ Never push objects of any kind through cabinet slots as they
may touch dangerous voltage points or short out parts that
could result in fire or electric shock.
❏ Never spill liquid of any kind onto the printer.
❏ Unless specifically instructed in this guide, do not attempt to
service this product yourself. Opening or removing those
covers that are marked Do Not Remove may expose you to
dangerous voltage points or other risks. Refer all servicing in
those compartments to a qualified service representative.
❏ Unplug the printer and refer servicing to a qualified service
representative under the following conditions:
A. If liquid has entered the printer.
B. If the printer has been exposed to rain or water.
C. If the printer does not operate normally or exhibits a
distinct change in performance.
D. If the printer has been dropped or the cabinet damaged.
E. When the power cord or plug is damaged or frayed.
Safety Instructions
5
Page 12

❏ Adjust only those controls that are covered by the operating
instructions, as improper adjustment of other controls may
result in damage and may require repairs by a qualified
service representative.
❏ If you plan to use the printer in Germany, observe the
following:
To provide adequate short-circuit protection and overcurrent protection for this printer, the building installation
must be protected by a 16 Amp circuit breaker.
Bei Anschlu
sichergestellt werden, daß die Gebäudeinstallation mit einem 16
A-Überstromschalter abgesichert ist.
ß des Druckers an die Stromversorgung muß
Warnings, Cautions, and Notes
Warnings
must be followed carefully to avoid bodily injury.
w
Cautions
must be observed to avoid damage to your equipment.
c
contain important information and useful tips on the operation of
Notes
your printer.
6
Safety Instructions
Page 13

2
System Requirements
To use your printer with a PC, you need Microsoft Windows
98, Windows 95, Windows 2000, or Windows NT 4.0, and a
shielded, twisted-pair parallel interface cable.
To install and use the printer software (printer driver and utilities)
included on the CD-ROM or floppy disk packed with your
printer, your system should meet the following requirements:
Component Minimum System Recommended System
CPU i486/25 MHz for Windows
RAM 16 MB RAM for Windows
Hard disk
space
95, or NT 4.0
i486/66 MHz for Windows
98
Pentium 133 MHz for
Windows 2000
98/95, or NT 4.0
32 MB RAM for Windows
2000
10 MB free hard disk
space for Windows 98/ 95
20 MB free hard disk
space for Windows 2000,
or NT 4.0
Pentium or higher
processor for Windows
98/95, or NT 4.0
Higher than Pentium
133 MHz for Windows
2000
32 MB RAM or more for
Windows 98/95
64 MB RAM or more for
Windows 2000, or NT 4.0
50 MB or more free disk
space for Windows
98/95
100 MB or more free disk
space for Windows
2000, or NT 4.0
Display 800 x 600 pixel monitor Greater than 800 x 600
pixel monitor, with High
Color (16 bit) or True
Color (32 bit) setting
Note:
Depending on the size of your print data, you may need more memory
and free hard disk space than that stated above.
System Requirements
7
Page 14

3
Assembling the Printer
Before assembling the printer, make sure that all protective
materials packed around and inside your printer are removed.
Follow the instructions in the Unpacking Guide to remove these
materials.
Note:
Keep all packing materials as you will need them when transporting the
printer.
Installing the Developer Cartridges
Before installing the developer cartridges, read the following
handling precautions:
❏ If toner gets onto your skin or clothes, wash it off with soap
and water immediately.
❏ Wait for at least one hour before installing a developer
cartridge after moving it from a cool to a warm environment
to prevent damage from condensation.
You need to install four developer cartridges into the printer.
Follow these steps to install the developer cartridges:
8
Assembling the Printer
Page 15
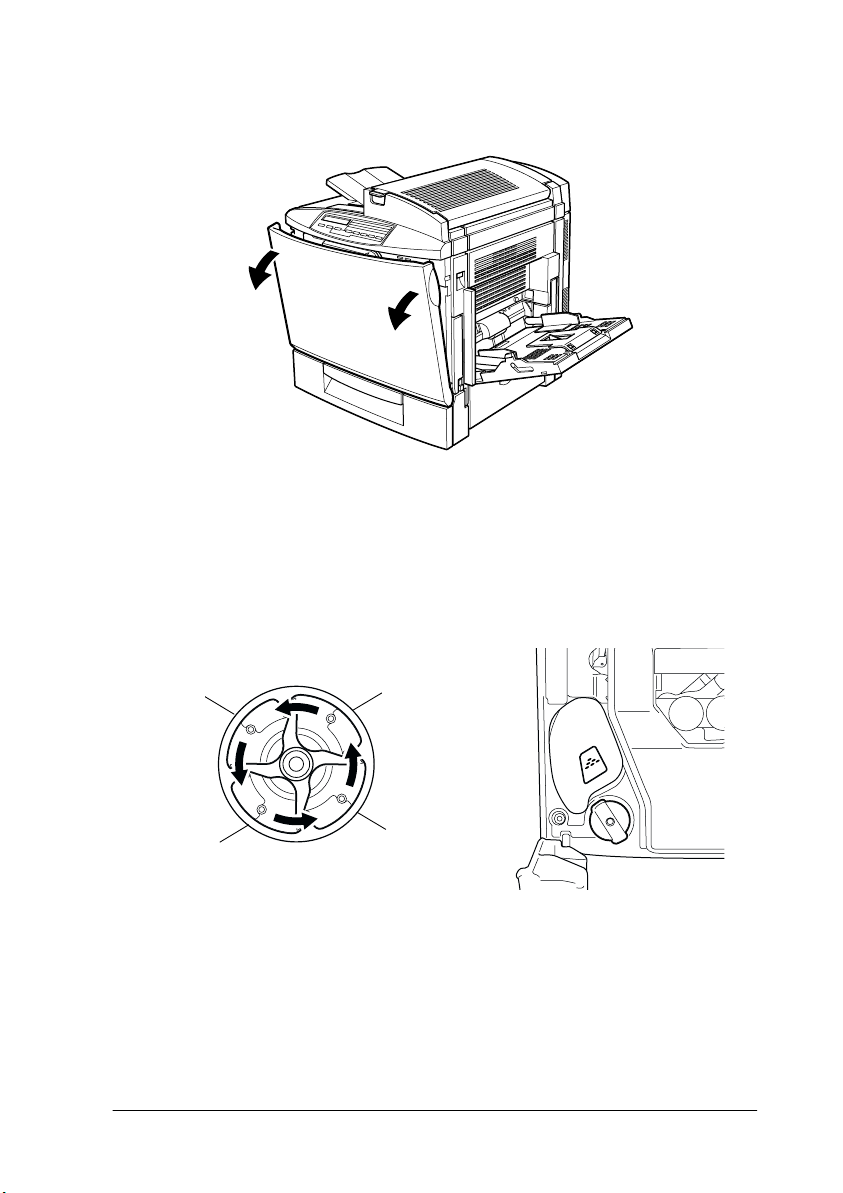
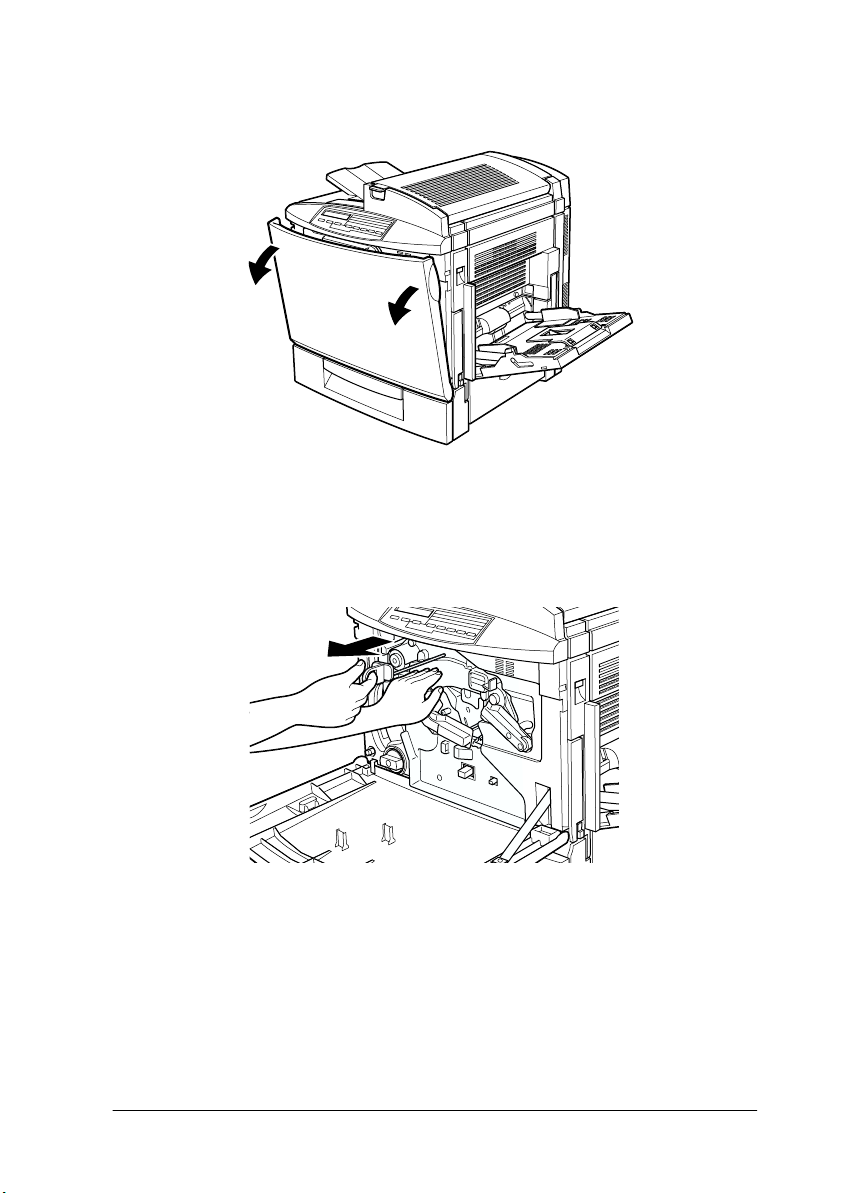
1. Open the front cover.
2. Check the color of the dotted triangle that appears in the
cartridge installment window and prepare the cartridge of the
same color.
Black
Yellow
Cyan
Magenta
Assembling the Printer
9
Page 16
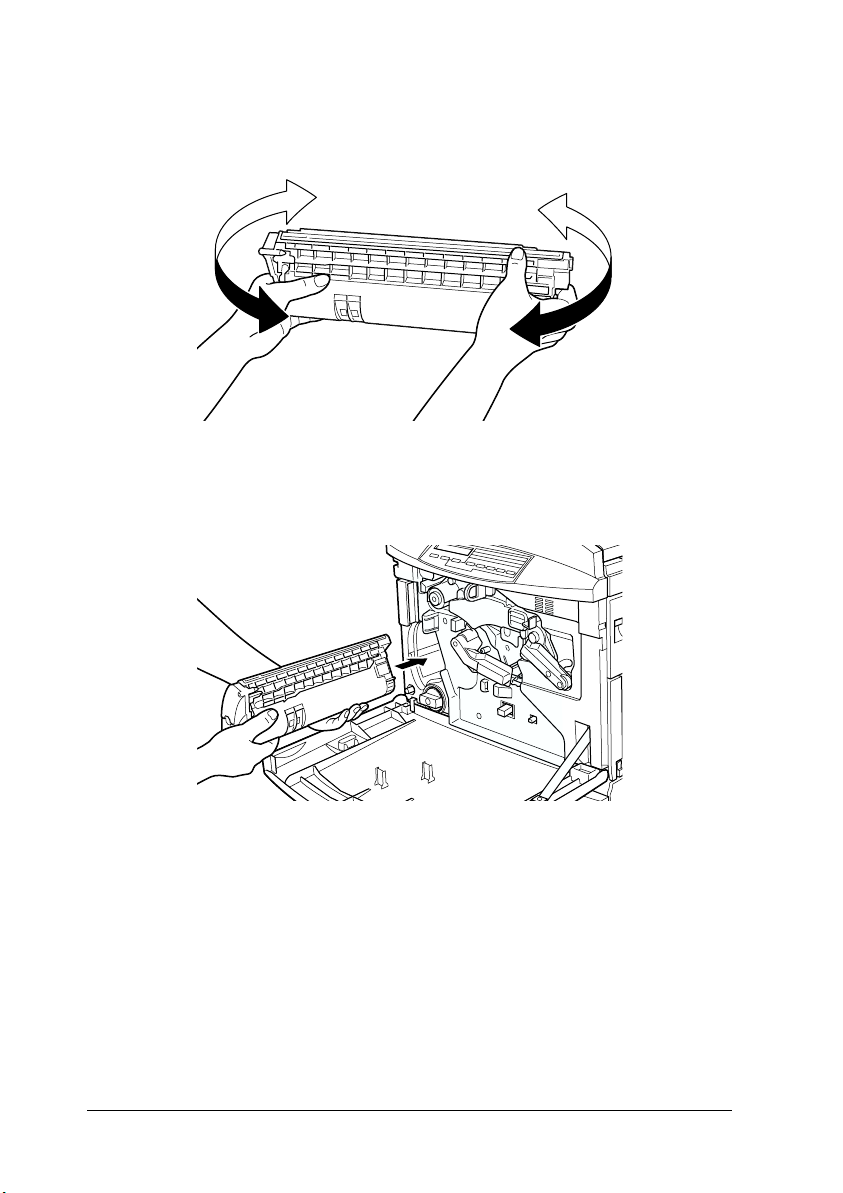
3. Take the cartridge out of its package, and gently shake it from
side to side and front to back to distribute the toner evenly.
4. Hold the cartridge as shown below, and insert it all the way
into the developer cartridge slot until it clicks.
10
Assembling the Printer
Page 17
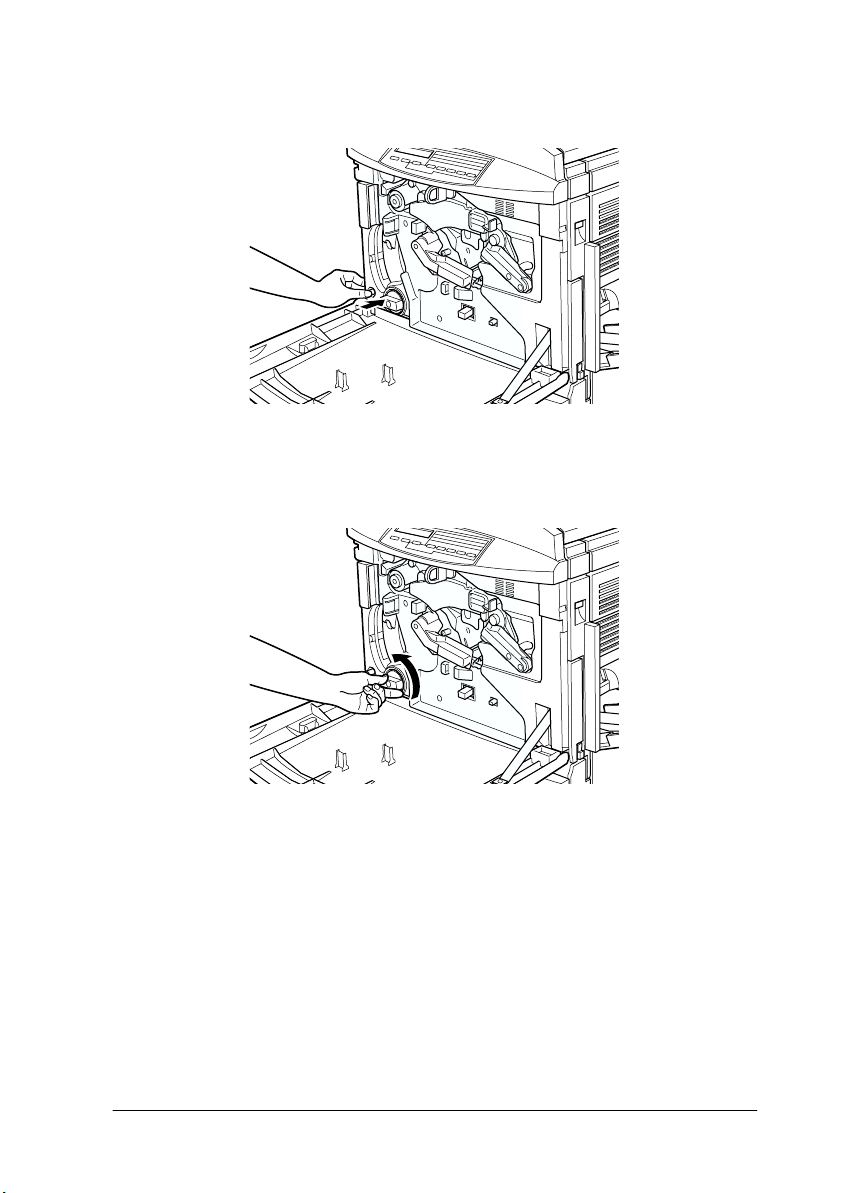
5. Press the green button.
6. Turn the knob counterclockwise until it stops. The next empty
cartridge slot appears in the cartridge installment window.
Note:
If the knob cannot be moved, first check that the green button has
been pushed down. Do not turn the knob by force.
7. Install the other cartridges as described in steps 2 to 5 (skip
step 5 for the last cartridge).
Assembling the Printer
11
Page 18
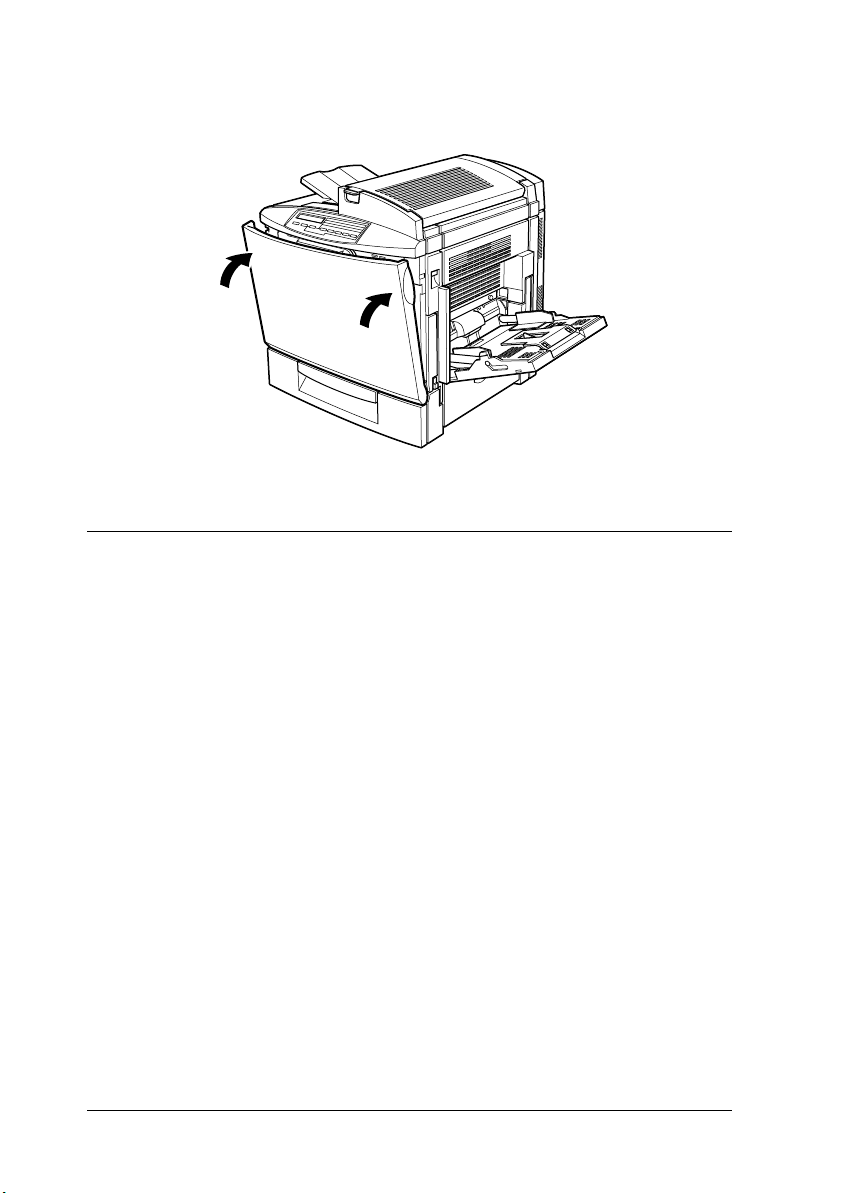
8. Close the front cover.
Installing the Photoconductor Unit and Waste Toner Collector
Before installing the photoconductor unit and the waste toner
collector, read the following handling precautions:
❏ When installing the photoconductor unit, avoid exposing it
to room light any longer than necessary.
❏ Be sure not to scratch the surface of the drum. Also, avoid
touching the drum, since oil from your skin may permanently
damage its surface and affect print quality.
❏ Keep the photoconductor unit and waste toner collector out
of the reach of children.
Follow these steps to install the photoconductor unit and the
waste toner collector:
12
Assembling the Printer
Page 19
1. Open the front cover.
2. While keeping the transfer belt unit in place with your left
hand, pull the ring toward you to remove the tension release
rod.
Note:
The tension release rod is used to prevent damage to the belt during
transportation and when the printer is not being used for long
periods. Make sure you keep the rod in a safe place so you can reinsert
it when you need to transport the printer.
Assembling the Printer
13
Page 20
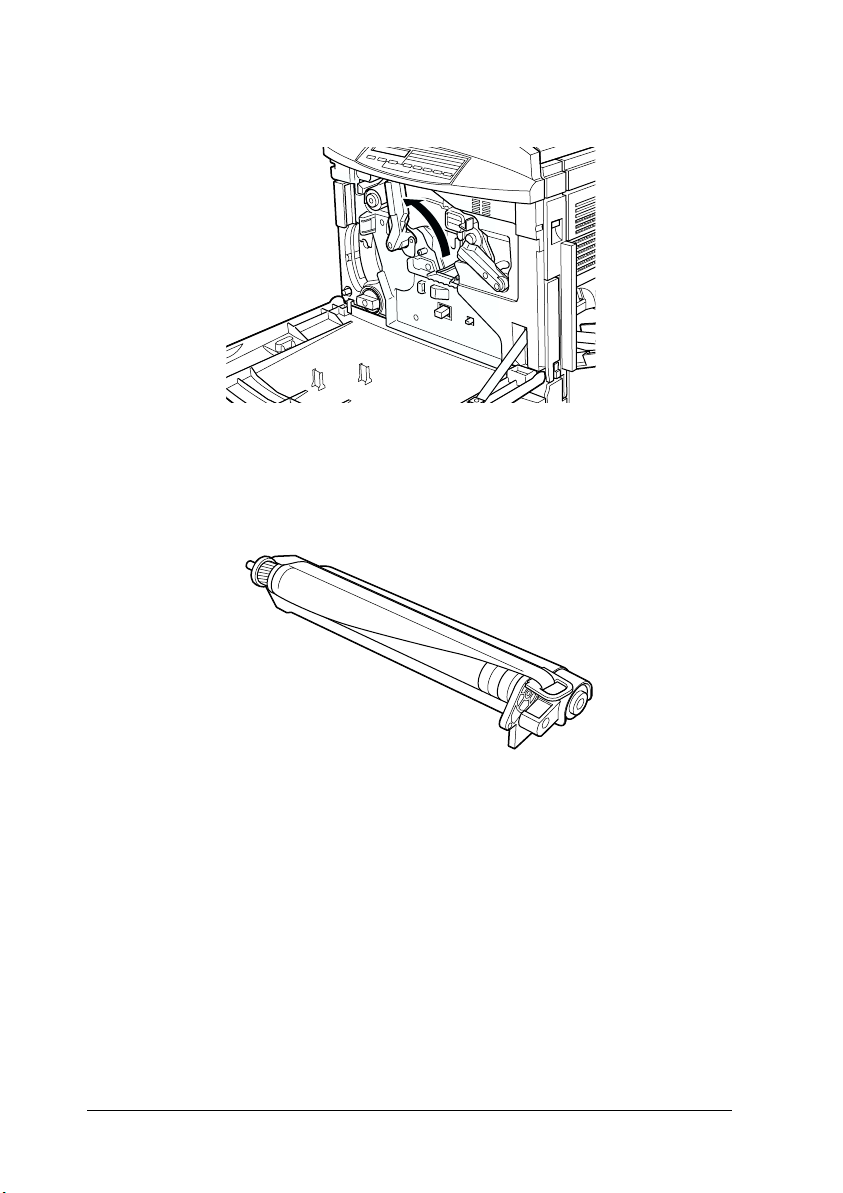
3. Turn the large lever counterclockwise to an upright position.
4. Take the photoconductor unit out of its package. Do not
remove the protective sheet at this stage.
c
14
Assembling the Printer
Caution:
❏ Be sure not to touch or scratch the surface of the drum.
❏ Avoid touching the drum, since oil from your skin may
permanently damage its surface and affect print quality.
Page 21
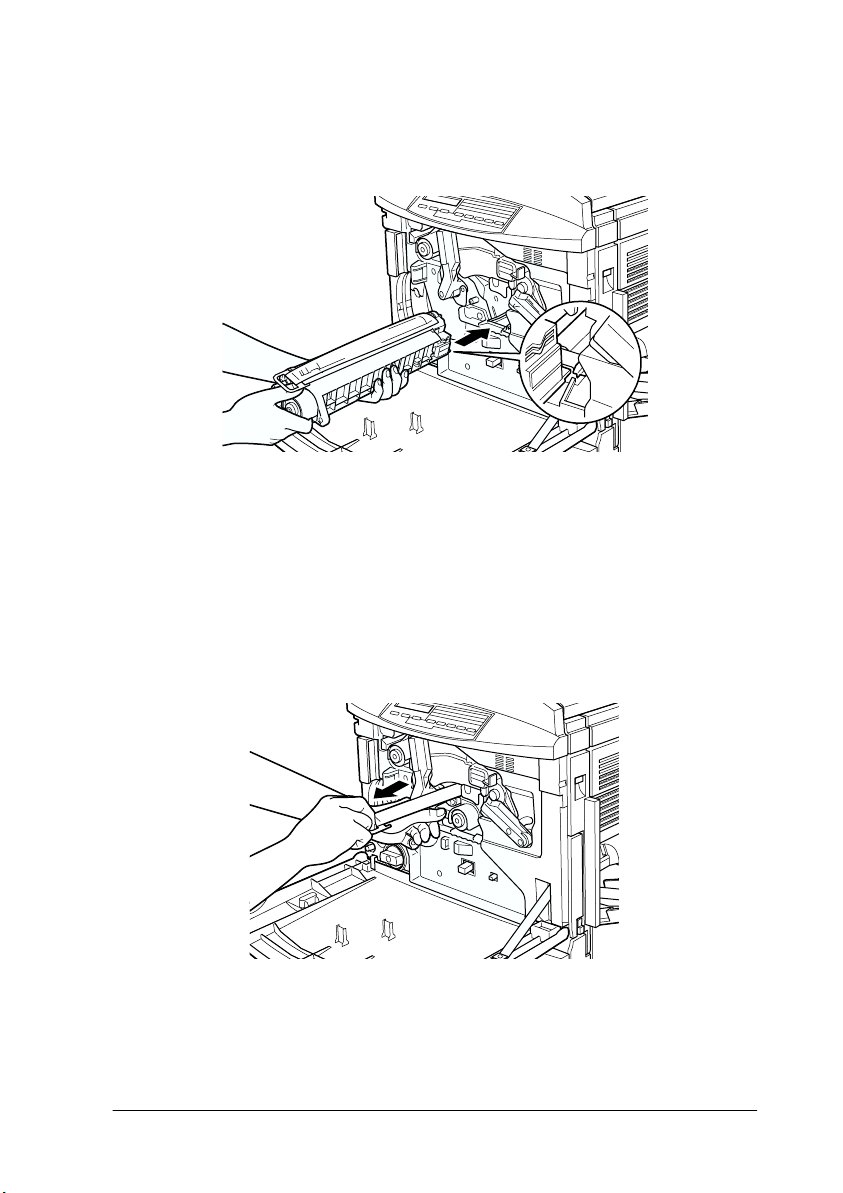
5. Hold the photoconductor unit as shown below, and insert it
firmly into the slot making sure that the bottom of the unit
slide into the guide rails.
Note:
Make sure that the unit is completely inserted into the slot.
Otherwise, the lever cannot be restored to a position that
accommodates the waste toner collector.
6. While keeping the photoconductor unit in place with your left
hand, pull the ring toward you to remove the protective sheet.
c
Caution:
Failure to remove the protective sheet may damage your
printer.
Assembling the Printer
15
Page 22
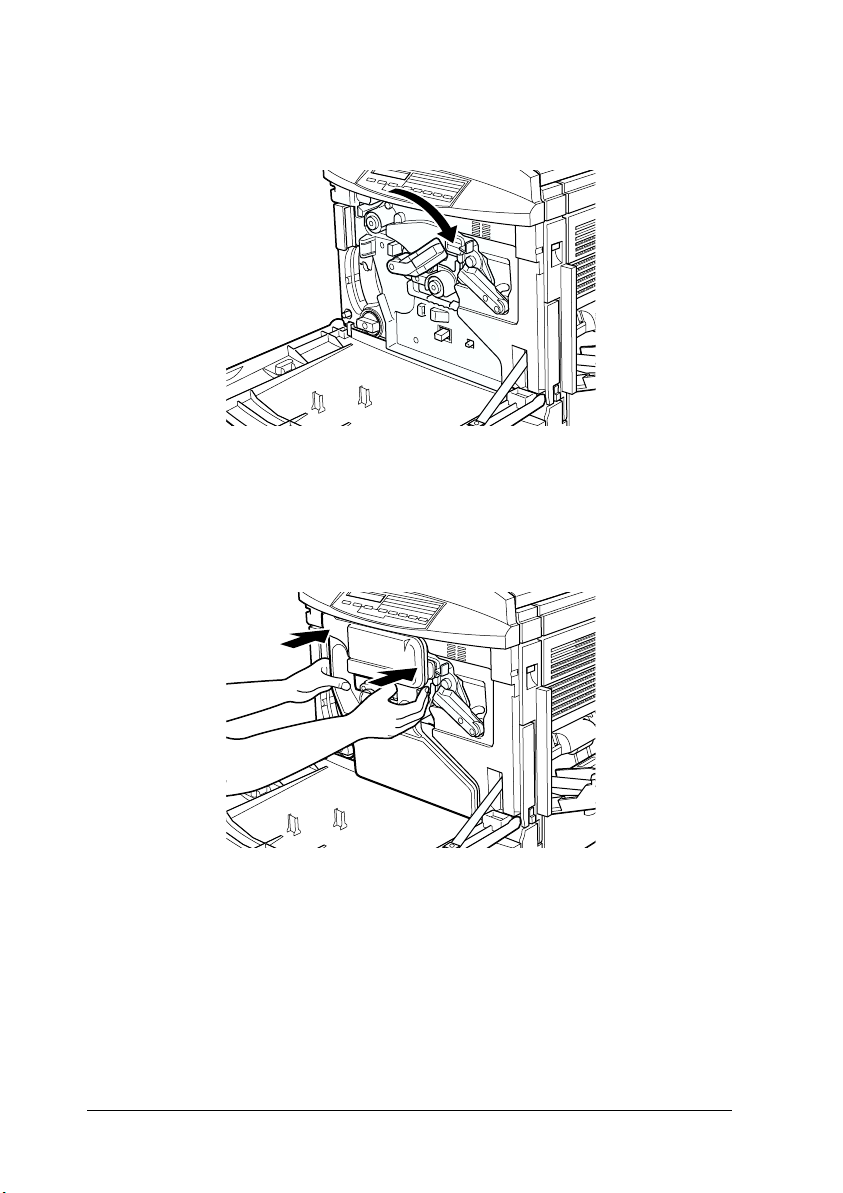
7. Turn the large lever clockwise, until the lever rests on the
photoconductor unit as shown below.
8. Take the waste toner collector out from its package.
9. Attach the waste toner collector, making sure that the fit is
snug.
16
Assembling the Printer
Page 23
10. Close the front cover.
Installing the Fuser Oil Roll
Before installing the fuser oil roll, read the following handling
precautions:
❏ Do not touch the white roll surface.
❏ If oil gets on your skin or clothes, wash it off immediately.
❏ Keep the fuser oil roll out of the reach of children.
❏ The fuser oil roll should always be kept horizontal. Do not tilt
or lean it against something. Doing so might cause oil to leak
and impair print quality.
Follow these steps to install the fuser oil roll:
Assembling the Printer
17
Page 24
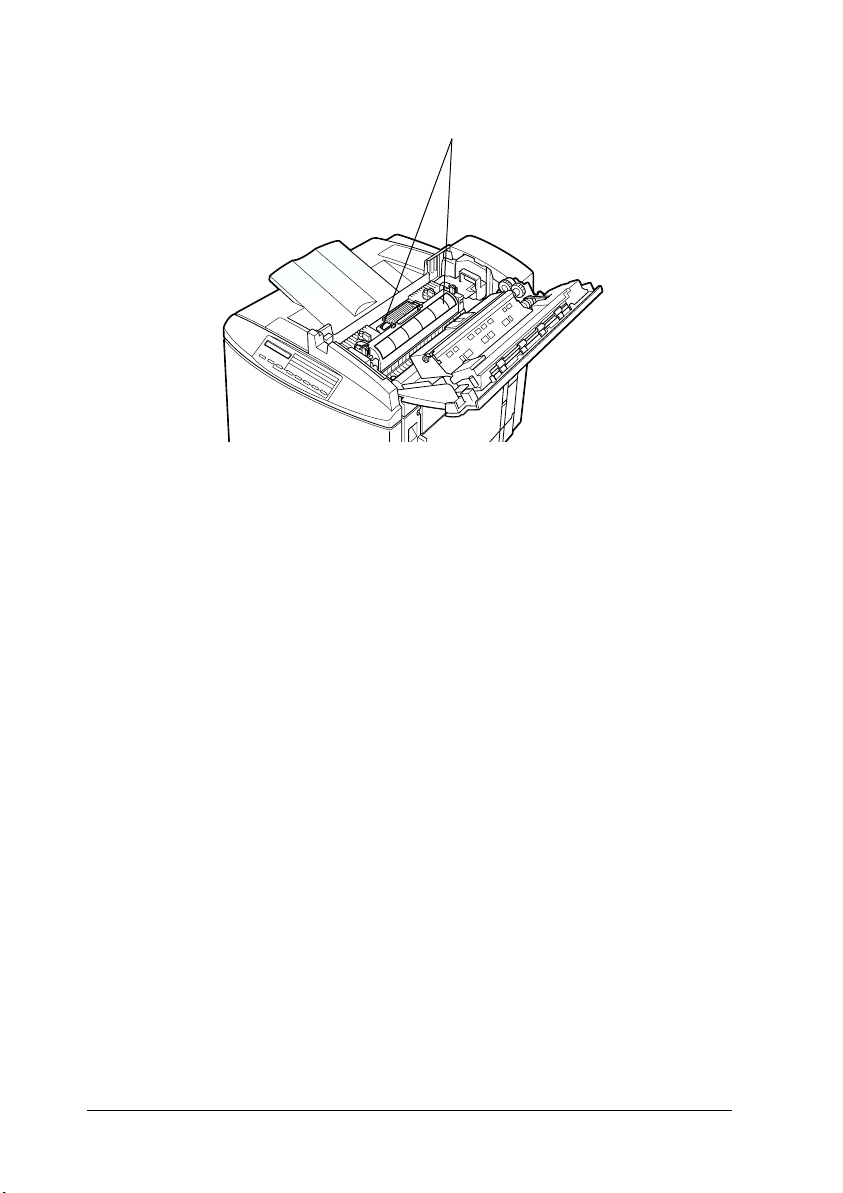
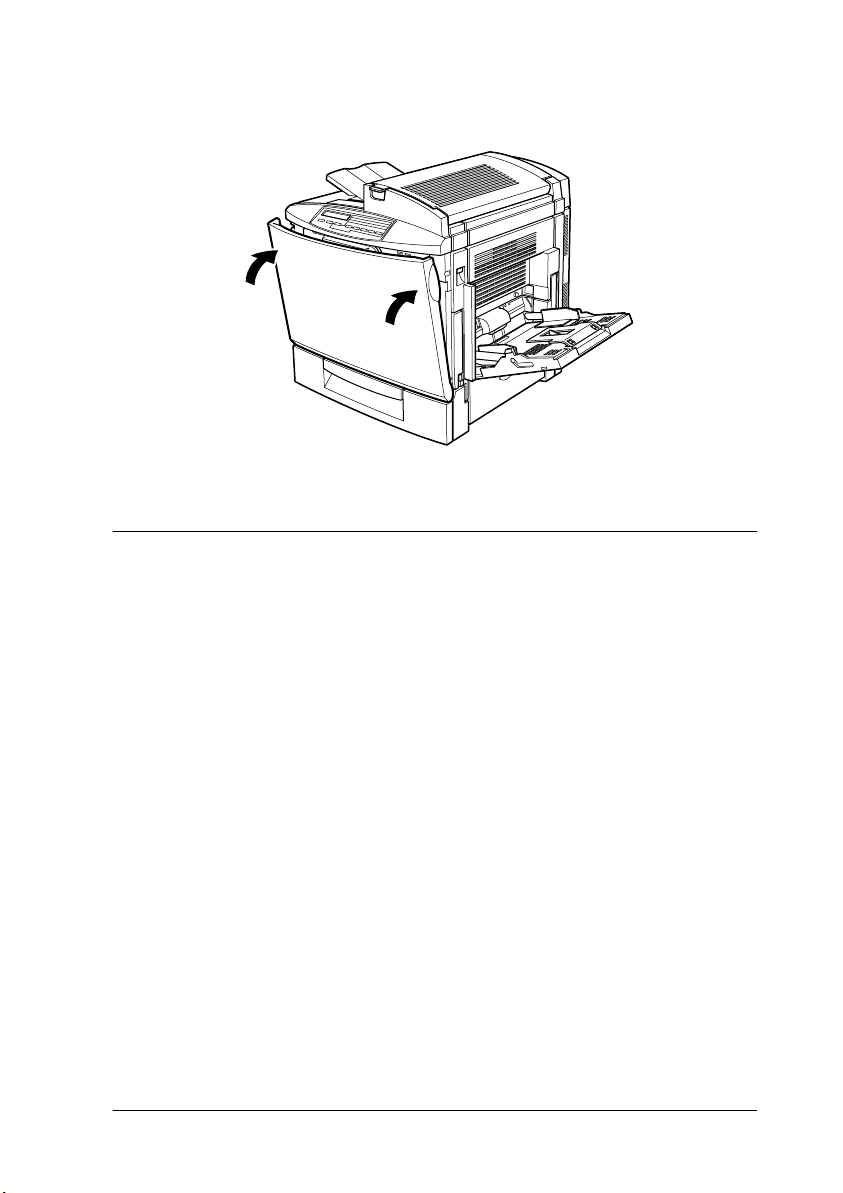
1. Push the lever and lift the printer’s top cover.
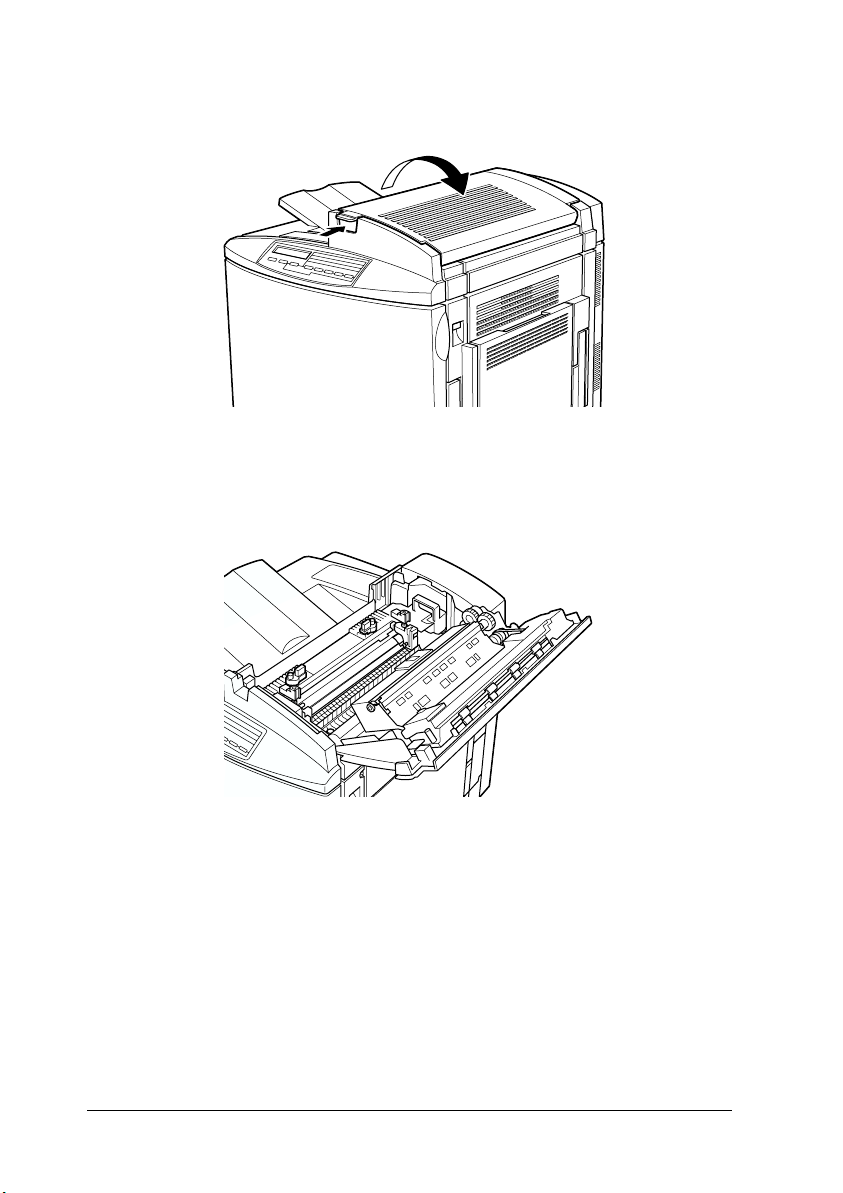
2. Make sure that the two fuser oil roll levers are in the position
shown below.
.
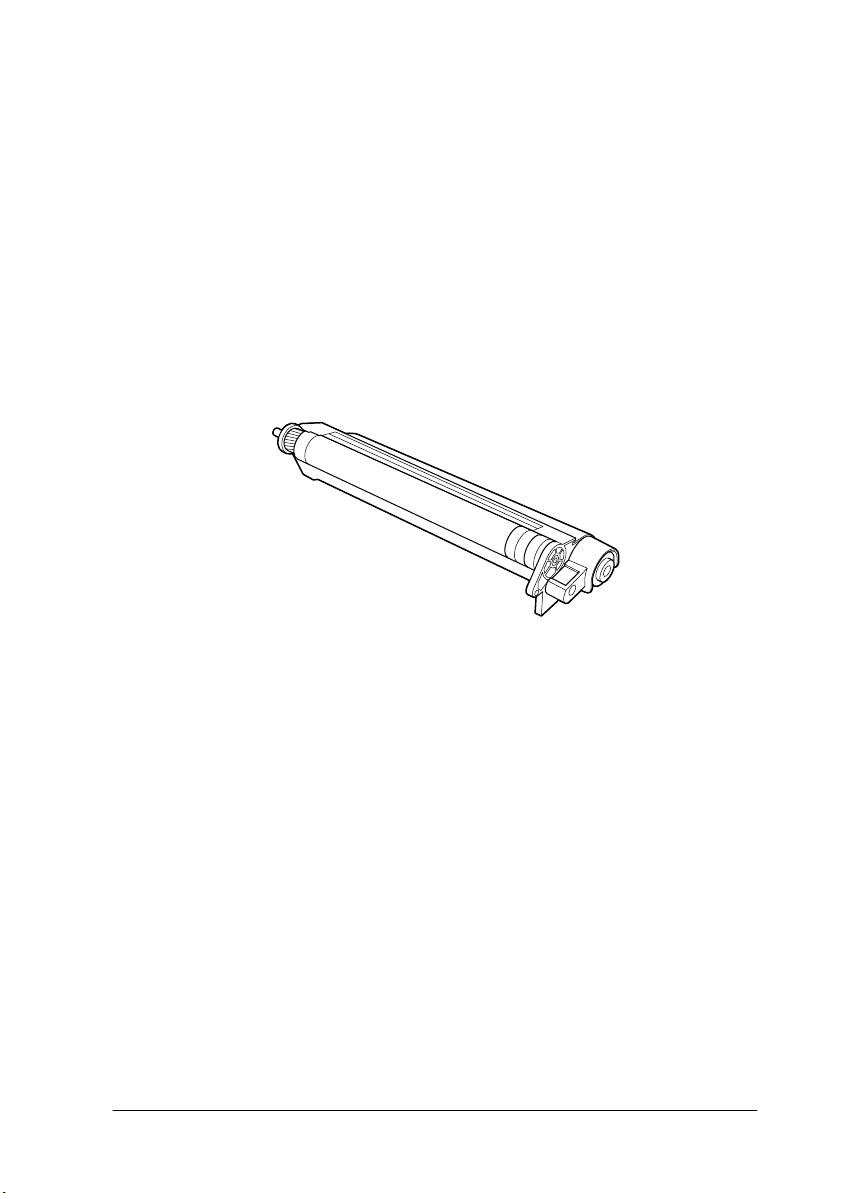
3. Remove the fuser oil roll from its package.
Note:
Be careful not to touch the white roll surface.
18
Assembling the Printer
Page 25
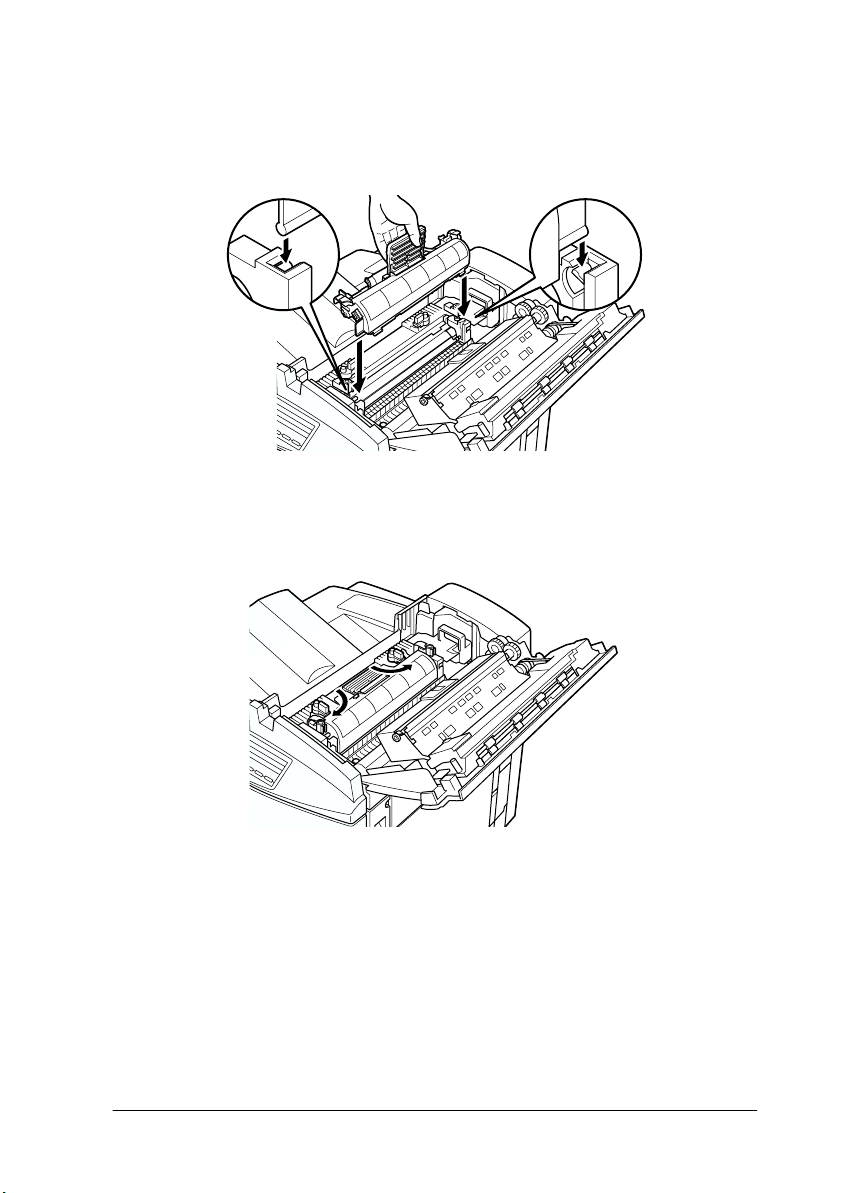
4. Hold the roll by the handle and lower it into the printer,
making sure that the two side flaps fit into their
corresponding slots on the fuser unit.
5. Turn the two levers outward such that they rest above the
fuser oil roll, as shown below.
Assembling the Printer
19
Page 26

6. Gently close the top cover until it clicks.
20
Assembling the Printer
Page 27

4
Installing the Options
If you purchased any options with the printer, install them before
plugging in the printer.
Installing the 500-Sheet Paper Cassette Unit
The optional 500-Sheet Paper Cassette Unit allows you to increase
paper-feeding capacity.
Follow these steps to install the 500-Sheet Paper Cassette Unit:
1. Make sure the printer is not turned on, and unplug the power
cord if it is plugged into an electrical outlet.
2. Carefully remove the 500-Sheet Paper Cassette Unit from its
carton and place it on a flat stable surface.
Note:
❏ The unit comes packaged with three small metal fittings and
three screws. Make sure you have these items as you will need
them to complete the installation.
Installing the Options
21
Page 28

❏ Try to place the unit where the printer will be positioned so you
will not have to move the printer and the unit after they are
assembled together.
❏ Do not place the unit on a high surface as the printer is heavy
and will make lifting the printer and placing it over the unit
difficult.
❏ Remove the packaging materials from the unit and keep them
for future use.
3. With the assistance of two or more people, grasp the printer
at the positions indicated below and lift it carefully.
v
22
Installing the Options
Page 29

4. Align each of the printer’s corners with those of the 500-Sheet
Paper Cassette Unit, then lower the printer until it rests
securely on the unit.
Caution:
c
The printer weighs about 45 kg (99.2 lb) with the
consumables installed; always lift it with two or more people.
Installing the Options
23
Page 30

5. Remove the standard lower cassette from the printer, then
attach the metal fittings labeled L (left) and R (right) to the
indicated positions, and tighten them with the screws
provided.
Note:
Use a coin to fasten the screws because a normal screwdriver will
probably not fit into the slot of the paper cassette.
6. Reinsert the standard lower cassette into the printer.
7. Face the back of the printer and remove the screw as shown
below.
24
Installing the Options
Page 31

8. Attach the third metal fitting labeled B (back) to the position
indicated, and fasten it with the screw you just removed.
9. Plug the printer’s power cord into an electrical outlet.
10. Turn on the printer.
To confirm that the 500-Sheet Paper Cassette Unit is installed
correctly, print a status sheet. If the unit is not listed on the status
sheet, make sure the electronic connectors connecting the 500Sheet Paper Cassette Unit to the printer are connected securely.
For instructions on how to print a status sheet, see “Printing a
status sheet” on page 48.
Installing the Duplex Unit
The optional Duplex Unit allows you to automatically print on
both sides of paper.
Follow these steps to install the Duplex Unit:
1. Make sure the printer is not turned on, and unplug the power
cord if it is plugged into an electrical outlet.
Installing the Options
25
Page 32

2. Face the right side of the printer and remove the screws on
the right side cover.
3. Open the printer’s right cover.
26
Installing the Options
Page 33

4. Remove the right side cover from the printer, then push in the
printer’s side until it clicks closed.
Note:
❏ The cover cannot be removed if the printer’s right cover is closed.
❏ Keep the right side cover in a safe place as you will need to
reinstall it if you remove the Duplex Unit in the future.
5. Unpack the Duplex Unit and remove the tape that keeps the
cover of the unit in place.
Installing the Options
27
Page 34

6. Lift the Duplex Unit with both hands and fit it onto the right
side of the printer, making sure that the fit is snug and that
the electronic connectors are securely connected.
7. Open the cover of the unit.
c
28
Installing the Options
Caution:
❏ The MP tray has to be open to be able to open the cover
of the Duplex Unit.
❏ Be sure to hold the unit in place with one hand while
opening the cover. The unit is rather heavy and may slip
off the side of the printer before it is fastened with screws.
Page 35

8. Fasten the unit with the retaining screws.
Caution:
c
9. Close the cover of the unit.
The unit is heavy and may slip off the side of the printer before
the screws are fastened. To be safe, have someone hold the
unit in place for you while you fasten the screws.
Installing the Options
29
Page 36

10. Open the printer’s right cover.
11. Pull out the small plastic piece that is attached to a selfretrieving string on the right side of the Duplex Unit.
30
Installing the Options
Page 37

12. Attach the plastic piece onto the hook on the side, as shown
below.
13. Gently close the printer’s right cover.
14. Plug the printer’s power cord into an electrical outlet.
15. Turn on the printer.
To confirm that the Duplex Unit is installed correctly, print a
status sheet. If the unit is not listed on the status sheet, make sure
the electronic connectors connecting the Duplex Unit to the
printer are connected securely. For instructions on how to print a
status sheet, see “Printing a status sheet” on page 48.
Installing the Options
31
Page 38

Installing the Hard Disk Drive
The optional Hard Disk Drive allows you to expand the printer’s
receive buffer through the network, and gives you additional
memory for graphics and faster multi-page, multi-output sorting.
Follow these steps to install the optional Hard Disk Drive:
Caution:
c
w
1. Make sure the printer is not turned on, and unplug the power
2. Remove the screws and the circuit board cover on the back of
Before you install the Hard Disk Drive, be sure to discharge any
static electricity by touching a grounded piece of metal.
Otherwise, you may damage static-sensitive components.
Warning:
Be careful when working inside the printer as some components
are sharp and may cause injury.
cord if it is plugged into an electrical outlet.
the printer.
32
Installing the Options
Page 39

3. Identify the Hard Disk Drive socket. It’s relative position is
shown below.
4. Remove the Hard Disk Drive from its package.
5. Hold the Hard Disk Drive such that its electrical connector is
on the same end as the Hard Disk Drive socket, then press the
Hard Disk Drive down until the socket and connector are
firmly connected.
Installing the Options
33
Page 40

6. Secure the Hard Disk Drive by fastening it with the screws
provided.
Caution:
c
7. Replace the circuit board cover and fasten the screws.
You should not remove any modules from the circuit board.
Otherwise, the printer will not work.
8. Plug the printer’s power cord into an electrical outlet.
34
Installing the Options
Page 41

9. Turn on the printer.
To confirm that the Hard Disk Drive is installed correctly, print a
status sheet. If the drive is not listed on the status sheet, try
reinstalling the drive. Make sure that the electronic connector on
the Hard Disk Drive is securely connected to the socket on the
circuit board. For instructions on how to print a status sheet, see
“Printing a status sheet” on page 48.
Installing a Memory Module
Increasing the printer’s memory allows you to print complex or
graphics-intensive documents. You can increase printer memory
up to 512 MB by installing optional Dual In-line Memory Modules
(DIMMs).
This printer has two DIMM slots, but one slot has a 32 MB DIMM
already installed in it at the time of manufacture. To increase
printer memory to its maximum of 512 MB, you have to purchase
two 256 MB DIMMs and remove the original 32 MB DIMM.
You can purchase DIMMs from various vendors. Be sure they
meet the following requirements:
DRAM type Synchronous Dynamic RAM Dual In-line
Memory size 32 MB, 64 MB, 128 MB, or 256 MB
Type 168-pin type, 64 bit, with SPD*
Access speed 66.66 MHz or higher (15 ns or less)
Height Less than 40 mm
* SPD stands for Serial Pres ence Detect, a chip resid ing on the memory module
that contains information about the size, speed, and other specifications of
the memory as well as manufacturer information that can be retrieved by
the motherboard through electronic signals.
Memory Module (SDRAM DIMM)
Follow these steps to install an optional memory module:
Installing the Options
35
Page 42

Caution:
c
w
1. Make sure the printer is not turned on, and unplug the power
2. Remove the screws and the circuit board cover on the back of
Before you install a memory module, be sure to discharge any
static electricity by touching a grounded piece of metal.
Otherwise, you may damage static-sensitive components.
Warning:
Be careful when working inside the printer as some components
are sharp and may cause injury.
cord if it is plugged into an electrical outlet.
the printer.
36
Installing the Options
Page 43

3. Identify the DIMM slot. It’s relative position is shown below.
4. Remove the DIMM from its package.
5. Hold the memory module above the DIMM slot in the
following orientation, then insert it into the slot. Do not apply
too much force.
c
Caution:
Be sure to install the DIMM into the S0 slot.
Installing the Options
37
Page 44

6. Push one end of the DIMM into the slot until the clip comes
up.
7. Push the other end of the DIMM into the slot until the clip
comes up to retain the memory module securely.
Caution:
c
❏ Do not force the DIMM into the slot.
❏ Be sure to insert the DIMM facing the correct way.
❏ You should not remove any modules from the circuit
board. Otherwise, the printer will not work.
38
Installing the Options
Page 45

8. Replace the circuit board cover and fasten the screws.
9. Plug the printer’s power cord into an electrical outlet.
10. Turn on the printer.
To confirm that the memory module is installed correctly, print a
status sheet. If the total amount of memory listed does not include
the size of the optional memory module, try reinstalling the
module. Make sure that the module is securely attached to the
DIMM slot. For instructions on how to print a status sheet, see
“Printing a status sheet” on page 48.
Installing the Options
39
Page 46

Installing a ROM Module
The optional ROM modules that expand your printer’s features
differ, depending on the country of purchase.
Follow these steps to install an optional ROM module:
Caution:
c
w
1. Make sure the printer is not turned on, and unplug the power
2. Remove the screws and the circuit board cover on the back of
Before you install a ROM module, be sure to discharge any static
electricity by touching a grounded piece of metal. Otherwise, you
may damage static-sensitive components.
Warning:
Be careful when working inside the printer as some components
are sharp and may cause injury.
cord if it is plugged into an electrical outlet.
the printer.
40
Installing the Options
Page 47

3. Identify the ROM slot. It’s relative position is shown below.
Caution:
c
4. Remove the ROM module from its package.
5. Insert the module all the way into slot A in the orientation
shown below. The X tab at the top of the slot will jut out when
the module is inserted correctly.
You should not remove any modules from the circuit board.
Otherwise, the printer will not work.
Installing the Options
41
Page 48

Caution:
c
6. Replace the circuit board cover and fasten the screws.
7. Plug the printer’s power cord into an electrical outlet.
8. Turn on the printer.
❏ Do not force the ROM module into the slot.
❏ Be sure to insert the module facing the correct way.
To confirm that the ROM module is installed correctly, print a
status sheet. If the module is not listed on the status sheet, try
reinstalling the module. Make sure that it is securely fastened to
the ROM slot on the printer. For instructions on how to print a
status sheet, see “Printing a status sheet” on page 48.
42
Installing the Options
Page 49

Installing an Interface Card
Your printer comes with a Type B interface slot. Various optional
interface cards are available to expand your printer’s interface
options. See the Reference Guide for more details on optional
interface cards.
Follow these steps to install an optional interface card:
Caution:
c
1. Make sure the printer is not turned on, and unplug the power
2. Remove the screws that secure the interface slot cover on the
Before you install the interface card, be sure to discharge any
static electricity by touching a grounded piece of metal.
Otherwise, you may damage static-sensitive components.
cord if it is plugged into an electrical outlet.
far left side of the printer and remove the cover.
Note:
Keep the slot cover in a safe place. You will need to reattach it if you
remove the interface card later.
Installing the Options
43
Page 50

3. Slide and push the interface card into the slot firmly, making
sure that the connector at the back of the interface card is fully
inserted into the printer’s internal socket.
4. Secure the interface card by fastening the retaining screws.
5. Plug the printer’s power cord into an electrical outlet.
6. Turn on the printer.
44
Installing the Options
Page 51

To confirm that the interface card is installed correctly, print a
status sheet. If the interface is not listed on the status sheet, try
reinstalling the card making sure the card is securely fastened to
the socket on the printer. For instructions on how to print a status
sheet, see “Printing a status sheet” on page 48.
Installing the Options
45
Page 52

5
Testing and Connecting the Printer
This chapter provides you with the necessary instructions to test
that the printer is correctly set up for use with a computer. You
will also find information on how to connect the printer to your
computer.
Plugging in the Printer
Follow these steps to connect the printer to an electrical outlet:
1. Check the label on the left side of the printer to make sure that
the voltage required by the printer matches that of the
electrical outlet it will be plugged into. Also, make sure that
you have the correct power cord for your power source.
Caution:
c
It is not possible to change the printer’s voltage. If the
required voltage and your outlet voltage do not match,
contact your dealer for assistance. Do not plug in the power
cord.
46
Testing and Connecting the Printer
Page 53

2. Make sure that the printer is turned off. It is off when the
N
side of the power switch on the left side of the printer is
pushed in.
O
N
P
O
W
E
R
O
F
F
3. Connect the power cord to the AC inlet on the left side of the
printer.
4. Plug the power cord into a properly grounded electrical
outlet.
Testing the Printer
To test whether the printer is set up correctly, print a status sheet.
The status sheet contains information about the printer, including
the current settings. To print a status sheet, follow the procedures
below. You will have to first load the MP tray with paper.
Loading paper
Follow these steps to load paper into the MP tray:
1. Fan a stack of A4 or Letter size paper, then tap it on a flat
surface to even the edges.
Testing and Connecting the Printer
47
Page 54

2. Be sure to load paper into the MP tray short edge first. Load
the stack of paper with the printable surface down, then slide
the paper guides against the sides of the paper stack.
Printing a status sheet
Follow these steps to print a status sheet:
1. Turn on the printer. The lights and the LCD panel messages
on the control panel change in the following order:
All lights turn on once and then turn off. The display shows
ROM CHECK.
The display shows RAM CHECK XXXMB, with the actual memory
size of your printer (including the memory size of any
optional memory module installed) displayed in place of XXX.
The display shows Self Test, Calibrating Printer, then
Warming Up. The On Line light turns on.
After about three minutes, the display shows Ready.
2. Press the Enter button. The display shows Status Sheet.
3. Press the Enter button again. The message on the LCD panel
starts flashing and the printer starts printing a status sheet.
48
Testing and Connecting the Printer
Page 55

4. Check that the printer has printed the status sheet clearly and
that information on the options installed in the printer is
correct. If the printer properly recognizes an installed option,
the option’s name appears under Hardware Configurations.
If the printer cannot print a status sheet, or if you are unable to
get the printer to print a correct status sheet, contact your dealer.
Connecting to the Computer
To connect your computer to the printer’s built-in parallel
interface, you need a shielded, twisted-pair parallel interface
cable that is IEEE-1284 compatible.
Note:
If you want to connect the printer to your computer through an installed
optional interface card, you need a different type of cable. See the optional
interface card’s manual.
Follow these steps to connect the printer to your computer using
the parallel interface:
1. Make sure that both the printer and the computer are turned
off.
Testing and Connecting the Printer
49
Page 56

2. Plug the cable connector securely into the printer’s parallel
interface connector, then squeeze the wire clips together until
they lock in place on both sides of the connector.
3. Plug the other end of the cable into the computer’s parallel
interface connector.
50
Testing and Connecting the Printer
Page 57

6
Installing the Printer Software
All necessary software are included on the “Printer Software for
EPSON AcuLaser C2000” CD-ROM that shipped with your
printer.
The printer software includes the following items:
❏ Printer driver
The printer driver gives you complete control over your
printer with the Microsoft
®
or NT
settings such as print quality, color setting, and paper size.
❏ EPSON Status Monitor 3 utility
The EPSON Status Monitor 3 utility allows you to view
printer status information such as the amount of toner
remaining and check for any printer errors. When the printer
driver is installed, the EPSON Status Monitor 3 utility is also
installed automatically.
❏ EPSON Font Manager
The EPSON Font Manager provides you with 31 printer fonts
and 96 software fonts.
4.0 operating systems. With it, you can make various
®
Windows® 98/95, Windows 2000,
❏ Online help
Online help gives you instant on-screen access to detailed
information and instructions on printer settings.
Note:
❏ If you wish to make a floppy disk version of the printer software on
your CD-ROM, you can use the driver disk creation utility included
on the CD-ROM.
❏ If you are running DOS, you must use a driver other than the one
included with the printer. See “For DOS Programs” on page 56.
Installing the Printer Software
51
Page 58

About the Printer Driver
When you install the printer driver, the EPSON Status Monitor 3
utility and online help are also automatically installed. The
EPSON Status Monitor 3 utility functions as part of the printer
driver and is accessed by clicking the Utility tab in the printer
driver. Online help is accessed by clicking the Help button in the
printer driver.
For All Windows Users
The software installation procedures for the various Windows
operating systems are similar and will be treated together in the
following sections.
Installing the printer driver
Follow these steps to install the printer driver for Windows 98/95,
Windows 2000, or Windows NT 4.0:
Note:
❏ When you use your printer on a network, you need to have approval
from the network administrator. Ask your network administrator
for more information, or see the Administrator's Guide.
❏ If you do not follow the steps below to install the printer software,
Microsoft’s Universal driver may be installed. To check if the
Universal driver is installed, right click anywhere on the printer
driver properties screen and then click About. If a screen with the
words “Unidrv Printer Driver” appears, follow the steps below to
reinstall the printer driver.
❏ If the Found New Hardware Wizard appears, click Cancel and
follow the steps below to install the printer software.
52
Installing the Printer Software
Page 59

❏ If the Digital Signature Not Found screen appears, click Yes. If you
click No, you must reinstall the printer software as described below
1. Make sure that the printer is off and that Windows is running
on your computer.
2. Insert the CD-ROM that comes with your printer into your
CD-ROM drive (this is usually the D: drive).
3. The EPSON Installation Program screen opens automatically.
If the EPSON Installation Program screen does not appear
automatically, click Start and choose Run. Then enter
D:EPSETUP.EXE and click OK (substitute the appropriate drive
letter, if necessary).
4. In the dialog box that appears, double-click Install Printer
Driver/Utility. Alternatively, you can install by selecting Install
Printer Driver/Utility and then clicking the arrow on the top
right.
Installing the Printer Software
53
Page 60

5. For Windows 2000 users only: Follow the on-screen
instructions to turn on the printer. The printer port
configuration starts automatically.
6. In the dialog box that appears, select EPSON AL-C2000
Advanced and click OK. This automatically installs the
printer driver.
7. When installation is complete, click OK
.
Note:
❏ The EPSON Status Monitor 3 utility is also installed.
❏ Installation time varies depending on your computer system.
The printer driver is now installed on your computer. The
installation program automatically selects this printer as the
default printer for Windows applications.
If you installed options into the printer, you need to make certain
settings after installing the printer driver. See “Making Settings
for Printer Options” in the Reference Guide for information.
Before using the printer driver, read the README file located in
the printer software CD-ROM.
54
Installing the Printer Software
Page 61

Installing the EPSON Font Manager
Follow these steps to install the EPSON Font Manager:
1. Make sure that the printer is turned off and that Windows is
running on your computer.
2. Insert the CD-ROM that comes with your printer into your
CD-ROM drive.
3. In the dialog box that appears, double-click Install EPSON
Font Manager. Alternatively, you can install by selecting
Install EPSON Font Manager and then clicking the arrow at
the top right.
4. Follow the on-screen instructions.
5. When installation is complete, click OK.
The EPSON Font Manager is now installed on your computer.
Installing the Printer Software
55
Page 62

For DOS Programs
When using this printer with DOS programs, only black-andwhite printing is available.
Since DOS applications differ in their driver selection procedures,
there is no standard way to select the printer driver. See your
application software manual for information on how to select the
printer.
When asked to select a printer, pick the first printer available on
the list below.
AL-C2000
EPL-5700
EPL-5500/5500+
EPL-N1600
EPL-N1200
EPL-5600
EPL-3000
EPL-5200/5200+
HP LaserJet 4L
HP LaserJet 4
If you choose a printer other than the AL-C2000, you may not be
able to use some printer features.
56
Installing the Printer Software
Page 63

7
Accessing Online Help
Your Windows printer driver has an extensive online help feature
that includes detailed information and instructions on driver
settings. Online help will answer most of your questions about
the driver.
Note:
Online help is not available for DOS applications.
Accessing from the Printer Driver
Online help is automatically installed when you install the printer
driver. It is accessed by clicking on the Help button that appears
in the printer driver.
For Windows 98/95 users
Follow these steps to access online help from the printer driver:
1. Double-click the My Computer icon and double-click the
Printers folder.
2. Right-click the icon of your printer, then click Properties.
3. Click the Help button at the bottom of the window that
appears.
For Windows 2000, Windows NT 4.0 users
Follow these steps to access online help from the printer driver:
1. Click Start, select Settings and then Printers.
Accessing Online Help
57
Page 64

2. Right-click the icon of your printer, and click Printing
Preference (in Windows 2000) or Document Defaults (in
Windows NT 4.0).
3. Click the Help button at the bottom of the window that
appears.
Accessing from Windows Applications
To access online help from your application, open the File menu
and choose Print or Print Setup. Then click Printer, Setup,
Options, or Properties (you may need to click a combination of
these buttons), depending on the software you are using. Then
click the ? or Help button in the window that appears.
58
Accessing Online Help
Page 65

8
Printing with Windows
This chapter explains how to print documents from Windows
applications and how to cancel printing.
Starting to Print
To get started with printing right away, follow the printing
procedure explained below, which is typical of many Windows
applications. The actual way you print may vary depending on
the application you use. See your application manual for details.
Note:
While many Windows applications override the settings made with the
printer driver, some do not. Always check the settings to get the results
you want.
Follow these steps to make the necessary settings in the printer
driver when printing:
1. From your application, open the document you want to print.
2. Click Print on the File menu. The Print dialog box (or a similar
dialog box) appears.
Printing with Windows
59
Page 66

3. Make sure that your printer is selected, then click Printer,
Setup, Properties, or Options. You may need to click more
than one of these buttons in different dialog boxes. The printer
driver window appears.
4. Make all necessary settings for your document under the
various tabs in the printer driver. Refer to the driver’s online
help or the Reference Guide for details on each setting.
5. Click the OK button at the bottom of the window, and you
will return to the Print dialog box (or a similar dialog box).
6. Click Close, OK, or Print t o print. You may n eed to cl ick more
than one of these buttons in different dialog boxes.
60
Printing with Windows
Page 67

Canceling Printing
Follow these steps to cancel printing:
1. Press the On Line button on the printer’s control panel. The
On Line light turns off.
Paper Source
RITech
Menu
ContinueForm FeedOn Line
AltReset
Page Size
Copies
Item
Manual Feed
MP Tray Size
Value
Orientation
Enter
/
Note:
If your computer continues to print, double-click the printer icon in
the task bar at the bottom right of the screen, then select the printing
job that you want to cancel and click Purge Print Jobs in the
Printer menu.
2. Check that the Form Feed light is on (not flashing). If this
light is flashing, the printer is still receiving data from the
computer. In this case, wait until the printer receives all the
data and the Form Feed light turns on.
3. Hold down the Alt and Reset buttons at the same time until
Reset appears on the LCD panel. The received data is cleared.
Paper Source
RITech
Menu
Page Size
Copies
Item
Manual Feed
MP Tray Size
Value
Orientation
Enter
ContinueForm FeedOn Line
AltReset
Printing with Windows
/
61
Page 68

Note:
Be careful not to hold the buttons down for more than five seconds.
If you do so, Reset All appears on the LCD panel and the printer
settings are restored to their default settings in addition to clearing
the print job and printer memory.
62
Printing with Windows
Page 69

9
After This...
What to do Next
After completing the hardware setup and the driver installation,
see the Reference Guide for detailed information about your
printer’s functions, maintenance, troubleshooting, technical
specifications and optional products.
Using the Online Guide
The online guide contains detailed instructions on how to use the
printer, and information on installing and using optional
products. You can view this guide directly from the CD-ROM, or
install it into your computer and view it from your hard disk.
Note:
Microsoft Internet Explorer 4.0 or later, or Netscape Navigator 4.0 or
later, must be installed in your computer to read the online guide.
System requirements
The following tables list the system requirements necessary to use
the online guide.
After This...
63
Page 70

For Windows
System Windows 98/95, or Windows 2000/NT 4.0
CPU i486/25 MHz (for Windows 95, NT 4.0)
Memory 16 MB for Windows 98/95, NT 4.0 (32 MB or more
Hard disk space 3 MB to install the
CD-ROM drive Double-speed (Quad-speed or faster
Display 640 × 480 pixel or 800 × 600 pixel resolution, with High
Browser Web browser (Microsoft Internet Explorer 4.0 or later
For Macintosh
System System 7.5.1 (System 7.6 or later recommended)
Memory 16 MB (32 MB or more recommended)
Hard disk space 3 MB to install the
i486/66 MHz (for Windows 98)
(Pentium or higher recommended for Windows 98)
Pentium 133 MHz (for Windows 2000)
(Pentium higher than 133 MHz recommended)
recommended)
32 MB for Windows 2000 (64 MB or more
recommended)
Reference Guide
recommended)
Color (16 bit) or True Color (32 bit) setting
recommended)
Reference Guide
64
CD-ROM drive Double-speed (Quad-speed or faster
recommended)
Display Color monitor with 640 × 480 pixel resolution or
greater (Thousands of colors recommended)
Browser Web browser (Microsoft Internet Explorer 4.0 or later
recommended)
After This...
Page 71

10
Laser safety
For European users
United Kingdom
Safety Information
This printer is certified as a Class 1 laser product under the U.S.
Department of Health and Human Services (DHHS) Radiation
Performance Standard according to the Radiation Control for
Health and Safety Act of 1968. This means that the printer does
not produce hazardous laser radiation.
Since radiation emitted by the laser is completely confined within
protective housings and external covers, the laser beam cannot
escape from the machine during any phase of user operation.
The EPSON AcuLaser C2000 is a page printer which utilizes a
semiconductor laser.
There is no possibility of danger from the laser, provided that the
printer is operated according to the instructions in the guides
provided.
Since radiation emitted by the laser is completely confined within
protective housings and external covers, the laser beam cannot
escape from the machine during any phase of user operation.
Warning:
w
This is a semiconductor laser. The maximum power of the laser
diode is 15 m
The use of controls, or the performance of procedures and
adjustments other than those specified in this guide may result
in hazardous radiation exposure.
W and the wavelength is 775 to 795 nm.
Safety Information
65
Page 72

Denmark
Advarsel
Usynlig laserstråling ved åbning, når sikkerhedsafbrydere er ude
af funktion. Undgå udsættelse for stråling.
Klasse 1 laser produkt der opfylder IEC60825 sikkerheds kravene.
Finland and Sweden
EPSON AcuLaser C4000 on lasertoiminen sivukirjoitin. Laserista
ei aiheudu käyttäjälle vaaraa, kun kirjoitinta käytetään
käyttäohjeiden mukaisesti.
Laserin aiheuttama säteily jää kokonaisuudessaan
suojarakenteiden sisäpuolelle, eikä lasersäde pääse laitteen
ulkopuolelle sit käytettäessä.
VAROITUS!
Laitteen käyttäminen muulla kuin tässä käyttäohjeessa
mainitulla tavalla saattaa altistaa käyttäjän turvallisuusluokan 1
ylittävälle näkymättämälle lasersäteilylle.
VARNING!
Om apparaten används på annat sätt än i denna bruksanvisning
specificerats, kan användaren utsättas för osynlig laserstrålning,
som överskrider gränsen för laser klass 1.
LUOKAN 1 LASERLAITE
KLASS 1 LASER APPARAT
Kirjoittimen taakse kuvan osoitamiin paikkoihin on kiinnitetty
tarrat, jotka osoittavat, että kirjoitin on B.S.7192 ja IEC60825määräysten mukainen luokan 1 laserlaite. Jos kirjoittimen kuori
poistetaan, näkyviin tulee kolmas, alla oleva tarra.
66
Safety Information
Page 73

Norway
Advarsel
Dersom apparatet brukes på annen måte enn spesifisert i denne
bruksanvisning, kan brukeren utsettes for unsynlig laserstråling
som overskrider grensen for laser klasse 1.
Dette er en halvleder laser. Maksimal effeckt til laserdiode er
15 mW og bølgelengde er 775-795 nm.
CDRH regulations
The Center for Devices and Radiological Health (CDRH) of the
U.S. Food and Drug Administration implemented regulations for
laser products on August 2, 1976. Compliance is mandatory for
products marketed in the United States. The label shown below
indicates compliance with the CDRH regulations and must be
attached to laser products marketed in the United States.
Laser safety labels
Warning:
w
The use of controls, or the performance of procedures and
adjustments other than those specified in this guide may result
in hazardous radiation exposure.
Safety Information
67
Page 74

Your printer is a Class 1 laser product as defined in the IEC60825
specifications. The label shown below is attached in countries
where required.
Internal laser radiation
Max. Radiation Power 1.16 m
Wave Length
775 to 795 nm
W
This is a Class IIIb Laser Diode Assembly that has an invisible
laser beam. The printer head unit is NOT A FIELD SERVICE
ITEM. Therefore, the printer head unit should not be opened
under any circumstances.
An additional laser warning label is affixed to the inside of the
printer.
68
Safety Information
Page 75

Ozone safety
Ozone emission
Ozone gas is generated by laser printers as a by-product of the
printing process. Ozone is produced only when the printer is
printing.
Ozone exposure limit
The recommended exposure limit for ozone is 0.1 parts per
million (ppm) expressed as an average time-weighted
concentration over an eight (8) hour period.
The EPSON AcuLaser C2000 laser printer generates less than 0.1
ppm for 8 hours of continuous printing.
Minimize the risk
To minimize the risk of exposure to ozone, you should avoid the
following conditions:
❏ Use of multiple laser printers in a confined area (see above)
❏ Operation in conditions of extremely low humidity
❏ Poor room ventilation
❏ Long, continuous printing together with any of the above
Printer location
The printer should be located so that the exhaust gases and heat
generated are:
❏ Not blown directly into the user’s face
❏ Vented directly out of the building whenever possible
Safety Information
69
Page 76

ENERGY STAR Compliance
As an International ENERGY STAR Partner,
EPSON has determined that this product
meets the International ENERGY STAR
Program guidelines for energy efficiency.
The International ENERGY STAR Office Equipment Program is
a voluntary partnership with the computer and office equipment
industry to promote the introduction of energy-efficient personal
computers, monitors, printers, fax machines, copiers, and
scanners, in an effort to reduce air pollution caused by power
generation.
For United Kingdom Users
Use of options
Epson (UK) Limited shall not be liable against any damages or
problems arising from the use of any options or consumable
products other than those designated as Original EPSON
Products or EPSON Approved Products by Epson (UK) Limited.
Safety information
Warning:
for voltage and check that the appliance voltage corresponds to
the supply voltage.
Important:
in accordance with the following code:
Green and yellow—Earth
Blue—Neutral
Brown—Live
70
Safety Information
This appliance must be earthed. Refer to rating plate
The wires in the mains lead fitted to this appliance are coloured
Page 77

If you need to fit a plug:
As the colours of the mains lead of this appliance may not match any
coloured markings used to identify the terminals in a plug, please proceed
as follows:
❏ The green and yellow wire must be connected to the terminal
in the plug which is marked with the letter E or the Earth
symbol (
G
).
❏ The blue wire must be connected to the terminal in the plug
marked with the letter N.
❏ The brown wire must be connected to the terminal in the plug
marked with the letter L.
If damage occurs to the plug, replace the cord set or consult a
qualified electrician.
Replace fuses only with a fuse of the correct size and rating.
Safety Information
71
Page 78

72
Safety Information
Page 79

Index
Numerics
500-Sheet Paper Cassette Unit,
installing, 21
A
Assembling the printer, 8
D
Developer cartridges, installing, 8
DOS programs, 56
Driver
about, 52
EPSON Status Monitor 3, 51
installing, 51, 52
system requirements, 7
Duplex Unit, installing, 25
E
ENERGY STAR compliance, 70
EPSON Font Manager
about, 51
installing, 55
F
Fuser oil roll, installing, 17
H
Hard Disk Drive, installing, 32
I
Installing
500-Sheet Paper Cassette Unit, 21
developer cartridges, 8
Duplex Unit, 25
EPSON Font Manager, 55
EPSON Status Monitor 3, 51
fuser oil roll, 17
Hard Disk Drive, 32
Interface Card, 43
Memory Module, 35
photoconductor unit, 12
printer driver, 51, 52
ROM Module, 40
Interface Card, installing, 43
M
Memory Module, installing, 35
O
Online guide
system requirements, 63
using, 63
Online help
about, 51
accessing, 57
P
Paper, loading in MP tray, 47
Photoconductor unit, installing, 12
Printer
assembling, 8
connecting to the computer, 49
plugging in, 46
testing, 47
Printing
canceling, 61
status sheet, 48
with Windows, 59
R
ROM Module, installing, 40
Index
73
Page 80

S
Safety
before operating the printer, 4
CDRH regulations, 67
ENERGY STAR compliance, 70
for United Kingdom users, 70
internal laser radiation, 68
labels, 67
laser, 65
laser printer precautions, 1
ozone, 69
Warnings, Cautions, and Notes, 6
Status sheet, printing, 48
System requirements, 7
74
Index
Page 81

Index
75
Page 82

EPSON OVERSEAS MARKETING LOCATIONS
Epson America, Inc.
3840 Kilroy Airport Way
Long Beach, CA 90806
Phone: (562) 981-3840
Fax: (562) 290-5220
EPSON DEUTSCHLAND GmbH
Z lpicher Stra e 6,
40549 D sseldorf Germany
Phone: (0211) 56030
Fax: (0211) 5047787
EPSON AUSTRALIA PTY. LTD.
70 GIBBES STREET,
CHATSWOOD 2067 NSW.
Phone: 2-9903-9000
Fax: 2-9903-9177
EPSON HONG KONG LTD.
Rooms 4706-10, 47/F,
China Resources Bldg.,
26 Harbour Road, Wanchai, Hong Kong
Phone: 2585-4300
Fax: 2827-7083
EPSON ITALIA S.p.A.
V.le F.lli Casiraghi 427
20099 Sesto S.Giovanni
MI, Italy
Phone: +3902262331
Fax: +39022440750
EPSON UK LTD.
Campus 100, Maylands Avenue,
Hemel Hempstead, Herts,
HP2 7TJ, U.K.
Phone: (+44) 01442 261144
Fax: (+44) 01442 227227
EPSON FRANCE S.A.
68 bis, rue Marjolin
92300, Levallois-Perret, France
Phone: 33.1.41.86.26.56
Telex: 610657
EPSON SINGAPORE PTE. LTD.
No. 1 Temasek Avenue #36-00
Millenia Tower, Singapore 039192
Phone: (065) 33 77 911
Fax: (065) 33 41 185
EPSON TAIWAN TECHNOLOGY &
TRADING LTD.
10F, No. 287 Nanking E. Road, Sec. 3,
Taipei, Taiwan, R.O.C.
Phone: (02) 717-7360
Fax: (02) 712-9164
EPSON IBERICA S.A.
Av. de Roma, 18-26
08290 Cerdanyola del Valles
Barcelona, Spain
Phone: 582. 15.00
Fax: 582. 15.55
SEIKO EPSON CORPORATION
(Hirooka Office)
80 Harashinden, Hirooka
Shiojiri-shi, Nagano-ken
399-0785 Japan
EPSON PORTUGAL, S.A.
R. do Progresso, 471, 1 Perafita
4460 Matosinhos, Portugal
Phone: (02) 996 14 02
Fax: (02) 996 14 11
2001 January
Page 83

Color Laser Printer
Setup Guide
Printed in Japan
00.XX-XX
 Loading...