

Page 1

User’s Guide
NPD4429-00 EN
Page 2

Epson AcuLaser C1750 Series User’s Guide
Contents
Preface
Copyright and Trademarks............................................................... 7
Using This Guide........................................................................ 8
Conventions....................................................................... 8
Product Features........................................................................ 9
About the Epson AcuLaser C1750 Series. . .............................................. 9
Features........................................................................... 9
Chapter 1 Specifications
Specifications.......................................................................... 11
Chapter 2 Basic Operation
Main Components..................................................................... 15
Front View........................................................................ 15
Rear View......................................................................... 16
Operator Panel.................................................................... 16
Printing a Panel Settings Page............................................................ 18
The Operator Panel................................................................ 18
The Printer Setting Utility........................................................... 18
Power Saver Mode...................................................................... 19
Exiting the Power Saver Mode........................................................ 19
Chapter 3 Printer Management Software
Print Driver........................................................................... 20
EpsonNet Config....................................................................... 20
Creating an Administrative Password................................................. 20
Printer Setting Utility (Windows Only).................................................... 21
Status Monitor (Windows Only).......................................................... 22
Launcher (Windows Only). . . ............................................................ 23
Contents 2
Page 3

Epson AcuLaser C1750 Series User’s Guide
Chapter 4 Network Basics
Overview of Network Setup and Configuration.............................................. 24
Connecting Your Printer. . . . . ........................................................... 24
Connecting Printer to Computer or Network........................................... 25
Setting the IP Address................................................................... 28
TCP/IP and IP Addresses............................................................ 28
Automatically Setting the Printer’s IP Address.......................................... 28
Dynamic Methods of Setting the Printer’s IP Address.................................... 28
Assigning an IP Address (for IPv4 Mode).............................................. 30
Verifying the IP Settings............................................................. 32
Printing and Checking the Printer Settings Page......................................... 33
Installing Print Driver on Computers Running Windows..................................... 34
Identifying Print Driver Pre-install Status (for Network Connection Setup).................. 34
USB Connection Setup.............................................................. 36
Network Connection Setup.......................................................... 38
Configuring Wireless Settings (Epson AcuLaser C1750W Only). .......................... 39
Setting Up for Shared Printing....................................................... 74
Installing Print Driver on Computers Running Mac OS X..................................... 83
Installing the Driver................................................................ 83
Adding a Printer................................................................... 84
Chapter 5 Printing Basics
About Print Media..................................................................... 91
Print Media Usage Guidelines........................................................ 91
Print Media That Can Damage Your Printer............................................ 92
Supported Print Media.................................................................. 92
Usable Print Media................................................................. 93
Loading Print Media.................................................................... 95
Capacity.......................................................................... 95
Print Media Dimensions............................................................ 96
Loading Print Media in the Multipurpose Feeder (MPF).................................. 96
Loading Print Media in the Priority Sheet Inserter (PSI)................................. 105
Manual Duplex Printing (Windows Print Driver Only).................................. 111
Using the Output Tray Extension.................................................... 115
Printing............................................................................. 115
Sending a Job to Print.............................................................. 115
Canceling a Print Job.............................................................. 116
Contents 3
Page 4

Epson AcuLaser C1750 Series User’s Guide
Selecting Printing Options.......................................................... 117
Printing Custom Size Paper......................................................... 122
Checking Status of Print Data....................................................... 124
Printing a Report Page............................................................. 125
Printer Settings................................................................... 126
Printing with Web Services on Devices (WSD)............................................. 129
Adding Roles of Print Services...................................................... 129
Printer Setup..................................................................... 130
Chapter 6 Using the Operator Panel Menus
Understanding the Printer Menus........................................................ 132
Information Pgs.................................................................. 132
Billing Meters.................................................................... 133
Admin Menu..................................................................... 133
Panel Language................................................................... 149
Panel Lock Function................................................................... 149
Enabling the Panel Lock............................................................ 149
Disabling the Panel Lock........................................................... 150
Setting the PowerSaver Time Option..................................................... 151
Resetting to Factory Defaults............................................................ 151
Chapter 7 Troubleshooting
Clearing Jams......................................................................... 152
Avoiding Jams.................................................................... 152
Identifying the Location of Paper Jams. . . ............................................. 153
Clearing Paper Jams From the Front of the Printer...................................... 154
Clearing Paper Jams From the Back of the Printer...................................... 155
Clearing Paper Jams From the Center Output Tray..................................... 157
Jam Problems.................................................................... 160
Basic Printer Problems................................................................. 161
Display Problems..................................................................... 161
Printing Problems..................................................................... 162
Print Quality Problems................................................................. 164
The Output Is Too Light........................................................... 164
Toner Smears or Print Comes Off/Stain on Back Side................................... 165
Random Spots/Blurred Images...................................................... 166
Contents 4
Page 5

Epson AcuLaser C1750 Series User’s Guide
The Entire Output Is Blank......................................................... 166
Streaks Appear on the Output....................................................... 167
Pitched Color Dots................................................................ 167
Vertical Blanks................................................................... 167
Mottle........................................................................... 168
Ghosting........................................................................ 168
Fog............................................................................. 169
Bead-Carry-Out (BCO)............................................................ 170
Auger Mark...................................................................... 171
Wrinkled/Stained Paper............................................................ 171
The Top Margin Is Incorrect........................................................ 172
Color Registration Is out of Alignment............................................... 173
Protrudent/Bumpy Paper........................................................... 175
Adjusting Color Registration............................................................ 175
Performing Auto Correct........................................................... 175
Printing the Color Registration Chart. . . . . . . ......................................... 176
Determining Values............................................................... 177
Entering Values................................................................... 178
Noise................................................................................ 180
Other Problems....................................................................... 182
Understanding Printer Messages......................................................... 182
Contacting Service..................................................................... 193
Getting Help......................................................................... 193
LCD Panel Messages. . . . . . . ........................................................ 193
Status Monitor Alerts.............................................................. 193
Non Genuine Toner Mode.............................................................. 194
The Operator Panel............................................................... 194
The Printer Setting Utility.......................................................... 194
Chapter 8 Maintenance
Cleaning the Printer................................................................... 196
Cleaning Inside the Printer......................................................... 196
Cleaning the Color Toner Density (CTD) Sensor....................................... 199
Replacing Toner Cartridges. . . . ......................................................... 201
Overview........................................................................ 201
Removing the Toner Cartridges..................................................... 202
Installing a Toner Cartridge......................................................... 204
Ordering Supplies..................................................................... 205
Contents 5
Page 6

Epson AcuLaser C1750 Series User’s Guide
Consumables..................................................................... 206
When to Order Toner Cartridges.................................................... 206
Storing Consumables.................................................................. 206
Managing the Printer.................................................................. 207
Checking or Managing the Printer with EpsonNet Config................................ 207
Checking Printer Status with Status Monitor (Windows Only)............................ 207
Checking Printer Status Through E-mail.............................................. 208
Conserving Supplies................................................................... 210
Checking Page Counts................................................................. 211
Moving the Printer.................................................................... 212
Appendix A Where To Get Help
Contacting Epson Support.............................................................. 216
Before Contacting Epson. . . . . ...................................................... 216
Help for Users in Europe. . . . ....................................................... 216
Help for Users in Taiwan........................................................... 216
Help for Users in Singapore. ........................................................ 218
Help for Users in Thailand.......................................................... 218
Help for Users in Vietnam.......................................................... 219
Help for Users in Indonesia......................................................... 219
Help for Users in Hong Kong....................................................... 221
Help for Users in Malaysia.......................................................... 221
Help for Users in India............................................................. 222
Help for Users in the Philippines.................................................... 223
Index
Contents 6
Page 7

Epson AcuLaser C1750 Series User’s Guide
Preface
Copyright and Trademarks
No part of this publication may be reproduced, stored in a retrieval system, or transmitted in any form
or by any means, mechanical, photocopying, recording, or otherwise, without the prior written
permission of Seiko Epson Corporation. No patent liability is assumed with respect to the use of the
information contained herein.
Neither is any liability assumed for damages resulting from the use of the information contained
herein. Neither Seiko Epson Corporation nor its affiliates shall be liable to the purchaser of this
product or third parties for damages, losses, costs, or expenses incurred by purchaser or third parties
as a result of: accident, misuse, or abuse of this product or unauthorized modifications, repairs, or
alterations to this product, or (excluding the U.S.) failure to strictly comply with Seiko Epson
Corporation’s operating and maintenance instructions.
Seiko Epson Corporation and its affiliates shall not be liable against any damages or problems arising
from the use of any options or any consumable products other than those designated as Original
Epson Products or Epson Approved Products by Seiko Epson Corporation.
Apple
United States and/or other countries.
Microsoft
Corporation in the United States and/or other countries.
EPSON is a registered trademark and EPSON AcuLaser is a trademark of Seiko Epson Corporation.
General Notice: Other product names used herein are for identification purposes only and may be
trademarks of their respective owners. Epson disclaims any and all rights in those marks.
Copyright © 2011 Seiko Epson Corporation. All rights reserved.
, Bonjour®, ColorSync®, Macintosh®, and Mac OS® are trademarks of Apple Inc. in the
®
, Windows Vista®, Windows®, and Windows Server® are trademarks of Microsoft
®
Preface 7
Page 8
Epson AcuLaser C1750 Series User’s Guide
Using This Guide
Conventions
1. In this guide, personal computers and workstations are collectively called “computers”.
2. The following terms are used throughout this guide:
Important:
Important information that must be read and followed.
Note:
Additional information that merits emphasis.
See Also:
References within this guide.
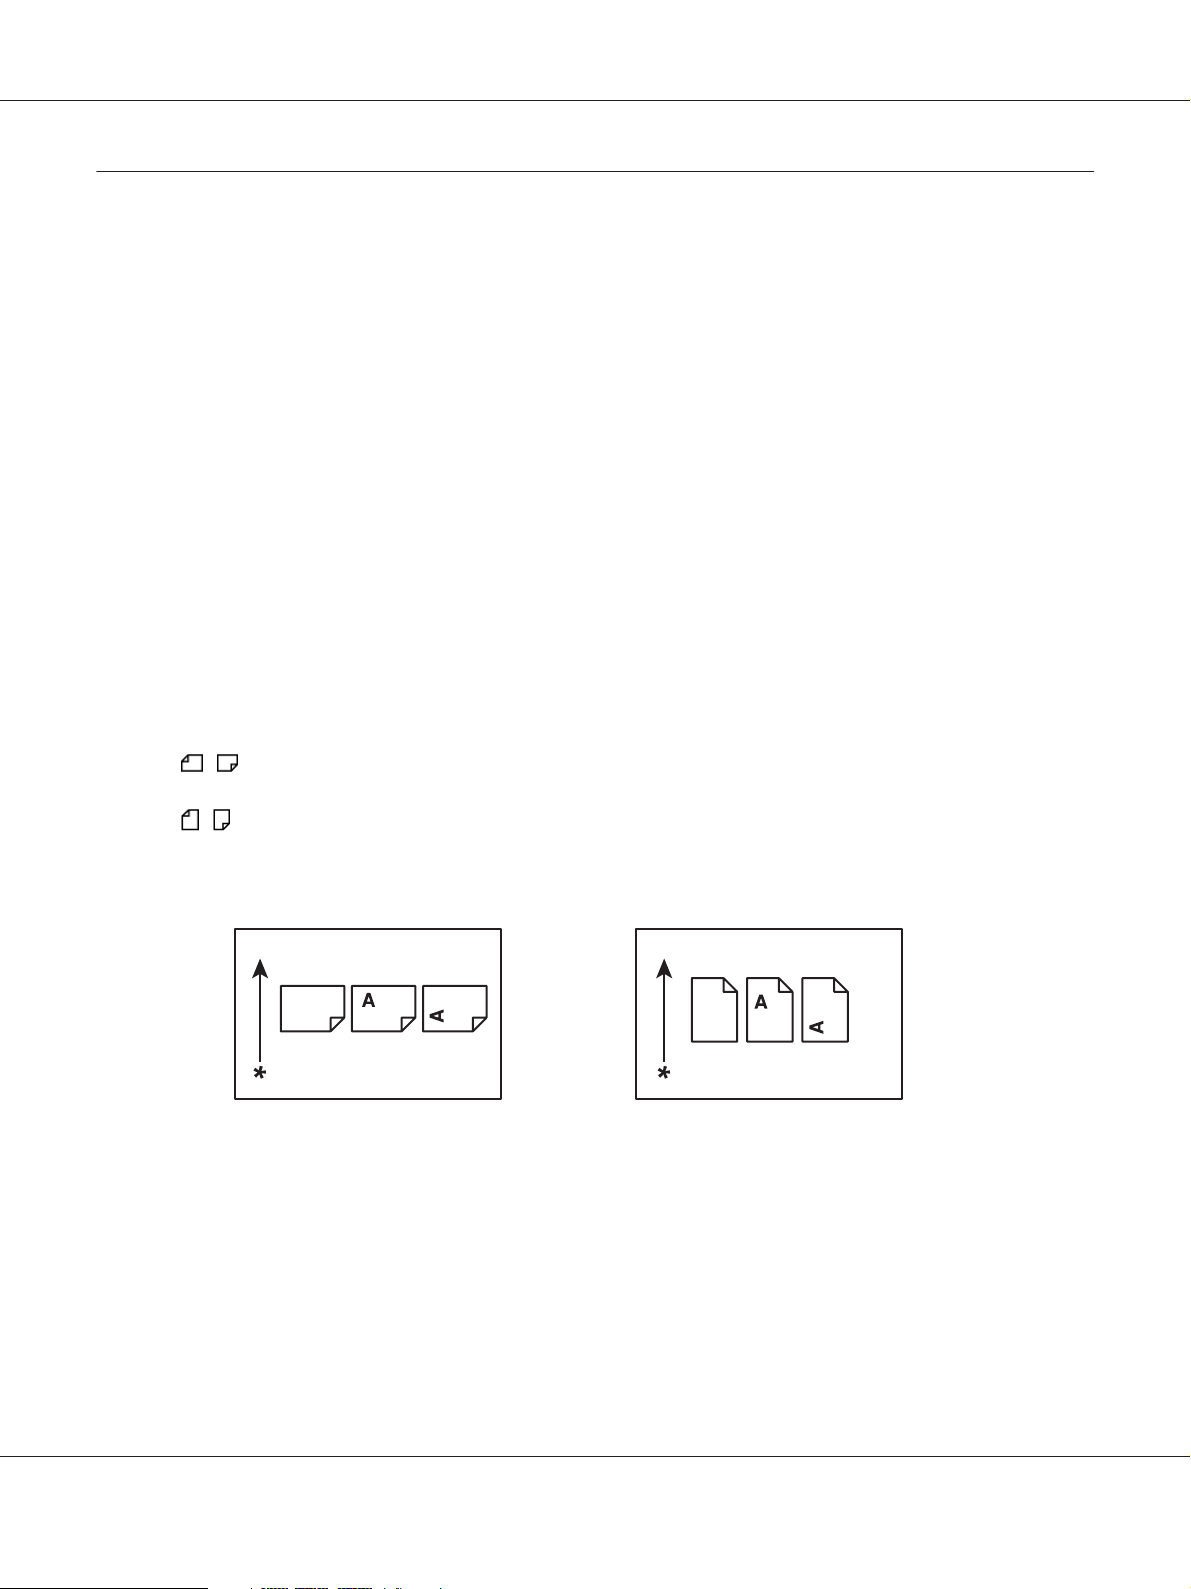
3. Orientation of documents or paper is described in this guide as follows:
, , Long Edge Feed (LEF): Loading the document or paper in portrait orientation.
, , Short Edge Feed (SEF): Loading the document or paper in landscape orientation.
LEF Orientation SEF Orientation
* Paper feed direction
Preface 8
Page 9
Epson AcuLaser C1750 Series User’s Guide
Product Features
About the Epson AcuLaser C1750 Series
The Epson AcuLaser C1750 series consists of the following two products:
❏ Epson AcuLaser C1750N: Network capable model
❏ Epson AcuLaser C1750W: Wireless communication capable model
Features
This section describes the product features and indicates their links.
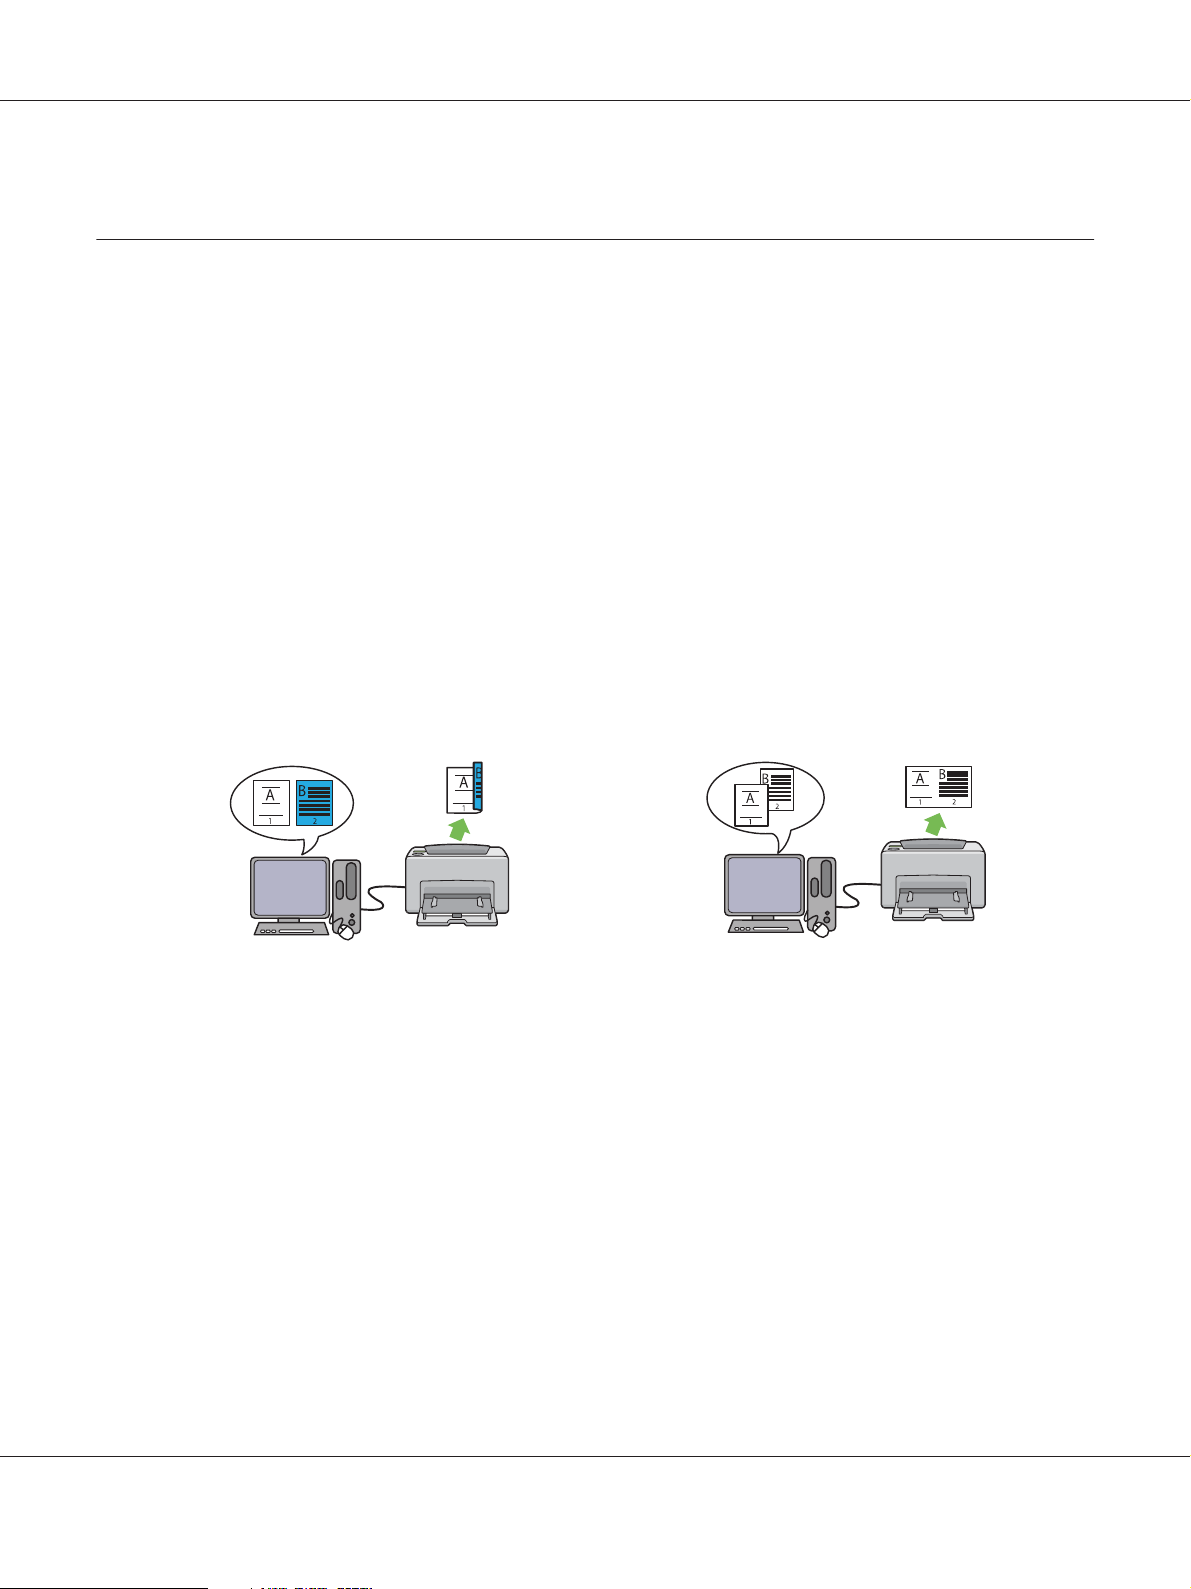
2 Sided Print (Manual)
2 Sided Print is to print two or more pages on the
front and back sides of a single sheet of paper
manually. This feature allows you to reduce the
paper consumption.
For more information, see “Manual Duplex
Printing (Windows Print Driver Only)” on page
111.
Multiple-Up Print
Multiple-Up enables you to print multiple pages
on a single sheet of paper. This feature allows
you to reduce the paper consumption.
For more information, see the print driver’s
Help.
Preface 9
Page 10

Epson AcuLaser C1750 Series User’s Guide
Printing Through Wireless Connection
(Wireless Print) (Epson AcuLaser C1750W
Only)
The Wireless LAN feature on your printer
allows you to install the printer at any location,
and enables printing without a wired
connection to your computer.
The Wireless LAN feature is unavailable
depending on the region you purchased.
For more information, see “Configuring
Wireless Settings (Epson AcuLaser C1750W
Only)” on page 39.
Priority Sheet Inserter (PSI)
Print media loaded on the PSI is given
precedence over those loaded on the
multipurpose feeder (MPF). Using the PSI
allows you to use other types or sizes of print
media preferentially over the regular print
media loaded on the MPF.
For more information, see “Loading Print
Media in the Priority Sheet Inserter (PSI)” on
page 105.
Preface 10
Page 11

Epson AcuLaser C1750 Series User’s Guide
Chapter 1
Specifications
Specifications
This chapter lists the main specifications of the printer. Note that the specifications of the product may
change without prior notice.
Items Description
Product Code Epson AcuLaser C1750N 220V: C11CB71021
Epson AcuLaser C1750N 110V: C11CB71031
Epson AcuLaser C1750W 220V: C11CB71041
Epson AcuLaser C1750W 110V: C11CB71051
Type Desktop
Printing method LED Xerography
Important:
LED + LED electrophotographic system
Fusing system Thermal fusing system using a belt
Continuous print speed
Resolution Data Processing Resolution:
*1
A4 : When plain paper fed is from the multipurpose feeder
*2
Color 1 Sided
Monochrome 1 Sided: 15 sheets/min
Important:
*1 Print speed may decrease due to factors such as paper type, paper size, and
printing conditions.
*2 When continuously printing a single document of A4
600 × 600 dpi
Output Resolution:
1200 × 2400 dpi
: 12 sheets/min
.
Tone/Color 256 tones/color (16.7 million colors)
Specifications 11
Page 12

Epson AcuLaser C1750 Series User’s Guide
Items Description
Paper Size Multipurpose feeder:
A4, B5, A5, Legal (8.5 × 14"), Fol io (8.5 × 13"), Letter (8.5 × 11"), Executive, #10 Env,
Monarch, DL, C5, Custom Size (Width: 76.2 – 215.9 mm, Length: 127 – 355.6
mm)
Priority sheet inserter:
A4, B5, A5, Legal (8.5 × 14"), Fol io (8.5 × 13"), Letter (8.5 × 11"), Executive, #10 Env,
Monarch, DL, C5, Custom Size (Width: 76.2 – 215.9 mm, Length: 190.5 – 355.6
mm)
Image loss: 4.1 mm from the top, bottom, left, and right edges
Paper Type Plain, Bond, Lightweight Cardstock, Lightweight Glossy Cardstock, Recycled,
Labels, Envelope, Letterhead, Pre-Printed, Hole Punched, Colored, Special,
Custom Type
Important:
❏ Use only the recommended paper. Using paper other than that
recommended for the printer can cause printing problems. Do not use
special ink jet paper.
❏ Note that poor printing quality due to paper-related printing problems
can occur when using the printer in an environment that is dry, cold, or
very humid.
❏ Printing over the printed side or on the reverse side of paper that already
has been printed on can result in poor print quality.
❏ When printing on envelopes, use envelopes that do not have adhesive
applied.
❏ The type of paper being used and environmental conditions can affect
printing quality. Because of this, it is recommended that you test print and
confirm proper print quality before using the printer.
Paper capacity Standard:
Multipurpose feeder: 150 sheets; Priority sheet inserter: 10 sheets
Output tray capacity Standard: approximately 100 sheets (face down)
2-sided Printing Feature Standard (Manual)
Memory capacity Standard: 128 MB (Onboard)
Important:
The above memory capacity does not guarantee print quality depending on
the type and content of print data.
Hard disk —
Page Description Language — (Host-based)
Specifications 12
Page 13
Items Description
Epson AcuLaser C1750 Series User’s Guide
Supported OS
Interface Epson AcuLaser C1750N:
Supported protocol TCP/IP (LPR, Port9100, WSD, HTTP, SMTP, RARP, AutoIP), SNMP, DHCP, BOOTP,
Power AC 110 – 127 V ± 10%; 7 A; both 50/60 Hz ± 3 Hz
*1
Windows® XP, Windows® XP x64 Edition, Windows Vista®, Windows Vista
x64 Edition, Windows Server® 2003, Windows Server® 2003 x64 Edition,
Windows Server
Server
OS
Important:
*1 For the latest information about the supported operating systems, contact
our Customer Support Center or your dealer.
*2 Mac OS
Standard: USB 1.1/2.0 (Hi-Speed), Ethernet (10Base-T, 100Base-TX)
Epson AcuLaser C1750W:
Standard: USB 1.1/2.0 (Hi-Speed), Ethernet (10Base-T, 100Base-TX),
IEEE802.11b/g/n
Bonjour (mDNS)
AC 220 – 240 V ± 10%; 5 A; both 50/60 Hz ± 3 Hz
2008 R2 x64 Edition, Windows® 7, Windows® 7 x64 Edition, Mac
®
*2
®
2008, Windows Server® 2008 x64 Edition, Windows
®
X 10.3.9 – 10.6 are supported.
®
®
Power consumption Maximum: 340 W, During Mode 2 of Power Saver Mode: 7 W or less
Average:
During standby: 69 W,
During continuous color printing: 340 W,
During continuous monochrome printing: 340 W
Important:
Mode 1 of Power Saver Mode: 14 W average
(The printer does not use electricity when the power is switched off even with
the power cord is plugged in.)
Dimensions (main unit only)
Weight Main Unit: 10.55 – 10.65 kg (main unit only, including toner cartridges)
394 (W) × 304 (D)
Important:
*1 When the front cover is closed.
*1
× 234 (H) mm
Specifications 13
Page 14

Epson AcuLaser C1750 Series User’s Guide
Items Description
Usage Environment During Use: Temperature: 10 – 32 ˚C; Humidity: 10 – 85% (except malfunctions
due to dew condensation)
Non-Use: Temperature: -20 – 40 ˚C; Humidity: 5 – 85% (exce pt malfunctions due
to dew condensation)
Important:
Until the conditions (temperature and humidity) inside the printer become
acclimated to the installation environment, certain qualities of the paper can
cause poor printing.
Specifications 14
Page 15
Epson AcuLaser C1750 Series User’s Guide
Chapter 2
Basic Operation
Main Components
This section provides an overview of your Epson AcuLaser C1750 series.
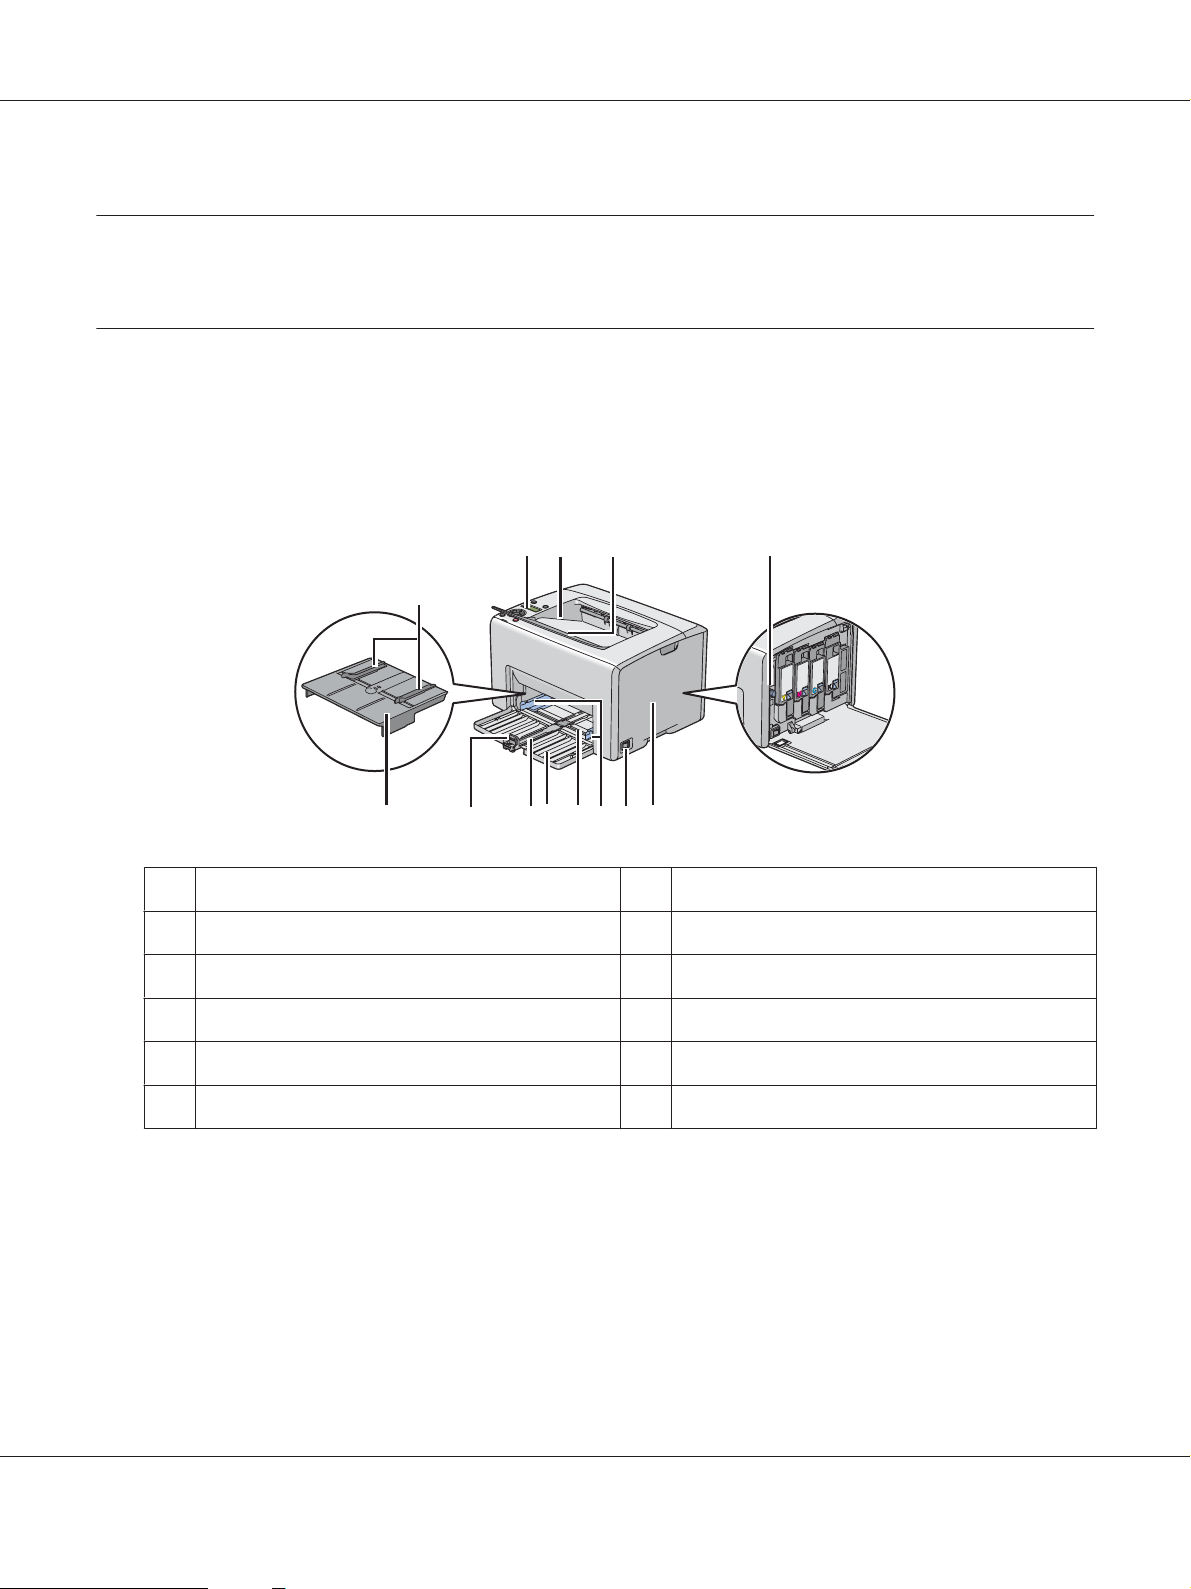
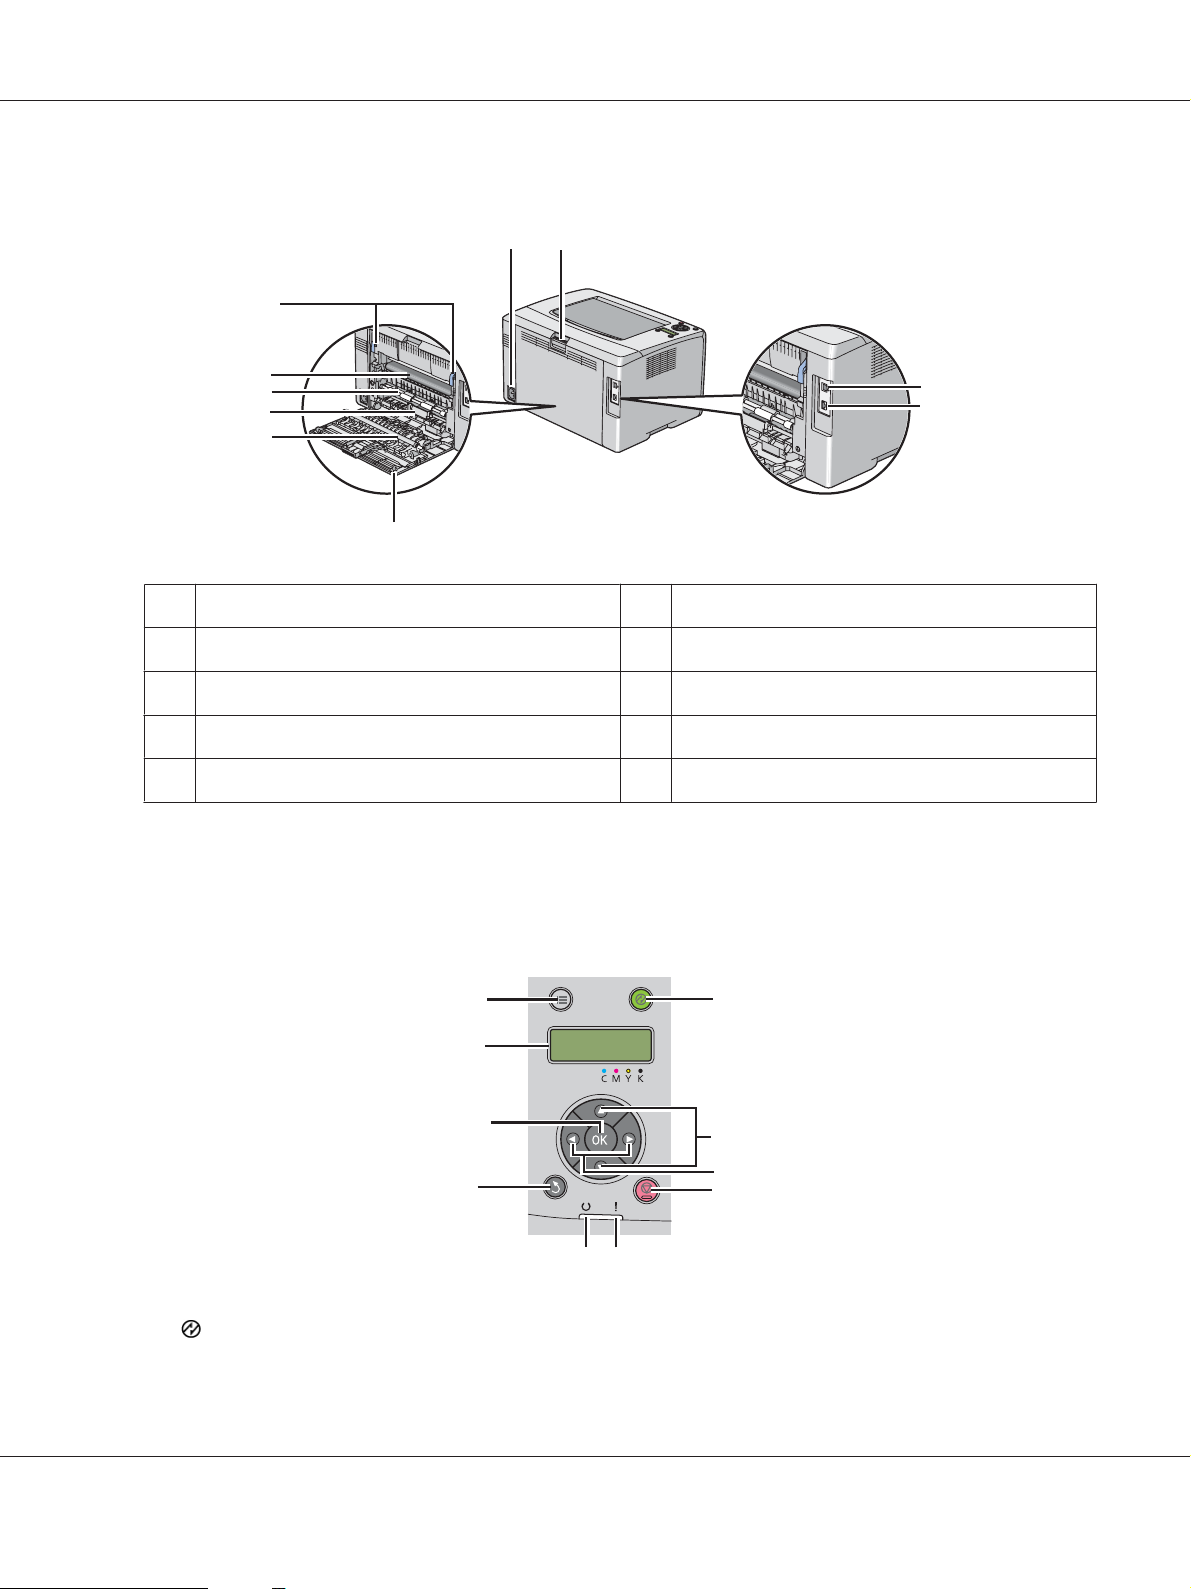
Front View
12 3 4
7
12 11 10 9 8 7 6 5
1 Operator Panel 2 Center Output Tray
3 Output Tray Extension 4 Print Head Cleaning Rod
5 Toner Access Cover 6 Power Switch
7 Paper Width Guides 8 Multipurpose feeder (MPF)
9Front Cover 10Slide Bar
11 Length Guide 12 Priority Sheet Inserter (PSI)
Basic Operation 15
Page 16
Rear View
Epson AcuLaser C1750 Series User’s Guide
12
10
9
8
7
6
5
1 Power Connector 2 Rear Cover Handle
3 USB Port 4 Ethernet Port
5 Rear Door 6 Transfer Roller
7 Paper Chute 8 Paper Feed Roller
9 Transfer Belt 10 Levers
Operator Panel
The operator panel has a liquid crystal display (LCD), buttons, and indicators.
3
4
10
9
8
7
1. (Energy Saver) Button/Indicator
1
2
3
4
5
6
Basic Operation 16
Page 17
Epson AcuLaser C1750 Series User’s Guide
❏ Lights up in the Mode 2 for the Power Saver Mode. Press this button to exit the Power Saver
Mode.
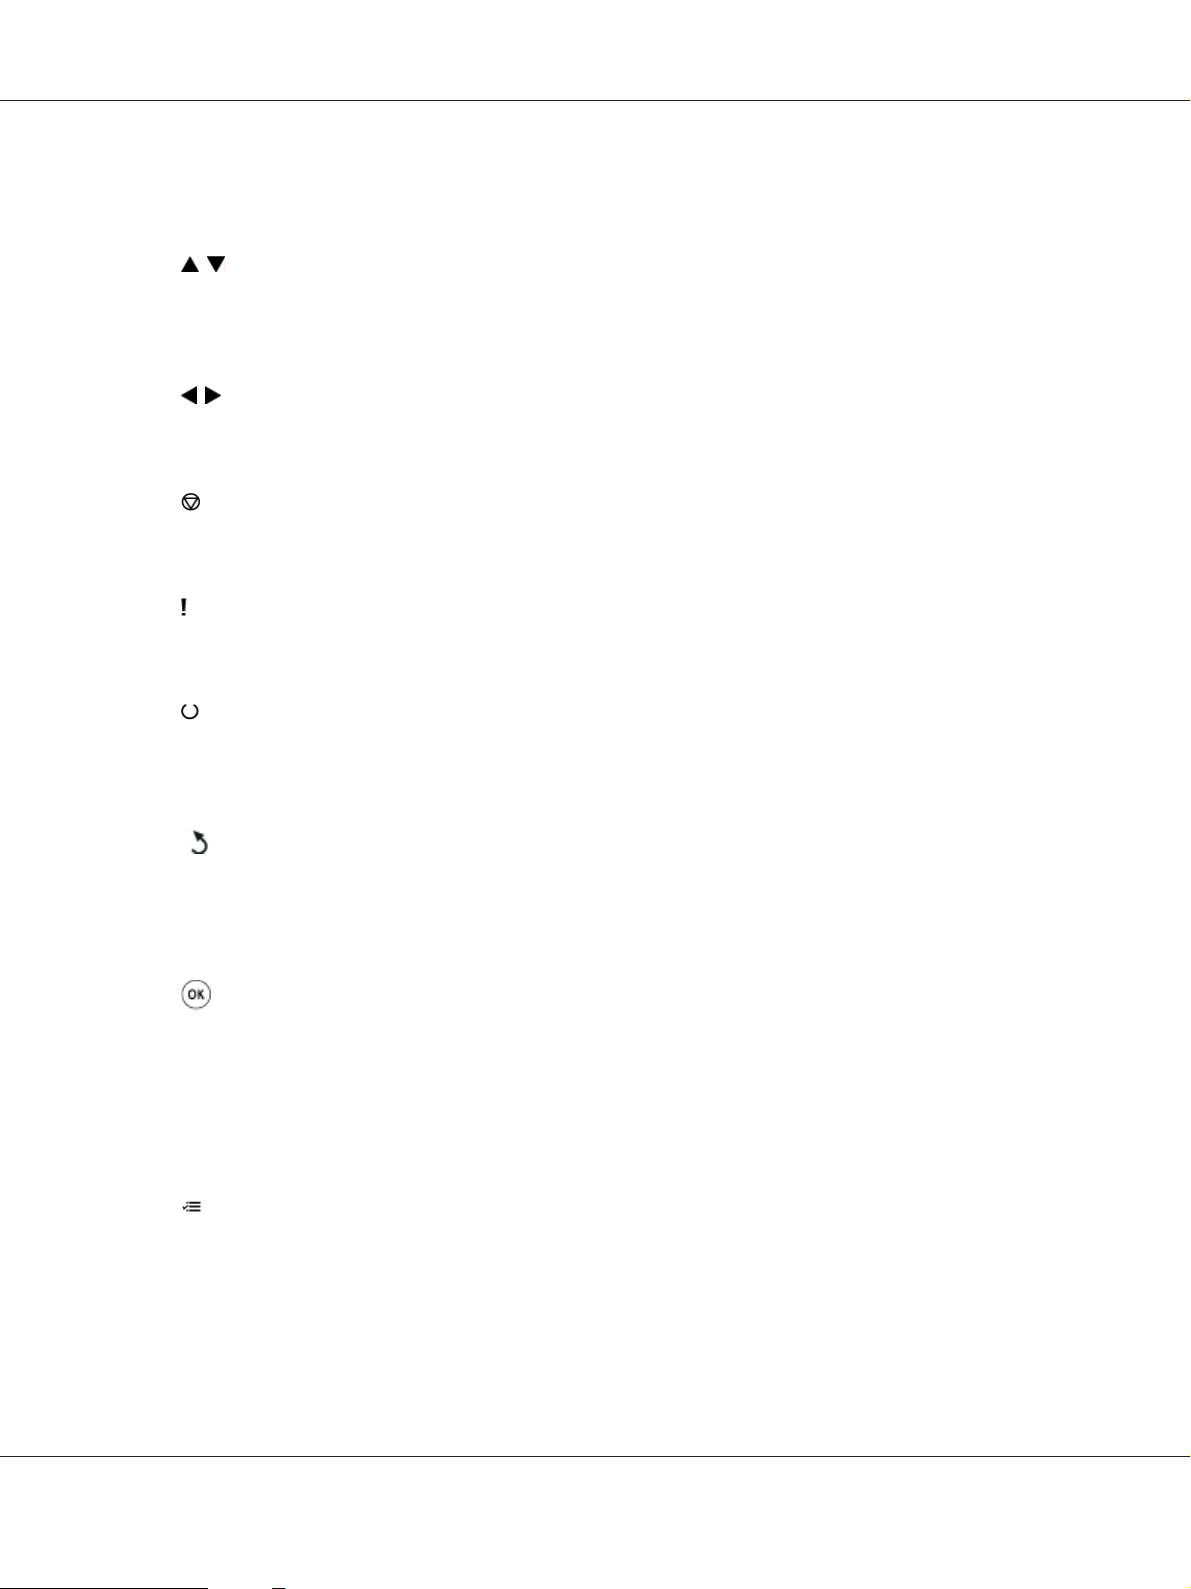
Buttons
2.
❏ Scrolls through menus or items in the Menu mode. To enter numbers or passwords, press
these buttons.
3.
Buttons
❏ Selects submenus or setting values in the Menu mode.
4.
(Cancel Job) Button
❏ Cancels the current print job.
5.
(Error) Indicator
❏ Lights up when an error occurs and blinks when an unrecoverable error occurs.
6.
(Ready) Indicator
❏ Lights up when the printer is ready or the printer is in the Mode 1 for the Power Saver Mode
and blinks when data is being received.
7.
(Back) Button
❏ Switches to the print mode from the top menu of the Menu mode.
❏ Returns to the upper hierarchy of the menu from the submenu of the Menu mode.
8.
Button
❏ Displays the selected menu or item and determines the selected value in the Menu mode.
9. LCD Panel
❏ Displays various settings, instructions, and error messages.
10.
(Menu) Button
❏ Moves to the top menu.
Basic Operation 17
Page 18

Epson AcuLaser C1750 Series User’s Guide
Printing a Panel Settings Page
The Panel Settings page shows current settings for the operator panel menus.
The Operator Panel
1. Press the (Menu) button.
2. Select Information Pgs, and then press the
3. Select Panel Settings, and then press the
The Panel Settings page is printed.
button.
button.
The Printer Setting Utility
The following procedure uses Microsoft® Windows® XP as an example.
1. Click start — All Programs — EPSON — EPSON Printer Software — EPSON AL-C1750N /
EPSON AL-C1750W — Printer Setting Utility.
Note:
The Select Printer window appears in this step, when multiple print drivers are installed on your
computer. In this case, click the name of the desired printer listed in Printer Name.
The Printer Setting Utility appears.
2. Click the Printer Settings Report tab.
3. Select Information Pages from the list at the left side of the page.
The Information Pages page is displayed.
4. Click the Panel Settings button.
The Panel Settings page is printed.
Basic Operation 18
Page 19

Epson AcuLaser C1750 Series User’s Guide
Power Saver Mode
The printer has a power saving feature which reduces power consumption during periods of
inactivity. This feature operates in two modes: Mode 1 and Mode 2. The power consumption of the
printer in Mode 2 is lower than in Mode 1. As delivered, the printer switches to the Mode 1 five
minutes after the last print job is printed. The printer then switches to the Mode 2 after another six
minutes of inactivity. When the printer is in the Mode 1, the display shows Ready/Standby. In the
Mode 2, all lamps on the operator panel except for the
also goes blank and displays nothing.
The factory default settings of five minutes (Mode 1) and six minutes (Mode 2) are changeable within
the range of 5 to 30 minutes (Mode 1) and 1 to 6 minutes (Mode 2). The printer returns to the
ready-to-print state in about 25 seconds when re-activated.
See Also:
“Setting the PowerSaver Time Option” on page 151
(Energy Saver) button go out. The display
Exiting the Power Saver Mode
The printer automatically exits the Power Saver Mode when it receives a print job from a computer. To
manually exit the Mode 1, press any button on the operator panel. To exit the Mode 2, press the
(Energy Saver) button.
Note:
❏ Opening and closing the rear door will cause the printer to exit the Mode 1.
❏ When the printer is in the Mode 2, all buttons on the operator panel except for the
button do not function. To use the buttons on the operator panel, press the
to exit the Power Saver Mode.
See Also:
“Setting the PowerSaver Time Option” on page 151
( Energy Saver) button
( Energy Saver)
Basic Operation 19
Page 20

Epson AcuLaser C1750 Series User’s Guide
Chapter 3
Printer Management Software
Print Driver
To access all of your printer’s features, install the print driver from the Software Disc.
The print driver enables your computer and printer to communicate and provides access to your
printer features.
See Also:
❏ “Installing Print Driver on Computers Running Windows” on page 34
❏ “Installing Print Driver on Computers Running Mac OS X” on page 83
EpsonNet Config
This section provides information on EpsonNet Config, a hyper text transfer protocol (HTTP)-based
web page service that is accessed through your web browser.
These pages give you instant access to printer status, and printer configuration options. Anyone on
your network can access the printer using their web browser software. In administrative mode you can
change the configuration of the printer, and manage your printer settings without leaving your
computer.
Note:
❏ Users who are not given passwords by the administrator can still view the configuration settings and
options in user mode. They will not be able to save or apply any changes to the current configuration.
❏ For details on the menu items of EpsonNet Config, refer to the Help on the Software Disc.
Creating an Administrative Password
1. Launch your web browser.
2. Enter the IP address of the printer in the address bar, and then press the Enter key.
Printer Management Software 20
Page 21

Epson AcuLaser C1750 Series User’s Guide
3. Click the Properties tab.
4. In the left navigation panel, scroll down to Security and select Administrator Settings.
5. Select Enabled for Administrator Mode.
6. In the Administrator Login ID field, enter a name for the administrator.
Note:
The default ID and password are both blank (NULL).
7. In the Administrator Password and Re-enter Password fields, enter a password for the
administrator.
8. In the Maximum Login Attempts field, enter the number of login attempts allowed.
9. Click Apply. Your new password has been set and anyone with the administrator name and
password can log in and change the printer configuration and settings.
Printer Setting Utility (Windows Only)
The Printer Setting Utility allows you to view or specify the system settings. You can also diagnose the
system settings by using the Printer Setting Utility.
The Printer Setting Utility consists of the Printer Settings Report, Printer Maintenance, and
Diagnosis tabs.
The Printer Setting Utility is installed with your Epson print driver.
Note:
The Password dialog box appears the first time you try to change settings on Printer Setting Utility when
Panel Lock is set on the printer. In this case, enter the password you specified, and click OK to apply the
settings.
Printer Management Software 21
Page 22

Epson AcuLaser C1750 Series User’s Guide
Status Monitor (Windows Only)
You can check the printer status with Status Monitor. Double-click the Status Monitor printer icon on
the taskbar at the bottom right of the screen. The Select Printer window appears, which displays the
printer name, printer connection port, and printer status. Check the column Status to know the
current status of your printer.
Status Setting button: Displays the Status Settings screen and allows you to modify the Status
Monitor settings.
Click the name of the desired printer listed on the Select Printer window. The Status Monitor
window appears.
The Status Monitor window alerts you when there is a warning or when an error occurs, for example,
when a paper jam occurs or toner is running low.
By default, the Status Monitor window launches automatically when printing starts. You can specify
the conditions for starting the Status Monitor window in Auto start setup.
To change the pop-up settings for the Status Monitor window:
The following procedure uses Microsoft
1. Click start — All Programs — EPSON — Status Monitor — Activate Status Monitor.
The Select Printer window appears.
2. Click Status Setting.
The Status Settings dialog box appears.
3. Select the Pop up setting tab, and then select the type of the pop-up from Auto start setup.
You can also check the toner level of your printer and the job information on the Status Monitor
window.
The Status Monitor is installed with your Epson print driver.
Windows® XP as an example.
®
Printer Management Software 22
Page 23
Epson AcuLaser C1750 Series User’s Guide
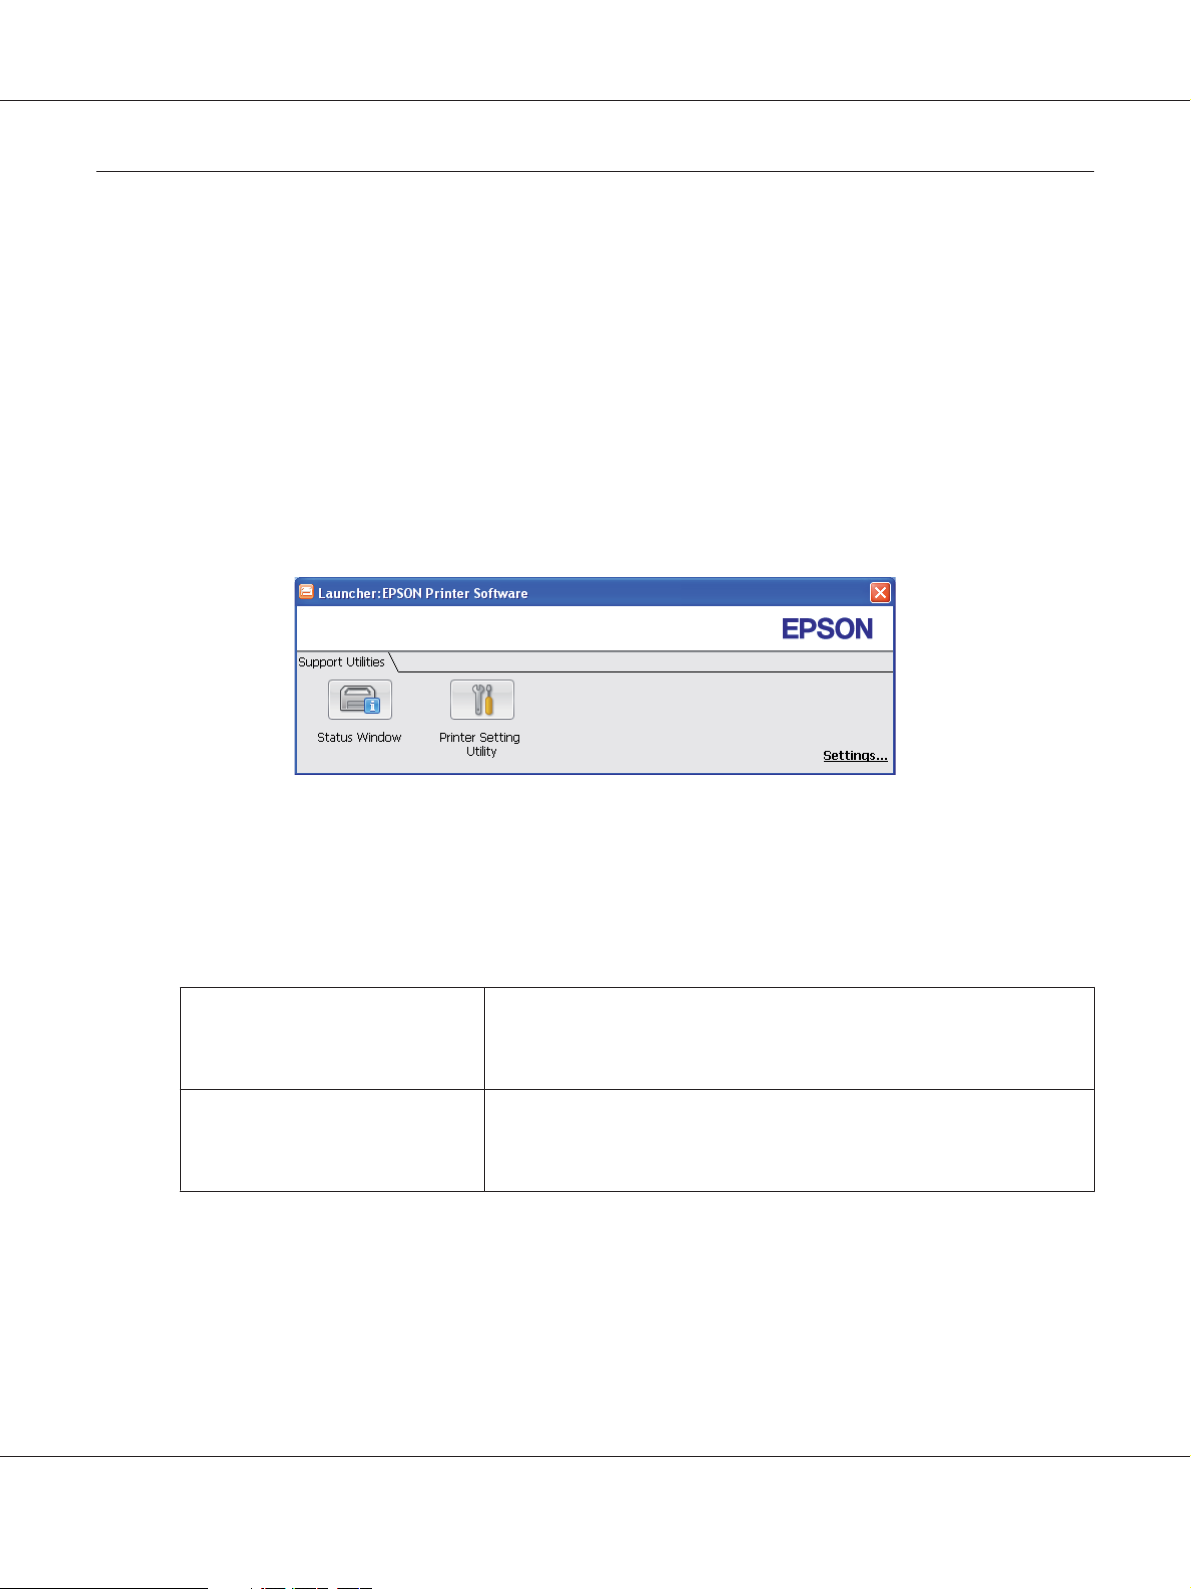
Launcher (Windows Only)
Using the Launcher window, you can open the Status Window and Printer Setting Utility.
To use the Launcher, select to install the Launcher when you install the Epson print driver.
The following procedure uses Windows XP as an example.
To open the Launcher window:
1. Click start — All Programs — EPSON — EPSON Printer Software — Launcher.
The Launcher window appears.
2. The Launcher window provides two buttons; Status Window and Printer Setting Utility.
To exit, click the X button at the top-right of the window.
For details, click the Help button/icon of each application.
Status Window Click to open the Status Monitor window.
See also:
“Status Monitor (Windows Only)” on page 22
Printer Setting Utility
Click to open the Printer Setting Utility.
See also:
“Printer Setting Utility (Windows Only)” on page 21
Printer Management Software 23
Page 24

Epson AcuLaser C1750 Series User’s Guide
Chapter 4
Network Basics
Overview of Network Setup and Configuration
To set up and configure the network:
1. Connect the printer to the network using the recommended hardware and cables.
2. Turn on the printer and the computer.
3. Print the Printer Settings page and keep it for referencing network settings.
4. Install the driver software on the computer from the Software Disc. For information on driver
installation, see the section in this chapter for the specific operating system you are using.
5. Configure the printer’s TCP/IP address, which is required to identify the printer on the network.
❏ Microsoft
automatically set the printer’s Internet Protocol (IP) address if you connect the printer to an
established TCP/IP network. You can also manually set the printer’s IP address on the
operator panel.
❏ Mac OS
6. Print a Printer Settings page to verify the new settings.
See Also:
“Printing a Printer Settings Page” on page 125
Windows® operating systems: Run the Installer on the Software Disc to
®
X systems: Manually set the printer’s TCP/IP address on the operator panel.
®
Connecting Your Printer
Your Epson AcuLaser C1750 series interconnection cables must meet the following requirements:
Connection Type Connection Specifications
Ethernet 10 Base-T/100 Base-TX compatible
USB USB 1.1/2.0 compatible
Network Basics 24
Page 25
Connection Type Connection Specifications
Epson AcuLaser C1750 Series User’s Guide
Wireless (Epson AcuLaser
C1750W only)
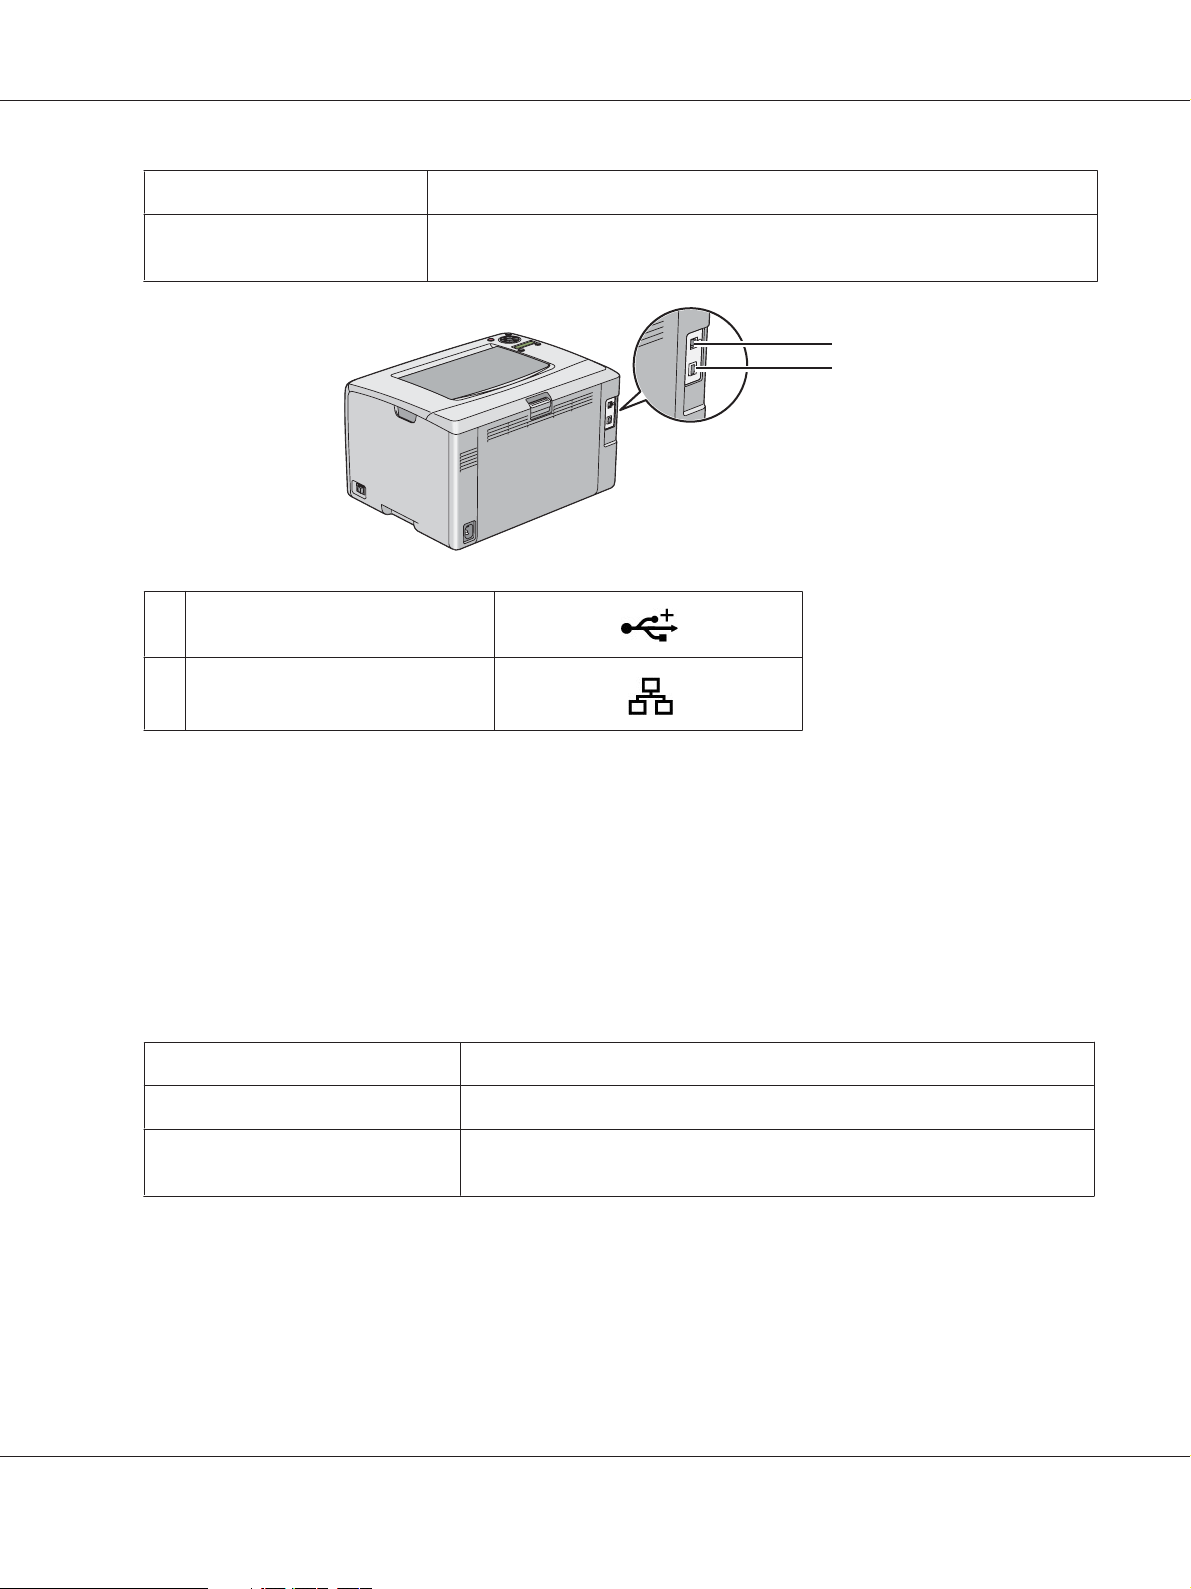
1USB Port
2Ethernet Port
IEEE 802.11b/802.11g/802.11n
Connecting Printer to Computer or Network
1
2
Connect the printer via Ethernet or USB. A USB connection is a direct connection and is not used for
networking. An Ethernet connection is used for networking. Hardware and cabling requirements
vary for the different connection methods. Ethernet cable and hardware are generally not included
with your printer and must be purchased separately.
The available feature for each connection type is shown in the following table.
Connection Type Available Feature
USB When connected via USB, you can instruct print jobs from a computer.
Ethernet When connected via Ethernet, you can instruct print jobs from a computer on
the network.
USB Connection
A local printer is a printer which is directly attached to your computer using the USB cable. If your
printer is attached to a network instead of your computer, skip this section and go to “Network
Connection” on page 27.
Network Basics 25
Page 26

The following operating systems support USB connection:
❏ Windows XP
❏ Windows XP 64-bit Edition
Epson AcuLaser C1750 Series User’s Guide
®
2003
®
❏ Windows Server
❏ Windows Server 2003 x64 Edition
❏ Windows Server 2008
❏ Windows Server 2008 64-bit Edition
❏ Windows Server 2008 R2
❏ Windows Vista
❏ Windows Vista 64-bit Edition
❏ Windows 7
❏ Windows 7 64-bit Edition
❏ Mac OS X 10.3.9/10.4.11/10.5.8 -10.6
To attach the printer to a computer:
1. Ensure that the printer, computer, and any other attached devices are turned off and unplugged
from the power source/outlet.
2. Connect the smaller USB connector into the USB port at the back of the printer and the other end
of the cable into a USB port of the computer.
Network Basics 26
Page 27

Epson AcuLaser C1750 Series User’s Guide
* USB port
Note:
Do not connect the printer USB cable to the USB connector available on the keyboard.
Network Connection
To connect the printer to a network:
1. Ensure that the printer, computer and any other connected devices have been turned off and all
cables have been disconnected.
2. Connect one end of an Ethernet cable into the Ethernet port at the rear of the printer, and the other
end to a LAN drop or hub.
* Ethernet port
Note:
Connect the Ethernet cable, only if you need to setup a wired connection.
See Also:
“Configuring Wireless Settings (Epson AcuLaser C1750W Only)” on page 39
Network Basics 27
Page 28

Epson AcuLaser C1750 Series User’s Guide
Setting the IP Address
TCP/IP and IP Addresses
If your computer is on a large n etwork, contact your network administrator for the appropriate TCP/
IP addresses and additional system settings information.
If you are creating your own small Local Area Network or connecting the printer directly to your
computer using Ethernet, follow the procedure for automatically setting the printer’s IP address.
Computers and printers primarily use TCP/IP protocols to communicate over an Ethernet network.
W it h TC P/ IP p ro to c ol s, ea c h p ri n te r a n d c om p ut er mu s t h av e a u ni qu e IP a dd re ss . It is i mp or t an t t h at
the addresses are similar, but not the same; only the last digit needs to be different. For example, your
printer can have the address 192.168.1.2 while your computer has the address 192.168.1.3. Another
device can have the address 192.168.1.4.
Many networks have a Dynamic Host Configuration Protocol (DHCP) server. A DHCP server
automatically programs an IP address into every computer and printer on the network that is
configured to use DHCP. A DHCP server is built into most cable and Digital Subscriber Line (DSL)
routers. If you use a cable or DSL router, see your router’s documentation for information on IP
addressing.
Automatically Setting the Printer’s IP Address
If the printer is connected to a small established TCP/IP network without a DHCP server, use the
installer on the Software Disc to det ec t o r a ss ig n a n IP address to your printer. For further instructions,
insert the Software Disc into your computer’s CD/DVD drive. After the Installer launches, follow the
prompts for installation.
Note:
For the automatic installer to function, the printer must be connected to an established TCP/IP network.
Dynamic Methods of Setting the Printer’s IP Address
There are two protocols available for dynamically setting the printer’s IP address:
❏ DHCP (enabled by default)
❏ AutoIP
Network Basics 28
Page 29
Epson AcuLaser C1750 Series User’s Guide
You can turn on/off both protocols using the operator panel, or use EpsonNet Config to turn on/off
DHCP.
Note:
You can print a report that includes the printer’s IP address. On the operator panel, press the
button, select Information Pgs, press the
button. The IP address is listed on the Printer Settings page.
button, select Printer Settings, and then press the
Using the Operator Panel
To turn on/off either the DHCP or AutoIP protocol:
(Menu)
1. On the operator panel, press the
2. Select Admin Menu, and then press the
3. Select Network Setup, and then press the
4. Select TCP/IP, and then press the
5. Select IPv4, and then press the
6. Select Get IP Address, and then press the
7. Select DHCP/AutoIP, and then press the
(Menu) button.
button.
button.
button.
button.
button.
button.
Using EpsonNet Config
To turn on/off the DHCP protocol:
1. Launch your web browser.
2. Enter the IP address of the printer in the address bar, and then press the Enter key.
3. Select Properties.
4. Select TCP/IP from the Protocol Settings folder on the left navigation panel.
5. In the Get IP Address field, select the DHCP / Autonet option.
6. Click the Apply button.
Network Basics 29
Page 30

Epson AcuLaser C1750 Series User’s Guide
Assigning an IP Address (for IPv4 Mode)
Note:
❏ When you assign an IP address manually in IPv6 mode, use the EpsonNet Config. To display the
EpsonNet Config, use the link local address. To check a link local address, see “Printing and Checking
the Printer Settings Page” on page 33.
❏ Assigning an IP address is considered as an advanced function and is normally done by a system
administrator.
❏ Depending on the address class, the range of the IP address assigned may be different. On Class A, for
example, an IP address in the range from 0.0.0.0 to 127.255.255.255 will be assigned. For
assignment of IP addresses, contact your system administrator.
You can assign the IP address by using the operator panel or using the Printer Setting Utility.
The Operator Panel
1. Turn on the printer.
Ensure that Ready message appears on the LCD panel.
2. On the operator panel, press the (Menu) button.
3. Select Admin Menu, and then press the
4. Select Network Setup, and then press the
5. Select TCP/IP, and then press the
6. Select IPv4, and then press the
7. Select Get IP Address, and then press the
8. Ensure that Panel is selected, and then press the
9. Ensure that Get IP Address is selected.
10. Select IP Address, and then press the
button.
button.
button.
button.
button.
button.
(Back) button.
The cursor is located at the first digit of the IP address.
11. Enter the value of the IP address using the
or button.
Network Basics 30
Page 31

12. Press the button.
The next digit is selected.
Epson AcuLaser C1750 Series User’s Guide
13. Repeat steps 11 to 12 to enter all of the digits in the IP address, and then press the
14. Press the
15. Select Network Mask, and then press the
(Back) button, and then ensure that IP Address is selected.
button.
The cursor is located at the first digit of the network mask.
16. Enter the value of the network mask using the
17. Press the
button.
or button.
The next digit is selected.
18. Repeat steps 16 to 17 to set network mask, and then press the
19. Press the
20. Select Gateway Address, and then press the
(Back) button, and then ensure that Network Mask is selected.
button.
button.
The cursor is located at the first digit of the gateway address.
button.
21. Enter the value of the gateway address using the
22. Press the
button.
or button.
The next digit is selected.
23. Repeat steps 21 to 22 to set gateway address, and then press the
24. Turn off and turn on the printer.
See Also:
“Operator Panel” on page 16
The Printer Setting Utility
The following procedure uses Windows XP as an example.
button.
Network Basics 31
Page 32

Epson AcuLaser C1750 Series User’s Guide
Note:
When you use IPv6 mode for network printing, you cannot use the Printer Setting Utility to assign an IP
address.
1. Click start — All Programs — EPSON — EPSON Printer Software — EPSON AL-C1750N /
EPSON AL-C1750W — Printer Setting Utility.
Note:
The Select Printer window appears in this step, when multiple print drivers are installed on your
computer. In this case, click the name of the desired printer listed in Printer Name.
The Printer Setting Utility appears.
2. Click the Printer Maintenance tab.
3. Select TCP/IP Settings from the list at the left side of the page.
The TCP/IP Settings page is displayed.
4. Select the mode from IP Address Mode, and then enter the values in IP Address, Network
Mask, and Gateway Address.
5. Click the Restart printer to apply new settings button to take effect.
The IP address is assigned to your printer. To verify the setting, display the web browser on any
computer connected to the network and enter the IP address into the address bar on the browser. If the
IP address is set up correctly, the EpsonNet Config displays in your browser.
You can also assign the IP address to the printer when installing the print drivers with installer. When
you use the network installation feature, and the Get IP Address is set to DHCP/AutoIP on the
operator panel menu, you can set the IP address from 0.0.0.0 to the desired IP address on the printer
selection window.
Verifying the IP Settings
The following procedure uses Windows XP as an example.
1. Print the Printer Settings page.
2. Look under the IPv4 heading on the Printer Settings page to ensure that the IP address, network
mask, and gateway address are appropriate.
Network Basics 32
Page 33

Epson AcuLaser C1750 Series User’s Guide
To verify if the printer is active on the network, run the ping command in your computer:
1. Click start, and select Run.
2. Enter cmd, and then click OK.
A black window is displayed.
3. Enter ping xx.xx.xx.xx (where xx.xx.xx.xx is the IP address of your printer), and then press the
Enter key.
4. Reply from the IP address denotes printer is active on the network.
See Also:
“Printing and Checking the Printer Settings Page” on page 33
Printing and Checking the Printer Settings Page
Print the Printer Settings page and check your printer’s IP address.
The Operator Panel
1. Press the (Menu) button.
2. Select Information Pgs, and then press the
3. Select Printer Settings, and then press the
The Printer Settings page is printed.
4. Confirm the IP address next to IP Address under Network Setup on the Printer Settings page. If
the IP address is 0.0.0.0, wait for a few minutes to resolve the IP address automatically, and then
print the Printer Settings page again.
If the IP address is not resolved automatically, see “Assigning an IP Address (for IPv4 Mode)” on
page 30.
button.
button.
The Printer Setting Utility
The following procedure uses Windows XP as an example.
Network Basics 33
Page 34

Epson AcuLaser C1750 Series User’s Guide
1. Click start — All Programs — EPSON — EPSON Printer Software — EPSON AL-C1750N /
EPSON AL-C1750W — Printer Setting Utility.
Note:
The Select Printer window appears in this step, when multiple print drivers are installed on your
computer. In this case, click the name of the desired printer listed in Printer Name.
The Printer Setting Utility appears.
2. Click the Printer Settings Report tab.
3. Select Information Pages from the list at the left side of the page.
The Information Pages page is displayed.
4. Click the Printer Settings button.
The Printer Settings page is printed.
If the IP address is 0.0.0.0 (the factory default) or 169.254.xx.xx, an IP address has not been
assigned.
See Also:
“Assigning an IP Address (for IPv4 Mode)” on page 30
Installing Print Driver on Computers Running Windows
Identifying Print Driver Pre-install Status (for Network Connection Setup)
Before installing the print driver on your computer, print the Printer Settings page to check the IP
address of your printer.
The following procedure uses Windows XP as an example.
The Operator Panel
1. Press the (Menu) button.
2. Select Information Pgs, and then press the
button.
Network Basics 34
Page 35

Epson AcuLaser C1750 Series User’s Guide
3. Select Printer Settings, and then press the button.
The Printer Settings page is printed.
4. Find the IP address under Network Setup/Wireless Setup on the Printer Settings page.
If the IP address is 0.0.0.0, wait for a few minutes to resolve the IP address automatically, and then
print the Printer Settings page again.
If the IP address is not resolved automatically, see “Assigning an IP Address (for IPv4 Mode)” on
page 30.
The Printer Setting Utility
1. Click start — All Programs — EPSON — EPSON Printer Software — EPSON AL-C1750N /
EPSON AL-C1750W — Printer Setting Utility.
Note:
The Select Printer window appears in this step, when multiple print drivers are installed on your
computer. In this case, click the name of the desired printer listed in Printer Name.
The Printer Setting Utility appears.
2. Select TCP/IP Settings from the list on the left side of the page.
The TCP/IP Settings page appears.
If the IP address shows 0.0.0.0 (the factory default) or 169.254.xx.xx, an IP address has not been
assigned. To assign one for your printer, see “Assigning an IP Address (for IPv4 Mode)” on page
30.
Disabling the Firewall Before Installing Your Printer
Note:
For Windows XP, Service Pack 2 or 3 must be installed.
If you are running one of the following operating systems, you must disable the firewall before
installing the Epson printer software:
❏ Windows 7
❏ Windows Vista
Network Basics 35
Page 36

Epson AcuLaser C1750 Series User’s Guide
❏ Windows Server 2008 R2
❏ Windows Server 2008
❏ Windows XP
The following procedure uses Windows XP as an example.
1. Click start — Help and Support.
Note:
For Windows Vista, Windows Server 2008, Windows Server 2008 R2 and Windows 7 operating
systems, if you use Online Help, switch to Offline Help on Windows Help and Support window.
2. In the Search box, enter firewall and then press the Enter key.
In the list, click Turn Windows Firewall on or off and then follow the instructions on the screen.
Enable the firewall after the installation of the Epson printer software is complete.
USB Connection Setup
The following procedure uses Windows XP as an example.
When the Printer is Connected to Computer With a USB Cable
1. Insert the Software Disc into your computer’s CD/DVD drive.
Note:
If the Software Disc does not automatically launch, click Start (start for Windows XP) — All
Programs (for Windows Vista and Windows 7) — Accessories (for Windows Vista and Windows
7) — Run, and then enter D:\setup.exe (where D is the drive letter of your computer), and then click
OK.
2. Turn on the printer.
Note:
If Found New Hardware Wizard appears, click Cancel at this time.
3. Click Easy Install.
The SOFTWARE LICENSE AGREEMENT appears.
Network Basics 36
Page 37

Epson AcuLaser C1750 Series User’s Guide
4. If you agree to the terms of the SOFTWARE LICENSE AGREEMENT, select Agree and then click
Next.
The Easy Install Navi launches.
5. Click Installing Drivers and Software.
6. Select Personal Installation (USB), and then click Next.
7. Follow the on-screen instructions.
The Plug and Play installation starts and the installation software proceeds to the next page
automatically.
8. Click Finish to exit the wizard.
When the Printer is not Connected to Computer With a USB Cable
1. Turn off the printer.
2. Insert the Software Disc into your computer’s CD/DVD drive.
Note:
If the Software Disc does not automatically launch, click Start (start for Windows XP) — All
Programs (for Windows Vista and Windows 7) — Accessories (for Windows Vista and Windows
7) — Run, and then enter D:\setup.exe (where D is the drive letter of your computer), and then click
OK.
3. Click Easy Install.
The SOFTWARE LICENSE AGREEMENT appears.
4. If you agree to the terms of the SOFTWARE LICENSE AGREEMENT, select Agree and then click
Next.
The Easy Install Navi launches.
5. Click Installing Drivers and Software.
6. Select Personal Installation (USB), and then click Next.
Network Basics 37
Page 38

Epson AcuLaser C1750 Series User’s Guide
7. Follow the on-screen instructions to connect the computer and the printer with the USB cable, and
then turn on the printer.
8. Click Finish to exit the wizard.
9. Proceed the Plug and Play installation.
USB Printing
A personal printer is a printer attached to you r comp uter or a prin t serve r using a USB. If you r print er
is attached to a network and not your computer, see “Network Connection Setup” on page 38.
Network Connection Setup
1. Insert the Software Disc into your computer’s CD/DVD drive.
Note:
If the Software Disc does not automatically launch, click Start (start for Windows XP) — All
Programs (for Windows Vista and Windows 7) — Accessories (for Windows Vista and Windows
7) — Run, and then enter D:\setup.exe (where D is the drive letter of your computer), and then click
OK.
2. Click Easy Install.
The SOFTWARE LICENSE AGREEMENT appears.
3. If you agree to the terms of the SOFTWARE LICENSE AGREEMENT, select Agree and then click
Next.
The Easy Install Navi launches.
4. Click Installing Drivers and Software.
5. Select Network Installation, and then click Next.
6. Select the printer you want to install from the printer list, and then click Next. If the target printer
is not displayed on the list, click Refresh to refresh the list or click Manually add using IP
address to add a printer to the list manually. You may specify the IP address and port name at this
point.
Network Basics 38
Page 39

Epson AcuLaser C1750 Series User’s Guide
If you have installed this printer on the server computer, select I am setting up this printer on a
server check box.
Note:
When using AutoIP, 0.0.0.0 is displayed in the installer. Before you can continue, you must enter a
valid IP address.
7. Specify the printer settings, and then click Next.
a Enter the printer name.
b
If you want other users on the network to access this printer, select Share this printer with
other computers on the network, and then enter a share name that users can identify.
c
If you want to set a printer as the default, select the Set this printer as default check box.
8. Select the software and documentation you want to install, and then click Install. You can specify
folders in which to install the software and documentation. To change the folders, click
Browse.
9. Click Finish to exit the wizard when the “Congratulations!” screen appears. If necessary, click
Print Test Page to print a test page.
Configuring Wireless Settings (Epson AcuLaser C1750W Only)
This section describes how to configure wireless settings through Easy Install Navi.
Important:
❏ The Wireless LAN feature is unavailable depending on the region you purchased.
❏ Be sure to get the SSID and security information from a system administrator in advance when you
use other than WPS to configure wireless settings.
The specifications of wireless setting function are described below:
Item Specification
Connectivity Wireless
Connectivity Standard IEEE 802.11b/g/n compliant
Bandwidth 2.4 GHz
Network Basics 39
Page 40

Epson AcuLaser C1750 Series User’s Guide
Item Specification
Data Transfer Rate IEEE 802.11b mode: 11, 5.5, 2, 1 Mbps
IEEE 802.11g mode: 54, 48, 36, 24, 18, 12, 9, 6 Mbps
IEEE 802.11n mode: 65 Mbps
Security 64 (40-bit key)/ 128 (104- bit key) WEP, WPA- PSK (TKIP, AES), WPA2-PSK (AES)
(IEEE802.1x attestation function of WPA 1x non-corresponds)
Certifications Wi-Fi, WPA2.0 (Personal)
Wi-Fi Protected Setup (WPS) Push Button Configuration (PBC), Personal Identification Number (PIN)
You can select a method to configure a wireless setting from the following:
Wizard Setup Through USB Connection
Advanced Setup Through
*1
WPS-PIN (Wi-Fi® Protected Setup-Personal Identification Number) is a method to authenticate and register devices
required for wireless configuration, by entering PIN assignments in the printer and computer. This setting, performed
through access point, is available only when the access points of your wireless router supports WPS.
*2
WPS-PBC (Wi-Fi Protected Setup-Push Button Configuration) is a method to authenticate and register devices required for
wireless configuration, by pressing the button provided on the access point via wireless routers, and then performing
WPS-PBC setting on the operator panel. This setting is available only when the access point supports WPS.
Ethernet connection
Operator Panel
EpsonNet Config
WPS-PIN
WPS-PBC
*1
*2
Note:
For information on how to install a wireless, see “Using Wizard Setup to Configure Wireless Settings” on
page 40or “Using Advanced Setup to Configure Wireless Settings” on page 47.
Using Wizard Setup to Configure Wireless Settings
The following procedure uses Windows XP as an example.
1. Insert the Software Disc provided with the printer in your computer.
2. Click Easy Install.
The SOFTWARE LICENSE AGREEMENT appears.
Network Basics 40
Page 41

Epson AcuLaser C1750 Series User’s Guide
3. If you agree to the terms of the SOFTWARE LICENSE AGREEMENT, select Agree and then click
Next.
The Easy Install Navi launches.
4. Click Start Setup.
5. Click Connect Your Printer.
Select your type of connection screen appears.
6. Select Wireless Connection, and then click Next.
The setting method selection window appears.
Network Basics 41
Page 42

7. Ensure that Wizard is selected, and then click Next.
Epson AcuLaser C1750 Series User’s Guide
Network Basics 42
Page 43

8. Enter the SSID.
Epson AcuLaser C1750 Series User’s Guide
9. Select Type of wireless network.
10. Configure the security setting, and then click Next.
The IP Address Settings screen appears.
11. Select IP Mode depending on your network scheme.
When IPv4 is selected:
❏ Configure the following:
a
Select Type.
Network Basics 43
Page 44

b Enter the following items:
❏ IP Address of your printer
❏ Network Mask
❏ Gateway Address
When IPv6 is selected:
❏ Configure the following:
a
Select Use Manual Address.
b Enter IP address of your printer.
c Enter the gateway address of your network.
Epson AcuLaser C1750 Series User’s Guide
When Dual Stack is selected:
Configure the IPv4 Settings and IPv6 Settings.
Network Basics 44
Page 45

Epson AcuLaser C1750 Series User’s Guide
12. Click Next.
13. Ensure that the wireless settings are displayed, and then click Apply.
Network Basics 45
Page 46

The Complete configuration screen appears.
Epson AcuLaser C1750 Series User’s Guide
14. Wait a few minutes until the printer restarts to establish the wireless network.
15. Click Print Printer Setting.
16. Confirm that “Wireless Status” is shown as “Good”, “Acceptable” or “Low” on the report.
Note:
When “Wireless Status” is “No Reception”, check if the wireless settings are correctly configured. To
reconfigure the wireless settings, click Next on the Complete configuration screen and then click
Return.
17. Follow the instructions until the Check Setup screen appears.
18. Confirm there are no errors displayed on the LCD panel, and then click Start Installation.
If you see any errors, click Trouble Shooting Guide and follow the instruction.
19. Check if the printer to be installed is listed in the Select Printer screen, and then click Next.
Network Basics 46
Page 47

Epson AcuLaser C1750 Series User’s Guide
Note:
If the printer to be installed is not listed in the Select Printer screen, try the following steps:
❏ Click Refresh to update the information.
❏ Click Manually add using IP address, and then enter the details of the printer manually.
20. Select the required items on the Enter Printer Settings screen, and then click Next.
21. Select the software to be installed, and then click Install.
The “Congratulations!” screen appears.
22. Click Finish to exit this tool.
The wireless configuration is complete.
Using Advanced Setup to Configure Wireless Settings
To use the Advanced setup, display the Configure Wireless Settings screen.
The following procedure uses Windows XP as an example.
Displaying Configure Wireless Settings Screen
1. Insert the Software Disc provided with the printer in your computer.
2. Click Easy Install.
The SOFTWARE LICENSE AGREEMENT appears.
3. If you agree to the terms of the SOFTWARE LICENSE AGREEMENT, select Agree and then click
Next.
Network Basics 47
Page 48

The Easy Install Navi launches.
Epson AcuLaser C1750 Series User’s Guide
4. Click Start Setup.
5. Click Connect Your Printer.
6. Select Wireless Connection, and then click Next.
The setting method selection window appears.
Network Basics 48
Page 49

7. Select Advanced.
Epson AcuLaser C1750 Series User’s Guide
Select a connection method from the following
❏ “Ethernet Cable” on page 49
❏ “WPS-PIN” on page 56
❏ “WPS-PBC” on page 57
❏ “Operator Panel” on page 59
❏ “EpsonNet Config” on page 60
Ethernet Cable
1. Select Ethernet Cable, and then click Next.
2. Follow the instructions, and then click Next.
Network Basics 49
Page 50

Epson AcuLaser C1750 Series User’s Guide
The Printer Setup Utility screen appears.
3. Select the printer to be configured in the Select Printer screen, and then click Next.
Note:
If the printer to be configured is not listed in the Select Printer screen, try the following steps:
❏ Click Refresh to update the information.
❏ Click Enter IP Address, and then enter the IP address of your printer.
4. Enter the SSID.
5. Select Type of wireless network.
6. Configure the security setting, and then click Next.
The IP Address Settings screen appears.
7. Select IP Mode depending on your network scheme.
Network Basics 50
Page 51

When IPv4 is selected:
❏ Configure the following:
a
Select Type.
b Enter the following items:
❏ IP Address of your printer
❏ Network Mask
❏ Gateway Address
When IPv6 is selected:
❏ Configure the following:
a
Select Use Manual Address.
Epson AcuLaser C1750 Series User’s Guide
b Enter IP address of your printer.
c Enter the gateway address of your network.
When Dual Stack is selected:
Network Basics 51
Page 52

Configure the IPv4 Settings and IPv6 Settings.
Epson AcuLaser C1750 Series User’s Guide
8. Click Next.
Network Basics 52
Page 53

Epson AcuLaser C1750 Series User’s Guide
9. Ensure that the wireless settings are displayed, and then click Apply.
Network Basics 53
Page 54

The Complete configuration screen appears.
Epson AcuLaser C1750 Series User’s Guide
10. Wait a few minutes until the printer restarts to establish the wireless network.
11. Print a Printer Settings page from the operator panel.
See “Printing a Printer Settings Page” on page 125.
12. Confirm that “Wireless Status” is shown as “Good”, “Acceptable” or “Low” on the report.
Note:
When “Wireless Status” is “No Reception”, check if the wireless settings are correctly configured. To
reconfigure the wireless settings, click Next on the Complete configuration screen and then click
Return.
13. Click Next.
14. Follow the instructions until the Check Setup screen appears.
15. Confirm there are no errors displayed on the LCD panel, and then click Start Installation.
Network Basics 54
Page 55

Epson AcuLaser C1750 Series User’s Guide
If you see any errors, click Trouble Shooting Guide and follow the instruction.
16. Check if the printer to be installed is listed in the Select Printer screen, and then click Next.
Note:
If the printer to be installed is not listed in the Select Printer screen, try the following steps:
❏ Click Refresh to update the information.
❏ Click Manually add using IP address, and then enter the details of the printer manually.
17. Configure the required items on the Enter Printer Settings screen, and then click Next.
18. Select the software to be installed, and then click Install.
The “Congratulations!” screen appears.
19. Click Finish to exit this tool.
Network Basics 55
Page 56

Epson AcuLaser C1750 Series User’s Guide
The wireless configuration is complete.
WPS-PIN
Note:
WPS-PIN (Wi-Fi Protected Setup-Personal Identification Number) is a method to authenticate and
register devices required for wireless configuration, by entering PIN assignments to a printer and
computer. This setting, performed through access point, is available only when the access points of your
wireless router supports WPS.
1. Select WPS-PIN, and then click Next.
2. Follow the instructions until the Check Setup screen appears.
3. Confirm there are no errors displayed on the LCD panel, and then click Start Installation.
If you see any errors, click Trouble Shooting Guide and follow the instruction.
Network Basics 56
Page 57

Epson AcuLaser C1750 Series User’s Guide
4. Check if the printer to be installed is listed in the Select Printer screen, and then click Next.
Note:
If the printer to be installed is not listed in the Select Printer screen, try the following steps:
❏ Click Refresh to update the information.
❏ Click Manually add using IP address, and then enter the details of the printer manually.
5. Configure the required items on the Enter Printer Settings screen, and then click Next.
6. Select the software to be installed, and then click Install.
The “Congratulations!” screen appears.
7. Click Finish to exit this tool.
The wireless configuration is complete.
When the WPS-PIN operation is successful and the printer is rebooted, wireless LAN connection is
completed.
WPS-PBC
Note:
WPS-PBC (Wi-Fi Protected Setup-Push Button Configuration) is a method to authenticate and register
devices required for wireless configuration, by pressing the button provided on the access point via
wireless routers, and then performing WPS-PBC setting on the operator panel. This setting is available
only when the access point supports WPS.
1. Select WPS-PBC, and then click Next.
2. Follow the instructions until the Check Setup screen appears.
3. Confirm there are no errors displayed on the LCD panel, and then click Start Installation.
Network Basics 57
Page 58

Epson AcuLaser C1750 Series User’s Guide
If you see any errors, click Trouble Shooting Guide and follow the instruction.
4. Check if the printer to be installed is listed in the Select Printer screen, and then click Next.
Note:
If the printer to be installed is not listed in the Select Printer screen, try the following steps:
❏ Click Refresh to update the information.
❏ Click Manually add using IP address, and then enter the details of the printer manually.
5. Configure the required items on the Enter Printer Settings screen, and then click Next.
6. Select the software to be installed, and then click Install.
The “Congratulations!” screen appears.
7. Click Finish to exit this tool.
Network Basics 58
Page 59

Epson AcuLaser C1750 Series User’s Guide
The wireless configuration is complete.
Note:
For WPS-PBC operation on the wireless LAN access point, refer to the manual supplied with the wireless
LAN access point.
When the WPS-PBC operation is successful and the printer is rebooted, wireless LAN connection is
completed.
Operator Panel
1. Select Operator Panel, and then click Next.
2. Follow the instructions until the Check Setup screen appears.
3. Confirm there are no errors displayed on the LCD panel, and then click Start Installation.
If you see any errors, click Trouble Shooting Guide and follow the instruction.
Network Basics 59
Page 60

Epson AcuLaser C1750 Series User’s Guide
4. Check if the printer to be installed is listed in the Select Printer screen, and then click Next.
Note:
If the printer to be installed is not listed in the Select Printer screen, try the following steps:
❏ Click Refresh to update the information.
❏ Click Manually add using IP address, and then enter the details of the printer manually.
5. Configure the required items on the Enter Printer Settings screen, and then click Next.
6. Select the software to be installed, and then click Install.
The “Congratulations!” screen appears.
7. Click Finish to exit this tool.
The wireless configuration is complete.
EpsonNet Config
1. Select EpsonNet Config, and then click Next.
2. Follow the instructions until the Check Setup screen appears.
3. Confirm there are no errors displayed on the LCD panel, and then click Start Installation.
Network Basics 60
Page 61

Epson AcuLaser C1750 Series User’s Guide
If you see any errors, click Trouble Shooting Guide and follow the instruction.
4. Check if the printer to be installed is listed in the Select Printer screen, and then click Next.
Note:
If the printer to be installed is not listed in the Select Printer screen, try the following steps:
❏ Click Refresh to update the information.
❏ Click Manually add using IP address, and then enter the details of the printer manually.
5. Configure the required items on the Enter Printer Settings screen, and then click Next.
6. Select the software to be installed, and then click Install.
The “Congratulations!” screen appears.
7. Click Finish to exit this tool.
Network Basics 61
Page 62

Epson AcuLaser C1750 Series User’s Guide
The wireless configuration is complete.
When the EpsonNet Config operation is successful and the printer is rebooted, wireless LAN
connection is completed.
Setting up a New Wireless Network Environment for Your Computer (When You Need to
Setup Your Wireless Connectivity With Your Computer)
For DHCP Network:
1. Setting up your computer for wireless connectivity:
Note:
You can also change the wireless settings using the wireless application that may be installed in your
computer.
For Windows XP and Windows Server 2003:
a
Select Network Connections from Control Panel.
b
Right-click Wireless Network Connection and select Properties.
c
Select the Wireless Networks tab.
d
Ensure that the check box for Use Windows to configure my wireless network settings
is selected.
Note:
Make note of the wireless settings on the Advanced window (step f) and the Wireless network
properties window (step h). You may require these settings later.
e
Click the Advanced button.
f
Select Computer-to-computer (ad hoc) networks only and close the Advanced dialog
box.
g
Click the Add button to display Wireless network properties.
Network Basics 62
Page 63

Epson AcuLaser C1750 Series User’s Guide
h
On the Association tab, enter the following information and click OK.
Network name (SSID): xxxxxxxx (xxxxxxxx indicates a wireless device’s SSID which you
use)
Network Authentication: Open
Data encryption: Disabled
i
Click the Move up button to move the newly added SSID to the top of the list.
j
Click OK to close the Wireless Network Connection Properties dialog box.
For Windows Vista:
a
Display Control Panel.
b
Select Network and Internet.
c
Select Network and Sharing Center.
d
Select Connect to a network.
Network Basics 63
Page 64

Epson AcuLaser C1750 Series User’s Guide
e
Select xxxxxxxx (xxxxxxxx indicates a wireless device’s SSID which you use) from the
network items listed in the available network list, and click Connect.
f
Click Close in the dialog box after confirming the connection is a success.
For Windows Server 2008:
a
Display Control Panel.
b
Select Network and Internet.
c
Select Network and Sharing Center.
d
Select Connect to a network.
e
Select xxxxxxxx (xxxxxxxx indicates a wireless device’s SSID which you use) from the
network items listed in the available network list, and click Connect.
f
Click Close in the dialog box after confirming the connection is a success.
For Windows Server 2008 R2 and Windows 7:
a
Display Control Panel.
b
Select Network and Internet.
c
Select Network and Sharing Center.
d
Select Connect to a network.
e
Select xxxxxxxx (xxxxxxxx indicates a wireless device’s SSID which you use) from the
network items listed in the available network list, and click Connect.
2. Check the IP address assigned by AutoIP on the printer.
a
On the operator panel, press the
b Select Admin Menu, and then press the
(Menu) button.
button.
c Select Network Setup, and then press the
button.
Network Basics 64
Page 65

d Select TCP/IP, and then press the button.
Epson AcuLaser C1750 Series User’s Guide
e Select IPv4, and then press the
f Select IP Address, and then press the
button.
button.
(Default IP address range: 169.254.xxx.yyy)
IP Address
169.254.000.041*
3. Ensure that the IP Address on your computer is assigned by DHCP.
4. Launch your web browser.
5. Enter the IP address of the printer in the address bar, and then press the Enter key.
Network Basics 65
Page 66

EpsonNet Config page appears.
Epson AcuLaser C1750 Series User’s Guide
6. Create wireless setting of the printer on EpsonNet Config.
7. Reboot the printer.
8. Restore the wireless settings on your computer.
Note:
If the operating system on your computer provides a wireless configuration software, use it to change
the wireless settings. See the instructions below.
For Windows XP and Windows Server 2003:
a
Select Network Connections from Control Panel.
b
Right-click Wireless Network Connection and select Properties.
c
Select Wireless Networks tab.
d
Ensure that the check box for Use Windows to configure my wireless network settings
is selected.
Network Basics 66
Page 67

Epson AcuLaser C1750 Series User’s Guide
e
Click Advanced.
f You can either set the printer to the ad-hoc mode or the infrastructure mode.
❏ For Ad hoc mode:
Select Computer-to-computer (ad hoc) networks only and close the dialog box.
❏ For Infrastructure mode:
Select Access point (Infrastructure) networks only and close the dialog box.
g
Click Add to display Wireless network properties.
h
Enter the setting that you will send to the printer and click OK.
i
Click Move up to move the setting to the top of the list.
j
Click OK to close the Wireless Network Connection Properties dialog box.
For Windows Vista:
a
Display Control Panel.
b
Select Network and Internet.
c
Select Network and Sharing Center.
d
Select Connect to a network.
e
Select the network, and then click Connect.
f
Click Close in the dialog box after confirming the connection is a success.
For Windows Server 2008:
a
Display Control Panel.
b
Select Network and Internet.
c
Select Network and Sharing Center.
d
Select Connect to a network.
Network Basics 67
Page 68

Epson AcuLaser C1750 Series User’s Guide
e
Select the network, and then click Connect.
f
Click Close in the dialog box after confirming the connection is a success.
For Windows Server 2008 R2 and Windows 7:
a
Display Control Panel.
b
Select Network and Internet.
c
Select Network and Sharing Center.
d
Select Connect to a network.
e
Select the network, and then click Connect.
For Fixed IP Networks:
1. Set up your computer for wireless connectivity:
Note:
If the operating system on your computer provides a wireless configuration software, use it to change
the wireless settings. See the instructions below.
For Windows XP and Windows Server 2003:
a
Select Network Connections from Control Panel.
b
Right-click Wireless Network Connection and select Properties.
c
Select the Wireless Networks tab.
d
Ensure that the check box for Use Windows to configure my wireless network settings
is selected.
Note:
Be sure to write down the current wireless computer settings in step f and step h so that you can restore
them later.
e
Click the Advanced button.
Network Basics 68
Page 69

Epson AcuLaser C1750 Series User’s Guide
f
Select Computer-to-computer (ad hoc) networks only and close the Advanced dialog
box.
g
Click the Add button to display Wireless network properties.
h
On the Association tab, enter the following information and click OK.
Network name (SSID): xxxxxxxx (xxxxxxxx indicates a wireless device’s SSID which you
use)
Network Authentication: Open
Data encryption: Disabled
i
Click the Move up button to move the newly added SSID to the top of the list.
j
Click OK to close the Wireless Network Connection Properties dialog box.
For Windows Vista:
a
Display Control Panel.
Network Basics 69
Page 70

Epson AcuLaser C1750 Series User’s Guide
b
Select Network and Internet.
c
Select Network and Sharing Center.
d
Select Connect to a network.
e
Select xxxxxxxx (xxxxxxxx indicates a wireless device’s SSID which you use) from the
network items listed in the available network list, and click Connect.
f
Click Close in the dialog box after confirming the connection is a success.
For Windows Server 2008:
a
Display Control Panel.
b
Select Network and Internet.
c
Select Network and Sharing Center.
d
Select Connect to a network.
e
Select xxxxxxxx (xxxxxxxx indicates a wireless device’s SSID which you use) from the
network items listed in the available network list, and click Connect.
f
Click Close in the dialog box after confirming the connection is a success.
For Windows Server 2008 R2 and Windows 7:
a
Display Control Panel.
b
Select Network and Internet.
c
Select Network and Sharing Center.
d
Select Connect to a network.
e
Select xxxxxxxx (xxxxxxxx indicates a wireless device’s SSID which you use) from the
network items listed in the available network list, and click Connect.
Network Basics 70
Page 71

2. Check the IP address on your computer.
Epson AcuLaser C1750 Series User’s Guide
3. Set the IP address on the printer.
See “Assigning an IP Address (for IPv4 Mode)” on page 30.
4. Launch your web browser.
5. Enter the IP address of the printer in the address bar, and then press the Enter key.
Network Basics 71
Page 72

EpsonNet Config page appears.
Epson AcuLaser C1750 Series User’s Guide
6. Change the wireless setting of the printer on EpsonNet Config.
7. Reboot the printer.
8. Restore the wireless settings on your computer.
Note:
If the operating system on your computer provides a wireless configuration software, use it to change
the wireless settings. Or you can change the wireless settings using the tool provided with the
operating system. See the instructions below.
For Windows XP and Windows Server 2003:
a
Select Network Connections from Control Panel.
b
Right-click Wireless Network Connection and select Properties.
c
Select Wireless Networks tab.
Network Basics 72
Page 73

Epson AcuLaser C1750 Series User’s Guide
d
Ensure that the check box for Use Windows to configure my wireless network settings
is selected.
e
Click Advanced.
f You can either set the printer to the ad-hoc mode or the infrastructure mode.
❏ For Ad hoc mode:
Select Computer-to-computer (ad hoc) networks only and close the dialog box.
❏ For Infrastructure mode:
Select Access point (Infrastructure) networks only and close the dialog box.
g
Click Add to display Wireless network properties.
h
Enter the setting that you will send to the printer and click OK.
i
Click Move up to move the setting to the top of the list.
j
Click OK to close the Wireless Network Connection Properties dialog box.
For Windows Vista:
a
Display Control Panel.
b
Select Network and Internet.
c
Select Network and Sharing Center.
d
Select Connect to a network.
e
Select the network, and then click Connect.
f
Click Close in the dialog box after confirming the connection is a success.
For Windows Server 2008:
a
Display Control Panel.
b
Select Network and Internet.
c
Select Network and Sharing Center.
Network Basics 73
Page 74

Epson AcuLaser C1750 Series User’s Guide
d
Select Connect to a network.
e
Select the network, and then click Connect.
f
Click Close in the dialog box after confirming the connection is a success.
For Windows Server 2008 R2 and Windows 7:
a
Display Control Panel.
b
Select Network and Internet.
c
Select Network and Sharing Center.
d
Select Connect to a network.
e
Select the network, and then click Connect.
Setting Up for Shared Printing
You can share your new printer on the network using the Software Disc that shipped with your printer,
or using Windows Point and Print or peer-to-peer method. However, if you use either of the Microsoft
methods you will not get features such as the Status Monitor and other printer utilities, which will get
installed with the Software Disc.
If you want to use the printer on a network, share the printer and install its drivers on all the computers
on the network.
Note:
You need to purchase a Ethernet cable separately for shared printing.
For Windows XP, Windows XP 64-bit Edition, Windows Server 2003, and Windows Server
2003 x64 Edition
1. Click Start (start for Windows XP) — Printers and Faxes.
2. Right-click this printer icon and select Properties.
3. From the Sharing tab, select Share this printer, and then enter a name in the Share name text
box.
Network Basics 74
Page 75

Epson AcuLaser C1750 Series User’s Guide
4. Click Additional Drivers and select the operating systems of all network clients using this
printer.
5. Click OK.
If the files are not present in your computer, and then you will be prompted to insert the server
operating system CD.
6. Click Apply, and then click OK.
For Windows Vista and Windows Vista 64-bit Edition
1. Click Start — Control Panel — Hardware and Sound — Printers.
2. Right-click the printer icon and select Sharing.
3. Click Change sharing options button.
4. The “Windows needs your permission to continue” appears.
5. Click Continue button.
6. Select the Share this printer check box, and then enter a name in the Share name text box.
7. Select Additional Drivers and select the operating systems of all network clients using this
printer.
8. Click OK.
9. Click Apply, and then click OK.
For Windows Server 2008 and Windows Server 2008 64-bit Edition
1. Click Start — Control Panel — Hardware and Sound — Printers.
2. Right-click the printer icon and select Sharing.
3. Select the Share this printer check box, and then enter a name in the Share name text box.
4. Click Additional Drivers and select the operating systems of all network clients using this
printer.
Network Basics 75
Page 76

Epson AcuLaser C1750 Series User’s Guide
5. Click OK.
6. Click Apply, and then click OK.
For Windows 7, Windows 7 64-bit Edition, and Windows Server 2008 R2
1. Click Start — Devices and Printers.
2. Right-click the printer icon and select Printer properties.
3. On the Sharing tab, select the Share this printer check box, and then enter a name in the Share
name text box.
4. Click Additional Drivers and select the operating systems of all network clients using this
printer.
5. Click OK.
6. Click Apply, and then click OK.
To check that the printer is shared:
❏ Ensure that the printer object in the Printers, Printers and Faxes or Devices and Printers
folder is shared. The share icon is shown under the printer icon.
❏ Browse Network or My Network Places. Find the host name of the server and look for the shared
name you assigned to the printer.
Now that the printer is shared, you can install the printer on network clients using the Point and Print
method or the peer-to-peer method.
Point and Print
Point and Print is a Microsoft Windows technology that allows you to connect to a remote printer.
This feature automatically downloads and installs the print driver.
For Windows XP, Windows XP 64-bit Edition, Windows Server 2003, and Windows Server 2003 x64
Edition
1. On the Windows desktop of the client computer, double-click My Network Places.
2. Locate the host name of the server computer, and then double-click the host name.
Network Basics 76
Page 77

Epson AcuLaser C1750 Series User’s Guide
3. Right-click the shared printer name, and then click Connect.
Wait for the driver information to be copied from the server computer to the client computer, and
for a new printer object to be added to the Printers and Faxes folder. The time taken to copy
varies based on the network traffic.
Close My Network Places.
4. Print a test page to verify installation.
a
Click start (Start for Windows Server 2003/Windows Server 2003 x64 Edition) — Printers
and Faxes.
b Select the printer you have installed.
c
Click File — Properties.
d
On the General tab, click Print Test Page.
When a test page is printed successfully, installation is complete.
For Windows Vista and Windows Vista 64-bit Edition
1. Click Start — Network.
Network Basics 77
Page 78

Epson AcuLaser C1750 Series User’s Guide
2. Locate and double-click the host name of the server computer.
3. Right-click the shared printer name, and then click Connect.
4. Click Install driver.
5. Click Continue in the User Account Control dialog box.
Wait until the driver is copied from the server to the client computer. A new printer object is added
to the Printers folder. The duration of this procedure may vary based on the network traffic.
6. Print a test page to verify installation.
a
Click Start — Control Panel — Hardware and Sound.
b
Select Printers.
c
Right-click the printer you just created and select Properties.
d
On the General tab, click Print Test Page.
When a test page is printed successfully, installation is complete.
For Windows Server 2008 and Windows Server 2008 64-bit Edition
1. Click Start — Network.
2. Locate the host name of the server computer, and then double-click the host name.
3. Right-click the shared printer name, and then click Connect.
4. Click Install driver.
5. Wait until the driver is copied from the server to the client computer. A new printer object will be
added to the Printers folder. The time taken for these activities varies based on network traffic.
6. Print a test page to verify installation.
a
Click Start — Control Panel.
b
Select Hardware and Sound.
Network Basics 78
Page 79

Epson AcuLaser C1750 Series User’s Guide
c
Select Printers.
d
Right-click the printer you just created and select Properties.
e
On the General tab, click Print Test Page.
When a test page is printed successfully, installation is complete.
For Windows 7, Windows 7 64-bit Edition, and Windows Server 2008 R2
1. Click Start — Network.
2. Locate the host name of the server computer, and then double-click the host name.
3. Right-click the shared printer name, and then click Connect.
4. Click Install driver.
5. Wait until the driver is copied from the server to the client computer. A new printer object will be
added to the Devices and Printers folder. The time taken for these activities varies based on
network traffic.
6. Print a test page to verify installation.
a
Click Start — Devices and Printers.
b
Right-click the printer you just created and select Printer properties.
c
On the General tab, click Print Test Page.
When a test page is printed successfully, installation is complete.
Peer-to-Peer
If you use the peer-to-peer method, the print driver is installed on each client computer. The client
computers can modify the driver and handle the print jobs.
Network Basics 79
Page 80

Epson AcuLaser C1750 Series User’s Guide
For Windows XP, Windows XP 64-bit Edition, Windows Server 2003, and Windows Server 2003 x64
Edition
1. Click start (Start for Windows Server 2003/Windows Server 2003 x64 Edition) — Printers and
Faxes.
2. Click Add a printer (Add Printer for Windows Server 2003/Windows Server 2003 x64 Edition)
to launch the Add Printer Wizard.
3. Click Next.
4. Select A network printer, or a printer attached to another computer, and then click Next.
5. Click Browse for a printer, and then click Next.
6. Select the printer, and then click Next. If the printer is not listed, click Back and enter in the path of
the printer in the text box.
For example:\\[server host name]\[shared printer name]
The server host name is the name of the server computer that identifies it to the network. The
shared printer name is the name assigned during the server installation process.
If this is a new printer, you may be prompted to install a print driver. If no system driver is
available, specify the location where the driver is available.
7. Select Yes if you want this printer to be set as the default printer, and then click Next.
Network Basics 80
Page 81

Epson AcuLaser C1750 Series User’s Guide
8. Click Finish.
For Windows Vista and Windows Vista 64-bit Edition
1. Click Start — Control Panel — Hardware and Sound — Printers.
2. Click Add a printer to launch the Add Printer wizard.
3. Select Add a network, wireless or Bluetooth printer. If the printer is listed, select the printer
and click Next, or select The printer that I want isn’t listed and enter in the path of the printer in
the Select a shared printer by name text box and click Next.
For example:\\[server host name]\[shared printer name]
The server host name is the name of the server computer that identifies it on the network. The
shared printer name is the name assigned during the server installation process.
4. If this is a new printer, you may be prompted to install a print driver. If no system driver is
available, specify the location where the driver is available.
5. Confirm the printer name, and then select whether to use this printer as the default printer and
click Next.
6. If you want to verify installation, click Print a test page.
7. Click Finish.
Network Basics 81
Page 82

Epson AcuLaser C1750 Series User’s Guide
When a test page is printed successfully, installation is complete.
For Windows Server 2008 and Windows Server 2008 64-bit Edition
1. Click Start — Control Panel — Hardware and Sound — Printers.
2. Click Add a printer to launch the Add Printer wizard.
3. Select Add a network, wireless or Bluetooth printer. If the printer is listed, select the printer
and click Next, or select The printer that I want isn’t listed and enter in the path of the printer in
the Select a shared printer by name text box and click Next.
For example: \\[server host name]\[shared printer name]
The server host name is the name of the server computer that identifies it on the network. The
shared printer name is the name assigned during the server installation process.
4. If this is a new printer, you may be prompted to install a print driver. If no system driver is
available, specify the location where the driver is available.
5. Confirm the printer name, and then select whether to use this printer as the default printer and
click Next.
6. Select whether to share this printer or not.
7. If you want to verify installation, click Print a test page.
8. Click Finish.
When a test page is printed successfully, installation is complete.
For Windows 7, Windows 7 64-bit Edition, and Windows Server 2008 R2
1. Click Start — Devices and Printers.
2. Click Add a printer to launch the Add Printer wizard.
3. Select Add a network, wireless or Bluetooth printer. If the printer is listed, select the printer
and click Next, or select The printer that I want isn’t listed. Click Select a shared printer by
name and enter in the path of the printer in the text box, and then click Next.
For example: \\[server host name]\[shared printer name]
Network Basics 82
Page 83

Epson AcuLaser C1750 Series User’s Guide
The server host name is the name of the server computer that identifies it to the network. The
shared printer name is the name assigned during the server installation process.
4. If this is a new printer, you may be prompted to install a print driver. If no system driver is
available, you need to specify the path to the available drivers.
5. Confirm the printer name, and then click Next.
6. Select whether to use this printer as the default printer, and then click Next.
7. If you want to verify installation, click Print a test page.
8. Click Finish.
When a test page is printed successfully, installation is complete.
Installing Print Driver on Computers Running Mac OS X
Installing the Driver
The following procedure uses Mac OS X 10.6 as an example.
1. Run the Software Disc on the Mac OS X.
2. Double-click the AL-C1750 C1700 Installer icon.
3. Click Continue on the displayed screen.
4. Click Continue on the Introduction screen.
5. Select a language for the Software License Agreement.
6. After reading the Software License Agreement, click Continue.
7. If you agree to the terms of the Software License Agreement, click Agree to continue the
installation process.
8. Click Install to perform the standard installation.
Network Basics 83
Page 84

Epson AcuLaser C1750 Series User’s Guide
9. Enter the administrator’s name and password, and then click OK.
10. Click Close to complete installation.
Adding a Printer
Adding a Printer on Mac OS X 10.5.8/10.6 or Later Version(s)
When Using a USB connection
1. Turn off the printer and your computer.
2. Connect the printer and your computer with the USB cable.
3. Turn on the printer and your computer.
4. Display System Preferences, and then click Print & Fax.
5. Confirm your USB printer is added to Print & Fax.
If your USB printer is not displayed, execute the following procedures.
6. Click the plus (+) sign, and then click Default.
7. Select the printer connected via USB from the Printer Name list.
Name, Location, and Print Using are automatically entered.
8. Click Add.
When Using Bonjour
1. Turn on the printer.
2. Ensure that your computer is connected to the network.
If you use wired connection, ensure that the Ethernet cable is connected between the printer and
the network.
If you use wireless connection, ensure that wireless connection is configured properly on your
computer and printer.
Network Basics 84
Page 85

Epson AcuLaser C1750 Series User’s Guide
3. Display System Preferences, and then click Print & Fax.
4. Click the plus (+) sign, and then click Default.
5. Select the printer connected via Bonjour from the Printer Name list.
Name and Print Using are automatically entered.
6. Click Add.
When Using IP Printing
1. Turn on the printer.
2. Ensure that your computer is connected to the network.
If you use wired connection, ensure that the Ethernet cable is connected between the printer and
the network.
If you use wireless connection, ensure that wireless connection is configured properly on your
computer and printer.
3. Display System Preferences, and then click Print & Fax.
4. Click the plus (+) sign, and then click IP.
5. Select Line Printer Daemon - LPD for Protocol.
6. Enter the IP address of the printer in the Address area.
7. Select the model of your printer for Print Using.
Note:
When the printing is set up using IP printing, the queue name is displayed as blank. You do not need
to specify it.
8. Click Add.
Adding a Printer on Mac OS X 10.4.11
When Using a USB Connection
Network Basics 85
Page 86

Epson AcuLaser C1750 Series User’s Guide
1. Turn off the printer and your computer.
2. Connect the printer and your computer with the USB cable.
3. Turn on the printer and your computer.
4. Start Printer Setup Utility.
Note:
You can find Printer Setup Utility in the Utilities folder in Applications.
5. Confirm your USB printer is added to Printer List.
If your USB printer is not displayed, execute the following procedures.
6. Click Add.
7. Click Default Browser in the Printer Browser dialog box.
8. Select the printer connected via USB from the Printer Name list.
Name, Location and Print Using are automatically entered.
9. Click Add.
When Using Bonjour
1. Turn on the printer.
2. Ensure that your computer is connected to the network.
If you use wired connection, ensure that the Ethernet cable is connected between the printer and
the network.
If you use wireless connection, ensure that wireless connection is configured properly on your
computer and printer.
3. Start Printer Setup Utility.
Note:
You can find Printer Setup Utility in the Utilities folder in Applications.
Network Basics 86
Page 87

Epson AcuLaser C1750 Series User’s Guide
4. Click Add.
5. Click Default Browser in the Printer Browser dialog box.
6. Select the printer connected via Bonjour from the Printer Name list.
Name and Print Using are automatically entered.
7. Click Add.
When Using IP Printing
1. Turn on the printer.
2. Ensure that your computer is connected to the network.
If you use wired connection, ensure that the Ethernet cable is connected between the printer and
the network.
If you use wireless connection, ensure that wireless connection is configured properly on your
computer and printer.
3. Start Printer Setup Utility.
Note:
You can find Printer Setup Utility in the Utilities folder in Applications.
4. Click Add.
5. Click IP Printer in the Printer Browser dialog box.
6. Select Line Printer Daemon - LPD for Protocol.
7. Enter the IP address of the printer in the Address area.
8. Select EPSON for Print Using, and then select the model of your printer.
Note:
When the printing is set up using IP printing, the queue name is displayed as blank. You do not need
to specify it.
9. Click Add.
Network Basics 87
Page 88

Adding a Printer on Mac OS X 10.3.9
When Using a USB Connection
1. Turn off the printer and your computer.
2. Connect the printer and your computer with the USB cable.
3. Turn on the printer and your computer.
4. Start Printer Setup Utility.
Note:
You can find Printer Setup Utility in the Utilities folder in Applications.
5. Confirm your USB printer is added to Printer List.
If your USB printer is not displayed, execute the following procedures.
Epson AcuLaser C1750 Series User’s Guide
6. Click Add.
7. Select USB from the menu.
8. Select the printer from the Product list.
Printer Model is automatically selected.
9. Click Add.
When Using Rendezvous (Bonjour)
1. Turn on the printer.
2. Ensure that your computer is connected to the network.
If you use wired connection, ensure that the Ethernet cable is connected between the printer and
the network.
If you use wireless connection, ensure that wireless connection is configured properly on your
computer and printer.
3. Start Printer Setup Utility.
Network Basics 88
Page 89

Epson AcuLaser C1750 Series User’s Guide
Note:
You can find Printer Setup Utility in the Utilities folder in Applications.
4. Click Add.
5. Select Rendezvous from the menu.
6. Select the printer you want to install from the Name list.
Printer Model is automatically selected.
7. Select the printer model from the Model Name list.
8. Click Add.
When Using IP Printing
1. Turn on the printer.
2. Ensure that your computer is connected to the network.
If you use wired connection, ensure that the Ethernet cable is connected between the printer and
the network.
If you use wireless connection, ensure that wireless connection is configured properly on your
computer and printer.
3. Start Printer Setup Utility.
Note:
You can find Printer Setup Utility in the Utilities folder in Applications.
4. Click Add.
5. Click IP Printing from the menu.
6. Select LPD/LPR for Printer Type.
7. Enter the IP address of the printer in the Printer Address area.
8. Select EPSON for Printer Model, and then select the model of your printer.
Network Basics 89
Page 90

Epson AcuLaser C1750 Series User’s Guide
Note:
When the printing is set up using IP printing, the queue name is displayed as blank. You do not need
to specify it.
9. Click Add.
Network Basics 90
Page 91

Epson AcuLaser C1750 Series User’s Guide
Chapter 5
Printing Basics
About Print Media
Using paper that is not appropriate for the printer can cause paper jams, image quality problems, or
printer failure. To achieve the best performance from your printer, we recommend you to use only the
paper described in this section.
When using paper other than that recommended, contact the Epson local representative office or an
authorised dealer.
Print Media Usage Guidelines
The printer tray accommodates various sizes and types of paper and other specialty media. Follow
these guidelines when loading paper and media:
❏ Envelopes can be printed from the multipurpose feeder (MPF) and priority sheet inserter (PSI).
❏ Fan paper or other specialty media before loading in the paper tray.
❏ Do not print on label stock once a label has been removed from a sheet.
❏ Use only paper envelopes. Do not use envelopes with windows, metal clasps, or adhesives with
release strips.
❏ Print all envelopes single-sided only.
❏ Some wrinkling and embossing may occur when printing envelopes.
❏ Do not overload the paper tray. Do not load print media above the fill line on the inside of the paper
width guides.
❏ Adjust the paper width guides to fit the paper size.
❏ If excessive jams occur, use paper or other media from a new package.
Warning:
w
Do not use conductive paper such as origami paper, carbonic paper or conductively-coated paper.
When paper jam occurs, it may cause short-circuit and eventually a fire accident.
Printing Basics 91
Page 92

Epson AcuLaser C1750 Series User’s Guide
See Also:
❏ “Loading Print Media in the Multipurpose Feeder (MPF)” on page 96
❏ “Loading Print Media in the Priority Sheet Inserter (PSI)” on page 105
❏ “Loading Envelope in the Multipurpose Feeder (MPF)” on page 102
❏ “Loading Envelope in the Priority Sheet Inserter (PSI)” on page 108
❏ “Printing on Custom Size Paper” on page 123
Print Media That Can Damage Your Printer
Your printer is designed to use a variety of media types for print jobs. However, some media can cause
poor output quality, increased paper jams, or damage to your printer.
Unacceptable media includes:
❏ Rough or porous media
❏ Plastic media
❏ Paper that has been folded or wrinkled
❏ Paper with staples
❏ Envelopes with windows or metal clasps
❏ Padded envelopes
❏ Non-laser glossy or coated paper
❏ Perforated media
Warning:
w
Do not use conductive paper such as origami paper, carbonic paper or conductively-coated paper.
When paper jam occurs, it may cause short-circuit and eventually a fire accident.
Supported Print Media
Using unsuitable print media may lead to paper jams, poor print quality, breakdown and damage to
your printer. To use the features of this printer effectively, use the suggested print media that is
recommended here.
Printing Basics 92
Page 93

Epson AcuLaser C1750 Series User’s Guide
Important:
The toner may come off the print media, if it gets wet by water, rain, steam and so on. For details, contact
the Epson local representative office or an authorized dealer.
Usable Print Media
The types of print media that can be used on this printer are as follows:
Note:
❏ SEF and LEF indicate the paper feed direction; SEF stands for short-edge feed. LEF stands for
long-edge feed.
❏ Use only laser print media. Do not use ink jet paper in this printer.
❏ Printing on print media that differs from the paper size or paper type selected on the print driver may
lead to paper jams. To ensure that printing is correctly done, select the correct paper size and paper
type.
Multipurpose Feeder (MPF)
Paper Size
A4 SEF (210 × 297 mm)
B5 SEF (182 × 257 mm)
A5 SEF (148 × 210 mm)
Letter SEF (8.5 × 11 inches)
Legal SEF (8.5 × 14 inches)
Folio SEF (8.5 × 13 inches)
Executive SEF (7.25 × 10.5 inches)
C5 SEF (162 × 229 mm)
Monarch SEF (3.875 × 7.5 inches)
Monarch LEF (7.5 × 3.875 inches)
# 10 Env SEF (4.125 × 9.5 inches)
DL SEF (110 × 220 mm)
DL LEF (220 × 110 mm)
Custom Size:
Width: 76.2 – 215.9 mm (3 – 8.5 inches)
Length: 127 – 355.6 mm (5 –14 inches)
*1
*1
*2
*3
Printing Basics 93
Page 94

Paper Type (Weight) Plain
Bond
Lightweight Cardstock
Lightweight Glossy Cardstock
Labels
Envelope
Recycled
Letterhead
Pre-Printed
Hole Punched
Colored
Special
Custom Type
Epson AcuLaser C1750 Series User’s Guide
Loading Capacity 150 sheets of standard paper
*1
Monarch and DL envelopes can be supported by LEF with their flap open.
*2
The maximum width is 220 mm for DL LEF.
*3
The minimum length is 3.875 inches for Monarch LEF and 110 mm for DL LEF.
Priority Sheet Inserter (PSI)
Paper Size
A4 SEF (210 × 297 mm)
B5 SEF (182 × 257 mm)
A5 SEF (148 × 210 mm)
Letter SEF (8.5 × 11 inches)
Legal SEF (8.5 × 14 inches)
Folio SEF (8.5 × 13 inches)
Executive SEF (7.25 × 10.5 inches)
C5 SEF (162 × 229 mm)
Monarch SEF (3.875 × 7.5 inches)
# 10 Env SEF (4.125 × 9.5 inches)
DL SEF (110 × 220 mm)
Custom Size:
Width: 76.2 – 215.9 mm (3 – 8.5 inches)
Length: 190.5 – 355.6 mm (7.5 –14 inches)
Printing Basics 94
Page 95

Paper Type (Weight) Plain
Bond
Lightweight Cardstock
Lightweight Glossy Cardstock
Labels
Envelope
Recycled
Letterhead
Pre-Printed
Hole Punched
Colored
Special
Custom Type
Epson AcuLaser C1750 Series User’s Guide
Loading Capacity 10 sheets of standard paper
Loading Print Media
Loading print media properly helps prevent jams and ensures trouble-free printing.
Before loading print media, identify the recommended print side of the print media. This information
is usually on the print media package.
Note:
After loading paper in the feeder, specify the same paper type on the print driver.
Capacity
Multipurpose feeder (MPF) can hold:
❏ 150 sheets of standard paper
❏ 16.2 mm (0.64 inches) of thick paper
❏ One sheet of coated paper
❏ Five envelopes
Printing Basics 95
Page 96

❏ 16.2 mm (0.64 inches) of labels
Priority sheet inserter (PSI) can hold:
❏ 10 sheets of standard paper or one sheet of other paper
Print Media Dimensions
The MPF accepts print media within the following dimensions:
❏ Width: 76.2 – 215.9 mm (3.00 – 8.50 inches)
❏ Length: 127 – 355.6 mm (5.00 – 14.00 inches)
Note:
❏ The maximum width is 220 mm for DL LEF.
Epson AcuLaser C1750 Series User’s Guide
❏ The minimum length is 3.875 inches for Monarch LEF and 110 mm for DL LEF.
The PSI accepts print media within the following dimensions:
❏ Width: 76.2 – 215.9 mm (3.00 – 8.50 inches)
❏ Length: 190.5 – 355.6 mm (7.50 – 14.00 inches)
Loading Print Media in the Multipurpose Feeder (MPF)
Note:
❏ To avoid paper jams, do not remove the priority sheet inserter (PSI) while printing is in progress.
❏ Use only laser print media. Do not use ink jet paper in this printer.
Printing Basics 96
Page 97

Epson AcuLaser C1750 Series User’s Guide
1. Open the front cover.
Note:
When you use the MPF for the first time, open the front cover by pulling out the instruction sheet.
2. Pull the PSI out.
Printing Basics 97
Page 98

Epson AcuLaser C1750 Series User’s Guide
Note:
❏ When you use the MPF for the first time, remove the instruction sheet attached to the PSI with
adhesive tape.
❏ Read the instruction sheet before you use the PSI.
3. Pull the slide bar forward until it stops.
4. Pull the length guide forward until it stops.
Printing Basics 98
Page 99

Epson AcuLaser C1750 Series User’s Guide
5. Adjust the paper width guides to their maximum width.
6. Before loading the print media, flex the sheets back and forth, and then fan them. Straighten the
edges of the stack on a level surface.
7. Load print media on the MPF with the top edge first and with the recommended print side facing
up.
Printing Basics 99
Page 100

Epson AcuLaser C1750 Series User’s Guide
8. Adjust the paper width guides until they rest lightly against the edges of the stack of print media.
9. Slide the length guide towards the printer until it touches the print media.
Note:
Depending on the size of print media, first slide the slide bar backward until it stops, and then pinch
the length guide and slide it backward until it touches print media.
Printing Basics 100
 Loading...