

Page 1

Where to Find Information
Before using the EPSON AcuLaser Color Copy Station 8600, be
sure to follow the instructions in the following manuals.
EPSON AcuLaser Color Copy Station 8600 Setup Guide
(this manual)
Explains how to assemble the copy statio n’s components and test
bas ic copying op eration.
EPSON AcuLaser C olor Copy St atio n 8600 Quick Refer ence
Gives you quick access to i nformat ion neede d for dai ly copying,
including explanation s of control panel functions and touch panel
messages. This guide can be hung on the printer with the hook
provided.
EPSON AcuLaser Color Copy Statio n 8600 Reference Gui de
(suppli ed on t he CD-ROM accompanyi ng the copy st ation)
Provides you with detailed in formation on the copy station , from
general maintenance and troubleshooting to technical
specifications.
English
For information on assembling the printer, the large capacity
paper un it, and the scanner, refer to the Unpacking Sheet and
Setup G uide included with each device.
1
Page 2

All rights reserved. No part of this publication may be reproduce d , stored in a retrieval
system, or transmitted in any form or by any means, mechanical, photocopying, recording,
or otherwise, without the prior written permission of SEIKO EPSON CORPORATION. No
patent liabil ity is assumed with respect to the u se of the infor mation contained her ein. Neither
is any liability assumed for damages r e s u lting from the use of the inform ation contained
herein.
Neither SEIKO EPSON CORPORATION nor its affiliates shall be liable to the purchaser of
this product or third parties for damages, losses, costs, or expenses incurred by purchaser as
a result of: accident, misuse, or abuse of this product or unauthorized modifications, repairs,
or alterations to this product, or (excluding the U.S.) failure to strictly comply with SEIKO
EPSO N co r po rati on ' s op e r a ting an d m ai ntenance in s t r uctio ns .
SEIKO EPSON CORPORATI ON shall not be li able against any d amages or probl ems arising
from the use of any options or any consumable products other than those designated as
Original EPSON Approved Products by SEIKO EPSON CORPORATION.
EPSON is a registe red tradema rk of SEIKO EP SON CORPORA TION.
General Notice: Other product names used herein are for identification pu rpo ses only and may be
trademarks of their respective owners. EPSON disclaims any and all rights in those marks.
Copyright © 2002 by SEIKO EP SON CORPORATION, Nagano, Japan
Setup Guide
2
Page 3

Contents
Safety Instructions. . . . . . . . . . . . . . . . . . . . . . . . . . . . . . . . . . . . . . .5
Finding a Place for the Copy Station . . . . . . . . . . . . . . . . . . . . . . .8
Checking the Copy Station Components. . . . . . . . . . . . . . . . . . . .9
Setting Up the Cabinet . . . . . . . . . . . . . . . . . . . . . . . . . . . . . . . . . . . 11
Setting Up the Scanner . . . . . . . . . . . . . . . . . . . . . . . . . . . . . . . . . . . 18
Setting Up the Printer . . . . . . . . . . . . . . . . . . . . . . . . . . . . . . . . . . . .20
Setting Up the Copy Station. . . . . . . . . . . . . . . . . . . . . . . . . . . . . . .29
Testing the Copy Station . . . . . . . . . . . . . . . . . . . . . . . . . . . . . . . . .34
Selecting a Language. . . . . . . . . . . . . . . . . . . . . . . . . . . . . . . . . . . . .4 1
Using Online Referenc e Guide . . . . . . . . . . . . . . . . . . . . . . . . . . . .44
English
3
Page 4

4
Page 5

Safety Instructions
Importan t Sa fe ty Instruc tions
Read all of these instructions and save them for later reference.
Warning:
This is a class A product. In a domestic environment this product
w
may cause radio interference in which case the user may b e
required to take adequate measures.
❏ Follow all warnings and instructions marked on the copy
station.
❏ Do not block or cover the openings in the printer or the
scanner.
❏ Do not insert objects through the slots i n the printe r or the
scanner.
English
❏ Do not spill liquid on the copy station.
❏ Use only the type of power source indicated o n the printer
and scanner labels.
❏ Connect all equipment to properly grounded power outlets.
Avoid using outlets on the same circuit as photocopier s or air
control systems that regularly switch on and off.
❏ Do not use a damaged or frayed power cord.
❏ Unless otherwise explained in this guide , do not attempt to
service this product yourself.
Safety Instructions 5
Page 6

❏ Unplug the copy station and refer servicing to qualified
service personnel under the following conditions:
If a power cord or plug is damaged; if liquid has entered the
copy station; if any copy station component has been dropped
or the cabinet damaged; or if the copy station does not operate
normally or exhib its a distinct change in performance. Adjust
only those controls that are covered by the operating
instructions.
❏ If you plan to use the copy station in Germany, observe the
following:
To provide adequate short-circuit protection and
over-current protection for this product, the building
installation must be protected by a 10 Amp or 16 Amp circu it
breaker.
Note for German-spea kin g users:
Bei Anschluss des Druckers an die Stromv ersorgung muss
sichergestellt werden, dass die Gebäudeinst allation mit einer
10 A- oder 16 A-Sicherung abgesichert ist.
❏ Place the copy stat ion near a w all outl et where you can easily
unplug the po wer cords .
Note for French-s peaking users:
Placez le copy station près d'une prise de courant où les fiches
peuvent-être débranchées facilement.
6 Safety Instructions
Page 7

Warnings, Cautions, and Notes
Warnings must be fo llowed carefu lly to avoid bodily injury.
w
Cautions must be observed to avoid damage to your equipment.
c
Notes contain important information and useful tips on the operation
of your copy station.
English
Safety Instructions 7
Page 8

Finding a Place for the Copy Station
Before assembling the copy station, find a place that meets the
following requirements.
❏ Leave adequate room for easy operation, maintenance, and
ventilation. The minimum space requirements are shown
below.
596 mm
1348 to 1568 mm
785 to 985 mm*
150 mm
920 mm
620 mm
825 mm
* The cabinet heigh t is adj ustable to five positions.
8 Finding a Place for the Copy Station
780 mm
1332 mm (with tray extended)
656 mm (with tray folded)
835 mm
Page 9

❏ Place the copy station on a flat, stable surface.
❏ The copy station will operate properly under the following
conditions:
Temperature: 10 to 32°C
Humidity: 15 to 80%
Caution:
❏ Avoid locations that are subject to shock, direct sunlight,
c
extreme variation in temperature or humidity, excessive
heat, moisture, or dust.
❏ Do not place the copy station in locations where volatile
substances are used or stored.
Checking the Copy Station Components
English
The copy station consists of a cabinet and central control panel,
a scanner (EPSON GT-10000+), a printer (EPSON AcuLaser
C8600), and a large capacity paper unit or 500-sheet paper cassette
unit. Make sure you have the b oxes for each of the copy station
components listed below.
❏ Color laser printer (EPSON AcuLaser C8600)
❏ Large capacity paper unit or 500-sheet paper cassette unit
❏ Color image scanner (EPSON GT-10000+)
❏ Cabinet
❏ Copy station accessories
Checking the Co p y Station Components 9
Page 10
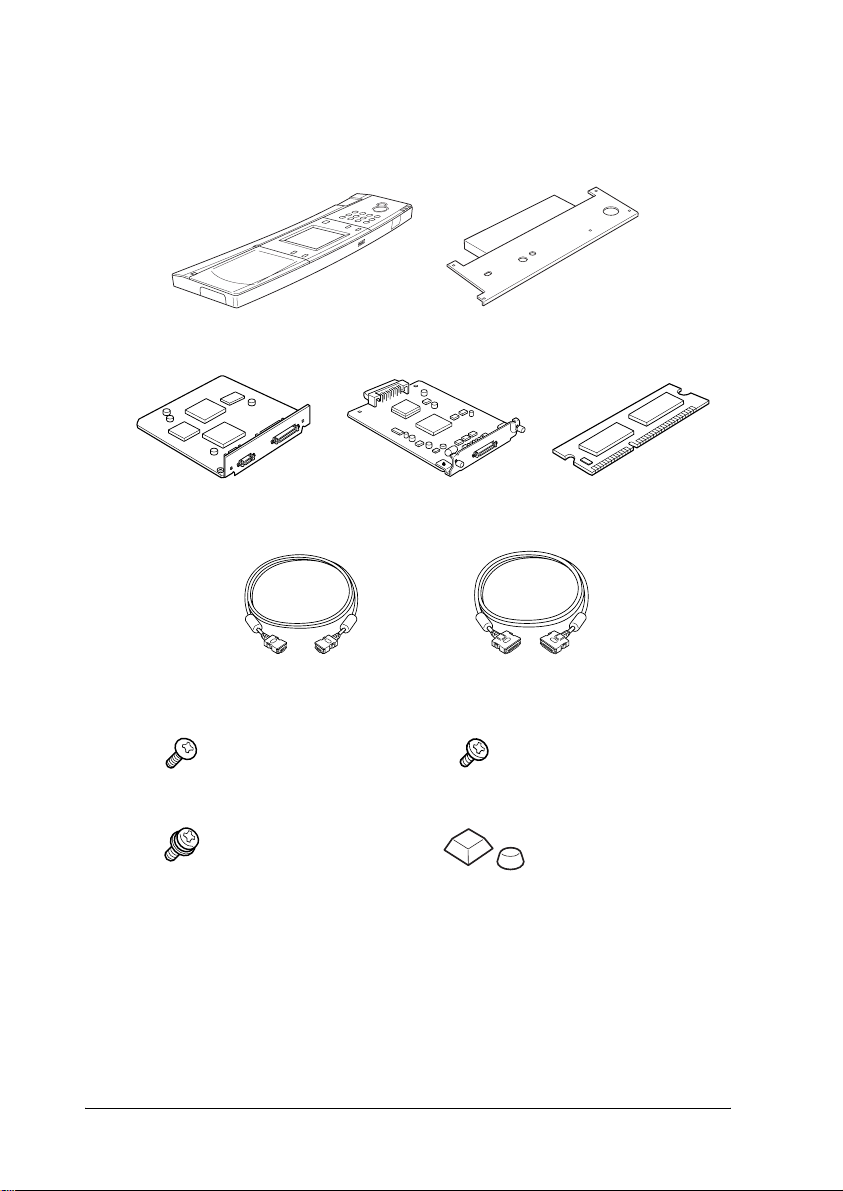
The copy station accessories box contain s th e items list ed below.
Confirm that none of these items is missing or damaged.
control pan el control panel shelf
printer interface board
control panel cable scanner cable
screws for control
panel shelf
(5)
screws with washers for
EPSON Image Express
(2)
caution label
product docume nt ation
EPSON AcuLaser Color Copy Station 8600 Setup G uide (this manu al)
EPSON AcuL aser Color C o py Station 86 00 Quick Reference
EPSON AcuLaser Color Copy Station 8600 Online Guide CD-ROM
scanner interface board
screw for printer
interface board
(1)
program ROM module
rubber feet
(2 types × 2)
10 Checking the Copy Station Components
Page 11

Setting Up the Cabin et
Make sure the ca b inet box co ntains all of the parts listed b e lo w.
Then follow the steps in this section to assemble the cabinet and
to install the control panel.
left frame
caster fixer joint A
front panel
top panel right support left support
joint B
right frame
panel cover
English
cable clips (8)
Large fasteners (3)* Small fasteners (1)*
stoppers (2)
Miscellaneous
M8 × 35 bolts (8)
M6 × 12 screws (4)
M4 × 10 screws (29)
flat washers (8)
spring washers (8)
spanner
lock pins (2)*
* Not for use with this mode l.
Setting Up the Cabinet 11
Page 12

Assembling the Cabinet
Caution:
The cabinet is bulky and requires two people for assembly or
c
handling.
1. Place flat washers and spring washers onto four M8 × 35 bolts
as shown below. Align the positioning marks on the right
support and the rig ht frame, then fasten the support to the
frame with the bolts.
right support
M8 × 35 bolt
spring washer
positioning
marks
right frame
flat washer
2. Assemble the left support and left frame as explained in
step 1.
12 Setting Up the Cabinet
Page 13

3. Use M4 × 10 screws to fasten joint A and the front panel to the
frame in the order shown below. Fast en the joint only loos ely
in this step. It is to be fastened securely later in the assembly
procedure.
➂
➀
➂
➁
joint A
front panel
4. Fasten the caster fixer and the stoppers to the bottom of the
frame with four M4 × 10 screws.
English
caster f i xer
stopper
Setting Up the Cabinet 13
Page 14

5. Fasten the top panel onto the frame with seven M4 × 10
screws.
top panel
6. Fasten joint B to the frame with eight M4 × 10 screws. Then
securely fasten joint A, which was installed in step 3.
A
A
A
A
joint B
14 Setting Up the Cabinet
1
2
3
4
5
985 mm
The s tand he ight i s adj ustable
to five positions. When the
stand is in position 3, 4, or 5,
use holes A to fasten joint B.
Page 15

7. Attach cable clips to the cabinet as needed. Holes are provided
for this purpose in various positions around the cabinet.
Warning:
Do not climb ont o the cabinet. Doi ng s o may result in inju r y ,
w
or may damage the cabinet.
Caution:
This cabinet is designed for use exclusively with the EPSO N
c
AcuLaser Color Copy Station 8600, EPSON AcuLaser
C8600/EPSON GT-10000+ copy syst em. Do not use it with any
other devices.
Installing the Control Panel
Follow the instructions below to install the control panel. As the
surface of the panel is easily damaged, prepare a soft cloth on
which to lay the panel during the installation procedure.
Note:
The control panel can be used i ndependent ly from th e cabinet. If you do
not plan to install the panel in the cabinet, attach the rubber feet to the
the bottom of the control panel as shown, then follow the instructions
below to connect the cable and to attach the panel cover.
English
Setting Up the Cabinet 15
Page 16

1. Plug the shielded contr ol panel cab le i nto th e cont rol panel ’ s
interface connecto r, located on the botto m of the control
panel.
control panel cable
interface connector
Note:
As the interface connector head is covered, disconnec t the cable by
pressing the spring on the side of the control pa nel.
2. If you pl an to attach the control panel to the cabinet, fasten
the cont rol panel shelf onto the bottom of the control panel
using the screws included with the copy station accessories.
control panel shelf
16 Setting Up the Cabinet
control panel
Page 17

3. Insert the co ntr ol pan el s hel f s tra ight in t o the openi ng on th e
front of the cabinet’s top panel.
Note:
If you do not plan to attach the control panel to the cabinet, attach
the panel cover included in the cabinet box to the opening on the
cabinet’s top panel.
4. Secure the control panel shelf with the screws included with
the cabi ne t.
English
Setting Up the Cabinet 17
Page 18

Setting Up the Scanner
Lock
To prepare the scanner for use with the copy station, you need to
install the scanner inter face board and place the scanner onto t he
cabinet, as explained below.
1. Unpack and set up the scanner as explained in the scanner’s
Setup Guide.
2. Turn the transportation lock to the unlocked position using a
coin or small disc as shown below.
Unlock
3. Use a cross-head screwdriver to remove the two screws
securing the sh ield plate to the opti onal interface slot; then
remove the plate.
Note:
Keep the screws and the shield plate in a safe place. You will need to
reattach the plate if you remove the interface board later.
18 Setting Up the Scanner
Page 19

Caution:
Static electricity can damage electronic components.
c
Discharge static electricity by touching the metal frame of
your scanner before handling the interface board.
4. Insert the interface board along the side guide rails into the
expansion slot in the optional interface slot.
5. Secure the board with the re taining screws.
English
Sett ing Up the S canner 19
Page 20

6. Place the scanner onto th e cabinet in the dire ction sh own
below.
Setting Up the Printer
To prepare the printer for use with the copy station, you need to
install the printer interface board, ROM module, and large
capacity paper unit or 500-sh e e t pa pe r cassette uni t, then place
the printer into the cabinet. Follow t he steps in this sect ion.
Warning:
Be careful when working inside the printer as some components
w
are sharp and may cause injury.
Caution:
Before you install the modules, be sure to discha rg e any st atic
c
electricity by touching a grounded piece of metal. Otherwise, you
may damage static-sensitive componen ts.
20 Setting Up the Printer
Page 21

1. Unpack the printer as explained in the p ri nter’s Unpacking
Sheet, the n follow the in struction s in the printer ’s Setup Guide
to carry out the following proced ures.
❏ Installing the face-up tray
❏ Installing the toner cartridge s
❏ Installing the photoconductor unit
2. Make sure that the printer is no t plugged in.
3. Remove the two screws securing the shield plate on the rear
of the printer; then remove the plate.
English
Note:
❏ You will need the screws to secure the printer interface board
later in this pr oc e dure.
❏ Keep the shield plate in a safe place. You will need to reattach it
if you remove the interface board later.
Setting Up the Printer 21
Page 22

4. Open the printer cover and pull out the pa pe r path unit at
least 10 cm (4 inches).
5. Remove the screws on the righ t cover.
22 Setting Up the Printer
Page 23

6. Slide the right cover backwa rd and remove it as shown below.
7. Identify the socket for the printer interfa ce board .
printer interface
board socket
English
Caution:
You should not remove any modules from the circuit board.
c
Otherwise, the p r inter will not w ork.
Setting Up the Printer 23
Page 24

8. Insert the inter face c onnectors through the slot at the back o f
the printer, then press the interface board firmly onto the
socket.
Caution:
Do not touch the surface of the printer interfa ce b oard. Be
c
sure to hold it at the edges.
9. Secure the interface board wi th the screw included with the
copy station accessories.
Note:
Use a magnetic cross-head screwdriver to prevent the screw from
dropping inside the printer.
24 Setting Up the Printer
Page 25

10. Secure the printer interface board with the two screws which
you removed from the shield plate in step 3.
11. Identify the s lots for the ROM module.
ROM module slot A
English
Setting Up the Printer 25
Page 26

12. Insert the modul e all the way into slot A as shown below.
13. Make sure the tab on the lef t of the s lot shown bel ow will stic k
out when the module is inserted correctly.
Caution:
❏ Do not force t he ROM module into the slot.
c
❏ Be sure to insert the module facing the correc t w ay.
26 Setting Up the Printer
Page 27

14. To reattach the right cover, align the bottom of the cover with
the right side of the printer, then fit the pins on the top of the
cover onto the holes on the printer.
15. Secure the right cover with the screws, then close the front
cover and push the paper path unit back into the p rinter.
English
16. Install the large capacity paper unit or 500-sheet paper
cassette unit as explained in the printer’s manual.
Setting Up the Printer 27
Page 28

17. Roll the large capacity paper unit or 500-sheet paper cassette
unit and the printer into the cabinet.
18. Lock all casters on the bottom of the large capacity paper unit
or 500-sheet paper cassette unit.
Warning:
Make sure the casters are securely locked. Otherwise, the
w
printer may move and cause an accident.
28 Setting Up the Printer
Page 29

Setting Up the Copy Station
int
Once you have added each device to the cabinet, you are ready to
set up the copy station. This process involves connecting the
interface cables and power cords. Follow the steps in this section.
Connecting Interface Cables
The copy station devices are connected as shown below.
pr
er
scanner
control panel
control pane l cablescanner cable
Follow the steps in this section to connect the interface cables.
English
1. Make sure the printer and scanner are not plugged in.
Setting Up the Copy Station 29
Page 30

2. Plug the control panel cable into the printer’s serial interface
connect or. Mak e sure the lock s on both sid es of th e connec tor
snap into place.
3. Plug the scanner cable into the scanner’s interface connector.
30 Setting Up the Copy Station
Page 31

4. Plug the other end of the ca b le into the c onnector on the
printer.
Plugging in the Printer and Scanner
The printer and scanner power is supplied through separate
power cords. Take note of the Warnings and Cautions below, then
follow t he steps in this sect ion to plug in the printer and the
scanner.
English
Warning:
❏ Use only the power cords that come with the printer and
w
scanner. Using other power cords could result in fire or
electric shock.
❏ Do not use multi-plug adapters or extension cords, or
auxiliary power fr om a co mputer. Using su ch power sources
could result in fire or electric shock.
❏ Do not allow dust to build up on the plug or the outlet. Doing
so in a damp environment could result in fire or electric shock.
❏ Never touch a power plug with wet hands. Doing so could
result in electric shock.
Setting Up the Copy Station 31
Page 32

Caution:
❏ Do not unplug a device when its power is on.
c
❏ When unplugging a power cord, grasp it by the plug—not
the cord.
Plugging in the printer
1. Check the label on the printer to make sure that the voltage
required by the printer matches that of the electrical outlet it
will be plugged into. Also, make sure t hat you have the correct
power cord for your power source .
2. Make sure that the printer is turned off. It is off when the
(N) side of the power switch on the left side of the printer is
pushed in.
3. Connect the power cord to the AC inlet on the left side of the
printer.
4. Plug the other end in to a p rope rly gr ounded elec trical outlet.
32 Setting Up the Copy Station
Page 33

Plugging in the scanner
1. Check the label on the back of the scanner to make sure
that the voltage required by the scanner matches that of the
electrical outlet it will be plugged into. Also, make sure tha t
you have the correct power cord for your power source.
2. Make sure the scanner is turn ed off. The p ower is off w he n
the P OPERATE button is rais ed.
3. Conne ct the power cord to th e AC inlet on the back of the
scanner, and plug the other end into a properly-grounded
electrical outlet.
English
Setting Up the Copy Station 33
Page 34

Testing the Copy Station
You can check the operation of the cop y stat ion by making a few
test copies. You will need to prepare a document to copy and a
stack of paper that is the same size as yo ur document, then follow
the steps in this section to make your copies.
Getting Ready to Copy
To prepare to make your first copies, you need to load a stack of
paper into the printer, turn the printer and scanner on, and select
the paper source from the copy station’s control panel. Follow
these steps.
1. Pull the paper cassette out until it stops.
34 Testing the Copy Station
Page 35

2. Press down on the metal plate in the cassette until it clicks into
place.
3. Press on the side and back paper guides, then slide them
outward until they are wide open enough to accommodate
the size of paper you want to load.
English
Testing the Copy Station 35
Page 36

4. Fan a stack of plain paper and insert it into the cassette. Make
sure that all the paper is under the retaining clip on the right
side of the cassette.
Note:
Use papers with no creases or wrinkles.
5. Slide the paper guides until they just touch the edges of the
paper.
36 Testing the Copy Station
Page 37

Note:
Make sure you adjust the side paper guide to the correct position,
because the copy station auto ma tica lly senses the si ze of paper load ed
in the cassette from the position of this paper guide.
If the paper guide
is not correctly align ed with the paper size indi catio n (for example ,
A4 or LT), the correct paper size will not be displayed on the control
panel and copying will be impossible.
6. Push the paper cassette all the way into the printer.
7. Turn on the scanner by pressing the P OPERATE button.
Note:
Always turn on the scanner before the printer.
8. Turn o n the printer by pressing the ( |) side of i ts power
switch.
The copy station checks the connections of the scanner and
the printer.
Caution:
Do not turn off the power while the copy station is checking
c
the scanner and printer connections, or while copying.
English
When the following screen appears, the copy station is ready
for copying.
Ready to Copy
A4
Plain
LC1
Copy
Type: Magazine
DarkerLighter
Paper
1-Sided 1-Sided
Reduce Enlarge
Adjust Advanced
Testing the Copy Station 37
Page 38

Copying
Once you have loaded paper and turned on the copy station, you
are ready to make test copies. Follow these steps.
1. Make sure the scanner’s READY light is on.
2. Open the document cover.
3. Place your document on the document table, with the side to
be scanned facing down. Make sure that the do cume nt is
carefully aligned.
corner of the
document
Use the document guide strip to align the horizon tal edg e of
the document.
38 Testing the Copy Station
Page 39

Note:
An area 2 ± 1.5 mm in from both horizontal and vertical rulers will
not be scanned.
2 ± 1.5 mm
2 ± 1.5 mm
Document
4. Close the document cover gently so that the document does
not move.
Note:
Make sure the document is flat against the glass surface, otherwise
the image will appear fuzzy and out of focus. Also be sure to close
the document cover to prevent interf erenc e from ex t e rnal light.
English
5. Press the Paper button o n the touch screen.
Ready to Copy
A4
Plain
LC1
Copy
Type: Magazine
DarkerLighter
Paper
1-Sided 1-Sided
Reduce Enlarge
Adjust Advanced
Testing the Copy Station 39
Page 40

6. Select the paper size and orientation that matches the size of
the document and the direction in which it is placed on the
document table.
Select Output Paper
A4
Magazine
Lower Cassette MP Tray
1
A4
2
B5
3
A3
Plain
A4
B5
Current
A3W
Plain paper
Change
Cancel
7. Press the x start button on the copy stati on’s control panel.
The document is scanned and then printed.
start button
If the copy station does not work, or if the copy results are not
what you expected, check the connections between all devices,
and make sure the surface of the document table is clean and clear
of foreign objects. For more solutions to problems you may
encounter, see “Problem Solver” in the online Reference Guid e.
40 Testing the Copy Station
Page 41

Selecting a Language
The default language for the LCD touch screen is English.
However, German, Span ish, F rench, Ital ian, Portu gues e , a nd
Chinese are also available. If you want to change the language,
follow the steps below.
1. Press the Admin button on the c ontrol panel.
Admin button
2. Press the Admin. Set button on the touch screen.
Status Display
[
]
Main Unit
Model
Status
Version
Panel Version
Language
: AL-CCS 8600
: Idle
: 01.00
: 01.00
: English
English
1 / 5
Print
ExitAdmin. Set
Selecting a Language 41
Page 42

3. Enter the administrat or password when th e following screen
appears
Enter Password
Password
Key pad entry
O K
Note:
❏ The default password setting is “9999”.
❏ For more information on administrator password, see “Making
Administrator Mode Settings” in Reference Guide.
❏ We recommend that you change the admi nist rator passw ord
from the de fault setting .
4. The following screen appears. Press the >> butto n until the
Select Language button appears.
Select Administrator Items
Key T one
Object Sensor
42 Selecting a Language
Auto Feed
OFFON
Password
OFFON
1 / 3
OFFON
OFFON
CancelOK
Page 43

5. Press the Select Language bu t t on.
Select Administrator Items
Select Language
Counter
3 / 3
CancelOK
6. Choose a language and press the Exit butto n.
Select Language
English
German
French
Italian
English
Spanish
Portuguese
Chinese
EXIT
Selecting a Language 43
Page 44

Using Online Re fere nce Guide
System Requirements
Your system must meet the following requirements for you to use
the onlin e Reference G uide.
For Windows
®
Systems: Microsoft
Windows® Me/98/95/XP/2000
Microsoft
CPU: i486/25 MHz (for Windows 95, NT 4.0)
(Pentium or better recommended)
i486/66 MHz (for Windows 98)
(Pentium or better recommended)
Pentium 133 MHz (for Windows 2000)
Pentium 150 MHz (for Windows Me)
Pentium 233 Mhz (for Windows XP)
(Pentium 300 MHz or higher recommended)
Memory: 16 MB RAM (for Windows 98/95/NT 4.0)
(32 MB RAM or more recommended)
32 MB RAM (for Windows Me and 2000)
64 MB RAM (for Windows XP)
(128 MB RAM or more recommended)
Hard disk space: 3 MB to install the Reference Guide
®
Windows NT® 4.0
44 Using Online Reference Guide
Page 45

CD-ROM drive: Double-speed
(Quad-speed or faster recommended)
Display: 640 × 480 pixel or 800 × 600 pixel resolution,
with High Color (16 bit) or True Color (32 bit)
setting
Browser: Web browser
Microsoft Internet Explorer 4.0 or later
recomm ended
For Macintosh
System: System 7.5.1
(System 7.6 or later recommended)
Memory: 16 MB (32 MB or more recommended)
Hard disk space: 5 MB to install the Reference Guide
CD-ROM drive: Double-speed
(quad-speed or faster recommended)
English
Display: Color monitor with 640 × 480 pixel resolut ion
or greater
(Thousands of colors recommended)
Browser Web browser
(Microsoft Interne t Explorer 4.0 or later
recommended)
Using Online Reference Guide 45
Page 46

Viewing online Reference Guide
The online Reference Guide allow s you to learn mor e about your
copy station. It includes deta iled information on m aking the copy
station, from general maintenance and troubleshooting to
technical specificat ions. You can view this guide directly from the
CD-ROM, or install it on your computer and view i t f rom your
hard disk.
Note:
Microsoft Internet Explorer 4.0 or later, or Netscape Navigator 4.0 or
later, must be installed in your computer to read the onlin e gu ide.
For Windows
1. Insert the Online Guide CD-ROM in the CD-ROM drive. The
dialog box appears. If it does not, double-click the My
Computer icon. Click the CD-ROM icon, then select Open
from the File menu. Double-click Manual.exe.
2. To open the Reference Guide, click the View Reference
Guide button.
To install the Reference Guide on your hard disk, click Install
Reference Guide and follow the on-screen instruction s. When the
installation is c omplete, the CCS8600 Guide icon appears in the
EPSON folder. Double click the icon to open the guide.
Note:
If your hard disk does not have enough space to install the Reference
Guide, view it directly from the CD-ROM.
46 Using Online Reference Guide
Page 47

For Macintosh
1. Insert the Online Guide CD-ROM in the CD-ROM drive.
2. Double-click User Guides in the User Guides window. The
dialog box appears .
3. To open the Reference Guide, click the View Refer ence
Guide button.
To install the Reference Gui de on your hard disk, clic k the Install
Reference Guide button and follow the on-screen instructions.
When the installation is complete, the View Reference Guide icon
appears in the EPSON folder. Double-click the icon to open the
guide.
Note:
If your hard disk does not have enough space to install the Reference
Guide, view it directly from the CD-ROM .
English
Using Online Reference Guide 47
Page 48

48 Using Online Reference Guide
 Loading...