

Page 1

User’s Guide
Printed on recycled paper with a t least 10 % post-c onsumer content.
Page 2
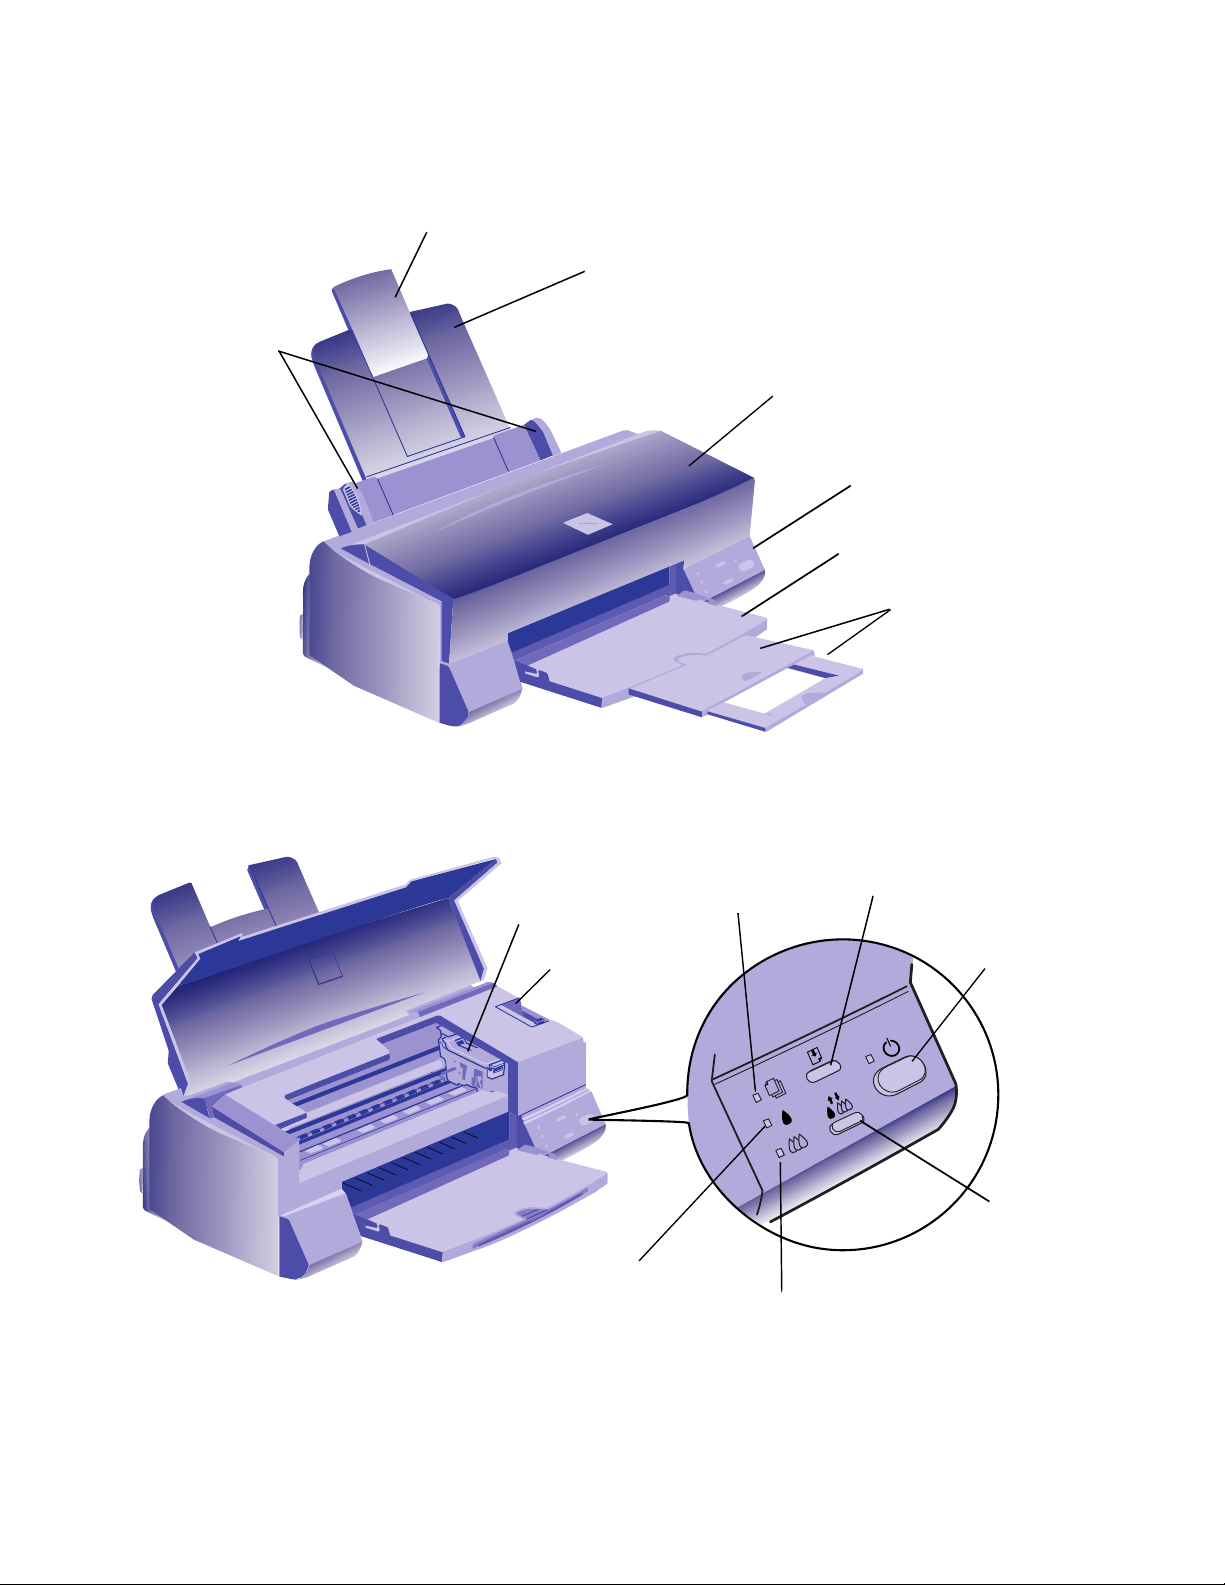
edge guides
paper support extension
paper support
printer cover
control panel
output tray
output tray
extensions
ink cartridge
clamp
adjust lever
black
ink out light
load/eje ct
button
paper light
power
button
cleaning button
color
ink out light
Page 3

All rights reserved . No pa r t of th is pub lic atio n ma y be reproduced, stored in a retrie va l syste m, or transmitted
in any form or by any means, electronic, mechanical, photocopying, recording, or otherwise, without the prior
written permission of
use with this
EPSON
SEIKO EPSON CORPORATION
printer.
EPSON
is not responsible for an y us e o f this in fo rm atio n as ap plie d to other
. The information contained here in is de sig ne d only for
printers.
Neither
SEIKO EPSON CORPORATION
nor its affiliates shall be liable to the pu rcha se r of th is pr oduct or third
parties for dam ag e s, losses, co sts, or exp e nse s inc ur r ed by pu rc h as er or third pa rties a s a result of : acc ide nt,
misuse, or ab use of this pr oduct or unauthor ized modif i c a tions , rep a irs, or alter a tions to this product, or
(excluding the U.S.) failure to strictly comply with
SEIKO EPSON CORPORATION
’s operating and
maintenance instructions.
SEIKO EPSON CORPORATION
options or any c onsumable produc ts other than those designated as Original
Approved P r oducts by
SEIKO EPSON CORPORATION
shall not be liable for any dama ge s or pro blems arising from the use of any
EPSON
Products or
EPSON
.
Compaq and Presario Registered U.S. Patent and Trademark Office.
EPSON
and ESC/P are registered trademarks and ESC/P 2 is a trademark of
SEIKO EPSON CORPORATION
.
General Notice: Other product names used herein are for identification purposes only and may be trademarks
of their respective owners.
NERGY STAR
The E
emblem does not represent EPA endorsement of any product or service.
EPSON
disclaims any and all rights in those marks.
Copyrig ht © 1997 by Epson America, Inc. CPD 4962
6/97
ii
Page 4

FCC Compliance Statement
For United States Users
This equipment has b een teste d a nd found to comply with the limits for a Class B digital dev ice, pur suant to
Part 15 of the FCC Rules. These limits are de signed to provide reasonable pr ote ction against harmful
interference in a resid en tia l installa tion. Th is e quipment generates, use s, and can radia te radio frequency
energy and, if not installe d a nd use d in a cco rd an c e with th e ins tru ctio ns, ma y ca use ha r mf ul inte r fer en c e to
radio or television r ece ptio n. Ho w ev e r, the re is no gua r ante e that inte r fer e nc e will not occur in a particular
installation. If this equipment does cause interference to radio and television reception, which can be
determined by turnin g the equip ment off and on, th e user i s encou raged to try to cor rect th e inte rferen ce by one
or more of the following measures.
◗ Reorient or relocate the receiving antenna.
◗ Increase the separation between the equipment and receiver.
◗ Connect the equi pment into an outlet on a circuit different from that to which the receiver is conn ected.
◗ Consult the dealer or an experienced radio/TV technician for help.
WARNING
The connection of a non -s hie lde d equipment interface cable to this e quip me nt w ill invalidate the FCC
Certification of this dev ice and may cau se interfere nce lev els wh ich exc eed the lim its estab lishe d by the FCC
for this equipment. It is the responsibility of the user to obtain and use a shielded equ ipme nt interface cable
with this device. If this equipment has more than one interface connector, do not leave cables connected to
unused in terfaces. Cha ng es o r modificatio ns not express l y ap pr ov ed b y t he m an uf act u rer could vo i d the user’s
authority to opera te the e qu ipme nt.
For Canadian Use rs
This Class B digital apparatus meets all requirements of the Can a dian In terfe renc e- Ca using Equipment
Regulations.
Cet appareil numérique de la classe B respecte toutes les exigences du Règlement sur le materiel brouilleur du
Canada.
iii
Page 5

iv
Page 6

Contents
Introduction
Windows System Requirements 2
How To Use Your Man ua ls 2
Warnings, Cautions, Notes, and Tips 3
Where To Get Help 4
Electronic Support Services 4
1
NERGY STAR
E
Energy-saving Tips 6
Important Safety Instructions 6
Compliance 6
Basic Printing
Printing from Windows 1-1
Setting Printer Options from Windows Applications 1-2
Setting Default Printer Options 1-4
Checking Printer Status 1-6
Printing from DOS 1-7
Choosing Paper an d Other Media 1-8
What To Do When the Printer Lights Flash 1-9
Using the Control Panel Buttons 1-10
Using Online Help 1-10
Accessing Online Help from Windows Applications 1-10
Accessi ng Online Help from Windows 95 1-11
Accessi ng Online Help from Windows 3.1 1-11
v
Page 7

Contents
2
3
Custom Prin ting
Using Predefined Advanced Settings 2-1
Customizing Print Quality and Special Effects 2-3
Customizing Color Settings 2-6
Saving Custom Settings 2-8
Deleting Custom Settings 2-9
Print ing on Special Medi a
Using Special Media 3-1
Letterhead, Pre-printed Forms, and Legal-size Pape r 3-3
EPSON 360 dpi, High Quality, and Photo Quality
Ink Jet Pa per 3-3
EPSON Photo Quality Glossy Paper, Film, and
Transparencies 3-4
Envelopes 3-5
4
EPSON Photo Quality Ink Jet Cards 3-6
EPSON I r o n- O n Transfer Paper 3-6
EPSON Photo Quality Self Adhesive Sheets 3-6
Printing Banners and Other Custom Size Projects 3-7
Printing a Banner 3-8
Managing Print Jobs and
Network Printing
Managing Print Jobs 4-1
Using the Spool Manager 4-2
Using the Status Monitor 4-4
Network Printing 4-5
Setting Up Your Network Path in Windows 95 4-6
Setting Up Your Journal File Directory 4-7
vi
Page 8

Contents
5
Mainte na nc e and
Transp or t at i on
Cleaning the Print Heads 5-1
Using the Head Cleaning Utility 5-2
Using the Control Panel 5-3
Examining the Nozzle Check Pattern 5-4
Replacing an Ink Cartridge 5-4
Removing an Empty Ink Cartridge 5-5
Installing the New Cartridge 5-6
Replacing an Outdated Ink Cartridge 5-7
Aligning the Print Heads 5-8
Cleaning the Printer 5-8
Transporting the Printer 5-9
6
Troubleshooting
Diagnosing Prob l ems 6-1
Running a Printer Check 6-2
Improving Print Quality 6-3
Printed image has horizontal banding 6-3
Vertical lines are misaligned or vertical banding
appears 6-4
The printed image has incorrect or missing colors 6-4
The printed image is faint or has gaps 6-5
The printed image is blurry or smeared 6-5
Photogr aphic ima ges look grainy or r ough 6-6
Color documents print in black and white 6-6
Solving Printing Problems 6-6
All lights are off 6-6
P
Only the
S
The
A
paper out l i ght is flashing or on 6-7
B
black or A color ink out light is flashing or on 6-7
power light is on, but nothing pr ints 6-7
vii
Page 9

Contents
S
The
All the lights are flashing 6-8
The printer has finished charging the ink cartridge,
The printer software installed with Windows 3.1
After you install your printing software, you see the
You see a spooling error message (W indows) 6-9
In Windows 95, the Status Monitor box does not
Printing is too slow 6-9
Fixing Paper Problems 6-10
Paper doesn’t feed 6-10
Multiple pages feed at the same time 6-11
Paper jams inside the printer 6-11
Paper doesn’t eject fully or is wrinkled 6-11
paper and
but the
does not work correctly after you upgrade to
Windows 95 6-8
Windows 95 New Hardware Found window 6-9
appear with the Despooler 6-9
P
P
power lights are flashing 6-8
power light is still flashing 6-8
Solving Miscellaneous Printout Problems 6-12
Characters are incorrect or garbled 6-12
The margins are incorrect 6-12
The image is inverted as if viewed in a mirror 6-12
The printer prints blank pages 6-12
viii
Page 10

Contents
A
Specifications
Printing A-1
Paper A-3
Ink Cartridge A-5
Mechanical A-5
Electrical A-6
Environment a l A-6
Safety Approvals A-6
Interface A-6
Default Settings A-8
Built-in Fonts and Character Tables A-8
Command List A-9
Glossary
Index
ix
Page 11

/
Introduction
Your
output device for business graphics, single-page layout
proofs, digital photography—or any project you create on
your computer. With resolutions up to 1440 by 720 dots per
inch (dpi), you get amazingly realistic photographic images
and vivid graphi cs in color, superb grayscale images, an d
razor-sharp black printing for crisp text and detailed line art.
The
provides advanced color management, with adjustable levels
of brigh tne ss, cont ra st , sa tu ratio n, an d in k col or s. Su pp ort f o r
Windows Image Color Matching (ICM) ensures printouts
that match the colors on your monitor.
You can al so perform many pr inter maintenance procedures
right from your computer, such as cleaning and ali gning the
print heads. An d
you through printer operations in real time.
EPSON 600Q for Compaq Presario
EPSON
®
printer software for Microsoft® Windows®
EPSON
’s extensive online help can gui d e
printer is the ideal
With a standard parallel port, setting up your printer is fast
and easy.
wide va riet y of ink j et p aper s gi v e you t he b es t qu al it y ou tpu t
and offer the most flexibility for getting the results you want.
EPSON
’s specially formul ated in k cartri dges an d
1
Page 12

Introduction
Windows System Requirements
To use your printer and its software with a Compaq Presario
computer, your system should have:
◗ At least a 386/25 MH z or faster processor
◗ DOS, Windows
Windows 95
◗ At least 8MB of RAM (more for Win dows 95)
◗ At least 20MB of free hard disk space for storing images
(40MB or m ore is rec ommended)
◗ VGA, Super VGA, or better display adapter and mo nitor
◗ A shielded, twisted-pair parallel cable (6 to 10 feet long)
to connect your computer to the printer; the cable must
have a D -SUB, 2 5-pi n, ma le c onnec tor f or you r c ompute r
and a 36-pin, Centronics
printer.
3.1x, W indows for W orkgroups 3.11, or
®
compatible connector for the
To use the
486/33 processor and a 2x CD-ROM drive (4x or faster
recommended). You also should have at least 20MB of free
disk space for full program installation or at least 8MB of
free disk space to run
more details on
booklet.
EPSON A
nswers online guide, you need at least a
EPSON A
EPSON A
nswers, see your Quick Setup
nswers from the CD. For
How To Use Your Manuals
To set up your printer and in stall your printer software , see
the Quick Se t up
EPSON Answers online guide. This
the following information:
Chapter 1, “Basic Printing,” covers the basics of printing.
booklet
. For color printing tips, see the
User’s Guide
contains
2
Page 13
Introduction
Chapter 2, “Custom Printing,” tells you how to print special
projects with custom settings for print quality and color
management.
Chapter 3, “Printing on Special Media ,” gives guidelines for
select ing the right p ap er or ot her medi a f or yo ur pr in t job a nd
instructions for loading it in your printer.
Chapter 4, “Managing Print Jobs and Network Printing,”
explains how to manage print jobs, check pr inter s tatus, and
set up you r system for network printin g.
Chapter 5, “Maintenance and Transportation,” gives
instructions for replacing ink cartridges, cleaning and
aligning the print heads, and cleaning and transporting the
printer.
Chapter 6, “Troubleshooting,” provides solutions for any
printi ng problems you ma y have.
The Appendix, “Specifications,” provides the technical
detail s on your printer, ink cartridge s, and
are
A Glossary and an Index
inclu d ed at the end of the book.
EPSON
media.
Warnings, Cautions, Notes, and Tips
You’ll find this information throughout yo ur guide:
Warnings
Cautions
equipme nt .
must be followed carefully to avoid bodily injury.
must be obs erved t o avoid damage to your
Notes
contain important information about your printer.
3
Page 14

Introduction
Tips contain additional hints for great printing.
Where To Get Help
EPSON
network of authorized
(800) 922-8911 for the nearest location or the following
services:
◗ FaxAdv ice acc ess to
◗ Literature on current and new products
◗ The location of your nearest Authorized
◗ Technical information on the installation, configuration,
◗ Customer relations
For answers to commonly asked questions about
products 24 hours a day, seven days a we ek, call
Sound A dvice at (800) 442- 2110.
provides custom er support and service through a
EPSON
library
or Customer Care Center
and oper ation o f
EPSON
Customer Care Centers. Dial
EPSON
’s technical information
EPSON
products
EPSON
EPSON
Reseller
You can purchase manuals, accessories, or parts from
A
ccessories at (800) 873-77 66 (U.S. sales o nly).
If you ne ed help usi ng softwa re with an
the documentat ion for that program for techni cal suppo rt
information.
EPSON
product, see
EPSON
Electronic Support Services
You can access helpful tips, specifications, DIP switch or
jumper sett i ngs, drivers, fr equently asked questions (FAQs),
sample files, application notes, and
24 hour s a day , seve n days a week, usin g a modem and one of
the following online services.
4
EPSON
product bulletins
Page 15

World Wi de We b
Introduction
From the Internet , you can reach
http://www.epson.com
EPSON
’s Home Page at:
EPSON Download Service
You can call the
(800) 442-2007. Set your communications software to 8 data
bits, 1 stop bit, no parit y . Modem speed can be up to
28.8 Kbps.
EPSON
Download Service at
EPSON FaxAdvice Service
You can access
calling (800) 442-2110 and selecting the appropriate phone
option. You must provide a return fax number to use
FaxAdvice.
EPSON
’s technical information library by
EPSON Forum on CompuServe
Member s of CompuServe® can type
promp t to re ach Co mpuS erve’ s Ep son A meric a For um. A s an
owner of an
introductory CompuServe membership, which entitles you to
an introductory credit and your own user ID and password.
To take advantage of thi s offer, call (800) 848-8199 and ask
for representative #529.
EPSON
product, you are eligible for a free
GO EPSON
at the me nu
5
Page 16

Introduction
NERGY STAR
E
Compliance
As an E
this product meets the E
efficiency.
The EPA E
voluntary partners hip with the computer and o ffice
equipment industry t o promot e the introduction of
energy-efficient personal computers, monitors, printers, fax
machines, and copiers in an effort to reduce air pollution
caused by power generation.
NERGY STAR
NERGY STAR
Partner,
NERGY STAR
Office Equipment program is a
EPSON
has determined that
guidelines for energ y
Energy-saving Tips
Here are a few tips you can use to be even more energy-wise:
◗ If your monitor isn’t E
off when you’re not using it.
NERGY STAR
compliant, turn it
◗ Turn off your computer, p rinter, and monitor each day
when yo u ar e done using t he m.
◗ Use the print preview option in your software so you can
catch errors before you print something.
◗ Send e-mail rather than distributing memos. Not only is
this fas t er, but you’ll sa ve paper a nd storage space too.
Important Safety Instructions
Before using your printer, read the following safety
instructions to make sure you use the printer safely and
effectively.
◗ Turn off and unplug the printer before cleaning. Clean
with a damp cloth only. Do not spill liquid on the printer.
◗ Do not place the printer on an unstab le surface or near a
radiator or he at i ng vent.
6
Page 17

Introduction
◗ Do not block or cover t he openin gs in the pri nter’s
cabinet or insert objects through the slots.
◗ Use onl y the type of power source indicated on the
printer’s label.
◗ Connect all equipment to properly grounded power
outlets. Avoid using outlets on the same circuit as
photocopiers or air control systems that regularly switch
on and of f.
◗ Place the printer near a wall outlet where the plu g c an be
easily unplugged.
Placez l’imprimante près d’une prise de contacte où la
fiche peut être débranchée facilement .
◗ Do not let the power cord be co me damaged or f ra y ed .
◗ If you use a n extension cord w ith the pr inter, make sure
the total ampere rating of the devices plugged into the
extension cord does not exceed the cord’s ampere rating.
Also, make sure the total of all devices plugged into the
wall outlet does not exceed 15 amperes.
◗ Except as specifically explained in this User’s Guide, do
not attempt to service the printer yourself.
◗ Unplug the printer and refer servicing to qualified service
personnel under the following conditions:
If the power cord or plug is damaged; i f liqui d has
entered the printer; if the printer has been dropped or the
cabinet damaged; if the printer does no t operate normally
or exhibits a distinct change in performance.
7
Page 18

Introduction
Even if you are familiar with other types of printers, be sure
to read through the following list of precautions before
operating your ink jet printer:
◗ Do not put your hand inside the printer or touch the
cartridge during printing.
◗ Under normal circumstances, ink will not come out of the
cartri dges. If i t does get on your skin, was h it off with
soap an d water. If it gets i n your eyes, flush them
immediately with water.
◗ Keep ink cartridges out of the reach of children.
◗ Do not dismantle the ink cartridges or try to refill them.
This could result in damage to the print head.
◗ Once you install an ink cartridge, do not open the clamp
or remove the ca rtridge except to replace it with a new
one. The cartridge may become unusable otherwise.
◗ Install the ink cartridge immediately after you remove it
from its package. Lea ving the cartr idge unpacked for a
long time before use may result in reduced print quality.
◗ Do not use an ink cartridge beyond the date printed on
the cartridge carton. For best results, use up the ink
cartridges within six months of installing them.
◗ Do not shake an ink cartridge; this can cause leakage.
P
◗ Always turn the printer off using the
When this button is pressed, the
briefl y t h en goes out. Do no t unplug the printer or tu rn
off the power to the outlet until the
◗ Before transporting the printer, make sure the print head
is in the home position and the ink cartridges are in place.
P
power button.
power light flashes
P
power light is off.
8
Page 19

Basic Printing
1
It’s easy to print all your color and black and white
docume nts wi th yo ur ne w
up your printer and install the software, following the
instructions in the Quick Setup booklet. Then read this
chapter to find out about the following:
◗ Printing from Windows
◗ Printing from DOS
◗ Choosing paper and other media
◗ What to do when the printer lights flash
EPSON
600Q. Firs t yo u h ave t o se t
◗ Using the control panel buttons
◗ Using online help
Printing from Windows
When you want to print from your Windows application, y ou
Print
click the print icon or choose
can then choose which pages to prin t , the num ber of copies,
and other options. The settings that describe your print job—
whether you want to use color or black ink, for example—are
part of your printer driver software.
The following sections tell you how to set printer options
from Windows appli cations , how to change the default
printer settings, and how to check your printer’s status.
from the File menu. You
1-1
Page 20
Basic Printing
Note:
The settings you se le ct
through your Windows
application apply on ly until
you exit that application.
Then the driver settings
return to the driver’s default
values or the value s se le cted
through the Wi ndows 95
Printer Properties or
Windows 3.1 Control Panel.
Setting Printer Options from Windows Applications
This section describ es the preferences you’ ll need to set for
your everyday printing. See Chapter 2 “Custom Printing,” for
information about advanced settings for special print jobs.
Follow these steps to check printer settings from your word
processor or other Windows software:
1. Click the print icon or choose
Print
File menu. You see a Print dialog box.
If you choose
Print
, you first see a Print dialog box that
contains the settings you change most often, including
the number of copies and the pages you want printed.
Print Setup
or
from t h e
For more informatio n ab ou t
printer settings, click the
Help bu tt on. I n W ind ow s 95 ,
you can right-c lick any ite m
on the screen and then click
What’s This?
2. Be sure your
click the
EPSON
Printer, Setup, Properties
600Q printer is selected, and then
, or
Options
button. (You
may have t o cl ick a com bination of these buttons.) Y ou
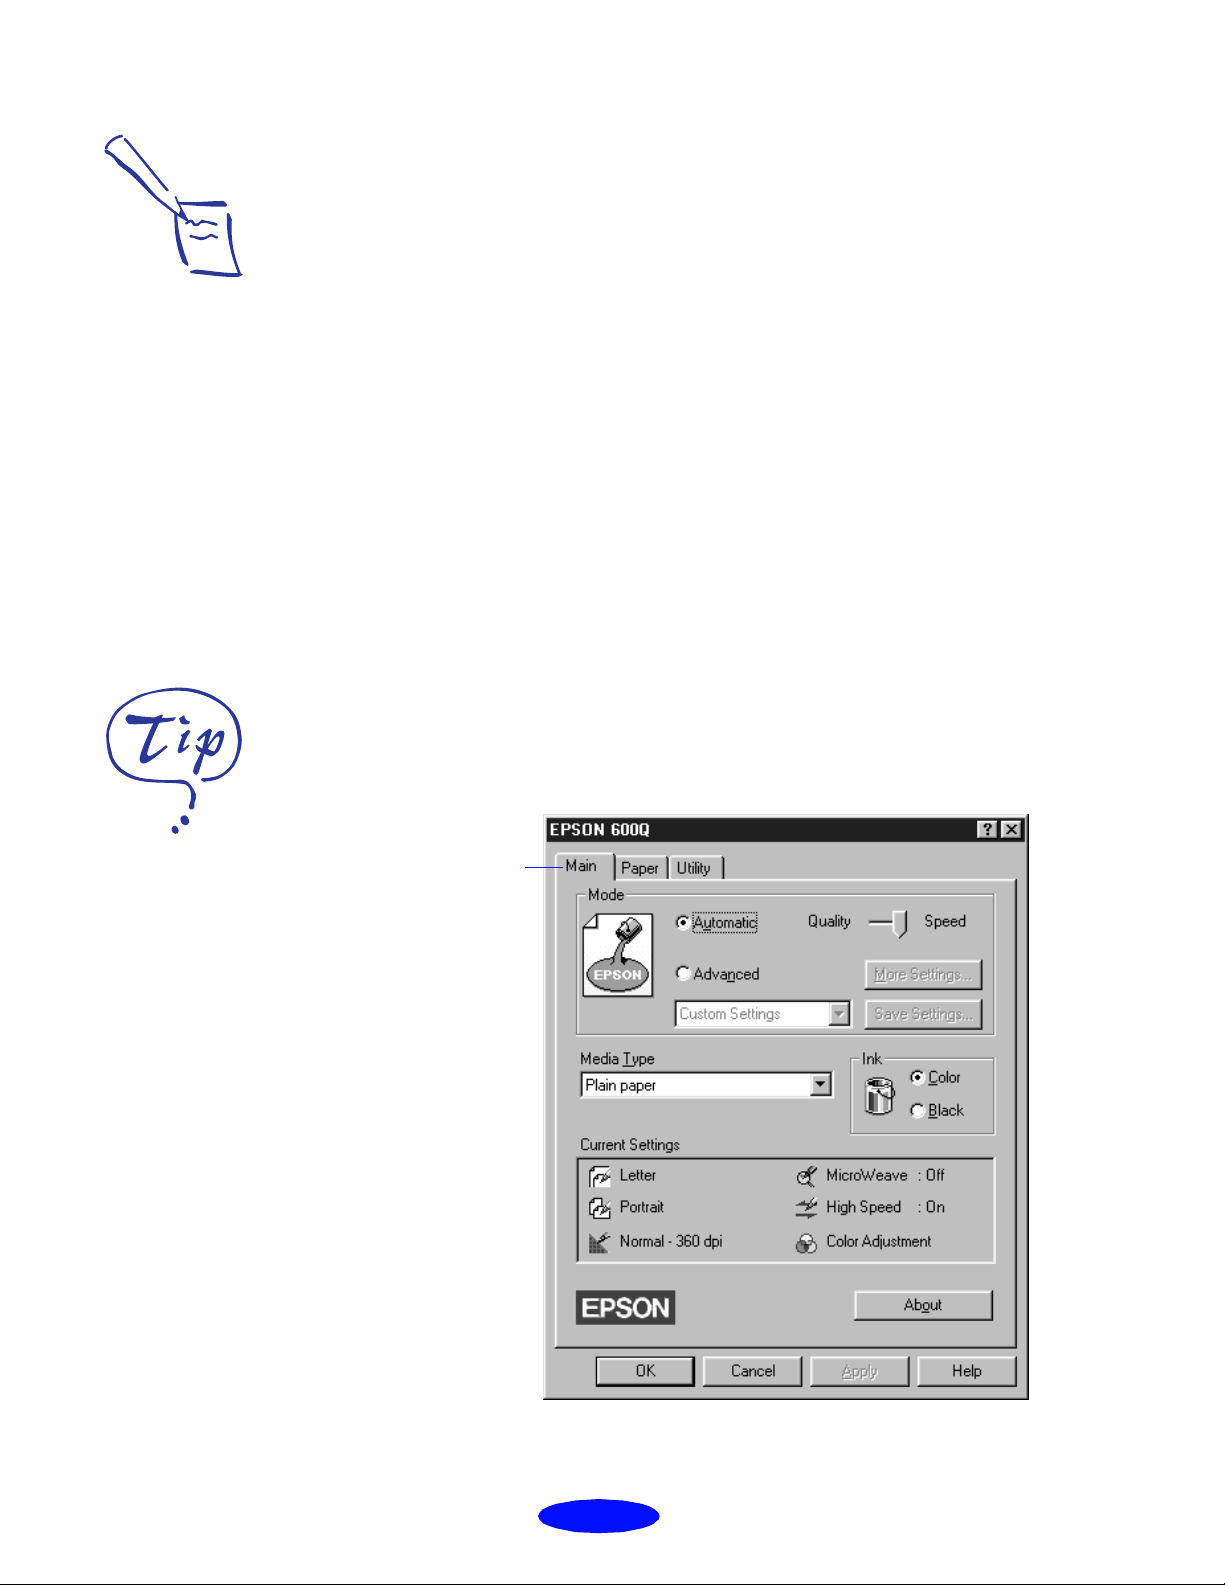
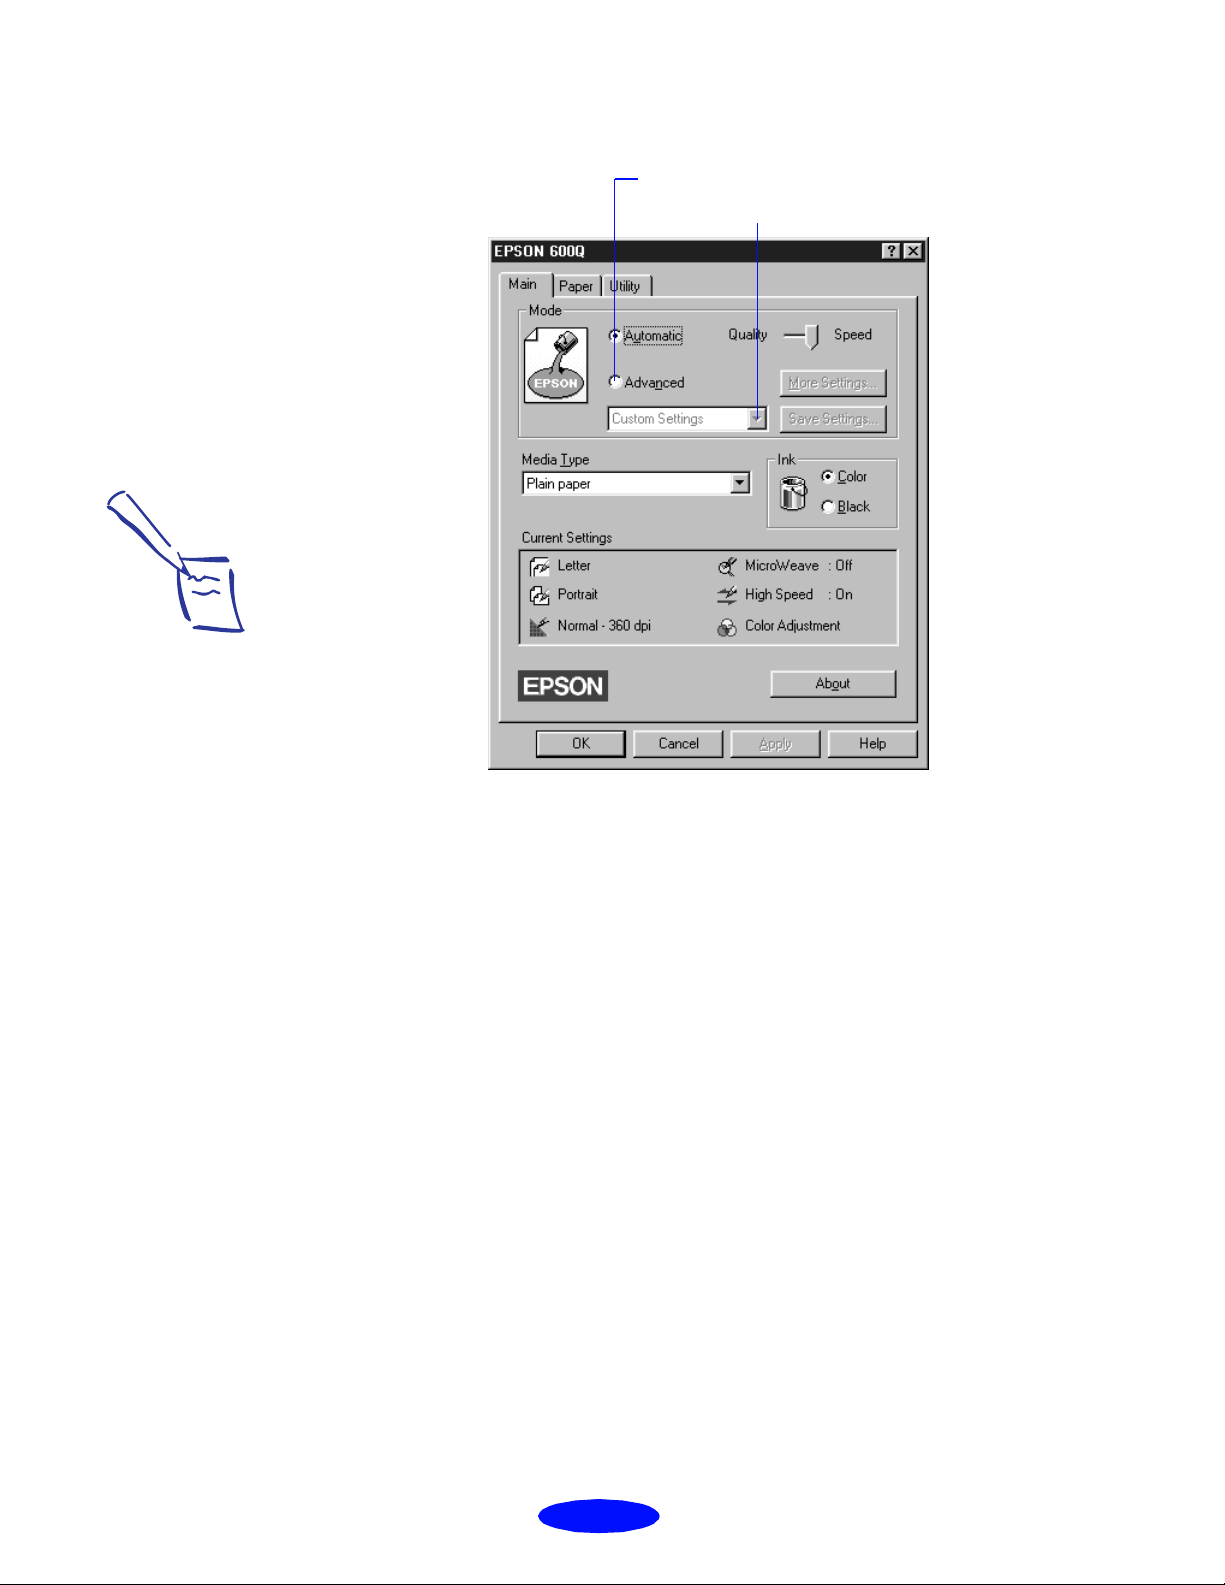
see a dialog box like the following:
Main tab
1-2
Page 21

Basic Printing
3. If you do n ot se e the d ial og bo x sho w n in st ep 2, c lick t he
Main
tab.
For printing at th e hi ghe st
resolution (S upe r Fine
quality at 1440 dpi), you need
to use one of the photo
quality media. For the best
printing at any resolution,
always use EPSON media.
4. Make sure the Mode option is set to
Automatic
. The
printer software determines the best settings according to
the Media Type and Ink settings yo u make. Th is is the
easiest way to get good prin t ing result s for all kinds of
docume nts, on all types o f paper.
5. Choose the
Media Type
you want to print on from the
following list (you may need to scroll through th e list). If
you are not sure which setting to select for your media,
refer t o the table on page 3-2.
Plain paper
◗
360 dpi Ink Jet Paper
◗
Photo Quality Ink Jet Paper
◗
Photo Quality Glossy Paper
◗
Photo Quality Glossy Film
◗
Ink Jet Transparencies
◗
The type of media you choose determines the print
quality or resolution you can use.
6. Choose
Color
or
Black
ink. I f you are pr inti ng bla ck te xt, a
draft, or if you want colors to print as varying shades of
gray, select
7. Set the slider to
Black
for faster printing.
Quality
or
Speed
. This lets you choose
between the highest resolution or the fastest printing for
the media you’ re using. (The slider is not available for
certain me di a types.)
Once you’ve changed these basic settings as needed,
check t he Curr ent Settings box on the bottom of th e menu
to see if the other settings are correct for your document.
If you need to adjust t h em, use Advanced mode as
described in Chapter 2, “Custom Printing.”
1-3
Page 22
Basic Printing
Note:
To cancel your changes and
exit the driver, click the
Cancel button at the bottom
of the menu at any time.
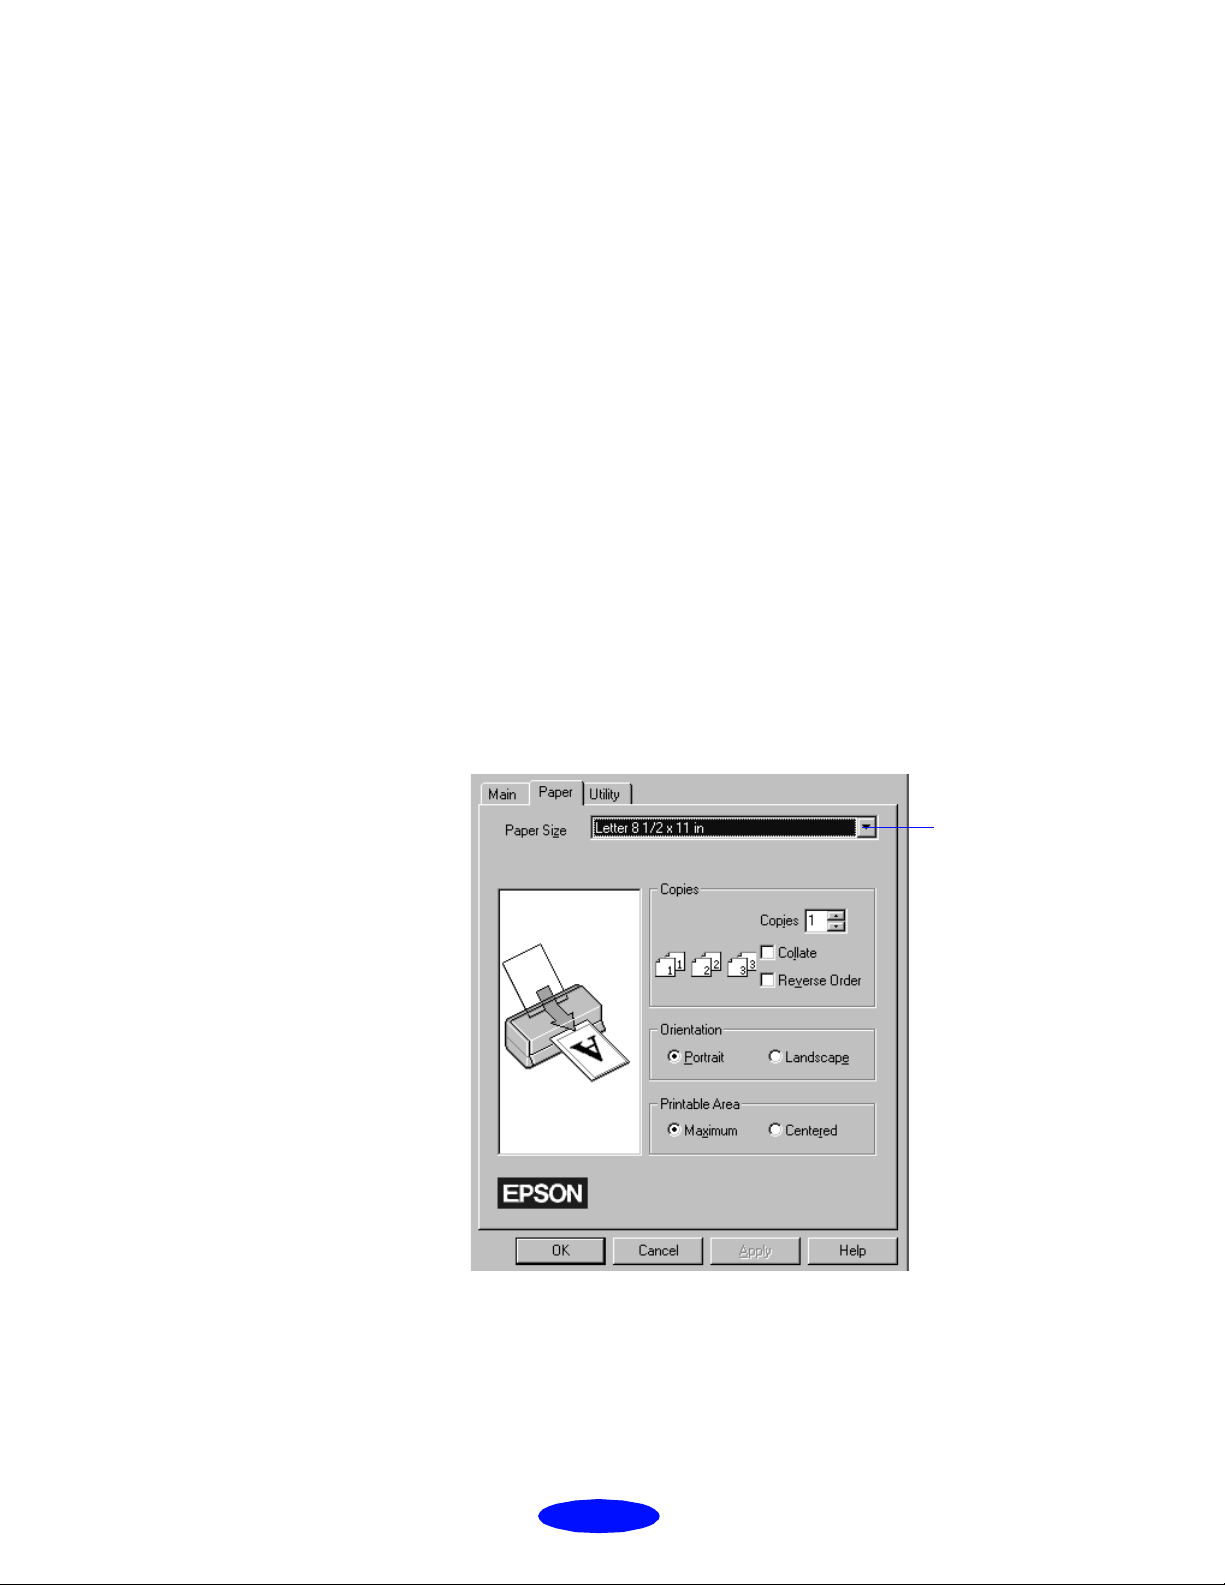
8. If necessary, click the
Paper
tab and choo s e yo u r pap er
size, number of copies, ori entation, and printable ar ea. If
your software application lets you control these settings,
you don’t need to use the
OK
9. Click
when you’re finished checking your settings.
Paper
tab.
The dialog box closes.
10. I n the printing dial og box, click
Close, OK
, or
Print
may need to click a combination of these buttons.
While your document is printing, the
EPSON
Despooler
dialog box a ppears, showing the pr inting pro gress and t he
status of your printer. If you’re using Windows 95, this
box also displays the Sta t us Monitor. (See “Checking
Printer Status,” on page 1-6 for more information.)
Setting Default Printer Options
. You
Note:
Some application settings
override pr inte r so ftw a re
settings (such as Paper Size
or Orientation), so it’s a good
idea to check the setti ngs in
your application before you
print.
When you chang e printe r settings through your software
application, the settings apply only to the application you’re
using. If you want to adjust the default settings for all your
Windows appl ication s, y ou can a ccess t he dia log bo x throug h
the Windows 95 Settings option or the Windows 3.1 Control
Panel.
Make sure all your software applications are closed before
you s tart. If not, you’ll have to close and then reop en them to
have the new default settings take effect.
1-4
Page 23

Basic Printing
Setting Default Options in Windows 95
Follow these steps:
Start
1. Click
, point to
2. Right-click the
3. Select
Properties
Settings
EPSON 600Q
, and then point to
icon.
. Then click the
Main
Printers
tab.
You see the Main printer settings dialog box, as shown
on page 1-2.
OK
4. Change the settings you want and click
.
Any changes you make will become the default settings
for all your applications and documents.
Setting Default Options in Windows 3.1
Follow these steps:
1. Double-click the
Control Panel
icon in the Main group.
.
2. Double-click the
3. Select
Setup
EPSON 600Q
.
Printers
icon.
from the list of printers and click
You see the Main printer settings dialog box, as shown
on page 1-2.
OK
4. Change the settings you want and click
.
Any changes you make will become the default settings
for all your applications and documents.
1-5
Page 24
Basic Printing
Checking Printer Status
Note:
If you don’t want the
Despooler dial o g box to
appear each time you print,
you can turn it off. To do
this, start Spool Ma na ge r,
open the View menu, and
select Show Despool
Popup; the checkmark next
to the option disa ppe a r s.
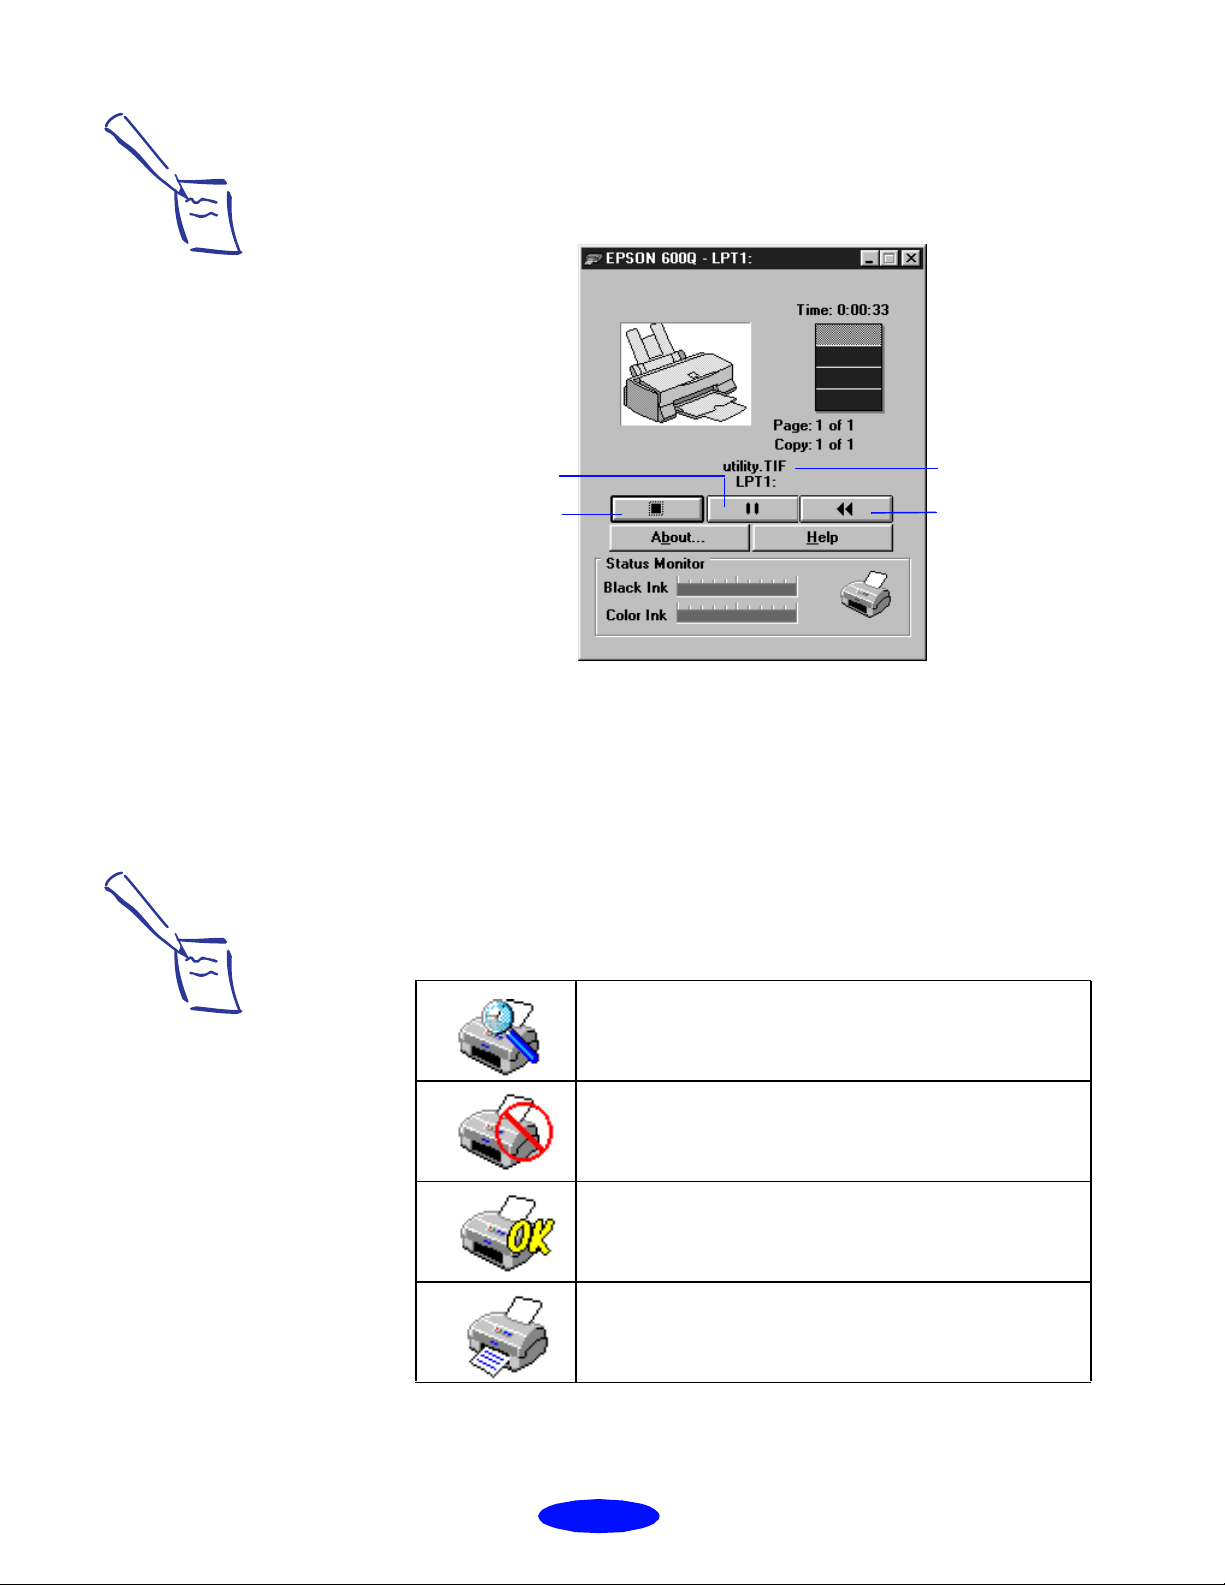
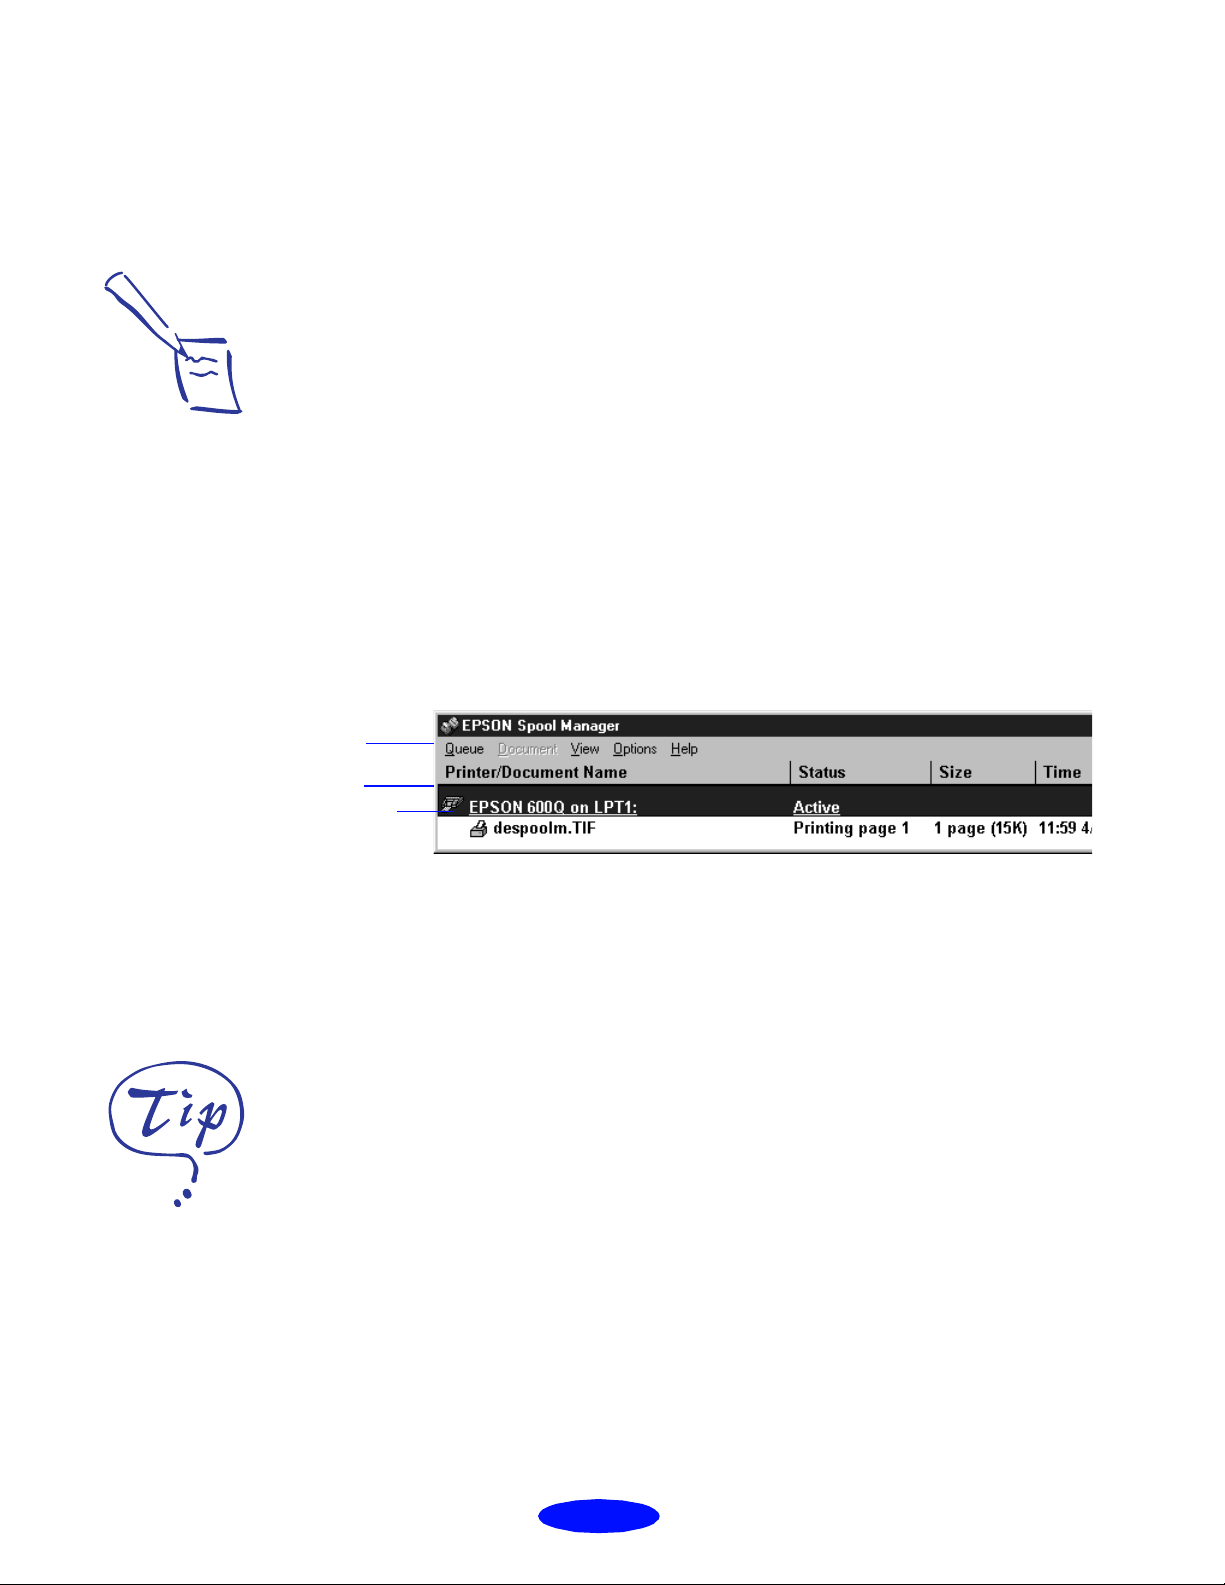
While your document is printing, the
EPSON D
espooler
dialog box appears on your screen:
The name of
the file you’re
Click to
pause printing
Clic k to cancel
printing
printing appears
here
Click to
restart prin ting
This dia log box shows the pr ogress of your print job and the
status of your prin ter. If you r un out of paper while printing,
for example, the Despooler warns you. You can use the
buttons t o cancel, pause, or rest art your print job.
Note:
The Status Monitor appear s
only if you’re using
Windows 95 and you’re not
printing over a network.
The Status Monitor at the bottom of the dialog box shows
how much ink is left in your printer, along with these status
icons:
Checking the printer status.
A printing err or h as occu rr e d and your printer cannot
print. Check your pr inte r or see C hapte r 6 for
troubleshooting information.
The printer is ready to print.
The printer is currently printing.
1-6
Page 25
Basic Printing
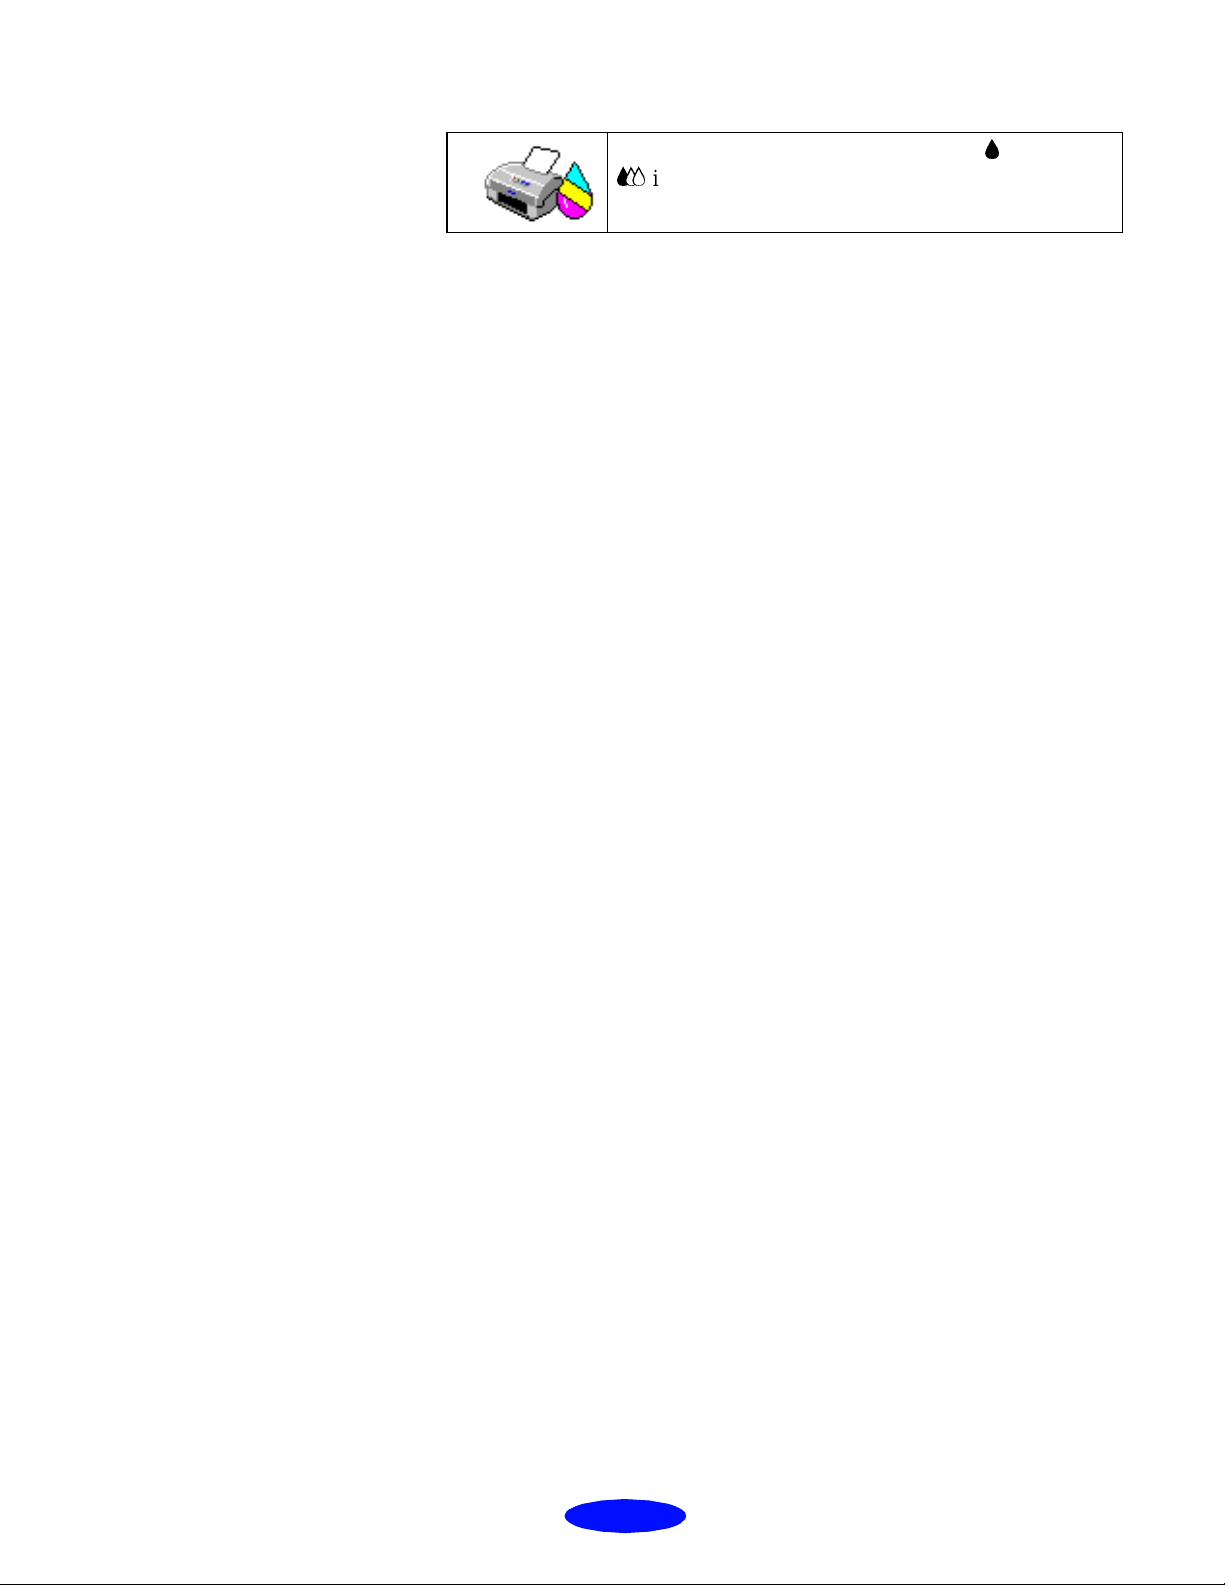
The ink level is low or emp ty; c he ck the B or
A
ink out light on the printe r contr ol panel and
replace the cartridge if necessary.
1-7
Page 26

Basic Printing
Printing from DOS
Note:
The driver s for the pr inte rs
listed do not provide all
EPSON
as 1440-dpi printing, 720-dpi
printing, and MicroWeave .
600Q featur es, such
Most DOS software programs include software for
™
ESC/P 2
printers. You need to select the correct printer
EPSON
soft ware t o take advant age o f yo ur pri nter ’s adv ance d built -in
scalable fonts and graphics handling.
Most DO S program s require you to sel ect from a list of
printers to install the printer software. If
EPSON
600Q is not
included in the list, contact your software manufacturer to
obtain updated software.
If updated software is not available, pick the first printer
available in the lists below.
When printing black and color, select:
EPSON S
EPSON S
EPSON S
tylus
tylus
tylus
Pro
COLOR
COLOR
500
II
LQ-860
LQ-2550
When printing black only, select:
LQ-870/1170
LQ-500
LQ-570(+)/1070(+)
SQ-870/1070
LQ-850
1-8
Page 27
Basic Printing
Choosing Paper and Other Media
You can use most plain paper with your printer and achieve
good results. For better results, use
EPSON
ink jet paper because it provides the best surface for the ink
used in yo ur printer .
for
EPSON
ink jet printers, available in a choice of sizes. See
EPSON
offers specially designed m edia
Chapter 3, “Printing on Special Media,” for more information
on using special media.
Media name Size Part number
specially coated
EPSON 36 0 dpi Ink Jet Paper A4
Letter
EPSON High Q ua lity Ink Jet Paper L etter S041111
EPSON Photo Q ua lity I nk Je t Pa pe r A4
Letter
Legal
EPSON Photo Q uality G lossy Paper A 4
Letter
EPSON Photo Q uality G lossy Film A4
Letter
EPSON Ink Jet Transparencies A4
Letter
EPSON Photo Q ua lity I nk Je t Ca rd s A6
5 × 8
10 × 8
EPSON Iron-On Transfer P ap e r Letter S041001, S 041002
EPSON Photo Q uality Se lf
Adhesive Sheets
A4 S041106
S041059
S041060
S041061
S041062
S041067
S041126
S041124
S041071
S041072
S041063
S041064
S041054
S041121
S041122
To order
or call
EPSON
EPSON
papers and other media, contact your dealer
Accessories at (800) 873-7766 (U.S. sales
only). In Canada, pleas e call (80 0) 873-7766 for d ealer
referral.
1-9
Page 28
Basic Printing
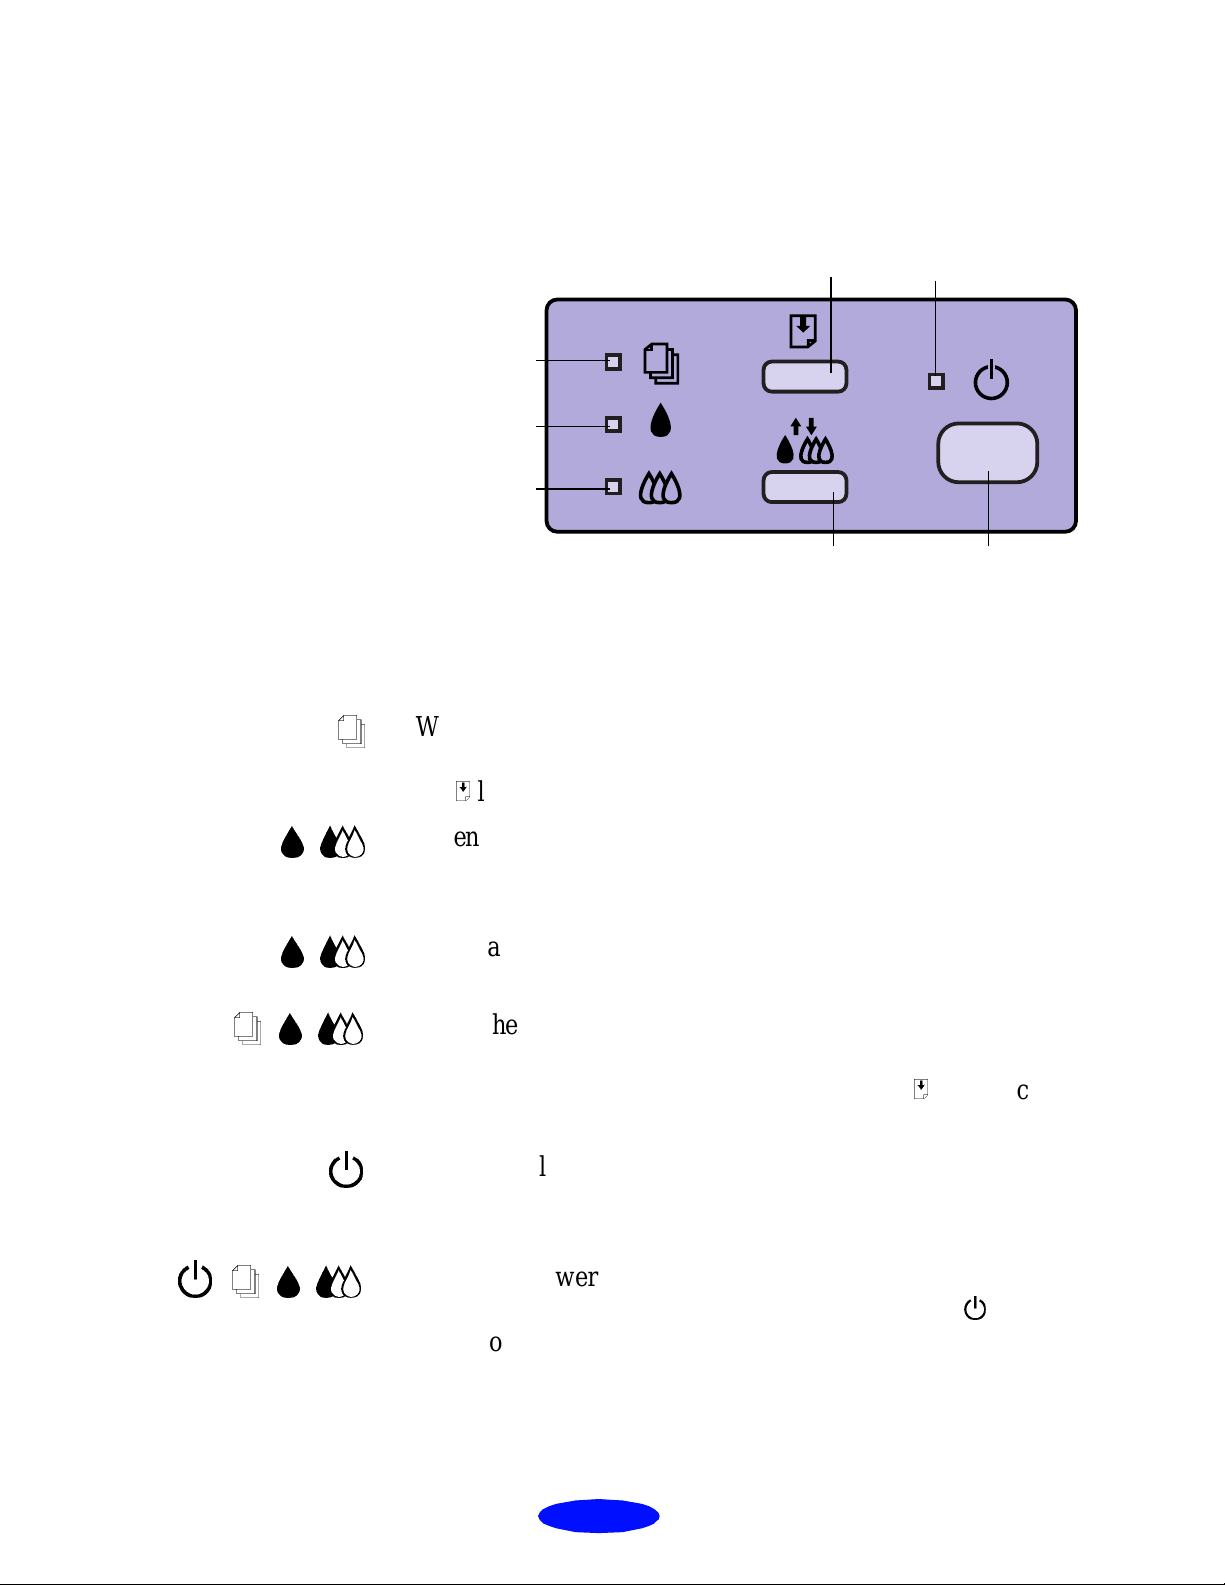
What To Do When the Printer Lights Flas h
load/eject
button
paper light
black ink out
light
color ink out
light
power light
S
BA
BA
SBA
cleaning
button
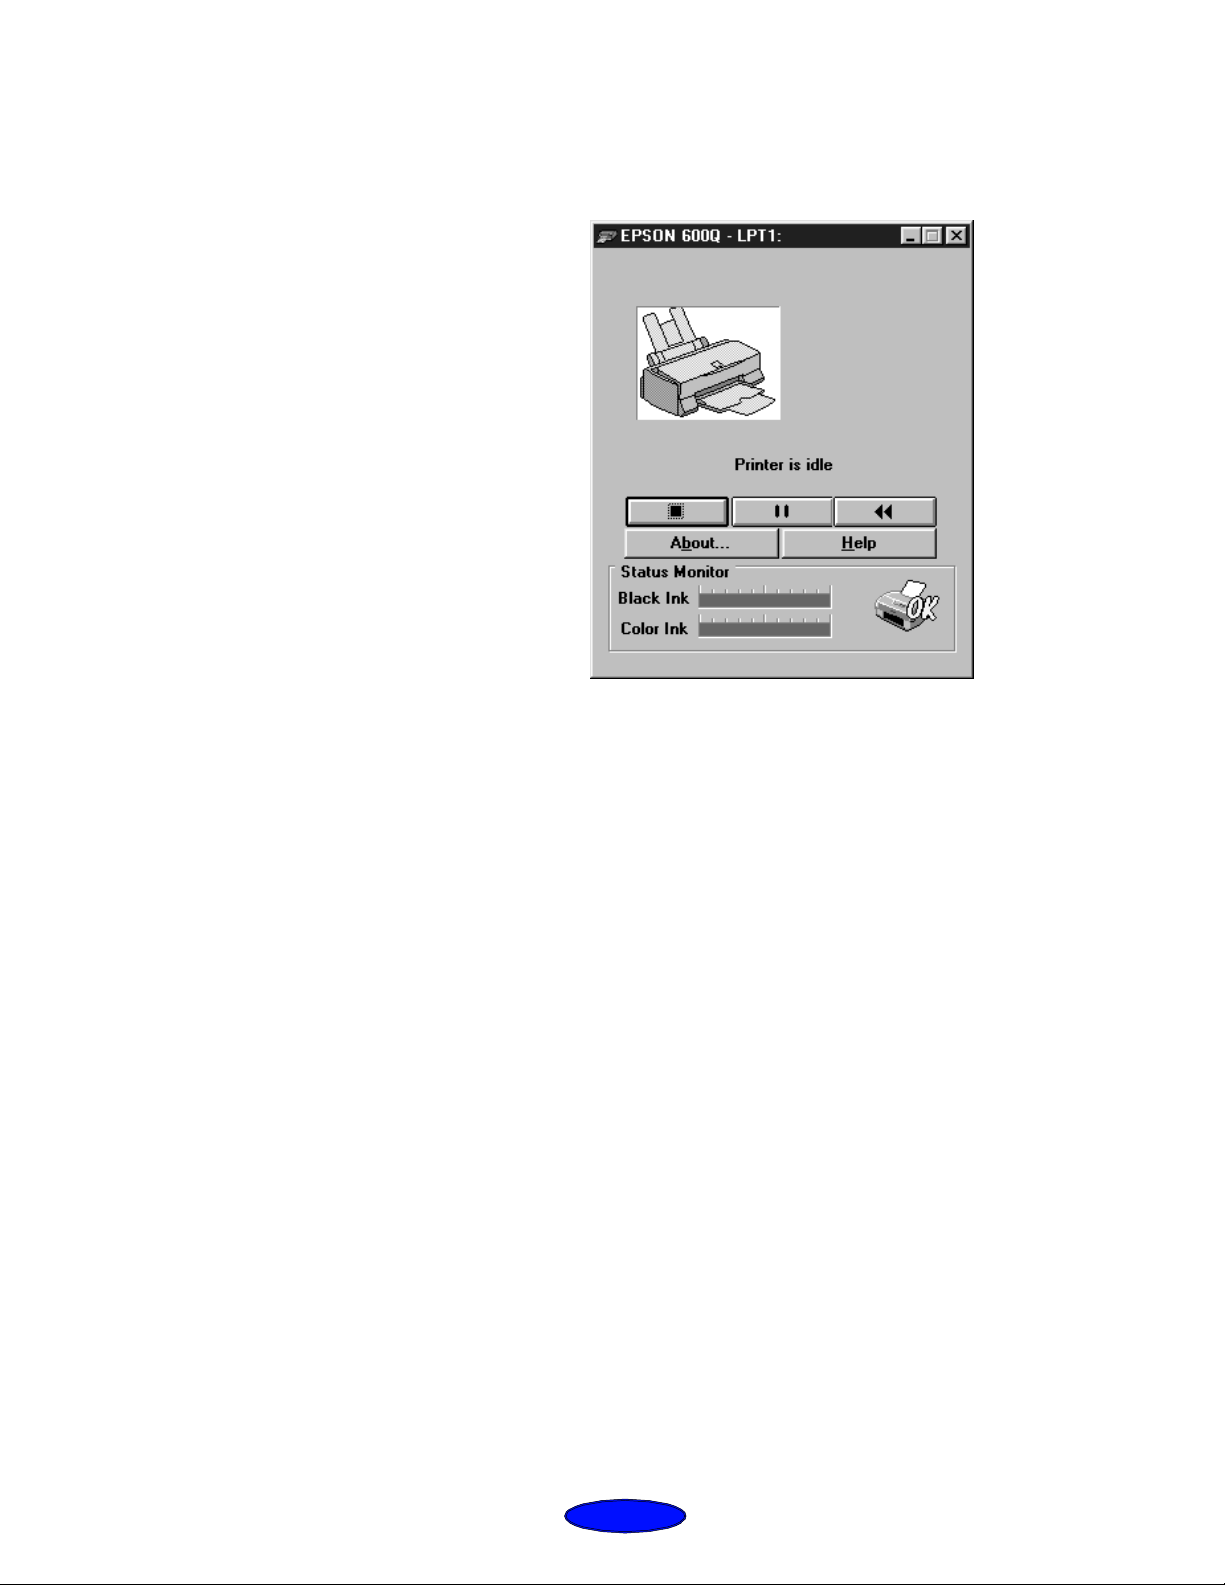
The fo ur light s on your pr inter’ s control panel show the
print er’s status and alert you to problems like paper jams.
When the paper l ight comes on, your paper ran out or is
incorrectly loaded. Load paper in the feeder and then press
the
E
load/eject button.
When an i nk light c omes on, you need to r epla ce the ink
cartridge. See Chapt er 5, “Ma intenanc e and T rans portation, ” for
instructions.
When an ink light fla shes, yo ur i nk supp ly i s low . Ma ke s ure
you have a replacement cartridge.
When the paper li ght flashes and the ink out lights are on, you
have a paper jam. Turn off the printer and gently pull out all
jammed paper. Reload the paper, then press the
button.
power button
E
load/eject
P
PSBA
The power light is on w hen the p rinter is on. The power l ight
flashes when the printer is receivin g data or chargin g ink, or
if you are repla cin g an i nk cart ri dg e or cleaning a print he ad .
When the power and paper lights flash and the ink out light s
P
are on, your printer has a carriage error. P ress the
twice to reset the printer. See Chapter 6, “Troubleshooting,”
for more information.
1-10
button
Page 29

Basic Printing
PSBA
P
E
When all the lights flash, your printer may have an in ternal
error. See Chapter 6, “Troubleshooting,” for more
information.
Using the Control Panel Buttons
Follow these guidel ines when using the cont rol panel
buttons:
Turns the printer on and off.
Resets the printer (clears its memory) if pressed twice within
10 seconds whil e the power is on.
Loads or ejects paper if pressed and released within two
seconds. Resumes printing if pressed after a paper out error
is corrected .
R
Moves the print head to the replacement position if pressed
B
for about three seconds while the
flashing or on. Returns the print head to its home position
after ink cartridge replacement.
Performs print head cleaning if pressed for about three
seconds when the
B
or A ink out light is off.
or A ink out light is
Using Online Help
For complete information about using the printer driver, you
can easil y acc ess onli n e help any tim e. It pro v ides detailed
descriptions of the different settings and options.
1-11
Page 30

Basic Printing
Accessing Online Help from Windows Applications
To access online help from your application, open the
menu an d choo se
Options
these buttons) depending on the software you are using. Click
Help
the
related to the items on that dialog box. Then select a help
topic.
Properties
, or
button at the bottom of the di alog box f o r help
Print
Print Setup
or
(you may need to click a combination of
. Then click
Printer, Setup
File
,
1-12
Page 31

Basic Printing
You can also access online help when you’re not using the
driver, as desc ribed bel ow.
Accessing Online Help from Windows 95
Click the
click
use help, read the online “Quick Guide to Using Help.”
While you’re using the printer driver, you can get specific
help related to any item in the menus by right-clicking the
item and then clicking the
Start
button, point to
EPSON 600Q Help
. If you need instructions for how to
Programs
What’s This?
Epson
, and
prompt.
, and then
Accessing Online Help from Windows 3.1
To access online help from Program Manager, ope n the
EPSON
If you need instructions for how to use help, read the online
“Quick Guide t o Usin g Help .”
program group and click the
EPSON 600Q Help
icon.
1-13
Page 32

Custom
2
Printing
When you want to pr int pres entation graph i cs, phot o graphs,
or other special projects, you can use the custom settings in
EPSON
your
settings or adjust individual options like brightness, contrast,
saturation, and halftoning. For professional-quality color
accuracy, you can use Image Color Matching (ICM) under
Windo w s 95.
This chapter includes the following information:
◗ Using predefined advanced settings
600Q software. You can choose predefined
◗ Customizing print quality and special effects
◗ Customizing color settings
◗ Saving custom settings
◗ Deleting custom settings
Using Predefined Advanced Settings
Predefined settings provide an easy way to fine-tune your
printer’s operation for special projects. Follow these steps to
print with predefined settings:
1. Create your document, image, or project in your
application software.
2. Access the Main printer settings dialog box as described
on page 1-2.
2-1
Page 33
Custom Printing
You see the following dialog box:
Click
Advanced
Then click here to see a list of project types
Note:
When yo u use advanced
settings, the Qua lity/Spee d
slider disappears.
Always choose your Ink
setting befor e yo u se le c t a
project setting from th e
Customs Settings list.
Selecting Video /Dig ita l
Camera or ICM
automatically se ts the In k
option to Color.
3. Select
4. Click
Color
Advanced
Black
or
, and then
Ink.
Custom Settings
. You see the list
of project types.
5. Follow these guidelines to choose the right one for your
project:
Photo
◗
For print ing scanne d pho tog r aphs . Inc r ease s cont ra st
in the image.
Text/Graph
◗
For printing graphi cs-intensive document s like
presentation pages with charts a nd graphs. Intensif ies
colors and ligh tens the midtones and highlights .
2-2
Page 34

Custom Printing
Video/Digital Camera
◗
For images captured from a digital camera or video.
Increases color brightness and makes the image
sharper.
Economy
◗
For rough drafts of text only, on plain paper. Saves
ink.
ICM
◗
(Windows 95 only)
Automatically adjusts printout colors to match the
color s on your screen.
Note:
See Chapter 3, “ Printi n g on
Special Media,” for
information about using
special media.
Note:
After you customize your
print settings for a spec i a l
project, you can save them as
a group. Then
you can reu se them whenever
you print a similar pro ject.
See page 2-8 for instructions.
6. Choose the
Media Type
you want to print on. (If you are
not sure which setting to select, refer to the table on
page 3-2.) The available media are limited by the projec t
you choose. For example, you can’t use pla in paper or
transparencies with the
OK
7. Click
, then cl ick any other but t o ns that your
ICM
setting.
application uses for printing.
Customizing Print Quality and Special Effects
If you need the maximum control ov er your project, or you
want t o experiment wi th special effects, y o u can adjust
individual settings in your printer software. Follow these
steps:
1. Create your document, image, or project in your
application software.
2. Access the Main printer settings dialog box as described
on page 1-2.
3. Click
Advanced,
2-3
and then click
More Settings
.
Page 35
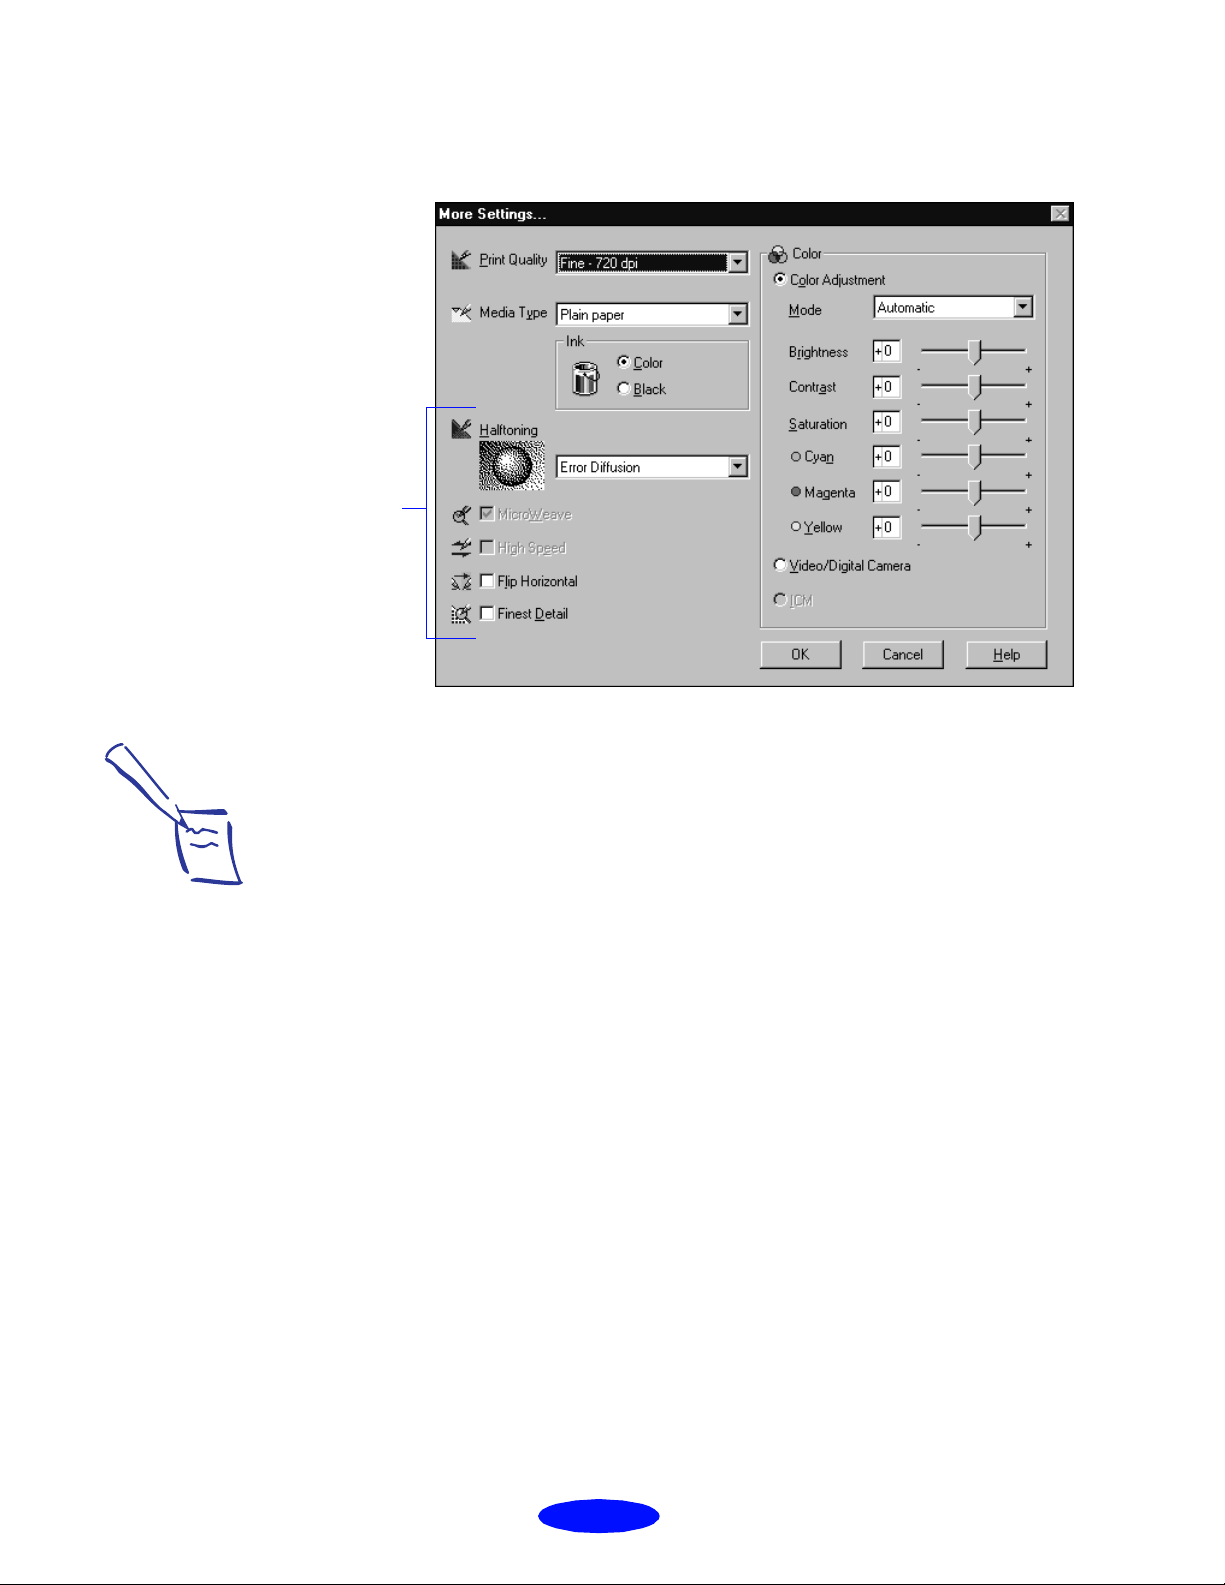
Custom Printing
Some of these options are
automatically set or d is abled
by other settings you c hoose
You see the More Settings dialog box:
Note:
The Print Quality is sele cted
automatically de pending on
the current Media Type. If
you choose a Print Qu ality
setting that is not appropriate
for your med ia , the driver
changes the Media Type
setting. Be sure to check both
of these settings.
4. Choose one of the follo wing
Economy
◗
Print Quality
options
For low-resolution rough drafts on plain paper. Saves
ink.
Normal - 360 dpi
◗
For most documen t s on plain paper, transpar encies ,
or 360 dpi Ink Jet pape r.
Fine - 720 dpi
◗
For high-resolution output. Works best on photo
quali ty media.
SuperFine - 1440 dpi
◗
For the highest-resolution output on photo quality
media only.
5. Choose the
Media Type
and
Ink
setti ngs you want to use,
following the guidelines in Chapter 1, “Basic Printing,”
and Chapter 3, “Printing on Special Media.”
:
2-4
Page 36
Custom Printing
Note:
In Automatic mo de , the
Halftoning setting is selected
based on the data in your
print job. In Advanced mode,
Halftoning is preselected for
each docume nt typ e setting.
No Halftoning is available
only when you select Black
as the Ink setting .
6. Choose one of t he fo llo w i n g
No Halftoning
◗
Halftoning
options:
For printing bl ack text only.
Error Diffusion
◗
For printing phot ographic or video/digital came ra
images. Blends each dot of color with the
surrounding dots.
Fine Dithering, Coarse Dithering
◗
For printing charts, graphs, and other images that
requi re p rec is e, sol i d ar ea s of brig ht c ol or s. A rr an ges
dots in orderly patterns. Use
more shading and less detail. Use
Coarse
for images with
Fine
for images
with more detail and less shading.
7. Choose any of t he fo llo w i n g op t i on s . Som e of th ese
settings are automatically selected or disabled by th e
Quality
(resol ut ion) you choose.
Print
If vertical lines in your
printout are misaligned when
you use the High Speed
setting, you may n eed to
align the print heads . See
Chapter 5, “Mainten an ce
and Transpor ta tion ,” fo r
instructions.
MicroWeave
◗
For improved print quality. Prints graphic data in
finer i ncrements to eliminat e unwanted banding
effects (light horizontal lines). Always use for color
printing.
High Speed
◗
For fast, bidirectional printing at lower quality.
Flip Horizontal
◗
Prints a mirror image of your document. Use for
printing with iron-on transfer paper. When you iron
the printout onto a T-shirt or other item, it will read
correctly.
Finest Detail
◗
For pri nting te xt, graphi cs, and line ar t with very
sharp edges. Slows print speed and increases your
system memory requireme nts .
OK
8. Click
if you’re ready to print, or see the next section
if you want to adjust your printer’s color settings.
2-5
Page 37
Custom Printing
For more information ab ou t
working with c olor , see the
EPSON Answers Color
Guide. To launch EPSON
Answers, click the EPSON
600Q Answ e r s ico n in the
EPSON program folder or
group.
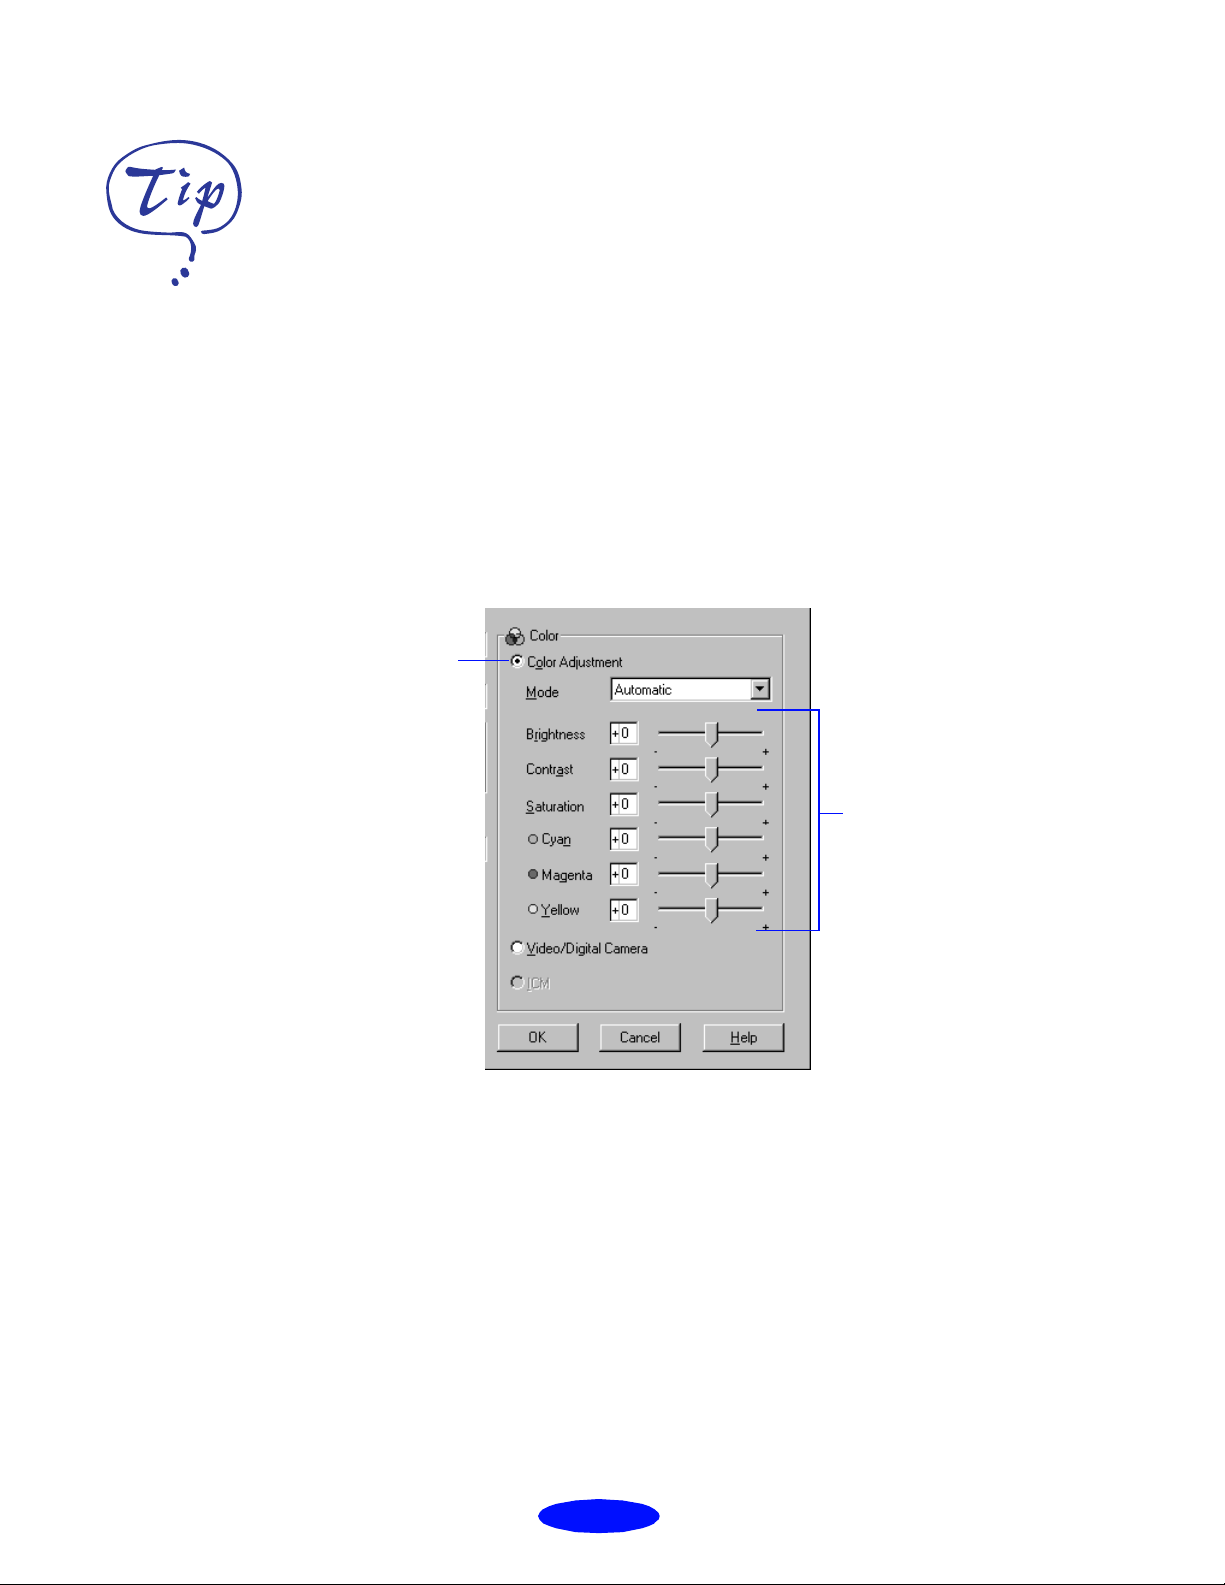
Click to set Color
Adjustment Mode
Customizing Color Settings
You c an choose from several color adj ustment modes or
manually adju st brig htness, contrast, and satu ration. For
professional color correction, you can set individual Cyan,
Magenta, or Yellow (CMY ) color values. To achieve the
maximum color accuracy, you can use ICM under Windows
95.
Follow these steps to customize your color settings:
1. Access the More Settings dialog box as described on
page 2-3. The color settings appear on the right side of
the dialog box, as shown:
2. Choose one of the follo wing
Automatic
◗
Analyz es the color infor mation i n your project and
optimizes color correction accordingly.
Photo-realistic
◗
For printing color photog raphs.
Drag sliders to
set values
between -25%
and +25%
Color Adjustment Modes:
2-6
Page 38

Custom Printing
Vivid
◗
For pri nting g ra p hics-i ntensive documents like
presentation pages with char ts and graphs. Intensifie s
colors and lig h t en s the mi dt o n es an d hi g hli g ht s.
3. If you want to specify indivi dual color correction values,
use the scroll bars to incr ease (drag right) or decrease
(drag left) the settings listed below. (If you want to use
the opt ions des cribed in step 4, you won’t be able to
speci fy indivi dual color correction values .)
◗
Brightness
Makes your image lighte r or darker.
Contrast
◗
Increases or de creases the differ en ce be t wee n t he
bright or da r k pa rts of an image.
Note:
When yo u choose
Video/Digital Camera or
ICM, all the other color
options are preset.
The availability of ICM
depends on your Print
Quality, Med ia T yp e, a nd
Halftoning se ttings.
◗
Saturation
Makes colors more vivid or less v ivid.
Cyan, Magenta, Yellow
◗
Increases or decreases the amount of the three ink
colors that combine to make a full-color picture. Use
to fine-tune the color ba lance in your printout.
4. For even more fine-tuning, choose
ICM
or
◗
(Window s 95 only).
Video/Digital Camera
Use for printing images captured from a digital
camera or video. Increases contrast and saturation
and makes the image sharper.
ICM
◗
(Windows 95 only)
Automatically adjusts printout c olors to m atch colors
on the screen.
Video/Digital Camera
,
5. Click
box.
OK
to return to the Main printer settings dialog
2-7
Page 39
Custom Printing
Note:
You can save up to 10 groups
of settings.
6. Click
Save Settings
if you want to save your custom
settings as a group that you can reuse for special projects.
See the following section for more information about
saving settings.
7. Click
OK
, then click any other buttons that your
application uses for printing.
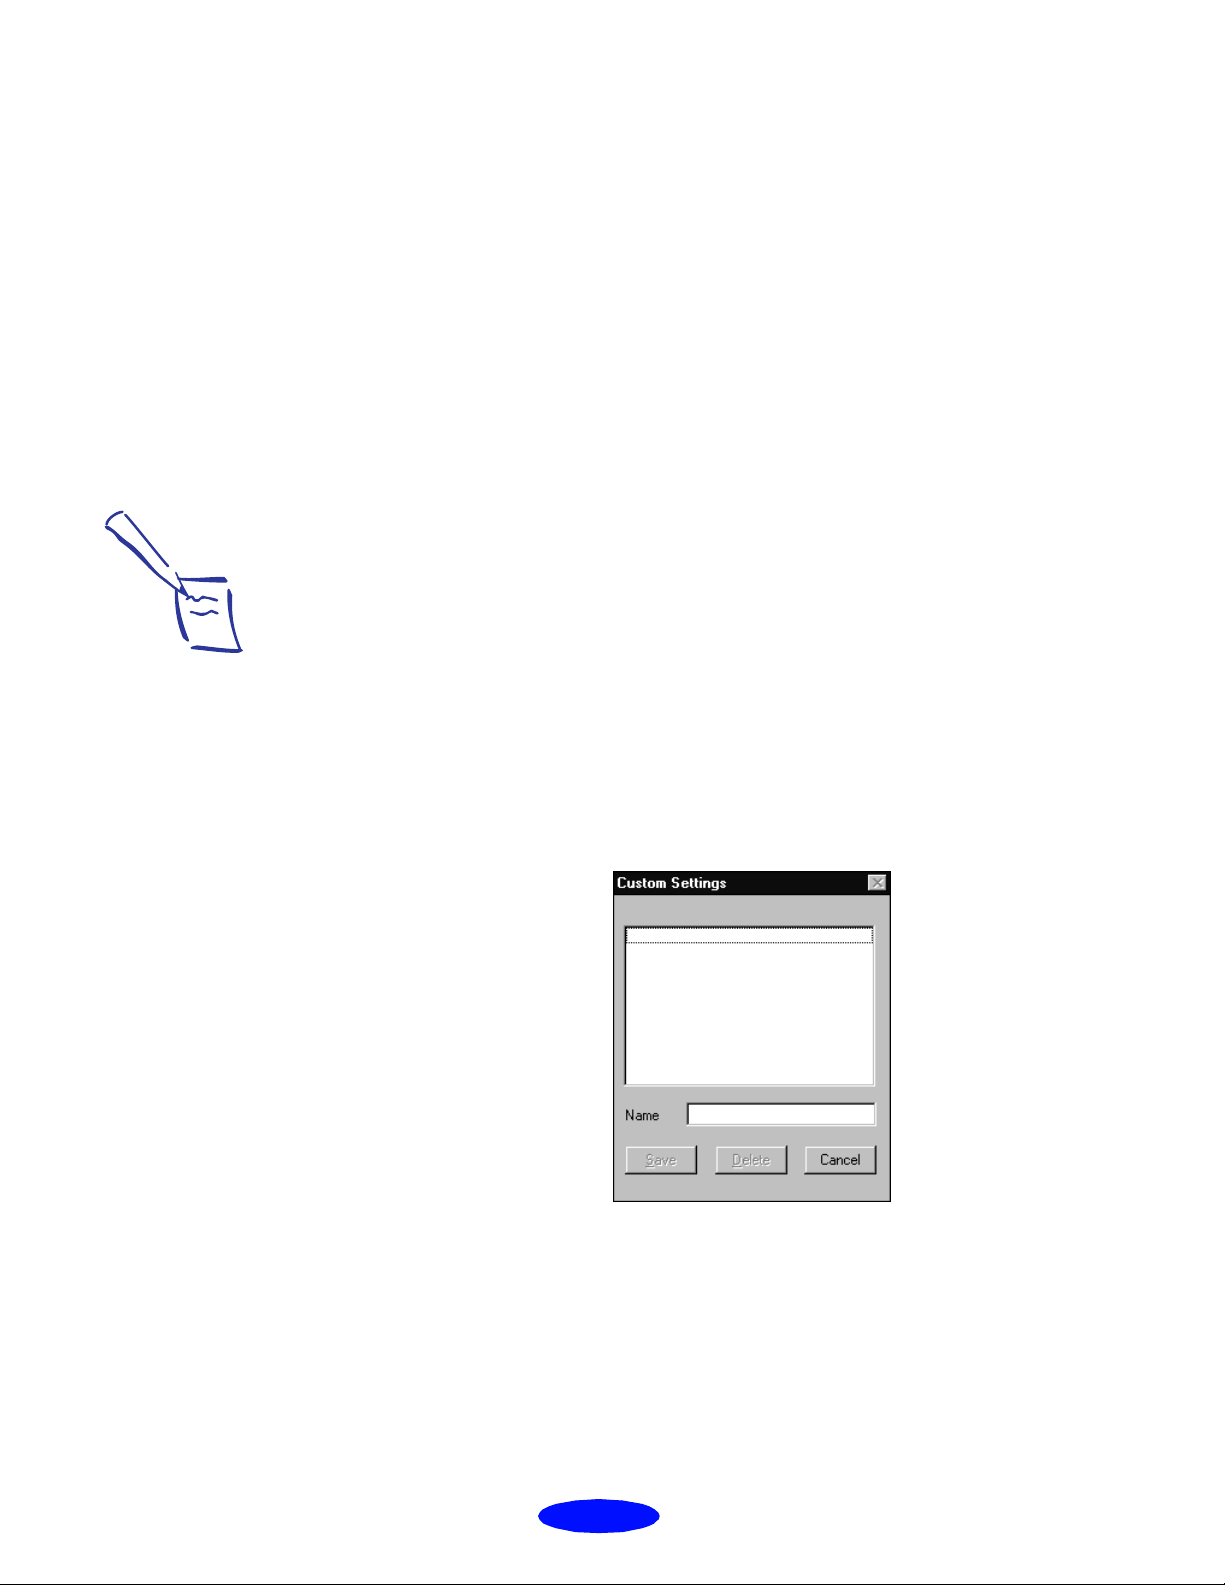
Saving Custom Settings
After you’ve fine-tuned your printer settings for a special
project, you can save your group of custom settings with a
unique name and add it t o the Custom Setti ngs d rop-d own lis t
on the Main menu. Then you can easi ly select the settings th e
next time you print a similar project. Follow these steps:
1. Customize your printer settings as described in this
chapter.
If you change the Media
Type or Ink setting when
your customize d setting is
selected, the setting selected
in the list changes to Custom
Settings. This does not affect
your customize d setting. To
return to your cu stomized
setting, simply resele c t it.
2. Click the
Save Settings
button on the Main printer setti ngs
dialog b ox. You see the following di alog box:
3. Type a unique name for your settings (up to 16
characters) and click the
Save
button.
The name you choose will now be available on the Main
printer settings dialog box when you click
Custom Settings
then
.
Advanced
, and
2-8
Page 40

Custom Printing
Deleting Custom Settings
If you no longer need your customized settings, follow these
steps to delete them:
1. Select
Custom Settings drop-down list.
2. Click
3. Select t he docum ent t ype in t he Cu stom S etti ngs box, and
click
document types.)
Advanced
Save Settings
Delete
mode and the document type in the
.
. (You cannot delet e an y of the pr e defined
2-9
Page 41

3
Printing on
Special Media
Your
paper you want to us e. You can get great results prin t ing on
variou s size s of pl ain p aper, lett erhea d, and e nvelo pes. You’l l
get even better results with specially coated ink jet paper. For
the best output, use
paper, glossy paper, glossy film, and index car ds.
For special pro j ects, you can use a variety of
designed for ink jet printers, ranging from transparencies to
iron-on transfer pap er. You ca n even set up your printer to
use custom paper sizes to print lar ge posters and banners .
This chapter covers the following:
◗ Using specia l med ia
◗ Print ing banners an d ot h er custom siz e projects
EPSON
600Q lets you print on just about any kind of
EPSON
’s photo quality media: ink jet
EPSON
media
Using Special Media
When you print on special media, you need to be careful
about choosing t he correct Media Type and Paper Siz e
settings in your printer software. Use the table on the next
page to help you match the media type you loaded in the
printer with the Media Type setting in the printer driver.
3-1
Page 42

Printing on Special Media
Select this Media Type
For this media name . . .
Plain paper Plain paper
Envelopes Plain paper
setting . . .
Note:
If the corresponding Media
Type option for your paper is
not shown in the Media Type
list, change the Print Quality
setting in the More Settings
dialog box, select
Automatic as the Mo de
setting, or change the
predefined setting in
the Advanced settings list on
the Main menu. See
Chapter 2, “Custom
Printing,” for more
information.
Always ha ndle sheets by the
edges, and don’ t touc h the
printable surf ace . W he n you
load paper, make sure the
printable side is faci ng up.
Some special media ha ve a
cut corner that you need to
position correctly; follow
any instructions in the
package.
EPSON 360 dpi In k Je t Pap e r 360 dpi Ink Jet Pape r
EPSON Special Coated Paper for 360
dpi Printing
EPSON High Qua lity In k Jet Pap e r Photo Quality Ink Je t Pape r
EPSON Photo Quality Ink Jet Paper
EPSON Special Coated Paper for 720
dpi Printing
EPSON Photo Quality Ink Jet Cards
EPSON 720 dp i Index Card s
EPSON Photo Quality Self Adhesive
Sheets
EPSON Photo Quality Glo ssy Pa pe r Photo Quality Glossy Paper
EPSON Photo Quality Glo ssy Film Photo Quality Glossy Film
EPSON High Quality G lossy Paper
EPSON Iron-On Tra nsf e r P a pe r
EPSON Ink Jet Transparenci es Ink Jet Transparen cies
The ty pe of paper or other media yo u use is on e of the most
important factors in determining the quality of your printed
output. For example, you can achi eve the highest resolut ion
(SuperFine quality at 1440 dpi) only when you u se EPSON
Photo Quality media. The fo llowing tip s will help you get the
best results on any type of paper or other media.
3-2
Page 43

Printing on Spec ial Media
Letterhead, Pre-printed Forms, and Legal-size Paper
Always load the top edge first.
If you ar e loading long paper, pu ll out the paper sup p ort
extension and both output tray extensions. Don’t load it
more than half way to the arrow mark on the left edge
guide.
Caution:
Don’t use the c leaning sheets
that may be inclu de d w ith
your special media; they may
damage the printer .
EPSON 360 dpi, High Quality, and Photo Quality Ink Jet Paper
You can load paper up to the arrow mark on the left edge
guide. If you use l egal-size ink jet paper, don’t l o ad it more
than half way to the arrow mark.
3-3
Page 44

Printing on Special Media
EPSON Photo Quality Glossy Paper, Film, and Transparencies
To print on transparencies, remove the paper support and
rein stal l it in the re ar pa pe r s up port slo t . F or glo s sy pape r an d
film, leave the paper support in the normal position.
Note:
Use ink jet papers within one
year of purchase. Use glossy
media and transparencies
within six months. R eturn
unused sheet s a nd env e lopes
to their original packa ge as
soon as possible. See the
Appendix for more storage
information.
Before you lo ad gl ossy me dia or t rans pare ncies , put a suppor t
sheet (packed with th e media) or a plain p aper she et beneath
the stack. You can load up to 20 sheets of glossy paper,
30 sheets of glossy film, or 10 transparencies.
However, you may get better results b y loading one sheet at a
time. With multiple sheets loaded, the minimum top margin
you can use is 1.2 inches. If you want to use a smaller top
margin, load and print one sheet at a time.
Remove each sh eet from th e out pu t tray im me di a te ly aft er
it’s printed. Make sure eac h sheet is dry before stacking it.
3-4
Page 45

Note:
Be sure to load the enve l ope
flap edge first and printable
side up.
In the printer dr ive r, set the
Paper Size to the correct
envelope size.
Printing on Spec ial Media
Envelopes
You can load up to 10 envelope s as show n below:
If ink smears when you print on envelopes or other thick
media, set the adjust lever to the + position. Open the printer
cover and position the lever as shown below. Then close the
cover and print. (Make sure you return the lever to the 0
position before you print on thin media.)
3-5
Page 46

Printing on Special Media
EPSON Photo Quality Ink Jet Cards
You can use these cards to print photographs that look almost
as good as the ones you get from film processing.
You can load up to 30 cards at a time with a support sheet
(packed with the cards ) or a sheet of plain paper beneath th e
stack. When you’re ready to print, use your software to set
the Paper Size option for the size card you’re using.
If ink smears on the cards, set the adjust lever to the +
position as shown on page 3-5.
For iron-on transfers, make
sure you reverse your image
before you print it, especially
if it includes text. Then the
text will read correctly when
it’s trans f erre d. You c a n use
the Flip Horizontal option in
your printer software, as
shown on page 2-5.
EPSON Iron-On Transfer Paper
You can print photos, company logos, or anything else you
want on this paper, and then transfer your images to T-shirts
or other cloth items. Load one sheet of transfer paper at a
time. After you print, follow the instructions that came with
the paper to iron the image onto the shirt or other item.
EPSON Photo Quality Self Adhesive Sheets
Use these sheets to print labels or stickers. You should load
these media one sheet at a time. Make sure your adhesive
sheets are fully adhered to their backing sheet before you
load them.
3-6
Page 47

Printing on Spec ial Media
right edge guide
Printing Banners and Other Custom Size Projects
You can use banner paper or ordinary (continuous-form)
computer paper to print a banner up to 44 inches long. You
can also print on any size paper that fits into the printer (at
least 3.94
feature of your printer software.
1. To make a 44-inc h banner wit h cont inuous-f o r m
computer paper, first tear off four sheets and remove the
perforations at the edges. If you are usi ng banner paper,
cut the paper to the length you want for easier handling.
2. Insert the paper in the printer as shown. The right edge of
the paper should be against the right edge guide:
×
3.94 inches), by using the custo m page size
3. Slide the left edge gu ide next to th e le ft edge of t he pa pe r.
4. Follow the instructions below to print your banner.
3-7
Page 48
Printing on Special Media
Printing a Banner
Follow these steps to print a banner or other custom-size
docume nt:
1. Create the do cument in your wor d proces sor or other
applic ation so ftware. You can create a banner in eit her
portrait or landsc ape orientation.
2. Click the print icon or choose
Print
Print Setup
or
from th e
File menu. You see a printing di alog box.
3. Make sure your printer is selected, and then click the
Printer, Setup, Properties,
or
Options
button. (You may ha ve
to click a combination of these buttons.) You see the
Main printer settings dialog box, as shown on page 1-2.
4. Cli ck the
Paper
tab. You see a dialog box like the
following:
Click to dis play li st
of paper sizes
5. Choose the paper you want to use from the
Paper Size
list. If you want to print a banner or other custom-s ize
document, choose
User Defined
.
3-8
Page 49
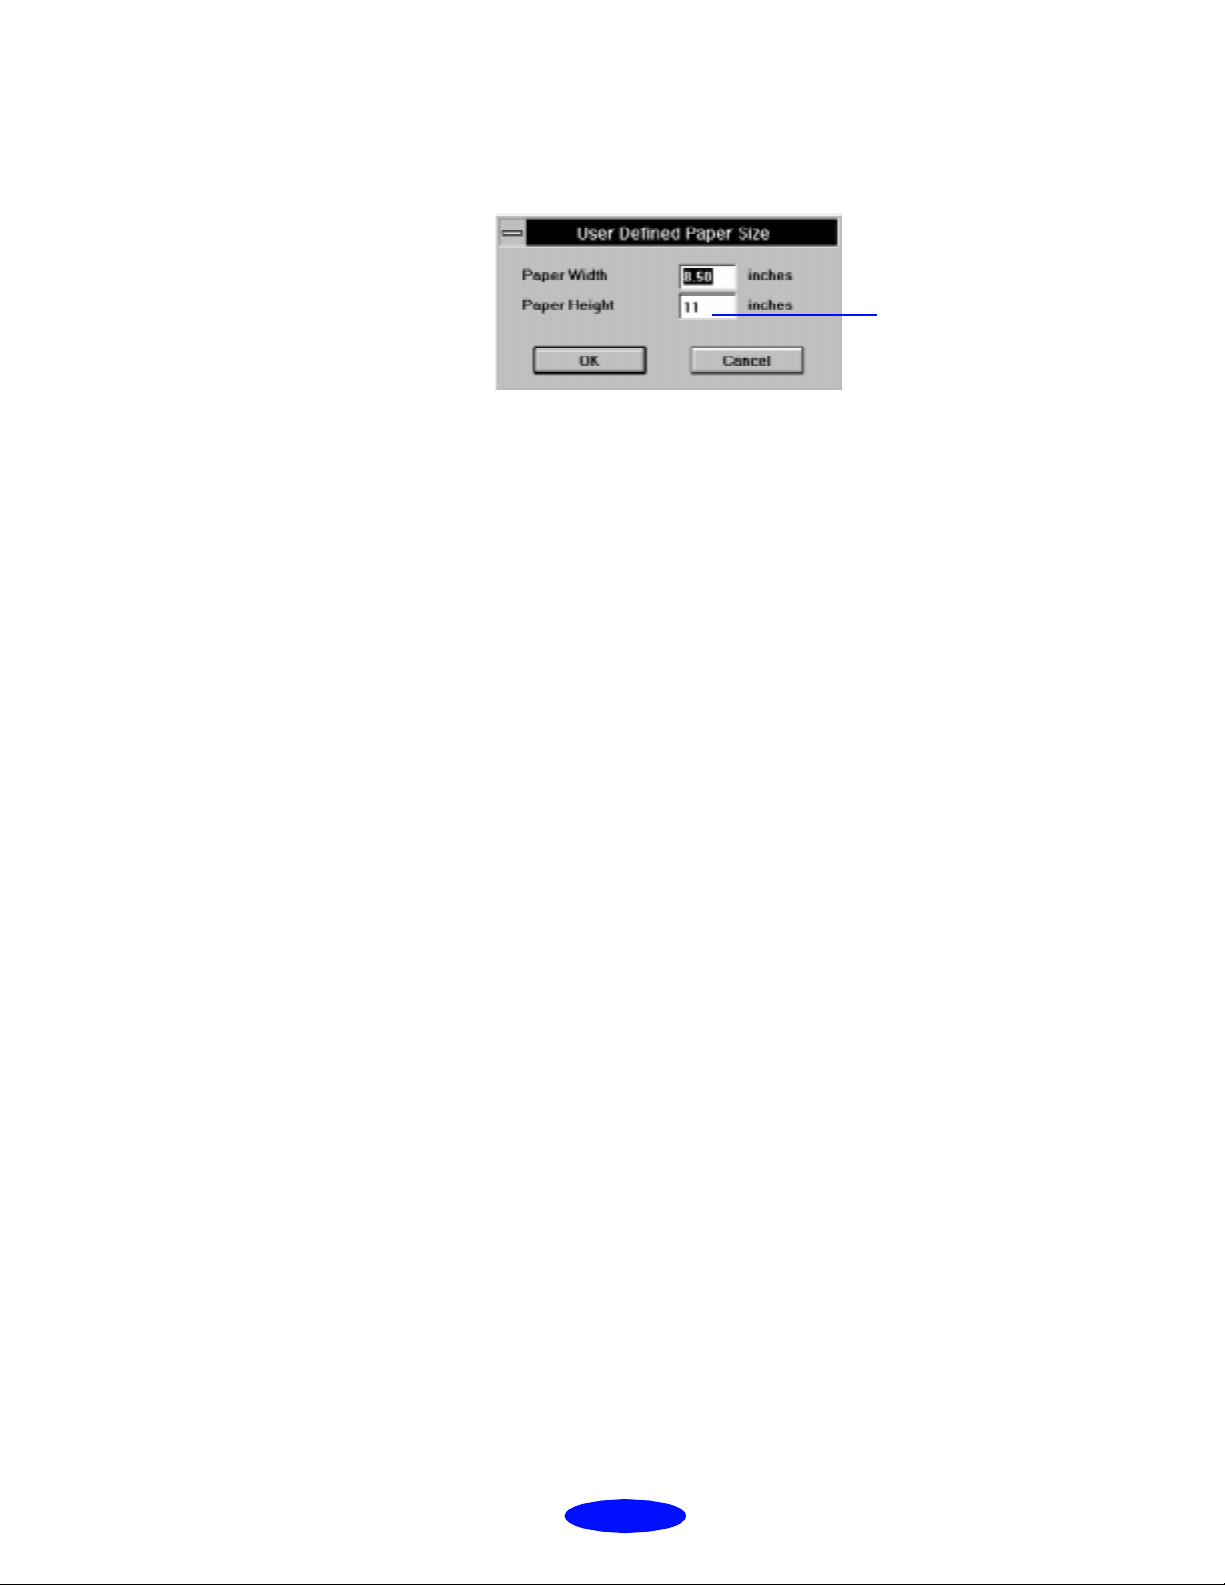
Printing on Spec ial Media
For banner printi ng, type any
siz e up to 44 inches
If you choose
User Defined
, the following dialog box
appears:
6. To print a banner, type
44
inches for the
Paper Height.
8.5
inch es for t he
(This works for both
Paper Width
“lands cape” and “portrait” s tyle banners.) C lick
7. Choose
Portrait
Landscape
or
if you haven’t already
specified the orientation in y our applica tion softwa re. Set
the printable area if necessary.
Main
8. Click the
dialo g box. Mak e sure you c hoose
other settings you want to use, and then click
tab to return to the Main printer settings
Plain paper
and the
OK
OK
.
and
.
9. Click
Close, OK
, or
Print
to print your banner. You ma y
need to click a combination of these buttons.
3-9
Page 50
Managing
d
k
4
Print Jobs an
Networ
Your printer software includes several utilities for managing
print j obs. You can use them to monitor your printer’s status,
set up large jobs to prin t later, and handle network p rinting. If
you’re using your print er on a network, you n eed to fo l low
specia l setup procedure s.
This chapter provides instructions for the following:
◗ Managing pri nt jobs
◗ Networ k printing
Note:
The Status Monitor doesn’t
appear if you’ r e pr intin g
over a network.
Managing Print Jobs
Your Windows printer software includes two management
utilities: the Spool Manager and Status Monitor.
◗ The Spool Manager starts au tomatically when you send a
job to the printer. It allows you to print in the background
while yo u conti nue to w ork on y our com puter and to hold
jobs to print at a later time. If you’re using your printer
on a network, it also handles multiple print jobs that
come in at the same time.
◗ The Status Monitor, which is available only if you’re
using Windows 95, also starts automatically when you
send a job to the printer. It displays on your screen to
alert you about pri nter and i nk status .
4-1
Page 51
Managing Print Jobs and Network Printing
Using the Spool Manager
The Spool Manager works like the Windows Print Manager.
When you send a j ob t o your printer, your printer sof tware
creates a temporary journal file, stores it in the C:\TEMP or
C:\WINDOWS\TEMP folder or directory, and assigns it to a
print queue. The software then sends the file to your printer at
the right time.
Note:
In Window s 3. 1, you
may not see the Spool
Manager icon if the Program
Manager or cu rre nt w indow
is maximized. Ma ke the
window sma lle r to see
the Spool Manag er ic on.
menus
queue
journal file
◗ To open the Spool Manager whi le you’re printing, click
Spool Manager
the
icon that appears on the Taskba r
(Windows 95) or at the bottom of your deskto p
(Window s 3.1).
◗ To open it at any time, double-click the
Spool Manager4
icon in the EPSON program group or folder.
You see the Spool Manager win dow:
The Spool Manager window displays the status of your print
queues and journal files and lets you control them. Here are
some o f the things you can do:
For information about any of
these procedures, use the
Spool Mana ge r H e lp me nu.
◗ Hold or release a q u eue
◗ Send journal fi les to your printer over a netw ork
◗ Hold, re-queue, or delete a journal file
◗ Select the information you want to see in the Spool
Manager window
◗ Prevent the Despooler popup window from appearing on
your screen whenever you print
◗ Change your default spool directory
4-2
Page 52

Managing Print Jobs and Networ k Printing
Deleting a Stalled Print Job
If you’ re having trouble printing, it ma y be because of a
stalled print job. Follow these steps to delete it so you can
continue printing:
1. Open the Spool Manager as desc ribed on page 4-2.
Held
2. Click on any print jobs marked
Document menu a nd click
Delete
, then open the
.
3. Click
Yes
.
4. Exit Spool Manager and try printing again.
Changing the Default Spool Directory
If you get an err or message when you try to print, or print ing
is very slow, you can try changing your default spool
directory. Follow these steps:
1. Make a directory on your hard disk where you want
Spool Manager to st ore journa l files, for example,
C:\SPLTEMP.
2. Open the Spool Manager as desc ribed on page 4-2.
3. Choose
Default Spool Directory
from the Options menu.
4. In the dialog box, change the spool directory to the one
you created in step 1. Then click
5. Make sure
Setup
EPSON 600Q
from t he Q ueue m enu. The Q u eue Set up di al og bo x
is selected, and then choose
OK
.
appears.
6. Make sur e t he spool directory is th e one you created in
step 1. Also make sure
checked. Then click
Use Print Manager for this port
OK
. (If you are using Windows 95
is
and don’t see the Status Monitor when you print, make
sure it’s unchecked.)
4-3
Page 53
Managing Print Jobs and Network Printing
7. Close Spool Manager.
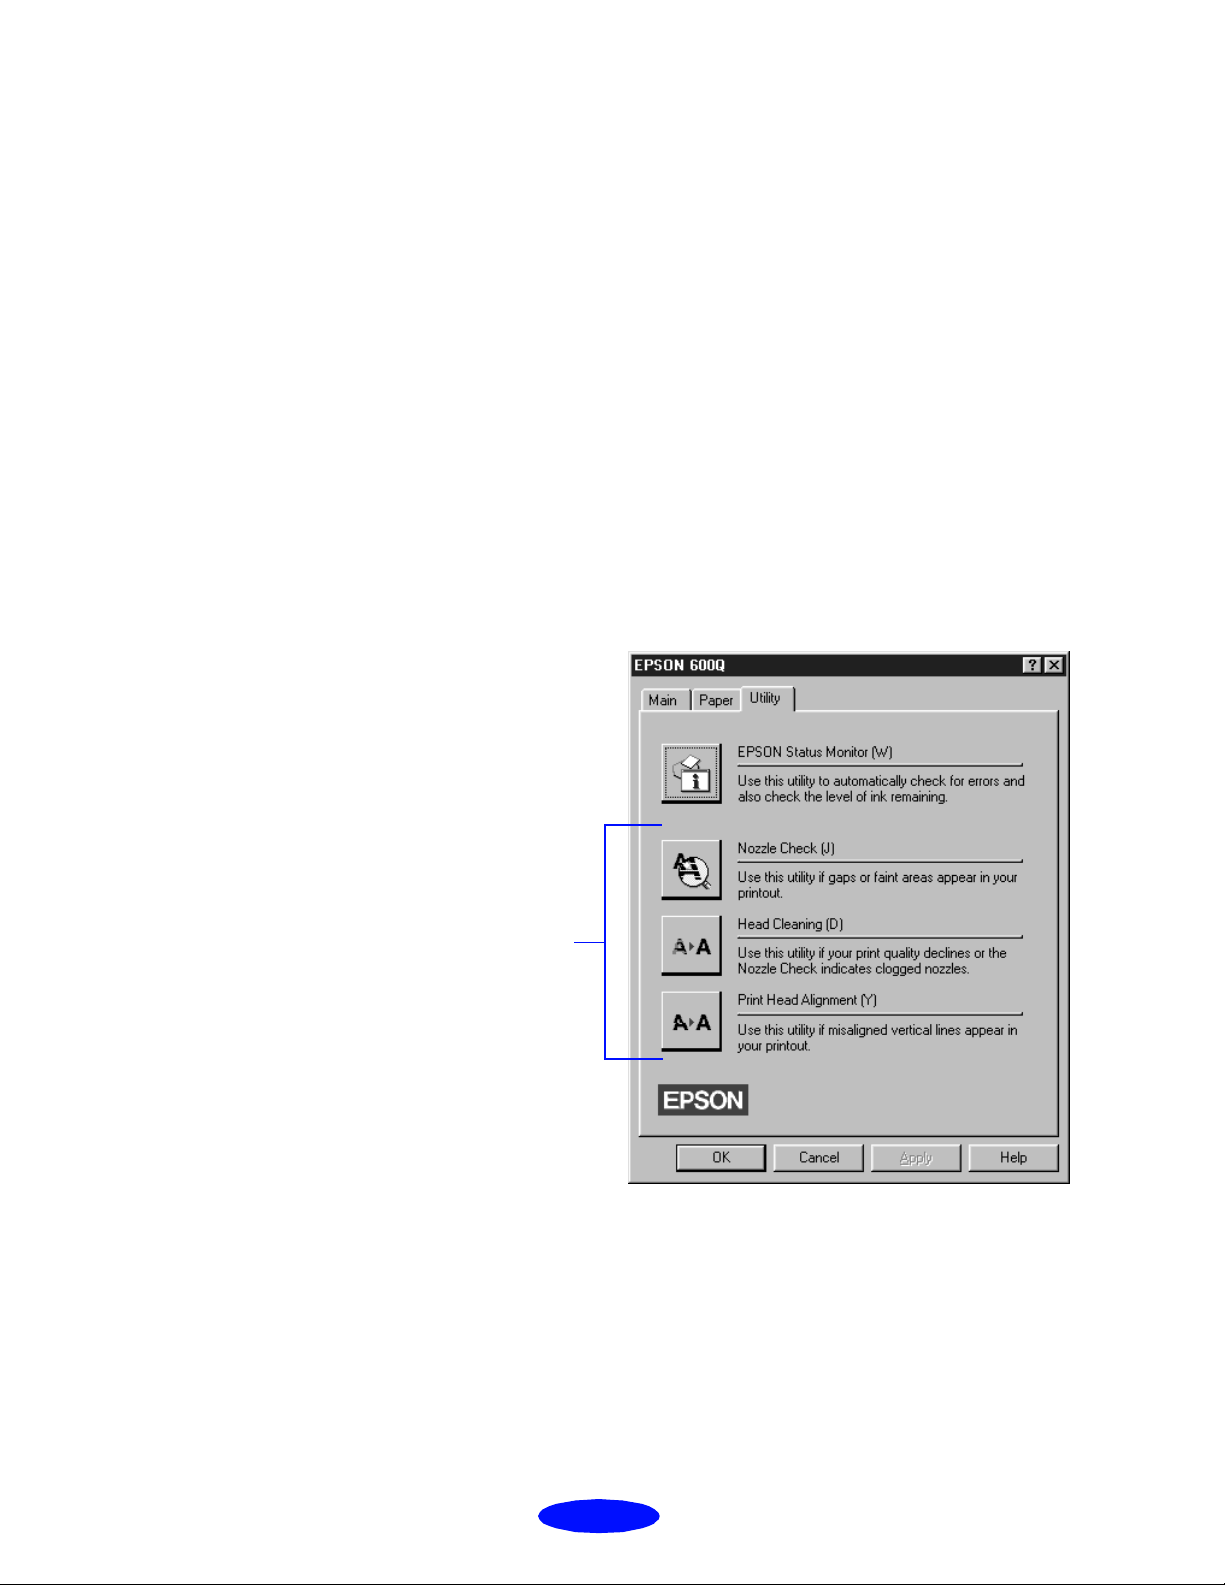
Using the Status Monitor
The Status Monitor, available on l y if you’r e using Windows
95, displays automatically whe n you send a job to the prin ter.
Howeve r, you ca n us e it at any t ime t o see how m uc h ink yo u
have left. Follow these steps:
1. Access the Main printer settings dialog box as described
on page 1-2.
2. Cli ck the
Utilit y
tab.
You see the Utility menu:
For informatio n about
these three utilities,
see Chapter 5,
“Maintenance and
Transportation.”
4-4
Page 54
Managing Print Jobs and Networ k Printing
3. Click the
Despoole r w ind ow with the Sta tus Mon itor at the bot t om:
EPSON Status Monitor
icon. You see the
4. Check the amount of i nk you have l ef t. For more
information about the Despool er window, see p age 1-6.
Network Printing
You can use your printer on a net work under Windows 95 or
other net work ope rating s ystems. The Spool Manager sends
journal files from y our computer to a shared directory on a
network server. These files can then be pr inted from another
computer attached to the printer.
First you need to install the
each computer that is going to print on th e network. Then run
Spool Mana ger and identify the shared director y to use for
journal files. After you set this up on the system connected to
the printer, you need to p erform a similar procedure on each
remote system on the network.
EPSON
600Q printer software on
Under Wi n dows 95, you also need to specify the port and
network path to the printer.
4-5
Page 55

Managing Print Jobs and Network Printing
Setting Up Your Network Path in Windows 95
If you w ant to use your printer on a network r unning
Windo ws 95, you ne ed to set u p th e p ort a nd ne tw ork pa th o n
the computer connected to the printer. Follow these steps:
1. Double-click
2. Double-click the
3. Right-click the
4. Cli ck the
My Computer
EPSON 600Q
Detai ls
.
Printers
tab. The following dialog box appears:
folder.
icon and choose
Properties
.
5. Cli ck the
to the printer and click
6. Open the Spool Manager window by double-clic king the
Spool Manager4 icon in the EPSON program group or
folder.
Add Port
4-6
button, then specify the network path
OK
.
Page 56

Managing Print Jobs and Networ k Printing
7. In the Spool Manager window, double-cli ck your
print er’s qu eue. The Queue S etup di alog box appears.
8. Make sure the
checked. Then click
Use Print Manager for this port
OK
.
option is
Setting Up Your Journa l File Directory
Follow these steps to set up the computer connected to the
printer and any o ther computers on t he network:
1. On the comp ut er co nnec ted to t he pr int er , op en the Sp ool
Manager window as described on page 4-2.
2. In the Spool Manager window, double-cli ck the qu eue
you want to use for network printing. The Queue Setup
dialog box ap pears.
3. Click the
4. Click the
Spool to remote printer
Browse
button.
button.
5. Select the remote server directory that will receive
OK
journal files and click
.
6. On remote systems, open the Spool Manager window as
described on page 4-2.
7. In the Spool Manager window, double-cli ck the qu eue
you want to use for network printing. The Queue Setup
dialog box ap pears.
8. Click the
from remote queues
9. Click the
Remote Despool
option.
Browse
button.
tab and then click the
Printing
10. Sel ect the di rectory you’re using for journal files on the
OK
remote server (selected in step 5) and click
OK
11. Click
to exit t he Queue Setup dialog box.
.
4-7
Page 57

5
d
Maintenance
an
Transportation
It’s easy to keep your
best. All you have to do is follow the simple instructions in
this chapter for replacing ink cartridges, performing routine
maintenance, and moving the printer.
This chapter covers the following procedures:
◗ Cleaning the print heads
◗ Replacing an ink cartridge
◗ Aligning the print heads
◗ Cleaning the printer
◗ Transporting the printer
EPSON
600Q pri nter working at its
Cleaning the Print Heads
If your printed image is unexpectedly light or faint, or dots
are missing from the image, you may need to clean the print
heads. This unclogs the nozzles so they can deliver ink
properly.
Cleaning the print heads uses ink, so clean them only if print
quali ty decli n es. You can use ei ther of th e following to clean
the print heads:
◗ The Head Cleaning utility in your printer software
◗ The printer’s control panel buttons
5-1
Page 58

Maintenance and Transportation
Using the Head Cleaning Uti lity
Follow these steps to run the utility:
1. Make sure the printer is turned on but not printing, and
2. Access the Main printer settings dialog box as described
B
black and A color ink out li ght s are off.
the
in Chapter 1.
Caution:
Never turn off the printer
P
while the
flashing. However, if the
light is still flashing after 10
minutes and th e prin t head is
not moving or making noise,
you may turn off the printer.
power light is
3. Cli ck the
4. Cli ck the
Utilit y
Head Cleaning
tab. You see the Utility menu.
icon.
5. Follow the instructions on the screen to clean the print
heads. Cleaning each head takes about two minutes,
during w hich the pr inter makes some noise a nd the
P
power light fl ashes.
P
When the
power li g ht st op s f las hi ng, y ou ne ed to ru n a
nozzle check to check the print quality and reset the
cleaning cy cle.
6. Make sure paper is loaded in the printer and click
nozzle check pattern
. See page 5-4 for instr u ct ions on
Print
examining the nozzle check pattern.
If your print quality h as not improved, repeat the steps above.
If you don’t not ice any improvement after doing this four
or five times, check the print quality solutions in Chapter 6,
“Troubleshooting.”
5-2
Page 59

Mainte nance and T ran s p o r t ati on
Using the Control Panel
1. Make sure the printer is turned on and not printing, and
B
that the
2. Press the
Cleaning takes about two minutes, during which the
printer makes some noise and the
black and A color ink out lights are off.
R
clean ing bu tton and hold it for three sec onds.
P
power light flashes.
After the cleaning cycle is complete and the
light stops flashing, you need to run a noz zl e check to
check the print quality and reset the cleaning cycle.
3. Access the Main printer settings dialog box as described
in Chapter 1.
4. Click the
5. Click the
instructions on examining the nozzle check pattern.
If your print quality has no t improved, re peat the steps a bove.
If you don’t notice any improvement after doing this
several times, check the print quality solutions in Chapter 6,
“Troubleshooting.”
Utility
Nozzle Check
tab. You see the Utility menu.
icon. See the next section for
P
power
5-3
Page 60

Maintenance and Transportation
Examining the Nozzle Check Pattern
Examine the noz zle check patte rn you print. It sh ould loo k
something like this, with the lower pattern colored cyan,
magent a, and yellow:
Each stagg er ed hor iz ont al and str aig ht vert ica l li ne shou ld be
complete, with no gaps in the dot pattern. If your printout
looks okay, you’ re done. If any do t s are missing, clean the
print heads again, as explained in the previous sections.
W0186B
Caution:
For best results, don’t
replace an ink cart ridge
unless its ink out light is
flashing or on.
If ink runs ou t , you can’ t
continue printing, even if
ink remains in the oth e r
cartridge.
To ensure good resul ts, use
genuine EPSON cartridges
and do not refill them. Oth e r
products may cause damage
to your printer not cov e red
by EPSON’s warrant y.
Replacing an Ink Cartridge
When a B black or A color ink out light flashes, the indicated
cartridge is low on ink. This is a good time to make sure you
have a new cartridge. When the light stays on, the cartridge is
empty a nd you need to replace it.
Use these
instal l ing th em an d be for e the expi rati on da te on th e packa ge :
Black ink cartridge S020093
Color ink cartridge S020089
When you need new ink cart ridges, conta ct your dealer or
EPSON
call
Canada, please call (800) 873-7766 for dealer referral.
EPSON
ink car tridges within six months of
Accessories at (800) 873-7766 (U.S. only). In
5-4
Page 61

Mainte nance and T ran s p o r t ati on
ink cartridge clamp
Removing an Empty Ink Cartridge
You can replace a cartridge when the B black or A color ink
out light is either flashing or on. Follow these steps:
Caution:
cleaning
If you press the
button when no ink ou t light
is flashing or on , the printer
cleans the print heads as
described on page 5-9.
If you need to replace an ink
cartri dge before t he ligh t s
flash (because the ink is too
old, for example) follow the
instructions on page 5-7.
Leave the old cartridge
installed until you are ready
to replace it with a new one.
Attempting to print without a
cartridge installed can
damage your prin te r.
Once your remove an ink
cartridg e, it becomes
unusable and c a nnot be
reinstalled.
R
1. Make sure the printer is turned on and not printing.
2. Determine which cartridge needs to be replaced.
3. Lower the output tray and raise the printer cover.
4. Press the
The print heads move slightly left and the
R
clean ing bu tton and hold it for three sec onds.
P
power light
begins flashing. (The print heads return to their home
position if you don’t proceed to step 5 within 60
seconds.)
5. Pull up the ink cartridge clamp. The cartridge rises up
from its holder. (Although the illustration shows the
color ink cartridge, the procedure is the same for
replacing the black ink cartridge .)
6. Lift the cartridge out of the printer and dispose of it
carefully.
5-5
Page 62

Maintenance and Transportation
7. Follow the steps in the next section to install the new ink
cartridge.
Warning:
If ink gets on your hands, wash
them thorou ghly with soap and
water. If ink gets into your
eyes, flush them immediately
with water.
Caution:
You must remove the tape
seal from the top of the
cartridge; leaving the tape on
will permanently damage it.
Do not remove th e cl ear seal
from the bottom of the
cartridge; ink will leak ou t.
Installing the Ne w Cartridge
Once you have removed the em pt y cart ridge, you’re ready t o
install the new one. Follow these steps:
1. Remove the new ink cartridge from its packaging.
2. Remove the yellow tape seal as shown:
black ca r tri dg e
color cartridge
3. Lower the ink cartridge into its holder with the label
facing up and the arrow pointing to the back of the
printer. The larger cartridge (color) goes on the right, the
black ink cartridge on the left.
5-6
Page 63

Caution:
Don’t open the clamp or
remove a cartridge ex cep t
to replace it with a new one.
Once you remove a
cartri dge, you can’t reu se it,
even if it contains ink.
Mainte nance and T ran s p o r t ati on
4. Press down the ink cartridge clamp until it locks in place.
5. If you need to replace the other ink cartridge, remove it
as described in “Removing an Empt y Ink Cartridge” on
page 5-5. Then follow steps 1 through 4 in this section.
Caution:
Never turn off the printer
power light is
while the
flashing. However, if the
light is still flashing after 10
minutes and the prin ter is
not mov ing or ma king nois e,
you may turn off the printer.
P
6. Press the
R
cleani ng button and close the printer cover.
The printer moves the p rint heads and begins char gi ng
the ink delive ry system. (Even if you don’t press the
button, ink charging begins 60 seconds after you close
the cl amp.)
P
The
power light fl ashes and the prin t er makes variou s
sounds. Charging takes about two minutes. When it’s
finished, you can print again.
Replacing an Outdated Ink Cartridge
If an ink ca rt rid ge is m ore tha n s ix mo nths ol d, yo u m ay need
to replace it. How can you t ell? You may notice that your
printouts don’t look as good as they used to. If print quality
doesn’t improve after cleaning and al igning the print heads,
you can replace one or both cartridges.
5-7
Page 64
Maintenance and Transportation
Caution:
To avoid dama ging the
printer, never move the print
heads by hand.
Follow these steps to replace an ink cartridge before the
A
black or
color ink out light is flashing or on:
B
1. Make sure the printer is turned on and not printing.
2. Lower the output tray and raise the printer cover.
E
3. Press the
load/eject button and hold it down for a few
seconds until the print heads move to the left.
4. Pull up the ink cartridge clamp. The cartridge rises up
from its holder.
5. Lift the cartridge out of the printer and dispose of it
carefully.
6. Follow the steps in the previous section, “Installing the
New Cartridge,” to install the new ink cartridge.
5-8
Page 65
Caution:
Load paper that’s at least 8.3
inches wide so ink doesn’t
spray onto the platen.
Mainte nance and T ran s p o r t ati on
Aligning the Print Heads
If your printout s conta in misaligned ver tical lines, you may
need to align the print heads. Follow these steps:
1. Make sure the printer is turned on and paper is loaded.
2. Access the Main printer settings dialog box as described
in Chapter 1.
Caution:
Don’t touch the gears inside
the printer.
Never use alcohol or thinner
for cleaning; they can
damage the printer
components and case.
Don’t use a hard or abrasive
brush.
Don’t get water on the
printer components.
Don’t spray lubricants or oils
inside the printer.
3. Click the
4. Click the
Utility
Print Head Alignment
tab. You see the Utility menu.
icon.
5. Follow the instructions on the screen to print a test page
and select th e co rrect al i g nm en t .
Cleaning the Printer
To keep your printer worki ng at its best, yo u should clean it
several times a year, following these steps:
1. Turn off the printer, unplug the power cord, and
disconnect the printer cable.
2. Remove all the paper from the sheet feeder.
3. Carefully clean away dust and dirt with a soft, damp
cloth.
4. Clean t h e exteri or of the pr inter w ith a soft, damp cloth.
Keep the printer cover closed so water doesn’t get inside.
5. Clean ink out of the printer’s interior with a soft, damp
cloth.
5-9
Page 66

Maintenance and Transportation
Transporting the Printer
If you w ant to mov e your printer some distan ce, you need to
prepare it for transportation and repack it in the original box.
Caution:
To avoid damage, always
leave the ink cartridges
installed when transporting
the printer.
Follow these steps:
1. Turn on the printer and wait until the print heads lock in
2. Unp lug th e po wer co rd fro m the el ec t ri cal ou t l et. T he n
3. Remove any paper from the sheet feeder and remove the
4. Push in the output tray extensions and close the tray.
the far right position. Then turn off the printer.
disconnect the interface cable from the printer.
paper support.
5. Repack the printer and attachments in the original box
using the protective materials that came with it. See the
Notice Sheet that was packed with the printer.
Be sure to keep the printer flat as you transport it. If you
notice a decline in print quality after transporting the printer,
clean the print heads; if output is misaligned, align the print
heads. See the instructions in this chapter.
5-10
Page 67

Trou
bl
eshooting
6
As you use your pr i n t er, you may occasionally exper ience a
paper jam or other pr o bl em. The firs t th i n g you shoul d do is
diagnose the problem, following the guidelines in this
chapter. Then try the most likely solutions until the problem
is fixed.
This chap t er te ll s you e ve rythi n g yo u need t o k now ab out t he
following:
◗ Diagnosing problems
◗ Improving print quality
◗ Solving printing problems
◗ Fixing paper jams and other paper problems
◗ Solvin g miscellaneou s printout probl ems
Diagnosing Problems
Your prin ter inc lu de s a numb er of ways to he lp yo u di agno se
proble ms :
◗ To identify the most common problems, check the lights
on the printer’s control panel. See “What To Do When
the Printer Ligh t s Flash” on page 1-9.
◗ You can also use the Status Monitor utility to identify
commo n problems. For in struct ions, see page 4-4.
6-1
Page 68
Troubleshooting
◗ For the latest information, check the
program and the ReadMe file in the
EPSON
EPSON
600Q Help
program
group or f older.
◗ If none of the suggested solutions in this chapter solve
your prob lem, con tact
EPSON
as described under “Where
to Get Help” in the Introduction.
Running a Printer Check
You ca n run a prin ter check to d etermine whet her the
problem comes from the printer itself or some other source.
◗ If the results are satisfactory, the problem lies in software
settings, the interface cable, or your computer.
◗ If the printer check does not print correctly, you have a
problem with your printer. See the suggestions in this
chapter for possible solutions.
Caution:
Use paper that’s at least 8.2
inches wide. Othe r wise the
print head will spray ink
directly onto the platen.
Follow these steps to check the printer:
1. Ma ke su re both the prin te r an d computer ar e tur ne d off .
2. Disconnect the interface cable from the printer.
3. Make sure paper is loaded in the printer.
E
4. Hold down the
load/eject button and pre ss the Ppower
button to turn on the printer. Then release both buttons.
The print er prints one page conta ining a no zzle che ck
pattern and the printer’s ROM version. The following
sample is in black, but the actual printout is in color.
W0186 02BB
5. After it prints the page, turn off the printer. Reconnect the
interface cable and turn on yo u r pri nter and compute r.
6-2
Page 69
Troubleshooting
Improving Print Quality
You can often improve pri n t quali ty by doing one of the
following:
◗ Clean the print heads (see Chapter 5 for instructions).
◗ Use higher quality paper appropriate for your print job
(see Chapter 3 for a list of
EPSON
◗ Match the Media Type setting in the Main printer settings
dialog box to the type of media you loaded in the printer
(see Chapter 3 for details).
◗ Turn off High Speed mode in the Advanced printer
settings dialog box (see Chapter 2 for details).
◗ Make sure Economy mode is off in the printer driver.
paper s) .
◗ Replace the ink cartridges. (Check the status of the
black and
instructions.)
Here are some detailed solutions to specific print quality
problems.
Printed image has horizontal banding
Possible cause Solution
The Media
doesn’t match the loa de d
paper.
The printable side of the paper
is face down.
The print head nozzles are
clogged.
The ink cartridg es are lo w on
ink.
Type setting
Make su r e the Me di a Type setting matche s the loaded paper o r oth e r
media. Then the pr inte r so ftw a r e ca n automatically select other setti ngs
for the best quality. See Chapters 1 and 3.
Remove the pape r an d reloa d it with the printable side face up. See
Chapter 3 for instructions.
Clean the print heads. See Chapter 5 for instructions.
Check the
may need to replace. See Chapter 5.
B
A
color ink out lights first. See Chapter 5 for
B
black a nd A color ink out lights to see which cartridge you
The MicroWeave opt ion is not
set.
Turn on MicroWeave in the advanced printer settings dialog box. See
Chapter 2 for more information.
6-3
Page 70
Troubleshooting
Vertical lines are misaligned or vertical banding appears
Possible cause Solution
The print head nozzles are
clogged.
High
Speed mode is turne d
on.
The print heads are
misaligned.
Clean the print heads. See Chapter 5 for instructions.
Turn off High Speed mode if vertical lines are misalig ne d. See Chapter 2
for information.
Run the Print Head Alignmen t utility. See Ch apte r 5 for instructions.
The printed image has incorrect or missing colors
Possible cause Solution
The Ink option is set to Black. Change the Ink setting to Color. See Chapter 1 for instructions.
The Media
doesn’t match th e load ed
paper.
The pri n tabl e s ide of th e p ap er
is face down.
The Halftoning and Color
Adjustment Mode options are
set incorrectly fo r yo ur
document type.
Type setting
Make sure the Me dia Type setting m a tche s the pa pe r o r me dia you’re
using. Then the printer software can automatically select other settings for
the best quality. See Chapters 1 and 3.
Remove the paper and reload it with the printable side face up. See
Chapter 3 for instructions.
Use the correct se ttings for the project you are printing, following the
instructions in Chap ter 2.
The print head nozzles are
clogged.
The ICM (Windows 95)
settings are incorrect for your
document.
The ink cartridges are low on
ink or one or more ink colors
are empty.
The colors dis pla ye d on your
monitor don ’t matc h the
printed colors.
The color settings in your
application software need
adjustment.
Clean the print heads. See Chapter 5 for instructions.
Use the Automatic mode setting or choose a different project type setting.
See Chapter 2 for mor e informa tion.
Check the B black and A color ink out lights to see which cartridge you
may need to replace. See Chapter 5 for instructions.
Because your mo nitor an d pr inte r use dif fer en t technologies to represent
colors, your printed c olo rs cannot exactly match the color s you see on
your monitor screen . Use the ICM (Win dows 95) setting. See Ch apter 2
for more information.
You may be able to adjust various color settings in your application
software. See your so ftw are documentation for mo re inf or ma tion.
6-4
Page 71
The printed image is faint or has gaps
Possible cause Solution
Troubleshooting
The print head nozzles are
clogged.
The Media
doesn’t match the loa de d
paper.
The loaded paper is damaged,
old, or dirty.
The ink cartridg es are lo w on
ink.
Type setting
Clean the print heads. See Chapter 5 for instructions.
Make su r e the Me di a Type setting matche s the loaded paper o r oth e r
media. Then the pr inte r so ftw a r e ca n automatically select other setti ngs
for the best quality. See Chapters 1 and 3.
Remove the paper and reload a new stack with the pri nta ble sid e face up.
See Chapter 3 for instructions.
Check the B black a nd A color ink out lights to see which cartridge you
may need to replace. See Chapter 5 for inst ru ct ion s .
The printed image is blurry or smeared
Possible cause Solution
The printer’s adjust lever is in
the 0 position.
The paper is damp or the
printable side is face down.
You loaded special med ia
without a support sheet.
Set the adjust lever to the + position and try printing again. See Chapter 3
for instruct i o ns .
Remove the paper and reload a new stack with the pri nta ble sid e face up.
See Chapter 3 for instructions.
Follow the special med ia load ing instru ctions in Chapter 3 and on the
paper packa gin g fo r media that require support sheets. Also try lo ad ing
your media one sh eet a t a time.
You tried to print on
cardboar d or othe r
nonrecommended media.
The Media
not match the loade d pa p er.
The sheets ente ri n g th e ou tput
tray are smearing the ink on
ejec ted page s .
Ink has leake d inside the
printer.
The color ink cartridge is
empty.
You’re using t he Hi gh Speed
and MicroWeave settings with
a misaligned pr int he a d.
Type setting doe s
Make sure your pa pe r o r med ia mee ts the spe c if i catio ns liste d in the
Appendix. If your printouts are still blurry afte r yo u cha nge paper, clean
the print heads as desc r ibe d in Chapter 5.
Make su r e the Me di a Type setting matches the media you loaded . Then
the printer softwar e can a uto ma tic ally se lect other settings for the best
quality. See Chap ter 3 for information.
Remove each sh eet from the output tray as soon as it is printed to pr eve nt
smearing, especially if you use transparencies.
Clean carefully inside the printe r to remove spilled ink. See Chapter 5 for
instructions.
Replace the color ink cartridge following the instructions in Chapter5 or
choose Black ink in you r pr inte r soft war e.
Turn off High Speed following the instructions in Chapter 2. Run the Print
Head Alignmen t utility f ollow in g the instr uc tio ns in Chapter 5.
6-5
Page 72
Troubleshooting
Photographic images look grainy or rough
Possible cause Solution
The print heads are
misaligned.
The resolutio n of your image
may be too low.
Run the Print Head Alignmen t utility. See Ch apte r 5 for instructions.
Increase the image re solu tion using your image- e diting sof t w are , or
decrease the si ze of the image.
Color documents print in black and white
Possible cause Solution
Your printe r is not selec te d in
your application.
Color printin g is not selected. Select color printing in you r a pp lic atio n a nd th e printer driver.
Select your printer and port in your software ap plic a tion.
Solving Printing Problems
If the printer won’t print, first check that:
P
◗ The printer is turned on and the
power light is on.
◗ Paper is loaded in the printer.
◗ The printer is plugged into a working electrical outlet
◗ The interface cable is securely connected to the printer
If you still can’t print, check the following solutions.
All lights are off
Possible cause Solution
The printer is not receiving
power.
Try these solution s:
◗
◗
◗
that’s not controlled by a switch or timer.
and computer and both are turned on.
Make sure the pr inte r is tur ned on.
Turn off the power and plug in the power cord securely.
Make sure the outlet is not controlled by a switch or timer and is
operable.
6-6
Page 73
Only the
Possible cause Solution
power light is on, but nothing prints
P
The interface cable is not
connected securel y .
The printer has an inter na l
problem.
Your printer or app lication
software is installed
incorrectly.
Your computer doesn’t have
enough memory to handle the
data in the file you a re
printing.
Printing is stalled in Spool
Manager.
The print heads are clogged or
the ink cartridge s are too old.
6
Turn off your pr inte r and computer. Then ma ke sure the cable is
connected securel y and meets the pri nter’s specificat i o ns. Try prin ti ng
again.
Turn off the printer and computer, disconnect the interface cable, and run
a printer check as described on page6-2.
If the printer check p rin ts co rre ctly , chec k y our pr inte r and application
software for cor r ect insta lla tion. If you’re printing on a Windows 9 5
network, yo u ma y ne e d to set up your printer for networ k pr inting, as
described in Chapter 4.
Try one of the fol lowing:
◗ Reduce the resolution o f yo ur ima ge .
◗ Select fewer colors or a lowe r res olu tion f or you r monitor.
◗ Add more memory to your computer.
Delete the stalled pr int jobs in Spool Manager and r es ume pr inting; see
Chapter 4 for instructions.
If the printer sounds like it’s trying to prin t but do es n’t feed paper, clean
the print heads; see Chapter 5 for instructions.
If cleaning d oesn’t help, replace the car tridges. For informatio n on
cartridge life and replacement instructions, see Chapter 5 .
The
A
paper out light is flashing or on
S
Possible cause Solution
If flashing, pap er is jam me d. Remove the pape r an d fo llow the guidelines for preventing jams on page
6-11.
If on, paper is not load ed or is
loaded incorrectly.
black or A color ink out light is flashing or on
B
Possible cause Solution
If flashing, the ink supply is
getting low.
If on, the ink cartridge is
empty.
Load paper or re mov e the st ack a nd reloa d it a s de sc rib e d in the Quick
Setup booklet or C ha pter 3. Then press the E load/eject button to turn off
the light and resu me pr inting.
You need to replace the indicate d in k car tri d ge so on . Make s ur e yo u hav e
a new cartridge, then see Chapter 5 for instructions.
You must replace the indicated ink cartridge; see Chapter 5 for
instructions.
6-7
Page 74

The S paper and Ppower lights are flashing
Possible cause Solution
A carriage error has occurred . Remove any paper in the printe r. Pres s the
30 seconds. Then press it again. Turn the printer off, wait a few seconds,
and then turn it on and try pr inting again. If the error is not clea red,
contact EPSON as described in the Introduction.
load/eject button for about
E
All the lights are flashing
Possible cause Solution
You haven’t removed all the
packing material from the
printer.
An internal error ma y ha ve
occurred.
Remove the packing ma te r i al, follow i n g the instr uc tion s on the Notice
Sheet in the box.
Turn off your printer, wait a few seconds, and turn it on again. If the lights
still flash or stay on, contact E PSO N as de sc r ibe d in the In tr oduction.
The printer has finished charging the ink cartridge, but the Ppower light is still flashing
Possible cause Solution
The ink cartrid ge clamp isn’t
locked down.
Press down on the clamp to loc k it into p lace .
Packing mater ial rema ins in
the printer.
The printer ne ed s to initializ e . If the printer is not moving or making noise, but the light is still f las hing
Remove the packing material, following the instructions on the Notice
Sheet in the box.
after 10 minutes, turn the printer off. If the light is still flashing when you
turn it back on, contac t EPSO N as desc rib ed in the Introduction.
The printer software installed with Windows 3.1 does not work correctly after you upgrade to
Windows 95
Possible cause Solution
Your printe r sof tw a re is not
set up correctly for Win d o ws
95.
Reinstall the printer software after installing Windows 95, as described in
the Quick Setu p booklet.
After you install your printing software, you see the Windows 95 New Hardware Found window
Possible cause Solution
An operating system error has
occurred.
Click Do
not install a driver, and then clic k OK.
6-8
Page 75

You see a spooling error message (Windows)
Possible cause Solution
Spooling error me ssa ge s or
very slow printin g ma y be
caused by tem po ra r y files.
Your hard drive is too full. Delete unnecessary files to ma ke r oom on the drive.
Your computer doesn’t have
enough memory for the file
you’re printin g.
Change the Spool Manager default directory, following the instructions in
Chapter 4.
Try one of the fol lowing:
◗ Reduce the resolution o f yo ur ima ge .
◗ Select fewer colors or a lowe r res olu tion f or you r monitor.
◗ Add more memory to your computer.
In Windows 95, the Status Monitor box does not appear with the Despooler
Possible cause Solution
The Windows Print Manager
is interfering with th e Status
Monitor.
Make sure Use Prin t Ma na ge r for this port is not checked in the Spool
Manager Que ue se tup. Then check yo ur bidir e ct iona l spool settings. See
Chapter 4 for instructions.
Printing is too slow
Possible cause Solution
Your printer software options
are set incorrectly.
Your system doesn’t have
enough resources .
Your port setting s a re
incorrect in Windows 95.
For faster printing, try the fo llow ing:
◗ Set Print
◗ Turn MicroWeave off.
◗ Turn High
◗ Choose No
◗ Choose Black ink.
See Chapters 1 and 2 for more information.
◗ Clear space on you r har d disk drive or run a defra gmentation utility.
◗ Don’t run too many applications at the same time .
◗ Turn o ff virtual memory.
◗ Increase y our sys t em’s m emory (RAM ).
Change your default spool directory and disable port settings as described
in Chapter 4.
Quality to Econo my.
Speed on.
Halftoning.
6-9
Page 76

Fixing Paper Problems
You can avoid mos t paper handlin g proble ms by doing the
following:
◗ Use smooth, high-quality media designed for ink jet
printers that meet the media specifications in the
Appendix.
◗ Follow all loading and handling instructions included
with the media.
◗ Load the media with the printable side face up, as
described in the Quick Setup booklet or Chapter 3.
If you have prob l ems with paper feeding, paper jams, or
ejected paper, check here for solutions.
Paper doesn’t feed
Try this Then do this
Remove th e stac k of pa pe r
from the sheet feed er.
Check that the paper:
◗
Isn’t curled or creased.
◗
Isn’t too old (see Cha pte r 3 or your pape r p ackaging for more
information).
◗
Isn’t loaded above th e arrow on the left edge guide.
◗
Isn’t jammed inside the prin ter. (If the
paper is jammed.)
Then reload the paper as described in Chapter 3, making sure the left edge
guide is adjusted to fit the pap e r’s w idth.
S
paper out light is flashing,
Multiple pages feed at the same time
Try this Then do this
Remove th e stac k of pa pe r . ◗ Make sure the pape r isn’t to o thin (see the paper specifications in the
Appendix).
◗ Fan the edges of the stack of paper to separate the sheets.
◗ Reload the paper as described in the Quick Setup booklet and
Chapter 3.
◗ If more copies of a page or document are pr inting than you expect e d,
check that the Copies se ttings in both the printer settings dialog box
and your application program are set to 1. See Chapter 1 for
information.
6-10
Page 77

Paper jams inside the printer
Try this Then do this
Turn off your printer, open the
cover, and remove a ll the
paper that’s inside , inc luding
any little pieces that may have
torn off.
Reload the paper as de sc rib e d in the
If your paper jams frequently, mak e su re you:
◗
Use smooth, hig h- qu ality pape r, loa de d prin ta ble side up.
◗
Fan the stack and then even the edges before loading it.
◗
Don’t load paper above the arrow mark on the left edge guide.
◗
Adjust the left edge guide to fit the width of yo ur pa pe r.
Paper doesn’t eject fully or is wrinkled
Possible cause Solution
If the paper doesn’t eject fully,
you may have set the wron g
paper size.
If it’s wrinkled when it comes
out, the paper may be damp or
too thin.
Press the E load/eject button to eject the paper. Then make sure you select
the correct paper size in your application or printer software. (See the
paper specific a tions in the Appendix f or the pa pe r size s you can print
with.)
See the paper specifications in the Appendix for pa pe r thickne sses you
can print with, as we ll as env iro nmental requirements for storage.
Quick Setup
booklet and Cha pter 3.
Solving Miscellaneous Printout Problems
If your printout result s are not what you expected, try these
solutions.
Characters are incorrect or garbled
Possible cause Solution
Your printer is not the
Windows d efa ult pr inte r .
Printing is stalled in Spool
Manager (Windows).
The interface cable is not
secu rely connec t ed.
Select your pr inte r as the de f au lt W indows printer. See y our W indows
document ation or online help for ins tru ctio ns.
Delete the stalled pr int jobs in Spool Manager follow i ng the instr uc tion s
in Chapter 4. Then try printing again.
Turn off your pr inte r and computer. Then ma ke sure the cable is
connected securel y and meets the pri nter’s specificat i o ns.
.
6-11
Page 78

The margins are incorrect
Possible cause Solution
Margins are set inc orr ectly in
your software application.
Paper settings in the pr inte r
software are in correc t f or you r
paper size.
Check your software documentation f or instr uc tions on selecting the
correct mar g i ns for your paper siz e.
Make sure the ma rg ins a re w ithin the printable area of the pa ge . See the
Appendix for m or e inf or ma tion.
Select the correct pape r setting s fo r yo ur pa pe r size . See Cha pte r 1 for
more information.
The image is inverted as if viewed in a mirror
Possible cause Solution
You used a Flip
option in your ap plic a tion
software or the pr inte r
software.
Horizontal
Turn off the Flip Horizontal or mirror setting in your application software
or the printer software. See Cha pter 2 for information.
The printer prints blank pages
Possible cause Solution
Your printe r is not the
Window s de fault printer.
Paper settings in the pr inte r
software are in correc t f or you r
paper size.
The print head nozzles are
clogged.
Select your printer as the default W indows printer. See your Windows
documentation or o nline he lp for instructions.
Select the correct pape r setting s fo r yo ur pa pe r size . See Cha pte r 1 for
more information.
Clean the print heads following the instr uctions in Chapter 5.
6-12
Page 79

Printing
Specifications
A
Printing method
Nozzle configuration
Printable columns
and printing speeds
On-demand ink jet
Monochrome (black) 64 nozzles (32 × 2 staggered)
Color (cyan, magenta, yellow) 32 nozzles × 3
Character mode
Character pitch
(characters per inch) Printing column Draft speed
10 80 400 cps 200 cps
12 96 480 cps 240 cps
15 120 600 cps 300 cps
17 (10 condensed) 137 684 cps 342 cps
20 (12 condensed) 160 800 cps 400 cps
cps = characters per se co nd
Raster graphics mode
Print quality Printable area Available dots CR speed
180 dpi 8.26 inches 1488 20 ips
LQ printing
speed
Resolut io n
Print direction
Control code
Line spacing
Paper feed speed
Input buffer
360 dpi 8.26 inches 2976 20 ips
720 dpi 8.26 inches 5952 20 ips
ips = inches per se cond
Maximum 1440 dpi × 720 dpi
Bidirectional with logic seeking for text and graphics. (Auto print
direction can be set in the default-setting mode.)
ESC/P 2 and expanded raster graphics code
1/6 inch, 1/8 inch, or programmable in 1/360-inch increments
66.6 milliseconds per 1/6-inch line
32KB
A-1
Page 80
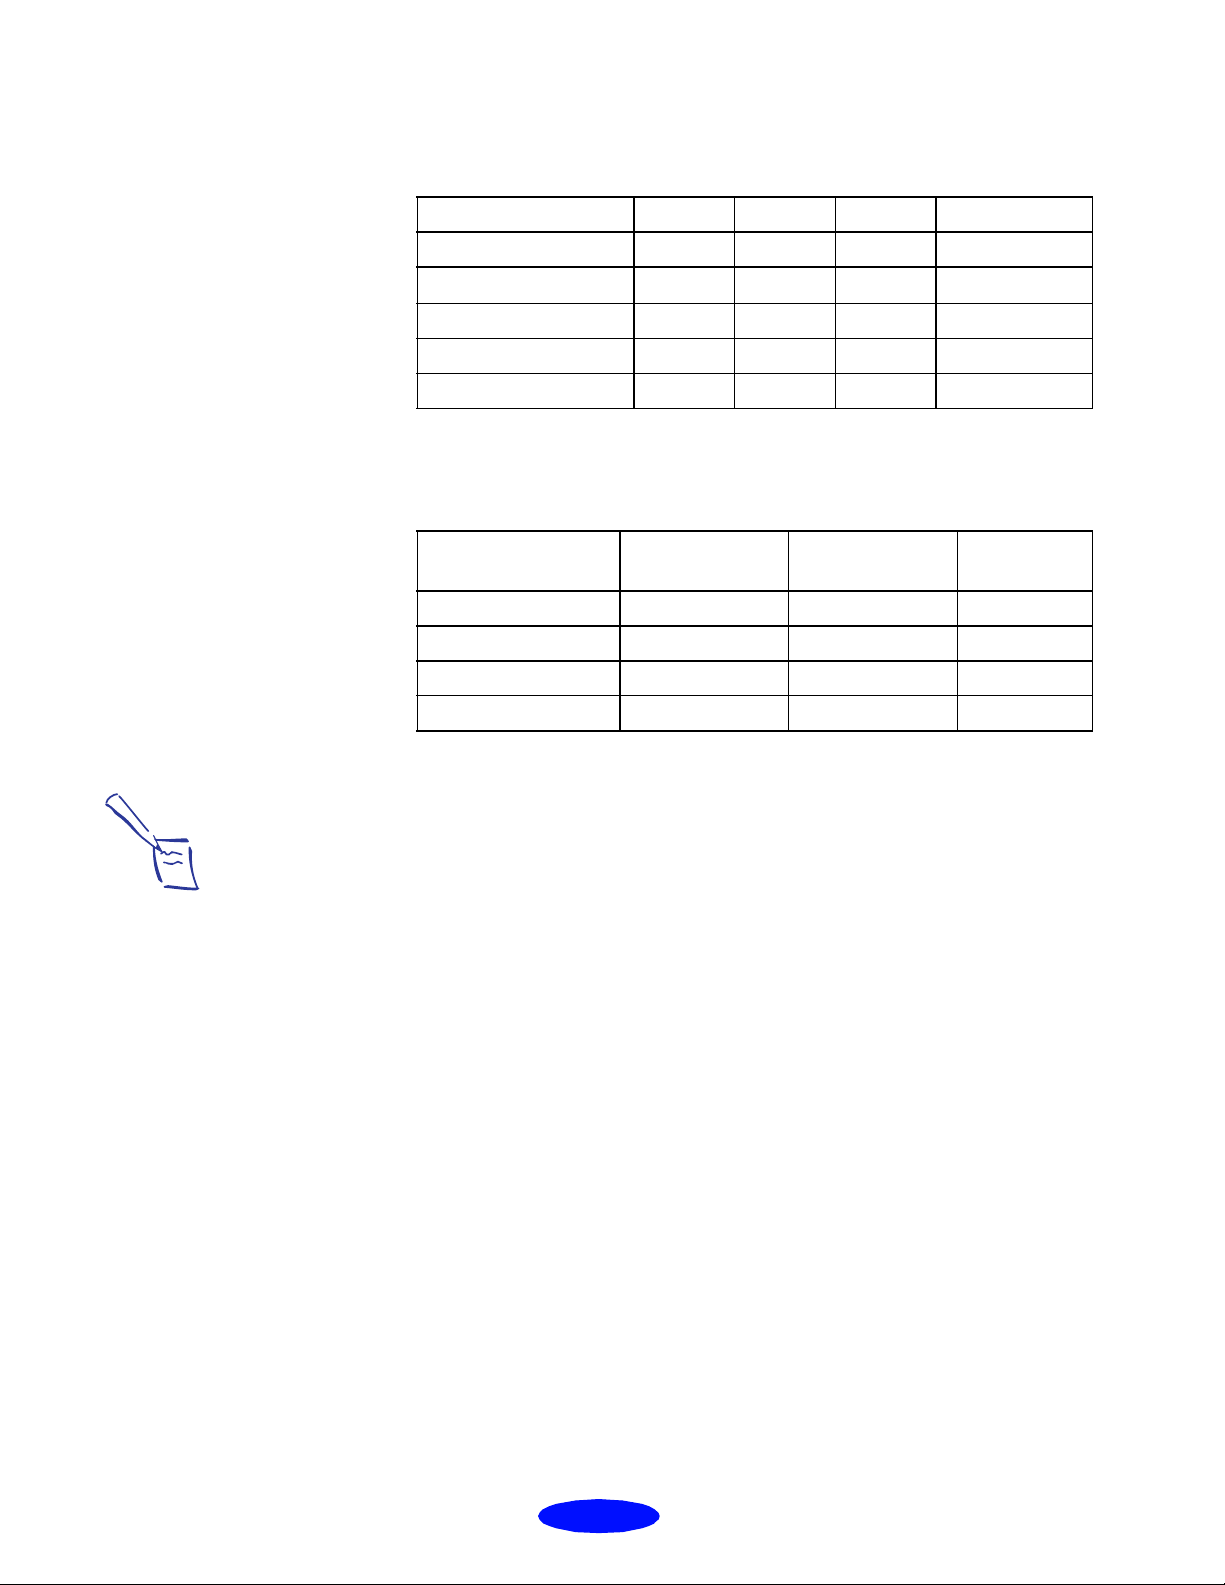
Specifications
Fonts
Bitmap fonts
Font 10 cpi 12 cpi 15 cpi Proportional
EPSON Roman x x x x
EPSON Sans Serif
EPSON Courier x x x
EPSON Prestige x x x
EPSON Script x x x
Select other font/pitch co mbinations using ESC/P 2 commands.
See the Command Li st on page A-9.
x
xx x
Scalable fonts
Minimum
Font
EPSON Roman 8 32 2
EPSON Sans Serif 8 32 2
EPSON Roman T 8 32 2
EPSON Sans Serif H 8 32 2
Each font has four vari ations: normal, bold, italic, and bol d italic.
Note:
The printer always uses the fonts you selected with your software applic ation. You need to use the printer’s
internal fonts only if your application doesn’t allow you to select fonts.
point size
Maximum
point siz e Incremen ts
Character tables
Character sets
These character tables are selected with the default setting mode
(see page A-8 for instructions) or by using software commands.
PC437 (U.S./Standard Europe)
◗
PC850 (Multilingual)
◗
PC860 (Portuguese)
◗
PC861 (Icelandic)
◗
PC863 (Canadian-French)
◗
PC865 (Nordic)
◗
Abicomp
◗
BRASCII
◗
Roman 8
◗
ISO Latin 1
◗
Italic
◗
14 international character sets and 1 legal character set
A-2
Page 81
Specifications
Paper
Paper type Size Paper types Thickness Weight
Single sheets Letter (8.5 × 11 inches)
A4 (210 × 297 mm)
A5 (148 × 210 mm)
B5 (182 × 257 mm)
Legal (8.5 × 14 inches)
Statemen t (5.5 × 8.5 inches)
Executive (7.5 × 10 inches)
Transparencies,
Glossy film,
Glossy paper
Adhesive sheets A4 (210 × 297 mm) Self adhesive sheets
Envelopes No. 10 9.5 × 4.1 inches
Letter (8.5 × 11 inches)
A4 (210 × 297 mm)
A6 (105 × 148 mm, glossy fil m
only)
(240 × 104 mm)
DL 8.7 × 4.3 inc h e s
(220 × 110 mm)
C6 4.4 × 6.4 inches
(114 × 162 mm)
Plain bond paper and
special ink jet papers
distributed by EPSON
Transparencies,
glossy paper, and
glossy film distri buted
by EPSON
distributed by EPSON — —
Plain bond paper or air
mail paper
0.003 to 0.004 inch (0.08
to 0.11 mm)
Glossy film and
transparencies:
0.005 to 0.006 inch (0.13
to 0.15 mm)
glossy paper:
0.0066 to 0.0070 inch
(0.17 to 0.18 mm)
0.006 to 0.017 inch (0.16
to 0.43 mm)
17 to 24 lb
(64 to 90 g/m
—
12 to 20 lb
(45 to 75 g/m
2
)
2
)
Index cards A6 (105 × 148 mm)
5 × 8 inches (127 × 203 mm)
10 × 8 inches (254 × 203 mm)
Note:
Since the quality of any part icular brand or type of pa per may be changed by the manufacturer at any time,
EPSON cannot attest to the quality of any non-EPSON brand or type of paper. Always test samples of paper
stock before purchasing large quantities or printing large jobs.
Poor quality paper may reduce print quality and cause paper jams and other problems. If you encounter
problems, switch to a higher gra de of pa per.
Do not load curled or folded paper.
Ink jet paper, envelope s, glossy film, glossy paper, and transpa r encies are usable only under normal
conditions:
Temperature: 59 to 77 °F (15 to 25 °C)
Humidity: 40 to 60% RH
EPSON Photo Quality Glossy Paper and Photo Quality Self Adhesive Sheets should be stored under the
following conditions:
Temperature: 59 to 86 °F (15 to 30 °C)
Humidity: 20 to 60% RH
Ink jet cards
distributed by EPSON
0.0091 inch (0.23 mm) 50.7 lb
(188 g/m
2
)
Printable area
A-3
Page 82
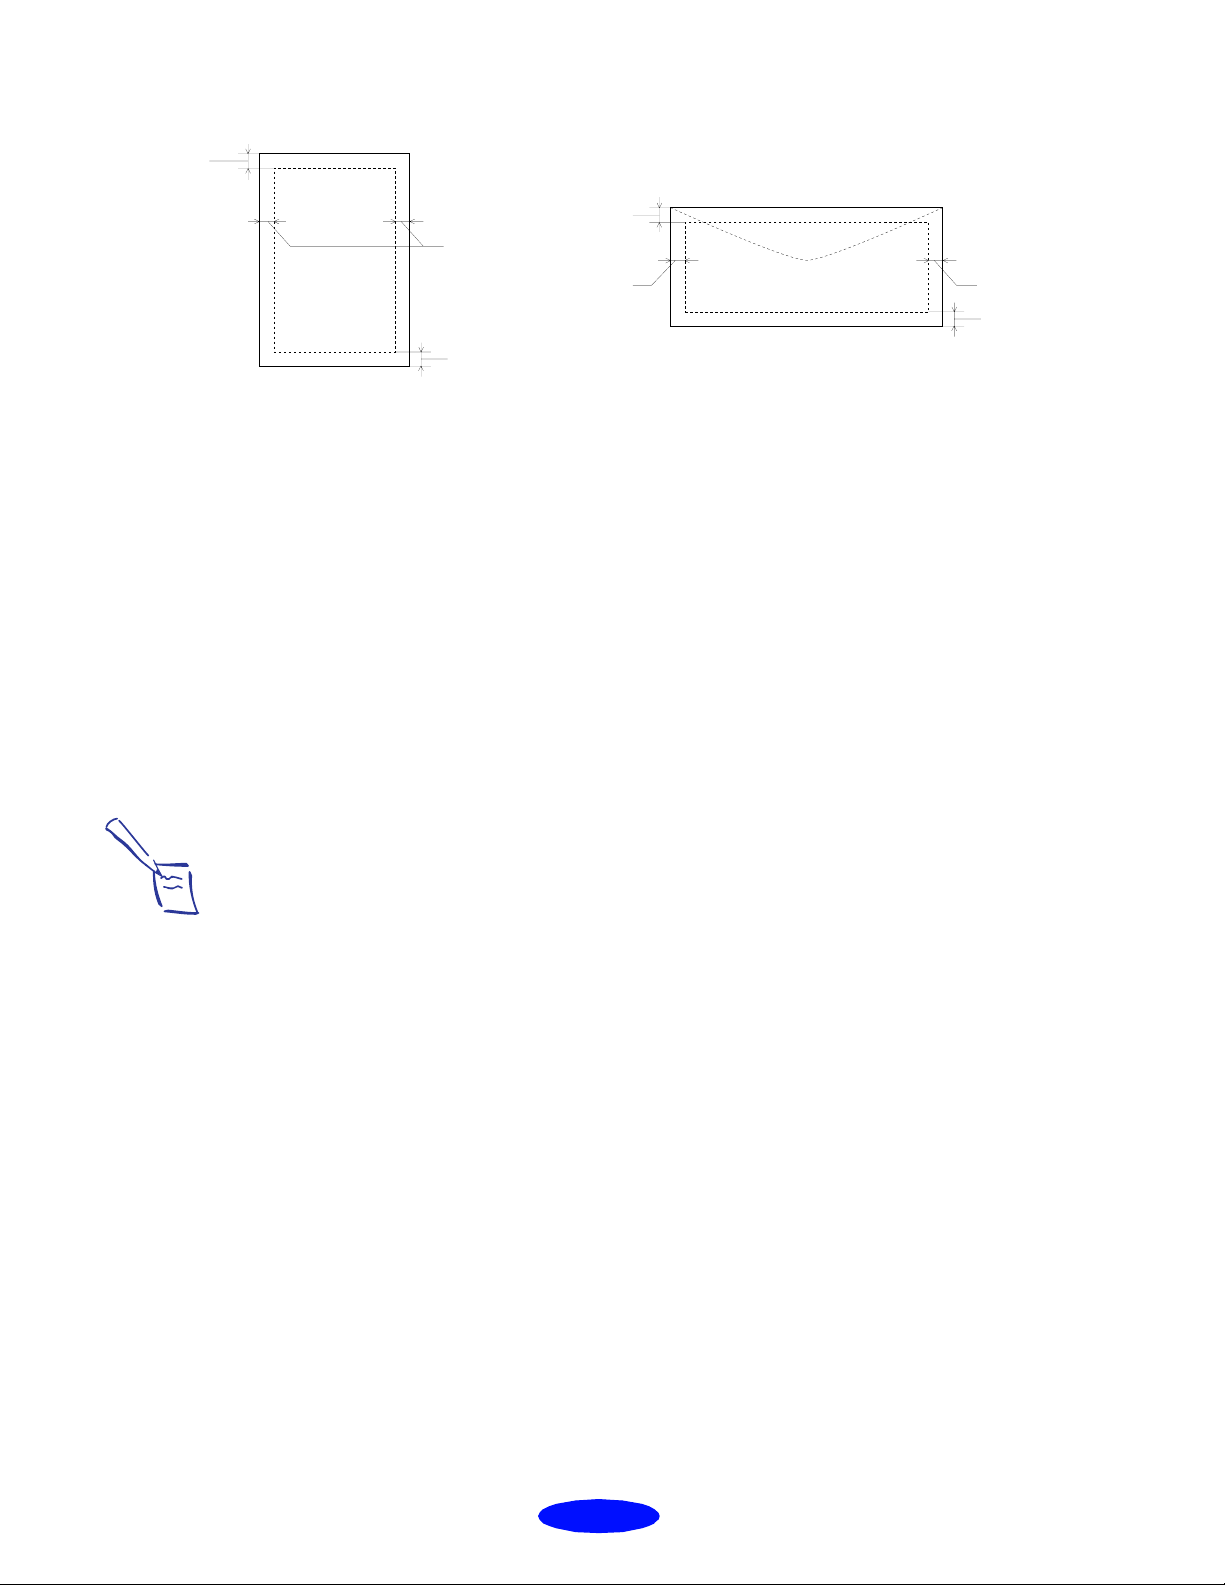
Specifications
A
B-L
A
B-R
C
EnvelopeSingle shee t
B-L
B-R
C
A: The minimum top margin is 0.12 inch (3.0 mm).
When loading multiple sheets of EPSON Photo Quality Glos sy Film, the minimum top margin is 1.2 inches
(30 mm).
B–L: The mini mum le ft mar gin is 0.12 inch (3.0 mm).
B–R: The minimum right margin for single sheet paper is 0.12 inch (3.0 mm) except for letter an d lega l size paper. The
minimum right margin for le tter and legal size paper is 0.35 inch (9.0 mm).
The minimum right margin for env elopes is as follows :
0.28 inch (7.0 mm) for DL envelopes.
1.10 inches (28.0 mm) for No. 10 envelopes.
0.12 inch (3.0 mm) for C6 envelopes.
C: The minimum bottom margin is 0.54 inch (14.0 mm).
Note:
Always load pape r into the s heet feeder s hort edge first. However, envelopes should be loaded long edge firs t.
A-4
Page 83
Ink Cartridge
Specification Black ink cartrid ge (S020093) Color ink cartridge (S020089)
Color(s) Black Cyan, Magenta, and Yellow
Specifications
Print capacity* 540 pages/A4 (ISO/IEC 10561 Letter Pattern at
360 dpi)
Cartridge life 2 years from production date (if unopened)
(within 6 months after opening package, at 77 °F (25 °C))
Storage temperature –4 to 104 °F (–20 to 40 °C)
1 month at 104 °F (40 °C)
Transit temperature –22 to 140 °F (–30 to 60 °C)
1 month at 104 °F (40 °C)
120 hours at 140 °F (60 °C)
Freezing
temperature**
Dimensions 0.7 (W) × 2.1(D) × 1.5 (H) inches
* The print capacity may vary, depending on how often you use th e print head cleaning fun ction.
** It thaws and is usable after approximately 3 hours at 77 °F (25 °C).
Caution:
To ensure good results, use genuine EPSON ink cartridges. Other products may cause damage to your
printer not covered by EPSON’s warranty.
3.2 °F (–16 °C) –0.4 °F (–18 °C)
19.8 (W) × 52.7(D) × 38.5 (H) mm
300 pages (A4, 360 dpi, 5% duty each color)
1.7 (W) × 2.1(D) × 1.5 (H) inches
42.9 (W) × 52.7 (D) × 38.5 (H) mm
Don’t use an ink cartridge if the date on the package has expired.
Mechan ical
Paper feed method
Paper path
Sheet feeder capacity
Total print volume
Dimensions
Storage Width: 16.9 inches (429 mm)
Printing Width: 16.9 inches (429 mm)
Weight
Friction
Sheet feeder, rear entry
100 sheets at 17 lb (64 g/m
2
) paper
75,000 pages (A4, Text)
Depth: 10.8 inches (275 mm)
Height: 6.6 inches (168 mm)
Depth: 24.1 inches (613 mm)
27.4 inches (695 mm) when printing transparencies
Height: 12.2 inches (309 mm)
7.7 inches (196 mm) when printing transparencies
11.5 lb (5.2 kg) without the ink cartridges
A-5
Page 84
Specifications
Electrical
Note
:
Check the label on the back of the printer for the voltage of your printer.
Environmental
Specification 120V Model 220−240V Model
Input voltage rang e 103.5 to 132V 198 to 264V
Rated frequency range 50 to 60 Hz
Input frequency range 49.5 to 60.5 Hz
Rated current 0.4A 0.2A
Power consumption Approx. 15W (ISO/IEC 10561 Letter Pattern)
Temperature
Humidity
Safety Approvals
Safety standards
EMC
Interface
Parallel interface
Forward channel Data format: 8-bit parallel, IEEE-1284 compatibility mode
Operation: 50 to 95 °F (10 to 35 °C)
Storage:
4 to 140 °F (–20 to 60 °C), stored in shipping container
–
1 month at 104 °F (40 °C)
120 hours at 140 °F (60 °C)
Operation: 20 to 80% RH
Storage: 5 to 85% RH (stored in shipping container, without
condensation)
UL 1950 with D3, CSA C22.2 No.950 with D3
FCC part 15 subpart B class B, CSA C108.8 class B
Your printer is equipped with an 8-bit parallel interface and a serial
interface.
The built-in parallel interface has the following characteristics:
Synchronization:
STROBE
pulse
Handshake timing:
BUSY
and
ACKNLG
signals
Signal level: TTL compatible
Connector: 57-30360 Amphenol connector or equivalent
Reverse channel Transmission mode: IEEE-1284 Nibble mode
Adaptable connector: 57-30360 Amphenol Connector or equivalent
Synchronization: Refer to the IEEE-1284 specification
A-6
Page 85
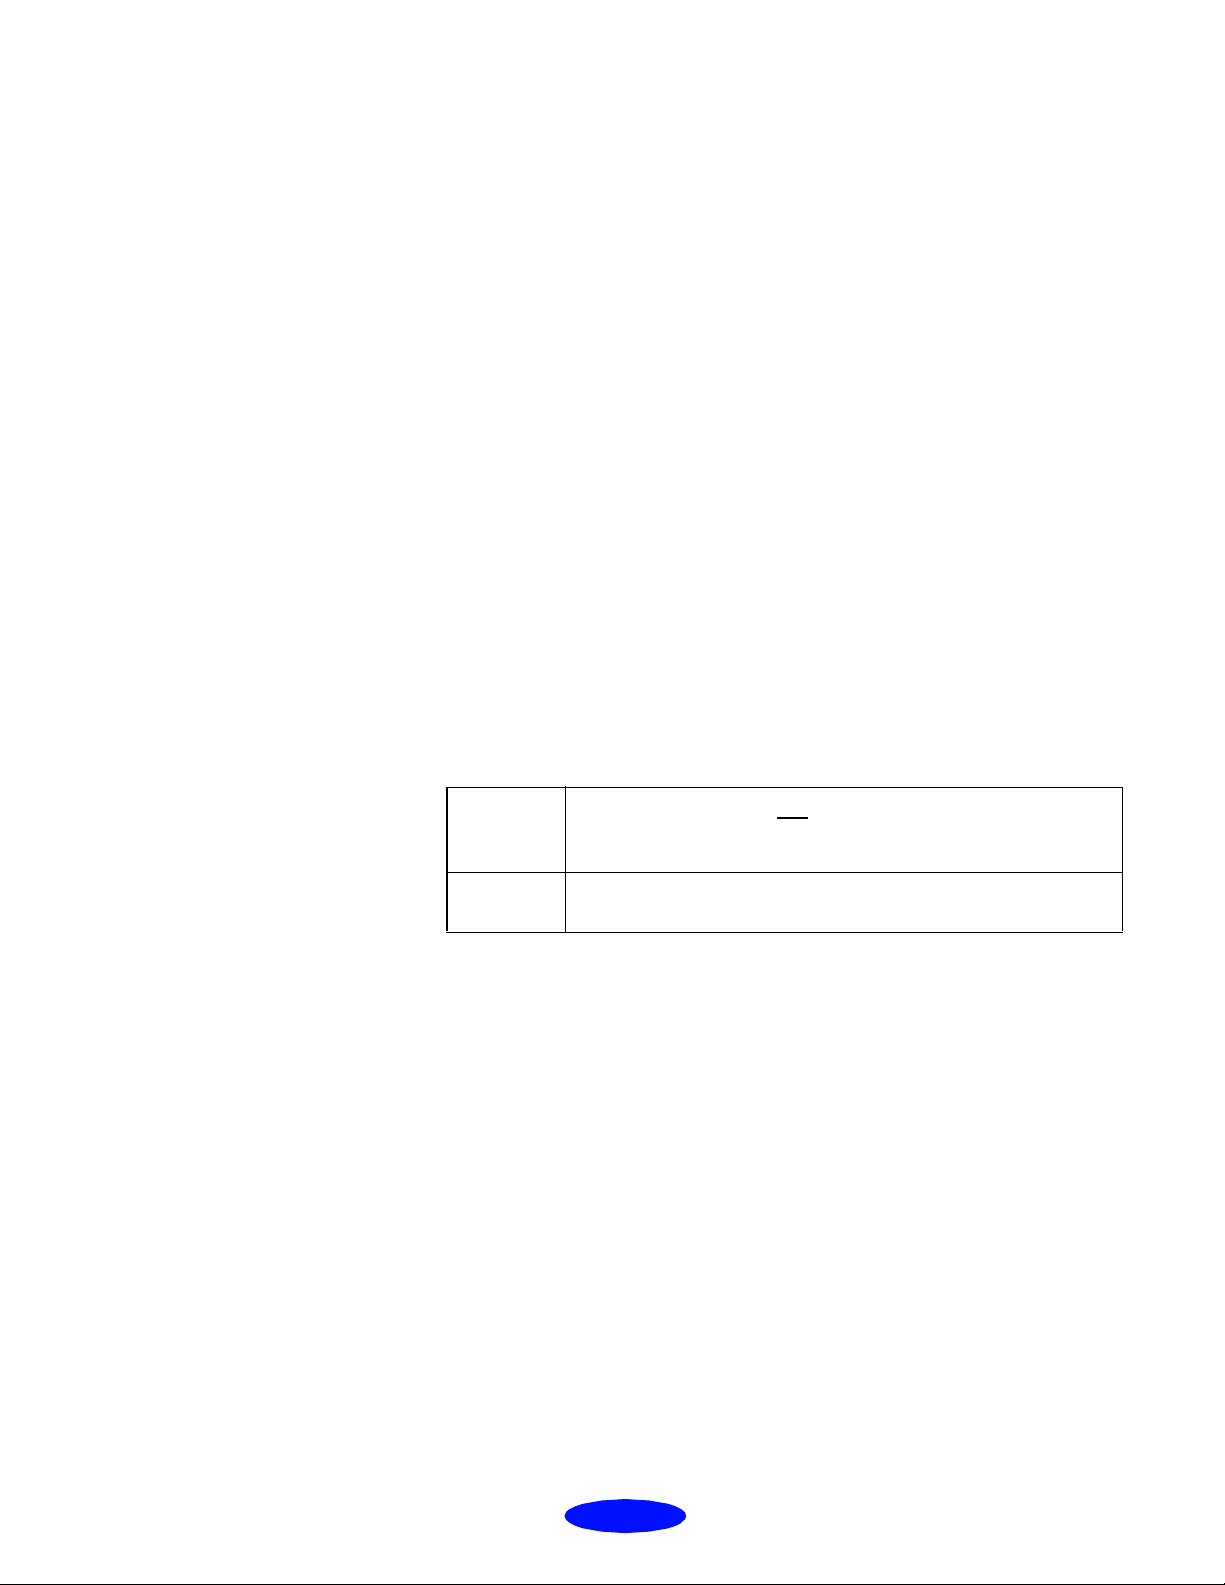
Specifications
Handshaking: Refer to the IEEE-1284 specification
Signal level: IEEE-1284 Level 1 device
Data transmission timing: Refer to the IEEE-1284 specification
Serial interface The printer’s built-in serial interface is based on the RS-423
standard. This interface has the following characteristics:
Standard: Based on RS-423
Synchronization: Synchronous
Bit rate: Approx. 900 Kbps
Handshaking: X-ON/X-OFF DTR protocol
Word format:
Data bit: 8 bits
Parity bit: None
Start bit: 1 bit
Stop bit: 1 bit
Connector: 8-pin mini-circular connector
Recommended cable: Apple System Peripheral-8 cable (Part
number M0197)
Initialization The printer can be initialized (returned to a fixed set of conditions)
in these ways:
∗
The printer is turned on.
∗
The printer receives an
interface.
∗
Software send s the ESC @ (initializ e the printer) command.
The last panel settings are kept.
INIT
signal from the parallel
Hardware
initialization
Hardware
initialization
Software
initialization
When the printer is turned on, the printer mechanism is initialized,
the input and print buffers are cleared, and all settings return to their
default values. However, the printer mechanism is not initialized if
the printer is turned on within 10 seconds after being turned off. In
this case, the printer caps the print head, and ejects any paper in the
paper path.
Software
initialization
Software initialization clears the print buffer and returns all settings
to their default values, as shown below.
A-7
Page 86
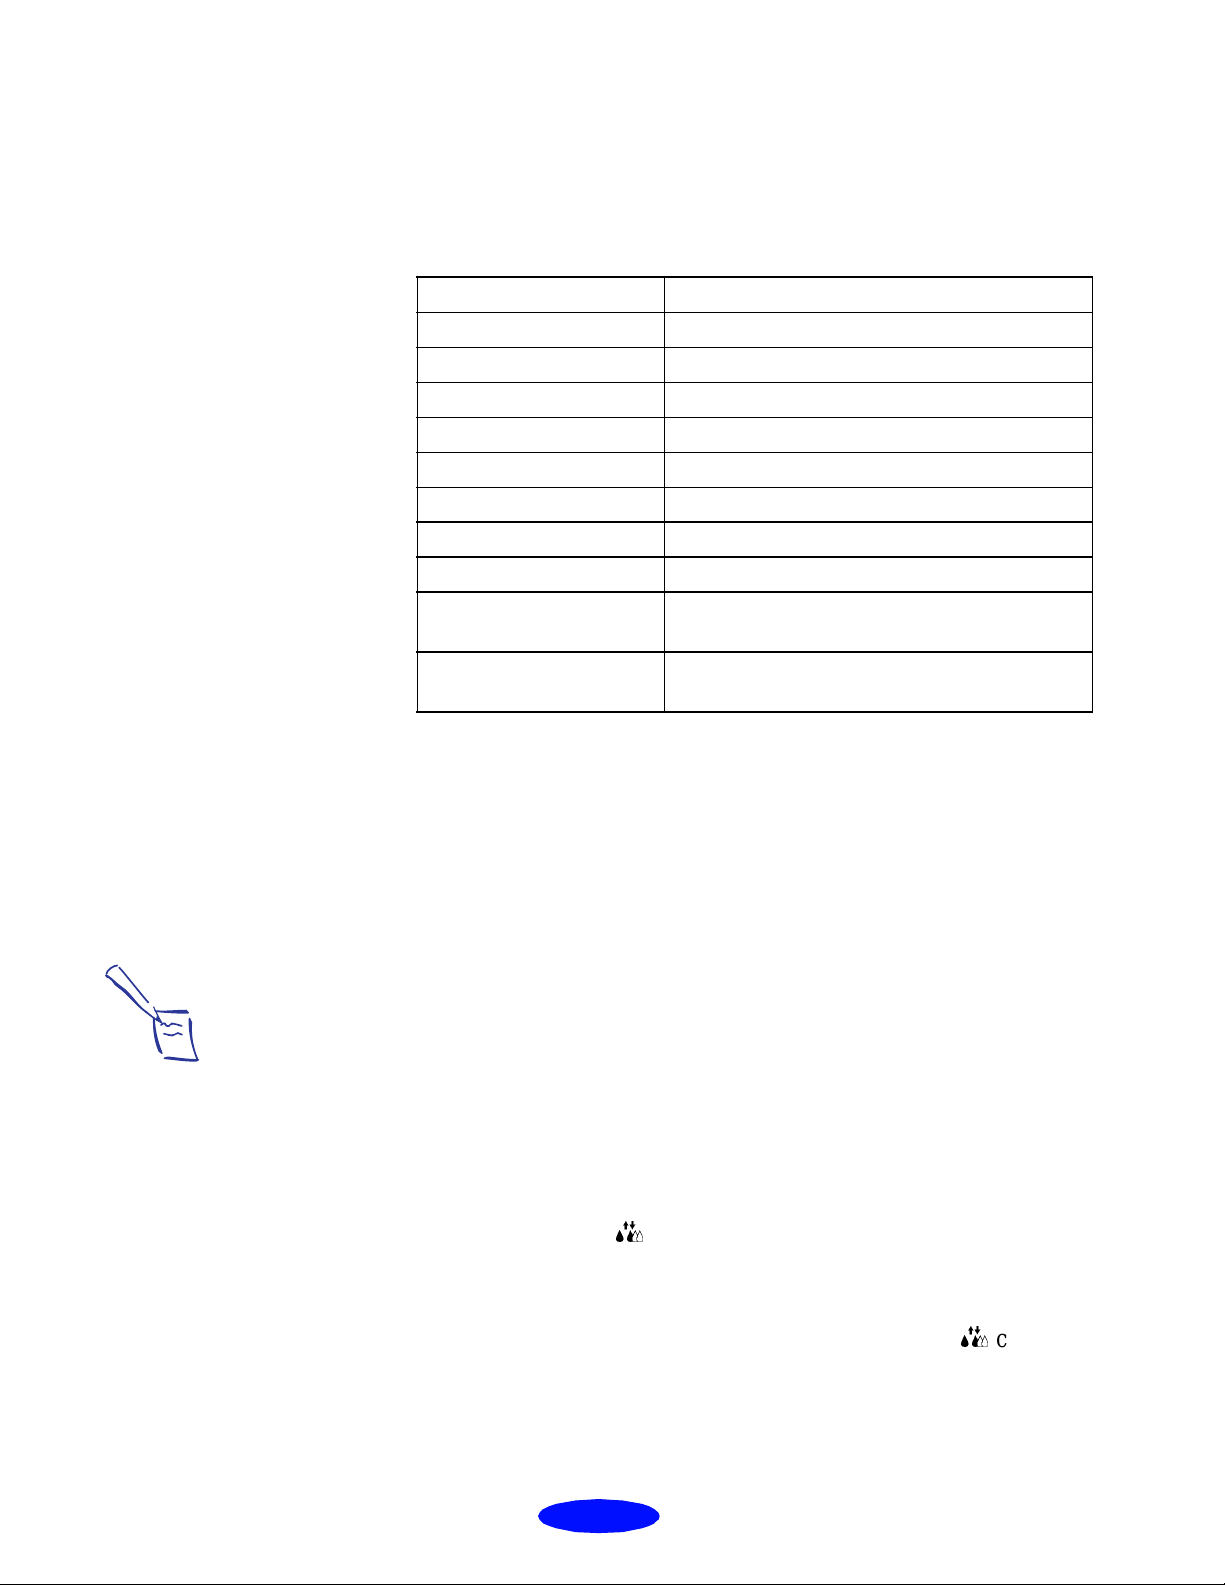
Specifications
Default Settings
The table below shows the default settings that take effect when the
printer is initialized. To change these settings, follow the
instructions in “Built-in Fonts and Character Tables.”
Item Default setting
Top-of-form position Current paper position
Page le ngth Singl e sh eets: 22 in c hes
Left and right margins Cancelled
Line spacing 1/6-inch line s p acing
Character pit ch Last font selected using defau lt setting mode
Vertical tab position Cleared
Horizontal tab positions Every eight characters
Font selection Last font selected using default setting mode
Special printing effects Cancelled (except condensed and economy
printing)
User-d ef ined char acter s et Hardware/control panel initialization: cleared
Built-in Fonts and Character Tables
Your printer has eight built-in fonts and eleven character tables that
you can select using the printer’s default setting mode as described
below. The setting you choose takes effect each time you turn on
the printer. Available fonts and character tables are listed on
page A-2.
Note
:
The font and character t able selections you make wi th your software override the settings you make using the
default setting mode. For best results, use your software to make these settings.
To change the default font or character table, follow these steps:
1. Make sure the printer is turned off and paper is loaded in the
sheet feeder. (Use paper at least 8.3 inches wide. Otherwise the
print heads will spray ink directly onto the platen.)
2. Hold down the
R
Software in itialization: deselected only
cleaning button and turn on the printer.
The printer loads a sheet of paper and prints a brief summary
and instructions.
3. Follow the instructions on the sheet and press the
R
button until the control panel lights indicate the language of
your choice.
A-8
cleaning
Page 87

Specifications
4. Press the E load/eject button to print the default font and
character table and the next page of instructions.
The instruction sheet lists all of the fonts and character tables
you can select.
5. Select the font and character table you want to use.
6. Exit the default setting mode by turning off the printer.
If you want to check the current default font and character table,
enter the default setting mode again and print the current settings,
which are indicated by arrows.
:
Note
You may exit defaul t set ting m ode any t ime b y tur ning off th e pri nter. Any chang es you made r emain in e ffect
until you change them again.
Command List
ESC/P 2 control
codes
General operation ESC@, ESC U, ESC EM
Paper feeding CR, FF, LF, ESC 0, ESC 2, ESC 3, ESC +
Page format ESC ( C, ESC C, ESC C0, ESC Q, ESC l, ESC ( c, ESC N, ESC O
Print position
motion
Font selection ESC k, ESC x, ESC X, ESC P, ESC M, ESC g, ESC p, ESC 4, ESC
Font enhancement ESC W, DC4, SO, DC2, SI, ESC w, ESC G, ESC H, ESC T,
Spacing ESC Space, ESC c, ESC ( U
Character handling ESC t, ESC ( t, ESC R, ESC %, ESC &, ESC :, ESC 6, ESC 7,
Bit image ESC *
This section lists the available printer commands by topic. Your
printer works with the following commands.
Selecting EPSON ESC/P 2 printer in your software allows you to
use the most advanced font and graphics handling available. See the
ESC/P
Reference Manual for details.
ESC $, ESC \, ESC ( V, ESC ( v, ESC D, HT, ESC B, VT, ESC J
5, ESC E, ESC F, ESC !
ESC S, ESC -, ESC ( -, ESC q
ESC ( ^
Graphics ESC ( G, ESC ., ESC ( i, ESC ( e, ESC ( \, ESC ( s
Color ESC r, ESC ( r
Printing mode ESC ( K
A-9
Page 88

Glossary
banding The horizontal lines that sometimes appear when printing
graphics. See also
buffer The portion of the printer’s memory used to store data before
printing it.
charact er table A collection of letters, numbers, and symbols that provides
you with the characters used in a particular language.
MicroWeave
.
characters per inch
(cpi)
CMYK Cyan (blue-green), magenta, yellow, and black. These
default A value or setting that takes effect when the equipment is
dithering A halftoni ng m eth od in whi ch dot s a re a rr ange d in a n ord erl y
dpi Dots per inch. The dpi measures the resolution. See also
driver A software program that sends instructions to a computer
A measure of the size of text characters, sometimes referred
to as pitch.
colored inks are used to create the subtractive system array of
printed colors.
turned on, reset, or initialized.
pattern. Dithering works best for printing images with solid
colors, such as ch arts an d gra phs. S ee al so
resolution
device to tell it what to do. For example, your printer driver
accepts print data from your word processing application and
sends instructions to the printer on how to print this data.
.
halftoning
.
Error Diffusion This halftoning setting smooths out edges by randomly
placing dots of varying colors. This has the opposite effect of
the Finest Detail setting.
G-1
Page 89

Glossary
ESC/P Abbreviation for Epson Standard Code for Printers. This
system of commands gives you control of your printer from
your computer. It is standard for all EPSON printers and
supported by most application programs for personal
computers.
ESC/P 2 The enhance d version of the ESC/P printer command
language. Commands in this language produce laser-like
features, such as scalable fonts and enhanced graphics
printing.
Finest Detail This printer driver setting automatically makes your printed
images sharper and clearer. This has the opposite effect of the
Error Diffusion setting. Be aware that this may increase the
time required for printing.
font A style of type designat ed by a name.
grayscale A scale of shades of gray from black to white. Grayscale is
used to represent colors when printing with black ink only.
halftoning A method of using dot patterns to represent an image.
Halft o ning makes it possible to produce varying shades of
gray using only black dots, or a nearly infinite array of colors
using only a few colors of dots.
initialization Returns the printer to its defaults (fixed set of conditions).
This happens every time you turn on or reset the printer.
ink jet A method of printing in which each letter or symbol is
forme d by preci sely sp raying ink onto paper.
interface The connection between the computer and a peripheral such
as a printer. Some printers have two interfaces, parallel and
serial. A parallel interface transmits data one byte, or eight
bits, at a time. A serial interface transmits data one bit at a
time.
ips Inches per seco nd. This scale is used t o measure the pri n ting
speed.
G
-2
Page 90

media Materia l s upon which data is printed, such as envelopes,
plain paper, special paper, and transparencies.
MicroWeave Printing technology that produces images in fine increments
to reduce the possibility of banding. See also banding.
monochrome This means printing with only one color of ink, which is
generally black ink.
parallel interface See interface.
print queue Print jobs that are sent to the printer while it is busy are stored
in a waiting line, or print queue, until they can be printed.
print server The computer connected to the printer. It receives the jobs
and then distributes them to the assigned printer. It also holds
extra print jobs while the printer is busy. See also print
queue.
Glossary
printable area The area of a page on which the printer can pr int. It is smaller
than the physical size of the page due to margins.
printer driver See driver.
proportional printing Printing in which the width of the character varies from
character to character. For example, a capital W receives
much more space than a lowercase i. The result looks more
like a typeset book than a typewritten draft.
reset To return a printer to its defaults either by sending a
command, an
signal or by turning the printer off and then
INIT
back on.
resolution The number of dots per inc h used to represent an image.
RGB Red, gr een, and blue. T hese colors , in phos phors irradi ate d by
the comput er mo ni to r’s el ec t ron gun , are us ed to create t he
additive array of screen colors.
scalable fonts Fonts that can be enl arg ed or redu ce d. No ns cal a ble font s are
called bitmap fonts and can’t change in size.
G-3
Page 91

Glossary
screen pattern This feature prints shaded areas as they appear on screen,
instead of printing them as halftones.
serial interfa ce See interface.
spool The process by which the printer driver converts the print
data into codes that your printer understands. This data is
then sent to the printer directly or to the print server.
Spool Manager An
EPSON
software program that converts print data into
codes that your printer unders tands. See also spool.
Status Monitor An
EPSON
software program that displays the printer’s
status, such as paper out or the amount of ink remaining
before printing.
subtractiv e co lors Colors prod uced by pi gment s th at abs orb som e colo rs of lig ht
and reflect others. See also CMYK.
G
-4
Page 92

Index
A
B
Adjust lever, 3-5
Advanced mode and halftoning
2-5
Advanced mode, selecting
2-1to2-2
Advanced settings
custom
predefined
Aligning print heads
Automatic mode
Banding, 6-3to6-4
Banners
loading paper
printing,
Blank pages, 6-13
Blurry printouts
Brightness setting
Built-in fonts
2-3to2-9
,
2-1to2-3
,
,
,
3-8to3-9
6-5
,
A-8
,
1-3
3-7
2-7
,
5-8, 6-4
,
,
Custom paper size
Custom settings
,
D
color
deleting
print quality
project types
saving
special effects
Customer Care Centers
Cyan setting
Default printer options, setting
1-4to1-5
Deleting print job
Despooler
Dithering
DOS, printing from
Draft printing
Driver, help
2-6to2-8
,
2-9
,
2-8
,
,
1-6, 4-5
,
2-5
,
1-10
,
,
2-3to2-5
,
2-2
,
2-3to2-5
,
2-7
,
2-3
,
to 1-11
3-7, 3-8
4
,
4-3
1-7
,
,
C
Cards, see Photo Quality Ink Jet
media
Character tables
Characters, garbled, 6-12
Cleaning
print heads
printer
Cleaning sheets
Color Adjustment modes
Color problems
CompuServe
Contrast setting
Control codes
Control panel
buttons
lights
using
5-8
,
,
1-9
,
1-9to1-10, 6-1to6-2
,
6-6to6-8
5-1to5-3
,
5
,
A-1, A-9
,
1-10
,
,
,
,
A-8
3-3
6-4
2-7
,
2-6
,
E
Economy setting, 2-3
Electrical specifications
ENERGY STAR
Energy-saving tips
Envelopes
printing
specifications
Environmental specifications
A-6
EPSON
Accessories
Answers
Customer Care Centers
Electronic Support Services
4to5
help
media
World Wide Web site
ESC/P 2
3-5
,
,
, 4to
1-8, 3-1to3-2
,
1-7, A-9
,
2
5
6
,
,
A-3, A-4
,
4
,
A-6
,
6
4
,
5
,
,
,
I-1
Page 93

Index
F
G
H
I
Faint printouts, 6-5, 6-6
FaxAdvice
see
Film,
media
Flip horizontal setting, 6-12
Fonts
,
Forms, printing
Glossy media
choosing
printing
specifications
Halftoning setting, 2-4, 2-5
Head Cleaning utility
Help, online
Horizontal banding, 6-3
ICM (Image Color Matching), 1,
2-1, 2-3
Index cards,
Ink Jet media
Initialization
Ink cartridge
replacing
specifications
Ink jet cards
choosing
printing
specifications
Ink jet paper
choosing
printing
specifications
Ink setting
Ink, monitoring level
Interface specifications
parallel
serial
5
,
Photo Quality Glossy
A-2
3-3
,
1-8
,
3-4
,
A-3
,
5-2
,
1-10
,
2-6to2-8
,
,
,
3-6
,
,
3-3
,
2-4
,
A-6
,
A-7
,
to 1-11
see
Photo Quality
A-7
,
5-4to5-7
A-5
,
1-8
A-3
,
1-8, 3-8
A-3
,
1-6, 4-5
,
J
L
M
N
O
Internet
Iron-On Transfer Paper
Jammed paper, 1-9, 6-10, 6-11
Journal files
Legal-size paper, 3-3
Letterhead
Lever, adjust
Lights, using
Magenta setting, 2-7
Maintaining printer
Managing print jobs,
Margins
Mechanical specifications
Media Type setting
MicroWeave setting
Mirror images
Moving printer
Network
Nozzle Check
Online driver help, 1-10
5
,
choosing
printing
problems, 6-12
specifications
with multiple sheets
path
printing
pattern
utility
1-8
,
2-5, 3-6
,
4-2, 4-7
,
3-3
,
3-5, 6-5
,
1-9, 6-1, 6-6to6-7
,
4-6to4-7
,
4-5
,
5-4, 6-2
,
5-2to5-4
,
5-1to5-8
,
A-4
,
2-4, 3-1
,
,
2-5, 6-12
,
5-9
,
4-1to4-5
2-5
3-4
,
,
to 1-11
A-5
I-2
Page 94

P
Paper
adjust lever
coated
,
glossy,
3-5
,
3-1
see
Photo Quality
Glossy media
handling problems,
6-10 to 6-11
legal
letterhead
menu
plain
specifications
support
thickness lever,
,
,
3-3
1-4
,
3-1
,
,
3-4
3-3
A-3toA-4
,
see
Adjust
lever
Paper jams
Paper size, custom
1-9, 6-10, 6-11
,
3-7
,
Photo Quality Glossy media
choosing
printing
specifications
,
1-8
,
3-4
A-3
,
Photo Quality Ink Jet media
choosing
printing
specifications
Photo setting
1-8
,
3-3, 3-6
,
2-2
,
A-3
,
Predefined advanced settings
2-1to2-3
Print Head Alignment utility
6-4
Print job, deleting
Print quality problems
Print Quality setting
Print queue
,
4-2
Printable area
A-4
,
,
4-3
,
6-3to6-5
,
2-4
Printer driver, accessing
Control Panel
Windows applications
Printer operation check
Printer software, using
1-10
to 1-11
1-4to1-5
,
,
,
,
6-2
1-2
Printer status, Windows, 1-6
,
,
5-8
Index
Problems
diagnosing
paper handling, 6-10 to 6-11
print quality
printing
solving, 6-1
unexpected printout results,
6-12 to 6-13
Q
R
Quality/Speed slider, 1-3
Replacing ink cartridges
5-4to5-7
Resolution
S
Safety
approvals
instructions
Saturation setting
Self adhesive sheets
choosing
printing
specifications
Self test
,
Service
Smears
,
, 4to
3-5, 6-5
,
Specifications
electrical
environmental
ink cartridge
interface
mechanical
paper
,
printing
Spool directory
Spool Manager
problems
Windows
6-1to6-2
,
6-3to6-5
,
6-6
,
to 6-10
to 6-13
2-4, A-1
,
A-6
,
, 6to
,
1-8
,
3-6
,
A-3
,
6-2
5
A-6
,
,
A-5
,
A-6
,
A-5
,
A-3toA-4
A-1toA-2
,
4-3
,
6-7, 6-9, 6-12
,
4-2to4-3
,
,
8
2-7
A-6
I-3
Page 95

Index
Status Monitor
problems
Windows
Support, EPSON
System requirements
Windows
6-1
,
1-6, 4-4
,
, 4to
2
,
5
T
U
V
Technical specifications
A-1toA-7
Testing printer
Text/Graph setting
Transfer paper
Transparencies
choosing
printing
specifications
Transporting printer
Troubleshooting
User Defined paper size, 3-8, 3-9
Utilities
Head Cleaning
Nozzle Check
Print Head Alignment
Video/Digital Camera setting
2-2, 2-7
,
1-8
,
3-4
,
,
6-2
3-6
,
,
,
A-3
6-1
,
,
2-2
,
5-9
,
to6-12
5-2
5-2to5-4
5-8
,
,
W
Y
Windows
managing print jobs from
4-1to4-5
printing from
Spool Manager
Windows 95, ICM
World Wide Web
Yellow setting, 2-7
1-1to1-4
,
4-2to4-3
,
2-6to2-8
,
5
,
,
I-4
 Loading...