

Page 1

EPSON
Contents
®
Introduction
S
i
COLOR DIGITAL CAMERA
On-line
User’s Guide
Point & Click here for tips on using this On-line Guide
rr
Important Notice & Declaration of Conformity
Getting Started
Taking Pictures with PhotoPC 600
Using PhotoPC 600 with Your Computer
Using the LCD Monitor Menus
Using the Uploader Utilities
Camera Options
Maintenance and Troubleshooting
Using the Direct Print Kit
Specifications
Contacting Customer Support
Glossary
1
2
3
4
5
6
7
8
A
B
G
EUL 07/10/97
Index
?
Page 2

IMPORTANT NOTICE
All rights reserved. No part of this publication may be reproduced,
stored in a retrieval system, or transmitted in any form or by any
means, electronic, mechanical, photocopying, recording, or otherwise,
with o ut the prior written permissio n of SEIKO EPSON
CORPORATION. No patent liability is assumed with respect to the use
of the information contained herein. Neither is any liability assumed for
damages resulting from the use of the information contained herein.
Neither SEIKO EPSON CORPORATION nor its affiliates shall be
liable to the purchaser of this product or third parties for damages,
losses, costs, or expenses incurred by the purchaser or third parties as
a result of: accident, misuse, or abuse of this product or unauthorized
modifications, repairs, or alterations to this product, or (excluding the
U.S.) failure to strictly comply with SEIKO EPSON
CORPORATION’s operating and maintenance instructions.
SEIKO E P SON CORPORATION shal l not be liable against any
damages or problems arising from the use of any options or any
consumable products other than those designated as Original EPSON
Products or EPSON Approved Products by SEIKO EPSON
CORPORATION.
EPSON is a registered trademark of SEIKO EPSON CORPORATION.
PhotoPC is a trademark of SEIKO EPSON CORPORATION. Macintosh
is a registered trademark of Apple Computer, Inc. Microsoft and
Windows are registered tradema rks of Microsoft Corporatio n.
CompactFlash is a trademark of SanDisk Corporation.
General Notice: Other product names used herein are for identification
purposes only and may be trademarks of their respective owners. EPSON
disclaims any and all rights in those marks.
Copyri ght©1997 by SEIKO EPSON CORPORATION, Nagano, Japan.
Declaration of Conformity
According to ISO/IEC Guide 22 and EN 45014
Manufacturer: SEIKO EPSON CORPORATION
Address: 3-5, Owa 3-chome, Suwa-shi, Nagano-ken 392 Japan
Representative: EPSON EUROPE B.V.
Address: Prof. J. H. Bavincklaan 5 1183 AT Amstelveen
The Netherlands
Declares that the Product:
Product Name: Digital Still Camera
Type Name: EPSON Ph otoPC 600
Model: G660A
Conforms to the following Directive(s) and Norm(s):
Directive 89/336/EEC:
EN 55022 Class B
EN 50082- 1
IEC 801-2
IEC 801-3
IEC 801-4
EN 61000- 3-2 (Using AC Adapter Mode l EU-20)
EN 61000- 3-3 (Using AC Adapter Mode l EU-20)
July, 19 97
Y. Ishii
President of EPSON EUROPE B. V .
A NOTE CONCERNING RESPONSIBLE USE OF
COPYRIGHTED M ATER IAL S
Like photocopiers, digital cameras can be misused by improper
photographing of copyrighted material. Unless you have the advice
of a knowledgeable attorney, be responsible and respectful by not
photographing published material without the permission of the
copyright holder.
Page 3

Contents
S
Introduction
PhotoPC 600 Features . . . . . . . . . . . . . . . . . . . . 7
Options . . . . . . . . . . . . . . . . . . . . . . . . . . . . 8
For United Kingdom users - use of options . . . . . 8
System Requirements . . . . . . . . . . . . . . . . . . . . 8
PCs . . . . . . . . . . . . . . . . . . . . . . . . . . . . 8
Macintosh Computers . . . . . . . . . . . . . . . . . 9
Safety Instructions . . . . . . . . . . . . . . . . . . . . . . 9
Warnings, Ca ut io ns, and N otes . . . . . . . . . . . . . . 11
Chapte r 1
Unpacking Your PhotoPC 600 . . . . . . . . . . . . . . . 12
Getting to Know the Camera . . . . . . . . . . . . . . . . 13
Installing Batteries . . . . . . . . . . . . . . . . . . . . . . 15
Handling batteries . . . . . . . . . . . . . . . . . . . 16
Attaching the Hand Strap . . . . . . . . . . . . . . . . . 17
Installing EPSON Photo!2 Software . . . . . . . . . . . . 17
Installing the software in your Macintosh . . . . . . 18
Installing EPSON Photo File Uploader . . . . . . . . . . 18
Installing the software in your PC . . . . . . . . . . 19
Installing the software in your Macintosh . . . . . . 19
Setting the Language . . . . . . . . . . . . . . . . . . . . 20
Setting the Date and Time . . . . . . . . . . . . . . . . . 20
Getting Started
Chapte r 2
Turning the Camera On and Off . . . . . . . . . . . . . . 22
Auto Shut-off . . . . . . . . . . . . . . . . . . . . . . . . . 23
The Display Panel . . . . . . . . . . . . . . . . . . . . . . 24
Checking the Battery . . . . . . . . . . . . . . . . . . . . . 24
Clicking the Shutter . . . . . . . . . . . . . . . . . . . . . 24
Using the viewfinder . . . . . . . . . . . . . . . . . . 24
Using the LCD monitor . . . . . . . . . . . . . . . . . 25
Picture-taking Range . . . . . . . . . . . . . . . . . . . . . 26
Adjusting Set tings . . . . . . . . . . . . . . . . . . . . . . 27
Image quality . . . . . . . . . . . . . . . . . . . . . . . 28
Flash . . . . . . . . . . . . . . . . . . . . . . . . . . . 29
Self timer . . . . . . . . . . . . . . . . . . . . . . . . . 29
Macro mode . . . . . . . . . . . . . . . . . . . . . . . 30
Special photo formats . . . . . . . . . . . . . . . . . . 30
Checking the Picture Counter . . . . . . . . . . . . . . . . 32
Playing Back Your Photos . . . . . . . . . . . . . . . . . . 33
Displaying photos on a television . . . . . . . . . . . 34
Taking Pictures with PhotoPC 600
Contents
3
Page 4

S
Chapte r 3
Connecting PhotoPC 600 to Your Computer . . . . . . . 36
Connecting to a PC . . . . . . . . . . . . . . . . . . . 37
Connecting to a Macintosh . . . . . . . . . . . . . . 38
Accessing EPSON Photo!2 . . . . . . . . . . . . . . . . . 40
For Windows users . . . . . . . . . . . . . . . . . . . 40
For Macintosh users . . . . . . . . . . . . . . . . . . . 41
Working with EPSON Photo!2 . . . . . . . . . . . . . . . 41
Closing EPSON Photo!2 . . . . . . . . . . . . . . . . 42
Getting help . . . . . . . . . . . . . . . . . . . . . . . 42
Getting status and progress information . . . . . . . 42
Using the Camera Menu . . . . . . . . . . . . . . . . . . 43
Selecting images . . . . . . . . . . . . . . . . . . . . . 43
Transfering selected photos . . . . . . . . . . . . . . 44
Saving selected photos to a folder . . . . . . . . . . . 44
File names . . . . . . . . . . . . . . . . . . . . . . . . 45
Transferring pictures to your documents . . . . . . 45
Erasing selected pictures from your camera . . . . . 48
Getting photo information . . . . . . . . . . . . . . . 48
Using the Folder Menu . . . . . . . . . . . . . . . . . . . 48
Selecting images . . . . . . . . . . . . . . . . . . . . . 49
Transfering photos . . . . . . . . . . . . . . . . . . . 49
Finding the folder containing your photos . . . . . . 50
Uploading photos . . . . . . . . . . . . . . . . . . . . 50
Transferring pictures to your documents . . . . . . 51
Erasing selected files from a folder . . . . . . . . . . 51
Getting photo information . . . . . . . . . . . . . . . 51
Using the Controls Menu . . . . . . . . . . . . . . . . . . 52
Controlling the camera from your computer . . . . 52
Using PhotoPC 600 with Your Computer
Taking pictures from your computer . . . . . . . . . 53
Erasing photos . . . . . . . . . . . . . . . . . . . . . . 54
Using the Setup Menu . . . . . . . . . . . . . . . . . . . . 55
Making computer connection settings . . . . . . . . 55
Making camera settings . . . . . . . . . . . . . . . . . 56
Chapte r 4
Working with LCD Monitor Menus . . . . . . . . . . . . 58
Using the Settings Menu . . . . . . . . . . . . . . . . . . 60
Setting the clock . . . . . . . . . . . . . . . . . . . . . 60
Setting the alert beep . . . . . . . . . . . . . . . . . . 61
Setting LCD brightness . . . . . . . . . . . . . . . . . 61
Setting the multi-frame shooting time . . . . . . . . . 62
Using the Information Menu . . . . . . . . . . . . . . . . 62
Using the Playback Mode Menu . . . . . . . . . . . . . . 62
Using the Erase Photo Menu . . . . . . . . . . . . . . . . 63
Using the Photo Control Menu . . . . . . . . . . . . . . . 63
Erasing photos . . . . . . . . . . . . . . . . . . . . . . 63
Locking photos . . . . . . . . . . . . . . . . . . . . . . 65
Getting memory information . . . . . . . . . . . . . . 66
Copying photos . . . . . . . . . . . . . . . . . . . . . 66
Formatting memory cards . . . . . . . . . . . . . . . 67
Using the Slide Show Menu . . . . . . . . . . . . . . . . . 68
Using the Option Menu . . . . . . . . . . . . . . . . . . . 68
Using the Language Menu . . . . . . . . . . . . . . . . . 69
Using the LCD Monitor Menus
Contents
4
Page 5

S
Chapte r 5
Uploading Images to the Camera . . . . . . . . . . . . . 70
Uploading images from your PC . . . . . . . . . . . 71
Uploading images from your Macintosh . . . . . . . 73
Making Screen Copies . . . . . . . . . . . . . . . . . . . . 75
For Windows users . . . . . . . . . . . . . . . . . . . 75
For Macintosh users . . . . . . . . . . . . . . . . . . . 77
Uploading Programs to the Camera . . . . . . . . . . . . 78
Uploading programs . . . . . . . . . . . . . . . . . . 78
Removing programs . . . . . . . . . . . . . . . . . . 79
Chapte r 6
Using CompactFlash Memory Cards . . . . . . . . . . . 80
Installing a CompactFlash Card . . . . . . . . . . . . 81
Removing a CompactFlash Card . . . . . . . . . . . 82
Using the optional PCMCIA adapter . . . . . . . . . 82
Using the AC Adapter . . . . . . . . . . . . . . . . . . . 83
For United Kin gd o m users - safety informatio n . . . 85
Chapte r 7
Caring for the Camera . . . . . . . . . . . . . . . . . . . 86
Caution . . . . . . . . . . . . . . . . . . . . . . . . . . 86
Cleaning the camera . . . . . . . . . . . . . . . . . . 86
Storing the camera . . . . . . . . . . . . . . . . . . . 86
Camera Problems . . . . . . . . . . . . . . . . . . . . . . 87
Picture Problems . . . . . . . . . . . . . . . . . . . . . . . 90
Using the Uploader Utilities
Camera Options
Maintenance and Troubleshooting
Chapte r 8
Preparing to Use the Direct Print Kit . . . . . . . . . . . 92
Connecting Your Camera to the Printer . . . . . . . . . . 93
Paper Types . . . . . . . . . . . . . . . . . . . . . . . . . . 94
Using the Direct Print Kit . . . . . . . . . . . . . . . . . . 95
Accessing the Direct Print program . . . . . . . . . . 95
Printing your images . . . . . . . . . . . . . . . . . . 95
LCD Screen and Display Panel Messages . . . . . . . . . 101
Printed Image Dimensions . . . . . . . . . . . . . . . . . 102
Appendix A
Camera . . . . . . . . . . . . . . . . . . . . . . . . . . . . 103
Product type . . . . . . . . . . . . . . . . . . . . . . . 103
Recorded Image . . . . . . . . . . . . . . . . . . . . . 103
Optical . . . . . . . . . . . . . . . . . . . . . . . . . . . 103
Functional . . . . . . . . . . . . . . . . . . . . . . . . . 104
Interface . . . . . . . . . . . . . . . . . . . . . . . . . . 104
Power . . . . . . . . . . . . . . . . . . . . . . . . . . . 105
Physical Dimensions . . . . . . . . . . . . . . . . . . 105
Optional CompactFlash Card . . . . . . . . . . . . . . . . 105
Optional PCMCIA Adapter . . . . . . . . . . . . . . . . . 106
Optional AC Adapter . . . . . . . . . . . . . . . . . . . . 106
Using the Direct Print Kit
Specifications
Contents
5
Page 6

S
Appendix B Contacting Customer Support
For United King d om and the Republic of Irelan d U sers 107
Customer Support . . . . . . . . . . . . . . . . . . . . 108
Faxon EPSON . . . . . . . . . . . . . . . . . . . . . . 108
EPtec - Bull eti n Boa rd Service for latest drivers and
utilities . . . . . . . . . . . . . . . . . . . . . . . . . . 108
World Wide Web . . . . . . . . . . . . . . . . . . . . 108
For United States Users . . . . . . . . . . . . . . . . . . . 109
Electronic support services . . . . . . . . . . . . . . . 109
For Australian Users . . . . . . . . . . . . . . . . . . . . 110
EPSON FAXBACK . . . . . . . . . . . . . . . . . . . 110
EPSON Bulletin Board System . . . . . . . . . . . . . 110
Internet URL http://www.epson.com.au . . . . . . 110
Your dealer . . . . . . . . . . . . . . . . . . . . . . . . 110
EPSON Helpdesk . . . . . . . . . . . . . . . . . . . . 110
For Hong Kong Users . . . . . . . . . . . . . . . . . . . . 111
Internet home page . . . . . . . . . . . . . . . . . . . 111
Electronic bulletin board system . . . . . . . . . . . 111
Technical Support Hotline . . . . . . . . . . . . . . . 111
For Philippi nes U sers . . . . . . . . . . . . . . . . . . . . 111
For Singapore Users . . . . . . . . . . . . . . . . . . . . . 112
Glossary
. . . . . . . . . . . . . . . . . . . . . . . . . . . . . . . . . 113
Index
. . . . . . . . . . . . . . . . . . . . . . . . . . . . . . . . . 114
Contents
6
Page 7

Introduction
i
Your new EPSON® PhotoPC 600 is a revolut io nary,
easy-to-use digital camera that enables you to take
full-color pictures and im m ediately use them with your
computer. Pho t oP C 600 comes with everything yo u
need, including EPSON Photo!2 so ftw are that let s yo u
trans fer your pictur e s t o your comp uter’ s hard disk
drive. You can then edit, enhance, and organize your
pictures or simply place them into your doc uments.
Create professional letters, documents, and presentations
with real life images right on your des k top . Sh are
pictures with bus iness colleagues or friends over the
Internet. Ad d co lor and visual appeal to y ou r
newsletters, flyers, and brochures. Anything you can
display on your screen or print will look better with
PhotoPC 600 pic t ures.
PhotoPC 600 Features
PhotoPC 600 is a c omplete system for capturing digital
images, and inclu des the follo w ing f eatures:
❏ 24-bit color im age capture
❏ High resolution (1024 × 768 pixels)
❏ 4MB internal memory holds approximately
8 super fine qu ality color or monoch rom e im ages,
18 fine quali ty col or o r m ono chrome images, or
56 standard qua lit y co lor images.
❏ Three color an d two monochrome imag e qu ali ty
settings
❏ Built-in color LCD monitor for previewing and
playing ba ck p ict ures
❏ Optical viewfinder
❏ Macro, zoom , pano ram a, and multi-fram e pho t o
formats
❏ Autom atic date and time recording for each picture
❏ Video ca ble fo r di splaying your pic t ures on a
television monitor
❏ Built-in fl ash w it h au tom at ic , forc ed fl ash, and flash
off settings
❏ Self tim er
❏ Automatic shut-off to save batteries
❏ Serial cables for transf erring photos to your comp ut er
Introductio n
7
Page 8

❏ EPSON Pho to! 2 sof twa re let s you tr ansf er yo ur
pictures to your computer.
❏ EPSON Photo File U ploader software allow s yo u t o
convert images stored in your computer to EPSON
Photo file for m at and upload them to your ca m era.
❏ EPSON Photo!2 Program Up lo ad er so ftware lets you
upload optional programs to the camera from your
computer.
❏ Use your pictures with Wi ndows
applications
®
and Macintosh
®
For United Kingdom users - use of options
Epson (UK) Limit ed shall not be liable against any
damages or problems arising from the use of any options
or consumable products other than tho se designated as
Original EPSON Products or EPSON Approved Products
by Epson (UK) Limited.
System Requirements
PCs
i
Options
The following Pho toPC 600 options are available fro m
EPSON:
❏ CompactFlash Cards (4MB : B808311, 15MB:
B808301)
❏ PCMCIA adapter (B867041)
❏ AC Adapter (B86703✽) for use with a standard
electrical outlet
Note:
The asterisk is a substitute for the last digit of the product
number, which varies by cou ntr y.
Introductio n
IBM®-compatibl e PC w ith 386 or higher processo r (w ith
Windows NT
Serial port wit h st andard RS-232C interf ace and a
communic at ion speed o f 192 00 bp s or higher
8MB RAM (with Windows NT, at least 16MB is required)
Hard disk dr iv e with at least 30MB free space
VGA or SVGA monitor with at least 16-color display
Microsoft
Workgroups
Version 3.51 or later
®
, 486 or higher processor is required)
®
Windows 3.1 or later, Microsoft Windows for
®
3.11 or later, Wi ndows 95, or Windows NT
8
Page 9

Macintosh Computers
Macintosh with 68040 or Power PC proc essor
Serial port and a comm unication speed of 19200 bps or
higher
8MB RAM
Hard disk dr iv e with at least 30MB free space
Monitor with m inim um resolution of 640x 480
Macintosh Syst em 7. 1 or la ter (System 7.5 or later is
required to access optional CompactFlash Card memory
directly from the Macintosh)
Safety Instructions
Read all of these instru ctio ns and save them for later
reference. Follow all warnings and instructions marked
on the ca m e r a and its options.
❏ To reduce the risk o f electr ic sh oc k, d o not remov e
the cover of the camera or any of its options and do
not open any comp art m ent s ex cep t as instructed in
this User’s Guide.
❏ Do not insert objects through any openings.
❏ To prevent fire or electric shock, do not expose the
camera or its opt ion s to rain or moisture.
❏ To prevent fire or explosion, do not use the camera
where inflamm able or volatile gas is stored.
❏ Do not use outdoors during a thunderstorm.
❏ If the camera or any of its options shows un usu al
signs such as no ise, odo r, or smo ke, stop using it and
turn the camera off immediately. Remove the
batteries and/or d isc onnect the AC adapter, and
unplug the AC adapter from the electrical outlet.
❏ Do not use harsh or abrasive cleaners. Wi pe of f du st
with a clean, dry cloth.
❏ To avoid damage to the optics of the camera, do not
expose the lens to direc t sunlight for extended
periods of time.
❏ Handle the camera gent ly and avoid subjecting it to
strong shoc ks o r vi brat io ns. If th e cam era is dropped
or otherwise jarred, the following errors may occur
even if the camera is not permanently damaged:
The camera’s date an d tim e settin gs m ay be lo st .
If the camera is jarred w hile processing an image,
the camera may f ail to rec or d th e im age in its
memory.
i
Introductio n
9
Page 10

❏ Do not store the cam era or its optio ns near sources of
bright light, direct sunlight, high humidity, heat,
excessive dirt or dust, or where they wil l be exposed
to strong vibrations or magnetic fields.
❏ Always keep your camera in its case when you’re not
using it.
❏ To prevent possible eye injury, do not take flash
pictures of faces at cl ose ra nge.
❏ Avoid sud d en tem pera tu re ch anges, which can cause
moisture to condense on the camera and its options.
Keep the camera an d it s opti ons in a case or bag if
you need to move them from a cold environm ent to
a warm one. Allow time for the camera and its
options to adjust to temperature chang es befo re
using them.
❏ Use only the type of power source indicated in this
User’s Guide.
❏ Do not use a dam aged o r fra yed po w e r co rd .
❏ If you use an extension cord wi th the optional A C
adapter, mak e sure t he total am pere rating of the
devices plug ged int o the extension cord does not
exceed the cord’s am per e rat ing. A lso, make sure the
total ampere rating of all devices plugged into the
wall outlet does not exceed the wall outlet’s ampere
rating.
❏ Remove the batteries and/or unplug the camera and
refer servicing to qualified service personnel under
the following con dit io ns:
If the power cord or plug is damaged; if liquid ha s
entered the camera o r its op ti ons ; if th e came ra
or its options ha v e b ee n d ropped or t he case
damaged; if the camera o r it s opti ons do no t
operate normal ly or exhi bit a dist inct change in
performance. Adjust only those controls that
are covered by the operating instructions.
❏ If you pl an to use the camera and its op tions in
Germany, observe the following:
To provide adequate short-circuit protection and
over-current protection for the products, the
building in st alla ti on must be protected by a 16
Amp circuit breaker.
Bei Ansch luß des Produkts an di e Stromversorgung
muß sicherges tellt werd en, daß die
Gebädeinstallation mit einem 16
A-Überstrom sc halt er abgesichert ist.
❏ If the liquid cryst al so lution contained in the displa y
panel or in the screen on the LC D m oni tor leaks out
and gets on your hands, was h them thoro ugh ly w ith
soap and water. If it gets into your eyes, flush them
immediately with water.
i
Introductio n
10
Page 11

Warnings , Cautions, and Notes
Warnings must be followed carefully to avoid bodily
w
c
Notes contain important info rm a tion and useful tips on the
operation of your camera and its options.
injury.
Cautions must be observed to avoid damage to your
equipment.
i
Introductio n
11
Page 12
Chapter 1
Getting Started
This chapter helps you get ready to use your Photo PC
600. It covers the following:
Unpacking your PhotoPC 600
Getting to know the camera
Installing the batteries
Attaching the hand stra p
Installing your EPSON Photo!2 softwar e
Installing your EPSON Photo File Upl oad er sof twa re
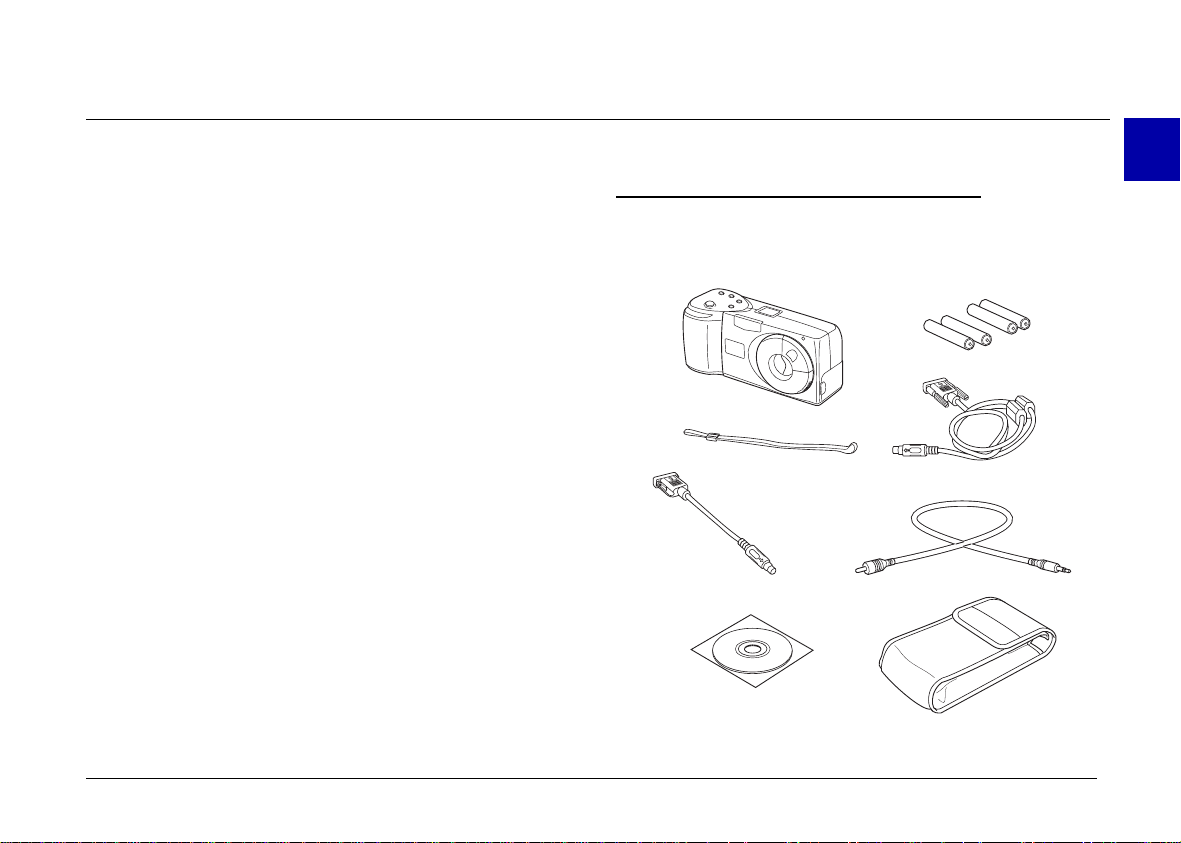
Unpacking Your PhotoPC 600
Make sure you have all the pa rt s sho wn below .
camera
hand strap
Macintosh
adapter cable
CD-ROM and/or floppy disks
(media type and quantity
varies depending on area)
1
batteries (4)
serial cable
video cable
camera case
Getting Started
12
Page 13
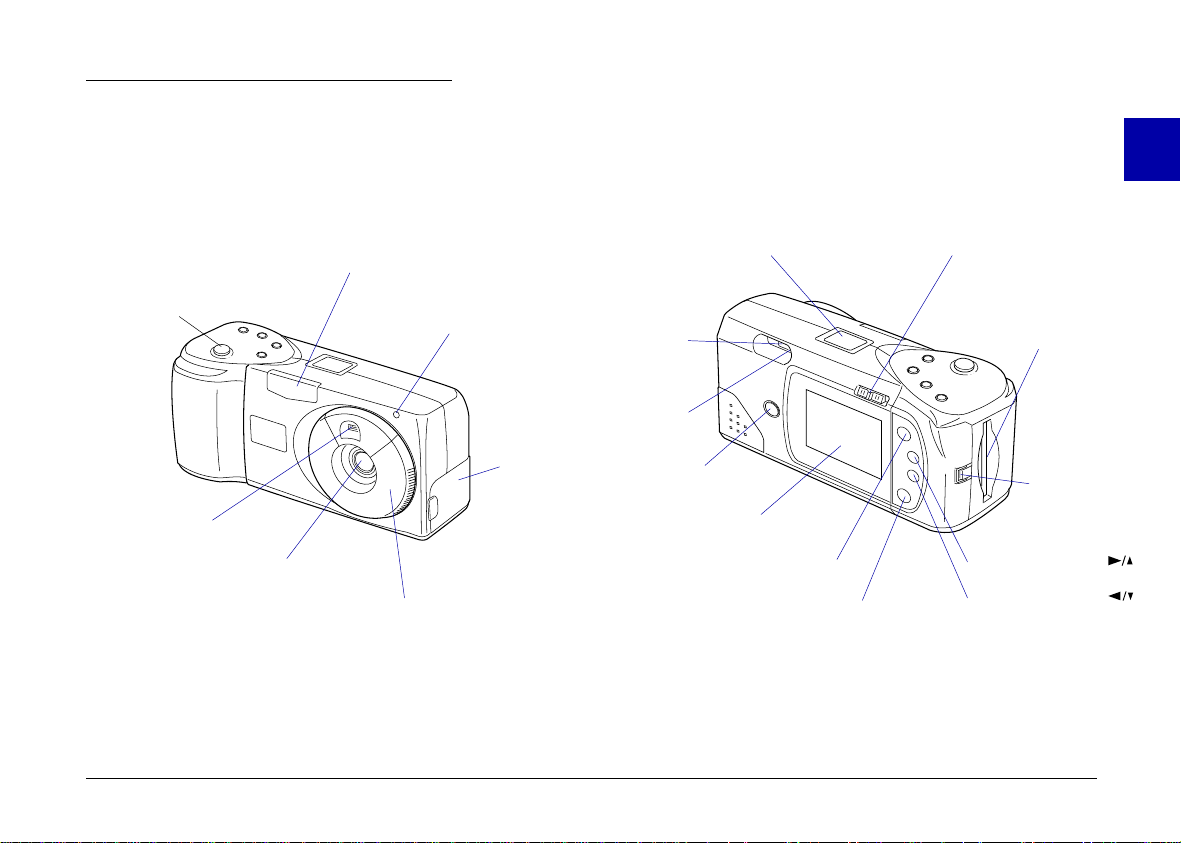
Getting to Know the Camera
After you unpack your PhotoPC 600, take a few minutes
to learn about its featu res, as shown below.
Front view
flash
shutter button
timer light
viewfinder
lens
lens cover and power switch
connector
cover
Back view
viewfinder
status light
photo format
button
LCD mo nitor
display panel
SELECT button
BACK button
1
monitor mode switch
memory card
slot
hand strap
holder
navigation button
navigation button
Getting Started
13
Page 14
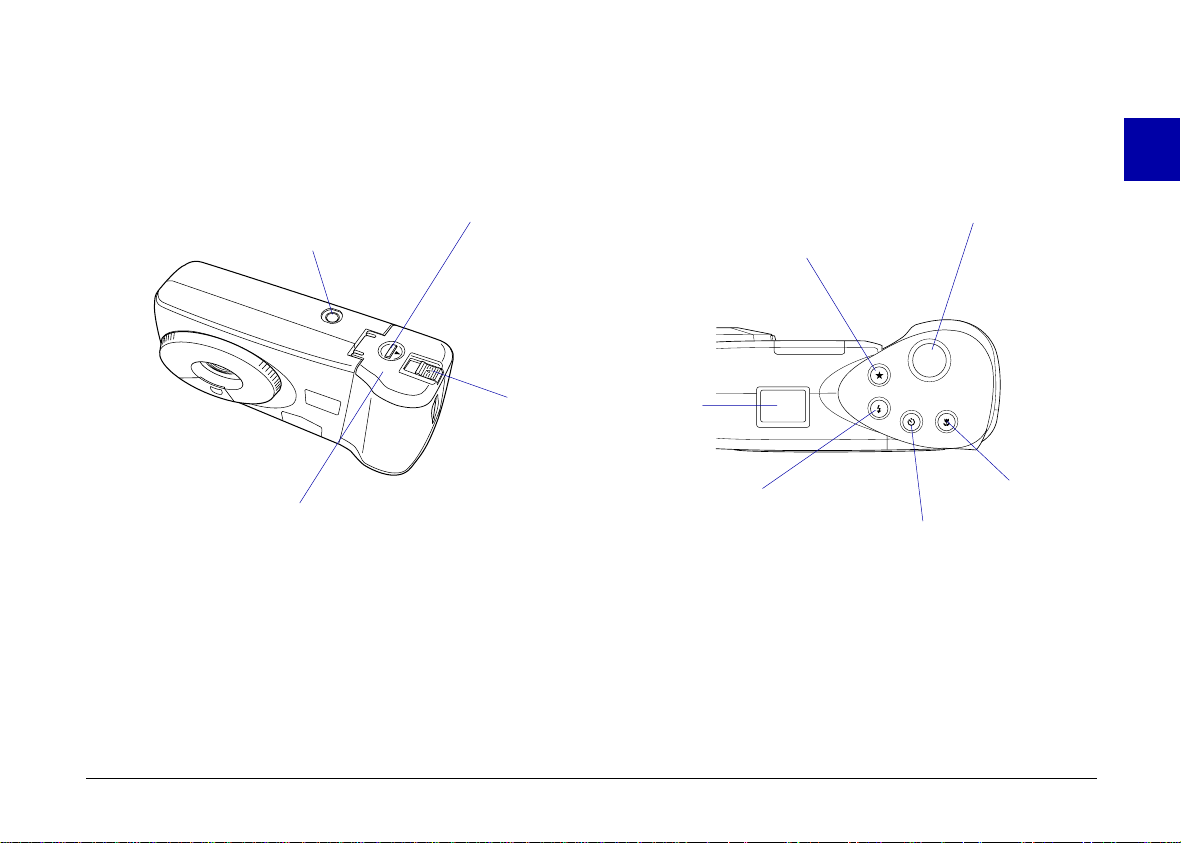
Bottom view
tripod socket
battery cover lock
Top view
1
shutter button
image quality setting
Getting Started
battery cover
memory card
eject lever
display panel
flash setting
macro mode
setting
self timer setting
14
Page 15
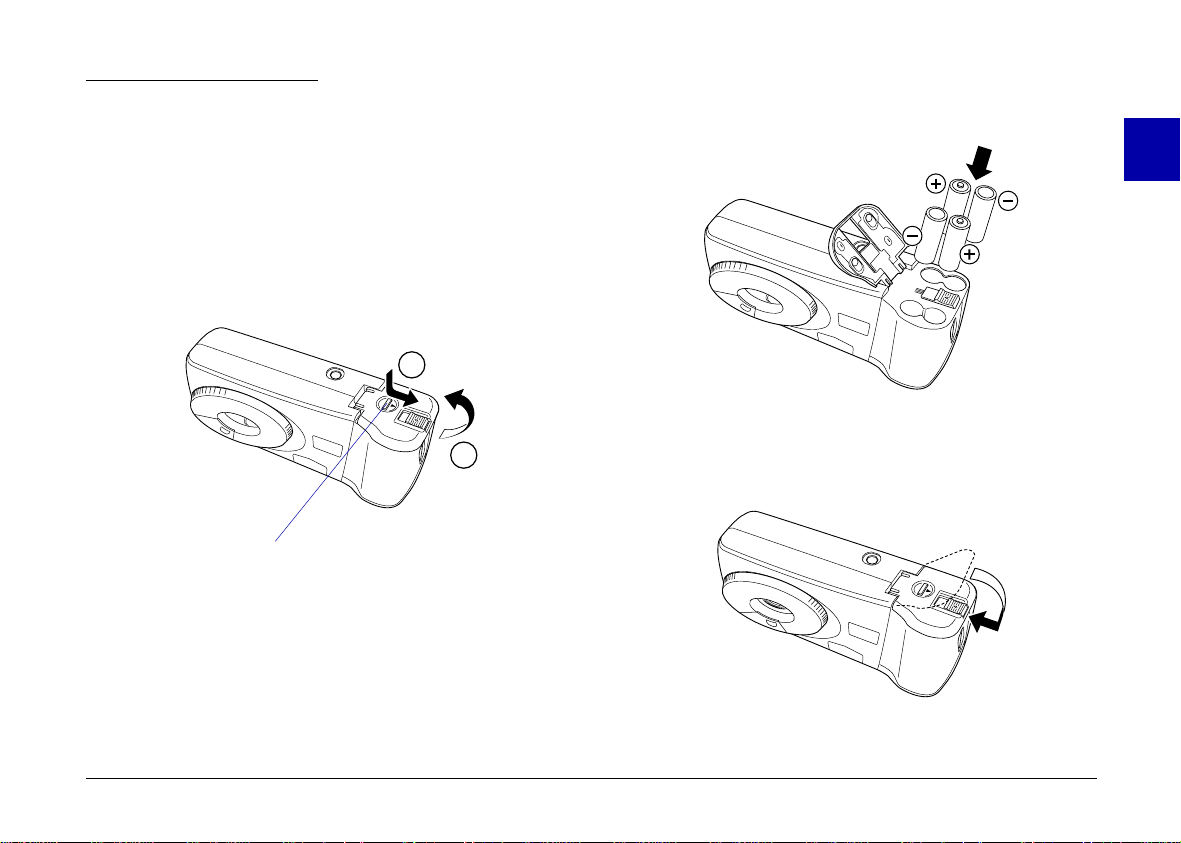
Installing Batteries
Your PhotoPC 600 comes wit h four AA (LR6) al k a l ine
batteries. Make sure t he cam era is off, and follow these
steps to insert the batteries :
1. Turn the camera upside down with the lens facing you.
Push the battery cover lock down and slide it to the
right, then open the cover.
1
2
battery cover lock
2. Insert all four batteries into the com par tment,
positioning the + and - ends as shown below.
1
3. Clos e the battery cover and make sure the loc k snap s
into place as s how n below.
Getting Started
15
Page 16

Handling batteries
When your PhotoPC 600 batteries wear out, you can
replace them with an y of the foll owing:
Single-use AA (LR6 ) alk aline batteries
Singl e -use AA (F R 6) lithium batt eries
(longe st batter y life)
❏ When the camera is no t u sed for lo ng periods of
time, remove the batteries and store them at a low
temperatur e in a d ry lo cation.
1
❏ Dispose of used batteries according to the battery
manufactu rer’s instructions and in compliance with
all applicable laws. Contact yo ur local government
agency for information about battery recyc ling and
disposal.
Rechargeable AA Ni -C d batt eries
Rechargeable AA Ni-MH batteries
Warning:
w
Note the following when handling batteries:
❏ Do not use manganese batteries.
❏ Replace all four batteries at the sam e tim e.
❏ Do not drop, puncture, disassemble, or mutilate
Getting Started
To avoi d the dange r of f ire or expl osion, do no t mix
different types of batteries. Do not allow the battery
contacts to touch metal objects such as coins or keys,
which could sh ort out the battery’s circuits.
batteries. Do not get them wet or expose them to fire.
❏ If you use rechargeable Ni-Cd or Ni-MH batteri e s,
replace them with four fully -c harged batteries. If you
find that your batter ies ru n ou t fast er af ter you
recharge them a number of times, make sure you
discharg e them c omp let ely bef ore rec harging.
❏ Battery life varies depending on the batt ery t ype and
the manufacturer.
16
Page 17
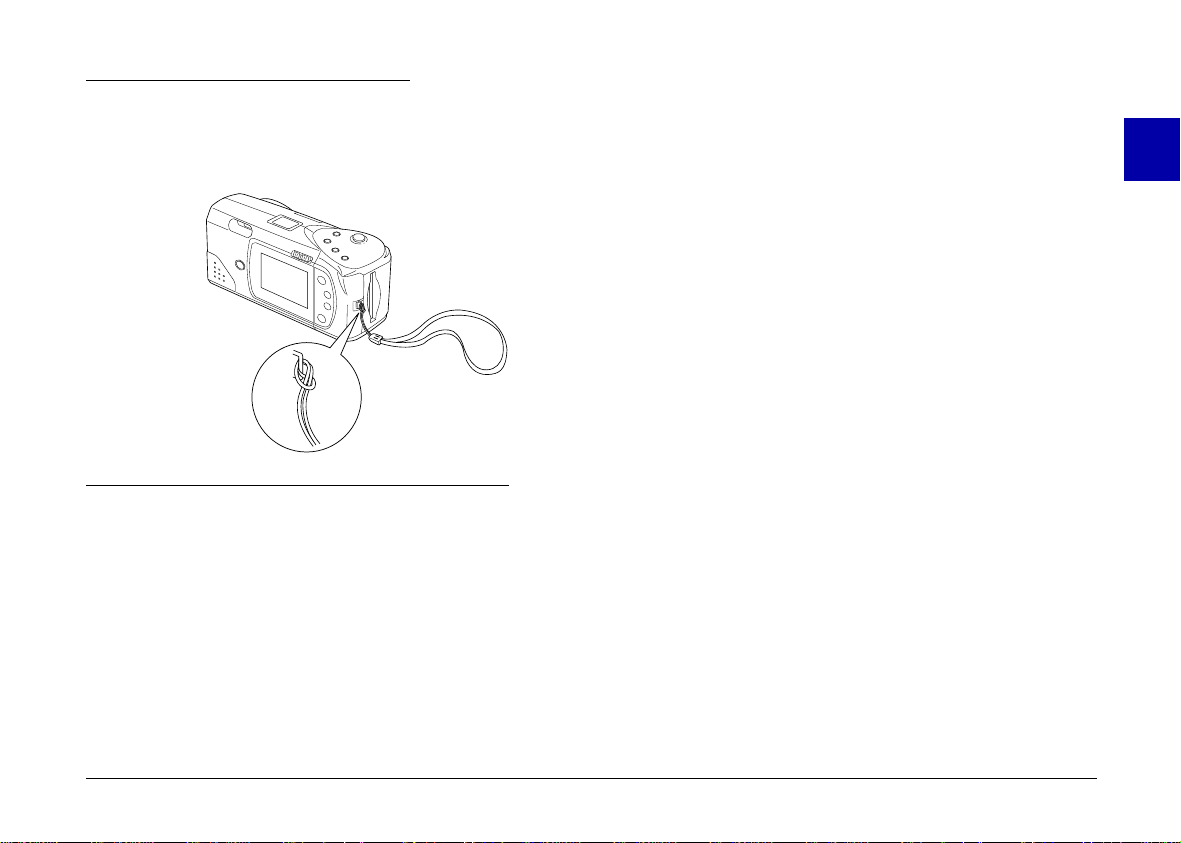
Attaching the Hand Strap
To attach the hand strap, loop the strap around the
holder on the side of the camera as sho w n belo w.
Installing the software in your PC
Follow the steps in this sec t ion to install your EPSON
Photo!2 software .
For Windows 95 or NT 4.0
1. Insert the cam era software CD shipped wi th you r
camera in the CD-ROM dr iv e. (If you use the floppy
disk version, insert it in a disk drive.)
1
Installing EPSON Photo!2 Software
PhotoPC 600 co mes with EPSON Photo!2 software that
lets you transfer your pictures from the camera to your
computer and plac e them into docu m ents. You can als o
use this software t o take pictures and change camera
settings from your com pu t er.
Note:
When you install EPSON Photo!2, the EPSON Photo!2
Program Uploader utility is also installed automatically.
Getting Started
2. Double-click the
3. Double-c lic k th e CD-RO M ic on . You see the EPS ON
folder. (If you use the floppy disk version,
double-click t he fl op py di sk icon.)
4. Open the EP SON f old er and double-click
Depending on the country, the EPSON folder may
contain multi ple-language versions of the softwar e.
Double-clic k t he folder f or yo ur preferred language
and double-clic k
5. Double-click the
instructions on the screen.
My Computer
.
Disk 1
SETUP.EXE
icon.
Disk 1
icon. Follow the
.
17
Page 18

For Windows 3.1x or NT 3.51
1. Insert the cam era software CD shipped wi th you r
camera in the CD-ROM dr iv e. (If you use the floppy
disk version, insert it in a disk drive.)
2. Open File Man ager, then cl ick the CD -RO M dri ve.
(If you use the floppy di sk v ersio n, cli ck the fl op py
disk drive.)
3. Open the EP SON d irectory and the
Depending on the country, the EPSON directory may
contain multi ple-language versions of the softwar e.
Double-clic k t he subdirectory for your preferred
language and dou ble- click
4. Double-click
screen.
SETUP.EXE
. Follow the instruc ti ons on the
Disk 1
.
Disk 1
subdirectory.
Installing the software in your Macintosh
Follow the steps below to in st all EPSON Photo!2
software in your Macintosh.
1. Insert the cam era software CD shipped wi th you r
camera in the CD-ROM dr iv e. (If you use the floppy
disk version, insert it in a disk drive.)
2. Doubl e-click the CD-ROM icon. (If you use the flopp y
disk version, do uble-click the floppy disk icon. )
3. Double-click the
Depending on the country, the EPSON Photo!2 folder
may contain mu lt ipl e -language versions of the
software. Doubl e-click the folder for your preferred
language.
4. Double-click the
the installati on p rog ram . Fol low the inst ructions on
the screen.
EPSON P h oto!2
Photo!2 Installer - Part 1
folder.
icon to start
Installing EPSON Photo File Uploader
PhotoPC 600 also comes with EPSON Photo File
Uploader software that lets you convert digital images to
EPSON Photo file format and transer them from the
computer to your camera. You can then display the
images on the camera’s LCD screen or on a television
monitor.
1
Getting Started
18
Page 19

Installing the software in your PC
Follow the steps in this sec t ion to install the EPSON
Photo File Upl oad er sof twa re fo r Windows.
For Windows 3.1x or NT 3.51
1. Insert the cam era software CD shipped wi th you r
camera in the CD-ROM dr iv e. (If you use the floppy
disk version, insert it in a disk drive.)
1
For Windows 95 or NT 4.0
1. Insert the cam era software CD shipped wi th you r
camera in the CD-ROM dr iv e. (If you use the floppy
disk version, insert it in a disk drive.)
2. Double-click the
3. Double-c lic k th e CD-RO M ic on . You see the
FUPL OAD fo l d e r . (If you u s e the floppy disk
version, doub le-c lick the floppy disk icon. )
4. Open the FUPLOAD folder and do uble-click
Depending on the country, the FUPLOAD folder m ay
contain multi ple-language versions of the softwar e.
Double-clic k t he folder f or yo ur preferred language
and double-clic k
5. Double-click the
instructions on the screen.
My Computer
.
Disk 1
SETUP.EXE
icon.
icon. Follow the
Disk 1
2. Open File Man ager, then cl ick the CD -RO M dri ve.
(If you use the floppy di sk v ersio n, cli ck the fl op py
disk drive.)
3. Open the FUPLOAD directo ry and double-click
Depending on the country, the CD-ROM may contai n
multiple-language versions of the software.
Double-clic k t he subdirectory for your preferred
language and dou ble- cl ick
.
4. Double-click
screen.
SETUP.EXE
. Follow the instruc ti ons on the
Disk 1
.
Installing the software in your Macintosh
Follow the steps below to in st all EPSON Photo File
Uploader Softw are in yo ur Macintosh.
1. Insert the cam era software CD shipped wi th you r
camera in the CD-ROM dr iv e. (If you use the floppy
disk version, insert it in a disk drive.)
Disk 1
.
Getting Started
19
Page 20
2. Double-click the CD-ROM icon. (If you use the
floppy disk vers ion , double-click the floppy dis k
icon.)
3. Double-click the
Depending on the country, the File Uploader folder m ay
contain multi ple-language versions of the softwar e.
Double-clic k the fo lder f or your preferred language.
4. Drag the contents of the folder to the folder on your
hard drive where you want to install the so ftw are.
File Uploader
folder .
2. Press the
highlighted.
monitor mode switch
SELECT button
BACK button
button until the lang uage you want is
SELECT
1
Setting the L anguage
You need to set the language for messages displayed on
the LCD monitor the first time you use it. Depending on
your country, you can choose English, Jap anese, French,
German, Italian, Portuguese, or Spanish.
Follow these steps to set the language.
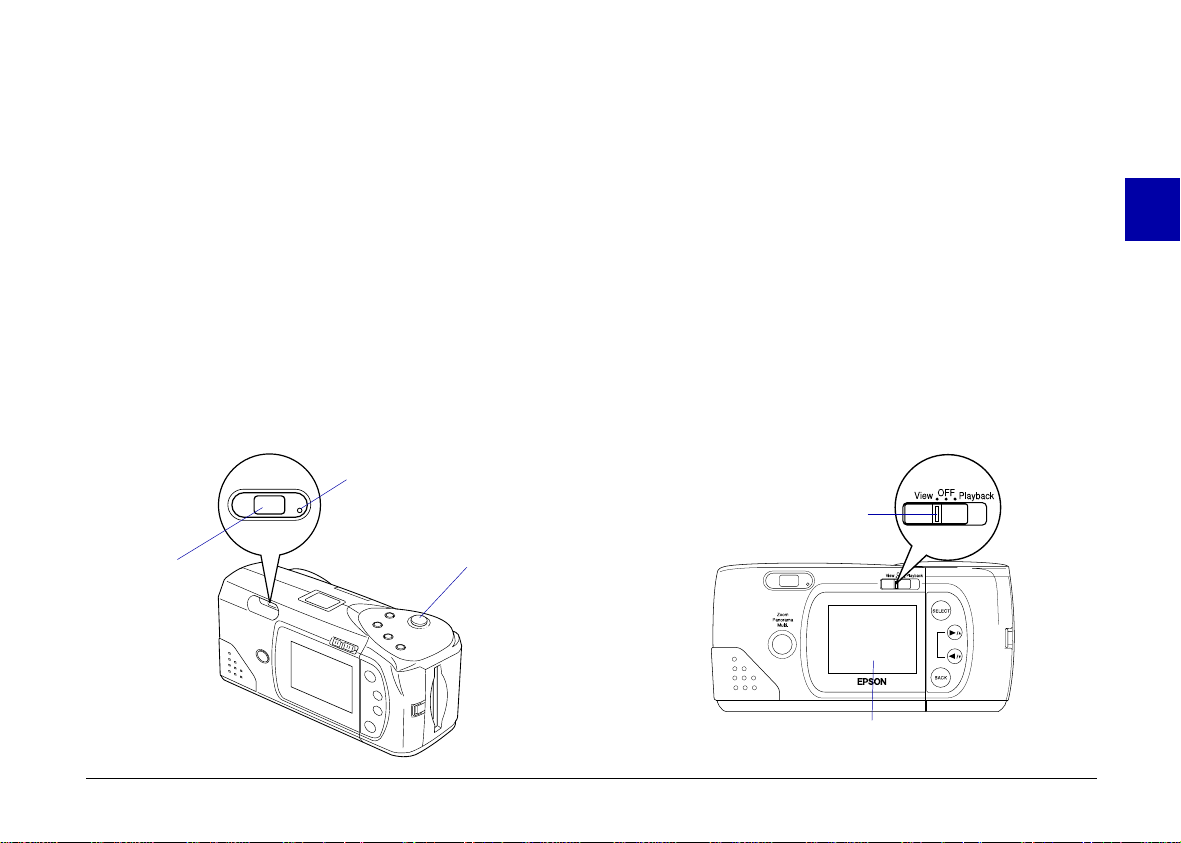
1. Slide th e m oni tor m od e swi tch on the back of the
camera to
A message in Eng lish stating that you need to set the
language appea rs on the LCD scr een. Press any of the
monitor control buttons to the right of the screen, or
wait 5 seconds. The language setting screen app ears.
Getting Started
View
or
Playback
.
3. Press the
return to the View or P layback mode.
If you want to change t he language setting, see page 69
for instruct ion s .
button to save your selec tion and
BACK
Setting the Date and Time
When you install the batteries for the first ti me or when
you replace them, you need to set the date (year, month,
and day) and tim e (hour and minute).
After installing the bat teries, follow these steps to set the
clock on the LCD monitor and to have the time and date
of each picture automatically reco rded.
20
Page 21

Note:
If you connect Phot oPC 60 0 to your com put er w hen the
camera’s clock is not set, the camera is set to your computer’s
time and date au to m atically. For instructions on c onn ec ting
the camera to the computer, see page 36.
1. Slide th e m oni tor m od e swi tch on the back of the
camera to
you need to reset the clock appears on the screen.
2. Press the
setting screen appe ars with the setting for the year
highlighted in red.
Note:
If you do not want to set the clock, press the
to return to the View or Playback mode.
3. Press the button to increase the number, or the
button to decrease the number, until the year is
correct.
or
View
SELECT
Playback
button to set the clock. The clock
. A message sta ting t hat
BACK
button
5. Adjust the m onth, day, hour, and minute settings as
described ab ov e until the date and time are correc tl y
adjusted and saved .
1
Note:
If you want to reset any previous item, simply press the
BACK button until the item you want to reset turns red.
When you finish ma king the minute setting and press the
SELECT button, the LCD screen returns to the View
or Playba ck m o d e.
You’re now read y to take pi ct ures with your PhotoPC
600. Turn to Chapter 2 for simple, step-by-step
instructions.
4. Press the
the month setting is hi ghlighted.
Getting Started
SELECT
button. The year setting is sav ed and
21
Page 22
Chapter 2
Taking Pictures with PhotoPC 600
Using PhotoPC 600 to take pictures is sim ilar to using a
traditional "point and shoot" camera. This chapter tell s
you everything yo u need t o kn ow about the following:
Turning the cam era on and off
Auto shut-off
The display panel
Checking the battery
Clicking the shutter
Picture-takin g range
Adjusting setting s
Checking the picture coun ter
Play ing back your p hotos
Displaying ph otos on a telev isio n
Turning the Camera On and Off
To turn the camera on, simply rotate the lens cover
counterclockw ise. The lens cover opens and the display
panel on the top of the camera light s u p. The st at us li ght
on the back of the ca m era flashes red for a few seconds,
then turns green. The came ra is ready to take pictures.
On
Off
Rotate the lens cover clockwise to turn off the camera.
The lens cover closes and the di spl ay pa nel turns off.
2
Taking Pictures with PhotoPC 600
22
Page 23

Auto Shut-off
To save battery power, the camera turns itself off
automaticall y after 60 seconds if no buttons ar e pressed.
To turn the camera back on, close the lens cover then
open it again.
When your camera is connected to the optional AC
adapter, the aut o shut - of f fea ture is disabled.
Note:
If you want, you ca n change the 60 second time per iod f or
❏
auto shut-off by using your EPSO N Photo!2 software.
For more inf or mation, see page 57 .
When the camera is connected to your computer, it shuts
❏
itself off after 5 minutes of inactivity. It comes back on
automatically when you use any of the software camera
controls in y ou r EPSON Phot o !2 software.
LCD monitor power saving features
Because the LCD m on it or c ons um es additional power,
the LCD monitor turns off automatically in the following
cases:
❏ When you turn off the camera with the LCD monitor
in View mode
❏ When the camera is not used for 30 seconds with the
LCD monitor in View mode
❏ When the camera is not used for 5 m inutes with the
LCD monit or in Playback mode
❏ When the camera is no t turned on within 15 seconds
of switching the LCD moni tor t o View m ode
❏ When the camera is connec ted to a com pu ter with
the LCD monitor in View mode
❏ When the camera is connec ted to a tel evisio n
To turn the LCD monitor back on, slide the monitor
mode switch to OFF then slide it back to View or
Playback.
When your camera is connected to the optional AC
adapter, the LCD monitor auto shut-off feature is
disabled.
2
Taking Pictures with PhotoPC 600
23
Page 24
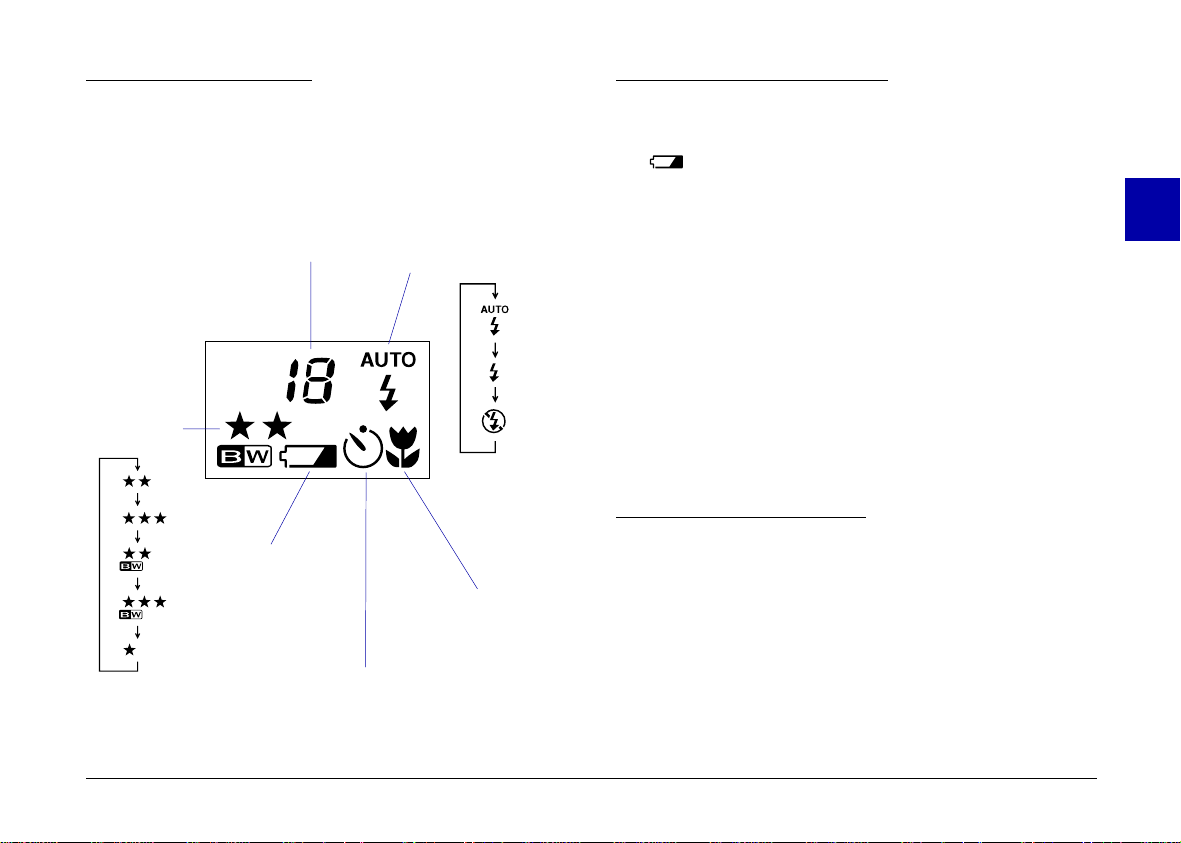
The Display Panel
Checking the Battery
The display panel keep s track of how many pictures you
can take and gives you inf orm a ti on on cam era settings
and the battery level.
number of pictures remaining
(see page 32)
flash (see page 29)
image quality
(see page 28)
low battery icon
(see page 24)
macro mode
(see page 30)
self timer (see page 29)
When the battery po w e r is alm o st ou t, a lo w ba ttery icon
appears on the display panel. When this icon is
flashing, you cannot take pictures unti l you cha nge t he
batteries. When the battery power runs out with the LCD
monitor in the Playback or View mode, the low battery
icon appears on the L CD sc reen fo r fi ve secon d s, th en the
monitor and the camera turn off automatically.
You should use t he lo w ba ttery icon only as a rough
guide to remainin g po wer . No te that several factors can
affect battery life, in clu ding the surrounding temperature
and the type of batteries you use. Low temperatures
(especially below 10°C) wi ll drain your batteries m ore
rapidly. See page 15 for information ab out changing
batteries.
Clicking the Shutter
Follow the steps below to take p hoto s using the
viewfinder or the LCD monitor.
Using the viewfinder
1. Turn the cam e ra on and wait until the status light
beside the viewfinder turn s green.
2
Taking Pictures with PhotoPC 600
24
Page 25
2. Look straight through the viewfinder and center your
subject in the cross-hairs.
Note:
The frame in th e viewfinder indica t es the area capture d
when t aking pictu res at clos e range.
3. Hold th e shut te r bu tto n half w ay down to lock the
auto focus. The status light beside the viewfinder
changes from green to orange. If you wish, you can
now move y o ur su bject off-cente r w ithout alte ring
the focus. Press the shutter button the rest of the way
down to take the photo.
4. Hold th e came ra s till until the status light start s
flashing red and t he camera beeps.
status light
The flashing red light indicates that the image is
captured and the c ame ra is processing it. (If you try to
press the shutter button while the status light is flashing
red, you will hear t wo “error” beeps.) When the light
stops flashing an d turns green, the image is saved. Saved
images remain in m em or y fo r years, even when the
camera is turned off and the batteries are removed. Y ou
can take another photo w hen t he stat us light turns green.
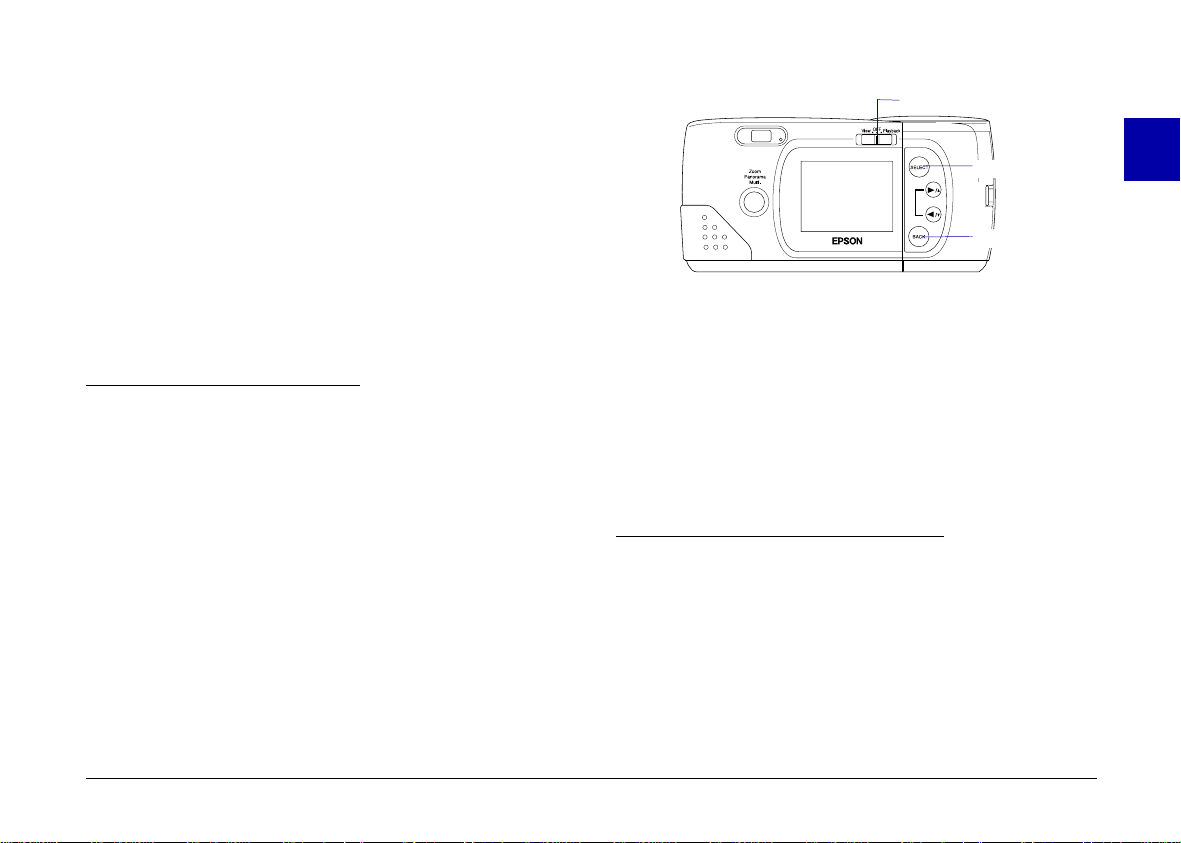
Using the LCD monitor
1. Turn the cam e ra on and slide the monitor mod e sw it ch
on the back of the camera t o View. You will see a live
preview on the LCD screen. Ce nter your su bjec t on
the screen.
monitor mode switch
2
viewfinder
Taking Pictures with PhotoPC 600
shutter button
LCD screen
25
Page 26

Note:
Icons indi cati ng the image quality se tt in g , the number
of photos you can take , and the nu mber of photos
taken appear at the bottom of the LCD screen.
2. Hold th e shut te r bu tto n half w ay down to lock the
auto focus. A sm all green circle appears o n th e cor ner
of the LCD screen, and the status light beside the
viewfinder changes from green to orange. If you
wish, you can now mo ve y our subject off-center
without altering the focus. Press the shutter button
the rest of the way down to take the photo.
3. Hold th e came ra s till until the status light start s
flashing red and t he camera beeps.
When you press the shutter button, the LCD m on itor
displays the picture you took with a processing ico n
in the center of the screen until the camera finishes
processing it, then the monitor returns to live preview.
Note:
When battery power is low and the flash was used to take
❏
the picture, the re turn to live preview m ay be delayed
while the camera recharges the flash. The LCD screen will
be blank du ri ng t hi s period.
Picture-taking Range
When composin g a sho t thro ugh the viewfinder, you
should be at least 50 c m awa y from you r subject. When
using the LCD monitor, you can use the camera’s macro
mode to take photos as close as 20 cm. See page 30 for
instruction s.
You can take flash pi ctures within a range of 20 cm to
2.4 m. See page 29 fo r m ore information on using the
built-in flash.
Note:
When you are taking pictures outdoors, make sure the sun is
at your back . In very bright light (at t he beach or in snow, f or
example) yo ur pictures may com e out too light. How ev er, you
can correct most over-exposure problems from your computer
using image-edit in g softwa re .
2
The li v e preview im age may appear to f li cker when viewed
❏
under strong fluorescent lighting , depending on the
lighting ’s fre qu ency . This is normal .
Taking Pictures with PhotoPC 600
26
Page 27

Adjusting Settings
The buttons on the top of the camera allow you to
control the following PhotoPC 600 features:
Image quality (see page 28)
Flash (see page 29)
Self timer (see page 29)
Macro mode (see page 30)
image quality
When the LCD monitor on the back of your camera is
switched to View, you can use the buttons surrounding
the monitor to select these special photo formats:
Zoom
Panorama
Multi-frame
monitor mode switch
photo format
button
2
flash
self timer
All control button settings (except the self timer) remain
in effect even after you turn off the camera.
macro
LCD monitor
Note:
All camera settings return to their factory defaults when you
remove or change the batteries.
Taking Pictures with PhotoPC 600
27
Page 28
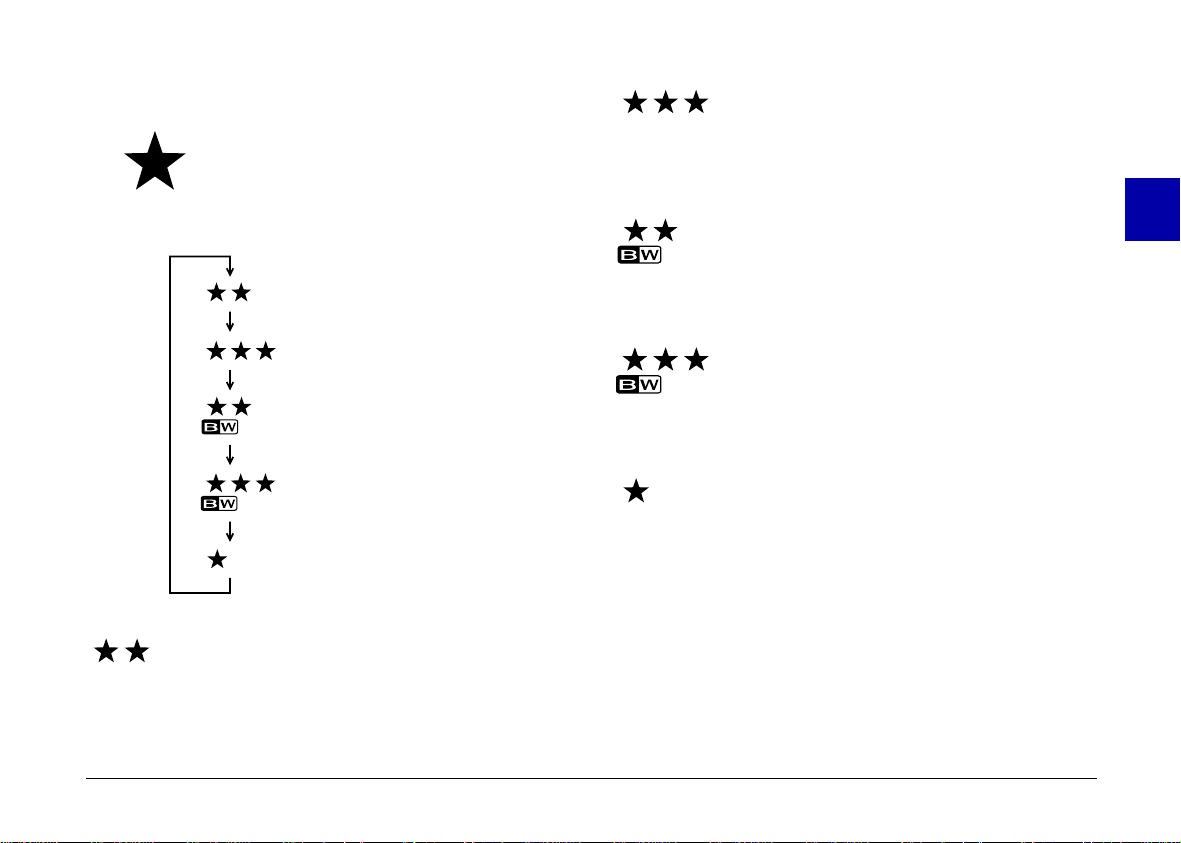
Image quality
PhotoPC 600 has three color and two
monochrome im age quality settings. Press
the image quali ty con tr ol bu t ton t o cycle
from one setting to another. The setti ngs ap pea r on the
display panel as sh ow n belo w .
Fine
Super fine
Images are capt ured in color at 1024 x 768
pixels. Your pictures inclu d e greater detai l,
but the camera onl y holds approximat ely
8 pictures.
Monochrome fine
Images are capt ured in black and whit e at
1024 x 768 pixels. Your pictures inc lude
moderate detail, and the camera holds
approximat ely 18 p i ctures.
2
Super fine
Monochrome fi ne
Monoc hrome super fine
Standard
Fine
Images are capt ured in color at 1024 x 768
pixels. Your pict u res include moderate detail,
and the camera ho lds approximately 18
pictures.
Taking Pictures with PhotoPC 600
Monochrome super fine
Images are capt ured in black and whit e at
1024 x 768 pixels. Your pictures inc lude
greater detail, but the camera only holds
approxim ately 8 pictures.
Standard
Images are capt ured at 640 x 480 pixel s.
The camera holds approximately 56 pic tures,
but the images incl ude less detail.
Note:
If you select one of the mon ochrome image q uality settings when th e
LCD monitor is in View m ode, the image turns from color to b lack
and white, a blue frame appear around the image, and
MONOCHROME appears brief ly on the screen.
28
Page 29
You can switch freely bet w een these set tings and mix
pictures of varying quality in the camer a. Th e camera’s
image capac it y will vary accordi ngly.
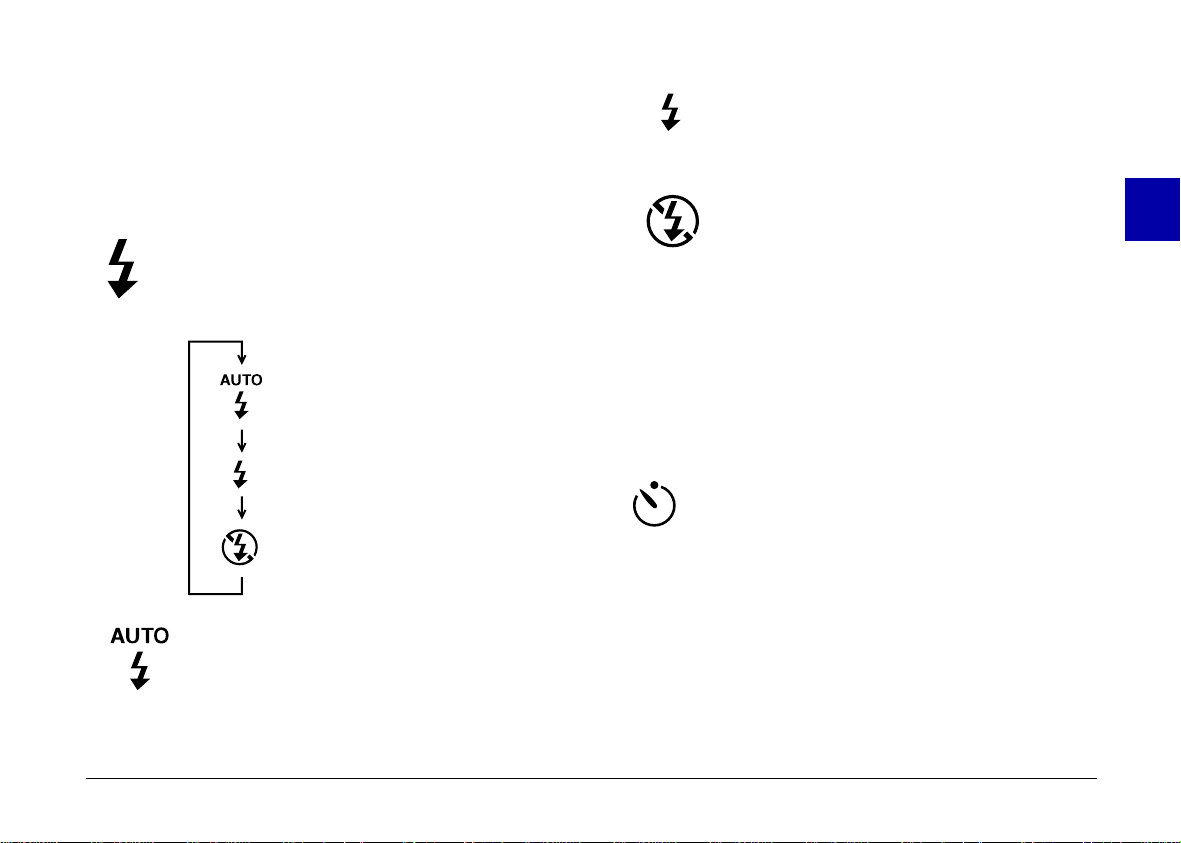
Forced flash
The flash fires with every picture you take. Use
this setting to compensat e fo r bac klighting; for
example, when you are facing the sun .
Flash
PhotoPC 600’s built-in flash is effective wit hin a
range of 20 cm to 2.4 m . Press the flash control
button to cycle through the three flash settings. The
settings appear o n th e disp lay panel as shown below.
Automatic
Forced flash
Flash off
Automatic
The flash fires automatically when ever it is
needed for adequate lighting (factory setting).
Flash off
The flash is disabled, even when adequate
lighting is not availab le. Us e this set ting fo r
special effects, or where flash photography is
prohibited.
Note:
After taking a flash photo, the flash icon blinks until the flash is
fully recharged.
Self timer
Setting the self timer creat es a 10- seco nd delay
between the time you press the shutter button and
the actual image capture. This allows you to take a
picture of yourself. The timer ico n appears on the display
panel when you use the timer. Follo w these steps to take
a picture with the timer:
1. Secur e the c am era on a flat surface or a tripo d.
2. Turn on the cam era and wait until the status light turns
green.
2
Taking Pictures with PhotoPC 600
29
Page 30

3. Press the tim e r bu tto n. The timer icon appears on the
display panel.
4. Press the shutter button. The timer icon and the red
timer light on the front of the camera flash slowly for
eight seconds, then ra pidly for two seconds before
the shutter releas es.
The camera beeps when the image is captured. The status
light on the back of the camera flashes red as PhotoPC
600 processes the image. When the status light stops
flashing and turns green, you can take another picture.
You need to press the timer button again each time you
want to t ake a pi ctu r e usi ng the se lf ti m er .
Macro mode
Use the macro mode to take pictures at close
range. This mode enables you to take pictures
within a range of 20 cm to 50 cm. Follow these
steps to take a picture in the mac ro mo de:
1. Turn the cam e r a on and slide the monitor mode sw itch
to View. A live preview appears on the LCD screen.
2. Press the m acro button. The macr o m od e ico n appears
on the display panel . A green frame appears aroun d
the previewed image and MACRO appears briefly
on the LCD screen.
3. Press the shu t ter butt on.
Note:
To make sure you r subject is framed accurate l y , we recomm end
that you use the L C D monito r rather than the viewfinde r w h en
taking a pho to in macro mode.
To turn off macro mode, simply press the macro button again.
Special photo formats
Your camera features three special photo format modes:
zoom, panor am a, and m ulti-frame. Zoom m ode allows
you to enlarge the image by as muc h as three tim es. In
panorama mo de you can shoot wide-angle panor am as.
Shooting in multi-frame mo de cau ses the shu tter to
release nine times in rapid sequence, produ ci ng a single
image composed of nine st o p- actio n fr am es. This m o de
can be useful if you w ant t o brea k d own a complex
motion, such as your golf swing, into a series of
easy-to-see steps.
2
Taking Pictures with PhotoPC 600
30
Page 31

To use these special photo formats, follo w these steps:
1. Turn the cam e ra on and slide the monitor mod e sw it ch
to View. A live preview appears on the LCD screen.
2. Use the photo format button and nav igat io n bu tto ns
surrounding the LCD monitor to contro l th e pho to
format modes, as described below.
monitor mode switch
photo format
button
Zoom
To sele ct the zoom m ode, press t h e photo format
button. An or ange f ram e appears around the
previewed image, and ZOOM is displayed briefly on
the screen along with t he zoom power and a zoom
icon .
navigation buttons
You can inc rease the zoom rate from 1 (norma l) to 1.3,
1.6, 2, 2.5, or 3 time s no rm al by pressing the
button. To decrease th e rate fr om 3 back down to
1, press the button. (If the zoom rate is already 1,
pressing the button switches the photo format
mode to panorama.) In zoom mode, images are
captured at standard image quality (64 0 x 48 0 pix els).
Panorama
To select the panorama mod e, press the ph oto format
button, then press the button once. PANORAMA
appears briefl y on the screen along with a panor ama
icon and the LCD screen is framed w ith blac k
margins at the top and bo t tom .
While in panorama mode, you can use the image qu ality
control button on top of the camera to select fine or
super fine im age quality (1024 x 384 pixels) . See page
28 for more inform at io n on image quality settings.
Multi-frame
To select the multi-frame mode, press the photo
format button, then press the button twice. A
red frame appears arou nd the preview ed im a ge, and
MULTI is displayed briefly on the screen along with
a multi-frame icon . Images are captured at
standard im age quality (640 x 480 pixels) .
2
Taking Pictures with PhotoPC 600
31
Page 32

Note:
You can switch freely between these settings and mix these
formats in the camera.
3. Once you have selected a photo format mo de, press
the shutter button. In multi-frame mode, the LCD
screen goes black for a moment, then displays the
nine stop-action fram es one by one. When all nine
frames appear, you hav e fin ished taking the
multi-frame picture.
Note:
If your camera is for use with PAL television broadcasting
standard, when you press and release the shutter button,
the LCD screen goes black and the status light flashes red.
When all nine f rames are c a ptured, the camera beeps. Af t er
a few seconds, the multi-frame image appears on the LCD
screen. When the camera finishes processing the image, the
moni tor returns to live preview and the status light turns
green. Y ou can then take another p hot o.
To exit the photo format mode, simply press the photo
format button again.
Checking the Picture Counter
The large number in the center of the cam era’s display
panel shows you how many pictures you can take.
number of pictures remaining
The number of pictures remaining depends on the image
quality setting you have chosen. If you change this
setting, the number of pic tures remaining will change.
When the camera’s memory is full, the number on the
display panel read s 0. The statu s light on the back of the
camera turns red, and you cannot press the shut te r
button. You need to erase some or all of the ima ges in
your camera before you can take any more pictures. See
page 63 for instruc t ion s on era sing photos using the LC D
monitor. If you w ant to save you r ph otos be fore you
erase them, connect the camera to your computer and
transfer the photo s as d escribed in Chapter 4.
2
Taking Pictures with PhotoPC 600
32
Page 33

If you install an o pt io nal CompactFlash C ard , th e
number of pictures you can store in the m emor y car d
appears in brackets on the camera’ s d isp lay panel as
shown below. For instructions on using optional memory
cards, see page 80.
number of pictures remaining in the memory card
brackets
You can use the LCD monit o r to fin d ou t how ma ny
photos you have alrea dy t aken. See page 25 for
instruction s.
Playing Back Your Photos
When the LCD monitor is in Playback mode, you can
play back photos on your camera’s LCD screen or on a
regular television set.
Note:
Since you do not nee d to tur n on the camera to play back your
photos, we recommend leavin g the camera off to save batt er y
power.
1. Slide th e m oni tor m od e swi tch t o Playback. The last
photo you took appears on the LCD screen along
with the date and time that the photo was taken.
Icons indic ating the im age quality setting , frame
number , and the numb er of photos taken
appear at the bottom of the screen.
monitor mode switch
2
To play back your photos, follow the steps below.
Taking Pictures with PhotoPC 600
LCD screen
2. Press the or button to display the previous or
next photos.
33
Page 34

Note:
You can also disp la y up t o ni ne co nsec utive "thumbnail"
images at a time using the Multi-photo Playback mode, or
automatically play back your photos in sequence using the
Slide Show feature. See Chapter 4 for instructions.
Displaying photos on a television
Follow these steps to co nnect PhotoPC 600 to your
television:
1. Make su re the camera and television are turned off.
2. Open the connect or cover on the side of the camera.
2
You can display the pictures in your camera on a regular
television just as you can on the LCD screen simply by
using the video cable that came with your PhotoPC 600.
Note:
Color television telecasting specifications are different
depending o n the count ry. If you have an NTSC c am e ra model,
your television must meet NTSC color television telecasting
specifications. If you have a PAL camera model, your television
must meet PAL specifications.
Taking Pictures with PhotoPC 600
connector cover
3. Connect the video cable to the Vi d eo Out port on the
camera as shown below.
34
Page 35

4. Connect the other end of the video cable to the video
input port on the television.
5. Turn on the television and switch it to video mode.
6. Slide th e m oni tor m od e swi tch t o Playback.
The last picture you took appears on the televisio n
instead of the LCD monitor screen.
Note:
If you use the opti onal AC adapter, you can see t h e pictures on
both the television an d th e LCD screen.
2
Taking Pictures with PhotoPC 600
35
Page 36

Chapter 3
Using PhotoPC 600 with Your Computer
When your are fini shed taking pictures, you can conn ect
the camera to your computer and transfer the images.
Then you can use them in your letters, presentation s, or
just about anythi ng you create on your comp ut er. This
chapter tells you how, including:
Connecting Ph otoP C 600 to your computer
Transferring pictures to your c omp uter
Erasing pictures fr om the camera
Using pictures in you r documents
Uploading EPSON Photo images to the camera
Connecting PhotoPC 600 to Your
Computer
Before you start, make sure the camera is finished
processing, th en loc ate th e serial cables that came with
your PhotoPC 600. The long cable is for connecting the
camera to a PC, and bo t h th e long and short cables are
needed to connect it to a Ma cin tosh computer. If you
have the optional A C adapter, you can sav e on batteries
by using the adapter whenever you connect the camera
to your comp ut er.
Note:
When the camer a is connected to your compute r, you cannot
use an y of the cont rol butto n s or the shu tter butt on on the
camera. You can only operate the camera through your
computer.
3
Using Photo PC 600 w it h Yo u r Com pu te r
36
Page 37

The camera’s au to shu t -o ff feature remains in effect
when the camera is connected to your c omp uter, but it
takes place after 5 minutes of inactivity. To turn the
camera back o n, you can c los e and reo pen the lens cover,
or you can use any of the software camera co nt rols on
your computer.
3. Line up the serial c onn ector on the cable with one of
the serial ports on you r computer, and insert the
connector. Then tighten the screws.
Connecting to a PC
Follow these steps to connect the camera:
1. Make su re th e camera and your computer are t ur n ed
off. Also make sure the LCD monitor is turned off.
2. Loca te a ser ial port on the back of your c omputer. You
may have two serial ports labeled COM1 and COM2,
or the ports may be labeled with icons. If you have
two serial ports av ailable, use port 1 to con nect yo ur
camera.
Using Photo PC 600 w it h Yo u r Com pu te r
serial port on computer
4. Open the connect or cover on the side of the camera.
serial cable
(long cable)
Connector cover
37
3
Page 38

5. Dependin g on the type of cable you have, line up either
the arrow or the flat surface of the cable conn ector
with the mark on the cam era’s serial port. Then insert
the connector.
mark
Connecting to a Macintosh
Follow these steps to connect the camera:
1. Make su re th e camera and your computer are t ur n ed
off. Also make sure the LCD monitor is off.
2. Locate the mo dem p o rt and the pr inter port on the
back of your computer. The ports should be labeled
with icons.
3
6. Turn on the cam era and your computer system.
Caution:
c
Using Photo PC 600 w it h Yo u r Com pu te r
Keep th e entire co mputer system away from potential
source s of electromagne tic interference, such as
loudspeakers or the base units of cordless telephones.
flat surface
arrow surface
modem port printer port
38
Page 39

3. Connect the long cable to the short cable (Macintosh
adapter cable), then tighten the scr ews . Li ne up the
serial connector on the short cab le wi th either th e
modem or the print er port on your compu ter , an d
insert the connector.
4. Open the connect or cover on the side of the camera.
connector cover
Macintosh adapter cable
Using Photo PC 600 w it h Yo u r Com pu te r
serial cable
3
5. Depending on the type of cable you have, line up
either the arrow or the flat surfa ce of th e long cabl e
connector with the mark on the came ra’ s serial port.
Then insert the connector.
mark
flat surface
arrow surface
39
Page 40

6. Turn on the cam era and your computer system.
Caution:
If you c on nected the camera to a serial port that
c
❏
you use for another device and A ppl eTalk is
turned on, turn off AppleTalk. The computer may
not recognize the camera if AppleTalk is turned on.
Keep th e entire computer system awa y f rom
❏
potential sources of electromagnetic interference,
such as loudspeakers or the base units of cordless
telephones.
Accessing EPSON Photo!2
Once your cam era and computer are co nnected and
turned on, you are ready to start working with the
EPSON Photo!2 software that cam e w it h PhotoPC 600.
This software allows you to download your photos to
your computer so that you can use them in you r
documents.
If you have not inst alled EPSON Photo!2 yet, do so now ,
following the in structions on page 17. Then foll ow the
instruction s in this section to access the software.
Note:
If the camera’s c lock was no t set when you conne ct ed it to your
computer, the camera is set to your computer’s date and time
automaticall y aft er open in g EPSON Photo!2.
For Windows users
To open EPSON Pho t o!2 directly, simply double-click its
icon in the EPSON Photo!2 program group (for Windows
3.1x and NT 3.51 ) or clic k its icon in the EPSON Pho to! 2
folder (for Windows 95 and NT 4.0).
To access EPSON Photo!2 from an application program
that supports the TWA IN image acquisit io n st andard,
choose
EPSON Ph oto P C 600
on your applicatio n’ s File menu, then acquire the imag e.
To access EPSO N Photo!2 f rom an ap plication tha t
supports OLE2 (object linking and embedding), choose
EPSON P hotoPC 600 Obje ct
and click OK.
as the TWAIN data source
on the Inse rt Object menu
3
Using Photo PC 600 w it h Yo u r Com pu te r
40
Page 41

For Macintosh users
To open EPSON Pho t o!2 directly, simply double-click its
icon, located in th e EPSON Photo!2 folder.
To access EPSON Photo!2 from an application program
that supports the TWA IN image acquisit io n st andard,
choose
PhotoPC 600
your applic ation’s File menu, then acqui re th e im age.
Note:
The exac t w ay to access EP S O N P hoto!2 from T WAIN- or
OLE2-co m pl ia nt appl i c ations varies depe nding on your
software. Refer to your software manual for detailed
instructions on selecting TWAIN data sources or inserting
OLE objects.
as the TWAIN data source from
Working with EPSON Photo!2
When you open EPSON Photo!2, an introductory sc reen
appears briefly in th e EPSON Photo!2 windo w , then the
Camera menu appears, indicating your camera and
computer are connected pr operly.
menu
tabs
status bar
If the Setup menu ap pears in place of the Camera menu,
your camera and computer may not be properly
connected. Make sure your camera is correctly connected
to your computer. If the Camera menu still does not
appear, see page 55 for instructions on using the Setup
menu to establish the proper con nection.
Note:
While the camera and the computer are communicating, star
icons move across the camera’s display panel. Avoide opening
or using other applications during this time; otherwise the
communications may be interrupted.
progress meter
3
Help button
Close button
Using Photo PC 600 w it h Yo u r Com pu te r
41
Page 42

Click the menu tabs along the top of the EPSON Photo!2
window to open the following four menus:
Camera
The Camera menu displays small thum bnail images of
all the photos stored in the camera so you can easily
select which images you w ant to transfer to the comput er
or erase from the cam era.
If an optional C ompactFlash Card is installed in the
camera, the Camer a m enu displays the images stored in
the card instead of the images stored in the camera’ s
internal memo ry.
Setup
The Setup menu allows you to make the communication
link settings needed to connect the computer to the
camera. From this m e nu you can also make the camera’s
internal time, date, and identification settings, and
change the camera’s auto shut-off time.
Closing EPSON Photo!2
You can close EP SON P h oto !2 by cli cking
of the menus.
Close
3
on any
Folder
The Folder menu displa ys thum b nail images of photos
that have been saved to a fol der. Fro m thi s m enu you can
select thumbnails and transfer p hotos to your applicatio n
or erase them from the folder. Also, you can uplo ad
images from your computer to yo ur camera.
Controls
The Controls menu allo w s you to see a liv e preview on
your computer screen, take photos from your computer,
and change the camera setti ngs.
Using Photo PC 600 w it h Yo u r Com pu te r
Getting help
Click
related to the items on that m enu.
on any of the EPSO N Photo! 2 menus for help
Help
Getting status and progress information
In addition to the Close and Help buttons, EPSON
Photo!2 disp lays the status bar and pro gress meter no
matter what menu is currently displayed.
Status bar
The status bar tells you what operation EPSON Pho to! 2
is currently performing.
42
Page 43

Progress meter
The progress meter shows the progress of lengthy
operations, such as downloading images from the
camera.
Using th e Camera Menu
When you open EPSON P hoto !2, the Cam era m enu
appears and EPSON Photo!2 starts do w n lo ading
thumbnail im ages of the photos stored in you r cam era.
The images are dow nloaded in the order that they we re
taken and are displayed in the ima ge selection window.
You can change the dow nloading order by clic king on
the blank thumbnail frames for the photos you want to
see first.
Note:
If the camera is not co nne c te d pro pe rly, the Set up m e nu w i ll
appear instead of the Camera menu . Check the se rial port
settings of your computer to confirm the settings are
appropri ate and the port is working. See page 55 for more
information on using the Setup menu.
photo transfer
button
image selection
Selecting images
You can use the
in your camera at once, or you can select individual
photos by clicking the thumbnail im ages in the image
selection windo w. Blue borders appear aro und selected
images. You can click the
EPSON Photo! 2 is st ill downloading your im ages, so they
appear in the image selection window pre-s elect ed and
ready to be transferr ed to you r application or to a folder.
Select All
button to select all the photos
Select All
window
button even while
photo save
button
3
Using Photo PC 600 w it h Yo u r Com pu te r
43
Page 44

You can se l e ct individ ual photo s or g roups of photos in a
number of ways depending on your system, as described
in this table:
Windows Macintosh
Selecting a single
thumbnail
Selecting multiple
thumbnails
Selecting a
continuous range of
thumbnails
Cancelling the
selection of a single
thumbnail in a
selected group
Click Click
CTRL + click COMMAND + click
Click the first image
in the range. Then
SHIFT + click the last
image in the range.
CTRL + click COMMAND + click
Click the first image
in the range. Then
SHIFT + click the last
image in the range.
Transfering selected photos
The name and function of the photo trans fer button
located in the top right corner of the Camera men u varies
depending on whether EPSON Photo!2 is opened
directly, or from a TWAIN- or OLE2-c omp lian t
applicati on p rog ram . The fo llo wing table describes the
characteristics of the photo trans fer bu tto n de p e nding on
how EPSON Pho t o! 2 is o pene d.
TWAIN OLE Stand Alone
Button
Name
Button
Function
Notes
Get Photos Get Photo Save To Folder
Transfers
selected phot os
from the
camera to your
application.
Some TWAIN
applications will
only accept one
image at a time.
Transfers a
selected phot o
from the
camera to your
application.
Only one image
can be
transferred at a
time.
Displays a dialog
box that allows
you to save
selecte d photos as
EPSON Photo files
in JPEG format.
File names are
created
automatically.
Saving selected photos to a folder
The name and function o f the phot o save bu tto n locat ed
below the photo transf er bu tto n on the Camera menu
varies depending on whether EPSON Photo!2 is opened
directly, or from a TWAIN- or OLE2-c omp lian t
applicati on p rog ram . The fo llo wing table describes the
characteristics of the photo save button depending on
how EPSON Pho t o!2 is opened.
3
Using Photo PC 600 w it h Yo u r Com pu te r
44
Page 45

Button
Name
Button
Function
Notes
TWAIN OLE Stand Alone
Save To Folder Save To Folder Export Photos
Displays a dialog
box that allows
you to save
selected photos
as EPSON Photo
files in JPEG
format.
File names are
created
automatically.
Displays a dialog
box that allows
you to save
selected phot os
as EPSON Photo
files in JPEG
format.
File names are
created
automatically.
Displays a dialog
box that allows
you to name and
save photos in
JPEG, BMP, or
PCX format. On
the Macintosh
the PICT format is
also supported.
If you assign a
single file name
to more than one
photo, a counter
is added to each
file sharing the
same name.
File names
When you transfer a picture to your computer using the
Save To Folder but ton, EPSON Photo! 2 sav es it as an
EPSON Photo file in JPEG format, and names it with the
date and order in whic h it was taken.
When you transfer a picture to your computer using the
Export Photos butt on, yo u ca n nam e t he fil e y ourself and
save it as a JPEG, BMP, or PCX file. On the Macintosh
you can also ch oose th e PIC T fil e form at .
Transferring pictures to your documents
After you select pi ct ures in the image selection window,
you can insert them in your documents. You can use
your pictures in many different types of applic at io n
programs, such as word proc esso rs, presentation
programs, spreadsheets, database managers, page layout
and desktop publishing packages.
If your applica ti on su pp or ts OLE2 or TWAIN, EPSON
Photo!2 allows you to directly transfer your photos from
your camera to y ou r doc um ent. If your appli catio n d o es
not support OLE2 or TWAIN , you need to save you r
photos as JPEG, BMP, or PCX files, and then open them
from your application. On the Macintos h, you can al so
save photos as PICT files.
3
Using Photo PC 600 w it h Yo u r Com pu te r
45
Page 46

Inserting photos directly into documents
You can us e t wo method s to add pictures directly to
your documents:
❏ Photo transfer button
❏ Drag and drop (Windows only)
Transferr ing p ictures with the photo transfer button
You can use this method to transfer pictures to Windows
applications supporting OLE2 (object linking and
embedding ), or W indo w s and Macintosh applic at ion s
supporting TWAIN. Some examples of applications
supporti ng OLE2 are Microso ft Wo rd 6. 0 & 7. 0 and
WordPerfect
supporting TWAI N are H otSho ts, Pho tosho p,
PicturePu blisher and Photostyler.
If you are not sure whet her yo ur application suppo rts
OLE2 or TWAIN, give it a try. If it does not work, you
can always insert the photo by first saving it in EP SON
Photo!2 as a JPEG, BMP, or PCX file and opening it from
your applic ation. On the Macintosh, you can al so sa ve
the ph ot o as a PICT fi le.
®
6.1. Some examples of applications
Following is a typical procedure for directly transferring
a photo to an OLE2- or TWAIN-compliant application:
1. Start your word processo r or oth e r app lication.
2. Open the docum ent or file where you want to use the
picture.
3. Positi on the cu rso r w here yo u w ant to inser t the
picture.
4. For OL E 2- co m pliant applicatio ns, cho ose
the Insert menu and do uble-click
600 Object
For TWAIN-c om p liant application s, select
PhotoPC 600
the TWAIN data source, th en acqu ire the im age.
Note:
The exact method for accessing EPSON Photo!2 varies
depending on the application. Please refer to your software
manual for detailed instructions.
5. Select the picture yo u w ant use. Then c lic k th e photo
transfer button. A copy of the picture appears in your
document.
in the Object T ype list box.
(or
PhotoPC 600
EPSON P h otoPC
for Macintosh) as
Object
from
EPSON
3
Using Photo PC 600 w it h Yo u r Com pu te r
46
Page 47

Transferring a picture with drag and drop (Windows
only)
You can use this method to transfer a pict ure to any
Windows application supporting OLE2 (object linking
and embedding).
1. Make su re EPSON Photo!2 is open and t he picture you
want to use is in the imag e select io n window.
2. Start your word processo r or oth e r app lication.
3. Open the docum ent or file where you want to use the
picture.
4. Arr ange yo ur screen so that both the application
window and the EPSON Photo!2 window can be
seen.
5. Select the picture yo u w ant to use.
6. Drag the picture fr om the im age sel e ctio n wi ndo w to
your documen t. After a f ew sec on ds you see the drop
cursor. If your ap pl ication does not support drag and
drop, the drop cursor will not appear.
7. Position the dro p cursor where you want the picture
and release the mouse button. A copy of the picture
appears in y ou r doc um ent.
Ins e rting a pic t u re by im port i ng
If your applica ti on p rog ram does not support OLE2 or
TWAIN, you need to export your photos to a folder, and
open them from your application. If your application
cannot handle JPEG fi les, you need to ch ange the
picture’s file type to BMP or PCX. (O n the Mac intos h,
you can also change the file type to PICT.) Follow these
steps to insert a picture by im p orting:
1. Open EP SON Photo!2 by clicking its icon.
2. Select the picture yo u w ant to use in the ima ge
selection window.
3. Clic k th e
in which you can select a folder, specify a file name,
select a file form at , and sav e t he photos.
4. Start your application.
5. Open the docum ent or file where you want to use the
picture.
6. Positi on the cu rso r w here yo u w ant to inser t the
picture.
7. Choose the
The command may have a different name in your
application . I t may app ear on the Fi le m enu, t he
Insert menu, or anot her m enu.
Export P h o tos
Insert Picture
button. A dialog box appears
or
Import File
command.
3
Using Photo PC 600 w it h Yo u r Com pu te r
47
Page 48

After you choose the command, you see a box where
you can enter the file name of you r pi cture or choose
from a list of files.
8. Enter the file nam e o r use the list to locate and select
your picture.
9. Click OK. The picture appea rs in yo ur document.
Erasing selected pictures from your
camera
You can use the Camera menu’s Erase Photos button to
erase selected images from your camera, as described
below:
1. Select th e im ages yo u want to erase.
Getting photo information
The thumbnail im ages in the image selection wind ow are
quite small and you m ay have problems seeing what is
actually in the pi ct ur e. C lic k th e
the Camera menu to see a double-size view of a selected
thumbnail im age along with the date, time , ima ge
quality setting , an d zoo m rate, as well as the flash ,
macro , and lock symbols when applicable.
You can also get this enlarged view by clicking the image
with the right mo use bu t ton w hen running Windows, or
on a Macintosh by c licking the image while the control
key is pressed. The Photo Info button is disabled when
multiple images are selected.
Photo In fo
button on
3
2. Clic k th e
asking you to confi rm that you wan t to erase these
photos.
3. Clic k
If any of the photos are loc ked , a dialog box appears
asking you wh ether you wa nt to leave the photo s in
your camera or erase th em . Click
photos in your camera, or click No to erase them.
Erase Photos
. The image you selected are erased.
Yes
button. A d ialo g bo x ap pears
Using Photo PC 600 w it h Yo u r Com pu te r
to leave the
Yes
Using the Folder Menu
When you click the Folder men u, the Folder menu opens
and thumbn ails of images in the currentl y selec ted fol der
appear in the image sel ection window. The name of the
currently selected fo lder is displayed below the image
selection windo w.
The images displa yed in t he Fo lder m enu’s image
selection windo w can be t ransferred to your application
using the methods described on page 51.
48
Page 49

The only differences between the Folder menu and the
Camera menu are that th e Fold er m e nu do es not have a
photo save button, and does have a Browse button and
an Upload Ph otos button. The Browse button allo ws y ou
to select the folder containing the image files you want to
display in the imag e se lectio n window. The Upload
Photos button allows you to upload images saved in
EPSON Phot o file format from your computer to your
camera.
photo transfer
button
Upload
Photos
button
Selecting images
Click on an im age in the im age selection window to
select it. The border around an image turns blue when it
is selected. Cl ick the
photos at once.
You can use the same m ethods to select multiple im ages
on the Folder menu as you can o n the Cam era menu. See
page 44 for details.
Select All
button to select all the
Transfering photos
As on the Camera menu, the name and function of the
Folder menu’s photo transfer button varies de pending
how you open you r EPS ON Photo!2 software. See the
table on the next page for a su m m ary.
3
Using Photo PC 600 w it h Yo u r Com pu te r
49
Page 50

Button
Name
Button
Function
Notes
TWAIN OLE Stand Alone
Get Photos Get Photo Export Photos
Transfers
selected photos
to your
application.
Some TWAIN
applications will
only accept
one image at a
time.
Transfers a
selected photo
to your
application.
Only one image
can be
transferred at a
time.
Displays a dialog
box that allows
you to name and
save photos in
JPEG, BMP, or
PCX format. On
the Macintosh
the PICT format is
also supported.
If you assign a
single file name to
more than one
photo, a counter
is added to each
file sharing the
same name.
Uploading photos
Click the
Uploa d P h ot os
photos to the camera or to an optional CompactFlash
memory ca rd installed in your com pu ter . W hen yo u click
this button, the following dialog box appears.
Uploaded images are added to the camera or the
memory card in the order they appear in the Fold er
menu’s image sel e ctio n wi ndow.
button to upload selected
3
Finding the folder containing your photos
Click the
Browse
you to locate the folder containing the im ages yo u
downloaded f rom your PhotoPC 600. Selec t the fold er
where you stored the photos and cli ck OK.
Using Photo PC 600 w it h Yo u r Com pu te r
button to open a dia log box that allows
Note:
Image files that were not orig in ally downloaded from the
camera using the Save To Folder button or were not converted
to EPSON Photo file format using the EPSON Photo File
Uploader uti lit y cannot be uploaded using th is bu tt on. For
instructions on using this utility to convert files to EPSON
Photo f il e format, see "Uplo ading Imag es to the Cam era" on
page 70.
50
Page 51

Transferring pictures to your documents
Erasing selected files from a folder
After you select pictures in the Fol der m enu’s image
selection windo w, yo u ca n insert them in your
documents. You can u se you r pi ctures in many different
types of applic at ion pro grams, such as word processors,
presentation programs, spr eadsheets, database
managers, page lay ou t an d desktop publishing packag es.
If your applica tion su pp or ts OLE2 or TWAI N , you can
directly transfer your photos . If it does not, you need to
save your pho tos in a f ile fo rm at yo ur application can
use, and open the file from the application.
You can use the same m et ho d s to transfer and insert
your photos as de scribed in the Came ra m enu section on
page 45. However, from the Folder men u, im ages are not
transferred from your camera but from the fold er wh ere
you downloaded the images.
Click the
from a folder. A dialog box appears asking you to
confirm that you want to erase these pictu res.
If any of the photos are loc ked , a dialog box appears
asking you whether you wan t to leave the ph otos in you r
camera or erase them. Click
your camera, or click No to erase them.
Erase Files
button to erase selected pictures
to leave the photos in
Yes
Getting photo information
The thumbnail im ages in the image selection wind ow are
quite small and you m ay have problems seeing what is
actually in the pi ct ur e. C lic k th e
a double-size view of a selected thumbnail image along
with the date, time, im age quality setting, and zoom rate,
as well as the flash , macro , and lock
symbols when applicable.
You can also get this enlarged view by clicking the image
with the right mo use bu t ton w hen running Windows, or
on a Macintosh by c licking the image while the control
key is pressed. The Photo Info button is disabled when
multiple images are selected.
Photo In fo
button to see
3
Using Photo PC 600 w it h Yo u r Com pu te r
51
Page 52

Using the Controls Menu
When you click the Controls tab, the Control s m e nu
appears. The Cont rol s m enu allows you to see a live
preview on your computer screen, take photos from your
computer, and c hange the camera settings. When yo ur
camera is not connected to the computer, this menu is
not accessible.
Controlling the camera from your
computer
The Control Option s box co nt ains a display panel and
settings that correspond to the control buttons on the top
of your camera. Y ou can change camera settings by using
the controls in this box, just as you would u se the con tr ol
buttons on the top of the camera. When the camera is
connected to the computer, the only control you can use
on the camera itself is the power switch.
The display panel in this box and the display panel on
the camera are updated when ever the image qual ity
setting, flash mode, or picture count changes.
The auto shut-off feature remains in effect when the
camera is connected to your computer ( except when yo u
use live preview). However, it takes pla ce after 5 minutes
of inactivity. Any action you take with the camera via
EPSON Photo!2, for example clicking the
will wake the camera u p. Or yo u c an cl ose and open the
lens cover again to turn the camera bac k on.
Start
button,
3
Using Photo PC 600 w it h Yo u r Com pu te r
52
Page 53

Selecting the image quality setting
Use the arrow beside the Mode list to select the following
settings:
Setting the self timer
Click the
See page 29 for more inform a ti on o n using the self timer.
Self Timer
check box to activate the self timer.
Standard (640 x 480 pixels)
Fine (1024 x 768 pixels)
Super Fine (102 4 x 76 8 pix e ls)
Monochrome Fine (1024 x 768 pixels)
Monochrom e Super Fine (1024 x 768 pix els)
You can switch freely between these settings and mix
pictures of varying image quality in the camera. Keep in
mind that the camera’s picture capacity will vary
accordingl y. See page 28 for more inform a ti on o n the
image quality set tings.
Selecting the flash mode
You can use the arr ow beside the Flash list to select the
following settings:
Off
Automatic
Forced
See page 29 for more details on the fla sh m od es.
Selecting macro mode
Click the
page 30 for details on the mac ro mo de.
check box to select macro mode. See
Macro
Taking pictures from your computer
When the camera is connect ed to your com pu t er, you
can take pictures and use PhotoPC 600 features through
the EPSON Photo!2 software on your comp uter. The onl y
control you ca n use o n th e camera itself is the power
switch.
When you take pictures from your computer, you can use
the camera’s viewfinder to set up your shot, or you can see
a live preview of the shot on your computer screen before
you capture it. This live preview feature works something
like a video camera, except that the image moves more
slowly. See the next section for details on using the live
preview feature.
3
Using Photo PC 600 w it h Yo u r Com pu te r
53
Page 54

Displaying a live preview on your screen
Position the ca m e ra fa cing the subject. Using a t rip od
will give you maximum flexibility in setting up your
shots. Click the
the Controls menu to display your image in t he Liv e
Preview window. To stop the live preview, clic k the
button in the Live Pr evi ew bo x , or select another menu
tab.
Note:
Using the live preview feature uses a lot of battery power.
❏
Use of the optional AC adapter is recommended. See page
83 for more information about using the AC adapter.
You cannot turn off the camera when you are using live
❏
preview. Click the
the Controls menu to turn off the live preview feature, and
then tu rn off the c amera.
button in the Live Preview box on
Start
button in the Live Preview box on
Stop
Stop
Setting the auto-stop timer
You can move or tilt the camera until you see the image
you want t o capture in th e wi ndow. EPSON Photo!2
updates the live preview image ev ery few sec ond s fo r
the amount of time specified in the Auto-Stop Timer list.
The settings availa ble fo r t he auto-stop timer are:
30 Seconds
1 Minute (default val ue)
3 Minutes
5 Minutes
Clicking the shutter
To take a picture from your computer, simply click the
Take a Picture
light beside the viewfi nder o n you r ca m era fl ashes red
and the camera beeps. When the light stops flashing and
turns green, the imag e is sav ed and you can shoot
another pictu re.
button on the Controls menu. The status
Erasing photos
3
Using Photo PC 600 w it h Yo u r Com pu te r
To erase the last picture you took, click the
button.
To erase all the photos in your camera, cl ick the
button.
Erase Last
Erase All
54
Page 55

Using th e Setup Menu
Making computer connection settings
When you cl ick the Setup tab, the Setup m enu appears.
The Setup menu allows you to change computer
connection settings and to make other camera settings,
such as t he date and time.
You can change settings for communication bet ween
your computer and camera with the Port and Speed
options. You can al so test th e connect io n and establish
communic ation by cli cking the
Connection inf ormation appears in the Computer
Connection windo w.
Note:
Do not change the Port and Speed settings from Auto unless
you know the confi guration of the serial por t yo u w ant to use .
If you change t he Port and Speed settings, you may lo se the
connection b etw ee n the cam er a and your computer.
Test Connection
Computer Connection window
The window in the Compu ter Con nection bo x di spl ays
the current statu s of the c am era and its connection to the
computer. If there is a problem with the co nnec tion,
EPSON Photo! 2 pro v ides information in this window to
help you solve the problem .
Note:
If you get an error message in the Computer Connection
window:
1. Make sure that both Port and Speed are set to Auto.
button.
3
Using Photo PC 600 w it h Yo u r Com pu te r
55
Page 56

2. Make sure that the cable is connected correctly, as described
on page 36.
3. M ake sure th e camera is turned on and the batterie s have
enough pow er .
4. Make sure the serial port to which you connected the camera
is enabled and properly configured on your computer.
5. Click the Tes t Co nne cti on b ut ton to conf irm the conne c tion
between your camera and the computer.
Test Connection button
Click the
on the camera’s status and its connection to the
computer. T his information appears in the Computer
Connection windo w.
Test Connection
button to updat e inf orm ation
Port
The Por t opt ion all ows you to ch a ng e the com munication
port that is connec ted to the cam era. When Auto is
selected, EPSON Photo!2 automaticall y selec ts the port
that is connected to the camera. If the port is changed,
EPSON Pho to! 2 tes ts the c onn ect io n and reports the
results in the Computer Connection win dow .
Speed
The Speed option allows you to change the speed at
which EPSON Photo!2 communicates with the camera.
When Auto is selected, EPSON Photo!2 automatically
selects the fastest possible comm unication speed. If the
speed is changed, E PSO N Photo!2 tests the
communication link with the camera and reports the
results in the Computer Connection win dow .
3
The speed choices fo r Windows are Auto, 19200, 38400,
57600, and 115200 bps. For Macin tosh, t he choices are
Auto, 19200, 38400, and 57600 bps.
Making camera settings
You can see the camera’s internal time and date setti ngs
in the Time and Date field s, and yo u ca n change these
settings with the Set Time bu tto n. You c an also change
the camera’s au to shut-off time by clicking the ar row
beside the Auto Shut-off Time list. The Camera ID edit
box allows you to change the camera’s internal
identification setting.
The port choic es fo r Windows are Auto, CO M1, COM2,
COM3 and COM4. For Macintosh, the choices are Auto,
Modem Port and Printer Port.
Using Photo PC 600 w it h Yo u r Com pu te r
56
Page 57

Setting the clock
PhotoPC 600 can record the date and time o f yo ur
pictures automatically. When you transfer the pictures
from the camera to your computer, you can see exactly
when each shot was tak en.
In order to have the time and date recorded, you need to
set the camera’s clock by using the camera’s LCD
monitor or by using the Set Time feature described
below. The PhotoPC 600 c loc k w ill c ontinue to keep time
accurately until you rep lac e th e batteries. See pag e 20 for
instruction s on sett ing the camera’s clock by u sing the
LCD monitor.
Follow these steps to set the camera’s clock from your
computer:
1. Clic k th e
Date dialog box below appears. The way the tim e
and date are displayed in this dialog box depend s on
the time and date disp lay set t ings for your computer.
Set Time
button. The Set Cam era T im e and
2. Use the arrows to change the time and date. Or you
can just click the
set your camera to your computer’s current date and
time.
3. Click OK. EPSON Photo!2 updates the date and time in
your camera.
Copy From Computer
button to
Setting auto shut-off time
PhotoPC 600’s po wer-saving feature autom atically shuts
off the camera if you wa it more t han 60 seconds before
taking a pictur e. Yo u ca n adjust this time period by
connecting the camera to your computer. Click the arrow
on the Auto Shut-off Time list to change t he setting. Y ou
can select from 1 to 5 minutes.
Auto shut-off takes plac e after 5 m inutes when the
camera is connected to your computer. You cannot
change this time period.
Changing the camera ID
If you want to change t he nam e t hat is used to identify
the camera when it is connec ted to a co m pu ter , sim ply
type a new name into the Camera ID edit box.
The camera nam e app ears on the introductory screen
when you start EP SO N Photo!2 and in the About dia log
box.
3
Using Photo PC 600 w it h Yo u r Com pu te r
57
Page 58

Chapter 4
Using the LCD Monitor Menus
When the LCD monitor is in Playback mode, you can
access the LCD mon itor menus, where you can erase
selected phot os and m ake a variety of camera and op ti on
settings. This chapter explains how, including:
Working with L CD m on it or menus
Using the Settings me nu
Using the Information menu
Usin g the Pla yback Mode me nu
Using the Erase Photo menu
Usin g t he Phot o Control menu
Using the Slide Show menu
Using the Option menu
Using the Language menu
Working with LCD Monitor Menus
The LCD monitor features eig ht men us that all ow you to
delete selected photos from the camera, and to make a
variety of camera and option settings. You c an op en all
of the menus described in this chapter from the monitor’s
Playback mode. The Setti ngs and Information menus c an
also be accessed from the View mode. By pressing the
SELECT, BACK , an d nav iga ti on bu ttons as described in
this chapter, you can access and make settings on each
menu.
4
SELECT button
navigation
buttons
BACK button
Using the LCD Monitor Menus
58
Page 59

Following are the eig ht LCD m on it or menus:
Settings
See page 60
You can change the
following settings:
clock
alert beep
LCD brightness
multi-frame
shooting time
Photo control
See page 63
This menu allows you to
do the following:
erase photos
lock photos
get memory i nformation
copy images
format memory cards
Information
→
←
You can ch oose
whether or not to have
photo information
displayed on the LCD
screen by switching
between ON and OFF .
Slide Show
→
←
This menu let you play
back all the photos in
your camera
one-by-one
automatical ly.
See page 62
See page 68
Playback Mode
→
←
You can choose to
display a single photo
or 9 photos at a time
by switching betw een
Normal and Multi.
Option Menu
→
←
This menu allows you to
install, use, and delete
optional programs
availab l e for use with
your camer a.
See page 62
See page 68
Erase Photo
→
←
This menu allows you to
erase the currently
displayed photo.
Language
→
←
Dependin g on the
country, you can
choose one of the
following languages for
displaying information
on the LCD screen :
English, Japanese,
French, German,
Italian, Portuguese,
or Spanish
See page 63
See page 69
→
←
4
Using the LCD Monitor Menus
59
Page 60

Follow these steps to access the LCD monitor menus:
1. Slide the monitor mode swi tc h to
press the
top of the LCD screen with the currently selected
menu framed in o range. The settings for this menu
are displayed on the screen.
2. Press the and buttons to view the setting s fo r
other menus. The orange frame indicates the
currently selected menu.
Note:
To exit the LCD monitor menus, press the
the menu icons and settings disappe ar . (D epe n di ng on the
menu, you ma y have to press this bu tton several times to
return to the Playback mode.)
Read the following menu descriptions for inst ru ct io ns on
changing the settings for each menu.
button. Menu ic ons appear at the
SELECT
Playback
BACK
, then
button until
Using th e Settings Menu
The Settings menu al low s yo u t o c hange
settings for the camera’s internal clock, the
alert beep, the LCD brightness level, and the
shoo ting tim e for the mu l t i -frame ph oto form a t. (See
page 30 for details on the mu lt i-fram e photo format).
You can also acc ess t he Sett ings menu from the LCD
monitor’s View mode.
Follow the instruc t ion s belo w f or the settings you want
to change.
Setting the clock
Follow these steps to adjust the date (year,
month, day) and the time (hour and minute).
1. With the Settings menu selected, pr ess the
button. Icons for each setting appe ar o n th e screen,
with the clock icon highlighted in oran ge.
4
SELECT
Using the LCD Monitor Menus
2. Press
3. Press the SELECT button until the item you want to
adjust is selected. The selected item turns red.
again to enter the clock setting mode.
SELECT
60
Page 61

4. Press the button to increase the number, or the
button to decrease the number, until the item
you want to adjust is correct.
3. Press the
to the Settings menu.
BACK
button to save your setting and return
5. Repeat steps 3 and 4 until the date and time are
correctly adjusted and saved. Press the
button or
menu.
Note:
You need to reset the time and date whenever y ou replac e the
camera’s batteries. In this case, you can enter the clock setting
mode directly rather than going thr ough the Settings menu.
See page 20 for instructions.
button to return to the Settings
BACK
SELECT
Setting the alert beep
To turn the camera’s alert beep on or off, follow
these steps:
1. With the Settings menu selected, pr ess the
button. Icons for each setting appe ar o n th e screen,
with the clock icon highlighted in oran ge.
2. Press the button to select the beep setting icon ;
then press the
The current selection is highlighted.
button to select ON or
SELECT
SELECT
OFF
Setting LCD brightness
To adjust the brightness of the LCD scr een, follow
the steps below:
1. With the Settings menu selected, pr ess the
button. Icons for each setting appe ar o n th e screen,
with the clock icon highlighted in oran ge.
2. Press thebutton until the brightness icon is
highlighted in orange, then press the
again. The mark on the brightness setting slide bar
turns orang e.
3. Slide the mark on the bar by press the and
buttons to adjust the screen brightness.
4. Press the
and r etur n to the S e tting s menu.
.
SELECT
or
button to save your setting
BACK
SELECT
SELECT
4
button
Using the LCD Monitor Menus
61
Page 62

Setting the multi-frame shooting time
Follow these steps to set the total time the
camera takes to shoo t nine fr am es in m u lt i-fram e
photo format.
1. With the Settin gs m enu selected, press the
button. Icons for each setting appe ar o n th e screen,
with the clock icon highlighted in orange.
2. Press the button until the multi-frame icon is
highlighted. Then p ress the
0.5, 1, 2
current selection is highlighted.
3. Press the
to the Settings menu.
, or 3 seconds as the total shooting t ime . The
button to save your setting and return
BACK
SELECT
SELECT
button to select
Using th e Informati on Menu
On this menu you can choo se w het her or not
to have photo informatio n displayed on the
LCD screen. Choosi ng ON for this setting
allows you to get information on the date and time that
the photo was taken, the im age quality setting, frame
number, and the number o f photos taken.
The current setting is hig hlighted. To change the setting,
press the
save your settin g.
This menu is also acc essible when the LCD monitor is in
View mode. In this ca se, cho osi ng ON allows you t o get
information on th e im age quality setting, the num ber o f
photos you can take, and the number of photos taken.
button. Then press the
SELECT
BACK
butt on to
Using th e Playback Mode Menu
This menu allow s yo u t o swit ch between
Normal an d Multi-photo Playbac k modes.
Press
to save your setting and ex it th is m enu .
BACK
If you switch to Multi-photo Playbac k mode, sm al l
"thumbnail" im ages of the last photos you took ap pear
on the screen, with the currently selected im age framed
in white.
Press the and buttons to move the white selection
frame forward and back through the images on screen.
When the frame reaches the first or last ph oto of the
current group, the previous or next group o f up to nine
images is displayed.
to make your setting, an d pres s
SELECT
4
Using the LCD Monitor Menus
62
Page 63

Using the Erase Photo Menu
Using the Photo Control Menu
This menu allows you to erase the currently
displayed image. Before accessing the LCD
monitor menus, make sure the photo you want
to erase is displayed and is not locked. (See page 65 for
instructions on locking and unlocking photos.) Then
select the Erase Photo menu as described on page 60, and
press the
confirm that you want erase the image. Press
again to erase the image, or press
image and return to the Playback mode.
Note:
If you try to erase a locked photo, a message stating that the
photo is locked appears on the screen. Press any of the monitor
control buttons to the right of the LCD screen to exit the Erase
Photo menu, then open the Photo Control menu and unlock
the photo as described on page 65.
button. A message appears asking you
SELECT
BACK
SELECT
to preserve the
You can use the Photo Control menu to erase,
lock, or unlock images in your camera and to
get information on the camera’s internal and
CompactFlash card memory. This menu also allows you
to format memory cards and copy images between the
camera and the card.
Access the LCD monitor menus and select the Photo
Control menu as described on page 60, then follow the
instructions below for the Photo Control feature you
want to use.
Erasing photos
This mode gives you two ways to erase photos from
your camera: Select Photo or Erase All. Use Select Photo
to erase one or several photos at a time; use Erase All to
erase all photos from the camera’s memory. Follow the
steps below for the method you want to use.
Note:
Be sure to unlock the photos before erasing them. See "Locking
photos" on page 65 for instructions.
4
Using the LCD Monitor Menus
63
Page 64

Select Photo
1. With the Photo Control menu selected, press the
button. The Pho to Co nt rol feat ures appear
SELECT
on the screen, with the
orange.
2. Press the
press the or button to choose
3. Press the
button to move fo rw ard or back through the
images in the camera u ntil the pho to you w ant to
erase appears on the screen.
4. Press the
around the image. If yo u w ant to erase o ther pho t os
at the same time, use the or button to display
them, then press the
Note:
❏
❏
SELECT
To cancel the select ion of a photo, si mply press th e
SELECT
If you select a locked photo, the c amera be eps and you
can’t select the photo until you un lo ck i t, as des cri bed
on page 65.
button to enter the Erase mode, then
SELECT
button, then press the or
SELECT
button. An orange f ram e appears
SELECT
button again.
option highlighted in
Erase
Select Ph oto
button to select them.
6. Press the
to the Photo Control menu; press
the Photo Control menu wi thou t erasing the photos.
button to erase the images and return
SELECT
BACK
to return to
Erase All
1. With the Photo Control menu selected, press the
button. The Pho to Co nt rol feat ures appear
.
SELECT
on the screen, with the
orange.
2. Press the
press the or button to choose
3. Press the
you to confirm that you want to erase all photos.
Press the
return to the Photo Contro l m enu; press the
button to return to the Photo Control menu without
erasing the photos.
Note:
If there are locked photos in your camera, a message
appears on the sc reen before the er ase photo s c onfirm ation
message. Press the
unlocked images from the camera.
button to enter the Erase mode, then
SELECT
button. A message app e ars asking
SELECT
button to erase the photos and
SELECT
SELECT
option highlighted in
Erase
Erase All
button to erase only the
.
BACK
4
5. When you have selected all the photos you wan t to
erase, press the
asking you to confi rm you r selec t ion s.
button. A message appears
BACK
Using the LCD Monitor Menus
64
Page 65

Locking photos
The lock feature allows you keep your p hoto s from
being accid ent ally erased. You can lock and unlock
select ed photos fro m the Select P hoto menu , o r lock all
the photos in the camera from the Lock All menu. To
unlock all pho t os, use the Unlock All menu . Follow the
steps below for each procedur e:
4. Press the
bottom of the screen, or disappears if it was loc ked
original ly. If you want to lock or unloc k other photos
at the same time, use the or button to display
them, then press the
5. When you have selected all the photos you wan t to
lock or unlock, press the
appears asking you to confirm your selections.
button. A lock icon appears at the
SELECT
button.
SELECT
button. A message
BACK
Select Photo
1. With the Photo Control menu selected, press the
button. The Pho to Co nt rol feat ures appear
SELECT
on the screen, with the
orange.
2. Press the button to select the Lock option, then
press the
Then press the or button to choose
.
Photo
3. Press the
button to move forw ard or back throug h th e im ages
in the camera until the photo you want to lock or
unlock appears on the screen.
button to enter the Lock mode.
SELECT
button, then press the or
SELECT
option highlighted in
Erase
Using the LCD Monitor Menus
Select
6. Press the
and r etur n to the P h oto Control men u ; press
to return to the Photo Control menu without locking
or unlocking the photos.
button to lock or unlock the images
SELECT
Lock All
1. With the Photo Control menu selected, press the
button. The Pho to Co nt rol feat ures appear
SELECT
on the screen, with the
orange.
2. Press the button to select the Lock option, then
press the
Then press the or button to choose
button to enter the Lock mode.
SELECT
option highlighted in
Erase
BACK
Lock All
4
.
65
Page 66

3. Press the
you to confirm tha t you w ant t o lo ck all the photos in
the camera. Press the
photos and retu rn to the Photo Control menu; P ress
the
BACK
menu without locking the photos.
button. A message app e ars asking
SELECT
button to lock the
SELECT
button to return to th e Photo Control
Unlock All
1. With the Photo Control menu selected, press the
button. The Pho to Co nt rol feat ures appear
SELECT
on the screen, with the
orange.
2. Press the button until Lock is highlighted in
orange. Press the
Photos mode, then press the or button to
choose
Unlock All
SELECT
.
option highlighted in
Erase
button to enter the Lock
Getting memory information
This mode allows you to get information on bo th you r
camera’s in ter nal memory and on opti on al
CompactFlash memory cards.
With the Photo Control menu selected, press the
button. Then press the button until
highlighted. Press the
internal and external memory appears, including th e
number of photos you can take , the number of
photos stored in internal memory and externa l
memory , and the total number of photo s th at can be
stored at the current image quality setting .
button. Information on
SELECT
Memory Info
Copying photos
SELECT
is
4
3. Press the
you to confirm that you want to unlock all the photos
in the camera. Press the
photos and retu rn to the Photo Control menu; press
the
BACK
menu without unlocking the photos.
button. A message app e ars asking
SELECT
button to return to th e Photo Control
Using the LCD Monitor Menus
button to unlock the
SELECT
When an optional CompactFlash m em ory card is
installed in your ca m e ra, you can use t he Co py mode to
copy photos between the camera’s internal memory and
the memory card. Follow these steps:
1. Make su re th e memo ry card is installed in the cam e ra.
2. With the Photo Control menu selected, press the
button. Then press the button until
SELECT
is highligh ted in orange.
Copy
66
Page 67

3. Press the
press the or button to select
or
Card→Camera
4. Press the
button to move fo rw ard or back through the
images in the camera u ntil the pho to you w ant to
copy appear s on the screen.
5. Press the
around the photo. If you wa nt to copy sev eral photos
at the same time, use the or button to display
them and press the
Note:
To cancel the select ion of a photo, si mply press th e
❏
SELECT
If you select mo re photos than the car d or camera c an
❏
hold, an error message appears.
6. When you have selected all the photos you wan t to
copy, press the
asking you to confi rm you r selec t ion s.
7. Press the
to the Photo Control menu; press
the Ph ot o Control m e n u without copyin g the photos.
button to enter the Copy mode, then
SELECT
Camera→Card
as the copy desti nat io n.
button, then press the or
SELECT
button. An orange frame appears
SELECT
button each time .
SELECT
button again. The orange frame disappears.
button. A message appears
BACK
button to copy the images an d return
SELECT
to return to
BACK
Formatting memory cards
Use this feature to format optional CompactFlash
memory cards. Follow these steps:
Caution:
c
Note:
EPSON CompactFlash Cards are already formatted when you
buy them. You only need to format a card only if you want to
erase all the data on the card or if a message on the LCD screen
instructs you to do so.
1. Make su re th e memo ry card is installed in the cam e ra.
2. With the Photo Co ntrol menu selec t ed, press the
3. Press the
When you format a memory card, all the data on the
card is lost, including any locked images.
button. Then press the button until
SELECT
Format Card
that all data on the card w ill be erased and asking
you to confirm the procedure. Press the
button again to f ormat the card and return to t he
Photo Control menu; press the
return to the Photo Control menu without formatting
the card.
is highlighted.
button. A message app e ars stat ing
SELECT
BACK
SELECT
button to
4
Using the LCD Monitor Menus
67
Page 68

Using the Slide Show Menu
Using th e Option Menu
This menu allows you to automatically play
back all the pho tos in your camera
one-by-one.
Select this menu as described on page 60, then press the
button. The LCD m oni tor begins playing back
SELECT
the photos in you r camera one-at-a-time at regular
intervals.
To move f orwar d or bac k t hrough the ph otos ma nually,
press the or button. To pause the slide show at a
particul ar photo, press the
icon and current picture cou nt app ear at the bott om
of the screen.
To stop the slide sho w an d ret urn to normal Playback
mode, press the
BACK
SELECT
button.
button. The pause
This menu al lows you to install, use, or delete
optional prog ram s available for use with
your camera.
Access the LCD moni tor m enu s and select the Option
menu as described on page 60. The names of an y
programs al read y installed in your c am e ra w ill appear
on the menu, along with an Add/Delete command,
which you ca n use to install programs from a m em o ry
card or delete pro grams from your camera.
To use an installed optio nal program, press the
button then press the or button to select the
optional prog ram yo u w ant to use. Press the
button again to open the program.
Use the Add/Delete command to copy a program from a
CompactFlash memory card t o yo ur camera, or to delete
an optional program from your camera. Follow these
steps:
Note:
You can al s o u pl oad optional programs to y our camera fro m
your computer. See page 78 for instructions.
SELECT
SELECT
4
Using the LCD Monitor Menus
68
Page 69

1. If there are any photos in the camera’ s internal
memory, transfer the ones you wa nt to your
computer o r to a Co m pactFlash Card, then erase all
the photos from the camera.
Caution:
If any images are left in the camera’s memory
c
when yo u u pl oad an optional progra m , the
camera may not work properly.
2. Insert t he m em ory card into your cam era.
With the Option menu selected, press the
button then press the or button to select
SELECT
Add
.
button, then use the or button
or
Delete
.
Add/De lete
2. Press the
to select
SELECT
4. Press the
program and return to the Option menu; press the
button to return to the Option menu without
BACK
installing or delet ing the program.
button to install or delete the
SELECT
Using th e Language Me nu
With this menu you can sel e ct the language
used to display cam era information on the
LCD screen. Dependi ng on the count ry, you
can choose English, Ja pan ese, Frenc h, Germ an, Italian,
Portuguese, or Spanish. The current setting is
highlighted. To selec t a different language, press the
button until the language you want is
SELECT
highlighted. Press
to return to the Playback mode.
BACK
4
3. Press the
camera starts inst alling the program. A mes sage
appears asking you to confirm that you w ant t o
install the program.
If you selected
in your cam e ra ap pears. Use the or but ton t o
choose the program you want to delete, then press
the
SELECT
confirm that you want to delete the program.
button. If you selected
SELECT
Delete
button. A message app e ars asking you to
Using the LCD Monitor Menus
, the
Add
, a list of the programs in st alled
69
Page 70

Chapter 5
Using the Uploader Utilities
EPSON Photo PC 600 comes with two uploader utility
programs that allow you to upload im ages and optional
programs from yo ur computer to your came ra. This
chapter explain s how, inc luding:
Uploading images to the camera
Upload ing optional programs
Uploading Images to the Camera
The EPSON Photo File U ploader software includ ed on
the CD-ROM th at cam e w it h your camera allow s yo u t o
convert any JPEG or BMP image to EPSON Photo file
format and upload it to your came ra or to a flash
memory card.
You can also use this software to make and save “screen
captures” of everything disp layed on the computer
screen. Use this feature to turn any of the documents you
create, for example PowerPoint pr esentations, into image
files that you ca n up load to the camera or to a memory
card.
You can upload images in 640 x 480 p ix el, 1024 x 768
pixel, or 1024 x 38 4 pix e l sizes.
Note:
EPSON Photo File Uploader automat ically converts images
from th eir original size to whichev er of these three siz es you
choose.
5
Using the Uploader Utilities
70
Page 71

To use EPSON Photo File Uploader, you need to install it
in your compute r al ong with t h e EPSON Photo!2
software. If you have not yet inst alled these programs,
do so now, following the in structions on page 17.
Uploading images from your PC
Follow these steps to upload im ages to your camera from
PCs running Windows 3.1, Windows 95, or Windows NT
versions 3.51 or 4. 0:
1. Make sure the camera is connected to the computer,
and that both the co m puter and the camera are
turned on. Al so make sure EPSON Photo! 2 is not
open and the LCD monitor is turned off.
2. Open your EPSON Photo File Uploader program . T he
EPSON Pho t o File Uploader wind ow appears with
the Upload To Camera menu displayed.
5
3. Select a file type from the File Type list. From the
Folder list, dou ble- click the folder containing the
images you w ant t o up load.
Note:
To upload images from a network drive, you may need to
map the drive before opening EPSON Photo File Uploader.
Using the Uploader Utilities
71
Page 72

4. Select the images you want to up lo ad in the File Name
list. Then click the -> button. If you wa nt to upload
all the images in the list at once, simply click the >>
button.
The selected files appear in the Selected Files List in the
order they will be uploaded. If you want to change
your selection, click the <- button to remove selected
files or click the << button to remove all the files
from the Selected Files list.
If you want to rearr ange t he uploading order, select t he
image you want to rearrange, then click the ↑ or ↓
Sort arrows.
5. For each fil e in th e Selected Files List, select an image
size from the Im age Size box.
5
During the uploading process, EPSON Ph oto Fi le
Uploader convert s yo ur files to EPSON Phot o file
format with the image sizes you specified .
If you want to save copies of the convert ed fi les on you r
computer, click the Save file to checkbox before
uploading the ph otos . C lic k Browse, t h en select the
folder where you w ant to save th e files . Click OK.
The folder you selected is displayed to the right of
the Browse button.
Using the Uploader Utilities
72
Page 73

Note:
If you want to preview a selected image and confirm its
size, cli c k the Preview checkbox.
6. Click the Start button. EPSON Photo!2 opens with the
Folder menu di splayed. The images you want to
upload app ear in the im age selection window .
7. Clic k th e Select All button to select all the images, or
select indiv idual images by clicking the thumbnails
in the image selection window.
8. Clic k th e Upl oad Photos button. The Uploa d Photos
dialog box ap pea rs. Click the Camera rad io button
to upload the images to your camera, or click the
Compact Flash Memory Card radio button to
upload the ima ges t o a co m pa ct fla sh card installed
in your computer; then click OK. The images are
uploaded to the dest ination you selected.
If you clicked the Save file to checkbox in the EPSON
Photo File Upload er w indo w , the converted im ages
are also saved to the folder yo u sp eci fied.
Uploading images from your Macintosh
Follow these steps to upload im ages to your camera from
your Macintosh:
1. Make sure the camera is connected to the computer,
and that both the co m puter and the camera are
turned on. Al so make sure EPSON Photo! 2 is not
open and the LCD monitor is turned off.
2. Double-click the EPSON Photo File Uploader icon.
The EPSON Pho t o Fil e Uploader window app ears.
5
Using the Uploader Utilities
73
Page 74

3. Click the Add button. The Select Files dialog box
appears. Double- cl ick the folder containing the
images you want to upload, then select each file
you want to upload and click the Select button.
4. For each fil e in th e Selected Files List, select an image
size from the Im age Size box.
When you finish se lecting image files, click Done to
close the Select Files dialog box. The selected images
appear in the Selected Files List in the order they will
be uploaded.
If you want to remove files fr om t his li st , sel ect the files
and click the Remove button.
Using the Uploader Utilities
5
During the uploading process, EPSON Ph oto Fi le
Uploader convert s yo ur files to EPSON Phot o file
format with the image sizes you specified .
74
Page 75

If you want to save copies of the convert ed fi les on you r
computer, click the Save file to checkbox before
uploading the ph otos . C lic k Browse, t h en select the
folder where you w ant to save th e files . Click OK.
The folder you selected is displayed to the right of
the Browse button.
Note:
If you want to preview a selected image and confirm its
size, cli c k the Preview checkbox.
5. Click the Upload button. EPSON Pho t o! 2 op ens w it h
the Folder menu displa yed. The im ages you want to
upload app ear in th e im age selection window.
6. Clic k th e Select All button to select all the images, or
select indiv idual images by clicking the thumbnails
in the image selection window.
7. Clic k th e Upl oad Photos button. The Uploa d Photos
dialog box ap pea rs. Click the Camera rad io button
to upload the images to your camera, or click the
Flash Memory Card radio button to up l o ad th e
images to a flash memory card installed in you r
Macintosh; then click OK. The images are uploaded
to the destination you selected.
Making Scr een Copies
If you want to upload a document to your camera that is
not saved as a stand ard im age file, you can turn the
document into an im age fi le by m aking a copy, or "screen
capture," of your computer desktop with the document
open on it. Windows users can make screen captures
from within the EP SO N Pho to File U ploader utility;
Macintosh users need to use the standard M aci ntosh
screen shot function.
For Windows users
Follow these steps to make screen c aptu res:
1. Make sure the camera is connected to the computer,
and that both the co m puter and the camera are
turned on. Al so make sure EPSON Photo! 2 is not
open and the LCD monitor is turned off.
2. Open your EPSON Pho t o File Uploader program . T he
EPSON Pho t o File Uploader wind ow appears.
5
If you clicked the Save file to checkbox in the EPSON
Photo File Upload er w indo w , the converted im ages
are also saved to the folder yo u sel e cted.
Using the Uploader Utilities
75
Page 76

3. Click the Screen Capture menu tab. The Screen
Capture menu ap pe ars.
4. From the Fol der list, double-click the folder w here yo u
want to save the screen capture.
If you need to create a new folder for the images, c lic k
the New Folder button.
Note:
To select a folder located on a network drive, you may need
to map the drive before opening EPSON Photo File
Uploader.
5. Specify the key combination you want to use for
screen captures u sing the Hot Key Settings box. Click
the ALT, CTRL, or SHIFT checkbox, then select a key
from the hot key list. The default hot key is the F5
key.
6. Click Start to register the key combination. When the
key combination is registered, the Start button will
change to a Stop button. The key combination
remains registered only for the current session.
Pressing the Stop button erases the hot key
combinatio n.
7. Start your application and open the file you wan t to
capture, then press the hot key combination you
selected.
You can make as man y screen captures as you’d like;
simply open each file you want to captur e and press
your screen capture key combination again.
Note:
File names are created automat ically.
8. When you are finished maki ng screen captures, close
your applic ation and click the Stop button in the
Screen Capture menu. The key combination you
selected is erased.
5
Using the Uploader Utilities
76
Page 77

If you want to uploa d you r sc reen ca pt ures to the camera
right away, click the Upload To Camera menu tab. The
screen capture files app ear in the File Name list. Follow
the uploadin g directions from step 4 on page 72 to
upload the screen captur es.
For Macintosh users
EPSON Photo File U p loa der fo r the Macintosh does not
have a screen shot featu re. However, you can make
screen shots using yo ur Macintosh system softw are, then
use EPSON Photo File Uploader to upload the screen
shots to your cam e ra.
The instructions below ar e repres entativ e of man y
Macintosh computers , but the procedure may be
different depending on your Maci ntosh . See your
computer manu al for detailed instructions on making
screen shots.
Follow these steps to make sc reen shots of your
Macintosh desktop:
1. Make sure the camera is connected to the computer,
and that both the co m puter and the camera are
turned on. Al so make sure EPSON Photo! 2 is not
open and the LCD monitor is turned off.
2. Open the EPSON Photo!2 folder and double- cli ck the
EPSON Photo File Uploader icon. The EPSON Photo
File Upload er wi nd o w ap pears.
3. Start your application and open the file you want to
capture, then press SHIFT+ CO MM A N D+3 on you r
computer key boa rd. You r Macintosh names and
saves the screen shot on your hard drive.
You can make as man y screen shots as you’d like;
simply repeat this step.
4. When you are finished maki ng sc reen sho t s, clo se your
application.
To upload your screen shots to the camera, click the
EPSON Photo File U p loa der window to make it active,
then follow the uploading instruction s from st ep 3 on
page 74.
5
Using the Uploader Utilities
77
Page 78

Uploading Programs to the Camera
Uploading programs
The EPSON Pho to! 2 Program Uploader utility allows
you to upload u p t o five o ptional programs from your
PC or Ma cintosh to your PhotoPC 600.
Note:
When you install your EPSON Photo!2 software, EPSON
❏
Photo!2 Progr am Uploa de r is inst alled automatically.
When uploading optional programs, the number
❏
of pict u res you can store in your camera ’s internal
memory decreases.
You can also upload optional programs from
❏
CompactFlash memory cards. See page 68 for instructions.
Follow these steps to upload optional programs to the
camera:
1. Make sure the camera is connected to the computer,
and that both the com puter and camera are turned
on. Also make sure that EPSON Photo!2 is not open
and the LCD monitor is turned off.
2. If there are an y pho t os in the c am era’ s internal
memory, transfer the ones you wa nt to you computer
or to a CompactFlash Card, then erase all th e pho tos
from the camera.
Caution:
c
3. Clic k or double-click the EPSON Phot o! 2 Progr am
Upload er icon in t h e E PSON Photo!2 program grou p
or folder. The EPSON Photo!2 Program Uploader
window ap pears.
Note:
If the camera i s n ot conn ec ted to the computer, an error
dialog box appears. Check the cable connections and make
sure the came ra is turned on. If nec essary, a djust the
communi c at io n port and speed setti ngs in this dialog bo x.
If any images are left in the camera’s memory
when yo u u pl oad an optional progra m , the
camera may not work properly.
5
Using the Uploader Utilities
78
Page 79

4. Clic k th e Browse button to select the folder that
contains the programs you want to uploa d.
5. Select th e pro gram s you want to upload f rom t he
Applications in Folder list.
6. Clic k th e Upload button. EPSON Phot o! 2 Program
Uploader beg ins uploading the selected pro gram s.
When the uploading pro cess is fin ished, the uploaded
programs app ear in t he A pp lic at io ns in Camera list.
Now you can us e the p rog ram s in your camera. See page
68 for instructions on opening the programs.
Removing programs
Follow these steps to remove optional programs from the
camera:
Note:
You can also remove programs by using the Option menu in
the camera’s LCD monitor menus. See page 68 for instructions.
1. Make sure the camera is connected to the computer,
and that both the com puter and camera are turned
on. Also make sure that EPSON Photo!2 is not open
and the LCD monitor is turned off.
2. Clic k or double-click the EPSON Phot o! 2 Progr am
Upload er icon in t h e E PSON Photo!2 program grou p
or folder. The EPSON Photo!2 Program Uploader
window ap pears.
Note:
If the camera i s n ot conn ec ted to the computer, an error
dialog box appears instead of the confirmation message.
Check the cable c onnectio n s and make sure the c am era is
turned on. If nec essary, adjust the c ommunication port
and speed se tt i n gs in t his dialog box.
3. Clic k th e program s you want to remove in the
Applica ti ons in Camera list.
4. Clic k th e Remove button. A confirmation message
appears.
Click OK. The selected programs are rem oved f rom
5.
the camera and from the Applications in Camera list.
5
Using the Uploader Utilities
79
Page 80

Chapter 6
Camera Options
A variety of option s are available that expand the
flexibility of you r PhotoPC 600. Option al CompactFlash
Cards allows you to increase the camera’s storage
capacity. If you use t he op t ional PCMCIA adapter, you
can access images stored on CompactFlash Cards directly
from your comp ut er. The op t ion al A C A dapter helps you
save battery power, particularly when previewing and
transferring pic tures t o your computer. This chapter
describes the follo wi ng:
Using optional CompactFlash Cards
Using the optional PCMCIA adapter
Using the AC Adapter
Using CompactFlash Memor y Cards
PhotoPC 600 co mes with 4MB of inter nal m em ory,
which holds up to ap pro x im ately 8 super fine quality
pictures (1 024 x 768 pixels), approx im ately 18 fine quality
pictures (1024 x 768 pixels), or approximately
56 standard quality pictures (640 x 480 pixels). You can
increase the camera’s storage capacity as described in the
following table by installing an optional 4MB (B808311)
or 15MB (B8 08301) CompactFl ash Card:
4MB
Internal
Memory
Standard 56 63 238
Fine 18 21 79
Super fine 89 35
4MB
CompactFlash
Card
15MB
CompactFlash
Card
6
Camera Options
80
Page 81

Note:
EPSON recommends use of EPSON CompactFlash Cards
only. Other memory cards may be incompatible with the
EPSON PhotoPC 600.
Also, if your computer is equipped with a Type II
PCMCIA memory card slot, you can ac cess images
stored on memory cards directly from you r computer by
using the optional PCMCIA adapter (B867041).
Installing a CompactFlash Card
Follow these steps to install a memory card in the cam era:
1. Make su re the came ra and t he m oni tor m ode switch
are turned off.
2. Insert the card all the way into the memo ry card slot, as
shown below.
arrow mark
3. Loop th e card slot cover string around t he hand strap
holder.
1
4. Align the tabs on the back of the cover with the
installed memory card, as shown below.
5. Press the cover onto the memory card so that the
memory card slot is completely sealed.
Note:
Alwa y s attach th e c ard slot cov er to your c amera wh en y ou
use optional CompactFlash Cards.
2
6
Camera Options
81
Page 82

When a memory card is installed, photos you tak e are
stored in the card’ s m em or y rat her t han the camera’s
internal memo ry. The num ber of pictures you can stor e
in the memory card appears in bracket s o n the cam e ra’s
display panel.
When a memory card is installed, you m ay no t ice a delay
between the time you press the shutter button and when
the camera beeps. To av oid blurring, make sure to hold
the camera still unt il the camera beeps.
Caution:
c
Never remove the card while the camera is accessing it.
Data in the card may be lost or damaged.
Removing a CompactFlash Card
Follow these steps to rem o ve a mem ory card from the
camera:
1. Make su re the camera and the monitor mode swi tch
are turned off.
2. Remo ve the card slot cover.
3. Slide the lever on the bottom of the camera to eject the
memory card .
4. Remo ve it by ha nd.
2
1
Caution:
Never remove the card while the camera is
c
❏
accessing it. Data in the card may be lost or
damaged.
Avoid using or s to ring t he c ar d i n dusty places, in
❏
direct sunlight, or in places that become extremely
hot or humid.
Using the optional PCMCIA adapter
The opt ional PCMCIA adapte r al lows yo u t o access
images stored on C ompactFlash Cards directly from
your computer. To use this adapter, your computer must
be equipped w it h a T ype II PCMCIA mem ory card slot.
6
Camera Options
82
Page 83

Macintosh users must enable the PC Exchange extension
software to access files on CompactFlash Cards. See your
Macintosh user’s manual for more information.
Follow these steps to use the optional adapter:
1.Insert the memory card into the optional adapter all
the way, as shown below.
Now you can access the photos in the memory card from
your computer.
Using the AC Adapter
The AC Adapter (B86703✽) allows you to connect your
PhotoPC 600 to a standard electrical outlet. This is
especially useful when you are transferring pictures and
operating the camera from your computer. The adapter
powers the camera, but does not charge the batteries. In
some locations the AC adapter comes with a separate AC
power cable.
2.Insert the adapter into your computer’s Type II
PCMCIA slot.
Camera Options
Note:
The asterisk in the product number (B86703✽) is a substitute
for the last digit, which varies by country.
Warning:
w
Use only the AC adapter designed for PhotoPC 600.
Use of any other adapter could cause fire, electrical
shock, or injury. Do not use the AC power cable and
the adapter for any purpose other than powering your
PhotoPC 600. If the AC plug doesn’t fit your outlet,
have a proper outlet installed by a qualified electrician.
To avoid radiation danger, do not expose or remove the
ferrite core.
6
83
Page 84

To avoid losing any images or settings, make sure the
camera is finished processing and is turned off before
you connect or disco nnec t the AC adap ter . Then follow
these steps:
1. If your A C adapter has a separate A C p ow er cable,
push the cable connector firm ly into the AC inlet.
2. Open the connector cover located on the side of the
camera.
connector cover
3. Plug the adapter cable into th e DC po rt on th e cam era.
4. Plug the AC adapter into an electrical ou t let .
Caution:
c
Place the camera and the AC adapter near an electrical
outlet where the pl u g can be easily unp l u gged.
Note for French- spe aki ng users:
Place z l ’apparei l photograp h i que et ses op ti ons près
d’une prise de coura nt où la prise peut être débranchée
facilement.
Avoid electrical outlets controlled by wall switches or
automatic timers. Also, avoid outlets on the same
circuit as large motors or other appliances that ca n
cause fluctuations in line voltage.
6
Camera Options
84
Page 85

For United Kingdom users - safety
information
Warning:
w
This ap pliance must be earthed. R efer to ra ting pla te
for voltage and check that the appliance voltage
corresponds to the suppl y vo l tage.
IMPORTANT:
The wires in the mains lead fitted to this appliance are
coloured in accordance with the following code:
Green and yel lo w - Earth
Blue - Neutral
Brown - Live
The brown wire must be connected to the terminal in the
plug marked with the letter L.
If damage occurs to the plug, replace t he co rd set or
consult a qualif ied electrician.
Replace fuses only with a fuse of the correct size and
rating.
If you have to fit a plug:
As the colours of the m ain s lead of this appliance may
not match coloured markings used to identify t he
termi na ls in a plug, pl e ase proceed as foll ows:
The green and yellow wire mus t be conn ected to the
terminal in the plug which is marked with the letter E o r
the Earth symbol (G).
The blue wire mus t be c onn ect ed t o the ter m inal in the
plug marked with the letter N.
Camera Options
6
85
Page 86

Chapter 7
Maintenance and Troubl eshooting
Your PhotoPC 600 is easy to take care of, and any
problems you may have are easy to solve.
See the following sect ion for guidance on cleaning the
camera. For solutions to common camera problems, see
the section beginni ng on page 87 .
Caring for the Camera
Your PhotoPC 600 camera requires only the most basic
care. Before you do any m aintenance procedures on the
camera, be sure to read t he Saf et y Instructions in the
Introduction. Then follow these gui d elines:
Caution
Handle the camera gently and avoid subjecting it to
strong shocks or vibrations. If the camera is dropped or
otherwise jarred, the follow ing errors may occur even if
the camera is not permanently damaged.
❏ The camera’s da te an d ti m e settin gs m ay be lo st.
❏ If the camera is jarred while processing an image, the
camera may fai l to reco rd the im age in its memory.
Cleaning the camera
❏ Use a clean, dry cloth to keep the camera free of dust.
❏ Do not use harsh or abrasive cleaners.
❏ To clean the len s, firs t bl ow of f any loo se dust or dirt.
Then breathe on the lens and wipe off all moisture
with a soft, lint-free cloth o r lens cleaning tissue.
❏ To avoid scratching the lens, be careful not to press
too hard.
❏ If necessary, clean the battery con tacts w ith a dry
cloth.
Storing the camera
❏ Make sure the came ra ’s power is off and keep your
camera in its case when you are not using it.
7
Maintenance and Troubleshooting
86
Page 87

❏ When the camera is no t used for lo ng period of time,
remove the batteries and store them at a low
temperature in a dry loca tion. This prevents camera
damage from ba ttery le aks o r co rro sion.
Do not store the camera in t he fo llo w ing locations:
The camera may hav e shut off au t omatically. Close and
open the lens cover to turn the power back on.
Check the batteri es and m ake sure they are installed
correctly. Replace the batteries if necessary, follo wi ng
the instructions on page 15.
❏ Where it will be ex po sed to dir e ct sunlight, for
example, on a c ar dashboard
❏ Near sou rces of br ight light or high humidit y
❏ Near heat sou rces or in a closed car
❏ In areas of excessive dirt or dust
❏ Where it will be ex po sed to stro ng v ibrations or
magnetic fields
Camera Problems
Before you call for help, check this list of problems and
possible soluti ons .
The camera has no power.
Make sure the lens cover is op en all the way. The power
comes on automatically when the lens cover is
opened fully.
Maintenance and Troubleshooting
If you are using the AC adapter, make sure it is plug ged
into a working o utlet .
You cannot take a picture with the camera.
The flash may be recharging. Wait until th e stat us light
beside the viewfinder turn s green, and try again.
The camera may be connected to your computer. When
it is connected, you cannot use any of the controls on
the camera itsel f. See pag e 53 fo r instructions on
taking pictu res fr om yo ur computer.
The camera’s memory may be full. Check the picture
counter on the displ ay pa nel. Erase some pictures
using the LCD mon itor, or transf er the pic tures to
your computer and then erase them.
Note:
❏ To use the LCD monitor to delete pictu re s, se e pa ge 63.
To use yo u r computer to transfer and eras e p i ctures,
see page 44.
87
7
Page 88

❏Installing an optional CompactFlash Card allows you
to take more pictures without deleting any images
currently in the camera. See page 80 for details.
The flash does not work.
Make sure the flash is set to Automatic or Forced Flash.
See page 29 for more information on setting the flash.
Check the batteries and make sure they are installed
correctly. Replace the batteries if necessary, following
the instructions on page 15.
The image on the LCD monitor screen is too dark, or
is not visible at all.
Adjust the the brightness of the LCD screen if
necessary, following the instructions on page 61.
The EPSON Photo!2 Setup menu appears instead of
the Camera menu when you connect the camera to
your computer and open EPSON Photo!2.
Make sure the cable is connected correctly, as described
on page 36.
Nothing appears on the LCD screen in View mode.
Make sure the power is on. It comes on automatically
when the lens cover is opened fully.
Check the batteries and make sure they are installed
correctly. Replace the batteries if necessary, following
the instructions on page 15.
Nothing appears on the LCD screen in Playback
mode.
Check the batteries and make sure they are installed
correctly. Replace the batteries if necessary, following
the instructions on page 15.
Make sure the camera is turned on and the batteries have
enough power.
Check the serial port settings on the Setup menu of your
EPSON Photo!2 software. You may need to change
the Port and Speed serial connection settings to Auto.
Make sure the port to which your camera is connected
is properly configured and that the Base I/O port
address and the Interrupt Request Number (IRQ)
assigned to the port are not in conflict with other
devices.
If you are a Macintosh user and the camera is sharing a
serial port with another device, make sure AppleTalk
is turned off.
Maintenance and Troubleshooting
7
88
Page 89

An error message appears when you are using
EPSON Photo!2 with the camera connected to the
computer.
Make sure the cable is co nnected correctly, as described
on page 36.
Make sure the camera is turned on and the batteries have
enough power.
Check the serial port settings on the Setup menu of your
EPSON Pho t o!2 so ftw are. Y ou ma y need to ch ange
the Port and Speed serial connection settings to Auto.
Avoid opening or w ork ing w it h applications unrela ted
to the photo transfer process while the camera and
computer are communicating.
Note:
When the camera and computer are communicating, star
icons move across the camera’s display panel.
Make sure the television is sw itched to the video mode.
Make sure the camera ’s batteries hav e eno ugh power.
Your camera m ay not be compatible wi th loc al t elev isio n
broadcasting standards. Cameras pu rch ased in
countries using the NTSC standard c an on ly be used
with NTSC televi sio ns, and c am eras purchased in
countries conforming to the PAL standard can only
be used with PAL televisions.
Note:
Also check your television user’s manual for possible
solutions.
You cannot take a picture with the camera when an
optional CompactFlash Card is installed.
Check your camera’s LCD monitor for messages. If you
get a message ind icating that you need to format or
eject the card, follow the instructions.
7
Nothing appears on the TV monitor when the
camera is connected to your television.
Make sure the video ca ble is connected correct ly, as
described on page 34.
Make sure the LCD m on it or is swi tch ed to the Playback
mode.
Maintenance and Troubleshooting
Your card’s memory may be full. Check the picture
counter on the displ ay pa nel. If the card is full,
change to anoth er card, erase some pictures u sing the
LCD monitor, or transfer the pictures to your
computer and then erase them .
89
Page 90

Picture Problems
If you are not satisfied w ith th e pic tures yo u get fr om
PhotoPC 600, you m ay need t o ad jus t som e of the cam era
settings. Or mayb e you need to brush up on your
photography tech niques. Read the suggestions listed
below and give them a try.
Your pictures display poor image quality on the
screen or when you print them out.
PhotoPC 600 captures images in 24- bit co lor (16 million
colors). Your pictures will not display maximum
image quality if your monitor or your computer’s
video controller do es no t su pport this color depth.
You may need to up grade your system to achieve the
best possible image quality.
If your pictures look better on the screen than when
you print them out, you may need to upgrade your
printer. An EP SO N col or ink jet printer, for example,
will provide excellent image qua lity.
Your picture is blurry or out of focus.
Make sure your subjec t is withi n th e camera’s range.
You should be at least 50 cm away to take a picture
without the flash, and 20 cm to 2.4 m away to take a
picture with th e flas h. You c an t ake a pi cture as close
as 20 cm in ma cro mode.
Make sure the subject is no t mo ving.
Be careful to hold the camera steady whi le the im age is
being captured.
Make sure your flash is not set to Flash Off.
Your picture is too dark (underexposed).
You may need to use the flash. Set the flash to Automatic
or Forced Flash, following the instruc t ion s on page 29.
If you are using the flash, make sure your subj ect is
within the range of 20 cm to 2.4 m.
Use an image-editing pro gram to adjust the picture’s
brightness and contrast.
If you are using macro mode to take a close-up photo,
make sure to provide adequate lighting for your
subject, since the camera’s aperture is automatically
set to its smallest setting w hen in this mode.
7
Maintenance and Troubleshooting
90
Page 91

Your picture is too light (overexposed).
If you are using the forc ed fl ash sett ing, it may be too
bright. Try setting the flash to Automatic. See page 29.
If the camera has been subj ected t o a stro ng sho ck or
viration the camera’ s da te an d ti me settin gs m ay be
lost.
If you are facing a bri ght light source, you may need to
shoot your picture from a different angl e.
Use an image-editing pro gram to adjust the picture’s
brightness and contrast.
Part of your picture is missing.
Make sure you are not bl ocking the lens with your
finger, hand stra p, clo thing, or other object.
A horizontal or vertical red line appears on your
picture.
Red lines are caus ed by glare. Avoid photographing
very shiny surfaces that reflect a glare of light into
your lens.
The wrong date and/or time are displayed on your
camera.
Whenever you change batteries in the camera you
need to reset the clock. See page 60 to use the LCD
monitor to set the clock, or see page 57 to set the
clock from yo ur computer.
The colors in your picture do not look right.
When you take pi ctures under certain art if icial lighting
conditions, th e col ors ma y be slightly distorted. You
can use image-ed iting software to adjust the col ors .
Your pictures do not look as good as they used to.
Your camera’s lens may be dirty or dusty. Try clea ning
it following the inst ruc t ion s on p age 86.
The area captured in the photo is different from
what you saw in the viewfinder.
Take care to look straight throug h the viewf inder .
When taking photos in macro mode, we recommend
you to use the LCD monitor rather than the
viewfinder to frame your subject.
Keep in mind that the area visible throu gh the
viewfinder is slightly smaller than the area cap tured
in the actual photo.
7
Maintenance and Troubleshooting
91
Page 92

Chapter 8
Using the Direct Print Kit
The Direct Print Kit is software and a cable which allow
you to print images directly from your PhotoPC 600 on
an EPSON Stylus Photo inkjet printer.
The software includes the following features:
❏Color, monochrome, blue, and sepia printing
❏Standard, Album, Index (contact sheet), and Sticker
printing modes
This chapter explains how to print directly from your
PhotoPC 600, including:
Preparing to Use the Direct Print Kit
Connecting Your Camera to the Printer
Paper Types
Using the Direct Print Kit
LCD Screen and Display Panel Messages
Printed Image Dimensions
Preparing to Use the Direct Print Kit
You need the following items to use the Direct Print Kit.
Digital camera: EPSON PhotoPC 600
Printer: EPSON Stylus Photo
Printer cable: Apple System Peripheral-8 cable
(8-pin mini-circular connector )
Note:
We also recommend using the optional AC adapter (B86703✽)
to make sure that the batteries do not run out while printing.
Before you can print directly from your camera, you
need to upload the Direct Print Kit software to your
PhotoPC 600. See page 78 for instructions on how to
upload programs to the camera.
8
Using the Direct Print Kit
92
Page 93

Connecting Your Camera to the Printer
Follow these steps to connect the camera to the EPSON
Stylus Photo printer.
1.Make sure that both the camera and the printer are
turned off.
2.Connect one end of the interface cable to the serial
connector on the back of the printer.
3.Open the connector cover on the side of the camera.
connector cover
Note:
Use the Apple System Peripheral-8 cable (8-pin
mini-circular connector) cable. Do not use the PC
connection cable or Macintosh adapter cable that also
came with the camera.
Using the Direct Print Kit
4.Depending on the type of serial cable you have, line up
either the arrow or the flat surface of the cable
connector with the mark on the camera’s serial port.
Then insert the connector.
Caution:
c
Be sure to position the cable correctly before
pushing it into the connector. Otherwise, the
cable’s pins may be damaged.
mark
flat surface
arrow
8
93
Page 94

Paper Types
You can use any of the paper types listed below.
Photo Quality Ink Jet Paper
Use this pape r for st andard photo quality p rint ing.
EPSON Photo Quality Ink Jet Pa per (A4) S041061
EPSON Photo Quality Ink Jet Ca rd (A6) S041054
EPSON Pho to Quality Ink Jet Paper (L etter ) S041062
Photo Quality Glossy Paper
Use this paper for pho t o qua lit y glo ssy prints.
EPSON Photo Quality Glos sy Paper (A4) S041126
EPSON Pho to Quality Glossy Pa per ( Let ter ) S041124
EPSON Photo Paper (4 × 6 in.) S041134
Photo Quality Glossy Film
Use glossy film to get high gloss photo quality images.
EPSON Pho to Quality Glossy Fil m (A4) S041071
EPSON Pho to Quality Glossy Fil m (A6) S041107
EPSON Pho to Quality Glossy Fil m (Lett er) S041072
EPSON Photo Stickers (A6 ) S041144
S041026
Note:
The availability of special media varies by country.
❏
Ink jet printers are particularly sensitive to the condition
❏
of your paper . Keep unused paper in its original packa gi n g
and store it in a cool, dark place.
8
Using the Direct P rin t Ki t
94
Page 95

Using the Direct Print Kit
Printing your images
Once you have uploaded the Direct Print software to
your camera, follow the instructions in this section to
access the software and print out images.
Accessing the Direct Print program
1.Slide the monitor mode switch on your camera to
Playback
2.Press the
Menu icons appear at the top of th e LCD screen with
the currently selected menu highlighted in orange.
3.Press the or button until the Option menu is
highlighted, then press the
4.Press the or button until
highlighted. Then press the
the Direct Print modes.
To print, see the instructions in the next section for the
print mode you want to use.
.
button on the back of the camera.
SELECT
SELECT
Direct Print
SELECT
button.
button to display
is
The Direct Print Kit features the following print modes:
❏Standard
The Standard Print mode allows you to print a single
image on each sheet. In this mode you can select the
paper size and type, layout (printing position), color,
number of copies, and whether to print the time and
date that the photo was taken. See page 96 for
instructions on printing with this mode.
❏Album
Lets you to print up to three images on A4 or letter
size paper, or up to two images on A6 size paper.
The options in this mode allow you to select the
paper size and type, and whether to print the time
and date that the photo was taken. See page 97 for
instructions on printing with this mode.
❏Index (contact sheet)
The index Print mode allows you to print A4, Letter,
or A6 size contact sheets consisting of small
“thumbnail” images of all the photos in your camera.
In this mode you can select the paper size and type,
and whether to print the date that the photos were
taken. See page 98 for instructions on printing with
this mode.
8
Using the Direct Print Kit
95
Page 96

❏Sticker
The Sticker Print mode allows you to print on
EPSON Photo Stickers. This mode prints 16 small
copies of the image you select onto each Photo
Sticker sheet. See page 99 for instructions on printing
with this mode.
To print, access the Direct Print program as described on
page 95, then follow the instructions below for the print
mode you want to use.
3.After selecting an image, press the
Standard Print options and current settings appear
on the screen.
4.To change a setting, press the or button to select
the option you want to change, then press the
button. The settings for that option appear on the
screen.
5.Press the or button to select a setting, then press
the
SELECT
button.
SELECT
button. The
SELECT
Standard Print mode
Follow these steps to print using the Standard Print
mode:
1.Access the Direct Print program as described on page 95,
then press the or button to highlight
Standard Print
images of the first nine photos in your camera appear
with the currently selected image framed in blue.
2.Press the or button until the image you want to
print is framed in blue.
To see an enlarged view of a selected image, press the
photo format button to the left of the LCD screen. To
return to the thumbnail view, press any button on
the camera.
. Press the
button. Thumbnail
SELECT
Note:
The settings available for some options depend on the type
of image selected. For example, A4 and Letter paper size
settings are only available for panorama photos.
6.Connect the camera to the printer as described on page
93, then turn on the printer and load the size and
type of paper you selected. For paper loading
instructions, see your printer User’s Guide.
7.When you are ready to start printing, press the or
button to select
8.Press the
image data to the printer.
SELECT
.
Print
button. The camera starts sending the
Using the Direct Print Kit
8
96
Page 97

While the camera is sending data, the LCD screen goes
blank and star icons move across the display panel
on the top of the camera. When printing starts, the
display panel returns to normal.
Note:
To cancel printing, hold down the camera’s
for about three seconds. A message stating that printing is
canceled appears on the LCD screen for five seconds, then
the screen returns to the Direct Print menu. The printer
stops printing and ejects the paper.
9.When printing is finished, the LCD screen returns to
the Direct Print menu. When you finish printing,
close the Direct Print program by pressing the
button. Then slide the monitor mode switch to OFF
and turn off the printer.
BACK
button
BACK
2.Press the or button until the first image in the
series you want to print is framed in blue. Then press
the
To see an enlarged view of a selected image, press the
photo format button to the left of the LCD screen. To
return to the thumbnail view, press any button on
the camera.
3.Press the or button to select the last image in the
series you want to print, then press the
button. The Album Print options and current settings
appear on the screen.
Note:
You can print up to three images on an A4 or letter size
sheet, or up to two images on an A6 size sheet.
SELECT
button.
SELECT
Album Print mode
Follow these steps to print using the Album Print mode:
1.Access the Direct Print program as described on page 95,
then press the or button to highlight
. Press the
Print
the first nine photos in your camera appear with the
currently selected image framed in blue.
button. Thumbnail images of
SELECT
Album
4.To change a setting, press the or button to select
the option you want to change, then press the
button. The settings for that option appear on the
screen.
5.Press the or button to select a setting, then press
the
SELECT
button.
SELECT
Using the Direct Print Kit
8
97
Page 98

6.Connect the camera to the printer as described on page
93, then turn on the printer and load the size and
type of paper you selected. If a message telling you
how many sheets to load appears at the bottom of the
Album Print options screen, be sure to load at least
that many sheets. For paper loading instructions, see
your printer User’s Guide.
7.When you are ready to start printing, press the or
button to select
8.Press the
image data to the printer.
While the camera is sending data, the LCD screen goes
blank and star icons move across the display panel
on the top of the camera. When printing starts, the
display panel returns to normal.
SELECT
.
Print
button. The camera starts sending the
To print a new group of photos, follow these instructions
from step 2. To finish printing, close the Direct Print
program by pressing the
monitor mode switch to OFF and turn off the printer.
button. Then slide the
BACK
Index Print mode
Follow these steps to print using the Index Print mode:
1.Access the Direct Print program as described on page 95,
then press the or button to highlight
. Press the
Print
the first nine photos in your camera appear with the
currently selected image framed in blue.
2.Press the or button until the first image in the
series you want to print is framed in blue. Then press
the
SELECT
button.
button. Thumbnail images of
SELECT
Index
Note:
To cancel printing, hold down the camera’s
for about three seconds. A message stating that printing is
canceled appears on the LCD screen for five seconds, then
the screen returns to the Direct Print menu. The printer
stops printing and ejects the paper.
9.When printing is finished, the LCD screen again
displays thumbnail images of the photos in your
camera in Album Print mode.
BACK
button
To see an enlarged view of a selected image, press the
photo format button to the left of the LCD screen. To
return to the thumbnail view, press any button on
the camera.
3.Press the or button to select the last image in the
series you want to print, then press the
button. The Index Print options and current settings
appear on the screen.
SELECT
Using the Direct Print Kit
8
98
Page 99

4.To change a setting, press the or button to select
the option you want to change, then press the
button. The settings for that option appear on the
screen.
5.Press the or button to select a setting, then press
the
6.Connect the camera to the printer as described on page
93, then turn on the printer and load the size and
type of paper you selected. If a message telling you
how many sheets to load appears at the bottom of the
Album Print options screen, be sure to load at least
that many sheets. For paper loading instructions, see
your printer User’s Guide.
7.When you are ready to start printing, press the or
button to select
8.Press the
image data to the printer.
While the camera is sending data, the LCD screen goes
blank and star icons move across the display panel
on the top of the camera. When printing starts, the
display panel returns to normal.
SELECT
button.
.
Print
button. The camera starts sending the
SELECT
SELECT
Note:
To cancel printing, hold down the camera’s
for about three seconds. A message stating that printing is
canceled appears on the LCD screen for five seconds, then
the screen returns to the Direct Print menu. The printer
stops printing and ejects the paper.
9.When printing is finished, the LCD screen returns to
the Direct Print menu.
When you finish printing, close the Direct Print program
by pressing the
mode switch to OFF and turn off the printer.
button. Then slide the monitor
BACK
BACK
Sticker Print mode
Follow these steps to print using the Sticker Print mode:
1.Access the Direct Print program as described on page
95, then press the or button to highlight
Sticker Print
images of the first nine photos in your camera appear
with the currently selected image framed in blue.
2.Press the or or button until the image you want
to print is framed in blue.
. Press the
button. Thumbnail
SELECT
button
8
Using the Direct Print Kit
99
Page 100

To see an enlarged view of a selected image, press the
photo format button to the left of the LCD screen. To
return to the thumbnail view, press any button on
the camera.
3.After selecting an image, press the
option appears on the screen.
Print
4.Connect the camera to the printer as described on page
93, then turn on the printer and load EPSON Photo
Stickers. See the loading instructions that came with
the PhotoStickers.
SELECT
button. The
6.When printing is finished, the LCD screen returns to
the Direct Print menu.
When you finish printing, close the Direct Print program
by pressing the
mode switch to OFF and turn off the printer.
button. Then slide the monitor
BACK
5.When you are ready to start printing, press the
button. The camera starts sending the image data to
the printer.
While the camera is sending data, the LCD screen goes
blank and star icons move across the display panel
on the top of the camera. When printing starts, the
display panel returns to normal.
Note:
To cancel printing, hold down the camera’s
for about three seconds. A message stating that printing is
canceled appears on the LCD screen for five seconds, then
the screen returns to the Direct Print menu. The printer
stops printing and ejects the paper.
BACK
SELECT
button
Using the Direct Print Kit
8
100
 Loading...