

Page 1
A
B
Page 2

IMPORTANT NOTICE
DISCLAIMER OF WARRANTY
Epson America makes no representations or warranties, either express
or implied, by or with respect to anything in this manual, and shall not
be liable for any implied warranties of merchantability and fitness for a
particular purpose or for any indirect, special, or consequential
damages. Some states do not allow the exclusion of incidental or
consequential damages, so this exclusion may not apply to you.
COPYRIGHT NOTICE
All rights reserved. No part of this publication may be reproduced,
stored in a retrieval system, or transmitted, in any form or by any
means, electronic, mechanical, photocopying, recording, or otherwise,
without the prior written permission of Epson America, Inc. No patent
liability is assumed with respect to the use of information contained
herein. Nor is any liability assumed for damages resulting from the use
of the information contained herein. Further, this publication and
features described herein are subject to change without notice.
TRADEMARKS
EPSON is a registered trademark of SEIKO EPSON CORPORATION
PhotoPC 500, PhotoPix, PhotoSpan, EPSON Stylus, EPSON PhotoPC 500
imaging software, and EPSON Photo! TWAIN are trademarks of Epson
America, Inc.
General notice: Other product names used herein are for identification
purposes only and may be trademarks of their respective owners.
EPSON disclaims any and all rights in those marks.
Copyright © 1996 by Epson America, Inc. CPD 4185
Torrance, California, USA 11/96
A NOTE CONCERNING RESPONSIBLE USE OF
COPYRIGHTED MATERIALS
Like photocopiers, digital cameras can be misused by improper
photographing of copyrighted material. Although Section 107 of the U.S.
Copyright Act of 1976 (Title 17, United States Code), the “fair use”
doctrine, permits limited copying in certain circumstances, those
circumstances may not be as broad as some people assume. Unless you
have the advice of a knowledgeable attorney, be responsible and
respectful by not photographing published material without the
permission of the copyright holder.
ii
Page 3

Introduction
our new EPSON PhotoPC 500TM is an advanced,
Yeasy-to-use digital camera that captures clear and
attractive images. PhotoPC 500 comes with everything you
need to quickly load your photos into the computer and
then transform them into great-looking pictures to place in
your documents. Here are just a few of the things you can
do with your new, versatile camera:
❙ Add color and visual appeal to your newsletters, flyers,
and brochures.
❙ Use your pictures in slide show presentations.
❙ Make photo calendars and greeting cards for work and
for play.
❙ Use the optional EPSON PhotoPix
display images you have captured.
TM
LCD Monitor to
A
B
Introduction 1
Page 4

PhotoPC 500 Features
PhotoPC 500 is a complete system for capturing digital
images, and includes the following features:
❙ Base unit with 2MB internal flash memory that holds
up to 30 high-resolution or 60 standard-resolution
images
❙ Sierra
Print ArtistTM for creating calendars, banners,
and other cool projects.
The Optional EPSON PhotoPix LCD Monitor
An exciting accessory to use with your PhotoPC 500 is the
EPSON PhotoPix LCD Monitor. It offers the following
advanced features:
❙ 24-bit color image capture
❙ Built-in flash with auto, manual, and red-eye reduction
settings
❙ Self-timer
❙ Automatic shut-off to save batteries
❙ Cable for transferring photos to your computer
Your camera comes with the PhotoPC 500 Software pack,
which includes the following useful applications:
❙ EPSON PhotoPC 500 Imaging Software for
downloading, organizing, editing, and enhancing your
pictures
❙ The EPSON Photo!
transferring your pictures to the computer and
changing the settings on the camera
TM
TWAIN and Utility Driver for
2 Introduction
❙ Playback of all the pictures stored in the camera
❙ Close-up picture mode
❙ Selectable image erasing
❙ Brightness adjustment for outdoor use
❙ Slide show of all your pictures
❙ Multi mode for viewing several images at once
❙ Real Time live preview so you can see the exact picture
before you snap the shutter
For more information about the EPSON PhotoPix LCD
Monitor, see Chapter 11.
Page 5

Other Optional Accessories
EPSON also offers these accessories for the PhotoPC 500:
❙ 2MB and 4MB PhotoSpan
expanding the storage capacity of your PhotoPC 500
❙ AC adapter for use with any electrical outlet
You can also use standard 37 mm video camcorder lenses
and filters available from leading suppliers, such as Tiffen
Manufacturing Corp.
TM
memory modules for
❙ Microsoft
3.11 (or later), Windows 95 (or later), Windows NT
version 3.5 (or later)
Windows 3.1, Windows for WorkgroupsTM
Where to Get Help
EPSON provides customer support and service through a
network of authorized EPSON Customer Care Centers. Dial
(800) 922-8911 for the nearest location or for the following
services:
Minimum System Requirements
To transfer images to your computer and edit them, make
sure your system meets these minimum requirements:
❙ IBM
❙ Serial port with standard RS-232C interface
❙ VGA viewing screen with at least 256-color display
❙ 8MB RAM (with Windows NT
❙ At least 25MB free hard disk space
❙ Mouse or other pointing device
❙ CD-ROM drive
-compatible PC with 486 or higher processor
TM
, at least 16MB is
required)
❙ Fax-on-demand access to EPSON’s technical
information library
❙ Literature on current and new products
❙ The location of your nearest Authorized EPSON
Reseller or Customer Care Center
❙ Technical information on installation, configuration,
and operation of EPSON products
❙ Customer relations.
For answers to commonly asked questions about EPSON
products 24 hours a day, 7 days a week, call EPSON Sound
Advice at (800) 442-2110
Introduction 3
A
B
Page 6

You can purchase manuals, accessories, or parts from
EPSON Accessories at (800) 873-7766 (U.S. sales only).
In Canada, please call (800) 463-7766 for dealer referral.
If you need help using software with an EPSON product, see
the documentation for that program for technical support
information.
Electronic Support Services
You can access helpful tips, specifications, DIP switch or
jumper settings, drivers, FAQs, sample files, application
notes, and EPSON product bulletins 24 hours a day, 7 days a
week, using a modem and one of the on line services below.
World Wide Web
From the Internet, you can reach EPSON’s home page at
http://www.epson.com.
EPSON Internet FTP Site
If you have Internet FTP capability, use your Web browser
(or other software for FTP downloading) to log onto
ftp.epson.com with the user name anonymous and your
e-mail address as the password.
EPSON Download Service
You can call the EPSON Download Service BBS at
(800) 442-2007. Set your communications software to
8 data bits, 1 stop bit, no parity. Modem speed can be up to
28.8 Kbps.
EPSON Fax-on-Demand Service
You can access EPSON’s technical information library by
calling (800) 442-2110 or (800) 922-8911 and selecting the
appropriate phone option. You must provide a return fax
number to use Fax-on-Demand.
EPSON Forum on CompuServe
Members of CompuServe can type GO EPSON at the menu
prompt to reach CompuServe’s Epson America Forum. As
an owner of an EPSON product, you are eligible for a free
introductory CompuServe membership, which entitles you
to an introductory credit and your own user ID and
password. To take advantage of this offer in the U.S. or
Canada, call (800) 848-8199 and ask for representative
#529.
4 Introduction
Page 7

Registration
Please take a minute to fill out the registration card for the
PhotoPC 500 digital camera and mail it back to us. This
enables you to receive special information on accessories,
new products, and software upgrades. You’ll get immediate
attention if you have a problem with your PhotoPC 500.
❙ To reduce the risk of electric shock, do not remove the
camera’s cover or open any of the compartments
except as instructed in this User’s Guide.
❙ Do not insert objects through any openings.
❙ To prevent fire or electric shock, do not expose the
camera to rain or moisture.
Software Support
If you’ve tried the on-screen help and you still have
questions, call the number for the application you need
help with:
❙ EPSON Photo! TWAIN driver (800) 822-8911
❙ PhotoPC 500 imaging software (800) 822-8911
❙ Sierra Print Artist (206) 644-4343
See the inside back cover for information about additional
support services for your software.
Safety Instructions
Read all of these instructions and save them for later
reference. Also follow all warnings and instructions
marked on the camera.
❙ To prevent fire or explosion, do not use the camera
where inflammable or volatile gas is stored.
❙ Do not use outdoors during a thunderstorm.
❙ If the camera shows unusual signs such as noise, odor,
or smoke, turn it off immediately. Remove the batteries
and/or disconnect the AC adapter, and unplug the AC
adapter from the electrical outlet.
❙ Do not use harsh or abrasive cleaners. Wipe off dust
with a clean, dry cloth.
❙ To avoid damage to the optics of the camera, do not
expose the lens to direct sunlight for extended periods
of time.
❙ To prevent possible eye injury, do not take flash
pictures of faces at close range.
Introduction 5
A
B
Page 8

❙ Do not store the camera or its optional accessories near
sources of bright light, direct sunlight, high humidity,
heat, excessive dirt or dust, or where they will be
exposed to strong vibrations or magnetic fields.
❙ Avoid sudden temperature changes, which can cause
moisture to condense on the camera. Keep the camera
in a case or bag if you need to move it from a cold
environment to a warm one. Allow time for the
camera and its optional accessories to adjust to
temperature changes before using them.
❙ Use only the types of power sources listed in this User’s
Guide.
cord or plug is damaged; if liquid has entered the
camera; if the camera has been dropped or its exterior
has been damaged; if the camera or its optional
accessories do not operate normally or exhibit a
distinct change in performance.
❙ Adjust only those controls that are covered by the
operating instructions.
❙ If the liquid crystal solution contained in the camera’s
control panel or in the screen on the optional EPSON
photo LCD Monitor leaks out and gets on your hands,
wash them thoroughly with soap and water. If it gets
in your eyes, flush them immediately with water.
❙ Do not use a frayed or damaged power cord.
❙ If you use an extension cord with the optional AC
adapter, make sure the total ampere rating of the
devices plugged into the extension cord does not
exceed the cord’s ampere rating. Also, make sure the
total of all devices plugged into the wall outlet does not
exceed 15 amperes.
❙ Remove batteries and/or unplug the camera and the
AC adapter and refer servicing to qualified service
personnel under the following conditions: If the power
6 Introduction
If you plan to use the camera and its optional accessories in
Germany, observe the following:
❙ To provide adequate short-circuit protection and over-
current protection for the products, the building
installation must be protected by a 16 amp circuit
breaker.
❙ Bei Anschluß des Produkts an die Stromversorgung
muß sichergestellt werden, daß die Gebädeinstallation
mit einem 16 A-Überstromschalter abgesichert ist.
Page 9
1
handstrap
PhotoPC 500
software
Getting Started
camera
batteries
Mac adapter cable
PhotoPC500 cable
his chapter helps you get ready to use your new
TPhotoPC 500. It covers the following:
❙ Unpacking your PhotoPC 500
❙ Getting to know the camera
❙ Removing the plastic film
❙ Installing the batteries
❙ Attaching the hand strap
❙ Installing your PhotoPC 500 software
Unpacking Your PhotoPC 500
The PhotoPC 500 includes all the parts shown to the left.
You will need everything but the Mac adapter cable. If you
purchased the EPSON PhotoPix LCD Monitor, see page 11-2
for instructions on unpacking it.
A
B
Getting Started 1-1
Page 10
Getting to Know the Camera
After you unpack your PhotoPC 500, take a few minutes to
get to know its features.
green ready
light
red standby
light
control panel
shutter
button
timer light
memory
cover
memory
cover lock
power switch
1-2 Getting Started
front view
viewfinder
lens
flash
port cover
LCD
cover
back view
port cover
tripod screw
opening
hand strap
holder
battery cover
battery cover
lock
bottom view
Page 11
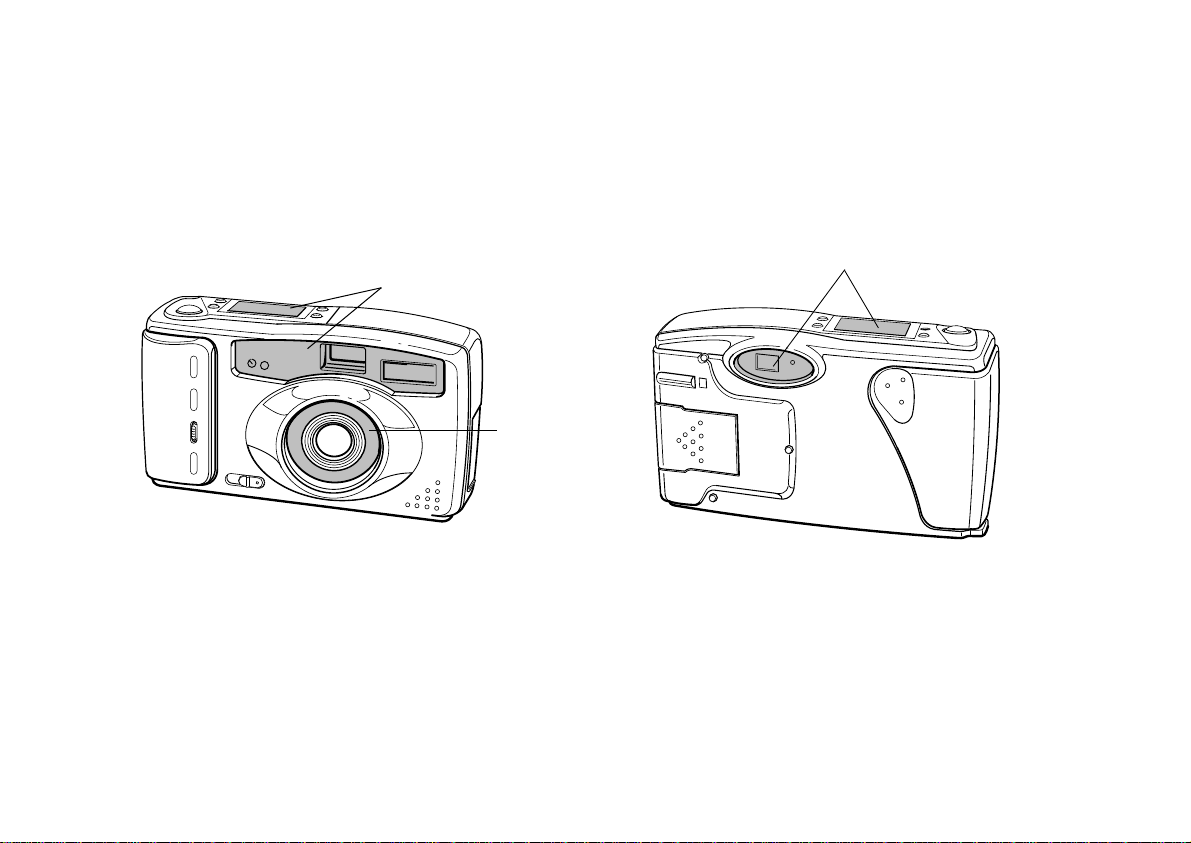
Removing the Plastic Film
To protect the camera from scratches, some parts have
been covered with plastic film, as shown in the gray areas
below. Peel off the plastic film before you use your camera.
plastic film
plastic film
plastic film
A
Getting Started 1-3
B
Page 12

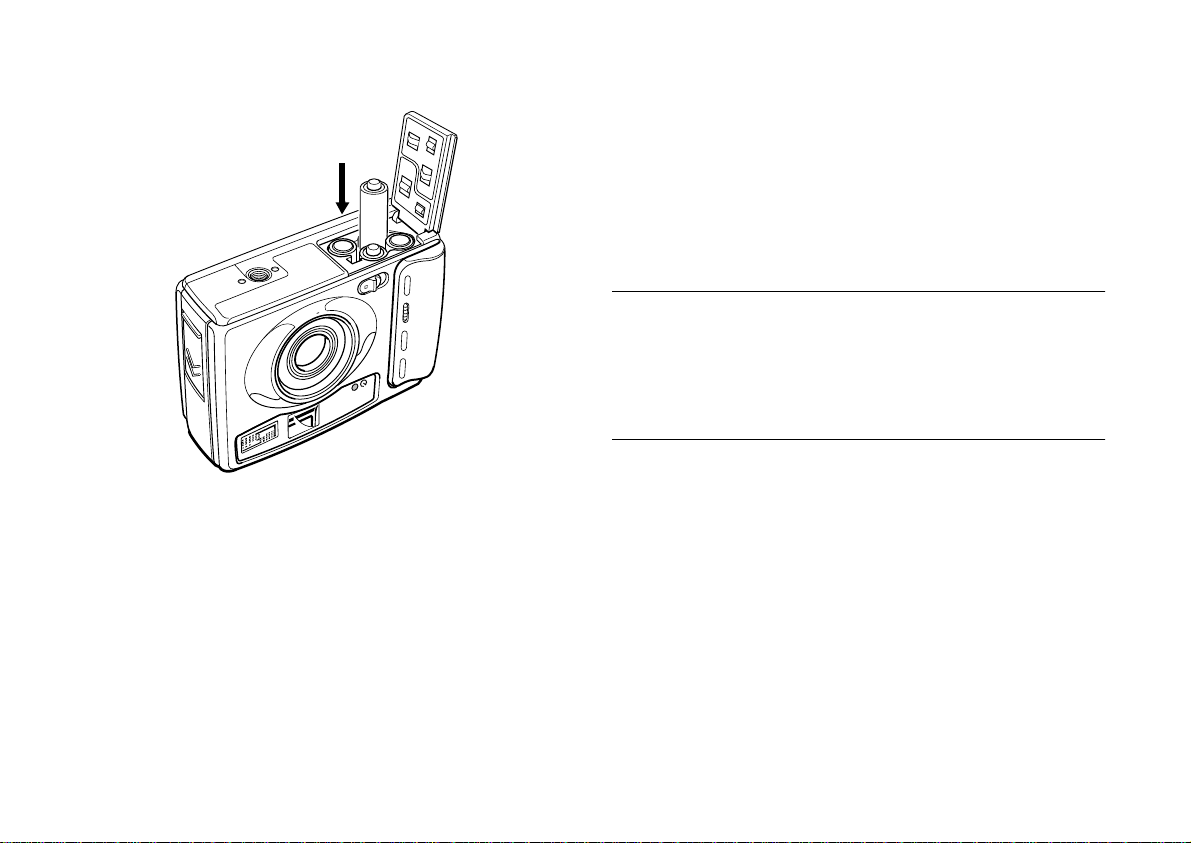
Installing Batteries
Your PhotoPC 500 comes with four AA alkaline batteries.
Make sure the camera is turned off, and follow these steps
to insert the batteries:
1 Using a fingernail or a small screwdriver, slide the
battery cover lock in the direction of the arrow and
hold it in that position while lifting up the battery
cover door.
battery cover
battery cover
lock
.
battery compartment
2 Insert all four batteries into the compartment,
positioning the + and - ends as marked in the
compartment and shown in the following illustration.
1-4 Getting Started
Page 13
3 Close the battery cover, making sure that it snaps in
place.
Handling Batteries
When your PhotoPC 500 batteries wear out, you can
replace them with any of the following:
❙ Single-use AA alkaline batteries
❙ Single-use AA lithium batteries (longest life)
❙ Rechargeable AA Ni-Cad batteries
❙ Rechargeable AA Ni-MH batteries
If you have the optional PhotoPix LCD Monitor, we
recommend that you use lithium or rechargeable batteries.
Alkaline batteries have a shorter life when used with the
monitor.
WARNING
To avoid the danger of fire or explosion, do not mix different types
of batteries. Do not allow the battery contacts to touch metal
objects such as coins or keys, which could short out the battery’s
circuits.
Note the following when handling batteries:
❙ Do not use manganese batteries.
❙ Replace all four batteries at the same time
❙ Do not drop, puncture, disassemble, or mutilate
batteries. Do not get them wet or expose them to fire.
❙ When the camera is not used for long periods of time,
remove the batteries and store them at a low
temperature in a dry location.
A
B
Getting Started 1-5
Page 14
❙ Dispose of used batteries according to the battery
manufacturer’s instructions and in compliance with
all applicable laws. Contact your local government
agency for information about battery recycling and
disposal.
❙ If you use rechargeable Ni-Cad or Ni-MH batteries,
replace them with four fully charged batteries. If you
find that your batteries run out faster after you
recharge them a few times, make sure you discharge
them completely before recharging.
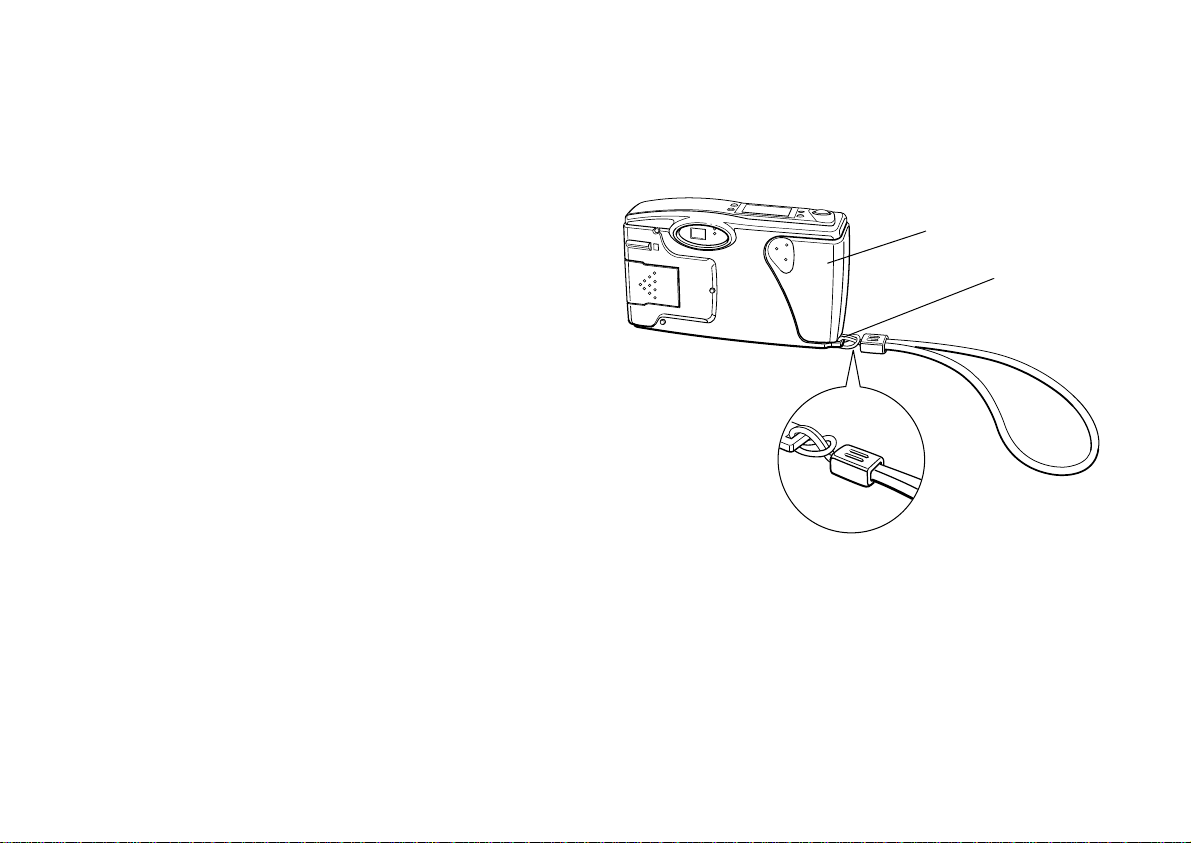
Attaching the Hand Strap
To attach the hand strap, loop the strap around the holder
on the side of the camera as shown below.
memory
module cover
(back piece)
hand strap
holder
1-6 Getting Started
Page 15

Installing Your PhotoPC 500 Software
The PhotoPC 500 comes with everything you need to
transfer your pictures to the computer, edit your images,
and insert them into documents. You can also send your
images over the
The included CD-ROM has these three applications: EPSON
PhotoPC 500 imaging software, EPSON Photo! TWAIN
driver and utility software, and Sierra Print Artist.
Follow these steps to install your software from the
CD-ROM:
1 Insert the PhotoPC 500 CD into your CD-ROM drive.
2 From Windows 95 or Windows NT, 4.0 click the start
button, and then click Run.
From the Windows 3.1 or the Windows NT, 3.51
Program Manager screen, choose Run from the file
menu.
internet and turn them into screen-savers.
5 Make sure PhotoPC 500 is checked, along with the
EPSON Photo! driver and Sierra Print Artist if you want
to install it.
6 Click Install and follow the instructions on the screen
to complete the installation.
NOTE
Don’t restart Windows until all the software programs have been
installed.
You now have the following new program groups (or folders):
❙ PhotoPC 500 (PhotoPC 500 imaging software and
EPSON Photo! TWAIN driver)
❙ Sierra (Print Artist)
3 In the dialog box, type: D:\INSTALL. If your CD-ROM
drive is not drive D, substitute the correct letter.
4 Click OK. You see the main installation screen.
A
B
Getting Started 1-7
Page 16

2
Using Your PhotoPC 500 Camera
aking pictures with PhotoPC 500 is similar to
Tusing a traditional “point and shoot” camera. This
chapter shows you everything you need to know, including
the following information:
❙ Turning the camera on and off
❙ Saving power with auto shut-off
❙ Using the control panel
❙ Checking the battery icon
❙ Snapping the shutter
❙ Taking close-up pictures
❙ Adjusting settings
❙ Erasing pictures
❙ Checking the picture counter
Using Your PhotoPC 500 Camera 2-1
A
B
Page 17
Turning the Camera On and Off
To turn the camera on, simply slide the power switch to the
ON position. The lens cover opens and the control panel on
the top of the camera lights up. The red standby light on
the back of the camera flashes for a few seconds. When it
stops flashing, the green ready light is on and the camera is
ready to take pictures.
control panel
green ready
light
red standby
light
Saving Power with Auto Shut-off
If you wait more than 60 seconds before taking a picture,
the camera turns off automatically to save battery power.
To turn the camera back on, either slide the power switch
to OFF, then ON, or press the shutter button. You will have
to press the shutter button a second time to take a picture.
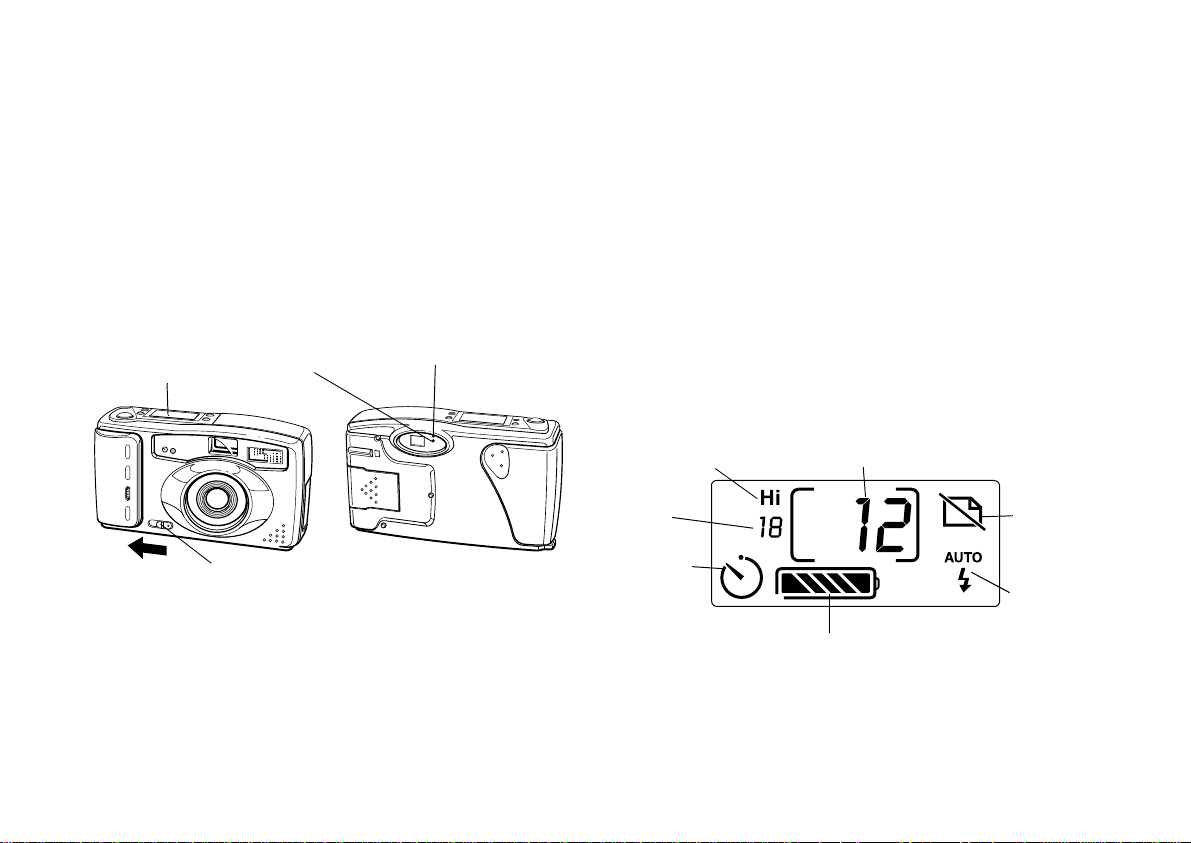
Using the Control Panel
The control panel keeps track of how many pictures you’ve
taken and provides important information about the
status of your batteries and the camera’s current settings.
ON
power switch
To turn off the camera, slide the power switch to the OFF
position. The lens cover closes and the control panel turns
off.
2-2 Using Your PhotoPC 500 Camera
resolution mode
pictures
remaining
self-timer
pictures taken
battery level indicator
erase last
image
flash mode
Page 18
Checking the Battery Icon
Before you take pictures, check the battery icon on the
control panel. The icon shows how much battery power
you have left, in the following stages:
2 Look straight through the viewfinder and center your
subject. Make sure that the entire image you want in
the picture is within the viewfinder’s yellow frame.
3 Slowly press the shutter button.
Full battery power (or AC adapter in use)
to
Battery power is decreasing
Battery power low (time to buy new batteries)
Battery power is almost out
Change batteries
You should use the battery icon only as a guide to estimate
remaining power. Several factors can affect battery life,
including the surrounding temperature and the type of
batteries you use. Low temperatures (especially below
50 °F) weaken your batteries.
Snapping the Shutter
Follow these steps to take a picture:
1 Turn the camera on and wait until the green ready
light comes on.
4 Hold the camera still until it beeps and the red standby
light starts flashing.
green ready
light
viewfinder
The flashing red light indicates that the camera has
captured the image and is processing it. (If you try to press
the shutter button again, you’ll hear an “error” beep.)
red standby
light
shutter
button
Using Your PhotoPC 500 Camera 2-3
A
B
Page 19

When the red light stops flashing, the image is saved. Saved
images remain in memory for up to a year, even when the
camera is turned off and the batteries are removed.
For instructions for using the LCD monitor in Macro mode,
see page 11-12. For instructions on using a camcorder lens,
see page A-7.
You can take another picture when the red standby light
stops flashing and the green ready light is on. If the red
light flashes longer each time you take a picture, your
batteries are getting weaker.
NOTE
Remember that the camera shuts off automatically after 60
seconds. To turn the camera back on, either slide the power switch
to OFF, then ON, or press the shutter button to turn on the camera.
You will have to press the shutter button again to take a picture.
Taking Close-up Pictures
You should be at least 2 feet (60 cm) away from the subject
you are photographing. If you want to take pictures at a
closer range, you should use the PhotoPix LCD Monitor in
Macro mode or a 37 mm video camcorder close-up lens.
If you use a close-up or “macro” lens for a camcorder, the
viewfinder does not give you an accurate representation of
your picture. You may want to connect the camera to your
computer and view your close-up images on the screen
before you capture them. See page 5-5 for information on
viewing and taking pictures from your computer.
You can take flash pictures within a range of 1.5 to 10 feet.
TIP
When you’re taking pictures outdoors, make sure the sun is at your
back. In very bright light (at the beach or in snow, for example),
your pictures may come out too light. You can use an ND filter to
reduce the light. See page A-7 for information.
2-4 Using Your PhotoPC 500 Camera
Page 20
Adjusting Settings
You can adjust the following three settings on PhotoPC 500
using the control panel buttons on top of the camera:
❙ Flash
❙ Resolution
❙ Timer
Flash and resolution settings remain in effect even after
you turn off the camera.
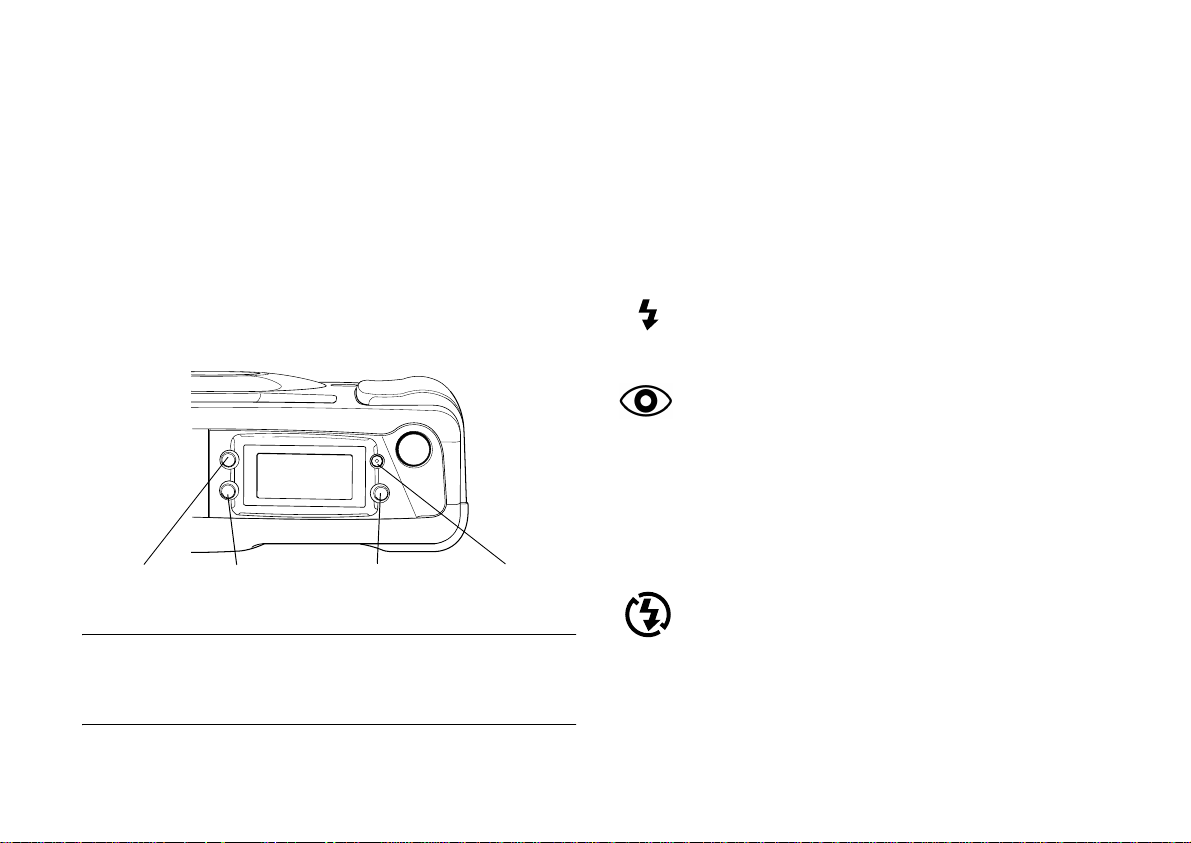
Flash
PhotoPC 500’s built-in flash has four settings as listed
below, which are effective within a range of 1.5 feet (Macro
mode with PhotoPix LCD monitor) to 10 feet. Press the flash
control button to cycle from one setting to another.
Auto
AUTO
Red-eye Reduction
The flash goes off automatically whenever it’s
needed for adequate lighting (factory setting).
The flash blinks on and off rapidly and then goes
off. This prevents the light from shining directly
off the subject’s pupils and making them appear
red. Use this setting when you take pictures of
people or animals and you want the flash to go off
automatically.
resolution timer
NOTE
The controls return to their factory settings when you remove or
change the batteries.
flash
erase
Flash Off
The flash is disabled, even when adequate lighting
is not available. Use this setting for special effects,
or where flash photography is prohibited.
Using Your PhotoPC 500 Camera 2-5
A
B
Page 21

Forced Flash
The flash goes off with every picture you take. Use
this setting to compensate for backlighting; for
example, when you are facing the sun.
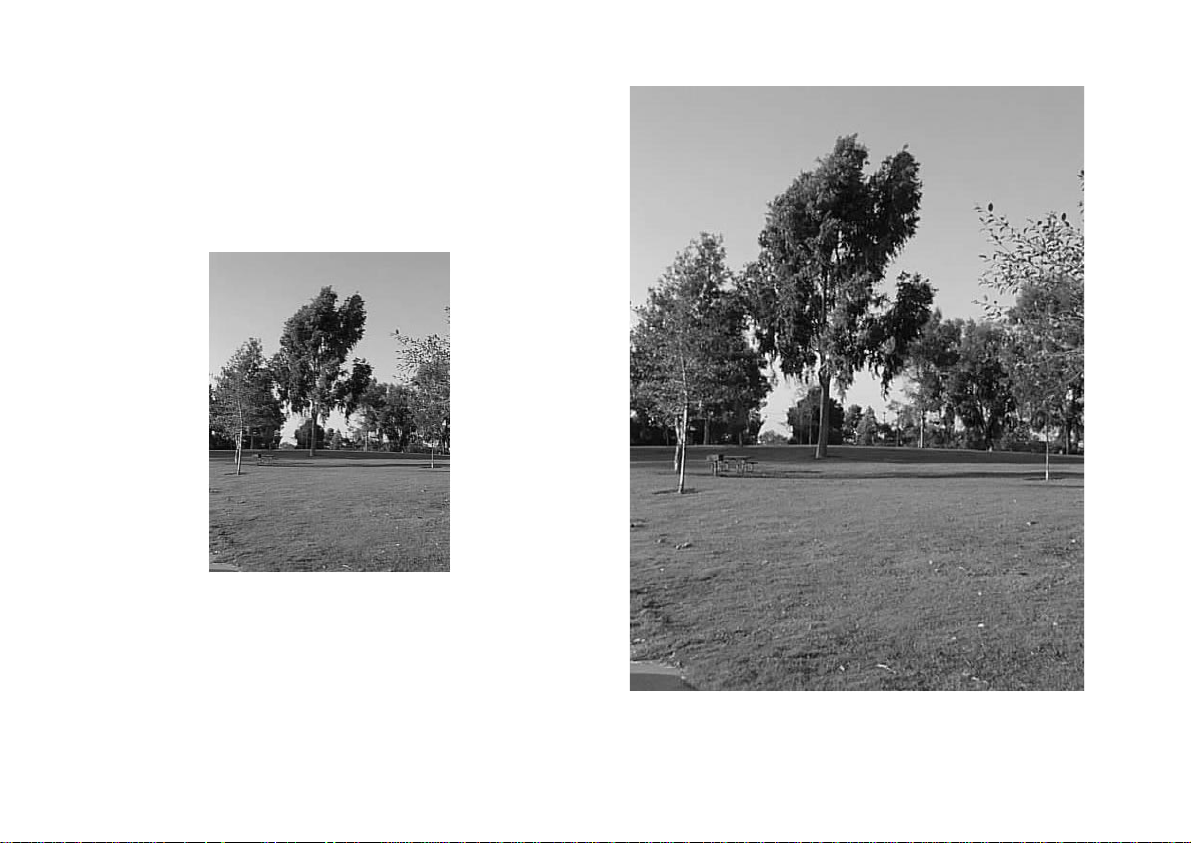
Resolution
PhotoPC 500 has two resolution settings, high and standard.
Press the resolution button to switch from one setting to the
other. The settings appear on the control panel.
High resolution
Camera captures images at 640 × 480 pixels. Your
pictures include more detail, but the camera only
holds 30 pictures (factory setting).
Standard resolution
Camera captures images at 320 × 240 pixels. The
S
camera holds 60 pictures, but the image size is
smaller and contains less detail when enlarged.
You can switch freely between the two settings and store
both standard and high resolution pictures in the camera.
The camera’s capacity varies accordingly. This is because a
high resolution image uses twice as much memory as a
standard resolution image. For example, the camera holds
48 pictures if you take 12 at high resolution and 36 at low
resolution.
TIP
Choose high resolution if you want “snapshot”-size or larger
pictures. Standard resolution is sufficient for “wallet”-size pictures.
The following examples show the same image captured at
standard and high resolution.
2-6 Using Your PhotoPC 500 Camera
Page 22
A
Standard resolution image
320 × 240 pixels
High resolution image
640 × 480 pixels
Using Your PhotoPC 500 Camera 2-7
B
Page 23
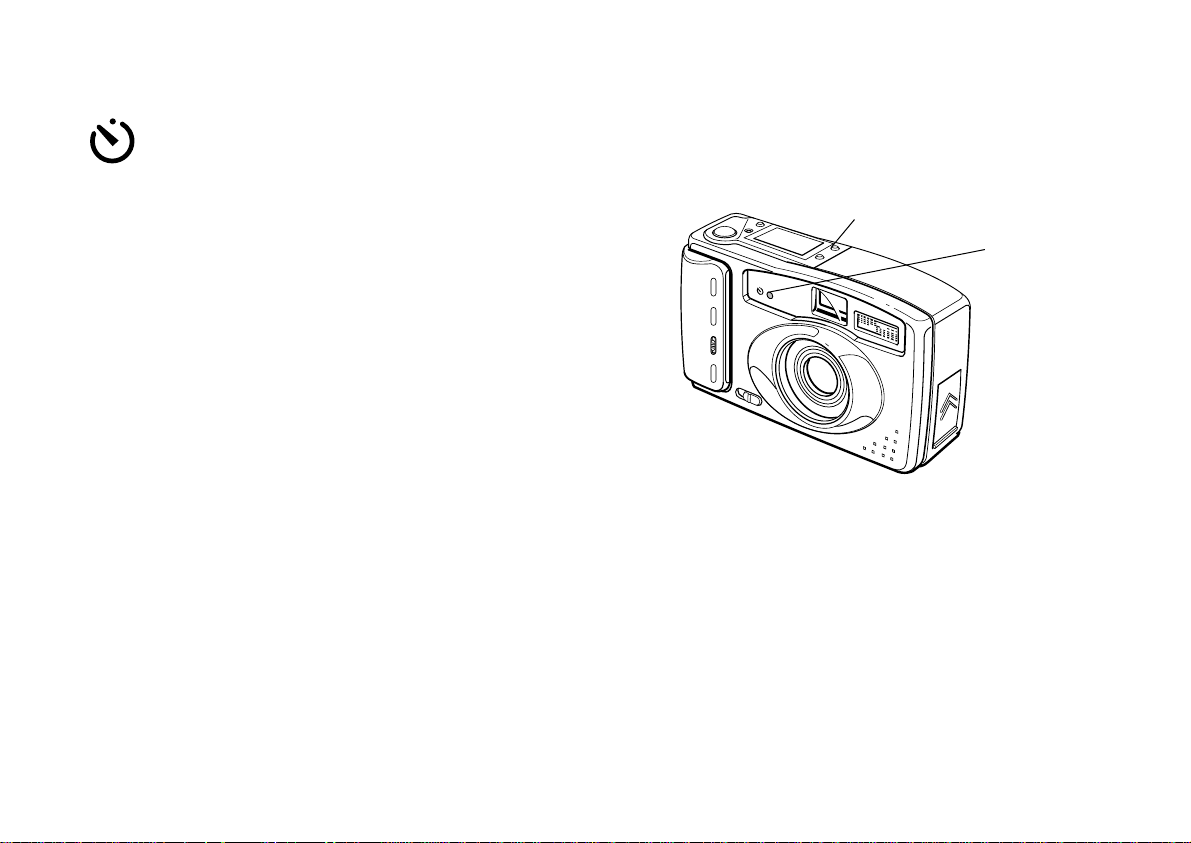
Timer
Setting the timer creates a 10-second delay
between the time you press the shutter button and
the time that the camera actually captures the
image. This allows you to take a picture of
yourself. The timer icon on the control panel
flashes when you use the timer.
Follow these steps to take a picture with the timer:
1 Secure the camera on a flat surface or on a tripod. (See
page A-7 for information on attaching the camera to a
tripod.)
2 Turn on the camera and wait until the red standby
light stops flashing.
4 Press the shutter button. The red timer light on the
front of the camera comes on and stays on for 7
seconds. Then it flashes three times.
timer
button
red timer
light
3 Press the timer button. The timer icon on the control
panel flashes.
2-8 Using Your PhotoPC 500 Camera
The camera beeps when the image is captured. The red
standby light on the back of the camera flashes as
PhotoPC 500 processes the image. When the red light stops
flashing and the green ready light comes on, the timer is off
and you can take another picture.
Page 24
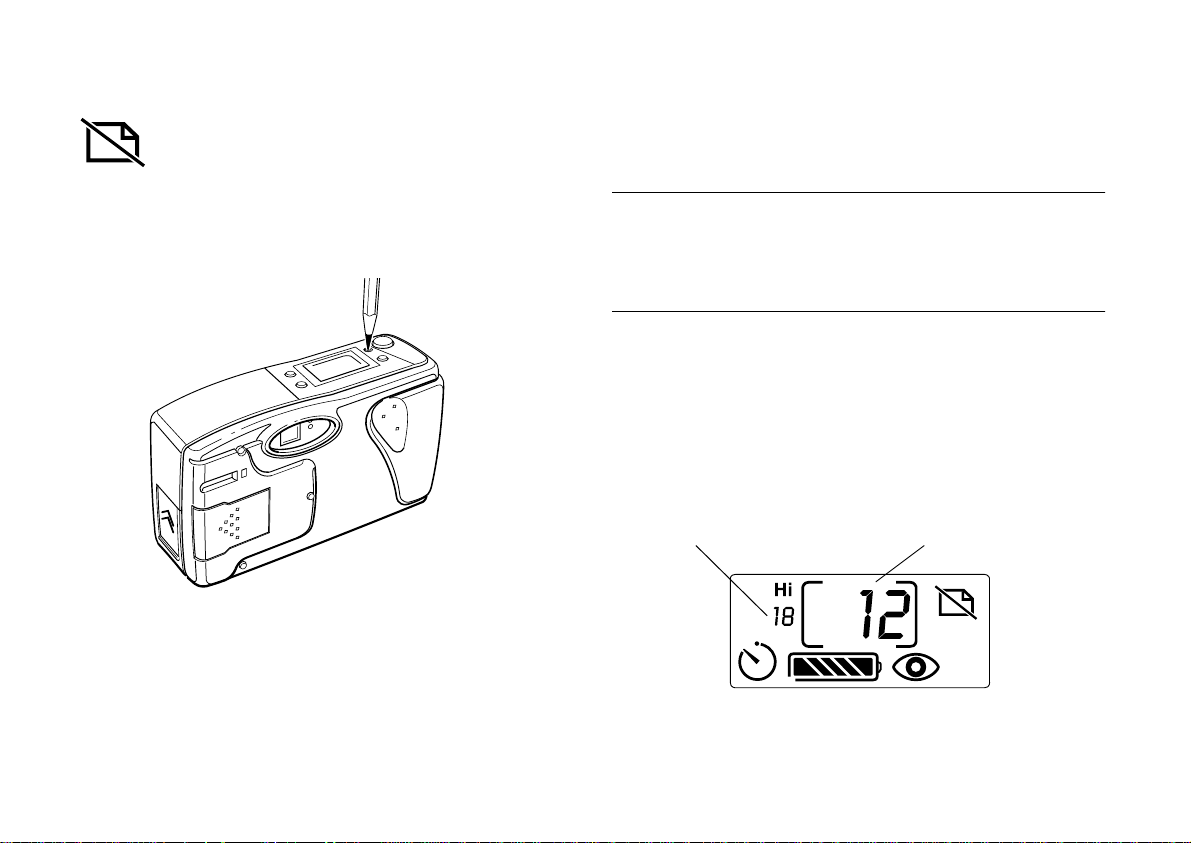
Erasing Pictures
If you don’t want to keep the last picture you took,
you can erase it from the camera’s memory. Using
a small pointed object such as a pencil, press the
erase button on the top of the camera. The erase
icon on the control panel flashes when you press
the button.
If you have the optional LCD monitor, you can use this
button to selectively erase any picture on the camera. See
page 11-7 for more information.
TIP
You can also erase all the pictures in the camera’s memory. While
holding down the erase button, press the timer button. The erase
icon flashes until all the pictures are deleted.
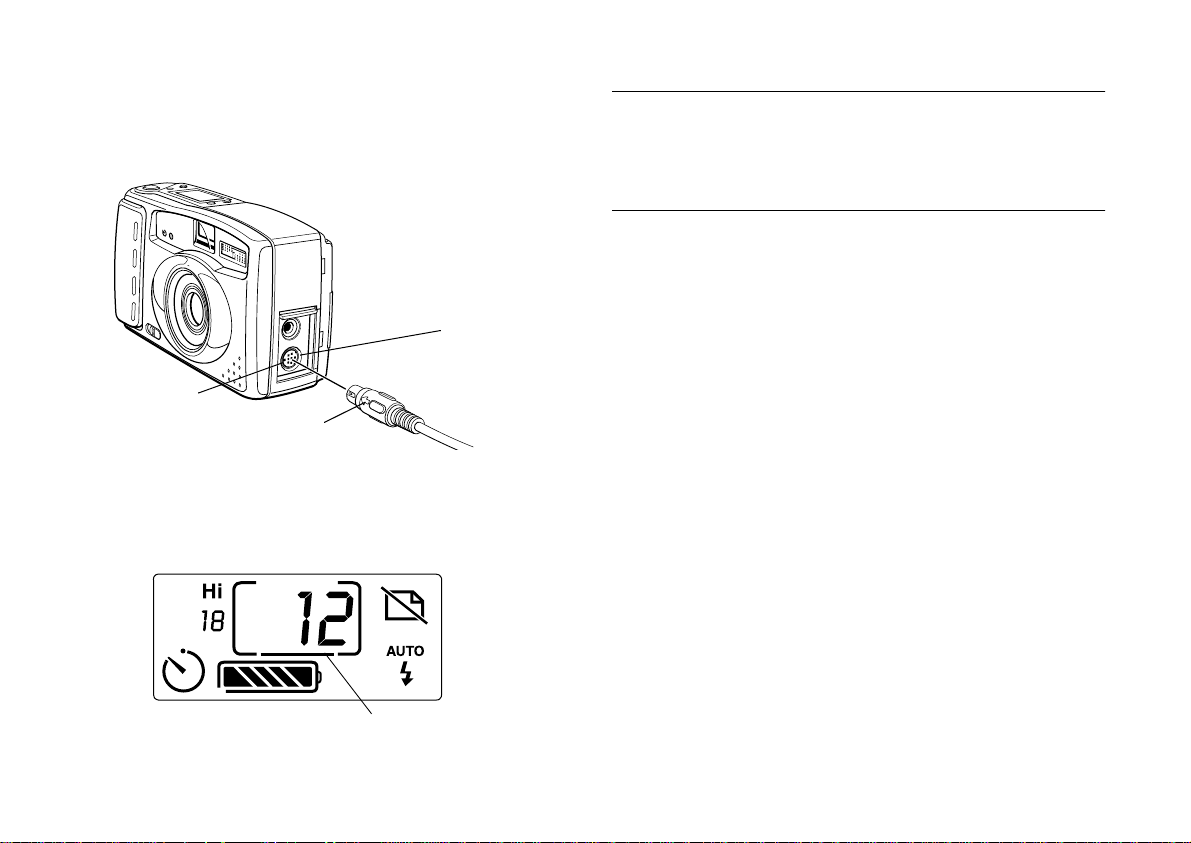
Checking the Picture Counter
The large number in the center of the control panel shows
how many pictures you have taken. The smaller number
on the left below the resolution mode shows how many
additional pictures you can take.
pictures remaining pictures taken
After a few seconds, the last picture you took is erased from
the camera’s memory. The picture counter (number of
pictures taken) decreases by one. You can continue pressing
the button to erase more pictures, if you want.
A
B
Using Your PhotoPC 500 Camera 2-9
Page 25

The number of pictures remaining depends on your
resolution settings. A high resolution image uses twice the
amount of memory in your camera that a standard
resolution image uses. Therefore, if you switch between
standard and high resolution, the number of pictures
remaining changes. For example, if the number of pictures
remaining is 4 at high resolution, it changes to 8 if you
switch to standard resolution.
When the camera’s memory is full, the number of pictures
remaining is 0. The green ready light on the back of the
camera goes off, the red standby light remains on, and you
can’t press the shutter button. You need to connect the
camera to your computer and transfer the pictures. Then
you can erase the images and start taking pictures again.
2-10 Using Your PhotoPC 500 Camera
Page 26

3
Connecting to Your Computer
hen you’re finished taking pictures you can
W connect the camera to your computer and transfer
the images. This chapter covers the following:
❙ Connecting PhotoPC 500 to your computer
❙ Connecting with the optional LCD monitor
❙ Setting up the camera connection
❙ Adjusting auto shut-off
❙ Setting the camera’s clock
Connecting PhotoPC 500 to the Computer
Make sure you do the following before you start:
❙ Locate the serial cable that came with your camera.
❙ Make sure the camera has finished processing.
❙ If you have the optional AC adapter, use it when you
connect the camera to your computer. See page A-5 for
instructions on using the AC adapter with the camera.
NOTES
❙ The AC adapter should be available where you bought your
PhotoPC 500. See page A-2 for information on ordering an AC
adapter through EPSON.
❙ If you have a 25-pin serial port, you can use a 9- to 25-pin
adapter with your cable connector. See page A-8 for
instructions.
A
B
Connecting to Your Computer 3-1
Page 27
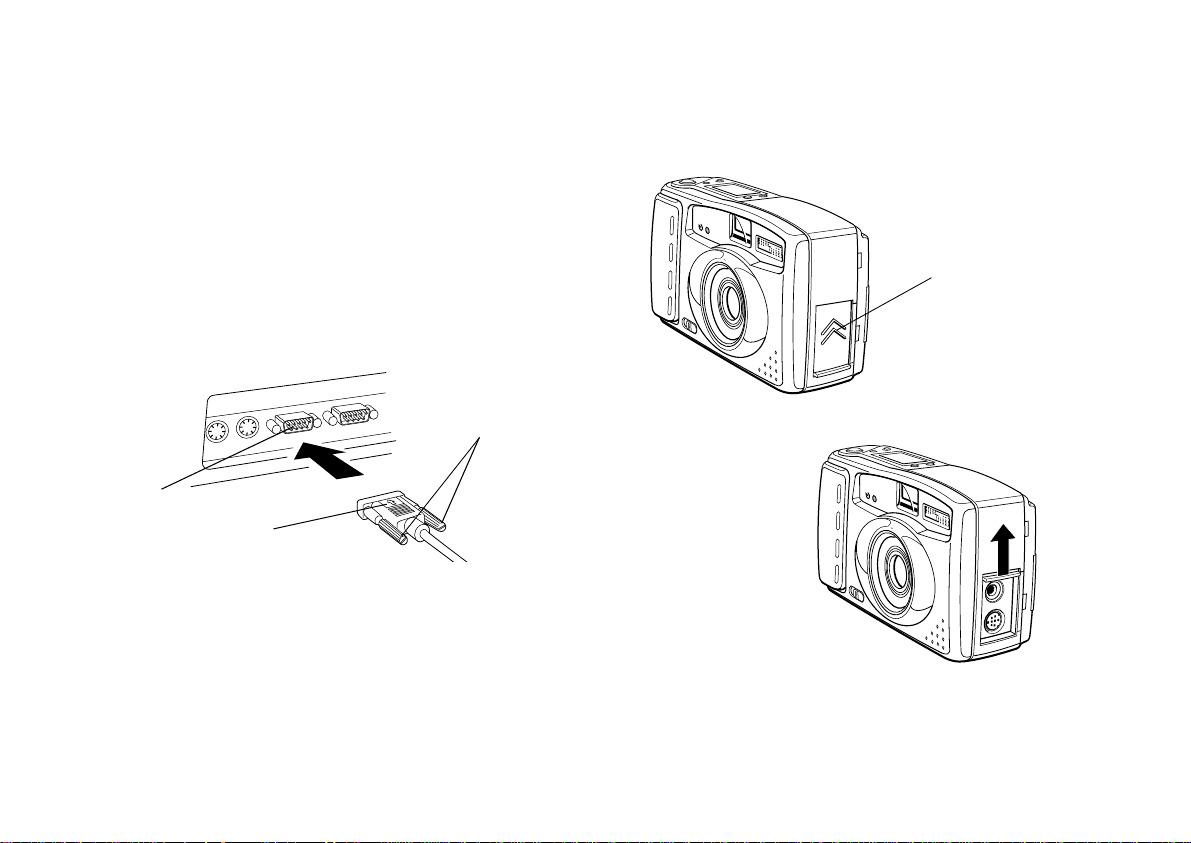
Follow the steps below to connect the camera to the
computer:
1 Locate a serial port on the back of your computer. You
may have two serial ports labeled COM1 and COM2, or
the ports may be labeled with icons.
3 Locate the port cover on the side of the camera. Press
on the arrows and slide the cover up to open it.
2 Line up the serial connector on the cable with one of
the serial ports on your computer, and insert the
connector. Then tighten the screws.
screws
serial port
serial
connector
3-2 Connecting to Your Computer
arrows
Page 28
4 Line up the arrow on the cable connector with the
notch on the camera’s serial port. Then insert the
connector.
serial port
notch
arrow
5 Turn on the camera and your computer system. A line
appears at the bottom of the picture counter on the
camera’s control panel.
NOTE
When the camera is connected to your computer, you can’t use any
of the control buttons or the shutter button on the camera. You can
only operate these features through the computer.
The auto shut-off feature remains in effect when the
camera is connected to your computer, but shut-off takes
place after 5 minutes of inactivity instead of 60 seconds. To
turn the camera back on, slide the power switch OFF and
ON again, or use EPSON Photo! to turn on the camera by
clicking the Controls tab, Setup tab, or Start tab. You can
adjust the auto shut-off time by following the instructions
on page 3-6.
A
line
B
Connecting to Your Computer 3-3
Page 29
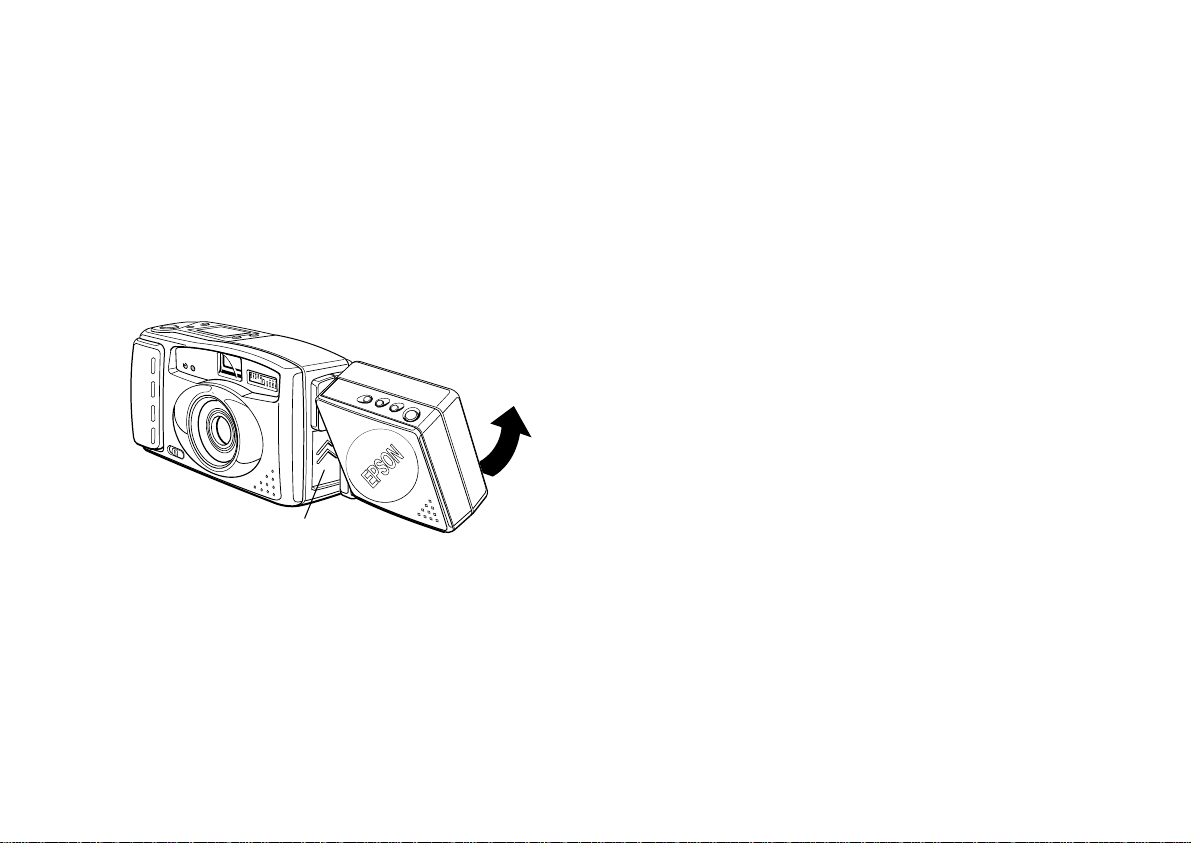
Connecting with the Optional LCD Monitor
If you want to connect the camera to the computer while
the optional EPSON PhotoPix LCD Monitor is attached,
follow these steps:
1 Tilt the bottom of the EPSON PhotoPix LCD Monitor up
to expose the port cover as shown.
EPSON
EPSON
port cover
2 Follow the steps on page 3-1 to connect the camera to
the computer.
If the EPSON PhotoPix LCD Monitor is on when you connect
the camera to the computer, it will turn itself off.
Setting Up the Camera Connection
Now that you have connected the PhotoPC 500 to your
computer, you can use the EPSON Photo! software to adjust
the connection speed and port setting, if necessary. You can
also see information about your camera displayed on the
Setup screen.
Testing the Camera Connection
If the software displays a message in the status box
indicating that the camera is not connected, follow these
steps to test the connection:
1 Double-click the EPSON Photo! icon in the PhotoPC 500
program group.
3-4 Connecting to Your Computer
Page 30
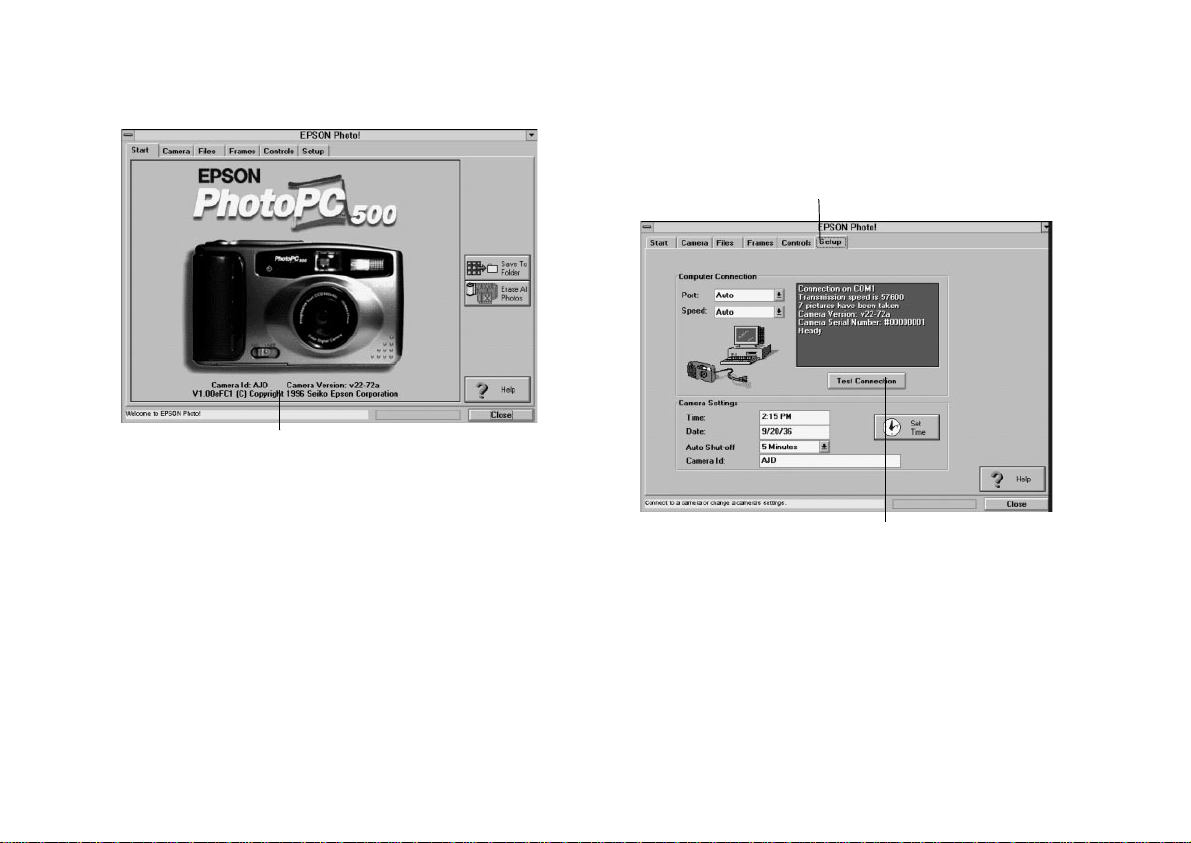
EPSON Photo! opens with the following screen:
camera information and ID
If the camera is connected, the screen displays the
camera’s information and ID.
2 If EPSON Photo! does not detect the connection, try the
following:
3 To check the connection after making any
adjustments, click the Setup tab. The Setup screen
appears.
Setup tab
click to test
connection
❙ Check the cables to make sure they are securely
attached.
❙ Check to make sure the camera has not shut off
automatically.
A
B
Connecting to Your Computer 3-5
Page 31

4 Click the Test Connection button. If you see the
camera information as shown on the previous page,
the camera connection is complete. If you see an error
message, you may need to change your port and speed
settings.
Adjusting Port Settings
You can manually change the port or communication
speed if EPSON Photo! is unable to detect the camera or
download photos. Follow these steps:
1 Open the Setup screen as described on page 3-4.
2 Click the arrow to change the port setting. You can
choose Auto, COM1, COM2, COM3, or COM4.
NOTE
In most cases, it is best to leave the Port setting on Auto
because EPSON Photo! can detect the location of the camera
automatically. When you change the port setting, you lose the
connection between the camera and your computer.
If possible, you should keep the camera connected to
the COM1 or COM2 port on the computer.
If you have a serial device connected to one port and
an internal modem on the other, you can try COM3 or
COM4. If you get an error message, see page 12-3 for
more information.
3 Click the arrow to change the speed setting.
NOTE
EPSON Photo! automatically chooses the fastest speed that
works with your operating system. This may actually be too
fast for the configuration of your port. If you get an error
message while trying to download photos, you may need to
choose a slower speed. For more information see page 12-4.
4 When you are finished, click OK.
3-6 Connecting to Your Computer
Page 32

Adjusting Auto Shut-off
You can adjust the time the camera takes to shut off when
it is connected to the computer. Follow these steps:
NOTE
The auto shut-off time can only be changed while it is connected to
the computer. When the camera is not attached, the auto shut-off
time is 60 seconds.
1 Connect the camera to the computer and open the
Setup screen as described earlier in this chapter.
camera’s
time
and date
2 Click the arrow to select an auto shut-off time.
click to change
auto shut-off time
You can choose 1, 2, 3, 4, or 5 minutes for auto shut-off.
The default is 5 minutes, so if you are afraid of running
down your batteries, you might want to shorten this
period.
Connecting to Your Computer 3-7
click to set the
camera’s clock
A
B
Page 33

Setting the Camera’s Clock
PhotoPC 500 can record the time and date of your photos
automatically. When you transfer the pictures to the
computer, you can see exactly when each one was taken.
In order to have the time and date recorded, you need to set
the camera’s clock from the computer. The PhotoPC 500
clock will continue to keep time accurately until you
replace the batteries; at that point you will have to connect
the camera to your computer again and reset the clock.
Follow these steps to set the camera’s clock:
You see a screen like the one below:
click arrows to
change time and date
click to use
computer’s settings
1 Connect the camera to the computer and open the
Setup screen as described earlier in this chapter.
The Time and Date boxes show the current settings of
your camera’s internal clock.
2 Click the Set Time button.
3-8 Connecting to Your Computer
3 Click the Copy From Computer button to set the
camera to the computer’s date and time.
You can also click the arrows to change the setting or
type the numbers for the time and date in the boxes.
4 When you are done, click OK. EPSON Photo! updates
the time and date in your camera.
Page 34

4
Downloading Pictures
hen you are ready to transfer your images to your
W computer, read this chapter to find out which
download method best suits your needs. This chapter
describes the following:
❙ PhotoPC 500 imaging software transfer
❙ Additional download methods
PhotoPC 500 Imaging Software Transfer
The EPSON PhotoPC 500 imaging software allows you to
transfer photos and download them directly into an
electronic photo album. You can open the pictures from the
album for organizing, editing, enhancing, and printing.
A
B
Downloading Pictures 4-1
Page 35

Follow these steps to download pictures with your
PhotoPC 500 imaging software:
1 Make sure your camera is connected to the computer
and turned on, as described in Chapter 3.
2 Double-click the PhotoPC 500 icon in the PhotoPC 500
program group. PhotoPC 500 asks you to select a
project:
If you select New Album, PhotoPC 500 asks you to
name the album.
5 Type in a name for the album and click OK.
PhotoPC500 asks you to select a source.
6 Make sure Epson Digital Camera is highlighted and
click Select. The EPSON Photo! Start screen appears.
Camera tab
Open
Acquire
Album
Slide
Show
Template
Go to
work
area
Exit
PhotoPC 500
3 Click the Acquire button. PhotoPC 500 asks you to
select an album for organizing your downloaded
images.
4 Select an album from the Album menu or select New
Album and click Select.
4-2 Downloading Pictures
Page 36

7 Click the Camera tab. If you already know which
pictures you want to transfer by their image numbers,
or if you want to transfer all the pictures, you do not
need to wait for all the thumbnails to appear before
you transfer images. If you do not know the image
numbers, wait a few moments for the thumbnails to
appear.
8 Select the photo you want to transfer, or select multiple
photos by holding down the Control or Shift key and
clicking on the photos you want. To select all the
photos, click the Select All button.
NOTE
This transfer allows you to use the frame photo and high-quality
options. The high-quality option resizes your high-resolution photo
to 8.4” × 6.3” or your standard resolution image to 4.2” × 3.2,” but it
does not actually increase the resolution. The enlarged photo will
not look as good as the original, especially when printed. This mode
also slows down the transfer time and creates larger file. The frame
option adds a permanent frame to your image. This feature reduces
the size of your image. For information on selecting frames for the
frame photo option, see Chapter 5.
status area
click to select
all the photos
click to
transfer photos
9 Click the Get Selected Photos button. The status area
displays your progress as the images are transferred.
10 Click Close when all your pictures are transferred.
You see the images as thumbnails in your new
PhotoPC 500 album. You can edit the images by
opening them as described on page 6-5.
11 Save the album by clicking the Save button.
Downloading Pictures 4-3
A
B
Page 37

Additional Download Methods
Besides using the PhotoPC 500 imaging software, there are
six additional methods for transferring images to the
computer. Read the descriptions below to decide which one
you may want to use.
NOTE
Some methods allow you to use the frame photo and high-quality
options. The high-quality option resizes your high-resolution photo
to 8.4” × 6.3” or your standard resolution image to 4.2” × 3.2,” but it
does not actually increase the resolution. The enlarged photo will
not look as good as the original, especially when printed. This mode
also slows down the transfer time and creates larger file. The frame
option adds a permanent frame to your image. This feature reduces
the size of your image. For information on selecting frames for the
frame photo option, see Chapter 5.
TWAIN Transfer
You can use any TWAIN-compliant application, such as
Adobe Photoshop or the PhotoPC 500 imaging software, to
transfer images to your computer without saving them in
albums. The images are opened in the work area and you
can save them as individual files, or add them to albums
later. (See page 4-5.)
Direct Hard Drive Transfer
You can use EPSON Photo! as a stand-alone utility
application to download your pictures quickly and directly
to the hard drive. The file names in this method are long, so
you’ll need to find your pictures by their thumbnails. If you
want an easier method of organizing your files, you should
use the PhotoPC 500 transfer method, described on page 4-1.
(See page 4-7 for instructions.)
Export Photo Transfer
You can use the EPSON Photo!. export photo transfer
feature to save the image in any of four file types as you
transfer it to the computer. This transfer also lets you add a
permanent frame to the image. (See page 4-11.)
4-4 Downloading Pictures
Page 38

Insert Object Transfer
You can download an image directly from the camera into
Microsoft Word or PowerPoint
that supports OLE (object linking and embedding) 2.0by
inserting it as an object. (See page 4-12.)
or any other application
Drag and Drop Transfer
You should check your system’s configuration before you
use drag and drop. This method works best on fast systems
that have a large amount of RAM. Your system also needs a
screen resolution of greater than 640 × 480. Drag and drop
allows you to grab a thumbnail from the EPSON Photo!
Camera screen and drop the image directly into your
document. (See page 4-13.)
NOTE
If you choose either the insert object transfer or the drag and drop
transfer, you may also want to save the file in a PhotoPC 500 album
as described on page 4-1. These methods allow the picture to appear
in your document, but do not save it as a separate file.
Acquiring Images with TWAIN Programs
Follow these steps to acquire photos from the camera using
TM
TWAIN-compliant programs such as Adobe Photoshop
or PhotoPC 500 imaging software. These steps are based on
these two programs, so your software may have different
commands or menus. See your software’s help or
documentation for more information.
1 Open your application. Make sure the camera is
connected to your computer and turned on.
2 Click Select TWAIN Source (or Select Source) in the
File menu.
3 Select Epson Digital Camera as the TWAIN source.
A
Downloading Pictures 4-5
B
Page 39

4 Select EPS JPEG Acquire (or Acquire) from the File
menu.
5 Click the Camera tab and go to the Camera screen.
The EPSON Photo! Start screen appears.
4-6 Downloading Pictures
selected
photo
click to transfer
photos
click to select
all the photos
6 Select the picture you want to use, or hold down the
Control or Shift key and select multiple pictures. Click
Select All to transfer all the pictures.
Page 40

NOTE
If you want to put a permanent frame on your photo, click the
Frame Photo box. If you have not selected a frame style yet,
click the Frames tab and turn to page 5-8 for instructions on
selecting a frame. Adding a frame reduces the size of your
image and increases the transfer time.
7 Click the Get Selected Photos button. The status area
displays the progress as the images are transferred.
Then EPSON Photo! closes and you see your images in
the work area.
Transferring Images Directly to the Hard Drive
You can transfer all your pictures to the hard drive or
preview and select pictures to transfer with a few simple
steps.
Transferring All Images
If you want to load all your pictures directly onto the hard
drive, follow these steps:
From the Windows 3.1 or Windows NT 3.5 program
manager, double click the PhotoPC 500 program
group.
2 Double-click the EPSON Photo! icon.
The EPSON Photo! Start screen appears:
A
click to download images
1 In Windows 95 or Windows NT, 4.0 click Start, point to
Programs, and then select PhotoPC 500.
B
Downloading Pictures 4-7
Page 41

3 Click the Save to Folder button.
In Windows 95, the Browse for Folder dialog box
appears.
In Windows 3.1, the Choose Folder dialog box appears.
4 Select a folder for your photos.
If you want to create a new folder, select the directory
you want to place the folder in. Click the New Folder
button. Type the name of the new folder in the dialog
box and click OK. Then select the new folder.
5 Click OK. The status area displays your progress as the
images are transferred to the hard drive.
4-8 Downloading Pictures
6 The images are saved in JPEG format. You can view
them on the Files screen as described on page 5-6.
Page 42

Transferring Selected Images
You can preview and select the images you download by
following these steps:
1 Open EPSON Photo! as described on the previous page.
2 Click the Camera tab to view the Camera screen. It
takes a few moments for the thumbnails of your
images to appear.
3 Click a thumbnail to select an image you want to
download. To select more than one image, hold down
the Shift key or Control key and click the photos you
want.
4 Follow steps 3 to 5 on page 4-8 to transfer the images
you have selected.
Camera tab
selected image
click to transfer selected
image(s)
A
Downloading Pictures 4-9
B
Page 43

Reading File Names
EPSON Photo! uses the time, date, and photo number for
your images’ names. The format for these names is
explained below:
Windows 95 and Windows NT follow this naming format:
PhotoPC Monday, September 23, 1996 1008 AM 7.jpg
File names in Windows 3.1 follow this format:
MMDDNNNN.JPG
MM = month
DD = date
NNNN = image number
JPG = JPEG file extension
file source
(PhotoPC500)
date
4-10 Downloading Pictures
time
image
number
file extension
(JPG)
month
(September)
date
(21st)
image number
(picture 8)
file extension
jpg (jpeg)
Page 44

Exporting Images
If your software application is not TWAIN compliant and
you want to download your photos in format that it
recognizes, you can use EPSON Photo! as a stand-alone
utility program to export your files in any of four file types.
1 Open your EPSON Photo! software and click the
Camera tab to open the Camera screen.
2 Click the picture you want to export.
The selected photo is highlighted in yellow and blue
and the Export Selected Photo button is active.
NOTE
If you want to put a permanent frame on your photo, click the
Frame Photo box. If you have not selected a frame style yet,
click the Frames tab and turn to page 5-8 for instructions on
selecting a frame. Adding a frame reduces the size of your
image and increases your transfer time.
3 Click the Export Selected Photo button. The Save As
dialog box appears.
A
selected picture
click to export
photo
click to select
all photos
B
Downloading Pictures 4-11
Page 45

4 Select the file type for the image from the Save File as
Type pull-down menu. You can save your image in
any of the following formats:
❙ Bitmap: BMP, DIB
❙ JPEG
❙ PCX
5 Type in a name for your file.
6 Choose the directory where you want to save the file
and click OK.
2 Make sure your camera is connected to the computer
and turned on as described in Chapter 3.
3 Select Object from the Insert menu. You see a list of
sources.
NOTE
You cannot open or edit the exported photos in EPSON Photo!.
Use PhotoPC 500 or another application to view or edit the
exported images.
Inserting Images as Objects with OLE
You can use your images in applications that support OLE
(object linking and embedding) 2.0 or higher. Follow these
steps to insert a photo as an object:
1 Open the document you are inserting the picture in.
4-12 Downloading Pictures
4 Select Epson Digital Camera as the Source and click OK.
The EPSON Photo! Start screen appears.
5 Click the Camera tab to view the Camera screen.
6 Click the image you want to insert. It is highlighted in
yellow and blue.
7 Click Get Selected Photo. The image appears in your
document.
.
Page 46

Using Drag and Drop
If your application supports OLE (object linking and
embedding) 2.0 or higher you can use this method to
transfer your pictures from your camera into your
documents. Follow these steps:
NOTE
You can only use drag and drop if your screen resolution is greater
than 640 × 480 pixels. Some applications do not support the millions
of colors in your Photo PC 500 images. If you drag and drop your
picture into one of these programs and it appears blotchy, try
transferring your picture into PhotoPC 500 and changing the image
mode to indexed, 256 colors as described on page 7-10. Then import
or cut and paste the image into the application as explained in
Chapter 9.
1 Open the document you want to place a picture in.
2 Make sure the camera is connected to your computer
and turned on as described in Chapter 3.
4 Click the center of the image you want to insert and
drag it to your document, holding down the button on
your mouse while you drag.
5 Release the button of your mouse when the object is
placed in the document where you want it. The image
appears in your document.
A
3 Open EPSON Photo! and click the Camera tab to view
the Camera screen.
B
Downloading Pictures 4-13
Page 47

4-14 Downloading Pictures
Page 48

5
Using the Camera with Your Computer
ou can adjust the camera controls from your
Ycomputer just as you would by using the control
panel. You can even take a picture from the computer
while viewing a live preview of your subject, which works
well when you are taking portrait photos or close-ups with
a macro lens. This chapter includes the following
information about using the camera with your computer:
❙ Using the camera controls
❙ Erasing pictures from your camera
❙ Setting the shutter speed
❙ Taking pictures from the computer
❙ Using file folders
❙ Setting up frames for your photos
Using the Camera Controls
When the camera is connected to your computer, you
cannot adjust the controls on the camera’s control panel.
Instead, you can use EPSON Photo! by following these steps:
1 Make sure the camera is connected to your computer
and turned on, as described in Chapter 3.
2 In Windows 95 or Windows NT 4.0 click Start, point to
Programs, then select PhotoPC 500.
From the Windows 3.1 or Windows NT 3.5 Program
Manager, double-click the PhotoPC 500 program group.
A
B
Using the Camera with Your Computer 5-1
Page 49

The Start screen appears:
3 Click the Controls tab to view the Controls screen,
shown to the right.
The control panel lets you do the following:
❙ Check the battery icon to see how much power is
left in the camera.
❙ Change the flash and resolution settings just as
you do on the camera by clicking on the arrows
and highlighting the settings you want to use.
5-2 Using the Camera with Your Computer
See page 2-2 for more information on using the
camera’s controls.
Erasing Pictures from Your Camera
After you have viewed your pictures and transferred them
to your computer, you can erase them from your camera
using either the Camera screen or the Controls screen.
Page 50

Erasing Photos from the Camera Screen
Follow these steps to erase photos from the camera using
the Camera screen:
1 Open EPSON Photo! as described on page 5-1.
3 If you want to erase all of your photos, click Select All.
If you want to erase one of your photos, click the photo
to select it. Select more than one by holding the Control
or Shift key and clicking the images you want.
2 Click the Camera tab to view the Camera screen.
selected photo
click to select all
photos
click to erase
photos
4 Click Erase Photos. A message box appears asking to
confirm your selection.
5 Click Yes to erase the photos in your camera or click No
to cancel.
Erasing Photos from the Controls Screen
Follow these steps:
1 Open EPSON Photo! as described on page 5-1.
A
B
Using the Camera with Your Computer 5-3
Page 51

2 Click the Controls tab to view the Controls screen.
Setting the Shutter Speed
When the camera is connected to the computer, you can
use the Controls screen to adjust the shutter speed. Slower
shutter speeds allow more light to strike the lens; faster
speeds allow you to take “stop-action” pictures of moving
subjects. Shutter speed settings remain in effect only while
the camera is connected to your computer. The camera
adjusts the speed automatically when it is not connected.
NOTE
When you adjust the shutter speed manually, you can’t use the
camera’s flash.
click to erase last
photo
click to change
shutter speed
click to erase all
photos
3 Under Erase Photos, click All to erase all the photos or
click Last to erase the last image that you captured.
A message box asks you to confirm your selection.
4 Click Yes to erase the photos or No to cancel.
5 Click Close when you are finished.
5-4 Using the Camera with Your Computer
Follow these steps to adjust the shutter speed:
1 Open EPSON Photo! as described on page 5-1.
2 Click the Controls tab to view the Controls screen
3 Select the shutter speed you want to use from the
Shutter Speed pull down menu.
The camera uses the shutter speed you select as long as
it is connected to the computer.
Page 52

Taking Pictures from the Computer
You can take pictures while you are controlling the camera
from your computer. This allows you to see a live preview
of your subject and get the perfect shot. Follow these steps:
1 Connect the camera to the computer as described in
Chapter 3.
2 Position the camera facing the subject. Using a tripod
will give you the most control when setting up your
shots. See page A-7 for instructions.
3 Turn on both your camera and your computer system.
4 Double-click the EPSON Photo! icon.
.
5 Click the Controls tab to view the Controls screen.
click to start
live preview
click to stop
live preview
click to adjust
preview time
click to take
a picture
6 Press the Start button under Preview to display the
image on the screen.
7 You may need to move the camera or the subject until
you see the image you want to capture in the window.
The image is updated every eight to ten seconds,
depending on your communication speed.
Using the Camera with Your Computer 5-5
A
B
Page 53

NOTE
The Live Preview has an auto-stop timer that shuts the preview
off after a short time to save batteries. You can adjust this
time by clicking the button and highlighting the time you want
to use. If the timer stops the preview, just press Start and the
image will appear again.
8 When you see the image you want to capture on the
screen, press the Take a Picture button to snap the
shutter.
9 Click Stop to stop the preview. Transfer your picture to
the computer as described in Chapter 4 and turn off
the camera.
Using File Folders
EPSON Photo! allows you to view and erase picture files
and their information. The file folders are useful for finding
pictures you have transferred using the export photo
method, described on page 4-11 or the direct hard drive
transfer, described on page 4-7.
Viewing Files in Folders
Follow these steps to view thumbnails of files in folders:
1 Open the EPSON Photo! software as described on page
5-1. Click the Files tab to view the Files screen.
The default folder is EPSON\Photo!\Photos.
2 If your photos are not on the screen, click Browse and
select the folder where your photos are located. Your
images will appear as miniature “thumbnails” in the
boxes on the screen.
5-6 Using the Camera with Your Computer
Page 54

3 Use the arrows to scroll through additional images.
Displaying File Information
Follow these steps to see information about the images you
have saved in folders:
Erasing Files from Your Hard Drive
Follow these steps to erase image files stored on your hard
drive:
1 Open EPSON Photo! as described on page 5-1.
1 Open the folder where your image file is located.
2 Select the image you want to see information for. (The
selected photo is highlighted with yellow and blue.)
3 Click the Photo Info button to view the selected photo’s
information. If the information is available, you see the
date, time, shutter speed, flash mode, and image
resolution displayed.
NOTE
You can also view image information by clicking a thumbnail with
the right mouse button.
2 Click the Files tab to view the Files screen.
3 Select the photo you want to erase or select multiple
photos by holding down the Control or Shift key and
clicking on the pictures. To select all the photos, click
the Select All button.
The selected images are highlighted in blue.
4 Click the Erase Files button. A message appears asking
you to confirm the deletion.
5 Click Yes to erase the image files or click No to cancel.
A
B
Using the Camera with Your Computer 5-7
Page 55

Setting Up Frames for Your Photos
You can set up permanent frames to add to your images
with EPSON Photo!. Follow these steps:
1 Open your EPSON Photo! software. Click the Frames tab
to open the Frames screen.
2 Click on the frame style you would like to use. A
preview appears in the window.
3 If you want to change the color of the frame or the
matte, click Frame Color or Matte Color.
.
click to
frames tab
edit colors
5-8 Using the Camera with Your Computer
frame preview
click boxes
to select
frame type
Page 56

The following screen appears:
A preview of your color appears in the Color/Solid
window.
click boxes to
select color
click for
new colors
4 Select the color you want and click OK.
5 If you want to define your own color, click Define
Custom Colors to view the color palette, as shown on
the right.
❙ Move the crosshairs to select a color.
❙ Move the arrow on the light/dark scale to make
the color darker or lighter.
❙ Type in numbers to adjust the hue, saturation,
luminescence, red, green, and blue values for the
color.
6 Click Add to Custom Colors to add your selected color.
Your new color appears in a box under Custom Colors.
7 Select your new color and click OK. The frame or matte
appears in your selected color.
:
selection
crosshairs
color preview
click to add
color
adjust
light/dark
A
B
Using the Camera with Your Computer 5-9
Page 57

5-10 Using the Camera with Your Computer
Page 58

6
Albums: Managing Files in PhotoPC 500
ou can use PhotoPC 500 to organize all the
Ypictures you take with your camera. This chapter
describes how to use the PhotoPC 500 features in the
following sections:
❙ Transferring saved images to albums
❙ Working with your albums
❙ Sorting your albums
❙ Opening image files
❙ Printing your pictures
❙ Saving your pictures
❙ Viewing your album as a slide show
❙ Using your album as a screen saver
Albums: Managing Files in PhotoPC 500 6-1
A
B
Page 59

Transferring Saved Images to Albums
If you didn’t acquire your photos with PhotoPC 500, you
can still open the images you downloaded with your
EPSON Photo! software and save them in albums. Follow
these steps:
1 In Windows 95 or Windows NT 4.0, click Start, point to
Programs, and then point to PhotoPC 500 to open the
application.
From the Windows 3.1 or Windows NT 3.5 Program
Manager, double-click the PhotoPC 500 icon in the
PhotoPC 500 group to start the application.
PhotoPC 500 asks you to select a project.
The Album opens as shown:
click to select
an album
click to add
a file
3 Click the down arrow to select a different album or
select New Album to create a new album.
2 Click the Album button to open one of your
albums or to create a new album.
6-2 Albums: Managing Files in PhotoPC 500
4 Click the Add button to add one of your image
files.
.
Page 60

The Add Thumbnails dialog box appears.
Working With Your Albums
PhotoPC 500 Albums store and display your images, just
like the photo albums used for printed snapshots. You can
organize your pictures by subject matter or date, or in any
way you want. Albums let you view miniature
“thumbnail” versions of your images, along with image
information.
1 To open your album, click the Album button
or choose Open Album from the File menu.
5 Select a file to add to your album and click OK. The
image appears in your album.
6 Click the Save button to save your album . If
you chose New Album, the Save New Album dialog box
appears.
7 Type a name for the album and click OK.
2 The Album window appears, with miniature
“thumbnail” representations of your image or images,
as shown on the next page.
A
B
Albums: Managing Files in PhotoPC 500 6-3
Page 61

.
❙ Click and drag a thumbnail to rearrange the
images in the album.
❙ Click the Acquire button and follow the steps
on page 4-1 to download photos directly to your
album.
❙ Click an image and click the Delete button
to remove it from the album. The image file itself is
not affected.
❙ Print out the whole set of thumbnails by clicking
the Print button.
3 Enter a description for the album (up to 36 characters)
in the description box, if you want.
❙ Click an image to select it. The Information box
displays image file information.
❙ Double-click a thumbnail to open the image.
❙ To add pictures, click the Add button
and choose the image or images you want.
❙ Click the down arrow at the top of the screen to
see a different album or create a new album.
6-4 Albums: Managing Files in PhotoPC 500
4 Click the Save button to save your album.
5 If you’re finished working with albums, click the Exit
button .
Page 62

Sorting Your Albums
PhotoPC 500 gives you several methods for sorting the
images in your albums. You can sort them by file name, file
size, file type, file date, or description. Follow these steps to
organize your photos:
:
1 Open the album you want to sort.
2 Click the Sort button.
The Sort dialog box appears as shown on the right.
3 Select the sort method you want to use.
4 If you want the images to appear in reverse order (Z to
A instead of A to Z, for example), click the Reverse
Order box.
5 Click OK when you are finished. The images appear in
the order you have selected.
click to reverse
order
Opening Image Files
With the PhotoPC 500 imaging software, you can have
several images open at the same time (depending on your
computer’s memory), each in its own window. The
window’s title bar is highlighted if it contains the active
image (the one you’re currently working on). You can even
open the same image in two windows; this lets you
experiment while you keep the original picture in view.
You can open an image using either the Album button or
the Open button.
Albums: Managing Files in PhotoPC 500 6-5
A
B
Page 63

Opening an Image in an Album
When you use albums, you can see small thumbnail
versions of your pictures. You can easily choose the image
you want, even if you don’t remember the file name. Follow
these steps:
1 Click the Album button or choose Open Album
from the File menu. The Album window appears, as
shown to the right.
2 Double-click the thumbnail to open the image you
want.
3 If the picture you want to open is in a different album,
click the Album arrow at the top of the window and
choose a different album.
4 When you have finished opening the images you want
to work with, close the Album window. Your images
appear in the PhotoPC 500 workspace where you can
edit them.
6-6 Albums: Managing Files in PhotoPC 500
Page 64

Opening an Image with the Open Button
If you want to open an image that’s not in an album, you
can use the Open button. Follow these steps:
1 Click the Open button . The Open dialog box
appears.
2 Choose the image file you want to open. The
PhotoPC 500 imaging software lets you open the
following types of image files:
❙ BMP ❙ TGA
❙ TIF ❙ JPG
❙ PCX ❙ PCD
❙ GIF
NOTE
For more information on image file formats, see page 6-8.
Printing Your Pictures
When you want to print out your image, follow these steps:
1 Open the image you want to print.
2 Click the Print button or choose Print from the
File menu. The Print dialog box appears:
3 If you want to place a title or caption below the
picture, type it in the Description box.
A
4 Enter the number of copies you want to print. (This
option is available only if your printer supports it.)
Albums: Managing Files in PhotoPC 500 6-7
B
Page 65

5 If you want to change the position of your image on
the page, move the picture in the window.
6 Use the Hori-centered and Vert-centered checkboxes
to indicate if you want to center your image on the
page horizontally, vertically, or both.
7 Drag the slider if you want the printed image to be
larger or smaller than the original image.
NOTE
The resolution automatically increases if you reduce the size
and decreases if you enlarge it.
8 Click OK when you’re ready to print.
Saving Your Pictures
Follow these steps to save a picture in the PhotoPC 500
imaging software:
1 Click the Save button or choose Save As from the
File menu.
The first time you save your image file, the Save As
dialog box appears:
2 Choose the drive and directory where you want to
save the file, or leave it in the default location
(C:\PhotoPC5\Photos).
3 Choose the file type. The PhotoPC 500 imaging
software lets you choose from five file formats. Each
format has a different internal structure and use:
❙ JPG. JPEG is the default format and produces small,
compressed files. When you save in this format,
the screen displays a slider that allows you to
choose a degree of compression. For best quality,
choose 100 percent.
6-8 Albums: Managing Files in PhotoPC 500
Page 66

❙ BMP. This is the “native” format for Windows
bitmap files. This format is the best for importing
files into other Windows applications.
❙ TIF. TIFF files can be used on many types of
systems.
❙ PCX. The PCX format lets you use your pictures in
many Windows and DOS programs.
❙ TGA. Targa files were originally designed for
specialized hardware and software.
4 Type a name for the file and click OK.
2 Click the down arrow and choose the album you want
to use.
3 When you leave the Transition Effect box checked,
PhotoPC 500 displays various fades and dissolves
between images. If you don’t want these effects, click
the Transition Effect box to remove the check.
click to select
album
leave checked to
view effects
Viewing Your Album as a Slide Show
You can turn any album into a slide show that you can
share with friends, co-workers, and family members. For
instructions on how to create an album, see pages 4-1
and 6-2.
Follow these steps to turn your album into a slide show:
1 Click the Slide Show button . You see the Slide
Show dialog box (shown below).
leave checked
to continuously
play slide show
enter time
between
images
4 When you leave the Auto Loops box checked,
PhotoPC 500 plays the slide show continuously (until
you press Esc). To play the slide show only once, click
the Auto Loops box to remove the checkmark.
Albums: Managing Files in PhotoPC 500 6-9
A
B
Page 67

5 Enter the number of seconds you want to see each
image.
If you’re using Windows 3.1, double-click Desktop. You
see the Screen Saver dialog box.
6 Click OK to start the show. You can press Esc to exit the
show at any time.
Using an Album as a Screen Saver
A screen saver is like a slide show that plays whenever
your computer is idle for more than a few minutes. You use
the Windows Control Panel to turn an album into a screen
saver.
NOTE
If you need help creating a screen saver, see your Windows
documentation.
Follow these steps:
1 Open the Windows Control Panel.
2 If you’re using Windows 95, select Display, and then
click the Screen Saver tab.
3 Click the Screen Saver Name down-arrow to display
the list, and choose PhotoPC 500 Slide Show.
4 Click Settings or Setup.
5 Choose the album you want to use, and set the other
options if you want. Click OK when you’re finished.
6 Set the Wait or Delay time.
7 Click Preview or Test if you want to see a sample of
your screen saver.
8 Click OK when the screen saver is set up the way you
want.
6-10 Albums: Managing Files in PhotoPC 500
Page 68

7
Editing Photos in PhotoPC 500
our PhotoPC 500 imaging software lets you edit
Y your images to improve their composition, size, or
appearance. You can crop edges you don’t want, copy and
paste parts of one image into another one, or convert the
image type so you can print it in black and white or use it
in an application. This chapter includes instructions for:
❙ Viewing images and image information
❙ Selecting part of your image
❙ Cutting, Copying, and Pasting
❙ Cropping
❙ Resizing
❙ Rotating
❙ Flipping an image or selection
❙ Converting image types
Viewing Images and Image Information
To get a close-up look at part of your open image, you can
use the Zoom tool or Zoom In command on the View menu.
You can also use the View menu to display information
about your image and to hide the Tools Bar and Status Bar
on your PhotoPC 500 screen.
NOTE
You are not actually changing the image size when you zoom in. If
you want to change the size, use the Resize tool or the Image Size
command on the Edit menu. See page 7-7 for instructions.
Zooming In and Out with the Zoom Tool
Follow these steps to get a close-up look at your image and
then return to your original view.
1 Click the Zoom tool .
Editing Photos in PhotoPC 500 7-1
A
B
Page 69

2 Click the left mouse button on the part of your image
that you want to see in detail.
.
The image is magnified to twice its size.
3 Continue clicking to increase the magnification. You
can increase it up to 16 times its original size.
4 To decrease the magnification, click the right mouse
button on the image. You can continue to click the
right mouse button to zoom out even more.
7-2 Editing Photos in PhotoPC 500
Page 70

Using the Zoom Commands in the View Menu
Follow these steps to zoom in and out on your image from
the View menu:
1 Choose Zoom In or Zoom Out from the View menu.
You see a list of magnification ratios:
2 Choose the degree of magnification or reduction you
want.
Viewing Image Information
Choose Image Information from the View menu to display
an information box like the one below.
❙ Select the units you want to use for displaying the
image’s dimensions. You can select pixels, inches, or
centimeters.
❙ Click Histogram to display a graph like the one below:
The histogram shows the brightness of the overall image
and each of the three color channels (red, green, and blue)
that make up the image. The vertical axis of the graph
A
B
Editing Photos in PhotoPC 500 7-3
Page 71

represents the number of pixels. The horizontal axis
represents the brightness level, from the darkest pixels at
the left to the brightest pixels at the right.
Click OK when you’re finished with each information box.
Selecting Part of Your Image
Selecting or masking a portion of your image allows you to
make changes that affect only that portion. The rest of the
image isn’t affected.
NOTE
When you enhance an image, change its size, or convert it to
another file type, PhotoPC 500 shows your changes in the Image
Information box. The histogram reflects changes in brightness and
contrast, hue and saturation, tone, and sharpening or blurring.
Hiding the Tools Bar and Status Bar
To create more space for displaying images on your
PhotoPC 500 screen, you can hide the Tools bar or Status
bar. Follow these steps:
1 From the View menu, choose Show Tools Bar or Show
Status Bar. The checkmark disappears from the menu.
2 To restore the Tools or Status Bar, choose Show Tools
Bar or Show Status Bar again. The checkmark
reappears.
7-4 Editing Photos in PhotoPC 500
Using a Selection Mask
When using a selection mask, you can choose the Discard
command on the Edit menu to cancel all changes made to
the selected area. This lets you experiment freely, knowing
you can undo a series of changes quickly and easily.
Follow these steps to select a part of your image:
1 Click the Select tool.
2 Click and drag the mouse to select the part of the
image you want.
Page 72

When you release the mouse button, an “animated”
rectangle surrounds the selected area:
NOTE
After you select an area, you can use many of the PhotoPC 500
menu commands and tools to work on the area. For example, you
can use the Crop, Resize, and Rotate tools. See pages 7-6 to 7-8
for more information about cropping, resizing, and rotating.
Once you have added a selection mask, you can work with
it by following these procedures:
❙ To move the selected area, click and drag inside the
area. The selection “floats” on top of the original image.
❙ To decrease the size of a selection or change its shape,
press Ctrl while you select part of the already selected
area.
❙ To remove the selection mask, click anywhere outside
it, or press the Delete key. If the entire image is selected,
click the Crop tool and then click the image to remove
the selection mask.
❙ To cancel all changes made to the selected area and
remove the selection mask, choose Discard from the
Edit menu. But be careful! This works only while the
selection is “active.”
A
B
Editing Photos in PhotoPC 500 7-5
Page 73

Cutting, Copying, and Pasting
You can use the Cut, Copy, and Paste commands on the
Edit menu with a selected area of an image or an entire
image. The Paste as New command lets you create a new
image file from an image on the clipboard.
❙ Choose Cut from the Edit menu to remove the selected
area (or the entire image if there is no selection). A
white “hole” appears where you made the cut.
PhotoPC 500 places the cut-out area on the Windows
Clipboard.
❙ Choose Paste as New to create a new file from an
image on the Clipboard. PhotoPC 500 displays the new
image file in its own window, and you can save it or
add it to an album.
Cropping
Cropping an image is the opposite of cutting; instead of
removing the selected area, cropping removes everything
outside the area. Follow these steps:
1 Click the Crop tool.
❙ Choose Copy from the Edit menu to place a copy of the
selected area (or the entire image if there is no
selection) on the Windows Clipboard. The original
image is not affected.
❙ Choose Paste from the Edit menu to paste an image
from the Clipboard into the active image. You can drag
the pasted area with your mouse if you want to move
it.
7-6 Editing Photos in PhotoPC 500
2 Click and drag to select the part of the image you want
to keep. When you release the mouse button, an
animated rectangle surrounds the selected area.
3 Click outside the selected area if you change your
mind or want to start over. When you move the mouse
pointer inside the selection, it turns into a pair of
scissors. Click inside the selection to “cut away” the rest
of the picture.
.
Page 74

Resizing
You can use the Resize tool to enlarge or reduce a selected
part of an image. Then you can use the resized area like
any other selection—by cutting, copying, or pasting it, and
so on. To change the size of an entire image, use the Image
Size command on the Edit menu.
Resizing a Selection
Follow these steps:
1 Click the Resize tool.
2 Click and drag on the part of the image you want to
resize. When you release the mouse button, an
“animated” rectangle surrounds the selected area.
3 Click and drag a corner of the selection to change its
size. The selected area “floats” on top of the original
image; you can move it by clicking inside the selection
and dragging it with your mouse.
4 To remove the selection mask, click the Crop tool and
then click the image outside of the selection.
Resizing an Image
When you change the size of an image, you have several
choices to make:
❙ You can keep the aspect ratio (height-to-width
proportion) of the original or change it.
❙ You can set an exact size for the image’s height or
width (or both) in pixels. Or, you can set a percentage
of enlargement or reduction.
❙ You can change the image’s resolution (up to 1200 dpi
or more, depending on your computer’s memory).
Follow these steps to resize an image:
1 Choose Image Size from the Edit menu. A dialog box
like the one on the next page appears.
2 Click to uncheck Keep Aspect Ratio if you want to
change the height-to-width proportion. Leave it
checked if you want to keep the proportion.
A
B
Editing Photos in PhotoPC 500 7-7
Page 75

3 Enter new values for the size or percentage of
enlargement or reduction.
4 Enter a value for the image’s resolution (dots per inch).
PhotoPC 500 will keep the image the same size and
interpolate a higher resolution.
5 Click OK to apply your changes to the image.
NOTE
To maintain image quality when printing, you should try increasing
the resolution when you enlarge an image. For example, if you scale
a picture by 300 percent (3 times larger), you should increase the
resolution from 152 dpi to 456dpi.
Rotating
You can use the Rotate tool to tilt or turn a selected part of
an image. To rotate an entire image to the exact degree you
want, use the Rotate command on the Edit menu.
Rotating a Selection
Follow these steps:
1 Click the Rotate tool.
2 Click and select the part of the image you want to
rotate. When you release the mouse button, an
“animated” rectangle surrounds the selected area.
7-8 Editing Photos in PhotoPC 500
Page 76

3 Click and drag a corner of the selection to rotate it. The
selected area “floats” on top of the original image; you
can move it by clicking inside the selection and
dragging it with your mouse.
4 To remove the selection mask, click another tool such
as the Select tool or the Crop tool and then click the
image outside of the selection.
Rotating an Entire Image
You can use the Rotate command on the Edit menu to
rotate either a selected area or an entire image. With this
command, you can even set the exact degree of rotation.
Follow these steps:
1 Choose Rotate from the Edit menu. The following list
of choices appears:
2 Choose the angle you want, or choose Degree to
display the Rotate dialog box, shown on the next page.
A
Editing Photos in PhotoPC 500 7-9
B
Page 77

.
3 Enter the exact degree of rotation in the box or drag
the dial.
4 Click OK to rotate the image.
Flipping an Image or Selection
You can use the Flip command on the Edit menu to reverse
or “turn over” a selected area or an entire image. This is
useful for applications such as printing a T-shirt transfer.
Follow these steps:
1 Select the area you want to flip, or make sure no area is
selected if you want to flip the entire image.
2 Choose Flip from the Edit menu, and then select
Horizontally or Vertically. Your image or selection is
flipped.
3 If you flipped a selected area, click the Crop tool and
then click the image outside of the selection to remove
the mask.
original
flipped
Converting Image Types
Converting images gives you the maximum flexibility for
editing, displaying, and printing your pictures. Keep in
mind that changing an image’s data type is permanent.
7-10 Editing Photos in PhotoPC 500
Page 78

The image may lose information when it is changed to a
different type, so you should always keep your original file
and use the Save As command to create the converted file.
Five image data types are available on the Convert menu:
❙ 1-bit black-and-white
This type of image is like a drawing with no shades of
gray. You must convert black-and-white images to
grayscale if you want to use PhotoPC 500
enhancements or special effects.
❙ 8-bit grayscale
This type of image contains 256 shades of gray, like a
black-and-white photograph. You can use most
PhotoPC 500 tools and commands with grayscale
images. If you want to print a color image with a
black-and-white printer, you should convert it to
grayscale first. This makes the image file smaller
(in KB) and faster to process.
❙ 4-bit indexed 16-color
Some older VGA monitors and software applications
can display only 16 colors. Use this data type for images
that may be viewed on low-resolution systems or used
with older software.
❙ 8-bit indexed 256-color
Some Super VGA monitors and software can display
only 256 colors. Use this data type for the best image
quality on low-resolution systems or with some
software applications.
NOTE
PhotoPC 500 special effects and some other features don’t
work on indexed color images.
❙ 24-bit RGB True Color (over 16 million colors)
This type of image provides the most accurate color
and gives you the most options for editing and
enhancing in PhotoPC 500. You can convert your
A
B
Editing Photos in PhotoPC 500 7-11
Page 79

indexed color image to this type for editing purposes.
The image will appear the same, but you will be able
to use all of the PhotoPC 500 features with it.
Below is an example of an image that was originally
converted from 24-bit color to 8-bit grayscale and then to
1-bit black-and-white.
8-bit grayscale 1-bit black-and-white
See page 6-7 for information on printing your converted
images.
7-12 Editing Photos in PhotoPC 500
Page 80

8
Using Other Features in PhotoPC 500
ou can fine-tune your images and create unusual
Y results using the special effects available in your
PhotoPC 500 software. This chapter describes the following:
❙ Using enhancement tools and special effects
❙ Adjusting brightness and contrast
❙ Adjusting hue and saturation
❙ Setting tone adjustment
❙ Sharpening images
❙ Blurring images
❙ Using special effects
❙ Using the matte template
❙ Using the calendar template
Using Enhancement Tools and Special Effects
In the PhotoPC 500 workshop, there are several options for
enhancing your images and for adding special effects. All of
the tools for enhancing and adding special effects follow
similar procedures. Follow these guidelines when using
these features in PhotoPC 500:
❙ Slide the control to the right to increase the effect or
enhancement you are using.
❙ Slide the control to the left to decrease the effect or
enhancement you are using.
❙ If you want to see a specific area of your image
enlarged in the Before and After windows, click the
Pan Mode box.
Using Other Features in PhotoPC 500 8-1
A
B
Page 81

❙ If you want to cancel any enhancement or special
effect, you can choose Undo from the Edit menu at any
time, even after you click OK.
NOTE
To use the enhancements or special effects, your images must be in
either the grayscale or 24-bit color data type. See page 7-10 for
information on converting images to these types.
Adjusting Brightness and Contrast
You can adjust the brightness and contrast of an entire
image or a selected part of an image. Follow these steps:
1 Select the area you want to change, or make sure no
area is selected if you want to change the entire image.
The Brightness and Contrast dialog box appears:
2 Click the Brightness button or choose Brightness
and Contrast from the Enhance menu.
3 Select the color channel you want to adjust. To adjust
the brightness and contrast of all the colors, select RGB.
8-2 Using Other Features in PhotoPC 500
4 Slide the Brightness control right to lighten the image,
or left to darken it.
5 Slide the Contrast control right to increase contrast, or
left to decrease it.
6 Click OK when you are finished.
Page 82

NOTE
You can make similar enhancements, with finer control, by choosing
Tone Adjustment from the Enhance menu. See page 8-4 for more
information.
Adjusting Hue and Saturation
Hue and saturation describe the color values and intensity
of an image. Picture a color wheel like the one you used in
art class, with all the colors of the rainbow arranged in a
circle. When you change the hue of an image, all the colors
are shifted by the same degree around the circle.
You can adjust the hue and saturation of a selected area or
an entire image. Follow these steps:
1 Select the area you want to change, or make sure no
area is selected if you want to change the entire image.
2 Click the Hue tool or choose Hue and
Saturation from the Enhance menu.
3 The Hue and Saturation dialog box appears:
4 Slide the Hue control right or left to modify colors.
Sliding it all the way to either side shifts the colors 180
degrees around the color wheel.
5 Slide the Saturation control right to increase intensity,
or left to decrease it.
6 Click OK when you’re finished.
A
B
Using Other Features in PhotoPC 500 8-3
Page 83

Setting Tone Adjustment
The Tone Adjustment option works like Brightness and
Contrast, but it gives you more control. You can adjust the
brightness of three tone ranges in your image or selection:
the highlights, the midtones, and the shadow areas.
Follow these steps to set tone adjustment:
1 Select the area you want to change, or make sure no
area is selected if you want to change the entire image.
2 Choose Tone Adjustment from the Enhance menu. The
Tone Adjustment dialog box appears.
❙ The mapping curve, which initially looks like a straight
line, shows the tone adjustments you make. The
horizontal axis represents the original brightness level
(from the dark on the left to the bright on the right),
and the vertical axis represents the new brightness
level.
❙ The histogram represents the brightness of the image
or selected area. The horizontal axis represents the
brightness level (from the dark on the left to light on
the right), and the vertical axis represents the number
of pixels.
8-4 Using Other Features in PhotoPC 500
Page 84

3 Click Auto to have PhotoPC 500 make the tone
adjustment automatically. You can see the mapping
curve change to reflect the modified image.
4 Slide the Highlight control right to expand the
highlight area. This also increases contrast in the
midtones. Slide the control left to reduce the highlight
area and darken the image.
5 Slide the Midtone control right to lighten the midtones
or left to darken these areas. Adjusting the midtones
(also known as gamma value) does not affect the
highlights or shadows.
6 Slide the Shadow control right to reduce the shadow
area and lighten the image. Slide it left to expand the
shadow area and darken the image. This also increases
contrast in the midtones.
7 Click OK when you’re finished.
Follow these steps:
1 Select the area you want to change, or make sure no
area is selected if you want to change the entire image.
2 Click the Sharpen button or choose Sharpen from
the Enhance menu.
The Sharpen dialog box appears:
Sharpening
You can use the Sharpen tool to give your image a more
focused look, with clearer edges.
A
B
Using Other Features in PhotoPC 500 8-5
Page 85

3 Slide the control to increase or decrease the sharpening
effect.
4 Click OK when you’re finished.
Blurring
You can use the Blur tool to give your image a softer, less
focused effect. Follow these steps:
1 Select the area you want to change, or make sure no
area is selected if you want to change the entire image.
2 Click the Blur button or choose Blur from the
Enhance menu. You see the blur dialog box.
3 Slide the control to increase or decrease the softening
effect.
4 Click OK when you’re finished.
8-6 Using Other Features in PhotoPC 500
Page 86

Using Special Effects
PhotoPC 500 special effects let you transform your images.
You can create abstract or surrealistic art, design wild and
colorful patterns, or turn portraits into caricatures. The best
way to learn about using special effects is to experiment—
so have fun with them!
Follow these steps:
1 Select the area you want to transform, or make sure no
area is selected if you want to change the entire image.
2 Click the Effects browser button or choose
Browser from the Effects menu. The Effects Browser
dialog box appears, as shown on the right.
3 Choose the effect you want.
4 Slide the intensity control to increase or decrease the
intensity of the special effect.
5 Click OK when you’re finished, examples of some of the
effects are shown on the next page.
For even more unusual results, try combining two or more
of the effects listed below.
Painting Wrinkle Cone
Sketch 3D Grid Sphere
Film Grain Mosaic Whirlpool
Splash Emboss Spiral
Melting Motion Blur Cylinder
Ripple Fisheye Ribbon
Using Other Features in PhotoPC 500 8-7
A
B
Page 87

Fisheye
Emboss
Wrinkle
Whirlpool
Mosaic
8-8 Using Other Features in PhotoPC 500
Ribbon
Sketch
Ripple
Page 88

Using the Matte Template
You can use the Template feature to create a framed
picture with personalized text. Choose from 9 attractive
backgrounds to design your printout.
NOTE
Before you use the Template feature, make sure your printer is set
up correctly. (You must have a printer driver installed to use a
Template.) Choose Printer Setup from the File menu to check the
settings. The Paper option for EPSON Stylus
to 8 1/2 × 11, centered. See your printer documentation if you need
more information.
Follow these steps to get started:
1 Click the Template button.
printers should be set
double-click
to change
background
double-click to
add image
click to select
orientation
The Template dialog box appears.
double-click
to add text
click arrows
or slide bar to
change image
keep checked
to add frame
type
number of
copies
If you have an image open, it appears in the dialog box
window.
Using Other Features in PhotoPC 500 8-9
A
B
Page 89

2 Click the down arrow to select Matte, if it’s not already
selected.
3 If your screen is not displaying the image you want to
use, double-click the gray rectangle or existing picture.
A file selection dialog box appears.
NOTE
Your picture takes longer to print with a colored or patterned
background.
Follow these steps to add a background:
4 Select your picture file and click OK. The image
appears in the center of the page.
5 Choose Portrait or Landscape page orientation.
6 Drag the slider if you want to change the size of the
image.
7 When you leave the Draw Frame box checked,
PhotoPC 500 draws a line around your picture. If you
don’t want a line around the picture, click Draw Frame
to remove the checkmark.
8 Click and drag your image to place it where you want.
Adding Background
You can add a custom color background to your picture or
choose from 9 patterned backgrounds.
8-10 Using Other Features in PhotoPC 500
1 Double-click the background. The Template
Background dialog box appears:
2 Click the down arrow to choose a color or a pattern.
If you click one of the pattern names (such as Birthday
Party or Sports), the pattern appears in the window,
behind your picture.
Page 90

3 To choose a color, select Color on the list of pattern
names, and then click the Change Color button. The
Color dialog box appears:
4 Click one of the basic or custom colors, or click Define
Custom Colors. (See page 5-9 for information about
defining a custom color.)
Now you can add some text, or just print your framed
picture. See page 8-13 for printing instructions.
NOTE
The PhotoPC 500 imaging software creates your matted picture
with opaque layers. The background is the bottom layer, your
picture is the middle layer, and any text you add is the top layer.
You can even have the text print on top of your picture. Feel free to
experiment to get the effect you want.
Adding Text
You can add one or two blocks of text to your matted
picture, designed any way you want. Follow these steps:
1 Double-click one of the text boxes. The Edit Text dialog
box appears:
A
5 Click OK twice. The color you choose appears in the
Template window, behind your picture.
B
Using Other Features in PhotoPC 500 8-11
Page 91

2 Type your text. If you have more than one line of text,
press Enter to start a new line. (Although text appears
to wrap automatically as you type, it wraps on your
printout only if you press Enter.)
3 Click Font. The Select Font dialog box appears:
4 Choose your font, style, size, color and any effects you
want. The Sample box shows you how your printed
text will look. Remember that the text prints over the
background you select. If the background is dark, you
should choose a light color for the text.
5 Click OK when you’re finished.
7 If you want two blocks of text on your page, repeat
steps 1 through 6 for the other block of text.
You can drag the blocks around the screen to place
them where you want.
Here’s what a finished matte template might look like
on your screen:
6 Click OK again on the Edit Text box when you’re
finished typing your text.
8-12 Using Other Features in PhotoPC 500
Page 92

Printing Your Matted Picture
When you finish designing your matted picture, you can
print it. Follow these steps:
1 Enter the number of copies you want to print. (This
option is available only if your printer supports it.)
2 Click Print.
3 When you’re finished, click Exit.
While PhotoPC 500 is open, you can reuse the template
with another image and background, and different text.
Just click the Template button and start creating.
Using the Calendar Template
You can create a personalized calendar using a different
picture for each month. Then you can add a colored or
patterned background, a title or caption, and design the
dates in any size, color, and style you want.
Follow these steps:
1 Click the Template button. The Template dialog
box appears. If you have an image open, it appears in
the window.
2 Click the down arrow to select Calendar, if it’s not
already selected.
click and drag photo, text, and calendar
boxes to move around on template
3 If the screen doesn’t display the image you want,
double-click the gray rectangle or existing picture. A
file selection dialog box appears.
4 Select your picture file and click OK. The image
appears in the center of the page.
A
B
Using Other Features in PhotoPC 500 8-13
Page 93

5 Choose the Portrait or Landscape page orientation.
Follow these steps:
6 Drag the slider if you want to change the size of the
image.
7 When you leave the Draw Frame box checked,
PhotoPC 500 draws a line around your picture. If you
don’t want a line around the picture, click Draw Frame
to remove the checkmark.
8 Drag your image if you want to change its position on
the page.
Adding Background and Designing the Dates
You can add a custom-color background to your calendar
and choose from 9 patterned backgrounds. Then you select
the month and year, and design the date portion.
NOTE
PhotoPC 500 creates your calendar with opaque layers. The
background is the bottom layer, your picture is the middle layer,
and the dates are the top layer. If you add text, it appears on top of
all other layers. You can experiment with these elements to get the
effect you want.
1 Follow the steps on page 8-10 to add a colored or
patterned background.
2 Double-click the calendar month displayed on the
Template screen. The Edit Calendar dialog box
appears:
3 Click the down arrows and select the month and year
you want.
4 Click Font. The Select Font dialog box appears, as
shown on page 8-12.
Choose your font, style, size, color, and any effects you
want. The larger the font, the more space the dates
occupy on the page. The Sample box shows you how
your printed dates will look.
8-14 Using Other Features in PhotoPC 500
Page 94

Remember that the dates are printed over the
background you select (or over your picture, if you
want). If the background is dark, you should choose a
light color for the dates.
5 Click OK when you’re finished.
6 Click OK again on the Edit Calendar box. The dates
appear on the page with your image.
7 Drag the date box to position it where you want.
Adding Text and Printing the Calendar
When you finish designing the picture and dates, you can
add a title or caption, and then print your calendar page.
Follow these steps:
1 Follow the steps under “Adding Text” on page 8-11 to
add a title or caption. (The calendar has only one text
box.) When you’re finished with the text, you see
something like the following on your screen:
You’re ready to print.
2 Enter the number of copies you want to print. (This
option is available only if your printer supports it.)
3 Click Print.
4 Click Exit when you’re finished.
A
Using Other Features in PhotoPC 500 8-15
B
Page 95

After you complete the first calendar page, you can
continue with the next month and make a calendar for the
whole year. Or you can create a new calendar page each
month.
8-16 Using Other Features in PhotoPC 500
Page 96

9
Inserting Pictures into Documents
hen your images are saved in albums or on your
Whard drive, you can insert them in your documents
by copying and pasting, or importing them. You can use
your pictures in applications such as word processors,
presentation programs, database managers, spreadsheets,
page layout and desktop publishing packages. This chapter
explains how in the following sections:
❙ Inserting pictures with Windows 95
❙ Inserting pictures with Windows 3.1
❙ Using copy and paste to insert a picture
NOTE
You can also transfer images directly from the camera into
documents with drag and drop or by inserting them as objects as
described on page 4-5.
Inserting Pictures into Documents 9-1
A
B
Page 97

NOTE
If you want to change a picture before you insert it, you can use the
Photo PC 500 imaging software to crop, rotate, resize, or make
other types of enhancements. (After you insert your picture, you
can use your application to change the size and position of your
picture.) For more information on using the PhotoPC 500 imaging
software, see Chapters 4, 6, 7, and 8.
Inserting Pictures with Windows 95
Follow these steps to insert your PhotoPC 500 pictures with
Windows 95 or Windows NT 4.0:
1 Open the document you want to add a picture to in
your application.
2 Select the point where you want to insert your picture.
3 Select Picture from the Insert menu. (In some
applications you may need to select a different
command, such as Import, which is often found in the
File menu.) An Insert Picture dialog box appears:
4 Find the file you want to insert. Most of your pictures
are probably in C:\PHOTOPC5\PHOTOS. In some
applications, such as Microsoft Word 7.0, you see a
preview of your picture.
9-2 Inserting Pictures into Documents
Page 98

NOTE
You can conduct a search to find your file in many applications
designed for Windows 95. You can search by file name, type,
text or property associated with the file, or the day your file
was last modified. You can also conduct an advanced search.
See your application’s documentation or help for more
information.
5 Click OK to insert your picture. The picture appears in
your document
6 Add a frame, if you want, so you can move your
picture around on the page and resize it if necessary.
.
A
Inserting Pictures into Documents 9-3
B
Page 99

Inserting Pictures with Windows 3.1
In Windows 3.1, Microsoft Word and other applications are
often unable to recognize the JPEG format that the camera
uses to capture your pictures. Convert your picture to a Tiff
or bitmap file in PhotoPC 500 as described on page 6-8 or
export your photo in the bitmap format as described on
page 4-11. Then, follow these steps to insert your converted
PhotoPC 500 pictures into documents using applications in
Windows 3.1:
1 Open the document in your application.
The Insert Picture dialog box appears:
2 Select the area of your document where you want to
place the picture.
3 Select Picture from the Insert menu. (In some
applications you may need to select another command
such as Import, which you can usually find in the File
menu.)
9-4 Inserting Pictures into Documents
4 Find the file you want to insert. Most of your pictures
are probably in C:\PHOTOPC5\PHOTOS. If you
converted the file, look for the file in the directory
where you saved it. In some applications, such as
Microsoft Word, you see a preview of your picture.
NOTE
You can conduct a search for your file in many Windows
applications. See your application’s documentation for more
information on conducting a search.
Page 100

5 Click OK.
The picture appears in your document:
Using Copy and Paste to Insert a Picture
Follow these steps to insert a PhotoPC 500 picture into your
document using Copy and Paste:
1 Open your image in PhotoPC 500 or other image-
editing application.
2 Click the picture (or choose Select All) to make sure it is
selected.
3 Select Copy from the Edit menu.
4 Start your word processor or other application and
open the document where you want to use the picture.
5 Choose Paste or Paste Special from the Edit menu. A
copy of the picture appears in your document.
A
Inserting Pictures into Documents 9-5
B
 Loading...